

Page 1
Models: JVM1650
JVM1651
JVM1653
EM03000
Spacemaker Microwave Oven
Owner'sManual
[]
2
5
Operating Instructions
F_a_'_s of Ya_I_M;rc_'QWaVe
T_meC#ok#_%
A_fomadc Cow,king
Otflez£eat_t_s
Ore# She#
[]
Helpful Information
If SomethingGoes Wrong
_8
H
_4
20
2{Y
34
m
[]
Write the model and serial nmnbers here:
Model#
Serial#
ge.com
DE68-00126A
49-40475 ]
01-06 JR
Page 2
READ ALL SAA_2TY
INFORMATION BEFORE USING
,_ WARNING!
Foryoursafety,theinformationinthis manualmustbe followed tominimizetherisk offire or
explosion, electric shock,ortoprevent property damage,personal injuryorloss of life.
For your safiqy, dm intbrmafion in this manual
mus/be tollowed to minimize /he risk of fire
or explosion or to prevem property damage,
PRECA UIYONS perso,,_,l_,_>.or_osso,li_.
Do Not Attempt Do Not Operate 1he oven
/o operate tiffs oven ifil is dmnaged. 1/is
with lhe door open parficulariy importan/
,ince openKloor that the eve11 door
operanon can resul/ close properly and
TO EXCESSIVE 1,1 harmftd exposure tlmt ,here is 1,o
lo illicrowave ellergw, dalllage to tile:
MICROWA_ It is imporlmlr no, to I door (ben,).
ENERGY ,hesali_ly imerlo_ ks.
detk_a_ or tamper with 2 hiJlges and lmches
,broken or loosened _.
Do Not Place any objec_ 3 door seals and sealing
between llle oven [i'Oll/ surihces
tace and the door or The Oven Should Not
allow soil or cleane_ be adjusled or repaired
residue to accumulate by altvolle excepl
on sealing sur[aces
properly qualified
service persOlllle].
Page 3
I'.l
_ ! _i_ ii ! !9¸¸_i_!_!!_!_!!_!!!_ _!!_! !!!_ !_!_!_!_!Jl....
This microwave oven is
ii intended for household
use and is UL listed for
installation over electric
and gas ranges.
This microwave oven is
not approved or tested
for tnariue use,
• Read and tk)ll()w the
specific "Precalltions to
A\ old Possible Exl)osure
to Excessive Mi(row_e
Ellergy" on t)_ge 2.
• This _q)l)li_m(e must be
grom_de(t. Conne(t only
to t)roperly grom_ded
outlet. See (',rom_di_g
Instru(tions section on
t)_ge 9.
• l)o not mom_t this
_l)l)lian(e over _ sink.
• Install or lo(_te this
_l)l)lian(e only in
_1CC()17(|_t1/((' Wit]l t]l( +
t)rovided Installation
hlstl;tl( tions.
• This ove_=the-ra_ge oven
was designed/or use over
ranges no wider them 36Y
It m_v be installed over
both g_s m_d ele(tri(
(ooki_g eq_it)ment.
• I)o not o])erate this
appliance it:it has a
damaged power cord or
plug, if it is not worki_g
t)rol)erly or if it has been
damaged or drol)pe(t.
• I)o _ot (-over or block
any openings on the
al)l)lim we.
• Use this al)l)limwe only
Jot its i_ten(led use as
des(ribed in this mmmal.
Do not [is(' corrosive
(t'_emi(Ms or v_lt)ors in
this _ppli_m(e. This
l//i(row_l_e oven is
sl)e(ifi_ ally designed to
he_t, (/r_' or cook/oo(t,
and is not i_ten(led
Jk)r l_b()r_tt()_w o17
i_dustrial use.
Page 4
t_2AD ALL SAPETY
INFORMATION BEFORE USING
'_Do not stor( this appliance
Ot/tdoors. Do not rise this
prod/tct lleaF water J(_r
(_K_'tll/ple, ill a wet basell/ellt,
l/ear a swimnling pool, llear
a sink or in similar locations.
• [_eep power cord awa} ]i'()l//
heated sur/i_ces.
• Do llO[ il/lll/erSe power cord
or plug in watel:
®To reduce th( risk of fire ill
the Ot(II Caii|\:
-- Do llOt ov(rcook 1()o(/.
Care/hlly attend appliance
M_en pap(l; plasuc or
oth(r combustible
materia]s are placed insi(k
th( o_en uhile cooking.
-- Rel//O_e t_Jre t_isVtJes all(]
m(tal handles fi-om paper
or plastic con tain(rs behn:e
placing fl/em ill the oven,
-- DO 110[ /IS( tile ot(ii
tot storage purposes. Do
I/or leme paper ])rod/lcts,
cooking utensils or R)od ill
the ()*,el/ tx]lel/ I/ot 111t/se.
-- If mamrials inside the oxen
ignit(, keep tl/e o_en door
closed, t/Irll tile ()x(n o1]
and disc(mn(ct th( power
cord, or sht/t oJ] power at
th( ills( or circufi breaker
panel If th( door is
op(n(d, th( fir( mW
spr(ad.
--Do l/()[/lSe the S(llsor
Features mice in
S/ICCeSS1OI/ Oil [he _lll/(
tbod portion. I['fi)od is
undercooked :dier file first
countdown, us( TimeCook
tot additional cooking
time.
• S(e door surthce cleaning
instructions ill tile Care and
Cleaning s(c6on (s) of this
///al/t/_/1.
'_This appliance must only be
serviced b} qt[nlifi(d selMce
persolllleL ( k)iltact ll(al-est
authorized service tilcilig
]{)r (%2alllil/a_J()i/, repair
or at{it/sill/el/t,
'_As with ally appliance, clos(
S/lpeFxisioI/ is l/ecessar}
Mien used kw children.
• Do not storeanything
dire(fly (m toil of file
///icr()/_;tv( ()veil S[[F_i_C(
t_]/(11 the I/liCl()l_a_e OV(l/
is ill opera6(m.
SAVE THESE INS TR UC770 NS
Page 5
SPECIAL N07 2S ABOUF MICRO WAVING
I!1
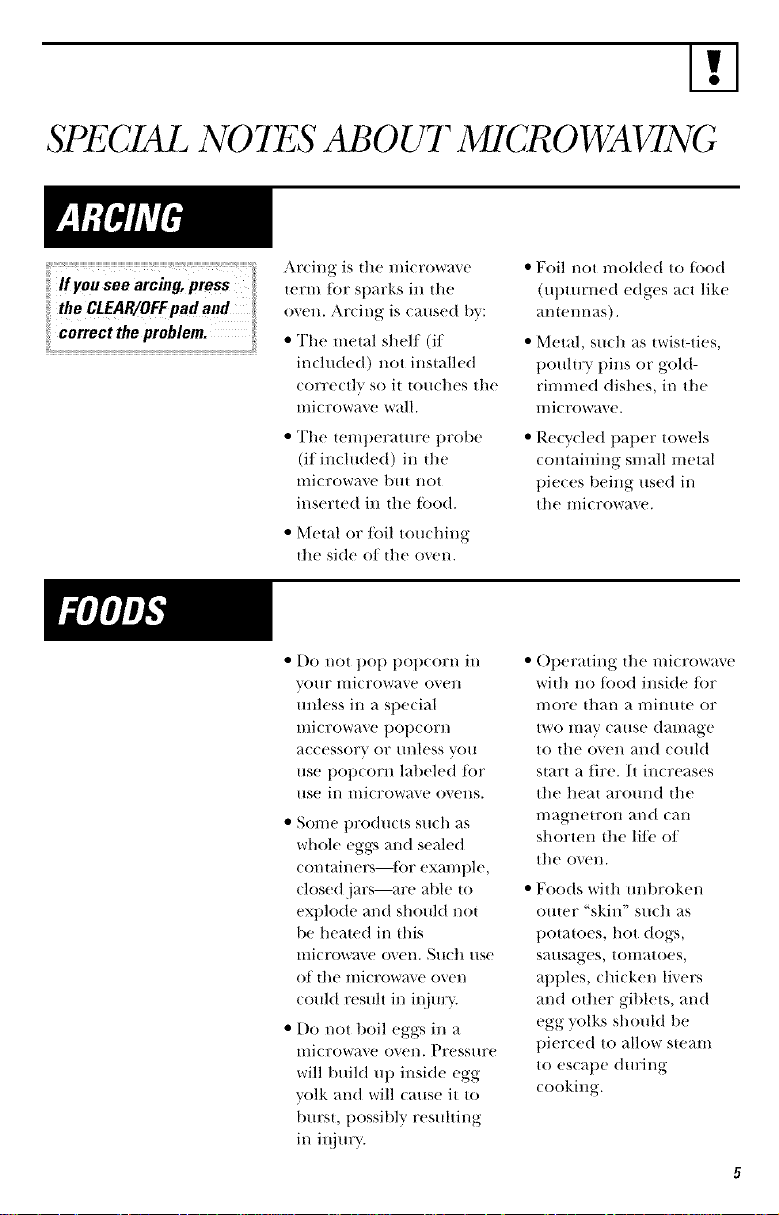
Arcing is the n/icrowave
ternl lot sliarks in the
oven. Arcing is caused by:
• The metal shelf (if
inchlded) not installed
correctly so it touches the
nlicrowave wall.
• The telnt)erature probe
(if included) in the
lllicrowave btlt llOt
inserted in the tood.
• Metal or foil touching
the side ot the oven.
• Do not pop llOlICOrn in
your microwave oven
mfless in a special
microwave pOliCOrn
accessory or m/less you
use l/Op(orll lat/eled tor
use in microwave ovens.
• Sol//e t)l?odtlctS Stlch as
whole eggs and sealed
(ontainers tor examl/le,
closed jars--are able to
explode and should not
be heated in this
microwa_v oven. Such use
of the microwave oven
could result in i_jtn T.
• I)o not boil eggs in a
mi(ro_ave oven. Pressure
will build up inside egg
yolk and will (ause it to
burst, t)ossibly resulting
in ill jmT.
• Foil not n/olded to tood
(ut)turned edges act Hike
antennas).
• Metal, suth as twist-ties,
t)oultry pins or gold-
rinm/ed dishes, in the
n/icrowave.
• Recycled l/al/er towels
containing sn/all metal
pieces being used in
the lilicrowave.
• ()l/erating the microwave
with no tood inside/or
more than a minute or
tWO lIl;4y C_ItlSe (]_t+I//;4ge
to the oven and could
start a life. It ill(Feases
the heat around the
magnetron and can
shorten the lilt of
the ()Veil.
• Foods with tmbroken
outer "skill" S/l(h _tS
potatoes, hot dogs,
sausages, tOlilatoes,
apples, chicken li_ers
and other giblets, and
egg yolks should be
pierced to allow steam
to escape dm:ing
cooking.
Page 6
SPECIAL N07 2S ABOUF MICRO WAVING
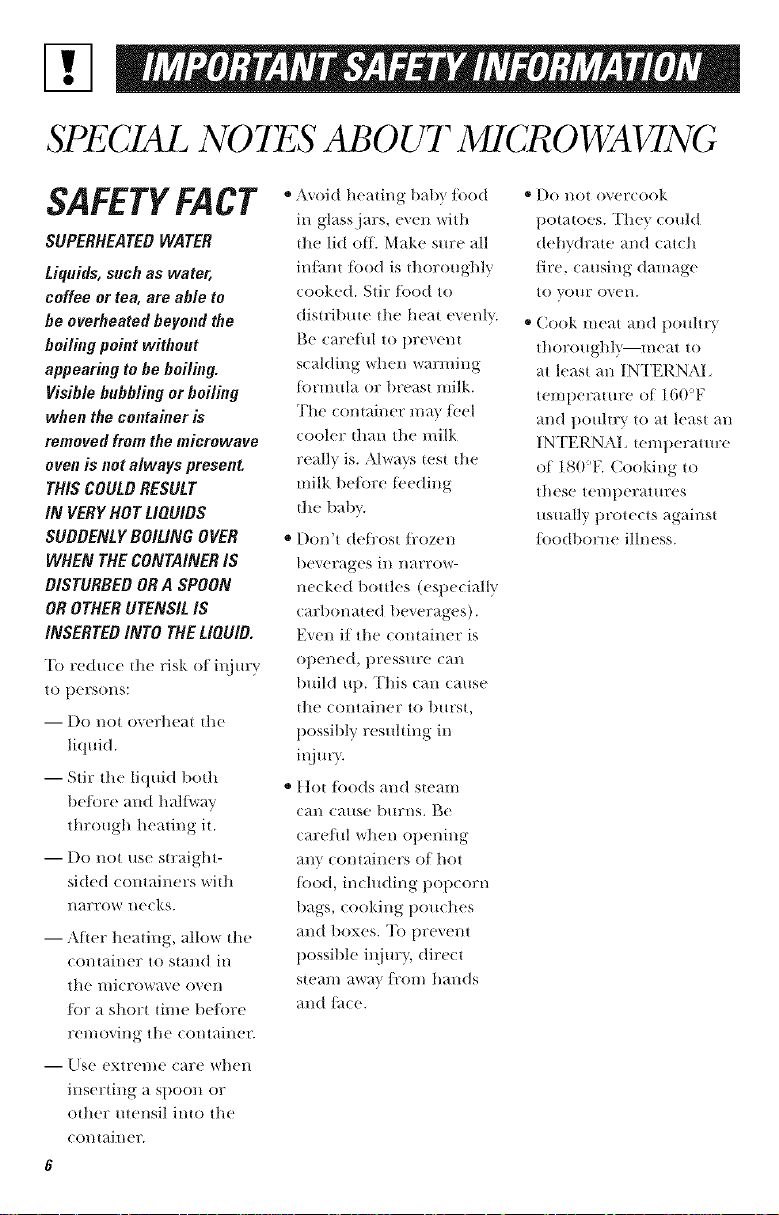
SAFETYFACT
SUPERHEATED WATER
Liquids, such as water,
coffee or tea, are able to
he overheated beyond the
boiling point without
appearing to he boiling.
Visible bubbling or boiling
when the container is
removed from the microwave
oven is not always present.
THIS COULD RESULT
IN VERY HOT LIQUIDS
SUDDENLY BOILING OVER
WHEN THE CONTAINER IS
DISTURBED OR A SPOON
OR OTHER UTENSIL IS
INSERTED INTO THE LIQUID.
"1_)reduc( the risk el il_jur),
tO 1)ersons:
-- Do not overheat tile
liquid.
-- Stir tile liquid l)oth
be/ore and hall\ray
through heating it.
-- Do not use straight-
sid(d containers with
narrow necks.
-- Al_er heating, allow tile
container to stand ii/
the l/licrow_l\e oven
lot a short din( belore
removing tile contai]leL
-- IJse extreme car( when
inserting a spoon or
other utensil imo the
comainer.
6
o ,\\ old heating babx Ibod
in glass jars, ev(n with
the lid off. Make sur( all
inlhnt lood is thoroughly
cooked. Stir Ibod to
distribme tile heat e_enlv.
Be careful to prex(m
scaMing when warming
lbrmula or br(ast milk.
The contain(r ma} Joel
cooler than tile milk
r(ally is. Always _est the
milk belore lbeding
tile baby.
o Don't defl'ost li'ozen
beverages ill nm;row-
n((ked bottles (especially
(arbonated beverages).
Even if the contain( r is
op(ned, liress/lre C_lll
Imild up. This can caus(
tile co]ltainer to btlrst,
possibly r(sulting in
iii jur}.
o I]ot li)ods and steam
can cause burns. B(
careflfl when opening
ally coi/taillers of hot
tood, including l)opeorn
bags, (ooking pou(hes
and 1loxes. ']k) prevent
possible il{im:}, direct
steam away fi:om hands
and Etce.
® Do 1lot overtook
potatoes. They could
d(hvdrate and catch
fire, causing damage
to vom: ov(n.
®Cook meat and poultr}
thoroughl}--meat to
at le_st an INTERNAI,
temperature of 160'F
and l)oultr} , to at least an
INTERNAl, _emperatm:e
of 180'E Cooking to
these temlleratm:es
usually protects against
Ibodborne illness.
Page 7

I'.1
Make sure all cookware used
ill ¥O/IF l/Ill FowaVe ovell is
Sl/ilable tot n/icrowavhlg.
Most glass cassetx)|es,
cooking dishes, l//eaMlFillg
CtlllS , CtlStalX| ClipS, pottery
or china ¢tinnerware which
does I/Or have//leta||ic tlJl//
or glaze with a met;dlic
s]leen Call be Ilse(t. gol_/e
cookwal_e it labeled _Mlilablc
lot nficrowavit:g."
How to test for a microwave-
safe dish
• [/vou are not sure if
a dish is n/icrowa\ e-sail',
use this test: Place ill tile
oven both the dish _X)/I
are msdng and a glass
measuring cup/ilh'd with
1 CUll of \_ltetmset the
measulJng CUll either
ill or nexi to die dish.
Microwa\ e 1 nlinute at
high. If the dish heats,
ii shouM not be used
tot microwaving.
K tile dish remains cool
and only tile water ill tile
cut) heats, then the dish
is microwm e-sate.
• If rOll rise a llleat
thermometer while
cooking, make sure
it is sate lot use ill
microwa\ e o\ ens.
• I)o not use rec}vled paper
products. P,eQaled paller
towels, natlkins and waxed
paper Call (onlain n/etal
flecks which ma_, cause
arcing or ignite. Paper
products containing IMon
or talon filan/ents should
be ms)ideal, as they n/av
also ignhe.
• SolIle stv1x)l()al// tFaVS
(like those that nleat is
packaged on) ha\ e a thin
strip of n/etal embedded
ill tile bouon/. When
microwa\ ed, the metal
can lturn tile floor of
the oven or ignhe a
paper towel.
• I)o not use tile microwave
1o all'} newslla]lel'.S.
• Not all plastic wratl
is suitable tot use ill
microwa\ e o\ ens.
Cheek ihe package
tor tn'oper use.
• Paper lowels, waxed tlaper
and plastic wrap Call be
used to co_er dishes ill
order to retain l/lOiSIii17e
and l)It'Vell[ sllattering, ge
SIIl?e tO vent plastic wra t) SO
stealll Call escape.
• Cookware l/la'v becollle hot
because of heat transt('rred
/i'om tile heated/ood. Poi
hoMel:s max be needed io
handle tile cook\vat'e.
• "Boilable" cooking
t)ouches and lightly closed
t)lastic bags shoukt be slit,
tlietx ed or _vnted as
direcmd kg tlackage.
If th(\v are noL plastic
couM burst during or
imn/ediatel} after (ooking,
tlossibly tx'suhing ill il_jury.
Also, plastic S[o17age
containers should be at
leasi partially uncovered
because tl/e_ torln a light
seal. When cooking with
containers ughtly cox ered
with plastic wrall, remove
courting careflllly and
dire(t steam awa} ti'om
hands and time.
Page 8
SPECIAL N07 2S ABOUF MICRO WAVING
®Use loll only as
dir( cted in this manual.
When /lsing loll in th_
microwave or<n, keep tile
loll at l_ast 1" a*_W fl:om
tile sides of tile oven.
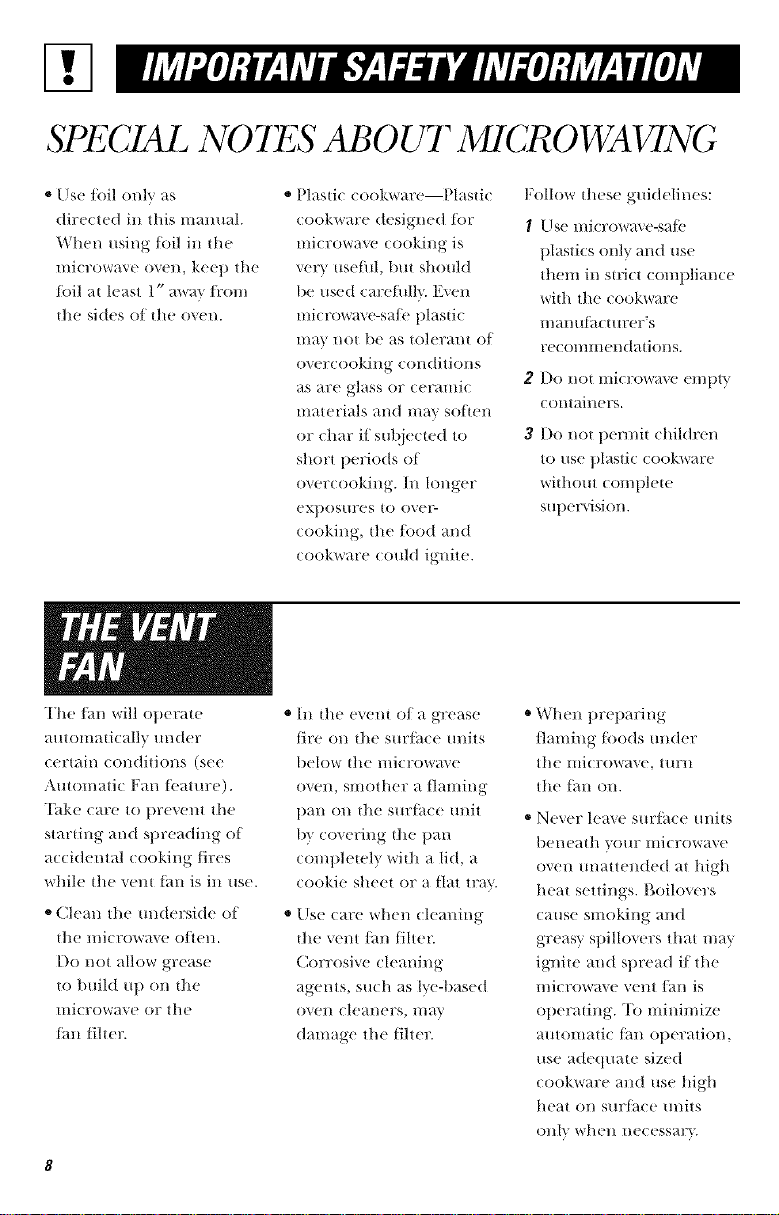
The ]_li/will op(rate
a/It oinaticallv/re(let
certain (onditions (see
Automatic Fan tbamre).
"E_k_ care to prevent tile
starting and spreading of
accidental ( ooking lires
while tile xent lml is in use.
®Clean tile ml(lersi(le of
tile l//ic1x)W_t\ e ()lien.
Do not allow grease
to build /_I/ on tile
i/licrowave or the
tml lilter.
* Plastic eookware--Plastic
eookware designed tot
microwave cooking is
vet) usefld, but should
be used carefllll}. Exert
microwa_ e-sati plastic
I/l_t} no[ [)e as tolerant of
ox ( rcooking conditions
as are glass or (eramic
materials and nl W solten
or char if sut!iected to
short periods of
oxercooking. Ill longer
eXl)()SllFeS to ovel _
cooking, tile Iood and
cookware could ignite.
* Ill th_ event of a grease
fire on tile sm:lh(e milts
below tile microwave
oxell, SIllother a IIallling
l)a]l Oll tile S/llTl_lc( ullit
b) co_ering tile pan
completely with a lid, a
cookie sheet or a fiat tray.
* Use care when cleaning
tile v_nt I_m lilter.
Corrosive cleaning
agents, su(h as lye-based
OVell cleaners, Ill}l}'
damage the lilter.
Follow these guidelines:
I LIse microwm e-sale
plastics only and use
them in StlJCt comi/liance
with the cookware
l/laI//ll_t( t 1117elT_S
1;el Ol/liIl( I/(lations.
2 Do not illic]?owave el//1)| },
contailleFs.
3 Do not l/_ rmit childr(n
to use plastic cookware
without ( omt/lete
SUl)( Fvision.
o When pret/aring
flaming loods under
the illi( rowave, tllFll
the l;nl on.
®N(ver leax( S/llTlklce {lI/its
t)en_ ath vo/iF illicrowave
()veil unatlended at high
heat settings, goilov_ rs
cause smoking and
greasy spillovers that may
ignite and spread if tile
micr()w_t_( v(_lt t_tn is
olleradng. "Ib ininimize
a/ltoIllatic l[_ll oil(ration,
/lse a(l_ qlmte sized
cook*_are and use high
heat on surl:_(?e units
only wllen n_ eessar}.
Page 9
I!1
GR0 UNDING INSTRUC770NS/ Offl TONALKFIS
Ensure proper ground
exists before use.
.4,WARNING
hnproper use of the
grounding plug can result
in a risk of electric shock,
This appliance must be
grom_(h'd. In the event of
an electrical short cir(uit,
grom_ding reduces the
risk of electric shock by
providing an escape wire
/or the electric era:rent.
This applian(e is equipped
with a power (ord having
a grtmnding wire with a
grtmnding plug. The plug
must l>e plugged into an
outlet that is properly
installed and gromMed.
Consuh a quali/ied
electrician or service
technician if the
grotmding instructions
are not completely
tmderstood, or if doubt
exists as to whether the
appliance is t>roperly
gromMed.
If the omlet is a standard
2-prong wall outlet, it is
your personal responsibility
and obligation to ha'+e it
repla(ed t_,ith a 1)rot)efly
grotmded 3-prong wall
outlet.
Do not trader any
circmnstances cut or
remove the third (grotmd)
prong/i'ont the t)ower
cord.
1)O not ttse an _l(l_lt)ter
plug with tiffs appliance.
Do not use an extension
(ord with this applian(e.
If the power cord is too
short, have a qualitied
ele(tri(ian or service
te(hnician install an outlet
near the appliance.
For best ol)eration, t)lug
this apt>liame into its ()_rt_
ele(tri(al outlet to in:event
flickering of lights, l)lowiltg
of tuse or tripping of
circuit breaker.
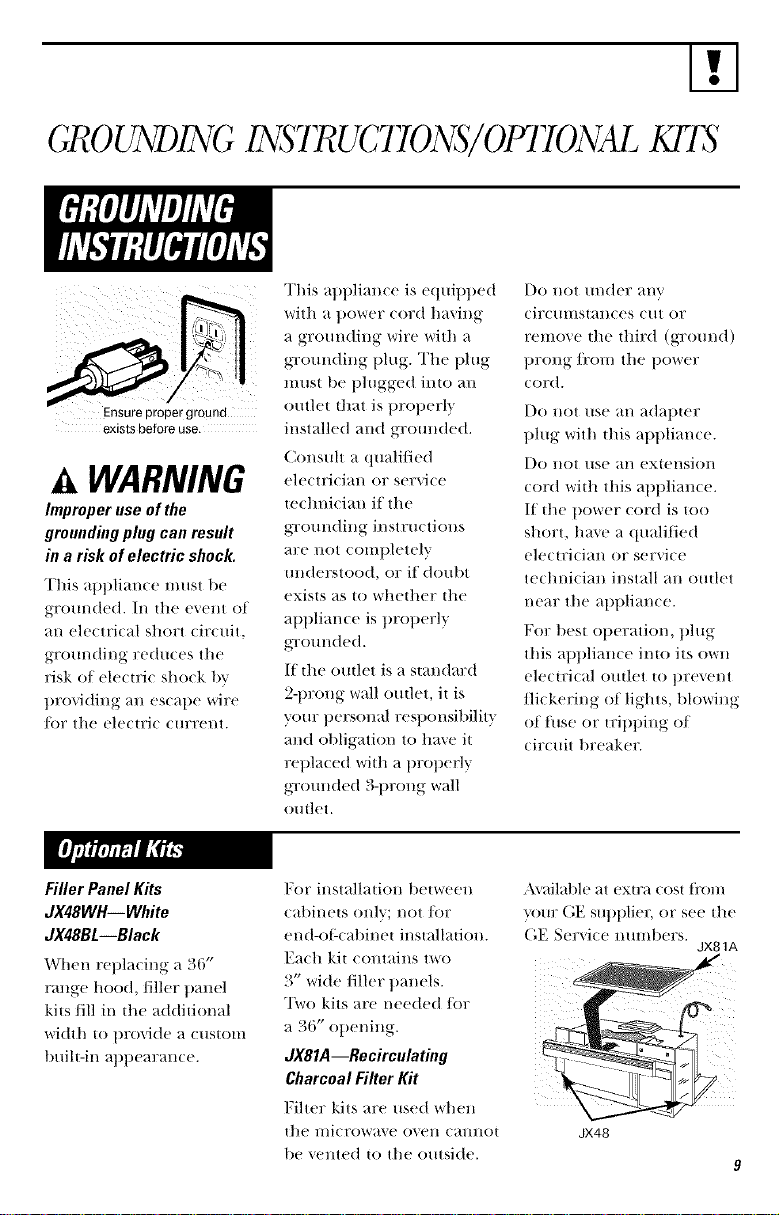
Filler Panel Kits
dX48WH--White
dX48BL--Black
When ret)lacing a 36"
range hood,/iller panel
kits fill in the additional
width to l)rovide a custom
buih-in appearance.
For installation between
cat)inets only; not /or
end-ol:cat)inet installation.
Ea(h kit contains ttst) ..........
x,,Me filler panels.
Two kits are needed for
,1*
a o0 opet/tttg.
JX81A--Recirculating
Charcoal Filter Kit
Fiher kits are used t_h('n
the microwave oven camtot
be vented to the outside.
•\\ ailable at extra cost ti'om
_)ttr GE sut)l)lier, or see the
(',E Service *mmbers.
JX81A
JX48
Page 10
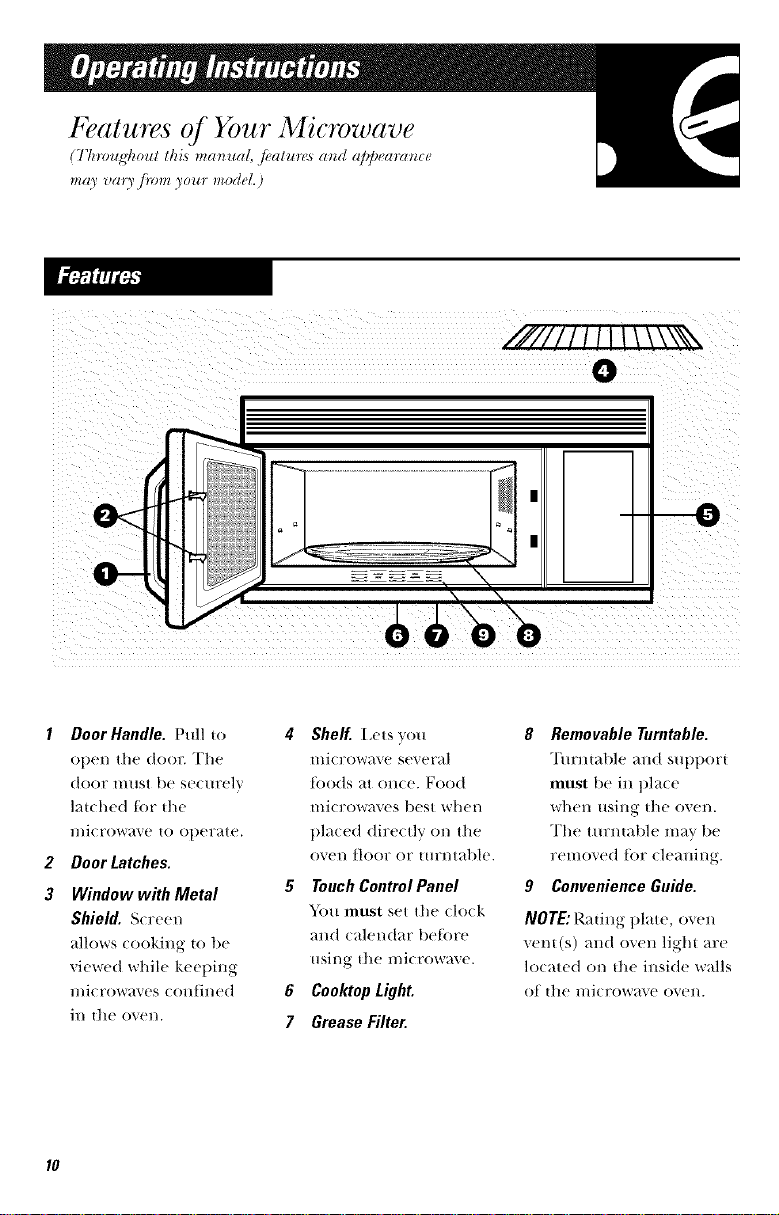
1 Door Handle. Pull to
ol)en the door. The
door must be se(urelv
hitched lot the
microwaw to operate.
2 Door Latches.
3 Window with Metal
Shield. Screen
alh)ws (()()king to be
yielded whih' keeping
microwa_ es conlined
ill ttle oven.
4 Shelf. I.ets you
microwave several
tends at once. Food
microgrooves best when
placed (lire(tl}, ron the
o_en floor or turntable.
5 Touch Control Panel
"_bu must set the (lo(k
mid calendar belore
using ttle microwave.
6 Cooktop Light.
7 Grease Filter.
8 Removable Turntable.
TurlJaable a_J,(t supl)ort
must be in t)la(e
when using the o_en.
The tm:mable lm_v be
removed tor cleaning.
9 Convenience Guide.
NOTE:Rating plate, oven
veto(s) and oven light are
h)cated on tile inside walls
of the l//i(row_,_.e oven.
Page 11
The Controls on Your Microwave Oven
(T/nvugt_oul this ma_ua!, f_alur_'._m_d a]_]_earm_c_ma) vm3 ji_mz )our model.)
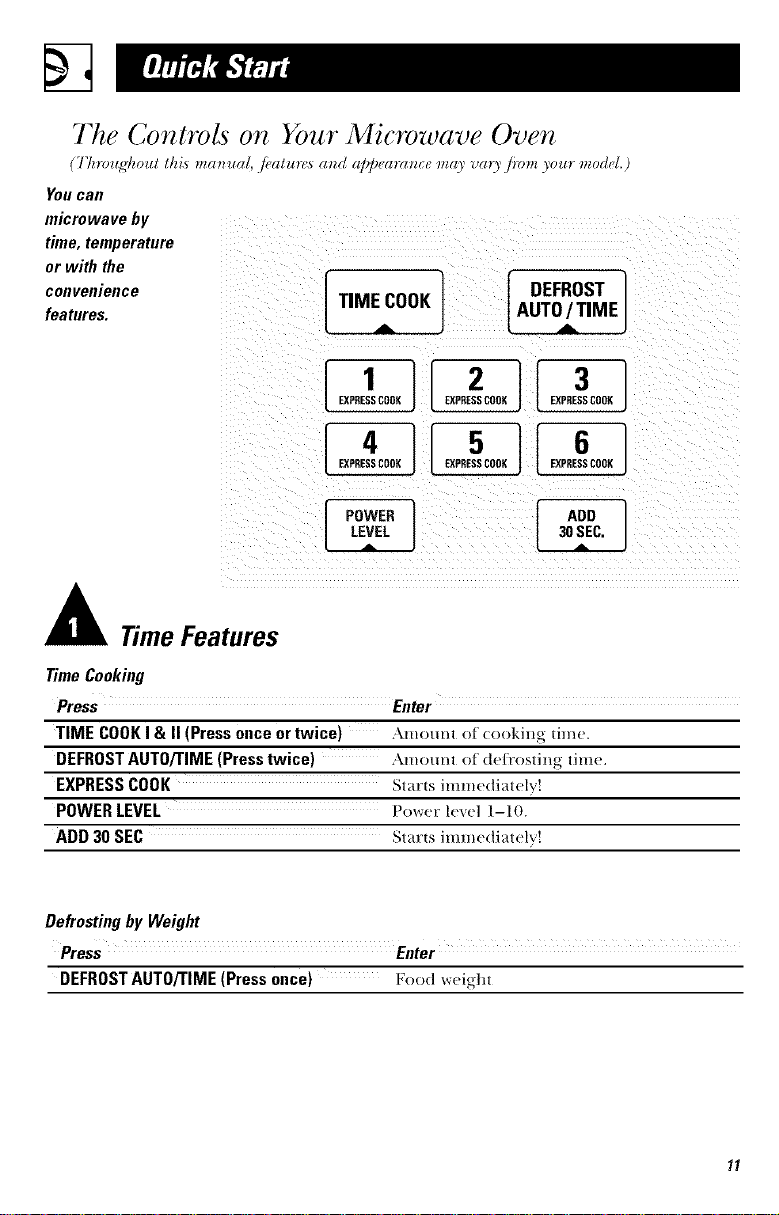
You Call
microwave by
time,temperature
or with the
convenience
features,
TIME COOK AUTO / TIME
I I /° F"°sTI
EXPRESSCOOK EXPRESSCOOK EXPSESSCOOK
f ,oo 1
Time Features
TimeCooking
Press Enter
TIME COOKI & II (Press onceortwice) \mount of (ookhlg dnw.
DEFROSTAUTO/TIME(Presstwice) Amount of defi'osting time.
EXPRESSCOOK Stm'ts imm(!([iatelv!
POWERLEVEL [_()_r_rlexel l-I O.
ADD 30 SEC Starts imm_,(liatelv!
Defrosting by Weight
Press Enter
DEFROST AUTO/TIME (Press once) Food w(_i_llt
2 3
Page 12
The Controls on Your Microwave Oven
I'k_vu_,'koul tkis ma_ua . jealun_ a_m al_/_eara_tce may v(n)'.lmm ) ur model.
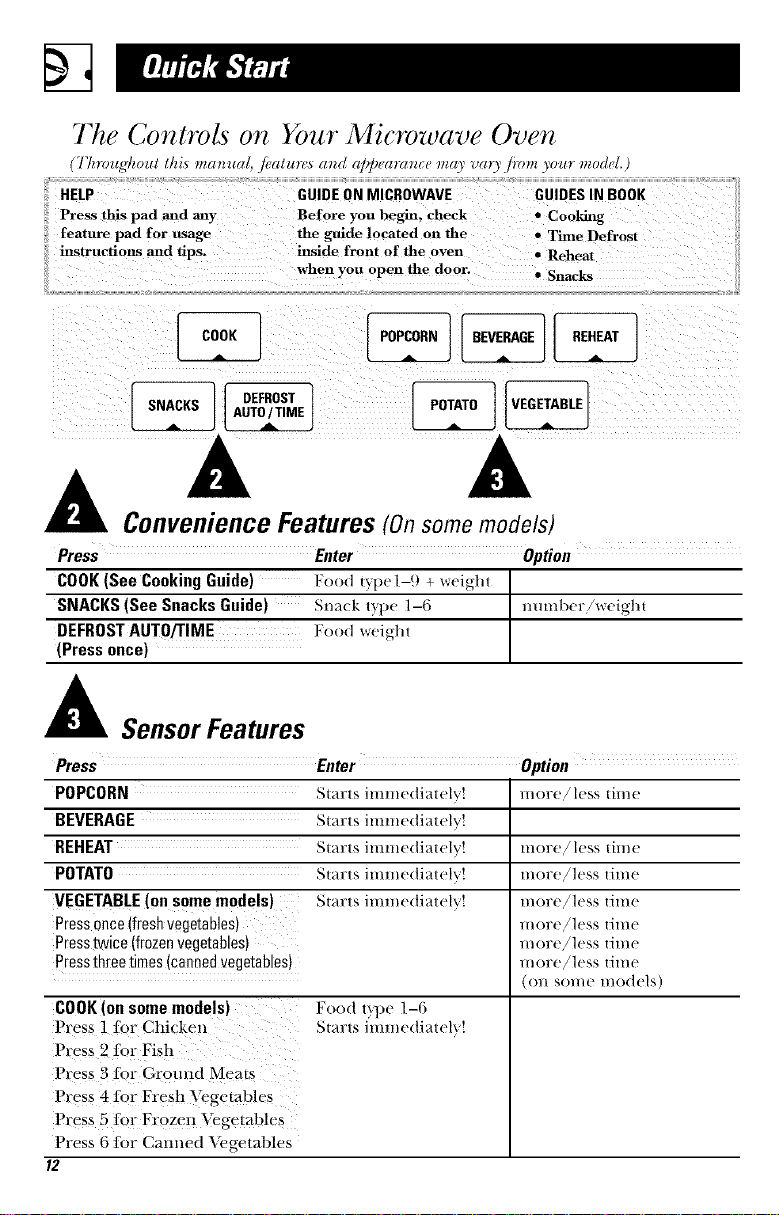
HELP GUIDE ON MICROWAVE GUIDES IN BOOK
Press this pad and any Before you begin, check • Cooking
feature pad for usage the guide located on the • Time Defrost
instructions and tips. inside fronl of the oven • Reheat
when you open the door. • Snacks
OEF,OST]
A A
ConvenienceFeatures (On some models)
Press Enter Option
COOK (See Cooking Guide) Food t yrt)(_ 1-_) + Wei_ht
SNACKS (See Snacks Guide) Sna(k t_])e ]--6 1HIHlber/weig]lt
DEFROST AUTO/TIME ];ood weight
(Press once)
A Sensor Features
Press Enter Option
POPCORN Starts immediately! more,/less time
BEVERAGE Starts lmmedlatel"" '_'
REHEAT Starts immediately! more,/less dine
POTATO Starts immediately! more!less time
VEGETABLE (on some models) Starts mmle(hatel more/less Hme
Pressonce (fresh vegetables)
Presstwice(frozenvegetables)
Pressthree times (canned #egetables)
COOK (on some models)
Press 1 for Chi(ken
Press 2 for Fish
Press 3 tor Grotmd Meats
I ress 4 tor Fresh "_k_getab!es
Press 5 R)r Frozen Vegetables
Press 6 for Cammd Vegetables
12
Food ryl)e 1-6
Starts immediateh'!
1/10lTe,/less [ilIle
l//ore,/less |ilile
l/lOre/less |ilile
(on some models)
Page 13
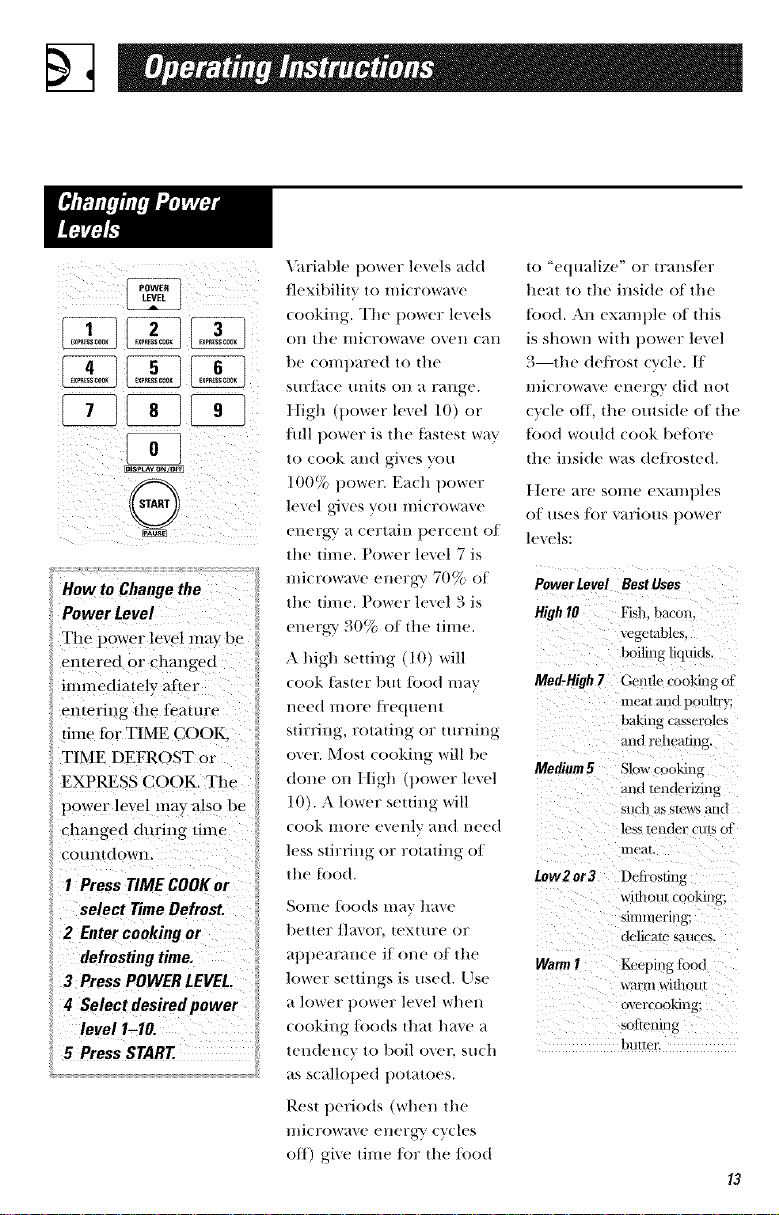
TIMEDEFROSTor
EXPRESSCOOK.The
powerleve!maya!sobe
chano-eddulingtinle
4 Selectdesiredpower
level I-I0.
7
SPressSTART.
\hriable power levels add
t]exibilitv to microwave
cooking. The 1)ower levels
Oil [he IIli(rowav( + ovell (_lll
be (/)mt)ared to tile
sur/a(e units on a range.
ttigh (t)ower level 10) or
lull l)ower is tile thstest _r_l_r
to cook and gives you
100% power: Each power
level gives you microwave
energ?_ a certain percent of
It) "equ;dize" or |rmlS/br
heal It) |he inside of lhe
fi)od. An exmnple of lllis
is shown wi|h power level
3 the de/i'os| (_clc. l[
l/licFowave el/eFg} did no|
(}cle off, the outside of the
tbod would _ook belbrc
Ihe inside \_as deli'oswd.
t t('F( + _ll'( + SOll/e ex_il/ p](+s
O]/lses t()Y _arious l)()/_rel _
levels:
the time. Power level 7 is
microwave energ-y 70% of
the dine. Power level 3 is
PowerLevel BestUses
High10 Fish. bacon.
energy 30% of tlle time.
A high seuing (10) will
cook thswr but/k)od may
Med-High7 Gentle cooking o{
need more fl:e(luent
stirring, rotating or tm:ning
oxer. Most cooking will be
done on/[igh (power lmel
Medium5 Slow cooking
10). A lower scuiug will
cook lilt)re cVelllv ;_ll(] need
less slirl'illg or ro1;_lillg of
tile R)od. tow2or3
So/tie/()o(|s l/laV tl;we
t)ellel ° /1;l_Ol °, Iex! life OF
_])t)earaHce i[ olle el Ill('
WarmI
lower seltings is used. Use
a lower power level W]lell
looking too(ts dial have a
tellden(x It) 1)oil o\er such
as scalh)l)ed i)olatoes.
Rest periods (when lhe
H/icrow;_e ellergv cycles
ott) give li//le lot lhe/ood
_Y'getablcs.
boiling lkllfids.
meal mid poultlT;
baking c_lsseroles
,rod reheating.
mid wnderizing
SI/Ch AS MI-"W_ arid
h'ss tender cl,t+,ot
irle31.
Defrosting
a,ifl-loutcooking;
sltunlel iIIg;
dclica K' sauces
Keeping li0od
D,';//'I 11 withoI/l
OVI'I'( ookillg;
sollCllltlg
btlltcl;
Page 14
Time Features
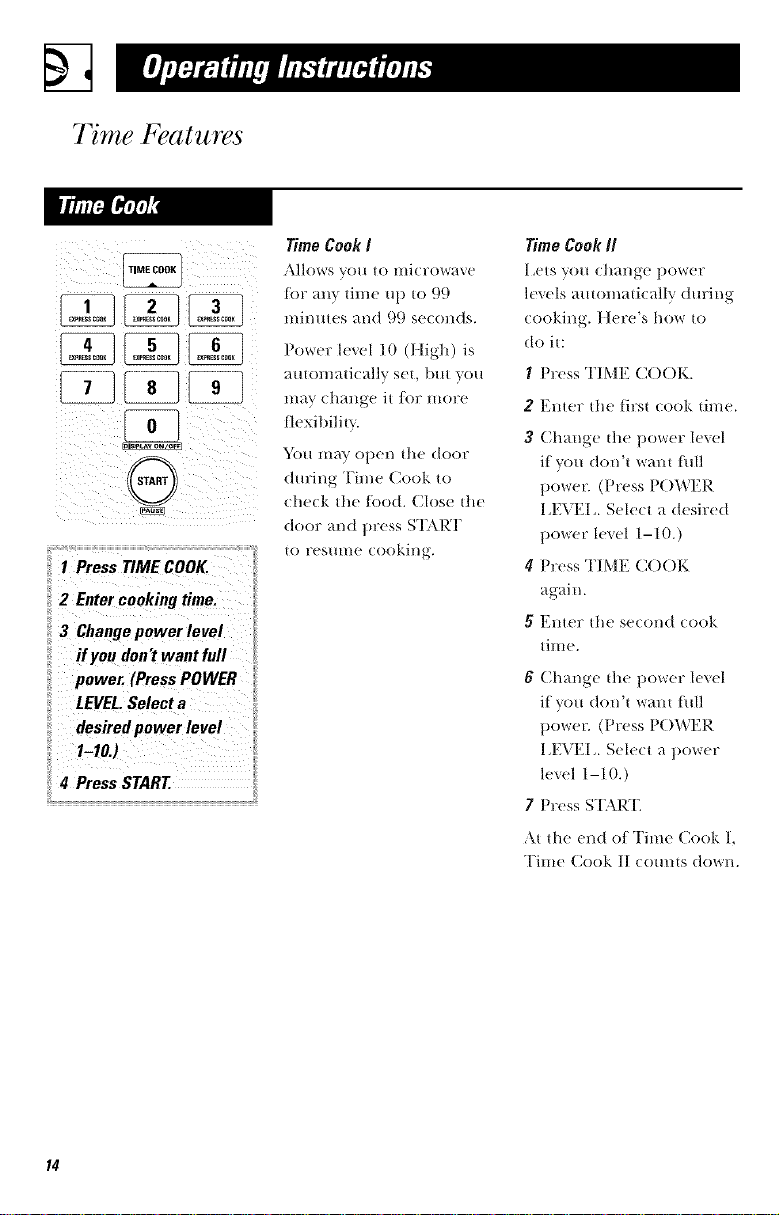
TIME COOl(
I Press TIME COOK.
2 Enter cooking time.
3 Change power level
ffyou don't want full
power. (Press POWER
LEVEL.Select a
desired power level
I-lO3
4 Press START.
Time Cook I
Allows _'o/1 to mi(To>,ave
Jot any time up to 99
mimltes and 99 seconds.
Power level 10 (High) is
autonlatically set, lint you
may change it ]or iilOlPe
fl( xibilit?.
_k)ll ill}l}, open tile door
d m:ing Time Cook to
check the Iood. (;Ills( tile
door and press ST\RT
tO 1?esHI/le cooking.
Time Cook II
I,ets y/m chang-( i)ower
kvels autonlatically during
cooking. }tere's how to
do it:
I Press TIME C()()K.
2 Emer lhe firsl (ook time.
3 Change tile power level
if you don't warn full
power. (Press P()WER
I,EVEI,. Select a desir( d
power lexel 1-10.)
4 Press TIME COOK
again.
5" Emer tile second (ook
time.
0 Chai]ge the power l(vel
if y/m don't warn full
power. (Press P()WER
I _EVEI, Select a power
level 1-10.)
7 Press ST, kR'E
,\t |he end /)I Tim( (2)/)k l,
Time (;//ol_ II (//Un|S do_rl/.
Page 15
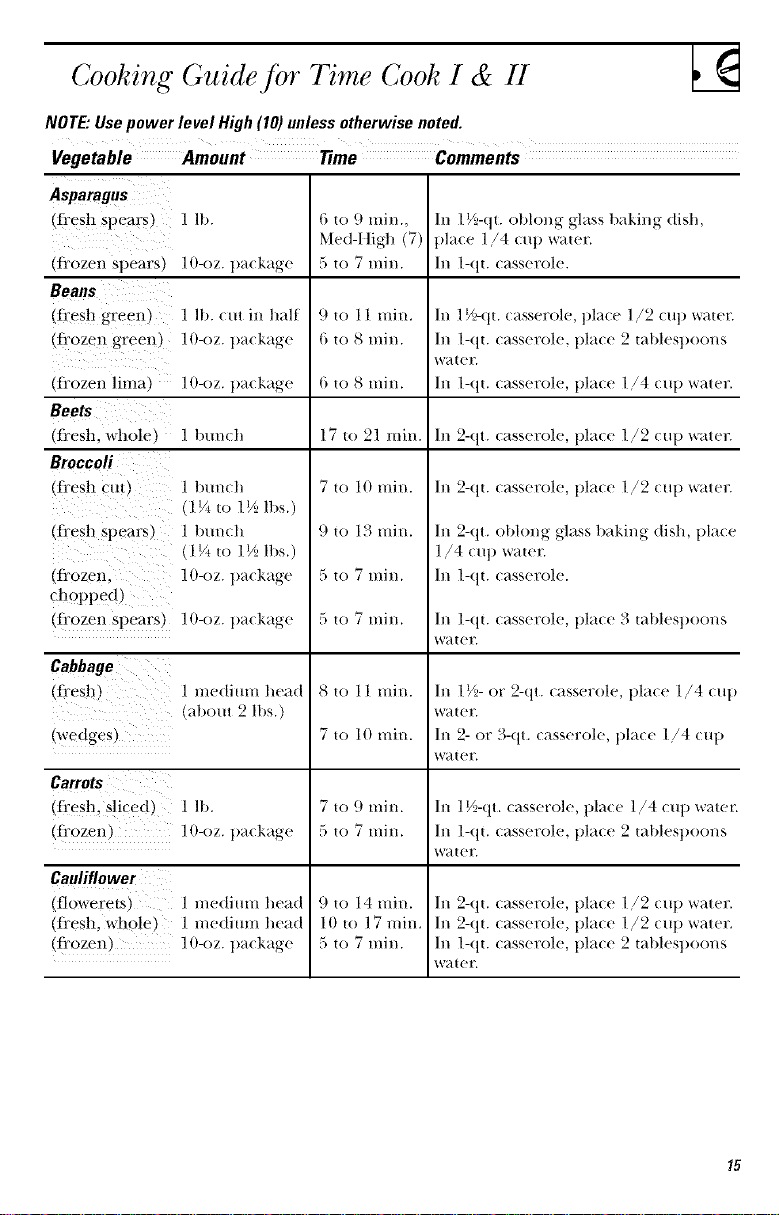
Cooking Guidejbr Time Cook I & II
NOTE."Use power level High (10) unless otherwise noted.
Vegetable Amount Time Comments
Asparagus
(fi'cs!! spears) 1 lb.
(frozen Spears) 10-oz. package
{) tO 9 IIlin.,
Med-I tigh (7)
5 to 7 min.
In 1V2-qt. oblong glass baking dish,
pla(e 1/4 (up vvat{!r.
In 1-qt. (asserole.
(ffCS h green) 1 lb. cut in half
(ITozen green) 10-oz. pa(kage
(frozen lima)
1O-oz. t)a( kage
9 to 11 mim
6 to 8 min.
6 to 8 min.
In 1V>(tt. casserole, place 1/2 cup wat{!r.
In 1-qt. (asserole, t)la(e 2 tablespoons
W;-I t (!I'.
In 1-qt. (asserole, t)la(e 1/4 (u t) water.
Beets
(fresh, whole) 1 lmn(h In 2-qt. (asserole, pla(e 1/2 (u t) _ater.
(flesh cm) 1 bmlch
17 to 21 min.
7 to 10 min.
In 2-qt. casserole, place 1/2 cut) ware12
(1 _/, to 1'/: ")s.)
(fresh spears) 1 t)m'[,, h
2 U 2 2 2 2 (1V, to lV21t)s.)
(frozen, lO-oz, package
9 to 13 min.
5 to 7 min.
In 2-qt. oblong glass baking dish, place
1/4 cup watet2
In 1-qt. casserole.
chopped)
(frozen spears) lO-oz, package
5 to 7 min.
In 1-qt. casserole, place 3 tablespoons
water.
Cabbage
(fresh)
1 me(limn head
(about 2 lbs.)
(wedges)
(li'esh, s!iced ) 1 lb.
(frozen) 10-oz. t)ackage
Cauliflower
(flowerets) 1 me(titan head
(li'esh, \_ho!{') ] me(tium head
(frozen) 1 O-oz. t)a( kage
8 to l 1 min.
7 to 10 min.
7 to 9 min.
5 to 7 min.
9 to 14 mir[.
10 to 17 min.
5 to 7 min.
In 1V2-or 2-qt. casserole, t)lace 1/4 cut)
W;-I t (!1".
In 2- or 3-qt. (asserole, t)la(e 1/4 (u t)
W;-I t (!l'.
In 1V2-qt. casserole, place 1/4 cup water.
In 1-qt. (asserole, pla(e 2 tablespoons
W;-I t (!l'.
In 2-qt. casserole, 1)lace 1/2 cup wat{!12
In 2-qt. ( asserole, pla(e 1/2 {up water.
In 1-qt. (as.;erole, pla(e 2 tablespoons
W;-I t (!l'.
5; •
Page 16

Cooking Guide for 71me Cook I & II
Coru
di'ozen kernel, ] O-oz. package 5 to 7 rain. In l-qt. casserole, place 2 tab|esl)oon.s
Corn on the cob
(li'esh 1 to 5 ears
1] rOZell }
3 to 4 rain.
)er e_ll?
5 to 6 nlin.
3 to 4 rain.
)er e_ll7
Mixed
vegetables
tt_ozen_
] O-oz. package
5 to 7 nlin.
Peas
(ti'esh. shelled) 2 lbs. unshelled
(fi'ozen_ ] (l-oz. package
9 to 12 rain.
5 to 7 rain.
Potatoes
(fi'esh. cubed. 4 t)olmoe.s
9 to 12 rain.
white, +_to 8 oz. each
(ti'esh. whole. ] +_t(> 8 oz.)
3 to 4 rain.
sweel or while,
Spinach
(Ii'esh) ]0 to 16 oz.
(fi'ozeIL 10-oz. t)ackage
5 to 7 nlin.
5 to 7 nlin.
chopped
and leal J
Squash
,2i'csh. Stlllllller ] lb. sliced
5 to 7 nlin.
alld vello_v
_Willler. acorll ] to _ s(ltl_l.sl/
8toll nlin.
but|ernuE i qabottt 1 lb. each)
w_Her.
h/2-qt, oblong glass baking dish, place
corn. If corn is in husk, use no water;
if corn has been husked, add 1/4 cup
water. Rearrange after half of tin/e.
Place in 2-qu oblong glass baking dish.
Cover with vented plastic wrap.
Rearrange atter half of time.
h/ 1-qt. casserole, place 3 tablest_oons
water.
h/ 1-qt. casserole, place 1/4 cup water.
h/ 1-qt. casserole, place 2 tablesl)oons
water.
Peel and cut into 1 inch cubes. Place
in 2-qt. casserole with 1/2 cup water.
Stir atter half of tin/e.
Pierce with cooking tork. Place in
center of tile ()Veil. I el stalld .'_ l//ill/l|es.
hi 2-qt. casserole, place washed Slfinach.
h/ 1-qt. casserole, place 3 tablesl)oons
water.
hi 1½-qu casserole, place 1/4 cut/water.
Cut in half and ren/ove fibrous
membranes. In 2-qt. oblong glass
baking dish, l)la(e squash (m-side-
down. "Ihrn cm-side-ut_ alter 4 n/inures.
Page 17

Time Features
Iol
1 Press DEFROST
AUTO/TIME twice.
2 Enter defrosting time,
3 Press START
4 Turnfood over when
the oven signals.
5 Press START
(Auto Defrost explained
in the section on
Convenience Features.)
Mlows \ou to defrost tot tile
length of time you select. See
tile I)efl'osting C,uide tor
suggested times.
Power hwel 3 is automaticall}
set, but you n/W change dlis
tor more tlexibilitv "_bu ma'_
(le_i'ost small items n/ore
quickl_ t)} raising tile power
lexvl after entering tile time.
Itowever, thex _qll need i/lore
ti'equent attemion allan usual.
Power hwel 7 curb the total
defi'osthlg time in about half!
power level 10 cuts die total
time to approximatel} 1/3.
Rotate or stir tood [i:equently.
At one half ot selected
defi'osting time, tile ()xr_'_
signals TURN. At this time,
ttlrll t()od O\_.T alld break
apart or rearrange pieces tor
more e_vn defl:osthlg. Shield
aIIv warlil areas witll small
pieces of tbil.
A dull thumping noise may
be hem'd during de/i'osting.
This sound is normal \_llen
tile o\_.'ll is l/or operating at
Itigh power:
Defrosting Tips
• I;oods [}'ozell in paper or
plastic can be de/i:osted in
tile package. Tighdy closed
packages should be sliL
pierced or \_:nted AFI'ER
lood has partiall} de/i'os_ed.
Plastic storage COl/tk/illers
should be at least parfiall}
t tl/COVered.
• IVamil}-size, prepackaged
ti'ozell dillllers (all be
deli'osted and microwa_ed.
If tile tood is ill a toil
COl/{aiI/el; trallsIi?r it to a
microwmv-sati., dish.
• D)ods that spoil easil g sttch
as milk, eggs, fish, stuffings,
poulu) mill pork, should
110[ 1)e allowe(l to sit out
I()r I//()l'e thai] Olle ho/lr
after deffosthlg. Room
tenlperature promotes tile
growth of harmfifl bacteria.
• IQ)r l/lore evell defi:os{ing of
larger tbods, such as lleeli
lamb alld \val roast.'_, ttse
Att{o I)eli'ost.
• Be Stlre large Illeats are
completely de[i'osted beIore
cooking.
• When de/i'osted, tood
shottld be cool but soliened
in all areas. If still sligh{l} i%
rettllTll 1o tile illicrowa\_' \rerv
briefl}, or let it stand a ti:w
minutes.
Page 18

Defrosting Guide
Food Time Comments
Breads, Cakes
Bread, hunsorrolls_] piece. | mh_.
Sweetrolls dpprox. ]2 oz.. 3 m ", rain.
Fish and Seafood
Fillets, frozen (1 lb., _im _ rain.
Shellfish, smallpieces (1 lb.) 5 to 7 rain. ])hue 1)|ol k in (a.',seroh'. Turn o_('r mid
break utl a/l('r hal/the time.
Fruit
Plastic pouch--1 to2 3 to _ rain.
(10-oz. package)
Meat
Bacon l lb.t
Franks (] lb,)
Groundmeat ] lb.,
Roast: beef, lamb, veal, pork
Steaks, chops and cutlets
Poultry
Chicken,broiler-fryer
cutup(2½to 3 lbs.
Chicken,whole
(2½m 3 lbs.
Cornishhen
Turkey breast (4 to 6 lbs.,
18
7_I() 7 min.
1,2 to |G min.
per |b
:5 io "7 min.
per 111
15 to |9 rain.
17 to 21 min.
Place m_ol)ened package in oven.
I,et stand 5 minutes after defix)sdng.
Place m_ol)ened package in oven.
Microwave just until/t'anks can be
separated, let stand 5 minutes, if
ne(essar}', to coml)lete (te/i'osfing.
Turn meat over after half the time.
Use power level l.
Place m_wral)l)ed meat in cooking dish.
"Ihrn o_er a/ler half tlle time and shield
warm areas witft/oil. When tinished,
sellarate pieces and let stand to eomt)lete
de/i'osting.
Place wrapped chicken in dish. Unwratl
and turn o_er a/let half the time. When
finislle(t, sellarate pieces and microwm e
2 to 4 l/linHtes iilore, if necessary.
I,et stand to tinish (let]:osfing.
Place wrapped chicken in (tish. AJler half
tfte time, /ll/wratl and tllrn chicken over.
Shield warm areas witft toil. Finisll
de/i'osting. If necessary, rim cold water in
the cavity mull giblets can t)e removed.
Place m_wrat)t)ed hen in the oven breast-
side-up. Tm:n over after ftalt the time.
Rm_ cool water in the cavity mull gJt)lets
can be removed.
Place m_wral)l)ed kweast in dish breast-
side-down. After half the time, turn over
and shield warm areas with loll. Finish
deti'osting. I,et stand 1 to 2 hours in
refi'igerator to eOmlllete de/i'osting.
Page 19

Time Features
This is a quick way to set
cooking time for 1-6 minutes.
Press one of the Express
Cook pads (/i'om 1 to 6)
t_)r ] to 6 mimues o/
cooking at t)ower h'vel 10.
For example, 1)ress the
2 1)ad/i)r 2 mimltes of
cooking time.
You can use this feature
two ways:
• It will add 30 se(onds to
the tilIle (Otll/til/_ dowI/
ea(h time the pad is
t)ressed.
The t)ower level can be
challged as thne is
comning down. Press
POWER I ,E_2I _and
enter 1-10.
• It (an t)e used as a (lukk
(ooking time.
Page 20

Convenience Features
(On some models)
The Smmks/i'attll'c
SNACKS
SnacksGuide
I Bread,rolls, muffins 1 to 4
2 Sandwiches 1 to 2
3 Pizza(leftoverslices) 1 to 4
4 Desserttoppings 1 to 4
5 Soup 8 to 40 oz.
6 Cheesedip 4 to 16 oz.
_tltOl//_ttJe_tllv sets Ihe
nli(rowaving |in/es all(|
powel" hwels to W_l]?l/l _t
variety of snack toods.
1 Press SNACKS.
2 Select snack type 1-6
(see die Snacks Guide
below),
3 Ellter the ll/Illlt)el; ()_
iwms or die tbod weight
ill olin( es.
4 Press S'[':\R'[_
Hint:Ym call press
and hold tile SNACKS pad
d m:ing cooking to distlla }
the snack type and
remaining microwaving
time.
2O
Page 21

(On some models)
The Cook/i'amre
amomaticallv sets tile
cooking fillies and t)ower
levels R)r a variety of/oods.
/ Press C()()K.
2 Select/_)od type 1-9 (see
the Cook Guide below).
Cook Guide
Food Type Weight Comments
I Canned Vegetables 4 to 20 oz. /Jse l//i(-ro\*,r;tve-s_lt( • ('_lsserole or t)ovvrl.
Co\er witl/lid or vented t)laxtic wr_lt).
2 Frozen Vegetables 4 to 20 oz. Use l/li(-ro\v;tve-sat(' casserole or 1)ovvrl.
Folio\\ rt)_i(k_lge iu.stru(tions [_)r adding
\_ater. Cover with lid or vetoed
plastic wrap.
3 Fresh Vegetables 4 to | () oz. Use l/li(-ro\\r;IVe-S;|t( ' casserole or 1)ovvrl.
Add 2 tablest)oons \\rawr /or each serving.
Co\er witl/lid or vented t)laxtic wr_lt).
4 Potatoes 8 to 40 oz. Pier(e skin \,,its fork. Plale t)otatoes on
o'_el) [loor or ltlrlllab|e.
5 Fish 4 to 16 oz. Use obhmg, square or r()tmd dish. Co\er
\\rilh \ented plastic _r]'_]) ()]" _r_x ])_tl)('t'.
6 Chicken Pieces 4 to 40 oz. Use obh)ng, square or round (ti.sl/. Co\er
\\rill/ \ented plastic _r]'_]).
7 GroondMeat 8 to 48 oz. Use round (asserole dish. (I,rHIlll)le l/leal
(beef, pork, turkey) into dish. Co\er With lid or \cured plastic
wrap. Drain and sur at signal.
8 Bacon 2 to 10 oz. [,a}er s|ril).S (hi a plate, 4 to a la\er.
Co\er e;4c]| |;iver with ;1 t);{t)er l()_r('].
9 Pizza 4 to | (; oz+ Fol|(.l\\ r package iu.smu dons to prepare
(frozen, microwaveable) t)izza/or mi(+_'()_r_xi]_g.
3 Ellter v,reig]lt in Otlllles.
4 Press ST,\R'[_
Hint'. Press and hold the
(;()OK pad dm:ing cooking
to display the/i)od type
and remaining ((>ok time.
21
Page 22

Convenience Features
DEFROST
AUTO/TIME
I0}
G
1 Press DEFROST
AUTO/TIME once.
2 Using the Conversion
Guide at right, enter
food weight. For
example, press pads 1
and2 for 1.2pounds
(I pound, 3 ounces).
3 Press START.
(Time Defrost is
explained in the 77me
Features section.)
22
The l)eJi'ost AutofI'ime
tbature gives you two ways
to defl:ost Ji'ozen Jbods.
Press DEFR()ST
ALIT()!TIME once _br
Auto Defl:ost or twice Jbr
Time De/t'ost.
Use Auto Defl:ost/or meat,
])otfltv} and fish up to
6 pomlds. Use Time
DeJi'ost |or most other
frozen fi)ods.
Auto Defl:ost amomaficallv
sets die defl:osfiHg times
and power levels to give
even defi:osdng results fi)r
meats, poultry and fish.
There is a ftandy guide
located on the inside fi'om
ot tile ovell.
Guide
Conversion Guide
IS the weight 0f tbod is
stated in pounds mM
OUllCes, tile outlces 17fillS[
be com'erted to tenths
(:1) of a pound.
Weight of Enter Food
Foodin Weight
Ounces (tenths of
a paund)
1-2 ' A
3 .2
4-5 .3
6-7 14
8 ' 15
9-10 16
11 ' .7
12-13 .8
14-15 .9
• Rel//o'_e l/le}tt i]?Olll
package and place on
lnierowax, e-sat_! dish.
• "I\vice during de/i'ost,
the oven signals TURN.
At each TURN signal,
turn the |hod over.
Remove (leli'osted me_t
or shield warm +we+is with
small pieces of |bil.
• After defl:osting, most
meres ts,eed to stms,:t
5 mim:ttes to complete
defi'osting. I,arge ro+_sts
should stmld |br _ff>out
30 mimnes.
Page 23

Sensor Features
; ..o.;+he.
::,,si.gthes..so.
:: FeaturesA_
::The Sensor Features
detect t!le increasing ....
:: lmmiditY released i
during cooking: The {
::ove*_automatically
ad'ustsy the cooking
{ t!Ine tO van0us types
: and amotmts 0ffbod.
i Do not Use the Sensor
iiFeatures twice in
succession on the same
::fb0d P0rti0n=it may
:: resul t in severely ::
Overcooked Or burnt
food. Iftood is
tmdercooked atier the
i
::coumdown,u_eTime
{ Cook Rlr additional
cooking time.
Oe_e_ed
• The t)roper (Olltainers
alld covel?s al?e essel/tial
for best sensor (ooking.
! ¸
Vented
• Always/lse l//icrowa_e-
sati' containers and co_er
them with lids or vetoed
plastic wrap. Never use
ught sealing plastic
containers--they can
prevent stean/t_:om
escaping and cause
tood to overtook.
a '3 6
Dr, off dishes so they dofft
mislead the sensor.
• Be sure tile outside of
tile cooking (omainers
and tile inside of the
n/icrowa_e oven are (hu
be/ore placing tood in
the oven. Beads of
l//oisHIl?e Hll?nillg illtO
steal// can mislead tile
sensoE
23
Page 24

Sensor Features
leSstlmel H_norel me
Use only with prepackagea
nucrowave Dor3cor/i wo Unln9
.7 5 to 3.5 ounces
NOTE: Do not use the
metal sheff when cooking
popcorn.
/VOTE:Do not use this
feature twice in
succession on the same
food portion--it may
result in severely
overcooked or burnt food.
How to Use the Popcorn
Feature
I Follow pack_ge
insmmtions, /lsing Tiine
Cook if the package is less
than 1.75 ounces or larger
than 3.5 (mnces. Place tile
packag-e of popcorn in the
ceilter
of tile llliCrow_l\ e.
2 Press POPCORN. The
(wen st_tr[s illlllleeliately.
If yo/l otlen the door while
"P()PCOI, LN" is displayed,
"SENS()R EPd{( )l;F will
appear. Close the doo_; press
CI I':.\P,/()FF and begin
again.
fflbod is undercooked alier
tile corn/re/own, use lime
Cook Ior additional cooking
time.
How to Adjust the Popcorn
Program to Provide a Shorter
or Longer Cook time
If you find that tile brand of
popcorn you/lse [ll/eleY[)OllS
or overcooks eOllSisteI/tl}.
yo/l can add or subtract
20 seconds to the autonlatic
popping time.
To add llme:
,\lier l )re._filg POPC()RN,
press 9 imlnediately alier the
()\ell starts I()r an extra 20
seconds.
Press 9 again to add another
10 seconds (total 30 seconds
additional time).
To subtract time:
.\tier ln'e_ing POPC()I_N,
press 1 immediately alier the
(/,,en starts lor 20 seconds
less cooking lime.
Press 1 again to red/ice
cooking time another
] 0 seconds (total 30 seconds
less time).
Press t{EVEI,L\(;E to heat a
cup of oolite or ()tiler
t)everage.
If tood is undercooked a/ker
Drhfl_s heated with the
Beverage feature nlay be
very hot. Remove the
contahler with care.
tile cotmtetown use _me
Cook tot _dditional (()()king
time.
24
Page 25

(_ess _me _moreemet
For reheating single sewings of
previously cooked foods or a
plate of leftovers
How to Change the
Automatic Settiugs
To reduce time b} 10%:
Press I after the [(_ature
p_ld.
To add 10% to cooking
time: Press 9 after the
tbature pad.
metalshelfwhe.usi,g :i
ii theReheatfeature.
::NOTE: Do nnt use this
il feature twice in
succession on the same
:: foodportion---itmay
ii result in severely :
overcookedorhurmuod.
How to Use the Reheat
Feature
1 Place covered loud in
d'_e o_en. Press I_ItEAE
The oven sire:Is
immediawly.
2 The oven signals when
s_eam is se_lsed and the
time remaining begins
counthlg down.
Do _:_()topen tilt' oven
door m_til dine is (OtHItJllg
down. If tilt' door is
o])elled, (lose it and press
ST\RT i_mnediat,.'ly.
After removing food from
the oven, stir, ff possible,
to even out the temperature.
Reheated foods may have
wide variations in
temperature. Some areas
may he extremely hot.
If ibod is not hot enough
alter the c(mntdown, use
Time Cook Ibr additional
rt'heatillg Iim_.
Some Foods Not
Recommended For Use
With Reheat
It is best to us(" Time Cook
lor these/bods:
• Bread products.
• Foods that must be
reht'_ted /lllCOVere(|.
• Foods that ueed to be
stirred or rotated,
• Foods calling |or a (Iry
look or crisp sur/ace
aJier rehe_lting.
25
Page 26

Sensor Features
NOTE: Do not use the
metal sheff with Sensor
Cooking.
NOTE."Do not use this
feature twice in
succession on the same
food portion--it may
result in severely
overcooked or burnt food.
(On some models)
Sensor Cooking gi',es you
(_{S?', _t,tltOl//_l|i( resuhs with
a ',arietv ot foods.
Place coxered food in
the o'_ el/.
2
Press the C()()K pad.
3
Select/god type 1-6
(see die Cooking Guide
below). The oven starts
The oxen signals v_rhell
steal// is sellse(I alld til//e
remaining is counting
down. Turn or stir tile
toed if necessary.
Do not open tile oven
door until time is counting
down. If the door is
el)cried, (lose it and press
S'I;MIT immediately.
If toed is mldercooked
_tJlt'F the coHllt(towI/, [IS('
Time Cook/or additional
cooking time.
How to Change the
Automatic Settings
(automatic settings for
canned vegetables cammt
be adjusted on some models)
(lesstime) (moretime)
You can a(/just tile cooking
time tor all leeds to suit
your personal taste.
Toreduce time by 10%:
Press I a/ler tile toed pad.
Toadd 10%to cooking time."
Press 9 al'ter the food t)ad.
CookingGuide
FoodType Amount Comments
I. Chicken Pieces 2-8 t)ie(es Coxer with "_el/ted t)lasd(_r_]).
2. Fish 4-16 oz. (_ox er wit h ',,ent e(t t)l;-istic vvrral).
3. Ground Meats 1/2 - 2 lbs. Llse rom_d (asserole dish. Crmnl)le meat illtO
(Beef, Pork, Turkey) dish. (;oxel7 with lid or xented t)lastic wrap.
Drain and stir at signal.
4. Fresh Vegetables 4-16 oz. kdd 1/4 (u t) _%r_.te]")el"serving
Coxer with lid or xented t)lasti(wrat).
5. Frozen Vegetables 4-16 oz. Follow t)a(kage instru(tiOllS tor adding water.
Coxer with lid or xented t)lasti(wrat).
6. Canned Vegetables 4-16 OZ. (]oxel _ with lid or xented t)lasti( wrap.
26
Page 27

Sensor Cooking gives you easy,
automatic results with avariety
of foods (see the Cooking Gu!de
below).
(On some models)
Vegetable
1 Place covered Ji)od in
the oven+ Press the tbod
pad+ (For _cgetabh's,
press the X+_GE'I'.\BI,E
pad once tbr Desh
vegetal)les, twice [br
trozen vegetables, or
three tiIlleS ]()17 Callned
vegetables.) The oven
starts immediately.
If tbod is mldercooked
after tile comndown, use
Time Cook It),: additional
cooking ume.
How to Change the
Automatic Settings
(automatic settings for
canned vegetables cannot
be adjusted on some models)
succession on the same :_
ii foodportion--itmay
: res.lti,severely
overcooked or burnt food+
2 The oven signals when
steal//is sensed alld tll//e
remaining is ( omning
down. mtlrn /)F stir the
food it ne(essar}.
[)O not Op(!ll the O'_ell
door tmtil time is c()ttnting
down. If the door is
opened, close it and press
S%kRT immediately.
(less time) (more time)
You can a(/just tile cooking
time tbr all the(Is to suit
your personal taste.
Reduce time by I0%:
Press 1 a/ler tile tbod pad.
Add 10% to cooking time:
Press 9 after tile tbod pad.
CookingGuide
FoodType Amount Comments
Canned Vegetables 4-16 oz. Coxer with lid or xented plasti( wrap.
Frozen Vegetables 4-1 () oz. Foll()_ r ])a(kage instFtl(tiOllS t()l" a(t(lillg x_r_ttel ".
Cover with lid or vented plasti(_rl_]).
Fresh Vegetables 4-16 oz. Add 1/4 (up water per serxqng.
Cover with lid or vented plasti( wrap.
27
Page 28

Sensor Features
(On some models)
I POTATO
A
NOTE: Do not use the
metal sheff with Sensor
Cooking.
NOTE: Do not use this
feature twice in
succession on the same
food portion--it may
result in severely
overcooked or burnt food.
1 Pierce potato skin wfth
tbrk and place potato in
the oven.
2 Press P()TATO. The
ovell starts immediately.
3 The oxen signals *&rhell
sle_ll/l iS sellsed alld til//e
remaining is comuing
down. Turn or stir the
]bed if necessaz,-v.
Do not open the oven
door m/til time is comuing
down. If the door is
opened, close it and press
START immediately.
If _bod is mMercooked
after tl'te countdown, use
Time Cook Ior addhioHal
cooking time.
How to Change the
Automatic Settings
You can a(/just the cooking
time tbr all tbods to suit
yotlr persolla] Histe,
(less/ime) (moretime)
Reduce time by 10%:
Press I after tile It)()(] pad.
Add 10% to cooking time:
Press 9 after the [ood pad.
28
Page 29

Other Features Your Model May Have ___
The t ]EI P t)ad disl)la}s
[i.,ature in/i)rmation all(t
hell)rid hires. Press t ]EIP,
then select a/bamre pad.
To remind you that you
have/i)od in the oven, the
oven will display "F()()[) IS
RI_L+\[W" and beep once a
minute mHil you either
open the o_en door or
press CI EAR/()FE
CLOCK
Press to el/ter the ti_//e of
ct_y or to check the time of
clay while microwaving.
I Press CI,()CK.
2 EHter time o/(tar.
3 Select AM or PM.
4 Press STkRT or CI,()CK.
"['o (he(k the time of (tar
while microwaving, press
(;1,()(_K.
29
Page 30

Other Features Your Model May Have
The scroll speed of the
display (an be (hanged.
AM/PM
SCROLL SPEED
Press and hold the
i
AM!I)M pad about 2/
seconds to bring u I) the
display. Sele(t 1-5/or
slow to thst scroll speed.
[0 1:
[DISPLAY ON/OFF]
f--_
DELAY
START
_nO_S_ED
To turn the (lo(k display
off, press and hold (l tor
al)o[l{ |]lree se(ollds.
Delay Start alh)ws you to se|
the microwave to delta
cooking up to 24 hours.
I Press DEI AY S%\RI"
2 Enter |he time you
wan| the o_en to start.
(Be sure the microwave
clock shows the correct
time of day.)
3 Select AM or PM.
"[b redisplay the do(k,
r(_t)eat.
4 Selee| any combination
of Defrost Auto!Time
or Time Cook I 8,: II.
5 Press S%\RT.
The Delay Start |ime will
be displayed plus "DS."
The ()_xq_ will au|oma|icallv
s|ar| a| the delayed time.
The time of day mm be
disl)la}ed 1)y t)ressing
CI ()CK.
3O
Page 31

Timer ()n/()/1 operates as
a mim/te timer and can be
used at any time, even
when tile o_en is operating.
I Press TIMER ()N/()FE
2 Enter tin/e VO/l w}ti/t to
CO/lilt (]OUvll.
3 Press TIMER ()N!()FF
to start.
Ill addition to starung
lll+lllV /tlllCtiOllS,
START!PAUSE allows you
to stop cooking without
opening tile door or
clearing tile displ_ff.
When time is up, tile <)veil
will signal. "Ib turn off tile
timer signal, press TIMER
()N/()FF.
NOTE: The timer indicator
will be Hitwhih' the timer
is operating+
iy5 [_
_!ii_i__!i_i_i!__i i_i;ii!_i_i_;iI_i__i_i_i
'File Remillder/cature call
be used like an alarm clock
all(t Call be tlsed at allY
time, even when tile oven
is operating. The
Reminder time can be set
up to 24 hours later.
I Press REMINDER.
2 Ellter till' tiII/e VOtl Wt4llt
tile ()veil to remind you.
(be sure tile mi( rowave
clock shows tile correct
time of da}.)
3 Select AM or I'M.
4 Press 1@2MINI)ER. When
Reminder signal occm:s,
press I@2MINI)ER to tm:n
it oIL The Reminder
time liia+, be (tispl_l}ed by
pressing RI+_MINI)ER.
NOTE: The REM indicator
will remain Hit to show that
tile Reminder is set. To
clear tile Reminder betbre
it occurs, press REMINDER,
then 0. The REM indicator
will no longer be Hit.
31
Page 32

Other Features Your Model May Have
[ VENTAFAN]
HI-LO-OFF
Wotl IIl_lV lock the CO]ltrol
panel to prevent the
microwave/i'om being
accidentally started or
used 1)v children.
For best cooking results,
lea_e the turntable on.
It can be turned off lot
large dishes. Press
TURNT\BI E to tm:n
the turntable on or off.
The xel/t fan relilo'_es
steam and other "+apors
fi:om sm:tace cooking.
To lock or tmh)ck the
controls, press and hold
CI EAR!OFF/or about
three seconds. When the
control panel is locked,
an "I" will be displayed to
the extreme right.
Sometilnes the turntable
cml become too hot to
touch. Be carehfl touching
the tm:ntabh' during and
alter cooking.
Press VENT FAN once for
high thn speed, twice tor
low thn speed or a third
time to turn the thn off.
All a/ltOlI/atic t_lll ]('atlllTe
protects the microwave
fi'om too much heat rising
fi'om the (ooktop below it.
It automatically ttlrns on at
low speed i/it senses too
much beat.
If you have turned the fan
on VO/l l//av lind that VO/I
cam_ot turn it otE The Jim
will automatically turn off
when the internal [)arts are
COOl. It l//av Stilt on tk)r
30 mimttes or more after
the cooktop and microwaxe
controls are turned o/t.
32
Page 33

BRIGHT-NIGHT
0 FF
[ VOLUMEBEEPERA ]
Press to |tlrn the sHr{_l(e
light on or off.
The beel)er sound level
can be a(!justed. Press
BEEPER VO[ JJME.
Choose 0-3 tot nmte
to h)ud.
()n some models, there is
a night light option.
Press SLIRFA(]E I,IGIIT
once lot bright light, twice
/or the night light or three
times to turn the light ott.
AUTO
RITE LIGHT
SI;.O_ SPIn
[+7++71
You can set the night
light to turn on and off
nutonlati(-allv at lilly thne
VO/I W_.l] t,
I Press AUT() NITE
I,I(;I t'E
2 Ellter the time you W_lllI
the ligl'[t to ttlrn on.
Seh'ct AM or PM.
Press AI_IT() NITE
LI(;ItT again and emer
the time you warn tile
light to turn o/]_ Select
AM or PM.
Press AUT() NITE
1+l(;l IT.
NITE will stay lit to remind
you that the/cature is set.
_)tl can review the Auto
Nile I,ight settings bv
pressing AUT() NITE
I +I(',I tT.
To erase your settings
an(t ttlrn oil |he p./ltomatic
/cature, press AUT() NITE
11(1I IT, the]] 0.
33
Page 34

Other Features Your Model May Have
How to Use the Sheff
When Microwaving
/////////! !\\\\_
• Make sure tile shelf is
posi/ioned properly
inside lhe microwave
lo prevent dalnage to
the oven fi'onl arcing.
• Do llO! rise >1 iiiicrowave
browning dish on tile
shell The shelf could
overhear.
• Do llO1 liSP tile OVell
widl the shelf on die
microwaw _floor. This
could damage dm
mict_x_lve.
• E se pot holders
handling the shelf
i/ nla,. be ho_.
• Do nor use lhe shell
when cooking
popcorn,
• Do no_ use /he shell
wiih Sensor Cooking
or Reheat
Food i//ilixiwaxes best
"_vhen pla< ed <ill the
ttlrnta|)le oF ()ii the sllelt
ill till! lower position.
Only use tile shelI when
reheaiing (ill lll()lTe than
lille lexel. Do not store tile
shelf inside the oven cavity.
For best results
2
Uneven results
The shelf gJves you tile
option to reheat more
than one dish of lood at
tlle satlle tillle.
24evel reheating
34
Page 35

i _ii ii
Switch places after 1/2 time.
Switch places after 1/2 time.
Switch places twice
o To reheat on 2 levels
or
o To reheat 2 dishes on the
lower level:
I M/dtiplv r(heat time
lV 11/,_.
2 Switch places alter 1/2
the time.
o To reheat on 3 levels
(on some models)
I Double the reheating
time.
2 Switch places twice and
give the dishes a 1/2
turn d m:ing reheating.
(Place (hnse li}ods, or
those that require a
longer cook time, on the
Ui)l)er shell first.)
35
Page 36

Microwave 7 ms
Term Definition
Arcing Arciu_ i_, th(' I/Ii(FOW_I'_(" t('I'lil /()F sl)_lrks in Ill(' oven. Arciu_ is
(-_lilS('(t b'_ :
• die mcml shell being iustMlcd iu(orrcclly mid louchiug Ill('
u/i(rowa\c \vails.
• lllCt_+l r)r I()i] touchin_ tilt' sit|t' oJ t]/c O'_Clh
• [(_i) t]Kfl is nol molded lo |hod (upturned edges act like
mn('ml;_s
• mctM such as IWiSt tics. potdtry pin.',, gold-rimmed dishes.
• l't'( V(-]('(I |)_l|)(q" l()\%r('|_ (Oll[}Iillillg" SI//_II1 IIl(q_/1 })i(W('S.
Covering (_ov('rs hold iu molsmr(', _iHo\_+ r I()F lllOFU UV(ql ll('_l|iIlg _lll(l F('(]II(-("
_'l|IO\_,rs UX(('SS Sl('_ll// [0 ('S(_l])().
Shielding In ,_ r( ._ulm <"o\('u. _ou shi(qd (hick('n |)i<'('_zstsor I);ikcd Jbods to
i)r('_,('m r)'_(,r-|)rowniug. \_h('u lllJ(TO\_r_IVJllg ", yotI lib(' MIKII| slrips oJ
R)il )o shield d/iu l)m'ts, such ;)s Ill(' tills of \'dugs ;rod legs on
[)oultr_. \'J/i(-h _r()lll(t (-()()k 1)(']()l'(' larger ]);Irt.s.
Standing Time Wh(,. VO/l (ook will/ r('K/llm" ov(qlb, J'oods sll(]/ aN FO_t.MS OF (_Ik('s _IFU
_l||O\_+r('d[0 stand to linish cooking or to set+ St_il/(]il/_ time is
,"_] )(Wia||V ill J)OFI_tlll ill l//i(l'O\*_r}|\( ` ('OOkillg'. NOt(' []/}|I a I//J('I'O\V_iV('d
('ilk(' JSllO[ l)l_)c('d on _ (ooliug r_i(-k.
Venting \|i('r co'_.criu_ _-zdish WJtll ])l_-zsti(-_r]'_[), _r())_ _(']lt Ill(' })|_i"li(--_r]'_l}) I)_r
mnl)))_ b_)(-k on(' (-oru(-r so ('×(-('ss slcmn ('m_ ('s(-_q)c.
38
Page 37

Care and Cleaning
An o((asiona] thorough
wiping with a so]ution of
baking soda and water
keeps die inside fi:esh.
NOTE: Be certain the power
is off before cleaning any
part of this oven.
Walls, Floor, Inside Window,
Metal and Plastic Parts on
the Door
Sol/It spatters (_111 be
l_elilo'_e(t wilh a ])a])cF
towel, others m_ require
a damp c]oth. P,emove
grea._y spatwrs widl a sudsy
(]oth, then rinse _,,ith a
dam]) c]oth. Do not use
abrasive c]eaners or sharp
Illensi]s Oll ovell wa]]s.
Never use a colmnercial
oven cleaner on rely part
of your microwave.
Shelf (if included)
C]ean Wit]l mi]d
soa]) and water or in I]le
dishwasher. Do not clean
in a self-cleanlng oven.
Removable Turntable and
Turntable Support
To prevent breakage,
do not ])lace die turmab]e
imo water just alter
cooking. Wash it careflfl]v
in warm, sudsy wamr or
in die dishwasher. The
tm:mab]e and support
can lie broken if dropped.
UemembeL (to llO[ operate
the ()_en withom die
mrmab]e and su])])ort
in ])]ace.
Temperature Probe
(if included)
C]ean immediaw]v after
using. To dean, wipe with
a sudsy c]odl, dlen rul)
light]y with a p]astic
s(om:ing ba]] if ne(essavv.
Rinse and (tvv. The probe
can a]so 1)e washed in the
dishwasher.
37
Page 38

%
Care and Cleaning
We recommend against
using cleaners with
ammonia or alcohol,
as they can damage
the appearance of the
microwave oven. ff you
choose to use a common
household cleaner, first
apply the cleaner directly
to a clean cloth, then
wipe the soiled area.
Case
Clean tile outside of file
microwave with a sudsy
cloth. Rillse and then dry.
Wil)e the window clean
with a dam t) cloth.
Control Panel
Wipe with a dam 1) cloth.
Dry thoroughl}. Do not
use cleaning sprays, large
amounts of soa l) and water,
abrasives or shar t) ok!jeers
Ol/file t)anel--flley ('all
damage it. Some paper
towels call also scrat€h
tlle control t)anel.
Door Panel
Belore cleaning tlle t)'ont
door 1)ariel, make sure you
know what t}])e of panel
you hme. Re/('r to tile
eighth digit of the model
munber. "S" is stainless
steel, "I" is CleanSteel and
"B", "W" or "C" are plastic
colors.
Stainless Steel
blea(h or t)r(ldH( [s
(ontaining (hlorine on
Stainless Steel tinishes.
CleanSteel
Use a clean, soft, light and
lightly damt)ened clofll,
then dry thoroughly. Do
I/Or /lSe apl)liallCe Wax,
t)olish, bleach or 1)rodmts
(ontaining m_y (hemi(al
agent on the CleanSteel
sllrlktees.
Plastic Color Panels
Use a clean, sofL lightly
(taml)eHed cloth, then dry
thoroughly.
Door Seal
It's important to kee t) tlle
area clean \_]lere tile door
seals against tile Illi(rowtlve.
Use only miM, non-abrasive
detergents at)plied with a
clean sponge or soft cloth.
Rinse well.
Bottom
The stainless steel 1)ariel
can be cleaned with
Stainless Sieel Magic or a
similar product using a
clean, so/t cloth. Apl)ly
stainless cleaner caretullv
to axoid the surroml(ting
plastic t)arts. Do Hot use
at)t)lian( e wax, t)olish,
38
Clean off tile grease and
(ttlst Ol/ the bottolll o/lell.
Use a solution of warm
water an(t detergem.
Page 39

LightBub placeme,zt
40-watt incandescent
bulb (WB36X10003),
available from your ;
GE Supplier.
40-watt incandescent }
bulb {WB36X10003),
available from your ;;
GES.pplie .
I "Ib repla(e the bulb(s),
first (tiS(OHHe(I tile t)ower
_lt the m_dn tuse or (ir(tzit
1)reaker t)allel or pull
the t>lug.
2 ReIllO'_e tile strew at t]le
left oI tht! light ( o_,er
and lower the ( o',er.
REMOVE SCREW
1 "Ib replace tile ()veil light,
first (tiscolmect the power
at tile main fllse or circuit
breaker panel or tmll
tile t)lug.
2 Remove tile top gdlle t)_
taking ()lit the 2 S(__(_rs
that hold it ill l)l;_(e.
3 Be sure tile bulb(s) to be
replaced are cool be/ore
removing. AJler breaking
the adhesive seal, remove
tile bull) 1)y gently turning.
4 Retilace tile screw.
Connect electrical power
to the ov(m.
3 Next, remove tile screw
located al)ove the (toor
I/e_lr the cel/ter ot {he
()veil th;-i{ set/IreS the
light housing.
4 Retila(e Ill(! scre_v.
COllllett ele( {ri( al t)ower
to the ()veil.
39
Page 40

%
The Exhaust Feature
Charcoal Filter
on some rood#Is
Reusable Grease Filter
(onallmodels)
The vent t_m has a metal
r_ usable grease filwr.
The reusable grease filler
lraps grease released by
too(Is on tile ¢ooktoi/. It
also prevents ]lali/es ]l'oi//
toods on tile cooktop [IX)Ill
damaging {lie inside of
the l//Jcrowave.
Models that re<irculaW air
ba(k ill|() the ]?()()Ill also
use a (har(oal fiher.
For this reason, tile filter
mils{ AI 7_XWt_Sbe in place
when tile hood is used.
The grease tiher should be
cleaned once a montll, or
as needed.
4O
To remove, slide it to die
side using the ml). Pull it
down and ()lit.
To clean the grease filter,
soak it and then swish i{
aromld in hot water and
dewrgent. Don'{ use
_lllllllOllia or al//l//Ollia
t/rod ucts because i{ will
darken tile metal. IJgtu
brushing can be used {o
remove embedded diri.
Rinse, shake and let it dry
betore replacing.
To replace, slide tile filter
in tile/i'ame sloi on ille
lett side of {he opening.
Pull u I) and to tile righ{
to lock into t/lace.
Page 41

IiI
Part No. WBO2X9883
frmn your GE supplier.
If the n/odel is not v(nted
to the outside, the air will
lie recirculated through a
distiosable charcoal lilter
that helps r(move smoke
and odors.
To remove the charcoal
filter, disconnect power at
the n/ain fllse or circuit
breaker panel or pull
the plug.
To install a _r filter,
relilove t)lasti( and Ot]ler
outer _rapping fi'om the
new filter.
The charcoal filter should
be retilaced when it is
noticeably dirty or
discoh)red (usually alter
6-12 ulonths, deliending
on hood usage). Se_
"()pti(lnal Kits," page 9,
]()1" l/IOr( inlk)rl//ation.
Remove the top grille bv
removing the 2 screws that
hold it in place. Slide the
/ilter towards the/i'ont of
the ()Veil alld relilove it.
Insert the filter into the
top opening of the oven
as shown. It will rest at an
angle on 2 side SUl)l)ort
tabs and in/i'ont of the
right rear tab. Replace
the grille and 2 screws.
41
Page 42

Before You Call For Service
Problem
Oven will not A fuse in your home
start may be blown or the
circuit breaker tripped.
Power surge.
Plug not fully inserted
into wall outlet.
Door not securely closed.
Floor of the oven is
warm, even when
the oven has not
Heat from the cooktop
light may make the oven
floor get warm.
been used
"LOCKED"appears
on display
Youhear an
unusual, low-tone
beep
The control has been
locked.
You have tried to start
the Reminder without
a valid time of day.
You have a'ied to change
the power level when it is
not allowed.
"SENSOR ERROR" When using a Sensor
appears on display feature, the door was
opened before stereo
could be detected.
Stereo not detected
hi maximtun mnotmt
of time.
Food amoont too Sensor Reheat is for
large for Sensor single servings of
Reheat recommended foods.
"BAD PROBE" or Probe has been
!'PLEASE INSERT forgotten or may not be
PROBE"appears h_serted properly into
ondisplay oven outlet.
The probe is defective,
• Rel)lace tuse or reset circuit lweaker.
• lJot)lug the microwave oven, then plug
it back in.
• Make sure the 3-1)rong plug on the
oven is fully inserted into wall omlet.
• ()t)en the door and close securely.
• This is nornml.
• Press and hohl CI,IL,\R!()FF fi)r
about 3 seconds to mllock the control.
StmTt over alld enter a valid time
of (tax.
NlallV of the o_,ell'S i(!atllres are t)reset
al/d Cgtl/l/Ot bc chal/ge(/.
Do 1/ot ol)ell door Ill/ill steal//is
Sellse(t al/(] t1111e is showll co/lntillg
doxvll (111 dist)la" _.
Usc Time Cook to heat f¥/r more time.
• Llse Time Cook for large amorous
of tood.
• /nserl the t)rol)e t)rol)erl} iron Ihe
OVel/ wall Ollilet.
• Replace lhe l)robe.
42
Page 43

o Moisture on ttl( oven
door and walls while
cooking. _\ip( the
moistm'e off with a pap(_
tow(1 or soli dod/.
o Moisture b(_een tile
OVell door pan( Is wh(I/
cooking certain Ioods.
Moismr( shotdd dissipate
shordv alier cooking is
finish(&
o Steam or vapor (scaping
[l'Ol/l arot/l/d th( door.
o Light refl(ction aro/md
door or o//t(r (ase.
o Dimming oven light and
change in the blow(r
so/rod at power kv(ls
other than high.
o D/ill thumping sound
while ov(n is operating.
o Th( veto/:m op(rating
while tile microwav( is
operating. "I'h( vent Jan
will not go off nor call it
b( turned off/mti] the
microwa_( is off.
o T\'-radio interli'r(n(:e
might be noticed while
/lSil/g tile I//icFow_I\(.
Similar to tile imerli.'renc(
caused 1)_ othe_ small
appliances, it do(s not
indicate a problenl with
tile microw_ e. Ph/g th(
microwav( into a dilh rent
electrical circ/fit, move the
radio or TV as 15r away
]roi/l 1]1( i/licrowav( as
possibl( or check ill(
position and signal of
tile TViradio antenna.
43
Page 44

Notes
44
Page 45

Notes
45
Page 46

WeTlBe
ge.com
ge.com
800.GE.CARES
(800.432.2737)
ge.com
800.TDD.GEAC
(800.833.4322)
I _e _t (l/lestiOll Or I/eed
apl)lian(e? Try dw (;E
At)t)liances Wel)siw 24 hours
Ext)ert C,E repair ser\'ice is
olJ,lv o_J,e step a'w;_yti'om
your door. (;et on-line m_d
schedule VO/ll? seY_,ice ;4t VO/ll?
(omvnien(e 24 homes allY
(t_Ivof the \'ear!
(;E sut)t)orts tile Unhvrsal
I)esign concet)t--l)ro(t ucts,
ser\'i(es and enviromnents
that can be used l)yt)eople
of all ages, sizes and
cal)al)ilities. \_i' recognize
the need to design/or a
wide rang(' of t)hysical _31d
mental al)ilith's mid
For glx'_lItl]? €olive]lie]ice _tl/(t
_ts|el? se_ce, VOll c_tll llOW
download Owner's Manuals,
order parts, c_tt_ll()gs, o1? evell
schedule service on-line, him
can also L\sk Our "Ibam of
Experts r'' _r()__rquesdons,
_tl/d so lllllch lilOl'e,..
()r call 800.GE.(2\RES
(800.432.2737) (huing
1/O1_1//;41 1)/ISil/eSS ho/ll?S.
imt)airments. For de{ails
of ( ;E's Universal I)esigm
al)l)lications, including
kitchen (tesigal ideas lot
t)eople with disat)ilities,
check om ore: X_i'bsite to(la\.
For the heating imp;fire(I,
please call 800.TI)D.GIL_\C
(800.833.4322).
Purchase a GE exten(led
ge.com
800.626.2224
46
warl'allU,,' and learn ab()llt
special discotmts that are
m ailable while your warmm\
is sdll in ett_'ct, him can
tmrchase it on-line amdme,
or call 800.626.2224 during
nomml business horn's. GE
Consmner t tome SelMces
will sull be dlere a/{er \'ore:
warranty expires.
Page 47

m
ge.com
800.626.2002
ge.com
hldivid uals qualified
to service their own
_lppliances Cml have
t)m;ts or accessories Sellt
directly to their home.
(VISA, MasterCm:d and
Discover (ards are
accepted.)
()rder on-line today,
_4 hO/II?S every day or
b} phone at 800.628.2002
d m:ing normM business
hoIIrs.
Register your new
appliance on-lhle-
at your conve_dence!
Timely prod uct reKistration
will allow/or enhan( ed
COil/ill [ulicatioll and
t)rol//l)t service/lnder tile
terms of your warranty,
should the need m:ise.
him n/av Mso n/ml in tile
pre-primed registration
cm:d in(luded in die
t)_wking m_terial.
Instructions contained
in this manual cover
procedures to be
performed by may user.
Other servichlg generally
should be referred
to qualified service
personnel. Caution
must be exercised, since
improper servichlg may
cause tmsafe operation.
47
Page 48

S/aplesah_5_l!p or ca_cdh, d clu.ck he, v,. Pmo o ori._qmd
purchase daie i_ _teeded goobiain service under warra_tly.
LIMHT]) ONE-Yb_ WARRANTIT
I?or olle v_lF [l'OlU (]_tt( of oi_Jl/al l_tll'(ll_l_;e,
GE _il] r_ pl:_te a_F/)art in the mi(rowa\('
oxen that fidls due lo a defix t in mat_ fi;ds <>r
_orkmanship. DmJ1_glhis limited one-yearwmvanly,
(;E will pro_&,five ofc'h_ge, all l_dxw and related
ser_i(c _osl_ to/vpl_e d_e dcfi:_ dw p_u't.
:/:/ ,
Xll \_arrantx serfiee _ill be provided 1t3ore" E_ctory
Ser\ke Cent_ rs or b} ore" ?lutholJzed Customer
Care _ serxk ers dudug normal _orking horn's.
Should your applianc_ need ser_Jce, dining
\v_lrmnl} p(riod or be}ond, call 8(}(LGE.C.\RES
(800.4322737).
Ple_lse hme serial and mod(I mm_bers ax_dlabl(
_d_en calling ]br serxice.
• Service trips to your home to teach you how m
use the product.
• hnproper installation, delivery or maintenance.
If you have an instaJlatiou problem, contact
your dealer or installer. You are responsible for
providing adequate electrical, exhausting and
other com_ecfing fadlifies.
• Product not accessible to provide required
service.
• Replacement of house fuses or resetting of
circuit breakers.
• Replacement of the cooktop light bulbs.
• Failure of the product or damage to
the product if it is abused, nffsttsed (for
exan'_ple, cavity"arcing from wire rack or
metal/foil), or used for other than the intended
purpose or used commercially.
• Dunnage to product caused by"accident, fire,
floods or acts of God.
• Incidental or consequential damage caused by
possible defects with tiffs appliauce.
• Damage caused after delivery:
EXCLUSIONOFIMPLIEDWARRANtiES--Yoursole andexclusiveremedyisproduct
repairasprovidedin thisLimitedWarranty.Anyimpliedwarranties,includingtheimplied
warrantiesofmerchantability orfitnessforaparticular purpose,arelimitedtooneyearor
theshortestperiod allowed bylaw.
This wma_ant\ is extended m the original pmvhaser ;md maysucceedhlg owner ibr pioducts purchased f;:whonle
use within the [ SA.1€tile product [s located in an m>a where se_wicebya GE Authorized Se_a'iceris llor avail_ahle.
you nlay be responsible fbr a trip chmNe oryou mm b_ _quhvd ro bang tile p_duct m _uaAuthorized GE Service
Location _br seivice. In Alaska. the wma'antvexcludes the service cars to your home.
Sonle states do nut _dlo_ tile exclusion or fimitatiou ofincidenta or consequential danlngca, so the abovv
limitation or exclusion lilly 110[applyTO_OU.This \WiH'alltygives },oilspecific legalfights, madyou mm' also hm'e
other rights _hich wua trom stare m stare. To know what your legal fight_sm'e mvo_a"stare, cons_dl ,'our loczdOl
SNrU _'onSHlller _l_ilil3 ottice or VOllr state's Xlrorne_ I_enevdl.
Warraraor:GeneralEle_ie Company.LoMsville.KY 40225
Printed in Malaysia
 Loading...