

Page 1
GEAppliances.com
®l
U
Safety Instructions ...... 2-7
Operating Instructions
Aluminum Foil ................ 13
Clock and Timer ........... 15, 16
Oven ...................... 10-25
Baking and Roasting ........ 13
Broiling, Broiling Guide ....... 14
Oven Control ............. 10, 11
Power Outage ........... 12, 16
Preheating ................... 13
Sabbath Feature ......... 19, 20
Self-Cleaning ............. 24, 25
Special Features ............. 18
Thermostat Adjustment ..... 21
Timed Baking
and Roasting ................ 17
Surface Cooking ............. 8, 9
Warming Drawer ......... 22, 23
Care and Cleaning
Burner Assemblg .......... 26-28
Burner Grates ................. 26
Control Panel and Knobs ..... 32
Cooktop Surface .............. 29
Door Removal ................. 30
Kick Panel ..................... 31
Lift-Up Cooktop ............... 29
Oven Bottom ................. 30
Oven Light Replacement ...... 32
Oven Vents ................... 29
Self-Cleaning .............. 24, 25
Racks ......................... 32
Stainless Steel Surfaces ....... 29
Storage Drawer ............... 31
Warming Drawer ............. 31
Installation
Instructions ............ 33-44
Air Adjustment ................ 43
Anti-Tip Device ............ 36, 44
Checking Burner Ignition ...... 42
Connecting the Range
to Gas .................... 37-40
Dimensions and Clearances ...35
Electrical Connections ..... 41, 42
Leveling the Range ........... 43
Location ...................... 36
LP ............................. 44
Troubleshooting
Tips ...................... 45-48
Accessories ................ 49
Consumer Support
Consumer
Support .............. Back Cover
Warrantg for Customers
in Canada ..................... 51
Warrantg for Customers
in the U.S.A................... 50
EGR3000
EGR3001
JGB280
JGB290
JGB300
JGB400
JGBP25
JGBP26
JGBP27
JGBP28
JGBP29
JGBP55
In Canada contact us at:
www.GEAppliances.ca
Write the model and serial
numbers here:
Nodel #
Serial #
You can find them on a label
on the front of the range behind
the warming drawer, storage
drawer or kick panel.
183D5580P254 49-85172-1 06-09 JR
Page 2
IMPORTANT SAFETY INFORMATION.
iiii_i_i_i_iiiii/iiii!!iii!'iiiiiii_'_i_i_i_i_:!iiiiiii!i!
WARNING!
READ ALL INSTRUCTIONS BEFORE USING.
iiiiiiiiiiiiii_iiiiiiiiii_iiiiiiYiiiiii_iii!i!iliiiii
i,',',',iiYiiii_i/iiiiiiiililili_iii_iiiiililili_iili
££
w
.£
For your safety, the information in this manual must be followed to minimize the risk of fire
or explosion, electric shock, or to prevent property damage, personal injury, or loss of life.
WARNING: If the information
in this manual is not followed exactlg,
a fire or explosion mag result causing
propertg damage, personal injurg
®
or death.
- Do not store or use gasoline or other
flammable vapors and liquids in the
vicinity of this or any other appliance.
- WHAT TO DO IF YOU
SMELL GAS
Do not try to light ang appliance.
L_
n
v
v_ r_
_ m
o
o
o.
E
o
_j
Do not touch any electrical switch;
do not use any phone in your
building.
Immediately call your gas supplier
from a neighbor's phone. Follow the
gas supplier's instructions.
If you cannot reach your gas supplier,
call the fire department.
- Installation and service must be
performed by a qualified installer,
service agency or the gas supplier.
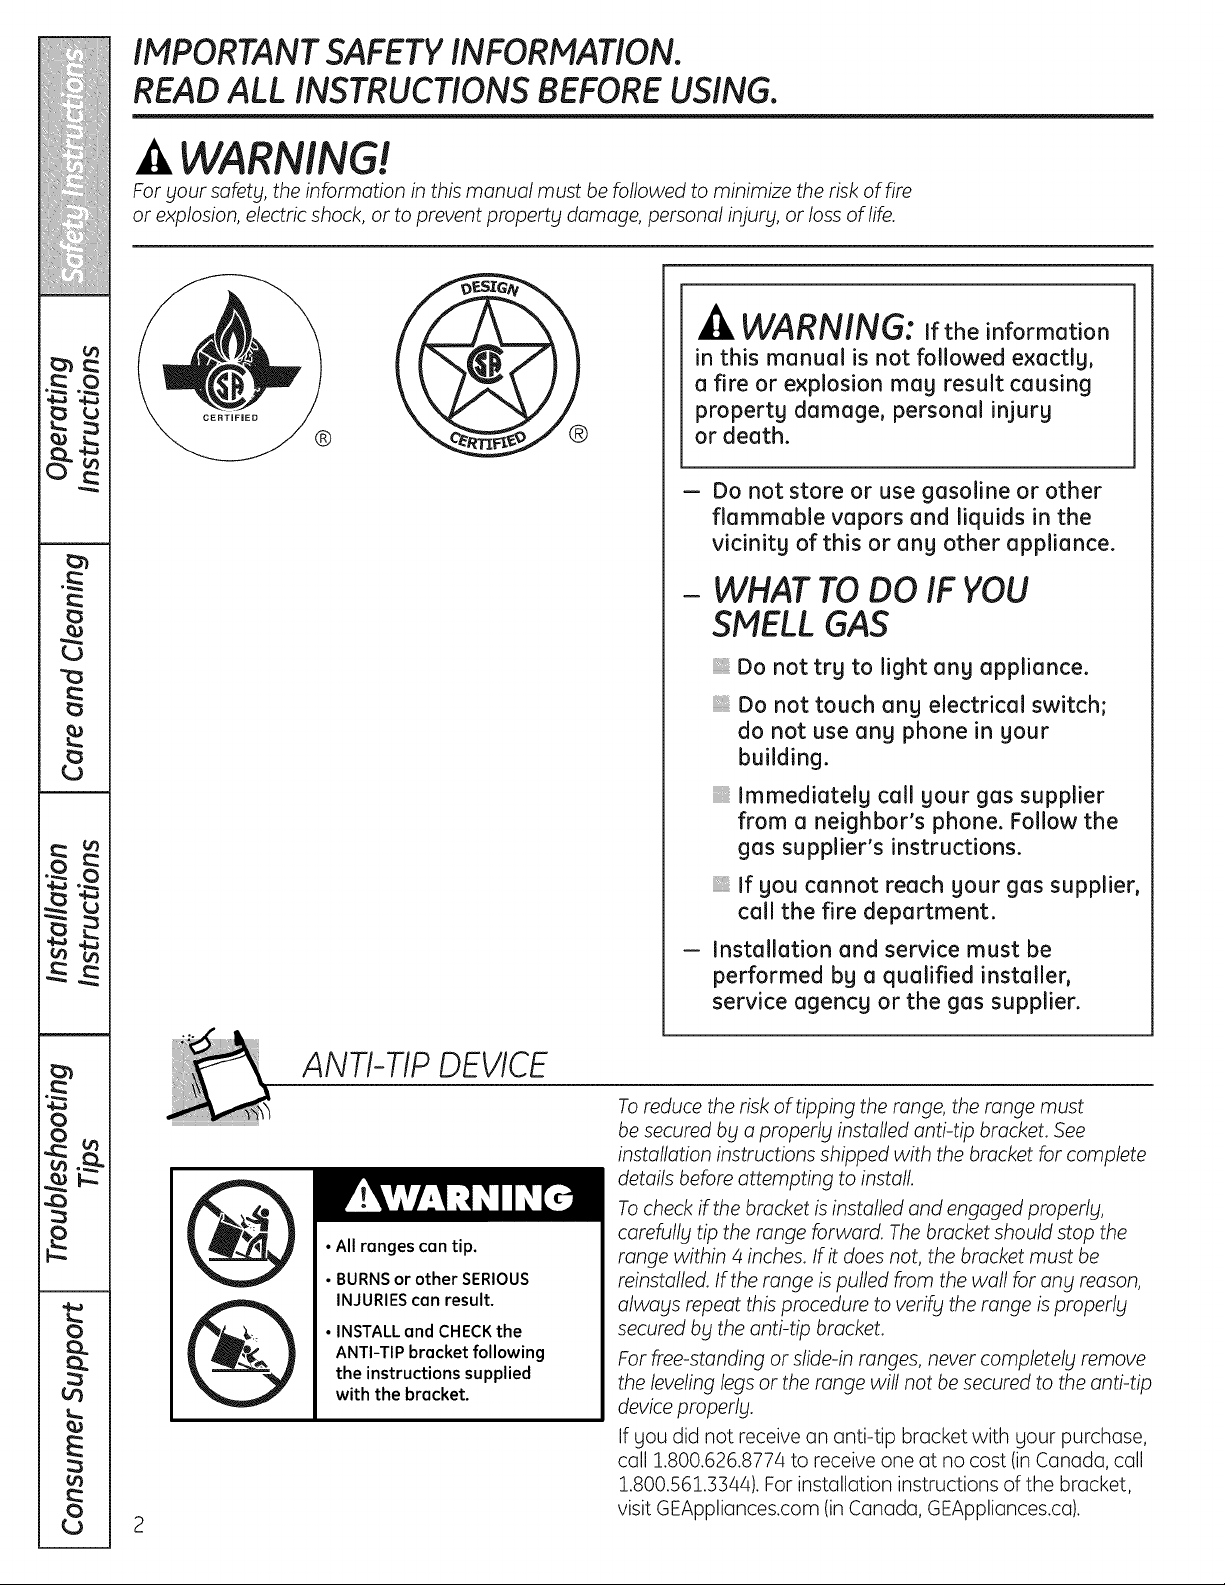
ANTI-TIP DEVICE
Toreduce the risk of tipping the range, the range must
be secured by a properly installed anti-tip bracket. See
installation instructions shipped with the bracket for complete
details before attempting to install
Tocheck ff the bracket is installed and engaged properly,
• All ranges can tip.
• BURNSor other SERIOUS
INJURIEScan result.
• INSTALLand CHECKthe
ANTI-TIP bracket following
the instructions supplied
with the bracket.
2
carefully tip the range forward. The bracket should stop the
range within 4 inches. Ifit does not, the bracket must be
reinstalled. If the range is pulled from the wall for any reason,
always repeat this procedure to verify the range isproperly
secured by the anti-tip bracket.
For free-standing or slide-in ranges, never completely remove
the leveling legs or the range will not be secured to the anti-tip
device properly.
If you did not receive an anti-tip bracket with your purchase,
call 1.800.626.8774 to receive one at no cost (in Canada, call
1.800.561.3344). For installation instructions of the bracket,
visit GEAppliances.com (in Canada, GEAppliances.ca).
Page 3
GEAppliances.com
!iii!!i_iiii]]iiiiiiii/i!_ii_iiitiiiiiiiiiii!
WARNING!
IMPORTANT SAFETYNOTICE
The California Safe Drinking Water and Toxic Enforcement Act requires the Governor of California
to publish a list of substances known to the state to cause birth defects or other reproductive harm,
and requires businesses to warn customers of potential exposure to such substances.
Gas appfiances can cause minor exposure to four of these substances, namelbl benzene, carbon
monoxide, formaldehgde and soot, caused primarilbl bbl the incomplete combustion of natural gas
or LPfuels. Propeflbl adjusted burners, indicated bbla bluish rather than a blellow flame, will minimize
incomplete combustion. Exposure to these substances can be minimized bbtventing with an open
window or using a ventilation fan or hood.
SAFETYPRECAUTIONS
Have the installer show gou the location of the range gas shut-off valve and how to shut it off if necessarg.
} Have your range installed and properly } Plug your range into a 120-volt grounded
grounded by a qualified installer, in
accordance with the Installation Instructions.
Any adjustment and service should be
performed only by qualified gas range
installers or service technicians.
]!! Do not attempt to repair or replace any
part of your range unless it is specifically
recommended in this manual. All other service
should be referred to a qualified technician.
outlet only. Do not remove the round
grounding prong from the plug. If in doubt
about the grounding of the home electrical
system, it is your personal responsibility and
obligation to have an ungrounded outlet
replaced with a properly grounded,
three-prong outlet in accordance with
the National Electrical Code. Do not use
an extension cord with this appliance.
!iiiiiiii!!iiiiiiiii!i!i_iiiiiiii_Li!iiiiiii
iiiiiij!X_:iiiii!iXiii_,;Jil;iiiiiiisii
i4iiiiiiii[iii[iiii[iiiiiii]ii[iiMiii[
r
o
o_
db
q
q
q
r0
i m m
v
d3
o
o_
tO
"o
"o
o
¢
c
¢
Page 4
IMPORTANT SAFETY INFORMATION.
iiiiiii_iiiii/iiii!!iii!'iiiiiii_'_;i;i;i;i;_!iiiiiii!i!
READ ALL INSTRUCTIONS BEFORE USING.
ii]iiiii(iiiii_iiiiiiiiiiiiiiiiiiJiiji_iji!i!iliiiii
i,',',',iiYiiii_i/iiiiiiiilililflii_iiiiilililflili
££
w
.£
"o
n
v
v_ r_
_ m
o
o
Q..
Q..
E
o
4
SAFETYPRECAUTIONS
Locate the range out of kitchen traffic path
and out of drafty locations to prevent poor air
circulation.
iiiiiil
Be sure all packaging materials are removed
from the range before operating it to prevent
fire or smoke damage should the packaging
material ignite.
iiiiiiili_
Be sure your range is correctly adjusted by
a qualified service technician or installer for
the type of gas (natural or LP)that is to be
used. Your range can be converted for use
with either type of gas. See the Installation
of the range section.
_, WARNING: These adjustments
must be made by a qualified service
technician in accordance with the
manufacturer's instructions and all codes
and requirements of the authority having
jurisdiction. Failure to follow these instructions
could result in serious injury or property
damage. The qualified agency performing
this work assumes responsibility for the
conversion.
':_After prolonged use of a range, high floor
temperatures may result and many floor
coverings will not withstand this kind of
use. Never install the range over vinyl tile
or linoleum that cannot withstand such type
of use. Never install it directly over interior
kitchen carpeting.
':_Do not leave children alone or unattended
where a range is hot or in operation. They
could be seriously burned.
':, Do not allow anyone to climb, stand or hang
on the oven door, storage drawer, warming
drawer or cooktop. They could damage the
range and even tip it over, causing severe
personal injury.
CAUTION: Items of interest
to children should not be stored in cabinets
above a range or on the backsplash of
a range-children climbing on the range
to reach items could be seriously injured.
WARNING: usethis
appliance as a space heater to heat or
warm the room. Doing so may result
in carbon monoxide poisoning and
overheating of the oven.
Neverwear loose-fittingor hanging garments
while usingthe appliance.Becareful when
reachingfor itemsstored in cabinetsoverthe
range.Flammablematerial could beignited
ifbrought in contact with flame or hot oven
surfaces andmay cause severeburns.
Do not store flammable materials in an oven,
a range storage drawer, a warming drawer
or near a cooktop.
Do not store or use combustible materials,
gasoline or other flammable vapors and
liquids inthe vicinity of this or any other
appliance.
Do not let cooking grease or other flammable
materials accumulate in or near the range.
Do not use water on grease fires. Never pick
up a flaming pan. Turn the controls off.
Smother a flaming pan on a surface burner
by covering the pan completely with a
well-fitting lid,cookie sheet or flat tray.
Use a multi-purpose dry chemical or
foam-type fire extinguisher.
Flaming grease outside a pan can be put
out by covering it with baking soda or,
if available, by using a multi-purpose dry
chemical or foam-type fire extinguisher.
Flame in the oven or warming drawer can
be smothered completely by closing the oven
door and turning the control to off or by using
a multi-purpose dry chemical or foam-type
fire extinguisher.
iiiiiil
Let the burner grates and other surfaces cool
before touching them or leaving them where
children can reach them.
iiiiiiili_
Never block the vents (air openings) of
the range. They provide the air inlet and outlet
that are necessary for the range to operate
properly with correct combustion. Air openings
are located at the rear of the cooktop, at the
top and bottom of the oven door, and at the
bottom of the range under the warming
drawer, kick panel or storage drawer.
iiiiiiili_
Large scratches or impacts to glass doors can
lead to broken or shattered glass.
Page 5

GEAppliances.com
!iii!!i_iiii]]]iiiiii]/i!_ii_iiitiiiiiiiiiii!
WARNING!
SURFACEBURNERS
Use proper pan size-avoid pans that are unstable or easfl_l tipped. Select cookware having flat
bottoms large enough to cover burner grates. To avoid spillovers, make sure cookware is large enough
to contain the food properly. This will both save cleaning time and prevent hazardous accumulations
of food, since heavy spattering or spillovers left on range can ignite. Use pans with handles that can
be easily grasped and remain cool.
Always use the LITE position when igniting
the top burners and make sure the burners
have ignited.
Never leave the surface burners unattended
at high flame settings. Boilovers cause
smoking and greasy spillovers that may
catch on fire.
Adjust the top burner flame size so it
does not extend beyond the edge of the
cookware. Excessive flame is hazardous.
Use only dry pot holders-moist or damp pot
holders on hot surfaces may result in burns
from steam. Do not let pot holders come near
open flames when lifting cookware. Do not use
a towel or other bulky cloth in place of a pot
holder. ':_
When using glasscookware, make sure
itis designedfor top-of-range cooking.
':_To minimize the possibility of burns,
ignition of flammable materials and spillage, ':_
turn cookware handles toward the side or
back of the range without extending over
adjacent burners.
Carefully watch foods being fried at a high
flame setting.
Always heat fat slowly, and watch as it heats.
Do not leave any items on the cooktop. The
hot air from the vent may ignite flammable
items and will increase pressure in closed
containers, which may cause them to burst.
If a combination of oils or fats will be used in
frying, stir together before heating or as fats
melt slowly.
Use a deep fat thermometer whenever
possible to prevent overheating fat beyond
the smoking point.
Use the least possible amount of fat for
effective shallow or deep-fat frying. Filling the
pan too full of fat can cause spillovers when
food is added.
iiiil}i
Do not flame foods on the cooktop. Ifyou do
flame foods under the hood, turn the fan on.
iiiiiiili_
Do not use a wok on the cooking surface
if the wok has a round metal ring that is
placed over the burner grate to support
the wok. This ring acts as a heat trap,
which may damage the burner grate and
burner head. Also, it may cause the burner
to work improperly. This may cause a carbon
monoxide level above that allowed by current
standards, resulting in a health hazard.
Foods for frying should be as dry as possible.
Frost on frozen foods or moisture on fresh
foods can cause hot fat to bubble up and
over the sides of the pan.
Never try to move a pan of hot fat, especially
a deep fat fryer. Wait until the fat is cool.
iiiiiil
Do not leave plastic items on the cooktop-
they may melt if left too close to the vent.
Keep all plastics away from the surface
burners.
To avoid the possibility of a burn, always be
certain that the controls for all burners are at
the OFFposition and all grates are cool before
attempting to remove them.
If range is located near a window, do not hang
long curtains that could blow over the surface
burners and create a fire hazard.
iiiiiil
If you smell gas, turn off the gas to the range
and call a qualified service technician. Never
use an open flame to locate a leak.
iiiiiiili_
Always turn the surface burner controls off
before removing cookware.
iiiiiiili_
Do not lift the cooktop on sealed burner
models. Lifting the cooktop can lead
to damage and improper operation
of the range.
!iii]iiiiJ!iiiiiiiii!i]i_iiiiiii(_]!imi
iiiiiij]X_;iiiii!i:(iii_iJil;iiiiiii_ii
i_iiiiiiiiiiiii]iiii]iiiiiiii]iiiiiiiiii]iiii]i
r
o
o_
db
to
i m m
v
¢
.<
¢
d3
o
o_
tO
"o
"o
o
Page 6
IMPORTANT SAFETY INFORMATION.
iiiiiii_iiiii/iiii!!iii!'iiiiiii_'_;i;i;i;i;_!iiiiiii!i!
READ ALL INSTRUCTIONS BEFORE USING.
ii]iiiii(iiiii_iiiiiiiiiiiiiiiiiTiJiiji_iji!i!iliiiii
i,',',',iiYiiii_i/iiiiiiiililili_iii_iiiiililili_iili
££
w
.£
"o
"o
r,4
n
v
v_ r_
_ m
o
f
COOK MEATAND POULTRY THOROUGHLY...
Cook meat and poultry thoroughly-meat to at least an INTERNALtemperature of160°F and poultry
to at least an INTERNALtemperature of l80°F. Cooking to these temperatures usually protects against
foodbome illness.
OVEN
Stand away from
can cause burns to hands, face and eyes.
} Do notuse theoven fora storagearea. }
Itemsstoredintheoven can ignite.
Keep the oven free from grease buildup.
} Place the oven racks in the desired position
while the oven iscool. }
iiiil}i
Pulling out the rack to the stop-lock isa
convenience in lifting heavy foods. It is also
a precaution against burns from touching hot
surfaces of the door or oven walls. The lowest
position is not designed to slide.
iiiiiiili_
Do not heat unopened food containers.
Pressure could build up and the container
could burst, causing an injurg.
WARNING: NEVERcover
ang slots, holes or passages in the oven
bottom or cover an entire rack with
materials such as aluminum foil. Doing
so blocks air flow through the oven and
mag cause carbon monoxide poisoning.
Aluminum foil linings mag also trap
heat, causing a fire hazard.
iiiil}i
Do not use aluminum foil angwhere in
the oven except as described in this manual.
Misuse could result in a fire hazard or damage
to the range.
the range when opening the door of a hot oven. The hot air and steam that escape
When using cooking or roasting bags in the
oven, follow the manufacturer's directions.
Do not use gour oven to drg newspapers.
If overheated, theg can catch fire.
Use onlg glass cookware that is recommended
for use in gas ovens.
iiiil}i
Alwags remove ang broiler pan from range
as soon as gou finish broiling. Grease left in
the pan can catch fire if oven is used without
removing the grease from the broiler pan.
iiiiiiili_
When broiling, if meat istoo close to the flame,
the fat mag ignite. Trim excess fat to prevent
excessive flare-ups.
iiiiiiili_
Hake sure ang broiler pan is in place correctlg
to reduce the possibilitg of grease fires.
iiiiiiili_
If gou should have a grease fire in a broiler
pan, touch the Cleor/Off pad, and keep
the oven door closed to contain fire until
it burns out.
iiiiiiili_
For safetg and proper cooking performance,
alwags bake and broil with the oven door
closed.
r,4
o
o..
o,.
E
o
6
Page 7
GEAppliances.com
!iii!!i_iiii]]]iiiiiiJ/i!_ii_iiitiiiiiiiiiii!
ELECTRICWARNING DRAWER (onsomemodels)
The purpose of the warming drawer
isto hold hot cooked foods at serving
temperature. Always start with hot food;
cold food cannot be heated or cooked
in the warming drawer.
} Do not use the warming drawer to drg
newspapers. If overheated, theg can catch
on fire.
} Do not leave paper products, cooking utensils
or food in the warming drawer when not
in use.
Neverleavejars orcans of fat drippings
in ornear gour warming drawer.
Alwags keepwooden and plastic utensils
and cannedfood a safe distance awag from
gourwarming drawer.
Donot warm food in the warming drawer
for morethan two hours.
Do not touch the heoting element or the
interior surfoce of the worming drawer.
These surfaces mag be hot enough to burn.
REMEMBER:The inside surface of the warming
drawer mag be hot when the drawer is
opened.
} Use care when opening the drawer. Open the
drawer a crack and let hot air or steam escape
before removing or replacing food. Hot air or
steam which escapes can cause burns to
hands, face and/or eges.
} Do not use aluminum foil to line the drawer.
Foil is an excellent heat insulator and will
trap heat beneath it. This will upset the
performance of the drawer and it could
damage the interior finish.
!iii]iiiiJ!iiiiiiiii!i!i_iiiii@Li!iiiiiii
iiiiiij!X_:iiiii!i:(iii_,;Jil;iiiiiii_ii
i4iiiiiiiiFiiii[iiiiiii]ii[iiiiiiii[iiii[
r
o
o_
db
Q
r0
SELF-CLEANING OVEN
Be sure to wipe off excess spillage before
self-cleaning operation.
Before self-cleaning the oven, remove
the racks, ang broiler pan, grid and other
cookware.
Do not clean the door gasket. The door gasket
isessential for a good seal. Care should be
taken not to rub, damage or move the gasket.
Clean onlg parts listed in this Owner's Manual.
iiiil}i
If the self-cleaning mode malfunctions,
turn the oven off and disconnect the power
supplg. Have it serviced bg a qualified
technician.
iiiiiiili_
Do not use oven cleaners. No commercial
oven cleaner or oven liner of ang kind should
be used in or around ang part of the oven.
Residue from oven cleaners will damage
the inside of the oven when the self-clean
cgcle is used.
READAND FOLLOWTHISSAFETYINFORMATIONCAREFULLY.
SAVE THESE INSTRUCTIONS
i m m
v
d3
o
o_
¢
c
¢
"o
"o
tO
o
Page 8
09
0
09
Using the gas surface burners.
Throughout this manual, features and appearance may vary from your model.
Before Lighting a Gas Burner
After Lighting a Gas Burner
o_
e_
"o
"0
- 09
w
J
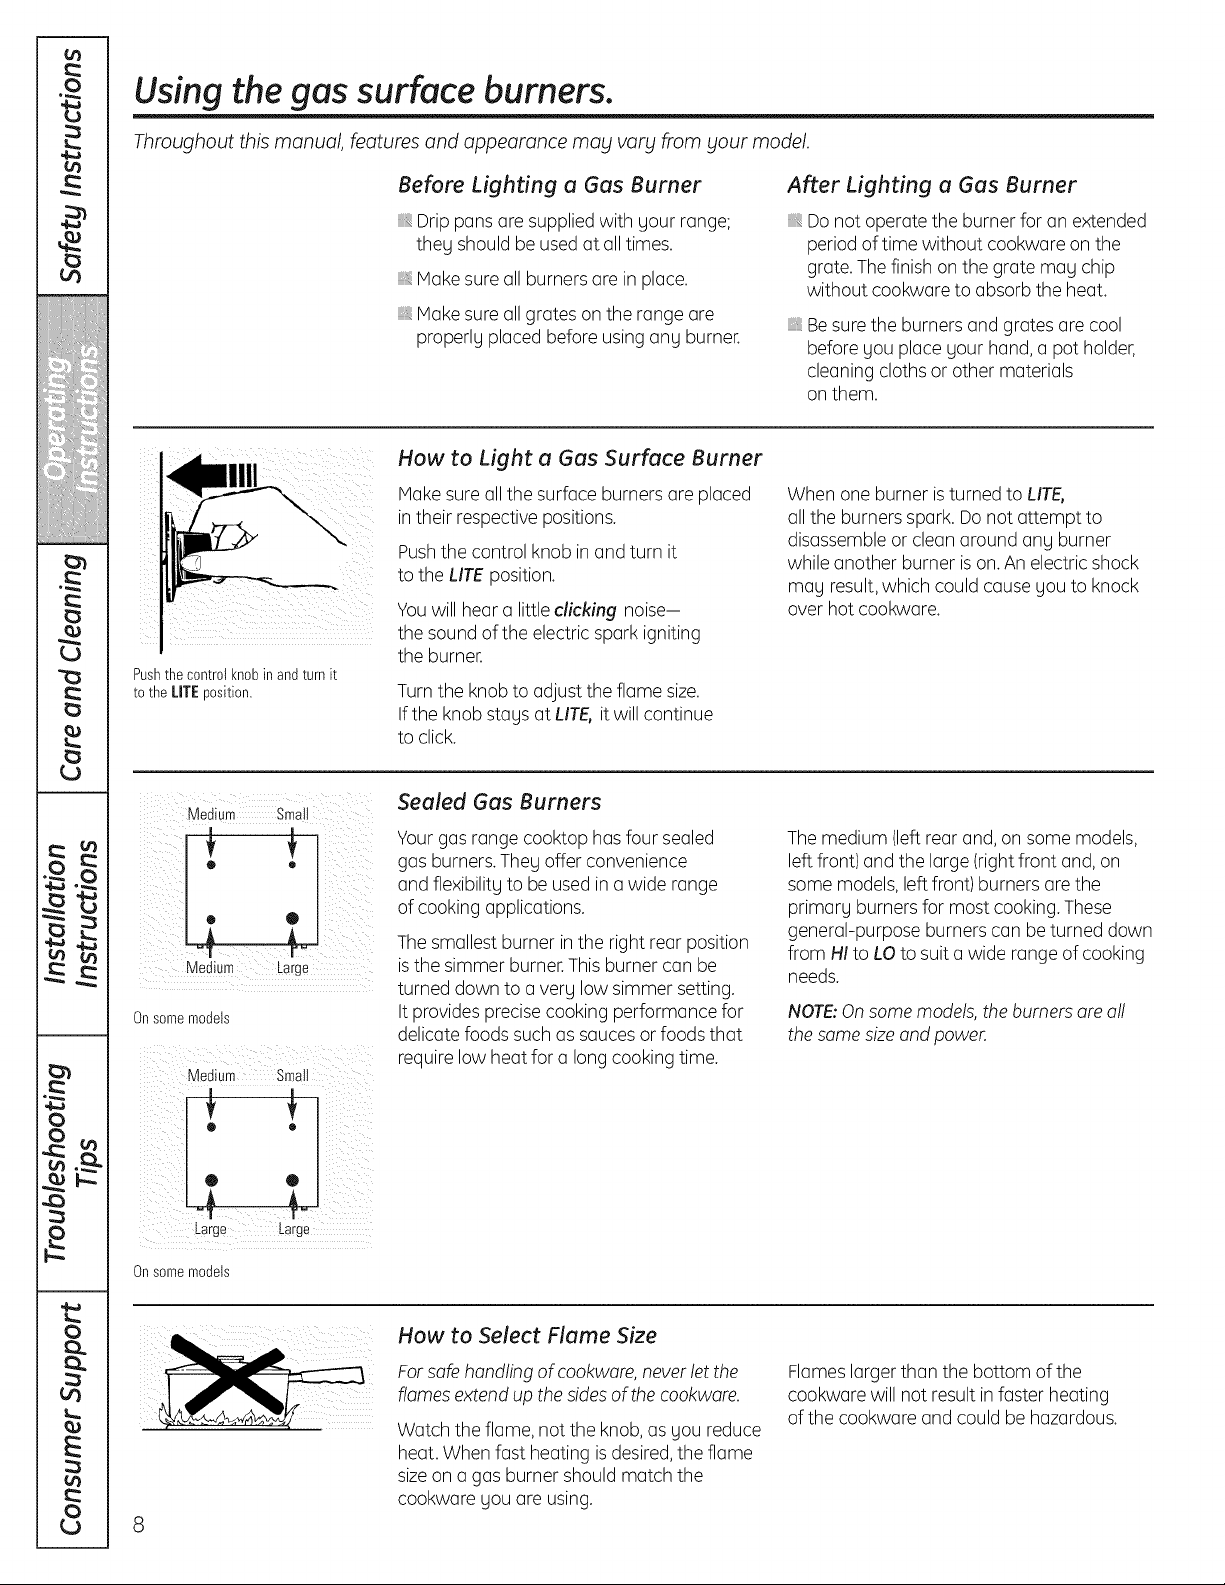
Pushthecontrol knobin andturnit
to the IlTE position.
Medium Small
®
Onsome models
ii ¸(:
Medium Small
Drip pansare supplied with gour range;
theg should be used at all times.
Hake sure all burnersare in place.
Hake sure all grates on the range are
properlg placed before using ang burner.
How to Light a Gas Surface Burner
Hake sure all the surface burners are placed
intheir respective positions.
Pushthe control knob in and turn it
to the LifE position.
Youwill hear a littleclicking noise-
the soundof the electric spark igniting
the burner.
Turnthe knob to adjust the flame size.
Ifthe knob stags at LifE, it will continue
to click.
Sealed Gas Burners
Your gas range cooktop hasfour sealed
gas burners.Theg offer convenience
and flexibilitg to be usedin a wide range
of cooking applications.
Thesmallest burner inthe right rear position
isthe simmer burner.This burner can be
turned down to a verg low simmer setting.
It provides precisecooking performance for
delicate foods such as sauces or foods that
require low heat for a long cooking time.
Do not operate the burner for an extended
period of time without cookware on the
grate. The finish on the grate mag chip
without cookware to absorb the heat.
Besure the burners and gratesare cool
before gou place gour hand,a pot holder,
cleaning cloths or other materials
on them.
When one burner isturned to LITE,
all the burners spark. Do not attempt to
disassemble or cleanaround ang burner
while another burner ison.An electricshock
mag result,which could cause gou to knock
over hot cookware.
Themedium (leftrear and, on some models,
left front) and the large (rightfront and, on
some models, left front) burners are the
primarg burnersfor most cooking.These
general-purpose burners can be turned down
from HI to LOto suit awide range of cooking
needs.
NOTE:Onsome models, the burners ore a/!
the some sizeand power.
4-J
a
0
E
09
Large Large
Onsomemodels
8
®
How to Select Flame Size
Forsafe handling of cookware, never let the
flames extend up the sidesof the cookware.
Flameslarger than the bottom of the
cookware will not result infaster heating
of the cookware and could be hazardous.
Watch the flame, not the knob,asyou reduce
heat. When fast heating is desired,the flame
size on a gas burner should match the
cookware you are using.
Page 9
GEAppliances.com
O_
Q
Top-of-Range Cookware
Aluminum: Medium-weight cookware
isrecommended becauseit heQtsquickly
and evenly. Most foods brown evenly in
an aluminum skillet. UsesQucepQnswith
tight-fitting lidswhen cooking with minimum
amounts of water.
Cast-Iron: IfheQtedslowly, most skillets
will givesQtisfactory results.
Enamelware: Undersome conditions,
the enQmelof some cookware may melt.
Follow cookwQre manufacturer's
recommendQtionsfor cooking methods.
Glass: Thereore two types of gloss
cookware-those for oven use only Qndthose
for top-of-range cooking (sQucepQns,coffee
and teQpots).Glossconducts heQtvery
slowly.
HeutproofGluss-Cerumic: Conbe usedfor
either surface or oven cooking. It conducts
heQtvery slowly Qndcoolsvery slowly. Check
cookware manufacturer's directions to be
sure it can be used on gQsranges.
Stainless Steel: This metal (]lone hQspoor
heQtingproperties and isusuQIlycombined
with copper,aluminum or other metalsfor
improved heat distribution. CombinQtion
metal skilletsusuQIlywork sQtisfactorily
if they are usedwith medium heQt
asthe manufacturer recommends.
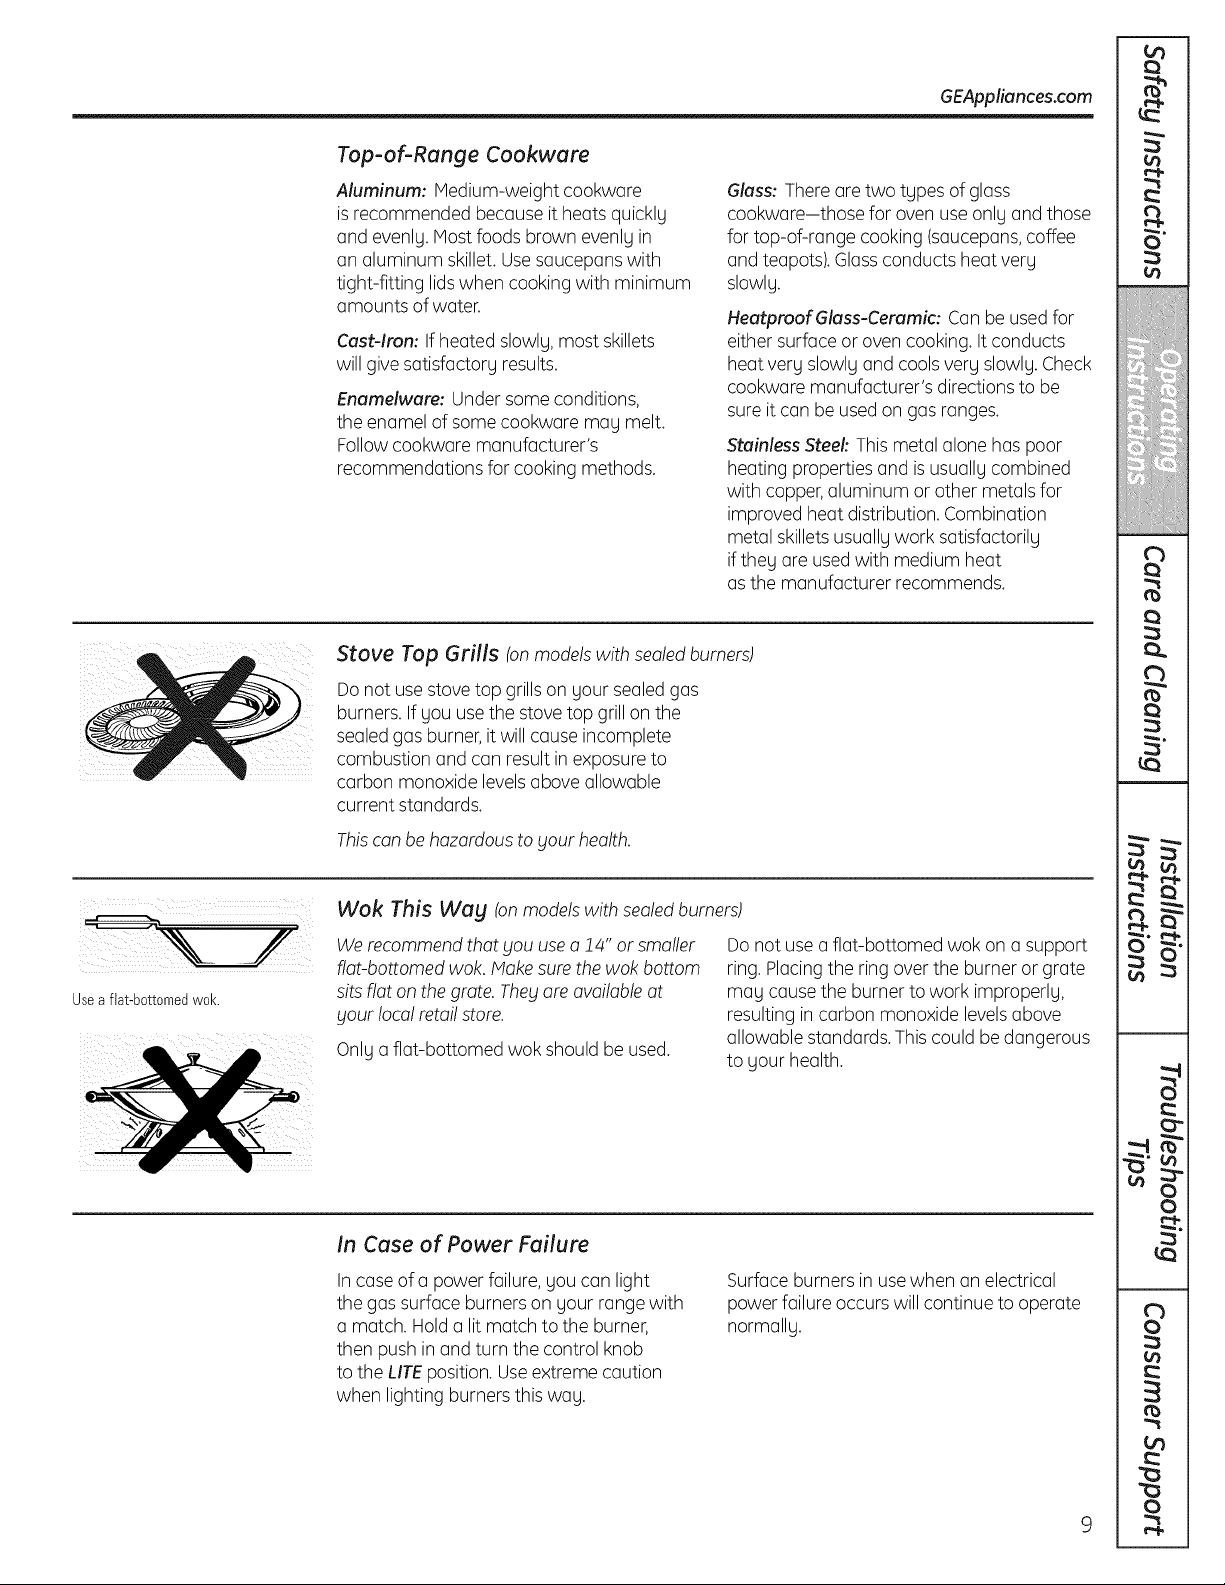
Stove Top Grills (on models with sealed burners)
Do not usestove top grills on your seQledgas
burners. If you usethe stove top grill on the
sealedgas burner,it will cause incomplete
combustion and can result in exposure to
carbon monoxide levelsabove allowable
current standards.
e_e
¢n
Cb
Q
Q
Q
ro
3"
Usea flat-bottomedwok.
Thiscanbe hazardousto gout health.
Wok This Wag (on models with sealed burners)
Werecommend that you usea ! 4" or smaller
flat-bottomed wok. Hake sure the wok bottom
sitsflat on the grate. Theyare available at
your loca!retai!store.
Only a flat-bottomed wok should be used.
In Case of Power Failure
In caseof a power failure,you can light
the gas surface burners on your range with
a match. Holda lit match to the burner,
then pushin and turn the control knob
to the Life position. Useextreme caution
when lighting burners this way.
Do not usea flat-bottomed wok on a support
ring. Placingthe ring over the burner or grate
may cause the burner to work improperly,
resulting in carbon monoxide levelsabove
allowable standards. Thiscould be dangerous
to your health.
Surface burners in usewhen an electrical
power failure occurs will continue to operate
normally.
w
¢}-
o
db
0
o_
"0
"0
0
Page 10

.£
Using the oven controls.
Throughout this manual, features and appearance may vary from your model.
ul
.£
"o
"0
rn
v
vm rm%
. A
o
0
E
0
en Contrails
;3 [. On J
Temp Recsll
0
_.._TimerJ_,.__..... _J
_-Oven_ J_-O°: ' ng_ Jr-St_ rt-_J
Coot:s
On / Off
U 3LT m9
Y
OvenControl,Clockand TimerFeaturesandSettings(onsomemodels)
o ake/Temp Recall Pad O
Touch this pad to select the bake function.
Bake Light
Flasheswhilein editmode-sou can change
the oventemperature at this point.Glowswhen
the ovenisin bake mode.
up
lO
O Start/On Pad
Mustbe touchedto startany cooking or cleaning
function.
O ispla_l
Showsthe time of dag,oven temperature,
whether the oven is in the bake, broil or
self-cleaning mode and the times set for
the timer or automatic oven operations.
The displagwillshow PREwhile preheating.
When the oven reaches the selected
temperature, the oven control will beep and
the displag will show the oven temperature.
If'F-" and anumber or letterflash inthe displaF
and the oven contro! signals,this indicates afunction
error code.
If blOUrovenwas set for a timed ovenoperation
and a power outage occurred,theclockand a!!
programmed functions must be reset.
Thetime of daFwi!!flash in the displaFwhen there
hasbeen a power outage.Resetthe clock.
If the function error codeappearsduring the
self-cleaningcFde,checkthe oven door latch.The
latch handle mablhave been moved,evenif on!F
slightltj, from thelatched position. Makesure the
latch is moved to the right asfar as it wi!!go.
Touch the Cleur/Off pud. Allow the ovento coo!
for one hour. Put the oven back into operation.
If the function error coderepeats,disconnect
thepower to the range and ca!!for service.
Kitchen Timer On/Off Pad
Touch this pad to select the timer feature.
Then pressthe + and - padsto adjust the timer.
Timer Light
Flasheswhilein editmode-sou can change
the settime at thispoint. Glowswhen thetimer
hasbeenactivated.Flashesagainwhen the time
hasrun out until the control isreset.
Clock Pad
0
To setthe clock, pressthis pad twice and then
pressthe + and - pads. Thetime of dag will
flash inthe displagwhen the oven isfirst
turned on.
Start Time Pad (on some models)
0
Usealong with the Cooking Time or SelfCleon
pads to set the oven to start and stop
automaticallg at a time Sou set.
Start Time Light
Flasheswhilein editmode-sou can change
the starttime at this point. Glowswhen the
function hasbeenactivated.
Cooking Time Pad (on some models)
0
Touch this pad and then touch the + or - pads
to set the amount oftime Souwant sour food
to cook.Theoven will shut off when the cooking
time has run out.
Cooking Time Light
Flasheswhilein editmode-sou can change
the settime at thispoint. Glowswhen the
function hasbeenactivated.Flashesagain when
thetime has run out untilthe control is reset.
Page 11
GEAppliances.com
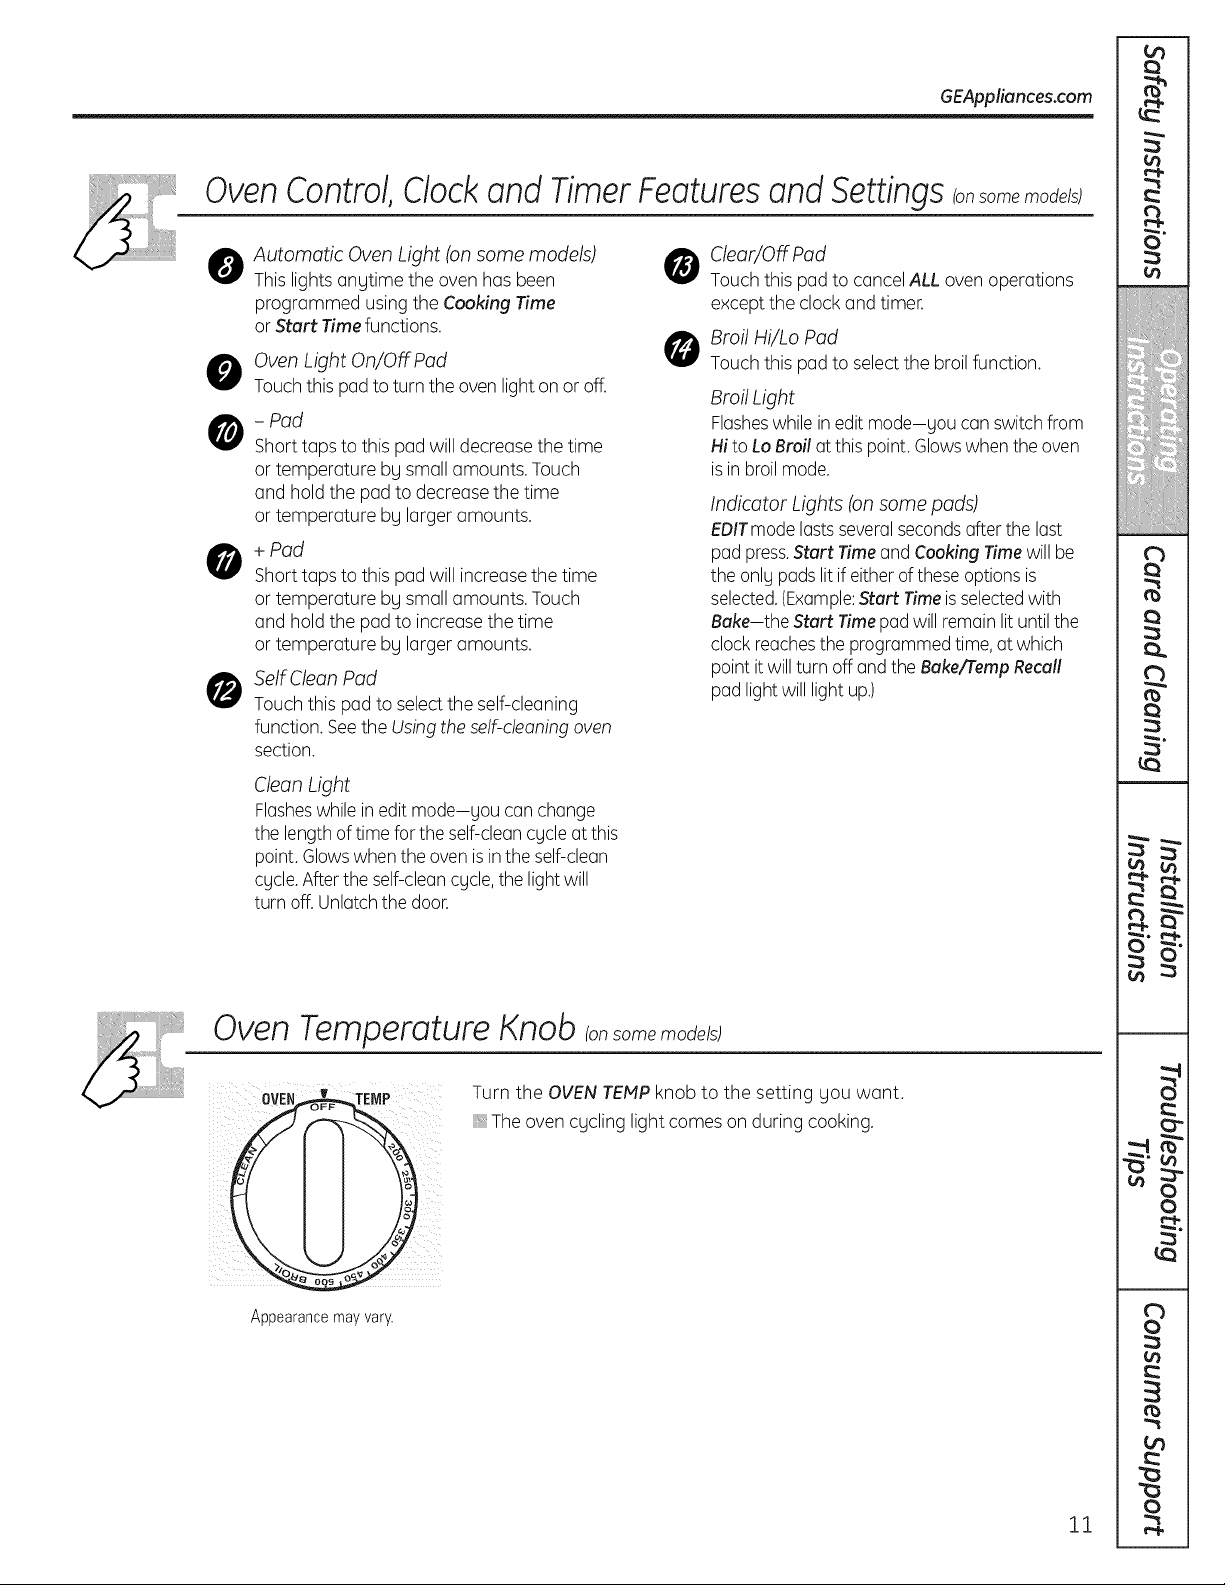
OvenControl,Clockand TimerFeaturesandSettings(onsomemodels)
Automatic Oven Light (on some models)
0
This lights anytime the oven has been
programmed using the Cooking Time
or Start Timefunctions.
Oven Light On/Off Pad
Touch this pad to turn the oven light on or off.
- Pad
Shorttaps to this pad will decrease the time
or temperature by small amounts.Touch
and hold the pad to decreasethe time
or temperature by larger amounts.
+ Pad
0
Shorttaps to this pad will increasethe time
or temperature by small amounts.Touch
and hold the pad to increasethe time
or temperature by larger amounts.
Self Clean Pad
0
Touch this pad to select the self-cleaning
function. Seethe Usingtheself-cleaningoven
section.
O lear/OffPad
Touch this pad to cancel ALL oven operations
except the clock and timer.
O Broil Hi/Lo Pad
Touch this pad to select the broil function.
Broil Light
Flasheswhilein editmode-you can switch from
Hito Lo Broil at this point. Glowswhen theoven
isin broilmode.
Indicator Lights (onsome pads)
EOlTmodelastsseveralsecondsafterthe last
pad press.Start Timeand Cooking Timewill be
the onlg pads lit if either of theseoptions is
selected.(Example:Start Timeisselectedwith
Bake-the Start Timepadwill remainlituntilthe
clockreachesthe programmed time, at which
point itwillturn off and the Bakefremp Recall
pad light willlight up.)
o_
Q
e_e
¢n
db
q
q
q
ro
q
3"
Clean Light
Flasheswhilein editmode-you can change
the lengthoftime for the self-cleancycleat this
point. Glowswhen the oven is inthe self-clean
cycle.Afterthe self-cleancycle,the lightwill
turn off.Unlatchthe door.
OvenTemperatureKnobIonsome models)
Turn the OVENTEMPknob to the setting gou want.
Theoven cgcling light comes on during cooking.
Appearance mav varv.
w
o
t'b
o
11
"o
"o
o
Page 12
o_
0
€4
o_
Using the oven.
To avoid possible burns, place the racks in the desired position before you turn the oven on.
Before you begin...
m
O_
L_
"0
L>
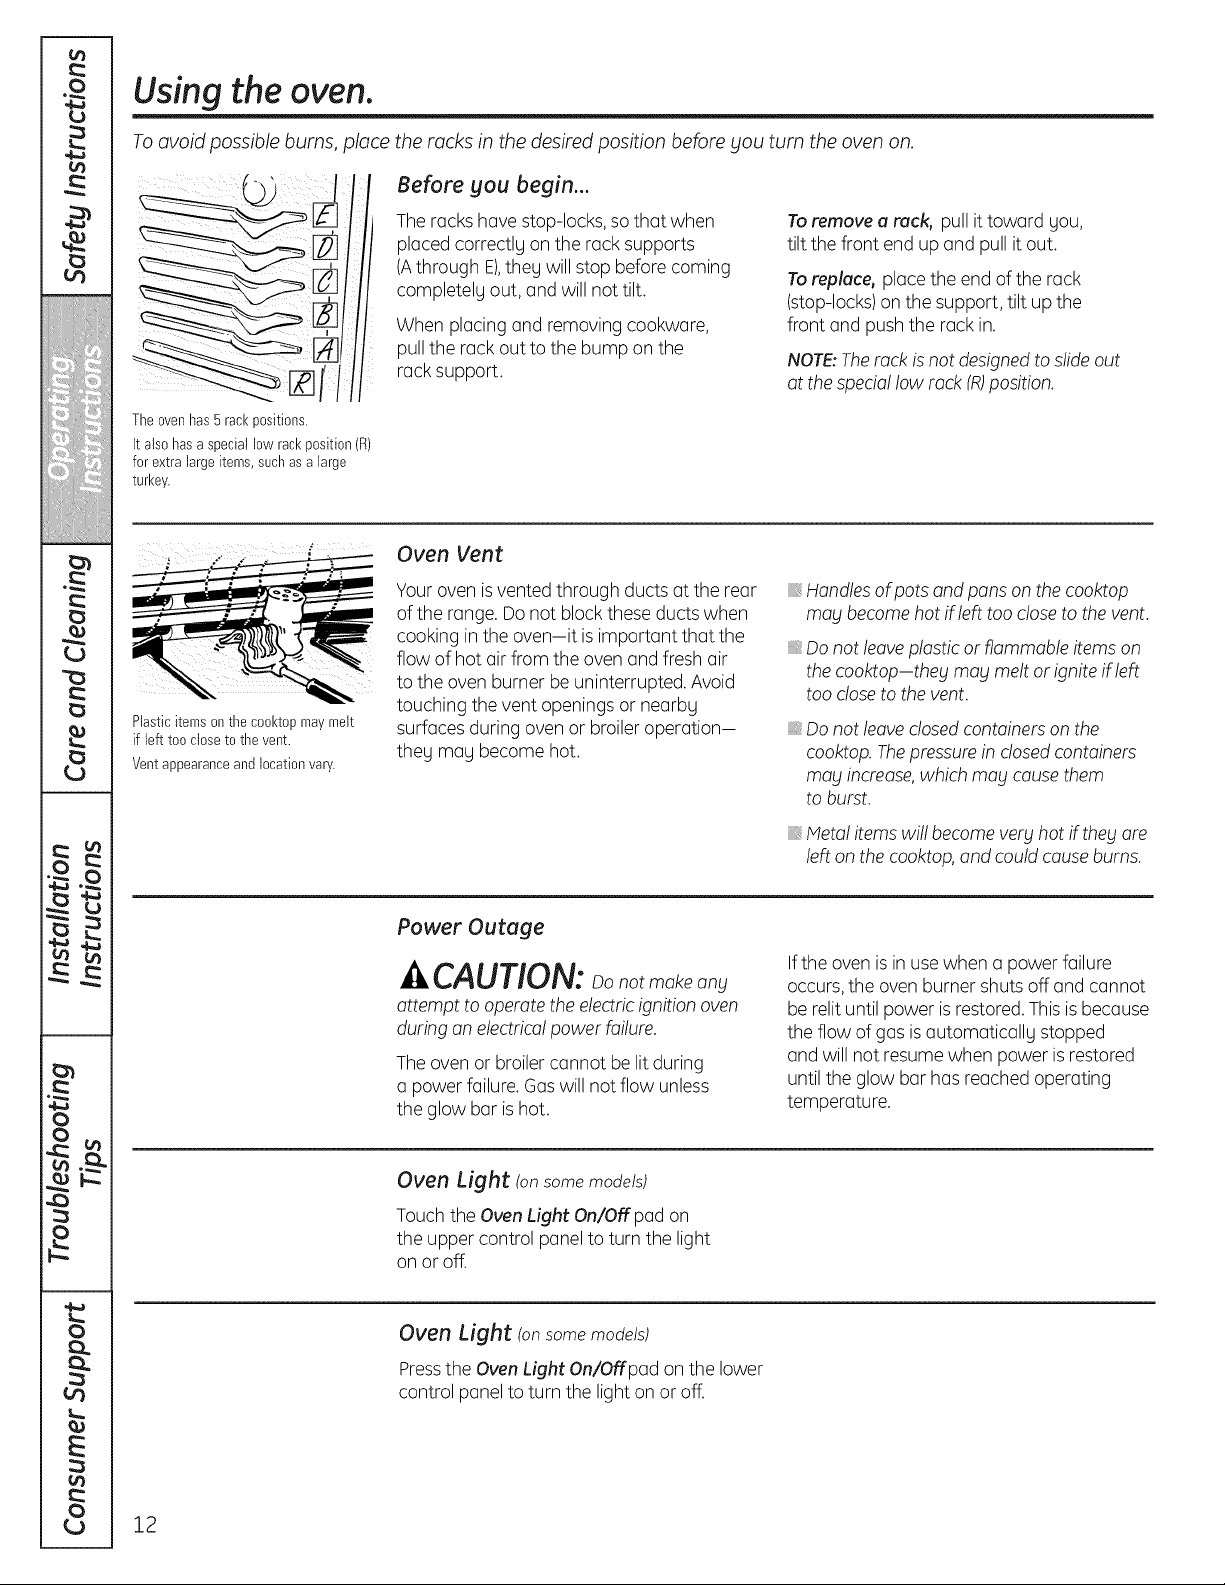
Theovenhas 5rackpositions.
It also hasaspecial low rackposition(R)
for extra largeitems,suchas alarge
turl<ey.
Plasticitems onthe cool<topmaymelt
if left tee dose to thevent.
Ventappearanceand locationvary.
Theracks havestop-locks, so that when
placed correctlg on the rack supports
(Athrough E),theg will stop before coming
completelg out, and will not tilt.
When placing and removing cookware
pull the rack outto the bump on the
rack support.
Oven Vent
Youroven isvented through ducts at the rear
of the range. Donot block these ducts when
cooking in the oven-it is important that the
flow of hot air from the oven and fresh air
to the oven burner be uninterrupted. Avoid
touching the vent openings or nearby
surfaces during oven or broiler operation-
they may become hot.
Toremove e reck, pullit toward gou,
tilt the front end up and pull itout.
Toreplece, place the end of the rack
(stop-locks)on the support, tilt up the
front and push the rack in.
NOTE:Therack is not designedto slideout
at the speciallow rack (R)position.
_,Handles ofpots and pans on the cooktop
may becomehot ifleft too closeto the vent.
:, Do not leave plastic or flammable items on
the cooktop-thebl mag melt orignite if left
too closeto the vent.
_,Do not leaveclosedcontainers on the
cooktop. Thepressurein closedcontainers
may increase,which may causethem
to burst.
:, Metal items will become verblhot iftheblare
left on the cooktop,and could causeburns.
Power Outuge
^ CAUTION:oonotmakeany
attempt to operate the electric ignition oven
during an electrica!power failure.
Theoven or broiler cannot be lit during
a power failure. Gaswill not flow unless
the glow bar is hot.
Ifthe oven is in usewhen a power failure
occurs,the oven burner shutsoff and cannot
be relit until power is restored. Thisisbecause
the flow of gas is automatically stopped
and will not resume when power isrestored
until the glow bar has reached operating
temperature.
Oven Light (onsomemodels)
Touchthe OvenLight On/Off pad on
m
4_
0
the upper control panel to turn the light
on or off.
Oven Light (onsomemodels)
Pressthe OvenLight On/Offpad on the lower
control panel to turn the light on or off.
E
0
12
Page 13
Using the upper oven.
o_
Q
GEAppliances.com
If your model has a door latch,
for self-cleaning only.
!
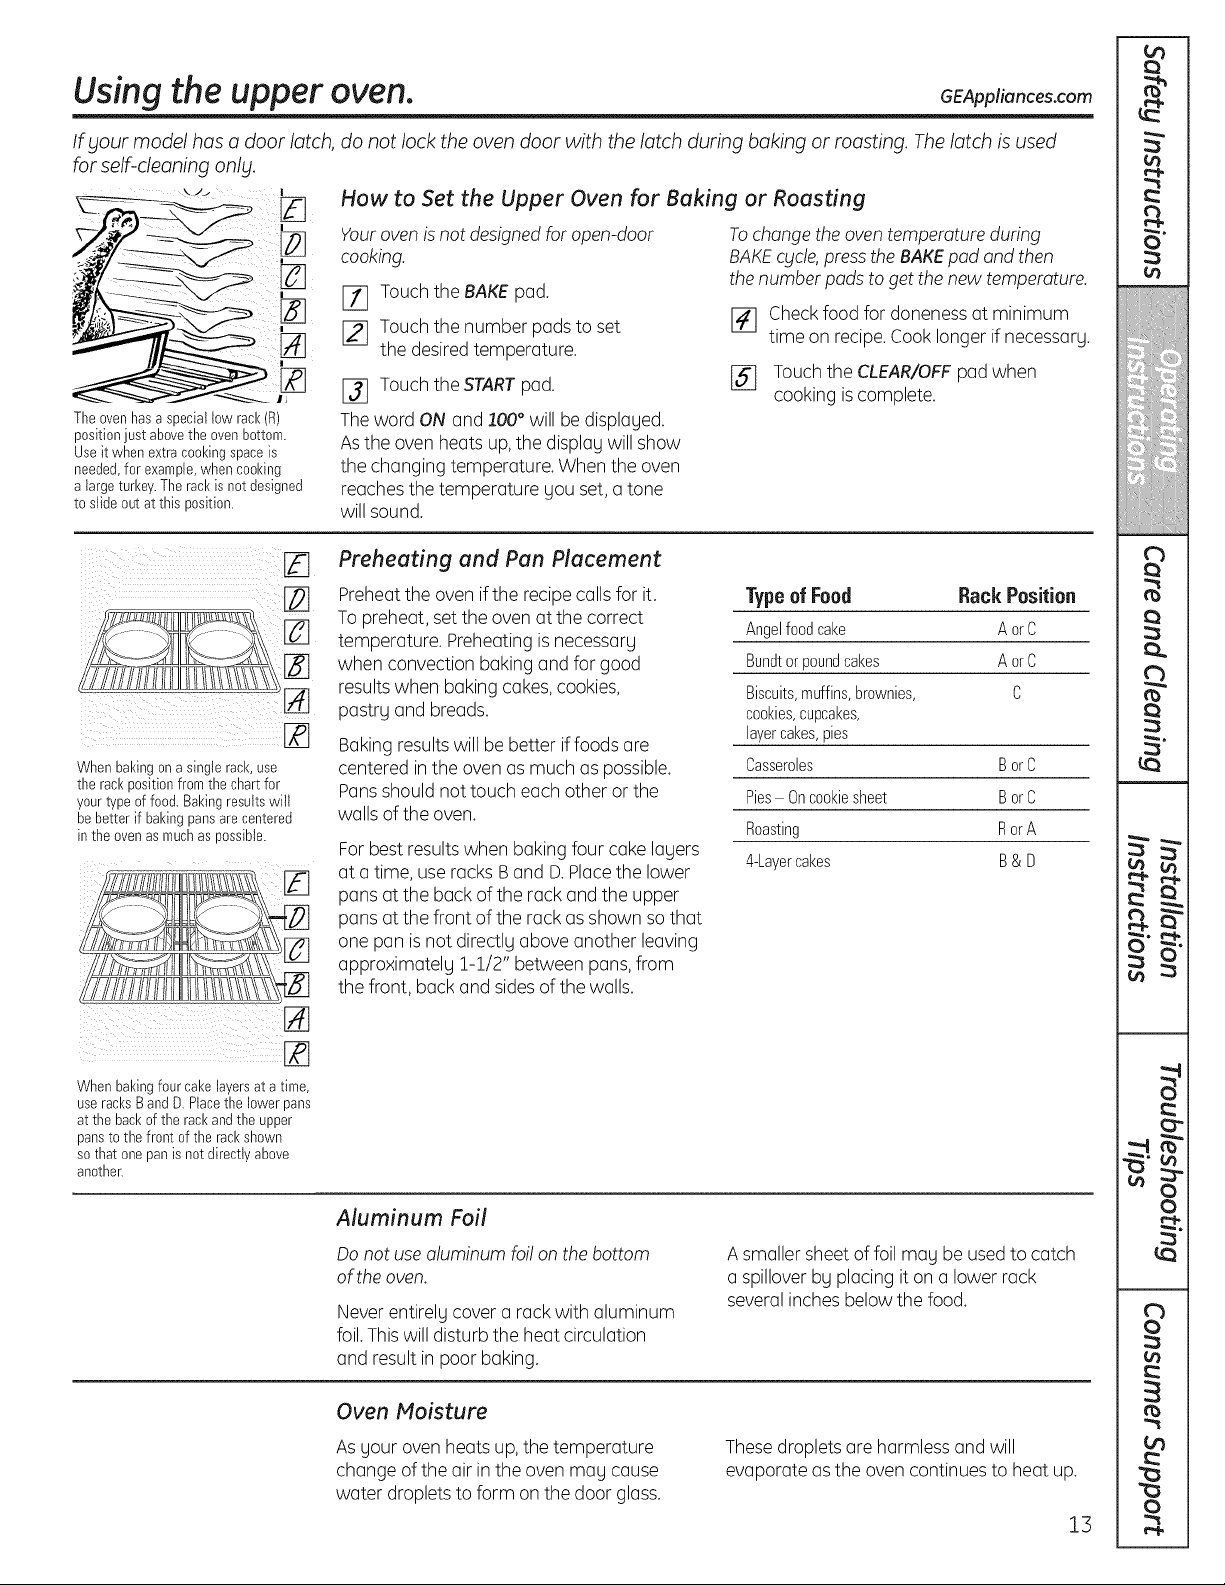
The ovenhasa speciallow rack(F1)
positionjust abovethe ovenbottom.
Useit when extracoeldngspaceis
needed,for example,whenceoldng
alarge turkey.Therackis notdesigned
toslide out atthis position.
[_ Preheating and Pan Placement
[_ Preheatthe oven if the recipe callsfor it.
_] temperature. Preheating isnecessary
[_ when convection baking and for good
[_ pastry and breads.
[]
When bakingona single rack,use
the rackpositionfrom thechart for
yourtypeof food.Baldngresultswill
bebetter if baldngpansarecentered
in the ovenasmuchas possible.
do not lock the oven door with the latch during baking or roasting. The latch is used
How to Set the Upper Oven for Baking or Roasting
Yourovenisnot designedfor open-door
cooking.
Tochangethe oventemperature during
BAKEcycle,press the BAKEpad and then
the number pads to getthe new temperature.
Ell Touchthe BAKEpad.
[_ Touchthe number padsto set
the desiredtemperature.
[_] Touch the STARTpad.
_] Checkfood for doneness at minimum
time on recipe.Cook longerif necessary.
_-] Touchthe CLEAR/OFFpadwhen
cooking is complete.
Theword ON and .100° will bedisplayed.
Asthe oven heats up,the display will show
the changing temperature. When the oven
reaches the temperature you set, a tone
will sound.
Typeof Food Rack Position
To preheat, set the ovenat the correct
Angelfoodcake AorC
Bundtorpoundcakes AorC
resultswhen baking cakes,cookies,
Biscuits,muffins,brownies, C
cookies,cupcakes,
Bakingresultswill be better iffoods are
centered inthe oven asmuch as possible.
Pansshould nottouch each other or the
layercakes,pies
Casseroles BorC
Pies Oncookiesheet BorC
walls of the oven.
Roasting RorA
Forbest resultswhen baking four cake layers
at a time, use racks Band D.Placethe lower
4-Layercakes B& D
pans atthe back of the rack and the upper
pans at the front of the rack as shown so that
one pan isnot directly above another leaving
approximately 1-1/2" between pans,from
the front, back and sidesof the walls.
e_e
tb
¢n
rb
Q
Q
rO
3"
w
When bakingfour cakelayersat a time,
useracksBandD. Placethe lower pans
at the back ofthe rackandthe upper
panstothe front ofthe rackshown
so thatone pan isnot directty above
another.
Aluminum Foil
Donot usealuminum foi! on the bottom
of theoven.
Never entirely cover a rack with aluminum
foil.Thiswill disturb the heat circulation
and result in poor baking.
Oven Moisture
Asyour ovenheats up, the temperature
change of the air in the oven may cause
water droplets to form on the door glass.
A smaller sheet of foil may beusedto catch
a spilloverby placing it on a lower rack
several inches below the food.
Thesedroplets are harmless and will
evaporate as the oven continues to heat up.
13
"0
"0
db
0
o_
0
o
Page 14
0
cz_
"o
"o
£.)
w
J
)
)
)
0
Using the oven.
Do not lock the oven door with the latch during broiling. The latch is used for self-cleaning only.
How to Set the Oven for Broiling
NOTE: On models with an OVEN TEMP knob, turn
it to BROIL.
.Placethe meat or fish on a broiler grid
in a broiler pan.
[_ Followsuggested rack positions
inthe BroilingGuide.
Closethedoor.Alwaysbroilwith
the doorclosed.
Theoven door must be closed during
broiling.
Touchthe Broil Hi/Lo pad once for
Hi Broil.
Tochange to Lo Broil, touch the
Broil Hi/Lo pad again.
Broiling Guide
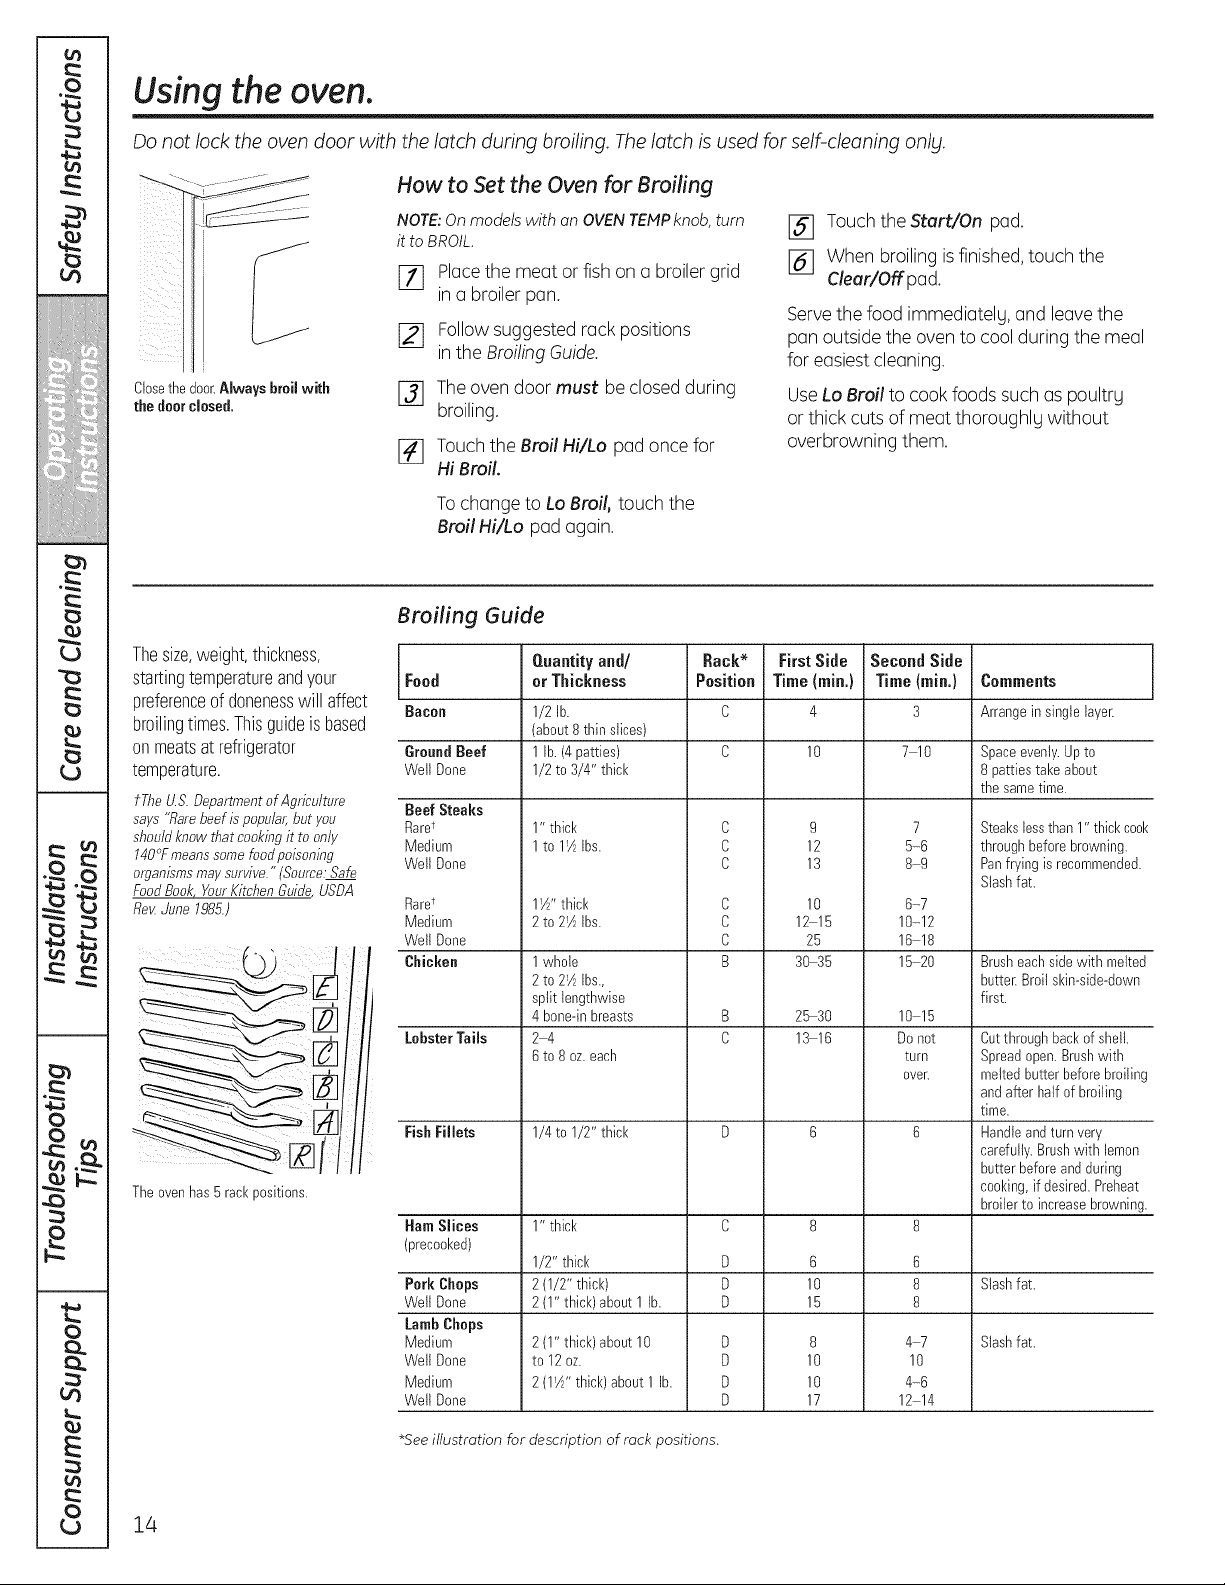
Thesize,weight,thickness,
startingtemperatureandyour Food
preferenceof donenesswillaffect Bacon
broilingtimes.Thisguideisbased
onmeatsatrefrigerator
temperature.
tThe U.S.Departmentof Agriculture BeefSteaks
says "Rarebeefis popular,butyou Raret
shouldknow that cookingit to only Medium
140°Fmeanssomefeodpoisoning Well Done
organismsmaysurvive."(Source:Safe
FoodBook,YourKitchenGuide,USDA
Re_June 1985.)
Theovenhas 5rackpositions.
GroundBeef
Well Done
Raret
Medium
Well Done
Chicken
Lobster Tails
Fish Fillets
Ham Slices
(precooked)
Pork Chops
Well Done
Lamb Chops
Medium
WeNDone
Medium
Well Done
Quantityand/
orThickness
1/2 lb.
(about8thin slices)
1lb. (4 patties)
1/2to 3/4" thick
1" thick
1to 172Ibs.
11A"thick
2 to 2_AIbs.
1whole
2 to 21½Ibs.,
split lengthwise
4 bone-inbreasts
24
6 to 8oz.each
1/4to 1/2" thick
1" thick
1/2" thick
2 (1/2" thick)
2 (1" thick)about1 lb.
2 (1" thick)about 10
to 12oz.
2 (I_A'' thick) about 1lb.
C
C
C
C
C
C
B
B
C
D
D
D
D
D
D
D
[_ Touchthe Start/On pad.
[_ When broiling isfinished,touch the
Clear/Off pad.
Servethe food immediatelu, and leave the
pan outside the oven to coolduring the meal
for easiestcleaning.
UseLo Broil to cook foods such as poultry
or thick cuts of meat thoroughly without
overbrowning them.
10
g
12
13
10
12 15
25
30 35
25-30
13 16
6
10
15
8
10
10
17
710
7
5-6
8-9
6-7
10-12
16 18
15 20
10 15
Donot
turn
oven
6
8
8
47
10
4-6
12 14
_omments
Arrange in single layer.
Spaceevenly.Upto
8patties takeabout
thesametime.
Steakslessthan 1" thickcool<
throughbeforebrowning.
Panfryingis recommended.
Slashfat.
Brusheachside with melted
butter.Broilskin-side-down
first.
Cutthroughbackofshell.
Spreadopen.Brushwith
meltedbutterbefore broiling
andafter half of broiling
time.
Handleandturn very
carefully.Brushwith lemon
butterbeforeand during
cooking,ifdesired. Preheat
broilerto increasebrowning.
Slashfat.
Slashfat.
8
E
*See illustration for description of rack positions.
14
Page 15

Using the clock and timer, ronsomemodels)
Not allfeatures are on allmodels.
To Set the Clock
Theclock must be set to the correct time
of dag for the automatic oventiming
functions to work properlg.Thetime of dag
cannot be changed during a delaged cooking
or a delaged self-cleaning cgcle.
[7] Touch the Clock padtwice.
[_ Touchthe + or - pads.
If the + or - pads are not touched within
Makesure theclock isset to thecorrect
time ofday.
one minute after gou touch the Clock pad,
the displag revertsto the original setting.
If this happens,touch the Clock padtwice
and reenter the time of dag.
To Turn Off the Clock Display
If gou have several clocksin gour kitchen,
gou mag wish to turn off the time of dag
clock displag on gour range.
GEAppliances.com
[_] Touchthe Stert/On pad until the time
of dag shows in the displag.This enters
the time and starts the clock.
To check the time of day when the display
is showing other information, simply touch
the Clock pad. The time of day shows unti!
another pad is touched.
¢b
[_ Touchthe Clockpad twice to recall
the clock displag.
o
irner _
On/Off
Thetimer isa minutetimeronly.
The(:leadOff paddoesnot affect
thetimer.
I_] Touch the Clock padonce to turn
off the time of dag displag.Although
gou will not be able to see it, the clock
maintains the correct time of dog.
To Set the Timer
Thetimer doesnot contro!oven operations.
Themaximum setting onthe timer is 9hours
and 59 minutes.
[_ Touch the Kitchen Timer On!Off pad.
[_ Touchthe + or - pads until the amount
of time gou want shows in the displag.
The maximum time that can be entered
in minutes is 59.Times more than 59
minutes should be changed to hours
and minutes.
Ifyou make a mistake, touch the Kitchen
Timer On!Off pad and begin again.
Touchthe Start!On pad.Thetime
%
will start counting down, although
the displag does not change until
one minute has passed.
When the timer reaches :00, the control
[]
will beep 3 times followed bg one beep
everg 6 seconds until the Kitchen Timer
On!Off pad is touched.
3"
w
o
15
"0
"0
rb
o
0
Page 16
.o
t_
Using the clock and timer, ionsomemode/sj
Not all features are on all models.
To Reset the Timer
¢/1
"o
"0
r,j
o
imer_
On / Off
Or
o
ime_
If the display isstill showing the time
remaining, you may change it by touching
the Kitchen Timer On/Off pad and then
touching the + or - pads until the time
you want appears inthe display.
To Cancel the Timer
Touchthe Kitchen Timer On/Off pad twice.
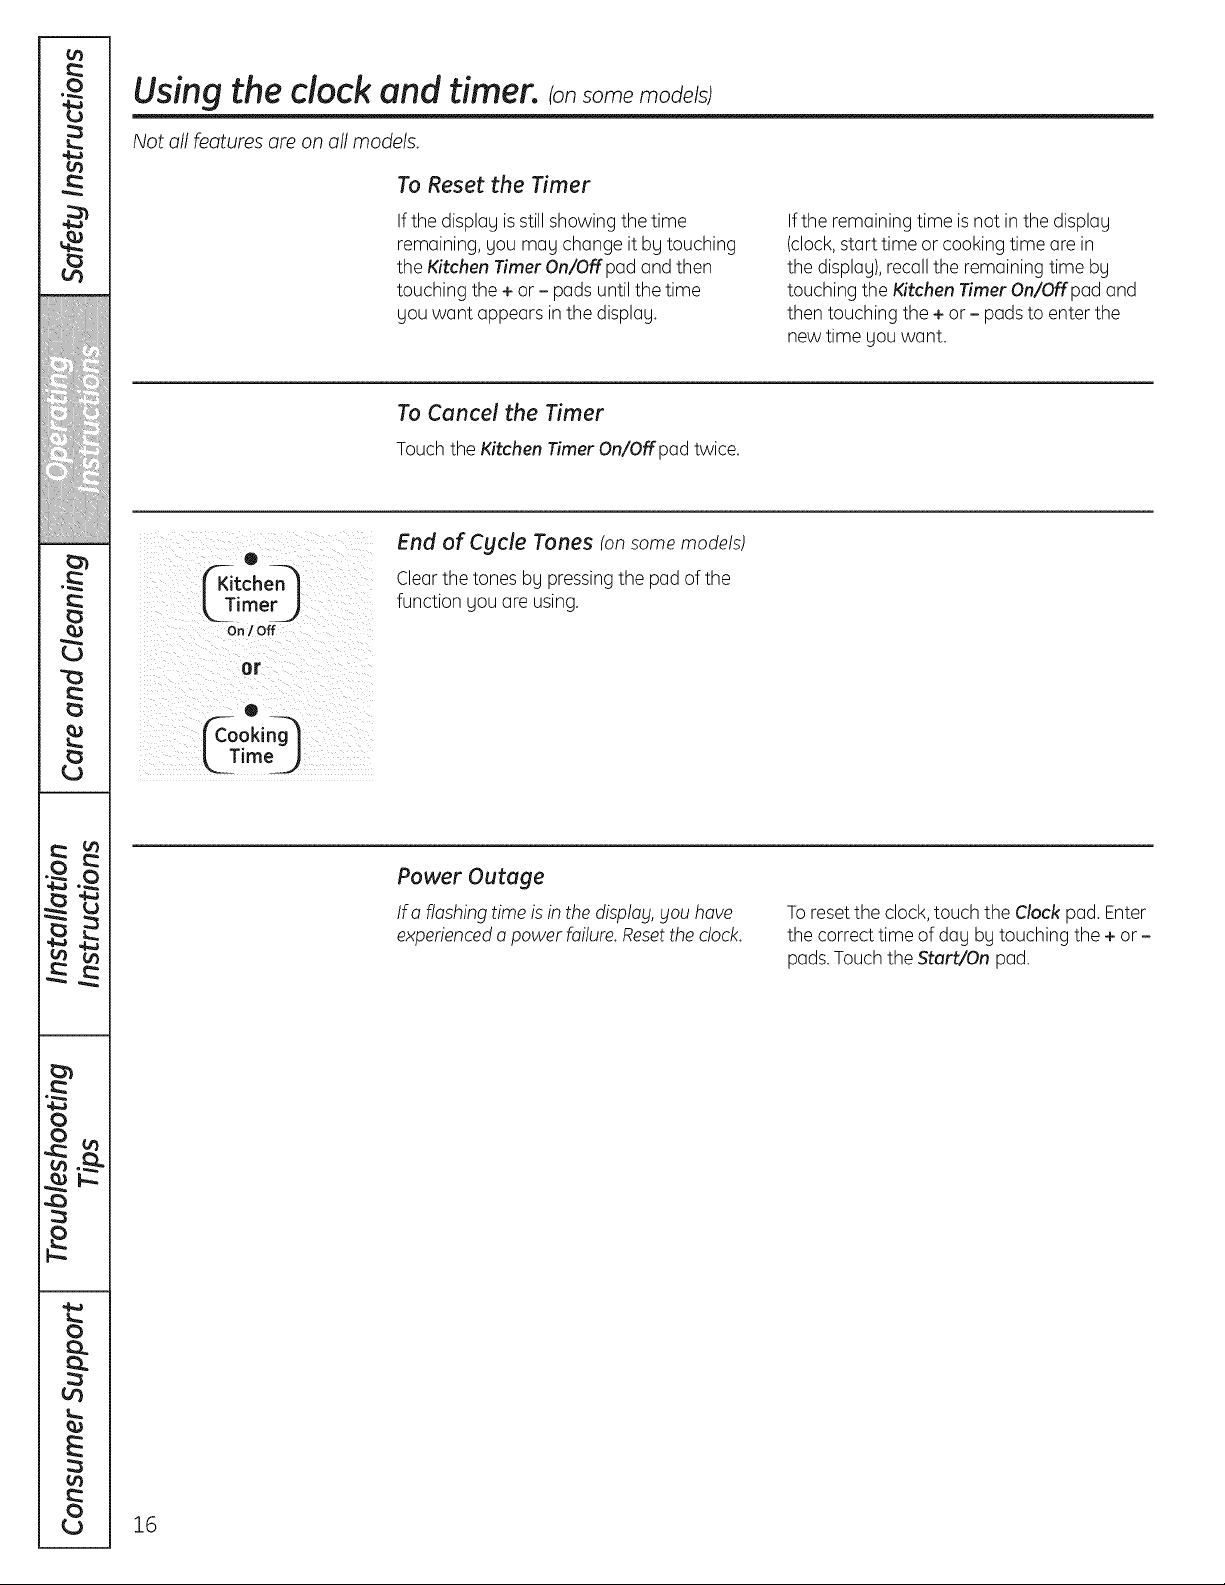
End of Cycle Tones ton some models)
Clearthe tones by pressingthe pad of the
function you are using.
Ifthe remaining time isnot in the display
(clock,start time or cooking time are in
the display),recallthe remaining time by
touching the Kitchen Timer On/Off pad and
then touching the + or- pads to enter the
new time you want.
v
vm r_._
. A
o
0
up
Power Outage
Ira flashing time isin the display, you have
experienceda power failure.Resetthe clock.
Toresetthe clock,touch the Clock pad. Enter
the correct time of day by touching the +or -
pads.Touch the Start/On pad.
E
0
16
Page 17

Using the timed baking and masting features. Ionsomemode slGEAppliances.com
Do not lock the oven door with the latch during timed cooking. The latch is used for self-cleaning only.
NOTE: Foods that spoil easily-such as milk, eggs, fish, stuffings, poultry and pork-should not be allowed to sit for
more than 1 hour before or after cooking. Room temperature promotes the growth of harmful bacteria. Be sure that
the oven light is off because heat from the bulb will speed harmful bacteria growth.
How to Set an Immediate Start and Automatic Stop
i_i_Z i_ i _ ii _III iiI i
iL L -"6_J ¸¸ ¸¸¸¸¸¸
i i
i i i /
('-clear_1
L off j
The oven wi!!turn on immediately and cook
for a selected length of time. At the end of the
cooking time, the oven wi!!turn off
automatically.
[_ Touchthe Bake pad.
[_ Touchthe + or - pads to set the
oven temperature.
[_ Touch the Cooking Time pad.
NOTE:Ifyour reciperequirespreheating,you
may need to add additiona! time to the length
of thecooking time.
[41 Touch the + or - pads to set the
baking time.
Thecooking time that gou enteredwill be
displaged.(If gouselect CookingTimefirst
and then adjust the BakeTemperature,the
oven temperature will be displayed instead.)
[_ Touchthe Start/On pad.
The displagshows either the oven
temperature that gou set or the cooking time
countdown. (Thedisplay starts with PREif
showing the oven temperature.)
The ovenwill continue to cook for the
programmed amount of time, then turn
off automatically.
[_ Touchthe Clear/Off pad to clear
the displag if necessarg.
Removethe food from the oven.Remember,
eventhough the ovenshuts off automatica!ly,
foods continue cooking after controlsare off.
¢n
t'b
q
q
ro
q
3"
®
Tamp Recall
[.__Time_.)
®
FStort_/
LTim%)
LooJ
How to Set a Delaged Start and Automatic Stop
Theoven wi!! turn on at the time of day you
set,cook for a specific length of time and then
turn off automatica!ly.
Make sure the clock shows the correct
time of dag.
[_ Touchthe Bake pad.
[_ Touchthe + or - pads to set the
oven temperature.
[_] Touch the Cooking Time pad.
[_ Touchthe + or - pads to set the
desiredlength of cooking time.
[] Touch the Start Time pad.
[_] Touch the + or - pads to setthe time
ofdag you want the oven to turn on
and start cooking.
[_ Touchthe Start/On pad.
NOTE:An attention tone wi!!sound if you
are using timed baking and do not touch
the Start/On pad.
NOTE:Ifgou would liketo check the times
you haveset,touch the Start Time pad to
checkthe start time you have set or touch
the Cooking Time pad to check the length
of cooking time you haveset.
When the oven turns on at the time of dag
gou have set, the displag will show PREuntil
it reaches the selected temperature, andthen
it will display the oven temperature.
Atthe end of cooking time,the ovenwill turn
off and the end of cucle tone will sound.
[_ Touchthe Clear/Off pad to clear
the display if necessarg.
Removethe food from the oven.Remember,
eventhough the ovenshuts off.automatica!!g,
foods continue cooking after controlsare off.
w
o
Lq
0
u_
(b
L- LJ
"0
0
17
Page 18

0
Special features ofyour ovencontrol, somemodels)
Yournew touch pad control has additional featuresthat you may chooseto use.Thefollowing arethe featuresand
how you may activate them.
The specialfeature modes can only be activated while the display is showing the time of dag. They remain in the
control's memory until the steps are repeated.
When the display shows your choice, touch the StartlOn pad. The special features will remain in memory after
a power failure.
NOTE: The Sabbath feature and the Thermostat Adjustment feature are also SpecialFeatures, but they are addressed
separately in the following sections.
12 Hour Shut-Off
Touchthe Clock pad.The displaywill
the ovenon,the contro!wi!!automatica!lg turn
_°_°°°" _"_° offthe ovenafter !2 hours during baking
functions or after 3 hoursduring a broi!
function.
e_
CStart_
If you wish to turn OFF this feature, follow
the steps below.
17J Touchthe Bake and Broil Hi/Lo pads
at the same time for 3 seconds until
the display shows SF.
show ON (12 hour shut-off). Touch the
Clock pad repeatedly until the display
shows OFF(no shut-off).
Touchthe Stert/On padto activate
%
the no shut-off and leave the control set
in this specialfeatures mode.
J
)
8
0
E
18
Page 19

"'-usingthe Sabbath feature. (onsomemode/sJ
(Designed for useon the Jewish Sabbath and Holidags) GEAppliances.com
The Sabbath feature can be used for baking/roasting only. It cannot be used for broiling, self-cleaning or delay start
cooking.
NOTE: The oven light comes on automatically (onsome models) when the door is opened and goes off when
the door is closed. The bulb may be removed. See the Oven Light Replacement section. On models with a light switch
on the control panel, the oven light may be turned on and left on.
How to Set for Regular Baking/Roasting
Temp Recall Hi / LO
( ,ooLI
Coo' o]
Temp Recall
Looj
Whenthedisplay shewsD theevenis
set in Sabbath.Whenthedisplayshews
D C theevenis baking/roasting.
NOTE:To understand how the oven control works,
practice using regular baking (non-Sabbath) before
entering Sabbath mode.
Makesure the clockshows the correct time of day
and the oven is off
[_ Touch and hold both the Bake and
Broil Hi/Lo pods, at the same time,
untilthe displag shows SF.
[_ Tap the Clock pad until SAb appears
in the displag.
[] Touch the Start/On pad and D will
appear inthe displag.
[_ Touch the Bake pad. No signal will
be given.
[_ The preset starting temperature will
automaticallg be set to 350.° Tap the +
or - pads to increase or decrease the
temperature in 25° increments. The
temperature can be set between 170°
and 550° No signal or temperature
will be given.
[_ Touch the Start/On pad.
[_ After a random delaUperiod of
approximatel U30 secondsto ! minute, D c
will appear in the display indicating that the
oven is baking!roasting.If D c doesn't appear
inthe displaU,start again at Step/4.
Toadjust the oven temperature, touch the
Bake pad and tap the + or - pads to increase
or decrease the temperature in 25° increments.
Touchthe Start/On pad.
NOTE:TheClear/Off and Cooking Time pads are
active during the Sabbath feature.
¢n
¢n
t'b
to
3"
How to Set for Timed Baking/Roasting--Immediate Start and Automatic Stop
NOTE:Tounderstand how theoven control works,
practice using regular (non-Sabbath)Immediate
Temp Recall Hi / Lo
0
Start and Automatic Stopbefore entering the
Sabbath mode.
Nake sure the clock shows the correct time of day
and the oven is off
[_ Touch and hold both the Bake and
[_ Tap the Clock pad until SAb appears
%
%
WhenthedisplayshewsD theevenis /h_
setinSabbath.Whenthedisplayshews
D C theevenisbaking/roasting.
Broil Hi/Lo pads, at the same time,
untilthe displa Ushows SF.
in the displag.
Touch the Start/On pad and D will
appear inthe displag.
Touch the Cooking Time pad.
Touch the + or - padsto setthe desired
length of cooking time between ! minute
and 9 hours and 59 minutes. Thecooking
time that you entered will be displaued.
Touch the Start/On pad.
Touch the Bake pad.No signal will
begiven.
The presetstarting temperature will
%
automaticallg be setto 350.°Tap the +
or - pads to increase or decreasethe
temperature in 25° increments.The
temperature can be set between Z70°
and 550.°No signal or temperature
will be given.
Touch the Start/On pad.
%
After a random delag period of
[]
approximatel U30 secondsto i minute,D c
will appear in the displaUindicating that the
oven is baking!roasting.If D c doesn't appear
inthe displaU,start again at Step7.
Toadjust the oven temperature, touch the
Bake pad and tap the + or - pads to increase
or decrease the temperature in 25° increments.
Touchthe Start/On pad.
When cooking is finished,the displaUwill change
from D C to D, indicating that the oven has turned
OFFbut is still set in Sabbath. Removethe cooked
food.
19
w
o
t'3
O
¢n
tO
"o
O
Page 20

¢n
"'-usingthe Sabbath feature. (onsomemode/sJ
(Designed for useon the Jewish Sabbath and Holidays)
¢n
e_
"o
"o
How to Exit the Sabbath Feature
[_ Touch the Clear/Offpad.
L o_j
® ®
L0o O0,o,0_
Temp Rect_ll Hi I Lo
I-_ Touchand hold both the Bake and
C ,ocO
¢s__3
Loo J
Ifthe oven is cooking, wait for a random
delay period of approximatel U30 seconds
to ! minute, until onlUD isin the displaU.
Broil Hi/Lo pads, at the same time,
untilthe displau shows SF.
[_Tap the Clock pad until ONor OFFappears
inthe displaU.ON indicatesthat the oven will
automaticallu turn off after !2 hours.OFF
indicatesthat the oven will notautomaticallu
turn off.Seethe Specialfeaturessection for an
explanation of the J2 HourShut-Offfeature.
[_] Touch the Start/On pad.
NOTE:tfa power outage occurred while theoven
was in Sabbath,the oven will automatically turn
off and stay off evenwhen the power returns.
Theoven control must be reset.
8
= v
s ltJ
J
0
E
0
20
Page 21

Adjust the oven thermostat--Do it yourseifl
GEAppliances.com
You may find that your new oven cooks differently than the one it replaced. Use your new oven for a few weeks to
become more familiar with it. If you still think your new oven is too hot or too cold, you can adjust the thermostat
yourself.
Do not use thermometers, such as those found in grocery stores, to check the temperature setting of your oven.
These thermometers may vary 20-40 degrees.
NOTE: This adjustment will not affect the broiling or the self-cleaning temperatures. The adjustment will be retained
in memory offer a power failure.
To Adjust the Thermostat (onsomemodels)
0 _ t •
Ternp Recall HI / L
0
GokO
Temp Recall [_
Touch the Bake and Broil Hi/Lo pads
at the same time for 3 seconds until
the displag shows SF.
Touch the Bake pad. Atwo-digit number
shows in the displag.
The oventemperature can beadjusted
up to (+)35°Fhotter or(-) 35°Fcooler.
Touch the + padto increasethe
temperature in!-degree increments.
Touch the - padto decreasethe
temperature in!-degree increments.
[_ When gou have made the adjustment,
touch the Start/On pad to go back to
the time-of-day display. Usegour oven
as gou would normallg.
NOTE:Thisadjustment wi!!not affect the
broiling or self-cleaningtemperatures. It wi!!
be retained in memorg after a power failure.
¢n
¢n
¢b
Q
to
OVEN v TEMP
Frontof OVENTEMPknob
(knob appearance may vary)
Backof OVENTEMPknob
(knobappearancemayvary)
To Adjust the Thermostat (onmodels with an OVENTEMPKnob)
[_ Pull the OVEN TEMPknob off the range Each clickwillchange the oven
and look at the back side. To make an temperature approximatelg !O°F.(Range
adjustment, loosen (approximatelg one is plus or minus 60°Ffrom the arrow.)
turn),but do not completelg remove, We suggestthat gou make the
the two screws on the back of the knob. adjustment one click from the original
With the back of the knob facing gou,
[]
hold the outer edge ofthe knob with one
hand and turn the front of the knob with
the other hand.
Toincrease the oven temperature,
move the top screw toward the right.
You'llhear aclick for each notch gou
move the knob.
Todecrease the oven temperature,
move the top screw toward the left.
setting and check oven performance
before making ang additional
adjustments.
After the adjustment is made, retighten
%
screws so theg are snug, but be careful
not to overtighten.
Replacethe knob, matching the flat area
of the knob to the shaft, and check
performance.
The type of margarine will affect baking performance!
Most recipes for baking have been developed using high-fat products such as butter or margarine (80% fat).
Ifyou decrease the fat, the recipe may not give the same results as with a higher-fat product.
Recipe failure can result if cakes, pies, pastries, cookies or candies are made with low-fat spreads. The lower the fat
content of a spread product, the more noticeable these differences become.
Federalstandards require products labeled "margarine" to contain at least 80% fat bg weight. Low-fat spreads,
on the other hand, contain lessfat and more water.The high moisture content of these spreadsaffects the texture and flavor
of baked goods. For best resultswith your old favorite recipes,usemargarine, butter or stick spreads containing at least 70%
vegetable oil.
21
3"
w
o
rb
o
o_
to
"0
0
Page 22

Using the worming drawer ionsomemodels)
Control Knob (on models equipped with a knob)
Pushand turn the control knobto any desired
setting.
NOTE:Thewarming drawer should not
be used during a self-clean cycle.
I.o ................................. Pies
Medium(midp0siti0nontheknob)....... Casseroles
Hi ............................... Meats
When Using the Worming Drawer
Thewarming drawer will keep hot, cooked
foods at serving temperature. Always start
with hot food. Donot use to heat cold
food other than crisping crackers, chips
or dry cereal.
Do not fine the warming drawer with
aluminum foiL Foil is an excellent heat
insulator and will trap heat beneath it.
This will upset the performance of the
drawer and could damage the interior
finish.
Preheatprior to use according to these
recommended times:
Setting Lo .................... 15 minutes
Setting Medium .............. 25 minutes
Setting Hi ..................... 35 minutes
On Signal Light
TheOn signal light is located above
the control knob and glows when the knob
isin the on position.It stays on until the knob
ismoved to the Offposition.
Donot put liquid or water in the warming
drawer.
Formoistfoods, cover them with a lid
or aluminum foil.
Forcrisp foods, leavethem uncovered.
Foodshould be kept hot in its cooking
container or transferred to a heat-safe
serving dish.
CAUTION: Plasticcontainersor
plastic wrap wi!!melt if in direct contact with
thedrawer or a hot utensi!.Meltedplasticmag
not beremovableand isnot coveredunder
gout warranty.
Removeserving spoons,etc.,before
placing containers in warming drawer.
22
Page 23

Temperature Selection Chart
To keepseveral different foods hot, setthe control
Q
GEAppliances.com
to the food needing the highest setting.
Thetemperature, tgpe and amount of food,
and the time heldwill affect the qualitg of
the food.
Foodin heat-safe glassand glass-ceramic
utensilsnag need a higher control setting
ascompared to food in metal utensils.
Repeatedopening of the drawer allowshot
air to escape and food to cool.
Allow extra time for the temperature inside
the drawer to stabilizeafter adding items.
With large loads it nag be necessarg
to usea higher thermostat setting and
cover some of the cooked food items.
Donot useplastic containers or plastic
wrap.
To Crisp Stale Items
FoodType Control Setting
Bacon Hi
Breads Medium
Casserole Medium
Chicken,fried Hi
Eggs,scrambled Medium
Fish Hi
Gravy,sauces Hi
Ham Hi
Muffins Medium
Onionrings Hi
Pies Lo
Pizza Hi
Potatoes,baked Hi
Potatoes,mashed Lo
TortillaChips Lo
^ CAUTION:oonotkeen ood
the warming drawer for more than two hours.
rb
Q
Q
ro
Place food in low-sided dishes or pans.
_, Preheaton Lo setting.
To Warm Serving Bowls end Plates
Towarm serving bowls and plates,
set the control on Lo.
Useonlg heat-safe dishes.
If gou want to heat fine china, pleasecheck
with the manufacturer of the dishesfor
their maximum heat tolerance.
Checkcrispnessafter 45minutes.
Add time as needed.
You may warm emptg serving disheswhile
preheating the drawer.
II,CAUTION: isheswil!behot
Usepot holdersor mittswhen removing hot
dishes.
w
o
r'b
o
o_
23
"o
o
Page 24

09
0
09
Usingthe self-cleaningoven.
Never force the latch handle. Forcing the handle will damage the door lock mechanism.
The oven door must be closed and all controls set correctly for the cycle to work properly.
Before a Clean Cycle
o_
"o
"0
Wipe up heavysoil onthe ovenbottom.
Forthe first self-clean cycle, we recommend
venting your kitchen with an open window or
using a ventilation fan or hood.
Removethe racks,any broiler pan,broiler
grid,all cookware and any aluminum foil
from the oven.
Theoven rackscan be self-cleaned,
but they will darken, losetheir luster
and become hard to slide.
Do not usecommercial oven cleaners or oven
protectors in or near the self-cleaningoven.
A combination of any of these products plus
the high clean cycle temperatures may
damage the porcelain finish of the oven.
Soilon the front frame of the rangeand
outside the gasket on the door will need
to be cleaned by hand. Cleanthese areas
with hot water, soap-filled scouring pads
or cleansers such as SoftScrub.®Rinse
well with clean water and dry.
Donot clean the gasket. The fiberglass
material of the oven door gasket cannot
withstand abrasion. It is essential for the
gasket to remain intact. If you notice it
becoming worn or frayed, replace it.
Wipe up any heavy spilloverson the oven
bottom.
Makesurethe oven light bulb cover isin place
and the oven light is off.
CAUTION: Thegrates and
drip pans tif so equipped) should never
be cleaned in the self-cleaning oven.
Do not usecommercial oven cleaners or
oven protectors in or near theself-cleaning
oven. A combination of any of these products
plusthe high clean cycle temperatures may
damage the porcelain finish of the oven.
IMPORTANT:The health of some birdsis
extremely sensitiveto the fumes given off
during the self-cleaning cycle of any range.
Movebirdsto another well-ventilated room.
w
J
)
)
)
8
4-J
0
L..
E
09
09
How to Set the Oven for Cleaning (onmodels with an OVEN TEHP Knob)
Followthe directions in the Beforea Clean
Cyclesection.
Latch the door.
[_ Turn the OVENTEMPknob to CLEAN.
TheClean Timeis4 hours and 20 minutes.
Theself-clean light wi!! come on and stay
on unti! the self-dean cycle is complete.
Theoven shuts off automatica!ly when
theclean cgde iscomplete.
[_ After a clean cycle,turn the OVENTEIP
knob to OFFand slide the latch handle
to the left as far as it will go.
Tocancel self-clean cycle, turn OVENTEt,4P
knobto off and slide latch to left asfar as
itwill go.Wait until self-clean light stops
blinking.Useoven as desired.
NOTE:Neverforce the latch. Ifthe oven
istoo hot, you will not be able to slide
the latch.Allowthe ovento cool.
How to Set the Oven for Cleaning
0•
¢ Selfq
CStart_
[Z TJ
24
Followthe directions in the Beforea Clean
Cyclesection.
171 Latch the door.
NOTE:Neverforce the latch. If the oven
istoo hot, you will not be able to slide
the latch.Allow the oven to cool.
[_ Touchthe SelfClean pad.
[_] Touch the + or - pads until the desired
CleanTime isdisplayed.
TheClean Timeisnormally 4 hoursand 20
minutes. Youcan change the Clean Timeto
an_jtime between3 and 5 hours, depending
on the amount of so!!in your oven.
[_ Touchthe Start/On pad.
Theself-clean cgcle will automaticallg
begin after CLEAN is displayed and the time
countdown appears inthe display.
While the oven isself-cleaning, gou can
touch the Clock pad to displagthe time
of day. To return to the clean countdown,
touch the Self Clean pad.
Theoven shuts off automaticallg when
the clean cgcle is complete, and 0:00 will
flash in the display.
Slidethe latch handleto the left as far
as it will go and open the door.
Page 25

The oven door must be closed and all controls set correctly for the cycle to work properly.
How to Delay the Start of Cleaning (on some models)
_0
¢-solfq
Lcleo
Csto,tq
Uim
L o°J
You can set the oven control to delay-start
the oven, clean for a specific length of time
and then turn off automatica!ly.
Make sure the clock shows the correct time
of day.
Followthe directions in the Beforea Clean
Cyclesection.
[_ Latchthe door.
NOTE:Neverforce the latch. If the oven
istoo hot, you will not be able to slide
the latch.Allow the oven to cool.
[_ Touch the Self Cleon pad.
[_] Touch the + or - pads to set the
Clean Time.
TheClean Timeispresetfor 4 hoursand
20 minutes. Youcan changethe CleanTime
to anbttime between 5 and 5 hours,
depending on the amount of so!! in your oven.
If a differentCleanTimeisdesired,touch the +
or - pads unti!thedesiredCleanTime is
displayed.
ChangetheStart Timeby touching the + or-
pads. Thestart time wi!! appearin the display.
I_ Touchthe Stere/On pad.
Theself-clean cgcle will automaticallg begin
at the time set.
While the oven isself-cleaning, gou can
touch the Clock pad to displagthe time
of dag.To return to the clean countdown,
touch the Self Cleon pad.
Theoven shuts off automaticallg when the
clean cgcle is complete, and 0:00 will flash
inthe display.
I_ Slidethe latch handle to the leftasfar
as it will go and open the door.
o_
Q
GEAppliances.com
e_e
¢n
t'b
Q
Q
Q
ro
3"
[_ Touchthe StoreTime pad.
To Stop a Cleon Cycle (on some models)
Touch the Cleur/Offpad.
Wait until the oven has cooled below the
locking temperature to unlatch the door.You
will not be able to open the door right away
unlessthe oven hascooled below the locking
temperature.
After o Cleon Cycle (onsome models)
Youcannot setthe oven for cooking until
the oven iscool enough for the door to be
unlatched.
Younag notice some white ash inthe oven.
Wipe it up with adamp cloth after the oven
cools.
If white spotsremain, remove them with a
soap-filledscouring pad and rinsethoroughly
with a vinegarand water mixture.
Thesedepositsare usuallga saltresidue
that cannot beremoved bgthe cleancgcle.
If the oven is not clean after one clean cycle,
repeat the cycle.
You cannot set the oven for cooking
untilthe oven iscool enough for the door
to unlock.
Whilethe oven is self-cleaning,you can
touch the Clock padto display the time
of day.Toreturntothe cleancountdown,
touch the Cooking Timepad.
Ifthe racks become hardto slide,apply
a small amount of vegetable oil or cooking
oil to a paper towel and wipe the edges
of the oven rackswith the paper towel.
w
¢}-
o
t'b
o
o_
25
"o
o
Page 26

m
0
_c
¢
4,
£
4,
c
!iiiiiiiii_i_iiiiiii
i_.iMiiii'iiii
iiiii',iiiii_iiii;ii'iii
Careand cleaning of the range.
Be sure electrical power is off and all surfaces are cool before cleaning any part of the range.
Ii WARNING: Ifyourrangeisremovedforcleaning,servicingoranyreason,
be sure the anti-tip device is reengaged properlg when the range is replaced. Failure
to take this precaution could result in tipping of the range and cause injurbt.
Burner Grates
Lift out when cool. Gratesshould be washed
regularly and,of course,after spillovers.
Wash them inhot, soapy water and rinse
with clean water. When replacing the grates,
be sure they are positioned securely over
the burners.
On models with professional-style double
grates,the grates are position-specific.For
maximum stability, these grates should only
be used in their proper position; they cannot
be interchanged leftto right or front to back.
Forconvenience,the undersides ofthe left
and right grates are marked "LEFTFRONT"
and "RIGHTFRONT."
Do not operate a burner for an extended
period of time without cookware onthe grate.
Thefinish on the grate may chip without
cookware to absorb the heat.
Toget rid of burned-on food, place the grates
in a covered container. Add 1/4 cup ammonia
and let them soakseveral hoursor overnight.
Wash,rinsewell and dry.
Although theg are durable, the grates
will graduallg lose their shine, regardless
of the best care you can give them. This
isdue to their continual exposure to high
temperatures. Youwill notice thissooner
with lighter color grates.
NOTE:Do not clean thegrates ina self-cleaning
oven.
m
m
0
0..
0,,
o
E
o
¢
t
,4.
0
Drip Pans (ifsoequipped)
Removethe grates and lift out the drip pans.
Drip panscan be cleaned in a dishwasher
or by hand.
When replacing the drip pans, make sure
they are inthe correct position.
Placethem ina coveredcontainer.Add
1/4 cup ammonia and letsoak several hours
or overnight. Wash, rinsewell and dry.
--ACAUTION:_ono_clean_ne_ip
pansin a self-cleaningoven.
0
J
26
Page 27

GEAppliances.com
Grate
Drippa_(ifSOequipped)
surfaceburner
- CAUTiON:
Donot operatethe cool<topwithout all
burnerparts,drip pans(if so equipped)
andgrates in ptace.
Cleantheseholes thoroughlyoneach
burner.
Standard Twin Burner Assemblies (on
Forcleaninginformation on sealed burners,
seesection below.Sealedburner cooktops
do not !ift up.
Onmodels with standard twin burners,
the cooktoplifts up for easg access.
Turn all controls OFFbefore removing burner
parts and drip pans (if so equipped).
The burner grates and drip pans (ifso
equipped)can be liftedoff, making them
easy to clean.
The holesin the surface burners of your
range must be kept clean at all times for
proper ignition and an even, unhampered
flame.
Youshould cleanthe surface burners
routinely, especially after bad spillovers,
which could clog these holes.
Wipe off surface burners. If heavy spillover
occurs, remove the surface burnersfrom the
range. Burnerslift out for cleaning. Lift up the
cooktop and then lift out the surface burners.
To remove burned-on food,soakthe surface
burner in a solution of mild liquid detergent
and hot water. Soak the surface burner for
20 to 30 minutes.
some models)
Formore stubborn stains,use a cleanserlike
Soft Scrub®brand or BanAmP brand. Rinse
well to remove any traces of the cleanser
that might clog the surface burner openings.
Donot usesteel wool because itwill clogthe
surface burner openings and scratch the
surface burners. If the holes become clogged,
clean them with a sewing needleor twist-tie.
Beforeputting the surface burner back,
shake out excesswater and then dry it
thoroughly by setting it in a warm oven
for 30 minutes.Then place it back in the
range, making sure it is properly seated
and level.
Checkthe flame pattern of each burner.
Ifthe flames are 'jumpy" (notsteady),
clean the holes again with a sewing
needle or twist-tie.
Grate
Burnercad
Burner heaa
Drie
Sealed Burner Assemblies (onsomemodels
Turnall controls OFFbefore removing the
burner parts and drip pans (ifso equipped).
Theburner grates, caps, burner heads and
drip pans (ifso equipped)can be lifted off,
making them easy to clean.
CAUTION:oonot operate
the cooktop without a!!burner parts, drippans
(ifso equipped) and grates in place.
NOTE:Donot lift the cooktop.Lifting the
cooktop on sealed burner models can leadto
damage and improper operation of the range.
/
Electrode_
The electrode of the spark igniter is
exposed when the burner head is
removed.When one burner isturned
to LIFE,all the burners spark. Do not
attempt to disassemble or clean
around any burner while another
burner is on. An electric shock may
result,which could cause you to
knock over hot cookware.
27
Page 28

m
ul
O
B
Care and cleaning of the range.
u_
_c
¢
4,
£
4,
c
!ii@i_iiii/i
iii,iiiii_i_iiiiiiii'iiii
iiiii',iiiFiiii_ii,lii
iiiiii_'_iiiii
0
¢
t
0
m
F,
Use a sewing needle or twist-tie
to unclog the srnatl hole in the burner
head.
Burner Caps and Heads
NOTE:Before removing the burner caps
and heads, remember their size and
location. Replace them in the same
location after cleaning.
Burner caps
Lift off when cool. Wash burner caps
in hot, soapy water and rinsewith clean
water.Youmay scourwith a plastic scouring
pad to remove burned-on food particles.
Burner heads
Forproper ignition, make sure the small hole
in the section that fits overthe electrode is
kept open. A sewing needle or wire twist-tie
works well to unclog it.
Theslits in the burner heads must be kept
cleanat a!!times for an even,unhampered
flame.
Cloggedor dirtg burner ports or electrodes
will notallow the burner to operate properly.
Ang spill on or around an electrode must
be carefullg cleaned.Takecare to not hit
an electrode with anything hard or it could
be damaged.
Youshould cleanthe burner capsand
burner heads routinelg, especiallgafter bad
spillovers,which could clog the openings
in the burner heads.Lift offwhen cool.
Toremove burned-on food,soak the burner
heads in a solution of mild liquid detergent
and hot water for 20-]0 minutes. Formore
stubborn stains, usea toothbrush.
After cleaning
Beforeputting the burner caps and heads
back, shakeout excesswater and then dry
them thoroughly by setting ina warm oven
for ]0 minutes.
NOTE:Donot usestee!woo! orscouring
powders to clean the burners.
Replacement
Replaceburner heads over the electrodes
on the cooktop, in the correct locations
according to their size.
On some models:
Mediumhead small head
andCap andcap
Frontof range
and Cap and cap
On some models:
Mediurnhead small head
andcap andcap
(
, FrontOfrange
Mediumhead Largehead
andcap andcap
Hake sure the slot in the burner head
is positioned over the electrode.
m
L.
0
0..
0,,
o
E
u_
0
J
Replacethe matching sizecaps onto
the heads.
Hake sure that the heads and caps are
replaced in the correct locations.
NOTE:Onsome models,the burnersare
a!!the same sizeand power.
28
Page 29

Cooktop Surface
Toavoid damaging the porcelain-enamel
surface of the cooktop and to prevent it
from becoming dull,clean up spillsright
away. Foodswith a lot of acid (tomatoes,
sauerkraut, fruit juices,etc.)or foods with
high sugar content could cause a dull spot
if allowed to set.
GEAppliances.com
NOTE:Donot store flammable materials
in an oven or near the cooktop.Do not
store or usecombustible materials,
gasoline or other flammable vapors and
liquidsin the vicinity ofthis or any other
appliance.
Somemodelshavedualsupportrods
thatwill holdthe cool<topup while you
cleanunderneathit.
When the surface hascooled,wash and
rinse. Forother spillssuch asfat spatterings,
wash with soap and water once the surface
NOTE:Donot lift the cooktop onsealed
burner models. Lifting the cooktop can lead to
damage and improper operation of the range.
has cooled.Then rinseand polishwith a dry
cloth.
Stainless Steel Surfaces (onsome models)
Do not use a steel wool pad; it will scratch
the surface.
To cleanthe stainlesssteel surface,
usewarm sudsy water or a stainless steel
cleaner or polish.Always wipe the surface in
the direction of the grain. Followthe cleaner
instructions for cleaningthe stainlesssteel
surface.
Lift-Up Cooktop (onmodels with standard twin burners)
Cleanthe area under the cooktop often.
Built-up soil,especiallygrease, may catch
on fire.
To make cleaning easier,the cooktop may be
lifted up.
NOTE:Donot lift thecooktop on sealed
burner models. Lifting the cooktop can leadto
damage and improper operation of the range.
Toinquire about purchasing stainlesssteel
appliance cleaner or polish,or to find the
location of a dealer nearest you, please call
our toll-free number:
National Parts Center 800.626.2002(U.S.)
GEAppliances.com (U.$.)
www.GEAppliances.ca (Canada}
Cleanunder the cooktop with hot,soapy
water and a clean cloth. If you removed
your surface burners while cleaning, make
surethey are properly seated when replacing
them.
After cleaning, lower the cooktop (becareful
not to pinch your fingers).
800.661.1616(Canada}
iJi ii ¸¸ L LL (Lil (ii ill
Vent appearance and location vary.
Toraise the cooktop:
_] Besurethe burners are turned off.
[_ Removethe grates.
[] Graspthe two front burner wells
and lift up.
Oven Air Vents
Neverblock the vents (airopenings)of the
range.They provide the air inlet and outlet
that are necessary for the range to operate
properly with correct combustion.
Air openings are located at the rear of
the cooktop, at the top and bottom of the
oven door,and at the bottom of the range,
under the warming drawer,storage drawer
or kick panel (dependingon the model).
29
Page 30

m
ul
0
Care and cleaning of the range.
u_
_c
¢
4,
£
L,
4,
c
!iiiiiil_i_iiiii/
i_,iiiii_i_iiiiiiii'iiii
iiiii,,iiiii_iiii_ii,lii
iiiiii_'_iiiii
0
¢
t
0
m
F,
Lift thedoor straightup andoff
thehinges.
i are inthe special stop position.Position
Thegasketisdesignedwith a gap
atthe bottomto ailow for proper
aircirculation.
Donotrubordean the doorgasket--
it hasanextremelylowresistanceto
abrasion.
If younotice the gasketbecomingworn,
frayedor damagedin anyway or ifit
hasbecomedisplacedon thedoor,
youshouldhaveit replaced.
Lift-Off Oven Door
Theoven door isremovable,but it isheavy.
Youmag need helpremoving and replacing
the door.
Toremove the door, open it afew inches
to the special stop position that will holdthe
door open. Grasp firmly on e(_chsideand lift
the door straight up and offthe hinges.
NOTE:Becarefu! not to place hands between
the hinge and the ovendoor flame since
the hinge could snap back and pinch fingers.
Toreplace the door, makesurethe hinges
the slots in the bottom of the door squarely
overthe hinges.Thenlower the door slowly
and evenly over both hingesat the same
time. If the hinges snap back against
the oven frame, pull them backout.
To clean the inside of the door:
Donot allow excesswater to run into
any holesor slots inthe door.
,, Becausethe area insidethe gasket is
cleanedduring the self-cle(_ncycle, you
do not need to clean this by hand. Any
soap left on the liner causes additional
stainswhen the oven isheated.
Oven Bottom
Theoven bottom has a porcelain-enamel
finish.To make cleaning easier,protect
the oven bottom from excessivespilloversby
placing a cookie sheet on the rock below the
rack you are cooking on. This isp(_rticul(_rly
important when baking afruit pieor other
foods with ahigh acid content. Hot fruit
fillings or other foods that arehighly (_cidic
(suchas tomatoes, sauerkraut, and sauces
with vinegar or lemonjuice)may cause
pitting and damage to the porcelain-enamel
surface and should be wiped up immediately.
_,Thearea outside the gasket can be
cleaned with a soap-filled scouring pad.
To clean the outside of the door:
Usesoap and water to thoroughly clean
the top, sidesand front of the oven door.
Rinsewell.You may also usea glass
cleaner to cleanthe glasson the outside
of the door.
,, Spillage of marinades,fruit juices, tomato
sauces and basting materials containing
acids may c(_usediscoloration and should
bewiped up immediately. When the
surface iscool,clean _nd rinse.
Donot useoven cleaners,cleansing
powders or harsh _brasiveson the
outside of the door.
Wedon't recommend usingaluminum foil
on the oven bottom. It can affect airflow if the
holesare blocked and it can concentrate heat
at the bottom ofthe oven, resulting in poor
baking performance.
Tocle(_nupspillovers,usesoap and water,
_n abrasive cleaner or soap-filled scouring
pad. Rinsewell to remove any soap before
self-cleaning.
m
0
0..
0..
z_
o
E
0
J
30
Page 31

Removable Kick Panel Ionsome modds/
The kickpanel may be removed for cleaning
under the range.
To remove:
Lift up the bottom of the panel slightlg to
disengagethe panel from the tabs at the
baseof the range. Pullthe bottom of the
panel forward until the spring clipsare
releasedat the top of the panel.
To replace:
Insert the two slots at the bottom of the
panel onto the two tabs at the base of the
range,and push the top of the panel forward
to engage the spring clips.
Removable Storage Drawer (on some models)
GEAppliances.com
Thestorage drawer isa good placeto store
cookware and bakeware. Do not store plastics
and flammable materia! in the drawer.
The storage drawer mag be removed
Toremove storage drawer:
Ell Pulldrawer straight out until it stops.
[] Tiltthe front of the drawer up and free
of the range.
for cleaning under the range. Cleanthe
Thestoragedrawer mayberemoved
for cleaningunderthe range.
storage drawer with adamp cloth or sponge.
Never use harsh abrasives or scouring pads.
To replace storage drawer:
[_] Set the stops on the back of the drawer
over the stops in the range.
Slidedrawer evenlgand straight back,
so that the rails in the range are
engaged.
Removable Warming Drawer (on some models)
_ ! NOTE:For models with on electric worming To replace the warming drawer:
drawer, before performing ang adjustments, [_ Place the left drawer rail around
cleaningor service,disconnectthe range the inner left railguide and slide
electrica!power supply at the household it in slightly to hook it.
distribution pond by removing the fuseor
!
switching offthe circuit breaker.Makesure _ Placethe right drawer rail around
the warming drawer heating element iscoo!. the innerright railguide and slide
it in slightly to hook it.
t (iii iilL i! i iiii ii illi
Host cleaning can be done with the drawer
in place. However,the drawer mag be
r3] Slidethe drawer all the wag in.
removed if further cleaning isneeded. Use
soapand warm water to thoroughlg clean.
To remove the warming drawer:
[_] Pullthe drawer straight out until
it stops.
[_ Pressthe left rail release up and press
the right rail release down, while pulling
the drawer forward and free.
]1
Page 32

m
0
_c
¢
4.
4.
c
!iiiiiil_i_iiiii/
iii,iMiiii'iiii
iiiii',iiiii_iiii;ii'iii
iiiiii_"_iiiiiii
Careand cleaning of the range.
Lower Control Panel (Front Manifold Panel) and Knobs
It'sa good ideato wipe the control panelafter
each useof the oven. Usea damp cloth to
clean or rinse.Forcleaning, use mild soap
and water or a 50/50 solution of vinegar and
Pullthe knobstraight offthe stem.
water. Forrinsing,useclean water. Polishdry
with a soft cloth.
Donot useabrasive cleansers,strong liquid
cleaners,plastic scouring pads or oven
cleaners on the control panel-they will
damage the finish.
Donot bend knobs by pulling them upor
down or by hanging a towel or other such
loads.Thiscan damage the gasvalve shaft.
Oven Racks
Cleanthe rackswith an abrasive cleanser or
scouring pad. After cleaning, rinse the racks
with clean water and drg with a clean cloth.
Thecontrol knobs may be removed for easier
cleaning.
Hake sure the knobs are in the Offpositions
and pull them straight off the stems for
cleaning.
Theknobs can be cleaned in a dishwasher
or they may alsobe washed with soapand
water.Hake sure the insidesof the knobs are
dry before replacing.
Replacethe knobs inthe Offposition
to ensure proper placement.
Hetal parts can be cleaned with soap
and water. Do not use steel wool, abrasives,
ammonia, acids or commercial oven
cleaners.Dry with asoft cloth.
If the racks ever become hard to slide,wipe
the rack edges or oven rack supports with
vegetable oil.
NOTE:Takethe racks out of the oven before
gou begin the self-cleancgcleor theg mag
discolor.
m
m
0
0,,
o
E
0
J
0
¢
t
"4.
0
Wire coverholder.
]2
Heavg-Dutg Oven Racks (onsomemodels)
Cleanthe rackswith an abrasive cleanser.
The oven racksmay be cleaned in the
self-cleaning oven. However,the racks
will darken in color,losetheir luster
and become hard to slide if cleaned
during the self-cleaning cycle.
To make the racks slide more easily, apply
Oven Light Replacement
CAUTION:Beforereplacingyour
oven light bulb, disconnect the electrica! power
to the range at the main fuse orcircuit breaker
pane!. Be sure to let the light cover and bulb
coo! completely.
The oven light bulb iscovered with a
removable glasscover that is heldin place
with a bail-shaped wire. Removethe oven
door,ifdesired,to reach cover easily.
Toremove:
Holda hand under the cover soit
doesn't fall when released.With fingers
of the same hand, firmly push back
the wire cover holder. Liftoff the cover.
Do not remove ang screws to remove
the cover.
a small amount of vegetable oil or cooking
oil to a paper towel andwipe the edges
of the oven rackswith the paper towel.
[_ Donot touch hot bulbwith awet cloth.
Replacebulb with a 40-watt household
appliance bulb.
To replace cover:
I_] Placeit into the groove of the light
receptacle. Pullthe wire forward to
the center of the cover until it snaps
into place.When in place,the wire holds
the cover firmly. Becertain the wire
is inthe depression inthe center
of the cover.
[_ Connect electrical power to the range.
Page 33

m
I stallati I structi
[ If gou have questions, call 1.800.GE.CARES or visit ourWebsite at: GEAppliances.com
In the Commonwealth of Massachusetts:
* This product must be installed by a licensed plumber
or gas fitter.
* When using ball-type gas shut-off valves, they shall
be the T-handle type.
* A flexible gas connector, when used, must not exceed
3 feet.
BEFOREYOU BEGIN
Read these instructionscompletelgand carefullg.
Installation of this range must conform with local
codes or, in the absence of local codes, with the
National Fuel Gas Code, ANSI Z223.1/NFPA.54, latest
edition. In Canada, installation must conform with
the current Natural Gas Installation Code, CAN/CGA-
B149.1 or the current Propane Installation Code,
CAN/CGA-B149.2, and with local codes where
applicable. This range has been design-certified
bg CSA International according to ANSI Z21.1, latest
edition, and Canadian Gas Association according
to CAN/CGA-I.1 latest edition.
Aswith any appliance using gas and generating heat,
there are certain safety precautions you should follow.
You will find these precautions in the Important Safety
Information section in the front of this manual. Read
them carefully.
•IMPORTANT - Savetheseinstructions
for localelectrical inspector's use.
FOR YOUR SAFETY
Do not store or use combustible materials, gasoline or
other flammable vapors and liquids in the vicinitg of this
or any other appliance.
If you smell gas:
O Open windows.
O Don'ttouch electrical switches.
Extinguishany open flame.
Immediately coil your gas supplier.
TOOLS YOU WILL NEED
Phillipsscrewdriver
Flat-bladescrewdriver 0pen-endor
adjustablewrench
Pencilandruler
Level
Pipewrenches(2)
(oneforbackup) Drill,awlornail
e
I
•IMPORTANT- Observeallgoverning codes
and ordinances.
• Note to Installer - Besureto leavethese
instructions with the Consumer.
• Note to Consumer - Keepthese instructions
for future reference.
• Note - Thisappliance must be properly grounded.
• Servicer -The electrical diagram is in an envelope
attached to the back of the range.
• Skilllevel- Installationof this appliance requiresbasic
mechanical skills.
* Properinstallation isthe responsibility of the installer.
* Product failure due to improper installation isnot covered
under the Warranty.
Anti-Tipbracketkit _""LJJ 33
MATERIALS YOU MAY NEED
*Gaslineshut-off valve.
* Pipe-jointsealant or UL-opproved pipe thread tope
with Teflon* that resistsaction of natural and LPgases.
* Flexiblemetal appliance connector (1/2" I.D.)
A 5-foot length is recommended for easeof installation
but other lengths are acceptable. Never usean old
connector when installing a new range.
* Flareunion adapter for connection to gas supply line
(3/4" or 1/2" NPTx 1/2" I.D.)
* Flareunion adapter for connection to pressureregulator
on range (1/2" NPTx 1/2" I.D.)
* Liquid leak detector or soapy water.
* Lag bolt or 1/2" O.D.sleeveanchor (for concrete floors
only).
*Teflon: Registeredtrademark of DuPont
Page 34

Installation Instructions
WARNING!
INSTALLATION SAFETY
INSTRUCTIONS
Readthese instructions completely and carefully.
Improper installation, adjustment, alteration, service or
maintenance can cause injury or propertg damage. Refer
to this manual. For assistance or additional information,
consult a qualified installer, service agencg,
manufacturer (dealer) or the gas supplier.
Neverreuseold flexibleconnectors.The useof old flexible
connectors con couse gos leoks ond personol injurg.
Alwogs use NEW flexible connectors when installing
o gos opplionce.
IMPORTANT - Remove ollpockingmoteriol
ond literoturefromovenbeforeconnectinggosond
electrical supplg to ronge.
-&CAUTION - Donotottempttooperote
the oven of this ronge during o power foilure (Electric
Ignition models onlg).
II Hovegour ronge instolled bgo quolified instoller.
ii Yourronge must beelectricollg grounded inoccordonce
with Iocolcodes or, inthe obsence of Iocol codes,in
occordonce with the Notionol ElectricolCode(ANSI/NFPA
70,Iotest edition).InConodo, electricol grounding must
be in occordonce with the current CSAC22.1Conodion
ElectricolCode Port 1ond/or Iocolcodes.SeeElectfica/
Connections in this section.
II Beforeinstolling gour rongeon linoleum orong other
sgnthetic floor covering, moke surethe floor covering
con withstond 180°Fwithout shrinking,worping or
discoloring. Donot instoll the ronge over corpeting
unlesso sheetof 1/4" thick plgwood or similor insulotor
isploced between the ronge ond corpeting.
Ii
Avoidplocing cobinets obovethe ronge.To reduce
the hozord coused bg reoching over the open flomes
of operoting burners, instoll o ventilotion hood overthe
ronge thot projectsforword ot leost5" begondthe front
of the cobinets.
Ii
Theventiloting hood must beconstructed of sheet metol
not lessthon 0.0122"thick. Instollobovethe cooktop with
o cleoronce of not lessthon 1/4" between the hood ond
the undersideof the combustible moteriol or metol
cobinet. Thehood must be ot leostos wide osthe
opplionce ond centered over the opplionce.Cleoronce
between the cooking surfoce ond the ventilotion hood
surfoceMUST NEVER BE LESSTHAN 24 INCHES.
EXCEPTION:Instollotion of o listedmicrowove oven
or cooking opplionce over the cooktop shollconform
to
the instollotion instructions pocked with thot opplionce.
Ii
If cobinets ore ploced obovethe ronge,ollow o minimum
cleoronce of 30" between the cooking surfoce ondthe
bottom of unprotected cobinets.
Ii
Ifo 30"cleoroncebetweencookingsurfoceond
overheodcombustiblemoteriolormetolcobinetsconnot
bemointoined,protecttheundersideofthecobinets
obovethecooktopwithnotlessthon1/4"insuloting
millboordcoveredwithsheetmetolnotlessthon0.0122"
thick.Cleoroncebetweenthecookingsurfoceond
protectedcobinetsMUST NEVER BE LESSTHAN
24 INCHES.
Ii
The verticol distonce from the plone of the cooking
surfoce to the bottom of odjocent overheod cobinets
extending closerthon 1"to the plone of the ronge sides
must not be lessthon 18".(Seethe Dimensionsand
Clearancesillustrotion inthis section.)
-ACAUTION - Itemsofinteresttochildren
Ii
shouldnotbestoredincobinetsoboveo rongeoron
thebocksploshofo ronge-childrenclimbingonthe
ronge to reoch items could be seriouslginjured.
II Mokesurethe wall coveringsoround the rongecon
withstond heot generoted bg the ronge up to 200°R
34
Page 35

Installation Instructions
DIMENSIONS AND CLEARANCES
Provide adequate clearances between the range and adjacent combustible surfaces. These dimensions must be met for safe
use of gour range. The location of the electrical outlet and pipe opening (see Gas Pipe and Electric Outlet Locations) mag be
adjusted to meet specific requirements.
The range mag be placed with O"clearance (flush)at the back wall.
Minimum to
cabinets on
either side of
the range
r
I I I
30"
.... IA 1"To wall on either side, standard
30" _-
tvllnlmum'-_T"_- burnermodels
30"
for cabinets
above
Maximumdepth
countertops
2'°To wall on either side,
sealedburnermodels
Tocabinetsbelow
cool<topandat the
rangeback
Depthwith doorclosed(includesdoorhandle):
l 28" to 281/4"
"''''11"_ i ._,_1_1"_ Depthvaries dependingonnlodel.
Seespecificationssheetfor yourmodel.
1
Height
Depthwith dooropen:
46s/s" x\\ .-_
35
Page 36

Installation Instructions
WARNING!
ANTI-TIPDEVICE
• All ranges can tip.
• BURNS or other SERIOUS
INJURIES can result.
• INSTALL and CHECK the
ANTI-TIP bracket following
the instructions supplied
with the bracket.
Toreducethe risk of tipping the range,therange must
be securedby a properly installedanthtip bracket. See
installation instructionsshippedwith the bracket for
completedetails before attempting to install
Tocheckif the bracket is installed and engaged praperlg,
carefu!lgtip therange forward. The bracket should stop
the range within 4 inches.If it doesnot, the bracket must
be reinstalled.If the rangeispulled from the wa!!for ang
reason,alwags repeat thisprocedureto verify the range
ispraperlg securedbg the anti-tip bracket.
LOCATION
Do not locate the range where it mag besubject to
strong drafts. Ang openings in the floor or wall behind
the range should be sealed. Make sure the openings
around the base of the range that supplg fresh air for
combustion and ventilation are not obstructed bg
carpeting or woodwork.
Yourrange, likemany other household items, isheavy end
can settle into soft floor coverings such as cushioned vingl
or carpeting. Usecarewhen movingthe range on this type
of flooring. It isrecommended that the following simpleand
inexpensiveinstructions befollowed to protect your floor.
The range should be installed on a sheet of plywood
(orsimilar material).When the floor covering endsat
the front of the range, the area that the range will rest
on should be built up with plgwood to the same level
or higher than the floor covering.
This will allow the range to be moved for cleaning
or servicing. Also,make sure gour floor covering will
withstand 180°R(Seethe Installation SafetgInstructions
section.)
Make sure the wall coverings around your rangecan
withstand the heat generated (upto 200°F)by the range.
(Seethe Installation SafetgInstructions section.)
Forflee-standing or slide-in ranges, nevercompletdg
remove the leveling legs or the range wi!! not besecured
to the anti-tip deviceproperlg.
If you did not receivean anti-tip bracketwith your
purchase,ca!! !.800.626.8774 to receiveone at no
cost (inCanada,ca!!!.800.56!.3344). For installation
instructionsof the bracket, visit GEAppliances.com
(inCanada,GEAppliances.ca).
m Foryour safety, never use your range for warming
or heating the room. Your oven and cooktop are not
designed to heat your kitchen. Top burners should
not be operated without cookware on the grate. Such
abuse could result in fire and damage to your range
and will void your warranty.
BBDonot store or use combustible materials, gasoline
or other flammable vapors and liquids in the vicinity
of this or any other appliance. Explosions or fires
could result.
BBDonot use oven for a storage area. Items stored
in the oven can ignite.
BBDonot let cooking grease or other flammable
materials accumulate in or near the range.
IMPORTANT!
Removeall tape and packaging. Make sure the burners
are properly seated and level.
Lift up the cooktop Ion models with standard twin
burners} and remove any packing material under it.
Take the accessory pack out of the oven andlor drawer.
Checkto besure that no range parts have come loose
during shipping.
36
Page 37

Installation Instructions
rT] PROVIDE ADEQUATE GAS SUPPLY
Your range isdesigned to operate at a pressure of 4"
of water column on natural gas or, if designed for LPgas
(propane or butane), 10" of water column.
Makesure you are supplying your range with the type
of gas for which it is designed.
Thisrange isconvertible for use on natural or propane gas.
Ifyou decideto usethis rangeon LPgas,conversion must
be made by a qualified LPinstaller before attempting to
operate the range on that gas.
Forproper operation, the pressureof natural gas supplied
to the regulator must be between 4" and 15" of water
column.
ForLPgas,the pressuresupplied must be between 10"
and 15" of water column.
When checking for proper operation of the regulator,the
inlet pressure must be at least 1" greater than the operating
(manifold)pressure asgiven above.
Thepressure regulator located at the inletof the range
manifold must remain inthe supply line regardless
of whether natural or LPgas isbeing used.
Aflexible metal appliance connector usedto connect the
range to the gas supply line should have an I.D.of 1/2" and
be 5feet in lengthfor easeof installation. In Canada,flexible
connectors must be singlewall metal connectors nolonger
than 6 feet in length.
CONNECT THE RANGE TO GAS
Shut off the main gas supplg valve before disconnecting
the old range and leave it off until the new hookup has
been completed. Don't forget to relight the pilot on other
gas appliances when gou turn the gas back on.
Because hard piping restricts movement of the range,
the useof a CSAInternational-certified flexiblemetal
appliance connector is recommended unlesslocal codes
require a hard-piped connection.
Never use an old connector when installing a new range.
If the hard piping method isused,you must carefully align
the pipe;the range cannot be moved after the connection
is made.
To prevent gas leaks, put pipe-joint compound on,or wrap
pipe-thread tape with Teflon* around, all male (external)
pipe threads.
A. Installa manual gas lineshut-off valve in the gas line
in an easily accessed location outside ofthe range.
Make sure everyone operating the range knows where
and how to shut off the gas supply to the range.
B.Install male 1/2" flare union adapter to the 1/2" NPT
internal thread at inlet of regulator. Usea backup wrench
on the regulator fitting to avoid damage.
When installing the range from the front, remove the 90°
elbow for easier installation.
C. Install male 1/2" or 3/4" flare union adapter to the NPT
internal thread of the manual shut-off valve, taking care
to back up the shut-off valve to keepit from turning.
D.Connect flexible metal appliance connector to
the adapter on the range. Positionrange to permit
connection at the shut-off valve.
E.When all connections have been made, make sure
all range controls are in the off position and turn on
the main gas supply valve. Usea liquid leakdetector
at alljoints and connections to check for leaksin
the system.
WARNING: DONOTUSEAFLAME
TO CHECK FOR GAS LEAKS.
When using test pressures greater than 1/2 psig to
pressure test the gas supply system of the residence,
disconnect the range and individual shut-off valve from
the gas supply piping. When using test pressures of 1/2
psig or less to test the gas supply system, simply isolate
the range from the gas supply system by closing the
individual shut-off valve.
*Teflon: Registered trodemork of DuPont
37
Page 38

Installation Instructions
GAS PIPEAND ELECTRICAL OUTLET LOCATIONS (formodels with Sealed Burners)
Thisareaallows for flush range
installationwith through-the-wall
connectionof pipestub/shut-off valve
andrearwall 120Voutlet.
\
Shortestconnectionfrom
hardpipe stublocationto
rangehookup.
This areaallows forflush rangeinstallation
with through-the-floor connectionof pipe
stub/shut-offvalve.
GAS PIPEAND ELECTRICAL OUTLET LOCATIONS lformodels with Standard Twin Burners)
connectionfromhard
Thisareaallows for flush range
installationwith through-the-wall
connectionof pipestub/shut-off valve
andrearwall 120Voutlet.
pipestub locationto range
hookup.
38
Thisareaallowsfor flush rangeinstallation
with through-the-floor connectionof pipe
stub/shut-offvalve.
Page 39

Installation Instructions
FLE×IBLE CON N ECTOR HOOKUP (formodels equippedwithSealedBurners)
installer: Inform
the consumer of the
I location of the gas
shut-off valve.
1/2" or 3/4" _ shut-off
Gaspipe '-_'L_ - vatve
Gas
RIGID PIPEHOOKUPOPTIONS(formodels equipped with Sealed Burners)
Alternate Hookup
450Elbow
.__ _ 90° Elbow
(_/'_/y/_'_ Nipple | _ _,_-----, ironpipe
Nipple_ _ •
¢/,/.//// Un_on Iit
_,.V_ "_-._ Pressure
_ regulator @ _ Union
L_as _&--I 4.__ N@pte , .
shut-off _ _ _ 90° regwa_:or
Adapter
I [ _ Quickconnect
I_ I_ /or union
_ _ AI¢ ,,, Pressure
_1 _-=- Nipple
Installer: Inform _ Gas
the consumer of the ] ]_-_._.._- shut-off
location of the gas ).]_]]1 valve
shut-off valve. [_r_L,.3_-=--- 1/2" or3/4"
Gaspipe
39
valve _ Elbow 1
1/2" or 3/4"
Gaspipe
consumer of the location
i lnstaller: Inform the i
of the gas shut-off valve.
90° Elbow
Adapter
Page 40

Installation Instructions
FLEXIBLECONNECTOR HOOKUP (formodels equippedwithStandardTwin Burners}
Pressureregulator --
Manifoldpipe__ @
Adapter "_ _Flexconnector
Installer: Inform (6ft. max.)
the consumer of the
location of the gas Adapter
shut-off valve.
1/2" or3/4" Gaspipe__ Gasshut-offvalve
RIGID PIPE HOOKUP (formodels equipped with Standord Twin Burners}
Pressureregulator
Manifoldpipe__
_ 900Elbow
Nipple Union _ Blackironpipe
_ Union
Installer: Inform
the consumer of the
location of the gas
shut-off valve.
1/2"0r3/4" Gaspipe_L_ o
_ Nippte
L_]_ Gasshut-offvatve
4O
Page 41

Installation Instructions
ELECTRICAL CONNECTIONS
Electrical Requirements
120-volt,60 Hertz,properly grounded branch circuit
protected by a iS-amp or 20-amp circuit breaker
or time-delay fuse.
Extension Cord Cautions
Becauseof potential safety hazards associated with certain
conditions, we strongly recommend against the useof
an extension cord. However,if you stillelect to usean
extension cord, it is absolutely necessarythat it be a
UL-listed,]-wire grounding-type appliance extension cord
and that the current carrying rating of the cord in amperes
be equivalent to, or greater than, the branch circuit rating.
Grounding
IMPORTANT--(Pleaseread carefullg}
FORPERSONALSAFETY,THISAPPLIANCEMUST
BEPROPERLYGROUNDED.
PreferredMethod
ELECTRICALCONNECTIONS (CONT.)
A. Usage Situations Where Appliance Power Cord Will
Be Disconnected Infrequentlg.
An adapter may beusedonly on a iS-amp circuit.
Do not usean adapter on a 20-amp circuit. Where local
codes permit, a TEMPORARYCONNECTIONmay be
made to a properly grounded 2-prong wall receptacle by
the useof a UL-listed adapter, availableat most hardware
stores.Thelarger slot inthe adapter must be aligned
with the larger slot in the wall receptacleto provide
proper polarity inthe connection ofthe power cord.
TemporaryMethod
(Adapterplugsnot permittedin Canada)
Alignbargeprongs/slots
Ensureproperground
andfirm connection
beforeuse
E_lsureproper groundexistsbeforeuse
Thepower cord ofthis appliance is equippedwith a
]-prong (grounding)plug which mateswith a standard
]-prong grounding wall receptacle to minimize the
possibility of electric shock hazard from this appliance.
Thecustomer should have the wall receptacle and circuit
checked by a qualified electrician to make surethe
receptacle isproperly grounded.
Where a standard 2-prong wall receptacle is encountered, it
isthe personal responsibility and obligation of the customer
to haveit replaced with a properly grounded ]-prong wall
receptacle.
DO NOT, UNDER ANY CIRCUMSTANCES, CUT OR REMOVE
THE THIRD (GROUND) PRONG FROM THE POWER CORD.
A word about GFCIs- GFCIsare not required or
recommended for gas range receptacles.
Ground FaultCircuit Interrupters(GFCIs)are devicesthat
senseleakageof current ina circuit and automatically
switch off power when a threshold leakage levelis detected.
Thesedevicesmust be manually reset by the consumer.
TheNational ElectricalCoderequiresthe useof GFCIsin
kitchen receptacles installedto servecountertop surfaces.
Performanceofthe range will not be affected if operated
on a GFCI-protectedcircuit but occasionalnuisance tripping
of the GFCIbreakerispossible.
^_CAUTION: Attaching the adapter ground
terminal to the wall receptacle cover screw does not
ground the appliance unlessthe cover screw is metal,
and not insulated, and the wall receptacle isgrounded
through the house wiring. The customer should have
the circuit checked by a qualified electrician to make
surethe receptacle isproperly grounded.
When disconnecting the power cord from the adapter,
always hold the adapter with onehand. If thisis not done,
the adapter ground terminal isvery likelyto break with
repeated use.Should thishappen, DO NOTUSEthe
appliance until a proper ground has again beenestablished.
41
Page 42

Installation Instructions
ELECTRICALCONNECTIONS (CONT.)
B.Usage Situations Where Appliance Power Cord Will
Be DisconnectedFrequentlg.
Donot usean adapter plug in these situations because
disconnecting of the power cord places undue strain on
the adapter and leads to eventual failure of the adapter
ground terminal. The customer should havethe 2-prong
wall receptacle replaced with a 3-prong (grounding)
receptacle bg a qualified electrician before usingthe
appliance.
Theinstallation of appliances designed for mobile
home installation must conform with the Manufactured
Home Construction and Safety Standard,Title 24CFR,
Part3280 (formerly the FederalStandard for MobileHome
Construction and Safety,Title 24, HUD,Part280)or,
when such standard isnot applicable,the Standard
for Manufactured Home Installations,latest edition
(Manufactured Home Sites,Communities and Set-Ups),
ANSIA225.1,latestedition, or with local codes.InCanada,
mobile home installation must be in accordance with the
current CAN/CSAZ240/MH MobileHome Installation Code.
ElectricDisconnect
II Locate disconnect plug onthe range back.
II Pinchsidesof connector and pull out of range back.
[] CHECK IGNITION OF SURFACE
BURNERS
Operationofall cooktopandovenburnersshouldbe checked
afterthe rangeandgas supplglineshavebeencarefullU
checkedfor leaks.
Electric Ignition Models
Selecta top burnerknobandsimultaneouslUpushinandturn
to LITEposition.Youwill heara clickingsoundindicatingproper
operationof the sparkmodule.Oncetheair has beenpurged
fromthe supplglines,burnersshouldlightwithin 4seconds.
Afterburnerlights,rotateknoboutofthe LITEposition.TrU
eachburnerinsuccessionuntilallburnershavebeenchecked.
Qualitg of Flumes
ThecombustionqualitUof burnerflames needsto be
determinedvisuallg.
(A) Yellow flames--
Call for service
(B)Yellow tips on
outer cones--
Normal for LP gas
(C) Soft blue
flames--Normal
for natural gas
I-4--ISEAL THE OPENINGS
Sealang openings inthe wall behind the range and
in the floor under the range when hookups are completed.
If burner flames looklike(A),callfor service.Normal burner
flamesshouldlook like(B)or (C),dependingonthe type of gas
gouuse.
With LPgas,someyellowtippingon outerconesisnormal.
[] CHECKIGNITION OFOVEN BURNER
Theovenisdesignedto operatequietlgand automaticallg.
Tooperatetheoven,presstheBakepad andthenpressthe
numberpadsuntil 350° appearsinthedisplay.Touchthe
Start/On pad.After30-90 seconds,theovenburnerwillignite
and burnuntilthesettemperatureisreached.Theovenburner
willcontinueto cycleon and off asnecessaryto maintain
theovenat the temperatureindicatedbythe display.
Tocheckignitionofthe broilburner,touchthe BroilHi/Lo pad
andthenthe Start/On pad.After30-90 seconds,thebroil
burnerwillignite.
Electricignition modelsrequireelectricalpowerto operate.
Incaseof a poweroutage,the ovenburnersonthesemodels
cannotbe litmanuallywith a match.Gaswillnotflow unless
theglowbar is hot.
Ifthe ovenisin usewhena poweroutageoccurs,theburnerwill
shutoff andcannotbe relituntilpowerisrestored.
42
Page 43

Installation Instructions
E_ ADJUST BROIL AND OVEN BURNER
AIR ADJUSTMENT SHUTTERS
IF NECESSARY
Air adjustment shutters for the top and bottom burners
regulate the flow of air to the flames.
Theair adjustment shutter for the top (broil)burner is
in the center of the rear wall of the oven.
ustment
shutter
E_ ADJUST BROIL AND OVEN BURNER
AIR ADJUSTMENT SHUTTERS
IF NECESSARY{CONT.)
Ovenbottom
To remove the oven bottom:
A. Removethe screws holding down the rear of the oven
bottom.
B.
Graspthe oven bottom at finger slotson each side.
C.
Liftthe rear of the oven bottom enough to clearthe lip
of the range frame, push it back, and then pull it up
and out.
J-8qLEVELING THE RANGE
I
Theshutter for the bottom (oven)burner is near the back
wall behindthe warming drawer,storagedrawer or kick
panel.Removethe draweror panel.SeetheCareandcleaning
oftherange section.
Toadjust the flow of air to either burner, loosen the
Phillips-head screw and rotate the shutter toward open
or closed position as needed.
Theflames for the top (broil)burner should be steadu with
approximately 1" blue cones and should not extend out
overthe edgesof the burner baffle.
A. Installthe oven racks in the oven and position
the range where it will be installed.
Raise
_ . _ Lower range
_'_ range
Leg _ A
leveler --"_'_
RaiseJ _'--_
range
(onsomemodels) (onsomemodels)
B.
Checkfor levelnessbu placing aspirit levelor a cup,
partially filled with water, on one of the oven racks.
If using a spirit level,take two readings-with the level
placed diagonally first in one direction and then
the other.
C.
Removethe storage drawer or kick panel. Seethe Care
and cleaning of the range section.Thefront leveling legs
can be adjusted from the bottom and the rear legs can
be adjusted from the top or the bottom.
D.
Usean open-end or adjustable wrench to adjust
the levelinglegsuntil the range is level.
Lower
range
Todetermine if the bottom burner flames are burning
properly, remove the oven bottom. Flamesshould have
approximatelu 1" blue cones and,if range is supplied with
natural gas,should burn with no yellow tipping. (Withmost
LPgas,small yellowtips at the endof outer conesare
normal.) Flamesshould not lift off burner ports. Iflifting is
observed,gradually reduce air shutter opening until flames
are stabilized.
E.After the range is level,slidethe range away from
the wall sothat the Anti-Tipdevice can be installed.
43
Page 44

Installation Instructions
[_] INSTALLING THE ANTI-TIP DEVICE
-AWARNING!
m Range must be secured with an approved Anti-Tip
device.
m Unless properly installed, the range could be tipped
by you or a child standing, sitting or leaning on
an open door.
mAfter installing the Anti-Tip device, verify that
it is in place by carefully attempting to tilt the range
forward.
mThis range has been designed to meet all
recognized industry tip standards for all normal
conditions.
raThe use of this device does not preclude tipping
of the range when not properly installed.
m If the Anti-Tip Device supplied with the range does
not fit this application, use the Anti-Tip Device
WB2X7909.
A. Mark the wall where the RIGHTEDGEof the range
isto be located. Be sureto allow for the countertop
overhang if you intend to installthe range nextto
cabinets.
Anti-Tip
device
Slottedhead
screw
Wallplate
Approx.20c
[_] INSTALLING THE ANTI-TIP DEVICE
(CONT.)
Wallboard
Woodscrew
Installthe sleeveanchor intothe drilled holeand then install
the lag bolt through the device.The bolts must beproperly
tightened as recommended for the hardware.
E.Slidethe range against the wall, and checkfor proper
installation by grasping the front edge of the cooktop
and carefully attempting to tilt the range forward.
Thebracket should stop the range within/4 inches.
If it does not, the bracket must be reinstalled.
Backof range
WHEN ALL HOOKUPSARE COMPLETED
Make sure all controls are left inthe off position.
Make sure the flow of combustion and ventilation
air to the range is unobstructed.
CONVERTINGTOLPGAS(orconverting back
to natural gas from LP)
21_. j/ of range
Markededge
B.Locate the outside edge of the device 2_/s"toward
the center of the range from the marked edge of
the range.
C. Usingthe device as a template, mark the position
of the holefor the screw.
D. Forwood construction, drilla pilot holeat an angle
of 20 degrees from the horizontal.A nail or awl
may be usedifa drill isnot available.
Mount the Anti-Tip devicewith the screw provided.
Forcement or concrete construction, you will need
a 1/4" x 1V2"lag bolt and a 1/2" O.D.sleeveanchor,which
are not provided. Drillthe recommended sizehole for
the hardware.
This range leaves the factorg set for use with natural
gas. If gou want to convert to LP gas, the conversion
must be performed bg a qualified LP gas installer.
The conversion instructions and LPorifices can be found
attached to the range next to the pressureregulator.
Keepthese instructions andthe orificesin case you want
to convert back to natural gas.
44
Page 45

Before gou call for service... GEAppliances.com
Troubleshooting Tips
gave time and moneg! Review the charts on the following
pages first and _tou ma_t not need to call for service.
Possible Causes
Topburners do not light • Hake sureelectrical plug is plugged into a live,properlg
or do not burn evenlg grounded outlet.
Plug on range is not compJetelg
inserted in the electrical outlet.
Burner hole or slits on the side
of the burner mug be clogged.
What To Do
• Removethe burners Ion models with standard twin
burners)or burner headsand caps (on models with
sealedburners)and clean them with a sewing needle
or twist-tie. Hakesure gou do not enlarge the holes.
On sealed burner models,checkand clean the electrode
area for burned-on food or grease.
Improper burner assembly. • Hake surethe burner parts are installed correctlg.
Seethe Careand cleaningof the range section.
Burner flames very Improper air to gas ratio. • Ifrange isconnected to LPgas,contact the person
large orgellow who installed gour range or made the conversion.
Surface burners light Theoven gas shut-off valve • Tocheckthe ovengas shut-off valveon sealedburner
but oven does not mag have accidentally been models,remove the warming drawer,storage drawer or
moved during cleaning or kick panel (seethe Careand cleaningof the range section)
moving, and lookfor the gasshut-off leverat the back of the range.
Leveris
shownclosed.
PULLTOOPEN.
Sealed burner models
Tocheckthe ovengas shut-off valve on standard twin
burner models, raise the cooktop and look for the gas
shut-off lever at the extreme right rear corner. Follow
the directions in box A or Bthat match your regulator
type.
Leverisshownclosed.
PULLTOOPEN. //_-_. A
Standard twin burner models Standard twin burner models
Control signals after Youforgot to enter a bake = Touchthe Bakepad and desiredtemperature
entering cooking time or temperature or cleaning time. orthe Self Cleanpad and desiredclean time.
start time .onsomemodels'
Clockand timer Plug on range is not compietelg * Hake sureelectrical plug is plugged into a live,
do not work inserted in the electrical outlet, properly grounded outlet.
ran some models)
A fuse in your home may be • Replacethe fuse or resetthe circuit breaker.
blown or the circuit breaker
tripped.
Oven controls improperly set. • Seethe Usingthe clockand timer section.
45
Page 46

m
0
c
¢
e_
Before gou call for service...
t
L,
4-
0
c
4-
Troubleshooting Tips
¢
Possible Causes What To Do
Fooddoes not bake Oven controls improperly set. • Seethe Usingthe oven section.
or roast properlg Rack position is incorrect. • Seethe Usingthe ovensection.
Incorrect cookware or cookware • Seethe Usingthe ovensection.
of improper sizebeing used.
Oven thermostat needs * SeetheAdjust theoven thermostat Doit_lourself!section.
adjustment.
Clocknot set correctly. • Seethe Usingthe clockand timer section.
(onsome models)
m
Aluminum foil used improperly • Seethe Care and cleaningof the range section.
€
e_
¢
in the oven.
Oven bottom not securely • Seethe Installationof the range section.
seated in position.
c
Food does not Oven controls improperlg set. • On models with touch pads, make sure gou touch
broil properly the Broil Hi/Lo pad. On models with an OVEN TENP
knob,make sureit is set at BROIL.
C
Oven door not closed. • Seethe Usingthe oven section.
Improper rack position • Seethe Broiling Guide.
being used.
2
2
Food being cooked in a hot pan. • For best results,usea pandesignedfor broiling.
Make sure it is cool.
Cookware not suited for broiling. • Forbest results,usea pan designedfor broiling.
Oven bottom not securelg • Seethe Installation of the range section.
seated in position.
Oventemperature Oven thermostat • Seethe Adjust theoven thermostat Do it gourself! section.
too hot or too cold needs adjustment.
Ovenlight does not work Light bulb is loose or defective. • Tightenor replacethe bulb.
Plug on range is not completelg • Makesureelectrical plug is plugged into a live,properlg
inserted in the electrical outlet, grounded outlet.
Ovenwill not self-clean The oven temperature is too • Allow the range to coolto room temperature and
high to set a self-clean operation, reset the controls.
Oven controls impropedg set. • Seethe Usingthe self-cleaningoven section.
On models with a door latch, * Makesure gou move the door latch handle all the wag
4-
¢
£
C
"Crackling" or This is the sound of the * Thisisnormal.
the oven door is not in the to the right.
locked position.
"popping" sound metal heating and cooling
L
Q
during both the cooking and
cleaning functions.
[
46
Page 47

Possible Causes What To Do
GEAppliances.com
Excessive smoking
Excessivesoil.
• On modelswith touch pads,touch the Clear/Off pad.
On models with an OVENTEMPknob,turn itto OFR
Open the windows to rid the room of smoke. Wait until
the SELFCLEANlight goes off. Wipe up the excesssoil
and resetthe clean cycle.
Ovendoor will not open Oven too hot. • Allowthe ovento cool below locking temperature.
offer a clean cycle
Ovennot clean after Oven controls not properlg set. • Seethe Usingthe self-cleaningoven section.
a clean cycle Oven was heavilg soiled. • Clean up heavy spillovers before starting the clean cycle.
Heavilysoiledovens may needto self-clean again orfor
a longer period of time.
Ovendoor will not Oven is too hot. • Allowthe ovento cool below locking temperature.
unlock (onmodels Donot lock the door with the door latch except when
with a door latch) using the self-cleanfeature.
Self-clean light (on The OVENTEh4Pknob has not • Set the OVEN TEh4Pknob to CLEAN.Seethe Using the
some modelsJ blinks been set to CLEANwhen the self-cleaning oven section.
when trging to set a latch was moved to the right.
self-dean cgde
The latch was not moved to the • Move the latch to the right as far as it will go. See the
right when the OVENTEtvtpknob Using the self-cleaning oven section.
was set to CLEAN.
Self-clean light (on A power interruption occurred. • Turn the OVEN TEMP knob to OFF and move the latch
some modelsJ blinks to the left as far as it will go. Resetthe range controls
during self-clean cgcle to the desired settings. See the Using the self-cleaning
oven section.
"Door" appears in the Self-cleaning cgcle has been • Movethe latch handle all the wag to the right.
displag Ionsome modelsJ selected but the latch handle
was not moved all the wag
to the right.
Latch handle was moved to the , Move the latch handle to the right onlg when setting
right but a program other than the self-cleaning cgcle.
self-cleaning was selected.
"F--" and a number or On models with a door latch, • The latch mag have been moved, even ifonlg slightlg,
letter flash in the display ifa function error code appears from the locked position. Make sure the latch is moved
on some moaetsl during the self-cleaning cgcle, to the right as far as itwillgo.
check the oven door latch.
You have a function error code. • Touch the Clear/Off pad. Allowthe oven to cool for
one hour. Put the oven back into operation.
Ifthe function code repeats. • Disconnect all power to the range for 5 minutes
and then reconnect power. Ifthe function error
code repeats,callfor service.
47
Page 48

.c
Before gou call for service...
Troubleshooting Tips
¢z
Displag goes blank A fuse in gour home mag be , Replacethe fuseor resetthe circuit breaker.
!onsomemodels! blown or the circuit breaker
Displag flashes Power failure. • Resetthe clock.
_onsome models"
m
Q
L
L.
0
Unable to get the Oven control pads were • TheBake and Broil Hi/Lo pads must betouched at
displag to show "SP' not touched properlg, the sametime and heldfor ] seconds.
on some models'
Power outage, Power outage or surge. , Resetthe clock. Ifthe oven was in use,you must reset
dock flashes it by touching the Clear/Offpad, setting the clock and
onsomemodels' resetting any cooking function.
"Burning" or "oilg" odor This is normal in a new oven • Tospeedthe process,set a self-clean cycle for a
emitting from the vent and will disappear in time. minimum of ] hours. Seethe Usingthe self-cleoning
Strong odor An odor from the insulation • Thisistemporary.
Fan noise
Possible Causes What To Do
tripped.
Theclock is turned off so that it , Seethe Usingthe clock and timer section.
does not show in the displag.
oven section.
around the inside of the oven
is normal for the first few times
the oven isused.
A cooling fan mag automaticallg
turn on and offto cool
internal parts.
• Thisis normal. Thecooling fan will turn off and on.
Drawer does not slide Thedrawer isout ofalignment. • Fullyextend the drawer and pushitall the way in.
smoothlg or drags Seethe Coreond deoning of the tonga section.
Drawer is overloaded or load • Reduceweight. Redistributedrawer contents.
is unbalanced.
¢
¢
E
¢
L
48
Page 49

®
Acce..._ssorles__z. GEAppliances.com
i Looking For Something More?
youcan indtheseaccessoriesandmanymoreatGEAppliances.com(US
or www.GEAppliances.ca (Canada), or carl 800.626.2002 (U.S.)or 800.661.1616
(Canada) (during normal business hours). Have your model number ready.
! i))
!
Grates SurfaceBurnerHeadsandCaps SurfaceElementsandDripPans Knobs
Griddle OvenRacks OvenElements
LightBulbs
Experience these other great products to keep your kitchen looking great!
CleaningKit: CleaningWipes AppliancePolish
includescleaner, Wipes
scraperandpad
[_ CeramicCooktop _ CeramicCooktop _ StainbssSteeJ _
WXlOX117GCS WXIOX305 WXIOXlO001
StainlessSteel
Appliance
Cleaner
PM10X311
Get the most out of your Broiler Pan! (Not for use with Broiler Drawer models.)
Useyour pan and grid coverto broil hamburgers, seafood,steaks,vegetables, bacon, chops and so much
more! The pan below catches the excessfats and oils.
* GenuineGEPart
EasyToCleon
One-YearWarranty _ ..
Limited Time Offe!! Free Shipping!
When you order your broiler pan within 30 days of purchasing your GEcooking product.
Small
U.S. Part # WB48X10055
Canada Part # 222D2097GO01
Dimensions 8-3/4" W x 1-1/4"H x 13-1/2"D
Price US$10.50'
t Plus applicable state salestax (PST/HSTandGST)
* Thelarge (standard)broilpan doesnot fitin 20"/24" ranges.
** TheXLpan does not fit in 24" wall ovens, 27" drop-ins or 20"/24" ranges.
Toplace gour order, call 800.626.2002 (U.&),800.661.1616 (Canada)or mail this form to:
In the U.S.:GEParts, £0. Box221027, Memphis, TN38122-1027. In Canada: GEParts,1 Factorg Lane,Moncton,N.B.EI C9M3
12-5/4"Wxl-1/4"Hxlg-1/2"D 17"Wxl-1/4"Hxlg-1/4"D
Large* XL**
WB48X10056 WB48X1005 7
222D2097GO02 N/A
US$14.50' US$16. 75'
Quantitg
Model Number
First Name
Address
City
Phone
Credit Card
Visa
Exp. Date: Month
MasterCard
Check
Broiler Pun Order Form
Part Number
Serial Number
Money Order
Discover AmEx
Year
Brand Date of Purchase
Last Name
State Zip Code
E-Mail
Credit Card #
Signature:
a9
Page 50

GE GGS Range WQrrGnty. (Forcustomersin the UnitedStates)
All warranty service provided by our Factory Service Centers,
or an authorized Customer Care®technician. To schedule
service, visit us on-line at GEAppliances.com, or call
800.GE.CARE5 (800.432.2737). Please have serial number and
model number available when calling for service.
Staple Four receipt here.
Proof of the origina! purchase
date is needed to obtain service
under the warrant F.
GE Will Replace:
Ang port of the range which fails due to a defect in materials or workmanship. Duringthis
Fromthe doteofthe limited one-gear warrantg, GEwill also provide,free of charge, all labor and in-home service
originalpurchose to replace the defective part.
Service trips to gout home to teach gou how to use
the product.
Improper installation, delivery or maintenance.
Failure of the product if it is abused, misused,
or used for other than the intended purpose or
usedcommercially.
Replacement of house fuses or resetting of circuit
breakers.
Damage to the product caused bg accident, fire, floods
or acts of God.
Incidental or consequential damage caused bg possible
defects with this appliance.
Damage caused after deliverg.
Product not accessible to provide required service.
EXCLUSION OF IMPLIED WARRANTIES--Your sole and exclusive remedg is product repair as provided
in this Limited Warrantg. Ang implied warranties, including the implied warranties of merchantabilitg
or fitness for a particular purpose, are limited to one gear or the shortest period allowed bg law.
This warranty is extended to the original purchaser and any succeeding owner for products purchased
for home use within the USA. If the product is located in an area where service by a GEAuthorized Servicer
is not available, you may be responsible for a trip charge or you may be required to bring the product to an
Authorized GE Service Location for service. In Alaska, the warranty excludes the cost of shipping or service
calls to your home.
Some states do not allow the exclusion or limitation of incidental or consequential damages. This warranty
gives you specific legal rights, and you may also have other rights which vary from state to state. To know
what your legal rights are, consult your local or state consumer affairs office or your state's Attorney General.
Warrantor: General Electric Compang. Louisville, KY 40225
50
Page 51

GE Gas
Range Warrants. iForcustomersincanadaJ
All warrants service provided bg our Factors Service Centres
or an authorized Customer Care®technician. For service,
call 1.800.561.3344. Please have serial number and model
number available when calling for service.
Mabe Will Replace:
One Year
From the dote of the
OriginaimrchaSe
Service trips to gour home to teach gou how to use
the product.
Improper installation, deliverg or maintenance.
_,Failure of the product if it is abused, misused,
or used for other than the intended purpose or
used commerciallg.
Ang part of the range which fails due to a defect in materials or workmanship. Duringthis
limited one-gear warranty, Mabewill alsoprovide, free of charge, all labor and in-home service
to replacethe defective part.
Staple your receipt here.
Proof of the origina! purchase
date is needed to obtain service
under the warranty.
Replacement of house fuses or resetting of cimuit
breakers.
Damage to the product caused bg accident, fire, floods
or acts of God.
Inddental or consequential damage caused bg possible
defects with th is a pplia nce.
Damage caused after deliverg.
Product not accessible to provide required service.
EXCLUSION OF IMPLIED WARRANTIES--Your sole and exclusive remedy is product repair as provided
in this Limited Warranty. Ang implied warranties, including the implied warranties of merchantability
or fitness for a particular purpose, are limited to one gear or the shortest period allowed bg law.
This warrant_l is extended to the original purchaser and an_l succeeding owner for products purchased in
Canada for home use within Canada. In-home warrantg service will be provided in areas where it is available
and deemed reasonable bg Mabe to provide.
Some provinces do not allow the exclusion or limitation of incidental or consequential damages, so the above
exclusion mag not applg to gou. This warrant_l gives btou specific legal rights, and gou mag also have other
rights which var_l from province to province. To know what btour legal rights are in btour province, consult btour
local provincial consumer affairs office.
Warrantor: Mabe Canada Inc.
Burlington, Ontario
51
Page 52

Consumer Support.
GEAppliances Website Inthe U.S.:GEAppliances.corn
Have a question or need assistance with your appliance?Try the GEAppliancesWebsite 24 hours aday,
any day ofthe gear! Forgreater convenience and faster service,you can now download Owner's Manuals,
order parts or even schedule service on-line.In Canada: www.GEAppliances.ca
Schedule Service Inthe U.S.:GEAppliances.com
Expert GErepair service isonly one step away from your door.Geton-line and schedule your service at your
convenience any day of the gear! Orcall 800.GE.CARES(800./452.2757)duringnormal businesshours.
In Canada, call 1.800.561.3344
Real Life Design Studio Inthe U.S.:GEAppliances.cam
GEsupports the UniversalDesignconcept-products, servicesand environments that can be usedby people of all
ages,sizesand capabilities.We recognizethe needto designfor a wide rangeof physical and mental abilities and
impairments. Fordetails of GE'sUniversalDesignapplications, including kitchen designideas for people with disabilities,
check out our Website today. Forthe hearing impaired, pleasecall800.TDD.GEAC(800.833./4322).
In Canada, contact: Manager,Consumer Relations,Mabe Canada Inc.
Suite310, ! Factory Lane
Moncton, N.B.E1C9M3
Extended Warranties
Purchasea GEextendedwarranty and learn about special discounts that are available while your warranty isstill
in effect. You can purchase it on-line anytime, or call800.626.2224during normal business hours. GEConsumer Home
Serviceswill still be there after your warranty expires.In Canada, call 1.888.26::[.2133
Parts and Accessories
Individualsqualified to servicetheir own appliances can have parts or accessoriessent directly to their homes (VISA,
MasterCard and Discovercards are accepted).Orderon-line today, 2/4hours every day or by phone at
800.626.2002during normal businesshours.
Instructions contained in this manual cover procedures to be performed by any user. Other servicing generally
should be referred to qualified service personnel Caution must be exercised, since improper servicing may cause
unsafe operation.
Customers in Canada should consult the yellow pages for the nearest Mabe service center,or call 1.800.661.1616.
Contact Us
If you are not satisfiedwith the service you receivefrom GE,contact us on our Website with all the details including
your phone number,or write to: GeneralManager,Customer Relations
GEAppliances,Appliance Park
Louisville,KY/40225
In Canada: www.GEAppliances.ca, or write to: Director,Consumer Relations,MabeCanada Inc.
Suite5!0, ! Factory Lane
Moncton, N.B.E1C9M3
In the U.S.:GE,Appliances.corn
In the U.S.:GE,Appliances.corn
In the U.S.:GEAppliances.corn
Register Your Appliance IntheU.S.:GEAppliances.com
Register your new appliance on-line--at your convenience! Timely product registration willallow for enhanced
communication and prompt service under the terms of your warranty, should the need arise. You may also mail
in the pre-printed registration card included in the packing material. In Canada: www.GEAppliances.ca
Printed in Mexico
This book is printed on recgcled papen
 Loading...