

Page 1
GEAppliances
.......... EDW2020 GSD5130
EDW2030 GSD5132
EDW2050 GSD5134
EDW2060 GSD5150
GHDS015 GSD5152
GHD5025 GSD5154
GHDS035 GSD5310
GSD5110 GSD5320
GSD5112 GSD5330
GSD5114 GSD5350
GSD5120 GSD5360
GSD5122 GSDL122
GSD5124 GSDL132
www.geappliances.com 165D4700P228 49-5902 11-OOJR
Page 2
Congratulations!
YouAreNow Partof theGEFamily.
Welcome to the (;E tinnily.
We're proud oF(mr quality
products and we are
committed to proxiding
dependable sePd(e. You'll
see it in this easy-to-use
()wner's Manual and ,'ou'll
hear it in the lt'ien(lb voices
of our customer sel%ce
depamnent.
Best oF all, you'll experience
these vahles each time roll
use your dishwasher. That's
ilnportalll, because "'OllF lleW
dish_<M_er will be part oF
your lmliily R_rnlany years.
And we hope you will be part
of ours lor a long time to
COllie.
We thank you li)r buying
GE. We appreciate your
purchase, and hope yon
will continue to rely on us
whenever you need quali b"
appliances t(_r your home.
Important!
lqll out and return tile Consumer Product
Registration Card. There are t_voeas} wa}s to
register your appliance.
_ Through the Internet at
www.geappliances.com.
_ Complete and mail ttle enclosed card.
Write themodel and serial numbers
here.
#
#
Youcan find them on the tub wall just
inside the door.
Staple sales slip or cancelled check
here.
Proof of the original purchase date
is needed to obtain service under the
warran_
Page 3
GE& You,
A ServicePartnership.
Ask any GEappliance owner and they will
te#you we stand behind our products with
unmatched quality service. However, did
you know that most questions result from
simple problems that you can easily fix
yourself injust a few minutes? This
Owner's Manual can tefl you how.
thisManual
Inside ym will find many
helpful hints on how to use
and maintain y)ur dishwasher
properly.Just a little preventive
care on y)ur part can save you a
gxeat deal of time and money
over the lite of your dishwasher.
ReviewtheSection
onTroubleshooting
Safety Information ...... 4J
OperatingInstructions
ControlPaneland
Settings................ 8-10
UsingtheDishwasher... 11-12
LoadingtheRacks ...... 13-17
OptionalAccessories .... 18, 19
CareandCleaning ......... 20
TroubleshootingTips
BeforeYou
CallForService........ 21-25
Tips
answers to
common problems here.
Ilyou review our chart of
Troubleshooting Tips first,
you may not need to call t0r
service at all.
If YouNeedService
llyou do need service, ?xn_can
relax knowing help is only a
phone call away. A list ot toll-fl'ee
(llstomer service iltllnl)ers is
included in the back section.
()r xxm can always call the
GE'Answer Cenier <'_at
8(t(t.626.2(t(t(t, 24 hours a day,
7 days a week.
CustomerService
ProductRegistration..... 27 28
Warrantj ............. 30-31
ServiceTelephone
Numbers.......... Back Cover
Page 4
IMPORTANTSAFETYINFORMATION.
READALLINSTRUCTIONSBEFOREUSING.
i!iiiiiigH!iiiiiHi
A WARNING!
For your safe_ the information in this manual must be
foflowed to minimize the risk of fire, explosion, electric
shock, or to prevent property damage, personal injury,
or loss of life.
WATERHEATERSAFETY
Under certain conditions hydrogen gas may be produced in
a water heater thathas notbeen used for two weeks or
more. HYDROGENGAS IS EXPLOSIVE.
If tile hot water has not been tlsed tot two weeks or more, prevent
the possibilit 3of damage or ir{itu), by turning on all hot water
tm_cets and allow them to run tor several minutes. Do this betore
using any electrical appliance which is connected to the hot water
s_stem. This simple procedure will allow any built-up hvdro_,-en oas
to escape. Since the gas is flammable, do not smoke or use an open
fianm or appliance during this process.
!iiiii!iN_i!iiil
i_i!ii_i:iiiiii!i
ilili:iiii!ili!iliii!iiiii_
Page 5
Use this appliance only for its intended purpose as
described in this Owner's Manual
PROPERINSTALLATION
ANDMAINTENANCE
This dishwasher must be properly installed and located in
accordance with the Installation Instructions before #is
used. If you did not receive an Installation Instructions
sheet with your dishwasher, you can receive one by calling
us toll-free at the GEAnswer Cente_ 800.626.2000.
s_,Connect to a grounded
metal, permarmr_t wiring
system; or run an equipment-
grour_dir_oconductor with
the cirolit conductors and
connect to the equipment-
groundino terminal or lead
of the appliance.
N Improper connection ot
the equipmentNrounding
conductor can resuh in a risk
of electric shock. Check with
a qualitied electrician or
service representative if
?_u are in doubt whether
the appliance is properly
grounded.
_ l)ispose of discarded
appliances and shipping or
packing material properl).
N I)o not attempt to repair
or replace any part ot }_ur
dishwasher unless it is
specilically recommended
in this manual, All other
servicing should be reterred
to a qualitied technician.
N To minimize the possibility ot
electric shock, disconnect this
appliance ti'om the power
supply bei_)re attempting any
maintenance. NOTE:Turning
the dishwasher off does not
disconnect the appliance
ti'om the power supply,
We recommend having a
qualified technician service
your appliance.
iiiiHi!i iiiiii!!
l{i{{iiii!i>ii_i,!ii{iiiii!ii
iii!!iii i iiiHH
5
Page 6
IMPORTANTSAFETYINFORMATION.
READALLINSTRUCTIONSBEFOREUSING.
A WARNING!
DONOT...
i!iiiiiiHiiHiililH!iiiiiHi
!iiiii!iN_i!iiil
i_i!ii_i:iiiiii!i
i¢ Do not tamperwith controls.
i_ Do not abuse, sit on, or stand
on the door or dish rack oi
dm dishwasher,
s_i'I)o not discard a dishwasher
without first removing the
door of the washing
compartment.
i_ Do not store or use
combustible materials,
g_/soline or other tlammable
vapors and liquids in the
vicinity ot this or any other
appliance.
i¢ Do not allowchiMren to
playinside, onor with this
appliance or any discarded
appliance.
ilili:iiii!ili!iliii!iiiii_
Page 7
WHENUSINGYOURDISHWASHER
i_ Use only powder, tabs,
liquid (letergents or rinse
agents recommended t0r use
in a dishwasher and keep
them out of the reach of
children, Cascade '>
Automatic Dishwashing
Detergent has been approved
tieruse in all GE dishwashers,
I,ocate sharp items so that
the} are not likel} to damage
the door seal.
_ I,oad sharp knives widl the
handles up to reduce the risk
of (aH-t?pe iqjuries.
i¢ Do not wash plastic items
unless marked dishwasher
safe or the equivalent. For
plastic items not so marked,
check the mamditcturer's
reconnnendations.
i¢ Nonq)ishware Items: I)o not
"_\;/S[1itelns Stlch as electronic
air cleaner fihers, turnace
filters and paint brushes in
your dishwasher. Damage to
dishwasher and discoloration
or staining ot dishwasher
may resuh.
s_?'l)o not touch the heating
element during or
immediatel) after use,
_ I)o not operate your
dishwasher unless all
enclosure panels are properly
in place.
N Close supervision isnecessa_ 3-
it this appliance is used by or
near children.
i_ Ix_ad light, plastic items
so they will not become
dislodged and drop to the
bottom ot the dishwasher-
the) might come into contact
with the heating element and
be (t_-u-n_-Ic_-ed
Readandfollow this
SafetyInformation carefully.
SAVETHESEINSTRUCTIONS
iliiiii_liP_"lii_liiii_tii_
7
Page 8
_iiiiii_iiiiliiiil
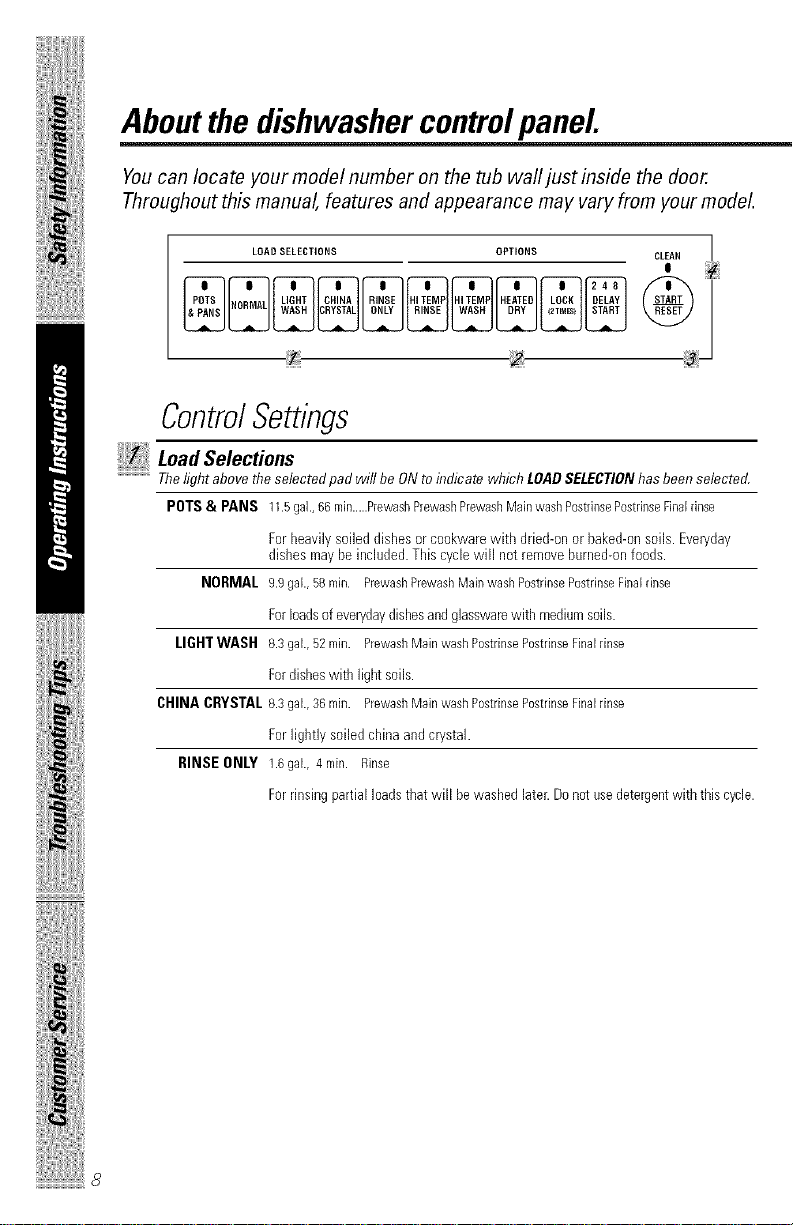
Aboutthe dishwasher control aneL
Youcan locate your model number on the tub wall just inside the door.
Throughout this manual, features and appearance may vary from your model.
LOAD SELECTIONS OPTIONS CLEAN J
ControlSettings
!:I! i LoadSelections
The light above the selected pad wilt be ON to indic ate which LOADSELECTION has been selected.
POTS & PANS 11.5gal.,66 min.....RewashPrewashPrewashMainwashPostriDsePostrinseFiDalnDSe
For I_eaviiy soiled dishes or cookware witll dried-on or baked-on soils. Everyday
dishes may be included. Tiffs cycle will not remove burned-on foods.
NORMAL 9.9gal., 58 rnin. PrewashPrewashMain washPostrinsePestrinseFinalrinse
Forloads of everyday disl_esand glassware with medium soils.
LIGHT WASH 8.3gal., 52rnin. RewashMain washPostrinsePestrinseFinalrinse
Fordisl_eswith iigN soils.
CHINA CRYSTAL 8.3gal., 36 rnin. RewashMain washPostrinsePestrinseFinalrinse
For lightly soiled china and crystal.
RINSE ONLY 1.6gal., 4 rain. Rinse
For rinsing partial loads that will be washed later. Do not use detergent with this cycle.
Page 9
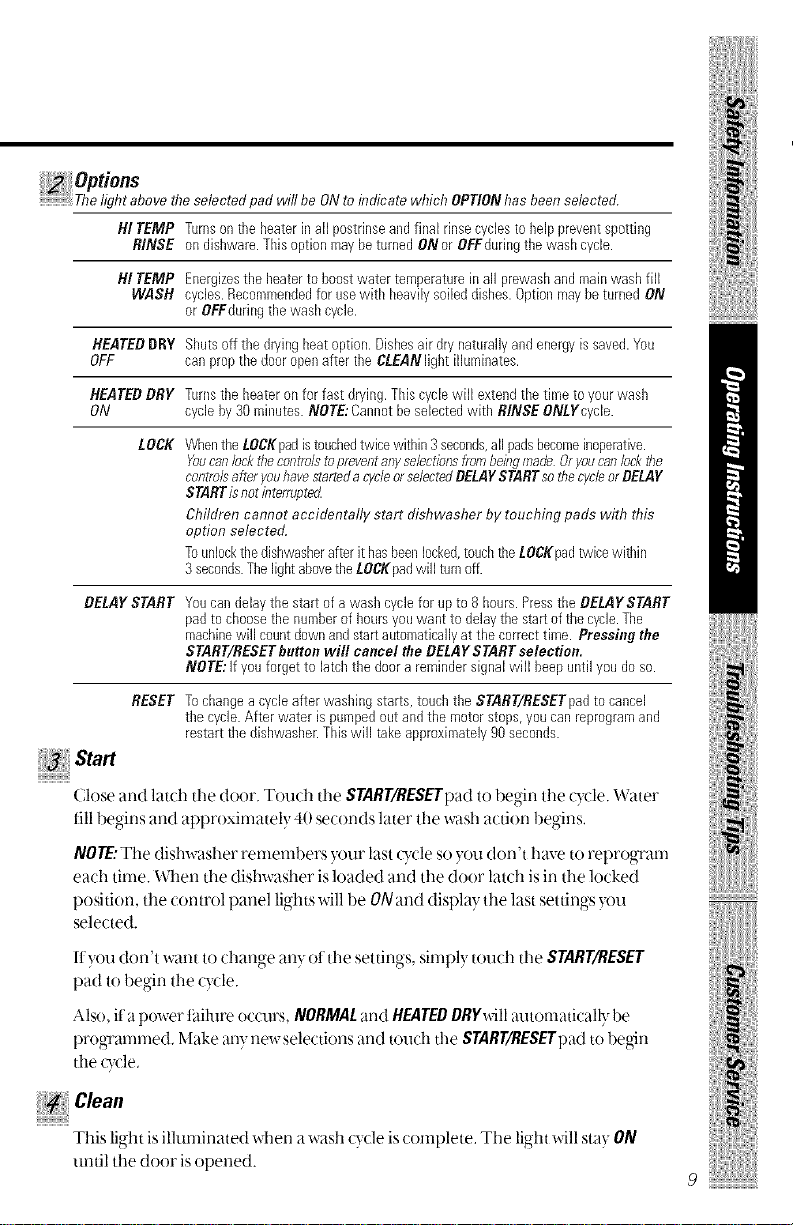
optio,s
Thelight abovefl?eselectedpad will be ONtoirrdicate which OPTIONhas been selected,
H! TEMP Turnsoilthe heaterin all postrinseandfinal rinsecyclesto helppreventspotting
RINSE on dishware.ThisoptionmaybeturnedONor OFFduringthe wash cycle.
H! TEMP Energizestl_eIleatertoboostwatertemperatureinall prewashandmainwashfill
WASH cycles.Recommendedfor usewith heavilysoileddishes.Optionmaybeturned ON
or OFFduringthewash cycle.
HEATEDDRY Shutsoff tl_edryingheatoption.Dishesair drynaturallyand energyis saved.You
OFF canpropthe door openafter the CLEANlightilluminates.
HEATEDDRY Turnsthe heateron for fast drying.Thiscyclewill extendthetime toyourwash
ON cycleby30 minutes.NOTE:Cannotbeselectedwith RINSE ONLYcycle.
LOCK WhentheLOCKpadistouchedtwicewithin3seconds,allpadsbecomeinoperative.
Yeacanlockthe_ntro/s to preventanyse/ectiunsfrombeingmadeOryeacan/oc_tile
controbafteryet/havestartedacycleorselectedBELAYSTARTsottlecycleorBELAY
STARTisnotioterropted
Children cannot accidentafly start dishwasher by touching pads with this
option selected.
Tounlockthe dishwasherafter it hasbeenlocked,touchtheLOCKpadh#icewithin
3seconds.ThelightabovetheLOC/(padwill turn off.
BELAYSTART
Youcandelaythe start of awasll cyclefor up to 8 hours.PresstheBELAYSTART
padtochoosethe numberof hoursyouwant to delaythe start ofthecycle.The
machinewill countdownandstartautomaticallyatthe correcttime. Pressin9 the
START/RESETbutton will cancel the BELAg STARTselection.
NOTE:if youforgetto latclltile doora remindersignalwill beepuntilyou do so.
RESET Tochangea cycle afterwashing starts,touchtheSTART/RESETpadto cancel
thecycle.Afterwater ispumpedoutandthemotorstops,you canreprogramand
restarttile dishwasher.Thiswill takeapproximately90seconds.
iiii iiH!
!i ii iii iiiiii!
Close and latch the door. Touch the START/_ESETpadto begin the cycle. Water
till begins and approximately 40 seconds later the wash action begins.
NOTE:The dishwasher remembers )our last cTcle so )ou don't have to reprogram
each time. When the dishwasher is loaded and the door latch is in the locked
position, the control panel lights will be ONand display the last settings )ou
selected.
ltyou don't want to change any oI the settings, simpl} touch the START/RESET
pad to begin the cycle.
Also, ifa power t_filum occurs, NORMALand HEATEOORYwill automatically be
progq'ammed. Make any new selections and touch the START/RESETpadto begin
the Qvle.
This light is illuminated when a wash cs(le is complete. The light will sta) ON
until the door is opened.
iili!i!i!i,liliii
9
Page 10
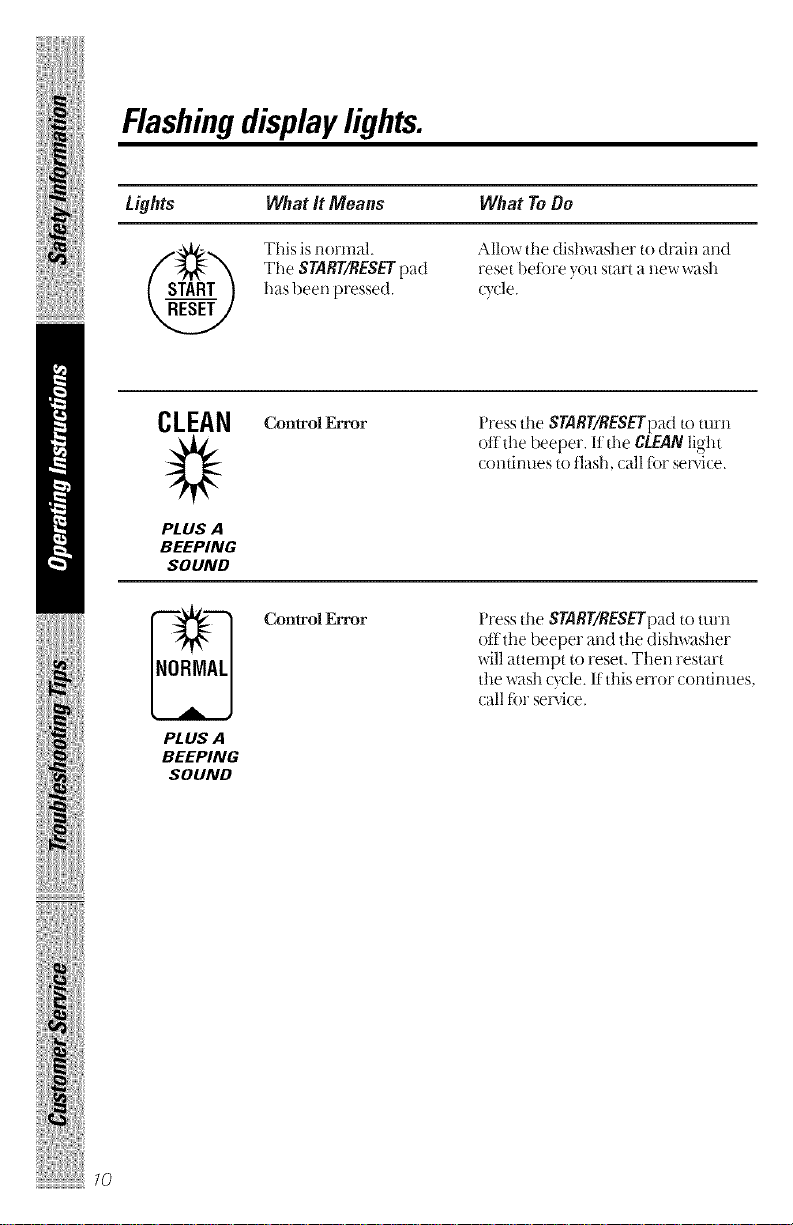
Flashingdisplaylights.
Lights WhatIt Means What ToDo
Allow tile dishwasher to drain and
Tile START/RESETpad
has been pressed.
This isnormal.
reset before )K)ll start a llew _.,,ash
cycle.
CLEAN
PLUS A
BEEPING
SOUND
PLUS A
BEEPING
SOUND
Control EITor
Control Error
Press tile START/RESETpadto turn
oft'the beeper. It the CLEAN light
continues to tlash, call for se_%ce.
Press tile START/RESETpadto turn
off the beeper and the dishwasher
will attempt to reset. Then restart
the wash cycle. If this e_'ror continues,
call l_r see'vice.
Page 11

Usingthe dishwasher.
Checkthe Water Temperature
The entering water must be at least 120°F. and not more than
15()°F., tot etlective cleaning and to prevent dish damage. Check
the water temperature with a candy or meat thermonmter. Wllyn on
the hot xx_ltert_tucet nearest the dishwasher, place the thermonmter
in aglass and let tile x_ater mn continuoush,, into tile_olass.until tile
temperature stops rising.
UseJebDty ® RinseAgent
Jet-Dry®rinse agent removes spots and prevents new fih-n build-up
on your dishes, glasses, flatware, cookware and plastic.
Fill tile rinse agent dispenser
until it reaches the bottom otlip
inside tile opening. I)o not overfill
the dispenser. Replace cap.
To check if rinse agent is needed,
press the clear center of the fill ca g
2 or 3 times. If rinse agent fills tile center of the fill cap, you have
enotgh.
A full dispensershouldlast aboutone month.
Ifrinse agent isspilled, wipe upthe excess.
DishPreparationPriorto Loading
No pre-rinsing of normal tood soil is required.
i_ Scrape ott hard soils, including bones, toothpicks, skins, and
seeds.
i{',Remove large quantities of an', remainino-todd
s_?'Remove lealS, vegetables, nleat trimmings, and excessive al-notlnts
of grease or oil.
_ Remove acidic t0od soils that can discolor stainless steel.
iiii iiH!
!i_ii_,iii_iiiiii!
UsingtheDishwasherDoor
Tile door must be closed and locked into place to select a
LOADSELECTIONor an OPTION,
If the door is opened during a q,,cle and left open, thedishwasher
.....................willbeep once every minute until tile door is closed and latched
into place.
//
Page 12

Using the dishwasher.
ProperUseof Detergent
Use only detergent specitically made tot use in dishwashers. Cascade"
Automatic I)ishwashing Detergent has been approved for use in all ( ;E
dislncdshers, Kee l) your detergent li'esh and dry. I)on't put deteruent
into the dispenser until you're ready to wash dishes.
inside door otyour dishwasher. All wash Q'cles
except RINSE OM.Frequire detergent in the main 0pen cu.p
cup. Wash t_vles with a pre-_zish and a main
wash xfill also use tile open cup. Tile amount el
You'll lind two detergent dispensers on tile M /fS2___
detergent 1(1use depends on whether your
water is harder soft. With hard water, lill the
main cup and open cup completely. With soft
x_ater till both cuds halt_a av When using, autonlatic dislncashino
detergent tabs. simply place one tab in tile main Ctl1)and dose.
l'rotect your dishes and dishwasher by contacting your x_vuer
dq/arunent and asking how hard your water is. Twelve or more gTains
is extremely hard water. A water soliener is recommended. Without
it, lime can buiM tip in the water valve, which couM slick while open
and cause llooding. Too nmch detergent widi soti water can cause a
permanent doudiness ot glassw_u'e, called etching.
NOTE:Toopen detergent cup atier ithas / (
been dosed, unlatch the door. l'ress the
$TABT/BESETpadthree times witlfin t'_x)
se{ ends and the detergent cup will release.
You may also turn the detergent cup handle
counter41ockwise until it releases. _ snapp ng sound may be heard.
ForgettoAddaDish?
A torg-otten dish can be added an) time before the main wash.
Push the door latch to the left.
iiiiiiii_ii_'_i{
I)o not open the door until tim water spra} action stops. Steam
Ilia} rise out of the dishwasher.
Close the door and push the latch to the t_tr right.
12
Page 13

Loadingthe dishwasher racks.
For best dishwashing results, follow these loading guidelines. Features and
appearance of racks and silverware baskets may vary from your model
Upper Rack
Ahhotgh the upper rack is tar glasses, Qlps and
saucers, pots and pans can be placed in this rack
tor ett_'ctive cleaning. Cups and glasses fit best
along the sides. This is also a secure place tar
dishwasher-sa_, plastics.
The cup shelf (on some models) may be placed
in the up or down position to add flexibility.
A wine glass holder (on some models) secures
wine glasses at an angle tar best washability.
Because wine glasses come in v_-lriotlssizes, alier
loading, slowly push in the rack to make sure they
will clear the top of the dishxcdsher.
The upper rack is good tbr all kinds ot odd-
shaped utensils. Saucepans, mixing bowls and
other items should be placed tilce down. Fold-
down fingers (on some models) provide flexibility
for extra-large and hard-to-fit items.
Securelargerdishwasher-safeplasticsovertwofingers
whenpossible.
Makesuresmaflplasticitemsaresecuresotheycan'tfall
ontotheheater
Besurethatitemsdonotprotrudethroughthebottomof
therackandblockrotationofthemiddlesprayarm.This
couldresultinpoorwashperformanceforitemsle the
upperrack.
Checktomakesurethattallitemswillnotblockrotation
ofthetopwasharm.
iiii iiH!
!i ii ,iii iiiiii!
13
iliiiii_liP_"lii_liiii_tii_
Page 14

_iiiiii_JJJJliiiil
Loadingthe dishwasher racks.
The Wash Tower
Keep the center area clear th the lower rack.
Tile wash tower rises throllgh tile center of tile lower
rack during tile _ash and rinse portions of the c}cle.
Tile wash tower shoots water into the mid-level _sll
arm located under the upper rock. Blocking the
wash tower couM result in poor wash pe_lbrmance
for items intile upper rack.
Don'tblockorloadtaftthingsnextto the
WashTower
Lower Rack
When loading the lower rack,do not load large platters or
traysin the front right corner.Theymay prevent detergent
from circulating during the wash cycle.
Tile lower rack is hest used tbr plates, saucers, and
cookware. I.arge items such as broiler pans and
racks shouM go along the right-hand side, [.oad
platters, pots and howls along tile sides, in corners,
or in the hack. The soiled side of items should titce
tile center oI the rack, If necessa_)', oversized
glasses and nmgs can he placed in tile lower rack
to m_edmize loading flexibility,
Also, be caretul not to let a portion ()fan item such
as a pot or dish handle extend through the bottom
rack. This could block tile wash arm and result in
poor _v_sllpertormance.
F'oM-down fingers (on some models) provide
flexibility t0r extrMaNe and hard4o-fit items.
Tile fingers may be left in tile up position or tolded
down to customize tile lower rack.
14
Page 15

Don't let any
iitem extend
h bottom.
Silverware Basket
Put flatware in the removable basket with knits'
handles up to protect y_ur hands. Place spoons in
the basket with handles dox_-n Mix knives, tbrks
and spoons so they don't nest together. Distribute
evenly,. Small plastic items, such as measuring
spoons and lids from small containers, should go in
the bottom of the silverware basket with silverware
on top.
IJds can be assembled to eidmr end of the
silverware basket to contain small items.
To assemble an end lid, place the outer lid stud
into the hole on the outside otthe silverware
basket. Then place the inside lid stud into the
inner hole in the silverware basket. Repeat tbr
other side if desired 1 ono- items can be olaced
on the cupshelf in the upper rack.
The Olverware basket can be placed in the fl'ont,
side or back of the lo_vr rack.
iiii iiH!
!i ii ,iii iiiiii!
15
i/}iiii_liJJ_'_"lii_/iiii_tii_
Page 16

iiiiii_Ii;iiiiY
Loadingplacesettings.._
Follow these guidelines for loading lOplace settings. Features and
appearance of racks and silverware baskets may vary from your model.
Upper Rack--lO place settings
ii_i{i,iiiiii/iJ}iiiiiii;i;iiiiiii{i
Lower Rack--lO place settings
Page 17

Foflow these guidelines for loading 12place settings. Features and
appearance of racks and silverware baskets may vary from your model
Upper Rack-- 12place settings Lower Rack--12 place settings
ii_!iiiiiiii/i!il
!iii_/
!iiii_,iii_iiiiii!
iiiiiiiiiiiiiiiiiii
iiliiiiiilii=iili!!!ili
iti
!_:i,iiii'_!li
i:i[!
i!i!I_ili/iii
i@i_iiili
17
Page 18

Aboutoptional accessories.
Youcan change the door and lower access panel appearance of your
dishwasher by ordering one of these optional accessories:
_ Color Panels
_ 1/4" Wood Panel TrimKit
_ 3/4" Trimless Panel Kit
These accessories are available at extra cost (VISA, MasterCard, or
Discover cards accepted) by calling 800-626-2002.
Specify accessory number when ordering.
Descriptionsof OptionalAccessories
Colorpanels--Replacement door panels and lower a(cess panels
are available in the tollowing (oh)rs:
i_ GPF4OOA(Almond)
i_ GPF4OOB(Black)
_:i: GPF4OOW(White)
_:i: GPF400S (Stainless Steel)
_ GPF400C (Bisque)
!iiiiiiiiiiiii!iliiii!i
NOTE:The GPFIO0 dishwasher door spring kit is included with the
stainless steel color panel kitand nmst be installed with it (GPF400S),
Wood panel trim kit-- This at(essex)" contains trim and instructions
fin" you to supply and install a I/_Uthick decorative wood door and
lower access panel:
_ GPF425A (Almond)
i_ GPF425B (Black)
i_ GPF425W (White)
_ GPF425C (Bisque)
NOTE:The GPFIO0 dishwasher door spring kitmust also be ordered
and installed when the door panel weighs four Ibs. or more,
Trimlesspanel kit--This ac(esso_y contains parts and instructions
fin" you to supply and install a 3/4" thick decorative wood door and
lower access panel:
_ GPF475
NOTE: The GPFIO0 dishwasher doorspring kit is included with the
trimloss panol kit and must be installed with it.
Page 19

Aboutoptional rack accessories.
Baby Bottle Holder
Part Number: WX69X200
_ Prevents movement of baby bottles during the
dishwasher cycle
_i: Snaps easily onto any dishwasher upper rack
_ Eliminates hand washing
For best results,
the Baby Bottle
Holder should
be installed on
the upper rack
of the dishwasher.
i_ Fits all baby bottles
You can order a package of 5 Baby Bottle Holders, at extra
cost, by calling 800-626-2002, or through the Internet at
www geappliances.com (Visa, MasterCard, or Discover
cards accepted).
iiii iiH!
!i_ii_,iii_iiiiii!
19
i/i@_"lii_/iiii_tii_
Page 20

Caringfor the dishwasher.
Toclean the control panel use a lightly dampened cloth then dry thoroughly.
Toclean the exterior use a good appliance polish wax.
Never use sharp objects, scouring pads or harsh cleaners on any part of
the dishwasher.
Protect Against Freezing
I1your dishwasher is lett in an unheated plate during
tile winter, ask a service techrfician to:
Cut off elet u'k al power to the dishwasher. Remove
fuses or trip circuit breaker.
N Turn oil the water suppl) and disconne_.t the water
.....................inlet line t_'om the water valve.
a I)rain water from the water inlet line and water
.....................valve. (Use a pan to catch the water.)
Re_.onnect the water inlet line to the water valve.
Does FourDishwasher Have anAir Gap?
i air ,ap protects VOllrd sh.aasher agai 1stwater
o , ,
backing up into it ira drain clogs. The air gap is not
a pm't of the dishwasher. It is not covered by your
_arranty Not all plumbing codes require air gaps
SO yOtl may not have ()lie.
Checktheair gap any
time your dishwasher isn't
draining well.
2O
The air gap N easy to clean.
Turn off the dishwasher and lilt oft the chrome
(over.
Remove the plastic cap and clean with a toothpick.
The Stainless Steel Panels
The stainless steel panels can be cleaned with StainlessSteelMagic or a
similar product using a clean, sell cloth.
You can order Stainless Steel Magic # WXlOXl5 throtgh GE Parts by
(alling 8004_26-2002.
Page 21

Beforeyou call for service...
Troubleshooting -tips
Review the charts on the following pages first and you may not
need to call for service.
Possible Causes What ToDo
Controlpanel lightsgo
offwhenyou"resetting
controls
Noise Some of the sounds
Detergentleft in Dishes are blocking the Reposition the dishes.
dispensercups detergent cups
Detergentcuplid
latchedaccidentally
byuser
Time too long between
touching of selected pads
you'll hear are normal
Utensils are not secure
in the rack or something
small has dropped into
the rack
Motor hums l)ishwasher has not been
Each pad must be touched
within 30 seconds of the
others. To relight, touch
any pad again, or unlock
and relatch door.
Hard tbod disposal
shredding action.
Drain valve opening to
pump water out.
Timer control as cycle
progTesses,
Detergent cup opeMr N.
The motor stopping during
the dr?_ng period.
Water draining out of file
tub immediately _flier you
touch START/RESETpad.
Make sure everything is
se(alred in dishwasher,
used on a reDflar basis, ILl
you do not use your
dishwasher often, set it to
fill and pump out once
evelT week. This will help
keep the seal moist and
the garbage disposer clear,
' Unlatdl the door. Press
the START/RESETpad
three times withiri two
seconds. The detergent
(alp will trip.
i_iiiii/LJ,!,iiiiiii/i
iiiiiiiii iii!
27
Page 22

Water standing m
the bottom of the tub
i iiii ;iiiii!iiii i iii ii,i
Water won't pump
out of the tub
Sudsinthetub
Stained tubinterior
22
This is normal
Drain is clogged
Correct detergent
wasn't used
Rinse agent
was spilled
Detergent with
colorant was used
Some tomato-based
foods can stain
A small amount ot clean
water around the outlet on
the tub bottom at the back
of the tub keeps the water
seal lubricated,
It}on havean air gap,
clean it.
Check to see it y_ur kitchen
sink isdraining well. It not.
you may need a phunber.
It the dishwasher drains into a
disposer, mn disposer clear.
Use only automatic dishwasher
detergents to avoid sudsing.
Cascade' Automatic
Dishwashing DeteNent has
been approved t0r use in all
GE dishwashers.
To remove suds fl'om the tub,
open the dishwasher and let
suds dissipate. Add 1 g_dlon
of cold water to the rob. Close
the door until it locks into
place, t'ump oHt water by
pressing START/RESETthen
immediately press STARt/RESEt
again. Repeat if necessa U.
Always wipe up rinse agent
spills immediately.
Some detergents contain
colorant (pigment or dyes)
that will discolor the tub
interior with extended use.
Check the deteNent talp
ti)r signs of any discoloration.
ltcup is discolored chano-e to
detergent without any coh)rant.
Cascade _'_Automatic
Dishwashing Detergent has
been approved fi_ruse in all
GE dishwashers.
LTseot the RINSEONLY_ycle
(on some models) after adding
the dish to the load can
decrease the level ot staining.
Page 23

Dishesandflatware
not clean
Spots and filming
on glasses and
flatware
Possible Causes What ToDo
Low inlet water
temperature
Make sure inlet _ater
temperature is correct
(see page 12).
Use HI TEMP WASH.
Water pressure is _ Turn oil a taucet, Iswater
temporarily low coming out more slowly
than usual? If so, wait until
pressure is normal bet0re
using }our dishwasher.
Air gap is clogged (;lean the air gap.
Improper rack loading ' Make sure lane dishware
does not block the
TO I "
dete ge it dispenser or the
wash arms,
Extremely hard water
Low inlet water
temperature
Overloading the
dishwasher
Improper loading
Old or damp powder
detergent
Rinse agent dispenser
empty
Too little detergent
Use det-Dry ® rinse
remove spots and prevent
new fihn buikt-up.
To renlove Stllbborll spots
and pre-existing fihn ti'om
glasgvare:
I Remove all metal utensils
fl'om the dishwasher.
2 I)o not add deteNent.
3 Select the longest tycle,
4 Start the distm_asher and
allow to run tbr 18 to 22
agent
minutes. Dishwasher will
now be in tile main wash.
5 ()pen tile door and pour
2 olps (500 ml) ot white
vinegar into tile bottom of
the dishx_,lsher.
6 (;lose tile door and allow
to complete tile Q-de.
If vinegar rinse doesn't
work: Repeat as above,
except use 1/4 cup (60ml)
ot citric acid {_)-stals
instead ot vinegar.
i !ii ii{{i!i
iI_.................I___
to
23
Page 24

iilii i!iHiWi!ii!,ii
Beforeyou call forservice...
iiilg!{iiiii!;iiiiiiiiiiiiiiii!7
i! iil! iii! ilii iii!}!iliiiiiiiTillii!liiiii!i!illi
Cloudinesson
glassware
Z
Black or gray Almninmn mensils have Remove marks with a nfild,
marks on dishes rubbed against dishes abrasive cleaner.
Yellow or brown fihn Tea or coffee stains Remove the stain by band,
on inside surfaces using a sohltion ()1 i/2/llp
Whitefilmoninside
surfaces
Possible Causes
Combination of soft
water and too much
detergent
Water temperature
entering the dishwasher
exceeds 150°F.
An overall yellow or
brown film can be caused
by iron deposits in water
Hard water minerals
What ToDo
This iscalled etching and
is permanent. To prevent
tiffs ii'om happening, use
less detergent if)ou have
soft water. Wash glasgvare
in the shortest (ycle that
MII get dram clean.
1_ower tile water heater
temperature,
blea/ll and 3 cups warm
water.
A WARNING
Betore cleaning interior
wait at least 20 nfinutes
_dter a cy/le tbr tile
beating element to cool
doom. Failure to do so can
resuh in burns,
A special fiher in the water
supply line istile only way
to correct this problem.
Contact a water sotiener
company.
' To clean tile interior, apply
dishwasher detergent to a
damp sponge. Wear
rubber gloves. Donotuse
any type of cleanser odmr
than dishwasher detergent
because it may cause
foanfing or sudsing.
Cascade':' Aut()ma{ic
l)isbwashing Detergent
has been approved ior use
in all GE dislm_ashers.
24
Page 25

Possible Causes
Dishes don't dry Low inlet water
temperature
Rinse agent dispeuser
is empty
Controlpanel Door latch may not be
responded to inputs properly seated
butdishwashernever
filledwith water
Dishwasherwon'trun
Steam This is normal
Fuse is blown, or the
circuit breaker wipped
What To Do
Make sure inlet x_ltel"
temperature is correct
(see page 12).
' Select HI TEMPRINSE
and/or HEATEDDRY.
' Che(k the rinse agent
dispenser.
(;all tor service.
' Replace fllse or reset
circuit breaker. Remove
any other appliances fl'om
the cir_afit.
TiT resetting the
START/RESETpad.
Steam comes through
the vent by the door latch
(turino dpdng and when
wamr is being pumped out.
i_iiiii/hJ,!,ii{ii{i/i
iiiiiiiii iii!
25
Page 26

_iiiii%iiiii/ii/iiiiiiiii_¸
_ Notes.
iliiiii_ii!!iii!
i!iiiiiiHiiHii/ilH!iiiiiHi
i_i!ii_iiiiiiii!i
ilii_i_iiii!i:ii_!_iliii!iiiii_
Page 27

GE Service Protection Plus TM
GE, a name recognized worldwide for qualit 3 and dependabilit?,
offers )ou Service l'rotection l'lusrM--comprehensive protection on
all }our appliances--No Matter What Brand!
Benefits Include:
• Backed by GE
• All brands covered
• Unlimited service calls
• All parts and labor costs included
• No out-of-pocket expenses
• No hidden deductibles
• One 800 number to call
You will be completely satistied with our service protection or }ou may request your
l-none} back on ttle remaining value ot )our contract. No questions asked. It's that simple.
Protect v( ur refl'igerator dishx_asher xsasher and dP, er rano-e TV V( R and much
more-any brand! Plus there's no extra char ,e for emergenc_ service and low monthl}
tinancing is available. Even icemaker coverage and food spoilage protection is otlered.
You can rest easy, knowing that all your valuable household products are protected
against expensive repairs.
Place your coniidence in (;E and call us in the U.S. toll-fl'ee at 800-626-2224
for more information.
*All bI'_l]ds cox eied, lip IO20 _ eal's old ill lhe (7orllillt!nlal U.Sg.
We'll CoverAny Appliance.
Anywhere. Anytime.*
............................................................. _,_g. (.:,.dJ.,:,.e.....
Please place in envelope and mail to:
General Electric Company
Warranty Registration Department
P.O. Box 32150
Louisville, KY 40232-2150
27
Page 28

Consumer Product Ownership Registration
l)ear (]tlstonlei':
Thank you tor purchasing our product and thank you for placing )our contidence in us.
We are proud to have }ou as a CllStOl-ner!
Follow these three steps to protect your new appliance investment:
your Consumer the registration below,
Product Ownership store this document in
Complete and mail 2 Mter mailino
Registration today, a saie place. It
Have the peate of COl-ltainsinformation
mind of knowing we you will need should
can contact }X)[1 lU }X)[1 require service.
the unlikely event of ()ur service number is
a satety modification. 800 GE CARES
• o
(800432-2737).
Model Number Serial Number
I I I I I I I I I I I III I I I I I I I I
Important: If you did not get a registration card with your product, detach and
return the form below to ensure that your product is registered, or
register online at www.geappliances.com.
................................................................. .>_.(.:_L_,:,_.
Consumer Product Ownership Registration
Read your (hmer's
Manual careflflly.
It will help you
operate your new
appliance properly.
If you have questions,
or need more
information, call the
GE Answer Center_
800.626.2000.
I ........... I I,, ,,,, ,I
Nit. [] Ms. [] Mrs. [] Miss []
t:irst I Last I I
Name I I I I I I I I I Name I I I I I I I I I I I | I
Street I I
Address t t t t t t t t I t t t t t t t t t t t t t t t t t
Apt. # I i i i i i i i IE-mailAddress
( tv i i i i i i i i i i i i i State Code i i i i
I)ale l>la({ d In (Jse ]Phone
Model Number Serial Number
Month Yeart__JNum,,erl,, I'1,, I'1 , , , I
()ccasionall_. we ma_ allow selected con]panies to send }ou intormation.
6E Appliances[] Check here if }ou do not want this intormation.
General Electric Company
Louisville, Kentucky
www, geapp/iances com
28
Page 29

Notes.
_i_i,l,iiiiiiiiii!iii!!iiiiiiii'iiiiiiii
29
Page 30

GEDishwasher Warranty. (GHD5000series)
OneYear
Fromthe date of the
originalpurchase
SecondYear
Fromthe date of the
originalpurchase
FiveYears
Fromthe date of the
originalpurchase
i!iiiii iiiii ! !
Ten Years
From the date of the
original purchase
Aft warranty service provided by our Factory Service Centers,
or an authorized Customer Care®technician. For service,
carl 800-GE-CARES.
GE Will Replace:
Anypart ot the dishwasher which thils due to a defect in
materials or w()rkmanship. During this full one-year
watTantg GE will also provide, free of charge, all labor
and in-home service to replace the (tetective part.
Any part of the Water Distribution Systemwhich iitils due
to a detect in materials or workmanship. During this
second-year limited watTantg, you will be responsible tor
any labor or in-home service costs.
The electronic control module itit should iitil due to
a detect in materials or workmanship. During this
five-year limited warranty, you will be responsible tot
;tny labor or in-home servicecosts.
The Pennarumub or doorliner,itit iitils to contain water
due _()a detect in materials or x_x)rkmanship. During this
full ten-year warranty, GE will also provide, free of charge,
all labor and in-home service to repla(e the (lete(tive part.
i_ Service lrips to your home to teach you
how to use the product.
iiiHiiil'i iii!iiii t
iiii!iiiiii!!iiiHiiiiii
_::hnproper iuslallation.
_ Replacement of house fuses or
reselling of circuit breakers.
i_ Failure of the product ff it is
abused, misused, or used for other
than the intended purpose or used
commercially.
Thiswarranty is extended to the original purchaser and any succeedingowner for products purchased
for home use within the USA.Proofof original purchase da te is needed to obtain service under the
warranty In Alaska, thewarranty excludes the cost of shipping or service calls to your home,
Some states donot allow the exclusion or limitation of incidental or consequential damages. This
warrantygives youspecific legal rights, and you may also haveother rights which varyfrom state to
state. Toknow what your legal rights are, consult your local or state consumer affairs office or your
state's Attorney General
Warrantor: General Electric Company. Louisville, KY 40225
3(?
i_ Damage to the product caused by
accidenL fire, floods or acts of God.
_ Incidental or consequential dmnage
caused by possible defects with this
appliance.
i_ Cleaning or servicing of the air gap
device in the drain line.
Page 31

(All models except
GEBishwasher Warranty. GHD5000Series)
All warranty service provided by our Factory Service Centers,
or an authorized Customer Care®technician. For service,
carl 800-GE-CARES.
GEWill Replace:
OneYear
Fromthe date of the
originalpurchase
SecondYear
Fromthe date of the
originalpurchase
FiveYears
Fromthe date of the
originalpurchase
LifetimeofProduct
Anypart at the dishwasher whkh iidls due 1o a defect in
materials or workmanship. I)uring this full one-year
warran_ GE will also provide, free of charge, all labor
and in-home service to replace the detective part.
Any part at the dishwasher which iilils due It) a detect in
materials or workmanship. I)uring this second-year
limitedwarran_ you will be responsible tar any labor or
in-home service costs.
The dishwasher rack, it it should rust, or the electronic
control module itit should tidl due to a (tei_'(t in
materials or workmanship. I)uring this five-year limited
warran_ you will be responsible tar any labor or in-home
se[_,ice costs.
The PetmaTufqub or door liner, if it tidls to contain water
due to a (letect in materials or workmanship. During this
full watran_ GE will also provide, free of charge, all labor
and in-home service to replace the (tetective part.
iI!ltl
_iiiiii/iii'i'i,'ii_iiii!iiiiiii¸
!li'ii ill
iiiii!iili:iii!l
iiiiiiiiiiiiiiiiiii/iiliiiiiii
_ Service trips to your home to teach you
how to use the product.
i; Improper installation.
_ Replacement of house fuses or
resetting of circuit breakers.
_ Failure of the product if it is
abused, misused, or used for other
than the intended purpose or used
commercially.
Thiswarranty is extended to the original purchaser and any succeedingowner for products purchased
for home use within the USA. Proofof odginal purchasedate is needed to obtain service under the
warranty In Alaska, thewarranty excludes the cost of shipping or servicecalls to yourhome,
Some states donot allow the exclusionor limitation of incidental or consequential damages. This
warrantygives youspecific legal dghts, and youmay also haveother dghts which varyfrom state to
state. Toknow what your legal dghts are, consult your local or state consumer affairs office or your
state's Attorney General
Warrantor:GeneralElectricCmnpany.Louisville,KY40225
_ Damage to the product caused by
accident, fire, floods or acts of God.
i_ Incidental or consequential dmnage
caused by possible defects with this
appliance.
i__Cleaning or servicing, of the air gap
device in the drain line.
ii;i_i:;ii_i_:ii,liiiii
31
Page 32

ServiceTelephoneNumbers.
GEAnswer Center®800.626.2000
• , 4,,
The ( d:,Answer (;enter'" _sopen 24 hours a (la_. / days a",_eek.
OR
Visit our _ ebsite at: www..geappliances.com
In-HomeRepairService800-GE-CARES(800-432-2737)
Expert (/E repair service s only a phone call awa},
SpecialNeedsService800.626.2000
TDD 800-TDD-GEAC (800-833-4322)
(,E otters, t_'ee of charge, a brodmre to assist in planning
a barrier-ti'ee kitchen tot persons with limited nlobilit?.
ServiceContractssoo-62_-2224
_iii!i!_!_ili!!iiiiii!!ii!i!/iiii_
l'urchase a GE service contract x_dfileyour warranty is still in effect
and you'll receive a substantial discount. GE Consumer Service will
still be there after your warrant? expires.
_i_l_!iiii!i{iii
32 Printofl t}l LouisvtT/e,KY
PartsandAccessories800-626-2002
lndMduals qualitied to sepdce their own appliances can 1-,ave parts
or accessories sent directly to their homes (VISA, MasterCard and
l)iscover cards are accepted).
Instructions contained in this manual cover procedures to be performed
by any user, Other servicing generally should be referred toqualified
service personnel Caution must be exercised, since improper servicing
may cause unsafe operation,
ServiceSatisfaction
lf}x_uare not satistied Mth the sepdce you receive from GE, tbllow
these stops. First, contact the people who sepdced }x)ur appliance.
Next, if}x_u are still not pleased, write all the details--including your
phone number-to: Manager, Cusu)mer Relations, GE Appliances,
Appliance Park, I_ouisville, KY 40225.
 Loading...