

GE DSXH47GG0WW, DSXH47EG0WW Owner’s Manual
ge.com
Safety Instructions ............ 2-5
Operating Instructions
Care and Cleaning .................... 8
Controls ............................. 6
Features ............................. 7
Loading and Using the Drger .......... 8
Installation Instructions ..... 9-20
Electrical Installation for
Electric Drger ................... 16, 17
Electrical Requirements .............. 11
Exhausting the Drger ............. 12, 13
Gas Connection for Gas Drger ........ 18
Gas Supplg Requirements ............ 13
Location of Your Drger ............... 14
Mobile Home Installation ............. 15
Preparing to Install Your Drger ..... 9, 10
Reversingthe Door Swing ............ 18
DSXH47
®
Troubleshooting Tips ........ 19, 20
Consumer Support
Consumer Support .................. 24
Warrantg .......................... 23
®
134802300 175DISOTP581 49-90515 i0-06JR

IMPORTANTSAFETYINFORMATION.
READALLINSTRUCTIONSBEFOREUSING.
WARNING!
For your safety, the information in this manual must be followed to minimize the risk of fire
or explosion, electric shock, or to prevent property damage, personal injury, or death.
• Donotstoreor use gasoline or other
flammable vaporsand liquids in the
vicinityof thisor any otherappliance.
• Installation andservice mustbe performed
bya qualified installer,service agency or
the gas supplier.
WHATTODOIF YOUSMELLGAS:
[] Do nottry to light a match,or cigarette, or
turnonany gas orelectrical appliance.
[] Do nottouch anyelectrical switch; do not
useany phonein yourbuilding.
[] Clear the room,buildingor area of all
occupants.
California Safe Drinking Water and Toxic Enforcement Act
This act requires tile goxernor of Califimfia to publish a list of substances knox_n to tile state to cause cance_,
birth delbcts or other reproducfixe harm and requires businesses to warn customei_ of potential exl)osure
to Stlch st/bstances.
(_as al)l)liances C_lil C_ltlSe iilinoi" exl)OStli'e [o [()tlI" of these stlbstances, nail/ely benzene_ C_li'bon illonoxi(le_
fimnaldehvde and soot, caused primarily b)' the incomplete combustion of natural gas or I,P fllels.
Propedy ac!justed drye_ will minimize incomplete combustion. EN)osure to these substances can be
minimized flH'ther by propedy venting the (h_'er to the outdoors.
[] Immediatelycall yourgas supplierfrom
a neighbor'sphone.Follow the gas
supplier'sinstructionscarefully.
[] ffyou cannotreach yourgas supplier,call
the fire department.
2
PROPERINSTALLAtiON
This dryer must be properly installed and located in accordance with the Installation Instructions
before it is used.
[] Prol)erlx, ,gr(mnd drxer to conform _ith all
go_ erning codes and ordinances. Follo_
derails ill Inst:dlation Instructions.
[] Install or store where it will not be exposed to
temperatures belo_ freezing or exposed to the
_eath er.
[] (]onnect to a properl} r_lted, protected and
sized power suppl) circuit to axoid electric;d
overload.
[] Remox e :Ill sharp packing items and dispose of
all shipping materi:ds properl).
Exhaus_/Ducting:
[_ This dr) er MUSTbe exhausted to the outside.
[_ l_.se onl} ngld metal 4 diameter ductx_ork
inside the dr}er c:d)inet. Use only rigid metal
or flexible metal 4" diameter ductwork fi)r
exhausting to the (mtside, USE OFPLASTICOR
OTHERCOMBUSTIBLEOUCTWORKCANCAUSE
A FIRE•PUNCTUREOOUCTWORKCAN CAUSEA
FIREIFIT COLLAPSESORBECOMES
OTHERWISERESTRICTEOIN USEORDURING
INSTALLATION.
For complete details, fi_llow the lnst:dl:ltion
Instructions.
iMPORTANTSAFETYiNFORMATiON.
READALLiNSTRUCtiONSBEFOREUSING.
WARNING!
YOURIAUNDflYAflEA
• Keep tile area underneath and around ",'our
appliances fl'ee of coml_ustible matelials, such
as lint, paper; rags and chemicals.
• Keep tile floor around your appliances clean and
dry to reduce tile possibilib' of slipping.
• Keep area around tile exhaust opening and
s/u'ro/mding areas ti'ee from tile accumulation
of lint, dust and dirt.
• Do not obstruct tile flow of ventilating ai_: Do not
stack or place lmmch T or throw rugs against tile
ti'ont or back of tile ch_'e_:
WHENUSINGYOURDRYER
• Never reach into tile cha'er while tile drum is
moving. Before loading, unloading or adding
clothes, wait tmtil tile drum has completely
stopped.
• Clean the lint filterbefore each lead to prevent lint
accumulation inside tile dryer or in tile room.
DO NOT OPERATETHEDRYERWITHOUT THELINT
FILTERIN PLACE,UNLESS THEDRYING RACKIS IN
USE. Mways replace tile lint screen when finished
using tile (hTing rack.
• Do not wash or dry articles that have been
cleaned in, washed in, soaked in or spotted
with combustible or explosive substances (such as
wax, oil, paint, gasoline, degreasers, dr)_cleaning
solvents, kerosene, etc.). These substances give
off'vapo_ that may ignite or explode. Do not add
these s/lbstJlnces to tile wash w;IteI'. Do not rise or
place these s/Ibst}lnces }li'o/ind FOllY washer or
dryer dining operation.
• Any article on which you have used a cleaning
solvent or that contains flammable materials
(such as cleaning cloths, mops, towels used in
beaut}," salons, restaurants or barber shops, etc.)
must not be placed in or near tile d_yer until
solvents or flammable materials have been
removed. There are many highly flammable
items used in homes such as acetone, denatured
alcohol, gasoline, kerosene, some household
cleaners, SOllle spot i'ell/OVei's_ ttli])entines_
waxes_ W_lX i'eillovers and pI'o(hlctS containing
petroleum distillams.
• Tile latmdry process can reduce tile flame
retardancy of rid)tics. To avoid such a result,
carefulk fi)llow tile gali/lent i/lant/filcttlrer's
care instructions.
• Close supervision is necessary if this appliance is
used bv or near children. Do not allow children
to play on, with or inside this or any other
appliance.
• Keep all laundry aids (such as detergents,
bleaches, etc.) out {ff tile reach of children,
preferably in a locked cabinet. Observe all
warnings on container labels to avoid ii_jm'};
• Never climb on or stand on tile dryer top.
• Do not (hy articles containing rubbe_; plastic
or similar materials such as padded bras, temfis
shoes, galoshes, bath mats, rugs, bibs, baby pants,
plastic bags and pillows that may melt or btlFn.
Some rubber materials, when heamd, can trader
certain drcumstances produce fire by
spont;ineo/is COlllb/istion.
• Do not store plastic, paper or clothing that may
b/ml or melt on top _ff the dryer dining
Olleration.
• Gammnts labeled 0n/Away from Heater Do
Not Tumble Dry (such as life jackets containing
kapok) must not be put in your d_ e_:
• Do not d_T fiberglass articles in veto" dryer:
Skin irritation could result from tile remaining
particles that may be picked up by clothing
dining subsequent (hTer uses.
• To minimize tile possibility ot electric shock,
mq)lug this appliance fl'om tile power supply
or disconnect the dryer at the household
distribution panel b)' removing tile fllse or
switching off the circuit breaker befi)re
attempting any maintenance or cleaning
(except the removal and cleaning of the lint
filter). NOTE:Pressing tile PAUSEbutton does
NOTdiscomlect tile appliance ti'om tile power
supply:
• Do not spray any t)pe of aerosol into, on or near
dryer at m w time.
• Do not place items exposed to cooking oils in
your dryer: Items contaminated with cooking oils
ram' contribute to a chemical reaction that could
cause a clothes load to catch fire.
4
WARNING!
• Ne',er attempt to operate this appliance if • You may wish to soften _our laundered tid)fics
it is dmnaged, malflmcfioning, partiall) or reduce the static electricity in them b) using
disassembled or has missing or broken parts, a drye>applied tiO)iic softener or an antistatic
inchlding, a damaged, cord or I)lug,. conditionei: _,\'e recoininend _ou use either a
• The interior of the machine and the exhaust
duct connection inside the ch) er should be or tia' a drve>added product for which the
cleaned at least once a )ear by a qualified manuthcturer gixes wiitten assurance on the
technician. See the Loadingand Usingthe Dryer package that their product can be safel_ used in
section. Do not use any type of spray cleaner )our (lryei; Service or peitonnance problems
when cleaning {h) er intelioi: Hazardous fiunes
or electiical shock could occur
• products and are not coxered under the warrant_
If yom_ is a gas (hTeI; it is equipped with an
automatic electric ignition and does not have a
pilot light. DO NOTATTEMPT TO tIGHT WITH A
MATCH. Burns may result ti'om having v, mr hand
in the vicinity of the burner when the automatic
ignition turns on.
thbric softener in the wash c_cle according to the
manttthcttu'er's instructions fi)r those products,
caused b_ use of these products are the
responsibilit) of the manufi_cturei_ of those
to this appliance.
WHENNOTUSINGYOURDRYER
• Grasp the plug firefly when disconnecting this
appliance to avoid damage to the cord while
pulling. Place the cord away fl'om traffic areas so
it will not be stepped on, tripped over or
subjected to damage.
• Do not attempt to repair or replace any part of
this appliance oi" attempt any servicing unless
specifically recommended in this Owner's Manual
or in published use>iepair instructions that you
undei._tand and have the skills to carry out.
• Befiwe discarding a (hTei; or removing it flxm_
service, remove the dryer door to prevent
children fl'om hiding inside.
• Do not tamper with controls.
READANDFOLLOWTHISSAFETYINFORMATIONCAREFULLY.
SAVETHESEINSTRUCTIONS
Aboutthe dryercontrolpane/.
SENSORDRY
TIMED DRY
PERMA PRESS
REGULAR
45
DELICATE
6O
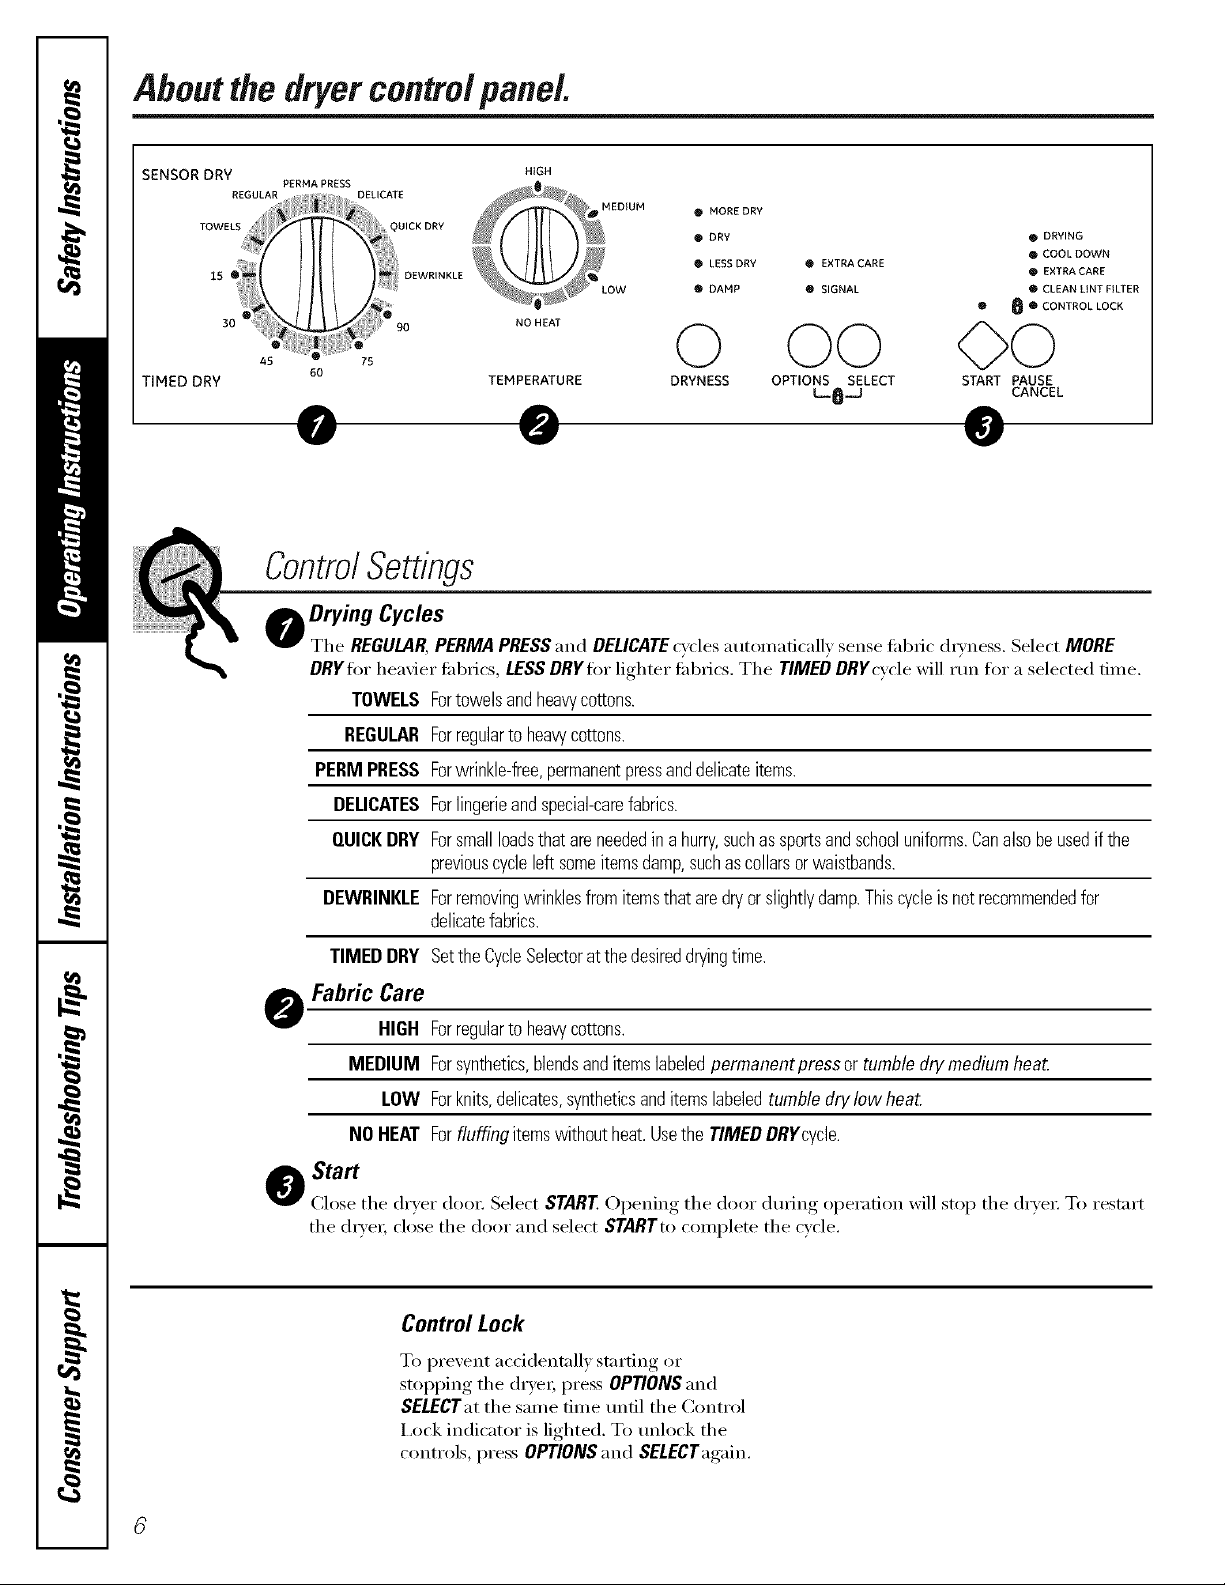
ControlSettings
O Drying Cycles
The REGULAR,PERMAPRESSand DELICATEcycles autonmti(alh sense rid)tic dryness, Select MORE
DRYIor heavier rid)tics, LESSDRYIor lighter rid)tics. The TIMEDDRYcvde will run for a selected time.
TOWELSFortowelsandheavycottons.
REGULARForreguIartoheawcottons.
PERMPRESSForwrinkle-free,permanentpressanddelicateitems.
DELICATESForlingerieandspecial-carefabrics.
HIGH
MEDIUM 0 MORE DRY
® DRY • DRYING
• LESSDRY ® EXTRA CARE
LOW ® DAMP • SIGNAL ® CLEAN LINT FILTER
O
8 • CONTROL LOCK
.o...O OO OO
TEMPERATURE DRYNESS OPTIONS SELECT START PAUSE
L_8.J CANCEL
O COOL DOWN
® EXTRACARE
QUICKDRY Forsmallloadsthatareneededinahurry,suchassportsandschooluniforms.Canalsobeusedif the
previouscycleleftsomeitemsdamp,suchascollarsorwaistbands.
DEWRINKLEForremovingwrinklesfromitemsthataredryorslightlydamp.Thiscycleisnotrecommendedfor
delicatefabrics.
TIMED DRY SettheCycleSelectoratthedesireddryingtime.
o Fabric Care
HIGH Forregulartoheawcottons.
MEDIUM Forsynthetics,blendsanditemslabeledpermanentpressor tumbledrymedium beat.
LOW Forknits,delicates,syntheticsanditemslabeledtumble drylowheat.
NOHEAT Forfluffingitemswithoutheat.Usethe TIMEDDRYcycle.
O Start
Close the dryer (loon Select START Opening the door dining operation will stop the dryer To restnrt
the (hTe_; close the door and select STARTtocomplete the cycle.
Control Lock
To prevent acddentnlly stnrting or
stoppingthe&'yenpressOPTIONSand
SELECTatthesame timemuiltheControl
i,ock indicator is lighted. To mdock the
controls, press OPTIONSand SELECTagain.
About your dryerfeatures.
SignalOption
When tile signal is on it will sound just
befisre tile end of tile cycle to remind
y(s// to reI//(sve tile clothes.
If the dried load cannot be removed
promptly dm'ing the cycle, tile Cycle
Selector will advance to the EXTENDED
COOL DOWN setting. Ij nheated rambling
continues dm'ing EXTENDED COOL DOWN
and WRINKLE CARE (on some models)
fl)r 40 minutes to help reduce wrinkling.
When tile CYCLE SIGNAL is on, it will
s(mnd briefly every five minutes as a
reminder to rem(sve tile load.
Wrinkle Cam
Use this option to minimize tile wrinkles
in clothes. It provides approxilnately 15
nfilmtes of no-heat mnfl)ling alter tile
clothes are dry.
This option can only be used with the
PERMA PRESSand DELICATEcycles.
NOTE"
• If itemsare removedbeforethe end of
thecycle, pressthe CANCELbuttontwice.
• Removegarmentspromptlyat thesound
of thesignal.Place clotheson hangers
so wrinkles won'tset in.
• Use theCycle Signalespecially when
dryingfabrics like polyesterknits and
pennanentpress. Thesefabrics should
heremovedso wrinkles won't set in.
Pr
screwdriver Light
housing
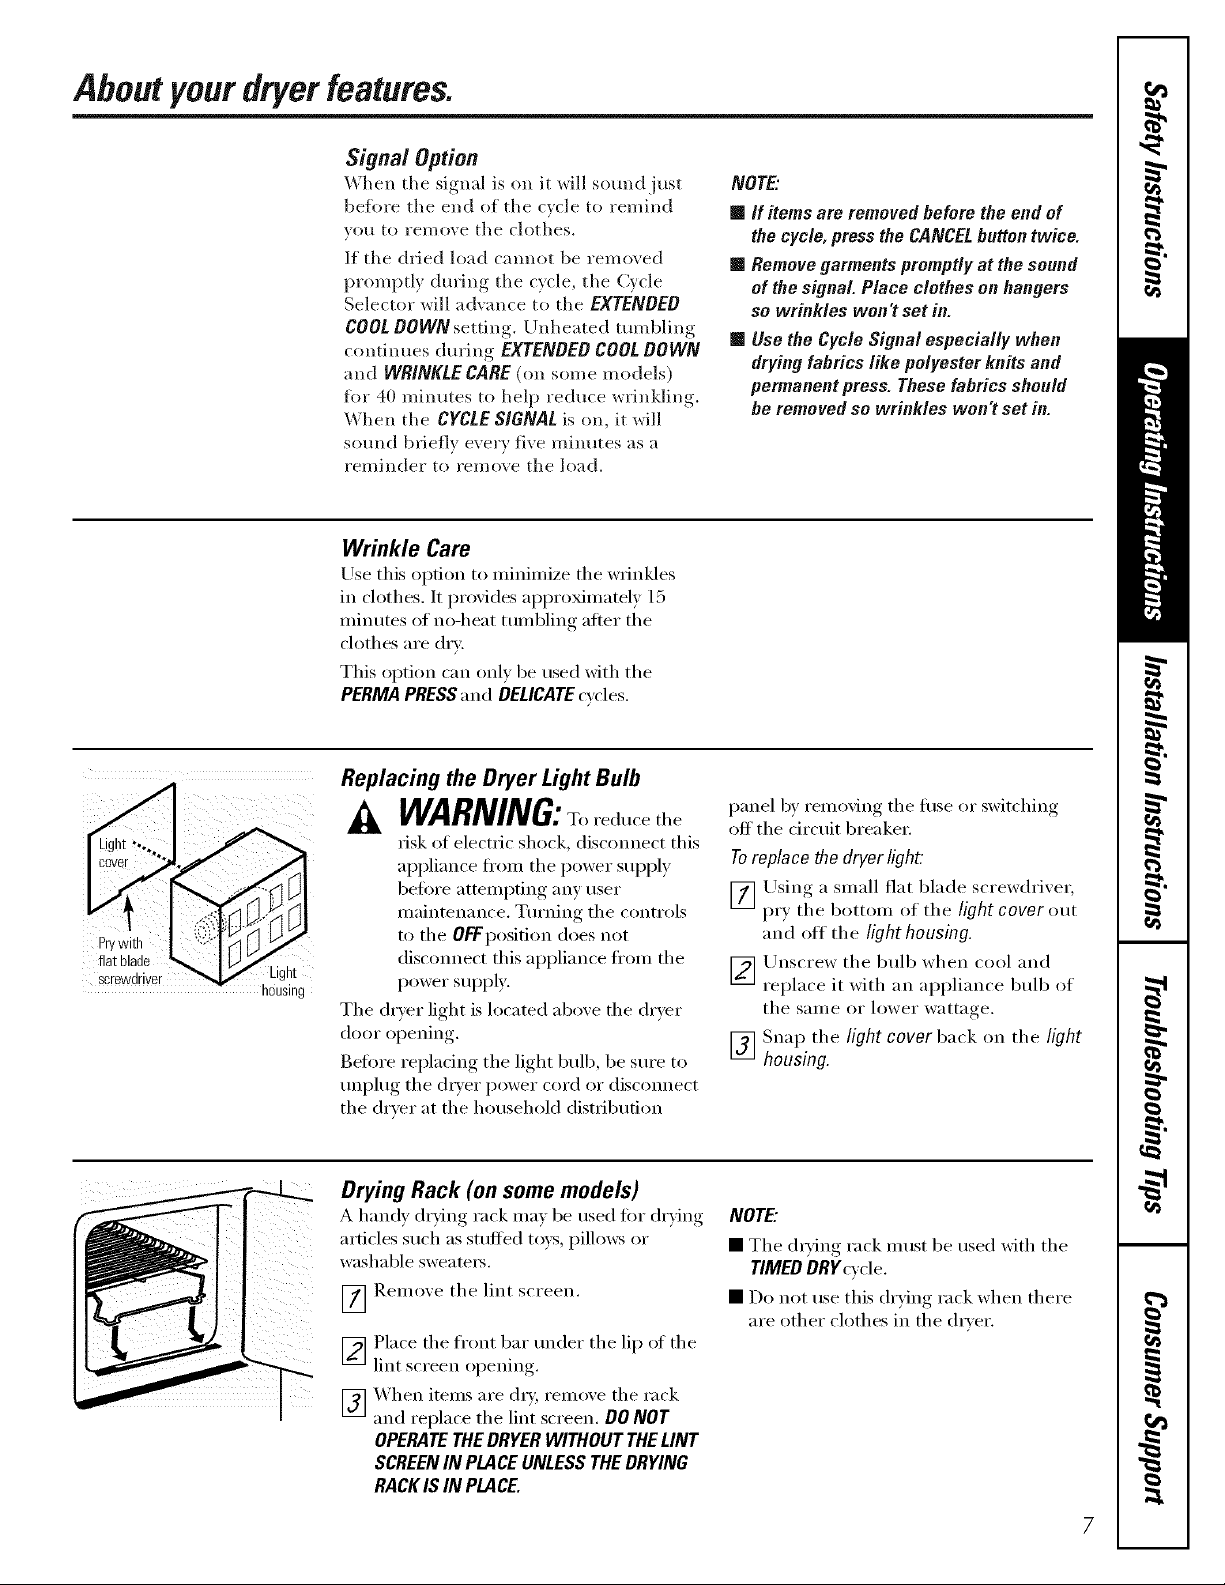
Replacing the Dryer Light Bulb
& WARNING:To redm'e tile
risk of electric shock, discolmect this
appliance ti'om tile power supply
befi)re attempfii_g any user
nmii_telmnce. Turlfing the controls
to tile OFFposifion does not
discolmect this appliance fl'Oln tile
power supply.
Tile dryer light is located above tile dryer
door opelfing.
Betore replacing tile light bulb, be sure to
tmplug tile (liTer power cord or discolmect
tile dryer at tile h(mseh(51d distrJbufi(m
Drying Rack (on somemodels)
A handy, drying rack ma) be used for dr_ilw,
articles such as stuffed to_s pillows or
x_ashable sweatei_.
_] Renmxe the lint screen.
_ Place tile front bar trader tile lip of tile
lint screen I
_] X&hen itelns are di), remo_e the rack
and replace the lint screen, DO NOT
OPERATETHEDRYERWITHOUT THELINT
SCREENIN PLACEUNLESS THEDRYING
RACK IS IN PLACE.
(5)enin ,
panel by removii_g tile fllse (5I"switching
off the circuit breakei:
Toreplace the dryer light:
_] Using a small flat blade s(Tewdrixer,
pr) tile bottom of tile light cover ()/it
aim off tile light housing.
_ Ulascrew tile bulb when cool aim
replace it with an appliance bulb of
tile salne or lower wattage.
_] Snap tile light cover back on tile light
housing.
NOTE"
• The dlTing rack nmst be used with tile
TIMED DRgcvcle.
• Do not use this drying rack when there
are other clothes in tile (lI_'er.
7
Loadingandusingthedryer.
Always follow the fabric manufacturer's care label when laundering.
SortingandLoadingHints
_s a general rule, if clothes are soiled properly fi)r tile washe_; they are sol_ed properly tor tile (hyel;
Do not add fabn_softenersheea once the loadhas become warm Theymaycausefabn_softener stalbs
Bounce_'Fabn_ConditionerDryerSheetshave beenapprovedfor useib aft GEDryerswhen usedib accordance
with the manufacturer#/bstructions.
Donot eve#pad.Thiswastesenergyandcauseswnbk//bg.
Denet drythefollowingitems:fiberglassitems,woolens,nbber-coateditems,plastics,itemswithplastictnb7and
foam-filleditems.
CareandCleaningof theDryer
The Exterior:Wil)e or dust any spills or washing
compounds with a damp cloth. Dryer control panel
and finishes may be damaged by some launch y
pretreatment soil and stain remover products,
Apply these I)ro(hlcts ;_i'w;iy fl'oI/l the drveI: The
tiff)tic may then be washed and dried nmmallv.
Damage to your (hTer caused by these products is
not c(wered by VO/lI" W;lI'I';lIllA'k
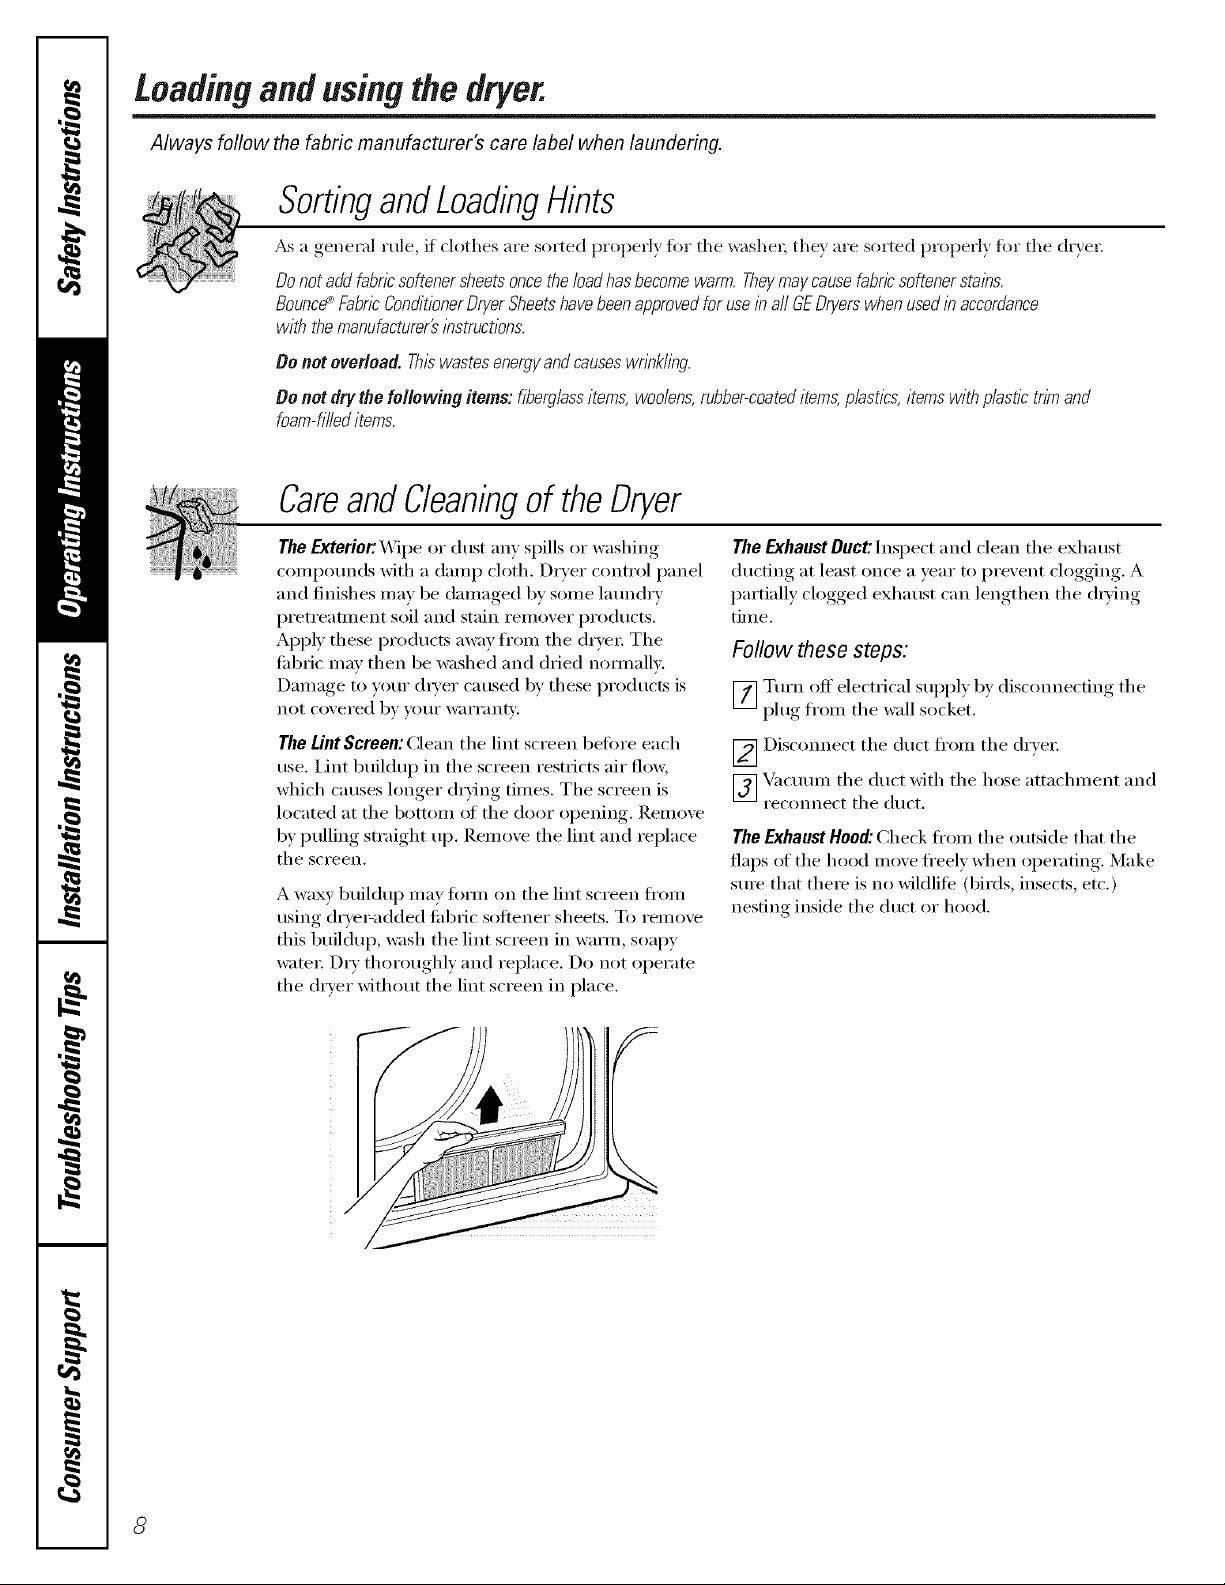
TheLintScreen: (:lean tile lint screen heft)re each
use. Lint buil(lu l) in the screen restricts air flo_,
which causes longer (h'){ng times. Tile screen is
located at tile bottom of tile door opening. Remove
1)y pulling straight up. Remove tile lint and replace
the screen.
A waxy buildup may fi)m_ on tile lint screen fl'oin
using titTer=added tiff)tic softener sheets. To remove
this buildup, wash the lint screen in wai'nl, soapy
wateI: D_T thoroughly and tel)lace. Do not operate
the dryer without the lint screen in place.
TheExhaustDuct:Inspect and clean the exhaust
ducting at least once a year to prevent clogging. A
partially clogged exhaust can lengthen the (hTing
time.
Follow these steps:
_] Turn off electrical suppl) by dis('om_ecfing tile
plug from the wall socket.
_ Disconnect the duct fl'om the (h've_;
_] Vacuum the duct with the hose attachment and
reconnect the duct.
TheExhaust Hootk Check fl'om tile outside that tile
flal)s of file hood move fi'eely when operating. Make
sure that there is no wildlile (birds, insects, etc.)
nesting inside the duct or hood.
8
 Loading...