

GE DSS25KGTBBB, DSS25KGRDBB, GSF25TGTABB, LSS25XGTEWW, DSS25KSRBSS Owner's Manual And Installation
...Page 1
ge.com
°e..<
:/3
Safety Instructions ............... 2-4
Operating Instructions
Automatic Icemaker ............... ] ]
Care and Cleaning .............. ] 3, ] 4
Crispers and Pans ................. ] 0
Ice and X_'ater Dispenser ......... ] 2, ] 3
Reflig_ramr Doors ................. 9
Replacing the Light Bu]bs ........... 15
Shelves and Bins ................. 7, 8
Temperature Controls ............... 5
TurboCool _'' . ...................... 5
V(ater Filter ....................... 6
Installation Instructions
Installing the Refligerator . ....... 21-24
Moving the Refiigerator . ........ 17-20
Preparing to Install
the Refiigerator . .................. 16
VC_ter Line Installation .......... 25-27
Troubleshooting Tips ........... 28-31
Normal Operating Sounds .......... 28
Consumer Support
Consumer Support ......... Back Cover
Performance Data Sheet ............ 32
Product Registration (U.S.) ....... 33, 34
Product Registration (Canadian) . . .35, 36
State of California X_'ater
Treatment Device Certificate ......... 37
VCarranty (Canadian) ............... 38
X_'arrantv (U.S.) ................... 39
Models23,25and27
C6te a C6te
R frig rateurs
La sectionfran_aise commencea la page40
Iado a Iado
Refrigeradores
La seccionen espa#olempieza enla pagina 74
Write the model and serial numbers here:
Model #
Serial #
Find these numbe_ on a label inside
the refl'igerator compartment at the
top on the IJght side.
200D8074PO03 49-60412 11-05JR
Page 2
IMPORTANTSAFETYINFORMATION.
READALLINSTRUCTIONSBEFOREUSING.
WARNING!
Use this appliance only for its intended purpose as described in this Owner's Manual
SAFETYPRECAUTIONS
When using electrical appliances, basic safety precautions should be followed, including the following:
i)::This refi'igerator must be properly installed
and located in accordance with tile Installation
Instructions before it is used.
i)::Do not allow children to climb, st;rod or hang
on the shelves in the reli-igerato_: They could
damage the reti_igerator and seriously iqj ure
themselves.
::_ Do not touch tile cold sui_lilces in tile fl'eezer
compartment when hands are damp or wet. Skin
may stick to these extremely cold sudhces,
}_'<Do not store or use gasoline or other flammable
\_q)o_ and liquids in tile vicinity of this or any
other appliance.
i)_:In refl'igerato_ with automatic icemake_,
avoid contact with the moving parts of the
ejector mechanism, or with tile heating element
located on tile bottom of tile icemake_: Do
not place tinge_ or hands on tile automatic
icemaking mechanism while the refrigerator
is plugged in.
i)_:Kee I) finget_ out of tile "pinch point" areas;
clearances between the doo_ and between
the doo_ and cabinet are necessarily small.
Be caretul closing doo_ when children are
in the area.
i)_:Unplug tile refrigerator befiwe cleaning and
making repairs.
NOTE."We stronglyrecommendthatanyservicingbe
performedby aqualified individual
i)::Setting either or both controls to 0 (off)does not
remove power to the light circuit,
::__Do not refl'eeze fl'ozen fi)ods which have
thawed completely,
Page 3
ge.com ........
A DANGER! RISK OFCHILDENTRAPMENT
PROPERDISPOSAOFTHEREFRIGERATORL 0 0 0
Child entral)ment and .;tiff' cati n are n t pr blems Refrigerants
of the past.Junked or abandoned refl_igerato_ are
still danoerous exen if they will sit for "'ust a few M1 refl_igeration products contain refl'i_erants,,
days." If)ou are getting cid of)our old refcigeratox; which trader federal law must be removed prior
to )roduct disposal If you are ,ettin , cid of
I:1 refIJgerati°n [ff°d uct: ('li:c k '_i: hthe
0 } '* ' " ' _ 8 }lIl
accidents.
cmpan) handlin_ the di.;p ,;al abut what _'D
Before YouThrowAway YourOldRefrigerator t,, d,,.
or Freezer: _"
iJi::Take off the cloox_. _"
!i_:I,eaxe the shelxes in place so that children ma) _
not easilx climb inside, t'_
USEOFEXTENSIONCORDS
Because of potential safety hazards under certain conditions, we strongly recommend against the use
of an extension cord.
However; if xou must use an extension cord, it is absolutelx necessarx that it be a UIAisted (in the United _"
States) or a CSA-listed (in Canada), 3-wire grotmding D'pe appliance extension cord haxing a grounding _'
_])e I)lu'*_ and outlet and that the electcical ratin,*_ of the cord be 15 amperes (minimum) and 120 xolts.
g
g
g
3
Page 4
IMPORTANTSAFETYINFORMATION.
READALLINSTRUCTIONSBEFOREUSING.
WARNING!
HOWTOCONNECTELECTRICITY
Do not, under any circumstances, cut or remove the third (ground) prong from the power cord. For
personal safe_ this appfiance must be properly grounded.
The power cord of this appliance is equipped with
a 3-prong (grounding) plug which inates with
a standard 3-prong (gromMing) wall outlet to
minimize the possibili_' of electric shock hazard
from this appliance.
Have the wall outlet and circuit checked by a
qualNed electridan to make sure the outlet is
propedy grotmded.
If the outlet is a standard 2-prong outlet, it is
yore" personal responsibili_' and obligation to
have it replaced with a properly grotmded
3-prong wall outlet.
The refl_igerator should always be plugged into its
own individual electrical outlet which has a voltage
rating that matches the rating plate.
This provides the best pertimnance and also
I)rexents oxerloading, house wiring circuits which
could cause a fire hazard fl'om oxerheated wires.
Never tmplug yore" refrigerator by pulling on
the power cord. Mways grip plug firefly and pull
straight out fl'om the outlet.
Repair or replace immediately all power cords that
have become fl'ayed or otherwise damaged. Do not
use a cord that shows cracks or abrasion damage
along its length or at either end.
When moving the refl_igerator away from the
wall, be careflfl not to roll over or damage the
power cord.
READANDFOLLOWTHISSAFETYINFORMATIONCAREFULLY.
SAVETHESEINSTRUCTIONS
4
Page 5
Aboutthe temperaturecontrols, gecom
FREEZER FRESHFOOD _-_
91SCOLDEST
OISOFF
I
J
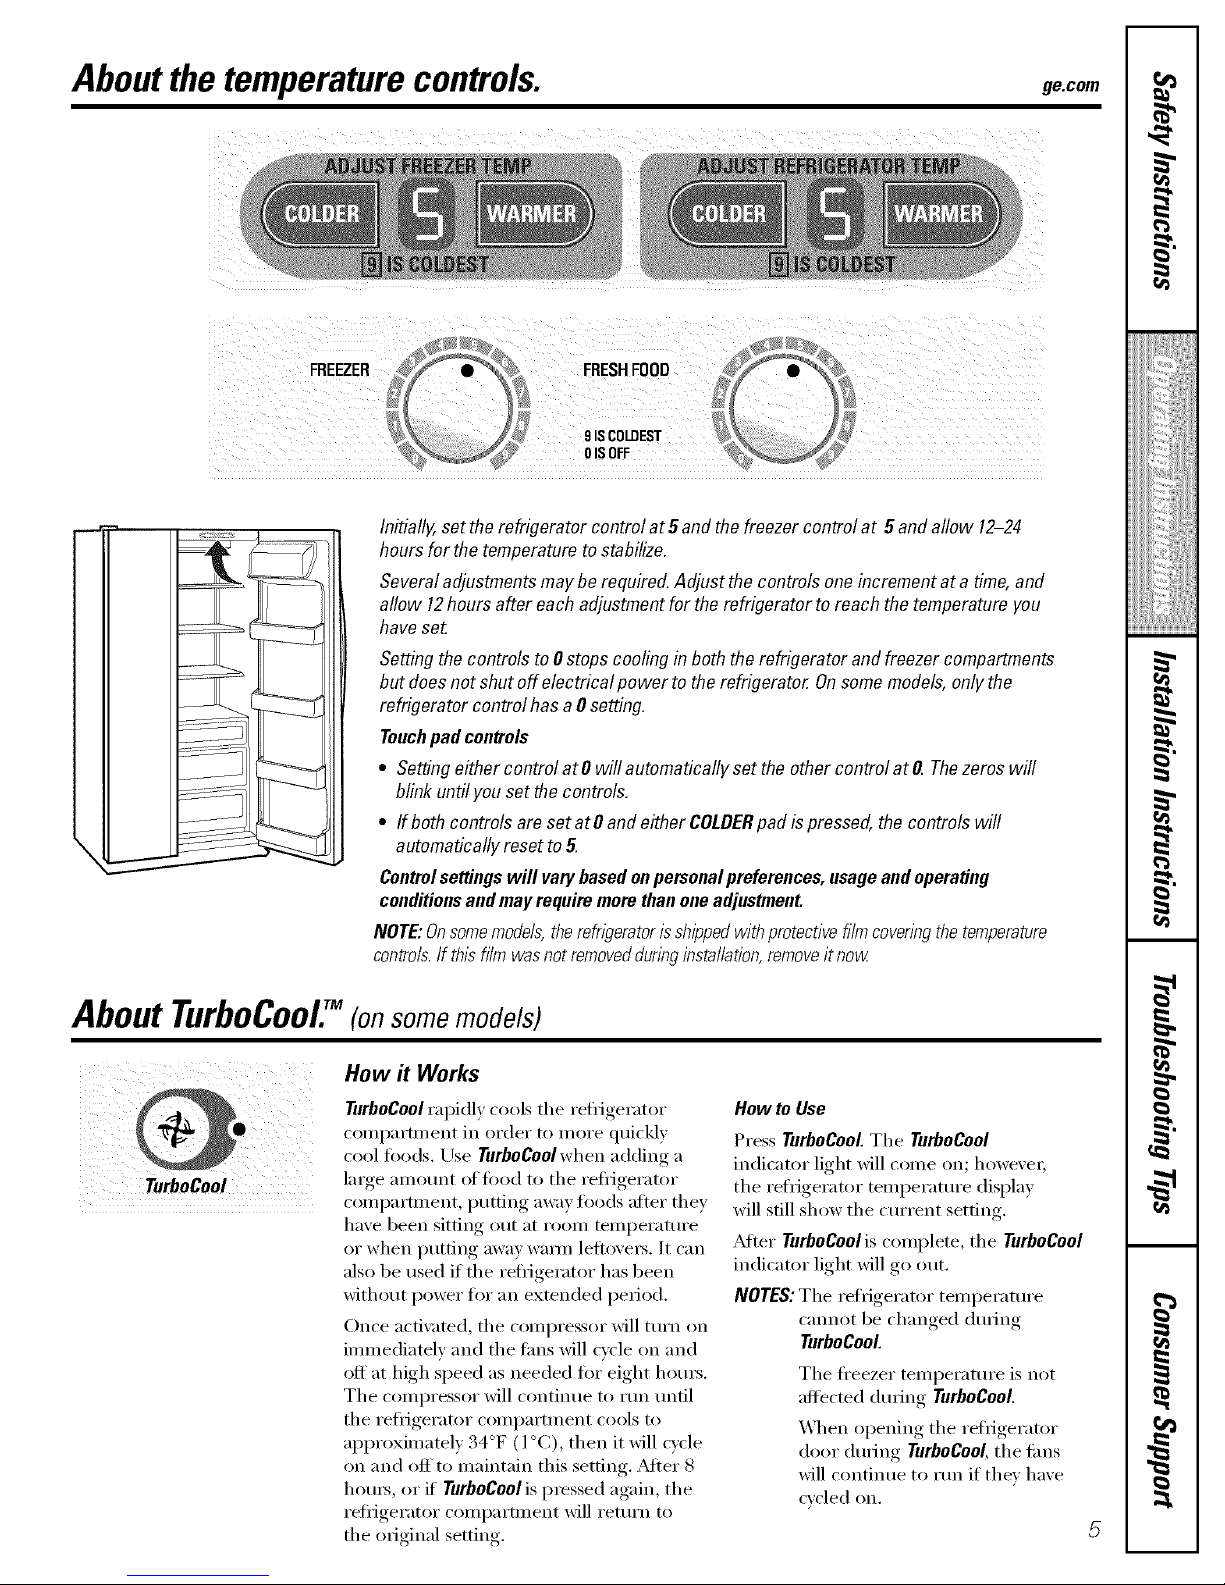
Initially,set therefrigeratorcontrolat5 and thefreezercontrol at 5 andallow 12-24
hoursfor thetemperaturetostabilize.
Severaladjustmentsmaybe required.Adjust the controls oneincrementata time,and
allow 12hours after eachadjustmentfor the refrigeratorto reachthe temperatureyou
haveset
Settingthe controlsto 0 stopscooling in boththerefrigerator andfreezer compartments
but does notshutoffelectrical power to therefrigerator.Onsomemodels,onlythe
refrigerator control hasa0setting.
Touchpadcontrols
• Settingeithercontrol at0will automaticallyset the other controlat O.Thezeroswill
blink until yousetthecontrols.
• If both controlsaresetat0 andeither COLDERpad ispressed,thecontrolswill
automaticallyresetto 5.
Controlsettings will varybasedonpersonalpreferences,usageandoperating
conditionsandmayrequiremorethanoneadjustment.
NOTE:Onsomemodels,therefr/_?eratorisshippedwithprotectivefilmcoveringthetemperature
controls.If thisfilmwasnotremoveddunnginstallation,removeitnow
About TurboCooEM(onsome models)
How#Works
TurboCool rapidly cools tile refi_igerator
coml)amnent in order to more quickly
cool fi)ods. Use TurboCool when adding a
large alnount of food to tile refl_igerator
compartment, putting away foods alier they
have been sitting out at room temperatm'e
or when putting away wam_ leftovers. It can
also be used if the reti{gerator has been
without power fl)r an extended period.
Once acti\:_te(l, tile compressor will turn on
immediately and the rims will cycle on and
off at high speed as needed fin" eight horns.
Tile compressor will continue to rtm tmtil
tile refl_igerator compartment cools m
approximately 34°F (l °C), then it will cycle
on and off to maintain this setting. _Mter 8
hom_, or if TurboCool is pressed again, tile
refligerator compartment will retm'n to
the original setting.
How to Use
Press TurboCool.Tile TurboCool
indicator light Mll come on; howe\'e_;
tile refrigerator temperatm'e display
will still show the current setting,
_Mter TurboCoolis colnplete, tile TurboCool
indicator light will go out.
NOTES:The refl{gerator temperature
cam_ot be changed during
TurboCool.
Tile fl'eezer temperature is not
affected duI_ng TurboCooL
_]/en opening tile reli_gerator
door dm'ing TurboCooLtile rims
will continue to rt:m if they have
cycled oIL
Page 6
Aboutthe water filter (onsomemodels).
On some models
Water FilterCartridge
The water filter cartridge is located in tile back upper right
corller of tile reflJgerator COlllpartl/lellt.
When toReplace the Filter onModels With a
ReplacementIndicatorLight
There is a replacement indicator light for tile water filter
cartridge on the dispense_; This light will mrn orange to tell
you that you need to replace tile filter soon.
The filter cartridge should be replaced when the
replacement indicator light ttlI'IlS red or if tile flow of water
to the dispenser or icemaker decreases.
When toReplace the Filter onModels Withouta
ReplacementIndicatorLight
The filter cartridge should be replaced every sixmonths
or earlier if the flow of water to tile water dispenser or
icemaker decreases.
Removingthe Filter Cartridge
If you are replacing tile cartridge, ti_t remove tile old one
by slowly turning it to tile lelL Do n0t pull down on tile
cam-klge. A small amo/mt of water may drip down.
Installing the Filter Cartridge
If _u are re )la('im, a SmartWater cart_idoe with an
adapte_, tile adapter illtlst be remoxed before mstalhng
tile cartridge. To remove tile adapte_; turn it to tile left
about l/4 turn.
lfw_u are replacing a Water by Culligan cartridge,
leave the adapter in place. This adapter will stay in the
refligerator when you replace filture cartridges.
With adapter Withoutadapter
(appearance may vary)
@ On models without a replacement indicator light,
apply tile month and year sticker to tile new cartfidoe
to remind _ou to replace tile filter in six months.
0 t[_ii)'lait111),e:_ i)11! ;i(;;lt_ e I_]to,<_i 111.1J)11f t_/_;it(ll;s;_i_tlesl;J!; i_ i i{lel(_itl_Ie;v
after installation.
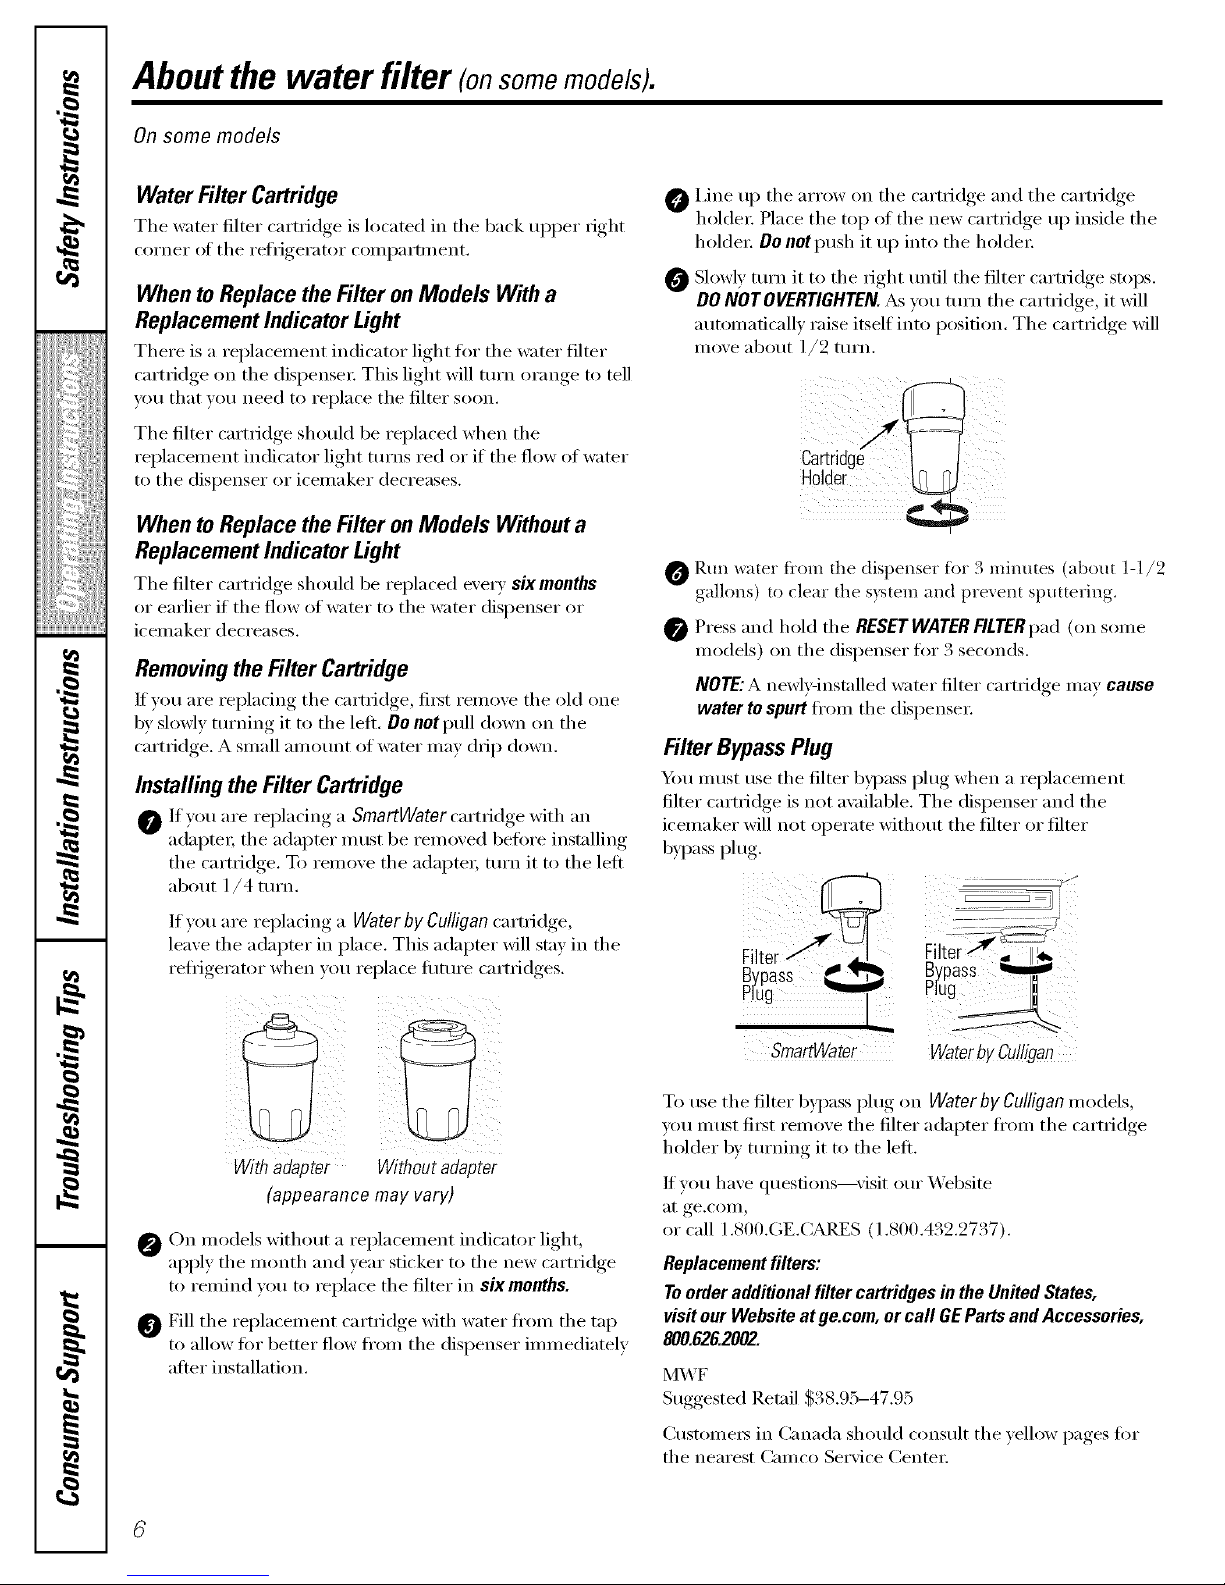
O i,ine up tile arrow on tile cartridge and tile cartridge
holder: Place the top of the new cartridge up inskle the
holdex: Do not push it up into tile holdex:
Slowly mrn it to tile right tmfil tile filter cartridge stops.
DO NOTOVERTIGHTEN. As you turn tile cartridge, it will
automatically raise itself into position. The cartridge will
inoxe about ]/2 turn.
O Run water fl'om the dispenser fin" 3 mintttes (about 1-1/2
galhms) to clear the s_stem and pre_ent sputtering,
Press and hold tile RESET WATERFILTERpad (on some
models) on the dispense_ fin 3 seconds.
NOTE:A newly-installed water filter cartridge may cause
water to spurt li'om tile dispenser.
FilterBypassPlug
"Mu must use tile filter bH)ass plug when a replacement
filter cartridge is not a\_filable. Tile dispenser and tile
icemaker will not operate without the filter or filter
bxl)ass plug
SmartWater
r-
]
• - 4 _
Filter-I",,
Bypass
Plug_
WaterbyCulligan
To use the filter bypass plug on Waterby Cu//igan Inodels,
you must first remove the filter adapter tram the cartri(l_e
hokler bx turniwd it to the left.
If wm have q uesfi(ms--visit ()/u" XA'ebsite
;It ge.c( )111,
or call 1.800.GE.CARES (1.800.432.2737).
Replacement filters:
To order additional filter cartridgesin the United States,
visit our Website at ge.com, or call GE Parts and Accessories,
800.626.2002.
M\,_F
Suggested Retail $38.95-47.95
(;ustomers in Canada should consult tile )elh)w pages fin.
tile nearest Camco Serxice Centei:
Page 7
Abouttheshelvesandbins. gecom
Not all features are on all models.
Snugger
Refrigeratorom
Freezer bin
Freezer tilt-out bin
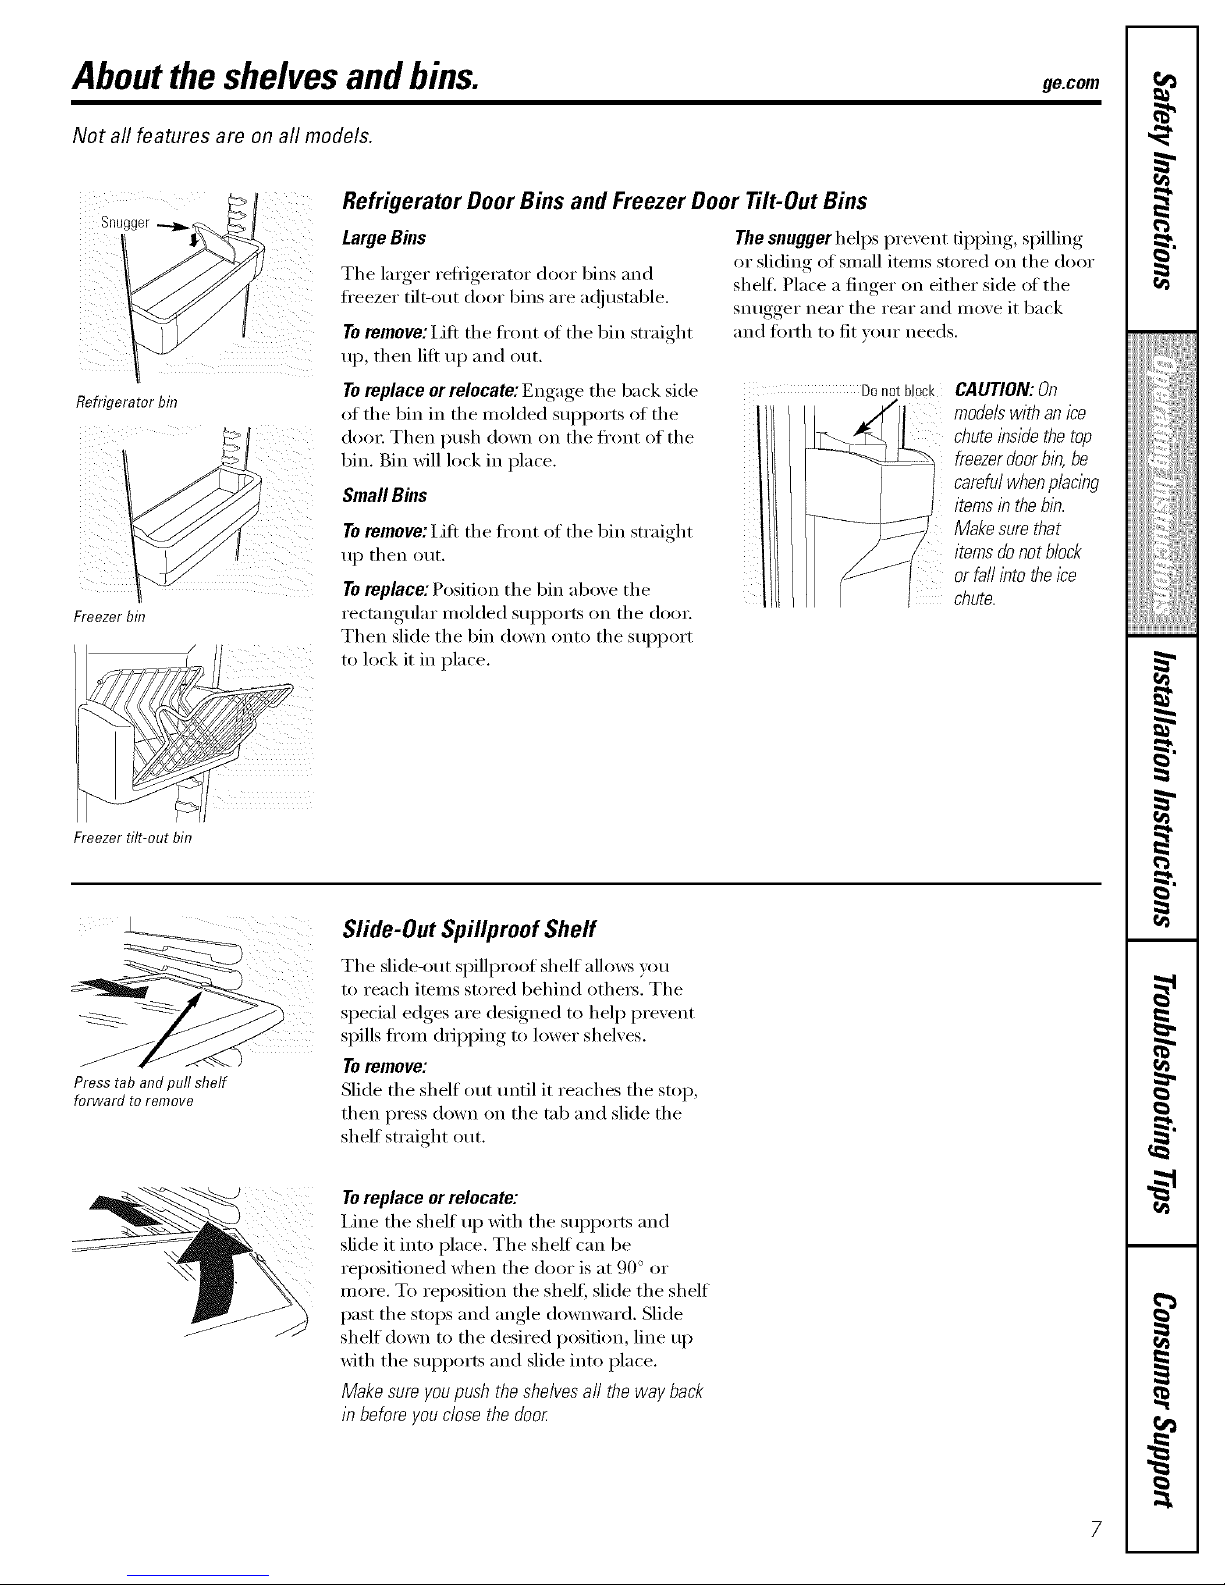
Refrigerator Door Bins and Freezer Door Tilt-Out Bins
Large Bins
The larger refligerator door bins and
fl'eezer tilt-out door bins are ac!iusmble.
Toremove: lift the ti'ont ot the bin straight
up, then lift up and out.
The snugger helps prevent tipping, spilling
or sliding of small items stored on the door
shelfi Place a finger on either side of the
snugger near the rear and move it back
and forth to fit your needs.
Toreplace or relocateJ Engage the back side Donotblock
of the bin in the molded supports of the [[ /J]
dora: Then push down on the front of the
bin. Bin will lock in place.
SmallBms
Toremove: IJfl the fl'ont of the bin straight
up then out.
Toreplace: Position the bin above the
rectangular molded supports on the (lore:
Then slide the bin down onto the support
to lock it in place.
CAUTION:On
modelswithanice
chuteinsidethetop
freezerdoorbin,be
carefulwhenp/aclbg
itemsinthebb.
Makesurethat
itemsdonotblock
orfailintotheIce
chute.
Press tab and pull shelf
forward to remove
Slide-Out Spillproof Sheff
The slide-out spillproot shelf allows you
to reach items stored 1)ehind othe_. The
special edges are designed to help prevent
spills fl'om dripping to lower shelves.
Toremove:
Slide the shelf out tmtil it reaches the stop,
then press down on the tab and slide the
shelf straight out.
Toreplace orrelocate:
I,ine the shelf up Mth the supports and
slide it into place. The shelf can be
reposifioned when the door is at 90 ° or
more. To reposition the shelf, slide the shelf
past the stops and angle downward. Slide
shelf down to the desired position, line up
with the supports and slide into place.
Make sure youpush the shelves all the way back
in before you dose the door
Page 8
Abouttheshelvesandbins.
Not all features are on all models.
QuickSpace TM Sheff (onsomemodels)
This shelf splits in half and slides under
itself for storage _ff tall items on the shelf
below.
This shelf can be removed and replaced
or relocatedj ust like Slide-Out Spillpmof
Shelves,
On some models, this shelf can not be used
in the lowest position.
Freezer Baskets
To remove, slide out to the stop position,
lift the fl'ont past the stop position, and
slide out,
Makesureyoupushthebasketsall thewayback
in beforeyouclosethe door
i/ iTM:
Sfide-Out Freezer Shelves
Toremove, slide out to the stop position,
lift the front past the stop position, and
slide out fl'om rib,
Makesureyoupushtheshelvesall thewayback
in beforeyouclosethe door
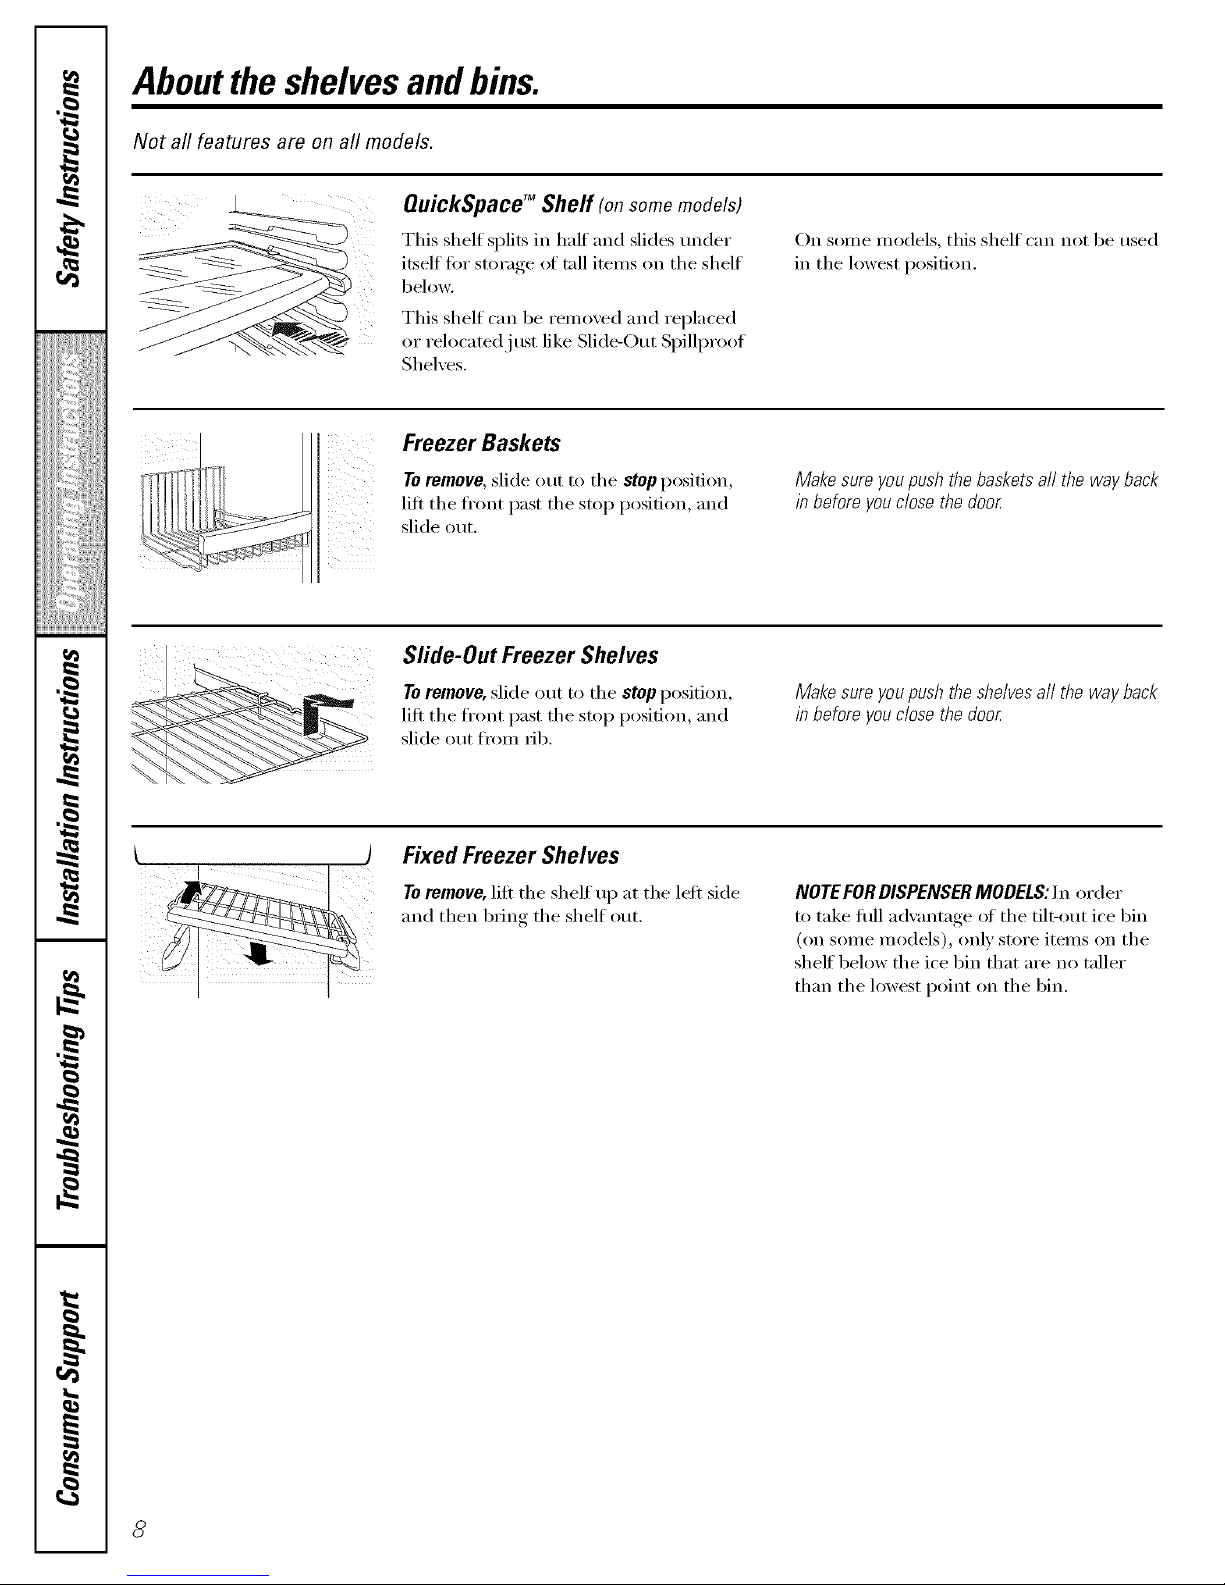
Fixed Freezer Shelves
To remove, lift the shelf up at the left side
and then bring the shelf out,
NOTE FOR DISPENSER MODELS: In order
to take flfll advantage of the tilt-out ice bin
(on some models), only store items on the
sheff 1)elow the ice bin that are no taller
than the lowest point on the bin,
Page 9
Abouttherefrigeratordoors, gecom
I.
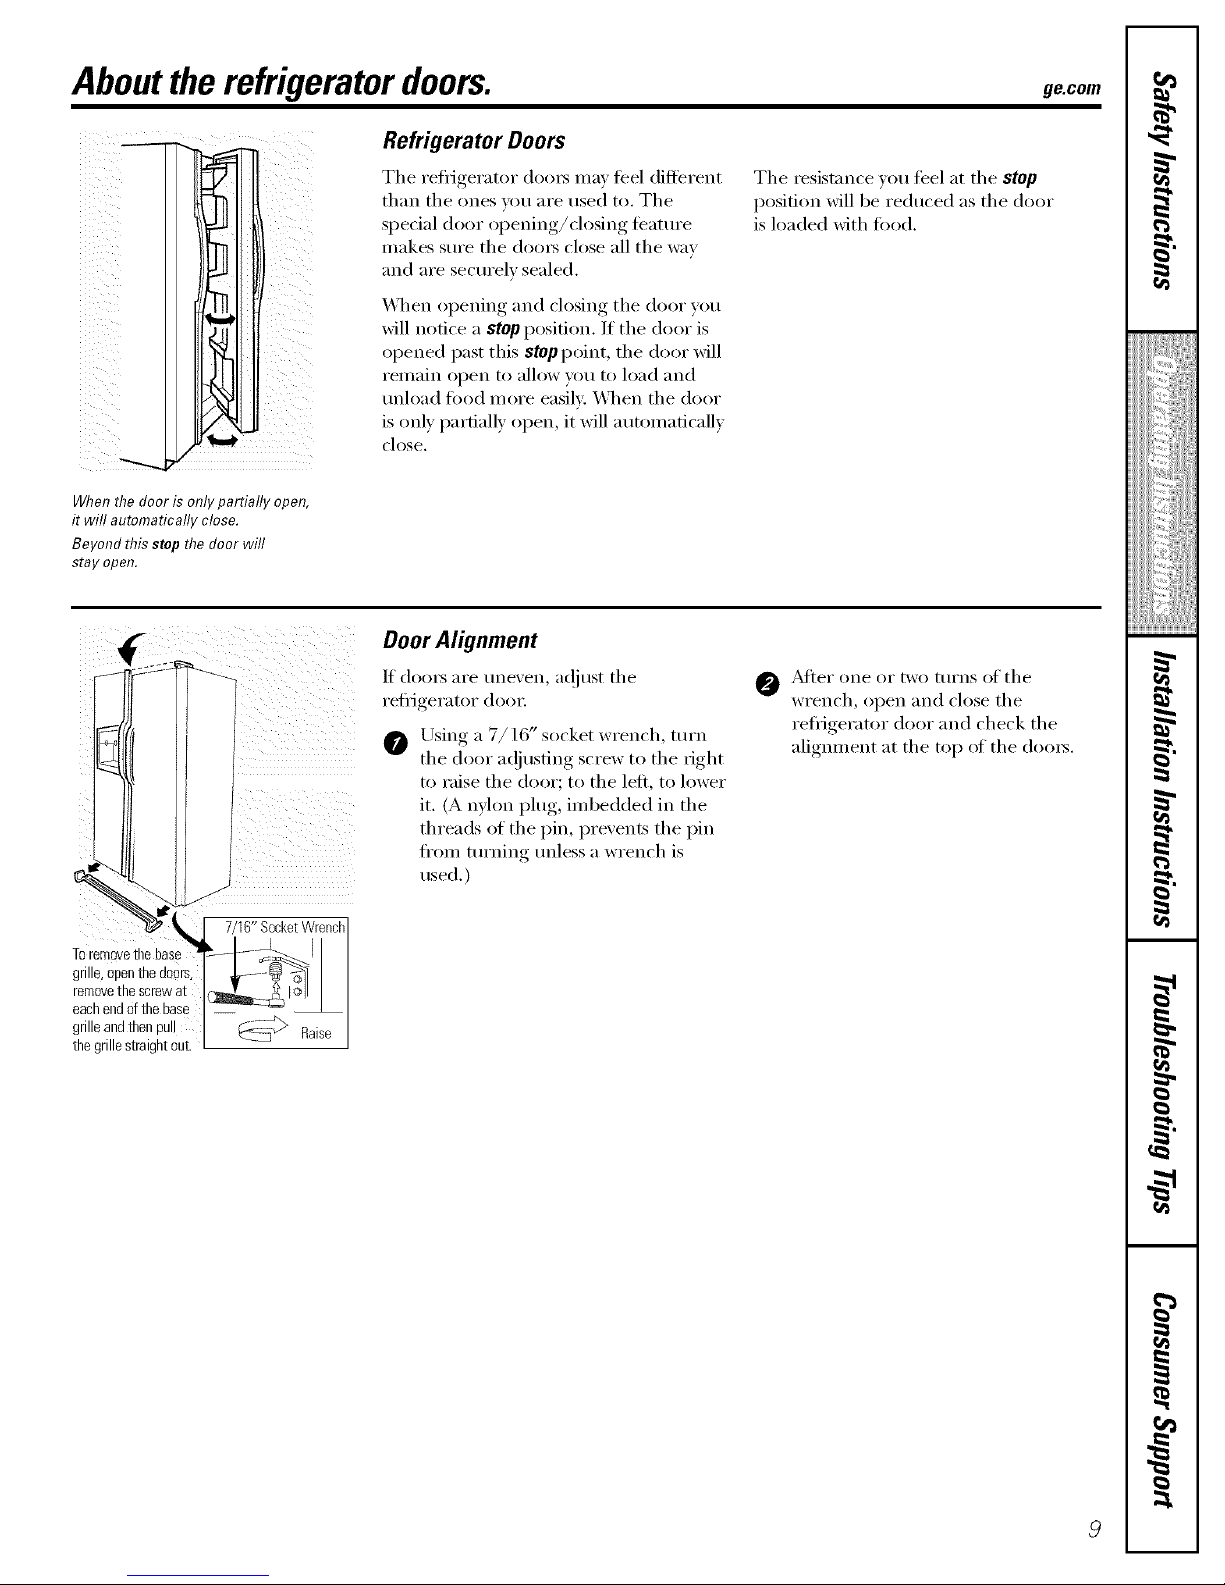
Refrigerator Doors
The refl_igerator (loo_ may teel different
than the ones you are used to. The
special door opening/closing teature
makes sm'e the do(n_ close all the way
and are secm'elv sealed.
_Al_en opening and closing the door you
will notice a stop position. If the door is
opened past this stop point, the door will
I'eI/l}lin el)on 1o allow you to load }lll(1
mdoad fi)od inore easily. _\]/en the door
is only partially open, it will automatically
close,
The resistance xou teel at the stop
position will be reduced as the door
is loaded with fi)od.
When the door is only partially open,
it will automatically close.
Beyond this stop the door will
stay open.
Door Alignment
If doot_ are tme\'en, at!just the
refligerator dooI:
O Using a 7/] 6" socket wrench, ttli'n
the door a(!justing screw to the right
to raise the door; to the left, to lower
it. (A nfl(m plug, imbedded in the
threads of the pin, prevents the pin
fl'om turning tmless a wrench is
used.)
0 _Mter one or [\vo turns of the
wrench, open and close the
refl_igerator door and check the
aligmnent at the top of the doors.
Page 10
Aboutthe crispersandpans.
Not all features are on all models.
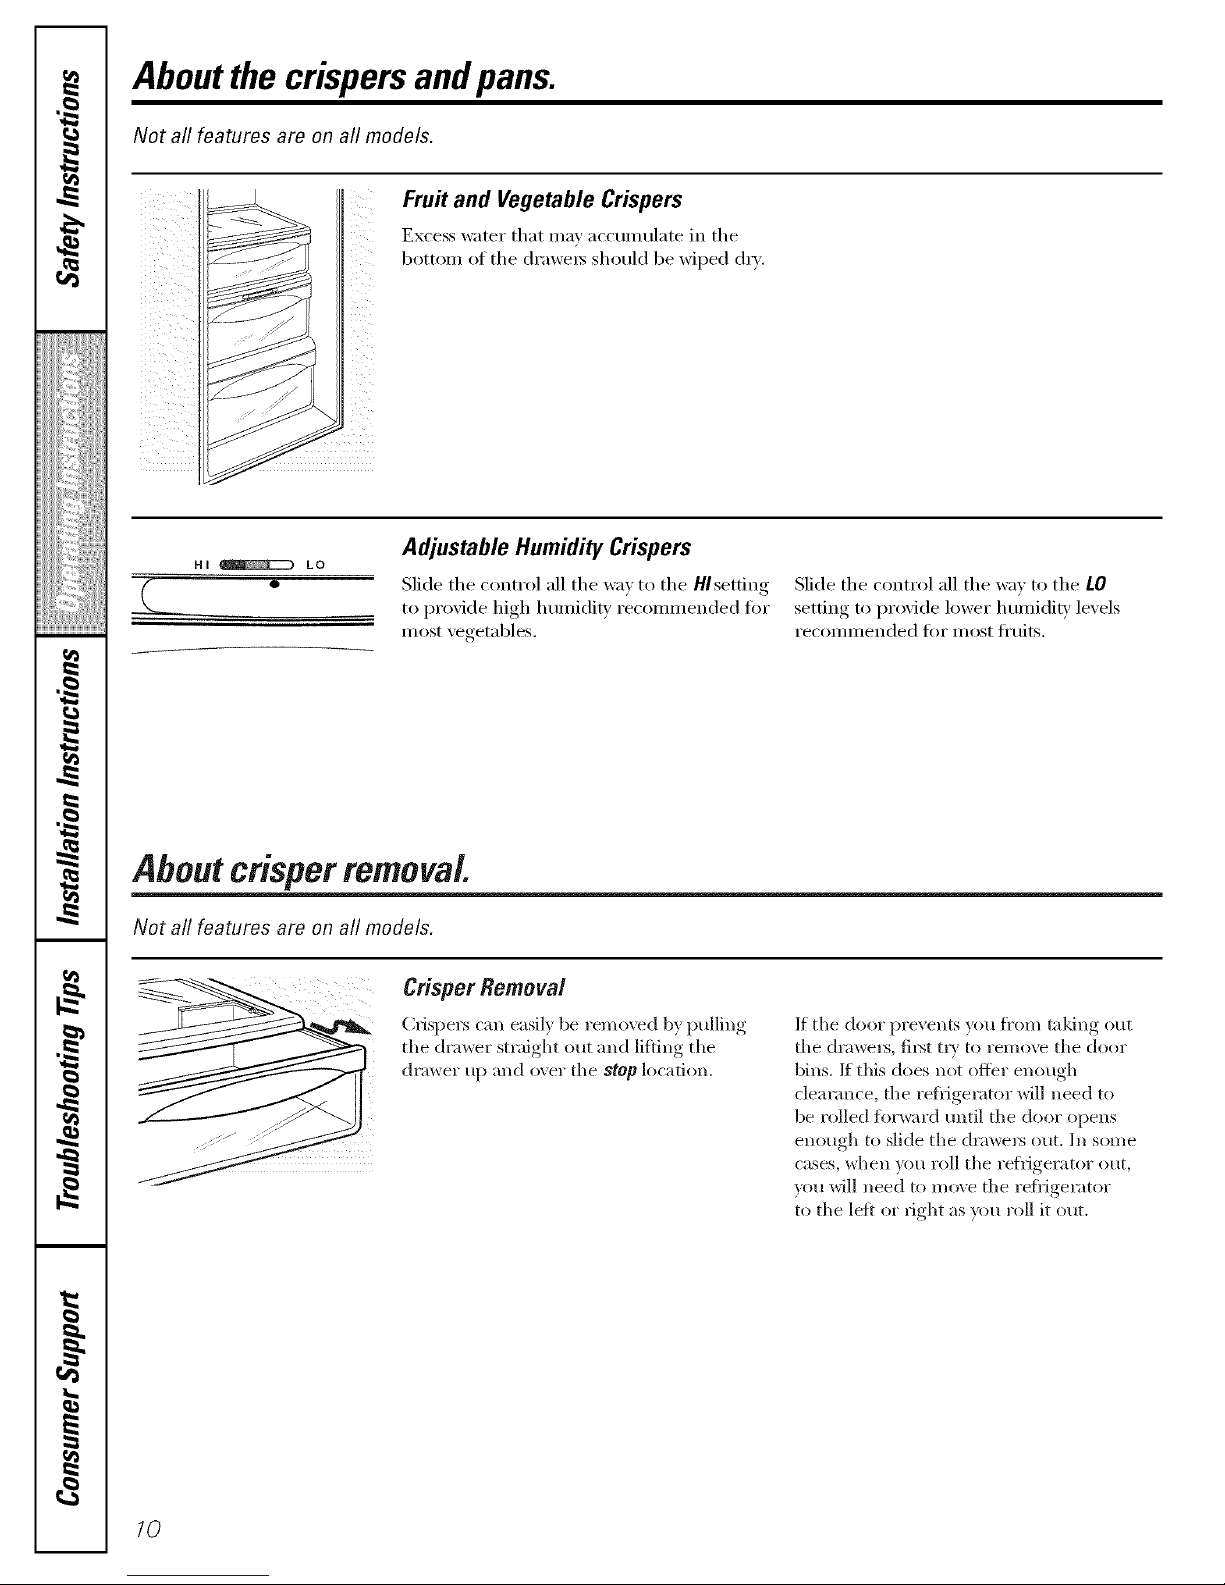
Fruit and Vegetable Crispers
Excess water that may a(('unmlate in the
botton_ of the drawe_s should be wiped (h_'.
Adjustable Humidity Crispers
Slide the control all tile _W to the HI setting
to provide high humidly' recommended tor
most vegetables.
Slide tile control all tile wm to tile LO
,settino_ to proxi(le lower humidity, lex els
recommended tot most ti'uits.
Aboutcrisper removal
Not all features are on all models.
Crisper Removal
Crispers can easily be remo\vd by pulling
tile drawer straight out and lifting the
drawer up and _wer tile stop location,
If tile door prevents you fl'om mldng out
tile dmwels, fil_t t D' to remove tile door
bins. If this does not offer enough
clear;race, tile refl_ge)ator will need to
be rolled ii)r_rd until tile door opens
enough to slide tile ch'a_'e_ ()l/t, Ill soi//e
cases, when )_m roll tile refldgerator out,
3_m will need to m_we tile refiigelator
to tile lett or right as you roll it out.
10
Page 11
Abouttheautomaticicemaker, ge.com
A newly installed refrigerator may take 12to 24 hours to begin making ice.
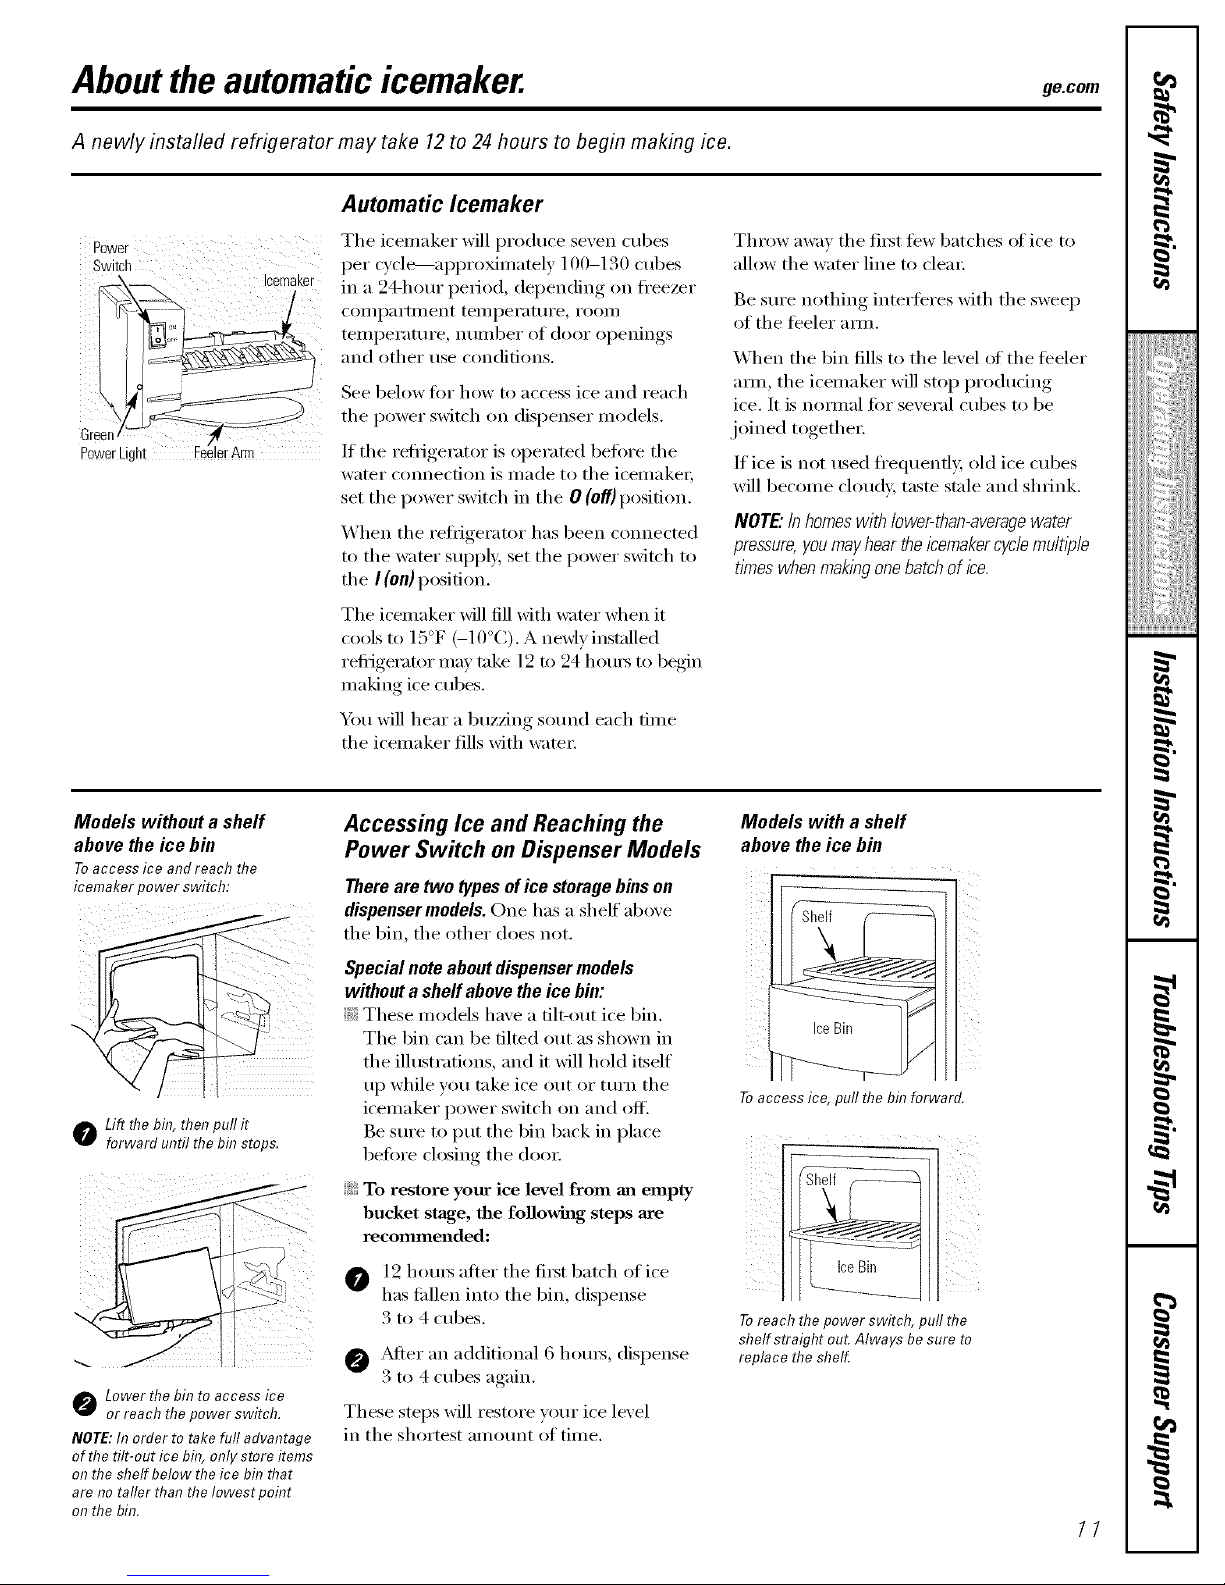
Automatic Icemaker
Power
Switch Icemaker
PowerLight _rArm
The icemaker will produce seven cubes
per cycle----ai)i)roxin/ately 100-130 cubes
in a 24-hour period, depending on fl'eezer
coi//l)ai'tillent tei//l)ei'attli'e _ i'ooi//
temperature, number of door openings
and other use conditions.
See below fin" how to access ice and reach
the power switch on dispenser models.
If the reti_igerator is operated betore the
water connection is made to the icemakei;
set the power switch in the 0 (off) position.
When the refl-igerator has been connected
to the water supply, set the power switch to
the I (on) position.
The icemaker will fill with water when it
cools to 15°F (-10°C). A newly installed
refi_igerator may take 12 to 24 hours to begin
making ice cubes.
You will hear a buzzing sound each dine
the icemaker fills with watei:
Throw awm the first tew batches of ice to
allow the water line to clem:
Be sure nothing interteres with the sweep
of the feeler ram.
When the bin fills to the level of the teeler
ram, the icemaker will stop producing
ice. It is nomml fin" several cubes to be
joined togethei:
If ice is not used fl'equenfl> old ice cubes
will become cloudy, taste stale and shrink.
NOTE."Inhomeswith lower-than-averagewater
pressure,you mayhear the icemaker cyclemultiple
times whenmakingone batchof ice.
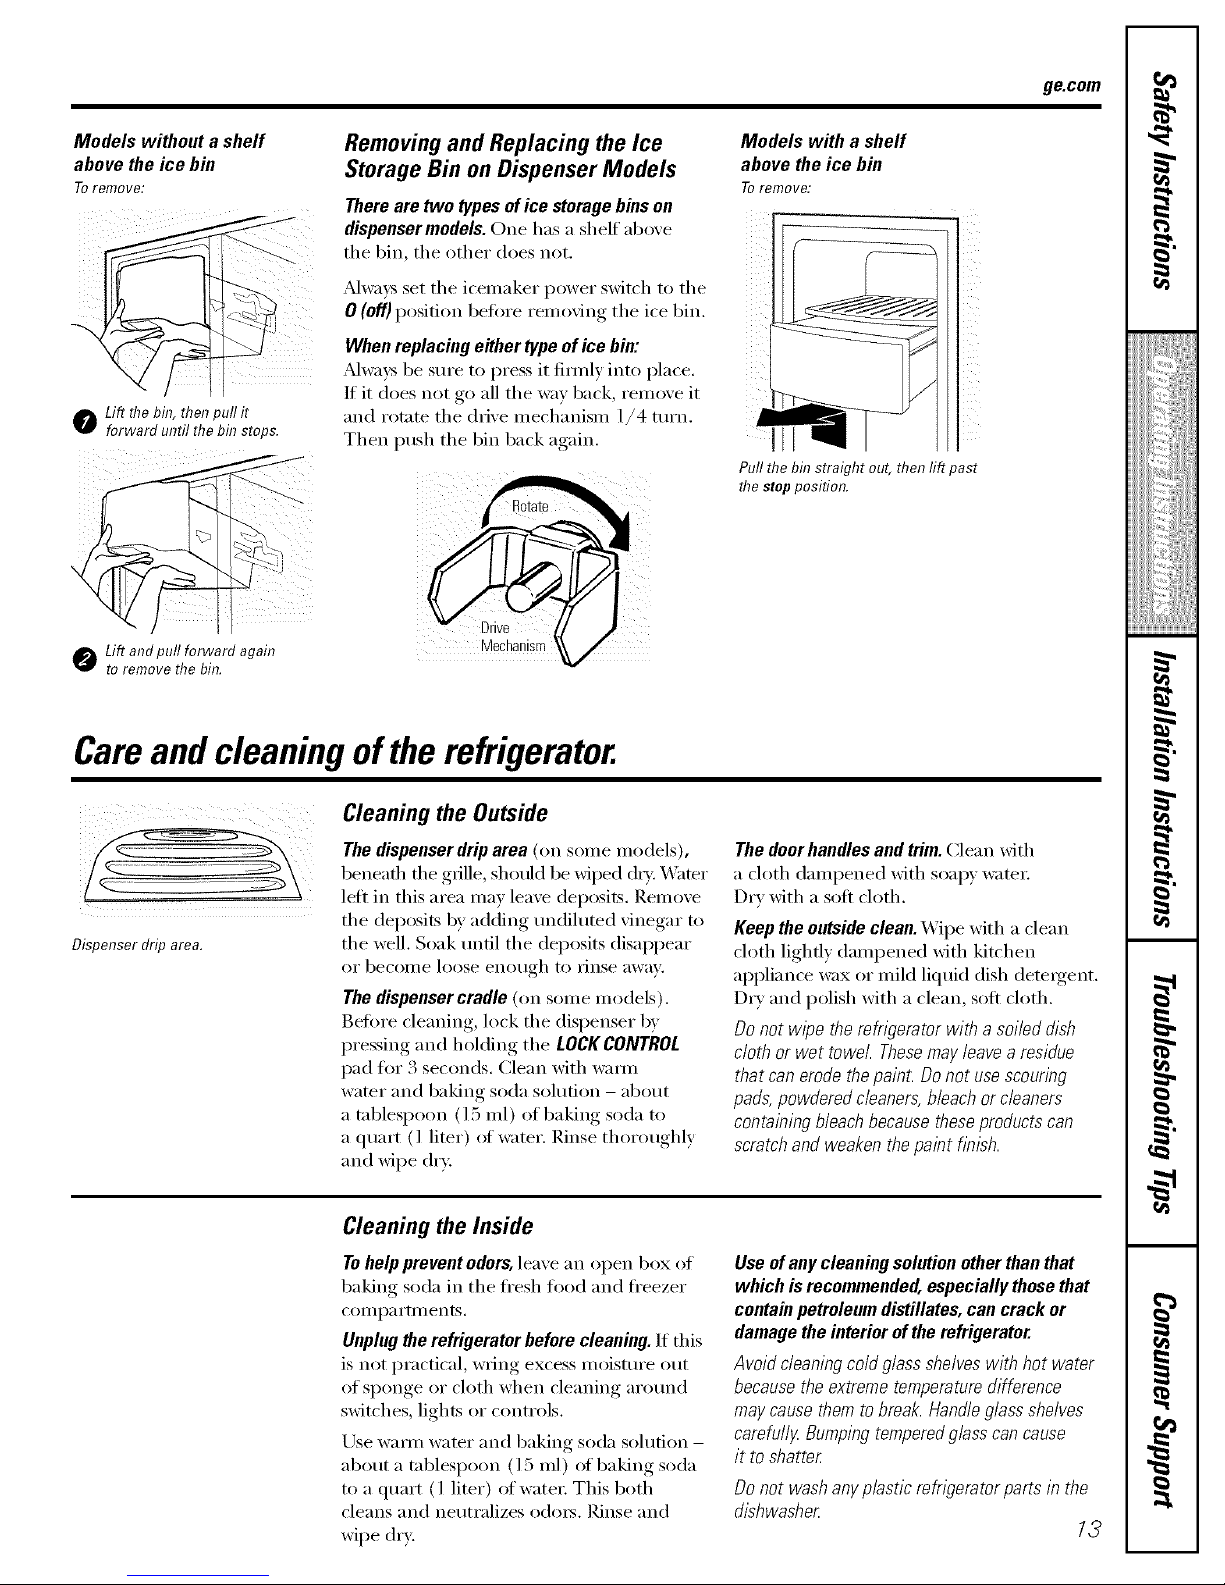
Models without a shelf
above the ice bin
Toaccessiceandreachthe
icemakerpowerswitch:
o Lift flTebin, then pull it
forward until the bin stops.
Lower thebin to access ice
or reach the power switch.
NOTE:In order to take full advantage
of the tilt-out ice bin, only store items
on the shelf below the ice bin that
are no taller than the Iowest poflTt
on the bin.
Accessing Ice and Reaching the
Power Switch on Dispenser Models
Thereare two types of ice storage bins on
dispenser models. One has a shelf aboxe
the bin, the other does not.
Special note about dispenser models
without a shelf above the ice bin:
ii;:These models have a tilt-out ice bin.
The bin can be tilted out as shown in
the illustrations, and it will hold itself
up while you take ice out or turn the
icemaker power switch on and off.
Be sure to put the bin back in place
before ch)sin_* the (looI:
To restore your ice level from an empty
19 houi_ atter the fii_t batch ofice
O
has fidlen into the bin, dispense
3 to 4 cubes.
@ _Mter an additional 6 horns, dispense
3 to 4 cubes again.
Models with a shelf
above the ice bin
Toaccessice,pullthe binforward.
Toreach the power switch, pull the
shelf straight out Always besure to
replace the shelf.
These steps will restore your ice level
in the shortest ai//otint of time.
11
Page 12
About the ice and water dispenser (onsome models).
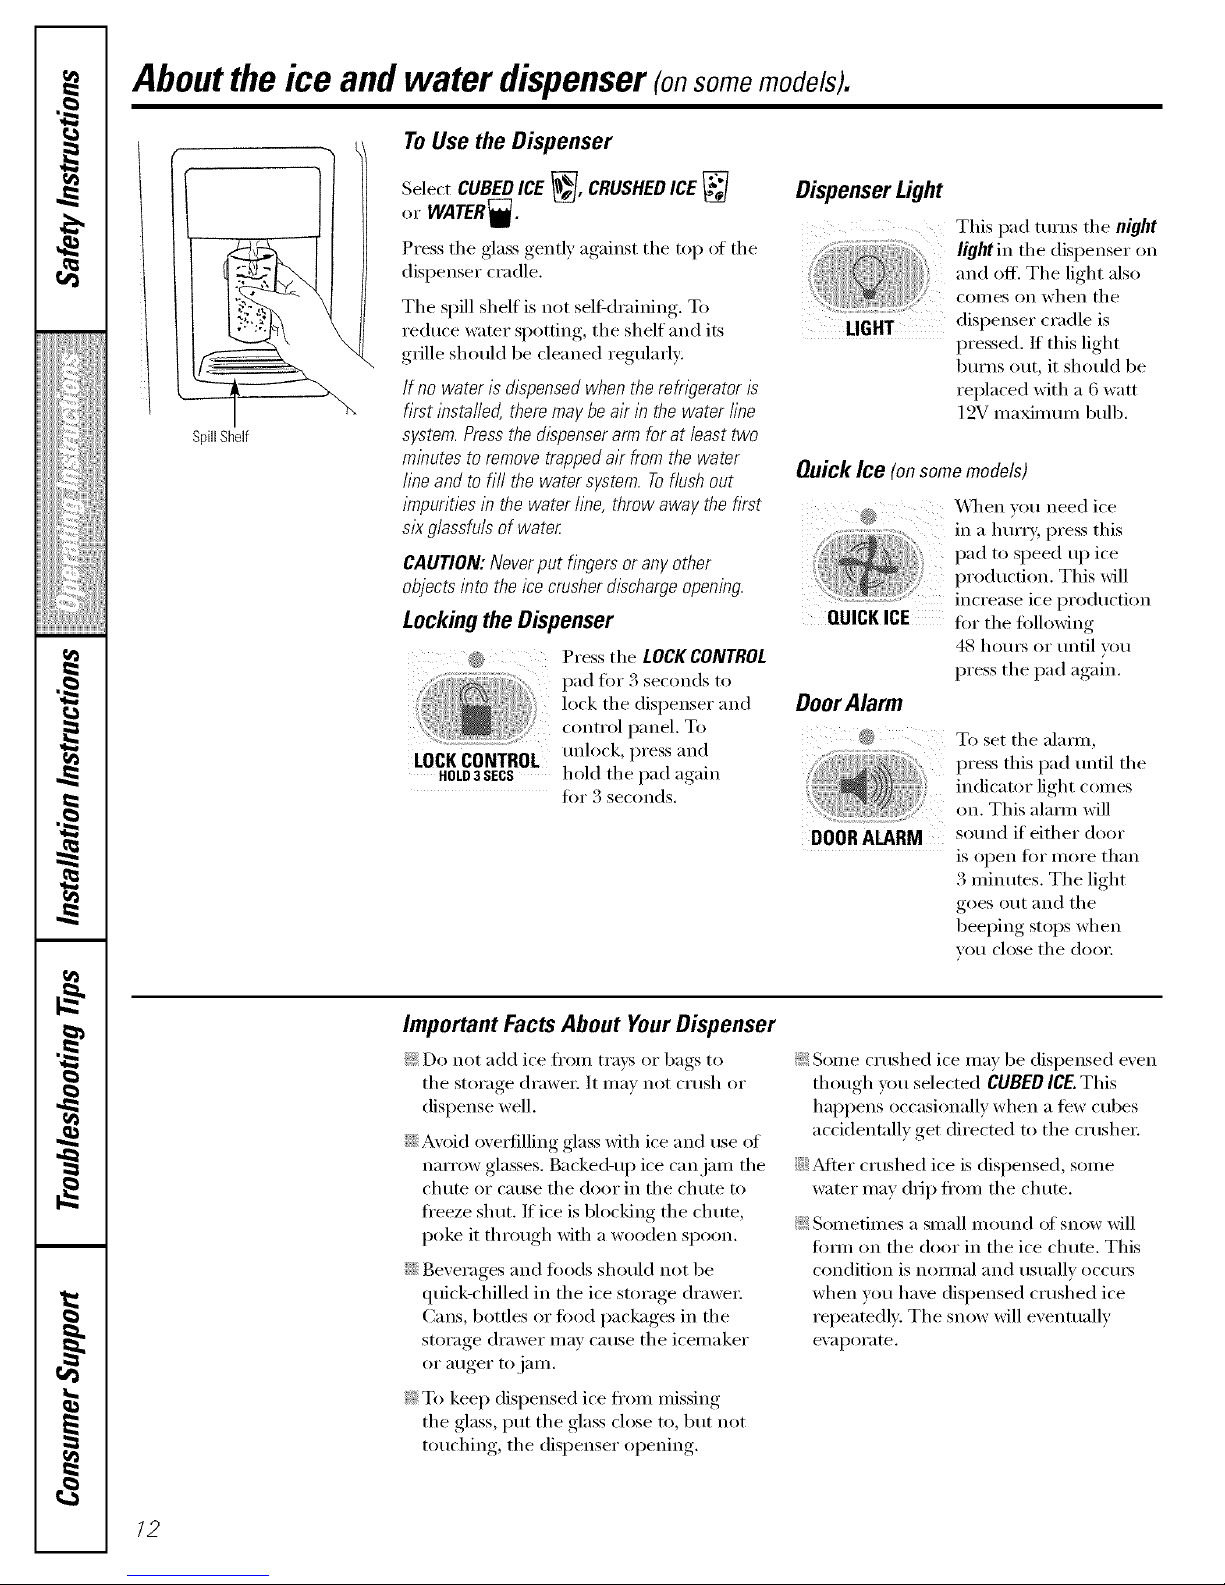
ToUsetheDispenser
Select CUBEDICE _, CRUSHEDICE
or WATER_.
Press the glass gently against the top oI the
dispenser cradle.
The spill shelf is not self-draining. To
reduce water spotting, tile shelf and its
grille should be cleaned regulmty:
If no water is dispensed when therefn)erator is
first instafled, there may be air in the water fine
system. Press the dispenser arm for at least two
minutes to remove trapped air from the water
fine and to fi// the water system. Toflush out
impurities in the water line, throw away the first
slk glassfuls of water
CAUTION; Neverput fingers or any other
objects into the ice crusher discharge opening.
Lockingthe Dispenser
@ Press the LOCKCONTROL
pad for 3 seconds to
lock tile dispenser and
control panel. To
(mlock, press and
HOLD3SECS hold tile pad again
for 3 seconds.
LOCKCONTROL
Dispenser Light
This pad turns tile night
and off. Tile light also
coII/es on when tile
dispenser cradle is
LIGHT
pressed. If this light
b/lrns (tilt, it should be
replaced with a 6 watt
12V maximum bulb.
QuickIce (onsomemodels)
QUICKICE
DoorAlarm
_,\]/en you need ice
in a hurry, press this
pad to speed up ice
production. This will
hlcl'e;Ise ice pi'odHction
tot the tollowing
48 hotu_ or until you
press the pad again.
DOOR ALARM
T() set the ;ll;ll]ll,
press this pad until the
indicat()r light c()mes
on. This almm will
sound if either do()r
is open for more than
3 minutes. The light
goes out and tile
beeping stops when
vo(/ close the dool:
Important Facts About Your Dispenser
_: Do not add ice fl'om trm_s or bags to
tile storage drawei: It may not crush or
dispense well.
iJi::Avoid oveitilling glass with ice and use of
narrow glasses. Backed-up ice can jam tile
chute or cause tile door in tile chute to
ti'eeze shut. If ice is blocking tile chute,
poke it through with a wooden spoon.
iJi::Beverages and foods should not be
quick-chilled in the ice storage drawer
Cans, bottles or food packages in tile
storage drawer may cause tile icemaker
or a/iger to jaIll.
_: To kee I) dispensed ice fl'om missing
tile glass, put tile glass close to, but not
touching, tile dispenser opening.
_: Some crushed ice may be dispensed even
though you selected CUBED ICE.This
happens occasionally when a few cubes
accidentally get directed t() the crushei:
iJi::_Mter crushed ice is dispensed, some
water may dIip fl'om tile chute.
_: Sometimes a small mound of snow will
timn on tile door in tile ice chum. This
condition is nomml and usually occurs
when you have dispensed crushed ice
repeamdly. Tile snow will eventually
evaporate.
/2
Page 13
ge.com
Models without a shelf
above the ice bin
Toremove:
o Lift flTebin. then duo/r
forward until the bin stoos
o Ldt and dull forward again
to remove the bin.
Removing and Replacing the Ice
Storage Bin on Dispenser Models
Thereare two types of ice storage bins on
dispenser models. One has a shelf ab,:,',e
the bin, the other does not.
Mwavs set tile icemaker power switch to tile
0 (off) position befi)re rein (Mn(,_tile ice bin.
When replacing either type of ice bin:
Mwavs be sure to press it firefly into place.
If it does not go all the wm back remo_e it
and rotnte tile (hixe mechanism 1/4 ttlYn.
Then push the bin back again.
Models with a shelf
above the ice bin
Toremove:
Pullthebinstraightout,thenlift past
flTestopposition.
Careandcleaningoftherefrigerator.
Dispenser drip area.
Cleaning the Outside
The dispenser drip area (on some models),
beneath tile grille, shotfld be wiped (hT: _\'ater
left in this area may leave deposits. Remove
tile deposits by adding mMiluted vinegar to
the well. Soak until the deposits disappear
or becoll/e loose enough to IJnse a_vav,
The dispenser cradle (on some models).
Before cleaning, lock tile disi)enser bv
pressing and holding the LOCK CONTROL
pad for 3 seconds. Clean with wam_
water and baking soda sohlfion - about
a tnblespoon (l 5 ml) of baking soda to
a quart (1 limr) of water. Rinse thoroughly
and wipe drx;
The doorhandles and trim. Clean Mth
a cloth dampened Mth soapy wateI:
Dry with a soft cloth.
Keep the outside clean. Wipe with a clean
cloth lightly dami)ened with kitchen
al)pliance wax or mild liqtfid dish detergent.
D_T and polish with a clean, soft cloth,
Do not wipe the refrigerator with a soi/ed dish
cloth or wet towel Thesemay leave aresidue
that can erode the paint. Do not use scouring
pads,powdered cleaners, bleach or cleaners
containing bleach because these products can
scratch and weaken the paint hblsh.
Cleaning the Inside
Tohelp prevent odors,leave an open box of
baking soda in tile fl'esh fl)od and fl'eezer
COIIll)a i'[lilents.
Unplug the refrigerator before cleaning. If this
is not practical, wring excess moisture out
of sponge or cloth when cleaning around
switches, lights or controls.
Use warn/water and baking soda solution -
about a tnblespoon (15 ml) of baking soda
to a quart (l liter) of watex: This both
cleans and neutralizes odms. Rinse and
wipe dry:
Use of any cleaning solution other than that
which is recommended, especially those that
contain petroleum distillates, can crack or
damage the interior of the refrigerator.
Avoid cleaning cold glass shelves with hot water
because the extreme temperature difference
may cause them to break. Handle glass shelves
carefullg Bumping temperad g/ass can cause
it to shatter
Do not wash any p/astic refngerator parts in the
dishwasher
13
Page 14
Careand cleaningoftherefrigerator.
Behind the Refrigerator
Be carefill when moving the refl_igerator
away fl'om the wall. _M1types of floor
coverings can be damaged, particulady
cushioned coverings and those with
embossed surfhces.
Pull the retiigerator straight out and return
it to position by pushing it straight in.
Moving the refligerator in a side direction
may result in damage to the floor covering
or reti_igeratm:
When pushing the refngerator back, make sure
you don't rofl over the power cord or icemaker
supply hne (on some models).
Preparing for Vacation
For long \;ications or absences, i'eillove
food and unplug the reliigerato_: Clean
the interior with a baking soda solution
of one tablespoon (15 ml) of baking soda
to one qum* (1 liter) of water: I,eave the
dooI_ open.
Set the icemaker power switch to the
0 (off)position and shut off the water
supply to the refl'igeratox:
If the temperature can drop below
fl'eezing, have a qualified servicer drain
the water supply system (on some models)
to prevent serious propert}, damage due
to flooding.
Preparing to Move
Secure all loose items such as shelves and
dr;mv_ by taping them secm'ely in place
to prevent damage.
\_]_en using a hand truck to move the
reflJgeratm; do not rest the fl'ont or back
of the refligerator against the hand truck.
This could damage the refligeratm: Handle
only fl'om the sides of the refligeratm:
Be sure the refngerator stays in an upright
position during moving.
14
Page 15
Replacingthe lightbulbs, gecom
Setting either or both controls to 0 does not remove power to the light circuit.
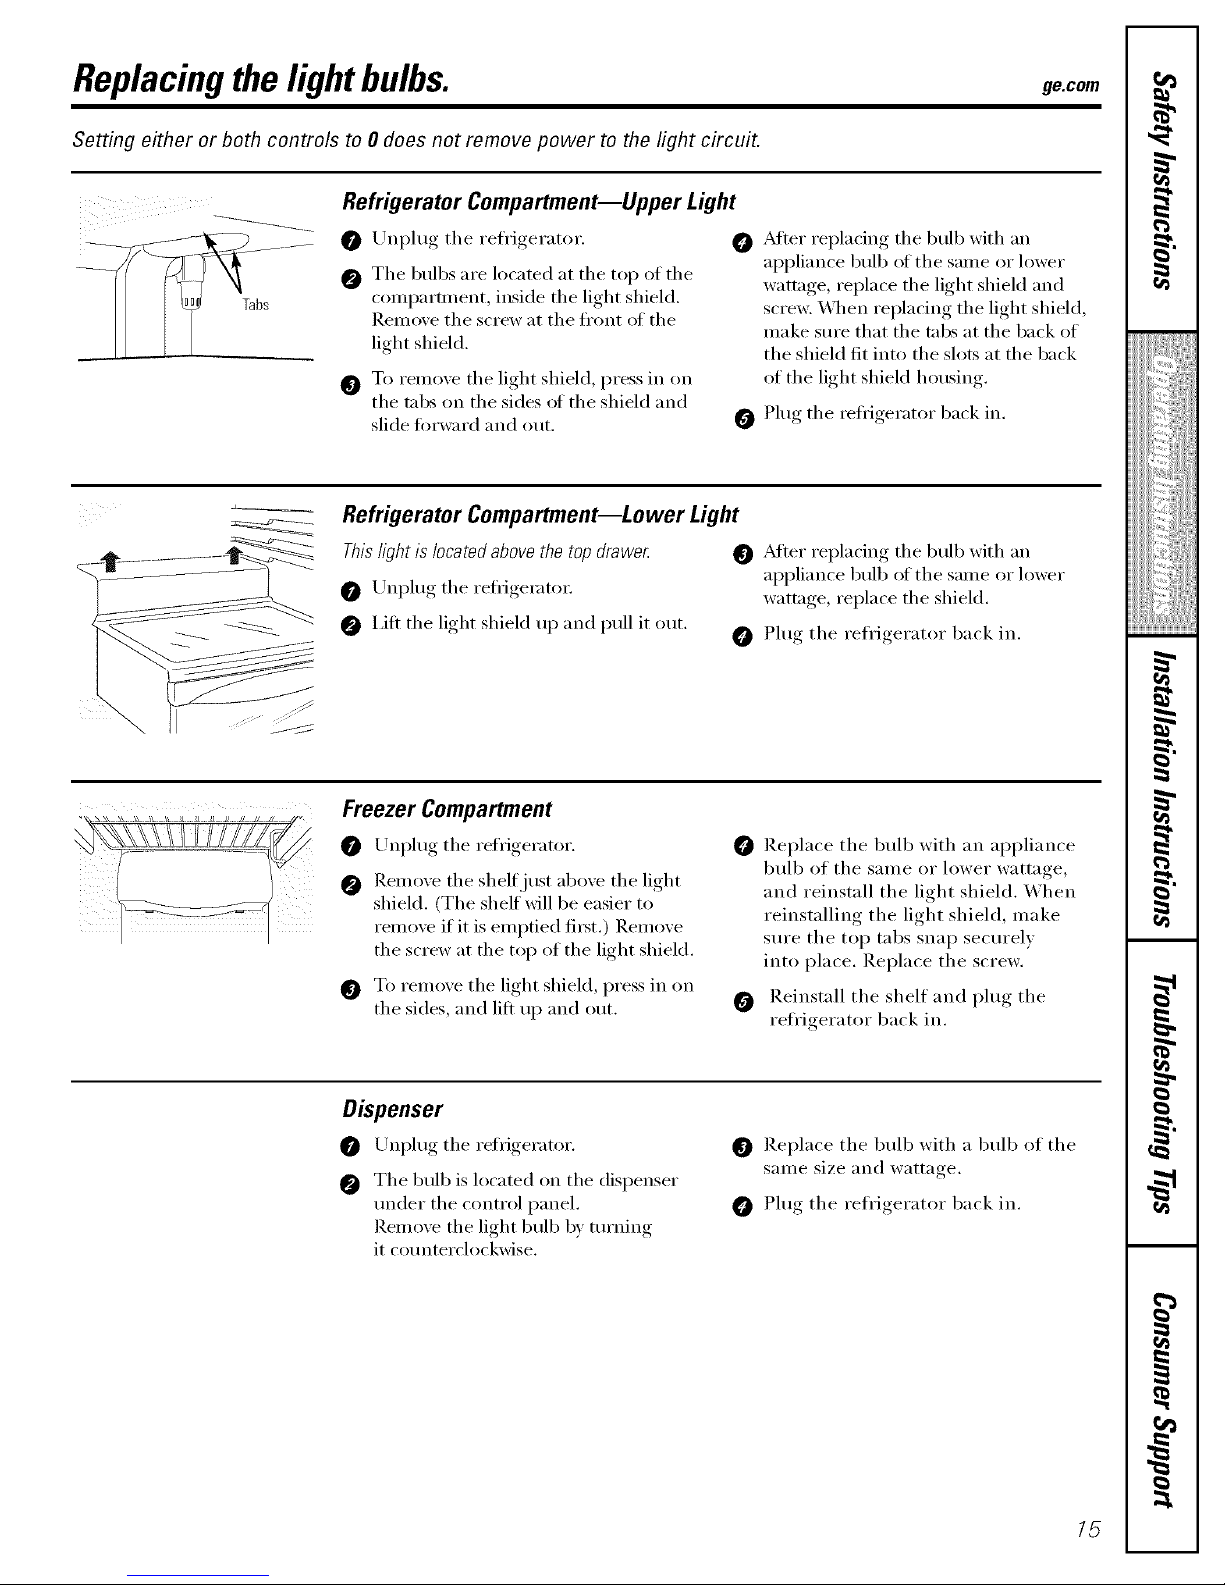
Refrigerator Compartment--Upper Light
0
@
Unplug the refl'igerator.
The bulbs are located at the top of the
compartment, inside the light shield.
I_.emove the screw at the fl'ont ot the
light shield.
O To remove the light shield, press in on
the tabs on the sides ot the shield and
slide fin'ward and out.
_Mter replacing the bulb with an
appliance bulb ot the same or lower
wam_ge, replace the light shield and
screw. X,_]_en replacing the light shield,
make sure that the tabs at the back of
the shield fit into the slots at the back
of the light shield housing.
Plug the refrigerator back in.
Refrigerator Compartment--Lower Light
This fight is located above the top drawe_
Unplug the refl-igemtm:
O I,ifl the light shield up and pull it out.
After replacing the bulb with an
appliance bulb of the same or lower
wattage, replace the shield.
Plug the refl'igerator back in.
Freezer Compartment
Unplug the refrigerator.
Remove the shelf just above the light
shield. (The shell will be easier to
relnove if it is emptied filst.) Remove
the screw at the top of the light shield,
To remove the light shield, press in on
the sides, and lift up and out.
Replace the bulb with an appliance
bulb of the same or lower wattage,
and reinstall the light shield. When
reinstalling the light shield, make
sure the top tabs snap securely
into place. Replace the screw.
Reinstall the shelf and plug the
refl'igerator back in.
Dispenser
Unplug the reti_igerator.
The bulb is located on the dispenser
trader the control panel.
Remove the light bulb by turning
it counterclockwise.
Replace the bulb with a bulb of the
same size and wattage.
Plug the refl'igerator back in.
15
Page 16
Installation
Instructions
Refrigerator
Models 25 & 27
I
BEFORE YOU BEGIN
Questions? Call 800.GE.CARES (800.432.2737) or Visit our Website at: ge.com
In Canada, call 1.800.361.3400 or Visit our Website at: www.geappliances.ca
Read these instructions completely
and carefully.
• iMPORTANT - Savethese
instructions for local inspector's use.
• iMPORTANT - Observeall
governing codes and ordinances.
Note to Installer - Be sure to leave these
instructions with the Consumer.
Note to Consumer - Keep these
instructions for future reference.
Skill level - Installation of this appliance
requires basic mechanical skills.
Completion time - Refrigerator Installation
30 minutes
Water Line installation
30 minutes
Proper installation is the responsibility of
the installer.
Product failure due to improper installation
is not covered under the Warranty.
if the refrigerator has already been installed,
remove the base grille (see Step 2 in Moving
the Refrigerator), then skip to Step 5 in
Installing the Refrigerator.
I
PREPARATION
WATER SUPPLY TO THE ICEMAKER
If the refrigerator has an icemaker, it will have
to be connected to a cold water line. AGE
water supply kit (containing tubing, shutoff
valve, fittings and instructions) is available
at extra cost from your dealer, by visiting
our Website at go.corn (in Canada at
www.geappliances.ca) or from Parts and
Accessories, 800.626.2002 (in Canada
1.888.261.3055).
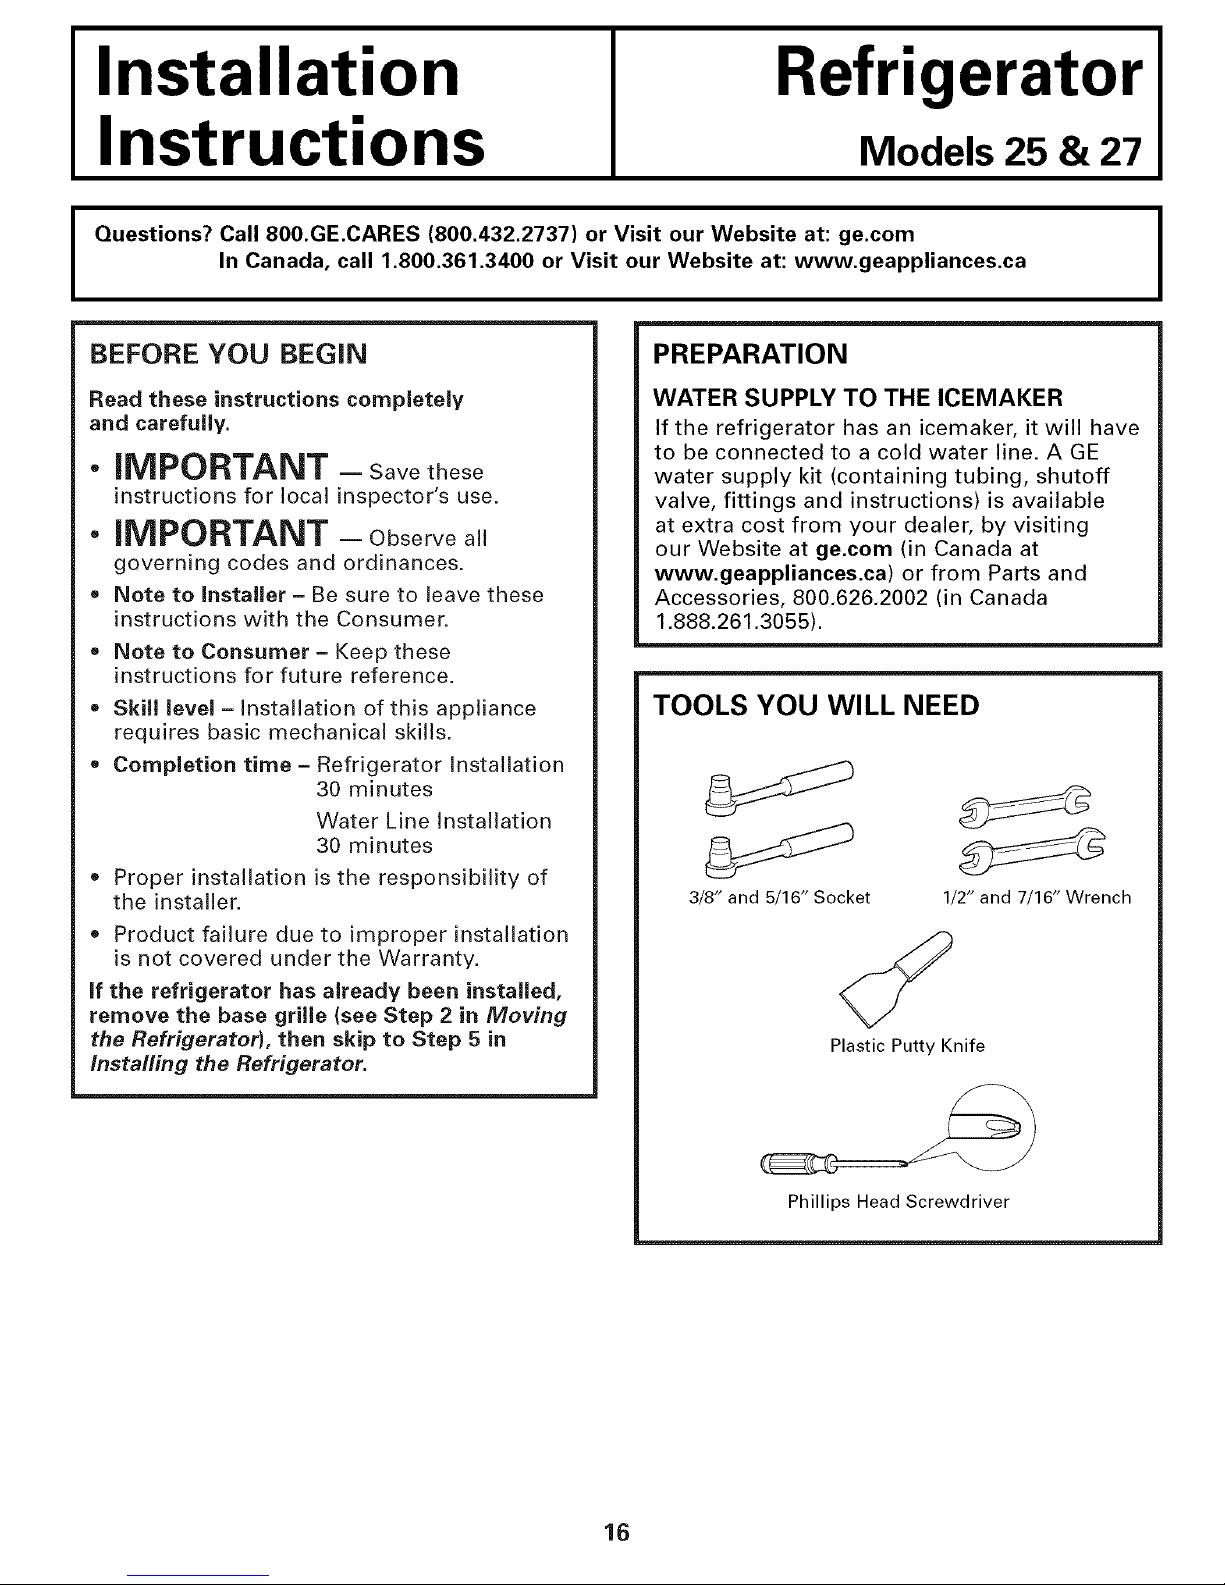
TOOLS YOU WILL NEED
3/8" and 5/16" Socket 1/2" and 7/16" Wrench
Plastic Putty Knife
Phillips Head Screwdriver
16
Page 17
Installation Instructions
MOVING THE REFRIGERATOR
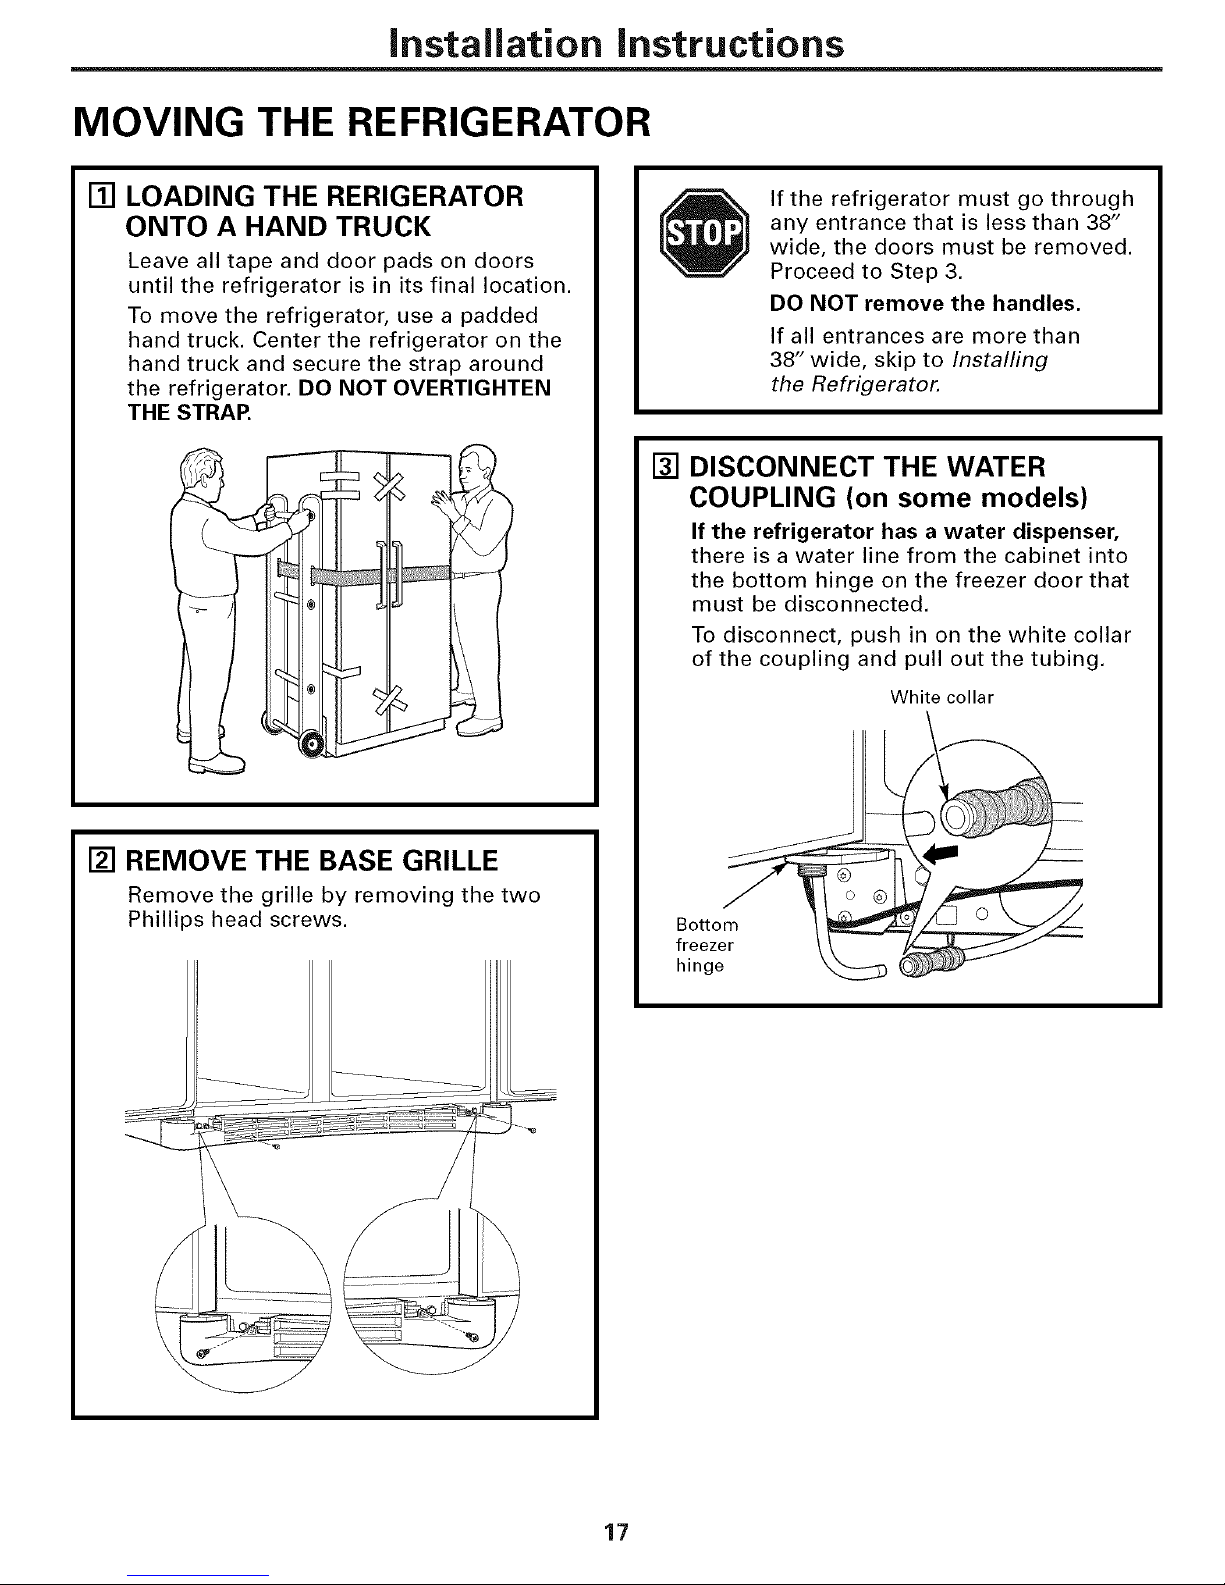
[] LOADING THE RERIGERATOR
ONTO A HAND TRUCK
Leave all tape and door pads on doors
until the refrigerator is in its final location.
To move the refrigerator, use a padded
hand truck. Center the refrigerator on the
hand truck and secure the strap around
the refrigerator. DO NOT OVERTIGHTEN
THE STRAP.
[] REMOVE THE BASE GRILLE
Remove the grille by removing the two
Phillips head screws.
If the refrigerator must go through
any entrance that is less than 38"
wide, the doors must be removed.
Proceed to Step 3.
DO NOT remove the handles.
If all entrances are more than
38" wide, skip to Installing
the Refrigerator.
[] DISCONNECT THE WATER
COUPLING (on some models)
If the refrigerator has a water dispenser,
there is a water line from the cabinet into
the bottom hinge on the freezer door that
must be disconnected.
To disconnect, push in on the white collar
of the coupling and pull out the tubing.
White collar
Bottom
freezer
hinge
17
Page 18
Installation Instructions
MOVING THE REFRIGERATOR (CONT.)
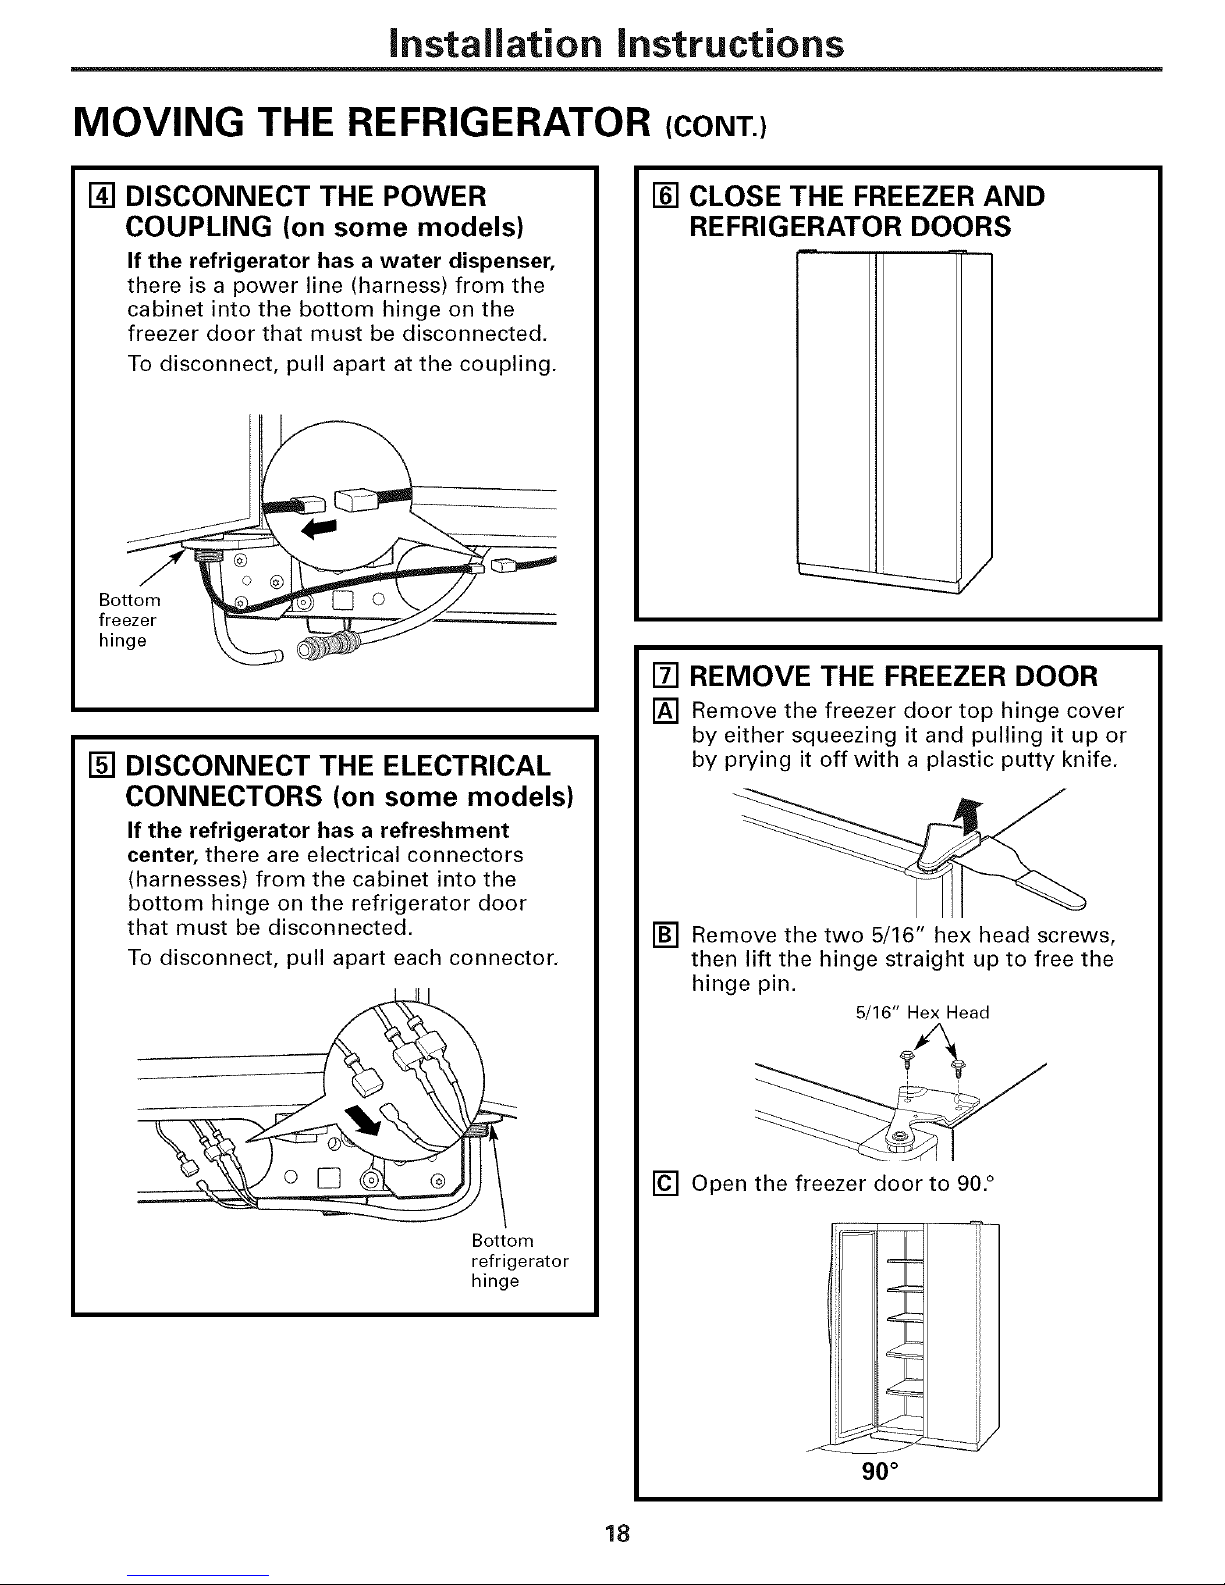
[] DISCONNECT THE POWER
COUPLING (on some models)
If the refrigerator has a water dispenser,
there is a power line (harness) from the
cabinet into the bottom hinge on the
freezer door that must be disconnected.
To disconnect pull apart at the coupling.
Bottom _ _ L_J 0 _//
freezer / _ __J-----------'-----
hin
[]
DISCONNECT THE ELECTRICAL
CONNECTORS (on some models)
If the refrigerator has a refreshment
center, there are electrical connectors
(harnesses) from the cabinet into the
bottom hinge on the refrigerator door
that must be disconnected.
To disconnect, pull apart each connector.
Bottom
refrigerator
hinge
[] CLOSE THE FREEZER AND
REFRIGERATOR DOORS
[] REMOVE THE FREEZER DOOR
[] Remove the freezer door top hinge cover
by either squeezing it and pulling it up or
by prying it off with a plastic putty knife.
[] Remove the two 5/16" hex head screws,
then lift the hinge straight up to free the
hinge pin.
5/16" Hex Head
[] Open the freezer door to 90. °
r
90 °
18
Page 19
Installation instructions
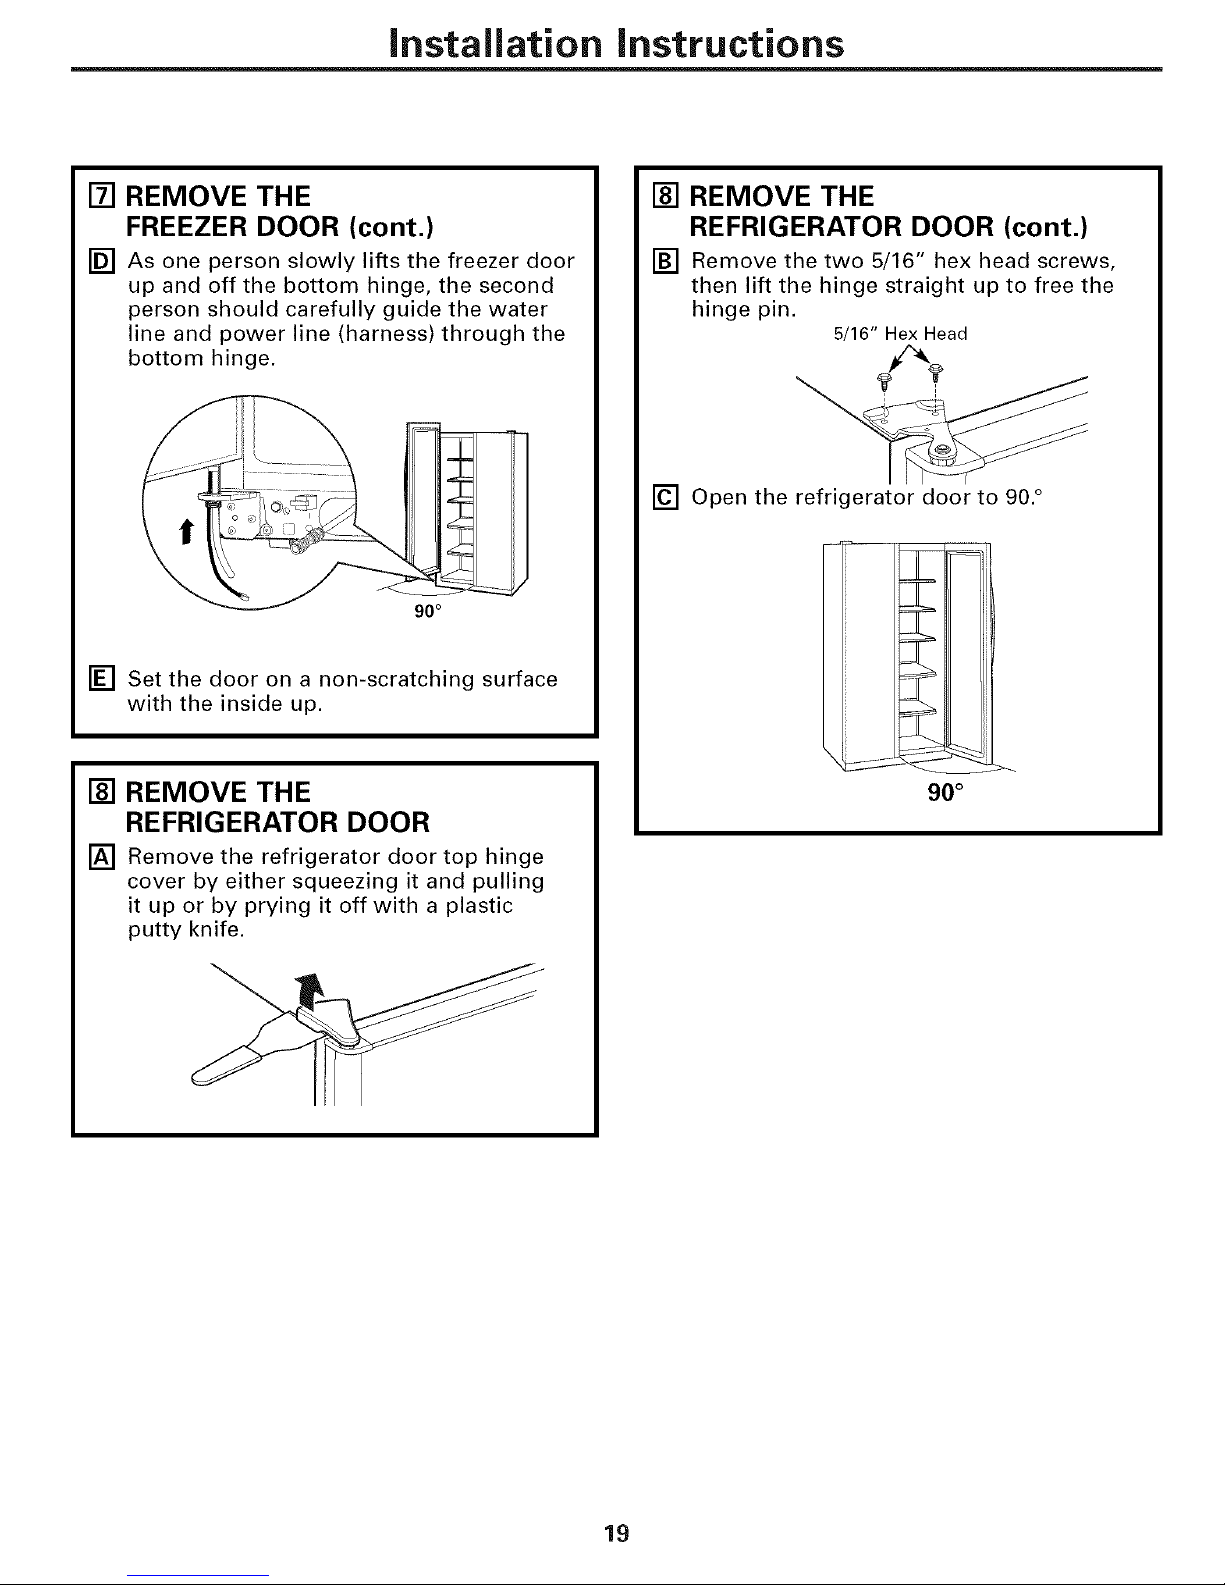
[] REMOVE THE
FREEZER DOOR (cont.)
[] As one person slowly lifts the freezer door
up and off the bottom hinge, the second
person should carefully guide the water
line and power line (harness) through the
bottom hinge.
[] Set the door on a non-scratching surface
with the inside up.
[] REMOVE THE
REFRIGERATOR DOOR
[] Remove the refrigerator door top hinge
cover by either squeezing it and pulling
it up or by prying it off with a plastic
putty knife.
[] REMOVE THE
REFRIGERATOR DOOR (cont.)
[] Remove the two 5/16" hex head screws,
then lift the hinge straight up to free the
hinge pin.
5/16" Hex Head
[] Open the refrigerator door to 90. °
_H
90 °
19
Page 20
Installation instructions
MOVING THE REFRIGERATOR (CONT.)
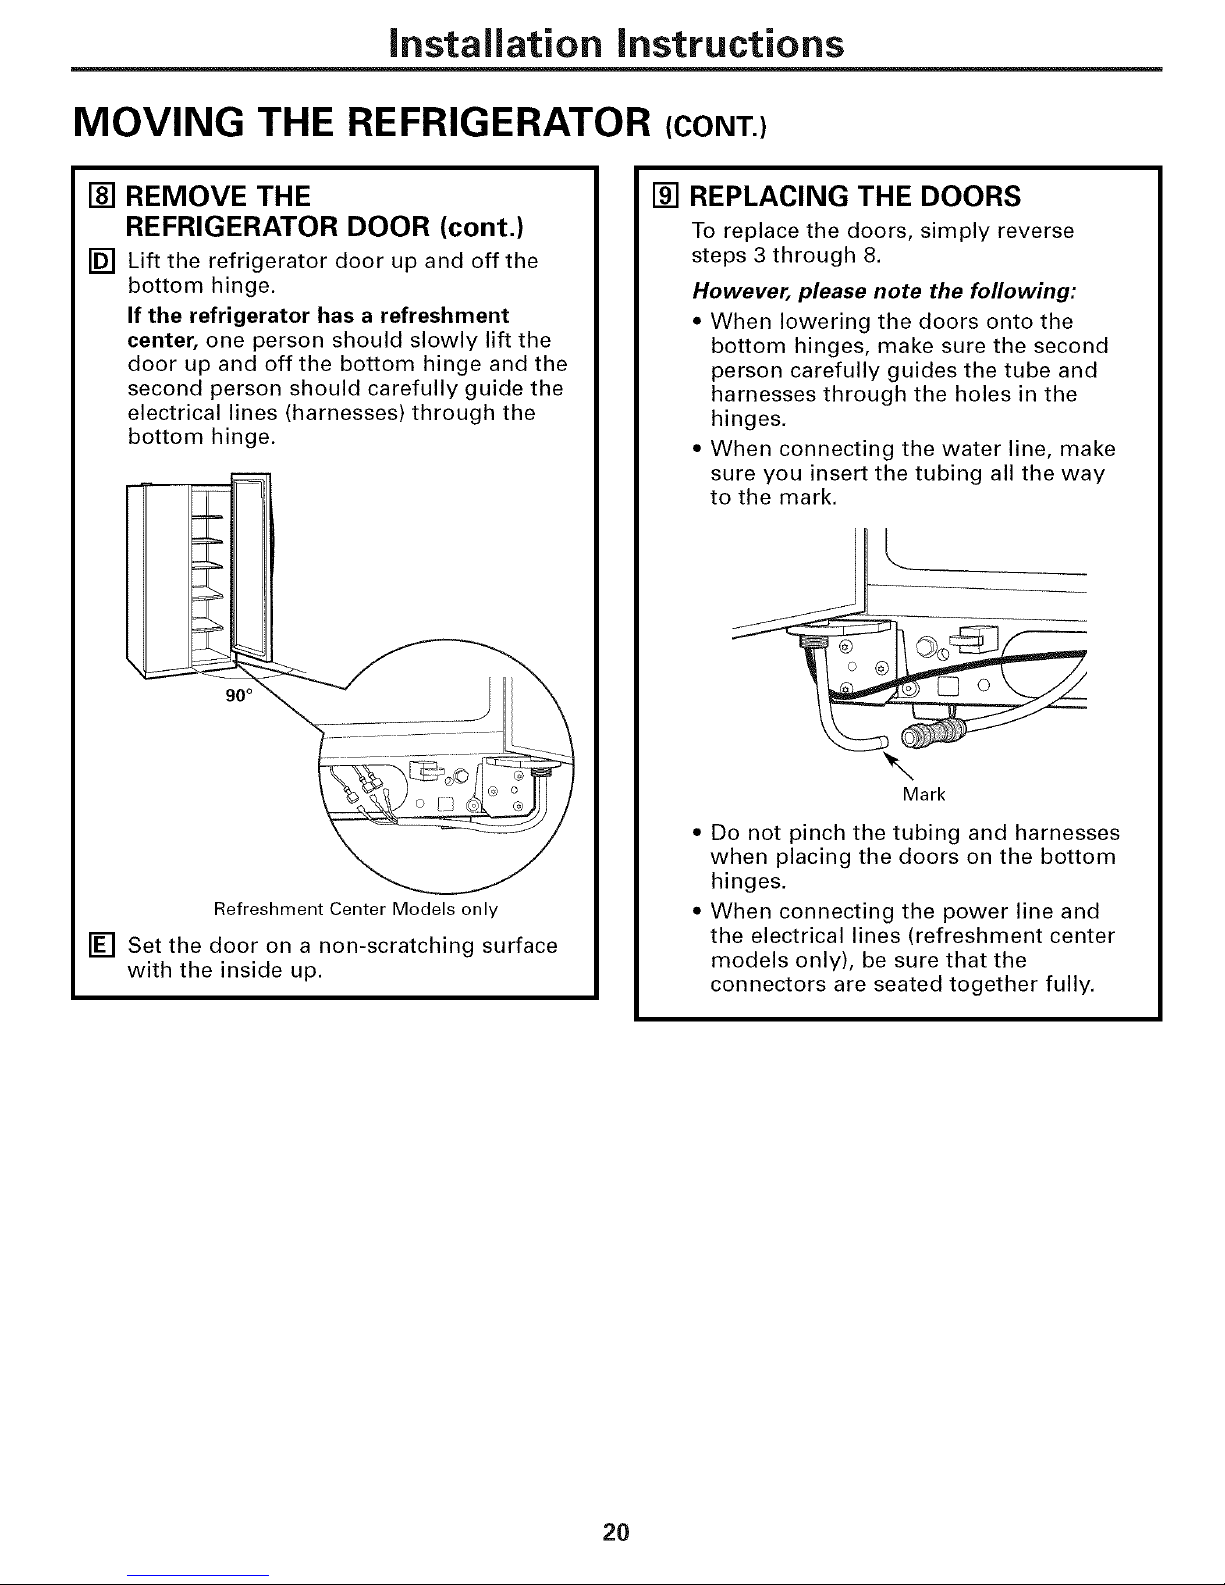
[]
[]
REMOVE THE
REFRIGERATOR DOOR (cont.)
Lift the refrigerator door up and off the
bottom hinge.
If the refrigerator has a refreshment
center, one person should slowly lift the
door up and off the bottom hinge and the
second person should carefully guide the
electrical lines (harnesses) through the
bottom hinge.
90°
Refreshment Center Models only
[] Set the door on a non-scratching surface
with the inside up.
[] REPLACING THE DOORS
To replace the doors, simply reverse
steps 3 through 8.
However, please note the following:
• When lowering the doors onto the
bottom hinges, make sure the second
person carefully guides the tube and
harnesses through the holes in the
hinges.
• When connecting the water line, make
sure you insert the tubing all the way
to the mark.
L
Mark
• Do not pinch the tubing and harnesses
when placing the doors on the bottom
hinges.
• When connecting the power line and
the electrical lines (refreshment center
models only), be sure that the
connectors are seated together fully.
20
Page 21
Installation Instructions
INSTALLING THE REFRIGERATOR
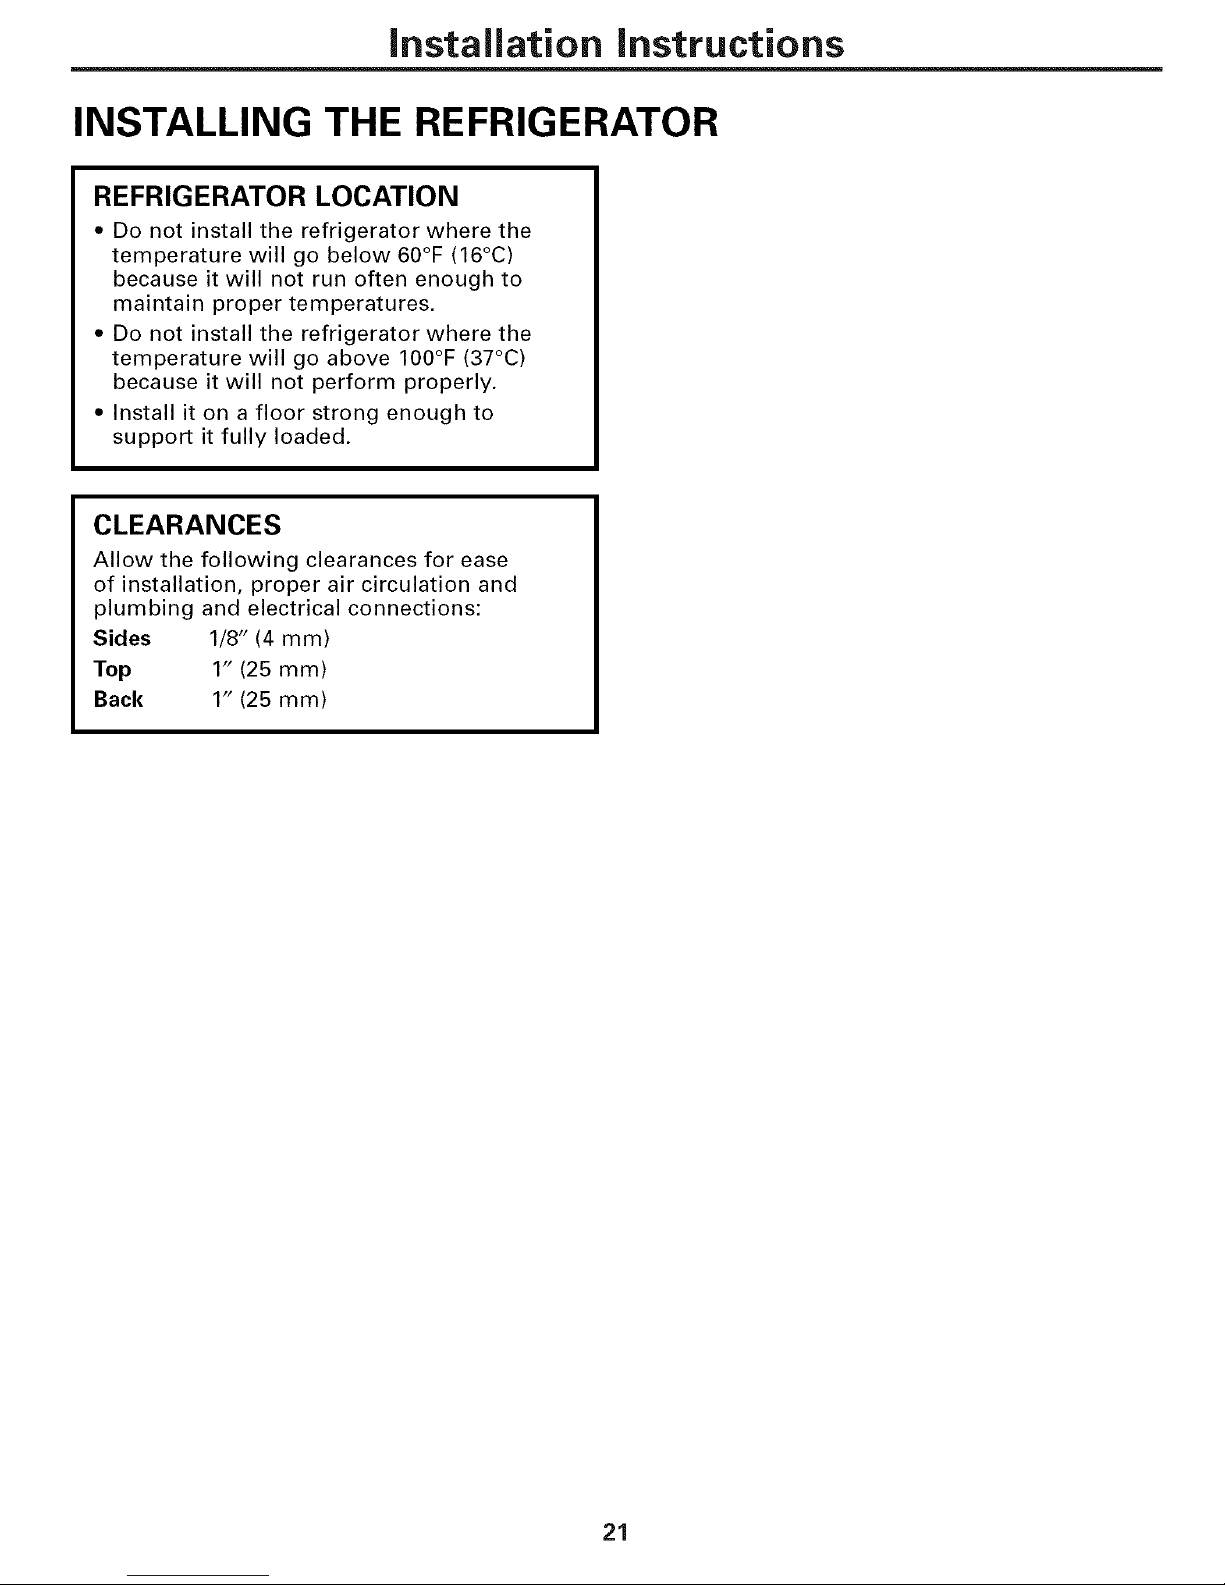
REFRIGERATOR LOCATION
• Do not install the refrigerator where the
temperature will go below 60°F (16°C)
because it will not run often enough to
maintain proper temperatures.
• Do not install the refrigerator where the
temperature will go above 100°F (37°C)
because it will not perform properly.
• Install it on a floor strong enough to
support it fully loaded.
CLEARANCES
Allow the following clearances for ease
of installation, proper air circulation and
plumbing and electrical connections:
Sides 1/8" (4 mm)
Top 1" (25 mm)
Back 1" (25 mm)
21
Page 22
Installation Instructions
INSTALLING THE REFRIGERATOR (CONT.)
[]
[]
[]
CONNECTING THE REFRIGERATOR
TO THE HOUSE WATER LINE
(icemaker and dispenser models)
A cold water supply is required for
automatic icemaker and dispenser
operation. If there is not a cold water
supply, you will need to provide one.
See "Installing the Water Line" section.
NOTES:
Before making the connection to the
refrigerator, be sure the refrigerator
power cord is not plugged into the wall
outlet.
• If your refrigerator does not have a
water filter, we recommend installing
one if your water supply has sand or
particles that could clog the screen of
the refrigerator's water valve. Install it
in the water line near the refrigerator.
If using GE SmartConnect TM Refrigerator
Tubing Kit, you will need an additional
tube (WXO8XIO002) to connect the filter.
Do not cut plastic tube to install filter.
If you are using copper tubing, place a
compression nut and ferrule (sleeve) onto
the end of the tubing coming from the
house cold water supply.
If you are using the GE SmartConnect TM
tubing, the nuts are already assembled to
the tubing.
If you are using copper tubing, insert
the end of the tubing into the refrigerator
connection, at the back of the refrigerator,
as far as possible. While holding the
tubing, tighten the fitting.
If you are using GE SmartConnect TM
tubing, insert the molded end of the
tubing into the refrigerator connection,
at the back of the refrigerator, and tighten
the compression nut until it is hand tight.
Then tighten one additional turn with a
wrench. Overtightening may cause leaks.
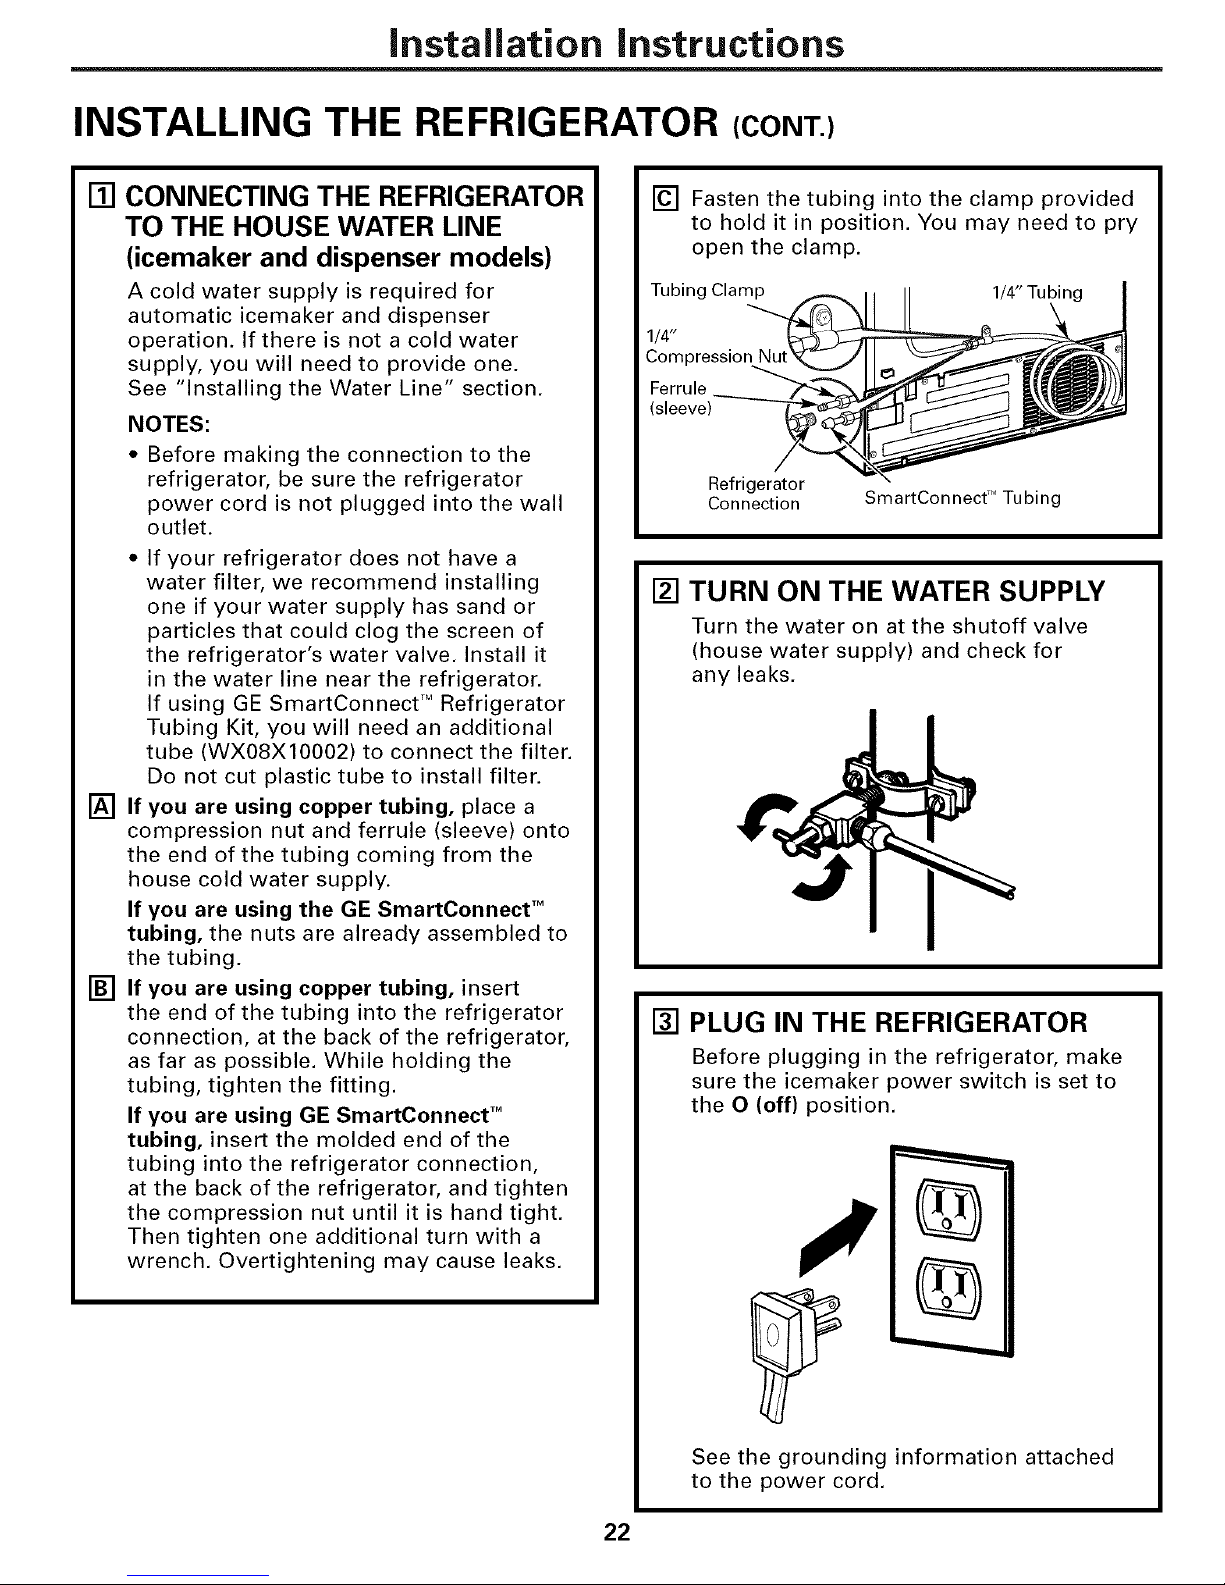
[] Fasten the tubing into the clamp provided
to hold it in position. You may need to pry
open the clamp.
Tubing Clamp 1/4" Tubing
1/4"
Compression
(sleeve)
Refrigerator
Connection
SmartConnect TMTubing
[] TURN ON THE WATER SUPPLY
Turn the water on at the shutoff valve
(house water supply) and check for
any leaks,
[] PLUG IN THE REFRIGERATOR
Before plugging in the refrigerator, make
sure the icemaker power switch is set to
the O (off) position.
%
See the grounding information attached
to the power cord.
22
Page 23
Installation instructions
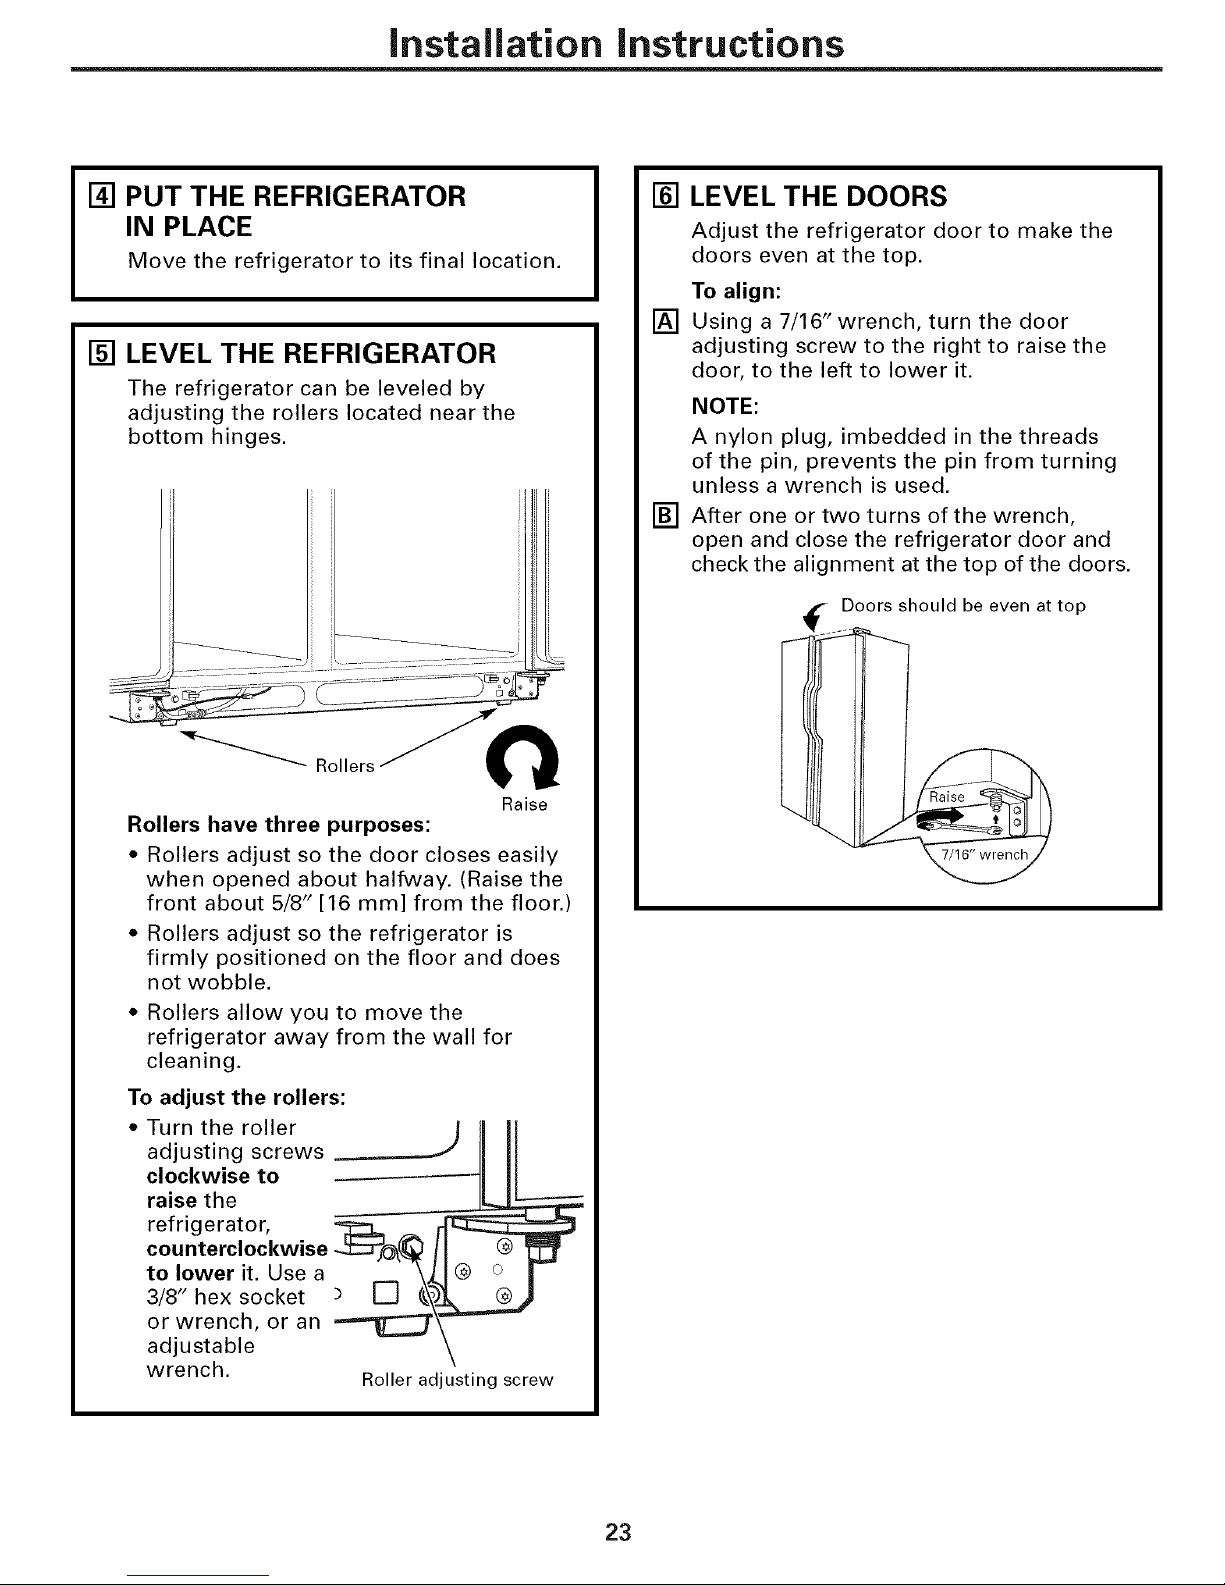
[] PUT THE REFRIGERATOR
IN PLACE
Move the refrigerator to its final location.
[] LEVEL THE REFRIGERATOR
The refrigerator can be leveled by
adjusting the rollers located near the
bottom hinges.
o _
Raise
Rollers have three purposes:
• Rollers adjust so the door closes easily
when opened about halfway. (Raise the
front about 5/8" [16 mm] from the floor.)
• Rollers adjust so the refrigerator is
firmly positioned on the floor and does
not wobble.
• Rollers allow you to move the
refrigerator away from the wall for
cleaning.
To adjust the rollers:
• Turn the roller _ L__
adjusting screws
clockwise to
raise the
refrigerator, _counterclockwise
to lower it. Use a
3/8" hex socket
or wrench, or an
adjustable
wrench.
Roller adjusting screw
[] LEVEL THE DOORS
[]
[]
Adjust the refrigerator door to make the
doors even at the top.
To align:
Using a 7/16" wrench, turn the door
adjusting screw to the right to raise the
door, to the left to lower it.
NOTE:
A nylon plug, imbedded in the threads
of the pin, prevents the pin from turning
unless a wrench is used.
After one or two turns of the wrench,
open and close the refrigerator door and
check the alignment at the top of the doors.
Doors should be even at top
I
23
Page 24
Installation Instructions
INSTALLING THE REFRIGERATOR (CONT.)
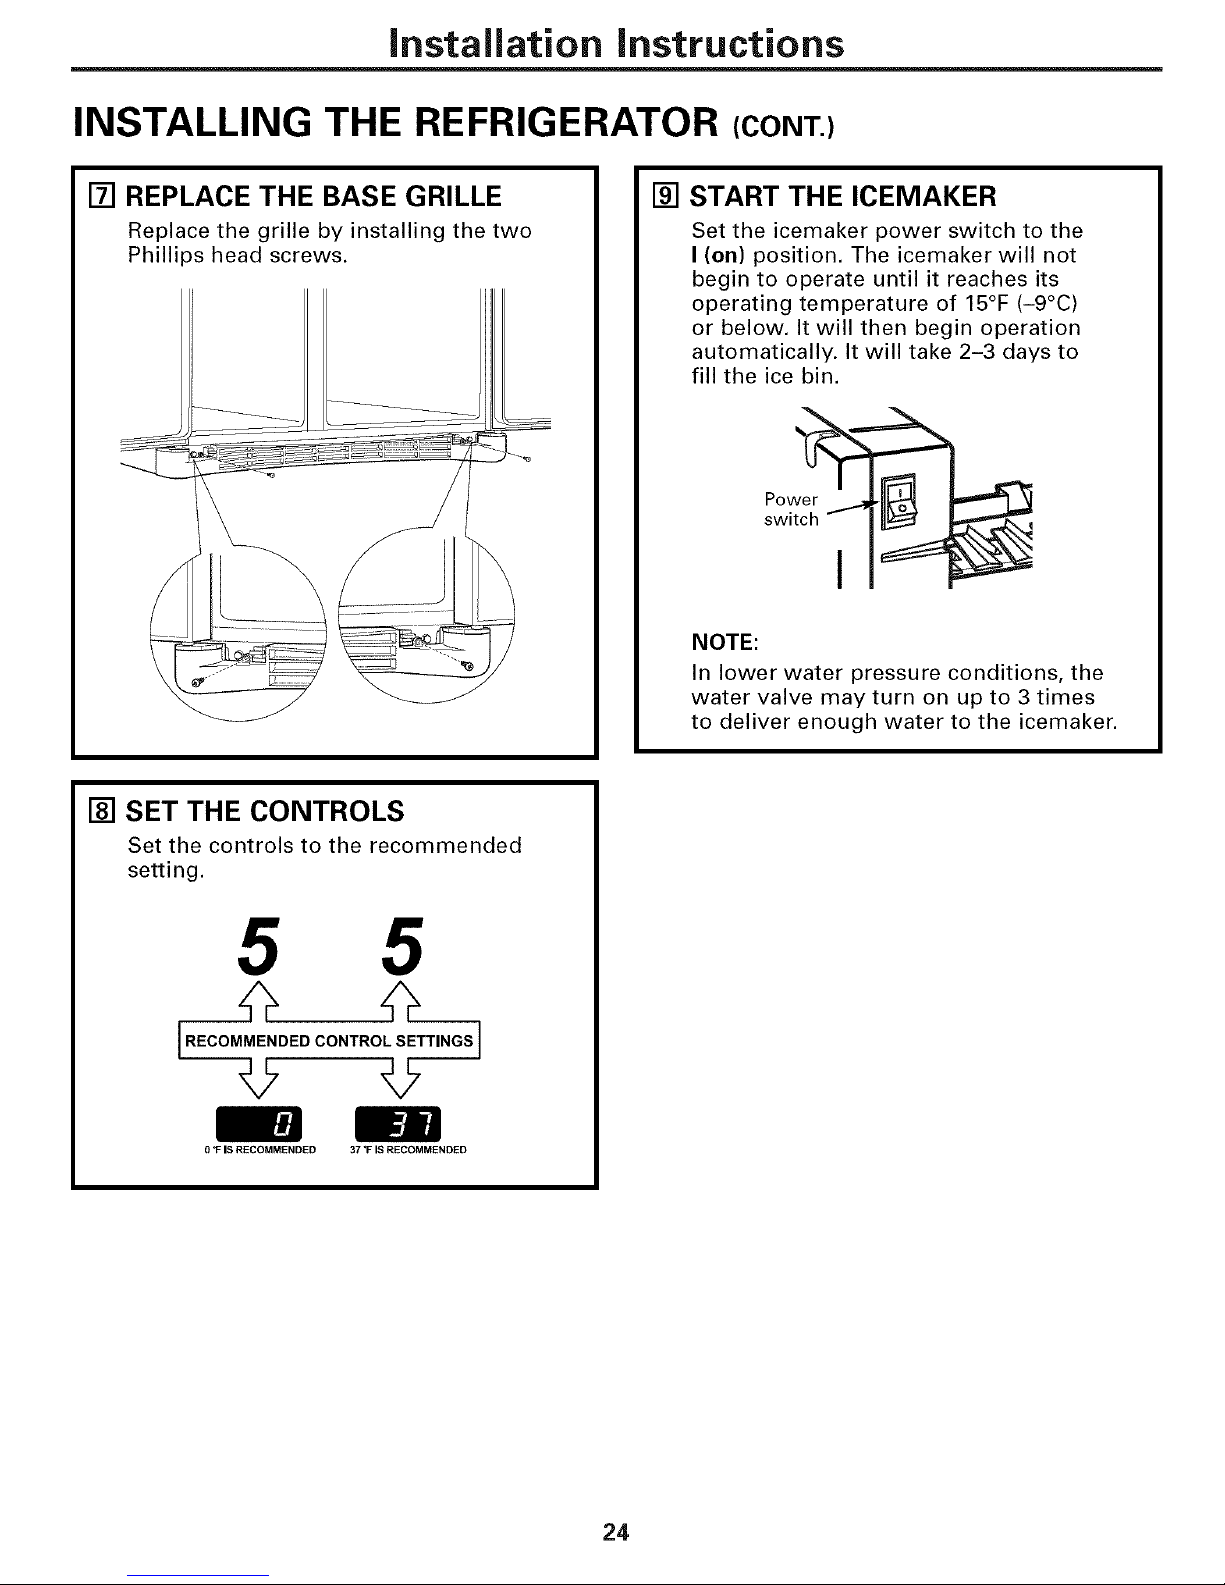
[] REPLACE THE BASE GRILLE
Replace the grille by installing the two
Phillips head screws.
[] START THE ICEMAKER
Set the icemaker power switch to the
I (on) position. The icemaker will not
begin to operate until it reaches its
operating temperature of 15°F (-9°C)
or below. It will then begin operation
automatically. It will take 2-3 days to
fill the ice bin.
Pow
switch r I _"
NOTE:
In lower water pressure conditions, the
water valve may turn on up to 3 times
to deliver enough water to the icemaker.
[] SET THE CONTROLS
Set the controls to the recommended
setting.
5 5
[.EOOMME.OEOCO.T.O'SE ..OS]
0 *FIS RECOMMENDED 37 *F IS RECOMMENDED
24
Page 25
Installation instructions
iNSTALLiNG THE WATER LiNE (ICEMAKER&DISPENSERIVIODELS)
BEFORE YOU BEGIN
Recommended copper water supply kits are
WX8X2, WX8X3 or WX8X4, depending on the
amount of tubing you need. Approved plastic
water supply lines are GE SmartConnect TM
Refrigerator Tubing (WX08Xl0002,
WX08X10006, WX08X10015 and
WX08X 10025).
When connecting your refrigerator to a GE
Reverse Osmosis Water System, the only
approved installation is with a GE RVKit. For
other reverse osmosis water systems, follow
the manufacturer's recommendations.
If the water supply to the refrigerator is from
a Reverse Osmosis Water Filtration System
AND the refrigerator also has a water filter,
use the refrigerator's filter bypass plug. Using
the refrigerator's water filtration cartridge in
conjunction with the RO filter can result in
hollow ice cubes and slower water flow from
the water dispenser.
This water line installation is not warranted
by the refrigerator or icemaker manufacturer.
Follow these instructions carefully to
minimize the risk of expensive water damage.
Water hammer (water banging in the pipes)
in house plumbing can cause damage to
refrigerator parts and lead to water leakage
or flooding. Call a qualified plumber to correct
water hammer before installing the water
supply line to the refrigerator.
To prevent burns and product damage, do not
hook up the water line to the hot water line.
If you use your refrigerator before connecting
the water line, make sure the icemaker power
switch is in the O (off) position.
Do not install the icemaker tubing in areas
where temperatures fall below freezing.
When using any electrical device (such as a
power drill) during installation, be sure the
device is double insulated or grounded in a
manner to prevent the hazard of electric
shock, or is battery powered.
All installations must be in accordance with
local plumbing code requirements.
WHAT YOU WiLL NEED
J
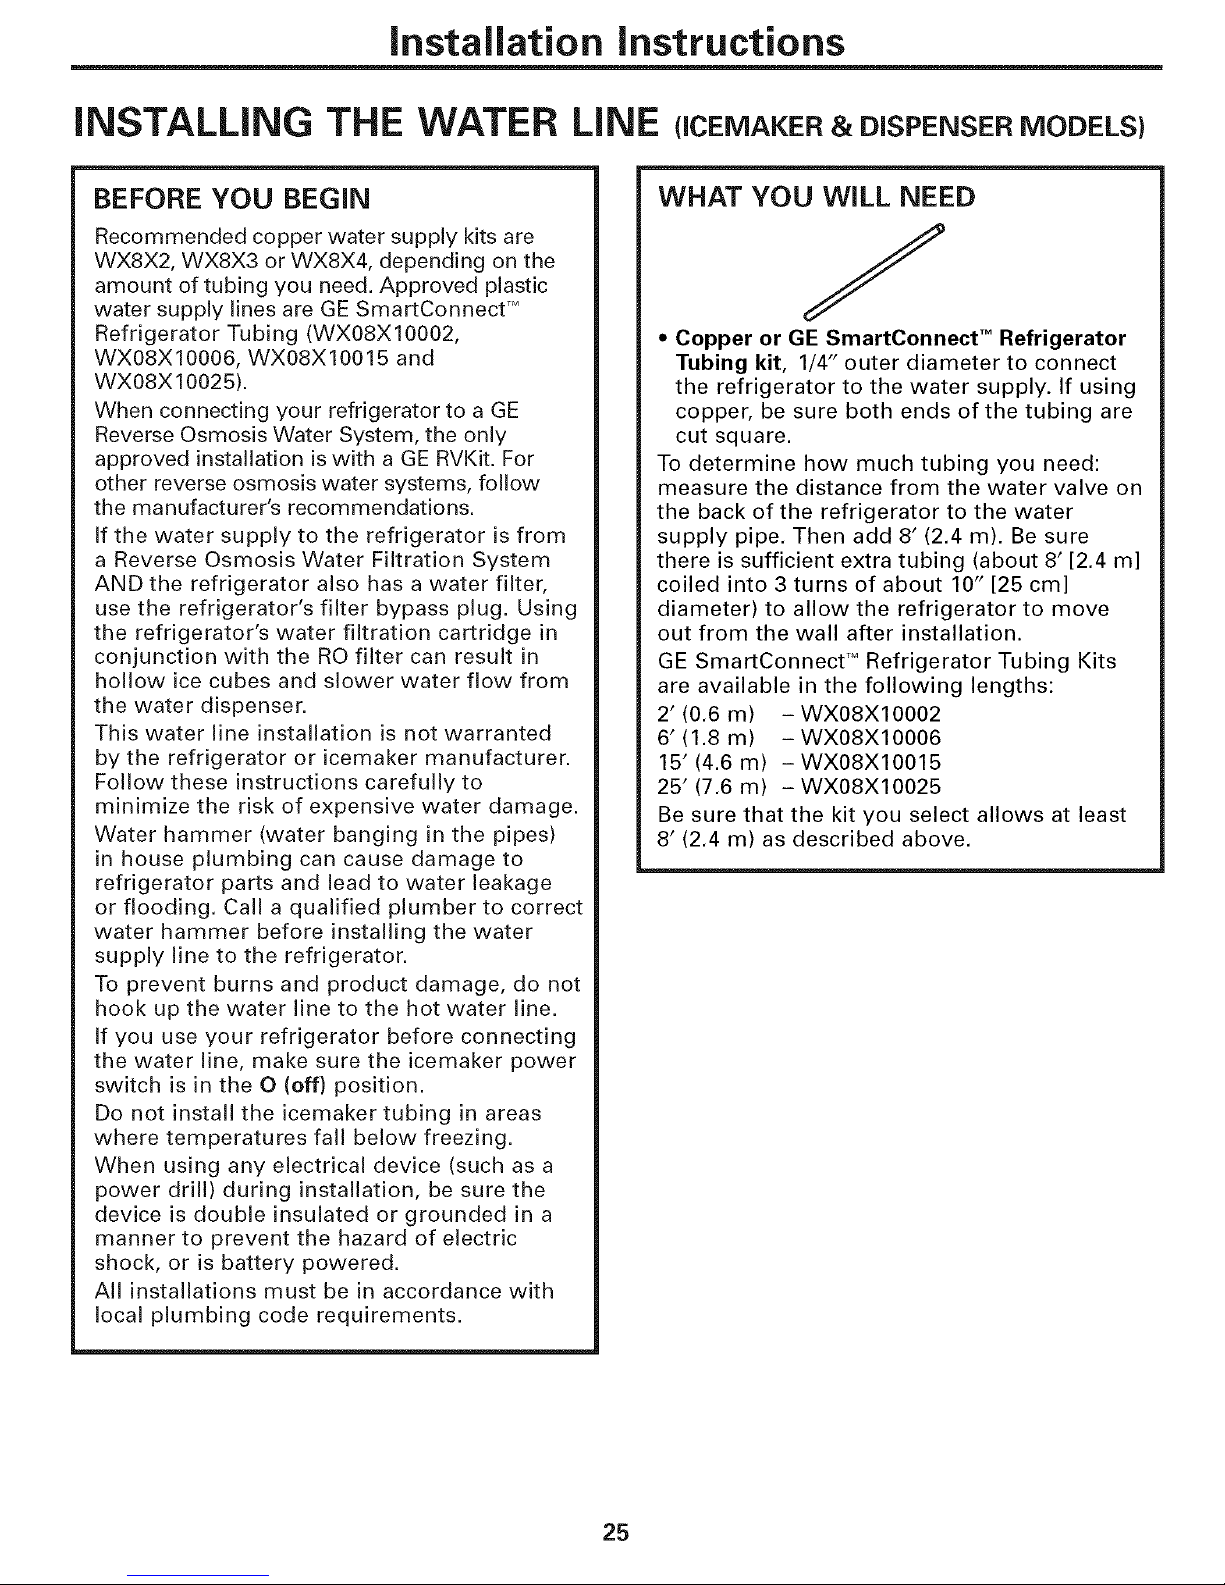
• Copper or GE SmartConnect TM Refrigerator
Tubing kit, 1/4" outer diameter to connect
the refrigerator to the water supply. If using
copper, be sure both ends of the tubing are
cut square.
To determine how much tubing you need:
measure the distance from the water valve on
the back of the refrigerator to the water
supply pipe. Then add 8' (2.4 m). Be sure
there is sufficient extra tubing (about 8' [2.4 m]
coiled into 3 turns of about 10" [25 cm]
diameter) to allow the refrigerator to move
out from the wall after installation.
GE SmartConnect TMRefrigerator Tubing Kits
are available in the following lengths:
2' (0.6 m) - WX08Xl0002
6' (1.8 m) -WX08Xl0006
15' (4.6 m) - WX08X10015
25' (7.6 m) - WX08X10025
Be sure that the kit you select allows at least
8' (2.4 m) as described above.
25
Page 26
Installation Instructions
INSTALLING THE WATER LINE (CONT.)
WHAT YOU WILL NEED (CONT.)
NOTE: The only GE approved plastic tubing
is that supplied in GE SmartConnect"
Refrigerator Tubing kits, Do not use any
other plastic water supply line because the
line is under pressure at all times. Certain
types of plastic will crack or rupture with age
and cause water damage to your home.
= AGE water supply kit (containing tubing,
shutoff valve and fittings listed below) is
available at extra cost from your dealer or
from Parts and Accessories, 800.626.2002
(in Canada 1.888.261.3055).
• A cold water supply. The water pressure must
be between 20 and 120 p.s.i. (1.4-8.1 bar).
• Power drill.
* 1/2" or adjustable wrench.
= Straight and Phillips blade screwdriver.
= Two 1/4" outer diameter compression nuts
and 2 ferrules (sleeves)--to connect the
copper tubing to the shutoff valve and the
refrigerator water valve.
OR
If you are using a GE SmartConnect TM
Refrigerator Tubing kit, the necessary
fittings are preassembled to the tubing.
• If your existing copper water line has a
flared fitting at the end, you will need an
adapter (available at plumbing supply
stores) to connect the water line to the
refrigerator OR you can cut off the flared
fitting with a tube cutter and then use a
compression fitting. Do not cut formed end
from GE SmartConnect TMRefrigerator tubing.
• Shutoff valve to connect to the cold water
line. The shutoff valve should have a water
inlet with a minimum inside diameter of
5/32" at the point of connection to the COLD
WATER LINE. Saddle-type shutoff valves are
included in many water supply kits. Before
purchasing, make sure a saddle-type valve
complies with your local plumbing codes.
Install the shutoff valve on the nearest
frequently used drinking water line.
[] SHUT OFF THE MAIN WATER
SUPPLY
Turn on the nearest faucet long enough
to clear the line of water.
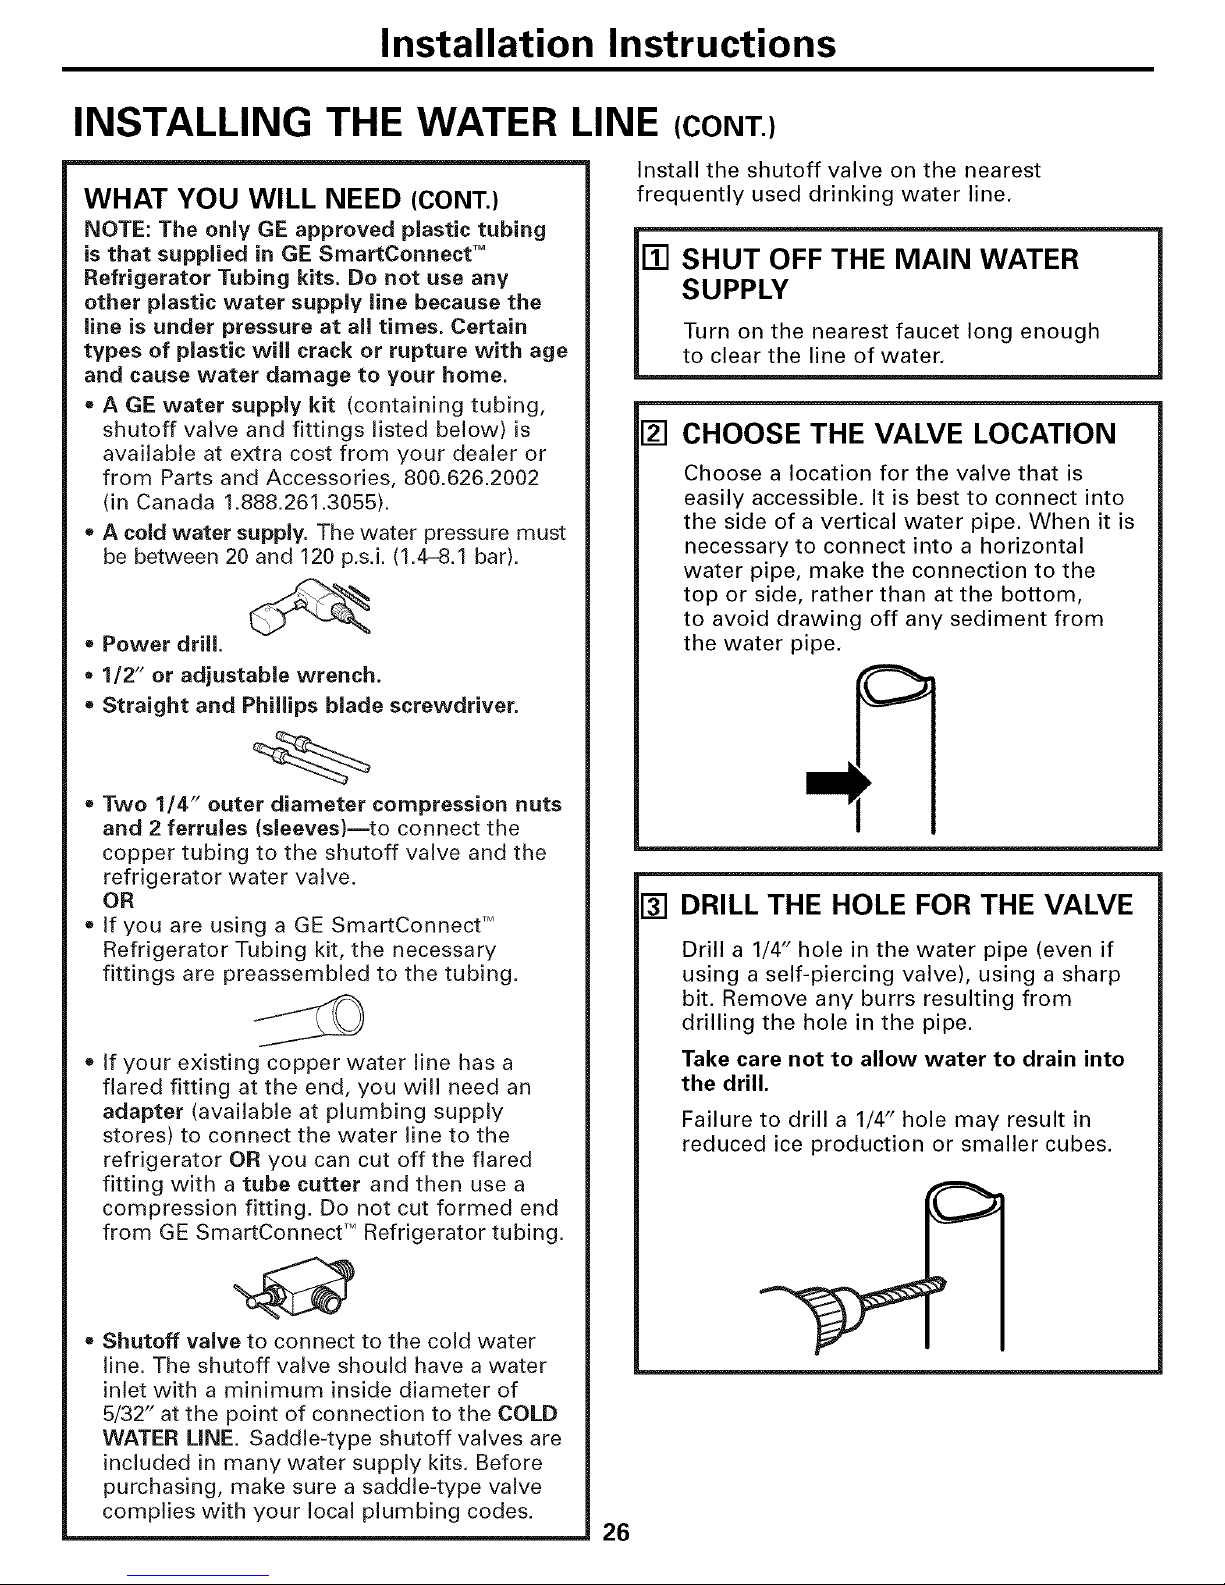
[] CHOOSE THE VALVE LOCATION
Choose a location for the valve that is
easily accessible. It is best to connect into
the side of a vertical water pipe. When it is
necessary to connect into a horizontal
water pipe, make the connection to the
top or side, rather than at the bottom,
to avoid drawing off any sediment from
the water pipe.
[] DRILL THE HOLE FOR THE VALVE
Drill a 1/4" hole in the water pipe (even if
using a self-piercing valve), using a sharp
bit. Remove any burrs resulting from
drilling the hole in the pipe.
Take care not to allow water to drain into
the drill.
Failure to drill a 1/4" hole may result in
reduced ice production or smaller cubes.
26
Page 27
Installation Instructions
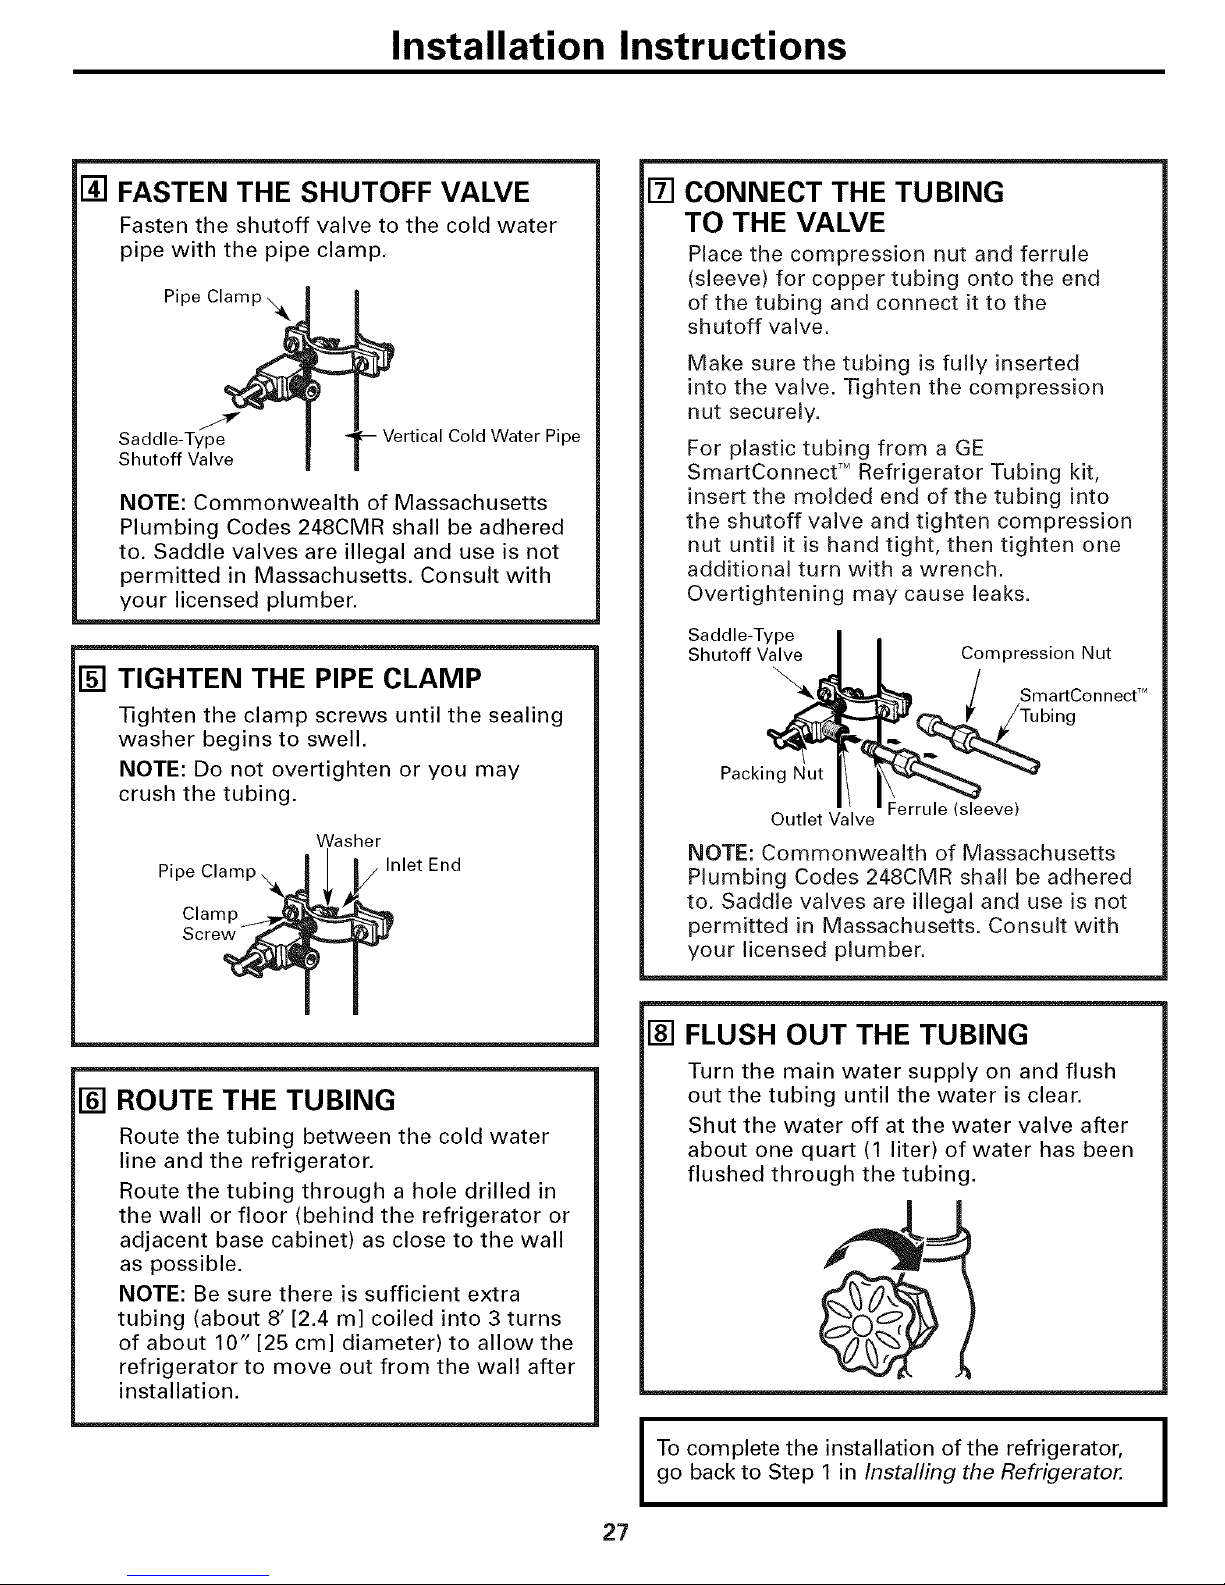
[] FASTEN THE SHUTOFF VALVE
Fasten the shutoff valve to the cold water
pipe with the pipe clamp.
Pipe
Saddle-Type
Shutoff Valve
Cold Water Pipe
NOTE: Commonwealth of Massachusetts
Plumbing Codes 248CMR shall be adhered
to. Saddle valves are illegal and use is not
permitted in Massachusetts. Consult with
your licensed plumber.
[] TIGHTEN THE PIPE CLAMP
Tighten the clamp screws until the sealing
washer begins to swell.
NOTE: Do not overtighten or you may
crush the tubing.
Pi
Clamp
Screw
Washer
Inlet End
[] ROUTE THE TUBING
Route the tubing between the cold water
line and the refrigerator.
Route the tubing through a hole drilled in
the wall or floor (behind the refrigerator or
adjacent base cabinet) as close to the wall
as possible.
NOTE: Be sure there is sufficient extra
tubing (about 8' [2.4 m] coiled into 3 turns
of about 10" [25 cm] diameter) to allow the
refrigerator to move out from the wall after
installation.
[] CONNECT THE TUBING
TO THE VALVE
Place the compression nut and ferrule
(sleeve) for copper tubing onto the end
of the tubing and connect it to the
shutoff valve.
Make sure the tubing is fully inserted
into the valve. Tighten the compression
nut securely.
For plastic tubing from a GE
SmartConnect TMRefrigerator Tubing kit,
insert the molded end of the tubing into
the shutoff valve and tighten compression
nut until it is hand tight, then tighten one
additional turn with a wrench.
Overtightening may cause leaks.
Saddle-Type
Shutoff Valve
Packing Nut
Outlet Valve
Compression Nut
/ SmartConnect 'M
Tubing
Ferrule (sleeve)
NOTE: Commonwealth of Massachusetts
Plumbing Codes 248CMR shall be adhered
to. Saddle valves are illegal and use is not
permitted in Massachusetts. Consult with
your licensed plumber.
[] FLUSH OUT THE TUBING
Turn the main water supply on and flush
out the tubing until the water is clear.
Shut the water off at the water valve after
about one quart (1 liter) of water has been
flushed through the tubing.
27
I To complete the installation of the refrigerator,
I
go back to Step 1 in Installing the Refrigerator.
I
Page 28
Normal operatingsounds.
Newer refrigerators sound different from older refrigerators.
Modem refrigerators have more features and use newer
technology.
Do you hear what I hear? These sounds are normal.
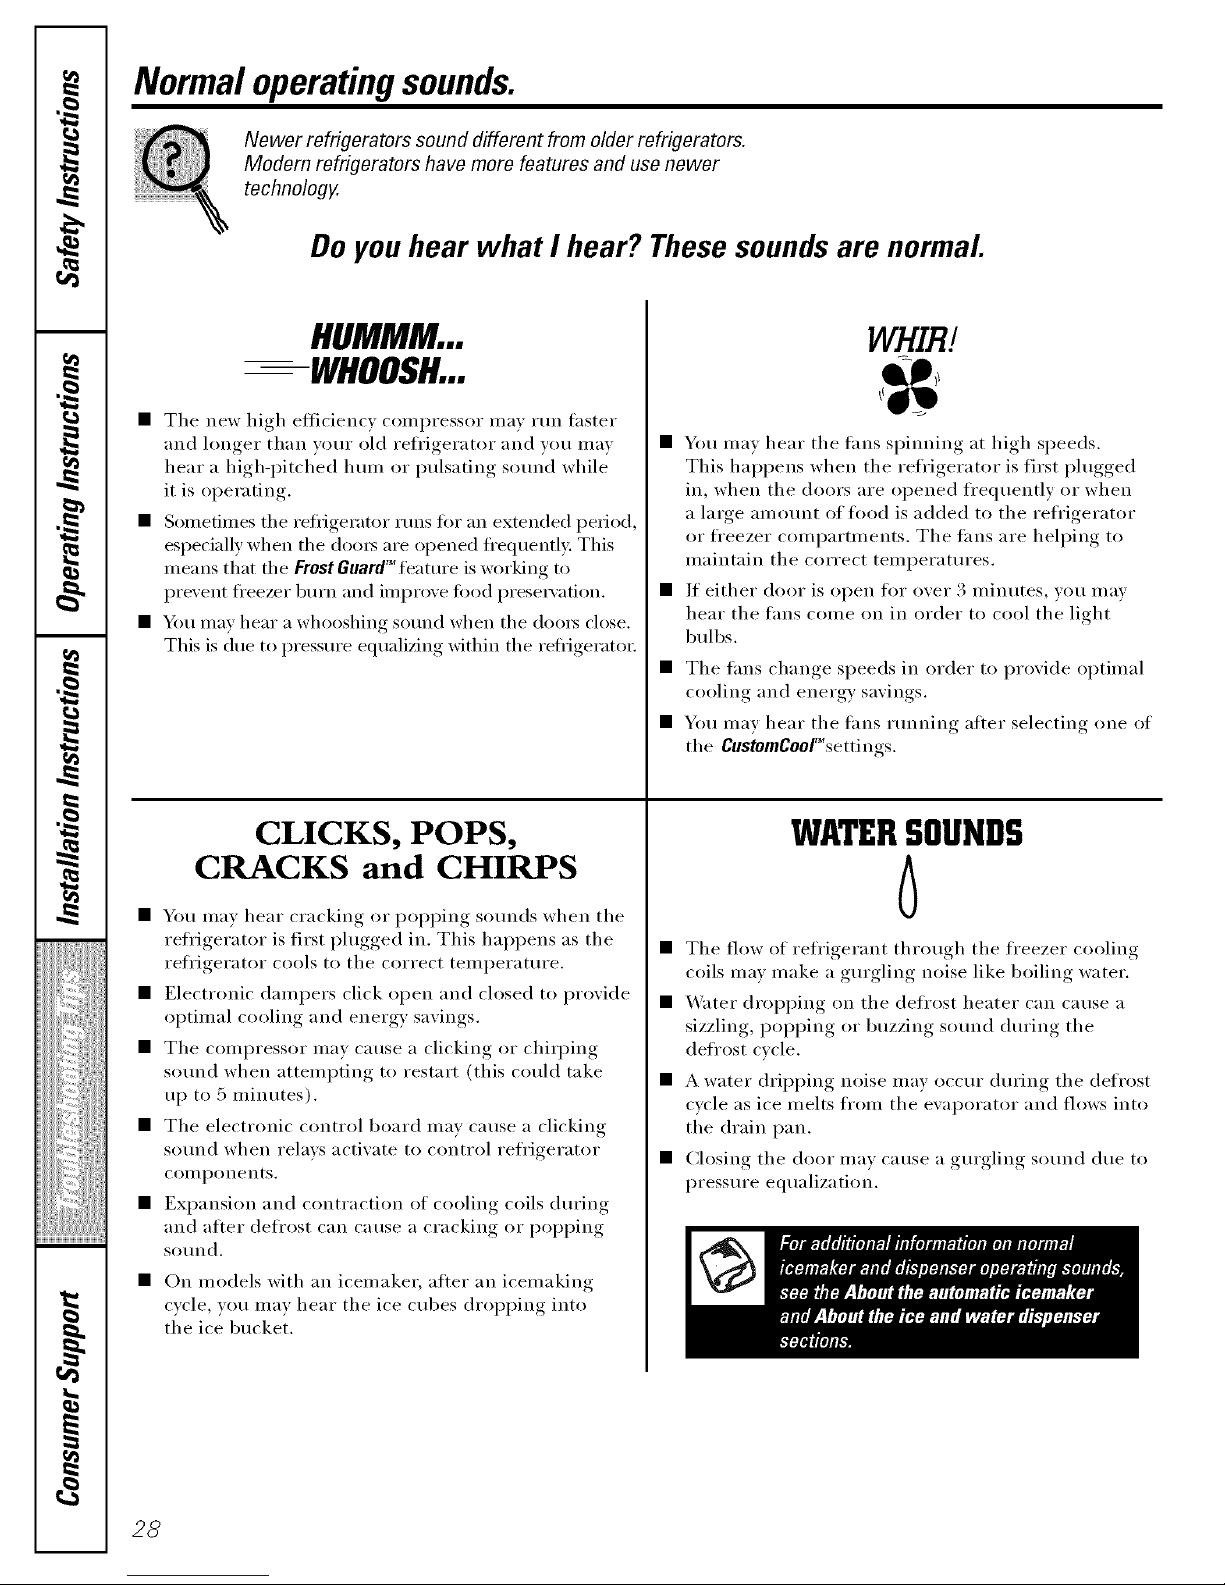
HUMMM...
--WHOOSH...
• The new high eflicienc) compressor ma) Hm faster
and hmger than wmr old refl'igerator and you may
hear a high-i)itched hum or pulsating sound while
it is operating.
• Sometimes the retiJgeramr runs tot an extended period,
especially when the doo_s are opened ti'equently. This
means that the Frost GuardT"feature is working to
prevent ti'eezer burn and improve tood preseP,'ation.
• 54m may hear a whooshing sound when the (loo_ close.
This is due to pressure equalizing within the reliigerato_:
CLICKS, POPS,
CRACKS and CHIRPS
• You may hear cracking or i)oi_ping sounds when the
reli'igerator is first phlgged in. This hai)pens as the
reti'igerator cools to the correct temperature.
• Electronic dampers click open and closed to provide
optimal cooling and energy savings.
• The compressor may cause a clicking or chiq_ing
sound when attempting to restart (this could take
up to 5 minutes).
• The electronic control board may cause a clicking
sound when relays activate to control reii'igerator
COII/l)OIleIltS,
• Expansion and contraction of cooling coils during
and aiter deii'ost can cause a cracking or i)oi)ping
SOtlnd.
• On models with an icemake_; after an icemaking
cycle, yotl Ill}IV hear the ice ctlbes dropping into
the ice bucket.
• You may hear the tans spinning at high speeds.
This hal)pens when the reti'igerator is first plugged
in, when the doors are opened ti'equently or when
a latge aI//Otlllt of food is added to the refrigerator
or ti'eezer comi)artments. The tans are helping to
maintain the correct temperatures.
• If either door is open fin" over 3 minutes, you may
hear the trois come on in order to cool the light
bulbs.
• Tile rims change speeds in order to provide optimal
cooling and energy savings.
• You may hear the tans running atter selecting one of
the CustomCool_%ettings.
WATERSOUNDS
6
• Tile flow of refl'igerant through the fl'eezer cooling
coils may make a gurgling noise like boiling water.
• _4_lter dropping on the defl'ost heater can cause a
sizzling, I)opping or buzzing SOHild during the
defl'ost cvcle.
• A water dripping noise may occur during the defrost
cycle as ice melts from the ewq)orator and flows into
the drain pan.
• Closing the door may cause a gurgling sound due to
pressure equalization.
28
Page 29
Beforeyoucall forservice...
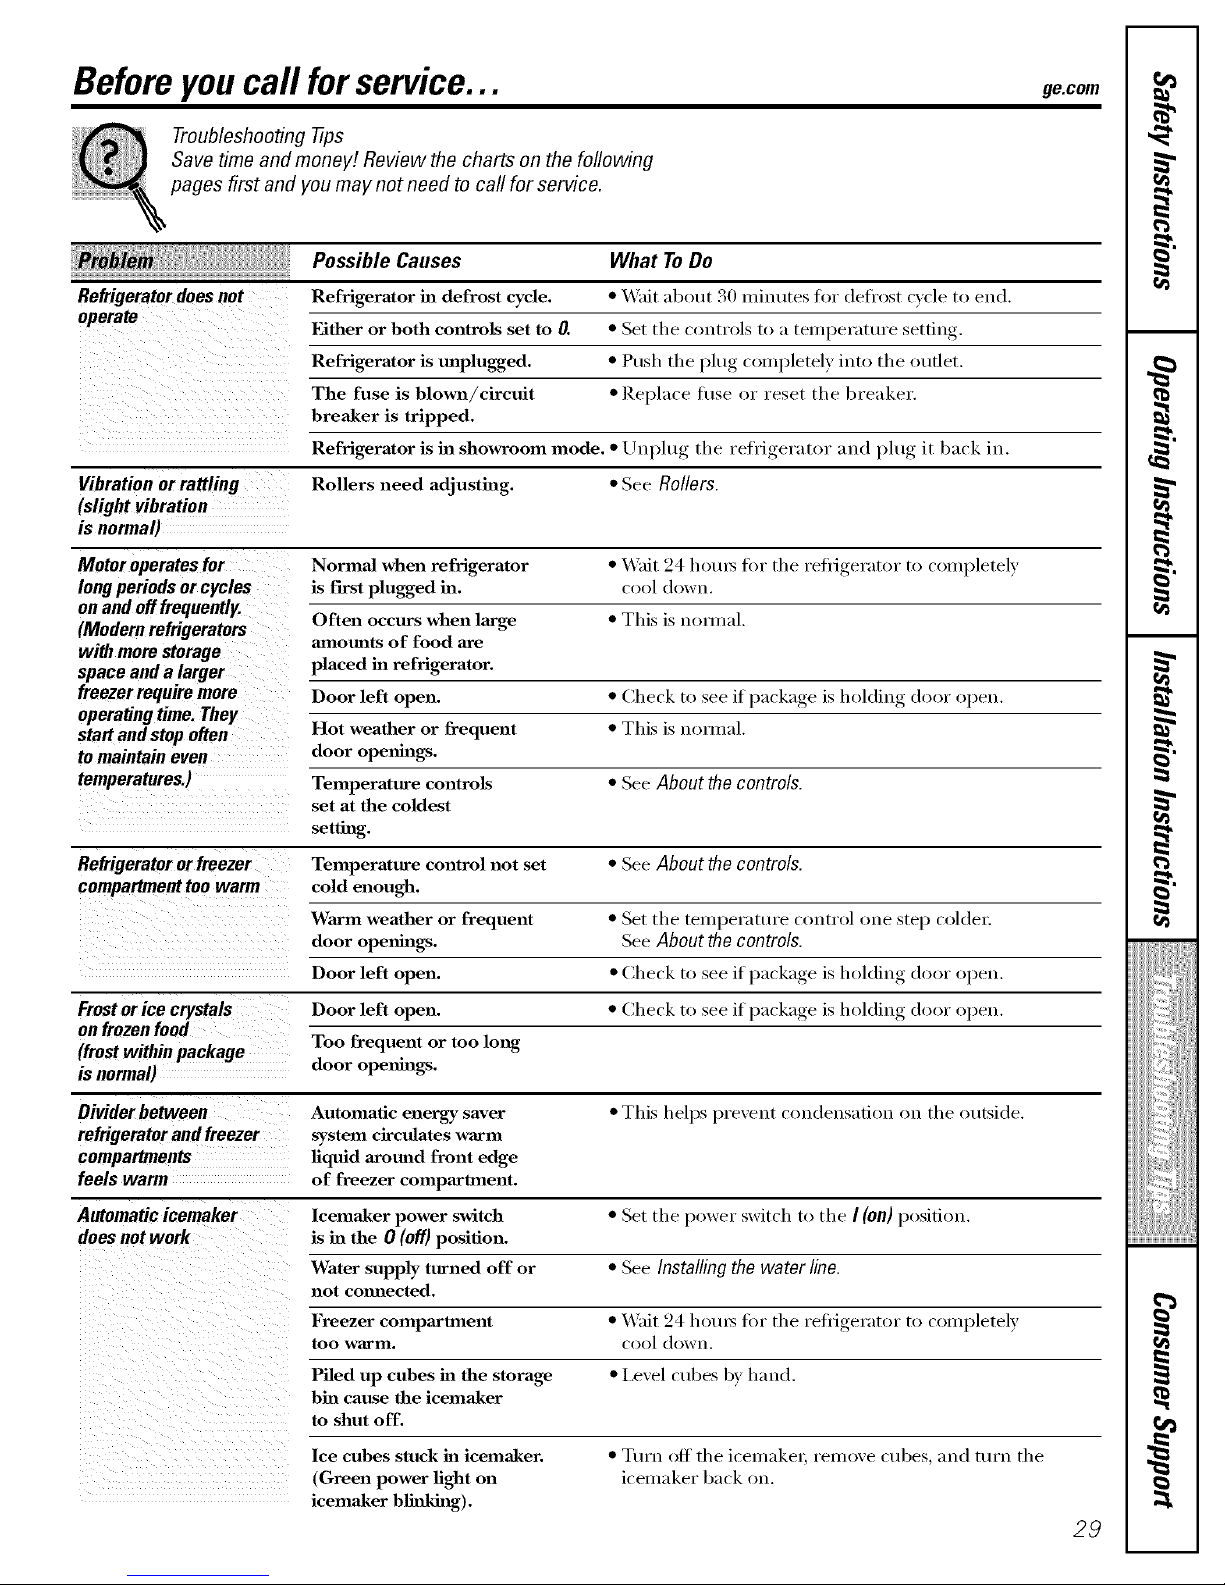
Troubleshooting -tips
Save time and money! Review the charts on the following
pages first and you may not need to call for service.
ge.com
Possible Causes What ToDo
Refrigerator does not Refrigerator in defrost cycle. * _'ait about 30 minutes tot (leti'ost cycle to end.
Either or both control] set to O. * Set tile coutrols to a teH]l)erature settiug,.
Refrigerator is unplugged. * Push the I)lu'"_ completely into the outlet.
The fuse is blown/cireuit * Replace fl/se or reset the breaker.
breaker is tripped.
Refrigerator is ha showroom ]node. * Lluplug tire refrigerator, aud I_lug, it back in.
Vibration or rattling Rollers need adjusting. * See Rollers.
(slight vibration
is normal)
Motor operates for Normal when refrigerator * _4'ait 24 hotu_ fi:,r tire refiigerator to completely
long periods or cycles is first plugged ha. c(>ol (h>wu.
onandofffrequently.
Often occurs when large * This is uoH.al.
(Modern refrigerators
with more storage amounts of food are
spaceanda larger placed ha refrigerator.
if )acka,,e is holding door open.
freezer require more Door left open. * Check to see I ,_
operatingtime,They
startandstop often Hot weather or frequent * This is uo_ual.
tomaintaineven door openings.
temperatures.) Temperature control] • SeeAbout thecontrols.
set at the coldest
setting.
Refrigeratororfreezer Temperature control not set • See About thecontrols.
compartment too warm cold enough.
WaJ_n weather or frequent * Set tire telul)erature coutrol oue step colder.
door ope]mags. SeeAbout the controls.
if )a(ka,,e i_ holding door open.Door left open. * Check to see I
if )acka,,e is holding door open.Frost or ice crystals Door left open. * Check to see l _ ,
onfrozenfood
(frost within package Too frequent or too long
isnormal) door openhags.
Divider between Automatic energy saver • This helps px'eVel]t ('ol]del]S;itiol] Ol] tire outside.
refrigerator and freezer system circulates warm
compartments liquid around front edge
feels warm of freezer compartment.
Automatic icemaker lcemaker power switch * Set the power _witch to tire I (on) position.
doesnotwork is ha the 0 (Off) position.
Water supply turned off or * See Installing thewater line.
not comaected.
Freezer compartment * _'ait 24 hotu_ fi:,r tire refiJgerator to completely
too warm. cool dowl].
Piled up cubes ha the storage * Level cttbes by hand.
bin cause the icemaker
to shut off.
Ice cubes stuck ha icemaker.
(Green power fight on
icemaker blinking).
• Turn off the icemaket, remove cubes, and turn the
icelnaker back on.
29
Page 30
Beforeyoucall forservice...
Possible Causes What ToDo
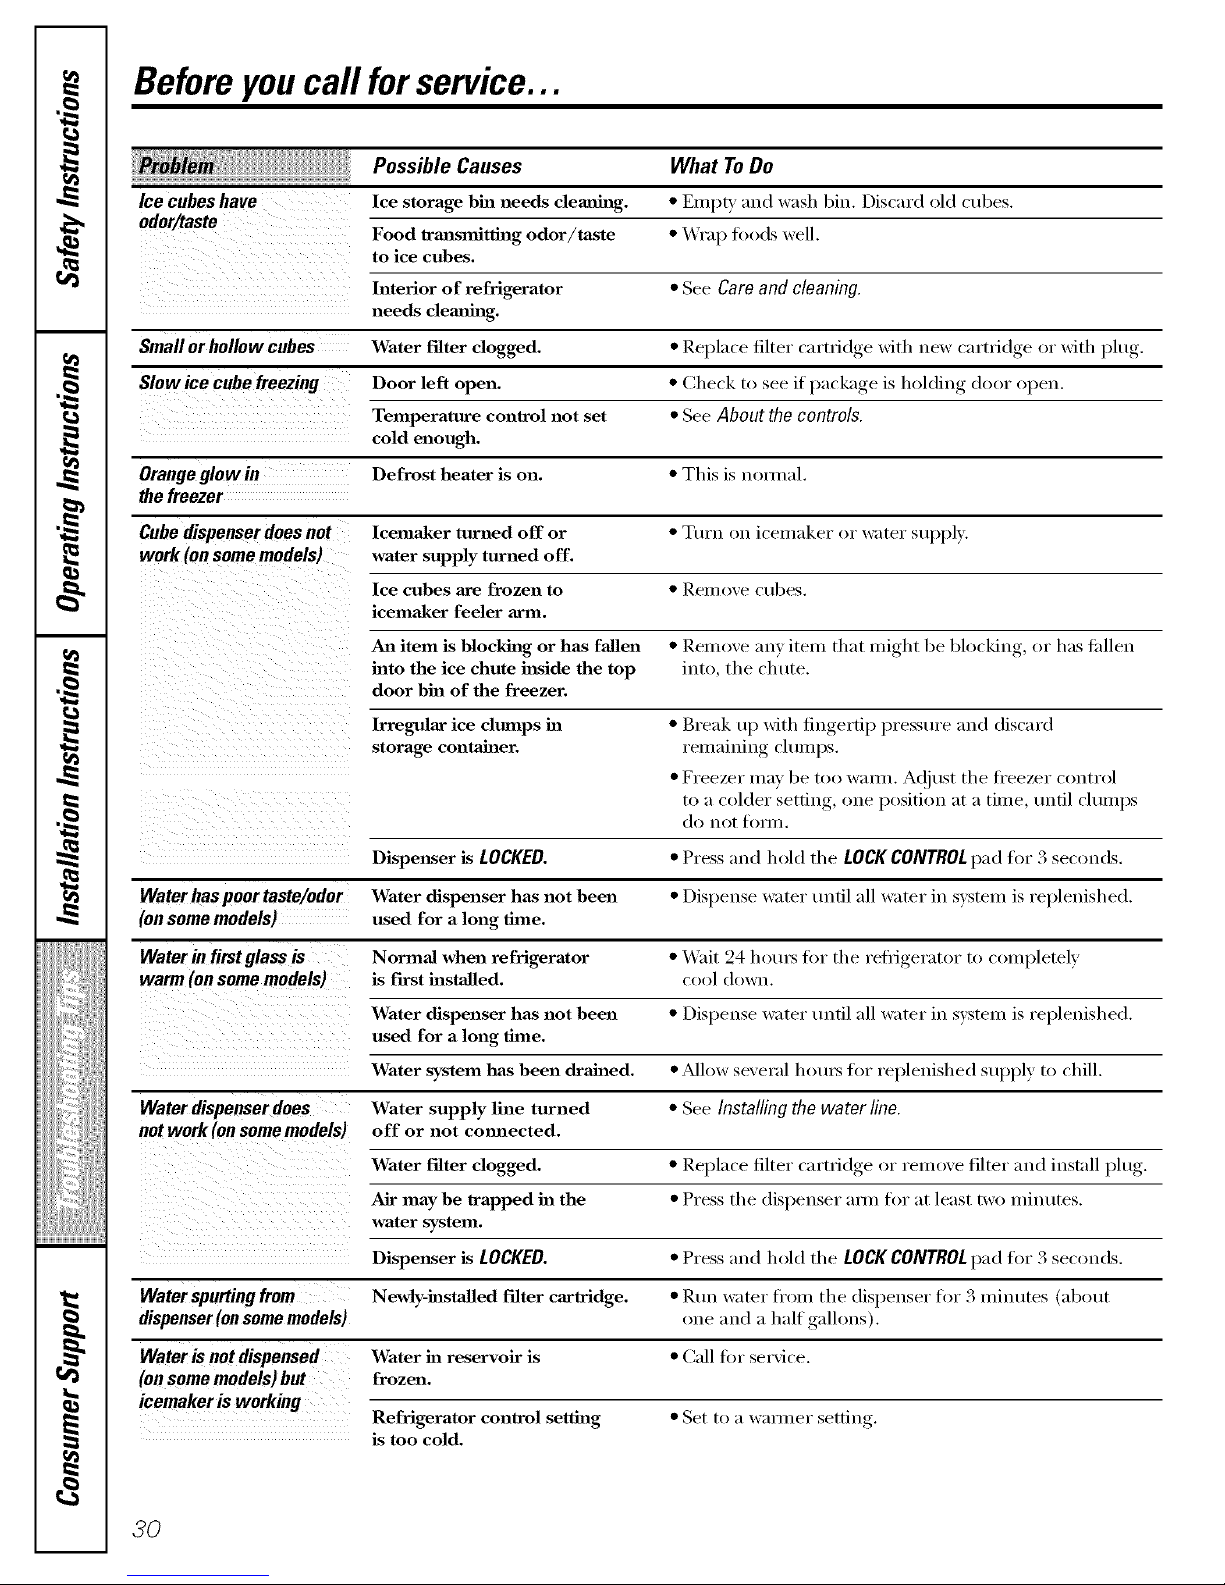
Ice cubes have Ice storage bin needs clemlhlg. * EmpF and wash bin. Discard old cubes.
odor/taste
Food trmlsllfitthlg odor/taste * _M'ap fi)ods well.
to ice cubes.
Interior of refrigerator * See Careand cleaning.
needs demfing.
Small or hollow cubes Water Filter clogged. * Replace filter cartridoe with new cartridge or with )ltv,
Slow icecubefreezing Door left open. * Check to see I
if )ackaoe is holding door open.
Temperature control not set * See About the controls.
cold enough.
Orange glowin Defrost heater is on. * This is nolmal.
the freezer
Cube dispenser does not lcema_ker turned off or * Turn on icelnaker or water supply.
work (on some models) water supply turned off.
Ice cubes are frozen to * ken/oxe cubes.
icema_ker feeler arm.
An item is blocking or has fallen * Relnove am iteln that inight be blocking, or has tidlen
into the ice chute h_side the top into, tile chute.
door bhl of the freezer.
Irregular ice clmnps in * Break up with fingertip pressure and discard
storage container, relnaining chunps.
• Freezer nlay be too waml. A(!iust tile ti'eezer control
to a colder setting, one position at a tilne, until chunps
do Ilot fonn.
Dispenser is LOCKED. • Press and hold tile LOCKCONTROLpad for 3 seconds.
Waterhaspoortaste/odor Water dispenser has not been • Dispense water until all water ill sxsteln is replenished.
(on some models) used for a long thne.
Water in first glass is Normal when refrigerator • "_.%fit24 houi_ t0r tile reflJgerator to completely
is first installed, cool down.
Water dispenser has not been • Dispense water until all water ill sxsteln is replenished.
nsedforalong ne.
Water system has been drained. • _Mlow sexeral houi_ for replenished suppl) to chili.
Water dispenser does Water supply lille turned • See Installing the water line.
not work (on some models) o ff or not colnlected.
Water Filter clogged. • Replace filter cartridge or relnoxe filter and install _lu,
I
Air may be trapped in the • Press tile dispenser arnl tor at least two ininutes.
waters stem.
Dispenser is LOCKED. • Press and hold the LOCKCONTROLpad for 3 seconds.
Waterspurting from Newly-hlstaJled filter cartridge. • RtlII water fl'oln tile dispenser for 3 ininutes (about
dispenser (on some models) one and a half galhms).
Water is not dispensed Water in reservoir is • Call fin" service.
(on some models) but frozen.
icemakeriswerking
Refrigerator control setting • Set to a Waliner setting.
is too cold.
30
Page 31

ge.com
Possible Causes What To Do
No water or ice cube Supply line or shutoff * Call a phunbe_:
production valve is clogged.
Water Filter clogged. * Replace filter cartridge or remoxe filter and install )lu 7-
Dispenser is LOCKED. * Press and hold the LOCKCONTROLpad fi)r 3 seconds.
CUBEDICEwas selected Last setting was * A tew cubes were lett in the crusher fl'om the previous
but CRUSHEDICE CRUSHEDICE. settin , This is nom_al.
was dispensed
(onsome models)
Refrigerator has odor Foods trmasmitthag * Foods with smmg odo,_ should be tightly wrapped.
odor to refrigerator. * Keep an oI)en box of baking, soda in the refi_igerator;
rep_. e exe,_,three m,mth_.
Interior needs clemfing. * See Care and cleaning.
Meistureformsen Not mmsuaJ durhag * _ipe stu'til('e dYv.
outside of refrigerator periods of high humidity.
Moisture collects inside Too frequent or too
(in humid weather, air long door openhags.
carries moisture into
refrigerator when doors
are opened)
Interiotlightdoes No power at outlet. * Replace fuse or reset the breaker:
not work
Light bulb burned out. * See Replacing the light bulbs.
Water on kitchen flooror Cubes jammed in chute. • Poke ice thi-otlgh with a wooden s[)o()n.
on bottom offreezer
iii!i_i iii i i/iiiiiiiiiiiiiiiiiiiiii
Refrigerator never
shuts offbutthe
temperatures are OK
Refrigerator is beeping
Ooo,.otclosi.gproporlv
Normal air flow cooling
motor. In the refrigeration
process, it is uormaJ that
heat be expelled ha the
area reader the refrigerator.
Some floor coverings
axe sensitive mad will
discolor at these normal
mad safe temperatures.
Adaptive defrost keeps * This is noxmal. The refrigerator xfill cycle off after the
compressor rmufing during door remains closed fi)r 2 horus.
door ope_mags.
Door is open. * Close door
Door gasket on hinge side "_II_-) )lx, i)arattin.... wax to the ti_ce of the ,gasket_.
sticking or folding over.
31
,,_,; ,i,,,,,
i:;_i:4iii!i!i!i!
i_iiiiii'_iiii_i!iiiil
i/iiii iiIil
Page 32

Performance Data Sheet
SmartWater Filtration System
MWF Cartridge
This systemhasbeentested accordingto NSF/ANSI42/53for reductionof thesubstanceslisted below.
Theconcentration of the indicated substances in water enteringthesystemwasreduced toa concentration
less thanor equal tothepermissible Ibnit for water leaving thesystem, as specified inNSF/ANSI42/53.*
€100%safety factors built in for unmetered usage)
USEPA
MCL
Parameter
Chlofin_
T&O
Panicttlat_ **
m
m
m
Influent
Challenge Concenlrafion
2.0 mg/L + ]0%
_>10,000 pardck s/mI,
Stmldard No. 42: Aesthetic Effects
hffluent Effluent
Average Average Maximum
].96 rag/I, 0.06 rag/I, 0.11 rag/I,
6,4(10,000 #/mL 58,833 #/mL 130,000 #/mL
Standard No. 53: Health Effects
Parameter USEPA
MCL
05 NT_
"Ihrbklit_
Cvsls _>99.95% Reduction
Asbestos _>99% Rcducfiola
1;:ad at pI {6.5 0.0] 5 mg/L
I_ead at pl {8.5 0.012,mg/L
Mert ur} at pH 6.5 0.002 mg/L
.\ler_ my at pH 8.5 0.002mg/L
Alachlor 0.002 rag/I,
l in(lane 0.0002mg/L
]xffluent
Challenge Concentration
] ] + ] KI'/5"**
Minim(m( 50,000 I<
] (F to ]0s tibe/_/I; > ]0tim
0.12, rag/l< + ]0%
0.12, rag/I, + ]0%
0.006 mg/L + ]05(
0.006mg/L + ]0{(
0.04 rag/I, + ]0!(
0.002 mg/L + ]0{(
0.210 mg/L + ]0{(
0.015 mg/L + ]0{(
0.015 mg/L + ]0{(
hffluent
Average
] 0.5 NT[ 5
]] 8,75(}#/1,
57 MF/I<
0.1567 rag/l<
0.1433 rag/I,
0.0059 rag/I,
0.0057 rag/I,
0.0367 rag/I,
0.0020 rag/I,
Effluent
Average Maximum
0.14 NT/ 0.28 NT{
< ] #/I, 4 #/L
0.996 MF/L < ] \IF/I<
< 0.001 mg/L < 0.(}01 mg/L
< (}.001 mg/L < (}.(}01rag/I,
0.000350 mg/L 0.0007 mg/L
0.000325mg/L 0.0006mg/L
0.00023 rag/I, 0.0{X)4 mg/L
< 0.00{)02 rag/I, < 0.00002 mg/L
2,44) 0.070mg/L 02033mg/I, 0.00337mg/I, 0.0]]000mg/I,
"Ibxaph_ne 0.003mg/L 0.0]60rag/I, 0.00]00rag/I, 0.(_)]000mg/I,
Benz_ne 0.005 mg/L 0.0145 rag/I, 0.000500 mg/L 0.()00500 mg/I,
Carbofimm 0.040mg/L 0.080mg/l,+]0!( 0.0830rag/I, 0.00]000mg/I, 0.00]000mg/I,
],4di&lorol>enzene 0.075mg/L 0.225mg/L+]0[_( 0.2283mg/L 0.0005(X)mg/L 0.(X)0500mg/L
Atmzine 0.003mg/L 0.009mg/L+_]0!_( 0.0087mg/L <0.0005mgq_ <0.0005rag/l.
% Reduc6on
Average
96.77%
99.14%
_Ulffl
94.74%
{)7.97%
% Reduction
Average Minlmtml
98.54% 97.20%
> 99.99% > 99.{)9%
99.6(1% {)9.39%
99.36% 99.29%
99.30% 99.29%
94.70% 87.50!_(
93.20% 89.29!_(
99.34% 98.67%
99.00% 98.95[(
98.32!( 94.50!_(
93.44[( 91.67[(
96.5] {( 95.83!(
98.78!( !)8.65!(
9!).78!( 99.77{_(
94.22!( 93.33!(
Min. Required
ReducGon
> 50%
_>85%
Min. Required
Reduction
0.5 NT/5
_>99.95%
_>99%
0.010 mg/L
0.010 mg/L
0.002mg/L
0.002mg/L
0.002 mg/L
0.0002mg/L
0.070mg/I,
0.003 rag/I,
0.005 rag/I,
0.04 rag/I,
0.075 mg/L
0.003 rag/l,
* Testedusinga flowrateofO.5Ogpm;pressure of GOpsigpHofZS_+ 0.5, temp. of 68°_+ 5°F{20°_+3°C1
** Measurement b Particles/ml. Particles used were 0.5-1 microns
*_ NTU=Nephelometric Turbidity units
Operatino Specifications
[] Capa(it? : cerGfied tot up to 300 gallons (I 135 1); up to six months h)r models _dthout a replacement tiher indicator light;
up to one }ear fi)r models with a replacement fiher indicator light
[] Pressure requirement: 40-120 psi (2.8-8.2 bar), non-shock
[] Tempera(re'e: 33-100°F (0.6-38°(2)
[] Fhwv rate: 0.5 gpm ( 1.9 lpm)
General Instaflation/Operation/Maintenance Requirements
[] Fhlsh new cartridge at hill f]o_ for ,, minutes to purge ()tit trapped air.
[] Replace cartridge when the indicator light flashes or water flow rate is reduced (m non-indicator units.
Special Notices
[] Installation instructions, parts and service availabilit}, and standard x<arrant) are included *_ith the product when shipped.
[] This drinking >,ater s}stem must be maintained according to mamffactmer's instructions, inchlding replacement of filter carQJdges.
[] Do not use Mth water that is microbiologicall} unsafe or of unknown qualit} without adequate disinfectioil before or
after the sxstem. Sxstems certified for c}st reductioil max be used on disinfected water that me} contain filterable cxsts.
[] The contaminants or other substances l'enioved o1" reduced b} this water treatment s}stem are not necessaril} in xour water.
[] Check for compliance with the state and local laws and regulations.
[] Note that while the testing *sas performed under standard laborator} conditions, actual performance me} Xr_*'}i S}stems must
be installed and operated in accordance with manuihcturer's recommended procedures and guidelines.
Standard No. 42: Aesthetic Effects
Chemical Unit
Chlorine Taste and Odor
Mechanical Fihration Lnit
Particulate Reduction, Class I
System "[\,sted and Certified by NSF International against ANSIiNSF Standard 42 & 53 for the reduction of:
Standard No. 53: Health Effects
Chemical Reduction Unit
Alachlor and Atrazine Reduction
Benzene and (iarbofllran Reduction
1,4 dichlorobenzene and 2,44) Reduction
Lead and Lindane Reduction
Mercury and Toxaphene Reduction
Mechanical Filtration [nit
Turhidity Reduction
Cyst and Asbestos Reduction
Manufactul-ed fin-: General Electric Compal_y, Louisville, t\T 40225
Elt\ ES'IL No. 070595-MN-001
32
Page 33

GE Service Protection Plus rM
GE, a name recognized _orldwide fbr quality and dependability; of;_ers you
Service Protection Plus'"- comprehensive protection on all your appliances -
No Matter What Brand!
Benefits Include:
• Backed by GE
• All brands covered
• Unlimited service calls
• All parts and labor costs included
• No out-of-pocket expenses
• No hidden deductibles
• One 800 number to call
WeT! Cover Any Appliance.
Anywhere. Anytime.
You _ill be complete b satisfied with ore" service protection or )ou ma} request }our mone} back
on the remaining value of your contract. No questions asked. It's that simple.
Protect your refl'igerator, dishwasher, washer and (byer, range, TV; VCR and much more - any brand!
Plus there's no extra charge I()r emergency service and low monthly financing is available. Even icemaker
coverage and t()od spoilage protection is ofli_red. You can rest easy, knowing that all your valuable
household products are protected against expensive repairs.
Place ,ore" confidence in (;E and call us in the [!,S. toll-free at _UO.DZD.ZZZz-I:
tot I/lore ]ll[orI//at]Oll.
*-MI l)l-iiiids ci)_,(?l(!d, ill:} Ii) _(} y(?(tYb old, in Ihe (OlltJn(!llt_l] I _.
Please place in envelope and mail to:
General Electric Company
Warranty Registration Department
EO. Box 32150
Louisville, KY 40232-2150
3,7
Page 34

Consumer Product Ownership Registration
Dear Customer:
Thank you for purchasing our product and thank you for placing your confidence in us.
V(e are proud to haxe you as a customer!
Follow these three steps to protect your new appliance investment:
Complete and mail
your Consumer
Product Ownerslfip
Registration today.
Itave the peace ot
mind of knowing we
(an (onta(t you in
th( unlik(ly event o[
a satbtv modification.
Aller mailing the
regisu:ation below,
siore this doe/Ill/ell|
in a sad t)lace. It
COlHaills i111()rl//atJo/l
you will need should
yotl req Hire service.
Our service mmd)er is
800.GE.CARES
(800.432.2737).
Read yore: Owner's
Mmmal carefldlv.
h will hel t) you
ot)erate y(mr new
appliance t)rot)erly.
Model Number Serial Number
I I I I I
Important: If you did not get a registration card with your
product, detach and return the form below to
ensure that your product is registered, or register
online at ge.com.
,_,,,_ Cut here
Consumer Product Ownership Registration
Model Number Serial Number
M_ Ms. Mrs. Miss
First] ] Last]
Name I I I I I I I I I Nam( I I I I I I I I I I I I
Street ]
Address I I I I I I I I I I I I I I I I I I I I I I I
, I
I
I
_\l)l. #I ' ' ' ' ' ' ' I E-mail \(ldr(ss*
Zip [
Dlle 1)1I(:_d
hi Usl [ I [ I)av [ I I xt_:4/r [ L ] Pholl(!
_,.,,l_rl I , I-I , , II
Monlh
GE Consumer&, Industrial
Appliances
General Electric Compang
Louisville,KY40225
ge.com
i i I [
* Please provide your emmil address to receive, via emmil, discounts, special ottk,r,, and other
important communications from (;E Appliances (GEA).
[ Check here ifvou do not want to receive communications ti-om GEA's carefully selected partners.
FAII.I RE TO COMt)IA{TE AND RETI RN TIIIS CARD DOES NOT DIMINISII ",_)t R
_,E\RRAN'IY RI(;IH'S.
For inli)rmation al)out GEA's prixacy and data usage polic}; go to ge.com and
click on "Privacy Poli(V' or call 800.626.2224.
34
Page 35

Please place in envelope and mail to:
Veuillez mettre dans une enveloppe et envoyez _ :
OWNERSHIPREGiSTRATiON
P,O. BOX1780
MISSISSAUGA,ONTARIO
L4Y4G1
(FORCANADIANCONSUMERSONLY)
35
Page 36

For Canadian
Customers
Pour ;es
Consommateurs
Canadiens
P',easeregisteryourproducttoenableustocontactyou
inbheremoteeventasafetyn_ce isissuedforthisproduct
andtoa;owforefficientcommunicalionunderlbeterms
ofyourwarranty,shou;dlheneedarise.
REGISTERON-IJNE: vvww,geapp_iances,ca MAiLTO:
ENREGISTREMENTSURINTERNETA: ww_(.e;ectromeeag_e_rs__e,.caPOSTERA:
MR./M [] MRS./MME.=6RSTNAME/PRENOM =LASTNAME/NOM
[] MiSS/MLLE. [] MS. i i
1 .I
1 "r
STREETNO/N° RUE _STREETNAME/RUE _APT.NO/APP./RR#
I I
I I
QqY/¼LLE rpROVINCE, _I_SfAL C /POSTAL
b ±
AREACODE/IND.REG.I_ _ PN-O-NE ],E-MAiL
I I
J J
DIDYOUPURCHASEASER¼CECONTRACTFORTHISAPPL;ANCE? YES/OUi [] iFYES/SiOUi:EXPiRATiON
Y/A M O/J
AVEZ-VOUSACHETEUN CONTRATDESERVICEPOURCETAPPAREiL? NO/NON []
NAME OFSELGNGDEALER/ NOMDU MARCHAND i
MODEL/MODt_LE
I
I
Veui;ezenregisb-ervolzeproduitalandenouspermellrede
communiqueravecvoussijamaisunavisdes6curit6concemant
ceproduit@tait6misetdecommuniquerfaciiementavecvousen
vertudev_e gara_e,si',ebesoinsenfairserrdr.
RO.BOX1780,M;SS;SSAUGA
ONTAR;O,L4Y461
INSTALLATIONDATE/DATED'INSTALLATION[ CORRESPONDENCE [] ENGGSH
Y/A M O_J I
CORRESPONDANCE [] FRANr.AiS SER_L /St_RiE
I
[] ido notwish to receiveanypromotionaloffersregardingthisproduct.
[] Je ned_ire pasrecevolrd'offrespromotionneiiesconcemantceproduit.
36
Page 37

State of Calilk)rnia
Department of Health Services
Water Treatment Device
Certificate Number
05-1698
Date Issued: February 2, 2005
Trademark/Model Designation
MWF
Replacement Elements
MWF
Manufacturer: General Electric Company
The water treatment device{s)
116830 of the Health and Safet
Microbiological Contaminants and Turbidity
Cysts
Turbidity
pnrsnant to Section
Organic Contaminants
AlachlOr
Atr_Lzine
Benzene
Carbofuran
Lindane
Mercury
Toxaphene
1.4-dichlorobenzene
2.4-D
Inorganic/Radiological C 0ntaminants
Rated Service Capacity: 300 gal
Conditions of Certification:
Do not use where water is microbiologically unsafe or with water of unknown quality, except that systems certified for
cyst reduction may be used oll disinfected waters that may contain filterable cysts.
?7
Page 38

CUSTOMER WARRANTY
(forcustomersin Canada)
Yourrefrigeratoris warrantedto be freeof defectsin materialandworkmanship.
Whatiscovered HowLongWarranted Parts Labour
(FromDateof Sale) Repairor Replace
at Camco'sOption
Compressor GEProfile:Ten(10)Years GEProfile:Ten(10)Years GEProfile:Five(5)Years
GEandAll Other GEandAll Other GEandAll Other
Brands:One(1)Year Brands:One(1)Year Brands:One(1)Year
SealedSystem(including GEProfile:Five(5)Years GEProfile:Five(5)Years GEProfile:Five(5)Years
evaporator,condenser GEandAll Other GEandAll Other GEandAllOther
tubingandrefrigerant) Brands:One(1)Year Brands:One(1)Year Brands:One(1)Year
All OtherParts One(1)Year One(1)Year One(1)Year
TERMS AND CONDITIONS:
Thiswarrantyappliesonlyfor singlefamilydomesticusein
CanadawhentheRefrigeratorhasbeenproperlyinstalled
accordingto the instructionssuppliedbyCamcoandis
connectedto anadequateandproperutilityservice.
Damageduetoabuse,accident,commercialuse,andalteration
or defacingoftheserialplatecancelsallobligationsof this
warranty.
Serviceduringthis warrantyperiodmustbe performedbyan
AuthorizedCamcoServiceAgent.
NeitherCamconortheDealerisliablefor anyclaimsor
damagesresultingfromfailureoftheRefrigeratororfrom
servicedelaysbeyondtheirreasonablecontrol.
Toobtainwarrantyservice,purchasermustpresenttheoriginal
BillofSale.Componentsrepairedor replacedarewarranted
throughthe remainderoftheoriginalwarrantyperiodonly.
Thiswarrantyis extendedtotheoriginalpurchaserandany
succeedingownerforproductspurchasedfor homeusewithin
Canada.Inhomewarrantyservicewillbeprovidedinareas
whereit isavailableanddeemedreasonablebyCamcoto
provide.
Thiswarrantyis in additionto anystatutorywarranty.
WHAT IS NOT COVERED:
• Ownerisresponsibleto payfor servicecallsrelatedto
productinstallationand/orteachinghowto usethe product.
• Damagetofinishmust bereportedwithin48hoursfollowing
thedeliveryof theappliance.
• Damagetofinishafterdelivery.
• Improperinstallation--properinstallationincludesadequate
aircirculationto therefrigerationsystem,adequateelectrical,
plumbingandotherconnectingfacilities.
• Replacementofhousefusesor resettingofcircuitbreakers.
• Replacementoflight bulbs.
• Damageto productcausedbyaccident,fire,floodsor acts
ofGod.
• Lossoffooddueto spoilage.
• Properuseandcareof productaslistedintheowner's
manual,propersettingof controls.
• Productnotaccessibleto providerequiredservice.
° WARRANTORISNOTRESPONSIBLEFORCONSEQUENTIAL
DAMAGES.
I
I EXCLUSIONOFIMPLIEDWARRANTIES--Yoursoleandexclusiveremedy isproductrepair as providedhithisLimited I
Warranty.Anyimpliedwarranties,iucludiugtheimpliedwarrantiesofmerchantabilityorfituessfora particularpurpose,
I
arelimitedto oneyearortheshortestperiodallowedbylaw.
IMPORTANT
Keep this warranty and your bill of sale as proof of original purchase and purchase date.
Please have serial number and model number available when calling for service.
CamcoServiceis availablecoastto coast.Iffurtherhelpis
neededconcerningthis warranty,contact:
Manager,ConsumerRelations
CamcoInc.,ConsumerService
1 FactoryLane,Suite310
Moncton,NewBrunswickE1C9M3
1.800.361.3400
Staple your receipt here.
Proof of the original purchase
date is needed to obtain service
under the warrant_
38
Page 39

RefrigeratorWarranty.(Forcustomers in the United States)
All warranty service provided by our Factory Service Centers,
or an authorized Customer Care® technician. Toschedule service,
on-line, 24 hours a day, vis# us at ge.com, or carl 800.GE.CARES
(800.432.2737).Please have serial number and model number
available when calling for service.
Staple your receipt here.
Proof of the original purchase
date is needed to obtain service
under the warrantz
GEWill Replace:
GEandGEPROFILEMODELS:
Fromthedateofthe
originalpurchase
ThirtyDays
(Water filter,if included)
Fromtheorigina!
purchase dateof
therefrigerator
Any part of the refl_igerator which fifils due to a detect in materials (:,r workmanship.
During this limited one-year warranty, GE will also provide, free of charge, all labor and
related serxice to replace the (lelecti_e part.
Anypartot the water filter cartridge which tifils (lue to a detect in materials or workmanship.
During this limited thirty-day warranty, GE will also provide, free of charge, a replacement water
filter ca rtri dge.
GEPROFILEMODELSONLY:
(GEProfilemodels only)
Fromthe date of the
originalpurchase
Any part of thesealed refrigerating system (the corn press(n; condenset; e_aporator
and all connecting ttfl)ing) which fifils (lue to a (lefect in materials or workmanship.
During this limited five-year sealed refrigerating system warranty, GE will also provide,
free of charge, all lal)or and related service to replace the defecti\'e part in the sealed
reflJgerafing system.
::Ji::Service trips to your home to teach you how to use
the product.
_: Improper installation, delivery or maJnteumace.
::Ji::Failure of the product if it is abused, misused, or used for
other thml the intended purpose or used commercially.
::Ji::Loss of food due to spoilage.
_: Replacement of house fuses or resetting of circuit
breakers.
::Ji::Damage caused after delivery.
::Ji::Replacement of the water Filter cartridge, if h_duded,
due to water pressure that is outside the specified
operating rm_ge or due to excessive sedimeut in the
water supply.
)_:Replacement of the light bulbs, if included, or water filter
cm'tridge, if included, other thml as noted above.
)_:Dmnage to the product caused by accident, fire, floods
or acts of God.
iJi::h_cidentaJ or consequentiaJ dmnage caused by possible
defects with this applimlce.
iJi::Product not accessible to provide required service.
I
EXCLUSION OF IMPLIED WARRANTIES--Your sole and exclusive remedy is product repair as provided in this
Limited Warranty, Any implied warranties, including the implied warranties of merchantability or fitness for a
particular purpose, are limited to one year or the shortest period allowed by law.
This warranty is extended to the original purchaser and any succeeding owner for products purchased for home
use within the USA. If the product is located in an area where service by a GEAuthorized Servicer is not available,
you may be responsible for a trip charge or you may be required to bring the product to anAuthorized GE Service
location for service. In Alaska, the warranty excludes the cost of shipping or service calls to your home.
Some states do not allow the exclusion or limitation of incidental or consequential damages. This warranty gives
you specific legal rights, and you may also have other rights which vary from state to state. To know what your
legal rights are, consult your local or state consumer affairs office or your state's Attorney General.
39
Warranter: General Electric Company, Louisville, KY 40225
Page 40

.g
,0
,0
(la
I
I
.g
m
C2_ r,_
Mesures de s&_rit_ ............... 41,42
Fonc¢ionnement
Clayettes et bacs ................... 45, 46
Entrefien et nettoyag_
du r_flig_rateui . .................. 51,52
Le disuibumur d'eau et de g]aqons . . .50, 51
I,e filtre _ eau ....................... 44
Les commandes ..................... 43
I,es portes du rOfrig_rateur ............. 47
I,es tiroirs et contenants _ l_gume ....... 48
Machine _ glaqons aummafique ........ 49
Remplacement des ampoules .......... 53
TurboCool _'*. ..................... 43
Inslallation
D_m&mgement du r_flig_rateur...55-58
Installation de la conduite d'eau ..... 6,3--65
Installation du rOfrigOrateur ...... 59-62
Preparation ......................... 54
Com'eils de d@armage ............ 66-70
Bruits de fonctionnement nommux ..... 66
Soutien au consommateur
Feuillet de dom_es relatives _ la
perfommnce de la cartouche M_]?. ..... 72
Garanfie pour la clientele au Canada .... 71
Soufien au consommamur . ............ 73
Transcrivezles numems de modele et de serie ici :
# de modele
# de serie
]Is tigm'ent sin" l'_tiquette qui se trouve 5 l'interiem"
du compartiment r_qi_igg_ratem" en haute 5 droite.
4O
Page 41

MESURESDESf:CURITf:IMPORTANTES.
LISEZD'ABORDTOUTESLESDIRECTIVES.
www.electromenagersge.ca
A A VERTISSEMENT!
N'utilisez cet #lectrom#nager que pour I'usage auquel il est destin#, comme expliqu# dans le present manuel.
MESURESDES@URITE-
Lorsque vous utilisez un appareil #lectrique, observez toujours les mesures de s#curit# de base,
y compris les suivantes.
iJi::Installez le r_fl_ig_rateur confimn&nent aux
directives d'installation axant de l'utilisex:
_: Ne laissez pas les enflmts grimpe_; s'asseoi_;
se tenir debout ni se pendre aux clavettes du
r_li_ig_ratem: ]ls pomTaient endommager le
rg_fl_ig_rateur et se blesser gravement.
_: Ne touchez pas les surlilces fl'oides du
cong_latem" si wins avez les mains humides
ou mouill_es : la peau risque d'adh&'er fi ces
sm'li_ces tr&s fl'oides.
::Ji::N'entreposez et n'utilisez pas d'essence ou
autres \_q)em_ et liquides inflammables 5
proximit_ de cet appareil ou de tout a utre
appareil (decm nn (_nage_:
::Ji::Si votre r_fl_ig_ratem" est dot_ d'tme machine
5 glaqons autolnatique &'itez le contact avec les
pibces mobiles du n/_calfiSlne _jecteui; ou avec
l'(_l(_Ilmnt chauflimt situ(_ 5 la partie inl_rieure
de la machine 5 glaqons. Ne posez pas les doigts
ou les mains sin" le m_canisme de la machine 5
glaqons pendant que le r_fl_ig&'atem" est branch,.
::Ji::t_loignez les doigts des parties du r_li'ig_ramm" off
l'on peut fi_cilement se pincer: les espaces entre
les portes et entre les portes et les placards sont
tot/jOtllS _troits. Soyez prudent lo_que votts tbm/ez
les portes de l'appareil en presence des enfimts.
_: D_branchez w)tre r6li_ig_ratem" avant de le
nettover ou de le rg_i)are_;
REMARQUE : Nousvousrecommandonsvivementde
confier route r_paration_ un technicienqualifi_.
::_i::I,o_sque w_us rOglez la commande sin" 0 (arrOt),
l'alimentation _lectrique de l'ampoule n'est
pas couple.
_: Ne recongelez pas les aliments smgel& qui ont
compl&tement d_gel&
A DANGER! RISQUES POUR LESENFANTS
COMMENTVOUSDEBARRASSERCONVENABLEMENT
DEVOTREANCIENREFRIGERATEUR
I,es enfimts pris au pi&ge ou morts d'asphy_e sont
toujom_ d'actualit_. I,es r_qi_ig_ratem_ abandom_s
sont tot{joui5 aussi dangereux, re&me si on n'attend
que <_quelquesjom_,, pour s'en dgd)arrasse_: Si wms
ne gardez pas wme ancien rg_fl_ig_ramm; veuillez
suiwe les directives ci<lessous afin de prg_venir les
accidents.
Avant de volts debarrasser de votre ancien
refrigerateur ou congelateur:
::_i::D&n ontez les portes.
_: i,aissez les clavettes en place afin d'emp_cher les
enflmts de grimper 5 l'intg_riem:
Refrigerants
Tousles appareils de r_frig&'ation contiem_ent
des r_li'ig_rants qui, confin'm&nent aux lois
tiad_rales, doivent 6tre enlev_s avant toute
_limination de l'appareil. Si wins wins
dgd)arrassez de vieux appareils de rg_li'ig_ration,
vg_rifiez, aupr_s de la socig_t(_ qui s'occuI)e de
lem" (Jimination, ce que vous devez fifire.
CORDONSPROLONGATEURS
Nous vous recommandons fortement de ne pas utiliser de cordons prolongateurs _ cause des risques
potentiels qu'ils pr#sentent dans certaines conditions.
T()tlteli)is si VOtlSdg_cidez d'ufiliser tout de m_me tm cordon prolongatem; il est al)solmnent n&-essaire
qu'il s)_gisse d'un cordon 5 3 ills avec raise 5 la terre pour appareils _lectrom_nage_ homologu_ Lri,
(aux Etats-Unis) ou certifi_ CSA (au Canada), pourvu d'une fiche et d'une prise raises fi la telTe
de 15 amperes (minim urn) et de 120 volts.
4/
Page 42

MESURESDESECURITEIMPORTANTES.
LISEZD'ABORDTOUTESLESDIRECTIVES.
AVERTISSEMENT!
RACCORDEMENTELECTRIOUE
Ne coupez ni retirez en aucun cas la troisiOme broche (mise _ la terre) de la fiche du cordon
d'alimentation. Pour votre s_curit#, cet appareil doit Otrecorrectement mis _ la terre.
I,e cordon d'alimentation de cet appareil est muni
d'une fiche _'l3 broches (raise _'lla terre) qui se
branche dans une prise murale ordinaire _'l
3 alv&_les (raise fl la terre) pore" r_duire au
minimum les dsques de chocs _lectdques.
Fakes examiner la prise de courant et le drcuit
par un Olectiiden qualifiO pOllY VO/IS _ISSIII'eI"que
la prise est correctement raise fi la tene.
Si la pdse murale est du D'pe standard fi 2 alv&_les,
il w_us incombe de la edre remplacer par line
pdse fi 3 alv_oles correctement raise fi la terre.
I,e r0li_ig_rateur doit to//jO/lIN _tre branch_
darts sa propre pdse de courant, dont la tension
nominale est identique fi celle indiqu0e sur la
plaque signal_tique.
Cette precaution est recolmnand0e pour garanfir
un rendement optimum et 0viter une surcharge des
drcuits 01ectriques de la r0sidence, ce qui pourrait
cr0er un risque d'incendie par sm'chaufle des ills.
Ne d0branchezjamais le r6li_ig6rateur en timnt
sur le cordon d'alimentation, Saisissez tem/ement
la fiche du cordon et fiI'ez droit pore" la i'efii'er
de la pdse.
R0parez ou remplacez imm&liatement tout cordon
efliloch_ ou endommag_. N'ufilisez pas un cordon
tendill_ ou pr&entant des signes d'usure.
I,o_que \'otts d_placez votre rOflJg&'ateur du ram;
efiWs attention de ne pas le edre fouler sur le cordon
d'alimentation afin de ne pas l'endommaget;
VEUILLEZLIREETSUIVREATTENTIVEMENT
CESMESURESDESECURITE.
CONSERVEZCESDIRECTIVES
42
Page 43

Lescommandos, www.electromenagersge.ca
FREEZER FRESHFOOD
9 ISCOLDEST
OISOFF
Initialement, r#glez le r#glage de votre compartiment r#frig#ration en position 5et celui de
votre compartiment cong#lation en position 5et attendez 12-24 heures que la temperature se
stabilise,
P/usieurs ajustements peuvent #tre requis, Ajustez /e r@lage une unit# _/a lois, et attendez
12heures apr#s chaque ajustement que le r#frig#rateur atteigne la temperature que vous
avez r@l#e,
Le fait de placer/es r@lages sur 0 arr#te /e refroidissement de votre compartiment
r#frig6rateur et cong#lateur, mais n'affecte pas I'alimentation #lectrique du r6frig#rateur,
Sur certains modules, seulement le r@lage de r#frig#rateur a une position de O,
Reglagespar touchetactile
• Si vousajustez/'un des deuxr6g/ages en position O,/'autrese mettra automatiquement en
position O.Lesz6ros clignoteront jusqu'_ ce que vous r#gliez votre r6frig#rateur,
• Si les deux r@/ages sont en position 0 et vous appuyezsur/'une des deux touches tactiles
COLDER(plus froid), les r@lages se remettront automatiquement en position 5.
Vousdevezmgler la temperaturede votrerefrigerateur en fonctionde vospreferences, votre
usage et vos conditionsd'utilisation et cela peut necessiterplus d'unreglage.
NOTE: Surcertainsmodb,les,le r_frigb,rateurest exp_di_avecunepelliculedeprotectioncouvrantlos
commandosde tempbrature.Sicette pellicu/en'a pasbt_ retir_e aucoursdeI'instal/ationfaites-/e
maintenant.
Au sujetde TurboCoofM(surcertainsmodOles).
TurboCool
Fonctionnement
I,. commande TurboCool.(c_l_re le
reii'oidisselnent du compartiment rOfi_ig_rafion
afin de x_fi'oidir plus mpidement les aliments.
Ufilisez TurhoCoolquand vous @)utez une
grande quanfit_ d'_fliments dans le
comparfiment r_fi'ig_rafion, quand vous mettez
de cgt_ des aliments _Jprbs les a_oir laiss&
reposer ;_la temp&ature de la piece ou quand
vous mettez de c6t(_des l_stes (l'aliment,_
chauds. Vous i)ouvez (_g_alementl'utiliser apr_s
que le r(_ii'ig(Xrawursoit rest(_ d(_branch(_
t)ei_dant tree p0riode prolong(Xe.
Une Ibis activ(_,le compl_sseur se met
imm&tiamment en route et les ventilateurs se
mettent en marche et s'al_'_tent fi haute vitesse
t)ei_dant lmit heures, en suivant leur cycle.,i e
compresseur contilme a inarcherjusqu',_ ce que
le compamment r(Xfiig(Xrationse reti'oidisse a
emiroi_ l ° C (34 ° F), puis il se met en marche et
s'arr(_m selon son propre (}cle pour m_dntenir
cette temp(_mture. Aprbs 8 heures ou si vous
pressez a nou\eau sur le bouton rurboCool,]e
compartiment r(_fiig0ration re\ient a son
r(_glage original.
Utilisation
Appuyez sur le bouton TurboCool.i,e _ov,mt
huninet_xrurhoCools'allume, mais la
temp(_rature du compartimei_t r(_tiJg(_n_tioi_
indique tol!jour, _,le m_me r(_glage.
(_)uand TurboCooltinit (te ti)I/ctionlle g son
vot_mt s'(_teint.
NOTES:Vous ne pomez pas changer la
temp0rature du r0fi'ig(Xrateur pendant
que la commande rurboCool
fonctionne.
I,erurboCooln'a pas d'eitetsur la
temp0rature du cong0lamur
Q)uand vous ouvrez la porte du
r6fi'ig_rawur pendant Faction de la
commande rurboCool,les ventilamurs
continuei_t fifonctionner si leur cycle
le demande.
4,3
Page 44

Lefiltre a eau (surcertains modOles).
Sur certains modOles
Cartouche du filtre a eau
Ia cartouche du filtre 5 eau se trouve darts le coin dmit
artiste supOrieur du compartin/ent r_ffigOratem;juste au-
dessous des commandes de temperature.
,4 quel moment remplacer le filtre sur les modeles
avec indicateur lumineux de remplacement
Une hmfiOre indique la n_cessit_ de remplacer la cartouche
du filtre 5 eau sur le distributeur. Cette lumi_re devient
orange pour vous avertir de remplacer bient6t le filtre.
Vous devez remplacer la cartouche de filtre quand la
lumi_re de l'indicateur devient rouge ou quand le (l_bit de
l'eau qui va au distibuteur d'eau ou au distributeur de glace
diminue.
,4 quel moment remplacer le filtre sur los modeles
sans indicateur lumineux de remplacement
I a cartouch e dtl filtre (hilt &tre rempla c(% tousles six mois
ou moins sile d_bit d'eau du distributem" d'eau ou du
distributeur de glace diminue.
Retraitde la cartouchedu filtre
S'il s'agit d'une cartouche de remplacement, enlevez d'abord
l'ancienne en la tournant lentement vers la gauche. No tirez
pas stir la cartouche. Un peu d'eau peut s'_couler.
Installation de la cartouche du filtre gleau
O Si _ous remplacez une cartouche SmartWatera_ec
un adaptatem; l'adaptateur doit _tre retir(_ axant
l'installation de la cartouche. Pour retirer l'adaptateui;
fifites-le pivoter vers la gauche d'environ un quart
de [()Ill:
Si vous remplacez une cartouche Watorbygulligan,
laissez l'adaptateur en place. Cot adaptateur demeurera
darts le r_fl_ig&'ateur h)i_(lue que vous remplacerez les
liltllI'eS ca I'tO[lches.
Avec adaptateur
iiiii
Sans adaptateur
(/'apparonco pout varior)
Sill" les modOles sans indicatem" lumineux de
remplacement, appliquer l'autocollant du mois et de
l'mm_e 5 la nouvelle cartouche pour vous rappeler de
remplacer le filtre darts six mois.
Remplissez la cartouche de remplacement d'eau du
robinet imm&]iatement aprbs l'installation afin de
pem_ettre un meilleur (l_bit du distributeui:
44
Mi,mez la flbche de la cartouche avec celle de support
O de_'artouche. Placez le haut de la nou',elle cartouche _'_
l'int&-ieur du support. NeI'enfoncezpasdarts le
porte-ca rto/lch e.
O Tournez la cart(roche lentement vers la droite
jusqu'au point ot'l la cartouche s'arr_m. NESERREZ
PASTROPFORTi,oIsque vous la tournez, elle se lOvera
en position automatiquement, I,a cartouche tera
approximativement une 1/2 rotation.
O Faites couler l'eau du distributeur pendant 3 minutes
(emiron 6 litres) afin de (l_gager le syst&me et
emp_cher le bredouillement.
O Pressez et maintenez appuy_e la touche RESETWATER
FILTER(re-r_glage du filtre _'leau) sur le distributeur
pendant 3 secondes (sur certains modules).
REMARQUE: Line cartouche de remplacement qui vient
d'etre install_e peut faire jaillir I'eau du distributem:
Bouchon de derivation du filtre
11flint utiliser le bouchon de d&'ivation du filtre
lorsqu'tme cartouche de remplacement n'est pas
disponible, i,e distributeur et la machine 5 glaqons
ne peuvent pas fimctionner sans le filtre ou sans le
bouchon de d&'ivation du filtre.
f
Bouchon _- /_
de _ _ Bouchon_',. I_
d_rivation _ de
dOrivation 1_
du fiitre du fi]_
SmartWater Waterby Culligan
Pour utiliser la prise de d(q_i_:ltion du filtre sur les modbles
Watorbl/Culligan, vous devez d'abord retirer l'adaptateur du
filtre du support de la cartouche en le tifisant pivoter vel_ la
gauche.
Si vous avez des questions--visitez notre site Web 5 l'adresse
_%_V, el ectl'()lllell_l gel_ge,ca
ou appelez le 1.800.461.3636.
Filtres de remplacement :
Pour commander des cartouches supplOmentaires
aux Etats-Unis, visitez notre site Web a I'adresse
ge.com, ou appelez le Service des piOces et
accessoires GEau 800.626.2002.
_" F
Pfix sugg&'6 pour la vente
au d6tail $38.95-47.95 USD
I,es clients au Canada devraient consulter los pagesjaunes
pour connaitre la succm_ale Camco la plus pros.
Page 45

Clayetteset bacs. vvvvw.electromenagersge.ca
Toutes les caract_ristiques ne sont pas disponibles sur tous les modOles.
L'ergot
Bac de porte de r#frig#rateur
Bac de cong#lateur
/
Bac basculant deporte
de congfilateur
Bacs de porte de refrigerateur et bacs basculants de porte de congMateur.
Grands bats
Vous pouvez rg_gler les plus grands bacs de
porte de r_fl_ig_rateur et les bacs basculants
de porte de cong_latetm
Enlevement: Soulevez l'avant du bac droit
\'e_s le haut, puis soulevez et enlevez.
Remise en place ou relocalisation :Engagez
l'arri_re du bac darts les soutiens moul_s de
la porte. Puis poussez \'exs le bas l'a\m_t du
bac. I,e bac se fixe en place.
Petits bacs
Enlevement: Soule\'ez l'awmt du bac dx'oit
vex_ le haut, puis enlevez.
Remise en place: Placez le bac au dessus des
soutiens moulg_s rectangulaires de la porte.
Puis tidtes glisser le bac vexs le bas darts les
supports pour le fixer en place.
L'ergotaide 5 emp&cher que de petits
articles places sur la clayette de la porte se
renvexsent, coulent ou glissent. Mettez un
doigt de chaque c6t(_ de l'ergot prt's de
l'arri&re et titites bouger la clayette vexs
l'a\mlt Otl vex's l'arri_re sehm vos besoins.
Nepasobstruer
MISEENGARDE:
Sivotremod6leest
munid'unechute
g/agons_ l'intMeur
dubacsupfirieur
de/aportedu
compamYnent
congfi/ation,soyez
prudents/orsque
vousplacezdes
articlesdens/ebac.
Assurez-vous
qu'aucunobjetne
bloqueoutombe
denslachute
g/a_ons.
Appuyez sur le taquet et
tirez la clayette vers
I'avant pour I'enlever
Clayette coulissanteanti-deversement
GrSce 5 la clayette glissimte anti-
dt4versement, x_lls polP,'ez atteindre des
articles places derri&re d'autres. Ses bords
spt_ciaux sont concus pour emp&cher tout
d_vetsement aux clavettes inl>rieures.
Enlevement :
Faites glisser la clavette vex_ l'ext_riem"
.jusqu'fi ce qu'elle atteigne son point
d'arr&t, ptfis apptgez le taquet vels le
baset fifites glisser la clayette directement
vers l'extt4fieul:
Remise en place ourelecalisation :
_Mignez la clayette avec les supports et
iidtes glisser en place. I,'(_mg_re peut 6tre
repositiomx6e lomque la pox_e est ouvel_e
5 90 ° ou plus. Pour ce fidre, fidtes glisser
l'6mgi_re at* dela des butt4es et incline>la
vel_ le bas. Faites la glisser vex_ le bas dans
la posidon d&ir6e, aligne>la avec les
supports et glissez-la en })lace.
Prenezso/n depousser /a c/ayette jusqu'au fond
pour refermer /a porte, 45
Page 46

Clayetteset bacs.
Toutes los caract_ristiques ne sont pas disponibles sur tous los modbles.
C/ayette OuickSpace 'M(surterrainsmod#les)
Vous pouvez diviser en deux cette clayette
et fidre coulisser sa pattie ax:mt sous sa
pa*_ie arfi_re pour ranger des al_icles de
haute taille sur la clayette du (lessons.
Vous pomez enle\vr cette clavette et la
remettre ell place ou ]aplacer COl/lille fine
clavette coulissante anti-d(4ve_ement.
Darts cer[_Jins u/(}de]es, v(}tlS ne ])otwez
pas utiliser cette clayette darts ]a position ]a
plus basse.
Paniem du congelateur
Pour retirer,tifites-la glisserjusqu';'_ la
position d'atr_t, soulevez l'awmt au (lel;'l
de la position d'arrbt et taites sortir
en glissant,
Prenezsoin depousser /espanniers jusqu au
fond pour refermer /aporte.
Clayettes de congelateur gtretra# par coulissement
Pour retirer,fifites-la glisser jusqu';'_ la Prenezsoin depousser /es c/ayettes jusqu'au
posit.ion d' arr#t, Sotlle\'ez l'a\'ant all (]el;'l fond pour reformer la porte.
de la position d'arr_t et taites-la glisser
en dehoI_ du supp()rt.
Clayettes de congelateur fixes
Pour retirer,levez-la par le ('6t6 gauche
et ensuite retirez-la du r_ffigt)i'ateui:
NOTE CONCERNANT LESMODELES AVEC
DISTRIBUTEUR: Afin de tirer pleinement
avantage du tiroir basculant, la taille des
articles (16pos6s sur la clavette en dessous
du firoir ;'1glaqons ne doit pas exct)cler
le point le plus bas de ce firoii:
46
Page 47

Lesportesdu refrigerateur.
Lorsque la porte est partiellement
ouverte, elle se ferme automatiquement,
Au del_ de cette position d'arr_t laporte
restera ouverte.
Portes du refrigerateur
I,es portes de votre r_fi'ig_rateur ne sent
pas tout _'ltait comme celles dent vous
avez l'habimde. Un syst_me special
d'ou\'erture/fe_neture assure que les
portes tiq_nent compl_tement et
hem_tiquement.
Ix)I'S(ltle veils OtlVl'ez et l[_iilleZ les l)oIles,
Veils i'ei/larqtlei'ez qu'elles sent I/ltlnies
d' une position d'arrOtSivous ouvrez la
porte au delft de cette position d'arrOt
elle restera ouverte afin de w)us pe_nettre
de ranger et de prendre vos aliments
phls fi_dlement. I,orsque la porte est
partiellement ouverte, elle se ferule
a tltomatiquement.
I,'impression de r6sismnce que vous
ressentez _'lla position #'arr#t diminue
lorsque des aliments sent ranges darts
la porte.
Alignement des portes
Si les portes ne soient pas align_es, r_glez
la porte (hi compartiment r_liig&'atem:
_ l'aide d'tme cl_ _'ldouille de 7/16
po, tournez la sis de r_glage de la
porte _ers la droite pore" rele_er la
l)orte, oH ",ers la gat]che I)OHI"
l'abaisse_: (Une &mille de nylon
encastr_e darts les filets de l'axe,
emp&chera cehfi-ci de torn'net si l'on
ne se serf l)aS d'tlne cle.)
Apr&s avoir tourn6 la cl_ tree ou deux
tiffs, ouvrez et ternlez la porte du
colnpartinlent r_fi-ig_rateur et x_rifiez
l'alignement des portes ;'1la pattie
sup_rieure.
47
Page 48

Lestiroirsde rangement.
Toutes les caract_ristiques ne sont pas disponibles sur tous les modbles.
Contenants a fruits et legumes
Si une quantit_ d'eau excessive s'accmnule
darts le fired des tiroi_, essmez-les.
NI _ LO
Contenants avec humidite variable
ROglez la connnande 5 HI pour que le tiroir
conserxe tm degr(_ d'humidit_ (_lex (_ pour la
conserx _tion des l(_gumes.
ROglez la commande 5 LO pour abaisser le
degr(_ d'humidit(_ darts le firoir pore" la
conserxation des fl'uits.
Enlevementdescontenants.
Toutes los caractOristiques no sont pas disponibles sur tous los modbles,
Enlevement des contenants
Vous pou\'ez ti_cilement enlever les tiroi_
en les tirant droit et en les soule\'ant au
dessus de leur position d'arr_t
Si la porte wins emp6che d'enlever les
tiroi_, essayez d'abord d'enlever les bacs
5 porte. Si la porte n'ofli'e pas assez
d'espace libre, vous devez fouler le
r6fl'igg_ratem" vets l'avantjusqu';_ ce que la
porte S'Otl\'I'e StlfliS_llllll/ellt pOtlI" VOIIS
pem_ettre d'enlever les tiroi_. Paffois, pour
tifire sortir le r_ti_ig_ratem; vous devez le
tifire aller \'e_ la gauche ou ve_ la droite en
le roulant.
48
Page 49

Machine k gla ons automatique.
II faut pr_voir entre 12et 24 heures avant qu'un r_frig_rateur nouvellement install_ commence _ produire des glagons.
Interrupteur
d'alimentation
Machine_,
Voyantt6moinin yert ulateur
d'alimentation
Machine glgla_ons automatique
l,a machine ;'iglaoms produira environ
7 gla<ons par cycle---soitenviron
100-130 glao>ns toutes les 24 heures-
selon la temp&'ature du cong_)latem;
la temp&'amre ambiante, la fi'&luence
d'ot:vertt:i'e des portes et d'at:tI'es
conditions d' utilisation.
Regardez ci-dessous pour savoir comment
acceder fi la glace et fi l'interrupteur sur
les mod&les avec distributeur.
Si vous mettez votre rg_fligtq'ateur en
marche avant que la machine fi glaqons ne
salt aliment_e en eau, mettez l'interrupteur
d'alimentation a la position 0 (arrOt).
ixn3que la conduite d'eau est raccord_e
au rg_fl'ig_ratem; mettez l'interrupteur
d'alimentation fi la position I (marche).
I,a machine ;'1glaoms se remplit d'eau
lo:_qu'elle atteint le point de -10 ° C
(15 ° F). I1 timt pr_voir entre 12 et 24 heures
awmt qu'un r_qfig_rateur nouvellement
install_ commence fi produire des glagons.
Vot:s entendrez t::l bot:i'donnei/lent
chaque tois que la machine fl gla<ons se
remplit d' eat:.
Jetez les premie:_ lots de gla<ons afin
d'Oliminer les impm'et6s provenant de
la conduite d'eau.
_ssurez-vous que rien ne g6ne le
inouvelnent du bras r_gulateur.
Si le lxlc fi glagons est pleinjusqu'au niveau
du bras r_gulatem; la machine fi glagons
s'arr&t de produire des glagons. I1 est
normal que plusieuls glaqons soient coll(_s
ent:'e et:x.
I,o:_que vous n'utilisez pas souvent de
glaqons, les vieux glaqons perdent leur
transparence, pre:ment un goflt
d_sagr&d)le, et diminuent de taille.
NOTE: Oans los maisons oO la pressionde l'eau
estpiusfalbie que ia normaie,vous entendrez ia
machine _ gia_onse remettre en marche _ piusieurs
repnsespourfabn)uerun /at de gia_ons.
Modeles sans clayette
au-dessusdutiroira glace
Pour acceder _ la glace ou
I'interrupteur :
o Soulevezle tiroir, puis tirez vers
I'avantjusqu'_ son arrOt.
o Abaissezle tiroirpour avoiraccbs
aux glacons oupour atteindre le
commutateurde marche.
NOTE:A fin detirer plehTement
avantagedu tiroir basculant, la tail&
des articles d#posfissurla clayette en
dessousdu tiroir _glacons ne doitpas
exc#der le pohTtleplus basdece tiroin
Acces a la glace et a 17nterrupteur
sur les modeles avec distributeur
II existe deux typesde tiroirs a glace stir les
modeles avec distributeur.Un _])e est (lot_
d'une cla_ette au<lessus (11:tiroi:; l'autre
b])e n'en a pas.
Note particuliere au sujet des modMes avec
distributeursans clayette au-dessus du tiroir
glace :
_,::Ces mod_les sent m unis d' un tiroir ;'1
glace basculant, i,e tiroir peut basculer
comme indiqu(_ sur les illustrations,
et il se maintiendra en position 61ev6e
lo:_que vous prendrez de la glace ou
mettrez l'interrupteur de la machine
figlacons en position Marche ou Arr_t.
_&ssurez-xous de remettre le tiroir en
place axmt de tem:er la porte.
N Pour restaurer volre niveau de glaeons
lorsque le seau eat vide, nous
recommm_dons de suivre lea &tapes
sttivm_tes :
12 heures apr_s la premiere chute
de glaqons darts le ti:'oi:; dist:ibuez
3"• a 4 cubes.
@ Apr0s une autre p&_iode de 6 heures,
distribuez 3 fi 4 cubes de nomeau.
Cette procedure restaurera xotre nixeau de
glaoms darts la plus br_xe p_riode possible.
ModMes avec clayette
au-dessus du tiroir a glace
Pour avoir accbs _la glace, tirez
sllr le tiroir e!7 aValTt,
ilji_
iIIiiiI
Pour atteindre rinterrupteur, ttrez sur
la clayette en ligne droite. Assurez-
vous de toujours remettre la clayette
en place.
49
Page 50

Ledistributeurd'eau et degla ons (surcertainsmodOles).
Bacdetrop-plein
Pour utiliser le distributeur
S_lectionnez CUBED ICE
(gla<ons),
I2ZJ
o'" "_
CRUSHED/CE !_ (,,.,lace concassee) ou
WATER _l_(eau).
Appuyez doucement le _erre contre le
haut du bras de distribution.
Lumieredu distributeur
Cette touche allume
et _teint la lumi_re du
distributeur.Vous
LIGHT
I,a clmette de troi>plein n'est pas mmfie
(Ftm syst_me d'_coulement. Pour r_duire
les taches d'eau, xous devez nettoyer
r_guli_rement la clmette et sa grille.
S'il n'y a pas d'oau distribubo lorsquele
rdfngdrateur est initlalement installd, il ya pout-
gtre de l'al?clansla conduite fl'eau. Appuyezsur la
commandodedistribution pendant deuxminutes Glace rapide (sur
au minimumpour expu/ser fair de la conduite
d'eau et remphYle rOservoird'eau.Afin dVhYniner @
/es &entue//es lYnpuretOsprovenant de/a conduite
d'eau,jotez los sixpremiors verresd'eau.
!!
ATTENTION" Ne mettez jamais les doigts
ou d'autres objets dans I'ouverture du QUICKICE
distributeur
Verrouillagedu distributeur
@ Appu,_ez sin" la touche
LOCKCONTROL (r_glage
dm errouillage)
pendant 3 secondes
pore" xerrouiller le
LOCKCONTROL distfibutem" et le
HOLD3SECS [)_lIlIle_ltl de rg_glage.
Pore" d& errouille_;
appu}ez sur la touche
et tenez-la enfimc6e
pendant encore
3 sec_mdes.
Door Alarm
@
DOOR ALARM
allmnez _galement la
lumi_re en appuyant
sm" le bms de
distribution. Si cette
ampoule brfile, vous
devez la remplacer par
tllle all/pO/lle d'_l[l
ma_mum 6 watts 12V.
certabs modbles)
Si vous avez besoin
de glace rapidement,
appuyez sin" cette
touche pore" acc_l&'er
la production de glace.
Cela augmenm la
production de glace
pendant les 48 hem'es
suivantes oujusqu'_'l ce
que vous appuyez _'l
no//\'e_ltl s/IY cette
totlche.
Potlr iilettl'e ei1 ii/ai'che
le signal sonore, appuyez
SIAl"cette totlche po/li"
allumer l'indicatem"
ltmfineux. Ce signal
s(mne si l'tme des portes
reste ot/\'erte plus de
3 minums. I,a lumi_re
s'_teint et le signal
sonoi'e S'_lI'I'_[e quand
VO/IS J[eY//lez la porte.
50
Renseignements importants concernant votre distributeur
::Ji::N'ajoutez pas darts le bac _'lglaqons des
gla<ons non thbfiqu_s par votre machine
fi glagons. ]ls risquent d'&tre difliciles fi
concasser ou fi (list_ibue_:
::Ji::t_vitez de trop remplir les verres de
glaqons et d'utiliser des verres Otroits ou
tr&s hauts. I,e condtfit peut se bloquer et
le volet peut geler et coince_: S'il v a des
glaqons qtfi bloquent le condtfit, thites-les
passer au moyen d'tme cuill_re en bois.
_: Ne placez pas de boissons ou d'aliments
darts le bac _'lgla,_ons pore" les rafl'aichi_:
i,es boites, bouteilles et paquets
alimentaires peuvent coincer la machine
_'lglaoms ou la vis sans fin.
_: _Min que la glace dist_ibu(_e ne puisse
manquer le verre, placer le verre _'_
proximit& mais sans toucher l'ouvermre
du dist_ibuteu_:
::_i::M&me si vous avez s_lectionn_ CUBEDICE
(gla<ons), il est possible que de la glace
concass_e tombe darts votre verre. Cela
se prodtfit de temps _'_atm'e lo_que
plt_sietus gla<ons sont achemin& ve_s
le 1)r_wem'.
_: Apr_s distribution de la glace concass_e,
de l'eau peut s'_couler du condtfit.
_: Pmt0is, tm peu de givre se forage sur le
volet dtl conduit fi glace. Ce ph_nom_ne
est n(mnal et se produit en g_n&'al apr_s
des distributions r_p_t6es de glace
concass_e, i,e givre \:_ &'enmellement
&'aporer
Page 51

www.electromenagersge.ca
Modeles sans clayette
au-dessus du tiroir a glace
Pour en/ever :
Soulevez le rlrOll OUlS urez vers
I'avant]usqu'_sonarr#t
o Soulevez et tirez_ nouveau
vers I'avant pour I'enlever.
Enlevement et remise en place du tiroir
glglacesurlesmodelesavec distributeur
fl existe deux typesde tiroirs a glace stir les ......
modMesavec distributeur. Un b'pe est dot_ ___
d'une ('layette au-dessus du tiroi_, l'autre
gpe n'en a pas.
Mettez toqjom_ l'interrupteur de la
machine fi glacons 5 la position 0 (arr_t)
axant d'enlever le firoir fi glace.
Au moment de remettre enplace n'importe
quel type de tiroir :
_ssm'ez-',ous toqjom_ de presser fi_rmement
le firoir ell place. S'il lie Va p_Lsjtlsqtl'atl []
tond, enlexez-le et taites ___ 77rezsur le firoiron ligne droite,
totlI'neI" le II/eC_lIliSIIle puis soulevez-le par-dessus
de raise en place d' 1/4 laposition d'arr#t.
de tom: Repoussez ah)rs
le tiroir en place fi
not/x, ea tl. M6canisme d'entra_nement
Modeles avec clayette
au-dessus du tiro# a glace
Pour on]ever :
Entretien et nettoyage du r .frig .rateur.
ZotTo do ramasse-gouttes
dur#partiteu_
Nettoyage de I'exterieur
Le bac detrop-plein du distributeur
(sur certains mod_les)devrait _tre
soignettsement essuv_. Vous pouvez (_liminer
les (l_pgts calcai_es laiss_s par les taches
d'eau en trempant le bac darts du vinaigre
non dilu(_. I,aissez tremperjusqu'5 ce que les
(l(_pgts dispamissent ou soient sttffisamment
ramollis pore" &tre _limin_s par fin(:nge.
Lebras de distribution (sur certains
modules). Avant nettoyage, appuyez
pendant 3 secondes sur la touche LOCK
CONTROL.Nettovez-la au moven d'une
solution d'eau et de bicarbonate de soude -
environ une cuill_re _'lsoupe (15 ml) de
bicarbonate de soude par pinte (1 liter)
d'eau. Rincez bien et essuvez.
Lespoignees de porteet leurgarn#ure.
Nettoyez-les au moyen d'tm linge humect(_
d'eml savonneuse. S(_chez avec un linge doux.
Gardez I'exterieur tit/refrigerateur propre.
Essuyez-le avec un linge propre l_g_rement
hmnect(_ de cite pore" appareils
(_lectromg_nagers ou d'tm (l(_te_gent liquide
doux pour la wfisselle. SOchez et polissez
avec tm linge (h)ux et propre.
N'essugezpas /erbfrigbrateuravecun/bge _ vaisse//e
saleou uneservbtte humide. ilspourrabnt lalsserun
rbsiduqui pourraendommagerlapebture. N'utilisez
pasde tampons _rbcurer,deproduits nettoyants en
poudre,dejavelhsantsou deproduitsnettoyants
contenantunjavelhsant, car cespro&its peuvent
dgratlgnerla pebture et la rendre mobs rbsistante.
Nettoyage de I'interieur
Pour Oviter les mauvaises odeurs, laissez
une boite otwerte de bicarb(mate de soude
darts les compartiments r_qiigg_rateur
et cong_latem-
Debranchez le refrigOrateur avant de le
nettoyer.S'il est trop diflicile de le fifire,
essorez bien votre linge ou votre @onge
pore" enlever l'exc&s d'eau lorsque vous
nettovez autom" des interruptem's, des
lampes ou des commandes.
Utilisez une solution d'eau tilde et de
bicarbonate de soude - environ tlne
cuill&re 5 soupe (l 5 ml) de bicarbonate de
soude par pinte (l liter) d'eau - afin de
nettoyer tout en neutralisant les odem's.
Rincez et essuvez bien.
L_tilisationde solutionsnettoyantesautres
quecellesquenousrecommandons,plus
particulierementcellescontenantdes
distillatsdepetrolepeut fissurerou
endommagerrintOrieur durefrigOrateur.
Ewtezdenettoyerlesclayettesenverre(surcertabs
modb/es)encorefroidesdamde/'eauchaudecar
e//esrisquentdesecasser_causede/'bcart
excessffdetempbrature.Manipu/ez/esc/ayettesen
verreavecprudence.Si vouscognez/everretremp4
i/pourrasebriser
Ne/avezaucunepibcedep/astiquedurbfwbrateur
aulave-va/sselle.
51
Page 52

Entretienet nettoyagedurefrigerateur.
Derriere le refrigerateur
Prenez m_ soin particulier lo_que vous
_loignez le r_fi_ig_rateur du ram: Tousles
types de rev_tements de sol peuvent _tre
endommag_s, particuli_rement cetlx qui
sont co/issines Oil dont la Stli]ilce est _ufl'6e.
Tirez le r_fi_ig_ramm" en ligne droite et,
lo_que vous le remettez en place, poussez-
le ve_ le ram" en ligne droite, i,es
d_placements lat_raux du rbfl_ig_ratem"
pourraient endommager le rev_mment
de sol ou le r6li_ig_ratem:
Lorsque vous remettez le rbfrl_?brateuren p/ace
en le poussant, veil/ez _ ne pas le fake rouler sur
ie cordon d'ah_nentation ou sur ia conduite d'eau
de ia machine _ gia_ons.
Depart en vacances
I,o_que vous vous absentez pendant m_e
i%fiode prolong_e, videz et d_branchez le
r_liJg_ratem: Nettovez l'int0rieur avec une
solution d'eau et de bicarbonate de soude,
_'lraison d'tme cuill&re fi soupe (15 ml)
de bicarbonate par pinte (1 litre) d'eau.
I_dssez les portes ouvertes,
Mettez l'interreptem" d'alimentntion de
la machine _'lglaqons _'lla position 0 (atr6O
et texmez l'alimentation d'eau au
r_liJg_ratem:
Si la temperature risque de descendre sous
le point de cong_lation, demandez _'ltm
r_paratem" de vidanger la conduite d'eau
afin d'6vimr les d_gfits s_rieux causes par
les inondations.
Demenagement
]mmobilisez tousles _l_ments amovibles,
tels que les clavettes et les bats, _'_l'aide
de ruban gomm(_ pour (_viter de les
endoii/iil_lgei:
Si vous utilisez tm charriot pore" dOm_nager
le r(_fl_ig(_ratem; ne laissezjamais le devant
ou le derri0re du r_flJg_rateur reposer
contre le charriot. Cela pourrait
endommager le r0flJg_ratem: Ne
transportez le r(_fl_ig_ratem" que par
les cgt(_s.
Assurez-vousquele rbfwbrateurdemeuredebout
pendantsondbmbnagement
52
Page 53

Remplacementdesampoules, www.electromenagersge.ca
Lorsque vous r@lez la commande du cong_lateur sur O, I'alimentation _lectrique de I'ampoule n'est pas couple.
______ Compartiment refrigerateur--lampe superieure
ets
D(_bl'axlchez le l'(;tYig(q'ateul:
I,es axnpoules se trouvexlt ell haut du
coxnpartixnexlt, _'ll'int(q_ieur du pare-
huni('re. Retirez la vis se tl'oU\mlt _'l
l'awnlt du logenlent d'anlpoule.
Pour enlever le pare-huni&i'e, appuyez
Sill" les taquets se tro/l\;int stir les c6t_s
(Ill pare-hunibre et enlevez ell tidsant
glisser vel_ l'a\mlt.
Apl'&S a\_fir renlplac(_ l'anlpoule avec
une alnpoule neu\'e p(mr appareil
_lectlique de capacit_ _gale Oil
infblieui'e, relnettez el1 place la \'is et
le logenlent d'alnpoule. Pour renlettre
le pare-huni_i'e, aSStlrez-\'OtlS que les
taquets qui se trou\'ent _'ll'arri<)re du
pare-huni&re aillent dans les ti'ous qui
se trouvent fi l'arlJ<)re du boitieI:
O Rebranchez le l'_fiig_l'ateul:
Compartiment refrigerateur--lampe inferieure
Cetteiumi#reso trouveau dessusdutiroir
d'enhaut.
D_bl'anchez le l'_flig_rateul:
Soule',ez le pare-huni0re et enle',ez-le
el1 tirant.
Aprbs avoir relnplac_ l'anlpoule par
une anlpoule d'appareil _lectro-
in_nager de in_ine puissance ou
de puissance inf&rieure, renlettez
le pare-hllni_)re.
Rebranchez le r(q'i_ig(_i'ateur.
Compartiment congelateur
D_bl'anchez le l'(qi_ig(_l'ateul:
Ellle\'ez la clayette qui se trou\'ej uste au
dessus du pare-hlnli_i'e (vous pou\'ez
enlever cette clavette phls tilcilenlent
apl'&S l'avoir ridge). Retirez la vis se
ti'ou\mlt fi la partie sup_i_ieui'e du
logenlent d'anlpoule.
Pour enlever le pare-hnni0re, appuyez
Sill"les c6t_s et enlevez el1 soule\mlt.
O
O
Renlplacez l'alnp()ule par une
anlpoule d'appareil _lectro-nl_nager
de in_ine puissance Oil de puissance
inf&'ieui'e, puis renlontez le pare-
huniOre. Pour renlonter le pare-
hllni_)re, assurez-\'ous que les taquets
(Ill haut soient solidenlent fixes ell
place. Renlettez la vis (Sill" certains
lnod&les).
]_,enlontez la clayette et rebranchez
le r_frig_rateur.
Distributeur
D_bl'anchez le l'(qi_ig(_l'ateul:
i,'anlpoule se trouve sur le distributeur
SOilSle panneau de i'_glage.
Enlevez l'alnpoule el1 la tidsant tourner
dans le SellS oppos_ fi cehli des aiguilles
d' lille IllOntI'e.
]),enlplacez l'anlpoule par une anlpoule
de in&nle taille et de nl&ine puissance.
]_,ebranchez le r(_fl_ig(_l'ateur.
5,_?
Page 54

Instructions
d'installation
Refrigerateur
IVlodeles25 et 27
I Questions? Appelez le 1.800.361.3400 ou Visitez notre site Web a I'adresse : www.electromenagersge.ca I
AVANT DE COMMENCER
Veuillez lire toutes les directives attentivement.
• IMPORTANT - Conservezces
instructions pour I'inspecteur local.
• IMPORTANT - Respecteztoutes
les ordonnances et les codes Iocaux.
• Note a I'installateur- Assurez-vous de laisser
ces instructions au consommateur.
• Note au consommateur- Conservez ces
instructions pour reference future.
• Niveau de competence- L'installation de
cet appareil necessite des competences
mecaniques de base.
• Temps d'installation - Installation du
refrigerateur
30 minutes
Installation de la
conduite d'eau
30 minutes
• L'installateur est responsable de bien installer
ce refrigerateur.
• Toute panne du produit due a une mauvaise
installation n'est pas couverte par la garantie.
Si le refrigerateur a deja ete installe, enlevez
la grille de base (voir I'etape 2 de la section
Demenagement du refrigerateut), puis sautez
I'etape 5 de la section Installation du
refrigerateur.
PREPARATION
ALIMENTATION D'EAU DE
LA MACHINE A GLA_ONS
Si votre refrigerateur a une machine a gla_ons,
il faut le brancher a une conduite d'eau froide.
Vous pouvez acheter une trousse d'alimentation
d'eau GE (contenant la tuyauterie, le robinet
d'arr6t, les joints et les instructions) chez votre
revendeur ou en vous adressant a notre site
Web a I'adresse www.electromenagersge.ca
ou a notre service de Pieces et accessoires au
numero de telephone 1.888.261.3055.
OUTILS REQUIS
Cle a douille, 3/8 po et 5/16 po Cle, 1/2 et 7/16 po
U
Couteau a mastiquer en plastique
Tournevis cruciforme (Phillips)
54
Page 55

Instructions d'installation
DI MI NAGEMENT DU RI FRIGI RATEUR
[] CHARGEMENT DU
RI_FRIGERATEUR SUR UN
CHARIOT MANUEL
Laissez le ruban et les protecteurs sur
les portes jusqu'a ce que le refrig6rateur
arrive a destination.
Pour transporter le refrig6rateur, utilisez
un chariot manuel rembourre. Centrez le
refrigerateur sur le chariot et entourez-le
d'une courroie. NE SERREZ PAS LA
COURROIE EXCESSlVEMENT.
[] ENLEVEZ LA GRILLE DE BASE
Enlevez la grille en retirant les deux vis
t6te cruciforme.
[]
Si le refrig6rateur doit passer par
une ouverture de moins de 38 po
de largeur, ses portes doivent _tre
enlevees. Passez a I'etape 3.
N'ENLEVEZ PAS les poignees.
Si toutes les ouvertures ont plus de
38 po de largeur, sautez a la section
Installation du refrig6rateur.
DI_BRANCHEZ LE RACCORD
D'ALIMENTATION D'EAU
(sur certains modeles)
Si le compartiment r6frigeration est dote
d'un rafraichisseur d'eau, alors il faut
debrancher la conduite d'eau qui part de
la carosserie et s'insere dans la charniere
inferieure de la porte du compartiment
congelation.
Pour debrancher, poussez sur le collet
blanc du raccord puis tirez sur le tube.
Collet blanc
Charniere
inferieure du
compartiment
congelation
55
Page 56

instructions d'installation
DI MI NAGEMENT DU RI FRIGI RATEUR (SUITE)
[] DI_BRANCHEZ LE RACCORD
D'ALIMENTATION I_LECTRIQUE
(sur certains modeles)
Si le compartiment refrigeration est
dote d'un rafraichisseur d'eau, alors
il faut debrancher la conduite electrique
(faisceau) qui part de la carosserie et
s'insere dans la charniere inferieure de
la porte du compartiment congelation.
Pour debrancher, tirez de chaque c6te
du raccord.
a
[]
DCBRANCHEZ LES
CONNECTEURS I_LECTRIQUES
(sur certains modeles)
Si le compartiment refrigeration est
dote d'un centre de rafraichissement,
alors il faut debrancher les connecteurs
electriques (faisceaux) qui partent de la
carosserie et s'inserent dans la charniere
inferieure du compartiment refrigeration.
Pour debrancher, tirez de chaque c6te
des connecteurs.
Charniere
inferieure du
compartiment
refrigeration
56
[] FERMEZ LES PORTES DES
COMPARTIMENTS CONGELATION
ET RI_FRIGERATION
[]
[]
ENLEVEZ LA PORTE DU
COMPARTIMENT CONGCLATION
Enlevez le couvercle de la charniere
superieure de la porte du compartiment
congelation, soit en le pressant et le tirant
vers le haut, soit en le degageant a I'aide
d'un couteau a mastiquer en plastique.
[] Enlevez les deux vis a tSte hexagonale
5/16 po, puis soulevez la charniere en ligne
droite pour degager I'axe de charniere.
_-_ T_le hexa_,_5/16p_/
[] Ouvrez la porte du compartiment
congelation a 90.°
J_
J_
90 °
Page 57

instructions d'installation
[]
[]
ENLEVEZ LA PORTE DU
COMPARTIMENT CONGI_LATION
(suite)
Pendant qu'une personne souleve lentement
la porte du compartiment congelation pour
la degager de la charniere inferieure, une
deuxieme personne doit minutieusement
guider la conduite d'eau et la conduite
electrique (faisceau) a travers la charniere
inferieure.
90°
[] Placez la porte sur une surface lisse pour
la proteger des egratignures, I'interieur
vers le haut.
[]
[]
ENLEVEZ LA PORTE DU
COMPARTIMENT RI_FRIGI_RATION
Enlevez le couvercle de la charniere
superieure de la porte du compartiment
refrigeration, soit en le pressant et le
tirant vers le haut, soit en le degageant
I'aide d'un couteau a mastiquer
en plastique.
[] ENLEVEZ LA PORTE DU
COMPARTIMENT RI_FRIGI_RATION
(suite)
[] Enlevez les deux visa t_te hexagonale
5/16 po, puis soulevez la charniere en
ligne droite pour degager I'axe de
charniere.
T6te hexagonale 5/16 po
[] Ouvrez la porte du compartiment
refrigeration a 90. °
i
90 °
57
Page 58

Instructions d'installation
DI MI NAGEMENT DU RI FRIGI RATEUR (SUITE)
[] ENLEVEZ LA PORTE DU
COMPARTIMENT RI_FRIGI_RATION
(suite)
[] Soulevez la porte du compartiment
refrigeration pour la degager de la
charniere inferieure.
Si le compartiment refrigeration est dote
d'un centre de rafraichissement, une
personne doit soulever lentement la porte
pour la degager de la charniere inferieure,
pendant qu'une deuxieme personne guide
minutieusement les conduites electriques
(faisceaux) a travers la charniere inferieure.
Modeles dotes d'un centre de refraichissement seulement
[] Placez la porte sur une surface lisse pour
la proteger des egratignures, I'interieur
vers le haut.
[] REMISE EN PLACE DES PORTES
Pour replacer les portes, inversez
simplement les etapes 3 a 8.
Veuillez cependant noter les points suivants :
• Au moment d'abaisser les portes sur
les charnieres inferieures, une deuxieme
personne doit guider minutieusement
le tube et les faisceaux electriques
travers les ouvertures des charnieres.
• Lorsque vous branchez la conduite
d'eau, assurez-vous d'inserer le tube
jusqu'a la marque.
L
Marque
Ne pincez pas le tube et les faisceaux
electriques Iorsque vous placez les
portes sur les charnieres inferieures.
Lorsque vous branchez la ou les
conduites electriques (plusieurs
conduites seulement sur les modeles
dotes d'un centre de rafrafchissement),
assurez-vous que les connecteurs sont
completement imbriques.
58
Page 59

Instructions d'installation
INSTALLATION DU RI FRIGI RATEUR
EMPLACEMENT DU REFRIGI_RATEUR
• N'installez jamais votre refrigerateur dans
un emplacement ou la temperature ambiante
sera inferieure a 16° C (60° F). II ne se mettra
pas en marche suffisamment souvent pour
maintenir des temperatures convenables.
* N'installez jamais votre refrigerateur dans
un emplacement ou la temperature ambiante
sera superieure a 37 ° C (100 ° F). II ne
fonctionnera pas bien.
• Installez votre refrigerateur sur un plancher
suffisamment solide pour le porter Iorsqu'il
est plein.
DI_GAGEMENTS
Prevoyez les degagements suivants pour
faciliter I'installation, la bonne circulation d'air
et les raccordements de plomberie et
d'electricite :
C6tes 4 mm (1/8 po)
Dessus 25 mm (1 po)
Arriere 25 mm (1 po)
59
Page 60

Instructions d'instaliation
INSTALLATION DU RI FRIGI RATEUR (SUITE)
[]
[]
[]
BRANCHEMENT DU
RI:!:FRIGI_RATEURA LA CONDUITE
D'EAU DE LA MAISON
(modeles avec machine a gla_ons
et distributeur)
Une alimentation d'eau froide est requise
pour faire fonctionner la machine
gla_ons et le distributeur. Vous devrez en
fournir une si elle n'existe pas. Voir la
section Installation de la conduite d'eau.
NOTES :
• Avant de brancher la conduite au
refrigerateur, assurez-vous que le
cordon d'alimentation electrique n'est
pas branche a la prise murale.
• Si votre refrigerateur n'est pas equipe
de filtre a eau, nous recommandons
d'en monter un si votre alimentation
d'eau contient du sable ou des
particules qui peuvent boucher la grille
du robinet d'eau du refrigerateur.
Installez-le sur la conduite d'eau pres
du refrigerateur. Si vous utilisez une
trousse GE SmartConnect TM Refrigerator
Tubing, vous aurez besoin d'un tuyau
additionnel (WX08X10002) pour
brancher le filtre. Ne coupez pas le
tuyau de plastique pour installer le filtre.
Si vous utilisez un tuyau de cuivre,
placez un ecrou de compression et une
bague (manchon) a I'extremite du tuyau
qui vient de I'alimentation d'eau froide
de la maison.
Si vous utilisez un tuyau GE
SmartConnect, TM les ecrous sont deja
assembles au tuyau.
Si vous utilisez un tuyau de cuivre,
inserez aussi loin que possible I'extremite
du tuyau darts le raccord a I'arriere du
refrigerateur. Tout en tenant le tuyau,
serrez le raccord.
Si vous utilisez un tuyau GE
SmartConnect TM, inserez I'extremite
moulee du tuyau dans le raccord
I'arriere du refrigerateur, puis serrez
I'ecrou a compression a la main. Serrez
ensuite un autre tour a I'aide d'une cl&
Un serrage excessif pourrait occasionner
des fuites.
60
[] Fixez le tuyau dans le collet (fourni) pour
le maintenir en position. II est possible
que vous deviez ecarter le collet.
Collet a tuyau
I_crou
compression
1/4 po
Bague
(manchon)
Tuyau 1/4 po
Raccord du
refrigerateur
Tuyau SmartConnect TM
[] OUVREZ L'ALIMENTATION D'EAU
Ouvrez I'alimentation d'eau au niveau du
robinet d'arr6t (l'alimentation d'eau de la
maison) et verifiez la presence de fuites.
[] BRANCHEZ LE CORDON DU
RI_FRIGERATEUR DANS LA PRISE
Avant de brancher le refrigerateur, assurez-
vous que I'interrupteur de la machine
gla_:ons est a la position O (arr_t).
Lisez I'etiquette concernant la mise a la terre
qui est attachee au cordon d'alimentation.
Page 61

instructions d'instaliation
[] PLACEZ LE REFRIGI:!:RATEUR
DANS SON EMPLACEMENT
Transportez le refrig6rateur jusqu'a sa
destination.
[] METTEZ LE RI_FRIGERATEUR
DE NIVEAU
La mise a niveau du refrig6rateur
s'effectue en ajustant les roulettes situees
pres des charnieres inferieures.
Roulettes __"
Relevez
Les roulettes de nivellement jouent trois rbles :
• Elles peuvent 6tre regl6es pour que les
portes se referment automatiquement
Iorsqu'elles sont a moitie ouvertes.
(Reglez le bord inferieur avant du
r6frigerateur a 16 mm [5/8 po] du sol.)
• Elles peuvent 6tre regl6es de maniere
permettre a I'appareil de reposer solidement
sur le sol et I'emp6cher ainsi de branler.
• Elles vous permettent d'eloigner le
r6frigerateur du mur pour le nettoyage.
Pour regler les roulettes :
• Tournez les vis
de reglage des
roulettes dans
le sens des
aiguilles d'une
montre pour
faire monter le
r6frigerateur,
dans le sens
oppose a celui
des aiguilles
d'une montre
-sL_
Vis de reglage
pour le faire descendre. Utilisez une
douille hexagonale ou une cle de 3/8 po,
ou une cle anglaise.
61
[] ALIGNEZ LES PORTES
Reglez les portes du r6frigerateur pour
qu'elles soient bien alignees a la partie
superieure.
Pour aligner les portes :
[] #, I'aide d'une cle de 7/16 po, tournez la
vis de reglage de la porte vers la droite
pour relever la porte, ou vers la gauche
pour I'abaisser.
NOTE :
Une douille de nylon, encastree dans les
filets de I'axe, emp6chera celui-ci de
tourner si I'on ne se sert pas d'une cle.
[] Apres avoir tourne la cle une ou deux fois,
ouvrez et fermez Portes doivent 6tre
la porte du alignees
refrig6rateur la partie
et verifiez superieure
I'alignement des
portes a la partie
superieure.
Cle 7/16 po
Page 62

instructions d'instaliation
INSTALLATION DU RI_FRIGI_RATEUR (SUITE)
[] REPLACEZ LA GRILLE DE BASE
Replacez la grille de base en installant
les deux visa t6te cruciforme (Phillips).
[] REGLEZ LES COMMANDES
Reglez les commandes selon les
recommandations.
5 5
[.EOOMME.OEOCO.T.O'SE ..OS]
0 _FIS RECOMMENDED 37 _F IS RECOMMENDED
[] METTEZ EN MARCHE
LA MACHINE A GLAqONS
Mettez le commutateur de la machine
gla_:ons en position I (marche). La
machine a gla£ons ne se met en marche
que Iorsqu'elle atteint une temperature de
fonctionnement de -9 ° C (15 ° F) ou moins.
Elle commence immediatement
fonctionner. II faudra 2 a 3 jours pour
remplir le bac a gla_:ons.
Com mutateur___
ed.lalcitrmqntea iiti°"- I_
NOTE :
Si votre pression d'eau est trop faible,
le robinet peut se remettre en marche
jusqu'a trois fois pour envoyer
suffisamment d'eau a la machine
gla£ons.
62
Page 63

instructions d'instaliation
iNSTALLATiONDE LACONDUITE D'EAU IsuRCERTAINSMODI LES}
AVANT DE COMMENCER
Nous recommandons les trousses d'alimentation
d'eau en cuivre WX8X2, WX8X3, WX8X4, selon la
Iongueur de conduite dont vous avez besoin. Nous
approuvons les conduites d'eau en matiere plastique
GE SmartConnect TMRefrigerator Tubing
(WX08XI0002, WX08X10006, WX08X10015 et
WXO8X10025).
Si vous branchez votre refrigerateur a un systeme
d'eau GE Reverse Osmosis, la seule installation
approuvee est celle de la trousse GE RVKit. Pour les
autres systemes d'osmose de I'eau, suivez les
recommandations du fabricant.
Si le refrigerateur est alimente en eau a partir d'un
systeme de filtration d'eau par osmose inversee, ET si
le refrigerateur comporte egalement un filtre a eau,
utilisez le bouchon du circuit de derivation du filtre du
refrigerateur. Si la cartouche de filtration d'eau du
refrigerateur est utilisee en conjonction avec le
systeme de filtration par osmose inversee, on peut
observer une reduction du debit d'eau au point de
puisage, et la production de cubes de glace creux.
Cette installation de conduite d'eau n'est pas garantie
par le fabricant de refrigerateur ou de machine
gla£ons. Suivez soigneusement ces instructions pour
minimiser le risque de dommages onereux
d'inondation.
Les coups de belier (eau qui donne des coups dans
les tuyaux) dans la tuyauterie de la maison peuvent
occasionner des dommages aux pieces de votre
refrigerateur, ainsi que des fuites ou des inondations.
Appelez un plombier certifie pour corriger les coups
de belier avant d'installer la conduite d'eau de votre
refrigerateur.
Pour prevenir toute brOlure et tout dommage a votre
refrigerateur, ne branchez jamais la conduite d'eau
une canalisation d'eau chaude.
Si vous utilisez votre refrigerateur avant de
brancher la conduite d'eau, assurez-vous de laisser
le commutateur de la machine a gla(_ons en position
0 (arr_t}.
N'installez jamais les tuyaux de la machine a gla£ons
dans des endroits ou la temperature risque de
descendre en dessous du point de congelation.
Si vous utilisez un outil electrique (comme une
perceuse electrique) pendant I'installation, assurez-
vous que I'isolement ou le c_blage de cet outil
emp_che tout danger de secousse electrique.
Vous devez proceder a toutes vos installations
conformement aux exigences de votre code local de
plomberie.
CE DONT VOUS AUREZ BESOIN
J
• Tuyaux en cuivre ou trousse GE SmartConnect TM
Refrigerator Tubing, diametre exterieur de 1/4 po
pour brancher le refrigerateur a I'alimentation
d'eau. Si vous utilisez un tuyau en cuivre,
assurez-vous que les deux extremites du tuyau
soient coupees bien droit.
Pour trouver la Iongueur de tuyau dont vous aurez
besoin : mesurez la distance qui va du robinet
d'eau situe derriere le refrigerateur jusqu'au tuyau
d'alimentation d'eau. Ajoutez 2,4 m (8 pi). Assurez-
vous qu'il y ait assez de tuyau en trop (environ 2,4
m [8 pi] enroules trois fois en cercles d'environ 25
cm [10 po] de diametre) pour vous permettre de
decoller le refrigerateur du mur apres I'installation.
Les trousses GE SmartConnect TM Refrigerator
Tubing sont disponibles dans les dimensions
suivantes :
0,6 m (2 pi) - WX08X10002
1,8 m (6 pi)- WX08X10006
4,6 m (15 pi)- WX08X10015
7,6 m (25 pi)- WX08X10025
Assurez-vous que votre trousse ait au moins
2,4 m (8 pi) comme indique ci-dessus.
NOTE : Les seuls tuyaux en matiere plastique
approuves par GE sont ceux qui font fournis darts
les trousses GE SmartConnect TM Refrigerator
Tubing. N'utilisez jamais un autre tuyau en matiere
plastique, car le tuyau d'alimentation d'eau est
tout le temps sous pression. Certaines categories
de tuyaux en matiere plastique peuvent devenir
cassants avec I'_ge et peuvent se fendre, en
occasionnant des dommages d'inondation dans
votre maison.
* Vous pouvez acheter une trousse d'alimentation
d'eau GE (contenant un tuyau en cuivre, un
robinet d'arr6t et les joints enumeres ci-dessous)
chez votre distributeur local ou en le
commandant au service de pieces et
accessoires, au 1.888.261.3055.
63
Page 64

Instructions d'installation
INSTALLATION DE LA CONDUITE D'EAU (SUITE)
CEDONT VOUS AUREZ BESOIN (SUITE)
• Une alimentation d'eau froide potable. La
pression de I'eau doit _tre entre 20 et 120 p.s.i.
(1,4 et 8,1 bar).
• Une perceuse electrique.
• Une cle de 1/2 po ou une cle anglaise.
• Un tournevis a lame plate et un tournevis
Phillips.
• Deux ecrous a compression d'un diametre
exterieur de 1/4 po et deux bagues
(manchons)--pour brancher le tuyau en cuivre
au robinet d'arr6t et au robinet d'eau du
refrigerateur.
OU
• Si vous utilisez une trousse GE SmartConnect TM
Refrigerator Tubing, les garnitures necessaires
sont deja montees au tuyau.
• Si votre conduite d'eau en cuivre actuelle a un
raccord evase a une extremite, vous aurez besoin
d'un adaptateur (que vous trouverez dans votre
magasin de materiel de plomberie) pour
brancher le tuyau d'eau au refrigerateur, OU
vous pouvez couper le raccord evase a I'aide
d'un coupe-tube, puis utiliser un raccord
compression. Ne coupez jamais I'extremite finie
d'un tuyau de la trousse GE SmartConnect TM
Refrigerator Tubing.
• Un robinet d'arr6t pour brancher le tuyau d'eau
froide. Le robinet d'arr6t doit avoir une entree
d'eau avec un diametre interieur minimal de 5/32
po au point de jonction avec le TUYAU D'EAU
FROIDE. Des robinets d'arr_t a etrier sont
souvent inclus dans les trousses d'alimentation
d'eau. Avant d'acheter, assurez-vous que le
robinet a etrier se conforme a vos codes de
plomberie Iocaux.
64
Installez le robinet d'arr_t sur la canalisation
d'eau potable la plus frequemment utilisee.
[] FERMEZ L'ALIMENTATION
PRINCIPALE D'EAU
Ouvrez le robinet le plus proche
suffisamment Iongtemps pour purger
le tuyau.
[] CHOISISSEZ L'EMPLACEMENT
DU ROBINET
Choisissez pour le robinet un emplacement
facilement accessible. II vaut mieux le
brancher de c6te a un tuyau vertical.
Si vous devez le brancher a un tuyau
horizontal, faites le branchement en haut
ou de c6te, plut6t qu'en bas du tuyau,
pour eviter de recevoir des sediments
du tuyau d'alimentation d'eau.
[] PERCEZ UN TROU POUR LE
ROBINET
Percez un trou de 1/4 po dans le tuyau
d'eau (m6me si vous utilisez un robinet
autotaraudeux), a I'aide d'un foret dur.
Enlevez toute barbure due au per_age du
trou darts le tuyau.
Faites attention de ne pas laisser de I'eau
couler dans votre perceuse electrique.
Si vous ne percez pas un trou de 1/4 po,
vous obtiendrez une production de gla_:ons
reduite ou des gla_ons plus petits.
Page 65

Instructions d'installation
[] FIXEZ LE ROBINET D'ARRET
Fixez le robinet d'arr_t a la conduite d'eau
froide a I'aide du collier de serrage,
Collier de serrage
Robinet d'arr_t Conduite verticale
etrier d'eau froide
NOTE : Vous devez vous conformer aux Codes
de plomberie 248CMR du Commonwealth of
Massachusetts. Les robinets d'arr6t a etrier
sont illegaux et leur utilisation n'est pas
autorisee au Massachusetts. Consultez votre
plombier local.
[] SERREZ LE COLLIER
DE SERRAGE
Serrez les vis du collier jusqu'a ce que la
rondelle d'etancheite commence a enfler.
NOTE : Ne serrez pas trop. Vous risquez
d'ecraser la conduite.
Collier de serrac
Rondelle
Entree
Vis du
collier
[] ACHEMINEZ LE TUYAU
Acheminez le tuyau entre la conduite d'eau
froide et le refrigerateur.
Faites passer le tuyau par un trou perce dans
lemur ou le plancher (derriere le refrigerateur
ou au niveau de I'armoire de cuisine
adjacente), aussi pres du mur que possible.
NOTE : Assurez-vous qu'il y ait assez
de tuyau en trop (environ 2,4 m [8 pi]
enroules trois fois en cercles d'environ
25 cm [10 po] de diametre) pour vous
permettre de decoller le refrigerateur
du mur apres I'installation.
[] BRANCHEZ LE TUYAU
AU ROBINET
Placez un ecrou de compression et une
bague (manchon) a I'extremite du tuyau
et branchez-les au robinet d'arr_t.
Assurez-vous que le tuyau soit bien insere
dans le robinet. Serrez fort I'ecrou de
compression.
Pour le tuyau en matiere plastique d'une
trousse GE SmartConnect TMRefrigerator
Tubing, inserez I'extremite moulee du
tuyau dans le robinet d'arr_t et serrez
I'ecrou de compression a la main, puis
serrez un autre demi tour avec une cle.
Si vous serrez trop fort, vous pouvez
occasionner des fuites.
Robinet d'arr6t
aetrier _ "_I
Presse-joint
Robinet de sortie
Ftcrou de compression
'_r'__ J /Tuyau
. '*_ SmartConnect 'M
Bague (manchon)
NOTE : Vous devez vous conformer aux Codes
de plomberie 248CMR du Commonwealth of
Massachusetts. Les robinets d'arr6t a etrier
sont illegaux et leur utilisation n'est pas
autorisee au Massachusetts. Consultez votre
plombier local.
[] PURGEZ LE TUYAU
Ouvrez le robinet d'alimentation principale
d'eau et purgez le tuyau jusqu'a ce que
I'eau soit claire,
Fermez I'eau au niveau du robinet d'eau
apres ecoulement d'environ 1 litre (1 quart)
d'eau par le tuyau.
Pour completer I'installation du refrigerateur,
retournez a I'etape 1 de la section Installation
du refrigerateur.
65
Page 66

Bruitsnormauxde fonctionnement
Les r_frig_rateurs plus r_cents font des bruits diff_rents de ceux
des anciens. Les r#frig#rateurs modemes pr#sentent plus de
fonctions et sont plus avanc#s sur le plan technologique.
Entendez-vous ce que j'entends ?Ces bruits sont normaux.
HUMMM...
--OUUCH....
• I,e nouveau compresseur 5 rendement (_lev_ peut
ton(-tionnei" phls longteillps et phls vite qtle votre
ancien r_fl'ig&'ateur et w)us pouvez ei_tendre un son
modul_ ou un roi_flement aigu pei_dant son
tonctionnel/lent.
• PaYfois le r_qi-ig_i'ateur fimctiolme pendant tlne pg_i_o(le
prohmg_e, suYtout loi_que les portes sont ou\'eYtes
fl'&lUelmnei_t. Cela siglfifie que la fimction Frost 6uard "°
est active pour elnp&cher la br0hu'e de cong_lation et
am_liorer la conser\:lfion des aliments.
• Vous pouvez entendre un sifllement hn_que les portes
se tbm/ent. Cela vient de l'&luilibrage de pression dans
le rbffigOratem:
CLICS, CLAQUEMENTS,
CRAQUEMENTS et
GRESILLEMENTS
• Moils potlvez entendi"e des craqt]ell/ents Oil des
claquemei_ts lorsque le r_fl'ig_rateur est branch_
pour la premiere lois. Cela se produit lorsque le
rSfl'ig_rateur se refl'oidit ;'1la boime tempSrature.
• i,es registres 81ectroniques s'ouvrent et se fern_ent
pour assurer des 8COl_olnies d'Sneigie et un
refl'()idissement optimaux.
• I,e colnpresseur peut causer un clic ou un
grSsillelnent lors de la tentative de redSinarrage
(cela peut prendre 5 iniimtes).
• i,e tableau de c()imnande 81ectronique peut causer
un clic lorsque les relais s'activent pour c()nm/ander
les c(m_posants du rSfl'ig_rateur.
• I/expansion et la contracti(m des serpentins de
refl'oidissen_ent pendant et api"&s le dSgivrage
petivent Catlsei" till ci"aqtlei/lent Oil till claqtlelllent.
• Sur les mod&les &luip_s d'une n/achine ;'1glaqons,
api"&s un cvcle de thbrication de glaqons, wins pouvez
entendre les glagons tomber darts le bac.
OUIR !
• Molls potlvez entendi"e les ventilateurs totli"nei"
;'1hautes vitesses. Cela se produit lorsque le
r_fl'ig_rateur vient d'6tre branch,, h)rsque les portes
sont ouvertes fl'(_quelnlnent ou lors de l'ajout d'une
grande quantit_ d'alin/ents darts les con_partilnents
cong_lateur ou r_fl'ig&'ateur. I,es ventilateurs
pern_ettent de maii_telfir les bolmes temp&'atures.
• Si une des portes est ouverte pel_dant plus de
3 nfilmtes, wins pouvez entendre l'actiwltion des
ventilateurs pern_ettant de refroidir les alnpoules.
• i,es ventilateurs chai_gent de vitesses pour assurer des
_cononfies d'_neigie et un refl'oidissen_ent opfimaux.
BRUITSD'EAU
• I,e passage de l'agent fl'igorifique darts les seq)entins
de refl'oidisselnent (111congg_lateur peut _tI'e
accompagi_ d'un gaigouillelnent semblable ;'1celui
de l'eau en _bullition.
• I,'eau tombant sur l'_l_ment chauflant de d_givrage
peut taire un biuit de gr_sillement, de claquelnent
ou de bourdolmelnent pendant le cycle de
d_givrage.
• Un bruit de suil_tement d'eau peut &tre entendu
pendant le cycle de d_givrage lorsque la glace de
l'_wq)orateur fond et tolnbe darts le bac de
r(_cup_ration.
• Ferlner la porte peut causer 1111gargouillelnent
en raison de l'&luilibrage de pression.
66
Page 67

Avantd'appelerunreparateur.., www.electromenagersge.ca
Conseils de d#pannage - E-conomisezdu temps et de I'argent/.
Consultez d'abord los tableaux quisuivent et vous pourrez peut-
#tre #viter de fake appel _ un r@arateur.
Causes possibles Correctifs
Le refrigerateur ne Le cycle de degJvrage * Atteudez euvil ou 30 lniuutes afiu que le cycle de
est peut-_lre en cours, d(_gix'l'age, , l)uisse tenniuer.
Les commmldes de temperature * R(_glez los COUlUlaudes de teulp(_rature sur uu l'(_glage
sont reglees sur 0 (Oehat). de teuq_(_l'attu'e.
Le refrigerateur est debrmache. • Enfi)ncez la fiche de l'appareil dztus la prise ulurale.
Le disjoncteur ou le fusible • Reiuplacez le fltsible ou r(_eucleuchez le disioucteul:
pout avoir saute.
Vibration ou bruit Los roulettes de nivellement * (_ousultez Roulettes.
metallique (une leg_re avmlt doivent Ore reglees.
vibration est normale)
Le moteur fonctionne Ceci est normal lorsque le * Atteudez 24 heures pour que le r(_frig(_rateur reti'oidisse
pendant deIongues refrigerateur vient d'etre brm_ch6, complbtelneut.
periodes ou d_marre et Une grmlde quanfit6 d'alhnents * (Test UOllnal.
s'arr_te frequemment (Los a 6te raise au refrigerateur.
refrigerateurs modernes
et leurs congelateurs Porte laissee ouverte. * V(_riliez qu'il u'y :t pas till paquet qui elnp_che
etant plus grands, leur la 17()rtede fe'rm el:
moteur doit fonctionner Temps chaud ou ouverture * C'est UOl_nal.
plus Iongtemps. IIs frequente des portes.
demarrent et s'arr#tent
afin demaintenirdes Los commmldes de temperature * (]ousultez Los commandos.
temp#ratures uniformes.) ont ete reglees &la temperature
la plus froide.
Temp#raturetrop #lev#e La commando de temperature • (]ousultez Los commandos.
dans le cong#lateur ou n'a pas 6t6 reglee h tree
le refrigerateur temperature assez basso.
Temps chaud ou otwerture * Abaissez la col[lUlaude de tellqT(_rature d'uue positiou.
frequente des portes. Cousultez Los commandos.
Porte laissee ouverte. *V(_riliez qu'il u'y ;t pas till p;lqt/et qui elTq)&(he la
17()rte de telln el:
Givre sur les aliments Porte laissee ouverte. * V(_rifiez qu'il u'y :t pas till paquet qui eUlp&che la
surgeles (il estnormal porte de fennel:
que dugivre se forme
I_nt_rieur dupaquet) Los portes ont 6t6 ouvertes
trop souvent ou pendant trop
longtemps.
Laseparation entre Le systbme automafique * Ceci chip&the la fomlafiou (le coudeusafiou sttr
le refrigerateur et le d'economie d'energie fait 1'ext&rietu" du r(_fi_ig(_l'ateur.
congMateur est chaude circuler du liquide chaud autour
du rebord avmat du congelateur.
Formation lente des Porte laJssee ouverte. * V(_riliez qu'il u'y :t pas till paquet qui erupt( he la
glafons (sur eertains porte de iel'Uler.
modMes)
La COllUnmlde de temperature * Cousultez Los commandes.
du congelateur n'est pas reglee
h tree temperature assez froide.
Mauvais goM/odeur
de I'eau (sur certains
modMes)
9
Le dJstributeur d eau n a pas 6te
utilis6 depuis longtemps.
• Faites c(/tder l'eaujusqu'ft ceque l'eau du svst(_ule st)it
reuq)lac(_e par de l'eau ti'aiche.
67
Page 68

Avantd'appelerunreparateur...
Lamachine_gla_ons
nefonctionnepas
Causespossibles
L'hlterrupteur d'alimentation de la
machine h gla_ons est h la position 0 (arr_t).
L'alimentation en eau est coupee
ou n'est pas raccordte.
Correctifs
* R(_glezl'interrupteur (Falimentation _'_la position
I (marche).
* Consultez Installation do la conduitod'oau.
Le compartiment congelateur * Attendez 24 ]lettres pour qtte [a temp(_mmre du
est lrop chaud, r0ti'ig0rateur se stabilise.
Un areas de gla_ons dmls le bac provoque * Ni\ elez les glaCons _'_lu muitt.
l'arr& de la machine h glafons.
Cubes de glace sont cohlc6s dmls * D0brattchez le distributeur enle_ez [es cttbes et
le distributeur. (La lunfi6re rebnmchez le distfibuteur.
d'alimentation verte clignote).
Le refrig6rateur est en mode d'exposition. * D_br:mchez le r(_t)'ig(_rateur et rebrunchez-le.
Odeur/saveuranormale ]] faut nettoyer le bach gla_;ons. * Videz et lm'ez le bac fi glacons. Jetez les vieux glacons.
desgla_ons
Des aliments ant lrmlslnis leur * Emballez bien les aliments.
odem'/gofit aux gla_:ol[_s.
I1 faut nettoyer l'int6rieur du * Ctmsultez Entrotion ot nottoyago.
refrig6rateur.
Petits glaFons ou glaFons Le Fdtre heau est bouch& * Remplacez 1:_cartouche du filtre mec une nora elle
crenx_ I'int_rienr cartouche ou insta[[ez ]e bouchott (ht ti[tre.
Le distributeut de gla_ons La machine _ gla_:ons est 6teinte * Mettez e/t marche la machine _'lglacons ou r0t:d)lissez
ne fonctionnepas ou l'alimentation en eau a et6 coupee, l'alirrtetttation en eau.
(surcertainsmodeles)
Des gla_;ons sont coll_.s au bras r6gulateur. * Retirez les gluqotts.
Un objet bloque ou est tomb6 dmls la " Enlevez tout objet qui blo(tue ou est tomb0 dans la chttte.
chute h glace situee h l'hlt6rieur du
bac superieur de la porte du
compardment cong61ation.
Distributeur est VERROUILff. * Appu_'ez et maitttettez e/t[imc(Xe [a touche LOCKCONNOL
(r0glage du _err(,uillage) pendant 3 sectmdes.
• 13risez-ettautant que pox_ible m'ec vos doigts etjetez ceux
qui restent.
• Le c(mg_lateur est peut-_tre trap chaud. R0g]ez la
commatt(le du cttttg0latettr sur une terrlp0ratttre phls
basse, ett :d>aissant ]a corrmtattde d"ttne position fi la Ibis
jusqu'f* ce que ]es blocs de glace disparaissent.
Blocs de glace irrtguliers dans
le bac hglagons.
L'eauvers6edansle Normal lorsque le r6frigerateur * Attendez 24 ]lettres pour que [a temp0n_tttre (Its
premierverreest est htitialement h_stall6, r0ti'ig0rateur se stabilise.
chaude(surcertains
modeles) Le distributeur d'eau n'a pas et6 * Faites couler l'eatt.ittscttt'_ ce que l'eau du s}stbme soit
ufilis6 depuis longtemps, rempl:_c0e par de l'eau fl'aiche.
Le reservoir d'eau vient d'6tre vidang6. * Attendez l)lusieurs heures pour que l'eatt reti'oidisse.
Ledistributeurd'oau L'alimentation en eau est * Consultez Installation do/a conduito d'oau.
ne fonctionnepas coupee ou n'est pas raccordte.
(sur certains mod_les) Le fihre heau est bouch& * Remplacez la cartouche du filtre mec une nou_ elle
cartouche ou installez ]e bouchttlt (lit filtre.
11y a de Fair dm_s la conduite * Appuyez .sur le bras de distribution })ett(lant an
d'eau, mains deux mimttes.
Distributeur est VERROUILff. " Appuyez et maitttettez ett[bnc(Xe la tottche LOCKCONTROL
(r0glage du _errouillage) pendant 3 secott(les.
L'eaujaillit dudistributeur La cartouche du Fdlre vient d'61re " Faites couler l'eatt (ht distfibuteur })en&mt 3 rrfintttes
h_stall6e. (environ 6 litres).
85
Page 69

www.electTomenagersge.ca
Causes possibles Correctifs
La machine _ gla_ons L'eau du r_servoir est gel(?e. * Appelez un rOparateu_:
fonctionne,maisne
[ , ,
distribuepasd'eau Le r_glage de commmlde est * R(=g[ez le conmmnde de tern )0rature sur un r0glage
_'op froid, plus chaud.
Lamachine _ gla_ons La conduite d'eau ou le * Appe[ez tm ph)mbiex:
nedistribueni eau robhlet d'aJcr_t est bouch_.
ni gla_ons
Le filtre a eau est bouch_. • Remplacez [a cartou(-he du filtre axec m_e nomel[e
cartouche ou installez le bouchon du filtre.
Distributeur est VERROUILLE'. • AI)pu}ez et maintenez enfon((=e [a touche LOCK
CONTROL (r_glage du xerrouil[age) pendant 3 secondes.
CUBEDICE(cubesde
glace)etaitchoisimais
CRUSHEDICE(glace
concassee)a et_
dis_ibuee(sur
certainsmodeles)
Le r_glage precedent _taJt
CRUSHED ICE.
• (_uelques cubes sont rest(_s et ont _t_ concass(_s fi cause
du r0glage pr_c(=(lent. C'est nomm[.
Des aliments ont trmlslnis • I,es aliments fi odeur fi)rte doivent btre emball6s
leur odeur au r_frig_rateur, hem/6tiquement.
• (;ardez tree boite ouverte de bicarbonate de soude
dans le r_fl_ig(=ratem:
II faut nettoyer l'hlt_riettr. • ())nsultez Entretienet nettoyage.
Dela condensation Cela n'est pas inhabituel pendaalt • Esstlvez bien la Stlil'ilce ext0iJetlre.
s'accumule _ I'extOrieur les p6riodes de forte humidJt&
De la condensation Les portes sont ouvertes trop
s'accumule _ lYnterieur fr_quemment ou pendmlt trop
(par temps humide, lon_emps.
I'ouverturedesportes
laisseentrerdeI'humidite)
L_clairageinterieur 11n'y a pas de courmzt au _fiveau • Remp[acez le fusible ou r6enclenchez [e disionctem:
de la prise.
L'mnpoule est grill_e. •ConsultezRemp/acementdesampoules.
Eausurle so!on au I1 y a des glaqons bloqu6s dm_s • Faites passer les gla£oils ,i l'aide d' tlile cuill Ore en bois.
dn conge/atenr le conduit.
Air chaud_ labasedu Courmztd'air normal provenmzt
du moteur. Pendmzt le processus
de r6frig_ration, il est normal que
de la chalettr soit exptds_e it la
base du r6frig_rateur. Certahzs
rev6tements de sol sont sensibles
et peuvent se d_colorer sous
l'effet de cette temperature de
fonctiom_ement nonnale qui
est sm_s dm_ger.
_;_ ii !iii iiiiiiiiiiiiiiiiiiiiiiiiii
Laporteneseferme
pascorrectement
Lejohzt de la porte du c6t_ des
chmafi&res est coll_ ou repli&
• Mettre une couche de cite de parafline sur lejoint
de la porte.
iiii_i_/_iiiii/il
_:;;VJiiii_i
ii_ilYi;_iiii
; €
€
€
Page 70

Avantd'appelerun reparateur...
Causes possibles
Lueurorangedans Le cycle de d6givrage est
le cong_lateur en coup.
Le refrigerateurne La fonction de d6givrage
s'arr_te jamais mais maJntient le compresseur en
les temperatures sont maJcche au cours de l'ouverture
normales des portes.
Lerefrigerateuremet La porte est ouverte.
un signa! sonore
Correctifs
• C'est IlOI_mal.
• Ceci est nom/al, i,e r(_flJg(_i'ateur passe sur cv('le
d'arr6t loI_que les portes ont (_t(_tenn(_es pe'ndant
2 heures.
• Fei-)nez la porte.
7O
Page 71

GARANTiE DU CLIENT
(pour la clientele au Canada)
Votre refrig6rateur est garanti contre tout defaut de rnateriau et de fabrication.
Ce quecette Duree de garantie Pi_ces Main-d'oeuvre
garantie couvre (a partir de la R@aration ou
date d'achat) remplacement au
choix de Camco
Compresseur GEProfile : Dix (10) ans GEProfile:Dix (10)ans GEProfile : Cinq (5) ans
GEet toutes autre GEet toutes autre GEet toutes autre
marques : Un(1) an marques : Un(1) an marques : Un (1)an
Syst_me scelle(y GEProfile : Cinq (5) ans GEProfile : Cinq(5) ans GEProfile :Cinq(5) ans
compris I'@aporateur,la GEet toutes autre GEet toutes autre GEet toutes autre
tuyauterie du condenseur marques : Un(1) an marques : Un(1) an marques : Un (1)an
et le frigorig_ne)
Toutesles autres pi_ces Un (1)an Un(1) an Un(1)an
TERMES ET CONDITIONS :
La presente garantie ne s'applique qu'a I'utilisation domestique
par une seule famille au Canada,Iorsquele refrig6rateur a et6
install6 conform6ment aux instructions fournies par Camco et
est aliment6 correctement en eau et en electricit&
Les dommagesdos a une utilisation abusive, un accident,
uneexploitation commerciale, ainsi que lamodification,
I'enl_vement ou I'alteration de la plaque signal6tique annulent
la presentegarantie.
L'entretien effectue dans le cadre de la presentegarantiedoit
I'_tre par un r@arateur agre6Camco.
Camcoet le marchand ne peuvent _tre tenus pour responsables
en cas de reclamationsou dommages resultant de toute panne
du refrig6rateur ou d'un entretien retarde pour des raisonsqui
raisonnablement echappenta leur contr61e.
L'acheteur doit, pourobtenir un service dans le cadre de la
garantie, presenter la facture originale. Les616mentsr@ares ou
remplac6s ne sont garantisque pendant le restantde la p@iode
de garantie initiale.
Cette garantie est offerte a I'acheteur initial, ainsiqu'a tout
propri6taire subs6quent d'un produit achet6 en vue d'une
utilisation domestique au Canada.Le service a domicile en vertu
de la garantie serafourni darts lesregionsoQ il est disponibleet
oQCamco estime raisonnable de le fournir.
Cette garantie est en sus de toute garantie statutaire.
EXCLUSIONS DE LA GARANTIE :
• Le propri6taire est responsablede payerlesr@arations
occasionn6es par I'installation de ce produit et/ou les visites
n@essairespourlui apprendre a utiliser ce produit.
• Tout dommageau fini de I'appareil doit _tre signal6aupr_s
du magasin oQa et6effectu6 I'achat dansles 48 heures
suivant la livraison de I'appareil.
• Dommagescaus6s a la peinture ou a I'email apres livraison.
• Installation incorrecte--I'installation correcte inclut la
bonne circulation d'air pour le syst_me de refrig6ration,
des possibilites de branchement aux circuits electriques,
d'alimentationen eauet autres.
• Remplacementdes fusiblesou rearmementdesdisjoncteurs.
• Remplacementdes ampoules61ectriques.
• Dommagessubis par I'appareil a la suite d'un accident, d'un
incendie,d'inondations ou en cas de force majeure.
• Utilisationcorrecte et entretien adequat de I'appareil selon
le manuel d'utilisation, reglagecorrect des commandes.
• Pertedes aliments doe a lad6terioration.
• Leservices'il estimpossibled'avoiracc6s auproduit
pource faire.
• LEGARANTN'ESTPASRESPONSABLEDESDOMMAGES
INDIRECTS.
I
EXCLUSION DE GARANTIES IMPLICITES--Votre seul et unique reoours est la reparation du produit selon les dispositions de
oette Garantie limitee. Toutes les garanties implicites, incluant les garanties de commercialite et d'adequation a un usage
speoifique, sont limitees a une annee ou a la periode la plus courte autorisee par la legislation.
I
IMPORTANT
Gardez cette garantie et votre facture originale comme preuve d'achat et preuve
de la date d'achat.
Camco vous offre ses services dans tout le pays. Pour de plus amples
renseignements sur la presente garantie, veuillez prendre contact avec :
Directeur, Relations avec les consommateurs, Camco Inc,, Bureau 310,
1 Factory Lane, Moncton, N,B. E1C 9M3
1,800.361,3400
Agraphez votre re9u icL
Vousdevezfournir la preuve de
I'achat original pour obtenir des
services en vertu de la garantie.
71
Page 72

Feuillet de donn#es relatives g_/a performance
CartoucheMWF duwsteme de
Filtrationd'eau GESmartWater
CewsMme a #t_ essay#se/on /esnormesNSF/ANS/42/53pourune reductiondes substances _num_rees ci-dessous.
Laconcentrationdessubstancesindiqu#esdans/'eau qui entre dansle wsteme a #t_ reduiteh une concentration inf#rieure
ou_ga/e a la /bnitepermise pour I'eau quittantle sltsteme,te//e quepr_cis#e par la normeNSF/ANS/42/53.*
_facteursint@r_s des_curit6 _ 100%pour une utilisation sans compteur)
Pm'am_re
Chlore
T&O
Pal-ticules**
USEPA
MCL
QuaKt_
h_f]_lent concentration
2,0 mg/L + ]0%
l0.0(X119_wticlesimL minimum
Norme N ° 42 : Effets esth6fiques
Moyemm Effluent
hlfluente Moyelme M_ttm
] ,9(irag/l, 0,0(i rag/l, 031 rag/l,
{i.400.0(_')#/mL 58.833 #/mL 150.000 #/mL
Norme N° 53 : Effets de smlt6
Paramb_re
qhrbidiw
Spores
Asbestos
Plolnb au pH 6,5
Plolnb au pit 8,5
,_4(F( tire _'t pit @5
M,.r( m'e .t pH 8,5
.\laddore
[ in(brae
2 ,_D
qbxaphSne
Benzi'n(
Carbofi mine
1,4Di(:h/orobenz_ne
Atrazin(
Qualit_
hffluent concen'*ra_on
] ] + ] NT! ***
50.000 L milfimunl
] (F _'_]()8fibres/I,; > ]0pro
03 5 rag/I, + ]()!_1
03 5 rag/l, + ]0!_1
0,006 mg/L + ]()!_1
0,00{i mg/L + ]()!_1
0,04 rag/l,_+ ]()5_1
0,002 mg/L k ]()!_
0,2](1 mg/L k ]()!_
0,0] 5 mg/L k ]()!_
0,0] 5 mg/L k ]()!_
(1,(18{)mg/L k ]()!_
0,225 mg/L + ]0!(
(},(}09mg/L + ]0!(
USEPA
MCL
0,5 NT[
_>!)!),95% rd(lucfiol]
>--99(/0 l'6(h/( tioll
0,0] 5 mg/L
0,0] 5 mg/L
0,002 mg/L
0,002 mg/L
0,002 mg/L
0,0002 mg/L
0,07(} mg/L
0,003 mg/L
0,005 mg/L
(},040 mg/L
0,075 mg/L
(},(}03mg/L
Moyem_e
influente
] 0,5 NT! '
] ] 8.750 #/I,
57 MF/I,
0,1567 rag/l,
0,1433 rag/l,
0,0059 mg/I.
0,0057 mS/I,
0,0367 rag/l,
0,0020 rag/I,
02033 rag/I,
0,0] {_)mg/I_
0,0] 45 mg/I_
0,0830 rag/I,
02283 mg/I_
0,0087 mg/I_
Effluent
Moyemm M_tml
03 4 NT/' 0,28 NT[
< ] #/L 4#/L
0,996 MF/I, < ] MF/I.
< 0,00] mg/L < 0,00] rag/l,
< 0,001 mg/L < 0,00] rag/l,
0,000350 mg/L 0,0007 mg/L
0,000325 mg/L O,O00{img/L
0,00023 rag/I, 0,0004 mg/L
< 0,00002 mS/I, < 0,00002 mg/L
0,00337 rag/I, 0,011000 rag/I,
0,00]00 mg/I_ 0,0(}]000 mg/I_
(},(}0050(}mg/L 0,0(}0500 mg/I_
(},(}0]00(} mg/L 0,0(}]000 mg/I_
(},(}0050(}mg/L 0,0(}0500 mg/I_
< (},(}005mg/L < 0,0(}05 rag/I,
% R6duction
Moyemm Minimum
96,77% 94,74%
99,] 4% 97,97%
% R{'duction
Moyemm _tml
98,54!( 97,20!_(
> 99,99% > 99,99%
99,60% 99,39!_1
99,36% 99,29%
99,30% 99,29%
94,70!( 87,50!?(
9320!( 89,29!_(
99,34% 98,67%
99,00% 98,95%
98,32% 94,50%
93,44% 91,67%
96,51% 95,83%
98,78% 98,65%
99,78% 99,77%
94,22% 93,33%
R6&_cfion
exigem_'_e rain.
> 50%
_>8?}%
R6ducfion
exigem_te rain.
0,5 NI'[ '
_>99,95%
_>99%
0,0] 0 rag/l,
0,0] 0 rag/l,
0,002 mS/I.
0,002 mg/I.
0,002 mg/l_
0,0002 mg/L
0,07{}mg/I_
0,003 mg/I_
0,005 mg/I_
(},(}4mg/I_
0,075 mg/I_
0,003 mg/I_
* Test#utilisant und#bit de 0,50gpm; une pression de60 psig; unpH de 7,5+_0,,5;et une temp. de 20°C+_3°C (68°F+_5°F)
** Mesures enparficules/mL Lesparficules utilis#s #talent de 0,_1 micron.
*** NTU=unit#s de turbidit# n@h#lom#trique
Sp#cifications flop#ration
[] Capacit(': ('(Ttili('( .j/ls(iu'£11/KIXilIIHI//d(' 300 gP.1lons (1135 I);.jusq/l'_'z IIIHXiI///IIII (l( SiX inois ])o/u _h's ino(t6les non dot('s (l'Hn V(}f;tnt indi( atcur dc
r{'mi)la( cm('nl d(' {iltr(';j/lS(]II'_'l Illaxilll[lIll d_[lI/ _tI/ i)oHr l('s modbl{'s dotds (l'ull v(}\,;mt indicat{,(_r d(' rcmpla(cmcnt (/(' lihrc
[] Exigcnce cn mati6rc de ])£('ssion : 2,8 _'1 8,2 bktl: (40 i 120 psi), sans choc
[] "Dmpdrature : 0,0'-38 _'(2 (33'-100 'F)
[] [)('bit : ] ,(.)1pro (0,5 gpm)
Exigences g#n#rales dTnstallation/op#ration/ontmtien
[] RJI](('z l_t l]Om('lle (artotl{]l(, _'_Dl(in (t('bit p('l](lam 3 minuws ali]] (I( lil)('rer (h' Fail_
[] R{,nll)la('cz la ( ;llPtO/l('h(' lorsqu(' l(' voy;mt {lig]]otc cm lors(lu(' l(' ddl)it d'{au cs_ r&lui_ pO/IF I('S appar(ils sans roy;mrs.
Avis sp#ciaux
[] I x_s dire('tivcs d'installation, la dist)onibilitd (1( 1)i_'(:('s ct (h' s(rvi{e ainsi qu(' la g-re°antic standard sont expddidcs ax('c 1(' ])ro(hfit.
[] C{' s_st6me d'(au potable (/oi_ £'t]P( ('IHI-('[('II/I (()II{(}FIII('/]]( Ill _It/Xdire(fiv( s du liff)ritant, y {ompris le r{'l]l])lH('('l/]( lit d{'s C_HPtOt/('h('s all1 Jilt]P(.
[] N'utilisez [}as lorsq//( l'cau 1)rds('mc m] (l_ti/g('l: nli{ robiologJ(luc ou lorsq/le Feau ('st (l'm]c qualitd in{ ommc sans (l('sinlbctcr _t(t('q/l;lt('lll('Ht
1(' S}'St('IIl(' _t\ _tnt O// ;tl)r6s; 1(' s} st('ll/(' t)( tit servir ])otlr (I(' l'('aH d('sinlb{ t&' (tui po/lr]'_dt ('oilt{'I/ir (l(s spor('s Iihrables.
[] L(s ('()l/[illl/il/_ll/tS O/I _l/lEl'( S s[/bstHlI('('S r('tJr('( s o/1 r('dt/it('s par ce s}st61ll(' d(' tr:dt('lll('lH d( ]'('_lt/I/(' S()l/t pas l/('(('SS2til('lil('l/t dal/S votr( ('_l/l,
[] \ driii('z pour vous }iSS[llP(,lPdc voHN ('()I/[()FIII('F _I[IX lois (t rbgleinems lo(aux ('t (le I'dmt.
[] Notcz (lUe bicn (pro 1'( ssai a (m lieu d;ms des conditions IlOl?illal('s (I( laboratoirc, mais (lUC 1( rcn(len_( i]t r&'l ])('ut V_tlPi(T.l (S S}St('l/l('S
(toi_cnt 6n'c install(,s et ]()ll( tiOnll('l? conJ()rl/l('i/l(,n[ atlx pl?o( ('(hw('s et dire{ ti_es re{ommanddes ])or 1(' Ihl)ricant.
Norme N ('42 :Effets esfll6fiques
I nit_ chimique
Iiod(m et le gofit de chlorc
I nit_ de filn-4tion ln_cani(lue
P..&/uction de particules, catdgorie I
"I2_,t('e et certifide selon les normes 42 et 53 de ANSI/NSF pour la rdduction de :
Norme N ° 53 : Effels de sant6
[ 7nitd (le rdduction dfimi(lU(
Rdducfion aladflore et aw4zine
R_ducfion benz6ne et carbohwan
R_ducfion 1,4 dichlorobenz6ne et 2,44)
R_duction plomb et lin(lane
R_duction mercure et toxaph6ne
[ nitd de fihrafion mdcmfiqu{
P,.dduction de turl)i(lit{:
P,.&luction de spores et asbestos
Fabriqude pour : General Electric Compare; I _ouisville, KY 40225 EPA ES'E No. 070595-M N-001
72
Page 73

Soutiefi aU consommateu_
Site Webapparei/sdectrom_nagers GE www.electromenagersge.ca
VOus avez une question ou vans avez besoin d'aide pore" votre ai:)pareil (_le(trom(4nager? Contactez-nous
S _ c
par Internet au ,'lte www.eleetromenagersge.ea 24 hem'es par join; tous lesjom_ de l'mm6e.
Serviceder_parations
Service de r(4parations GE est tout i)r_s de _ous.
Pour fidre r_parer votre _lectrom_nager GE, il suftit de nous t_l_phonel:
1.800.361.3400
Studio de conceptionr6aliste
Sur dem:mde, GE peut torn'nit une brochure sur l'am0nagement (I'mle cuisine pour les persomles
5 mobilit_ r&iuite.
Ecrivez: Diiectem; ]).elations avec les consommatem_, Cameo, Inc.
Bureau 310, 1 Facto* T lane
Moncton, N.B. E 1C 9M3
Prolongationde gamntie www.electromenagersge.ca
Achetez un (ontrat d'entretien GE axant que _otre ,garlmtie n'exl)ire et b_n0fkiez (I'un rabais substantiel.
_Mnsi le set;ice apr_s-; ente (;E sera tot!}otlrs la apl'0s expiration de la garantie.
Visitez notre site Web ou appelez-nous an 1.800.461.3636.
Pibceset accessoires
Ceux qui d(_sirent r(4parer eux-m&mes leul3 (qectrl)m(4nagei_ pelwent rece\_)ir pibces et accessoires
directement "5la maison (cai*es VISA, Maste*Card et Disco\ er accept_es).
Los directives stipul_es dons le present manuelpeuvent 6tre effectu6es par n'importe quel utilisateur, tes outres
r@aratiens doivent g_n_ralement 6tre effectu6es par un technicien qualifi_. Soyezprudent, car une r_paration
inadequate pent affecter le fenctionnement s_curitaire de I'appareil.
Vous trouverez dans les pagesj:nmes de votre ammaire le num0ro du Centre de service Cameo le plus
proche. Autrement, appele>nous all 1.888.261.3055.
Contactez-nous
Si w,us n'6tes pas satisfidt du sels'ice apr6>vente dent xous avez b_n(4fid_ :
Premi_rement, commmfiquez avec les gens qui ont r_par_ _tre appaieil.
Ensnite, si ;:otis n'&tes tot!ioui_ pas satisfitit envoyez tolls les d_tails - num(4ro de tg_l(41)hone compris - all
Di_ectem; Relations avec les consommatem's, Cameo, Inc.
Bureau 310, 1 Factory lane
Moncton, N.B. E 1C 9M3
Inscrivezvotreappareildectrom_nager www.electromenagersge.ca
Inscrivez votre appa_eil 61ectmm_nager en direct, aussit&t que possible. Cela am_liorera nl)s
COlllilltllliCations et notl'e service apl'es-vente, Molls potlvez 6galement hellS ellvoyel" par la poste
le timnulaire d'inscliptionjoint 5 wm'e documentation.
73
Page 74

m
,g
Informa_6n de seguridad ....... 75, 76
Instrucciones de opera_6n
Cuidado y limpieza del
reflig>rador. ................... 85, 86
E1 dispensador de agua y de hielo.. 84, 85
El dispositix_ autom_itico
para hacer hielo ................... 83
El filtro de agua ................... 78
Grooms y cacerolas ................. 89
Los controles del refiigerador. ....... 77
Los enuepafios y recipientes
del refiigerador. ................ 79, 80
Puertas del refligerador. ............ 81
Reemplazo de bombillas ............ 87
TurboCool _'*. ................... 77
Instrucciones de instala_i6n
C6mo instalar el refligerador . . . 93-96
C6mo mover el refrigerador .... 89-99
Instalaci6n de la mberfa de agua... 97-99
Preparaci6n para
instalar el refiig>rador .............. 88
Soht_4onarproblemas ........ 100-104
Sonidos normales de la operaci6n . . . 1O0
Servic4o al consumidor
Garantfa para consumidores
eta los Esmdos Unidos ............. 105
Hoja de datos de flmcionamiento ... 106
Servicio al consumidor ............. 107
Anote aqui los numeros de modeloy de serie:
No.
No.
Usted los \'er_i en tma etiqueta en el interior
del compartimiento de refl'igerador en la parte
superior en el lado derecho.
74
Page 75

/NFORMAC/ONES/MPORTANTESBESEGUR/DAB.
LEAPR/MEROTODAS/.AS/NSTRUCC/ONES. 9_._o,,
iADVERTENCIA!
Use este aparato s61opara los fines que se describen en este Manual del propietario.
PRECAUCIONESDESEGURIDAD
Cuando use electrodom6sficos, siga las precauciones b#sicas de seguridad, incluyendo las siguientes:
iJi::Antes de usatse, este refrigerador deberfi
estar instalado v ubicado de acuerdo con las
instrucciones de instalaci6n.
_: No pemfita que los nifios se suban, se paten o se
cuelguen de las charolas del refligera(hn: Podrfa
dafia_e el refl'igerador y causarles serias lesiones.
::Ji::No toque las superficies fl'fas del congelador
cuando tenga las manes hfimedas o mojadas.
I,a piel se podrfa adherir alas superficies
extremadamente fl'ias.
::Ji::No gt_arde ni use gasolina u otros\:q)ores o lkluidos
inflamabl_ cerca de este o ct_dquier otto apamto.
_;_Meje los dedos flmra de las fireas deride se puede
pinchar los dedos; los espacios enti'e las puertas
y entre las puertas y los gabinems son
necesariamente estrechos. Cierre las puertas
con cuidado en la presencia de los nifios.
::Ji::Si su refrigerador tiene tm dispositivo automfitico
para hacer hielo, evite el contacto con las partes
mdviles del mecanismo de expulsidn, o con el
elemento calefi_ctor locali/_,do en la parte inferior
del dispositivo para hacer hielo. No ponga los
de(los ni las manes en el mecanismo automfitico
para hacer hielo mientras el refl_igerador est0
conectado.
_: Desconecte el refrigerador antes de limpiarlo o
electtlar i'epa i'a ciones.
NOTA: Recomendamos enNticamente encargar cualquier
servicio a un personalcafificado.
::Ji::E1 colocar el control en posicidn 0 (apagado)
no quita la corriente del circuito de la luz.
_: No vuelw_ a congelar los alimenU_s congelados
tlna vez que se ha};ln descongelado.
iPELIGRO! RIESGODE QUE
UN IVINO PUEDA QUEDARATRAPADO
DESHACERSEDEBIDAMENTEDESUREFRIGERADOR
E1 atrapamiento y la sofimaci6n de los nifios no
son tm problema del pasado. Ix_s reffigeradores
abandonados son tm peligro...aunque sea s(Slo per
"pocos dfas." Si se deshace de su viejo reti_igeradm;
per ewor siga las instrucciones abajo para
avudarnos a prevenir algfin accidente.
Antes de deshacerse desu viejo refrigerador
o congelador:
_: Quite las puertas.
N Deje los entrepafios en su sitio para que los nifios
no se stlban.
Refrigerantes
To(los los aparatos de reffigeraci6n contienen
refl_igerantes, los cuales se deben retirar antes de
la eliminaci6n del producto de acuerdo con la lev
fi_deI'al. Si w_ a desechar algfin aparato anfiguo
de reli_igeracidn, consulte con la colnpafifa a calgo
de desechar el aparato para saber (lU(_ hace_:
USODECABLESDEEXTENSION
Debido a los accidentes potenciales que pudieran ocurrir bajo determinadas condiciones, se recomienda
estrictamente no usar cables de extensidn.
Sin embargo, si decidiera usarlos, es absolutamente necesario que sea del tipo IUI, trifilar para aparatos
y cuente con t/Ila clax!ja con conexion a [ielTa y que el cable el_ctlJco sea de 15 alllpelJoS (Illfnill/O) }
12(I xoltios. 75
Page 76

INFORMACIONESIMPORTANTESDESEGUR/DAO.
LEAPRIMEROTODALASINSTRUCCIONES.
iADVERTENCIA!
COMOCONECTARLAELECTRICIDAD
Bajo ninguna circunstancia debe cortar oquitar la tercera punta (fierra) dela clav#a. Para su seguridad
personal, este aparato deber# conectarse debidamente a fierra.
E1 cable elOctrico de este aparato est_i equipado con
una clav!ja de tres pm_tns (tierra) que enchufi_ en
un contacto estSndar de pared de tres salidas
(tierra) para reducir al mfnimo la posibilidad de
d_lflOS poI" tlIl choque el_ctrico con este _lp_lI'il[O,
Haga que tm electdcism calificado vefifique el
enchufe de la pared y el circuito para asegura_e
que la salida est_ conectnda debidamente a tierra.
Donde se dispon_ s61o de un contncto de pared con
salida para dos puntas, _ su responsabilidad pexsonal
v su obli_ddn reempla/m'lo pot tm contacto
adecta_do pare tres p/IIIt1IS ('on ('onexi(_)n [i tieiTa.
E1 refi_igerador deber5 conectn_e siempre en su
propio conmcto el_ctfico individual que tenga
tm w)lmje que w_);_ de acuerdo con la tabla de
clasNcaci6n.
Esto garanfiza la mejor ejecuci6n ) evitn la
sobrecarga del circuito elOctrico de la casa _ los
dafios a causa del sobrecalentnmiento de los cables.
Nunca desconecte el refl_igeradorjalando el cable.
Tome siempre fim/emente la cla',!ja ) sSquela del
contncto sin doblarla.
Repare o reemplace imnediammente todos los
cables el_ctricos de servicio que se ha)ml desgastndo
o dafiado en algtma otra fimna. No utilice cables
qt]e illtlesti'en i'O[tli'ilS o d_ll_lOS poi" _lbi'_lsi6n _1 lo
largo de (_ste ni en la clav!ja o en algtmo de sus
extreillOS.
Pd alejar su refl_igerador de la pared, cuide que no
pase sobre el cable o lo dafle.
FAVORDELEERYSEGUIRCUIDADOSAMENTELASPRECAUCIONES
DESEGURIDAD.
GUARBEESTA$INSTRUCCIONES
76
Page 77

Loscontro/esde/refrigerador, ge.oo,,
FREEZER FRESHFOOD _0_
9 ISCOLDEST
0 ISOFF
I
/
Inicialmente,fije el control del refrigeradoren5 y el controldel congeladoren5 y permita
que transcurran 12-24horaspara que la temperaturase estabilice.
Esposible que seannecesarios variosajustes.Ajuste los controles conunlocremento
a la vez,ypermita quetranscurran 12horasdespu#sde cadaajusteparaque el
refrigeradoraloancela temperaturaquehafijado.
Ajustar loscontrolesa 0 detienelarefrigeraciSntanto en elcompartimbnto del
refrigeradorcomodelcongeladorperu no loterrumpeel sumloistroel#ctrico al
refrigerador Enalgunos modelos,solamenteel control delrefrigeradortiene una
opci6nde0.
Controlesdetoque
• Fijarcualquiercontrolen0 f_aMautom_ticamenteelotrocontrol en0 los ceros
estar#nintermitenteshastaque fijelos controles.
• Siambos controles sef_anen0 yse presk_nacualquieradelosbotonesCOLDER,los
controlesautom#ticamentese fijaMn de nuevoen 5.
LosnivelesdeloscontrolesvariaMn seghnlaspreferenciaspersonales,usoy
condicionesde operaci6nypuedenrequerirmasde unajuste.
NOTA:Enalgunosmodelos,elrefweradorseenvfaconunapelfculadeproteccibnquecubrelos
controlesde/a temperatura.Siestape/fcu/anose retir6duranteia insta/aci6n,h@a/oahora.
Acerca de TurboCool'%nalgunosmodelos).
Como funciona
TurboCool enfl'fa rlipidamente el
compartimiento del retiigerador para
refl-igerar los alimentos m_s ri_pidamente.
lJse YurboCoo/cuando agregue grlmdes
cantidades de alimentos al comparfimiento
del refl_igerado_, guardando alimentos
despug_s de que hart estado expuestos a
temperamrll ambiental o cuando se
disponga a guardar platos sobrlmtes.
Tambig_n puede set usado si el reii_igerador
ha estado sin suministro el_ctfico pot tm
perfodo extenso.
Una xvz acfivado, el compresor se
encenderll imnediatamente y los
•,vnfiladores harsh el ciclo de encendido
y apagado a alms _vloddades, seg(m sea
necesmJo por ocho ht)ras. El c(_l//]Dresor
confinuaM flmdonando hasta que el
compartimiento del refi_igerador se
reii-igere a aproximadamente 34° F (1 o C),
]uego har:i el dclo de encendido y apagado
para mantener este ajuste. Despu6s de 8
horas, o si el TurboCool es presionado om_
vez, el compalqtimiento del refiigerador
regresarli al ajuste original,
Cbmousar
Presione TurboCool. Ia luz indicadora de
YurboCoo/seenciende, sin embargo, la
pantalla de telnperilturas del refiigerador
muestla el nixvl actual.
Despug_s de que YurboCool complete el
dc]o, ]a luz indicadora se apaga.
NOTAS: I,a temperlmu'i_ del reti_igerador
no puede cambiarse din'irate
rurboCoot
I,a temperature de] congelador
no es afectada dmante TurhoCool.
Cuando abra la puerta del
refiigerador durlmte TurhoCoo/,
los xvntiladores continuarlin
flmdonando si hart hecho
el dclo de encendido. 7 7
Page 78

Elfi/tro de agua (enalgunosmodelos).
En algunos modelos
Cartucho del filtro de agua
El carmcho del filtro de agua est_ ubicado en la esquina
superior derecha trasera del compardmemo del refrigerador.
Cugmdoreemplazar el filtro en los modelos con luz
indicadora de recambio
En el dispensador hay una luz de indicaci6n de recm-nbio del
cartucho del filtro del agua. Esta luz se volverfi anaranjada
para advertirle que necesita reemplazar el filtro pronto.
E1 cartucho del filtro deberfa reemplazm_e cuando la luz
indicadom de recambio se vuel;'a i'()ia o si la salida de agua
al dispensador o al dispositivo para hacer hielo disminuvera.
Cugmdoreemplazar el filtro on los modelos sin luz
indicadora de recambio
E1 carmcho del filtro se debe reemplazar cada seis meses,
o antes, si disminuye el flujo de agua al dispensador o al
dispositivo para hater hielo.
C6moretirar el cartuchodel filtro
Si estfi cambiando el cartucho, reIlltle\'a primero el viejo
girfindolo lentamente hacia la izquierda. N0jale el cartucho
directamente hacia abajo. Un pace de agua puede gotem:
Instalar el cartucho de/filtro
Siva a reemplazar un carmcho SmartWater con
adaptador, debe retirar el adaptador antes de instalar
el cartucho. Para retirar el adaptador, gfrelo hacia la
izquierda aproximadamente l/4 de giro.
Si x_ a reemplazar tm cartucho Water by Cu//igan, deje el
adaptador colocado. Este adaptador pei_nlanecerfi en el
refl_igerador ctlando reemplace cartuchos en el fl/ttlro.
Conadaptador Sinadaptador
(el aspecto puede variar)
En los modelos sin luz indicadora de recambio, pegue
la etiquetn con el ines v el aria al nuexo cartucho para
que se recuerde de cambiar el filtro en $ei$ mese$.
i]ene el carmcho de reemplazo con agua de la llave
para pemfitir que OcmTa tm mejor flqjo a partir del
dispensador imnediatamente despu(_s de la instalaci6n.
78
0
O
Minee la flecha del cartucho ) del soporte del cartucho.
(_oloque la parte superior del nuexo cartucho hacia
arriba dentro del soporte./V0 emptlje el cartucho hacia
arriba a dentro del soporte.
Gire el carmcho lentamente hada la derecha hasta que
el ('amwho se pare. NOAPRETARMUYFUERTE. Mientras
estfi girfindolo, el se alzarfi par sf mismo en su posici6n.
E1 cmtucho rotnr_ aproMmadamente 1/9 de vuelta.
I
O Dele cotter el agua desde el dlspensador pot 3 mmutos
(aprox. ] ½ gahms) para aclarar el sistema y para
prevenir salpicadm'as.
O Presione la tecla RESET WATERFILTERen el dispensador
y inantg_ngala presionada durante tres segundos (en
algtmos modelos).
NOTA:Un cartucho de filtro de agua reci_n instalado
puede causar el agua de chorrear del dispensadm:
Tap6n de derivaci6n del filtro
Se debe usar el tap6n de deri;'aci6n del filtro cuando
tm cartucho de filtro de reemplazamiento no se puede
enconmm E1 dispensador y el dispositivo para hacer hielo
no pueden fimcionar sin el filtro o sin el mp6n de
deri\uci6n dd film:>.
Tap6nde_'€.,,_
derivaci6n _1
SmartWater Waterby Cu//igan
Para usar el tap6n de derix _ci6n del filtro en h)s modelos
Water by Culligan, primero debe quitar el adaptador del
filtro del soporte del cartucho girfindolo hacia la izquierda.
Si fiene preguntas, visite nuestro sifio web
ell ge.COlll,
o llame al 1.800.GE.(_AIIES (1.800.432.2737).
Filtrosde recambio:
Para pedk cartuchos adicionales en los Estados Unidos,
visite nuestrositio Web, ge.com, o Ilame a GEpara partes y
accesorios a1800.626.2002m
MWF
Precio sugerido de venta
al pfiblico $38.95-47.95 USD
Page 79

Losentrepa os y recipientesdel refrigerador, g .oo
No todos los modelos tienen todas las caracterfsticas.
Tapa
Recipiente del refrigerador
Recipiente de congelador
/
Recipiente inclinable
del congelador
Recipientes depuerta del refrigerador
y recipientes inclinables de puerta de congelador
Recipientes grandes
I,os recipientes de la puerta del refl_igemdor
y los recipientes inclinables de puella de
congelador m;_s grandes son ajustables.
Para extraerlos: I,exm_te la parte fl'ont;d
del recipiente hacia arfiba, luego le\';intelo
y S;kluelo.
I,a tapa deslizante ayuda a prevenir que tm
golpecito haga delTamai_e algo o qtle las
cosas pequefias guardadas en el interior
del entrepafio de la puerta se caigan o
resbalen. Ponga tm dedo en cada lado de
la mpa deslizante hacia la parte trasera y
nm&ala hacia delante y hada atMs para
que se ajuste a sus necesidades..
Para reemplazarlos o reubicarlos: Ajuste la
parte trasera del recipiente en los soportes
inoldeados de la puerta, iamgo presione
hada abajo ell la parte fl'ontnl del
redpiente, E1 redpiente se ajustai';1
ell Stl sitio.
Recipientes pequefios
Para extraerlos: i,evante la parte frontal del
recipiente hacia arriba, luego S;kluelo.
Para reemplazarlos: Sitfie el recipiente por
encinm de los soportes moldeados
rectangulares en la puerta, I,uego deslice el
recipiente hacia abajo hacia el soporte para
que se _!juste en su hlgaI:
No bloquee
PRECAUCION:
Enlosmodelos con
un vertedorde hielo
en el intenor de/
recipientesuperior
de la puertade/
congeiador,tenga
cuidadocuando
coloqueartfculos
en el recipiente.
Cerci6resede que
nlng@ ardcuio
bloqueeocaiga en
el vertedordehie&.
Presionela lengtqetayjale
haciadelantedelentrepafio
parasacarlo.
Entrepa#o deslizable a prueba de derramamientos
E1 entrepafio deslizable pemfite alcanzar
artfculos ouardados atrfis de otros. I,os
bordes especiales est;h_ diseflados para
ayudar a prexenir derramamientos o
goteos a los enti'epallOS que se enctlenti'an
m_is abajo.
Para sacarlos:
Deslice el ei_trepafio hacia tuei'a hasta que
llegue al pui_to donde se atranca, luego
apliete la lengfiet;_ hacia abajo y deslice el
entrepafio directamente hada flmm.
Para reemplazarlos o reubicarlos:
SitOe el entrepafio a la almra de las gufas
y deslfcelo hacia su luga_: E1 entrepafio
puede ser recolocado cuando la puerta est_
a 90 ° o mils. Para recolocar el entrepafio,
deslice el entrepaflo mils allfi de los topes y
dele tm fingulo hacia abajo. Deslice el
entrepaflo hacia abajo hasta llegar a la
posici6n deseada, col6quelo en lfnea con
los soportes y deslfcelo ell SUlugaI:
Aseg&ese de haber empujado los entrepafios
hasta el rondo antes de cerrar/a puerta.
79
Page 80

Losentrepa#osy recipientesdelrefrigerador.
No todos los modelos tienen todas las caractedsticas.
Entrepa#o QuickSpace TM (en a/gunos modelos)
Este entrepafio se divide en dos v la mitad En algunos modelos, este entrepafio no
se desliza deb_!jo de sf mismo para guardar puede usai_e en la posici6n mils b_!ja.
art/culos mu)' altos ubicados en el
entrepafio que se encuentra mils abajo.
Este entrepaflo se puede sacar y cambiar
v tambi_n puede reubicm_e igual que los
entrepafios deslizables a prueba de
delTalll aillientos,
Cestas de congelador
Para remover, deslfcelo hasta la posici6n
tope, levante el fl'ente mils allfi de la
posici6n de tope, y deslfcelo hacia aflmra.
Asegfirese de haber empujado /as cestas hasta
el fondo antes de cerrar /a puerta.
ij i! 2¸¸¸¸¸¸¸¸///
Entrepa#os deslizantes del congelador
Para remover, deslfcelo hasta la posi('i6n
tope, lexante el fl'ente mils allfi de la
posici6n de tope, ) deslfcelo hacia aflmra.
Asegdrese de haber empujado los entrepafios
hasta el fondo antes de cerraria puerta.
Entrepa#os fijos del congelador
Para remover, desli(e el entrepaflo hacia
arriba en el lado izquierdo ) entonces
extrfiigalo del alojamiento.
NOTA PARALOSMODELOSCON
DISPENSADORES:Para aprovechar al
mfi_mo la inclinaci6n para sacar el hielo
del cubo, solamente ahnacene artfculos en
el entrepafio deb_!jo del cubo de hielo que
no sean mils altos que el punto inferior en
el cubo.
8O
Page 81

Puertasde/refrigerador, ge.oo,,
)
Lapuerta se cerraM
automMicamente s61ocuando
est# parcialmente abierta.
M#s all# de la posici6n detope
de parada, la puerta permaneceM
abierta.
Puertas del refrigerador
Es posible que Ud. note una diferencia
entre el manejo de las puertas de su
antiguo y nuew) refl_igerador I_
caracterfsfica espedal de abertura v
cierre de las puertas asegura que estas
cierren por coil/pleto y peiiilanezcan
selladas fimmmente.
Cuando Ud. abre o cierre las puertas,
notar5 una posicidn de topedeparada.Si
la puerta es abierta mils all5 de este
punto, pemmnecer5 abierta
pemfitig_ndole asf de meter y sacar
alimentos del reffigerador con mils
fi_cilidad. I,a i)uerta se cerrar5
autolnfificalnente s61o cuando est_i
parcialmente abierta.
I,a resistencia que Ud. puede notar en
la posiddn de tope de parada es inenor
a medida que la puerta es ca_ga(la con
alim entos.
Alineacion de las puertas
Si las puertas no estSn niveladas, ajuste le
ILrsando una llave de cubo de 7/16",
gire el tornillo de ajuste de la puerta
hacia la derecha para elexar la
[)tlerta; ,gh'el° hacia la izquierda para
haceda descende_: (Un tap6n de
nvhm est5 enc_tjado en la rosca del
pin para impedir que el pin gire a
menos de que se use una llave.)
0 Despug_s de una o dos vueltas con la
llaxe abra v cierre la puerta de los
alimentos fl'escos y luego controle la
alineaci6n superior de las puertas.
ool
Page 82

Gavetasy cacero/as.
No todos los modelos fienen todas las caractedsficas.
Gavetas para /as frutas y los vegeta/es.
E1 exceso de agua que pueda acumu]arse
en el rondo de las gax'etas deben set
seca(l_ls.
Idl _ LO
° _
Gavetas con humedad ajustable
Deslice el control hasta llegar a la posici6n
HI (alto) para proporcionar el alto nivel de
humedad recomendado para la ma_ or_a
de los vegetales.
Deslice el control hasta llegar a la posid6n
tO (b:!io) para proporcionar el nivel de b:!ia
humedad recomendado pare la mayorfa
de las fl'utas.
Comosacar /asgavetas.
No todos los modelos fienen todas las caractedsficas.
Como sscBr JBs _SllCttas
Pueden extrae_e fiicilmente le'_ant_ndolas
lioeramente,_ _,j'alando de elias hasta pasar
el ptmto donde se atrancan.
Si no puede quitar las gavetas a causa de la
pue_ta, pfimero trate de sacar las bandejas
de la puerta. Si esto no proporciona el
espado necesafio, se necesitm5 hacer rodar
el reti'igerador hada adelante hasm que la
pue_ta se abra lo basmnte para deslizar las
gavems hasta quitaflas. En algtmos casos,
cuando se hace rodar el refl'igeradol;
hacia adelante se necesitar:_ mo\erlo el
refi_igerador hada la izquierda o derecha
al mismo tiempo.
82
Page 83

Eldispositivoautomaticopara hacer hielo, gecom
Un refrigerador reci_n instalado puede tardar hasta 12 a 24 horas antes de empezar a hacer hielo.
Dispositivo automfttico
para hacer hielo
E1 disp )sifi_o para hacer hielo producir_i
Interrupterde
alimentaci_n Dispositivo state ('ubos per cic[o--'aproxhn'adamente
para hacer hiel0 100-130 cubes en tin ciclo de 94 horas,
alimentaci6nverde
dependiendo de la temperamra ([el
congelado_; de la temperatura ambiente,
del nfimero de veces que se abra la puerta
y de otras condiciones del uso,
V&lse abajo cdmo lograr acceso
al hielo y c6mo alcanzm" el interruptor
en los modelos con dispensado_:
Si el retiigerador se usa antes de que se
haga la conexi6n de agua al (lispositivo
para hacer hielo, coloque el interruptor
de alimentaci6n el_ctrica en la posici6n
0 (apagado).
Cuando el refrigerador est_i conectado al
suministro de agua, coloque el inmrruptor
de alimentad6n el0ctrica en la posici6n
I (encendido).
E1 disposifi_o para hacer hielo se llenarfi
de aoua_ cuando la temperatura alcance el
ptmto de - [ 0 ° C (15 ° F). Un refl_igerador
redg_n instalado puede necesitar entre
12 y 24 horas para empezar a hacer hielo.
Escuchar;i un zumbido cada vez que la
mfiquina de hielos se llene de agua.
Deshaga las piimeras cmgas de cubes de
hielo para pemfitir que la lfnea de agua
se limpie.
_segfirese de que nada impide el
movimiento del braze demctoi:
Cuando el recipiente est:] lleno (al nivel
del brazo detector), el dispositivo para
hacer hielo no produdr_i hielo. Es nomml
que algtmos cubes salgan pegados.
Si no se usa hielo con fl'ecuencia, los cubes
de hielo viejos se opacan, adquieren un
s_lboI" I';lllCiO V se conti'ilen.
NOTA: Encasasque tenganunapresiSnde agua
menoral promedio, esposible queustedescuche/a
m#qulnadehie/oshacercic/ovar&s vecescuando
seencuentrehaciendohie/o.
Modelos sin entrepa#o
encima del cube de hielo
ParaIograraccesoalhieloopara
alcanzarelinterrupter:
o Levante el cube, entonces tfrelo
hacia afeera hasta que el cube
se detenga.
o Baje el cube para Iograr
acceso alhielo opara alcanzar
el flTterruptor.
NOT,!: Para aprovechar al mdximo
la flTclinacidn para sacar el hielo del
cube, solamente almacene artfculos
en el entrepafio debajo del cube de
hielo que no sean mils altos que el
punto fl#erior enel cube.
Come Iograr acceso al hielo y
come alcanzar el interrupter
en los modelos con dispensador
Modeloscon entrepafo
encima del cube de hielo
Hay dos tipos de cubes de almacenamiento
de hielo en los modelos con dispensador.
Uno tiene un entrepafio en('ima del cubo,
y el oti'o no lO tiene.
Nota especial acerca de los modelos
con dispensadorsin un entrepa#o encima
del cube dehielo:
?,!_Estos modelos de dispensadores tienen
un cube dispensador de hielo inclinable.
E1 cube puede ser inclinado hacia afllera
COll/Ose illtlesti';i ell las ilustraciones, y se
sostendr_i per si solo mientras usted
extrae hielo o mientras usted enciende
l; 2;2':;";d211l
1 _ be
dispensador de regreso a su posici6n
antes de cerrar la puerta.
_d:Paaca restaurax el lfivel de hielo a paactir
de ma envase vacio, los pasos siguientes
son recomendados:
O 19 horas despu_s de la primera partida
de hielo ha cafdo en el cube, dispensa
de 3 a 4 cubes de hielo.
ParaIograraccesoalhie&, tire
haciaadelante.
i
Paraalcanzarelinterrupter,t_re
delentrepafiodirectamentehacia
afuera.Siemprecercidresede
reemplazarel entrepafio.
Despu0s de 6 horas adicionales,
_4 ct/bos otI'a _,ez,
dispensa de. a 4
Estos pasos i'es[;itli'ai'fin Stl nivel de hielo
en la menor cantidad de tiempo.
83
Page 84

Eldispensadordeaguay dehie/o(ena/gunosmodelos),
Para usar el dispensador
Sele,doneCUREDICE_ <ubos dehielo), Dispenser Light
CRUSHEDICE _ (hielo t6turado) o WATER
(agua)._ _-_
Presione el _aso S/laSeillente conti'a el
brazo del dispensadm;
E1 recogedor no se vacfa solo. Para evitnr
las manchas de agua, el recogedor y la
pardlla se deberfin limpiar regulam/ente.
(Luzdel dispensador)
Esta tecla enciende y
apaga la luznoctuma
del dispensadm: i,a luz
tambi_n se enciende al
presionar el brazo del
LIGHT dispensador. Si esta
luz se tirade deberfa
i'eelllplazai3e con tlll}l
bombilla de tm mfiximo
de 6 w_tios 12V,
Sino haydlstn_)uci6ndeaguacuandoel refngerador
est_pn?neramenteinsta/ado,hayposibilidad dea/re
enel sistemade/a l[neade agua.OpnYnaelbrazo
de/dlspensadorduranteal menDsdosml);utospara Ouick lee (Hie/o rapido) (en algunos modelos)
ehYnl);arel ake atrapado de/a l[nea deagua y//enar
el s/sterna.ParaeflYmnar/as lYnpurezasde/a lfnea de @
PRECAUClON:No l);troduzcanuncalos dedosni
otrosobjetosen /aapertura de/dispensadorde .......................................................
hieio trlturado. QUICK ICE producci6n de hielo
durante las pr6Mmas 48
Para bloquear el dispensador ho_-.so hasta que vuelva
Presione la tecla LOCKCONTROL(control a presionar la tecla.
de bl,,que,,) durante DoorAlarm (Alarmade puerta)
3 segundos para (erra_ ...........
@ Pare ajustar la alarum,
LOCKCONTROL
HOLD3 SECS
el dispensador y el
panel de control.
Para desbloqueado,
presione la misma tecla
din'ante 3 segundos
nuevanlente.
f
DOOR ALARM
Cuando necesite hielo
rfipidamente, presione
esta tecla para acelerar
la producci6n de hielo.
Esto incrementarfi la
presione estn tecla hasta
que la luz indicadora se
encienda. Esta alarum
sonarfi si cualquiera
de la puerta estuviera
abierta pot mils de
3 minutos. I_ luz v
el sonido cesan
a tltOIll_/ticaI//ente
al cerrm_e la puerta.
Dates importantes de su dispensador
_: No agregue hielo de charolas o de bolsas
en el recipiente. Podrfa prow)car que
no salga bien o que no se tlJture
adecuadamente.
?_: Evite los wasos demasiado llenos de hielo
v el uso de \:_sos estrechos o demasiado
altos. E1 hielo amontonado podrfa
obstruir el orifido o hacer que se congele
la puerta del orifico de inanera que no
se pueda al)_i_: Si hubiera hielo
bhxluefindoh_, desprenda con tma
cuchara de madem.
_: I_s bebidas y los alimentos no se debeMn
enfliar rfipidamente en el recipiente del
hielo. I_s latas, botellas o paquetes de
comida en el recipiente de hielos podrfan
causar la obstrucci6n del dispositivo pare
hacer hielo o del recipiente.
?_:Para evitar que el hielo dispensado caiga
fimra del vaso, ponga el vaso cerca, pero
sin tocm; la apertm'a del dispensadm:
_: Un poco de hielo tritumdo puede sin*it
atulque habfa seleccionado CUBEDICE
(cubos de hielo). Esto sucede en
ocasiones Ctlando alg/lnos ctlbos se
canalizan en el tritm'ador.
::Ji::Despug_s de usar hielo trimrado, tm poco
de agua puede gotear del vertedero.
::Ji::A veces, se tbnnai'_i un pequeflo inont6n
de nieve en la salida del hielo simada en
la puerta. Esto es nomml y, pot regla
general, sucede cuando ha dispensado
hielo picado repetidamente, i_a nieve se
e\_q)orarfi pot sf misma.
84
Page 85

ge.com
Modelos sin entrepafio
encima del cube de hielo
Pararemover:
Levante el CUlJOelTtOlTOes t[re]o
178Ol8afuera hasta que et CUl)O
se aerenga.
Levante _ tlre tTaclaadelante
otra vezpara remover el cube.
Remover y reemplazar el cube
de almacenamiento de hielo
en los modelos con dispensador
Hay dos tipos de cubes de almacenamiento
de hielo en los modelos con dispensador.
IUno tiene un entrepafio encinla del cube,
y el otto no lo tiene.
Sienlpre coloque el interrupter de la
mfiquina de hielos en la posici6n 0 (apagade)
antes de remover el cube de hielo.
Cuandose disponga a reemplazar cualquier
de lostipos de cubes dehielo:
Siempre cercidrese de presionarlo
_ililleillente en stl lu_u: Si no ellU'a hasta
el mfiximo, remu&alo
y rote el mecanismo de
accionai//iento (])ii final
vuelta de ]/4, Entonces
empt!je el ctfl)o hacia
atrfis otra vez.
Modelos con entrepafio
encima del cube de hielo
Pararemover:
77redol cube direetamente haeia
___.._ afuera, entonces lev#ntelo m#s all#
de la posici6n de descanso.
Mecanismode accionamiento
Cuidadoylimpiezade/refrigerador.
Area de goteo del dispensador
timpiar el exterior
E/pozo de/dispensador (en algunos
modelos), per deb@) de la parrilla, se debe
mantener limpio } sect). El agua que se
queda en el pozo puede dejar dep6sitos.
Quite los dep6sitos agregando vinagre sin
diluir al pozo. Remoje basra que
desaparezcan los deptsitos o hasta que se
desprendan 1o sufidente para quimrlos.
Elbraze de/dispensader (en algunos
modelos). Antes de limpia_; optima y
detenga la tecla LOCKCONTROL(control de
bloqueo) durante 3 segundos. Se limpia con
una soluddn de agua tibia y bicarbonate de
sodio - aproximadalnente una cuchanlda
(l 5 ml) de bicarbonate de sodio per cada
cuarto (l litro) de agua. Eqjuague
con/pletamente Coil agua y seque.
Las manijas de la puerta glos omamentes.
Se limpian coil un patio humededdo con
una solucidn de detergente suave y agua.
Seque coil 1111patio suave.
Mantenga limpio el terminado. IJmpie con
ml patio limpio ligeramente humede(ido
con cel'il para aparatos de cocina o [in
detergente suave y agua. Seque y pula
con un patio limpio y suave.
No IInTploel rofn)orador con unpatiosuc/opara
trastesni conun patio h#medo.Estospodffandejar
residuesqueafectena/a plntura. Nouse estropajos,
/knpladoresen po/vo,b/anqueadoresni/knpladores
quecontenganb/anqueador,ya queestosproductos
podrfanrayar ydesprenderel termlnadodeplntura.
Limpiar el interior
Para evitar olores, deje una c_!ja abierta de
bicarbonate de so(rio en los compartimientos
de alimentos fl'escos v del congelado_:
Desconecte el refrigerador antes de limpiarlo.
Si no filera posible, exprima el excesi/de
humedad de la espoqia o del patio cuando
se limpie ah'ededor de botones, bombillas
o controles.
Use agua caliente y una solud6n de
bicarbonate de sodio - aproximadamente
una cucharada (l 5 ml) de bicarbonate de
sodio per cada cuarto (l litro) de agua.
Esta solud6n limpia y neutraliza oh)res.
Eqjuague y seque.
El use de cualquier soluci6n de limpieza que
no sea la recomendada, especialmente
aquella que contienen destilados del petr61ee,
pueden agrietar o da_ar el interior del
refrigerader.
Ewtelimpiar losentrepatiosde wdrio (enalgunos
mode/os)fifes con aguacaliente, yaque /a extrema
dfferenc& de temperaturapuedehacerque se
quiebren.Maneje los entrepatiosde w_lriocon
cuidado.Chocarvidrio temp/adopuedehacerque
setempeenpedazos.
No/ave partes p/#sticas de/refngerador en
el iavaplatos. 85
Page 86

Cuidadoy limpiezade/refrigerador.
Arras de/refrigerador
Se deber_ tenet cuidado al retirar el
reti-igerador de la pared. Todos los tipos de
recubrinfiento de pisos se pueden dafia_,
sobre todo los recubfimientos acojina(los
v los que tienen superficies repujadas.
Jale el refl_igerador en fimna recta y
empt{je nHewllllente para devolverlo a
su posid6n. Mover el refrigerador en
direcci6n lateral puede causar dafios al
recubrimiento del piso o al refl_igerado_;
AI empujarelrefwerador a sulugar,aseg&esede
nopasar sobreel cabie eibctriconi sobre/a ifneade
ahrnentaci6nde/dlsposifivo para hacerhie/os{en
algunosmodelos).
Preparacion para vacaciones
En el caso de ;'a(-aciones o atlsencias
prolongadas, quite los alimentos v
desenchufe el refl_Jgera(lo_: i,impie el
interior con soluci6n de bicarbonato de
tma cucharada (l 5 ml) de bicarbonato pot
tm cuarto (l litro) de agua. Deje abiertas
las puertas.
Coloque el interruptor de alimentaci6n
el_ctrica del disposifiw) automfitico para
hacer hielo en la posici6n 0 (apagado)y
derre el suministro de agua al reti_Jgeradm:
Si la temperatura pueda llegar al ptmto de
congelacidn, haya tma persona calificada
para desaguar el sistema del smninistro de
agua (en algtmos modelos) para evitar
daflos a la propiedad causados pot
inm_da('i6n.
En caso de mudanza
_&segm'e to(los los elementos sueltos
como entrepaflos y recipientes pegfindolos
con cinta adhesi\_ en su lugar para evitar
dal-los.
/_d (lS[li (lil[l carretilla p[li';i illOVei" el
refl_igeradm; no haga descansar la parte
frontal o trasera del reli_igerador contra la
carretilla. Esto podrfa daflar el refi_igeradm:
Man_jelo s61o desde los laterales del
refl_igera(lo_:
Aseg&ese dequeel refrigerador socoloque
enposicibn verticaldurante /a mudanza.
86
Page 87

Reemplazode bombillas, g .oo
El colocar el control en posicidn 0 no quita la corriente del circuito de la luz.
--_______ Compartimento del refrigerador--Luz superior.
Desenchufe el refligeradox:
I,as ])ombillas estfin situadas en la parte
superior del compartimento, dentro de
la cubiertn de la luz. Remueva el tornillo
del fl'ente del protector superiox:
Para quitnr la cubierta de la luz,
presione las lengfietns de los lados de
la cubiertn v deslfcelo hacia delante v
hacia atr_is.
@
Despug_s de reemplazar la bombilla con
otra bombilla de electrodomg_sticos del
IIliSlIlO 0 iilenos v_ltios_ reemplace el
protector de luz v el tornillo. _M
reemplazar la cui)iertn de la luz,
asegfirese de que las lengfietas de la
parte trasera de la cubiertn quepan en
las ranm'as de la parte trasera del
emplazamiento de la cubierta de la luz.
Vuel\:_ a enchufiu" el refligerador a la
coFiJente.
Compartimento del refrigerador--Luz inferior.
Estaiuzestfi situada por enclmade/a
gaveta superior
0 Desenchttfe el refl_igerado_:
I,evante la cubierta de la luz yjale
de ella.
electrodom_sticos del mismo volt,lie
o interim', reemplace la cubierta v
el mango.
Vuel\_ a enchtffhr el refl_gerador a
la corfiente.
Despug_s de reemplazar la
bombilla con tma bombilla de
Compartimento del congelador
Desenchute el refiigeradm:
Retire el entrei)afio.iusto pro" encima
de la cubiertn de luz. (El entrepafio
serfi mils filcil de quitnr si se vacfa
pfimero.) Remueva los tornillos de la
parte superior del protector superior:
Para (ltfitnr la cubiertn, presione en los
lados v levfintela hacia arfiba v afllera.
Reemplace la bombilla con tma
bombilla de electrodom_sticos del
mismo \'olt;lje o inferior, y reinstale
la cubierta de la luz. A1 reinstalar la
cubierta de la luz, aseg6rese de que
las lengfietas superiores hacen clic
en su lugar de torma segm'a. Vuelva
a colocar el tornillo (en algtmos
modelos).
Vuelva a instalar el entrepafio y
enchtffe el refl'igerador de nuew).
Dispensador
Desenchttfe el refligeradot:
I_ bombilla estfi situada en el
dispensador b_!jo el panel de control.
Quite la bombilla girfindola en sentido
contmfio a las agtfias del reloj.
Cambie la bombilla pro" tma bombilla
del mismo tamafio ) xoltaie.
Vuelxa a enchtflhr el refrigerador a
la corriente.
87
Page 88

Instrucciones para
la Instalacion
Refrigerador
Modelos 25 y 27
ZPreguntas? Llame al 800.GE.CARES (800.432.2737) o bien Visite nuestra pagina Web: ge.com I
ANTES DE COMENZAR
Lea estas instrucciones completamente y
cuidadosamente.
• IMPORTANTE - Guardeestas
instrucciones para que su inspector local
las use.
• IMPORTANTE - Observetodos
los c6digos y ordenanzas aplicables.
• Nota al instalador - Cerci6rese de dejar
estas instrucciones con el consumidor,
• Nota al consumidor - Guarde estas
instrucciones para referencia futura.
• Nivel de habilidades- La instalaci6n de
este electrodomestico requiere habilidades
mecanicas basicas.
• "riempo de complexion - La instalaci6n
del refrigerador
requiere 30
minutos.
- La instalaci6n de
la linea de agua
requiere 30
minutos.
• La instalaci6n apropiada es
responsabilidad del instalador.
• Cualquier fallo del producto causada
por una instalaci6n inapropiada no se
consideraba cubierto por esta garantia.
Si el refrigerador ya ha sido instalado,
remueva la parrilla base (Ver el Paso 2 en
Como mover el Refrigerador), entonces pase
al Paso 5 en Como instalar el Refrigerador,
PREPARACION
SUMINISTRO DE AGUA HACIA LA
MAQUINA DE HIELOS
Si el refrigerador tiene una maquina de
hielos, la misma estara conectada a una
linea de agua fria. Un kit de suministro de
GE (que contiene una tuberia, una valvula
de cierre, accesorios e instrucciones) esta
disponible a un costo adicional en su
distribuidor, o visitando nuestro sitio a
ge.com o en nuestro Departamento de Partes
y Accesorios, Ilamando al 800.626.2002.
HERRAMIENTAS QUE USTED
NECESITARA
Cubos de 3/8" y 5/16" Llaves de 1/2" y 7/16"
Cuchilla plastica de masilla
Destornillador Phillips
88
Page 89

Instrucciones para la instalacion
COMO MOVER EL REFRIGERADOR
[] COMO CARGAR EL
REFRIGERADOR EN UNA
CARRETILLA DE MANO
Deje toda la cinta adhesiva y las
almohadillas hasta que el refrigerador
Ilegue a su destino final.
Para mover el refrigerador use una
carretilla de mano con almohadillas.
Coloque el refrigerador en el centro de la
carretilla y asegt3relo con un cintur6n de
seguridad alrededor del refrigerador. NO
LA APRIETE DEMASlADO.
[] REMUEVA LA BASE DE LA
PARRILLA
Remueva la parrilla removiendo los dos
tornillos de cabeza Phillips.
Si el refrigerador debe pasar por
alguna entrada menor de 38" de
ancho, entonces las puertas pueden
ser removidas. Proceda al paso 3.
NO REMUEVA las manijas.
Si todas las entradas son mas
anchas de 38" pase a Como instalar
el refrigerador.
[] DESCONECTE EL ACOPLAMIENTO
DE AGUA (en algunos modelos)
Si el refrigerador tiene un dispensador
de agua, eso significa que hay una linea
de agua que viene desde el gabinete
hacia la bisagra del fondo de la puerta del
congelador que debe ser desconectada.
Para desconectarla, empuje hacia adentro
sobre el collarin blanco del acoplamiento
y entonces extraiga la tuberia.
Collarin blanco
Bisagra del
fondo del
congelador
89
Page 90

Instrucciones para la instalacion
COMO MOVER EL REFRIGERADOR (CONT.)
[] DESCONECTE EL ACOPLAMIENTO
ENERGI_TICO (en algunos
modelos)
Si el refrigerador tiene un dispensador
de agua, entonces hay una linea de
suministro electrico (alambrado) que
va desde el gabinete hacia la bisagra
del fondo de la puerta que debe ser
desconectado.
Para desconectar, separe el acoplador.
[] DESCONECTE LOS
CONECTADORES ELI_CTRICOS
(en algunos modelos)
Si el refrigerador tiene un centro para
refrescar, entonces hay conectadores
electricos (alambrados), que van desde
el gabinete hasta la bisagra del fondo
del refrigerador, que deben ser
desconectados.
Para desconectar, separe cada conectador.
Bisagra del
fondo del
refrigerador
[] CIERRE LAS PUERTAS DEL
CONGELADOR Y DEL
REFRIGERADOR
[]
[]
REMUEVA LA PUERTA DEL
CONGELADOR
Remueva la cubierta de la bisagra de
la puerta del congelador apretandola y
levantandola o simplemente levantandola
por uno de sus costados con una cuchilla
plastica de masilla.
[] Remueva los dos tornillos a la cabeza
hexagonal de 5/16," entonces levante la
bisagra hacia arriba para liberarla del
pasador de la bisagra.
Cabeza hexagonal de 5/16"
[] Abra la puerta del congelador a 90. °
90
90 °
Page 91

Instrucciones para la instalaci6n
[]
[]
REMUEVA LA PUERTA DEL
CONGELADOR (cont.)
Mientras una persona levanta lentamente
la puerta del congelador y la libera de la
bisagra del fondo, una segunda persona
debe, con cuidado, guiar la linea de agua
y la linea energetica (alambrado) a traves
de la bisagra del fondo.
[] Coloque la puerta en una superficie
donde no se ralle con la parte interna
hacia arriba.
[]
[]
REMUEVA LA PUERTA DEL
REFRIGERADOR
Remueva la cubierta de la bisagra de
la puerta del refrigerador apretandola y
levantandola o levantandola por uno de
sus costados con una cuchilla plastica de
masilla.
[] REMUEVA LA PUERTA DEL
REFRIGERADOR (cont.)
[] Remueva los dos tornillos de cabeza
hexagonal de 5/16", entonces levante la
bisagra hacia arriba para liberarla del
pasador de la bisagra.
Cabeza hexagonal de 5/16"
[] Abra la puerta del refrigerador a 90. °
90 °
91
Page 92

Instrucciones para la instalaci6n
COMO MOVER EL REFRIGERADOR (CONT.)
[]
[]
REMUEVA LA PUERTA DEL
REFRIGERADOR (cont.)
Levante la puerta del refrigerador y
liberela de bisagra del fondo.
Si el refrigerador tiene un centro para
refrescar, una persona levanta lentamente
la puerta del congelador y la libera de la
bisagra del fondo, mientras una segunda
persona, con cuidado, guia la linea de
agua y la linea energetica (alambrados)
a traves de la bisagra del fondo.
90°
Modelos con Centro para Refrescar solamente
[] Coloque la puerta en una superficie
donde no se ralle con la parte interna
hacia arriba.
[] COMO REEMPLAZAR LAS
PUERTAS
Para reemplazar las puertas simplemente
de reversa a los pasos del 3 al 8.
Sin embargo, note Io siguiente:
• Cuando se encuentre bajando las
puertas hacia la bisagra del fondo,
cerci6rese de que una segunda persona
guie, con mucho cuidado, la tuberia y el
alambrado a traves de los agujeros de
las bisagras.
• Cuando se encuentre conectando la
linea de agua, cerci6rese de insertar la
tuberia hasta el maximo indicado por la
marca.
L__.
Marca
No pellizque la tuberia o el alambrado
mientras se encuentre remplazando las
puertas en las bisagras del fondo.
Cuando se encuentre conectando
la linea energetica, (en los modelos
con centro para refrescar solamente),
cerci6rese de que los conectadores
estan todos asentados juntos.
92
Page 93

Instrucciones para la instalaci6n
COMO INSTALAR EL REFRIGERADOR
LOCALIZACION DEL
REFRIGERADOR
• No coloque el refrigerador donde la
temperatura este por debajo de 60 ° F
(16 ° C) porque no operara con la suficiente
frecuencia como para mantener las
temperaturas apropiadas.
• No instale el refrigerador donde la
temperatura este por encima de 100 ° F
(37 ° C) porque no funcionara
apropiadamente.
• Instalelo en un piso suficientemente
resistente como para soportar todo
su peso.
ESPACIO
Permita los siguientes espacios para
Iograr una instalaci6n facil, una circulaci6n
apropiada del aire y conexiones electricas
y de plomeria.
Lados 1/8" (4 mm)
Superior 1" (25 mm)
Posterior 1" (25 mm)
93
Page 94

Instrucciones para la instalaci6n
COMO INSTALAR EL REFRIGERADOR (CONT.)
[]
[]
[]
COIVIO CONECTAR EL
REFRIGERADOR A LA LJNEA DE
AGUA DE LA CASA
(en los modelos con mfiquina de
hielos y dispensador)
Se requiere un suministro de agua
fria para la operaci6n de la maquina de
hielos y el dispensador. Si no existe un
suministro de agua fria, usted necesitara
hacer una. Ver la secci6n CSmo instalar
una I[nea de agua fr[a.
NOTAS:
Antes de hacer la conexi6n, cerci6rese
de que el cable electrico del refrigerador
no estd conectado al interruptor de la
pared.
Si el refrigerador no tiene un filtro de
agua, recomendamos que instale uno
si su suministro de agua tiene arena o
particulas que pudieran obstruir la
pantalla de la valvula de agua del
refrigerador. Instalelo en la Iinea de
agua cerca del refrigerador. Si usted
esta usando un kit de tuberia de
refrigeraci6n GE SmartConnect TM,
usted necesitara una tuberia adicional
(WX08X10002) para conectar el filtro.
No use tuberias plasticas para instalar
el filtro.
Si usted estfi usando tuberia de cobre,
coloque una tuerca de compresi6n y un
casquillo (manga) en el extremo de la
tuberia que viene del suministro de agua
fria de la casa.
Si se encuentra usando tuberias de GE
SmartConnect TM, las tuercas estan ya
ensambladas a la tuberia.
Si estfi usando una tuberia de cobre,
inserte el extremo de la tuberia en la
conexi6n del refrigerador, en la parte
posterior del refrigerador, hasta donde
sea posible. Mientras sostiene la tuberia,
apriete el accesorio.
Si se encuentra usando tuberias de GE
SmartConnect TM, inserte el extremo
moldeado de la tuberia en la conexi6n del
refrigerador en la parte posterior del
refrigerador, y apriete la tuerca de
compresi6n hasta que este apretada a
mano. Entonces apriete una vuelta
adicional con una Ilave. Si la aprieta
demasiado causara fugas.
94
[] Apriete la tuberia en la abrazadera
proporcionada para sostenerla en su
posicion. Es posible que usted necesite
levantar la abrazadera haciendo palanca.
Abrazadera
de latuberia Tuberia de 1/4"
Tuerca de
compresi6n
de 1/4"
Ferula
(manga))
Conexi6n del
refrigerador
Tuberia SmartConnect TM
[] ACTIVE LA CONEXION DE AGUA
Haga pasar la corriente de agua en la
vfilvula de cierre (el suministro de agua
de la casa) e inspeccione en busca de
fugas.
[] CONECTE EL REFRIGERADOR
Antes del conectar el refrigerador
cerci6rese de que el interruptor de la
mfiquina de hielos estfi colocada en la
posici6n 0 (apagado).
Ver la informaci6n adjunta sobre la
conexi6n a tierra del cable electrico.
Page 95

Instrucciones para la instalaci6n
[] COLOQUE EL REFRIGERADOR EN
SU LUGAR
Mueva el refrigerador a su destino final.
[] COMO NIVELAR EL
REFRIGERADOR
El refrigerador puede nivelarse ajustando
los rodillos Iocalizados cerca de las
bisagras inferiores.
Levante
Los rodillos tienen tres propositos:
• Los rodillos se ajustan para que la
puerta cierre con facilidad cuando
este medio abierta. (Levante el frente
aproximadamente 5/8" [16 mm]
del piso.)
• Los rodillos se ajustan para que el
refrigerador este colocado firmemente
en el piso y no tambalee.
• Los rodillos se ajustan para que el
refrigerador pueda ser alejado de la
pared en momentos de limpieza.
Para ajustar los rodillos:
• Gire los tornillos de S ___
ajuste del rodillo en
sentido de las agujas
del reloj para
levantar el
refrigerador, yen
contra de las agujas
del reloj para bajarlo.
Use una Ilave o un
cubo de cabeza
hexagonal de 3/8" o Tornillo de ajuste del
una Ilave ajustable, rodillo
[] NIVELES LAS PUERTAS
[]
[]
Ajuste la puerta del refrigerador para que las
puertas esten niveladas en la parte superior.
Para linear:
Usando una Ilave de 7/16", gire el tornillo
ajustable de la puerta hacia la derecha para
levantar la puerta, y a la izquierda para bajarla.
NOTA:
Un tap6n de nilon, empotrado en las roscas
del pasador, evita que el pasador gire a no ser
que se use una Ilave.
Despues de una o dos vueltas de la Ilave, abra
y cierre la puerta del refrigerador y cerciorese
de que estan alineadas en la parte superior.
Las puertas deben estar alineadas
en la parte superior
!
95
Page 96

Instrucciones para la instalaci6n
COMO INSTALAR EL REFRIGERADOR (CONT.)
[] REEMPLACE LA PARRILLA DE LA
BASE
Reemplace la parrilla de la base
instalando los dos tornillos de cabeza
Phillips.
[] AJUSTE LOS CONTROLES
Ajuste los controles donde se
recomienda.
[] INICIE LA IVIAQUlNA DE HIELOS
Fije el interruptor de la maquina de hielos
en la posici6n I (encendido). La maquina
de hielos no empezara a operar hasta que
alcance su temperatura de operaci6n de
15° F (-9 ° C) o menor. Luego, empezara a
operar automaticamente. Sera necesario de
2 a 3 dias para que se Ilene el cubo de hielo.
InterruptOr__
II
NOTA:
En condiciones de menor presi6n
del agua, la valvula de agua puede
encenderse hasta 3 veces para
suministrar suficiente agua a la
maquina de hielos.
5 5
[.EOOMME.OEOCO.T.O'SE ..OS]
0 *FIS RECOMMENDED 37 *F IS RECOMMENDED
96
Page 97

Instrucciones para la instalaci6n
COMO INSTALAR LA LJNEA DE AGUA
(EN IVIODELOS CON MAQUINA DE HIELOS Y DISPENSADOR)
ANTES DE COMENZAR
Recomendamos el uso del kit de suministro de agua
de tuberia de cobre WX8X2, WX8X3, o WX8X4,
dependiendo de la cantidad de tuberia que sea
necesaria. Las lineas de tuberia de refrigeradores
plasticas aprobadas por GE SmartConnect TM
(WXO8XIO002, WXO8XIO006, WXO8X10015, y
WXO8X10025).
Cuando se encuentre conectado el refrigerador a un
Sistema de Osmosis de agua reverso de GE, el _nico
kit de instalaci6n aprobado es el RVKit. Para otros
sistemas de osmosis de agua reversos, siga las
instrucciones en el manual del fabricante.
Si el suministro de agua del refrigerador es de un
Sistema de Filtracion de Osmosis de Agua Reverso Y
el refrigerador tambien tiene un filtro de agua, use el
tap6n de bypass del filtraciSn. Usar el cartucho de
filtraci6n de agua del refrigerador ademas del filtro
RO podria resultar en la formaci6n de cubos de hielo
huecos yen un flujo de agua mas lento a partir del
dispensador de agua.
Esta instalaci6n de la linea de agua no esta
garantizada por el fabricante del refrigerador o
de la maquina de hielos. Siga estas instrucciones
cuidadosamente para minimizar el riesgo de dahos
causados por el agua que puedan ser costosos.
Martilleo de agua (agua golpeando en las tuberias)
en la plomeria de la casa podria dahar las partes
del refrigerador y traer consigo fugas de agua e
inundaci6n. Llame a un plomero calificado para que
corrija este problema de martilleo antes de instalar la
linea de suministro de agua hacia el refrigerador.
Para evitar quemaduras y dahos al producto, no
conecte la linea de agua fria con la linea de agua
caliente.
Si usted usa su refrigerador antes de conectar la
linea de agua, cerciSrese de que el interruptor de la
maquina de hielos esta en la posici6n 0 (Off).
No instale la tuberia de la maquina de hielos en
areas donde la temperatura baja por debajo de la
temperatura de congelamiento.
Cuando use cualquier dispositivo electrico (como
una taladradora, por ejemplo), durante la instalaci6n,
cerci6rese de que tal disposkivo este aislado
doblemente o conectado a tierra de forma tal
que se evite el peligro de electrocuci6n, u operado
por bateria.
Todas las instalaciones deben ser hechas de acuerdo
con los c6digos y requiskos locales e plomeria.
LO QUE USTED NECESITARA
J
', El kit de cobre o de tuberia de refrigeracion
o GE SmartConnect TM, de 1/4" de diametro
para conectar el suministro de agua al
refrigerador. Si se encuentra usando un kit
de tuberias de cobre, cerci6rese de que
ambos extremos de la tuberia son
cuadrados.
Para determinar cuanta tuberia necesitara:
mida la distancia desde la valvula de agua
hasta la parte posterior del refrigerador hasta
el tubo de suministro de agua. Entonces
agregue 2,4 m (8'). Cerci6rese de que existe
suficiente tuberia adicional (entre 2,4 m [8']
embobinada en 3 vueltas de
aproximadamente 25 cm [10"] de diametro)
para permitir el movimiento a partir de la
pared.
Los kits GE SmartConnect TMde tuberia de
refrigerador estan disponibles en las
longitudes siguientes:
2' (0,6 m) - WXO8XIO002
6'(1,8 m) -WXO8XIO006
15' (4,6 m) - WXO8X10015
25' (7,6 m) - WXO8X10025
Cerciorese de que el kit que usted
seleccione tenga por Io menos 2,4 m (8'),
como describimos anteriormente.
97
Page 98

Instrucciones para la instalaci6n
COMO INSTALAR LA LJNEA DE AGUA (CONT.]
LO QUE USTED NECESITARA (CONT.)
NOTA: La unica tubaria plastica aprobada por GEas
Jaqua proporcionamoscon el Kit SmartConnect TM para
refrigeradores.No use ninguna otra tuberia plastica
para el suministro porque la linea astara bajo presi6n
en todo momento. Ciertostipos detuberias plasticasse
romparan y aJpasar el tiempo desarroJlaran grietas y el
agua podria causarda_osa la casa.
= Un kit de suministro de agua GE (contienetuberia,
valvula de cierre y el accesorio mostrado mas adelante)
esta disponiNe a un costo adicional si se pone en
contacto con su distribuidor o con Partes y Accesorios
llamandonos al 800.626.2002 (en Canada
1.888.261.3055).
= Unsuministro de agua caliente.Lapresi6n del agua debe
serdeentre 20y 120p.s.i.(1,4-8,1bar).
• Taladradoraalectrica
• Llave ajustable o llave de 1/2".
• DestornilJadorespianos y Phillips.
%
. Dos tuercas de compresionde diametro externo de
1/4" y 2 casquilJos--paraconectar la tuberia de cobre
a la valvula de cierre y a la vaJvula de agua del
refrigerador.
O
• Si se encuentra usando un kit SmartConnect TMde GE,
los accesorios necesarios estan preensamblados con la
tuberia.
• Si su linea de agua de cobra existente es ensanchada
en el extremo, usted necesitara un adaptador
(disponible en las tiendas de plomeria) o conecte la
linea de agua con el refrigerador Ousted puede cortar
la parte ensanchada del extremo del tubo con un
cortador de tubos y entonces usar un accesorio de
compresi6n. No corte un extremo formado por GE
SmartConnectTMde la tuberia del refrigerador.
• VaJvuJade cierre para conectar la lineade agua fria.
La valvula de cierre debe tener una entrada de agua
con un diametro internominimo de5/32"en el punto de
conexion a la LJNEADE AGUA FRiA. WJvulas de cierre
tipo corona estan incluidasen muchos kits de suministro
de agua. Antes de comprar, cerci6rese de que la valvula
tipo corona cumple con los c6digos de plomerJadesu
localidad.
Instale la valvula de cierre en la linea de agua
de tomar mas cercana
[] CIERRE EL SUMINISTRO DE
AGUA PRINCIPAL
Abra el grifo mas cercano Io suficiente
como para aclarar la linea de agua.
[] ESCOJA LA LOCALIZACION DE
LA VALVU LA
Escoja una Iocalizacion para la valvula
de facil acceso. Es mejor conectarla a un
costado de una tuberia vertical. Cuando
sea necesario conectarlo en una linea
horizontal, cerci6rese de que la conexi6n
sea hecha en la parte superior o en el
lado, en vez del fondo, para evitar la
acumulaci6n de sedimentos de la linea
de agua.
[] TALADRE UN AGUJERO PARA LA
VALVULA
Taladre un agujero de 1/4" en la tuberia
de agua (aun siesta usando una valvula
autoperforadora), usando una broca filosa.
Remueva cualquier rebaba que haya
resultado del taladrado del agujero
en la tuberia.
Tenga cuidado de no permitir que el agua
drene hacia el agujero.
No hacer un agujero de 1/4" podria resultar
en una producci6n de agua reducida o en
cubos de hielo menores.
98
Page 99

Instrucciones para la instalaci6n
[] APRIETE LA VALVULA DE CIERRE
Apriete la valvula de cierre a la tuberia de
agua fria con una abrazadera de tubo.
Abrazadera de tubo
Valvula de cierre de agua fda
tipo corona vertical
NOTA: Los c6digos de plomeria del estado
de Massachusetts 248CMR deben ser
obedecidos. Las valvulas de corona son
ilegales y su uso no es permitido en
Massachusetts. P6ngase en contacto
con un plomero licenciado.
[] APRIETE LA ABRAZADERA DE
TUBO
Apriete los tornillos de la abrazadera hasta
que la arandela de sello comience a
ensancharse.
NOTA: No la apriete demasiado o podria
romper la tuberia.
Arandela
Abrazadera
de Extremo de
Tornillo de r •
la
[] COIVIO ORIENTAR LA TUBERJA
Oriente la tuberia entre la linea de agua fria
y el refrigerador.
Oriente la tuberia a traves de un agujero
taladrado en la pared on en el piso (detras
del refrigerador o en la base de una
gabinete adyacente) tan cercano a la
pared como sea posible.
NOTA: Cerci6rese que existe tuberia
suficiente tuberia (entre 2,4 m [8']
embobinada en 3 vueltas de aprox. 25 cm
[10"] de diametro) para permitir que el
refrigerador se mueva de la pared despues
de la instalaci6n.
[] COIVIO CONECTAR LA TUBERIA A
LA VALVULA
Coloque la tuerca de compresi6n y el
casquillo para tuberia de cobre en el extremo
de la tuberia y conectela con la valvula cierre.
Cerciorese de que la tuberia esta insertada
completamente en la valvula. Apriete la
tuerca de compresi6n con seguridad.
Para tuberias plasticas de un kit de tuberia
para refrigeradores SmartConnect T"GE,
inserte el extremo moldeado de la tuberia en
una valvula de cierre y apriete la tuerca de
compresion hasta que quede apretada a
mano, entonces aprietela una vuelta adicional
con la Ilave. Si la aprieta demasiado, causara
fugas.
Valvula de cierre
tipo corona
Tuerca de cruz
Tuerca de compresion
_1 / Tuberia
_ SmartConnect TM
Valvula de salida Casquillo (manga)
NOTA: Los cddigos de plomeria del estado
de Massachusetts 248CMR deben ser
obedecidos. Las valvulas de corona son
ilegales y su uso no es permitido en
Massachusetts. P6ngase en contacto
con un plomero licenciado.
[] ENJUAGUE LA TUBERJA
Abra el suministro principal de agua y
enjuague la tuberia hasta que el agua este
totalmente limpia.
Cierre el suministro de agua en la valvula de
agua cuando aproximadamente un cuarto
(1 litro) haya salido a traves de la tuberia
durante el enjuague.
99
I Para completar la instalaci6n del refrigerador, I
regrese al Paso 1 en Como instalar el refrigerador.
Page 100

Sonidosnormalesde operacion.
Los refrigeradores m#s nuevos proclucen sonidos diferentes a
los modelos m#s antiguos. Los refrigeradores modemos tienen
m#s funciones y usan tecnologfa m#s reciente.
Usted escucha Io que yo escucho ?Estos sonidos son normales.
HMMMM...
-- WHOOSH....
• E1 nuew) compresor de alta eficiencia puede
flmcionar re;is r;ipido y durar re;is que el de su
refligerador anterior y puede escuchar tm zmnbido
de tono alto o tin sonido p/llsante nlientras opera.
• A veces el refligerador flmciona por un perfodo
prohmgado, especiahnente cuando las puertas se
abren continuamente. Esto significa que la flmci6n
Frost GuardT"estfi ell operaci6n para ilnpedir que el
congelador se quelne y inejorar la preserwlci6n
de los alimentos.
• Puede escuchar un sonido de soplido cuando las
puertas se cierran. Esto se debe a que la presi6n se
estfi estabilizando dentro del refrigerador.
CHASQUIDOS,
ESTALLIDOS, CRU D O,
GORJEOS
• Puede escuchar sonidos como de clqjido o
estallidos cuando el refl'igerador se conecta por
prilnera vez. Esto pasa a inedida que el reliigerador
se enfi'fa hasta la tenlperatura COl'recta.
• I,os reguladores electr6nicos se abren v se cierran
para oli'ecer till enfi'ialniento 6ptinlo y ahorrar
energfa.
• E1 compresor puede causar un chasquido o un
gmjeo cuando intenta volver a arrancar (esto
puede tOlnar hasta 5 minutos).
• E1 tablero de control electr6nico puede causar
till sonido de chasquido cuando se activa el rel_
para controlar los componentes del refl'igerador.
• Expansi6n y contraccidn de las bobinas durante
o despu_s del ciclo de descongelaci6n puede
causar sonidos como de clqiido o estallidos.
• En nmdelos con dispositivo de hielo, despu_s
de completar un ciclo de hacer hielo, se pueden
escuchar los cubos de hielo cuando caen a la
bandeia de hielos.
iWHIR!
• Puede escuchar los ventiladores movi&Mose a gran
velocidad. Esto pasa cuando el refl'igerador se
conecta por pYilllera vez, C/lando las p/lertas se _lbi'en
frecuentelnente o cuando se guarda gran cantidad
de aliment()s ell el refrigerador o ell los
c()n_partimient()s del c(mgelad()r. I,os ventilad()res
est;ii1 avtldando a ii/antenei" las telllpei'attlras
COlTectas.
• Si cualquiera de las puertas perlnanece abierta por
In;is de 8 ininutos, puede escuchar los ventiladores
para enfliar los tOcos de luz.
• I,os ventiladores cambian la velocidad para
SUlninistrar enfl'iamiento 6ptinlo y ahorrar energfa.
SONIDOSDEAGUA
6
• E1 fluido del refl'igerante a tray,s de las bobinas
puede producir un sonido de borboteo conlo de
agua hirviendo.
• E1 agua que cae en el calentador de descongelacidn
puede causar un chisporroteo, estallido o zulnbido
durante el ciclo de descongelaci6n.
• Un iuido de agua cayendo se puede escuchar
durante el ciclo de descongelacidn a inedida que el
hielo se derrite del evaporador y fluye hacia la
bandeia de drenaje.
• E1 cierre de las puertas puede producir till sonido de
gorgoteo debido a la estabilizaci6n de la presi6n.
700
 Loading...