

GE Druck DPI612 series, Druck DPI612- PFX, Druck DPI612- HFP, Druck DPI612- PFP Safety And Quick Start Manual

GE
Measurement and Control
© 2015 General Electric Company. All Rights Reserved. Specifications are
subject to change without notice. GE is a registered trademark of General
Electric Company. Other company or product names mentioned in this
document may be trademarks or registered trademarks of their respective
companies, which are not affiliated with GE.
Druck DPI612
Portable Pressure Calibrator
Safety and Quick Start guide – 109M0089
Safety and Quick Start Guide Druck DPI612
Page 2 of 20 [EN] English – 109M0089
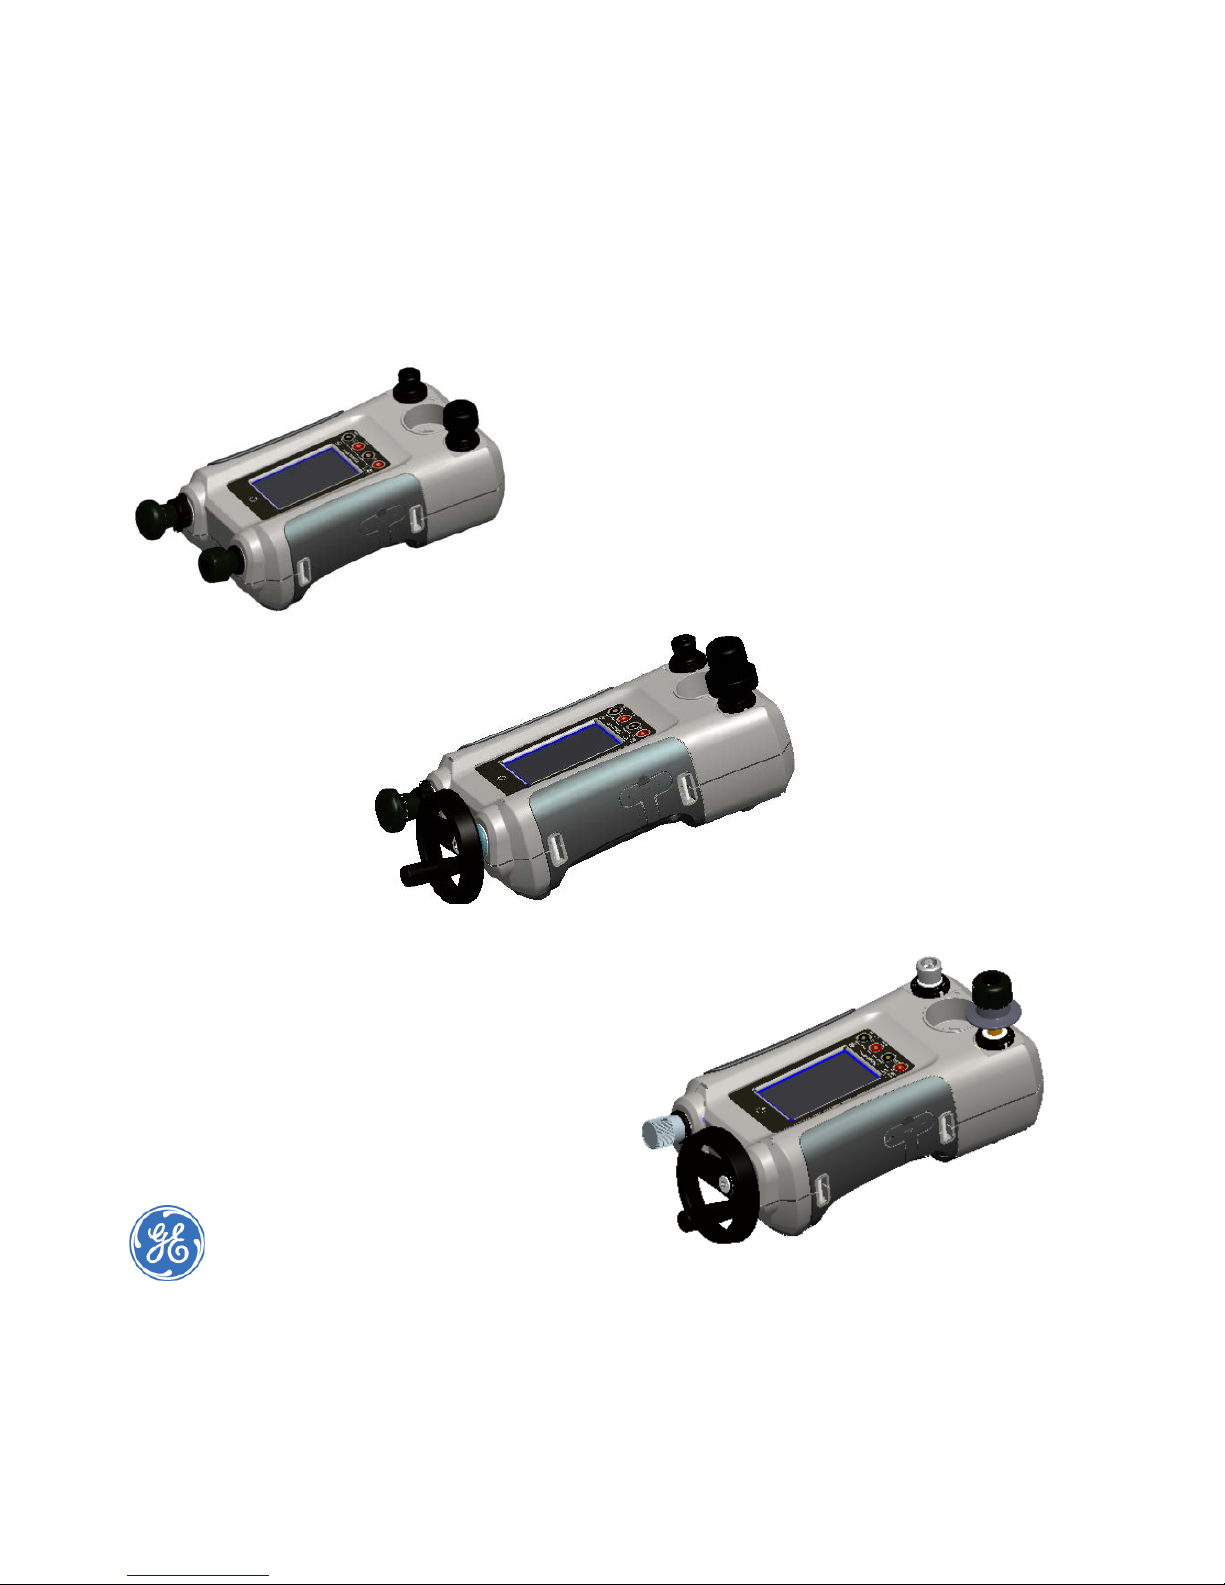
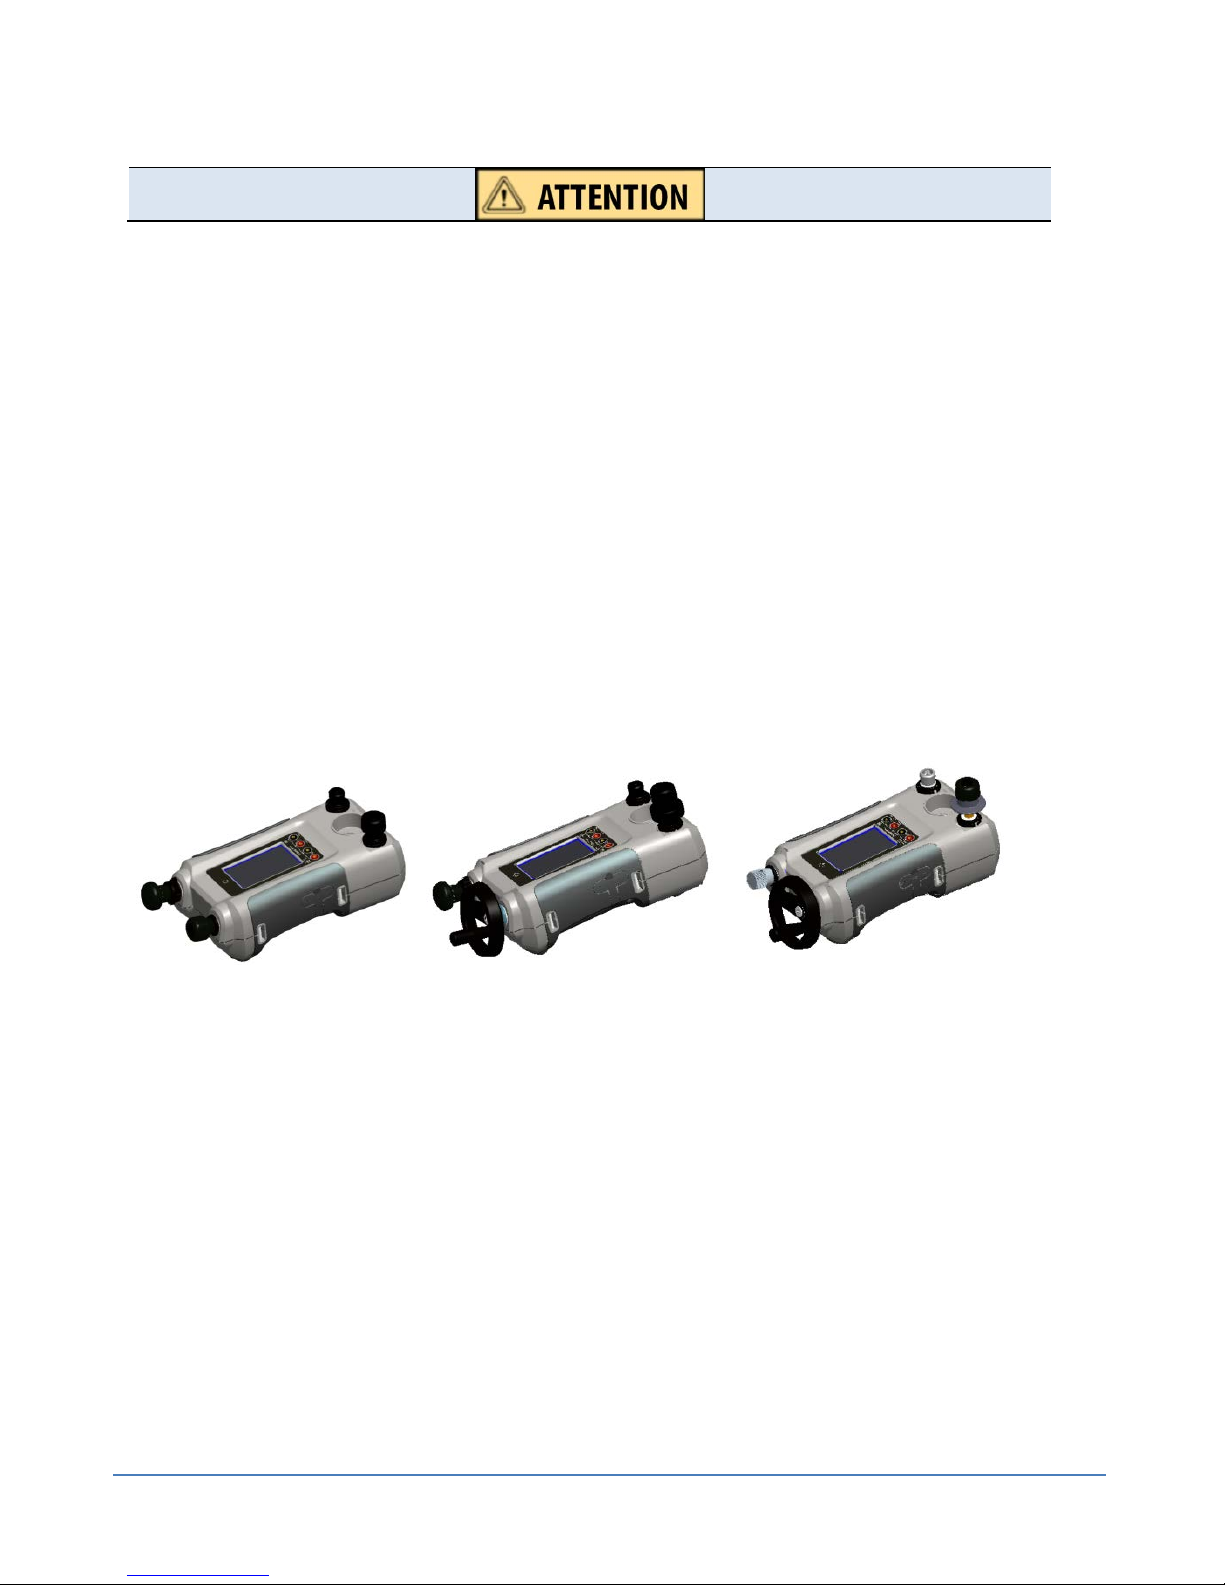
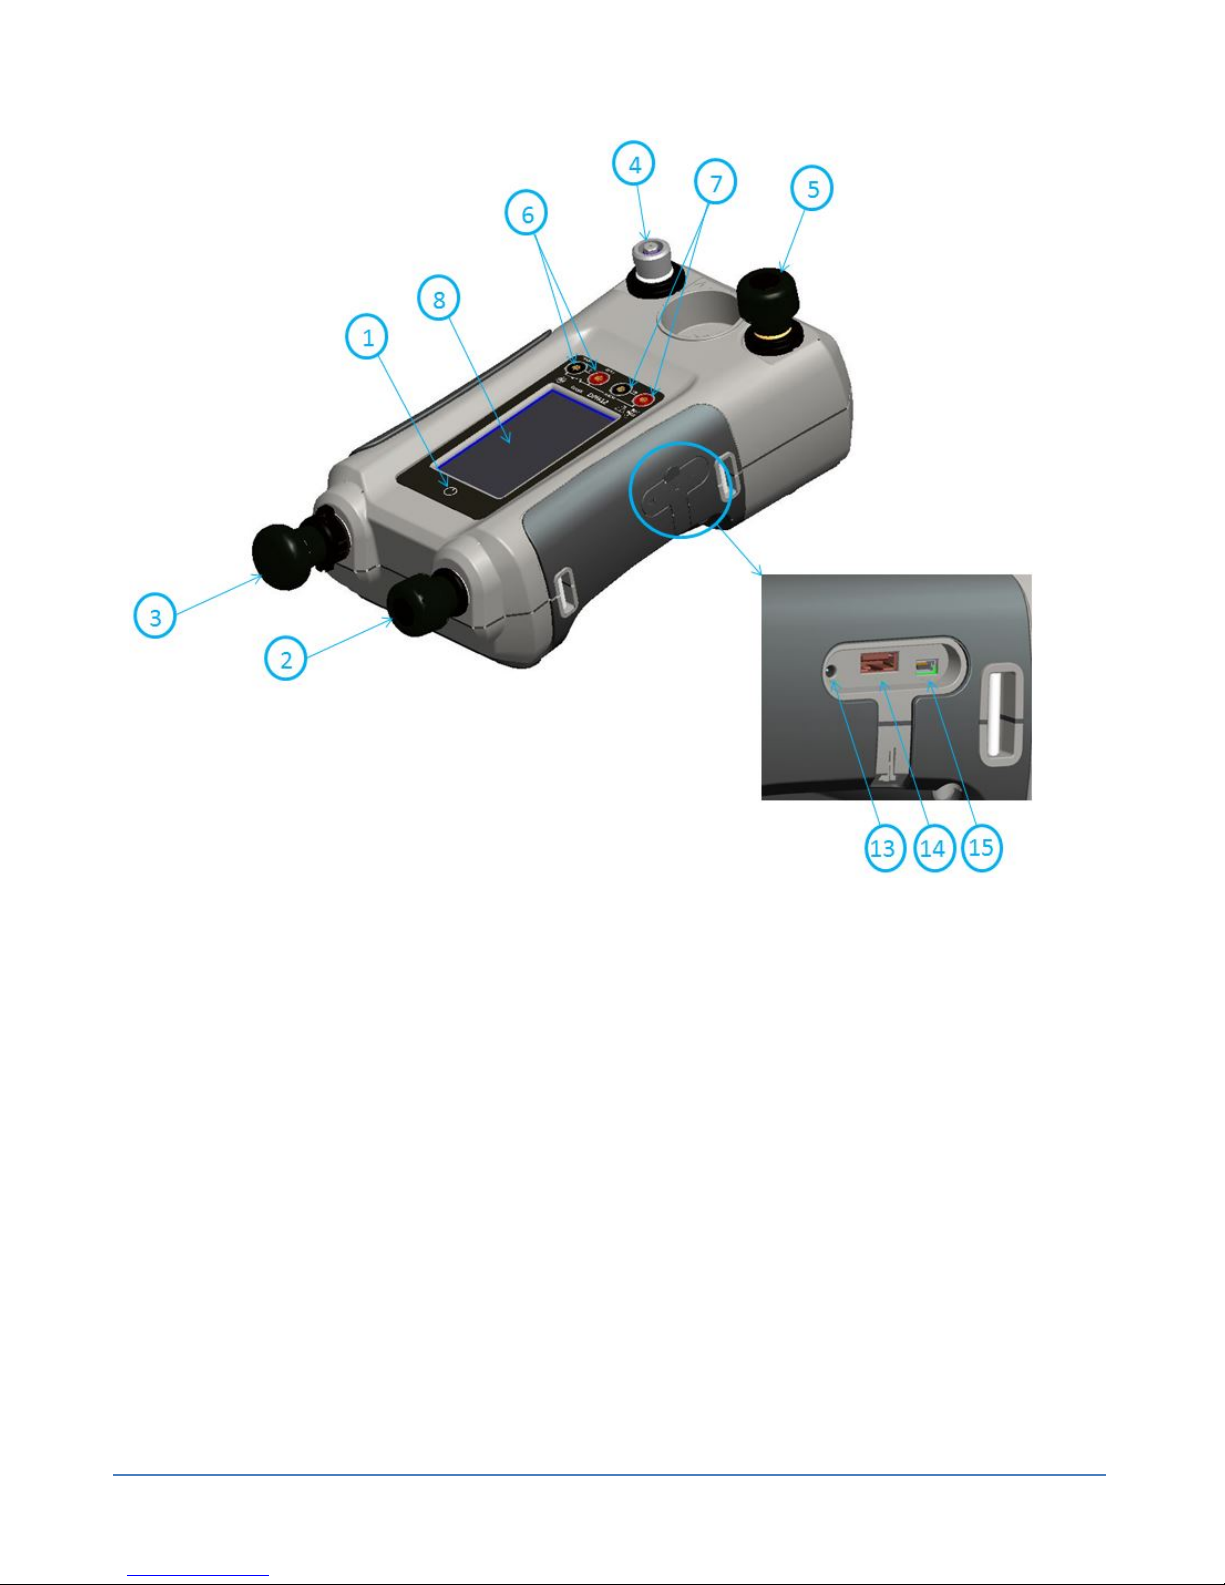
DPI612: Pressure Calibrator (Figure 1)
DPI612-PFX (pFlex Pneumatic Calibrator):
-950 mbar to 20 bar (-13.5 to 300 psi)
DPI612-PFP (pFlexPro Pneumatic Calibrator):
-950 mbar to 100 bar (-13.5 to 1500 psi)
DPI612-HFP (hFlexPro Hydraulic Calibrator):
0 to 1000 bar (0 to 15000 psi)
Operating Temperature Range:
-10 °C to +50 °C (+14 °F to +122 °F)
+10 °C to +30 °C (optimized calibration specification)
0 °C – 40 °C with optional mains power supply
Storage Temperature: -20 °C to +70 °C (-4 °F to +158 °F)
Humidity: 0 to 90 % Relative Humidity (RH)
Non-condensing
Power Supply: 100 – 260 V +/-10 %, 50 / 60 Hz AC, Output DC V=5 A,
1.6 A, CATII of IEC60364-4-443
Altitude: Up to 2000 m
Batteries (Rechargeable): LiIon 14.1Wh GE Part number: CC3800GE
Nominal voltage 3.7V 3800mAh Charge temperature: 0° to 40°C (32°
to 104°F) Discharge temperature: -10° to 60°C (14° to 140°F). Note: For
best battery performance, keep the temperature less than 60°C
(140°F).
Batteries (Non-rechargeable): 8 × AA Alkaline
Pressure Leak rates:
DPI612-PFX = 0.01 bar/min at 20 bar
DPI612-PFP = 0.02 bar/min at 100 bar
DPI612-HFP = 1 bar/min at 1000 bar
Vacuum Leak rates:
DPI612-PFX = 0.005 bar/min at 95% Vacuum
DPI612-PFP = 0.005 bar/min at 95% Vacuum
DPI612-HFP = n/a
Recommended Pressure Modules (PM620)
DPI612-PFX: 2 to 20bar (3 to 300 psi)
DPI612-PFP: 20 to 100bar (300 to 1500psi)
DPI612-HFP: 200 to 1000bar (3000 to 15000psi)

Safety and Quick Start Guide Druck DPI612
Page 3 of 20 [EN] English – 109M0089
GENERAL WARNINGS
• Before using this instrument, read and understand the “Safety” section,
the user manual and the instructions for the accessories / options /
equipment you are using it with.
• Read and understand the applicable local safety procedures.
• It is dangerous to ignore the specified warnings.
• It is dangerous to ignore the specified limits for the instrument or to use
the instrument when it is not in its normal condition. Use the applicable
protection and obey all safety precautions.
• Do not use the instrument in locations with explosive gas, vapor or dust.
There is a risk of an explosion.
• Do not use damaged equipment and use only original parts supplied by
the manufacturer.
ELECTRICAL WARNINGS
• To prevent electrical shocks or damage to the instrument, do not connect
more than 30 V between the terminals, or between the terminals and the
ground (earth).
• This instrument uses a Lithium Ion rechargeable battery pack or optional
standard AA size batteries. To prevent an explosion or fire, do not short
circuit, crush or disassemble.
• To prevent battery leakage or heat generation, only use the GE specified
battery, power supply and battery charger. Note: The power supply is only
specified for operation in the temperature range 0 to 40 °C (32 to 104 °F).
Safety and Quick Start Guide Druck DPI612
Page 4 of 20 [EN] English – 109M0089
CAUTIONS
• To prevent damage to the display, do not use sharp objects on the touch-
screen.
• Removal of power without appropriately shutting down the DPI612 can
lead to loss of date and time; if it happens re-set the date and time upon
re-start.
• To prevent damage to the DPI612 and PM620 module, only use it within
the specified pressure limit.
• To prevent damage to the instrument, do not allow dirt into the pressure
mechanism. Clean any attached equipment before connection.
• This instrument is not suitable for permanent outdoor installation.
1. OVERVIEW
Figure 1
The DPI612 is a battery-powered instrument for electrical measure and source
operations. You can use the touch-screen to display the different parameters.
The DPI612 instrument measures and displays, via user interchangeable
pressure modules, Pneumatic or Hydraulic Pressure/ Vacuum generated by
the instrument. The type and range of pressure generation is dependent on
the model selected.
DPI612- PFX
DPI612- PFP
DPI612- HFP

Safety and Quick Start Guide Druck DPI612
Page 5 of 20 [EN] English – 109M0089
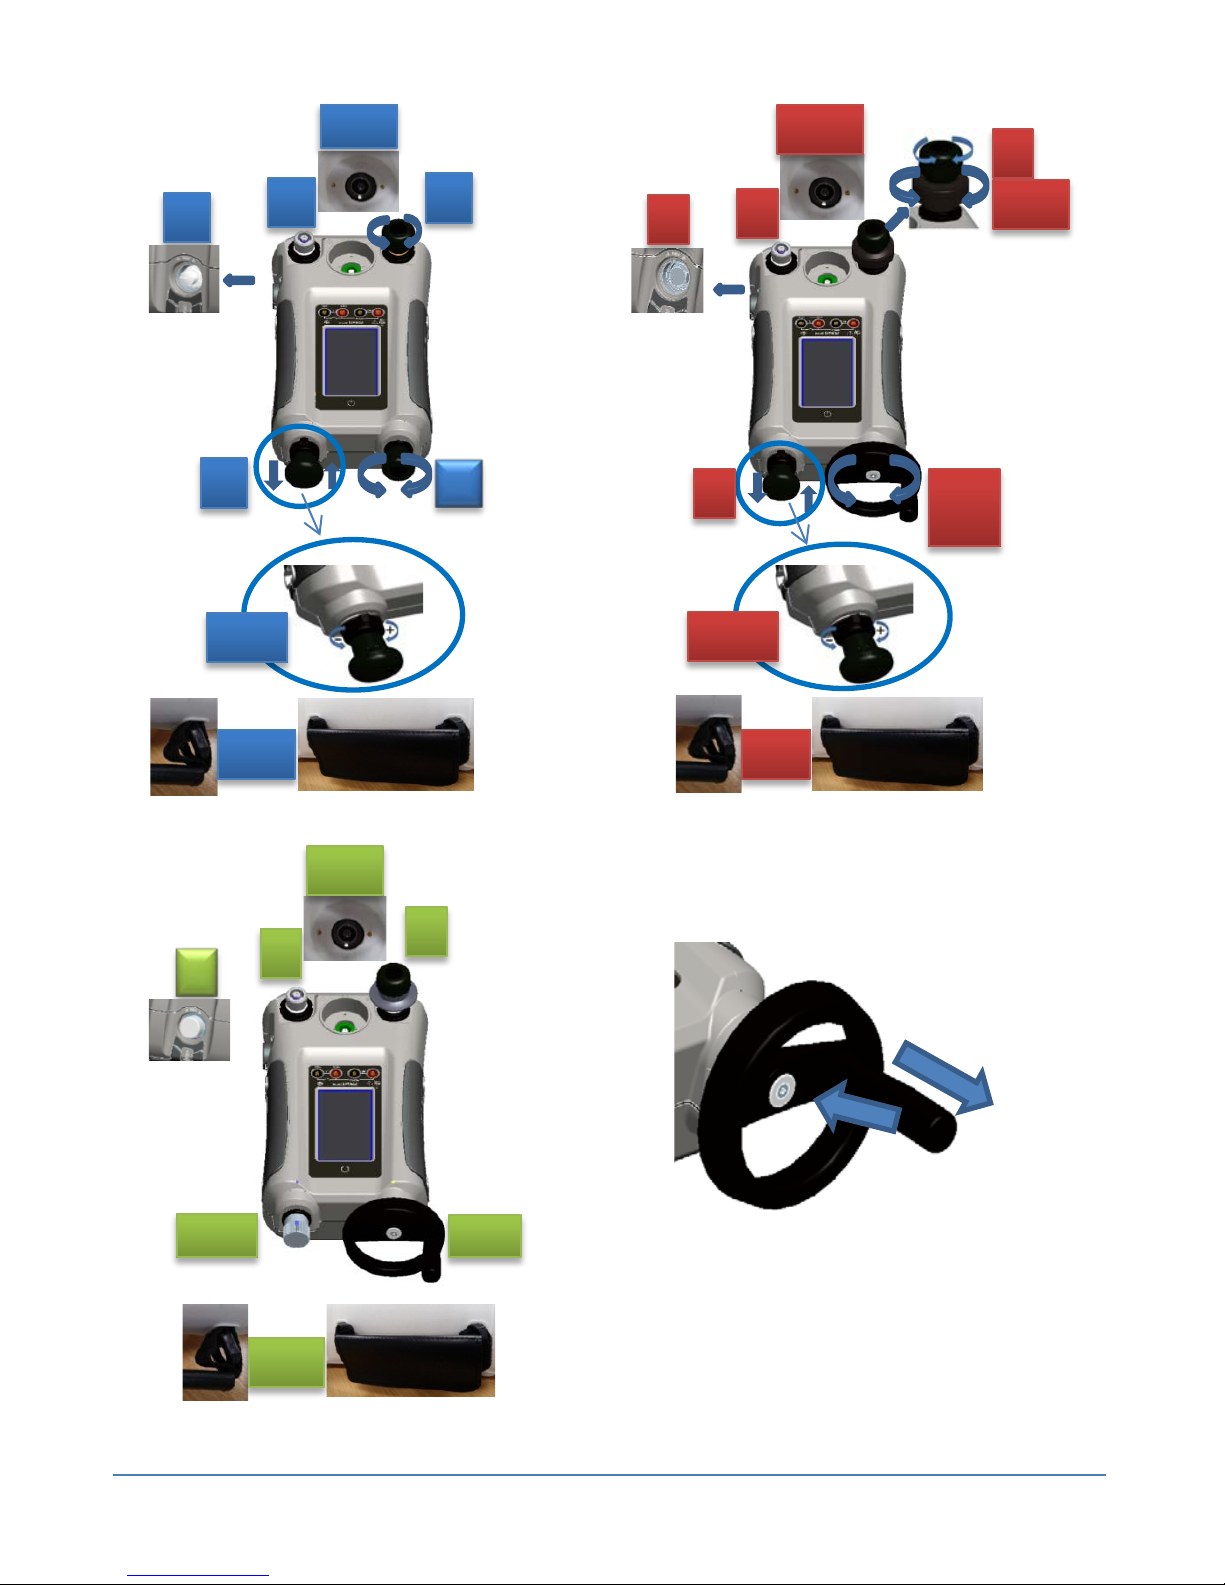
Figure 2
9 4 5
5.1
3
3.1
10
2.
1
12
9 5 10
12
11
4
9
5 4 3
12 2 3.1
Safety and Quick Start Guide Druck DPI612
Page 6 of 20 [EN] English – 109M0089
Figure 3
Safety and Quick Start Guide Druck DPI612
Page 7 of 20 [EN] English – 109M0089
1.1 PARTS LIST
Item
No.
Description
1
ON or OFF button.
2 PFX only: Pneumatic volume adjuster.
2.1
PFP, HFP models only: Volume adjuster wheel with fold-in handle.
3 Pump mechanism.
3.1
PFX, PFP models only: Pressure/vacuum selector to set the pump operation: pressure (+),
vacuum (-).
4 Test port: To attach the device under test.
5 Pneumatic pressure release valve to release pressure in the system.
5.1
PFP models only: Pneumatic refill valve. Close it to seal off the device pressure and refill
the pressure mechanism.
6 CH1 connectors for: Voltage (V); Current (mA+, mA-); Switch operation.
7 Isolated CH2 connectors for: Voltage (V); 24 V loop power supply (24 Vo).
8 Liquid Crystal Display (LCD): Color display with touch-screen. To make a selection, lightly
tap on the applicable display area.
9 Optional accessory (not shown): Pressure connection for a relief valve (PRV). A blanking
plug is standard.
10
Pressure and electrical connections for a PM620 module (not shown):
DPI612 models PFX and PFP: Seal the pressure connection with a blanking plug (Part:
IO620-BLANK) or a PM 620 module.
DPI612 HFP models only: The pressure connection seals itself.
11
HFP models only: Hydraulic refill valve (not shown):Close it to seal off the device pressure
and refill the pressure mechanism with fluid.
12
Hand straps
13
+5 V DC power input socket. This supply also charges the optional battery pack.
14
USB type A connector for connections to external peripherals (USB flash memory or
optional external modules).
15
USB mini-type B connector for communication with a computer.
Safety and Quick Start Guide Druck DPI612
Page 8 of 20 [EN] English – 109M0089
2. EXTERNAL
PRESSURE CONNECTION
Use an applicable method to seal the external pressure connections, and then
tighten to the applicable torque.
Maximum torque: ISO 228/1, 1/8 NPT: 35 Nm (26 lbf.ft)
ISO 228/1, G1/8: 25 Nm (18.4 lbf.ft)
Attach the pressure adaptor to the DPI612 and tighten to finger tight.
3. DPI612 PRE-CALIBRATOR – START OPERATIONS
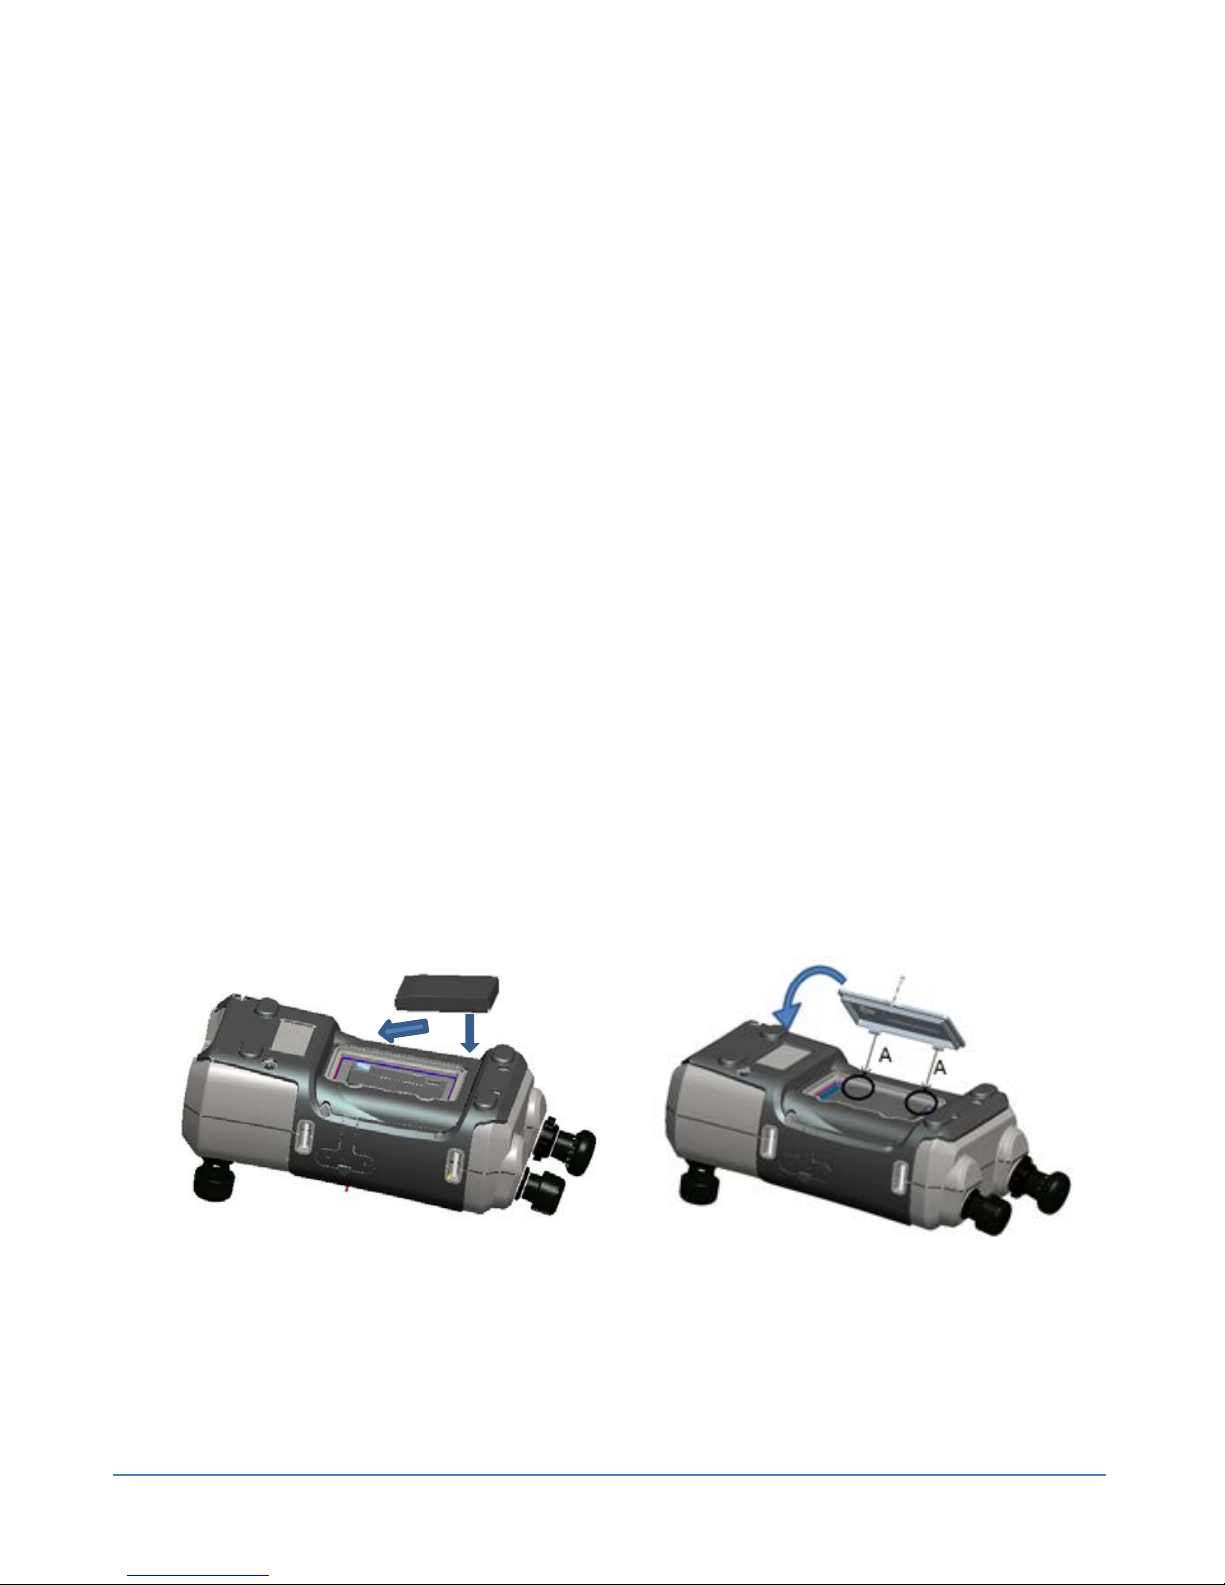
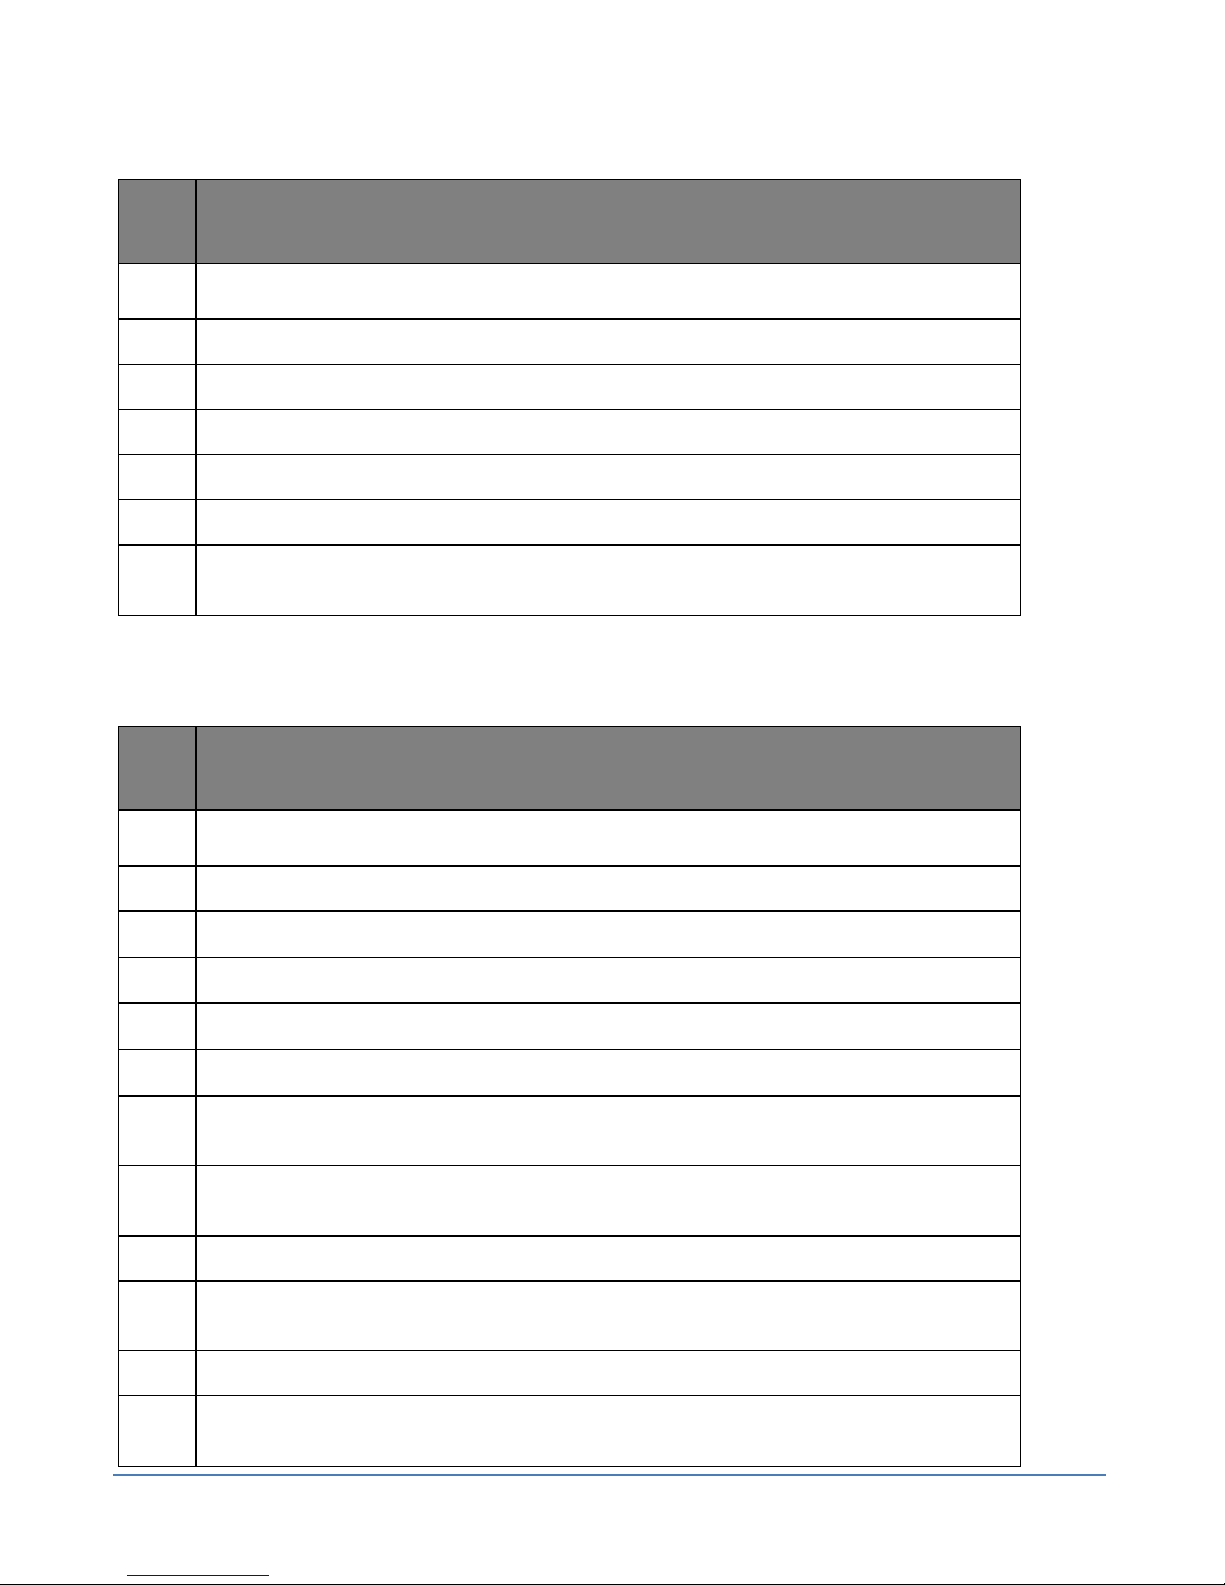
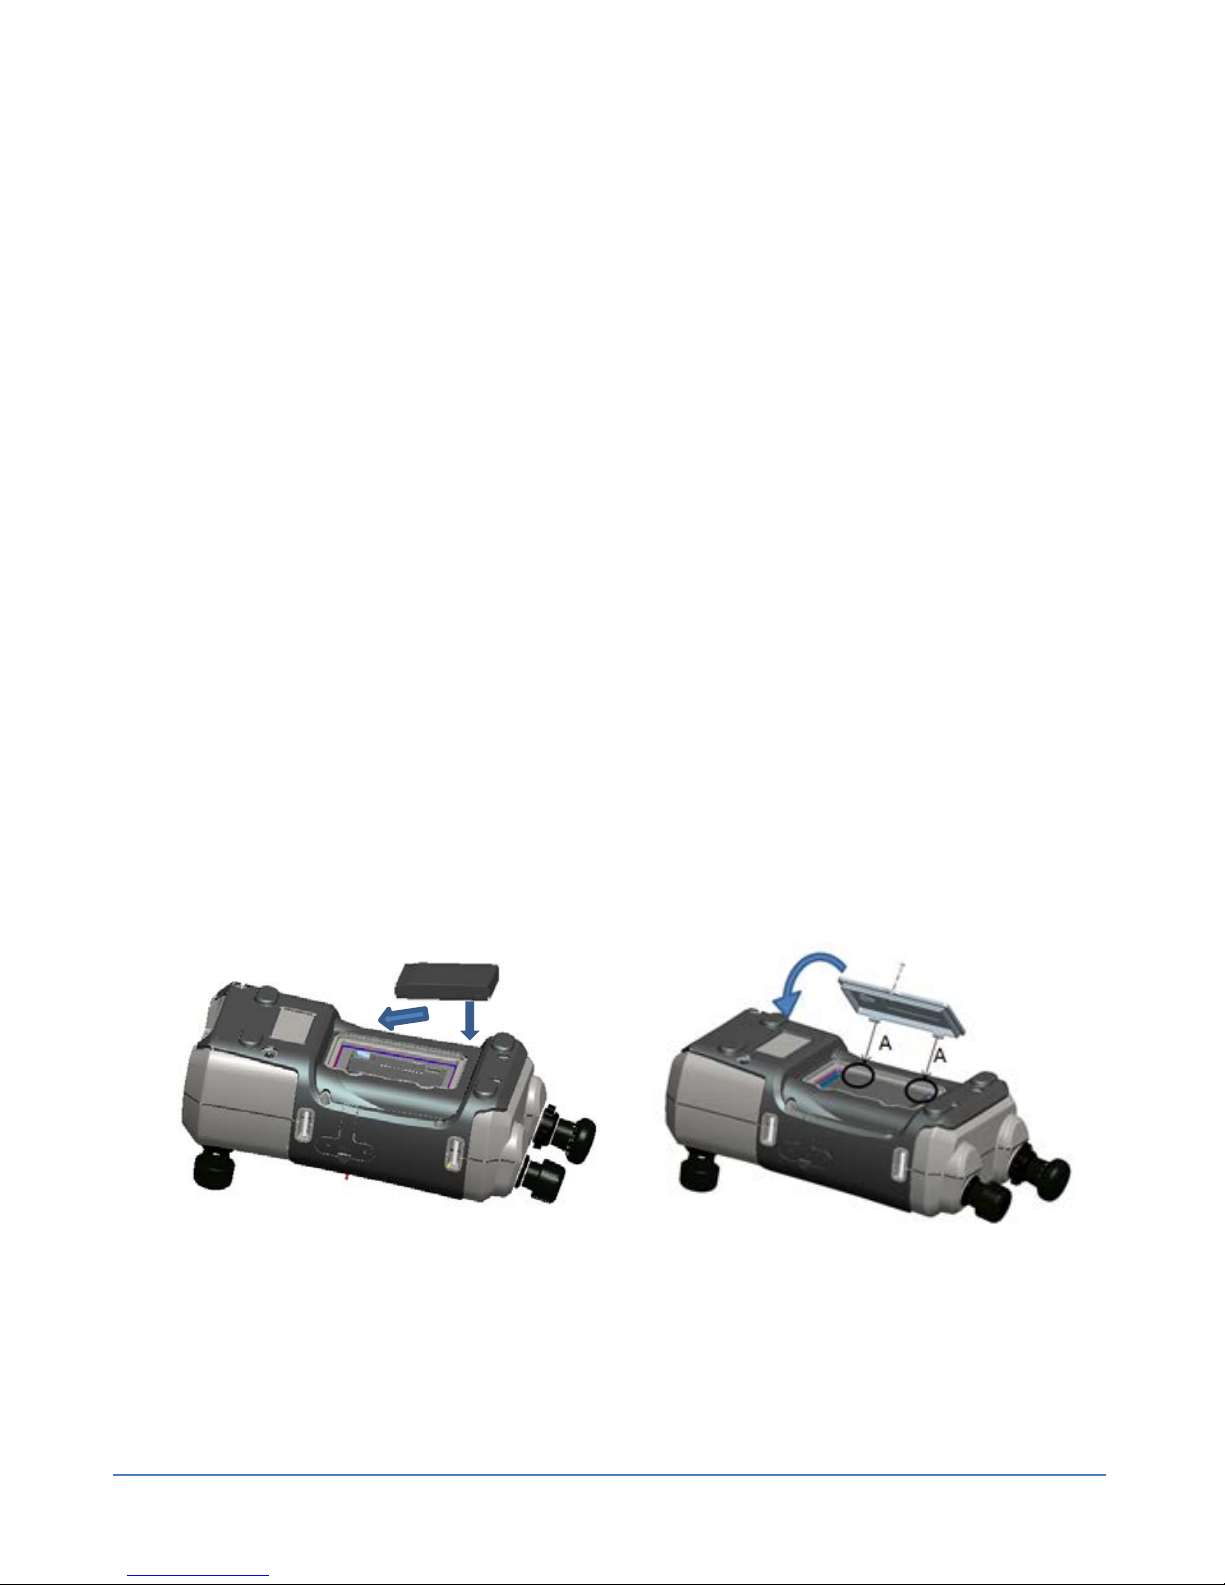
3.1 Install the rechargeable battery
1. Remove the battery cover by unscrewing the retaining screw and lifting the
cover upwards.
2. Insert the CC3800GE rechargeable battery into the compartment as shown
in Figure 4.
3. Refit the battery cover by locating the lugs of the cover (A) at an angle into
the slots and close the compartment as shown in Figure 4.
4. Refit the battery cover retaining screw.
Figure 4

Safety and Quick Start Guide Druck DPI612
Page 9 of 20 [EN] English – 109M0089
4. POWER
MODES
4.1 Power ON (See Figure 3)
From OFF – momentarily press the power button until the GE logo appears.
4.2 Power OFF
Press and Release the Power Button:
Select SWITCH OFF from the POWERDOWN OPTIONS window displayed.
Figure 5
Notes:
• SWITCH OFF can also be achieved by Pressing and holding the power
button until the screen is blank.
• Use Power OFF to preserve the battery capacity when the instrument is
not in use for extended periods of time.
4.3 Standby Mode
Press and Release Power button:
Select GO TO STANDBY from the POWERDOWN OPTIONS window displayed.
Note: Use Standby mode between the jobs to provide a quick start-up.
4.4 Power up from Standby Mode
When powered up from the standby mode, instrument always opens the last
screen shown before going to standby mode.
Safety and Quick Start Guide Druck DPI612
Page 10 of 20 [EN] English – 109M0089
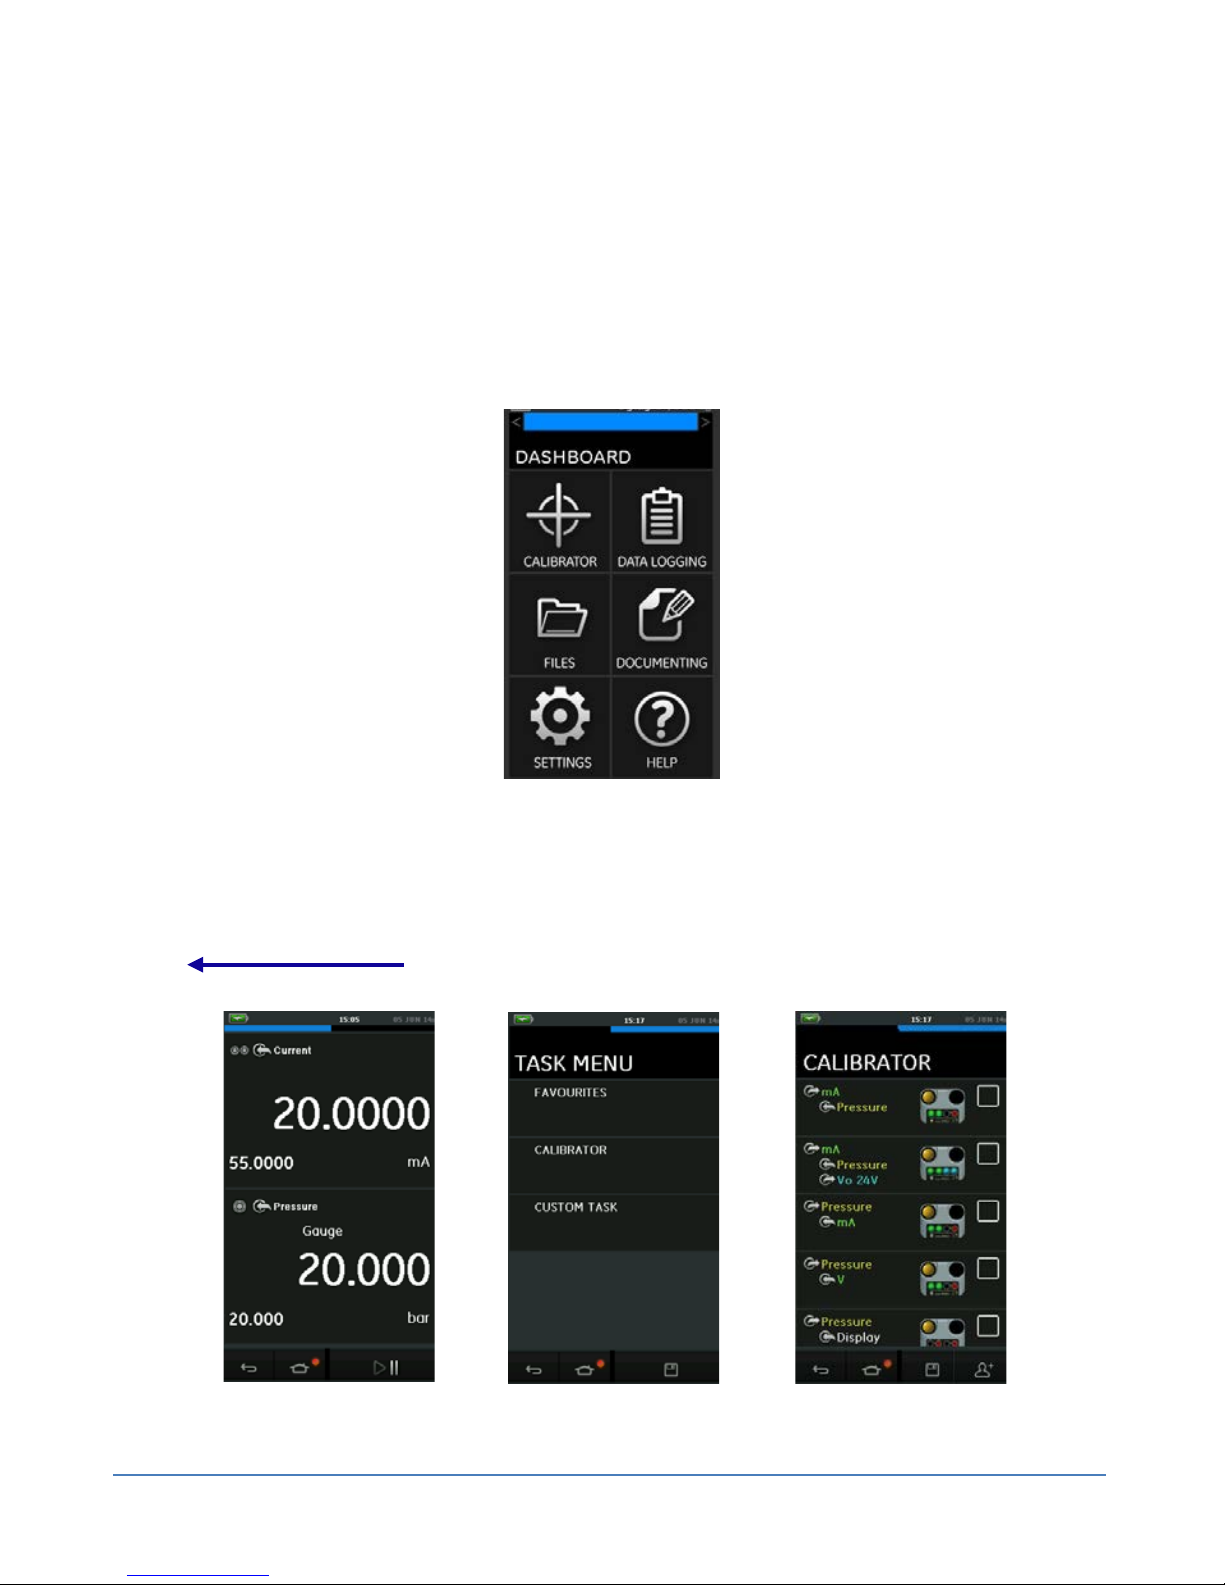
5. DASHBOARD NAVIGATION
The application DASHBOARD allows quick selection of a function without
menus or special keys. The DASHBOARD icons represent the functional
applications of the DPI612, for example, the CALIBRATOR application. Touch
the appropriate icon to start the application.
When more choices are available than shown on the display, swipe a finger up
or down, left or right to scroll.
FIGURE 6
1) Swipe from right to left.
2) Touch the TASK menu.
3) Touch the TASK.
Figure 7
Safety and Quick Start Guide Druck DPI612
Page 11 of 20 [EN] English – 109M0089
5.1 Functions
To change the measure and source functions swipe from right to left on the
calibrator application screen. Select CALIBRATOR in the TASK menu to choose
from a library of pre-configured TASKs appropriate for common tests. For
example:
Select
to test a pressure transmitter and provide 24 V loop
power.
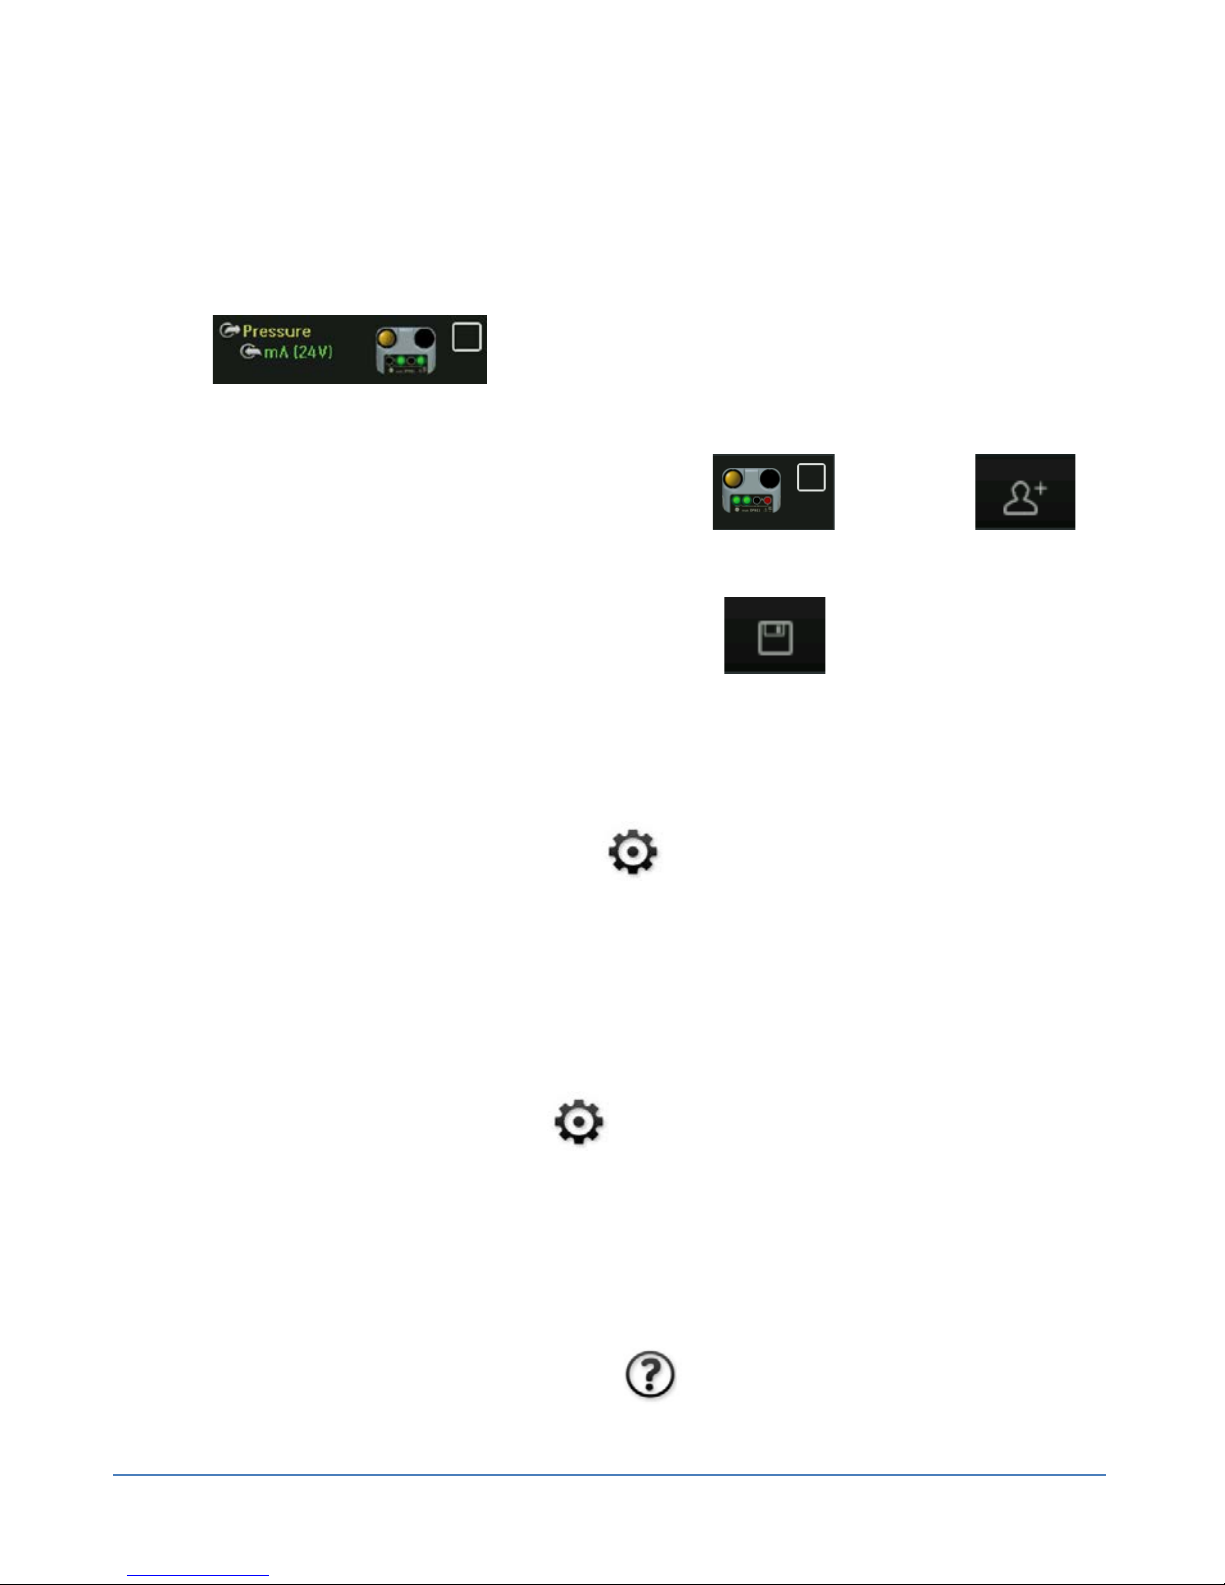
To save a TASK in FAVOURITES select the check box followed by .
To create a custom TASK select CUSTOM TASK and manually configure the required
measure and source functions. CUSTOM TASK tasks can be saved for future use by
adding them to FAVOURITES using the Save function in the TASK MENU.
5.2 Set Date, Time and Language
To access Date, Time and Language menus
Select:
5.3 Themes
Two themes are available: Dark and Light; select the correct theme for the
light level.
Select:
5.4 Druck DPI612 Manual
Select the Help icon on the Dashboard to access the manual. All the
information required to operate the Druck DPI612 is in the Help section of the
Dashboard which is accessed by selecting:
DASHBOARD >> SETTINGS >> DATE
DASHBOARD >> SETTINGS >> THEME
DASHBOARD>> HELP
Safety and Quick Start Guide Druck DPI612
Page 12 of 20 [EN] English – 109M0089
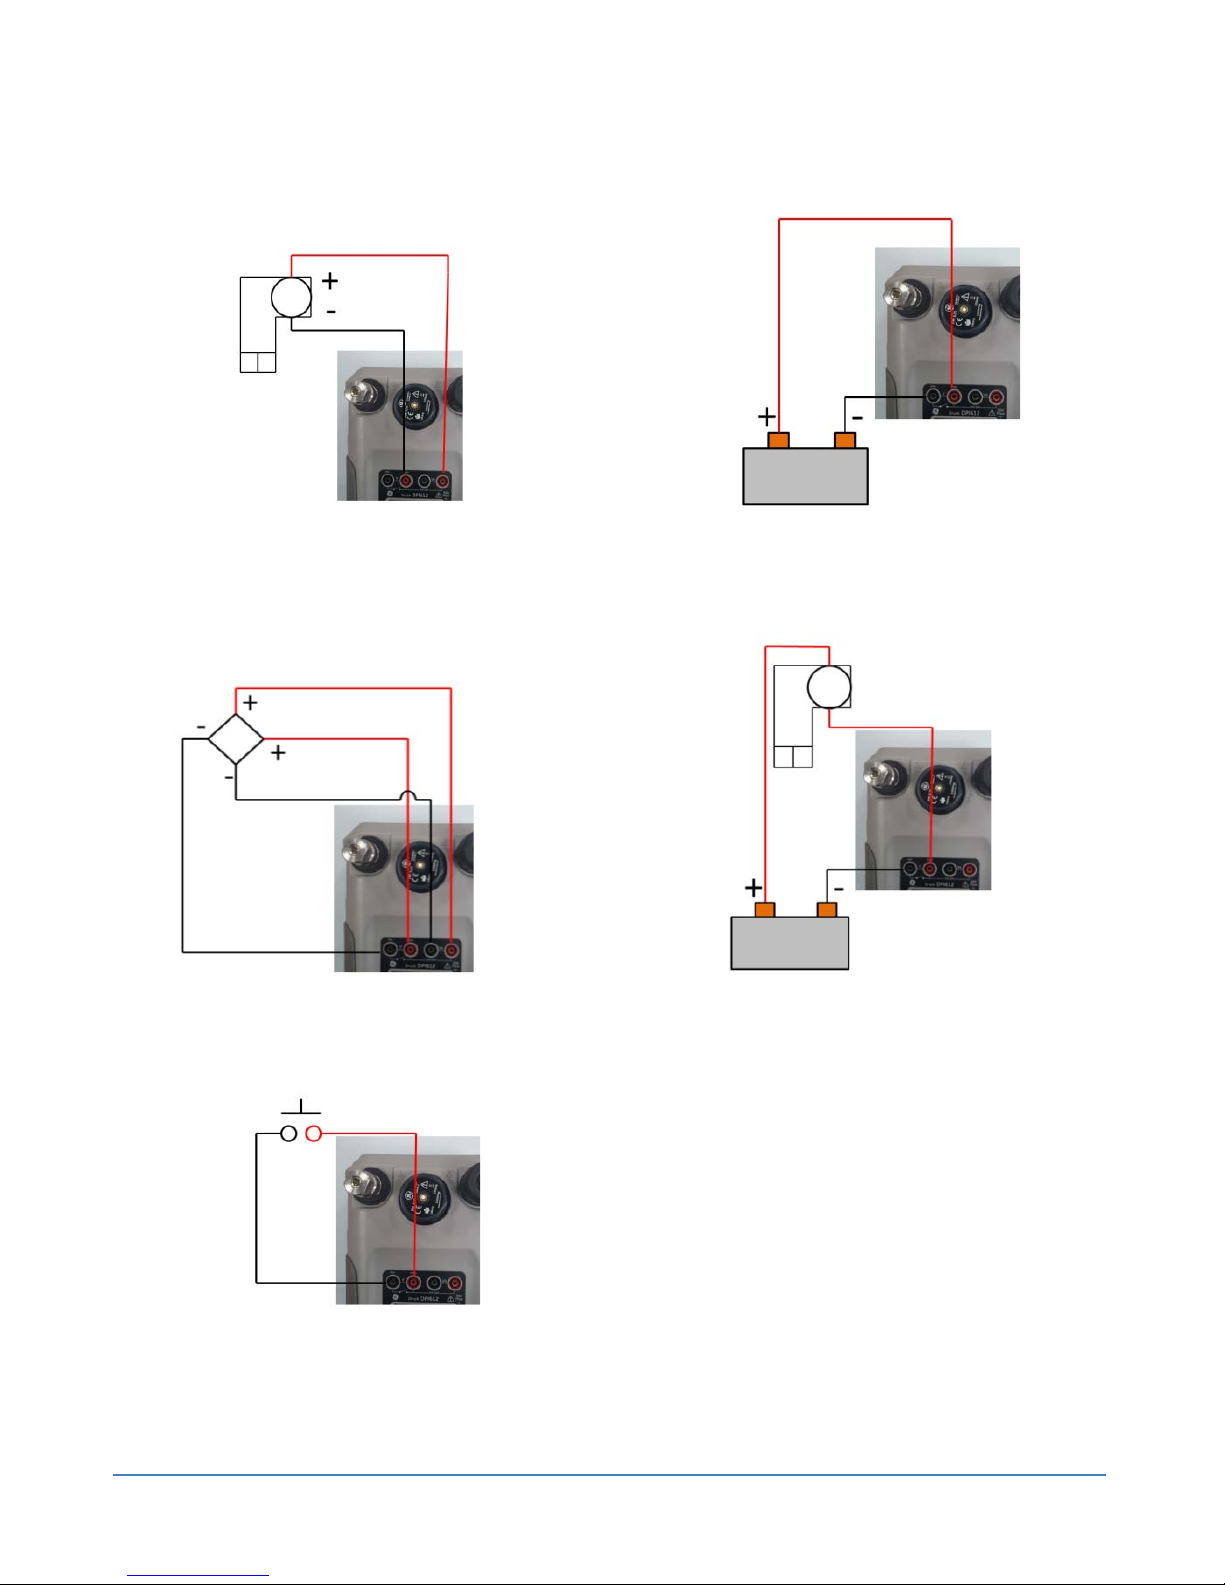
6. BASIC ELECTRICAL OPERATIONS (See Figure 3)
Measure current on CH1, Range
± 55 mA (24V loop on CH2)
Measure DC Volts or DC mV
on CH1
Measure DC Volts (10V) or
DC mV (10V) on CH1
Measure current with external
loop power (Range: ±55mA)
Switch Test
Safety and Quick Start Guide Druck DPI612
Page 13 of 20 [EN] English – 109M0089
7. PRESSURE OPERATIONS
7.1 DPI612 - PFX (20 Bar)
PRESSURIZED GASES AND FLUIDS ARE DANGEROUS. BEFORE CONNECTING
OR DISCONNECTING PRESSURE EQUIPMENT, SAFELY RELEASE ALL THE
PRESSURE.
To prevent damage to the pressure station, do not let dirt get into the
pressure mechanism. Before connecting equipment, make sure it is clean
or use the applicable dirt trap.
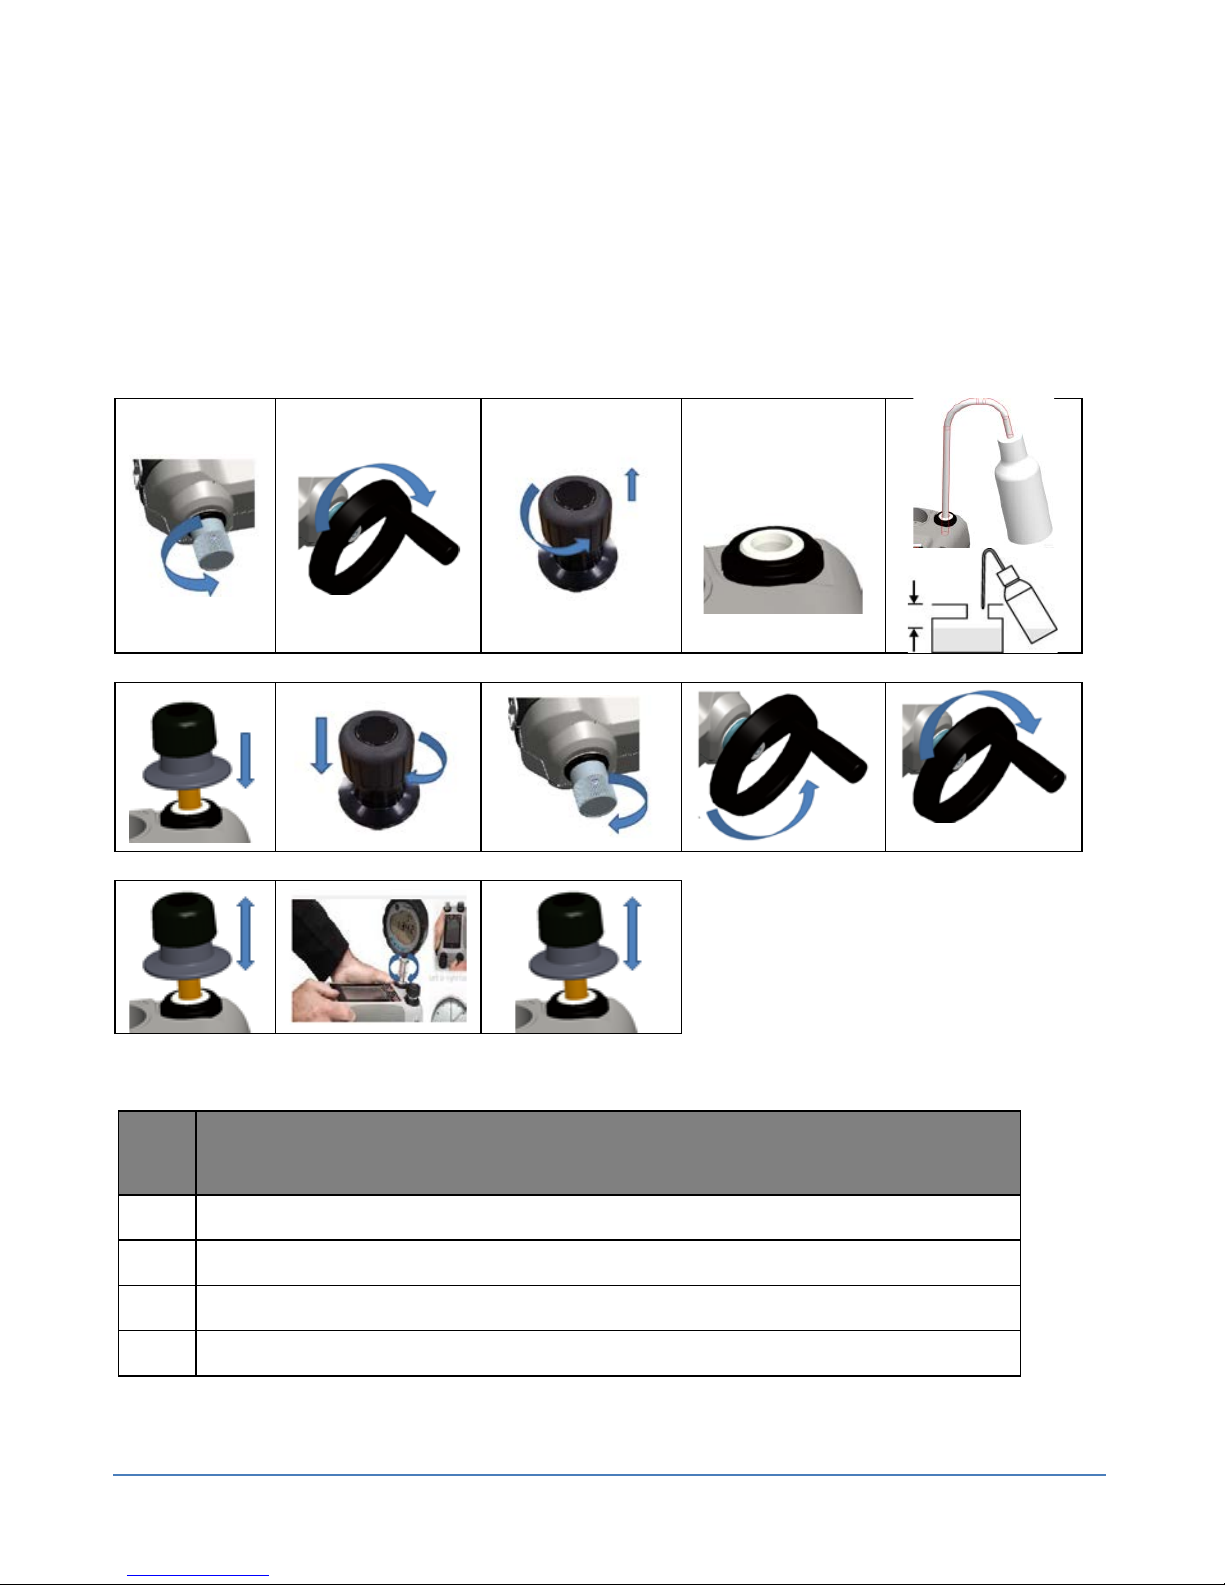
7.1.1 Release the pressure/Attach the device under test
Step Procedure
1.
Open the pressure release valve (one turn) (Ref: Item5).
2.
Use the applicable adaptor to attach the device, (Ref: Figure 8).
7.1.2 Vacuum operation
Step Procedure (Vacuum)
1.
Set to vacuum operation (-) (Ref: 3.1).
2.
Turn the volume adjuster to mid-range or fully clockwise (Ref: Item 2).
3.
Seal the system (Ref: Item 5).
4.
Set the approximate vacuum with the pump (Ref: Item 3).
5.
Adjust the vacuum with the volume adjuster (Ref: Item 2).
6.
On completion of test, open the pressure release valve one turn (Ref: Item 5) to
release vacuum before disconnection of device under test.
Safety and Quick Start Guide Druck DPI612
Page 14 of 20 [EN] English – 109M0089
7.1.3 Pressure operation
Step Procedure (Pressure)
1.
Set to pressure operation (+) (Ref: Item 3.1).
2.
Turn the volume adjuster to mid-range (Ref: Item 2).
3.
Seal the system (Ref: Item 5).
4.
Set the approximate pressure with the pump (Ref: Item 3).
5.
Adjust the pressure with the volume adjuster (Ref: Item 2).
6.
On completion of test, open the pressure release valve one turn (Ref: Item 5) to
release pressure before disconnection of device under test.
7.2 DPI612 – PFP (100 Bar)
PRESSURIZED GASES AND FLUIDS ARE DANGEROUS. BEFORE CONNECTING
OR DISCONNECTING PRESSURE EQUIPMENT, SAFELY RELEASE ALL THE
PRESSURE.
To prevent damage to the pressure station, do not let dirt get into the
pressure mechanism. Before connecting equipment, make sure it is clean
or use the applicable dirt trap.
7.2.1 Release the pressure/Attach the device under test
Step Procedure
1.
Fully open the refill valve (Ref: Item 5.1)
2.
Open the pressure release valve (one turn) (Ref: Item 5)
3.
Use the applicable adaptor to attach the device, (Ref: Figure 8)
Safety and Quick Start Guide Druck DPI612
Page 15 of 20 [EN] English – 109M0089
7.2.2 Vacuum operation
Step Procedure (Vacuum)
1.
Set to vacuum operation (-) (Ref: Item 3.1).
2.
Fully open the refill valve (Ref: Item 5.1).
3.
Wind the volume adjuster to mid-range or fully clockwise (Ref: Item 2.1).
4.
Seal the system (Ref: Item 5).
5.
Set the approximate vacuum with the pump (Ref: Item 3).
6.
Adjust the vacuum with the volume adjuster (Ref: Item 2.1).
7.
On completion of test, open the pressure release valve one turn (Ref: Item 5) to
release vacuum before disconnection of device under test.
7.2.3 Pressure operation
Step
Procedure (Pressure)
1.
Set to pressure operation (+) (Ref: Item 3.1).
2.
Turn the volume adjuster to mid-range (Ref: Item 2.1).
3.
Seal the system (Ref: Item 5).
4.
Use the pump to set a pressure up to ≈20 bar (300 psi) (Ref: Item 3).
5.
Open the refill valve (1 turn) (Ref: Item 5.1).
6.
Increase or decrease the pressure with the volume adjuster (Ref: Item 2.1).
7.
If increasing pressure the limit of travel is reached, close the refill valve (Ref: Item
5.1).
8.
Wind the volume adjuster fully counter-clockwise. (Ref: Item 2.1).There is no
change in pressure.
9.
Refill the pressure mechanism with the pump (≈15 cycles) (Ref: Item 3).
10.
Wind the volume adjuster clockwise until the pressure starts to increase (Ref:
Item 2.1).
11.
Continue to do steps 7 to 10 until you get the necessary pressure.
12.
On completion of test, open the pressure release valve one turn (Ref: Item 5) to
release pressure before disconnection of device under test.
Safety and Quick Start Guide Druck DPI612
Page 16 of 20 [EN] English – 109M0089
7.3 DPI612 – HFP (1000 bar)
PRESSURIZED GASES AND FLUIDS ARE DANGEROUS. BEFORE CONNECTING
OR DISCONNECTING PRESSURE EQUIPMENT, SAFELY RELEASE ALL THE
PRESSURE.
ENSURE THAT THE SYSTEM IS BLED OF EXCESS AIR BEFORE OPERATION. (IF
THE ITEM UNDER TEST HAS A LARGE VOLUME, PRE-FILL WITH THE
PRESSURE FLUID TO ENSURE THAT TRAPPED AIR IS KEPT TO A MINIMUM).
To prevent damage to the pressure station, do not let dirt get into the
pressure mechanism. Before connecting equipment, make sure it is clean.
7.3.1 Release the pressure
1
2
Note: Fill the reservoir before attaching the device.
7.3.2 Filling, priming
Ice in the pressure mechanism can cause damage. If the temperature is less
than 4°C (39°F), drain all water from the DPI612 - HFP.
Safety and Quick Start Guide Druck DPI612
Page 17 of 20 [EN] English – 109M0089
When using the DPI612 - HFP for the first time, fill the reservoir with the
correct hydraulic fluid (Fluid type: Demineralised water or a mineral oil
(Recommended ISO viscosity grade ≤ 22)). Fill and prime the pressure station.
If new, remove the red plastic blanking cover from the Test port.
Fill the reservoir using the procedure that follows:
Filling and Priming the pump
Remove Priming
Pump
1 2 3 4 5
x5 6 7 8 9
10
11
12
13
Step Procedure
1.
Turn the Refill valve fully counter-clockwise (Ref: Item 11).
2.
Turn the Volume adjuster fully clockwise (Ref: Item 2.1).
3.
Turn the Release Valve Stem fully counter-clockwise (Ref: Item 5).
4.
Remove the Priming pump piston/Release valve stem assembly.
Safety and Quick Start Guide Druck DPI612
Page 18 of 20 [EN] English – 109M0089
5.
Fill the reservoir with the recommended fluid, (Fluid type: Demineralised water or
a mineral oil (Recommended ISO viscosity grade ≤ 22)) 25mm approx from the
top.
6.
Re-fit the Priming pump piston/Release valve stem assembly
7.
Turn the Release Valve Stem fully clockwise (Ref: Item 5).
8.
Turn the Refill valve fully clockwise, until finger tight (Ref: Item 11).
9.
Turn the Volume adjuster fully counter-clockwise (Ref: Item 2.1).
10.
Turn the Volume adjuster 5 turns clockwise (Ref: Item 2.1).
11.
Operate the Priming pump until the air is expelled and fluid is visible at the Test
port.
12.
Fit the “Item under test” to the Test port use the existing adaptor or the
applicable AMC adaptor and applicable seals.
13.
Operate the Priming pump and prime the system to a maximum pressure of 10
bar.
14.
Turn the Volume adjuster (Ref: Item 2.1) clockwise, until the required pressure is
indicated.
15.
Turn the refill valve (Ref: Item 11) fully counter-clockwise to allow full pressure
control.
16.
On completion of test, open the pressure release valve one turn (Ref: Item 5) to
release pressure before disconnection of device under test.
7.3.3 Attach the device under test
Step Procedure
1.
Open the refill valve fully counter-clockwise (Ref: Item 11).
2.
Open the pressure release valve counter-clockwis (Ref: Item 5)e.
3.
Use the applicable adaptor to attach the device, (Ref: Figure 8).
Safety and Quick Start Guide Druck DPI612
Page 19 of 20 [EN] English – 109M0089
Figure 8
b. (G)/BSPP
P≥100 bar
c. (G)/BSPP
P≤100 bar
Pressure Port
a. NPT
1 2 3
Safety and Quick Start Guide Druck DPI612
Page 20 of 20 [EN] English – 109M0089
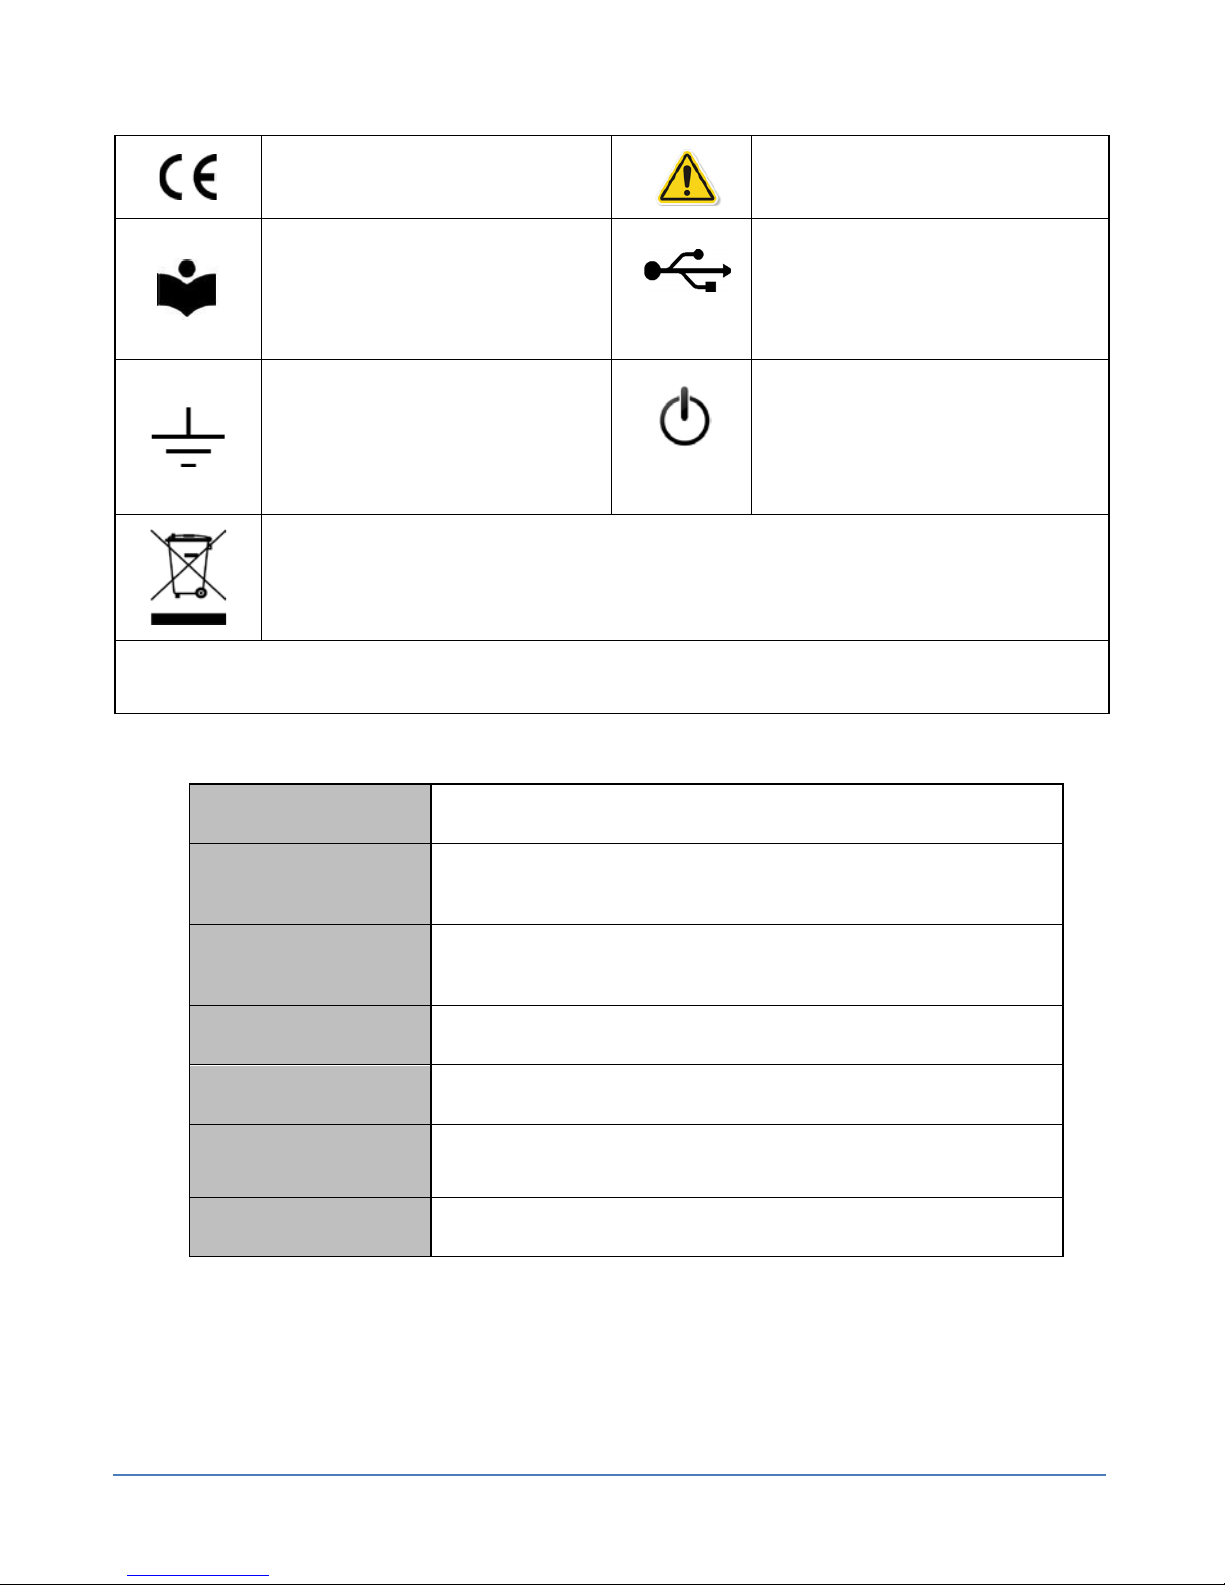
8. MARKS AND SYMBOLS ON THE INSTRUMENT
Complies with European Union
directives
Warning – refer to the manual
Read the manual
USB ports: Type A; Mini-type B
connector
Ground (Earth)
ON / OFF
Do not dispose of this product as household waste. See the “Maintenance”
section of the User manual.
More marks and symbols are specified in the User Manual (Druck DPI612 Pressure Calibrator,
109M4017).
9. GENERAL SPECIFICATION
Display
LCD: Color display with touch-screen
Ingress
Protection
IP54 rated
Shock /
Vibration
BS EN 61010-1:2010 / MIL-PRF-28800F CLASS 2
EMC
BS EN 61326-1:2013
Electrical safety
BS EN 61010-1:2010
Pressure safety
Pressure Equipment Directive - Class: Sound Engineering
Practice (SEP)
Approved
CE Marked
GE
Measurement and Control
© 2015 General Electric Company. Tous droits réservés. Spécifications sujettes
à modifications sans préavis. GE est une marque déposée de General Electric
Company. Les autres noms de société ou de produit mentionnés dans ce
document peuvent être des marques commerciales ou des marques
déposées de leur détenteur respectif, non affilié à GE.
Druck DPI612
Contrôleur de mesure de pression portatif
Guide de sécurité et de démarrage rapide – 109M0089

Guide de sécurité et de mise en route rapide Druck DPI612
Page 2 sur 20 [FR] Français – 109M0089
DPI612: Contrôleur de mesure de pression (Figure 1)
DPI612-PFX (contrôleur de mesure pneumatique pFlex) :
-950 mbar à 20 bar (-13,5 à 300 psi)
DPI612-PFP (contrôleur de mesure pneumatique pFlexPro) :
-950 mbar à 100 bar (-13,5 à 1500 psi)
DPI612-HFP (contrôleur de mesure hydraulique hFlexPro) :
0 à 1000 bar (0 à 15000 psi)
Plage des températures de fonctionnement :
-10 °C à +50 °C (+14 °F à +122 °F)
+10 °C à +30 °C (spécification d'étalonnage optimisée)
0 °C – 40 °C avec alimentation secteur en option
Température de stockage : -20 °C à +70 °C (-4 °F à +158 °F)
Humidité : 0 à 90 % d'humidité relative (HR)
Sans condensation
Alimentation électrique : 100 – 260 V +/-10 %, 50 / 60 Hz CA, sortie CC V=5 A,
1,6 A, CATII selon CEI60364-4-443
Altitude : jusqu'à 2000 m
Batteries (rechargeables) : Li-ion 14,1 Wh, référence GE : CC3800GE Tension
nominale 3,7 V 3800 mAh Température de charge : 0 °C à 40 °C (32 °F à 104 °F)
Température de décharge : -10 °C à 60 °C (14 °F à 140 °F). Remarque : Pour
une performance optimale des piles, la température ne doit pas dépasser 60
°C (140 °F).
Piles (non rechargeables) : 8 × AA alcaline
Débits de fuite de pression :
DPI612-PFX = 0,01 bar/min à 20 bar
DPI612-PFP = 0,02 bar/min à 100 bar
DPI612-HFP = 1 bar/min à 1000 bar
Débits de fuite de vide :
DPI612-PFX = 0,005 bar/min à 95 % de vide
DPI612-PFP = 0,005 bar/min à 95 % de vide
DPI612-HFP = s/o
Modules de pression recommandés (PM620)
DPI612-PFX : 2 à 20 bar (3 à 300 psi)
DPI612-PFP : 20 à 100 bar (300 à 1500 psi)
DPI612-HFP : 200 à 1000 bar (3000 à 15000 psi)
Guide de sécurité et de mise en route rapide Druck DPI612
Page 3 sur 20 [FR] Français – 109M0089
AVERTISSEMENTS GÉNÉRAUX
• Avant d'utiliser cet instrument, lisez et assurez-vous de bien comprendre la
section "Sécurité", le manuel d'utilisation et les consignes d'utilisation des
accessoires/options/équipements que vous utilisez.
• Lisez et assurez-vous de bien comprendre les procédures de sécurité locales en
vigueur.
• Il est dangereux d'ignorer les avertissements spécifiés.
• Le non-respect des limites spécifiées pour l’instrument ou des conditions
d’utilisation anormales présentent un danger. Utilisez les protections appropriées
et respectez toutes les consignes de sécurité en vigueur.
• N'utilisez pas cet instrument en présence de gaz explosifs, de vapeur ou de
poussière afin d'éviter tout risque d’explosion.
• N'utilisez aucun équipement endommagé et utilisez exclusivement des pièces
d'origine fournies par le fabricant.
AVERTISSEMENTS RELATIFS À L'ÉLECTRICITÉ
• Po
ur éviter tout risque d'électrocution ou de détérioration de l'instrument, ne
générez pas une tension supérieure à 30 V entre les bornes, ou entre les bornes et
la masse (terre).
• Cet instrument utilise une batterie rechargeable Lithium-ion ou des piles AA
standard en option. Pour éviter tout incendie ou explosion, ne mettez pas la
batterie en court-circuit, ne l'écrasez pas et ne la démontez pas.
• Pour éviter toute fuite ou tout échauffement de la batterie, utilisez exclusivement
la batterie, le bloc d'alimentation et le chargeur de batterie spécifiés par GE.
Remarque : Le bloc d'alimentation est conçu pour fonctionner exclusivement
dans une plage de températures comprise entre 0 °C et 40 °C (32 °F et 104 °F).
Guide de sécurité et de mise en route rapide Druck DPI612
Page 4 sur 20 [FR] Français – 109M0089
ATTENTION
• Pour éviter d'endommager l'écran, n'utilisez pas d'objets pointus sur l'écran
tactile.
• Couper l'alimentation sans arrêter correctement le DPI612 peut entraîner la perte
de la date et de l'heure ; si cela se produit, réglez de nouveau la date et l'heure en
redémarrant l'instrument.
• Pour éviter toute détérioration des modules DPI612 et PM620, utilisez-les
uniquement dans les limites de pression spécifiées.
• Pour éviter tout endommagement de l'instrument, ne laissez pas s'encrasser le
mécanisme de mise sous pression. Nettoyez tout équipement raccordé avant
connexion.
• Cet instrument n'est pas adapté à une installation permanente en extérieur.
1. PRÉSENTATION
Figure 1
Le DPI612 est un instrument fonctionnant sur batterie pour effectuer des opérations
de mesure et de génération électrique. L'écran tactile vous permet d'afficher les
différents paramètres. L'instrument DPI612 mesure et affiche, via des modules de
pression interchangeables par l'utilisateur, la pression pneumatique ou hydraulique/le
vide générés par l'instrument. Le type et la plage de génération de pression
dépendent du modèle sélectionné.
DPI612- PFX
DPI612- PFP
DPI612- HFP
Guide de sécurité et de mise en route rapide Druck DPI612
Page 5 sur 20 [FR] Français – 109M0089
Figure 2
9 4 5
5.1
3
3.1
10
2.
1
12
9
5
10
12
11
4
9
5 4 3
12 2 3.1
10
Guide de sécurité et de mise en route rapide Druck DPI612
Page 6 sur 20 [FR] Français – 109M0089
Figure 3
Guide de sécurité et de mise en route rapide Druck DPI612
Page 7 sur 20 [FR] Français – 109M0089
1.1 LISTE DES PIÈCES
Élément n°
Description
1
Bouton
ON ou OFF.
2 PFX uniquement : régleur de volume pneumatique.
2.1
Modèles PFP, HFP uniquement : régleur de volume avec poignée repliable.
3 Mécanisme de la pompe.
3.1
Modèles PFX, PFP uniquement : sélecteur de pression/vide pour régler le fonctionnement de la
pompe : pression (+), vide (-).
4 Orifice d'essai : pour raccorder l'appareil testé.
5 Soupape de surpression pneumatique pour libérer la pression dans le système.
5.1
Modèles PFP uniquement : soupape de remplissage pneumatique. Fermez-la pour évacuer toute la
pression de l'appareil et remplir le mécanisme de mise sous pression.
6 Connecteurs CH1 pour : tension (V) ; courant (mA+, mA-) ; fonctionnement du contact
7 Connecteurs CH2 isolés pour : tension (V) ; boucle d'alimentation 24 V (24 V).
8 Écran à cristaux liquides (LCD) : Écran couleur avec touches tactiles. Pour effectuer une sélection,
touchez la zone de l'écran concernée.
9 Accessoire en option (non illustré) : Raccord de pression pour une soupape de surpression (PRV). Un
obturateur standard est disponible.
10
Raccords de pression et électriques pour un module PM620 (non illustré) :
Modèles DPI612 PFX et PFP : Scellez le raccord de pression avec un obturateur (réf. : IO620-BLANK)
ou un module PM620.
Modèles DPI612 HFP uniquement : Le raccord de pression se scelle lui-même.
11
Modèles HFP uniquement : soupape de remplissage hydraulique (non illustrée) : fermez-la pour
évacuer toute la pression de l'appareil et remplir de fluide le mécanisme de mise sous pression.
12
Dragonnes
13
Prise d'entrée de l'alimentation CC +5 V. Cette alimentation charge également la batterie en option.
14
Connecteur USB de type A pour le raccordement de périphériques externes (mémoire flash USB ou
modules externes en option).
15
Connecteur USB mini de type B pour communiquer avec un ordinateur.
Guide de sécurité et de mise en route rapide Druck DPI612
Page 8 sur 20 [FR] Français – 109M0089
2. RACCORD
DE PRESSION EXTERNE
Employez une méthode adéquate pour assurer l’étanchéité des raccords de pression
externe, puis serrez au couple approprié.
Couple maximal : ISO 228/1, 1/8 NPT : 35 Nm (26 lbf.ft)
ISO 228/1, G1/8 : 25 Nm (18,4 lbf.ft)
Raccordez l'adaptateur de pression sur le DPI612 et serrez à la main.
3. PRÉ-CONTRÔLEUR DE MESURE DPI612 – DÉMARRAGE DES
OPÉRATIONS
3.1 Installer la batterie rechargeable
1. Retirez le cache de la batterie en desserrant la vis de fixation et en levant le cache
vers le haut.
2. Insérez la batterie rechargeable CC3800GE dans le compartiment comme illustré à
la Figure 4.
3. Pour remettre le cache de la batterie en place, positionnez les ergots du cache (A)
de manière inclinée dans les emplacements prévus à cet effet, puis fermez le
compartiment comme illustré à la Figure 4.
4. Resserrez la vis de fixation du cache de la batterie.
Figure 4

Guide de sécurité et de mise en route rapide Druck DPI612
Page 9 sur 20 [FR] Français – 109M0089
4. MODES
D'ALIMENTATION
4.1 Mise sous tension (voir Figure 3)
Appareil éteint – appuyez momentanément sur le bouton d'alimentation jusqu'à ce
que logo GE s'affiche.
4.2 Mise hors tension
Appuyez sur le bouton d'alimentation et relâchez-le :
Sélectionnez SWITCH OFF dans la fenêtre POWERDOWN OPTIONS affichée.
Figure 5
Remarques :
• La mise hors tension est également possible en maintenant le bouton
d'alimentation enfoncé jusqu'à ce que l'écran s'éteigne.
• Utilisez la mise hors tension pour préserver la capacité de la batterie lorsque
l'instrument reste inutilisé sur de longues périodes.
4.3 Mode Veille
Appuyez sur le bouton d'alimentation et relâchez-le :
Sélectionnez GO TO STANDBY dans la fenêtre POWERDOWN OPTIONS affichée.
Remarque : Utilisez le mode Veille entre deux tâches pour bénéficier d'un démarrage
rapide.
4.4 Mise sous tension à partir du mode Veille
Lorsque la mise sous tension s'effectue à partir du mode Veille, l'instrument présente
toujours le dernier écran affiché avant la mise en veille.

Guide de sécurité et de mise en route rapide Druck DPI612
Page 10 sur 20 [FR] Français – 109M0089
5.
NAVIGATION SUR LE TABLEAU DE BORD
L'application DASHBOARD (tableau de bord) permet de sélectionner rapidement une
fonction sans menus ni touches spéciales. Les icônes DASHBOARD représentent les
applications fonctionnelles du DPI612, comme par exemple l'application CALIBRATOR
(contrôleur de mesure). Touchez une icône pour démarrer l'application
correspondante.
Lorsqu'il y a plus de choix possibles que ceux affichés à l'écran, faites glisser votre
doigt vers le haut, le bas, la gauche ou la droite pour faire défiler l'écran.
FIGURE 6
1) Faites glisser votre doigt de droite à gauche.
2) Touchez le menu TASK.
3) Touchez la tâche choisie.
Figure 7
 Loading...