

Page 1

GEAppliances
English section begins on page 2
Owner'sManual
Manuel d'utilisation
Manual del propietario
Type473
Type475
La section franqaise commence a la page 16
La seccion en espa_ol empieza en la pagina 30
Part No. 175D1807P274Pub.No.49-90007 5-99JR
500A277P022Rev.1
Page 2

SafetyInformation s-5
Operating Instructions
Controls .................... 6
Features................... 7 8
ReversingTheDoor........... 9
LoadingandUsingTheDryer.. 10
VentingTheDryer........... 11
Congratulations!
YouAre Now Part of theGEFamily.
Welcome to the GE fmnily. We're proud of our quality pro(tuct_s and we are committed
to providing dependable service. You'll see it in this eas?_to-use Owner's Manual and
you'll hear it in the fiiendly voices of our customer service deparunent.
Best of all, you'll experience these values each time you use your dpyer. That's
important, because your new (tuer willbe part of your fmnily for ma W years. And we
hope you will be part of ours for a long time to come.
We thankyou for buying GE. We appreciate your purchase, and hope you will continue
to rely on us whenever you need quality appliances for your home.
GE& You,A Service Partnership.
IMPORTANT!
Staple sales slip or cancelled check here.
Proof of the original purchase date is needed to obtain service
under the wan'anty.
,wm_
m
Troubleshooting tips
BeforeYouCallForService.. 72,13
w
w
m
w
Customer Service
Warranty.................. 74
ServiceTelephone
m_
w
Numbers............ BackCover
w
m_
W
m.
w
FORYOURRECORDS
Write the model and serial numbers here:
#
#
They are on the label on the front of the (hyer behind the (toot'.
READTHISMANUAL
Inside you _411find many helpfitl hin_s on how to use and maintain
your (tuer properly.Just a little preventive care on your part can sm_e
you a _'eat deal of time and money over the life of your (tuer.
PROPERVENTING
For the best &bqng perforntance the &b_r needs to be properly
vented. The duer xdll use more energy and mn longer if it is not
vented to tile specifications outlined in the Ventingthe Dryersection in
this manual and tim Exhausting section in tim Installation Instructions.
IFYOUNEEDSERVICE
You'll find ma W answers to common problems in the Before You
CallForServicesection. If you review our chart of TroubleshootingTips
first, you may not need to call for service at all.
If you do need service, you can relax knowing help is only a phone
call a_vty. A list of toll-flee customer service numbers is included in
the back section. Or, in the O.$.,you can always call the GE Answer
Center ®at 800.626.2000, 24 hours a day, 7 days a week. In Canada,
call 1-800-361-3400.
2
Page 3

IMPORTANTSAFETYINFORMATION.
READALL INSTRUCTIONSBEFOREUSING.
tL WARNING!
Foryour safety, the information in this manual must be followed to minimize the risk of fire
or explosion, electric shock, or toprevent property damage, personal in.jury,or death.
[] Do net store or use gasoline or other
flammable vapors and liquids in the
vicinity of this or any other appliance.
[] Installation and service must be performed
by a qualified installer, service agency or
the gas supplier.
WHATTODOIF YOUSMELLGAS:
_ Do not try to light a match, or cigarette, or
turn on any gas or electrical appliance.
_Do not touch any electrical switch; do net
use any phone in your building.
Clear the room, building or area of all
occupants.
California Safe Drinking Water and Toxic Enforcement Act
This act requires the governor of California to publish a list of substances kno_,_ to the state to cause cancer,
birth defects or other reproductive harm and requires businesses to warn customers of potential exposure
to such substances.
Gas appliances can cause minor exposure to %ur of these substances, nmnely benzene, carbon monoxide,
formaMehyde and soot, caused primarily by the incomplete combustion of natural gas or LP fuels.
_ lmmediately call your gas supplier from a
neighbor's phone. Follow the gas
supplier's instructions carefully.
_ff you cannot reach your gas supplier, call
the fire department.
Properly adjusted (hyers will minimize incomplete combusuon. Exposure to these substances can be
minimized fllrther by properly venting the (hyer to the outdoors.
PROPERINSTALLATION
This dryer must be properly installed and located in accordance with the Installation Instructions
before it is used. If you did not receive an Installation Instructions sheet, you can receive one by
calling us toll-free at the GEAnswer Cente/_, 800.626.2000.
[] Properly ground (hyer to confbrm with all
governing codes and ordinances. Follow details in
Installation Instructions.
[] Install or store where it will not be exposed to
temperatures below freezing or exposed to the
weather.
[] Connect to a properly rated, protected and sized
power supply circuit to re<lid electrical overload.
[] Remove all shmp packing items and dispose of all
shipping materials properly.
Exhaust/Ducting:
[-_ Gas (hyers MUST be exhausted to the outside.
[_Exhausting electric diTers to the outside is
stronglyrecommendedto prevent large amounts
of moisture and lint from being blown into the
FOO1TI.
[_Use only rind metal or flexible metal 4"
diameter (lnctwork inside the (hyer cabinet or
for exhausting m the outside. USE OFPLASTIC
OROTHERCOMBUSTIBLEDUCTWORKCAN
CAUSEA FIRE.PUNCTUREDDUCTWORKCAN
CAUSEA FIREIFIT COLLAPSESORBECOMES
OTHERWISERESTRICTEDIN USEORDURING
iNSTALLATiON.
For complete details, follow the Installation 3
Instructions.
Page 4
IMPORTANTSAFETYINFORMATION.
READALL INSTRUCTIONSBEFOREUSING.
WARNING!
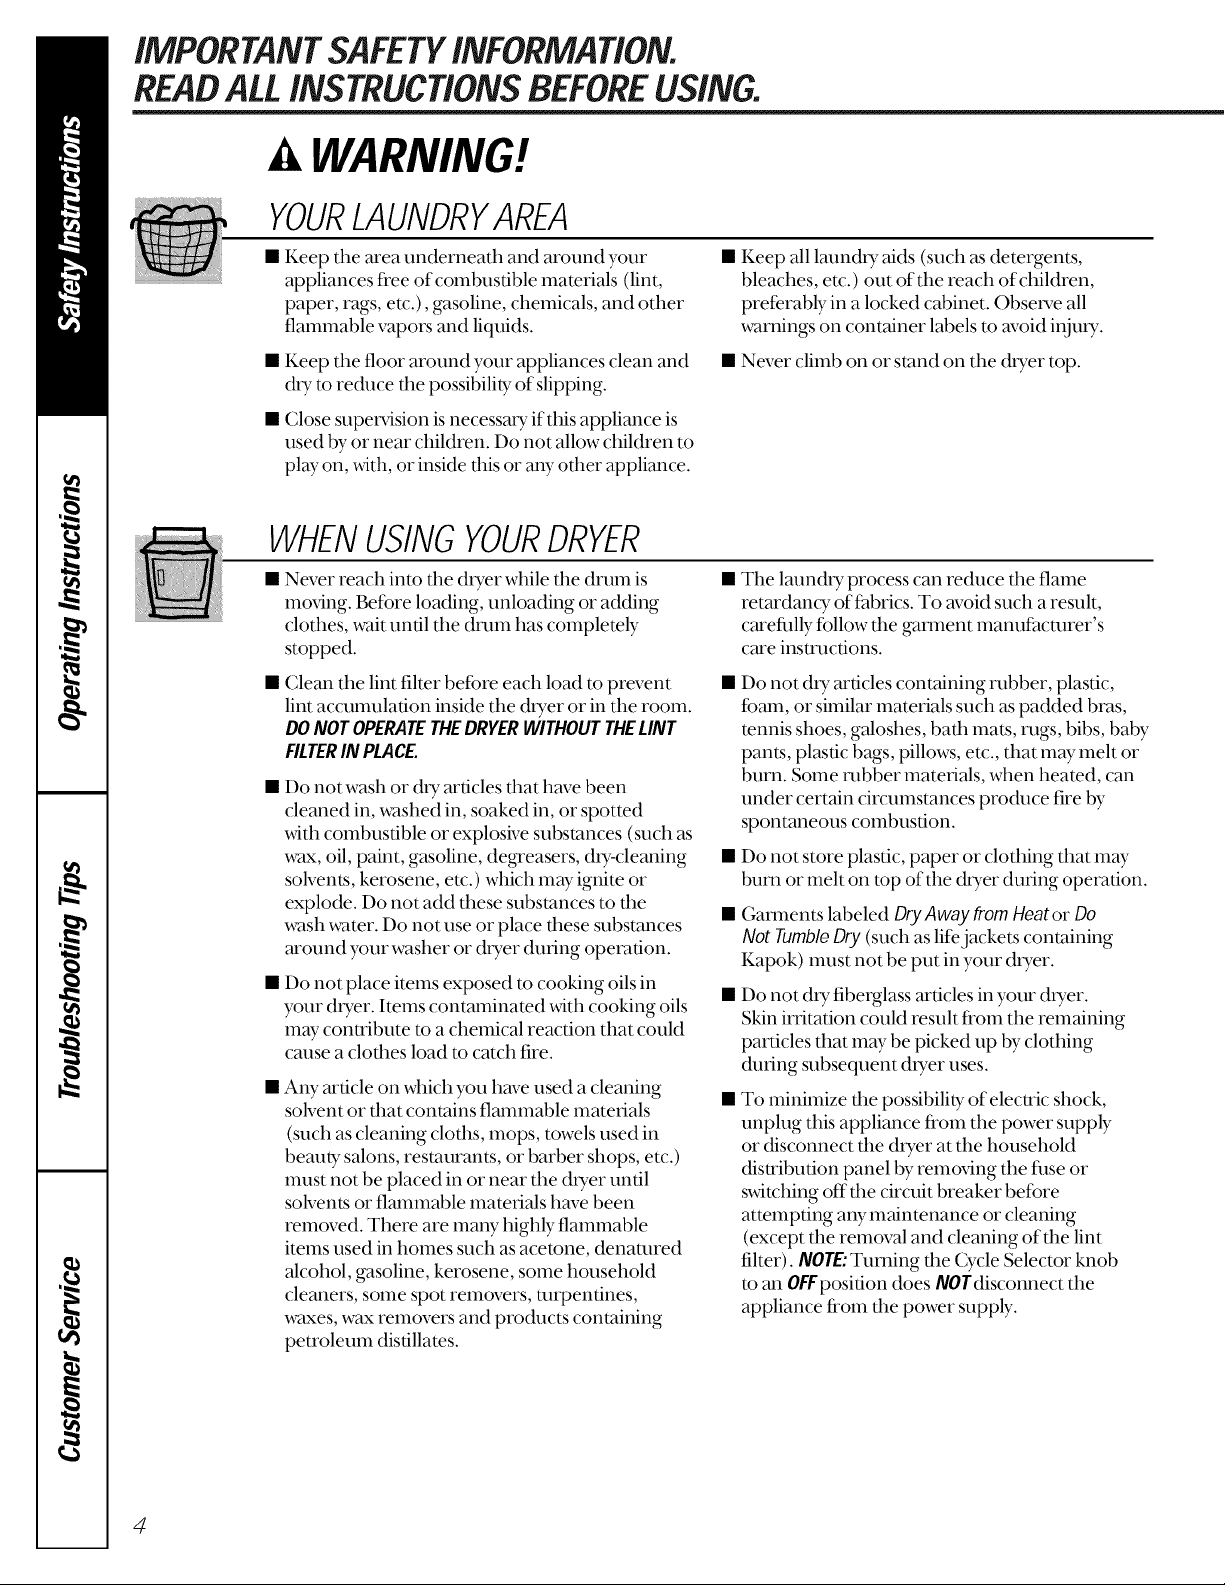
YOURLAUNDRYAREA
Keep the area underneath and around your
appliances fi'ee of combustible materials (lint,
paper, rags, etc.), gasoline, chemicals, and other
flamlnable vapors and liquids.
• Keep the floor around your appliances clean and • Never climb on or stand on the (hyer top.
cityto re&me the possibility of slipping.
• Close supervision is necessa,y if this appliance is
used by or near children. Do not allow children to
play on, xdth, or inside this or any_other appliance.
• Keep all lmmdty aids (such as detergents,
bleaches, etc.) out of the reach of children,
preferably in a locked cabinet. Obsexve all
warnings on container labels to avoid inju U.
WHENUSINGYOURDRYER
Never reach into die (hyer while die drum is
lnoving. Before loading, unloading or adding
clothes, wait until the dram has COlnpletely
stopped.
Clean the lint filter before each load to prevent
lint accumulation inside the duer or in the room.
DONOTOPERATETHEDRYERWITHOUTTHELINT
FILTERIN PLACE.
• Do not wash or city articles fllat have been
cleaned in, washed in, soaked in, or spotted
with combustible or explosive substances (such as
wax, oil, paint, gasoline, de_'easers, (h?:cleaning
solvent.s, kerosene, etc.) which m W ignite or
explode. Do not acid these substances to the
wash water. Do not use or place these substances
around your washer or (hyer during operation.
• Do not place items exposed to cooking oils in
your (hyer. Itelns contaminated,_4th cooking oils
inW contribute to a chelnical reaction that could
cruise a clothes load to catch fire.
• AW article on which you have used a cleaning
solvent or that contains flamlnable materials
(such as cleaning cloths, mops, towels used in
bern W salons, restaurants, or barber shops, etc.)
lnUSt not be placed in or near the duer until
solvent.s or flammable materials have been
removed. There are ma W highly flammable
items used in homes such as acetone, denatured
alcohol, gasoline, kerosene, seine household
cleaners, some spot removers, tmpentines,
waxes, wax removers and pro&rots containing
petroleum distillates.
• The lmmchy process can reduce die flame
retardanQ_ of fabrics. To avoid such a result,
carefiflly follow the gammnt manuf_mmrer's
care instructions.
• Do not dpy articles containing rubber, plastic,
foam, or similar materials such as padded bras,
tennis shoes, galoshes, bath mats, rugs, bibs, baby
pant_s,plastic bags, pillows, etc., that InW melt or
burn. Some robber materials, when heated, can
under certain circumstances pro&me fire by
spontaneous combustion.
• Do not store plastic, paper or clothing that may
bum or melt on top of the duer duting operation.
• Garments labeled DryAway from Heater Do
Not Tumble Dry (such as life jackets containing
Kapok) lnUStnot be put in your (hyer.
• Do not city fiberglass articles in your (hyer.
Skin irritation could result ffOln the relnaining
particles that may be picked up by clothing
chuing subsequent duer uses.
• To minimize tim possibility of electric shock,
unplug this appliance fi'oln the power supply
or disconnect tim (hTer at the household
distribution panel by removing the filse or
switching off tim circuit breaker before
attempting any maintenance or cleaning
(except tim removal and cleaning of tim lint
filter). NOTE: Turning tim Cycle Selector knob
to an OFFposition does NOTdisconnect the
appliance fi'Oln the power supply.
4
Page 5

Never attempt to operate this appliance if it is
damaged, malfimctioning, partially
disassembled, or has missing or broken parks,
including a damaged cord or plug.
The interior of tim machine and the exhaust duct
connection inside the &yer shouM be cleaned at
least once a year by a qualified technician. See the
Loadingand Usingthe Dryersection.
Ifyours is a gas (hyer, it is equipped with an
automatic electric ignition and does not have a
pilot light. DONOTATTEMPTTOLIGHTWITHA
MATCH.Burns may result fi'om having your hand
in the vicinib_ of the burner when the automatic
ignition rams on.
WHENNOTUSINGYOURDRYER
• You may wish to soften your laundered f>lbrics
or re&me the static electrici b, in theln by using
a due>applied f>tbricsoftener or an anti-static
conditioner. We recommend you use either a
f>tbricsoftener in the wash cycle, according to
the manufacturer's instructions for those
pro(hm_s, or uy a due>added product for
which the manufacturer gives written assurance
on the package that their product can be safely
used in your duer. Sets@e or perfbmlance
problems caused by use of these pro(hints are
the responsibility of the manuf_mmrers of those
produc_s and are not covered under the wan'anty
m this appliance.
• Grasp file plug firefly when disconnecting this
appliance to avoid dmnage to the cord while
pulling. Place the cord away fi'om traffic areas so
it,_411not be stepped on, tripped over or
subjected to damage.
Do not attempt to repair or replace any part of
this appliance or attempt aW sel_:idng unless
spedfically recommended in this Ox.mer's Manual
or in published user-repair instructions that }<)u
understand and have the skills to cany out.
• Befbre discarding a dxyer, or relnoving it ffOln
sexvice, remove the dxyer door to prevent
chiMren fi'Oln hiding inside.
• Do not tamper,_ith controls.
ReadandfollowthisSafetyInformationcarefully
SAVETHESEINSTRUCTIONS
5
Page 6
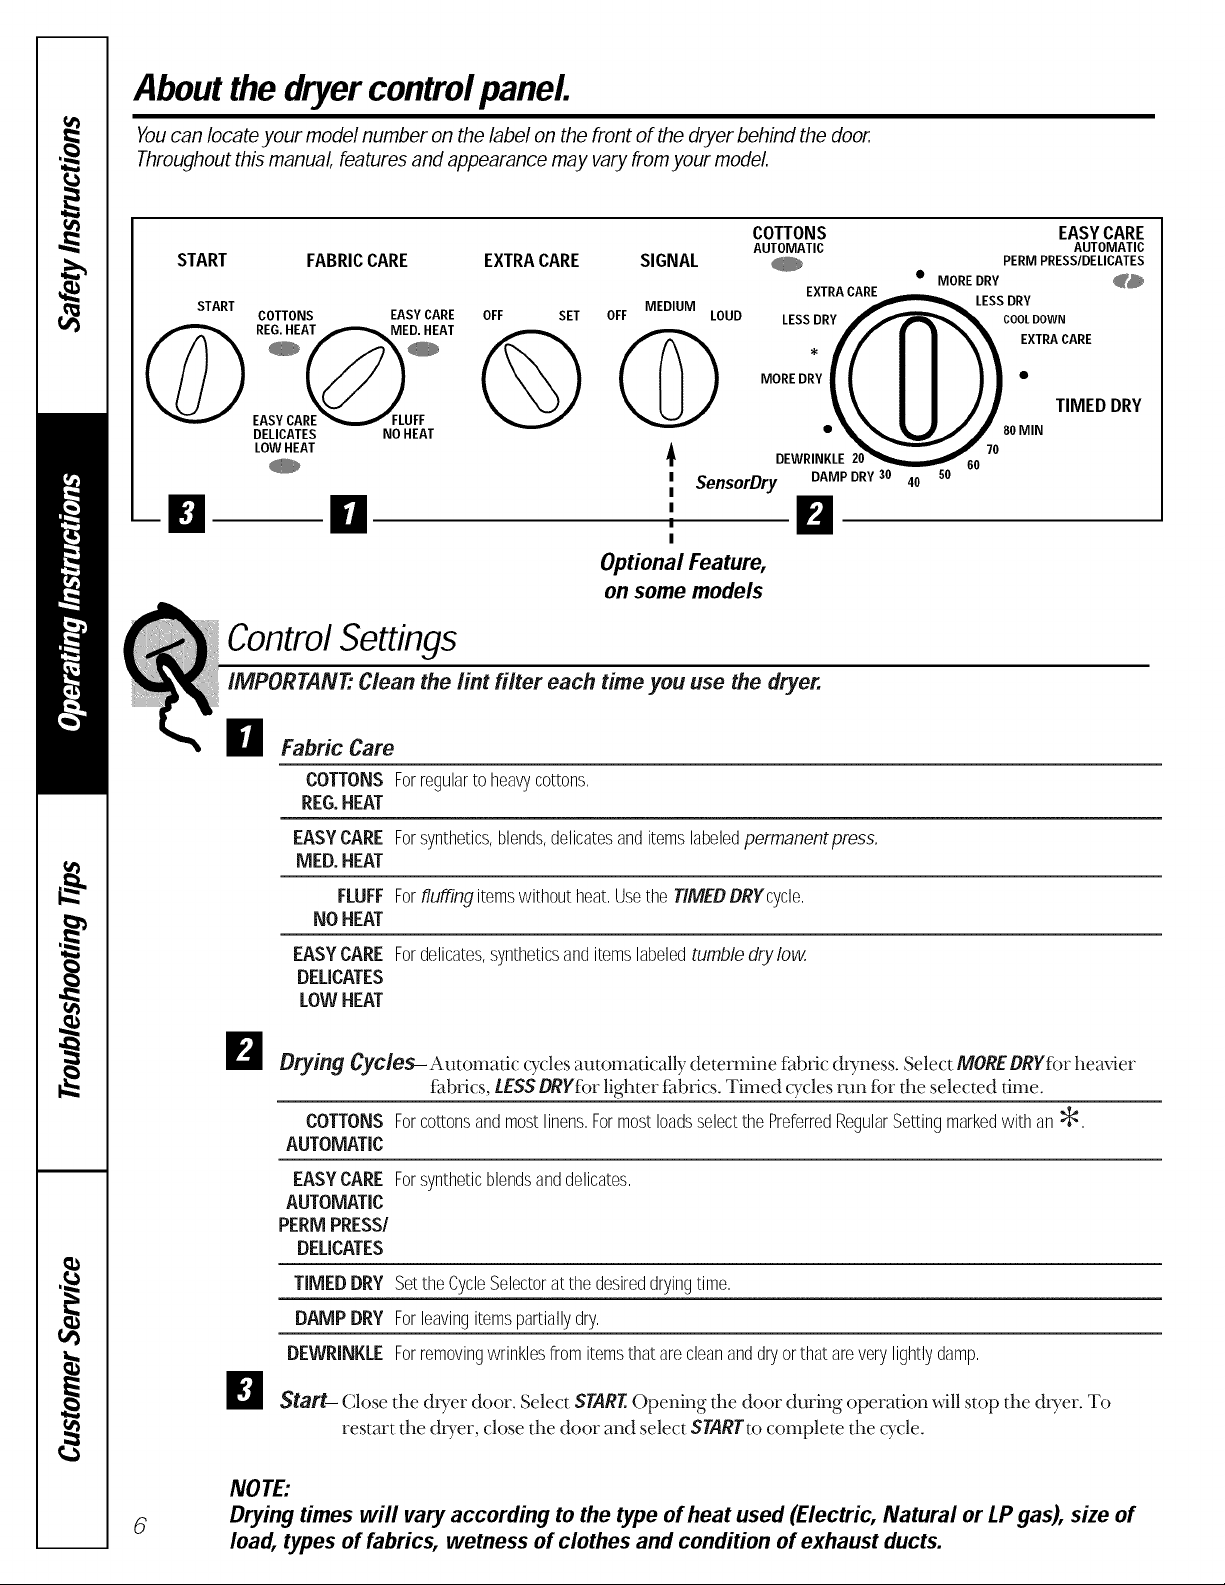
Aboutthe dryercontrolpanel
Youcan Iocate your model number on the label on the front of the dryer behind the door.
Throughout this manual, features and appearance may vary from your model.
COTTONS EASYCARE
START FABRICCARE
START
COTTONS EASYCARE OFF SET
EXTRACARE SIGNAL
MEDIUM
OFF LOUD
AUTOMATIC AUTOMATIC
! PERMPRESS/DELICATES
EXTRA__CARE_ LESSDRY
LESSDRY 5 COOLDOWN
• MORE DRY _
O Q
DELICATES NO HEAT
LOWHEAT
El ',
Control Settings
IMPORT/INK" Clean the lint filter each time you use the dryer.
I'm Fabric Care
COTTONSForregulartoheavycottons.
REG.HEAT
EASYCAREForsynthetics,blends,delicatesanditemslabeledpermanentpress.
MED.HEAT
FLUFFForfluffingitemswithoutheat.Usethe TIMEDDRgcycle,
NOHEAT
EASYCAREFordelicates,syntheticsanditemslabeledtumbledrylow.
DELICATES
LOWHEAT
Q
i SensorDry
I
!
Optional Feature,
on some models
MOREDR"IIII II"
TIMEDDRY
• ulJ.oo,°
DEWRINKLE 2_0 70
DAMP DRY 30 40 S0
El
Drying Cycles-Automatic cycles automatically determine fabric duness. Select MOREDRgfbr hemmer
f:abrics, LESS DRgfbr lighter f:abfics. Timed q:cles mn fbr the selected ume.
COTTONS Forcottonsandmostlinens.FormostloadsselectthePreferredRegularSettingmarkedwithan :_.
AUTOMATIC
EASYCARE Forsyntheticblendsanddelicates.
AUTOMATIC
PERMPRESS/
DEUCATES
TIMEDDRY SettheCycleSelectoratthedesireddryingtime.
DAMPDRY Forleavingitemspartiallydry.
DEWRINRLEForremovingwrinklesfromitemsthatarecleananddryorthatareverylightlydamp.
lrl
Start- (;lose the duet door. Select START Opening tl_edoor during operauon will stop tl_e duet. To
restart the (hTer, close the door and select sraRrto complete the QTcle.
NOTE:
6
Drying times will vary according to the type of heat used (Electric, Natural or LP gas), size of
load, types of fabrics, wetness of clothes and condition of exhaust ducts.
Page 7
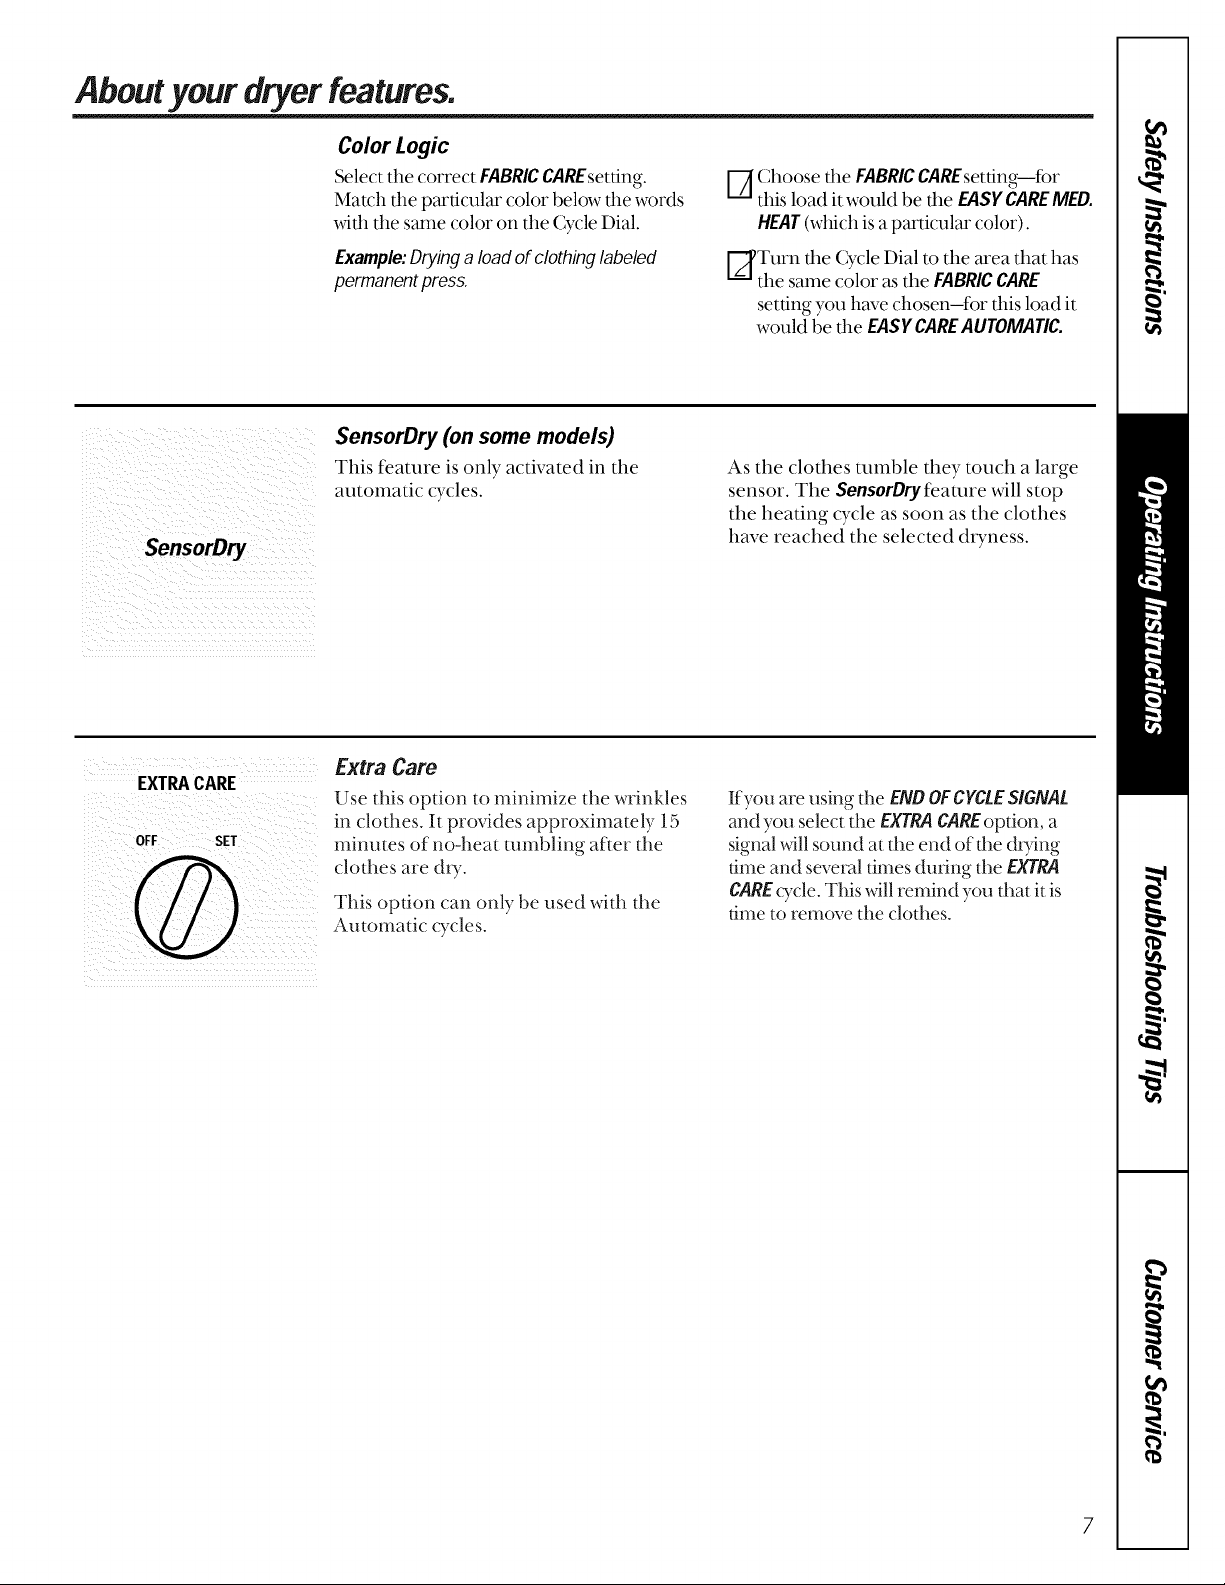
About your dryer features.
Color Logic
Select the correct FABRICCAREsetting.
Match the particular color below the words
with the same color on the Cycle Dial.
Example:Dryinga load of clothinglabeled
permanentpress.
SensorDry (on some models)
This feature is only activated in the
automatic cycles.
SensorDry
[-_ Choose the FABRICCAREsetfing--for
this load it would be the EASYCAREMED.
HEAT(whichis a particular color).
Turn the CycleDial to the area that has
the samecolor asthe FABRICCARE
setting you have chosen-for this load it
would be the EASYCAREAUTOMATIC.
As the clothes ramble they touch a large
sensor. The SensorDryfeamre will stop
the heating cycle as soon as the clothes
have reached the selected duness.
EXTRACARE..............
Extra Care
Use this option to minimize the wrinkles
in clod_es. It provides approximately 15
minutes of no-heat rambling after dm
clothes are dU.
This option can only be used wid_ tt_e
Automatic cycles.
If you are using the ENDOFCYCLESIGNAL
and you select the EXTRACAREopOon, a
signal xdll sound at the end of the (h)dng
time and several umes during the EXTRA
CARE(.Tcle.This will remind you tidal it is
time to remove tt_e clodms.
7
Page 8
Aboutyour dryerfeatures.
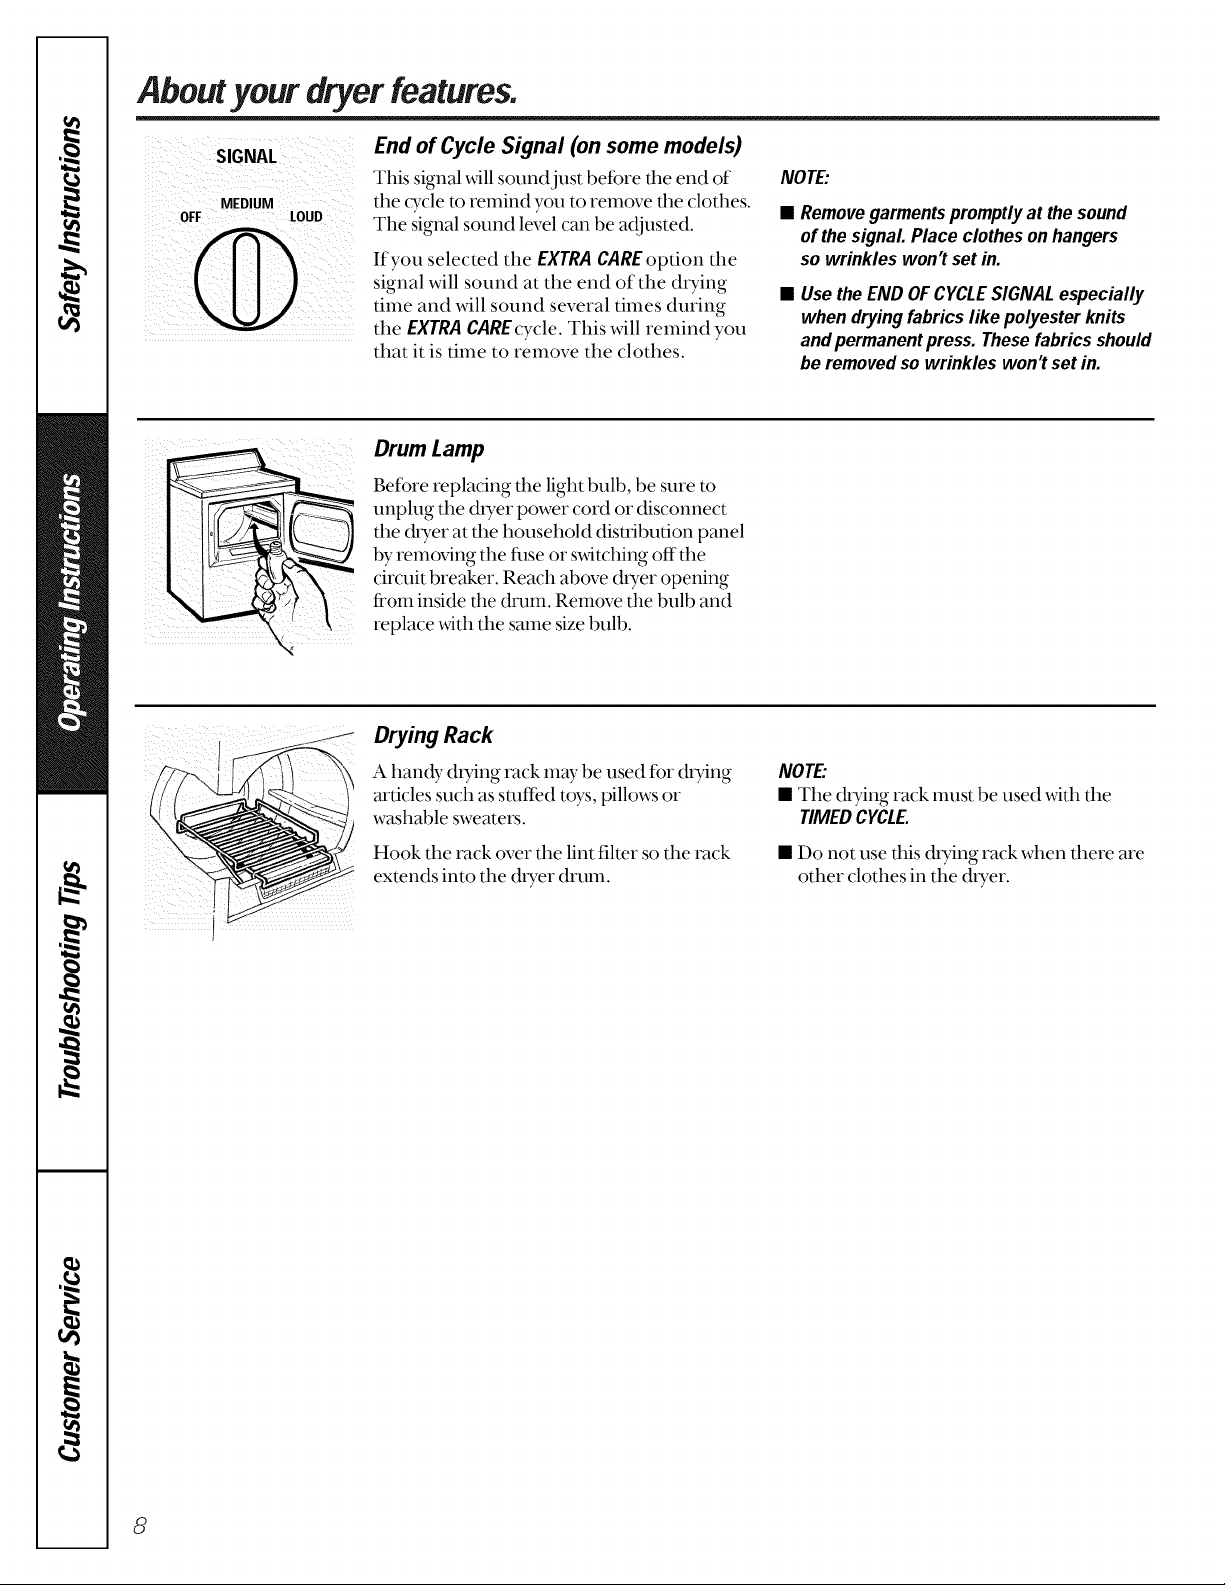
SIGNAL
MEDIUM
OFF LOUD
End of Cycle Signal (on some models)
This signal _ill sound just befbre dm end of
the cycle to remind you to remove the clothes.
The signal sound level can be adjusted.
If you selected the EXTRACAREoption the
signal will sound at the end of the (hying
time and will sound several times during
the EXTRACAREcycle. This will remind you
that it is time to remove the clothes.
Drum Lamp
Before replacing the light bulb, be sure to
unplug the &yer power cord or disconnect
the (hyer at the household distribution panel
by removing the filse or switching off the
circuit breaker. Reach above duer opening
from inside the dram. Remove the bulb and
replace with the same size bulb.
NOTE:
• Removegarmentspromptlyat the sound
ofthe signal Place clothesonhangers
so wrinkles won't set in.
• Use the END OF CYCLE SIGNAL especially
when drying fabrics like polyester knits
and permanent press. These fabrics should
be removed so wrinkles won't set in.
Drying Rack
A handy (hying rack may be used fbr (lp)_ng
articles such as stuffed tWs, pillows or
washable sweaters.
Hook the rack over the lint filter so the rack
extends into the (hyer drum.
NOTE:
• The (hying rack must be used with the
TIMEDCYCLE.
• Do not use this (hying rack when there are
other clothes in the (hyer.
8
Page 9
About reversing the door.
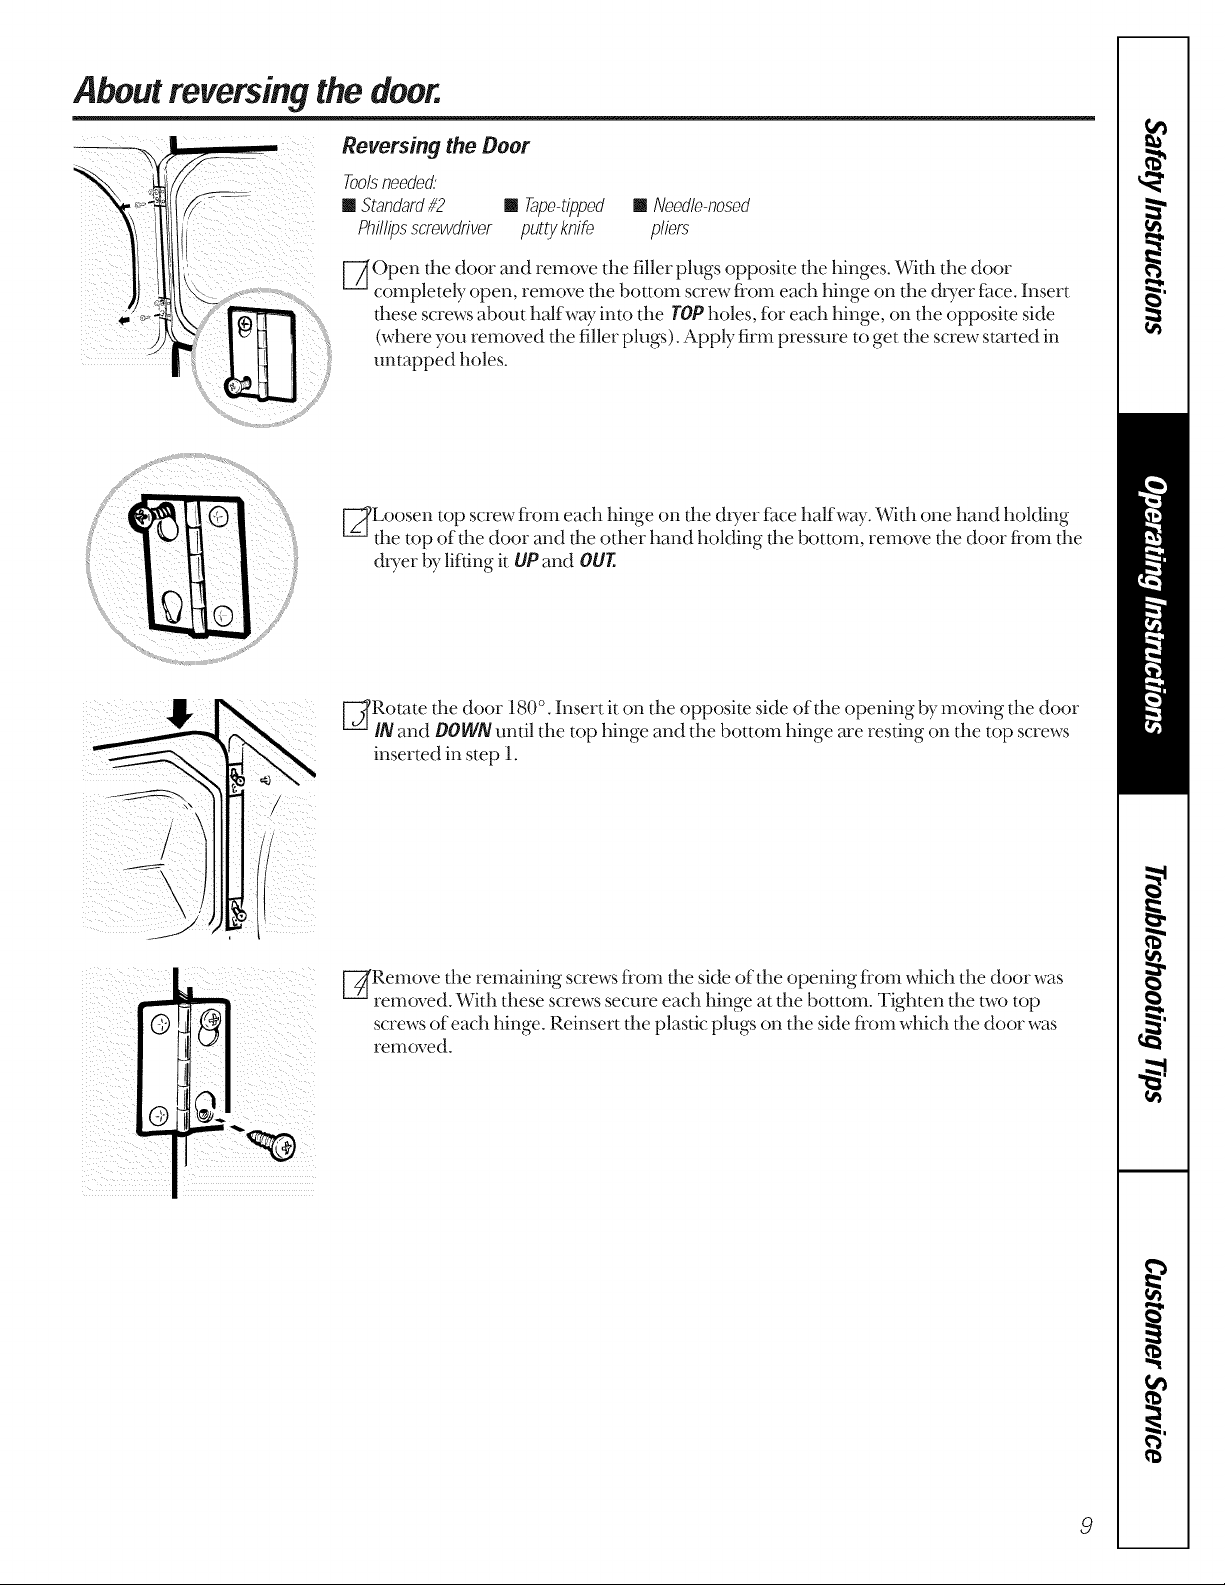
[--_Open the door and remove tt_e filler plugs opposite the hinges. With d_e door
completely open, remove the bottom screw from each hinge on the (h)Terf:ace. Insert
these screws about halfway into the TOPholes, for each hinge, on the opposite side
(where you removed the filler plugs). Apply firm pressure to get the screw started in
untapped holes.
[_Loosen top screw from each hinge on d_e (hTer f:ace halfway. Witt_ one hand holding
the top of the door and the other hand holding the bottom, remove the door from the
(h)Ter1)77lifting it UPand OUT.
[] Need/e-nosed
priers
; ¸2¸¸)¸¸¸¸¸¸
_iii_i_!!iii__i_!i_ i!iiii_!iili!i_i!iii_i!iii_i__
[_Romte the door 180% Insert it on tt_e opposite side oldie opening by moving tt_e door
I/Vand DOWN until the top hinge and the bottom hinge are resting on the top screws
inserted in step 1.
[_Remove d_e remaining screws from the side of tt_e opening from which tt_e door was
removed. Witt_ tt_ese screws secure each hinge at d_e bottom. Tighten d_e t_,,'otop
screws of each hinge. Reinsert the plastic plugs on tt_eside from which the door was
removed.
9
Page 10
Loadingandusingthedryer.
Always foflow the fabric manufacturer's care label when laundering.
SortingandLoadingHints
As a general rule, if clothes are sorted properly fbr the washer, they are sorted properly fbr the (hyer.
Donotaddfabricsoftenersheetsoncetheloadhasbecomewarm.Theymaycausefabricsoftenerstains.
Bounce._'FabricConditionerDryerSheetshavebeenapprovedforuseinaftGEDryerswhenusedinaccordancewiththe
manufacturer_instructions.
Donotoverload. Thiswastesenergyandcauseswrinkling.
Donotdotthe following items:fiberglassitems,woolens,rubber-coateditems,plastics,itemswithplastictrimand
foam-filleditems.
CareandCleaningof theDryer
TheExterior:Wipe or dust any spills or washing
compounds with a damp cloth. Duer control
panel and finishes may be damaged by soule
laund U pretreatment soil and stain relnover
products. Apply these products awW fl'Oln the
duer. The fabric in W then be washed and dried
normally. Damage to your duer caused by these
products is not covered by your warranty.
The Lint Filter: Clean tim lint filter before each
use. Moisten your fingers and reach into the filter
opening. Run your fingers across the filter, Have a
qualified technician vacumn the lint fi'om the dpyer
once a year.
FabricCareLabels
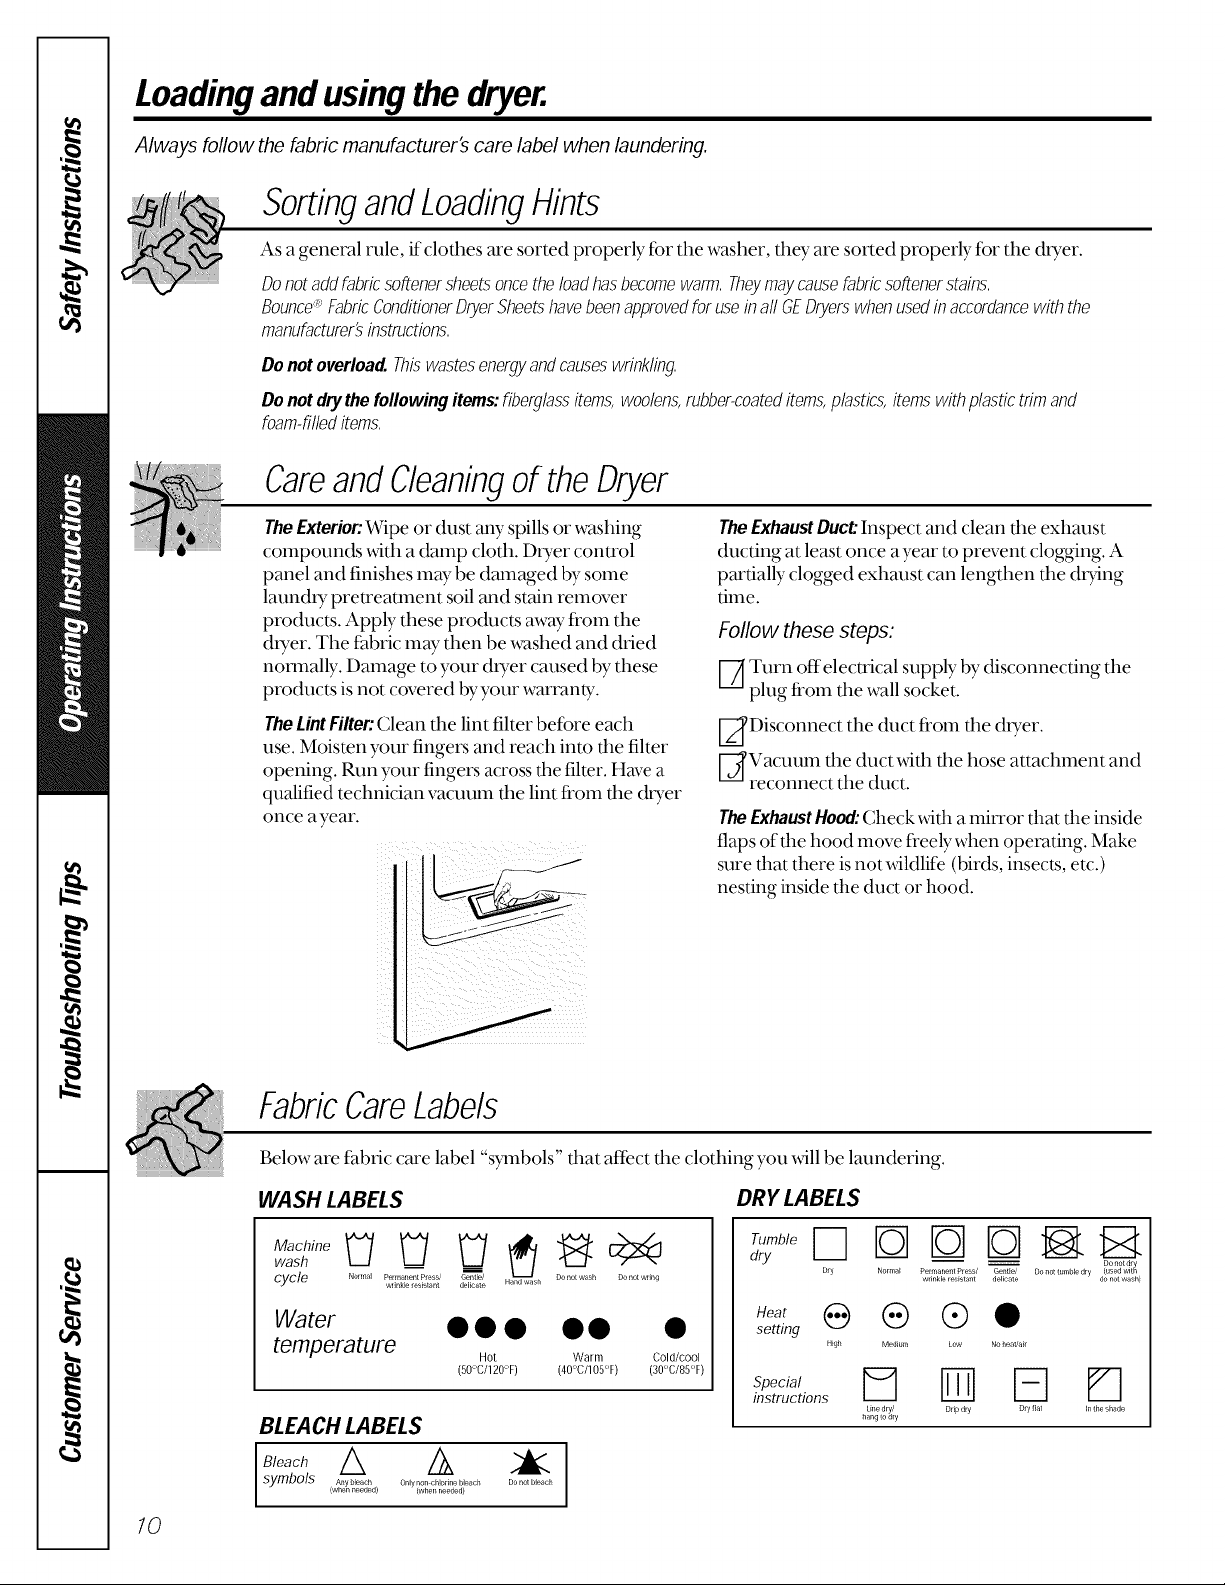
The Exhaust DucL"Inspect and clean tim exhaust
ducting at least once ayear to prevent clogging. A
partially clogged exhaust can lengthen tim dp)ing
time.
Follow these steps.
F-_ Turn offelectrical supply by disconnecting the
plug fi'om the wall socket.
[_Disconnect the duct fi'om tim dryer.
E_Vacuum the duct _4th the hose attachment and
reconnect the duct.
TheExhaustHood:Check xdfll a milTor that tim inside
flaps of the hood move freely when operating. Make
sure that there isnot xdldlife (birds, insects, etc.)
nesting inside the duct or hood.
/O
Below are ri0)tic care label "s)lnbols" fllat affect file clothing you _ill be laundering.
WASH LABELS
wash __ __
cycle Normal Pelmanent Press/ Genteel/ an was Do not wash Do not wri_g
wHnk_e resistant delicate h
Water • • • • •
temperature Hot w_m
(50°C/120°F) (40°C/105°F)
BLEACH LABELS
Cold/cool
(30°C/85°F)
DRYLABELS
.eat ® ® @
setting
High Medium Low No heat/ak
Une dry/ Drip dry Dry fiat In the shade
hang to ary
Bleach A //}X
symbols i_'J._gdl O,,,y,,_oh_or_,_<,_e_,ohDono_b,e_,oh
(when needed)
wrinkle resistant delicate do not wash)
Page 11
Ventingthedryer.
For the best (hTing per%rmance the &Tar needs to be properly vented. The dryer will use more energy
andrunlonger if it is not vented to thebelow specifications. Carefullyfollow thedetails on Exhaustingin the
Installationinstructions.
[] Use only rigid metal or flexible metal 4" diameter
ductwork inside the duer cabinet or for exhausung
to the outside.
[] Do not use plastic or other combustible ductwork.
[] Use the shortest length possible.
[] Do not crush or collapse.
[] Avoid resting the duct on sharp objects.
[] Ventingmustconform to localbuildingcodes.
Correct
Venting
Incorrect
Venting
i
11
Page 12
Beforeyou call forservice...
Troub/eshooting Tips
Save time and money! Review the charts on the fo//owing
pages first and you may not need to ca//for service.
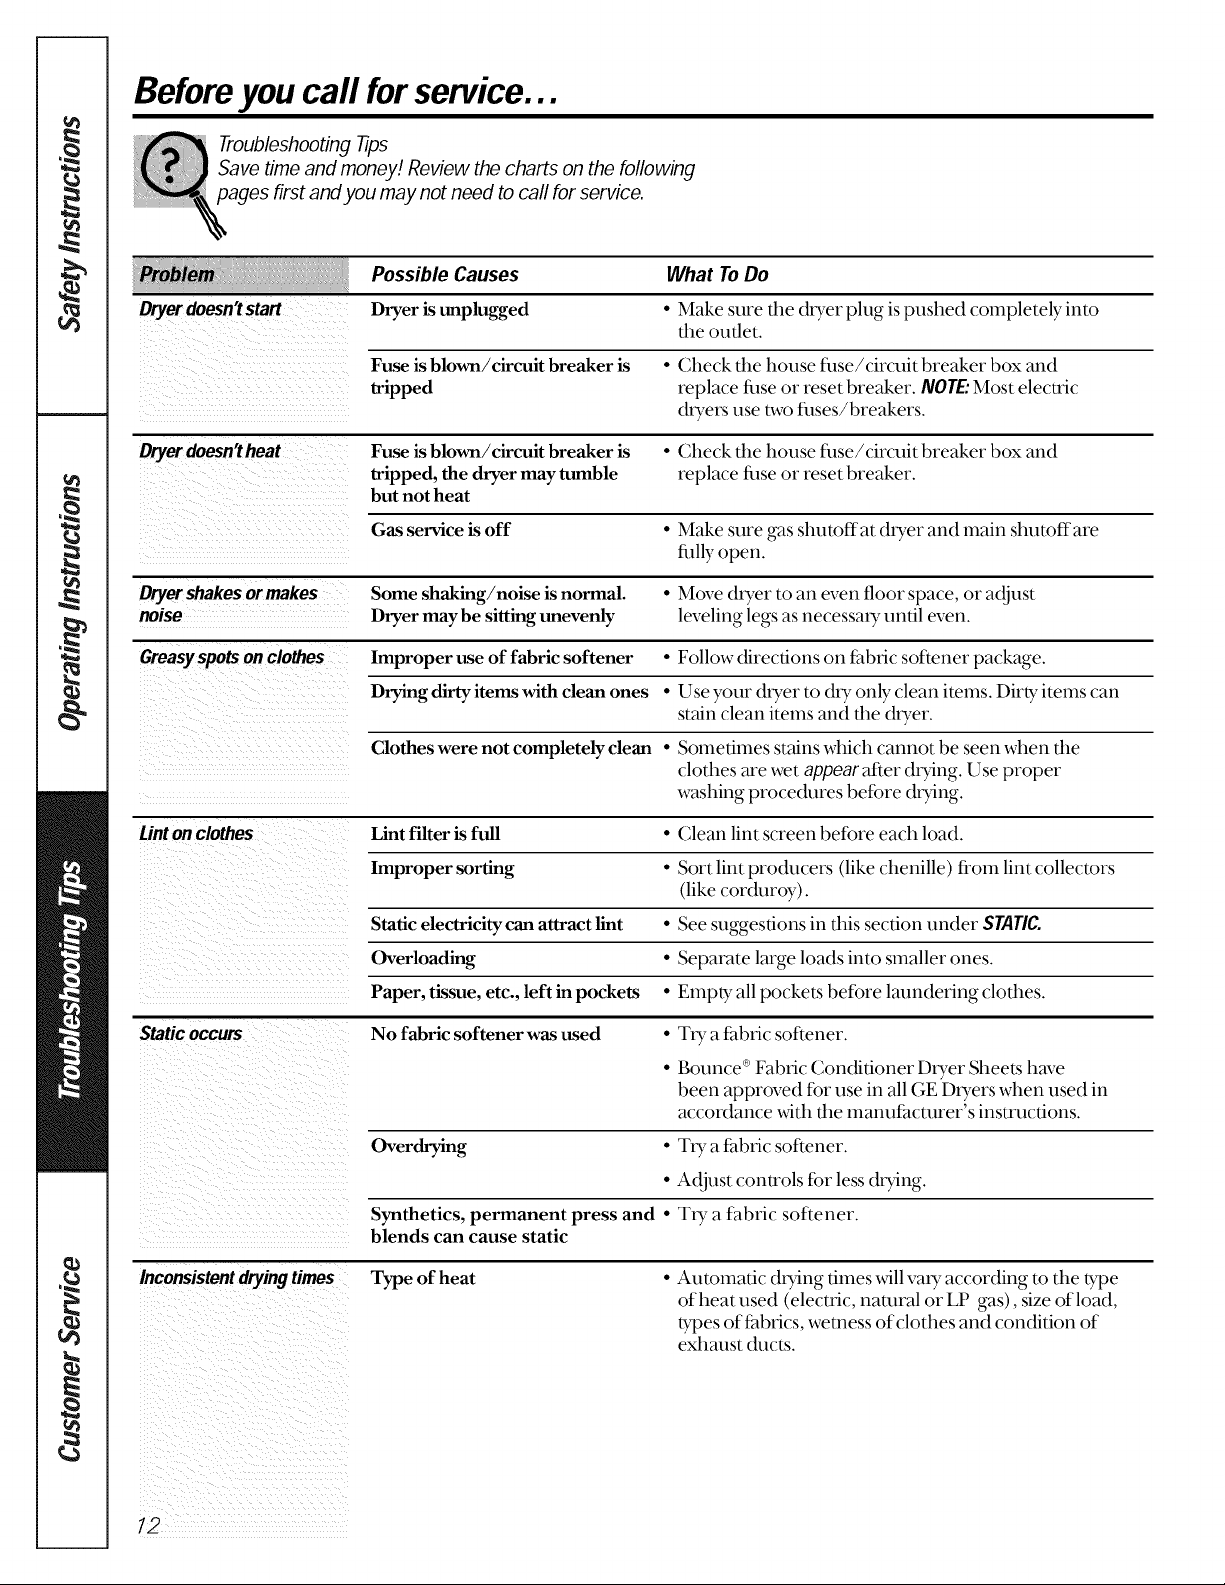
Possible Causes What ToDo
Dryerdoesn'tstart
Dryer is unplugged • Make sure the (hyer plug is pushed COlnpletely into
tim outlet.
Fuse is blown/circuit breaker is • Check the house filse/circuit breaker box and
tripped replace filse or reset breaker. NOTE."Most electric
(hyers use two rises/breakers.
Dryer doesn't heat Fuse is blown/circuit breaker is • Check the house rise/circuit breaker box and
tripped, the dryer may ramble replace filse or reset breaker.
but not heat
Gas service is off • Make sure gas shutoffat (hyer and main shutoffare
filly open.
Dryer shakes or makes Some shaking/noise is normal. • Move (hyer to an even floor space, or a(ljust
noise Dryer may be sitting unevenly leveling legs as necessaly until even.
Greasyspots on clothes Improper use of fabric softener • Follow directions on fhbric softener package.
Drying dirty items with clean ones • Use your (hyer to (hy only clean items. Dirty items can
stain clean items and the (hyer.
Clothes were not completely clean • Sometimes stains which cannot be seen when the
clothes are wet appear after (hying. Use proper
washing proce(hlres before (hying.
Lint on clothes Lint filter is full • Clean lint screen before each load.
Improper sorting • Sort lint pro(hmers (like chenille) fi'Oln lint collectors
(like cor(hlroy).
Static electricity can attract lint • See suggestions in this section under STATIC.
Overloading • Separate large loads into slnaller ones.
Paper, tissue, etc., left in pockets • Elnpvy all pocke_s befbre laundering clothes.
Static occurs No fabric softener was used • Try a filbric softener.
Bounce ®Fabric Conditioner Dryer Shee_s have
been approved fbr use in all GE D_yers when used in
accordance with the manufacturer's instructions.
Overdrying • Try a filbric softener.
• Adjust controls far less (hying.
Synthetics, permanent press and • Try a filbric softener.
blends can cause static
Inconsistent drying times Type of heat • Automatic (hying times will vaxy according to the type
of heat used (electric, natural or LP gas), size of load,
types of f_lbrics, wemess of clothes and condition of
exhaust (hlcts.
12
Page 13
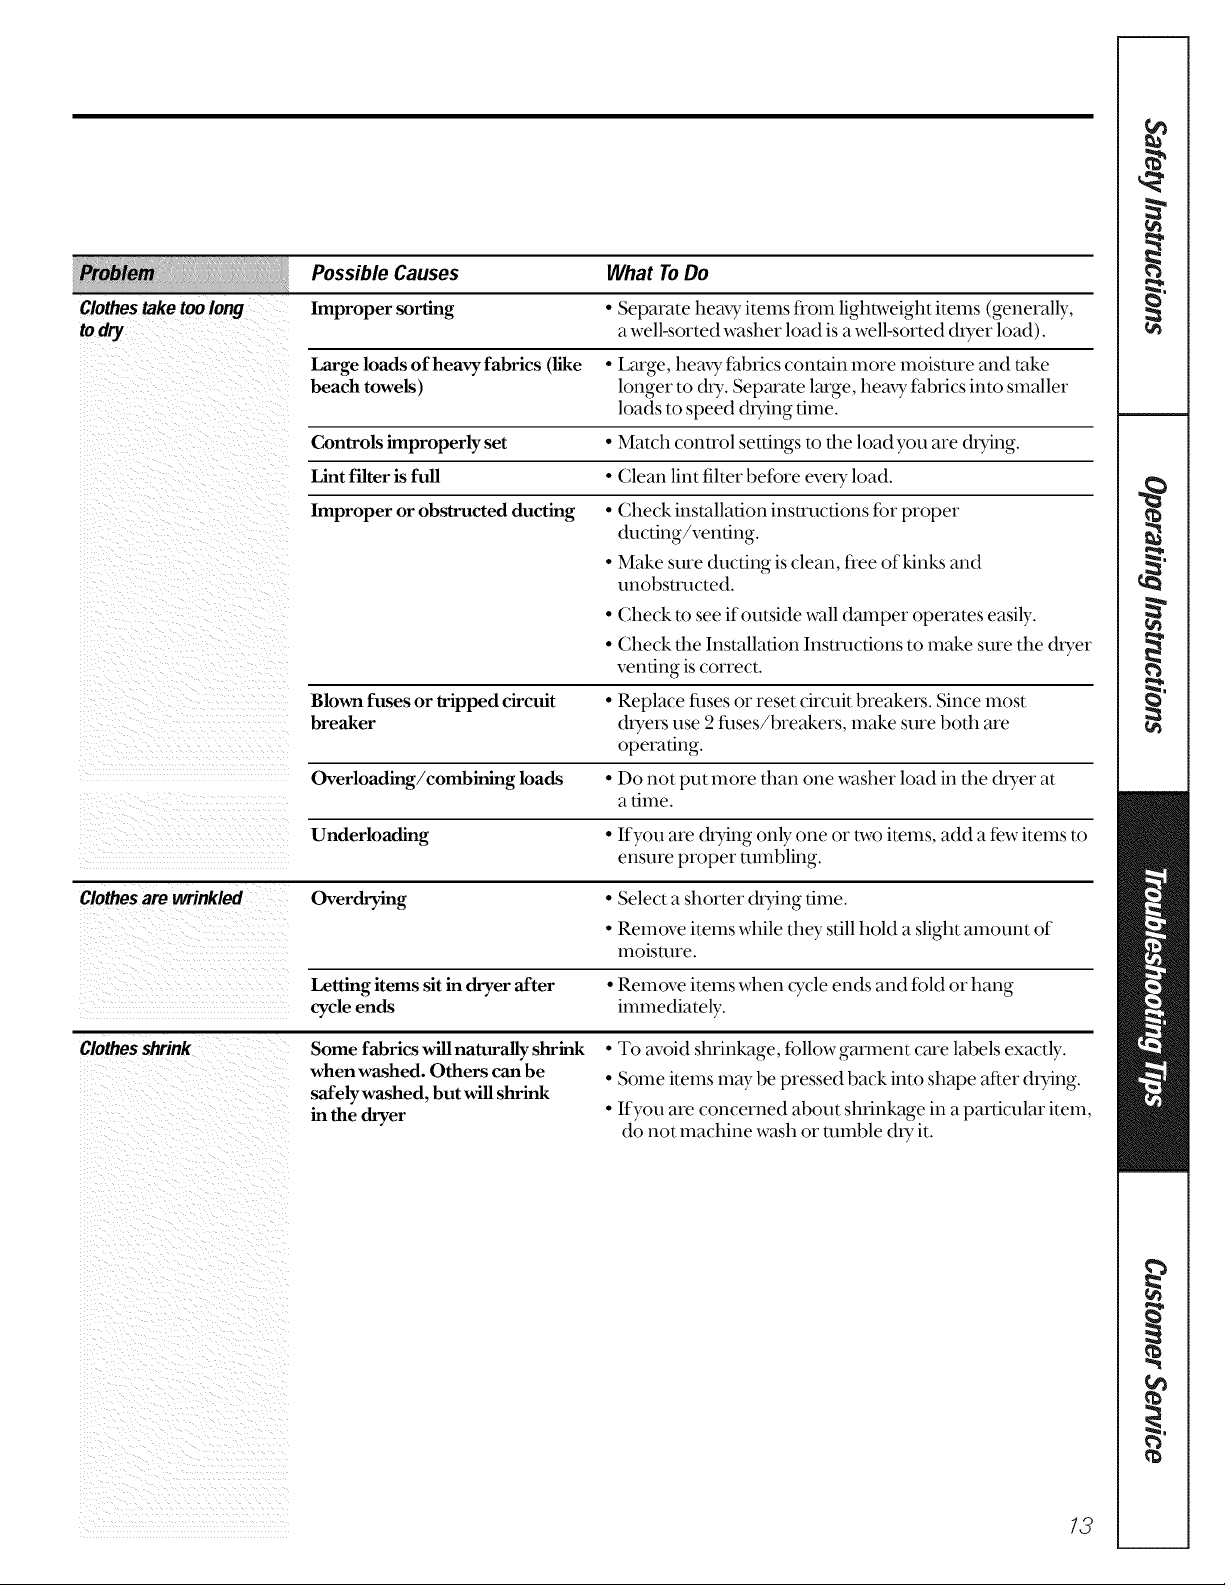
Possible Causes What ToDo
Clothes take too long
todq
Improper sorting
• Separate hem T items fi'om lightweight items (generally,
a well-sorted washer load is a well-sorted &yer load).
Large loads of heavy fabrics (fike
beach towels)
• Large, heax,yfabrics contain more lnoismre and take
longer to dpy. Separate large, hem T fabrics into smaller
loads to speed (h)_ng time.
Controls improperly set
Lint filter is full
Improper or obstructed ducting
• Match control settings m the loadyou are dp)5ng.
• Clean lint filter before every load.
• Check installation instructions fiorproper
&rating/venting.
• Make sure ducting is clean, flee of kinks and
unobstructed.
• Check to see if outside wall damper operates easily.
• Check the Installation Instructions to make sure the (hyer
venting is correct.
Blown fuses or tripped circuit • Replace filses or reset circuit breakers. Since most
breaker dpyers use 2 fllses/breakers, make sure both are
operating.
Overloading/combining loads • Do not put more than one washer load in the dryer at
Underloading • If you are (hying only one or two items, add a few items to
a time.
ensure proper mlnbling.
Clothes are wrinkled Overdrying • Select a shorter (hying time.
• Remove items while they still hold a slight amount of
lnoisture.
Letting items sit in dryer after • Remove items when <Tcle ends and fold or hang
cycle ends imlnediately.
Clothes shrink Some fabrics will naturally shrink • To avoid shrinkage, fiollow gammnt care labels exactly.
when washed. Others can be • Some items may be pressed back into shape after dp)5ng.
safelywashed, but will shrink
in the dryer • If you are concerned about shrinkage in a particular item,
do not machine wash or mlnble (hy it.
13
Page 14

GEDryer Warranty(Forcustomers in the United States)
Aft warranty service provided by our Factory This warranty is valid only in the United States.
Service Centers, or an authorized Customer Card _ Warranty may vary in Canada. See your approved
technician. For service, call 800-GE-CARES. Profile dealer for details.
GE Will Replace:
Anypartofthe (hyer which f_lilsdue to a defe(:t in materials or worklnanship. During this full
From the date ofthe one-year warranty,GE will also provide, free of charge, all labor and in-heine sewice to replace the
originalpumhase defective part.
Any extra large or super capacity dryer drumwhich f_tilsdue m a deDct in materials or
From the date of the worklnanship. During this five-year limited warranty,you will be responsible for aW labor or
originalpurchaso in-home sewice costs.
• Service trips to your home to teach you how to use the
product.
• Improper installation.
• Failure of the product if it is abused, misused, or used for
other than the intended purpose or used commercially.
• Replacement of house fuses or resetting of circuit
breakers.
• Damage to the product caused by accident, fire, floods or
acts of God.
• Incidental or consequential damage to personal property
caused by possible defects with this appliance.
This warranty is extended to the original purchaser and any succeeding owner for products purchased for home
use within the USA. In Alaska, the warranty excludes the cost of shipping or service calls to your home.
Some states do not allow the exclusion or limitation of incidental or consequential damages. This warranty gives
you specific legal rights, and you may also have other rights which vary from state to state. Toknow what your
legal rights are, consult your local or state consumer affairs office or your state's Attorney General.
Warrantor: General Electric Company. Louisville, KY 40225
14
Page 15

Notes
_m
A
w
w
m
w
15
Page 16

Mesures de securite , .77- 79
Felicitations!
Desormais vous faites pattie de la famille GE.
Bienvenue dans la fmnille GE. Nous sommes tiers de la qualitd de nos produits
et de la tiabilit(_ de notre seivice apr&s-vente. Vous le constaterez dans le present
manuel, f:acile 5 utiliser, et dans lavoix mnicale de notre personnel du sewice 5 la
clientele.
Mais, surtout, vous le constaterez chaque lois que vous ferez votre lessive. C'est
important, car votre nouvelle lm,euse Dra partie de votre fmnille pendant des anndes.
Et nous esp(_rons que vous Drez partie tie la n6tre pendant longtemps aussi.
Nous vous remercions de votre achat GE, et espdrons qu'a l'm,enir vous penserez fi
nous chaque fffisque vous aurez besoin d'un dlectromdnager de qualitd.
Unpartenariat de service.
Directives de
fonctionnement
Tableauxdecommande .... 20
Autrescaracteristiques ,21, 22
m
InversiondeIbuverture
de laporte ............. 23
Utilisationde la
secheuse .............. 24
Evacuationde la secheuse . 25
IMPORTANT!
Agrafez ici votre facture ou une copie de votrecheque.
Pour bdndticier de rdparations sousgarantie, il flint fbumir une
preuve de la date d'achat d'odgine.
A CONSERVERSOIGNEUSEMENT
w
m
m
,raa
m
Conseils de de.pannage
Avant d'appeter
unreparateur .......... 26.27
Service a la clientele
Oarantie .............. 28
Numerosde
service.................. 29
Transcrivezlesnumeros de modele et de serie icL
N°
N°
Vous les trouverez detr'i_re le tableau de commande.
LISEZVOTREMANUEL
Vous y trouverez de nombreux conseils pour l'utilisation et
l'entretien de votre sdcheuse. Ces quelques mesures prdventives vous
permem'ont d'dconomiser du temps et de l'argent, et, ainsi, de
prolonger la vie de votre sdcheuse.
EVACUATIONCORRECTE
Pour un meilleur rendement, la sdcheuse doit atre correctement
avacu6e. La sacheuse usera plus d'anergie et fonctionnera pendant
plus longtemps si elle n'est pas &acu6e suNant les consi_ms donndes
dans la section Evacuationdela secheuseet dans la section Evacuation
dans les Directives d'installation.
Sl VOUSAVEZBESOINDESERVICE
16
Vous trouverez des solutions aux probliemes courant_s que vous
pourdez rencontrer dans la section Avant d'appeler un reparateur.
Et, en consultant d'abord nos Consoils do dopannago, vous potur'ez
peut-etre dviter de faire appel fiun rdparateur.
Sivous avez besoin de sets_ice,vous savez que vous n'avez qu'fi
nous tdldphoner. Vous trouverez fila tin (hi prdsent manuel les
numdros sans ffais (hi service fila clientble. Aux Etats-Unis,vous
pouvez appeler 24 heures parjour, 7jours par semaine au GE
Answer Center ®,800.626.2000. Au Canada,appelez le 1-800-361-3400.
Page 17

MESURESDESECURITEIMPORTANTES.
LISEZD'ABORDTOUTESLESDIRECTIVES.
MISE EN GARDE!
Pour votre securite, suivez les directives fournies dans le present manuel afin de minimiser les risques
d'incendie, d'expIosion et de chocs electriques et prevenir des deg_ts materiels et des blessures graves
or mortelles.
• N'entreposez pas ou n'utilisez pas d'essence
ou autres vapeurs ou liquides inflammables
proximit# de cet appareil ou de tout autre
electrom#nager.
• L'installation et les reparations doivent Otre
effectuees par un installateur qualifie, une
entreprise de reparation ou votre fournisseur
de gaz.
SI VOUSREMARQUEZUNEODEURDEGAZ:
Ne faites fonctionner aucun appareil
electrique.
_N'actionnez aucun interrupteur; n'utilisez
aucun t#lephone dans votre edifice.
_Evacuez la piece, I'edifice ou les environs.
Loi sur les produits toxiques et I'eau potable de la Califomie
En vertu de cette loi, le Gouverneur de la Califomie est tenu de publier une liste des substances reconnues par
l'F'7_tatcomme pouvant causer le cancer, des malformations congenitales ou autres problemes (Illgenre et d'obliger
les entreprises "am_ertir leurs client.s de route exposition potentielle "ade telles substances.
Les electromenagers "agaz peuvent entrainer une exposition mineure "aquatre de ces substances, en l'occurrence
le benzene, le monoxyde de carbone, le fbrmaldehyde ou la suie, attribuables pIincipalement _ala combustion
incomplete du gaz namrel ou du gaz de petrole liquefie.
Une secheuse bien reglee re(hilt au minimum les risques de combustion incomplete. Pour re&fire au minimum
l'exposition "aces substances, f_dtesevacuer Fair de la secheuse "al'exteIieur.
_Appelez immediatement votre fournisseur
de gaz en utilisant le tP,IP,phone d'un voisin.
Suivez les directives qu'il vous donnera.
_Si vous ne pouvezjoindre votre fournisseur
de gaz, appelez les pompiers.
UNEINSTALLATIONADEQUATE
Avant d'utiliser votre secheuse, assurez-vous qu'elle a eto adoquatement installee, conformement
aux Directives d'installation. Si vous n'avez pas requ de Directives d'installation avec votre secheuse,
appelez sans frais aux Etats-Unis au Centre de reponse GEau 800-626-2000.Au Canada appelez sans
frais au 1-800-361-3400.
• Mettez l'appareil ala telr'e confbnnement a tous
les codes et reglements en vigueur. Suivez les
Directives d'installation.
• Installez ou entreposez l'appareil dans une piece
o_ la temperature est supefieure "a0 °C. et o_ elle
sera _al'abIi des intempefies.
• Branchez l'appareil sur un circuit protege et de
capacita appropriae afin d'aviter route surcharge
electrique.
• Retirez tousles articles tranchants d'emballage et
jetez tousles matOriaux de transport.
Conduit d_vacuafion "
[--_L'air des sOcheuses "a DOITetreOvacuO"a
l'exteIieur.
gaz
[_I1 est fortement recommanded'&_acuer l'air
des secheuses electriques a 1exterieur _din
d'eviter l'accumulation d'une grande quantite
d'humidite et de charpie dans la piece. Suivez
les consignes donnees pour l'&Tacuation dans
les Directives d'installation.
[_N'utilisez qu'un conduit mOtallique figide ou
souple de 4 po de diametre _al'intOrieur de la
caIr'osserie de la secheuse ou pour l'&,acuation
vers l'exterieur. L'UTILISATIOND'UNCONDUIT
DEPLASTIQUEOUFABRIQURAVECTOUTAUTRE
MAT£RIAUCOMBUSTIBLEPEUTCAUSERUN
INCENDIE.LORSQU'UNCONDUITESTPERFOR£
OUDEVIENTOBSTRURAUCOURSDE
L'UTILISATIONOUDEL'INSTALLATION,ILPEUT
CAUSERUN INCENDIE.
Pour plus de details, suivez les Directives
d'installation.
17
Page 18

MESURESDESECURITEIMPORTANTES.
LISEZD'ABORDTOUTESLESDIRECTIVES.
A MISE EN GARDE!
AUTOURDEVOTRESECHEUSE
18
Ne laissez pas s'accumuler autour et au-dessous
de vos dlectromdnagers des lnatdfiatLx
combustibles, comme de la charpie, du papier,
des chiffons, des pro&tit_s chimiques, etc.
Gardez le sol propre et sec "aproximitd de vos
dlectroIndnagers afin de ne pas glisser.
I1fruit exercer une etroite smsTeillance lorsque
vous faites fbnctionner cet appareil en presence
d'enfants. Ne les laissez pasjouer avec l'appareil
ni inonter dessus, ou s'introduire "al'interieur
d'un vieil appareil qui ne sert plus.
• Gardez tousles pro&fit.s pour la lessive (coInIne
les ddtersifs, laJavel, etc.) en dehors de la portde
des enfmlts, de prdf_3rence clans une armoire
fennde "acld. Suivez toutes les raises en garde stir
les dtiquettes pour &_iter des blessures.
• Ne montezjamais stir le dessus de la sdcheuse.
LORSQUEVOUSUT/LISEZLASECHEUSES
• Ne vous penchezjamais clans la secheuse pendant
que le tambour toume. Avant de charger ou
dechaNer la secheuse ou d'y ajouter des
vetements, attendez que le tambour se stir
coInpl&teInent an'etC.
• Avant chaque sechage, nettoyez le fihre "achmpie
afin de prevenir l'accumulation de chmpie "a
l'interieur de la secheuse ou dans la pigece.NE
FAITESPASFONCTIONNERLAS£CHEUSESANSLE
FILTREA CHARPIE.
• I1ne fruit pas mem'e dans la secheuse, ou "a
proximite de celle-ci, tout article ayant ete utilise
avec un solvant degraissant ou contenant une
substance itfflammable (comme des chiffons de
nettoyage, des vadrouilles, des sexviettes utilisees
dans les salons de coiffilre, etc.), _amoins qu'ils ait
ere deban'asse de route trace et route vapeur de
substance flfflamInable. On utilise "ala maison de
nombreux produit_s inflammable :acetone, alcool
denatnre, essence, kerosene, nettoyants
mdnagers, detachants, terebenthine, cire,
decapants, contenant (hi distillat de petrole.
• Ne rangez pas clans votre secheuse des articles qui
ont ete en contact avec des huiles de cuisson;
ceux-ci peuvent provoquer une reaction
chimique susceptible de faire s'enflamIner vos
veteInents.
• Ne lavez pas oune faites pas secher des articles
qui ont ere laves avec des produits combustibles
ou explosifs, ou qui ont ere trempes dans ces
produits ou qui en sont tachds (cire, peinulre,
huile, essence, de_'aissant_s, solvants pour le
nettoyage "asec, kerosene, etc.) car ils fisquent de
s'enflannner ou d'exploser. Ne versez pasces
substances dans l'eau de la laveuse. N'utilisez pas
ces substances "aproximite de votre laveuse ou de
votre secheuse pendant qu'elles fbnctionnent.
La lessive peut attenuer les proprietes
ignifllgeantes des tissus. Pour eviter cette
siulation, suivez "ala lem'e les directives donnees
par le fabricant (hi veteInent.
Ne faites pas secher des articles contenant (hi
caoutchouc, du plastique, de la mousse ou autres
matefiaux similaires (coInme des soutiensgorge
prefbnnds, des chaussures de tennis, des
caoutchoucs, des tapis de bain, des carpettes, des
bavoirs, des culottes de bebe, des sacs de
plastique, des oreillers, etc.) car ces matefiaux
peuvent fondre ou br61er. De plus, clans certaines
circonstances, certains matefimlx de caoutchouc
peuvent causer tin incendie par combustion
spontanee lorsqu'ils sont chmlffk3s.
Ne rangez pas des articles qui peuvent fondre ou
brOler, comIne du plastique, papier, ou des
vetements stir le dessus de la secheuse pendant
qu'elle fbnctionne.
Les vetement_s portant la mention <<Fairesecher
loin de la chaleur,, ou <<Nefaites pas secher par
culbutage,, (comme les gilet_sde sauvetage
contenant du kapok) no doivent pas Otresechos
clans votre secheuse.
Ne faites pas secher d'articles en fibre de verre
clans votre secheuse. Les particules qui restent
dans la secheuse et qui pourraient etre recueillies
par les vetements lors d'un sechage subsequent
risquent de cruiser des irritations cutanees.
Pour reduire les risques de chocs electriques,
debranchez mujours l'appareil ou debranchez la
secheuse au panneau de distribution en enlevant
le fllsible ou declenchant le disjoncteur avant de
le reparer ou de le nettoyer (saufpour enlever et
nettoyer le fihre _ charpie). REMARQUE:Lefair de
placer le selecteur de pro_'amme a une position
d'ARR[-Tnecoupe PASl'alimentation electrique
de l'appareil.
Page 19

• Ne filites pas fonctionner l'appareil s'il est
endolnlnagO, dOfecmeux, partiellelnent
damontO, ou si des pieces sont manquantes ou
&3fecmeuses, ou si le cordon d'alimentation ou la
fiche sont endommag4s.
• L'intdrieur de l'appareil et le raccord du conduit
d'&_acuation Al'int_3fieur de la s_3cheuse doivent
etre nettwds une lois par an par une personne
qualifiae. Vwez la section Utillsoret chargerla
socheuse.
• Sivotre sacheuse fbnctionne "agaz, elle est
pouxsale d'un systeme d'allumage alectrique
aumInatique et ne possede pas de veilleuse.
N'ESSAYEZPASDEL'ALLUMERAVECUNE
ALLUMETTE.Vous risquez de vous bx_ler sivous
• II est possible que vous dasiriez assouplir votre
lessive ou r_3duire le colleInent _31ectrostatique en
utilisant un assouplissant textile dans votre
s_3cheuse ou tin produit antistatique. Nous vous
recommandons d'utiliser un assouplissant liquide
au cours du pro wamme de lavage, conformOment
aux directives du tZabficant de ce _pe de produit,
ou de faire l'essai d'un assouplissant textile pour la
secheuse, pour lequel le fabficant certifie sur
l'emballage que son produit peut etre utilise en
toute secufitO dans la secheuse. La responsabilitO
des problemes de rendement ou de
fonctionnement qui ne sont pas couverts pax"la
garantie de cet appareil et sont attribuables ft
l'utilisation de ces produits releve du fabficant de
ces produits.
approchez votre main du bx_leur et que le
dispositif d'allumage mltoInatique s'allume.
LORSOUELASECHEUSESN'ESTPASUT/LISEE
• Lorsque vous &3branchez l'appareil, tirez stir la
fiche et non pas stir le cordon afin d'&_iter
d'endoInInager le cordon d'alimentation.
Installez le cordon de sorte que personne ne
inarche ni tr_3buche dessus ou qu'il ne soit pas
• Avant dejeter ou d'entreposer une sacheuse,
enlevez toujours la porte afin d'empecher les
ex6_mts de se cacher "al'int_3rieur.
• Ne trafiquez pas les coInInandes de l'appareil.
exposa "ades doInInages ou des contraintes
• Ne raparez oune reInplacez mmune piece de cet
appareil, AInoins que cela ne stir sp_3cifiquement
recommand_3 dans le pr&ent manuel ou dans des
directives de raparation que vous coInprenez et
que vous etes en Inesure de suix_'e.
VeuillezfireetsuivreottentivementcesmesuresdesOcuritO.
CONSERVEZCESDIRECTIVES
19
Page 20

Lescommandesde votresecheuse.
Voustrouverez votre numero de modele sur I_tiquette a I'avant de la secheuse derriere la porte.
Les caracteristiques et I'aspect de votre modele peuvent varier de ceux presentes a travers ce manuel.
START FABRICCARE EXTRACARE SIGNAL
START
COTTONS EASYCARE OFF SET OFF LOUD
Q
Llrl
Reglage des commandes
IMPORTANT: Nettoyez le filtre a charpie chaque lois que veus utilisez la secheuse.
D
_r_ Caracteristiqu_,acuitative, _El
sur certains modeles
Fabric Care (entretien des tissus)
COTTONSREG.HEAT PourloscotonsordinairesouIourds.
(cotonstemp.reguliere)
EASYCARE IVIED.HEAT Pourlestissussynthetiques,losmelangeset losarticlesportantlamention
(entretienfacile temp.moyenne),,Sansrepassage>>.
FLUFFNOHEAT Pourfaire,,aOrer,>losarticlessanschaleur.ReglezunSECHAGEMINUTE.
(Duvetage/Sanschaleur)
EASY CARE DELICATES Pourlostissus delicats,synthetiqueset losarticles portant la mention,,Secherpar
LOW HEAT (entretien facile culbutage a basse temperature>>.
delicatsbassotemp.)
Programmes de sechage-Les pro_'ammes mltomadques (t_mrminent la s_3cheresse des ussus
mlmmadquement. Choisissez More Dry (plus sec) pour les ussus plus
lourds, et tess Dry (moins sec) pour les ussus plus l_gers. Les
programmes de s_3chage minuu3 fbncfionnem pour la dur_e choisie.
COTTONS Pourlescotonset laplupartdestoiles.Pourlaplupartdesbrassees,choisissezle
AUTOMATIC Reglageregulierprdere marqueavecun _.
(Cotonsautomatique)
EASYCARE AUTOMATIC PERM Pourlesmelangessynthetiqueset delicats.
PRESSIDELICATES(entretien
facile sansrepassageldeJicats)
COTTONS
AUTOMATIC
• MOREDRY _
MEDIUM
EXTRA CARE
LESS_R_
'
e SensorDry DAMP DRY30 40 50
PERM PRESSIDELICATES
LESSDRY
COOLDOWN
XTRA CARE
80MINTIMEDDRY
60
EASYCARE
AUTOMATIC
20
TIMED DRY Reglezleselecteurdeprogrammea ladureedesechagedesir0e.
(Sechageminute)
DAMP DRY Pourquelosarticlessoientlegorementhumides,reglezleselecteurdeprogramme.
(Sechagepartied
DEWRINKLEPourfaire disparaYtrelesfauxplis d'articlespropresetseesoulegorementhumides,
(Defroissage) reglezleselecteurdeprogramme.
El
MJse eB marche-Fm'mez la porte de la s&cheuse. Acdonnez le bomon START (raise en marche).
Lorsque vous ouvrez la porte pendam qu'elle fbncdonne, la secheuse s'arrete.
Pour la remeure en marche, fermez la porte et acuonnez START (mise en marche)
pour terminer le programme.
REMARQUE : Les durees de sechage varient selon le type d'energie utilise (electricite, gaz naturel ou gaz de petrole
liquefie), la grosseur de la brassee, le type de tissu, I'humidite des v_tements et I'etat des conduits d'evacuation.
Page 21

LescaracMristiquesde la secheuse.
La Iogique des couleurs
SOlectionnez leprogramme de FABRICCARE
(entretiendestissus).Fakescorrespondre la
couleur en dessous des roots axec la marne
couleur sur le sdlecteur de pro_'amme.
Par exemple : Socher une brassoe do
votoments marquos sans repassage.
SensorDr 2 (detecteur de secheresse des v_tements) (sur certains modeles)
Cette caractdristique fonctionne /_lnesure que les vOtelnents tournent ils
uniquelnent avec les progralnlnes touchent un grand ddtecteur. Le
autolnatiques, dOtecteur de sOcheresse arrOtera le
5ensorDry
[-_ Choisissez FABRICCARE(entretien des
tissusJ-pour cette brassOe cela devrait
etre EASYCAREMEDHEAT(entretien
facile temp.moyenne)(qui est d'une
couleur particuliOre).
[_Tournez le sOlecteur "al'endroit qui a la
meme couleur que le pro_'mnme
FABRICCAREque vous m_ezchoisi-pour
cette brassOe cela devrait Otre EASY
CAREAUTOMATIC(entretienfacile
automatique).
progralnlne (lOsque les vOtelnents ont
atteint ¿a sOcheresse sOlectionnOe.
i(iiiii ii ii_ii _iII i_ i _ii_ii i_iii
OFF SET
Extra Care (soins plus)
Utilisez ce programme pour rOduir au
minimum la formation de fmlx plis. I1
procure un culbmage sans chaleur
d'environ 15 minutes lorsque les
vOternents sent secs.
Ce pro_'amme ne peut OtreudlisO qu'm_ec
les pro_'ammes automadques.
Sivous choisissez l'option ENDOFCYCLE
SIGNAL (avertisseur de fin de programme),
l'avertisseur se fera entendre ;_la fin (tu
programme de sOchage etse fera
entendre plusieurs lois pendant le
programme EXTRACARE(soinsplus). I1
vous rappelle qu'il est temps de retirer les
vOternents.
27
Page 22

Lescaractoristiquesde la socheuse.
_,IGNAL
MEDIUM
OFF LOUD
i i i I i i
End of Cycle Signal (avertisseur de fin de programme) (sur certains modeles)
Get avertisseur se fair entendre toutjuste
avant la fin du programme pour vous
rappeler de retirer les vetements de la
sdcheuse.
Sivous sdlectionnez le programme EXTRA
CARE(soins plus) l'avertisseur se fera
entendre "ala fin du programme de
sdchage et se fera entendre plusieurs lois
pendant le programme EXTRACARE
(soins plus). I1vous rappelle qu'il est
temps de retirer les vetelnents.
REMARQUE :
• Sortez rapidement les vOtements
au signal sonore. Suspendez-les
sur des cintres afin d'eviter qu'ils se
froissenL
• Reglez I'avertisseur surtout Iorsque volts
fares secher des tissus comme des
tricots de polyester et des vOtements sans
repassage, fl faut sortir rapidement ces
tissus de la secheuse pour eviter la
formation de faux plis.
Lampe de tambour
Avant de remplacer l'ampoule, ddbranchez
le cordon d'alimentation de la sdcheuse ou
ddbranchez la sdcheuse ml panneml de
distribution en enlevant le fhsible ou
ddclenchant le disjoncteur. _kla par'tie
supdrieure de l'ouvermre de chargement
de la sdcheuse, enlevez l'ampoule et
remplacez-la par une ampoule de la ln_lne
taille.
Grille de sechage
Une grille de sdchage pratique vous perlnet
de faire sdcher des articles tels que lesjouets
en peluche, les oreillers ou les tricot_s
lavables. Accrochez la grille sur le fihre "a
charpie de sorte qu'elle soit suspen&le "a
l'intdrieur &l tambour de la sdcheuse.
REMARQUE:
• La grille de sdchagedolt Otreutilisde avec
un programme de SECHAGEMINUTE.
• Ne vous setvez pas de la grille lorsqu'il y a
d'autres v_tement_s "al'intdrieur de la
sdcheuse.
22
Page 23

inversiondeI'ouv orte
Inversion de I'ouverture de la porte
Outils nOcessaires:
• ToumevisPhillips • 6outeau a mastic
n°2 standard (extrernite recouverte
F-_ Om_'ez la porte et enlevez les capuchons qui se u'ouvent du c6tOopposa aux chamibres.
Ouvrez complbtement la porte, puis enlevez lavis itffbrieure de chaque charniere sur le
rebord de la s6cheuse. Vissez ces vis fimoiti6 clans les trous SUPfRIEURS,pour chaque
charniOre, du c6t6 oppos6 (oOvous m_ezenlev6 les capuchons). Appliquez une certaine
pression pour que les vis commencent fitourner clansles trous non filet6s.
[_D&_issez fi moiti6 la x4ssup_3rieure de chaque chamiOre sur le rebord de la s6cheuse. En
tenant d'une main le haut de la porte et de l'autre le bas de la porte, enlevez la porte de
la s6cheuse en la SOULEVANT,puis en la TIRANr.
• Pinces a bec long
de ruban gornrne)
i i
[_Toumez la porte de 180 °. Installez-la du c(5t_3oppos6 de l'ouvermre en RENTRANTet
ABAISSANTlaportejusqu ace que les x_slnstallees a 1etape 1 solent mserees dans la
charniere sup6tieure et clans la chamiere inf_rieure.
I
[_Enlevez les vis qui restent du c6t6 oO se u'ouvait la porte pr_3c6demment. Insudlez ces vis
fila partie infarieure de chaque charniere. Serrez les deux visfi la partie sup6rieure de
chaque chami#ere. Remettez les capuchons de plastique fi l'endroit oO se trouvait la
porte pr6c6demment.
23
Page 24

Utiliser et chargerla secheuse.
Lors de la lessive, observez toujours les directives donnos sur I_tiquette d'entretien du v6tement.
Trietconseilspourlechargement
En r_gle g_3n@'ale,lorsque les v_tements sont coN'ectement tfi_3spour le lavage, ils le sont aussi pour le
s_3chage.
N'doutezpasvotrefeuille d?_ssoupIissanttextile IorsquelabmssOeacommencOZ_chauffer,carcelle-cirisquede
provoquerdes tachesd?_ssouplissant.Lesfeuillesd'assouplissantdetissusBounce_'poursocheusesont OtOappmuvoes
pourrouteslessocheusesGEsi dies sentutilisoesconformOmentauxinstructionsdufabricant.
Ne surchargezpas la secfleusecarcelapeutaffecterlaqualitodusochageetpmvoquerdesfauxplis. Lesvetements
doiventculbuterlibmmenL
Ne faitespas secherlesarticles suivantsdansla secheuse: articlesenfibrede verre,lainages,articlesrecouverts
decaoutchouc,plastiques,articlesdotosd'unegarniture,enplastique,articlesremplisde moussedecaoutchouc.
Entretienet nettoyagedelasOcheuse
Exterieur: Essuyez les produi_s de lessive renvers4s.
Enlevez la poussiere avec un linge humide. Le fini et
le tableau de commande de la sacheuse peuvent etre
endommag_3s par certains produi_s de traitement
pr41iminaire et d4tachan_s. Appliquez ces produits
loin de la s_3cheuse. Vous pouvez ensuite laver et
faire s_3cherles v#ztements nonnalement. Les
dommages cmls4s "avotre s4cheuse par ces pro(hfi_s
ne sont pas couverts par votre garantie.
Conduitd'evacuation:Inspectez et nettoyez au moins
une lois par annae le conduit d'4vacuation de la
s4cheuse afin d'4viter qu'il se bloque. Lorsque le
con&fit d'(3vacuation est partiellement obstnl4, cela
a pour effet d'allonger la durae de s4chage.
Suivez ces Otapes "
Pour nettoyer le conduit d'4vacuation, proc4dez de
la fhgon suivante :
Filtrea charpie:Nettoyez le fihre "achaq_ie avant
chaque utilisation. Humectez vos doig_s et mettez
votre main dans l'omTerture du fihre. Faites que un
r_3parateur qualifiO aspire la charpie de la s_3cheuse
une lois par an.
i iiI/}ii!
(iiiiii_ iiiil_(i/
[-_ Coupez l'alimentation dlectrique en
ddbranchant le cordon d'alimentation de la
prise murale.
[_Ddbranchez le conduit d'dvacuation de la
sdcheuse.
E_Passez le myau de l'aspirateur dans le conduit
(t'_3vacuation, et rebranchez le conduit
(t'&_acuation "ala s_3cheuse.
Eventmural:V&ifiez avec un miroir que les volets
l'int4rieur de l'&ent bougent fadlement quand la
s4cheuse fonctionne Assurez-vous qu'il n'y a pas de
nid (d'oiseaux, d'insectes, etc.) _ l'intdfieur du
conduit d'4vacuation ou de l'&ent.
Etiquettesd'entretiendestissus
Les "s)_nboles" ci-dessous setrom_entsur lesQtiquetlesd'entrelien el ont un eflet sur le lavage de vosv&temenls.
ETIQUETTESPOURLELAVAGE ETIQUETTESPOURLESECHAGE
lavage ,ore,a, r_............passa_/_ ,epa_.... _p.........
Temperature • • • • • •
de I'eau
ETIQUETTESPOURL'EAUDEJAVEL
Chaude Tiede Froide/ffaiche
(50_C/120_F) (40_C/105_F) (30_C/85°F)
culbutage S_oho_ _orma,S_...........pa_a_e/_ou×/
de la
chaleLIr Haute Moyenne Basse Sans chaleur/air
resistants aux plis delicat
IFil
Symboles A Z_
d _eau de Toutes les eaux Eaux de Javel sans Eau de Javel hlterdite
davel de Javel (si necessaire) chlore (si necessaire)
Sechage sur corde/ Laisser egoutter Sechage a plat Sechage aI'ombre
pendre pour secher
Sechage par (en combinaison
culbutageinterdit avec ne pas laver)
Ne pas socher
24
Page 25

Evacuation de la secheuse
Pour un meilleur rendelnent de la sdcheuse, l'air de la sdcheuse doit _2trecorrectelnent dvacud. La
secheuseuseraplusd'energie et fonctionnerapendantplusIongtempssi elle n'estpasevacueeselonles
directivesci-dessous.Suivezles consignesdonneespourI'evacuationdanslesDirectivesd'installation.
• N'utilisez flu'un conduit d'dvacuation de mdtal rigide ou flexible de 4 po de diamietre dans le
cabinet de la sdcheuse pour l'dvacuation de Fair "al'extdrieur.
• N'utilisez pas de conduit d'dvacuation de plastique ou d'autre conduit d'dvacuation combustible.
• Utilisez une longueur la plus courte que possible.
• N'dcrasez pas ou ne pliez pas.
• l_Mtez de poser le conduit d'&acuation sur les objets tranchants.
• t'evacuationdoltOtreconformea lareglementationlocale onmatieredeconstruction.
Evacuation
correcte
Evacuatio
n
incorrecte
iii i. ! (i_I_Ii
_ _ _ i_ i_ _i_i_i_i_i_i_i_i_i ii__ i_ _ii
/ 7
iiil
25
Page 26

Avant d'appeler un reparateur...
Consei/s de dopannage--£conomisez du temps et de
i'argent! Consuitez d'abord ies tableaux qui suivent et vous
pourrez peut-6tre eviter de faire appe/a un reparateur.
Causespossibles
Lasecheusene
S6cheuse non branch6e
fonctionnepas
Fusible _ll6/disjoncteur • V(,fifiez les fllsibles/disjoncteurs de la r('si(tence.
d6clench6 Relnplacez le filsible ou r(.enclenchez le disjoncreur.
La secheuse ne Fusible grill6/disjoncteur • V_Srifiez les fusibles/disjoncteurs de la residence.
chauffe pas d6clench6, la s6cheuse tourne, Remplacez le filsible ou r(_enclenchez le disjoncteur.
mais ne chauffe pas
Alimentation en gaz coup6e • Assurez-vous que le robinet d'alilnentation en g;Lz de la
La secheuse est Un peu de vibration/bruit est • Installez stir un plancher unifbrIne, ou faites en sorte
bruyante ou vibre normal. Elle ne repose pas qu'elle soit bien de niveau.
solidement sur le plancher
Taches de graisse sur Utilisation inad6quate • Suivez les directives sur l'eInballage de l'assouplissant.
los vOtements d'assouplissant
S6chage d'articles sales avec • Ne fhites s_3cher que des articles propres (lans vorre
des articles propres s(_cheuse. Les articles sales peuvent tacher les articles
Nettoyage insuffisant des • Quelquefbis les taches qui sont invisibles lorsque les
v6tements articles sont lnouill(_s apparaissent apff's le s(_chage.
Correctifs
• Assurezwous que le cordon d'alimentation est bien
branchd la dans laprise de courant.
REMARQUE:La plupart des s('cheuses (qectriques
exigent deux disjoncteurs.
s(_cheuse et de la con(hike de gaz sont ouver_s.
propres et la s(_cheuse.
Utilisez les proc('(l('s de lavage coH'ec_s avant de s_3cher.
Charpie sur los v_tements Filtre ai charpie plein • Nettoyez le fihre _ chaq)ie avant chaque utilisation.
Tri incorrect • S(,parez les tissus produisant de la chaq)ie (coInIne la
chenille) de ceux qui la recueillent (coInIne le velours
c6teh3).
Charpie atfir6e par l'61ectricit6 • Voir les suggestions donn('es ci-dessous _ la section
statique _ELECTRICITESTATIQUE,_.
Surcharge • DMsez les grosses charges en brass('es plus petites.
Papier, papier mouchoir, etc., • Videz routes les poches avant de laver les v_.teInents.
oubli6s dans les poches
Bectricite statique Utilisation d'aucun produit • Utilisez tin produit assouplissant.
assouplissant
Les feuilles d'assouplissant de tissus Bounce ®pour
s(3cheuses ont (3t(3approm£es pour toutes les s(3cheuses
GE si elles sont utilis(3es confbrIn(3Inent mix instructions
du f>lbricant.
S6chage excessif • Utilisez tin produit assouplissant.
• R_3glez une dur_3e de s_3chage plus courte.
Les m61anges, les tissus • Utilisez tin produit assouplissant.
synth6tiques et sans repassage
peuvent causer de r61ectricit6
statique
26
Page 27

Dureesde sechage
irregulieres
Causes possibles
Type de chaleur
Correctifs
• Les durdes de sdchage autolnatiques varieront selon
le type d'dnergie utilisd (alectrique, gaz namrel ou
gaz de patrole liquafia) la grosseur de la brassae, le
type de tissu, l'humiditd des v_etelnents et l'atat des
conduits d'dvacuation.
Lesv_tementsprennent
tropde tempsasecher
Tri incorrect
• S_3parez les articles lourds des articles lagers (en g_3n_3ral,
lorsque la brass_3eest bien tfi_3epour le lavage, elle l'est
aussi pour le s_3chage).
Grosses brass6es d'articles lourds • Les gros articles lourds retiennent davantage d'hulnidit_3
(comme des serviettes de plage) et prennent plus de temps "as_3cher. Fakes s_3cher de plus
petites brass_3es pour aco31arer le s_3chage.
Cornmandes real r6gli_es • R4glez les comlnandes en fbnction de la brass4e que vous
faites s4chage.
Filtre a charpie plein • Nettoyez le fihre "achaq)ie avant chaque utilisation.
Conduit d'6vacuation inad6quat
ou obstru6
• V_3rifiezles Directives d'installation pour que le con&tit
d'&_acuation soit a(Kquat.
• Assurez-vous que le con&tit est propre, qu'il n'est pas
pint3 ni obstru&
• V_3fifiezsi le volet de l'&_ent mural bouge librelnent.
• Voir la section Directives d'installation pour vous assurer
que la s_3cheuse est correctelnent &_acu_3e.
Fusibles grill6s ou disjoncteurs • Relnplacez les fllsibles ou r(.enclenchez les disjoncteurs.
d6clench6s Comme la plupart des s_'cheuses n_'cessitent deux
fusibles/disjoncteurs, assurez-vous que les deux sont en
bon Otat.
Surcharge/brass6es m61ang6es • Ne lnettez qu'une brass_3edans s_3cheuse "ala fbis.
Brass6e trop petite • Lorsque vous ne fitites s('cher qu'un ou deux articles,
ajoutez quelques articles pour assurer culbutage adi'quat.
tes vP.tementssont S6chage excessif • Ri,glez une dur(" de si'chage plus courte.
froisses
• Retirez les v&tements de la s_3cheuse lorsque'ils sont
encore 14gerelnent humides.
Articles laissfs dans la s6cheuse • Retirez les articles de la sdcheuse lorsque le pro_'alnme
apr_s la fin du programme est terlnin(,. Pliez-les ou suspendez-les ilnln('diatelnent.
Los vOtements Certains tissus r6tr6eissent au • Pour (,viter tout r(,tr('cisselnent, suivez "alettre les
retrecissent lavage. D'autres peuvent 6tre directives sur l'('tiquette d'entretien des v_,telnents.
lav6s en toute s6curit6 mais • Certains articles peuvent retrouver leur fbrme d'ofigine
r6tr6cissent au skchage apff's le s('chage _'_ce _ un pressage.
• Lorsque vous ne savez pas si un article r/'tr/'cit ou non, ne
le lavez pas ou ne le f_fites pas s_3cher "ala machine.
27
Page 28

Garantiede vet.resd.cheuseGE(pourlaclientoleauEta>Unis)
Toutesles rOparationssousgarantieseronteffectuOespar Cettegarantienes'appliquequ'auxEtats-Unis.LaGararOe
noscentres derOparatlbnounos rOparateursautorisOs, peut vaderauCanada.Voyezvdre marchandProfile
Appelezle 1-800-361-3400. approuvOpour lesdOtails.
GEremplacera :
Un an Toutepi_e de la sdcheuse flui se r(3v?:le(tafectueuse en raison d'un vice de mati_res ou de fabrication.
A cornpterdela Pendant cette garantie complete d'un an,GE fournira (3galement, gratuiteme_, mus les fl'ais de main
d'achat d'origine d'(euvre et de d(3placement du r(3parateur "avotre domicile pour remplacer la piece d(3fecmeuse.
Cinqans N'importequeltambourde secheusetresgrandoude grandecapacitequi ser(3valed(3Dcmet_
A cornpter de ladate en raison dun vice de mati?:res ou de fabrication. Pendant cette garantie limitee de deux ans, vous
d'achat d'origine devez assumer tousles fi'ais de main d'(euvre et de d@lacement du r@arateur Avotre domicile.
• Toute visite "avotre domicile pour vous expliquer le
fonctionnement de l'appareil.
• Une installation inad(3quate.
• Toute (t(3fbcmosit(3du produit lorsqu'il est utilis(3 de fhqon
abusive, ou "ades fins commerciales ou "atoute mm'e fin
que celle pour laquelle il a (3tOconqu.
Cettegarantie est offerte a I'acheteur initial ainsi qu'a tout acheteur subsequentd'un pmduit achete a desfins domestiques
aux £tats-Unis. EnAlaska, la garantie d'un an ne cornprend pas les frais d'expodition du pmduit ou de deplacernentdu
rOparateura votre domicile.
Dans certains Otats, il est interdit d'exclure ou de lirniter les dornrnages directs ou indirects. II est alors possible que les
limitations ou exclusions ci-dessus ne s'appliquent pas darts votre cas.La prOsentegarantie vous confOredes droitsjuridiques
spOcifiques. Vouspouvez bonoflcier d'autres droits qui varient d'un Otata I'autre. Pour connaitre les droits dont vous
bonoflciez dans votre Otat,cornrnuniquezavec le bureau des Relations avec les consornrnateurs de votre rOgionou de votre
Otat,ou avec le pmcureur gOnoral de votre Otat.
Garant: General Electric Company. Louisville, KY 40225
• Le remplacement des fllsibles ou le r(3enclenchement des
disjoncteurs du panneau de (listribution.
• Tout domlnage au produit attfibuable "aun accident, un
incendie, une inondation ou un cas de force majeure.
• Les dommages accidentels ou incons(3quents "ala
propri(3t(3personnelle qui sent imputables aux (t(3fmlts
(3venmels de cet appareil.
28
Page 29

Numerosdeservice
GE Answer CelT[er _R_pux Etats-Unis: 800.626.2000
Notre se_ice d'i_ffonnation est ouvert 24 heures parjour, 7jours par semaine.
Au Canada,dcrivezau Directeur, Relations aveclesconsommateurs, Camco Inc., 1, FactoU Lane, Bureau
310, Moncton, N.B. E1C 9M3.
ReparationsadomicileAuxEtats-Unis :800-432-2737
Pour faire r_3parervotre _31ectrom_3nagerGE, il suffit de nous t_31_3phoner.
AuCanada,appelez le 1-800-361-340R
Pour/esbesoinsparticuliersauxEtats-Unis:800.626.2000
Surdemande, GE peut foumir sansf_vdsdescommandesavecinscdption enbraille ou une brochure
sur l'am_3nagement d'une cuisine pour les personnes Amobility3r_3duite.Aux£tats-Unis,appelez le
800-833-4322.
AuCanada,OcfivezauDirecteur, Relations avec]esconsommateurs,CamcoInc., 1,FactoU Lane,
Bureau 310, Moncton, N.B. E1C 9M3.
Contratsd'entretien auxEtats-Unis:800-626-2224
Achetez un contrat d'entretien GE avantque votre _rantie n'expire et bt3n_ficiezd'un rabais substantiel.
Ainsile ser_ice apras-vente GE sera toujours la aprasexpiration de la garantie.
AuCanada,appelez le 1-800-461-3636.
PiQces e[ occessoires Aux Etats-Unis :800-626--2002
Ceux qui &3sirent rdparer eux-memes leurs _31ectrom_3nagerspeuvent recevoir pi_ces et accessoires
directement Ala maison (cartes VISA, Masteff;ard et Discover accept_3es).
LosdirectivesstipuleesdanslepresentmanueIpeuventetreeffectueespar n'importequelutilisateur.Los
autresreparationsdoiventgeneralementetreeffectueesparuntechnicienqualifie.Soyezprudent,carune
reparationinadequatepeutaffecterlefonctionnementsecuritairedeI'appareil.
AuCanada,appelez le1-800-361-3400.
Unservicesatisfaisant
Sivous n'etes pas safisfait du set_ice aprbs-vente dontvous avezb_3ndficit3:
Premierement,communiquez avecles gens qui ont r_3parOvou'e appareil. Ensuite,sivous n'_3testoujours
pas satisfait, auxEtats-Unis,envoyez tousles dOtails-numOro de t_lOphone compds-au Manager,
Consumer Relations, GE Appliances, Appliance Park, Louisville, KY40225; ou, au Canada,au
Direcmur, Relations avec les consommateurs, Cmnco Inc., 1,FactoU Lane, Bureau 310, Moncmn, N.B.
E1CgM3.
29
Page 30

Informacion de
seguridad ........... 37-33
Instrucciones de
operacion
PanelesdecontroJ .......... 34
Caracterfsticas........... 35.36
Voltearlapuerta............ 37
Cargary usarlasecadora...... 38
w
Ventilacidndela secadora..... 39
!
iFelicidades!
AhoraListedespartedela familiaGE.
Bienvenido a la fitmilia GE. Estamos orgullosos de la calidad de nuesu'os productos
}7creemos en el sei_icio confiable. Lo ver_ien este manual y lo escuchar_i en las voces
de nuestro departamento de sel_cio al consumidor.
Lo mejor ser_ique usted expefimentar_i 4stos valores cada vez que use su secadora.
Eso es impormnte porque su lm_adora ser;_ parte de su fitmilia durante un largo uempo.
Y esperemos que usted sera parte de nuestra fiunilia por mucho uempo.
Los agTadecemos de comprar GE. Apreciamos su compra y esperamos que seguir_i
confiando en nosotros cuando necesite un aparato de calidad en su hogar.
Una Asociacion de Servicio.
IMPORTANTE!
Engrape la factura de comprao el cheque cancelado aqui.
Se refluiere prueba de la fecha de la COlnpra original para obtener el
sewicio cubierto bajo la garantia.
, wp,.
, wp,.
Solucionar problemas
Antesdesolicitarservido ...40, 41
M
w
Servicio al consumidor
6arantfa.................. 42
Nomerosdel
serwclo................... 43
3O
PARA6UARDARCOMOREFERENCIA
Anote aqui los mimeros de modeloy de serie:
No.
No.
Localizados en el fi'ente de la secadora (tetras de la puerta.
LEAESTEMANUAL
Este contiene instrucciones que le a)aMara a usar ymantener de
manera correcta su secadora. Un poco de cuidado preventivo le
a)aMar_ a ahoN'ar tiempo y dinero durante la vida de su secadora.
VENTILACIONCORRECTA
Para el mejor rendimiento de secado, la secadora debe ventilarse
CO_Tectamente. Para mils informaci6n sobre una ventilaci6n
CO,Tecta,vea la secci6n Ventilacidnde la secadora en este manual y la
secci6n Tubode escape en la Instmcciones de instalaci6n.
SlNECESITASERVICIO
Encontrar_ en la secci6n de Antes de solicitar unservicio soluciones
a los problemas mas comunes. En revisar nuestra secci6n de
Solucionar problemas ptimero, tal vez no necesitar_ de solicitar
un sets_icio.
Sirequiere un sets_icio, puede sentirse relajado al saber que la a)aMa
estfi s61o a una llamada de dismncia. Se incluye una lista de n6meros
gratuitos yde setvicio a clientes en la contraportada de la secci6n en
espafiol. O llame on los Estados Unidos al GE Answer (,enter al
800.626.2000, las 24 horas adel dia, los 7 dias de la semana.
Page 31

INFORMACIONE$IMPORTANTE$DESEGURIDAD.
LEAPRIMEROTODALAS INSTRUCCIONE$.
A ill DVERTENCIA!
Por suseguridad,la informacion contenida en este manual debe seguirse al pie de la letra para
minimizar el riesgo de incendio o explosion,choque electrico o para evitar dafnosa lapropiedad,
lesionespersonales ofallecimientos.
[] No almacene ni use gasolina ni otros vapores o
Iiquidos inflamables cerca de este o de
cualquier otro aparato.
SICREEQUEHUELEA GAS:
[] La instalacion y servicio deben ser realizados por
un instalador calificado, una agencia de servicio o
por su proveedor de gas.
_ oenciendeunfosforo,uncigarrillo,o cualquier
aparatoagasoelectrico.
_ otoqueninguninterruptorelectrico;nouse
ninguntelefonoensuedificio.
_ aquede lahabitacion,edificiooarea a todoslos
ocupantes.
Acta de Obligatoriedad del Estado de California sobre Agua Potable y Sustancias Toxicas
Esta acta requiere que el gobernador de California publique una lista de sustancias de las que el estado tiene
conocimiento como causantes de c_ncer, defectos de nacimiento y otros daY_osreproductivos y requiere
a los negocios que a(Mertan a los clientes sobre los tiesgos de la exposici6n potencial a dichas sustancias.
Los aparatos que fimcionan con gas pueden pro&mir exposiciones poco importantes a cuatro de estas
sustancias, que son benceno, mon6xido de carbono, fbtmaldehido y hollin, causados ptincipalmente por
la combusti6n incompleta de los combustibles de gas natural o de gas LP.
Las secadoras que est_n correctmnente ajustadas minimizan la combusti6n incompleta. La exposici6n
a estas sustancias puede disminuirse aOn mas si se ventilan adecuadamente las secadoras con salidas al
exterior.
_De inmediato Ilame a suproveedor de gas
desde el telefono de algun vecino. Siga las
instrucciones de suproveedor de gas.
_ Sinopuedeponerseencontactoconsuproveedor
degas,Ilamea losbomberos.
INSTALACIONADECUADA
Esta secadora debe instalarse de manera adecuada y colocarse de acuerdo con las Instrucciones
de instalacion antes de usarse. Si no recibe una hoja de Instrucciones de instalacion, Ilame sin
costo al GEAnswer Cente/_, 800.626.2000.
[] La secadora debe instalarse con una conexi6n a
tien'a adecuada que estd en confbrmidad con los
c6digos y ordenanzas vigentes. Siga los detalles
en las Instnmciones de instalaci6n.
[]
Instale o guarde la secadora donde no esta
expuesta a temperamras b@) cero o a la
intemperie.
[]
Conecte a un circuito el_3ctrico con'ectmnente
medido, protegido y del calibre c(m'ecto para
ex4tar una sobrecarga eldctrica.
[] Quite to(los los articulos de embalaje afilados
y deshagase de todos los materiales de ernbal_oe
correctmnente.
Tubode escape:
[-_ Secadoras a gas DEBENescapar al exterior.
[_So recomiendaampliamentetener un mbo de
escape al exterior para las secadoras eldctricas,
para evitar _'andes canudades de humedad y
de pelusa en el cuarto.
[_Use s61o mbo de metal rigido o flexible de 4" de
difimetro dentro el gabinete de la secadora
o como salida al exterior. ELUSODETUBOSDe
PLASTICO0 TUBOSCOMBUSTIBLESDEOTRO
TIPOPUEDECAUSARUNINCENDIOSI SECAE
0 SIESTARESTRINGIDODEALGUNAMANERA
OURANTEELUSO0 LAINSTALACION.
Siga las Instrucciones de instalaci6n para detalles
completos. 3 1
Page 32

INFORMACIONE$IMPORTANTE$DESEGURIDAD.
LEAPRIMEROTODALAS INSTRUCCIONE$.
iADVERTENCIA!
ALREDEDORDESUSECADORA
32
• Mantenga la area alrededor ydebajo de sus
aparatos libre de la aommlaci6n de matefiales
combustibles tales como pelusa, papel, trapos,
productos quimicos, etcdtera.
• Mantenga limpio y seco el suelo alrededor de sus
aparatos para reducir de este modo la posibilidad
de que alguien resbale.
CUAIVDOUSESUSECADORA
Nunca meta las manos en la secadora mientras el
tambor se mueva. Antes de cargar, descargar
o afiadir ropa, espere hasta que el tambor se
detiene por complem.
Limpie el filtro de pelusa antes de cada carga para
evitar la acumulaci6n de pelusa en la secadora
o en el cuarto. NUNCAOPEREtA SECADORASIN
ELFILTRODEPELUSAENSUSITIO.
No lave ni seque articulos que se hayan limpiado,
lavado en, remojado en o manchado con
sustancias combustibles o explosivas (tales como
cera, aceite, pinmra, gasolina, desen_'asantes,
solventes para lavado en seco, queroseno,
etcdtera) que puedan incendiarse o estallar.
No a£m(ta estas sustancias al again de lavado.
No use estas sustancias cerca de su lavadora y de
su secadora durante la operaci6n de cualquiera
de dstas.
No ponga en la secadora articulos expuestos a
aceite para cocinar. Los articulos contaminados
con aceite para cocinar pueden contfibuir auna
reacci6n quimica que po(kia incendiar la carga
de ropas.
Cualquier articulo en el que usted haya usado un
solvente limpiador o que contenga matefiales
inflamables (tales como trapos de limpieza,
jergas, mallas que se usan en salones de belleza,
restaurantes o barberias, etcdtera) no (leben
colocarse en o cerca de la secadora hasta que se
hayan quitado todos los rastros de estos liquidos
o s61idos inflamables y sus vapores. Hay una _'an
cantidad de articulos altamente inflamables que
se usan en los hogares. Por ejemplo: acemna,
alcohol desnamralizado, gasolina, queroseno,
algunos limpiadores caseros, algunos
removedores de manchas, aguarr_s, ceras,
removedores de cera y pro(hmtos que contienen
destilados de petr61eo.
• Es necesaria una supetvisi6n muy estrecha si este
aparato va a ser usado por nif_os o cerca de ni_-_os.
No permita que los ni_-_osjuegllen en el interior,
sobre el aparato o con cualquier otro aparam.
• Mantenga todos los auxiliares de limpieza (como
detergentes, blanqueadores, etc.) lejos del
alcance de ni_-_os,de preferencia en un gabinete
con llave. Obsets_e mdas las advertencias en las
etiquetas de los recipientes para evitar lesiones.
• No se trape ni se pare encima de la secadora.
• E1proceso de lavado reduce la capacidad de las
telas a ser retardantes al fi_ego. Para evitar ese
resultado, (leben seglfirse con gran cuidado las
instrucciones impresas en la etiqueta del
fhbticante de la prenda.
• No seque articulos que contengan hule, plastico,
espuma de caucho o matetiales similares (por
ejemplo, sostenes acojinados, tenis, zapatillas de
hule, tapetes de baY_o,tapetes, baberos, calzones
de hule para bebd, bolas de plastico, ahnohadas,
etcdtera) ya que esms matetiales pueden
derretirse o quemarse. Tambidn, algunos
materiales de hule, cuando se calientan, bajo
detemfinadas circunstancias pueden provocar un
incendio por combusti6n espontfinea.
• No guarde articulos que puedan quemarse
o dexr'etirse como ropas, papeles o plasticos
sobre la secadora mientras asta se encuentre en
operaci6n.
• Las prendas que estdn marcadas con la etiqueta
"Sequelejosde l'uentesdecalor"o "IVosequeon
m_iquino"(como chalecossalvavidasque
contengan Kapok) no (leben meterse en su
secadora.
• No seque en su secadora articulos de fibra de
vi(kio. Podria sufiir irtitacidn de la piel como
resultado de que hayan quedado particulas de
fibra de vidrio que puedan haberse adhefido
a otras prendas (hlrante el uso subsecuente de
la secadora.
• Para minimizar la posibilidad de un choque
eldctrico, desconecte este aparato del suministro
eldctrico o desconecte la secadora al panel de
distribuci6n quitando el filsible o apagando
el intermptor de circuitos antes de intentar llevar
a cabo cualquiera actividad de mantenimiento o
limpieza (excepto quitar y limpiar el filtro para
pelusa). NOTA:Colocar la petilla de ciclo en OFF
(apagado), NOdesconecta el aparato del
suministro eldctrico.
Page 33

• No ponga a fimcionar este aparato si est_ dafiado,
si fimciona real, si est_ parciahnente desaxmado
o si tiene partes rotas o fhltantes, incluyendo un
cable o clavija en lnalas condiciones.
• E1interior de la lnaquina y la conexi6n del ulbo
tie escape a dentro tie la secadora debe limpiarse
al menos una vez la afio por un instalador
capacitado. Vea la secci6n Corgory usor Io
secadora.
• Si la suya es una secadora de gas, estara equipada
con un lnecanismo de ignici6n eldctricay no tiene
una luz piloto. NOINTENTEENCENDERLA
UTILIZANDOUNFOSFORO.Puede sufi'ir
quemaduras por colocar la mano cerca del
quemador cuando se encienda la ignici6n
autoln_tica.
• Tal vez quiera suavizar las telas que haya lavado
CUANDONOUSESUSECADORA
o reducir la electficidad est_tica tie las mismas
usando tin suavizante para telas que se aplique en
la secadora o tin acondicionador anti-est_tica. Le
recoInendamos que utilice ya sea tin suavizante
para telas en el ciclo de lavado, siglliendo las
instmcciones del f_lbricante para ese tipo tie
producto, o que pmebe tin producto que se
afiada durante el secado, en el que el fabricante
asegura por escrito en la etiqueta del eInpaque
tie que su producto puede usarse sin riesgo en
su secadora. Los problemas tie setvicio o tie
fimcionamiento causados por el uso tie estos
pro&mtos son responsabilidad de los fabficantes
tie esos productos y no estfin cubiertos por la
garantia tie este aparato.
• Cuando desconecte este aparato tire de la clavija y
no del cable para evitar que se dane el cable o la
uni6n entre el cable yla clavija. Aseg_rese tie que
el cable se localice en tin sitio en donde no lo
puedan pisar, tropezar con dl o que no estd sujem
a dafio o tensi6n.
• No repare ni reelnplace ninguna parte tie este
aparam ni intente llevar a cabo ning_n setvicio a
menos que estd recoInendado de manera
especifica en este Manual del propietario o que
estd publicado en instructivos de reparaciones
hechas por el usuario que usted comprenda bien
yque sea capaz tie llevar a la practica.
• Antes de deshacerse de una secadora o si ya no
estfi en setvicio, quite la puerta tie la secadora
para impedir a los nifios tie esconderse adentro.
• No inanipule indebidamente los controles.
Favordeleery seguircuidadosamentelasprecaucionesde
sa
GUARDEESTASINSTRUCCIONES
33
Page 34

Elpanel de controldesusecadora.
Puede Iocalizar su nOmero de modelo enla etiqueta en el frente de la secadora detras de la puerta.
Su modelo puede tener otras caracteristicas y apariencia que las ilustradas per todas partes de este manual.
COTTONS
START FABRICCARE EXTRACARE SIGNAL
START MEDIUM
COTTONS EASYCARE OFF SET OFF LOUD LESSDRY
DELICATES NO HEAT I
LOWHEAT
-- _1 _r_ Caracteristicafacultativa, -- B
enalgunosmodelos
t DEWRINKLE 20
/ -" "_]¢ensornr,, DAMPDRY
t
l
AUTOMATIC
Ajustar los controles
IMPORTANTE: Limffie el filtre de pelusa cada vez que use la secadera.
_r_ Fabric Care (cuidado de telas)
COTTONS(algodones)Paraalgodonesregularesopesados,
REG.HEAT(calerregular)
EASYCARE(cuidadef_icil)Parasinteticos,mezclas,prendasdelicadasy artfculosmarcadosplanchadopermanente.
NED.HEAT(calermedio)
EXTRACARE
MOREDRY _
LESSDRY
4O
60
50
3O
EASYCARE
PERMPRESS/DELICATES
COOLDOWN
80 MIN
70
AUTOMATIC
EXTRACARE
TIMED DRY
FLUFF(prendasrellenas)Paraprendas rellenassincalorUseelciclode TIMEDDRY(secadoper tiempo)
NOHEAT(sincaler)
EASYCARE(cuidadofacil)Paraprendasdelicadas,sint0ticosyarticulosmarcadossecarconcalor bajo.
DELICATES(prendasdelicadas)
LOWHEAT(calerbaje)
D
Ciclos de secado- Los ciclos automaficos sienten la sequedad de las mlas. Seleccione MOREDRY(mas
secade)para telas m_s pesadas, LESSDRY(menossecado)para telas m_s ligeras.
Los ciclos per uempo fimcionan &lranm el dempo seleccionado.
COTTONS(algedenes)Paraalgodonesy lamayoriadeloslines,Parala mayoriadelascargasseleccionelaSeleccion
AUTOMATIC(autom_itico)RegularPreferidamarcadaconun::_:,
EASYCARE(cuidadef_icil)Paramezclassinteticasyprendasdelicadas,
AUTOMATIC(automatico)
PERMPRESS/(pianchadepermanente)
DELICATES(prendasdelicadas)
TIMEDDRY(secadepertiempe)Ajustelaperilladecicloparaeltiempodesecadodeseado,
DAMP DRY(secadehumede)Paradejarlosarticulosparcialmentehumedos,
DEWRINKLE(desarmgar)Paraquitararrugasdearticulosqueestanlimpios)/secosomu)/pocohumedos,
Start (inicio)- Cierre |a puerbt de la secadora. Seleccione START(inJcio). Abrir la puerto durame |a
lrl
operaci6n demndra la secadora. Para velvet a iniciar la secadora, cierre la puerta y
seleccione START (inicie)para completar el ciclo.
34
NOTA:Los tiemposde secado variaran de acuerdo al tipo de calor que se utilice (electrico, natural o de ga LP),el
tamafio de la carga, los tipos de tela, la humedad de lasprendas y la condicion de los ductos de escape.
Page 35

Caracteristicasde la secadora.
Logica pot colores
SensorDry
Seleccione el ajuste correct() de FABRIC
CARE(cuidadode telas). Paree el color
particular bajo las palabras con el mismo
color en el selector de ciclos.
Ejemple:Secar una carga de mpas de
planchado permanente.
SensorOry (detector de sequedad) (en algunos modelos)
Esta caracteristica flmciona s61o en los
ciclos automfiticos.
D Escoja el @lste de FABRICCARE--para
esta carga, ser_i EASY CAREMED HEAT
(cuidadofacil calor medio) (que es de
un color particular).
[_Gire el selector de ciclos al firea que
tiene el mismo color que el ajuste de
FABRIC CAREque habia escogido-
para esta carga, sera EASY CARE
AUTOMATIC(cuidado faci! automatico).
Mientras las ropas se mueven dentro de
la secadora, tambidn tocan un grande
detector. E1 detector de sequedad parara
el secado en cuanto las ropas alcanzarfin
el nivel de sequedad seleccionado.
Extra Care (cuidado extra)
Use esta opcidn para minimizar las
arrugas en las prendas. Esto proporciona
aproximadamente 15 minutos de secado
sin calor despuds de que las prendas
est_n secas.
Esta opci6n puede usarse solamente con
los ciclos automfiticos.
Si esO usando el ENDOFCYCLESIGNAL
(serialdel final de ciclo), y seleccion6 la
opci6n EXTRACARE(¢uidado extra),una
serial sonara al final del uempo de secado y
varias veces durante el ciclo EXTRACARE
(cuidadoextra).Esto le recordar_i que es
uempo de sacar la ropa de la secadora.
35
Page 36

Caracteristicas de la secadora.
SIGNAL
MEDIUM
OFF LOUD
End of Cycle Signal (sePal del final de ciclo) (en algunos modelos)
La serial sonar_justo antes del final del ciclo
para recordarle de sacar la ropa. E1 nivel de
la serial se puede ajustar.
Siseleccion6 la opci6n EXTRACARE
(cuidado extra), una serial sonara al final del
tiempo de secado y varias veces durante el
ciclo EXTRACARE(cuidadoextra).Esto le
recordar_ que es tielnpo de sacar la ropa de
la secadora.
NOTA:
• Saque la ropa con prontitud cuando suena
la set)aL Ponga la ropa en colgaderos
para que no se formen arrugas.
• Use la set)al en especial cuando seque
telas de tejidos de poliester y de
planchado permanente. Estas telas deben
sacarse con prontitud para que no se
formen arrugas en la ropa.
Luzdel tambor
Antes de reemplazar la bolnbilla de luz,
asegOrese de desconectar el cable de
suministro eKctrico de la secadora
o desconecte la secadora al panel de
distribuci6n quitando el filsible
o apagando el interrupter de circuitos.
Meta la inane en la parte superior de la
secadora desde adentro del tambor.
Ojfite la boml)illa y reemplacela con una
del mismo tamario.
Rejilla de secado
Una rejilla de secado pr_ctica puede ser
usada para secar articulos comojuguetes
rellenos, ahnohadas o su_3teres lavables.
Enganche la rejilla sobre el fihro de pelusa
asi que la rejilla se prolonga dentro del
tambor de la secadora.
NOTA:
• La rejilla de secado debe ser usada (:on el
SECADOPORTIEMPO.
• No use la rejilla de secado cuando hay
otras prendas en la secadora.
36
Page 37

Comovoltear la puerta.
Voltear la puerta
HeFF_mieRtas ReCesaFi_s,"
[] Destomillador [] Espatulacon [] Pinzasde
Phillips//2estandar cintaadhesiva puntafina
F_Abra la puertay quite los tapones en el lado opuesto de las bisagras. Con la puerta
completamente abierta, quite el tornillo interior de cada bisagl£l en el lado de la
secadora. Inserte estos tornillos hasm la mired en los agujeros SUPERIORE$, de cada
bisaD'a, en el lado opuesto (donde quk6 los mpones). Aplique una presi6n firme para
que el tomillo emre en los agl_eros no peKbrados.
[_Afloje el tornillo de arriba en cada bisagra hasta la mira en el lado de la secadora. Con
una mano sosteniendo la parte superior de la puerta y con la otra sosteniendo la parte
interior, quite la puerta de la secadora levantfindola hacia ARRIBA y hacia AFtlEtN.
¸:7¸¸¸¸
i i i i i
[_Gire la puerta de 180 °. Insdrtela en la parte opuesta de la abermra moviendo la puerta
hacia ADENTROyhacia ABAJOhasta que la bisa_'a superior descanse en los tomillos
supefiores que se colocaron en el paso 1.
[_Quke los tornillos restantes de cada lado de la abermra de donde quk6 la puerta. Con
estos tornillos, asegure cada bisagra en la parte interior. Apriete los (los tomillos
superiores de cada bisa_'a. Vuelva a insermr los tapones de plfistico en el lado de
donde se quit6 la puerta.
37
Page 38

Cargary usar la secadora.
Siempre siga /asinstrucciones del fabricante de/as prendas antes de/avar.
Consejosparaclasificary cargar
Como regla general, si las prendas se clasifican coN'ec_unente para el lavado, estar_n bien clasificadas para
el secado.
NoaOadahojasdesuavizanteparatelasunavezquela cargaestotibia,Estopuedecausarelsuavizantedemancharlaropa,
LasHojasdeSuavizantede TdidosBounce._'paresecadorashartsidoaprobadasparetodaslassecadorasGEsiemprequese
usendeacuerdoalas instruccionesdelfabricante,
Nosebrecargue.Estocausaraunadesperdiciadeenergfay arrugas,
Nosequelossiguientesarticulos:Artfculosdelibradevidrio,lanas,artfculosconteniendogoma,plasticos,artfculoscon
adomosdeplasticoyrellenosdegoma,
Cuidadoy limpiezadesusecadora
E1Exterior:Limpie cualquier derrame o compuesto
para lavar, con tin trapo hOmedo. E1panel de
control y los acabados pueden (ta*mrse con algunos
productos de pretratalniento de suciedad ycon
productos relnovedores de manchas. Aplique estos
productos fhera de la secadora. Luego, las prendas
pueden lavarse ysecarse norlnahnente. Da*_os a su
secadora causados pot estos pro(hmtos no estAn
cubiertos bajo la garanda.
E1filtrode pelusa: Limpie el fihro de pelusa antes de
cada uso. Con los dedos humedecidos alcance en la
aberulra del fihro. Pase sus dedos pot el fihro. Haga
que tin t(3cnico capacitado aspire la pelusa de la
secadora unavez al afro.
E1tubodeescape:Inspeccione y limpie el ulbo de
escape de la secadora por lo menos una vez al aflo
para evitar que se obstrwa. Un ulbo parciahnente
tapado puede alargar el tielnpo de secado.
Sigaestos pasos:
[--_Apaglm el suministro el(3ctfico desconectando
el enchufe el(3ctrico de la pared.
[_Desconecte el ult)o de la secadora.
[_Aspire el ult)o de escape con la manguera del
aspirador y conecte otra vez el tubo.
Lacampana de escape:Revise con un espejo flue las
pestaflas intellor de la campana se mueven con
t_acilidadcuando la secadora estAfundonando.
Cerciorese que no haya vida silvesu'e (ayes, insectos,
etcdtera) anidando denu'o del mbo o de la campana
de escape.
Etiquetasdecuidadodetelas
Abajo estan "simbolos" de cuidado de telas que afectan la ropa que va linear.
ETIOUETAS PARA EL LA VADO ETIQUETAS PARA EL SECADO
lavado en __ :
maquina No.na_P,aoohadop..........re/Suavo/ No_ave N........
Temperatura • • • • • •
del agua col_oote tibia F_,a/r.....
ETIQUETAS PARA EL BLANQUEADOR
S/mbolosde A //_
blanqueador Cua,qu_erb_anqueadorSo,ob,anqueo,o_,_o,o_oN.....b_anqueodor
resistente a arrugas delicado Lavar a mano
(50_C/120_F) (40_C/105_F) (30'C/%°F)
(cuando se necesita) (cuando se necesita)
38
Secar Normal Planchadopermanente/ Suave/ Nosequeporvoiteo (usadocon
de calor
Alto Medio Bajo Sin calor/aire
e_eciales s............... da/ Dejar gotear S......... S....... la
roqto-1roq
resistentea arruqas delicado nolave}
colgar para secar sitio llano sombra
No seque
Page 39

Ventilation de la secadora
Para el mejor flmcionamiento la secadora necesita ventilarse correctamente, ta socadora usar,_ mas
energiay funcionarapor mastiemposi la ventila¢ionnose haga de acuerdocon/as especificacionesabajo.
$iga concuidado los detallespara el tubode escapeen /as Instruccionesde instalacion.
[] Use s61o mbo de metal r_gido o flexible de 4" de
di_imetro dentro el gabinem de la secadora o como
salida al exterior.
[] No use ulbos de plfistico o de otro combustibles.
[] Use un largo tie mbo lo rmis corto posible.
[] No aplaste o doble.
[] Evite dejar el ulbo sobre objetos afilados.
[] ta ventilaciondebeajustarse a/as normasvigentes on materia deconstruction.
Ventilacion
correcta
Ventilacion
incorrecta
39
Page 40

Antesde solicitar unservicio...
Solucionar problemas
iAhorra tiempo y dinero/ Reviseprimem las tablas en las siguientes
paginas y tal vezno necesitara de solicitar un servicio.
Causas posibles
La secadora no funciona La secadora estfi desconectada • Vea que la clavija est(' enclmf_Ma en la tolna de corfiente.
Fusible fundido/interruptor de • Revise la c_oa de fllsibles de la casa/el intermptor de
circuito fallando circuito y reemplace el filsible o reenciende el inteH'uptor.
Que hacer
NOTA:La mayotia de las secadoras el(,ctficas man (los
filsibles/intermptores de circuito.
ta secadora no calienta Fusible fundido/interruptor de • Revise la caja de fllsibles de la casa/el inrermptor de
circuito fallando, la secadora se circuito y reelnplace el filsible o reenciende el inteH'upror.
mueve pero no calienta
Servicio de gas cerrado • AsegOrese que la v_lvula de gas de la secadora y la %hafla
principal de gas esff'n coInpletamenre abiertas.
ta secadora se sacude Un poco de sacudimiento/ruido • Mu(,vala en un suelo illas unifbmm o ajuste las patas
o hace ruido es normal. La secadora no estfi niveladoras hasta que est(" nivelada
Manchas grasosas en Mal uso del suavizante para telas • Siga las instmcciones en el paquete del suavizante.
la ropa Secar ropa sucia con ropa limpia • Seque articulos limpios solamente. Articulos sucios
nivelada
pueden Inanchar la ropa limpia o la secadora.
La ropa no estuvo completamente • Algunas inanchas que no se pueden ver en la ropa
limpia hOmeda aparecen despu('s de secar. Use procedilnientos
correctos de lavado antes de secar.
Pelusa on la ropa El filtro de pelusa estfi Ueno • Limpie el fihro antes de cada uso.
Clasificaci6n incorrecta • Separe las telas que producen pelusa (coIno la felpilla)
de las que la recogen (coIno la pana).
Electricidad es_fica puede • Vea las sugerencias en esta secci6n bajo ESTATICA.
atraer pelusa
Sobrecarga • Separe las cargas grandes en pequefias cmgas.
Papel, pa_uelos desechables, etc. • Vacie todos los bosillos antes de lavar y secar la ropa.
que se quedaron en bosillos
Hay estatica No se us6 suavizante para telas • Use un suavizante para telas.
Las Hojas de Suavizante de Tejidos Bounce ®para
secadoras han sido aprobadas para todas las secadoras
GE siempre que se usen de acuerdo a las instrucciones
del fabficante.
Exceso de secado • Use tin suavizante para telas.
• Ajuste los controles para Inenos secado.
Sint_ficos, planchado permanente • Use tin suavizante para telas.
y mezclas pueden causar estatica
Inconsecuentes tiempos Tipo de calentamiento • Tiempo autoIn_ticos de secado vafiar_n de acuerdo al
de secado tipo de calentamiento usado (el(.crrico, gas natural o LP),
tipo de telas, humedad de las telas y estado de los tubos
de escape.
4O
Page 41

Causas posibles
Que hacer
Lasprendastardan
muchoen secarse
Clasificaci6n incorrecta
• Separe articulos pesados de los ligeros, (en general una
carga bien clasificada para la lavadora est_ bien
clasificada para la secadora).
Cargas grandes de telas pesadas • Telas _'andes y pesadas contienen mas humedad y
(como toaUas de playa) ulrdan m_s en secarse. Separe articulos grandes y pesados
en pequefias cargas para acelerar el fiempo de secado.
Controles incorrectamente • Ajuste los controles de acuerdo con la carga que estfi
ajustados secando.
Filtro de pelusa lleno • Limpie el fihro antes de cada uso.
Tubos de escape inadecuados
o tapados
• Revise las instmcciones de instalaci6n para ulbos de
escape y para la ventilaci6n.
• AsegOrese que los ducms est0n limpios, que no est0n
obstruidos.
• Revise que la venfilaci6n hacia el exterior flmciona bien.
• Revise las instmcciones de instalaci6n para asegurarse
que la ventilaci6n de la secadora estfi correcta.
Fusible ftmdido/interruptor de
circuito fallando
• Reemplace los fhsibles o reenciende los inteN'uptores de
circuim. Ya que la mayoria de las secadoras usan (los
filsibles y intermptores asegOrese que ambos flmcionan.
Sobrecarga/combinaci6n de
cargas
Cargas muy pequefias
• No ponga mas de una carga de la lavadora en la secadora
al mismo tiempo.
• Si est_ secando s61ouno o (los articulos, afiada algamos
mas para asegurarse que la secadora flmciona bien.
Ropaarrugada
tasprendasencogen
Exceso de secado
Dejar la ropa en la secadora
cuando el ciclo ya termin6
Algamas telas encogen
naturalmente cuando se lavan.
Otras pueden lavarse sin riesgo
pero encogeran en la secadora
• Seleccione tin tiempo de secado mas breve.
• Qtfite la ropa cuando tiene IlllIy poca hflmeda.
• Qtfite la ropa cuando temfine el ciclo y d6blela o
cuOlguelas inmediatamente.
• Para eviutr encogeramiento siga la instrucciones del
fabficante de las prendas.
• Algunos articulos pueden recuperar sus formas despuas
desecarse.
• Si cree que tin articulo en particular puede encoger, no
lo lave en lavadora ni lo seque en secadora.
41
Page 42

Garantia de la secadora GE(Paralosconsumidores en los Estados Unidos)
Todos los servicios los proporcionan nuestros centros de fabrica o nuestros prestadores
Customer Care® autorizados. Para soficitar servicio, flame a 800-GE-CARES.
GE reemplazara:
Cualquierparte dela secadora flue falle debido a un (tefecto de fabdcaciGn o de mano de obra.
A partir de la fecha
de compra origina!
A partir de la fecha
de compra origina!
Durante este ano de garantia completa GE tambi4n proporcionar'a sin costo, mano de obra y
sen4cio en su hogar para reemplazar las partes (tefectuosas.
Untambormi_sgrandeode mi_scapacidadque fidle debido aun (tefecto (tefid)ricaciGn o (te
mano (te obra. Durante estoscincoat)osdegarantialimitada,pagara loscostos(teviaticos para
hacer sen4cio en su hogar.
• Viajes de servicio a su hogar para ensefiarle c6mo mar el
producto.
• Una instalaci6n incorrecta.
• Fallas del producto si hay abuso, mal uso, o uso para otros
prop6sitos que los propuestos, o uso para fines
comerciales.
• Reemplazo de fusibles de su hogar o reajuste de
interruptores de circuito.
• Dafio al producto causado por accidente, fuego,
intmdaciones, o actos de Dios.
• Dafio incidental o consecuencial a su propiedad causado
pot posibles defectos con el aparato.
Estagarantiaseextiendealcom_pradororiginaly acualquierpropietarioqueIosucedaparaelcasodeproductoscompradosparausodomestico
normalenlosEstadosUnidos,EnAlaska,ustedtendraquepagarelfletedelproductooloscostosdevidedeltecnicodeserviciohastasuhogar,
Algunosestadosnopermitenlaexclusiono limitaciondedanosincidentalesoconsecuenciales,Estagarantialeproporcionaderechoslegales
especificos,y puedetenetotrosderechosquepuedenvariardeun estadoa otto,Paraconocerlosdemchoslegalesdesuestado,consultecon
suoficinalocaldeasuntosdelconsumidoroalprocuradorgeneraldesuestado,
Garantidor: General Electric Company. Louisville, KY 40225
42
Page 43

NiJmerosde servicio.
GEAnswerCentersenItsEE.UU.:800.626.2000
E1GE Answer Center ®est_ abierto las 24 horas del dia, los 7 dias de la semana.
ReparacionesensuhogarenItsEE.UU.:800-432-2737
Para reparar su aparato GE, s61o llame pot" teh3fbno.
NecesidadesespecialesEnIts EE.UU.:800.626.2000
TDD 800-TDD-GEAC (800-833-4322)
GE le ofi'ece, sin costo, un folleto de a_Tl(taen planear cocinas para personas limiuldas
en sumovilidad. EnlosEE.UU.,Ilame800-TDD-GEAC(800-833-4322).
ContratosdeservicioEnItsEE.UU.:800-626-2224
Compre un contrato GE antes de que su garantia expire, y recibir_ un discuento considerable.
Asi el setvicio al consumidor GE estar_ alli aOn despu(3s de que expire su garantia.
Portesy accesoriosEnItsEE.UU.:800-626-2002
Las personas calificadas para dar sen_icio a sus aparatos pueden recibir partes y accesotios
a sus hogares (se aceptan VISA, MasterCard y Discover).
Lasinstrucciones de mantenimiento para el usuario que contiene este manual, le puede realizar
cualquier usuario. Otro tipo de servicios los debera ejecutar un personal calificado. Tenga
precaucion, un servicio inadecuado puede ser causa de peligros en la operacion.
Serviciosatisfactorio
Sino quedara satisfecho con el sen_icio GE:
Primero,contacte las personas que le dieron sen_icio.
Dospues, si sigaleinsatisfecho, on Its EE.UU.,escliba todos los detalles-incluso sun6mero de tel(3fono--
a:Manager, Consumer Relations, GE Appliances, Appliance Park, Louisville, KY40225.
43
Page 44

ServiceTelephoneNumbers.
GEAnswer Center_/ntheu.s.:800.626.2000
The GE Answer Center ®isopen 24 hours a day, 7days a week.
/n Canada,contact: Manager, Consumer RelaOons, Camco In(:., 1 Facto U Lane, Suite 310,
Moncton, N.B., E1C 9M3.
/n-HomeRepairService/,theu.s.:800-432-2737
Expert GE repair setsd(:eisonly a phone call away.
In Canada,call 1-800-361-3400.
SpecialNeedsService/,1theU.S.:800.626.2000
GE offers, fi'ee of charge, abrochure to assistin planning a barfier4i'ee kitchen for persons
_dth limited mobility. Inthe U.S.,call800-TDD-GEAC(800-833-4322).
InCanada,contact: Manager, Consumer Relations, Camco Inc., 1 Factory Lane, Suite 310,
Moncton, N.B., E1C 9M3.
ServiceContracts/,1theU.$.:800-626-2224
Purchase aGE se_dcecontract while your wan'anty isstill in effect and you'll receive a
substantial discount. GE Consumer Set_dce_dll still be there after your warranb, expires.
In Canada,call 1-800-461-3636.
PartsandAccessoriesInthe U.S.:800-626-2002
Indixdduals qualified to set_dce their o_m appliances can hm_epar_s or accessories sent directly
to their homes (VISA, MasterCard and Discover cards are accepted).
Instructions contained in this manual cover procedures tobe performed by any user. Otherservicing
generally should be referred to qualified service personnel Caution mustbe exercised, since
improper servicing may cause unsafe operation.
InCanada,call 1-800-3614400.
ServiceSatisfaction
Ifyou are not satisfied _ith the set_dce you receive fi'om GE:
First,contact the people who setsdced your appliance.
Next, ifyou are still not pleased, in the U.S.,write all the details-including your phone numberito:
Manager, Consumer Relations, GE Appliances, Appliance Park, Louisxdlle, KY 40225; or,
in Canada,to Director, Consumer Relations, Camco Inc., 1Facto U Lane, Suite 310, Moncton, N.B.,
E1C9M3.
Printed in Canada
 Loading...