

Page 1
GE
GEH-5828A
g
READ THOROUGHLY BEFORE INSTALLING
Lighting Solutions
WARNING
Risk of electric shock
• Turn power off before servicing
– see instructions
GENERAL
This luminaire is designed for outdoor lighting applications, and should not be used in areas of limited ventilation, or in high ambient temperature enclosures; it should
be installed and maintained according to following recommendations.
UNPACKING
This luminaire has been properly packed so that no parts
should have been damaged during transit. Inspect to
confirm.
INSTALLATION
Reflector Rotation: Reflectors may be rotated such that
socket is in any of four positions. This allows for variations
in beam aiming. In order to rotate the reflector the following procedure should be followed.
1. Rotation is best accomplished before mounting the
luminaire on pole.
2. Note the rear edge of reflector position with respect to
hinges (edge inserted into hinge pocket). Access reflec-
tor by loosening reflector plate to main housing screw
and allowing reflector plate assembly to lie on door
assembly. It is not necessary to detach tether.
3. Remove four screws which attach reflector to reflector
plate.
4. Rotate reflector to desired position, being careful not to
twist socket lead wires.
5. Reattach reflector by re-inserting four screws.
6. Reposition reflector plate by inserting rear edge of plate
into hinge pocket and attach plate to main housing with
screw.
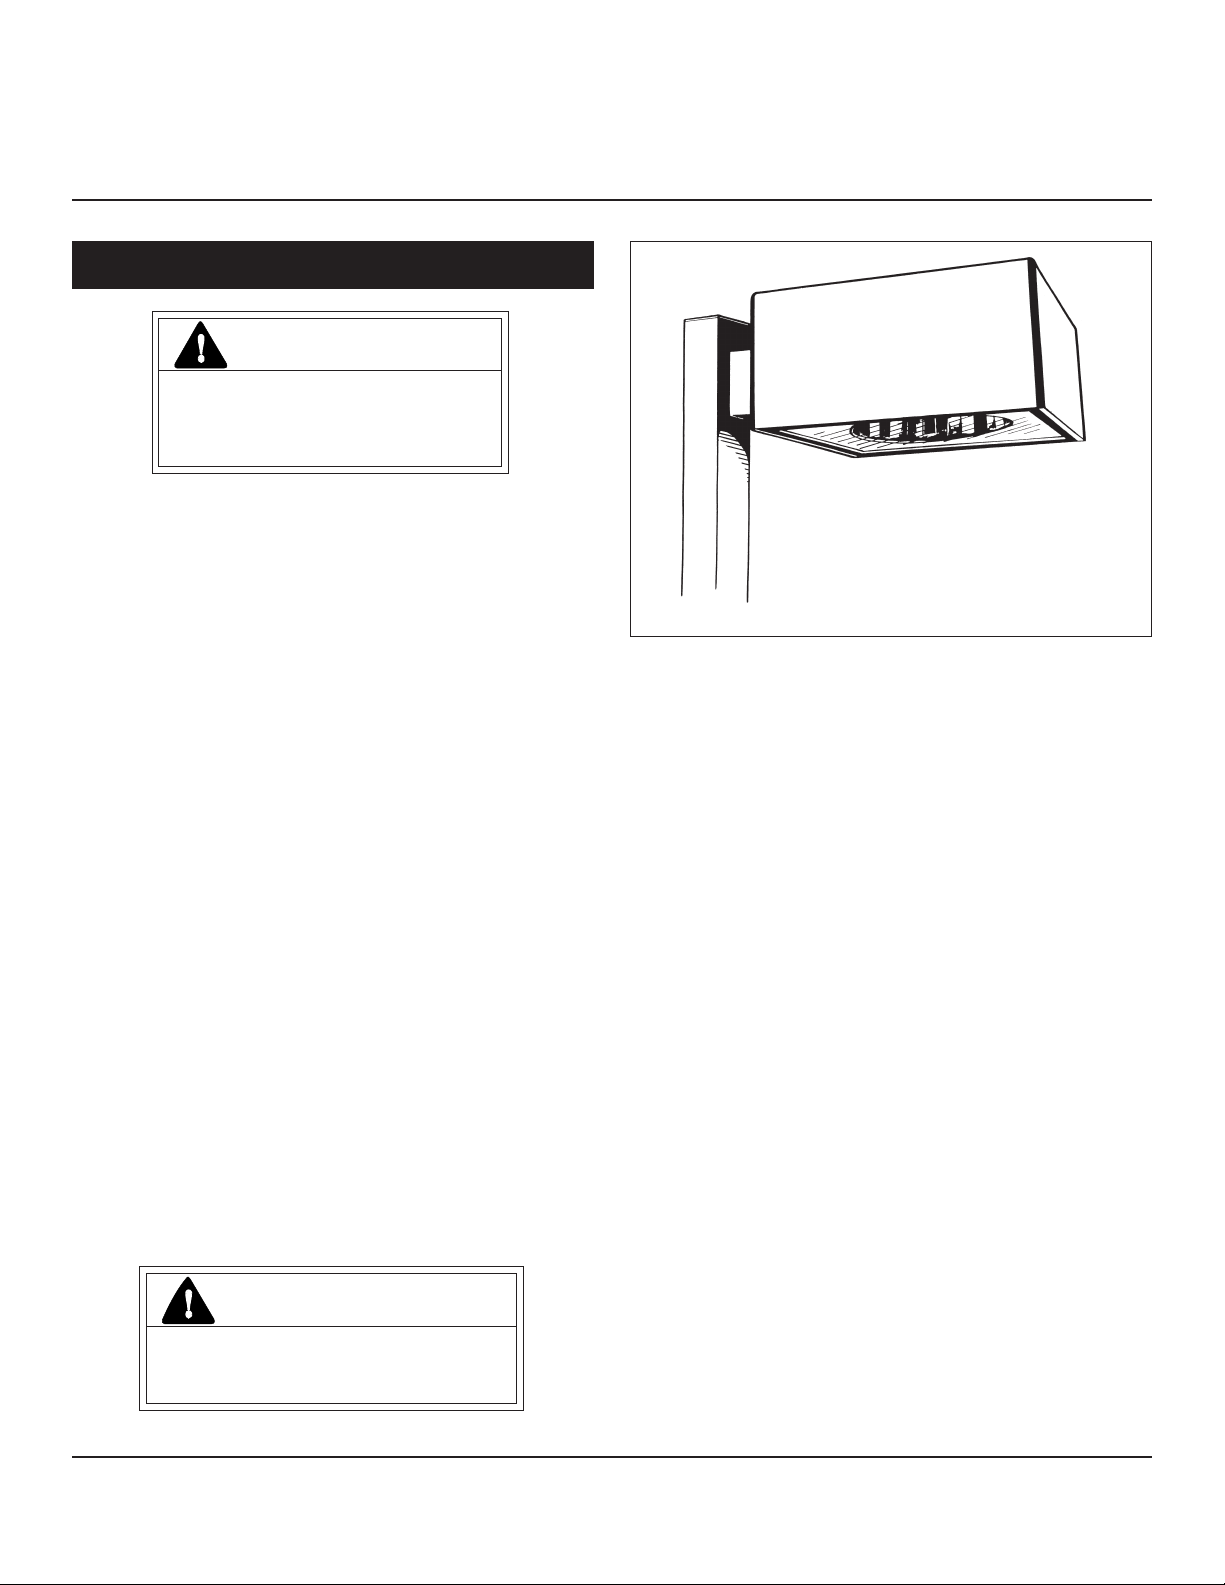
MOUNTING
INSTRUCTIONS
DimensionTM DMA (Arm)
NOTE: Power leads should be pulled as mounting
parts are assembled, verifying that leads are free
and not pinched. Ballast voltage selection is best
accomplished before mounting luminaire. See
Wiring for instruction.
A. ARCHITECTURAL MOUNTING:
(Arm)
1. Install nut plate inside pre-drilled pole with nuts to
inside. Secure with screw provided.
2. Install the two (2) studs ensuring that they fully penetrate the nuts on the nut plate.
3. Align upper and lower guides on inside of mounting
arm with their respective studs and slide it into place
against pole.
4. Open luminaire door by pushing inward on latches
while supporting door. Release reflector plate by loosening plate main housing screw and allow plate to hang
from tether.
5. Install the luminaire and secure with flat washers and
locknuts provided. Align the system as the nuts are
tightened.
CAUTION: Ensure that nuts fully engage the two
studs. Correct tightening of stud nuts is important
to ensure proper function of mounting system.
Torque nuts to 18-22 foot pounds.
CAUTION
Unit will fall if not installed properly
• Follow installation instructions
These instructions do not purport to cover all details or variations in equipment nor to provide for every possible contingency to be met in connection with installation, operation or
maintenance. Should further information be desired or should particular problems arise which are not covered sufficiently for the purchaser’s purposes, the matter should be referred
to GE Lighting Solutions.
Page 2
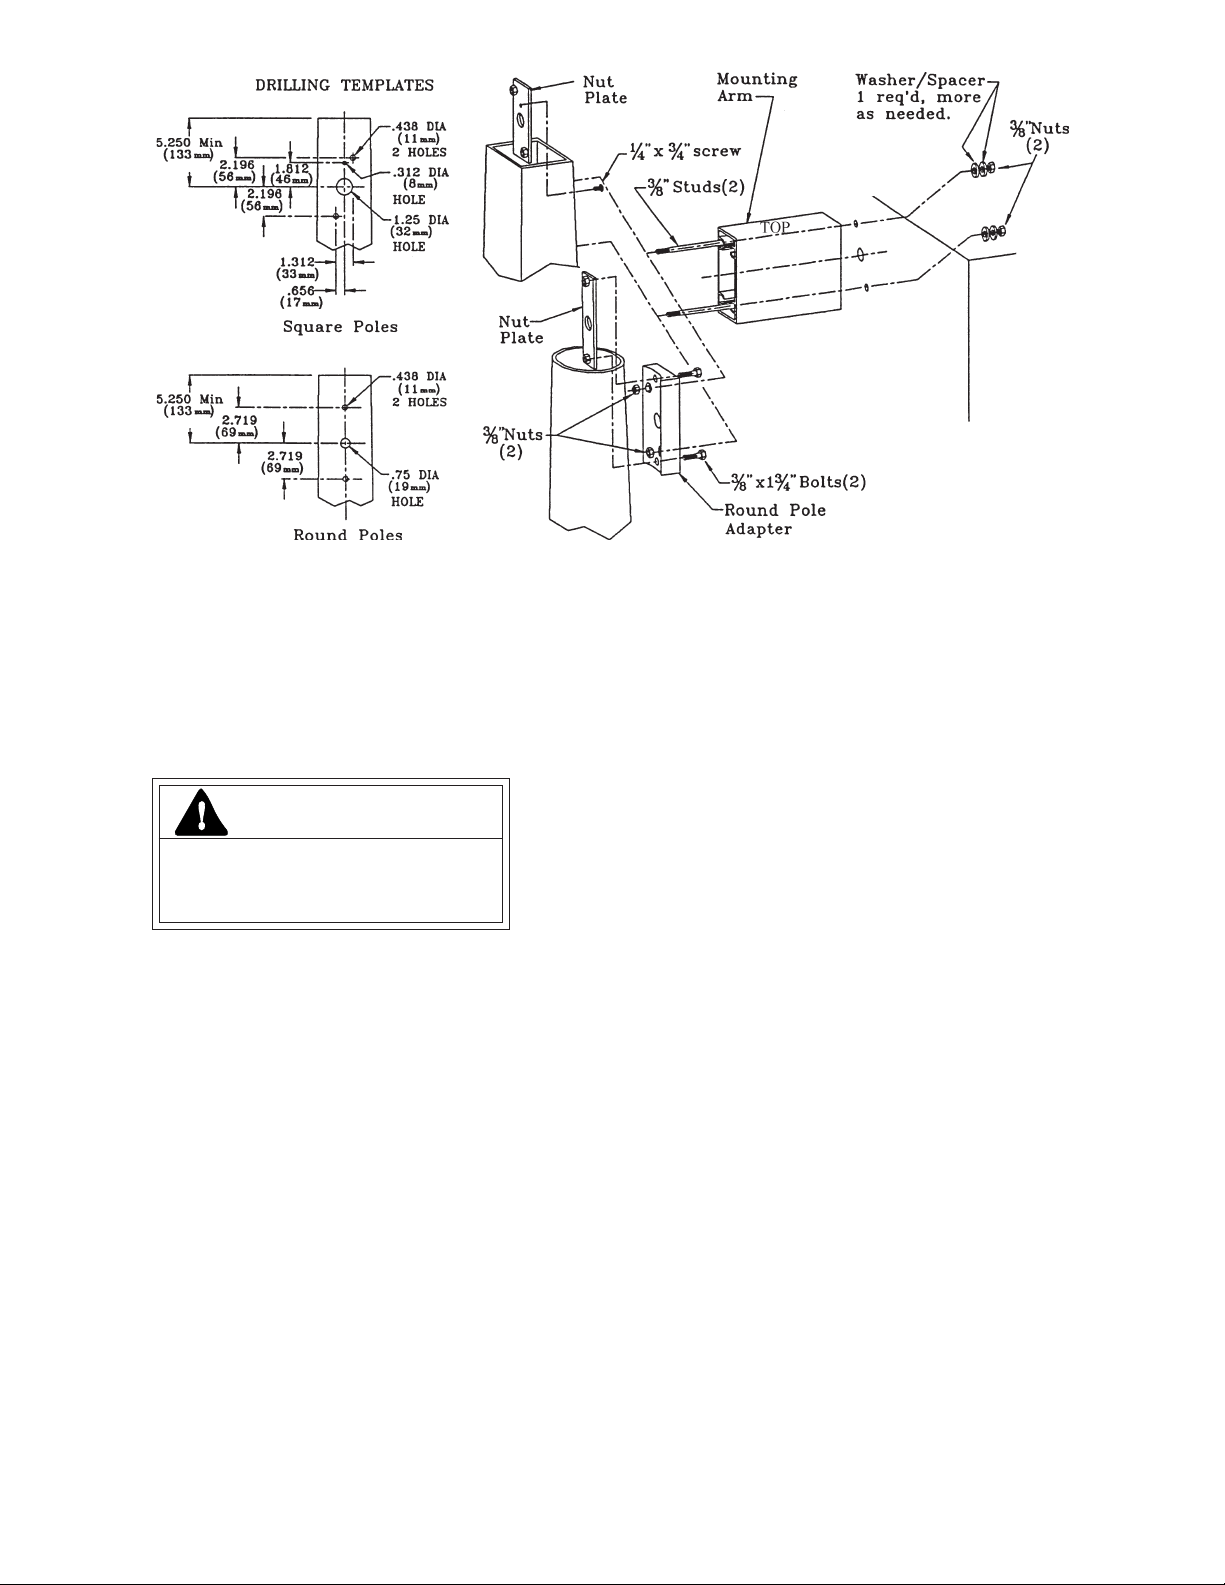
B. OTHER MOUNTINGS
External Slipfitters, Knuckle Flat Surface, Knuckle Pole
Top and Round Pole Adapters are also available for use
with housings machined with a diagonal hole pattern.
Installation is similar to the Architectural Mounting.
CAUTION: Do not mount any unit below or greater
than 60° above horizontal.
LAMP INSTALLATION
CAUTION
Risk of burn
• Allow lamp/fixture to cool before
handling
Use only lamps specified on nameplate. Observe
lamp manufacturer’s recommendations and restric-
tions on lamp operation, particularly ballast type,
burning position, etc.
LAMP TIGHTNESS — The lamp should be securely inserted to NEMA-EEI specified torque of 35 inch-pounds,
which is best achieved by very firmly tightening to insure
application of sufficient torque. Tightening must be
sufficient to fully depress and load center contact of socket.
WIRING
Make all electrical connections in accordance with
the National Electrical Code and any applicable
local code requirements.
Verify that supply voltage is correct by comparing it
to nameplate.
Do not remove insulated connectors from wires not
needed for required voltage connection.
Strain relief for incoming power must be provided
in the pole top by the customer.
1. Connect supply leads to internal terminal board as
shown on wiring tag.
(check nameplate for minimum temperature requirement and electrical data).
2. Check luminaire nameplate for ballast type, single or
multivolt, or multiwatt.
IF SINGLE VOLTAGE — All single voltage ballasts are
prewired such that user need only connect the supply
conductors.
IF MULTIVOLT — (120/208/240/277 volts) Connect
the ballast lead with the insulated terminal to the desired
voltage terminal as indicated on the ballast terminal
nameplate.
IF MULTIWATT — Multiwatt ballasts are available in
various combinations of wattage. See wiring instructions on
wiring tag inside the luminaire.
Reattach reflector plate, close door and check for secure
latch engagement. Installation is complete.
PHOTOELECTRIC CONTROL (if option present)
Photoelectric control receptacle should be oriented
before control is installed. Loosen the two holding screws
and rotate receptacle until “North” is directed as near as
possible to true North. Tighten holding screws and install
control.
MAINTENANCE AND CLEANING
It will occasionally be necessary to clean outside of door
glass to maintain light levels. Frequency of cleaning will
depend on ambient dirt levels and minimum light level
which is acceptable to user. Door glass should be washed in
a solution of warm water and any mild, nonabrasive
household detergent, rinsed with clean water and wiped
dry. Should the optical assembly become dirty on inside,
wipe reflector and clean door glass in above manner, and
replace any damaged gasket.
The light output of a luminaire is also dependent on age
of lamp. In applications where light levels are critical it may
be desirable to replace lamps before they burn out. Lamp
manufacturer can provide data showing how lamp light
output decreases with use.
NOTE: Terminal board will accept supply leads
ranging in size from AWG No. 14 through No. 6
Page 3

GE
GEH-5828A
g
Lighting Solutions
À LIRE TOTALEMENT AVANT D'INSTALLER
DANGER
Risque d’électrocution
• Mettre hors tension avant d’intervenir
– Suivez les instructions
PRÉSENTATION
Ces luminaires sont conçus pour fournir un éclairage à l’extérieur,
et ne doivent pas être utilisé dans des zones à ventilation limitée ou
sous des températures ambiantes élevées. Les meilleurs résultats sont
obtenus avec une installation et un entretien conformes aux
recommandations qui suivent.
DÉBALLAGE
Le luminaire a été emballé correctement de façon à ce qu’aucune
de ses pièces ne soit endommagée pendant son transport. Veuillez
procéder à une vérification pour le confirmer.
INSTALLATION
Rotation du Réflecteur— Les réflecteurs qui ont des supports
internes peuvent pivoter pour prendre quatre positions. Ceci permet de
varier le ciblage du faisceau lumineux. Pour faire pivoter le réflecteur :
1. La rotation est le plus facilement réalisée avant le montage du
luminaire .
2. Notez la position du bord arrière du réflecteur par rapport aux
charnières (bord inséré dans le logement de charnière). Accédez
au réflecteur en desserrant la vis de la plaque de réflecteur sur le
caisson principal et en lui permettant d’appuyer sur l’assemblage
de porte. Il n’est pas nécessaire d’enlever l’attache.
3. Enlevez les quatre vis qui fixent le réflecteur sur la plaque de
réflecteur.
4. Faites tourner le réflecteur pour prendre la position désirée, en
faisant attention de ne pas tordre les fils de connexion de douille.
5 Fixez à nouveau le réflecteur en remettant les quatre vis.
6. Replacez la plaque de réflecteur en insérant son bord arrière dans
le logement de charnière et fixez-la avec la vis.
INSTRUCTIONS
DimensionTM DMA (Arm)
non pincés. La commutation de tension sur le ballast est le
plus facilement réalisée au montage. Reportez-vous à la
section “Câblage”.
A. MONTAGE ARCHITECTURAL : (Bras)
1. Montez la plaque à écrous dans le bout de poteau percé à l’avance.
Fixez-la avec la vis fournie.
2. Montez deux (2) goujons en les vissant bien à fond dans les écrous
de la plaque.
3. Alignez les guides supérieur et inférieur à l’intérieur du bras de
montage avec leurs goujons respectifs et placez-le en position contre
le poteau.
4. Ouvrez la porte du luminaire en poussant vers l’intérieur sur ses
charnières tout en la supportant. Libérez la plaque de réflecteur en
desserrant la vis sur le caisson principal et permettez à la plaque de
pendre à partir de son attache.
5. Installez le luminaire et bloquez-le avec les rondelles plates et
écrous freinés fournis. Alignez en jouant sur le serrage des écrous.
ATTENTION : Assurez-vous que les écrous soient bien
engagés sur les deux goujons. Un serrage correct des écrous
de goujon est important pour un bon montage du système.
Serrez les écrous au couple de 27-33 mkg (18-22 livre-pied).
MONTAGE
ATTENTION
Risque de chute en cas de mauvais
montage - Suivez les instructions
NOTE : Les fils d’alimentation doivent être tirés au moment
de l’assemblage des pièces, en vérifiant qu’ils sont libres et
Ces instructions n'ont pas pour destination de couvrir tous les détails ou variantes de l'équipement, ni de répondre à toutes les éventualités que vous pourriez rencontrer pendant l'installation,
le fonctionnement ou l'entretien. Si vous souhaitez des informations complémentaires, ou si vous rencontrez un problème particulier qui ne soit pas adressé de votre point de vue d'acheteur,
le sujet doit être remonté jusqu'à la société GE Lighting Solutions
Page 4

5.250 in. MIN
(133mm)
5.250 in. MIN
(133mm)
DESCRIPTEUR DE FORAGE
2.196 in.
1.812 in.
(56mm)
(46mm)
2.196 in.
(56mm)
1.312 in.
(33mm)
.656 in.
(17mm)
POTEAU CARRÉ
2.719 in.
(69mm)
2.719 in.
(69mm)
POTEAU ROND
.438 in.
(11mm)
2 TROUS
.312 in.
(8mm)
TROU
1.25 in.
(32mm)
TROU
.438 in.
(11mm)
2 TROUS
.75 in.
(19mm)
TROU
PLAQUE
ÉCROU
ÉCROUS DE
3/8 IN. (2)
PLAQUE
ÉCROU
VIS 1/4" x 3/4"
GOUJONS DE
3/8" (2)
BRAS DE
MONTAGE
DESSUS
BOULONS 3/8" X 1 3/4" (2)
ADAPTATEUR
POUR POTEAU
ROND
WASHER/spacer
1 A EXIGÉ, PLUS COMME
NÉCESSAIRES
ÉCROUS DE 3/8 IN. (2)
B. AUTRES TYPES DE MONTAGE
Des manchons extérieurs, rotules pour surface plane ou haut
de mat, et des adaptateurs pour poteau rond sont aussi
disponibles pour utilisation avec des chassis usinés avec une
configuration de perçage diagonale. Leur installation est similaire à
celle du montage architectural.
ATTENTION : Ne montez aucun luminaire avec un
écart de plus de 60° par rapport à l’horizontale.
INSTALLATION DE LAMPE
ATTENTION
Risque de brûlure
• Laissez le bloc d’ampoule refroidir
avant d’y toucher
N’utilisez que le type de lampe spécifié sur la plaque
d’identification. Observez les recommandations et restrictions du
fabricant sur le fonctionnement de la lampe, en particulier pour le
type de ballast, la position d’utilisation, etc.
SERRAGE DE LAMPE - La lampe doit être insérée de façon
sûre avec un couple de serrage NEMA-EEI spécifié à 4,4 mkg (35
livre-pouce), ce qui est le mieux réalisé en serrant fortement à la
main pour mettre un couple suffisant. Le serrage doit
complètement appuyer et charger le contact central de la douille
avec le culot de la lampe.
CÂBLAGE :
Effectuez tous les raccordements en conformité avec les normes
nationales et les éventuels règlements locaux applicables.
Vérifiez que la tension secteur disponible est la bonne en
comparant avec l'indication de tension sur la plaque
d'identification.
N'enlevez pas les connecteurs isolés des fils non concernés par
le raccordement de la tension.
Le client prévoira une protection contre la contrainte pour le
câble d’alimentation en haut du poteau.
1. Connectez les fils d’alimentation sur le bornier interne comme
indiqué sur l’étiquette de câblage.
NOTE : Le bornier peut recevoir des fils secteur allant des
tailles AWG N°14 à N° 6 (vérifiez sur la plaque d’identification
la température de résistance minimale requise et les données
électriques).
2. Vérifiez sur la plaque d’identification du luminaire son type de
ballast, mono ou multi-tenion, et son wattage.
MONO-TENSION - Tous les ballasts sont précâblés et
l'utilisateur n'a qu'à relier les fils d'alimentation pour la tension
prévue.
MULTI-TENSIONS (120/208/240/277 volts)- Reliez le fil de
ballast avec sa terminaison isolée sur la borne de tension
adéquate comme indiqué sur la plaque du ballast.
MULTI-PUISSANCES - Des ballasts sont disponibles avec
différentes combinaisons simultanées de wattages. Suivez les
instructions portées sur l’étiquette de câblage à l’intérieur du
luminaire.
Remettez en place la plaque de réflecteur, fermez la porte et
verifiez le bon verrouillage. L’installation est terminée.
COMMANDE PHOTOÉLECTRIQUE (si l’option est
installée)
Le module de commande photoélectrique doit être orienté avant
d’installer la commande. Desserrez ses deux vis de maintien et
tournez le module pour diriger au mieux le marquage “North” vers
le Nord vrai. Resserrez les vis de maintien et installez la
commande.
ENTRETIEN ET NETTOYAGE
Il sera nécessaire à l’occasion de laver l’extérieur de la porte
vitrée pour garder un bon niveau d’éclairage. La fréquence de ce
nettoyage est fonction du niveau local d’empoussièrage et du seuil
minimum d’éclairage toléré par l’utilisateur. La porte vitrée se lave
avec une solution d’eau chaude et n’importe quel détergent
ménager doux et non abrasif, rincez à l’eau claire et séchez par
essuyage. Si l’assemblage optique devenait également sale,
nettoyez le réflecteur et le côté intérieur de la porte vitrée de la
même façon que ci-dessus, et remplacez le joint s’il est
endommagé.
La luminosité du luminaire dépend aussi de l’âge de sa lampe.
Dans les applications où le niveau de lumière est critique il peut
être souhaitable de remplacer les lampes avant qu’elles ne
grillent. Les fabricants de lampes fournissent des données sur
l’atténuation de la luminosité en fonction du temps de
fonctionnement.
g
GE Lighting Solutions • 1-888-MY-GE-LED • www.gelightingsolutions.com
16943533----888
GE Lighting Solutions is a subsidiary of the General Electric Company. Evolve and other trademarks belong to GE Lighting Solutions. The GE brand and logo are trademarks of the General Electric Company.
© 2011 GE Lighting Solutions. Information provided is subject to change without notice. All values are design or typical values when measured under laboratory conditions.
35-201578-2K (9/02)
 Loading...