

Page 1
ENTER
DisplayKEY
Pocket Guide
BACK
DisplayKEY
112233
445566
778899
00
ENTER
®
Page 2

Copyright Copyright © 2006, GE Security Inc. All rights reserved.
This document may not be copied or otherwise reproduced, in
whole or in part , except as specifically permitted under US and
international copyright law, without the prior written consent
from GE.
Document number: 43670-01 (July 2006).
Disclaimer THE INFORMATION IN THIS DOCUMENT IS SUBJECT TO CHANGE
WITHOUT NOTICE. GE ASSUMES NO RESPONSIBILITY FOR INACCURACIES OR OMISSIONS AND SPECIFICALLY DISCLAIMS ANY
LIABILITIES, LOSSES, OR RISKS, PERSONAL OR OTHERWISE,
INCURRED AS A CONSEQUENCE, DIRECTLY OR INDIRECTLY, OF
THE USE OR APPLICATION OF ANY OF THE CONTENTS OF THIS
DOCUMENT. FOR THE LATEST DOCUMENTATION, CONTACT YOUR
LOCAL SUPPLIER OR VISIT US ONLINE AT WWW.GESECURITY.COM.
This publication may contain examples of screen captures and
reports used in daily operations. Examples may include fictitious names of individuals and companies. Any similarity to
names and addresses of actual businesses or persons is entirely
coincidental.
Trademarks
and patents
GE and the GE monogram are registered trademarks of General
Electric. Supra is a registered trademark of GE Security.
Other trade names used in this document may be trademarks or
registered trademarks of the manufacturers or vendors of the
respective products.
Intended use Use this product only for the purpose it was designed for; refer
to the user documentation. For the latest product information,
visit us online at www.gesecurity.com.
FCC compliance Part 15 information. This equipment has been tested and
found to comply with the limits for a Class B digital device,
pursuant to part 15 of the FCC Rules. These limits are
designed to provide reasonable protection against harmful
interference in a residential installation. This equipment
generates, uses, and can radiate radio frequency energy
and, if not installed and used in accordance with the
instruction manual, may cause harmful interference to
radio communications.
Changes or modifications not expressly approved by the
party responsible for compliance could void the user’s
authority to operate the equipment.
Part 68 information. This equipment complies with Part 68
of the FCC Rules and the requirements adopted by ACTA. On
the bottom of the enclosure of this equipment, a label
contains a product identifier in the format
US:AAAEQ##TXXXX. If requested, this information must be
provided to your telephone company.
The plug and jack used to connect this equipment to the
premises wiring and telephone network comply with the applicable FCC Part 68 rules and requirements adopted by ACTA. A
compliant telephone cord and modular plug is provided with this
product. It is designed to be connected to a compatible modular
jack that is also compliant. See installation instructions for
details.
Page 3

The REN is used to determine the number of devices that may
connect to a telephone line. Excessive RENs on a telephone line
may result in the devices not ringing in response to an incoming
call. In most but not all cases, the sum of the RENs should not
exceed five (5.0). To be certain of the number of devices that
may connect to a line, as determined by the total RENs, contact
your local telephone company. For product approved after July
23, 2001, the REN for this product is part of the identifier that has
the format US:AAAEQ##TXXXX. The digits represented by the ##
are the REN without the decimal point. (For example, 03 is a REN
of 0.3.) For earlier products, the REN is shown separately on the
label.
If this equipment causes harm to the telephone network, the
telephone company will notify you in advance that temporary
discontinuance of service may be required. But if advance notice
isn’t practical, the telephone company will notify you as soon as
possible. Also, you will be advised of your right to file a
complaint with the FCC if you believe it is necessary.
iii
The telephone company may make changes in its facilities,
equipment, operations, or procedures that could affect the
proper functioning of your equipment. If it does, you will be notified in advance in order for you to make necessary modifications to maintain uninterrupted service.
If your home has specially wired alarm equipment connected to
the telephone line, ensure the installation of this equipment does
not disable your alarm equipment. If you have questions about
what will disable alarm equipment, consult your telephone
company or a qualified installer.
Connection to party line service is subject to state tariffs.
Contact the state public utility commission, public service
commission, or corporation commission for information.
If you experience trouble with this equipment, or for warranty/
repair information, please contact the support number listed in
this document. If the equipment is causing harm to the telephone network, the telephone company may request that you
disconnect the equipment until the problem is resolved. DO NOT
DISSASSEMBLE THIS EQUIPMENT.
Page 4

iv
DisplayKEY
Pocket Guide
Rules and
regulations
relating to use
of the service
1. Possession of Key: Each Keyholder (as defined in the
Agreement entered into by your Organization) is responsible
for the key issued to him or her. If a key is lost or requires
replacement for any reason, the replacement cost for the key
shall be the replacement price in the Keyholder Agreement.
2. Current Update Code: The key has an update code that
expires daily to prohibit further use of the key until a new
current update code is obtained from Supra or your
Organization and entered into the key. Update codes shall be
issued only to Keyholders in good standing with the
Organization. A Keyholder is in good standing if he/she is in
full compliance with all obligations in the Keyholder
Agreement, including, without limitation, the terms of these
Rules and Regulations.
3. Security of Equipment: It is necessary to maintain the
security of each key and the Personal Identification Number
("PIN") of each key to prevent the use of the key by
unauthorized persons. Each party in possession of a key,
whether such key is being actively used or not, shall abide by
the following conditions:
a. To keep the key in such party's possession or in a safe
place at all times;
b. Not to allow the PIN for the key to be displayed on or
attached to the key for any purpose whatsoever or to be
disclosed to any third party;
c. Not to lend or otherwise transfer the key to any other
person or entity, or permit any other person or entity to
use the key for any purpose whatsoever, whether or not
such other person or entity is a real estate broker or
salesperson;
d. Not to duplicate the key or allow any other person to do
so;
e. Not to assign, transfer or pledge the key;
f. Not to destroy, alter, modify, disassemble or tamper with
the key or knowingly or unknowingly allow anyone else to
do so;
g. To notify your Organization immediately in writing, and in
any event within 48 hours, of a loss or theft of the key or
any keyboxes, and of all circumstances surrounding such
loss or theft;
h. To complete and deliver to your Organization a stolen key
affidavit prior to and as a condition of the issuance of a
replacement key;
i. To follow all additional security procedures as specified by
your Organization; and
Page 5

j. To safeguard the code for each keybox from all other
individuals and entities, whether or not they are
authorized users of the Service.
4. Authorization: Before a keybox is installed or used on any
piece of real property, the prior written authorization to install
or use a keybox must be obtained from the property owner,
as well as from any tenant(s) in possession of the property, if
applicable. Extreme care shall be used to ensure that all
doors to the listed property and the keybox are locked. All
owners and/or tenant(s) of real property shall be informed
that the keybox is not designed or intended as a security
device.
v
Page 6

vi
DisplayKEY
Pocket Guide
Page 7

Contents
Preface . . . . . . . . . . . . . . . . . . . . . . . . . . . . . . . . . . . . . . 1
Conventions used in this document . . . . . . . . . . .2
Chapter 1. Introduction . . . . . . . . . . . . . . . . . .3
Supra KeyBox system . . . . . . . . . . . . . . . . . . . . . . . . . 4
DisplayKEY overview. . . . . . . . . . . . . . . . . . . . . . . . . . 5
Navigation. . . . . . . . . . . . . . . . . . . . . . . . . . . . . . . . . . .6
Audio tones. . . . . . . . . . . . . . . . . . . . . . . . . . . . . . . . . .8
Battery . . . . . . . . . . . . . . . . . . . . . . . . . . . . . . . . . . . . . .9
vii
Chapter 2. Cradle . . . . . . . . . . . . . . . . . . . . . . .11
Cradle setup . . . . . . . . . . . . . . . . . . . . . . . . . . . . . . . . 12
Analog phone line connection . . . . . . . . . . . . . . 14
Open Internet connection . . . . . . . . . . . . . . . . . . 17
Charging your DisplayKEY. . . . . . . . . . . . . . . . . . . . 20
Chapter 3. Updating . . . . . . . . . . . . . . . . . . . .23
eSYNC . . . . . . . . . . . . . . . . . . . . . . . . . . . . . . . . . . . . . . 24
Automatic eSYNC . . . . . . . . . . . . . . . . . . . . . . . . . . 24
Manual eSYNC . . . . . . . . . . . . . . . . . . . . . . . . . . . . . 25
eSYNC phone number. . . . . . . . . . . . . . . . . . . . . . 26
Manual update . . . . . . . . . . . . . . . . . . . . . . . . . . . . . . 28
Page 8

viii
DisplayKEY
Pocket Guide
Chapter 4. KeyBoxes. . . . . . . . . . . . . . . . . . . . 31
Accessing KeyBoxes . . . . . . . . . . . . . . . . . . . . . . . . . 32
Releasing the key container . . . . . . . . . . . . . . . . 33
Releasing the shackle . . . . . . . . . . . . . . . . . . . . . . 36
Timed access . . . . . . . . . . . . . . . . . . . . . . . . . . . . . . . 37
CBS codes . . . . . . . . . . . . . . . . . . . . . . . . . . . . . . . . . . 39
Cooperating systems . . . . . . . . . . . . . . . . . . . . . . . . 40
Chapter 5. Showing activity . . . . . . . . . . . . . 43
Viewing showing activity. . . . . . . . . . . . . . . . . . . . . 44
ShowingValue. . . . . . . . . . . . . . . . . . . . . . . . . . . . . . 44
KIM voice access . . . . . . . . . . . . . . . . . . . . . . . . . . . 55
Reading a KeyBox. . . . . . . . . . . . . . . . . . . . . . . . . . 56
Chapter 6. Support . . . . . . . . . . . . . . . . . . . . . 59
Before calling support . . . . . . . . . . . . . . . . . . . . . . . 60
Troubleshooting tips. . . . . . . . . . . . . . . . . . . . . . . . . 61
Error codes . . . . . . . . . . . . . . . . . . . . . . . . . . . . . . . . . 65
Technical support . . . . . . . . . . . . . . . . . . . . . . . . . . . 73
Page 9

Preface
This is the GE DisplayKEY Pocket Guide. This
document includes an overview of the product
and detailed instructions explaining:
• how to connect your cradle and charge
your DisplayKEY;
• how to update your DisplayKEY;
1
• how to access KeyBoxes; and
• how to view showing activity for your
listings.
There is also information describing how to
contact technical support if you have questions
or concerns.
Page 10

2
DisplayKEY
Pocket Guide
Conventions used in this document
The following conventions are used in this
document:
Bold Menu items and buttons.
Italic Emphasis of an instruction or point;
special terms.
File names, path names, windows,
panes, tabs, fields, variables, and
other GUI elements.
Titles of books and documents.
Blue italic (Electronic version.) Hyperlinks to
cross-references, related topics, and
URL addresses.
Page 11

Chapter 1 Introduction
This chapter explains the Supra KeyBox
system and provides an overview of your
DisplayKEY, including navigation,
interpreting the audio tones, and charging
the battery.
In this chapter:
Supra KeyBox system . . . . . . . . . . . . .4
DisplayKEY overview. . . . . . . . . . . . .5
Navigation . . . . . . . . . . . . . . . . . .6
Audio tones . . . . . . . . . . . . . . . . .8
Battery . . . . . . . . . . . . . . . . . . . . .9
Page 12

4
DisplayKEY
Pocket Guide
Supra KeyBox system
The DisplayKEY is part of the Supra KeyBox
system. The components of the system are:
KeyBoxes. Supra KeyBoxes hold the listing
keys to your properties. To show a
listing, you must access the keys inside
the KeyBox placed on the listing.
DisplayKEY. The DisplayKEY allows you
to access Supra KeyBoxes and keeps
track of the KeyBoxes it has opened.
DisplayKEY cradle. The DisplayKEY
cradle updates your DisplayKEY and
charges the battery.
KIM. KIM, the KeyBox Information
Manager, is the network that maintains
all DisplayKEY and KeyBox data.
Page 13
Chapter 1
Introduction
DisplayKEY overview
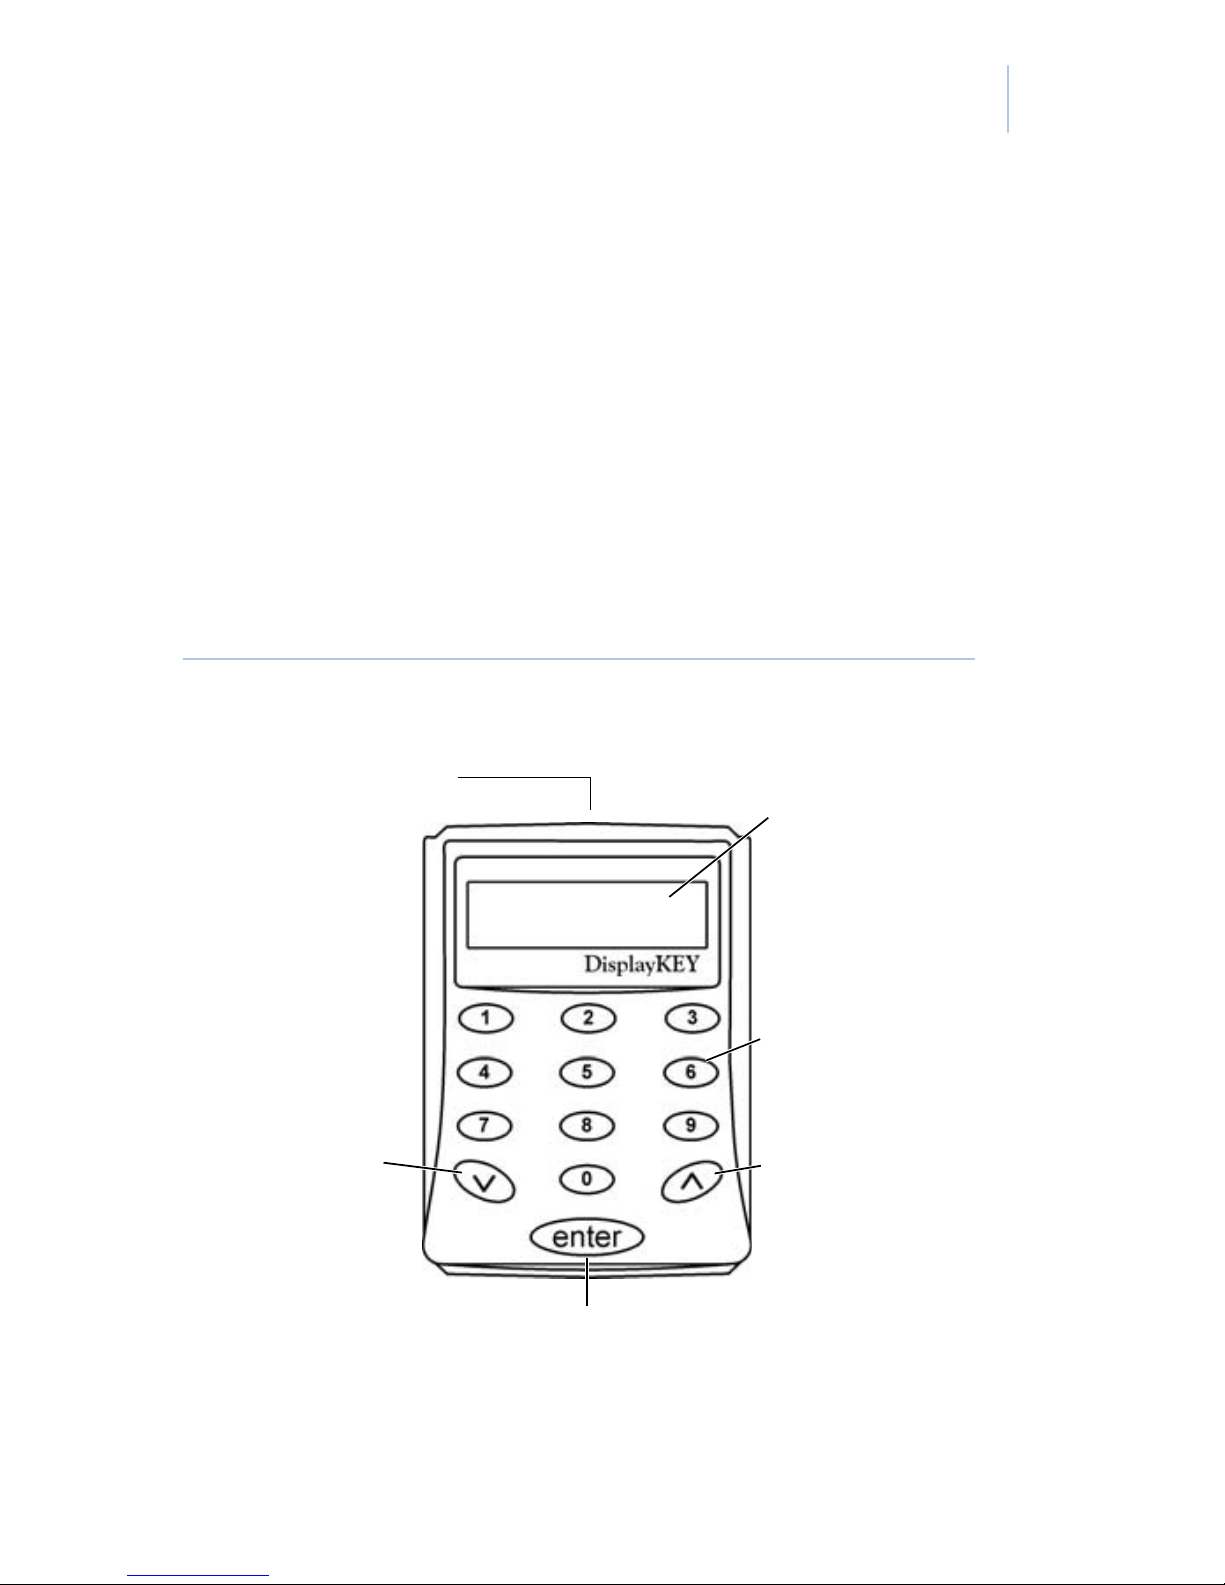
Your DisplayKEY allows you to access both the
AEII KeyBox and the Supra iBox. The LCD
screen on the front of the DisplayKEY displays
menu options, codes, and messages. Use the
numbered keypad to enter codes into the
DisplayKEY.
5
Figure 1. DisplayKEY
Infrared (IR) Port
Uses infrared
technology to
communicate
with the Supra
iBox.
Down arrow
Navigates
menu options
or backspaces
LCD screen
Displays
messages and
codes.
KEY UPDATED
FOR: 10/28/05
Numbered
buttons
Enters codes.
Up arrow
Navigates
menu options.
when entering
codes.
Enter button
Turns on your
DisplayKEY or selects
a menu option.
Page 14
6
DisplayKEY
Pocket Guide
Navigation
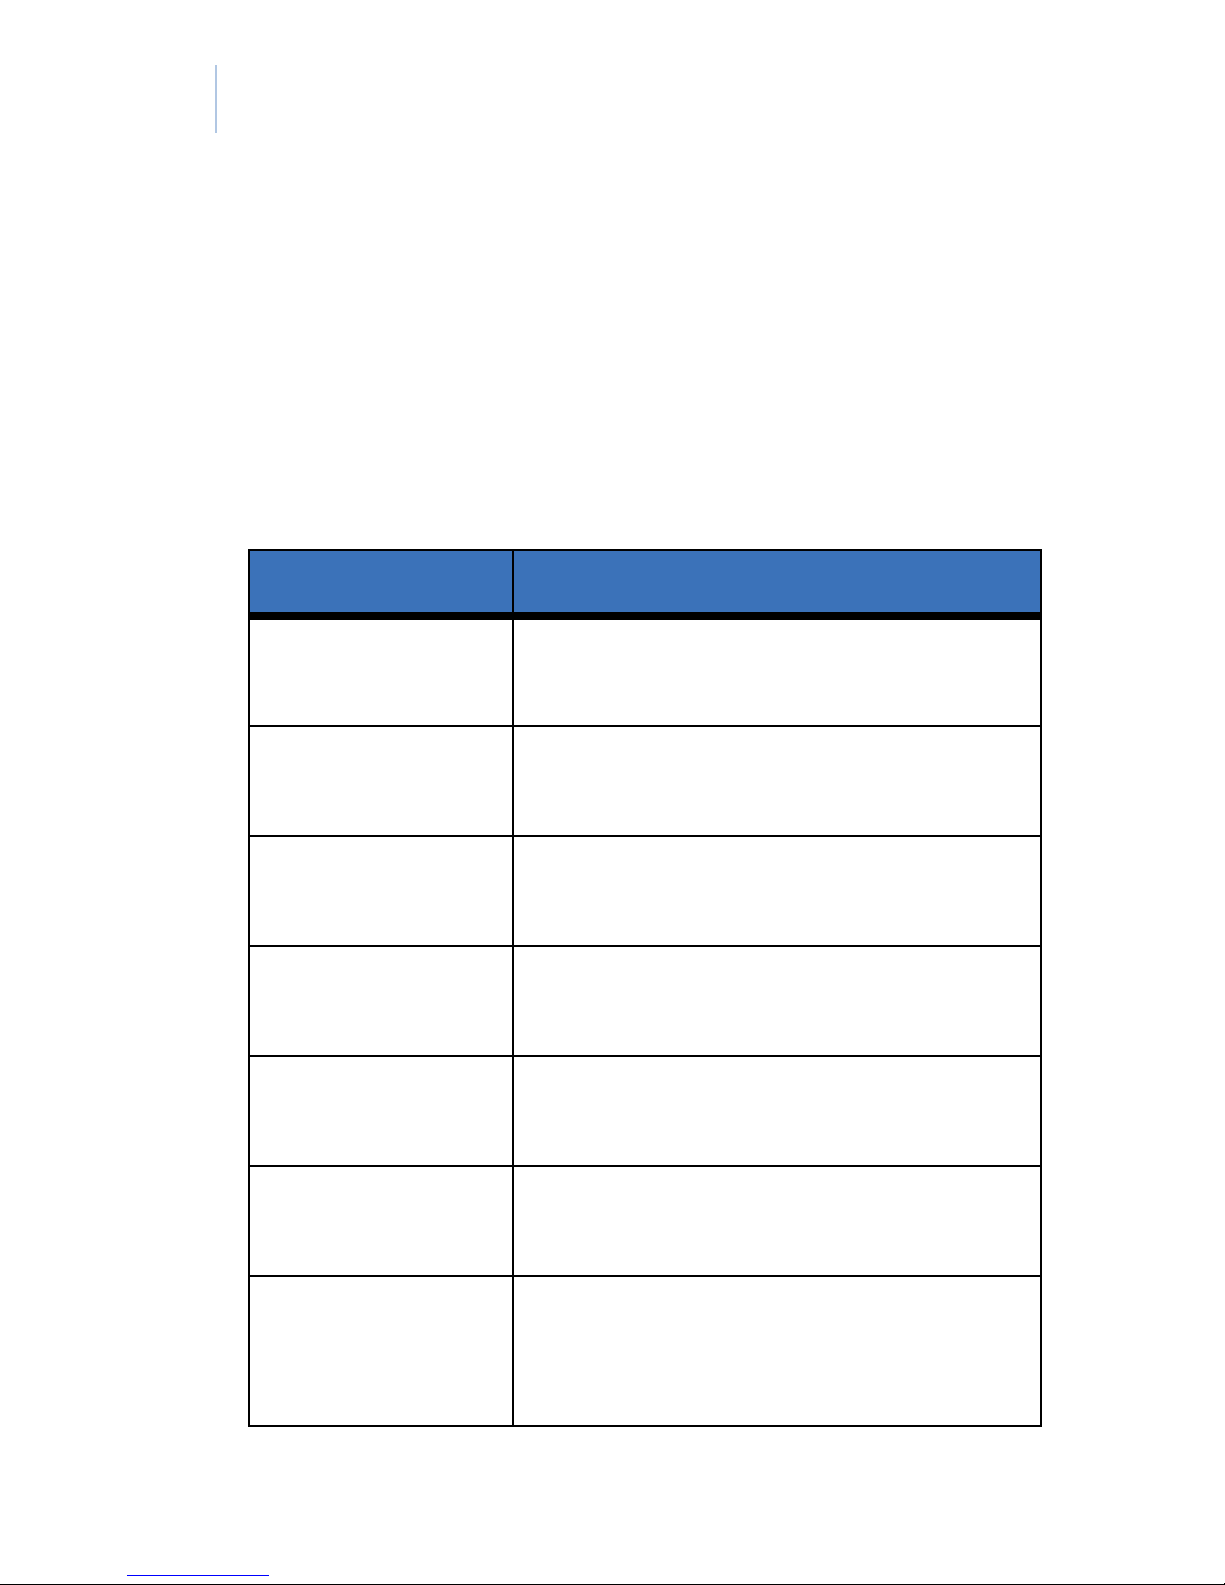
Press Enter to turn on your DisplayKEY and use
the arrow buttons to scroll through the menu
options listed in Tabl e 1.
Table 1. DisplayKEY menu options
Menu option Action
OBTAIN KEY Access a KeyBox to obtain the
listing key.
RELEASE
SHACKLE
READ KEYBOX Display the activity information
PROGRAMMING Program a KeyBox for timed access
MANUAL ESYNC Initiate an eSYNC to update your
REVIEW
MESSAGES
Release the KeyBox shackle.
stored in a KeyBox.
or 24-hour access.
DisplayKEY.
View messages from your broker,
association, or Supra.
ESYNC PHONE # View or change the phone number
your DisplayKEY uses to connect to
KIM.
Page 15
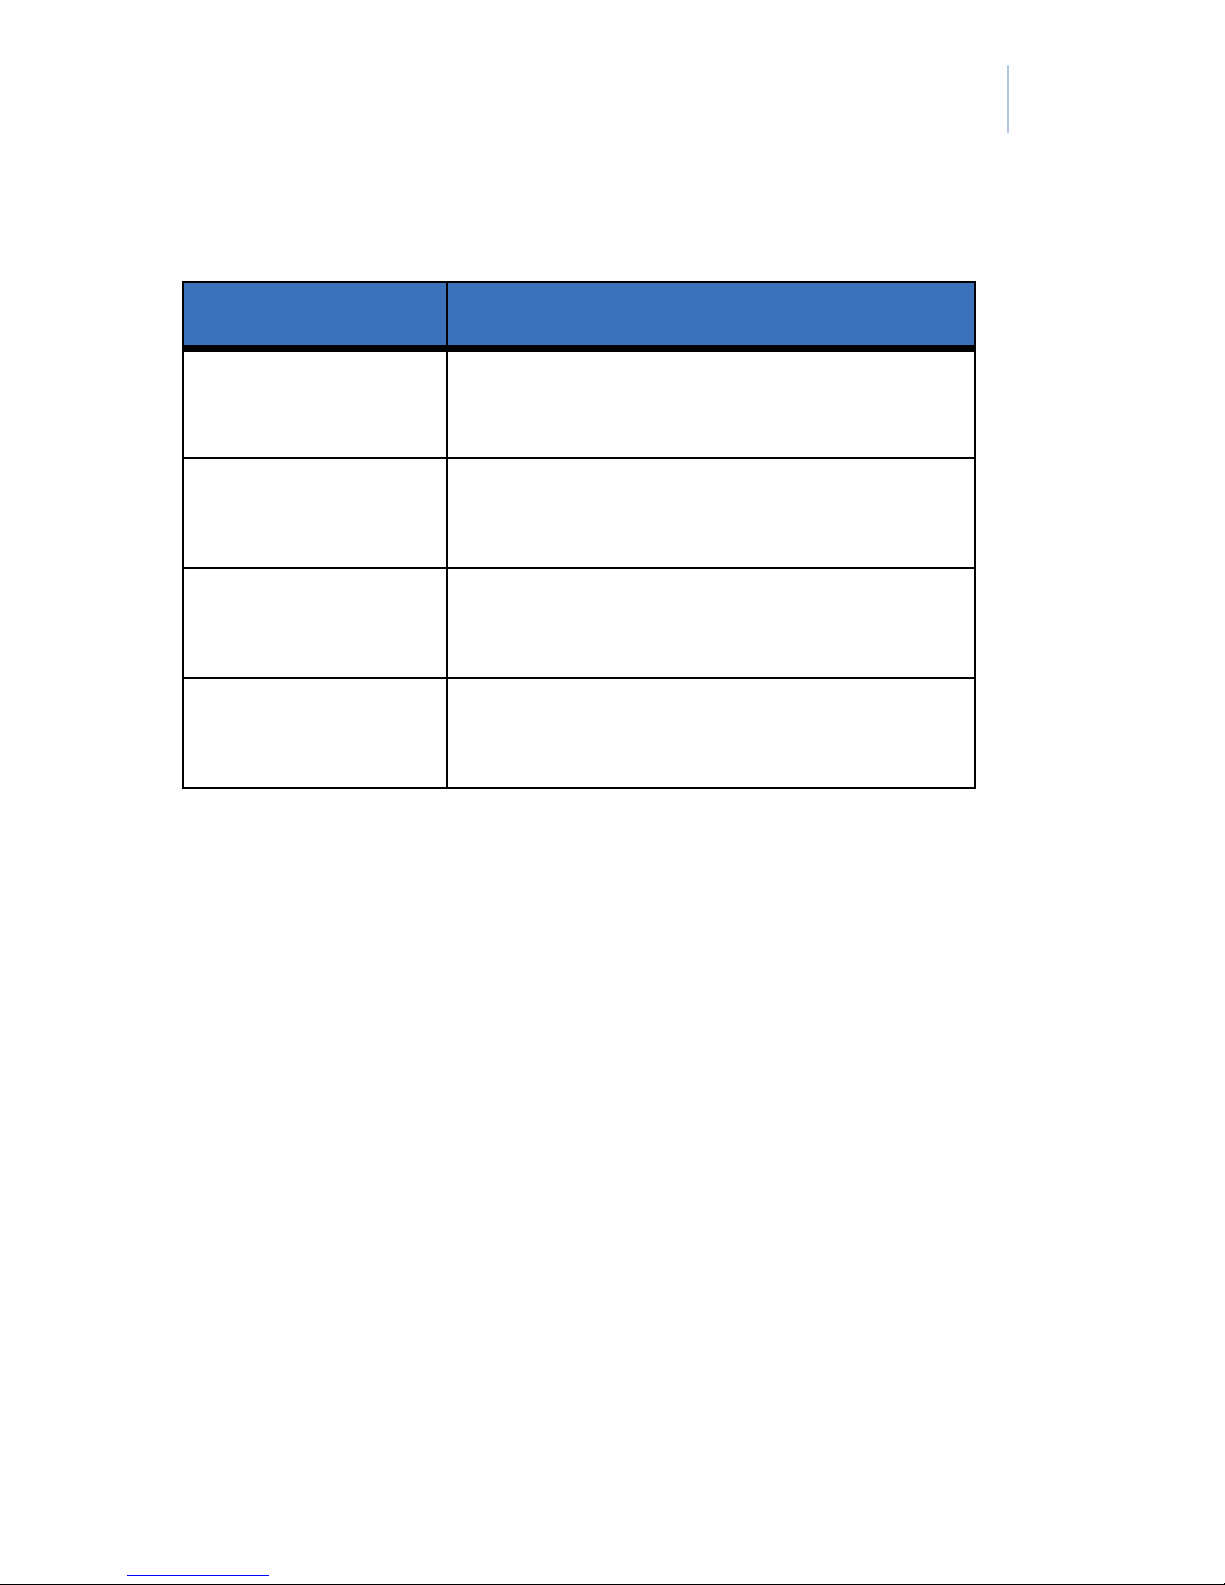
Table 1. DisplayKEY menu options (continued)
Menu option Action
Chapter 1
Introduction
7
INPUT UPDATE
OR CBS
ERROR CODES View recent error codes for
BATTERY STATUS Display the battery charge level in
CLEAR IBOX
LISTING DATA
Enter an update or CBS code.
troubleshooting.
the DisplayKEY.
Clear listing information
programmed into an iBox.
Press Enter to select a menu option and use the
down arrow button to backspace. Press the up
arrow button to exit a menu option. If you are
unable to exit a menu option, press Enter and 1
at the same time to reset the DisplayKEY.
Your DisplayKEY comes with a backlight that
illuminates the LCD screen in dim lighting.
After the DisplayKEY is turned on, you can
activate the backlight by holding down the Enter
button for two seconds.
To preserve battery power, the DisplayKEY
shuts down when not in use.
Page 16

8
DisplayKEY
Pocket Guide
Audio tones
Your DisplayKEY uses several audio tones to
communicate with you.
1 beep A button has been pressed on the
DisplayKEY keypad
2 beeps Searching for a KeyBox
4 beeps Operation complete
Series of beeps Communicating with a KeyBox
1 buzz Error. See Error codes on page 65
in Chapter 6 for assistance
diagnosing the error.
2 buzzes Low battery
3 buzzes Your DisplayKEY is no longer
usable. Call Support to determine
if your key needs to be
reprogrammed or replaced.
Page 17

Chapter 1
Introduction
Battery
Your DisplayKEY has a nonreplaceable,
rechargeable battery that is automatically
charged each time you place the DisplayKEY in
the cradle. You can check the battery status any
time by selecting the BATTERY STATUS menu
option.
If the battery is low, the DisplayKEY alerts you
9
by emitting two buzz tones. Place your
DisplayKEY in the cradle for at least four hours
to fully charge it. The DisplayKEY battery
cannot be overcharged.
Page 18

10
DisplayKEY
Pocket Guide
Page 19

Chapter 2 Cradle
This chapter provides instructions for
setting up your DisplayKEY cradle and
charging your DisplayKEY.
In this chapter:
Cradle setup . . . . . . . . . . . . . . . . . . .12
Analog phone line connection . .14
Open Internet connection . . . . .17
Charging your DisplayKEY . . . . . . .20
Page 20
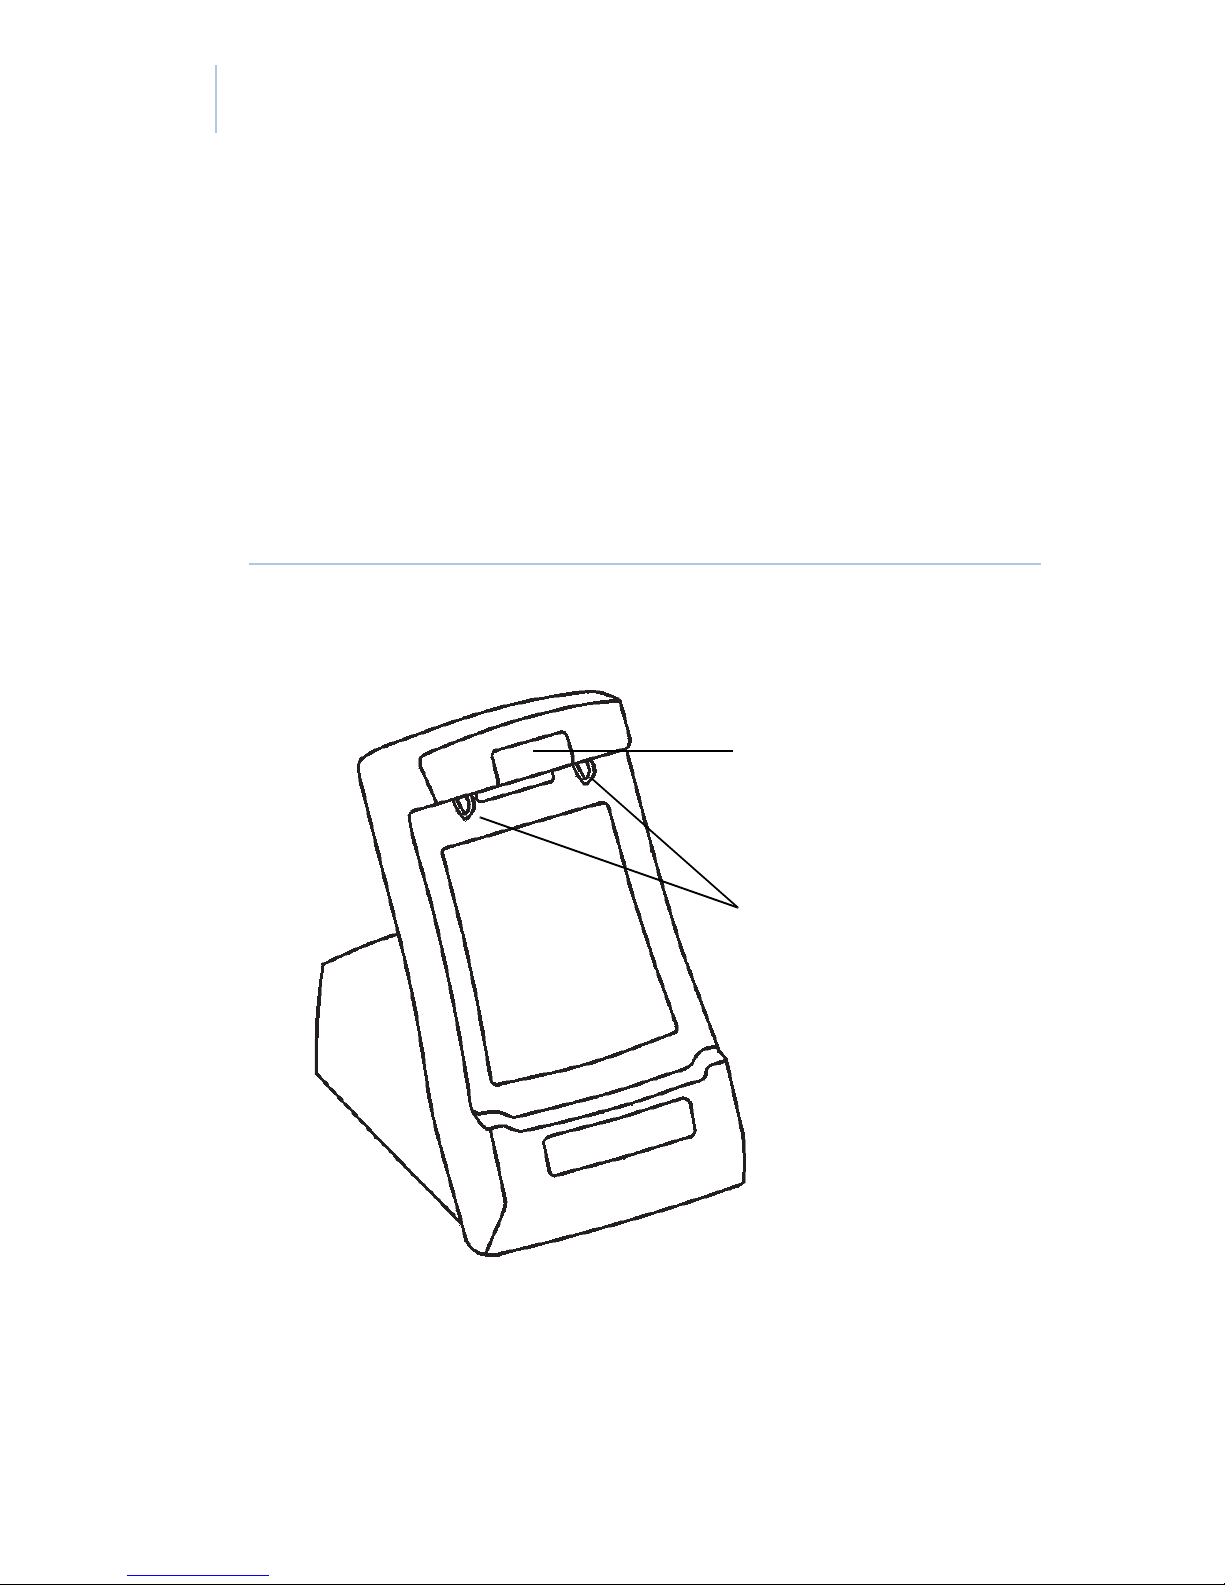
12
DisplayKEY
Pocket Guide
Cradle setup
The DisplayKEY cradle charges and updates
your DisplayKEY. The cradle communicates
with your DisplayKEY through the contacts at
the top of the cradle (Figure 2).
Figure 2. DisplayKEY cradle
Cradle light
DisplayKEY contacts
Page 21

Chapter 2
Cradle
The light on the front of the cradle indicates the
cradle status. Green indicates that the
DisplayKEY is successfully connected to the
cradle and is charging, and amber indicates that
the DisplayKEY and cradle are communicating.
When the cradle light is red, a process called
eSYNC is occurring.
CAUTION: Do not remove the DisplayKEY from
13
the cradle when the light is red.
During the eSYNC process, the cradle connects
to KIM to update your DisplayKEY, upload
access information, and receive messages.
Before your cradle can connect to KIM, it must
be connected to a power source and either a
phone line or open Internet connection. Follow
the setup instructions for the type of cradle you
have.
Page 22

14
DisplayKEY
Pocket Guide
Analog phone line connection
The DisplayKEY can connect to KIM using an
analog phone line.
CAUTION: Do not connect the cradle to a digital
phone line. This could result in damage to both
your cradle and your telephone line.
If you have a cradle that uses an analog phone
line, do the following:
1. Insert one end of the provided phone
cord into either of the two phone ports
on the back of the cradle (see Figure 3
on page 15).
2. Insert the other end of the phone cord
into an open analog phone line.
3. Insert the provided AC adapter into the
AC connector and plug the cradle into an
electrical outlet.
Page 23
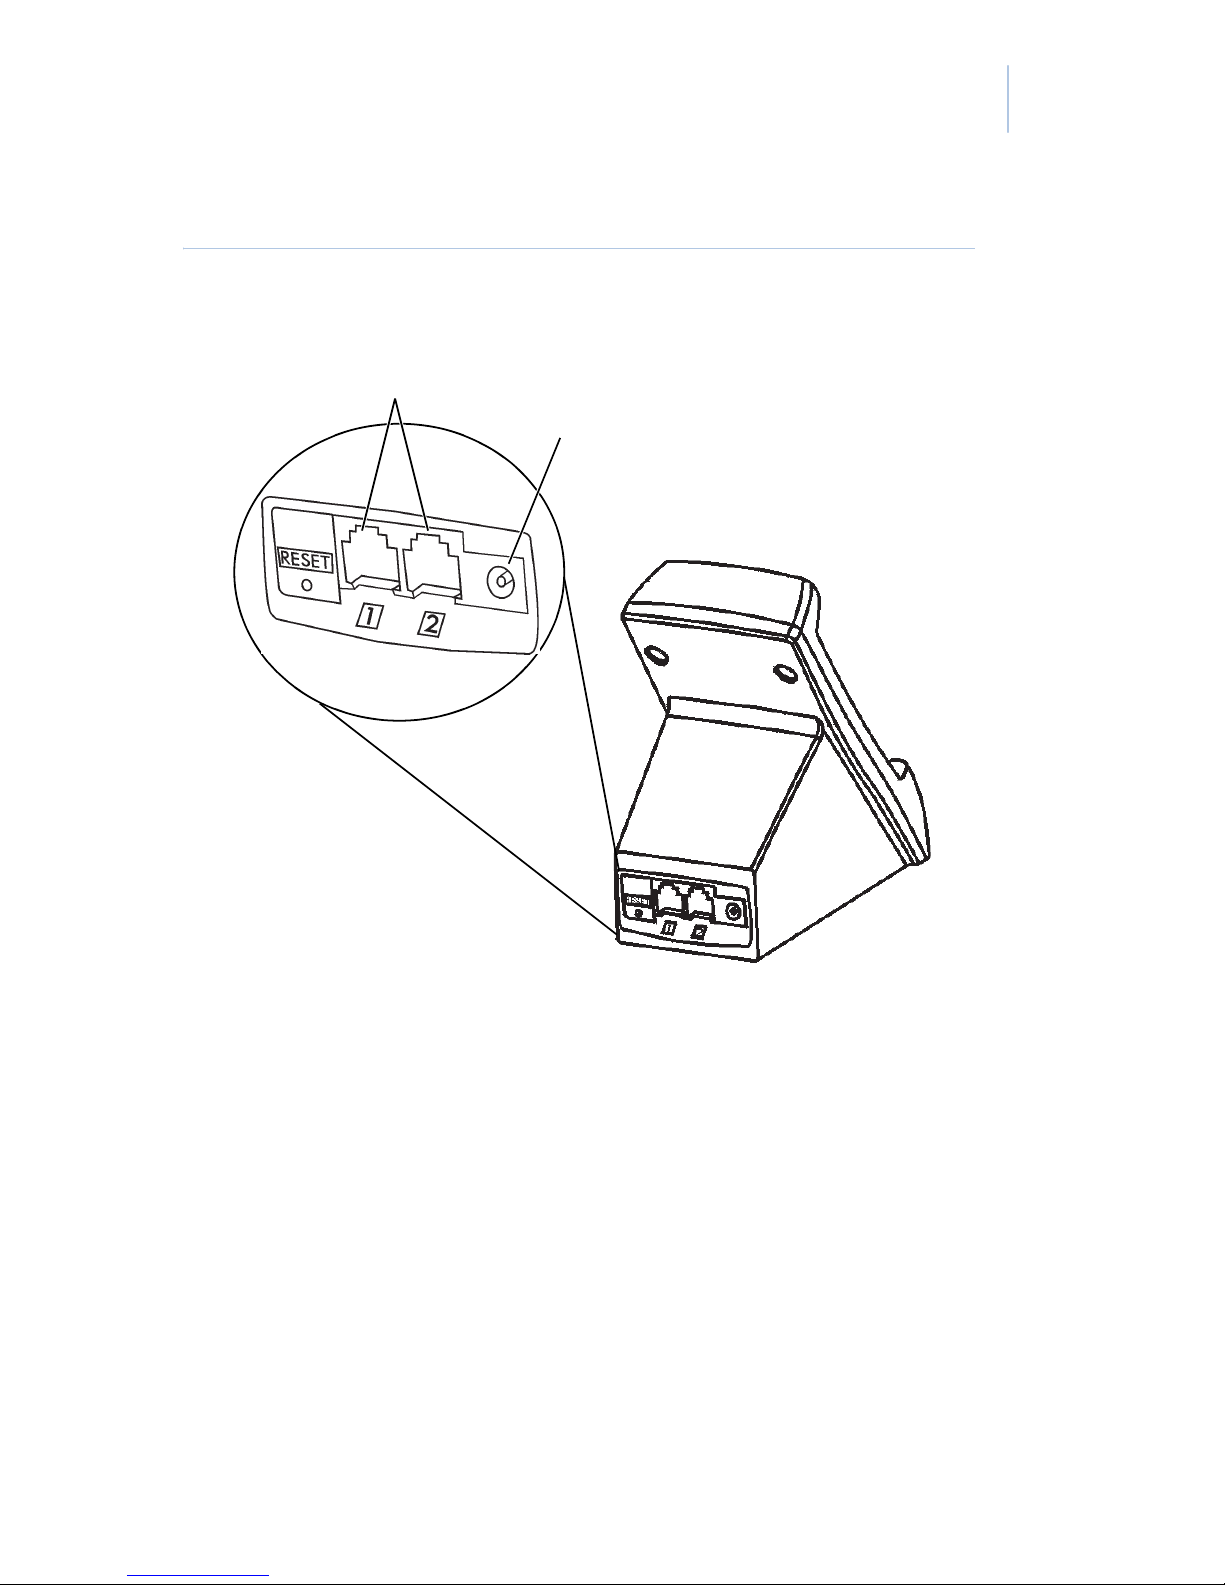
Figure 3. DisplayKEY cradle phone ports
Phone ports
AC connector
Chapter 2
Cradle
15
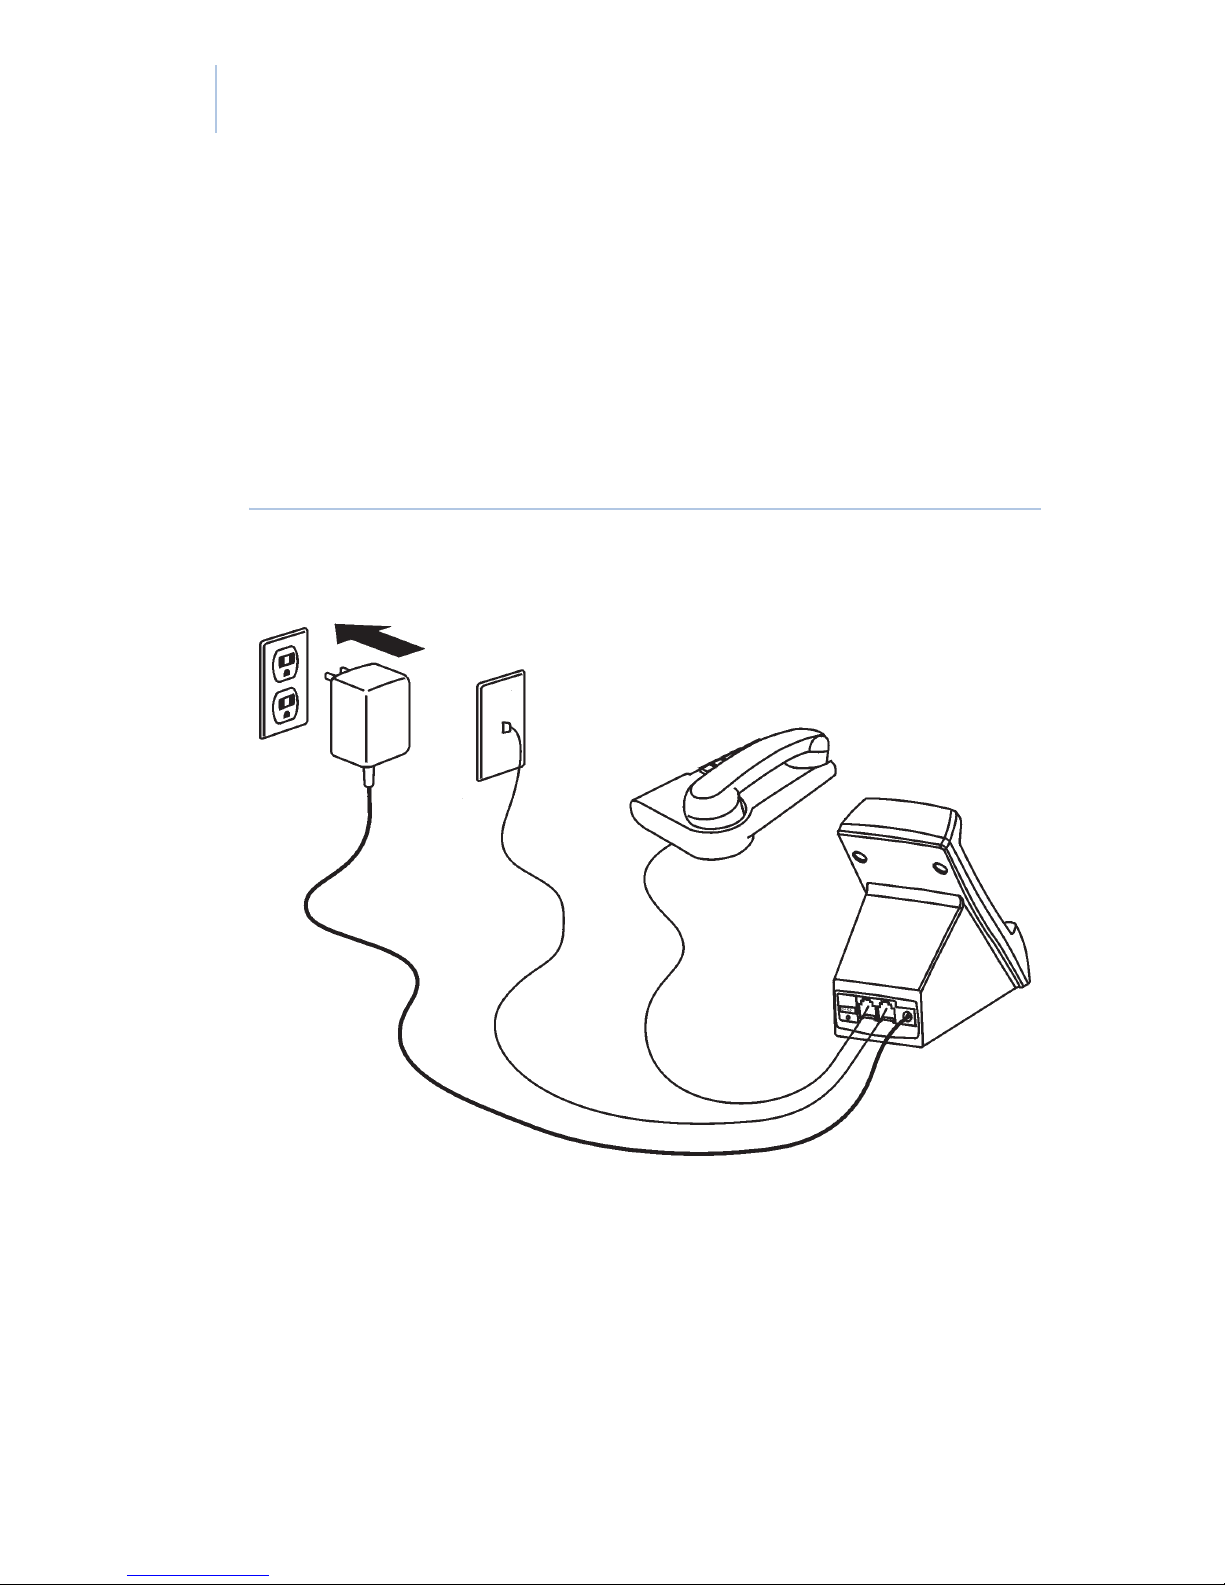
If you do not have an open phone line, follow
these steps to share the line with your telephone:
1. Unplug your existing phone cord from
the wall jack and plug it into either of the
phone ports on the back of the cradle.
Page 24
16
DisplayKEY
Pocket Guide
2. Plug the phone cord provided with your
DisplayKEY into the remaining open
port on the cradle and connect the other
end to the phone jack in the wall
(Figure 4).
Figure 4. Shared connection with telephone
Page 25

Chapter 2
Cradle
Open Internet connection
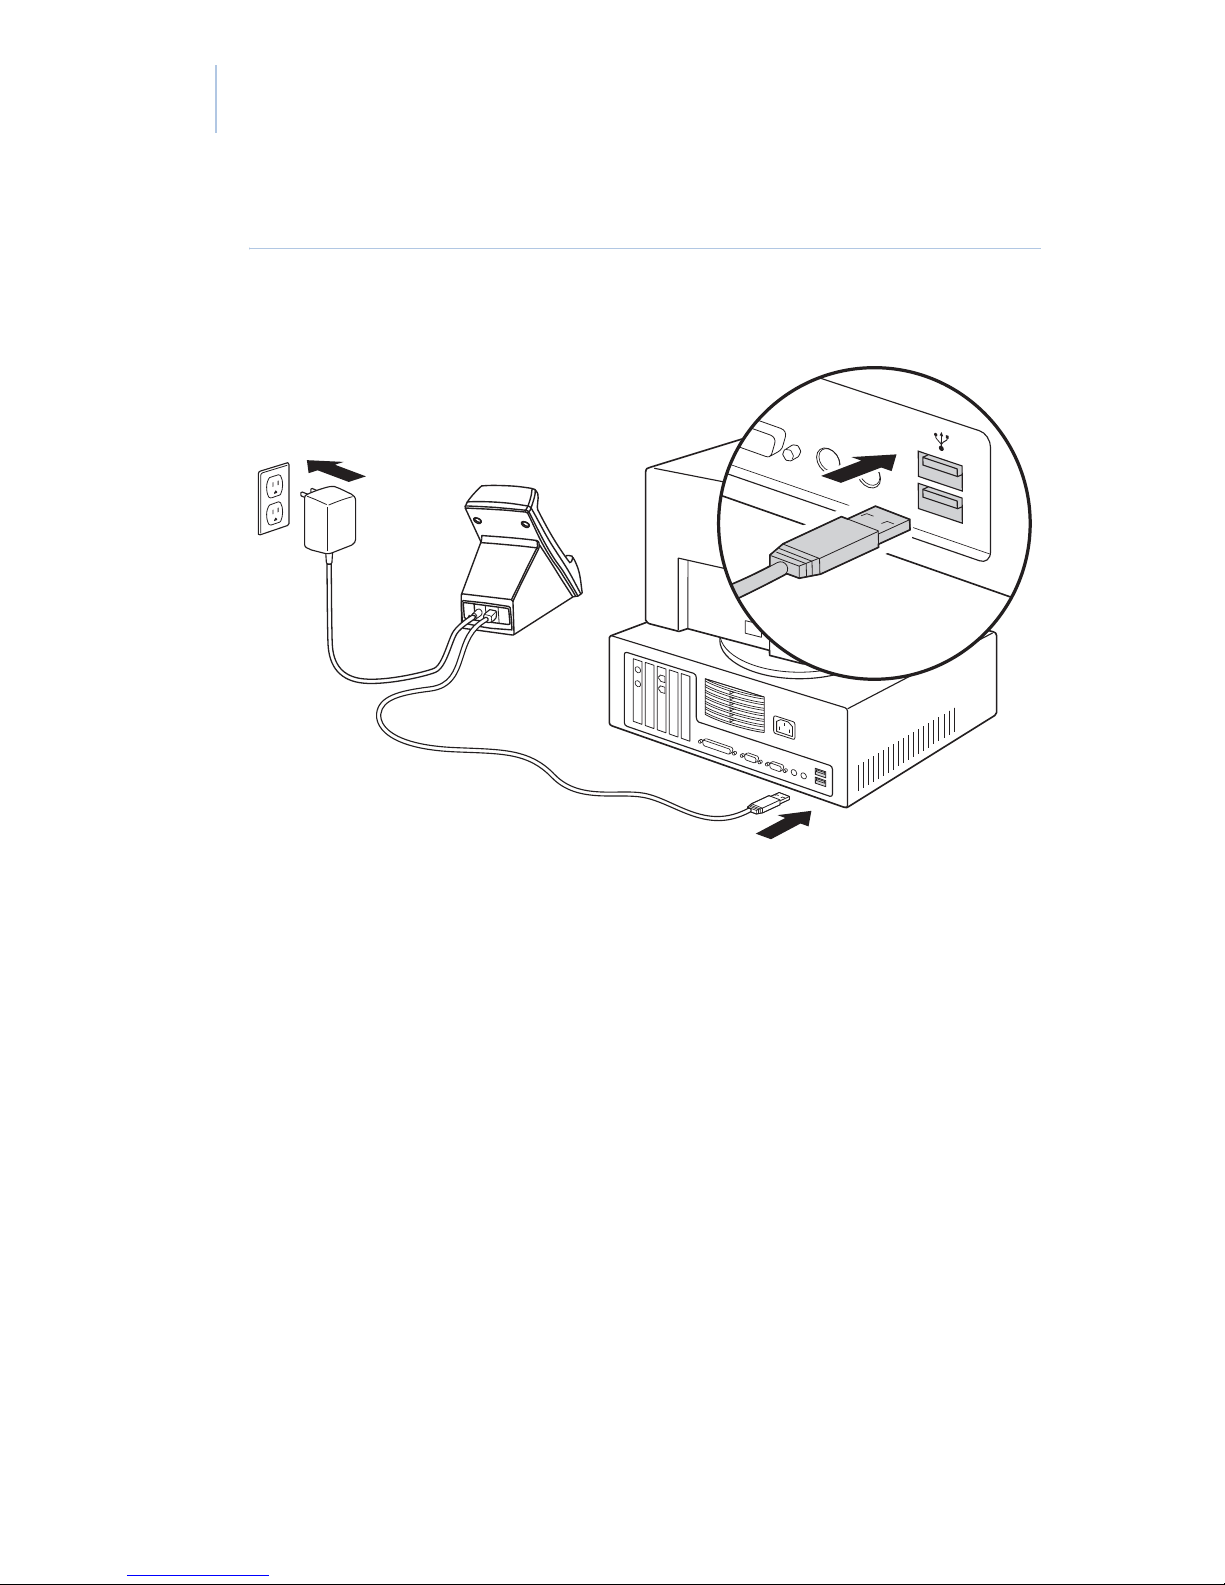
If you have a DisplayKEY USB cradle that uses
an Internet connection on your computer to
connect to KIM, do the following:
1. Insert the installation CD into the
CD-ROM drive on your computer. The
DisplayKEY USB Cradle Setup Wizard
opens automatically. Follow the
17
onscreen instructions to install the cradle
software.
Note: Windows XP users may encounter
one or more Software Installation
Warning messages during the
installation. Click Continue Anyway if
you encounter this message.
2. When prompted by the wizard, set up the
cradle. Insert the provided AC adapter
into the AC connector and plug the
cradle into an electrical outlet. Use the
provided USB cable to connect the
cradle to an open USB port on your
computer (see Figure 5 on page 18).
Page 26
18
DisplayKEY
Pocket Guide
Figure 5. DisplayKEY USB cradle setup
RESET
3. Windows recognizes the new USB
device. Follow the instructions for your
operating system to install the driver for
the cradle.
Windows 2000. Windows
automatically installs the driver.
Windows XP. The Found New
Hardware Wizard opens. Follow the
onscreen instructions to install the driver.
When prompted to perform a Windows
update to search for the software, select
Page 27

Chapter 2
Yes, this time only then click Next. In
the next screen, select Install
automatically and click Next to
complete the installation. A second
Found New Hardware Wizard opens for
the CP210x USB to UART bridge
controller. Go through the wizard,
selecting the same options as the first.
4. Click OK in the DisplayKEY USB
19
Cradle
Cradle Finder window to complete the
cradle installation.
5. Perform a manual eSYNC to verify that
the installation was successful. Turn on
your DisplayKEY by pressing the Enter
button. Scroll to the MANUAL ESYNC
option and press Enter, then place your
DisplayKEY in the cradle.
You can connect up to five USB cradles to a
computer at one time, depending on USB port
availability. To add a cradle after the initial
installation, follow the instructions in Step 2 to
set up the cradle. After Windows installs the
driver, select Start | Programs | GE Security
Supra | USB Cradle Finder and follow the
onscreen instructions.
Page 28
20
DisplayKEY
Pocket Guide
Charging your
DisplayKEY
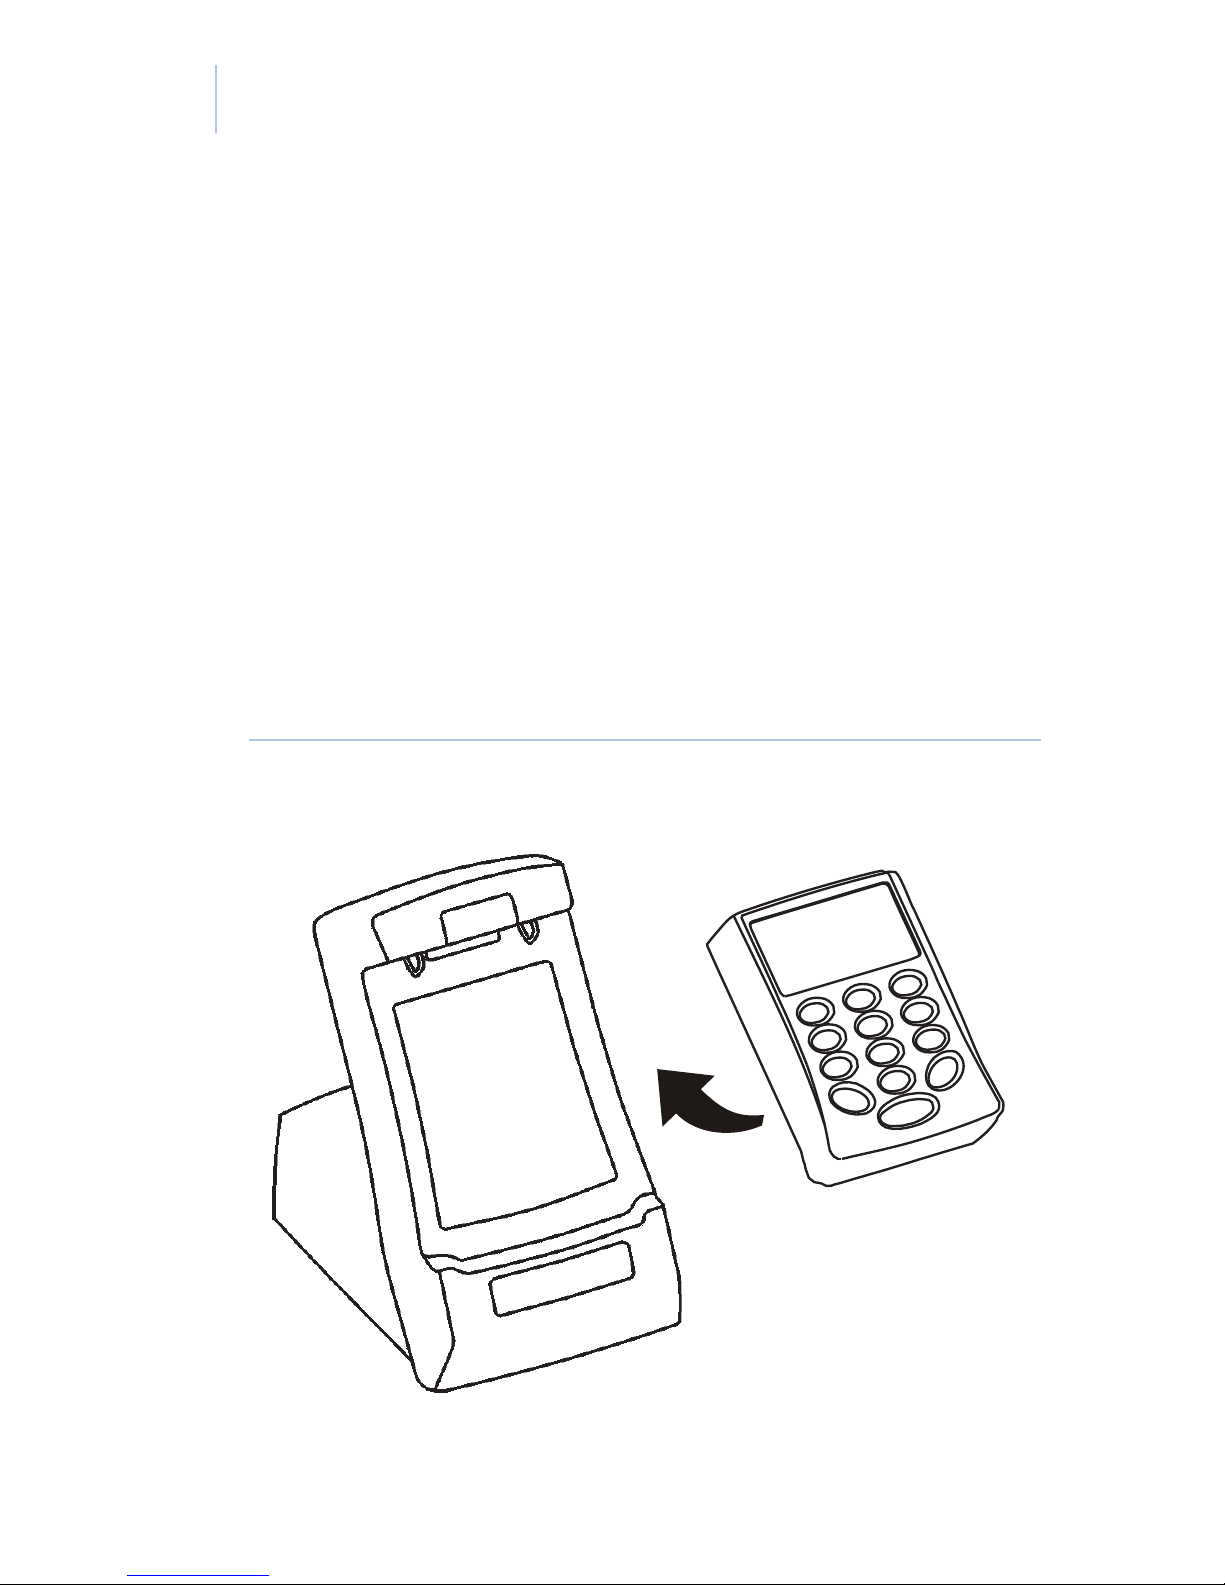
Once your cradle is set up, you can begin
charging your DisplayKEY. Place the
DisplayKEY in the cradle, matching the contacts
on the top of the key with the contacts on the
cradle. Make sure it is seated properly and that
the cradle light is green.
Figure 6. Placing the DisplayKEY in the cradle
Page 29

Chapter 2
Cradle
Charge your DisplayKEY for at least four hours
before using it. After the initial charge, it only
takes a few minutes a day to recharge your
DisplayKEY during regular use. We recommend
placing your DisplayKEY in the cradle each
night to ensure that it is updated and charged
each day.
21
Page 30

22
DisplayKEY
Pocket Guide
Page 31

Chapter 3 Updating
This chapter explains how to update your
DisplayKEY, including how to perform an
automatic or manual eSYNC, change the
eSYNC phone number, and update your
key manually.
In this chapter:
eSYNC . . . . . . . . . . . . . . . . . . . . . . .24
Automatic eSYNC . . . . . . . . . . .24
Manual eSYNC . . . . . . . . . . . . .25
eSYNC phone number . . . . . . . .26
Manual update . . . . . . . . . . . . . . . . .28
Page 32

24
DisplayKEY
Pocket Guide
eSYNC
Your DisplayKEY expires on a daily basis and is
designed to automatically update during the
night so it’s ready to access KeyBoxes the next
morning. In a process called eSYNC, your
DisplayKEY connects to the Supra network,
exchanges information, and updates itself. When
you turn on your DisplayKEY, the screen
displays a message indicating your key’s update
status.
If you forget to place your DisplayKEY in the
cradle and miss an automatic eSYNC during the
night, you can perform a manual eSYNC at any
time to update your key.
Automatic eSYNC
Your DisplayKEY is programmed to
automatically perform an eSYNC at a designated
time each night between midnight and 6 a.m.
During the eSYNC process, your DisplayKEY
uploads showing activity into KIM and updates
itself for the following day.
Page 33

Chapter 3
Updating
We recommend that you place your DisplayKEY
in the cradle each night to ensure that your key is
updated and fully charged the next morning.
Manual eSYNC
You can perform a manual eSYNC at any time to
update your DisplayKEY and upload your
showing activity into the KIM network.
25
To perform a manual eSYNC, do the following:
1. Press Enter to turn on your
DisplayKEY.
2. Scroll to the MANUAL ESYNC menu
option and press Enter.
3. Place your DisplayKEY in the cradle.
The cradle light turns green, indicating that the
DisplayKEY and cradle are connected. When
the cradle light turns red, the cradle is connected
to KIM.
CAUTION: Do not remove the DisplayKEY from
the cradle when the cradle light is red!
Page 34

26
DisplayKEY
Pocket Guide
The DisplayKEY screen displays the message
CONNECTING TO CRADLE during the eSYNC
process. When the process is complete, the
cradle light turns green, and the DisplayKEY’s
status is displayed on the screen. You can now
remove the DisplayKEY from the cradle.
eSYNC phone number
If your DisplayKEY cradle connects to KIM
through an analog phone line, the phone number
your DisplayKEY dials to perform an eSYNC is
stored in the Key. Up to two phone numbers can
be stored in the DisplayKEY. Your DisplayKEY
uses the most recently entered number to dial
KIM.
GE Security Support can provide you with the
best phone number for your area. Get assistance
from Support before changing the eSYNC phone
number in your DisplayKEY. See Tec hnical
support on page 73 for more information.
Page 35

Chapter 3
Updating
To change the eSYNC phone number in your
DisplayKEY, do the following:
1. Press Enter to turn on your
DisplayKEY.
2. Scroll to the ESYNC PHONE # menu
option and press Enter.
3. Press 1 to select the first phone number
or 2 to select the second.
27
4. The phone number is displayed. Press
Enter to accept the existing phone
number, or use the DisplayKEY keypad
to enter a new phone number. Press
Enter to accept the new phone number.
If your area uses 10-digit-dialing, include the
area code when entering the phone number.
Enter any dialing prefixes, such as a 1 for long
distance or a 9 to access an outside line.
The following special characters can be included
in an eSYNC phone number: pound (#), asterisk
(*), and comma (,). Check with your telephone
service provider to determine if you need to
include any of these special characters in your
eSYNC phone number.
Page 36

28
DisplayKEY
Pocket Guide
Manual update
If you do not have access to your DisplayKEY
cradle to perform an eSYNC, you can manually
update your key by obtaining an update code
from the KIM website or voice access system.
Note: If you manually update your DisplayKEY,
showing activity remains in your key until the
next time you perform an eSYNC.
To obtain an update code from the KIM website,
do the following:
1. Go to www.supraekey.com.
2. Select Log on to KIM.
3. Select the name of your association or
MLS from the dropdown list.
4. Enter your DisplayKEY serial number
and four-digit PIN code.
5. Click Login.
6. Select the Update Code link in the left
column of your screen. The update code
displays.
Page 37

Chapter 3
Updating
To obtain an update code from the KIM voice
system, do the following:
1. Call KIM at 1-888-968-4032.
2. Enter your three-digit area code.
3. When prompted, enter your DisplayKEY
serial number and PIN code into the
phone, followed by the # sign.
29
4. KIM reads a list of options. Press 1 on
the phone for an update code.
To enter the update code into your DisplayKEY,
do the following:
1. Press Enter to turn on your
DisplayKEY.
2. Scroll to the INPUT UPDATE OR CBS
option and press Enter.
3. Press 1 to select INPUT UPDATE.
4. Enter the update code using the keypad
and press Enter. Four quick beeps
indicate that the operation is successful.
Page 38

30
DisplayKEY
Pocket Guide
If you cooperate with another area, you may
obtain an update code for the cooperating
association or MLS after you have updated your
DisplayKEY for your primary association or
MLS.
Note: The number of updates codes you can obtain
from KIM before performing an eSYNC may be
limited. Contact your association/MLS for more
information.
Page 39

Chapter 4 KeyBoxes
This chapter explains how to access
KeyBoxes, including how to release the
key container and the shackle, how to
activate timed access, how to use the Call
Before Showing feature, and how to access
KeyBoxes in cooperating systems.
In this chapter:
Accessing KeyBoxes. . . . . . . . . . . . .32
Releasing the key container. . . .33
Releasing the shackle. . . . . . . . .36
Timed access. . . . . . . . . . . . . . . . . . .37
CBS codes. . . . . . . . . . . . . . . . . . . . .39
Cooperating systems . . . . . . . . . . . .40
Page 40
32
DisplayKEY
Pocket Guide
Accessing KeyBoxes
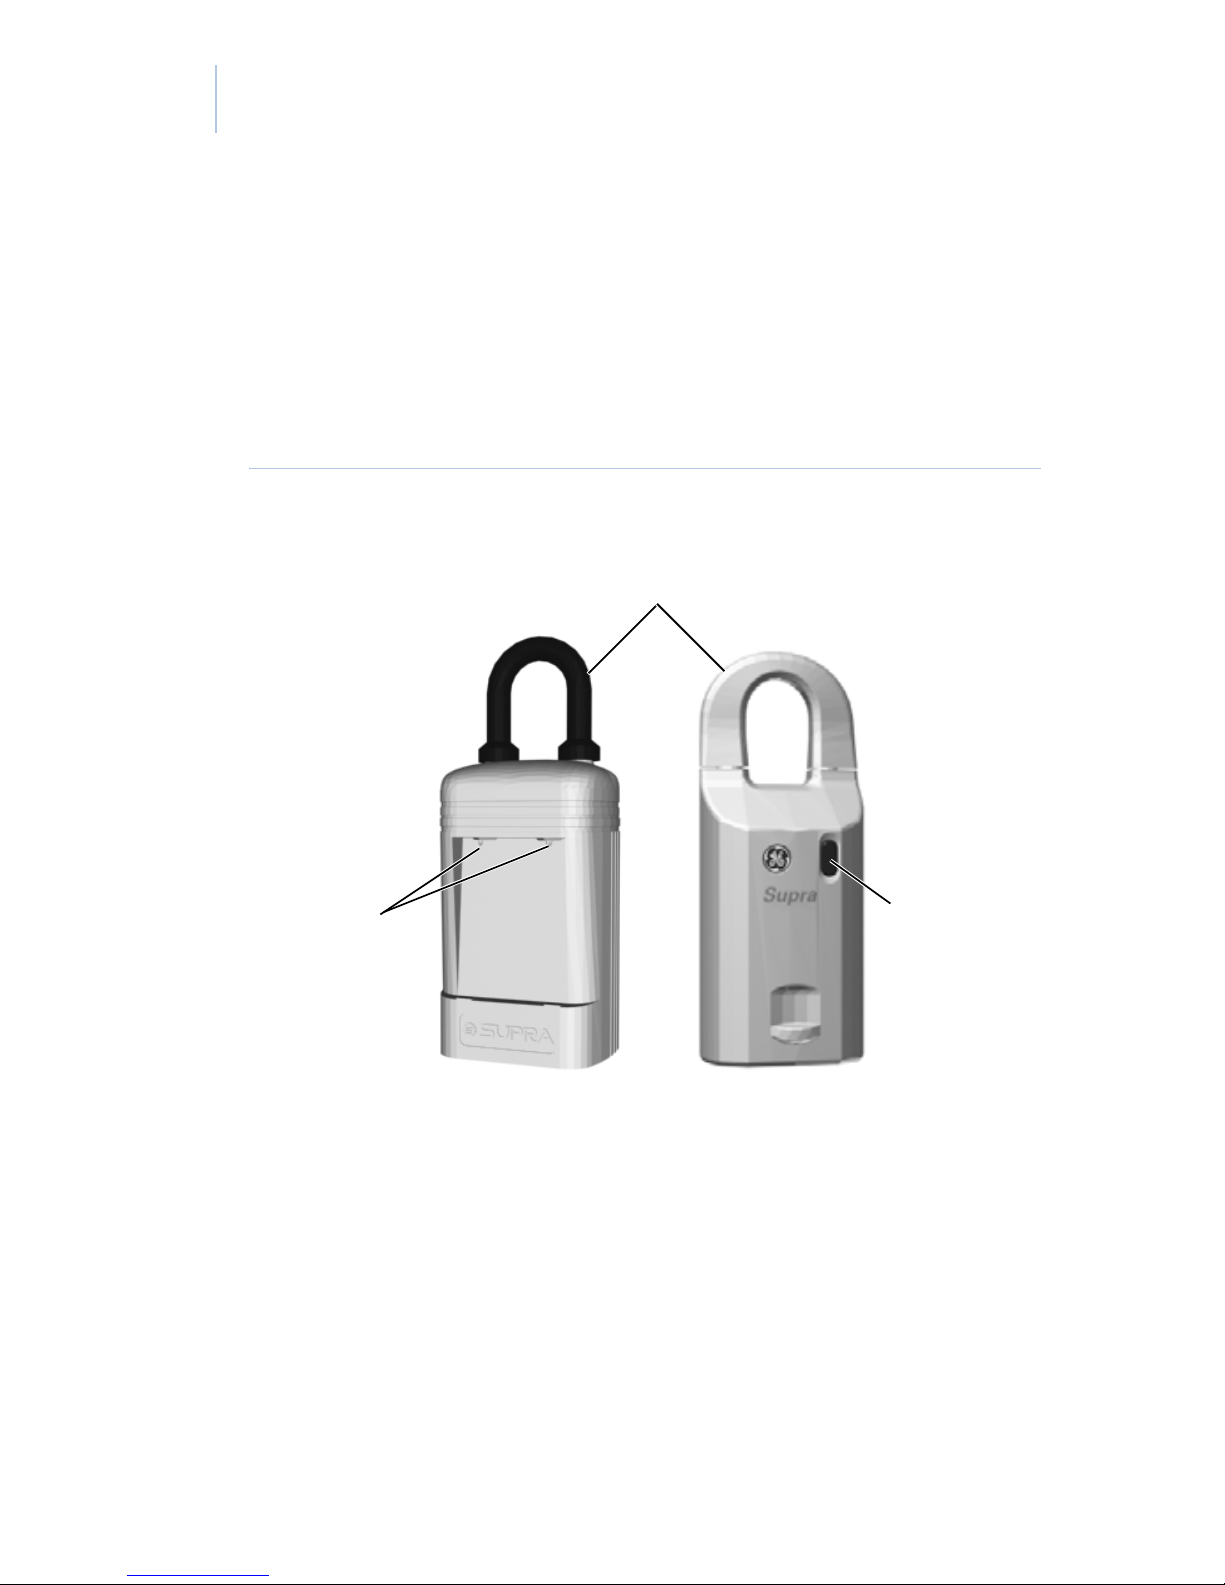
Your DisplayKEY accesses both the AEII
KeyBox and the iBox (Figure 7).
Figure 7. Supra KeyBoxes
shackle
contacts
AEII KeyBox iBox
AEII KeyBox. The DisplayKEY
communicates with the AEII KeyBox
through the contacts on the front of the
KeyBox. The DisplayKEY fits into the
recessed area on the front of the AEII
infrared
lens
Page 41

Chapter 4
KeyBoxes
KeyBox, with the contacts on the key
touching the contacts on the KeyBox.
iBox. The DisplayKEY communicates with
the iBox using infrared technology. The
infrared port on the top of your
DisplayKEY transmits information to
the infrared lens on the front of the iBox.
The distance should be less than a foot
between the DisplayKEY and the iBox.
33
Direct sunlight can interfere with
infrared communication, so you may
need to shade the area between the
DisplayKEY and the iBox when you are
accessing the key container.
Releasing the key container
Follow these steps to access the listing keys
inside a KeyBox.
Note: Your DisplayKEY must be updated to access
KeyBoxes. See Chapter 3 Updating.
1. Press Enter to turn on your
DisplayKEY.
Page 42

34
DisplayKEY
Pocket Guide
2. Press Enter at the OBTAIN KEY menu
option.
3. Enter your four-digit PIN code and press
Enter. Two beeps sound and you have
five minutes to access a KeyBox before
your DisplayKEY powers down.
4. Access the KeyBox:
AEII KeyBox. Insert your
DisplayKEY into the KeyBox,
matching the contacts on top of
the key with the contacts on the
KeyBox. After a few seconds,
the key container drops. Grasp
the sides of the container and
pull straight down to remove it.
iBox. Point the top of your
DisplayKEY at the iBox. After
a few seconds, the key container
unlocks. Press up on the bottom
of the key container within 30
seconds to remove it from the
iBox. If you do not press up on
the container within 30 seconds,
it relocks.
Page 43

Chapter 4
KeyBoxes
A buzz tone sounds if the operation is
unsuccessful, and the DisplayKEY displays a
message alerting you to the error. See Error
codes on page 65 in Chapter 6 for help
troubleshooting the error.
Use the chain inside the key container to attach
the listing keys. The AEII KeyBox container
holds up to two listing keys, and the iBox holds
up to three. Before closing the key container,
35
verify that all items are well inside and that the
front is not bowing or bulging out. If you are a
listing agent, always make sure you have a spare
set of keys before you close the key container.
CAUTION: Do not place ID tags, key rings, or
loose objects in the key container. They can
jam the container.
To close the key container, turn it so that the
compartment holding the keys is facing you.
Insert the key container into the bottom of the
KeyBox and push up until it closes.
Page 44

36
DisplayKEY
Pocket Guide
Releasing the shackle
Each KeyBox has a shackle code that releases
the shackle for installation or removal at a listing.
To release the shackle on a KeyBox, follow these
steps:
1. Press Enter to turn on your
DisplayKEY.
2. Scroll to the RELEASE SHACKLE
option and press Enter.
3. Enter the four-digit shackle code for the
KeyBox and press Enter.
4. Insert your DisplayKEY into an AEII
KeyBox or point it at an iBox. After a
few seconds, the shackle releases.
5. Repeat steps 1 through 4 to completely
remove the shackle from the KeyBox.
Page 45

Chapter 4
KeyBoxes
Timed access
KeyBoxes can be programmed to allow 24-hour
access or timed access for specific hours. To
determine the timed access hours programmed
into your KeyBox, contact your association or
MLS.
Access hours are set in standard time. If your
37
area observes daylight saving time from April to
October, the actual access hours are one hour
later than the hours set in the KeyBox. For
example, if a KeyBox is programmed for access
from 8 a.m. to 9 p.m. standard time, the actual
access hours are 9 a.m. to 10 p.m. during
daylight saving time.
To activate or deactivate timed access, do the
following:
1. Press Enter to turn on your
DisplayKEY.
2. Scroll to the PROGRAMMING option
and press Enter.
3. Select 1 to activate timed access hours,
or select 2 to activate 24-hour access.
Page 46

38
DisplayKEY
Pocket Guide
4. Enter the KeyBox shackle code and
press Enter. You have five minutes to
program the KeyBox before your
DisplayKEY powers down.
5. Insert your DisplayKEY into an AEII
KeyBox or point it at an iBox.
Four quick beeps indicate that the operation was
successful.
Page 47

Chapter 4
KeyBoxes
CBS codes
Every KeyBox contains a Call Before Showing
(CBS) code that your association or MLS can
activate. The CBS code allows the listing agent
to control KeyBox access by requiring the
showing agent to call for authorization before
opening the KeyBox. If the CBS code is active
in a KeyBox, you must enter the CBS code into
39
your key before accessing the KeyBox.
To enter a CBS code, do the following:
1. Press Enter to turn on your
DisplayKEY.
2. Scroll to the INPUT UPDATE OR CBS
option and press Enter.
3. Press 2 to select INPUT CBS.
4. Enter the CBS code and press Enter.
Once you’ve entered the CBS code for a
particular KeyBox into your DisplayKEY,
follow the standard procedure for releasing the
key container. You can access the KeyBox until
the listing agent changes the KeyBox or until you
enter a CBS code for a different KeyBox.
Page 48

40
DisplayKEY
Pocket Guide
Cooperating systems
Your DisplayKEY may be able to access
KeyBoxes in a neighboring association/MLS.
Check with your association/MLS to determine
if your area has a cooperating agreement.
In order to show listings in a cooperating area:
• your DisplayKEY must be programmed
to access KeyBoxes in that area; and
• the cooperating association/MLS must
give you permission to update your
DisplayKEY for that area.
Your DisplayKEY may have been manufactured
with cooperating areas already programmed into
it. If not, you can take your DisplayKEY to your
primary association/MLS to have the
cooperating areas programmed into it. Once
your key is programmed, contact the cooperating
association/MLS to receive permission to update
your DisplayKEY in their system.
If the cooperating KeyBox system is networked,
your DisplayKEY is updated automatically for
both your primary system and the cooperating
system when you perform an eSYNC. If you
Page 49

Chapter 4
KeyBoxes
manually update your DisplayKEY, you must
first update it for your primary association/MLS
before updating it for cooperating areas.
41
If the cooperating system is not
networked, call
the system’s KIM voice access once a month to
receive an update code for your DisplayKEY.
The date your DisplayKEY expires for the
cooperating system is printed on the back of your
key. You must be updated for your primary
system before you can get an update code for the
cooperating system.
Page 50

42
DisplayKEY
Pocket Guide
Page 51

Chapter 5 Showing
activity
This chapter explains how to view your
DisplayKEY’s showing activity, including
how to use the ShowingValue feature on
the KIM website, and how to read a
KeyBox.
In this chapter:
Viewing showing activity . . . . . . . . .44
ShowingValue. . . . . . . . . . . . . . .44
KIM voice access. . . . . . . . . . . .55
Reading a KeyBox . . . . . . . . . . .56
Page 52

44
DisplayKEY
Pocket Guide
Viewing showing activity
Each time your DisplayKEY releases the key
container in a KeyBox, the access is recorded in
both your key and the KeyBox. There are three
ways to view this showing activity information:
• use the ShowingValue feature on the
KIM website,
• request a report from KIM voice access,
or
• read your KeyBoxes to transmit the
showing information to your
DisplayKEY.
ShowingValue
ShowingValue is a web application included in
KIM that provides you with several enhanced
showing features. You can receive e-mails
automatically when you’ve had a showing, create
customized showing reports, and e-mail updates
to agents who’ve shown your listings.
ShowingValue also lets you send and receive
showing feedback, add feedback about your
Page 53

Chapter 5
Showing activity
listings for reporting to sellers, and have KIM
remind you by e-mail to send feedback on
properties you’ve shown.
Adding KeyBoxes to your inventory
You must add your KeyBoxes to your inventory
in KIM in order for showing activity to appear in
ShowingValue. Once you’ve added your
45
KeyBoxes, you will receive a message on your
DisplayKEY after you eSYNC that indicates
how many times your listings have been shown
since your last eSYNC. You can then go to the
KIM website and view your showing activity in
ShowingValue.
To add your KeyBoxes to your inventory, follow
these steps:
1. Go to www.supraekey.com.
2. Select Log on to KIM.
3. Select the name of your association or
MLS from the dropdown list.
4. Enter your DisplayKEY serial number
and four-digit PIN code.
Page 54

46
DisplayKEY
Pocket Guide
5. Click Login.
6. Click Add New KeyBox in the left-hand
column under KeyBox Inventory.
7. Enter the KeyBox serial number, shackle
code, and the listing ID where the
KeyBox is assigned, then click Add.
Once the KeyBox is added, KIM asks if you’d
like to view the KeyBox settings. Click Yes to
view the settings, or No to view a list of
KeyBoxes in your inventory. Repeat Steps 6 and
7 to add more KeyBoxes.
Showing activity reports
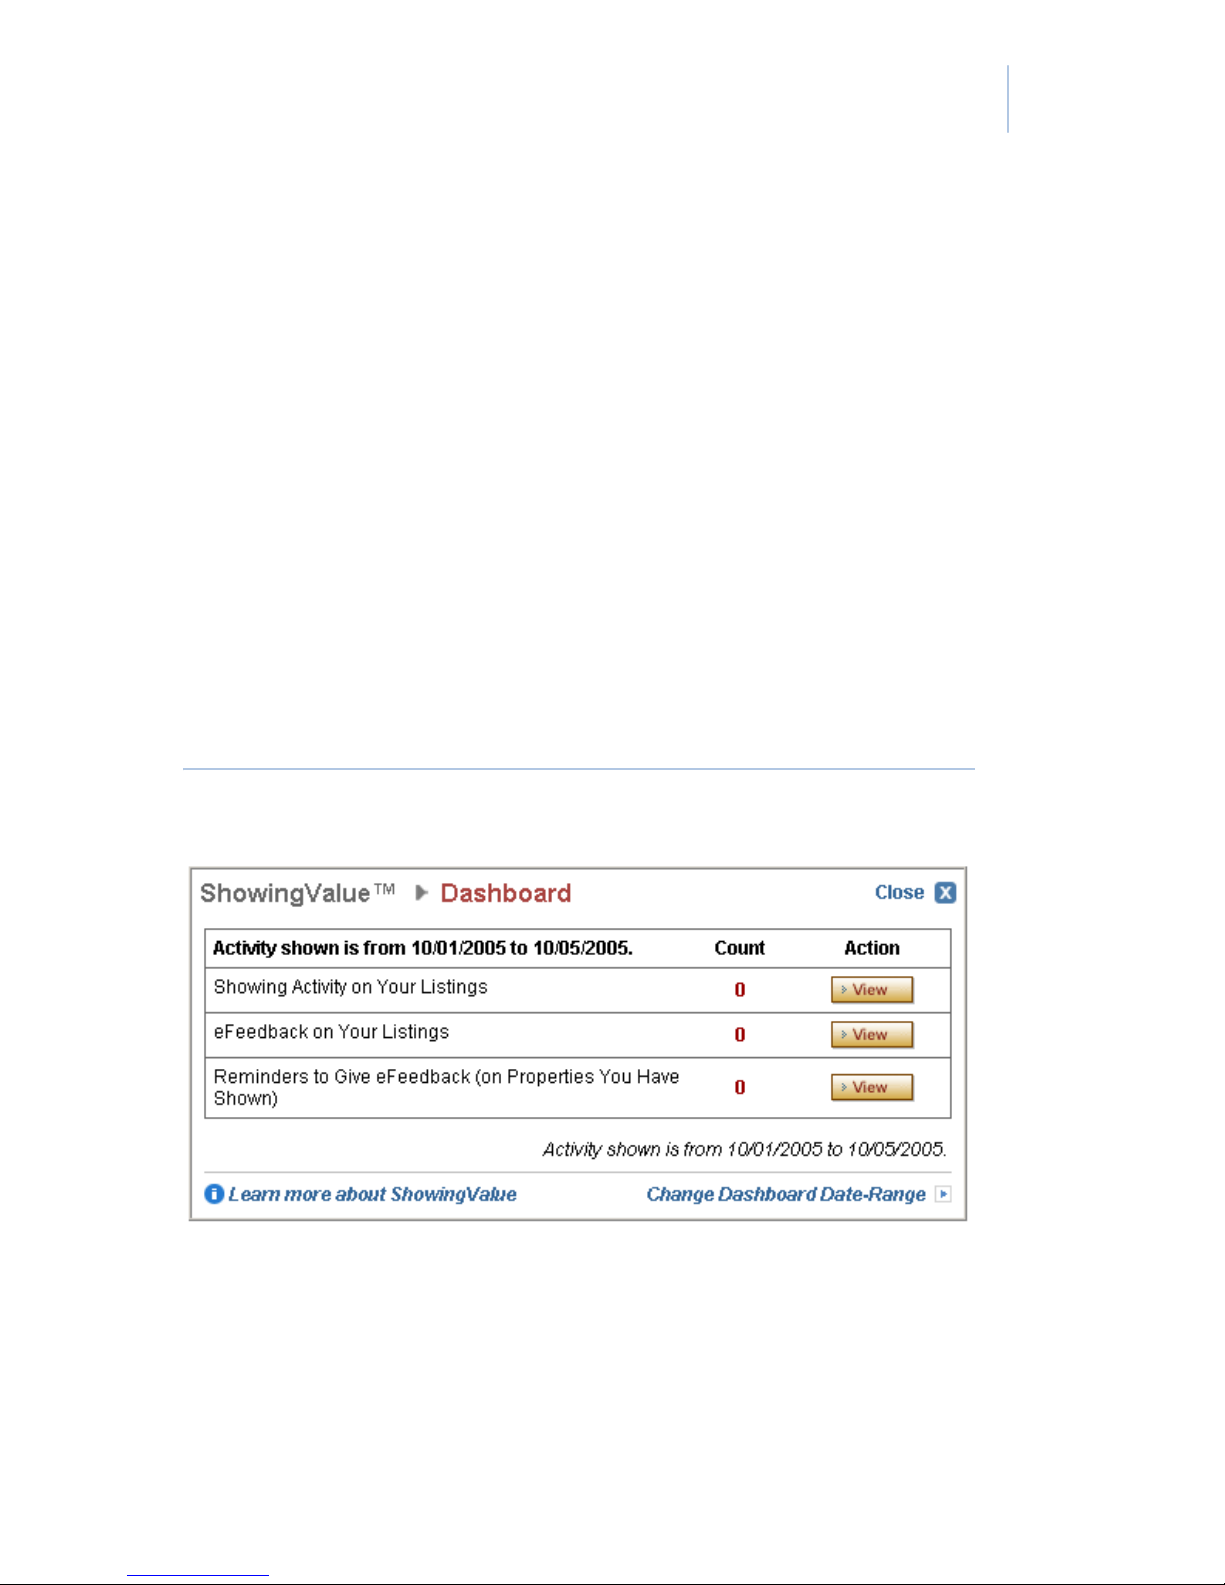
The ShowingValue Dashboard (Figure 8 on
page 47) provides a quick summary of the
showing activity at your listings. The
Dashboard displays on the main page after you
log on to KIM. You can also access it by
clicking Dashboard under ShowingValue in the
left-hand column of your screen.
The total number of showings displays on the
first row of the Dashboard. To change the date
range for the activity displayed on your
Page 55
Chapter 5
Showing activity
Dashboard, click Change Dashboard Date-
Range. Use the Dashboard Date Range
dropdown menu to select the new date range,
then click Save Now to activate the setting.
From your Dashboard (Figure 8), click the View
button for a detailed Showing Activity report that
includes the date/time of the showing, showing
agent, KeyBox serial number, listing number,
and listing address. From the Showing Activity
47
Report screen, you can print or e-mail the report.
Figure 8. ShowingValue Dashboard
Page 56

48
DisplayKEY
Pocket Guide
Click Create New Report to generate a new
Showing Activity report for a specific KeyBox,
listing number, or date range. In the Configure
Report screen, select the report criteria then click
Continue.
E-mail notifications
ShowingValue lets you receive e-mail
notifications for the following:
• when showings occur at your listings;
• when showing agents submit feedback
about your listings;
• when you want reminders to submit
feedback about properties you’ve
shown; and
• when listing agents send messages about
listings you’ve shown.
To opt-in to receive e-mails for any of these
events, do the following:
1. Click the Settings link in the left-hand
column of your screen under
ShowingValue.
Page 57
Chapter 5
Showing activity
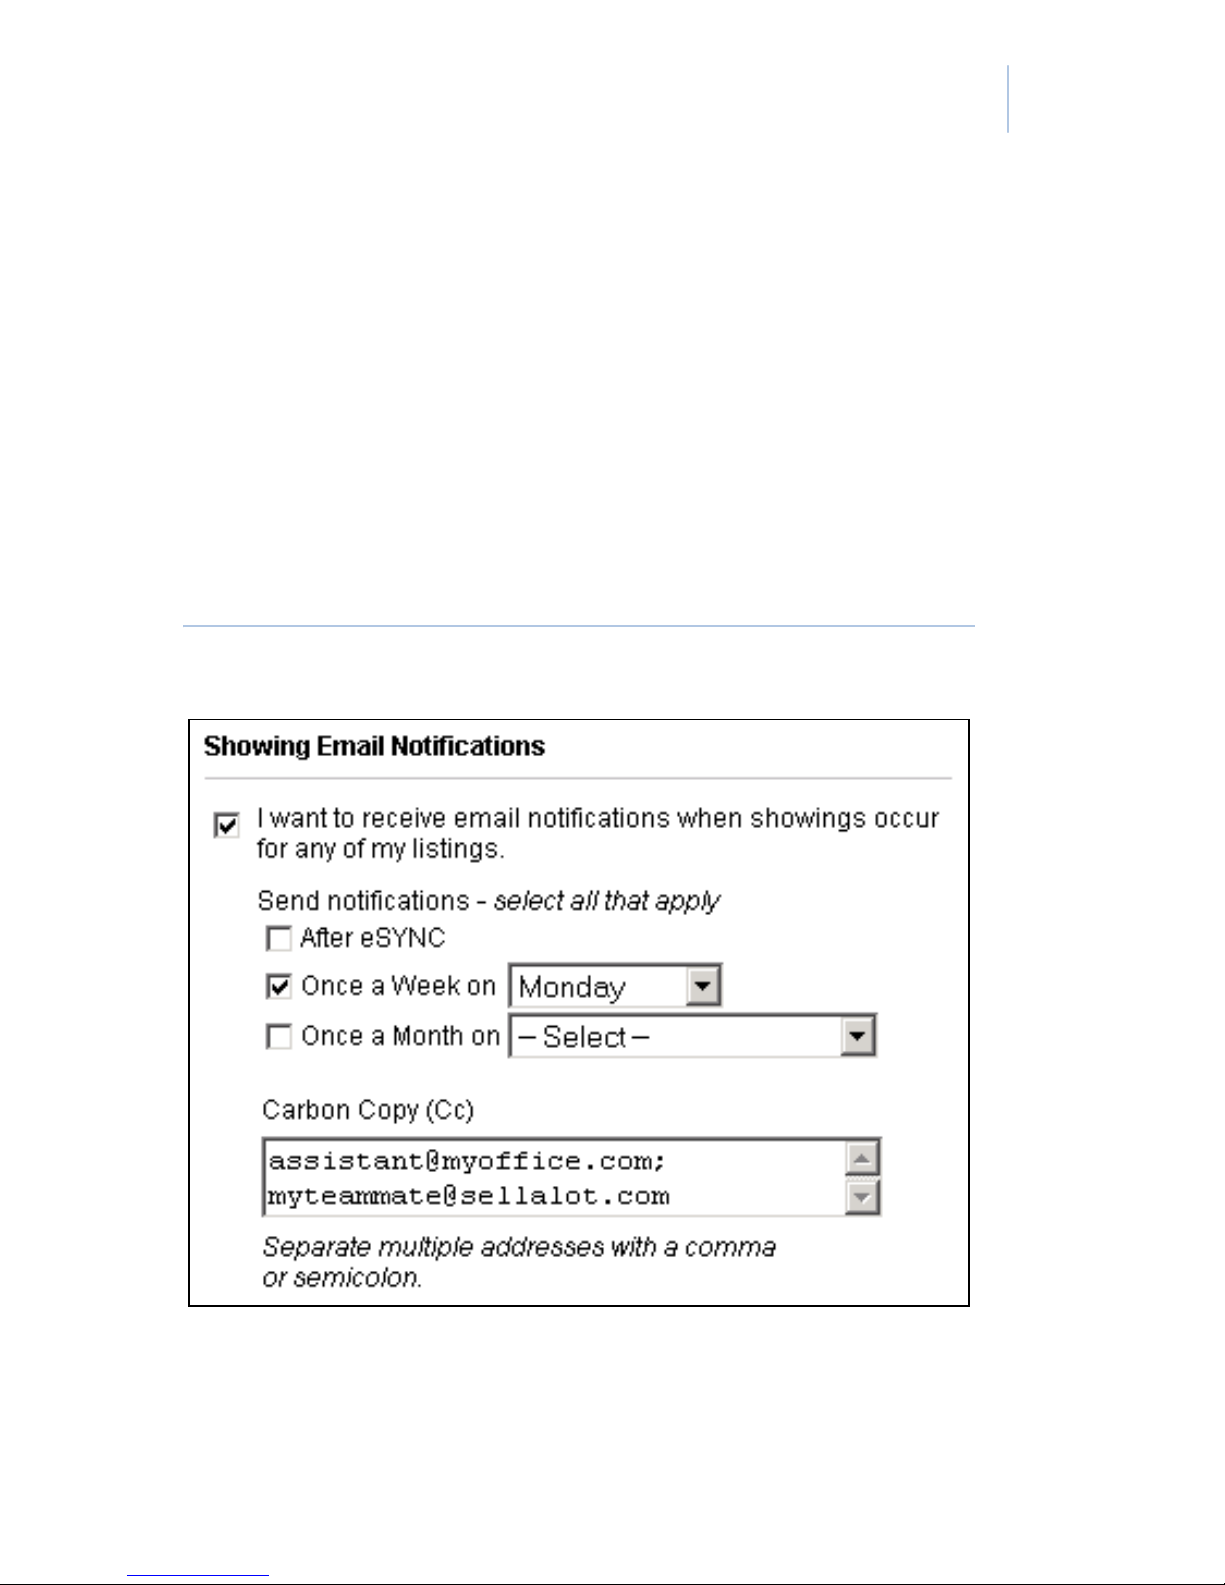
2. Check the I want to receive an email...
box for each category that you want
e-mail notifications for (Figure 9).
3. For Showing and eFeedback
notifications, use the checkboxes and
dropdown lists to specify the e-mail
frequency.
49
Figure 9. Opt-in for showing e-mail notifications
Page 58

50
DisplayKEY
Pocket Guide
4. In the Also send a copy to: (CC) box,
enter any additional e-mail addresses
you want to include in the notifications.
If you are entering more than one e-mail
address, use a comma or semicolon to
separate the addresses.
5. Click Save Now when you are finished
configuring your e-mail settings.
CAUTION: In order to receive e-mail notifications,
your e-mail address must be current at your
association/MLS.
To save your personal e-mail signature for
e-mails you send through ShowingValue, enter
your signature information in the Personalized
Email Signature field and click Save Now.
E-mailing showing agents
You can e-mail announcements or updates, such
as price reductions or rescinded offers, directly to
agents who’ve shown your listings. Only the
agents who’ve opted to receive listing update
Page 59

Chapter 5
Showing activity
e-mails in the ShowingValue Settings screen will
receive your e-mail.
To send an e-mail to showing agents, do the
following:
1. Click the Actions link in the left-hand
column of your screen under
ShowingValue.
2. Under Actions, click Send an Email to
51
Showing Agents.
3. Select the listing by entering the KeyBox
number or MLS number. You can enter
the KeyBox number manually or select it
from the dropdown list.
4. Select the date range for the showings at
your listing. Select a range from the
dropdown list, or select specify date
range to enter your own dates. Click
Continue.
5. A list of agents who’ve shown the listing
is displayed. Select the agents you want
to send an e-mail to by checking the
boxes in the Send Email column. You
can use the Select All and Unselect All
Page 60

52
DisplayKEY
Pocket Guide
links at the top of the column to select/
deselect all agents at once. Click
Continue.
6. In the Compose Email screen, type your
e-mail in the Comments field. If you do
not have a saved e-mail signature, enter
the information in the Personal Email
Signature field.
7. Click Preview to view your message
before sending, and click Send Now to
send the e-mail.
Viewing eFeedback
eFeedback is information about a listing,
including the buyer’s interest level, how the
buyer learned about the listing, and if the price is
within the buyer’s range.
eFeedback sent by showing agents about your
listings is displayed in the second row of your
Dashboard. Click the View button to generate a
detailed eFeedback report that includes the date/
time of the showing, KeyBox serial number,
showing agent, listing number, listing address,
and the feedback received from the buyer. Click
Page 61

Chapter 5
Showing activity
Create New Report to generate a new
eFeedback report for a specific KeyBox, listing
number, or date range.
If a showing agent is unable to send you
eFeedback for one of your listings but provides
feedback verbally, you can add the feedback to
the listing in ShowingValue. If necessary, you
can also edit eFeedback already received from a
showing agent.
53
To add or edit eFeedback for a showing, do the
following:
1. Click Actions under ShowingValue in
the left-hand column of your screen.
2. Click Add or Edit eFeedback on Your
Listing.
3. Locate the showing record and click the
Add or View/Edit button.
4. Use the dropdown menus to enter or
modify the feedback about your listing,
then click Save Now.
Page 62

54
DisplayKEY
Pocket Guide
eFeedback reminders
Feedback reminders for the properties you’ve
shown are displayed in the third row of your
Dashboard. Click the View button to see
detailed showing information for each reminder,
including the date/time, listing number, KeyBox
serial number, and listing address.
To respond to an eFeedback reminder, follow
these steps:
1. Click the Respond button next to the
showing record.
2. Use the dropdown menus and Notes field
in the Enter eFeedback screen to provide
feedback to the listing agent.
3. Click Send Now to send your feedback.
To ignore an eFeedback reminder, click the
Ignore button next to the showing record.
Page 63

Chapter 5
Showing activity
KIM voice access
If you do not have access to the Internet, you can
request a showing activity report through KIM
voice access. The KeyBox serial number and
shackle code are required when you request the
report.
To request an activity report from KIM, do the
following:
55
1. Call KIM at 888-968-4032.
2. Enter your three-digit area code.
3. On your phone keypad, enter your
DisplayKEY serial number and PIN
code, then press #.
4. Select option number 5 from the voice
menu.
5. Press 1 for a voice report or 2 for a faxed
report. Follow KIM’s instructions to
receive the report.
Page 64

56
DisplayKEY
Pocket Guide
Reading a KeyBox
The KeyBox stores the key serial numbers of
agents showing your listing, along with the date
and times that the property was shown. To
determine who has recently accessed your
KeyBox, go to the listing and read the KeyBox
with your DisplayKEY.
To read a KeyBox, perform these steps:
1. Press Enter to turn on your
DisplayKEY.
2. Scroll to the READ KEYBOX option
and press Enter.
3. Press 2 to select NEW READ.
4. Enter the KeyBox shackle code and
press Enter.
5. Insert your DisplayKEY into an AEII
KeyBox or point it at an iBox.
Four beeps indicate that the read was successful.
The DisplayKEY screen displays the key serial
numbers of showing agents who’ve accessed the
KeyBox and the date and time of the access.
Page 65

Chapter 5
Showing activity
The DisplayKEY displays up to 100 of the last
iBox showings and up to 43 of the last AEII
KeyBox showings, beginning with the most
recent access. Use the arrow buttons on your
DisplayKEY’s keypad to scroll through the
showing records.
If you read an iBox, press Enter in a showing
record to display the agent’s name and phone
number on your DisplayKEY. If you read an
57
AEII KeyBox, identify the showing agent by
calling KIM voice access or going to the KIM
website.
To identify an agent by calling KIM, do the
following:
1. Call KIM at 888-968-4032.
2. Enter your three-digit area code into the
phone keypad.
3. Select the # option from the voice menu.
4. Enter your region number, followed by
the # sign. If you don’t know your
region number, contact technical
support. See Technical support on
page 73 for more information.
Page 66

58
DisplayKEY
Pocket Guide
5. When prompted, enter the key serial
number for the agent you wish to
identify, followed by the # sign.
KIM reads the agent’s name, office name, and
office telephone number.
To identify an agent by visiting the KIM website,
do the following:
1. Go to www.supraekey.com.
2. Select Log on to KIM.
3. Select your association or MLS from the
dropdown list.
4. Enter your DisplayKEY serial number
and four-digit PIN code.
5. Click Login.
6. Select Identify Keyholder in the
left-hand column of your screen.
7. Enter the serial number of the agent you
wish to identify, then click Find.
The agent’s name and association/MLS displays.
Page 67

Chapter 6 Support
This chapter provides information to help
you troubleshoot problems and contact
technical support in case you need assistance with your DisplayKEY.
In this chapter:
Before calling support . . . . . . . . . . .60
Troubleshooting tips. . . . . . . . . . . . .61
Error codes. . . . . . . . . . . . . . . . . . . .65
Technical support . . . . . . . . . . . . . . .73
Page 68

60
DisplayKEY
Pocket Guide
Before calling support
If you encounter a problem using your
DisplayKEY, try these solutions before
contacting technical support:
• Keep your DisplayKEY charged. Place
it in the cradle each night before you go
to bed.
• Make sure the connections are secure
between the cradle, phone line, and
power cord. Make sure the DisplayKEY
is seated firmly in the cradle.
• Reset the cradle by disconnecting the
power cord for ten seconds.
• If your DisplayKEY is not updated,
perform a manual eSYNC to update it.
• If an operation fails, verify that you are
entering the correct code, then try again.
• If you cannot access a KeyBox, call the
the listing agent to confirm the timed
access hours and find out if a Call Before
Showing (CBS) code is required.
Page 69

Chapter 6
Support
Troubleshooting tips
The following tips can help you troubleshoot
common DisplayKEY issues.
DisplayKEY is expired
If your DisplayKEY is expired, you need to
update it. There are three ways to update your
DisplayKEY:
61
• Place your DisplayKEY in the cradle
each night to perform an automatic
eSYNC.
• Perform a manual eSYNC.
• Go to the KIM website or call KIM
voice access to get an update code.
For more information on updating your
DisplayKEY, see Chapter 3, Updating on
page 23.
Cannot eSYNC
If you cannot perform an eSYNC, follow these
steps:
1. Verify that your cradle is connected
properly. If your cradle connects to KIM
Page 70

62
DisplayKEY
Pocket Guide
through a phone line, make sure your
phone line is analog and not digital. If
your cradle connects to KIM through the
Internet, verify that your Internet
connection is active.
2. If your cradle is connected to a phone
line, check the eSYNC number in your
DisplayKEY by selecting the ESYNC
PHONE # option on your key. Check to
see if you need a dialing prefix such as a
1 for long distance or a 9 to access an
outside line.
3. Reset the DisplayKEY cradle (see
Cradle is not responding below for
instructions).
Cradle is not responding
If you place your DisplayKEY in the cradle and
no lights illuminate on the cradle, you need to
reset the cradle. Use one of the following
methods to reset your cradle:
• Disconnect the cradle’s power cord for
ten seconds.
• Insert one end of a paper clip into the
reset opening on the back of the cradle.
Page 71

Chapter 6
Support
The reset opening is very small and is
located next to the telephone ports.
Cannot exit menu option
If your DisplayKEY won’t let you exit an menu
option by pressing the up arrow button, press
Enter and 1 at the same time to reset your key.
Key container won’t close
63
If the key container in a KeyBox appears to be
jammed, check to see if the listing keys are
blocking the container. If nothing seems to be
preventing the container from closing, do not
force it. Take the KeyBox to your association/
MLS for assistance.
Code forgotten or lost
If you do not remember your PIN or KeyBox
shackle code, contact your association/MLS for
assistance.
Bad code timeout
If you enter ten incorrect codes within a tenminute period, your DisplayKEY emits a buzz
tone and times out for ten minutes. At the end of
this time period, your DisplayKEY reactivates
Page 72

64
DisplayKEY
Pocket Guide
and is ready for use. To avoid a bad code
timeout, verify that you have entered the correct
PIN or shackle code before repeating the
procedure.
Page 73

Chapter 6
Support
Error codes
Error codes help you identify DisplayKEY or
KeyBox problems. Your DisplayKEY stores the
five most recent errors that have occurred.
To view error codes:
1. Press Enter to turn on your
DisplayKEY.
65
2. Scroll to the ERROR CODES menu
option and press Enter.
The five most recent error codes are displayed.
Each entry is four characters long. The first two
characters indicate the error code, and the second
two indicate how many times that error occurred,
starting at 00.
For example, if your DisplayKEY screen
displays 4000 0601, the most recent error is
4000, which indicates that error code 40 occurred
once. Prior to that, error code 06 occurred twice.
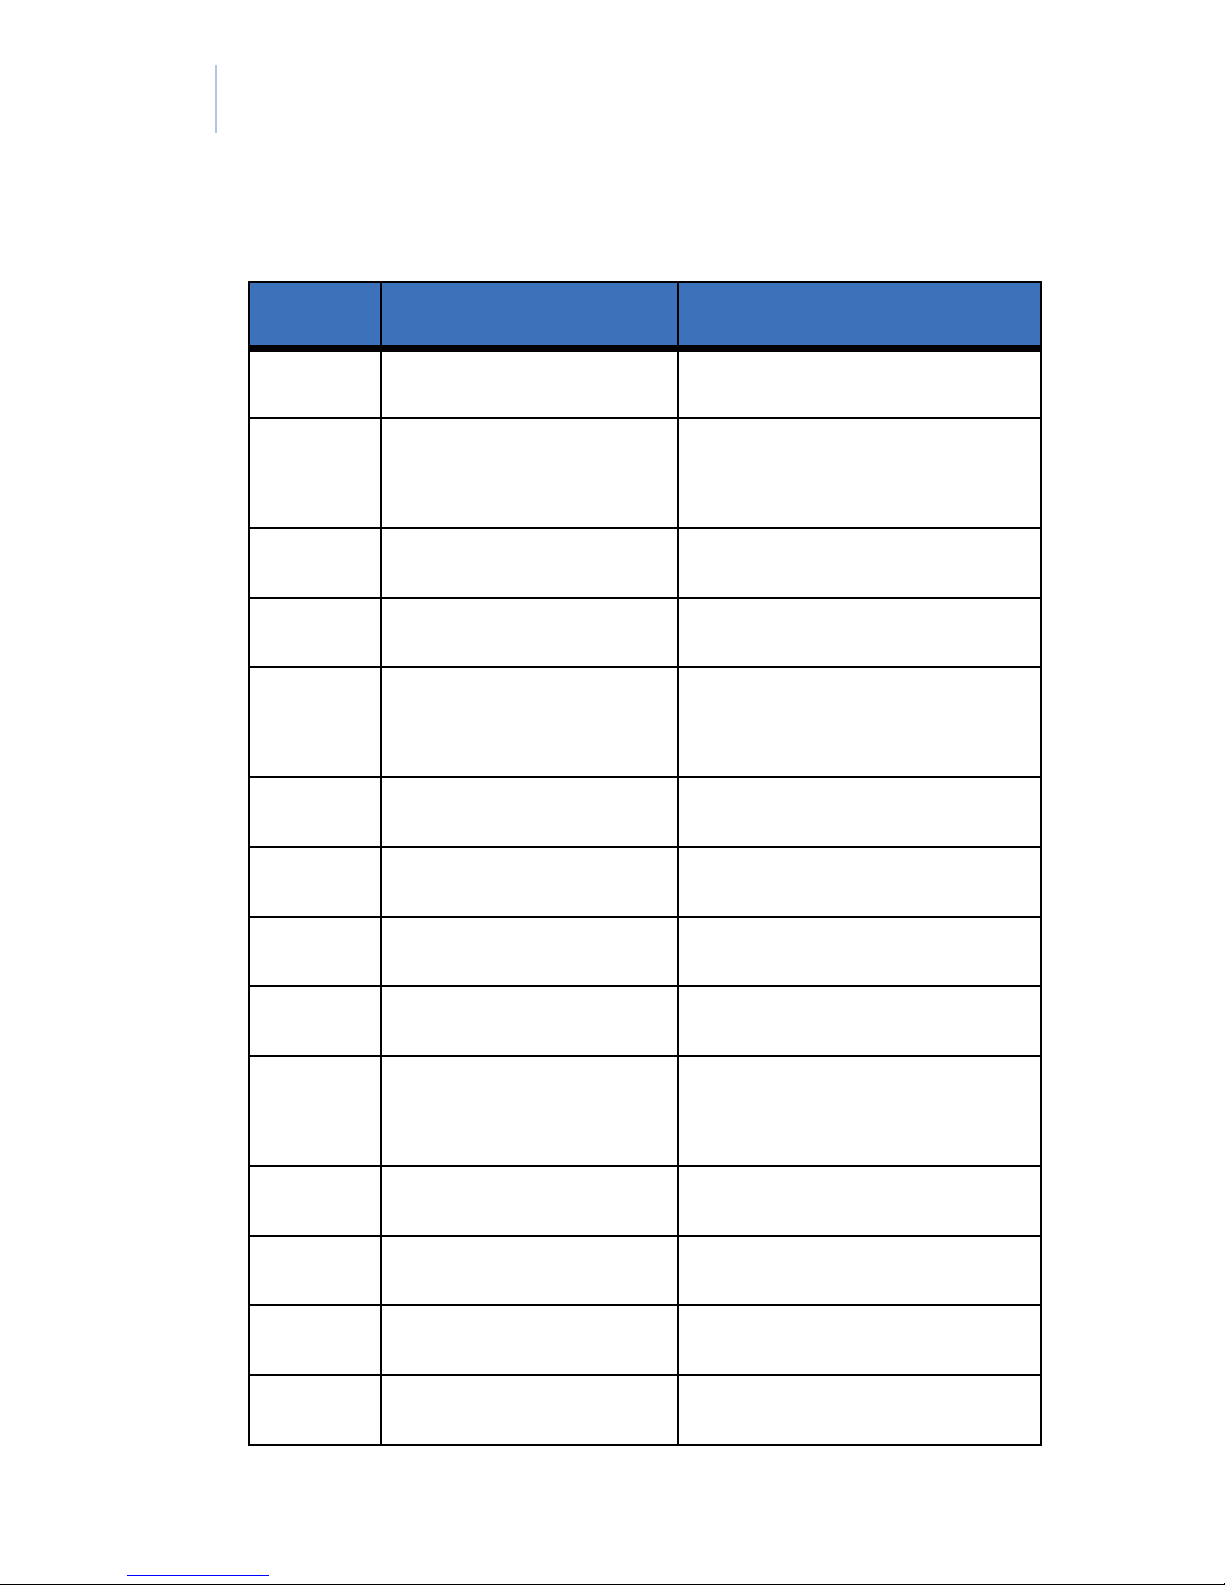
See Table 2, DisplayKEY error codes on page 66
for a complete list of error codes.
Page 74
66
DisplayKEY
Pocket Guide
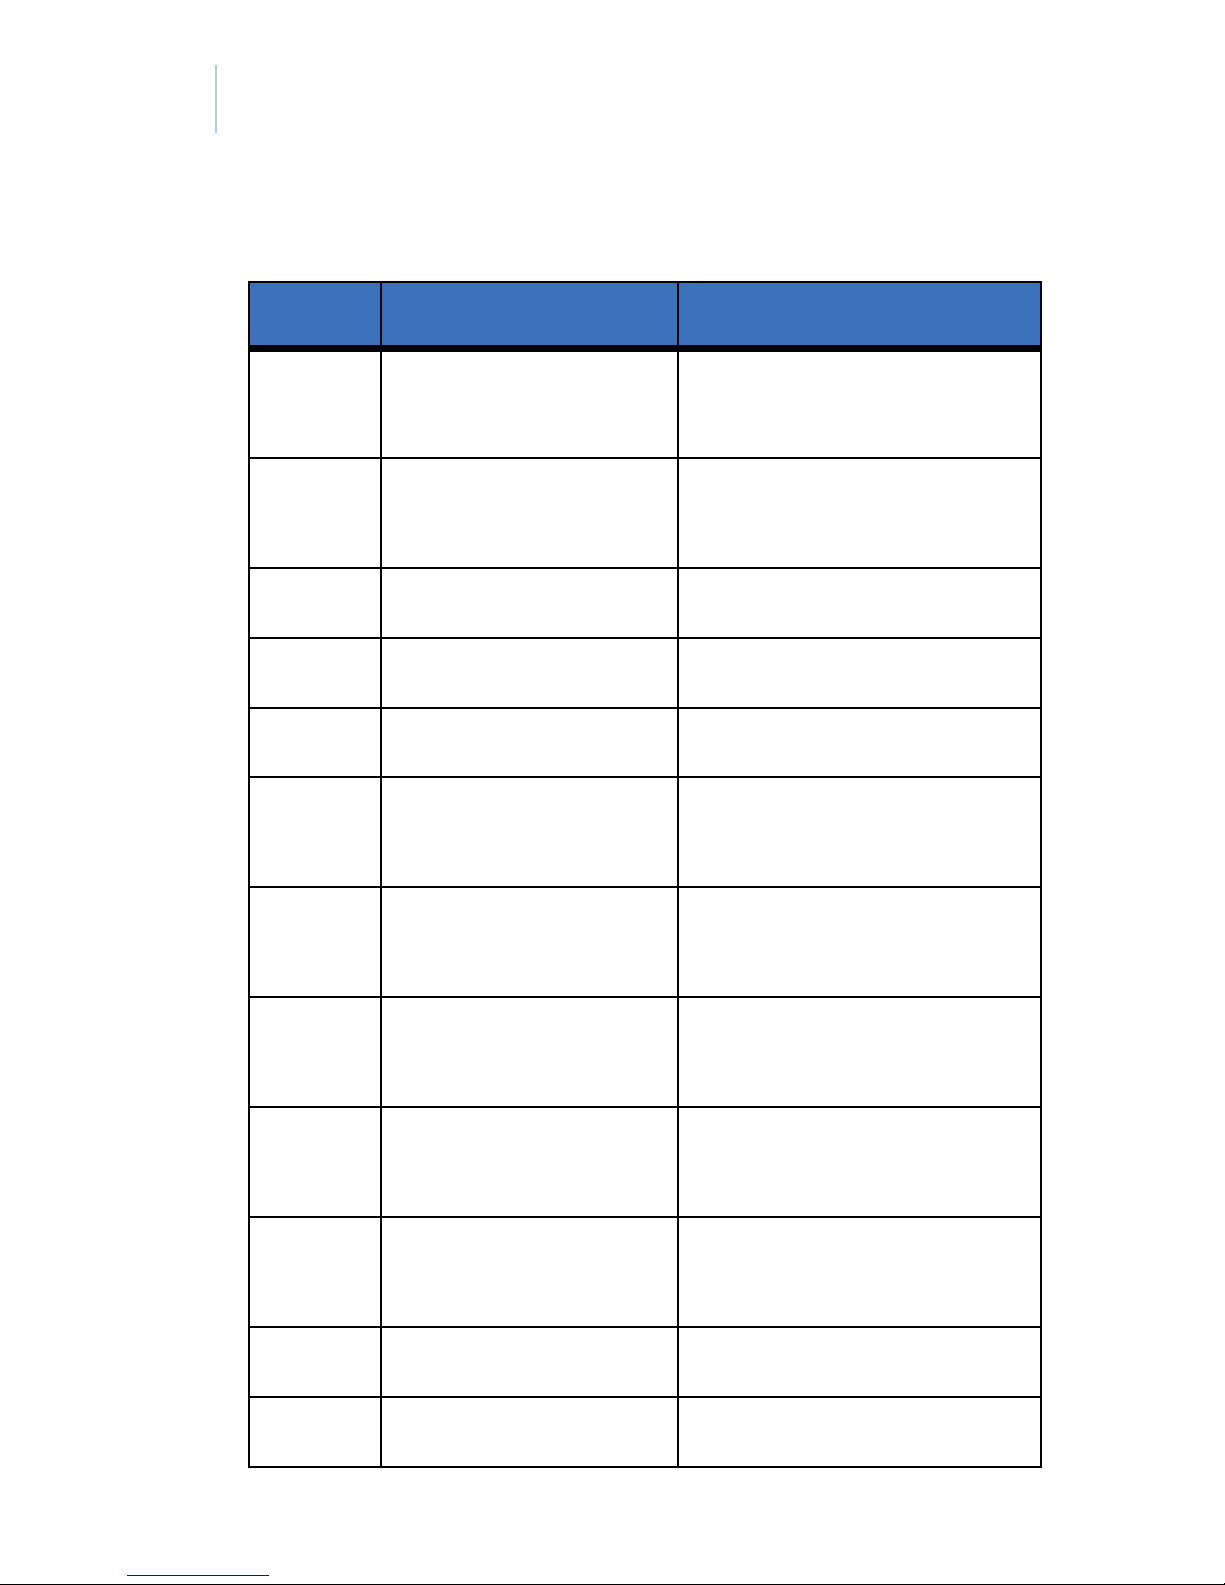
Table 2. DisplayKEY error codes
Code Description Solution
01 Login error Perform eSYNC again
02 Key inactive in KIM
Call association/MLS
database
03 No carrier Perform eSYNC again
04 Modem error Reset cradle
05 Phone number
error
Check eSYNC phone
number
06 No dial tone Check phone line
07 Phone line busy Perform eSYNC again
08 No answer Perform eSYNC again
09 eSYNC timed out Perform eSYNC again
10 Error flashing
firmware
16 Update disrupted Perform eSYNC again
17 Abnormal eSYNC Perform eSYNC again
19 No phone line Check phone line
20 Phone line in use Perform eSYNC again
Perform eSYNC
Page 75
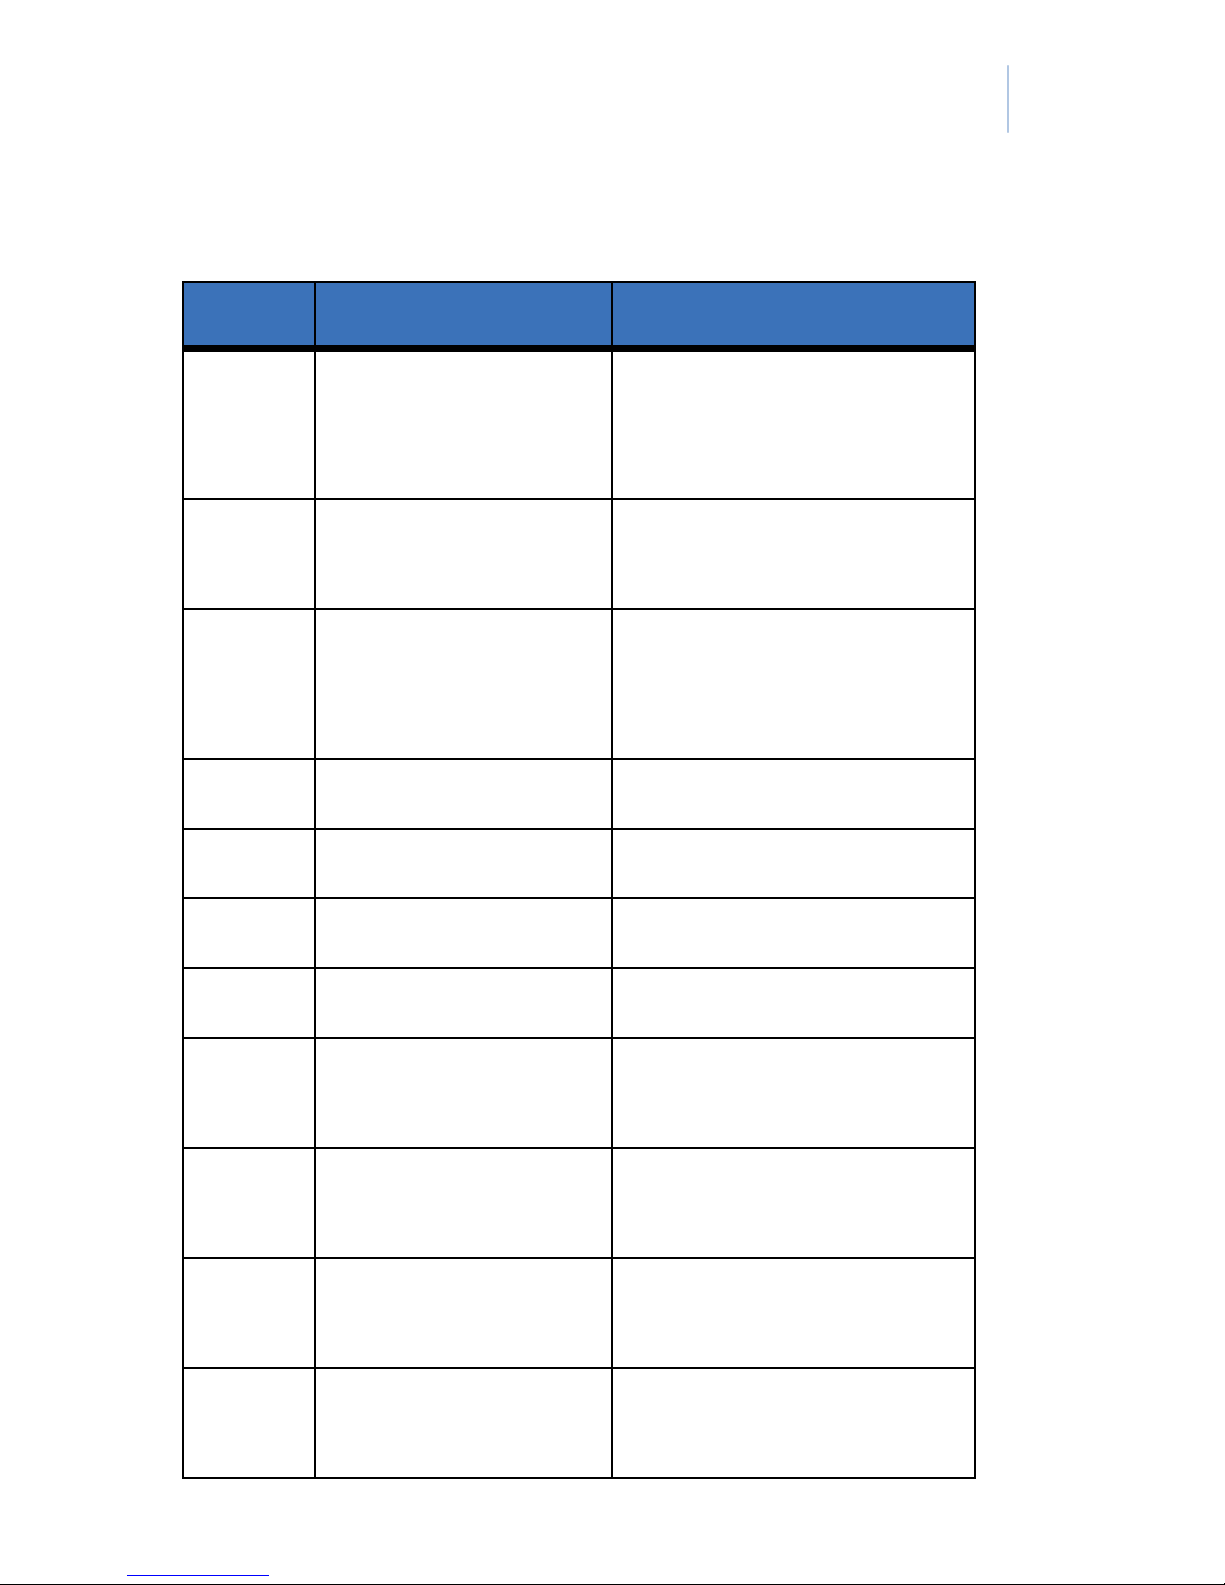
Table 2. DisplayKEY error codes (continued)
Code Description Solution
Chapter 6
Support
67
21 Too much phone
line current
Verify cradle is
connected to analog
phone line
22 Unable to verify
Perform eSYNC
firmware
23 Wrong device Verify you are not
accessing an AEII
KeyBox
26 Bad cookie Perform eSYNC
27 Key expired Update DisplayKEY
29 Command denied Call technical support
2A Unknown cookie Perform eSYNC
30 Real-time clock
crystal failure
35 Battery failure at
power-up
36 Battery failure
during charging
38 Tracking full
lockout
Replace DisplayKEY
Charge DisplayKEY
Charge DisplayKEY
Perform eSYNC
Page 76
68
DisplayKEY
Pocket Guide
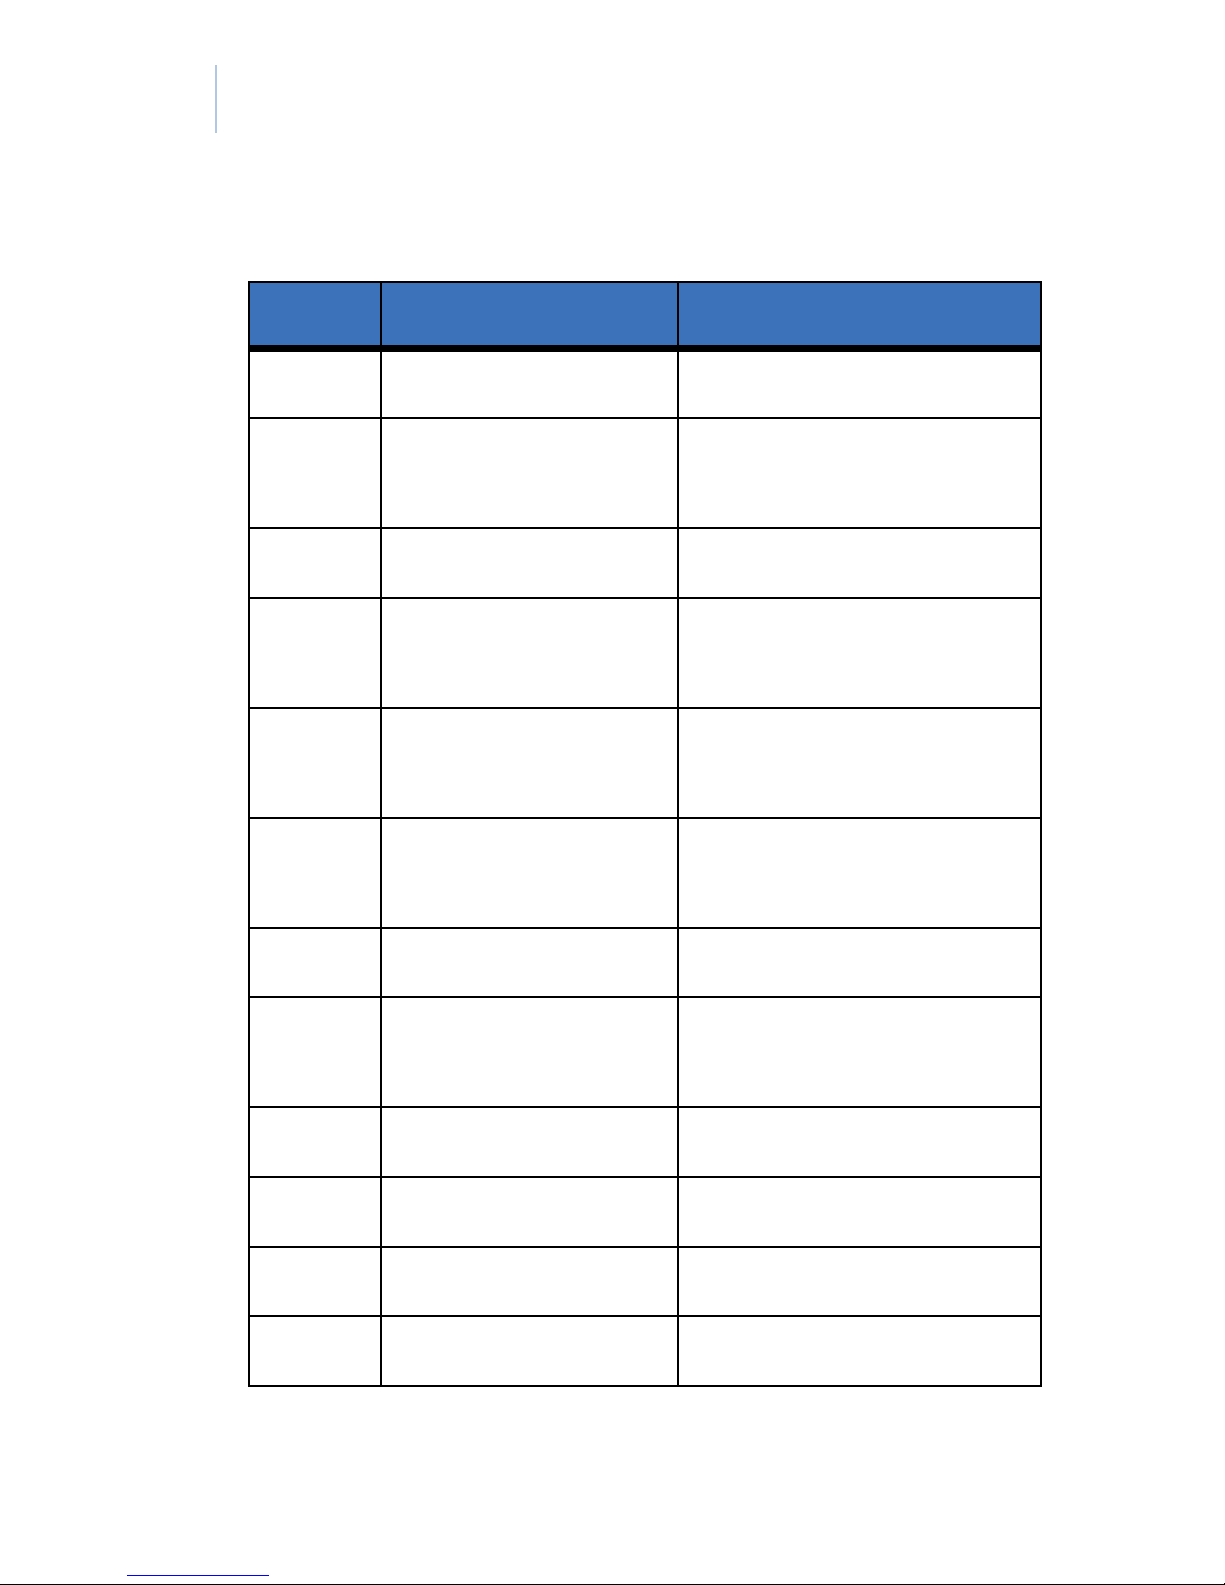
Table 2. DisplayKEY error codes (continued)
Code Description Solution
39 Too many errors Call technical support
3A Premature line
Perform eSYNC again
break
3B CBS mismatch Verify CBS code
3D Incorrect update
code
3E Memory full for
Verify and reenter
update code
Perform eSYNC
iBox read
3F Low battery in iBox Contact the listing
agent
40 Key expired Update DisplayKEY
41 Security bad
Perform eSYNC
cookie lockout
42 Bad ID cookie Perform eSYNC
43 Bad config cookie Perform eSYNC
44 Not KeyBox owner Call association/MLS
45 Invalid response Call technical support
Page 77
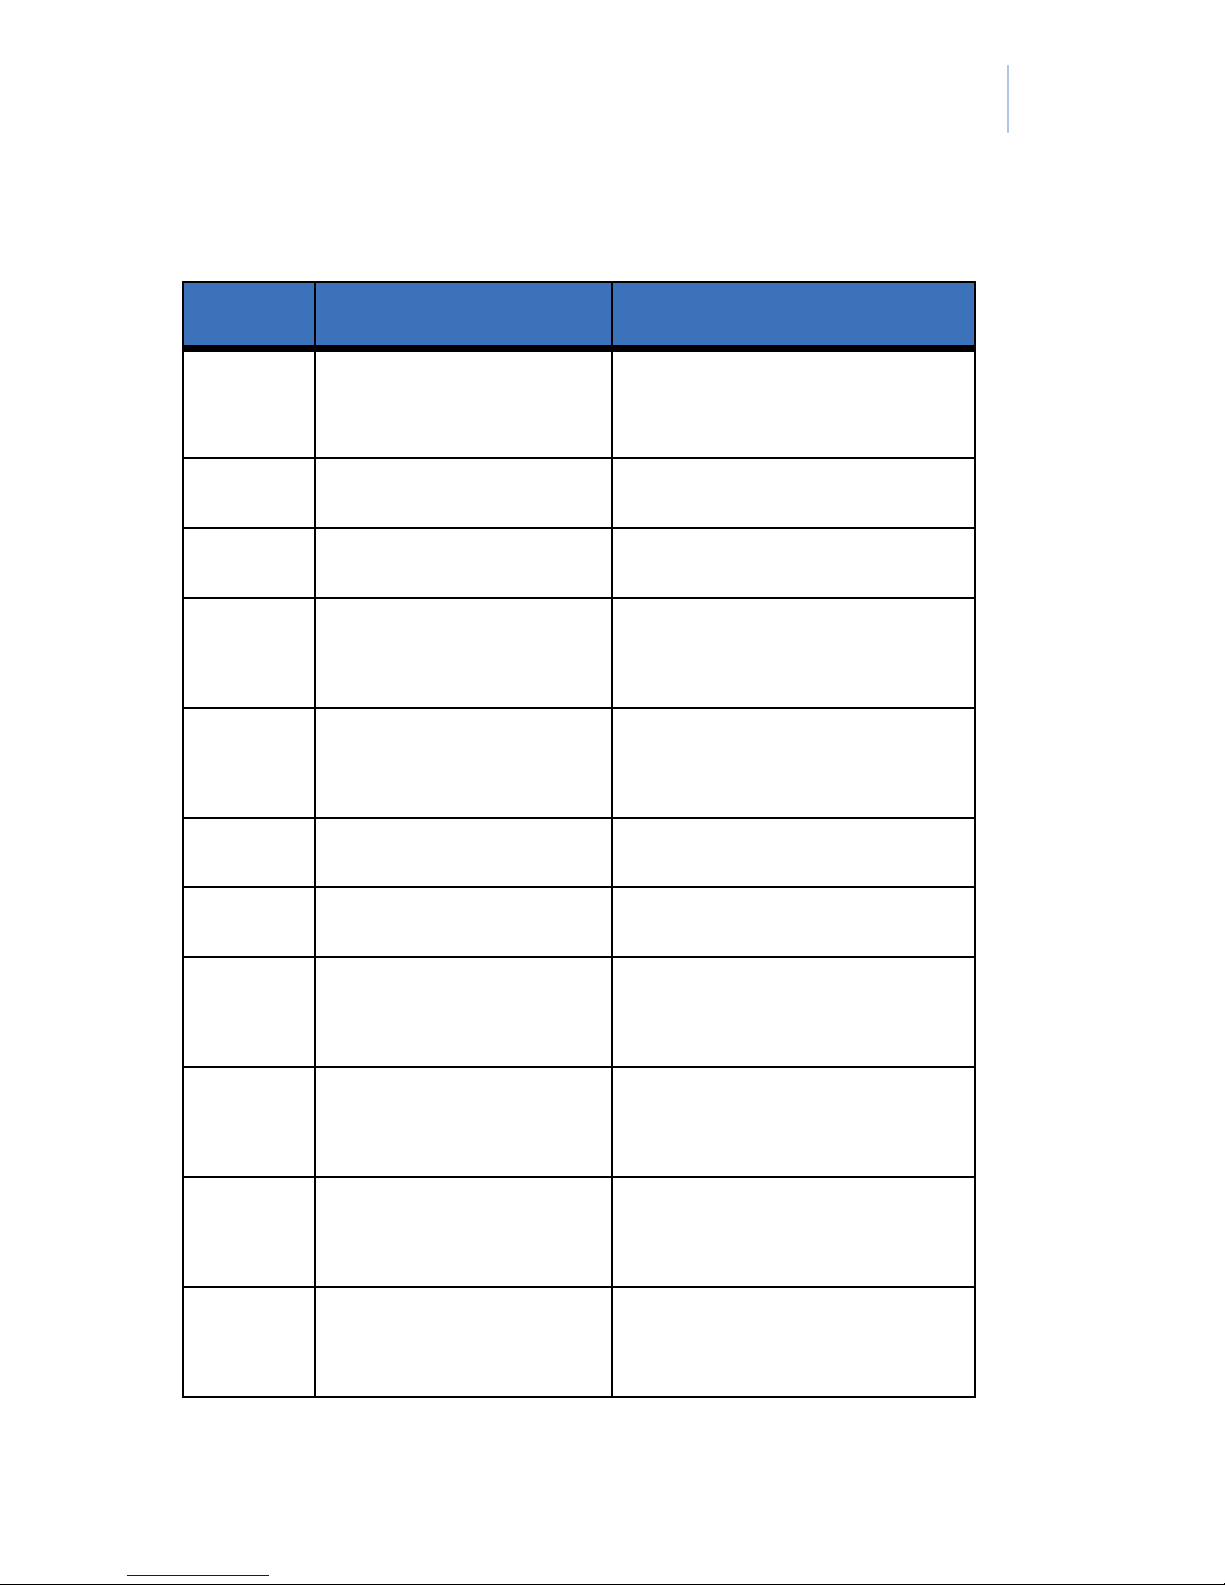
Table 2. DisplayKEY error codes (continued)
Code Description Solution
Chapter 6
Support
69
46 Copy protection
Call technical support
violation
48 Clock not adjusted Call technical support
49 Key locked out Wait ten minutes
5A, 5B, 5CContacts not
Call technical support
making connection
5D IR communication
Try operation again
error
60 KeyBox failure Try operation again
61 Charge not started Update DisplayKEY
65 KeyBox read
disallowed
67 Shackle code
release refused
6B Read/write
permission denied
71 Incorrect PIN Verify PIN code and try
Call association/MLS
Verify shackle code and
try again
Call technical support
again
Page 78
70
DisplayKEY
Pocket Guide
Table 2. DisplayKEY error codes (continued)
Code Description Solution
72 Incorrect shackle
code
73 Incorrect
Verify shackle code and
try again
Call technical support
programming code
74 Bad code lockout Wait ten minutes
75 Obtain key lockout Wait ten minutes
76 Key not updated Update DisplayKEY
77 CBS does not
Verify CBS code
match
78 Permissions do not
Call technical support
match
79 System code does
not match
7A Access hour
restriction
7B Key container
timeout
7D Invalid update Update DisplayKEY
7E Empty log Call technical support
Call technical support
Verify access hours
Wait ten minutes
Page 79
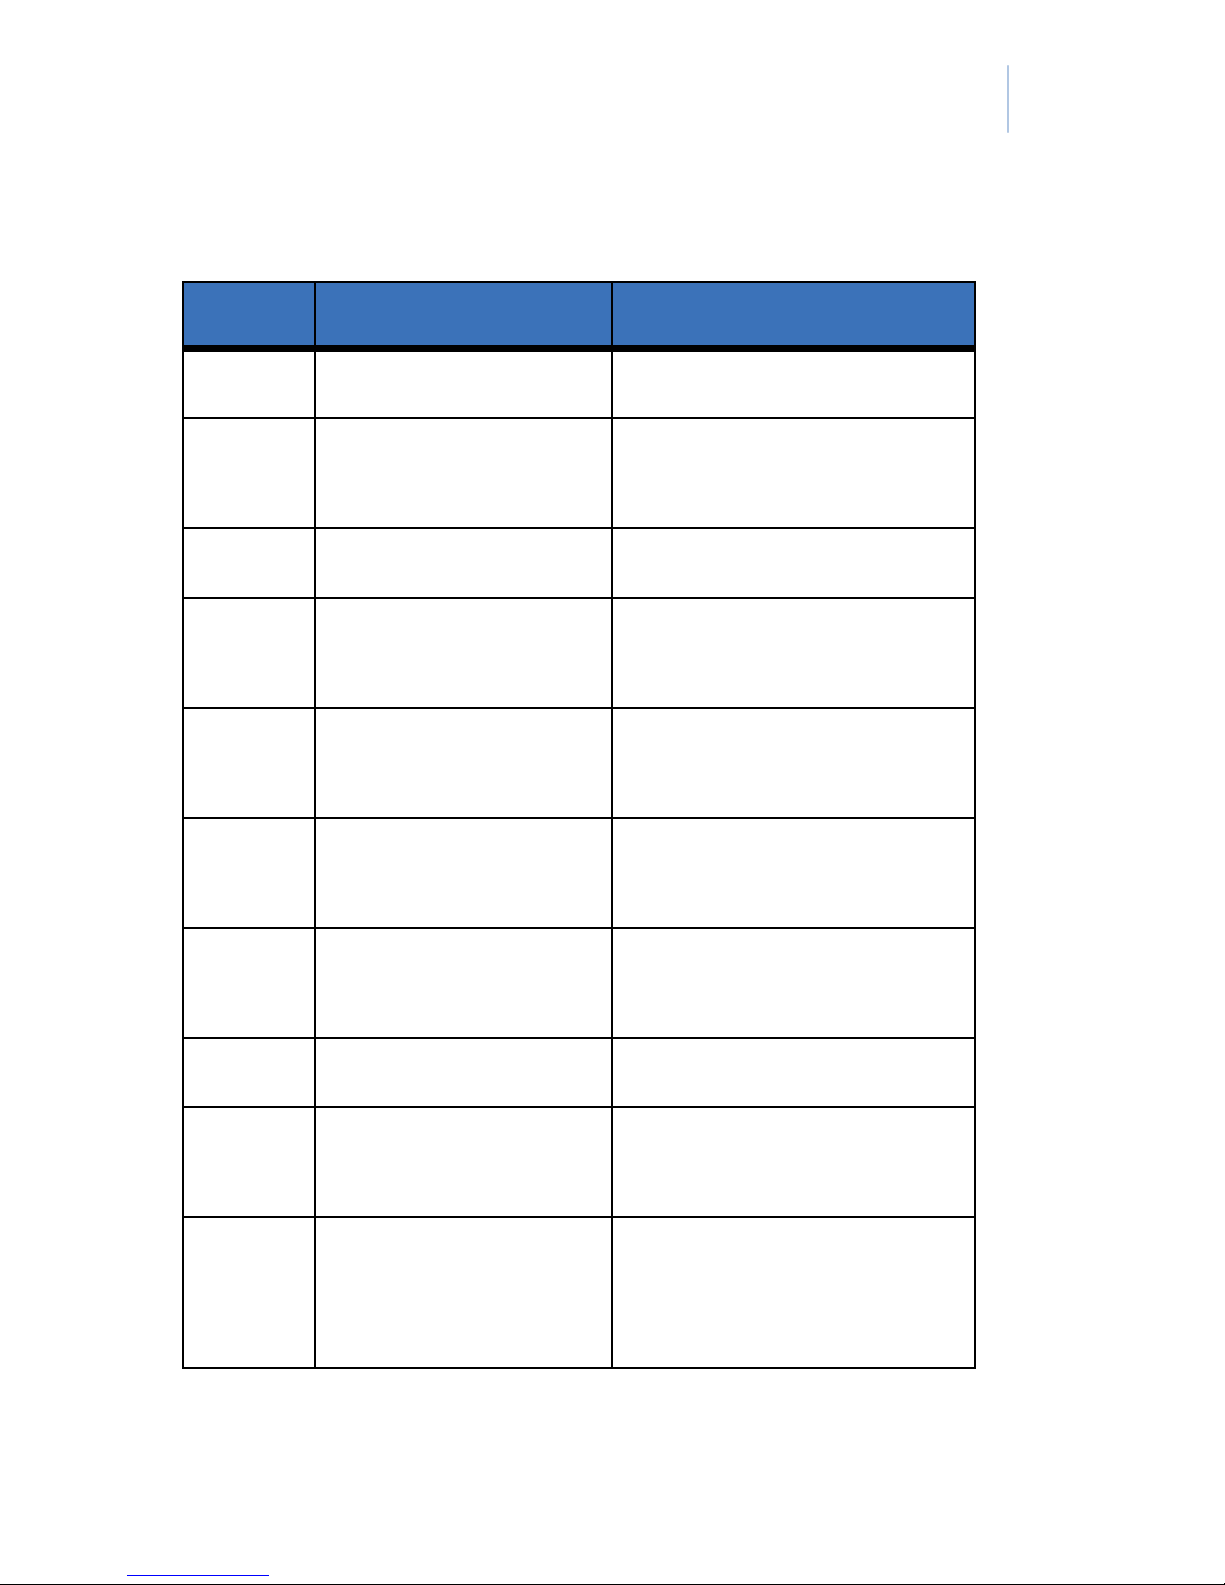
Table 2. DisplayKEY error codes (continued)
Code Description Solution
7F Invalid time Perform eSYNC
Chapter 6
Support
71
80 Low battery on
Charge DisplayKEY
charge pump
82 Failed to find KPDA Perform eSYNC
83 Failed to find valid
Perform eSYNC
auth cookie
92, 93, A8Too many digits Verify and reenter code
A9 Lockout list error in
Call technical support
KeyBox
AA Update code
exception
Verify and reenter
update code
AF Card zapped Replace DisplayKEY
C2 KeyBox storage
violation
D0 Obtain key
operation
restriction
Call technical support
Update DisplayKEY
Page 80
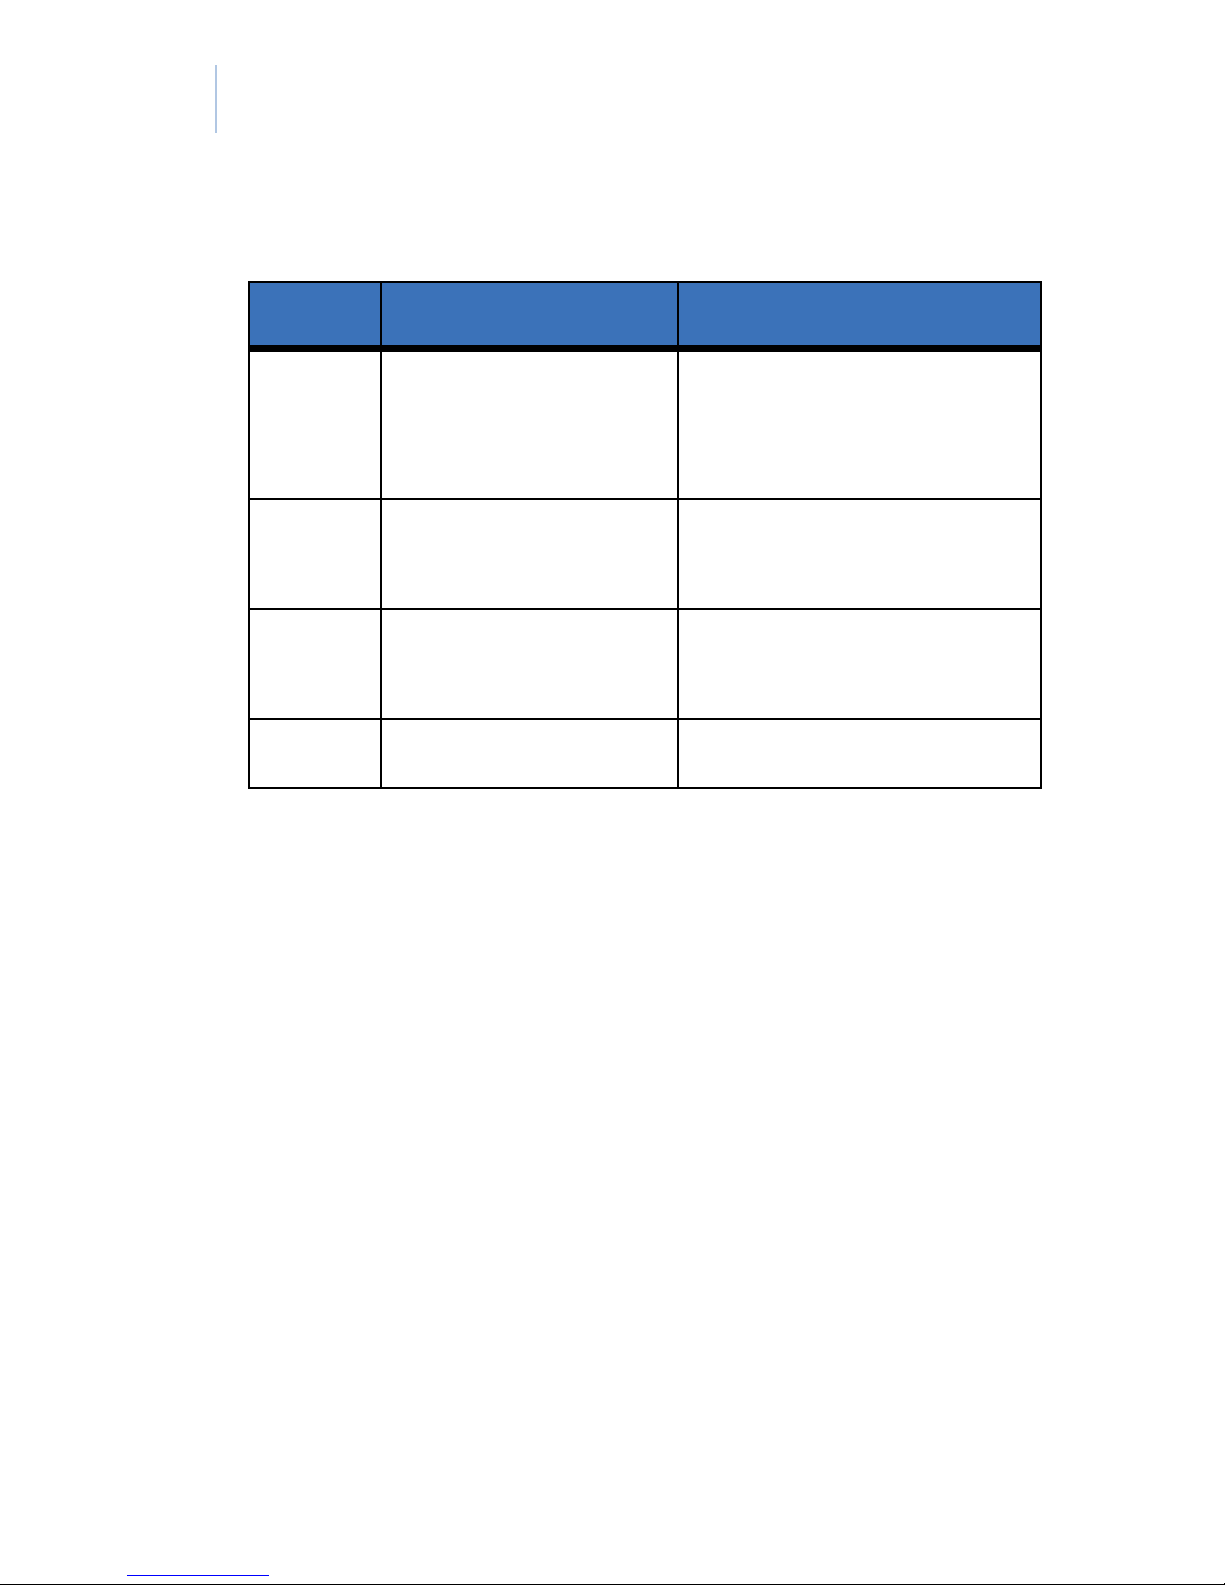
72
DisplayKEY
Pocket Guide
Table 2. DisplayKEY error codes (continued)
Code Description Solution
D1, D2, D3KeyBox shackle
operation
Verify and reenter the
shackle code
restriction
E1 Owner only
Call technical support
violation
E2 Time access
violation
Verify timed access
hours
E3 On lockout list Call association/MLS
Page 81

Chapter 6
Support
Technical support
If you need assistance troubleshooting your
DisplayKEY, technical support is available from
5 a.m. to 7 p.m. Pacific Time, seven days a week.
Table 3. Technical support contact information
Website http://www.supraekey.com
73
E-mail [email protected]
Telephone 877.699.6787
Fax 503.589.8677
Note: Please have your DisplayKEY ready before
calling for technical support.
Another great resource for assistance with your
DisplayKEY is our training library, available to
all agents. To access the library, go to our
website at the following location:
http://www.supraekey.com
In the left-hand column of your screen, click the
Training link under the Related Services section.
Page 82

74
DisplayKEY
Pocket Guide
Page 83

Index
75
A
accessing KeyBoxes ............32
AEII KeyBox.......................32
analog phone line.................14
automatic eSYNC................24
C
CBS codes ...........................39
charging DisplayKEY .........20
conventions............................2
cooperating systems ............40
cradle setup..........................12
analog phone...................14
Internet............................17
E
error codes........................... 65
eSYNC
automatic ........................ 24
manual............................ 25
phone number ................. 26
I
iBox..................................... 33
K
KeyBox ............................... 32
AEII ................................ 32
CBS codes....................... 39
D
DisplayKEY
audio tones........................8
battery ...............................9
charging ..........................20
error codes......................65
menu options .....................6
navigation .........................6
overview ............................5
updating ..........................24
iBox................................. 33
key container .................. 33
reading............................ 56
shackle............................ 36
timed access.................... 37
M
manual
eSYNC............................. 25
update ............................. 28
Page 84

76
DisplayKEY
Pocket Guide
O
open Internet connection .....17
P
preface ...................................1
R
reading a KeyBox................56
release
key container...................33
shackle ............................36
S
showing activity .................. 44
ShowingValue..................... 44
activity reports................ 46
adding KeyBoxes ............ 45
eFeedback....................... 52
e-mail notifications......... 48
T
technical support ................. 73
timed KeyBox access.......... 37
U
updating DisplayKEY......... 24
 Loading...