

Page 1
Contents
D!er
Appliance Registration
Automatic Drying
Care and Cleaning
Controls Setting Guide
Dryer Exhaust 13
End-of-Cycle Signal
Energy-Saving Tips
Knits Drying Tips
Light Bulb Replacement 13
Lint Filter
Loading 4,9
Model and Serial Numbers
Operating Instructions
Perm Press Drying Tips
13
6,7 Sorting 4,8
5, 11 Warranty Back Cover
4,9, 13
4,5
5,11, 12
Models DDE9200G
DDG9280G
DDE9300L
DDG9380L
2 Problem Solver
5 Repair Service
Safety Instructions
Storing Dryer
5 Timed Drying
9
2
User Maintenance Instructions 13
GEAmw &kter@
8ww’a
10-12
15
2-4
13
5
GEAppR&mes
4wul&L
Page 2
Help us helpyou...
IMPOKIANT
Before using your dryer,
read this book ~fdy.
Itis intended to help you operate and
maintain your new dryer properly.
Keepithandy for answersto your
questions.
Ifyou don’tunderstand something
or need more help, write (include
your phone number):
Consumer Affairs
GE Appliances
Appliance Park
Louisville, KY40225
If you received a
damaged dryer...
Immediately contact the dealer
(orbuilder) that soldyou the
dryer.
Savetime and money.
Beforeyou request service...
checkthe Problem Solver on
pages 10-12.Itlists causes of
minor operating problems that
youcancorrect yourself.
Writedownthe modeI
and serial numbers.
You’llfindthem on a label on the
front of the dryer behind the door.
These numbers are also on the
Consumer Product Ownership
Registration Card that came with
your dryer. Before sending in this
card, please write these numbers
here:
Model Number
Serial Number
Use these numbers in any
correspondence or service calls
concerning your dryer.
Toobtain a Spanish language
version of this book, call
GE Answer Center@
800.626.2000
consumer information service.
Para obtener la versi6n en
espa.iiolde este manual,
name a
GE Answer Cente&
servicio de informaci6n
para el consumidor,
teh$fono800.626.2000.
FOR
YOURSAFETY
Ifyousmellgas:
1,Open windows.
2. Don’ttouch
electricalswitches:
3.Extinguishany
openflame.
4.Immediatelycall
yourgassupplier.
*Don’t turn electric switches
on or off because sparks may
ignite the gas.
FORYOURSAFETY
Donotstoreoruse
gasolineor other
flammablevaporsand
liquidsinthevicinity
ofthisoranyother
appliance.
Read all iIIStI’UCtiOnS ‘
before using this “-‘
appliance.
IMPmTmT
MFETY
The California Safe Drinking
Waterand Toxic Enforcement Act
Rquiresthe Governor of Califbmia
topublish a list of substances
known to the state to cause cancer
and requires businesses to warn
customers of potential exposure
to such substances.
Gas appliances can cause minor
exposureto time ofthese substances,
namely benzene, formaldehyde and
soot, caused primarily by the
incomplete combustion of natural
gas or LP fuels. Properly adjusted
dryers will minimize incomplete
combustion. Exposure to these
substances can be minimized .-“’
further by properly venting the
dryers to the outdoors.
W~G-To reduce the risk
of fire, electric shock, or injury
to persons when using your
appliancq foUowbasic precautions,
inciuding the following:
~Use this appliance only for its
intended purpose
this Use and Care Book.
● This dryer must be properly
installed and located in
accordance with the Installation
Instructions before it is used. If
you did
Instructions sheet with your dryer,
you can obtain one by contacting
the service location nearest you.
—Properly ground to conform
with all governing codes and
ordinances. Follow details in
Installation Instructions.
N~CE
$,
as described in
not receive an Installation
All drying instruction terms in this book conform to the Care Labeling
Rule established by the Federal Trade Commission, January 1984.
Page 3
“ --
—Locate where the temperature
isabove 50°F. (lO°C.)for
satisfactory operation ofthe dryer
control system. Donot install or
storethe dryer where itwill be
exposed tothe weather.
–Connect to aproperly rated,
protected and sized power-supply
circuit to avoidelectrical overload.
—Exhausting tothe outside is
STRONGLY RECOMMENDED
toprevent large amounts of
moisture and lint from being blown
into the room. Carefully followthe
ExhaustingDetailsintheInstallation
Instructions.
. men disconnecting
this
appiiance pull by the plug rather
than thecord to avoiddamage tothe
cord orjunction ofcord andplug.
Make sure that the cord is located so
that itwill not be stepped on,
tripped overor otherwise subjected
todamage or stress.
**--
oDo not repairor replace any
~ part of the appiiance or attempt
any servicing unless specflcaily
recommended in this Use and
CareBook or in published userrepair instructions that you
undemtand and havethe skilis to
carry out.
minimix the possibility
To
ofafirehazard.
● ~ not~ h-t todry~cl~
containing rubber, plasti~ or
simkrmaterhds (SUCilaspadded
b- tennis shoes, galoshes, bath
-w%b*mP@%-
- etc.) asthesematerhdsmay
melt or burn. Also, some rubber
~b--mder
certain circumstances produce
f~by spontaneous combustion.
● Garments labeled “Dry AW
FromHeat”(such asiitbjacicets
containing Kapok)must not be put
inyour dryer.
k
● DO notwashor dry articles
thathavebeen cleaned in, washed
in, soaked in, orspotted with
combustibleorexpiosivesubstances
(such as wax, paint, gasoline,
degreasers, dry-cieaning solvents,
kerosene, etc.) which mayignite
or explode. Do not use orstore
such substances on/or around
your washer and/or dryer during
operation.
● Any article on which you have
used acleaning solvent,
or which
contains flammable materials
(such as cleaning cloths, mops,
towelsused inbeauty salons,
restaurants orbarbershops, etc.)
must not beplaced inor near the
dryer until all traces ofthese
flammable liquids or solids and
their fumes havebeen removed.
There aremany highly flammable
items used in homes suchas:
acetone, denatured alcohol,
gasoline, kerosene, some household
cleaners, some spotremovers,
turpentines, waxes, wax removers
and products containing petroleum
distillates.
. cl-n the ~t fiiter ~fom ~ch
load to preventiint accumulation
inside thedryer or in theroom.
Do IN(YrOPERATETHE
DRYERWITHOUT THE LINT
FIIXERINPLACE.
● ~p areaaround and
underneath your appliance free
fmm the accumulation of
combustible materials, such as
lint, paper, rags, chemicals, etc.
● DO notstoreitemsthatmaybum
ormelt (suchas clothing, paper
material, plastics or plastic
containers, etc.) on topof the dryer
during O~EitiO1l.
. me ~te~or Of&e ~~e
and theexhaust ductconnection .
Mdethedryersliould beckankd
periodically bya qualified
individual.
● ❞❞ dud (~ Wation
instructions). Use only metal duct
inside dryeror for exhausting
dryertothe outside.
Tominimize the possibility
of iqjury.
● Never reach into the dryerwhile
the drum is moving.Beforeloading,
unloading or adding clothes, wait
until the drum has completely
stopped.
● Close supervision isnecessary
if this appiiance is used by or near
children. Do not ailow children to
play inside, on or with this
appiiance or any discarded
appliance. Dispose of discarded
appliances and shippingor packing
materiais properiy. Before
discarding a dryer, or removing
from service, removethe door of
the drying compartment.
● Keep ail laundry aids (such
as detergents, bleaches, fabric
softeners, etc.) out of the reach of
children, preferably in a locked
cabinet. Observe all warnings on
container labels to avoidpersonal
injury.
● Keep the floor around your
appliances clean and dry to reduce
the possibility of slipping.
● Do not dry fiberglass articles in
your dryer. Skin irritation could
resuit from the remaining glass
particles that may be picked up
by clothing during subsequent
dryer uses.
. me la~d~ ~~ess ~ ~~ce
theflame
avoid such a resuit, the garment ~
rnanuiiwturer’s care instructions ~; -
● To
ofekxt& ‘tiyk, UX@UfJi$is+. ~ ~.~~;
8@kUkCdfK$tith6$Ck& S@
&cfore attfynpting my Iw@mq+&;&j
or ck&&g @k&f#tM &&5w!n&$’@
darling &the tit fikef). NOTE: ‘:;f
‘IhrningtheC@e SActor knob
to anOFF position does N(YI’ .
discomect the
the power supply.
re&&ncyof M3rics. lb *.
mkimize thqpossibility s ~;
appiiance I%Om
I
..- ..-... ..——
...._..__.. —-.
3
-
i
Page 4
ImpOI’t2111tSafety Instructions (continued)
--. .:--- A . . .
, G+IlppCU
;agasdryer, iti$: “ ‘ “
with an auton@ic electric
ignition and does not have a pilot
light. DO NCYi’A~EMPI’ ?0 .
LIGHT WITH A MATCH, &iRIS
may result from having your hand
in the vicinity of the burner when
theautomatic ignition may turn on.
“static ektricity in th&n.We ~
recommend you use either a
fabric softener in the wash cycle,
accordingto the manufiwturer’s
instructions far thk produe@ or
try a dryer-added product for
which the manufacturer gives
written
assurance on *hepackage
.that their product can be safely
. .
..
. .,
. *in
yO~’ ~eG ., ,
.,
How to operateyourdryer
W~ING-To reduce the risk offire, electric shock, or injury topersons,
readthe IMPORTANT SAFETYINSTRUCTIONS beforeoperating thisappliance.
t *
tiktnmk Semw Dryer
Extre Care Cycle
*
c
“(?I ‘@
Vermble !3gnal
I
Fsbmc
Cfwe
SelectIons
‘cl
.0
❑
❑
❑
COTTONS
MOW HEAT
WRMPress
MEOW HEAT
UMTS/C.ELKATES
LOW HEAT
FLuFr
NO MEAT
PUSH TO
START
SAW THESE
INSTRUCTIONS ~~
,.
,.
3
Load Your Dryer PropeAy
c Clean the lint filter each time the
dryer is used. Always be sure the
lint filter is in place. Don’t use the
dryer without it.
● Good sorting for the dryer begins
at the washer. Generally, if clothes
are sorted right for washing, they’re
sorted right for drying. See page 8
for sorting help. (If you do mix
various types of fabrics in your
load. set the controls for the
lighter-weight fabrics and remove
when dry. Reset controls for the
remaining heavier fabrics. )
Set the Controls
See the Controls Setting Guide
on pages 6 and 7.
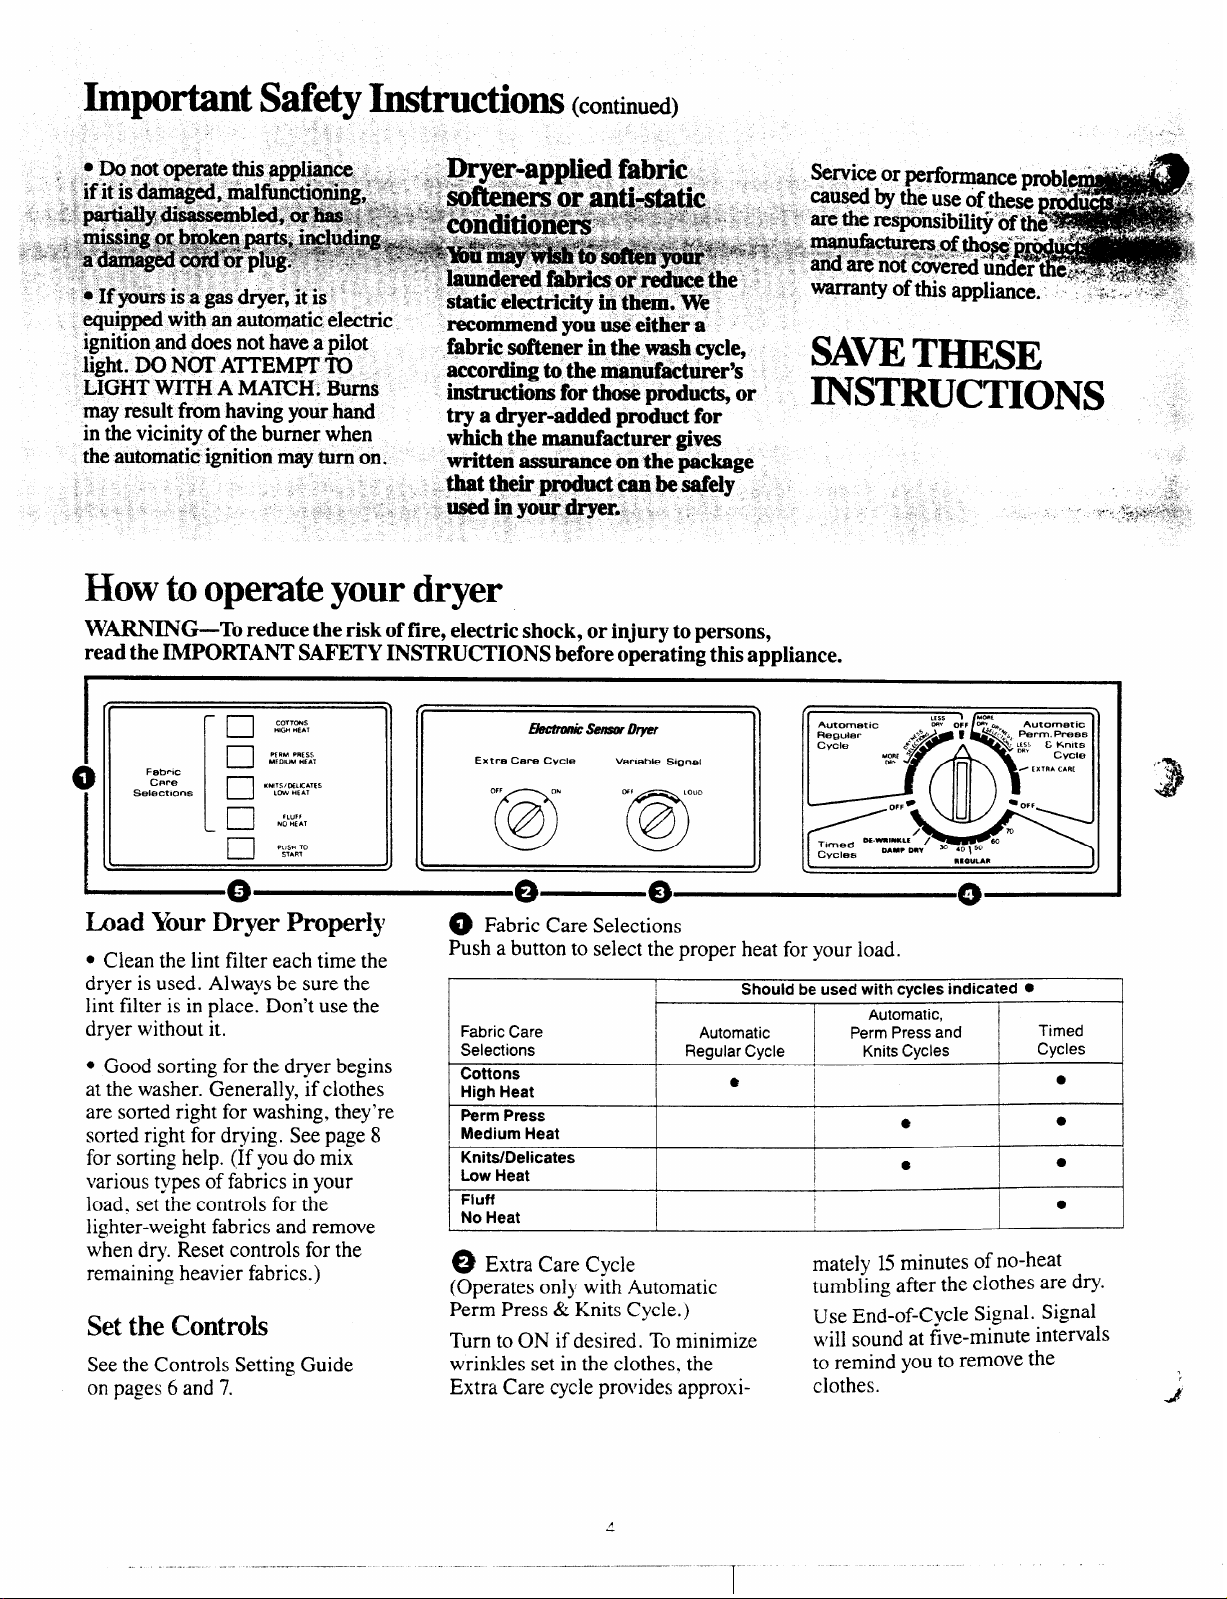
~ Fabric Care Selections
Push a button to select the proper heat for your load.
Should be used with cycles indicated ●
Fabric Care
Selections Regular Cycle Knits Cycles
Cottons
High Heat
Perm Press
Medium Heat
Knits/Delicates
Low Heat
Fluff
No Heat
~
Extra Care Cvc]e
Automatic
●
(Operates onl~ w;th .4utomatic
Perm Press& Knits Cycle.)
Turn to ON if desired. Tominimize
wrinkles set in the clothes, the
Extra Care cycle provides approxi-
Automatic,
Perm Press and
!
~
I
,
I
e
8
mately 15minutes of no-heat
tumbling after the clothes are dry.
Use End-of-Cycle Signal. Signal
~,ill sound at five-minute
to remind you to remove the
clothes.
Timed
Cycles
●
●
●
1.
htt3Wik
i
Page 5

~ Select End of Cycle Signal, if Dryness selections guide for the automatic cycles
desired.
~ Turn Cycle Selector to desired
cycle setting. The selector may be
turned in either direction.
~ Press PUSH lU STARTbutton
to start dryer. (Opening the door
during operation stops the dryer. To
re-start, close the door and press
the STARTbutton.)
Setto
Middle
Auromat!c CaJWV
RfIQuh- >.”
CVC19
Position
Automatm ‘%’ OW
Set
toward
Regular ,->
cycle
MORE DRY = ~
Set
toward
Autof?’tetIC ‘:s ~F
Regular ~..
Cvcla
LESS DRY =
wlw!-
M-4
$’.:
(R
a“+’
/
{a
,,ss
a
7
● Formostnormalloads.
L
c
● Forloadsthat includeheavy
weightfabrics.
● If youdesireto removemore moisture,
9
0+
rh
● Forlightweightfabricloads.
Ifyoudesire to removeless moisture.
●
. Forverysmallloads.
End-of-Cycle Signal
(Operates with any cycle.)
Verwble 91gnal
OFF
The Signal control can be set
anywhere between OFF and
LOUD, depending on desired
sound level. The signal will sound
just before the end of the cycleto
remind you to remove the clothes.
Tostop signal while sounding, turn
Signal control to OFF or advance
Cycle Selector to OFF.
The Signal should always be used
when drying Polyester Knits or
Permanent Press items which
should be removed as soon as the
dryer stops to help prevent setting
of wrinkles.
The signal should also be used with
the Extra Care Cycle.
LOU0
@
Polyester Knits &
Permanent Press
drying tips
● DO N(YI’OVERLOAD—
Garments being dried or
dewrinlded should tumble freely.
● REMOVE CLOl?HES
PROMITLY-TO help prevent
wrinkling, remove from the dryer
promptly at the end of the drying
cycles.
● PLACE ON HANGERS—
Permanent Press and Polyester
Knit garments look best if placed
on hangers after drying.
What is the difference
between Automatic &
Timed drying?
Automatic Drying
When using the Automatic Cycles,
the Electronic Sensor Control
system continually senses the
moisture in the tumbling clothes,
determines when they are dried to
your pre-selected setting, and
terminates the cycleautomatically.
Referto the CONTROLS SETTING
GUIDE for recommended settings.
The Cycle Selector will not advance
until clothes have reached a certain
degree of dryness.
Timed Drying
When using the TIMED CYCLES,
you select the number of minutes
you wish the dryer to run and it
turns off at the end of this time
period.
. ......—----
..—..——
—..—..— .
Page 6

ControlsSetting Guidefor differentfabrics and loads
—.
-.-—.
Fabric
Load
Cottons&Linens
Permanent Press, Treated Cottons,
Blends with Cotton
Syrtthetics-I%lyester, Nylon,
Acrylic Knits and WovenFabrics
sturdy
Delicate
Silks and Wmls, Blends includlng
Silks and Wmls
Rayonand Acetate Knits/Delicates
Down-filled garments, if machine
washing and drying are
recommended.
BabyClothes—Sturdy: Diapers,
Nightgowns, Shirts, Pads, Sheets,
Receiving Blankets, Coveralls. See
Special Instructions.
Baby Clothes—Delicate Knits/Delicates
Blankets-Wool, Part Wool,
Cotton, Electric, Synthetic. See
below under “Extra-large Items:’
Curtains, Slipcovers, Draperies.
DO N(YTMACHINE DRY
FIBERGLASS.
Chenille Bedspreads, Robes. See
below under “Extra-large Items:’
Rubber-coated Items, Laminated
Fabrics, Vinyl, Plastics and
Articles with Plastic Trim.
Bathmats and Rugs Cottons
Extra-large Items-Queen or King
Size Sheets, Blankets or Spreads,
Sleeping Bags, Insulated Jackets or
Suits, Mattress Covers (Pads),
Quilted Bedspreads.
hying Selection*
cottons
HighHeat
Perm Press
Medium Heat
Perm Press
Medium Heat
Knits/Delicates
Low Heat
Knits/Delicates
Low Heat
Low Heat
Cottons
High Heat
Cottons
High Heat
LOW Heat
Cottons
High Heat
Cottons
High Heat
Cottons
High Heat
Fluff
No Heat
High Heat
Permanent Press
Medium Heat
Cam/
Cycle
AutomaticRegularCycle
or
TimedCycle
Automatic Perm Press
and Knits Cycle
Timed Cycle
Automatic PerrnPress
and Knits Cycle
Automatic Perm Press
and Knits Cycle
Automatic Perrn Press
and Knits Cycle
Automatic Regular Cycle
Automatic Regular Cycle See Dryness Selection Guide on page 5.
Automatic Perrn Press
and Knits Cycle
Timed Cycle
Timed Cycle
Timed Cycle
Timed Cycle
Timed Cycle
Timed Cycle First setting—20 minutes;
Cycle Setting
See Dryness Selection Guide on page 5.
Set at REGULAR for dry; at DAMP-
for ironing.
DRY
See Dryness Selection Guide on page 5.
Use Extra Care Cycle if desired.
DE-WRINKLE settingto de-wrinkle
garments that havenot been washed.
See Dryness Selection Guide on page 5.
Use Extra Care Cycle if desired.
Set toward LESS DRY. See Dryness
Selection Guide on page 5.
Set toward LESS DRY. See Dryness
Selection Guide on page 5.
See Dryness Selection Guide on page 5.
See Dryness Selection Guide on page 5.
Set at 20 to 25 minutes.
For first setting, set at 20 minutes;
for second setting, set at 15minutes.
First setting-20 minutes;
additional settings-5 minutes.
Set for time desired.
First setting—20 minutes;
additional settings—5 minutes.
second setting—15minutes;
additional settings—5 minutes.
{
6
—..——— -.
——
Timed Cycle
1-
-..---
Cottons
High Heat
.
Pillows-Feather and Polyesterfilled (if manufacturer recommends
they be dried in a dryer). See
Special Instructions.
Vhe terms High, Medium and Low Heat are those usual]y found on fabric care labels. For best results. followyour fabric care labels.
N~E: The Cycle Selector settings indicated above are to be used as a guide. Youmay find that best results are obtained for certain of your fabrics
by setting the Cycle Selector to either side of the recommended settings.
..- .. ------
Set at 70 minutes.
Page 7

@
Special Instructions
Do not dry non-colorfast items with whites or light-colored items.
Do not overload dryer; clothes should tumble freely. Remove promptly as soon as dryer stops; place clothes on hangers to
minimize wrinkling.
Do not overload dryer; clothes shouid tumble freely. Remove promptly as soon as dryer stops, place clothes on hangers to
minimize wrinkling.
Dry silks and WOOISin your dryer only if recommended by the garment manufacturer. Follow instructions carefully.
Tumble drying is mandatory. Down must be thoroughly dried to removeodor and prevent mildewing. Place two large, dry towels in the
dryer to improve tumbling and shorten drying time. Be sure to dry thoroughly.
IMPORTANT. If children’s sleepwear is made of Modacrylic, tumble dry only on Low Heat. High Heat can damage these fabrics.
Check manufacturer’s drying instructions.
e
See above instructions.
Place in dryer with 3 or 4 dry towels which havebeen heated for 5 minutes. Set timer for 20to25minutes. Do not set control for mom than
25 minutes. Do only one blanket at a time. Remove blanket at end of cycle and block blanket back to original shape. Press binding with warm
iron. A11owto dry before storing.
Use dry towels as buffers. Set timer for 20 minutes. If items are still wet, reset for 15minutes and check again. Items should be removed while
still damp. Place slipcovers on furnitute immediately. Hang draperies and curtains so that creases will fallout. Stop dryer periodically and check
fflter fbr excess lint. Remove and restart dryer.
TUmbleon FLUFF (No Heat) setting asheat may cause alteration in shape, color and appearance of such articles.
Stop dryer periodically and check filter for excess lint. Remove and restart dryer.
Speciafprecautions must be taken for extra-lqe items. Setdryer for 20 nu”nutesthen check ca@idfy Set15minutes for second setting, check
again; and 5 minutes for each additional setting. Make sure that article does not fill drum. Many large articles, when wet, have ample room in
dryer, but as they dry and fluff up may not haveroom to tumble. Check carefully every few minutes and if article is still wet or damp and ffils
dryer, finish drying online. Do not, under any circumstances operate dryer for longer times without checking. CAUTION: If large items do not
have room totumble, the air flow maybe blocked which could result in scorching your valuable items. Many large items, like shag rugs, cannot
be dried in home size dryers. DO NUTtumble dryjackets containinghpok. (See filter cleaning instructions above.)
Check ticking fbr holes or weak seams where tithers or filling could escape. Dry no mom than one pillow at a time and setdryer Ibr maximum
time. Stop dryer occasionally and shake pillows to rediiribute filling fix more even drying. Check pillows at end of drying time. If they are not
completely dry, return them to dryer and reset for more drying time. Feather pillows dry very slowly and must be dried completely to prevent
mildewing. DO IW?Tturnbledry pillows contairu”ngKapok.
Refer to Garment Manufactnrem’ Care Labels
For mom information on care labeling, send fix “What’s New About CARE LABELS?
For sale by the Superintendent of Documents, U.S. Government Printing OffIce, Washington, D.C. 20402.
7
Page 8

How tosort the clothes
Normally, if youhave sorted clothes correctly for washing,
you will also haveproperly sorted drying loads.
Sort by surface texture
Separate
\
Ii54
from
w
LINT PRODUCERS—such as
terry toweling and chenille—give
up lint. LINT COLLECIORS—
such as man-made fibers and
napped fabrics like velveteen and
corduroy—attract lint, and must be
dried separately.
Sort by fabric
Separate
w
from
from
from
Sort by color
Separate
from
w
from
from
@
w
In addition to sorting to reduce lint
collection, it is recommended that
fabrics of similar construction be
dried together whenever possible.
w
Sort by weight
Separate
w
from
w
For information on tumble drying
extra-large items and different
fkbricsand loads, see pages 6 and 7.
8
Page 9

How toload the
clothes
o
Don’toverload your dryer.
Crowded loads don’t dry efficiently
and clothes may be unnecessarily
wrinkled.
Loads should look like this:
Drumwith
Cottons&Linens
Drum with
Permanent Press Load
Clean the lint falterbefore
drY@
Clean lint filter (see shaded area)
byputting your moistened fingers
at the comer of fiber and wiping in
a downward motion all the way
across to the other comer.
every load.
e
Energy-Sa* ‘IIps
. So~ clothes byweight so youwon’t
haveto run an extra cyclefor one or
two heavier, slower-drying items.
See page 8.
Do not overload dryer. For
.
efficient drying, clothes need to
tumble fkely.
. Use Automatic Drying Cycles
whenever possible to help prevent
overdrying and to save energy.
● Tohelp prevent ironing, use
Perm Press Medium Heat or
Knits/Delicates Low Heat. Remove
garments promptly at end ofdrying
cycleand place on hangers.
● Dry your clothes inconsecutive
loads. Using a “warm” dryer will
saveenergy.
For additional information on lint
filter, see page 13.
● Clean dryer lint faltereach time
YOUdry.
● Clean dryer exhaustductingat least
once a year. A partially clogged
exhaust can lengthen drying time.
9
~
—
?
—.. —-.
—
Page 10

~ Questions?
m
~
PROBLEM
=~’” “$:
- ‘3”;~:z<>+;~
%4<’”
->,..,
;:- .. .’.”
,.+”
“/t.
,.~-.,
.+
. .
.’
.{
.
,;’,
..
.
UseThis Problem Solver
POSSIBLE CAUSEAND REMEDY
tmplugg&l;M&!&&’~r M@? $agg@ ~:&_&:3%;
*,
“*.
,.
*No power to dryer. Check fhses &d’&it &%%%!&’:&&?~~&;~a~We ~$~~~.
current. Most electric dryers use &.: ‘~~‘ <‘.“:$~~~~ ‘Y”?”%;”~:~~~-*:-??@$;::TF:Y;’:-?.:.. ~-
● Controls improperly set. Make sure con&&re ‘~t~ai~~is ##hedi ‘A~~;\.’
Opening the door during operation stops the dryer.’Tore-start, close the door and pusfi (
the STARTswitch.
. Dryer door is open. Close door s&curely-dry&:&ll ~ @;~~~ d@&~;< f+ ..~..~-;
● Circuit is overloaded. Do not operate other ap$&%s on tlie wgnee&&c~ ‘&t& ““~
“ $<$:Y>~+ti$&%*#e;qjg;;’w’w”’’’”~’’’’’”’”’””@’d;.‘:;;<~~;“:*
or circuit while the dryer is operating.
CL~HES TAKE
● Controls improperly set. Check all controls to make sure they are correctly set for
’100 LONG ‘IODRY the load you wantto dry. Seepages 4-7.
● Clogged lint filter. Remove and clean filter before every load. Periodically clean area
under lint filter with vacuum cleaner. See page 13.
. ,-
‘ ?’>:!,~,.‘t&
, X1”~.
.M:(Y“+g.~%,m“,..-e
$.
. . .
.“+
‘%? ...”...,””:&:%:
:
-.,
,., ,1,., .’+>,( .’,~r. ~.>t
,?%-<$~.~;:,J?;).“‘?,-x?,p?z%:
;$;Q;$:;.q”,?+;5,..~~%..:
; s’
,.
. *-->:*5;>.;‘,., .,*,;.~.~y”..
:..%$<$$. +:y:>,~
,“
/;; ?.’:”$:~%$y<]4“3.Y:; *~‘.‘
*“,’:.,,,: %’,: *><,; ,.
>.:*1
, ,4,.+.<:,2,’?;
~,,
.;/<
.<y.’;i~.~>%::.<’($:
.&~$,’3:.:
“>. .
,1.; ~’
.,.
SHRINKAGE,
GENERAL
● Improper ducting. Make sure dryer is ducted in accordance with Xnstdlation
Instructions.
● Obstruction in exhaust ducting. Make sure ducting is clean and free of obstruction;
make sure damper in outside wall cap operates easily. If flexible ducting is used, be
sure it is not kinked and is properly installed according to Installation Instructions.
c Blown fuses or tripped circuit breakers. Check household fuses or circuit breakers.
Most electric dryers use two. It is possible for one to be Mownor tripped and the dryer
still tumble without heat.
● Improper sorting. Do not mix heavy,hard-to-dry items with lightweight articles.
● Large loads of moisture-holding fabrics, such as beach towels, take a long time to
remove moisture.
c Toomany items in dryer. Dry only one washer load at a time. Do not combine loads.
● Too fewitems in dryer. If drying only one article, add two more similar articles, even
if dry, to insure proper tumbling.
● Some fabrics will shrink whether machine washed and tumble drkd or washed by hand
and drip dried; others may be safe]y washed but will shrink in a dryer. Follow Garment
Manufacturers’ Care Labels exactly. If in doubt, do not machine wash or tumble dry.
Page 11

PROBIXM
POSSX3LECAUSEANDREMEDY
SHRINKAGE,
● Relaxationshrinkage canoccur in knit fabrics that havebeen improperly stretched
KNITS and elongated by the manufacturer. When this occurs, garment maybe pressed back into
shape after each washanddry cycle.
● Progressiveor delayed shrinkage is caused when starch or sizing (in some fabrics) is
gradually removed by laundering. Maybe noticed in older garments that havebeen
launderedmanytimeswithoutpreviousshrinkage.Treatas forRelaxationShrinkageabove.
● Shrinkage caused byoverheating occurs incertain knit fabrics thathave been heat-
shaped. When washing,drying or ironing temperatures exceedthe temperatures used to
shape set, shrinkage mayoccur. This camot be corrected, but itcan beprevented by
washing in cold or warm water; drying onlow heat.
WRINKLING IN
● Leavingclothes in dryer after tumbling stops. Remove clothes promptly and hang
PERMANENT PRESS them immediately.
AND “NO-IRON”
ITEMS
● Tw many items indryer. Dry only one washer load ata time. Do not combine loads.
● Tm fewitems in dryer. Ifdrying only one article, add two or more similar articles, even
ifdry,toinsure proper tumbling.
● Improper loads. Avoidlaundering hea~ Permanent Press items, such as work clothes,
with lighter Permanent Press items, such as shirts or blouses. Do not wash or dry
Permanent Press with regular laundry.
.,
“<
.-. :k:>”..:<<$.’
---- ~.-
.
>
i’
,“. ,
<~-
● Toomy clothes in w~her. Items must have r~m to move fredy. Permanent Press
loads should alwaysbesmaller than regular loads.. .no more than medium loads.
● u= of~comct ~h ~d @ ~cles. use pe~ment aess Wuh Cycle which provides
acoddmvn rinse tominimize wrinkling. AIso, use Permanent Press Dry Cycle.
● Incomct wtterlevel. Usekuge water level for m+ium lq$; m~~t*~ @~f@ 2%
~$*,.
*k@& %+:%2’..“ 5;;,. , ‘, .- ,’, .“ ~:,4” “?:i :3::>>$”%$$::%y.
~.“$&%A..-s~- /’,,,+%”“$>‘:L$.:‘?::’~’e
,.,
. . ..’.>’j:,~.g..~.?~’k..~e~~w
.~+..~.
~“,‘..?. . . .
,;:.
?,,
. .
-;,.’<.,“.
~=g =y in=hot water.Washin cool or warmwaterwithpl~ty ofd&~t.’
(continued nextpage)
11
Page 12

The Problem Solver(continued)
PROBLEM POSSIBLE CAUSEAND REMEDY
.
-.. /
WRINKHNG ti” ‘.‘~+’ ~
“PERMANENT PRESS
AND ‘+NO-IRONSY
ITEMS (continued)
“
● Accumulation of lime s~e due’to use of carbonate detergents. If you must use a
non-phosphate detergent, avoidthe use ofa high-carbonate detergent.
● Failure to use fabric softener. Proper use of fhbric softener will minimize wrin~ing.
removewrinkles:
W
s’~e~ble on“permment
Press” setting.
. Rerinse md dry on “Permanent press” setting.
● Ifunsuccessful, retumble onhigh heat for 10-12minutes and bang immediately.
s Iron carefully.
● Send to dry cleaners forpressing,.
. . .._...
.:,
● Some wrinkles may remain which cannot be removed:
*NOIX: Ifyou followgood laundry procedures and Permanent Press clothes still come
out wrinkled, the finish maynot begood quality. Also, inpermanent press synthetic/
cotton blends, the cotton portion ofthe fabric caneventually wear awayleaving only the
synthetic. Since it’sthe cotton portion which istreated for Permanent Press, a loss or
decrease of Permanent Press performance will result.
If you need more help . . .call, toI1free:
GE Answer Center”
800.626,2000
consumer information service
Page 13

Care and Cleaning
USER NL41N77ElVkNCE
@
INSTRUCTIONS
Good dryer care
The Drum. Porcelainenamel
drum is rust-resistant and requires
no special care.
The Exterior.Wipe off any spills or
washing compounds. Wipe or dust
with damp cloth. Try not to strike
the surface with sharp objects.
The Lint Filter. Wipe lint filter
beforeevery use asdescribedon
page9. Periodicallylint filter
shouldbe removedandsuction
hose from vacuumcleanershould
be insertedintotheopening.
See below.
Tostore dryer: Forshortperiodof
time,disconnectpower supply and
clean lint filter.
Do not store dryer where it will be
exposed to the weather.
CAUTIONS:
● Before having your electric dryer
connected in your new residence,
be sure your licensed electrician
confirms that the supply voltage
matches the voltagespecified on
the rating plate.
● Dryer control panel and finishes
may be damaged by some laundry
pre-treatment soil and stain remover
products if such products are
sprayed on or havedirect contact
with the dryer.
Apply these pre-treatment products
awayfrom the dryer. The fabric
may then be washed and dried
normally. Damage to your dryer
caused by pre-treatment products
not covered by your warranty.
is
Howto replaceDrum LaMp
I
BEFORE REPLACING LIGHT
BULB, BE SURE TO UNPLUG
THE DRYER POWER CORD.
Unscrew the bulb and replace it
with the same type 10watt bulb.
I
Do not obstruct the flow of
combustion and ventilating air. The
air intake is located on rear ofdryer.
Dryer Exhaust: Inspectandclean
thedryerexhaustductingatleast
once ayear.
minimum
Make sure there is at least 3”
clearance from rear dryer louvers
to the wall.
--------
13
.. ..
Page 14

Page 15

If YouNeedService
Toobtain service, see your warranty
on the back page ofthis book.
We’reproud of our service and
wantyou to be pleased. If for some
reason you are not happy with the
service you receive, here are three
steps to follow for further help.
FIRST, contact the people who
serviced your appliance. Explain
why you are not pleased. In most
cases, this will solve the problem.
NEXT, if you are still not pleased,
write all the details-including
your phone number—to:
Manager, Consumer Relations
GE Appliances
Appliance Park
Louisville, Kentucky 40225
FINALLY, if your problem is still
not resolved, write:
Major Appliance
Consumer Action Panel
20 North Wacker Drive
Chicago, Illinois 60606
Page 16

YOUR GENERAL ELECTRIC AUlOMATIC CLOTHES DRYER
WARRANTY
Save proofoforiginalpurchasedate such as yoursalessliporcancelledchecktoestablishwarrantyperiod.
11
(
WHAT IS COVERED
I
WHAT IS NOT COVERED
FULL ONE-YEARWARRANTY
For one year from date of original
purchase, we will provide, free of
charge, parts and service labor
in your home to repair or replace
any pati of the dryer that fails
because of a manufacturing
defect.
● Service trips to your home to
teach you how to use the product.
Read your Use and Care material.
If you then have any questions
about operating the product,
please contact your dealer or our
Consumer Affairs office at the
address below, or call, toll free:
GE Answer CenteF
800.626.2000
consumer information service
. Improper installation.
If you have an installation problem,
contact your dealer or installer.
You are responsible for providing
adequate electrical, gas, exhausting
and other connecting facilities.
This warranty is extended to
the original purchaser and any
succeeding owner for products
purchased for ordinary home use
in the 48 mainland states, Hawaii
and Washington, D.C. In Alaska the
warranty isthe same except that it
is LIMITED because you must pay to
ship the product to the service shop
or for the service technician’s travel
costs to your home.
All warranty service will be provided
by our Factory Service Centers or
by our authorized Customer Care”
servicers during normal working
hours.
Look in the White or Yellow Pages
of your telephone directory for
GENERAL ELECTRIC COMPANY,
GENERAL ELE~RIC FACTORY
SERVICE, GENERAL ELECTRIC-
HOTPOINT FA(XORY SERVICE or
GENERAL ELECTRIC CUSTOMER
CARE@ SERVICE.
● Replacement of house fuses or
resetting of circuit breakers.
. Failure of the product if it is used
for other than its intended purpose
or used commercially.
● Damage to product caused
by accident, fire, floods or acts
of God.
WARRANlOR IS NOT RESPONSIBLE
FOR CONSEQUENTIAL DAMAGES.
Some states do not allow the exclusion or limitation of incidental or consequential damages, so the above limitation or exclusion
may not apply to you. This warranty gives you specific legal rights, and you may also have other rights which vary from state to state.
Toknow what your legal rights are in your state, consult your local or state consumer affairs office or your state’sAttorney General.
Part No. I13D 5497 P102
Pub. No. 49-9612
Warrantor: General Electric Company
If further help is needed concerning this warranty, write:
Manager—Consumer Affairs, GE Appliances, Louisville, KY 40225
#’i
DDE9200G DDE9300L
DDG9280G DDG9380L
 Loading...