

Page 1
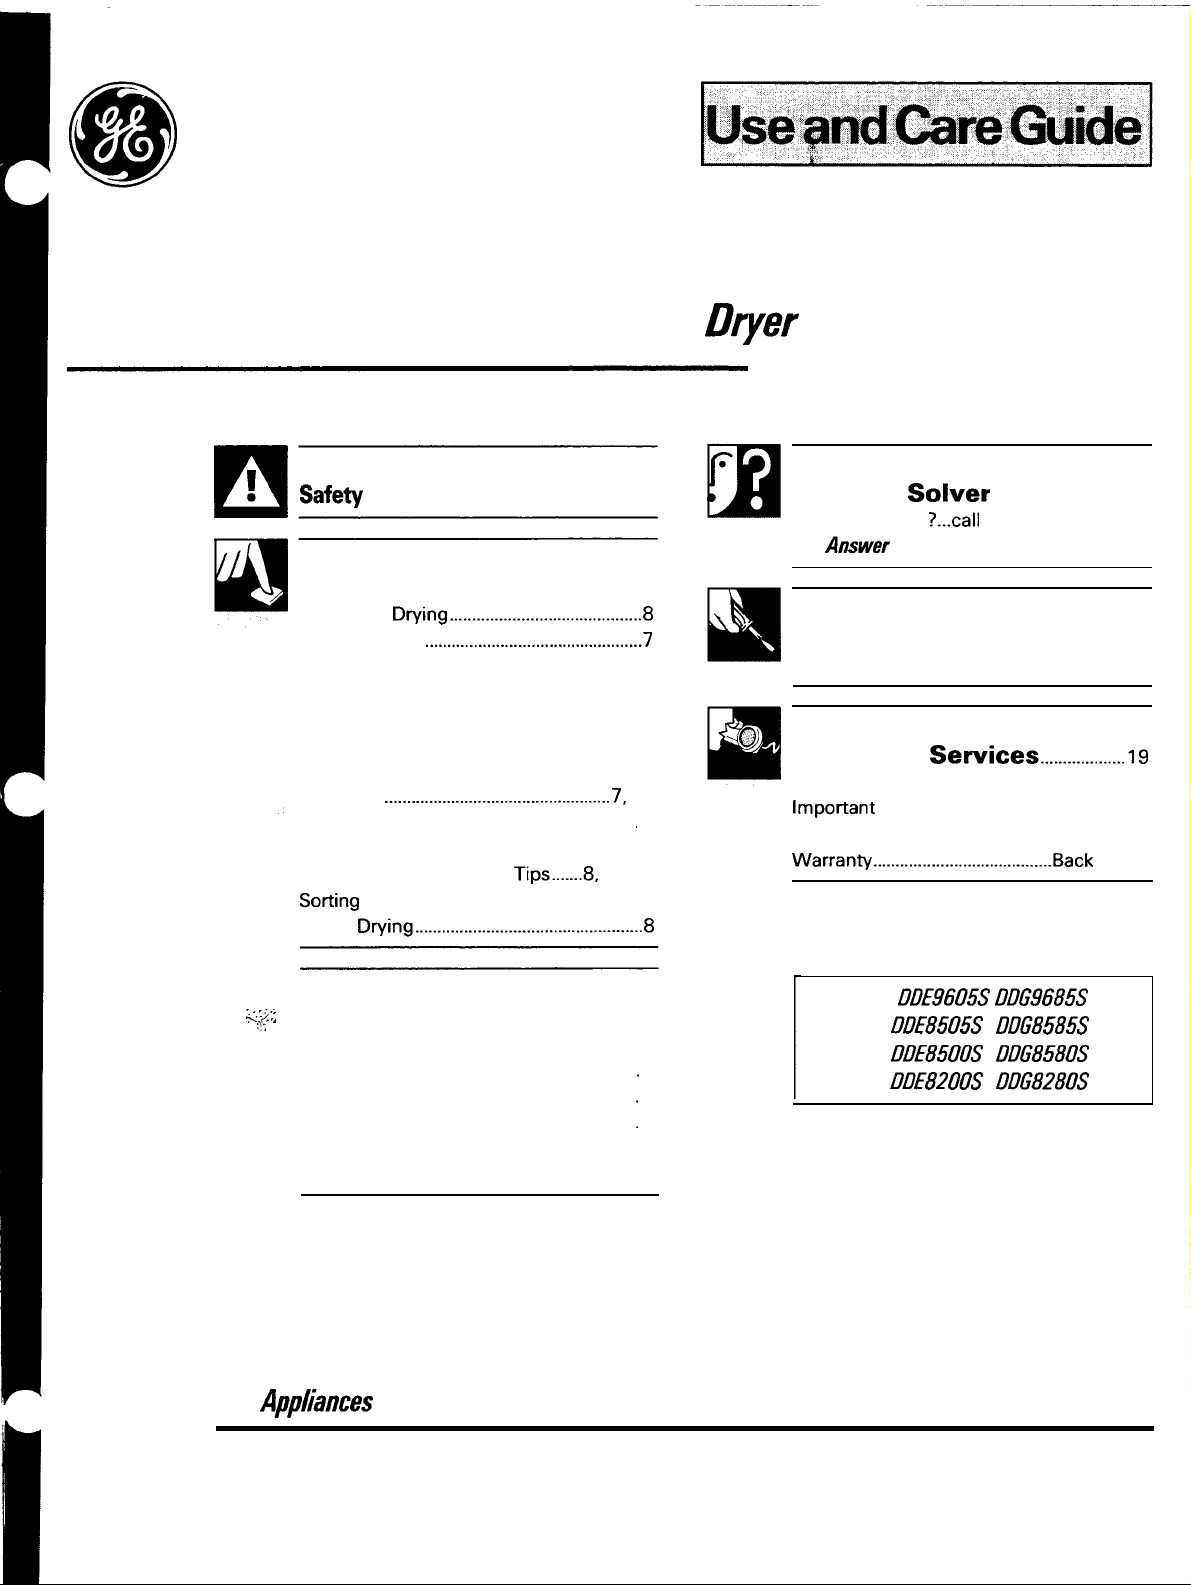
instructions....................3-5
Operating Instructions, Tips
Automatic
Cycle Settings
End Cycle Signal ........................................7, 8
Energy-Saving Tips ........................................5
Fabric and Drying Selections . . . . . . . . . . . . . . . . . . . . 10
Knits Drying Tips .....................................7, 13
Light Bulb Replacement . . . . . . . . . . . . . . . . . . . . . . . . . . . . 11
Lint Filter
Loading . . . . . . . . . . . . . . . . . . . . . . . . . . . . . . . . . . . . . . . . . . . . . . . . . . . . . . .
Operating the Dryer ..................................6, 7
Permanent Press Drying
Clothes ..........................................7, 9
Timed
11
7,9
14, 15
Problem solver ......................14-16
More questions
GE Amwer Centera 800.626.2000
Preparation
Reversing Door . . . . . . . . . . . . . . . . . . . . . . . . . . . . . . . . . . . . . . . . . . . . 13
Consumer
Appliance Registration .................................2
Phone Numbers .......................1 9
Model and Serial Numbers ..........................2
✎
✎ ✎ ✎ ✎ ✎
✎✌
Care and Cleaning
...
❑
Dryer Exhaust . . . . . . . . . . . . . . . . . . . . . . . . . . . . . . . . . . . . . . . . 11, 12
Drum . . . . . . . . . . . . . . . . . . . . . . . . . . . . . . . . . . . . . . . . . . . . . . . . . . . . . . . . . . . . . .
Exterior . . . . . . . . . . . . . . . . . . . . . . . . . . . . . . . . . . . . . . . . . . . . . . . . . . . . . . . . . .
Lint Filter . . . . . . . . . . . . . . . . . . . . . . . . . . . . . . . . . . . . . . . . . . . . . . . . . . . . . . .
Storing the Dryer . . . . . . . . . . . . . . . . . . . . . . . . . . . . . . . . . . . . . . . . . 11
User Maintenance Instructions ...............11
GE
Models: DDE9605S DDG9685S
11
11
11
Page 2
US
YOU...
Read this book carefully.
It is intended to help you
operate and maintain your
new dryer properly.
Keep it handy for answers to
your questions.
If you don’t understand something
or need more
your phone number)
Consumer Affairs
GE Appliances, Appliance Park
Louisville, KY 40225
To obtain a Spanish language
version of this book,
GE Answer
800.626.2000
consumer information service.
write (include
For your safety the information in this
the risk of
or
or to prevent property
Save time and money.
Before you request service . . .
check the Problem Solver
section. It lists causes of minor
operating problems that you can
correct yourself.
If you received a
damaged dryer...
Immediately contact the dealer (or
builder) that sold you the dryer.
GE Answer
la
de
800.626.2000.
manual, name a
en
de
must
personal
Write
the model
and serial numbers.
You’ll find them on a label on the
front of the dryer behind the door.
These numbers are
Consumer Product Ownership
Registration Card that came
with your dryer. Before sending
in this card, please write these
numbers here:
Model Number
Number
Use these numbers in any
correspondence or service calls
concerning your dryer.
to
on
or loss of
store or
flammable vapors and
vicinity of this or any
●
not try to
gasohe or other
in the
YOU
GM
any electrid switch;
do not use any phone inyourbddiug.
●
neighbor’s
●
you cannot reach your gas
your gas sup~er
the fire
—Mation and service
by a
service agency or
a
the gas
be performed
(
--
the gas
the room, btiding or area of
occupants.
All drying instruction terms in this book conform to
Labeling Rule established by the Federal Trade Commission, January 1984.
I
Care
you need service
To obtain service, see the
Consumer Services page
in the back of this book.
We’re proud of our service and
want you to be pleased. If for some
reason you are not happy with the
service you receive, here are three
steps to follow for further help.
First, contact the people who
serviced your appliance. Explain
why you are not pleased. In most
cases, this will solve the problem.
NEXT, if you are still not pleased,
write all the details-including
your phone number—to:
Manager, Consumer Relations
GE
Louisville, KY 40225
Park
FINALLY, if your problem
is still not resolved, write:
Major Appliance Consumer
Action Panel
20 North
Chicago, IL 60606
Drive
2
Page 3
The
Enforcement Act r~uires the governor of
to the state to cause cancer, birth defects or other
reproductive harm and rquires businesses to warn
customers of potential exposure
Gas appliances can cause minor exposure
to four of these substances, namely benzene,
carbon monoxide, formaldehyde and soot,
caused primarily by the incomplete combustion
of
Properly adjusted dryers
combustion. Exposure
to the outdoors.
gas or
tirther by properly venting the dryers
Drinking Water
fuels.
minimize incomplete
these substances can be
and
such substances,
Toxic
●
repair or replace any
part of the
any servicing
recommended in
in
understand and have the
or junction of cord and plug. Make sure that
cord is located so that it
on, tripped over or otherwise subjected to
damage or stress.
user-repair instructions that you
●
When
by the plug rather than the
cord
* ● e
Use and Care Book or
to avoid damage to the cord
or attempt
to carry out.
this appliance
not be stepped
of a Fire
A
w
electric
when using your
reduce
shock, or
risk of
to persons
precautions, including the following:
Use this
purpose as
●
is used.
one by
800.626.2000.
This
If you did
—Properly ground to
governing
—Locate where the temperature is
(10*C.) for satisfactory operation of the dryer
control
dryer
and
electrical overload.
of moisture and lint
in
system.
to a
power supply circuit
Carefully follow the Exhausting Details
for its intended
described in this Use and Care Book.
dryer must be properly instiled
located in accordance with
receive an
with your dryer, you
the GE Answer
before it
obtain
and ordinances.
in
not
it
be
to the outside is STRONGLY
to prevent large amounts
Instructions.
above
store the
the weather.
rated, protected
to avoid
being blown into the
Use otiy rigid
diameter ductwork inside the dryer cabinet
or for efiausting to
PUNCTURED DUCTWORK CAN CAUSE
A
●
not dry articles containing rubber,
or
shoes, galoshes, bath mats,
plastic bags, pillows, etc.) as
heated, can under certain circumstances produce
fire by spontaneous combustion.
●
Do not store items that
(such as clothing, paper material, plastics
or plastic containers, etc.) on top of the dryer
during operation.
CAN CAUSE A
COLLAPSES OR BECOMES
~STALLA~ON.
or burn. Also, some rubber materials, when
lnsMation
or
outside.
(such as padded bras, tennis
metal 4“
USE OF
USE OR
bibs, baby pants,
bum or melt
may
3
Page 4
(continued)
●
Garments labeled
(such as Me jackets containing Kapok)
must not be put in your dryer.
●
Do not wash or dry articles
have been cleaned in,
with combustible or explosive
as wax,
etc.) which may ignite or explode. Do not add
these substances to the wash water. Do
these substances around your washer
dryer during operation.
●
Any article on which you have used a cleaning
solvent, or which contains flammable materials
(such as cleaning cloths, mops, towels
salons, restaurants or barbershops,
must
placed in or near the dryer until
traces of these flammable liquids or
their fumes have been removed. There are many
flammable items
acetone,
some household cleaners, some spot removers,
turpentines, waxes, wax removers and products
containing petroleum
Away from Heat”
g
in homes such as:
alcohol,
kerosene,
use
in
and
kerosene,
To
●
Never reach into the dryer while the
drum is moving.
or adding clothes, wait until the drum has
completely stopped.
●
Do not dry
Skin irritation could result from the remaining
glass particles that may be picked up by clothing
during subsequent dryer uses.
&’\
shipping or packing
discarding a dryer, or removing from service,
remove the door of the dryer compartment.
of
Before loading, unloading
articles
●
The laundry process can reduce
the flame
your dryer.
of fabrics.
manufacturer’s care instructions
should
●
Close supervision is necessary
if this
near
is used by or
Do not
very
to play inside, on, or
with this
Dispose of discarded
or any discarded
and
properly. Before
●
the
to
prevent
the dryer or in the room.
Keep the area
appliances free from the
combustible
around and underneath your
before each load
DO
such
paper, rags,
inside
of
chemicals, etc.
●
The interior of the machine and the exhaust
duct connection inside the dryer
cleaned
by a
be
individual
●
Keep
(such
as detergents, bleaches, fabric
m
container labels to avoid personal injury.
●
Keep the floor around
and dry to reduce the
and cleaning of the lint
●
Do not tamper with the
softeners, etc.) out of the reach
of
cabinet. Observe
minimize the
●
To
power supply before attempting
or cleaning (except the removal
knob to anOW position does NOT
.
power
preferably in a
this
Turning
the
supply.
warnings on
of
of electric
Cycle
from
the
4
Page 5
●
Do not operate this
if it
damaged,
disassembled,
has
missing or broken parts, including a damaged
cord or plug.
●
Never
●
yours
on or stand on the dryer top.
is a gas
dryer, it is equipped
an
automatic electric ignition and does not have
a
your hand in the vicinity of the burner when the
automatic ignition may turn on.
A
DO NOT
Burns may restit from having
Fabric Softeners or
Anti-static Conditioners
You may
fabrics or reduce the static electricity in them.
We raomrnend you use either a fabric
in the wash cycle, according to the manufacturer’s
instructions
product for which
assurance on the package that their product can be
safely used in your dryer.
Service or performance problems caused by
the use of
of the manufacturers of those products and
not covered under the warranty of this appliance.
to soften your laundered
products, or try a dryer-added
manufacturer gives written
products are the responsibility
●
Sort clothes by weight so you won’t have to run an extra cycle for
one or two heavier, slower-drying items.
●
Do not overload your dryer. For efficient drying, clothes need
to tumble freely.
●
Use Automatic Cycles whenever possible to help prevent overdying
and to save energy.
●
Remove garments promptly at the end of the drying cycle and place
on hangers.
●
Dry your clothes in consecutive loads. Using a “warm” dryer
will save energy.
●
Clean the dryer lint filter each time you dry.
●
Clean the dryer exhaust
at least once a year.
A
clogged
exhaust can lengthen drying time.
Page 6
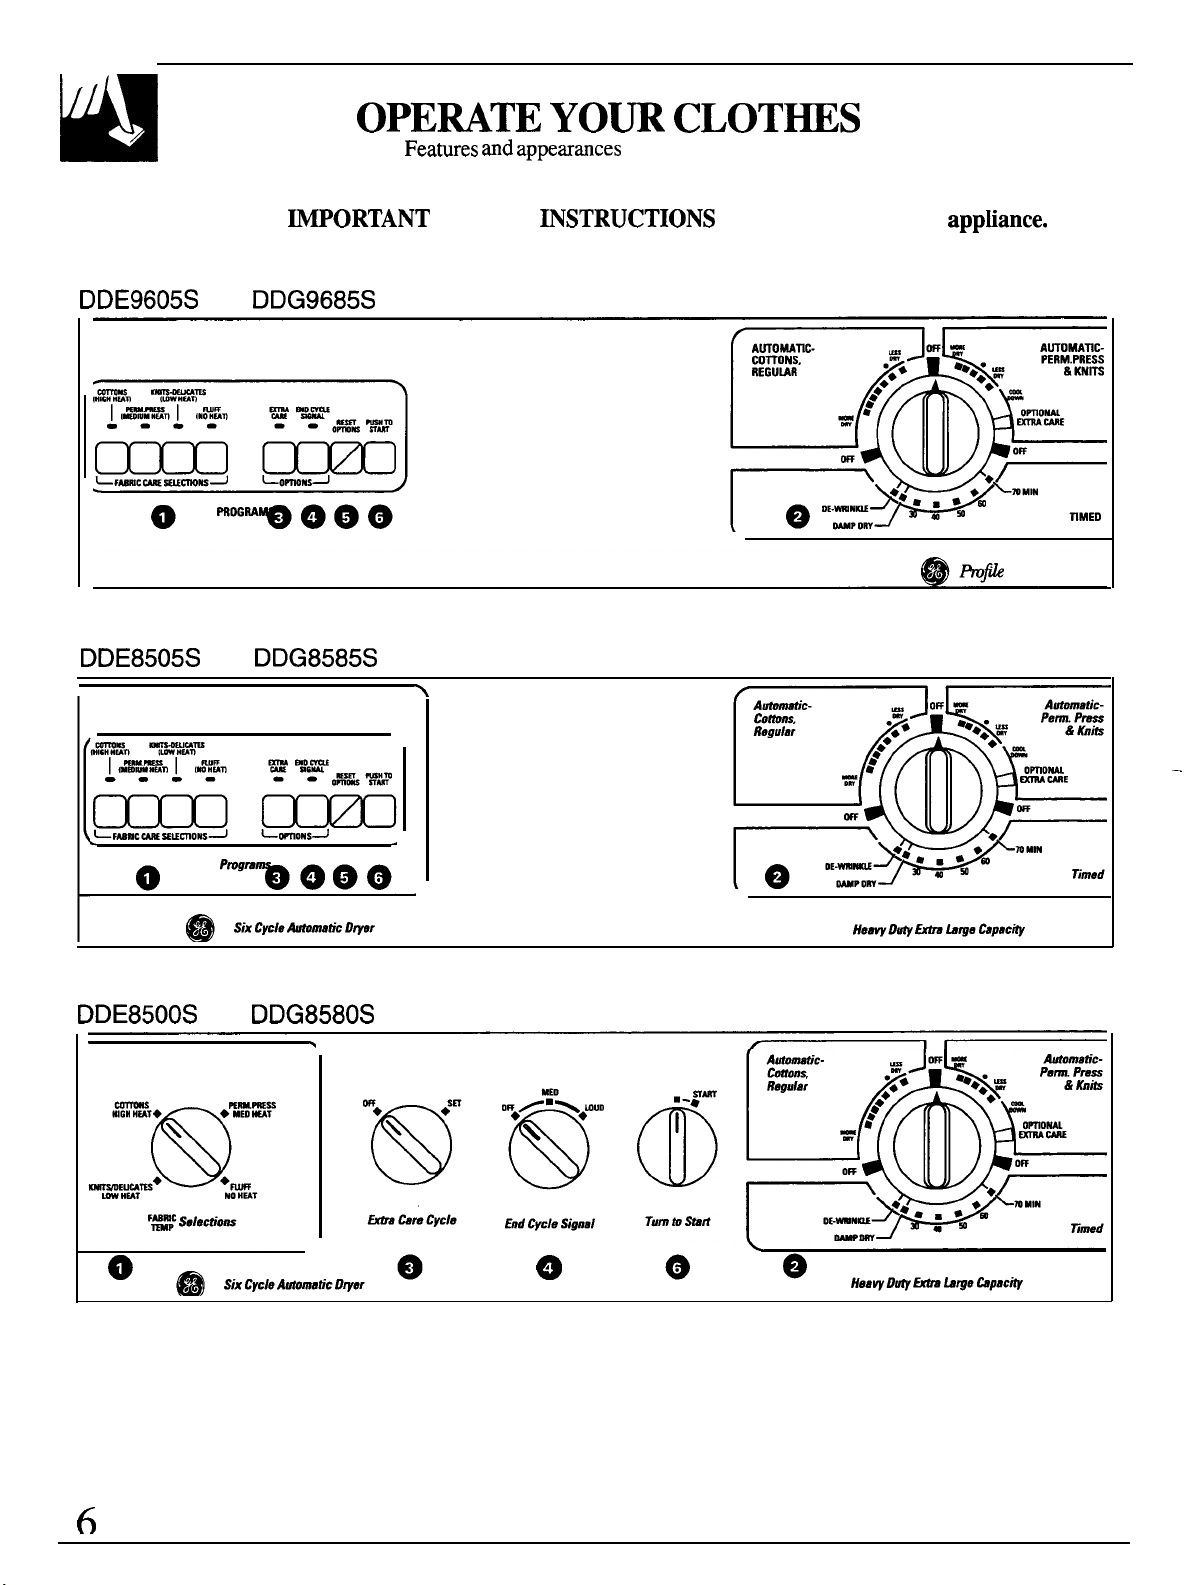
HOW TO
md
WARNINGTO reduce the risk of fire, electric shock, or injury to persons when using your
appliance, read the
I
SAFETY ~STRUCTIONS before operating this
may vary slightly
DRYER
Page 7
-
I
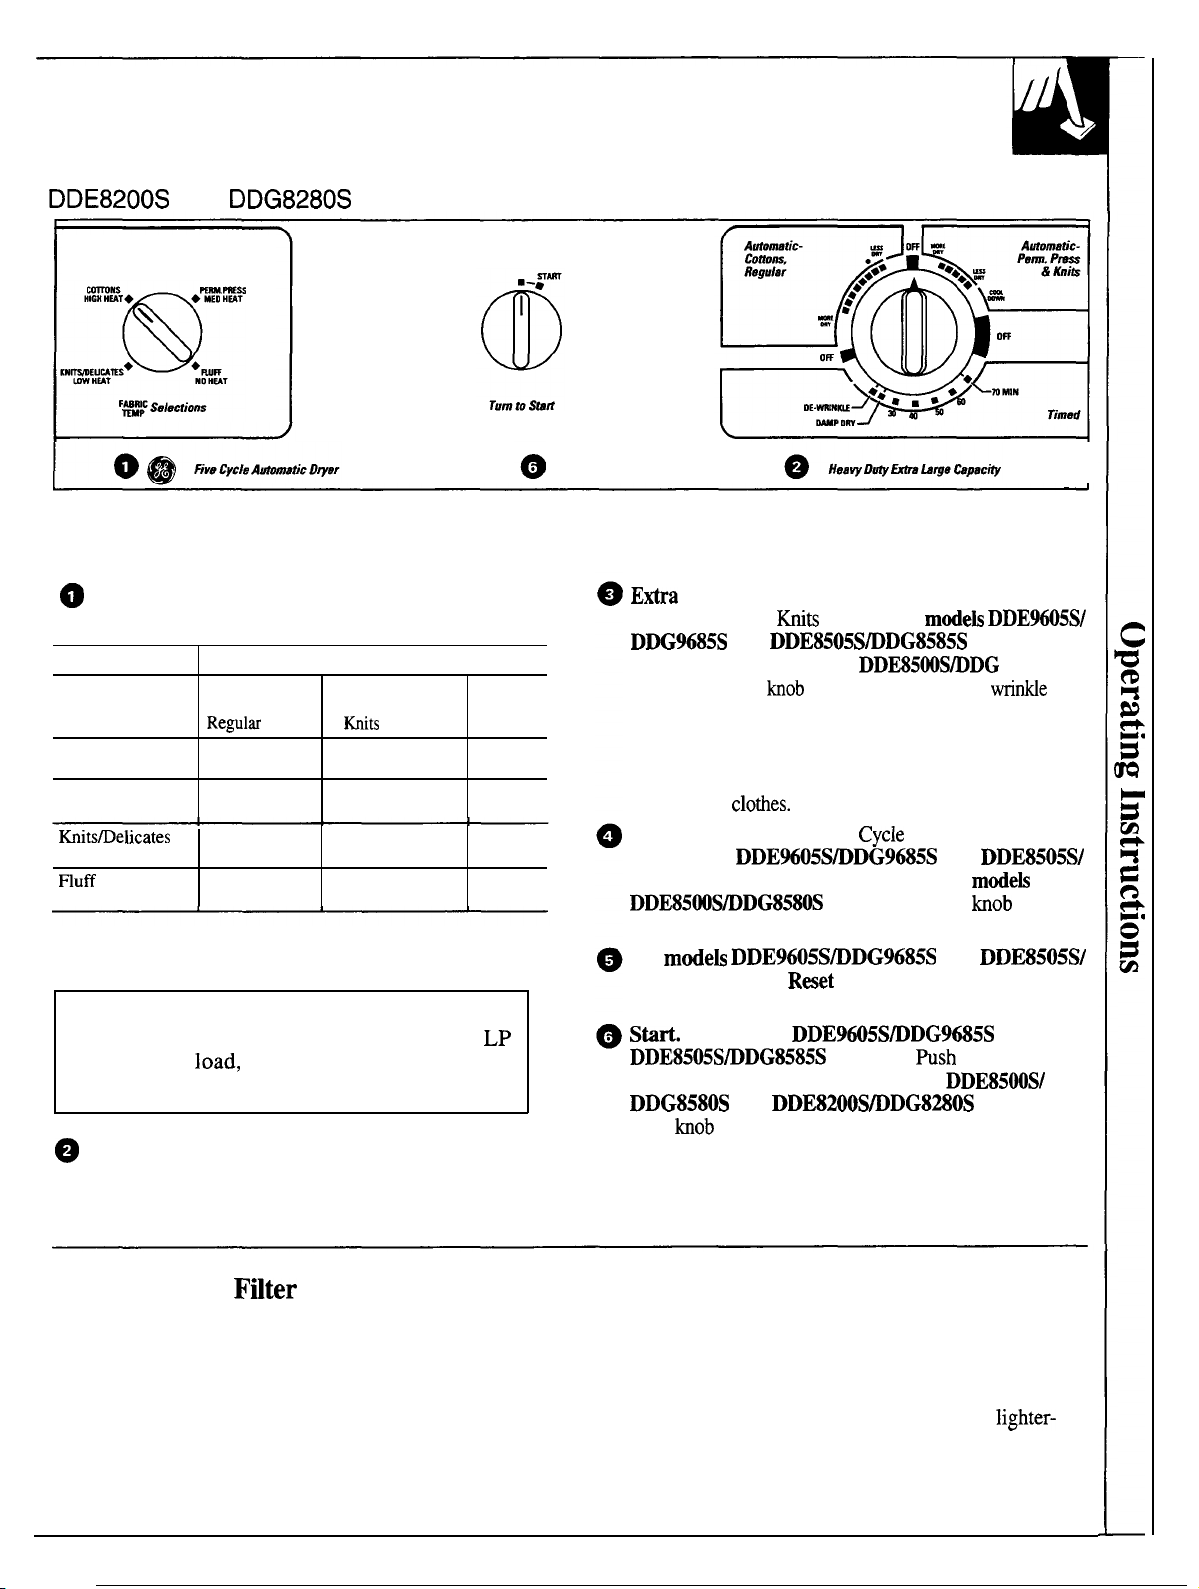
Set the Controls —
Controls and features will vary from model to model.
See Suggested Fabric and Drying Selections guide.
Drying Selections.
your load.
Drying
Selections
Cottons
High Heat
, Perm. Press
Medium Heat
Low Heat
No Heat*
*Huff-No Heat option can be used with an automatic cycle, but for
best performance it is recommended to be used with a timed cycle.
NOTE:
Drying times will vary according to the
Select the proper heat for
Should
be used with cycles indicated
Automatic
Automatic
cycle fiits
●
Perm. Press and
Cycles
● ●
● ●
●
Timed
Cycles
●
●
Perm. Press and
pad, to select. For
turn the
setting in clothes, the Extra Care cycle provides
approximately 15 minutes of no-heat tumbling after
the clothes are dry. Use End Cycle Signal if your
dryer has one. Signal will sound to remind you to
remove the
End Cycle Signal.
For
DDG8585S
desired level.
On
DDG8585S
change an option.
type of heat used (Electric, Natural gas or
gas), size of
clothes, and condition of exhaust ducts.
types of fabrics, wetness of
button to start the dryer. For
Start
Cycle Selector.
desired cycle setting. The selector may be turned
in either direction.
Turn the Cycle Selector to the
(Opening the door during operation stops the
dryer. To restart, close the door and follow above
directions.)
Care Cycle.
Operates only with the Automatic
cycles. For
and DDE8505S~DG8585S
models
control
models DDE%05S~DG9685S and
to SET. To minimize
Set End
Signal, if desired.
press the
press the pad, to select. For
control
For
select
models
and
Options
press the
and DDE8505S/
if you wish to
to Start
models
to start the dryer.
8580S
to
and
turn the
Check the Lint
Clean the lint filter each time the dryer is used.
Always be sure the lint filter is in place. Don’t use
the dryer without it. See the Care and Cleaning section.
and Load the Clothes
Good sorting for the dryer begins at the washer.
Generally, if clothes are sorted right for washing,
they’re sorted right for drying. See the How to Sort
the Clothes section. If you do mix various types of
fabrics in your load, set the controls for the
weight fabrics and remove when dry. Reset controls
for the remaining heavier fabrics.
7
Page 8
HOW TO
YOUR DRYER
(continued)
End
For models DDE8500S and DDG8580S. This
signal operates with
set anywhere between OFF
on the desired sound level. The signal will sound
just before the end of the cycle to remind you to
remove the
turn the signal control to OFF or advance the Cycle
Selector to OFF.
(on models so equipped)
For models DDE9655S~DG9685S and
cycle. The control can be
LOUD, depending
with any cycle. Press pad to select. The signal
will sound just before the end of the cycle to
remind you to remove the clothes. To cancel the
stop the signal while sounding,
signal while sounding, press the Reset Options pad.
This signal should always be used when drying
polyester knits or permanent press items which should
be removed as soon as the dryer stops to help prevent
setting of
Polyester
● DO NOT
Garments being dried or
& Permanent Press Drying Tips
● REMOVE
PROMPTLY-TO
help prevent
should tumble freely. wrinkling, remove clothes from knit garments look best if placed
the dryer promptly at the end of on hangers after drying.
the drying cycles.
The Difference Between Automatic and Timed Drying
This signal operates
PLACE ON
Permanent press
polyester
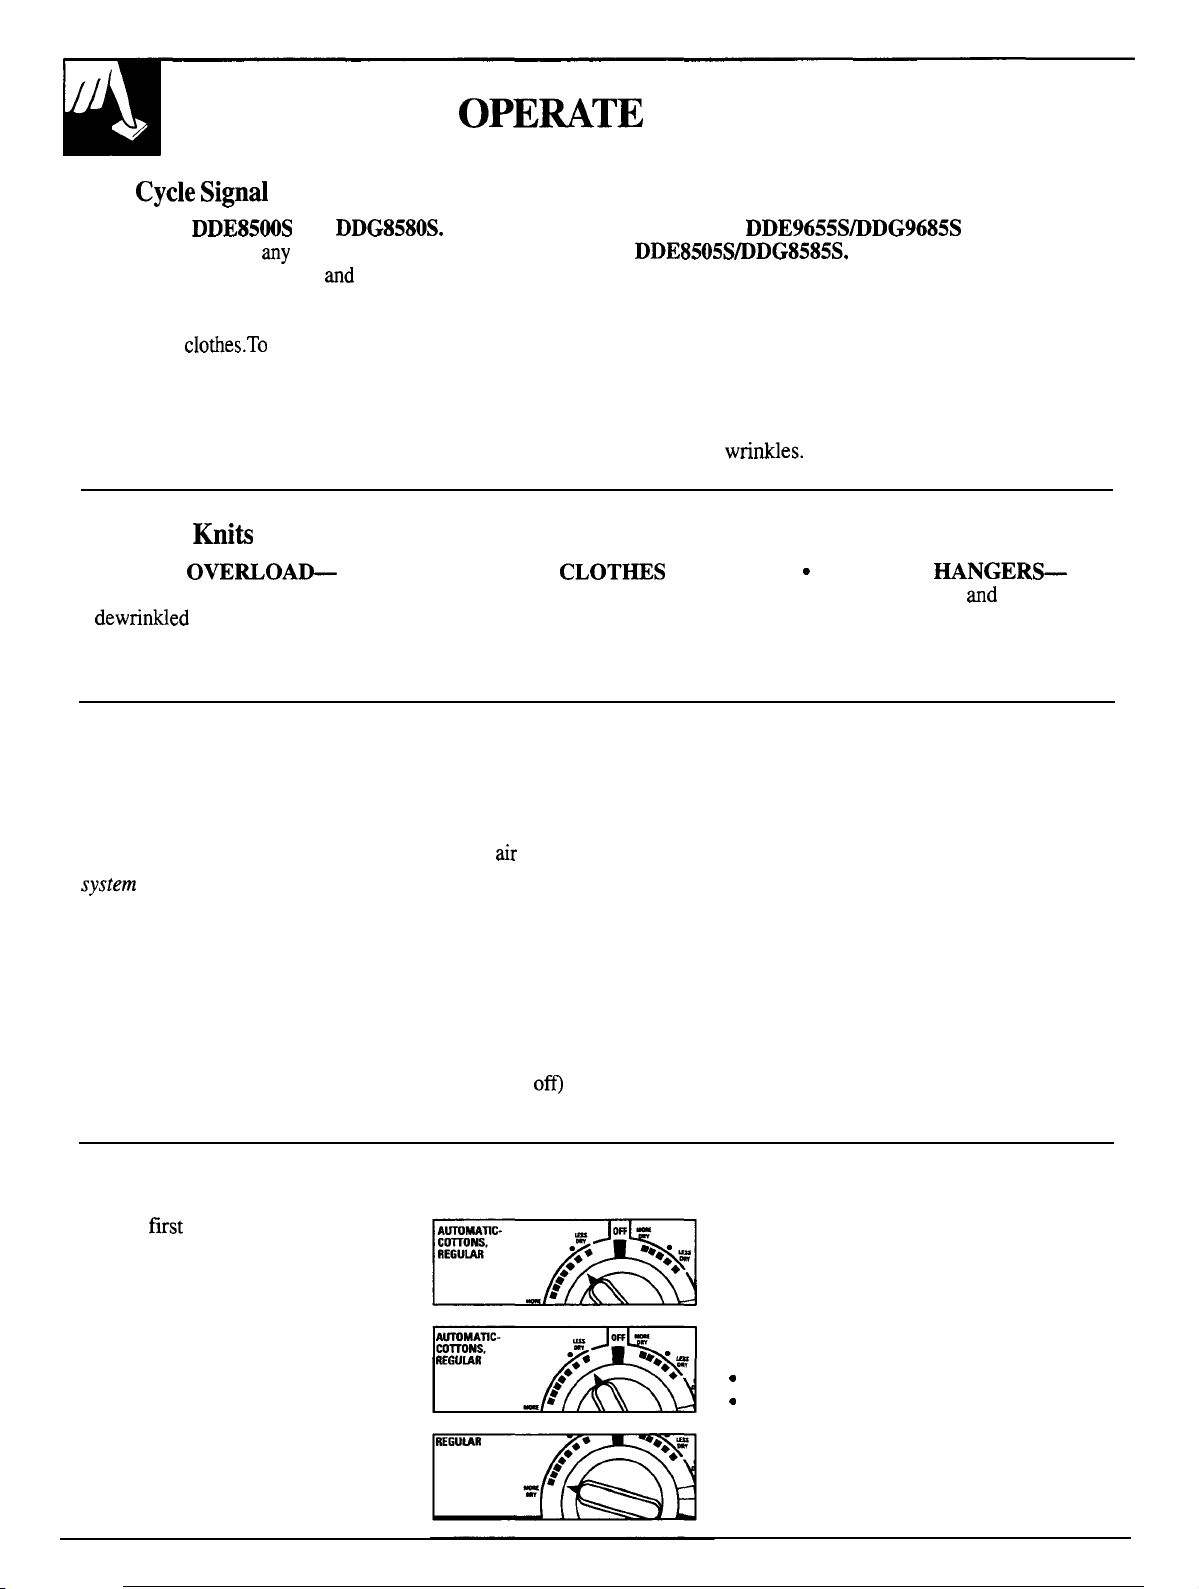
Automatic Drying (Electronic)
Automatic Drying.
When using
Timed Drying
When using
(on some models) the Automatic Cycles, the dryer the Timed Cycles, you select
When using the Automatic Cycles,
the
Electronic Sensor Control
continually senses the
moisture in the tumbling clothes,
determines when they are dried
to your pre-selected setting, and
terminates the cycle automatically.
Refer to the Controls Setting
Guide for recommended settings.
The Cycle Selector will not
advance until clothes have reached
a certain degree of dryness.
continually senses the temperature
of the
in the dryer drum. Wet
laundry keeps this air cool. When at the end of this time period.
laundry is dry enough (and the
drum air warm enough) the heat
turns off. When the air cools, the
heat turns back on. This off and on
cycling may happen a number of
times (depending on the fabric, load
size and Cycle Selector setting).
The Cycle Selector advances (when
the heat is
until it automatically
turns off the dryer.
the number of minutes you wish
the dryer to run and it turns off
Drying Selections Guide for the Automatic Cycles
For the
dryer set near
the dried items when the dryer stops.
If they are drier than you would like
set toward Less Dry the next time you
dry a similar load.
few times you use your
●
position and feel
As a general guideline...
Set near ● position
●
For most normal loads.
Set toward Less Dry
●
For light-weight fabric loads.
If you desire to remove less moisture.
For very small loads.
If you desire them to be drier, set
toward More”Dry the next time you
dry a similar load.
8
Set toward More Dry
●
For loads that include heavy-weight fabrics.
●
If you desire to remove more moisture.
Page 9
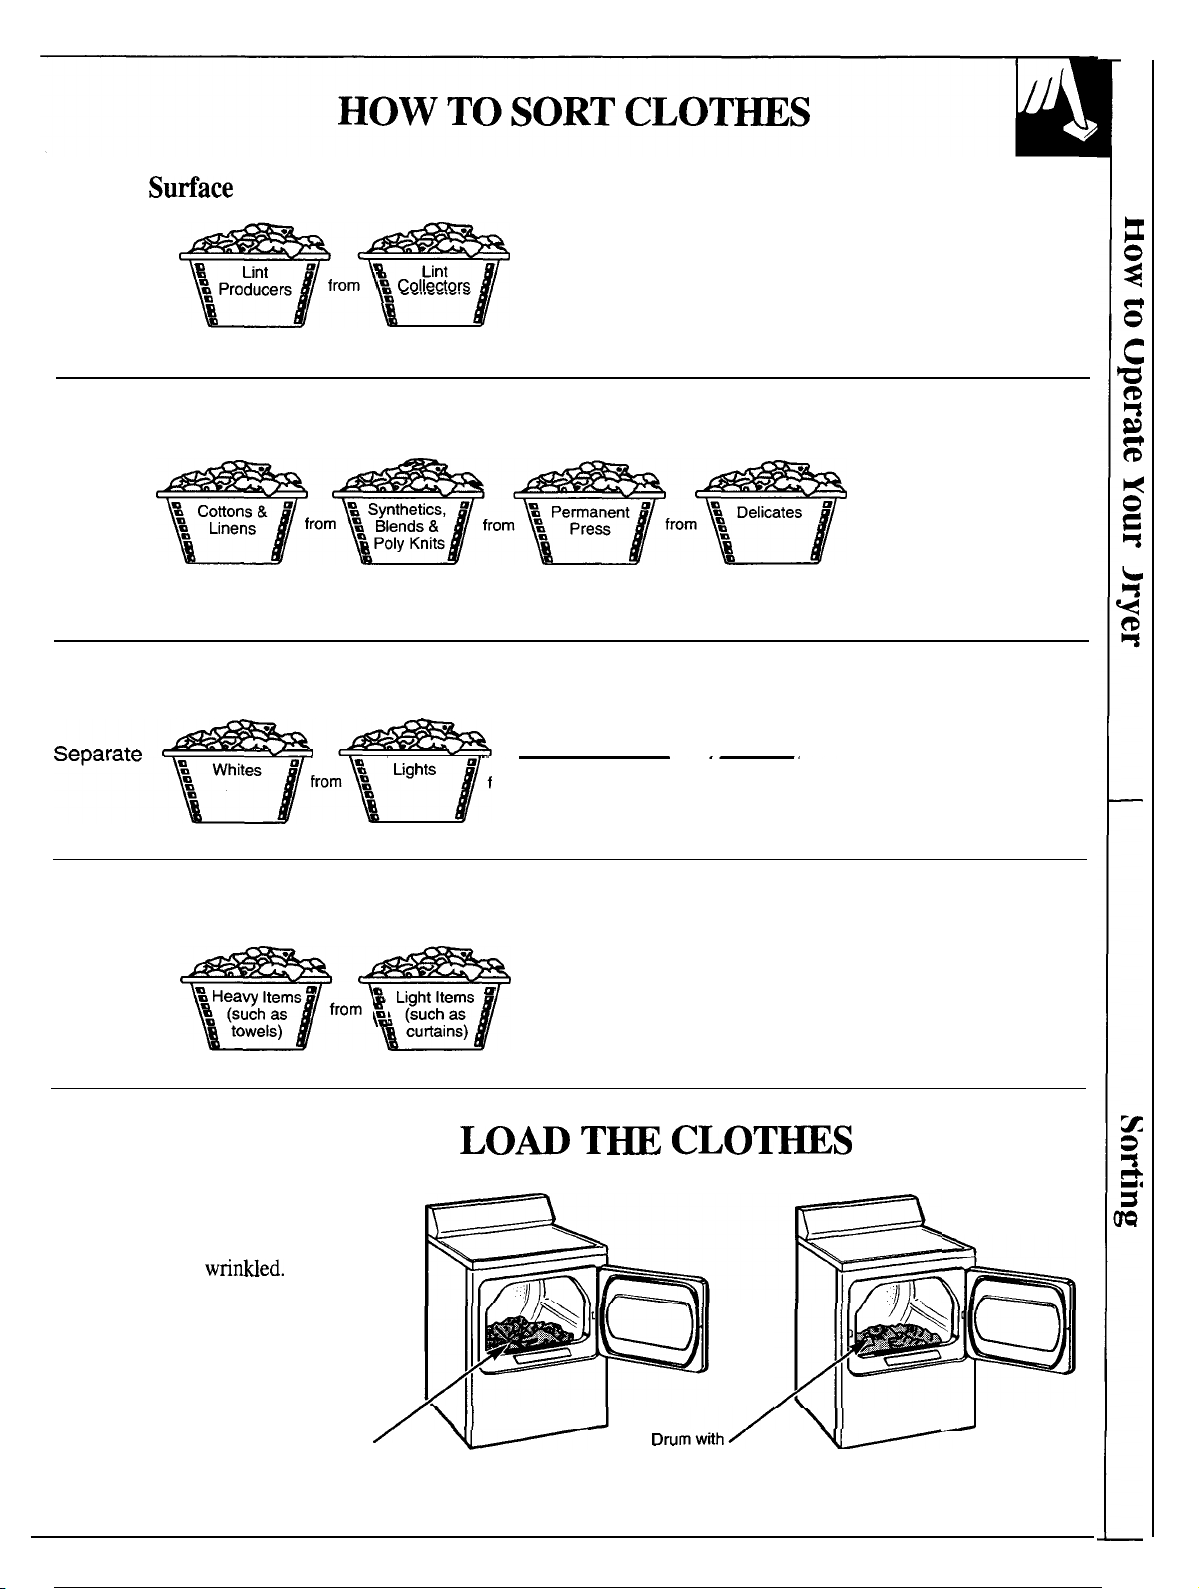
Sort by Sutiace Texture
Separate
Producers
Sort by Fabric
Separate
Sort by Color
Lint
.
m
from
Lint u
LINT PRODUCERS—such as terry toweling and
chenille—give up lint.
LINT COLLECTORS—such as man-made fibers and
napped fabrics like velveteen and corduroy—attract
lint. These must be dried separately.
In addition to
sorting to reduce
lint collection, we
recommend that you
wash fabrics of similar
construction together
whenever possible.
Sort
by Weight
Separate
Items
(such as
towels)
HOW TO
Don’t overload your dryer.
Crowded loads don’t dry
efficiently and clothes may
be unnecessarily
Loads should look like this:
Drum with
Cottons & Linens
from
Light Items
(such as
curtains)
For information on tumble drying extra large
items and different fabrics and loads, see the
Suggested Fabrics and Drying Selections guide.
Permanent Press Load
-
9
Page 10
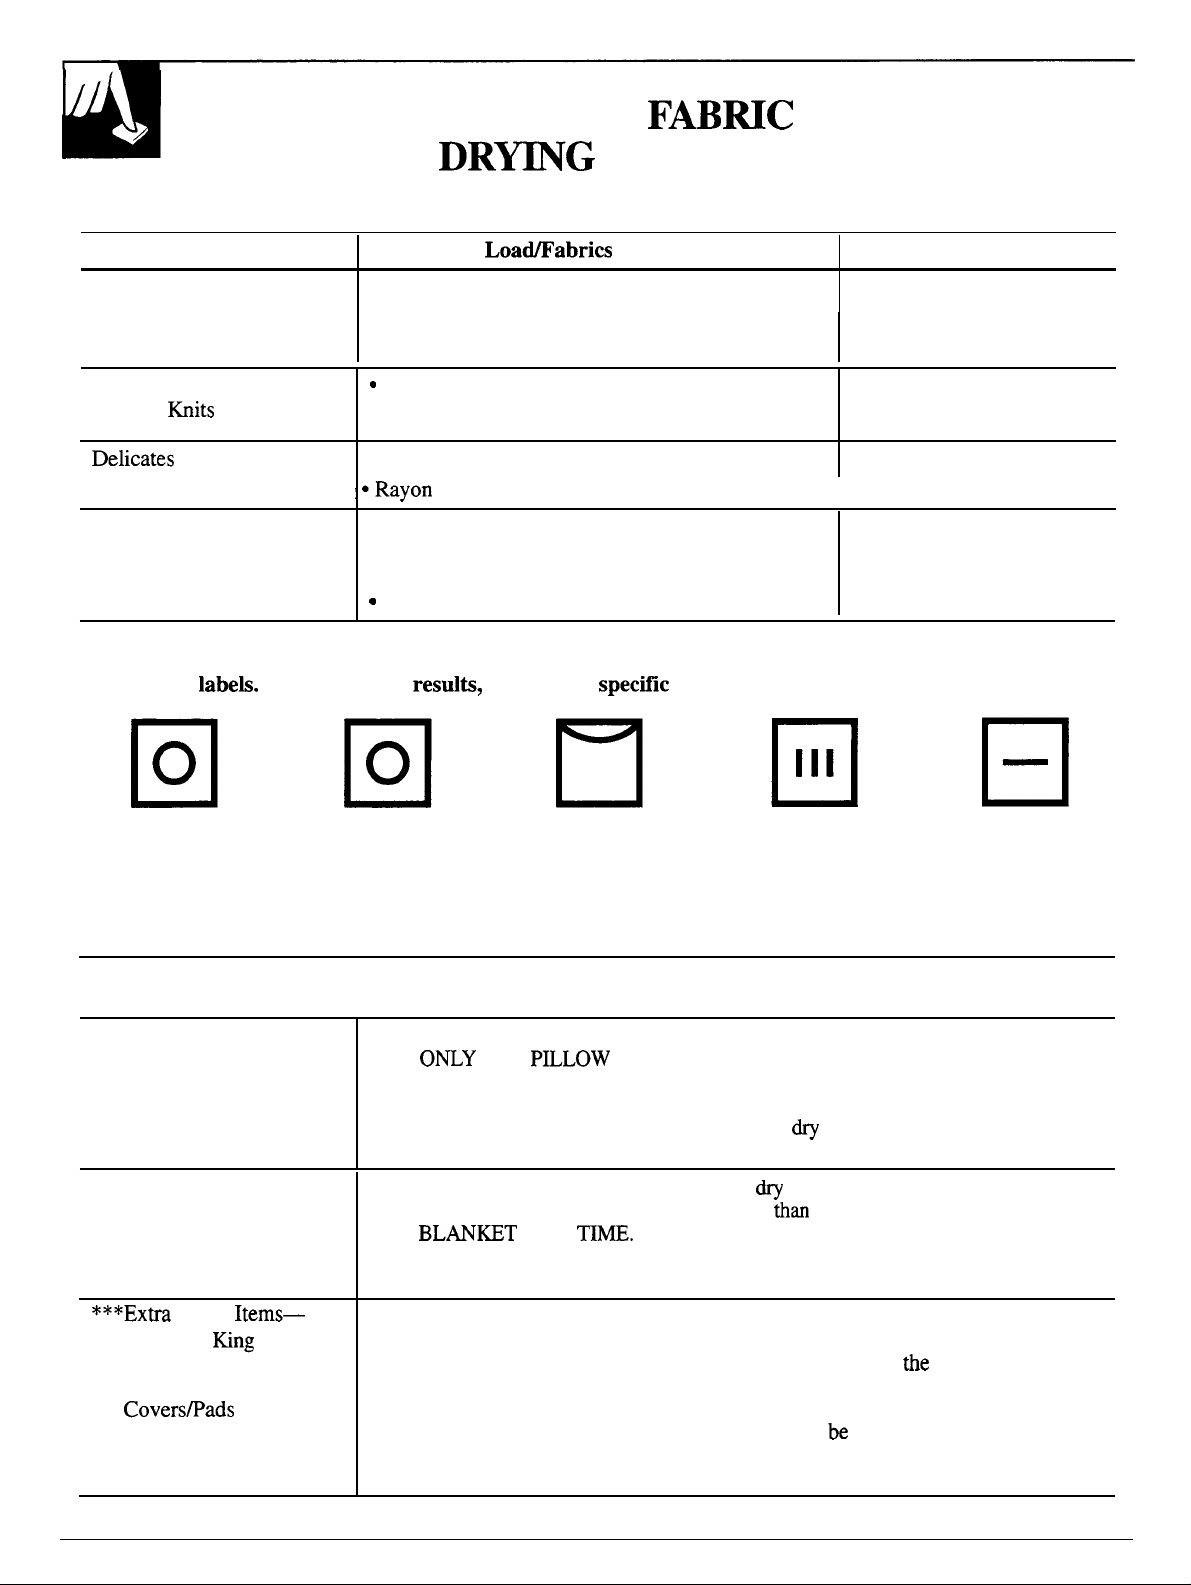
SUGGESTED
Cycle Suggested
Automatic Regular
AND
For Clothes
●
Cottons and linens
●
Down-filled garments, if machine
SELECTIONS
such as:
washing and drying is recommended
Automatic Permanent
Press &
Timed
Permanent press fabrics with cotton
●
Synthetics
●
Silks and wools
●
●
and acetate
Pillows*
Blankets**
Extra large items***
The terms High, Medium and Low Heat are those usually found on
fabric care
Drying Selection
High Heat
Medium Heat
Low Heat
I
High Heat
Medium Heat
Articles may be
dried in a tumble in a tumble dryer at a
dryer at medium to
Articles may be dried Articles should be
hung to dry.
low setting.
high setting.
Special Instructions
Refer to garment manufacturer’s care labels for more information.
*Pillows
Check ticking for holes or weak seams where feathers or filling could escape.
DRY
ONE
AT A TIME. Set dryer for maximum time. Stop
dryer occasionally and shake pillow to redistribute filling for more even drying.
Check pillow at end of drying time-if not completely dry, return pillow to dryer
and reset for more drying time. Feather pillows
completely to prevent mildew. DO NOT tumble dry pillows containing kapok.
**Blankets
Put 2
or
4 dry
towels into the dryer; tumble
20-25 minutes. DO NOT set control for more
ONE
AT A
Remove blanket at the end of the cycle and
block the blanket back to its original shape. Allow to dry thoroughly
before storing.
Large
Queen or
size
sheets; Blankets or
Spreads; Mattress
First setting-20 minutes; check and redistribute load. Then set timer for
15 minutes; check load again. Reset timer at 5 minute intervals, checking
after each 5 minutes to make sure that the articles do not fill
many large articles, when wet, have ample room in the dryer, but as they
dry and fluff up, they may not have room to tumble. CAUTION: If large
items do not have room to tumble, the air flow may
could result in scorching your valuable items.
should be dried alone.
Articles should be
hung soaking wet to
drip dry.
very slowly and must be dried
for 5 minutes. Set timer for
25 minutes. DRY ONLY
blocked, which
NOTE:
Mattress cover/pads
Articles should be
dried on a flat surface.
dryer drum:
10
Page 11
‘ ‘ User Maintenance Instructions
CAUTION:
connected in your new residence, be sure your licensed electrician
confirms that the supply voltage matches the voltage specified on
the rating plate.
If yours is an electric dryer, before you have it
Dryer Exterior
Wipe off any spills or washing
compounds. Wipe or dust with a
damp cloth. Try not to strike the
surface with sharp objects.
Dryer control panel and finishes
may be damaged by some laundry
pre-treatment soil and stain
remover products if such products
are sprayed on or have direct
contact with the dryer.
Apply these pre-treatment products
away from the dryer. The fabric
may then be washed and dried
Damage to your dryer
caused by pre-treatment products
is not covered by your warranty.
Dryer Drum
The drum is rust-resistant and
requires no special care.
Dryer
Inspect and clean the dryer
exhaust
a year. See the section, Maximize
Your Dryer Efficiency by Keeping
the Exhaust Duct Clean.
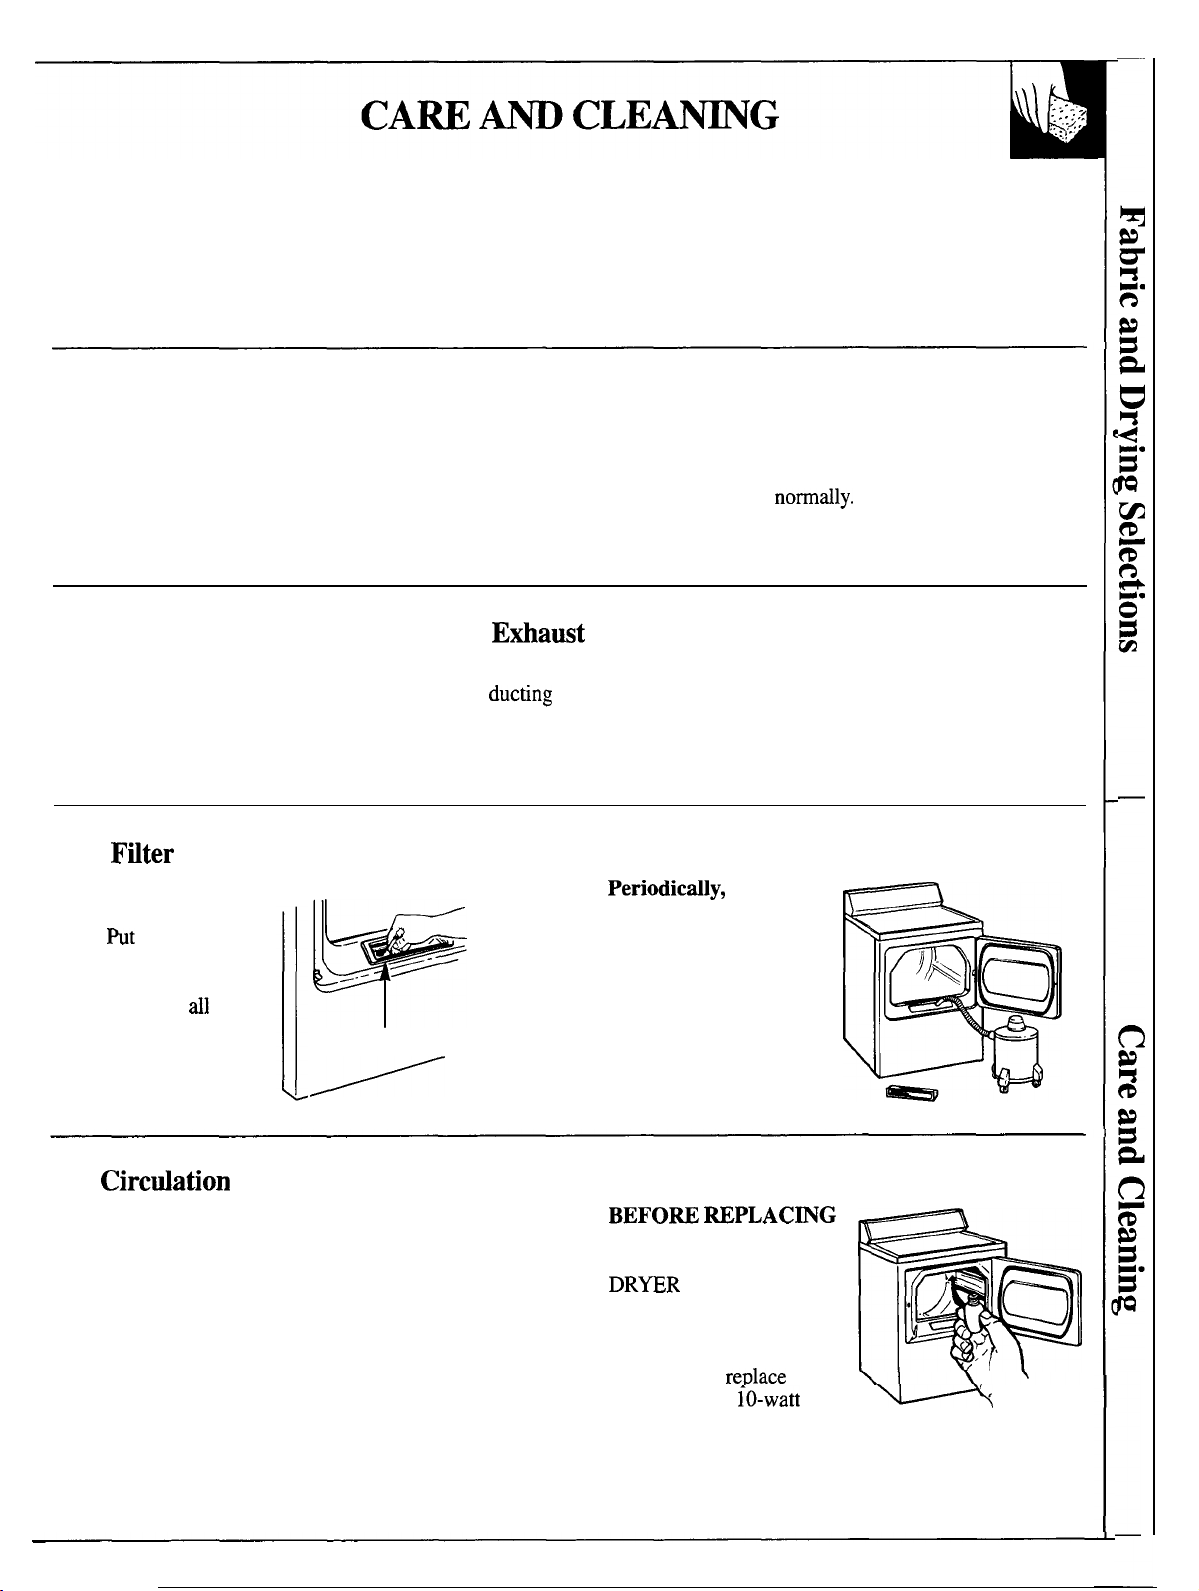
Lint
Before every dryer
use,
clean the lint
filter.
moistened fingers
at the comer of the
filter and wipe
the way across to
the other comer.
your
Lint
Filter
Air Circtiation
Do not obstruct the flow of combustion and
ventilating air.
at least once
remove the lint
filter and insert the
suction hose from
your vacuum cleaner
into the opening.
Drum Lamp
THE LIGHT BULB, BE
SURE TO UNPLUG THE
POWER CORD.
Simply reach above
loading opening from
inside the drum. Remove
the bulb and
the same type
Dryer Storage
To store your dryer for a
short period of time, disconnect
the power supply and clean the
lint filter.
with
bulb.
11
Page 12
YOUR
BY
DUCT CLEAN
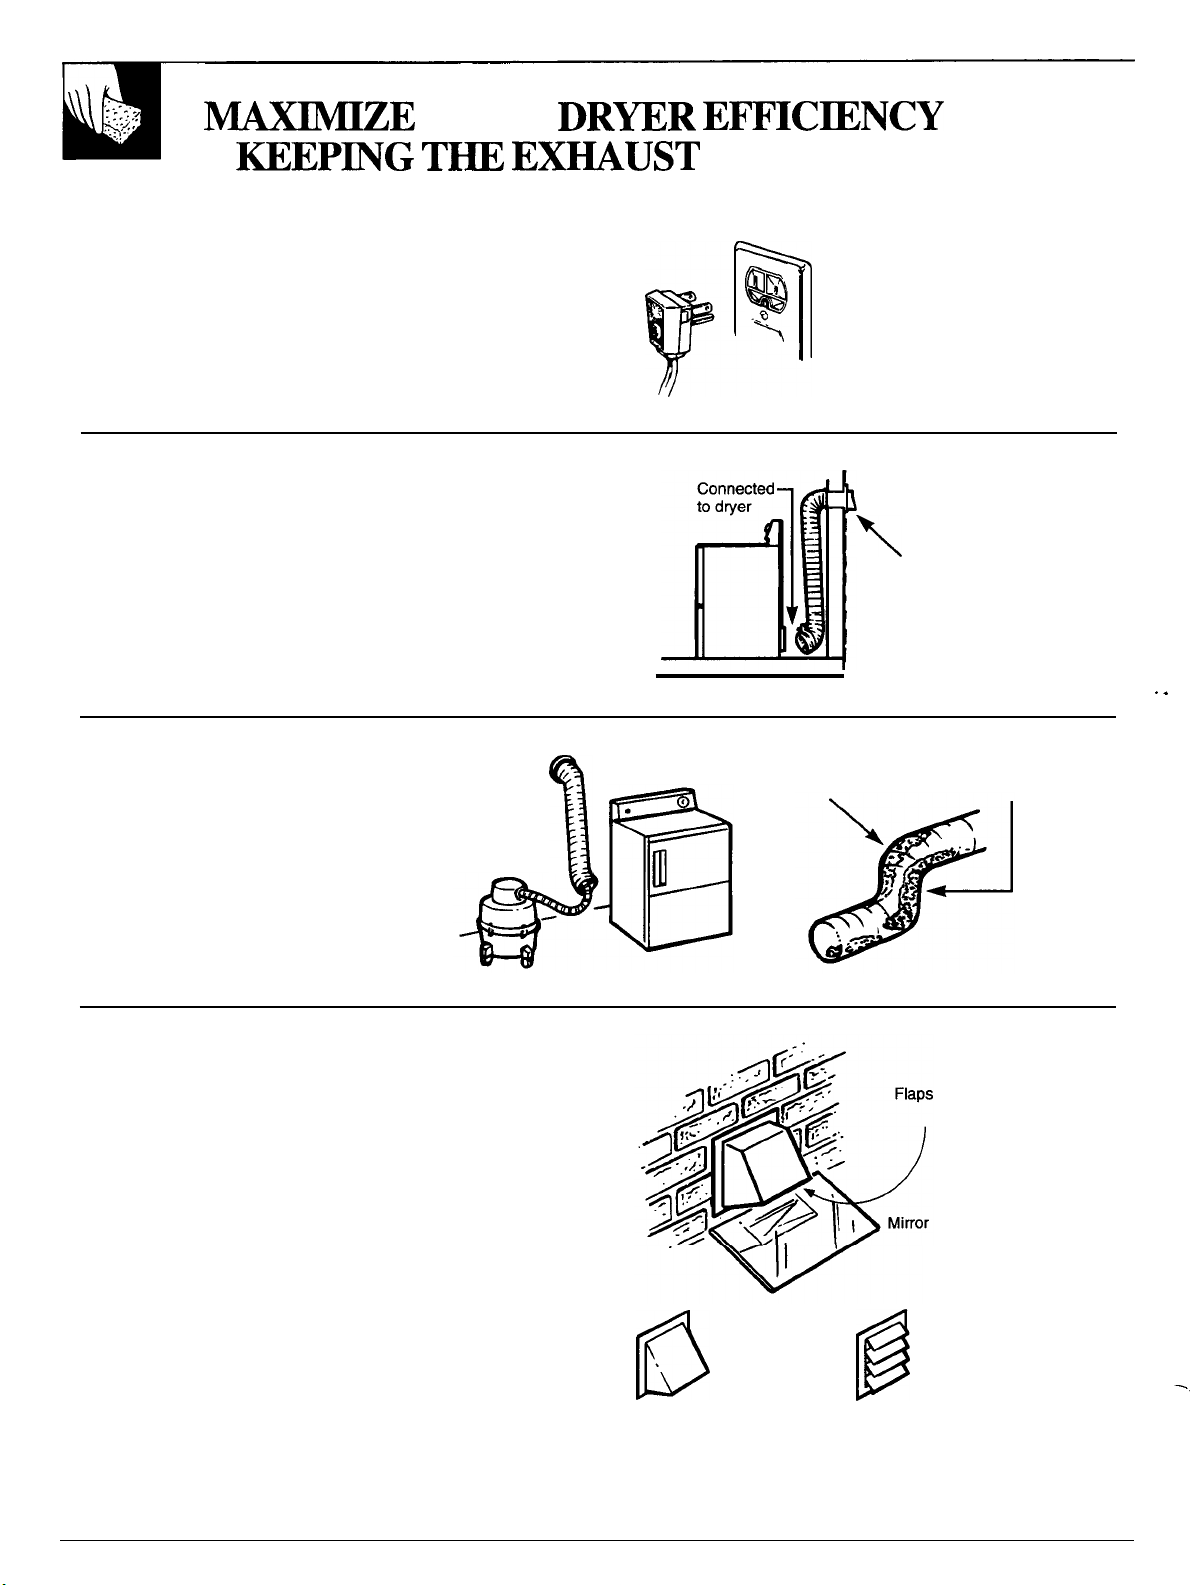
Maintenance should be done periodically (at least once a year) to prevent clogging.
1.
Disconnector turn off the electrical
power to your appliance.
.
-\
2. Disconnect the exhaust duct from your dryer.
Exhaust
hood
3. Clean the exhaust duct from the
end where the dryer is connected
to the exhaust hood using:
●
the hose attachment of your
vacuum cleaner;
●
a dust rag attached to a pole
(for straight stretches) or
attached to a drain cleaning
wire (for less accessible turns).
4. Inspect the exhaust hood. To minimize resistance
to the exhaust air flow:
●
make sure the flaps move freely (you may check
with a mirror);
●
make sure the flaps are fully open when the
dryer is on;
●
make sure there is no wildlife (birds, insects, etc.)
nesting inside the exhaust duct.
/
Check turns in the exhaust duct for
any collected lint and remove.
move
freely
12
Exhaust Hood
Flaps
Page 13
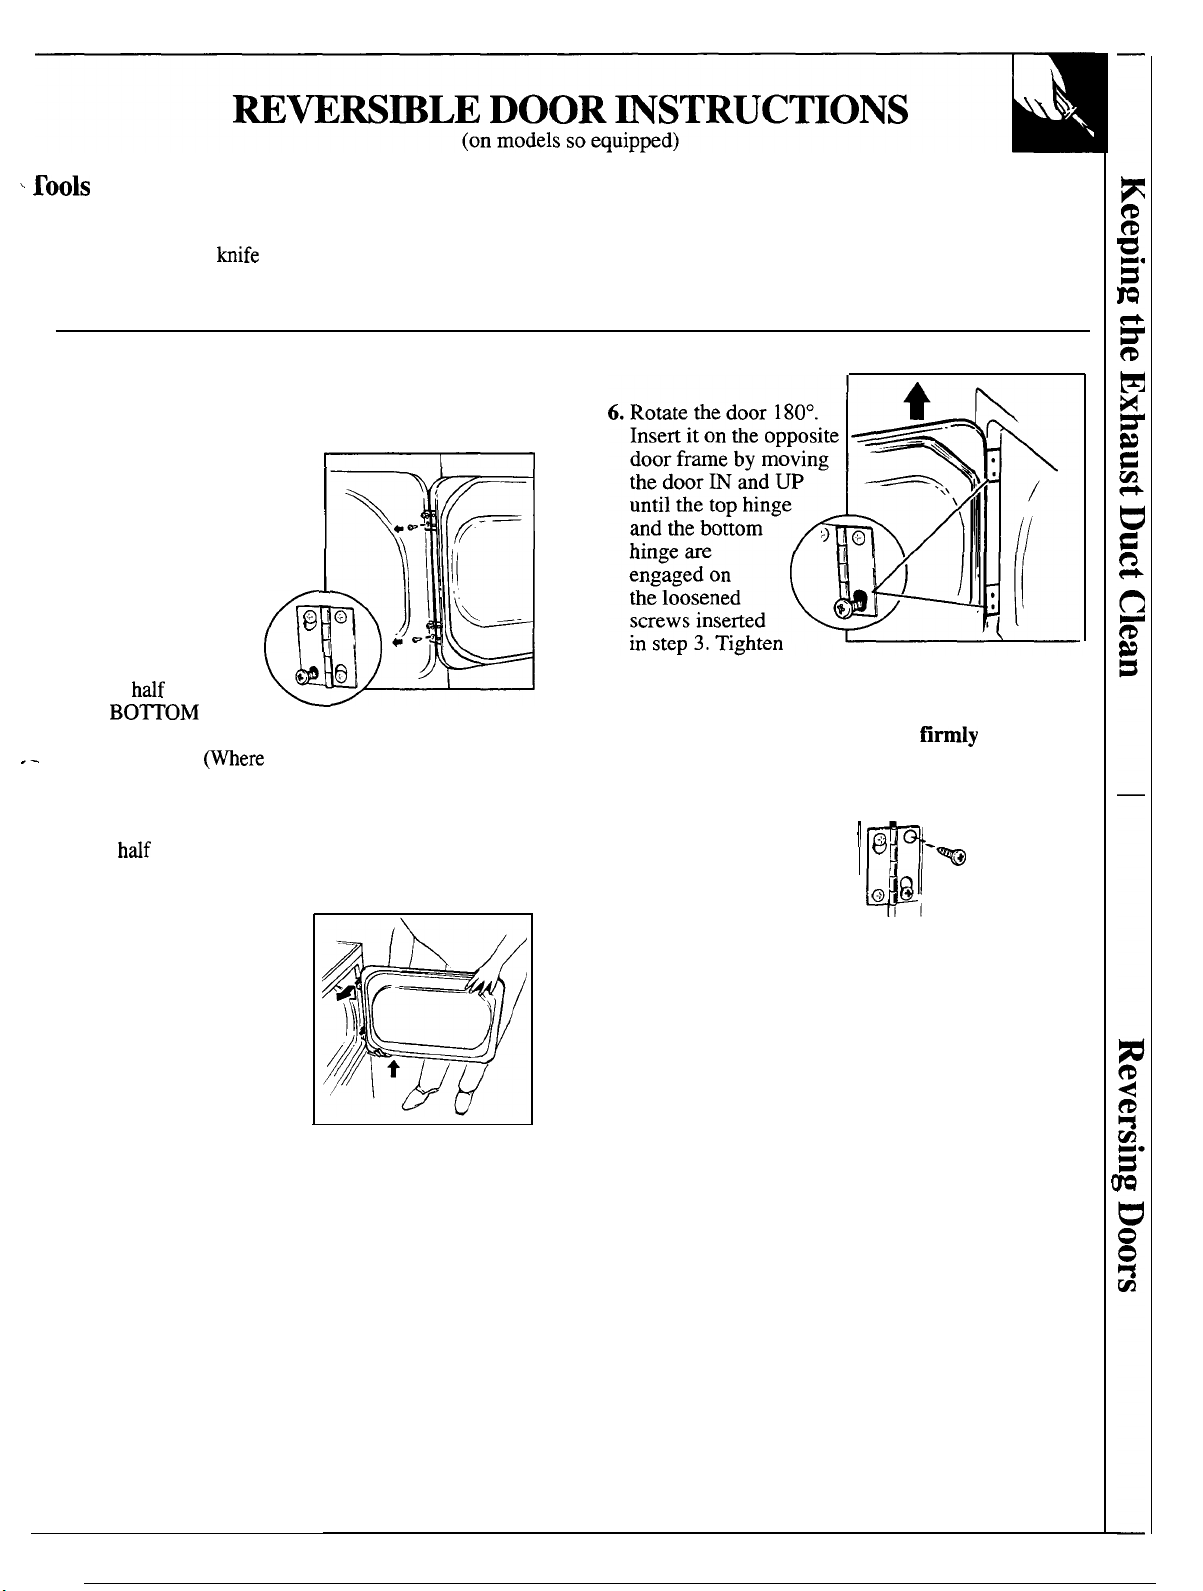
Needed
Standard #2 Phillips screwdriver
Tape-tipped putty
Needle-nosed pliers
Dryer Door
1.
Open the door and
remove the filler plugs
opposite the hinges.
2. With the door completely
open, remove the bottom
screw from each hinge
on the dryer face.
3. Insert these screws
about
the
for each hinge, on the
opposite side.
4.
Loosen the top screw from each hinge on the dryer
face
5. With one hand holding
the top of the door and
the other hand holding
the bottom, remove the
door from the dryer by
lifting it UP and OUT.
way into
holes,
you removed the filler plugs.)
way.
the two screws.
Attention: The door must be held firmly in place
until the two screws are tightened.
7.
With the other screws,
secure each hinge at
the top.
8.
Tighten the two top
screws of each hinge.
9.
Reinsert the plastic plugs on the side from which
the door was removed.
,
II
13
Page 14
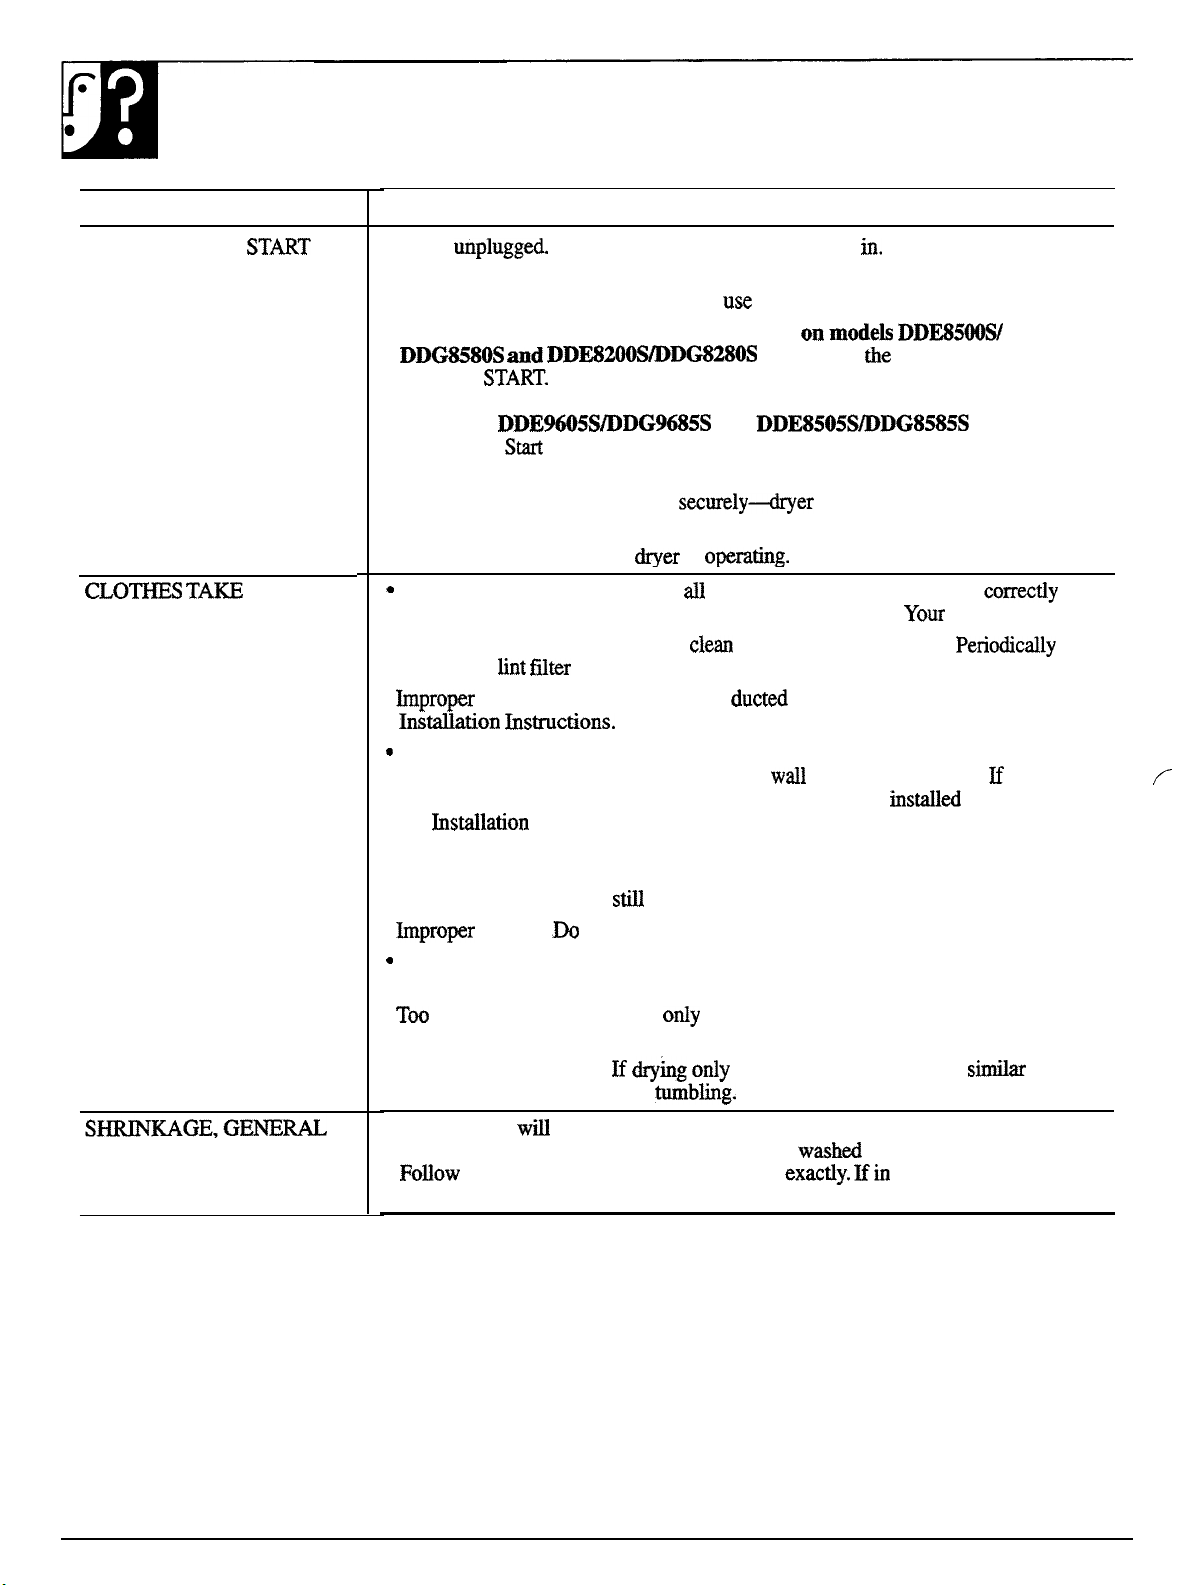
QUESTIONS?
USE THIS PROBLEM SOLVER
PROBLEM
DRYER WON’T
LONG TO DRY
TOO
POSSIBLE CAUSE
●
Dryer
●
No power to dryer. Check fuses and circuit breakers to make sure dryer is
getting current. Most electric dryers
●
Controls improperly set. Make sure controls
turned to
Make sure power cord is plugged
two.
are
set and
Start knob is
Opening the door during operation stops the dryer. To
resin close the door and turn Start knob to START. Make sure controls
on models
the Push To
pad is pressed. Opening the door
and
are
set and
during operation stops
the dryer. To restart, close the door and press the Push To Start pad.
●
Dryer door is open. Close door
●
Circuit is overloaded. Do not operate other appliances on the same electrical
outlet or circuit while the
Controls improperly set. Check
is o~rating.
controls to make sure they are
set for the load you want to dry. See the How to Operate
* Clogged lint filter. Remove and
area under
●
ducting. Make sure dryer is
with vacuum cleaner. See the Care and Cleaning section.
falter before every load.
will not run with door open.
Dryer section.
clean
in accordance with the
Obstruction in exhaust ducting. Make sure ducting is clean and free of
obstruction; make sure damper in outside
cap operates easily.
ducting is used, be sure it is not kinked and is properly
the
●
Blown fuses or tripped circuit breakers. Check household fuses or circuit
Instructions.
flexible
according to
breakers. Most electric dryers use two. It is possible for one to be blown or
tripped and the dryer to
●
not mix heavy, hard-to dry items with lightweight articles.
tumble without heat.
Large loads of moisture-holding fabrics, such as beach towels, take along
time to remove moisture.
●
many items in dryer. Dry
one washer load at a time. Do not
combine loads.
●
Too few items in dryer.
one article, add two more
articles,
even if dry, to insure proper
14
●
Some fabrics
shrink whether machine washed and tumble dried or washed
by hand and drip dried; others maybe safely
garment manufacturers’ care labels
wash or tumble dry.
but will shrink in a dryer.
doubt, do not machine
Page 15

PROBLEM POSSIBLE CAUSE
●
can occur
knit fabrics that have been improperly
stretched and elongated by the manufacturer. When this occurs, garment may
be pressed back into shape after each wash and dry cycle.
●
fabrics) is
or delayed shine
removed by laundering. Maybe noticed in older garments
is caused when starch or sizing (in some
that have been laundered many times without previous shrinkage. Treat as for
relaxation shrinkage above.
●
by
occurs in certain
fabrics that have
heat-shaped. When washing, drying or ironing temperatures exceed the
temperatures used to
set, shrinkage may occur. This cannot be corrected,
but it can be prevented by washing in cold or warm water; drying on low heat.
●
Leaving clothes in dryer after tumbling stops. Remove clothes
and
hang them immediately.
●
Too many items in dryer. Dry only one washer load at a time. Do not
combine loads.
Too few items in dryer.
articles, even if dry, to
●
loads. Avoid laundering heavy permanent press items, such as work
drying only one article, add two or more similar
proper tumbling.
clothes, with lighter permanent press items, such as shirts or blouses. Do not
wash or dry permanent press with regular laundry.
●
Too
Permanent press loads should always be smaller than
clothes in washer. Items must have room to move freely.
loads.
more
than medium loads.
●
Use of incorrect wash and dry cycles. Use
which provides a cool-down
to minimize
Press wash cycle
use Permanent
Press drying cycle.
●
or
●
Washing repeatedy in too hot water. Wash in cool or warm water
water level. Use large water level for medium load; medium level
for
load.
plenty of detergent.
●
Failure to use
softener. Proper use of fabric softener
minimize w-rig.
(continued next page)
15
Page 16
PROBLEM
(continual)
PROBLEM
TO
ON
A
POSSIBLE CAUSE
PERMANENT PRESS
you need more help... call, toll free:
GE Answer
800.626.2000
consumer information service
●
●
and dry on Permanent Press setting.
on Permanent Press setting.
norrnd
for 10-12 minutes
and hang immediately.
● kon
●
Send to Dry Cleaners for pressing.
●
Some
*
clothes
may remain which cannot be removed.*
If
follow good laundry
come out
the finish may not be good
and
permanent press synthetic/cotton blends, the cotton
eventually wear away leaving
the synthetic. Since it’s the cotton portion
which is treated for permanent press, a loss or
performance
press
Also,
of the
can
of permanent press
16
Page 17
17
Page 18
Page 19
We’ll Be There
With the purchase
information or
from GE, wdll be
Repair
AGE consumer service professional will provide expert repair service,
scheduled at a time that’s convenient for you. Many GE Consumer Service
locations offer you
convenience
Our factory-trained technicians know your appliance inside and out–so most
repairs can be handled in just one visit.
Whatever your question about any GE major appliance, GE Answer
information service is available to help. Your call—and your question-will be
answered
service is open 24 hours a day, 7 days a week.
a.m. to
p.m. weekdays,
GE appliance, receive
All you have to do is cdl–toll-free!
today or tomorrow, or at your
a.m. to
p.m. Saturdays).
that
ever need
For
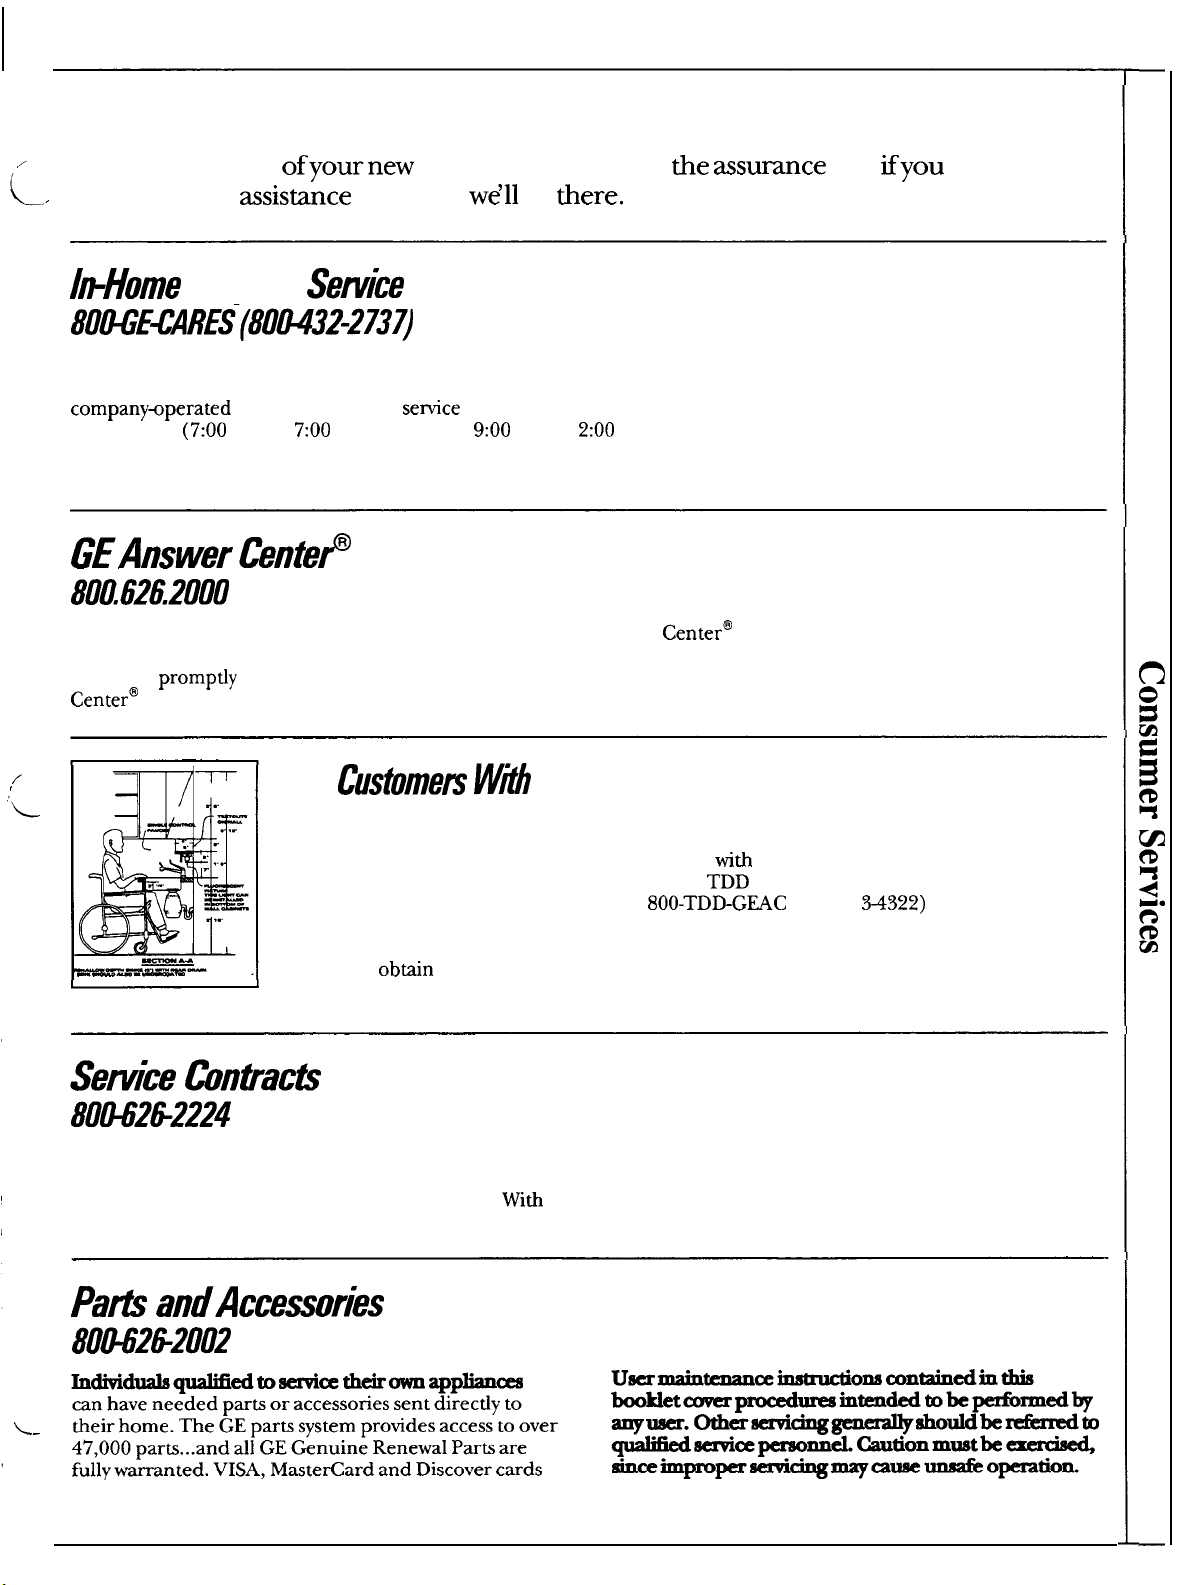
Upon request, GE will provide
Braille controls for a variety of
GE appliances, and a brochure to call
assist in planning a barrier-free
kitchen for persons with limited
—..
You can have the secure feeling that GE Consumer Service will still be there
after your warranty expires. Purchase a GE contract while your warranty is still
in effect and you’ll receive a substantial discount.
you’re assured of future service at today’s prices.
mobility. To obtiin these items,
free of charge, call 800.626.2000.
Special Needs...
Consumers
access to a
information or service.
a multiple-year contract,
impaired hearing or speech who have
(800-83
to request
are ‘accepted.
Page 20
YOUR GE AUTOMATIC
WARRANTY
Staple sales slip or cancelled check
proof
date is
needed to obtain semice
under warranty.
WHAT IS COVERED
WHAT IS NOT COVERED
FULL ONE-YEAR WARRANTY
For one year from date of original
purchase, we will provide,
charge, parts and service labor in
your home to repair or replace
of
dryer that fails
because of a manufacturing
defect.
LIMITED ADDITIONAL
FOUR-YEAR WARRANTY
From the second through fifth
year from date of original purchase,
we will replace, free of charge,
an extra-large capacity dryer
drum that fails because of a
manufacturing defect. You pay for
the service trip to your home and
service labor charges.
●
Service trips to your home to teach
you how to use the product. resetting of circuit breakers.
Read your Use and Care material.
If you then have any questions
about operating the product, please purpose or used commercially.
contact your dealer or our Consumer
Affairs office at the address below,
or call, toll free:
GE Answer
800.626.2000
consumer information service
Improper installation,
If you have an installation problem,
contact your dealer or installer.
You are responsible for providing
adequate electrical, exhausting
and other connecting facilities.
free of
This warranty is extended to
the original purchaser and any
succeeding owner for products
purchased for ordinary home use
in the 48 mainland states, Hawaii
and Washington,
warranty is the same except that it
is LIMITED because you must pay
to ship the product to the service
shop or for the
travel costs to your home.
All warranty service will be
provided by our Factory Service
Centers or by our authorized
Customer
normal working hours.
Should your appliance need
service, during warranty period or
beyond, call 800-GE-CARES
(800-432-2737).
●
Replacement of house fuses or
. Failure of the product if it is used
for other than its intended
●
Damage to product caused
by accident, fire, floods or acts
of God.
WARRANTOR IS NOT
RESPONSIBLE FOR
CONSEQUENTIAL DAMAGES.
In Alaska the
technician’s
Some states do not allow the exclusion or limitation of incidental or consequential damages, so the above limitation or exclusion
may not apply to you. This warranty gives you specific legal rights, and you may also have other rights which vary from state to state.
To know what your legal rights are in your state, consult your local or state consumer affairs office or your state’s Attorney General.
This
book is printed on recycled paper.
No. 175 D1807P060
Pub
49-9827
If
Warrantor: General Electric Company
Affairs, GE Appliances, Louisville, KY 40225
Printed
in
 Loading...