

GE Custom Hood Inserts Owner's Manual

Owner’s
Manual
Custom Hood Inserts
Hotte encastrable et adaptable
Manuel du propriétaire
La section française commence à la page 11
Campana a medida
Manual del propietario
La sección en español empieza en la página 21
monogram.com

Consumer Information
Custom Hood Insert
Contents
Before
using your
custom
hood
insert
Write
down the
model
& serial
numbers
Consumer Information
Important Phone Numbers ..................... 9
Model and Serial Numbers ...................... 2
Problem Solver ................................. 8
Safety Instructions ............................. 4
Warranty ...................................... 10
Read this manual carefully. It is intended to help
you operate and maintain your new custom hood
insert properly.
Keep it handy for answers to your questions.
You’ll find them on a label behind the removable
filters.
These numbers are also on the Consumer Product
Ownership Registration Card packed separately
with your hood.
Visit monogram.com and click on “Register Your
Appliance” to register your custom hood insert.
Controls and Features ......................... 5
Care and Cleaning
Light Bulbs ..................................... 7
Metal Grease Filters ............................ 6
Stainless Steel Hood Surfaces .................. 7
If you don’t understand something or need more
help, there is a list of toll-free consumer service
numbers included in the back section of this
manual.
OR
Visit our Website at: monogram.com
Before sending in this card, please write these
numbers here:
Model Number
Serial Number
Use these numbers in any correspondence or
service calls concerning your hood.
If you
received a
Immediately contact the dealer (or builder) that
sold you the hood.
damaged
hood
2

Consumer Information
Custom Hood Insert
Save time
& money
If you
need
service
Before you request service, check the Problem
Solver in the back of this manual.
To obtain service, see the Consumer Services page
in the back of this manual.
We’re proud of our service and want you to be
pleased. If for some reason you are not happy with
the service you receive, here are some steps to
follow for further help.
FIRST, contact the people who serviced your
appliance. Explain why you are not pleased.
In most cases, this will solve the problem.
It lists causes of minor operating problems that
you can correct yourself.
NEXT, if you are still not pleased, write all the
GHWDLOV³LQFOXGLQJ\RXUSKRQHQXPEHU³WR
Manager, Customer Relations
GE Appliances
Appliance Park
Louisville, KY 40225
3
READ ALL INSTRUCTIONS BEFORE USING
SAFETY PRECAUTIONS
IMPORTANT SAFETY INSTRUCTIONS
WARNING³725('8&(7+(5,6.
2)),5((/(&75,&6+2&.25,1-85<72
PERSONS, OBSERVE THE FOLLOWING:
A. Use this unit only in the manner intended
by the manufacturer. If you have questions,
contact the manufacturer.
B. Before servicing or cleaning unit, switch
power off at service panel and lock the service
disconnecting means to prevent power
from being switched on accidentally. When
the service disconnecting means cannot be
locked, securely fasten a prominent warning
device, such as a tag, to the service panel.
C. Do not use this unit with any solid-state speed
control device.
D. This unit must be grounded.
CAUTION³)25*(1(5$/
VENTILATING USE ONLY. DO NOT USE TO
EXHAUST HAZARDOUS OR EXPLOSIVE
MATERIALS AND VAPORS.
WARNING³725('8&(7+(5,6.
2),1-85<723(56216,17+((9(172)$
RANGE TOP GREASE FIRE, OBSERVE THE
FOLLOWING*:
A. SMOTHER FLAMES with a close-fitting lid,
cookie sheet or metal tray, then turn off the
burner. BE CAREFUL TO PREVENT BURNS. If the
flames do not go out immediately, EVACUATE
AND CALL THE FIRE DEPARTMENT.
B.1(9(53,&.83$)/$0,1*3$1³<RXPD\EH
burned.
C. DO NOT USE WATER, including wet dishcloths
RUWRZHOV³DYLROHQWVWHDPH[SORVLRQZLOO
result.
D. Use an extinguisher ONLY if:
1. You know you have a Class ABC
extinguisher, and you already know how to
operate it.
2. The fire is small and contained in the area
where it started.
3. The fire department is being called.
4. You can fight the fire with your back to an
exit.
* Based on “Kitchen Firesafety Tips” published by
NFPA.
READ AND SAVE
THESE INSTRUCTIONS.
4
WARNING³725('8&(7+(5,6.
OF A RANGE TOP GREASE FIRE:
A. Never leave surface units unattended at high
settings. Boilovers cause smoking and greasy
spillovers that may ignite. Heat oils slowly on
low or medium settings.
B. Always turn hood ON when cooking at high
heat or when flambéing food (i.e. Crepes
Suzette, Cherries Jubilee, Peppercorn Beef
Flambé).
C. Clean ventilating fans frequently. Grease
should not be allowed to accumulate on fan
or filter.
D. Use proper pan size. Always use cookware
appropriate for the size of the surface
element.
WARNING³725('8&(7+(5,6.
2)),5((/(&75,&6+2&.25,1-85<72
PERSONS, OBSERVE THE FOLLOWING:
A. Installation work and electrical wiring must be
done by qualified person(s) in accordance with
all applicable codes and standards, including
fire-related construction.
B. Sufficient air is needed for proper combustion
and exhausting of gases through the flue
(chimney) of fuel burning equipment to
prevent back drafting. Follow the heating
equipment manufacturer’s guidelines and
safety standards such as those published
by the National Fire Protection Association
(NFPA), and the American Society for Heating,
Refrigeration and Air Conditioning Engineers
(ASHRAE), and the local code authorities.
applicable, install any makeup (replacement)
air system in accordance with local building
code requirements. Visit GEAppliances.com for
available makeup air solutions.
C.
When cutting or drilling into wall or ceiling, do not
damage electrical wiring and other hidden utilities.
D. Ducted fans must always be vented to the
outdoors.
When
WARNING³725('8&(7+(5,6.
2)),5(86(21/<0(7$/'8&7:25.
• Do not attempt to repair or replace any part of
your hood unless it is specifically recommended
in this manual. All other servicing should be
referred to a qualified technician.
CAUTION³$8720$7,&$//<
23(5$7(''(9,&(725('8&(7+(5,6.2)
,1-85<',6&211(&7)52032:(56833/<
BEFORE SERVICING. THE UNIT IS EQUIPPED
WITH AN INTEGRAL DISCONNECTING SWITCH
LOCATED INSIDE THE BLOWER HOUSING.
Controls and Features
Custom Hood Insert
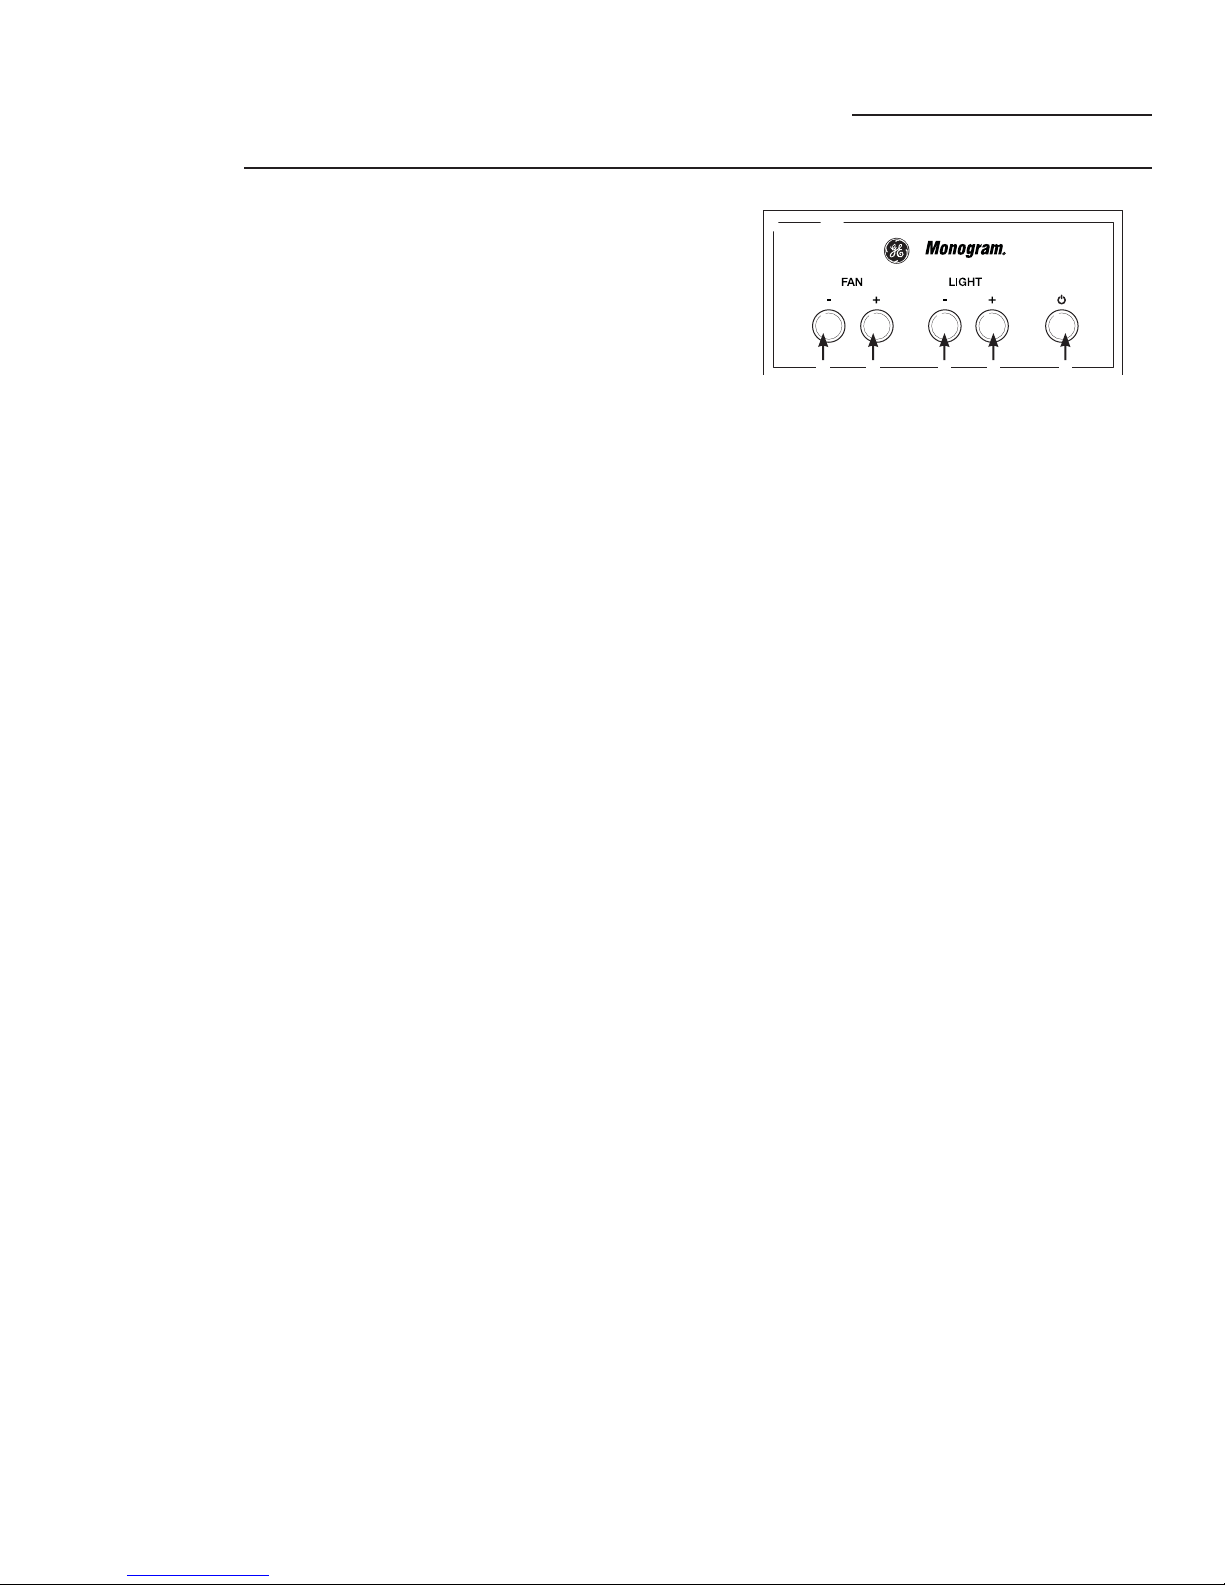
Controls
NOTE: Avoid using food products that produce
flames under the range hood.
1. FAN DECREASE ON/OFF. Press to turn on and
decrease fan settings. It remembers the last
fan level used. The buttons allow you to cycle
around to the desired setting. (Use to set the fan
speed to LOW, MED, HIGH, BOOST or OFF.)
2. FAN INCREASE ON/OFF. Press to turn on and
increase fan settings. It remembers the last
fan level used. The buttons allow you to cycle
around to the desired setting. (Use to set the fan
speed to LOW, MED, HIGH, BOOST or OFF.)
6(1625)($785(³The hood fan will
automatically turn on at the MED setting (or it
will increase if already set to MED) if cooking
temperatures become too hot. The fan will stay
on for a minimum of 3 minutes and will turn off
when temperatures cool to an appropriate level.
While the Sensor Feature is actively operating
the fan, the blue LEDs around the control
buttons will be flashing. While the blue lights are
flashing, you may continue to operate the light
levels and you can increase the fan speed, but
you cannot decrease the fan speed or turn it off.
The fan is protecting both the electronics and
your cabinet. Reducing the heat will allow for
normal operation of the hood.
1
2 3
54
3. LIGHT DECREASE ON/OFF. Press to turn on
and dim the lights. It remembers the last light
level used. The buttons allow you to cycle
around to the desired setting. (There are four
light levels/settings and OFF.)
4. LIGHT INCREASE ON/OFF. Press to turn on
and brighten the lights. It remembers the last
light level used. The buttons allow you to cycle
around to the desired setting. (There are four
light levels/settings and OFF.)
5. POWER ON/OFF. Press to activate (turn on)/
deactivate (turn off) the control buttons. When
the buttons are active (turned on), their outer
rings will be illuminated. When active (turned
on), the hood lights and fan will automatically
turn on at their last settings.
NOTES:
• Always deactivate (turn off) the buttons when
the hood is not in use.
• If both the LIGHT and FAN are set to OFF, the
buttons will automatically deactivate (turn off)
after 10 seconds.
5
Care and Cleaning
Custom Hood Insert
For your
safety
Metal
grease
filters
Before servicing or cleaning the unit, switch
power off at the service panel and lock the service
panel to prevent power from being switched on
accidentally. If the service panel cannot be locked,
fasten a tag or prominent warning label to the
panel.
The metal filters trap grease released by foods on
the cooktop. The filters also help prevent flames
(from food, grease) from damaging the inside of the
hood.
For this reason, the filters must ALWAYS be in place
when the hood is used. The grease filters should be
cleaned every 6 months, or as needed.
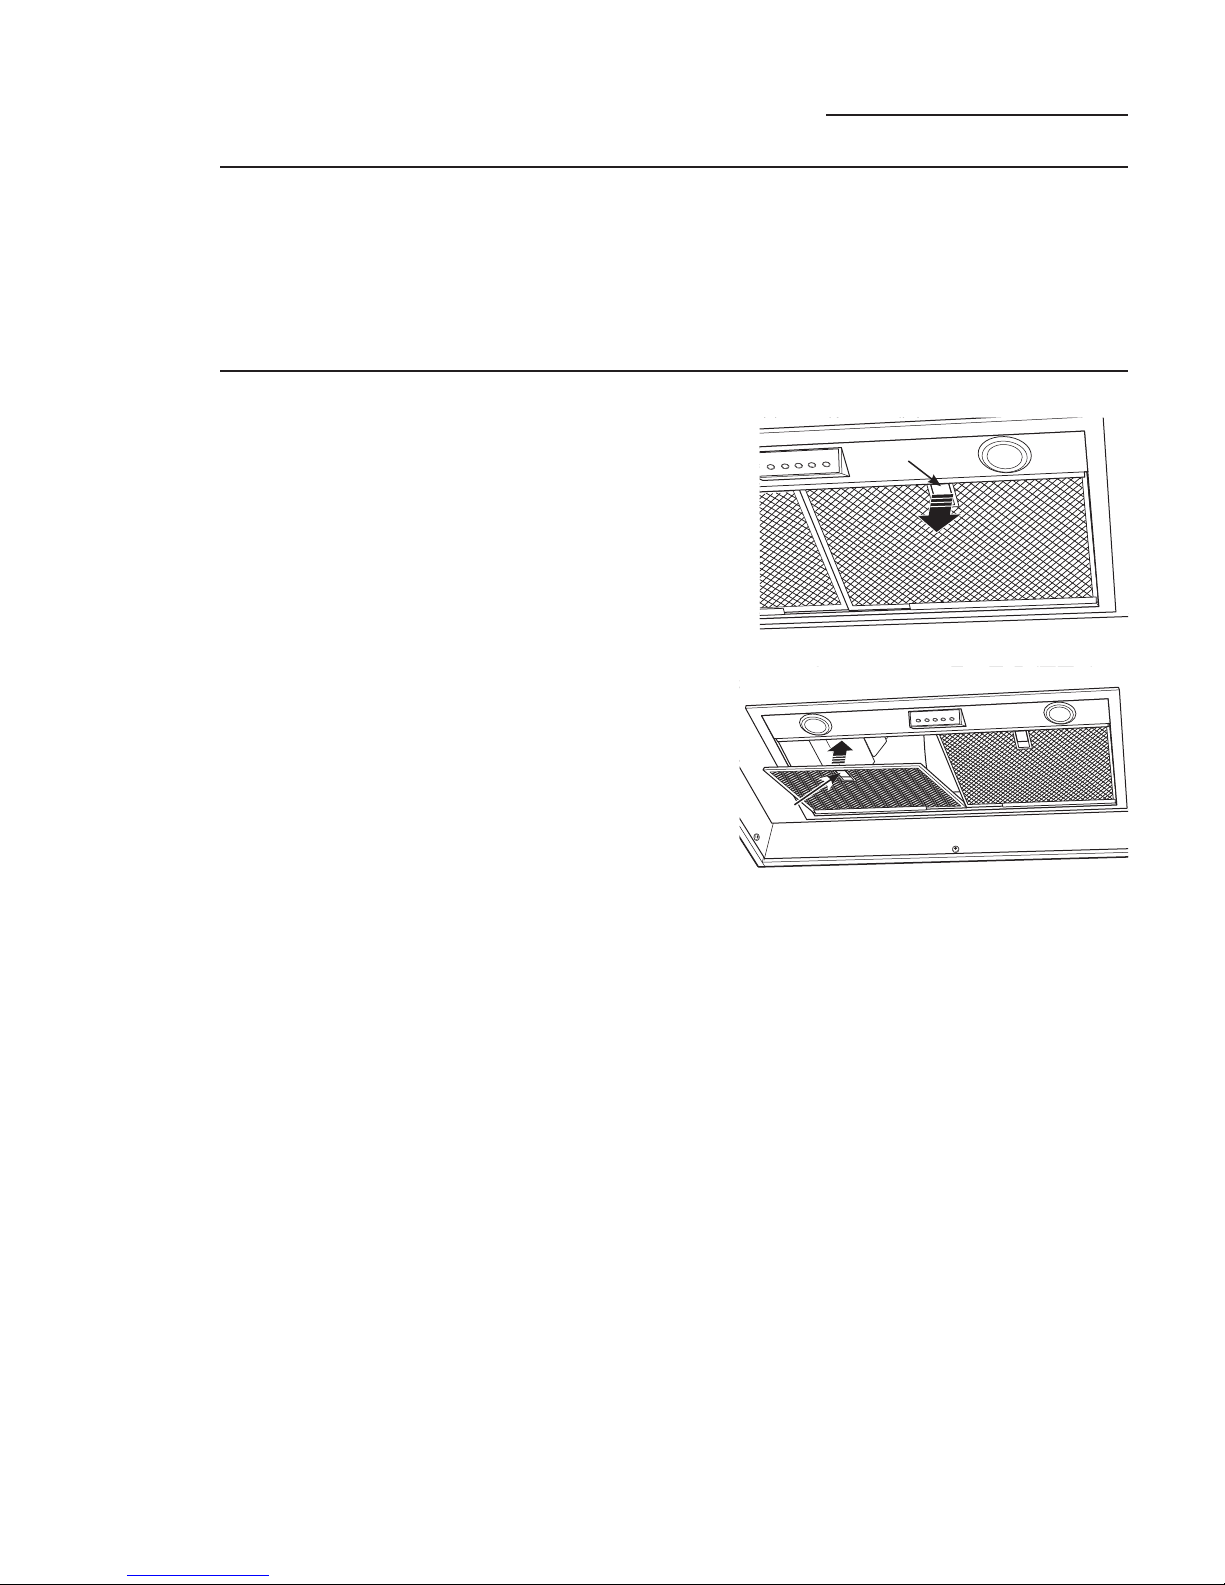
To remove:
Support the filter with one hand while pulling down
filter clip with the other. Pull the filter down and out.
To replace:
1. Tip the filter into the back tab slots and lift up.
2. While maintaining slight upward pressure on
filter, open clip and press into place with two
hands.
Clip
Clip
To clean, swish the filter in hot soapy water and
rinse in clean water or wash it in the dishwasher.
Do not use abrasive cleansers.
6
Care and Cleaning
Custom Hood Insert
Stainless
steel hood
surfaces
Light bulbs
Do not use a steel wool pad; it will scratch the
surface.
To clean the stainless steel surface, use warm
sudsy water or a stainless steel cleaner or polish.
Always wipe the surface in the direction of the
grain. Follow the cleaner instructions for cleaning
the stainless steel surface.
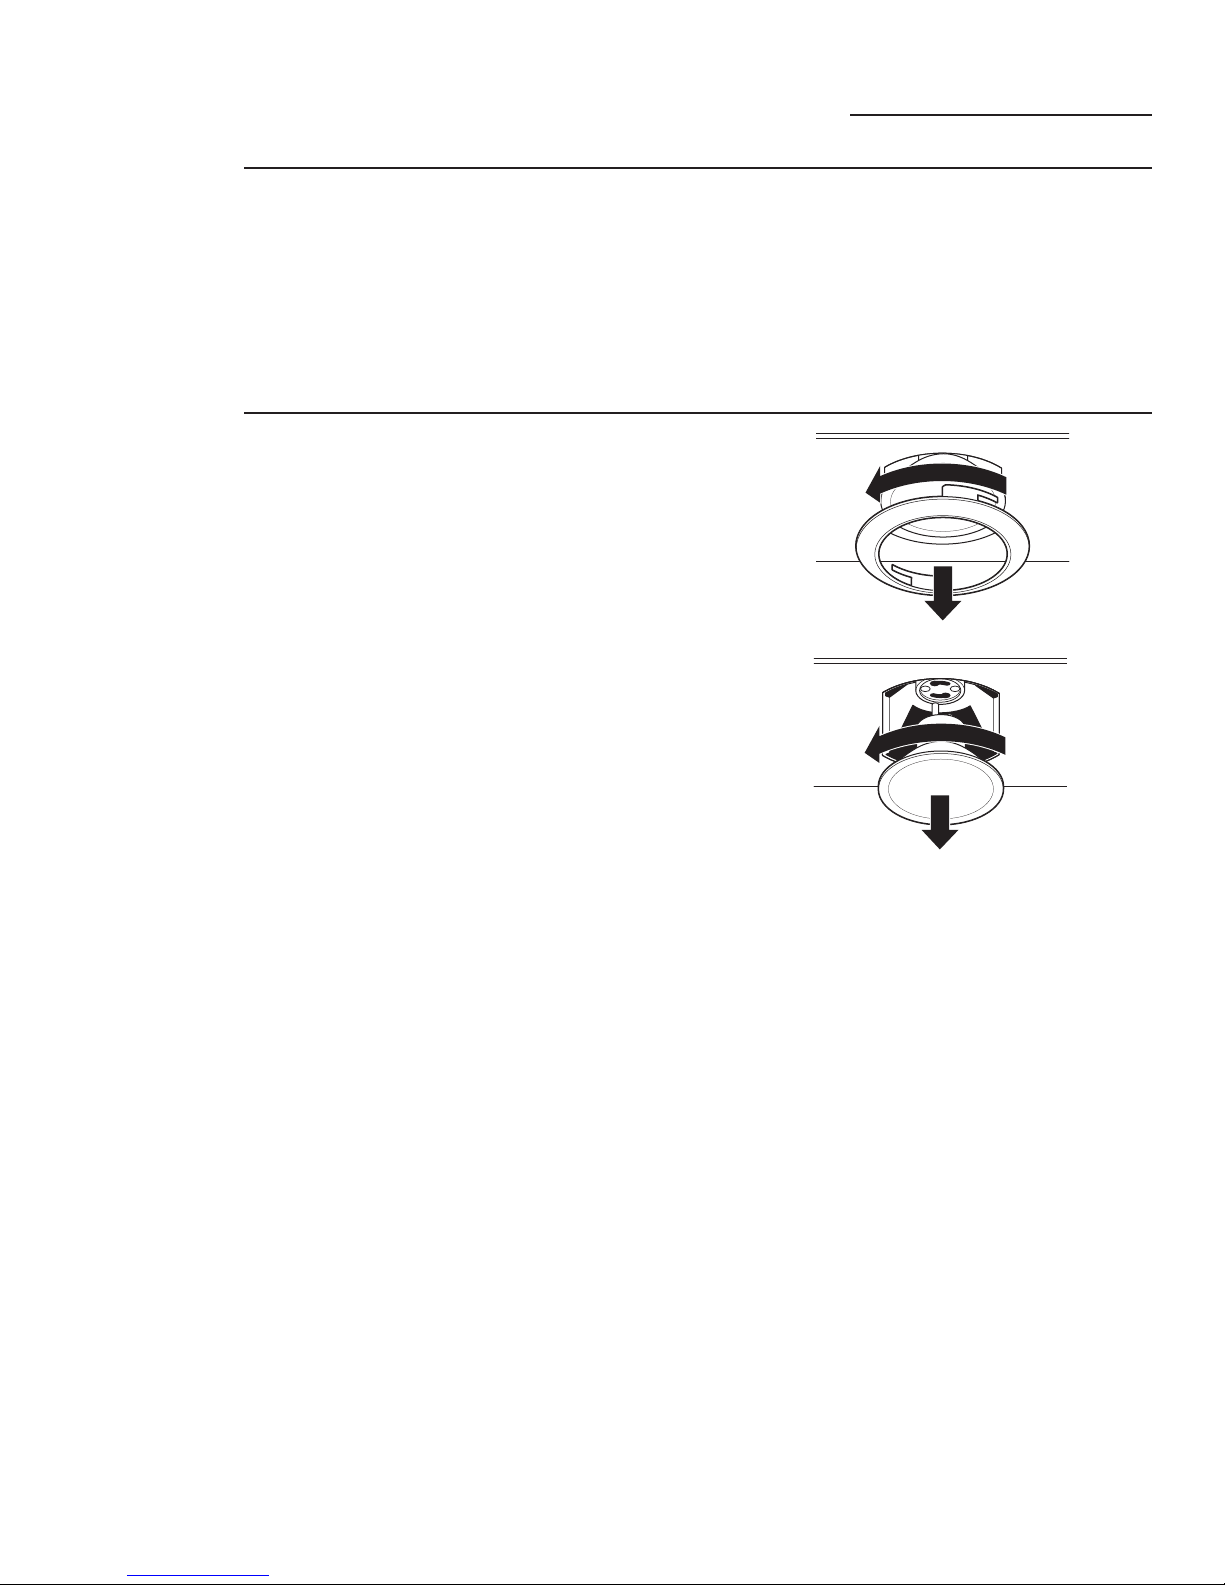
To change the light bulbs:
1. Grasp the outer trim ring and twist until reaching
the unlock position. Then pull the ring straight out.
2. Grasp the bulb and twist until reaching the unlock
position. Then gently pull the bulb straight out.
3. Replace with the same wattage, type and size
bulb. Wear gloves. Do not touch bulb with your
bare fingers.
These 120 volt, 50 watt halogen bulbs with a
GU10 base are available at specialty lighting
stores and home building centers.
4. Replace the outer trim ring by inserting the two
retaining tabs into the two tab slots, pressing the
ring flush with the surface of the hood insert and
twisting until reaching the lock position.
To inquire about purchasing stainless steel
appliance cleaner or polish, or to find the location
of a dealer nearest you, please call our toll-free
number:
National Parts Center 800.626.2002
monogram.com
7
The Problem Solver
Custom Hood Insert
Questions?
Use this
problem
solver!
PROBLEM POSSIBLE CAUSE
FAN AUTOMATICALLY • The Sensor feature will automatically turn the fan on at the
TURNS ON AND CAN MED setting if cooking temperatures become too hot. The fan
NOT BE TURNED OFF will stay on for a minimum of 3 minutes and will then turn off when
temperatures cool to an appropriate level.
FAN DOES NOT • A fuse may be blown or a circuit breaker tripped. Replace fuse or
OPERATE WHEN reset circuit breaker.
TURNED ON
FAN FAILS TO CIRCULATE • Check to be sure the metal grease filters are clean. Clean the metal
AIR OR MOVES AIR grease filters (see the Metal grease filters section). If cleaning
SLOWER THAN NORMAL the filters does not correct the problem, call for service.
• Sufficient makeup (replacement) air is required for exhausting
appliances to operate to rating. Check with local building codes,
which may require or strongly advise the use of makeup air. Visit
GEAppliances.com for available makeup air solutions.
)$1.((36*2,1* • The motor is probably overheating and turning itself off. Th is can
OFF AND ON be harmful to the motor. Check to be sure the filters are clean. If off
and on cycling continues, call for service.
LIGHT WILL NOT STAY • Use 120 volt, 50 watt halogen bulbs with a GU10 base and make sure
ON HIGH SETTING they are inserted securely. See the Light bulbs section.
THE HOOD CONTROLS • Disconnect power to the hood by removing the fuse or turning the
ARE NOT OPERATING circuit breaker off in the home fuse box. Wait 30 seconds to allow the
CORRECTLY hood controls to reset and then replace the fuse or move the circuit
breaker back on.
• The power disconnect switch inside the hood may be switched off.
Remove the metal grease filters and flip the switch on.
SEQUENTIAL PRESSES • It is normal for the light and fan buttons to cycle around through the
OF THE LIGHT OR FAN settings so that you can easily set the controls to the desired setting.
BUTTONS WILL
SOMETIMES CHANGE
THE SETTING FROM THE
LOWEST SETTING–TO OFF–
TO THE HIGHEST SETTING,
OR FROM THE HIGHEST
SETTING–TO OFF–TO THE
LOWEST SETTING
WHEN PRESSING THE • For your convenience, it is normal for the lights and fan to remember
POWER ON/OFF BUTTON their last setting when you press the Power On/Off button. If you
TO TURN ON THE LIGHT, want only the lights on, press the “FAN +” (or the “FAN –” ) button until
THE FAN COMES ON the fan is off. When you power the hood up next time, only the lights
INSTEAD will function.
8
Consumer Services
Custom Hood Insert
With the purchase of your new Monogram appliance,
receive the assurance that if you ever need information or
DVVLVWDQFHIURP*(ZH·OOEHWKHUH$OO\RXKDYHWRGRLVFDOO³
toll-free!
GE Answer
Center
®
800.626.2000
Monogram
Preferred
Service
800.444.1845
For Customers
With Special
Needs…
800.626.2000
Whatever your question about any Monogram major appliance, GE Answer Center® information
VHUYLFHLVDYDLODEOHWRKHOS<RXUFDOO³DQG\RXUTXHVWLRQ³ZLOOEHDQVZHUHGSURPSWO\DQG
courteously. GE Answer Center® service is open 8 a.m. to 10 p.m. EST Monday – Friday and
8 a.m. to 7 p.m. EST Satur day.
OR
Visit our Website at: monogram.com
A GE consumer service professional will provide expert repair service, scheduled at a time that’s
convenient for you. Many GE Consumer Service company- operated locations offer you service
today or tomorrow, or at your con venience (7 a.m. to 10 p.m. EST Monday – Friday, 8 a.m. to
6 p.m. EST Satur day and Sunday). Our factory-trained technicians know your appliance inside
DQGRXW³VRPRVWUHSDLUVFDQEHKDQGOHGLQMXVWRQHYLVLW
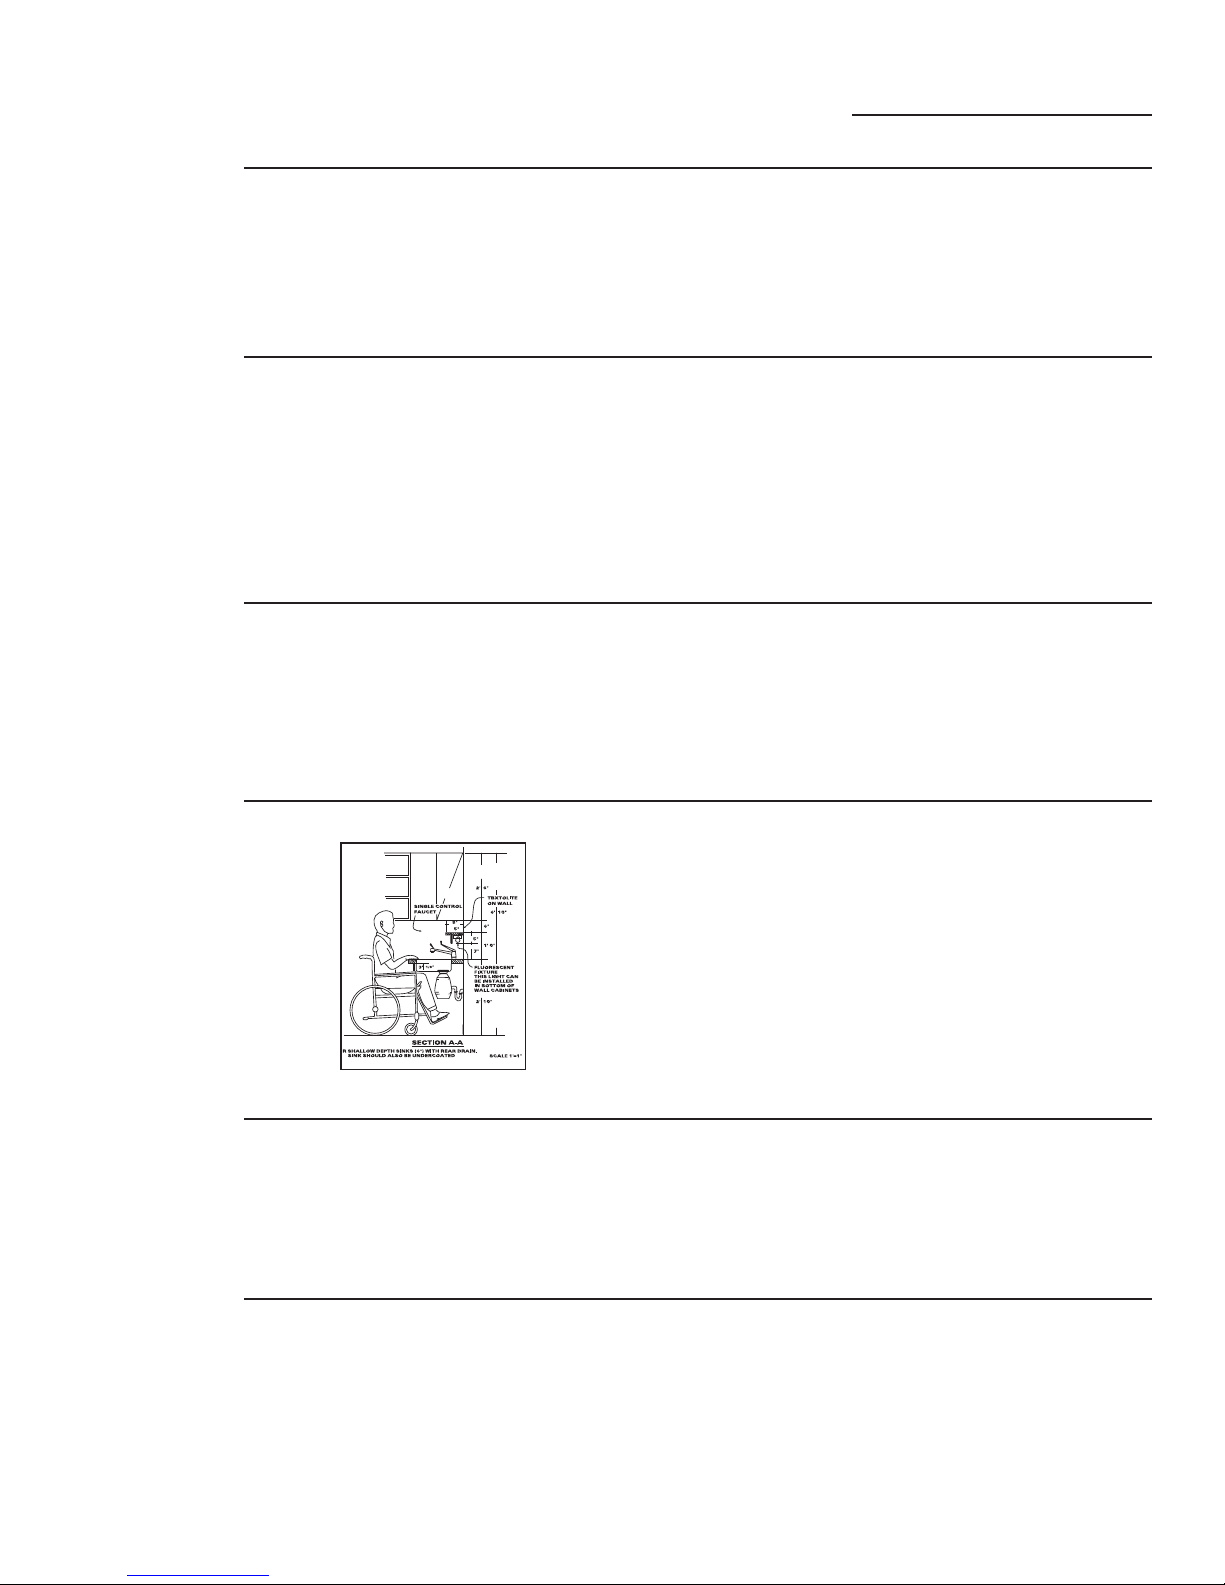
GE offers, free of charge, a brochure to assist in planning a barrier-free
kitchen for persons with limited mobility.
Consumers with impaired hearing or speech who have access to a TDD
or a conventional teletypewriter may call 800.TDD.GEAC (800.833.4322)
to request information or service.
Service
Contracts
800.626.2224
Parts and
Accessories
800.626.2002
You can have the secure feeling that GE Consumer Service will still be there after your
warranty expires. Purchase a GE contract while your warranty is still in effect and you’ll receive
a substantial discount. With a multiple -year contract, you’re assured of future service at today’s
prices.
Individuals qualified to service their own appliances can have parts or accessories sent directly
to their home. The GE parts system provides access to over 47,000 parts…and all GE Genuine
Renewal Parts are fully warranted. VISA, MasterCard and Discover cards are accepted.
User maintenance instructions contained in this manual cover procedures intended to be
performed by any user. Other servicing generally should be referred to qualified service
personnel. Caution must be exercised, since improper servicing may cause unsafe operation.
9
Warranty
Custom Hood Insert
YOUR MONOGRAM HOOD WARRANTY
Staple sales slip or cancelled check here. Proof of original
purchase date is needed to obtain service under warranty.
WHAT IS
COVERED
WHAT IS NOT
COVERED
LIMITED ONE-YEAR WARRANTY
For one year from date of original purchase, we will provide, free of charge, parts and
service labor in your home to repair or replace any part of the hood that fails because of a
manufacturing defect.
This warranty is extended to the original purchaser and any succeeding owner for products
purchased for ordinary home use in the 48 mainland states, Hawaii and Washington, D.C. If the
product is located in an area where service by a GE Authorized Servicer is not available, you may
be responsible for a trip charge or you may be required to bring the product to an Authorized
GE Service Location for service. In Alaska the warranty is the same except that it is LIMITED
because you must pay to ship the product to the service shop or for the service technician’s
travel costs to your home.
All warranty service will be provided by our Factory Service Centers or by our authorized
Customer Care® servicers during normal working hours.
Should your appliance need service, during warranty period or beyond, call 800.444.1845.
Please have your serial number and model number available when calling for service.
• Service trips to your home to teach you
how to use the product.
• Replacement of house fuses or resetting
of circuit breakers.
• Incidental or consequential damage
caused by possible defects with this
appliance.
• Replacement of the replaceable filters.
• Damage to the product caused by
accident, fire, floods or acts of God.
• Damage caused after delivery.
• Failure of the product if it is used for
other than its intended purpose or used
commercially.
• Improper installation.
If you have an installation problem,
contact your dealer or installer. You
are responsible for providing adequate
electrical, gas, exhausting and other
connecting facilities as described in the
Installation Instructions provided with the
product.
• Product not accessible to provide required
service.
• Installation or service for a makeup
(replacement) air system.
(;&/86,212),03/,(':$55$17,(6³<RXUVROHDQGH[FOXVLYHUHPHG\LVSURGXFWUHSDLU
as provided in this Limited Warranty. Any implied warranties, including the implied
warranties of merchantability or fitness for a particular purpose, are limited to one
year or the shortest period allowed by law.
Some states do not allow the exclusion or limitation of incidental or consequential damages, so
the above limitation or exclusion may not apply to you. This warranty gives you specific legal
rights, and you may also have other rights which vary from state to state.
To know what your legal rights are in your state, consult your local or state consumer affairs
office or your state’s Attorney General.
10
:DUUDQWRU*HQHUDO(OHFWULF&RPSDQ\/RXLVYLOOH.<
 Loading...