

Page 1
conten~
I
ApplianceRegistration
BaseGrille
Care and Cleaning
Condenser
ConsumerServices
Door SwingOption
I
Energy-SavingTips
Food StorageSuggestions
StorageTimes
Ice Travs
19
U-15
2
9
9
9
4
5
5
8
Modeland SerialNumbers 2
ProblemSolver
SafetyInstructions
Shelves
StorageDrawers
Drawer&Cover Removal 7
TemperatureControl
Vacation& MovingTips
Warranty
WaterFilter Accessory
10,11
2,3
6,7
Back Cover
useandcareof
7
4
16
16
Icemaker
Icemaker Accessory Kit
Installation
AdapterPlug
Clearances
Electrical Requirements
Extension Cord
Grounding
Location
RollersancILevelingLegs 4
W~tcrSupply to Icemaker 4
LightBulb Replacement
8
16
3,4
3
4 How to Reversethe
3
3,4
3,4
4
9
Door swiIlg
GE Answer Center”
800.626.2000
U-15
u
I
Page 2
Readthisbookcarefu~ly.
It is intendedto help you operate
and maintain your newrefrigerator
properly.
Keep it handy for answersto your
questions.
If you don’t understandsomething
or nee more help, write (including
your phone number):
Consumer Affairs
Hotpoint
Appliance Park
Louisville, KY 40225
Writedownthemodeland
sefial numbers.
You’llsee them on a label at the
upper left side of the fresh food
compartment.
These numbers are also on the
Consumer Product Ownership
Registration Card that came with
your refrigerator.
Before sending in the registration
card, please write these numbers
here:
Model Number
Serial Number
Usc these model and serial
numbers in any correspondence
or service calls concerning
your refrigerator.
If yo~l~*eceiveda damageti
refrigerator, immediately contact
the deaier (or bui]der) that sold you
tllcrefrigerator.
Save time and money. Before you
request service, check the
Problem Solver in the back of this
~Fl]i~fe.Ii lists causes of min(lr
~
OJ>Cratill~])rOb]CIllSthat yOLICLln
correct yourself.
Toobtain service,see the
ConsumerServicespage in the
backof thisguide.
We’reproud of our serviceand
wantyou to be pleased.If for some
reason you are not happy with the
serviceyoureceive,hereare three
stepsto follow for further help.
FIRST,contactthe peoplewho
servicedyou appliance.Explain
why you are not pleased.In most
cases, this will solvetheproblem.
NEXT, if you are stillnotpleased,
write all the details-including
yourphone number—to:
Manager,ConsumerRelations
Hotpoint
Appliance Park
Louisville,KY 40225
FINALLY, if yourproblem is still
notresolved, write:
Major ApplianceConsumer
Action Panel
20 North WackerDrive
Chicago, IL 60606
A WAWING–When
using this appliance, always
exercise basic safety precautions
including the following:
6use this
intendedpurpose
in this Use and Care Guide.
s This
properlyinstalledinaccordmce
tith thehstallation
Instructionsbeforeit is used.
See
*Never unplug
bypullingonthe powercord.
Always grip plug firmly and pull
straight out from the outlet.
* Repairorreplaceimmediately
311electricservicecordsthat
havebecomefrayedorothertise
dmaged, Do
shows cracks or abrasion darnage
along its length or at either the
plug or connector end.
e~~ ~~t a~~ow~~~~~~~~~~
climb,standorhangonthe
shelvesin the refrigerator.
could damage the refrigerator and
seriously injure themselves.
~Ifyourrefrigeratorhas an
icemaker9do net placefingers
or hands on the automatic
icemakingmechanismwhile
the refrigeratorispluggedin.
This will help protect you from
possible il~jury.It will also
prevent interference with the
moving parts of’the ejector
mechanism, or with the heating
element that releases the cubes.
applianceOdyforit$
as described
refrigeratormustbe
the grounding irtstructions,
yourrefrigerator
not use a cord that
They
Page 3
Im@lIationRequiremen@—
* Do not store or use gasoline
r otherflammablevaporsand
*
liquidsin the vicinityof thisor
anyotherappliance.
Don9t refreeze frozen foods
~
which
The United States Department of
Agriculture in Home and Garden
Bulletin No. 69 says:
“... You may safely refreeze
frozen foods that have thawed if
they still contain ice crystals or if
they are still cold—below 40”F.
“.. .Thawed ground meats, poulb~
or fish that have a~~?yoff-odor or
off-color should not be refrozen
and should not be eaten. Thawed
ice cream should be discarded. If
the odor or color of any food is
poor or questionable, get rid of it.
The food may be dangerous to eat.
“.. .Even partial thawing and
~ refreezing reduce the eating quality
—
of foods, particularly fruits,
- ~egetab!es and prepared foods.
s= 1Deeating quality of red meats is
affected less than that of many
other foods. ~~serefrozen foods
as soon as possible to save as [much
of their eating quality as you can.”
havethawedcomp~etely.
woRTmT.eo
PleaseReadCarefuuye
Howtoconnect
electricity
ForpersomI safety,
thk appBiancemwtbe
properly grounded.
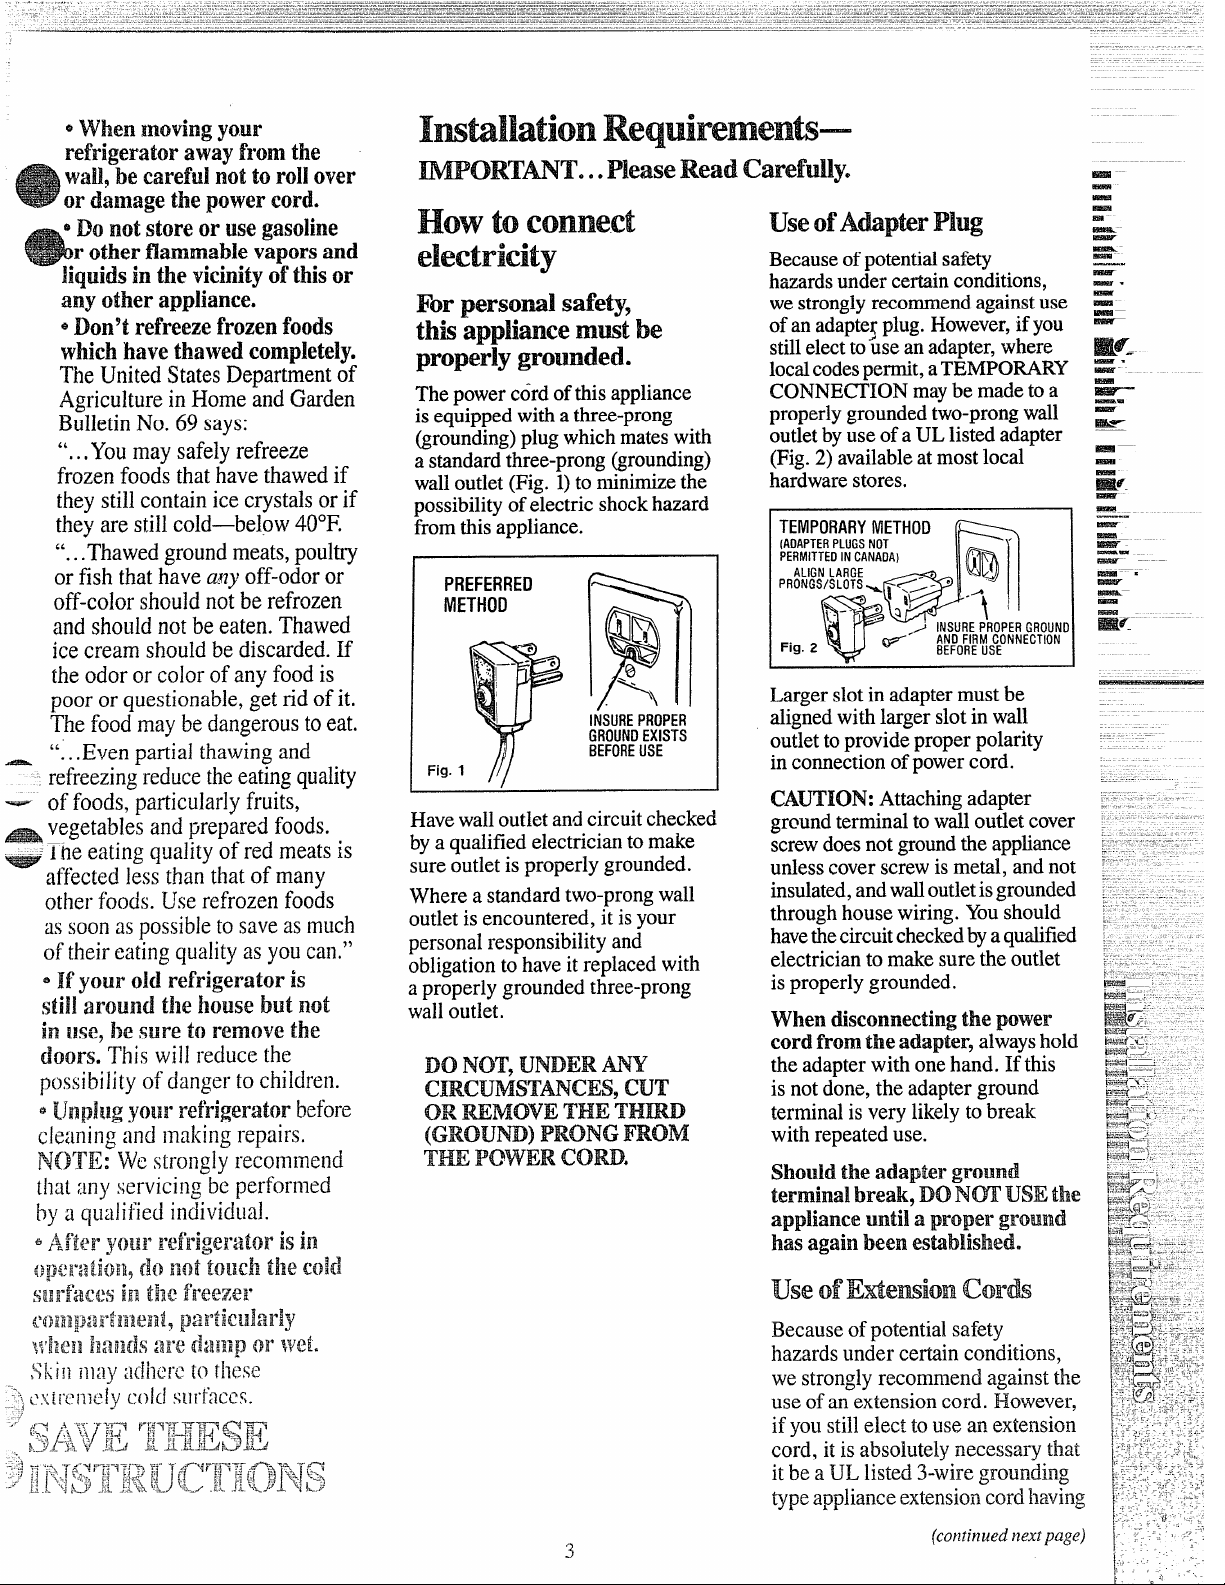
The powercordofthisappliance
isequippedwithathree-prong
(grounding)plugwhich mateswith
a standardthree-prong(grounding)
walloutlet(Fig. 1)to minimizethe
possibilityofelectric shockhazard
from this appliance.
PREFERRED
METHOD
Fig. 1 ///
Havewalloutletandcircuitchecked
bya qualified electrician to make
sure outlet is properly grounded.
Where a standard two-prongwall
outletis encountered, it is your
personal responsibility and
obligationtohaveitreplaced with
a properly grounded three-prong
walloutlet.
DO NOT,
um~~my
\
QQ
a
%
~,
R
INSUREPROPER
GROUNDEXISTS
BEFOREUSE
cmcuMsTmcEs,CUT
ORm~ov~THE~~m
(~~oum)PRONGFROM
~mPowERtom.
useofA&pkr PB~
Becauseof potential safety
hazardsunder ce~in conditions,
westronglyrecommendagainstuse
ofan adapte~plug.However,ifyou
stillelecttouse an adapter,where
localcodespermit, aTEMPOWRY
CONNE~ION maybe madetoa
properlygroundedtwo-prongwdl
outletbyuseofa UL listed adapter
(Fig.2)availableatmostlocal
hardwarestores.
TEMPORARYMETHOD
(ADAPTERPLUGSNOT
PERMITTEDINCANADA)
ALIGNLARGE
‘RoNGs’sLOT:+! y;: 0 -:
\----- : ~ ‘
a
INSUREPROPERGROUND
.>
ANDFIRMCONNECTION
Fig.2
v
w
BEFOREUSE
Larger slot in adapter must be
alignedwith larger slotinwall
outlettoprovideproper polarity
in comection ofpowercord.
CA~ION: Attachingadapter
groundterminalto w~l oufietcover
screwdoesnot groundthe appfimce
unlesscoverscrew is meti, andnot
insulated,andwalloutletisgrounded
throughhousewiring. Youshould
havethecircuitcheekedbya qualified
electrician to make sure the outlet
is properly grounded.
when &sconneeting the power
cord from the
adapter?alwayshold
the adapter with onehand. If this
is not done, the adapter ground
terminal is very likelyto break
with repeated use.
$hould
theadapterground
terminalbreak,DON~ USEthe
appliance Mntilla proper ground
hats
againbeenestibiished.
.
@
\
Because of potential safety
hazards under certain conditions,
we strongly recommend against the
use of an extension cord. However,
if you still elect to use an extension
cord, itisabsolutely necessary that
it be a UL listed 3-wire grounding
typeapplianceextensioncord l]aving
3
(contint[edIIextpage)
Page 4
a groundingtype plugandoutlet
andthattheelectricalratingof the
cord be 15amperes (minimum)and
120 volts. -
Therefrigeratorshouldalways
beplugg;d into its own -
individualelectricaloutIet—
(115volt,60 Hertz, singlephase
AC). This is recommendedfor
bestperformanceand toprevent
overloadinghouse wiring circuits,
whichcouldcause a firehazard
from overheatingwires.
.Refrigeratorhcation
Do not installrefrigeratorwhere
temperaturewi~lgobelow6t)°F.
becauseit will notrun ofien enough
to maintainproper temperatures.
Do instill it on a floorstrong
enoughto support a fully loaded
refrigerator.
Also seeEnergy-SavingTips
regardinglocation.
clearances
Allowthe followingclearances for
ease ofinstallationand proper air
circulation.
Sides...............3/4°
Top . . . . . . . . . . . . . . . . ..l”
Back . . . . . . . . . . . . . . . ..l”
If your refrigerator has an
icen]akcr,or if you plan to add an
iccmaker later, the iccmaker will
haveto be connected to a cold
water line, A water supply kit
containing copper tubing, shut-off
valve, fittings and instructions is
availableatextra cost from your
dctile~>.There s~~ouldbe sufficie~lt
tubing for the icemakcr from the
cold water supply to allow moving
[he refrigerator out from tile wall
sevcrai feet (approximately 8 feet
of 1/4”copper tubing in three
[(l-inchdiameter coils).
hveling legsneareach front
corner ofthe refrigeratorare
adjustable.They firmly position
the refrigeratorandpreventitfrom
movingwhen the doorsare opened.
Levelinglegsshould be set so the
frontoftherefrigerator is raised
just enoughthatthedoors close
easilywhen openedabouthalfway.
Turn the
levelinglegs
clockwise
to raisethe
refrigerator,
counterclockwise
to lowerit.
Rollersnextto the levelinglegs
enableyoutomove the refrigerator
awayfrom the wallforcleaning.
Turn the legs counterclockwise
untilthe weightoftherefrigerator
istransferred fromthem to the
rollers.After rollingtherefrigerator
back intoplace, turn the legs
clockwise until the legs againbear
the weight of the refrigerator.
m
o
d
operating
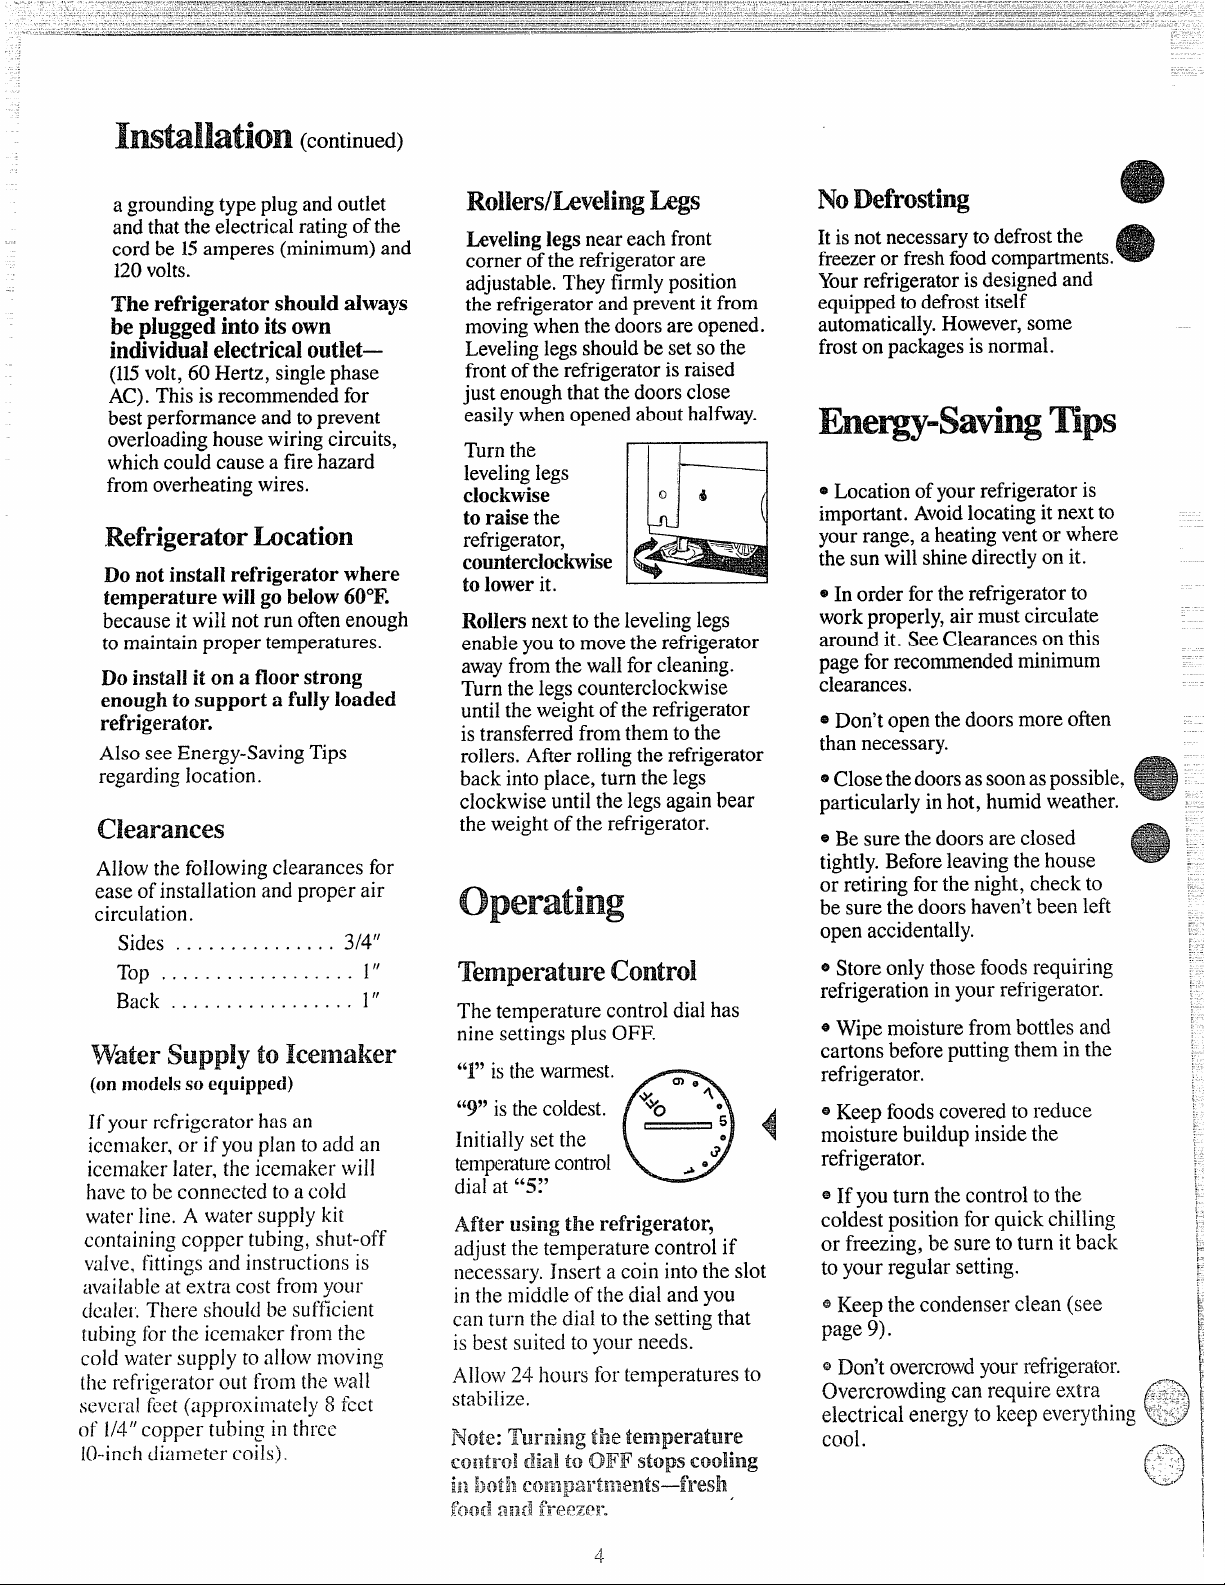
Temperaturecontrol
The temperature control dial has
nine settingsplus OFF.
“1”isthewa~mest.
“9” isthecoldest.
Initially set the
temperaturecontrol
dial at “5?’
Afterusingthe refrigerator,
adjust the temperature control if
necessary. Insert a coin into the slot
in the middle of the dial and you
can turn the dial to the settingthat
is best suited to your needs.
Allow 24 hours for temperatures to
stabilize,
F40te:h~fiing tile temperature
Coiltro!diai to OFF stops cooling
iii i}ot!}c4)E22paF$323&.nts—fresh
f~~{]Q:]{]fy~~~epn
.
NoDefrosting
Itisnotnecessaryto defrostthe
freezeror freshfoodcompartments.
Yourrefrigeratorisdesignedand
equippedto defrostitself
automatically.However,some
frostonpackagesis normal.
~Locationofyourrefrigeratoris
important. Avoidlocatingitnext to
yourrange,a heatingventor where
the sun will shinedirectly on it.
~Inorder for the refrigeratorto
workproperly,airmustcirculate
around it. SeeClearanceson this
pagefor recommendedminimum
clearances.
~Don’t open thedoors more often
than necessary.
@Closethedoorsas soonaspossible,
particularly inhot, humid weather.
~Besurethe doors are closed
tightly.Beforeleavingthe house
or retiring forthe night, check to
be sure the doors haven’tbeen left
open accidentally.
~Storeonly those foods requiring
refrigeration in your refrigerator.
~Wipemoisturefrom bottles and
cartons beforeputting them in the
refrigerator.
@Keep foodscoveredtoreduce
moisture buildup inside the
refrigerator.
~If you turn the control to the
coldest position for quick chilling
or freezing, be sure to turn it back ~
to your regular setting.
@Keep the condenser clean (see
page 9).
~ Don’t overcrowdyourrefrigerator.
Overcrowdingcan reqt~ireextra ~~;.:.
electrical energy to keep everything “’:~~. ~
cool.
(1 I
.—
i
1.
~
\
}
i’
[
!
41.
Page 5
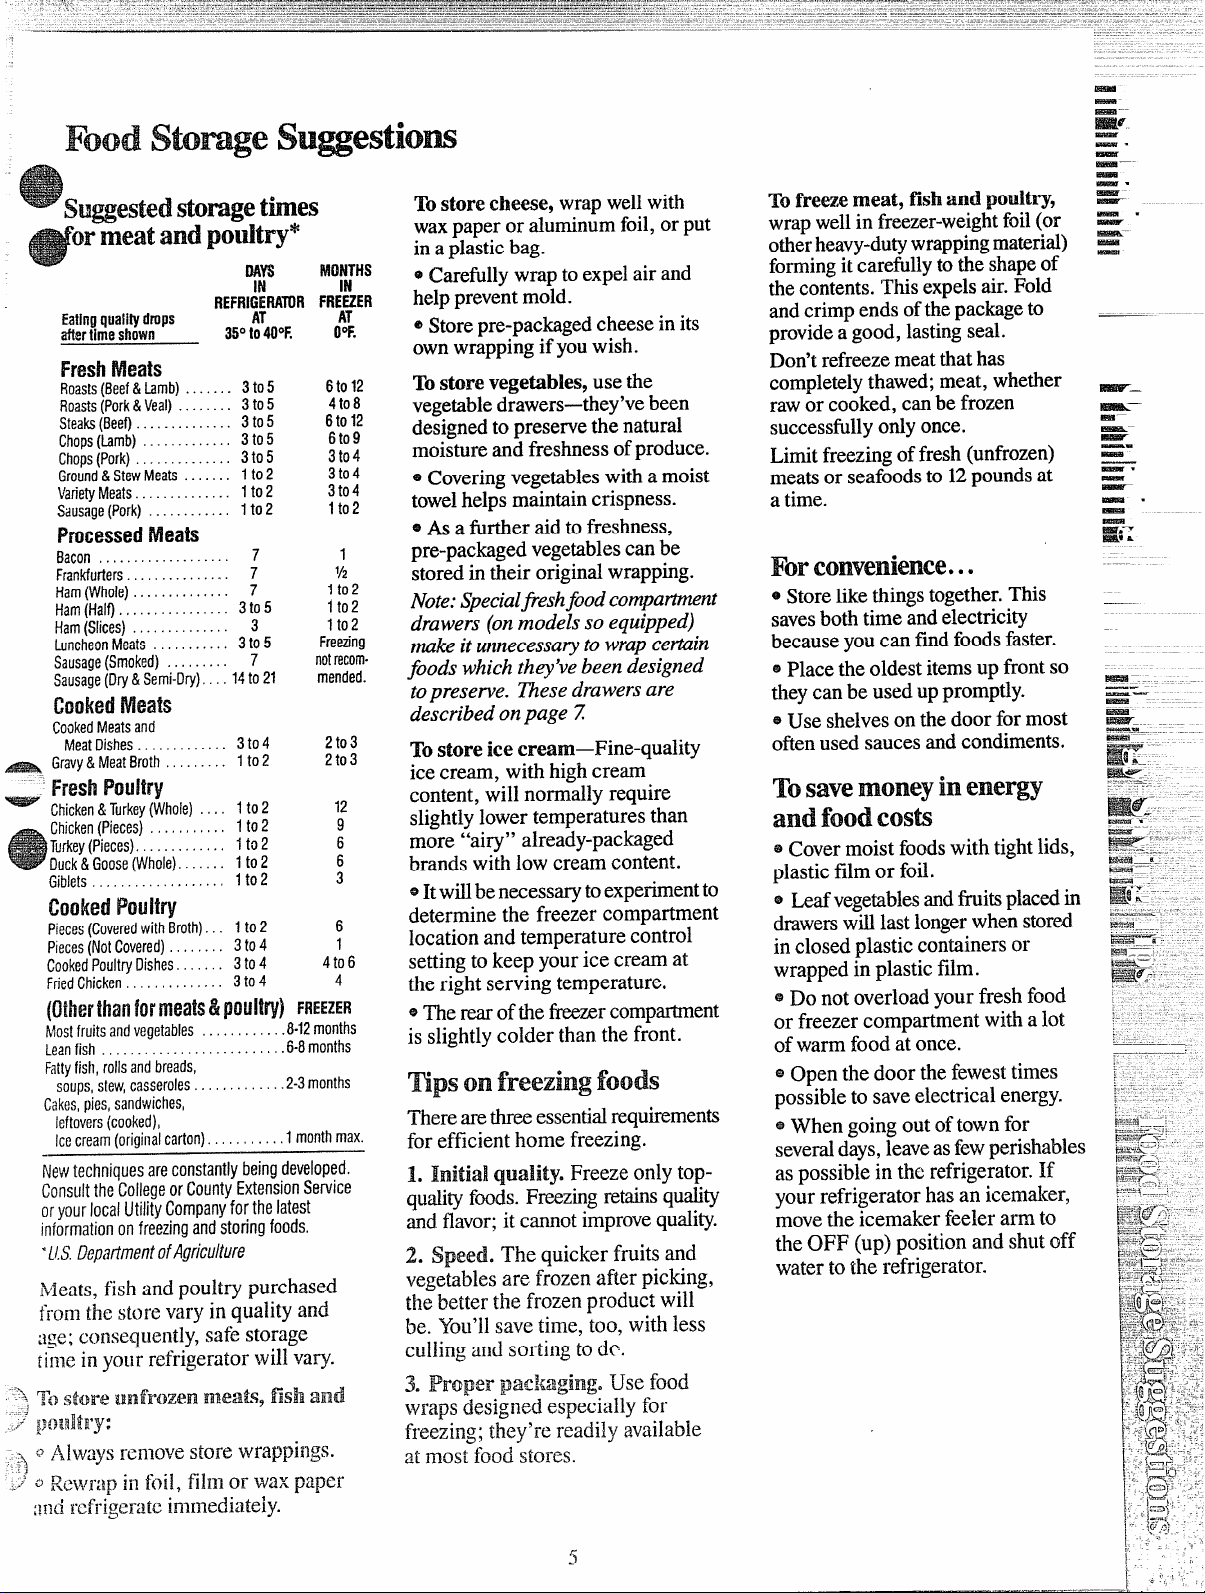
Swested Somge thes
or
meatandpotdtry*
Mvs
REFf?le~MTUR FREi~ER
FreshMeats
Roasts(Beef&Lamb) . ... ... 3 to5
Roasts(Pork&Veal) . ... ... . 3 to5
Steaks(Beef). ... ... . .. ... . 3t05
Chops(Lamb) ... ... . .. . ... 3t05
Chops(Pork) ... . .. . .. . ... . 3t05
Ground&Stew Meats . . ... .. lto2
VarietyMeats. . ... ... . .. . .. lto2
Sausage(Pork) . ... . ... ... . lto2
ProcessedMeats
Bacon . ... ... . ... ... ... . . 7
Frankfurters... .... ... . .. .. 7
Ham(Whole) . .. . . .. . ... ... 7
Ham(Half) ... ... . ... . ...-. 3:5
Ham(Slices) ... . ... . .. . ...
LuncheonMeats . . ... ... . .. 3~5
Sausage(Smoked) . .. . ... ..
Sausage(Dry &Semi-Dry) . ... 14to 21
~00~~~
CookedMeatsand
Gravy&Meat Broth .. . ... . .. lto2
Meals
MeatDishes ... . ... . .. . .. 3t04
FreshPOU[t?y
Chicken&Turkey(Whole) ... . 1to 2
Chicken(Piecej : . ... . ... . lto2
Turkey(Pieces)... ... . ... . .. lto2
Duck& Goose(Whole). . .. . .. 1to 2
Giblets.. .... . ... . ... ... . . lto2
cooked Pouli~
Pieces(Coveredwith Broth)... 1to2
Pieces(NotCovered). ... . ... 3 to 4
CookedPoultryDishes... ... . 3 to 4
FriedChicken. . .. . . ....t... 3t04
(Olh~rthaflf0rm6fl!s&pOti!t~)FREEZER
Mostfruits and vegetables .... . .... ...8-12 months
Leanfish . ... . . ... . .... ... . ... . . . ..6-~ months
Fattyfish, rollsandbreads,
soups,stew,casseroles. . .. . . ... . . ..2-3 months
Cakes,[lies,sandwiches,
Newtechniquesareconstantlybeingdeveloped.
ConsulttheCollegeorCountyExtensionService
oryourlocalUtilityCompanyfor thelatest
information on freezingandstoring foods.
+[1.$.
Rleats, fish and poultry purchased
from the store vary in quality arid
;~ge;conseql]ent]y,safe storage
t~lleinyour refrigerator will vary.
“-~~,Tostore ilglfr{lzenEneats$fisiland
,#
~:~)il~~itry:
~ ~~,41waysremove store wrappi~lgs.
.j
‘ QRewr:ipin f{?i[,film
-‘F
:~ndrefrigerate immedi:]tely.
(cooked),
leftovers
Icecream(originalcarton)... . ...... .1monthmax.
DepdtimenfofAgriculture
or waxpaper
MONTHS
Frea”ng
notrecom-
mended.
4t06
.. .
0%.
6to12
4t08
6to12
6t09
3t04
3t04
3t04
lto2
1
I/*
lto2
lto2
lto2
2t03
2t03
12
9
6
:
6
1
4
Tostorechine, wrap wellwith
waxpaper or durninum foil, or put
in a plasticbag.
@Carefullywrapto expelair and
helppreventmold.
@Storepre-packagedcheese in its
ownwrappingifyouwish.
Tostorevegetables,use the
vegetabledrawers—they’vebeen
designedtopreservethe natural
moistureand freshness ofproduce.
@Coveringvegetableswith a moist
towelhelps maintaincrispness.
@& a further aid to freshness,
pre-packagedvegetablescan be
storedintheir originalwrapping.
Note:Specialfieshfood compartment
drawers (onmodels so equipped)
mak itunmeessarytowrapce~in
foods whichthey’vebeen designed
topreserve. ~ese drawers are
describedonpage Z
To store ice cr@m—Fine-quality
ice cream, with high cream
content, will normally require
slightlylowertemperatures than
more “airy” already-packaged
brands with low cream content.
@Itw~ benecessarytoexpefient to
determine the freezer compartment
location and temperature control
settingto keep your ice cream at
the right serving temperature.
~me ~ of&efreezercompartment
is slightlycolder than the front.
mps on freezing foods
Therearethreeessentialrequirements
for efficient home freezing.
1. Initial quality. Freeze only topqutity fds. Freezingretainsquality
and flavor;it cannot improvequality.
2. Speed. The quicker fruits and
vegetablesare frozen after picking,
the better the frozen product will
lge.You’llsave time, too, with less
culling and sorting to de.
3’ Proper paekagillg. use food
wraps designed especially for
freezing; they’re readily available
at
mOSf food stores.
Tofreezemeat, fishand poult~,
wrap wellin freezer-weightfoil (or
other heavy-dutywrappingmaterial)
formingit carefu~ytothe shapeof
thecontents.This expelsair.Fold
andcrimp ends ofthepackageto
provide a good, lastingseal.
Don’trefreezemeatthat has
completelythawed; meat, whether
rawor cooked, canbe frozen
successfullyonly once.
Limitfreezingoffresh(unfrozen)
meatsor seafoodsto 12poundsat
a time.
Forconvenience.● o
~Storelike thingstogether.This
savesboth time andelectricity
becauseyoucan findfoodsfaster.
~Placethe oldest itemsup front so
theycan be used up promptly.
~Use shelvesonthe door for most
oftenused sauces and condiments.
Tosavemoneyinenergy
andfoodc@s@
@Covermoist foodswith tightlids,
plastic film or foil.
@Leafvegetablesandtiits placedin
drawersWNlast longerwhen stored
in closed plastic containers or
wrapped in plastic film.
@Do not overload your fresh food
or freezer compartment with a lot
ofwarm food at once.
@Open the door the fewesttimes
possibleto save electrical energy.
@When going outoftown for
severaldays,leaveasfewperishables
as possible in the refrigerator. If
your refrigerator has an icemaker,
movethe icemaker feeler arm to
the OFF (up) position and shut off
water to the refrigerator.
5
Page 6
shelves
..—
:J,.
-,:
,.
‘-:
‘::
F-
-
:,
,
~.
~-
1’
Shelfsupportsatvariouslevels
enableyou to repositionthe shelves
tobetteraccomnlodateyour variable
inventoryof refrigeratedfoods.
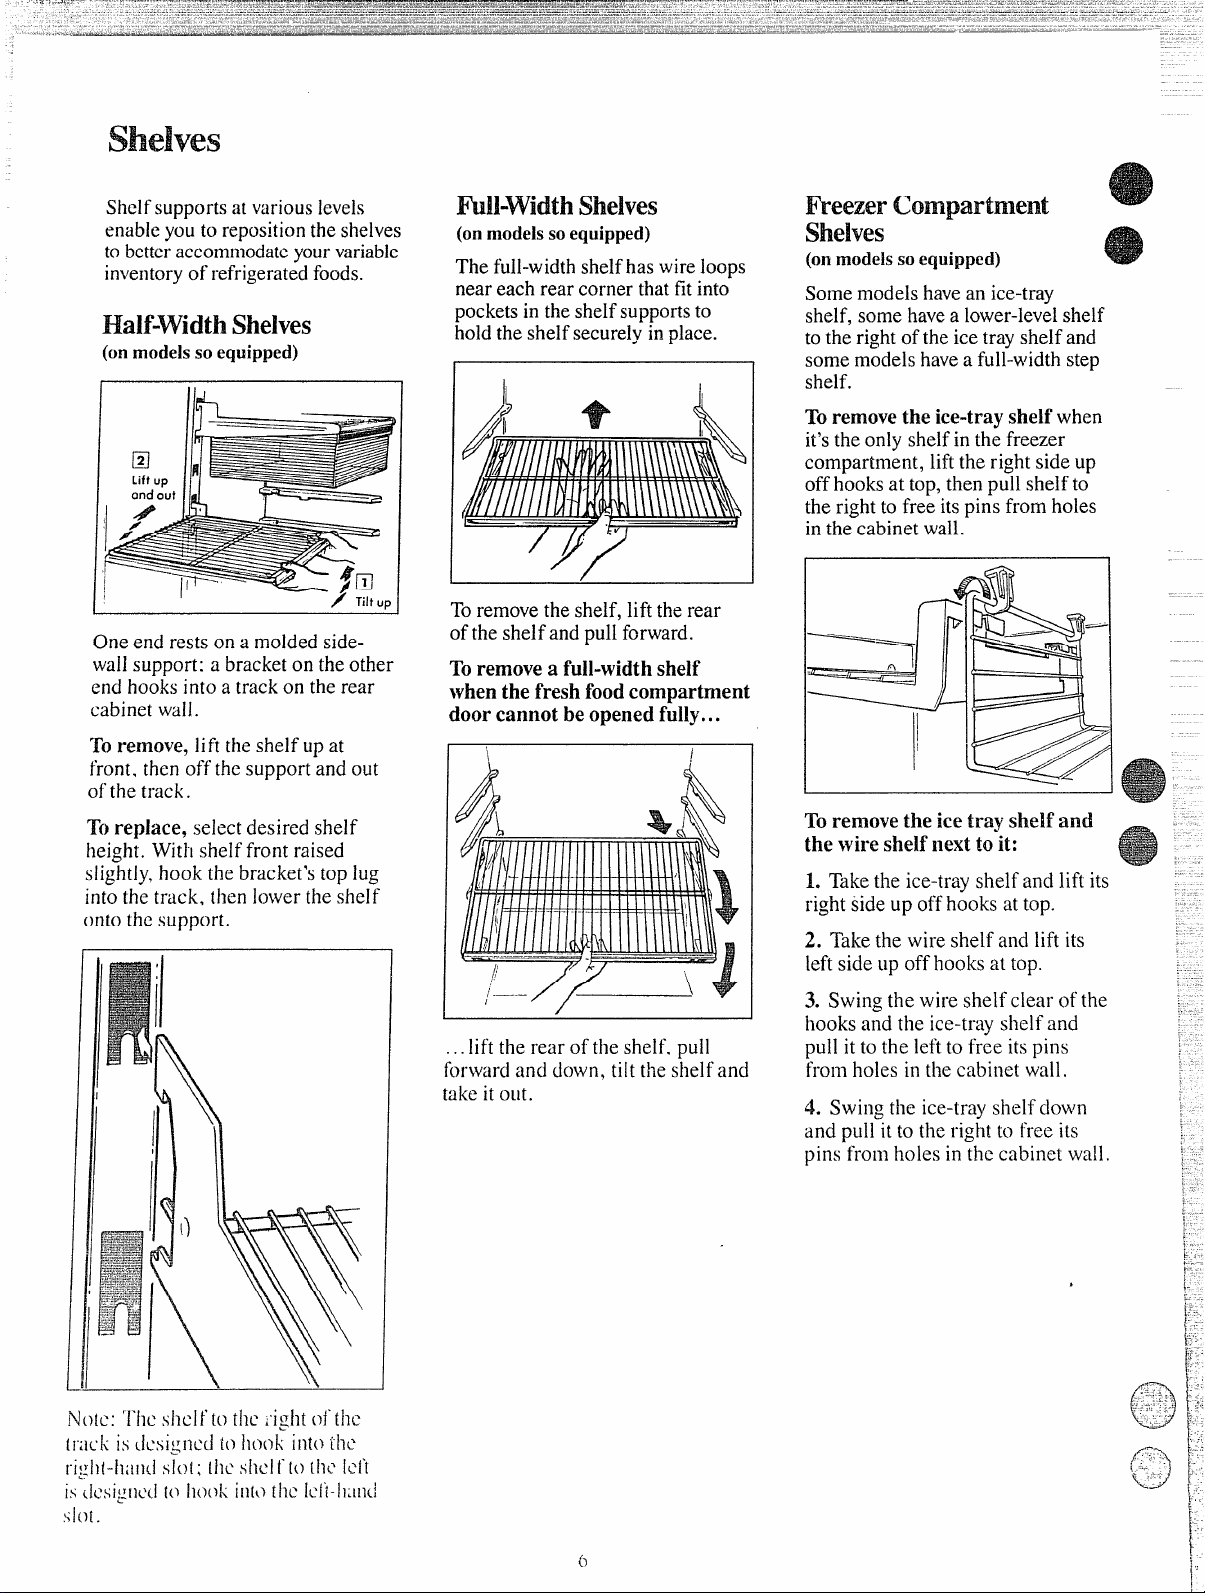
Half-Widtl]SheIves
modelssoequipped)
(on
11%1
I
One end rests on a molded side-
wailsupport: a bracketontheother
end hoois into a track on the rear
cabinet wall.
To remove, Iift the shelf up at
front, then off the support and out
ofthe track.
Toreplace, select desired shelf
height. With shelf front raised
slightly,hook the bracket’stop lug
intothe track, thenlowertheshelf
onto the support.
TiltUp
~
fill-Width Shelves
(onmodelssoequipped)
The full-widthshelfhaswireloops
neareachrear cornerthatfitinto
pocketsin theshelfsupportsto
holdtheshelfsecurelyinplace.
Toremovethe shelf, lifttherear
oftheshelfandpullforward.
Toremovea full-widthshelf
whenthefreshfoodcompartment
doorcannot be opened fully...
FreezerComoartn~ent
shelves
(onmodelssoequipped)
Somemodels havean ice-tray
.,. . . . . . .,-.
shelf, some have a lower-level shell
totherightofthe ice tray shelf and
somemodelshavea full-widthstep
shelf.
Toremovethe ice-trayshelf when
it’sthe only shelfinthe freezer
compartment, liftthe rightsideup
offhooks at top, then pull shelf to
therightto free itspinsfromholes
inthecabinetwall.
Toremovethe ice tray shelf and
the wire shelf next to-it:
1. Takethe ice-trayshelf aridlift its
right side up offhooks at top.
2. Takethe wire shelf and lift its
leftsideup off hooks at top.
‘
-.
.liftthe rear of the shelf. pull
fjrward and down, tilt the shelf and
take it out.
3. Swing the wire shelf clear of the
hooksand the ice-tray shelfand
pull it to the left to free its pins
from holes in the cabinet wall.
4. Swing the ice-trayshelf clown
and pull itto the right to free its
pins fronl holes in the cabinel wall. :
.?
=:.L=-
,.,
( 31
C-2
f
~-=-’)}
‘<:2
:.
L,
~.
i.
‘.’
~.
~..
t
\
\:-
~:
[’
i,
Page 7

b remove the step shelfi
1
1. Lift the left sideoftheshelf
sli~htlvand movetheshelfto the
le~to ~reeitsrightendsfromholes
in the cabinetwall.
2, Lowertherightsideofthe shelf,
movetheshelfto the right andtake
itout.
Toreplacethestepshelfi
1. With the shelf tilted as shown,
fitthe ieftends of the shelf into
holes in the cabinet wall.
2. Lift the Icftside ofthe shelf
slightly,swing [hc shelf up, fit the
righ[~ndsof t]l~shelf into holes in
the cabinet wall, and Iowcrthe
shelf intopl:lce,
StorweDrawers
High-Humidity Drawer
Ruit & Vegetible
The storage drawersat thebottom
ofthefresh foodcompartmentare
designedto provide high humidity
levels required bymostvegetables
and lowerhumiditylevelsrequired
for mostfruits.
When replacingthe drawers,
alwayspush themallthe wayin.
Storagetime willdependuponthe
type offood and its conditionwhen
placed in the drawers.
Excess water which may
accumulate in the bottom of the
drawersshould be emptied and
the drawerswiped dry.
High-Humidity
(onmodelssoequipped)
“rhisrefrigerateddraweris designed
to keep unwrapped foods fresh by
retaining[henaturalnioisturecontent
Offoodssuch
Artichokes ~ Cherries
~
~Asparagus
~Beets,tcpped @Currants e Rhubarb
~Blueberries ~ Greens,leafy ~Spinach
~Carrots
~Celery
in t]nyrcfrigcr:ilcdstl)ragearea,
As
0S:
~Corn ~Radishes
@Lettuce * Tomaloes,
0 Parsley
QPeas,green
it is Ti’conlll%dlldedthat foods with
Strong t}dorskleStoreti w’rappedfoodssuch as:
~
Broccoli
~’Brussels
sprouts
QCabbage
c ca[jlifl~,,~er
L
GreenOnions
Drawers
Drawer
* Plums
ripe
QParsnips
~Turnips
Low-Humidity Drawer
bw-Humidity Dmwer
(onmodelssoequipped)
Thisrefrigerateddraweris designed
toprovidelowerhuiniditystorage
for itemssuch as:
~
Apples eOranges
eApricots @Peaches
~Grapes
oMushrooms ~Raspberriese‘angednes
@Nectarines
~Pears
@Squash,
summer
~Strawberries
UtwtyDmwer
modelssoequipped)
(on
I
%
The slide-oututilitydrawercanbe
removedand takento the sinkor
foodpreparationarea. Youmay also
relocateitand the shelfto whichit
attacheswithinthe fresh food
compartmenttosuityour storage
needs.
1
7
Page 8

Iceservice
AutomaticIcemaker
(onmodelssoequipped)
Youricernakerwillproduceeight
cubespercycle—approximately
IW cubesin a 24-hour period,
dependingon freezer compartment
temperature,roomtemperature,
numberof’door openings and other
useconditions.
If your refrigerator is operated
before water connectionis made
to the icemaker, keep the
icemakerfeeler arm in the STOP
(up) position as shown below.
Feeler Arm in
Icemaker
Ice Storage
Bin
When refrigeratorhas been
connectedti water suppiy~move
the feeler arm to the ON (down)
position.
STOP (uP)position
Feeler Arm in
ON position
Icemakingwillcontinueuntilthe
feelerarm sensesa sufficient
accumulationoficecubes in the
storagebin and haltsthe operation
temporarily.For maximumice
storage,levelthe storedcubeswith
yourhandoccasiona~y.Besure
nothinginterfereswiththe swingof
the feelerarm.
The icemakerejectscubesin
groupsofeightanditisnormalfor
severalcubestobejoined together.
Onceyouricemakeris in
operation9throwawaythefirst
few batchesoficecub=. Thiswill
flush awayany impuritiesin the
waterline. Do the samethingafter
vacationsor extendedperiods when
ice isn’t used.
caution:
Under certain rare
circumstances,icecubesmay
be discolored,usuaUyaping
with a green-bluishhue. The
causeofthis unusualdiscoloration
isapparentlyduetoacombination
of factorssuch ascertain
characteristics oflocalwaters,
household plumbingandthe
accumulation ofcopper saltsin
an inactivewatersupplyline
which feedsthe icemaker.
Continued consumptionof such
discolored ice cubes may be
injuriousto health. If such
discoloration is observed,
discard the ice cubesand
contact your Hotpoint Factory
Service Center or an authorized
Customer Care” servicer.
NIoYeieemaker
STOP (lip) position when:
feelerarm to
If ice is used infrequently,old
cubeswi~becomecloudyandtaste
stie andwillshrink. Empty ice
storagebin periodicallyandwashit
inlukewarmwater.
If tMsis yourfirsticemaker,
you’llheir occasionalsoundsthat
maybe unftiar. Theyare normal
icemakingsoundsand are not
causeforconcern.
Icemys
(onmodelssoequipped) , ,
Ice traysare designedto release ice
cubeseasily.Holdtrayupsidedownoveracontainerand twist
both ends to release cubes.
Foronly one or two ice cubes,
leavethetray right-side up, twist
both ends slightly and remove
desired number of cubes.
Wash ice traysand storage bin in
lukewarm water only. Do not put
them in an automatic dishwasher.
e
@home water supply is to be off for
severalhours
o ice storage ~i~ lS tobe removed
for a period of time
Page 9

careandcleaning
—-.— -..1————... . ..- ... . . . . . .
IIedoorhandlesand trim
onmodelssoequipped)canbe
cleanedwith a clothdampenedwith
asolutionofmildliquid d“ishwashing
detergentand water.Dry with a sofi
cloth. Don’twaxhandlesor trim.
Keepthe finishclean. Wipewith
aclean cloth, lightlydampened
withkitchenappliancewaxormild
liquiddishwashingdetergent. Dry
andpolish with a clean, softcloth.
Do not wipe therefrigeratorwith a
soileddishwashingcloth or wet
towel.TheseWNleavea residuethat
can damage the paint. Do not use
scouringpads, powderedcleaners,
bleachor cleaners containing
bleachbecause these products can
scratchand weaken the paint finish.
fiotwt the paint fi~h. The finish
on the outside of the refrigerator is
a highquality,baked-onpaintfinish.
Withproper care, it will staynewlookingand rust-freefor years.
Apply a coat of kitchen/appliance
w~xwhen the refrigerator is new,
ndthen at least twice a year.
Appliance PolishWax& Cleaner
(Cat. No. WR97X0216)isavailable
from Hotpoint Appliance Parts
Nlarts.
Cleaning—Inside
f;lean the inside of the fresh food
ilnd freezer compartme~lts at least
c)nccayear. LJnplugrefrigerator I>efc)rccleaning.If this is not practical,
}vringcxccssmoistureout of sponge
or cloth when cleaning art)und
switches, }igh{sor controls.
Apply an appliance wax/polish to
theinsidesurfacebetweenthedoors.
[’se warm water and baking soda
s~>Iution-–abouta tablespoon of
[I:ikingsoda t{3a c~u:lrtof Watett
‘Thisb~>thcle:insa~ldneutralixcs
~~~j(}rs.
\\:]tcrand wipe dry
--=-
I<insc thOrou~hly with
Otherpartsoftherefrigerator—
includingdoorgaskets,vegetable
drawers,icetraysand allplastic
parts-can be cleanedthe same
way.Do not usecleansing powders
or other abrasive cleaners.
Tohelp preventodors, leave
an openboxof bakingsodainthe
rear oftherefrigerator,on the top
shelf. Changethebox everythree
months.An open box ofbaking
sodainthe freezer will absorb
stalefreezerodors.
Donotwashany of your
refrigerator’sp~mticpartsin
yourautomaticdishwasher.
Behindrefrigemtor
Be careful movingyour refrigerator
awayfrom the wall. Alltypes of
floor coveringscan be damaged,
particularly cushionedcoverings
and those withembossed surfaces.
Turn the levelinglegsat each
frontcorner of the cabinet
counterclockwiseuntilthe rollers
support the refrigerator; then pull
the refrigerator straight out and
return it to position by pushing
it straight in. Movingyour
refrigerator in a side direction
may result in damage to your
floor coveringor refrigerator.
After rolling the refrigerator back
intoplace, turn the legs clockwise
untilthe legsagainbear the weight
of the refrigerator.
Condemer
For most efficient operation, you
need to keep the condenser clean.
Turn temperature control to OFF.
Removethebase grille, ifyour
refrigerator has one. Sweep away
or vacuum dust that is readily
accessible on condenser coils, then
turn the c[)ntrolback on. For best
results,use a brush specially
designedforthis
purpose.It is
availableatmost
applianceparts
stores.Thiseasy
cleaningoperation ~<’should be done at
leastonce a year.
Toremovethe basegrille:
Grasp the bottomofthe grille and
pullitout.
To replacethebasegrille:
1,1
Line up the clips on the back of
the grille with the openingsin
the baseplate and push the grille
forwarduntil it snaps into place.
l-~
. ... ..... ~.
d-’” ~. -
Pi;*
[q
-G.’
Cond<nser ‘
-.--:. .
Lightbulb replacement
II
A lightbulb and socketare locatedat
thetopofthefreshfoodcompartment
just behind the temperature control
panel. To replace the bulb, unplug
refrigeratorfrom itselectricaloutlet,
unscrew bulb when cool, and
replace with same size bulb.
I
I
1
Page 10

-..
J..
. -.. _._. -
-––——
— .
..—
. . . .
-—
!
...
.
----------
c-_ L,-
—.
---=-~=~UseThk
T
-—-
-— .
Questiom?
ProblemSolver
PROBLEM
REFRIGERA~R
DOES N~ OPERATI
M~R OPERATES
FOR LONG PERIODS
tiOTORSTARTS&
, ;TOPSFREQUENTLY
POSSIBLECAUSEAND MMEDY
~Maybe in defrostcycle when motordoesnotoperatefor about 30 minutes.
~Temperaturecontrol in OFF position.
@Ifinterior lightisnoton, refrigeratormaynot be pluggedin at wall outlet.
~If plugis secureand the refrigerator stillfailsto operate, pluga lamp or a small
applianceintothe same outlettodetermineifthere is a tripped circuit breaker or
burned out fuse.
~Modem refrigeratorswith more storagespace and a larger freezer compartment
requiremore operatingtime.
@Normal when refrigeratoris first deliveredtoyourhome—usuallyrequires24hours
to completelycooldown.
@Large amounts of foodplaced in refrigeratorto be cooled or frozen.
~Hot weather-frequent door openings.
@Door left open.
@Temperaturecontrolis settoo cold. Refer to page4.
@Grille and condenser need cleaning. Refertopage9.
~Check ENERGY-SAVINGTIPS on @ge 4.
@Temperature control starts and stopsmotor to maintiin even temperatures.
VIBRATIONOR
RATTLING
OPERATING
SOUNDS
I
* lf refrigeratorvibrates, more thanlikelyitis not restingsolidlyon the floor. The front
levelinglegs need adjusting, or floor is weak or uneven. Refer to
ROLLERS/LEVELING LEGS on page 4.
@If dishes vibrate on shelves, try movingthem. Slightvibrationis normal.
*The high speed compressor motor required to maintain near zero temperatures in
:helargefreezercompanment mayproducehighersoundlevelsthanyourold refrigerator.
@Normal fan air flow-one fanblowscold air through the refrigerator and freezer
compafiments
—another fan cools the compressor motor.
* These NORMAL sounds wil~also be heard from time to time:
Defrost timer switch clicks at defrost.
DefrosI water dripping.
Temperature control clicks ON or OFF.
Refrigerant boiling or gurgling.
cracking or popping of coolingcoils caused by expansionand contraction during
defrost and refrigeration followingdefrost.
lcc cubes dropping into the bin and water running in pipes as icemaker refills.
Page 11

~ PROBLEM
~ ,,
POSS~LE CAUSEm WMEDY
FRESH FOOD
OR FREEZER
COMPARTMENT
TEMPERATURE
~0 WARM
FROSTORICE
CRYSTALSON
FROZEN FOOD
AU~MATIC
ICEMAKER
DOES I?~ WORK
(onmodels so equipped)
CUBES ~0 SMALL
I
SLOWICE CUBE
FREEZING
ICE CUBES HAVE
ODOR/TASTE
@Temperaturecontrolnotsetcold enough.
~Warmweather—frequentdooropenings.
~Doorleftopenfortoo long a time.
@Packageholdingdooropenorblotting air duct in freezer compartment.
@Door may havebeen lefiajar or packageholdingdoor open.
@Toofrequentor too longdooropenings.
@Frostwithinpackage is normal.
@Icemaker feeler arm in STOP (up)position.
~Water
@Freezer compartment too warm.
@Watershutoffvalveconnectingrefrigeratorto home waterline maybe clogged.
~Door mayhavebeen leftajar.
@Turn temperature control to colder setting.
* Old cubes need to be discarded.
~Ice storagebin needs to be emptied and washed.
@Unsealed packages in refrigerator and/orfreezer compartments maybe transmitting
odor/tasteto ice cubes.
~Interior of refrigerator needs cleaning.
supply turned offor not connected.
See the Care and Cleaning section.
,..=-
--
—w
MOISTURE FORMS
ON CABINET
SURFACEBETWEEN
THE DOORS
MOISTURE
COJ.LECTS INSIDE
REFMGERA~R
HAS ODOR
@Not unusualduring periods of high humidity.Tohelp prevent rust, wipesurface dry
1
and reset temperature control one settingcolder.
@TOOfrequent or too long door openings.
s In humid weather, air carries moisture into refrigerator when doors are opened.
s Foods with strong odors should be tightly covered.
e Check for spoiled food.
~Interior needs cleaning.
~Defrost water systemneeds cleaning.
~~~eeP~~en box of ba]{ingsodaillrefrigerator; replace every three
See the Care and Cleaning section.
mOnthS.
Page 12

RevemingtheDoor swing
~
k
~
f
.-
Theseinstructionsareforchanging
thehingesfrom the rightside to the
leftside.
If youeverwantto changethe
hingesback to the rightside,follow
thesesameinstructions (merely
reverseallreferencestoleftand
right).
@Readtheseinstructionsdl the
waythroughbefore starting.
@Handlepartscarefi~llyto avoid
scratchingpaint.
~Setscrewsdown bytheirrelated
partstoavoidusing theminthe
wrongplaces.
@Provide a non-scratchingwork
surfaceforthe doors.
~Whenreinstalling door hinges, be
suretousethe same number of
shimsandwashersaswere
originallyused.
@important:Once you begin,
do not movethe cabinetuntilthe
door-swingreversalis completed.
ToolsRequired
@~0 Torxdriver
@Phillipsscrewdriver
~5/16”endwrench
@5/16”hex-headsocketscrewdriver
@Masting tape
@Putty knifeor thin-blade
screwdriver
RemovetheDoors
Unplllg the refrigerator from its
~
electrical outlet.
@Empty all door shelves, including
the dairy compartment.
@Remove the freezer door.
a. Tapethe
door shutwith
maskingtape. .
b. Usea 5/16”
Top
H,~ ~ ~
??
hex-headsocket
screwdriverto
removethe
screwsthathold --- ‘‘
~~:
P
thetophinge to
the cabinet.
c. Lifithehinge
(and shimglued
+-
II
Ill
to it) straight up
to free the hingepinfromthe
socketinthetopofthe door and set
it aside, alongwithitsscrews.
d. Removetape, tiltthedoor away
from the cabinet, and carefullyIifi
the door to free its bottomsocket
from the hingepin on the center
hingebracket.
e. Setthedoor on anon-scratching
surfacewith the outsideup.
f. Using a DO Torxdriver,transfer
the two screwsfrom the opposite
side ofthe cabinettothe screw
holes vacatedbythetophinge
removal.
@Removethefresh food door.
a. Tapethe
door shut with
masking tape.
Use a 5/16”
b.
Center Hinge
Bracket ~
\l
I
Hinge
hex-head socket ~ ~
screwdriver and
5/16”end wrench
to removethetwo>-- .~=-
screwsholding
the center hinge
%
--‘“
--t
‘-“i-
‘=““:-f
Plastic Washer
(and shim glued
to it) to the
cabinet. Lift the
center hingeto free itspin from the
socket in the top of the door, and
set hinge and screwsaside.
c. Remove~ape,tilt door away
from cabinet, and lift it from the
pin ii]thebotton~hingebracket.
(If the plastic washer sticks to the
door bottom, put it back on the
hinge.)
e. Using a T20Torxdriver,transfer
thetwoscrewsfromtheopposite
sideofthecabinet to the screw
holesvacatedbythe center hinge
removal.
f. Takeone ofthescrewsremoved
in step(b)andstartit in the outmost
screwhole on theopposite side. Do
notdrive it all thewaydown—leave
enoughspaceunderthe screwhead
forthickness of shim and bracket.
Reverse cabinet Hardware
@Transfer the bottom.hinge to
the left.
a. Removethebasegrille if your
refrigeratorhas one (seepage9).
Grasp it at thebottomandpullit
straightout.
b. Usinga T20Torxdriver,remove
the hingebracket (and shim glued
to it), and plasticwasher from the
bottomright sideofthe cabinet.
l-i”
,@=p
~1
\
Bottom
Hinge
Bracket
A
0’”
~~ \
tin
/
e. Reinstallthe hinge bracket (and
shimglued to it) and plastic washer
to thebottomleftsideof the cabinet.
a, Removethe screws from the top
left front corner of the cabi~~etand
RIGHTSIDE
@
b
r
reinstall them on the right side. ~;~..
b. Rein.sbll the top hinge (and shim ~<~~-
glued
toit) on the left f~oritcorner
of the cabinet but do not tigilten the ~-~~
screws at this time.
n~
-~.
Page 13

eversethe.DoorHandes
........
on n~odeBssoequipped)
Transferthe fresh food door
handleto the right.
PLUG
BU
* tinsfer the freezerdoor
handleto the right.
TOPVIEW
60TTOM VIEW
-TO remove
the handle...
s.. Removethe bottom cap by
pushingittowardthe bottomofthe
oor and removethe screw
nderneath.
b. Removetwoscrewsholdingthe
handle to the top of the door.
c. Removethe handle.
After re~novingthe handle...
a. Removethe screws from the
rightedge of the door top and insert
them into the handle screw holes on
the opposite side.
b. Withtape-tipped putty knife or
[bin-b]adescrewdriver, pry outthe
plug button from the hinge hole on
the left side of the door and insert it
intt]the hole on the opposite side
that was vacated byremoval of the
top hinge.
e. Pull the plug button from the
fr~lntof tllc door and transfer itto
the opposile side.
- SCREWSFOR J
HANDLE
PLUGBU~ON
~hansfer the doorstop.
LEFT SIDE
HOLES
7
/
@Movethemetaldoor stop from
the right end to the left end. Use a
~0 Torxdriver.
~Moveany screwsfrom the left
end to the right end.
RIGHTSIDE
doorhalzdle...
a. Attach the handle to the right
side of the door with two screws at
the top of the door.
b. Screw the bottom of the handle
into place, and slide the bottom cap
into place.
LEFTSIDE
RIGHTSIDE
a. Removethe screwholding the
handleto the top ofthedoorad the
two screwsholdingthehandleto
thebottomofthedoor.
b. Removethe handle.
c. Removethe screwfrom the right
top edgeofthe door and insert it
intothehandle screw hole on the
lefi side.
d. Pull the plug button from the
front ofthe door and transfer it to
the opposite side.
e. Transferthe door stopas shown
at lefi.
f. Attachthe handle to the right
edgeofthe door with screwsattop
and bottom, usingbottomholes
vacatedbyremovalof the door
stopscrews.
(coiltinuedncxtpage)
—–.—
-
13
Page 14

—
~
Reha~ themsh FoodDoor
Washer
RehangtheReezerDoor
.~
_—
Hinge Pin ‘-
>1
_-----
.~
Plastic
Washer 1~
~
ExaminetheDoorGaskek
Checkthedoorgasketsallaround,
makingsureno gapsarevisible
betweenthe gaskets and the cabinet.
If a gap shows, try stretchingthe
gasketawayfromthedoorsothe
magnetin thegasket will contact
thecabinetsurface, beingcareful
nottodislodgethegasket,
a. Lower the bottomsocketof the
fresh fooddoorontothepinon the
bottomhinge. Be suretheplastic
washer is in place on the pin.
b. Insert the pin on thecenter hinge
into the socket in the top of the
door. Note: The center hingemust
be turned over as shownwhen
mounted on the left side.
e. Tilt the door towardthecabinet.
.4sthe door is brought intoposition,
slide the hinge under the head of
the screw which earlier had been
partly driven into the outermost
hole. Insert the remaining screw,
then tighten b(]thscrews securely.
a. Lowerthebottom socketofthe
freezerdoor ontothecenterhinge
pin. Be sure the washer is in place
on the pin.
b. Tiltthedoor towardthe cabinet,
liftingthetophingeso the pin fits
intothe socket on thetop ofthedoor.
c. Beforetightening the top hinge
screws, make sure the top of the
door is level with the cabinet top
and the space betweenthe doorsis
equal across the entirefront. Do
notovertightenthese screws—
tightenthem untiltheyarejust
snug, then turn them in another
one-halfturn.
Page 15

ReplacetheBaseGrille
(onmodelssoequipped)
RelocatethePlasticCoveredutilityDrawer
(orImodelswithhalf-widthwire
shelves)
For convenientaccesstothe
utilitydrawerafter reversingthe
door swing,youcan move the
drawertotheother sideofthe
cabinet.
1. Slidethedraweroutand remove
the shelfto which it was attached.
Pulltheplasticfillerup and off the
basegrille and reinstall it on the
oppositeside.
Replacethebasegrille by liningup
theclips on the back of the grille
e
withopeningsin the baseplate and
ushin”gthe~rille forward untilit
2. Removeanotherhalf-width
shelf.
--
3. Push the drawer coverback and
up offthe shelf.
4. PLltthe cover on the other half-
width shelf as shown, flushto the
side with the shelf-lockinglugs.
Return both shelves to the
refrigerator and slide the uti~ity
drawer into its relocated cover.
Page 16

Accessories
—— ..
. . ..— ———. ..... -
Automatic Icemaker
AccessoryEt
(optionalatextracost)
An automaticicemakerwillreplace
theice youuse... automatically.It
can keep you suppliedwith a binful
ofcubes—icefor everything,
everybody-without fiss or muss.
If your refrigeratordidnot come
already equippedwithan automatic
icemaker,youmayaddone—contact
yourlocalHotpointdealer; speci~
~-l. A water supplykitcontaining
copper tubing, shut-off valve,
fittingsand instructionsneededto
connect theicemaker toyourcold
waterlineis also availableat extra
cost.
Theperfectcompafionto
yourautomatic icemaker—
awaterfiIteraccessory
Yourice cubes can only
be as fresh-tastingasthe
water that produces
them. That’swhyit’sa
good idea to purify your
waterwith a WaterFilter.
Its activatedcharcoal
removesmusty,stale
odors and unpleasant
medicinal, metallic
tastes. A porous fiber
cartridge catches dirt,
rust particles, sand and
siltwhilespecialcrystals
reduce deposits of hard
scale.
The water filter is an option at
extra cost and is availablefrom
your Hotpoint dealer. Specify
WRWX0214.It has complete
installation instructions and
installs in minutes on 1/4”OD
copper water line.
Forextended vacationsor
absences,shut offpowerto the
refrigerator,turn thetemperature
controlto the OFF position, and
cleantheinteriorwithbaking soda
solutionofonetablespoonofbaking
sodato onequartofwater.Wipe
dry.Toprevent odors, leavean
openboxofbakingsodain
refrigerator.Leavethedoors open.
For shorter vacations,remove
perishablefoods and leavethe
controlsatregularsettings.
However,if roomtemperature
is expectedto drop below60”F.,
followsameinstructionsas for
extendedvacations.
If you have an icemaker,set it to
the STOP (up)positionand be sure
to shut off the water supply to the
refrigerator.
Disconnectthepowercord from
thewalloutlet,removeall foodand
clean and dry the interior.
Secure all looseitems suchas
grille, shehves,storagedrawersand
icetraysbytapingthem securely in
placeto preventdamage.
Besurerefrigeratorstaysinupright
position during actual moving and
in the van. Refrigeratormustbe
secured in the vanto prevent
movement.Protectthe outsideof
the refrigeratorwith a blanket.
.
16
Page 17

we’llBeThere
\~7i~~the~ur~~~aseof yournew~~tpoint appliance,receive
dleassurancethatif youeverneed informationor assis-
t~ance,we’llbe there.All you haveto do is call-toll-free!
In”HomeRepak
servicecontracts
Whateveryourquestionaboutany
Hotpointmajor appliance,GEAnswer
Cente@ informationserviceisavail-
ableto help.Yourcall-and your
question-will be answeredpromptly
andcourteously.Andyoucan callany
time.GE AnswerCente@ serviceis
open 24 hoursa day7 daysaweek.
service
JOB-GE-CARES
f800-432~z73fl
Our consumersemiceprofessionals
,\’illprovideexpertrepair serviceon
yourHotpointappliance,scheduled
.
8aR-626-m4
Youcan havethe securefeelingthat
GE ConsumerSemite willstillbe
thereafteryourHotpointproduct
warrantyexpires.Purchasea GE
contractwhileyourwarrantyis stillin
effectandyou’llreceivea substantial
discount.With a multiple-yearcontract,you’reassuredof futureservice
at today’sprices.
TelecommunicationDeticefortheDed
-’-i” p- ‘— ‘
I
I
~TponrcqLlcst, we will provideBraille
controlsforavarietyof Hotpoint
app]iailccs,ar~da brochLlreto assist.in
pla]lnillga ban-ier-freekitchen for
persons;rith lin~itedn~obiiity.To ob[;lintheseitenls,fl-eeof charge,call
300.626.2000.
Consl;mers withi~npairec3hearing
(>rspeechwho have access to a TDD
C>I-a con~~cntionaltele.typewritermay
call 800-TDD-CYFAC”(800-833-4322)”
t() reqLtesti~lfi)rnlationor service.
I
Page 18

YOURHOTPOINTREFRIGERATOR
WARRANTY
Save proofoforiginalpurchasedatesuch asyoursalesslip or cancelledchecktoestablishwarrantyperiod.
T
4
WHATisCOVERED
FULL ONE-YEAR WARRANTY
Foroneyearfromdate of original
purchase,wewill provide,freeof
charge,partsandservicelabor
in your home to repair or replace
anypati of the refrigeratorthat
fails becauseof a manufacturing
defect.
FULL FIVE-YEAR WARRANTY
Forfive yearsfromdateof original
purchase,we
will provide, freeof
charge,partsandservice labor in
your hometo repairor replaceany
pati of the sealed refrigerating
system(thecompressor,
condenser,evaporatorandall
connectingtubing) that fails
becauseofamanufacturing
defect.
WHATIsNm COVERED e‘ervice‘rips‘0your‘ometo
teach you howto usethe product.
ReadvourUseandCarematerial.
If you{hen haveanyquestions
about operating the product,
please contact yourdealer orour
Consumer Affairs office atthe
address below,orcall, toll free:
GE Answer Cente@
800.626.2000
consumer information service
@Improper installation.
If you havean installation problem,
contact your dealer or installer.
Youare responsible for providing
adequate
other connecting facilities.
electrical, plumbing and
This warranty is extended to
the original purchaser and any
succeeding owner for products
purchased for ordinary home use
in the 48 mainland states, Hawaii
and Washington,
D.C.InAlaskathe
warrantyisthe sameexceptthat it is
LIMITEDbecauseyou must payto
shipthe product tothe serviceshop
orforthe servicetechnician’s travel
coststo your home.
All warrantyservicewill be provided
byourFactoryServiceCentersor
byourauthorizedCustomerCare”
servicersduring normalworking
hours.
Lookin the White or YellowPages
ofyourtelephonedirectoryfor
HOTPOINTFACTORYSERVICE,
GENERAL ELECTRIC-HOTPOINT
FACTORYSERVICEor HOTPOINT
CUSTOMERCARE” SERVICE.
~Replacementofhousefusesor
resettingof circuit breakers.
~Failureof the product if it is used
for other than its intended purpose
or used commercially.
~ Damage to product caused
by accident, fire,
floods or acts
of God.
@Lossof
food dueto spoilage.
WARRAN~R ISNOTRESPONSIBLE
FOR CO~SEQUENTIA~ DA~AGE~.
w
may not apply to you. This warranty gives you specific legal rights, and you may also have other rights which vary from stateto state.
Toknow what
your legal rights are in your state, consult your local or state consumer affairs office or your state’sAttorneyGeneral.
statesdo not allow the exclusion or limitation of incidental or consequential damages, so the above limitation or exclusion
Some
V$aFrantor:Geneml Electric Company
if fu~her help is needed concerning this warranty, write:
Manager–consumer Aflair$, GEAppliances, Louisville, KY 40225
 Loading...