

Page 1
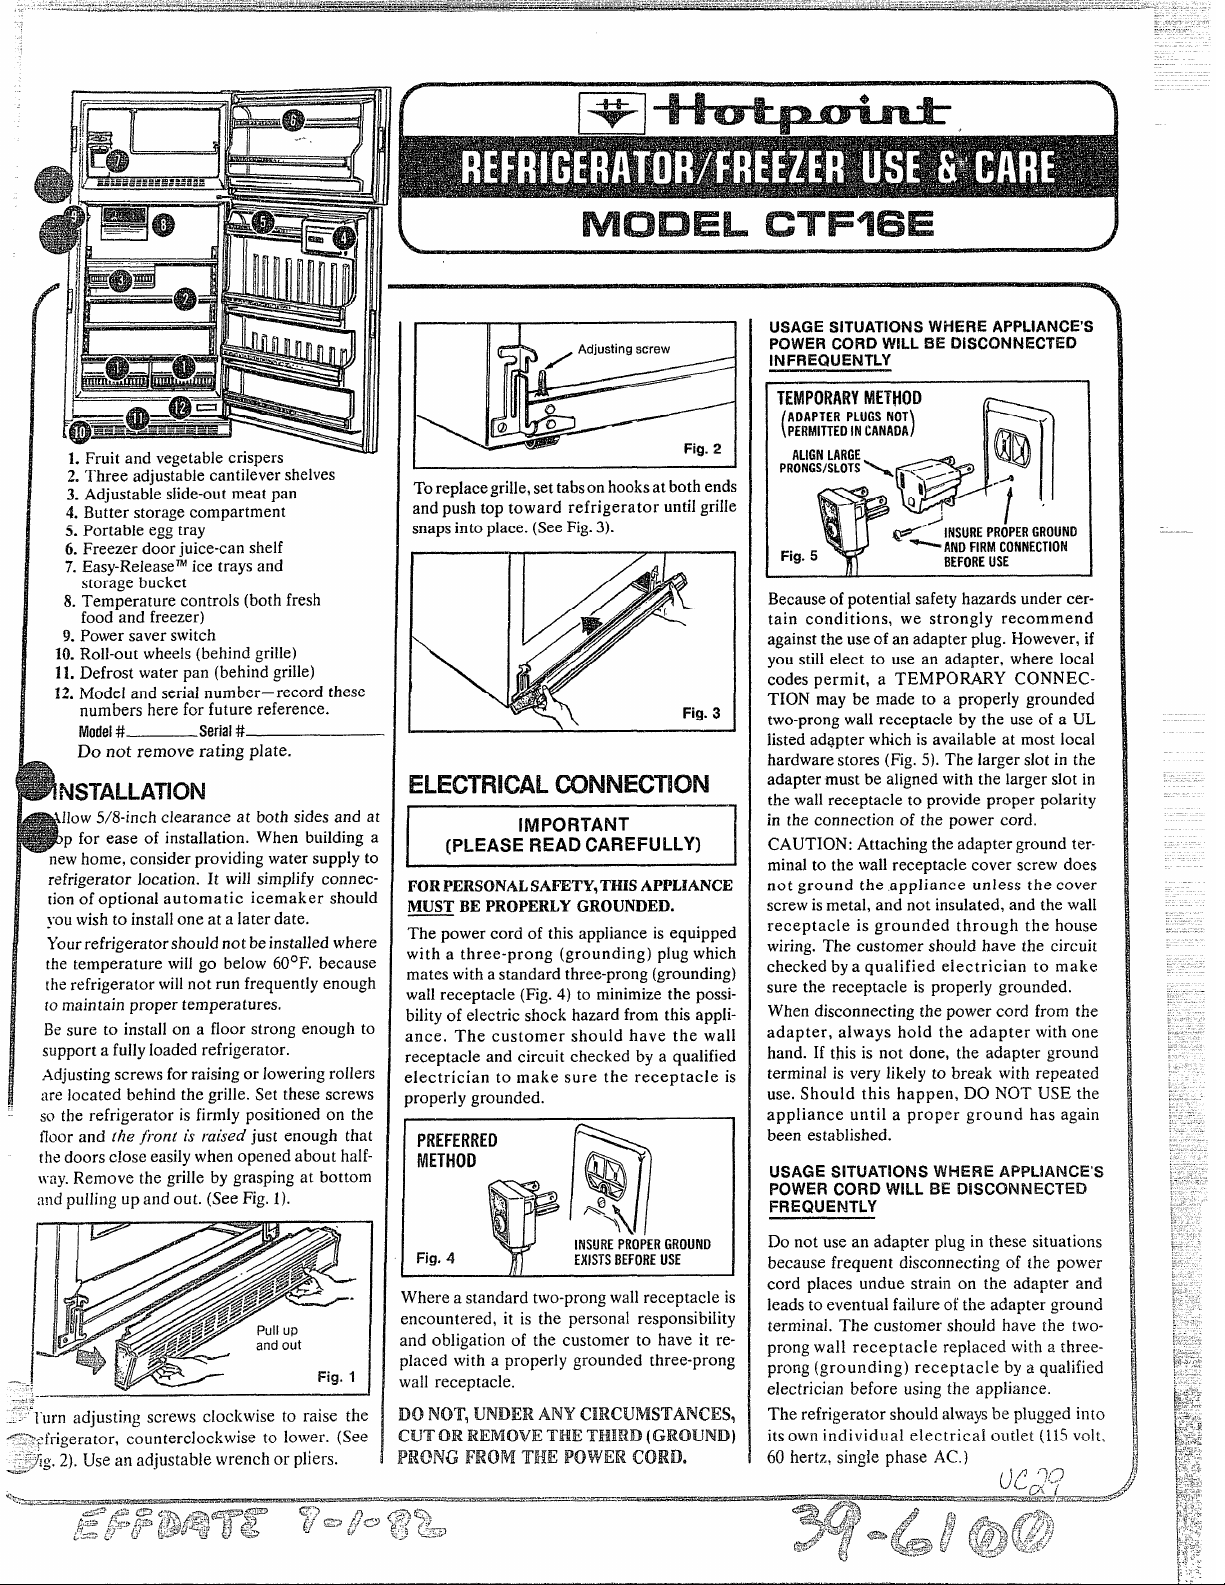
Fruit and vegetable crispers -
2. Three adjustable cantilever shelves
3. Adjustable slide-out meat pan
4. Butter storage compartment
5. Portable egg tray
6. Freezer door juice-can shelf
7. Easy-Releasemice trays and
storage bucket
8. Temperature controls (both fresh
food and freezer)
9. Power saver switch
10.Roll-out wheels (behind grille)
11.Defrost water pan (behind grille)
12.Model and seriai number– record these
numbers here for future reference.
hlodei#
Do not remove rating plate.
Serial#
hNSTALLATION
ilow5/8-inch clearance at both sides and
p for ease of installation. When building
B
‘new home, consider providing water supply
refrigerator Jocation. It will simplify connt
[ionof optional automatic icemaker shou
youwishto install one at a later date.
Yourrefrigerator should not beinstaIled whe
the temperature will go below 60°F. becau:
the refrigerator willnot run frequently enou{
to maintajn proper temperatures.
Besure to install on a floor strong enough i
support a fullyloaded refrigerator.
Adjustingscrews for raising or lowering rolle
are located behind the grille. Set these screv
so the refrigerator is firmly positioned on th
tloor and the front is raised just enough th:
the doors close easily when opened about hal
uay. Remove the grille by grasping at bettor
:lndpulling up and out. (See Fig. 1).
—_
,s
-,.
‘- “i-urnadjusting screws clockwise to raise th~
-.
‘~?:frigerator, counterclockwise to lower. (Set
-:.~~.2). Use an adjustable wrench or pliers.
R.G.+. “
MODEL CTFt6E
To replace grille,set tabson hooksat both ends
and push top toward refrigerator until grille
snaps into place. (See Fig.3).
ELECTRICALmNNEcTloN
IMPORTANT
[PLEASE READ CAREFULLY)
I
FORPERSONALSAFETY,’HUSAPPLIANCE
MUSTBEPROPERLYGROUNDED.
The power cord of this appliance is equipped
with a three-prong (grounding) plug which
mates with a standard three-prong (grounding)
wall receptacle (Fig. 4) to minimize the possi-
bilityof electric shock hazard from this appliance. The customer should have the wall
receptacle and circuit checked by a qualified
electrician to make sure the receptacle is
properly grounded.
PREFERRED
METHOD
Fig, 4
Where a standard two-prongwall receptacle is
encountered, it is the personal responsibility
and obligation of the customer to have it replaced with a properly grounded three-prong
wall receptacle.
DO NOT, UNDER ANYCIRCUMSTANCES
CUT OR REMOVE THE THIRD (GIUMJND)
PRONG’FROM TWE PO’WIERCORD.
Q
8
%
Q
%y
m
INSUREPROPERGROUND
EXISTSBEFOREUSE
USAGE SITUATIONS WHERE APPLIANCE’S
POWER CCN?D WILL BE D[S(20NNE(Y?’ED
1NFREQUENTL%
TH’WOIMRYMETHOD
ADAPTER PLUGS NOT
PERMITTEDINCANADA
(
ALIGNLARGE
PRONGSISLOTS\ ~
Fig. 5 ~
Becauseof potential safety hazards under certain conditions, we strongly recommend
against the use of an adapter plug. However, if
you still elect to use an adapter, where local
codes permit, a TEMPORARY CONNECTION may be made to a properly grounded
two-prongwall receptacle by the use of a IL
listed adapter which is available at most local
hardware stores (Fig. 5). The larger slot in the
adapter must be aligned with the larger slot in
the wall receptacle to provide proper polarity
in the connection of the power cord.
CAUTION: Attaching the adapter ground terminal to the wall receptacle cover screw does
not ground the appliance unless the cover
screw is metal, and not insulated, and the wall
receptacle is grounded through the house
wiring. The customer should have the circuit
checked bya qualified electrician to make
sure the receptacle is properly grounded.
When disconnecting the power cord from the
adapter, always hold the adapter with one
hand. If this is not done, the adapter ground
terminal is very likely to break with repeated
use. Should this happen, DO NOT USE the
appliance until a proper ground has again
been established.
USAGE SITUATIONS WHERE APPLIANCE’S
POWER CORD WILL BE D! SCCINNECTED
FREQUENTLY
Do not use an adapter plug in these situations
because frequent disconnecting of ihe power
cord places undue strain on the adapter and
ieads to eventual failure of the adapter ground
terminal. The customer should have the twoprong wall receptacle replaced with a threeprong (grounding) receptacle by a qualified
electrician before using the appliance.
The refrigerator should alwaysbe plugged into
its own individual electrica! outlet (115volt,
60 hertz, sing;e phase AC.)
)
‘y-;
BEFOREUSE
-.
*f
.,
Ii=
u<
All/j)
IL
II
..
Page 2
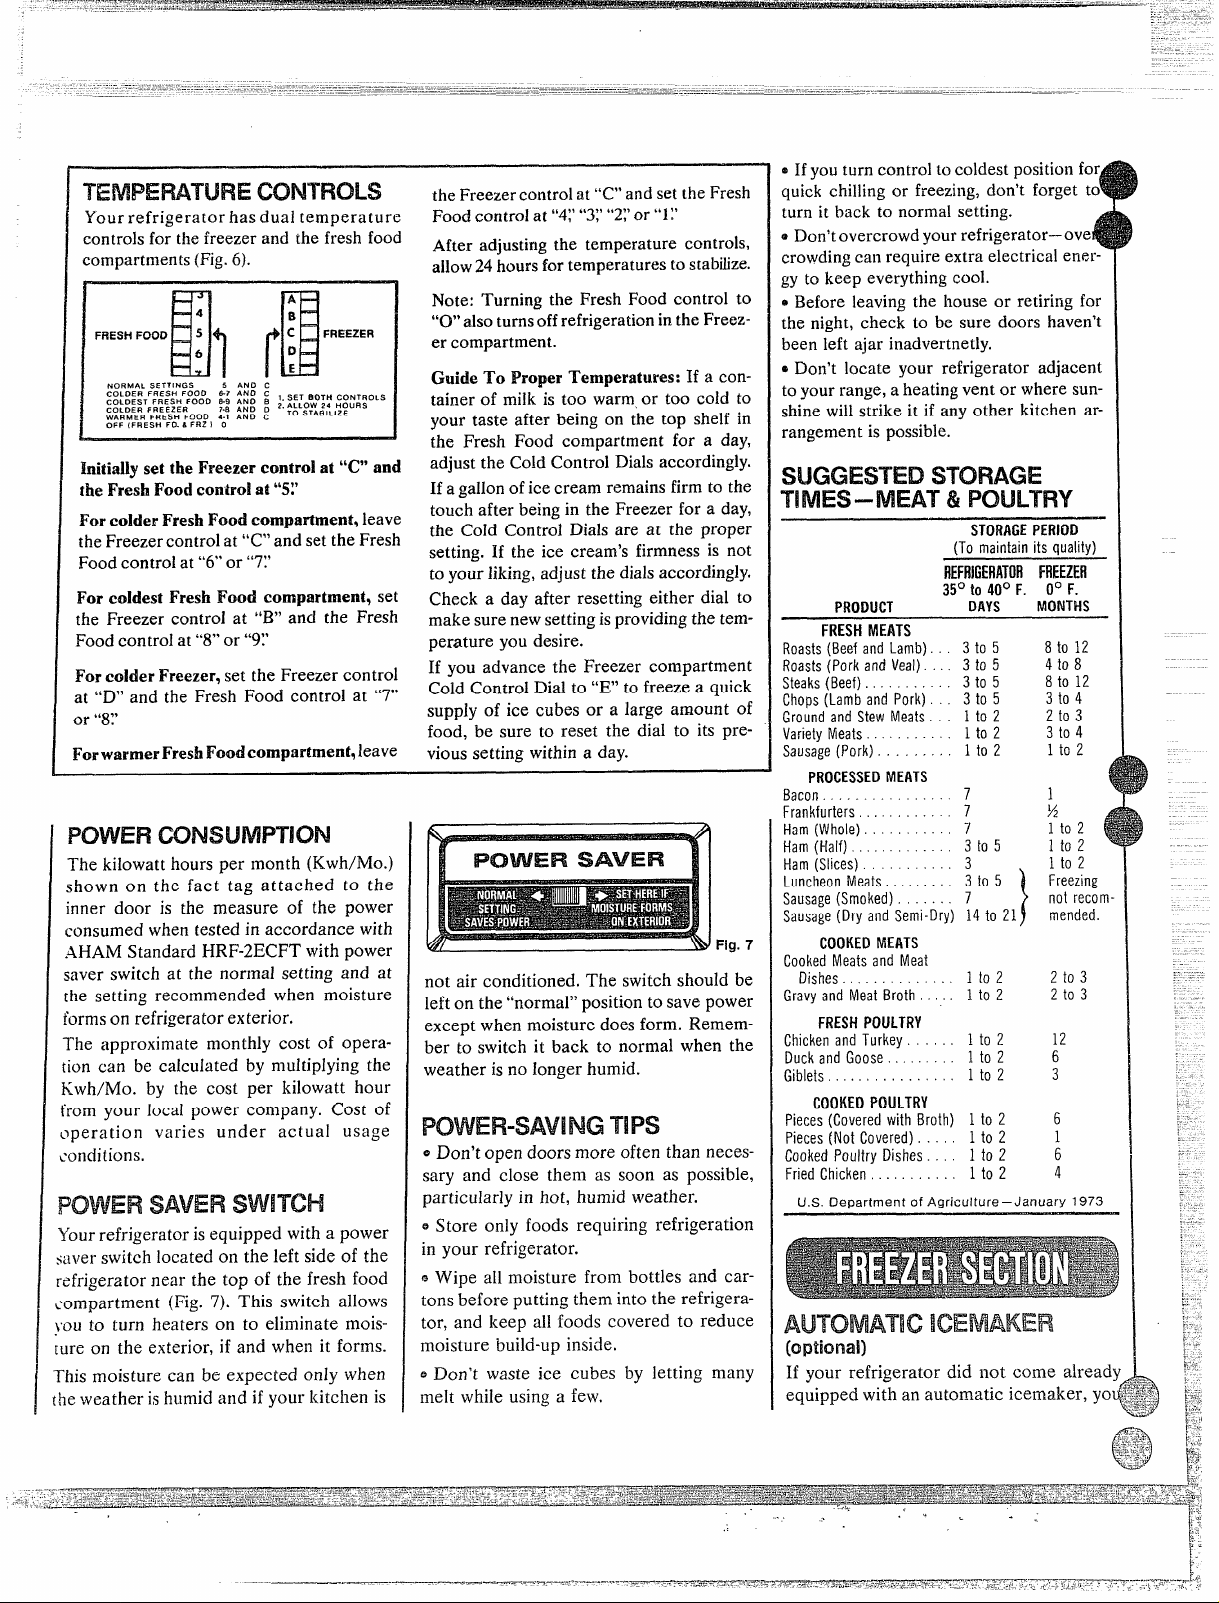
Your refrigerator has dual temperature
controls for the freezer and the fresh food
compartments (Fig. 6).
A
B
c
FRESHFOOD
AND C
NORMAL SETTINGS
cOLOER ‘RESH ’000 ‘7 ‘No c 1. SET BOTti CONTROLS
cOLDEST FRESH FOOD &9 AND E
cOLDER FREEZER
WARMER FRESH FOOO 4.1 ANO C
oFF (FRESH FO. 6 FRZ I O
5
7.8 AN O 0 2.;::T~::Ll;:u Rs
FREEZER
D
E
1111
Inigidiy set the Freezer control at “C”and
the Fresh Foodcontrol at “S’
Forcolder FreshFoodcompartment,leave
the Freezer control at “C” and set the Fresh
Food control at “6” or “7~’
Forcoldest Fresh Food compartment, set
the Freezer control at “B” and the Fresh
Food control at “8” or “9?
Forcolder Freezer, set the Freezer control
at “D” and the Fresh Food contro~ at “7”’
or “8?
ForwarmerFreshFoodcompartment, leave
POWERMNSUMPTION
The kilowatt hours per month (Kwh/Mo.)
shown on the fact tag attached to the
inner door is the measure of the power
consumed when tested in accordance with
AHAM Standard HRF-2ECFT with power
saver switch at the normal setting and at
the setting recommended when moisture
t’ormson refrigerator exterior.
The approximate monthly cost of operation can be calculated by nlultipIying the
Kwh/Mo. by the cost per kilowatt hour
from your local power company. Cost of
operation varies under actual usage
dcon itionso
POWERSAVERSW[TCH
Yourrefrigerator is equipped with a power
;aver switch located on the left side of the
efrigerator near the top of the fresh food
ompartment (Fig. 7). This switch allows
‘OUto turn heaters on to eliminate moisure on the exterior, if and when it forms.
“his moisture can be expected only when
the weather is hllmid and if your kitchen is
the Freezer control at “C” and set the Fresh
Food control at “47“3:’“2J’or”1 ~’
After adjusting the temperature controls,
allow 24hours for temperatures to stabdize.
Note: Turning the Fresh Food control to
“O” also turns off refrigeration in the Freezer compartment.
Chide To Proper Temperatures: If a con-
tainer of milk is too warm, or too cold to
your taste after being on the top shelf in
the Fresh Food compartment for a day,
adjust the Cold Control Dials accordingly.
If a gallon of ice cream remains firm to the
touch after being in the Freezer for a day,
the CoId Control Dials are at the proper
setting. If the ice cream’s firmness is not
to your liking, adjust the dials accordingly.
Check a day after resetting either dial to
make sure new setting is providing the temperature you desire.
If you advance the Freezer compartment
Cold Control Dial to “E’ to freeze a quick
supply of ice cubes or a large amount of
food, be sure to reset the dial to its previous setting within a day.
Fig. 7
not air conditioned. The switch should be
left on the “normal” position to save power
except when moisture does form. Remember to switch it back to normal when the
weather is no Ionger humid.
POWER-SAVING‘TIPS
~ Don’t open doors more often than necessary and close them as soon as possible,
particularly in hot, humid weather.
e Store only foods requiring refrigeration
in your refrigerator.
6 Wipe all moisture from bottles and cartons before putting them into the refrigerator, and keep all foods covered to reduce
moisture build-up inside.
~ Don’t waste ice cubes by letting many
melt while using a few.
* If you turn control to coldest position for
quick chilling or freezing, don’t forget to
turn it back to normal setting.
@Don’t overcrowd your refrigerator— ove
crowding can require extra electrical ener-
~Y to keep everything cool.
ISBefore leaving the house or retiring for
the night, check to be. sure doors haven’t
been left ajar inadvertnetly.
~Don’t locate your refrigerator adjacent
to your range, a heating vent or where sunshine will strike it if any other kitchen arrangement is possible.
SUGGESTEDSTORAGE
TIMES–MEAT &IP(XJLTFW
STORAGEPERIOD
(To maintain its quality)
lkFfliGERATllRFREEZER
35°to 40°F. 0° F.
PRODUCT
FRESHMEATS
DAYS
Roasts(Beef and Lamb). 3 to 5
Roasts(Pork and Veal). . .. 3 to 5
Steaks(Beef) . . . . . . . . . . . 3t05
Chops(Lamb and Pork) . . . 3 to 5
Ground and Stew Meats. 1 to 2
Variety Meats... . . . . . . . . lto2
Sausage(Pork) . . . . . . . . . lto2
PROCESSEDMEATS
Bacon. . . . . . . . . . . . . . . 7 1
Frankfurters . .... . . . . . . . 7
Ham(Whole) . . . . . . . . . . . 7 lto2
Ham(tlalf ) . . . . . . . . . . .
Ham(Slices) . . . . . . . . . . . 3
Luncheon Meats . . . .. . . . . 3t05
Sausage(Smoked). . . . . . 7
Sausage(Dry and Semi-Dry) 14 to 21
COOKEDMEATS
Cooked Meats and Meat
Dishes.... . . . . . . . . . . lto2 2t03
Gravyand Meat Broth . . 1 to 2
FRESHPOULTRY
Chickenand Turkey. . . . . 1 to 2
Duck and Goose . . . . . . . . . lto2 6
Giblets . . . .. . . . . . . . . . . . lto2 3
COOKEDPOULTRY
Pieces (Covered with Broth) 1 to 2 6
Pieces(Not Covered). . . 1 to 2
Cooked Poultry Dishes. . . 1 to 2
Fried Chicken ... .. . . . . . . lto2 4
U.S. De~artmentof Agriculture–January 1973
. 3t05
MONTHS
}
8 to 12
4t08
8 to 12
3t04
2t03
3t04
lto2
%
lto2
lto2
Freezing
not recoin
mended.
2t03
12
:
AUTOMATICICEMAKER
(optima!)
If your refrigerator did not come ahvead
equipped with an automatic icemaker, yo
(
4
[
(
Page 3

•l
.
ln~lll##~l~na~n~?:
~,:-A~
V
=
1:..
~~
[:=
.-=
~y
,;.
1.
,-
Moisiure forms on outside of refrigerator
❑ Moisture not unusual during periods
of high humidity
lJ Move power saver
switch to right
Moisture collects inside
Too-frequent and too-long door
openings
D Hot-humid weather increases rate of
frost build-up and internal sweating
Cabinet has odor
El
Certain foods produce odor–should
be covered
El Interior needs cleaning
El Defrost-water pan needs cleaning
Refrigerator runs too long
Modern refrigerators are larger
and run colder— require more
running time
Doors kept open too long
Temperature controis set too cold
Normal at time of installation or after
refrigerator has been turned off
Grille and condenser need cleaning
❑
Refrigerator runs too frequently
El Required to provide even
temperature
Too-frequent and too-long door
openings
Cabfnetvibrates
Roller screws need adjusting
❑ Check for weak floor
Slow
ice cube freezing
Freezer door may have been left ajar
Fresh food temperature too warm
Temperature control not set in cold
enough position
Too-frequent and too-long door
openings
❑ Package holding door open
Grille and condenser need cleaning
Fresh foods dry out
❑ Foods should be covered
Fresh food temperature too cold
Temperature control dial set in too
cold position
Noisy
❑ Noise level is slightly higher on
modern, larger refrigerators
Fan air flow-this is normal
Defrost-water pan not in correct
position
Roller screws need adjusting
Check for weak floor
Refrigeratordoes not run
❑ Temperature control in OFF position
Not plugged in
No power at outlet
House fuse blown
Hot air from bottom of refrigerator
II Normal air flow of fan-cooled
condenser
Water ORBfloor
Defrost-water pan full,
not in position
Interior light does not light
missing, or
❑ No power at outlet
❑ Light bulb needs replacing
Freezer too warm
Freezer door may have been left ajar
Package may be holding door open
Grille and condenser need cleaning
Frost on frozen food
❑ Too-frequent and too-long freezer
door openings
Freezer door may have been left ajar
Frozen foods dry out
❑ Packages not wrapped or sealed
properly
If you need to call a Hotpoint Serviceman, be sure ‘
nAPIDELECTRICALDIABNOSIS
Your refrigerator is wired for accurate electrical diagnosis in your home—takes only minutes to check
its entire electrical system. No need to unplug,
move or unload refrigerator to make diagnosis.
~ttt,,tat,,,,,,,t,,,,,@,,,,&,,,,,8,,,8,,B,,t,,,8,,,,,,,,,s,,,,,,*,,,,,,a,,,,88,B,,811n,,,ll#lcll,,llollill*1111t8:la1a[lJ1l1a1tl11111111111111111:11811111111111111111181118111lltll18$8:11111n11811111111111::1l181a1x1118111:11tBsm1IEll#~Q:a8Slhlna~l*~813#n8*n~~
z
:
....
,.?-7.?2
.>;:-..:~~r:.
C
$-~~
We main[ain a staff of Customer Relations Managers at major market
locations to whomyou mayappeal forservice help ifyou are not satisfied
withthe assistance received throughthe normal channels specifiedin the
g=
-L::--; W:lrrantyon the back cover under
y:>’ E
locations and telephone numbers is provided with the product. We also
x
:,i,,$,,,1,bit,,,,,,,,B,#l,,,,##,,,,,,,,g,,,,,,,,,,,,i,,,1,ts,,,,slO1l!O1!l!lll;s1911!I1111111!IIB1!I@ltslIlll#Itll#:liBllllllO1llilBIil118111llllollllll:rl!lr!ll:111811!lll!!1111111lcIllllsBl!llalllJil111!F11119S11191111:!Iallttoilll!lol:lal!l!alllll:ll!l!l~sleJllse$ill!illll!l!l!!
“Ho w ToObtainService.”A listing of
Complaint Handling
maintaina workingrelationshipwithMACAP,theMajor Appliance Con- :
sumer Action Panel, 20 North Wacker Drive, Chicago! ll~inois@t5~6~ ~
so that you maycontact them for help in resolvinga complaint but only
after you have tried to resolve the problem through our Customer
RelationsOffices.
to give the model number of your refrigerator. It ‘
maybe found at the front of your refrigerator at the :
bottom of the fresh food section near the hinge
(see model sketch, front COVEX) when service ;
is required, be sure to specify genuine Hotpoint
renewal parts.
:;.
:’--
:
:
:
:
:
:
.
: ,.:
: .\-
:
?:
&
~;.,.
,.-
t.
Page 4

quart ofwater. Rinse thoroughly with watt
and wipe dry. Follow this same procedur
for cleaning door gaskets, vegetable an
meat pans and all plastic parts.
outside – To clean and protect the finish
usc liquid polish or wax suitable for use o]
appliances. Never use oily furniture polish
cleaning powders, or alkaline soaps.
Whenmovingrefrigerator,always pull cat
inet straight out and return to position b
pushing straight in. Moving refrigerator i~
a side direction can cause damage to floo
covering by rollers.
In the refrigeration process, it is norms
that heat be expelled in the area under tht
refrigerator. Some synthetic floor covering
which are relatively new on the market wil
discoior at these normal and safe operatirq
temperatures. Your floor covering supplie]
should be consulted if
discoloration.
Defrost Water Pan– Pan located behinc
grilie should be cleaned at least once z
year.
nest efficient oper[tion, remove the
‘On’enser-FOrx!
;rille and either
weep away or vac-
um up dust that’s
eadily accessible.
his easy cIeaning
~eration should be
aone at least once a
year.
No DEFROSTING
It is not necessary to defrost the fresh food
section of your refrigerator; it will defrost
i(seif automatically.
If !’oushut off
e(i vacations, remove food and clean inter-
ior with soda solution using
of soda per each quart of water. Wipe dry.
To prevent formation of odor, place open
box of soda in refrigerator and leave doors
open.
[f you leave for shorter absences, remove
xrishable foods and ieave control dials at
lc>rmal setting. If, however, room tempera-
the house power for extend-
you object to thi:
r%
d.- ==sZg
1
\
h
“ – Condenser
+
one tablespoon
ture is expected to go below 60°F., turn
control dials to OFF, remove food, clean
interior, leave doors open and remove plug
from wall receptacle.
Ifyou have an icemaker, flip manual switch
to OFF position and be sure to shut off
water supply to icemaker. (Ask installer to
point out location of shut-off valve at time
of installation.)
Disconnect power cord from wall receptacle. Remove all foods and clean interior.
Such loose items as grille, shelves, storage
pans, ice trays, ice storage bucket, covers
and removable parts should be protected
or secured with tape. This prevents their
coming loose and causing damage. Your
refrigerator is on wheels; be sure it is properly secured in moving van to prevent roll-
ing and damage. Handle with care; exterior
should be protected with blanket covering.
The suggestions noted below apply to the
operation of your household electric refrigerator. Hotpoint recommends these
safety precautions:
1. If your old refrigerator is still around the
house but not in use, be sure to remove the
doors. This will reduce the possibility of
danger to children.
2. Some refrigerators are equipped with
automatic icemakers. Do not place fingers
or hands on the automatic icemaking
mechanism while the refrigerator is
plugged in. This will prevent contact with
he moving parts of the ejector mechanism,
i
~rwith the heating element that releases
c
he cubes,
t
1.The refrigerator should always be
3
dugged into its own individual electrical
P
~utlet(115volt, 60 cycle, single phase AC).
“hisis recommended for best performance
;
nd to prevent overloading house wiring
a
ircuits, which could cause a possible fire
c
azard from overheating wires.
h
JSE OF EXTENSION CORDS – Because
I.
f potential safety hazards under certain
o
onditions, we strongly recommend against
c
the use of an extension cord. However, if ,
you still elect to use an extension cord, it ‘
isabsolutely necessary that it be a UL listed
3-wire grounding type appliance extension (
cord and that the current carrying rating
of the cord in amperes be equal to or greater than the branch circuit size shown on
the rating nameplate of this appliance.
Such extension cords are obtainable
through your local service organization.
4. Repair or replace immediately all electric service cords that have become frayed
or otherwise damaged. Do not use a cord
that shows cracks or abrasion damage
along its length or at either the plug or connector end.
5. Never unplug your refrigerator by pulling on the wire. Aiways grip the plug firmly
and pull straight out from the receptacle.
6. Your refrigerator is equipped with rollers so that it can be easily moved out from
the wall. When rolling out the refrigerator
be careful not to roll over the service cord.
7. Do not operate your refrigerator in the
presence of explosive fumes.
8. A burned-out Iight bulb might break
when being replaced. In order to avoid
contact with a live wire filament, it is rec-
ommended that the refrigerator first be un-
plugged when replacing a light bulb.
Note: Turning control to OFF position
does not remove power to the light circuit.
9. Always remove the power cord from
wall outlet before removing the base grille.
10. Don’t refreeze frozen foods which have
thawed completely unless you cook them
after they have thawed. The United States
Department of Agriculture in Home and
Garden Bulletin No. 69 says, “... if foods
have thawed only partially and there are
still ice crystals in the package, they may
safely be refrozen . . .
be used as soon as possible.
“If foods have slowly thawed and have
warmed gradually over a period of several
days to a temperature of 40°F., they arc
not likely to be fit for refreezing. Undel
these conditions, meats, poultry, most veg
etables and some prepared foods may be
come unsafe to eat; most fruits and frui
products soon develop an undesirable
flavor.”
Refrozen food should
Also note and fol!ow other precautio?j
contairledin this Usec!?CareBook.
IWvg. No. 465057P05
I
f
Page 5

ay add one at any time. Contact your la
al I-fotpointdealer; request Cat. No. HP’I
E
1-?’-1,
e sure to shut off water supply to ice
&
‘maker when going on vacation or away fo
extended period of time.)
TIPS ON FREEZING FOODS
There are three essential requirements fo
efficient home freezing. First, of course, i:
initial quality. Only top-quality food!
should be frozen. Freezing retains qualit!
and flavor; it cannot improve quality. Sec
ond is speed. The quicker fruits and veg
embles are frozen after picking, the bette]
the frozen product will be. You’ll save time
too, because less culling and sorting will bt
necessary. The third requirement
packaging. Use food wraps designed espe”
cially for freezing; they’re readily available
in a wide selection at your favorite store.
Limitfreezing of fresh (unfrozen) meats 01
seafoods to 14 pounds at a time.
To FREEZE MEAT,
H~H
AND POULTRY
Wrap well in freezer-weight foil (or other
heavy-duty wrapping material), forming it
~arefuiIy to the shape of the contents. This
wpels air. Fold and crimp ends of the pack-
~e to provide a good, lasting seal. Don’t
k
freeze meat that has completely thawed;
neat, whether raw or cooked, can be frozen
uccessfuily only once.
is propel
SWGESTED iFFwEzER
STORAGETIMES
(other than for meat and poultry)
Most fruits and vegetables
Lean fish
Fatty fish, rolls and breads
soups, stew, casseroles
Cakes, pies, sandwiches,
Ieft-overs (cooked),
ice cream (original carton)
8-12 months
6-8 months
2-3 months
1 month
maximum
ite ice cream at the right serving ten~perature. Also, the rear of the freezer is slightiy
colder than the front.
EAsY”RELEAsEmICETF!AYS
Invert and twist trays at both ends to release cubes into storage bucket or bowl
(Fig. 8).
For only 1 or 2 cubes, leave the tray right
side up, twist ends slightly and pluck out
cubes with ease.
Wash ice trays and ice storage bucket in
lukewarm water only. Don’t place in automatic dishwasher.
No DEFROSTING
You never have to defrost the freezer. It
has been pre-set at the factory to defrost
itself, automatically.
ADJUSTABLESHELVES
This model has adjustable shelves. To adjust, remove shelf by tilting up at front, then
lifting up and out of slots at rear (Fig. 9).
lug on rear shelf with proper notches. Then
lower front until shelf locks into position
(Fig. 10).
Engage
top lug
Lower
intr3 place
to lock
~~
L
j /’-”’
/’”
/’
1
I~
Fig. 10
MEATPAN
Detach cover and relocate on any shelf to
meet storage needs. Slide-out pan can be
removed and taken to sink or food preparation area.
IFCXN3STORAGE
LJrrfrcuenMeats,
Fish and Poultry
Meats, fish and poultry purchased from the
store vary in quality and age; consequently,
safe storage time in your refrigerator will
vary. Always remove store wrapping from
meats, fish and poultry, Rewrap in foil, film
or wax paper and refrigerate immediately.
cheese
Cheese should be well wrapped with wa>
paper, aluminum foil or placed in a plastic
bag. Carefully wrap to expel air and pre
vent mold. Packaged cheese can be store(
in its own wrapping.
Vegetables
Fruit and vegetable crispers have been spc
cially designed to preserve natural mois
ture and freshness. Crispness can be main
tained by covering vegetables with a moi:
towel. As a further aid to freshness, it i
suggested that pre-packaged vegetables b
stored in their original wrapping.
Newtechniques are constantly being developed. Consult
!he State College or County Extension
local Utility Company
freezing and storing foods.
for the latest information on
Serviceor your
ICECREAMSTORAGE
Fine-quality ice cream, with high cream
content, will normally require slightly lowrr temperatures than more “airy” alreadypacked brands with low cream content. It
,\”illbe necessary (0 experiment to deter-
~line the exact setting to keep your favor-
—
Fo replace, select desired shelf height.
iVith shelf front raised slightly, engage top
CLEANING
Inside— Clean both refrigerator and free~
er sections at least once a year. It is re(
ommended that the refrigerator be ur
plugged before cleaning. If this is not p-at
tical, wring excess moisture out of spong
or cloth when cleaning in the vicinity of
switches, lights, or controls.
Use warm water and baking soda solution
—about a tablespoon of baking soda to a
Page 6

9ear Gonsumer:
This guide wi~l help you to get the best use from your new refrigerator, offering
money,time and energy saving tips. If you have any further questions, contact
the Consumer Coordinator near you whose number is available from your dealer
or call or write me. Wewould like to hear from you.
~ Sincerely yours,
Appliance Park AP 4-119, Louisville, Ky. 40225
FLU ONE-YEARwARRANTY-
HOTPOINTREFRIGERATOR
From Hotpoint to l.’ou–
This warrantyis extended byHotpointto the originalpurchaser and to
any succeeding owner and applies to products purchased in the United
States, retained within the 48 contiguous states, the State of Hawaii, or
the District of Columbia and employed in ordinary home use.
WhatWeWiiI 130–
If your Hotpoint Refrigerator fails because of a manufacturing defect
within one year from the date of original purchase, we will repair the
product without charge to you. Parts and service labor are included.
Service will be provided in the home in the 48 contiguous states, in the
State of Hawaii, or in the District of Coiumbia.
Obtain Service-
How ‘I’o
Service will be provided by our local Customer Care o factory service
organization or by one of our franchised Customer Care servicers during
normal business hours after you notify us of the need for service. Service
can be arranged by telephone. Look up“Hotpoint Customer Care Service”
in the yellow pages or write to the address given below.
Wlmt 1sNot Covered–
This warranty does not cover the failure of your refrigerator if it is dam-
aged while in your possession,
failure is caused by unreasonable use including use on house wiring not
in conformance with electrical codes, low power voltage, and failure to
provide reasonable and necessary maintenance. In noevent s/m/lHotpoint
be Iiablefor consequential damages. This warranty does not apply to the
State of Alaska. nor to the Virgin Islands, Guam, American Samoa or
[he Canal Zone or the Commonwealth of Puerto Rico.
Some States do not allow the exclusion or limitation of incidental or
conscqucn[ial damages, so that the preceding limitations or exclusion
may not apply to you. This warrunty gives you specific legal rights, and
YOUmay also have other rights which vary from state to state.
used for commercial purposes, or if the
v
Jane Butel, Manager
Consumers Institute, Hotpoint
ADDITIONALIFLU FOUR-YEARWARRANTY
oh!-n-ESEALED
REFRIGERATINGSYSTEM
The sealed refrigerating system (compressor, condenser, evaporator and
connecting tubing—see diagram) is
covered in the above full warranty. In
addition to that warranty we will repair
this sealed system if it fails because of
a manufacturing defect within the second through fifth year after original
purchase. We willbear the cost of both
parts and labor.
All other provisions are the same as
those stated in the above full warranty.
LIMITEDWARRANTY
Applicable
h the State of Alaska, free service including parts will be provided to correct
manufacturing defects at our nearest service shop location or in your
home, but we do not cover the cost of transportation of the product to
the shop or for the travel cost of a technician to your home. You are
responsible for those costs.
are the same as those stated in the warranties above.
to‘mestateofAkwka
All other provisions of this limited warranty
Appliance Park, Louisville, Kentucky 40225
%coNNE~;:
h
~ ~
TUBING
COMPRESSOR
RERWEIMWWSYSTEM
/
puh ~0, 39-6”fO0
Nyouwish b’dner Mp or Mlmmtim UMnm’ningIbis Wan’my, Ccmtzaet:
-Manager- O.nmmerRelations, Hoqmint
Appliance Park,W’CE-Room316Q Louisville, Kentucky 40225
~p
.[3-7!
,:$+ ~
:
-a..,”s::j;
L)
“-
Dwg. No. 465057P05
 Loading...