

Page 1
.*
. ..
Page 2
Page
Readthis kl)mkcarefully.
Etlergy-S~~\’i~~gTips.... . . . ...2
Important Safety Instructions. ..3
How to Connect Electricity. ..394
Installation Requirements. . . , .4
How to Adjus~Rollers. . . . . ...4
How to Adjust LevelingLegs. . ..4
Howto Set Temperature
Controls . . . . . . . . . . . . . . . . ...5
How to Use Energy-Saver
Switch. . . . . . . . . . . . . . . . . . ...5
Food Storage Suggestions. . . . ..6
SheIves. . . . . . . . . . . . . . . . . . ..’7
Storage Drawers. . . . . . . . . ..’798
Ice Service . . . . . . . . . . . . . . ...9
UserMaintenance
Instructions. . . . . . . . . ...10111
Problem Solver . . . . . . . . . ..12-14
Consumer Services . . . . . . . . . .15
Warranty. . . . . . . . . .BackCover
lti. sintendedto Mpyouo perate
and maintain you rnewref’rigeratmproperly.
Keep it handyfor answers toyour
questions.
If you don’t understand something
orneed more help...
Call, toll-free:
The GE Answer Centerm
800.626.2000
consumer information service
or write (include your phone
number)
Consumer Affairs
I-Iotpoint
Appliance Park
Louisville,KY 40225
You’llfindthemon a labelat the
bottom, just insidethe fresh food
compartment door.
These numbers are also on the
Consumer Product Ovnership
Registration card that came with
your refrigerator. Before sending
in this card, please write these
numbers here:
Model Number
Serial Number
Use these numbers inany correspondence or service calls c&cerning
your refrigerator.
Myowlreceived a damagedE’efrig-
er;toq immediately co~tact thedealer (or builder)-that sold you
the refrigerator.
save -timi!andmmey
Bekm you B’eqnwwSWviceq
check the Problem Solver on pages
12through 14.It listsminor causes
of operating problems that you can
correct yourself.
= Location of ywr refrigerator is
important. Avoid locating it next to
j’(~urrange.
a heating vent or where
sun will shine ciirectly on it.
CJDon’t opm doors more often than
necwMII”y.
Q C1OSC thedcmrsassoon :ispossible,
particularity in hot, humid weather.
QBe sure the cloors are closed
tightly. Before leaving the house or
retiring for the night+check to be
sure doors haven’t been left open
accidentally.
QStore only those fomis requiring
refri:eral ion in your refrigerator,
o Wipe all moistui-efrom bottles and
cw[[>ns before putting them in the
I-cfl-igmlm.
~ Keep all foods covwxi to reduce
moisture build-up insiciethe refrigerator.
@If YOUtunl COlltKlk tc) coldest
position for quick chilling or [reez-
ing, be sure to turn them back to
regular settings.
Page 3
&*3VdmNlNG–WhGnusirg this
.
%j.S%@p&mce,ahvaysexercise basic
safety
precawiOns. inc[udingthe
fokmving:
= t..kwthisapplianceonly for‘its
intended purpose m described in
this Use and Care Book.
* Never mplugyour R’efrigerwlrby
pdiing
on the p:wer cod. Always
gripplug firmly andpullstraight
out from the outlet.
a Repair m’ r’ephmeimedately
d ekchie Exm”keCods thathi-we
beam-m!iEwyed
aged. DO HOtuse a cord that shows
cracks or abrasion damage along
its length or at ei!her the-plug or
@when moving‘your M&igerator
.%(?B3ItheWan$be ‘cWehilRiot
way
d]
‘ova’ or damagethepower
md.
s After your rehigerator isin
C3perdion$do not mud the63UM
SWfmx?s,
are damp or wet. Skin may adhere
to these extreme]y cold sur~aces.
particu~arly when hands
or Odm%viset’km-
fingersCM’b%ds ml the automtic
icemamg
refFig@FHtor ‘is p154gged in. This will
prevent contact with the moving
parts of the ejector mechanism,
or with the heating element that
@Don’trefreezehxmm foodsWlwri
have thawed eompleteiye
The United States Department of
A.gricth.m in Home and Garden
Bulletin No. 69 says:
‘!..Youmay safely refreeze frozen
foods that have thawed if they still
contain ice crystals or if they are
stilIcold—below40°F.
‘~..Thawed ground meats, poultry,
or fish that have any off-odor or
off-color should not be refrozen and
should not be eaten. Thawed ice
cream should be discarded. If the
odor or color of any food is poor
or questionable, get rid of it. The ,,
food may be dan~erous to eat.
“Even partial thawing and refreezing reduce the eating quality of
foods, particularly fruits, vegetables,and prepared foods.The eating
quality of red meats is affected less
than that of many other foods. Use
refrozen foods as soon as possible
mwhati$mW’hikthe
‘sMyore’ @idF@ftigeFatoris ?!@
WDud im lmwsk? but Bmt in
sure to remove the doom. This will
reduce the possibilityof dmgm to
children,
A. Before making any repairs,
Note: We strongly recommend .: ..
that any servicing be performed
by a qualified individual.
B. Before cleaning. - “-..- ~
C. Before replacing a burned-out
light bulb, the refrigera~or should
be unplugged in order to avoid
contact with a live wire filament.
(A burned-out light bulb may
break when being replaced.) ‘
Note: Turning control to OFF
position does not remove power
to the light circuit.
,’
WN39k?
-...
%Z?G&!&
ma%---
b.wa::.–
-..—.————-.——— .-.....
1
PREFERRED
METHOD
7
NSUREPROPER
Fig, 1
.t--hvethe wall oLltletanclcircuit
.-.
/’
//
GROUNDEXISTS
BEFOREUSE
.3
{
al
h “
\
%
Q
.0”
‘=i]
7
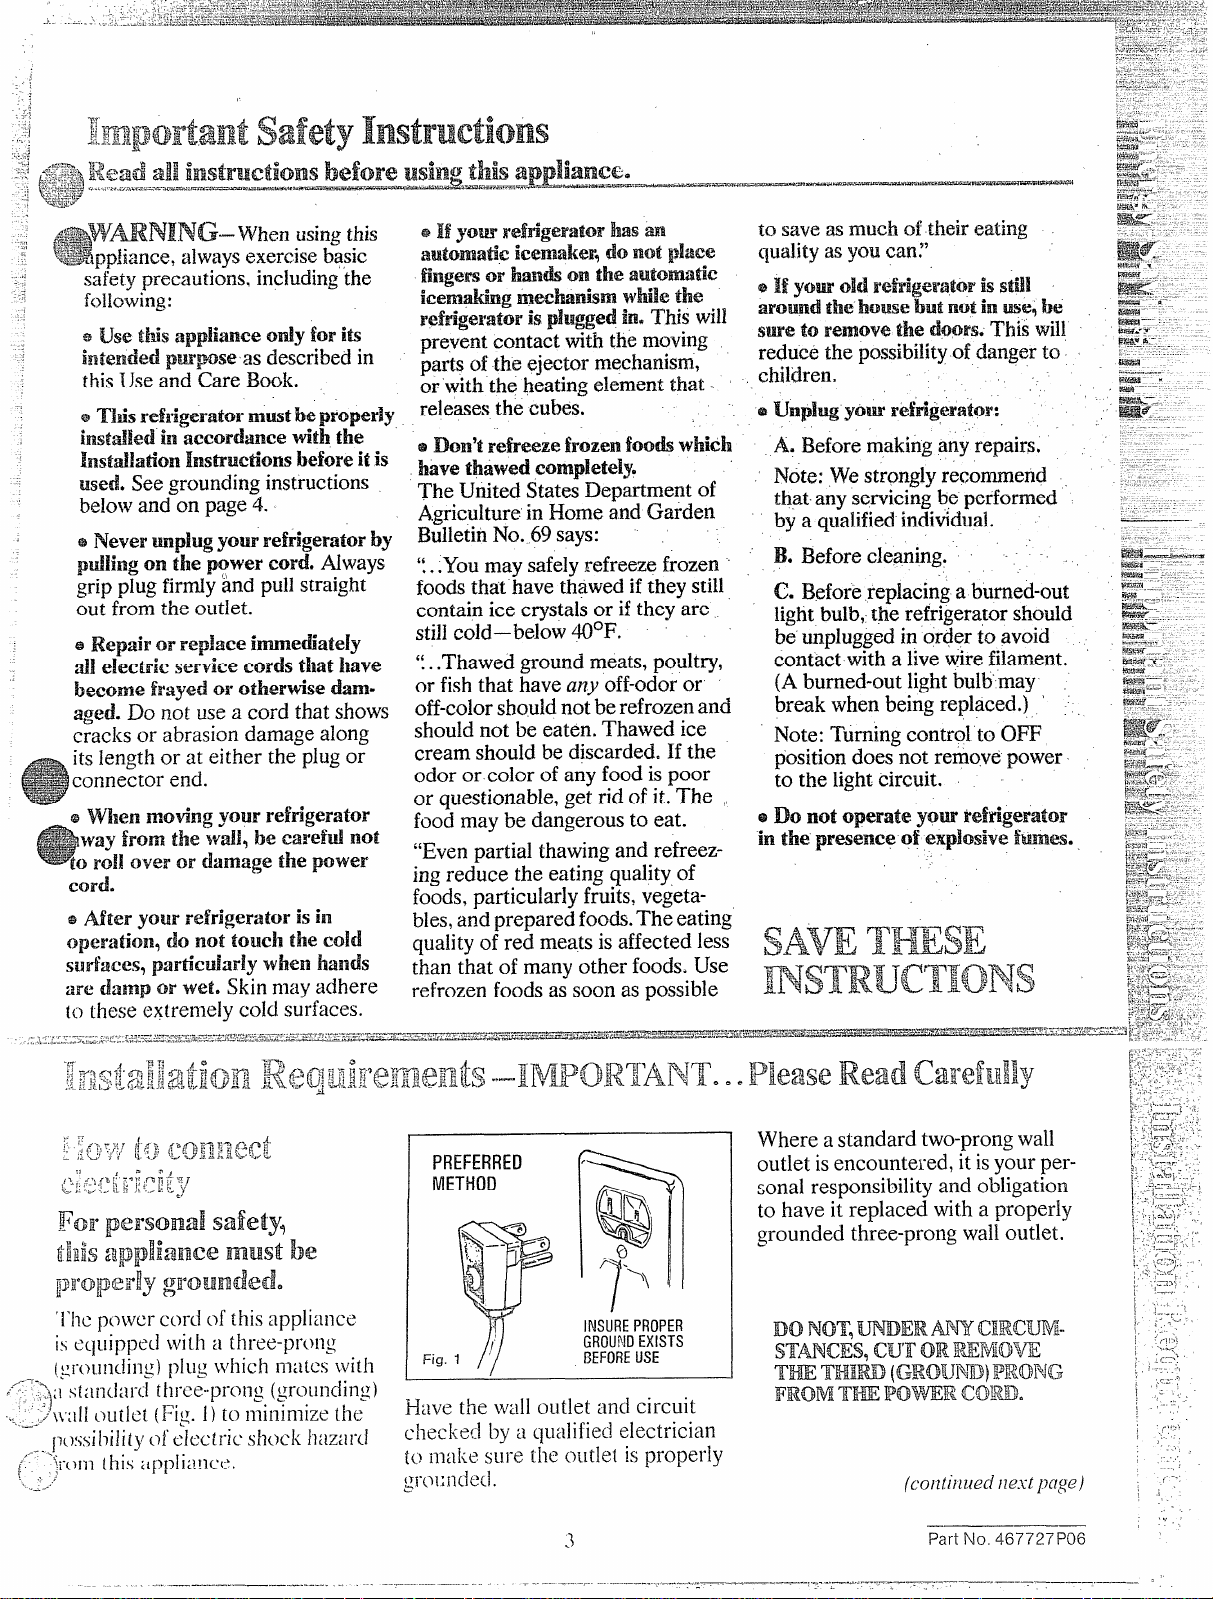
Where a standard two-prong wall
outlet isencounte~ed, it isyour personal responsibility and obligation
to have it replaced with a properly
grounded three-prong wall outlet.
DO NOT,I.JF+HDERANYCIRC3JPW
sTmcEs7 Gi.nr0!3?REM(IVE
THE TE-mwD(G)wMJND}FT&mw
FROMTHE Povi’%m(xNiWD=
(cc.vi[iiwed Hal pL7ge)
Part No. 467727PC)6
Page 4

Ekxauseof potential safety
hazards under certain conditions,
we strongly recommend against me
ofan adapter plug. However,if you
stillelect to usean adapter, where
localcodes permit, aTEMPORARY
CONNIXTIOiVmaybe made to a
properly grotmdecltwo-prong wall
outlet by use of a lJL listedadapter
{Fig.2) available at most local
hardware stores.
TEMPORARY
(ADAPTERPLUGSNOT
PERMITTEDINCANADA)
METHOD
Because of potential safety
hazards under certain conditions,
we strongly recommend against the
use of an extension cord. However,
if you stillelect to use an extension
cord, it is absolutely necessary that
it be a LJLlisted 3-wiregrounding
type appliance extension cord havinga grounding type plugand outlet
and that the electrical rating ofthe
cord be 15amperes (minimum)ancl
1~~volts.Such extensioncords
are obtainable through your local
service organization.
Adjtwmbleraw%%(on models!!@
equipped)which enable you to
move refrigerator away from wall
for cleaning, or levelinglegs?are
located behind base grille. They
shouldbeset sorefrigerator isfifily
positioned on floor and front is
raised just enough that doors c~ose
easilywhen opened about halfway.
Fig. 2
Iv
The larger slot in the adapter
must be aligned with the larger slot
in the wail outlet to provide proper
polarity in the connection of the
power cord.
CAUTION: Attaching adapter
ground terminal to wa~loutlet
cover screw does not ground the
appliance unless cover screw is
metal, and not insulated, and wall
outlet is grounded through house
wiring. Youshould have the circuit
checked hy a c[ualified electrician
to make sure the outlet isproperly
g~-~~unded,
when dis(xmwdillg the
cord from the.adapter, aiW21yShold
~headapter with one hand. If this
is not done, the adapter
terminal isvery Iikelyto break wi~h
repeated use.
BEFOREUSE
‘pm’’va’
ground
tNH&$-—
(115volt, 60 Hertz, or 100volt,
50 Hertz, single phase AC). This is
recommended for bestperformance
and to prevent overloading house
wiring circuits, which could cause
a possible fire hazard from overheating wires.
Do not install
Iten-npwutm will go bekw (more
because it will not run often enough
to maintain proper temperatures.
Do install it
E’drigerator where
Gm a floor strong
em.@toNnpp’t a My baded
.kx?fr@mtoF.
Also see Energy-Saving Tips
r~g:lrding location.
!% adjulst
remove base grilie by grasping it
at bottom and pulling it out.
N
-L~
Turn roller adjusting screws or
leveling legs eldwise $0raise
refrigerator, eoun$enclocktise @
hwer it. Use adjustable wrench or
pliers on the roller adjusting screw’s
3/8” hex head bolt.
When adjusting rollers or Ieveling
legsfor proper door closure, bottc~m
front edge of cabinet should be
approximately 5/8” from floor.
den m kwehg legs,
ROLLER
ADJUSTINGSCREW
LEVELINGLEG
L\
o
&
L
I
I
‘=
.-
-
——.-—... .. ...._m. T..—. _.
———.—-—-— . . . ,. . . . . .. .——.._-_ ——_________.-_____
.-.--— ————
T
Y.>
‘.- ,
!-
.-
{z
-
Page 5
,.
.—..
FREEZER
c INITIAL SETTING
~ IS COLDEST
I
1
BETWEEN ADJUSTMENTS
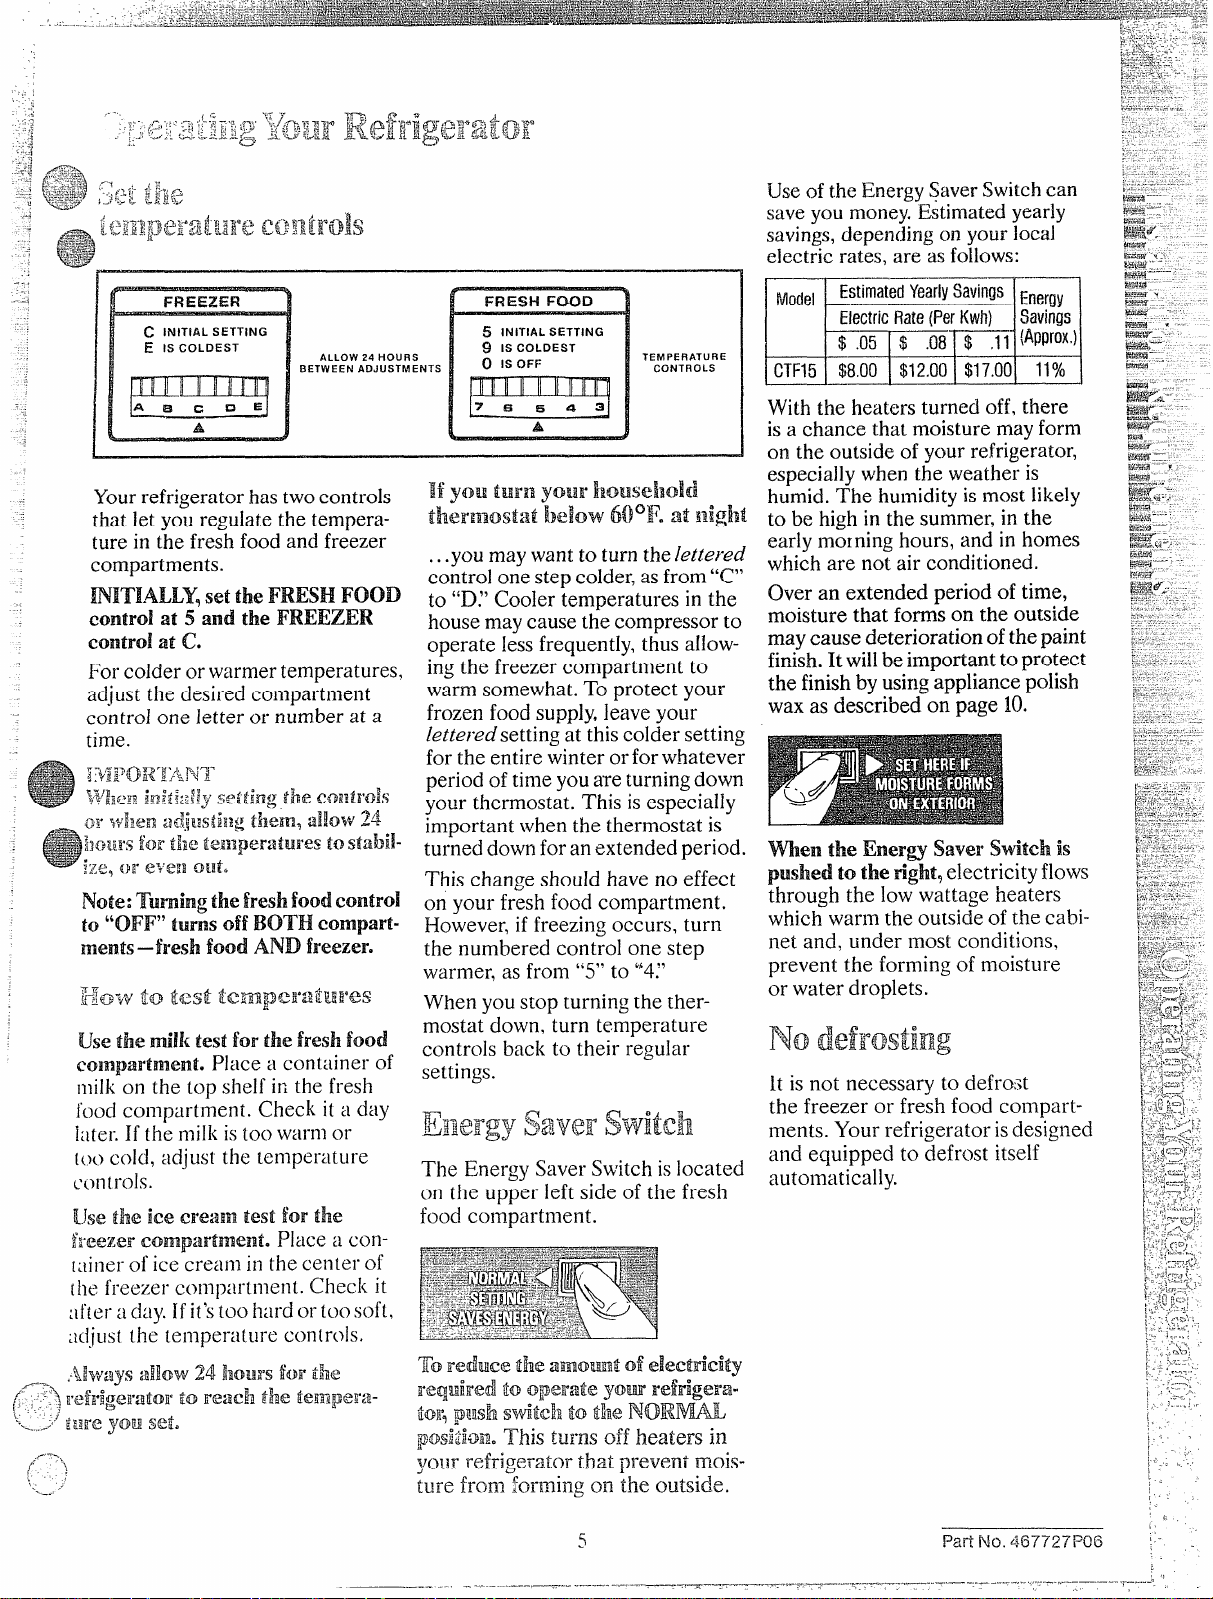
Yourrefrigerator has two controls
that let you regulate the temperature in the fresh food and freezer
compartments.
mITI.ALLY,set the FRESH FOOD
Conlrol at 5 and the FREEZER
Colltro!M c.
For colder or warmer temperatures.
adjust the desired compartment
control one letter or number at a
time.
];+fp~,f<”~y~q~
.
p-$;f&$i*
lwj$<~g
,.
.-....I.-3.
.{Seiiing the controls
ALLOW 24 HOURS
FRESH FOOD
s INITIAL SETTING
9 IS COLDEST
() IS OFF
1
IHHllllmlll[
7f3g543
A
TEMPERATURE
CONTROLS
Iif you il.mnyo’m’}aouse!lold
ti3eFEmost:zt ibdow
60*F.atmight
...you may want to turn the lettered
control one step colder, as from “C”
to “D.”Cooler temperatures in the
house may cause the compressor to
operate less frequently, thus allow-
ing the freezer compartment to
warm somewhat. To protect your
frozen food supply,leave your
/ettered setting at this colder setting
for the entire winter or for whatever
period of time you are turning down
your thermostat. This is especiaHy
important when the thermostat is
turned down for an extended period.
This change shotdd have no effect
on your fresh food compartment.
However, if freezing occurs, turn
the numbered control one step
warmer, as from “5” to “4:’
When you stop turning the thermostat down, turn temperature
controls back to their regular
settings.
The Energy Saver Switch islocated
on the upper left side of the fresh
food compartment.
Use of the Energy l!javerSwitchcan
save you money. Estimated yearly
savings,depending on your local
electric rates, are as follows:
E
——-—
_&3imatedYearly$avin~&e[gV
Mom
CTF15
ElectricRate(PerKwh)
$.05 [ $
~8.00 I $12.001-$17.001~~1
—
,08~ ~~~prox’)
I
1 I
‘1
Savkjs
{
With the heaters turned off, there
is a chance that moisture may form
on the outside of your refrigerator,
especially when the weather is
humid. The humidity is most likely
to be high in the summer, in the
early morning hours, and in homes
which are not air conditioned.
Over an extended period of time,
moisture that forms on the outside
may cause deterioration ofthe paint
finish. It willbe important to protect
the finish by using appliance polish
wax as described on page 10.
Vvkn the Energy
saverswitch is
pushed to the right?electricity flows
through the low wattage heaters
which warm the outside of the cabinet and, under most conditions,
prevent the forming of moisture
or water droplets.
it is not necessary to defrost
the freezer or fresh food con~partments. Your refrigerator isdesigned
and equipped to defrost itself
automatically.
To E-wrke the
ImQ@red
lwamw?wof‘eLWmfkity
toQpemte yowl neff@-pa-
torfqUmxJ-3stiEeh tothe 13mm&ML
~*@;i,
.OEILThis hums off heaters in
your refrigerator that prevent WlOk-
ture from forming on the outside.
5
—
t-,
;., ,..,
I
I
I
,.
I
!-
\,-
i
;
...-
(.
“
Page 6

Eatirrgquaii!ydrops
--
aftertimeshown
Fresh
Meats
Roasts(Beef and Lamb).... 3t05
Roasts(Pork and Veal)... . . 3t05
Steaks(Beef). . . . . . . . . . . 3t05
Chops (Lamb) . . .. . . . . . ..3to5
chops (Pork) ., . . . . . . . ..3tO5
Ground and StewMeats. 1 to 2
Variety Meats. . . . . . . . . . lto2
Sausage(Pork) . . . . . . . . . . lto2
REFRM:RATOIIFREEZER
35° to&l°F.
.—
DAYS
MONTHS
6 tO1.2
4t08
6to 12
6t09
3t04
3t04
3t04
1 to 2
ProcessedMeats
Bacon. . . . . . . . . . . . . ...7
Frankfurters . .. . . . . . . . . . 7
Ham(Whole) . . . . . . . . ...7
Ham(Half) . . . . . . . . . . . ..3to5
Ham(Slices) . . .. . . . . . ...3
Luncheon Meats. . . . . . . . . 3t05
Sausage(Smoked) 7
Sausage
(Dry and Semi-Dry). 14to 21
1
x
lto2
lto2
lto2
Freezing
not
recom-
mended.
CookedMeats
Cooked Meatsand
Meat Dishes. . . . . . . . . . 3t04
Gravyand Meat Broth. 1 to 2
2t03
2t03
FreshPoultry
Chicken and Turkey
(Whole) . . . . . . . . . . . ..lto2
Chicken(Pieces). . . . . . . 1 to 2
Turkey(Pieces) . . .. . . . . . . lto2
Duck and Goose(Whole). 1to 2
Giblets .... . . . . . . . . . . ..lto2
CookedPotdtry
Pieces
(Covered with Broth). 1 to 2
Pieces(Not Covered). . . . 3 to 4
Cooked Poultry Dishes. 3 to 4
Fried Chickerr.. . . . . . . . . . 3t04
(Otherthan for meals&poultry) mEzIx
Most fruits and vegetables. . . . . . ...8-12 months
Lean fish . .. . . . . . . . . . . . . . . . . . ..6-8 months
Fatty fish, rolls and breads,
soIJps, stew,
Cakes, pies, sandwiches,
Ieft-overs (cooked),
Ice cream (original carton). . . . ...1 month max
casseroles. . .. 2-3 months
New techniques are constantly being
developed. Consult the College or
County Extension Service or your
local Utility Company for the latest
information on freezing and storing
foods.
*li..$.
&pislIncII[ o,fAgricultl(t-e
Meats,fish and poultry purchased
from the store vary in quality and
age: consequently, safe storage time
in your refrigerator will vary.
12
9
6
6
3
6
1
4t06
4
‘I” S@re Udmzen meats, fish m-d
poultry:
* Alwaysremove store wrappings.
@Rewrap in foil, filmor wax paper
(f!:F,
and refrigerate irnmecliately.
TOstore cheese, wrap wellwithwax
paper or aluminum foil, or put in a
plastic bag.
~ Carefully wrap to expel air and
help prevent mold.
~ Store pre-packaged cheese in its
own wrapping ifyou wish.
T’ store vegetables, use the
vegetable drawers—they’vebeen
designed to preserve the natural
moisture and freshnessof produce.
~ Crispness can be maintained by
covering vegetables with a moist
towel.
@As a further aid to freshness,
pre-packaged vegetables can be
stored in their original wrapping.
lb store ice swam-Fine-quality
ice cream, with high cream
content, will normally require
slightly lower temperatures than
more “airy” already-packaged
brands with low cream content.
~ It willbe necessary to experiment
to determine the freezer compartment location and temperature control setting to keep your ice cream
at the right serving temperature.
~ The rear of the freezer compart-
ment isslightlycolder than the front.
l-@<,
:.q,;~$=-.
, :!~L$i).:: ,.><3!7?;$<<Ff@QGls
&r..,,&j~&*.”ui,&j.=
,,..,:.!,>
..
L)
There are three essential requirements for efficient home freezing.
1. Initial quality. Freeze only
top-quality foods. Freezing retains
quality and flavor; it cannot improve
quality.
2, Speed. The quicker fruits and
vegetables are frozen after picking,
the better the frozen product will
be. You’llsave time. too, because
less culling and sorting will be
Necessary.
3. Proper pidaging. (.Jsefood
wraps designed especially for
freezing.
‘lb h%ezemeat,
fish WMllpoumy,
wrap well in [reezer-weightfoil (or
other heavy-dutywrappingmaterial)
forming itcarefully to the shape of
the contents. This expels air. Fold
and crimp ends of the package to
provide a good, lustingseal.
Don’trefreeze meat that has completely thawed; meat, whether raw
or cooked, can be frozen successfullyonly once.
Limitfreezing of fresh (unfrozen)
meats or seafoods to 14pounds at
a time.
~ Store all~ikethingstogether. This
not onlysavestime, but electricity—
because you can find foods faster.
~Place the oldest items up front so
they can be used up promptly.
~Use shelves on the door for most
often used sauces and condiments.
~Use the meat drawer, if your
model has one, for meats you do
not freeze.
~Place most perishable items such
as milk, cream or cottage cheese
toward the rear of the top shelf as
they will stay coldest in this part
of the fresh food compartment.
* Cover moist foods with tight lids,
plastic film or foil.
~ Leaf vegetables and fruits -@aced
in storage drawers will last longer
when stored in closed plastic con-
tainers or wrapped in plastic film.
~ Do not overload your fresh food
or freezer compartment with a lot
of warm food at once.
~ Open the door the fewest times
possible to save electrical energy.
= When going out of town for severa] days, leave as fevvperishables t,,:2-~
as possible in the refrigerator.
$:+
,4.->,:++‘
~>.
~$j,
-
>
;’
6
Page 7

Some models have adjustable
shelvesin the fresh food compartment, enabling you rearrange the
shelves to fit your family’sfood
storage needs.
TOremove shelves: Tilt shelf up
at front, then lift it up and out of
tracks on rear wall of refrigerator.
~yg~https://manualmachine.com/- $/~g~iff$~}~u~)~’~~yy~y~
(0!3m.ddfi ?$:?ef~lii~>]lt’!l)
Drawers at bottom of fresh food
compartment willstop before comingall the way out of refrigerator
to help prevent contents from spih
Iingonto floor.Drawers can easily
be removed by tilting up slightly
and pullingpast “stop”location.
To remove drawers when the fresh
food com~artment door cannot IX
opened My,Mow the procedure
da’s applicableto yolw-ndd.
IEh’mfwn’Rm-m’vd–
Half”widt!l m%wem
(on models w equipped)
1. Remove food from drawers and
drawer coversand shelfabove them,
and take shelf out.
2. Grip drawer and cover farthest
from the door simultaneously with
both hands, lift them off the front
supports, and pull them out.
\
4. Tilt drawer and cover sideways.
,IiiI
To replace shelves: Select desired
shelf height. With shelf front raised
slightly,engage top lugs in tracks
at rear of cabinet. Then lower front
of shelf until it locks into position.
Tempered glass shelves (on models
so equipped) are adjustable in the
same manner.
5. Turn drawer and cover and take
them out.
To replace: reverse procedure,
making sure covers engage sup-
ports at rear and rest on supports
at front of refrigerator.
3. Grip remaining drawer and
cover simultaneously with both
hands, lift them off the front supports, and pull forward just enough
to detach from rear supports.
7
Page 8

4. Turn drawer and cover to left and
remove fromrefrigerator. (Withlefthand door, turn drawer and cover
to right.)
o
The slide-out meat drawer can be
removed afidtaken to the sink or
food preparation area. You mayalso
relocate it within the fresh food
compartment to suit your storage
needs.
\
2. Grip drawer and cover sin-iultaneously with both hands and pull
forward just enough to detach cover
from rear support brackets.
\
To rephme: reverse procedure,
making sure cover engagessupport
brackets at rear and rests on support
brackets at front of refrigerator.
On full-widthsheMmmMs9just
slide drawer out, remove drawer
cover from shelf above, relocate
cover in the position you desire it
and slide drawer back into place.
@R
kahvidthshdf EWMkk,the
drawer and the shelf to which it
attaches can be relacted any any
level.
3. Up-end drawer and cover with
fron~-sidedown.
Page 9

..
EasyRdwmw IsaTi’q%
l+%atk?l%la$ic&c.imdRw
(OM mmkls so equipped)
.-
kid it over storage bucket (on”
models so equipped) or bowl, and
twist tray at both ends.
For only one or
leave the tray right-side up, twist
both ends slightly and remove
desired number of cubes.
Wash trays and storage bucket in
lukewarm water only. Do not put
them in an automatic dishwasher.
two icedins,
/- +-
\
If ymu’!reh’igemtmisCDpemted
before
to the immmker,keep the manual
icemaker switch in (X?Fposition.
When
connected to water supply?turn
manual switch to ON position.
Ice cube mold will automaticaHy
fillwith water after cooling to
freezing temperature, and first
cubes normally freeze after
several hours. When cubes are
solidly frozen, they will be ejected
from the mold into the ice storage
bin by means of a sweeper arm.
Icemaking will continue until the
feeler arm is raised by a sufficient
accumulation of ice cubes in the
storage bin to halt the operation
temporarily. For maximum ice
storage, level the stored cubes
with your hand occasionally. Be
sure nothing interferes with the
swing of the feeler arm.
The icemaker ejects cubes in
groups of five and it is normal
for several cubes to be joined
together.
once ‘pm icemaker 1sin Opa’”
ation9&M9waway the first few
batches of!ice cubes. This will
flush away any impurities in the
water line. Do the same thing
after vacations or extended
periods when ice isn’tused.
1
watermmwtiimis made
refrigerator has been
Under certain rare circumstances, ice cubes may be
discolored, usually appearing
with a green-bluish hue. The
cause of this unusual discoloration is apparently due to a
combination of factors such as
certain characteristics of local
waters, household plumbing
and the accumulation of copper
salts in an inactive water supply
line which feeds the icemaker.
Continued consumption of such
discolored ice cubes may be
injurious to health. If such discoloration is observed, discard
the ice cubes and contact your
Hotpoint Factory Service Center
or an authorized Customer Care”
servicer.
Turn
ieemaker ON-OFF kver to
OFF position when:
@home water supply is to be offfor
several hours.
* ice storage bin is to be removed
for a period of time.
~going away on vacation, at which
time you should also turn off the
valve in the water supply line to
your refrigerator.
H ice isused infrequtmtlyqold cubes
wiHbecome cloudy and taste stale.
Empty ice storage bin periodically
and wash it in lukewarm water.
mena bilge’ supply d icewill
be needed, make an extra supply
ahead of time. Empty bin, put cubes
in plastic bags or containers and
store in the freezer compartment
until the bin refills.
M
this is ym.u’ firsticam?kx, you’ll
hear occasional sounds that may be
unfamiliar. They are normal icemaking sounds and are not cause
for concern.
Part No. 457’727P06
Page 10

,P
N
““~?,:; yfp ~~~~’
J@fc--~E3~,f
,L,ii?$,, ~<,; ::- ~
~@j’f@3y@-
w“”
#.>.
* .*gj@
@<a!g;t~$$] &< \%.
‘Jirllr
Protect the paint finish. The finish
on the outside of the refrigerator is
ahighquality,baked-on paint finish.
With proper care, it willstay new-
looking and rust-free for years.
Apply a coat of appliance polish
wax when the refrigerator is new
and then at least twice a year.
Appliance Polish Wax & Cleaner
(Cat. No. WR97X216)is available
from GE and Hotpoint Appliance
Parts Marts.
Keep the fimishclean. Wipe with
a clean cloth lightly dampened
with appliance polish wax or mild
liquid dishwashingdetergent. Dry
and polish with a clean, soft cloth.
Do not wipe the refrigerator with
a soiled dishwashing cloth or wet
towel. Do not use scouring pads,
powdered cleaners, bleach, or
cleaners containing bleach.
marl both ksll fbod and kxzer
compmhents at
kast once a yew
It isrecommended that the refrigerator be unplugged before cleatiing.
If this isnot practical, wring excess
moisture.out of sponge or cloth
when cleaning in the vicinity of
switches, lightsor controls.
Use warm water and baking soda
so{ution—about a tablespoon of
baking soda to a quart of water.
Rinse thoroughly with water and
wipe dry. Follow this same procedure forcleaning door gaskets, meat
and vegetable drawers, and all plastic parts. Wash ice trays and ice
storage bin in lukewarm water only.
Do not use cleansing powders or
other abrasive cleaners.
Do
MI(Mwash my pkastk parts
fkom your RiMgemtm’ ill your ~
automaticdshwashere
Care should be taken in moving
your refrigerator away from the
waH.AHtypes of floor coverings
can be damaged, particularly cushioned coverings and those with
embossed surfaces. If your refrigerator ison wheels, pull it straight
out and return it to position by
pushing it straight in. Movingyour
refrigerator in a side direction
may result in damage to your floor
covering or refrigerator.
Defrost water pan
Pan located on top of compressor
at rear of refrigerator should be
cleaned at least once a year. DO
NOT RHVlOVE PAN.Move ref-rig-
erator out from wall as far as Hecessary, and unplug power cord from
wallreceptacle before cleaning pan.
Use a clean cloth or sponge dampened in warm water and baking soda
solution—one tablespoon of baking
soda to a quart of water. Do not use
cleansing powders, abrasive clean-
ers, bleach or cleaners containing
chlorides.
Page 11

., ,
,.,-:,.;
:”.,<:.
,: .<
,, ,
* .,;8 ,, i. , :. ..;
,. :,.
.,..<r.~.:i.: .-.
-j,’: .],~ ,!. - ;-.. ;: .,,-.
>, :,,.:
‘;*,.:’’..! ..> . , .
&
,.
i ,,
,0,
Forext@FBdedVZKY3timsOrdmmxx,
shutoff powerto refrigerator, turn
the numbered control OFF, clean
interior with baking soda solution
of one tabiespowl of soda to one
quart of water.Wipe dry.Toprevent
odors, leave open box of soda in
refrigerator. Leave doors open.
For shorter vacations, remove perishablefoods and leave controls at
regular settings. However, if room
temperature is expected to drop
below 60°F.followsame instruc-
tions as for extended vacations.
If you have an icemaker, move
icernaker manual switch to C)FF
position and be sure to shut off
water supply.ON-OFF switch is
located near the front of the
icelmaker.
--:-
.,l..,:_:.. ..... ...
;,(‘>
.-rS:.
.. :!-.,
2.::::YE
Disconnect power cord from wall
receptacle, remioveall food and
clean and dry the interior.
Secure a?]loose items such as
grille, shelves, storage pans and
ice trays by taping them securely
in place to prevent damage.
/A
The optional automatic icemaker
wiHreplace the ice you use... auto-
matically.It can keep you supplied
withabinfulofcubes —ice for everything, everybody—without fuss or
muss.
If your refrigerator did not come
already equipped with an automatic icemaker, you may add one —
contact your local Hotpoint dealer;
specify UK-KIT-1.
Note: Some models are not equipped
to accept an automatic icemake~
. .
{flpiiwml ;5: +.”,%ir-.-iCSM)
Your ice cubes can only
be as fresh-tasting as the
water that produces them.
That’swhyit’sa good idea
to purify your water with
a Quadra Kleen Water
Filter.
Its activated charcoal
removes musty, stale odors
and unpleasant medicinal,
metallic tastes, A porous
fiber cartridge catches
dirt, rust particles, sand
and silt whije special
crystals reduce deposits
of hard scale.
The water filter is available from
your I-Iotpointdealer. Specify
WR97X214.It has complete installation instructions and installs in
minutes on 1/4”OaD. copper
water line.
Be sure refrigerator stays in upright
position onlj)during actual moving
and in van. Refrigerator must be
secured in van to prevent rnovernent. Protect outside of refrig-
erator with blanket.
——
f%ri No. 4G7727PC16
Page 12

if you have a problem, it t-naybe
.-.
minor.Youmay be able to correct
it yourself. Just use thisProblem
Solver to locate your problem and
then follow the suggested
recommendations.
PROBLEM
REFRIGERATOR
DOES NOT OPERATE
MOTOR OPERATES
FOR LONG PERIODS
May be in defrost cycle when motor does not operate for about 30 minutes.
Temperature control in OFF position.
If interior light is not on, refrigerator may not be plugged in at wall outlet.
If plug is secure and the refrigerator still fails to operate, plug a lamp or a small
appfian~e into the same outlet t~ determine ifthere is a trip~ed~ircuit breaker or
burned out fuse.
~ Modern refrigerators with more storage space and a larger freezer compartment
require more operating time.
@Normal when refrigerator isfirst delivered to your home —usually requires 24
hours to completely cool down.
~ Large amounts of food placed in refrigerator to be cooled or frozen.
@Hot weather—frequent door openings.
@Door left open.
~ Temperature controls are set too cold. Refer to instructions for use of
TEMPERATURE CONTROLS on page 5.
@Check EJNERGYSAVING TIPS on page 2.
MOTOR STARTS &
STOPS FREQUENTLY
VIBRATION OR
RATTLING
~ Temperature control starts and stops motor to maintain even temperatures.
~ If refrigerator vibrates, more than likely it isnot resting solidly on the floor and
front roller screws or front leveling legs need adjusting or floor is weak or uneven.
Refer to ROLLERS/LEVELING LEGS on page 4.
~ H dishes vibrate on shelves, try moving them. Slight vibration is normal.
Page 13

PROBLEM
OPERATING SOUNDS
FRESH FOOD
OR FREEZER
COMPARTMENT
TEMPERATURE
TOO WARM
@The high speed compressor motor required to maintain near zero
temperatures in the large frrezer compartment may produce higher sound
levelsthan your CMrefrigerator,
* Norrmdfan air flow—fan blowscold air through the refrigerator and freezer
compartments.
~ These NORMAL sounds willalso be heard from time to time:
~Defrost timer switch clicks at defrost.
@Defrost water dripping into drain pan.
@Temperature control clicks ON or OFF.
~Refrigerantt boilingor gurgling.
~ Cracking or popping of coolingcoilscaused by expansion and contraction
during defrost and refrigeration foHowingdefrost.
@With automatic icemaker, the sound ofcubes dropping into the bin and
running in pipes as icemaker refills.
~ Temperature control not set cold enough. Refer to THVIPERArURE
CONTROLS on page 5.
~ Wam~weather —frequent door openings.
~Door ~eftopen for long time.
~Package may be holding door open.
I’?(3ODS DRY OUT
%OST OR ICE
Y?YSTALS ON
T?OZEN FOOD
AUTOMATIC
ICEMAKER
DOES NOT WORK
ICE C?.JBES HAVE
ODOIVTASTE
~ Package blocking air duct in freezer compartment.
~ Foods not covered, wrapped or sealed properly.
~ Door may have been Ieft ajar or package holding door open.
~ Too frequent and too long door openings.
~ Frost within package is normal.
~ ON-OFF control in OFF position.
~ Water supply turned off or not connected.
=Freezer compartment too warm.
~ Cubes to~ snla]l—water shut-off valve connecting refrigerator to home
water line may be clogged.
=Piled up cubes in storage bin may cause icemaker to shut off prematurely.
shut off icemaker and level by hand.
GOld cubes need to be discarded.
Q‘Unsealedpackages in refrigerator and/or freezer compartments may be
transmitting odor/taste to ice cubes.
—
Q[nttu-iorof refrigerator needs cleaning-—refer to page 10.
0 Pm)r-tasting incoming wa~er.Instail Quadra-CIean water filter–see page H.
--
(Coil[illld I?et-t /?agc)
13
Part No. 467727P06
I
,,
Page 14

Page 15

&jj;$
gg$i$!~
kq~$$
R+&+
%s;i.
.$4
~&,;~?$.{;
mj~ j:~%
-d
warranty
Yournewappliance isa wellciesignedandengineered
product. Before it left the factory, it went thro~igh
rigoroustests to detect manufacturing defects. And
you have a written warranty to protect you.
Rompt service’at-your convenience
Whether your appliance is in or out of warranty,
you’re just a phone call away from our nationwide
network of Factory Trained Service professionals.
Simplycall our Hotpoint service organization.
You’llfindthem inthe White Pages under “Hotpoint
Factory Service” and in the YellowPages under
“Hotpoint Customer Care@Service.”
Service is scheduled at your convenience and the
tec~ician drives a fully-stocked parts service truck
so that, in most cases, the repair can be completed
in one visit.
We’reproud of our service and want you to be
pleased, but if for some reason you are not happy
with the service you receive, here are three steps
to followfor further help.
~....,..-,. .
. . . ...
--..,._; ;..,>.. ,
,.,.
,, ---:,;-
.—.-.,.., ..,.
.,...
,#
---, ,-,=------=
,,.-;...4
4..
~
servicecontracts
For trouble-he service beyond
the written warranty period.
Ifyou prefer to budget your repair expenditures . ‘-;~~:>+-;” ~.
J..-..— . . . ..—_ ,---- .. . .. . - .4 . ‘% --..4 . ..—..— - . .. . . . . -J
‘1““: ‘T%
>.
,... ;. ,-,
.’ ‘->:”~
,—=”’,
[2---j’%.
!-,,’,
....,
.,. ..._ ___
. .
instead of being surprised bythem, I-lotpoint ~ ...’=
offers service contracts for varyinglengths of
time on all Hotpoint major appliances. With a :
The (&cl-i I%@’system
You cansavemoneyand time
by doing it ym.mw.
For clo-it-yo~irselfers” who wouldprefer
to fix Hotp(>int
themselve s...Ho[point offers an
industry first, the Quick-Fix” System.
Rotection
--,-,-.”7--, ==,-s3T7-, --=*-m .---== ~.’?=~--- r-
7 :~--s.
,.-..tdb.d..- .- .,-
,.-—” —_.. x.”--- .
-----
m:~jm- appliances
. . . . . . . . ..
,-.
-—-m.,--y:w: ,.-, .. . ,r.=-:.-.v>,>w-.w-
. ::zw!~k..~,.k., ,-..-~
@iS$f
(’J
See the warranty cmthe back page of this book for
details.
.mn~.,.
FIRST, contact the people who serviced your
appliance. Explain why you are not pleased. In most
cases, this will solve the problem.
NEXT, ifyou are still not pleased write all the
details–including your phone number to:
Manager, Consumer Relations
Hotpoint
Appliance Park
Louisville, Kentucky 40225
FINALLY,if your problem is still not resolved, write:
Major Appliance Consumer Action Panel
20 North Wacker Drive
Chicago, Illinois 60606
.=--v.=..
_,&k...L,a,*k*~-.~-.
,::.+”,
J“u
4’.),,“’ -.
.\‘:$’”
.! ~.,-’~..’~’~-
../‘//..>7
f ---::..$.”
/
&&
$=22%-%.%.
&f @--s &L!hJ.m-,.&.x L,..--.,
., ~. contract, we’llkeep your appliance in good
operating condition during the contract period
,,
--.’=.
..””,*I.
.5+“
=-l
# Aprogram for do-it-yourself appliance repair,
$ the system includes
T
for refrigerators, most non-microwave electric
~~’ranges, dishwashers, and standard and large
K capacity washers and dryers, plus
~f
~]aclio<qe~ repl~~cement parts, and technical help
@ with a
~z.s~s%~~~
. ..--..
-—..Tm=-.-.-~pe.~?*J+<.? *J+’,-* ~-’--w”’- ~IV:“=
.,
,-.”.fa.. r...r , ..-., . .! ...+...... ,.. A... --.X-,,. . . . _ .. . .
v>:”, ?
.:7. .,: .,. .- —-,, --.,
at no additional charge. Service contracts
let you pay today’s prices for service
a month, a year, or several years from
now, And, you’ll receive service from
Hotpoint trained service technicians
using only Genuine Hotpoint parts.
step-bj’-step repc~i~.m[[~jl{~[l.s
speciall)’
toll-f)ee 600 ]Iwnbel:
F?
s
. .1
Helphim%hilbyPhoom
15
-----— --—-
-——
PartNo.
4e17727PoeJ
Page 16

.: ~- {
$5;%
$
f%?x
JR
$j$\
&f
#. .1
c1
~
Save proof of original purchase date such as your sales slip or cancelled check to establish warranty period.
.— .. —. ....--_ —---- .
FULL ONESYEAF!WARRANTY
For one yearfrom date of original
purchase, we wilJprovide,free of
charge, parts and
your home to repair or replace any
part of the refrigerator that faiIs
because of a manufacturing defect.
FULL.FIVE-YEARWARRANTY
For five years from date of original
purchase, we will provide, free of
charge, parts and service labor in
your home to repair or replace
part of the
system(the compressor, condenser,evaporator and all connecting
tubing) that fails because of a
manufacturing defect.
sealedrefrigerating
service labor in
any
This warranty is extended to the
original purchaserandanysucceeding owner for products purchased
for ordinary home use in the 48
mainland states, Hawaii and
Washington, D.C. In Alaska the
warranty is the same except that it
is LIMITEDbecauseyou must pay
to ship the product to the service
shop or for the service technician’s
travel costs to your home.
All warranty service will be provided
by our Factory
by our authorized Customer Care(’)
servicers during normal working
hours.
Look in the White or Yellow Pages
of your telephone directory for
HOTPOINTFACTORYSERVICE,
GENERAL ELECTRIC-HOTPOINT
FACTORYSERVICEor HOTPOINT
CUSTOMERCARE(BSERVICE.
service Centers or
—.
i!i!i
“>-
$24
~’ ‘—
%
%’
&$g
may not apply to you. This warranty gives you specific legal rights, and you may also have other rights which vary from state to state.
~Service trips to your home to
teach you how to use the product.
Read your Use and Care material.
If you then have any questions
about operating the product,
please contact your dealer or our
Consumer Affairs office at the
address below, or call, toll free:
The GE Answer CenterTM
800.626.2000
consumer information service
~ Improper installation.
If you have an installation problem,
contact your dealer or installer.
You are responsible for providing
adequate electrical, plumbing and
other connecting facilities.
———
Some states do not allow the exclusion or limitation of incidental or consequential damages, so the above limitation or exclusion
To know what your legal rights are in your state, consult your local or state consumer affairs office or your state’s Attorney General.
~ Replacement of house fuses
or resetting of circuit breakers.
@Failure of the product if it is
used for other than its intended
purpose or used commercially.
~ Damage to product caused
by accident, fire, floods or acts
of God.
WARRANTORIS NOT RESPONSI13LEFORCONSEQIJENTIAL
DAMAGES.
l;
-
@
“ ‘>
v
g:
%
P--,
$6
$&
.%d
%
$:
$
ParrNo.467727P(I3
piJ~4~(-j,39”6209
1
L-_”..—
—— . .
j
 Loading...