

Page 1
Contents
Appliance Registration
Base Grille
Care and Cleaning
Condenser
Consumer Services
Countermaker Compartment
Drawer and Cover Removal 12
Energy Saver System
Energy-Saving Tips
Food Storage Suggestions
Storage Drawers
Storage Times
Ice Dispenser
Icemaker
Installation
Adapter Plug
Adjustable Rollers
Clearances
Electrical Requirements 3, 4
Extension Cord
14,
11,
7-9
7-9
3,4
2
4
15
14
19
6
5
2
1()
12
I ()
4
4
4
4
Model and
Problem Solver
Safety
Shelves
Temperature Controls
Vacation & Moving Tips
Warranty
Water Filter Accessory
Serial Numbers
Instruction
Back Cover
16-18
13
15
2
use
3
model
5
and
care
CSX27H
Ice &Water Dispenser
9
Countermaker
Compartment
of
Grounding
Location
Water Supply to lcemaker 4
Light Bulb Replacement
15
3
4
GE Answer Center’
800.626.2000
Page 2
Help us help you...
Energy-sating tips
Myou
need
setice
Read this book carefully.
It is intended to help you operate
and maintain your new refrigerator
properly.
Keep it handy for answers to your
questions.
If
you don’t understand something
or need more help, write (include
your phone number):
Consumer Affairs
Hotpoint
Appliance Park
Louisville. KY 40225
Write down the model and
serial numbers.
You’ll see them on a label at the
bottom, just inside the fresh food
compartment door.
These numbers are also on the
Consumer Product Ownership
Registration Card that came with
your refrigerator.
Before sending in the registration
card, please
here:
Model Number
Serial Number
Use these numbers in any
correspondence or service calls
concerning your refrigerator.
If you received a damaged
refrigerator, immediately contact
the dealer (or builder) that sold you
the refrigerator.
Save time and money.
Before you request service, check
the Problem Solver on pages
through
operating problems that you can
correct yourself.
write these numbers
18. It lists
causes of minor
16
● Location of your refrigerator is
important. Avoid locating it next to
your range, a heating vent or
where the sun will shine directly
on it.
● Don’t open the doors more often
than necessary.
● Close the doors as soon as
possible, particularly in hot,
humid weather.
● Be sure the doors are closed
tightly. Before leaving the house or
retiring for the night, check to be
sure the doors haven’t been left
open accidentally.
“
Store only those foods requiring
refrigeration in your refrigerator.
● Wipe moisture from bottles and
cartons before putting them in the
refrigerator.
● Keep foods covered to reduce
moisture buildup inside the
refrigerator.
● If you turn the controls to the
coldest position for quick chilling
or freezing, be sure to turn them
back to regular settings.
●
Don’t overcrowd your refrigerator.
Overcrowding can require extra
electrical energy to keep everything
cool.
To obtain service, see the
Consumer Services page in the
back of this book.
We’re proud of our service and
want you to be pleased. If for some
reason you are not happy with the
service you receive, here are three
steps to follow for further help.
FIRST, contact the people who
serviced your appliance. Explain
why you are not pleased. In most
cases, this will solve the problem.
NEXT, if you are still not pleased,
write all the details—including
your phone number—to:
Manager, Consumer Relations
Hotpoint
Appliance Park
Louisville, Kentucky 40225
Finally, if your problem is still not
resolved, write:
Major Appliance Consumer
Action Panel
20 North
Chicago, Illinois 60606
Wacker
Drive
2
Page 3
~PORTANT
SAFETY INSTRUCTIONS
Read all instructions before using this appliance.
WARNING—
When using this
appliance, always exercise basic
safety precautions, including the
following:
● Use this appliance only for its
intended purpose as described in
this Use
● This refrigerator must be
and
Care Book.
properly installed in accordance
with the Installation Instructions
before it is used. See grounding
instructions below
● Never unplug your refrigerator
and on page
4.
by pulling on the power cord.
Always
&rip
plug
firmly
and
pull
straight out from the outlet.
● Repair or replace immediately
all electric service cords that
have become frayed or
otherwise damaged. Do not use
cord
that shows cracks or abrasion
damage along
either the
● When moving your
its length or
plug or
connector end.
a
at
refrigerator away from the wall,
be careful not to roll over or
damage the power cord.
●
After your refrigerator is in
operation, do not touch the cold
surfaces, particularly when hands
are damp or wet.
Skin may adhere
to these extremely cold surfaces.
. Do not place fingers or hands
on the automatic
icemaking
mechanism while the refrigerator
is plugged in.
contact with the moving
This will prevent
ptis
of
the ejector mechanism, or with the
heating element that releases the
cubes.
● Don’t refreeze frozen foods
which have thawed completely.
The United States Department
of
Agriculture in Home and Garden
Bulletin No.
“..
.YoL1
foods
that have thawed if they still
contain ice crystals or if they
still
cold-below
“.. .Thawed ground
or
fish that have
off-color
und
should not be eaten. Thawed
ice cream should be discarded.
may
should
69
says:
safely
refreeze
40”F.
meats,
UI?}I
off-odor or
not be refrozen
frozen
are
poultry
If
the odor or color of any food is
poor or
The food
questiontible, get
may be
dangerous to eat.
rid of it.
“Even partial thawing and
refreezing reduce the eating quality
of foods, particularly fruits,
vegetables and prepared foods. The
eating
quality of red meat is affected
less than that of many other
Use refrozen
foods as
foods.
soon as
possible to save as much of their
eating quality as you
● If your
old
refrigerator is still
can:’
around the house but not in use,
be sure to remove the doors. This
will reduce the possibility
of
danger to children.
● Unplug your refrigerator:
A. Before making
any
repairs.
Note: We strongly recommend
that any servicing be performed
by a qualified individual.
B. Before cleaning.
C. Before replacing a burned-out
light bulb, the refrigerator should
be unplugged in order to avoid
contact with a live wire filament.
(A burned-out light bulb may
break when being replaced.)
Note: Turning control to OFF
position does not
remove
power
to the light circuit.
●
Do not store or use combustible
materials, gasoline or other
flammable vapors or liquids in
the vicinity of this or any other
appliance.
SAVE THESE
INSTRUCTIONS
Installation
Requirements—
How to connect
electricity
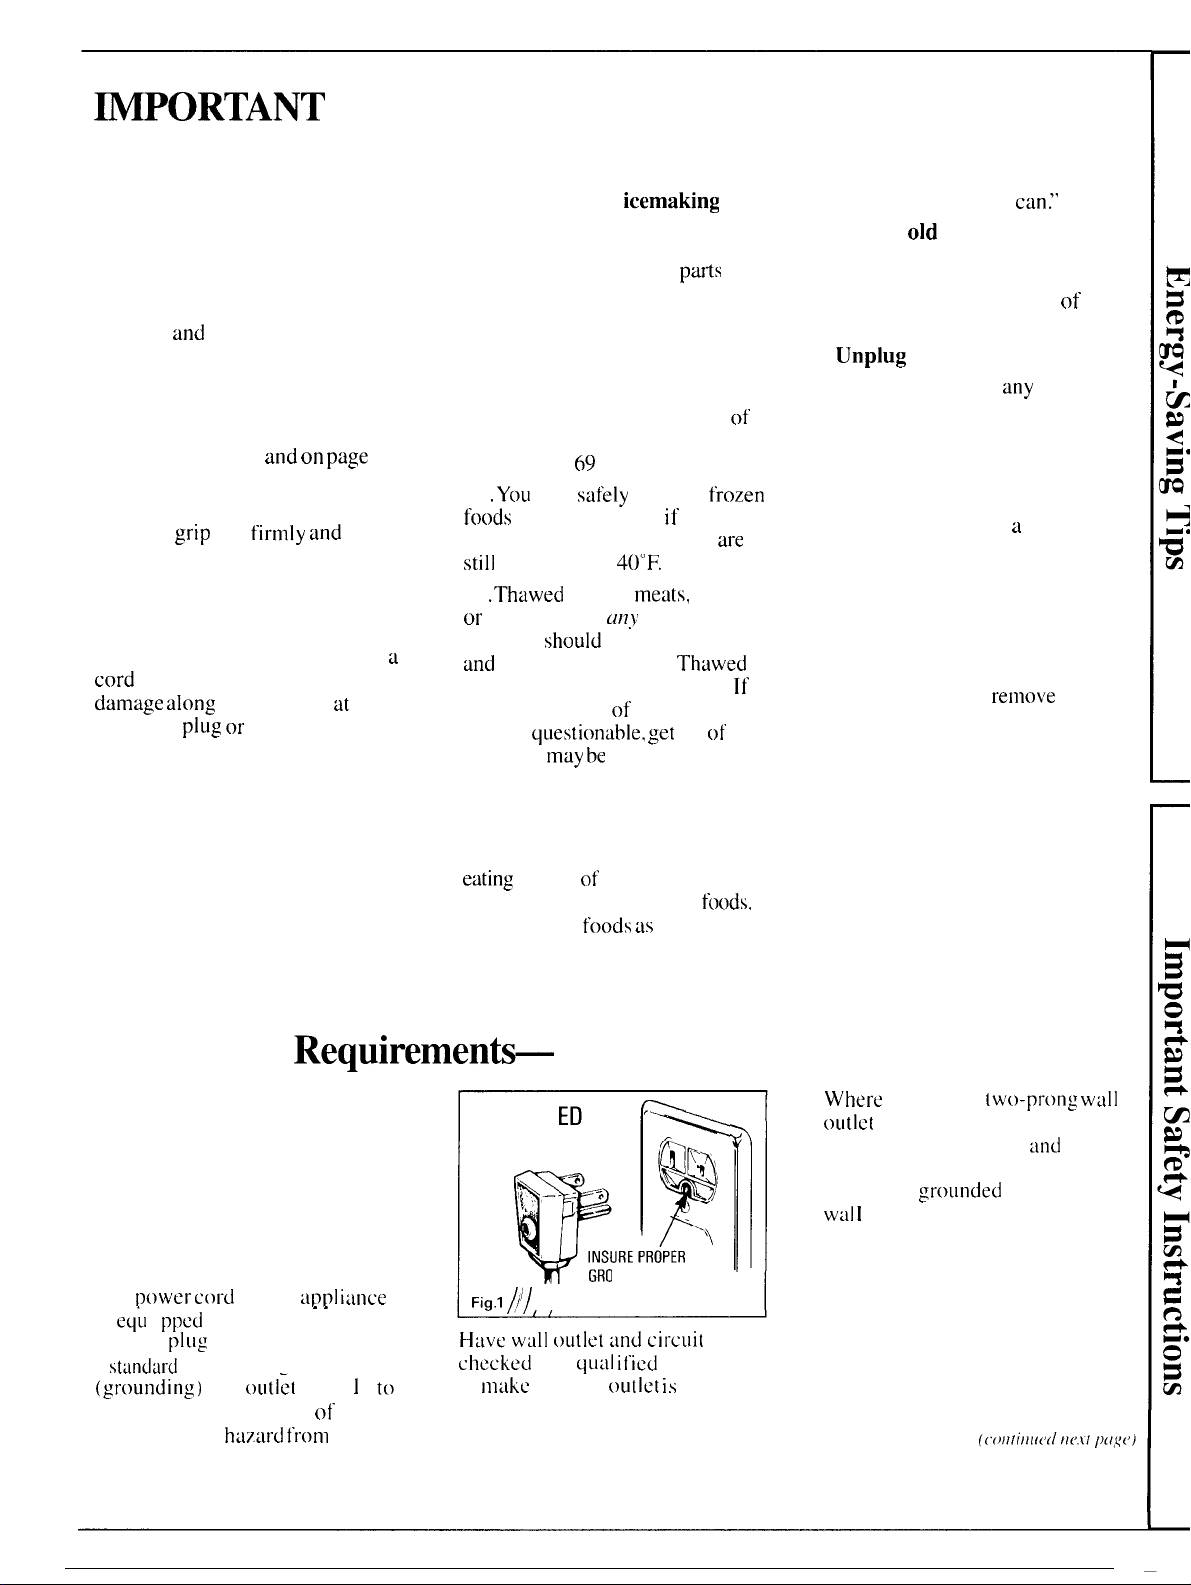
For personal safety,
this appliance must be
properly grounded.
The
t>ower cord
is
eq;l
i
ppcd
(
grounded)
a
stundard
plug
(grounding)
minimize the possibility
electric shock
appliance.
of this
a~?pl iance
. .
with a three-prong
which mates with
three –t?ron,g
wall-
outl:t
(Fig. 1 )
of
hazard from
this
t(}
IMPORTANT. .. Please read carefully.
PREFERRED
METHOD
h’-”
“
r
;F
Fi~l )/
BEFOREUSE
Have WUI] outlet and cit”cuit
checked
to
grounded.
make
by a
qual ificd
sure the
‘1
\h
QQ
%
>)
INSURE PROPER
GROUND EXISTS
electrician
outlet is
properly
‘,
Where
a standard
outlet
is encountered, it is your
personal responsibility
two-prong wall
and
obligation to have it replaced with
a properly
Wal I
:rounded three-prong
outlet.
DO NOT, UNDER ANY
CIRCUMSTANCES, CUT
OR REMOVE THE THIRD
(C; ROUND) PRONG FROM
THE POWER CORD.
3
Page 4
Instillation Requirement
(cc).ti...dIMPORTANTNpleaseease
Read Carefully.
Use of Adapter Plug
Because of potential
under
certain conditions, wc strongly
recommend against use
plug.
However, if you still
use an adapter, where
permit, a TEMPORARY
CONNECTION may be made to
properly grounded two-prong wall
outlet by use of a UL
(Fig. 2)
tivailablc at nlost ]octi]
hardware stores.
TEMPORARY METHOD
~~ti;!;;;:~fl~;A) . : .0
ALIGN LARGE
PRONGS/SLOT
I Fig,2
The
larger
~;~ Q ,; ‘“ “
pf
‘
slot in the
aligned with the
wall outlet to provide
in
the
connection of the power
CAUTION:
ground
Attaching
terminal to wall outlet cover
screw does not ground
unless cover screw is metal, and not
insulated,
grounded
You should
u
qualified electrician to
and
wall outlet is
throllgh
have circuit checked by
the outlet is properly grounded.
When disconnecting the power
cord from the adapter, always
hold
the adtipter
If this is not
ground
break with
done,
terminal is very likely
repetited
Should the adapter ground
terminal break, DO NOT USE the
appliance until a proper ground
has
again
been established.
safety huzards
of tin
elect to
local codes
listed
adapter
l“
~)
n
I
~’”
INSURE PROPER GROUND
AND FIRM CONNECTION
BEFORE USE
adapter
larger
slot in the
proper
tin
adapter
an
appliance
house wiring.
make
with
one hand,
the
adapter
use.
adapter
a
(
{~~”
-
must be
polarity
cord,
sure
to
Use of Extension Cords
Because of
under
strongly recommend against the
use
of an extension
if you still elect to use an extension
cord, it is absolutely necessary that
it be a UL 1
type appliance extension
having a grounding type
potentiui
cert~in
isted 3-w
safety hazards
conditions, we
cord,
However,
ire grounding
cord
plug
and
outlet and that the electrical
rating
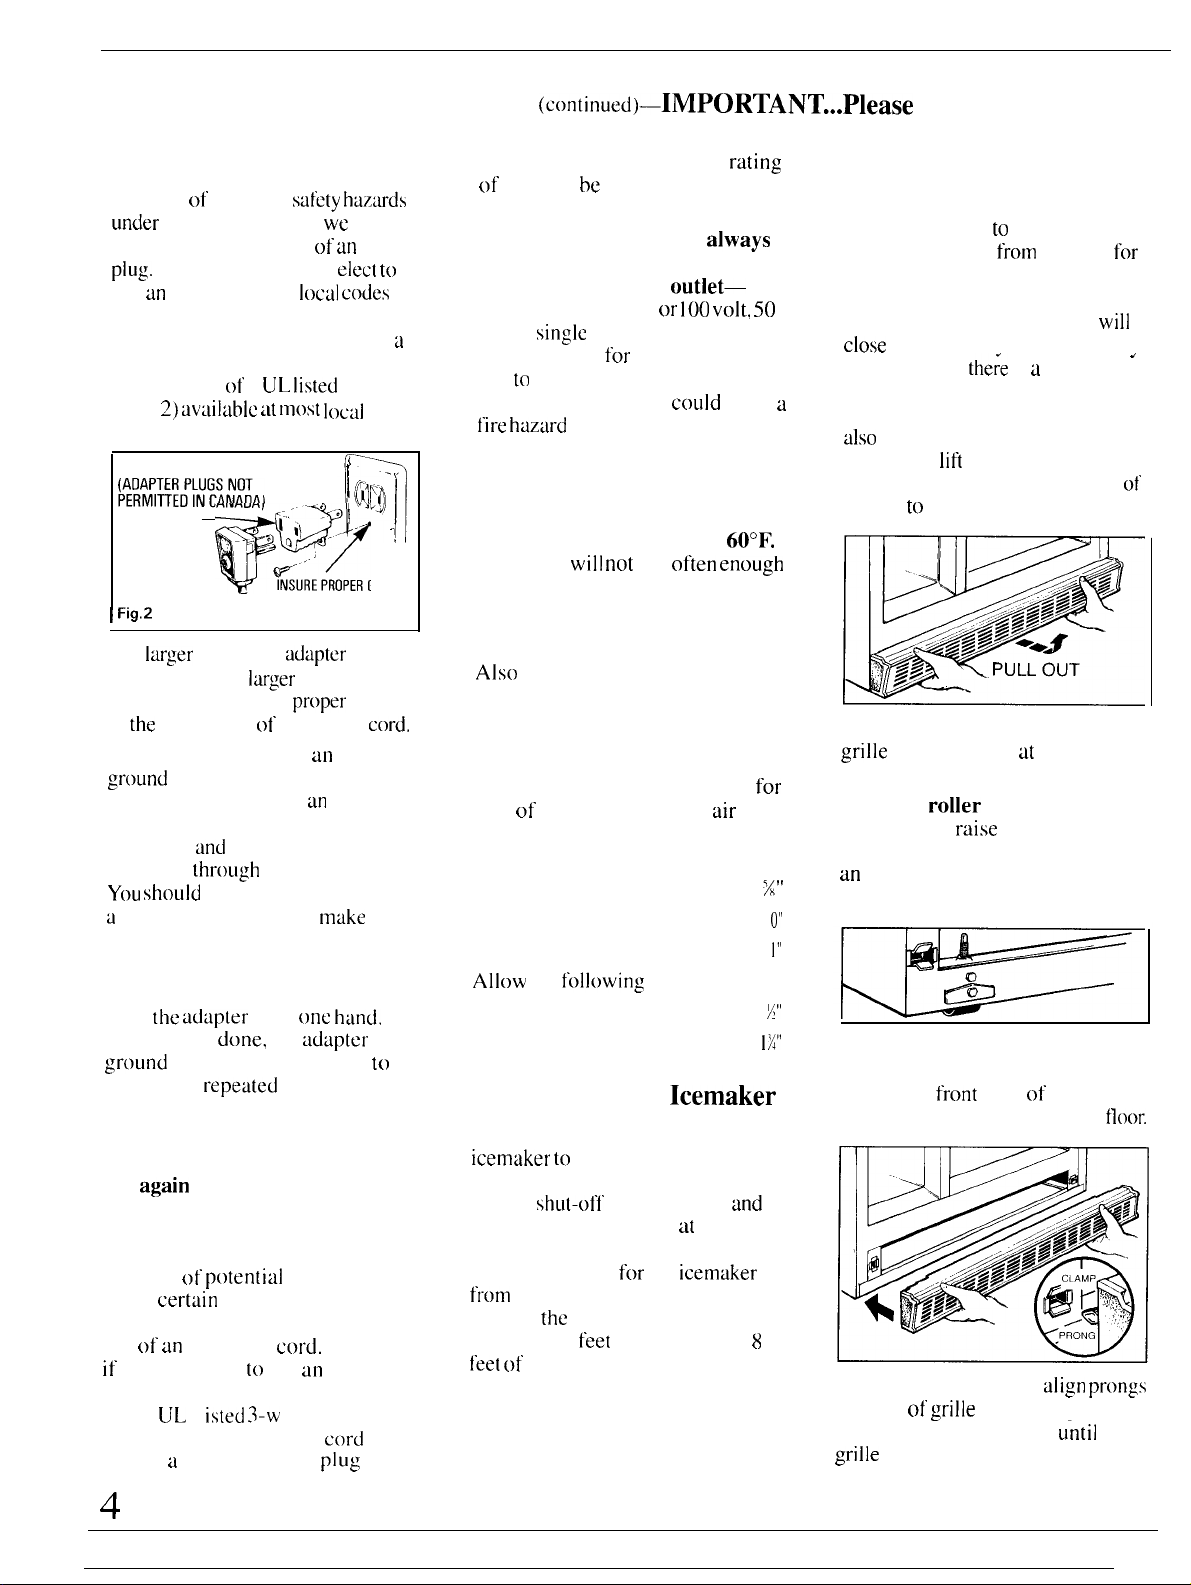
Rollers
of the cord be 15 amperes
(minimum) and 120 volts.
The refrigerator should
always
be plugged into its own
individual electrical
( 115
volt, 60 Hertz, or
Hertz,
single
phase AC). This is
recommended
and
to
prevent overloading house
for
wiring circuits, which
fire haztird
from overheating wires.
outlet—
100 volt, 50
best performance
could
cause
Refrigerator Location
Do not install refrigerator where
temperature will go below
because it
will not
run
60°F.
often enough
a
Adjustable rollers behind the base
grille enable you to move your
refrigerator away
cleaning. These rollers should be set
so the refrigerator rests firmly on the
floor. To assure that the doors
close
automatically from a halfwav-
open position,
the;e
from the front to the back of the
cabinet. Side-by-side refrigerators
also
have specially designed door
hinges that
lift
both doors slightly
when opened, allowing the force
gravity
to
help close them securely.
to maintain proper temperatures.
Do install it on a floor strong
enough to support it fully loaded.
Also
see Energy-Saving Tips
regarding location,
To adjust rollers,
grille
Clearances
Allow the following clearances
ease of installation, proper
circulation, and plumbing and
electrical connections:
Sides
. . . . . . . . . . . . . . . . . . . . . . . . . . . . . . . . . . . . . . . . .
Top . . . . . . . . . . . . . . . . . . . . . . . . . . . . . . . . . . . . . . . . . . . .
Back . . . . . . . . . . . . . . . . . . . . . . . . . . . . . . . . . . . . . . . . . .
Allow
the
following
door clearance:
Refrigerator Side . . . . . . . . . . . . . . . . . . . . . 1
Freezer Side . . . . . . . . . . . . . . . . . . . . . . . . . . . . .
for
air
%“
0“
1“
M“
I X“
by grasping it at the bottom
and pulling it out.
Turn the
clockwise to
roller
adjusting screws
raise
counterclockwise to lower it. Use
an
adjustable wrench (3/8” hex
head bolt) or pliers.
When adjusting front rollers for
proper door closure, we recommend
Water Supply to
Icemaker
the bottom
front
edge of the cabinet
be approximately 5/8” from the
You will need to connect your
icemaker to a cold water line. A
water supply kit containing copper
tubing,
shu-off
valve, fittings
and
instructions is available at extra cost
from your dealer. There should be
sufficient tubing
from
the cold water supply to allow
moving
the
wall several
feet of
1/4” copper tubing in three
1 ()-inch diameter coils).
for
the icemaker
refrigerator out from the
feet
(approximately
8
To replace base grille,
on back of
grille
with clamps in
cabinet and push forward
grille
snaps into place.
from
the wall
for
will
is a built-in tilt
of
remove the base
the refrigerator,
floor.
align prongs
until
.
Page 5
Operating Your Refrigerator
Set the
Temperature Controls
FREEZER
I
Your refrigerator has
that let you regulate the temperature
in the fresh
compartments.
INITIALLY, set the FRESH
FOOD controls at 5 and the
FREEZER control at C.
For
colder
adjust the desired
control one letter or number
a
time.
IMPORTANT
When initially setting the controls,
or when adjusting them, allow
hours
for
stabilize,
filling the refrigerator with
amounts of
Note: Turning the fresh food
control to “OFF” stops cooling in
BOTH compartments—fresh
food AND freezer—but does not
shut off power to the refrigerator.
C INITIAL SETTING
E COLDEST
TEMPERATURE CONTROLS
two
controls
food and
or warmer temperatures,
the temperatures to
or
even out. Do this
fresh
freezer
comptirtment
or
frozen
foods.
at
24
before
large
How to Test Temperatures
Use the milk test for the fresh
food compartment.
container
the fresh food compartment. Check
it a
warm or
temperature controls.
of milk on the top
day later. If
too
cold,
Place a
the milk is too
adjust
the
shelf
in
INITIAL SETTING 5
COLDEST 9
Use the ice
freezer compartment.
container of ice cream in the center
of
the freezer compartment. Check
it after
soft,
Always allow
refrigerator to reach the
temperature you set.
cream
a day. If
adjust
the temperature controls.
FRE~HFooD
test for the
Place
a
it’s too hard or too
24
hours for the
If you turn your
household thermostat
60°F.
below
. . you may want to turn the
control one step colder, as
to
“D:’
Cooler temperatures in the
house may cause the compressor to
operate less frequently, thus
allowing the freezer compartment
to warm somewhat. To protect your
frozen food
Ietter(’d
for the entire winter or
period of time
your thermostat. This is especially
important when the thermostat is
turned down
This change should have no effect
on your fresh
However, if freezing occurs, turn
the numbered control one step
warmer, as from
When
thermostat down, turn temperature
controls
settings.
setting at this colder setting
yOLI
at night
supply, leave your
you are
turning down
for
an extended period.
food
compartment.
6
’5” to “4.”
stop turning the
back
to their regular
from
for
whatever
leffered
“C”
Automatic
Energy Saver System
You won’t find an “energy saver”
switch on this refrigerator.
Warm liquid from the refrigerator’s
condenser is automatically
circulated around the front edge of
the freezer compartment to help
keep moisture from forming on the
outside of the refrigerator during
humid weather.
Many refrigerators use special
electric heaters. This refrigerator
needs none. That’s why there is no
“energy saver” switch.. there’s no
need for it.
No Defrosting
It is not necessary to defrost the
freezer or fresh food compartments.
Your refrigerator is designed and
equipped to defrost itself
automatically.
5
Page 6
Countermaker
This
ret’rigerator has
Compartment
a special
Countermaker Compartment
with its own door that becomes
a counter when
●
It mtikes
frequently used
you
open it.
items
stored on the fresh f(~(~d door
re:~dily :~ccessible
Counternlaker
without h:lving to open
through
the
Colllptirtlllent
the main
door
refriger:ltor door.”
● It provides
work surtfice
right at
:m extr~l
counter-high
with its
the refrigertitor
own
I
ight
when the
C(~unterm:lker Conlp~lrtment d(~or
is
open. T() open,
I
ift compartment
door” h;indle Lmd pull down. c](~se
door after
AltlIOlI<q/I
,~c’r(ltc’ll-r(’t ~i.$tcitlt,
011
t/7[)
t)t)t 1)~’ LI.s~Jd llt$ cl
S}I(Ir17 [!t(~il~il$ c(iIl (I(lttlct,s(’
LISC.
[iLIrlIb[C),
~’OUllt[’t-lll[ lko/.” (/()()t
,$’tllitl
tll(’ }%’t)rk
(L[ttit],q I]()(tt(l.
-
(!11([
,jl[rt~lcll
,\’/l<;Ll[(~
it.
Cold Air Duct ,
Cold k~ir
compartment keeps
in the
entering
from [he freezer
the tempertlture
Counterm:lker Conlp~irtment
at proper tood-keeping”
levels.
C~~unternl~lker Conl~~lrtment
The
is
~dso
door”
accessible
011 the
through ii 1 ift-up
inside
of the
Iresh food”
c{>nlpiirtmcnt d~~t)r.
T() remove the Counternl~lkcr
C(~nlpartnlcnt door”
outer
doc)t” to free the 1 ip on
bin,
open the
the bin
from the overlapping door.”
Ill
T(J remove
Compartment door”
—
outer” door” to tree
the
Countermtiker
the lip
bin,
open the
;)n
the bin
from the overlapping door.”
Then
r:iise the
the bin straight
bin
come out
Tl~(I coLllltot-lll(t k6Jl-” Cot}ll)(!rtttlolll”
(loot.” I)itt t71[(.st 1>(’ rc’j)l(lc.(’(! ill it.$
oricqitl(tl l)(),~iti()ll.
inner
door” and lift
Llp
until
of tracks on
hooks on
door.
6
Page 7

Ice & Water Dispenser
Automatic Icemaker and
Ice & Water Dispenser
Your refrigerator
icemaker
;nd a dispenser that
dispenses water,
crushed
ice
compartment door. Here’s
they work.
Water flows from the household
supply
throllgh a
(1) dual solenoid valve to the
(2) water reservoir
(3) automatic
Water is frozen in
(4) cube mold
(5) storage bin where a
powered
tillger moves
forward into the
Cubed or crushed
dispense through chute in door
when
cradle
When the switch is moved to
CRUSHED,
channels
and
cubes
crushed
into glass.
Water from reservoir flows
through the
(6) tubing
dispensed
in the door
when
pressed.
(7) A
light
switch turns the night
]ight
in
t]le
has an
automatic
ice
cubes
through
the
and
icernaker
freezer
to the
as needed.
the
and
ejected into the
rnotor-
cubes
dispensirlg
ice. as
selected,
is pressed.
battle in housing
through the crusher
ice fulls
dispenser
through chute
and
the
cradle
on or”
is
and
how
unit.
is
off.
Impo~nt
Facts about
Your Ice & Water
Dispenser
●
Your icemaker
cubes per
120 cubes in a 24-hour
depending on freezer compartment
temperature, room temperature,
number
of door openings and other
use conditions.
● Intermittent dispensing of ice is
normal.
If
more than brief, ice clump(s) may
be the cause
following instructions below and on
page 9.
● Avoid overfilling glasses with
ice and using narrow or
tall glasses. This can jam the chute
or cause the door in the chute to
freeze shut. Periodically open the
freezer compartment door and look
down into the chute. If ice is
blocking the chute, poke it through
with a wooden spoon.
● To help keep bits of ice from
being sprayed beyond the glass,
place glass
not so close
outcorning
● Ice should not be dispensed
into thin glasses, fine china or
delicate crystal—they can crack
or chip from the combined
pressure of your
them against the cradle
dropping into the container.
● Ice should be dispensed before
filling glass with soda or other
beverage mixes. This will prevent
splashing which is annoying
which, if the
selector switch, could cause it to
stick or bind.
● Beverages and foods should not
be quick-chilled in the ice
storage bin. Cans, bottles or food
packages in the storage bin may
cause the
● Ice other than that produced
icernaker
by your icemaker should not be
added to the ice storage bin—it
rnuy
not crush or dispense well.
will
produce eight
cycle—approximately
period—
ice
flow
interruption is
and
should be removed
extra-
close to ice chute— but
that
it blocks
ice.
hand
pressing
and
ice
and
splash
reaches the ice
to malfunction.
Icemaker and Dispenser
If you use your refrigerator before
the
water connection is made, raise
the ice access door and make sure
the icemaker feeler
OFF (up) position
When water supply has been
connected to
arm
to ON (down) position.
Depress water dispenser
fOr about
trapped
and
two minutes to remove
air
from the water
to fill water reservoir
automatically.
Ice cube mold automatically fills
with water
after cool
temperatures. First
freeze
after
severul
NOTE:
refrigerator,
With a newly-installed
allow ubout
the freezer compartment to coo] down
to the proper ice-making
arm
as
shown below.
icernaker,
ing
cubes
hours.
((”(~lll;f!lt(,(l
is in the
Ice access
door
Icemaker
rm
)
move feeler
rm
wn)
cradle
line
to freezing
normally
24 hours
for
ternpcrature.
11[,.1”1
/)(l,ql,
in
in
)
7
Page 8

Ice & Water Dispenser
(continued)
Once Your Icemaker and
Dispenser Are in Operation
Throw away the first
of ice cubes (16 or 24 cubes). This
will
flush
away any impurities in
the water line. Do the same thing
after vacations or extended periods
when ice isn’t used.
Discard the first six
water in the kitchen sink. This will
eliminate the slight “plastic” taste
temporarily imparted to the water
by the water reservoir.
Keep ice level to keep icemaker
productive. Cubes ejected into an
empty storage bin will pile up
close to the icemaker and push the
feeler arm
prematurely when the bin is only
partially full. Open the ice access
door, reach in, level the cubes by
hand
Keeping cubes distributed evenly
will allow the icemaker to produce
enough ice to
maximum capacity.
Caution:
Under certain rare
circumstances, ice cubes
may be discolored, usually
appearing with a green-bluish
hue. The cause of this unusual
discoloration is apparently
due to a combination of
factors such as
characteristics of local waters,
household plumbing and the
accumulation of copper salts
in an inactive water supply
line which feeds the icemaker.
Continued consumption of
such discolored ice cubes may
be injurious to health. If such
discoloration is observed,
discard the ice cubes and
contact your
Factory Service Center or
an authorized Customer
Care’”
LIp to the OFF position
and icemaking
fill
Hotpoint
Servicer,
few
batches
glassfuls
will resume.
the bin to its
ceflain
of
To Dispense Ice and Water
Q
For ice, set selector switch to
CUBED or CRUSHED. For water,
simply position glass beneath the
word “WATER.”
● Grip glass or other container
gently
firmly against ice or water
dispenser
near
the rim
cradle.
Caution: Never put fingers or
other objects into the ice
crusher discharge opening.
and
press rim
When Dispensing Ice...
Some crushed ice may be
dispensed even though you
selected CUBED. This happens
occasionally when a
accidentally get channeled to the
crusher.
Sometimes a mound of snow
form on the door in the ice
chute. This condition is normal.
and
usually
dispensed crushed
The
snow will eventually
evaporate.
occurs
few
cubes
will
when yOLI have
ice
repeatedly.
When Dispensing Water...
The water system provides
approximately six successive
6-ounce
several hours must be allowed
replenished
to
drain all
reservoir on a single occasion,
The first glass of water dispensed
may be warmer than the
following ones.
Dispensed water is cool, not iced.
For
crushed
dispensing water.
glassfuls—after
coo].
You
the
colder
ice
which
water l“eservoir
probtibty
chilltd water from
water, simply
or cubes before
will
This is normal.
udd
sLIppty
I1O[
for
the
8
Page 9

To Stop Dispensing
Release pressure
withdr~lw slowly to catch l~ist
of ice or drops
from cradle and
of water.
bits
To Remove Ice Cube
Storage Bin...
Move
Icemaker
Feeler
Arm to OFF (up) Position
When...
●
Home w:iter
turned
●
Ice st(~r.:ige
i’or:1 period
●
Going :Iwily LJtl v~ic~tiorl. ~it
which
(~ff’ the v:dve
line to your- rcl’rigeriltor.
supply is
off
for severtil hours.
tc)
bin is to be
of
time.
time you should ~llst)
in
the water
be
removed
turn
supply
Some
slight dripping
following dispensing
ice or
wuter. 11
excessive, the spill
should be wiped dry
Do not pour wtiter
because
pc)ur i[
shelf. tind
it is
not self-drainin-
in the kitchen sink. The
its
gri Ilc should
may occur
t)f
crushed
immediately.
in spill shelf
be
cleaned regulilrly ;iccording to
instruct
ic)ns on p:lge
I
3.
If Ice Clumps Form in
Storage Bin...
The icemaker ejects
(Troups 01”
e
eight,
scvcr:d cubes tc) be joined
However.
infrequent usage of
can cause ice
the
storage bin,
tenlporiiry m~lt’unction
dispenser
mechunism.
II [his h~ippens:
●
Remove st(~r:lge
c(~mpiu. tment.
●
Bre~ik
up
icc
I’ingertip prcssLlre ilnd disc:lrd
rcm:lining
●
Repl~ice bin bet.ore
clumps.
cubes melt itnd
cubes in
:ind
it is
normal for
together.
clumps to form in
resulting in
of the
bin
from
freezer
clumps with
remaining
fuse together.
—
ice
Lift the left
fr~)rn
the
shelf, and
straight
out
c(~rner to
while
free the bin
pull
the
bin
supporting
it
~lt
front and b:lck.
To Replace Ice Cube
Storage Bin
sll~e
the bin
the bin
b:ick
lt)cks into
until the
the
slot
in
ttib cln
the
she] 1.
If
bin does
remove
mech:ulism
back
~igtiirl
locks into the slot
not go till the wzly b~lck,
it
and r(>tate the drive
I/4 turn. Then push bin
until
the t:lb on the
in
the shelf.
bin
If Ice Is Not Used
Frequently...
“Old”
cloudy und taste stale.
stora~e
it in lukewarm
fillow st(~r~lgc
repl;lcing it—otherwise ice cubes
wi
II
ice cubes
bin
periodic~dly ~In-d
bin to
stick tt)
the
will
bec(~nle
Empty
w~lter.
Be sure
cool betore
metal uugcr.
ice
‘wash
to
If This Is Your First
Icemaker...
You’ll he~u- occ:lsion:d” sounds
nl~iy be unf:unil i~r-.
These
nor-rn:ll icern:lkin: sounds ;Ind ~ir-e
not C:IUSC lot- concern.
Water Filter
Accessory—
that
~lre
the perfect companion to
your automatic
Your” ice
be :1s Iresh-tllsting lls the
w~~tcr” th:lt produces
thcm. Th:lt
good” ide:l to
wilter
Its
rcllloves rll Llsty,
~)dors :Ind
medic
t:istcs.
c~u-tridgc c:ltches
rust
silt while
reduce
Iliu”d
The
cxtr:i
your Ht)tpoint detdcr. Specity
WR97XOZ 14. It h:ls complete
inst~lillltion instructions :md inst:dls
in minutes on I/4”
w;lter
cubes Cilrl only
’s why it’s
purify
with :1
water- I’ilter.
:lctiv~lted ch~lrcoal
Llrlplc[lsllrlt
in:ll. rnct~llic
A
porous” tiber-
p~lr”ticlcs. stind ;uld
speci~d cryst~lls
deposits
Scillc.
w:iter filter
cost
:md
is
I
inc.
icemaker
:1
your
Stillc
dirt.
ot
is
:ul
option” zlt
~lv:iil~iblc from
O.D. copper
9
Page 10

Food Storage Suggestions
To
Suggested storage times
for meat and poultry*
DAYS
Eating quality drops
fime shown
after
IN
REFRIGERATOR FREEZER
AT
35‘1040’ F.
Fresh Meats
Roasts (Beef & Lamb) 3 to 5
Roasts (Pork & Veal) 3 to 5
Steaks (Beef) 3 to 5
(Lamb),,, . . . . . . . . . . . 3 to 5
Chops
Chops (Pork) 3 to 5
Ground & Stew Meats . . . . . . . . 1 to 2
Variety Meats 1 to 2
Sausage (Pork) 1 to 2
Processed Meats
Bacon . . . . . . . . . . . 7
Frankfurters 7
Ham (Whole) 7
Ham (Half) 3 to 5
Ham
Luncheon Meats 3 to 5
Sausage (Smoked). 7
Sausage (Dry & Semi-Dry),
(Sllces) 3
f4 to 21
Cooked Meats
Cooked Meats and
Meat Dishes 3 to 4
Gravy & Meat Broth 1 to 2
Fresh Poultry
Chicken & Turkey (Whole) 1 to 2
Chicken (Pieces) 1 to 2
Turkey (Pieces) 1 to 2
Duck & Goose (Whole) 1 to 2
Giblets
fo 2
1
Cooked Poultry
Pieces (Covered with Broth) 1 to 2
Pieces (Not Covered) 3 to 4
Cooked Poultry Dishes.........,... 3 to 4
Fried Chicken 3 to 4
(Other than for meats& poultry)
Most fruits and vegetables 8-12 months
Lean fish 6-8 months
Fatty fish, rolls and
soups, stew. casseroles 2-3
Cakes,
ptes,
leftovers (cooked),
Ice
cream (orlglnal carton) t month max.
New techniques are constantly being developed.
Consult the College or County Extension
or your local Utility Company for the latest
information on freezing and storing foods.
Depaflfnent of Agr;co/tore
‘U.S.
Meats, fish
the
from
age:
Collscqllell(]y. sate
time in your
hreads
sandwiches,
and poultry purchased
store vary in quality and
Stol”age
refrigcr;ltor
will
MONTHS
O“F.
tO
6
tO
4
6 to 12
6 to 9
3 to 4
3 to 4
3 to 4
1 to 2
1
1/2
1
to 2
1 to 2
1 to 2
Freezing
recom-
not
mended.
2 to 3
2 to 3
12
9
6
6
3
6
1
4 to 6
4
FREEZER
rmonths
Service
v~u-y.
AT
IN
12
a
store
poultry:
● Always
●
Rewrap
find
refrigerate immediately.
To store cheese, wrap well with
wax
i n a plastic hag.
●
Clu”ct’ut Iy wrap to expel
help prevent
●
Store
own
wrapping
To store vegetables,
vegetable drawers-they. ve
designed to
nloi sture and t’reshness c)i. produce.
● Covering vegetables w
towel hetps muintain
● As a
p:lckilgcd
in their
N~)t~:
(/t-(
/\t’f’t-.s ttt([k(’
c(~t-t(till,~i)oc[s 11’lli(ll [/I(JII
(l(~,~i<qtlc~(l fo l)tz~,scjt.~1(’. 711(I,Y(~ (Itztvt(jt-,v
(IIXI (lc~.s(’t-il)(j(l otl I)([<V(J 11.
To store
ice cream,
content, will
SI
ightly lower tenlperatLlres
Illore
brands
● It
wi
11 bc necessary to
t[~
determine
conlpartmcnt l(~catiorl
temperature
yc)ut” ice
tenlperature,
●
The
rear
compartmcnt
(he
tront.
Tips on freezing foods
There are three
requ
i
Freezing.
1. Initial quality.
qLlality
qLILl[
ity :Illd
improve quality.
2. Speed.
vcgctabtcs are I.r[)zen at’[er
unfrozen
remove
i n
foi
meats, fish
store
wrtippings.
1, ii 1 m or wax
and
ptiper
paper or tiluminum foil, or put
air
and
mold.
pre-packaged
if’
yoLI
cheese
wish.
i n its
use the
been
preserve
the
natural
i[h
a
nl(~i st
crispness.
further
aid to freshness,
VC~CtLlbtCS can
original
.Yl)((i(\l,fir~,jlt,ti )()(l (OItlj)(\ItIIl(ItIt
wrapping.
it
[{]ltl(~((’,i,~((t> to it’f-(11)
’110
pre-
be s[orcd
l)~~~,tl
ice cream—Fille-cjl][llity
with h
“ai
I-y.’
with low cream content,
igb cre;itll
normatty req Llire
than
at ready-packaged
experi mcnt
the I’rcczer
and
control” se[ling tc) keep
cream at
ot”
rernertts I’or
[he
right serving
the I’l.eczel-
is SI
ightly colder
essential
cf’t.ic
than
icnt h~)nle
Freeze (~nty top-
foods.”
Freezing
[’]:lY’et”: it
The
quicker
retains
C:lllllo(
Iruits
and
picking,
the better the trozen product
bc. YOL1’11 stivc time, too,”
cLl]] ing
3.
and
Proper
sorting to do.
packaging.
wraps designed especially
will
with less
Use food”
for
freezing.
To
freeze meat, fish and poultry,
wrap well in freezer-weight
c)ther
heavy-duty wrapping
foil ((~r
material ) forming it carefully
the shape of
expels
the
package to
air.
the contents.
Fold
and crimp ends
provide
a
This
good,”
I:lsting seal,
Dc)n’[
refreeze
ct)nlptete]y thawed; meat,
raw
or c~)oked,
SLICCeSSfLll Iy
Limit freezing
meats or
meat [hut
has
whether
can be
ollty O1lCe.
frozen
ot” t’resh (unfrozen)
seat.()()ds to 29 pounds
a time.
For convenience...
●
Store 1
i kc things
saves
because yoLI
●
Place
both
the
time and electricity
can
oldest
together. This
find
[()()ds
items up
taster.
front S(J
they cart be used LIp promptly.
● Use
shcl vcs on the door” for most
ol.ten
ltsed
sauces and condiments.
To save money in energy
and food costs
● Cover moist t’()()ds w
plastic
●
in
stored
or
●
t’ilm or toil.
Leaf’ vege[ablcs
dr:iwers will
i n closed plastic
wrapped in
D() not
overload”
or freezer conlpartnlcnt with
{)t’
warm
●
Open the door” the t’ewest
possible to
● When going
several
food” at once.
save
days, Ie:lve
perishables as possible in
refrigerator-.
feeler
at-m
and Stl
Llt
rei’rigcrator.
Move the
tc) (he
ot’f
Wtitcl” to
itb
tight I ids.
and
[t-u
its
placed
last
longer
when
cont~li nets
ptastic fi Im.
yc~ur l.resh l~~od
a
t i
mes
clcctt-ical
energy.
out 01” town I.c)r
as
I’cw
[be
ice maker
OFF (up)
positi{)n
the
to
(Jf
at
lot
10
Page 11

Storage Drawers
Convertible Meat Keeper
The Convertible Meat
has
its own cold
stream
of cold
air
compartment to
drawer.
The variable temperature control
regulates the air
freezer compartment.
Set control lever to MEATS—the
coldest setting—to store fresh meats.
If
lever is
a long
form on the
left
in MEATS position
period of time, some
inside of the drawer.
Set control lever to VEGETABLES
to
convert the drawer to normal
refrigerator temperature and
provide extra vegetable storage
space.
Cold
air
duct
Variable settings between these
extremes can be selected.
Pan
air
duct to
from
the
flow
around
flow from
is turned
drawer
allow
freezer
the
the
frost may
off..
a
for
Sealed Snack Pan
The Sealed Sn:lck Patl-and shell’
to which it is
relocated within the Fresh Food
compartment. The sealed
retains high
convenient
cheese,
spreads and snacks.
attachecl-cail
humitdity f’or
stortige
b~icon,
hors d’
of
be
drawer
meats
and
t)cuvres,
Sealed and Fresh Drawer
This refrigerated drawer is designed
to
keep
unwrapped foods
retain in: the
content 01”
● Artichokes
● Asparagus ● Corn
● Beets, topped ● Currants
● Blueberries ● Greens, leafy ● Spinach
● Carrots
● Celery
na[ural
moisture
f’oods such
● Cherries
● Lettuce
● Parsley
● Peas, green
As in any refrigerated
it is recommended that
foods be stored
such
as:
● Broccoli ● Cabbage
● Brussels ● Cauliflower
Sprouts
wrapped—foods”
● Green Onions
St[)ragc time will depend upon the
type of. l’~)od
Iitilced
Excess
in the
Fresh
and the
The
Seated and
p~irti:i]ty
to the
edges. Al W:ly
i n lb is
(1[[
[11(’ }1’((\’ ;/1.
and its condition
in
the
drawer.
water
which may
bottom 01” the Sealed :lnd
Drawer
drawer
should bc
wiped
dry.
F’resb [>r:iwcr
scaled by gaskets
COVCI”
:tt
the tront
S
t“cl~lacc
cover
and
/)//.I/I f/l(J (11”((11(’}
as:
● Plums
● Radishes
● Rhubarb
● Tomatoes,
ripe
storage
odorous”
● Parsnips
● Turnips
acculllulale
poured
attache(l
:Lnd b~ick
the
dt”aw’et”
f’rcsh
area.
when
is
by
OU[
11
Page 12

Storage Drawers
To Remove Drawers
1.
Remove iood” from the shelt’
above
the
Setiled and
and take out the
the
glass cover and out of
2. Put
your
fingers
gtiske[ ~lt the reur
pLIll
forward. Remove the gtisket.
Fresh drawer
shelf.
Take fo(>d off
behind the
of
the dr:lwer imd
the drawer.
(cc,ntinued,
5. Pull
I’rent to
dr:iwcr. II the retriger:ltor d~)ot”
doesn’t open Cotnplete[y, pul]
dr:iwcr out untit
Then
higher
tilt
6. II ti~l]c holds
the t;l[?e.
Re:ich
up
it
\
the dr:twer lorw~ud. lift the
clctir slops, :Ind renl(~vc [be
lii’t [he clr:lwcr
thtln
the
it
:ind take
it hits
it
[he door.”
up until it is
LIr:lwct- supports.
OU[.
Convertible
pLl]t
dl-:lw’el.
in. push
. .
pLUIWtly
the I“C;U.
of
tind, ~lt the siune time, b;lck,
ctedt-s
l.r(~nt-corner
ret~litlers.
the
Me~it
OLlt.
the gl~iss
until
8.
Tilt
:ind remove
the
Aitet cle:lning, repl:lce
ordel”.
“\,
dr:lwcr.
in
I-cverse
3. PLIII
the
Rezlch
in, push
Ltp; at
the same time.
until it
4. Tilt
12
drtiwer ptirtway out.
the re:lr
of
push it b;ck
clears frc)nt-c(~rner
tind remove
the
cover.
the glass
retainers.
II
II
I
I
When
in
dr:lwers :ind c(~vcrs :irc b:ick
pl:ice,
reinstall
the g:iskct ilt the
re~u- of” [he Se:Ilcd :Ind Fresh dt.:lwer.
Fit
the end L)I the pl~lstic dr;lwer
support
with the ruhber g:lskct Il:ip I’:Ic
yoU. M:lkc
i
nt(~ the slot on the g~tsket.
SLIIC the
~~lskct SllLlpS
i
ng
into pt~lce.
Page 13

Shelves
Shelves in
t’reczer c~~inpartnlents
enabling
arrangelnents to fit
food storage
the fresh f“()()d and
are adjustable,
you to nlake et.ficien~
your
fanlily’s
needs.
shelf
Adjustable Shelves in
Fresh Food Compartment
To remove shelves:
at tr(~nt,
tracks on
then
lift it
rc:lr wall 01 refrigcra[or,
Tilt shelf up
up and
[Jut c)f
Removable Bins on Fresh
Food Compartment Door
To remove bins:
LIp
unti
I
nlounti ng hooks”
To relocate bins:
bin height.
the
tracks 01
Bin will
lock
Lift
bin
Select dcsirecl
engage hooks
the door,” :ind
in place.
straixht
disengage.
in
sh~ts on
push in.
Removable Shelves in
Freezer Compartment
Shelves in the freezer
are easily
relnoved
To remove shelves:
1. While pressing tabs on
supports on
(Jf gr~~(~ves
right wall, I
in
supp(lrts.
conlparttnent
and
replticed.
shelf
ift
shelf
out
To
replace shelves:
shelf.
height.
With shell.
Select
l’rent raised
s] ightly, engage top ]Llgs
retir
of cabinet.
shelf
Llntil
Then lower lront of”
it
locks in(()
position.
i n
cicsired
tl”acks lit
2.
PLIII shcl~
COI1lC out ()}
‘1’()
replace shelves: Insert rods into
holes.
lower shelf into grooves
Be sure shelf wire is
into
grooves.”
sideways
holes on left
Ltnti]
W:l[].
rods
Then, while pressing tabs,
in
supports.
fully
inserted
13
Page 14

Care and Cleating
Cleaning-Outside
The water
spill
immediately to prevent spotting,
Wuter left
deposits that you
soaking in undiluted vinegar,
YOLI can also
precipitating
as
Calgon
te~lspoon
pint of
deposit disappears or becomes
loose
UsLlally 30
~dequatc,
spill shelf and trim.
The
hc cleaned
with a
dishwashing
Dry with a
wax on
Keep the finish clean. Wipe with
a
clean cloth
with kitchen
liquid
and polish with a
Do not wipe
soiled disbwash i ng cloth or
towel. These
that can
use
cleaners.
containing
ploducts can
[he paint
Protect the paint finish.
on the outside of
high
quality, baked-on paint finish.
With proper
Iookin: and rust-tree for years.
Apply a coat of kitchen appliance
wax when the refrigerator is new
and then at least twice a
Appliance
Cleaner (Cat. No. WR92X02 I
a~’ai lable I’r{)nl Hotpoi” nt
por[s
and
ice dispenser
shelf
should be wiped dry
on
the
shelt
cfin remove
usc
a paste
water
softener (such
brand) tind
of
citric acid
hot
(ap water.
enough to
rinse
water. or
powder
Soak
away.
minutes soaking time is
Avoid using
door
handles and trim can
with a
solution
cloth
of mild liquid
detergent
soft cloth,
the door
lightly
Don’t use
handles and trim.
d~mpened
appliance
dishwashing
detergent. Dry
clean, soft
the
refrigerator with a
may leave a
damage
scoLlring
bleach
the
pads, powdered
or cleaners
bleach
bcc~use
paint.
scratch and
finish.
the
refrigerator is
care. it will stay
Polish
Wax &
Marts.
may leave
by
of
non-
onc
per
until
wax
on
the
dampened
tind water,
wax or mild
cloth.
wet
residue
Do not
these
weaken
The
finish
new-
year.
(>)
Appliance
the
is
Cleaning-Inside
Inside the fresh food and freezer
compartments
at least
once a year.
refrigerator
is
not
practical, wring excess
moisture
out of sponge or cloth
when cleaning
lights or controls.
Use
warm
solution-about a
btiking
soda to a quart of water.
This both
odors. Rinse thoroughly with
and
wipe dry.
Other parts of the
including
veget~b]e
tind till
plastic parts—can be
cleaned
the same
cleansing powders or other
ubrasive
cleaners.
To help prevent
open box of
of the refrigerator, on the top shelf.
Change
the
months. An open box
should
be cleaned
Unplu&
the
before cleaning. If this
around
switches,
water
cleans and
door
drawers, ice storage bin
and baking
tablespoon of
neutralizes
refrigerator-
gaskets. meat
way.
odors.
baking soda
box
every three
soda
water
and
Do not use
leave
tin
in the rear
of
baking
Behind Refrigerator
Care
should
be taken in moving
your refrigerator away from the
wall. All types
of
floor
coverings
can be damaged. particularly
cushioned coverings
and
those
with embossed surfaces. Pull the
refrigerator straight out and return
it to position by pushing it straight
in. Moving your refrigerator in
side direction
damage
to your
may
floor
result in
covering or
a
refrigerator.
Condenser
The condenser is located behind
the base grille.
operation,
condenser
grille
(see page 4) and either sweep
away
or
vacuum up dust that is
readily accessible.
use
a
brush specially designed for
this purpose.
appliance parts stores. This easy
cleaning operation
at
least
once a year.
For most
yOLI
need to keep the
clean.
Remove the base
It
is available at most
efficient
For
best results,
should
be done
soda in the freezer will absorb stale
freezer
odors,
Do not wash any plastic parts
from your refrigerator in your
automatic dishwasher.
Drain
opening in freezer
compartment. During
cleaning. remove bottom freezer
a
basket and
baking sodu-one
tlush
a solution of
yearly
teaspoon
and
Conderiser-
/
two cups of hot (not boiling)
watet--throllgh the
the help
of u
metit
help eliminate odor
I
ikel
i hood of
drain
baster. This will
and
reduce
a
line with
the
baking-s(~du-and- 1—
water solution to
force
the
clog
through the
drain
line.
IP$
14
Page 15

Light bulb
replacement
In Fresh Food Compartment
1.
Unplug refrigerator.
2. To
~dign the
properly, note position
numbered
re:issembly and
~~~.
3. Pull bottom of light
about
1 /4’’—just
disengage lip
in retainers on rear
4. Lift panel to disengage top
pins on side walls; remove panel.
After repl:lcing
bulb, reinstall
pins;
pLIll
back
and
grooves in retainers). Replace
temperature control knob in OFF
position,”
and
plug refrigerator back in.
control
control for pr(lper
pull off knob.
at reilr from
with same size
p~lnel (hang
bottom down, push it
release it to let lip
turn it to previous setting,
knob
01
... -, -
panel
enough to
wall.
down
grooves
from
top on
engage
In Freezer Compartment
1.
Unplug refrigerator.
I
H
2. Remove she]
shield. (Shelf will be easier to
remove if it is emptied first. )
3.
Pull
plastic
you. (It will bend to
grooves. )
After replacing with
bulb, reinstall shield
plug refrigerator
fjus(
light
shield
b:lck
below light
tow:lrd
tree t~~bs from
same
size
and
shelf
in.
and
When you goon
vacation
For extended vacations or
absences,
refrigerator.
control to OFF,
baking
t:tb]espoon
water. Wipe
le:lvc
refriger~~tor. Le~\ve
For shorter vacations, remove
perishable
:1( regul:u sett
room
drop
instructions
v:lcations,
Move
(Lip)
poSition” ~n~ be
ol.f. water
shLIt oft power
turn the
cletin
s(~dti solution
of
sodii to one qu~u-t
dry. To prevent odors.
open box
temperature is expected to
below
iccmakcr I’ecler arm 10
(Jf sodu
doors
foods und le~lve
i rigs. However. i
600 F.,
Lls for
extended
sLIpply
to
to
Illitnbel-ed
interior with
of
one
in
open,
controls
follow s~une
OFF
sLlrc tO
shut
the I-cfrigcl”titor.
When you move
Disconnect power
outlet, remove al I
and
dry the interior.
Secure all loose items such
gri 1 le,
shelves
taping
them securely in
prevent
Be
[i/>r;tq12t
moving
must be secured in
movement.
refrigerator with blanket.
d:ml:Lge.
sure refrigerator
j)(),viti()tl
~md
in van. Refrigerator
Protect outside
cord from w~dl
food und clean
and stor:ige
stuys
during
V:ln
to prevent
pans by
place
in
:lCtllLll
of
as
to
ol
[.
Page 16

PROBLEM
POSSIBLE CAUSE AND REMEDY
REFRIGERATOR
DOES NOT OPERATE
MOTOR OPERATES
FOR LONG PERIODS
MOTOR STARTS &
STOPS FREQUENTLY
●
May
be in defrost cycle when motor does not operate for about 30 minutes.
● Temperature control in OFF position.
● If interior light is not on, refrigerator may not be plugged in at wall outlet.
●
If
plug is secure
and
the refrigerator still fails to operate,
plug
a lamp or a small
appliance into the same outlet to determine if there is a tripped circuit breaker or
burned out fuse.
● Modern refrigerators with more storage space and a larger freezer compartment
require more operating time.
● Normal when refrigerator is first delivered to your home—usually requires 24 hours
to completely cool down.
● Large amounts of food placed in refrigerator to be
● Hot weather—frequent door openings.
● Door left open.
● Temperature controls are set too cold. Refer to instructions for use of
cooled
or frozen.
TEMPERATURE CONTROLS on page 5.
● Grille and condenser need cleaning. Refer to page 14.
● Check ENERGY-SAVING TIPS on page 2.
● Temperature control starts and stops motor to maintain even temperatures.
VIBRATION OR
RATTLING
OPERATING SOUNDS
● If refrigerator vibrates, more than likely it is not resting solidly on the tloor and front
roller screws or
front
leveling legs need adjusting or floor is weak or uneven. Refer to
ROLLERS on page 4.
“
If dishes vibrate on shelves, try moving them. Slight vibration is normal.
● The high speed compressor motor required to maintain near zero temperatures in the
large
freezer compartment
●
Normal
fan air
tlow-one
may
produce higher sound levels than your old refrigerator.
fan blows cold air through the refrigerator and freezer
compartments, another fan cools the compressor motor.
● These NORMAL sounds will also be heard from time to time:
●
Defrost timer switch c1
● Defrost water dripping.
● Temperature control
● Refrigerant boiling
● Cracking or popping of cooling coils caused by expansion and contraction during
icks
clicks
or
gurgling.
at defrost.
ON or OFF.
defrost and refrigeration following defrost.
● With automatic
running in pipes as
icemaker,
the sound of cubes dropping into the bin and water
icemaker refills.
16
Page 17

PROBLk;M
HOT AIR FROM
BOTTOM OF
REFRIGERATOR
POSSIBLE
●
Norma] air flow
CAUSE AND REMEDY
cooling motor. [n the refrigeration process, it is normal that heat
be expelled in the area under the refrigerator. Some
at these normal
and
safe operating temperatures. Your
be consulted if you object to this discoloration.
floor
coverings will discolor
floor
covering supplier should
DOOR NOT CLOSING
PROPERLY
FRESH FOOD
OR FREEZER
COMPARTMENT
TEMPERATURE
TOO WARM
FOODS DRY OUT
FROST OR ICE
CRYSTALS ON
FROZEN FOOD
SLOW ICE CUBE
FREEZING
ICE CUBES HAVE
ODOR/TASTE
● Door gasket on hinge side
stickin&
or folding over. To correct, put a small amount of
petroleum jelly on face of’ gasket.
● Temperature control not set cold enough. Refer to TEMPERATURE CONTROLS
on
page 5.
● Warm weather—frequent door openings.
● Door left open
● Package may be holding door open.
● Foods not covered, wrapped or sealed properly.
“
Door may have been left ajar or package holding door open.
● Door openings too frequent and too long.
● Frost within package is normal.
● Door may have been left
● Turn down temperature of freezer compartment.
● Old cubes need
● Ice storage bin needs to be emptied or washed.
● Unsealed packages in refrigerator
odor/taste to
● Interior of refrigerator needs cleaning—refer to page 14.
●
Poor-tasting incoming water. 1
too long.
to
be discarded.
ice
cubes.
ajar.
andor
freezer compartments may be transmitting
nstal
I a water filter—see page
9.
AUTOMATIC
ICEMAKER
DOES NOT WORK
CUBE DISPENSER
DOES NOT WORK
● Icemaker feeler arm in OFF (up) position.
● Water supply turned off or not connected.
● Freezer compartment too warm.
● Cubes too small-water
shutoff
valve connecting refrigerator to home water line may
be clogged.
● Piled up cubes in storage bin
icemaker feeler
● No
ice
cubes. Remove storage bin. If cubes are
● No ice cubes.
● Irregular
pressure
and
arm
in OFF (up) position, level cubes in bin by hand.
Icemaker
ice
clumps in storage container. Break up as
discard the remaining clumps.
may
cause icemaker to shut off prematurely. With
turned off or water supply turned off.
frozen
to wire arm, remove cubes.
many as
you can with fingertip
(<”(1/1/;1114(,(/ )1(,.1’t
/)(l,q(,)
17
Page 18

The Problem Solver
(continued,
PROBI.l?M
WATER HAS POOR
TASTE/ODOR
WATER IN FIRST
(~LASS
WATER
IS WARM
DISPENSER
DOES NOT WORK
DIVIDER BETWEEN
(TOM PA
FEELS
RTMENTS
WARM
MOISTURE FORMS
ON OUTSIDE OF
REFRIGERATOR
MOISTURE
COLLECTS INSIDE
POSSIBLE CAUSE AND REMEDY
●
If
water dispenser
manner
● Poor-tasting incoming water. Install a water filter—see page 9.
● Allow about 24 hours for water to cool to proper temperature after refrigerator is
until
has
not
been used
all
water in reservoir is replenished with fresh water.
for
an extended period, dispense water in regular
first installed.
●
If
water dispenser
be
as
cool as in succeeding glasses.
●
If
water reservoir has been drained, allow several hours for replenished supply to chill.
● Water supply
● Supply
● Normal warmth is created by automatic energy saver system circulating warm
around
1
ine
front
edge of freezer compartment to help prevent condensation on outside of
has
not been used for extended period, water in first glass will not
I
ine turned off or not connected.
may
be clogged with sediment.
liquid
refrigerator in hot, humid weather.
● Not unusual during period of high humidity.
● Door openings too frequent and too long.
●
1
n humid weather, air carries moisture into refrigerator when doors are opened.
WATER ON FLOOR
REFRIGERATOR
HAS ODOR
INTERIOR LIGHT
DOES NOT LIGHT
1[ IOU need more
(JIL
Answer Center
help... call, toll
‘“
800.626.2000
consumer information service
● The drain at the bottom of the freezer
bottom and clean the drain. Refer to page
Q If
you use a
funnel
chute. They
ice
on the
● Foods with strong odors
● Check
● Interior needs cleaning. Refer to page 14.
● Defrost water system needs cleaning.
● Keep open box of baking soda in refrigerator; replace every three months.
● No power at outlet.
● Light bulb needs replacing. See page 15.
glass
floor,
for
spoiled food.
over 6 inches
can fuse
inside the chute and drop out later, leaving water or
should
may
be clogged. Remove any ice on the freezer
14.
tall,
you may be jamming the cubes in the
be tightly covered.
free:
18
Page 19

Wdll
Be There
With the purchase of your new
Hotpoint
appliance, receive
the assurance that if you ever need information or
tance, we’ll
In-Home
Servjce
800-GE-CARES
(800-432-273fl
our c(msumer
will provide expert repair service on
your
Hotpoint”
at a time that’s convenient for
Many GE;
operated locati(ms offer
t{)day
or
venience
9:00
days,
Our factory. trained technicians
your appliance inside and
most repairs can be handled in just
(me visit.
be there. Al you have to do is cdl—toll-free!
Repak
Servjce
Contracts
800-626-2224
service professionals”
appliance, scheduled
(;cmsumer Service
you
t(mlorrow,”
(7:00
a.m.
or at your
a.m. to
t{) 2:00
7:00
p.m. week-
p.m. Saturdays).
you.
c(~mpany-
service
c(m.
know
out-so”
Y(JU can
[;E (;onsunler Service will
there after
warranty expires. Purchase
c<mtract
effect and
disc(~unt.
tract,
at
have the secure fkeling that
your Iiotpoint” product
while
yc)ur
warranty is still in
you’ll
receive a substantial
With a multiple-year
yc)u’re
assured of future service
today’s
prices.
assis-
still
be
a C,k;
((m.
GEAnswer Center@
800.626.2000
Whatever your
Hotpoint” maj(n(lente@ informati(m service is
ab]e to
belp.
qttesti(m-will
courteously.”
and
titne. (;E Answer Cente@ service is
open 24
Telecommunication Device for the Deaf
questi{m ab{)ut
appliance, (;E Answer
yoLlr
cdl—and your
be answered prompdy
And
you
b<)urs
a day 7 days a week.
.-i
can
,,
any
avail.
catl
any
I
I
Parts
andAccesorjes
800-626-2002
Individuds
own appliances
parts or accessories sent direcdy
their home, free of shipping charge!
Our parts system provides
over 47,000
and
Master(;arcl and
accepted.
User maintenance instructions
contained in this boo~et cover
dums
any user. Other servicing
should be referred to qudifled service personnel. Caution must be
exercised, since improper servicing
may cause unsafe operation.
qualified to service their
can have needed
to
access to
[;enuine Renew:d
all
are fully warranted.
Discover
Parts . . .
WSA,
cards are
proce-
intended to be performed by
genedy
:,
Sm,
m .
.
‘
-—
— . . . .
.-. —. ..-
For Customers
“ -—...
Wjth
,.,
---- -.
‘
“., .
SpecjalNeeds...
80~62&2000
Up(m
request, we will
cnntrols
appliances, and a brochure to assist in
planning a barrier-free kitchen
pers(ms
tain these items, free
f{)r
a variety
~iith
limited mobility To ob-
800.626.2000.
Consumers with impaired hearing
or speech who have access to a TDD
or a convention~ teletypewriter may
call 800.
to
TDD-GWC
request inffjrmati(m or service.
prc~vide
c)f Hotp(~int
c)f
(800-833-4322)
charge,
Braille
for
cdl
Page 20

YOUR HOTPOINT REFRIGERATOR
WARRANTY
Save proof of original purchase date such as your sales slip or cancel led check to establish warranty period.
.
WHAT IS COVERED
FULL ONE-YEAR WARRANTY
For one year from date of original
purchase, we will provide, free of
charge, parts and service labor in
your home to repair or replace any
pati
of
the
refrigerator that fails
because of a manufacturing
defect.
FULL FIVE-YEAR WARRANTY
For five years from date of original
purchase, we will provide, free of
charge, parts and service labor in
your home to repair or replace any
part of the sealed refrigerating
system (the compressor,
condenser, evaporator and all
connecting tubing) that fails
because of a manufacturing
defect.
WHAT IS NOT COVERED
LIMITED LIFETIME WARRANTY
For the life of the refrigerator, we will
replace, free of charge,
see-through storage drawer made
Lexatir<) po/ycarbonate
from
and furnished with the refrigerator if
the drawer breaks during normal
household use. Drawer covers are
not included. To avoid any trip
charges, you must take the pan or
drawer to a Hotpoint Appliance Parts
Mart and pick up a replacement.
● Service trips to your home to
teach you how to use the product.
Read your Use and Care material.
If you then have any questions
about operating the product please
contact your dealer or our
Consumer Affairs office at the
address below, or call, toll free:
GE Answer
800.626.2000
consumer information service
● Improper installation.
if
you have an installation problem,
contact your dealer or installer.
You are responsible for providing
adequate electrical, plumbing and
other connecting facilities.
Center’’”
any
tinted
resin
This warranty is extended to
the original purchaser and any
succeeding owner for products
purchased for ordinary home use
in the 48 mainland states, Hawaii
D.C.
and Washington,
warranty is the same except that it
is LIMITED because you must pay
to ship the product to the service
shop or for the service technician’s
travel costs to your home.
All warranty service will be
provided by our Factory Service
Centers or by our authorized
Customer
normal working hours.
Look in the White or Yellow Pages
of your telephone
GENERAL ELECTRIC
COMPANY, GENERAL
ELECTRIC FACTORY SERVICE,
GENERAL
FACTORY SERVICE or
GENERAL ELECTRIC
● Replacement of house fuses or
resetting of circuit breakers.
● Failure of the product if it is used
for other than its intended purpose
or used commercially.
● Damage to product caused
by accident, fire, floods or acts
of God.
● Loss of food due to spoilage.
WARRANTOR IS NOT
RESPONSIBLE FOR
CONSEQUENTIAL DAMAGES.
Care(’’”
ELECTRIC-HOTPOINT
In Alaska the
sewicers during
directoy for
I
Pafl
Pub.
2-91
Some states do not allow the exclusion or limitation of incidental or consequential damages, so the above limitation or exclusion
may not apply to you. This warranty gives you specific legal rights, and you may also have other rights which
To know what your legal rights are in your state, consult your local or state consumer affairs office or your state’s Attorney General,
Warrantor: General Electric Company
If further help is needed concerning this warranty, write:
Manager—Consumer Affairs, GE Appliances, Louisville, KY 40225
No. 162
No.
CG
D2543PO01
39-6281
va~
from state to state
CSX21
,
 Loading...