

Page 1

GEAppHances.com
Safety Instructions
.........
2-5
Operating Instructions
Aluminum Foil
Clock and Timer.........................14
Oven
.......................................
Baking and Roasting
Broiling, Broiling Guide
Control Lockout
Convection
Lights
Oven Control
Power Outage
Preheating...............................11
Probe
Racks
Sabbath Feature
Self-Cleaning............................27, 28
Special Features
Thermostat Adjustment
Timed Baking
and Roasting
Timed Convection Baking .20, 21
Vent.........................................10
Surface Cooking
Griddle.......................................8
............................
...............
...........
.......................
.........................
......................................
.............................
....................
................................
.......................................
.....................
......................
...........................
.......................
17-21
10,14
16,19,
...........
11
9-28
11
13
22
10
25, 35
24
22, 23
26
15
5-8
Installation
Instructions
Air Adjustment
Anti-Tip Device
Assemble Surface Burners
Checking Burner
Ignition
.......................................
Connecting the Range
to Gas
...................................
Dimensions and Clearances ... 40
Electrical Connections
9
Leveling the Range....................48
LP
..............................................
....................
.......................
..........................
Troubleshooting
Tips
....................................
Accessories
.....................
Consumer Support
Consumer Support... Back Cover
Warranty for Customers
in Canada
Warranty for Customers
in the U.S.A
..................................
...............................
38-48
47, 48
.........
42-44
...............
49-52
5 3
Owner's Manual
& Installation
48
45
47
45
41
55
54
Instructions
JGB850
JGB870
PGB995
CGS990
For a Spanish version
ofthis manual,
visit our Website at
GEAppliances.com.
Para consultar una
version en español
de este manual de
instrucciones, visite
nuestro sitio de internet
GEAppliances.com.
In Canada contact us at:
www.GEAppliances.ca
Care and Cleaning
Burner Assembly
Burner Grates
Control Panel and Knobs
Cooktop
Door............................................34, 35
Griddle
Oven Bottom..............................34
Oven Light Replacement
Oven Vents
Racks
Self-Cleaning
Stainless Steel Surfaces
Write the model and serial
numbers here:
Model#
Serial #
You can find them on a label under
the manifold above the upper oven
door.
.....................................
.......................................
........................................
.......................
.............................
...........
...........
................................
..............................
............
30
31, 32
33
33
31
37
33
35
27, 28
35
49-85181-3 08-12 GE
Page 2

IMPORTANT SAFETY INFORMATION.
READ ALL INSTRUCTIONS BEFORE USING.
AWARNING
result, causing propert
Do not store or use gasoline or other flammable vapors and liquids in the vicinity of this or any other appliance.
WHAT TO DO IF YOU SMELL GAS
■ Do not try to light any appliance.
■ Do not touch any electrical switch; do not use any phone in your building.
■ Immediately call your gas supplier from a neighbor's phone. Follow the gas supplier's instructions.
■ If you cannot reach your gas supplier, call the fire department.
Installation and service must be performed by a qualified installer, service agency or the gas supplier.
If the information in this manual is not followed exactly, a fire or explosion may
/ damage, personal injury or death.
A WARNING
■ All ranges can tip.
■ BURNS or other SERIOUS INJURIES can result.
■ INSTALL and CHECK the anti-tip bracket following the instructions supplied with the bracket.
To reduce the risk of tipping the range, the range must be secured by a properly installed anti-tip
bracket. See installation instructions shipped with the bracket for complete details before attempting
to install.
To check if the bracket is installed and engaged properly, look underneath the range to see that the
rear leveling leg is engaged in the bracket. On some models, the storage drawer or kick panel can be
removed for easy inspection. If visual inspection is not possible, slide the range forward, confirm the
anti-tip bracket is securely attached to the floor or wall, and slide the range back so the rear leveling leg is under the
anti-tip bracket.
If the range is pulled from the wall for any reason, always repeat this procedure to verify the range is properly secured
by the anti-tip bracket.
Never completely remove the leveling legs or the range will not be secured to the anti-tip device properly.
If you did not receive an anti-tip bracket with your purchase, call 1.800.525.8774 to receive one at no cost (in Canada,
call 1.800.551.3344). For installation instructions of the bracket, visitGEAppliances.com (in Canada, GEAppliances.ca).
A WARNING IMPORTANT SAFETY NOTICE
The California Safe Drinking Water and Toxic Enforcement Act requires the Governor of California to publish a list of
substances known to the state to cause cancer, birth defects or other reproductive harm, and requires businesses to
warn customers of potential exposure to such substances.
The fiberglass insulation in self-clean ovens gives off a very small amount of carbon monoxide during the cleaning cycle.
Exposure can be minimized by venting with an open window or using a ventilation fan or hood.
SAVE THESE INSTRUCTIONS
Page 3

IMPORTANT SAFETY INFORMATION.
READ ALL INSTRUCTIONS BEFORE USING.
A WARNING
NEVER use this appliance as a space heater to heat
or warm the room. Doing so may result in carbon
monoxide poisoning and overheating of the oven.
■ Use this appliance for its intended purpose as described
in this owner's manual.
■ Hove your range installed and properly grounded by
a qualified installer in accordance with the provided
installation instructions. Any adjustment and service
should be performed only by a qualified gas range
installers or service technicians. Do not attempt to repair
or replace any port of your range unless it is specifically
recommended in this manual.
■ Your range is shipped from the factory set for use
with natural gas. It con be converted for use with LP
gas. If required, thse adjustments must be mode by a
qualified technician in accordance with the instollotoin
instructions and local codes. The agency performing this
work assumes responsibility for the conversion.
■ Hove the installer show you the location of the range
gas shut-o1^ valve and how to turn it o1^ if necessary.
■ Plug your range into a 120-volt grounded outlet only. Do
not remove the round grounding prong from the plug.
If in doubt about the grounding of the home electrical
system, it is your responsibility and obligation to have an
ungrounded outlet replaced with a properly grounded,
three prong outlet in accordance with the National
Electrical Code. Do not use on extension cord with this
appliance.
■ Before performing any service, unplug the range
or disconnect the power supply at the household
distribution panel by removing the fuse or switching off
the circuit breaker.
■ Be sure all packing materials are removed from the
range before operating to prevent ignition of these
materials.
GENERAL SAFETY INSTRUCTIONS
■ Do not leave children alone or unattended in an
area where an appliance is in use. They should never
be allowed to climb, sit or stand on any part of the
appliance.
■ Do not store items of interest to children above a range
or on the backguard of a range-children climbing on
the range to reach items could be seriously injured.
■ Do not allow anyone to climb, stand or hang on the
oven door, drawer or cooktop. They could damage the
range or tip it over causing severe injury or death.
■ Never block the vents (air openings) of the range. They
provide the air inlets and outlets that are necessary for
the range to operate properly with correct combustion.
Air openings are located at the rear of the cooktop,
at the top and bottom of the oven door, and at the
bottomof the range under the warming drawer, lower
oven drawer or kick panel.
■ Use only dry pot holders—moist or damp pot holders on
hot surfaces may result in burns from steam. Do not let
pot holders touch surface burners, burner grate, or oven
heating element. Do not use a towel or other bulky cloth
in place of pot holders.
■ Be careful not to touch hot surfaces of the range.
Potentially hot surfaces include burners, grates, cooktop,
backguard, oven and door interior and crevices around
the oven door.
■ Do not heat unopened food containers. Pressure could
build up and the container could burst, causing an
injury.
■ Cook meat and poultry thoroughly—meat to at least an
internal temperature of 150°F and poultry to at least
an internal temperature of 180°F. Cooking to these
temperatures usually protects against foodborne illness.
GEAppliances.com
■ Avoid scratching or impacting glass doors, cooktops or
control panels. Doing so may lead to glass breakage. Do
not cook on a product with broken glass. Shock, fire or
cuts may occur.
SAVE THESE INSTRUCTIONS
Page 4

IMPORTANT SAFETY INFORMATION.
READ ALL INSTRUCTIONS BEFORE USING.
A WARNING KEEP FLAMMABLE MATERIALS AWAY FROM THE RANGE
■ Do not store or use flammable materials in an oven or
near the cooktop, including paper, plastic, pot holders,
linens, wall coverings, curtains, drapes and gasoline or
other flammable vapors and liquids.
■ Never wear loose-fitting or hanging garments while
using the appliance. Avoid storing commonly used items
in cabinetes above the range and be careful when
reaching over the range. Clothing in close proximity to
burners or hot surfaces may ignite causing severe burns.
■ Do not let cooking grease or other flammable materials
accumulate in or near the range. Grease in the oven or
on the cooktop may ignite.
■ Clean ventilating hoods frequently. Grease should not
be allowed to accumulate on the hood or filter.
A WARNING I IN THE EVENT OF A FIRE, TAKE THE FOLLOWING STEPS
TO PREVENT INJURY AND FIRE SPREADING:
■ Do not use water on grease fires. Never pick up
a flaming pan. Turn the controls o1^. Smother a
flaming pan on a surface burner by covering the pan
completely with a well-fitting lid, cookie sheet or flat
tray. If necessary, use a multi-purpose dry chemical or
foam-type fire extinguisher.
■ If there is a fire in the oven during baking, turn the oven
off and keep the door closed until the fire goes out. If
A WARNING
COOKTOP SAFETY INSTRUCTIONS
necessary, use a multi-purpose dry chemical or foam
type fire extinguisher.
■ If there is a fire in the oven during self-clean, turn the
oven o1^ and wait for the fire to go out. Do not force
the door open. Introduction of fresh air at self-clean
temperatures may lead to a burst of flame from the
oven. Failure to follow this instruction may result in
severe burns.
■ Never leave the surface burners unattended at medium
or high heat settings. Foods, especially oily foods, may
ignite resulting in fire that could spread to surrounding
cabinets.
■ Never leave oil unattended while frying. If allowed to
heat beyond its smoking point, oil may ignite resulting
in fire that may spread to surrounding cabinets. Use a
deep fat thermometer whenever possible to monitor oil
temperature.
■ To avoid oil spillover and fire, use a minimum amount of
oil when shallow pan-frying and avoid cooking frozen
foods with excessive amounts of ice.
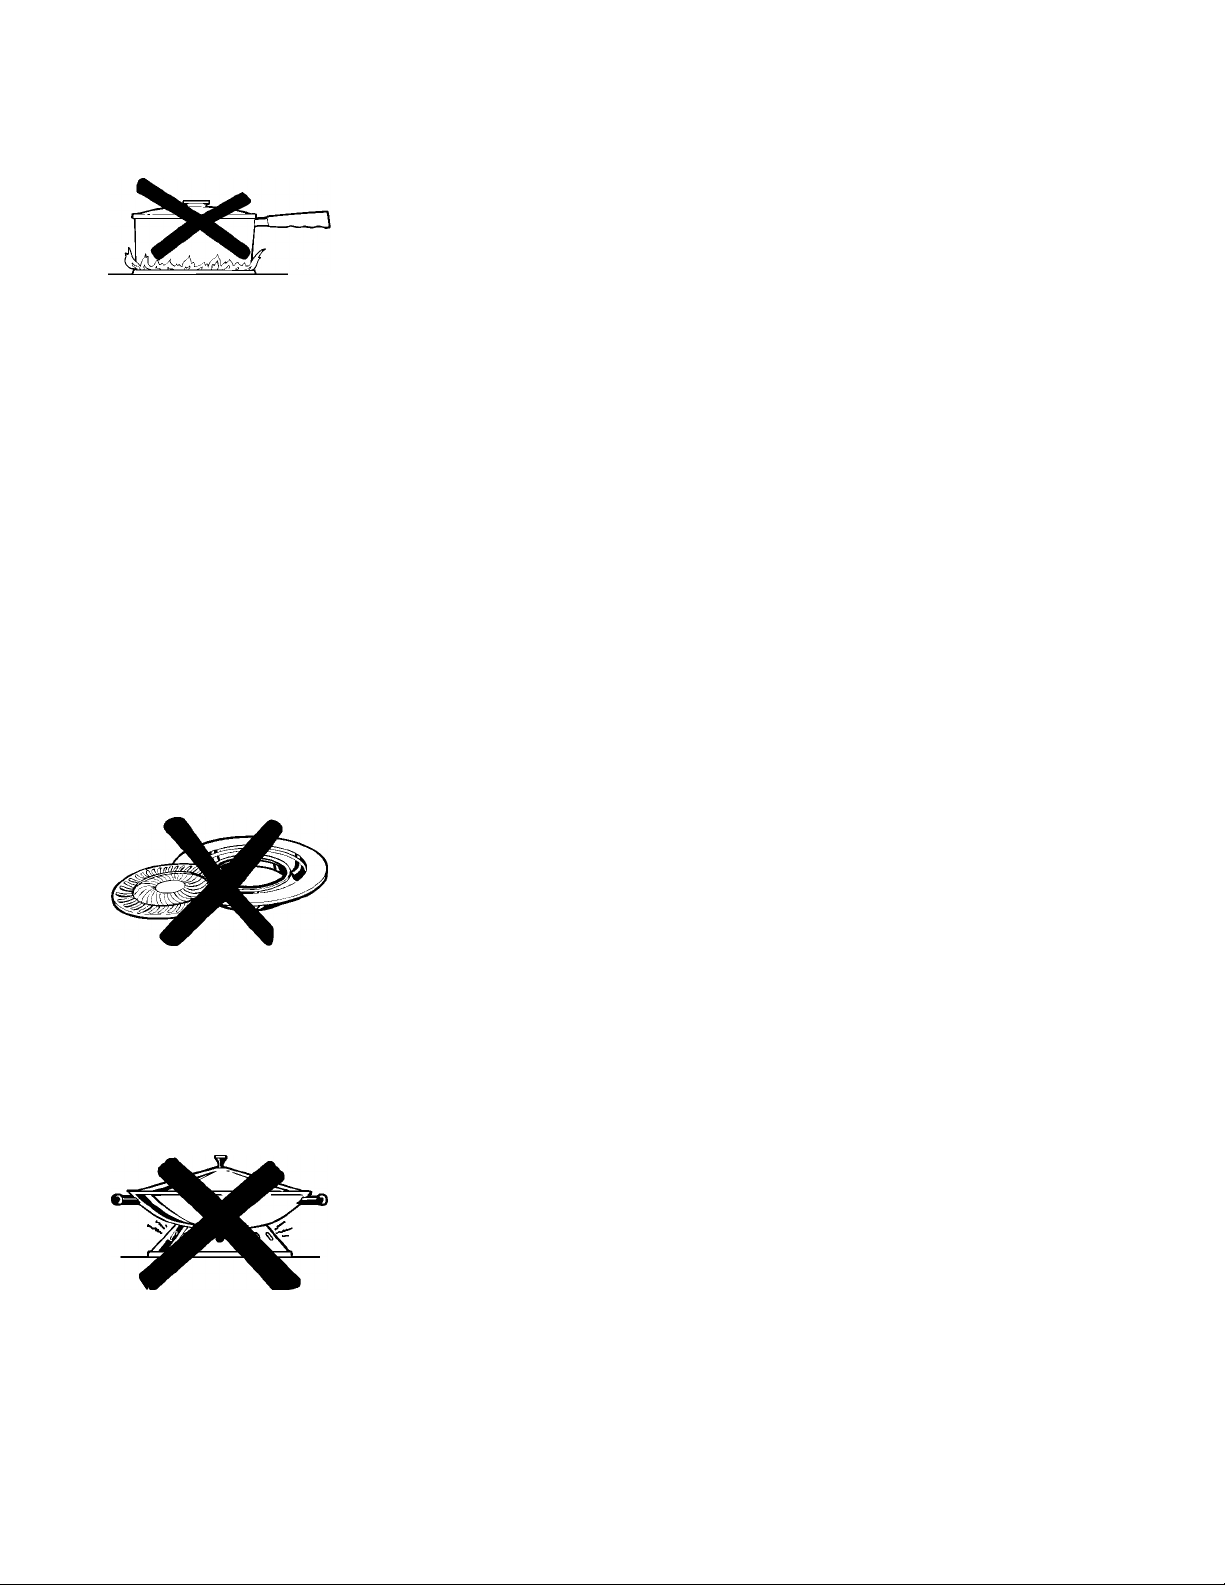
■ Use proper pan size and avoid pans that are unstable
or easily tipped. Select cookware that is matched to the
size of the burner. Burner flames should be adjusted so
that they do not extend beyond the bottom of the pan.
Excessive flame may be hazardous.
■ Always use the LITE position when igniting the top
burners and make sure the burners have ignited.
■ When using glass/ceramic cookware, make sure it is
suitable for cooktop service; others may break because
of sudden change in temperature.
■ To minimize the possibility of burns, ignition of
flammable materials and spillage, the handle of a
container should be turned toward the center of the
range without extending over nearby burners.
■ When preparing flaming foods under a hood, turn the
fan on.
■ Do not use a wok with a round metal support ring, the
ring may trap heat and block air to the burner resulting
in a carbon monoxide hazard.
■ Do not attempt to lil^the cooktop. Doing so may
damage the gas tubing to the surface burners resulting
in a gas leak and risk of fire.
■ When disabling Gas/Control Lockout (on some models),
make sure the surface controls are set to the OFF
position. This will prevent unintended gas flow from the
burners.
■ Do not use aluminum foil to cover the grates or line
any part of the cooktop. Doing so may result in carbon
monoxide poisoning, overheating of the cooktop
surfaces, or a potential fire hazard.
SAVE THESE INSTRUCTIONS
Page 5

IMPORTANT SAFETY INFORMATION.
READ ALL INSTRUCTIONS BEFORE USING.
A WARNING
Awarning
sassages in the oven bottom or cover an entire rack with
materials such as aluminum foil. Doing so blocks air flow
through the oven and may cause carbon monixide
poisoning. Aluminum foil linings may also trap heat, causing
a fire hazard.
■ Stand away from the range when opening the oven
door. Hot air or steam which escapes con cause burns
to hands, face and/or eyes.
■ Keep the oven free from grease buildup. Grease in the
oven may ignite.
■ Place oven rocks in desired location while oven is cool.
If rock must be moved while oven is hot, be careful to
avoid touching hot surfaces.
OVEN SAFETY INSTRUCTIONS
NEVER cover any slots, holes, or
■ Pull the oven rack to the stop-lock position when
loading and unloading food from the oven. This helps
prevent burns from touching hot surfaces of the door
and oven walls.
■ Do not leave items such as paper, cooking utensils or
food in the oven when not in use. Items stored in an
oven can ignite.
■ Do not leave items on the cooktop near the oven vent
which is in the center of the backguard. Items may
overheat resulting in a risk of fire or burns.
■ When using cooking or roasting bags in the oven, follow
the manufacturer's directions.
■ Never broil with door open. Open-door broiling is not
permitted due to overheating of control knobs.
GEAppliances.com
Awarning
The self-cleaning feature operates the oven at temperatures high enough to burn away food soils in the oven.
Follow these instructions for safe operation.
■ Before operating the self-clean cycle, remove pans,
shiny metal oven racks and other utensils from the
oven. Only porcelain-coated oven racks may be left in
the oven. Do not use self-clean to clean other parts,
such as grates.
■ Before operating the self-clean cycle, wipe grease and
food soils from the oven. Excessive amount of grease
may ignite leading to smoke damage to your home.
SELF-CLEANING OVEN SAFETY INSTRUCTIONS
■ If the self-cleaning mode malfunctions, turn the oven o1^
and disconnect the power supply. Have it serviced by a
qualified technician.
■ Do not clean the door gasket. The door gasket is
essential for a good seal. Care should be taken not to
rub, damage or move the gasket.
■ Do not use oven cleaners. No commercial oven cleaner
or oven liner protective coating of any kind should be
used in or around any part of the oven.
AWARNING WARMING DRAWER/LOWER OVEN DRAWER SAFETY
INSTRUCTIONS (Some models)
■ The purpose of the warming drawer is to hold hot
cooked foods at serving temperature. Bacteria will grow
in food while it is below 140°F. Do not put cold food in
warming drawer. Do not heat food for more than
2 hours. Failure to follow these instructions may result in
foodborne illness.
■ Do not leave paper products, plastics, canned food or
combustible materials in the drawer. They may ignite.
■ Use care when opening the drawer. Open the drawer a
crack and let hot air or steam escape before removing
or replacing food. Hot air or steam that escapes can
cause burns to hands, face and/or eyes.
■ Do not use aluminum foil to line the warming drawer.
Foil is an excellent heat insulator and will trap heat
beneath it. This will upset the performance of the
drawer and potentially cause a fire hazard.
■ Do not touch the heating element or the interior surface
of the drawer. These surfaces may be hot enough to
cause burns.
SAVE THESE INSTRUCTIONS
Page 6
Using the gas surface burners.
Throughout this manual, features and appearance may vary from your model.
Before Lighting a Gas Burner
■ Make sure all burners are in place.
■ Make sure all grates on the range are
properly placed before using any burner.
■ If your range has the Gos/Control Lockout
feature, moke sure it is disabled before
attempting to light the surface burners.
How to Light a Gas Surface Burner
After Lighting a Gas Burner
■ Do not operate the burner for on extended
period of time without cookware on the
grate. The finish on the grate may chip
without cookware to absorb the heat.
■ Be sure the burners and grates ore cool
before you place your hand, a pot holder,
cleaning cloths or other materials on them.
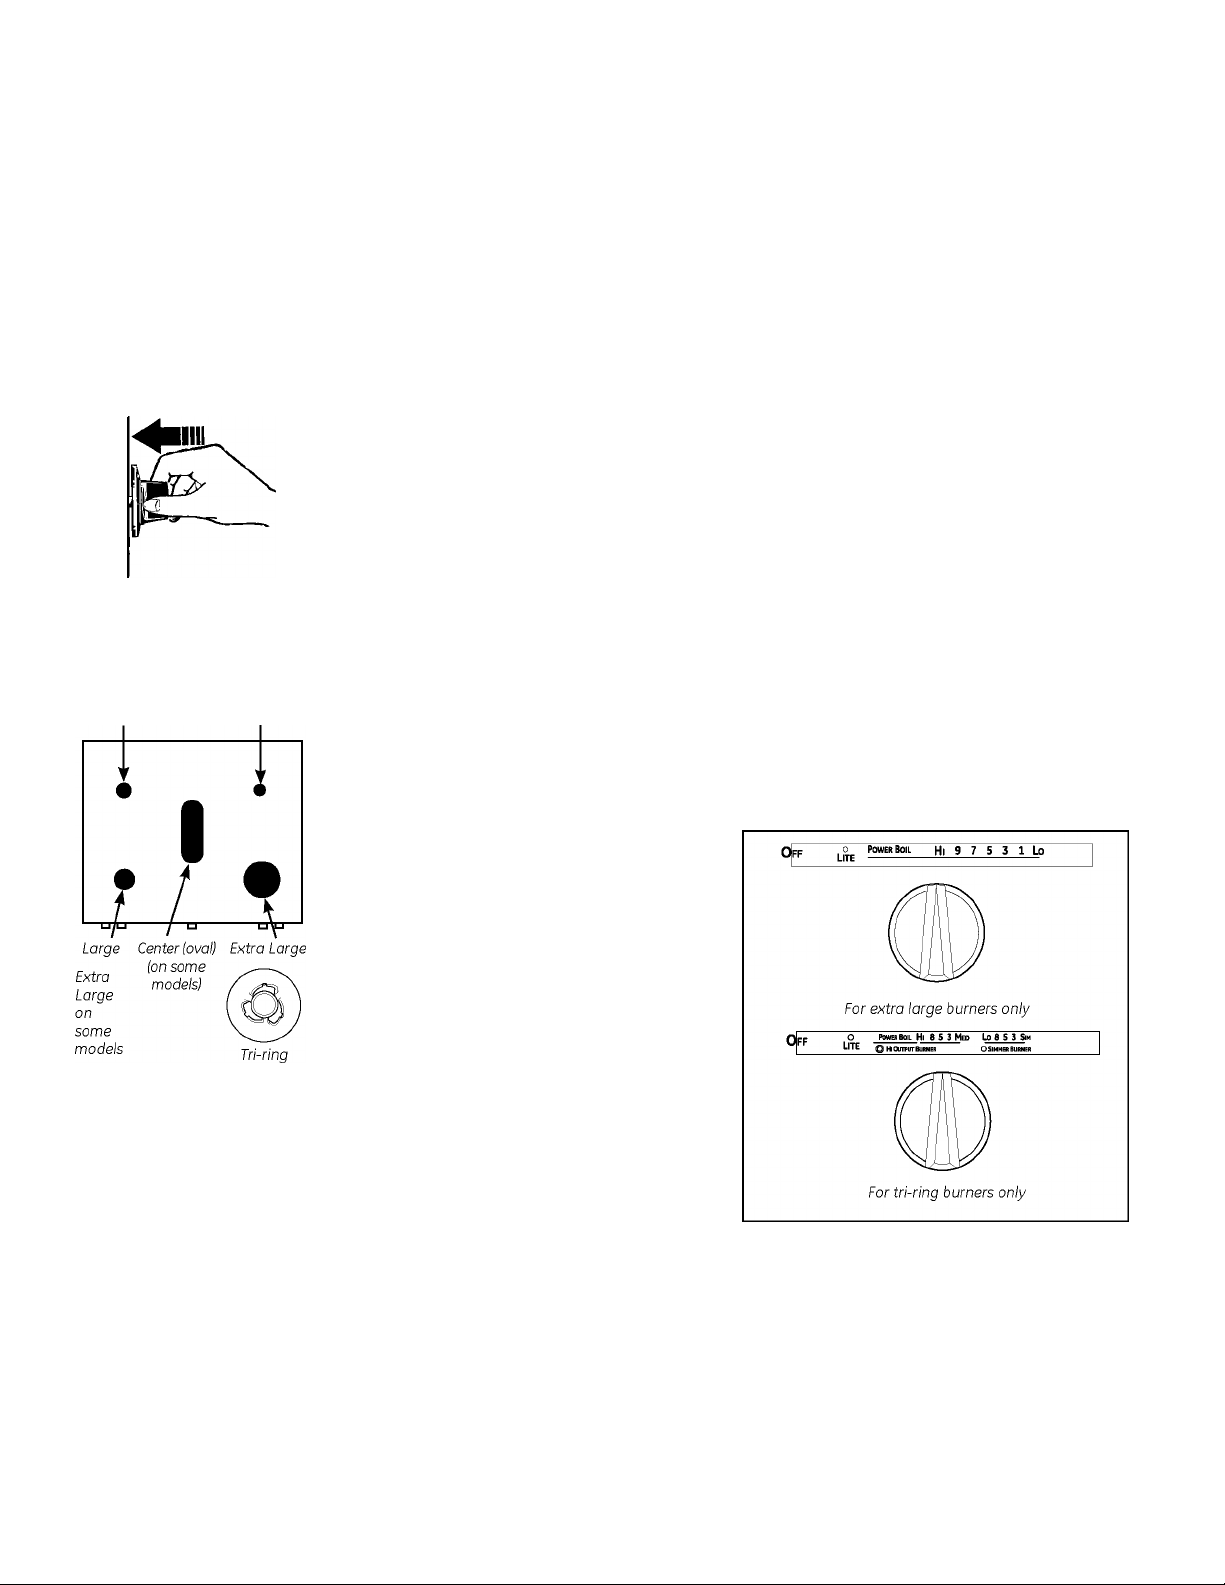
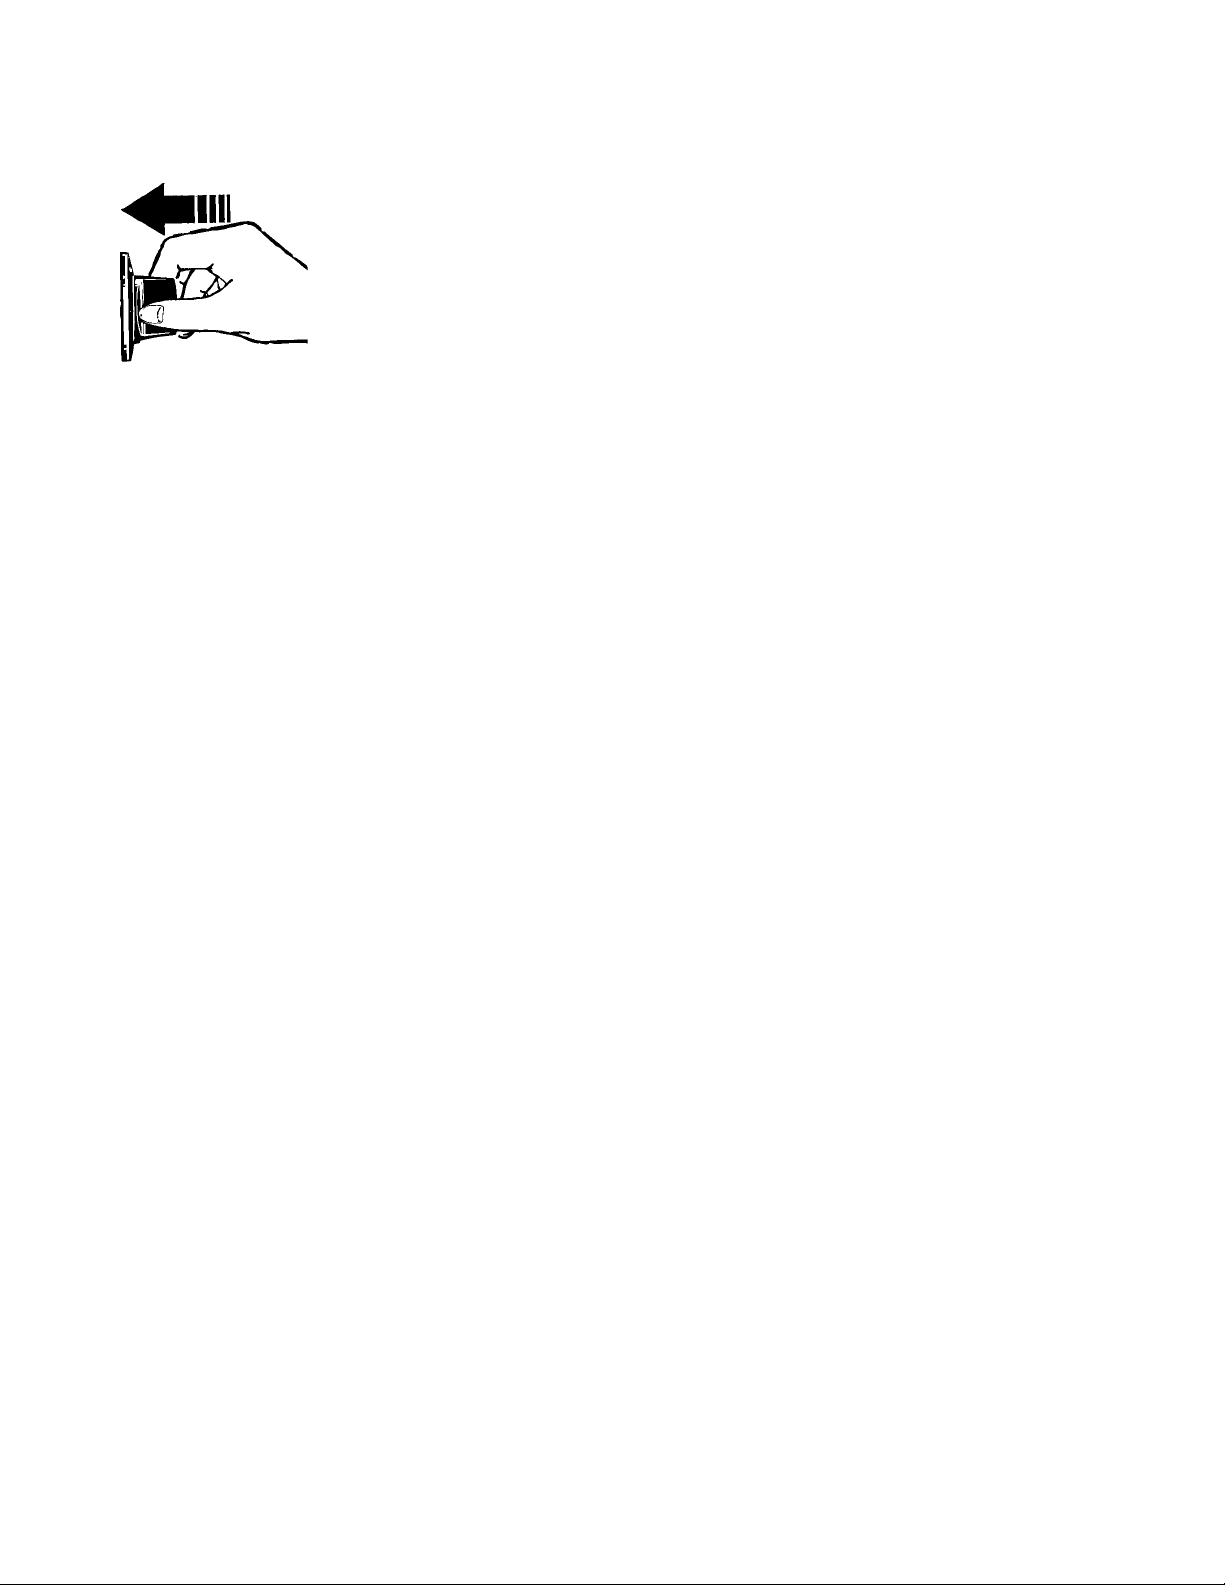
Push the control knob In and turn
It to the
LITE
position.
Medium Small
burner Ion
some models)
Bridge burner
Ion some
models)
AWARNING
are not covered by cookware may present a risk
of fire or clothing ignition. The griddle burner
should only be used with the griddle in place.
Failure to do so may result in serious injury.
Make sure all the surface burners are placed in
their respective positions.
Push the control knob in and turn it to the LITE position.
Burner flames that
Sealed Gas Burners
Your gas range cooktop has sealed gas
burners. They offer convenience, cleanability
and flexibility to be used in a wide range of
cooking applications.
The smallest burner in the right rear position
is the simmer burner. On some models, the
right front position triple flame burner will be
the simmer burner. This burner can be turned
down to S/Mfor a very low simmer setting.
It provides precise cooking performance for
delicate foods such as sauces or foods that
require low heat for a long cooking time.
The medium (left rear) and the large (left
front) burners are the primary burners
for most cooking. These general-purpose
burners can be turned down from HI to LO to
suit a wide range of cooking needs.
The extra large burner (right front, triple flame
burner, or left front burner on some models) are
the maximum output burners. Like the other
four burners, it can be turned down from
S/Mfor a wide range of cooking applications.
These burners are designed to quickly bring
large amounts of liquid to a boil. They have
HI to
You will hear a little clicking noise—the sound
of the electric spark igniting the burner.
Turn the knob to adjust the flame size. If the
knob stays at LITE, it will continue to click.
When one burner is turned to LITE, all the
burners spark. Do not attempt to disassemble
or clean around any burner while another
burner is on. An electric shock may result, which
could cause you to knock over hot cookware.
a special POWER BOIL™ setting designed to
be used with cookware 10 inches or larger in
diameter for the extra large and 11 inches or
larger for the triple flame burner.
The center oval burner (on some models) is for
large pots/pans or for use with the griddle.
Page 7
How to Select Flame Size
GEAppliances.com
AWARNING
not covered by cookware may present a risk
of burns or clothing igniton. Never let flames
extend beyond the sides of the cookware.
Watch the flame, not the knob, as you adjust
heat. When fast heating is desired, the flame
Flames that are
Top-of-Range Cookware
Aluminum: Medium-weight cookware is
recommended because it heats quickly
and evenly. Most foods brown evenly in an
aluminum skillet. Use saucepans with tightfitting lids when cooking with minimum
amounts of water.
Cast-Iron: If heated slowly, most skillets will
give satisfactory results.
Enamelware: Under some conditions, the
enamel of some cookware may melt. Follow
cookware manufacturer's recommendations
for cooking methods.
Glass: There are two types of glass
cookware—those for oven use only and
size on a gas burner should match the
cookware you ore using.
Flames larger than the bottom of the cookware
will not result in foster heating and may be
hazardous.
those for top-of-range cooking (saucepans,
coffee and teapots). Glass conducts heat
very slowly.
Heatproof Glass Ceramic: Can be used for
either surface or oven cooking. It conducts
heat very slowly and cools very slowly. Check
cookware manufacturer's directions to be
sure it can be used on gas ranges.
Sto/n/essStee/;This metal alone has poor
heating properties and is usually combined
with copper, aluminum or other metals for
improved heat distribution. Combination
metal skillets usually work satisfactorily
if they are used with medium heat as the
manufacturer recommends.
Use a flat-bottomed wok.
Stove Top Grills
Do not use stove top grills on your sealed gas
burners. If you use the stove top grill on the
sealed gas burner, it will cause incomplete
combustion and can result in exposure to
carbon monoxide levels above allowable
current standards.
Wok This Way
We recommend that you use a 14-inch or
smaller flat-bottomed wok. Make sure the wok
bottom sits flat on the grate. They are available
at your local retail store.
Only a flat-bottomed wok should be used.
In Case of Power Failure
In case of a power failure, you can light the
gas surface burners on your range with a
match. Hold a lit match to the burner, then
push in and turn the control knob to the
position. Use extreme caution when lighting
burners this way.
LITE
This can be hazardous to your health.
Do not use a wok support ring. Placing the
ring over the burner or grate may cause the
burner to work improperly, resulting in carbon
monoxide levels above allowable standards.
This could be dangerous to your health.
Surface burners in use when an electrical
power failure occurs will continue to operate
normally.
NOTE: If Gas/Control Lockout is in use at the
time of a power failure, the surface burners
cannot be lit.
Page 8

Using the griddle. (on some models)
Your nonstick coated griddle or preseasoned
griddle (on some models) provides an
NOTE: Your griddle will discolor over time as it
becomes seasoned with use.
extra-large cooking surface for meats,
pancakes or other food usually prepared in a
frying pan or skillet.
How to Insert the Griddle
The griddle can only be used with the center
burner. To insert the griddle, remove the center
grate and replace with the griddle.
NOTE: Do not clean the griddle in the self
cleaning oven
Using the Griddle Nonstick Griddle for Models JGB870
______________________Fire Hazard
AWARNING
■ The Pre-Heat setting (on some models) is provided to
quickly preheat your griddle. Turn control down before
placing food on the griddle. Cooking on the Pre-Heat
setting may result in fire.
■ Use care when cooking greasy foods. Spilled grease may
result in fire.
■ Never place or store any items on the griddle, even when
it is not in use. Heat from surrounding burners can heat
the griddle and may result in fire.
■ Place and remove the griddle only when all grates and
griddle are cool and all surface units are turned OFF.
Most griddled foods require cooking on a preheated surface.
Preheat griddle according to this guide, then switch to the
desired cook setting.
■ Do not use oil on the griddle for extended lengths of time.
Permanent staining and/or craze lines on the surface could result.
■ Do not overheat the griddle. Leaving the griddle burner
on at HI for an extended amount of time without food can
damage the nonstick coating.
■ Avoid using metal utensils with sharp points or rough sharp
edges which might damage the griddle surface.
■ Do not cut foods on the griddle.
Type of Food Preheat Time
Warmina Tortillas
Pancakes 4 min. 7
Hamburaers 4 min. 8
Fried Eaas 2 min. 7
Breakfast Sausaae Links 3.5 min. 8
Hot Sandwiches (such as
Grilled Cheese)
4 min. 6
3 min. 8
NOTE: Griddle settings may need to be adjusted if the griddle is
used for an extended time.
Preseasoned Griddle for Model PGB995
Type ofEood Preheat Conditions
Warmina Tortillas
Pancakes 7(Med-Hi)
Hamburgers 7(Med-Hi)
Breakfast Sausage Links Hi
Hot Sandwiches (such as
Grilled Cheese)
none 3 (Med-Low)
3 min.
5 min.
5 min.
Hi
4 min.
NOTE: Griddle settings may need to be adjusted if the griddle is
used for an extended time.
Nonstick Griddle for Model CGS990
Type of Food Preheat
Warmina Tortillas
Pancakes 4 (Med-Hi)
Hamburgers Hi
Fried Eggs Hi
Breakfast Sausage Links Hi
Hot Sandwiches (such as
Grilled Cheese)
NOTE: Griddle settings may need to be adjusted if the griddle is
used for an extended time.
Conditions
none 3 (Med-Low)
10 min.
5 min.
5 min.
5 min.
Hi
4 min.
Cook Settina
Cook Settina
7 (Med-Hi)
7 (Med-Hi)
5 (Med)
Hi
Cook Setting
4 (Med)
5 (Med)
Sear on Hi for 1
minute on each
side
4 (Med)
5 (Med)
Hi
Page 9

Using the lower oven,
(Throughout this manual, features and appearance may vary from your model.)
Oven Control, Clock, Timer and Features
Bake Pad
o
Touch to select the bake function.
Convection Bake Pad (on some models)
e
Touch to select baking with the convection function.
Convection Roast Pad (on some models)
o
Touch to select roasting with the convection
function.
Start Pad
Must be touched to start any cooking or cleaning
function.
Warm Pad
Touch to keep cooked foods warm. See the How to
Set the Oven for Warming section.
Q Display
Shows the time of day, oven temperature, whether
the oven is in the bake, broil or self-cleaning mode,
the times set for the timer or automatic oven
operations, and if the range is locked.
lf"F~" and a number or letter flash in the display
and the oven control signals, this indicates a function
error code. Touch the Clear/Off pad. Allow the oven to
cool for one hour. Put the oven back into operation, if the
function error code repeats, disconnect the power to the
oven and call for service.
If your oven was set for a timed oven operation and a
power outage occurred, the clock and all programmed
functions must be reset.
The time of day will flash in the display when there has
been a power outage.
0^ Self Clean Pad
Touch to select self-cleaning function. See the
Using the self-cleaning oven section.
0^ Delay Start Pad
Use along with Cooking Time or Self Clean pads
to set the oven to start and stop automatically at a
time you set.
ly Cooking Time Pad
Touch and then touch the number pads to set the
amount of time you want your food to cook. The
oven will shut off when the cooking time has run
out.
Clear/Off Pad
Q
Touch to cancel ALL oven operations except the
clock, timer and Gas/Control Lockout or Control
Lockout (depending on model).
Clock Pad
0
Touch before setting the clock.
Number Pads
©
Use to set any function requiring numbers, such
as the time of day on the clock, the timer, the oven
temperature, the internal food temperature, the
start time and length of operation for timed baking
and self-cleaning.
Kitchen Timer On/Off Pad
o
Touch to select the timer feature.
Probe Pad
©
' Touch when using the probe to cook food.
Gas/Control Lockout Pad (on some models)
Touch and hold the Gas Control Lockout pad
for 3 seconds to lock/unlockthe surface burners,
oven burners and control panel so they cannot be
activated.
Oven Light On/Off Pad
Touch to turn the oven light on or off.
Page 10

Using the ovens.
To avoid possible burns, place the racks in the desired position before you turn the oven on.
Before you begin^
The oven has 3 shelf positions.
It also has a special low shelf
position (Rl for extra large items,
such as a large turkey.
Plastic Items on the cooktop may
melt if left too close to the vent.
Vent appearance and location vary.
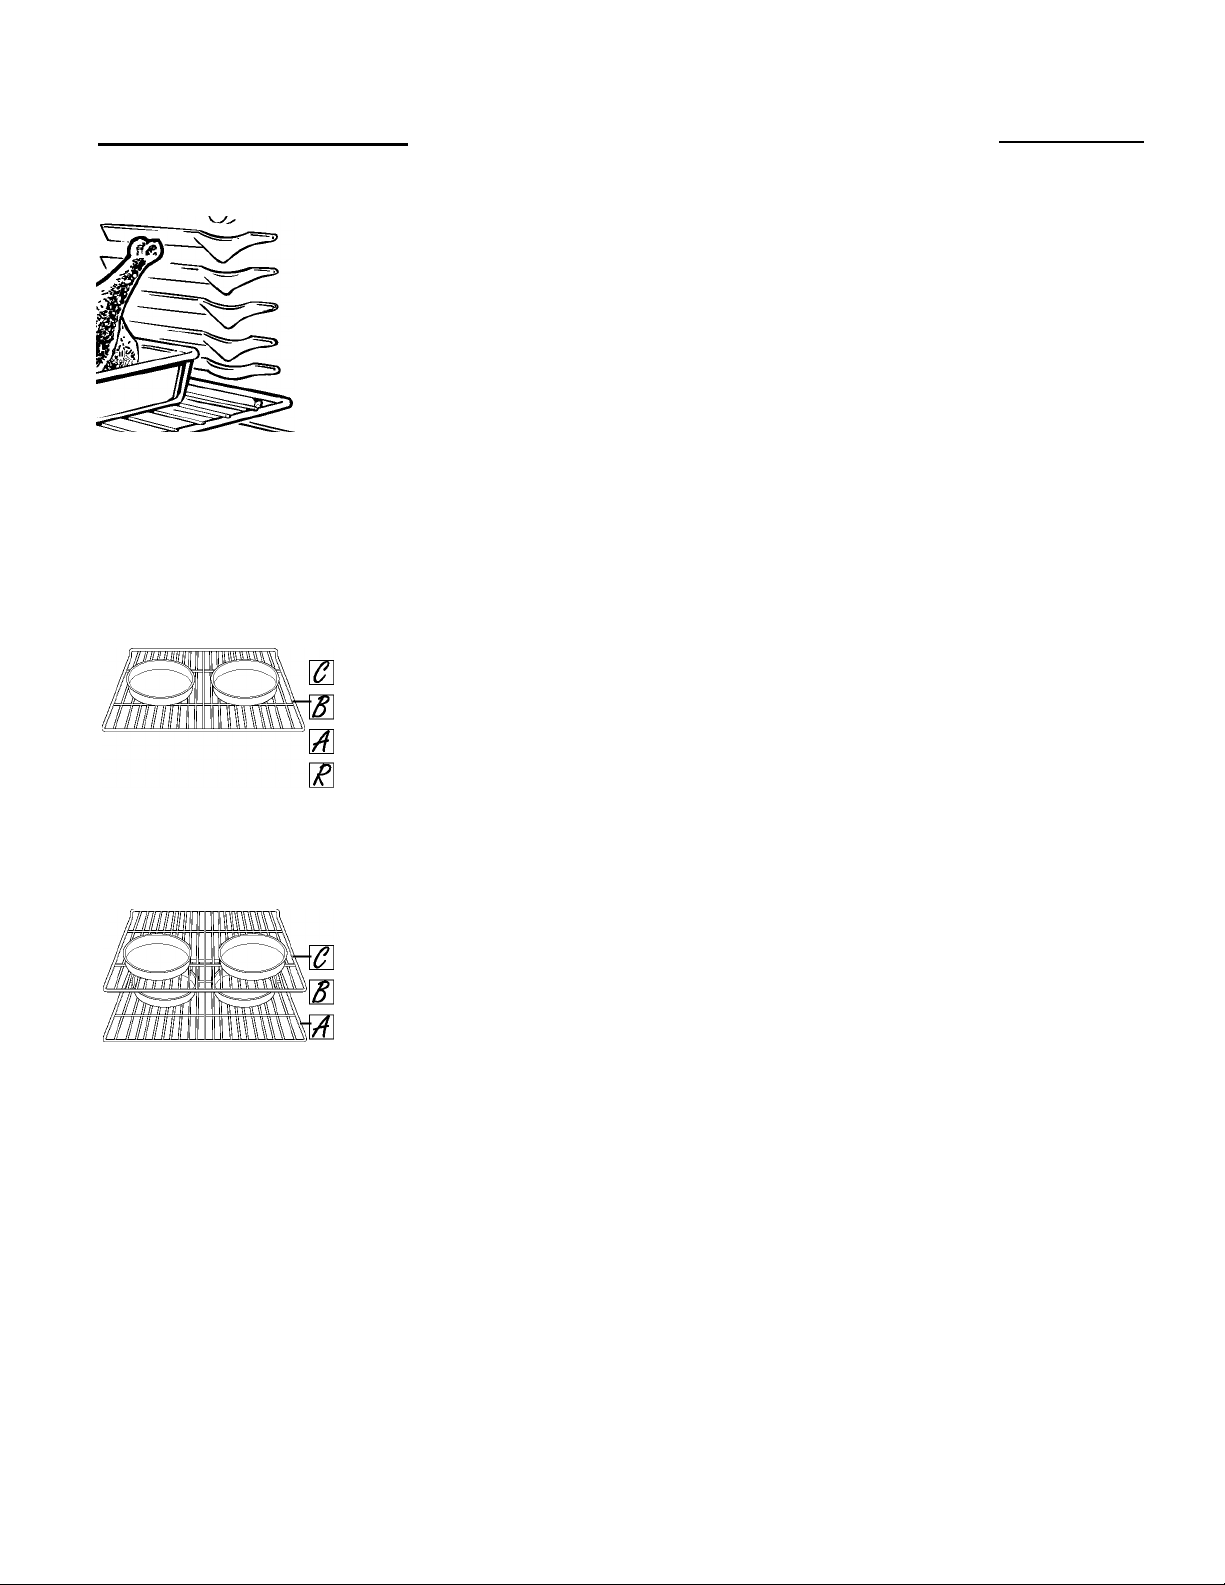
The racks have stop-locks, so that when placed
correctly on the rack supports (A through C),
they will stop before coming completely out,
and will not tilt.
When placing and removing cookware, pull the
rack out to the bump on the rack support.
ACAUTION
a rack in the lowest position (R), you will
need to use caution when pulling the rack
out. We recommend that you pull the rack
out several inches and then, using two pot
holders, pull the rack out by holding the
sides of it. The rack is low and you can be
burned if you put your hand in the middle of
When you are using
Upper Oven Vent
Your oven is vented through ducts at the rear
of the range. Do not block these ducts when
cooking in the oven—it is important that the
flow of hot air from the oven and fresh air
to the oven burner be uninterrupted. Avoid
touching the vent openings or nearby surfaces
during oven or broiler operation—they may
become hot.
the rack and pull all the way out. Be careful
not to burn your hand on the door when
using the rack in the lowest position (R).
To remove a rack, pull it toward you, tilt the
front end up and pull it out.
To replace, place the end of the rack (stop-
locks) on the support, tilt up the front and push
the rack in.
NOTE: The rack is not designed to slide out at
the special low rack (R) position.
I Handles of pots and pans on the cooktop
may become hot if left too close to the vent.
I Do not leave plastic or flammable items on
the cooktop—they may melt or ignite if left
too close to the vent.
I Do not leave closed containers on the
cooktop. The pressure in closed containers
may increase, which may cause them
to burst.
I Metal items will become very hot if they are
left on the cooktop, and could cause burns.
Power Outage
The oven or broiler cannot be lit during a power
failure. Gas will not flow unless the glow bar is
hot.
If the oven is in use when a power failure
occurs, the oven burner shuts off and cannot
be re-lit until power is restored. This is because
the flow of gas is automatically stopped
and will not resume when power is restored
until the glow bar has reached operating
temperature.
Upper Oven Light
Touch the Oven Light pad on the upper control
panel to turn the light on or off.
10
Page 11
Using the lower oven.
GEAppliances.com
If your model has a door latch, do not lock the oven door with the latch during baking or roasting. The latch is used for self
cleaning only.
How to Set the Lower Oven for Baking or Roasting
The oven has a special low rack
(Rl position just above the oven
bottom. Use it when extra cooking
space is needed, for example,
when cooking a large turkey. The
rack is not designed to slide out at
this position.
when baking on a single rack, use
the rack position from the chart for
your type of food. Baking results
will be better if baking pans are
centered in the oven as much as
possible.
Your oven is not designed for open-door
cooking.
~J\ Touch the BAKE pod.
^ Touch the number pods to set the desired
temperature.
S ra Touch the START pad.
The word ON and 100° will be displayed. As the
oven heats up, the display will show the changing
temperature. When the oven reaches the
temperature you set, a tone will sound.
Preheating and Pan Placement
To avoid possible burns, place the racks in the
desired position before you turn on the oven.
Preheat the oven if the recipe calls for it.
To preheat, set the oven at the correct
temperature. Preheating is necessary when
convection baking and for good results when
baking cakes, cookies, pastry and breads. For
ovens without a preheat indicator light or tone,
preheat 10 minutes.
Baking results will be better if baking pans are
centered in the oven as much as possible. Pans
should not touch each other or the walls of the
oven.
To change the oven temperature during BAKE
cycle, press the BAKE pad and then the number
pads to get the new temperature.
Check food for doneness at minimum time
on recipe. Cook longer if necessary.
Touch the CLEAR/OEE pad when cooking
is complete.
NOTE: A cooling fan may automatically turn on
and off to cool internal parts. This is normal and
the fan may continue to run even after the unit
is turned off.
when baking four cake layers at a
time, use racks A and C. Place the
lower pans at the back of the rack
and the upper pans to the front of
the rack shown so that one pan is
not directly above another.
If you need to use two shelves, stager the pans
so one is not directly above another leaving
approximately 1-1/2" between pans, from the
front, back and sides of the walls.
£
NOTE: Do not bake or store anything in either
oven during a self clean cycle
Aluminum Foil
Do not use aluminum foil to line oven bottoms.
The foil will trap heat below and upset the
performance of the oven. Foil can melt
and permanently damage the oven bottom.
Damage from improper use of aluminum foil is
not covered by the product warranty.
Oven Moisture
As your oven heats up, the temperature change
of the air in the oven may cause water droplets
to form on the door glass. These droplets
Foil may be used to catch spills by placing a
sheet on a lower rack, several inches below
the food .Do not use more foil than necessary
and never entirely cover an oven rack with
aluminum foil. Keep foil at least 1-1/2" from
oven walls to prevent poor heat circulation.
are harmless and will evaporate as the oven
continues to heat up.
11
Page 12
Using the upper oven.
To use the upper oven
rg Push in and turn the upper oven knob to
Allow the upper oven to preheat.
any desired setting.
NOTES:
■ The lower oven cannot be used during a
self-clean cycle of the upper oven.
Push in and turn the upper oven
knob to any desired setting.
■ The upper oven signal light is located on the
upper left side of the knob and glows when the
knob is in the ON position. It remains ON until
the knob is moved to the OFF position.
■ The "Heating" signal light is located on the
upper right side of the knob and glows when
the heating elements ore active. Preheat
is complete after the "Heating" signal has
turned off for the first time with each use.
A tone will NOT sound when the oven is
finished preheating.
■ Do not put food, foil or cookware directly on
the bottom of the upper oven.
■ If foods require a cover, use only foil or lids
able to wirhstand baking temperatures. Do
not use plastic.
■ For best baking results, use rack position B. If
your dish is too tall, place on rack position A.
■ For best results, bake cakes in lower oven.
12
Page 13

The size, weight, thickness,
starting temperature and
your preference of doneness
will affect broiling times. This
guide is based on meats at
refrigerator temperature.
tThe U.S. Department of
Agriculture says "Rare beef is
popular, but you should know that
cooking it to only 1A0°F means
some food poisoning organisms
may survive." (Source: Safe Food
Book, Your Kitchen Guide. USDA
Rev. June 1985.)
The upper oven has 2 rack positions.
** In general, higher rack positions
yield darker external searing and
lower positions yield more doneness.
For best results, the broil pan should
be oriented parallel to the broiler.
GEAppliances.com
Broiling Guide
Preheat oven for 5 minutes.
Food Doneness Type or
Thickness
Beef Rare -
Medium
Rare (140°-
150°F)
Medium
(150°F)
Well Done
(170°F)
Medium
(150°F)
Well Done
(170°F)
Steaks-1" thick Roller/Flat A Steaks less than 1" thick are
Steaks -
3/4" to 1" thick
Steaks -
3/4" to 1" thick
Ground Beef
Patties -1/2" to
3/4" thick
Ground Beef
Patties -1/2" to
3/4" thick
Chicken Breast,
boneless
Breast, bone-in Roller/Flat A
Fish
1/2" to 1" thick Roller/Flat A Handle and turn very carefully.
fillets
Pork
chops
*Due to the variety of meats and cuts available, you may select alternate rack positions based on personal
preference of doneness and external searing. See illustration for description of rack positions.
Well Done
(170°F)
3/4" thick Roller/Flat A To avoid curling, slash fat at 1"
Rock Type Rock
Comments
Position*
difficult to cook rare. They may
cook through before browning.
Roller/Flat A
Roller/Flat A
Roller/Flat A
Roller/Flat A
Roller/Flat A Broil skin side down first.
To avoid curling, slash fat at 1"
intervals.
For best results, broil no more
than 8 ground beef patties at
one time.
intervals.
Close the door. Always broil with
the door closed.
How to Set the Upper Oven for Broiling
|~^ Place the meat or fish on a broiler grid in a
broiler pan.
Follow suggested rock positions in the
Broiling Guide.
The oven door must be closed during
broiling.
Push in and turn the upper oven knob to
¥
broil setting.
Serve the food immediately, and leave the pan
outside the oven to cool during the meal for
easiest cleaning.
13
Page 14

Using the dock and timer.
Not all features are on all models.
To Set the Clock
Clock
Make sure the clock is set to the
correct time of day.
The clock must be set to the correct time of
day for the automatic oven timing functions
to work properly. The time of day cannot be
changed during a timed baking or self-cleaning
cycle.
If number pads are not touched within one
minute after you touch the Clock pad, the
display reverts to the original setting. If this
happens, touch the Clock pad and reenter the
time of day.
Kitchen
Timer
On/Off
Set UfMMiMe Omhcr
0 0 0 0 0
Start
The timer is a minute timer only.
The Clear/Off pad does not affect
the timer.
CoHTKOLLoam/r
~J\ Touch the Clock pad.
Touch the number pads.
Touch the number pads the same way you
read them. For example, to set 12:34, touch the
number pads
1,2,3 and 4 in that order.
To Set the Timer (For lower oven only.)
The timer does not control oven operations.
The maximum setting on the timer is 9 hours
and 59 minutes.
\J] Touch the Kitchen Timer On/Off pad.
Touch the number pads until the amount
^^ of time you want shows in the display. The
maximum time that can be entered in
minutes is 59. Times more than 59
minutes should be changed to hours and
minutes. For example, to enter 90 minutes
as 1 hour 30 minutes, touch 1,3 and 0 in
that order.
If you make a mistake, press the Kitchen Timer
On/Off pad and begin again.
Touch the Start pad until the time of day
shows in the display. This enters the time
and starts the clock.
To check the time of day when the display
is showing other information, simply touch the
Clock
pad. The time of day shows until another
pad is touched.
Touch the Start pad. After pressing the
Start pad. Set disappears; this tells you the
time is counting down, although the
display does not change until one minute
has passed.
When the timer reaches :00, the control
will beep 3 times followed by one beep
every 6 seconds until the Kitchen Timer
On/Off pad is touched.
The 6-second tone can be canceled by
following the steps in the Special features of
your oven control section under Tones at the
End of a Timed Cycle.
To Reset the Timer
If the display is still showing the time remaining,
you may change it by touching the Kitchen
Timer On/Off pad and then touching the
number pads until the time you want appears
in the display.
If the remaining time is not in the display (clock,
delay start or cooking time are in the display),
recall the remaining time by touching the
Kitchen Timer On/Off
the number pads to enter the new time you
want.
pad and then touching
To Cancel the Timer
Touch the Kitchen Timer On/Off pad twice.
Power Outage
If a flashing time is in the display, you have
experienced a power failure. Reset the clock.
14
Touch the Clock pad once to reset. Enter the
correct time of day by touching the appropriate
number pads. Touch the Start pad.
Page 15

Using the timed baking and roasting features. (lower oven only) GEAppliances.
com
NOTE: Foods that spoil easily—such as milk, eggs, fish, stuffings, poultry and pork—should not be allowed to sit for more
than 1 hour before or after cooking. Room temperature promotes the growth of harmful bacteria. Be sure that the oven
light is off because heat from the bulb will speed harmful bacteria growth.
How to Set an Immediate Start and Automatic Stop
Bake
ЩЩШИШ
И ШШ ш ы
Cooking
ШШШНШ
SFrWADMNeDuim
Сонпш Loofour
Time
H Ш Ш И Ш
Start
Clear
Off
The upper oven will turn on Immediately and
cook for a selected length of time. At the end
of the cooking time, the oven will turn off
automatically.
/ Touch the Bake pad.
Touch the number pads to set the desired
^^ oven temperature.
Touch the Cooking Time pad.
NOTE: If your recipe requires preheating, you
may need to add additional time to the length
of the cooking time.
Touch the number pads to set the desired
length of cooking time. The minimum
cooking time you can set is 1 minute.
The oven temperature that you set and
the cooking time that you entered will be
in the display.
^ Touch the Start pad.
The oven will turn ON, and the display will
show the cooking time countdown and the
changing temperature starting at 100°F. (The
temperature display will start to change once
the oven temperature reaches 100°F.) When
the oven reaches the temperature you set, 3
beeps will sound.
The oven will continue to cook for the set
amount of time, then turn off automatically.
After the oven turns off, the end-of-cycle tone
will sound.
Touch the Clear/Off pad to clear the
display if necessary. Remove the food
from the oven. Remember, even though
the oven turns off automatically, food left
in the oven will continue cooking after the
oven turns off.
Bake
Ш Ш Ш И Ш
Sir WAWtNe Оми*
н и и и и
Cooking
mm ШИШ
Sft ИГмикб Они*
Ш И Ш И И
шшшшш
Зет Warhws Они*
СОНПО! LocMKir
Time
Сомпш Locmur
Delay
Start
ш ш ш
Start
Clear
Off
How to Set a Delayed Start and Automatic Stop
The upper oven will turn on at the time of day you
set, cook for a specific length of time and then turn
off automatically.
Make sure the clock shows the correct time of day.
[7] Touch the Bake pad.
Touch the number pads to set the desired oven
temperature.
■jl Touch the Cooking Time pad.
NOTE: If your recipe requires preheating, you may
need to add additional time to the length of the
cooking time.
^ Touch the number pads to set the desired
length of cooking time. The minimum cooking
time you can set is 1 minute.
The oven temperature that you set and the
cooking time that you entered will be in the
display.
Touch the Delay Start pad.
Touch the number pads to set the time of day
you want the oven to turn on and start
cooking.
NOTE: An attention tone will sound if you are using
timed baking and do not touch the Start pad.
NOTE: If you would like to check the times you have
set, touch the Delay Start pad to check the start
time you have set or touch the Cooking Time pad to
check the length of cooking time you have set.
When the oven turns ON at the time of day you set,
the display will show the cooking time countdown
and the changing temperature starting at 100°F.
(The temperature display will start to change once
the oven temperature reaches 100°F.) When the
oven reaches the temperature you set, beeps will
sound.
The oven will continue to cook for the set amount of
time, then turn off automatically.
After the oven turns off, the end-of-cycle tone will
sound.
Touch the Clear/Off pad to clear the display if
s
necessary. Remove the food from the oven.
Remember, even though the oven turns off
automatically, food left in the oven will
continue cooking after the oven turns off.
^ Touch the Sfori pad.
15
Page 16

Using the probe, (lower oven only)
ACAUTION To prevent burns, do not unplug the probe from the oven outlet until the oven has cooled. Do not
store the probe In the oven.
If your model has a door latch, do not lock the oven door with the latch while cooking with the probe. The latch is used
for self-cleaning only.
For many foods, especially roasts and poultry, internal food temperature is the best test for doneness. The temperature
probe takes the guesswork out of cooking foods to the exact doneness you want.
Use of probes other than the one provided with
this product may result in damage to the probe.
Use the handles of the probe and plug when
inserting and removing them from the food and
The temperature probe has a
skewer-like probe at one end and
a plug at the other end that goes
into the outlet in the oven.
outlet.
■ To avoid damaging your probe, do not use
tongs to pull on the cable when removing it.
■ To avoid breaking the probe, make sure food
is completely defrosted before inserting.
■ To prevent possible burns, do not unplug the
probe from the outlet until the oven has cooled.
Never leave your probe inside the oven
during a self-cleaning cycle.
Do not store the probe in the oven.
Handles
Ш Ш И ИИ
ШШШНН
Srr WvwD>s Ояит
ИННИН
16
Catnot Lockout
Bake
Qwreoi LoooN/r
Start
Clear
Off
After preparing the meat and placing it on
a trivet or on a broiler pan grid, follow these
directions for proper probe placement.
Insert the probe completely into the meat.
It should not touch the bone, fat or gristle.
For roasts with no bone, insert the probe into
the meatiest part of the roast. For bone-in ham
or lamb, insert the probe into the center of the
lowest large muscle.
Insert the probe into the center of dishes such
as meat loaf or casseroles.
Insert the probe into the meatiest part of the
inner thigh from below and parallel to the leg of
a whole turkey.
How to Set the Lower Oven For Cooking When Using the Probe
[7] Insert the probe into the food.
Plug the probe into the outlet in the oven.
'—' Make sure it's pushed all the way in. Close
the oven door.
Touch the Probe pad.
Touch the number pads to set the desired
internal food or meat temperature
between 100°F and 200°F.
Touch the боке pad.
Touch the number pads to set the desired
oven temperature.
Touch the Stoft pad.
7
The display will flash if the probe is inserted
into the outlet and you have not set a probe
temperature and touched the Start pad.
The display will show LO until the internal
temperature of the food reaches 100°F; then
the changing internal temperature will be
shown.
When the internal temperature of the food
reaches the number you have set, the
probe and the oven turn off and the oven
control signals. To stop the signal, touch
the Clear/Off pad. Use hot pads to remove
the probe from the food. Do not use tongs
to pull on it—they might damage it.
To change the oven temperature during
probe cooking, touch the Bake pad and then
the number pads to set the new temperature.
■ If the probe is removed from the food before
the final temperature is reached, a tone will
sound and the display will flash until the
probe is removed from the oven.
■ You can use the timer even though you
cannot use timed oven operations while
using the probe.
Page 17

Using the convection lower oven, (on some models)
The convection oven fan shuts o1^ when the oven door is opened. DO NOT leave the door open for long periods of time
while using convection cooking.
GEAppliances.com
In a convection oven, a fan
circulates hot air over, under and
around the food. This circulating
hot air is evenly distributed
throughout the oven cavity. As a
result, foods are evenly cooked
and browned—often in less time
than with regular heat.
To help you understand the difference between
convection bake and roast and traditional bake
and roast, here are some general guidelines.
Convection Bake
■ Preheat the oven. See the Using the oven
Preheating and Pan Placement section.
■ Ideal for foods cooked on multiple racks.
■ Good for large quantities of baked foods.
■ Good results with cookies, biscuits, brownies,
cupcakes, cream puffs, sweet rolls, angel
food cake and bread.
The convection fan circulates the heated
air evenly over and around the food.
Convection Roast
■ Good for large tender cuts of meat,
uncovered.
The convection fan circulates the heated air
evenly over and around the food. Meat and
poultry are browned on all sides as if they
were cooked on a rôtisserie. Heated air will be
circulated over, under and around the food
being roasted. The heated air seals in juices
quickly for a moist and tender product while,
at the same time, creating a rich golden brown
exterior.
Roasts or poultry should be cooked on rack
position (A).
When you are convection roasting, it is
important that you use a broiler pan and grid
for best convection roasting results. The pan is
used to catch grease spills and the grid is used
to prevent grease spatters.
■ Place the rack in rack position (A).
Convection
Bake
[2 S [2 0 E
&r Wmms Omwn
0 0 0 0 0
Start
Clear
Off
Auto Recipe'^ Conversion
You can use your favorite recipes in the
convection oven.
When using Convection Bake, the oven will
automatically convert the oven temperature
from regular baking to Convection Bake
temperatures.
Using the number pads, enter the
m
temperature recommended in the recipe.
Touch the Start pad.
The display will show the actual
converted (reduced) temperature. For
example, if you enter a regular recipe
temperature of 350°F (177°C) and touch
the Start pad, the display will show CON
and the converted temperature of 325°F
(163°C).
NOTE: This feature only converts cooking
temperatures, not cooking times.
When convection roasting, the oven
temperature will not auto convert.
~j] Touch the Ciear/Off pad when baking is
finished.
■ Use pan size recommended In the recipe.
■ Some package Instructions for frozen
casseroles, main dishes or baked goods
have been developed using commercial
convection ovens. For best results In
this oven, preheat the oven and use the
temperature, for regular baking, on the
package.
To deactivate the feature:
Touch the lower oven Warm and Bake
pad at the same time until the display
shows SE.
Touch the Convection Bake pad. The
display will show Con On. Touch the
Convection Bake pad again. The display
will show Con Off.
jl Touch the Sforf pad.
17
Page 18

Using the convection lower oven, (on some models)
Cookware for Convection Cooking
CONVEOION
Bake
MwMweOMHCR
0 0 0 0
E
or
Start
Clear
Off
Convection
Roast
Before using your convection oven, check
to see if your cookware leaves room for air
circulation in the oven. If you are baking with
several pans, leave space between them. Also,
be sure the pans do not touch each other or the
walls of the oven.
Paper and Plastic
Heat-resistant paper and plastic containers that
are recommended for use in regular ovens can
be used in convection ovens. Plastic cookware
that is heat-resistant to temperatures of 400°F
can also be used, when oven is below 400°F.
Metal and Glass
Any type of cookware will work in your
convection oven. However, metal pans heat the
fastest and are recommended for convection
baking.
■ Darkened or matte-finished pans will bake
faster than shiny pans.
■ Glass or ceramic pans cook more slowly.
When baking cookies, you will get the best
results if you use a flat cookie sheet instead of a
pan with low sides.
For recipes like oven-baked chicken, use a pan
with low sides. Hot air cannot circulate well
around food in a pan with high sides.
How to Set the Lower Oven for Convection Baking or Roasting
|~^ Touch the Convection Bake or Convection
Roast pad.
^ Touch the number pads to set the desired
oven temperature.
~J\ Touch the Stoftpad.
To change the oven temperature, touch the
Convection Bake or Convection Roast pad
and then the number pads to set the new
temperature.
When the oven starts to heat, the changing
temperature, starting at 100°F, will be displayed.
When the oven reaches the temperature you
set, 3 beeps will sound.
Touch the Clear/Offpad when finished.
NOTE: You will hear a fan while cooking with
convection. The fan will stop when the door is
opened, but the heat will not turn off.
The fan will not start until the preheat
temperature is reached.
NOTE: When convection baking, the oven
temperature will be 25F (140 lower than the set
temperature. See Auto Recipe Conversion in the
Special Features section for more information.
When convection roasting, oven temperature
will not auto convert
18
Page 19

GEAppliances.com
How to Set the Lower Oven for Convection Roasting When Using the Probe (on some models)
For best results when roasting
large turkeys and roasts, we
recommend using the probe
included in the convection oven.
Convection
Roast
Ser IVMMM6 DuAwe»
0 0 0 0 0
Probe
Ser IVMMW6 Omwer
0 0 0 0 0
Start
Clear
Off
The display will flash PROBE and the oven
control will signal if the probe is inserted into
the outlet, and you have not set a probe
temperature and touched the Stoft pad.
Place the rack in the rock position (A).
Insert the probe completely into the food.
Plug the probe into the outlet in the oven.
Make sure it is pushed all the way in. Close
the oven door.
Touch the Convection Roast pad.
Touch the number pads to set the desired
oven temperature.
Touch the Probe pad.
Touch the number pads to set the desired
internal food temperature.
To change the oven temperature during the
Convection Roast cycle, touch the Convection
Roast pad and then touch the number pads to
set the new desired temperature.
Touch the Start pad.
When the oven starts to heat, the word LO will
be in the display.
After the internal temperature of the food
reaches 100°F, the changing internal
temperature will be shown in the display.
ACAUTION
To prevent burns, do
not unplug the probe from the oven outlet
until the oven has cooled. Do not store the
probe In the oven.
NOTE:
■ If the probe is removed from the food before
the final temperature is reached, a tone will
sound and the display will flash until the
probe is removed from the oven.
■ You will hear a fan while cooking with this
feature. The fan will stop when the door is
opened but the heat will not turn off.
■ You can use the timer even though you
cannot use timed oven operations while
using the probe.
When the internal temperature of the
food reaches the number you have set,
the probe and the oven turn off and the
oven control signals. To stop the signal,
touch the Ciear/Off pad. Use hot pads to
remove the probe from the food. Do not
use tongs to pull on it—they might
damage it.
19
Page 20
Using the convection lower oven. (on some models)
Convection Roasting Guide - Suggested Settings
Meats
Beef Rib Roast (4-8 lbs.)
Bone-in and Boneless
Oven
Temp.
Rare 325°F 145°F
Medium 325°F 160°F
Internal
Temp.
BeefTenderloin (2-3 lbs.) Rare 425°F 145°F
BeefTenderloin (4-6 lbs.) Rare 425°F 145°F
Pork Bone-In, Boneless (3-5 lbs.) 325°F 160°F
Lamb Bone-In (5-9 lbs.) Medium 325°F 165°F
Boneless (4-7 lbs.) Medium 375°F 165°F
Poultry Whole Chicken (5-7 lbs.) 350°F 170°F
Turkey, Whole*
Unstuffed (10 to 16 lbs.)
Unstuffed (18 to 24 lbs.)
325°F
325°F
170-180°F
170-180°F
Turkey Breast (4 to 6 lbs.) 325°F 170°F
*Stuffed birds generally require 30-45 minutes additional roasting time. Shield legs and breast with foil to prevent
overbrowning and drying ofskin.
Using the lower oven timed convection baking features. (on some models)
You will hear a fan while cooking with this feature. The fan will stop when the door is opened but the heat will not turn off.
NOTE: Foods that spoil easily—such as milk, eggs, fish, stuffings, poultry and pork—should not be allowed to sit for more
than 1 hour before or after cooking. Room temperature promotes the growth of harmful bacteria. Be sure that the oven
light is off because heat from the bulb will speed harmful bacteria growth.
How to Set an Immediate Start and Automatic Stop
Convection
Bake
m [B m 0 0
Set WuHiHS OMwa
H □ 0 0 0
Cooking
mm000
SErWwHwsOmwBt
Commi locxour
Time
0 0 0 0 0
Start
Clear
Off
20
The lower oven will turn on immediately and cook
for a selected length of time. At the end of the
cooking time, the oven will turn off automatically.
~J\ Touch the Convection Bake pad.
Touch the number pads to set the desired oven
temperature.
Touch the Cooking Time pad.
J
NOTE: If your recipe requires preheating, you may
need to add additional time to the length of the
cooking time.
Touch the number pads to set the desired
¥
length of cooking time. The minimum cooking
time you can set is 1 minute.
The oven temperature that you set and the
cooking time that you entered will be in the
display.
Touch the Start pad.
The oven will turn ON, and the display will show
the cooking time countdown and the changing
temperature starting at 100°F. (The temperature
display will start to change once the oven temperature
reaches 100°F.) When the oven reaches the
temperature you set, 3 beeps will sound.
The oven will continue to cook for the set amount
of time, then turn off automatically, unless the Cook
and Hold feature was set. See the Special features of
your oven control section.
After the oven turns off, the end-of-cycle tone will
sound.
Touch the Clear/Off pad to clear the display if
necessary. Remove the food from the oven.
Remember, even though the oven turns off
automatically, food left in the oven will
continue cooking after the oven turns off.
Page 21

Using the lower oven timed convection baking features. (on some models)
How to Set a Delayed Start and Automatic Stop
CONVEaiON
Bake
Ш S Ш И Ш
SerIVMHmeOuHei
H Ш И H Ш
Cooking
Time
Ш Ш Ш И И
Set WuwHE Oawei
И Ш И Ш Ш
Ш Ш Ш И Ш
Set IViUMwe Omws*
CONnotíoemur
Delay
Start
H Ш И Ш Ш
Start
Clear
Off
The lower oven will turn on at the time of day you
set, cook for a specific length of time and then turn
off automatically.
Make sure the clock shows the correct time
of day.
7] Touch the Convection Bake pad.
Touch the number pads to set the desired oven
'—' temperature.
~J] Touch the Cooking Time pad.
NOTE: If your recipe requires preheating, you may
need to add additional time to the length of the
cooking time.
Touch the number pads to set the desired
¥
length of cooking time. The minimum cooking
time you can set is 1 minute.
The oven temperature that you set and the
cooking time that you entered will be in the
display.
Touch the Delay Siari pad.
Touch the number pads to set the time of day
you want the oven to turn on and start cooking.
GEAppliances.com
~y] Touch the Start pad.
NOTE: If you would like to check the times you have
set, touch the Delay Start pad to check the start
time you have set or touch the Cooking Time pad to
check the length of cooking time you have set.
When the oven turns ON at the time of day you set,
the display will show the cooking time countdown
and the changing temperature starting at 100°F.
(The temperature display will start to change once
the oven temperature reaches 100°F.) When the
oven reaches the temperature you set, 3 beeps will
sound.
The oven will continue to cook for the set amount
of time, then turn off automatically, unless the Cook
and Hold feature was set. See the Special features of
your oven control section.
After the oven turns off, the end-of-cycle tone will
sound.
Touch the Clear/Off pad to clear the display if
s
necessary. Remove the food from the oven.
Remember, even though the oven turns off
automatically, food left in the oven will continue
cooking after the oven turns off.
WARM
START
How to Set the Oven For Warming
The WARM feature keeps cooked foods hot.
This feature is not designed to reheat cold food.
To use the WARM feature, touch the WARM
pad and then the START pad.
To use the WARMfeature after Timed Baking
or Roasting, follow these steps:
[71 Touch the mode of cooking that you want
^ to use [BAKE, CONVECTION BAKE or
CONVECTION ROASTl.
Touch the number pads to set the oven
temperature.
Touch the COOKING TIME pad.
Touch the number pads to set the desired
length of cooking time.
^ Touch the WARM pad.
Touch the START pad.
To Crisp Stale Items
■ Place food in low-sided dishes or pans.
■ For best results, place the food items in a
single layer. Do not stack.
■ Leave them uncovered.
■ Check crispness after 20-30 minutes.
Add time as needed.
IMPORTANT NOTES:
■ Food should be kept hot in its cooking
container or transferred to a heat-safe
serving dish.
■ For moist foods, cover them with an
oven-safe lid or aluminum foil.
■ Fried or crisp foods do not need to be
covered, but can become too dry if warmed
for too long.
■ Repeated opening of the door allows the hot
air to escape and the food to cool.
■ Allow extra time for the temperature inside
the oven to stabilize after adding items.
■ With large loads it may be necessary to
cover some of the cooked food items.
■ Remove serving spoons, etc., before placing
containers in the oven.
■ Do not use plastic containers, lids or plastic
wrap.
Note: Plastic containers, lids or plastic wrap will
melt if placed in the oven. Melted plastic may
not be removable and is not covered under
your warranty.
21
Page 22

Special features of your lower oven control.
Your new touch pad control has additional features that you may choose to use. The following are the features and how
you may activate them.
The special feature modes can only be activated while the display is showing the time of day. They remain in the control's
memory until the steps are repeated.
When the display shows your choice, touch the Start pad. The special features will remain in memory after a power failure.
12 Hour Shut-Off
Bake
Delay
Start
Start
Warm
With this feature, should you forget and leave the
oven on, the control will automatically turn off the
oven after 12 hours during baking functions or
after 3 hours during a broil function.
If you wish to turn OFF this feature, follow the
steps below.
|~^ Touch the Bake and Warm pads at the
same time for 3 seconds until the display
shows SF.
Touch the Delay Start pad. The display
will show 12 shdn (12 hour shut-off). Touch
the Delay Start pad again and the display
will show no shdn (no shut-off).
Touch the Start pad to activate the no
shut-off and leave the control set in this
special features mode.
Bake
Warm
Bake
+
+
Start
Kitchen
Timer
On/Off
Start
Warm
Cooking
Time
Warm
Fahrenheit or Celsius Temperature Selection
Your oven control is set to use the Fahrenheit
temperature selections, but you may change
this to use the Celsius selections.
r¥] Touch the Bake and Warm pads at the
same time for 3 seconds until the display
shows SF.
Tones at the End of a Timed Cycle
At the end of a timed cycle, 3 short beeps will
sound followed by one beep every 6 seconds
until the Clear/Off pad is touched. This continual
6-second beep may be canceled.
To cancel the 5-second beep:
|~^ Touch the Bake and Warm pads at the
same time for 3 seconds until the display
SF.
shows
~J] Touch the Start pad.
Gas/Control Lockout (on some models)
Touch the Warm and Cooking Time pads
at the same time. The display will show F
(Fahrenheit).
Touch the Warm and Cooking Time pads
again at the same time. The display will
show C (Celsius).
Touch the Stoft pad.
Touch the Kitchen Timer On/Off pad. The
display shows CON BffP (continual beep)
and BEEP. Touch the Kitchen Timer On/
Off pad again. The display shows BEEP.
(This cancels the one beep every 5
seconds.)
22
Gas/Control
Lockout
HOLD 3 SEC
Your control will allow you to lock out the
surface burners, oven burners and control
panel so they cannot be activated.
To lock/unlock the controls:
Turn all surface burners off.
m
Touch and hold the Gas/Control Lockout
pad for 3 seconds until the display shows
LOCON.
To unlock the control, touch and hold the
Gas/Control Lockout pad for 3 seconds
until the display shows LOC OFF.
When this feature is on and the touch pads are
touched, the control will beep and the display
will show LOC ON.
■ The gas/control lockout mode affects all
controls. No controls will work when this
feature is activated.
■ The adjustment will be retained in memory
after a power failure.
Page 23

Bake
Bake
Clock
Start
Cooking
Time
Start
Warm
Warm
12-Hour, 24-Hour or Clock Blackout
Your control is set to use a 12-hour clock.
If you would prefer to hove a 24-hour military
time clock or black out the clock display, follow
the steps below.
Touch the Bake and Warm pads at the
same time for 3 seconds until the display
shows SF.
Touch the Clock pad once. The display will
show 12 hr. If this is the choice you want,
touch the Start pad.
Cook and Hold
Your new control has a cook and hold feature
that keeps cooked foods warm for up to 3
hours after the cooking function is finished.
This feature can only be used when timed
cooking.
To activate this feature, follow the steps below.
|~^ Touch the Bake and Warm pads
at the same time for 3 seconds until the
display shows SF.
GEAppliances.com
Touch the Clock pad again to change
to the 24-hour military time clock. The display
will show 24 hr. If this is the choice you want,
touch the Start pad.
Touch the Clock pad again to black out the
clock display. The display will show OFF. If this
is the choice you want, touch the Start pad.
NOTE: If the clock is in the blackout mode, you
will not be able to use the Delay Start function.
Touch the Cooking Time pad. The display
will show Hid OFF.
Touch the Cooking Time pad again to
activate the feature. The display will show
Hid ON.
Touch the Start pad to activate the cook
and hold feature and leave the control set
in this special features mode.
Warm
Cook
Time
Start
Bake
Tone Volume (on some models)
This feature allows you to adjust the tone
volumes to a more acceptable volume. There
are three possible volume levels.
|~^ Touch the upper oven Warm and Bake
pads at the same time until the display sh
ows SF.
Touch the Cook Time pad. The display
shows 2 Beep This is the middle volume
level.
Touch the Cook Time pad again. The
display will show 3 Beep. This is the
loudest volume level.
Touch the Cook Time pad again. The
display will show 1 Beep. This is the
quietest volume level.
Choose the desired sound level (1 Beep, 2
Beep, 3 Beep).
Touch the Stoft pad.
23
Page 24

Using the Sabbath feature. (lower oven only)
(Designed for use on the Jewish Sabbath and Holidays)
The Sabbath feature can be used for baking/roasting In the upper and lower oven or baking drawer (on some models). It
cannot be used for convection, broiling, self-cleaning or delay start cooking. CERTIFIED A
NOTE: The oven light comes on automatically (on some models) when the door Is opened and goes Sabbath'^'Cit^^
off when the door is closed. The bulb may be removed. See the Oven Light Replacement section. On .. i Kf
models with a light switch on the control panel, the oven light may be turned on and left on.
How to Set for Regular Baking/Roasting
Delay
Start
Start
Warm
Make sure the clock shows the correct time of \~f.
day and the oven is off.
Press and hold both the Bake and Warm
pads, at the some time, until the display
shows SF.
Top the Delay Start pod until SAb bAtH
appears in the display.
Touch the Start pod and 3 will appear
in the display.
Touch the Bake pad. No signal will be
given.
Using the number pods, enter the desired
temperature between 170° and 550°. No
signal or temperature will be given.
To adjust the oven temperature, touch the
Bake pod, enter the new temperature using the
number pods and touch the Start pad.
NOTE: The Clear/Offand Cooking Time pads
are active during the Sabbath feature.
Touch the Sfort’ pod.
After a random delay period of
7
approximately 30 seconds to 1 minute,
3 c will appear in the display, indicating
that the oven is baking/roasting. If
3 c doesn't appear in the display, start
again at Step 4.
Bake
Ш И И И Ш
ш ш и ш ш
When the display shows 3 the
oven is set in Sabbath. When the
display shows 3 c the oven is
baking/roasting.
Mode
Bake Warm
Delay
Start
Cooking
Time
Ш И Ш И H
Ш Ш и и Ш
Start
when the display shows 3 the
oven is set in Sabbath. When the
display shows 3 c the oven is
baking/roasting.
Clear
Off
Bake
24
Warm jp If the oven is cooking, wait for a random
+
Delay
Start
Start
How to Set for Timed Baking/Roasting-lmmediate Start and Automatic Stop
Make sure the clock shows the correct time
of day and the oven is off.
~j\ Press and hold both the Bake and Warm
— pads, at the same time, until the display
shows SF.
Tap the Delay Start pad until SAb bAtH
appears in the display.
Touch the Start pad and 3 will appear
in the display.
Touch the Cooking Time pad.
Touch the number pads to set the desired
length of cooking time between 1 minute
and 9 hours and 99 minutes. The cooking
time that you entered will be displayed.
Touch the Sfort pad.
Touch the Bake pad. No signal will be
given.
Using the number pads, enter the desired
s
temperature. No signal or temperature will
be given.
Touch the Sfort pad.
9
After a random delay period of
Ш
approximately 30 seconds to 1 minute,
3 c will appear in the display, indicating
that the oven is baking/roasting. If з c
doesn't appear in the display, start again
at Step 7.
To adjust the oven temperature, touch the
боке pad, enter the new temperature using the
number pads and touch the
When cooking is finished, the display will
change from з c to з and 0:00 will appear,
indicating that the oven has turned OFF but is
still set in Sabbath. Remove the cooked food.
Sforf pad.
How to Exit the Sabbath Feature
jyj Touch the C/eor/Off^pad.
delay period of approximately 30 seconds
to 1 minute, until only 3 is in the display.
Press and hold both the Bake and Warm
pads, at the same time, until the display
shows SF.
Tap the Delay Start pad until 12 shdn
or no shdn appears in the display. 12
shdn indicates that the oven will
automatically turn off after 12 hours, no
shdn indicates that the oven will not
automatically turn off.
Touch the Sfort’ pad.
à
NOTE: If a power outage occurred while
the oven was in Sabbath, the oven will
automatically turn off and stay off even when
the power returns. The oven control must be
reset.
Page 25

Remove and replace full extension racks, (on some models) GEAppliances.com
ACAUTION
Make sure frame is fully inserted in the oven to lock it in place.
To avoid burns, place the racks in the correct position before turning on the oven.
Extension Rack
when placing and removing cookware, always
pull the rock out by its upper front roil to its
fully open position.
NOTE: Do not extend the rack quickly. Food
may slide off the front of the rack.
To remove the rock:
Make sure the rack is pushed all the way into
m
the oven so that the side paddles on the rack
frame disengages with the oven support.
Firmly grasp the rack handle and pull towards
you. The rack will stop when the curved end of
the rack hits the oven bump.
Tilt the front end up and pull it out.
NOTE; When handling the extension rack, do
not allow the sliding portion to fall open. This
can damage the slides.
To replace the rack:
m Firmly grasp both sides of the rack frame
and the sliding rack.
Place the curved end of the rack onto the
desired rack position, tilt up the front of the
rack and push it in as far as it will go.
I When the rack is properly installed and locked
into position, the locking side paddles on the
rack frame will click-lock into place on the oven
supports. If the side paddles did not click-lock
into position, repeat the steps above and make
sure the side paddles have been correctly
cleaned and lubricated. See
the Care and cleaning section.
Extension Rack in
25
Page 26
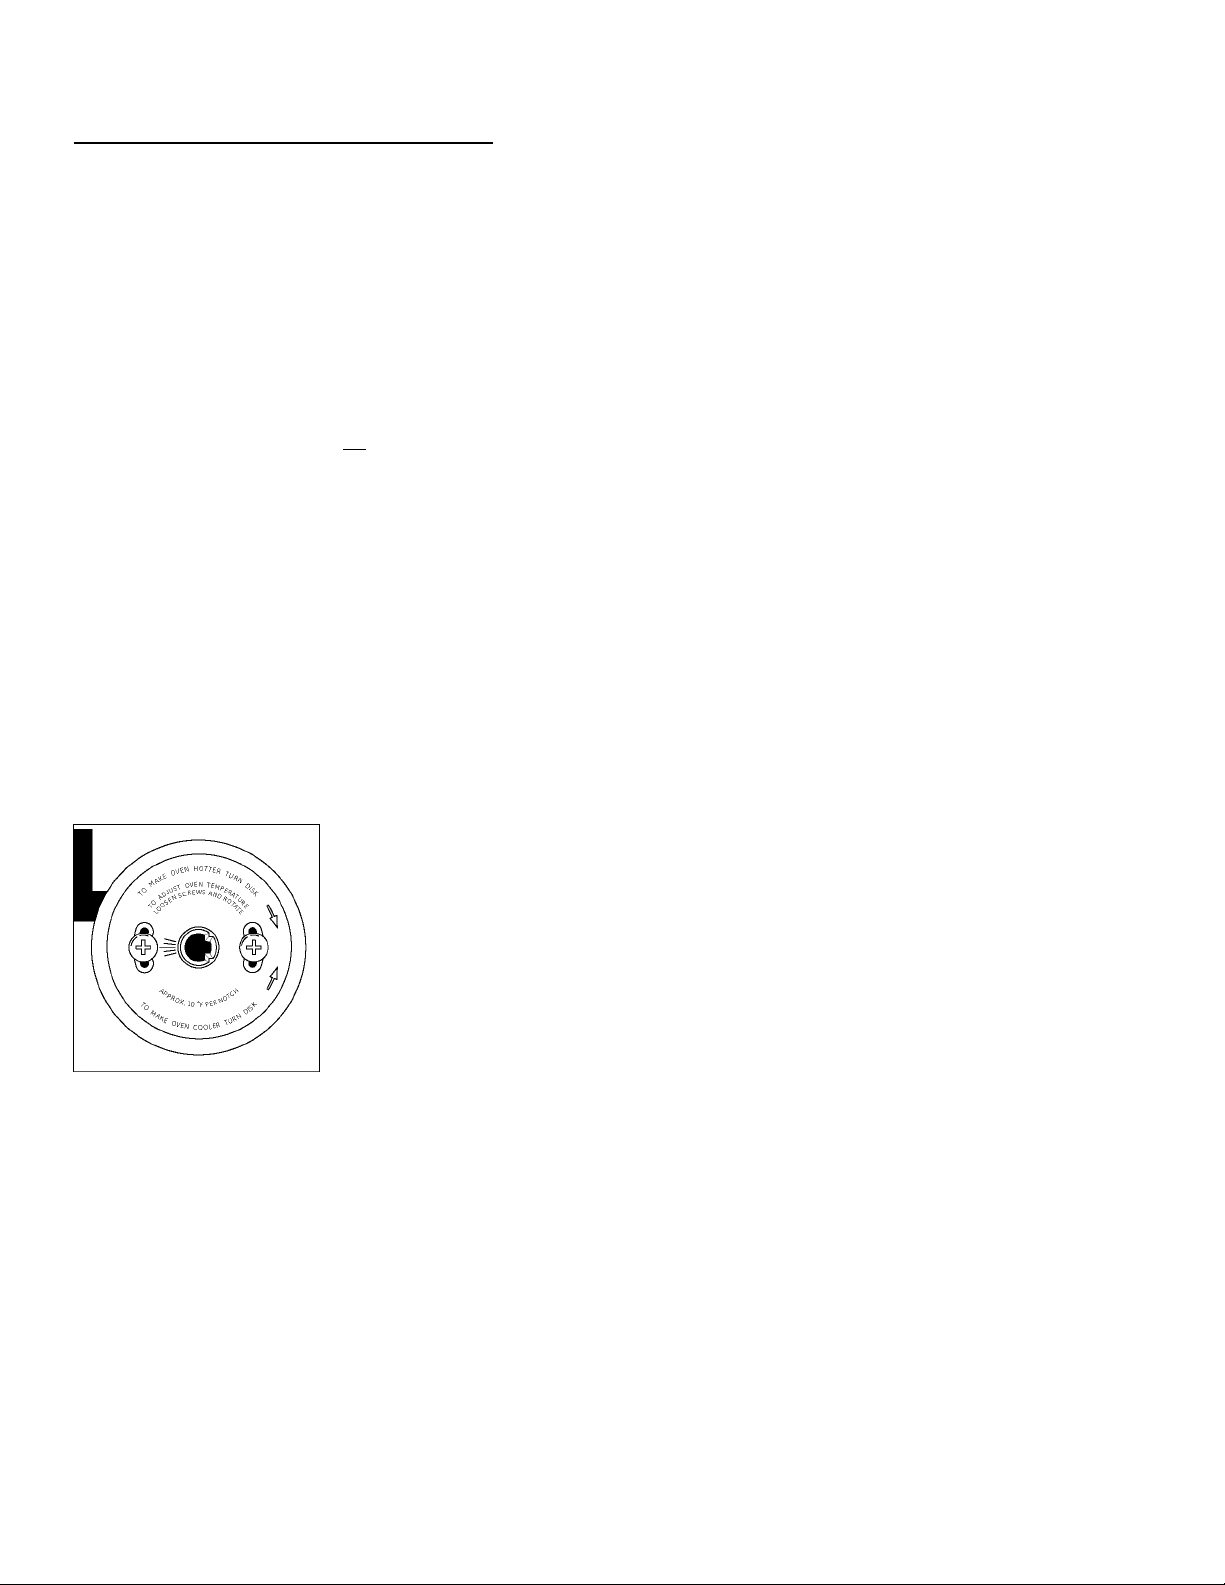
Adjust the lower and upper oven
thermostats—Do it yourself!
You may find that your new oven cooks differently than the one it replaced. Use your new oven for a few weeks to become
more familiar with it. If you still think your new oven is too hot or too cold, you can adjust the thermostat yourself.
Do not use thermometers, such as those found in grocery stores, to check the temperature setting of your oven.
These thermometers may vary 20-40 degrees.
NOTE: This adjustment will not affect the broiling or the self-cleaning temperatures. The adjustment will be retained in
memory after a power failure.
To Adjust the Lower Thermostat
Bake
Start
Warm
|~^ Touch the Bake and Warm pads at the
same time for 3 seconds until the display
shows SF.
^ Touch the Bake pad. A two-digit number
shows in the display.
Touch Bake once to decrease (-) the oven
temperature, or twice to increase (+).
The oven temperature can be adjusted up
as much as 35°F or down as much as
35°F. Touch the number pads the same
way you read them. For example, to
change the oven temperature 15°F, touch
1 and 5.
~/f\ When you have made the adjustment,
touch the Stoft pad to go back to the
time-of-day display. Use your oven as you
would normally.
NOTE- The thermostat adjustment for Baking
will also affect Convection Baking or Convection
Roasting.
Bake
0 0 0 0 0
0 0 0 0 0
To Adjust the Upper Thermostat
Pull the OVEN CONTROL knob off the
range and look at the back side. To make
an adjustment, loosen (approximately one
turn), but do not completely remove, the
two screws on the back of the knob.
With the back of the knob facing you, hold
the outer edge of the knob with one hand
and turn the front of the knob with the
other hand. To raise the oven temperature,
move the top screw toward the right. You'll
hear a click for each notch you move the
knob. To lower the temperature, move the
top screw toward the left.
Each click will change the oven
temperature approximately 10°F. (Range is
±30°F. from the arrow.) We suggest that
you make the adjustment one click from
the original setting and check oven
performance before makingany additional
adjustments.
~j] After the adjustment is made, retighten
screws so they are snug, but be careful
not to overtighten.
Re-install knob on range and check
performance.
The type of margarine will affect baking performance!
Most recipes for baking have been developed using high-fat products such as butter or margarine (80% fat). If you
decrease the fat, the recipe may not give the same results as with a higher-fat product.
Recipe failure can result if cakes, pies, pastries, cookies or candies are made with low-fat spreads. The lower the fat
content of a spread product, the more noticeable these differences become.
Federal standards require products labeled "margarine" to contain at least 80% fat by weight. Low-fat spreads, on the
other hand, contain less fat and more water. The high moisture content of these spreads affects the texture and flavor
of baked goods. For best results with your old favorite recipes, use margarine, butter or stick spreads containing at least
70% vegetable oil.
26
Page 27

Using the self-cleaning upper and lower ovens.
The oven door must be closed and all controls set correctly for the cycle to work properly.
Before a Clean Cycle
GEAppliances.com
Wipe up heavy soil on the oven
bottom.
DO NOT hand
DO hand clean
inside door Ararne
For the first self-clean cycle, we recommend
venting your kitchen with an open window
or using a ventilation fan or hood.
Remove any broiler pan, broiler grid, all
cookware, probe and any aluminum foil
from the oven—they cannot withstand the high
cleaning temperatures.
NOTE:
■ If your oven is equipped with nickel
oven racks, remove them before you begin
the self-clean cycle.
■ If your oven is equipped with gray porcelain-
coated oven racks, they may be left in the
oven during the self-clean cycle.
Soil on the front frame of the range and
outside the gasket on the front frame will
need to be cleaned by hand. Clean these
areas with hot water, soap-filled scouring
pads or cleansers such as Soft Scrub®? Rinse
well with clean water and dry. Wipe off
the flat inner door with soapy water and a
sponge.
Do not clean the gasket. The fiberglass
material of the front frame gasket cannot
withstand abrasion. It is essential for the gasket
to remain intact. If you notice it becoming worn
or frayed, replace it.
Wipe up any heavy spillovers on the oven
bottom.
Make sure the oven light bulb cover is in place
and the oven light is off.
IMPORTANT: The health of some birds
is extremely sensitive to the fumes given
off during the self-cleaning cycle of any range.
Move birds to another well-ventilated room.
NOTE: Use caution when opening the upper
and lower oven after the self-clean cycle has
ended. The oven may still be hot.
NOTES:
■ The surface burners must
be turened off prior to the
self-clean start time
■ Both ovens cannot be selfcleaned at the same time.
■ Cooktop burners and the oven
not in self-clean mode will not
start during self-clean cycle.
How to Set the Upper Oven for Cleaning
The oven door must be closed and all controls ^
set correctly for the cycle to work.
|~^ Rotate upper oven knob to self-clean
position.
Touch the Sfort’pad.
Doors will lock automatically. The display will
show the clean time remaining. If the upper
door is not locked and remaining clean time
is not displayed, within 1 minute of initiating
the cycle rotate the knob to the Offpositioin
and open both doors for 10 minutes. Repeat
step 1. It will not be possible to open the oven
door until the temperature drops below the
lock temperature and the LOCKED DOOR light
goes off.
The oven shuts off automatically when the
clean cycle is complete.
/f\ Rotate knob to the off position
■ The words LOCK DOOR will flash and the
■ To stop a clean cycle, touch the Clear/Off
■ After you complete the first oven clean cycle,
When the LOCKED DOOR light is off, the
door will unlock automatically.
oven control will signal if you set the clean
cycle and forget to close the oven door.
pad then turn the oven control knob to the
OFF position. After some period of time, the
LOCKED DOOR light will go off. This will
indicate that the oven has cooled below
the locking temperature and gas is able to
flow to the cooktop. The doors will unlock
automatically.
you can start the second oven clean cycle.
27
Page 28

Using the self-cleaning upper and lower ovens.
The oven door must be closed and all controls set correctly for the cycle to work properly.
Self
Clean
m [II [a s s
Ser WA»m6 Omwer
0 0 0 0 0
Start
NOTES:
■ The surface burners must
be turened off prior to the
self-clean start time
■ Both ovens cannot be selfcleaned at the same time.
■ Cooktop burners and the oven
not in self-clean mode will not
start during self-clean cycle.
Clean
I LO I I MED I I HI I I . I I - I
LU ^ LU 0 0
Set tViWime Omwí
0 0 0 0 0
Delay
Start
LO MED
1 I I 2 I I
Ser tVARMNS Dkawbi
CtwnwL Lockout
Self
Control LooovT
0 0
0 0 0 0 0
Start
How to Set the Lower Oven for Cleaning
[f\ Touch the Se//^C/eon pad.
Using the number pads, enter the desired
clean time, if a time other than 4 hours is
needed.
Clean cycle time is normally 4 hours. You can
change the clean time to any time between
3 hours and 5 hours, depending on how dirty
your oven is.
^ Touch the Stoft pad.
Doors will lock automatically. The display will
show the clean time remaining. If the upper
door is not locked and remaining clean time
is not displayed, within 1 minute of initiating
the cycle rotate the knob to the Offpositioin
and open both doors for 10 minutes. Repeat
step 1. It will not be possible to open the oven
door until the temperature drops below the
lock temperature and the LOCKED DOOR light
goes off.
The oven shuts off automatically when the
clean cycle is complete.
When the LOCKED DOOR light is off, the
door will unlock automatically.
31 Rotate knob to the off position
■ The words LOCK DOOR will flash and the
oven control will signal if you set the clean
cycle and forget to close the oven door.
■ To stop a clean cycle, touch the Clear/Off
pad then turn the oven control knob to the
OFF position. After some period of time, the
LOCKED DOOR
indicate that the oven has cooled below
the locking temperature and gas is able to
flow to the cooktop. The doors will unlock
automatically..
■ After you complete the first oven clean cycle
you can start the second oven clean cycle.
How to Delay the Start of Cleaning (lower oven only)
Make sure the clock shows the correct time
of day.
[f\ Touch the Se//^C/eon pad.
NOTE: The surface burners will be turned off
automatically when self-clean cycle starts.
Using the number pads, enter the desired
clean time.
Touch the Delay Start pad. The earliest
start time you can set will appear in the
display.
Using the number pads, enter the time of
day you want the clean cycle to start.
Touch the Stoft pad.
Doors will lock automatically. The display will
show the start time. It will not be possible to
open the oven door until the temperature drops
below the lock temperature and the LOCKED
DOOR light goes o1^.
The oven shuts off automatically when the
clean cycle is complete.
^ The doors will unlock automatically.
■ The words LOCK DOOR will flash and the
oven control will signal if you set the clean
cycle and forget to close the oven door.
■ To stop a clean cycle, touch the Clear/Off
pad. After some period of time, the LOCKED
DOOR light will go off. This will indicate
that the oven has cooled below the locking
temperature and gas is able to flow to the
cooktop. The doors will unlock automatically.
light will go off. This will
After a Clean Cycle
You may notice some white ash in the oven.
Wipe it up with a damp cloth after the oven
cools.
If white spots remain, remove them with a
soap-filled scouring pad and rinse thoroughly
with a vinegar and water mixture.
These deposits are usually a salt residue that
cannot be removed by the clean cycle.
28
If the oven is not clean after one clean cycle,
repeat the cycle.
■ You cannot set the oven for cooking until the
oven is cool enough for the door to unlock.
■ While the oven is self-cleaning, you can
touch the Clock pad to display the time of
day. To return to the clean countdown, touch
the Cooking Time pad.
■ If the racks become hard to slide, apply a
small amount of vegetable oil or cooking oil to
a paper towel and wipe the edges of the oven
racks with the paper towel.
Page 29

Be sure electrical power is off and all surfaces are cool before cleaning any part of the range.
GEAppliances.com
awarning
If your range Is removed for cleaning, servicing or any reason, be
sure the anti-tip device is reengaged properly when the range is replaced. Failure to take
this precaution could result in tipping of the range and cause injury.
To check if the bracket is installed and engaged properly, carefully tip the range forward. The
bracket should stop the range within 4 inches. If it does not, the bracket must be reinstalled.
If the range is pulled from the wall for any reason, always repeat this procedure to verify the
range is properly secured by the anti-tip bracket.
If your range has no anti-tip bracket, call 1.800.626.8774 to receive one at no cost.
Sealed Burner Assemblies (on some models)
Turn all controls OFF before removing the
burner parts.
The round side burner caps and burner
heads can be lifted off, making them easy to
clean. The electrodes ore not removable.
The oval center burner head and cop
assembly con be lifted off, making it easy
to clean. The burner electrode is not
removable.
The tri-ring burner inner cop con be lifted
off for cleaning, the outer cop and base
assembly con be lifted off the cooktop as one
piece for cleaning purposes.
ACAUTION
cooktop without all burner parts and grates
in place.
(on some models)
The electrode of the spark igniter is
exposed when the burner head is
removed. When one burner is turned
to LITE, all the burners spark. Do
not attempt to disassemble or clean
around any burner while another
burner is on. An electric shock may
result, which could cause you to knock
over hot cookware.
Do not operate the
Tri-ring base
■ Electrode
Chef's
griddle
Burner head
cap and
electrode
ACAUTION
tri-ring or bridge burner cap from head.
The tri-ring or bridge burner head and cap
assembly can be lifted off, making it easy to
clean. The electrode is not removeable.
Do not remove
29
Page 30
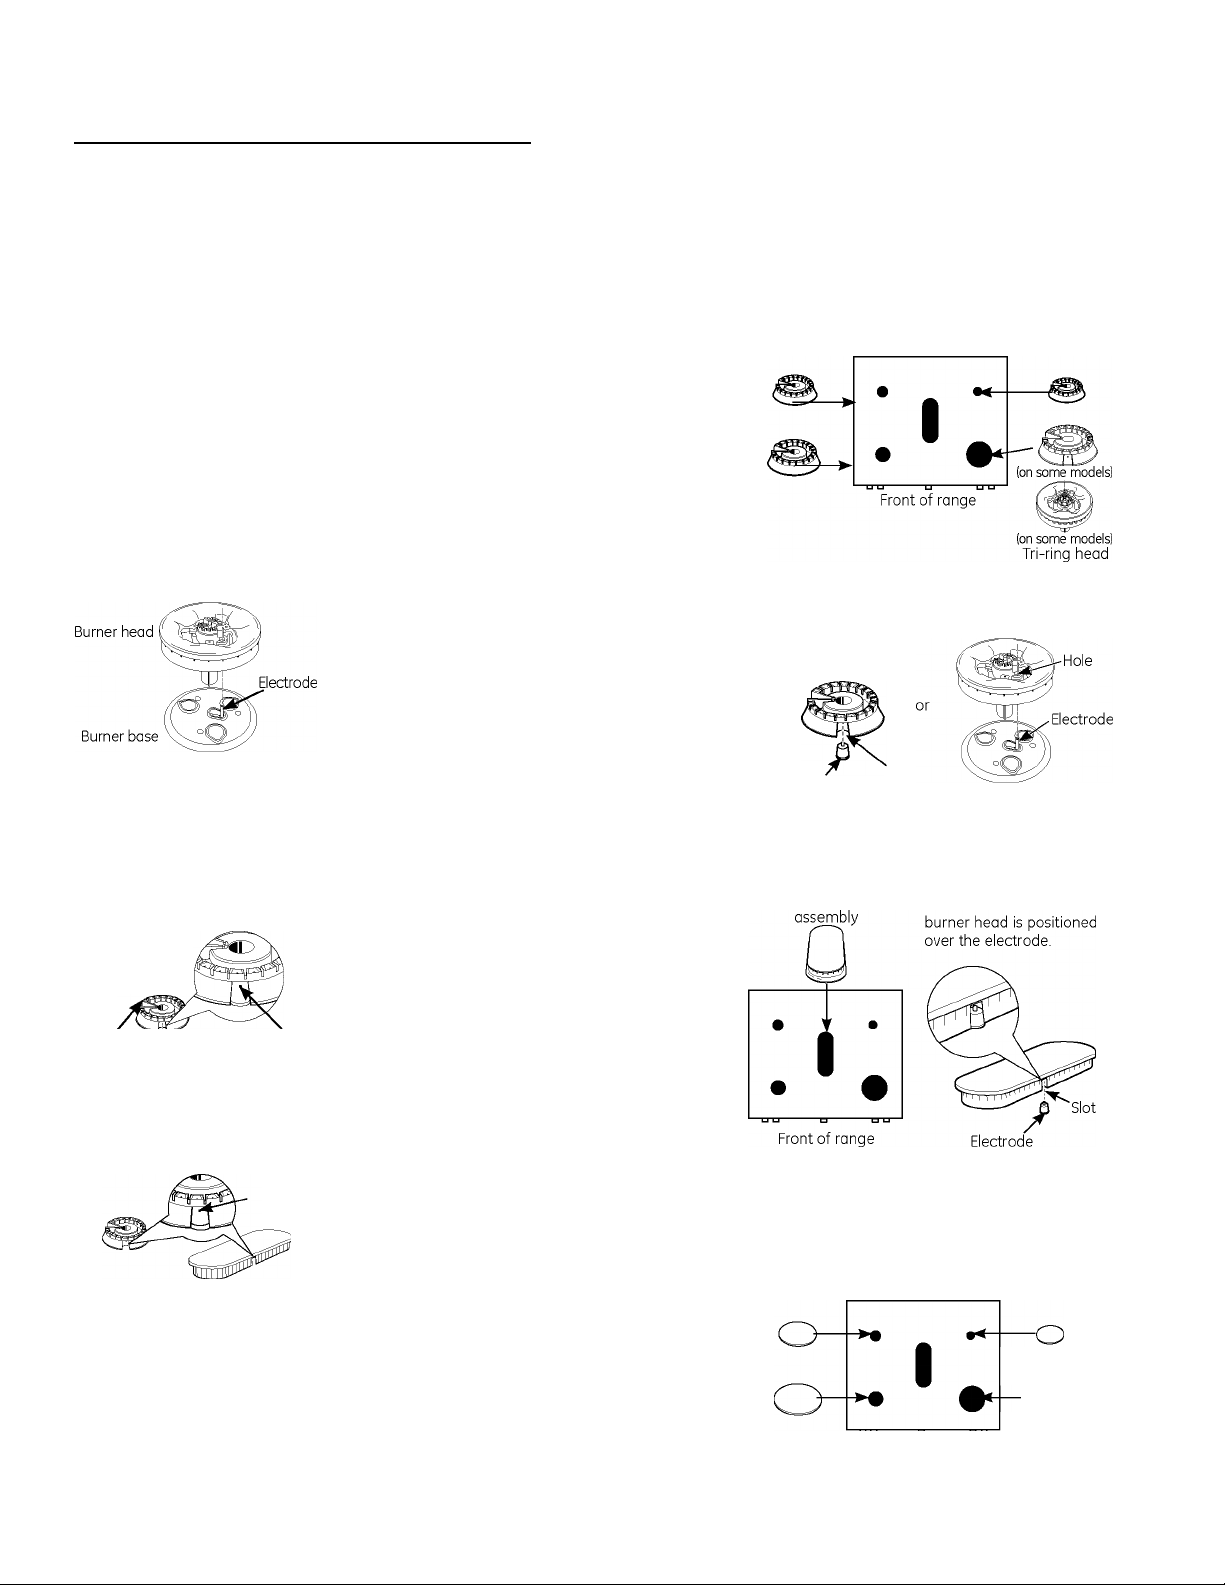
Care and cleaning of the range.
Burner Caps, Bases and Heads
Before removing the burner cops and heads (on
some models), remember their size and location.
Replace them in the same location after cleaning.
NOTE: Do not use steel wool or scouring
powders to clean the burner parts.
Burner caps
Lift off when cool. Wash burner caps in hot,
lit V V II V V
Burner cap is
properly seated.
Burner heads (on some models)
The burner heads (on some models)
are removable. Simply lift them off
the range for cleaning.
Tri-ring head (on some models)
Make sure the ring in the burner head
is positioned over the electrode and
that the burner head is fully inserted
inside the burner base. A small gap
between the base and head is normal.
Front-right head (on some models),
front-left head, back-right head and
Burner head
Stability chamber
Burner'
basi
Make sure the slot in the burner head
is positioned over the electrode.
The oval burner head/cap assembly is
removable. Simply lift it off the range for
cleaning. Use a sewing needle or twist-tie
to unclog the small hole in the burner
heads.
?
back-left head
é
Electrode burner head.
Burner cap is
NOT properly
seated.
Use a sewing
needle or twist-tie
to unclog the
small hole In the
Hole in
burner
head
soapy water and rinse with clean water. You
may scour with a plastic scouring pad to
remove burned-on food particles. To get rid of
burned on food, place the caps in a covered
container. Add 1/4 cup ammonia and let soak
for several hours or over night. Wash, rinse well
and dry.
Tri-ring burner (on some models)
The outer cap on the trI-rIng burner Is not
removable. Only the center round cap may be
removed for cleaning.
To clean the burner bases, use soapy water and a
plastic scouring pad. Wipe clean with a damp cloth.
Make sure that no water gets into the burner
bases. Allow them to dry fully before using.
Burner Heads (on some models) and Oval
(Center) Burner Head/Cap Assembly
The burner heads and the oval burner head/cap
assembly are removable. Simply lift them off the
range for cleaning.
For proper ignition, make sure the small hole in
the section that fits over the electrode is kept
open. A sewing needle or wire twist-tie works
well to unclog it.
The silts In the burner heads must be kept clean
at all times for an even, unhampered flame.
Clogged or dirty burner ports or electrodes will
not allow the burner to operate properly.
Any spill on or around an electrode must
be carefully cleaned. Take care to not hit an
electrode with anything hard or it could be
damaged.
Clean the burner heads routinely, especially
after bad spillovers, which could clog the
openings. Lift off when cool.
To remove burned-on food, soak the burner
heads in a solution of mild liquid detergent
and hot water for 20-30 minutes. For more
stubborn stains, use a toothbrush.
Replacement Burner Heads (on some models)
Replace burner heads over the electrodes on
the cooktop, in the correct locations according
to their size. There is one small, one medium,
one large and one extra-large burner head.
Make sure the slot or hole (depending on model) in
the burner head is positioned over the electrode.
Electrode
Oval (Center) Burner Head/Cap Assembly
Replace the oval (center) head/cap assembly over
the electrode on the cooktop.
Oval head and cap ^ake sure the slot In the
Caps
Replace the matching size caps onto the burner
bases or heads.
Make sure that the heads (on some models) and
caps are replaced in the correct locations.
Slot
After cleaning
Before putting the burner caps, heads (on some
models) and oval head/cap assembly back, shake
30
out excess water and then dry them thoroughly
by setting in a warm oven for 30 minutes.
Eront of range
l:;;)
(on some models)
TrI-rIng cap
O
(on some models)
Page 31

GEAppliances.com
Lodge® Reversible Cast-Iron Griddle
■ Rinse with hot water (do not use soap), and
dry thoroughly.
■ Before cooking, prepare the surface with
cooking spray or vegetable oil.
■ After cooking, clean the griddle with a stiff
brush and hot water. Using soap is not
recommended, and harsh detergents should
never be used.
■ Towel dry immediately and apply a light coat
of cooking spray or vegetable oil while the
griddle is still warm.
■ Store in a cool, dry place.
■ Do not wash in the dishwasher.
Nonstick Griddle (on some models)
NOTES:
■ The griddle is to be used over the center
burner only.
■ Do not clean the griddle in a self-cleaning
oven.
■ Do not clean the griddle in a dishwasher.
■ Wash with hot, soapy water after each use
while using a sponge or dishcloth.
■ If oil or food residue is left on the griddle,
further cooking will harden the residue and
cause sticking over time. Inthis case, use a
non-abrasive cleanser such as Bon Ami®
or one ofthe soft scrub cleansers. Apply
with a sponge, Scrunge® or other cleaning
pad labeled safe for non-stick pans
■ Use only plastic, nylon or wooden utensils
or SilverStone® kitchen tools to prevent
marring ofthe coating.
(on some models)
Griddle Precautions:
■ If something has spilled under the griddle, it
should be cleaned up as soon as possible to
prevent "baked on" food soil.
■ Do not allow grease to accumulate under the
griddle as it can be a fire hazard. Clean under
the griddle as soon as it is cool. Clean with hot
soapy water.
■ Do not place your griddle in the microwave.
■ Always turn off all surface burners before
removing the griddle. Use caution when
handling a hot griddle.
■ Never use knives or cutfood on the grid
dle. Wash with hot, soapy water after each
use. Store carefully to prevent scratching.
Griddle Precautions:
■ If something has spilled under the griddle,
it should be cleaned up as soon as possible
to prevent "baked on" food soil.
■ Do not allow grease to accumulate under
the griddle as it can be a fire hazard. Clean
under the griddle as soon as it is cool.
Clean with hot soapy water.
■ Do not place your griddle in the
microwave.
■ Always turn all surface burners before
removing the griddle. Use caution when
handling a hot griddle.
Appearance may vary.
The grates may be cleaned in a
dishwasher.
Left Front
Right Front
Burner Grates
Your range has 3 double grates or 4 single
grates. These grates are position-specific. For
maximum stability, these grates should only be
used in their proper position; they cannot be
interchanged left to right or front to back. For
convenience on double grates, the undersides
ofthe left and right grates are marked "LEFT
FRONT" and "RIGHT FRONT." Make sure the
front portion of both grates is in front. The
middle grate has a bow in front. Make sure the
bowed portion is toward the front ofthe range.
In addition, the middle grate is supported by the
left and right grates and must be installed LAST
for stability.
Cleaning
Lift out when cool. Grates should be washed
regularly and, of course, after spillovers. Wash
them in hot, soapy water and rinse with clean
water. When replacing the grates, be sure
they are positioned securely over the burners.
Replace the grates so that continuous arcs are
formed with the center ribs of all three grates.
Do not operate a burner for an extended period
of time without cookware on the grate. The
finish on the grate may chip without cookware
to absorb the heat.
To get rid of burned-on food, place the grates in
a covered container. Add 1/4 cup ammonia and
let them soak several hours or overnight. Wash,
rinse well and dry.
Although they are durable, the grates will
gradually lose their shine, regardless ofthe
best care you can give them. This is due to their
continual exposure to high temperatures. You
will notice this sooner with lighter color grates.
NOTE: Do not clean the grates in a self-cleaning
oven.
31
Page 32

Care and cleaning of the range.
Burner Grates for Model CGS990 Only
Your range has three professional-style double
grates. These grates are position-specific. For
maximum stability, these grates should only be
used in their proper position. For convenience,
the undersides of the side grates are marked
Appearance may vary.
The grates may be cleaned in a
dishwasher.
Outside
Grate
Outside
Grate
"OUTSIDE". Make sure the front portion of
both grates is in front. The center grate can be
interchanged front to back.
Cleaning Grates - Soap and Water
Lift grates out when cool. Grates should be
washed regularly and, of course, after spillovers.
Wash them in hot, soapy water and rinse with
clean water. When replacing the grates, be sure
they are positioned securely over the burners.
Replace the grates so that straight lines are
formed with the center ribs of all three grates.
Cleaning Grates—Dishwasher
The grates may be cleaned in the dishwasher.
Remove any burnt-on food particles that
you can prior to placing the grates in the
dishwasher. Place them on the lowest rack
of the dishwasher and run on a "heavy duty"
cycle.
Support Bumpers
If one or more of the circular silicone grate
support bumpers in the cooktop are missing or
damaged, replacement parts can be obtained
by calling 1.800.GE.CARES.
To insert the new bumpers, simply insert the cone
shaped end and push down while gently twisting or
rocking the bumper.
Do not operate a burner for an extended period
of time without cookware on the grate. The
finish on the grate may chip without cookware
to absorb the heat.
Although the grates are durable, they will
gradually lose their shine, regardless of the
best care you can give them. This is due to their
continual exposure to high temperatures and
abrasion by the cookware.
Cooktop Surface
To avoid damaging the porcelain-enamel
surface of the cooktop and to prevent it from
becoming dull, clean up spills right away. Foods
with a lot of acid (tomatoes, sauerkraut, fruit
juices, etc.) or foods with high sugar content
could cause a dull spot if allowed to set.
When the surface has cooled, wash and rinse.
For other spills such as fat spatterings, wash
with soap and water once the surface has
cooled. Then rinse and polish with a dry cloth.
NOTE: For stainless steel cooktops, refer to the
Stainless steel surfaces section.
32
Page 33

Oven Air Vents
Never block the vents (air openings) of the
range. They provide the air inlet and outlet that
are necessary for the range to operate properly
with correct combustion.
Air openings are located at the rear of the
cooktop, at the top and bottom of the oven
door, and at the bottom of the range.
Upper Control Panel
GEAppliances.com
Vent appearance and location vary.
Surface burner knob
--------------
-------------------------------------------------
Off
■U”!!!!' Red line
*i(]
Upper oven knob (on some models)
On models so equipped, lock out the touch pads
before cleaning.
See the Gas/Control Lockout information in
the Special features of your oven control section
in this manual.
You may also use a glass cleaner.
Remove heavier soil with warm soapy water.
Do not use abrasives of any kind.
Unlock the touch pads after cleaning.
Clean up splatters with a damp cloth.
Lower Control Panel (Front Manifold Panel) and Knobs
It's a good idea to wipe the control panel after
each use of the oven. Use a damp cloth to
clean or rinse. For cleaning, use mild soap and
water or a 50/50 solution of vinegar and water.
For rinsing, use clean water. Polish dry with a
soft cloth.
Do not use abrasive cleansers, strong liquid
cleaners, plastic scouring pads or oven cleaners
on the control panel—they will damage the
finish.
Do not try to bend knobs by pulling them up
or down or by hanging a towel or other such
loads. This can damage the gas valve shaft.
The control knobs may be removed for easier
cleaning.
Make sure the knobs are in the OFF positions
and pull them straight off the stems for
cleaning.
Replace the knobs in the OFF position to ensure
proper placement.
Metal parts can be cleaned with soap and
water. Do not use steel wool, abrasives,
ammonia, acids or commercial oven cleaners.
Dry with a soft cloth.
To determine the correct location of the knob
on the front control panel, examine the back
of the knob. Knobs with labels and two stem
holes are not interchangeable with other
types of knobs and should be returned to the
front panel first. Locate the proper position
by matching the label and the front panel
description or by matching the shape of the
knob holes to the shape of the control panel
stems. Knobs without labels and only one stem
hole can be returned to any position on the
front control panel that has only one stem.
The knobs can be cleaned in a dishwasher or
they may also be washed with soap and water.
Make sure the insides of the knobs are dry
before replacing.
33
Page 34

Care and cleaning of the range.
Oven Bottom
The oven bottom has a porcelain-enamel
finish. To make cleaning easier, protect the
oven bottom from excessive spillovers by
placing a cookie sheet on the rack below the
rack you are cooking on. This is particularly
important when baking a fruit pie or other
foods with a high acid content. Hot fruit
fillings or other foods that are highly acidic
Lift-Off Lower Oven Door (on some models)
The door is very heavy. Be careful when
removing and lifting the door.
Do not lift the door by the handle.
To remove the door:
|~7] Fully open the door.
r^ Pull the hinge locks down toward the door
'—' frame, to the unlocked position. A tool,
such as a small flat-blade screwdriver,
may be required.
Firmly grasp both sides of the door at the
top.
Close door to the door removal position,
which is halfway between the broil stop
position and fully closed.
Lift door up and out until the hinge arm
is clear of the slot.
To replace the door:
Firmly grasp both sides of the door at the
top.
(such as tomatoes, sauerkraut and sauces
with vinegar or lemonjuice) may cause pitting
and damage to the porcelain-enamel surface
and should be wiped up immediately.
To clean up spillovers, use soap and water, an
abrasive cleaner or soap-filled scouring pad.
Rinse well to remove any soap before self
cleaning.
With the door at the same angle
as the removal position, seat the
indentation of the hinge arm into the
bottom edge of the hinge slot. The notch
in the hinge arm must be fully seated into
the bottom of the slot.
Fully open the door. If the door will not
fully open, the indentation is not seated
correctly in the bottom edge of the slot.
Push the hinge locks up against the front
frame of the oven cavity to the locked
position.
Close the oven door.
Hinge —
lock
Hinge
arm
Push hinge locks up to lock.
-
34
Lift-Off Upper Oven Door (on some models)
To remove the door:
[f\ Fully open the door.
Lift up on the hinge lock toward the oven
frame until they stop.
close the door to 45 degrees (you will feel
the door stop). The hinge lock will contact
the oven frame.
On both sides of the door, press down on
the release buttons on each hinge.
Lift door up until it is clear of the hinge.
Pull on hinge arms slightly to relieve
pressure on the locking tabs.
Push the hinge locks down onto
/
the hinge.
Push the hinges in toward the unit
8
so they are closed.
To replace the door.
Pull the hinges down away from the oven
0
frame to the fully open position.
Lift up on the hinge locks toward the oven
z
frame until they stop.
The hinges will release to the 45-degree
T
position. The hinge locks will contact the
oven frame.
Slide the door back onto the hinges. Make
sure the buttons pop back out.
Fully open the door.
Push the hinge locks down onto the hinge.
Close the oven door.
Push in
Page 35

Oven Racks
GEAppliances.com
All oven racks may be cleaned by hand with an
abrasive cleaner or steel wool. After cleaning,
rinse the racks with clean water and dry with a
clean cloth. Gray porcelain-coated oven racks
may remain in the oven during the self-cleaning
cycle without being damaged. The nickel-plated
oven racks may remain in the oven during the
self-cleaning cycle, but they will lose their luster
Extension Rack
Extension racks may be cleaned by hand with
an abrasive cleaner or steel wool. During
cleaning, be careful not to allow water or
cleaner to enter the extension slides on the
sides of the rack.
NOTE: Do not clean in a dishwasher.
The rack may also remain in the oven during
the self-cleaning cycle without being damaged.
(Not applicable for nickel extension racks.)
To lubricate the slides:
NOTE: Do not spray extension rack with cooking
spray or other lubricant sprays.
Remove the rack from the oven. See
m
Extension Rack in the Using the oven
section.
Fully extend the rack on a table or
countertop. Newspaper may be placed
underneath the rack for easy cleanup.
If there is debris in the slide tracks, wipe it
away using a paper towel.
NOTE: Any graphite lubricant wiped away
must be replaced - see steps 4 through 7.
and become hard to slide. It will be necessary
to grease all oven rack side edges with a light
coating of vegetable oil after cleaning them by
hand or in the oven. This will help maintain the
ease of sliding the racks in and out of the oven.
If the rack becomes hard to remove or
replace, wipe the oven rack supports with
cooking oil. Do not wipe cooking oil on the
slides.
If the rack becomes difficult to slide or if the
paddle is difficult to actuate, the rack may need
to be lubricated using the Graphite Lubrication
shipped with your oven. To order additional
Graphite Lubrication, call our National Parts
Center at
WB02T10303.
s
To lubricate the paddle:
Shake lubricant and
apply to the moving
ports of the paddle
mechanisms as shown.
800.626.2002 and reference
Open and close the rack several times to
distribute the lubricant.
Replace the cap on the lubricant and
shake it again. Turn the rack over and
repeat steps 3,4,5 and 6.
Close the rack, turn rack right-side-up and
place in the oven. See Extension Rack in
the Using the oven section.
Rack right-side-up
Shake the graphite lubricant before
opening it. Starting with the left slide
mechanism of the rack, place four (4)
small drops of lubricant on the two (2)
bottom tracks of the slide close to the
bearing carriers.
Repeat for the right slide mechanism of
the rack.
35
Page 36

Care and cleaning of the range.
Cleaning the Door
To clean the inside of the door:
■ Do not allow excess water to run into any
holes or slots in the door.
■ Wipe dish washing detergent over any baked
-on spatters on the glass. Use a single sided
The gasket is designed with a gap
at the bottom to allow for proper
air circulation.
Do not rub or clean the door
gasket—it has an extremely low
resistance to abrasion.
If you notice the gasket becoming
worn, frayed or damaged in any
way or if it has become displaced
on the door, you should have it
replaced.
safety razor blade to clean it off. Then wipe
over the glass with a soapy cloth to remove
any residue and dry off.
■ The area outside the gasket can be cleaned
with a soap-filled plastic scouring pad.
Stainless Steel Surfaces (on some models)
To clean the outside of the door.
■ Use soap and water to thoroughly clean the
top, sides and front of the oven door. Rinse
well. You may also use a glass cleaner to
clean the glass on the outside
of the door.
■ Spillage of marinades, fruitjuices, tomato
sauces and basting materials containing
acids may cause discoloration and should be
wiped up immediately. When the surface is
cool, clean and rinse.
■ Do not use oven cleaners, cleansing powders
or harsh abrasives on the
outside of the door.
Do not use a steel wool pad; it will scratch the
surface.
This will help you to maintain the brightness
and appearance of your stainless steel range.
■ In order to avoid any discolorations and/or
grease stains, we recommend cleaning and
removing any spills, spots and grease from
the range after use.
■ It is important to use a soft cloth or paper
towel every time the range is cleaned to
avoid any scratches.
Read carefully the instructions on the back of
the Brightener for better results.
Cleaning Instructions:
1. Remove grates.
2. Wash using warm, soapy water:
Wet soft cloth or paper towel (avoid using
excessive water).
Wipe the surface in the direction of the grain
(following the steel lines).
Rinse and wring out a soft cloth or paper
towel and dry the range.
3. Apply a degreaser that does not contain
sodium hydroxide or stainless steel cleaner
(follow instructions).
4. Repeat steps 2-4 as many times as needed.
5. Put grates back in place.
Follow these instructions for any stainless steel
surface on your range.
DO NOT USE for cooktop or stainless steel
parts cleaning:
• Caustic lye (sodium hydroxide) or cleaners
containing this chemical
• Hard or steel wool pads
• Abrasive materials or chemicals
To inquire about purchasing stainless steel
appliance cleaner or polish, or to find the
location of a dealer nearest you, please call our
toll-free number:
National Parts Center 800.626.2002 (U.S.)
800.661.1616 (Canada)
GEApplianceParts.com (U.S.)
www.GEAppliances.ca (Canada)
36
Page 37

GEAppliances.com
AWARNING
Shock or Burn Hazard: Before replacing oven light bulb, disconnect the electrical power to the
range at the main fuse or circuit breaker panel. Failure to do so may result in electric shock or burn.
Oven Light Replacement (on some models)
To replace the cover.Be sure to let the light cover and bulb cool
completely.
To remove the cover.
Twist lens counterclockwise about a
m
quarter turn to remove.
Do not remove any screws to remove the cover.
^ Replace bulb with a 40-watt appliance
bulb or two-prong halogen bulb, as
appropriate.
|~^ Line up tabs of lens in front of tabs on
housing and rotate clockwise to engage.
37
Page 38

Installation
Range
Instructions
If you have questions, call 1.800.GE.CARES or visit our website at GEAppHances.com
In the Commonwealth of Massachusetts
• This product must be installed by a licensed plumber or
gas fitter.
• When using ball type gas shut-off valves, they shall be
the T-handle type.
• A flexible gas connector, when used, must not exceed 3 feet.
BEFORE YOU BEGIN
Read these instructions completely and carefully.
Installation of this range must conform with local
codes or, in the absence of local codes, with the
National Fuel Gas Code, ANSI Z223.1/NFPA.5A, latest
edition. In Canada, installation must conform with
the current Natural Gas Installation Code, CAN/
CGA-B1A9.1 or the current Propane Installation
Code, CAN/CGA-B1A9.2, and with local codes where
applicable. This range has been design-certified by
CSA International according to ANSI Z21.1, latest
edition, and Canadian Gas Association according to
CAN/CGA-1.1 latest edition.
As with any appliance using gas and generating heat,
there are certain safety precautions you should follow.
You will find these precautions in the Important Safety
Information section in the front of this manual. Read
them carefully.
FOR YOUR SAFETY
Do not store or use combustible materials, gasoline or
other flammable vapors and liquids in the vicinity of
this or any other appliance.
If you smell gas:
O Open windows.
Q Don't touch electrical switches.
Q Extinguish any open flame.
Q Immediately coll your gas supplier.
IMPORTANT ~ Save these instructions for
local electrical inspector's use.
IMPORTANT ~ observe all governing
codes and ordinances.
Not© to Installer - Leave these instructions with
the appliance after installation is completed.
Note to Consumer - Keep this Owner's Manual
and Installation Instructions for future reference.
Note - This appliance must be properly grounded.
Servicer - The electrical diagram is in on envelope
attached to the bock of the range.
Proper installation is the responsibility of the installer.
Product failure due to improper installation is not
covered under the Warranty.
Mobile Home - Additional Installation Requirements
The installation of this range must conform to the
Manufactured Home Construction and Safety Standard,
Title 24 CFR, Port 3280 (formerly the Federal Standard
for Mobile Home Construction, use the Standard for
Manufactured Home Installations, ANSI A225,1/NFPA
501A or with local codes.
Mobile home installations require:
• When this range is installed in a mobile home, it must
be secured to the floor during transit. Any method of
securing the range is adequate os long os it conforms
to the standards listed above.
MATERIALS YOU MAY NEED
• Gas line shut-off valve
• Pipe-joint sealant or UL-opproved pipe thread tope with
Teflon* that resists action of natural and LP gases
• Flexible metal appliance connector (1/2" I.D.) A 5-foot
length is recommended for ease of installation but other
lengths ore acceptable. Never use on old connector when
installing a new range.
• Flore union adopter for connection to gas supply line (3/4"
or l/2"NPTxl/2" I.D.)
• Flore union adopter for connection to pressure regulator on
range (1/2" NPTx 1/2" I.D.)
• Liquid leak detector or soapy water.
• Log bolt or 1/2" O.D. sleeve anchor (for concrete floors only).
*Teflon: Registered trademark of DuPont
38
Page 39

Installation Instructions
Awarning
INSTALLATION SAFETY
INSTRUCTIONS
Read these instructions completely and carefully.
Improper installation, adjustment, alteration, service
or maintenance can cause injury or property damage.
Refer to this manual. For assistance or additional
information, consult a qualified installer, service
agency, manufacturer (dealer) or the gas supplier.
Never reuse old flexible connectors. The use of old
flexible connectors con cause gas leaks and personal
injury. Always use NEW flexible connectors when
installing a gas appliance.
Leak testing of the appliance shall be conducted
according to the manufacturer instructions.
IMPORTANT ~ Remove all packing material
and literature from oven before connecting gas and
electrical supply to range.
A CAUTION
____________________
the oven of this range during a power failure (Electric
Ignition models only).
■ Have your range installed by a qualified installer.
■ Your range must be electrically grounded in
accordance with local codes or, in the absence of
local codes, in accordance with the National Electrical
Code (ANSI/NFPA 70, latest edition). In Canada,
electrical grounding must be in accordance with the
current CSA C22.1 Canadian Electrical Code Part 1
and/or local codes. See
section.
■ Before installing your range on linoleum or any other
synthetic floor covering, make sure the floor covering
can withstand 180°F without shrinking, warping or
discoloring. Do not install the range over carpeting
unless a sheet of 1/4" thick plywood or similar
insulator is placed between the range and carpeting.
■ Make sure the wall coverings around the range can
withstand heat generated by the range up to 200°F.
Do not attempt to operate
Electrical Connections in this
■ Avoid placing cabinets above the range. To reduce
the hazard caused by reaching over the open flames
of operating burners, install a ventilation hood over
the range that projects forward at least 5" beyond
the front of the cabinets.
■ The ventilating hood must be constructed
of sheet metal not less than 0.0122" thick.
Install above the cooktop with a clearance of not
less than 1/4" between the hood and the underside
of the combustible material or metal cabinet. The
hood must be at least as wide as the appliance and
centered over the appliance. Clearance between the
cooking surface and the ventilation hood surface
MUST NEVER BE LESS THAN 24".
EXCEPTION: Installation of a listed microwave oven or
cooking appliance over the cooktop shall conform to
the installation instructions packed with that appliance.
■ If cabinets are placed above the range,
allow a minimum clearance of 30" between the
cooking surface and the bottom of unprotected
cabinets.
■ If a 30" clearance between cooking surface and
overhead combustible material or metal cabinets
cannot be maintained, protect the underside of the
cabinets above the cooktop with not less than 1/4"
insulating millboard covered with sheet metal not less
than 0.0122" thick. Clearance between the cooking
surface and protected cabinets MUST NEVER BE LESS
THAN 24".
■ The vertical distance from the plane of the cooking
surface to the bottom of adjacent overhead cabinets
extending closer than l"to the plane of the range
sides must not be less than 18". (See the Dimensions
and Clearances illustration in this section.)
■ Do not install this product with an air curtain hood
or other range hood that operates by blowing air
down on the cooktop. This airflow may interfere
with operation of the gas burners resulting in fire or
explosion hazard.
ACAUTION ” Only the GE Café branded series
of Advantium® or microwave over-the-range ovens are
designed to be installed above the GE Café range. Surfaces
above a gas range can become hot. Installation of any other
over-the-range oven above a GE Café range may result in
surface temperatures that can cause burns.
39
Page 40

Installation Instructions
DIMENSIONS AND CLEARANCE
Provide adequate clearances between the range and adjacent combustible surfaces. These dimensions must be met for
safe use of your range. The location of the electrical outlet and pipe opening (see Gas Pipe and Electric Outlet Locations)
may be adjusted to meet specific requirements.
The range may be placed with 0" clearance (flush) at the back wall. (Some models will not fit flush.)
For island installation, Model CGS990, maintain 2-1/2 in. minimum from cutout to back edge of countertop and 3 in.
minimum from cutout to side edges of countertop.
*Models PGB900,
PGB910, PGB915,
PGB930 and PGB935
require only 3"
minimum clearance
to left wall. „ „„
18"
Minimum to
cabinets on
either side
of the range
i
‘ 30"
Maximum
depth for
cabinets above
countertops
30"
<-0"
To cabinets below cooktop
and at the range back
(Some models will not have
0" clearance.)
**Dimension are referenced from the point at
the back of the range that will contact the rear wall first.
Max dimension should be considered between the upper
and lower doors.
' Heightto backguard based on Café style backguard kit installed.
40
Page 41

Installation Instructions
LOCATION
Do not locate the range where it may be subject to strong drafts. Any openings in the floor or wall behind the range
should be sealed. Make sure the openings around the base of the range that supply fresh air for combustion and
ventilation are not obstructed by carpeting or woodwork.
Your range, like many other household items, is heavy and can settle into soft floor coverings such as cushioned vinyl
or carpeting. Use care when moving the range on this type of flooring. It is recommended that the following simple and
inexpensive instructions be followed to protect your floor.
The range should be installed on a sheet of plywood (or similar material). When the floor covering ends at the front of
the range, the area that the range will rest on should be built up with plywood to the same level or higher than the floor
covering.
This will allow the range to be moved for cleaning or servicing. Also, make sure your floor covering will withstand 180°F.
(See the Installation Safety Instructions section.)
Make sure the cabinets and wall coverings around your range can withstand the heat generated (up to 200°F) by the
range. (See the Installation Safety Instructions section.)
IMPORTANT!
Remove all tape and packaging. Make sure the burners are properly seated and level.
Take the accessory pack out of the oven and/or drawer.
Check to be sure that no range parts have come loose during shipping.
CONVERTING TO LP GAS (or converting bock to natural gas from LP)
This range leaves the factory set for use with natural gas. If you want to convert to LP gas, the conversion must be
performed by a qualified LP gas installer.
The conversion instructions can be found on back of the range.
Keep these instructions and the orifices in case you want to convert back to natural gas.
The conversion instructions identify where to find the kits on the model. The location is defined in the picture below.
41
Page 42

Installation Instructions
^ PROVIDE ADEQUATE GAS SUPPLY
Your range is designed to operate at a pressure of 5"
of water column on natural gas or, if designed for LP gas
(propone or butane), 10" of water column.
Make sure you are supplying your range with the type
of gas for which it is designed.
This range is convertible for use on natural or
propane gas. If you decide to use this range on LP gas,
conversion must be made by a qualified LP installer
before attempting to operate the range on that gas.
For proper operation, the pressure of natural gas supplied
to the regulator must be between 5" and 13" of water
column.
For LP gas, the pressure supplied must be between 10"
and 13" of water column.
When checking for proper operation of the regulator,
the inlet pressure must be at least 1" greater than the
operating (manifold) pressure as given above.
The pressure regulator located at the inlet of the range
manifold must remain in the supply line regardless of
whether natural or LP gas is being used.
A flexible metal appliance connector used to connect the
range to the gas supply line should hove on I.D. of 1/2"
and be 5 feet in length for ease of installation. In Canada,
flexible connectors must be single wall metal connectors
no longer than 6 feet in length.
^ CONNECT THE RANGE TO GAS
shut off the main gas supply valve before disconnecting
the old range and leave it off until the new hook-up
has been completed. Don't forget to relight the pilot on
other gas appliances when you turn the gas back on.
Because hard piping restricts movement of the range,
the use of a CSA International-certified flexible metal
appliance connector is recommended unless local codes
require a hard-piped connection.
Never use on old connector when installing a new range.
If the hard piping method is used, you must carefully align
the pipe; the range cannot be moved after the connection
is made.
To prevent gas leaks, put pipejoint compound on, or wrap
pipe thread tape with Teflon* around, all male (external)
pipe threads.
A. Install a manual gas line shut-off valve in the gas line in
on easily accessed location outside of the range. Moke
sure everyone operating the range knows where and
how to shut off the gas supply to the range.
B. Install mole 1/2" flare union adopter to the 1/2" NPT
internal thread at inlet of regulator. Use a backup
wrench on the regulator fitting to ovoid damage.
When installing the range from the front, remove
the 90° elbow for easier installation.
C. Install mole 1/2" or 3/4"flare union adopter to the
NPT internal thread of the manual shut-off valve,
taking core to back-up the shut-off valve to keep it
from turning.
D. Connect flexible metal appliance connector to the
adopter on the range. Position range to permit
connection at the shut-off valve.
E. When all connections hove been mode, moke sure
all range controls ore in the off position and turn on the
main gas supply valve. Use a liquid leak detector at all
joints and connections to check for leaks in the system.
Awarning
Fire hazard: Do not use
a flame to check for gas leaks.
when using test pressures greater than 1/2 psig to
pressure test the gas supply system of the residence,
disconnect the range and individual shut-off valve from
the gas supply piping. When using test pressures of 1/2
psig or less to test the gas supply system, simply isolate
the range from the gas supply system by closing the
individual shut-off valve.
*Teflon: Registered trademark of DuPont
42
Page 43

Installation Instructions
43
Page 44

Installation Instructions
44
Page 45

Installation Instructions
^ELECTRICAL CONNECTIONS
Electrical Requirements
120-volt, 60 Hertz, properly grounded dedicated circuit
protected by a 15-amp or 20-amp circuit breaker or
time-delay fuse.
Note: Use of automatic, wireless, or wired external
switches that shut off power to the appliance are not
recommended for this product.
Grounding
Awarning
This appliance must be properly grounded. Failure to
do so can result in electric shock.
The power cord of this appliance is equipped with a
3-prong (grounding) plug which mates with a standard
3-prong grounding wall receptacle to minimize the
possibility of electric shock hazard from this appliance.
The customer should have the wall receptacle and circuit
checked by a qualified electrician to make sure the
receptacle is properly grounded.
Where a standard 2-prong wall receptacle is
encountered, it is the personal responsibility and
obligation of the customer to have it replaced with a
properly grounded 3-prong wall receptacle.
DO NOT, UNDER ANY CIRCUMSTANCES, CUT OR REMOVE
THE THIRD (GROUND) PRONG FROM THE POWER CORD.
DO NOT USE AN ADAPTER. DO NOT USE AN EXTENSION
CORD.
A word about GFCIs - GFCIs are not required or
recommended for gas range receptacles.
Shock Hazard:
Ground Fault Circuit Interrupters (GFCIs) are devices that
sense leakage of current in a circuit and automatically
switch off power when a threshold leakage level is
detected. These devices must be manually reset by the
consumer. The National Electrical Code requires the
use of GFCIs in kitchen receptacles installed to serve
countertop surfaces. Performance of the range will not
be affected if operated on a GFCI-protected circuit but
occasional nuisance tripping of the GFCI breaker is
possible.
45
Page 46

Installation Instructions
^ SEAL THE OPENINGS
Seal any openings in the wall behind the range and in the
floor under the range when hookups ore completed.
S ASSEMBLE SURFACE BURNERS
m Burner Heads (on some models)
Place burner heads over the electrodes on the cooktop, in
the correct
locations
according to
their size. There
is one small,
one medium,
one large and
one extra-large
burner head..
Make sure the slot in the
burner head is positioned
over the electrode.
(on some models)
(on some models)
Triple flame head
Hole
[U ASSEMBLE SURFACE BURNERS (CONT.)
(on some models)
Front of range
Oval (Center) Burner Head/Cap Assembly
Place the oval (center) head/cap assembly over the
electrode on the cooktop.
H Caps
Place the matching size caps onto the burner bases
or heads.
Make sure that the heads (on some models) and caps
are replaced in the correct locations.
Grates
Single Grates
Locator Bumps
Tri-ring cap
O
(on some models)
Electrode
Electrode
Oval (Center) Burner Head/Cap Assembly
Place the oval (center) head/cap assembly over the
electrode on the cooktop.
Oval head and cap
assembly
Front of range
Make sure the slot in the
burner head is positioned
over the electrode.
Electrode
Single grates only fit one way. Locator bumps need to
face each other.
Double Grates
7 f\
Left-Front Center Right-Front
Place the left, right and center grates on the cooktop.
These grates are position specific. The undersides of
the left and right grates are marked "LEFT FRONT"
and "RIGHT FRONT." On some models the underside
is labeled "OUTSIDE." Place the middle grate with its
bowed front (on some models) toward the front of the
range.
Acaution
without all burner parts in place.
Do not operate the burner
46
Page 47

Installation Instructions
CHECK IGNITION OF SURFACE BURNERS
Operation of all cooktop and oven burners should be
checked after the range and gas supply lines have been
carefully checked for leaks.
Electric Ignition Models
Select a top burner knob and simultaneously push in
and turn to LITE position. You will hear a clicking sound
indicating proper operation of the spark module. Once the
air has been purged from the supply lines, burners should
light within 4 seconds. After burner lights, rotate knob out
of the LITE position. Try each burner in succession until all
burners have been checked.
Quality of Flames
The combustion quality of burner flames needs to be
determined visually.
(A) Yellow flames—
Call for service
[mmn]
(B) Yellow tips
on outer cones—
Normal for LP gas
ADJUST BROIL AND OVEN BURNER
AIR ADJUSTMENT SHUTTERS !£_
NECESSARY
Air adjustment shutters for the top and bottom burners
regulate the flow of air to the flames.
The air adjustment shutter for the top (broil) burner is in
the center of the rear wall of the oven.
-Air adjustment
shutter
(C) Sof^ blue
flames—Normal
for natural gas
If burner flames look like (A), call for service. Normal
burner flames should look like (B) or (C), depending on
the type of gas you use.
With LP gas, some yellow tipping on outer cones is
normal.
n CHECK IGNITION OF OVEN BURNER
The oven is designed to operate quietly and automatically.
To operate the lower oven, press the Bake pod and then press
the number pods until 350° appears in the display. Touch the
Start pod. After 30-90 seconds, the oven burner will ignite and
burn until the set temperature is reached. The oven burner will
continue to cycle on and off as necessary to maintain the oven
at the temperature indicated by the display.
To operate the upper oven, turn the Upper Oven Control Knob
to 350°.
To check ignition of the broil burner, touch the Broil Hi/Lo pad
and then the Start pad. After 30-90 seconds, the broil burner
will ignite.
Electric ignition models require electrical power to operate.
In case of a power outage, the oven burners on these models
cannot be lit manually with a match. Gas will not flow unless
the glow bar Is hot.
If the oven Is In use when a power outage occurs, the burner
will shut off and cannot be relit until power Is restored.
The shutter for the bottom (oven) burner is near the bock
wall. See the Core and cleaning of the range section.
To adjust the flow of air to either burner, loosen the
Phillips head screw and rotate the shutter toward open or
closed position os needed.
The flames for the top (broil) burner should be steady with
approximately 1" blue cones and should not extend out
over the edges of the burner baffle.
To determine if the bottom burner flames ore burning
properly, remove the oven bottom and enclosure over
burner shutter for lower oven. Flames should hove
approximately 1" blue cones and, if range is supplied
with natural gas, should burn with no yellow tipping.
(With most LP gas, small yellow tips at the end of outer
cones ore normal.) Flames should not lift off burner ports.
If lifting is observed, gradually reduce air shutter opening
until flames ore stabilized.
47
Page 48

Installation Instructions
ADJUST BROIL AND OVEN BURNER
AIR ADJUSTMENT SHUTTERS !£_
NECESSARY (CONT.)
Oven bottom -
To remove the oven bottom:
A. Remove the screws holding down the rear of the oven
bottom.
B. Grasp the oven bottom at finger slots on each side.
C. Lift the rear of the oven bottom enough to clear the
lip of the range frame, push it back, and then pull it up
and out.
^ LEVELING THE RANGE
A. Install the oven racks in the oven and check for
levelness before positioning the range where it will
be installed with front access to front leveling legs
and rear access to rear leveling legs. All legs must be
leveled before the product is installed.
INSTALLING THE ANTI-TIP DEVICE
awarning
anti-tip device
> All ranges can tip.
> BURNS or other SERIOUS INJURIES
can result.
> INSTALL and CHECK the
anti-tip bracket following the
instructions supplied with the bracket.
To reduce the risk of tipping the range, the range must
be secured by a properly installed anti-tip bracket. Follow
the instructions packaged with the bracket.
To check if the bracket is installed and engaged
properly, look underneath the range to see that the
rear leveling leg is engaged in the bracket. On some
models, the storage drawer or kick panel can be
removed for easy inspection. If visual inspection is not
possible, slide the range forward, confirm the anti-tip
bracket is securely attached to the floor or wall, and
slide the range back so the rear leveling leg is under
the anti-tip bracket.
If the range is pulled from the wall for any reason, always
repeat this procedure to verify the range is properly
secured by the anti-tip bracket.
B. Check for levelness by placing a spirit level or a cup,
partially filled with water, on one of the oven racks.
If using a spirit level, take two readings—with the level
placed diagonally first in one direction and then the
other.
C. The front leveling legs can be adjusted from the bottom
through the front of the unit. The rear legs can be
adjusted from the bottom through the side of the unit.
D. Use an open-end or adjustable wrench to adjust the
leveling legs until the range is level.
Awarning
the leveling leg as the range will not be secured to the
anti-tip device properly.
E. After leveling the unit, slide it into final position and
verify levelness.
F. After the range is level, slide the range away from the
wall so that the Anti-Tip device can be installed.
Never completely remove
If your range has no anti-tip bracket, call 1.800.626.8774
to receive one at no cost.
WHEN ALL HOOKUPS ARE COMPLETED
Make sure all controls are left in the off position. Make
sure the flow of combustion and ventilation air to the
range is unobstructed.
48
Page 49

Before you call for service^
Troubleshooting Tips
©
Problem Possible Causes What To Do
Top burners do not light
or do not burn evenly.
(The front right burner is
designed to have slightly
smaller flames between
the 6 and 9 o’clock
positions. This is normal.)
Save time and moneyl Review the charts on the following
pages first and you may not need to call for service.
Plug on range is not completely
inserted in the electrical outlet.
Burner slits on the side of the
burner may be clogged.
Make sure electrical plug is plugged into a live, properly
grounded outlet.
Remove the burners and clean them. Check the
electrode area for burned-on food or grease. See
the Care and cleaning of the range section.
Improper burner assembly. Make sure the burner parts are installed correctly.
See the Care and cleaning of the range section.
Burner flames very
large or yellow
Surface burners light
but oven does not
Control signals after
entering cooking time
or start time
Food does not bake or
roast properly in the
upper or lower oven
Improper air to gas ratio. If range is connected to LP gas, contact the person
who installed your range or made the conversion.
The oven gas shut-off valve
may have accidentally been
moved during cleaning or
moving.
You forgot to enter a bake • Touch the Bake pad and desired temperature
temperature or cleaning time. or the Self Clean pad and desired clean time.
Oven controls improperly set. • See the Using the upper oven or Using the lower oven section.
Rack position is incorrect. • See the Using the upper oven or Using the lower oven section.
Incorrect cookware or cookware • See the Using the upper oven or Using the lower oven section,
of improper size being used.
Oven thermostat needs • See the Adjust the lower and upper oven thermostat—Do it
adjustment. yourself! section.
To check the oven gas shut-off valve, pull unit forward
to have access to range back. Look for the gas shut-off
lever at the lower back section of the range.
Clock not set correctly. • See the Using the clock and timer section.
Aluminum foil used improperly • See the Care and cleaning of the range section,
in the oven.
Oven bottom not securely • See the Installation of the range section,
seated in position.
Burners do not light Gas/Control Lockout feature • Allow the range to cool down and touch and hold the
is activated. Gas/Control Lockout pad (on some models) for 3 seconds
until the display shows LOC OFF.
Plug on range is not • Make sure electrical plug is plugged into a live, properly
completely inserted in the grounded outlet,
electrical outlet.
Gas supply not connected • See the Installation Instructions that came with your
or turned on. range.
49
Page 50

Problem Possible Causes What To Do
GEAppliances.com
Burners do not light
(cont.)
Gas/Control Lockout
or Control Lockout
feature is activated
Food does not broil
properly in the upper oven
Upper or lower oven
temperature too hot
or too cold
A fuse in your home may be
blown or the circuit breaker
tripped.
Burner parts not replaced
correctly.
• Replace the fuse or reset the circuit breaker.
• See the Care and cleaning of the range section.
• If LOC ON appears in the display, the range control is
locked. Turn this feature off to use the range. See the
Gas/Control Lockout or Control Lockout section.
Oven controls improperly set. • Make sure you turn the upper oven knob to the broil position
Oven door not closed. • See the Using the upper oven section.
Improper rack position
being used.
Food being cooked
in a hot pan.
Cookware not suited
for broiling.
Oven bottom not securely
seated in position.
Oven thermostat
needs adjustment.
• See the Broiling Guide.
• For best results, use a pan designed for broiling.
Make sure it is cool.
• For best results, use a pan designed for broiling.
• See the Installation of the range section.
• See the Adjust lower and upper oven thermostat—Do It
yourselfl section.
Clock and timer
do not work
Upper or lower oven
light does not work
Upper or lower oven will
not self-clean
“Crackling" or
"popping" sound
Plug on range is not completely
inserted in the electrical outlet.
A fuse in your home may be
blown or the circuit breaker
tripped.
Oven controls improperly set. • See the Using the clock and timer section.
Light bulb is loose or defective. • Tighten or replace the bulb.
Plug on range is not completely
inserted in the electrical outlet.
The oven temperature is too
high to set a self-clean operation.
Oven controls improperly set. • See the Using the self-cleaning upper and lower ovens section.
This is the sound of the
metal heating and cooling
during both the cooking and
cleaning functions.
• Make sure electrical plug is plugged into a live, properly
grounded outlet.
• Replace the fuse or reset the circuit breaker.
• Make sure electrical plug is plugged into a live, properly
grounded outlet.
• Allow the range to cool to room temperature and
reset the controls.
• This is normal.
50
Page 51

Before you call for service^
Troubleshooting Tips
©
Problem Possible Causes What To Do
Excessive smoking Excessive soil. • Touch the Clear/Off pad or turn the upper oven knob to the.
OFF position and press the Clear/Off pad. Open the windows
to rid the room of smoke. Wait until the LOCKED DOOR
light goes off. Wipe up the excess soil and reset the
clean cycle.
Oven door will not open
after a clean cycle
Oven not clean after a Oven controls not properly set. • See the Using the self-cleaning upper and lower ovens section.
clean cycle
"Door^' appears in the
display (on models
with a door latch)
"LOCK DOOR" flashes
in the display
LOCKED DOOR light
is on when you want
to cook
"E-" and a number or
letter flash in the display
Oven too hot. • Allow the oven to cool below locking temperature.
Do not lock the door with the door latch except when
using the self-clean feature.
Oven was heavily soiled. • Clean up heavy spillovers before starting the clean
cycle. Heavily soiled ovens may need to self-clean
again or for a longer period of time.
Latch handle was moved to the
right but a program other than
self-clean was selected.
The self-clean cycle has been
selected but the door is not
closed and on models with a latch,
the latch was not moved all the
way to the right.
The oven door is locked
because the temperature
inside the oven has not
dropped below the
locking temperature.
On models with a door latch,
if a function error code appears
during the self-cleaning cycle,
check the oven door latch.
• Move the latch handle to the right only when setting
the self-cleaning cycle.
• Close the oven door and on models with a latch, move
the latch all the way to the right.
• Touch the Clear/Off pad. Allow the oven to cool
and then, on models with a door latch, unlock the door.
• The latch may have been moved, even if only slightly,
from the locked position. Make sure the latch is moved
to the right as far as it will go.
Oven racks are
difficult to slide
“Probe" appears in
the display (some models)
51
You have a function error code. • Touch the Clear/Off pad. Allow the oven to cool for
one hour. Put the oven back into operation.
If the function code repeats. • Disconnect all power to the range for 5 minutes
and then reconnect power. If the function error
code repeats, call for service.
The nickel racks (if so equipped)
were cleaned in a self-clean cycle.
The gray porcelain-coated racks
(if so equipped) were improperly
cleaned.
This is reminding you to enter a
probe temperature after plugging
in the probe.
• Apply a small amount of vegetable oil to a paper
towel and wipe the edges of the oven racks with
the paper towel. Do not spray with Pam® or other
lubricant sprays.
• Enter a probe temperature.
Page 52

Problem Possible Causes What To Do
GEAppliances.com
LOG shows in the
display
The Gas/Control Lockout feature
is activated.
• Be sure the surface burner controls are turned OFF.
Turn this feature off to use the range. See the Gas/Control
Lockout section.
Display goes blank A fuse in your home may be
blown or the circuit breaker
tripped.
The clock is in the
blackout mode.
• Replace the fuse or reset the circuit breaker.
• See the Special features of your oven control section.
Display flashes Power failure. • Reset the clock.
Unable to get the
display to show "SF"
Power outage,
clock flashes
Oven control pads were
not pressed properly.
Power outage or surge. • Reset the clock. If the oven was in use, you must reset
• The Bake and Broil Hi/Lo pads must be touched at
the same time and held for 3 seconds.
it by touching the Clear/Off pad, setting the clock
and resetting any cooking function.
"Burning" or "oily"
odor emitting from
the vent
Strong odor An odor from the insulation
This is normal in a new oven
and will disappear in time.
around the inside of the oven
is normal for the first few times
the oven is used.
• To speed the process, set a self-clean cycle for a
minimum of 3 hours. See the Using the self-cleaning
oven section.
• This is temporary.
Fan noise (some models) A cooling fan or a convection fan
(depending on the function you
are using) may automatically turn
on.
Convection fan not
working (some models)
Preheat temperature
not reached.
• This is normal. The cooling fan will turn on to cool internal
parts. It may run up to 1-1/2 hrs after the oven is turned
off. The convection fan will cycle on and off until the
function is over or the door is opened.
• Fan will start automatically once the preheat
temperature is reached.
52
Page 53

Accessories.
Looking For Something More? (Not all accessories are available for all models.)
You can find these accessories and many more at GEApplianceParts.com (U.S.)
or www.GEAppliances.ca (Canada), or call 800.626.2002 (U.S.) or 800.661.1616 (Canada)
(during normal business hours). Have your model number ready.
Grates Surface Burner Heads and Caps
Griddle Oven Racks Light Bulbs
Surface Elements and Drip
Pans
Knobs
Experience these other great products to keep your kitchen looking great!
Cerama Bryte®
Ceramic Cooktop
cleaning Kit:
Includes cleaner,
scraper and pad
WX10X117GCS
Cerama Bryte®
Touch Up Spray
WX10X391
Citrushine
Stainless Steel
Wipes
WX10X10007
Cerama Bryte®
Stainless Steel
Appliance
cleaner
PM10X311
Get the most out of your Broiler Pan! (Not for use with Broiler Drawer models.)
Use your pan and grid cover to broil hamburgers, seafood, steaks, vegetables, bacon, chops and so much
more! The pan below catches the excess fats and oils.
• Genuine GE Part
• Easy To Clean
• One-Year Warranty
Limited Time Offer! Eree Shipping!
When you order your broiler pan within 30 days of purchasing your GE cooking product.
Small Large* XL**
U.S. Part# WB48X10055 WB48X10056 WB48X10057
Canada Part# 222D2097G001 222D2097G002 N/A
Dimensions 8-3/4" Wx 1-1/4" H x 13-1/2" D 12-3/4" Wx 1-1/4" H x 16-1/2" D 17" Wx 1-1/4" H x 19-1/4" D
53
* The large (standard) broil pan does not fit in 20"/24" ranges.
** The XL pan does not fit in 24" wall ovens, '27" drop-ins or 20“/24" ranges.
To place your order, call
In the U.S.:
GE Parts, P.O. Box221027, Memphis, TN38122-1027. In Canada: GE Parts, 1 Eactory Lane, Moncton, N.B. E1C9M3
800.626.2002
(U.S),
800.661.1616
(Canada) or mail this form to:
Broiler Pan Order Form
Quantity _
Model Number_
First Name
____
Address
_____
City
_______
Phone
______
Check
____
Serial Number Brand Date of Purchase
Money Order_
Part Number
Last Name
State_
E-Mail
___________
Zip Code _
Call 800.626.2002 in the U.S. or 800.661.6161 in Canada for current pricing. All credit card orders must be called in.
Page 54

GE Gas Range Warranty. (For customers in the United States)
All warranty service provided by our Factory Service Centers,
or an authorized Customer Care^ technician. To schedule
service, visit us on-line at GEAppliances.com, or call 800.
GE.CARES (800.432.2737). Please have serial number
and model number available when calling for service.
For The Period Of: GE Will Replace:
One Year
From the date of the
original purchase
Any part of the range which fails due to a defect in materials or workmanship. During this
limited one-year warranty, GE will also provide, free of charge, all labor and in-home service
to replace the defective part.
What GE Will Not Cover:
I Service trips to your home to teach you how to use
the product.
I Improper installation, delivery or maintenance.
I Product damage or failure of the product if it is abused,
misused, modified, used for other than the intended
purpose or used commercially.
I Replacement of house fuses or resetting of circuit breakers.
Staple your receipt here.
Proof of the original purchase
date is needed to obtain service
under the warranty.
I Damage to the product caused by accident, fire, floods
or acts of God.
I Incidental or consequential damage caused by possible
defects with this appliance.
I Damage caused after delivery.
I Product not accessible to provide required service.
EXCLUSION OF IMPLIED WARRANTIES—Your sole and exclusive remedy is product repair as provided in
this Limited Warranty. Any implied warranties, including the implied warranties of merchantability or
fitness for a particular purpose, are limited to one year or the shortest period allowed by law.
This warranty is extended to the original purchaser and any succeeding owner for products purchased for home
use within the USA. If the product is located in an area where service by a GE Authorized Servicer is not available,
you may be responsible for a trip charge or you may be repaired to bring the product to an Authorized GE Service
Location for service. In Alaska, the warranty excludes the cost of shipping or service calls to your home.
Some states do not allow the exclusion or limitation of incidental or conseguential damages. This warranty gives
you specific legal rights, and you may also have other rights which vary from state to state. To know what your
legal rights are, consult your local or state consumer affairs office or your state's Attorney General.
Warrantor: General Electric Company. Louisville, KY 40225
54
Page 55

GE Gas Range Warranty. (For customers in Canada)
All warranty service provided by our Factory Service Centers
or an authorized Customer Care® technician. For service,
call 1.800.551.3344. Please hove serial number and model
number available when colling for service.
For The Period Of: Habe Will Replace:
One Year
From the date of the
original purchase
Any part of the range which fails due to a defect in materials or workmanship. During this
limited one-year warranty, Mabe will also provide, free of charge, all labor and in-home service
to replace the defective part.
What Mabe Will Not Cover:
■ Service trips to your home to teach you how to use the
product.
■ Improper installation, delivery or maintenance.
■ Product damage or failure of the product if it is abused,
misused, modified, used for other than the intended
purpose or used commercially.
■ Replacement of house fuses or resetting of circuit breakers.
Staple your receipt here.
Proof of the original purchase
date is needed to obtain
service under the warranty.
I Damage to the product caused by accident, fire, floods or
acts of God.
I Incidental or consequential damage caused by possible
defects with this appliance.
I Damage caused after delivery.
I Product not accessible to provide required service.
EXCLUSION OF IMPLIED WARRANTIES—Your sole and exclusive remedy is product repair as provided in
this Limited Warranty. Any implied warranties, including the implied warranties of merchantability or
fitness for a particular purpose, are limited to one year or the shortest period allowed by law.
This warranty is extended to the original purchaser and any succeeding owner for products purchased in Canada
for home use within Canada. In-home warranty service will be provided in areas where it is available and deemed
reasonable by Mabe to provide.
Some provinces do not allow the exclusion or limitation of incidental or consequential damages, so the above
exclusion may not apply to you. This warranty gives you specific legal rights, and you may also hove other rights
which vary from province to province. To know what your legal rights are in your province, consult
your local provincial consumer affairs office.
Warrantor: Mabe Canada Inc.
Burlington, Ontario
55
Page 56

Consumer Support.
GE Appliances Website In the U.S.: GEAppHances.eom
Have a question or need assistance with your appliance? Try the GE Appliances Website 24 hours a day,
any day of the yeorl For greater convenience and foster service, you con now download Owner's Manuals,
order ports or even schedule service on-line.
Schedule Service In the U.S.: GEAppHances.eom
Expert GE repair service is only one step away from your door. Get on-line and schedule your service at your
convenience any day of the yearl Or call 800.GE.CARES (800.432.2737) during normal business hours.
In Canada, call 1.800.561.3344
N
Real Life Design Studio In the U.S.: GEAppHonces.eom
In Canada:
www.GEAppliances.ca
\ ^
[ ^ 1
GE supports the Universal Design concept-products, services and environments that can be used by people of
all ages, sizes and capabilities. We recognize the need to design for a wide range of physical and mental abilities
and impairments. For details of GE's Universal Design applications, including kitchen design ideas for people with
J
disabilities, check out our Website today. For the hearing impaired, please coll 800.TDD.GEAC (800.833.4322).
In Canada, contact: Manager, Consumer Relations, Mobe Canada Inc.
Suite 310,1 Factory Lone
Moncton, N.B. EIC 9M3
Extended Warranties In the U.S.: GEAppHances.eom
Purchase a GE extended warranty and learn about special discounts that ore available while your warranty is still
in effect. You con purchase it on-line anytime, or call 800.525.2224 during normal business hours. GE Consumer
Home Services will still be there after your warranty expires. In Canada, coll 1.888.251.2133
Parts and Accessories In the U.S.: GEAppHonces.eom
Individuals qualified to service their own appliances con hove ports or accessories sent directly to their homes (VISA,
MasterCard and Discover cords ore accepted). Order on-line today, 24 hours every day or by phone at
800.525.2002 during normal business hours.
Instructions contained in this manual cover procedures to be performed by any user. Other servicing generally
should be referred to qualified service personnel. Caution must be exercised, since improper servicing may
cause unsafe operation.
Customers in Canada should consult the yellow pages for the nearest Mobe service center, or call 1.800.551.1515.
Contact Us In the U.S.: GEAppHances.eom
If you ore not satisfied with the service you receive from GE, contact us on our Website with all the details including
your phone number, or write to: General Manager, Customer Relations
GE Appliances, Appliance Pork
Louisville, KY 40225
In Canada: www.GEAppliances.ca, or write to: Director, Consumer Relations, Mobe Canada Inc.
Suite 310,1 Factory Lone
Moncton, N.B. EIC 9M3
Register Your Appliance
Register your new appliance on-line—atyour convenience! Timely product registration will allow for enhanced
communication and prompt service under the terms of your warranty, should the need arise. You may also moil
in the pre-printed registration cord included in the pocking material. In Canada:
In the U.S.: GEAppHances.eom
www.GEAppliances.ca
Printed in Mexico
This book is printed on recyded paper.
Page 57

GEAppliances.com
U
0)
E
<
<D
'O
•
u
Instrucciones de
seguridad
.........................
2-5
Instrucciones de
Funcionamiento
Papel de Aluminio
Reloj y Temporizador
Horno....................................9-28
Horneado y Dorado
Asado, Guía para Asar
Bloqueo del Control
Convección
Control del Horno
Corte de Corriente
Precalentamiento.................11
Sonda
..................................
Repisas................................25, 35
Modo Sabático.....................24
Auto Limpieza
Funciones Especiales
Ajuste del Termostato
Horneado y Dorado
por Tiempo...........................15
Horneado con Convección
por Tiempo
Cocina en la superficie
Plancha
.....................................
..................
.............
.............
........
.............
........................
......................
.............
......................
..........
.........
..........................
........
11
14
11
13
22
17-21
10,14
15, 19
27, 28
22, 23
25
20, 21
5-8
Instrucciones de ~ ~
Instalación
Ajuste del Aire
Dispositivo Anti-Volcoduros
Ensamble de Quemadores InStalaClQn
Superficiales
Control de Encendido del prnqqq
Quemador......................................47 rrcqqn
Conexión de la Cocino al Gas 42-44
Dimensiones y Espacio
Conexiones Eléctricas
Nivelación de la Cocina
9
LP......................................................41
.................
..........................
.................................
38-49 tlcjnualí^e
..............
..........
40
............
..........
45
48
48 . USUaflOe ^
49 InStrUCCIOnejS de
45 JGB870
Consejos para Solucionar
Problemas
Accesorios
....................
......................
50-53
54
Soporte al Cliente
Soporte al Cliente__Contratapa
Garantía para Clientes
en Canadá..............................57
Garantía para Clientes
en EE.UU ...............................55
8
En Canadá, comuniqúese
con nosotros en:
www.GEAppliances.ca
Cuidado y Limpieza
Ensamble del quemador
Rejillas del quemador............31, 32
Panel de Control y Perillas
Cocina
....................................
Puerta.....................................34, 35
o
Planea
....................................
u
Fondo del Horno
Reemplazo de la Luz del Horno .. 37
V)
Ventiladores del Horno
Estantes
a
Auto Limpieza.........................27, 28
Superficies de Acero Inoxidable ... 35
Escriba los números de modelo y
de serie aquí:
№ de Modelo ________________
№ de Serie
Los puede encontrar en una
etiqueta debajo del colector sobre
la puerta del horno superior.
.................................
....................
........
.....
...........
30
33
33
31
34
33
35
49-85181-3 08-12 GE
Page 58

INFORMACION IMPORTANTE DE SEGURIDAD,
LEA TODAS LAS INSTRUCCIONES ANTES DE USAR.
A ADVERTENCIA
producir un incendio o explosic
No guarde ni use gasolina u otros vapores inflamables y líquidos cerca de este ni de otros electrodomésticos.
QUÉ DEBE HACER SI HUELE GAS
■ No intente iluminar ningún electrodoméstico.
■ No toque ningún interruptor eléctrico; no use teléfonos en su edificio.
■ De inmediato llame a su proveedor de gas desde el teléfono de un vecino.
■ Si no se puede comunicar con su proveedor de gas, llame al departamento de bomberos.
La instalación y las reparaciones deberán ser realizadas por un instalador calificado, agencia de servicios o el
proveedor de gas.
Si la información de este manual no se sigue exactamente, se podrá
jn, ocasionando daños sobre la propiedad, lesiones o la muerte.
A ADVERTENCIA
■ Todas las cocinas pueden sufrir caídas.
■ Se pueden producir QUEMADURAS y otras LESIONES GRAVES
■ INSTALE y CONTROLE el soporte anti-volcaduras, siguiendo las instrucciones suministradas
con el soporte.
A fin de reducir el riesgo de caída de la cocina, ésta deberá estar asegurada por un soporte anti
volcaduras correctamente instalado. Consulte las instrucciones de instalación provistas con el
soporte, para acceder a detalles completos antes de intentar realizar la instalación.
Para controlar si el soporte es instalado y ajustado de forma apropiada, controle que debajo de
la cocina la pata niveladora trasera esté ajustada al soporte. En algunos modelos, el cajón de
almacenamiento o el panel de protección se pueden retirar para una fácil inspección. Si no es posible realizar una
inspección visual, deslice la cocina hacia adelante, confirme que el soporte anti-volcaduras esté ajustado de forma
segura al piso o la pared, y deslice la cocina hacia atrás de modo que la pata niveladora trasera se encuentre debajo
del soporte anti-volcaduras.
En caso de que la cocina sea empujada de la pared por alguna razón, siempre repita este procedimiento para
verificar que la cocina esté correctamente asegurada por el soporte anti-volcaduras.
Nunca retire completamente las patas niveladoras, ya que la cocina no estará asegurada de forma adecuada al
dispositivo anti-volcaduras.
Si no recibió el soporte anti-volcaduras con su compra, llame al 1.800.525.8774 para recibir uno sin costo (en
Canadá, llame al 1.800.551-3344). Para acceder a instrucciones de instalación del soporte, visite GEAppliances.
com (en Canadá, GEAppliances.ca).
A ADVERTENCIA
La Ley de Agua Potable Inocua y Tratamiento de Residuos Tóxicos de California (California Safe Drinking Water and
Toxic Enforcement Act) solicita al Gobernador de California que publique una lista de sustancias que el estado reconoce
que producen cáncer, defectos de nacimiento u otros daños reproductivos y solicita a los empresarios que adviertan a
sus clientes sobre la posible exposición a tales sustancias.
El aislante de fibra de vidrio en los hornos de auto limpieza despide una pequeña cantidad de monóxido de carbono
durante el ciclo de limpieza. La exposición puede ser minimizada si se ventila con una ventana abierta o si se usa un
ventilador o campana.
AVISO DE SEGURIDAD IMPORTANTE
GUARDE ESTAS INSTRUCCIONES
Page 59

A ADVERTENCIA INSTRUCCIONES GENERALES DE SEGURIDAD
■ No deje a los niños solos o fuera de su radio de
A ADVERTENCIA
NUNCA use este electrodoméstico para calentar el
ambiente. Como consecuencia de esto, se podrá
producir envenenamiento con monóxido de carbono y
el sobrecalentamiento del horno.
■ Use este electrodoméstico sólo poro su propósito
original, como se describe en el manual del propietario.
■ Solicite que un instalador calificado instale su cocina
y que esté correctamente conectada a tierra, de
acuerdo con las instrucciones de instalación provistas.
Cualquier ajuste
ser realizado únicamente por instaladores de cocinas
a gas calificados o por técnicos del servicio. No intente
reparar o reemplazar ninguna parte de la cocina, a
menos que esto se recomiende específicamente en este
manual.
■ Su cocina es enviada desde la fábrica para uso con
gas natural. Puede ser convertida para uso con gas LP.
Si se requieren, estos ajustes deben ser realizados por
un técnico calificado de acuerdo con las instrucciones
de instalación y códigos locales. La agencia que realiza
este trabajo asume la responsabilidad de la conversión.
■ Solicite que el instalador le muestre la ubicación de la
válvula de cierre de la cocina a gas y cómo apagarla en
caso de ser necesario.
■ Enchufe la cocina en un tomacorriente con conexión
a tierra de 120 voltios únicamente. No retire la pata
redonda de conexión a tierra del enchufe. Si tiene dudas
sobre la conexión a tierra del sistema eléctrico para
hogar, es su responsabilidad y obligación contar con
el reemplazo de un tomacorriente sin conexión a tierra
por un tomacorriente de tres patas correctamente
conectado a tierra, de acuerdo con el Código Nacional
de Electricidad. No use prolongadores con este
electrodoméstico.
■ Antes de realizar cualquier servicio técnico, desenchufe
la cocina o desconecte el suministro de corriente desde
el panel de distribución del hogar, retirando el fusible o
desconectando el disyuntor.
■ Asegúrese de que todos los materiales de embalaje
sean retirados de la cocina antes de su uso, a fin de
evitar que estos materiales se incendien.
■ Evite ralladuras o impactos sobre las puertas de metal,
cocinas o paneles de control. Hacer esto podrá producir
la rotura de vidrios. No cocine un producto con un vidrio
roto. Es posible que se produzcan descargas, incendio o
cortes.
y trabajo de servicio técnico deberá
atención en el área donde el electrodoméstico se
encuentre en uso. Nunca se les deberá permitir
trepar, sentarse o pararse sobre ninguna parte del
electrodoméstico.
■ No guarde artículos de interés para los niños sobre una
cocina o en la parte trasera de la misma - Si un niño
trepa sobre la cocina para alcanzar artículos, es posible
que sufra lesiones graves.
■ No permita que nadie se trepe, se pare o se cuelgue de
la puerta del horno, del cajón o de la parte superior de
la cocina. Se podrá dañar la cocina o provocar su caída,
ocasionando lesiones graves o la muerte
■ Nunca bloquee las ventilaciones (aberturas de aire) de
la cocina. Las mismas brindan las entradas y salidas
de aire que son necesarias para que la cocina opere
de forma correcta con la combustión adecuada. Las
aberturas de aire están ubicadas en la parte trasera
de la cocina, en la parte superior e inferior de la puerta
del horno, y en la parte inferior de la cocina debajo del
cajón calentador, del cajón del horno inferior o del panel
de protección.
■ Use sólo sostenedores de ollas secos - los sostenedores
húmedos sobre superficies calientes pueden producir
quemaduras debido al vapor. No permita que los
sostenedores de ollas tengan contacto con los
quemadores superficiales, la parrilla de los quemadores,
o el elemento de calefacción del horno. No use una
toalla u otra tela voluminosa para reemplazar el mango
de las cacerolas.
■ Tenga cuidado de no tocar las superficies calientes
de la cocina. Las superficies potencialmente calientes
incluyen los quemadores, parrillas, parte superior de
la cocina, parte trasera, horno e interior de la puerta y
aberturas alrededor de la puerta del horno.
■ No caliente envases de comida que no hayan sido
abiertos. Se podría acumular presión y el contenedor
podría explotar, ocasionando una lesión.
■ Cocine carnes y carnes de ave en forma completa - la
carne por lo menos a una temperatura interior de 150°
Fy la carne de ave por lo menos a una temperatura
interior de 180° F. Normalmente la cocción a estas
temperaturas brinda una protección contra las
enfermedades transmitidas por la comida.
GEAppliances.com
GUARDE ESTAS INSTRUCCIONES
Page 60

INFORMACION IMPORTANTE DE SEGURIDAD,
LEA TODAS LAS INSTRUCCIONES ANTES DE USAR.
A ADVERTENCIA
MANTENGA LOS MATERIALES INFLAMABLES
ALEJADOS DE LA COCINA
■ No guarde ni use materiales inflamables en un horno
o cerca de la parte superior de la cocina, incluyendo
papel, plástico, sostenedores de ollas, trapos, cobertores
de pared, cortinas, paños y gasolina u otros vapores y
líquidos inflamables.
■ Nunca use prendas holgadas o que cuelguen mientras
usa el electrodoméstico. Evite acumular artículos
comúnmente usados en gabinetes sobre la cocina, y
tenga cuidado al extender la mano sobre la cocina.
A ADVERTENCIA
EN CASO DE INCENDIO, SIGA LOS SIGUIENTES PASOS
PARA EVITAR LESIONES O LA PROPAGACIÓN DEL FUEGO:
■ No use agua sobre el fuego de la grasa. Nunca tome una
olla que se esté incendiando. Apague los controles. Extinga
la olla que se esté incendiando sobre un quemador
superficial, cubriendo la olla completamente con su
tapa correspondiente, una hoja metálica de galletas o
una bandeja plana. Si es necesario, use un químico seco
multiuso o un extintor de chorro de espuma.
■ En caso de que haya fuego en el horno durante la
cocción, apague el horno y mantenga la puerta cerrada
La ropa que se encuentre cerca de los quemadores o
superficies calientes se podrá encender, ocasionando
quemaduras graves.
■ No permita que la grasa de la cocción u otros materiales
inflamables se acumulen en o cerca de la cocina. La
grasa del horno o sobre la cocina se podrá incendiar.
■ Limpie las campanas de ventilación de forma frecuente.
No se debe permitir la acumulación de grasa en la
campana o el filtro.
hasta que el fuego se extinga. Si es necesario, use un
químico seco multiuso o un extintor de chorro de espuma.
■ En caso de que haya fuego en el horno durante el
período de auto limpieza, apague el horno y espere
a que el fuego se extinga. No fuerce la puerta
para abrirla. La entrada de aire fresco sobre las
temperaturas de auto limpieza podrá conducir a la
producción de llamas en el horno. Si no se siguen estas
instrucciones, se podrán producir quemaduras graves.
A ADVERTENCIA
INSTRUCCIONES DE SEGURIDAD DE LA PARTE
SUPERIOR DE LA COCINA
■ Nunca pierda de vista los quemadores cuando se
encuentren en las configuraciones de calor media o alta.
Las comidas, especialmente las que se preparan con
aceite, se pueden incendiar, lo cual puede ocasionar un
incendio que se propague a los gabinetes próximos.
■ Nunca pierda de vista el aceite cuando esté friendo. Si
se calienta más alió de su punto de cocción, el aceite
se puede quemar y provocar un incendio que se puede
propagar a los gabinetes próximos. Use un termómetro
para grasas profundas siempre que sea posible, a fin de
monitorear la temperatura del aceite.
■ Para evitar derrames e incendios, use una cantidad
mínima de aceite cuando esté friendo en una olla que
no sea profunda y evite cocinar comidas congeladas
con cantidades excesivas de hielo.
■ Use el tamaño de olla adecuado para evitar que sean
inestables o que sufran caídas fácilmente. Seleccione
utensilios que coincidan con el tamaño del quemador. Las
llamas del quemador se deberán ajustar de modo que no
se extiendan más alió de la parte inferior de la olla. Una
cantidad excesiva de llama puede representar un riesgo.
■ Siempre use la posición LITE al encender los quemadores
superiores y asegúrese de que estos se hayan encendido.
■ Al usar utensilios de vidrio/ cerámica, asegúrese de que
sean adecuados para el servicio de cocina; otros se podrán
romper debido a un cambio repentino de temperatura.
■ A fin de minimizar posibles quemaduras, incendio de
materiales inflamables y derrames, la manija de un
envase deberá ser inclinada hacia el centro de la cocina
sin que se extienda sobre los quemadores cercanos.
■ Al preparar comidas llameantes debajo de una
campana, encienda el ventilador.
■ No use un wok con un anillo con soporte de metal
redondo. El anillo podrá atrapar calor y bloquear el aire
hacia el quemador, produciendo el riesgo de emisión de
monóxido de carbono.
■ No intente elevar la cocina. Hacer esto podría dañar
la tubería de gas hasta los quemadores superficiales,
ocasionando una pérdida de gas y riesgo de incendio.
■ Al inhabilitar el Bloqueo del Control de Gas (en algunos
modelos), asegúrese de que los controles de superficie
se encuentren en la posición OFF (Apagado). Esto
evitará que haya un flujo de gas no intencional desde
los quemadores.
■ No use papel de aluminio para cubrir rejillas cualquier
parte de la cocina. Si se hace esto se podrá producir
envenenamiento con monóxido de carbono,
sobrecalentamiento de las superficies de la cocina o un
posible riesgo de incendio.
GUARDE ESTAS INSTRUCCIONES
Page 61

Aadvertencia instrucciones de seguridad
■ Coloque el estante del horno en la posición de bloqueo,
A ADVERTENCIA
ranura, agujeros o pasajes en el fondo del horno ni cubra
un estante entero con materiales tales como papel de
aluminio. Hacer esto bloquea el flujo de aire a través del
horno y puede ocasionar envenenamiento con monóxido
de carbono. Los recubrimientos de aluminio también
pueden atrapar el calor, causando riesgo de incendio.
■ Manténgase alejado de la cocina al abrir la puerto del
horno. El aire caliente o el vapor que sale puede causar
quemaduras en los monos, rostro y/u ojos.
■ Mantengo el horno libre de acumulación de graso. La
graso en el horno se puede incendiar.
■ Coloque los estantes del horno en la ubicación
correspondiente mientras éste se encuentro frío. Si
es necesario retirar el estante mientras el horno se
encuentro caliente, evite tocar los superficies calientes.
NUNCA cubra ninguna
■ No deje productos tales como papel, utensilios de
■ No deje artículos en la parte superior de la cocina cerca
■ Al usar las bolsas para cocinar o dorar en el horno, siga
■ Nunca ose con la puerto abierto. Se prohíbe asar con la
GEAppliances.com
al introducir y retirar comida del horno. Esto ayuda a
evitar quemaduras por tocar superficies calientes de la
puerto y los paredes del horno.
cocina ni comida en el horno cuando no esté en
uso. Los artículos guardados en el horno se pueden
incendiar.
de la ventilación del horno, que está en el centro de la
parte trasera. Los artículos se pueden sobrecalentar, y
existe riesgo de incendio o quemaduras.
las instrucciones del fabricante.
puerto abierto debido al sobrecalentamiento de los perillos
de control.
Aadvertencia
INSTRUCCIONES DE SEGURIDAD DEL HORNO CON
FUNCION DE AUTO LIMPIEZ
La función de auto limpieza usa el horno en temperaturas lo suficientemente altas como para consumir restos de
comida que hoyo dentro del mismo. Para un funcionamiento seguro, siga estas instrucciones.
■ Antes de utilizar el ciclo de auto limpieza, retire las
ollas, estantes de metal brillante del horno y otros
utensilios que haya dentro del mismo. Sólo se pueden
dejar dentro del horno los estantes para horno con
recubrimiento de porcelana. No use la función de auto
limpieza para limpiar otras partes, tales como parrillas.
■ Antes de utilizar el ciclo de auto limpieza, limpie la graso
y restos de comido que haya en el horno. Una cantidad
excesivo de graso se puede incendiar, lo cual puede
producir daños con humo en su hogar.
Aadvertencia
INSTRUCCIONES DE SEGURIDAD DEL CAJON
■ Si el modo de auto limpieza funciona de forma
incorrecta, apague el horno y desconecte el suministro
de corriente. Solicite el servicio de un técnico calificado.
■ No limpie la junta de la puerta. La junta de la puerta es
esencial para un buen sellado. Se debe tener cuidado
de no frotar, dañar ni mover lojunto.
■ No use limpiadores poro horno. No se deberá usar
limpiador para hornos comerciales ni revestimientos
de protección para hornos de ningún tipo en o
alrededor de cualquier parte del horno.
CALENTADOR/ CAJON DEL HORNO INFERIOR (Algunos modelos)
■ El propósito del cajón calentador es mantener las
comidas cocinadas a temperatura poro servir. Cuando
la comido esté a menos de 140° F, se producirán
bacterias. No coloque comida fría en el cajón
calentador. No caliente comida durante más de 2 horas.
Si no se siguen estos instrucciones, se podrán producir
enfermedades generadas en la comida.
■ No deje productos de papel, plásticos, comida enlatada o
materiales combustibles en el cajón. Se pueden incendiar.
■ No toque el elemento calentador ni la superficie
interior del cajón. Es posible que los superficies estén
lo suficientemente calientes como poro provocar GUARDE ESTAS INSTRUCCIONES 5
quemaduras.
■ Tenga cuidado al abrir el cajón. Abra un poco el cajón
y deje que salga aire caliente o vapor antes de retirar o
reemplazar la comida. El aire caliente o el vapor que sale
puede causar quemaduras en las manos, rostro y/u ojos.
■ No use popel de aluminio poro revestir el cajón
calentador. El aluminio es un excelente aislante del
color y atropará el color debajo de éste. Esto alterará
el funcionamiento del cajón y existe el riesgo de que se
produzco un incendio.
Page 62

cómo usar los quemadores superficiales de gas.
Es posible que las funciones y apariencias varíen con relación a su modelo a lo largo del manual.
Antes de Encender un Quemador de Gas
■ Asegúrese de que todos los quemadores
estén en su lugar.
■ Asegúrese de que todas las parrillas de la
cocina estén correctamente ubicadas antes
de usar un quemador.
■ Si su cocina cuenta con la función Bloqueo
del Control de Gas, asegúrese de que esté
deshabilitada antes de intentar encender los
quemadores superficiales.
_____
Luego de Encender un Quemador de Gas
■ No utilice el quemador durante un período de
tiempo prolongado sin un utensilio de cocina
sobre la parrilla. El acabado de la parrilla se
puede resquebrajar si no hay un utensilio de
cocina que absorba el calor.
■ Asegúrese de que los quemadores y las
parrillas estén fríos antes de colocar la mano,
tomar el mango de una olla, trapos de
limpieza u otros materiales sobre estos..
Cómo Encender un Quemador Superficial de Gas
Escuchará un pequeño ruido de clic-el
sonido de la chispa eléctrica que enciende el
quemador.
Gire la perilla para ajustar el tamaño de
la llama. Si la perilla permanece en LITE,
continuará haciendo clic.
Cuando un quemador se gira a LITE, todos
los quemadores hacen chispa. No intente
desensamblar ni limpiar un quemador mientras
otro quemador está encendido. Es posible que
se produzca una descarga eléctrica, lo cual
podría hacer que vuelque un utensilio de cocina
caliente.
Empuje e¡ mango de control y gire
el mismo hasta la posición LITE.
A ADVERTENCIA
del quemador que no están cubiertos por el
utensilio de cocina pueden presentar un riesgo
de incendio o incendio de telas. El quemador de
la plancha sólo se deberá usar cuando lo
plancho esté en su lugar. Si esto no se cumple,
se pueden sufrir lesiones graves..
Asegúrese de que todos los quemadores
superficiales estén ubicados en sus posiciones
respectivas.
Empuje el mango de control y gire el mismo
hasta la posición LITE.
Las llamas
Mediano Pequeño
tres anillos
Quemador
puente (en
algunos
modelos)
(en algunos
modelos)
Quemadores de Gas Sellados
La parte superior de su cocina a gas cuenta
con quemadores de gas sellados. Le ofrecen
conveniencia, facilidad de limpieza y flexibilidad
para ser usados en una amplia variedad de
aplicaciones de cocina.
El quemador más pequeño en la posición
trasera derecha es el quemador a fuego lento.
En algunos modelos, el quemador de triple
llama que se encuentra en la posición frontal
derecha es el quemador a fuego lento. Este
quemador se puede pasar a
para que funcione a un fuego muy lento. Brinda
un funcionamiento de cocción muy preciso
para comidas delicadas tales como salsas o
comidas que requieren fuego lento durante un
período de tiempo de cocción largo.
Los quemadores mediano (atrás a la
izquierda) y grande (frente a la izquierda) son
los quemadores principales para la mayoría
de las cocciones. Estos quemadores de uso
general se pueden pasar de
(Bajo), a fin de que se adecúen a una amplia
variedad de necesidades de cocción
El quemador extra grande (al frente a la
derecha, quemador de triple llama, o al frente
a la izquierda en algunos modelos) es el
quemador de máxima producción. Al igual que
los otros cuatro quemadores, se puede pasar
de H/(Alto) a S/M (Fuego Lento) para una amplia
variedad de aplicaciones de cocción.
SIM (Fuego Lento)
Hl (Alto) a LO
Estos quemadores están diseñados para
llevar rápidamente grandes cantidades de
líquido a punto de hervor. Cuentan con la
función especial POWER BOILTM, diseñada
para su uso con utensilios de cocina de
10 pulgadas o más de diámetro para el
quemador extra grande y 12 pulgadas o más
para el de triple llama.
El quemador oval central (en algunos modelos)
es para grandes ollas/ cacerolas o para uso
con la plancha.
Page 63

Cómo Seleccionar el Tamaño de la Llama
A ADVERTENCIA
del quemador que no están cubiertas por el
utensilio de cocina pueden presentar un
riesgo de quemaduras o incendio de telas.
Nunca permita que las llamas se extiendan
más allá de los costados del utensilio.
Las llamas
Utensilio sobre la Cocina
Aluminio: Se recomiendo un utensilio de peso
mediano, yo que caliento de formo rápido y
parejo. La mayoría de los comidos se doran
de formo parejo en un sartén de aluminio.
Use cacerolas con topo hermético cuando
cocine con cantidades mínimos de aguo.
Hierro Forjado: Si cocinará de formo lento, la
mayoría de los sartenes le darán resultados
satisfactorios.
Utensilios de esmalte: Bajo ciertos
condiciones, el esmalte de algunos utensilios
de cocino se pueden derretir. Sigo los
recomendaciones sobre métodos de cocción
del fabricante de utensilios de cocino.
Vidrio: Existen dos tipos de utensilios de cocina
de vidrio - aquellos para uso con el horno
únicamente y aquellos para la cocción en la
GEAppliances.com
Observe la llama, no la perilla, a medida que
reduce el calor. Cuando se desee calentar de
formo rápido, el tamaño de la llamo de un
quemador de gas deberá ser equivalente con el
utensilio de cocino que esté usando.
Cuando las llamas sean más grandes que la parte
inferior del utensilio de cocina, no calentarán el
utensilio más rápido y podrían ser riesgosas.
parte superior de la cocina (cacerolas, café y
teteras). Los conductores de vidrio calientan de
forma muy lenta.
Cerámica de Vidrio Resistente al Calor: Se
pueden usar poro cualquier superficie o poro
cocción en el horno. Conduce el color de formo
muy lento y se enfrío de formo muy rápido.
Consulte los instrucciones del fabricante de
utensilios de cocino poro saber con seguridad si
se puede usar con cocinas a gas.
Acero Inoxidable: Este metal posee
propiedades de calentamiento limitadas y
normalmente se combina con cobre, aluminio
u otros materiales para una mejor distribución
del calor. Los sartenes con combinación de
metales normalmente funcionan de forma
satisfactoria si se usan con calor medio, como
lo recomienda el fabricante.
Use un wok con fondo plano
Parrillas para la Parte Superior de la Cocina
No use parrillas para la parte superior de la
cocina sobre los quemadores de gas sellados. Si
usa la parrilla para la parte superior de la cocina
en el quemador de gas sellado, ocasionará
una combustión incompleta y podrá producir
exposición a niveles de monóxido de carbono
superiores a los estándares actualmente
permitidos.
This can be hazardous to your health.
Use el Wok de Esta Forma
Recomendamos que use un wok de 14 pulgadas
o más pequeño con fondo plano. Asegúrese de
que el fondo del wok se apoye de forma plana
sobre la parrilla. Están disponibles en su tienda
minorista local.
Sólo se deberá usar un wok con fondo plano.
No use un anillo de soporte para wok. Colocar el
anillo sobre el quemador o parrilla podrá hacer
que el quemador funcione deforma inadecuada,
produciendo niveles de monóxido de carbono
que superan los estándares permitidos. Esto
puede ser peligroso para su salud.
En Caso de Corte de Corriente
En caso de corte de corriente, puede encender
los quemadores de gas superficiales de la
cocina con un fósforo. Acerque un fósforo
prendido al quemador, y luego presione y
gire la perilla de control hasta la posición
LITE. Tenga especial cuidado al encender los
quemadores de esta manera.
Los quemadores que se estén usando cuando
se produzca un corte de corriente eléctrica
continuarán funcionando normalmente.
NOTA: Si el Bloqueo del Control de Gas está
en uso en el momento del corte de corriente,
los quemadores superficiales no se podrán
encender.
Page 64

Uso de la plancha. (en algunos modelos)
Su plancha cubierta y antiadherente o plancha
presazonada (en algunos modelos) brindo uno
superficie de cocción extra grande poro carnes,
panqueques u otros comidos normalmente
preparados en uno olla o sartén poro freír.
Cómo Insertar la Plancha Antiadherente y Reversible
La plancho sólo se puede usar con el quemador NOTA: No limpie la plancha en el horno de auto
central. Poro insertar la plancho, retire la porrillo limpieza.
central y reemplace la mismo con la plancho.
Uso de la Plancha.
A ADVERTENCIA
■ La configuración Pre-Heat (Precalentar) (en algunos
modelos) se brinda para precalentar la plancha deforma
rápida. Apague el control antes de colocar comida en
la plancha. La cocción en la configuración Pre-Heat
(Precalentar) puede ocasionar un incendio.
■ Tenga cuidado al cocinar comidas con grasa. La grasa
esparcida puede provocar un incendio.
■ Nunca coloque ni guarde un artículo en la plancha, incluso
cuando no esté en uso. El calor de los demás quemadores
puede calentar la plancha y provocar un incendio.
■ Coloque y retire la plancha sólo cuando todas las
parrillas y la plancha estén frías y todas las unidades
superficiales estén en OFF (Apagado).
La mayoría de las comidas a la plancho requieren uno
cocción en uno superficie precolentodo. Precaliente la
plancho de acuerdo con esto guío, y luego cambie a la
configuración de cocción deseado.
■ No use aceite sobre la plancha durante períodos de tiempo
prolongados. Es posible que se produzcan manchas permanentes
y/o grietas.
■ Do not overheat the griddle. Leaving the griddle burner on at
HI for on extended amount of time without food con damage
the nonstick coating.
■ Evite el uso de utensilios de metal con puntos pronunciados
o extremos muy filosos que podrían dañar la superficie de la
plancho.
■ No corte los comidos en la plancho.
Riesgo de Incendio
NOTA: Su plancha se descolorará con el paso
del tiempo, o medida que se sazone con el uso.
Plancha Antiadherente para el Modelo JGB870
Tipo de Comida Condiciones de
Precalentamiento
Cómo Calentar Tortillas 4 min. 5
Panqueques 4 min. 7
Hqmburquesqs 4 min. 8
Huevos Fritos 2 min. 7
Embutidos poro el Desayuno 3.5 min. 8
Sándwiches Calientes (Tales
como con Queso a la Plancha
3 min. 8
NOTA: Es posible que sea necesario ajustar las configuraciones
de la plancha si se usará por un periodo prolongado.
Cook Setting
Plancha Presazonada para los Modelo PGB995
Tipo de Comida Condiciones de
Precalentamiento
Cómo Calentar Tortillas Ninauno 3 (Med-Baio)
Panqueques 7 (Med-Alto)
Hamburguesas 7 (Med-Alto)
Embutidos para el
Desayuno
Sándwiches Calientes (Tales
como con Queso a la Plancha
3 min.
5 min.
Alto
5 min.
Alto
4 min.
NOTA: Es posible que sea necesario ajustar las configuraciones
de la plancha si se usará por un período prolongado.
Cook Setting
7 (Med-Alto)
7 (Med-Alto)
5 (Med)
Alto
Plancha Antiadherente para el Modelo CGS990
Tipo de Comida Condiciones de
Precalentamiento
Cómo Calentar Tortillas Ninauno 3 (Med-Baio)
Panqueques 4 (Med-Alto)
Hamburguesas Alto 5 (Med)
Huevos Fritos Hi
Embutidos para el Alto 5 (Med)
Desayuno 5 min.
Sándwiches Calientes Alto Alto
(Tales como con Queso a la
Plancha
10 min.
5 min. Dorar en Hi (Alto)
5 Alto.
4 min.
Cook Setting
4 (Med)
por 1 minuto de
cada lado.
4 (Med)
NOTA: Es posible que sea necesario ajustar las configuraciones
de la plancha si se usará por un periodo prolongado.
Page 65

Uso de los controles del horno.
(Es posible que las funciones y apariencias varíen con relación a su modelo a lo largo del manual.) GEAppliances.com
Control del Homo, Reloj, Temporizodory Funciones en
Modelos CG5985.
Tecla de Horneado
o
Presione para seleccionar la función hornear.
Tecla de Horneado por Convección
Presione para seleccionar hornear con la función
o
de convección.
Tecla de Tostado por Convección
Presione para seleccionar tostar con la función de
o
convección.
Tecla Iniciar.
o
Se deberá presionar para comenzar cualquier
función de cocción o limpieza.
Tecla Callente
Presione para mantener calientes las comidas
o
ya cocinadas. Lea la sección Cómo Configurar el
Horno para Calentar.
Pantalla
Muestra la hora del día, temperatura del horno,
si el horno está en el modo hornear, asar o auto
©
limpieza, los tiempos configurados para las
funciones del temporizador o de horno automático,
y si la cocina está bloqueada.
Si "F- y un número o letra" titilan en la pantalla y el
control del horno da una señal, esto indica un código
de error de función. Toque la tecla Clear/ Off (Borrar/
Apagar^. Permita que el horno se enfríe durante una
hora. Coloque el horno nuevamente en funcionamiento.
Si el código de error de función se repite, desconecte la
corriente del horno y llame al servicio técnico.
Si su horno fue configurado para un funcionamiento por
tiempo y se produce un corte de corriente, el reloj y las
funciones programadas serón reiniciados.
La hora del día titilará en la pantalla cuando haya
habido un corte de corriente.
Tecla de Auto Limpieza
Presione para seleccionar la función de auto
limpieza. Lea la sección homo con función de auto
limpieza.
Teda de Luz On/ Off (Encendida/Apagada) del horno.
Presione para encender o apagar la luz del horno.
e
Teda de Tiempo de Retraso
Usejunto con las teclas COOKiNG TÍME (Tiempo
0
de Cocción) o SELF CLEAN (Auto Limpieza) para
configurar el horno para que se inicie y detenga de
forma automática en el tiempo que configuró.
Tecla de Tiempo de Cocción
Q
Presione la tecla y luego presione las teclas
numéricas para configurar la cantidad de tiempo
durante el cual desee que su comida se cocine. El
horno se apagará cuando el tiempo de cocción se
haya terminado.
Tecla Clear/ Off (Borrar/ Apagarl
Q
Presione para cancelar TODAS las operaciones del
horno, excepto el reloj, temporizodory Bloqueo del
Control de Gas o Bloqueo del Control (dependiendo
del modelo).
Tecla de Reloj
0
Presione antes de configurar el reloj.
Teclas Numéricas
©
Use esta tecla para configurar cualquier función
que requiera números, tales como la hora del día
en el reloj, el temporizador, la temperatura del
horno, la temperatura interna de la comida, la hora
de inicio y la duración del funcionamiento para
horneado por tiempo y auto limpieza.
Tecla Kitchen Timer On/ Off (Temporizador de
Q
Cocina Encendido/ Apagado)
Presione para seleccionar la función del contador.
Tecla de Sonda
©
Presione al usar la sonda para realizar una
cocción.
Bloqueo del Control de Gas (en algunos modelos)
©
Mantenga presionada la tecla Gas/ Control
Lockout (Bloqueo del Control de Gas) durante
3 segundos para bloquear/ desbloquear los
quemadores superficiales, los quemadores del
horno y el panel de control, de modo que no
puedan ser activados.
Page 66

Uso del Hornos.
Para evitar posibles quemaduras, coloque los estantes en la posición deseada antes de encender el horno.
Antes de comenzar^
El horno tiene 2 posiciones de
estantes. También cuenta con una
posición especial del estante bajo
(Rl para cosas más grandes, tales
como un pavo grande.
Los artícuios de piástico sobre ia
parte superior dei horno se podrán
derretir si se ios deja demasiado
cerca de ia ventiiadón.
La apariencia y ia ubicación de ia
ventiiadón varían.
Los estantes poseen bloqueadores, de modo
que al colocarlos correctamente sobre los
soportes (A a C) se detendrán antes de salirse
completamente
y no se inclinarán.
Al colocar y retirar utensilios de cocina, empuje
el estante hacia afuera del tope sobre el
soporte del estante.
A PRECAUCIÓN:
Al usar
un estante en la posición más baja (R), se
deberá tener cuidado al empujar el estante
varias pulgadas hacia afuera y luego,
utilizando dos sostenedores de olla, empuje
el estante hacia afuera sosteniendo los
lados. El estante está en una posicián baja y
usted podría sufrir una quemadura si coloca
la mano en medio del mismo al empujar
hacia afuera.
Ventilación del Horno Superior
Su horno es ventilado a través de conductos
en la parte trasera de la cocina. No bloquee
estos conductos al cocinar en el horno - es
importante que el flujo de aire caliente desde
el horno y el aire fresco hacia el quemador
del horno no sean interrumpidos. Evite tocar
las aberturas de la ventilación o superficies
cercanas durante el funcionamiento del horno
y el asador - se podrán calentar.
■ Las manijas de las ollas y cacerolas se
podrán calentar al estar en la parte superior
del horno si se las ubica demasiado cerca de
la ventilación..
Para retirar el estante, empuje el mismo hacia
usted, incline el extremo frontal hacia arriba y
empuje hacia afuera.
Para hacer un reemplazo, coloque el extremo
del estante (bloqueadores) en el soporte, incline
el frente hacia arriba y empuje el estante hacia
adentro.
NOTA: El estante no está diseñado para
deslizarse hacia afuera en la posición especial
del estante bajo (R).
No deje envases cerrados en la parte
superior de la cocina. La presión en envases
cerrados se podrá incrementar, lo cual podrá
hacer que exploten.
Los artículos de metal se calentarán
demasiado si se los deja sobre la parte
superior de la cocina y podrán ocasionar
incendios.
10
■ No deje artículos de plástico o inflamables
sobre la parte superior de la cocina;
se podrán derretir o incendiarse si se
encuentran demasiado cerca de la
ventilación
Corte de Corriente
El horno o asador no se podrán iluminar
durante un corte de corriente. No circulará gas
a menos que la barra brillante esté caliente
Si el horno se encuentra en uso cuando se
produzca un corte de corriente, el quemador
del horno se apagará y no se podrá volver a
Luz del Horno Superior
Presione la tecla Oven Light (Luz del Horno)
en el panel de control superior para encender
o apagar la luz.
encender hasta que vuelva la corriente. Esto
se debe a que el flujo de gas se detiene de
forma automática y no se reiniciará cuando la
corriente sea restaurada, a menos que la barra
brillante haya alcanzado la temperatura de
funcionamiento.
Page 67

Uso del horno inferior
GEAppliances.com
Si su modelo cuenta con una traba para puerta, no bloquee la puerta con la traba durante el horneado o tostado.
La traba se usa para la función de auto limpieza únicamente.
Cómo Configurar el Horno Inferior para Horneado o Dorado
El horno cuenta con una posición
especial para estante bajo (Rl justo
sobre la parte inferior del horno.
Use esta posición cuando necesite
espado adicional para la cocción.
Por ejemplo, cuando cocine un
pavo grande. El estante no está
diseñado para deslizarse y ser
levantado en esta posición.
Su horno no está diseñado para la cocción con
la puerta abierta.
|~^ Presione la tecla Bake (Hornear).
^ Touch the number pads to set the desired
'—' temperature.
2] Presione la tecla Sfori’ (Iniciar).
Aparecerá la palabra ON (Encendido)y
100°. A medida que el horno se caliente, la
pantalla mostrará el cambio de temperatura.
Cuando el horno alcance la temperatura que
programó, sonarán un pitido.
Para cambiar la temperatura del horno durante
el ciclo BAKE (Hornear), presione la tecla Bake
(Hornear) y luego las teclas numéricas para
obtener la nueva temperatura.
Controle que la comida esté hecha en el
4
tiempo mínimo de cocción de la receta.
Cocine durante más tiempo si es
necesario.
Presione la tecla Ciear/ Off (Borrar/
ApogorJ cuando la cocción esté completa.
NOTA; Es posible que el ventilador se encienda
y apague de forma automática para enfriar las
partes interiores. Esto es normal, y es posible
que el ventilador continúe funcionando incluso
luego de que el horno se apague.
Precalentamiento y Ubicación de Ollas
A! hornear en un solo estante,
use la posición del estante
desde el cuadro para su tipo de
comida. Los resultados del horneado
serán mejores si las cacerolas de
horneado se encuentran en el centro
del horno la mayor cantidad de
tiempo posible.
Para evitar posibles quemaduras, coloque
los estantes en la posición deseada antes de
encender el horno.
Precaliente el horno si la receta lo requiere.
Para calentar el horno previamente, ajuste
la temperatura correcta. Es necesario
precalentar el horno para el horneado por
convección y para obtener buenos resultados
al cocinar tortas, galletas, pasteles y panes.
Para hornos sin una luz o tono indicador de
precalentamiento, precaliente durante 10
minutos.
Los resultados del horneado serón mejores
si las cacerolas de horneado se encuentran
en el centro del horno la mayor cantidad de
tiempo posible. Las cacerolas no deben tocarse
mutuamente ni tocar las paredes del horno.
Si necesita usar dos estantes, escalone las ollas
de modo que uno no esté directamente sobre
el otro, y deje aproximadamente un espacio
de 1
Vz" entre las ollas, desde el frente, la parte
trasera y los costados de la pared.
NOTA; No hornee ni almacene nada en
ninguno de los hornos durante un ciclo de auto
limpieza.
Al hornear cuatro capas de
torta de una sola •vez, use los
estantes A y C. Coloque las
ollas inferiores en la parte
trasera del estante y las ollas
superiores en la parte frontal
del estante que se muestra,
de modo que una olla no esté
directamente sobre la otra.
Papel de Aluminio
No use papel de aluminio para revestir el
fondo del horno. El aluminio atrapará el calor
inferior y alterará el funcionamiento del horno.
El aluminio se puede derretir y dañar de
forma permanente la parte inferior del horno.
Los daños por uso inadecuado del papel de
aluminio no están cubiertos por la garantía del
producto.
Humedad del Horno
A medida que el horno se caliente, el cambio
de temperatura en el aire del horno podrá
generar la formación de gotas de agua en el
Se podrá usar aluminio para evitar derrames,
colocando una hoja sobre un estante inferior,
varias pulgadas debajo de la comida. No use
más aluminio que el necesario y nunca cubra
totalmente el estante de un horno con papel de
aluminio. Mantenga el aluminio a por lo menos
11/2" de las paredes del horno, para evitar una
circulación deficiente del calor.
vidrio de la puerta. Estas gotas son inofensivas
y se evaporarán a medida que el horno se siga
calentando. 11
Page 68

Uso del horno superior.
Para usar el horno superior
|~^ Presione hacia adentro y gire la perilla
del horno superior hacia cualquier
configuración deseada.
^ Permita que el horno superior se
precaliente.
■ La luz de la señal del horno superior está
ubicada en el lado superior izquierdo de la
perilla y brilla cuando la perilla está en la
Push in and turn the upper oven
knob to any desired setting.
posición
(Encendido) hasta que la perilla es movida a la
posición OFF (Apagado).
■ La luz de la señal "Heating" (Calentar) está
ubicada sobre el costado superior derecho
y brilla cuando los elementos de calefacción
están activos. El precalentamiento está
completo luego de que la señal "Heating"
(Calentar) se haya apagado por primera vez
en cada uso. Un tono NO sonará cuando el
horno haya finalizado el precalentamiento.
ON (Encendido). Permanece en ON
NOTAS:
■ El horno inferior no se puede usar durante un
ciclo de auto limpieza del horno superior.
■ No coloque comida, papel de aluminio ni
utensilios de cocina directamente en el fondo
del horno superior.
■ SI las comidas requieren estar cubiertas, use
sólo papel de aluminio o tapas que resistan
las temperaturas de horneado. No use
plástico.
■ Para mejores resultados durante el horneado,
use el estante en la posición B. SI el plato
es demasiado alto, coloque el mismo en el
estante en la posición C.
■ Para obtener mejores resultados, hornee las
tortas en el horno Inferior.
12
Page 69

Uso del horno superior.
Guía para Asar
GEAppliances.com
El tamaño, peso, grosor,
temperatura ¡nidaly su
preferencia de preparación
afectarán los tiempos del
asado. Esta guia está basada
en carnes a temperatura de
refrigerador.
El Departamento de Agricultura
de EE.UU. ÍU.S. Department of
Agriculture) afirma gue "el bife
jugoso es popular, pero gue usted
debería saber gue cocinar el
mismo a sólo 140° E significa gue
algunos organismos venenosos
gue se encuentran en la comida
pueden sobrevivir" (Euente: Safe
Eood Book, Your Kitchen Guide
(El Libro de la Comida Segura, Su
Guía de Cocina). USDA Rev. Junio
de 1985.)
El horno superior tiene 2 posiciones
de estantes.
** En general, las posiciones de
los estantes superiores producen
dorados externos más oscuros y
las posiciones inferiores producen
mayor consistencia en la cocción.
Para obtener mejores resultados, la
olla para asar se debería orientar en
forma paralela a la parrilla.
Comida Preparada Tipo 0 Grosor
Bife Jugoso,
A punto
Jugoso (140°F -
150° F)
A punto
(160° F)
Cocido
(170° F)
A punto
(150° F)
Bistecs -
1" de grosor
Bistecs -%a
1" de grosor
Bistecs -%a
1" de grosor
Ground Beef
Patties -
Con
figuración
para Asar
Giratorio /
Plano
Giratorio /
Plano
Giratorio /
Plano
Giratorio /
Plano
‘Posición
del
Comentarios
Estante
A Es difícil cocinar
en el puntojugoso
los bistecs de un
grosor inferior a 1".
A
A
A
Es posible que se
cocinen antes de
dorarse.
1/2"to 3/4"
thick
Cocido
(170° F)
hamburguesas
de carne
Giratorio /
Plano
A
picada - 1/2" a
%" de grosor
Pollo Pechuga,
deshuesada
Pechuga,
con huesos
Filetes de
Pescado
Costilla
de cerdo
Cocido
(170° F)
yí' a 1" de
grosor
%" de grosor
Giratorio /
Plano
Giratorio /
Plano
Giratorio /
Plano
Giratorio /
Plano
Giratorio /
Plano
A Ase del lado de la
piel hacia abajo
A
primero.
A Sostenga y gire
con mucho
A
cuidado.
A Para evitar
ondeados, corte
la grasa por
intervalos de 1".
*Debido a una variedad de carnes y cortes disponibles, puede seleccionar posiciones alternativas de estantes en
base a su preferencia personal de preparación y apariencia externa. Consulte en la ilustración la descripción de las
posiciones de los estantes.
Cierre la puerta. Siempre ase con la
puerta cerrada.
Cómo Programar el Horno Superior para Asar
|~^ Coloque la carne o pescado sobre una
rejilla para asar en una cacerola para
asar.
^ Use las posiciones sugeridas para repisas
— en la Guia para Asar.
La puerta del horno se deberá cerrar
durante el asado.
Presione hacia adentro y gire la perilla del
horno superior para la configuración asar.
Sirva la comida de forma inmediata, y deje
la olla afuera del horno para que se enfríe
durante la comida para una limpieza más fácil.
13
Page 70

Uso del reloj y el temporízador.
No todas las funciones corresponden a todos los modelos.
Para Configurar el Reloj
Clock
Asegúrese que el reloj marque la
hora correcta del día.
Kitchen
Timer
On/Off
Ser WAmm Omwi!
H 0 H H E
Start
La función de temporízador sólo
cuenta por minutos. La función
Clear/ Off (Borrar/ Apagar! no
afecta el temporízador.
CoNnwL Loamn'
El reloj se deberá configurar en la hora correcta
del día para que las funciones automáticas
del temporízador del horno funcionen de
forma adecuada. La hora del día no se puede
cambiar durante un horneado por tiempo o el
ciclo de auto limpieza.
|~^ Presione la tecla Clock (Reloj).
12 Presione las teclas numéricas.
Presione las teclas numéricas de la misma
forma que las lee. Por ejemplo: para configurar
12:34, presione las teclas numéricas l,2,3y4
en ese orden.
Para Configurar el Temporízador (sólo el horno inferior)
El temporízador no controla el funcionamiento
del horno. La configuración máxima del
temporízador es 9 horas y 59 minutos.
Presione la tecla Kitchen Timer On/ Off
(Encendido/ Apagado del Temporízador
de Cocina).
Presione las teclas numéricas hasta que la
cantidad de tiempo que desea aparezca
en la pantalla. El tiempo máximo que se
puede ingresar en minutos es 59. Los
tiempos superiores a 59 minutos se
deberían cambiar a horas y minutos. Por
ejemplo: para ingresar 90 minutos como 1
hora y 30 minutos, presione 1,3 y 0 en ese
orden.
Si las teclas numéricas no se tocan dentro del
período de un minuto luego de haber tocado
la tecla Clock (Reloj), la pantalla vuelve a la
configuración original. Si esto sucede, presione
la tecla Clock ÍRe/oj)y vuelva a ingresar la hora
del día.
TPresione la tecla Start (Iniciar) hasta que
la hora del día aparezca en la pantalla.
Esto ingresa la hora e inicia el reloj.
Para controlar la hora del día cuando la pantalla
muestra otra información, simplemente
presione la tecla Clock (Reloj). La hora del día
aparece hasta que otra tecla es presionada.
Si comete un error, presione la tecla Kitchen
Timer On/ Off (Encendido/ Apagado del
Temporízador de Coc/no) y vuelva a comenzar.
Presione la tecla Start (Iniciar). Luego de
presionar la tecla Start (Iniciar), Set
(Configuración) desaparece; esto le indica
que el tiempo está en cuenta regresiva,
aunque la pantalla no cambia hasta que
haya pasado un minuto.
Cuando el contador llegue a :00, el control
hará 3 pitidos seguidos por un pitido cada
6 segundos, hasta que se presione la tecla
Kitchen Timer On/ Off (Encendido/
Apagado del Temporízador de Cocina).
El tono de 6 segundos se puede cancelar
siguiendo los pasos en la sección de control de
funciones Especiales de su horno, en Tones at
the End of a Timed Cycle (Tonos al Final de un
Ciclo por Tiempo).
14
Para Reiniciar el Temporízador
Si la pantalla aún muestra el tiempo restante,
la puede cambiar presionando la tecla Kitchen
Timer On/ Off (Encendido/ Apagado del
Temporízador de Cocina), y luego presionando
las teclas numéricas hasta que el tiempo que
desea aparezca en la pantalla.
Para Cancelar el Temporízador
Presione la tecla Kitchen Timer On/ Off
(Encendido/ Apagado del Temporízador de
Cocina) dos veces.
Corte de Corriente
Si la hora aparece titilando en la pantalla,
significa que se produjo un corte de corriente.
Reinicie el reloj.
Si el tiempo restante no se encuentra en la
pantalla (retraso del comienzo del reloj o
tiempo de cocción aparecen en la pantalla),
recuerde el tiempo restante presionando
la tecla Kitchen Timer On/ 01^ (Encendido/
Apagado del Temporízador de Cocina) y luego
presionando las teclas numéricas para ingresar
el nuevo tiempo que desee.
Presione la tecla Clock (Reloj) una vez para
reiniciar. Ingrese la hora del día correcta
presionando las teclas numéricas apropiadas.
Presione la tecla Start (Inicio).
Page 71

Uso de las funciones de horneado
y dorado por tiempo, (sólo el horno Inferior) GEAppliances.com
NOTA: Las comidas que se echan a perder rápidamente, tales como leche, huevos, pescado, rellenos, ave y cerdo, no se
deberán dejar reposar por más de 1 hora antes y después de la cocción. La temperatura ambiente estimula el desarrollo
de bacterias nocivas. Asegúrese de que la luz del horno esté apagada, ya que el color de la lámpara acelerará el
crecimiento de bacterias nocivas.
Cómo Configurar un Inicio Inmediato y Detención Automática
Bake
Ш S Ш И Ш
Sft Wawws Ohhcr
H И Ш И Ш
Cooking
шшшиш
SíT W<WtlN6 DUWER
И И Ш И Ш
Саипш Locnwr
Time
Сонтш LocmuT
Start
Clear
Off
El horno superior se encenderá de formo
inmediato y se cocinará por un período de tiempo
seleccionado. Al final del tiempo de coccián, el horno
se apagará automáticamente.
[/] Presione la tecla Bake (Hornear).
Presione los teclas numéricos poro programar
'—' la temperatura deseado del horno.
Presione la tecla Cooking Time (Tiempo de
J
Cocción).
NOTA: Si su receta requiere caientar en forma previa,
es posibie que necesite tiempo adicionai sobre ei
tiempo de cocción.
Presione los teclas numéricos poro configurar
el período de tiempo de coccián deseado. El
tiempo mínimo de coccián que puede
configurares 1 minuto.
La temperatura del horno que configure y el
tiempo de coccián que ingresá aparecerán en
la pantalla.
Presione la tecla Start (iniciar).
El horno aparecerá en ON (Encendido), y la pantalla
mostrará la cuento regresivo del tiempo y el cambio
de temperatura a partir de los 100° F. (La pantalla de
temperatura comenzará el cambio uno vez que la
temperatura del horno alcance los 100° F). Cuando
el horno alcance la temperatura que progromá,
sonarán 3 pitidos.
El horno continuará cocinando durante la cantidad
de tiempo configurada, y luego de apagará de
forma automática.
Luego de que el horno se apague, sonará el tono de
fin del ciclo.
Presione la tecla Clear/Off (Borrar/Apagar)
para apagar la pantalla si es necesario. Retire
la comida del horno. Recuerde que aunque el
horno se apague de forma automática, la
comida que permanezca dentro de éste
continuará cocinándose cuando el horno esté
apagado.
Bake
ШШШИШ
SFrW/WttwOMHCR
H и и и Ш
Cooking
Сонти Loatour
Time
ЩШШШШ
Ш И И И И
ШШШИШ
Sft Wwhws Dhher
ШШШИШ
CownoiLoamT
Delay
Start
CoNmoi Locxour
Start
Clear
Off
Cómo Configurar un Inicio Retrasado y Detención Automática
El horno superior se encenderá en el horario
del día que configure, cocinará durante un
período de tiempo específico y luego se apagará
automáticamente.
Asegúrese que el reloj marque la hora correcta del día.
Presione la tecla Bake (Hornear).
Presione las teclas numéricas para programar
la temperatura deseada del horno.
Presione la tecla Cooking Time (Tiempo de
Cocción).
NOTA: Si su receta requiere caientar en forma previa,
es posibie que necesite tiempo adicionai sobre ei
tiempo de cocción.
Presione las teclas numéricas para configurar
el período de tiempo de coccián deseado. El
tiempo mínimo de coccián que puede
configurares 1 minuto.
La temperatura del horno que configure y el
tiempo de coccián que ingresá aparecerán en
la pantalla.
Presione la tecla Delay Start (Retrasar inicio).
Presione las teclas numéricas para configurar
la hora del día en que desea que el horno se
encienda y comience a cocinar.
/ Presione la tecla Start (iniciar).
NOTA: Un tono de atención sonará si está usando ei
NOTA: Si desea controlar los horarios configurados,
presione la tecla Delay Start lanicio Retrasado) para
controlarla hora de Inicio que configuró o presione la
tecla Cooking Time (Tiempo de Cocción) para controlar
el período de tiempo de cocción que programó.
Cuando el horno esté en ON (Encendido) a
la hora del día que configuró, en la pantalla
aparecerá la cuenta regresiva de la cocción y
el cambio de temperatura a partir de los 100°F.
(La pantalla de temperatura comenzará a
cambiar una vez que la temperatura del horno
alcance los 100° F). Cuando el horno alcance
la temperatura que programó, sonarán varios
pitidos.
El horno continuará la coccián durante la cantidad
de tiempo programada, luego se apagará
automáticamente, a menos que la funcián
Cook and Hold (Mantener la Cocción) haya sido
programada. Lea las funciones Especiales de la
seccián de control del horno.
Luego de que el horno se apague, sonará el tono
de fin del ciclo.
Presione la tecla Clear/Off (Borrar/Apagar) para
apagar la pantalla si es necesario. Retire la
comida del horno. Recuerde que aunque el horno
se apague de forma automática, la comida que
permanezca dentro de éste continuará
cocinándose cuando el horno esté apagado.
horneado por tiempo y no se debe tocar ia teda Start
(inicio).
15
Page 72

Uso de la sonda. (sólo el horno inferior)
Aprecaución
Para evitar quemaduras, no desenchufe la sonda desde el enchufe del horno hasta que
este último se hoyo enfriado. No guarde la sonda dentro del horno.
Si su modelo cuenta con una traba para puerta, no bloquee la puerta con la traba durante la cocción con la sonda. La
traba se usa para la función de auto limpieza únicamente.
Para muchas comidas, especialmente comidas tostadas y ave, la temperatura interna de la comida es la mejor prueba
de que está hecha. La sonda de temperatura elimina las conjeturas con relación a la cocción de las comidas, e indica
con exactitud la preparación que usted desea.
Si se usa una sonda que no seo la provisto con
este producto, se podrán producir daños sobre
ésta.
Use las manijas de la sonda para enchufarlo ol
La sonda de temperatura cuenta
con una sonda tipo brocheta en
un extremo y un enchufe en el
otro extremo que se conecta en el
enchufe del horno.
insertar y retirar los mismos de la comido y del
enchufe.
■ Para evitar daños sobre la sonda, no use
agarraderas para empujar el cable al retirarlo
■ Poro evitar romper la sondo, asegúrese de
que lo comido hoyo sido completamente
descongelado antes de insertarlo.
Luego de preparar lo carne y de colocar lo
mismo en el salvamanteles o en una rejilla de
olla poro osar, sigo estos instrucciones poro
ubicar la sondo de formo correcto.
Inserte lo sondo completamente en lo carne.
No debería tocar el hueso, lo graso ni el
cartílago.
Poro dorar sin huesos, inserte la sondo en lo
Poro evitar posibles quemaduras, no
desenchufe lo sondo del enchufe del horno
hasta que este último se hoyo enfriado.
Nunca deje la sondo dentro del horno
durante un ciclo de auto limpieza.
No guarde la sondo dentro del horno.
jamón o cordero con hueso, inserte la sondo en
el centro del músculo o articulación más bajo y
largo.
Inserte lo sondo en el centro de platos toles
como pastel de carne o cazuelas.
Inserte lo sondo en lo porte más carnoso del
muslo interno desde abajo y paralelo a lo poto
de un pavo entero.
Manijas
porte más carnoso del dorado. Poro cocinar
HsaHE
SetWmhmsOmhgi
H □ H 0 0
ES000
Set Wmhms Omhgi
0 0 0 0 0
16
Probe
Bake
Start
Clear
Off
Cewna Lecnwr
Cewna Lecmi/r
Cómo Configurar el Horno Bajo para Cocinar Cuando se usa la Sonda
Inserte lo sondo en lo comido.
m
Enchufe la sondo en el enchufe del horno.
Asegúrese de que esté completamente
enchufado. Cierre la puerto del horno.
Presione la tecla Probe (Sonda).
Presione los teclas numéricos poro
configurar la comido interno deseado o la
temperatura de lo carne entre 100° F y
200° F.
5" Presione la tecla Bake (Hornear).
Presione los teclas numéricos poro
programar la temperatura deseado del
horno.
Presione la tecla Sfori’ (Iniciar).
7
La pantalla doró un aviso si la sondo es
enchufado en el enchufe de entrado y no se
configuró la temperatura ni se tocó la tecla
Stort (Inicio).
La pantalla mostrará LO (Bajo) hasta que lo
temperatura interno de la comido llegue a
los 100° F; luego se mostrará el cambio de la
temperatura interno.
Cuando la temperatura interno de la
s
comido llegue ol número que configuró, la
sondo y el horno se apagarán y el control
del horno da una señal. Poro detener lo
señal, presione la tecla Clear/Off (Borrar/
Apagar). Use un guante de cocina poro
retirar la sondo de lo comido. No use
agarraderos poro empujarlo; podrían
dañar la sondo.
Poro cambiar la temperatura del horno durante
lo cocción con sondo, presione la tecla Bake
(Hornear)y luego los teclas numéricos poro
configurar la nuevo temperatura.
■ Si la sonda es retirada de la comida antes de
que llegue a la temperatura final, sonará un
tono y la pantalla titilará hasta que la sonda
sea retirada del horno.
■ Puede usar el Temporizador, aunque no
puede usar operaciones del horno por tiempo
al usar la sonda.
Page 73

Uso del horno inferior por convección. (en algunos modelos) GEAppliances.com
El ventilador por convección se apaga cuando la puerta del horno se abre. NO deje la puerta abierta durante períodos
prolongados de tiempo mientras usa la cocción por convección.
En un horno por convección, un
ventilador hace circular aire sobre,
debajo y alrededor de la comida.
Este aire caliente que circula
se distribuye de forma pareja a
través de la cavidad del horno.
Como resultado, las comidas son
cocinadas y doradas de forma
pareja; con frecuencia en menos
tiempo que con el calor regular.
Para ayudarle a entender la diferencia entre
el horneado y el tostado por convección y el
horneado y tostado tradicional, aquí figuran
algunos pautas generales.
Horneado por Convección
■ Precaliente el horno. Leo la sección Uso del
Precalentamiento del Horno y Ubicación de
la Olla.
■ Ideal poro comidos cocinados en estantes
múltiples.
■ Bueno poro grandes cantidades de comidos
horneados.
■ Buenos resultados con galletas, galletitas,
bizcochos de chocolate y nuez, bocaditos de
crema, arrollados dulces, pastel de ángel y pan.
El ventilador por convección hoce circular el
aire caliente de formo parejo sobre y alrededor
de la comido.
Tostado por Convección
■ Bueno poro cortes de carne descubiertos
que sean grandes y tiernos.
El ventilador por convección hoce circular el
aire caliente de formo parejo sobre y alrededor
de la comido. La carne y el ove son dorados
en todos sus lodos, como si hubiesen sido
cocinados en una rotisería. El aire caliente
circulo sobre, debajo, y alrededor de la comido
que se está dorando. El aire caliente sella los
jugos rápidamente para obtener un producto
húmedo y tierno mientras que, al mismo
tiempo, crea una parte exterior rica y dorada.
Los dorados y el ave se deben cocinar en el
estante de la posición (A).
Cuando se está dorando por convección, es
importante que se use una olla para osar
y uno rejilla poro mejores resultados en
lo convección. La olla se uso poro atropar
derrames de graso y la rejilla se uso poro evitar
salpicaduras de graso.
■ Coloque el estante en la posición de estante (A).
Convection
Bake
Ser WAKMm Omhcr
H 0 H H 0
Start
Clear
Off
Conversión de Auto Recipe^^
Puede usar sus recetas favoritos en el horno
por convección.
Al usar CONVECTION BAKE (Horneado por
Convección), el horno convertirá de formo
automático la temperatura del horno del
horneado regular a los temperaturas de
Horneado por Convección.
Utilizando los teclas numéricos, ingrese
m
la temperatura recomendado en la
receto.
Presione la tecla Start (Iniciar).
Lo pantalla mostrará la temperatura real
convertido (reducido). Por ejemplo: si se
ingreso la temperatura regular de uno
receto de 350° F (177° C) y se presiono la
tecla Start (Iniciar), la pantalla mostrará
CON y la temperatura convertido de
325° F(163° C).
NOTA: Esto función sólo convierte
los temperaturas de cocción, y no
los tiempos de cocción. Al osar por
convección, la temperatura del horno no
se convertirá en formo automático.
Presione la tecla Clear/Off (Borrar/
Apagar) cuando la cocción esté
completo.
■ Use el tornano de olla recomendado en la
receto.
■ Algunos instrucciones del paquete poro
cazuelas congelados, platos principales o
productos horneados fueron desarrollados
utilizando hornos por convección
comerciales. Para mejores resultados con
este horno, precaliente el mismo y use la
temperatura, para un horneado regular,
que figura en el paquete.
Para desactivar la función:
Presione los teclas Warm (Calentar) y
m
Bake (Horneado) al mismo tiempo hasta
que la pantalla muestre SE.
Presione la tecla Convection Bake
(Hornear por Convección). La pantalla
mostrará Con ON (Convección
Encendida). Presione la tecla Convection
Bake (Hornear por Convección)
nuevamente. Lo pantalla mostrará Con
Off (Convección Apagada).
Presione la tecla Start (Iniciar).
17
Page 74

Uso del horno inferior por convección.
Utensilios de Cocina para Cocción por Convección
GEAppliances.com
Convection
Bake
a a [2 [II0
Set MAwwiNS OHM«
or
Convection
Roast
0 0 0
Start
Clear
Off
Antes de usar el horno por convección, controle
que su utensilio de cocina deje espacio para
la circulación de aire en el horno. Si horneará
con varias ollas, deje espacio entre las mismas.
Además, asegúrese de que los olios no se
toquen entre sí y que no toquen las paredes del
horno.
Papel y Plástico
El papel resistente al calor y los envases de
plástico que se recomiendan para uso con
hornos regulares se pueden usar en hornos por
convección. Los utensilios de cocina de plástico
resistentes a temperaturas de 400° F también
se pueden usar, cuando el horno se encuentre
por debajo de los 400° F.
Metal y Vidrio
Cualquier tipo de utensilio de cocina funcionará
en su horno por convección. Sin embargo,
las ollas metálicas calientan más rápido y se
recomiendan para el horneado por convección.
■ Las ollas oscurecidas o con acabado tipo
mate hornearán más rápido que las ollas
brillantes.
■ Las ollas de vidrio o cerámica cocinan con
mayor lentitud.
Al cocinar galletas, obtendrá mejores
resultados si usa una hoja plana para galletas
en lugar de una olla con lados bajos.
Para recetas toles como pollo al horno, use una
olla con lados bajos. El aire no puede circular
bien alrededor de la comida en una olla con
lados altos.
Cómo Configurar el Horno Bajo para Horneado o Dorado por Convección
jyj Presione la tecla Convection Bake
(Hornear por Convección) o Convection
Roast (Dorar por Convección).
Presione las teclas numéricas para
programar la temperatura deseado del
horno.
J Presione la tecla Start (iniciar).
Poro cambiar la temperatura del horno,
presione la tecla Convection Bake (Horneado
por Convección) o la tecla Convection
Roast (Dorado por Convección) y luego los
teclas numéricos poro configurar la nuevo
temperatura.
Cuando el horno se empiece a calentar,
se exhibirá el cambio de temperatura, que
comenzará en los 100°F. Cuando el horno
alcance la temperatura que programó, sonarán
3 pitidos.
^ Presione la tecla Ciear/ Off (Borrar/
Apagar) cuando la cocción esté completo.
NOTA: Escuchará un ventilador al cocinar por
convección. El mismo se detendrá cuando
se abra la puerta, pero el calentador no se
apagará.
El ventilador no comenzará hasta que se llegue
a la temperatura de precalentamiento.
NOTA: Al hornear por convección, la
temperatura del horno será de 25° F (14° C),
inferior a la temperatura configurada. Para
más información, lea Auto Recipe Conversion
(Conversión Automática de Recetas) en la
sección Special Features (Funciones Especiales).
Al asar por convección, la temperatura del horno
no se convertirá en forma automática.
18
Page 75

GEAppliances.com
Cómo Configurar el Horno Bajo para Tostar por Convección Cuando se Usa la Sonda, (en algunos modelos}
Para obtener mejores resultados al
tostar pavos grandes y tostados,
recomendamos el uso de la
sonda Incluida en el horno por
convección.
Convection
Roast
i HI
E E
Lj
’ IViWHtNe Omwb
m
H
I LO I I MED I I HI I I . I I - I
LU B B E E
E B B E E
B B E E
Probe
Set IVMHme Omwb)
CoMiRM Lockout
Start
Clear
Off
La pantalla hará que titile la palabra PROBE
(Sonda!y el control del horno dará la señal si la
sondo es enchufado en el enchufe de entrado y
no se configuró la temperatura de la sondo y se
tocó la tecla Start (Inicio).
|~^ Coloque el estante en la posición de
estante (A). Inserte la sondo
completamente en la comido.
Enchufe la sondo en el enchufe del horno.
Asegúrese de que esté completamente
enchufado. Cierre la puerto del horno.
Presione la tecla Convection Roast
(Tostado por Convección).
Presione los teclas numéricos poro
programar la temperatura deseado del
horno.
Presione la tecla Probe (Sonda).
Presione los teclas numéricos poro
programar la temperatura interno
deseado de la comido.
Poro cambiar la temperatura del horno
durante el ciclo de Tostado por Convección,
presione la tecla Convection Roast (Tostado
por Convección) y luego presione los
teclas numéricos poro configurar la nuevo
temperatura deseado.
Aprecaución
quemaduras, no desenchufe la sonda desde
el enchufe del horno hasta que este último
se haya enfriado. No guarde la sonda dentro
del horno.
NOTA:
■ Si la sondo es retirado de la comido antes de
que llegue a la temperatura final, sonará un
tono y la pantalla titilará hasta que la sondo
seo retirado del horno.
■ Escuchará un ventilador al cocinar con esto
función. El mismo se detendrá cuando se
obro la puerto, pero el calentador no se
apagará.
■ Puede usar el temporizodor, aunque no
puede usar operaciones del horno por
tiempo al usar la sondo.
Para evitar
~y\ Presione la tecla Start (iniciar).
Cuando el horno comience a calentar, la
palabra LO í6q/o) aparecerá en la pantalla.
Luego de que la temperatura interno de la
comido alcance los 100° F, los cambios de la
temperatura interno aparecerán en la pantalla.
Cuando la temperatura interno de la
<y
comido llegue al número que configuró, la
sondo y el horno se apagarán y el control
del horno do uno señal. Poro detener la
señal, presione la tecla Ciear/Off (Borrar/
Apagar). Use guantes de cocino poro
retirar la sondo de la comido. No use
agarraderos poro empujarlo; podrían
dañar la sondo.
19
Page 76

Uso del horno inferior por convección. (en algunos modelos)
Guía de Tostado por Convección - Configuraciones Sugeridas
Carnes
Bife Asado de Costilla (4a8 Ib.)
Deshuesada y Con Huesos
Temperatura
del Horno
Jugoso 325°F 145°F
A Punto 325°F 160°F
Temperatura
Interior
Bife de Lomo (2a3 Ib.) Jugoso 425°F 145°F
Bife de Lomo (4a6 Ib.) Jugoso 425°F 145°F
Cerdo Con Huesos, Deshuesada
325°F 160°F
(3a5 Lbs.)
CorderoCon Huesos (5a9 Lbs.) A Punto 325°F 165°F
Deshuesada (4a7 Ib.) A Punto 375°F 165°F
Ave Pollo Entero (5a7 Ib.) 350°F 170°F
Pavo,Entero*
Sin Relleno (10 a 16 Ib.)
Sin Relleno (18 a 24 Ib.)
Pechuga de Pavo (4a6 Ib.) 325°F 170°F
*Las aves con plumas generalmente requieren de un tiempo de asado adicional de30o45 minutos. Cubra las
patas y la pechuga con papel de aluminio para evitar un dorado excesivo yquese seque la piel.
Uso de las fundones de horneado por convección por tiempo en el
325°F
325°F
170-180°F
170-180°F
horno inferió. (en algunos modelos)
Escuchará un ventilador al cocinar con esta función. El mismo se detendrá cuando se abra la puerta, pero el calentador no se apagará.
NOTA: Las comidas que se echan a perder rápidamente, tales como leche, huevos, pescado, rellenos, avey cerdo, no se
deberán dejar reposar por más de 1 hora antes y después de la cocción. La temperatura ambiente estimula el desarrollo
de bacterias nocivas. Asegúrese de que la luz del horno esté apagada, ya que el calor de la lámpara acelerará el
crecimiento de bacterias nocivas.
Cómo Configurar un Inicio Inmediato y Detención Automática
CONVEOnON
Bake
Ш S Ш И Ш
Sir WvMwe OMwet
H Ш И Ш Ш
Cooking
Time
Ш Ш Ш И ш
Set Wmhws Омип
И И И Ш И
CeMTMxLocnvr
Start
Clear
Off
El horno superior se encenderá de formo
inmediato y se cocinará por un período de tiempo
seleccionado. Al final del tiempo de coccián, el horno
se apagará automáticamente.
[/] Presione la tecla Convection Bake (Hornear
por Convección].
Presione los teclas numéricos poro programar
la temperatura deseado del horno.
Presione la tecla Cooking Time (Tiempo de
Cocción).
NOTA: Si su receta requiere caientar en forma previa,
es posibie que necesite tiempo adicionai sobre ei
tiempo de cocción.
Presione los teclas numéricos poro configurar
4
el período de tiempo de coccián deseado. El
tiempo mínimo de coccián que puede
configurares 1 minuto.
La temperatura del horno que configure y el
tiempo de coccián que ingresá aparecerán en
la pantalla..
Presione la tecla Start (iniciar).
El horno estará en la posicián ON (Encendido) y
en la pantalla aparecerá el contee de la coccián
y el cambio de temperatura a partir de los
100°F. (La pantalla de temperatura comenzará a
cambiar una vez que la temperatura del horno
alcance los 100° F). Cuando el horno alcance la
temperatura que programá, sonarán 3 pitidos.
El horno continuará la coccián durante la cantidad
de tiempo programada, luego se apagará
automáticamente, a menos que la funcián
Cook and Hold (Mantener la Coccián) haya sido
programada. Lea las funciones Especiales de la
seccián de control del horno.
Luego de que el horno se apague, sonará el tono de
fin del ciclo.
Presione la tecla Clear/ Off (Borrar/ Apagar)
6
para apagar la pantalla si es necesario. Retire
la comida del horno. Recuerde que aunque el
horno se apague de forma automática, la
comida que permanezca dentro de éste
continuará cocinándose cuando el horno esté
apagado.
Page 77

Uso de ¡as funciones de horneado por convección por tiempo en el
horno inferior,. (en algunos modelos) GEAppliances.com
CONVEaiON
Bake
B El [2 0 [II
Set IWwMMis Ouu«
0 □ H 0 0
Cooking
CoHmoi LocMOUT
Time
miLSHH
0 0 0 0 0
Delay
Start
ESS00
Set IWwMWG Oautei
0 0 0 0 0
COfffMl LOOCDUr
Start
Clear
Off
cómo Configurar un Inicio Retrasado y Detención Automática
El horno superior se encenderá en el horario
del día que configure, cocinará durante un
período de tiempo específico y luego se apagará
automáticamente.
Asegúrese que el reloj marque la hora correcta del
día.
Presione la tecla Convection Bake (Hornear
por Convección],
Presione las teclas numéricas para programar
la temperatura deseada del horno.
Presione la tecla Cooking Time (Tiempo de
Cocción).
NOTA: Si su receta requiere caientar en forma previa,
es posibie que necesite tiempo adicionai sobre ei
tiempo de cocción.
Presione las teclas numéricas para configurar
el período de tiempo de coccián deseado. El
tiempo mínimo de coccián que puede
configurar es 1 minuto.
La temperatura del horno que configure y el
tiempo de coccián que ingresá aparecerán en
la pantalla.
Presione la tecla Delay Start (Retrasar inicio).
Presione las teclas numéricas para configurar
Ó
la hora del día en que desea que el horno se
encienda y comience a cocinar.
Presione la tecla Start (iniciar).
7
NOTA: Si desea controiar ios horarios configurados,
presione ia teda Delay Start (Inicio Retrasado)
para controlar ia hora de inicio que configuró o
presione ia teda Cooking Time (Tiempo de Cocción)
para controlar el periodo de tiempo de cocción que
programó.
Cuando el horno esté en ON (Encendido) a la hora
del día que configuré, en la pantalla aparecerá
la cuenta regresiva de la coccián y el cambio de
temperatura a partir de los 100° F. (La pantalla de
temperatura comenzará a cambiar una vez que la
temperatura del horno alcance los 100° F). Cuando
el horno alcance la temperatura que programé,
sonarán 3 pitidos.
El horno continuaré la coccián durante la cantidad
de tiempo programada, luego se apagaré
automáticamente, a menos que la funcién
Cook and Hold (Mantener la Coccián) haya sido
programada. Lea las funciones Especiales de la
seccién de control del horno.
Luego de que el horno se apague, sonaré el tono de
fin del ciclo.
Presione la tecla Clear/ Off (Borrar/ Apagar)
s
para apagar la pantalla si es necesario. Retire
la comida del horno. Recuerde que aunque el
horno se apague de forma automática, la
comida que permanezca dentro de éste
continuaré cocinándose cuando el horno esté
apagado.
WARM
START
Cómo Programar el Horno para Calentar
La función WARM (Calentar) mantiene calientes
las comidas cocinadas. Esta función no fue
diseñada para volver a calentar comida fría.
Para usar la función WARM (Calentar),
presione la tecla WARM (Calentar) y luego la
tecla START (Iniciar).
Para usar la función WARM (Calentar) luego
del Tiempo de Horneado o Dorado, siga los
siguientes pasos:
ryi Presione el modo de cocción que desee
^ usar (HORNEADO, HORNEADO POR
CONVECCIÓN o DORADO POR
CONVECCIÓN).
Presione las teclas numéricas para
programar la temperatura del horno.
Presione la tecla COOKING TIME
(Temporizador De Cocción).
Toque las teclas numéricas para
configurar el tiempo de cocción deseado.
Toque la tecla WARM (Calentar).
Presione la tecla START (Iniciar).
Para que ítems Duros queden
Crocantes
■ Place food in low-sided dishes or pans.
■ Para mejores resultados, coloque las
comidas en una sola capa. No las
amontone.
■ No las cubra.
■ Controle si están crocantes luego de entre
20 y 30 minutos. Agregue tiempo según sea
necesario.
NOTAS IMPORTANTES:
■ La comida se debería mantener caliente
en su envase de cocción o transferirla a un
plato con protección térmica para servir.
■ Para comidas húmedas, cubra las mismas
con una tapa segura para el horno o papel
de aluminio.
■ No es necesario cubrir las comidas fritas
o crocantes, pero es posible que se
sequen demasiado si se calientan durante
demasiado tiempo.
■ La apertura repetida del cajón permite que el
aire caliente salga y que la comida se enfríe.
■ Deje transcurrir un tiempo adicional para
que la temperatura interior del horno se
estabilice luego de agregar los ítems.
■ Con grandes cantidades es posible que sea
necesario cubrir algunos de las comidas
cocinadas.
■ Retire las cucharas para servir, etc., antes de
colocar recipientes en el horno.
■ No use recipientes, tapas ni envoltorios de
plástico.
NOTA: Los recipientes o tapas de plástico o
envoltorios plásticos se derretirán si se los
coloca dentro del horno. Es posible que no
pueda quitar el plástico derretido y esto no
está cuDierto por la garantía. 21
Page 78

Funciones especiales en el control del horno bajo.
Su nuevo control de teclas táctiles cuenta con funciones adicionales que puede elegir usar. Las siguientes son las
funciones y cómo las puede activar.
Los modos de funciones especiales sólo pueden ser activados mientras que la pantalla está mostrando la hora del día.
Permanecen en la memoria del control hasta que se repiten los pasos.
Cuando la pantalla muestre su elección, presione la tecla Start (Iniciar). Las funciones especiales permanecerán en la
memoria luego de un corte de corriente.
Corte de 12 Horas
Bake
Bake
Warm
Delav
Start
Start
Start
+
+
Warm
Warm
Cooking
Time
Con esta función, en caso de olvidarse y dejar
el horno prendido, el control apagará de forma
automática el horno luego de 12 horas durante
las funciones de horneado y luego de 3 horas
durante la función asar.
Si desea desactivar esta función, siga los
siguientes pasos.
Presione las teclas Bake and Warm
— (Horneary Calentar) al mismo tiempo
durante 3 segundos, hasta que la pantalla
muestre SF.
Selección de Temperatura Fahrenheit o Celsius
El control de su horno está configurado para
usar selecciones de temperatura Fahrenheit,
pero puede cambiar este uso a selecciones en
Celsius.
Presione las teclas Bake and Warm
— (Horneary Calentar) al mismo tiempo
durante 3 segundos, hasta que la pantalla
muestre SF.
Presione las teclas Warm (Calentary
Cooking Time (Tiempo de Cocción) al
Presione la tecla Delay Start (Retrasar
Inicio). La pantalla mostrará 12 shdn
(apagado luego de 12 horas). Presione la
tecla Delay Start (Inicio Retrasado)
nuevamente y la pantalla mostrará no
shdn (sin apagado).
Touch the Start pad to activate the no
shut-off and leave the control set in this
special features mode.
mismo tiempo. La pantalla mostrará F
(Fahrenheit).
Presione (astéelas Warm (Calentar) y
Cooking Time (Tiempo de Cocción)
nuevamente al mismo tiempo.
La pantalla mostrará C (Celsius).
Presione la tecla Start (Iniciar).
22
Bake
Gas/Control
Lockout
Kitchen
Timer
On/Off
Start
Warm
Tonos al Final de un Ciclo por Tiempo
Al finalizar un ciclo por tiempo sonarán 3
pitidos cortos, seguidos de un pitido cada 5
segundos hasta que se presione la tecla Clear/
Off (Borrar/Apagar). Este pitido continuo cada
5 segundos puede ser cancelado.
Para cancelar el pitido cada 5 segundos:
Presione las teclas Bake and Warm
— (Horneary Calentar) al mismo tiempo
durante 3 segundos, hasta que la pantalla
muestre SF.
j] Presione la tecla Start (Iniciar).
Bloqueo de Control del Gas (en algunos modelos)
Su control le permitirá bloquear los quemadores
superficiales, quemadores de horno y el panel de
control de modo que no puedan ser activados.
Para bloquear/ desbloquear los controles:
Cierre todos los quemadores
superficiales.
Mantenga presionada la tecla Gas/Control
Lockout (Control de Bloqueo del Gas)
durante 3 segundos, hasta que la pantalla
muestre LOC ON (Bloqueo Activado).
Para desbloquear el control, mantenga
presionada la tecla Gas/Control Lockout
Cuando esta función esté activada y las teclas
táctiles sean presionadas, el control dará un pitido
y la pantalla mostrará LOC ON (Bloqueo Activado).
■ El modo de bloqueo de control afecta todos
los controles. Ningún control funcionará
cuando esta función esté activada.
■ Los ajustes se guardarán en la memoria
luego de un corte de corriente.
Presione la tecla Kitchen Timer On/ Off
(Encendido/ Apagado del Temporizador
de Cocina). La pantalla muestra CON
BEEP (Pitido Continuo) y BEEP (Pitido).
Presione la tecla Kitchen Timer On/ Off
(Encendido/ Apagado del Temporizador
de Cocina) nuevamente. En la pantalla
aparece BEEP (Pitido). (Esto cancela un
pitido cada 5 segundos.)
(Control de Bloqueo del Gas) durante 3
segundos, hasta que la pantalla muestre
LOC OFF (Bloqueo Desactivado).
Page 79

Bake
Bake
Clock
Start
Cooking
Time
Start
Warm
Warm
12 Horas, 24 Horas o Apagado
Su control está configurado para ser usado en
un reloj de 12 horas.
Si prefiere utilizar un reloj con horario militar de
24 horas o apagar la pantalla del reloj, siga los
siguientes pasos.
ryi Presione las teclas Bake and Warm
— (Horneary Calentar) al mismo tiempo
durante 3 segundos, hasta que la
pantalla muestre SE.
Presione la tecla Clock (Reloj) una vez. La
pantalla mostrará 12 hr(12 horas). Si ésta
es la opción que desea, presione la tecla
Start (Iniciar).
Cocinar y Esperar
El nuevo control cuenta con la función de
cocinar y esperar, que mantiene calientes las
comidas cocinadas por hasta 3 horas una vez
que la función cocinar finalizó.
Esta función sólo puede ser usada cuando se
use la cocción por tiempo.
Para activar esta función, siga los siguientes
pasos.
jyj Presione las teclas Bake and Warm
(Horneary Calentar) al mismo tiempo
durante 3 segundos, hasta que la
pantalla muestre SE.
GEAppliances.com
Presione la tecla Clock (Reloj) nuevamente
para cambiar al horario militar de 24 horas.
La pantalla mostrará 24 hr (24 horas). Si ésta
es la opción que desea, presione la tecla Start
(Iniciar).
Presione la tecla Clock (Reloj) para apagar la
pantalla del reloj. La pantalla mostrará OFF
(Apagado). Si ésta es la opción que desea,
presione la tecla Start (Iniciar)..
NOTA: Si el reloj está en el modo apagado, no
podrá usar la función Delay Start (Retrasar Inicio).
Presione la tecla Cooking Time (Tiempo
de Cocción). La pantalla mostrará Hid
OEE (Demorar Apagado).
Presione la tecla Cooking Time (Tiempo
de Cocción) nuevamente para activar la
función. La pantalla mostrará Hid ON
(Demorar Encendido).
Presione la tecla Start (Inicio) para activar
la función de cocción y demora, y deje la
configuración del control en este modo
de funciones especiales.
Broil Bake
Hi/Lo
Cook
Time
Start
Volumen del Tono (en algunos modelos)
Esta función le permite ajustar los volúmenes
del tono en un volumen más aceptable. Hay tres
niveles de volumen posibles.
Presione las teclas Broil Hi/Lo (Asar Alto/
m
Bajo) del horno superior al mismo tiempo
hasta que la pantalla muestre SF.
Presione la tecla Cook Time (Tiempo de
Cocción). En la pantalla aparece 2 Beep (2
Pitidos). Éste es el nivel de volumen
intermedio.
Presione nuevamente la tecla Cook
Time (Temporizador de Cocción). La
pantalla mostrará 3 Beep (3 Pitidos).
Éste es el nivel de volumen más alto.
Presione nuevamente la tecla Cook Time
(Temporizador de Cocción). La pantalla
mostrará 1 Beep (3 Pitidos). Éste es el nivel
de volumen más bajo.
Elija el nivel de sonido deseado (1 Pitido, 2
Pitidos, 3 Pitidos).
Presione la tecla Start (Iniciar).
¥
23
Page 80

Uso del Modo Sabàtico, (sólo ei homo inferior)
(Diseñado para usar en el Descanso Judío y Feriados)
La función Sabbath (Sabática) se puede usar para hornear/ asar en el horno superior e inferior o en el cajón calentador CERTIFIED A
algunos modelos). No se puede usar para la cocción por convección, asar, auto limpieza o Delay Start (Inicio Retrasado).
NOTA: La luz del horno se enciende de forma automática (en algunos modelos) cuando la puerta se abre, y se apaga cuando Mnnp
la puerta se cierra. La lámpara se puede retirar. Lea la secclán de Reemplazo de la Luz del Horno. En modelos con interruptor
de luz en el panel de control, la luz del horno se puede encender y dejar encendida. MODO SABATICO
Cómo programar un Horneado/Asado Común
Asegúrese que el reloj marque la hora correcta
del día y que el horno esté apagado.
Presione las teclas Bake and Warm
И
(Horneary Calentar), al mismo tiempo,
hasta que la pantalla muestre SF.
Presione la tecla Delay Start (Retrasar
Inicio) hasta que SAb bATH (Sabático)
aparezca en la pantalla.
Presione la tecla Start (Inicio) y ^
aparecerá en la pantalla.
Presione la tecla Bake (Hornear). No se
dará ninguna señal.
Utilizando las teclas numéricas, presione la
temperatura deseada entre 170° y 550°.
No se dará ninguna señal ni temperatura.
Presione la tecla Start (Iniciar).
Luego del período de demora al azar de
/
entre aproximadamente 30 segundos y 1
minuto, aparecerá en la pantalla,
indicando que el horno está horneando/
asando. Si no aparece en la pantalla,
comience nuevamente en el Paso 4.
Para ajustar la temperatura del horno, presione
la tecla Bake (Hornear), ingrese la nueva
temperatura usando las teclas numéricas y
presione la tecla Start (Inicio).
NOTA: Las tedas Clear/Off (Borrar/Apagar)
y Cooking Time (Tiempo de Cocción) están
activas durante la función Sabbath (Sabático).
Cómo Configurar Horneado/Asado por Tiempo - Comienzo Inmediato y Detención Automática
Asegúrese que el reloj marque la hora correcta
del día y que el horno esté apagado.
Presione las teclas Bake and Warm
m
(Horneary Calentar), al mismo tiempo,
hasta que la pantalla muestre SF.
Presione la tecla Delay Start (Retrasar
Inicio) hasta que SAb bATH (Sabático)
aparezca en la pantalla.
Presione la tecla Start (Iniciar) y 3
aparecerá en la pantalla.
Presione la tecla Cooking Time (Tiempo
de Cocción).
Presione las teclas numéricas para
configurar el tiempo de cocción deseado
entre 1 minuto y 9 horas y 99 minutos.
Aparecerá el tiempo de cocción que ingresó.
Presione la tecla Start (Iniciar).
Presione la tecla Bake (Hornear). No se
7
dará ninguna señal.
Presione las teclas numéricas e ingrese la
s
temperatura deseada. No se dará ninguna
señal ni temperatura.
Presione la tecla Start (Iniciar).
Luego del período de demora al azar de
10
entre aproximadamente 30 segundos y 1
minuto, 3c aparecerá en la pantalla,
indicando que el horno está horneando/
asando. Si зс no aparece en la pantalla,
comience nuevamente en el Paso 7.
Para ajustar la temperatura del horno, presione
la tecla Bake (Hornear), ingrese la nueva
temperatura usando las teclas numéricas y
presione la tecla Start (Inicio).
Cuando la cocción haya finalizado, la pantalla
cambiará de зс азу aparecerá 0:00,
indicando que el horno está en OFF (Apagado)
pero aún está en Sabbath (Sabático). Retire la
comida cocinada.
Delay
Start
Warm
Bake
ш и и и ш
и и и ш ш
Start
Cuando la pantalla muestra 3
el horno está configurado en
Sobboth (Sabático). Cuando la
pantalla muestro el horno está
configurado en horneado/asado.
Broil Bake
Hi/Lo
Delay
Start
Cooking
Time
щщшиш
и [З ш и и
Start
Cuando la pantalla muestra 3 el
horno está configurado en Sabbath
(Sabático). Cuando la pantalla muestra
el horno está configurado en
horneado/ asado.
Sabbath
Ж
CERTIFICADO
¿i\
Bake
Clear
Off
Delay
Start
Start
Warm
Cómo Salir el Modo Sabático
Presione la tecla Clear/Off (Borrar/Apagar).
m
Si el horno está cocinando, espere un
período de retraso al azar de
aproximadamente entre 30 segundos y 1
minuto, hasta que sólo 3 aparezca en la
pantalla.
Presione las teclas Bake and Warm
(Horneary Calentar), al mismo tiempo,
hasta que la pantalla muestre SF.
Presione la tecla Delay Start (Inicio
Demorado) hasta que 12 shdn (apagar
luego de 12 horas) o no shdn (no apagar)
aparezca en la pantalla. 12 shdn (apagar
luego de 12 horas) indica que el horno se
apagará automáticamente luego de 12
horas. No shdn (no apagar) indica que el
horno no se apagará de forma
automática.
Presione la tecla Start (Iniciar).
NOTA: Si se produjera un corte de luz mientras
el horno se encuentra en Modo Sabático, éste
se apagará automáticamente y permanecerá
apagado incluso cuando regrese la luz. El
control del horno se debe reiniciar.
Page 81

Retíre y reemplace los estantes totalmente extensibles. (on some models)
APrecaución
Para evitar quemaduras, coloque los estantes en la posición correcta antes de
GEAppliances.com
encender el horno. Asegúrese de que la estructura esté completamente insertada en el horno, de modo que quede
bloqueada..
Estante Extensible.
Al colocar y retirar utensilios, siempre empuje
el estante hacia afuera desde su riel frontal
superior hasta la posición totalmente abierta.
NOTA: No extienda el estante rápidamente. La
comida se podría caer del frente del estante.
Para retirar el estante:
Asegúrese de que el estante sea empujado
m
totalmente dentro del horno, de modo que
las paletas laterales de la estructura del
estante se desconecten del apoyo del horno.
Firmemente tome la manija del estante y
empuje la misma hacia usted. El estante se
detendrá cuando el extremo cur^o golpee el
tope del horno.
Incline el extremo frontal hacia arriba y hacia
afuera.
NOTA: Al sostener el estante extensible, no
permita que la parte deslizable quede abierta.
This can damage the slides.
Para reemplazar el estante:
Firmemente tome ambos lados de la
0
estructura del estante y deslice el mismo.
Coloque el extremo cur^o del estante en la
posición deseada para estantes, incline la
parte frontal y empuje la misma hasta el
tope.
I Cuando el estante esté correctamente instalado
y bloqueado en su posición, las paletas laterales
de bloqueo de la estructura del estante harán
clic sobre los soportes del horno. Si las paletas
laterales no hicieron clic en la posición, repita los
pasos anteriores y asegúrese de que las paletas
laterales hayan sido limpiadas y lubricadas de
forma adecuada. Consulte Estante Extensible en
la sección de Cuidado y Limpieza.
Page 82

Ajuste los termostatos superior e inferior - ¡Hágalo usted mismo!
Es posible que encuentre que su horno nuevo cocina de forma diferente al que reemplazó. Use su horno nuevo durante
algunas semanas para familiarizarse con el mismo. Si aún piensa que su horno nuevo está demasiado callente o demasiado
frió, podrá ajustar el termostato usted mismo.
No use termómetros, tales como los que se venden en las tiendas, para controlar la temperatura del horno. Estos
termómetros pueden variar entre 20 y 40 grados.
NOTA: Este ajuste no afectará el asado o las temperaturas de auto limpieza. El ajuste se guardará en la memoria luego de
To Adjust the Lower Thermostat
Bake
Warm
Bake
Ш 0 0 И ш
0 0 0 0 0
Start
Щ Presione las teclas Bake and Warm
(Horneary Caliente) al mismo tiempo
durante 3 segundos, hasta que la pantalla
muestre SF.
Presione la tecla Bake (Hornear). En la
pantalla se muestra un número de dos
dígitos.
Presione Bake (Hornear) una vez para
reducir (-1 la temperatura del horno, o dos
veces para incrementar (+) la misma.
La temperatura del horno se podrá ajustar
hasta un máximo de 35° F, o un mínimo
Para Ajustar el Termostato Superior
VJ] Empuje la perilla OVEN CONTROL (Control
del Horno) hacia afuera y observe la parte
trasera. Para realizar un ajuste, afloje
(aproximadamente un giro), pero sin quitar
completamente, los dos tornillos en la
parte trasera de la perilla.
Con la parte trasera del tornillo hacia
usted, sostenga el extremo exterior de la
perilla con una mano y gire el frente de la
misma con la otra.
Para elevar la temperatura del horno,
mueva el tornillo superior hacia la derecha.
Escuchará un sonido de clic por cada
abertura que mueva la perilla.
Para bajar la temperatura, mueva el
tornillo superior hacia la izquierda.
de 35° F. Presione las teclas numéricas a
medida que las lee. Por ejemplo, para
cambiar la temperatura del horno en 15°
F, presione 1 y 5.
Cuando haya realizado el ajuste, presione
la tecla Start (Iniciar) para regresar a la
pantalla de la hora del día. Use su horno
como lo haría normalmente.
NOTA: El ajuste del termostato para Hornear
también afectará el Horneado por Convección y
el Asado por Convección.
Cada clic cambiará la temperatura del
horno en aproximadamente 10° F. (El rango
es de 60° F desde la flecha). Sugerimos
que haga el ajuste de a un clic desde la
configuración original y que controle el
rendimiento del horno antes de hacer
cualquier ajuste adicional.
Una vez realizado el ajuste, vuelva a
ajustar el tornillo de modo que esté firme,
pero tenga cuidado de no ajustarlo en
exceso.
Vuelva a instalar la perilla en la cocina y
¥
controle el rendimiento.
¡El tipo de margarina afectará el rendimiento del horneado!
La mayarla de las recetas para hornear fueron desarrolladas utilizando productos con alto contenido de grasa tales
como manteca o margarina (80% de grasa). Si se reduce la cantidad de grasa, es posible que la receta no dé los mismos
resultados como con un producto con alto contenido de grasa.
Puede haber fallas en la preparación de la receta si las tortas, tartas, pasteles, galletas o dulces se preparan con productos
untados con bajo contenido de grasa. Cuanto más bajo es el contenido de grasa del producto untado, más notarlas son
estas diferencias.
Los estándares federales requieren que los productos con la etiqueta "margarina" contengan por lo menos un 80% de grasa por
peso. Por otra parte, los productos con bajo contenido de grasa poseen menos grasa y más agua. El alto contenido de humedad
afecta la textura y el sabor de los productos horneados. Para un mejor resultado con sus viejas recetas favoritas, use margarina,
manteca o productos para untar que contengan por lo menos un 70% de aceite vegetal.
26
Page 83

Uso de los hornos de auto limpieza superior e inferior. GEAppliances.com
La puerta del harna deberá estar cerrada y tadas las cantrales canfiguradas de farma carrecta para que el cicla funclane
adecuadamente.
Antes de un Ciclo de Limpieza
Limpie cuaiquier suciedad
importante sobre ei fondo dei horno.
HAGA una limpieza
NO limpie
la junta
manualmente..
manual dentro
de la puerta y del
vidrio.
HAGA una limpieza manual de la
estructura del horno.
Para el primer ciclo de limpieza,
recomendamos ventilar su cocino con una
ventana abierto o usar un ventilador o
campano de ventilación.
Retire cualquier olla poro osar, rejilla poro
osar, todos los utensilios de cocino, sondo y
cualquier papel de aluminio dentro del horno,
ya que no resistirán las altas temperaturas de
limpieza.
NOTA:
■ Si el horno se encuentro equipado con
estantes poro horno de níquel, retire los
mismos antes de comenzar con el ciclo de
auto limpieza.
■ Si su horno está equipado con estantes
para horno grises y cubiertos de porcelana,
se podrán dejar dentro del horno durante el
ciclo de auto limpieza.
La suciedad en la estructura frontal de la
cocina y la parte externa de la junta de la
estructura f^rontal se deberán limpiar en
forma manual. Limpie estas áreas con agua
caliente, almohadillas de viruta y jabón
o limpiadores tales como Soft Scrub©.
Enjuague bien con agua caliente y seque.
Limpie la puerta plana interior y el vidrio
con agua y jabón y esponja.
No limpie lojunto. El moteriol de fibro de vidrio
de lojunto de lo estructuro frontol no resiste lo
obrosión. Es esenciol que lojunto permonezco
intocto. Si observo que comienzo o gostorse o
deshilochorse, reemploce lo mismo.
Limpie cualquier derrame importante sobre
el fondo del horno.
Asegúrese de que lo topo de lo lámparo de luz
del horno se encuentre en su lugar y que la
luz del mismo esté apagada.
IMPORTANTE: La salud de algunas aves
es extremadamente sensible a los humos
emitidos durante el ciclo de auto limpieza de
cualquier cocina. Coloque las aves en otra
habitación bien ventilada.
NOTA:Tenga cuidado al abrir el horno
superior una vez que el ciclo de auto
limpieza haya finalizado. Es posible que el
horno aún esté caliente.
NOTAS:
■ Los quemadores superficiales
se deberán apagar antes de
la hora de inicio de la auto
limpieza.
■ No es posible realizar la auto
limpieza de ambos hornos al
mismo tiempo.
■ Los quemadores de la cocino
y el horno que no estén en el
modo de auto limpieza no se
iniciarán durante el ciclo de
auto limpieza.
Cómo Configurar el Horno Superior para su Limpieza
La puerta del horno deberá estar cerrada
y todos los controles configurados de
forma correcta para que el ciclo funcione
adecuadamente.
Rote la perilla del horno superior hasta la
m
posición de auto limpieza.
^ Presione la tecla Start (Inicio).
Las puertas se bloquearán de forma
automática. La pantalla mostrará el tiempo
de limpieza restante. Si la puerta superior no
se bloquea y el tiempo de limpieza restante
no se muestra, dentro de 1 minuto de
iniciado el ciclo gire la perilla o la posición
Off (Apagado) y abra ambas puertas durante
10 minutos. Repita el paso 1. No será
posible abrir la puerta del horno hasta que la
temperatura sea inferior a la temperatura de
bloqueo y que se apague la luz de LOCKED
DOOR (Puerta Bloqueada).
El horno se apaga de forma automática
cuando el ciclo de limpieza es completado.
~j] Cuando la luz de LOCKED DOOR (Puerta
Bloqueada) esté apagada, la puerta se
desbloqueará de forma automática.
Gire la perilla a la posición off.
■ Las palabras LOCK DOOR (Puerta
Bloqueada) titilarán y el control del horno
señalará si configuró el ciclo de limpieza y
olvidó cerrar la puerta del horno.
■ Para detener un ciclo de limpieza, presione
la tecla Ciear/Off (Borrar/Apagar)y luego
gire la perilla de control del horno a la
posición OEE (Apagado). Luego de cierto
período de tiempo, la luz LOCKED DOOR
(Puerta Bloqueada) se apagará. Esto
indicará que el horno se enfrió por debajo
de la temperatura de bloqueo y el gas
puede fluir por la cocina. Las puertas se
desbloquearán de forma automática.
■ Luego de completar el primer ciclo de
limpieza del horno, puede iniciar el segundo
ciclo de limpieza del horno.
27
Page 84

Uso de los hornos de auto limpieza superior e inferior.
La puerta del horno deberá estar cerrado y todos los controles configurados de forma correcta para que el ciclo funcione
adecuadamente. ,,, „ ,r.
Self
Clean
щщшии
[З и Ц] и и
NOTAS:
■ Los quemadores superficiales
se deberán apagar antes de
la hora de inicio de la auto
limpieza.
■ No es posible realizar la auto
limpieza de ambos hornos al
mismo tiempo.
■ Los quemadores de la cocino
y el horno que no estén en el
modo de auto limpieza no se
iniciarán durante el ciclo de
auto limpieza.
CeNnocLeaour
Start
Como Programar la Limpieza ael Horno Inferior
[f\ Presione la tecla Se//^C/eon ÍAufo
Limpieza).
Usando los teclas numéricas, ingrese el
tiempo de limpieza deseado, si es necesario
usar un tiempo diferente a 4 horas.
El tiempo del ciclo de limpieza es normalmente
de 4 horas. Puede cambiar el tiempo de
limpieza a cualquier tiempo entre 3 horas y 5
horas, dependiendo del nivel de suciedad que
haya en el horno.
Presione la tecla Start (inicio).
Las puertas se bloquearán de forma
automática. La pantalla mostrará el tiempo de
limpieza restante. Si la puerta superior no se
bloquea y el tiempo de limpieza restante no
se muestra, dentro de 1 minuto de iniciado el
ciclo gire la perilla a la posición Off (Apagado)
y abra ambas puertas durante 10 minutos.
Repita el paso 1. No será posible abrir la puerta
del horno hasta que la temperatura sea inferior
a la temperatura de bloqueo y que se apague
la luz de LOCKED DOOR (Puerta Bloqueada).
El horno se apago de formo automático
cuando el ciclo de limpieza es completado.
4
Gire la perillo a la posición off (apagado).
■ Los palabras LOCK DOOR (Puerta
Bloqueada) titilarán y el control del horno
señalará si configuró el ciclo de limpieza y
olvidó cerrar la puerto del horno.
■ Poro detener un ciclo de limpieza, presione
la tecla Clear/Off(Borrar/Apagar)y luego
gire la perillo de control del horno a la
posición OFF (Apagado). Luego de cierto
período de tiempo, la luz LOCKED DOOR
(Puerta Bloqueada) se apagará. Esto
indicará que el horno se enfrió por debajo
de la temperatura de bloqueo y el gas
puede fluir por la cocino. Los puertos se
desbloquearán de formo automático.
■ Luego de completar el primer ciclo de
limpieza del horno, puede iniciar el segundo
ciclo de limpieza del horno.
Cuando la luz de LOCKED DOOR (Puerta
Bloqueada) esté apagado, la puerto se
desbloqueará de formo automático.
Self
Clean
ШШШИШ
Ser IVARMwe Dhawbi
И 0 И И И
Delay
Start
Ш [Il Ш И ш
Ser IVARMWe ОйАУЯЙ
0 0 0 0 0
Start
28
Control Lockout
Сото Retrasar el Inicio de la Limpieza (sólo el horno inferior)
Asegúrese que el reloj morque la hora correcto
del dio.
\J\ Presione la tecla Self Clean (Auto
Limpieza).
NOTE: The surface burners will be turned off
automatically when self-clean cycle starts.
Usando los teclas numéricos, presione el
tiempo de limpieza deseado.
Presione la tecla Delay Start (Retrasar
Inicio). El tiempo de inicio más próximo que
pueda configurar aparecerá en la pantalla.
Usando los teclas numéricos, ingrese la
hora del dio que desee poro que el ciclo
de limpieza comience.
Presione la tecla Start (Iniciar).
Los puertos se bloquearán de formo
automático. La pantalla mostrará la hora de
inicio. No será posible abrir la puerto del horno
hasta que la temperatura seo inferior a la
temperatura de bloqueo y que se apague la luz
de LOCKED DOOR (Puerta Bloqueada).
El horno se apago de formo automático
cuando el ciclo de limpieza es completado.
Los puertos se desbloquearán de formo
automático.
I Los palabras LOCK DOOR (Puerta
Bloqueada) titilarán y el control del horno
doró uno señal si configuro el ciclo de
limpieza y olvido cerrar la puerto del horno u
olvido trabar la puerto en modelos con trabo.
I Poro detener el ciclo de limpieza, presione
la tecla Clear/Off (Borrar/Apagar). Luego
de cierto período de tiempo, la luz LOCKED
DOOR (Puerta Bloqueada) se apagará.
Esto indicará que el horno se enfrió por
debajo de la temperatura de bloqueo y el
gas puede fluir por la cocino. Los puertos se
desDloqueorán de formo automático.
Después de un Ciclo de Limpieza
Es posible que observe cenizo blanco en el
horno. Limpie la mismo con uno telo húmedo
uno vez que el horno se enfríe.
Si quedan manchas blancas, elimine las
mismas con un estropajo con jabón y enjuague
completamente con una mezcla de agua y
vinagre.
Estos depósitos son normalmente un residuo
de sol que no puede ser eliminado por el ciclo
de limpieza.
Si el horno no se limpio luego de un ciclo de
limpieza, repito el ciclo.
I No puede configurar el horno poro cocinar
hasta que el mismo esté lo suficientemente
caliente poro que la puerto se desbloquee.
I Mientras el horno está realizando la función
de auto limpieza, puede presionar la tecla
dock (Reloj) poro visualizar la hora del día.
Poro regresar a la cuento regresivo de
limpieza, presione la tecla Cooking Time
(Tiempo de Cocción).
I Si resulto difícil deslizar los estantes, aplique
uno cantidad reducido de aceite vegetal
o aceite de cocino a uno toalla de popel y
limpie los extremos de los estantes del horno
con uno toalla de popel.
Page 85

GEAppliances.com
Asegúrese de que la corriente eléctrica esté apagada y que todas las superficies estén frías antes de limpiar
cualquier parte de la cocina.
AADVERTENCIA
SI la cocina es retirada para su limpieza, servido técnico
o cualquier otra razón, asegúrese de que el dispositivo ontl-volcaduras vuelva a ser
colocado de forma correcta cuando la cocina sea instalada nuevamente. SI no se tiene
esta precaución, se podrá ocasionar la caída de la cocino y provocar lesiones.
Para controlar que el soporte esté instalado y sujetado de forma adecuada, con cuidado incline
la cocina hacia adelante. El soporte debería detener la cocina dentro de las 4 pulgadas. Si no lo
hace, el soporte se deberá volver a instalar.
En caso de gue la cocina sea empujada de la pared por alguna razón, siempre repita este
procedimiento para verificar gue la cocina esté correctamente asegurada por el soporte anti
volcaduras.
Si la cocina no cuenta con el soporte anti-volcaduras, llame al 1.800.626.8774 para recibir uno
sin costo.
Ensambles del Quemador Sellado (en algunos modelos)
Coloque todos los controles en lo posición
OEE (Apagar) antes de retirar las partes del
quemador.
Las tapas del quemador lateral redondo y
las cabezas de los quemadores se pueden
levantar, facilitando su limpieza. Los
electrodos no se pueden retirar.
La cabeza del quemador central ovalado
y los ensambles de las tapas se pueden
levantar, facilitando su limpieza. El electrodo
del quemador no se puede retirar.
APRECAUCION
parte superior de la cocina sin que todas las
partes de los quemadores y las parrillas estén
en sus respectivos lugares.
No use la
_quemadory
ensamble de
la tapa
— Electrodo
Parrilla
del chef
Tapa de la
cabeza de los
quemadores y
electrodo
La tapa interna del quemador de tres anillos Base de tres anillos
se puede levantar para su limpieza. La tapa (en algunos modelos)
externa v el ensamble de la base se pueden , , , , , , , , ,
levantar de la parte superior de la cocina El electrodo del encendedor^de la
como una sola pieza con propósitos de ^^ispa es expuesto cua^ncfrsla cabeza
... ^ ^ ^ ^g| quemador es retirada. Cuando
un quemador se gira a LITE, todos los
quemadores hacen chispa. No intente
desensamblar ni limpiar un quemador
mientras otro quemador está
encendido. Es posible que se produzca
una descarga eléctrica, lo cual podría
hacer que vuelque un utensilio de
cocina caliente.
Aprecaución
¡a tapa del guemador del puente de ¡a
cabeza.
La cabeza del quemador del puente de
tres anillos y los ensambles de las tapas se
pueden levantar, facilitando su limpieza. El
electrodo no se puede retirar.
No retire
29
Page 86

Cuidado y limpieza de la cocina.
Tapas, Bases y Cabezas de Quemadores
Antes de retirar las tapas y cabezas de los Reemplazo de las Cabezas de los
quemadores (en algunos modelos), recuerde su
tamaño y ubicación. Reemplace los mismos en
la mismo ubicación luego de lo limpieza.
NOTA: No use estropajos ni polvos para fregar
para limpiar las partes del quemador.
Tapas de los Quemadores
Levantar cuando estén frías. Lave las tapas de los
La tapa del
quemador está
correctamente
colocada.
Cabezas del quemador (en algunos
Las cabezas del quemador (en
algunos modelos) se pueden retirar.
Simplemente levante las mismas de
la parrilla para su limpieza.
Cabeza de tres anillos (en algunos
posicionado sobre el electrodo y
que la cabeza del quemador esté
completamente insertado dentro de
la base del quemador. Uno pequeño
brecho entre la base y la cabezo es
Cabeza frontal derecha (en algunos
modelos), cabeza frontal izquierda,
cabeza trasera derecha y cabeza
Cámara de estabilidad Useuna aguja^de
quemador Electrodo
Asegúrese de que la ranura de
posicionado sobre el electrodo.
El ensamble de la cabeza/tapa oval del
quemiador se puede retirar. Simplemente
levante la mismia de la cocina para
su limpieza. Use una aguja de coser o
precintos para desbloquear el pequeño
agujero en el quemador.
30
modelos)
Asegúrese de que el anillo de
la cabeza del quemador esté
trasera izquierda
Cabeza del
quemador
V ^ para desbloquear
la cabeza del quemador esté
modelos)
normal.
La tapa del
quemador
NO está
correctamente
colocada.
coser o precintos
el pequeño agujero
Agujero
en la
cabeza del
quemador
quemadores en agua caliente con jabón y enjuague
con agua limpia. Puede fregar con una base de
fregado plástica para eliminar partículas de comida
quemadas. Agregue un % de taza de amoníaco y
deje que permanezcan mojadas durante varias horas
o durante la noche. Lave, enjuague bien y seque.
Quemador de tres anillos (en algunos modelos)
La capa exterior del quemador de tres anillos no
se puede retirar. Sólo la tapa redonda del centro
se puede retirar para su limpieza.
Para limpiar las bases de los quemadores, use
agua con jabón y una base para fregar de plástico.
Limpie con una tela húmeda.
Asegúrese de que no ingrese agua a las bases de
los quemadores. Permita que se sequen totalmente
antes de usar.
Cabezas de los Quemadores (en algunos
modelos) y Ensamble de la Tapa/Cabeza
del Quemador Ovalado (Centro)
Las cabezas de los quemadores y el ensamble de la
cabeza/tapa del quemador ovalado se pueden retirar.
Simplemente levante las mismas de la cocina para su
limpieza.
Para un encendido adecuado, asegúrese de que
el agujero pequeño en la sección que coincide con
el electrodo se mantenga abierto. Puede usar una
aguja de coser o un precinto para desbloquearlo.
Las hendiduras de las cabezas de los quemadores
se deben mantener limpias en todo momento para
obtener una llama pareja y sin obstrucción.
Las partes bloqueadas o sucias de los quemadores
o los electrodos no permitirán que el quemador
funcione de forma correcta.
Cualquier derrame en o alrededor de un electrodo se
deberá limpiar de formo cuidadosa. Tenga cuidado
de no golpear un electrodo con nada duro, ya que se
podrá dañar
Limpie las cabezos de los quemadores de formo
rutinaria, especialmente luego de derrames
importantes que podrían bloquear los oberturas.
Levantar cuando esté frío.
Para eliminar la comida quemada, moje las
cabezas de los quemadores en una solución de
detergente líquido suave y agua caliente por entre
20 y 30 minutos. Cuando se trate de manchas
más difíciles, use un cepillo de dientes.
Luego de la limpieza
Antes de colocar las tapas y cabezas de
los quemadores (en algunos modelos) y el
ensamble de la cabeza/tapa nuevamente,
escurra el exceso de agua y luego seque las
mismas totalmente, programando el horno
para que esté caliente por 30 minutos.
Quemadores (en algunos modelos)
Reemplace las cabezas de los quemadores sobre los
electrodos en la parte superior de lo cocino, en las
ubicaciones correctas de acuerdo con su tamaño.
Hay una cabezo de quemador pequeño, uno
mediano, uno grande y uno extra grande.
Asegúrese de que la ranura o agujero (dependiendo
del modelo) del quemador esté posicionado sobre el
electrodo.
Ensamble de la Cabeza/ Tapa del Quemador
Ovalado (Centro)
Reemplace el ensamble de la cabeza/tapa ovalada
(centro) sobre el electrodo en la parte superior de la cocina.
Cabeza ovalada y
ensamble de la tapa
Tapas
Reemplace los topos de tamaño coincidente en los
bases y cabezos de los quemadores.
Asegúrese de que los cabezos (en algunos modelos)
y los topos sean reemplazados en los ubicaciones
correctos.
Frente de la cocina
Asegúrese de que la ranura
de la cabeza del quemador
-O
(en algunos modelos)
Tapa de tres anillos
(en algunos modelos)
Page 87

Lodge® Reversible y Planchas para Chefde Hierro Forjado (en algunos modelos)
■ Enjuague con agua caliente (no use jabón) y
segue totalmente.
■ Antes de cocinar, prepare la superficie con
espray de cocina o aceite vegetal.
■ Luego de cocinar, limpie la plancha con
un cepillo duro y agua caliente. No se
recomienda el uso de jabón, y nunca se deben
usar detergentes potentes.
■ Seque con una toalla de forma inmediata y aplique
una capa suave de espray de cocina o aceite
vegetal mientras la plancha aún está caliente.
■ Guarde en un lugar frío y seco.
■ No lave en el lavavajillas.
Precauciones de la Plancha:
■ Si algo se derramó debajo de la plancha,
se deberá limpiar tan pronto como sea
posible para evitar la suciedad de la comida
"horneada".
■ No permita gue se acumule grasa debajo
de la plancha, ya gue puede haber riesgo de
incendio. Limpie la parte inferior de la plancha
tan pronto como esté fría. Limpie con agua
caliente y jabón.
■ No coloque la plancha en el horno microondas.
■ Siempre apague los guemadores superficiales
antes de retirar la plancha. Tenga cuidado al
sostener una plancha caliente.
GEAppliances.com
La apariencia puede variar.
Las parrillas se pueden limpiar en
un lavavajillas.
Frente
Izquierdo
Plancha Antiadherente (en algunos
NOTAS:
■ La plancha se deberá usar sobre el
quemador central únicamente.
■ No limpie la plancha en el horno de auto
limpieza.
■ No limpie la plancho en un lavavajillas.
■ Lave la mismo con agua caliente yjobón
luego de codo uso, mientras uso uno
esponjo y un paño de cocino.
■ Si quedan residuos de aceite o comido
sobre la plancho, los cocciones posteriores
endurecerán el residuo
y qenerorán
adherencias con el poso d^el tiempo. En
este coso, use un limpiador no abrasivo tal
como Bon Ami® o uno de los limpiadores
poro fregado suave. Aplique con uno
esponjo, Scrunge® u otro almohadillo de
limpieza con etiqueto que indique que es
segura para olios ontiodherentes.
■ Use sólo utensilios de plástico, nylon
o madera o herramientas de cocina
Parrillas de los Quemadores
Su estufo cuento con 3 porrillos dobles o
4 porrillos simples. Estos porrillos poseen
posiciones específicos. Poro uno estabilidad
máximo, estos porrillos sólo se deberán usar en
su posición adecuado; no se pueden cambiar
de izquierdo a derecho o del frente a atrás.
Poro su conveniencia con los porrillos dobles,
los lados inferiores de las parrillas izquierda y
derecho están morcados "LEFT FRONT" (Frente
Izquierdo) y "RIGHT FRONT" (Frente Derecho).
Asegúrese de que la posición frontal de ambas
parrillas esté en el frente. La porrillo intermedio
posee un arco en el frente. Asegúrese de que
la parte arqueada esté hacia el frente de la
cocino. Además, la porrillo intermedio está
apoyado por los porrillos izquierda y derecha
y debe ser instalado al final poro mayor
estabilidad.
Limpieza
Levante los mismos cuando estén fríos. Los
porrillos se deben lavar de formo regular y, por
supuesto, luego de derrames. Lave los porrillos
modelos)
SilverStone® para evitar que se arruine el
recubrimiento.
■ Nunca use cuchillos ni corte la comido
sobre la plancho. Lave con agua caliente
yjobón luego de codo uso. Guarde con
cuidado poro evitar ralladuras.
Precauciones de la Plancha:
■ Si oigo se derramó debajo de la plancho,
se deberá limpiar ton pronto como seo
posible poro evitar la suciedad de la
comido "horneado".
■ No permito que se acumule qroso debajo
de la plancho, yo que puedenober riesgo
de incendio. Limpie la porte inferior de la
plancho ton pronto como esté fría. Limpie
con agua caliente yjobón.
■ No coloque la plancha en el horno microondas.
■ Siempre apague los quemadores superficiales
antes de retirar la plancha. Tenga cuidado al
sostener una plancha caliente.
con aguo caliente yjobón y enjuague con aguo
limpio. Al reemplazar los porrillos, asegúrese de
que estén posicionadas de forma segura sobre
los quemadores. Reemplace las porrillos de
modo que se formen arcos continuos con las
líneas centrales de las tres parrillas.
No utilice el quemador durante un período de tiempo
prolongado sin un utensilio de cocina sobre la rejilla.
El acabado de la parrilla se puede resquebrajar si no
hay un utensilio de cocina que absorba el calor.
Para liberarse de comidas quemadas, coloque
las parrillas en un envase cubierto. Agregue
una taza de % de amoníaco y deje que
permanezcan mojadas varias horas durante la
noche. Lave, enjuague bien y seque.
Aunque son durables, las parrillas perderán
gradualmente su brillo, más allá del mejor
cuidado que les pueda dar. Esto se debe a
la exposición continua a altas temperaturas.
Observará esto antes con parrillas de color claro.
NOTA: No limpie las parrillas en el horno de t
limpieza.
Page 88

Cuidado y limpieza de la cocina.
Parrillas de Quemadores para el Modelo CGS985 Únicamente
Su cocina cuenta con tres parrillas dobles
de tipo profesional. Estas parrillas poseen
posiciones específicas. Para una máxima
estabilidad, estas parrillas sólo deberían ser
usadas en sus posiciones correspondientes.
La apariencia puede variar.
Las parrillas se pueden limpiar en
un lavavajillas.
Parrilla
Exterior
Parrilla
Exterior
Para mayor conveniencia, los lados inferiores
de las parrillas laterales cuentan con la marca
"OUTSIDE" (Afuera). Asegúrese de que la
posición frontal de ambas parrillas esté en el
frente. La parrilla central se puede cambiar del
frente a la parte trasera.
Limpieza de las Parrillas - Agua y
Jabón
Levante las parrillas cuando estén frías. Las
parrillas se deben lavar de forma regular y, por
supuesto, luego de derrames. Lave las mismas
con agua caliente yjabón y enjuague con agua
limpia. Al reemplazar las parrillas, asegúrese de
que estén posicionadas de forma segura sobre
los quemadores. Reemplace las parrillas de
modo que se formen líneas rectas con los arcos
centrales de lastres parrillas.
Protectores para Soporte
Si uno o más de los soportes protectores
circulares de silicona de la parrilla de la parte
superior de la cocina se pierde o daña, se
podrán obtener piezas de repuesto llamando al
1.800.GE.CARES.
Para colocar los nuevos protectores, simplemente
Inserte el extremo con forma de cono y empuje
mientras dobla o balancea suavemente el protector.
Limpieza de Parrillas - Lavavajillas
Las parrillas se pueden limpiar en un
lavavajillas. Retire cualquier partícula de comida
quemada que pueda antes de colocar las
parrillas en el lavavajilla. Coloque las mismas en
el estante inferior del lavavajillas y aplique un
ciclo de "limpieza a fondo".
No utilice el quemador durante un período de
tiempo prolongado sin un utensilio de cocina
sobre la parrilla. El acabado de la parrilla se
puede resquebrajar si no hay un utensilio de
cocina que absorba el calor.
Aunque son durables, las parrillas perderán
gradualmente su brillo, más allá del mejor
cuidado que les pueda dar. Esto se debe a la
exposición continua a altas temperaturas y a la
abrasión del utensilio de cocina.
32
Page 89

GEAppliances.com
Superficie de la Parte Superior de la
A fin de evitar daños sobre la superficie
esmaltado de porcelano sobre lo porte superior
de la cocina y para evitar que quede sin brillo,
limpie los derrames de inmediato. La comido
con mucho ácido (tomates, chucrut,jugos de
fruta, etc.) o las comidas con alto contenido de
azúcar pueden dejar un espacio sin brillo si no
se limpian.
Ventilaciones de Aire del Horno
Nunca bloquee los ventilaciones (oberturas
de aire) de la cocino. Los mismos brindan las
entrados y solidos de aire que son necesarias
poro que la cocino opere de forma correcta
con la combustión adecuada.
Los oberturas de aire se encuentran ubicados
en la porte trasero de lo cocino, en la porte
superior e inferior de la puerta del horno, y en la
parte inferior de la cocino.
Panel de Control Superior
En modelos equipados de este modo, bloquee
las teclas táctiles antes de limpiar.
Consulte la información de Bloqueo del Control
de Gas en las funciones Especiales de la
sección de control de su horno en este manual.
Limpie cualquier salpicadura con uno telo
húmedo.
Cocina
Cuando la superficie esté fría, lave y enjuague.
Poro otros derrames toles como salpicaduras
de graso, lave con aguo yjobón uno vez que lo
superficie se hoyo enfriado. Luego enjuague y
pulo con uno telo seco.
NOTA: Para las cocinas de acero inoxidable,
consulte la sección sobre superficies de acero
inoxidable.
La apariencia y la ubicación de la ventilación varían.
También puede usar un limpiador de vidrios.
Elimine la suciedad importante con agua
caliente yjobón. No use ningún tipo de material
abrasivo.
Vuelva a activar las teclas táctiles luego de la
limpieza.
Perilla del quemador superficial
Línea roja
Perilla del horno inferior (en algunos
modelos)
Panel de Control Inferior (Panel del Colector Frontal) y Perillas
Uno bueno ideo es limpiar el panel de control
luego de codo uso del horno. Use uno telo
húmedo para limpiar o enjuagar. Poro limpiar,
usejobón suave y aguo o uno solución que
seo mitad de vinagre y mitad de aguo. Poro
enjuagar, use aguo limpio. Pulo en seco con
uno telo suave.
No use limpiadores abrasivos, limpiadores
líquidos fuertes, almohadillas poro fregar de
plástico y limpiadores de horno en el panel de
control; dañarán el acabado.
No intente inclinar los perillos empujando los
mismos hacia arribo o hacia abajo o colgando
uno toalla u otros cargos de este tipo. Esto
puede dañar el eje de lo válvula de gas.
Los perillos de control se pueden retirar poro
facilitar la limpieza.
Asegúrese de que los perillos estén en los
posiciones OEE (Apagado)y empuje los mismos
desde los soportes de formo derecho poro su
limpieza.
Los perillos se pueden limpiar en un lovovajillos
o también se pueden lavar con agua yjobón.
Asegúrese de que los interiores de los perillos
estén secos antes de volver a colocarlos.
Reemplace las perillas en la posición OFF
lApagado) para asegurar una ubicación adecuada.
Los piezas metálicos se pueden limpiar con
aguo yjobón. No use estropajos, abrasivos,
amoníacos, ácidos o limpiadores poro hornos
comerciales. Seque con uno telo seco.
Para determinar la ubicación correcta de la perilla
en el panel de control frontal, examine la parte
trasera de la perilla. Las perillas con etiquetas y
los dos agujeros con caña no son intercambiables
con otros tipos de perillas y se deberán regresar al
panel frontal primero. Ubique la posición adecuada
enlazando la etiqueta y la descripción del panel
frontal o enlazando la forma de los agujeros de las
perillas a la forma de las cañas del panel de control.
Las perillas sin etiquetas y sólo un agujero de caña
podrá ser regresado a cualquier posición en el
panel de control frontal que sólo posee una caña.
33
Page 90

Cuidado y limpieza de la cocina.
Parte Inferior del Horno
La parte inferior del horno posee un acabado
de porcelano esmaltada. Poro facilitar la
limpieza, protejo el fondo del horno de
derrames excesivos colocando una hoja de
galletas en el estante que está debajo del
estante sobre el cual está cocinando. Esto
es particularmente importante al hornear
uno torta de fruto u otros comidos con alto
contenido de ácido. Los rellenos de fruta
caliente u otras comidas con alto contenido
Levante la Puerta del Horno (en algunos modelos)
La puerta es muy pesada. Tenga cuidado al
retirar y levantar la puerta.
No levante la puerta usando la manija.
Para retirar la puerta:
[7] Abra la puerta totalmente.
Empuje los bloqueos de bisagra
hacia abajo para desbloquear
Extreme
Inferior 11 I I I I
de la 11 ll \ V [
ranura'
Brazo de la bisagra
^ Empuje los bloqueos de bisagra hacia
abajo en dirección a la estructura de la
puerta, hasta la posición desbloqueada. Es
posible que necesite una herramienta tal
como un destornillador pequeño de punta
plana.
Firmemente tome ambos lados de la
puerta por la parte superior
Cierre la puerta hasta la posición de retiro
de la misma, que está en la mitad entre la
posición de detención para asar y
totalmente cerrada.
Levante la puerta hacia arriba y hacia
afuera hasta que el brazo de la bisagra
esté fuera de la ranura.
de ácido (tales como tomate, chucrut y
salsas con vinagre o jugo de limón) pueden
ocasionar fisuras y daños sobre la superficie
de porcelana esmaltada y se deberán limpiar
inmediatamente.
Para limpiar derrames, use aguo yjobón, un
limpiador abrasivo o uno almohadillo poro
fregar lleno de jabón. Enjuague bien poro
eliminar cualquier resto de jabón antes de la
función de auto limpieza.
Para reemplazar la puerta:
Firmemente tome ambos lados de la
— puerta por la parte superior.
Con la puerta en el mismo ángulo que en
la posición de retiro, apoye la hendidura
en la ranura de la bisagra. La abertura en
el brazo de la bisagra deberá estar
totalmente apoyada en la parte inferior de
la ranura.
ji Abra la puerta totalmente. Si la puerta no
— se abre totalmente, la hendidura no está
correctamente apoyada en el extremo
inferior de la ranura.
Empuje los bloqueos de bisagra contra la
estructura frontal de la cavidad del horno
en la
posición
de
Bloqueo de
la bisagra "
bloqueo.
Cierre la
puerta
Brazo de la
bisagra
del
horno.
Empuje los bloqueos de la bisagra
hacia arriba para bloquear.
Levante la Puerta del Horno Superior
Para retirar la puerta::
[/] Abra la puerta totalmente.
Levante el bloqueo de las bisagras hacia
el marco del horno hasta que se detenga.
Cierre la puerta a 45 grados (sentirá que
la puerta se detiene). El bloqueo de las
bisagras hará contacto con el marco del
horno.
~/pi A ambos lados de la puerta, presione los
botones para liberar cada bisagra.
31 .Levante la puerta hasta que se libere de
las bisagras.
Tire de los brazos de las bisagras para
liberar la presione sobre las lengüetas de
bloqueo.
Empuje los bloqueos de las bisagras
7
hacia abajo sobre las bisagras.
Presione las bisagras hacia la unidad, de
d
modo que se cierren.
(en algunos modelos)
Para reemplazar la puerta:
í~¥] Empuje las bisagras hacia afuera del
— marco del horno hasta la posición
completamente abierta.
Levante los bloqueos de las bisagras
hacia el marco del horno hasta que se
detengan.
Levante los bloqueos de las bisagras
hacia el marco del horno hasta que se
detengan.
Deslice la puerta hacia atrás sobre las
bisagras. Asegúrese de que los botones
se vuelvan a levantar.
Abra la puerta
totalmente.
Empuje los bloqueos de
las bisagras hacia abajo
sobre las bisagras.
Cierre la puerta del
7
horno.
Empuje
hacia
adentro
Page 91

Estantes del Horno
GEAppliances.com
Todas las parrillas del horno se podrán limpiar a
mano con un limpiador abrasivo o viruta. Luego
de la limpieza, enjuague las parrillas con agua
limpia y seque con una tela limpia. Las parrillas
del horno grises y cubiertas de porcelana
podrán permanecer en el horno durante el
ciclo de auto limpieza sin sufrir ningún tipo de
daños. Las parrillas del horno de níquel podrán
Estante Extensible (en algunos modelos)
Los estantes extensibles se podrán limpiar a
mano con un limpiador abrasivo o estropajo.
Durante la limpieza, evite que ingrese agua o
limpiador en las barras deslizantes
NOTA: No los limpie en un lavavajillas.
El estante también podrá permanecer en el
horno durante el ciclo de auto limpieza sin sufrir
ningún tipo de daño. (No aplicable con estantes
extensibles de níquel).
permanecer en el mismo durante el ciclo de
auto limpieza, pero perderán su lustre y será
difícil deslizarías. Será necesario engrasar
todos los costados de la parrilla del horno con
una capa suave de aceite vegetal luego de
limpiarlas a mano
a que las parrillas se puedan deslizar con
facilidad fuera de horno.
Si retirar o reempiazar ei estante resuita
dificii, limpie los soportes del estante con aceite
de cocina. No iimpie ei aceite de cocina en ei
espacio de desiizamiento.
Si es difícil de deslizar el estante o si es
difícil accionar la palanca, es posible que
sea necesario lubricar el estante usando
Graphite Lubrication (Lubricación de Grafito)
enviada con su horno. Para ordenar Graphite
Lubrication (Lubricación de Grafito) adicional,
llame a nuestro Centro Nacional de Piezas al
800.626.2002 y dé la referencia WB02T10303.
o en el horno. Esto ayudará
Estante con lado derecho hacia arriba
Para iubricar ei desiizamiento:
NOTA: No rocíe el estante extensible con espray de
cocina o cualquier otro lubricante en espray.
Retire el estante del horno. Consulte sobre
m
el Estante Extensible en la sección de Uso
del Horno.
Extienda totalmente el estante sobre una
mesa o mostrador. Se podrá colocar papel
de periódico debajo del estante para una
limpieza fácil.
Si hay restos en los espacios de
deslizamiento, limpie con una toalla de
papel.
NOTA: Cualquier lubricante de grafito que
se limpie deberá ser reemplazado -
consulte los pasos 4 a 7.
Agite el lubricante de grafito antes de abrir
el mismo. Comenzando con el mecanismo
del lado izquierdo del estante, coloque
cuatro (4) gotas pequeñas de lubricante
en los dos (2) espacios para deslizar
inferiores cerca del espacio externo de
deslizamiento.
Repita esto sobre el mecanismo del lado
derecho del estante.
^ Abra y cierre el estante varias veces para
— distribuir el lubricante.
Reemplace la tapa del lubricante y agite
/
nuevamente. De vuelta el estante y repita
los pasos 3, 4,5 y 6.
Cierre el estante, gire el estante con el lado
s
derecho hacia arriba y coloque el mismo
en el horno. Consulte sobre el Estante
Extensible en la sección de Uso del Horno.
Para lubricar la
palanca: ^
Agite el lubricante
y aplique a las
partes móviles de
los mecanismos de
la paloneo como se
muestro:
35
Page 92

Cuidado y limpieza de la cocina.
Limpieza de la Puerta
Para limpiar el interior de la puerta:
■ No permita que el excedente de agua entre a
ningún agujero o ranuras de la puerta.
■ Aplique detergente para lavar platos sobre
cualquier salpicadura que haya sobre el
vidrio debido al horneado. Use el filo de una
Lajunta está diseñada con un
espacio en la parte inferior para
permitir la circulación de aire
adecuada.
No frote ni limpie lajunta de la
puerta; posee una resistencia
extremadamente baja a la
abrasión.
Si observa que lajunta se vuelve
caliente, se deshilacha o daña de
cualquier forma
de la puerta, deberá reemplazar
la misma.
y si quedó fuera
navaja del lado seguro para despejarlo.
Luego limpie el vidrio con una tela con jabón
para eliminar cualquier residuo y seque.
■ El área fuera de lajunta se puede limpiar con
una almohadilla para fregar de plástico con
jabón.
Superficies de Acero Inoxidable (en algunos modelos)
Para limpiar el exterior de la puerta:
■ Use agua yjabón para limpiar
completamente la parte superior, los lados
y el frente de la puerta del horno. Enjuague
bien. También puede usar un limpiador
de vidrio para limpiar el vidrio de la parte
exterior de la puerta.
■ El derrame de adobo.jugos de fruta,
salsas de tomate y materiales glaseados
aue contengan ácidos pueden ocasionar
descoloración y se deberán limpiar de
inmediato. Cuando la superficie esté fría, lave
y enjuague.
■ No use limpiadores para horno, polvos de
limpieza o abrasivos duros sobre la parte
exterior de la puerta.
No use virutas de acero; éstas dañarán la
superficie.
Esto ayudará a mantener el brillo y el aspecto
de su cocina de acero inoxidable.
■ A fin de evitar cualquier descoloración y/o
manchas de grasa, recomendamos limpiar
y remover cualquier derrame, manchas y
grasa de la cocina luego de su uso.
■ Es importante usar una tela suave o toalla de
papel cada vez que se limpia la cocina, a fin
de evitar ralladuras.
Lea con cuidado las instrucciones que
aparecen en el reverso del Realzador de Brillo
para un mejor resultado.
Instrucciones de Limpieza:
1. Retire las parrillas.
2. Lave usando agua caliente yjabón:
Tela húmeda suave o toalla de papel (evite
usar agua en exceso).
Limpie la superficie en la dirección del
veteado (siguiendo las líneas de acero).
Enjuague y estruje una tela suave o una
toalla de papel y seque la cocina.
3. Aplique un desengrasante que no contenga
hidróxido de sodio o un limpiador de acero
inoxidable (siga las instrucciones).
4. Repita los pasos 2 a 4 tantas veces como
sea necesario.
5. Vuelva a colocar los estantes.
Siga las instrucciones para cualquier superficie
de acero inoxidable de su cocina.
NO LO USE para limpiar la parte superior de
la cocina o las partes de acero inoxidable:
• Lejía cáustica (hidróxido de sodio) o
limpiadores que contengan este químico
• Almohadillas duras o de estropajo
• Materiales o químicos abrasivos
Para consultar sobre la compra de
limpiadores o pulidores para el artefacto de
acero inoxidable, o para buscar la ubicación
del vendedor minorista más cercano a su
hogar, comuniqúese al número gratuito:
Centro Nacional de Piezas
800.626.2002 (EE.UU.)
800.661.1616 (Canadá)
GEApplianceParts.com (EE.UU.)
www.GEAppliances.ca (Canadá)
36
Page 93

GEAppliances.com
^ADVERTENCIA Riesgo de Descarga Eléctrica o Incendio: Antes de reemplazar la lámpara de luz del
horno, desconecte la conexión eléctrica del horno del fusible principal o del panel del disyuntor. SI esto no se cumple, se
podrá producir una descarga eléctrica o incendio.
Reemplazo de la Luz del Horno (en algunos modelos)
Asegúrese de dejar que la tapa de la luz y la
lámpara se enfríen completamente.
Para retirar ia tapa:
Doble los cristales en dirección contrario a
m
los agujas del reloj aproximadamente un
cuarto.
No retire ningún tornillo para retirar la tapa.
g] Reemplace la lámparo por uno poro
electrodomésticos de 40 watts o por uno
lámparo de luz halógeno de dos potos,
según correspondo.
Para reemplazar la tapa:
|~^ Line up tabs of lens in front of tabs on
housing and rotate clockwise to engage.
37
Page 94

Instrucciones Cocina
de Instalación
Ante cualquier duda, llame all.800-GE-CARES o visite nuestro sitio web en: GEADDliances.com
En el Commonwealth de Massachusetts
• Este producto debe ser instalado por un plomero
licenciado o un mecánico gasista..
• Al usar válvulas de cierre de gas tipo balón, deberán ser
del tipo de manija T.
• Al usar un conector de gas flexible no deberá exceder los 3 pies..
ANTES DE COMENZAR
Lea estas instrucciones en su totalidad y atentamente.
Esta cocina se deberá instalar de acuerdo con los códigos
locales, o en la ausencia de códigos locales, con el Código
de Gas Combustible Nacional, ANSIZ223.1/NFPA.5A, última
edición. En Canadá, la instalación deberá ser conforme
con el Código de Instalación de Gas Natural actual, CAN/
CGA-B1A9.1 o el Código de Instalación de Propano actual,
CAN/CGA-B1A9.2, y con los códigos locales cuando
corresponda. Esta cocina fue diseñada y certificada por
CSA International, de acuerdo con ANSI Z21.1, última
edición y con la Canadian Gas Association (Asociación de
Gas de Canadá) CAN/CGA-1.1 última edición.
Al igual que con cualquier electrodoméstico que utilice gas
y genere calor, existen ciertas precauciones de seguridad
que se deberán seguir. Encontrará estos precauciones en
la sección de Información Importante de Seguridad, en el
frente de este manual. Leo los mismos detenidamente.
IMPORTANTE — Conserve estas instrucciones
para uso del inspector de electricidad local.
PARA SU SEGURIDAD
No guarde ni use materiales combustibles, gasolina u
otros vapores inflamables y líquidos cerca de éste ni
de otros electrodomésticos.
Si huele gas:
^Abra las ventanas.
QNo toque los enchufes eléctricos.
^ Extinga cualquier llama abierta.
^Inmediatamente llame a su proveedor de gas.
IMPORTANTE — Cumplo con todos los códigos
y ordenanzas gubernamentales..
Nota para el Instalador - Guarde estos
instrucciones con el electrodoméstico uno vez
completado la instalación.
Nota para el Consumidor - Guarde este
Manual del Propietario y los Instrucciones de Instalación
poro referencia futuro.
Nota - Este electrodoméstico deberá estar conectado a
tierra de formo adecuado.
Servicio Técnico - EI diagrama eléctrico se
encuentro en un sobre adjunto al reverso de la cocino.
La correcto instalación del producto es responsabilidad
del instalador.
Si se producen fallas en el producto debido a una
instalación inadecuada, la Garantía no cubrirá las mismas.
Casa Rodante - Requisitos de Información Adicional
Esta cocina se deberá instalar conforme con el Estándar de
Construcción y Seguridad para Hogar, Título 24 CFR, Pieza 3280
(anteriormente Estándar Federal para las Construcciones en
Casas Móviles, use el estándar para las Instalaciones de Casas
Fabricadas, ANSI A225,1/NFPA 501A o con códigos locales).
Los instalaciones en casas móviles requieren:
• Cuando la cocina es instalada en una casa móvil, se deberá
asegurar al piso durante el tránsito. Cualquier método para
asegurar la cocina es adecuado, siempre y cuando se realice
conforme con los estándares que figuran a continuación.
MATERIALES NECESARIOS
• Válvula de cierre para tubería de gas
• Sellador para junta de tubería o UL - cinta para tubería
aprobada con Teflón*, resistente a la acción de gases
naturales o LP
• Conector para artefacto metálico flexible (1/2" I.D.)
Se recomienda una longitud de 5 pies para una fácil
instalación, pero otras longitudes son aceptables. Nunca
use un conector viejo al instalar una cocina nueva.
• Adaptador para unión cónica para la conexión al
suministro de gas (3/4" o NPT x I.D.)
• Adaptador para unión cónica para la conexión al
regulador de presión en la cocina (1/2" o NPT x I.D.))
• Detector de pérdida de líquido o agua con jabón.
• Tornillo de compresión o sujetador de manga de Vi'
O.D. (sólo para pisos de concreto).
*Teflón: Marca registrada por DuPont
38
Page 95

Instrucciones de Instalación
Aadvertencia
INSTRUCCIONES PARA UNA
INSTALACIÓN SEGURA
Lea estas instrucciones en su totalidad y
atentamente.
Una instalación, ajuste, alteración, servicio o
mantenimiento inadecuados pueden ocasionar lesiones
o daños sobre la propiedad. Consulte este manual. Poro
recibir asistencia o información adicional, consulte a
un instalador calificado, agencio de servicio, fabricante
(comerciante) o proveedor de gas.
Nunca vuelvo a usar conectores flexibles viejos. El uso
de conectores flexibles viejos puede ocasionar goteros
y lesiones personales. Siempre use conectores flexibles
NUEVOS ol instalar electrodomésticos a gas.
La pruebo de goteros del electrodoméstico se deberá
realizar de acuerdo con las instrucciones del fabricante.
IMPORTANTE ~ Retire todo el material de
embalaje y material escrito del horno antes de conectar
el gas y el suministro de corriente a la cocino.
APRECAUCION
horno de esta cocina durante un corte de corriente
(sólo en modelos de encendido eléctrico).
■ Solicite que su cocina sea instalada por un instalador
calificado.
■ Su cocina deberá estar correctamente conectada
a tierra de acuerdo con los códigos y ordenanzas
locales o, en ausencia de códigos locales, de acuerdo
con el Código Nacional de Electricidad (National
Electric Code), (ANSI/NFPA NO. 70., última edición).
En Canadá, la conexión a tierra se deberá realizar de
acuerdo con la Porte 1 del Código de Electricidad de
Canadá CSA C22.1 y/o los códigos locales. En esto
sección, consulte los Conexiones Eléctricos.
■ Antes de instalar su cocino sobre linóleo y cualquier
otro revestimiento de piso sintético, asegúrese de
que el revestimiento del piso resista los 180° F sin
contraerse, combarse o descolorarse. No instale la
cocina sobre alfombras, a menos que haya una hoja
de contrachapado de un grosor de o un aislante
similar entre la cocina y la alfombra.
■ Asegúrese de que el revestimiento de pared
alrededor de lo cocino pueda resistir el calor de hasta
200° F generado por lo cocino.
No intente utilizar el
■ Evite usar gabinetes sobre la cocina. Para reducir
el riesgo ocasionado por la extensión de las llamos
abiertos de los quemadores en funcionamiento,
instale una campano de ventilación sobre la cocino
que se proyecte hacia adelante por lo menos a 5" del
frente de los gabinetes.
■ La campano de ventilación deberá estar construido
de uno lámina de metal de no menos de 0.0122" de
grosor. Instale sobre lo porte superior de la cocina,
dejando un espacio de no menos de entre la
campana y lo porte inferior del gabinete de material
combustible o metal. La campano deberá ser por
lo menos ton ancho como el electrodoméstico y
estar centrada sobre el mismo. El despeje entre la
superficie de cocción y la superficie de la campana
de ventilación NUNCA DEBE SER INFERIOR A 24".
EXCEPCIÓN: La instalación de un horno microondas
o electrodoméstico de cocción que figuren en la listo
sobre la parte superior de la cocino deberá cumplir
con las instrucciones de instalación provistas con el
electrodoméstico.
■ Si se ubican gabinetes sobre la cocina, deje un
espacio mínimo de 30" entre la superficie de cocción
y la parte inferior de los gabinetes desprotegidos.
■ Si no se puede mantener una distancia de 30" entre
la superficie de cocción y el material combustible en
lo porte superior o los gabinetes de metal, proteja la
parte inferior de los gabinetes sobre la parte superior
de la cocino con no menos de 1/4" de cartulina
común aislante cubierta con una lámina de metal
de no menos de 0.0122" de grosor. El despeje entre
la superficie de cocción y los gabinetes protegidos
NUNCA DEBE SER INFERIOR A 24".
■ La distancia vertical desde el plano de lo superficie
de cocción hasta la porte inferior de los gabinetes
adyacentes de la porte superior que se extienden
más cerco que 1" al plano de los iodos de la
cocina no deberá ser inferior a las 18". (Consulte
la ilustración de Dimensiones y Espacios en esta
sección).
■ No instale este producto con una campana con
cortina de aire u otra campana de cocino que
funcione llevando aire a la placo de cocción. El flujo
de aire podrá interferir en el funcionamiento de los
quemadores de gas, produciendo riesgos de incendio
o explosión.
APRECAUCION ” sólo la serie de marca
de Café Advantium© de GE o los hornos microondas de
calidad excepcional están diseñados para su instalación
sobre el horno Café de GE. Es posible que las superficies
sobre una cocina a gas se calienten. La instalación de
cualquier otro horno excepcional sobre un horno Café de
GE puede producir temperaturas superficiales que pueden
ocasionar quemaduras.
39
Page 96

Instrucciones de Instalación
DIMENSIONES Y ESPACIOS
Deje el espacio adecuado entre la cocino y las superficies combustibles adyacentes. Estos dimensiones se deberán
cumplir poro un uso seouro de su cocina. La ubicación del tomocorriente de electricidad y la obertura de la tubería
(consulte Ubicaciones del Gas y el Tomocorriente Eléctrico) se podrán ajustar poro cumplir con los requisitos específicos.
La cocina se deberá ubicar con un espacio (nivelado) de 0" con relación a la pared trasero. (Algunos modelos no
quedarán nivelados.)
Para la instalación de la isla, modelo CGS990, deje un espacio mínimo de 2-%" entre la obertura y el extremo trasero de la
mesado y un mínimo de 3" entre la obertura y los extremos laterales de la mesado.
*Los modelos
PGB900, PGB910,
PGB915, PGB930y
PGB935 requieren un
espacio mínimo de
3" con relación a la
pared izquierda.
Mínimo para
gabinetes en
cada lado de
la parrilla
‘ 5"
Espado mínimo
18"-
con relación a la
- pared izquierda
i
‘ 30"
<-0"
Para gabinetes debajo de la
parte superior de la cocina y
la parte trasera de la cocina
(Algunos modelos no
quedarán nivelados.)
**Las dimensiones son referenciadas desde el punto de la parte
trasera de la cocina, que hará contacto con la pared trasera primero.
La dimensión máxima deberá ser considerada entre la
puerta superior y la inferior.
*** Altura de la parte trasera basada en el kit instalado de la porte
trasero estilo Café.
40
Page 97

Instrucciones de Instalación
UBICACION
No ubique la cocina donde pueda haber corrientes de aire fuertes. Cualquier abertura en el piso o la pared detrás
de la cocina deberán estar selladas. Asegúrese de que las aberturas alrededor de la base de la cocina que brindan
aire fresco para la combustión y ventilación no estén obstruidas por alfombras ni piezas de carpintería.
Su cocina, al igual que muchos otros artículos del hogar, es pesada y se puede colocar sobre revestimientos de
piso suaves tales como alfombras o vinilo acolchonado. Tenga cuidado al mover la parilla en este tipo de pisos. Se
recomienda que se sigan las siguientes instrucciones simples
La cocina se debería instalar sobre una lámina de madera contrachapada (o material similar). Cuando el revestimiento
del piso finaliza frente a la cocina, el área donde la cocina se apoyará deberá ser de contrachapado, al mismo nivel o
más alto que el revestimiento del piso.
Esto permitirá que la cocina pueda ser movida para su limpieza o reparaciones técnicas. Además, asegúrese de que el
revestimiento de su piso resista los 180° F. (Consulte la sección de Instrucciones para una Instalación Segura).
Asegúrese de que los gabinetes y los revestimiento de pared alrededor de la cocina pueda resistir el calor (de hasta
200° F) generado por la cocina. (Consulte la sección de Instrucciones para una Instalación Segura).
¡IMPORTANTE!
Retire todos los adhesivos y materiales de empaque. Asegúrese que los quemadores estén propiamente
acomodados y nivelados.
y económicas para proteger su piso.
Quite todos los accesorios de empaque del horno y/o cajón.
Asegúrese que ninguna pieza de su estufa se haya perdido durante el embarque.
CONVERTIR A GAS LP (o convertir nuevamente a gas natural de LP))
Esta cocina deja la configuración de fábrica para uso con gas natural. Si desea convertir a gas LP, la conversión
deberá ser realizada por un instalador de gas LP calificado.
Las instrucciones de conversión se pueden encontrar en la parte posterior de la gama.
Guarde estas instrucciones y los orificios en caso de que lo desee convertir nuevamente a gas natural.
Las instrucciones de convección identifican adónde encontrar los kits en el modelo. La ubicacione se definen en la
siguiente imagen.
41
Page 98

Instrucciones de Instalación
^ BRINDE EL SUMINISTRO DE GAS
ADECUADO
Su cocina fue diseñada para funcionar en una presión
de columna de agua de 5" con gas natural o, si se desea
usar con gas LP (propano y butano), una columna de
agua de 10".
Asegúrese de que esté suministrando a su cocina el tipo
de gas para el cual fue diseñada.
Esta cocina es convertible para uso con gas natural o
gas propano. Si decide usar esta cocina con gas LP, un
instalador de LP calificado deberá realizar la conversión
antes de intentar utilizar la cocina con dicho gas.
Para una instalación adecuada, la presión del gas natural
suministrado al regulador deberá ser de una columna de
agua de entre 5" y 13".
Para el gas LP, la presión suministrada deberá ser de una
columna de agua de entre 10" y 13".
Al controlar el funcionamiento adecuado del regulador, la
presión de entrada deberá ser por lo menos 1" mayor que
la presión de funcionamiento (tubo) como se indica más
arriba.
El regulador de presión ubicado en la entrada del tubo de
la cocina deberá permanecer en la línea de suministro,
más alió de si el gas natural o LP está siendo usado.
Un conector de metal flexible del electrodoméstico
usado para conectar la cocina al suministro de gas
debería tener un I.D. de Vi' y 5 pies de longitud para una
instalación más fácil. En Canadá, los conectores flexibles
deberán ser conectores metálicos de pared simples, de
no más de 5 pies de longitud.
^ CONECTE LA COCINA AL GAS
Cierre la válvula principal de suministro de gas
antes de desconectar su vieja cocina y deje la misma
apagada hasta que la nueva conexión se haya
completado. No olvide volver a encender el piloto
en otros electrodomésticos a gas cuando vuelva a
encender el gas.
Debido a que las tuberías duras restringen el movimiento
de la cocina, se recomienda el uso del conector para
electrodomésticos de metal flexible con certificación
internacional de CSA, a menos que los códigos locales
requieran una conexión de tubería dura.
Nunca use un conector viejo al instalar una cocina nueva.
Si se usa el método de tubería dura, deberá alinear la
misma con cuidado; la cocina no se podrá mover una vez
realizada la conexión.
Para evitar pérdidas de gas, coloque el compuesto de la
junta de gas, o envuelva la cinta para roscas de tuberías
con Teflón* alrededor de todas las roscas de tubería
macho (externas).
A. Instale una válvula de cierre manual de la línea de
gas en la línea de gas, en una ubicación de fácil
acceso fuera de la cocina. Asegúrese de que todas
las personas que usen la cocina sepan dónde y cómo
cerrar el suministro de gas de la cocina.
B. Instale el adaptador de la unión cónica macho de Vi'
a la rosca interna de 1/2" de NPT en la entrada del
regulador. Use la llave de repuesto en el accesorio
regulador para evitar daños.
Al instalar la cocina desde el frente, retire el codo de
90° para una instalación más fácil.
C. Instale un adaptador para unión cónica de Vi' o %" a
la rosca interna de NPT de la válvula de cierre manual,
procurando evitar que la válvula de cierre no gire.
D. Conecte el conector de metal flexible del
electrodoméstico al adaptador de la cocina. Posicione
la cocina para permitir la conexión en la válvula de
cierre.
E. Cuando todas las conexiones se hayan realizado,
asegúrese de que todos los controles de la cocina
estén en la posición de apagado y encienda la válvula
de suministro principal de gas. Use un detector de
pérdida de líquido en todas las uniones y conexiones,
para controlar pérdidas en el sistema.
A ADVERTENCIA
Riesgo de
incendio: No use una llama para controlar las
pérdidas de gas.
Al usar presión de prueba superior a ^ psig para
controlar la presión del sistema de suministro de gas de
la residencia, desconecte la cocina y la válvula de cierre
individual de la tubería de suministro de gas. Al usar las
presiones de prueba de ^ psig o menos para controlar el
sistema de suministro de gas, simplemente aísle la cocina
del sistema de suministro de gas, cerrando la válvula de
cierre individual.
*Teflón: Marca registrada por DuPont
42
Page 99

Instrucciones de Instalación
43
Page 100

Instrucciones de Instalación
CONEXION DEL CONECTOR FLEXIBLE
Tubería de gas desde el piso
Flujo del Gas en la Cocina
OPCIONES DE CONEXION DE TUBERIA RIGIDA
Tubería de gas desde la pared
Flujo del Gas en la Cocina
Instalador: Informe al
consumidor sobre la
ubicación de la válvula
de cierre de gas.
Instalador: Observe la
distancia recomendada
para una conexión a
través de la pared.
Codo de A5°
Flujo del Gas en la Cocina
Boquilla
roscada Unión
Regulador
de presión
Instalador: Informe al
consumidor sobre la
ubicación de la válvula de
cierre de gas.
Codo de 90°
Tubería de
hierro negro
Unión
Boquilla
roscada
Válvula
de cierre
de gas
Tubería de
gas de Vi"
o %"
Codo de 90°
Boquilla
roscada
Válvula
de cierre
de gas
Tubería de gas de
V2" o %"
Instalador: Informe al
consumidor sobre la
ubicación de la válvula
de cierre de gas.
Conexión Alterno
Adaptador
90° Codo de 90°
Boquilla roscada
Unión o conexión
rápida
Boquilla roscada
Codo Regulador
de 90° de presión
Codo de 90°
Adaptador
Flujo del Gas en la Cocina
44
 Loading...