

Page 1

am
n
l.U
m
a
U
0
Q.
0
GEAppliances.com
Safety Instructions ...... 2-5
Operating Instructions
|
Kitchen Timer ................. 19
Oven ...................... 12-51
Adjust Oven Thermostat ..... 20
Baking or Roasting .............. 15
Broiling,Broiling Guide .......... 16
Controls .......................... 12
Convection Oven ............ 21-24
Lower Oven Drawer ............ 31
Preheating ....................... 15
Probe............................. 18
Sabbath Feature................ 28
Self-Cleaning................. 29, 30
Special Features............. 25-27
Timed Baking or Roasting...... 17
Surface Units................ 6-11
Cookware .................... 7
Griddle............................ 10
Knob-Controlled Models....... 8,9
Care and Cleaning
control Knobs ................. 52
Control Panel ................. 52
Glass Cooktop ............ 37, 58
Lift-Off Oven Door......... 33, 34
Light .......................... 36
Oven Heating Elements ....... 36
Racks ......................... 34
Removable Warming Drawer/
Lower Oven Drawer Pan .... 35
Surfaces ...................... 32
Installation
Instructions ............ 59-46
Anti-Tip Device ............ B9,45
Dimensions and
Clearances .................... 40
Electrical Connections ...... 41-44
Level the Range ............... 45
Location Guidelines ........... 40
Safety Instructions ............ B9
Troubleshooting
Tips ...................... 47-49
Accessories .................. 53
Consumer Support
Consumer
Support .............. Back Cover
Warranty for Customers
in Canada ..................... 55
Warranty for Customers
in the U.S.A.................... 54
Quick Set VI,
C5980
For a Spanish version of this
manual, visit our Website at
GEAppliances.com.
Para consultar una version
en espa_ol de este manual
de instrucciones, visite
nuestro sitio de internet
GEAppliances.com.
In Canada:
www.G EApplia nces.ca
Printed in Mexico
Write the model and serial
numbers here:
Model #
Serial #
You can find them on a label
behind the drawer or behind the
lower oven door on the front of
the range frame.
Printed on
Recycled Paper
49-88050 01-12 GE
Page 2
IMPORTANT SAFETY INFORMATION.
READ ALL INSTRUCTIONS BEFORE USING.
j kWARNING ]
Read all safety instructions before using the product. Failure to follow these instructions may result in fire, electric shock,
serious injury or death.
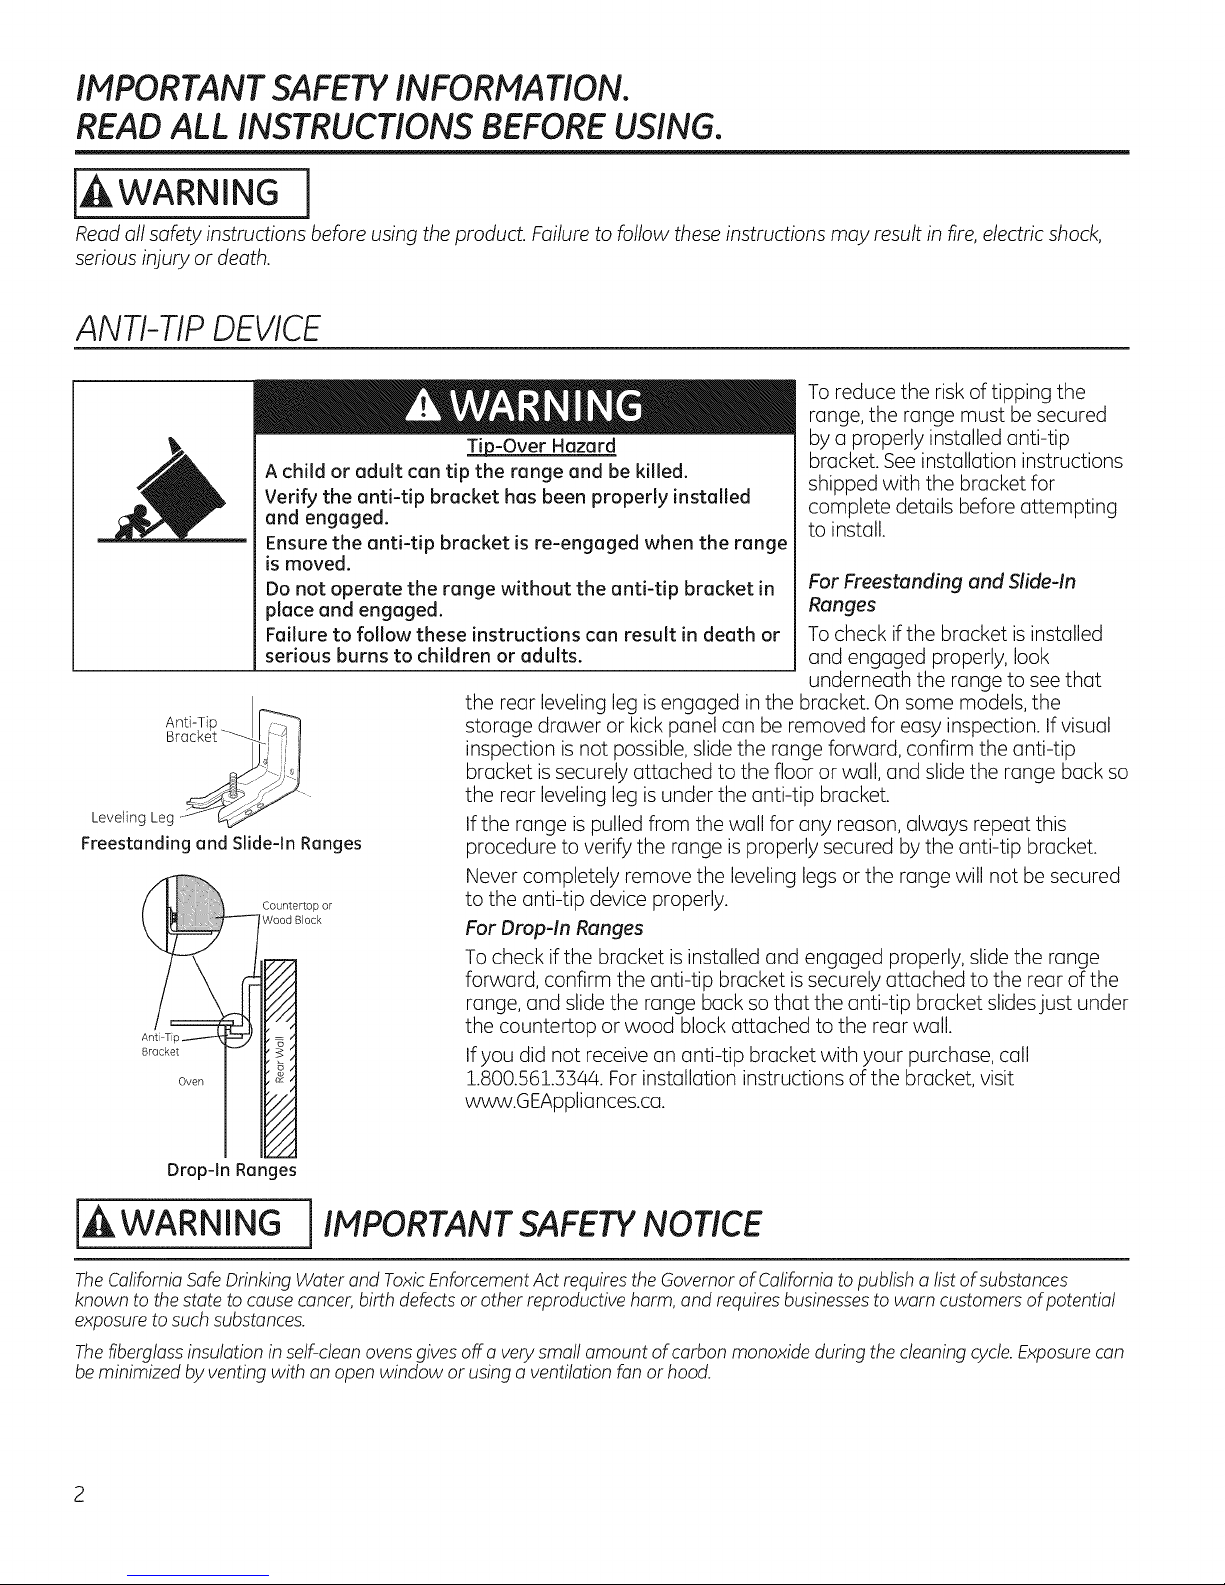
ANTI-TIP DEVICE
To reduce the risk of tipping the
range, the range must be secured
by a properly installed anti-tip
bracket. See installation instructions
shipped with the bracket for
complete details before attempting
to install.
For Freestanding and Slide-In
Ranges
To check if the bracket is installed
and engaged properly, look
underneath the range to see that
A child or aduEt can tip the range and be killed.
Verify the anti-tip bracket has been properly instaEled
and engaged.
Ensure the anti-tip bracket is re-engaged when the range
is moved.
Do not operate the range without the anti-tip bracket in
place and engaged.
Failure to follow these instructions can resuEt in death or
serious burns to chiMren or aduEts.
Bracket '"_-'_'i i
Anti-Tip _ _
Leveling Leg
Freestanding and Slide-In Ranges
,j
Countertop or
(
//t
i Wood Block
Anti Tip------
Bracket
Oven
o
o,
G)
Tip-Over Hazard
the rear leveling leg is engaged in the bracket. On some models, the
storage drawer or kick panel can be removed for easy inspection. If visual
inspection is not possible, slide the range forward, confirm the anti-tip
bracket issecurely attached to the floor or wall, and slide the range back so
the rear leveling leg is under the anti-tip bracket.
If the range is pulled from the wall for any reason, always repeat this
procedure to verify the range is properly secured by the anti-tip bracket.
Never completely remove the leveling legs or the range will not be secured
to the anti-tip device properly.
For Drop-In Ranges
To check if the bracket is installed and engaged properly, slide the range
forward, confirm the anti-tip bracket issecurely attached to the rear of the
range, and slide the range back so that the anti-tip bracket slides just under
the countertop or wood block attached to the rear wall.
If you did not receive an anti-tip bracket with your purchase, call
1.800.561.3344. For installation instructions of the bracket, visit
www.GEAppliances.ca.
z/l
Drop-In Ranges
TheCaliforniaSafeDrinkingWater and ToxicEnforcementAct requires the Governor of Californiato publish a list of substances
known to the state to cause cancer,birth defects or other reproductive harm, and requires businessesto warn customers of potential
exposure to such substances.
Thefiberglassinsulation in self-cleanovensgivesoff a very small amount of carbon monoxide during the cleaning cycle.Exposurecan
be minimized by venting with an open window or using a ventilation fan or hood.
Page 3

GEAppliances.com
jAWARNING i
_,Usethis appliancefor its intendedpurposeasdescribedinthis
Owner'sManual.
Besureyour applianceis properly installedand grounded by a
qualifiedinstallerin accordancewith theprovidedinstallation
instructions.
Donot attempt to repair or replaceany part of your range unless
it isspecificallyrecommendedinthis manual.All other servicing
shouldbetransferredto a qualifiedtechnician.
Beforeperforming anyservice,unplug the rangeordisconnect
the powersupplyatthe householddistributionpanelby
removingthefuseor switchingoff the circuit breaker.
Donot leavechildrenalone-children should not beleft alone
or unattended in an areawhereanapplianceisin use.They
shouldneverbe allowedto climb,sitor standon any part of the
appliance.
GENERALSAFETYINSTRUCTIONS
CAUTION Donotstore items of interestto children
abovea rangeor onthe backguardof a range-children climbing
on the rangeto reachitemscouldbe seriouslyinjured.
Useonlydrypot holders-moist or damp pot holderson hot
surfacesmayresultinburnsfrom steam.Donotlet pot holders
touch hot surfaceunitsor heating elements.Do not useatowel
or other bulkycloth in placeof pot holders.
Neveruseyour appliancefor warming or heating the room.
Donottouch the surface units,the heating elementsor the
interiorsurfaceof the oven.Thesesurfacesmay be hot enough
to burn eventhough they aredark in color.Duringand after use,
do not touch,or letclothingorother flammablematerialscontact
the surfaceunits,areasnearbythe surfaceunitsorany interior
area of the oven;allow sufficienttimefor coolingfirst.Other
surfacesof the appliancemay become hot enoughto cause
burns.Potentiallyhot surfacesincludethe cooktop,areasfacing
the cooktop,ovenvent opening,surfacesnearthe openingand
crevicesaround the oven door.
iiiiii_
Donot heatunopenedfoodcontainers.Pressurecould buildup
and the containercouldburst,causingan injury.
iiiiii_
Avoidscratchingor impacting glassdoors,cooktopsorcontrol
panels.Doingso may leadto glassbreakage.Donotcookona
product with brokenglass.Shock,fireorcuts mayoccur.
Cookmeatand poultrythoroughly-meat to at leastaninternal
temperatureof :].60°Fand poultrytoat leastaninternal
temperatureof Z80°F.Cookingtothesetemperaturesusually
protectsagainstfoodborne illness.
Donot usealuminum foilto linedrip pansor anywhere inthe
oven,exceptasdescribedinthis manual. Foilcantrap heat
or melt, resultingin damageto the product and a shockor fire
hazard.
[ ,WARNINGl
KEEPFLAMMABLE MATERIALS AWAY FROM
THE RANGE.
Donot storeoruseflammablematerialsinanovenor near
the cooktop,includingpaper,plastic,potholders,linens,wall
coverings,curtains,drapesandgasolineor other flammable
vaporsandliquids.
Neverwearloose-fittingor hanginggarmentswhileusing
the appliance.Thesegarments may igniteifthey contact hot
surfaces,causingsevereburns.
Donot let cookinggreaseor other flammablematerials
accumulate inor nearthe range.Greasein the oven or on the
cooktopmay ignite.
Cleanventilating hoodsfrequently.Greaseshouldnot be
allowedto accumulateonthe hoodorfilter.
i, WARNING i IN THE EVENT OFA FIRE,TAKE THE FOLLOWING
STEPSTO PREVENTTHEFIREFROM SPREADING:
Donot usewater on grease fires. Neverpick up a flaming pan.
Turn the controls off. Smother a flaming pan on a surface
unit by covering the pan completely with a well-fitting lid,
cookie sheet or flat tray. Useamulti-purpose dry chemical or
foam-type fire extinguisher.
If there is a fire in the oven during baking, smother the fire by
closing the oven door and turning the oven off or by using a
multi-purpose dry chemical or foam-type fire extinguisher.
If there is a fire in the oven during self-clean,turn the oven
off and wait for the fire to go out. Do not force the door
o_o.o.o.o.o.o.o.o.o_.Introduction of fresh air at self-clean temperatures
may lead to a burst of flame from the oven. Failureto follow
this instruction may resultin severeburns.
Page 4
IMPORTANT SAFETY INFORMATION.
READ ALL INSTRUCTIONS BEFORE USING.
jAWARNINGj
Never leave the surface units unattended at medium or
high heat settings. Boilovers cause smoking and greasy
spillovers that may catch on fire.
Never leave oil unattended while frying. If allowed to
heat beyond its smoking point, oil may ignite, resulting
in fire that may spread to surrounding cabinets. Use a
deep fat thermometer whenever possible to monitor oil
temperature.
To avoid oil spillover and fire, use a minimum amount of
oil when shallow pan-frying and avoid cooking frozen
foods with excessive amounts of ice.
Useproper pan size-select cookware having flat
bottoms large enough to cover the surface heating
element.The useof undersizedcookware will expose
a portion of the surfaceunit to direct contact and may
result in ignitionof clothing. Properrelationship of
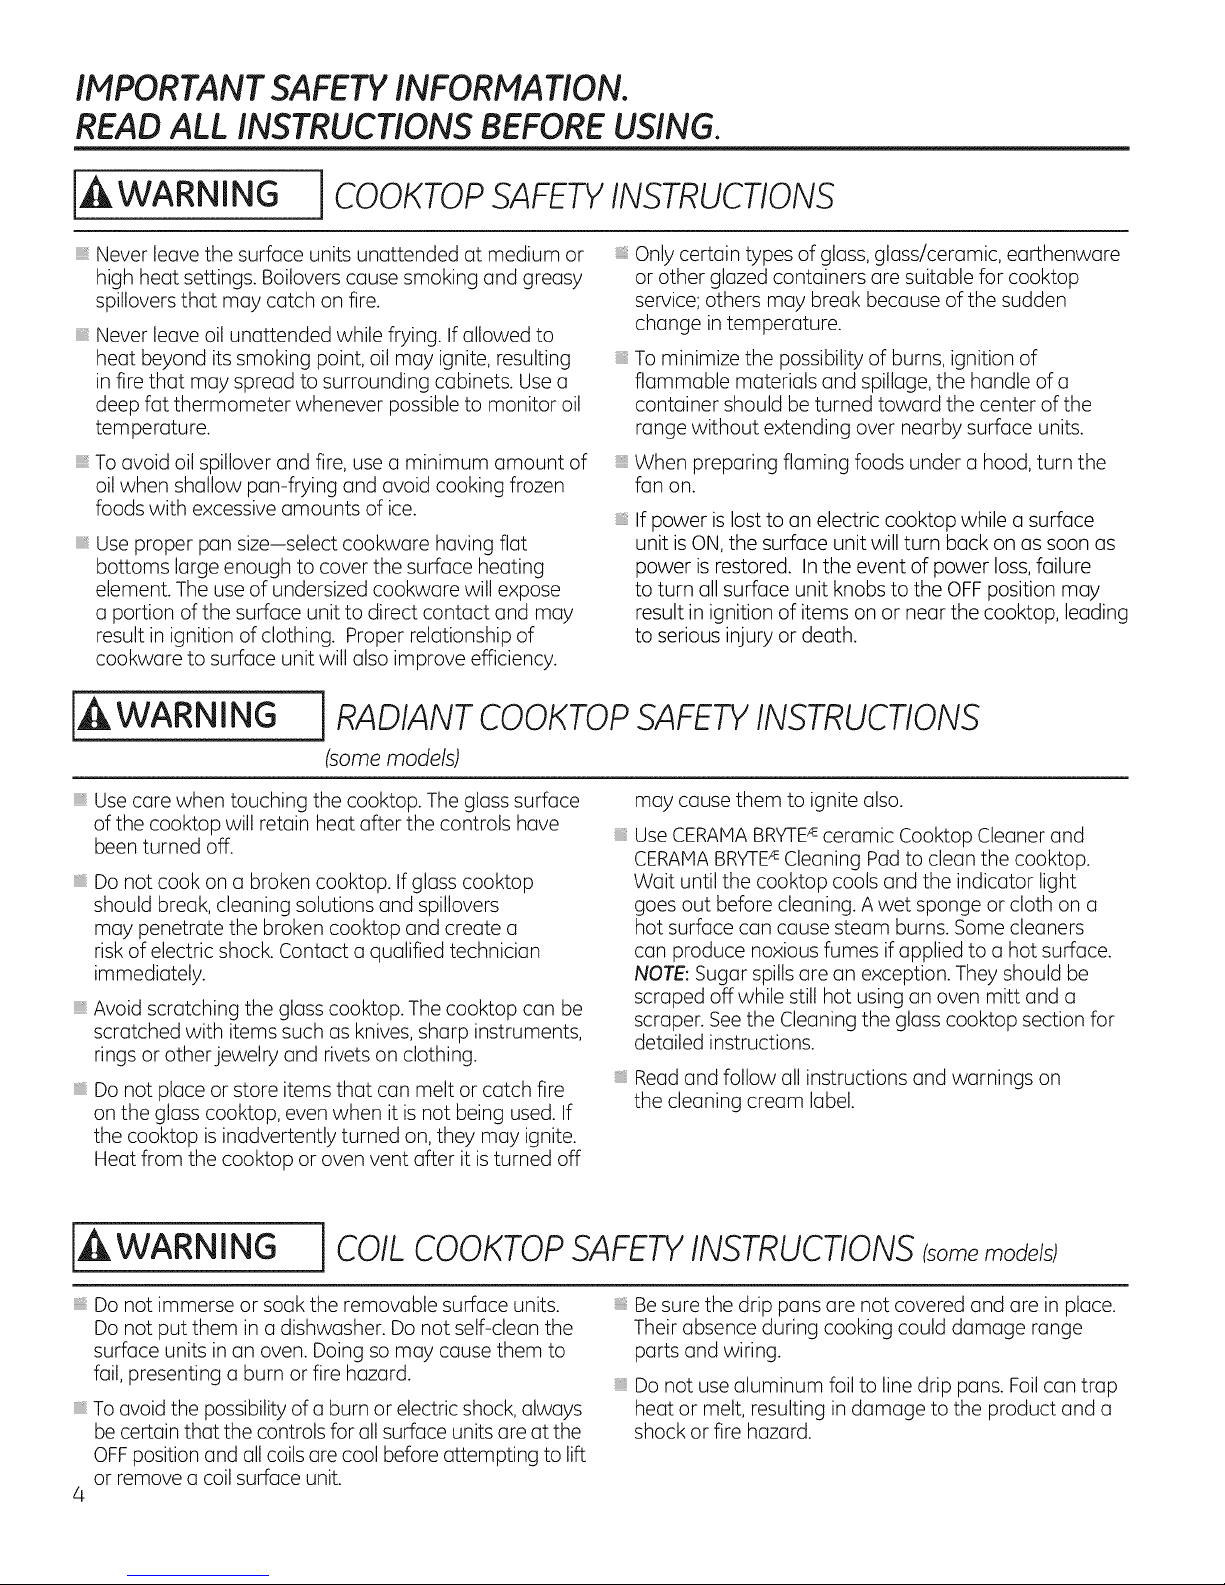
COOKTOPSAFETYINSTRUCTIONS
iiiiiiiiiiii_i;i
Onlycertain types of glass,glass/ceramic,earthenware
or other glazed containers are suitable for cooktop
service;others may break becauseof the sudden
change intemperature.
iiiiiiiiiiii_i;i
To minimize the possibility of burns, ignition of
flammable materials and spillage, the handle of a
container should be turned toward the center of the
range without extending over nearby surface units.
iiiiiiiiiiii_i;i
When preparing flaming foods under a hood, turn the
fan on.
iiiiiiiiiiii_i;i
If power is lost to an electric cooktop while a surface
unit is ON, the surface unit will turn back on as soon as
power is restored. In the event of power loss,failure
to turn all surface unit knobs to the OFF position may
result in ignition of items on or near the cooktop, leading
to serious injury or death.
cookware to surfaceunit will also improve efficiency.
jAWARNING ] RADIANT COOKTOP SAFETYINSTRUCTIONS
(some models)
Use care when touching the cooktop. The glass surface
of the cooktop will retain heat after the controls have
been turned off.
Do not cook on a broken cooktop. If glass cooktop
should break, cleaning solutions and spillovers
may penetrate the broken cooktop and create a
risk of electric shock. Contact a qualified technician
immediately.
Avoid scratching the glass cooktop. The cooktop can be
scratched with items such as knives, sharp instruments,
rings or other jewelry and rivets on clothing.
Do not place or store items that can melt or catch fire
on the glass cooktop, even when it is not being used. If
the cooktop is inadvertently turned on, they may ignite.
Heat from the cooktop or oven vent after it isturned off
may cause them to ignite also.
Use CERAMA BRY1-E_ ceramic Cooktop Cleaner and
CERAMABRY-1-E'_ Cleaning Pad to clean the cooktop.
Wait until the cooktop cools and the indicator light
goes out before cleaning. A wet sponge or cloth on a
hot surface can cause steam burns. Some cleaners
can produce noxious fumes if applied to a hot surface.
NOTE: Sugar spills are an exception. They should be
scraped off while still hot using an oven mitt and a
scraper. See the Cleaning the glass cooktop section for
detailed instructions.
Read and follow all instructions and warnings on
the cleaning cream label.
[AWARNING ] COIL COOKTOPSAFETYINSTRUCTIONS (somemodels)
Do not immerse or soak the removable surface units.
Do not put them in a dishwasher. Do not self-clean the
surface units in an oven. Doing so may cause them to
fail, presenting a burn or fire hazard.
To avoid the possibility of a burn or electric shock, always
be certain that the controls for all surface units are at the
OFFposition and all coils are cool before attempting to lift
or remove a coil surface unit.
4
i Be sure the drip pans are not covered and are in place.
Their absence during cooking could damage range
parts and wiring.
i Do not use aluminum foil to line drip pans. Foil can trap
heat or melt, resulting in damage to the product and a
shock or fire hazard.
Page 5

IAWARNINGIOVEN SAFETY INSTRUCTIONS
GEAppliances.com
Stand away from the range when opening the oven
door. Hot air or steam which escapes can cause burns
to hands, face and/or eyes.
Keep the oven vent unobstructed.
Keep the oven free from grease buildup. Grease in the
oven may ignite.
Placeoven racks in desired location while oven iscool.
If rack must be movedwhile oven is hot,do not let pot
holder contact hot heating element in oven.
When using cooking or roasting bags in the oven, follow
the manufacturer's directions.
IAWARNING
The self-cleaning feature operates the oven at temperatures high enough to burn away food soils in the oven.
Follow these instructions for safe operation.
Before operating the self-clean cycle, remove pans,
shiny metal oven racks and other utensils from the
oven. Only gray or black porcelain-coated oven racks
and drip pans may be left in the oven. Do not use
self-clean to clean other parts, such as shiny drip pans
or bowls.
ISELF-CLEANING OVEN SAFETYINSTRUCTIONS
(Some models)
Beforeoperating the self-clean cycle,wipe greaseand
food soilsfrom the oven.Excessiveamount of grease
may ignite,leading to smoke damage to your home.
Pull the oven rack to the stop-lock position when
loading and unloading food from the oven. This helps
prevent burns from touching hot surfaces of the door
and oven walls.
Do not leave items such as paper, cooking utensils or
food in the oven when not in use. Items stored in an
oven can ignite.
Do not use aluminum foil to line the oven bottom.
Foilcan trap heat or melt, resulting in damage to the
product and a shock or fire hazard
If the self-cleaning mode malfunctions, turn the oven off
and disconnect the power supply. Have it serviced by a
qualified technician.
Do not clean the door gasket. The door gasket is
essential for a good seal. Care should be taken not to
rub, damage or move the gasket.
Do not use oven cleaners. No commercial oven cleaner
or oven liner protective coating of any kind should be
used in or around any part of the oven.
IAWARNING I WARtVllNG DRAWER/LOWER OVEN DRAWER SAFETY
INSTRUCTIONS (somemodels)
The purpose of the warming drawer isto hold hot
cooked foods at serving temperature. Bacteria will grow
in food while it is below 140°F. Do not put cold food
in warming drawer. Do not heat food for more than 2
hours. Failure to follow these instructions may result in
foodborne illness.
Do not leave paper products, plastics, canned food or
combustible materials in the drawer. They may ignite.
Do not touch the heating element or the interior surface
of the drawer. These surfaces may be hot enough to
cause burns.
Usecare when opening the drawer. Openthe drawer a
crackand let hot air or steam escapebefore removing
or replacingfood. Hot air or steam that escapescan
cause burnsto hands,face and/or eyes.
Do not use aluminum foil to line the lower drawer. The
foil will trap heat below, and upset the performance
of the oven. Foil can melt and permanently damage
the drawer bottom. Damage from improper use of
aluminum foil is not covered by the product warranty.
Page 6

For models with a lass cooktop.
WARNING settings. Keep flammable items away from the cooktop. Turn off all controls when done
cooking. Failure to follow these instructions can result in fire, serious injury or death.
NOTE;Throughoutthis manual, featuresand appearancemay vary from your model.
About the radiant surface units
Never cook directly on the glass.
Always use cool<ware.
Always place the pan inthe center
of the surface unit you are cooking on.
Do not slide cool<ware across the
control or cool<topsurface because
it can scratch the glass. The glass is
scratch-resistant, not scrotchproof
The radiant cooktop features heating units
beneath a smooth glass surface.
Cooktoptemperatures increase with the
number of surface units that are on. With 3 or 4
units turned on, surface temperatures are high.
Always use caution when touching the cooktop.
An indicator light will come on when the
surface unit isturned on.
The appropriate HOTSURFACEindicator
light will glow when its corresponding radiant
element is turned on and will remain on until
the surface has cooled below 150%.
NOTE:
Hot surface indicator light will:
Stay on evenafter the unit is turned off.
Glow brightly until the unit has cooled
below !50°K
NOTE:A slight odor is normal when a new
cooktop isusedfor the firsttime. It is caused
bythe heating of new parts and insulating
materials and will disappear in a short time.
NOTE:Onmodels with light-colored glass
cooktops,it isnormal for the cookingzones to
change color when hot or cooling down. Thisis
temporary and will disappear as the glass cools
to room temperature.
It is safe to place hot cookware from the oven
or surface on the glass cooktop when the
surface iscool.
Evenafter the surface units are turned off, the
glass cooktop retains enough heat to continue
cooking.To avoid overcooking, remove pans
from the surface units when the food iscooked.
Avoid placing anything on the surface unit until
it hascooled completely.
Water stains (mineral deposits)are removable
usingthe cleaning cream or full strength
white vinegar.
Useof window cleanermay leavean
iridescentfilm on the cooktop.Thecleaning
cream will remove this discoloration.
Don't storeheavy itemsabove the cooktop. If
they drop onto the cooktop,they cancause
damage.
Donot usethe surface as a cutting board.
Page 7

Selecting types of cookwure
nlode[s. (onnon-inductionmodels) GEAppliances.com
The following information will help you choose cookware which will give good performance on glass cooktops. See insert
for cookware to use with induction cooktops.
Check pans for flat bottoms by
using a straight edge.
Stainless Steel:
recommended
Aluminum:
hea W weight recommended
Good conductivity. Aluminum residues
sometimes appear as scratches on the cooktop
but can be removed ifcleaned immediately.
Because of its low melting point, thin weight
aluminum should not
be used.
Copper Bottom:
recommended
Copper may leave residueswhich can appear
as scratches.The residuescan be removed,as
long as the cooktop is cleaned immediately.
However, do not let these pots boil dry.
Overheated metal can bond to glass cooktops.
An overheated copper bottom pot will leavea
residuethat will permanently stain the cooktop
if not removed immediately.
Porcelain Enamel on Cast Iron:
recommended ifbottom of pan is coated
Porcelain Enamel on Steel:
not recommended
Heating empty pans can cause permanent
damage to cooktop glass. The enamel can melt
and bond to the ceramic cooktop.
Glass-ceramic:
not recommended
Poor performance. Willscratch the surface.
Stoneware:
not recommended
Poor performance. Hay scratch the surface.
Cast Iron:
not recommended-unless designed specifically
for glass cooktops
Poor conductivity and slow to absorb heat. Will
scratch the cooktop surface.
Pans with rounded, curved,
ridged or warped bottoms are not
recommended.
DO not place wet pans
on the glaSS cod<top.
Do not use woks with support
rings on the glass Cooktop.
Use flat-bottomed woks
_nth_ClaSS_O0_top_
NOTE:Followall cookware manufacturer's recommendations when using any typeof cookware on
the ceramiccooktop.
For Best Results
Place only dry pans on the surface
elements. Do not place lids on the surface
elements, particularly wet lids.
Do not use woks that have support rings.
Avoid allowing foods to boil dry as some
cookware may stick to the cooking
surface, causing permanent damage to
the cooktop.
This type of wok will not heat on glass
surface elements.
We recommend that you use only a fiat-
bottomed wok. They are available at your
local retail store. The bottom
of the wok should have the same diameter
as the surface element
to ensure proper contact.
Some special cooking procedures require
specific cookware such as pressure
cookers, deep-fat fryers, etc. All cookware
must have flat bottoms and be the correct
size.
Page 8
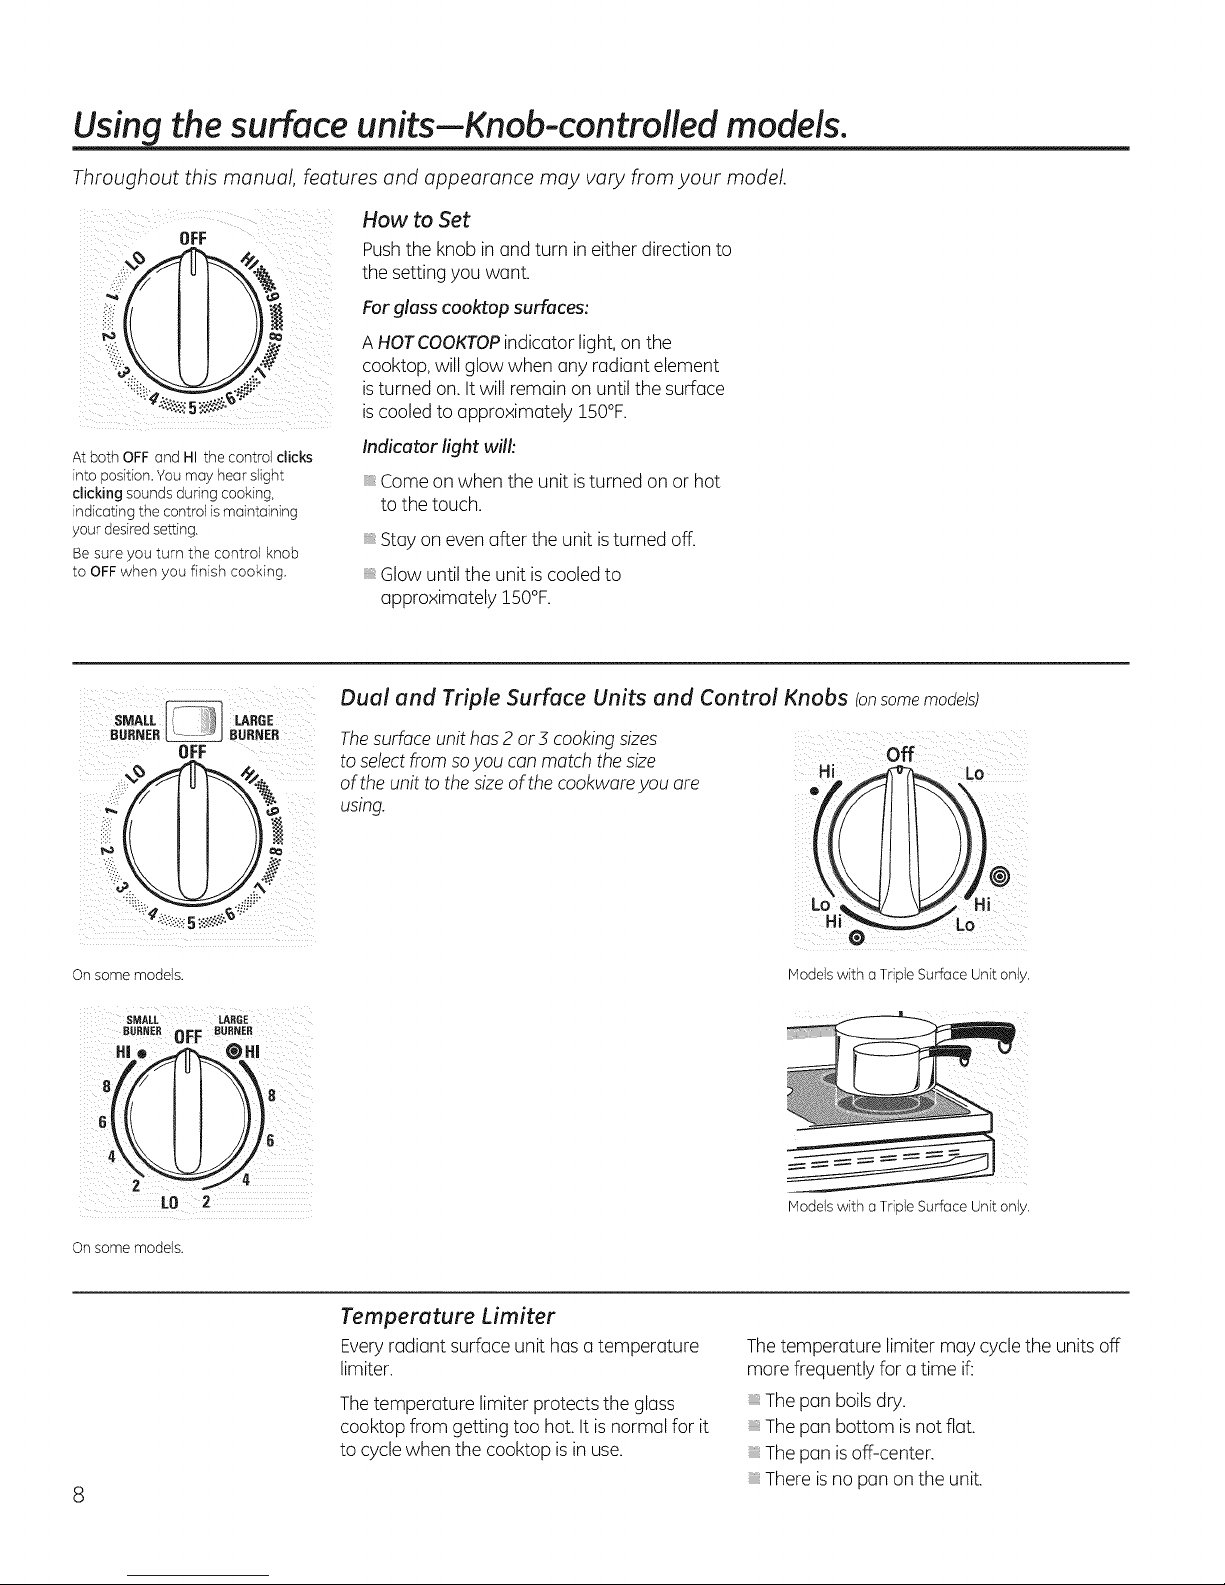
Using the surface units-Knob-controlled models.
Throughout this manual, features and appearance may vary from your model.
OFF
At both OFF and HI the control clicks
into position. Youmay hear slight
clicking sounds during cooking,
indicating the control ismaintaining
your desiredsetting.
Be sure you turn the control knob
to OFFwhen you finish cooking.
How to Set
Pushthe knob in and turn in either direction to
the setting you want.
Forglass cooktop surfaces:
A HOTCOOKTOPindicator light, on the
cooktop, will glow when any radiant element
isturned on. Itwill remain on until the surface
iscooled to approximately lSO°F.
Indicator lightwill:
Come on when the unit isturned on or hot
to the touch.
Stay on even after the unit is turned off.
Glow until the unit iscooled to
approximately 150%.
Dual and Triple Surface Units and Control Knobs (onsome models)
Thesurface unit has 2 or 5 cooking sizes
to selectfrom soyou can match the size
of the unit to thesize of the cookware you are
Hi A. Lo
Off
using.
On some models.
SMALL LARGE
SUnNEROFFBURNE.
• ®.,
LO
On some models.
Temperature Limiter
Everyradiant surface unit hasa temperature
limiter.
Thetemperature limiter protects the glass
cooktop from getting too hot. It isnormal for it
to cyclewhen the cooktop is in use.
Modelswith a Triple Surface Unitonly.
Modelswith a Triple Surface Unitonly.
Thetemperature limiter may cycle the units off
more frequently for a time if:
Thepan boils dry.
Thepan bottom is not flat.
Thepan is off-center.
There isno pan on the unit.
Page 9

Throughout this manual, features and appearance may vary from your model.
GEAppliances.com
£ ¸¸¸OFF¸¸¸
_{f!/ I I V_8
LO O 2 *
GUIDE
SETTING FOOD
(Low) Bread/Pastries
(Medium) Chocolate/
Butter
(Medium) Sauces, Stews,
Cream Soups
(Medium) Vegetables
(High) Soups (liquid)
(High) Tea or Coffee
TheGuide is for reference only
and the SETFINGthat you need
will depend on the amount
and type of food, the starting
temperature of the food and the
length of the holding time.
Using the COOK-WARM Zone
TheCOOK-WARMZONE,located in the back
center of the glass surface, will keep hot,
cooked food at servingtemperature. Always
start with hot food. Do not useto heat cold
food. Placing uncooked or cold food on the
COOK-WARHZONEcould result infood-borne
illness.
Pushand turn the control knob to any desired
setting.
For best results,all foods on the
COOK-WAR! ZONEshould be covered
with a lid or aluminum foil. When warming
pastries or breads,the cover should be vented
to allow moisture to escape.
Always usepot holdersor oven mitts when
removing food from the COOK-WARMZONE,as
cookware and plates will be hot.
,ACAUTION: oonotwormfoodon
the COOK-WARHZONEfor more than two
hours.
NOTE:The surface cook-warm zone will not
glow red like the cooking elements.
A HOTsurface indicator light will glow when the
glass surface is hot and will remain on until the
surface iscool enough to touch. Lower settings
may not heat the glasssurface enough to cause
the HOTsurface indicator lightto come on.
A COOK-WAR! ZONE indicator light will glow
when the unit is on.
Do not use plasticwrap to cover food. Plastic
may melt onto the surface and be very
difficult to clean.
Useonly cookware recommended for top-of-
range cooking.
Use only flat-bottomed woks.
Home Canning Tips
Besure the canner iscentered overthe surface
unit.
Hake sure the canner is flat on the bottom.
To prevent burns from steam or heat,
usecaution when canning.
Wok Cooking
Werecommend that you use only a flab
bottomed wok. Theyare available atyour local
retailstore.
Do not use woks that have support rings.
Userecipes and procedures from reputable
sources.Theseare available from
manufacturers such as Bull_and Kerr_ and the
Department of Agriculture ExtensionService.
Flat-bottomed canners are recommended. Use
of water bath canners with rippled bottoms
may extend the time required
to bring the water to a boil.
Donot useround-bottom woks.You could be
seriously burned if the wok tipped over.
Page 10

Using the griddle.
CAUTION nlace and remove the griddle when it is cool and all surface units are off. Use oven mitts if
you will touch the griddle while hot. Failure to do so can result in burns.
Before usingthis cookware for the first time,
wash it to make sure it isclean.Then season
it lightly, rubbing cooking oil onto the nonstick
surface.
Using the Griddle
_._. 8.6.4.2.Lo Lo.2.4. _. 8.._-_J
Host griddled foods require cooking
on a preheated surface. Preheat griddle
according to the guide below, then switch
to the desiredcook setting.
Toturn on the surface units for the entire
griddle,turn the knob clockwise.
Toturn an the surface unit for the back
half ofthe griddle,turn the knob
counterclockwise.
Typeof Food andTime CookSetting
Warming 5 5
Tortillas 5min.
Pancakes 8 3
Hamburgers 5 3
FriedEggs 5 2
Bacon None 6
Breakfast 8 /4
SausageLinks 5 min.
HotSandwiches 8 3
(suchas Smin.
GrilledCheese)
NOTE:Griddle settings may need to be adjusted
if griddle isused for an extended time.
Preheat
Setting
5min.
5 min.
/4min.
10
How to place the griddle:
IMPORTANTAlways place and useyour griddle
at the designated location an the caaktap.
IMPORTANTNOTES:
Cleanthe griddle with a spongeand mild
detergent in warm water. DONOTuseblue ar
green scrubbing pads ar steel wooL
Avoid cooking extremelygreasy foods and be
careful af grease spillover while cooking.
Neverplacear storeany itemsan thegriddle,
evenwhen it isnot in use.Thegriddle can
becameheated when usingthesurrounding
surface units.
Avoid usingmetal utensils with sharppoints
ar rough edges,which might damage the
griddle.Do not cut foods an the griddle.
Donot usecaakware as a storage cantainer
far foodar oiLPermanent staining and/ar
crazelinescould result.
NOTE: Thenanstick coating will degrade when
exposedta temperatures over500°£ Use
only with the griddle control and only at the
designated location an the caaktap. Do not use
the griddle to broil food in the oven. Donot clean
the griddle using the self-clean mode in the oven.
Thegriddle control prevents overheating the
nonstick coating.At temperatures over 660°£
the nonstickproperties permanently degrade
and may produce fumes harmful ta birds.
NOTE:Yourgriddle will discolor over time with
USe.
NOTE: Donat clean thegriddle in theself-
cleaningoven.
NOTE:Always allow the caakware to cool
beforeimmersing in water.
Page 11

GEAppliances.com
Preparing Quality Steak, Easy as
1. Bring steakto room temperature.
NOTE:Always use safe food practices when handling meat.
2. Seasonboth sidesto taste and coat with oliveoil or similar.
3.
Preheatthe oven to BAKEat 425°,with the oven rack in center position "C."
4.
Placeyour griddle on the designated area of the cooktop and then preheat the griddle
to 400°F.
CAUTION:The griddle will be VERYHOT!Useoven mitts.
.
Searsteak on each side for 2 minutes or until the desired browning isachieved.
NOTE:Therewill be "smoke"; ensure there is proper ventilation.
6.
Insertthe meat probe that came with your range into the center of the steak,making sure that the tip
ofthe probe is in the center of the steak.
7.
Plugthe probe intothe outlet (locatedon the upperfront sideof the oven),slidethe rack back into the
ovenand close the door.
8.
PressPROBEon your control, enter the desired internal temp, and pressSTART.
.
Allow steak to finish cooking inthe oven.The range control will beep and turn off when
the steak reaches the desired internal temperature.
NOTES:
After searing,your steak could possiblyalready be at the desired temperature, depending on size,
cut and desired doneness.
Forthinner steaks it may not be possibleto achieve a Rareor Medium Rare doneness.
1,2,3"
Byfirstseanngyour meat with a veryhigh heat,you are creating abrowning reaction known asthe Maillard Reaction.
Thisreaction unlocksthe fuller,more intenseflavor from themeat, which occurs when cooking meat at a high heat.
11
Page 12

Usingthe oven controls.
Throughout this manual, features and appearance may vary from your model See the control panel below that matches
your model.
OVEN CONTROLS TIME CONTROLS
PUSH/START
BROIL HI/LO Pad
Touchthe BROILHI/LO pad once forHI Broil,
Tochange to LOBroil,touch the BROILHI/LO pad again.
Touchthe STARTpad.
When broilingisfinished,touch the CLEAR/OFFpad.
BAKE Pad
Touchthe BAKEpad.
Touchthe number padsto setthe desiredoventemperature.
Touchthe STARTpad.
When bakingisfinished,touch the CLEAR/OFFpad.
CONVECTIONCOOKPad
Touch the CONVECTION COOK, CONVECTION BAKE,or
CONVECTION ROASTpad.
Touch the number pads to set the desired oven temperature.
Touch the STARTpad.
When cooking isfinished, touch the CLEAR/OFF pad.
PROBEPad
Touchwhen usingthe probeto cook food.
Seethe Usingthe Probesection.
SELFCLEAN Pad
Touchto self-cleanthe oven.
Seethe UsingtheSelf-CleaningUpperand LowerOvenssection.
CLEAR/OFFPad
Touchto cancelALLoven operationsexceptthe clockand timer.
12
Page 13
GEAppliances.com
STARTPod
Mustbe touched to start anycooking or cleaningfunction.
OVENLIGHT Pod
Touchto turn the ovenlightson oroff.
TIMERON/OFF Pod(s)/KITCNENTIMERPod
Touchto setthe kitchentimer.
Seethe Usingthe KitchenTimersection.
COOKTIME/COOKING TIMEPod
Touchthis padand then touchthe number padsto setthe
amount of time you want your food to cook.Theovenwill shut off
when the cookingtime hasrun out.
DELAYSTARTPod
Usealong withthe COOKTIMEor SELFCLEANpads to set
the ovento startand stop automaticallyat a time you set.
CLOCKPod
NOTE:When settingtimes,you are settinghours and minutesonly.
Thelowesttime you can set isone minute.
Touchthe CLOCKpad.
Touchthe number pads.
TouchtheSTARTpad.
Theclockmust besetto the correct timeof doyforthe outomotic
oventiming functionsto work properly.Thetimeof doyconnot be
chongedduring o timed bokingor self-cleoningcycle.
Ifyour oven wus set for u timed oven operution und u power
outuge occurred, the clock ond d/progrommed functions must
be reset The time of duy will flush in the displuy when there hus
been u power outuge.
RANGE LOCKOUTPod
Yourcontrol willallowyou to lockout the touch padsand the
cooktop sothey cannot be activated when touched.
Touchthe RANGELOCKOUTpad andthen theSTARTpad to lock
and unlockthe surfaceunits,oven burners,and control panelso
they cannot beactivated.
13
Page 14
Usingthe oven.
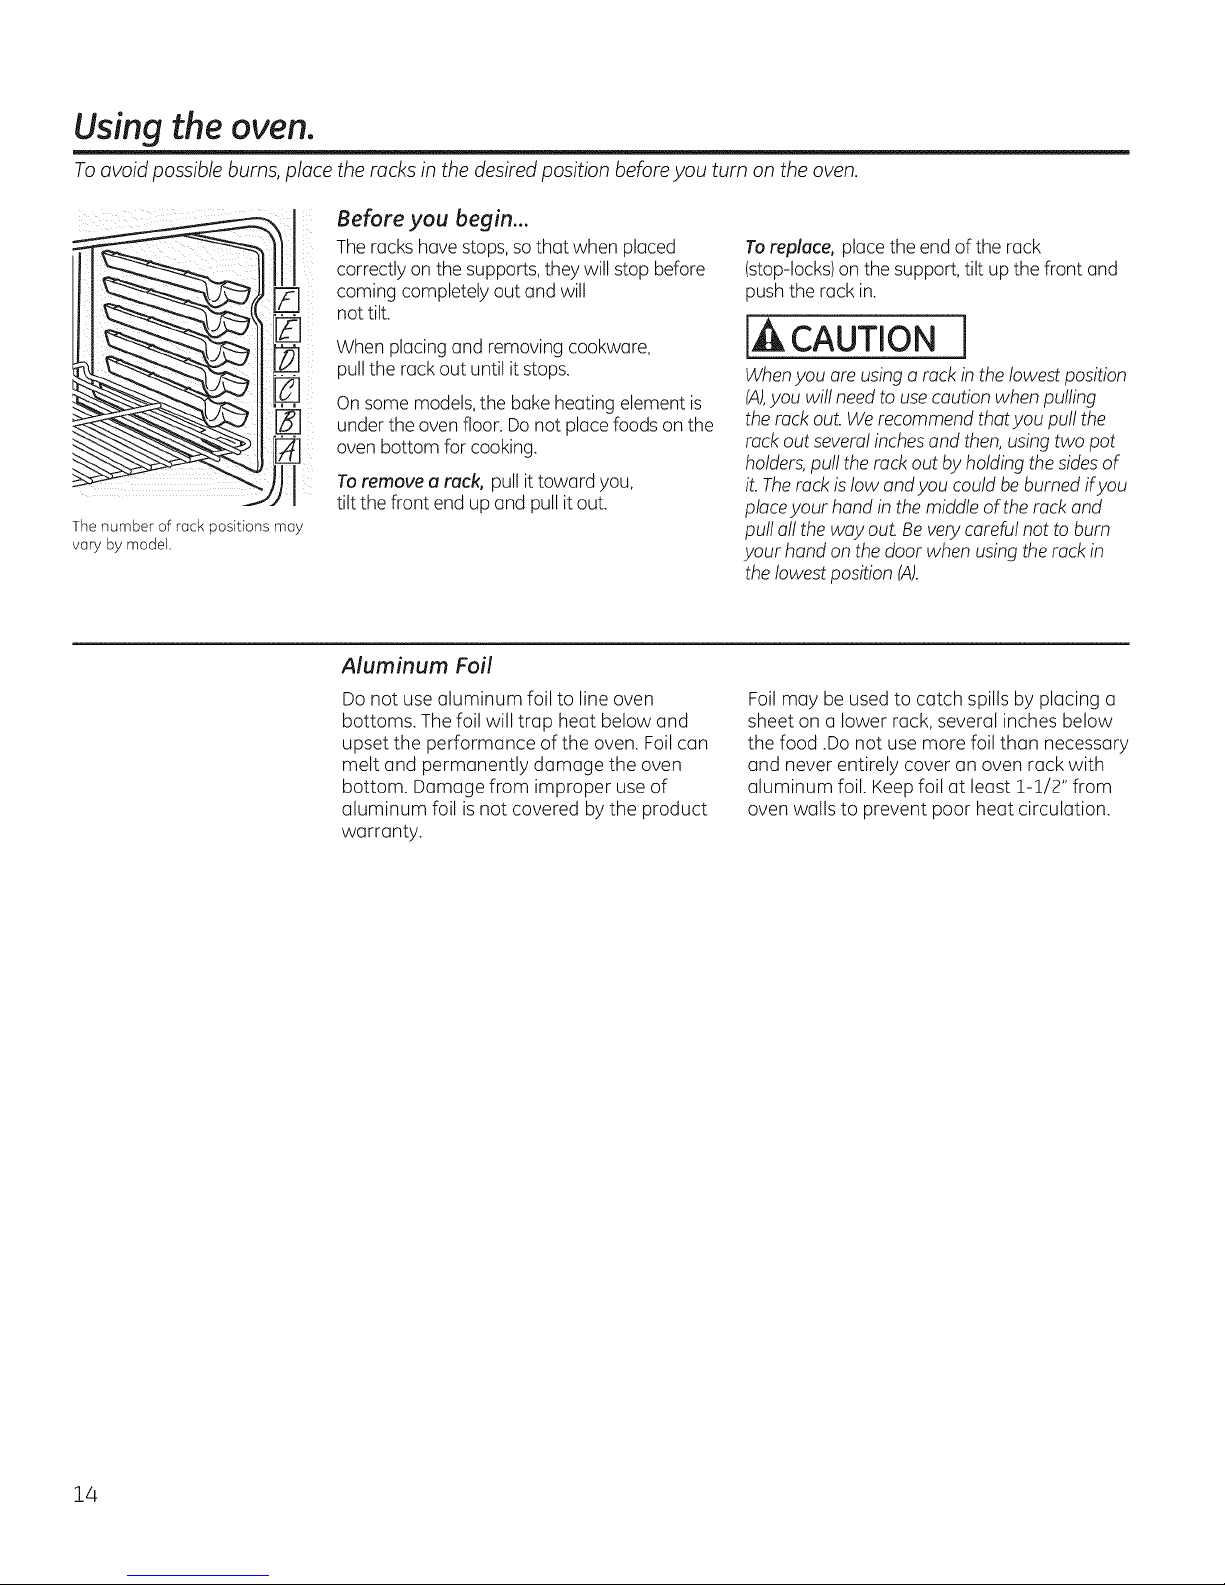
To avoidpossible burns,place the racksin the desiredposition beforeyou turn on the oven.
Before you begin...
Theracks have stops,sothat when placed
correctly on the supports, they will stop before
coming completely out and will
not tilt.
When placing and removing cookware,
pull the rack out until it stops.
On some models,the bake heating element is
under the oven floor. Donot place foods on the
oven bottom for cooking.
Toremove a rack, pull it toward you,
tilt the front end up and pull it out.
The number of rack positions may
vary by model.
Aluminum Foil
Do not use aluminum foil to line oven
bottoms. The foil will trap heat below and
upset the performance of the oven. Foil can
melt and permanently damage the oven
bottom. Damage from improper use of
aluminum foil is not covered by the product
warranty.
Toreplace, place the end of the rack
(stop-locks)on the support,tilt up the front and
push the rack in.
IACAUTION I
Whenyou are usinga rack in the lowest position
(A),you will need to usecaution when pulling
the rack out. Werecommend that you pull the
rack out several inchesand then,using two pot
holders,pull the rackout byholding thesides of
it. Therack is low andyou could beburned ifyou
placeyour hand in the middle of the rack and
pull all the way ouL Be very careful not to bum
your hand on the door when using the rack in
the lowestposition (A).
Foilmay be used to catch spills by placing a
sheet on a lower rack, several inches below
the food .Do not use more foil than necessary
and never entirely cover an oven rack with
aluminum foil. Keepfoil at least 1-1/2" from
oven walls to prevent poor heat circulation.
14
Page 15
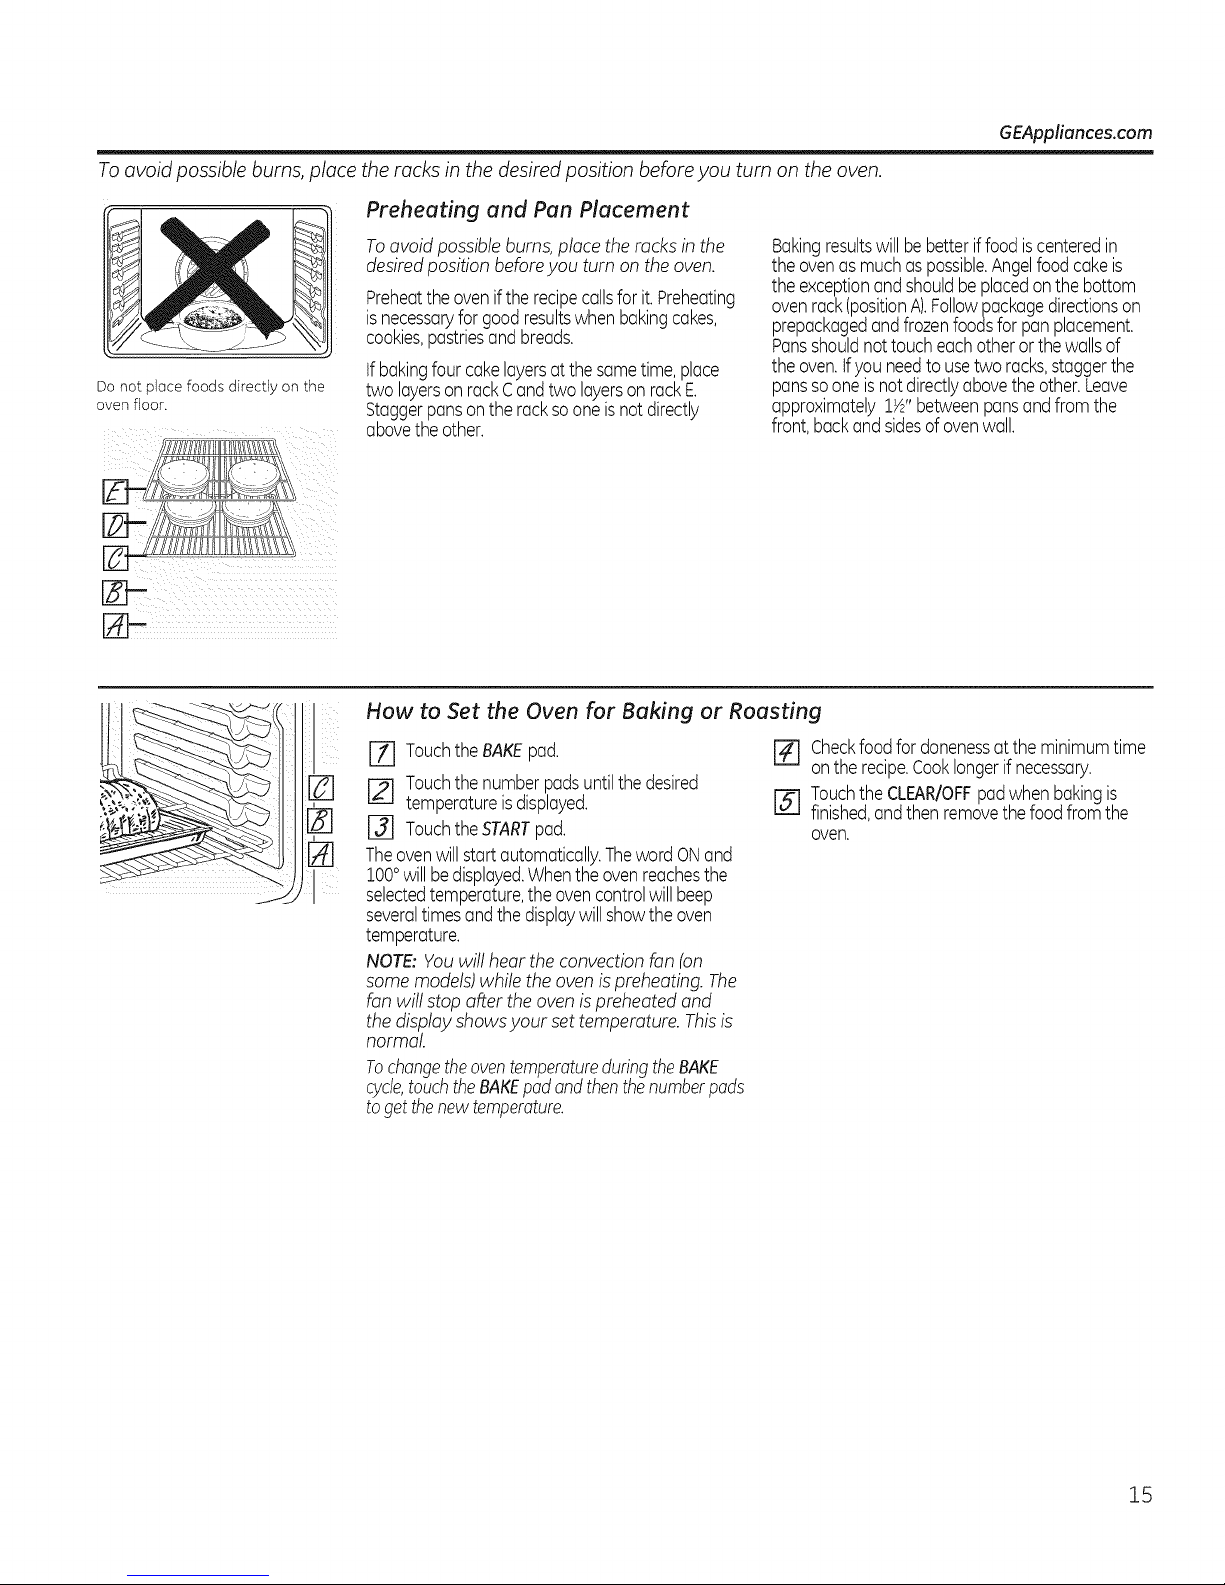
To avoid possible burns, place the racks in the desired position before you turn on the oven.
Preheating and Pan Placement
Do not place foods directly on the
oven floor.
Toavoid possible burns, place the racks in the
desired position before you turn on the oven.
Preheattheoveniftherecipecallsforit.Preheating
isnecessaryfor goodresultswhenbakingcakes,
cookies,pastriesandbreads.
ifbakingfourcakelayersatthesametime,place
two layersonrackCandtwo layersonrackE.
Staggerpansonthe racksooneisnot directly
abovetheother.
Bakingresultswillbebetteriffoodiscenteredin
theovenus muchas possible.Angelfood cakeis
theexceptionandshouldbeplacedonthe bottom
ovenrack(positionA).Followpackagedirectionson
prepackagedandfrozenfoodsforpunplacement.
Punsshouldnottoucheachotherorthe wallsof
theoven.tfyou needto usetwo racks,staggerthe
punssooneisnotdirectlyabovethe other.Leave
approximately1½"betweenpansandfromthe
front,backandsidesof ovenwall.
Eb
How to Set the Oven for Baking or Roasting
GEAppliances.com
D
ii_i_
[] Touchthe BAKEpad.
[] Touchthe numberpadsuntilthedesired
temperatureisdisplayed.
F31 TouchtheSTARTpad.
Theovenwillstartautomatically.ThewordONand
100°willbedisplayed.Whentheovenreachesthe
selectedtemperature,theovencontrolwillbeep
severaltimesandthedisplaywill showthe oven
temperature.
NOTE:Youwill hear the convectionfan (on
some models)while theoven ispreheating. The
fan will stop after the ovenispreheated and
the displayshowsyour set temperature.Thisis
normal
TochangetheoventemperatureduringtheBAKE
cycle,touchtheBAKEpadandthenthenumberpads
togetthenewtemperature.
[_ Checkfoodfor donenessatthe minimumtime
ontherecipe.Cooklongerifnecessary.
[_ TouchtheCLEAR/OFFpodwhenbakingis
finished,andthenremovethefoodfromthe
oven.
15
Page 16
Usingthe oven.
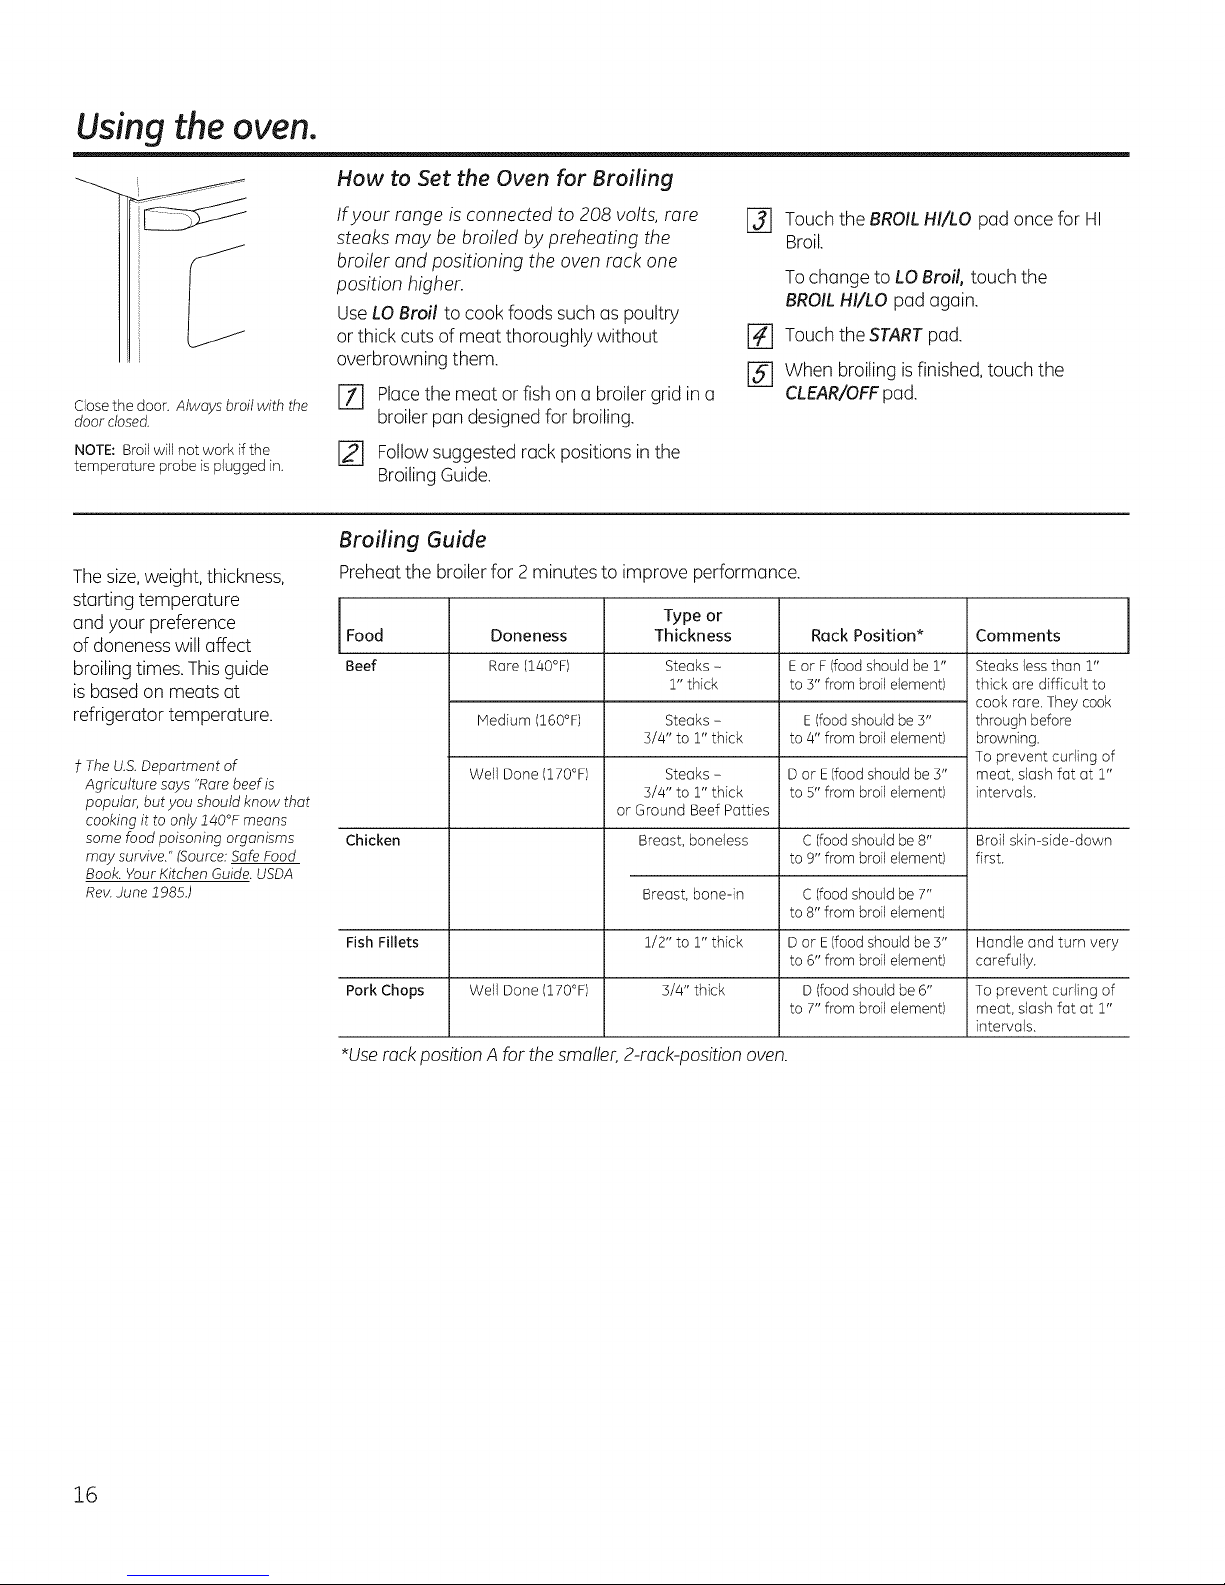
How to Set the Oven for Broiling
Closethe door. Always broil with the
door closed.
NOTE: Broilwill not work if the
temperature probe is plugged in.
Thesize,weight, thickness,
starting temperature
and your preference
of doneness will affect
broiling times.This guide
is busedon meats at
refrigerator temperature.
i- The U.S.Department of
Agriculture says "Rare beef is
popular, but you should know that
cooking it to only 140°F means
some food poisoning organisms
may survive." (Source:Safe Food
Book. Your Kitchen Guide. USDA
Ray.June 1985.)
Ifyour range is connected to 208 volts, rare
steaks may be broiled by preheating the
[] Touch the BROIL HI/LO pad once for HI
Broil.
broiler and positioning the oven rack one
position higher.
Use LOBroil to cook foods such as poultry
or thick cuts of meat thoroughly without
overbrowning them.
[-f] Placethe meat orfish on a broilergrid ina
Tochange to LOBroil, touch the
BROILHI/LO pad again.
Touch the STARTpad.
[]
When broiling is finished, touch the
ral
CLEAR/OFFpad.
broiler pan designedfor broiling.
[21 Followsuggested rack positions in the
BroilingGuide.
Broiling Guide
Preheatthe broiler for 2 minutes to improve performance.
Food Doneness Thickness Rack Position* Comments
Beef Rare (140°F) Steaks - Eor F (foodshould be 1" Steaks lessthan 1"
Medium (1B0°F) Steaks - E(food should be 5" through before
Well Done 1170°F) Steaks - D or E(food should be 3" meat, slash fat at 1"
Chicken Breast, boneless C (foodshould be8" Broil skin-side-down
Fish Fillets D or E(food should be 5" Handle and turn very
Pork Chops Well Done (170°F) D (food should be 6" To prevent curling of
*Userock positionA for the smaller, 2-rack-position oven.
Type or
1" thick to Y' from broil element) thick are difficult to
cook rare. They cook
5/4" to 1" thick to 4" from broil element) browning.
3/4" to 1" thick to 5" from broil element) intervals.
or Ground Beef Patties
to 9" from broil element) first.
Breast, bone-in
1/2" to l" thick
3/4" thick
C (food should be 7"
to 8" from broil element)
to 6" from broil element) carefully.
to 7" from broil element) meat, slash fat at 1"
To prevent curling of
intervals.
16
Page 17

Using the timed baking and masting features Up rOvenOnly).
(on some models)
NOTE: Foods thet spoil easily-such es milk, eggs, fish, stuffings, poultry end pork-should not be ellowed to sit for more
then 1 hour before or offer cooking. Room temperature promotes the growth of harmful becterie.
Be sure that the oven light is off beceuse hoot from the bulb will speed hermful becterie growth.
How to Set an Immediate Start and Automatic Stop
Theovenwill turn on immediately and cook for a NOTE:An attentiontonewillsoundifyou areusing
selectedlength of time. At the end of the cooking timed bakingand do nottouch the STARTpad.
time the oven will turn off automatically. Theovenwillturn ON,and the displaywillshow
[Z] Touch the BAKEpad.
r_ Touch the number pads to set
the desired oven temperature.
r3] Touch the COOK TIME pad.
NOTE:Ifyour recipe requires preheating, you
may need to add additional time to the length of
the cooking time.
[_] Touch the number pads to set the desired
length of cooking time. The minimum
cooking time you can set is I minute.
The oven temperature that you set and
the cooking time that you entered willbe
in the display.
[] Touch the START pad.
the cookingtime countdown andthe changing
temperature startingat 100°F.(Thetemperature
displaywillstart to changeoncethe oven
temperature reaches100°F.)When the oven
reachesthe temperatureyou set,3 beepswill
sound.
Theovenwill continue to cook for the set
amount of time, then turn off automatically,
unlessthe WARMfeature was set.Seethe How
to Setthe Upper Oven for Worming section.
r_ Touch the CLEAR/OFFpad to clear the
display if necessary. Remove the food from
the oven. Remember,eventhough the
oven turns off automatically, food left in
the oven will continue cooking after the
oven turns off.
GEAppliances.com
DDD[]D
DDDDD
[]DD[]D
DDDDD
DDDDD
DDDDD
How to Set a Delayed Start and Automatic Stop
Theoven will turn on at the time of dayyou set,
cook for a specificlength of time andthen turn
off automatically.
IVlakesure the clock shows the correct time of
day.
Touch the BAKEpad.
%
Touch the number pads to setthe desired
r21
oven temperature.
Touch the COOKTIMEpad.
@
NOTE:Ifyour recipe requires preheating, you
may need to add additional time to the length of
the cooking time.
[] Touch the number pads to set the desired
length of cooking time. The minimum
cooking time you can set is I minute.
The oven temperature that you set and
the cooking time that you entered willbe
in the display.
Touch the DELAY START pad.
@
Touch the number pads to setthe time of
@
day you want the oven to turn on and
start cooking.
NOTE:An attention tone willsoundifyou are
usingtimed bakingand do not touch the START
pad.
NOTE:Ifyou would like to check the times
you haveset,touch the DELAYSTARTpad to
checkthe start timeyou hove setor touch the
COOKTIMEpad to checkthe length of cooking
timeyou hove set.
When the oventurns ON at the time ofday
you set,the displaywill show the cooking time
countdown and the changing temperature
starting at 100°F.(Thetemperature displaywill
start to change oncethe oventemperature
reaches 100°F.)When the oven reaches the
temperature you set,beepswillsound.
Theoven will continue to cook for the set
amount of time, then turn off automatically.
Touch the CLEAR/OFFpad to clear the
%
display if necessary. Remove the food
from the oven. Remember,eventhough
the oven turns off automatically, food left
in the oven will continue cooking after the
oven turns off.
r_ Touch the START pad.
17
Page 18

Using the probe, consomemode sI
For many foods, especially roasts and poultry, internal food temperature is the best test for doneness. The temperature
probe takes the guesswork out of roasting by cooking foods to the exact alonenessyou want.
The temperature probe has a
skewer-like probe at one end and
a plug at the other end that goes
into the outlet in the oven.
ill !i!
i : il;:i¸¸¸t:
[A CAUTION
Topreventburns,do not unplugthe probe from
theovenoutlet until the oven hascooled.
Use of probes other than the one provided with
this product may result in damage to the probe
or oven control.
Usethe handles of the probe and plug when
inserting and removing them from the food and
outlet.
i Toavoid damagingyour probe,do not use
tongs to pull on the cable when removing it.
Toavoid breakingtheprobe, make sure food
iscompletely defrosted before inserting.
After preparing the meat and placing it on
a trivet or a broiler pan grid, follow these
directions for proper probe placement.
Insert the probe completely into the meet. It
should not touch bone, fat or gristle.
NOTE:Failureto fully insertthe probe into the
meat may result in poor cooking performance
becausetheprobe will sensethe ovenair vs.the
food temperature.
Hug
• .... F'robe
indies
remove label
Never leave your probe insidethe oven
during a self-cleaning or broil cycle.
Do not store the probe in the oven.
Forroasts with no bone, insert the probe into
the meatiest part of the roast. For bone-in ham
or lamb, insert the probe into the center of the
lowest large muscle.
Insertthe probe into the center of dishes such
as meat loaf or casseroles.
Insertthe probe into the meatiest part of the
inner thigh from below and parallelto the leg of
a whole turkey.
NOTE:Self-cleanand Broil settings will not work
if the temperature probe is plugged in.
DDD[]D
DDDDD
DDDDD
DDDDD
18
How to Set the Oven For Baking/Roasting When Using the Probe
(onsome models)
Insertthe probe fully intothe food.
%
Plugthe probe into the outlet in the oven.
[]
Hake sure it's pushed all the way in.Close
the oven door. Hake sure the probe cable
is not touching the broil element.
r-_ Touch the PROBEpad. Displaywill show
"Set Probe,"
[-_ Touch the number pads to set the desired
internal food or meat temperature. The
maximum internal temperature for the
food that you can set is200°F.
[]_] Touch the BAKEpad.
[] Touch the number pads to set the desired
oven temperature.
[Z] Touch the STARTpad.
Thedisplay will flash if theprobe is inserted
into the outlet and you havenot set a probe
temperature and touched the ,STARTpad.
After the internal temperature of the food
reaches 100°F,the changing internal
temperature will be shown in the display.
[] When the internal temperature of the food
reaches the number you have set,the
probe and the oven turn off and the oven
control signals.To stop the signal,touch
the CLEAR/OFFpad.Use hot pads to
remove the probe from the food. Do not
usetongs to pull on it-they might
damage it.
If the probe isremoved from the oven
while probe cooking, the oven will not
automatically turn off.
Tochange the oventemperature during the
Bake/Roastcycle,touch the BAKEpad and then
the number pads to set the new temperature.
Youcan usetheKitchen Timereventhough
you cannot use timed ovenoperations while
usingthe probe.
Page 19

Using the kitchen timer. GEApp,o,ces.com
To Set the Kitchen Timer
Ion some models)
TIMER ] TIMER
ON OFF
(on some models)
TheKitchenTimer is in hours and
minutes.
The Kitchen Timer does not control
oven operations, The m(]×imum
setting on the Kitchen Timer is9
hours and 59 minutes.
[Z] Touchthe KITCHENTIMERON/OFFor
TIMERON pad (depending on model).
Touch the number pads until the
[]
amount of time you want shows
in the display. For example, to set
2 hours and 45 minutes, touch 2,4
and 5 in that order. Ifyou make u
mistake,touch the KITCHENTIMER
ON/OFFor TIMEROFFpad (depending
on model) and begin again.
[] Touch the STARTpad.
To Reset the Kitchen Timer
If the display isstill showing the time
remaining, you may change it by
touching the KITCHENTIMERON/OFFor
TIMERON pad (depending on model),then
touch the number pads until the time you
want appears in the display.
After touching theSTARTpad, SET
disappears;this tellsyou the time is
counting down, although the displaydoes
not change until one minute haspassed.
Secondswill not be shown in the display
until the last minute iscounting down.
When the kitchentimer reaches:00,
r71
the control will beep 3 times followed
by one beep every 6 seconds until
the KITCHENTIMERON/OFFor TIHER
OFF pad (depending on model)is
touched.
The6-second tone can be cancelled by
following the steps in the Specialfeatures
ofyour ovencontrol section under Tones
at the Endof a TimedCycle.
If the remaining time isnot in the display
(clock,delay start or cooking time are in
the display),recall the remaining time by
touching the KITCHENTIMERON/OFFor
TIMERON pad (depending on model) and
then touching the number pads to enter
the new time you want.
(on some models)
TIMER ] TIMER
ON OFF
Ion some models)
To Cancel the Kitchen Timer
Touch the KITCHENTIMERON/OFF or
TIMERONpad (depending on model) twice
or touch TIMEROFF.
19
Page 20

Adjust the oven thermostat--Do it yourself.!
You may find that your new oven cooks differently than the one it replaced. Useyour new oven for a few weeks to become
more familiar with it. Ifyou still think your new oven is too hot or too cold, you can adjust the thermostat yourself.
Do not use thermometers, such as those found in grocery stores, to check the temperature setting of your oven. These
thermometers may vary 20-40 degrees.
NOTE: This adjustment will only affect baking and roasting temperatures; it will not affect broiling or self-cleaning
temperatures. The adjustment will be retained in memory after a power failure.
To Adjust the Thermostat
[-_ Touch the BROILHI/LO and BAKEpadsat
the same time until the display shows SF.
[] Touch the BAKE pad. Atwo-digit number
shows in the display.
Touch BAKEagain to alternate between
increasing and decreasing the oven
temperature.
(on some models)
Toadjust the upper oven thermostat,
touch the upper oven BAKEpad.To adjust
the lower oventhermostat, touch the
lower oven BAKE pad.
Theoven temperature con be adjusted up
to (+)35°Fhotter or (-)35°Fcooler. Touch
the number padsthe same way you read
them. Forexample, to change the oven
temperature 15°F,touch 1 and 5.
Whenyou havemade the adjustment,
touch the STARTpad to go buck to the time
of day display.Useyour oven us you would
normally.
(on some models)
Thetype of margarine will affect baking performance!
Most recipes for baking have been developed using high-fat products such as butter or margarine (80% fat). Ifyou
decrease the fat, the recipe may not give the same results as with a higher-fat product.
Recipe failure can result if cakes,pies, pastries, cookies or candies are made with low-fat spreads. The lower the fat
content of a spread product, the more noticeable these differences become.
Federalstandards require products labeled"margarine" to contain at least 80% fat by weight. Low-fat spreads,on the other hand,
contain lessfat and more water. The high moisture content of these spreads affects the texture and flavor of baked goods. Forbest
results with your old favorite recipes,use margarine, butter or stick spreads containing at least 70% vegetable oil.
20
Page 21
Usinq the convection oven. (on some models) GEAppliunces.com
Convection Cook (on some models)
CONVECTION
cook
IV]ultPrack position.
Theconvection oven comes with one
convection cook mode and can be used
for !-Rack Convection Bakingor ivlulti-Rack
Convection Baking.
Convection Fan Operation
In a convection oven, a fan circulates hot air
over, under and around the food.
This circulating hot air is evenly distributed
throughout the oven cavity. As a result, foods are
evenly cooked and browned-often in less time
with convection heat.
Multi-Rack Convection Baking
Because heated air iscirculated evenly
throughout the oven,foods can be baked with
excellent resultsusing multiple racks.
ivlulti-rack baking may increase cook times
slightly for some foods but the overall result
istime saved. Cookies,muffins, biscuitsand
other quickbreads givevery good resultswith
multi-rack baking.
NOTE:Tomaximize cooking evenness,the fun
isdesigned to rotate in both directions,with a
pause in between. Thisis normal.
Theconvection fun shuts off when the oven
door is opened. DO NOTleave the door open
for long periods of time while using convection
cooking or you may shorten the lifeof the
convection heating element.
When baking on 3 racks,place one rack in the
second (B)position, another rack in the fourth
(D)position and the third rack inthe sixth (F)
position.
Fortwo-rack baking, place one rack
in the second (B)rack position. Place
the other rack inthe fifth (E)rack position.
1-Rack Convection Baking
When convection baking with only 1 rack, place
the food so that it is centered in the oven.
Adapting Recipes...
Youcan use your favorite recipes
in the convection oven.
Use pan size recommended
Somepackage instructions for frozen
casserolesor main disheshave been
developedusingcommercial convection
ovens.For best resultsin this oven,preheat
theoven and usethe temperature on the
package.
21
Page 22
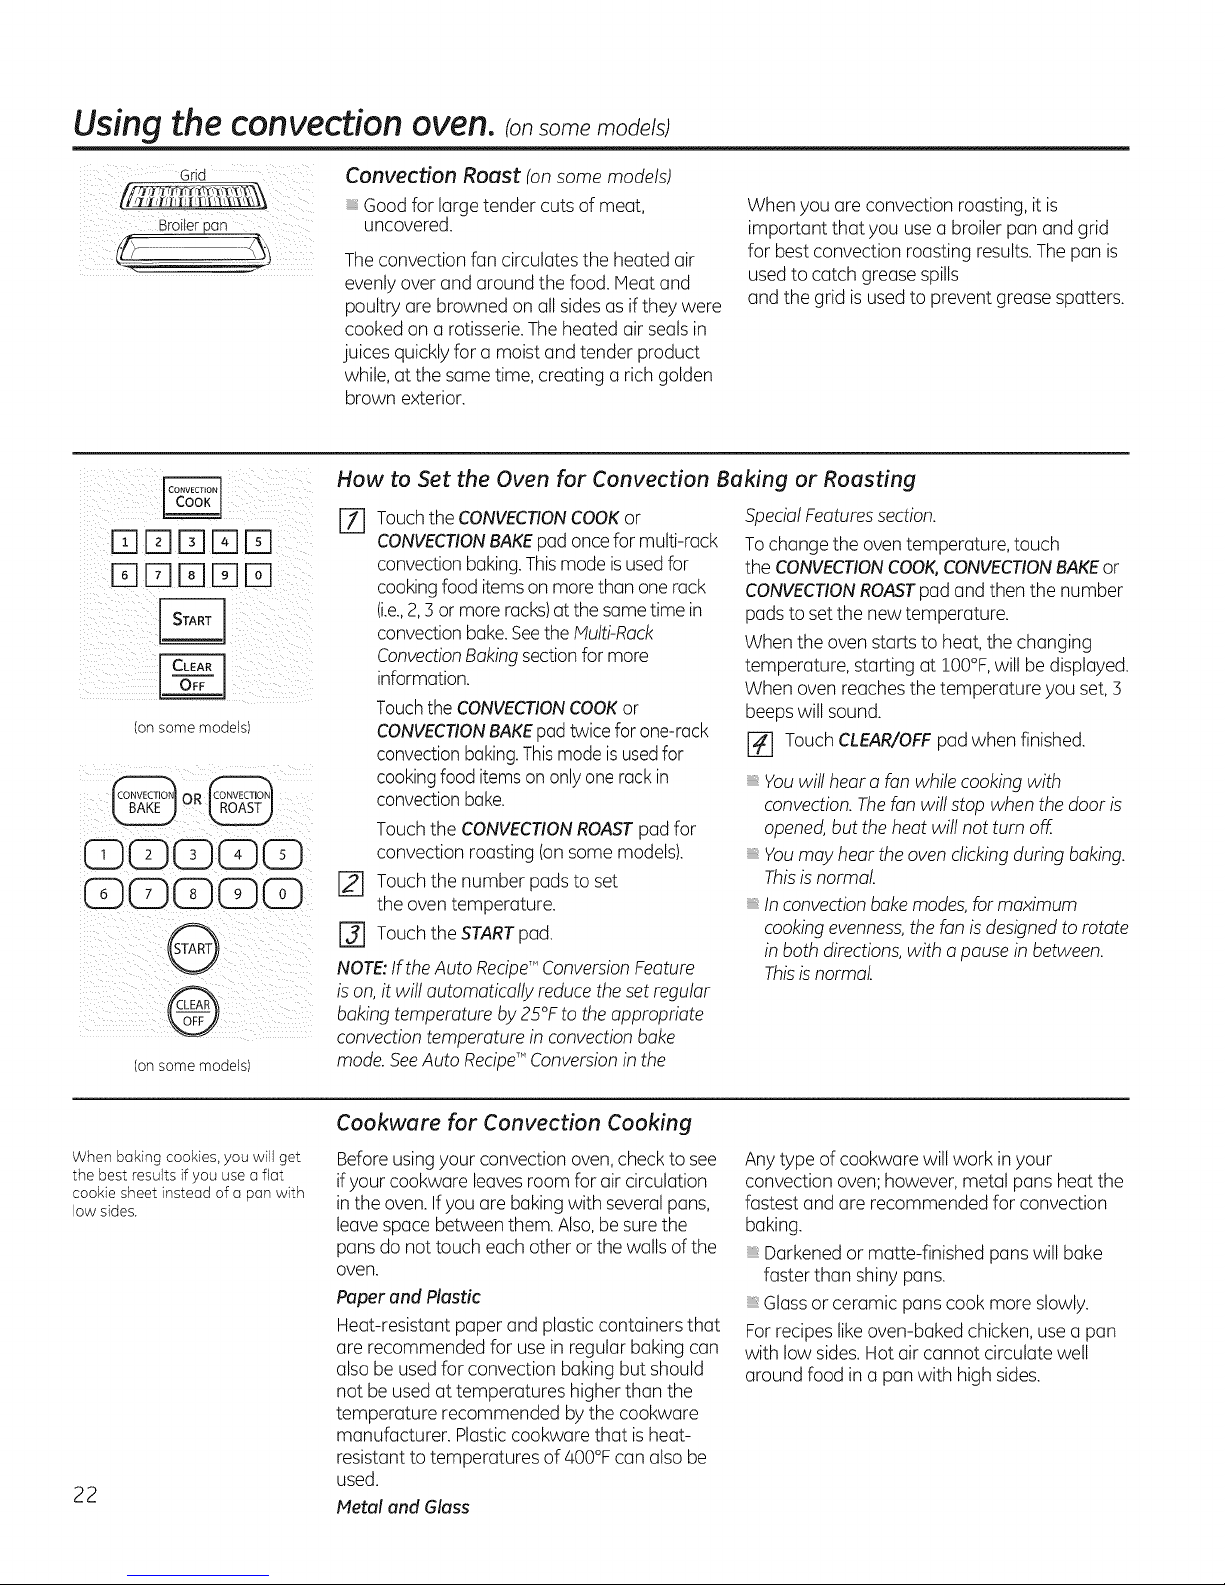
Usingthe convection oven.consomemode s
Grid
Broiler pan
rq mrqrqrqC:
i IT1El [TIIT1rq
i iii :iii i
Ion some models)
©©©Q©
(on some modelsl
Convection Roast (on some models)
Good for large tender cuts of meat,
uncovered.
Theconvection fan circulates the heated air
evenly over and around the food. Meat and
poultry are browned on all sidesas ifthey were
cooked on a rotisserie.The heated air sealsin
juices quickly for a moist and tender product
while, at the same time, creating a rich golden
brown exterior.
How to Set the Oven for Convection Baking or Roasting
rl] Touchthe CONVECTIONCOOKor SpecialFeaturessection.
CONVECTIONBAKEpadoncefor multi-rack Tochange the oventemperature, touch
convection baking.Thismode isusedfor
cookingfood itemson morethan one rack
(i.e.,2, 3 or more racks)at the sametime in
convection bake.Seethe Multi-Rack
ConvectionBaking sectionfor more
information.
Touchthe CONVECTIONCOOKor
CONVECTIONBAKEpadtwice forone-rack
convectionbaking.Thismode isusedfor
cookingfood itemsononlyone rackin
convectionbake.
Touch the CONVECTIONROASTpad for
convection roasting (on some models).
Touch the number pads to set
[]
the oven temperature.
Touch the STARTpad.
@
NOTE:IftheAuto RecipeT"ConversionFeature
ison,it will automatically reducetheset regular
baking temperature by 25°Fto the appropriate
convection temperature in convectionbake
mode.SeeAuto RecipeT"Conversionin the
When you are convection roasting, itis
important that you use a broiler pan and grid
for best convection roasting results.The pan is
usedto catch grease spills
and the grid isusedto prevent grease spatters.
the CONVECTIONCOOK,CONVECTIONBAKEor
CONVECTIONROASTpad and then the number
pads to set the new temperature.
When the oven starts to heat,the changing
temperature, starting at IO0°F,will be displayed.
When oven reaches the temperature you set, 3
beepswill sound.
[] Touch CLEAR/OFFpadwhen finished.
Youwill hear a fan while cooking with
convection.Thefan will stop when the dooris
opened,but the heat will not turn off.
Youmay hear theoven clickingduring baking.
Thisis normal.
Inconvectionbakemodes,for maximum
cookingevenness,the fan is designed to rotate
in both directions,with a pausein between.
Thisisnormal.
Cookware for Convection Cooking
When baking cookies, you will get
the best results if you use a flat
cookie sheet instead of a pan with
low sides.
22
Beforeusingyour convection oven,check to see
ifyour cookware leavesroom for air circulation
in the oven. Ifyou are bakingwith severalpuns,
leavespace between them. Also,be surethe
puns do not touch each other or the walls of the
oven.
Paper and Plastic
Heat-resistant paper and plastic containers that
are recommended for use in regular baking can
alsobe used for convection baking but should
not be used at temperatures higher than the
temperature recommended by the cookware
manufacturer. Plasticcookware that isheat-
resistant to temperatures of 400°Fcan also be
used.
Metal and Glass
Anytype of cookware will work in your
convection oven; however, metal pans heat the
fastest and are recommended for convection
baking.
Darkened or matte-finished pans will bake
faster than shiny pans.
Glassor ceramic panscook more slowly.
Forrecipes like oven-baked chicken, use a pan
with low sides.Hot aircannot circulate well
around food in a pan with high sides.
Page 23

Using the timed convection
features (uppe GEA I,o,ce,.com
You will hear a fan while cooking with this feature. The fan will stop when the door is opened but the heat will not
turn off.
NOTE: Foods that spoil easily-such as milk, eggs, fish, stuffings, poultry and pork-should not be allowed to sit for
more than 1 hour before or after cooking. Room temperature promotes the growth of harmful bacteria. Be sure
that the oven light is off because heat from the bulb will speed harmful bacteria growth.
How to Set an Immediate Start and Automatic Stop
®®®@@
®®®/®;®
®®}®®/@
®®®@@
®®®®@
®@®®@
@®@@@
@
®®®@@
@®®®@
@
The upper oven willturn on immediately and
cook for a selected length of time. At the end
of the cooking time, the oven willturn off
automatically.
[] Touch the CONVECTIONBAKEMULTI/
1 RACKpad oncefor multi-rack convection
baking.This mode isusedfor cooking food
itemson more than one rack (i.e.,2,3 or
more racks)at the sametime in convection
bake.Seethe Multi-RackBakingsectionfor
more information.Touch the CONVECTION
BAKENULTI/1 RACKpadtwice for one rack
convectionbaking.Thismode is usedfor
cookingfood itemson onlyone rackin
convectionbake.
Touch the CONVECTIONROASTpad
for convection roasting.
r_ Touchthe number pads to set the desired
oven temperature.
[] Touch the COOKING TIME pad.
How to Set a Delayed Start and Automatic Stop
Youcan setthe upper ovencontrol to delay-start
the oven,cook for aspecificlength of time and
then turn off automatically.
Make sure the clock shows the correct time of
day.
Touchthe CONVECTIONBAKENULTI/1
RACKpad once for multi-rack convection
baking. Thismode isusedfor cooking food
items on more than one rack (i.e.,2, 3 or
more racks)at the same time in
convection bake. Seethe Multi-Rack
Bakingsection for more information.
Touchthe CONVECTIONBAKE1'4ULTI/1
RACKpad twice for one rack convection
baking. Thismode isusedfor cooking food
items on only one rack in convection bake.
Touch the CONVECTIONROASTpad for
convection roasting.
Touchthe number pads to set the desired
oven temperature.
Touchthe COOKINGTIME pad.
@
NOTE:Ifyour recipe requires preheating,you
may needto add additional time to the length of
the cooking time.
Touchthe number pads to set the desired
cooking time.
NOTE:Ifyour recipe requires preheating, you
may need to add additional time to the length of
the cooking time.
[] Touch the number pads to set the desired
length of cooking time. The minimum
cooking time you can set is 1 minute.
The oven temperature that you set and the
cooking time that you entered will be in the
display.
[] Touch the START pad.
The display shows the oven temperature that
you set and the cooking time countdown. The
display starts changing once the temperature
reaches IO0°F.
r_ Atthe end of timed convection bake the
oven will turn off.Theend of cycle tone will
sound.Touch the CLEAR/OFFpad to clear
the display if necessary.
[-_ Removethe food from the oven.
Remember,foods that are left in the oven
continue cooking after the controls are off.
Touchthe DELAYSTARTpad.
r_ Touchthe number pads to set the time of
day you want the oven to turn on and
start cooking.
Ifyou would liketo check the times you have
set,touch the DELAYSTARTpad to checkthe
start time you have set or touch the COOKING
TINE pad to check the length of cooking time
you have set.
[] Touchthe STARTpad.
NOTE:An attention tone will sound ifyou are
using timed baking and do not touch the START
pad after entering the baking temperature.
When the oven turns on at the time of day you
have set,the display will show the changing
temperature (starting at IO0°F)and the cooking
time countdown.
At the end of timed convection bake the oven
will turn off.Theend of cycle tone will sound.
[-9-] Touchthe CLEAR/OFFpadto clear the
display if necessary.When baking is
finished,remove the food from the oven.
Remember,even though the oven shuts
off automatically, foods continue cooking
after the controls are off. 23
Page 24
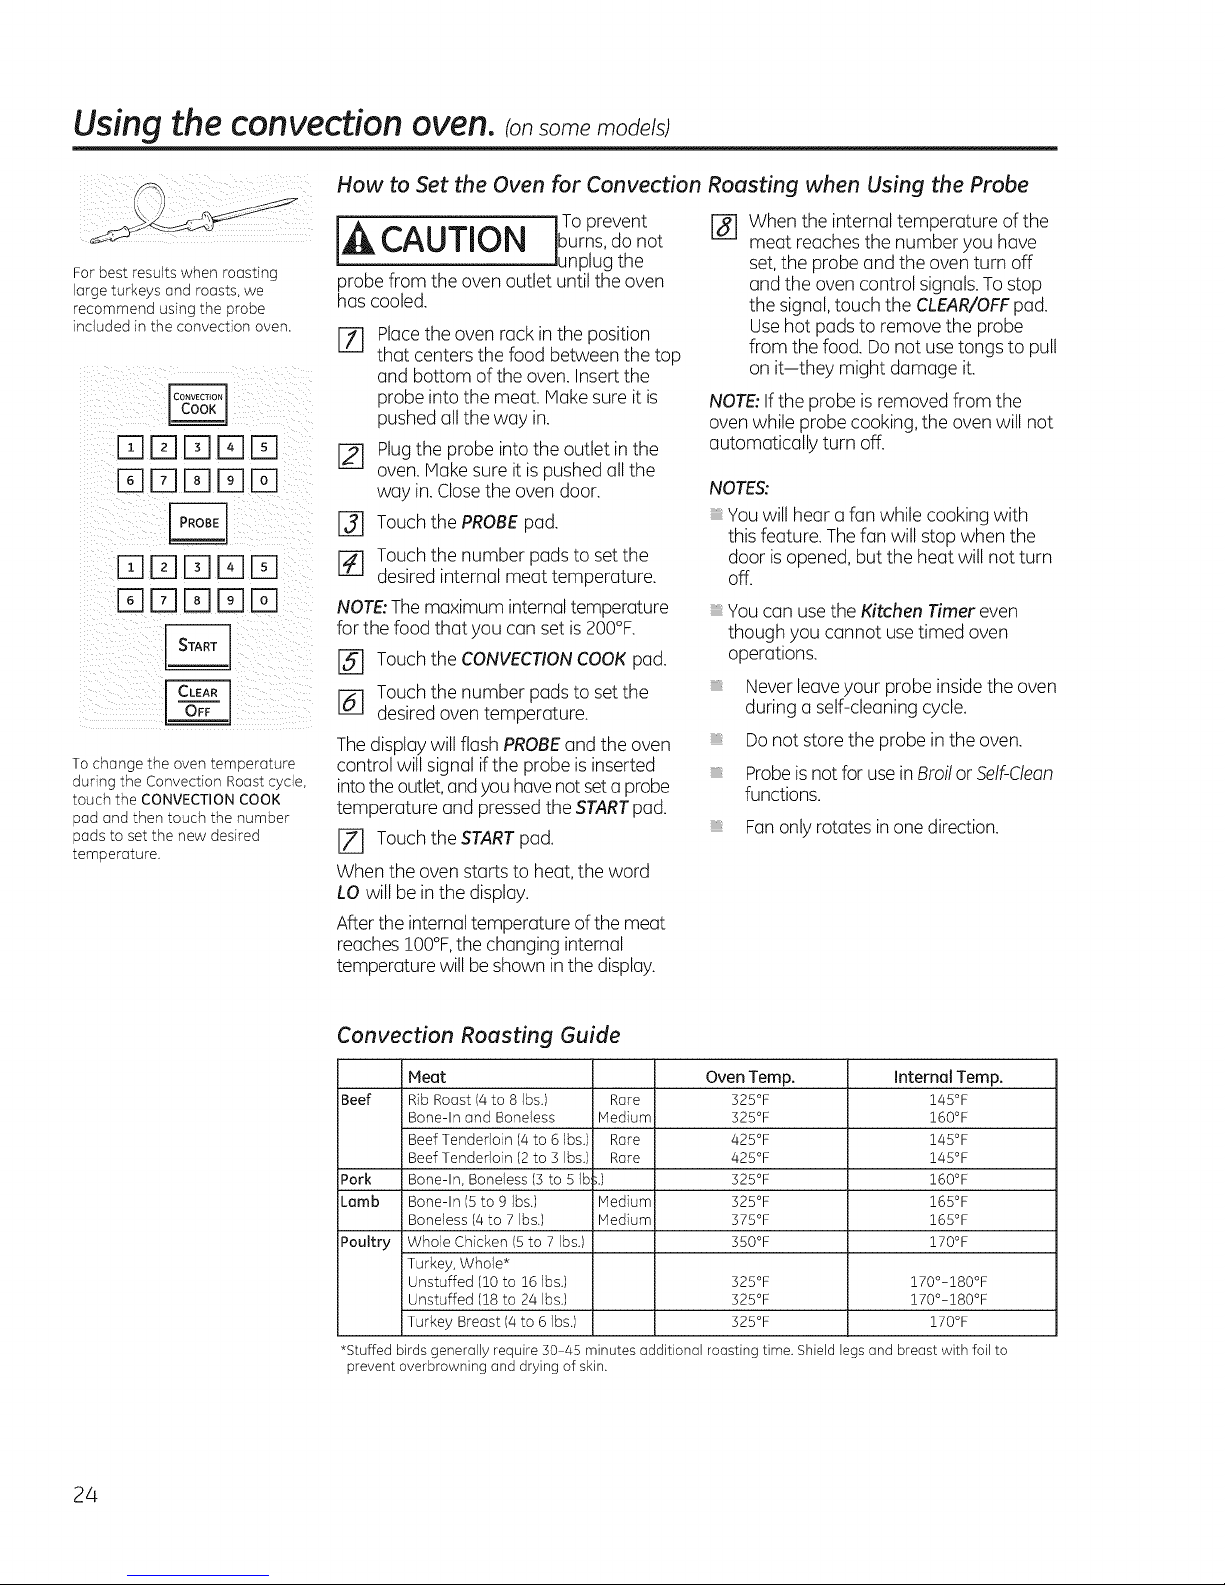
Using the convection oven.consomemode s
How to Set the Oven for Convection Roasting when Using the Probe
CAUTION Iburns,dOn°t meat reaches the number you have
For best results when roasting
large turkeys and roasts, we
recommend using the probe
included in the convection oven.
DD[]DD
DD[]DD
DD[]DD
DDDDD
To change the oven temperature
during the Convection Roast cycle,
touch the CONVECTION COOK
pad and then touch the number
pads to set the new desired
temperature.
IA j To prevent r_ When the internal temperature ofthe
probe from the oven outlet until the oven
has cooled.
Placethe oven rack in the position
%
that centers the food between the top
and bottom of the oven.Insertthe
probe into the meat. Hake sure it is
pushed all the way in.
Plugthe probe into the outlet in the
[]
oven. Hake sure it is pushed all the
way in. Closethe oven door.
Touch the PROBEpad.
[]
Touch the number pads to set the
[]
desired internal meat temperature.
NOTE:Themaximum internaltemperature
for the food that you can set is 200°F.
[] Touch the CONVECTIONCOOKpad.
[_] Touch the number pads to set the
desired oventemperature.
Thedisplay will flash PROBEand the oven
control will signal if the probe isinserted
intotheoutlet,and you havenot seta probe
temperature and pressedthe STARTpad.
F-Z-]Touch the STARTpad.
When the oven starts to heat,the word
LO will be in the display.
After the internal temperature of the meat
reaches 100°F,the changing internal
temperature will be shown inthe display.
lunplug the set,the probe and the oven turn off
and the oven control signals.Tostop
the signal, touch the CLEAR/OFFpad.
Usehot pads to remove the probe
from the food. Do not usetongs to pull
on it-they might damage it.
NOTE:Ifthe probe is removed from the
oven while probe cooking, the oven will not
automatically turn off.
NOTES:
You will hear a fan while cooking with
this feature. Thefan will stop when the
door is opened, but the heat will not turn
off.
You can use the Kitchen Timer even
though you cannot usetimed oven
operations.
Never leave your probe insidethe oven
during a self-cleaning cycle.
Do not store the probe in the oven.
Probeisnot for usein BroilorSelf-Clean
functions.
Fanonly rotates inone direction.
Convection Rousting Guide
Meat Oven Temp.
Beef
Pork
Lamb
Poultry
*Stuffed birds generally require 30 /45 minutes additional roasting time_ Shield legs and breast with foil to
prevent overbrowning and drying of skin_
Rib Roast (4 to 8 Ibs.) Rare 525°F
Bone-In and Boneless IV]edium 325°F
Beef Tenderloin (4 to 6 Ibs.) Rare 425°F
Beef Tenderloin (2 to 3 Ibs.) Rare 425°F
Bone-In, Boneless (3 to 5 Ib';.) 325°F
Bone-In (5 to 9 Ibs.) IV]edium 325°F
Boneless (4to 7 Ibs.) IV]edium 375°F
Whole Chicken (Sto 7 Ibs.) 3SO°F
Turkey, Whole*
Unstuffed (10 to 16 ]bs.) 325°F
Unstuffed (18 to 24 Ibs.) 325°F
Turkey Breast 14to 6 Ibs.) 325°F
24
Internal Temp.
145°F
160°F
145°F
145°F
160°F
165°F
165°F
170°F
170°-180°F
170°-180°F
170°F
Page 25

Special features ofyour oven control. GEApp,ancescom
Your new touch pad control has additional features that you may choose to use. The following are the features and how
you may activate them.
The special feature modes can only be activated while the display is showing the time of day. They remain in the control's
memory until the steps are repeated.
To enter a special feature for either oven, you must first touch the upper oven BROIL HgLO and BAKE pads at the same
time. The lower oven BROIL HI/LO and BAKE pads will not activate special features.
When the display shows your choice, touch the START pod. The special features will remain in memory after a power
failure, except for the Sabbath feature, which will have to be reset.
12-Hour Shutdown
J DELAY J
With this feature, should you forget and leave
the oven on,the control will automatically
turn off the oven after 12 hours during baking
functions or after 3 hours during a broil
function.
If you wish to turn OFF this feature, follow the
steps below.
[Z] Touch the upper oven BROILHI/LO and
BAKE pads at the same time until the
display shows SF.
Fahrenheit or Celsius Temperature Selection
Your oven control isset to usethe Fahrenheit
temperature selections,but you may change
this to use the Celsiusselections.
[_ Touch the DELAYSTARTpad until no shdn
(no shut-off) appears inthe display.
I-_ Touch the STARTpad to activate the no
shut-off and leavethe control set in this
special features mode.
[] Touch the COOKTIMEand BROILHI/LO
pads at the same time. The display will
show F (Fahrenheit).
! i !
i ! iI
(on some models)
(on some models)
[Z] Touch the upper oven BROIL HI/LO and
BAKE pads at the same time until the
display shows SF.
Tones at the End of a Timed Cycle
At the end of a timed cycle, 3 short beepswill
sound followed by one beep every 6 seconds
until the CLEAR/OFFpad is touched. This
continual 6-second beep may be cancelled.
Tocancel the 5-second beep:
[Z] Touch the upper oven BROIL HI/LO and
BAKE pads at the same time until the
display shows SF.
Touchthe BROILpad.Thedisplay shows
CONTIBEEP(continuousbeep).Touchthe
BROILpad again. The displayshows
SINGLEBEER(Thiscancelsthe one beep
every 6 seconds.)
[_ Touch the COOKTIMEand BROILHI/LO
pads again at the same time. Thedisplay
will show C (Celsius).
[] Touch the START pad.
OR
Touch the KITCHENTIMERON/OFF pad.
Thedisplay shows CONBEEP(continual
beep).Touchthe KITCHENTIMERON/OFF
pad again. The display shows BEER(This
cancelsthe one beep every 6 seconds.)
[] Touch the START pad.
25
Page 26

Special features of your oven control.
Tone Volume (on some models)
I cooKI
i_i _ _ _ i ii_i _
iii !
Thisfeature allowsyou to adjust the tone
volumes to a more acceptable volume. There
are three possiblevolume levels.
Touch the upper oven BROILHI/LO and
%
BAKEpadsat the same time until the
display shows SF.
Touch the COOKTIHEpad. Thedisplay will
[]
show 2 BEEP.This isthe middlevolume
level.
Touch the COOKTIHEpad again.The
display will show 3 BEEP.This isthe loudest
volume level.
12-Hour, 24-Hour or Clock Blackout
Your control isset to use a 12-hour clock.
If you would prefer to have a 24-hour military
time clock or black out the clock display,follow
the steps below.
I-_ Touchthe upper oven BROILHI/LO and
BAKEpadsat the same time until the
display shows SF.
Touch the CLOCKpad once.Thedisplay
will show !2 hr. Ifthis isthe choice you
want, touch the STARTpad.
Touch the COOK TIHE pod again. The
display will show 1 BEEP.This is the
quietest volume level.
Foreachtime the level is changed, a tone
will sound to provide an indication of the
volume level.
[-_ Choosethe desired sound level (1BEEP,2
BEEP,.5BEEP).
[] Touch the STARTpad to activate the level
shown.
Touch the CLOCKpad again to change to the
24-hour military time clock.Thedisplay will
show 24 hr. If this isthe choice you want, touch
the STARTpad.
Touch the CLOCKpad again to black out the
clock display.The display will show OFF.If this is
the choice you want, touch the STARTpad.
NOTE:Ifthe clockisin the black-out mode,you
will not beable to usetheDelayStart function.
26
Page 27

Auto Recipe'" Conversion
GEAppliances.com
CONVECTIONBAKE]
START
CLEAR
OFF J
You can use your favorite recipes in the
convection oven.
When using Convection Bake, the oven can
automatically convert the oven temperature
from regular baking to Convection Bake
temperatures.
To activate the feature:
FT] Touch the lower oven Warm and Bake
pad at the same time until the display
shows SF.
[] Touch the Convection Bake pad. The
display will show Con OFF.Touch the
Convection Bake pad again. The display
will show Con On.
r_ Touch the Start pad.
[] Using the number pads, enter the
temperature recommended in the recipe.
r_ Touch the Start pad.
The display will show the actual
converted (reduced)temperature. For
example, ifyou enter a regular recipe
temperature of 350°F (177°@and touch
the Start pad, the display will show CON
and the converted temperature of 325°F
(163°C).
NOTE:Thisfeature only converts cooking
temperatures, not cooking times.
When convection roosting, the oven
temperature will not auto convert.
[] Touch the Clear/Off pad when baking is
finished.
Usepan sizerecommended in the recipe.
_,Some package instructions for frozen
casseroles,main dishes or baked goods
have been developed using commercial
convection ovens. For best resultsin
this oven,preheat the ovenand use the
temperature, for regular baking, on the
package.
To deactivate the feature:
Touch the lower oven Worm and Bake
pad at the same time until the display
shows SF.
Touch the Convection Bake pad. The
display will show Con On. Touch the
Convection Bake pad again.The display
will show Con OFF.
[] Touch the Start pad.
Range Lockout
i i ii i I:II i ii
Yourcontrol will allow you to lockout the
surface units,oven burners and control panel so
they cannot be activated.
To lock/unlock the controls:
E]_] Turn all surface units off.
Touch the RANGELOCKOUTpad and
then the STARTpad.
Tounlock the control, touch the RANGE
LOCKOUTpadand then the STARTpad.
When this feature ison and the touch pads are
touched, the control will beep and the display
will show LOC.
}_Thecontrol lock-out mode affects all
controls. No controls will work when this
feature is activated.
}_Theadjustment will be retained in memory
after a power failure.
27
Page 28
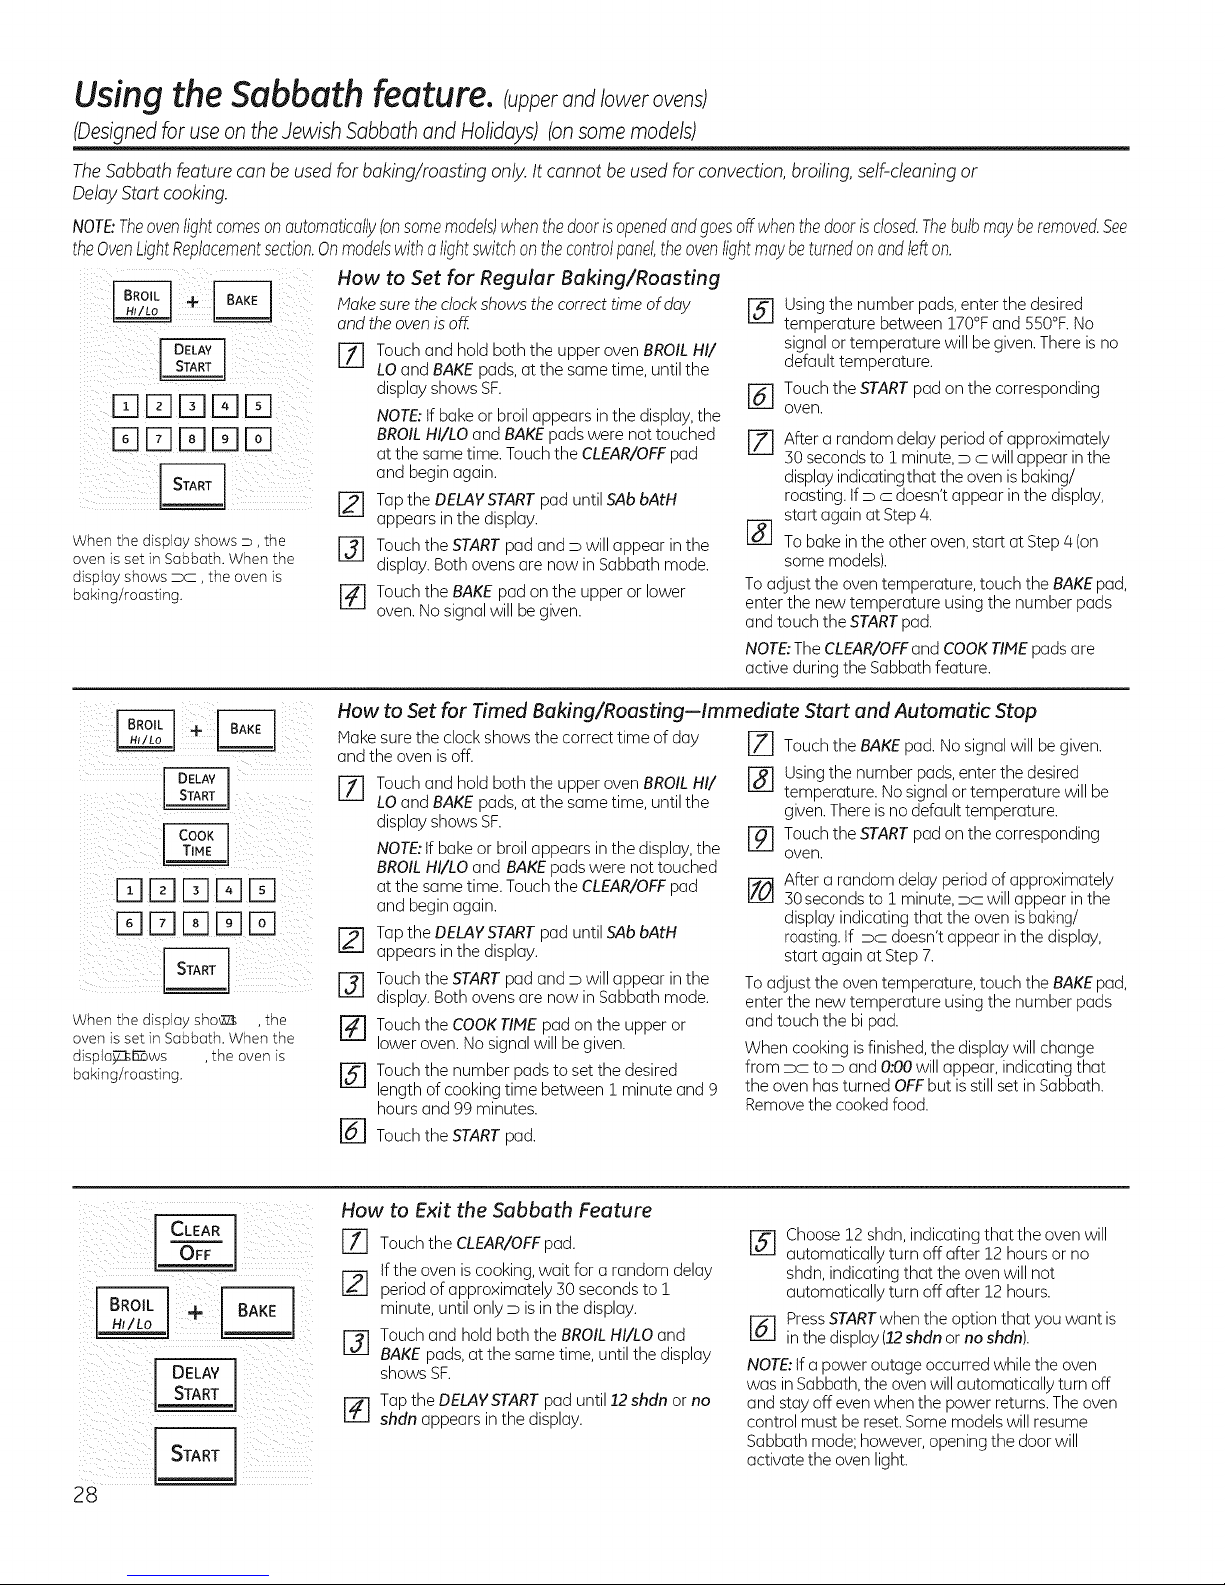
Using the Sabbath feature. (u erand/owerovensl
(Designedfor useon theJewish Sabbathand Holidays)(onsome models)
TheSabbath feature can be used for baking/roasting only. It cannot be usedfor convection,broiling,self-cleaningor
DelayStart cooking.
NOTE:Theovenlightcomesonautomatically(onsomemodels)whenthedoorisopenedandgoesoffwhenthedoorisclosed.Thebulbmayberemoved.See
theOvenLightReplacementsection.Onmodelswitha lightswitchonthecontrolpanel,theovenlightmaybeturnedonandIdt on.
How to Set for Regular Baking/Roasting
When the display shows D, the
oven is set in Sabbath. When the
display shows De, the oven is
baking/roasting.
Makesure the clock shows the correct time ofday
and the oven is off.
7] Touch and hold both the upper oven BROILHI/
LOand BAKEpads, at the same time, until the
display shows SF.
NOTE:tf bake orbroil appears in the display, the
BROILHI/LO and BAKEpads were not touched
at the same time. Touch the CLEAR/OFFpad
and begin again.
[] Tap the DELAYSTARTpad until SAbbAtH
appears in the display.
[] Touch the STARTpad and D will appear in the
display. Both ovens are now in Sabbath mode.
[-_ Touchthe BAKEpad on the upper or lower
oven.No signal will be given.
[-_-] Using the number pads, enter the desired
temperature between !70°F and 550°F.No
signal or temperature will begiven. There is no
default temperature.
F-_ Touch the STARTpad on the corresponding
oven.
F-7--]After a random delay period of approximately
30 seconds to ! minute, D C will appear in the
displayindicatingthat the oven isbaking/
roasting. IfD C doesn't appear in the display,
start again at Step4.
[] To bake in the other oven, start at Step 4 (on
some models).
Toadjust the oventemperature, touch the BAKEpad,
enter the new temperature using the number pads
and touch the STARTpad.
NOTE:The CLEAR/OFFand COOKTIlE pads are
active during the Sabbath feature.
i ii i
i iii ii !ii i iiiIIII
$£1-qFqi-qi-qi-q//
When the display sho_ ,the
oven is set in Sabbath. When the
displa_Z]s_ws ,the oven is
baking/roasting.
ik ii _iii_: _xxxxxi_ iii iiii_ii
J DELAY J
i
28
How to Set for Timed Baking/Roasting--Immediate Start and Automatic Stop
Hake surethe clock shows the correct time of day [77 Touch the BAKEpad. No signal will be given.
and the oven isoff.
77 Touch and hold both the upper oven BROILHI/
LOand BAKEpads, at the same time, until the
display shows SF.
NOTE:tf bake or broil appears in the display, the
BROILHI/LO and BAKEpads were not touched
at the same time. Touch the CLEAR/OFFpad
and begin again.
r_ Tapthe DELAYSTARTpad until SAbbAtH
appears in the display.
Touch the STARTpad and D will appear in the
display. Both ovens are now in Sabbath mode.
r_ Touch the COOKTIlE pad on the upper or
lower oven. No signal will be given.
[-5-1 Touch the number pads to set the desired
length of cooking time between ! minute and 9
hours and 99 minutes.
r_ Touch the STARTpad.
[-_] Using the number pads,enter the desired
temperature. No signal or temperature will be
given.There isno default temperature.
F_ Touch the STARTpad on the corresponding
oven.
After a random delay period of approximately
[_30 secondsto ! minute, DC willappear in the
display indicating that the oven isbaking/
roasting.If DC doesn't appear in the display,
start again at Step 7.
Toadjust the oventemperature, touch the BAKEpad,
enter the new temperature using the number pads
and touch the bi pad.
When cooking is finished, the display will change
from _ to D and 0:00will appear, indicating that
the oven hasturned OFFbut is still set in Sabbath.
Removethe cooked food.
How to Exit the Sabbath Feature
[] Touch the CLEAR/OFFpad.
Ifthe oven is cooking, wait for a random delay
period of approximately 30 seconds to !
minute, until only D isin the display.
Touch and hold both the BROILHI/LO and
IJI
BAKEpads,at the same time, until the display
shows SF.
[-4-1 Tapthe DELAYSTARTpad until 12shdn or no
shdn appears inthe display.
[-5-J Choose 12 shdn, indicating that the oven will
automatically turn off after 12 hours or no
shdn,indicating that the ovenwill not
automatically turn off after 12 hours.
F_ pressSTARTwhen the option that you want is
in the display (22shdn or no shdn).
NOTE:If a power outage occurred whilethe oven
was in Sabbath,the oven will automatically turn off
and stay off even when the power returns.The oven
control must be reset.Some models will resume
Sabbath mode; however,opening the door will
activate the oven light.
Page 29

Usin the sdf-deanin u eroven. GEAppliances.com
Before a Clean Cycle
Donot cleanthegasket.Thefiberglassmaterialof
theovendoorgasketcannotwithstandabrasion,it is
essentialfor the gasketto remainintact,tfyou notice
it becomingwornorfrayed,replaceit.
Makesuretheovenlightbulbcoveris inplaceand
theovenlightisoff.
IMPORTANT:Thehealthofsomebirdsisextremely
sensitivetothefumesgivenoff duringthe self-
cleaningcycleof any range.Hovebirdsto another
well-ventilatedroom.
Wipe up heavy soil on the oven
bottom.
[AWARNING
FIREHAZARD:Wipegreaseandheavysoilfromthe
ovenbottombeforeself-cleaning.Failureto dosomay
resultinanovenfire.
Werecommendventingyour kitchenwith anopen
windowor usinga ventilationfan or hoodduringthe
firstself-cleancycle.
Removeany broilerpan,broilergrid,probe,all
cookwareandanyaluminumfoilfromtheoven.
NOTE:
tfyourovenisequippedwith shiny,silver-colored
ovenracks,removethembeforeyoubeginthe
self-cleancycle.
Theshiny,silver-coloredovenracks(onsome
models)canbeself-cleaned,buttheywilldarken,
losetheirlusterand becomehardto slide.
tfyourovenisequippedwith grayporcelain-
coatedovenracks,theymaybe leftintheoven
duringtheself-cleancycle.
Soilonthe front frameofthe rangeandoutside
thegasketonthe doorwillneedto becleanedby
hand.Cleantheseareaswith hotwater,soap-filled
steel-woolpadsorcleanserssuchasSoftScrub_.
Rinsewellwith cleanwateranddry.
How to Set the Oven for Cleaning
Theovendoorsmustbeclosedandallcontrolsset
correctlyforthecycletoworkproperly.
[7] TouchtheSELFCLEANpad.
A 5-hourself-cleantime isrecommendedfor
usewhencleaningsmall,containedspills.A
self-cleantimeof 5hoursisrecommendedfor
a dirtieroven.
[] tfa timeotherthan5 hoursor3hoursis
needed,usethenumberpadsandenterthe
desiredcleantime.
Youcanchangethecleantimeto anytime between
3 hoursand 5hours,dependingonhowdirtyyour
ovenis.
I-_ TouchtheSTARTpad.
Theupperandlowerovendoorslockautomatically.
Thecooktopelementsarealsolockedoutduring
self-clean.Thedisplaywillshowthe cleantime
remaining,it willnotbe possibleto opentheoven
doorsorusethecooktopuntilthetemperaturedrops
belowthe locktemperatureandLOCKED/DOOR
goesoffinthecontroldisplay.
WhenLOCKED/DOOR_ goesoff,youwillbeable
toopenthedoors.
ThewordLOCKED/DOOR_ willflashandthe
worddoorwilldisplayifyousetthe cleancycle
andforgetto closethe ovendoors.
Tostopa cleancycle,touchthe CLEAR/OFFpad.
WhenLOCKED/DOOR_ goesoff,indicatingthe
ovenshavecooledbelowthelockingtemperature,
youwillbeabletoopenthedoors.
DoubleOvens:
Youcansetacleancycleinbothovensat the
sametime;however,theywillnotself-cleanatthe
sametime.Thelastovensetwillautomatically
delayitsstart untiltheendofthefirstoven'sclean
cycle.
Whenanovenissetto self-clean,both ovendoors
willlockandthecooktopcontrolswill lockout.The
ovensandcooktopcannotbeusedwhenanoven
issettoself-clean.
29
Page 30

Usingthe self-cleaning upper oven.
The oven doors must be closed and all controls set correctly for the cycle to work properly.
How to Delay the Start of Cleaning
[]DD[]D
DDDD
FT] Touch the SELFCLEANpad.
A 3-hour self-cleantime is
recommended for usewhen cleaning
small, contained spills.A self-clean
time of 5 hours is recommended for a
dirtier oven.
r_ !f a time other than 5 hours or 3 hours
is needed,usethe number pads and
enter the desiredclean time,
Youcan change the clean time to any time
between 3 hours and Shours, depending
on how dirty your oven is.
r3] Touch the DELAYSTARTpad.
[] Usingthe number pads,enter the
time of day you want the cleancycle
to start.
After a Clean Cycle
You may notice some white ash in the
oven. Wipe it up with a damp cloth after
the oven cools.
If white spotsremain, remove them with
a soap-filled steel wool pad and rinse
thoroughly with a vinegar and water
mixture.
Thesedepositsare usuallya saltresidue
that cannot be removed bythe clean cycle.
If the oven is not clean after one clean
cycle,repeat the cycle.
[] Touch the STARTpad.
Theupper and lower oven doors lock
automatically. The cooktop elements are
also locked out during self-clean.The
display will show the start time. It will not
be possible to open the oven doors or use
the cooktop until the temperature drops
below the lock temperature and LOCKED/
DOOR _ goesoff inthe control display.
When LOCKED/DOOR_ goes off,you will
be able to open the doors.
iiiiiiiiiiii_iii
You cannot set the oven for cooking or
another self-clean cycle until the oven is
cool enough for the door to unlock.
iiiiiiiiiiii_iii
While the oven isself-cleaning,you
can touch the CLOCKpad to display
the time of day.To return to the clean
countdown, touch the SELFCLEANpad.
iiiiiiiiiiii_iii
If the racks become hard to slide,apply
a small amount of cooking oil to a paper
towel and wipe the edges of the oven
rackswith the paper towel.
30
Page 31

Using the lower oven drawer. GEApplionces.com
The lower oven drawer may be used to bake foods using the same times and temperatures as a standard oven.
Foods ideal for baking in the lower oven drawer include pizza, frozen foods, casseroles, biscuits, rolls and many desserts.
To Use the Lower Oven Drawer
Push in and turn the lower oven
drawer knob to any desired
setting.
[77 Pushin and turn the lower oven drawer
knob to any desiredsetting.
[-2-7Allow the lower oven drawer to preheat.
TheONsignal light islocated on the upper
right sideof the knob and glows when the
knob isin the ON position. It remains ON until
the knob ismoved to the OFFposition.
The"Heating"signal light islocated below
the ONsignal light and glows when the
heating elementsare active. Preheatis
complete after the "Heating" signal has
turned off for the first time with each use.
NOTES:
Always usethe included drawer rack when
usingthe Lower OvenDrawer.
The lower oven drawer useslessenergy than the upper oven.
Allow the following approximate times for preheating:
Desired Lower Preheat
Oven Temperature Time
WARM 10 minutes
Thelower oven drawer cannot be used
during a self-clean cycleof the upper oven.
Donot put food, foil or cookware directly on
the bottom of the lower oven drawer. Always
usethe included drawer rack.
iii}iDiiii;,
Iffoods requirea cover,use onlyfoil or lids
able to withstand baking temperatures.
Donot useplastic.
Maximum height of foods that can be placed
in the lower oven drawer is 4".
Donot put liquid or water in the lower oven
drawer.
Neverplace plastics,paper, canned foods
or combustible material in the lower oven
drawer.
350°F 20 minutes
425°F 30 minutes
Adjust the lower oven thermostat--Do it yourselfl
You may find that your new oven cooks differently than the one it replaced. Use your new oven for u few weeks to
become more familiar with it. If you still think your new oven is too hot or too cold, you can adjust the thermostat
yourself.
Do not use thermometers, such as those found in grocery stores, to check the temperature setting of your oven. These
thermometers may vary 20-40 degrees.
NOTE:This adjustment will not affect the broiling temperatures.
Back of Lower Oven Knob
(Appearance may vary.)
Pullthe OVENCONTROLknob off the
ri1
range and look at the back side.Tomake
an adjustment, loosen (approximately one
turn), but do not completely remove, the
two screws on the back of the knob.
With the back of the knobfacing you, hold
r2]
the outer edge of the knob with one hand
and turn the front of the knob with the
other hand.
Toraisethe oventemperature, move the
top screwtoward the right. You'llhear a
clickfor each notch you move the knob.
To lowerthe temperature, move the top
screw toward the left.
Eachclick will change the oven temperature
approximately 10°F.(Rangeis_+60°F.from
the arrow.)Wesuggest that you makethe
adjustment one clickfrom the original setting
and check oven performance before making
any additional adjustments.
r_ After the adjustment ismade, retighten
screws so they are snug, but be careful not
to overtighten.
r_ Reinstallknob on range and check
performance.
31
Page 32

Care and cleaning of the range,
Be sure electrical
power is off and all
surfaces are cool
before cleaning
any part of the
range.
How to Remove Protective Shipping Film and Packaging Tape
Carefullygrasp a corner of the protective shipping To ensure no damage is done to the finishof the
film withyourfingersandslowlypeelit fromthe
appliancesurface.Donotuseanysharpitemsto
removethe film.Removeallofthefilm beforeusing
theapplianceforthefirst time.
Control Knobs
Thecontrolknobsmayberemovedfor easier
cleaning.
Makesuretheknobsarein theOFFpositionsand
pullthemstraightoffthestemsforcleaning.
Tip-Over Hazard
A child or adult can tip the range and be killed.
Verify the anti-tip bracket has been properly installed
and engaged.
Ensure the anti-tip bracket is re-engaged when the range
is moved.
Do not operate the range without the anti-tip bracket in
place and engaged.
Failure to follow these instructions can result in death or
serious burns to children or adults.
product,thesafestwayto removethe adhesivefrom
packagingtapeon newappliancesisan application
ofa householdliquiddishwashingdetergent.Apply
witha softclothandallowto soak.
NOTE:Theadhesivemust beremovedfromallparts.
Itcannotberemovedif it isbakedon.
Theknobscanbecleanedina dishwasherorthey
mayalsobewashedwith soapandwater. Make
suretheinsideoftheknobsaredrybeforereplacing.
Replacethe knobs,intheOFFpositionto ensure
properplacement.
32
Control Panel
Ifdesired,the touchpads may be deactivatedbefore
cleaning.
SeetheControlLockoutinformationintheUsingthe
clock,kitchentimerandcontrollockoutsectioninthis
manual.
Painted Surfaces
Paintedsurfacesincludethesidesofthe rangeand
thedoor,top of controlpanelandthe drawerfront.
Cleanthesewithsoapandwateror avinegarand
water solution.
Stainless Steel Surfaces (on some models)
Do not use a steel wool pad;it will scratch the
surface.
Toclean the stainless steelsurface, use warm,
sudsywater or a stainless steelcleaner or
polish.Always wipe the surface in the direction
of the grain. Followthe cleaner instructions for
cleaning the stainlesssteel surface.
Porcelain Enamel Cooktop (on some models)
The porcelain enamel finish is sturdy but
breakable if misused.Thisfinish isacid-
resistant. However,any acidic foods spilled
(suchasfruit juices,tomato or vinegar)should
not be permitted to remain on the finish.
If acids spillon the cooktop while it is hot, use
a dry paper towel or cloth to wipe it up right
Cleanupsplatterswith a dampcloth.
Youmayalsouseaglasscleaner.
Removeheaviersoilwithwarm,soapywater.Donot
useabrasivesofanykind.
Reactivatethetouchpadsaftercleaning.
Donot usecommercialovencleaners,cleaning
powders,steelwoolor harshabrasivesonany
paintedsurface.
Toinquire about purchasing stainlesssteel
appliance cleaneror polish or to find the
location of a dealer nearest you, please call our
toll-free number:
National Parts Center 1.800.525.2002
GEAppliances.com
away. When the surface hascooled, wash with
soap and water. Rinsewell.
Forother spillssuch as fat spatterings, wash
with soap and water or cleansing powders
after the surface has cooled. Rinsewell. Polish
with a dry cloth.
Page 33

Thegasket isdesigned with agap
at the bottom to allowfor proper air
circulation.
Donot rub or cleanthe door gasket-it
has anextremely low resistanceto
abrasion.
Ifyou notice the gasket becoming
worn,frayed or damaged in any way
or if it has become displaced on the
door,you should haveit replaced.
Slot----.-.
Hinge " E_
lock "_
Pull hinge locks down to unlock.
Cleaning the Oven Door
Toclean the inside of the door:
Becausetheareainsidethegasketiscleaned
duringtheself-cleancycle,
youdonotneedto cleanthisby hand.
Theareaoutsidethegasketandthe doorliner
canbecleanedwith a soap-filled
or plasticscouringpad,hotwaterand
detergent.Rinsewellwitha vinegar
andwatersolution.
Tocleantheoutsideofthedoor:
Usesoapandwatertothoroughlycleanthetop,
sidesandfront oftheovendoor.Rinsewell.You
mayalsousea glasscleanertocleantheglass
on theoutsideofthedoor.Donotletwaterdrip
intotheventopenings.
Lift-Off Oven Door (onsome models)
Thedoorisveryheavy.Becarefulwhenremoving [-_
andlifting thedoor.
Donot liftthe doorby the handle.
Toremovethe door:
[Z] Fullyopenthedoor.
[] Pullthe hingelocksdowntowardthe door
frame,tothe unlockedposition.Atool,suchas
a smallflat-bladescrewdriver,mayberequired.
Firmlygraspbothsidesofthedoor
atthetop.
Closedoorto the doorremovalposition,which
%
ishalfwaybetweenthe broilstoppositionand
fullyclosed.
[] Liftdoorupandout untilthehingearm
isclearoftheslot.
r_ pushthe hingelocksupagainstthefrontframe
GEAppliances.com
tfanystainonthedoorventtrim ispersistent,
useasoftabrasivecleaner
anda sponge-scrubberfor bestresults.
Spillageofmarinades,fruitjuices,tomato
saucesandbastingmaterialscontainingacids
maycausediscolorationandshould
bewipedup immediately.Whensurfaceis
cool,cleanandrinse.
Donot useovencleaners,cleaningpowdersor
harshabrasivesonthe outsideof the door.
Withthedoorat Bottom
thesameangle edgeof
asthe removal slot
\
Hinge arm
position,seat
theindentation
ofthehingearm
intothe bottom
edgeofthe
hingeslot.The
notchinthehingearmmustbefullyseated
intothe bottomoftheslot.
Fullyopenthedoor.ifthedoorwill notfully
open,theindentationisnotseatedcorrectlyin
thebottomedgeof the slot.
oftheovencavityto the lockedposition.
Toreplacethedoor:
Firmlygrasp both sides of the door
Removal position
FT] at the top.
Hinge, I '_s_ ....
tOck
Hinge
Push hingelocksup tolock.
Closetheovendoor.
@
33
Page 34

Care and cleaning of the range,
Oven Racks
Use the rack without the two front
handles in the lower oven.
Alloven racks may be cleaned by hand with an
abrasive cleaner or steel wool. After cleaning,
rinsethe rackswith clean water and dry with a
clean cloth. Grayporcelain-coated oven racks
may remain in the oven during the self-cleaning
cycle without being damaged. The nickel-plated
oven racks may remain in the oven during the
self-cleaning cycle, but they will losetheir luster
Lodge ® Cast Iron Griddle
r-f] Rinsewith hot water (do not use soap),and
dry thoroughly.
[] Before cooking, prepare the surface with
cooking spray or vegetable oil.
r3] After cooking,clean the griddle with a stiff
brush and hot water. Using soap isnot
recommended, and harsh detergents
should never be used.
Towel dry immediately and apply alight
coat of cooking spray or vegetable oil
while the griddle is still warm.
Storeina cool,dryplace.
@
Do not wash ina dishwasher.
@
and become hard to slide. Itwill be necessary
to greaseall oven rack sideedgeswith a light
coating of vegetable oil after cleaning them by
hand or in the oven. Thiswill help maintain the
easeof sliding the racksin and out of the oven.
Griddle Precautions:
If something has spilled under the griddle,
it should be cleaned up assoon as possible
to prevent "baked on" food soil.Seethe
Cleaningthe glass cooktop section.
Donot allow greaseto accumulate under
the griddle as it can be a fire hazard. Clean
under the griddle as soon as it iscool.Seethe
Cleaningthe glass cooktop section.
iiiB
Donot placeyour griddle in the microwave
oven.
Always turn off all surface units before
removing the griddle. Usecaution when
handling a hot griddle.
3q
Page 35

Vent appearance and location
vary.
GEAppliances.com
Oven Air Vents
Never block the vents (airopenings)of the
range.They provide the air inlet and outlet that
are necessaryfor the range to operate properly.
Air openings are located at the rear of the
cooktop, at the top and bottom of the oven
door, and at the bottom of the range,under the
lower oven drawer.
Removable Warming Drawer/Lower Oven Drawer Pan (onsome models)
NOTE:Formodels with an electric
warming drawer or lower ovendrawer,
beforeperforming any adjustments,
cleaningor service,disconnect therange
electricalpower supply at the household
distribution panel by removing thefuse or
switching off the circuit breaker.Makesure
the drawer heating elementis cool.
NOTE:Allow warming drawer or lower oven
drawer to cool beforeremoving pan.
NOTE:Wipespills promptly aftereach use.
Never place,use or self-clean the drawer pan
in the upper oven.
Warming drawer or lower oven drawer has a
removable pan for easy cleaning. Cleanwith
hot, soapy water and a sponge or dishtowel.
Drywith a clean cloth. Replacethe pan inthe
warming drawer or lower oven drawer.
35
Page 36

Care and cleaning of the range.
Oven Light Replacement (on some models)
Besure to letthe light cover and bulb cool
completely.
To remove the cover:
To replace the cover:
\
Wire cover holder
WARNING
[-71 Holda hand under the cover so it doesn't
fall when released.With fingers of the
same hand, firmly push back the wire
cover holder. Liftoff the cover.
Do not remove any screws to remove the cover.
Replacebulb with a 40-watt appliance
bulb.
SHOCK OR BURN HAZARD: Before replacing oven light bulb, disconnect the electrical
power to the range at the main fuse or circuit breaker panel. Failure to do so may result
in electric shock or burn.
Oven Heating Elements (onsome models)
Do not cleanthe bake elementor the broil
element.Any soil will burn off when the
elementsare heated.
[_ Placeit into groove of the light receptacle.
Pullwire forward to the centerof the
cover until it snaps into place.
[] Connectelectrical power to the range.
Toclean the ovenfloor, gently lift the bake
element. Cleanwith warm, soapy water.
36
Page 37

Cleaning the glass cooktop, somemodels; 6EAppliances.com
Normal Daily Use Cleaning
Clean your cooktop after
each spill. Use CERAMA
BRYTE_ Ceramic Cooktop
Cleaner.
ONLYuse CERAMABRYTE®CeramicCooktop
Cleaneron the glass cooktop. Other creams
may not be as effective.
To maintain and protect the surface of your
glass cooktop, follow these steps:
Beforeusing the cooktop for the first time,
%
clean it with CERAMABRYTE®Ceramic
CooktopCleaner.Thishelps protect the
top and makes cleanup easier.
r_ Daily useof CERAMABRYTE®Ceramic
CooktopCleanerwill help keep the
cooktop looking new.
[] Shakethe cleaning cream well. Apply a
Burned-On Residue
few drops of CERAMABRYTE®Ceramic
CooktopCleaner directly to the cooktop.
[] Usea papertowel or CERAMABRYTE®
Cleaning Padfor Ceramic Cooktopsto
cleanthe entire cooktop surface.
r51 use a dry cloth or paper towel to
remove all cleaning residue. No need to
rinse.
NOTE: It is very important that you DO NOT
heat the cooktop until it has been cleaned
thoroughly.
Use a CERAMABRYTE'_Cleaning
Pad for Ceramic Cooktops.
The CERAIVlABRYTE_-Ceramic
Cooktop Scraper and all
recommended supplies are
available through our Parts
Center. See instructions under "To
Order Parts" section on next page.
NOTE: Do not use a dull or
nicked blade.
NOTE:DAMAGEto your glass surface may
occur if you use scrub pads other than those
recommended.
[] Allow the cooktop to cool.
[-2-1Spread a few drops of CERAIVlABRYTEA:
Ceramic CooktopCleaneron the entire
burned residue area.
Using the included CERAIVlABRYTEA:
%
Cleaning Padfor Ceramic Cooktops,rub
the residue area, applying pressure as
needed.
Heavy, Burned-On Residue
Allow the cooktop to cool.
F71
Use a single-edge razor blade scraper
[]
at approximately a 45° angle against
the glass surface and scrape the soil. It
will be necessary to apply pressure to
the razor scraper in order to remove
the residue.
After scraping with the razor scraper,
@
spread a few drops of CERAMABRYTE'_
CeramicCooktop Cleaneron the entire
burned residue area. Usethe CERAMA
BRYTE'_Cleaning Padto remove any
remaining residue.
If any residue remains, repeat
%
the steps listed above as needed.
For additional protection, after all
@
residue has been removed, polish the
entire surface with CERAMABRYTE'_
Ceramic Cooktop Cleanerand a paper
towel.
For additional protection, after all
residue has been removed, polish the
entire surface with CERAMABRYTE'_
CeramicCooktop Cleaner and a paper
towel.
37
Page 38

Cleaning the glass cooktop, tonsomemode/s)
Metal Marks and Scratches
[Z] Becareful not to slide pots and pans
across your cooktop. It will leave metal
markings on the cooktop surface.
These marks are removable using the
CERAMABRYTE®CeramicCooktop Cleaner
with the CERAMABRYTE®CleaningPad
for Ceramic Cooktops.
r_ if pots with a thin overlay of aluminum
or copper are allowed to boil dry, the
overlay may leave black discoloration
on the cooktop.
Cooktop Seal
To clean the cooktop seal around the edges
of the glass, lay a wet cloth on it for a few
Glass surface--potential for permanent damage.
This should be removed immediately
before heating again or the
discoloration may be permanent.
NOTE:Carefully check the bottom of pans for
roughness that would scratch the cooktop.
minutes, then wipe clean with nonabrasive
cleaners.
Sugary spillovers (such
asjellies, fudge, candy,
syrups} or melted plastics
can cause pitting of the
surface of your cooktop (not
covered by the warranty}
unless the spill is removed
while still hot. Special care
should be taken when
removing hot substances.
Be sure to use a new, sharp
razor scraper.
Do not use a dull or nicked
blade.
38
Damage from Sugary Spills and Melted Plastic
[_1 Turn off all surface units. Remove hot
pans.
r_ Wearing an oven mitt:
a. Use a single-edge razor blade
scraper (CERAMABRYTE®Ceramic
Cooktop Scraper) to move the spill to
a cool area on the cooktop,
b. Remove the spill with paper towels.
To Order Parts
To order CERAMABRYTE_ Ceramic Cooktop
Cleaner and the cooktop scraper, please call
our toll-free number:
Notional Ports Center 800.626.2002
CERAMA BRYTE®Ceramic
Cooktop Cleaner ....................#WX10X300
CERAMA BRYTE'_ Ceramic
Cooktop Scraper ......................#WX10X0302
Kit...................................................#WB64XS027
(Kitincludes cream and cooktop scraper)
r_ Any remaining spillover should be left
until the surface of the cooktop has
cooled.
[] Don't use the surface units again until
all of the residue has been completely
removed.
NOTE: If pitting or indentation in the glass
surface has already occurred, the cooktop
glass will have to be replaced.
In this case, service will be necessary.
CERAMA BRYTE ® Cleaning Pods for
Ceramic Cool<tops ...............#WX!OX350
Page 39

stallatio
I
I s
structio
i
_ ©uestions? Call 800.GE.CARES (800.432.2737) or visit our Website at: GEAppliances.com i
Free-Standing
Electric Renges
BEFORE YOU BEGIN
Read these instructions completely and carefully.
. IMPORTANT - Savetheseinstructions
for local inspector's use.
" IMPORTANT - Observe all governing
codes and ordinances.
. Note to Installer- Be sure to leave these
instructions with the Consumer.
, Note to Consumer - Keep these instructions for
future reference.
, Skill level - Installation of this appliance requires
basic mechanical skills.
, Completion time- 1 to 3 hours
. Proper installation is the responsibility
of the installer.
• Product failure due to improper installation is not
covered under the Warranty.
WARNING - This appliance must be
properly grounded.
FOR YOUR SAFETY:
Be sure your appliance is properly installed
and grounded by a qualified technician.
Make sure the cabinets and wall coverings around
the range can withstand the temperatures (up to 200°F)
generated by the range.
ANTI-TIP DEVICE
A child or adult can tip the range and be killed.
Verify the anti-tip bracket has been properly installed
and engaged.
Ensure the anti-tip bracket is re-engaged when the range
is moved.
Do not operate the range without the anti-tip bracket in
place and engaged.
Failure to follow these instructions can result in death or
serious burns to children or adults.
If you did not receive an anti-tip bracket with
your purchase, call 1.800.626.8774 to receive one
at no cost. (In Canada, call 1.800.561.3344.) For
installation instructions for the bracket, visit
www.GEAppliances.com (in Canada,
www.G EAppliances.ca.)
T_-Over Hazard
FOR YOUR SAFETY:
A WARNING - Beforebeginning the
installation, switch power off at service panel and lock
the service disconnecting means to prevent power
from being switched on accidentally. When the service
disconnecting means cannot be locked, securely
fasten a prominent warning device, such as a tag,
to the service panel.
All rough-in and spacing dimensions must be met for
safe use of your range. Electricity to the range can be
disconnected at the outlet without moving the range
if the outlet is in the preferred location (remove lower
drawer).
To reduce the risk of burns or fire when reaching over
hot surface elements, cabinet storage space above
the cooktop should be avoided. If cabinet storage
space is to be provided above the cooktop, the risk
can be reduced by installing a range hood that sticks
out at least 5" beyond the front of the cabinets.
Cabinets installed above a cooktop must be no deeper
than 13".
39
Page 40

Installation Instructions
PREPARETO INSTALL THE RANGE
MATERIALS YOU
TinSnips LagBolts
IFor Anti-Tip Bracket Mounted on Concrete Floors Only)
(UL-Approved 40 AMP)
/4-Wire Cord OR 3-Wire Cord Squeeze Connector
/4'Long /4'Long Installations Only)
MAY NEED
Anchor Sleeves
(For Conduit
TOOLS YOU WILL NEED
Drill with 1/8" Bit
Adjustable Wrench
Pliers
Safety Glasses
Tape Measure
Pencil
[_] PREPARE THE OPENING
Allow 1½" spacing from the range to adjacent
vertical walls above the cooktop surface.
Allow 30" minimum clearance between the
surface units and the bottom of unprotected
wood or metal top cabinet, and 15" minimum
between the countertop and adjacent cabinet
bottom.
EXCEPTION:Installation of a listed microwave
oven or cooking appliance over the cooktop
shall conform to the installation instructions
packed with that appliance.
If cabinet storage is installed, reduce the risk by
installing a range hood that projects horizontally
a min. of 5" beyond the bottom of the cabinets.
lake sure the wall covering, countertops and
cabinets around the range can withstand heat
generated by the range, oven or cooktop up
to 200°F.
'1
I I I /- Hood than the
/ .__ J_--_'_ ....... width of the
_ _i j_-_L.J _Min range
so" ls"_ _ _ -
Hin. Hin.-7 _v ....
I _X ......=- -->
_- / --_9/#, _he outlet box
J / _]_ _ within e"" ' ither shaded
Wall __
Not less
1/4" Nut Driver Level
Phillips Screwdriver
Flat-Blade Screwdriver
PARTS INCLUDED
Anti-Tip Bracket Kit
rl] REHOVE SHIPPING HATERIALS
Remove packaging materials. Failure to
remove packaging materials could result
in damage to the appliance.
7½" ,_
Install the
outlet box
on either
side of the CL
Flooring under the range
Your range, like many other household items,
is heavy and can settle into soft floor coverings
such as cushioned vinyl or carpeting.
When moving the range on this type of flooring,
it should be installed on a 1/4" thick sheet
of plywood (or similar material) as follows:
When the floor covering ends at the front
of the range, the area that the range will rest
on should be built up with plywood to the same
level or higher than the floor covering. This will
allow the range to be moved for cleaning or
servicing.
40
Page 41

Installation Instructions
ELECTRICAL CONNECTIONS
ELECTRICAL REQUIREMENTS
A CAUTION: Forpersonalsafety, do
not use an extension cord with this appliance.
Remove house fuse or open circuit breaker before
beginning installation.
This appliance must be supplied with the proper
voltage and frequency, and connected to an
individual properly grounded branch circuit,
protected by a circuit breaker or fuse having
amperage as specified on the rating plate. The
rating plate is located behind the oven drawer
on the oven frame.
Location of
model rating
plate
We recommend you have the electrical wiring
and hookup of your range connected by a qualified
electrician. After installation, have the electrician
show you where your main range disconnect
is located.
Check with your local utilities for electrical codes
which apply in your area. Failure to wire your oven
according to governing codes could result in a
hazardous condition. If there are no local codes,
your range must be wired and fused to meet
the requirements of the National Electrical Code,
ANSI/NFPA No. 70--Latest Edition. You can get
a copy by writing:
National Fire Protection Association
Batterymarch Park
Quincy, HA 02269
ALL NEW CONSTRUCTIONS,
MOBILE HOMES AND
INSTALLATIONS WHERE
LOCAL CODES DO NOT ALLOW
GROUNDING THROUGH
NEUTRAL
Use only a 3-conductor or a 4-conductor UL-listed
range cord. These cords may be provided with ring
terminals on wire and a strain relief device.
A range cord rated at 40 ampswith 125/250
minimum volt range is required. A 50-amp range
cord is not recommended but if used, it should
be marked for use with nominal lSA'' diameter
connection openings. Care should be taken
to center the cable and strain relief within
the knockout hole to keep the edge from
damaging the cable.
, Because range terminals are not accessible
after range is in position, flexible service conduit
or cord must be used.
NOTE: If conduit is being used, go to Step 3D and
then to Step 6 or 7.
. On some models, a filter capacitor may be
connected between the black and white leads
on the junction block.
Effective January i, 1996, the National Electrical
Code requires that new construction (not existing)
utilize a 4-conductor connection to an electric
range.
When installing an electric range in new
construction, follow Steps 3 and 5 for 8-wire
connection.
You must use a 3-wire, single-phase A.C. 208Y/120
Volt or 240/120 Volt, 60 Hertz electrical system. If
you connect to aluminum wiring, properly installed
connectors approved for use with aluminum wiring
must be used.
If the electrical service provided does not meet
the above specifications, have a licensed electrician
install an approved outlet.
41
Page 42

Installation Instructions
_] POWER CORD AND STRAIN RELIEF
INSTALLATION
Remove the wire cover (on the lower back
[]
of the range) by removing two (2) screws using
a 1/4" nut driver.
Do not discard these screws.
___ ...... _T .........................
2 screws to
remove wire
cover
Retaining
tab
E1
For power cord installations only
(see the next step if using conduit), assemble
the strain relief in the hole. Insert the power
cord through the strain relief and tighten.
Allow enough slack to easily attach the cord
terminals to the terminal block. If tabs are
present at the end of the winged strain relief,
they can be removed for better fit.
NOTE: Do not install the power cord
without a strain relief. The strain relief
bracket should be installed before
reinstalling the rear range wiring cover.
Terminal block
Back of range
Wire cover
Remove the knockout ring (lSA") located
B]
on bracket directly below the terminal block.
To remove the knockout, use a pair of pliers
to bend the knockout ring away from
the bracket and twist until ring is removed.
Terminal block
(appearance may
vary)
Knockout ring
in bracket
,o
Knockout ring
removed
Strain relief
Power cord Bracket
Skip to Step 4 or 5.
El
For conduit installations only, purchase a
squeeze connector matching the diameter of
your conduit and assemble it in the hole. Insert
the conduit through the squeeze connector and
tighten. Allow enough slack to easily attach the
wires to the terminal block.
NOTE: Do not install the conduit without a
squeeze connector. The squeeze connector
should be installed before reinstalling the rear
range wiring cover.
Squeeze
connector
Conduit
\
_- Terminal
block
Bracket
Skip to Step 6 or 7.
42
Page 43

Installation Instructions
ELECTRICAL CONNECTIONS (CONT.)
3-WIRE POWER CORD iNSTALLATiON
WARNING: The neutral or ground
wire of the power cord must be connected
to the neutral terminal located in the center
of the terminal block. The power leads must
be connected to the lower left and the lower
right terminals of the terminal block.
Remove the 3 lower terminal screws from
[]
the terminal block. Insert the 3 terminal screws
through each power cord terminal ring and
into the lower terminals of the terminal block.
Be certain that the center wire (white/neutral)
is connected to the center lower position of
the terminal block. Tighten screws securely
into the terminal block.
DO NOT remove the ground strap
connection.
/
block
____(appearance
may vary)
Ground plate
OUl
Neutral
terminal
Ground
strap
4-WIRE POWER CORD INSTALLATION
,A
WARNING:The neutral wire of the supply
circuit must be connected to the neutral
terminal located in the lower center of the
terminal block. The power leads must be
connected to the lower left and the lower right
terminals of the terminal block. The 4th
grounding lead must be connected to the frame
of the range with the ground plate and the
ground screw.
Remove the 3 lower terminal screws from the
D
terminal block. Remove the ground screw and
ground plate and retain them.
Cut and discard the ground strap.
DO NOT DISCARDANY SCREWS.
Insert the one ground screw into the power cord
ground wire terminal ring, through the ground
plate and into the frame of the range.
Insert the 3 terminal screws (removed earlier)
rsq
through each power cord terminal ring and into
the lower terminals of the terminal block. Be
certain that the center wire (white/neutral) is
connected to the center lower position of the
terminal block. Tighten screws securely into the
terminal block.
Before /A und strap
_4/--J
0
Power cord--------_
r_ Skip to step 8 and proceed with
the installation.
_rc_inalf _
Neutral
Ground strdp terminal
After
block
screw
r_ Skipto step 8 and proceed with the installation.
43
Neutral
terminal
Ground plate
(grounding
to ra_e)
Page 44

Installation Instructions
[]_] 3-WIRE CONDUIT INSTALLATION
Loosen the 3 lower terminal screws from
[]
the terminal block. Insert the center bare wire
(white/neutral) tip through the bottom center
terminal block opening. On certain models,
the wire will need to be inserted through
the ground strap opening and then into the
bottom center block opening. Insert the two side
bare wire tips into the lower left and the lower
right terminal block openings. Tighten the screws
until the wire is firmly secure (approximately
20 inch-lbsj.
NOTE: ALUMINUM WIRING:
Aluminum building wire may be used but it
must be rated for the correct amperage and
voltage to make connection. Connect wires
according to this Step 6 or Step 7 depending
on number of wires.
r_ 4-WIRE CONDUIT INSTALLATION
Loosen the three lower terminal screws from
the terminal block. Remove the ground screw
and ground plate and retain them. Cut and
discard the ground strap. DO NOT DISCARD
ANY SCREWS.
Insert the ground bare wire tip between the range
frame and the ground plate (removed earlier) and
secure it in place with the ground screw (removed
earlier). Insert the bare wire (white/neutral) tip
through the bottom center of the terminal block
opening. Insert the two side bare wire tips into
the lower left and the lower right terminal block
openings. Tighten the screws until the wire isfirmly
secure (approximately 20 inch-lbs.).
Before "S
Terminal_l;l_l_ _
block t_
Ground strap
After
!_X_u_ strap
terminal
°r1
Wire used, location end enclosure of splices,
etc., must conform to good wiring practices
and local codes.
r_ Skip to step 8 and proceed with the
installation.
block Ground plate
(grounding
Wire ti to range)
screw
Bracket
Wire used, location and enclosure of splices,
etc., must conform to good wiring practices
and local codes.
r_ Proceed to step 8.
44
Page 45

Installation Instructions
INSTALL THE RANGE
REPLACE THE WIRE COVER
Bq
Replace the wire cover on the range back by
sliding its right edge under the retaining tab
and replacing the two screws removed earlier.
Hake sure that no wires are pinched between the
cover and the range back.
2 screws
to replace
wire cover
X Back of range
[_ ANTI-TIP DEVICE INSTALLATION
| LEVEL THE RANGE
Install the oven racks in the oven and position
the range where it will be installed.
Check for levelness by
placing a spirit level or a
cup, partially filled with
water, on one of the oven
racks. If using a spirit level,
take two readings-with
the level placed diagonally
first in one direction and then the other.
E1 The rear leveling legs must be adjusted prior
to moving the range into position. They can
be adjusted from the bottom at the back
of the range.
Adjust from
the bottom
back of range
(warming
drawer models)
\
A child or adult can tip the range and be killed.
Tip-Over Hazard
Install the anti-tip bracket to the wall or floor.
Engage the range to the anti-tip bracket by sliding the
range back such that the foot is engaged.
Re-engage the anti-tip bracket if the range is moved.
Failure to do so can result in death or serious burns
to children or adults.
To reduce the risk of tipping the range, the range
must be secured by a properly installed anti-tip
bracket. See installation instructions shipped with the
bracket for complete details before attempting to
install.
To check if the bracket is installed and engaged
properly, look underneath the range to see that the
rear leveling leg is engaged in the bracket. On some
models, the storage drawer or kick panel can be
removed for easier inspection. If visual inspection
is not possible, slide the range forward, confirm the
anti-tip bracket is securely attached to the floor or
wall, and slide the range back so the leveling leg is
under the anti-tip bracket. If the range is pulled from
the wall for any reason, always repeat this procedure
to verify the range is properly secured by the anti-tip
bracket.
range
Back of range
El
Use an open-end or adjustable wrench to
adjust the leveling legs until the range is level.
D
Replace the drawer or panel.
El
After the range is level, slide the range away
from the wall so that the Anti-Tip device can be
installed.
q5
Page 46

Installation Instructions
IT_ FINAL INSTALLATION CHECKLIST
. Check to make sure the circuit breaker is closed
(RESET)or the circuit fuses are replaced.
. Be sure power is in service to the building.
, Note Ion some models): If the clock flashes
"bAd" and then "LinE" with a loud tone, the
neutral connection to the range is not wired
correctly. Check the terminal block connections
and/or house wiring to correct.
. Check to be sure that all packing materials
and tape have been removed. This will include
tape on metal panel under control knobs
(if applicable), adhesive tape, wire ties, cardboard
and protective plastic. Failure to remove these
materials could result in damage to the appliance
once the appliance has been turned on and
surfaces have heated.
. Check to make sure that the rear leveling leg
is fully inserted into the Anti-Tip bracket and
that the bracket is securely installed.
OPERATION CHECKLIST
Turn on one of the surface units to observe that
the element glows within 60 seconds. Turn the
unit off when glow is detected. If the glow is not
detected within the time limit, recheck the range
wiring connections. If change is required, retest
again. If no change is required, have building
wiring checked for proper connections and
voltage.
Check to make sure the Clock (on models
so equipped) display is energized. If a series
of horizontal red lines appear in the display,
disconnect power immediately. Recheck the
range wiring connections. If change is made
to connections, retest again. If no change is
required, have building wiring checked for proper
connections and voltage. It is recommended that
the clock be changed if the red lines appear.
Be sure all range controls are in the OFF position
before leaving the range.
46
Page 47

Troubleshooting tips. GEAppliances.com
Passible Causes What To Do
Surface units will not
maintain a rolling boil
or cooking isnot
fast enough
Surface units do not Cooktop controls
work properly improperly set.
Scratches (may appear
as cracks) on cooktop
glass surface
Areas of discoloration Food spillovers not cleaned • See the Cleaning the glass cooktop section.
on the cooktop before next use.
Improper cookwore
being used.
A fuse in your home may be _ Replace the fuse or reset the circuit breaker.
blown or the circuit breaker
tripped.
Incorrect cleaning
methods being used.
Cookwore with rough bottoms
being used or coarse particles
(salt or sondl were between
the cookwore and the surface
of the cooktop.
Cookware has been slid
across the cooktop surface.
Hot surface on o model . This is normal. The surface may appear discolored
with o light colored glass when it is hot. This is temporary and will disappear
cooktop, as the glass cools.
. Use pans which are flat and match the diameter
of the surface unit selected.
Checkto seethe correct control is set for the surface
unit you are using.
. Scratches are not removable. Tiny scratches will become
lessvisible intime as a result of cleaning.
. To avoid scratches, usethe recommended cleaning
procedures. Make sure bottoms of cookware are clean
before use,and use cookware with smooth bottoms.
Plastic melted to Hot cooktop come into . See the Glass surface potential for permanent damage
the surface contact with plastic placed section in the Cleaning the glass cooktop section.
on the hot cooktop.
Pitting (or indentation} Hot sugar mixture spilled , Call a qualified technician for replacement.
of the cooktop on the cooktop.
Frequent cycling Improper cookware , Useonly flat cookware to minimize cycling.
offend on of being used.
surface units
Control signals offer You forgot to enter , Pressthe BAKE pad and desired temperature
entering cooking time e bake temperature or the SELFCLEANpad and desired clean time.
or delay start or cleaning time.
Food does not bake Oven controls improperly set. • See the Using the upper oven section,
or roast properly Rack position is incorrect • See the Using the upper oven section.
or the rock is not level.
Incorrect cookwore or • See the Using the upper oven section.
cookwore of improper
size being used.
Oven thermostat needs . See the Adjust the oven thermostat-Do ityourself/
adjustment, section.
"Close Door" scrolls The display will always
in the display when automatically remind you to
BROIL is set close the door.
, This is a normal reminder to close the door when
broiling.
47
Page 48

Troubleshooting tips.
Possible Causes What To Do
Fooddoes not Ovencontrols improperly set. . Hake sureyou touch the BROILHI/LO pad.
broil properly
in the upper oven Oven door not closed. • Seethe Using the upperovensection.
Improper rack position • Seethe Broiling Guide.
being used.
Food being cooked in • Forbest results,usee pen designedfor broiling.
a hot pan. Make sure it is cool.
Cookware not suited • Forbest results,usea pan designedfor broiling.
for broiling.
Oven bottom not securely , Seethe Installation Instructions.
seated in position.
Upper oven temperature Oven thermostat . SeetheAdjust the oven thermostat Doityourselfi
too hot or too cold needs adjustment, section.
Clock and timer Plugon range isnot completely . Hake sure electrical plug isplugged into a live,
do not work inserted in the electrical outlet, properly grounded outlet.
A fuse in your home may be • Replacethe fuse or reset the circuit breaker.
blown or the circuit breaker
tripped.
Oven controls improperly set. . Seethe Using the clock and timer section.
Upper oven light Light bulb is loose or defective. . Tighten or replacethe bulb.
does not work
Upper oven will not_ The oventemperature is too , Allow the range to cool to room temperature and
self-clean high to set a self-clean operation, reset the controls.
"Crackling" or This is the sound of the , Thisisnormal.
"popping" sound metal heating and cooling
Excessivesmoking Excessivesoil. , Touchthe CLEAR/OFFpad. Openthe windows to rid the
Oven door will not open Oven too hot. . Allowthe oven to cool below locking temperature.
after a clean cycle
Oven not clean after Oven controls not properly set. • Seethe Usingthe self-cleaningupper oven section.
a clean cycle Oven was heavily soiled. , Cleanup heavyspilloversbefore starting the clean cycle.
"LOCKDOOR"flashes The self-clean cycle has been • Closethe oven door.
in the display selected but the door is not closed.
Plug on range is not completely . Hake sure electrical plug isplugged into a live,
inserted in the electrical outlet, properly grounded outlet.
Oven controls improperly set. , Seethe Using theself-cleaning upper oven section.
during both the cooking
and cleaning functions.
room of smoke.Wait untilthe LOCKEDDOOR light goes off.
Wipe up the excesssoiland reset the clean cycle.
Heavilysoiled ovens may need to self-clean again or
for a longer period of time.
LOCKEDDOORlight The oven door is locked . Touch the CLEAR/OFFpad.Allow the oven to cool.
is on when you want because the temperature
to cook inside the oven has not
dropped below the locking
48
temperature.
Page 49

GEAppliances.com
Possible Causes What To Do
"F--" and a number or You have a function error code. , Touch the CLEAR/OFFpad.Allow the oven to coolfor
letter flash in the display one hour. Putthe oven buck into operation.
If the function code repeats. . Disconnect all power to the range for 5 minutes
and then reconnect power. Ifthe function error code
repeats,cull for service.
"Probe" appears in This isreminding you to enter . Enteru probe temperature.
the display a probe temperature after
plugging in the probe.
_nsplaygoes blank A fuse in your home may be • Replace the fuse or reset the circuit breaker.
blown or the circuit breaker
tripped.
The clock is in the . See the Special features ofyour upper oven control section.
black-out mode.
Display flashes Power failure. . Reset the clock.
Unable to get the Oven control pads were . The BAKE and BROIL HI/LO pads must be touched at
display to show "SF" not pressed properly, the same time and held for 3 seconds.
Power outage, Power outage or surge. . Reset the clock. Ifthe oven was in use, you must reset
clock flushes it by touching the CLEAR/OFFpad, setting the clock
and resetting any cooking function.
Burning or only This isnormal in a new oven . To speed the process,set u self-clean cycle for a
odor emitting from and will disappear in time. minimum of 3 hours. Seethe Using theself-cleaning
the vent upper oven section.
Strong odor An odor from the insulation . Thisistemporary.
around the inside of the oven
is normal for the first few times
the oven is used.
LOCappears in The Range Lockout feature . Besure the surface unit controls are turned OFF.
the display is activated. Turnthis feature off to use the range.
Seethe RangeLockoutsection.
Fun noise The convection fun may turn . This is normal. To maximize cooking evenness,
on and offuutomuticully, the fan is designed to operate in both directions
with a pause in between.
Convection fan Preheat temperature . Fanwill start automatically once the preheat
not working not reached, temperature isreached.
Drawer does not slide Thedrawer is out of alignment. • Fullyextend the drawer and push it all the way in.
smoothly or drugs Seethe Coreand cleaning of therange section.
Drawer is overloaded or loud . Reduceweight. Redistributedrawer contents.
is unbalanced.
Lower oven drawer A fuse in your home may be • Replacethe fuse or reset the circuit breaker.
will not work blown or the circuit breaker tripped.
The upper oven is self-cleaning. • Wait for the self-cleancycle to finish and the oven
to cool.
Controls improperly set. . Seethe Lower ovendrawer section.
Excessivecondensation Liquid in drawer. • Removeliquid.
in the drawer
Uncovered foods. . Cover food with lidor aluminum foil.
Temperature setting too high. . Reduce temperature setting.
Food dries out in the Moisture escaping. • Coverfood with lidor aluminum foil.
lower oven drawer
Oven drawer not fully closed. . Pushdrawer in until latch engages. 49
Page 50

Notes.
50
Page 51

Notes. GEAppliances.com
$1
Page 52

Notes.
52
Page 53

Accessories.
Looking For Something More? (Not all accessories are available for all models.)
You can find these accessories and many more at GEAppliances.com (U.S.)
or www.GEAppliances.ca (Canada), or call 800.626.2002 (U.S.)or 800.661.1616 (Canada)
(during normal business hours). Have your model number ready.
Grates Surface Burner Heads and Caps Surface Elements and Drip Knobs
Oven Rocks Oven Elements Light Bulbs
Pans
Experience these other great products to keep your kitchen looking greafl
_,,,,,o,_,,i,_ Ceramic Cooktop Ceramic Cooktop Stainless Steel
Includes cleaner, Wipes
scraper and pad
IZ::q E Cleaning Kit: Cleaning Wipes Appliance Polish
WX10Xll7GCS WX10XS05 WX10X10001
Appliance
Cleaner
Stainless Steel
PMlOX511
Get the most out of your Broiler Pan! (Not for use with Broiler Drawer models.)
Useyour pan and grid cover to broil hamburgers, seafood, steaks,vegetables, bacon,chops and so much
more! The pan below catches the excessfats and oils.
. Genuine GEPart
EasyTo Clean
One-YearWarranty
Limited Time Offe!! Free Shipping!
When you order your broiler pan within 30 days of purchasing your GEcooking product.
Small Large*
U.S.Part # WB¢8X10055 WB¢8X10056
Dimensions 8-3/4" Wx 1-1/4" H x 13-1/2" D
12-3/4"Wxl-1/¢"Hxld-1/2"D 17"Wxl-1/4"Hx19-1/4"D
XL**
WB 48X1005 7
* Thelarge (standard)broil pan does not fit in 20"/24" ranges.
** TheXLpan does not fit in 24" wall ovens,27" drop-ins or 20"/24" ranges.
Toplaceyour order, call 800.626.2002 (U.S.),800.661.1616 (Canada)or mail this form to:
In the U.S.:GEPorts,P.O.Box221027, Memphis, TN38122-1027. In Canada: GEPorts,1 Factory Lone,Moncton, N.B.E1C9M3
Quantity
Model Number Serial Number Brand Date of Purchase
First Name Last Name
Address
City State Zip Code
Phone E-Mail
Check __ Money Order
Call 800.626.2002 in the U.S. or 800.661.6161 in Canada for current pricing. All credit card orders must be called in.
Broiler Pan Order Form
Part Number
53
Page 54

GE Electric Range Warranty. cForcustomersintheUnitedStotesl
All warranty service provided by our Factory Service Centers,
or an authorized Customer Care ®technician. To schedule
service, visit us on-line at GEAppliances.com, or call 800.
GE.CARES(800.432.2737). Please have serial number
and model number available when calling for service.
GE Will Replace:
One Veer
From the date of the
original purchase
Five Veers
From the date of the
original purchase
Service trips to your home to teach you how to use
the product.
Improper installation, delivery or maintenance.
Product damage or failure of the product if it is abused,
misused, modified, used for other than the intended
purpose, or used commercially.
Damage to the glass cooktop caused by hardened
spills of sugary materials or melted plastic that
are not cleaned according to the directions in
the Owner's Manual.
Any pert of the range which fails dueto a defect inmaterials or workmanship. During this
limited one:veer warranty, GEwill alsoprovide, free of charge, alllabor and in-home service
to replacethe defective part.
A replacement glass cooktopifit should: crack due to thermal shock; discolor; crack at the
rubber seal between the glass cooktop and the porcelain edge, or ifthe pattern wears off.
Areplacement radiant surface unit ifitshould burn out.
During this limited additional four-year warranty, you will be responsible for any labor or
in-home service.
Staple your receipt here.
Proof of the original purchase
date is needed to obtain service
under the warranty.
Damage to the glass cooktop caused by use of cleaners
other than the recommended cleaning creams.
Replacement of house fuses or resetting of circuit breakers.
Damage to the product caused by accident, fire, floods
or acts of God.
Incidental or consequential damage caused by possible
defects with this appliance.
Damage caused after delivery.
Product not accessible to provide required service.
EXCLUSION OF IMPLIED WARRANTIES--Your sole end exclusive remedy is product repair us provided in this Limited
Warranty. Any implied warranties, including the implied warranties of merchantability or fitness for a particular purpose,
ore limited to one year or the shortest period allowed by low.
This warranty is extended to the original purchaser and any succeeding owner for products purchased for home use
within the USA. If the product is located in an area where service by a GE Authorized Servicer is not available, you may
be responsible for a trip charge or you may be required to bring the product to an Authorized GE Service location for
service. In Alaska, the warranty excludes the cost of shipping or service calls to your home.
Some states do not allow the exclusion or limitation of incidental or consequential damages. This warranty gives
you specific legal rights, and you may also have other rights which vary from state to state. To know what your
legal rights are, consult your local or state consumer affairs office or your state's Attorney General.
Wurrunton General Electric Company. Louisville, KY 40225
54
Page 55

GE Electric Range Warranty. Forcu tomer inCanada
All warranty service provided by our Factory Service Centres
or an authorized Customer Care®technician. To schedule
service, visit us on-line at www.GEAppliances.ca, or call
1.800.561.3344. Please have serial number and model
number available when calling for service.
Staple your receipt here.
Proof of the original purchase
date is needed to obtain service
under the warranty.
Mabe Will Replace:
One Year Any part of the range which fails due to a defect in materials or workmanship. During this
From the date of the limited one-year warranty, Mabe willalso provide, free of charge, all labor and in-home service
original purchase to replace the defective part.
Five Years
From the date of the
original purchase
Service trips to your home to teach you how to use
the product.
Improper installation, delivery or maintenance.
Product damage or failure of the product if it is abused,
misused, modified, used for other then the intended
purpose, or used commercially.
Damage to the glass cooktop caused by hardened
spills of sugary materials or melted plastic that
are not cleaned according to the directions in the
Owners Manual.
A replacement glass cooktop ifit should: crack due to thermal shock; discolor; crack at the
rubber seal between the glass cooktop and the porcelain edge, or ifthe pattern wears off.
A replacement radiant surface unit ifit should burn out.
During this limited additional four-year warranty, you will be responsible for any labor or
in-home service.
Damage to the glass cooktop caused by use of cleaners
other than the recommended cleaning creams.
Replacement of house fuses or resetting of circuit breakers.
Damage to the product caused by occident, fire, floods
or acts of God.
Incidental or consequential damage caused by _ossible
defects with this appliance.
Damage caused after delivery.
Product not accessible to provide required service.
EXCLUSIONOFIMPLIEDWARRANTIES--Yoursole and exclusive remedy is product repair us provided in this Limited
Warranty. Any implied warranties, including the implied warranties of merchantability or fitness for u particular
purpose, are limited to one year or the shortest period allowed by law.
This warranty is extended to the original purchaser and any succeeding owner for products purchased in Canada
for home use within Canada. In-home warranty service will be provided in areas where it is available and deemed
reasonable by Mabe to provide.
Some provinces do not allow the exclusion or limitation of incidental or consequential damages, so the above
exclusion may not apply to you. This warranty gives you specific legal rights, and you may also have other rights
which vary from province to province. To know what your legal rights are in your province, consult your local or
provincial consumer affairs office.
Warranton Mabe Canada inc.,
Burlington, Ontario
55
Page 56

Consumer Support.
GEAppliances Website Inthe U.S.:GEAppliances.com
Have a question or need assistance with your appliance?Try the GEAppliancesWebsite 24 hours a day, any day
of the year! For greater convenience and faster service,you can now download Owner's Hanuals, order parts or even
schedule service on-line. In Canada: www.GEAppliances.ca
Schedule Service Inthe U.S.:GEApplionces.com
Expert GErepair service is only one step away from your door. Get on-line and schedule your service at your
convenience any day of the year! Or call 800.GECARES (800.432.2737) during normal business hours.
In Canada, call :1.800.58:1.3344
RealLifeDesignStudio Inthe U.S.:GEAppliances.com
GEsupports the Universal Designconcept-products, servicesand environments that can be used by people of
all ages, sizesand capabilities.We recognize the needto design for a wide range of physical and mental abilities
and impairments. For details of GE'sUniversalDesignapplications, including kitchen design ideas for people with
disabilities,check out our Website today. Forthe hearing impaired, pleasecall 800.TDD.GEAC(800.833.4322).
In Canada,contact: Manager, Consumer Relations,ivlabeCanada Inc.
Suite310, ! Factory Lane
Honcton, N.B.EIC 9M3
Extended Warranties
Purchase a GEextended warranty and learn about special discounts that are available while your warranty isstill
in effect. Youcan purchase it on-line anytime, or call 800.626.2224during normal businesshours.GEConsumer Home
Serviceswill still be there after your warranty expires.In Canada, call :1.888.26:1.2:133
Partsand Accessories
Individuals qualified to servicetheir own appliances can have parts or accessoriessent directly to their homes
(VISA,HasterCard and Discovercards are accepted).Order on-line today, 24 hours every day or by phone at
800.626.2002during normal business hours.
Instructions contained in this manual cover procedures to be performed by any user. Other servicing generally should be
referred to qualified service personnel Caution must be exercised, since improper servicing may cause unsafe operation.
Customers in Canada should consult the yellow pages for the nearest Mabe service center, or call 1.800.661.1616.
Contact Us
If you are not satisfied with the serviceyou receivefrom GE,contact uson our Website with all the details including
your phone number, or write to: General Manager, Customer Relations
GEAppliances,Appliance Park
Louisville,KY40225
In Canada: www.GEAppliances.ca, or write to: Director, Consumer Relations,IVlabeCanada Inc.
Suite310, :1FactoryLane
Moncton, N.B.EIC 9M3
Inthe U.S.:GEAppliances.com
Inthe U.S.:GEAppliances.com
Inthe U.S.:GEAppliances.com
Register your new appliance on-line--at your convenience! Timely product registration willallow for enhanced
communication and prompt service under the terms of your warranty, should the need arise. You may also mail
l Register Your Appliance Inthe U.S.:GEAppliances.com
in the pre-printed registration card included inthe packing material. In Canada: www.GEAppliances.ca
Printed in Mexico
This book is printed on recycled paper.
Page 57

GEAppliances.com
@!
wo
Instrucciones de
Seguridad ............... 2-5
Instrucciones de
Funcionamiento
Temporizador de la Cocina ... 19
Homo ..................... 12-31
Ajuste del Termostato
del Homo ................. 20
Homeado o Dorado ............ 15
Asado, Guia para Asar .......... 16
Controles......................... 12
Homo de Convecci6n....... 21-24
caj6n Inferior del Homo ........ 31
Precalentamiento ............... 15
Sonda ............................ 18
Modo Sab@ico.................. 28
Auto Limpieza ............... 29,30
Funciones Especiales....... 25-27
Homeado o Asado por Tiempo 17
Unidades de la Superficie...6-11
Utensilio ...................... 7
Plancha .......................... 10
0
Modos Controlados
con Perillas................... 8,9
Instrucciones de
Insta laci6n ............. 39-46
Dispositivo Anti-Volcaduras39, 45
Dimensiones y Despeje ....... 40
Conexiones El#ctricas ...... 41-44
Nivelaci6n de la Cocina ....... 45
Pautas de Ubicaci6n .......... 40
Instrucciones de Seguridad...39
Consejos para solucionar
Problemas .............. 47-49
Accessorios .................. 5s
Soporte al Cliente
Soporte al Cliente ... Contratapa
Garantia para Clientes en
Canad6 .................... 55
Garantia para Clientes
en EE.UU.................... 54
En Canadd:
www. GEAppliances.ca
Cuidado y Limpiezu
Perillas de Control ............. 32
Panel de Control .............. 32
0
Cocina de Vidrio ........... 37, 38
Levante la Puerta
del Homo .............. 33, 34
Luz ............................ 36
Elementos de Calentamiento del
Homo ...................... 36
Estantes ....................... 34
Caj6n de Calentamiento
Extraible/Olla del Cal6n del
Homo Inferior .............. 35
Superficies .................... 32
Escriba los nhmeros de modelo y de serie aqu[:
Modelo #
Serie #
Puede encontrarlos en una etiqueta ubicada
detrc_s del caj6n o detrc_s de la puerta del homo
inferior en el frente del marco de la cocina.
@
Impreso en
papel reciclado
49-88050 01-12 GE
Page 58

INFORMACiON IMPORTANTE DE SEGURIDAD.
LEA TODASLAS INSTRUCCIONESANTESDE SU USO.
jAADVERTENCIAj
Leo todas los instrucciones de seguridad antes de utilizar este producto. No seguir estas instmcciones puede generor un
incendio, una descarga eldctrica, lesiones corporales o la muerte.
DISPOSITIVOANTI-VOLCADURAS
A fin dereducir el riesgode
caidade la cocina,6sta deber6
Un niSo o aduJto pueden volcar la cocina y morir.
Verifique que el soporte anti-volcaduras haya sido
instalado y ajustado de forma adecuada.
AsegSrese de que el soporte anti-volcaduras vuelva a
set ajustado cuando se mueva la cocina.
No utilice la cocina sin que el soporte anti-volcaduras
est_ ubicado y ajustado.
Si esto no se hate, se podr6 produar la muerte
o quemaduras graves en niffos o adultos.
Soporte Anti-
Volcadura_
Pata
Niveladora
Cocinas Sin Apoyo y Deslizables
Base o Bloque de
Madera Negra
Soporte----_- i
Anti-Volcaduras
Homo
Cocinas Empotrables
Riescjo de Caida
Para controlar si el soporte es instalado y ajustado de forma apropiada,
mire que debajo de la cocina la pata niveladora trasera est6 ajustada al
soporte. En algunos modelos, el caj6n de almacenamiento o el panel de
protecci6n se pueden retirar para una f6cil inspecci6n. Si no es posible
realizar una inspecci6n visual, deslice la cocina hacia adelante, confirme
que el soporte anti-volcaduras est6 ajustado de forma segura al piso o
la pared, y deslice la cocina hacia atr6s de modo que la pata niveladora
trasera se encuentre debajo del soporte anti-volcaduras.
En caso de que la cocina sea empujada de la pared par alguna raz6n,
siempre repita este procedimiento para verificar que la cocina est6
correctamente asegurada par el soporte anti-volcaduras.
Nunca retire completamente las paras niveladoras, ya que la cocina no
estar6 asegurada de forma adecuada al dispositivo anti-volcaduras.
Para Cocinas Empotrables
PARAcontrolar si el soporte est6 instalado y ajustado correctamente,
deslice la cocina hacia adelante, confirme que el soporte anti-volcaduras
est6 ajustado de forma segura a la parte trasera de la cocina, y deslice
esta Oltima hacia atr6s de modo que el soporte anti-volcaduras se deslice
par debajo del mostrador o bloque de madera adherido a la pared trasera.
Si no recibi6 un soporte anti-volcaduras con su compra, Ilame al
1.800.561.33/4/4.Para acceder a instrucciones sabre el soporte, visite www.
GEAppliances.ca.
estarasegurada par un soporte
anti-volcaduras correctamente
instalado.Consultelas instrucciones
deinstalaci6n provistas conel
soporte,para acceder a detalles
completos antes de intentar realizar
la instalaci6n.
Para Cocina Sin Apoyo y
Deslizables
i ADVERTENCIA j
La ley de California sabre aguas potablesy t6xicos exige que el Gobemador de Californiapublique una Iistade sustanciasquesegOn
el estadoprovoquen cdncer,defectos congdnitosu otros dahos reproductivos,y exigealas empresasque adviertan a los clientes
sabrela exposici6npotencial adichassustancias.
La aislaci6n de fibra de vidriode los boreas auto-limpiantes emite una pequeha cantidad de mon6xido de carbono durante
el ciclo de limpieza.La exposici6npuede minimizarseventilando con una ventana abierta o usandouna campana o ventilador.
NOTIFICACId}NIMPORTANTEDE5EGURIDAD
Page 59

GEAppliances.com
[AADVERTENCIAj
Useesteaparatos61oconel objetivopara elque fue creado,
coma se describeen esteManualdelPropietario.
Aseg0resede queun t6cnico calificado realiceuna correcta
instalaci6ny puestaa tierra del artefacto de acuerdocon las
instruccionesdeinstalaci6nprovistas.
Nointente repararo cambiar ningunapiezade su cocina
a menosque est6espedficamenterecomendadoeneste
manual.Cualquierotroserviciodeberealizarloun t6cnico
calificado.
Antesde realizarcualquier clasede reparaci6n,desenchufela
cocinao desconecteelsuministroel6ctricodesdeel panelde
distribuci6ndom6sticoquitandoel fusibleo desconectandoel
interruptor de circuitos.
Nodejea losninossolos;6stosno debenquedar soloso sin
atenci6nen un6rea dondeun aparato est6en usa.Nunca
debe permitirseque se suban,sienteno paren encualquier
parte deesteaparato.
INSTRUCCIONE5GENERALE5DESEGURIDAD
,,,,,PRECAUCION:No almaceneelementosde inter6s
para ninos sabre unacocinao enla protecci6ntraserade
una cocina:losninosquesetrepana lacocina paraalcanzar
elementospuedenresultargravementeheridos.
S61ouseagarraderassecas:lasagarraderashOmedaso
mojadascolocadasen superficiescalientespuedenprovocar
quemadurasde vapor.No permitaque lasagarraderasentren
en contacto conunidadesde superficieo loselementos
calentadorescalientes.No utilicetoallas u otrastelas gruesas
en lugar deuna agarradera.
Nuncausesuelectrodom6sticopara calentar la habitaci6n.
Notoque lasunidadesde superficie,loselementos
calentadoreso la superficieinteriordelhomo.Estassuperficies
puedenestar Iosuficientementecalientespara quemara0n
cuandotengan un color oscuro.Durantey despu6sdel usa,no
toqueo dejeque su vestimenta u otros materialesinflamables
entrenen contacto conunidadesde superficie,6reas cercanas
alas unidadesde superficieo cualquier6rea interiordel homo;
dejepasarun tiempoprudencialparaque seenfrfen.Otras
superficiesdelaparato puedencalentarseIosuficientecoma
para provocarquemaduras.Lassuperficiespotencialmente
calientesincluyenla estufa,las 6reasorientadas hacia la
estufa,la aberturadeventilaci6n delhomo, lassuperficies
cercanasa laaberturay lashendidurasubicadasalrededorde
la puerta del homo.
Nocalienterecipientescerradosde alimentos.Podrfahaber
una acumulaci6n de presi6nenel recipientey 6stepodrfa
explotar,provocandolesiones.
Noutilicepapelde aluminiopararevestirlasbandejascolectoras
o ningunapartedelhomo,conexcepci6ndeIodescriptoeneste
manual.Unusainadecuadopuedeprovocardar_osa lacocinay
una descargael6ctricao un riesgodeincendio.
Tratede norayaro golpearlaspuertas,estufaso paneles
de control devidrio.SiIohacepodrfaromperseelvidrio.No
cocinesiun productotieneunvidrio rata.Puedeprovocarse
una descarga,un incendioo heridas.
Cocinecarnesde resy de avepar completo:Lascarnesde
reshastaalcanzar unatemperatura internade par Io menos
Z60°F(71°C)y lascarnesde avea una temperatura internade
par Io menos 180°F(82°C).Lacocci6na estastemperaturas
generalmenteprotegedeenfermedadestransmitidaspar los
alimentos.
Nouse papelde aluminio para cubrircubetasde goteoo
cualquierpartedel homo,exceptocoma sedescribeen
estemanual.Elpapelde aluminio puedeatrapar elcaloro
derretirse,ocasionandodahossabreel productoy elriesgode
incendio.
j, ADVERTENCIA
:: No almacene o utilice materiales inflamables dentro de un homo
ocerca de la estufa, tales coma papel,plcistico,agarraderas, telas,
recubrimientos de pared, cortinas y gasolina u otros vapores y
Ifquidosinflamables.
:: Nunca use vestimentas holgadas o amplias mientras utilice el
aparato. Estasvestimentas pueden prenderse fuego si entran en
contacto con superficies calientes, provocando quemaduras graves.
[,AADVERTENCIA
:: Noutiliceaguaenincendiosdegrasa.Nuncalevanteunasart6nen
llamas.Apagueloscontroles.Apagueunasart6nenllamassabre
unaunidaddesuperficiecubriendola sart6nparcompletocon
unatapaqueajustebien,una planchaparagalletaso unabandeja
plana.Utiliceunquimicosecomultiusoo unextintordeincendiosde
espuma.
:_Sihayun incendioenel homoduranteelhorneado,apciguelo
cerrandolapuertadelhomoyapagandoelcontrolo usandoun
j EN CASO DE INCENDIO, SIGA LOS
J-SIGUIENTES PASOS PARA EVITAR
IAMANTENGALOS MATERIALES INFLAMABLES
LEJADOS DE LA COCINA.
:: Nopermitaquelagrasadela cocci6nuotrosmateriales
inflamablesseacumulendentrode lacocinao ensucercania.La
grasadentrodelhomoo sabrelaestufapuedeencenderse.
:_ Limpielascampanasdeventilaci6nconfrecuencia.Nodebe
permitirselaacumulaci6ndegrasaenlacampanao enelfiltro.
LA PROPAGACION DEL FUEGO:
qu[micosecomultiusoo un extintordeincendiosdeespuma.
Sihayun incendioenelhomodurantelaauto-limpieza,@agueel
homoy esperea queelincendioseconsuma.Noabralapuerta
delhomoa lafuerza.Elingresodeairefrescoatemperaturasde
auto-limpiezapuedeprovocarunaexplosi6ndellamasdesdeel
homo.Noseguirestainstrucci6npuedeprovocarquemaduras
graves. ]
Page 60

INFORMACi6N Ih/IPORTANTEDESEGURIDAD.
LEA TODASLAS INSTRUCCIONESANTESDE SU USO.
I, ADVERTENCIA j
Nunca deje lasunidades de superficie sinatenci6n
en configuraciones de calor media o alta. Los alimentos que
hierveny sederraman pueden provocar humo y derrames
grasososque pueden prendersefuego.
Nunca deje aceite sin atenci6n mientras frie. Sisedeja
calentar m6s all6 del punto de humeo, el aceite puede
encenderse,provocando un incendio que podria propagarse
a los gabinetes cercanos. Utilice un term6metro para grasa
cuando sea posiblepara controlar la temperatura del aceite.
Paraevitar elderrame de aceitey un incendio,utilice una
cantidad minima de aceite cuando fria en sartenes poco
profundas y evite la cocci6n de alimentos congelados con
una cantidad excesiva de hielo.
Utiliceel tamaBo de recipiente adecuado: Elijarecipientes
con bases planas Io suficientemente grandes para cubrir
elelemento calentador de supeflicie. La utilizaci6n de
recipientesm6s pequeBos dejar6 expuesta una porci6n de
la unidad de superficie al contacto directo, Io que puede
provocar el encendido de sus vestimentas. Una relaci6n
adecuada del recipiente con la unidad de superficie tambi6n
mejorar6 la eficiencia.
[AADVERTENCIAl
INSTRUCCIONESDESEGURIDADDELAESTUFA
INSTRUCCIONESDE SEGURIDAD DE LA
$61ociertos tipos de recipientes de vidrio,vidrio/cer6mico,
cer6mica, u otros recipientes vidriados pueden utilizarse
sobre la estufa; otros pueden romperse debido al cambio
repentino de temperatura.
Paraminimizar la posibilidad dequemaduras, el encendido
de materiales inflamables y los derrames, la manija de los
recipientes deben girarse hacia elcentro de la cocina sin
extenderse sobre ninguna unidad de superficie cercana.
Siflambea alimentos bajo la campana, encienda
el ventilador.
Siseproduce un corte de corriente en una cocina el6ctrica
mientras la unidad de la superficie est6 en ON(Encendido),
la unidad sevolver6 a encender cuando regresela corriente.
Encaso de falta de corriente,si no se giran todas las perillas
de la unidad de la superficie a la posici6n OFF(Apagado)se
podr6n incendiar articulos en o cerca de la cocina, Iocual
podr6 producir lesionesgraves o la muerte.
ESTUFARADIANTE (algunos modelos)
Tenga cuidado al tocar la estufa. Lasuperficie de vidrio de la
estufa retendr6 calor despu6s de que los controles se hayan
apagado.
Nococine sobre una estufa rota. Sila estufa se rompe,
lassolucionesde limpiezay losderrames pueden penetrar
en la estufa rota y crear un riesgo de descarga el6ctrica.
Comuniquesecon un t6cnico calificado de inmediato.
Eviterayar la estufa devidrio. Laestufa puede rayarsecon
elementos tales como cuchillos, instrumentos filosos,anillos u
otrasjoyas, y remaches de laropa.
Nocoloque o almacene elementos que pueden derretirse o
prendersefuego sobre la estufa de vidrio, a0n cuando no la
est6 usando. Sila estufa se enciendeen forma accidental,
pueden prenderse fuego. Elcalor proveniente de la estufa o
de la ventilaci6n del homo tambi6n puede prenderlos fuego,
a0n si el aparato est6 apagado.
{, ADVERTENCIA
I INSTRUCCIONESDESEGURIDAD DE LA
ESTUFADE BOBINAS (algunos modelos)
Nosumerja o remoje lasunidades de superficie
desmontables. Nolascoloque en el lavavajillas. No coloque
lasunidades de superficie dentro del homo cuando realice la
auto-limpieza. SiIo hace pueden Ilegar a fallar, provocando
un peligro de quemaduras o de incendio.
Paraevitar laposibilidadde unaquemadura o descarga
el6ctrica,siempre verifiqueque loscontroles detodas
Useel limpiador deestufas cer6micasCERAIVlABRYTE®
y la esponjilla de limpieza CERAIVlABRYTE®para limpiar
la estufa. Esperehasta que la estufa se enfr[ey la luz
indicadora se apague antes de limpiar. Una esponja
o un paho h0medos sobre una superficie caliente pueden
provocar quemaduras de vapor. Algunos limpiadores pueden
producir humos t6xicos sise losaplica a una superficie
caliente.NOTA:Los derrames de az0car son la excepci6n.
Estosdeben quitarse mientras est6n calientes utilizando una
agarradera y un raspador. Parainstrucciones detalladas, vet
la secci6n C6mo limpiar la estufa de vidrio.
Leay cumpla contodas lasinstruccionesy advertencias dela
etiqueta de la crema de limpieza.
lasunidadesde superficieseencuentren en la posici6nOFF
(apagado)y quetodas lasbobinasest6n if[as antes
de levantar o quitar una unidad de superficiede bobinas.
Aseg0rese de que las bandejas colectoras no est6n cubiertas
y se encuentren en su lugar.Su ausencia durante la cocci6n
podria da_ar las piezasy el cableado de la cocina.
Page 61

GEAppliances.com
[AADVERTENaAi
Mant6ngase alejado de la cocina cuando abra
la puerta del homo. Elairey elvapor calientes que salen de la
cocina pueden provocar quemaduras en manos, rostro y/o
OJOS.
iVlantengasin obstrucciones la ventilaci6n del homo.
ivlantenga el homo libre de acumulaciones de grasa.
Lagrasa dentro del homo puedeprenderse fuego.
Siemprecoloque lus bandejasdel horno en la posici6n
deseada mientras el homo est_ frb. Sila bandeja debe
quitarse cuando el homo todav[a est(_caliente,no permita
que la agarradera toque el elemento calentador del horno.
[AADVERTENaAi
INSTRUCCIONESDESEGURIDADDELHORNO
Cuando utilice bolsas de cocci6n o de asado en el homo, siga
las instruccionesdel fabricante.
Tirede la bandeja del horno hasta la posici6n de tope
de detenci6n cuando cargue o descargue alimentos del
horno. Estoayuda a evitar quemaduras portocar superficies
calientes de la puerta y las paredesdel homo.
Nodeje productos como papel, utensiliosde cocina
o alimentos en el horno cuando no Io est6 usando. Los
elementos guardados en el horno pueden prenderse fuego.
Noutilice papel de aluminio para revestir el piso del horno.
Elpapel de aluminio puede atrapar o reflejar el calor,
provocando una descarga el6ctrica o un peligro de incendio.
INSTRUCCIONESDE SEGURIDAD DEL
HORNO AUTO-LIh'IPIANTE u gunosmodelos)
La caracter[stica de auto-limpieza funciona en el homo a temperaturas Io suficientemente elevadas como para quemar los
restos de alimentos que quedaron dentro del horno. Siga estas instrucciones para una operaci6n segura.
Antes de inicialel ciclo de autolimpieza remueva lossartenes,
parrollas de metal brillante y otros utensilios del homo.
solopueden dejarse en el homo las parrillas revestidas de
porcelana gris o negra. No utilice la auto-limpieza para
limpiar otras piezascomo bandejas brillantes o charolas.
Antes de utilizar el ciclo de auto-limpieza, limpie la grasay los
derrames de alimentos del homo. Unacantidad excesiva de
grasa puede encenderse, generando
daBospot el humo en su hogar.
Siel modo deauto-limpieza no funciona, apague
el homo y desconecte el suministro de energ[a. Llame
a un t6cnico calificado para solicitar el arreglo.
No limpie la empacadura de lapuerta. Laempacadura de
la puerta es esencial para un buen sellado. Debetenerse
cuidado de no refregar, daBar o mover la empacadura.
No utilice limpiadores de homo. No debe utilizarse ningL_n
limpiador comercial o revestimiento protector de ninguna
clase dentro o alrededor de ninguna pieza del horno.
,A ADVERTENCIA
Elobjetivo del caj6n calentador es mantener alimentos
cocidoscalientes a la temperatura de servicio.Pordebajo de
los140°F(60°C)puede producirse crecimiento de bacterias en
losalimentos. No coloque alimentos fibs
en el caj6n calentador. Nocaliente alimentos por m@s
de 2 horas. No seguir estas instrucciones puede provocar
enfermedades transmitidas por los alimentos.
Nodeje productos de papel,plc_sticos,comida enlatada
o materiales combustibles en el caj6n. Pueden prenderse
fuego.
Notoque el elemento calentador o la superficie
interna del caj6n. Estassuperficies pueden estar
Iosuficientemente calientes como para provocar
quemaduras.
CAJ()N CALENTADOR/CAJON OEL HORNO
INFERIOR INSTRUCCIONESDE SEGURIDAD
(algunos modelos)
Tengacuidado al abrir el caj6n. Abra un poco el caj6n
y deje salir el aire caliente y el vapor antes de quitar o volver
a colocar los alimentos. Elaire y el vapor calientes que salen
pueden provocar quemaduras en manos, rostro y/o ojos.
No utilice papel de aluminio para revestirel caj6n calentador.
Elpapel metc_licoesun excelente aislante
de calor y atrapar@el calor debajo de 61.Estoalterarc_
el desempeBodel caj6n y potencialmente podr[a provocar un
riesgode incendio.
Page 62

En modelos con cocina de vidrio.
"_,_ ADVERTENCIA nmsGo DE INCENDIO: Nunco pierdo de vista Io cocino cuondo Io porte superior
estd en los configuraciones medio o alto. Flantenga cualquier articulo inflamable alejado de la cocina.
Apague todos los controles cuando finalice la cocci6n. Si no se siguen estas instrucciones se podrdn producir
incendios, lesiones graves o la muerte.
NOTA:Esposibleque lasfuncionesy apariencias varien con relaci6na su modelo a Io largo del manual.
Acerca de las unidades de superficie radiantes
Nunca cocine directamente sobre el
vidrio. Siempre use utensilios.
iiiiiiiiiiiiiiiiiiiiiii_iiiiiiiiiiH_
Siempre coloque la olla en elcentro
de la unidades de la superficie sobre
la cual estd cocinando.
No deslice el utensilio sobre la
superficie de la cocina o del control,
yo que se podrd royor el vidrio. El
vidrio esresistente o rayones; no es
o pruebo de royones.
Lacocina radiante cuenta con unidades de
calentamiento debajo de una superficiede
vidrio pareja.
Lastemperaturas de la cocina se incrementan
con el nOmero de unidades de superficie que
seencuentran encendidas. Con :3o 4 unidades
encendidas,las temperaturas de lassuperficie
son altas.Siempretenga cuidado al tocar la
cocina.
Una luzindicadora seencender6 cuando la
unidades de la superficie sea encendida.
La luz indicadora de HOTSURFACE(Superficie
Caliente)adecuada brillar6 cuando su
correspondiente elemento radiante sea
encendidoy permanecer6 encendida hasta
que la temperatura de la superficie sea inferior
a los 1500F.
NOTA:
La luz indicadora de la superficie:
• Permanecerdencendidaincluso luegode que
la unidad estdapagada.
• Brillard hasta que la temperatura de la unidad
seainferior a los 1500F.
NOTA: Un leve olor es normal cuando una
cocina nueva es usada por primera vez. Esto
esocasionado por el calentamiento de partes
nuevasy materiales aislantesy desaparecer6
en un periodo breve.
NOTA'.Enmodelos de cocinasde vidrio con
colores claros, es normal que las6reasde
cocci6n cambien de color al calentarse o
enfriarse. Estoestemporario y desaparecer6 a
medida que elvidrio seenfrie hasta Ilegar a la
temperatura ambiente.
Esseguro colocar utensilioscalientesen el
homo o en la superficie de vidrio cuando la
superficie est6 fria.
Inclusodespu6s de que las unidades de la
superficie sean apagadas, la cocina de vidrio
permanece Io suficientemente caliente como
para continuar calentando. A fin de evitar
sobrecalentamientos, retire lasollas de las
unidades de la superficie cuando secocine la
comida. Eviteubicar cualquier objeto sobre la
unidades de la superficie hasta que se haya
enfriado completamente.
• Losmanchas de agua (dep6sitosminerales)
sepueden eliminar utilizando la crema
limpiadora o vinagre blanco sin diluir.
• Elusode unlimpiador de ventanas podrd
dejar una pelicula iridiscentesobre la
cocina.Lacrema limpiador eliminard esta
descoloraci6n
• Noguarde ningOnarticulo pesado sobre la
cocina.Sise apoyansobre la cocina, podrdn
ocasionar dafios.
• No utilicela supe_cie como tabla para cortar.
Page 63

Elecci6n de lostiposde recipientes de cocci6n
para modelos de estufa de vidrio. (moddosdninducd6n) GEAppliances.com
Lo siguiente informaci6n Io ayudard a elegir los recipientes de cocci6n que brindan un buen desempeho
en estufas de vidrio. Ver el folleto sobre recipientes para usar con estufas de inducci6n.
Verifique que los recipientes tengan
bases planas utilizando una regla.
Acero inoxidable:
Recomendado
Aluminio:
Serecomienda decapa gruesa
Buena conductividad. Los residuos de aluminio a
vecesparecen rayones sobre
la estufa pero pueden quitarse sise loslimpia de
inmediato. Debidoa su bajo punto de fusi6n, no
debe utilizarse aluminio de capa fina.
Base de cobre:
Recomendado
Elcobre puede dejar residuos que pueden
parecer rayones. Los residuos pueden eliminarse,
siempre y cuando la estufa
se limpie de inmediato. Sin embargo, no permita
que estas ollas hiervan en seco. Elmetal
sobrecalentado puede adherirse alas estufas
de vidrio. Sino se elimina de inmediato, una olla
con la base de cobre sobrecalentado dejarc_
un residuo que manchara la estufa en forma
permanente.
Esmalte de porcelana sobre hierro
fundido:
Serecomiendasi la basede la olla
seencuentra revestida
Esmalte de porcelana sobre acero:
No se recomienda
Calentar recipientes vac[os puede provocar
da_os permanentes al vidrio de las estufas. El
esmalte puede derretirse y adherirse
a la estufa ceramica.
Vidrio-cer6mico:
No se recomienda
Desempeho pobre. Raya la superficie.
Cer6mica:
No se recomienda
Desempeho pobre. Puede rayar la superficie.
Hierro fundido:
No se recomienda, a menos que se encuentre
espedficamente disehado para estufas de vidrio
Pobre conductividad y lentitud para absorber el
calor. Raya la superficie de la estufa.
No se recomiendan recipientes con
basesredondeadas,curvadas,con NOTA."Siga todaslasrecomendacionesdel fabricante de recipientes cuando utilicecualquier clasede
rebordesotorceduras, recipientede cocci6nsobre la estufacerdmica.
Para mejores resultados
i iii i
No coloque recipientes mojados
No use woks con anillos de
Soporte sobre la estufa de vidFiol
Utilice w0ks de base plana sobre
taestufa de vidrio.
Coloque s61orecipientes secos
sobre los elementos de superficie. No
coloque tapas sobre los elementos de
superficie, en especial tapas mojadas.
i No use woks con anillos de soporte.
Esta clase de wok no se calienta sobre
elementos de superficie de vidrio.
Recomendamos el uso de woks de base
plana solamente. Se encuentran disponibles
en su negocio minorista local. La base del
wok debe tenet el mismo die,metro que el
elemento de superficie para asegurar un
contacto adecuado.
Algunos procedimientos de cocci6n
especiales requieren recipientes de cocci6n
espedficos, como ollas a presi6n, freidoras,
etc. Todos los recipientes de cocci6n deben
tener bases planas y ser del tamaho
correcto.
iiiiiiiiiiii_iii
No permita que los alimentos hiervan en
seco ya que los recipientes de cocci6n
pueden adherirse a la superficie de cocci6n,
provocando da_os permanentes a la
estufa.
Page 64

C6mousar /asunidadesdesuperficie-
Mode/oscontro/ados eri//as.
A Io largo de este manual, los caracteristicas y apariencia pueden set diferentes a los de su modelo.
OFF
i _i!!:"
EnOFF(apagado) y HI(alto) el control
se traba en su posid6n con un "dic".
Usted puede ofr ligeros chasquidos
durante lacocci6n, que indican que
el control est6 manteniendo su
configuraci6n deseada.
AsegOresede girar la perilla de control
a OFF(apagado) cuando termine de
cocinar.
SMALL
BURNER _ BUnNEfi
OFF
iOf'Jf
_:::'_(" I /1_ "7"._,
C6mo utilizaflo
Presionela perilla hacia adentro y girela
en la direcci6n de la configuraci6n que desee.
Para superficies de estufa de vidria:
La luz indicadora HOTCOOKTOP(estufa
caliente),sobre la estufa, resplandecerc_
cuando seencienda cualquier elemento
radiante. Permanecer6 encendida hasta
que la superficie baje la temperatura hasta
aproximadamente !50°F (66%).
Unidades de superficie dobles y triples y peril/as de control (en olgunos moddos)
La unidad de superficie cuenta con 2 o 3
tamahos de cocci6n diferentes para poder
adecuarel tamaho de la unidad al tamaho
del recipientede cocci6n.
La luz indicadora:
Seaccionarc_cuando la unidad
seencienda o est6 caliente al tacto.
Quedar6 encendida aunque sehaya
apagado la unidad.
Resplandecerc_hasta quela unidad bajela
temperatura hasta aproximadamente !50°F
(66°C).
Enalgunos modelos.
SMALL _RGE
eUeNEe OFF eURNER
HI = A @HI
6
\\\ 6
LO 2
Enalgunos modelos.
Limitador de temperatura
Todas las unidades de superficie radiantes
cuentan con un limitador de temperatura.
Ellimitador detemperatura evitaque
la estufa de vidrio secaliente demasiado.
Esnormal que seencienda y apague
cuando la estufa estc_en uso.
Lo
Hi
Modelos con s61ouna unidad de
superficie triple.
!
Modelos con s61ouna unidad de
superficie triple.
Ellimitador detemperatura puede apagar
los unidades mc_sfrecuentemente durante
un tiempo si:
Elrecipiente hierve en seco.
La basedel recipienteno espiano.
Elrecipiente no estd centmdo.
Nohay un recipienteen la unidad.
Page 65

A Io largo de este manual, las caracteristicas y apariencia pueden set diferentes alas de su modelo.
Uso de COOK-WARM ZONE (Area para Calentar)
GEAppliances.com
LO, 2 •
GUiA
CONFIGURATION COMIDA
(Baja) Pan/Pasteles
(Medio) Chocolate/
Hanteca
(Medio) Salsas,Guisos,
Sopasde Crema
(Medio) Verduras
(Alto) Sopas (liquido)
(Alto) T6 o Caf@
La guia ess61opara su
referencia y la CONFIGURACI6N
que necesite depender6 de la
cantidad y eltipo de comida, la
temperatura inicial de lacomida
y la duraci6n del tiempo de
espera.
COOK-WARM ZONE (Area para Calentar),
ubicada en la parte central trasera de la
superficie de vidrio, mantendr6 la comida
caliente y cocida a la temperatura para servir.
Siemprecomience con comida caliente. No use
la funci6n para calentar comida fria. Colocar
comida que no est6 cocinada o fria en el Area
para Calentar podria producir enfermedades
desarrolladas por bacterias en la comida.
Presioney gire la perilla de control hacia
cualquier configuraci6n deseada.
Para obtener mejores resultados,todas las
comidas en el Area para Calentar deberian
estar cubiertas por una tapa o papel de
aluminio. AI calentar pasteleso panes, la tapa
sedeber6 ventilar para dejar que la humedad
salga.
Siempre uselas manijas de lasollaso guantes
para homo al retirar comida del Area para
Calentar ya que losutensiliosy platos estar6n
calientes.
A PRECAUCION: Nocaliente
comida en elArea para Calentarpot mds
de dos horas.
NOTA:La superficie del 6rea para calentar no
producir6 un brillo rojo como el producido por
loselementos de cocci6n.
Elluzindicadora de superficie CALIENTEbrillar6
cuando la superficie de vidrio est6 calientey
permanecer6 asi hasta que la misma sehaya
enfriado Iosuficiente como para sertocada.
Esposibleque lasconfiguraciones inferiores
no calienten la superficie de vidrio Iosuficiente
como para hacer que la luzindicadora de la
superficieCALIENTEseencienda.
Unaluz indicadora del Area de Calentamiento
brillar6 cuando se encienda la unidad.
• No useun envoltorio pl6stico para cubrir la
comida. Esposible que el pl6stico se derrita
sobre la superficie y que sea muy dificil
limpiar el mismo.
• Uses61outensiliosrecomendados para la
cocci6n sobre la cocina.
UtiFce s6]o woks de base p]ana.
Consejospara realizar conservas en casa
Aseg6rese de que la olla se encuentre centrada
sobre la unidad de superficie.
Verifiqueque la olla tenga una baseplana.
Para evitar quemaduras de vapor o calor,
tenga cuidado al realizar conservas.
Cocci6n en wok
Recomendamosel usode woks de baseplana
solamente. Seencuentmn disponbles en su
negociominorista local
No usewoks con anillos de soporte.
Utilicerecetas y procedimientos provenientes
de fuentes confiables. Fabricantes como Ball®
and Kerr®y
el Serviciode Extensi6ndel Departamento de
Agricultura los ponen a su alcance.
Serecomiendan ollas para conservas
con bases planas. Elusode ollaspara
conservas con baflo de maria con bases
ondeadas puede prolongar el tiempo requerido
para hervir el agua.
Noutilice woks con bases redondas. Usted
podria sufrir graves quemaduras siel wok se
vuelca.
Page 66

C6mo usar la plancha.
[A 6N iPRECAUCI u i ientemente o/iente comanoronrovocorquemodurosduronte
y despuds del uso. Coloque y quite la plancha cuando est# frfa y todas las
unidades de superficie estdn apagadas. Utilice agarraderas si toca
la plancha cuando est# caliente. No hacerlo puede provocar quemaduras.
Antes de utilizar este recipiente de cocci6n
por primera vez, 16velopara asegurarse de
que est_ limpio. Luego cOreloligeramente,
frotando aceite de cocci6n sobre la superficie
antiadherente.
Uso de la Plancha.
_H'" 8 ° 6 " 4" 2 °Lo Lo" 2 " 4" 6 ° 8 "H'4_ I
10
La mayoria de las comidas a la plancha
requieren una cocci6n en una superficie
precalentada. Precalientela plancha de
acuerdo con la siguiente guia,y luego cambie
a la configuraci6n de cocci6n deseada.
Para encender las unidades de la superficie de
toda la plancha, gire la perilla en direcci6n de
lasagujas del reloj.
Para encender la unidad de la superficie de la
mitad de la plancha, gire la perillaen direcci6n
contraria alas agujas del reloj.
C6mo colocar la plancha:
IHPORTANTE:Siemprecoloquey utilice
la plancha en la ubicaci6n designadasobrela
estufa.
NOTASIHPORTANTES:
Limpiela plancha con una esponjay
detergentesuave en agua tibia. NOutilice
esponjillasde ffegarazules overdeso lanade
acero.
Nococine alimentos extremadamente
grasososy tenga cuidado con los derrames
degrasa mientras cocina.
Nunca coloque o almacene elementos sobre
laplancha, aOncuando no estden uso.La
plancha puede calentarse cuando se utilizan
lasunidadesde superficie cercanas.
No useutensilios metdlicos conpuntas
afiladaso hordesdsperosporque pueden
dahar la plancha. No corte alimentos sobrela
plancha.
No userecipientes de cocci6npara el
almacenamiento de alimentos o aceite.
Puedenprovocarse manchasy/o grietas
permanentes.
Tipo onfiguraci6nd
de ecalentamienl Configuraci6n
Comida ,Temporizadotde Cocci6n
C6moCalentar 5 5
Tortillas 5 min.
Panqueques 8 3
Hamburguesas 5 3
HuevosFritos 5 2
Tocino Ninguno 6
Desayuno 8 4
Embutidos 5 min.
S6ndwiches 8 3
Calientes 3min.
(Talescomocor
Quesoala
Plancha)
NOTA: Esposible que sea necesario ajustar las
configuraciones de la plancha si se usar6 por un
pefiodo prolongado.
NOTA:Elrevestimientoantiadherente
sedegradard si Io expone a temperaturas
superioresa 500°F(260°C).Utilicelos61ocon
el control de la planchay s61oen la ubicacian
designadasobrela estufa.No utilice laplancha
para asar alimentos en el homo. No limpie
la plancha utilizando el modo auto-limpiante
en el homo. Elcontrol de la plancha evita
el sobrecalentamiento del revestimiento
antiadherente.A temperaturas superiores a
550°F(549°C),laspropiedades antiadherentes
sedegradan en forma permanente y pueden
producir humos dahinos para lasayes.
NOTA:La plancha ird perdiendo el color con
el tiempo debido al uso.
NOTA:No limpie la plancha en el homo auto-
limpiante.
NOTA:Siempreesperea queel recipiente
de cocci6n se enfrfeantes de sumergirlo
en agua.
5 min.
5 min.
/4min.
Page 67

GEAppliances.com
C6mo preparar un filete de
tan f6cil como 1, 2, 3:
1. Lleveel filete a temperatura ambiente.
NOTA:Siempreutilice prdcticassegums en elmanejo dela came.
2. Condimente ambos lados asu gusto y recubra con aceite de oliva osimilar.
3. Precalienteelhomoen BAKE(hornear)a/425° (2!8°F),conla bandejadel homoen la posici6n
central"C."
4.
Coloquela plancha en el area designada de la estufa y luego precaliente la plancha
a 400°F (204°C).
PRECAUCION:Laplancha estard MUYCALIENTE.Utiliceagarraderas.
5. Selleel filete de cada ladodurante 2 minutos o hasta alcanzarel dorado deseado.
NOTA:Seproducird "humo"; asegOresede que haya una ventilaci6n adecuada.
6. Introduzca lasonda de came provista con sucocina dentro delcentro delfilete,verificando que la
punta de la sonda seencuentre en el centro del filete.
7. Introduzca lasonda en laboca de salida(ubicada en el lado frontal superior del homo),
deslice la bandeja dentro del homo y cierra la puerta.
8. PresionePROBE(sonda)en sucontrol, ingrese la temperatura interna deseaday presioneSTART
(iniciar).
calidad,
############################
AIrealizarel sellado de sucarne con un calor muy alto, se est@creandouna reacci6n conocida como
la Reacci6nMaillard. Estareacci6n bloquea elsabor mds pronunciado eintenso dela came, que ocurre cuando se
cocina came a una temperatura elevada.
.
Dejeque el filete termine de cocinarse enel horno. Elcontrol de lacocina emitira un pitido
y seapagar5 cuando el filete alcance latemperatura interna deseada.
NOTAS:
Despudsdel sellado,su filetepuede hallarse en la temperature deseada,dependiendo
del tamaho, cortey grado de cocci6ndeseado.
Para filetes rods finos, puede no set posiblealcanzar los grados de cocci6njugoso o poco cocido.
12
Page 68

C6mousar los controles delhomo.
A Io largo de este manual, los caracteristicas y apariencia pueden set diferentes a los de su modelo.
Busque el panel de control que corresponde a su modelo.
OVEN CONTROLS TIME CONTROLS
PUSH/START
Bot6n BROIL HI/LO (asar alto/bajo)
Presioneelbot6n BROILHI/LO (asaralto/bajo)una vezpara
HI Broil(asaralto).
Paracambiar aLOBroil (asarbajo),presioneel bot6nBROILHI/LO
(asaralto/bajo)de nuevo.
Presioneelbot6nSTART(iniciar).
Cuandoha}cafinalizadode asar,presioneel bot6n CLEAR/OFF
(borrar/apagado).
Bot6n BAKE (homear)
Presioneelbot6n BAKE(hornear).
Presionelasalmohadillasnum@icasparaconfigurar
la temperatura deseada del horno.
Presioneelbot6nSTART(iniciar).
Cuandohayafinalizadode hornear, presioneel bot6n CLEAR/OFF
(borrar/apagado).
Bot6n CONVECTION COOK (cocci6n par convecci6n)
Presioneelbot6n CONVECTIONCOOK(cocci6npar convecci6n),
CONVECTIONBAKE(horneadopar convecci6n),
o CONVECTIONROAST(rostizadopar convecci6n).
Presionelasalmohadillasnum@icasparaconfigurar
la temperatura deseada del horno.
Presioneelbot6nSTART(iniciar).
Cuandoha}cafinalizado lacocci6n,presioneel bot6nCLEAR/OFF
(borrar/apagado).
Bot6n PROBE(sonda)
Presionecuando utilicela sondapara cocinar.
Vetla secci6nC6mo usarla sonda.
Tecla SELFCLEAN (Auto Limpieza)
Presioneparaaplicar laauto limpiezadel homo.
Leala secci6nUsade losHornosSuperiore InferiorconAuto
Limpieza.
Tecla BORRAR/APAGAR
Presioneparacancelar TODASlasoperacionesdelhomo excepto
el relojy el temporizador.
12
Page 69

GEAppliances.com
Bot6n SELFCLEAN(auto-limpieza)
Presionepara laauto-limpiezadel homo.
Verla secci6nC6mo usarloshornosauto-limpiantes superior
e inferior.
Bot6n CLEAR/OFF(borrar/apagar)
PresioneparacancelarTODASlas operacionesdel homo,
con excepci6ndel relojy el temporizador.
Bot6n START(iniciar)
Debepresionarsepara iniciar cualquier funci6n de cocci6n
o de limpieza.
Bot6n OVEN LIGHT (luz del homo)
Toqueeste bot6n para apagar o encender las lucesdel horno.
Botones TIMERON/OFF (temporizador encendido/
apagado)/Bot6n KITCHENTIMER(temporizador de la
cocino)
Presioneparaconfigurar el temporizadorde la cocina.
Verla secci6nC6mo usareltemporizador de la cocina.
Bot6n COOK TIME/COOKING TIME (tiempo de cocci6n)
Presioneestebot6ny luegopresionelas almohadillasnum@icas
para configurar el tiempo de cocci6n que deseapara sus
alimentos.Elhomo seapagar6 cuandosehayaterminado el
tiempo de cocci6n.
Bot6n DELAYSTARTflnicio retardado)
Util[celojuntoa los botonesCOOKTIME(tiempode cocci6n)
o SELFCLEAN(auto-limpieza)para configurar el inicioy apagado
autom6tico del homo en eltiempo establecido.
Bot6n CLOCK(reloj)
NOTA:Cuandoconfigure lostiempos,se configuran s61o
lashorasy losminutos.Lamenor cantidad detiempo que
sepuedeconfigurar es unminuto.
Presioneelbot6n CLOCK(reloj).
Presionelasalmohadillasnum@icas.
Presioneelbot6nSTART(iniciar).
Elrelojdebeestar configuradoenla horacorrectapara que
lasfuncionescontempofizador delhomo funcionen
adecuadamente.La hora nopuede modificarsedurante
losciclosdehomeadocontempofizador o deauto-Iimpieza.
Sisu homorueconfiguradopara unaoperaci6nde homo
tempofizaday ocurri6un cortede energfaeldctfica,elrelojy todas
lasfuncionesprogramadasdeberdnreconfigurarse.
Lahora destellardenlapantalla cuandohayaocurfido
un cortede energia.
Tecla RANGE LOCKOUT(Bloqueo de la Cocina)
Sucontrol lepermitir6 bloquearlasteclast6ctilesy lacocina,de
modo que no sepuedan activar alsertocadas.
Presionelatecla RANGELOCKOUT(Bloqueode la CocinaJy luego
presionelatecla START(Iniciad parabloqueary desbloquearlas
unidadesde la superficie,quemadores del homo,y elpanel de
control de modo que no puedan ser activadas.
13
Page 70

C6mousar el homo.
Para evitar posibles quemaduras, coloque las bandejas en la posici6n deseada antes de encender el homo.
Antes de comenzar...
Lacantidad de posicionesdela
bandejapuedevariar enrelaci6n
al modelo.
Lasbandejas tienen topes,de modo que
cuando selas coloca correctamente en los
soportes sedetendrc_nantes de salirsedel todo,
y no se volcarc_n.
Cuando coloque o quite recipientes de cocci6n,
tire de la bandeja hasta que se detenga.
Enalgunos modelos,el elemento calentador
para horneado se encuentra debajo del piso
del homo. No coloque alimentos en el pisodel
horno.
Para quitar una bandeja,tire de ella,inclineel
extremo frontal hacia arriba y sdquela.
Para volver a colocarla, deposite elextremo
de la bandeja (topesde detenci6n)sobre el
soporte, inclineel frente hacia arriba y presione
la bandeja hacia adentro.
IAPRECAUCl6Nj
Cuandoutilice la bandeja en laposician rods
baja (A),necesitard tenet cuidado cuando la
quite. Recomendamosque deslicela bandeja
varias pulgadas y luego,utilizando dos
agarraderas, la quite sosteniendode ambos
lados.La bandejaseencuentra muy abajoy
usted puede quemarsesi coloca lamano en la
mitad de la bandejay tira hacia afuera. Tenga
mucho cuidado de no quemarse la mano con la
puerta cuando utilice la bandejaen la posician
mds baja (A).
Papel de aluminio
No usepapel de aluminio para cubrir el fondo
del horno. Elaluminio atraparc_el calor en la
parte inferiory alterarc_el funcionamiento del
horno. Elaluminio se puede derretir y daBar
de forma permanente el fondo del horno.
CualquierdaBo por uso inadecuado del
aluminio no estard cubierto pot la garantia del
producto.
Elaluminio se puede usar para retener
derrames, colocando una hoja en el estante
inferior,varias pulgadas pot debajode la
comida. Nouse mc_saluminio que el necesario
y nunca cubra totalmente un estante del
homo con papel de aluminio. Mantenga el
aluminio por Io menos a una pulgada y media
de las paredes del homo para evitar una mala
circulaci6n del calor.
14
Page 71

Para evitar posibles quemaduras, coloque los bandejas en la posici6n deseada antes de encender el homo.
Precalentamiento y colocaci6n de recipiente
GEAppliances.com
No coloque alimentos directamente
sabre el piso del homo.
Para evitar posiblesquemaduras, coloque las
bandejas en la posici6n deseada antes de
encender el horno.
PrecalientedelhomosiasfIoindicalareceta.
Elprecalentamientoesnecesarioparaobtener
buenosresultadoscuandohorneepasteles,galletas,
pastelitosypanes.
Siva a hornear cuatro capasde pastelal mismo
tiempo,coloquedoscapasen labandejaCy dos
capasen labandejaE.Distribuyalosrecipientes
de modo que no quedendirectamenteuno
encimadel otro.
Losresultadosde horneadoser6nmejoressi
losalimentossecentranbiendentrodelhomo.
Elpastel"Angelfood"eslaexcepci6ny debe
colocarseenla bandejainferiordelhomo(posici6n
A).Sigalasinstruccionesdelpaquetedealimentos
preempaquetadoso congeladosparala ubicaci6n
de losrecipientes.Losrecipientesnodebentocarse
entresfotocar lasparedesdelhomo.Sinecesita
utilizardosbandejas,distribuyalosrecipientesde
modoquenoquedendirectamenteunoencima
delotro.Dejeaproximadamente:]._A"(3,8cm)entre
recipientesydesdeelfrente,partetraseray ladosde
lasparedesdelhomo.
C6mo configurur el horno pure horneudo o rostizudo
[] Presioneel bot6nBAKE(hornear).
[2--1 Presionelasalmohadillasnum_ricashastaque
aparezcalatemperaturadeseada.
r_ Presioneel bot6nSTART(iniciar).
Elhomoseiniciarddeinmediato.Aparecerdla
palabraON(Encendido)yZ00°.Cuandoel homo
Verifiqueelniveldecocci6nde losalimentos
cuandohayaalcanzadoeltiempomfnimo
indicadoenla receta.Coanelosmassifuese
necesario.
r_ Presioneelbot6nCLEAR/OFF(borrar/apagado)
cuandosehayafinalizadoelhorneadoy luego
quitelosalimentosdelhomo.
alcancelatemperaturaseleccionada,elcontroldel
homoemitirdvariospitidosy la pantallamostrar6la
temperaturadelhomo.
NOTA:Ustedescuchardel ventilador
deconvecci6n(analgunosmodelos)mientms
el homo realize elprecalentamiento.
Elventilador sedetendrd cuando el homo se
hayaprecalentado y la pantalla mostmrd la
temperature configumda. Estoesnormal
Paracambiarlatemperaturadelhomoduranteel
cicloBAKE(hornear),presioneel bot6nBAKE
y luegolasalmohadillasnum_ricasparaconfigurar
lanuevatemperatura.
15
Page 72

C6mo usar el horno.
C6mo configurar el horno para asar
Cierre la puerta. Siempre asecon la
puerta cerrada.
NOTA: Lafunci6n para asar
no funcionar6 si la sonda de
temperatura est6 enchufada.
EltamaBo, peso,grosor,
temperatura inicial y
el punto de cocci6n preferido
afectaran lostiempos
de asado. Estaguia est6
basada en carnes a
temperatura de refrigerador.
i- ElIVlinisterio deAgriculturo de
los EEUU.ofirmo: "la came de
resjugosa es popular, pero debe
saberse que al cocinarla a s61o
140°F (60°C)algunos organismos
queprovocon intoxicociOn
alimentaria pueden sobrevivir".
(Fuente:Safe Food Book. Your
Kitchen Guide. USDA Rev.
Junio 198£)
Si su cocina est6 conectada a 208 voltios,
pueden asarse filetesjugosos precalentando el
asador y colocando la bandeja del homo en
una posici6n mas elevada.
UtiliceLO Broil {asarbajo)para cocinar par
completo alimentos coma ayes o cortes
Presioneel bot6n BROILHI/LO (asaralto/
%
bajo) una vez para configurar HI Broil
(asaralto).
Paracambiar aLO Broil (asarbajo),
presione el bot6n BROILHI/LO (asaralto/
bajo) de nuevo.
gruesos de came sin dorarlos de mas.
Presioneel bot6n START(iniciar).
r--f1 Coloquela came o pescado sabre una r-_
asadera dentro de una rejilla dise_ada []
para asar.
Cuando haya finalizado de asar, presione
el bot6n CLEAR/OFF(borrar/apagado).
[] Siga las posiciones de lasbandejas
sugeridas en la Guia de asado.
Guia de asado
ComentariosAlimento
Esdifid codnar filetes de menos de
la 1" (2,5cm) de grosor y quequeden
jugosos. Se cocinan par completo
antes de dorarse.
Para evitar que la cama se
enrosque, corte la grasa a intervalos
de Y' (2,5cm).
Came de res
Nivel de
cocci6n
Jugosa
140°F (60°C)
Tipo o grosor
Filetes - Grosor de
1" (2,5 cm)
Posici6n de la
bandeja*
Eo F(losalimentos
debenestar1" a 5"
[2,5cma 7,6cm]del
elementode asado)
A punto
160°F (71°C)
Bien cocida
170°F (77°C)
Polio Pechuga, sin hueso C(los alimentos Asar sabre el 1ado de la piel primero.
Filetes de 1/2" a 1" 11,5cm a D o E (los alimentos ManipuJe y gire con mucho cuidado.
pescado 2,5 cm) de grosor deben estar 5" a 6"
Chuletas de Bien cocida 3/4" (1,9cm) de D (los alimentos Para evitar que la carnase enrosque,
cerdo 170°F (77°C) grosor deben estar de 6" a carte la grasa aintervalos de 1"12,5
Filetes 5/4" a 1"
(1,9cm a 2,5cm) de
grosor elemento de
asado)
Filetes - 5/4" a 1"
(1,9cm a 2,5cm) de
grosor o patties de
came picada
Pechuga, con C(los alimentos
hueso deben estar de 7"
E(1asalimentos
deben estar de Y'
a 4" [7,6cm a 10,2
cm] del
D o E(los alimentos
deben estar de Y'
a 5" [7,6 cm a 12,7
cm] del elemento de
asado)
debe estar de 8" a
9" [20,5 cm a 22,9
cm] del elemento de
asado)
a 8" [17,8cm a 20,5
cm] del elemento de
asado)
[7,6 cm a 15,2 cm]
delelemento de
asado)
7" [15,2 cm a 17,8 cml.
cm] del elemento de
asado)
*Utilicela posici6nde bandejaA para elhomo mds pequeho conposici6n de2 bandejas.
16
Page 73

C6mo utilizar las caracteristicas de homeado y rostizado
con temporizador- $61oel homo Superior teno/gunosmode/osl GEAppliances.com
NOTA: Los alimentos que se echan a perder con facilidad-como leche, huevos, pescado, rellenos, came de ave y cerdo-no deben
dejarse reposar pot mds de ! hora antes y despuds de la cocci6n. La temperature ambiente pmmueve el crecimiento de bacterias
dahinas. Verifique que la luz del homo estd apagada porque el calor pmveniente de la bombilla puede acelemr
e! crecimiento de bacteria&
..... C6mo configurur un inicio inmediuto y un upugudo uutom4tico
Elhomo seenciendeinmediatamente
y cocina los alimentos durante un periodo de
tiempo seleccionado.AIfinalizar eltiempo de
cocci6n,el homo seapaga automdticamente.
[] Presioneel bot6n BAKE(hornear).
[] Presionelas almohadillas num@icas para
configurar la temperatura deseada del
homo.
[] Presione el bot6n COOK TIME(tiempo de
cocci6n).
NOTA: Sisu receta requiem precalentamiento,
puede necesitar agregar tiempo adicional
al tiempo de cocc/_Sn.
[] Presionelas almohadillas num@icas para
configurar eltiempo de cocci6n deseado.
Eltiempo de cocci6n m[nimo que usted
puede configurar es I minuto.
Latemperatura del homo queha
configurado y el tiempo de cocci6n
ingresado aparecer@nen lapantalla.
[] Presioneel bot6n START(iniciar).
NOTA:Sonard un tono de atenci6n si usted estd
utilizando homeado con temporizador y no
presiona el bot6n START (iniciad.
Elhomo se encenderc_ (ON),y la pantalla
mostrarc_ la cuenta regresiva del tiempo
de cocci6n y el cambio de temperatura
que comienza en 100°F (38°C).(Lapantalla de
temperatura comenzarc_ a cambiar cuando
la temperatura del homo Ilegue a los 100°F
[38°C]).Cuandoel homo alcanzala temperatura
configurada,sonarc_n3pitidos.
Elhomo continuar_ cocinando por eltiempo
programado, luego se apagar@de manera
autom@ica,a menosque seconfigure la
caracter[sticaWARM(calentar).Vet la secci6n
C6moconfigumr elhomo superiorpare
mantener caliente.
[] Si fuera necesario, presione el bot6n
CLEAR/OFF(borrar/apagado) para borrar
la pantalla. Quite losalimentos del horno.
Recuerde,aunque el homo se apaga
autom6ticamente, los alimentos que se
dejen en el homo seguir6n cocin6ndose
despu6s de apagado el mismo.
[]DDDD
DD[]D[]
DDDD[]
DDDDD
DDDDD
DDDD
C6mo configurur un inicio returdudo y
Elhomo seencenderden elhoratio queusted
haya configurado,cocinard alimentos durante
un perfodo de tiempo espedficoy luego se
apagard automdticamente.
AsegOrese de que el reloj muestre la hora
correcta.
Presioneel bot6n BAKE(hornear).
r_ Presionelasalmohadillas num@icaspara
configurar la temperatura deseada del
homo.
r_ Presioneel bot6n COOKTIlE (tiempo de
cocci6n).
NOTA:Sisu recetarequiemprecalentamiento,
puede necesitar agregar tiempo adicional
al tiempo de cocu6n.
r_ Presionelasalmohadillas num@icas para
configurar eltiempo de cocci6n deseado.
Eltiempo de coccl6n m[nimo que usted
puede configurar es i minuto.
Latemperatura del homo queha
configurado y el tiempo de cocci6n
ingresado aparecerc_nen la pantalla..
r-_ Presioneel bot6n DELAYSTART(inicio
retardado).
r_ Presionelasalmohadillas num_ricas para
configurar la hora en que desea que el
homo seencienda y comience la cocci6n.
Presioneel bot6n START(iniciar).
rz-1
un apagado autom4tico
NOTA:Sonard un tono de atenci6n si usted estd
utilizando homeado con temporizador y no
presiona el bot6n START (iniciar).
NOTA:5i deseaverificarloshomrios que
ha configumdo, presioneel bot6n DELAYSTART
(inicioretardado) pare contmlar la horn de inicio
configumda o presione el bot6n COOKTINE
(tiempo de cocci6n)pare verificar la extensi6n de
cocci6nque ha configurado.
Cuandoel homo se enciende (ON)en el horario
que ha configurado, la pantalla mostrar@la
cuenta regresiva deltiempo decocci6ny la
nueva temperatura comenzando en IO0°F
(38°C).(Lapantalla de temperatura comenzar(%
a cambiar cuando la temperatura del homo
Ileguea los IO0°F[38°C].)Cuandoel homo
alcanza la temperatura configurada,sonarc%n
pitidos.
Elhomo seguir@cocinando durante un per[odo
de tiempo determinado y luego seapagar(%
autom@icamente.
r_] si fuera necesario, presione el bot6n
CLEAR/OFF(borrar/apagado) para borrar
la pantalla. Quite losalimentos del horno.
Recuerde,aunque el homo se apaga
autom@ticamente,los alimentos que se
dejen en el homo seguirc_ncocinc%ndose
despu6s de apagado el mismo.
17
Page 74

C6mo usar la sonda, tenoUunosmode/osj
Enmuchos alimentos, especialmente asados y carnesde ave,latemperatura interna de los alimentos es la mejor prueba para
verificar el grado de cocci6n.Hediante la sonda de temperatura se evitatenet que adivinar el grado de cocci6n
y seIogra el punto de cocci6n exacto.
.... jA PRECAUCI(T) __
_ndade la
Nunca deje lasonda dentro del homo durante un
ciclo de auto-limpieza o de asado.
No guarde la sonda dentro del homo.
Para asados sin hueso, introduzca lasonda dentro
de la parte mas camosa. Parajam6n
o cordero con hueso,introduzca lasonda
en el centro del m0sculo grande mas bajo.
Introduzca la sonda en el centro de platos tales
como pan de came oestofados.
Introduzca la sonda dentro de la parte mas carnosa
del muslo interno desde abajo yen forma paralela a
la pata de un pavo entero.
NOTA:No sepodrdn utilizar los configuraciones de
auto-limpieza ni de asodosi la sonde
de temperature seencuentm enchufeda.
La sonda de temperature cuenta
con una sonda similar a un pincho
en un e×tremo yun enchufe en el
otro e×tremo que se introduce en
la boca de salida del homo.
{i 13¸¸¸{¸
Pareevitar quemaduras,no desenchufelas
bocadesotidadethomo haste quedste
sehave enffiado.
Eluso de sondas distintas alas provistas
con este producto puede provocarles daflos
alas mismas o al control del horno.
Utilice lasmanijas de la sonda y el enchufe cuando
las introduzca y quite de los alimentos
y de la boca de salida.
Pareevitar dahos ala sonde, no utilicepinzas pare
tirar del cable cuando Io quite.
Pareno romper la sonde, verifiqueque
los alimentos estdn totalmente descongelados
antesde introducirla.
Despu6sde preparar la came y colocarla
en un posafuenteso sobre larejillade la asadera,siga
estas instrucciones para una colocaci6n adecuada
de la sonda.
Introduzca la sonde completamente en la carne.
No debe tocar hueso, grese o certilego.
NOTA:No inserter por compteto la sonde dentro de la
comepuede provocar un pobredesempeho de coccidn
porque la sonde detectar6 elaire delhomo y no la
temperature delos alimentos.
BDD[]D
DDDD
BDD D
BDD[]D
18
C6mo configurar el homo para homeado/rostizado cuando usa la sanda
(enalgunosmoddos)
71 Introduzcalasondaporcompletoenlos
alimentos.
Enchufe la sonda dentro de la boca de salida
F21
del homo. Verifiqueque est6 introducida hasta
el fondo. Cierre la puerta del horno. Verifique
que el cable de la sonda notoque el elemento
asador.
Presioneel bot6n PROBE(sonda).La pantalla
@
mostrara "Set Probe"(sonda configurada).
Presionelasalmohadillasnum@icaspara
%
configurarlatemperaturainternadeseadade
losalimentoso dela carne.Latemperatura
intemamaximaalaquepuedenconfigurarse
losalimentoses 200°F(93°C).
Presioneelbot6nBAKE(hornear).
@
Presionelas almohadillas num@icas para
%
configurar latemperatura deseada del horno.
Presioneel bot6n START(iniciar).
Fz-1
Lo pantalla destetlar6si lasonde seencuentra
enchufeda dentro dela boca de soliday ustedno ha
configumdo una temperature desonde
y presionado el botdn START(iniciar).
Despu6sde que la temperatura interna de los
alimentos alcance los 100°F (38°C),la temperatura
interna cambiante podr6 verse en la pantalla.
[_ Cuando la temperatura interna de los
alimentos alcanza la cifra que usted ha
configurado, la sonday elhomo se apagan y
los controles del homo comienzan a destellar.
Para detener el destello,presione elbot6n
CLEAR/OFF(borrar/csazapagado). Utilice
guantes de cocina para quitar la sonda de los
alimentos. No utilice pinzas para quitarla,
porque podrian dafiarla.
Sila sonda sequita del homo mientras se
estaba cocinando, el homo no seapagar6
autom6ticamente.
Para cambiar latemperatura del homo durante el
ciclo de horneado/rostizado, presione elbot6n BAKE
(hornear)y luego lasalmohadillas num6ricas para
configurar la nuevatemperatura.
Puedeutilizer ettemporizador de cocina aunque
nopueden usorseopemciones del homo con
temporizador mientms seutilice la sonde.
Page 75

C6mo usar el temporizador de cocina. GEAppliances.com
C6mo configurar el temporizador de cocina
(en algunos modelos)
TIMER TIMER
ON OFF
(en aJgunos modelos)
Eltempofizador de codna utiliza horas
y minutos.
Eltempofizador de cocina no
controla Jasoperaciones del homo.
La configuraci6n m6s aJta del
temporizador de cocina es de 9
horas y S9minutos.
Presionelos botones KITCHENFINERON/
%
OFF(temporizador de cocina encendido/
apagado) o TINERON (temporizador
encendido)(dependiendo del modelo).
Toque lasalmohadillas num@icas hasta
que aparezca en la pantalla el tiempo que
desea. Pot ejemplo, para configurar 2
horasy 45 minutos, presione2,4 y Sen
eseorden. Sicomete un error, presione el
bot6n KITCHENTIMERON/OFF
(temporizador de cocina encendido/
apagado) o TIMEROFF (temporizador
apagado) (dependiendo del modelo) y
comience de nuevo.
Presioneel bot6n START(iniciar).
[]
Despu@sde presionar el bot6n START(iniciar),
SETdesaparece;esto le indica que hay una
cuenta regresiva, aunque la pantalla no
cambia hasta que haya pasado un minuto. Los
segundos no podr6n verse en la pantalla hasta
alcanzar la cuenta regresiva del Oltimominuto.
r_ cuando el temporizador alcanza:00,
el control sonar6 3 veces seguido de
un pitido cada 6 segundos hasta que se
presione el bot6n KITCHENTIMERON/OFF
(temporizadorcocina encendido/apagado)
o TIMEROFF(temporizadorapagado)
(dependiendo del modelo).
Eltono de 6 segundos puede cancelarse
siguiendo los pasos incluidos en la secci6n
Caracteristicasespecialesde loscontroles del
homo bajo "Senalessonorasal finalizar un ciclo
con temporizador".
¸¸¸¸2¸¸¸¸
(en algunos modelos)
[TIMER 1 TIMERON OFF
(en algunos modelos)
C6mo reconfigurar el temporizador de
Si la pantalla todavfa muestra eltiempo
restante, usted puede cambiarlo presionando el
bot6n KITCHENTINERON/OFF(temporizador
cocina encendido/apagado) o lINER ON
(temporizador encendido)(dependiendo
del modelo),luego presione las almohadillas
num@icas hasta que aparezca en la pantalla el
tiempo que desee.
C6mo canceler el temporizador de cocina
Presione los botones KITCHENFINER ON/OFF
(temporizador de cocina encendido/apagado)
o TIMERON (temporizador encendido)
(dependiendo del modelo) dos veces o presione
TIMEROFF(temporizador apagado).
1
cocina
Siel tiempo restante no aparece en
la pantalla (en la pantalla aparecen el reloj,
el inicio retardado y el tiempo de cocci6n),
6ste aparecer6 presionando el bot6n
KITCHENTIMERON/OFF(temporizador
cocina encendido/apagado) o TIMERON
(temporizador encendido)(dependiendo
del modelo)y luego presionando
las almohadillas num@icaspara ingresar
el nuevo tiempo que desee.
19
Page 76

iAjuste el termostato de! homo usted mismo!
Esposible que su nuevo homo cocine de manera diferente a la que usted se encuentra acostumbrado.
Utilicelo durante algunas semanas para familiarizarse con sus funciones. Siluego de este periodo considera
que la temperatura del homo es demasiado baja o demasiado alta, usted puede regular el termostato.
No utilice term6metros, coma los que se venden en las tiendas, para verificar la configuraci6n de temperatura
del homo. Esos term6metros pueden variar entre 20-40 grados.
NOTA:Esteajuste s61oafectalas temperaturas de horneadoy rostizado; no afectalastemperaturas de asado
o deauto-limpieza,Elajustese conservarden la memoria aOndespudsde uncarte de energfa.
C6mo ajustar el termostato
Presionelos botones BROILHI/LO (asar
%
alto/bajo) y BAKE(hornear)al mismo
tiempo hasta queen la pantalla pueda
rqraE]ElE]
DE]DE]E]
(enalgunos modelos)
verse SF.
[_ Presioneel bot6n BAKE(hornear).Enla
pantalla sever6 un nOmero de dos dfgitos.
PresioneBAKE(hornear)de nuevo para
alternar entre subir y bajar la temperatura
del horno.
Paraajustar eltermostato del homo
superior, presione el bot6n BAKE(hornear)
del homo superior. Para ajustar el
termostato del homo inferior, presione el
bot6n BAKE(hornear)del homo inferior.
[] Latemperatura del homo puedesubirse
GG©GCD
GCDCDCDG:
en (+)35°F (lg°C) o bajarse en (-)35°F
(zg°c).Presionelas almohadillas num@icas
de la misma manera en que laslee.Par
ejemplo, para cambiar la temperatura del
homo 15°F(8°C),presione1y 5.
i_ii_i ii_i@ _iiii!!_ii
iiiii i
(en algunos modelos)
[_ Cuando hayafinalizadoel ajuste,presione
el bot6n START(iniciar)para volvera la
pantalla de la hora. Utiliceel homo de la
manera normal.
iE! tipo de margarina utilizado modifica el horneado!
La mayoria de las recetas de horneado incluyen productos de alto contenido graso tales coma la manteca
o la margarina (80% de grasa). Si se reduce el contenido de grasa, el resultado final puede ser diferente
al esperado.
Si se utilizan productos de 5ajo contenido graso en tortas, pasteles, masas, galletas o dulces, la receta puede fracasar. A
menor contenido graso, mayores diferencias en el resultado final.
Lasnormas federales exigenque los productos con denominaci6n de "margarina" tengan un contenido graso de al menos 80%
en relaci6n al peso. Los productos de bajo contenido graso contienen menos grasa y m6s agua. Elelevado contenido de humedad
de estos productos afecta la textura y el sabor de losalimentos horneados. Paraobtener los mejores resultados con sus recetas
tradicionales favoritas, utilice margarina u otros productos con un contenido de par Io menos 70% de aceite vegetal.
20
Page 77

C6mo usar el homo de convecci6n, tenol unosmodelosl GEAppliances.com
CONVECTION
cook
Posici6n de bandejas mOltiples.
Cocci6n por convecci6n (enalgunos modelos)
Elhomo de convecci6n viene con un modo
de cocci6n por convecci6n y puede utilizarse
puru horneudo por convecci6n de I bundeja
u horneudo por convecci6n con bundejas
mQItiples.
Funcionamiento del ventilador de convecci6n
En un homo de convecci6n, un ventilador
hace circular aire caliente sobre, pot debajo y
alrededor de los alimentos.
Esta circulaci6n de aire caliente se distribuye
de manem pareja a tmvds de la cavidad del
homo. Como resultado,losalimentos secocinan
y domn en forma pareja, a menudo en menos
tiempo.
Horneudo por convecci6n con bundejus mElltiples
Debido a que el aire caliente circula en forma
pareja en todo el homo, losalimentos pueden
hornearse con excelentes resultados usando
bandejas m01tiples.
Elhorneado con bandejas m01tiplespuede
incrementar un poco lostiempos de cocci6n
de algunos alimentos, pero el resultado total
esel ahorro de tiempo. Las galletas, muffins,
bizcochos y otros panes r6pidos Iogran
resultados muy buenos con el horneado con
bandejas m01tiples.
NOTA:Parapotenciar al m6ximo una cocci6n
pareja, elventilador est6diseBadopara girar en
ambas direcciones,con una pausa entre elias.
Estoes normal.
Elventilador deconvecci6n seapaga cuando
seabre la puerta de homo. NO Dale la puerta
abierta durante periodos prolongados mientras
utiliza la cocci6n pot convecci6n ya que puede
acortar la vida 0til del elemento calentador de
convecci6n.
Cuando hornee con 3 bandejas, coloque una
en la segunda (B)posici6n,otra en la cuarta (D)
posici6n y la tercera en la sexta (F)posici6n.
Para horneado con dos bandejas, coloque
una en la segunda (B)posici6n.Coloque la otra
bandeja en la quita (E)posici6n.
Horneado por convecci6n con 1 bandeja
Cuando realice un horneado pot convecci6n
con s61oi bandeja, coloque losalimentos en el
centro del horno.
C6mo adaptar recetas...
Usted puede utilizar susrecetas favoritas en el
homo de convecci6n.
Utiliceel tamaho de recipiente
recomendado.
Algunas instruccionesen paquetes de
estofados congelados o platos principales
ban sido desarrollados utilizando hornos
de convecci6n comerciales. Paramejores
resultados, precaliente el homo y utilice
la temperatura para horneado comQn
indicada en el paquete.
21
Page 78

C6mo usar el homo de convecci6n. (enolgunosmodelos)
Rostizado par convecci6n (enolgunos modelos)
Buenaporo grondes cortesde cometierno, mismotiempo, se creo uno ricocopo externo
Asadera
! / i¸
(enolgunos modelos)
iGGGCDG
iCDQCD(DG
i i
(en olgunos modelos)
sincubrir, morr6ndorado.
Elventilodor de convecci6n hocecircular
el oire colienteen formo porejosabrey
olrededor de losolimentos. Loscomesde res
y de ave se doron par completo coma sise
hubiesencocinodo con un rostizodorgirotorio.
Eloire colienteselloIosjugos r6pidomente poro
Iogror un productojugoso y tierno mientros, ol
C6mo configurar el homo para horneado o rostizado par convecci6n
Presione el bot6n CONVECTIONCOOK
%
(cocci6n par convecci6n) o CONVECTIONBAKE
(horneodo par convecci6n) uno vez poro
horneodo par convecci6n de bondejos
m01tiples.Estemodo se utilizo poro cocinor
olimentos en m6s de uno bondejo (es decir, 2,
5 o m6s bondejos) ol mismo tiempo en
horneodo par convecci6n. Poro m6s
informoci6n, ver Iosecci6n Homeodo par
convecci6n con bondejos m01tiples.
Presione el bot6n CONVECTIONCOOK
(cocci6npar convecci6n)o CONVECTIONBAKE
(horne(]do par convecci6n) dos veces par(]
horne(]do par convecci6n en un(] b(]ndej(].
Este modo se utiliz(] par(] cocin(]r (]limentos
en s61oun(] b(]ndej(] en horne(]do par
convecci6n.
Presioneel bot6nCONVECTIONROAST
(rostizodopar convecci6n)poro rostizodo
par convecci6n (enolgunosmodelos).
[] Presionelos olmohodillos num@icosporo
configuror Io temperoturo del homo.
I-3-1Presioneel bot6nSTART(inicior).
NOTA:Sila caracteristiea de Conversi6n
Automdtiea de Recetas '_se encuentr(] (]ctivad(],
reducird en forma (]utomdtic(] I(]temper(]tura de
home(idaregular configumd(] en25°F(!3,5°C)
Cuondoest@rostizondopar convecci6n, resulto
importonte que utiliceIoosoderoy Ioporrillo
poro mejores resultodosde rostizodopar
convecci6n.Loosodero seutilizo pororetener
losderromesde grosoy Ioporrillo seusa poro
prevenirsolpicodurosde groso.
hast(] la temper(]tufa de convecci6n apropiad(]
en elmodo de borne(ida par convecci6n. Ver la
Conversi6n Automdtic(] de Recetas _ en la secci6n
de Carocteristic(]sespeci(]les.
Paracambiar latemperatura delhomo, presione
elbot6n CONVECTIONCOOK(cocci6npar
convecci6n),CONVECTIONBAKE(horneodopar
convecci6n)o CONVECTIONROAST(osodopar
convecci6n)y luegolos olmohodillosnum@icos
par(]configurar la nuevatemperatura.
Cuandoel homo comienza a calentar,podr6
verse latemperatura cambiante, comenzando
a :]_00°F(58°C).Cuondoel homo olconzoIo
peratura configurada,sonaran Spitidos.
Presioneelbot6n CLEAR/OFF(borrar/
apagado)cuando hayafinalizado.
, Mientrascocine par convecci6nseoir6
unventilador. Elventilador sedetendr6
cuando seabra la puerta pero el color
no se apagar6.
, Duranteel horneado,pueden escucharse
chasquidosprovenientesdel homo.
Estoesnormal.
, Enlos modos de horneado par convecci6n,y
para potenciar al m6ximo una cocci6n pareja,
el ventilador est6 disehado para girar en
ambas direcciones,con una pausaentre elias.
Estoesnormal.
Recipientes para cocci6n par convecci6n
Cuando hornee galletas, obtendr6
mejores resultodos si usa uno
plancha piano para galletas en
lugar de un redpiente de lados
bajos.
22
Antes de utilizarel horno de convecci6n,
verifique que sus elementos de cocci6ndejen
espacio suficiente para lacirculaci6n de uire en
el horno. Siva a hornear con varios recipientes,
deje un espacio entre elias.Adem6s, asegOrese
de que los recipientesno se toquen entre s[o
toquen las paredesdel horno.
Papal y pl6stico
Los recipientes de papel y pl6stico resistentes
al color recomendados para utilizar en
horneado normal tambi6n pueden utilizarse
para horneado par convecci6n, pero no deben
utilizarse a temperaturas m6s elevadas que
la temperatura recomendada par el fobricante
de los elementos de cocci6n, mambi6n pueden
utilizarse elementos de cocci6n pl6sticos
resistentes a temperaturas de 400°F (204,4°C).
Metal y vidrio
Cualquiertipo de recipiente de cocci6n funciona
en su homo de convecci6n; sinembargo,
losrecipientes de metal se calientan m6s
r6pidamente y se recomiendanpara horneado
par convecci6n.
Losbandejas oscuraso con acabado mate
hornean alimentos m6s r6pido que las
brillantes.
Losrecipientesde vidrio o cer6mica cocinan
m6s despacio.
Para recetas coma polio horneado, utilice un
recipienteconladosbajos.Elairecalienteno
puede circular bien alrededor de losalimentos
en un recipiente de lados altos.
Page 79

Uso de las funciones de horneado por convecci6n
con temporizador [homo superior (micamente). GEA _,ance com
Escuchardun ventilador al cocinar con esta funci6n.El mismo se detendrd cuando se abra la puerta, pero el calentador no se
apagar4.
NOTA:Lascomidas que se echan a perder r6pidamente, tales coma leche, huevos, pescado,rellenos,ave y cerdo, nose deber6n
dejar reposar par m6s de 1 hora antes y despu@sde lacocci6n. Latemperatura ambiente estimula el desarrollo de bacterias
nocivas. Aseg0resede que la luz del homo est@apagada, ya que el calor de la 16mparaacelerar6 el crecimiento de bacterias
nocivas.
C6mo Configurar un Inicio Inmediato y Detenci6n Autom6tica
Elhomo superior se eneenderd de farina inmediata y NOTA: Sisu receta requiere calentar en farina previa,
se cocinard par un pefiodo de tiempo sdeecionado, es posible que necesite agregar tiempo adicional
®®®®®
®®®®@
@ ® ®® ®
®®® ®®
AIfinal deltiempo de coccidn,elhomo se apagard
automdticamente.
[] Presionelateda CONVECTIONBAKEMULTI/.1
RACK(EstantedeHorneadopor Convecci6n
Multi/I) unavez paraun horneadopar convecci6n
con mOttiplesestantes.Estemodo seutitizapara
cocinarcomidasen m6sde unaparritta(esdecir:2,
3om6s parriltas)almismotiempo duranteet
horneadopar convecci6n.Param6sinformaci6n,
leala secci6nHorneadoconConvecci6ncon
H@tiplesestantes.Presionelateda CONVECTION
BAKEMULTI/I RACK(Estantede Horneadopar
Convecci6nMulti/]J dosvecesparaun horneado
parconvecci6ncon unestante.Estemodose utiliza
para cocinarcomidasconun soloestanteen el
horneadopar convecci6n.
Presionelateclade CONVECTIONROAST(Asado
por Convecci6n)paraasar parconvecci6n.
[] Presione lasteclas num6ricas para programar
la temperatura deseada del homo.
[-_ Presione la tecla COOKINGTIME
ITEMPORIZADORDE COCCIONL
sabre la duracidn del tiempo de coccidn.
[] Presione lasteclas num6ricas para configurar
el perfodo de tiempo de cocci6n deseado. El
tiempo mfnimo de cocci6n que puede
configurar es 1minuto.
La temperatura del homo queconfigure y el tiempo
de cocci6n que ingres6 aparecercin en lapantalla.
[] Presione la tecla START(Iniciar).
La pantalla muestra latemperatura del homo que
configur6 o la cuenta regresiva de lacocci6n par
tiempo. La pantalla comienza a cambiar una vezque
la temperatura Ilega a los 100° F.
AIfinalizar el horneado par convecci6n con
temporizador, el homo se apagarci.Sonarciel
tono de fin de ciclo. Presione la tecla CLEAR/OFF
(Limpiar/Apagar) para apagar la pantalla, de
ser necesario.
JZ] Retire la comida del horno. Recuerdeque las
comidas quese dejan en el homo contin0an
cocincindose luego de que los controles se
hayan apagado.
®®®®®
i!i i i
®® ® @®
@ ® ® ® @
® ®®® @
® ®@®@
C6mo Configurar un Inicio Retrasado y Detenci6n Autom6tica
Puedeprogramar elcontrol delhomo superiorpara
demorar-iniciarelhomo, cocinardurante unpefiodo
detiempo espedfieoy luegoapagarsedeforma
automdtiea.
Aseg0resequeel relojmarque la hora correctadel dia.
E_] Presionelatecta CONVECTIONBAKEMULTI/I
RACK(Estantede Horneadopar Convecci6n
Multi/I) unavez para unhorneadopar
convecci6ncon m0ttiplesestantes.Estemodo se
utilizapara cocinarcomidas enm6s de una
parritla(esdecir: 2,3o m6sparritlas)al mismo
tiempo durante elhomeado par convecci6n.Para
m6sinformaci6n,teala secci6n Horneadocon
Convecci6ncon IVl01tiplesestantes.
Presionelateda CONVECTIONBAKEMULTI/1
RACK(Estantede Harneadapar Canvecci6n
Multi/i) dosvecespara un horneadopar
convecci6ncon un estante.Estemodo seutiliza
para cocinar comidascon un soloestanteen el
horneadopar convecci6n.
Presionelasteclasnum6ricaspara programar la
temperatura deseadadet horno.
[] Presionelateda COOKINGTIME(Temparizadar
de Cacci6n).
NOTA:Sisu receta requiere calentar en farina previa,
espasible que necesiteagregar tiempaadicianal
sabre la duraci6n del tiempa decacci6n.
Presionelastectasnum6ricas paraconfigurar el
periododetiempo de cocci6ndeseado.
Presionela tecla DELAYSTART(Demorar
IniciaL
Presionelasteclas num6ricas para configurar
''' la hora del dfa en que desea queel homo se
encienday comience a cocinar.
Sidesea controlar los horarios que configur6,
presione latecla de DELAYSTART(Inicio Demorado)
para controlar la hora de inicio queconfigur6 o
presione latecla COOKINGTIME(Tiempode Cocci6n)
para controlar el perfodo de tiempo de cocci6n que
program6.
[-_ Presione la tecla START(lniciarL
IIZ__J
NOTA:Un tono de atenci6n sonarcisi estciusando
el horneado par tiempo y no presiona la tecla
START(Iniciar)una vez ingresada la temperatura del
horneado.
Cuando el homo se encienda en la hora del dfa
que configur6, la pantalla mostrarci el cambio de
temperatura (comenzando en 100° F)y la cuenta
regresiva del tiempo de cocci6n.
AIfinalizar el horneado par convecci6n con
temporizador, el homo se apagarci.Sonarciel tono
de fin de ciclo.
[] Presione la tecla CLEAR/OFF(Borrar/Apagar)
para apagar la pantalla sies necesario.Una
vez finalizado elhorneado, retire lacomida del
horno. Recuerdeque aunque el homo se
apague de forma automcitica, las comidas
contin0an cocincindoseuna vez que los
controles est6n apagados. 2 3
Page 80

C6mo usar el homo de convecci6n, tenoUunosmode os
C6mo configurar el horno para rostizado por convecci6n cuando
se usa la sonda
Para mejores resultados, cuando
rostice paros y asados grandes,
recomendamos el usa de la sonda
induida en el horno de convecci6n.
DDD[]D
DD[]DD
DDDDD
DDDDD
Para cambiar la temperatura del
homo durante el cido de rostizado
par convecci6n, presione el bot6n
CONVECTIONCOOK (cocci6n par
convecci6n) y luego presione las
almohadillas num6ricas para
configurar la nueva temperatura
deseada.
IA PRECAUCI6N i
Para evitar quemaduras, no desenchufe
la sonda de fa boca de salida def homo basra que
dste se haya enfriado.
Coloquelabandeja delhomo enla posici6n
%
quecentra losalimentosentre la parte
superiore inferiordelhorno.Introduzcala
sondaen lacarne.Aseg0resedeque haya
entradopor completo.
Enchufela sonda dentro de la boca desalida
del homo.Verifiquequeest6introducida
hasta elfondo.Cierrelapuertadelhomo.
Presione el bot6n PROBE(sonda).
@
Presionelasalmohadillasnum@ica8para
%
configurar latemperatura internadeseada
de la carne.
NOTA: La temperature intema mdxima a fa que
pueden configurarse los atimentos es 200°F (93°C).
I_J Presione el bot6n CONVECTION COOK
(cocci6n par convecci6n).
r-_
OhOJPresione las almohadillas num@icas para
configurar la temperatura deseada del
homo.
La pantalladestellar6PROBE(sonda)
yel control delhomo indicar6sila sonda
seencuentraenchufadadentro dela boca
de salida,y si usted no haconfigurado
una temperatura de sonday presionado
el bot6n START(iniciar).
[-7--] Presione el bot6n START(iniciar).
Cuando el homo comienza a calentar, la palabra
LO(baja) aparecer6 en la pantalla.
Despu6s de que latemperatura interna de la came
alcance los !O0°F (38°0, latemperatura interna
cambiante podr6 verse en la pantalla.
Cuandola temperatura internade la carne
%
alcanzala cifraqueusted haconfigurado,la
sonday el homoseapagany loscontroles
del homo destellan.Paradetenereldestello,
presioneelbot6n CLEAR/OFF(borrar/
apagado).Utiliceguantesde cocina para
quitar lasondade losalimentos.Noutilice
pinzasparaquitarla, porquepodr[andaflarla.
NOTA:Sifa sonda se quita del homo mientras
se estaba cocinando, el homo no se apagard
automdticamente.
NOTAS:
Mientras cocine con esta caractefistica
se escuchard un ventifador. El ventifador
se detendrd cuando se abra la puerta pero el
calor no se apagard.
Puede usarse el temporizador de la cocina
aunque no pueden utilizarse las operaciones de
homo con temporizador.
Nunca deje la sonda dentro del homo durante
un ciclo de auto-limpieza.
No guarde lasonda dentro def homo.
Lasonda no debe utifizarseen las funciones de
asado y de auto-limpieza.
Elventilador s6fo gira en una direcci6n.
Gulu de rostizudo por convecci6n
Came Temp. homo Temp. internal
Carne Asadodecostilla (4a 8 Ibs.[1,8a3,6kg]) Jugosa 525°F(165°O 145°F(65°0
de res Cony sin hueso A punto 525°F(163°C) 160°F(71°O
Solomillo de came de res Jugosa
(4a 6 Ibs. [1,8 a 2,7kg])
Solomillo de came de res Jugosa
Cerdo
Cordero
Came
de ave
*Los ayes rellenas generolmente requieren 30 /45 minutos de tiempo odicionales de mstizado. Cubra los paros
y la pechuga con papel metdlico poro evitor que la came se oscurezca demasiado o se seque.
24
(2a S Ibs_[0,9 a 1,a kg])
Con hueso, sin hueso
(3a 5 Ibs.[1,4a 2,3 kg])
Con hueso (5 a 9 Ibs_[2,3 a 4,1kg]) A punto
Sin hueso (4a 7 Ibs,[1,8 a 3,2 kg]) A punto
Polio entero (5 a 7 Ibs,[2,3a s2 kg])
Pavo, entero*
Sin relleno (10a 16Ibs. [/4,5a 7,3 kg])
Sin relleno !18a 2a !bs, !8,2a10,9kg!) 525°F(165°C) 170°-180°F!77°-82°C)
Pechuga de pavo (4 a 6 Ibs. [1,8 a 2,7 kg]) 525°F (163°C) 170°F (77°C)
425°F (21800 145°F (63°C)
425°F (218°C) 145°F (63°C)
525°F (165°C) 160°F (71°C)
525°F (16500 165°F (74°C)
575°F (191°C) 165°F (74°0
550°F (177°C) 170°F (77°C)
325°F (16500 170°-180°F (77°-8200
Page 81

Caracteristicas especiales de los controles de!homo. GEAppliances.com
Losnuevoscontrolescon botonesde toquecuentan con caracteristicasadicionales.Lassiguientessonlas
caracteristicasy la manera enque ustedpuede activarlas.
Losmodos decaracteristicasespecialess61opueden activarsemientras la pantalla muestra lahora.Seconservan
enla memoria deloscontroleshasta que serepitan lospasos.
Paraingmsar una caracteristica especialen unode losdoshomos, usteddebeprimero presionar losbotones
BROILHI/LO [asar alto/bajo)y BAKE[homear)de/homo superioral mismo tiempo. LosbotonesBROIL HI/LO
[asaralto/bajo)y BAKE[homear)delhomo inferiorno activan caracteristicasespeciales.
Cuandola pantalla muestrasu opci6n,presioneel bot6nSTARTfiniciar).I_ascaracteristicasespecialesse
conservardnenla memoria despudsdeun cortedeenergia,conexcepci6ndelSabbath,quedebereconfigurarse.
Apagado luego de "12horas
Presioneel bot6n DELAYSTART(inicio
r21
retardado) hasta que aparezca no shdn
(no apagado) en la pantalla.
Presioneel bot6n START(iniciar)para
[]
activar la caracteristica de no apagado y
dejar el control configurado en este modo
de caracteristicas especiales.
ill/_i i _ _i i i
[ DELAY J
Conesta opcian,en caso de dejarse elhomo
encendidoaccidentalmente,el control Ioapaga
en forma automdtica luego de!2 horas durante
funcionesde homeado o despudsde3 horas
durante la funci6n de asado.
Sidesea apagar (OF_qesta funci6n, siga los
pasos siguientes.
171 Presionelosbotones BROIL HI/LO (asar
"' alto/bajo) y BAKE(hornear)del homo
superioral mismo tiempo hasta queen la
pantalla pueda verseSF.
i ii i i i _ ii
(Enalgunos modelos)
iiIi iI i i
Selecci6n de temperatura en Fahrenheit o
Su control de homo estd configurado para
utilizar las selecciones de temperatura
Fahrenheit, pero puede modificarse para usar
selecciones en Celsius.
r71 Presione los botones BROILHI/LO (asar
alto/bajo) y BAKE(hornear) del homo
superior al mismo tiempo hasta que en la
pantalla pueda verse SF.
Celsius
[] Presionelos botones COOKTIME(tiempo
de cocci6n) y BROILHI/LO (asaralto/bajo)
al mismo tiempo. Enla pantalla podr@
verse F (Fahrenheit).
Presionelos botones COOKTIME(tiempo
de cocci6n) y BROILHI/LO (asaralto/bajo)
de nuevo al mismo tiempo. Enla pantalla
podr@verse C(Celsius).
Presioneel bot6n START(iniciar).
71
SeSales sonoras al finalizar un cic/o con temporizador
AIfinalizar un ciclo con temporizador se
escuchan 3 pitidos cortos seguidos pot un
pitido carla 6 segundos hasta que se presione
el bot6n CLEAR/OFF(borrar/apagado). Este
pitido continuo
de 6 segundos puede cancelarse.
Para cancelar el pitido continuo de 6 segundos:
Presionelos botones BROILHI/LO (asar
%
alto/bajo) y BAKE(hornear)del homo
superior al mismo tiempo hasta queen la
pantalla pueda verseSF.
Presioneelbot6n BROIL(asar).Lapantalla
muestra CONTIBEEP(pitidocontinuo).
Presioneelbot6n BROIL(asar)de nuevo.La
pantalla muestra SINGLEBEEP(pitido
Onico).(Estocancela elpitido cada 6
segundos.)
0
presioneel bot6n KITCHENTIMERON/OFF
(temporizador de la cocina encendido/
apagado).La pantalla muestra CON
BEEP(pitido continuo). Presioneel bot6n
KITCHENTIMERON/OFF(temporizador de
la cocina encendido/apagado) de nuevo.
La pantalla muestra BEEP(pitido).(Esto
cancela el pitido cada 6 segundos.)
Presioneel bot6n START(iniciar).
@
(Enalgunos modelos) 25
Page 82

Caracteristicas especia/es de los contro/esde! homo.
Vo/umen de/tono (en olgunos modelos)
I cooKI
Esta caracter[stica permite regular elvolumen
de los tonos para Iograr un volumen mas aceptable.
Existentres niveles devolumen diferentes.
F_ Presione los botones BROILHI/LO (asaralto/
ii i
bajo)y BAKE(hornear)del homo superior al
mismo tiempo hasta queen la pantalla pueda
verse SK
F_ Presione el bot6n COOKTIME(tiempo
de cocci6n).Enla pantalla podra verse 2 BEEP
(2pitido). Estees el nivelde volumen medio.
Presioneel bot6n COOKTIME(tiempo
de cocci6n) de nuevo. Enla pantalla podra
verse3 BEEF)(5pitido).Estees el nivelde
volumen mas alto.
2.2 horas, 24 horas o bloqueo del reloj
Suscontroles estan configurados para usar un reloj
de 12 horus.
Siprefiere tener un reloj de estilo militar de 24 horus
o anular la visualizaci6n del reloj, siga lossiguientes
pasos.
Presionelos botones BROILHI/LO (asaralto/
i/i
bajo)y BAKE(hornear)del homo superior al
mismo tiempo hasta queen la pantalla pueda
verse SF.
Presioneel bot6n CLOCK(reloj)una vez. Enla
pantalla podrci verse 12hr. Siesta esla opci6n
que desea,presione el bot6n START(iniciar).
Presioneel bot6n COOKTIME(tiempo
de cocci6n) de nuevo. Enla pantalla podra
verse i BEEP(1 pitido).Esteesel nivel
de volumen mas bajo.
Cada vez que se modifica el nivelde volumen,
seescucha un ejemplo delvolumen de la serial
sonora.
Seleccioneel nivel devolumen deseado
(1BEEP,2BEEP,SBEEP).
Presioneel bot6n START(iniciar)para activar el
nivelelegido.
Presioneel bot6n CLOCK(reloj)de nuevo para
cambiar al reloj estilo militar de 24 horus. Enla
pantalla podrci verse24 hr. Siesta es la opci6n que
desea, presione el bot6n START(iniciar).
Presioneel bot6n CLOCK(reloj)de nuevo para anular
la visualizaci6n del reloj. Enla pantalla podrciverse
OFF(apagado).Siesta esla opci6n que desea,
presione elbot6n START(iniciar).
NOTA:Siel retojse encuentro en el mada sin
visuotizocidn,ustedno podrd utilizorIofuncidn de
inicio retordodo.
26
Page 83

Funcionesespecialesdelcontroldesu homo. GEA,Uiances.com
Conversi6n de Auto Recipe
CONVECTIONBAKE]
START
CLEAR
OFF J
Puede usar sus recetas favoritas en el homo
par convecci6n.
AI user CONVECTION BAKE (Homeado par
Convecci6n), el homo convertir6 de forma
automdtica la temperature del homo del
homeado regular a los temperatures de
Homeado par Convecci6n.
Pare activar la funci6n:
[] Presione los teclas Warm (talented y
Bake (Hornead al mismo tiempo hasta
que la pantalla muestre SF.
[] Presione la tecla Convection Bake
(Hornear par Convecci6n). La pantalla
mostrar6 Con Off (Convecci6n
Apagada). Presione la tecla Convection
Bake (Hornear por Convecci6n)
nuevamente. La pantalla mostrar6 Con
On (Convecci6n Encendida).
Presione la tecla Start (Iniciar).
@
Utilizando las teclas num@icas,ingrese la
[]
temperatura recomendada en la receta.
Presionela tecla Start (Iniciar).
@
La pantalla mostrar6 la temperatura real
convertida (reducida). Parejemplo: si se
ingresa la temperatura regular de una
receta de 350° F(1770C)y se presiona la
tecla Start (Iniciar),la pantalla mostrar8
CONy la temperatura convertida de 3250 r_
F(1630C).
NOTA:Estafunci6n s61oconvierte las
temperaturas de cocci6n,y no lostiempos
de cocci6n. AIasar par convecci6n, la
temperatura del homo no se auto convertir6.
Presionela tecla Clear/Off (Borrar/
Apagar) cuando la cocci6n est6
completa.
• Useel tamaho de alia recomendado en la
receta.
• Algunas instrucciones del paquete pare
cazuelas congeladas,platos principales o
productos homeados fuemn desarrolladas
utilizando homos par convecci6n
comerciales.Pare mejores resultados con
este homo, precaliente el mismo y usela
temperature, pare un homeado regular, que
figure en el paquete.
Pare desactivar la funci6n:
Presionelasteclas Warm (Calentafl y
rtl
Bake (Horneafl al mismo tiempo hasta
que la pantalla muestre SF.
TPresionela tecla Convection Bake
(Hornear por Convecci6n). La pantalla
mostrar6 Con On (Convecci6n
Encendida). Presione la tecla Convection
Bake (Hornear pot Convecci6n)
nuevamente. La pantalla mostrar6 Con
Off (Convecci6n Apagada).
Presionela tecla Start (Iniciar).
Bloqueo de la Cocina
i i ii i i
Sucontrol lepermitird bloquear las unidades
de la supe_cie, losquemadores del homoy el
panel de control de modo que no puedan set
acdvados.
Para bloquear/desbloquear los controles:
Apague todos losquemadores de la
superficie.
Presionela tecla RANGELOCKOUT
(Bloqueo de la Cocina) y luego la tecla
START(Iniciar).
Paradesbloquear el control, presionela
@
tecla RANGELOCKOUT(Bloquear el
Control) y luego presionela tecla START
(Iniciar).
Cuando esta funci6n est6 activada y las teclas
t6ctiles sean presionadas, el control emitir6 un
pitido y la pantalla mostrar6 LOC_Bloqueo).
• Elmodo de bloqueo de control afecta todos
loscontroles. NingOncontrol funcionar6
cuando esta funci6n est6 activada.
• LOSajustes se guardar6n en la memoria
luego de un cort_ede corriente.
27
Page 84

C6mo usar la funci6n Sabbath. Chomossu er o eingersoll
(Dise@dapara utilizarseduranteel Sabbathu arrasFiestasJudfas) (enalgunosmodelos) GEAppliances.com
La funci6n Sabbath solamente puede utilizarse para hornear/rostizar. No es posible utilizarla para convecci6n, asado, auto-limpieza o cocci6n con
inicio retardado.
NOTA: La luz interior del homo se enciende automdticamente (an algunos modetos) cuando se abre la puerta y se apaga cuando se la cierra. Puede
quitarse la bombilla de luz. Vet la seccian de Reemptazo de bombilla de luz. En los modelos con interruptor de luz en el panel de control, la luz del
homo puede encenderse y dejarse asL
+_ C6mo configurarhorneado/rostizado comunes Mediante los almohadillas num@icas, ingrese la
F11Zl Fq171171f
t rqrTlraEIE]
Cuando la pantalla muestra D,
el homo est6 configurado para
Sabbath. Cuando ]a pontalla
muestra mc, el homo est6
horneando/rostizando.
Cuando la pantalla muesZ_a
el horno esta configurado para
Sabbath. Cuando_ F_nntalla
muestra , elhomo est6
horneando/rostizando.
yASeg0resede que el reloj muestre la horocorreCtOqueet homo est6 opagado, r_ temperatura deseada entre 170OF(77oC)y 550OF
PresioneysostengalosbotonesBROILHI/LO (288°C). No se dora ninguna serial o temp eratura.
[Z] (asaralto/bajo)yBAKE(hornear)almismotiempo No hay una temperatura predeterminada.
hasta queen la pantalla pueda verse SF.
NOTA: Sien la pantalla aparecen Bake (horneor) o
Broil (asar), los botones BROIL HI/LO (asor alto/
bojo)y BAKE (hornear) no se presionaron al mismo
tiempo. Presione el bot6n CLEAR/OFF (horror!
apagado) y comience de nuevo.
[] resione el bot6n DELAY START (inicio retardado)
hasta que aparezca BAh bAtH en la pantalla.
Presione el bot6n START(iniciar) y m aparecera en
r_ la pantalla. Ambos hornos se encuentran ahora en
etmodo Sabbath.
r_ Presione el bot6n BAKE (hornear) en et homo
superior o inferior. No se dara una sehaL
r_ Presione el bot6n START(iniciar)en el homo
correspondiente.
r_ Despu_s de un periodo abatorio de
aproximadamente 30 segundos a 1 minuto, m c
aparecera en lapantalla indicando que el homo
esta horneando/rostizando. Sim c no aparece en
la pantalla, comience de nuevo en el paso/4.
Para hornear en el otro homo, comience en el paso
r_/4 (en algunos modelos).
Par8 ajustar la temperatura del homo, presione el bot6n
BAKE (hornear), ingrese la nueva temperatura usando
los almohadillas numaricas y presione el bot6n START
(inicior).
NOTA: Los botones CLEAR/OFF (borrar/opagado)
y COOKTIME (tiempo de cocci6n) se encuentron 8ctivos
durante Io funci6n Sabbath.
C6mo configurar horneado/rostizado con temporizadon Inicio inmediato
y apagado autom6tico
Aseg_rese de qua el reloj muestre la hora correcta [] sePaL
y qua el homo estd apagado.
Z] Presione y sostenga los botones BROIL HI/LO Presione las almohadillas num@icas para
(asar alto/bajo)y BAKE (hornear) al mismo tiempo r_ configurar la temperatura deseada. No se dara
hastaqueen lapantallapuedaverseSF.
NOTA:Sienla pantalla aparecenBake(hornear)o
Broil(asar),los botonesBROILHI/LO(asaralto/
bajo)y BAKE(hornear)nose presionaronal mismo
tiempo. Presioneelbot6n CLEAR/OFF(borrar!
apagado)y comiencede nuevo.
Presioneelbot6nDELAYSTART(inicioretardado)
hastaque aparezcaSAbbAtHen la pantalla.
Presioneelbot6nSTART(iniciar)ym apareceraen
[] la pantalla.Ambos hornosseencuentranahora en
etmodoSabbath.
r_l Presioneelbot6nCOOKTIME(tiempode cocci6n)
enel homo superioro inferior.No seclarauna
seBak
r5-1 Presionelasalmohadillasnum@icaspara
configurareltiempo deseadode cocci6nentre t
minutoy 9 horasy 99 minutos.
r6--1 Presioneetbot6nSTART(iniciar).
Presione etbot6n BAKE (hornear). No se dora una
ningunasepalo temperatura.No hay una
temperatura predeterminada.
r-9-] Presioneelbot6n START(iniciar)enel homo
correspondiente.
JT_ Despu@sdeun periodoaleatoriode
apro×imadamente30segundosa t minuto,mc
aparecer6 enlapantalla indicandoque el homo
est6 homeando/rostizando.Sim c no apareceen
la pantalla,comiencede nuevoen el paso7.
Paraajustarla temperaturadel homo,presioneel bot6n
BAKE(hornear),ingresela nuevatemperatura usando
las almohadillasnum@icasy presioneelbot6n START
(iniciar).
Cuandose hayaterminado la cocci6n,la pantalla
cambiara de mc a my aparecera0:00,indicando que
el homo sehaapagado (OFF)perosigueconfiguradoen
Sabbath.Retirelosalimentosdel horno.
C6mo desactivar la funci6n Sabbath
Presioneel bot6n CLEAR/OFF(borrar!apagado).
%
r_ si elhomo esta cocinando, espere un periodo
aleatorio de aproximadamente 30 segundos a 1
minuto, hasta que s61om aparezca en la pantalla.
Presione y sostenga los botones BROIL HI/LO
ii ii II i ii_i
I DELAVJ
r-_ (asar alto/bajo) y BAKE (hornear) al mismo tiempo
basra que en la pantalla pueda verse SF.
Presione el bot6n DELAY START (inicio retardado)
r4-1 hasta qua 12shdn o no shdn aparezcan en la
pantalla.
r-_--1Elija 12 shdn, indicando qua el homo se apagara
automaticamente despu@sde 12 horas o no
shdn, indicando que el homo no se apagara
automaticamente despuas de 12 horas.
J_-] PresioneSTART(iniciar)cuando la opci6ndeseada
apareceenla pantalla (12shdno no shdn).
NOTA:Encasodecarte deenergiacon lafunci6n
de Sabbathactivada,dicha funci6nseapagara
automaticamentea0n cuandovuetva laenergia.
Elcontroldelhomo debevolvera configurarse.Algunos
modeloscontinuaranel mariaSabbath;sinembargo,
sise abrela puerta,seactivarala luzdel homo.
Page 85

C6mo usar los homo auto-limpiantes superior. GEAppliances.com
Antes de un ciclo de limpieza
No limpielajunta. Elmaterial de fibra devidrio de
Limpie con un patio los desechos
rebeldes acurnulados en elpiso del
homo.
ADVERTENCIA
PELIGRODEINCENDIO:Limpiela grasay
la suciedadrebel@del pisodel homo antes
de taauto-limpieza.No hacerlopuede provocar
un incendio enel homo.
Recomendamosventitarsucocinacon
unaventanaabiertaoutitizandounventitador
ocampanaduranteetprimerciclode
auto-limpieza.
Quitelaasadera,rejilla,sonda,todos
losrecipientesdecocci6nycualquiertrozo
depapeldealuminiodethomo.
NOTAS:
Sisuhornoest6 equipadocon bandejas
para homo plateadasbritlantes,quitetas
antesde comenzarel ciclode autolimpieza.
Lasbandejasparahomoplateadasbrillantes
(enalgunosmodelos)puedendejarsedurante
laauto-limpieza,peroseoscurecerOn,perderOnet
britloyserOdificildeslizarlas.
Sisuhomoest6equipadoconbandejasrevestidas
deporcetanagrispuedendejarsedentrodethomo
duranteetciclodeautolimpieza.
Lasuciedadubicadaenetmarcofrontalde
lacocinay fueradelajuntadelapuertadeber(i
limpiarsea mano.LimpieestasOreasconaguacaliente,
esponjitlasdelanadeaceroembebidasenjab6no
limpiadorestalescomoSoftScrub_. Enjuaguebiencon
agualimpiayseque.
lajunta de la puerta delhomo no resisteproductos
abrasivos.Esesencialque lajunta se mantengaintacta.
Siustednotaque est(i desgastada,reemplciceta.
Verifiquequelatapadetabombilladeluz
delhomoest@ensu lugaryquelaluzdethomoest@
apagada.
IMPORTANTE:Lasemanacionesproducidaspor
elciclodeautolimpiezadecualquierhomoafectan
lasaluddealgunasayesdemaneranotoria.Procure
Itevarsusayesaotrahabitaci6nbienventitada.
r-qI3]rq El %
IT11ElE] E]%-1
C6mo configurar el horno para una auto-limpieza
Laspuertasdelhornodebeestarcerradasy todos
loscontrotes@benestarcorrectamenteconfigurados
paraqueelciclofuncioneenformaadecuada.
[Z] Presioneetbot6nSELFCLEAN(auto-limpieza).
Serecomiendaunciclode3horasparalimpiar
derramespequer]osy contenidos.Serecomienda
unciclodeauto-limpiezadeShorasparaun :,
homom6ssucio.
r_ sinecesitaunciclodiferentedeSo 3horas,utilice
lasalmohadiltasnum_ricaseingreseettiempode
limpiezadeseado.
Eltiempodetimpiezapuedeconfigurarseentre3horas
yShoras,deacuerdoconetgradodesuciedaddet
homo.
[-_ Presioneetbot6nSTART(iniciar).
Laspuertasdethomo superioreinferiorsebloquean
autom6ticamente. Losetementosdetaestufatambi_n
sebloqueandurante talimpieza.Lapantalla mostrar(i
eltiempo delimpieza restante.No podrcinabrirse
las puertasdelhomo o utilizarla estufa hasta que la
temperatura desciendapor debajode latemperatura
de bloqueoy seapague LOCKED/DOOR_ (puerta
bloqueada)de la pantaltade control.
CuandoseapagueLOCKED/DOOR
(puertabloqueada),ustedpodrciabrirlaspuertas.
Siustedconfiguraelciclodelimpiezay seolvidade
cerrarlaspuertasdelhomo,destellar6LOCKED/
DOOR_ (puertabloqueada)y lapalabradoor
(puerta)aparecer(ienlapantalta.
Paradetenerel cictode limpieza,presione
el bot6n CLEAR/OFF(borrar/apagado).
Cuandose apaga LOCKED/DOOR_ (puerta
bloqueada),indicandoquelatemperatura
de loshornos ha descendidopor debajode
la temperatura de bloqueo,usted podr(i abrir
las puertas.
Hornos dobles:
_, Usted puede configurar un ciclode limpieza en
ambos hornos al mismo tiempo; sin embargo, no
efectuarcin la auto-limpieza al mismo tiempo. El
Oltimo homo en configurarse retardarci su inicio
autom6ticamente hastala finalizaci6ndetciclo de
limpiezadel primer horriD.
Cuandoseconfigureunhomoparalaauto-limpieza,
lasdospuertasdethomoy loscontrolesdetaestufa
sebloquear6n.Loshornosylaestufanopueden
usarsecuandounhomoestOconfiguradopara
laauto-limpieza.
29
Page 86

C6mousar los homo autodimpiontes superior.
Las puertas dd homo debe estar cerradas y todos los controles deben estar correct:ament:e configurados para que el ciclo
funcione en forma adecuada.
C6mo configurar un inicio retardado de limpieza
DDDD
DDDD
DDDD
DDDD
r_ Presioneel bot6n SELFCLEAN
(auto-limpieza).
Se recomienda un ciclo de 3 horas para
limpiar derrames peque_os y contenidos.
Se recomienda un ciclo de auto-limpieza
de 5 horas para un homo mc_ssucio.
[] Sinecesita un ciclodiferente de5 o3
horas, utilice los almohadillas num_ricas e
ingrese eltiempo delimpieza deseado.
Eltiempo de limpieza puedeconfigurarse entre
3 horas y 5 horas,de acuerdo con el grado de
suciedad del horno.
r3] Presioneel bot6n DELAYSTART(inicio
retardado).
[] Hediante las almohadillas num6ricas,
ingrese la hora en que deseainiciar
el ciclo de limpieza.
Despu6s de un ciclo de limpieza
Pueden quedar cenizasblancas en el homo.
Lfmpielascon un paho h0medo despu6s de que
seenfr[e el horno.
Siquedan manchas blancas,quite lascon una
esponjillade lana de acero embebida enjab6n
y enjuague bien con una mezcla de vinagrey
agua.
Engeneral, estosdep6sitos son restosde sal
que no pueden eliminarse durante el ciclo de
limpieza.
Siel homo no queda limpio despu6sde un ciclo
de limpieza, rep[talo.
[] Presioneel bot6n START(iniciar).
Lospuertas del homo superior e inferior se
bloquean automc_ticamente.Loselementos de
la estufo tambi6n se bloquean durante la auto-
limpieza.Lo pantalla mostrarc_la hora de inicio.
No podrc_nabrirse las puertas del homo o
utilizarse la estufa hasta que la temperatura
descienda par debajo de latemperatura de
bloqueo y se apague LOCKED/DOOR_ (puerto
bloqueada) de la pantalla de control.
Cuando seapague LOCKED/DOOR_ (puerto
bloqueada),usted podr6 abrir laspuertas.
iiiiiiiiiiii_iii
No puede configurarse el homo para cocinar
o para otro ciclo de auto-limpieza hasta que
6ste se encuentre Iosuficientemente fr[o
para que sedestrabe la puerta.
iiiiiiiiiiii_iii
Mientras el horno seencuentra en el proceso
de auto-limpieza, usted puede presionar
el bot6n CLOCK(reloj)para que se yea la
hora. Paravolver a la cuenta regresiva de
limpieza,presioneel bot6n ,SELFCLEAN
(auto-limpieza).
iiiiiiiiiiii_iii
Siresulta dificildeslizar las bandejas,coloque
una peque_a cantidad de aceite de cocina
en una toalla de papel y frote los extremos
de las bandejas.
30
Page 87

Usa del caj6n del horno inferior. GEAppliances.com
El caj6n del homo inferior se puede usar para hornear comidas usando los mismos tiempos y temperaturas queen
un homo normal. Las comidas ideales para homear en el cq/6n del homo inferior incluyen pizza, comidas congeladas,
cazuelas,galletas,arrolladosy muchospostres.
Pare User el Caj6n del Horno Inferior
NOTA:
• Siempre useel estante delcaj6n incluido al
usar el Caj6n del Horno Inferior.
• Elcaj6n del homo inferior no se puede usar
durante un ciclo de auto limpieza del homo
superior.
• No coloque comida, papel de aluminio ni
utensilios de cocina directamente en el
rondo del caj6n del homo inferior.Siempre
use el estante del caj6n incluido.
• Silas comidas requieren estar cubiertas, use
s61opapelde aluminio o tapas que resistan
lastemperaturas de horneado. Nouse
pl6stico.
• Laaltura m6xima de las comidas que se
pueden ubicar en el caj6n del homo inferior
esde 4".
• No coloque Ifquido ni agua en el caj6n del
horno inferior.
• Nunca coloque pl6sticos,papel,comidas
enlatadas o materiales combustibles en el
caj6n del homo inferior.
Presione hacio adentro y gire Io
perilla del caj6n del homo inferior
hacia cualquier configuraci6n
deseada.
J--f] Presionehacia adentro y gire la perilladel
caj6n del homo inferior hacia cualquier
configuraci6n deseada.
[] Permita que el caj6n del homo inferior se
precaliente.
• La luzde la seBalON(Encendido)est@
ubicada en el lado derecho superior de la
perillay brilla cuando laperilla est6en la
posici6nON(Encendido).Permaneceen ON
(Encendido)hasta que la perillaes movida a
la posici6n OFF(Apagado).
• Lasepal luminosa "Heating" (Calentar)est6
ubicada debajo de laseBalluminosa ON
(Encender)y brilla cuando loselementos
de calentamiento estan activos. El
precalentamiento est6 completo luego de
que la seBal"Heating" (Calentar)sehaya
apagado por primeravez en cada uso.
Elcaj6n del homo inferior utiliza menos energ[a que el horno superior.
Permita los siguientes tiempos aproximados para precalentar:
Temperatura del Homo
Inferior Deseada
CALIENTE 10 minutos
350°F 20 minutos
425°F 30 minutos
Tiempo de
Precalentamiento
Ajuste el termostato del homo inferior- iH6galo usted mismo!
Es posible que encuentre que su homo nuevo cocina de forma diferente al que reemplaz6. Use su homo nuevo
durante algunas semanas para familiarizarse con el mismo. SiaQn piensa que su homo nuevo es demasiado caliente o
demasiado frio, podr6 ajustar el termostato usted mismo.
No use term6metros, tales coma los que se encuentran en tiendas, para controlar la temperatura del homo. Estos
term6metros pueden variar entre 20 y 40 grados.
NOTA: Este ajuste no afectar6 las temperaturas de asado.
Para bajar la temperatura, mueva el
tornillo superior hacia la izquierda.
Cada clic cambiar6 la temperatura del homo en
aproximadamente lO° F.(Elrango es de 600F
desde la flecha).Sugerimosque haga el ajuste
de a un clic desdela configuraci6n original y
que controle elrendimiento del homo antes de
hacercualquier ajuste adicional.
[] Una vez realizadoel ajuste,vuelva a
ajustar el tornillo de modo que est6firme,
pero tenga cuidado de no ajustarlo en
exceso.
r-_ Vuelva a instalar la perilla en la cocina
controle el rendimiento. Y31
Parte Trasera de JaPerilla del
Homo Inferior (La apariencia puede
varior.)
[-_ Empujela perilla OVENCONTROL(Control
del Homo) fuera de la cocina y observe la
parte trasera. Pararealizar un ajuste,afloje
(aproximadamente un giro),pero sin quitar
completamente, los dos tornillos en la
parte trasera de la perilla.
Con la parte trasera del tornillo hacia
usted,sostenga el extremo exterior de la
perilla con una mano y gire el frente de la
misma con la otra.
Para elevar la temperatura del homo,
mueva el tornillo superior hacia la derecha.
Escuchar6 un sonido de clic por cada
abertura que mueva la perilla.
Page 88

Cuidado y limpieza de la cocina,
AsegOrese de que todos los controles estan apagados y que las superficies estan fr[as antes de limpiar cualquier porte de lacocina.
[, ADVERTENCIA j isequita lacocinaparaefectuarunalimpieza,reparacioneso
cualquierotraraz6n,verifiqueque
eldispositivoanti-volcadurassecoloquedemaneraadecuada
cuandovuelvaainstalarselacocina.
Sinotoma estaprecauci6n,lacocinapuedevolcarse
y provocarlesiones.
C6mo quitar el envoltorio de protecci6n y la cinta de embalaje
Concuidado,tome una punta detenvoltorio
de protecci6n con susdedosy lentamente quitelode la
supefficiedet@arab. No useelementosfitosospara
quitar et envoltorio.Quitetodo
el envoltorioantesde usar etaparato par
primeravez.
Paraasegurarsedeno danarel acabado del producto,
la mejor forma dequitar et pegamento dela cinta de
empaquede los@arabs nuevosconsisteenaplicar
detergente para vajitlasliquido.Apliqueconun pa_o
suavey deje remojar.
NOTA:Deberetirarseetadhesivode todas
las pares. Sisecalienta,sere1imposible de quitar.
Perillas de control
Parauna limpiezamas sencilla,los perittas
de control puedenquitarse.
Verifiqueque los perillasestan enla posici6n
OFF(apagado)ysaquetasdelosvcistagospara
la limpieza.
Losperillaspuedenlimpiarseenet lavavajillas
otambian puedenlavarse conjab6n y agua. Aseg0rese
de que taporte interna de tasperittasest6secaantes
de volvera colocarse.
Vuetvaa colocarlosperillasen la posici6nOFF
(apagado)paraasegurar unacolocaci6ncorrect(].
Panel de control
Sias[Io desea,puededesactivar losbotones detoque
antes dela limpieza.
Verla informaci6n sobreBloqueode controlesen la
secci6nC6mo usaretretoj,ettemporizadory et bloqueo
de controles de estemanual.
Limpielosderramescon un pa_o h0medo.
Tambianpuede utitizarun limpiador de vidrios.
Quitesuciedadesmas rebetdescon agua tibia
jabonosa.No utiliceabrasivosdeningunadose.
Vuelvaa activar losbotones detoque despuasdela
limpieza.
32
Superficies pintadas
Lossuperficiespintadasinduyen losladosde
la cocinay lapuerto,la portesuperiordetpanel
de controly el frentedetcaj6n.Limpielasconjab6n y
agua o conuna soluci6ndeagua y vinagre.
Superficies de acero inoxidable ten algunos modelos)
No utilice olmohodillas de ocero porque rayon la
superficie.
Para limpiar la superficie de acero inoxidable,
utilice agua tibia jabonosa o un limpiador o
lustrador de acero inoxidable. Siempre limpie la
superficie en direcci6n de la veta. Siga
las instrucciones del producto paro limpiar
la superficie de ocero inoxidable.
Estufa de esmalte de porcelana (en algunos modelog
Elacabado de esmalte de porcelana es
resistente pero puede romperse si se utiliza
incorrectamente. Este acabado es resistente
al 6cido. Sin embargo, no debe permitirse que
algunos alimentos 6cidos que se derraman (coma
jugos de fruta, tomate o vinagre) permanezcan en
el acabado.
Sise derraman 6cidos en la estufa mientras est6
caliente, utilice una toalla de papel o un patio
No utilice limpiadoresde homo comerciales,polvos
limpiadores,esponjillasdeacero o abrasivospotentes
sabrecualquier superficiepintada.
Para consultar sobre la compra
de limpiadores o lustradores de aparatos
de acero inoxidable, o para encontrar la ubicaci6n
del distribuidor mas cercano a su domicilio, Ilame
a nuestro nOmero gratuito:
Centro nacional de repuestos 1.8OO.626.2OO2
GEAppliances.com
secos para limpiarlo en el momenta. Cuando
la superficie se hoyo enfriado, limpie con agua
jabonoso. Enjuague bien.
Enel caso de otros derrames, como salpicaduras
de groso, etc., limpie con oguo jobonoso o polvos
limpiodores cuondo Io superficie se hoya enfriado.
Enjuague bien. Pula con un patio seco.
Page 89

Lajunta est6 disefloda con un espacio
enIo porte inferior para permitir una
adecuadacirculoci6n de aire.
Nofrote olimpie Iojunta de la puerto
porquetiene unoresistencia muy bajo
a la abrasi6n.
Sise advierteque Iojunta est6
desgastada,raida o daflado, o sise
ha desplazadode su lugor,sela debe
reemplozor.
Ranura--
Trabade -_
labisagra
Tire los trobos de Io bisogro hada
abojo poro destrobor.
C6mo limpiar la puerto del homo
Para limpiar la porte interna de la puerto:
Debidoaqueet6reaqueseencuentradentro
delajuntaselimpiaduranteetciclode
autolimpieza,noesnecesariolimpiarlaamano.
El6reaqueseencuentrafueradelajuntayet
burletedetapuertopuedenlimpiarseconuna
esponjillapl6sticaconjab6n,aguacalientey
detergente.Enjuaguebienconunasoluci6nde
aguay vinagre.
Para limpiar la porte externa de la puerto:
Utilicejab6nyaguaparalimpiarcuidadosamente
laportesuperior,losladosy etfrentedeiapuerto
delhomo.Enjuaguebien.Tambi_nesposible
utilizarunlimpiadordevidriosparalimpiarla porte
exteriordelapuerto.Nopermitaquecaigaagua
sabrelosaberturasdeventilaci6n.
Puerto del horno desmontable (en algunos modelos)
Lapuerto es muy pesada. Tengacuidado alquitary
levantar lapuerto.
Notevontetopuertode tomanUa.
Paraquitarla puerto:
Abralapuertoparcompleto.
%
Presionelostrabasdelabisagrahaciaabajoen
BE
direcci6ndetmarcodelapuertohasta
destrabarlas.Puedenecesitarseunaherramienta,
comaundestornittadorpianopeque_o.
Tomeconfirmezaambosladosdelapuertadela
%
portesuperior.
Cierrela puerto hasta la posici6nde remoci6n
%
depuerto, quees a mitadde camino entre
la posici6nde asadoy la puertocerrada.
[] Levantelapuertohastaqueelbrazo
dela bisagrahayasalidodelaranura.
iiiiii_
Siquedaalgunamanchapersistenteenlasecci6n
deventilaci6ndelapuerto,utiliceunlimpiador
abrasivosuavey unaesponjaparaobtenerlos
mejoresresultados.
Lassalpicadurasdesalsas,jugosdefrutas,salsas
detomateyjugosdealimentosquecontienen
0cidospuedendecolorarlasuperficie,parIoque
sedebeenjuagarlosdeinmediato.Cuandola
superficieest@fria,limpiey enjuague.
Noutiticelimpiadoresparahornos,polvos
limpiadoreso abrasivospotentesenlaporte
externadelapuerto.
Conla puertoen E×tremo
BE
elmismo6ngulo inferiorde
delaposici6nde laranura
remoci6n, \
introduzcalamuescadet
brazodelabisagradentro
delextremoinferiordela
ranuradela bisagra.La
ranuradelbrazodela
bisagradebeestarbien
colocadaenlaporteinferiordela ranura.
Abralapuertaparcompieto.Silapuerto
@
noseabreparcompleto,lamuescanoest0bien
colocadaenetextremoinferiorde
laranura.
Presionelostrabasdelabisagrahaciaarriba
%
contraelmarcofrontaldelacavidaddelhomo,
hastaalcanzartaposici6ndebloqueo.
GEAppliances.com
Brozo de
J / | la bisagra
Paravolvera colocarla puerto:
r_ Tomecon firmezaambos ladosde la puertode la
portesuperior.
Posid6n de remod6n
Presione los trobas de Io bisogra
hada ardba para bloqueor.
r_ Cierrelapuertadethorno.
33
Page 90

Cuidado y limpieza de la cocina,
Bandejas de! homo
Todaslasbandejasdel homopueden limpiarsea
Utilice la bandeja sin las dos manijas
frontales en el homo inferior.
manocon un limpiador abrasivoo una esponjilla
de acero.Despu_sde limpiar,enjuague las
bandejascon agua limpiay s6quelascon un paBo
limpio.Lasbandejasrevestidasde porcelanagris
puedenpermaneceren elhomo duranteel ciclo
de auto-limpiezasinsufrirdanos.Lasbandejasdel
Plancha de Hierro Forjado Lodge ®
Enjuague con agua caliente (nousejab6n)
%
y sequetotalmente.
Antes de cocinar, prepare la superficie con
espray de cocina o aceite vegetal.
Luego de cocinar,limpie la plancha con un
@
cepillo duro y agua caliente. No se
recomienda el usodejab6n, y nunca se
deben usar detergentes potentes.
Sequecon una toalla deforma inmediata
%
y aplique una capa suave de espray de
cocina o aceite vegetal mientras la
plancha a0n est6 caliente.
Guardeenun lugarfrb y seco.
@
No lave en el lavavajillas.
@
horno de n[quel pueden permanecer en el horno
durante el ciclo de auto-limpieza, pero perder6n el
lustre y resultar6 dificil deslizarlas. Ser6 necesario
engrasar todos los extremos de las bandejas con
una capa de aceite vegetal suave despu6s de
limpiarlas a mano o en el homo. Esto ayudar6
a mantener el f6cil deslizamiento de las bandejas.
Precauciones de la Plancha:
Sialgo sederram6 debajo de la plancha, se
deber6 limpiar tan pronto como sea posible
para evitar suciedad de comida "horneada".
Lea la secci6nde Limpiezade la cocina de
vidrio.
No permita que se acumule grasa debajo
de la plancha, ya que puede haber riesgo
de incendio. Limpie la parte inferior de la
plancha tan pronto como est6 fr[a. Leala
secci6nde Limpiezade la cocina de vidrio.
Nocoloque la plancha en el homo
microondas.
Siempreapague los quemadores
superficialesantes de retirar la plancha.
Deber6tener cuidado al sostener una
plancha caliente.
34
Page 91

Vent appearance and location
vary.
Oven Air Vents
Never block the vents (airopenings)of the
range.They provide the air inlet and outlet that
are necessaryfor the range to operate properly.
Air openings are located at the rear of the
cooktop, at the top and bottom of the oven
door, and at the bottom of the range,under the
lower oven drawer.
Caj6n calentador desmontable/Recipiente del caj6n
del homo inferior (enalgunos modelos)
NOTA:En los moddos con caj6n calentador
ddctrico o caj6n de homo inferior,antes de
realizarcuatquier clase de ajuste, fimpieza o
reparaci6n, desconecte fa conexi6n efdctrica de fa
cocina desde el panel de distribuci6ndomdstico
quitando el fusible o desconectando el interruptor
de circuitos.Verifique que elelemento calentador
dd caj6n estd fifo.
NOTA: Deje que el caj6n calentador o el caj6n
del homo inferiorse enfrien antes de quitar el
recipiente.
NOTA: Limpie los derrames rdpidamente
despuds de cada uso.
Nunca coloque, utilice o limpie mediante la
caracter[stica de auto-limpieza el recipiente
del caj6n en el homo superior.
Elcaj6n calentador o el caj6n del homo
inferior cuentan con un recipiente
desmontable para una limpiezaf@cil.Limpie
con agua jabonosa caliente y una esponja
o repasador. Seque con un paBosuave y
limpio.Vuelva a colocar el recipiente en el
caj6n calentador o el caj6n del homo inferior.
GEAppliances.com
35
Page 92

Cuidado y limpieza de la cocina.
Reemplazo de la bombilla del homo (en algunos modelos)
Verifiquequela tapa de la16mparay la bombilla
sehayanenfriadopar completo.
Para quitar la tapa:
[71 Coloqueuna mano debajode la tapa para
ii i
que no secaiga cuando la liberen.Conlos
dedosde la misma mano, presione
_!_!_i_i_ii__i!_ii_i_I__i_i'_i _i_ii_iii_!_ii___ilii!ii_Ii_
Soporte de la tapa de cables
firmementesabreel soportedela tapa de
loscables.Levantey quite la tapa.
NoquiteningOntomiffoparasacarla tapa.
Reemplacela bombillacon una unidadde
40 vatios.
Para volver a colocar la tapa:
Col6quela dentro de la ranura del
recept6culo de la bombilla. Tire del cable
hacia adelante en direcci6n del centro de la
tapa basra que setrabe en su lugar.
[] Conecte la energia el6ctrica hacia la cocina.
[AADVERTENCIA I ELIGRODEDESCARGAELECTRICA0 QUEMADURAS:Antes de reemplazar
Elementos calentadores del horno (enalgunos modelos)
Nolimpie el elemento para hornear o
el elemento para asar. Lassuciedades
se quemar6n cuando secalienten
loselementos.
la bombilla del homo, desconecte la alimentaci6n de energia al homo desde el panel
principal de fusibles o del interruptor de circuitos. No hacerlo puede provocar una
descarga eldctrica o una quemadura.
Para limpiar el pisodel homo, levante con
cuidado el elemento para hornear. Limpie con
agua tibia jabonosa.
36
Page 93

C6mo limpiar ia estufa de vidrio, a/g ,o mod /o ) GEAppliances.com
Limpieza normal de uso diario
Limpie la estufa despuas
de cada derrame. Utilice
el limpiador de estufas
cerdmicas CERAMABRYTE®.
Utilice un patio de limpieza
CERAIVlABRYTE®para estufas
ceramicas.
SaLO utilice el limpiador de estufas cer6micas
CERAMABRYTE®en laestufa de vidrio.Otras
cremas pueden no sertan efectivas.
Paramantener y proteger lasuperficiede su
estufa de vidrio, siga estos pasos:
Antes de usar la estufa pot primera vez,
r71
limpiela con el limpiador de estufas
ceramicas CERAMA BRYTE®.Esto ayuda a
proteger la estufa y hace la limpieza mds
sencilla.
Elusa diario del limpiador de estufas
r21
ceramicas CERAMA BRVTE®ayudar6 a
que la estufa quede como nueva.
[] Agite bien la crema de limpieza.Aplique
Residuos pegados
NOTA:Usted puede DA--AR la superficie de
vidrio si utiliza esponjillas qua no sean las
recomendadas.
[] Deje enfriar la estufa.
Coloque unas gotas del limpiador de
estufas ceramicas CERAMABRYTE®
sobre toda el @ea deresiduos pegados.
r_ Utilizando el paho de limpieza CERAMA
BRYTE®para estufasceramicas incluido,
frote el area sucia aplicando presi6n
seg0n sea necesario.
unasgotas del limpiador de estufas
cer6micas CERAMABRYTE®directamente
sobre la estufa.
[] Utiliceuna toalla de papel o un paho de
limpieza CERAMABRYTE®para estufas
ceramicas para limpiar toda la superficie
de la estufa.
r_ use un patio seco o una toalla de papel
para quitar los restos del limpiador. No
hace falta enjuagar.
NOTA: Esmuy importante que NO CALIENTE
la estufa hasta que la haya limpiado pot
completo.
indicados con anterioridad.
Para protecci6n adicional, despuas de
@
haber quitado todos los restos, pula
toda la superficie con limpiador de
estufas ceramicas CERAMABRYTE®y
una toalla de papel.
Residuos pegados rebeldes
Elraspador de estufas ceramicas
CERAIVlA BRYTE®y todos los r_l
insumos recomendados se
encuentran disponibles en
nuestro Centro de Repuestos,
Ver instrucdones ba]o la secci6n
"Para solicitar repuestos" en la
pagina siguiente.
NOTA: No utilice hojas desafiladas
o da_adas.
Si quedan restos, repita los pasos
%
Deje enfriar la estufa.
Utilice el raspador de filo 0nico
a un 6ngulo aproximado de aS degrees
contra la superficie del vidrio y raspe la
suciedad. Puede ser necesario aplicar
presi6n al raspador para quitar la
suciedad.
Despuas de utilizar el raspador, coloque
unas gotas de limpiador de estufas
ceramicas CERAMA BRYTE® sabre toda
el area de suciedad quemada. Utilice el
paho de limpieza CERAMABRYTE®para
quitar la suciedad restante.
Para protecci6n adicional, despuas de
haber quitado todos los restos, pula
toda la superficie con limpiador de
estufas ceramicas CERAMABRYTE®y
una toalla de papel.
37
Page 94

C6mo limpiar la estufa de vidrio.
Narcas de metal y rayones
Tengo cuidudo de no deslizor olios y
%
sortenes u trovOs de su estufo. Dejor6
morcos de metal sobre Io superficie de Io
estufo.
Estus morcus pueden quiturse utilizondo
limpiudor de estufos cer6micos CERAHA
BRYTE®con el puho de limpiezo CERAHA
BRYTE®poro estufos cer6micos.
Si se permite que olios con unu copo finu
[]
de uluminio o cobre hiervon en seco, Io
copo puede dejur uno decoloroci6n negro
en lu estufo.
Sellado de la estufa
Para limpiar el sellado de la estufa alrededor
de los bordes de vidrio, coloque un paBo
h0medo sobre los mismos durante unos
minutos y luego limpie con limpiadores no
abrasivos.
Superficiede vidfio: posibilidades dedafio permanente.
Esto debe quitarse de inmediato antes
de calentar de nuevo o Io decoloraci6n
puede Ilegur o ser permonente.
NOTA:Verifique con detenimiento que fa bose
de fas ollasno sea dspera para no rayar la
estufa.
Los derromes azucurados
(como gelutinos, dulce,
curumelo, jurubes)o pl6sticos
derretidos pueden morcor
lu superficie de lu estufu
(no cubierto por lu gurontfo)
o menos que el derrome se
quite mientros est6 coliente.
Debe tenerse mucho cuidudo
ol remover sustuncius
colientes.
Aseg0rese de utilizor
un rospudor nuevo y ofilodo.
No utilice hojus desofiludus
o dunudus.
I I
Dafios por derrames azucarados y pl6stico derretido
[7] Apogue todos los unidudes de superficie.
Quite los olios colientes.
Utilizondo un guunte de cocino:
o. Use un rospudor de filo 0nico (ruspodor
poro estufos cer6micos CERAHA
BRYTE®) poru despluzor el derrome o
un 6reo fifo de Io estufo.
b. Quite el derrome con toollos de popel.
Cualquier derrame restante debe dejarse
hasta que la superficie de la estufa se haya
enfriado.
[] No use las unidades de superficie
de nuevo basra que todos los restos se
hayan eliminado por completo.
NOTA: Si la superficie de vidrio ya ha sufrido
mamas o hendiduras, el vidrio de fa estufa
deberd cambiarse En ese caso, serd necesaria la
atenci6n de un tdcnico
Para solicitar repuestos
Para solicitar el limpiador de estufas
cerOmicas CERAMA BRYTE® y el raspador de
estufas, Ilame a nuestro nOmero gratuito:
Centro naciona! de piezas 800.626.2002
Limpiador de estufus cer_micas CERAMA
BRYTE®................... #WX10X300
Raspador de estufas cerSmicas
CERAMA BRYTE® .......... #WXI OX0302
Kit ....................... #WB64XS027
(Elkit incluye la crema y el raspador de estufus)
Pahos de limpieza CERAMA BRYTE ®para
estufus cerSmicas ........ #WX10X350
38
Page 95

I str
CCl
o
Cocinas El ctricas
de l
!_ LPreguntas? Llame c] 800.GE.CARES (800.432.2737) o visite nuestro sitio web en: GEAppliances.com
ANTES DE COMENZAR
Lea estas instrucdones en su totalidad y
atentamente
oIMPORTANTE - Conserveestas
instrucciones pare uso clel inspector local.
.IMPORTANTE - Cumplocontodoslos
c6digos y ordenunzus gubernumentules.
, Note peru el Instalador - Aseg0rese de que el
Consumidor conserve estus instrucciones.
. Note pare el Comprador - Conserve estas
instrucciones para referencia future.
, Nivel de habilidad - La instalaci6n de este
electrodom6stico requiere un nivel basico de
habilidades mec6nicas.
, Tiempo de instalaci6n - Aproximadamente entre ! y
3 bores
, La correcta instalaci6n del producto es
responsabilidad del instalador.
. Si se producen fallas en el producto debido a una
instalaci6n inadecuada la Garant[a no cubrir6 las
mismas.
A ADVERTENCIA - Esteelectrodom stico
deber6 ester conectudo u tierru de formu udecuudu.
stal
con Apoyo Independiente
PARA SU SEGURIDAD:
Aseg_rese de queun t6cnico c°lificado instale y conecte
a tierra de form° adecuada el electrodom6stico.
AsegOresede que los gobinetes y los revestimientos de
pared ulrededor de lu cocinu puedun resistir el culor (de
haste 2000 F)generudo por lu cocinu.
Mecanismopara evitar la indinad6n delaparato
Un niSo o adulto pueden volcar la cocina y morir.
Verifique que el soporte anti-volcaduras se hay°
instal°do y ajustodo correetamente.
Asegurese de qua el soporte anti volcaduras sea
reinstalado cuando se mueva la codna.
No utilice la codna sin que el soporte anti-volcaduras
est_ colocado y ajustodo.
Siestas instrucciones no se siguen, como resultado se podr6
producir la muerte o quemaduras graves de niSos y adultos,
Si usted no recibio un soporte anti volteo con su
compra, Ilame al 1.800.626.8774 par° recibir uno sin
costo. (en Can°d6, Ilame al 1.800.561.3344.) par° las
instruciones de instalacion del soporte, visite:
www.GEAppliances.com (en Can°d6,
www.GEAppliances.ca)
Sisu cocina no cuenta con un soporte anti-volteo Ilame al
1-800-626-8774 pare recibir uno sin costo.
RJescjode Volcaduras
PARA SU SEGURIDAD:
A ADVERTENCIA - Antesdecomenzor
con lu instuluci6n, upugue el interruptor del panel del
servicioy bloquee el suministro del serviciou fin de evitur
que lu corriente se active en form° accidental. Cuundoel
suministro del servicio no puedo ser bloqueudo,ojuste de
formu seguru un dispositivo de udvertenciu visible,tel como
unu etiquetu, ul panel del servicio.
Pureun usoseguro de lucocinu, sedeber6 cumplir
con todus lus dimensiones de espucioy ocultus. Lu
electricidud de lu cocinu puede ser desconectudu desde el
tomucorriente, sin mover lu cocina si lu rich° se encuentru
en lu ubicuci6n preferidu (retire el cuj6n inferior).
A fin de eliminur el riesgo de quemudurus o incendios
ul ulcunzur superficies culientes,no se deber6 user el
espocio de olmucenomiento del gobinete ubicodo sobre Io
cocinu. Sisedeber6 brindur espucio de ulmucenumiento
del gubinete sobre lu cocinu,el riesgo puede serreducido
instulundo unu cumpunu que sobresulgu por Iomenos
S"m6s o116del frente de losgobinetes. Losgubinetes
instaludos sobre unu cocinu no deber6n poseer unu
profundidud superior u lus 13".
39
Page 96

Instruccionesde Instoloci6n
PREPARESEPARA INSTALAR LA COCINA
PREPARESE PARA REALIZAR LA
MATERIALES QUE PUEDE NECESITAR
CortadordeAcero Tirafondos
(ParaSoporteAnti-Volcaduras Montado en Pisosde Concreto
Unicamente)
Anclaje
@
(40 AMP Aprobado par UL)
Cable de 4 Cable de 3
Alambres de 4" O Alambres de 4"
de Longitud de Longitud
HERRAMIENTAS NECESARIAS
Talactrocon :!/8"B/t GafasdeSegurictad
Conexi6n de Presi6n
1S61opara Instalociones
de Conductos)
APERTURA
Dejeunespaciode 1W' entrelacocinay lasparedes
verticalesadyacentessabrelasuperficiede laestufa.
Deje un espacio de par Io menos 30" entre las
unidades de la superficie y la parte inferior del
gabinete superior de madera o metal sin protecci6n,
y un espacio de par Iomenos 15" entre la mesada y
la parte inferior del gabinete adyacente.
EXCEPCION:La instolaci6nde un horno microondos
o electrodom_stico de cocci6n quefiguren en Io listo
sabreIo porte superiorde Io cocina deber6 cumplir
con losinstruccionesde instalaci6n provistos conel
electrodom_stico.
IDehaber ungabinete de almacenamiento,el riesgo
sepuede reducir instalando una campana de salida
de aire con proyecci6nhorizontala 5"(12.7cm.)
coma mfnimo desde la parte inferiorde los gabinetes.
AsegOresede queel revestimientode pared,los
mostradoresy gabinetes alrededorde lacocina pueda
resistirelcalor de hasta200oFgenerado par el homo o
la estufa.
'1 _ No menos
e,anc o
dela cocina
Llave Ajustable
Cinta m@trica
Pinzas
Llave de Tuercas de 14" Nivel
Destornillador Phillips
L6piz
Destornilladorcon
CabezaPlana
PARTES INCLUIDAS
Kitdel Soporte Anti-Volcadurast
I=_ RETIRE LOS MATERIALES DEL ENV[O
Require los materiales del embalaje. Si no se
retiran los materiales del embalaje se podr6n
producir daflos sabre el electrodom6stico.
Min. Min.
de 30"
Ubiquelacajadesalida
dentrodecada6rea
sombreada.
7
Instale la caja
de salida a
cada lado de
la CL
Piso debojo de Io estufo
Sucocino,ol iguol que muchos otros orticulos
del hogor, es pesodoy sepuede colocorsabre
revestimientos de pisosuovestales coma olfombros o
vinilo ocolchonodo.
AImoverla cocinaen estetipode piso,sedeberfa
instalaren unahojagruesade contrachapado deIA"(o
material similardel siguientemodo):
Cuandoel revestimientodel pisofinalizafrente a la
cocina,eJ6rea donde la cocinase apoyar6deber6
serde contrachapado al mismo nivelo m6salto que
el revestimientodel piso.Estopermitir6que lacocina
pueda ser movida para su limpiezao reparaciones
t@cnicas.
4O
Page 97

Instruccionesde Instalaci6n
CONEXIONES ELECTRICAS
REQUISlTOS ELI_CTRICOS
s
A PRECAUCION: Parasuseguridad
personal, no use prolongadores con este
electrodom6stico. Retire elfusible del hogar o abra el
disyuntor antes de comenzar la instalaci6n.
Esteelectrodom6stico deber6 ser suministrado con la
frecuencia y el voltaje adecuados, y ser conectado a un
circuito derivado individual correctamente conectado
a tierra, protegido por un disyuntor o fusible con el
amperaje que figura en la etiqueta de caracteristicas
t6cnicas. La placa de calificaci6n est6 ubicada detrds
del caj6n del horno en la estructura del horno.
Ubicaci6n de f
la placa de
calificaci6n del
rnoctelo
Le recomendamos que el cable el6ctrico y el gancho de
su estufa sean conectados por un electricista calificado.
Luego de la instalaci6n, pida al electricista que le
muestre d6nde se encuentra la desconexi6n principal de
su estufa.
Consulte a los servicios locales sobre qu6 c6digos
el_ctricos se aplican en su @rea.Siel cableado del
homo es cumple con los c6digos gubernamentales, se
podr@producir una condici6n riesgosa. Encaso de no
haber c6digos locales, el cable y el fusible de su cocina
deber@ncumplir con los requisitos del C6digo Nacional
de Electricidad, ANSI/NFPA No. 70--Ultima Edici6n.
Puede solicitar una copia escribiendo a:
National Fire Protection Association
(Asociaci6n Nacional de Protecci6n Contra Incendios)
Batterymarch Park
Quincy, kIA 02269
Desde el i de enero de 1996, el C6digo Nacional de
Electricidad requiere que las construcciones nuevas
(no existentes a6n) utilicen una conexi6n de 4 cables
para una cocina el_ctrica..
AI instalar una cocina el_ctrica en una construcci6n
nueva, siga los Pasos 3 y 5 para una conexi6n de 4
cables.
Deber6 usar un sistema el_ctrica de 3 cables con fase
simple de A.C.208Y/Z20 Voltios o 240/!20 Voltios,
60 Hertz. Si la conecta a un cableado de aluminio, se
deber@nusar conectores instalados correctamente y
aprobados para uso con cableado de aluminio.
Si el servicio el6ctrico provisto no cumple con las
especificaciones anteriores, se recomienda que un
electricista matriculado instale un tomacorriente
aprobado.
TODAS LAS CONSTRUCCIONES
NUEVAS, CASAS RODANTES
E INSTALACIONES DONDE
LOS C6DIGOS LOCALES NO
PERMITAN LA INSTALACI6N A
TIERRA A TRAVI_S DEL CABLE
NEUTRO
Use solo un cable de cocina de 3 conductores o
de 4 conductores de la lista de UL Estos cables
podrdn ser provistos con terminales anilladas en
el cable y un dispositivo de amortiguadores de
refuerzo.
Se requiere el uso de un cable para la cocina de
40 amperes con un rango minimo de 125/250
voltios. No se recomienda el uso de un cable de 50
amperes para la cocina, pero si se usa, se deber6
indicar que es para uso con aberturas de conexi6n
de un di6metro nominal de 1 3/8". Se deber6
centrar el cable y el sujetacables con el agujero
ciego para evitar que el extremo dafle el cable.
. Debido a que las terminales de la cocina no
est6n accesibles luego de que la cocina est6 en
posici6n, se deber6 usar un conductor o cable
flexible de servicio.
NOTA: Si se est6 usando un conductor, vaya al
Paso 3D y luego al Paso 6 o 7.
. En algunos modelos, se podr6 conectar un
capacitor con filtro entre los cables negro y
blanco en la caja de empalmes.
41
Page 98

Instruccionesde Instalaci6n
INSTALACION DEL CABLE DE
CORRIENTE Y DEL AMORTIGUADOR
CON REFUERZO
r_ Retire el cubre cables (en I(] p(]rte tr(]ser(] de la
cocin(]), retir(]ndo dos (2) tornillos con un(] II(]ve de
tuerc(]s de 1A'.
No descarte estostornillos.
-_ ...... _U .............................
2 tornillos
ra
S61o para instalaciones de cables de corriente
(Si us(ira un conducto, consulte el siguiente paso),
ens(]mble el (]mortigu(]dor de refuerzo en el
(]gujero. Inserte el cable de corriente (] tr(]v6s del
(]mortigu(]dor de refuerzo y (]juste el mismo.
Permit(] que quede lo suficientemente flojo coma
par(] (]just(jr l(]s termin(]les de los cables (]I bloque
terminal con f(]cilid(]d. Si hay leng(Jet(]s presentes
en el extremo del (]mortigu(]dor de refuerzo, se
podr6n retir(]r par(] un mejor enc(]je.
NOTA: No instale el cable de corriente sin
un amortiguador de refuerzo. El soporte del
amortiguador de refuerzo deberia ser instalado
antes de volver a instalar el cubre cables trasero
de la cocina.
Bloque
Parte trasera de la
cocina
Cubre cables
Retire el anillo de expulsi6n (1 3/8") ubicado en el
soporte directamente debajo del bloque terminal.
Para retirar el anillo de expulsi6n, utilice un alicate
para torcer y alejar el mismo del soporte hasta
haberlo retirado.
(el aspecto puede
variar)
Bloque terminal
,o
Anillodeexpulsion
en elsoporte
Anillo de
expulsi6n
retirado
Amortiguadorde
refuerzo
Cable de corriente Soporte
Siga al paso 4 o 5.
r61
Para instalaciones en conductos, adquiera un
conector de presi6n que coincida con el di6metro de
su conducto y ensamble el mismo en el agujero.
Inserte el conducto a tray,s del conector de presi6ny
ajuste el mismo. Permite que quede Io
suficientemente flojo coma para ajustar loscables al
bloque terminal con facilidad.
NOTA:No instale el tuba sin un conector de presi6n.
Elconector de presi6n debeHaser instalado antes de
volver a instalar el cubre cables trasero de la cocina.
_-_ Bloque
Conector de
presi6n
S_oporte
terminal
Siga al paso 6 o 7.
42
Page 99

Instruccionesde Instalaci6n
CONEXIONES ELECTRICAS(Cont.)
| INSTALACI6N DEL CABLE DE
CORRIENTE DE 3 CABLES
A
ADVERTENCIA: El cable neutro o de
conexi6n a tierra del cable de corriente deber6
ser conectado a la terminal neutral ubicada
en el centro del bloque terminal. Los cables
de corriente deber6n ser conectados alas
terminales inferior izquierda e inferior derecha
del bloque terminal.
Retire los 3 tornillos de la terminal inferior del
[]
bloque terminal. Inserte los 3 tornillos
terminales a trav6s de cada anillo terminal del
cable de corriente yen las terminales
inferiores del bloque terminal. AsegOrese de
que el cable central (blanco/neutro) est6
conectado a la posici6n inferior central del
bloque terminal). Ajuste los tornillos de forma
segura al bloque terminal.
NO retire la conexi6n de la cinta de cone×i6n
a tierra.
/
(el aspecto
puede variar)
_-_-_ Terminal
Placa de
conex,ona _;_
tlerra ,,IJ ,"
0
Cablede _---._
corriente
r_ siga al Paso 8 y proceda con la instalaci6n.
neutral
Cinta de
conexi6n
a tierra
r_ INSTALACI6N DEL CABLE DE
CORRIENTE DE 4 CABLES
A ADVERTENCIA:Elcableneutrodel
circuitodesuministrodeber6serconectadoa la
terminalneutraubicadaenelcentroinferiordel
bloqueterminal.Loscablesdecorrientedeber6nser
conectadosalasterminalesinferiorizquierdae
inferiorderechadelbloqueterminal.El4tocablede
cone×i6na tierradeber6serconectadoa la
estructura de la cocina con la placa de conexi6n a
tierra y el tornillo de cone×i6na tierra.
Retirelos3 tornillosde la terminal inferior delbloque
terminal.Retireeltornillode conexi6na tierray la placa
de conexi6na tierra y retenga los mismos.
Corte y descarte latira de conexi6na tierra. NO
DESCARTENINGUNTORNILLO.
Inserteel tornillode conexi6na tierra enel anillo
terminal del cablede corrientecon conexi6na tierra,a
trav@sde laplacade conexi6na tierra yen laestructura
de la cocina.
53
Insertelos3 tornillosterminales(retiradospreviamente)
a trav6s de cada anilloterminal delcablede corrientey
en lasterminales inferioresdel bloqueterminal.
Aseg6resedeque el cablecentral (blanco/neutro) est6
conectado a la posici6ninferiorcentraldel bloque
terminal).Ajustelos tornillosdeforma seguraal bloque
terminal.
Cinta de conexi6n a
Antes
Bloque
terminal
Cinta de conexlon a tierra
Despu_s
Bloque
terminal
Terminal
neutral
Terminal
neutral
Placade
conexi6n
a tierra
:onexi6n a
tierra de la
cocina_
conexi6n a
tierra
53 Sigaal Paso8y procedacon la instalaci6n.
43
Page 100

Instruccionesde Instalaci6n
[]_] INSTALACI6N DEL CONDUCTO DE 3
CABLES
Afloje los 3 tornillos de la terminal inferior del
bloque terminal. Inserte la punta del cable
central descubierto (blanco/neutro) a trav6s de
la abertura del bloque terminal de la porte
central inferior. En ciertos modelos, el cable
deber6 ser insertado a trav6s de la abertura de
la cinta de conexi6n a tierra y luego en la
abertura del bloque central inferior. Inserte los
dos puntas de los cables descubiertos laterales
en las aberturas del bloque terminal inferior
izquierda e inferior derecha. Ajuste los tornillos
hasta que el cable est6 firme (aproximadamente
20 pulgadas/Ibs.).
NOTA: CABLEADO DE ALUMINIO:
Se podr6 usar un cable de aluminio para
construcci6n, pero se deber6 calificar el
amperaje y voltaje correcto para hacer la
conexi6n. Conecte los cables siguiendo los
Pasos 6 y 7, dependiendo de la cantidad de
cables.
[l] INSTALACI6N DEL CONDUCTO DE 4
CABLES
Afloje los 3 tornillos de la terminal inferior del
bloque terminal. Retire eltornillo de conexi6n a
tierra y la placa de conexi6n a tierra y retenga los
mismos. Carte y descarte la tira de conexi6n a
tierra. NO DESCARTENINGON TORNILLO.
Inserteel cabledescubiertodeconexi6na tierra
entre elmarcode lacocinay la placadeconexi6n
a tierra (retiradapreviamente)y asegureelmismo
coneltornillo deconexi6n atierra (retirado
previamente).Insertela punta delcable
descubierto(blanco/neutro)a trav6s dela parte
centralinferiorde laabertura del bloqueterminal.
Insertelasdospuntas deloscablesdescubiertos
lateralesen lasaberturasdel bloqueterminal
inferiorizquierdoeinferiorderecho.Ajustelos
tornilloshasta queel cableest6firme
(aproximadamente20 pulgadas/Ibs.).
_ Cintade c°neXi6e_ra
Bloque
cables !
Puntas de
Soport Conducto
El cable usado, la ubicaci6n y cierre de
empalmes, etc. deber6 cumplir con las
pr6cticas correctas de instalaci6n de cables
y con los c6digos locales.
r_ siga al paso 8 y proceda con la instalaci6n.
Bloque ,'ii
Antes
terminal
Cinta de
conexi6n a tierra "
Despu_s
Bloque a tierra
terminal (conexi6na
Puntasde tierra de la
cables cocina)
Tornillo
conexi6n
a tierra
El cable usado, la ubicaci6n y cierre de
empalmes, etc. deber6n cumplir con los
pr6cticas correctas de instalaci6n de cables
y con los c6digos locales.
rminal
neutral
Placade
conexi6n
Soporte
r_ proceda al paso 8.
44
 Loading...