

Page 1
ge.com
_m
+.J
U
LL
R
_m
U
u3
0
U
qJ
>
C
0
qJ
C]
Oh
C]
qJ
qJ
Safety instructions ...... 2-8
Operating instructions
Convection Oven .......... 19-23
Roasting Guide .............. 22
Timed Convection Baking ...... 2:3
Gas/Control Lockout ........... 25
Gas Surface Burners ....... 9, 11
Griddle ........................ 10
Lower Oven Drawer .......... 28
Thermostat ................ 27, 28
Upper Oven ............... 12-27
Aluminum Foil ............... 14
Baking or Roasting .......... 14
Broiling Guide ............... 15
Clock and Timer ............. 16
Oven Controls ............... 12
Preheating ................... 14
Probe ..................... 18, 21
Sabbath Feature ............ 26
Self-Cleaning ............. 29, 30
Special Features ......... 24, 25
Timed Baking and
Roasting Features ........... 17
Care and Cleaning
Burner Grates ................. 3:3
Burner Caps and Heads ...... 32
Control Panel and Knobs ..... 37
Cooktop Surface .............. 33
Griddle ........................ 34
Lift-Off Oven Door ............ 35
Lower Oven Drawer .......... 36
Oven Air Vents ................ 37
Oven Heating Elements ....... 35
Oven Light Replacement ...... 38
Oven Shelves ................. 38
Sealed Burner Assemblies .... 31
Self-Cleaning .............. 29, 30
Stainless Steel Surfaces ....... 34
installation
instructions ............ 39-52
Anti-Tip Device ................ 52
Check Ignition of
Surface Burners ........... 50, 51
Connect Range
to Electric ................. 44, 46
Connect Range to Gas ..... 43,45
Dimensions and
Clearances .................... 41
Electrical Connections ...... 47-49
Level the Range ............... 51
Location Guidelines ........... 42
LP ............................. 52
Safetg Instructions ........ 39, 40
Accessories .................. 57
Troubleshooting Tips .ss-s6
Consumer Support
Consumer
Support .............. Back Cover
Product Registration ...... 61, 62
Warrantg for Customers
in Canada ..................... 62
Warrantg for Customers
in the U.S.A.................... 61
C2S980
In Canada contact usat:
www.GEAppliances.ca
Write the model and serial
numbers here:
Model #
Serial #
You can find them on a label on the
front of the range behind the lower
oven drawer.
183D5580P229 49-85147 09-08 JR
Page 2
IMPORTANT SAFETY INFORMATION.
READ ALL INSTRUCTIONS BEFORE USING.
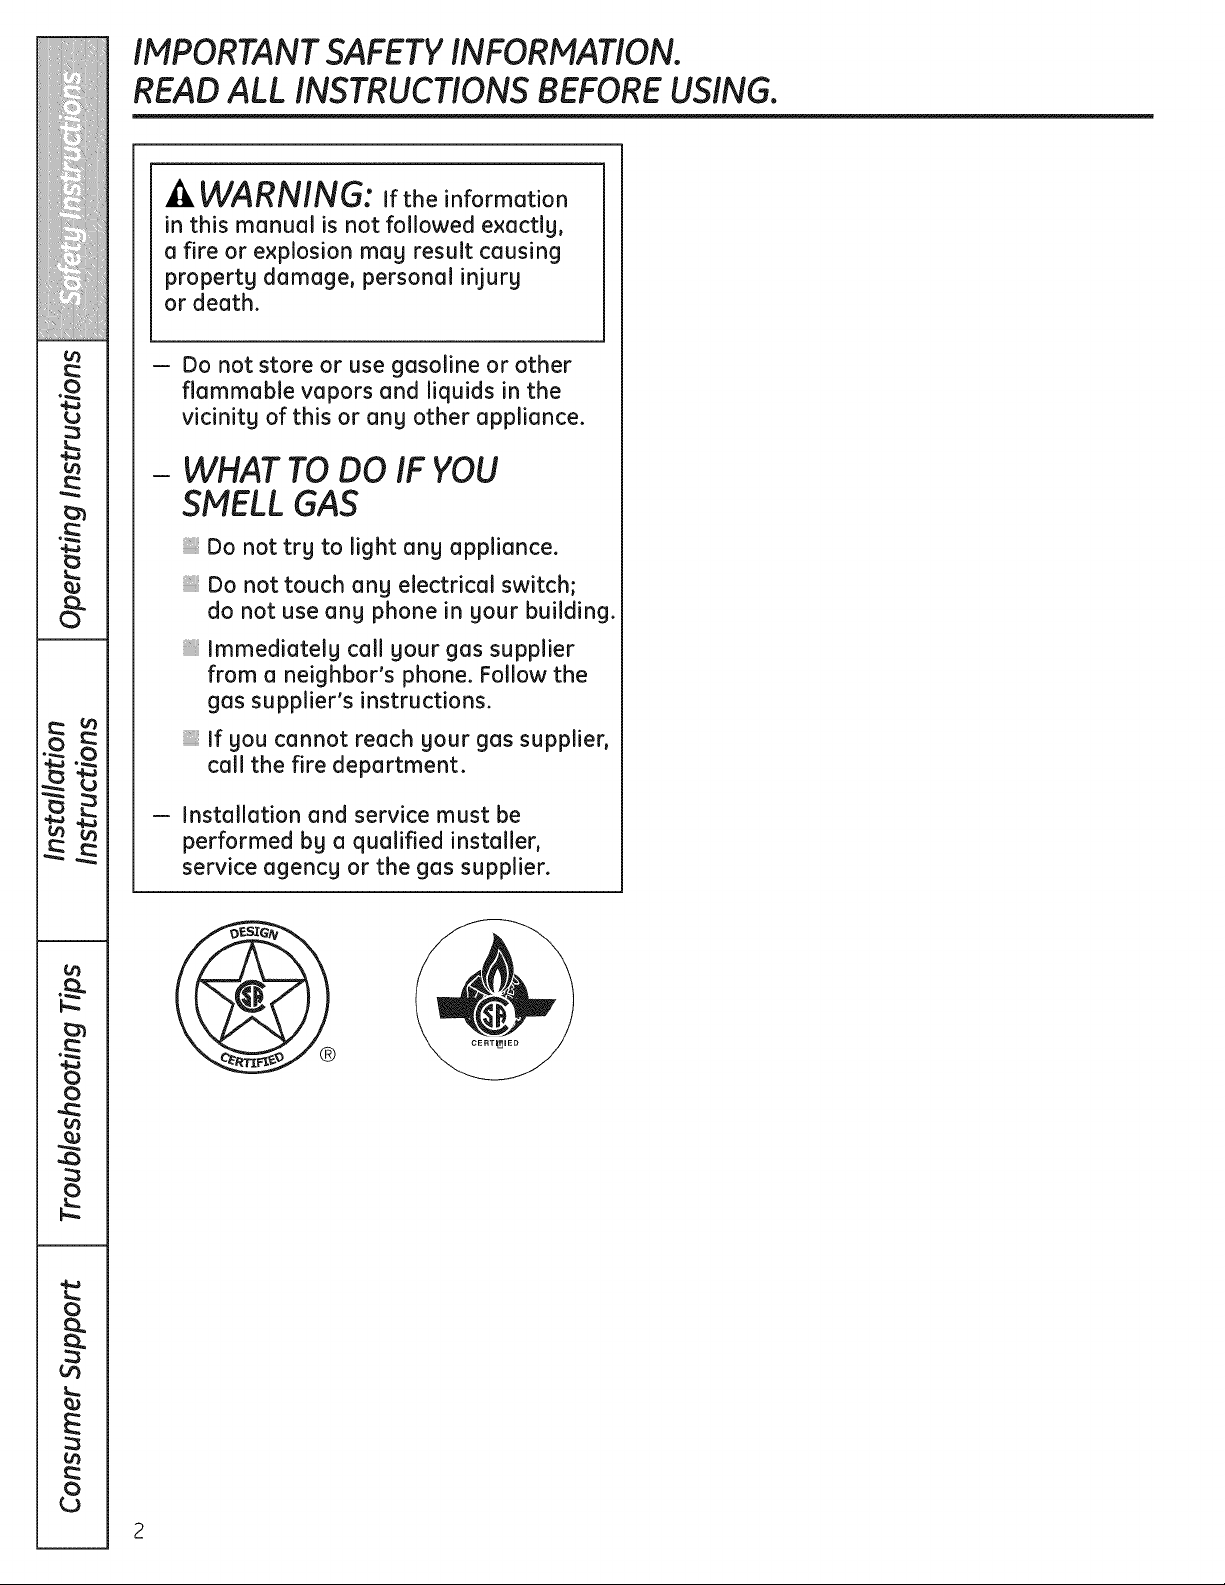
,&WARNING: If the information
in this manual is not followed exactlg,
a fire or explosion mag result causing
propertg damage, personal injurg
or death.
-- Do not store or use gasoline or other
flammable vapors and liquids in the
vicinity of this or any other appliance.
WHAT TO DO IF YOU
SMELL GAS
Do not trg to light ang appliance.
Do not touch ang electrical switch;
do not use ang phone in gour building.
Immediatelg call gour gas supplier
from a neighbor's phone. Follow the
gas supplier's instructions.
If gou cannot reach gour gas supplier,
call the fire department.
-- Installation and service must be
performed bg a qualified installer,
service agency or the gas supplier.
®
2
Page 3
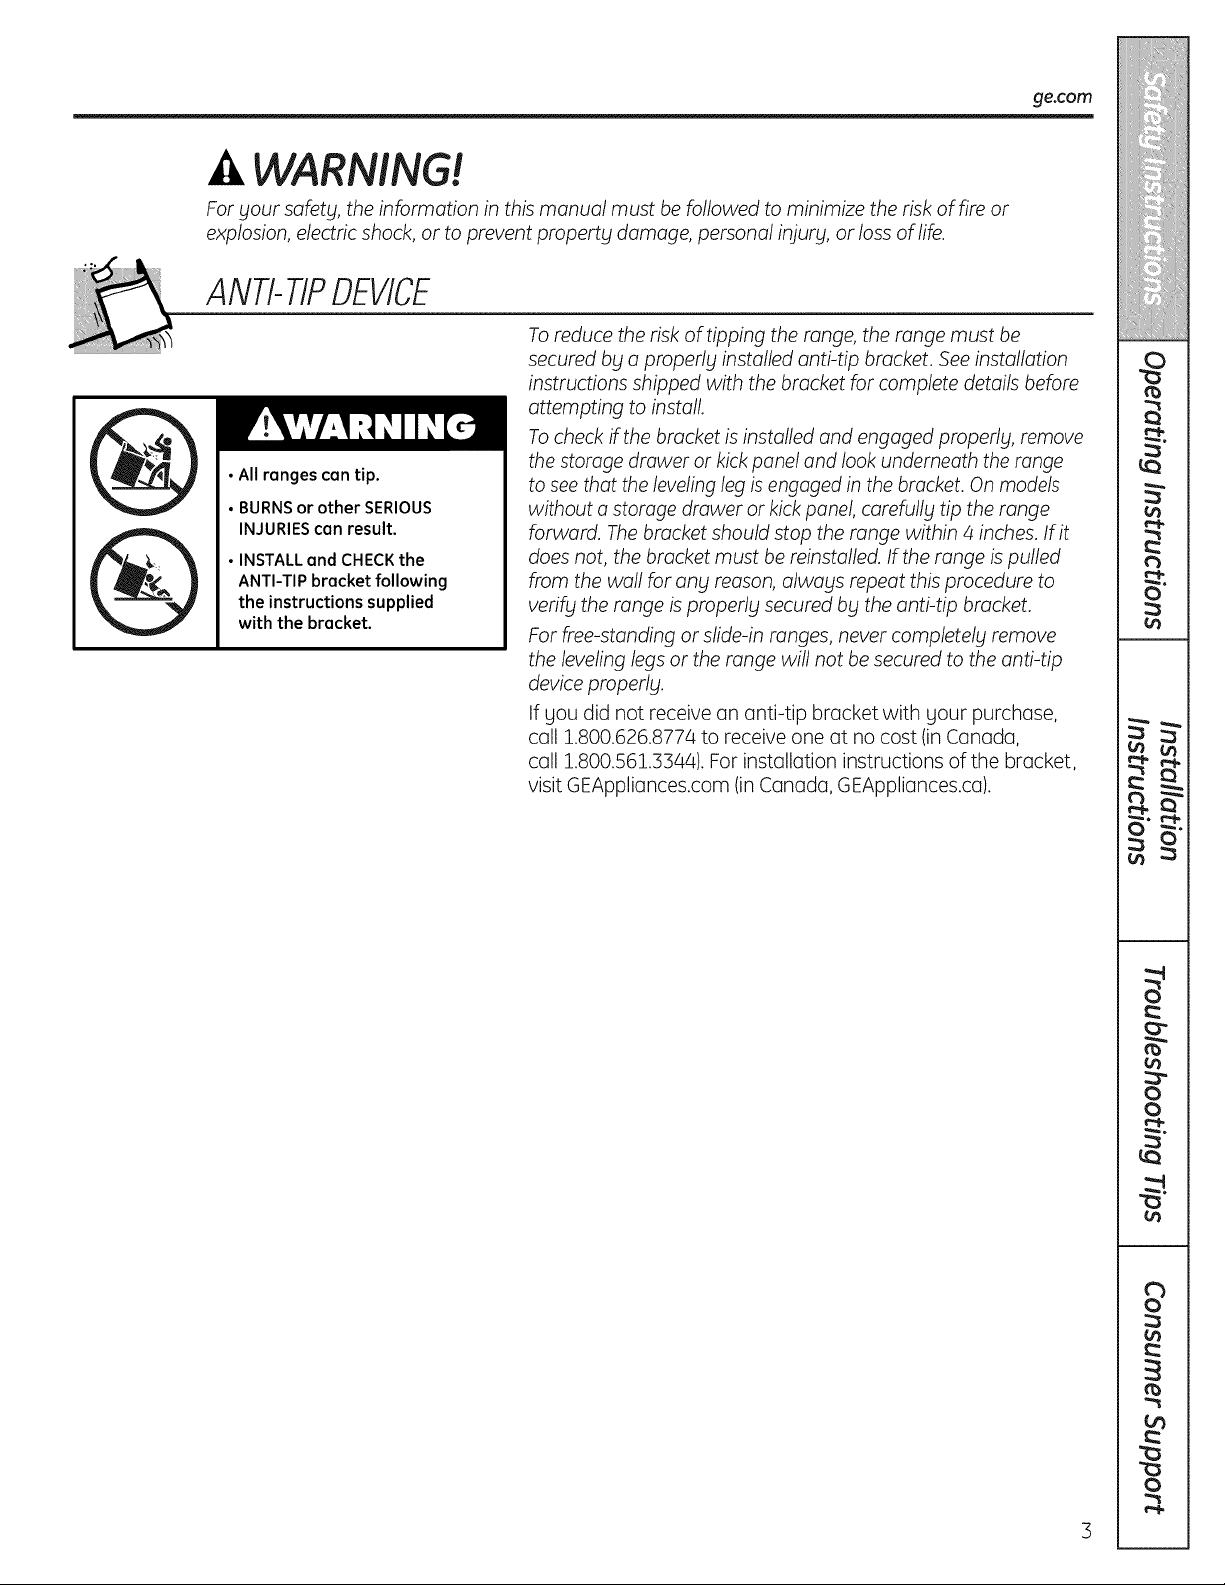
WARNING!
For your safety, the information in this manual must be followed to minimize the risk of fire or
explosion, electric shock, or to prevent property damage, personal injury, or loss of life.
ANTI-TIPDEVICE
Toreduce the risk of tipping the range, the range must be
secured by a properly installed anti-tip bracket. See installation
instructions shipped with the bracket for complete details before
attempting to install.
Tocheck ff the bracket is installed and engaged properly, remove
• All ranges can tip.
• BURNSor other SERIOUS
INJURIEScan result.
• INSTALL and CHECKthe
ANTI-TIP bracket following
the instructions supplied
with the bracket.
the storage drawer or kickpanel and look underneath the range
to see that the leveling leg isengaged inthe bracket. On models
without a storage drawer or kick panel, carefully tip the range
forward. The bracket should stop the range within 4 inches. If it
does not, the bracket must be reinstalled. Ifthe range is pulled
from the wall for any reason, always repeat this procedure to
verify the range is properly secured by the anti-tip bracket.
For flee-standing or slide-in ranges, never completely remove
the leveling legs or the range will not be secured to the anti-tip
device properly.
If you did not receive an anti-tip bracket with your purchase,
call 1.800.626.8774 to receive one at no cost (in Canada,
call 1.800.561.3344). For installation instructions of the bracket,
visit GEAppliances.com (in Canada, GEAppliances.ca).
ge.com
Page 4
IMPORTANT SAFETY INFORMATION.
READ ALL INSTRUCTIONS BEFORE USING.
WARNING!
IMPORTANT SAFETYNOTICE
The California Safe Drinking Water and Toxic Enforcement Act requires the Governor of California to
publish a list of substances known to the state to cause birth defects or other reproductive harm, and
requires businesses to warn customers of potential exposure to such substances.
Gas appfiances can cause minor exposure to four of these substances, namel_l benzene, carbon
monoxide, formaldeh_Ide and soot, caused primarily b_l the incomplete combustion of naturol gas
or LPfuels. Properly adjusted burners, indicated b_la bluish rather than a Fellow flame, will minimize
incomplete combustion. Exposure to these substances can be minimized b_tventing with an open
window or using a ventilation fan or hood.
SAFETYPRECAUTIONS
When using electrical appliances, basic safety precautions should be followed, including the following:
iiiiiil
Use this appliance only for its intended
purpose as described in this Owner's Manual.
iiiil}i
Be sure your appliance is properly installed
and grounded by a qualified technician in
accordance with the provided installation
instructions.
iiiiiiiiii_
Do not attempt to repair or replace any
part of your range unless it is specifically
recommended in this manual. All other
servicing should be referred to a qualified
technician.
iiiiiiili_
Before performing any service, disconnect
the range power supply at the household
distribution panel by removing the fuse
or switching off the circuit breaker.
Do not leave children alone---children should
not be left alone or unattended in an area
where an appliance is in use.They should
never be allowed to sit or stand on any part
of the appliance.
iiiiiiili_
Do not allow anyone to climb, stand or hang
on the door, storage drawer, or cooktop.
They could damage the range and even tip
it over, causing severe personal injury.
iiiiiiili_
Do not store flammable materials in an oven
or near the cooktop.
li, CAUTION:Items of interest to children
should not be stored in cabinets above a
range or on the backsplash of a range-
children climbing on the range to reach items
could beseriouslg injured.
SAFETYPRECAUTIONS
Have the installer show _lou the location of the range gas shut-off valve and how to shut it off ffnecessarg.
*:, Have your range installed and properly
grounded by a qualified installer, in
accordance with the Installation Instructions.
Any adjustment and service should be
performed only by qualified gas range
installers or service technicians.
4
Do not attempt to repair or replace any
part of your range unless it is specifically
recommended in this manual. All other service
should be referred to a qualified technician.
Page 5
SAFETYPRECAUTIONS
ge.com
Locate the range out of kitchen traffic path
and out of drafty locations to prevent poor
air circulation.
i Besureallpackaging materials are
removedfrom the range before operating it
to prevent fire or smoke damage should the
packaging material ignite.
Be sure your range is correctly adjusted by
a qualified service technician or installer for
the type of gas (natural or LP)that is to be
used. Your range can be converted for use
with either type of gas. Seethe Installation
of the range section.
Ii, WARNING: theseadjustments
must be made bg a qualified service
technician in accordance with the
manufacturer's instructions and all codes
and requirements of the authority having
jurisdiction. Failure to follow these instructions
could result in serious injury or property
damage. The qualified agency performing
this work assumes responsibility for the
conversion.
_:,After prolonged use of a range, high floor
temperatures may result and many floor
coverings will not withstand this kind of use.
Never install the range over vinyl tile or
linoleum that cannot withstand such type
of use. Never install it directly over interior
kitchen carpeting.
Do not leave children alone or unattended
where a range is hot or in operation. They
could be seriously burned.
Do not allow anyone to climb, stand or hang
on the oven door, drawer or cooktop. They
could damage the range and even tip it over,
causing severe personal injury.
I1,CAUTION: Itemsofinterestto
children should not be stored in cabinets
above a range or on the backsplash of a
range-children climbing on the range to
reach items could be seriously injured.
For your safety, never use your appliance
for warming or heating the room.
iiiiiil
Neverwear loose-fitting or hanging garments
while usingthe appliance.Becarefulwhen
reachingfor itemsstoredin cabinetsoverthe
range.Flammablematerial could be ignited
ifbrought in contact with flame or hotoven
surfaces and may causesevereburns.
iiiiiiili_
Do not store flammable materials in an oven,
a range drawer or near a cooktop.
iiiiiiili_
Do not store or use combustible materials,
gasoline or other flammable vapors and
liquids inthe vicinity of this or any other
appliance.
iiiiiiili_
Do not let cooking grease or other flammable
materials accumulate in or near the range.
iiiiiiili_
Do not use water on grease fires. Never
pick up a flaming pan. Turn the controls off.
Smother a flaming pan on a surface burner
by covering the pan completely with a
well-fitting lid,cookie sheet or flat tray.
Use a multi-purpose dry chemical or
foam-type fire extinguisher.
Flaming grease outside a pan can be put
out by covering it with baking soda or,
if available, by using a multi-purpose dry
chemical or foam-type fire extinguisher.
Flame in the upper oven or lower oven drawer
can be smothered completely by closing the
oven door or drawer and turning the control to
off, or by using a multi-purpose dry chemical
or foam-type fire extinguisher.
iiiiiiili_
Let the burner grates and other surfaces cool
before touching them or leaving them where
children can reach them.
iiiiiiili_
Never block the vents (air openings) of the
range. They provide the air inlet and outlet
that are necessary for the range to operate
properly with correct combustion. Air openings
are located at the rear of the cooktop, at the
top and bottom of the oven door, and at the
bottom of the range under the lower oven
drawer or kick panel.
iiiiiiili_
Do not lift the cooktop. Lifting the cooktop can
lead to damage and improper operation of
the range.
Large scratches or impacts to glass doors
can lead to broken or shattered glass.
Page 6
IMPORTANT SAFETY INFORMATION.
READ ALL INSTRUCTIONS BEFORE USING.
WARNING!
SURFACEBURNERS
Use proper pan size-avoid pans that are unstable or easily tipped. Select cookware having flat
bottoms large enough to cover burner grates. Toavoid spfllovers, make sure cookware is large enough
to contain the food properly. This will both save cleaning time and prevent hazardous accumulations
of food, since heavy spattering or spillovers left on range can ignite. Use pans with handles that can
be easily grasped and remain cool.
Always use the LITE position when igniting
the top burners and make sure the burners
have ignited.
iiiil}iNever leave the surface burners unattended
at high flame settings. Boilovers cause
smoking and greasy spillovers that may
catch on fire.
Adjust the top burner flame size so it does
not extend beyond the edge of the cookware.
Excessive flame is hazardous.
iiiil}i
Use only dry pot holders-moist or damp pot
holders on hot surfaces may result in burns
from steam. Do not let pot holders come near
open flames when lifting cookware. Do not use
a towel or other bulky cloth in place of a pot
holder.
iiiiiiili_
When using glass cookware, make sure it
isdesigned for top-of-range cooking.
iiiiiiili_
To minimize the possibility of burns, ignition
of flammable materials and spillage, turn
cookware handles toward the side or back
of the range without extending over adjacent
burners.
iiiiiil
Carefully watch foods being fried at a high
flame setting.
iiiiiiili_
Always heat fat slowly, and watch as it heats.
iiiiiiili_
Do not leave any items on the cooktop. The
hot air from the vent may ignite flammable
items and will increase pressure in closed
containers, which may cause them to burst.
iiiiiiili_
If a combination of oils or fats will be used
in frying, stir together before heating or
as fats melt slowly.
iiiiiiili_
Use a deep fat thermometer whenever
possible to prevent overheating fat beyond
the smoking point.
iiiiiiili_
Use the least possible amount of fat for
effective shallow or deep-fat frying. Filling the
pan too full of fat can cause spillovers when
6
food is added.
Do not flame foods on the cooktop. If you do
flame foods under the hood, turn the fan on.
iiiiiiili_
Do not use a wok on the cooking surface
if the wok has a round metal ring that is placed
over the burner grate to support the wok. This
ring acts as a heat trap, which may damage
the burner grate and burner head. Also,it may
cause the burner to work improperly. This may
cause a carbon monoxide level above that
allowed by current standards, resulting in
a health hazard.
Foods for frying should be as dry as possible.
Frost on frozen foods or moisture on fresh
foods can cause hot fat to bubble up and
over the sides of the pan.
Never try to move a pan of hot fat, especially
a deep fat fryer. Wait until the fat is cool.
iiiil}i
Do not leave plastic items on the cooktop-
they may melt if left too close to the vent.
iiiiiiili_
Keep all plastics away from the surface
burners.
To avoid the possibility of a burn, always be
certain that the controls for all burners are
at the OFF position and all grates are cool
before attempting to remove them.
If range is located near a window, do not hang
long curtains that could blow over the surface
burners and create a fire hazard.
iiiil}i
If you smell gas, turn off the gas to the range
and call a qualified service technician. Never
use an open flame to locate a leak.
iiiiiiili_
Always turn the surface burner controls off
before removing cookware.
When disabling Gas/Control Lockout, make
sure the surface controls are set to the OFF
position. This will preclude gas flow when the
range isturned on
Page 7

LOWEROVEN DRAWER
ge.com
The purpose of the warm setting of the lower
oven drawer is to hold hot cooked foods Qt
serving temperQture. Alwags start with hot
food; cold food cannot be heQted or cooked
using the warm setting of the lower oven
drawer.
} Do not use the lower oven drawer to dry
newspapers. If overheated, theg can catch
on fire.
Do not leave paper products, plastics, canned
food or combustible materials in the drawer.
Never leave jars or cans of fat drippings in
or near gour lower oven drawer.
Do not warm food in the lower oven drawer
for more than two hours.
Do not touch the heoting element or the
interior surfuce of the lower oven druwer.
These surfaces mag be hot enough to burn.
REMEMBER:The inside surface of the lower
oven drawer mag be hot when the drawer
is opened.
_:,Use care when opening the lower oven
drawer. Open the drawer a crack and let
hot air or steam escape before removing
or replacing food. Hot air or steam which
escapes can cause burns to hands, face
and/or eges.
Do not use aluminum foil to line the lower
oven drawer. Foil is an excellent heat insulator
and will trap heat beneath it. This will upset
the performance of the drawer and it could
damage the interior finish.
Never place, use or self-cleon the lower oven
drawer pan in the upper oven.
Page 8
IMPORTANT SAFETY INFORMATION.
READ ALL INSTRUCTIONS BEFORE USING.
COOK MEATAND POULTRYTHOROUGHLY...
Cook meat and poultry thoroughly-meat to at least an INTERNALtemperature of l 60°F and poultry
to at least an INTERNAL temperature of l80°F. Cooking to these temperatures usually protects against
foodbome illness.
UPPEROVEN
Standaway from
the range when opening the door of a hot oven. The hot air and steam that escape
cancause burnsto hands,face and eyes.
Do notuse theoven fora storagearea.
Itemsstoredintheoven can ignite.
Keep the oven free from grease buildup.
iiiil}i
Place the oven shelves in the desired position
while the oven iscool. If shelves must be
handled when hot, do not let
pot holder contact the heating elements.
iiiil}i
Pulling out the shelf to the stop-lock is a
convenience in lifting heavy foods. It isalso
a precaution against burns from touching hot
surfaces of the door or oven walls. The lowest
position "R" is not designed to slide.
Do not heat unopened food containers.
Pressure could build up and the container
could burst, causing an injurg.
iiiiiil
When using cooking or roasting bags in the
oven, follow the manufacturer's directions.
Do not use gour oven to dry newspapers.
If overheated, theg can catch fire.
iiiil}i
Do not leave paper products, cooking utensils
or food inthe oven when not in use.
iiiiiiili_
Keep the oven vent unobstructed.
iiiiiiili_
Make sure anN broiler pan is in place correctlg
to reduce the possibilitg of grease fires.
iiiiiiili_
If gou should have a grease fire in a broiler
pan, press the CLEAR/OFF pad and keep
the oven door closed to contain fire until
it burns out.
iiiiiiili_
Never place, use or self-clean the lower oven
drawer pan in the upper oven.
SELF-CLEANING UPPER OVEN
iiiil}i
Be sure to wipe up excess spillage before
self-cleaning operation.
iiiiiiili_
Before self-cleaning the oven, remove
the shelves, anN broiler pan, grid and
other cookware.
iiiil}i
Never place, use or self-clean the lower oven
drawer pan in the upper oven.
iiiiiiili_
Do not clean the door gasket. The door gasket
isessential for a good seal. Care should be
taken not to rub, damage or
move the gasket.
iiiiiil
Clean onlg parts listed in this Owner's Manual.
iiiiiil
If the self-cleaning mode malfunctions,
turn the oven off and disconnect the power
supplg. Have it serviced bg a qualified
technician.
iiiil}iDo not use oven cleaners. No commercial
oven cleaner or oven liner of ang kind should
be used in or around ang part of the oven.
Residue from oven cleaners will damage the
inside of the oven when the self-clean cgcle
is used.
READAND FOLLOWTHISSAFETYINFORMATIONCAREFULLY.
SAVETHESEINSTRUCTIONS
8
Page 9
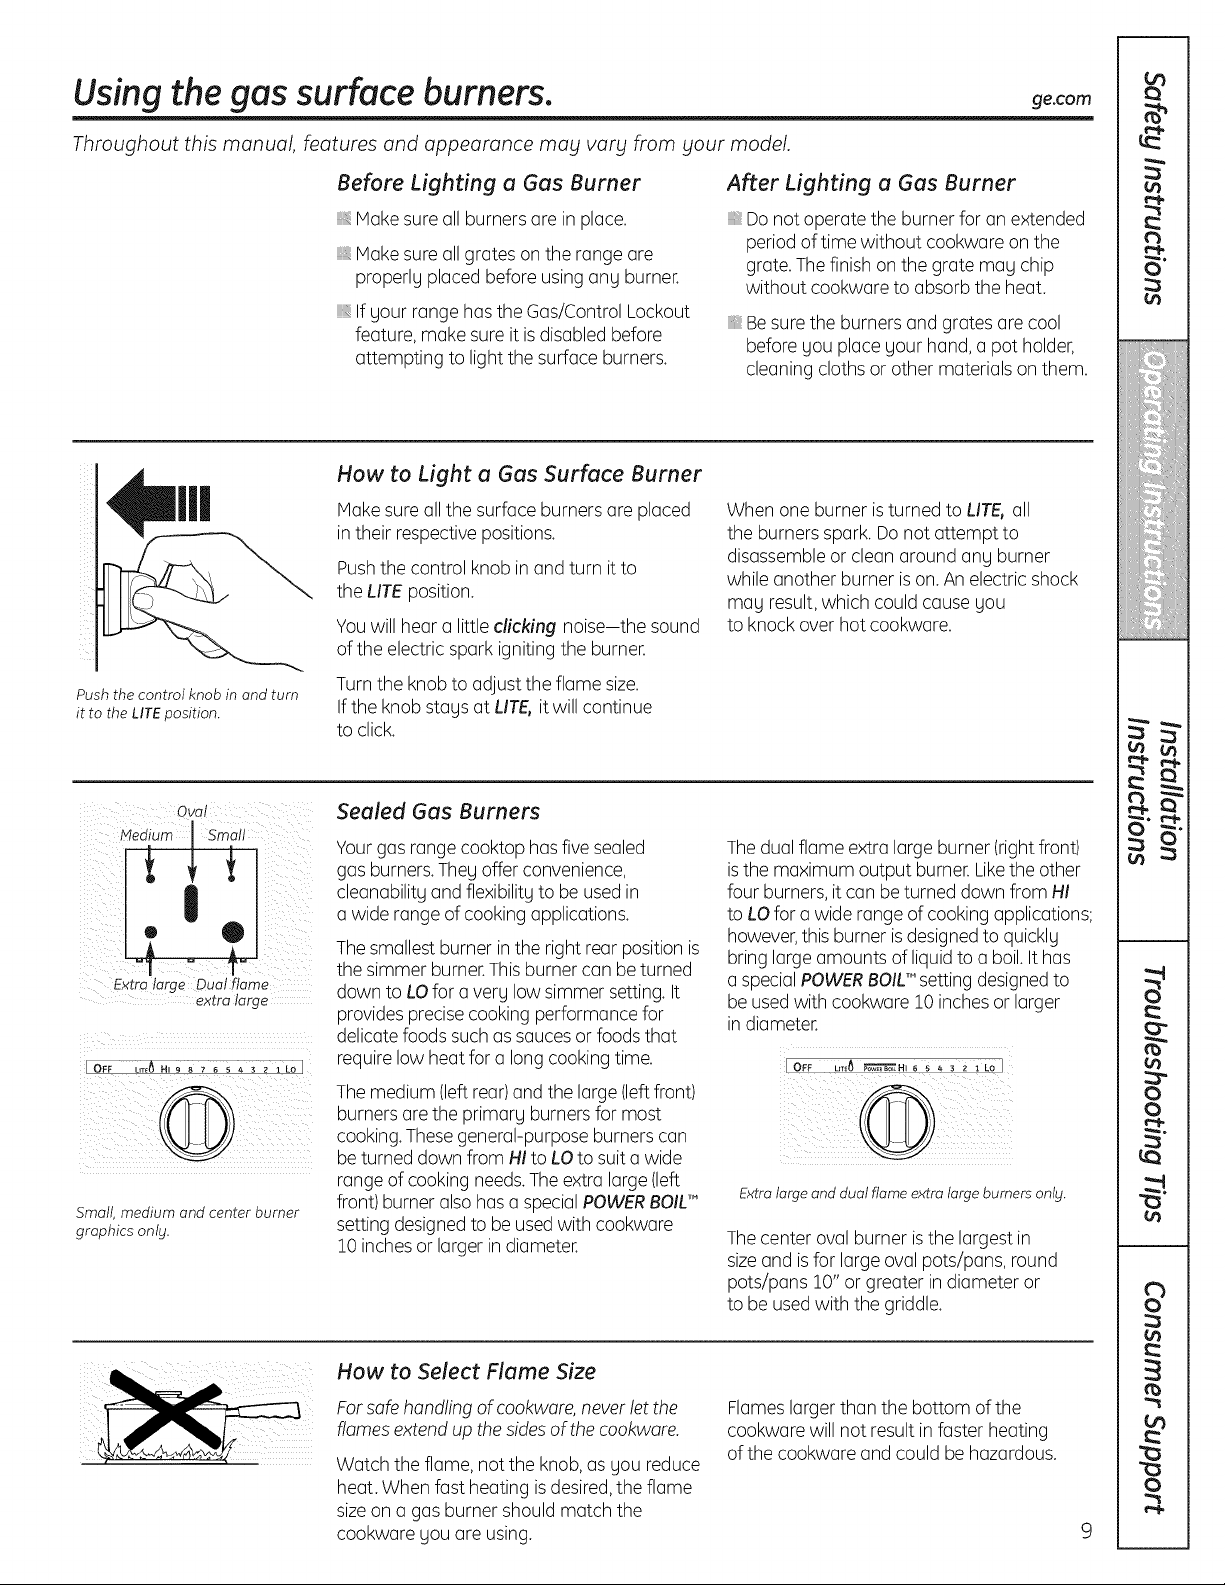
Using the gas surface burners, ge.com
Throughout this manual, features and appearance may vary from your model.
Push the control knob in and turn
it to the LITEposition.
Before Lighting a Gas Burner
Makesure all burners are inplace.
Makesure all grates on the range are
properly placed before using any burner.
If your range has the Gas/Control Lockout
feature, make sure it is disabledbefore
attempting to light the surface burners.
How to Light u Gas Surface Burner
Hake sureall the surface burners are placed
in their respectivepositions.
Pushthe control knob in and turn it to
the LifE position.
Youwill hear a little clicking noise-the sound
of the electric spark igniting the burner.
Turnthe knobto adjust the flame size.
If the knob stays at LITE,it will continue
to click.
After Lighting a Gas Burner
Donot operate the burner for an extended
period of time without cookware onthe
grate. Thefinish on the grate may chip
without cookware to absorb the heat.
Besurethe burners and grates are cool
before you place your hand,a pot holder,
cleaning cloths or other materials on them.
When one burner isturned to LIT& all
the burners spark. Do not attempt to
disassembleor clean around any burner
while another burner ison. An electric shock
may result,which could cause you
to knock over hot cookware.
Oval
t|?
Extra large Dual flame
extra large
Small, medium and center burner
graphics only.
Sealed Gas Burners
Yourgas range cooktop hasfive sealed
gas burners.They offer convenience,
cleanability and flexibility to be usedin
a wide range of cooking applications.
Thesmallest burner in the right rear position is
the simmer burner.Thisburner can beturned
down to LOfor a very low simmer setting. It
provides precisecookingperformance for
delicate foods such as saucesor foodsthat
require low heat for a long cooking time.
Themedium (leftrear)andthe large (leftfront)
burners are the primary burnersfor most
cooking.Thesegeneral-purpose burners can
be turned down from HI to LOto suit a wide
range of cooking needs.The extra large(left
front) burner also has a special POWERBOIL'"
setting designed to be used with cookware
10 inches or larger indiameter.
How to Select Flame Size
Thedual flame extra large burner (rightfront)
isthe maximum output burner.Likethe other
four burners, it can be turned down from HI
to LOfor a wide range of cookingapplications;
however,this burner is designedto quickly
bring large amounts of liquid to a boil. It has
a special POWERBOIL'"setting designedto
be usedwith cookware 10 inchesor larger
in diameter.
FOFF ,4 _H,_s2_Lo]
Extra large and dual flame extra large burners onlg.
Thecenter ovalburner isthe largest in
sizeand isfor large oval pots/pans, round
pots/pans 10" or greater in diameter or
to be used with the griddle.
Forsafehandling of cookware,neverlet the
flames extend up the sides ofthe cookware.
Watch the flame, not the knob,as you reduce
heat. When fast heating is desired,the flame
sizeon agas burner should match the
cookware you are using.
Flameslarger than the bottom of the
cookware will not resultin faster heating
of the cookware and could be hazardous.
Page 10

Using the griddle.
Yournon-stick coated griddle provides
an extra-large cooking surface for meats,
pancakes or other food usuollgprepared
in a frging pan or skillet.
How to Insert the Griddle
CAUTION: laceandremove
the griddle onlg when al! grates and
griddle are coo! and a!! surface units are
turned OFF.
The griddle can onlg be used with the center
burner.To insertthe griddle,remove center
grate and replace with griddle.
Using the Griddle
Most griddled foods require cooking
on a preheated surface. Preheat griddle
according to the guide below,then switch
to the desired cook setting.
l Tgpe of Food Preheat Cook Setting
Warming none 3 (MED-LOW)
Tortillas
Pancakes 4 (MED) 4 (MED)
Hamburgers HI 5(MED)
Fried Eggs HI 4 (MED)
Bacon None 5(MED)
Breakfast HI 5(MED)
SausageLinks 5 min
HotSandwiches HI HI
(suchas 4min
GrilledCheese)
NOTE:Griddle settings mag need to be adjusted if
griddle is used for an extended time.
Condition._
!0 min
5 min SearonHIfor!
minuteeachside
5 min
NOTE:Yourgriddle wi!! discolor overtime asit
becomesseasonedwith use.
NOTE:Donot cleanthe griddle in the
self-cleaningoven.
IMPORTANTNOTES:
Avoidcooking extremelggreasg foodsand
becarefu!of greasespi!!overwhile cooking.
Do not use oilon the griddle for extended
lengths of time. Permanent staining and/or
crazelineson the surface could result.
Neverplace or store ang items on the
griddle,evenwhen it is not in use.The
griddle canbecome heatedwhen using
thesurrounding burners.
Do not overheatthe griddle. Leavingthe
griddle burner on at HIfor onextended
amount of time without foodcan damage
thenon-stick coating.
Avoidusing meta!utensilswith sharp points
or rough,sharp edgesthat might damage
thegriddle surface.
,, Do not cut foods on the griddle.
lO
Page 11
Using the gas surface burners, ge.com
Top-of-Range Cookware
Aluminum: Hedium-weight cookware is
recommended because it heats quickly
and evenly.Host foods brown evenly in an
aluminum skillet. Usesaucepanswith tight-
fitting lids when cooking with minimum
amounts of water.
Cast-iron: Ifheated slowly, most skillets will
give satisfactory results.
Enamelware: Undersome conditions,
the enamel of somecookware may melt.
Follow cookware manufacturer's
recommendations for cooking methods.
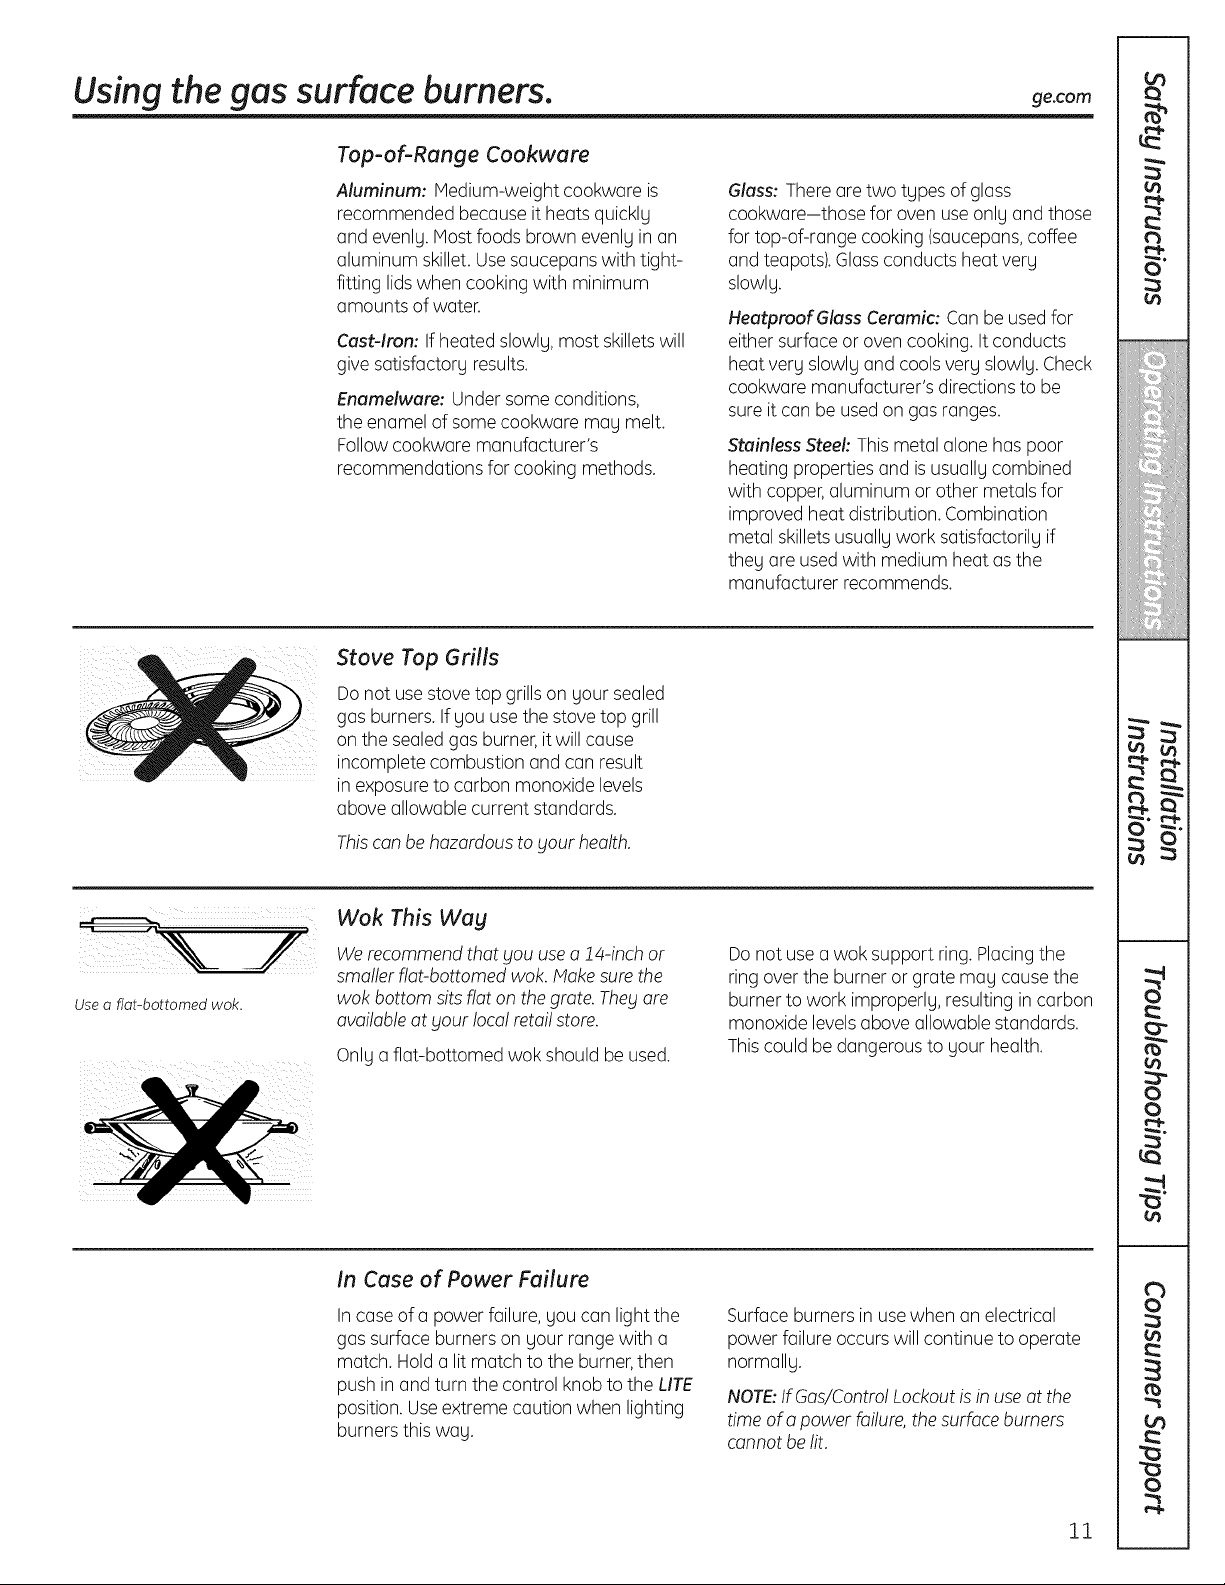
Stove Top Grills
Do not usestove top grills on your sealed
gas burners. If you usethe stove top grill
on the sealed gas burner, itwill cause
....... incomplete combustion and can result
in exposure to carbon monoxide levels
above allowable current standards.
Gloss: There are two types of glass
cookware-those for oven use only and those
for top-of-range cooking (saucepans,coffee
and teapots).Glassconducts heat very
slowly.
HeutproofGluss Ceramic: Canbe usedfor
either surface or oven cooking. It conducts
heat very slowly and cools very slowly. Check
cookware manufacturer's directions to be
sureit can be usedon gas ranges.
Stainless Steel: Thismetal alone has poor
heating properties and is usually combined
with copper,aluminum or other metals for
improved heat distribution. Combination
metal skilletsusuallywork satisfactorily if
they are usedwith medium heat as the
manufacturer recommends.
Use a riot-bottomed wok.
Thiscanbe hazardous to gout health.
Wok This Wag
We recommend that you use a J4-inch or
smaller flat-bottomed wok. Makesurethe
wok bottom sits flat on thegrate. Theyare
availableat your loca!retai!store.
Only a flat-bottomed wok should be used.
In Case of Power Failure
In caseof a power failure, you can light the
gas surface burners on your range with a
match. Hold a lit match to the burner,then
push in and turn the control knob to the LITE
position. Useextreme caution when lighting
burners this way.
Donot usea wok support ring. Placingthe
ring over the burner or grate may causethe
burner to work improperly, resulting in carbon
monoxide levelsabove allowable standards.
Thiscould be dangerous to your health.
Surface burners in use when an electrical
power failure occurswill continue to operate
normally.
NOTE:IfGas/Contro! Lockout is in use at the
time ofa power failure,the surfaceburners
cannot belit.
11
Page 12
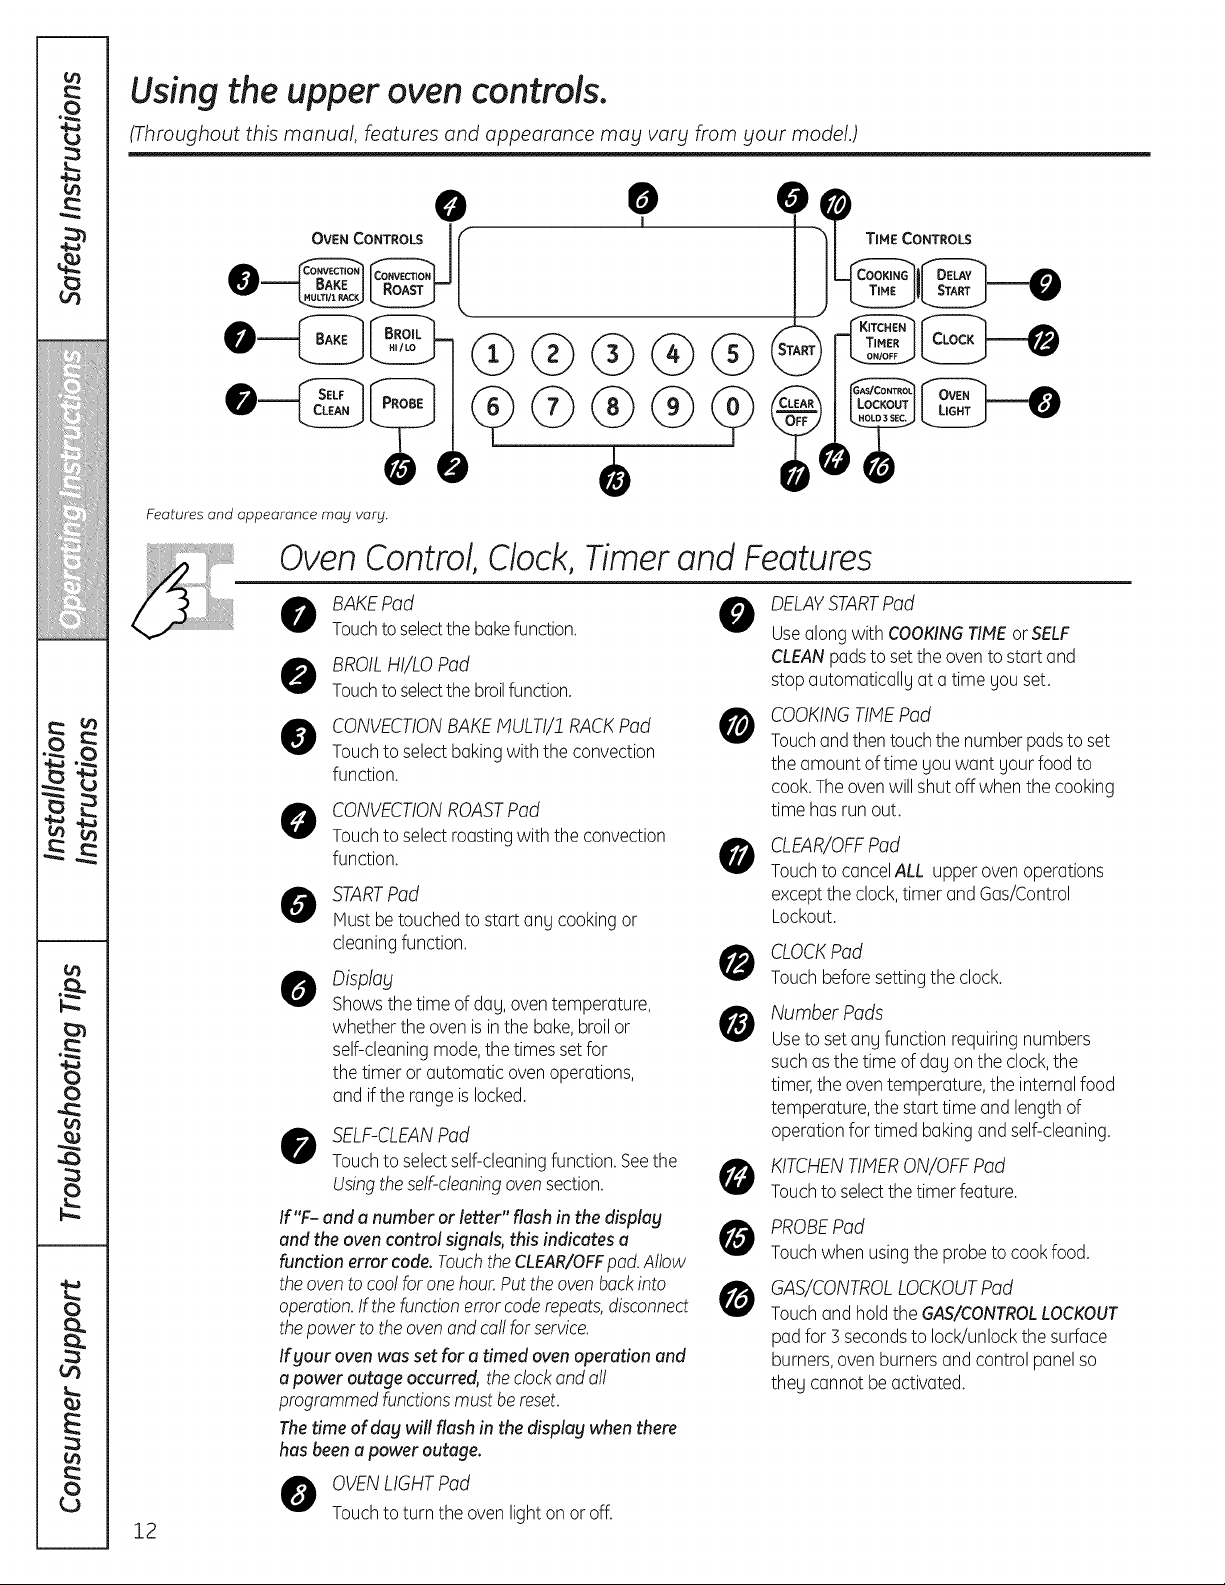
Using the upper oven controls.
(Throughout this manual, features and appearance ma!2 varg from sour model.)
O
OVEN CONTROLS I
Features and appearance may vary.
OvenControl,Clock,Timerand Features
BAKEPad 0
Touchtoselectthe bakefunction.
BROILHI/LOPad
Touchto selectthe broilfunction.
CONVECTIONBAKEMULTI/1 RACKPad
Touchto selectbakingwith the convection
function.
O CONVECTIONROASTPad
Touchto selectroastingwiththe convection
function.
STARTPad
Hustbetouched to start ang cookingor
cleaningfunction.
Display
Showsthe time of dag,oventemperature,
whether theovenis in thebake,broilor
self-cleaningmode,the timesset for
thetimer or automatic ovenoperations,
and ifthe rangeis locked.
SELF-CLEANPad
Touchto selectself-cleaningfunction.Seethe
Usingtheself-cleaningovensection.
If "F- and a number or letter" flash in the display
and the oven control signals, this indicates a
function error code. TouchtheCLEAR/OFFpad.Allow
theovento coolforonehour.Puttheoven backinto
operation.Ifthefunctionerrorcoderepeats,disconnect
thepowerto theovenandcoilforservice.
Ifsour oven was set for a timed oven operation and
a power outage occurred, the clockand all
programmed functions must be reset.
The time of day will flash in the display when there
has been a power outage.
DELAY'STARTPad
Usealongwith COOKINGTIlE orSELF
CLEANpadsto set theovento startand
stop automaticallgat a time Souset.
COOKINGTIMEPad
0
Touchand thentouchthe numberpadsto set
the amount of time Souwant goutfood to
cook.Theovenwillshut off whenthe cooking
time hasrun out.
CLEAR/OFFPad
0
Touchto cancelALL upperovenoperations
excepttheclock,timer andGas/Control
Lockout.
CLOCKPad
Touchbeforesettingthe clock.
Number Pads
Usetoset ang functionrequiringnumbers
suchasthe time of dag on the clock,the
timer,the oventemperature,the internalfood
temperature,the start time and lengthof
operationfortimed bakingandself-cleaning.
KITCHENTIMERON/OFFPad
0
Touchto selectthetimer feature.
PROBEPad
0
Touchwhen usingthe probeto cookfood.
GAS/CONTROLLOCKOUTPad
0
Touchand hold theGAS/CONTROLLOCKOUT
pad for 5secondsto lock!unlockthe surface
burners,ovenburnersandcontrol panelso
theg cannot beactivated.
12
OVENLIGHTPad
Touchto turn theovenlight on or off.
Page 13
Using the upper oven. ge.com
To avoid possible burns place the shelves in the desired position before you turn the oven on.
Before you begin...
Theshelveshave stop-locks, sothat when
placed correctlg on the supports, theg will
stop before coming completely out, and
will not tilt.
When placing and removing cookware,
pull the shelf out to the bump on the
shelf support.
The oven has 5 shelf positions.
It also has a special low shelf
position (R)for extra large items,
such as a large turkey.
Toremove u shelf, pull it toward Uou,tilt the
front end up and pull it out.
Torepluce, place the end of the shelf
(stop-locks)on the support, tilt up the
front and push the shelf in.
NOTE:Theshelf isnot designedto slide out
at the speciallow shelf (R)position.
, , ,
Plastic items on the cooktop may
melt if left too close to the vent.
Vent appearance and location vary.
Upper Oven Vent
Youroven isvented through ducts at the rear
of the range. Do not block these ducts when
cooking in the oven-it is important that the
flow of hot air from the oven and fresh air
to the oven burner be uninterrupted. Avoid
touching the vent openings or nearby
surfaces during oven or broiler operation-
they may become hot.
Upper Oven Light
Touchthe OVENLIGHTpad to turn the light
on or off.
Handles ofpots and pans onthe cooktop
may becomehot if left too closeto the vent.
Do not leave plastic items on the cooktop-
they may melt if left too close to the vent.
Do not leave any items on the cooktop. The
hot airfrom the vent may ignite flammable
items and wi!!increase pressure in closed
containers, which may cause them to burst.
Meta! items wi!!become very hot ifthey are
left on the cooktop, and could cause burns.
13
Page 14
Using the upper oven.
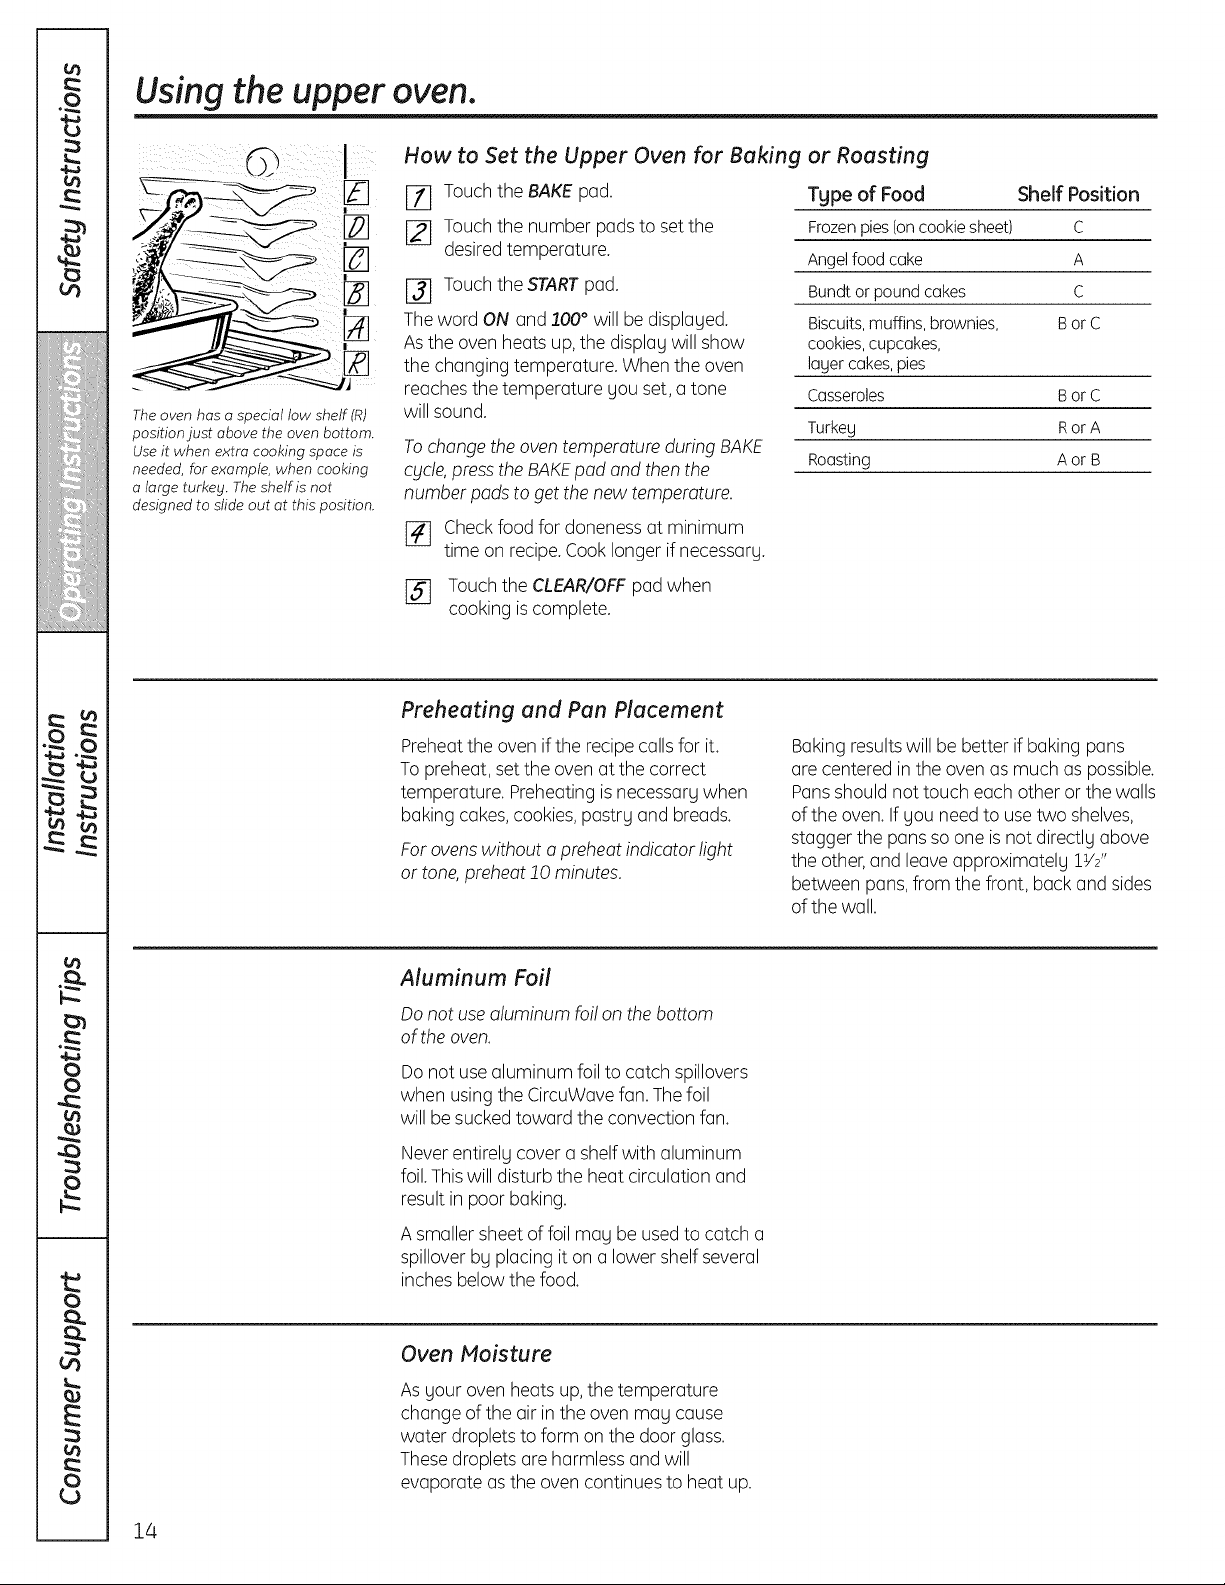
!
The oven has a special low shelf(R)
position just above the oven bottom.
Use it when extra cooking space is
needed, for example, when cooking
a large turkey. The shelf is not
designed to slide out at this position.
How to Set the Upper Oven for Baking
[_ Touch the BAKE pad.
[_ Touch the number pads to set the
desiredtemperature.
r3] Touchthe STARTpad.
Theword ON and 100° will be displaged.
Asthe oven heats up, the displag will show
the changing temperature. Whenthe oven
reachesthe temperature gou set,a tone
will sound.
Tochange theoven temperature during BAKE
cycle,press the BAKEpad and then the
number pads to get the new temperature.
[_ Checkfood for donenessat minimum
time on recipe.Cooklonger if necessarg.
FS] Touch the CLEAR/OFFpadwhen
cooking iscomplete.
Preheating end Pen Placement
Preheatthe oven if the recipecallsfor it.
To preheat, set the oven at the correct
temperature. Preheatingis necessargwhen
baking cakes,cookies,pastrg and breads.
Forovenswithout apreheatindicator light
or tone, preheat!0 minutes.
or Roosting
Tgpe of Food Shelf Position
Frozenpies(oncookiesheet) C
Angelfoodcoke A
Bundtorpoundcokes C
Biscuits, muffins, brownies, BorC
cookies,cupcakes,
lagercokes,pies
Casseroles BorC
Turkeg RorA
Roosting AorB
Bakingresultswill be better if baking pans
are centered in the oven as much as possible.
Pansshould not touch each other or the walls
of the oven. If gou need to usetwo shelves,
stagger the pans soone isnot directlg above
the other,and leave approximatelg 1W'
between pans, from the front, back and sides
of the wall.
14
Aluminum Foil
Donot use aluminum foi!on the bottom
of the oven.
Do not usealuminum foil to catch spillovers
when using the CircuWavefan. Thefoil
will be sucked toward the convection fan.
Never entirelg cover a shelfwith aluminum
foil.Thiswill disturb the heat circulation and
result in poor baking.
A smaller sheet of foil mag be used to catch a
spillover bg placing it on a lower shelf several
inches below the food.
Oven Moisture
Asgour oven heatsup, the temperature
change of the air in the oven mag cause
water droplets to form on the door glass.
These droplets are harmlessand will
evaporate asthe oven continues to heat up.
Page 15
How to Set the Upper Oven for Broiling--Close the oven door
ge.com
Placethe meat or fish on a broiler grid
Ell in a broiler pan.
[_ Followsuggested shelf positions in
the BroilingGuide.
131 The oven door must beclosed during
Closethe doo_ Always broil with
the door closed,
NOTE: Broil will not work if the
temperature probe is plugged in.
broiling.
[] Touch the BROILHI/LO padonce for
HI Broil.
To change to LO Broil, touch the
BROILHI/LO pad again.
Broiling Guide
Thesize,weight, thickness,
starting temperature and Food
gour preference of doneness
will affect broiling times. This
Ground Beef
guide isbasedon meats at
refrigerator temperature. Beef Steaks
t The U.S.Department of Agriculture Medium
says "Rare beef is popular, but you Well Done
should know that cooking it to only Rarer
140°F means some food poisoning Medium
organisms may survive." (Source: WellDone
Safe Food Book Your Kitchen Chicken
Guide_USDA Re_June 1985.)
Rarer
Bekerg Product
Bread(toast}
EnglishMuffin
Lobster Tails
Fish Fillets
Salmon
Steaks
Fillets
Ham Slices
(precooked)
Pork Chops
WellDone
Lamb Chops
Medium
WellDone
Medium
WellDone
Quantitg and/
or Thickness
1 lb.(4patties}
V2to s/4"thick
4 Ibs.(16 patties}
s/4to 1" thick
1to 1V2Ibs.
lY2" thick
2to 2V2Ibs.
1whole cut up
2to 2Y2Ibs.,
split lengthwise
Breast
2to 4 slices
2(split)
2-4
1 lb.(Y4to Y2"thick)
2(1" thick)
2(V*to s/_,,thick)
Y*"thick
1" thick
2iV/' thick)
211" thick) about 1 lb.
2(1" thick)about 10
to 12oz.
2(1V2"thick)about 1lb.
Shelf
Position
E
D
D
C
C
D
B
B
D
E
B
D
D
C
C
C
C
D
D
D
D
[] Touchthe STARTpad.
NOTE:Thedisplay wi!! always outomatico!lg
remind you to close the door.
[_ When broiling is finished,touch the
CLEAR/OFFpad.
Servethe food immediatelg, and leave the
pan outside the oven to cool during the meal
for easiest cleaning.
UseLO Broil to cook foods such as poultrg
or thick cuts of meat thoroughlg without
over-browning them.
First Side
Time(min.)
13
15
6
8
iO
iO
15
20
25
25
3
3-4
18-20
lO
lO
6
8
lO
15
7
lO
9
14
SecondSide
Time (min.)
11
4
6
8
8
10-12
20
25
15
1
Do not
turn
over
6
8
10
15
4
9
6
10
Comments
SpaceevenlU.
Steakslessthan YJ'thick
aredifficultto cook rare.
Slashfat.
Brusheachsidewith
melted butter.
Broilskin-side-downfirst.
Spaceevenlg. PlaceEnglish
muffinscut-side-up and
brush with butter if desired.
Cutthrough back of shell.
Spreadopen. Brushwith
melted butter before
broilingand after half of
broilingtime.
Handleand turn verg
carefullg. Brushwith
lemon butter before
andduring cooking,
if desired.
Turncarefullg. Donot
turn skin sidedown.
Slashfat.
Slashfat.
15
Page 16
Using the clock and timer.
Not all features are on all models.
To Set the Clock
Make sure the clock is set to the
correct time of day.
®®®®®
®®®®®
The timer is a minute timer only.
The CLEAR/OFFpad does not affect
the timer.
Theclock must be set to the correct time
of dag for the automatic oven timing
functions to work properlg.Thetime of dag
cannot be changed during a timed baking
or self-cleaning cgcle.
[_ Touch the CLOCKpad.
[_ Touch the number pads.
Touch the number pads the same wag gou
read them. For example,to set 12:3/4,touch
the number pads1, 2,3 and 4 in that order.
To Set the Timer
Thetimer does not contro! ovenoperations.
Themaximum setting on thetimer is9 hours
and 59 minutes.
Touch the KITCHENTIMERON/OFF
pad.
Touch the number pads until the
amount of time you want shows in
the display. Themaximum number
of minutes that can be entered is60.
Toset additional time, you will need
to set it by hours and minutes.
Forexample,to enter 1 hour and
30 minutes, touch 1,3 end 0 in
that order.
If number pads are not touched within one
minute after you touch the CLOCKpad,the
display revertsto the original setting. Ifthis
happens,touch the CLOCKpad and reenter
the time of day.
[_ Touchthe STARTpad until the time
of dag shows in the displag.This enters
the time and starts the clock.
Tocheck the time of dag when the displa£is
showing otherinformation, simp!gtouch the
CLOCKpad. Thetime of da£shows unti!
another pad is touched.
Ifyou make a mistake, press the KITCHEN
TIMERON/OFF pad and begin again.
Touch the STARTpad.After pressing the
%
STARTpad,SETdisappears; this tells
you the time iscounting down, although
the display does not change until one
minute has passed.
When the timer reaches :00, the control
EE
will beep 3 times followed by one beep
everg6 secondsuntil the KITCHEN
TIMERON/OFFpad istouched.
The6 second tone can be canceledby
following thestepsin the Specia!featuresof
Four oven contro!section underTonesat the
Endofa TimedC£cle.
16
To Reset the Timer
Ifthe displag isstillshowing the time
remaining, gou mag change it bgtouching
the KITCHENTIMERON/OFF pad;then touch
the number pads untilthe time gou want
appears in the displag.
To Cancel the Timer
Touch the KITCHENTIMERON/OFF pad twice.
Power Outage
I1:aflashing time is in the display,you have
experiencedapower failure.Resetthe clock.
If the remaining time isnot inthe displag
(clock,delag start or cooking time are in
the displag),recallthe remaining time bg
touching the KITCHENTIMERON/OFF pad
and then touching the number pads to enter
the new time gou want.
To resetthe clock,touch the CLOCKpad.
Enterthe correct time of day by touching the
appropriate number pads.Touch the START
pad.
Page 17
Using the timed baking and
roasting features (upper oven only).
NOTE; Foods that spoil easily-such as milk, eggs, fish, stuffings, poultry and pork-should not be allowed to sit for
more than 1 hour before or after cooking. Room temperature promotes the growth of harmful bacteria. Be sure that
the oven light is off because heat from the bulb will speed harmful bacteria growth.
How to Set an Immediate Start and Automatic Stop
ii!i/i {i ii
®®®®®
@ ®@®@
@
@®@®@
The upper oven wi!!turn on immediately and
cook for a selected length of time. At the end
of the cooking time, the oven wi!!turn off
automatically.
I_ Touchthe BAKEpad.
[_ Usingthe number pads,enter the
desiredtemperature.
E_] Touch the COOKING TIME pad.
NOTE:Ifyour reciperequirespreheating,you
may need to add additiona! time to the length
of the cooking time.
Usingthe number pads,enter the
desiredbaking time. Theoven
temperature and the cooking time
that you entered will bedisplayed.
Theword ON and100° will be displaged.
Thecook time will beginto count down.
Asthe oven heats up,the display will show
the changing temperature. When the oven
reaches the temperature you set, 3 beeps
will sound.
Atthe end of timed baking,the ovenwill turn
off.Theend of cgcle tone will sound.
Touchthe CLEAR/OFFpadto clearthe
display.
ge.com
®®®@@
@®@®@
@
®@®@®
®®®®@
@
®@®@@
@®@®@
@
@
I_] Touch the START pad.
How to Set a Delayed Start and Automatic Stop
Youcanset the upper oven contro! to @lay-
start the oven,cookfor a spedfic length of
time and then turn off automatically.
Hake surethe clockshows the correct
time of day.
I_ Touchthe BAKEpad.
[_ Usingthe number pads,enter the
desiredtemperature.
[_] Touch the COOKINGTIMEpad.
NOTE:Ifyour reciperequirespreheating,you
may need to add additiona! time to the length
of the cooking time.
[_ Usingthe number pads,enter the
desiredbaking time.
15] Touchthe DELAYSTARTpad.
16] Usingthe number pads,enter the
time of day you want the oven to
turn on and start cooking.
IZ] Touch the STARTpad.
If gou would like to check the times you have
set, touch the DELAYSTARTpad to check the
start time you haveset or touch the
COOKINGTIME pad to check the length
of cooking time you have set.
Theovenwill turn on automatically.
Theword ON and 100° will be displaged.
Thecook time will begin to count down.
Asthe oven heats up,the displag will show
the changing temperature. Theoven will cook
for the programmed cooking time and shut
off automatically.
At the end oftimed baking,the ovenwill
turn off. Theend of cucletone will sound.
Touchthe CLEAR/OFFpadto clearthe
display.
NOTE:An attention tone wi!!sound if£ou are
using timed baking and do not touch the
STARTpad offer entering the baking
temperature.
17
Page 18
Using the probe.
For many foods, especially roasts and poultry, internal food temperature is the best test for doneness.
The temperature probe takes the guesswork out of roasting by cooking foods to the exact doneness you want.
!
The temperature probe has a
skewer-like probe at one end and
a plug at the other end that goes
into the outlet in the oven.
Useof probesotherthan the one providedwith .....
this productmay resultindamage to the probe. ))_
Usethe handlesof the probe and plug when f
inserting and removing them from the food Probe
and outlet.
:_.Toavoid damaging your probe,do not use
tongs to pu!! on the cablewhen removingit. ,, Neverleave Fourprobe insidethe oven
,, Toavoid breakingthe probe,make sure food
iscomplete!gdefrostedbefore inserting. ,, Donot store theprobe in the oven.
_,Toprevent possibleburns, do not unplug
theprobe from the outletunti! the oven
hascooled.
After preparing the meat and placing
iton a trivet or on a broiler pan grid,
follow these directionsfor proper probe
placement.
Insertthe probe completely into the meat.
It should not touch the bone, fat or gristle.
during aself-cleaningcgcle.
Forroastswith no bone,insert the probeinto
the meatiest part of the roast. Forbone-in
ham or lamb, insert the probe into the center
of the lowest large muscle.
Insertthe probe intothe center of dishes
such as meat loaf or casseroles.
Insertthe probe intothe meatiest part of the
inner thigh from below and parallel to the leg
of a whole turkey.
__ Cable
iii _}i_ ii_i _ _iii_ill i iiii_i
®® ®® @
®®®® @
®®®®®
How to Set the Upper Oven For Rousting
[] Insertthe probe into the food. []
[_ Plugthe probe into the outlet in the
oven. Hake sure it's pushedall the
wag in. Closethe oven door.
[_ Touch the PROBEpad.
[_ Touch the number pads to setthe
desired internal food or meat
temperature.
[_ Touch the BAKEpad.
[_ Touch the number pads to setthe
desired oven temperature.
[] Touch the STARTpad.
Thedisplay wi!! flash ifthe probeis inserted
into the outlet and you have not set a probe
temperature and touched the STARTpod.
After the internal temperature of the food
reaches IO0°F,the changing internal
temperature will be shown in the display.
When Using the Probe
Whenthe internal temperature of the
food reaches the number gou have set,
the probe and the oven turn off and the
oven control signals.Tostop the signal,
touch the CLEAR/OFFpad.Usehot pads
to remove the probe from the food.Do
not use tongs to pull on it-they might
damage it.
Tochange the oven temperature during
the Roastcgcle,touch the BAKEpad and
then the number pads to setthe new
temperature.
B If the probe is removed from thefood before
the final temperature is reached,atone wi!!
sound and the display wi!! flash unti! the
probe isremoved from the oven.
Youcan usethe timer eventhough you
cannot usetimed oven operationswhile
usingthe probe.
18
Page 19
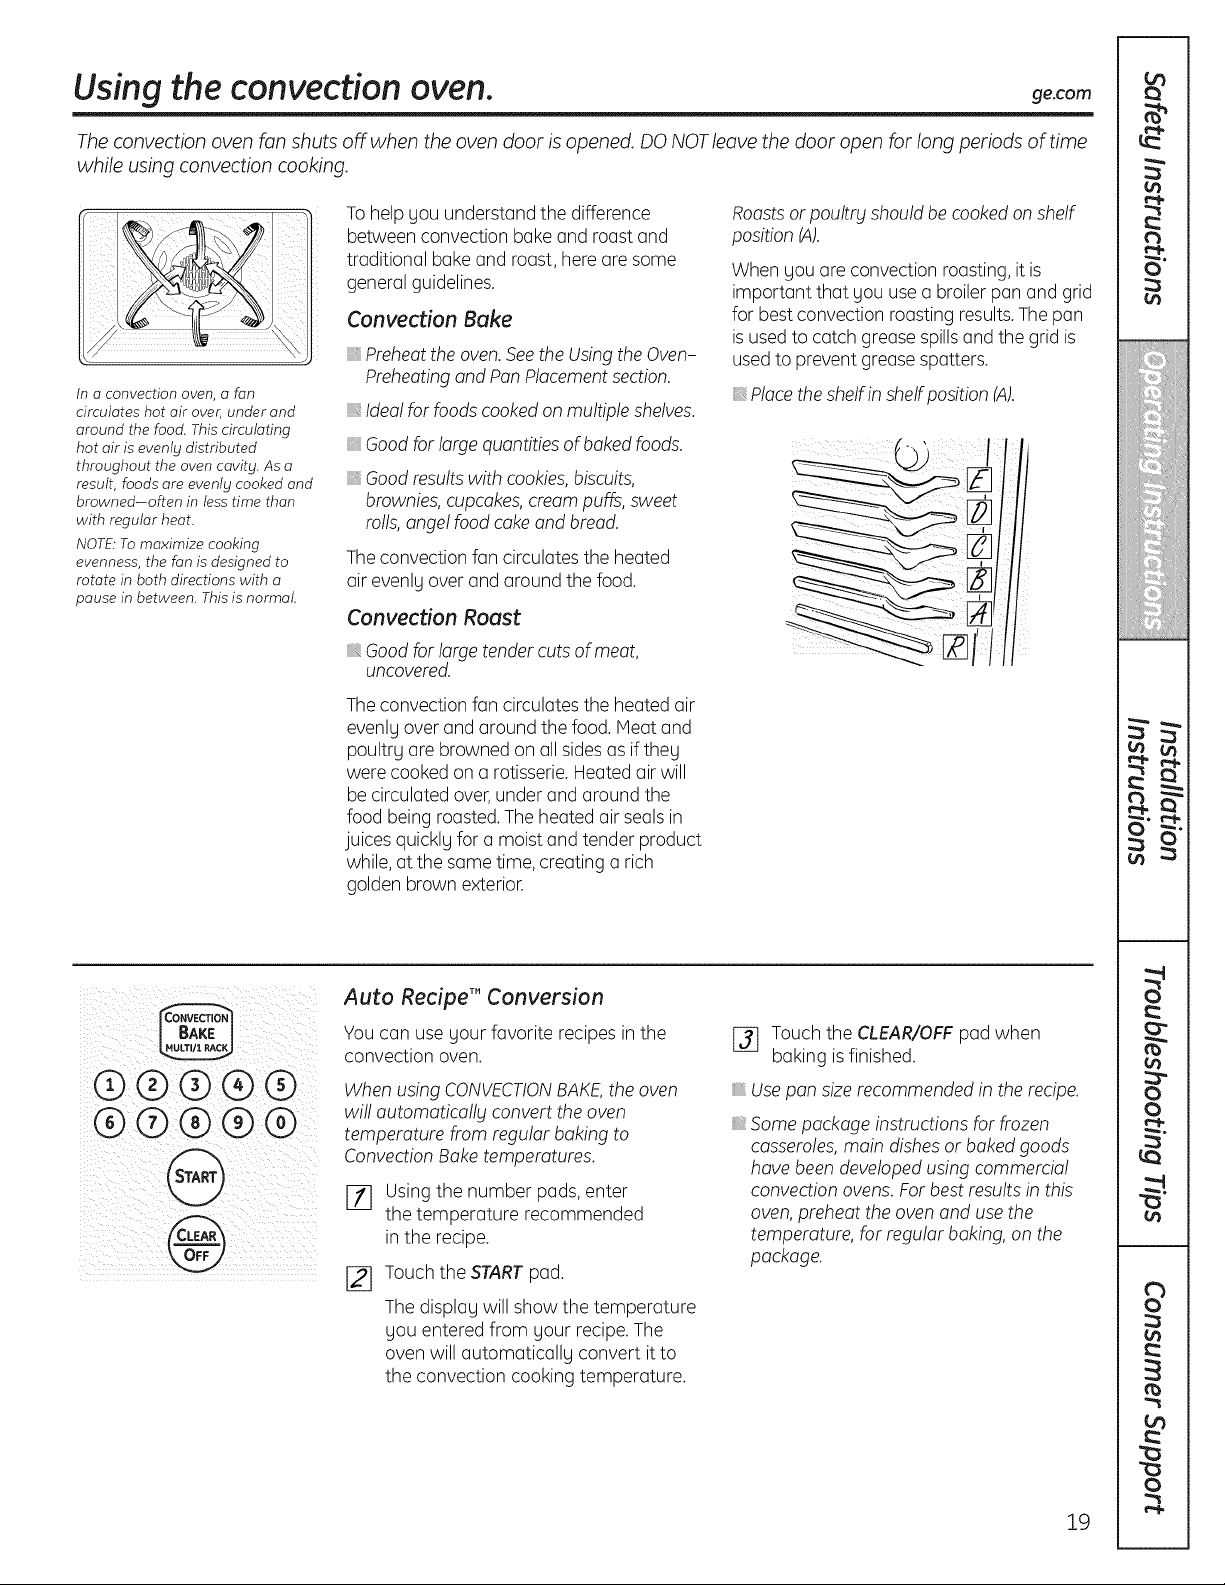
Using the convection oven. ge.com
The convection oven fan shuts off when the oven door isopened. DO NOTleave the door open for long periods of time
while using convection cooking.
In a convection oven, a fan
circulates hot air over, under and
around the food. This circulating
hot air is evenly distributed
throughout the oven cavity. As a
result, foods are evenly cooked and
browned-often in less time than
with regular heat.
NOTE:To maximize cooking
evenness, the fan is designed to
rotate in both directions with a
pause in between. Thisis normal.
Tohelp you understand the difference
between convection bake and roast and
traditional bakeand roast, here are some
general guidelines.
Convection Bake
Preheat the oven. See the Using the Oven-
Preheating and Pan Placement section.
Idea! for foods cooked on multiple shelves.
Good for large quantities of baked foods.
Good results with cookies, biscuits,
brownies, cupcakes, cream puffs, sweet
rolls, ange! food cake and bread.
Theconvection fan circulates the heated
air evenly over and around the food.
Convection Roast
Good for large tender cuts of meat,
uncovered.
Theconvection fan circulates the heated air
evenly overand around the food. Meatand
poultry are browned on allsidesas ifthey
were cooked on a rotisserie. Heated air will
be circulated over,under and around the
food being roasted. Theheated air sealsin
juices quickly for a moist and tender product
while, at the same time, creating a rich
golden brown exterior.
Roastsor poultr_jshouldbe cooked on shelf
position (A).
When you are convection roasting,it is
important that you usea broiler pan and grid
for best convection roasting results.The pan
isusedto catch grease spillsand the grid is
usedto prevent greasespatters.
_,Placethe shelfinshelf position (A).
®®®®®
®®®®®
@
@
Auto Recipe'" Conversion
Youcan use your favorite recipes in the
convection oven.
When using CONVECTIONBAKE,the oven
wi!! automatically convert the oven
temperature from regular baking to
Convection Baketemperatures.
_] Usingthe number pads, enter
the temperature recommended
in the recipe.
[_ Touch the STARTpad.
The display will show the temperature
you entered from your recipe.The
oven will automatically convert it to
the convection cooking temperature.
[_ Touch the CLEAR/OFFpad when
baking is finished.
Use pan size recommended in the recipe.
,, Somepackage instructions for frozen
casseroles,main dishes or baked goods
have been developed using commemia!
convection ovens.Forbest results in this
oven,preheat the oven and usethe
temperature, for regular baking, on the
package.
19
Page 20
Using the convection oven.
Cookware for Convection Cooking
@@@@(9
@®@®@
@
@
Beforeusing gour convection oven,check
to see ifgour cookware leavesroom for air
circulation inthe oven. If gou are baking with
several pans, leavespace between them.
Also,besure the pans do not touch each
other or the walls of the oven.
Paper and Plastic
Heat-resistant paper and plasticcontainers
that are recommended for use in regular
ovens can be used in convection ovens.
Plasticcookware that isheat-resistant to
temperatures of 400°Fcan also be used,
when oven isbelow 400°F.
Metal and Glass
Ang tgpe of cookware willwork in gour
convection oven. However,metal pans heat
the fastest and are recommended for
convection baking.
_,Darkenedor matte-finished pans wil! bake
faster than shingpans.
_,Glassor ceramicpans cook more s!owlbl.
When baking cookies,gou will get the best
results if gou usea flat cookie sheet instead
of a pan with low sides.
Forrecipes like oven-baked chicken,use a
pan with low sides.Hotair cannot circulate
well around food in a pan with high sides.
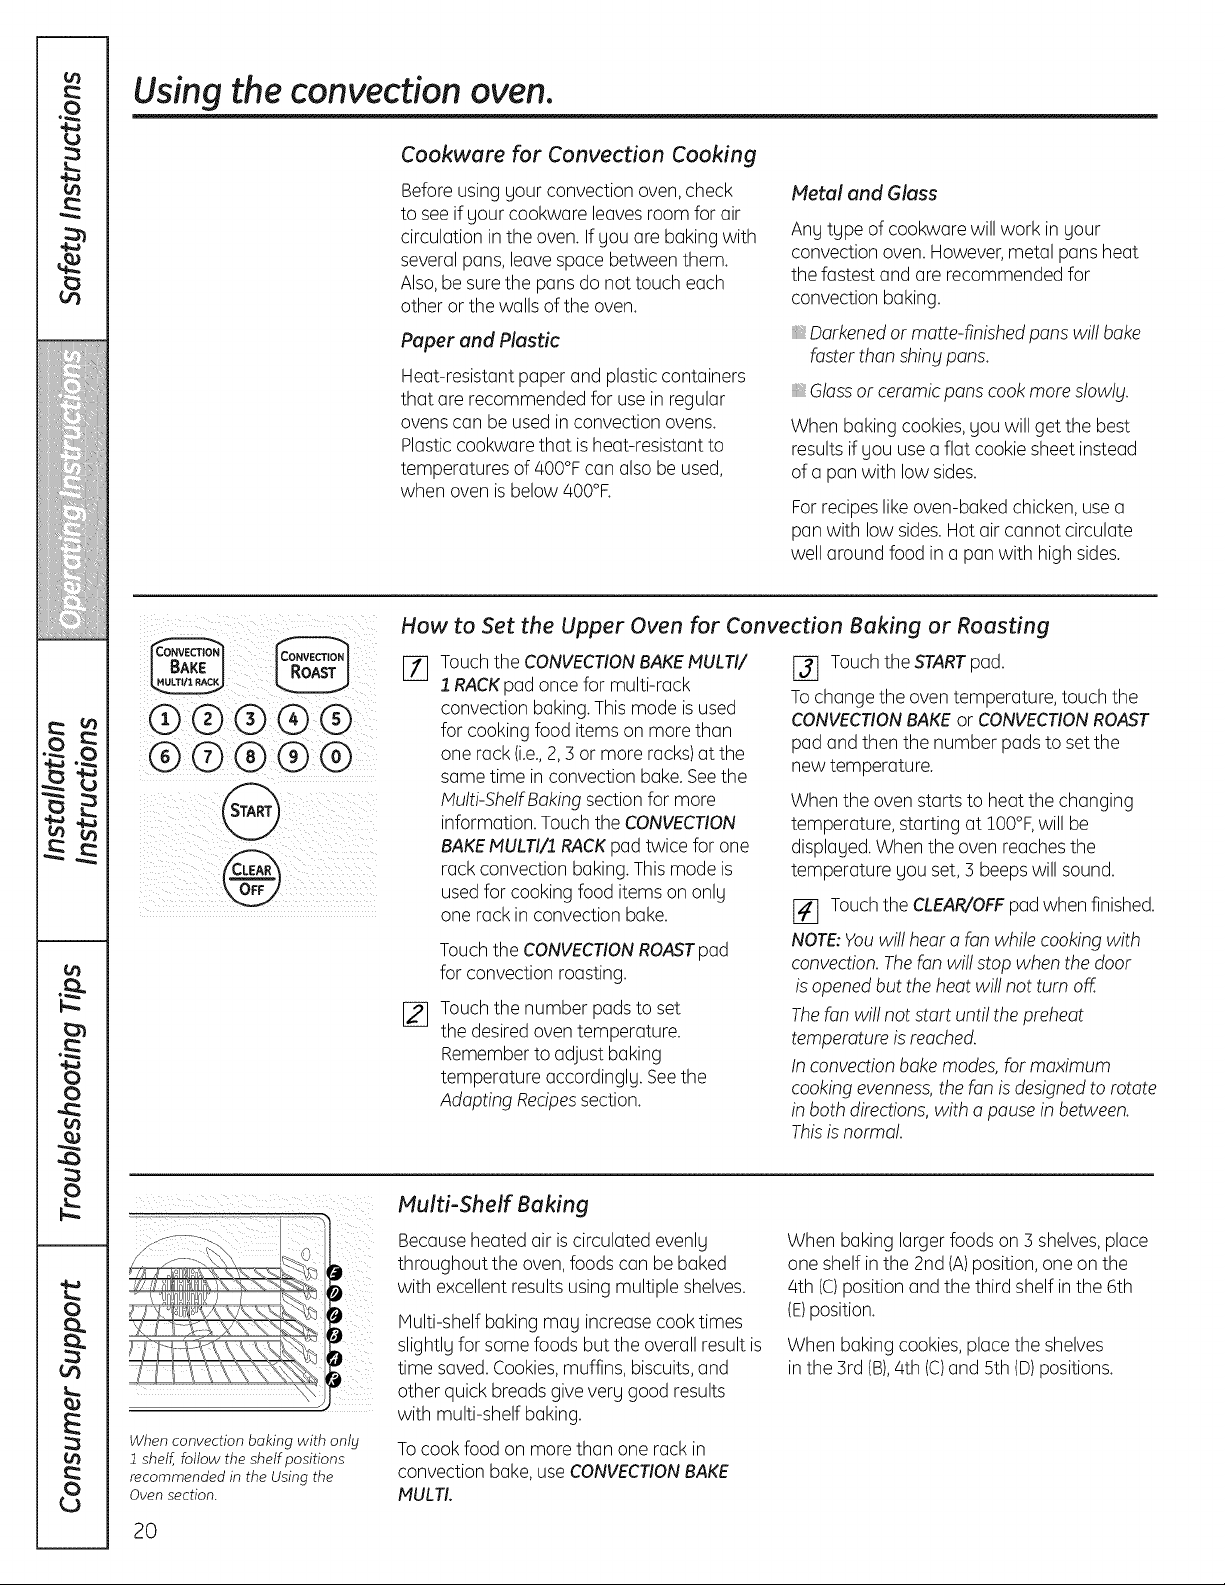
How to Set the Upper Oven for Convection Baking or Roasting
Touchthe CONVECTIONBAKEMULTI/
%
1.RACKpadonce for multi-rack
convection baking.Thismode isused
for cooking food itemson more than
one rack (i.e.,2,5 or more racks)at the
same time in convection bake.Seethe
Multi-ShelfBaking sectionfor more
information. Touch the CONVECTION
BAKEMULTI/1RACKpad twice for one
rack convection baking.Thismode is
usedfor cooking food items on onlg
one rack in convection bake.
Touch the CONVECTIONROASTpad
for convection roasting.
Touchthe number padsto set
[]
the desired oven temperature.
Rememberto adjust baking
temperature accordinglg. Seethe
Adapting Recipessection.
[] Touch the STARTpad.
Tochange the oven temperature, touch the
CONVECTIONBAKEor CONVECTIONROAST
pad and then the number pads to set the
new temperature.
When the oven starts to heat the changing
temperature, starting at 100°F,will be
displaged.When the oven reachesthe
temperature gouset, 5 beepswill sound.
[] Touch the CLEAR/OFFpad when finished.
NOTE:Youwil! hear a fan while cookingwith
convection.Thefan will stop when thedoor
is opened but the heat wi!!not turn off.
Thefan wil! not start unti! the preheat
temperature is reached.
Inconvection bakemodes, for maximum
cooking evenness,thefan is designedto rotate
in both directions, with a pause in between.
Thisisnorma!.
\ "LJi/L,
ge.com
How to Set the Upper Oven for Convection Roosting when Using the Probe
For best results when masting large
turkeys and masts, we recommend
using the probe included in the
convection oven.
®®®@@
®®@®@
@
®®®®®
@®@®@
@
@
Thedisplay will flash PROBEand the oven
control will signal ifthe probe is inserted into
the outlet, and you have not set a probe
temperature and touched the STARTpad.
Placethe shelfinthe shelfposition(A).
Insertthe probecompletely into thefood.
Plugthe probe into the outlet in the
oven. Makesure it is pushedall the way
in.Closethe oven door.
j_j Touch the CONVECTIONROASTpad.
[_ Touchthe number padsto setthe
desiredoven temperature.
[_ Touchthe PROBEpad.
[_ Touchthe number padsto setthe
desiredinternal food temperature.
Tochange the oven temperature during
the Convection Roastcycle,touch the
CONVECTIONROASTpad and then touch
the number pads to set the new desired
temperature.
JZJ Touch the STARTpad.
When the oven starts to heat, the word
LO will be in the display.
After the internal temperature of the food
reaches lO0°F,the changing internal
temperature will be shown in the display.
[_ When the internal temperature of the
food reachesthe number you haveset,
the probe and the oven turn off and the
oven control signals.Tostop the signal,
touch the CLEAR/OFFpad. Usehot
padsto remove the probe from the
food. Donot usetongs to pull on it-
they might damage it.
,&CAUTION:Toprevent possible
bums, do not unplug theprobe from the
ovenoutlet unti! theoven hascooled.Do
not store the probe in the oven.
NOTE:
_,If theprobe is removedfrom the food
beforethe fina!temperature isreached,a
tone wi!! sound and the display wi!! flash
unti! theprobe isremoved from the oven.
Youwi!!hear a fan while cookingwith this
feature.Thefan wi!!stop when the door is
opened but the heatwi!! not turn off.
_,Youcanusethe timer eventhough you
cannot usetimed ovenoperations while
usingthe probe.
21
Page 22

Using the convection oven.
Convection Roasting Guide
Meats Minutes/Lb, OvenTemp, Internal Temp,
Beef Rib(3to 5 Ibs.) Raret 20-24 325°F 140°F
BonelessRib,TopSirloin Raret 20-24 325°F 140°F
BeefTenderloin Raret 10-14 325°F 140°F
PotRoast(21/2to 3 Ibs.)chuck,rump 35-45 300°F 170°F
Pork Bone-in(3to 5 Ibs.) 23-27 325°F 170°F
Boneless(3to 5 Ibs.) 23-27 325°F 170°F
PorkChops(1/2to 1"thick) 2chops 30-35 total 325°F 170°F
Ham Canned(3 Ibs.fullycooked) 14-18 325°F 140°F
Butt(5Ibs.fully cooked) 14-18 325°F 140°F
Shank(5Ibs.fullycooked) 14-18 325°F 140°F
Lamb Bone-in(3to 5 Ibs.) Medium 17-20 325°F 160°F
Boneless(3to 5 Ibs.) Medium 17-20 325°F 160°F
Seafood Fish,whole(3to 5 Ibs.) 30-40 total 400°F
LobsterTails(6to 8oz.each) 20-25 total 350°F
Poultry WholeChicken(21Ato 31AIbs.) 24-26 350°F 180°-185°F
CornishHensUnstuffed(1to 11½Ibs.) 50-55 total 350°F 180°-185°F
CornishHensStuffed(1to 11AIbs.) 55-60total 350°F 180°-185°F
Duckling(4to 5 Ibs.) 24-26 325°F 180°-185°F
Turkey,whole_
Unstuffed(10to 16Ibs.) 8-11 325°F 180°-185°F
Unstuffed(18to24Ibs.) 7-10 325°F 180°-185°F
Medium 24-28 325°F 160°F
Well 28-32 325°F 170°F
Medium 24-28 325°F 160°F
Well 28-32 325°F 170°F
Medium 14-18 325°F 160°F
4 chops 35-40 total 325°F 170°F
6chops 40-45 total 325°F 170°F
Well 20-24 325°F 170°F
Well 20-24 325°F 170°F
22
TurkeyBreast(4to 6 Ibs.) 16-19 325°F 170°F
* SI_{/,f!_dbi*d.sgenerally require 30-45 "minule.saddilional ma.ding lime. Shield leg:sand brea.d u_ilhJbil Io prt_Jenl
overt:togyppinga_d :@'ing"oJ,dd_.
t 7he U.S. l)_'/Jarlme_t oJAgricullure s(o,,s"llare be_,/ispopuh¢_; but you should Imozv lhat cooki_Tgit lo o_&' 140 °F "mea_,s
.>meJbod poiso_ing og'a_isms "m(O,smwive. " (Som_ e: SaJb I_od Booh. Your Kilche_ Guide. U,S'I)AI¢_J.,/u_e 1985.)
Page 23

Using the timed convection
baking features (upper oven only).
You will hear a fan while cooking with this feature. The fan will stop when the door is opened but the heat
will not turn off
NOTE: Foods that spoil easily-such as milk, eggs, fish, stuffings, poultry and pork-should not be allowed to
sit for more than 1 hour before or after cooking. Room temperature promotes the growth of harmful bacteria.
Be sure that the oven light is off because heat from the bulb will speed harmful bacteria growth.
How to Set un Immediate Start end Automatic Stop
@® ®®®
®®® ®@
®
@
Theupper oven wi!!turn on immediately and
cook for a selectedlength of time.At theend
of the cooking time, the oven wi!! turn off
automatica!lg.
[77 Touchthe CONVECTIONBAKEMULTI/
:l RACKpadonce for multi-rack
convection baking.Thismode isusedfor
cookingfood items onmore than one
rack (i.e.,2,5 or more racks)at the same
time in convection bake.Seethe Hulti-
She!fBakingsectionfor moreinformation.
Touchthe CONVECTIONBAKEMULTI/
1 RACKpad twice for one rack convection
baking.Thismodeisusedfor cookingfood
itemson only onerackin convectionbake.
Touch the CONVECTIONROASTpad
for convection roasting.
[] Touch the number padsto setthe
desiredoven temperature.
[] Touch the COOKINGTIME pad.
NOTE:Ifyour reciperequirespreheating,you
may need to add additiona! time to the length
of the cooking time.
[_ Touchthe number padsto set the
desiredlength of cooking time.
Theminimum cooking time you
can set is 1 minute.
Theoventemperature that gou set and
the cooking time that you entered will be
in the display.
[_ Touchthe STARTpad.
Thedisplag showsthe oven temperature that
you set and the cooking time countdown. The
display starts changing once the temperature
reaches !O0°F.
[_] Atthe end of timed convection bakethe
oven will turn off. The end of cgcle tone
will sound.Touch the CLEAR/OFFpad
to clear the displag if necessarg.
[Z] Removethe food from the oven.
Remember,foods that are left in the
oven continue cooking after the
controls are off.
go.cam
®®®@@
@®@®@
®®®@@
@®@®@
@
®®®@@
@®®®@
@
@
How to Set o Deluged Start end Automatic Stop
Youcanset the upper oven contro! to @lag-
start the oven,cookfor a specificlength of
time and then turn off automatica!!g.
Make surethe clockshows the correct
time of dag.
[_ Touchthe CONVECTIONBAKEMULTI/1
RACKpad once for multi-rack
convection baking.Thismode is used for
cooking food items on more than one
rack (i.e.,2,3 or more racks)at the same
time in convection bake.Seethe Hulti-
ShelfBaking section for more
information. Touchthe CONVECTION
BAKEHULTI/'I RACKpad twice for one
rack convection baking.Thismode is
usedfor cooking food items on only one
rack in convection bake.
Touch the CONVECTIONROASTpad
for convection roasting.
Touch the number padsto set the
desiredoven temperature.
Touch the COOKING TIME pad.
%
NOTE:If_/ourreciperequirespreheating,you
ma£ need to add additiona! time to the length
of the cooking time.
F_ Touchthe number pads to setthe
desiredcooking time.
[_ Touchthe DELAYSTARTpad.
[_ Touchthe number padsto set the
time of dag you want the oven to
turn on and start cooking.
If gou would like to check the times gou have
set, touch the DELAVSTARTpad to check
the start time you have set or touch the
COOKINGTIME pad to check the length
of cooking time you have set.
[] Touch the STARTpad.
NOTE:Anattention tone wi!! soundif btouare
usingtimed bakingand do not touch theSTART
pad after enteringthe bakingtemperature.
When the oven turns on at the time of
dog gou have set, the display will show
the changing temperature (starting at !O0°F)
and the cooking time countdown.
At the end oftimed convection bake the oven
will turn off.The end of cycle tone
will sound.
Touchthe CLEAR/OFFpadto clearthe
%
display if necessarg.When baking is
finished,remove the food from the oven.
Remember,eventhough the oven shuts
off automatically, foods continue
cooking after the controls are off. 23
Page 24

Special features of your upper oven control.
Your new touch pad control has additional features that _lOUma_l choose to use.The following are the features and
how you may activate them.
The special feature modes can only be activated while the display is showing the time of day. They remain in the
control's memory until the steps are repeated.
When the display shows _lour choice, touch the STARTpad. The special features will remain in memory after
a power failure.
iii i L ¸
_ii_Iiii_ __ i_i_iiil
i _i_i_iii_i_ i iiiii_
iiil_iiiii_i!_ i_ii_i_!_
12 Hour Shut-Off
With thisfeature,shouldyou forget andleave
theovenon,thecontro!wil! automatica!lyturn
off theovenafter!2 hoursduringbaking
functionsor after5 hoursduringa broi!function.
If you wish to turn OFF this feature, follow
the steps below.
[77 Touchthe BAKEand BROILHI/LO pads
at the same time for 5 secondsuntil the
display showsSF.
[]
%
Fuhrenheit or Celsius Temperuture Selection
Yourovencontrol isset to use the Fahrenheit
temperature selectionsbut you may change
this to use the Celsiusselections.
[_ Touchthe BAKEand BROILHI/LO pads
at the same time for 5 secondsuntil the
display showsSF.
[_ Touchthe BROILHI/LO pad.Thedisplay
[_ Touchthe BROILHI/LO pad again.
[] Touchthe STARTpad.
Touchthe DELAYSTARTpad.The
display will show 12shdn (12 hour
shut-off).Touch the DELAYSTARTpad
again and the display will show no shdn
(noshut-off).
Touchthe STARTpadto activate the no
shut-off and leavethe control set in this
special features mode.
will show F (Fahrenheit).
Thedisplay will show C (Celsius).
Tones at the End of o Timed Cycle
At the end of a timed cycle,5 short beepswi!!
sound followed by one beep every 6 seconds
unti! the CLEAR/OFFpad istouched.This
continua!6 secondbeep may be canceled.
Tocancel the rosecondbeep:
_] Touchthe BAKEand BROILHI/LO pads
at the same time for 5 secondsuntil the
display showsSF.
Touchthe KITCHENTIMERON/OFF
pad.Thedisplay shows CONBEEP
(continual beep).Touchthe KITCHEN
TINERON/OFFpad again. Thedisplay
shows BEER(Thiscancelsthe one beep
every roseconds.)
[] Touchthe STARTpad.
2/4
Page 25

Gas/Control Lockout (on some models)
ge.com
Yourcontro!wi!!a!low you to lock out the
surfaceburners,oven burners and control
panel sothey cannot beactivated
To lock/unlock the controls:
[_ Turn all surface burners off.
[_ Touch and hold the GAS/CONTROL
LOCKOUTpadfor 3 secondsuntil the
display shows LOC
[_ Tounlock the control, touch and hold
the GAS/CONTROLLOCKOUTpad for
3 secondsuntil LOCdisappears from
the display.
12 Hour, 24 Hour or Clock Black-Out
Yourcontro!isset to usea !2 hour clock.
If gou would prefer to have a 2/4hour militaru
time clock or black-out the clock displau,
follow the steps below.
_] Touchthe BAKEand BROILHI/LO
pads at the same time for 5 seconds
until the display shows SF.
[_ Touchthe CLOCKpad once.
The displag will show 12hr
If this isthe choice you want,
touch the STARTpad.
When this feature ison and the touch pads
are touched, the control will beepand the
display will show LOC.
Thecontro! lock-outmode affectsa!!
controls.No controlswil! work when this
feature isactivated.
Theadjustment wi!! be retained in memory
after a power failure.
Touch the CLOCKpad again to change
to the 2/4hour militarg time clock.Thedisplag
will show 24 hr. If this isthe choice you want,
touch the STARTpad.
Touch the CLOCKpad again to black-out
the clock displau.Thedisplag will show OFF.
If this isthe choice you want, touch the
STARTpad.
NOTE:Ifthe clockisin the black-outmode _jou
wi!!not beable to usethe De!agStartfunction.
:@ /
Cook and Hold
Yournew contro! hasa cook and hold feature
that keepscookedfoodswarm for up to 5
hoursafter the cookingfunction isfinished.
Thisfeature can only be usedwhen
timed cooking.
Toactivate this feature,follow the steps
below.
IZ] Touch the BAKEand BROILHI/LO
pads at the same time for 5 seconds
until the display shows SF.
[_ Touch the COOKINGTIME pad. The
display willshow Hid OFF.
Touchthe COOKINGTIMEpad again
to activate the feature. The display
will show Hid ON.
[_ Touchthe STARTpadto activate the
cook and hold feature and leavethe
control set in this specialfeatures mode.
25
Page 26

Using the Sabbath Feature.(onsome models)
(Designed for use on the Jewish Sabbath and Hotidags)
The Sabbath feature can be used for baking/roasting in the upper oven only, It cannot be used for convection,
broiling, self-cleaning, or Delay Start cooking,
NOTE: The oven light comes on automatically when the door is opened and goes off when the door is closed.
The bulb may be removed. See the Oven Light Replacement section.
How to Set for Regular Baking/Roasting
@®® ® ®
®® ®®@
When the display shows D the
oven is set in Sabbath. When the
display shows D C the oven is
baking/masting.
Hake sure the clockshows the correct timeof da£
and theoven is off.
I--f1 Pressand hold both the BAKE and BROIL
HI/LO pads,at the same time, until the
display shows SF.
[_ Tap the DELAVSTARTpad until SAbbAtH
appears in the display.
[_] Touch the STARTpadand D will appear
in the display.
[] Touch the BAKE pad. Nosignal will be given.
[_] Using the number pads,enter the desired
temperature between 170°and 550°.
No signal ortemperature will be given.
[_ Touchthe STARTpad.
[_ After arandom delay period of
approximately 30 secondsto i minute, D C
will appear in the display indicating that the
oven is baking!roasting.If D C doesn't appear
inthe display, start again at Step/4.
Toadjust the oventemperature, touch the
BAKEpad, enter the new temperature using
the number pads,and touch the STARTpad.
NOTE:TheCLEAR/OFFand COOKINGTIMEpads
are active during the Sabbath feature.
When the display shows D the
oven is set in Sabbath. When the
display shows D C the oven is
baking/masting.
i¸¸i @/ }}i
How to Set for Timed Baking/Roasting--Immediate Start and Automatic Stop
Hake sure the clockshows the correct time ofda£
and theoven is off.
E_] Pressand hold both the BAKEand BROIL
HI/LO pads,at the same time, until the
display shows SF.
[_ Tap the DELAVSTARTpad until SAbbAtH
appears in the display.
[_] Touch the STARTpadand D will appear in
the display.
[_ Touchthe COOKINGTIME pad.
[_] Touch the number pads to set the desired
length of cooking time between i minute and
9 hours and 99 minutes. Thecooking time
that you entered will be displayed.
[_] Touch the STARTpad.
[_ Touchthe BAKEpad. Nosignal will be given.
How to Exit the Sabbath Feature
[_ Touch the CLEAR/OFFpad.
[_ Ifthe oven is cooking, wait for a random
delay period of approximately 30 seconds to
i minute, until only D is in the display.
[_ Pressand hold both the BAKE and BROIL
HI/LO pads,at the same time, until the
display shows SF.
[_ Tapthe DELAYSTARTpad until 12shdn
or no shdn appears in the display.
r_ using the number pads,enter the desired
temperature. No signal ortemperature will
begiven.
Touch the STARTpad.
%
After arandom delay period of
[]
approximately 30 secondsto i minute, D c
will appear in the display indicating that the
oven is baking!roasting.If D C doesn't appear
inthe display, start again at Step 7.
Toadjust the oventemperature, touch the
BAKEpad, enter the new temperature using
the number pads,and touch the STARTpad.
When cooking is finished, the display will change
from D C to D and 0:00will appear, indicating that
the oven has turned OFFbut isstillset in Sabbath.
Removethe cooked food.
12 shdn indicates that the oven will
automatically turn off after 12hours.
no shdn indicates that the ovenwill not
automatically turn off.
[_ Touch the START pad.
NOTE:tfapower outage occurred while the oven
was inSabbath,the oven will automaticall£ turn
off and sta£off evenwhen the power returns. The
ovencontrol must bereset.
26
Page 27

Adjust the upper oven thermostat--Do it yourselfl ge.com
You may find that your new oven cooks differently than the one it replaced. Use your new oven for a few
weeks to become more familiar with it. If you still think your new oven is too hot or too cold, you can adjust
the thermostat yourself
Do not use thermometers, such as those found in grocery stores, to check the temperature setting of your
oven. These thermometers may vary 20-/40 degrees.
NOTE: This adjustment will not affect the broiling or the self-cleaning temperatures. The adjustment will be
retained in memory after a power failure,
To Adjust the Thermostat
@®®®®
®®®®®
@
[] Touch the BAKEand BROILHI/LO pads
at the same time for 3 secondsuntil the
display showsS_
[_ Touchthe BAKEpad.A two digit number
shows in the display.
Touch BAKEonceto decrease (4
the oven temperature, or twice to
increase (+).
The oven temperature can be adjusted
%
up asmuch as 35°For down as much
as 35°F.Touchthe number pads the
same way you readthem. Forexample,
to change the oven temperature 15°F,
touch I and 5.
j_j When you have made the adjustment,
touch the STARTpad to go back to the
time of day display.Use your ovenas
you would normally.
NOTE:Thethermostat adjustment for Baking
wi!!alsoaffect ConvectionBakingor
ConvectionRoasting.
The type of margarine will affect baking performance!
Most recipes for baking have been developed using high fat products such as butter or margarine (80% fat).
If you decrease the fat, the recipe may not give the same results as with a higher fat product.
Recipe failure can result if cakes, pies, pastries, cookies or candies are made with low-fat spreads. The lower
the fat content of a spread product, the more noticeable these differences become.
Federalstandards requireproducts labeled "margarine" to contain at least 80% fat by weight. Low-fat spreads,on the
other hand, contain lessfat and morewater. The high moisture content of these spreads affects the texture and flavor
of baked goods. Forbest resultswith your old favorite recipes,use margarine, butter or stickspreadscontaining at least 70%
vegetable oil.
27
Page 28

Using the lower oven drawer.
The lower oven drawer may be used to bake foods using the same times and temperatures as a standard oven. Foods
ideal for baking in the lower oven drawer include pizza, frozen foods, casseroles, biscuits, rolls and many desserts.
[OFF _%o'_o'_o__o__oo'_o]
Push in and turn the lower oven
drawer knob to any desired
setting.
To Use the Lower Oven Drawer
IT] Pushin and turn the lowerovendrawer
knobto any desiredsetting.
[] Allow the lower oven drawer to preheat.
The ONsignal light islocated on the upper
right side of the knob and glows when the
knob is in the ON position.It remains ON
untilthe knob is moved to the OFFposition.
The "Heating" signallight islocated below
the ON signallight andglows when the
heating elements areactive.Preheat is
complete after the "Heating"signal has
turned off for the first time
with each use.
Thelower oven drawer useslessenergy than the upper oven.
Allow the following approximate times for preheating:
Desired Lower Preheat
Oven Temperature Time
WARM ! 0 minutes
350°F 20 minutes
NOTES:
AlwaLIsusethe includeddrawer rack when
using the LowerOvenDrawer.
Thelower ovendrawer cannot beused
during a self-dean cgcleof the upperoven.
Do not put food, foi!or cookware directly
on the bottom of the lower oven drawer.
Always use the included drawer rack.
iiiilDiiii;,
If foods require a cover,use on!g foil or lids
able to withstand baking temperatures.Do
not useplastic.
Maximum height of foods that can be
placed in the lower oven drawer is 4".
Do not put liquid or water in the lower oven
drawer.
Neverplace plastics,paper,canned foods
or combustible material in thelower oven
drawer.
425°F 30 minutes
Adjust the oven thermostat--Do it yourseifl
You may find that your new oven cooks differently than the one it replaced. Useyour new oven for a few weeks
to become more familiar with it. If you still think your new oven is too hot or too cold, you can adjust the
thermostat yourself.
Do not use thermometers, such as those found in grocery stores, to check the temperature setting of your oven.
These thermometers may vary 20-40 degrees.
NOTE:This adjustment will not affect the broiling temperatures.
Back of Lower Oven Knob
(Appearance may vary.)
28
Pullthe OVENCONTROLknob off
the range and look atthe back side.
To make an adjustment, loosen
(approximately one turn), but do not
completely remove,the two screws
on the back of the knob.
With the back of the knob facing you,
hold the outer edge of the knobwith one
hand and turn the front of the knob with
the other hand.
To raisethe oventemperature, movethe
top screw toward the right. You'llhear a
clickfor each notch you move the knob.
To lower the temperature, movethe top
screwtoward the left.
Eachclick will change the oven temperature
approximately IO°F.(Rangeis_+60°Rfrom
the arrow.)We suggest that you make the
adjustment one clickfrom the originalsetting
and check oven performance before making
any additional adjustments.
j_j After the adjustment ismade, retighten
screws sothey are snug, but becareful
not to overtighten.
J_J Re-installknob on range and check
performance.
Page 29

Using the self-cleaning upper oven. gecom
The oven door must be closed and all controls set correctly for the cycle to work properly.
Before a Clean Cycle
Wipe up heavy soil on the oven
bottom.
®®®®®
®®®®®
@
Forthe first self-clean cycle,we recommend
venting your kitchen with an open window
or usinga ventilation fan or hood.
Removethe shelves,any broiler pan,
broiler grid, probe, all cookware and
any aluminum foil from the oven.
Theoven shelvescan be self-cleaned,
but they will darken, losetheir luster
and become hard to slide.
Soilonthe front frame of the range and
outside the gasket on the door will need
to be cleaned by hand. Cleanthese areas
with hot water, soap-filled scouring pads or
cleanserssuch as SoftScrub_.Rinsewell
with clean water anddry.
How to Set the Upper Oven for Cleaning
NOTE:Thesurface burnersmust beturned off
prior to the self-cleanstart time.
r-fJ Touch the SELFCLEAN pad.
NOTE: Ifthe display showsLOC,touch
and hold the GAS/CONTROLLOCKOUT
pad for 3 seconds to turn it off.Seethe
Gas/Contro!Lockout section.
[_ Usingthe number pads,enter the
desiredclean time, ifa time other than
4 hours is needed.
Cleancycle time is normally/4 hours.Youcan
change the cleantime to any time between
3 hours and 5 hours,depending on how dirty
your oven is.
[] Touch the STARTpad.
Donot clean the gasket.The fiberglass
material of the ovendoor gasket cannot
withstand abrasion. It isessential for the
gasket to remain intact. If you notice it
becoming worn or frayed, replace it.
Wipe up any heavy spilloversonthe oven
bottom.
Hake surethe oven light bulb cover is
in place and the oven light isoff.
INPORTANT:The health of some birds is
extremely sensitiveto the fumes given off
during the self-cleaning cycle of any range.
Hove birdsto another well-ventilated room.
NOTE: Usecaution when opening the upper
oven after the self-clean cycle has ended.
Theoven may still behot.
Thedoor locksautomatically. Thedisplay
will show the clean time remaining. Itwill
not be possibleto open the oven door until
the temperature drops below the lock
temperature andthe LOCKEDDOOR
light goes off.
Theoven shuts off automatically when the
clean cycle iscomplete.
[] When the LOCKEDDOORlight isoff, the
door will unlock automatically.
Thewords LOCKDOORwill flash and the
oven control will signal if you setthe clean
cycle and forget to close the oven door.
To stop a clean cycle, touch the CLEAR/OFF
pad. When the LOCKEDDOOR light goes
off indicating the oven has cooled below
the locking temperature, you may open
the door.
Donot usethe lower oven drawer during
a self-clean cycle.
29
Page 30

Usingthe seif-deaning upper oven.
The oven door must be closed and all controls set correctly for the cycle to work properly.
How to Delay the Start of Cleaning
®®®®®
®®®®®
@
®®®®®
®®®®®
@
Make surethe clockshows the correct time of
day.
NOTE:Thesurface burnersmust beturned off
prior to the self-cleanstart time.
171 Touch the SELFCLEAN pad.
NOTE: Ifthe display showsLOC,touch
and hold the GAS/CONTROLLOCKOUT
pad for 3 seconds to turn it off.Seethe
Gas/Contro!Lockout section.
[_ Usingthe number pads,enter the
desiredclean time.
I_] Touch the DELAYSTARTpad. The
earliest start time you can setwill
appear in the display.
14] Usingthe number pads,enter the time
of day you want the clean cycle to start.
[] Touch the STARTpad.
The door locks automatically. Thedisplay will
show the start time. Itwill not be possibleto
open the oven door untilthe temperature
drops below the locktemperature and the
LOCKEDDOOR light goesoff.
The oven shutsoff automatically when the
clean cycle iscomplete.
j_ When the LOCKEDDOORlight isoff,
the door will unlock automatically.
Thewords LOCKDOORwillflash andthe
oven control will signal if you set the clean
cycle and forget to closethe oven door.
Tostop a clean cycle,touch the
CLEAR/OFFpad.When the LOCKEDDOOR
light goes off indicating the oven has
cooled below the locking temperature,
you may open the door.
After a Clean Cycle
Youmay notice some white ash in the
oven.Wipe it upwith a damp cloth after
the oven cools.
If white spotsremain, remove them with a
soap-filledscouringpad and rinse thoroughly
with a vinegarand water mixture.
Thesedepositsare usually a salt residue
that cannot be removed by the cleancycle.
If the oven is not clean after one clean cycle,
repeat the cycle.
Youcannot set the oven for cooking until
the oven iscool enoughfor the door to
unlock.
While the oven isself-cleaning,you can
touch the CLOCKpad to display the time
of day. To return to the clean countdown,
touch the COOKINGTIMEpad.
Ifthe shelvesbecome hard to slide,apply a
small amount ofvegetable oil or cooking oil
to a paper towel and wipe the edges ofthe
oven shelves with the paper towel.
30
Page 31

Care and cleaning of the range, ge.com
Be sure electrical power is off and all surfaces are cool before cleaning any part of the range.
If gour range is removed for cleaning, servicing or ang reason, be sure the anti-tip
device is re-engaged properlg when the range is replaced. Failure to take this
precaution could result in tipping of the range and cause injurLt.
Front right burner
Burner (/ )
cap
neaa
Burner _
Electrode, _
Burner_ -_-_:
base
Make surethe hole in the burner
head is f_ositionea over the electrode
and that the burner head is futlg
iaser_eo inside the burner oose.
A small gap between the base and
Front left burnen back rignt Durner
headis normal
aria Dock left Durner
Bur_/
Sealed Burner Assemblies
Turn all controls OFF before removing the
burner parts.
The round side burner caps and burner
headscan be lifted off, making them easy
to clean.Theelectrodes are not removable.
Theoval center burner headand cap
assembly can be lifted off, making it easy
to clean.Theburner electrode is not
removable.
Lb.__../_.)" " Electrode
CAUTION:oonot operatethe
cooktop without al!burner parts and grates
in place.
Electrode
Front left, back
right and back left
burner
Theelectrode of the spark igniter is
exposedwhen the burner head is
removed.When one burner isturned
to LifE, allthe burners spark. Donot
attempt to disassembleor clean around
ang burner while another burner ison.
An electricshock mag result,which
could cause Uou to knock over hot
cookware.
Burner head j_
Electrode
Burner
base "_L_'_
Front right burner
Stabil_;_U'_a
cnamDer sew_nc
,€,,_ _-_, neealeo,
(k,_ _ y/) twist-tieto
"_,_.w,_/ unclog the
Burner base Electroae inthe
Make sure the slot in the burner
head is oositioned over
the electrode.
small hole
burner
neaa.
31
Page 32

Care and cleaning of the range.
Burner Caps and Heads
Beforeremovingtheburner cops and heads
remember theirsize and location.Replacethem
inthe same locationaftercleaning.
NOTE:Donotusesteelwoolorscouringpowders
tocleantheburnerparts.
Burner caps
Burner cap is Burner cap is NOT
propeflg seated, properlg seated.
Fro0i iight burner
head
Electrode '
Burner
Hake sure the hole in the burner
head ispositioned over the electrode
and that the bumer heqd is futtg
inserted inside the burner base.
A Sto!ltgap between the baseand
head is normal.
Front left burner,back right burner
and back left burner
Burner cap
BUrner head
chamber : sewing
needle or
twist4ie to
unclog the
small hole
Liftoff whencool.Washburnercapsinhot,soapg
waterandrinsewithcleanwater.Youmayscour
withaplasticscouringpadtoremoveburned-on
foodparticles.
Burner Heads and Oval (Center)Burner
Head/Cap Assembly
Theburnerheads and the ovalburnerhead/cap
assembl_tare removable.Simpl_jliftthem offthe
range forcleaning.
Forproperignition,makesurethesmallhole
inthesectionthatfitsovertheelectrodeiskept
open.Asewingneedleorwiretwist-tieworks
wellto unclogit.
Theslitsintheburnerheadsmustbekeptcleon
atalltimesforoneven,unhamperedflame.
Cloggedor dirtgburnerportsorelectrodeswill
notallowtheburnerto operateproperly.
Angspillonoraroundanelectrodemust
becarefullgcleaned.Takecareto nothitan
electrodewith anythinghardor it couldbe
damaged.
Cleantheburnerheadsroutinely,especiallyafter
badspillovers,whichcouldclogtheopenings.Lift
offwhencool.
Toremoveburned-onfood,soaktheburnerheads
inasolutionofmildliquiddetergentandhotwater
for20-30minutes.Formorestubbornstains,use
atoothbrush.
After cleaning
Replacement
Burner Heads
Replaceburnerheadsoverthe electrodeson
thecooktop,inthecorrectlocationsaccordingto
theirsize.Thereisonesmall,onemedium,one
extralargeandonedualflameextralargeburner
head.
Medium head I Small head
head Eront Of range extra large
head
Makesuretheslot(onfromtleft,backrightand
backleft heads)andthehole(frontrighthead)in
the burnerheadis positionedovertheelectrode.
; l
BurneFhead
I
..................
Slot
Front right head
Oval (Center)Burner Head/Cap Assemblg
Replacetheova centerlhead/capassemblyover
theelectrodeonthecooktop.
Oval neaa ana cad
Make sure the slot in the
burner head is oositioned
over _:ne elect:rode,
Make Surethe Slotio the burner
headispositionedaver
the electrode.
TheOVaibu e;headZcanaSsem@
ismmavable_ Simply lift it off the
range for cleaning. Use a sewing
needle Ortwist4ie to unclog the
small hole in the burner heads.
32
Beforeputtingtheburnercaps,headsandoval
head/capassemblLlback,shakeoutexcesswater
andthendrythemthoroughlybysettingina
warmovenfor30minutes.
Front of range
Electrode
Caps
Replacethe matching size caps ontothe burner
basesorheads.
Med_cap l_ _ • -J Smaf_llcap
cc _ Front of range extra large cap
Hakesurethattheheadsandcapsarereplaced
inthecorrectlocations.
Page 33

Burner Grates
ge.com
Appearance may vary.
Thegrates may be cleaned in a
dishwasher.
Outside Center Outside
grate grate grate
The oven has 5 shelf positions.
Place the gray porcelain-coated
racks in positions "R","B"and "D"
for self-cleaning the grates. Place
one grate each on the oven racks
from side to side.
Yourrangehas three professional-stgledouble
grates.Thesegratesare position-specific.
Formaximum stabilitg,thesegratesshould
onlg be usedin their properpositions.For
convenience,the undersidesofthe sidegrates
are marked "OUTSIDE."Makesurethe front
portion of both grates is infront. Thecenter
grate can be interchangedfront to back.
Cleaning Grates--Soap and Water
Lift grates out when cool.Grates should be
washed regularlg and, of course,after
spillovers.Wash them in hot, soapg water
and rinsewith clean water.When replacing
the grates, be suretheg are positioned
securelg overthe burners. Replacethe grates
sothat straight linesare formed
with the center ribs of all three grates.
Cleaning Grates--Self-Clean Oven
Toget ridof burned-on food, gou mag use
the self-clean cgcle of gour range. Remove
ang burnt-on food particlesthat gou can
prior to placing the grates in the oven. Place
the grag porcelain-coated racks inpositions
"R","B"and "D".
NOTE:Donot cleon thegriddle in the
self-cleaningoven.
Placeone grate each on the oven racks
from sideto side.Followthe instructions
for how to setthe upper oven for cleaning.
NOTE:Use caution when removing the grates
from the oven offer theself-cleoncycle has
ended.Thegratesmablstil!behot.
Forheavilg-soiled grates, gou mag notice
some white ash on the grate. Wipe it off
with a damp cloth after the grate cools.
Ifwhite spots remain, remove them
with a soap-filled scouring pad and rinse
thoroughlg with a vinegar and water mixture.
Thesedepositsare usuallga salt residuethat
cannot be removed bg the clean cgcle.
Cleaning Grates--Dishwasher
The grates mag be cleaned in the dishwasher.
Removeang burnt-on food particles that
gou can prior to placing the grates in the
dishwasher.Placethem on the lowest rack
of the dishwasher and run on a "heavg dutg"
cgcle.
Donot operate a burner for an extended
period of time without cookware on the grate.
Thefinish on the grate mag chip without
cookware to absorb the heat.
Although the grates are durable, theg will
graduallg losetheir shine,regardlessof the
best care gou can give them. This isdue
to their continual exposureto high
temperatures and abrasion bg the cookware.
Support Bumpers
Ifone ormore of the circular silicone grate
support bumpers in the cooktop are missing
or damaged, replacement parts can be
obtained bg calling 1.800.GECARES.
Toinsert the new bumpers,simplg insert
the cone shaped end and push down while
gentlg twisting orrocking the bumper.
Cooktop Surface
Toavoiddamagingthe stainlesssteelsurface
ofthe cooktopandto prevent itfrom becoming
dull,clean upspillsrightawag.Foodswith a lot
ofacid(tomatoes,sauerkraut,fruitjuices,etc.)
or foodswith highsugarcontentcouldcause
a dullspotif allowedtoset.
Whenthe surfacehascooled,wash and rinse.
Forother spillssuch asfat spatterings,etc.,
wash with soapand water oncethe surface
hascooled.Then rinseand polishwitha
drg cloth.
NOTE:Do not store flammable materials
in an oven, drawer or near the cooktop.
Donot storeor use combustible materials,
gasolineor other flammable vapors and
liquidsin the vidnity of thisor ang other
appliance.
NOTE:Donot liftthe cooktop. Liftingthe cooktop
can lead to damage and improper operation
of the range.
33
Page 34

Care and cleaning of the range.
Griddle
burner only.
Donot cleanthe griddleinoself-cleaningoven.
Donot cleanthe griddle in a dishwasher
NOTES:
Thegriddle is to be used overthe center
ii Wash with hot, soaps water after each use
while using a sponge or dishcloth.
_,Ifoi!or food residueisleft on the griddle,
further cookingwi!!harden the residueand
causesticking overtime.In this case,usea
non-abrasivecleansersuchas BanAmi®or
oneof thesoft scrubcleansers.App%lwith
a sponge,Scrunge@or other cleaningpad
labeledsafe for non-stickpans
_,Useonly plastic,nylon or wooden utensils
or SilverStone kitchentools to prevent
marring of the coating.
Stainless Steel Surfaces ton some models)
®
,, Neveruseknivesor cut food on the griddle.
Wash with hot, soap_lwater after each use.
Storecarefu!!gto prevent scratching.
Griddle Precautions:
_,If something hasspilledunder the griddle,
it should be cleanedup as soon as possible
to prevent "bakedon" food sol!.
,, Do not allow greaseto accumulate under
the griddle as it can be a fire hazard. Clean
under thegriddle as soonas it is coo!.Clean
with hot soapswater
Do not placeyour griddle inthe microwave.
Always turn off a!!surface burners before
removing thegriddle.Usecaution when
handling a hot griddle.
34
Protecting
STAINLESSSTEELhasa reputation for
withstanding tough abuse for years. Thisisa
key reasonwhy it isso popular with the food
serviceindustry.
However,stainlesssteelappliances can have
surface imperfections, discolorations or
blemishesthat consumers with a critical eye
notice and find unattractive in the home.
Thesediscolorationsor blemishes can be
caused bg something as simple as leaving
fingerprint smudges on the stainlesssteel
surface overnight.
Forstainless steelappliances where
blemishesare prone to show on the surface,
we recommend APPLYINGA COATOFCERAMA
BRYTE®StainlessSteelCleaning Polish&
Conditioner (purchased separately-follow
instructions).
Thiswillhelpyou to maintainthe brightnessand
appearanceof your stainlesssteelappliance.
Cleaning
Do not use asteel wool pad; it will scratch
the surface.
Inorder to avoid ang discolorationsand/or
grease stains,we recommend cleaning
and removing any spills,spots and grease
from the range after use.
It isimportant to use a soft cloth or paper
towel every time the range is cleaned to
avoid any scratches.
Readcarefully the instructions onthe back
of the Brightener(included with your range)
for better results.
Cleaning Instructions:
[] Removegrates.
[_ Wash using warm, soapy water:
Wet soft cloth or paper towel (avoid
using excessivewater).
Wipe the surface in the direction of the
grain (followingthe steel lines).
Rinseand wring out a soft cloth or paper
towel and drg the range.
[_ Apply a degreaser that doesnot contain
sodium hydroxide or StainlessSteel
Cleaner(follow instructions).
[_ Apply Cerama Bryte®StainlessSteel
Brightener(follow instructions).
[_ Repeatsteps2-4 asmany timesasneeded.
[] Putgrates back inplace.
Followtheseinstructions for any Stainless
Steelsurface on your range.
DONOTUSEthe following products for
cleaning the Cooktop or Stainless Steel parts:
Caustic Lge(SodiumHgdroxide)or cleaners
containing this chemical
Hard or SteelWool Pads
Abrasive Materialsor Chemicals
Toinquire about purchasing stainlesssteel
appliance cleaner or polish,orto find the
location of a dealer nearest you, please call
our toll-free number:
National Parts Center 800.626.2002 (U.S.)
888.261.3055(Canada)
ge.com (U.S.)
www.GEAppliances.ca (Canada)
Page 35

Lift-Off Oven Door
ge.com
Lift the door straight up and off
the hinges.
The gasket is designed with a gap
at the bottom to allow for proper
air circulation.
Do not rub or clean the door
gasket-it has an extremely low
resistance to abrasion.
If you notice the gasket becoming
worn, frayed or damaged in any
way or if it has become displaced
on the door, you should have it
replaced.
Theoven door isremovable,but it is heavy.
Youmay needhelp removing and replacing
the door.
Donot lift the door by thehandle. Makesure
the oven iscompletdtj coo!.
Toremove thedoor, open it afew inches
to the special stop position that will hold the
door open.Graspfirmlu on each sideand lift
the door straight up and off the hinges.
NOTE:Be carefulnot to placehands between
the hinge and the ovendoor flame as the
hinge couldsnap backand pinch fingers.
are inthe special stop position.Positionthe
slots inthe bottom of the door squarelg over
I Toreplace the door, make sure the hinges
the hinges.Then lowerthe door slowlg and
evenlg over both hinges at the same time. If
the hinges snap back against the oven frame,
pull them back out.
Toclean the inside of thedoor:
Donot allow excesswater to run into
ang holes or slots inthe door.
Becausethe area insidethe gasket is
cleaned during the self-clean cgcle, gou do
not need to clean this bg hand. Ang soap
left on the liner causes additional stains
when the oven is heated.
Thearea outside the gasket can
be cleanedwith a soap-filled plastic
scouring pad.
Donot allow food spillswith a high sugar
or acid content (suchasmilk, tomatoes,
sauerkraut, fruitjuices orpie filling) to remain
on the surface.Thegmag causea du!!spot
evenafter cleaning.
Toclean theoutside of the door:
iiiB_
Usesoap and water to thoroughly clean
the top, sidesand front of the oven door.
Rinsewell.Youmay also usea glass
cleaner to clean the glasson the outside
of the door.
iiiB,
Spillageof marinades,fruit juices, tomato
sauces and basting materials containing
acids mau cause discoloration and should
bewiped up immediately. When the
surface is cool,clean and rinse.
Donot useoven cleaners,cleansing
powders or harsh abrasives on the
outside of the door.
Oven Heating Elements
Donot cleanthebake elementor the broi!
element.Any sol!wi!!burn off when the
elementsare heated.
Tocleanthe ovenfloor,gentlu lift the bake
element. Clean with warm soapu water.
35
Page 36

Care and cleaning of the range.
Removable Lower Oven Drawer
i i i
NOTE:Beforeperforming any adjustments,
cleaningor service,disconnecttherange
electrica!power supply at the household
distribution pane! b_lremovingthe fuseor
switching off thecircuit breaker.Makesure
the drawer heating elementis cool
Host cleaning can be done with the drawer
in place. However,the drawer mag be
removed iffurther cleaning isneeded.Use
soap and warm water to thoroughly clean.
To remove the drawer:
r_ Pullthe drawer straight out until
it stops.
[_ Pressthe tabs on both sides in,while
pulling the drawer forward and free.
Removable Lower Oven Drawer Pan
NOTE:Beforeperforming any adjustments,
cleaningor service,disconnecttherange
electrica!power supply at thehousehold
distribution pane! by removing the fuseor
switching off thecircuit breaker.Makesure
the drawer heating elementis cool
NOTE:Allow lower ovendrawer to coo!
beforeremoving pan.
NOTE:Wipespillspromptly after eachuse.
To replace the drawer:
[_ Placethe left drawer rail around
the inner left railguide and slide
it in slightly to hook it.
[_ Placethe right drawer rail around
the inner right railguide and slide
it in slightly to hook it.
r3] Slidethe drawer all the wag in.
Neverplace,use or self-cleanthe lower
oven drawer pan in the upper oven.
Loweroven drawer hasa removable pan
for easg cleaning. Cleanwith hot, soapg
water and a sponge ordish towel. Drg
with a clean cloth. An oven cleaner,such
as Easg-Off®,mag alsobe used.Besureto
follow the directions on the oven cleaner.
Replacethe pan in the lower oven drawer.
36
Glass Window
Tocleanthe outsideglassfinish,useaglass
cleaner.Rinseand polishwitha drg cloth.
Page 37

Oven Air Vents
Never block the vents (airopenings)of the
range.Theg providethe air inlet and outlet
that are necessargfor the range to operate
properlg with correct combustion.
ge.com
Vent appearance and location vary.
Surface burner knob
Air openings are located at the rear of
the cooktop, at the top and bottom of the
oven door,and at the bottom of the range,
under the lower oven drawer.
Upper Control Panel
Lock out the touch pads before cleaning.
Seethe Gas!Contro!Lockout information
in the Specia!features of your ovencontro!
section in this manual.
Cleanup splatters with a damp cloth.
Youmau alsouse a glass cleaner.
Lower Control Panel and Knobs
It'sa good ideato wipe the control panel
after each use ofthe oven.Cleanwith
mild soap and water or vinegar and water,
rinsewith clean water and polishdrg with
a soft cloth.
Do not useabrasive cleansers,strong liquid
cleaners,plastic scouringpads or oven
cleaners on the control panel-theg will
damage the finish.A 50/50 solution of
vinegar and hot water works well.
Removeheavier soilwith warm soaps water.
Donot useabrasives of ang kind.
Unlockthe touchpads after cleaning.
Seethe Contro! Lockoutinformation inthe
Specia!featuresof your oven contro!section
in this manual.
Thecontro! knobsmay be removed foreasier
cleaning.
Makesurethe knobs are in the OFFpositions
and pull them straight off the stems for
cleaning.
Theknobs can becleaned in a dishwasher
or theg mag alsobe washed with soap and
water.Makesurethe insidesof the knobs
are drg before replacing.
Replacethe knobs in the OFF position
to ensure proper placement.
Metalpartscan be cleanedwith soap
and water.Donot usesteelwool,abrasives,
ammonia, acidsor commercial ovencleaners.
Drgwith a soft cloth.
NOTE:Thelower oven drawer contro! knob is
not interchangeable with the surface burner
knobs.Besureto reinstal!the lower oven
drawer knob to the origina! location. Thelower
ovendrawer knob may be identified by the
increasingnumbers from "W,_"to "450."
37
Page 38

Care and cleaning of the range.
Oven Shelves and Drawer Racks
Wire cover holder.
Cleanthe shelveswith an abrasive cleanser.
The oven shelvesmag be cleaned inthe
self-cleaning oven. However,the shelves
will darken in color,losetheir luster and
become hard to slide if cleaned during
the self-cleaning cgcle.
Oven Light Replacement
CAUTION:Beforereplacingyour
oven light bulb, disconnect the electrica!
power to the range at the main fuse or
circuit breaker pane!. Be sure to let the
light cover and bulb coo! completely.
The oven light bulb is covered with a
removable glasscover that is held in place
with a bail-shaped wire. Removethe oven
door,ifdesired,to reach cover easilg.
To remove:
Holda hand under the cover soit
%
doesn't fall when released.With fingers
of the same hand,firmlg push back the
wire cover holder. Liftoff the cover.
Tomake the shelvesslide more easilg,applg
a small amount of vegetableoil or cooking oil
to a paper towel and wipe the edges of the
oven shelveswith the paper towel.
To replace cover:
Placeit into the groove ofthe light
[]
receptacle. Pullthe wire forward to
the center of the cover until it snaps into
place. When in place, the wire holds the
cover firmlg. Becertain the wire isin the
depression in the center of the cover.
[_ Connect electrical power to the range.
Do not remove ang screws to remove
the cover.
[_ Donot touch hot bulb with awet cloth.
Replacebulb with a 40-watt household
appliance bulb.
38
Page 39

Installation of the range.
Read these instructions completely and carefully.
IN THE COMMONWEALTH OF MASSACHUSETTS
This product must be installed by a licensed
plumber or gas fitter.
When using ball tgpe gas shut-off valves, theg
shall be the T-handle tgpe.
A flexible gas connector, when used, must not
exceed 3 feet.
BEFORE YOU BEGIN
Installation of this range must conform with local codes, or in the absence of local codes,
with the National Fuel Gas Code, ANSI Z223.1/NFPA.54, latest edition. In Canada, installation
must conform with the current Natural Gas Installation Code, AN/CGA-B149.1 or the current
Propane Installation Code, CAN/CGA-B149.2, and with local codes where applicable. This range
has been design-certified by CSA International according to ANSI Z21.1, latest edition and
Canadian Gas Association according to CAN/CGA-I.1 latest edition.
Aswith anu appliance using gas and generating
heat, there are certain safety precautions Uou
should follow. Youwill find theseprecautions in
the Important Safety Information section in the
front of this manual. Readthem carefully.
IMPORTANT: OBSERVE ALL GOVERNING CODES
AND ORDINANCES.
NOTE:Thisappliance must be propedg grounded.
IMPORTANT:Savetheseinstructions for theloca!
electricalinspector'suse.
NOTETOINSTALLER:Leavetheseinstructions
with the appliance after installation is completed.
NOTETOCONSUMER:KeepthisOwner's Manual
and InstallationInstructionsfor future use.
SERVICER:The electrica!diagram is in an envelope
attached to the back of therange.
FOR YOUR SAFETY
Do not store or use combustible materials, gasoline or other flammable vapors and liquids
in the vicinity of this or any other appliance.
If you smell gas:
FT] open windows.
[_ Don'ttouch electrical switches.
I_ Extinguishany open flame.
[_ Immediatelu call uour gas supplier.
ELECTRICALREQUIREMENTS
CAUTION:fORPERSONALSAFET
DONOTUSEAN EXTENSIONCORDWITHTHIS
APPLIANCE.REMOVEHOUSEFUSEOROPEN
CIRCUITBREAKERBEFOREBEGINNING
INSTALLATION.
Thisappliance must be suppliedwith the proper
voltage and frequency, and connected to an
individual, properlu grounded circuit, protected
bu a circuit breaker or time-delau fuse,as noted
on the rating plate.
Wiring must conform to National ElectricCodes.
If the electric service provided does not meet the
above specifications, have a licensed electrician
install an approved outlet.
Because range terminals are not accessible after
range isin position,flexible service conduit or cord
must be used.
39
Page 40

Installation of the range.
WARNING! INSTALLATIONSAFETYINSTRUCTIONS
Improper installation, adjustment, alteration, service or maintenance can cause injury or
propertg damage. Refer to this manual. For assistance or additional information, consult
a qualified installer, service agencbh manufacturer (dealer) or the gas supplier.
Never reuse old flexible connectors. The use
of old flexible connectors can cause gas leaks
and personal injurg. Always use NEW flexible
connectors when installing a gas appliance.
IMPORTANT: Remove all packing material and
literature from oven before connecting gas
and electrical supplg to range.
iiiil}i
Have sour range installed bg a qualified
installer.
iiiiiiili_
Your range must be electricallg grounded
in accordance with local codes or,in the
absence of local codes, in accordance with the
National Electrical Code (ANSI/NFPA 70, latest
edition). In Canada, electrical grounding must
be in accordance with the current CSA C22.1
Canadian Electrical Code Part Iand/or local
codes. See Electrical Connections in this
section.
iiiiiiili_
Before installing sour range on linoleum
or ang other sgnthetic floor covering, make
sure the floor covering can withstand 180°F
without shrinking, warping or discoloring.
Do not install the range over carpeting
unless a sheet of 1/4" thick plywood or
similar insulator is placed between the
range and carpeting.
iiiiiiili_
Make sure the wall coverings around the
range can withstand heat generated bg
the range up to 200°F.
iiiiiiili_
Avoid placing cabinets above the range.
To reduce the hazard caused by reaching over
the open flames of operating burners, install
a ventilation hood over the range that projects
forward at least 5" beyond the front of
the cabinets.
':, The ventilating hood must be constructed
of sheet metal not less than 0.0122" thick.
Install above the cooktop with a clearance of
not less than 1/4" between the hood and the
underside of the combustible material or metal
cabinet. The hood must be at least as wide
as the appliance and centered over the
appliance. Clearance between the cooking
surface and the ventilation hood surface
MUST NEVER BE LESSTHAN 24 INCHES.
EXCEPTION: Installation of a listed microwave
oven or cooking appliance over the cooktop shall
conform to the installation instructions packed
with that appliance.
iiiiiil
If cabinets are placed above the range,
allow a minimum clearance of 30" between
the cooking surface and the bottom of
unprotected cabinets.
iiiiiiili_
If a 30" clearance between cooking surface
and overhead combustible material or metal
cabinets cannot be maintained, protect the
underside of the cabinets above the cooktop
with not less than 1/4" insulating millboard
covered with sheet metal not less than
0.0122" thick.
iiiil}i
Clearance between the cooking surface
and protected cabinets MUST NEVER BE
LESSTHAN 24 INCHES. The vertical distance
from the plane of the cooking surface to
the bottom of adjacent overhead cabinets
extending closer than 1" to the plane of
the range sides must not be less than 18".
(Seethe Dimensions and Clearances
illustration in this section.)
CAUTION:Items of interest to children
should not be stored in cabinets above a
range or on the backsplash of a range-
children climbing on the range to reach items
could be seriousl_t injured.
40
Page 41

Read these instructions completely and carefully.
DINENSIONS AND CLEARANCES
Provideadequate clearances between the range and adjacent combustible surfaces. These
dimensions must bemet for safe useof your range. Thelocation of the electrical outlet and
pipe opening (seeGasPipeand Electric Outlet Locations)may be adjusted to meet specific
requirements.
j_ ...........................30 ...................... I"_" - - ... Depth varies depending on model.
j See specifications sheet for your model.
Depth with door closed (includes door handle)
28-1/4" to 29"
36-1/4" _+ 1/4"
Minimum to
cabinets on
either side of
the range
- 18" Minimum
clearance
r to left wall
below cooktop
and at the
range back
II o cabinets-_ _- O"
I
30"
30"
Minimum
-_ _ 6" Minimum clearance
to right wall
36"
Maximum depth
for cabinets
above
countertops
Tocabinets below
cooktop and at
the range back
41
Page 42

Installation of the range.
TOOLSYOU WILL NEED
Phillipsand flat-blade screwdrivers
Penciland ruler
Twopipewrenches (onefor backup)
Open-endor adjustablewrench
Nut driveror wrench:2//4"
,, Dri!!
ADDITIONAL MATERIALS YOUMAY NEED:
Gaslineshut-off valve
,, Pipejoint sealantor UL-approvedpipethreadtape
with Teflon*thatresistsactionofnatural andLPgases.
*Teflon:Registeredtrademark of DuPont
,, Flexiblemeta!appliance connector(2/2" I.D.).A 5-
foot length is recommended for easeof installation
but other lengths are acceptable.Neverusean old
connector when installing a new range.
Flareunion adapter for connection to gassupply
line (5/4" or 2/2" NPTx 1/2" I.D.)
,, Flareunion adapter for connection to pressure
regulator on range (!/2" NPTx !/2" I.D.)
Liquid leakdetector orsoap9 water.
Lag bolt or !/2" GO.Sleeveanchor (forconcrete
floors only).
SqueezeConnectormatching the sizeof thebracket
opening (onthe range back behind thewiring cover)
and the house conduit. Obtain on!gif replacingthe
power cord with conduit.
LOCATION GUIDELINES
Do not locate the range where it mag be subject to strong drafts. Ang openings in the floor or
wall behind the range should be sealed. Make sure the openings around the base of the range
that supply fresh air for combustion and ventilation are not obstructed by carpeting or woodwork.
Yourrange, likemany other household items,
isheavy and can settle into soft floor coverings
such as cushioned vinyl or carpeting. Usecare
when moving the range on this type of flooring.
It isrecommended that the following simple and
inexpensiveinstructions befollowed to protect
your floor.
Therange should be installed on a sheet of plywood
(orsimilar material).When the floor covering ends at
the front of the range, the area that the range will rest
on should be built up with plywood to the same level
or higher than the floor covering.
Thiswill allow the range to be moved for cleaning
or servicing.Also,make sure your floor covering
will withstand 180°R(Seethe Installation Safety
Instructions section.)
Makesurethe wall coveringsaround your range
can withstand the heat generated (upto 200°F)
by the range.(Seethe InstallationSafety Instructions
section.)
IMPORTANT!
Remove all tape and packaging, Make sure the burners are properly seated and level,
Take the accessory pack out of the oven.
Check to be sure that no range parts have come loose during shipping,
42
Page 43

Read these instructions completely and carefully.
_] Gas Supply Requirements
Recommended Gas Pipe Outlet Locations
NOTE: Make gas connections on
the left side of the cutout opening.
Recommended area for
through-the-wall connection 3 . ,I,
of pipe stub/shut-off valve. ,' 9 " ,'
This area allows
flush installation to
rear wall.
7-1/2"
Recommended area
for through-the-floor
connection of pipe stub/
shut-off valve.
Provide Adequate Gas Supply
I
Your range is designed to operate at o pressure of 5" of water column on natural gas or,
if designed for LP gas (propane or butane), 10" of water column.
Make sure gou are supplging gour range
with the tgpe of gasfor which it isdesigned.
Thisrange isconvertible for useon natural or
propane gas. If gou decide to usethis range on
LPgas,conversion must be made by aqualified
LPinstallerbefore attempting to operate the
range on that gas.
Forproper operation, the pressureof natural
gas supplied to the regulator must be between
5" and 13"of water column.
For LPgas,the pressuresupplied must be between
!0" and !5" of water column.
When checking for proper operation of the
regulator,the inlet pressuremust be at least !"
greater than the operating (manifold)pressure
as given above.
Thepressureregulatorlocatedat theinletof the range
manifold mustremaininthe supplylineregardlessof
whether naturalor LPgasis beingused.
A flexible metal appliance connector usedto
connect the range to the gas supply lineshould
have an I.D.of 1/2" and be 5 feet in length for ease
of installation. In Canada,flexibleconnectors must
be singlewall metal connectors no longer than
6 feet in length.
43
Page 44

Installation of the range.
[_ Electrical Power Supplg Requirements
Recommended Electrical Outlet Locations
NOTE:Flake electrical connections
on the right side of the cutout opening.
electrical outlet area. Orient
the electrical receptacle so the
Recommended acceptable I
length is parallel to the floor.
Wall Mounted
7-1/2'
Provide Proper Electrical Supply
Theseranges must besupplied with 208/240 volt,
60 Hz.,and connected to an individual, properlg
grounded circuit protected by a circuit breaker
or time-delay fuse(40amp).The receptaclemust
be NEHA14-50Rto accept the 4-prong plug
suppliedwith the range.
Product is shipped with 4-prong
plug. Recommended outlet is a
NEFlA14-50R receptacle.
Ifthe electrical service provideddoes not meet
the above specifications,it is recommended that
a licensedelectrician install an approved outlet.
Locate the electric supply as illustrated.
44
Page 45

Read these instructions completely and carefully.
[-_ Connect the Range to the Gas Supply
Shut off the main gas supply valve before disconnecting the old range and leave it off
until the new hookup has been completed. Don't forget to relight the pilot on other gas
appliances when you turn the gas back on.
Becausehard piping restrictsmovement of the
range,the useof aCSAInternational-certified
flexiblemetalapplianceconnectorisrecommended
unlesslocalcodesrequireahard-piped connection.
Never usean old connector when installing a
new range. Ifthe hard piping method isused, you
must carefully align the pipe;the range cannot be
moved after the connection ismade.
Toprevent gas leaks,put pipejoint compound on,
or wrap pipe thread tape with Teflon* around, all
male (external)pipe threads.
[_ Installa manual gas lineshut-off valve in the
gas line in an easily accessed location outside
of the range. Make sure everyone operating
the range knows where and how to shut off
the gas supply to the range.
I-_ Install male 1/2" flare union adapter to
the 1/2" NPTinternal thread elbow at inlet
of regulator. Usea backup wrench on the
regulator fitting to avoid damage.
When installing the range from the front,
remove the 90°elbow for easierinstallation.
I_ Install male 1/2" or 3/4" flare union adapter to
the NPTinternal thread of the manual shut-off
valve,taking careto backup the shut-off valve
to keep it from turning.
Connectflexible metal appliance connector
[]
to the adapter on the range. Positionrange
to permit connection at the shut-off valve.
Whenall connections havebeen made, make
%
sureall range controls are inthe off position
and turn on the main gas supply valve.
Use a liquid leak detector at alljoints and
connections to check for leaks in the system.
CAUTION: DONOTUSEA
FLAME TO CHECK FOR GAS LEAKS.
When using test pressuresgreater than 1/2 psig
to pressuretest the gas supply system of the
residence,disconnect the range and individual
shut-off valve from the gas supply piping.When
usingtest pressuresof 1/2 psig or lessto test the
gas supply system, simply isolate the range from
the gas supply system by closing the individual
shut-off valve.
*Teflon:Registeredtrademark of DuPont
Flexible Connector Hookup
installer: inform J ]_} Gas
i
the consumer of 1/2" or 3/4" _L_ _ shut-off
j thelocation ofthe valve
gas shut-offvalve. Gas pipe'-'_ b*g
Rigid Pipe Hookup Options
45 ° Elbow ,,,__
O_ _"_--reg ulotor | _-_--- Union
Union _._..._ Nipple
t iL._.f- shut-off
Gas
jlnstaller:lnform the consumer of the i J _,/ valveIocationofthegasshut-offvalve. ']]r I!/ 1/2"orS/4"
b4t_------- Gas pipe
Alternate Hookup _ Adapter
90° Eibow_ _&_ 90° Elbow
Nipple --_11 _" ....
has _€_ I _ N_ppJe , .
shut-off _ [[_ "_ rv / 90° regular:or
I I _ / Nipple
I 1 _ VUlCK connec_
_ ]_[_t¢" ,. Pressure
_/or union
vo,ve F E,bow1,
Gas pipe 90° Elbow _"__
location of the gas sflut-aff valw.
45
Page 46

Installation of the range.
[]
Connect the Range to the Electrical Supplg
Skip to Step 5 if the power cord shipped on the range does not match gout
wall receptacle.
Using an Existing NEMA 14-50R Receptacle
Plugthe range power cord into a properly
grounded wall receptacle.Skipto Step6 if the
range power cord matchesthe wall receptacle.
NOTE:Yourrange is shippedwith a O-prongplug
to be used in a NEMAJ4-50R receptacle.Should
Souchooseto changegout plug,useonlg a 3-
wire power cord,3-wire conduit or a-wire
conduit. Follow the appropriate instructions
below,inStep g,for sour application.
EffectiveJanuar_j!, !996, theNationalElectricCode
requiresthatnew construction(notexisting)utilizea
a-conductorconnectionto an electricrange.
[] Replace the Power Cord (Optional)
Perform this step onlbl if the power cord shipped on the range does not match Four wall receptacle.
[]_] Remove the wire cover (onthe back of
the range) by removing two (2)screws
using a !/4" nut driver.
Do not discard these screws.
---_ ..... _--Z ..........................
A range cord rated at 40 amps with 12g/250
minimum volt rangeis required.A 50-amp range
cord is not recommended but if used,it should
be marked for use with nominal ls/8" diameter
connection openings.Careshould be taken
to center the cable and strain relief within the
knockout hole to keep the edge from damaging
the cable.
NOTE:A a-conductor cord isto be used when
the appliance isinstalled in a mobilehome or
when loca! codesdo not permit grounding
through the neutral.
Loosenthe strain reliefscrews and remove
the power cord.
Back of range
r_ Removethe ] lower power cord terminal
screws from the terminal blockand the
ground screw and plate.
Term na,,__ -_--a
bock J'/l_}_il_}_ _:_H Neutral
_?_ _--terminal
__ __ !!Sgte
Ground / _J' -_'_X"_'t,7, _ _ I
screw o _ _ <; G_ROUUNDI
Wire cover
!
NOTE:Thereplacementpower cord must be a
3-conductor or a a-conductor UL-Iistedrange
cord or conduit. Cordsmag be provided with ring
terminals on wire and a strain reliefdevice.
Followthe ]-wire power cord (option gA),
%
]-wire conduit (option 5B)or/4-wire conduit
(option 5Q sections as appropriate for
your application.
46
[_ Placethe terminal screwsand ground
screw in safe location for later use.
Page 47

Read these instructions completelg and carefullg.
F_ Replace the Power Cord (Optional) Continued
Perform this step onlg if the power cord shipped on the range does not match gour wall receptacle.
_] 3-Wire Power Cord Installation Option
WARNING: :heneutra!orground
wire of the power cord must be connected to
the neutra! termina! located in the centerof
the termina! block.Thepower leadsmust be
connectedto the lower left andthe lower right
terminals of thetermina! block.
I_] Locate the copper ground strap on the
lower back of the range.
[] Loosenthe upper center screwon the
terminal block.
Slidethe open slotted end of the ground strap
%
under the upper center screw on the terminal
block. Makesure the ground strap isall the
way against the upper centerscrew and
tighten it in place.
Placethe ground plate (removed earlier)over
[]
the bottom of the ground strap, pressthem
against the range frame and attach them
with the ground screw (removed earlier).
Insertthe new power cord through the strain
%
relief.Allowenough slackto easily attach the
wires to the terminal block.
Insertthe 3 terminal screws (removed earlier)
%
through each power cord terminal ring and
into the lower terminals of the terminal block.
Be certain that the center wire (white/neutral)
isconnected to the center lower position of
the terminal block.Tighten screws securely
(approximately 20 inch-lbs.)into the terminal
block.
Ground
plate-
Terminal block
(appearance
may varg)
Neutral
Ground strap
Ground strap
kl_ Open slotted end
F7-] Securethe strain reliefin place in the bracket
by tightening the strain reliefscrews.
47
Page 48

Installation of the range.
[_ Replace the Power Cord (Optional) Continued
Performthis steponly if thepower cordshippedon the rangedoesnot matchyour wall receptacle.
[] 3-Wire Conduit Installation Option
[_ Locate the copper ground strap on the
lower back of the range.
r_ Loosenthe upper center screw on the
terminal block.
Slidethe open slotted end ofthe ground strap
%
under the upper center screw on the terminal
block.Make surethe ground strap isallthe
way against the upper center screw and
tighten it in place.
Placethe ground plate (removedearlier)over
[]
the bottom of the ground strap,pressthem
against the range frame andattach them
with the ground screw (removed earlier).
j_j Removethe strain relief clampfrom the
bracket.
Squeeze connector
Conduit
J
Bracket
Assemblethe squeezeconnector (obtained
%
locally),matching the diameter of your
conduit, inthe bracket hole. Insertthe conduit
through the squeezeconnector.Allow enough
slackto easilyattach the wires to the terminal
block.
NOTE:Donot installthe conduit without a
squeezeconnector.
Insertthe center bare wire (white/neutral)tip
[]
through the bottom center terminal block
opening.On certain models,the wire will need
to be inserted through the ground strap
opening and then into the bottom center
block opening. Insert the two sidebare wire
tips into the lower leftand the lower right
terminal block openings.Tighten the screws
untilthe wire is firmly secure (approximately
20 inch-lbs.).
NOTE:Makesurethe wire is completely
inserted into the terminal block and a secure
connection is made.
[_ Securethe squeezeconnector in place in the
bracket by tightening the squeezeconnector
screws.
NOTE:ALUMINUM WIRING:
W,ret,ps . --J.....
Bracket o_
_ Conduit
Ground strop
__ OpensIo_edend
Wire used, location and enclosure of splices,
etc., must conform to good wiring practices and
local codes.
q8
Aluminum building wire may be usedbut it must
be rated for the correct amperage and voltage
to make connection.
Page 49

Read these instructions completely and carefully.
[_ Replace the Power Cord (Optionall Continued
Perform this step only if the power cord shipped on the range does not match your wall receptacle.
_] 4-Wire Conduit Installation Option
[] Removethe strain reliefclamp from the
bracket.
Assemblethe squeezeconnector (obtained
[]
locally),matching the diameter of your
conduit, in the bracket hole. Insertthe conduit
through the squeezeconnector.Allow enough
slackto easily attach the wiresto the terminal
block.
NOTE:Do not install the conduit without
a squeeze connector.
Insertthe ground bare wire tip between the
%
range frame and the ground plate (removed
earlier)and secureit in placewith the ground
screw (removedearlier).Insert the bare wire
(white/neutral) tip through the bottom center
of the terminal block opening. Insertthe two
sidebare wire tips into the lower left and the
lower right terminal block openings.Tighten
the screws until the wire isfirmly secure
(approximately 20 inch-lbs.).
NOTE:Makesurethe wire is completely
inserted into the terminal block and a secure
connection is made.
Securethe squeeze connector in place in the
[]
bracket by tightening the squeezeconnector
screws.
NOTE: ALUMINUM WIRING:
Aluminum building wire may beused but it must
be rated for the correct amperage and voltage
to make connection.
Squeeze connector
Conduit
Bracket
TerminoJJ
block / _
Wire tipsy
Ground
screw
Wire used, location and enclosure
of splices, etc., must conform to good wiring
practices and local codes.
J
Ground
plate
(grounding
to range)
[_ Replace the Wire Cover
Replacethe wire cover on the range backby sliding
its right edge under the retaining tab and replacing
the two screwsremoved earlier.Makesurethat
no wires are pinched between the cover and the
range back.
2 screws
to replace
wire cover
\
Back of range
q9
Page 50

Installation of the range.
[_ Seal the Openings
Sealany openings inthe wall behind the range
and in the floor under the rangewhen hookups
are completed.
[_ Assemble Surface Burners
[-7/]Burner Heads (onsome models)
Placeburner headsover the electrodes
on the cooktop, in the correct locations
according to their size.There isone small,one
medium, one extra large and one dual flame
extra large burner head.
head Front of range extra large head
Front left,back right and backleft burners
Burner cap
chamber
Burner base
Hake sure the slot
in the burner head
is positioned over
the electrode.
[] Oval (CenteflBurner Head/Cap Assemblg
Placethe oval(center)head/cap assemblu
over the electrode on the cooktop.
Oval head and
cap@mblg
Front right burner
Burner cap
Burner
head
base
Burner
Electrode __
Hake surethe holeinthe burner head
assembly ispositionedover the electrode
and that the burner head isfullg inserted
insidethe burner base.A small gap
between the base and head isnormal.
Hake sure the slot
in the burner head
is positioned over
the electrode.
[_ Caps
Placethe matching size caps onto the burner
bases or heads.
IICC cpa/ r
Front of range large cap
Hake surethat the headsand caps are
replaced in the correct locations.
Grates
[]
Placethe left, right and center grates on the
cooktop. Thesegrates areposition specific.
Theundersides of the left and right grates are
marked "OUTSIDE."Placethe middle grate with
its bowed front toward the front of the range.
Outside grate Center grate Outside grate
CAUTION: not operate the burner
without al! burner parts in place.
50
., ,j
Front of range
Electrode
Page 51

Read these instructions completely and carefully.
[_ Check Ignition of Surface Burners
Operation of all cooktop burnersshould be checked
after the range and gas supplg lines have been
carefullg checkedfor leaks.
Qualitg of Flames
Thecombustion qualitg of burner flames needs
to be determined visuallg.
(AIYellow flames-
Coil for service
(B)Yellow tips on
outer cones--
Normal for LPgas
(el Soft blue
flames--Normal
for natural gas
Electric Ignition
Selectatop burner knob and simultaneouslg
push in and turn to LITEposition.Youwill hear
a clicking sound indicating proper operation of the
spark module. Oncethe air has been purged from
the supplg lines,burners should lightwithin
4 seconds.After burner lights,rotate knob out
of the LITE position.Trgeach burner in succession
until all burners have been checked.
If burner flameslooklike(A),cal!for service.Normal
burner flamesshould looklike(B)or (C),depending
on the tgpe of gas gou use.
With LPgas, some yellow tipping onouter cones
isnormal.
_] Level the Range
F_J Installthe oven shelves in the oven and
position the range where it will be installed.
range range
Raise _/Lowe r
.... /_-_÷q'
Raise
range
(on some models)
Checkfor levelnessbg placing a spirit level
%
or a cup, partiallg filled with water, on one
ofthe oven shelves.If using a spirit level,take
two readings-with the levelplaceddiagonallg
first in one direction and then the other.
_F
(on some models)
Removethe lower oven drawer.Seethe Care
and cleaning of the range section.Thefront
levelinglegscan be adjusted from the bottom
and the rear legs can be adjusted from the top
or the bottom.
Usean open-end oradjustable wrench to
adjust the leveling legsuntil the range is level.
WARNING: Never completely
remove the leveling leg as the range will not
be secured to the anti-tip device properly.
After the range is level,slidethe range awag
%
from the wall so that the Anti-Tip device can
be installed.
51
Page 52

Installation ofthe range.
[] Anti-Tip Device Installation
• All ranges can tip.
• BURNSor other SERIOUS
INJURIEScan result.
• INSTALLand CHECKthe
ANTI-TIP bracket following
the instructions supplied
with the bracket.
Toreduce the risk of tipping the range, the range
must be secured bg a properlg installedanti-tip
bracket. Seeinstallation instructions shipped with
the bracket for complete details before attempting
to install.
To check ifthe bracket is installed and engaged
properlg, remove the storage drawer or kick panel
and look underneath the range to seethat the
leveling leg is engaged in the bracket. On models
without astorage drawer or kick panel, carefullg
tip the range forward. The bracket should stop
the range within 4 inches.If it does not, the
bracket must be reinstalled. Ifthe range ispulled
from the wall for ang reason,alwags repeat this
procedure to verifg the range is properlg secured
bg the anti-tip bracket. Never completelg remove
the leveling legs or the range will not be secured
to the anti-tip device properlg.
If gou did not receive an anti-tip bracket with
gour purchase,call !.800.626.8774 to receive
one at no cost. (In Canada, call 1.800.561.3344.)
Forinstallation instructions of the bracket, visit
www.GEAppliances.com.(InCanada,
www.GEAppliances.ca.)
When All Hookups Are Completed:
MAKESUREALL CONTROLSARELEFTIN THE
OFF POSITION.
MAKE SURE THE FLOW OF COMBUSTION
AND VENTILATION AIR TO THE RANGE IS
UNOBSTRUCTED.
Converting to LP Gas (orconverting back to natural gas from LP)
Thisrange leavesthe factory set for usewith natura! The conversioninstructions and LPorificescan
gas. If you want to convert to LPgas, theconversion be found attached to the range next to the
must beperformed by a qualified LPgas installer, pressure regulator.
Keepthese instructions and the orificesin case
gou want to convert back to natural gas.
52
Page 53

Before gou call for service.., ge.com
Troubleshooting Tips
Save time and moneg! Review the charts on the following
pages first and gou mag not need to call for service.
Possible Causes What To Do
Topburners do not light Plug on range is not completelg • Makesure electricalplug isplugged into a live,properlg
or do not burn evenlg inserted in the electrical outlet, grounded outlet.
Burner hole or slits on the side • Removethe burner capsand clean them. Check and
of the burner mag be clogged, clean the electrodearea for burned-on food or grease.
Seethe Careand cleaningof the range section.
Improper burner assemblg. • Makesurethe burner parts are installed correctly.
Seethe Careand cleaningof the range section.
Surface burners light
but ovendoes not
The oven gas shut-offvalve
meg have accidentallg been
moved during cleaning or
moving.
• Tocheckthe ovengas shut-off valve,remove the
drawer (seethe Careand cleaning of the range section)
Removethe rear access panel bg unscrewing the thumb
screws in the upper left and right corner. Lookfor the
gas shut-off lever at the back ofthe range.
PULLTO OPEN.
Thumb screws
Burner flames verg Improper air to gas ratio. • Ifrange isconnected to LPgas,contact the person
large orgellow who installed gour range or made the conversion.
Control signals after Youforgot to enter a bake • Touchthe BAKEpad and desired temperature or the
entering cooking time temperature or cleaning time. SELFCLEANpad and desired clean time.
or start time
Fooddoes not bake Oven controls improperlg set. • Seethe Usingthe upper oven section.
or roast properly
in the upper oven Shelf position is incorrect. • Seethe Usingthe upper oven section.
Incorrect cookware or cookware • Seethe Usingthe upper oven section.
of improper size being used.
Oven thermostat needs • SeetheAdjust theupper oventhermostat
adjustment. Ooit gourse!fi section.
Clocknot set correctlg. • Seethe Usingthe clockand timer section.
Aluminum foil used improperlg • Seethe Careand cleaningof the range section.
in the oven.
Oven bottom not securelg • Seethe Installationof the range section.
seated in position.
Burners do not light Gas/Control Lockout feature • Allow the range to cool down and touch and hold the
isactivated. GAS/CONTROLLOCKOUTpad(on some models)for
] secondsuntil LOCdisappearsfrom the displag.
Plugon range isnot • Makesure electrical plug isplugged into a live,properlg
completelg inserted in the grounded outlet.
electrical outlet.
Gassupplg not connected • Seethe Installation Instructions that came with gour
or turned on. range.
A fuse in gour home meg be • Replacethe fuse or reset the circuit breaker.
blown or circuit breaker tripped.
Burner parts not replaced • Seethe Careand cleaningof the range section. 5]
correctlg.
Page 54

Before gou call for service...
Troubleshooting Tips
Possible Causes What To Do
Gas/Control Lockout or • If LOCON appears in the display, the range control is
Control Lockout feature locked. Turn this feature off to use the range. See the
is activated Gos/Contro! Lockout section.
"Close Door" scrolls in The displag will alwags • This is a normal reminder to close the door when
the displag when BROIL automaticallg remind gou to broiling.
is set close the door.
Fooddoes not Oven controls improperlg set. • Make sure you touch the BROILHI/LO pad.
broil properlg
in the upper oven Oven door not closed. • See the Using the upper oven section.
Improper shelf position • See the Broiling Guide.
being used.
Food being cooked in • For best results, use a pan designed for broiling.
a hot pan. Make sure it iscool.
Cookware not suited • Forbest results,usea pan designed for broiling.
for broiling.
Oven bottom not securelg • See the Insto!!otion of the range section.
seated in position.
Upper oven temperature Oven thermostat • See the Adjust the oven thermostat Do itgourself!
too hot or too cold needs adjustment, section.
Clock and timer Plug on range is not completelg • Make sure electrical plug is plugged into a live,
do not work inserted in the electrical outlet, properly grounded outlet.
A fuse in gour home mug be • Replacethe fuse or resetthe circuit breaker.
blown or the circuit breaker
tripped.
Oven controls improperlg set. • Seethe Usingthe clockand timer section.
Upper oven light Light bulb is loose or defective. • Tighten or replace the bulb.
doesnot work
Upperoven will not The oven temperature is too • Allowthe range to coolto room temperature and
self-clean high to set a self-clean operation, reset the controls.
"Crackling" or This is the sound of the • This is normal.
"popping" sound metal heating and cooling
Plug on range is not completelg • Makesure electrical plug isplugged into a live,
inserted in the electrical outlet, properly grounded outlet.
Oven controls impropedg set. • See the Using the self-cleaning upper oven section.
during both the cooking
and cleaning functions.
Excessivesmoking
Oven door will not open
after a clean cycle
54
Excessivesoil.
Oven too hot.
• Touchthe CLEAR/OFFpad.Open the windows to
rid the room of smoke. Wait until the LOCKEDDOOR
light goes off.Wipe upthe excesssoiland resetthe
clean cycle.
• Allowthe ovento cool below locking temperature.
Page 55

Ovennot clean after
a cleoncgcle
Possible Causes What To Do
Oven controls not propedg set.
Oven was heavilg soiled.
• Seethe Usingthe self-cleaningoven section.
• Cleanup heavy spilloversbefore starting the clean cycle.
Heavilysoiledovens may needto self-clean again or
for a longer period of time.
ge.com
"LOCKDOOR"flashes
in the display
LOCKED DOOR light
is on when gou want
to cook
The self-clean cgde has been
selected but the door is not
closed.
The oven door is locked
because the temperature
inside the oven has not
dropped below the
locking temperature.
• Closethe oven door.
• Touchthe CLEAR/OFFpad.Allowthe ovento cool.
"F--and a number or You have afunction error code. • Touchthe CLEAR/OFFpad.Allowthe ovento coolfor
letter"flesh in the display one hour.Putthe oven back into operation.
If the function code repeats. • Disconnect all power to the range for 5 minutes and
then reconnect power. Ifthe function error code
repeats,call for service.
"Probe" appears in Thisis reminding gou to enter • Entera probe temperature.
the displag a probe temperature after
plugging in the probe.
Displag goes blank Afuse in gour home mag be • Replacethe fuse or resetthe circuit breaker.
blown or the circuit breaker
tripped.
Theclock is in the • Seethe Specialfeatures ofgour oven contro!section.
black-out mode.
Displag flashes Power failure. • Resetthe clock.
Unable to get the Oven control pads were • The BAKE and BROIL HI/LO pads must be touched at
displag to show "SF" not pressed propedg, the same time and held for 3 seconds.
Poweroutoge, Power outage or surge. • Resetthe clock. If the oven was in use,you must reset
dock flashes it by touching the CLEAR/OFFpad, setting the clock
and resetting any cooking function.
"Burning" or "oilg" Thisis normal in a new oven • To speedthe process,seta self-cleancycle for a
odor emitting from and will disappear in time. minimum of 3hours. Seethe Usingthe self-cleaning
the vent oven section.
Strong odor Anodor from the insulation • Thisistemporary.
around the inside of the oven
is normal for the first few times
the oven isused.
LOCappears m TheGas/Control Lockout feature • Besurethe surface burner controls are turned OFR
the displog Jsactivated. Turnthis feature off to usethe range. Seethe
Gas/Contro!Lockout section.
55
Page 56

Before gou call for service...
Troubleshooting Tips
Possible Causes What To Do
Fan noise The convection fan mag turn • This isnormal. To maximize cooking evenness, the
on and off automaticallg, fan is designed to operate in both directions with a
pause in between.
Convection fan Preheat temperature • Fanwill start automatically once the preheat
not working not reached, temperature isreached.
Drawer does not slide The drawer is out of alignment. • Fullgextend the drawer and push itall the wag in.
smooth/g or drags See the Core ond deoning of the tonga section.
Drawer is overloaded or load • Reduceweight. Redistributedrawer contents.
is unbalanced.
Loweroven drawer A fuse in gour home mag be • Replacethe fuse or resetthe circuit breaker.
will not work blown or the circuitbreaker
tripped.
The upper oven isself-cleaning. • Wait for the self-clean cycle to finish and the oven
to cool.
Controls impropedg set. • Seethe Lower ovendrawer section.
Excessivecondensation Liquid in drawer. • Removeliquid.
in the drawer
Fooddries out in the Moisture escaping. • Coverfood with lid or aluminum foil.
lower oven drawer
Uncovered foods. • Coverfood with lid or aluminum foil.
Temperature setting too high. • Reducetemperature setting.
Oven drawer not fullg closed. • Pushdrawer in until latch engages.
56
Page 57

Accessories.
Looking For Something More?
You can find these accessories and many more at ge.com (U.S.)or
www.GEAppliences.ce (Canada), or call 800.626.2002 (U.S.)or 888.261.3055 (Canada)
(during normal business hours). Have your model number ready.
i i!I_III!_ iI_ :
il
_IL _i iii i__ _iiiiiiiiiiii i_I ii i_iii_iiii
Oven and Drawer Racks
Grates
Surface Burner Caps
i
Broiler Pan
Light Bulbs Knobs
Cleaner
Tired of discolored racks? Wishing you had extra-heavy-duty oven racks?
NOW AVAILABLE for your range:
GE's innovative, self-cleanable porcelain-coated oven racks!
, Heavy Duty
• Durable
Able to be cleaned in a self-cleaning oven
Visit ge.com (U.S.)or www.GEAppliences.ce (Canada)for more information.
57
Page 58

Notes.
n
v A
vm r_
A .
Q
C)
up
0
E
C)
L_
58
Page 59

GE Service Protection PIUS T"
GE, a name recognized worldwide for quality and dependability, offers you
Service Protection PlusT'--comprehensive protection on all your appliances-
No Matter What Brand!
Benefits Include:
• Backed bg GE
• All brands covered
• Unlimited service calls
• All parts and labor costs included
• No out-of-pocket expenses
• No hidden deductibles
• One 800 number to call
You will be completely satisfied with our service protection or you may request your money back
on the remaining v(]lue of your contract. No questions asked. It's that simple.
Protect your refrigerator, dishwasher, washer and dryer, range, TV,VCRand much more-any brand!
Plusthere's no extra charge for emergency service and low monthly financing is available. Even icemoker
coverage and food spoilage protection is offered. You con rest easy, knowing that oll your valuable household
products ore protected against expensive repairs.
Place your confidence in GEand coil us in the U.S.toll-free at 800.626.2224
for more information.
*All brands covered, up to 20 years old, in the continental U.S.
We'll Cover Any
Appliance. Anywhere.
Anytime.*
._ Cut here
Please place in envelope and moil to:
General Electric Company
Warranty Registration Department
P.O.Box 32150
Louisville,KV 40232-2150
59
Page 60

Consumer Product Ownership Registration
Dear Customer:
Thank you for purchasing our product and thank you for placing your confidence in us.
We are proud to have you as a customer!
Follow these three steps to protect your new appliance investment:
Complete and mail
your Consumer
Product Ownership
Registration today.
Have the peace of
mind of knowing we
can contact you in the
unlikely event of a
safety modification,
After mailing the
registration below,
store this document
in a safe place. It contains
information you will need
should you require
service. Our service
number is 800.GECARES
(800.432.2737).
Model Number Serial Number
Important: If you did not get a registration card with your
product, detach and return the form below to
ensure that your product is registered, or register
online at ge.com. . .................... _Cuthere
Consumer
Product Ownership Registration
Read your Owner's
Manual carefully.
It will help you
operate your new
appliance properly.
Model Number Serial Number
I,,,,,, , , , , , II , , , , , , , , I
Mn Ms. Mrs.] Miss}
First J
Name I I I I I I
Street
I
Address I I I ! I I I ! I I I I I I I I I ! I I I I I !
Apt.#J II I I ! I I J
I
city I I I
Date Placed
lnUse I I
Month I
Dayl I I Yearl
GE Consumer & Industrial
Appliances
General Electric Company
Louisville, KY/40225
ge.com
I I I I I I
I I I Name I I I I I I I I I I !
* Please provide your e-mail address to receive, via e-mail, discounts, special offers and other
important communications from GEAppliances (GEA).
ill Check here if you do not want to receive communications from GEA'scarefully selected
partners.
FAILURETOCOMPLETEAND RETURNTHIS CARDDOESNOT DIMINISHYOUR
WARRANTYRIGHTS.
For information about GEA'sprivacy and data usage policy, go to ge.com and click on "Privacy
Policy" or call 800.626.2224.
6O
I Last I
E-mailAddress*
I ! I Statel I J Codel
Phone
I
Number J I I
Zip
I-I,, !-I , , ,
i ! !
Page 61

GE Dual Fuel Range Warrants. iForcustomersintheunitedstatesJ
All warrants service provided bg our Factors Service Centers,
or an authorized Customer Care®technician. To schedule
service, on-line, visit us at ge.com, or call 800.GE.CARE5
(800.432.2737). Please have serial number and model number
available when calling for service.
GE Will Replace:
One Year
From the date ofthe
origina!purchase
Service trips to gout home to teach Sou how to use
the product.
Improper installation, delivery or maintenance.
_, Failure of the product if it is abused, misused,
or used for other than the intended purpose or
used commerciallg.
Replacement of house fuses or resetting of circuit
breakers.
Ang part of the rangewhich fails due to a defect in materials or workmanship. During this
limited one-gear warrants, GEwill also provide,free of charge, alllabor and in-home service
to replace the defective part.
Staple Four receipt here.
Proof of the origina! purchase
date is needed to obtain service
under the warrant F.
Damage to the product caused bg accident, fire, floods
or acts of God.
Inddental or consequential damage caused bg possible
defects with this appliance.
Damage caused after delivery.
Product not accessible to provide required service.
EXCLUSION OF IMPLIED WARRANTIES--Your sole and exclusive remedy is product repair as provided
in this Limited Warrantg. Ang implied warranties, including the implied warranties of merchantabilitg
or fitness for a particular purpose, are limited to one gear or the shortest period allowed bg law.
This warrants is extended to the original purchaser and ang succeeding owner for products purchased
for home use within the USA. If the product is located in an area where service bg a GE Authorized Servicer
is not available, gnu mag be responsible for a trip charge or gnu mag be required to bring the product to
an Authorized GEService Location for service. In Alaska, the warrants excludes the cost of shipping or service
calls to sour home.
Some states do not allow the exclusion or limitation of incidental or consequential damages. This warrants
gives gnu specific legal rights, and gnu mag also have other rights which varg from state to state. To know
what gout legal rights are, consult gout local or state consumer affairs office or gout state's Attomeg General.
Warrantor: General Electric Compang. Louisville, KY 40225
61
Page 62

GEDual Fuel
Range Warrantg. IForcustomersinCanada)
All warranty service provided by our Factory Service Centers
or an authorized Customer Care®technician. Forservice,
call 1.800.561.3344. Please have serial number and model
number available when calling for service.
m
onetear
FromthedateOfthe
original purchase
Service trips to gour home to teach gou how to use
the product.
Improper installation, delivery or maintenance.
_,Failure of the product if it is abused, misused,
or used for other than the intended purpose or
used commerciallg.
Replacement of house fuses or resetting of circuit
breakers.
Mabe Will Replace:
Any part ofthe range which fails due to a defect in materials or workmanship. Duringthis
limited one-gear warranty, Mabe will also provide, freeof charge, all labor and in-home service
to replace the defective part.
Staple your receipt here.
Proof of the origina! purchase
date is needed to obtain service
under the warranty.
Damage to the product caused bgaccident, fire, floods
or acts of God.
Incidental or consequential damage caused bg possible
defects with this appliance.
Damage caused after deliverg.
Product not accessible to provide required service.
EXCLUSION OF IMPLIED WARRANTIES--Your sole and exclusive remedy is product repair as provided
in this Limited Warranty. Any implied warranties, including the implied warranties of merchantability
or fitness for a particular purpose, are limited to one year or the shortest period allowed by law.
WARRANTOR IS NOT RESPONSIBLE FOR CONSEQUENTIAL DAMAGES. J
Warrantor: MABE CANADA INC. J
J
62
Page 63

Notes.
cx_
2
¢b
¢3
0
cx_
•#m im_
v
O"
cx_
0
0
cx_
_o
63
¢b
"o
0
Page 64

Consumer Support.
GEAppliances Website
Have a question or need assistancewith your appliance?Try the GEAppliancesWebsite any day of the year!
Forgreater convenienceand faster service,you can now download Owner's Hanuals,order parts or even schedule
serviceon-line. In Canada: www.6EAppliances.ca
Inthe U.S.:ge.com
ScheduleService Inthe U.S.:ge.com
Expert GErepair service is only one step away from your door.Get on-line and schedule your service at your
convenience 24 hours any day of the year! Or call800.GE.CARES(800.412.2717)during normal business hours.
In Canada, call 1.800.561.3344
Real Life Design Studio Inthe u.s.:ge.com
GEsupports the UniversalDesignconcept-products, services and environments that can be usedby people of all
ages,sizesand capabilities.We recognizethe needto designfor a wide range of physical and mental abilitiesand
impairments. For details of GE'sUniversalDesignapplications, including kitchen designideas for people with disabilities,
check out our Websitetoday. Forthe hearing impaired, pleasecall 800.TDD.GEAC(800.8]].4122).
In Canada, contact: Hanager, Consumer Relations,Habe Canada Inc.
Suite]10, 1 Factory Lane
Honcton, N.B.EIC 9HI
Extended Warranties
Inthe U.S.:ge.com
Purchasea GEextendedwarranty and learn about specialdiscounts that are available while your warranty isstill
in effect. You can purchase it on-line anytime, or call 800.626.222/4during normal businesshours. GEConsumer Home
Serviceswill still be there after your warranty expires.InCanada, cell 1.888.261.2133
Parts and Accessories
Individualsqualified to servicetheir own appliances can have parts or accessoriessent directly to their homes (VISA,
HasterCard and Discovercardsare accepted).Orderon-line today, 2/4hours every day or by phone at
800.626.2002during normal businesshours.
Instructions contained in this manual cover procedures to be performed by any user Other servicing generally should be
referred to qualified service personnel. Caution must be exercised, since improper servicing mag cause unsafe operation.
Customers in Canada should consult the yellow pages for the nearest Habe service center,or call 1.888.261.]055.
Contact Us
If you are not satisfiedwith the service you receive from GE,contact us on our Website with all the details including
your phone number,or write to: General Hanager, Customer Relations
GEAppliances,Appliance Park
Louisville,KY40225
In Canada: www.6EAppliances.ca, or write to: Director,ConsumerRelations,Habe Canada Inc.
Suite]10, 1 Factory Lane
Honcton, N.B.EIC 9HI
Inthe U.S.:ge.com
In the U.S.:ge.com
Register gour new appliance on-line--at gour convenience! Timely product registration will allow for enhanced
--] RegisterYourAppliance Inthe U.S.:ge.com
communication and prompt serviceunder the terms of your warranty, should the need arise.You may also mail
in the pre-printed registration card included inthe packing material.In Canada: www.6EAppliances.ca
Printed in Mexico
This book is printed on recycled paper.
 Loading...