

Page 1
YOUR
MONOGRAM
BUILT-IN
REFRIGEllA170R.
-.
~ AWG,STEWRDEMARKOFGENEMLEECTRICCOMPANY
MONOGRAM.
Page 2
Help us
Contents
Energy-Saving Tips . . . . . . . . ...2
Important Safety Instructions. . ..3
How to Set Temperature
Controls . . . . . . . . . . . . . . . ...4
How to Use Energy Saver
Switch . . . . . . . . . . . . . . . . . ...4
Food Storage Suggestions . . . ...5
Storage Drawers . ., . . . . . . ...6. 7
Shelves . . . . . . . . . . . . . . . . . . ...8
AutomaticIcemaker . . . . . . . . ...9
Water Filter Accessory . . . . . . ...9
UserMaintenance
Instructions . . . . . . . . . . ..lO.ll
DoorPanelInserts . . . . . . . . ...11
Howto Connect Electricity . ...12
Installation Requirements. . . ...12
Levelers . . . . . . . . . . . . . . . . . . . 12
TheProblemSolver . . . . ...13. 14
IfYouNeedService . . . . . . . ...15
Warranty . . . . . . . . . ..BackCover
-..
help you...
Read this book carefully.
It is intended to help you operate
and maintain your new refrigerator
properly.
Keep it handy for answers to your
questions.
If you donutunderstand something
or need more help, write (include
your phone number):
Consumer Affairs
General Electric Company
Appliance Park
Louisville. KY 402~5
Write down the
serial number.
You’11see it on a label on the right
side. near the bottom of the fresh ,
food compartment.
Thisnumber is also on the
Consumer Product Ownership
Registration Card that came with “
your refrigerator.
Before sending in the registration
card, please write the serial
number here:
Serial Number
BIS42A
Model Numoer
Use these model and serial numbers
in any correspondence or service
calls concern ing your refrigerator.
If you received a damaged
refrigerator, immediately contact
the {!caier(or [milder) thut sold jou
lbc refrigerator.
Save time and
money.
Before you request ser}ice.
check the Problem S(}l\’eron pm+s
13tind 14.It lists minor cikses ot
(}pcratingproblems that }’OUcan
correct yoursclf.
Energy-Saving ‘JIps
● Location of your refrigerator is
/
important. Avoidlocating it next to
your range. a heating vent or where
the sun will shine directly on it.
● Don’t open the doors more ofien
than necessary.
● Close the doors as soon as possible,
particularly in hot, humid weather.
● Keep Energy Saver Switch in the
OFF position unless moisture
forms on the outside of the
refrigerator.
● Be sure the doors are closed
tightly. Before leaving the house
or retiring for the night. check to
be sure the doors haven’tbeen left
open accidentally.
● Store only those foods requiring
refrigeration in your refrigerator.
● Wipe moisture from bottles and . Don’tovercrowdyour refrigerator.
cartons before putting them in the
refrigerator.
● Keep foods covered to reduce
moisture buildup inside the
refrigerator.
● If you turn the controls to the
coldest position for quick chilling
or freezing, be sure to turn them
back to regular settings.
Overcrowding can require extra
electrical energy to keep everything
cool.
2
.
Page 3
.
IMPORT~T SAFETY INSTRUCTIONS
Read all instructions before using this appliance.
wARNING-When using this
appliance, always exercise basic
safety precautions. including the
following:
● Use this appliance only for its
intended purpose as described in
this Use and Care Book.
● This refrigerator must be
properly installed in accordance
with the Installation Instructions
before it is used. See grounding
instructions on page 4.
● Never unplug your refrigerator
by pulling on the power cord.
Always grip plug firmly and pull
straight out from the outlet.
“
● Repairor replace immediatelyall
electric service cords that have
become frayed or otherwise
damaged. Do not use a cord that
shows cracks or abrasion damage
along its length or at either the plug
or connector end.
After your refrigerator is in
operation, do not touch the cold
surfaces, particularly when hands
are damp or wet. Skin may adhere
to these extremely cold surfaces.
● Do not place fingers or hands
on the automatic icemaking
mechanism while the refrigerator
is plugged in. This will help protect
you from possible injury. It will also
prevent interference with the moving
parts of the ejector mechanism, or
with the heating element that
releases the cubes.
● Don’t refreeze frozen foods
which have thawed completely.
The United States Department of
Agriculture in Home and Garden
Bulletin No. 69 says: -
“.. .Youmay safely refreeze frozen
foods that have thawed if they still
contain ice crystals or if they are
still cold—below 40”F.
“.. .Thawed ground meats, poultry
or fish that have any off-odor or
off-color should not be refrozen and
should not be eaten. Thawed ice
cream should be discarded. If the
odor or color of any food is poor or
questionable, get rid of it. The food
may be dangerous to eat.
“Even partial thawing and mfmezing
reduce the eating quality of foods,
particularly fruits, vegetables and
prepared foods. The eating quality
of red meats is affected less than
that of many other foods. Use “
refrozen foods as soon as possible to
save as much of their eating quality
as you canY
. If your old refrigerator is stil]
around the house but not in use,
be sure to remove the doors. This
will reduce the possibility of
danger to children.
● Disconnect power to your
refrigerator:
A. Before making any repairs.
Note: We strongly recommend
that any servicing be performed
by a qualified individual.
B. Before cleaning.
C. Before replacing a burned-out
lightbulb, powerto the refrigerator
should be discomected at the fke
box or circuit breaker in order to
avoid contact with a live wire
filament. (A bumdout lightbulb
may break when being replaced.)
Note: Tu%ing fiuzer compartment
temperature control to OFF
position does not remove power
to the light circuit.
● Do not operate your refrigerator
in the presence of explosive fumes.
SAW THESE
INSTRUCTIONS
3
Part No. 162D1525PO01
Page 4
Operating YourRefrigerator
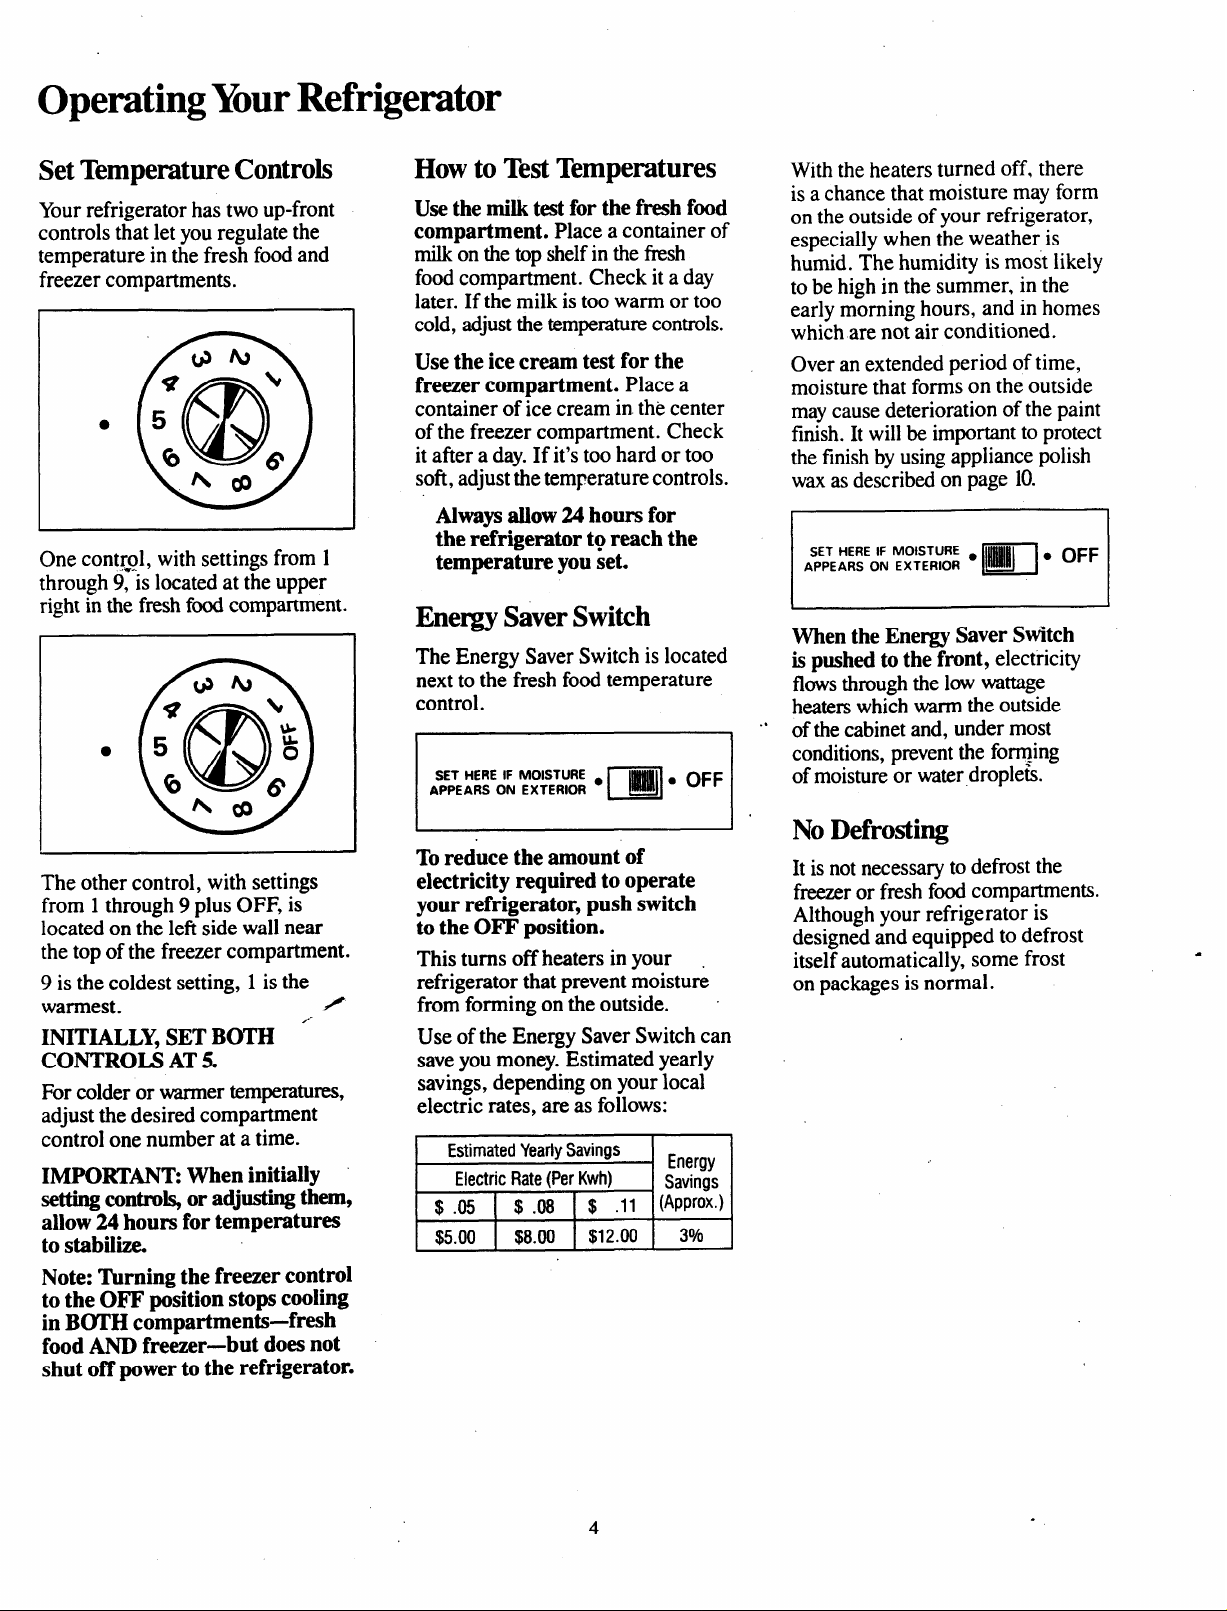
Set Temperature Controls
Your refrigerator has two up-front
controls that let you regulate the
temperature in the fresh food and
freezer compartments.
●
One cont~ol, with settings from 1
through 9, is located at the upper
right in the fresh fd compartment.
●
How to Test Temperatures
Use the milk test for the fresh f~d
compartment. Place a container of
milk on the top shelf in the fksh
food compartment. Check it a day
later. If the milk is too warm or too
cold, adjust the temperaturecontrols.
Use the ice cream test for the
freezer compartment. Place a
container of ice cream in the center
of the freezer compartment. Check
it after a day. If it’s too hard or too
sofi, adjust the temperature controls.
Always allow 24 hours for
the refrigerator t~ reach the
temperature you set.
Eneqg Saver Switch
The Energy Saver Switch is located
next to the-fresh food temperature
control.
SET HERE IF MOISTURE .
APPEARS ON EXTERIOR
m
.
OFF
With the heaters turned off, there
is a chance that moisture may form
on the outside of your refrigerator,
especially when the weather is
humid. The humidity is most likely
to be high in the summer, in the
early morning hours, and in homes
which are not air conditioned.
Over an extended period of time,
moisture that forms on the outside
may cause deterioration of the paint
finish. It will be important to protect
the finish by using appliance polish
wax as described on page 10.
SET HERE IF MOISTURE .
APPEARS ON EXTERIOR p!!lrl
When the Energy Saver Stitch
is pushed to the front, electricity
flowsthrough the low wattage
heaters which warm the outside
.,
of the cabinet and, undermost
conditions, prevent the fo~:ing
of moisture or waterdroplets.
●
OFF
The other control, with settings
from 1through 9 plus OFF, is
located on the left side wall near
the top of the freezer compartment.
9 is the coldest setting, 1 is the
warmest.
/
INITIALLY, SET BOTH “’
CONTROLS AT 5.
For colder or warmer temperatures,
adjust the desired compartment
control one number at a time.
IMPORTANT When initially
settingcontro& or adjusting them~
allow 24 hours for temperatures
to stabilize
Note: Thrning the freezer control
to the OFF position stops cooling
in B~H compartments-fresh
food AND freezer-but does not
shut off power to the refrigerator.
Toreduce the amount of
electricity required to operate
your refrigerator, push switch
to the OFF position.
This turns off heaters in your .
refrigerator that prevent moisture
from forming on the outside.
Use of the Energy Saver Switch can
saveyou money. Estimated yearly
savings, depending on your local
electric rates, are as follows:
EstimatedYearlySavings
ElectricRate
$.05
$5.00
(Per Kwh)
$.08
$8.00
$ .11
$12.00
Energy
Savings
UWox.)
30~
No Defrosting
It is not necessary to defrost the
freezeror fresh fd compartments.
Although your refrigerator is
designed and equipped to defrost
itself automatically, some frost
on packages is normal.
4
Page 5
.
Food Storage Suggestions
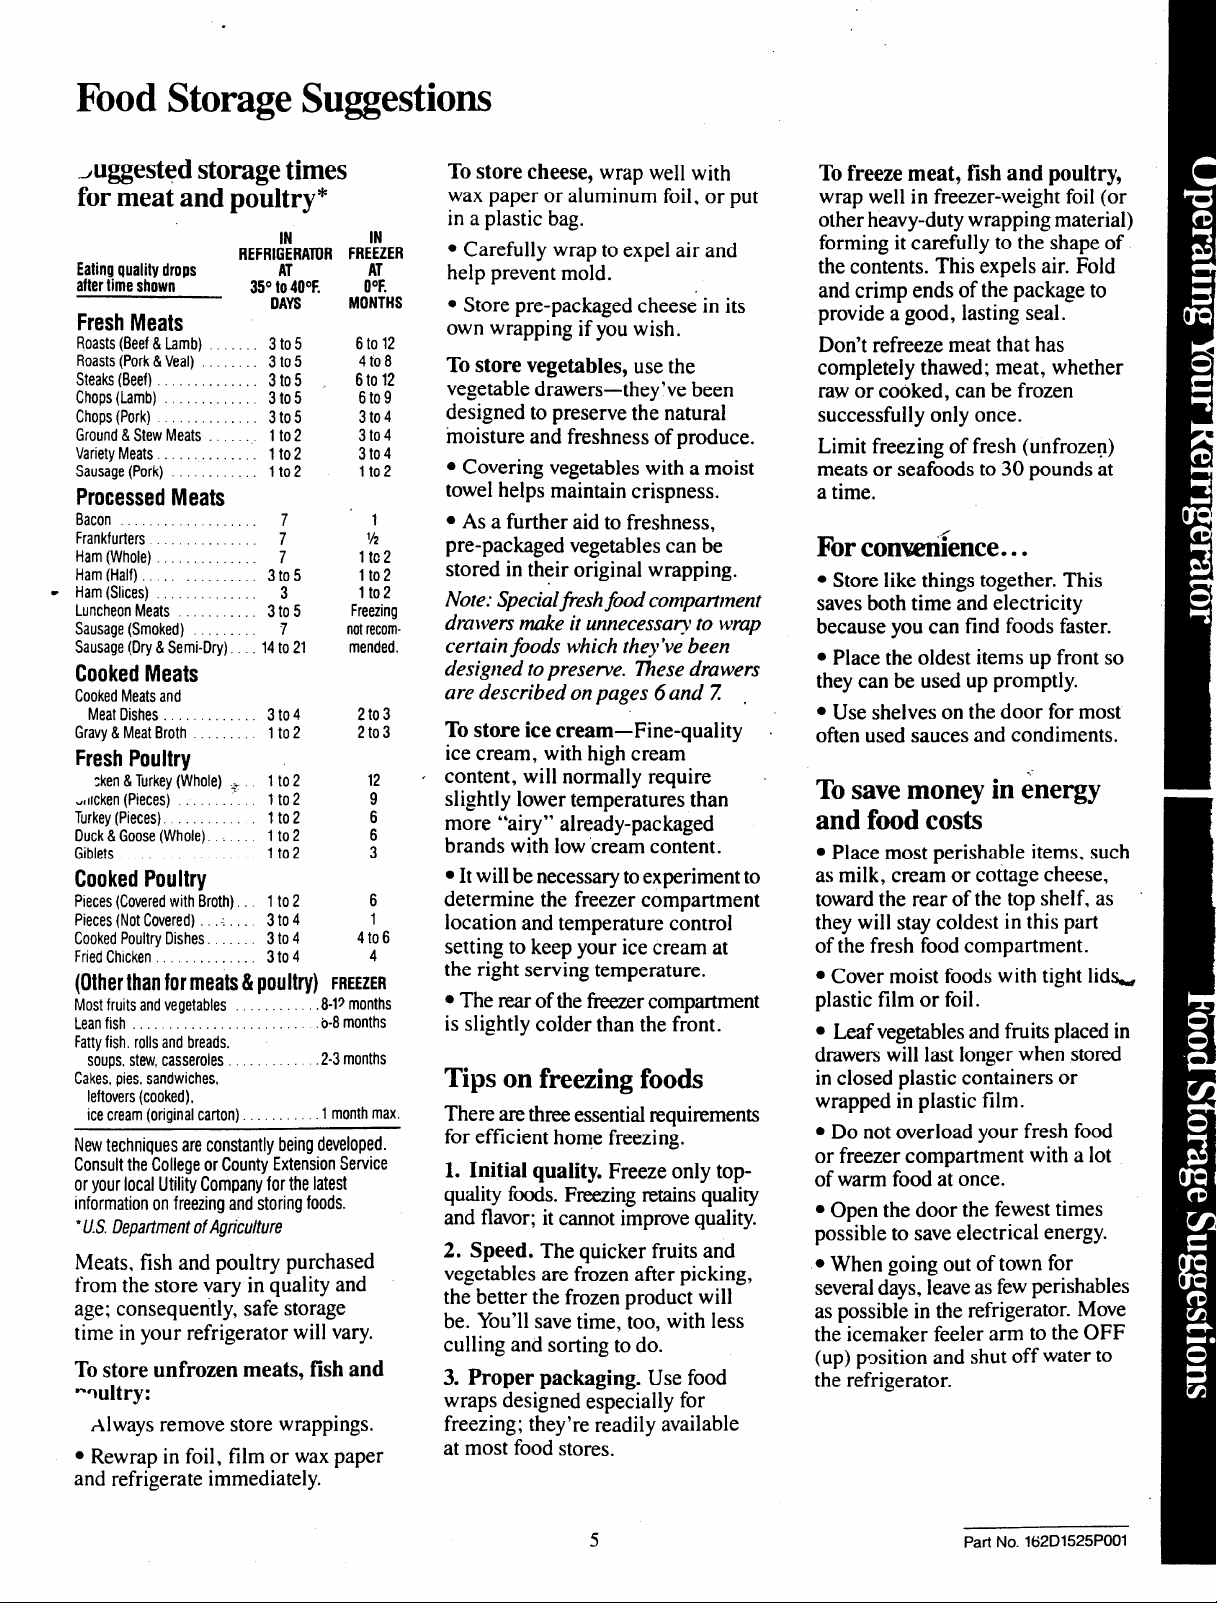
~uggested storage times
for meat and poultry*
Eating quality drops
after time shown
Fresh Meats
Roasts (Beef& Lamb) . . 3 to 5
Roasts (Pork&Veal) .. . .. . . 3 to 5
Steaks (Beef).. .. . . . ... . . . 3t05 ,,
Chops(Lamb) . . . . . . .. . 3t05
Chops(Pork) . . .. . . . .. . . 3t05
Ground&Stew Meats . 1 to 2
VarietyMeats . . .. . . . .. . lto2
Sausage(Pork) . . . . .. . . . . .. lto2
Processed Meats
Bacon . . ...,...., 7
Frankfurters . . . . . .. . . 7
Ham(Whole), . . . . .. . . . .. . 7
Ham(Half).. ., .. . .. . . . . 3t05
.
Ham(Slices), ... . . . .. 3
LuncheonMeats . . .. . . . . 3t05
Sausage(Smoked) . .. . . .. 7
Sausage(Dry& Semi-Dry),... 14to 21
Cooked Meats
CookedMeatsand
MeatDishes .,
Gravy& MeatBroth .
Fresh Poultry
:ken & Turkey(Whole)
-,llcken (Pieces) .,
Turkey(Pieces)
Duck & Goose (Whole).
Giblets
Cooked Poultry
Pieces(Coveredwith Broth).. 1to 2
Pieces(NotCovered) .. ... .. . 3 to 4
CookedPoultry Dishes. . . . . 3 to4
FriedChicken . .. . . . . 3t04
(Otherthanfor meats &poultry) FREEZER
Most fruits and vegetables . . . . . . . . ..8-V months
Lean fish.... . . . . . . . . . . . . . . . . . .o-8months
Fattyfish. rollsandbreads,
soups,stew,casseroles . .. . . . ...2-3 months
Cakes,pies,sandwiches,
leftovers(cooked),
icecream (original carton) . . . .,, . ...1 month max.
New techniques are constantly being developed.
Consult the College or
or your local Utility Company for the latest
information on freezing and storing foods.
●U.S.Depaflment of Agriculture
Meats, fish and poultry purchased
from the store vary in quality and
age; consequently, safe storage
time in your refrigerator will vary.
To store unfrozen meats, fish and
wultry:
Always remove store wrappings.
● Rewrap in foil, film or wax paper
and refrigerate immediately.
REFRlf!!RATOR
35o #400F.
OAYS
.,.
3t04
.
lto2
lto2
.::
lto2
lto2
lto2
lto2
County Extension Service
FRE’:ZER
(!;.
MONTHS
6 to 12
4t08
6 to 12
6t09
3t04
3t04
3t04
lto2
1
l/~
ltc2
lto2
lto2
Freezing
notrecom-
mended.
2t03
2t03
12
9
6
!
6
1
4t06
4
To store cheese, wrap well with
wax paper or aluminum foil, or put
in a plastic bag.
● Carefully wrap to expel air and
help prevent mold.
● Store pre-packaged cheese in its
own wrapping if you wish.
To store vegetables, use the
vegetable drawers—they’ve been
designed to preserve the natural
moisture and freshness of produce.
● Covering vegetables with a moist
towel helps maintain crispness.
● As a further aid to freshness,
pre-packaged vegetables can be
stored in their original wrapping.
Note: Specialji-esh food compartment
drawers make it unnecessary to wrap
certain foods which they ‘w?been
designed to preserve. These drawers
are described on
pages 6 and ~ .
To store ice cream–Fine-quality
ice cream, with high cream
content, will normally require
slightly lower temperatures than
more “airy” already-packaged
brands with low cream content.
● It will be necessary toexperiment to
determine the freezer compartment
location and temperature control
setting to keep your ice cream at
the right serving temperature.
● The rearofthe freezercompartment
is slightly colder than the front.
Tips on freezing foods
There are threeessential~quimments
for efficient home freezing.
1. Initial quality. Freeze only top-
quality ftis. Freezingretainsquality
and flavor; it cannot improvequality.
2. Speed. The quicker fruits and
vegetables are frozen after picking,
the better the frozen product will
be. You’llsavetime, too, with less
culling and sorting to do.
3. Proper packaging. Use food
wraps designed especially for
freezing; they’re readily available
at most food stores.
Tofreeze meat, fish and poultry,
wrap well in freezer-weight foil (or
other heavy-duty wrapping material)
forming it carefully to the shape of
the contents. This expels air. Fold
and crimp ends of the package to
provide a good, lasting seal.
Don’t refreeze meat that has
complete]y thawed; meat, whether
raw or cooked, can be frozen
successfully only once.
Limit freezing of fresh (unfrozen)
meats or seafoods to 30 pounds at
a time.
Forconwniience...
● Store like things together. This
saves both time and electricity
because you can find foods faster.
● Place the oldest items up front so
they can be
used up promptly.
QUse shelves on the door for most
often used sauces and condiments.
Tosave money in energy
and food costs
● Place most perishable items. such
as milk, cream or cottage cheese,
toward the rear of the top shelf, as
they will stay coldest in this part
of the fresh food compartment.
● Cover moist foods with tight lid%
plastic film or foil.
● Leaf vegetablesand fruits placed in
drawerswill last longer when stored
in closed plastic containers or
wrapped in plastic film.
. Do not overload your fresh food
or freezer compartment with a lot
of warm food at once.
● Open the door the fewest times
possible to save electrical energy.
c When going out of town for
severaldays, leaveas fewperishables
as possible in the refrigerator. Move
the icemaker feeler arm to the OFF
(up) position and shut off water to
the refrigerator.
5
Part No. 162 D1525PO01
Page 6
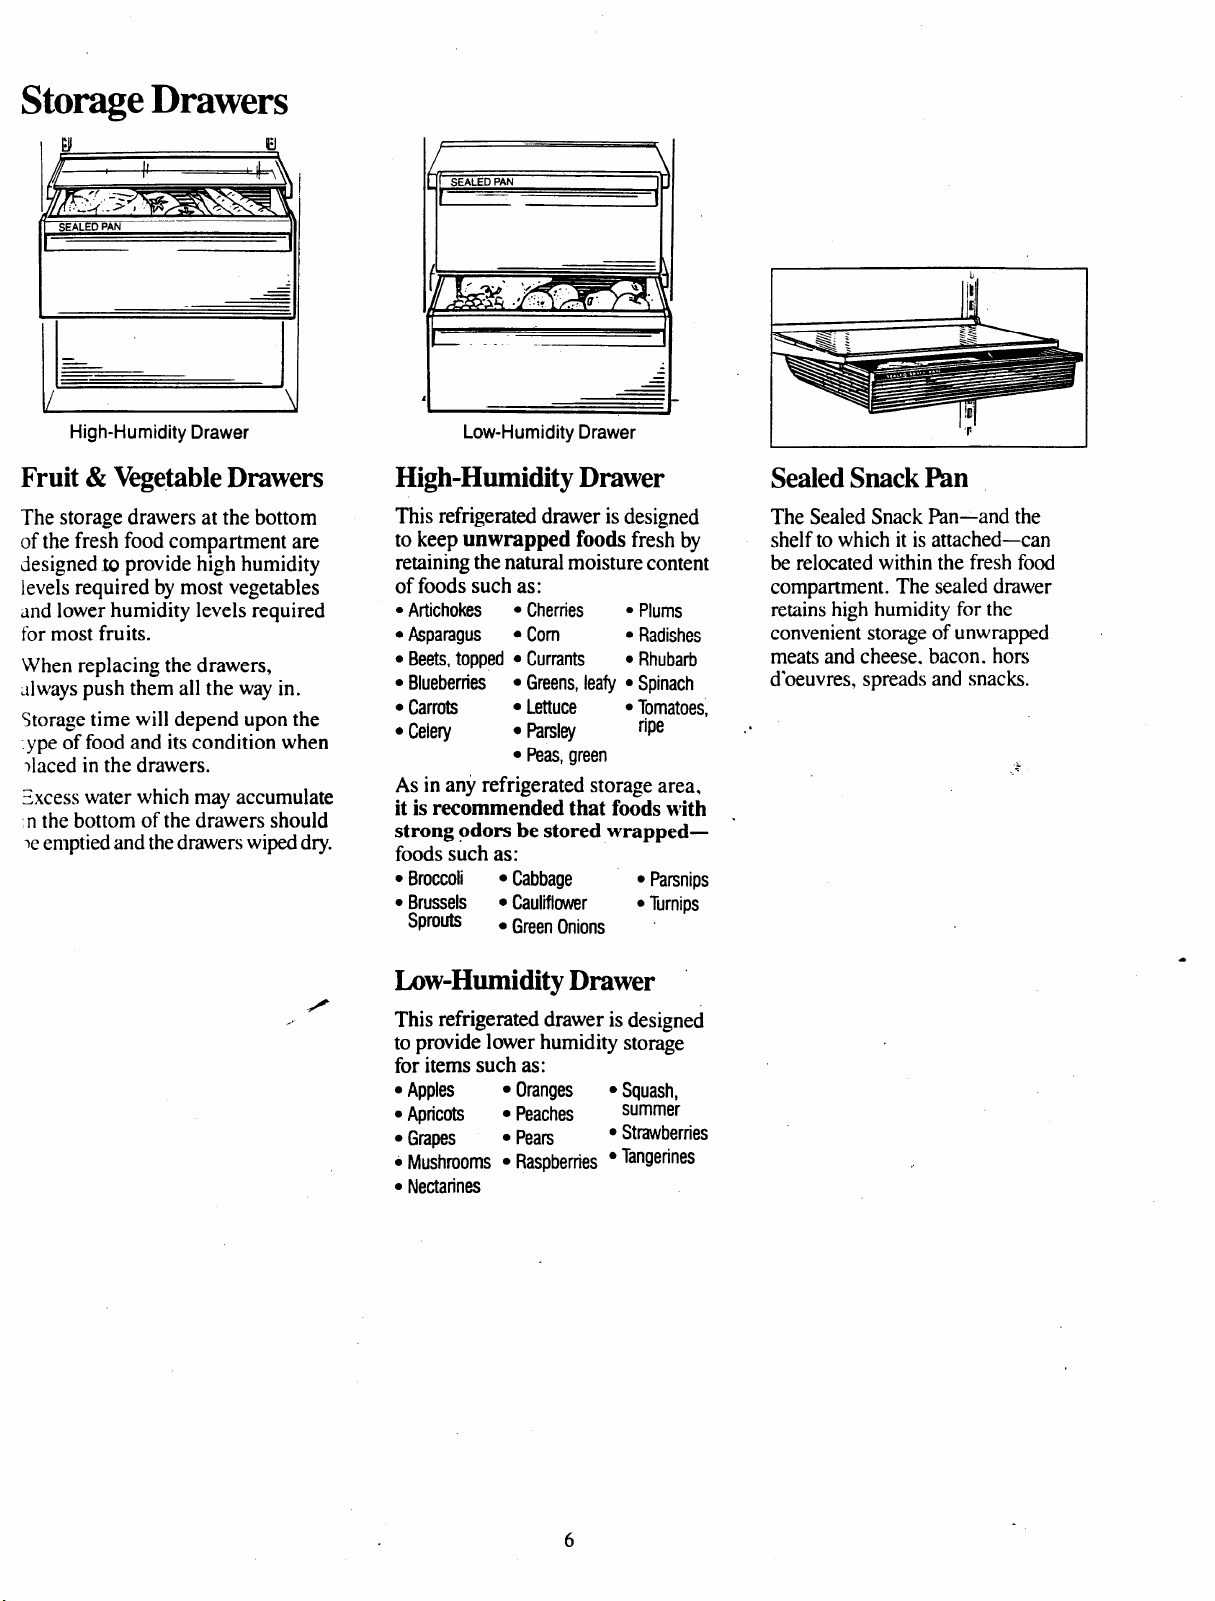
StorageDrawers
SEALED PAN
)
\
High-Humidity Drawer
Fruit & VegetableDrawers
The storage drawers at the bottom
of the fresh food compartment are
designed .tgprovide high humidity
levels required by most vegetables
and lower humidity levels required
for most fruits.
When replacing the drawers,
alwayspush them all the way in.
Storage time will depend upon the
.ype of food and its condition when
~lacedin the drawers.
=xcess water which may accumulate
n the bottom of the drawers should
>eemptiedandthedrawerswipeddry.
Low-Humidity Drawer
High-Humidity Drawer
This refrigerateddrawer is designed
to keep unwrapped foods fresh by
retainingthe natural moisture content
of foods such as:
● AfiChOk~
● Asparagus c Corn s Radishes
● Beets, topped QCurrants . Rhubarb
s Blueberries
● Carrm
● Celery
● Cherries s Plums
● Greens, leafy ● Spinach
. Lettuce
● Parsley
QPeas, green
● Tomatoes,
ripe
As in any refrigerated storage area.
it is recommended that foods with
strong odors be stored wrapped—
foods such as:
● Broccoli
● Brussels
Sprouts
● Cabbage . Parsnips
. caul~~r
● Green Onions “
● Turnips
Low-Humidity Drawer ‘
Sealed Snack I%
The Sealed Snack Pan-and the
shelf to which it is attached—can
be relocated within the fresh food
compartment. The sealed drawer
retainshigh humidity for the
convenientstomgeof unwrapped
meats and cheese, bacon. hors
d’oeuvres, spreads and snacks.
This refrigerated drawer is designed
to provide lower humidity storage
for items such as:
.
Apples QOranges
● Apricots ● Peaches
● Grapes
. Mushrooms
. Nectarines
. Pears
● Raspberries ● ‘angerines
● Squash,
summer
● Strawberries
Page 7

Drawerand Cover Removal
Drawers atthe bottom of the fresh
food compartment will stop before
coming all the wayout of the
refrigerator, to help prevent
contents from spilling onto floor.
These drawers can be removed
easily by lifting front up slightly and
pulling drawer past “stop” location.
Toremove drawers and their cover
when the fresh food compartment
door cannot be opened fully:
1. Empty and remove lower door
shelves that might interfere.
2. Removefood from the shelf
above the upper drawer and take out
the shelf. Take food off the glass
coverandout ofthe drawer.
6. Pull the upper drawer forward,
lift the front to clear stops, and
remove the drawer.
7. Pull the lower drawer partway
out. Reach in, push the rear ofthe
glass up and, at the same time, push
it back untii it clears the frontcorner retainers.
8. Removethe cover.
9. Remove the drawer.
After cleaning, replace in reverse
order.
3. Put your fingers behind the
gasket at the rear of the drawer and
pull forward. Remove the gasket.
1
4. Pull the upper drawer partway
out. Reach in, push the rear of the
glass up; at the same time, push it
back until it clears the front-corner
-etainers.
5. Remove the cover.
When drawers and covers are back
in place, reinstall the gasket at the
rear of the sealed upper drawer. Fit
the end ofthe plast~~drawer stipport
into the slot on the gasket, with the
rubber gasket flap facing you. Make
sure the gasket snaps into place.
.
Parl No. 162 D1525PO01
Page 8

Shelf Positions
Howto rearrange
yourshelves
Adjustable Shelves in
Both Compartments
Tempered glass shelves in the fresh
food compartment and steel wire
shelves in the freezer compartment
m adjustable,enablingyou to make
efficient shelf arrangements to fit
your family’s food storage needs.
Toremoveshelves: Tilt shelf up at
front, then lift it up and out of tracks
on rear wall of refrigerator.
❑ Engage
top lug
❑ Lower to
lock into place
Quick Serve System
.-———-...___.._
Cooking-serving-storage dishes
with Lexan@see-through lids fit
into a slide-out rack that, together
with the shelf to which it attaches,
can be relocated in the fresh food
compartment.
Dishes and lids are:
● safe for use in microwave ovens
. safe for use in refrigerators and
freezers
● dishwasher safe
Only the dishes are safe for use in
conventional ovens at temperatures
up to 400 “F’.
CAUTION:
1
~E
RemovableWine Rack
The wine rack is designed tohold
abottle on its side and will fit on
any shelf.
Torelocate the wine rack:
‘ Pull the wine rack straight out,
position its lip over either e~ge of
the shelfyouwantto suspend it from
and push it all the wayin.
Adjustable Shelves
on Both Doors
Door shelves can be moved up and
down to meet your varying on-thedoor storage requirements.
Toreplace shelves: Select desired
shelf height. With shelf front raised
slightly, engage top lugs in tracks at
rear of cabinet. Then lower front of
shelf until it locks into position.
s Use both hands when removing
a dish, especially when it is full.
Otherwise, it may slip out of your
grasp, fkll and spill.
● Lids cannot withstand the heat
generated in conventional ovens.
● Dishes and lids are not designed
for range top cooking or broiler
use. Such use can be hazardous.
Toremove: Lift the shelf straight
up until mounting hooks disen~age.
Torelocate: Select desired shelf
height, engage the shelfs hooks in
slots on the tracks of the door and
push in and down. The shelf will
hook in place.
Page 9

Automatic
%ernaker
Youricemaker will produce eight
cubes per cycle—approximately
100cubes in a 24-hour period,
depending on freezer compartment
temperature, room temperature,
number of door openings and other
use conditions.
Feeler arm ‘
in ON (down)
position
To start the automatic icemaking
operation:
Make sure the shelf under the
.umaker is in the factory-set
position. Two clips hold it in place
where it belongs to assure proper
icemaking operation.
● Place the ice storage bin directly
under the icemaker and all the way
to the rear.
● Move the icemaker feeler arm to
the ON (down) position. ~
The ice cube mold will fiii with
water automatically after cooling
to freezing temperature, and first
cubes will normally freeze after
several hours. When cubes are
solidly frozen, they will be ejected
from the mold into the ice storage
bin by means of a sweeper arm.
Icemaking will continue until the
feeler arm senses a sufficient
accumulation of ice cubes in the
storage bin and halts the operation
temporarily. For maximum ice
storage, level the stored cubes with
your hand occasionally. Be sure
nnthing interferes with the swing
he feeler arm.
The icemaker ejects cubes in
groups of eight and it is normal for
several cubes to be joined together.
Once your icemaker is in
operation, throw away the first
few batches of ice cubes. This will
flush awayany impurities in the
water line. Do the same thing after
mcations or extended periods when
ice isn’t used.
Caution:
Under certain rare
circumstances, ice cubes may
be discolored, usually appearing
with a green-bluish hue. The
causeofthis unusualdiscoloration
isapparently dueto acombination
of factors such as certain
characteristics of local waters,
household plumbing and the
accumulation of copper salts in ~*
an inactive water supply line
which fds the icemaker.
Continued consumption of such
discolored ice cubes may be s
injurious to health. If such
discoloration is observed,
discard the ice cubes and
contact your General Electric
Factory Service Center or an
authorized Customer Care”,
servicer.
Move icemaker feeler arm to
OFF (up) position when:
c home water supply is to be off for
several hours
● ice storage bin is to be removed
for a period of time
● going awayon vacation, at which
time you should also turn off the
valve in the water supply line to
your refrigerator
If ice is used infrequently, old
cubes will become cloudy and taste
stale. Empty ice storage bin
periodically and wash it in
lukewarm water.
When a large supply of ice will
be needed, make an extra supply
ahead of time. Empty bin. put cubes
in plastic bags or containers and
store in the freezer compartment
until the bin refills.
If this is your first icemaker,
you’ll hear occasional sounds that
may be unfamiliar. They are normal
icemaking sounds and are not
cause for concern.
The perfect companion to
your automatic icemaker—
Quadra K1eenWater Filter
Your ice cubes can only
be as fresh-tasting as the
water that produces
them. That’s why it’sa
good idea to purify your
water with a Quadra
Kleen Water Filter.
lts,activated charcoal
removes musty, stale
odors and unpleasant
medicinal, metallic
tastes. A porous fiber
cartridge catches dirt,
rust particles, sand and
silt while special crystals
reduce deposits of hard
scale.
The water filter is an option at
extra cost and is available from your
GE dealer. SpecifyWR9X214. Ithas
complete installation instructions
and installs in minutes on 1/4”OD
copper water line.
w
Part No. 162 D1525PO01
Page 10

User MaintenanceInstructions
Cleaning—Outside
The door handles and trim can be
cleaned with a cloth dampened with
a solution of mild liquid dishwashing
detergent and water. Dry with a soft
cloth. Don’t wax handles or trim.
Keep the paint finish clean (on
models so equipped). Wipe with a
clean cloth, lightly dampened with
kitchen appliance wax or mild
liquid dishwashing detergent. Dry
and polish with a clean, sofi cloth.
Do not wipe the painted surface
of the refrigerator with a soiled
dishwashing cloth or wet towel.
These may leave a residue that can
dama~the paint. Do not use
scouring pads. powdered cleaners,
bleach, or cleaners containing
bleach. because these products can
scratch and damage the paint finish.
Protect the paint finish. Apply
a coat of kitchenlappliance wax to
paintedsurfaceswhen the refrigerator
is new.andthen at least twice a year.
Appliance Polish Wax & Cleaner
(Cat. No. WR97X216) is avaiitible
from General Electric Appliance
Pints Marts.
Cleaning—Inside
Clean the inside of the fresh food
and freezer compartments at least
once a year. Unplug refrigerator
beforecleaning.Ifthis isnotp:ti6cal,
wring excess moisture out of sponge
or cloth when cleaning around
switches. lights or controls.
Use wdrm water and baking soda
solution—about a tablespoon of
baking soda to a quart of water.
This both cleans and neutralizes
odors. Rinse thoroughly with water
and wipe dry.
Other parts of the refrigerator—
including door gaskets, storage
drawers, ice storage bin and all
plastic parts—can be cleaned the
same way. Do not use cleansing
powders or other abrasive cleaners.
To help prevent odors, leave an
open box of baking soda in the
refrigerator. Change the box every
three months.
Do not wash any of your
refrigerator’s plastic parts in
your automatic dishwasher.
Condenser
The condenser is located in the
cooling compartment above the
refrigerator. For most efficient
operation, you need to keep the
condenser clean.
I
\
R
Turn the freezer compartment;
temperature control to OFF. Remove
the grill by grasping it at both sides
near the top and pulling it strd”ight
out. Use a “soft’*bristle brush and
a vacuum hose to remove dust and
lint particles that have accumulated
on the condenser. Replace the grill
and turn the temperature control
back on.
The condenser should be cleaned at
least once a year.
Lamp bulb replacement
Light bulbs and sockets areloca(e~
at the top front of the fresh food
and freezer compartments.
Fresh food compartment
r
Freezer compartment
To replace a light bulb, disconnect
power to the refrigerator at the fuse
box or circuit breaker. Then unscrew
the burned-out bulb and screw in
another of similar size and type.
Reconnect power to the refrigerator
when the replacement is completed.
:;
.
Page 11

Page 12

User Maintenance Instructions (continued)
Jorpanel inserts ~
Yourrefrigerator is designed to
accept decorative fresh food and
freezer compartment door insert
panels to match your kitchen
cabinets or blend with your
kitchen decor.
The panels are held in place by the
trim on the door.
.’
Toinstall door panel inserts:
● Remove the door handles by
backing out screws. Save the
screws. Toprevent tearing of screw
holes, one person should hold the
handle in place while the other
removes the screws.
● Insert the panels into the door
frame channels and push firmly to
make sure the panels slide all the
wayin.
● If panels are less than 1/4”thick,
add filler behind them to assure
proper fit.
● If panels are more than 1/4”
thick, they must be routed to a 1/4”
thickness (1/4”wide at the top,
bottom and hinge sides, 1/2”wide
at the handle side) in order to fit
into the channels.
● Replace the door handles and
secure them with their screws.
Dimensions for door insert panels:
Fresh food compartment door:
22%” X 65%”
Freezer compartment door:
15%”X 65%”
Additional routing may be
required when decorative raised
door panel inserts more than
l/4’’-thick are used-on the hinge
side to clear cabinet side trim
and/or an adjacent cabinet and
countertop, and on the handle side
to provide room for a comfortable
handle grip. See your Installation
Instructions (Pub. No. 49-6414)for
detailed instructions.
When you goon vacation
For extended vacations or
absences, remove food and shut
off power to the refrigerator at fuse
box or circuit breaker. Clean the
interior with baking soda solution
of one tablespoon of soda to one
quart of water. Wipe dry. Toprevent
odors, leave open box of soda in
refrigerator. Leave doors open.
For shorter vacations, remove
perishable foods and leave controls
at regular settings. However, if
room temperature is expected to
drop below 60”F., follow same
instructions as for extended
vacations.
Move the icemaker feeler arm to
the OFF (up) position and be sure
to shut off the water supply to the
refrigerator.
11 Part No. 162D1525PO01
Page 13

Installation Requirements—IMPORTANT...Please Read ~arefully.
See the Installation Instructions for complete details.
How to connect
electricity
For personal safety,
this appliance must be
properly grounded.
The power cord of this appliance
is equipped with a three-prong
(grounding) plug which mates with
a standard three-prong (grounding)
wall outlet (Fig. 1)to minimize the
possibility of electric shock hazard
from this appliance.
---;
w
INSURE PROPE)I
GROUND EXISTS
Fig. 1
Havewalloutlet and circuit checked
by a qualified electrician to make
sure outlet is properly grounded.
Where a standard two-prong wall
outlet is encountered, it is your
personal responsibility and
obligation to have it replaced with
a properly grounded three-pron
wall outlet.
BEFORE USE
}
The refrigerator should always
be plugged into its own
individual electrical outlet—
(115volt, 60 Hertz, single phase
AC—protected by a 20-amp. time
delay fuse or circuit breaker). This
is recommended for best
performance and to prevent
overloading house wiring circuits,
which could cause a fire hazard
from overheating wires.
Refrigerator Location
Install the refrigerator on a floor
strong enough to support it when
it is fully loaded.
Do not install refrigerator where
temperature will go below 60°F.
because it will not run often enough
to maintain proper temperatures.
Also see Energy-Saving Tips
regarding location.
Clearances
If the refrigerator is to be installed ‘
in a comer, allow 2” between the
hinges of the refrigerator and the
wall to assure a 90° door opening.
No other clearances at top, sides or
back are required.
WaterSupply to Icemaker
Youwill need to connect your
icemaker to a cold water line. A
water supply kit containing copper
tubing, shut-off valve, fittings and
instructions is available at extra
cost from your dealer.
Levelers
Rollers near each front corner of
the refrigerator are adjustable.
ADJUSTABLE
LEVELING SCQEW
I
LEVELING LEG-
I
Turn the roller adjusting screws
..
clockwise to raise the refrigerator,
counterclockwise to lower it. Use
an adjustable wrench, 3/8” ratchet
and socket, or pliers.
Lower the leveling legs at each front
corner of the cabinet until the legs
just start to support the cabinet.
Use a crescent wrench or 1%”open
end wrench. .
.
\
\
Ill
I
-4’!1 I
1
DO NOT, UNDER
ANY
CIRCUMSTANCES,CUT
OR REMOVE THE THIRD
(GROUND) PRONG FROM
THE POWER CORD.
DO N~ USE AN ADAPTER
PLUG lU CONNECT THE
REFRIGERATOR TO A
TWO-PRONG OUTLET.
DO NOT USE AN EXTENSION
CORDWITHTHISAPPLIANCE.
12
Page 14

Questions?
Use This Problem Solver
PROBLEM POSSIBLE CAUSEAND REMEDY
REFRIGERAlOR
DOES NCYI’OPERATE
● May be in defrost cycle when motor does not operate for about 30 minutes.
● Temperature control in OFF position.
● If the interior light is not on, the refrigerator may not be plugged in at the wall outlet
or the electrical connection between the cooling unit and the cabinet maybe loose.
● If the plugs are secure and the refrigerator fails to operate, plug a lamp into the same
outlet to determine if there is tripped circuit breaker or burned out fuse.
M~OR OPERATES
FOR LONG PERIODS
● Modem refrigerators with more storage space and a larger freezer compartment
require more operating time.
● Normal when refrigerator is first delivered to your home—usually requires 24 hours
to completely cool down.
:-.
MOIOR STARTS&
TOPS FREQUENTLY
VIBRATION OR
● Large amounts of food placed in refrigerator to be cooled or frozen.
● Hot weather—frequent door openings.
● Door left open.
● Temperature controls are set too cold. Refer to page 4.
● Condenser needs cleaning. Refer to page 10.
● Check ENERGY--SAVINGTIPS on page 2.
● Tempemture control starts and stops motor to maintain even temperatures.
● If refrigerator vibrates, more than likely it is not resting solidly on the floor. The front
-;.
-.
RATTLING roller screws need adjusting, or floor is weak or uneven. Referto LEVELERS on page 12.
● If dishes vibrate on shelves, try moving them. Slight vibration is normal.
OPERATING
● The high speed compressor motor required to maintain near zero temperatures in
SOUNDS the large freezer compartment may produce higher sound levels than your old refrigerator.
● Normal fhn air flow-one fimblows cold.air through the refrigerator and freezer
compartments-another fhncools thecompressormotor.
/
. ThreeNO~AL soun& will also be heard~m time to time:
. Defbst timer switch clicks at defrost.
● Defrost waterdripping.
c Temperaturecontrol clicks ON or OFF.
c Refrigerant boiig or gurgling.
s Crac~ or popping of cooling coils caused ly expansion and contraction during
deikost and refrigeration following defkost.
c Ice cubes droppinginto the bin and water running in pipes as icemaker refdls.
FOODS DRY OUT
FRESH FOOD
OR FREEZER
COMP~MENT
TEMPERATURE
‘)0 WARM
DOORS NCYI’
CLOSING PROPERLY
● Foods not covered, wrapped or sealed properly.
● Taperature control not set cold enough. Refer to page 4.
● W- weatier-~uent door openings.
● Door lefl open for longtime.
c Package maybe holding door open.
● Refrigerator not level. Adjust levelers, seepage 12. When cabinet is level, doors will
close gently and securely.
(continued next page)
13
No. 162D1525PO01
Part
Page 15

The Problem Solver (continued)
PROBLEM
FROST OR ICE
CRYSTALSON
FROZEN FOOD
SLOW ICE CUBE
FREEZING
ICE CUBES HAVE
ODOR/TASTE
--
AUTOMATIC
ICEMAKER
DOES N~ WORK
POSSIBLE CAUSEAND REMEDY
● Door may havebeen left ajar or package holding door open.
● Too frequent or too long door openings.
● Frost within package is normal.
● Door may have been left ajar.
● Turn temperature of freezer compartment colder.
c Old cubes need to be discarded.
● Ice storage bin needs to be emptied or washed.
. Unsealed packages in refrigerator and/or freezer compartments maybe transmitting
odorhaste to ice cubes.
. In~rior of refrigerator needs cleaning. Referto page 10.
● Poor-tasting incoming water. Install Quadra Kleen water filter-seepage 9.
● Icemaker feeler arm in OFF (up) position.
● Water supply turned off or not connected.
● Freezer compartment too warm.
● Cubes too small—water shut-off valve connecting refrigerator to home water line may
be clogged.
● Sometimes cubes fuse to the side of the ice mold and hold the feeler arm in the OFF
(up) position. Remove this ice to restart the icemaker. .
● When reaching for cubes by hand, you may have pushed the feeler arm into the OFF
%
(up) position bymistake.
● Piled up cubes in storage bin may cause icemaker to shut off prematurely. With
icemaker feeler arm in OFF (up) position, level cubes inbin by hand.
MOISTURE FORMS
ON OUTSIDE OF
REFRIGERATOR
OR ON DIVIDER
BETWEEN FRESH
● Not unusual during periods of high humidity.
● Make sure the energy saver switch is
in the ON (forward) position.
/
FOOD AND FREEZER
MOISTURE
COLLECTS INSIDE
REFRIGERAlOR
HAS ODOR
● Too frequent or too long door openings.
● In humid weather, air carries moisture into refrigerator when doors are opened.
● Foods with strong odors should be tightly covered.
● Check for spoiled food.
● Interior needs cleaning. Referto page 10.
c Keep open box of baking soda in refrigerator; replace every three months.
INTERIOR LIGHT
DOES N(YI’WORK
. No power at outlet.
● Light bulb needs replacing. Seepage 10.
.
If you need more help.. call, toll free:
The GE Answer Center”
800.626.2000
consumer information service
e
~~ =
14
Page 16

‘<”~If YouNeed Service
Toobtain service, see your warranty
on the back page of this book.
We’reproud of our service and
want you to be pleased. If for some
reason you are not happy with the
service you receive, here are three
steps to follow for further help.
FIRST, contact the people who
serviced your appliance. Explain
why you are not pleased. In most
cases, this will solve the problem.
NEXT, if you are still not pleased,
write all the details-including.
your phone number—to:
Manager, Consumer Relations
General Electric
Appliance Park
Louisville, Kentucky 40225
FINALLY, if your problem is still
not resolved, write:
Major Appliance
, Consumer Action Panel
. . ‘ 20 North Wacker Drive
3
Chicago, Illinois 60606
.
‘“)
Part No. 162D1525POO!
Page 17

~ YOUR GENERAL ELECTRIC
WARRAN
Save proof oforiginal purchase date such as yoursales slip or cancelled check to establish warranty period.
WHAT IS COVERED FULL ONE-YEAR WARRANTY
For one year from date of original
purchase, we will provide, free of
charge, parts and service labor in
your home to repair or replace any
part of the refrigerator that fails
because of a manufacturing defect.
FULL FIVE=YEAR WARRANTY
For five years from date of original
purchase, we will provide, free of
charge, parts and service labor in
your home to repair or replace any
part of the sealed refrigerating
system (the compressor, conden-
ser, evaporator and all connecting
tubing) that fails because of a
.
manufacturing defect.
This warranty is extended to the
original purchaser and any succeed-
ing owner for products purchased
for ordinary home use in the 48
mainland states, Hawaii and
Washington, D.C. In Alaska the
warranty is the same except that it
is LIMITED because you must pay
to ship the product to the service
shop or for the service technician’s
travel costs to your home.
All warranty service will be provided
by our Factory Service Centers or
by our authorized Customer Care@
servicers during normal working
hours.
Look in the White or Yellow Pages
of your telephone directory for
GENERAL ELECTRIC COMPANY,
GENERAL ELECTRIC FACTORY
SERVICE, GENERAL ELECTRICHOTPOINT FACTORY SERVICE or
GENERAL ELECTRIC CUSTOMER
CARE@ SERVICE.
If!lls
~
WHAT IS NOT COVERED
Some states do not aHow the exclusion or limitation of incidental or consequential damages, so the above limitation or exclusion
may not apply to you. This warranty gives you specific legal rights, and you may also have other rights which vary from state to state.
To know what your legal rights are in your state, consult your local or state consumer affairs office or your state’s Attorney General.
If further help is needed concerning this warranty, write:
Manager—Consumer Affairs, General Electric Company, Appliance Park, Louisville, KY 40225
c Service trips to your home to ‘
teach you how to ‘use the product.
Read your Use and Care material.
If you then have any questions .
about operating the product,
please contact your dealer or our
Consumer Affairs office at the
address below, or call, toll free:
The GE Answer Center@
800.626.2000
consumer information service
s Improper installation.
If you have an installation problem,
contact your dealer or installer.
You are responsible for providing
adequate electrical, plumbing and
other connecting facilities.
Warrantor: General Electric Company
. Replacement of house fuses
or resetting of circuit breakers.
. Failure of the product if it is
used for other than its intended
purpose or used commercially.
. Damage to product caused
by accident, fire, floods or acts
of God.
WARRANTOR IS NOT RESPON-
SIBLE FOR CONSEQUENTIAL
DAMAGES.
b
S&EzrEl
11-86
GE NE RAL@EIECTRIC
BIS42A
 Loading...