

Page 1

Guide to Ultrasonic Inspection
of Fasteners
Part No. 021-002-175
Rev . B
©2003 STRESSTEL
50 Industrial Park Road
Lewistown, PA 17044
Phone (866)243-2638
Fax (717) 242-2606
www.stresstel.com
Page 2

Page 3

Guide to Ultrasonic
Inspection of Fasteners
Copyright 2003 StressTel
Page 4

Page 5

Important Notice
Important Notice
The following information must be read and understood
by any user of a StressTel measurement instrument.
Failure to follow these instructions can lead to errors in
stress measurements or other test results. Decisions
based on erroneous results can, in turn, lead to property damage, personal injury or death. StressT el assumes
no responsibility for the improper or incorrect use of this
instrument.
General Warnings
Proper use of ultrasonic test equipment requires three
essential elements:
• Selection of the correct test equipment
• Knowledge of the specific “test application require-
ments”
• Training on the part of the instrument operator
This operating manual provides instruction in the basic
set-up and operation of the StressTel BoltMike III measurement instrument. There are, however, additional factors which affect the use of ultrasonic test equipment.
Specific information regarding these additional factors
is beyond the scope of this manual. The operator should
refer to textbooks on the subject of ultrasonic testing for
more detailed information.
Operator Training
Read the information in this manual prior to use of a
StressT el instrument. Failure to read and understand the
following information could cause errors to occur during
use of the instrument. Failure to follow these instructions can lead to error in stress measurement or other
test results. Decisions based on erroneous results can,
in turn, lead to property damage, personal injury or death.
Operators must receive adequate training before using
ultrasonic test equipment. Operators must be trained in
general ultrasonic testing procedures and in the set-up
required before conducting a particular test. Operators
must understand:
• Soundwave propagation theory
• Effects of the velocity at which sound moves
through the test material
More specific information about operator training, qualification, certification and test specifications is available
from various technical societies, industry groups, and
government agencies.
Testing Limitations
Information collected as a result of ultrasonic testing represents only the condition of test-piece material that is
exposed to the sound beam. Operators must exercise
great caution in making inferences about the test material not directly exposed to the instrument’s sound beam.
When a less-then-complete inspection is to be performed, the operator must be shown the specific areas
to inspect. Inferences about the condition of areas not
inspected, based on data from evaluated areas, should
only be attempted by personnel fully trained in applicable techniques of statistical analysis.
Sound beams reflect from the first interior surface encountered. Operators must take steps to ensure that the
entire thickness of the test material is being examined.
Calibrating the instrument/transducer combination is
particularly important when the test piece is being ultrasonically tested for the first time or in any case where
the history of the test piece is unknown.
Transducer Selection
The transducer used in testing must be in good condition without noticeable wear of its contact surface. Badly
worn transducers will have a reduced effective measuring range. The temperature of the material to be tested
must be within the transducer’s temperature range. If
the transducer shows any signs of wear it should be replaced.
• Soundwave propagation theory
• Effects of the velocity at which sound moves
through the
test material
• Behavior of the sound wave
• Which areas are covered by the sound beam
More specific information about operator training, qualification, certification and test specifications is available
from various technical societies, industry groups, and
government agencies.
• Behavior of the sound wave
• Which areas are covered by the sound beam
Guide to Ultrasonic Inspection of Fasteners Page iii
Page 6

Important Notice
Testing Limitations
Information collected as a result of ultrasonic testing represents only the condition of test-piece material that is
exposed to the sound beam. Operators must exercise
great caution in making inferences about the test material not directly exposed to the instrument’s sound beam.
When a less-then-complete inspection is to be performed, the operator must be shown the specific areas
to inspect. Inferences about the condition of areas not
inspected, based on data from evaluated areas, should
only be attempted by personnel fully trained in applicable techniques of statistical analysis.
Sound beams reflect from the first interior surface encountered. Operators must take steps to ensure that the
entire thickness of the test material is being examined.
Calibrating the instrument/transducer combination is
particularly important when the test piece is being ultrasonically tested for the first time or in any case where
the history of the test piece is unknown.
Transducer Selection
The transducer used in testing must be in good condition without noticeable wear of its contact surface. Badly
worn transducers will have a reduced effective measuring range. The temperature of the material to be tested
must be within the transducer’s temperature range. If
the transducer shows any signs of wear it should be replaced.
Page iv Guide to Ultrasonic Inspection of Fasteners
Page 7

Contents
Important Notice
Chapter 1: Ultrasonic Measurement of
Fasteners................................................................. 1
1.1 Important Concepts....................................... 1
1.1.1 Acoustic Velocity ................................. 1
1.1.2 The Use of Ultrasound ........................ 1
1.1.3 Initial Pulse and Multi-Echo
Measurement Modes .......................... 2
1.1.4 Time of Flight and Ultrasonic Length .. 2
1.1.5 Tensile Load........................................ 3
1.1.6 Stress .................................................. 4
1.1.7 Elongation ........................................... 4
1.1.8 Modulus of Elasticity (Eo) ................... 4
1.1.9 Stress Factor (K) ................................ 5
1.1.10 Temperature Coefficient (Cp) ............6
1.1.11 Calibration-Group Correction
Factors — Stress Ratio and Offset .... 6
1.1.12 Fastener Geometry ........................... 6
1.2 Principles of BoltMike Operation................... 7
1.3 Practical Limitations Of Ultrasonic
Measurement ................................................ 8
1.3.1 Material Compatible with Ultrasonic
Inspection............................................ 8
1.3.2 Significant Fastener Stretch ............... 8
1.3.3 Fastener End-Surface Configuration . 9
1.3.4 The Limitations of I.P. and M.E.
Measurement Modes .......................... 9
Chapter 4: Temperature Compensation .......... 17
4.1 Measuring Fastener Temperature .............. 1 7
4.2 Limits of Accurate Temperature
Measurement .............................................. 17
4.3 Adjusting the Temperature Coefficient ....... 1 8
Chapter 5: Selecting Phase ............................... 19
Chapter 6: Fastener Geometry.......................... 21
6.1 Approximate Length .................................... 21
6.2 Determining Effective Length...................... 21
6.3 Fastener Cross-Sectional Area .................. 2 4
Chapter 7: Material Constants .......................... 25
7.1 Standard Material Constants ...................... 25
7.2 Custom Material Constants......................... 2 5
7.3 Selecting a Material Constant..................... 25
7.4 Material Variations....................................... 26
Chapter 8: BoltMike Formulas........................... 27
Appendix: Tabular Data ....................................... 29
Chapter 2: Fastener Preparation ...................... 11
2.1 Fastener End-Surface Machining ............... 11
2.2 Methods Of Transducer Placement ............ 12
2.2.1 Practical Methods .............................12
2.2.2 Fixtures for Non-Magnetic Fasteners14
Chapter 3: Transducer Selection ...................... 15
3.1 General Acceptability .................................. 1 5
3.2 Transducer Frequency ............................... 15
3.3 Transducer Diameter .................................. 15
Purpose of Instrument and Transducer
Zeroing ........................................................ 15
Guide to Ultrasonic Inspection of Fasteners Page v
Page 8

Important Notice
Page vi Guide to Ultrasonic Inspection of Fasteners
Page 9
Chapter 1: Ultrasonic Measurement of Fasteners
Chapter 1: Ultrasonic Measurement of Fasteners
When threaded fastening systems (comprised of a bolt
or stud and a nut) are tightened, the threaded fastener
is said to be tensioned. The tensioning force in the fastener (identified in the BoltMike as its load) is equal to
the fastening system’s clamping force.
The BoltMike determines the load on a fastener by measuring the amount of time it takes for a sound wave to
travel along a fastener’s length, before and after a
tensioning force is applied to the fastener. The fastener
material’s acoustic velocity, together with difference in
the measured times, allows the instrument to calculate
the change in fastener length under the tensile load.
Provided the fastener’s dimensional and material properties are known, and the constants that represent the
material properties are entered into the instrument, the
BoltMike will calculate the load and stress present when
the fastener is in its tensioned state.
1.1 Important Concepts
To best understand exactly how ultrasonic sound waves
are used to determine loads, stress, and elongation of
threaded-fasteners, it is necessary that you understand
the concepts described in this section. Chapter 8 lists
the actual formulas used by the BoltMike to calculate
many of the quantities described below.
1.1.1 Acoustic Velocity
Applying a large electric pulse to a piezoelectric element
in a transducer creates an ultrasonic shock wave. This
type of shock wave, known as longitudinal wave, travels
through a fastener at a speed equal to the fastener
material’s acoustic velocity. A material’s acoustic velocity represents the speed with which sound moves through
it. All materials have a representative acoustic velocity
but true velocity can vary from one sample to another
(of the same material type) and even throughout the
material in a particular sample. It is important to realize
that the actual acoustic velocity is not truly a constant.
Instead, it varies between fasteners of like material, even
when the fastener’s material composition is tightly
controlled.
1.1.2 The Use of Ultrasound
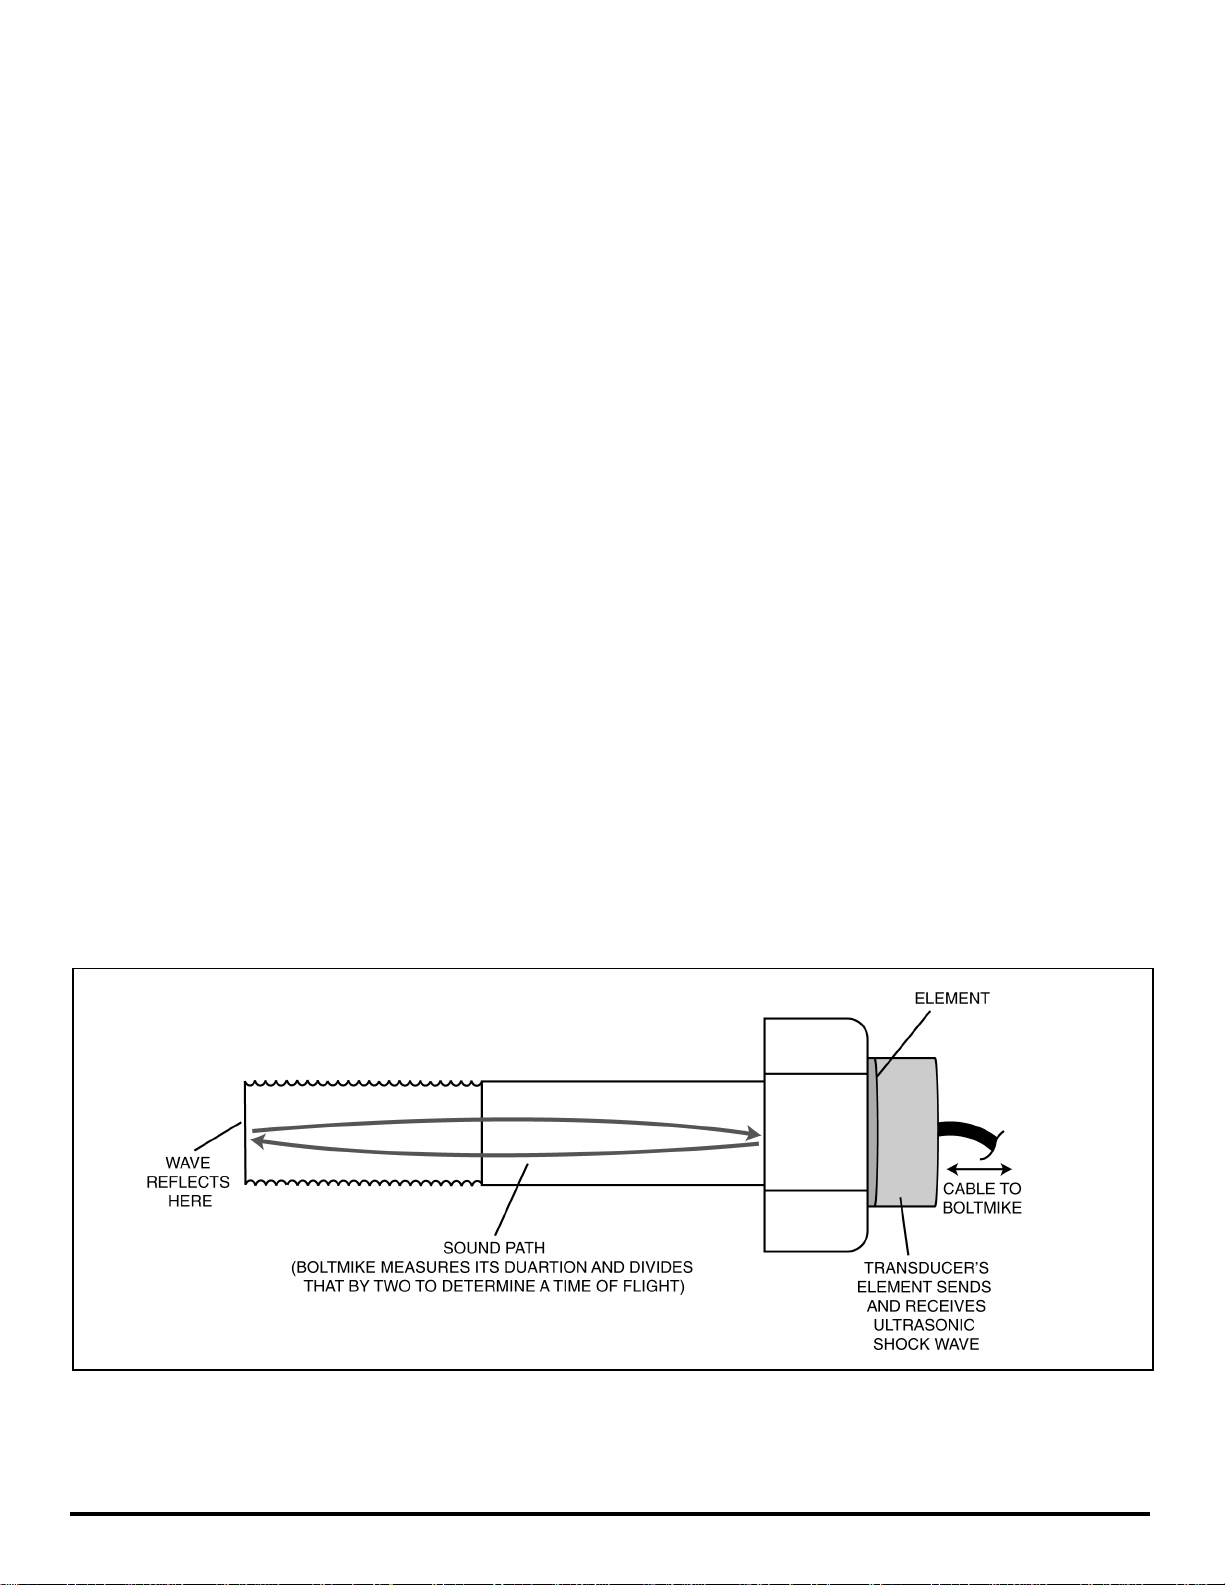
The ultrasonic wave is transmitted from a transducer into
the end of a fastener . When the ultrasonic wave encounters an abrupt change in density, such as the end of the
fastener, most of the wave reflects. This reflection travels back the length of the fastener and back into the
transducer. When the shock wave re-enters the piezoelectric element a small electrical signal is produced. This
signal is represented on the BoltMike’s display panel by
the triggering of a measurement gate. This signal is used
by the BoltMike to indicate the returning wave.
(Figure 1-1)
FIGURE 1-1—The BoltMike determines the length of a fastener by measuring how long it takes for sound to travel its
length.
Guide to Ultrasonic Inspection of Fasteners Page 1
Page 10
Chapter 1: Ultrasonic Measurement of Fasteners
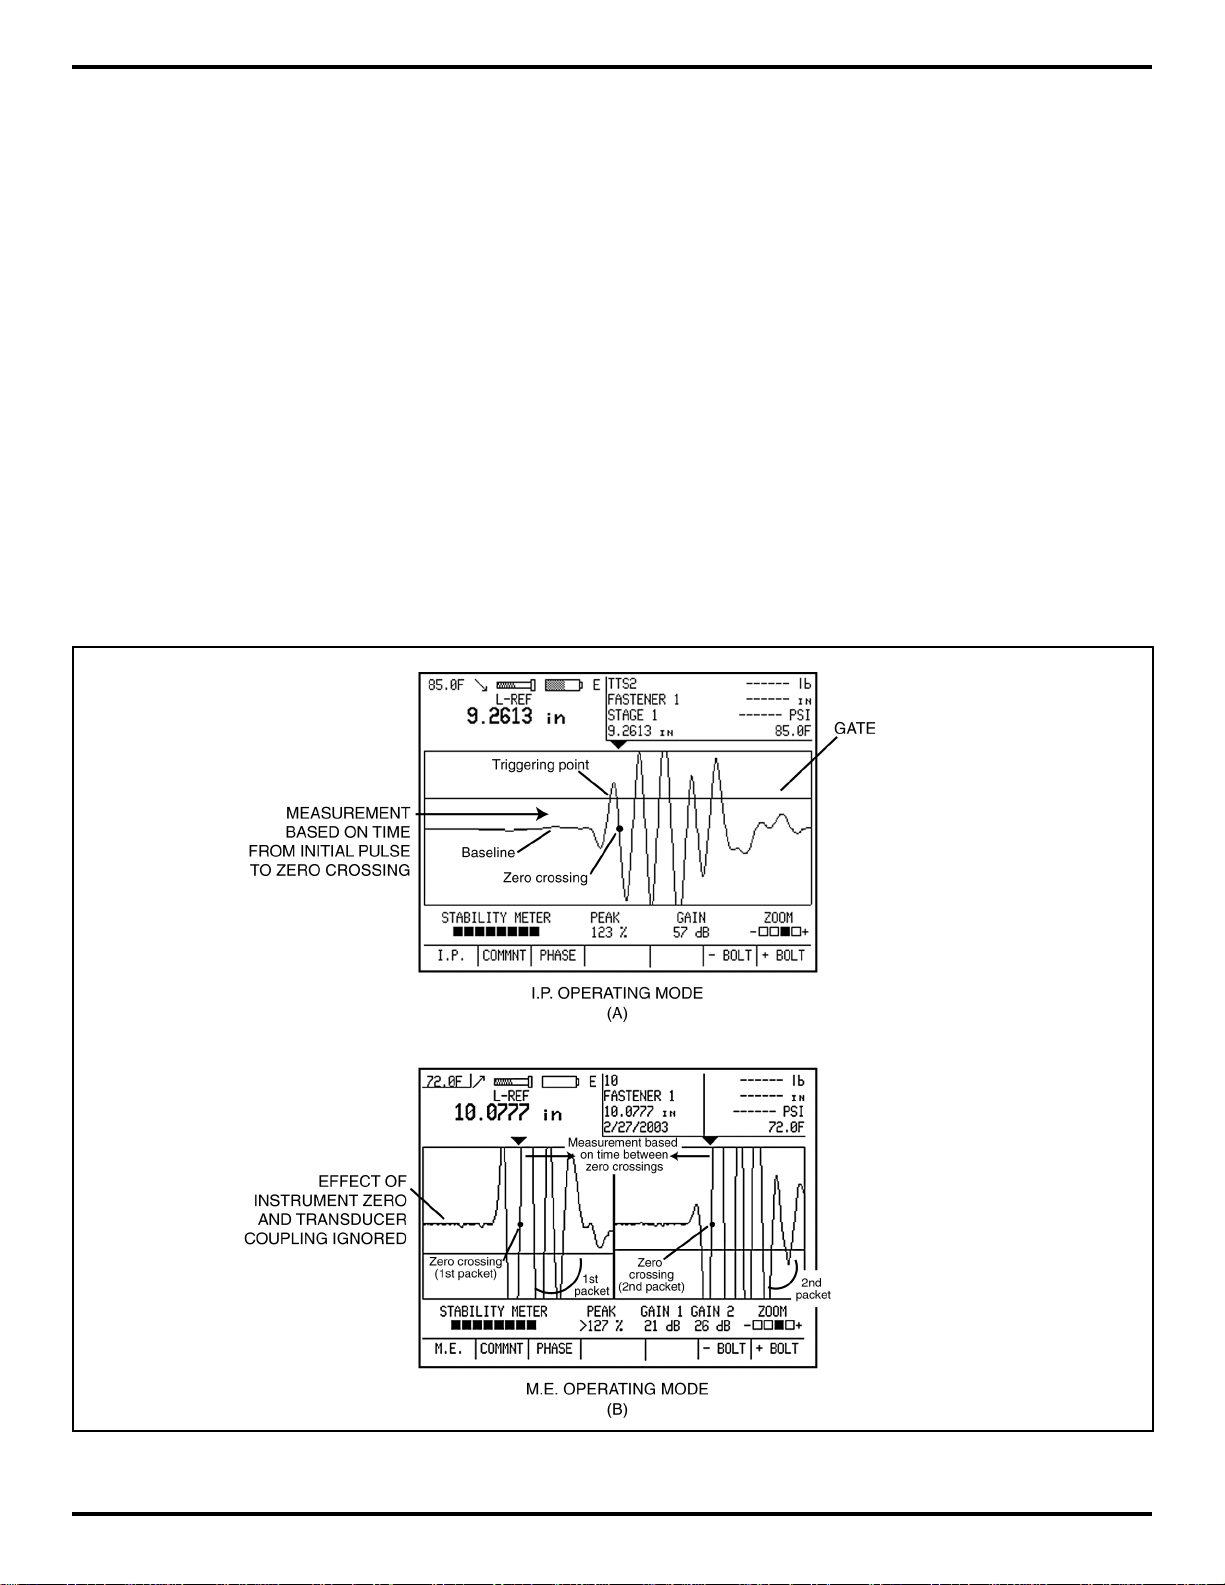
1.1.3 Initial Pulse and Multi-Echo Measurement Modes
The BoltMike III can be operated in one of two ultrasonic
measurement modes: initial pulse (I.P.) and multi-echo
(M.E.). In I.P . mode, as illustrated in Figure 1-2A, a sound
pulse is sent through the fastener. The BoltMike’s
triggering gate is positioned (based on the userinputted value of the fastener’s approximate length) to
detect this sound pulse’s first returning echo. The
BoltMike measures the time duration between transmitting and receiving the sound pulse, and uses this value
as the basis for its calculations.
In M.E. measurement mode, a sound pulse is again transmitted into the fastener. This time, however, the BoltMike
utilizes two triggering gates. These gates are positioned
so that the first returning echo triggers the first gate,
and the second returning echo triggers the second gate.
The gates are again positioned based on the user-in-
putted value of the fastener’s approximate length. In this
mode the BoltMike measures the time duration between
triggering of the two gates by two consecutive echoes. It
is critical, however, that similar features on the two consecutive packets be used to trigger the gates.
An advantage of operating in M.E. mode is that all measurements are taken between the first and second returning echoes. This means that variations in transducerto-fastener coupling (caused, for instance, by varying
couplant thickness) and instrument zeroing are factored
out of the BoltMike’s measurement. This is shown in
Figure 1-2B.
1.1.4 Time of Flight and Ultrasonic Length
The elapsed time between transmitting and receiving the
shock wave is known as the sound-path duration. Of
course, as shown in Figure 1-1, the sound-path duration actually represents the elapsed time taken by the
FIGURE 1-2—In Initial Pulse (I.P.) mode, the BoltMike measures the time to the first gate triggering. In Multi-Echo
mode the time between two consecutive gate crossings is measured.
Page 2 Guide to Ultrasonic Inspection of Fasteners
Page 11
Chapter 1: Ultrasonic Measurement of Fasteners
wave to travel the length of the fastener two times. This
duration is divided by two to find the time of flight (TOF),
which represents the time it takes for the shock wave to
travel once down the length of the fastener. The BoltMike
then determines the
ultrasonic length
by first correcting
the measured TOF for any changes in temperature, and
then multiplying by the fastener’s acoustic velocity . Acoustic velocity is represented in the BoltMike with the variable V and is determined by the fastener’s material type).
Further corrections (as described below) are then made
to this ultrasonic length to determine a measured physical length.
Because the actual acoustic velocity is not truly a constant, the uncorrected ultrasonic length is not exactly
the same as the physically measured length. Even if two
identical fasteners’ physical lengths are very tightly controlled, the measured time of flight through each fastener may vary by as much as one percent. Because of
this variability, the
change
in measured time of flight (recorded before and after each fastener is tensioned) must
be used to accurately determine the tensile stress in a
fastener. As you will learn shortly, acoustic velocity also
varies with factors other than material type including
stress (sections 1.1.9) and temperature (section 1.1.10).
For this reason the BoltMike incorporates logic to compensate for these effects on ultrasonic length.
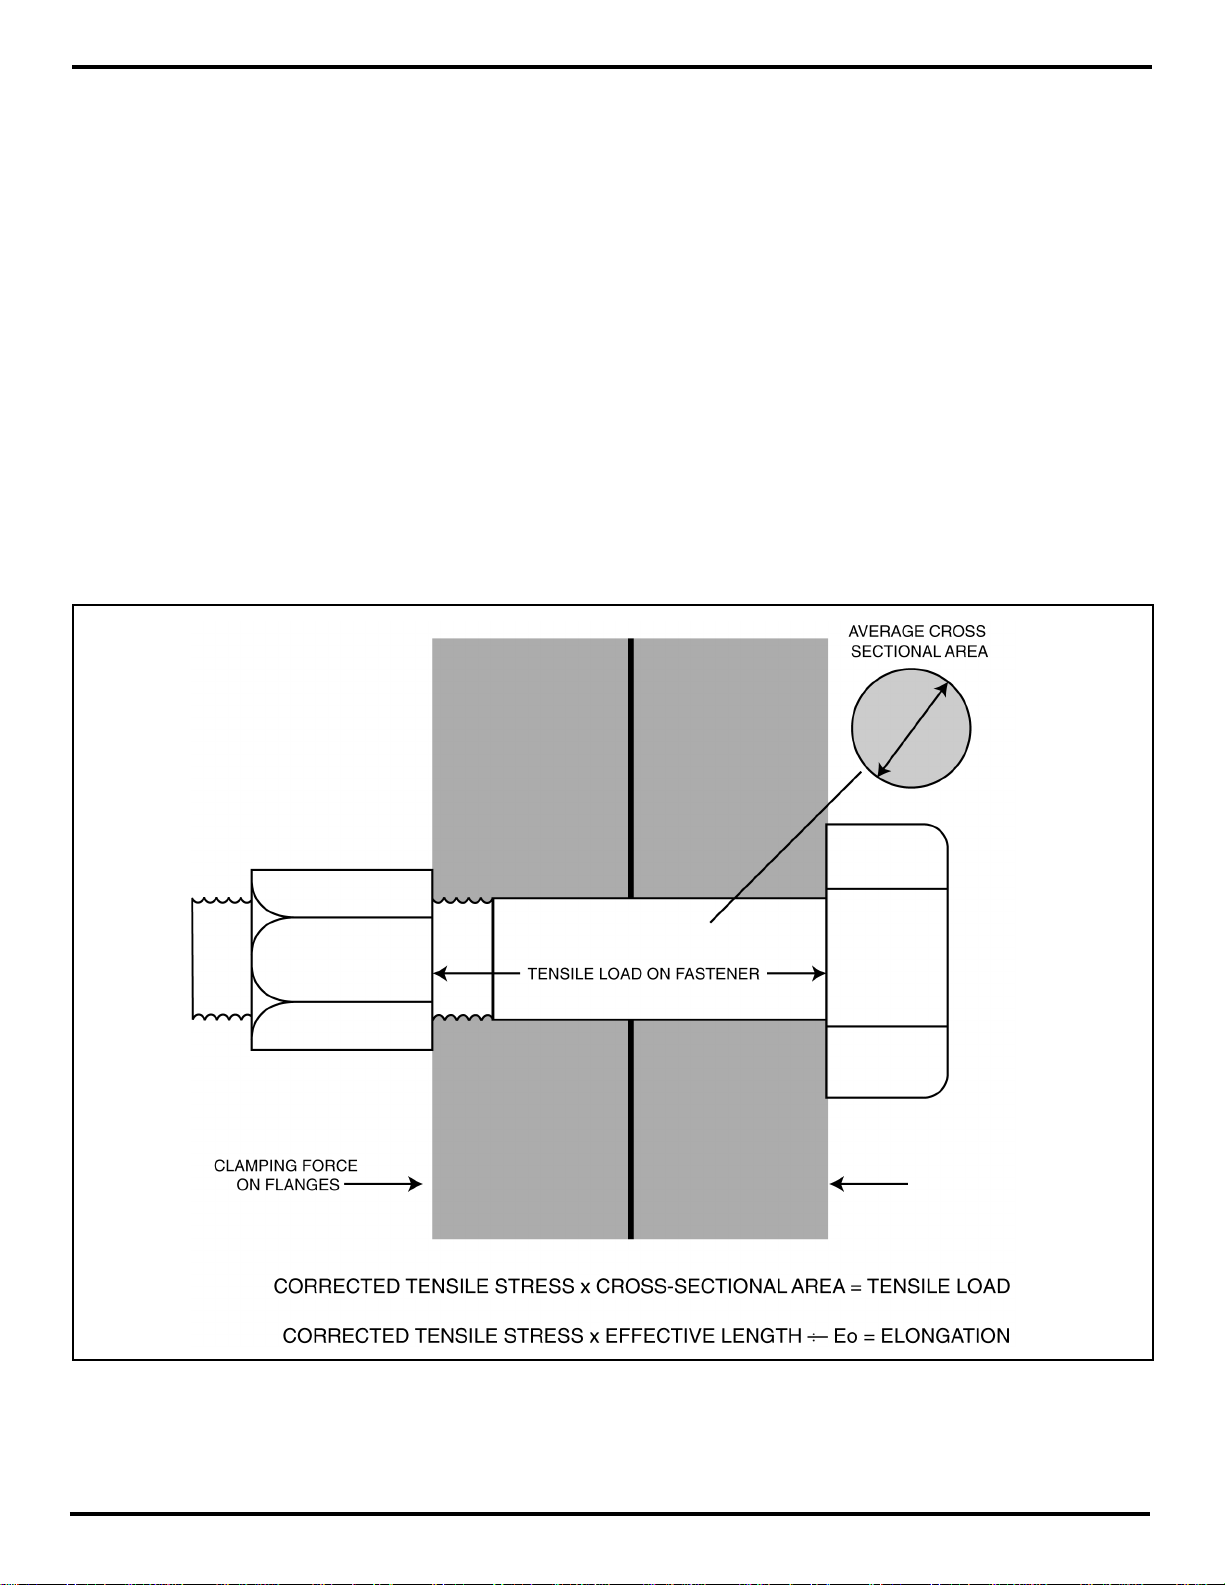
1.1.5 Tensile Load
As you may be aware, when the nut in a threaded fastening system is tightened, the clamping force the fastening system (nut and bolt or stud) places on the joint
is equal to the tensile load placed on the fastener. This
effect is shown in Figure 1-3. The BoltMike calculates
Load (L) by first determining tensile stress (as described
below), then multiplying by the fastener’s cross-sectional
area.
FIGURE 1-3—As the threaded fastening system is tightened, tensile loads are applied to the bolt or stud and
elongation occurs.
Guide to Ultrasonic Inspection of Fasteners Page 3
Page 12
Chapter 1: Ultrasonic Measurement of Fasteners
1.1.6 Stress
Stress occurs when load is applied to a fastener. When
a tensile load (like the one shown in Figure 1-3) is applied to a fastener, the tensile stress is equal to the tensile load divided by the fastener’s average cross-sectional area (see the Appendix for average cross-sectional areas). The BoltMike calculates tensile stress in
units of pounds per square inch (psi) or mega Pascal
(MPa). This calculation is performed using the change
in ultrasonic length, the effective length, acoustic velocity (described in section 1.1.1), the material’s stress factor (a property that is described below), and stress compensation parameters known as Stress Ratio and Stress
Offset. These are instrument correction parameters that
are described in section 1.1.11.
1.1.7 Elongation
As a tensile load is applied, a fastener stretches in the
same way a spring would. The amount of stretch, known
elongation
as
, is proportional to the tensile load as long
as the load is within the fastener’s working range (which
means at loads that are less than the fastener’s yield
strength – a term we’ll describe shortly). Using the effective length, the material’s modulus of elasticity, and the
calculated value for corrected stress the BoltMike calculates elongation. (Figure 1-3)
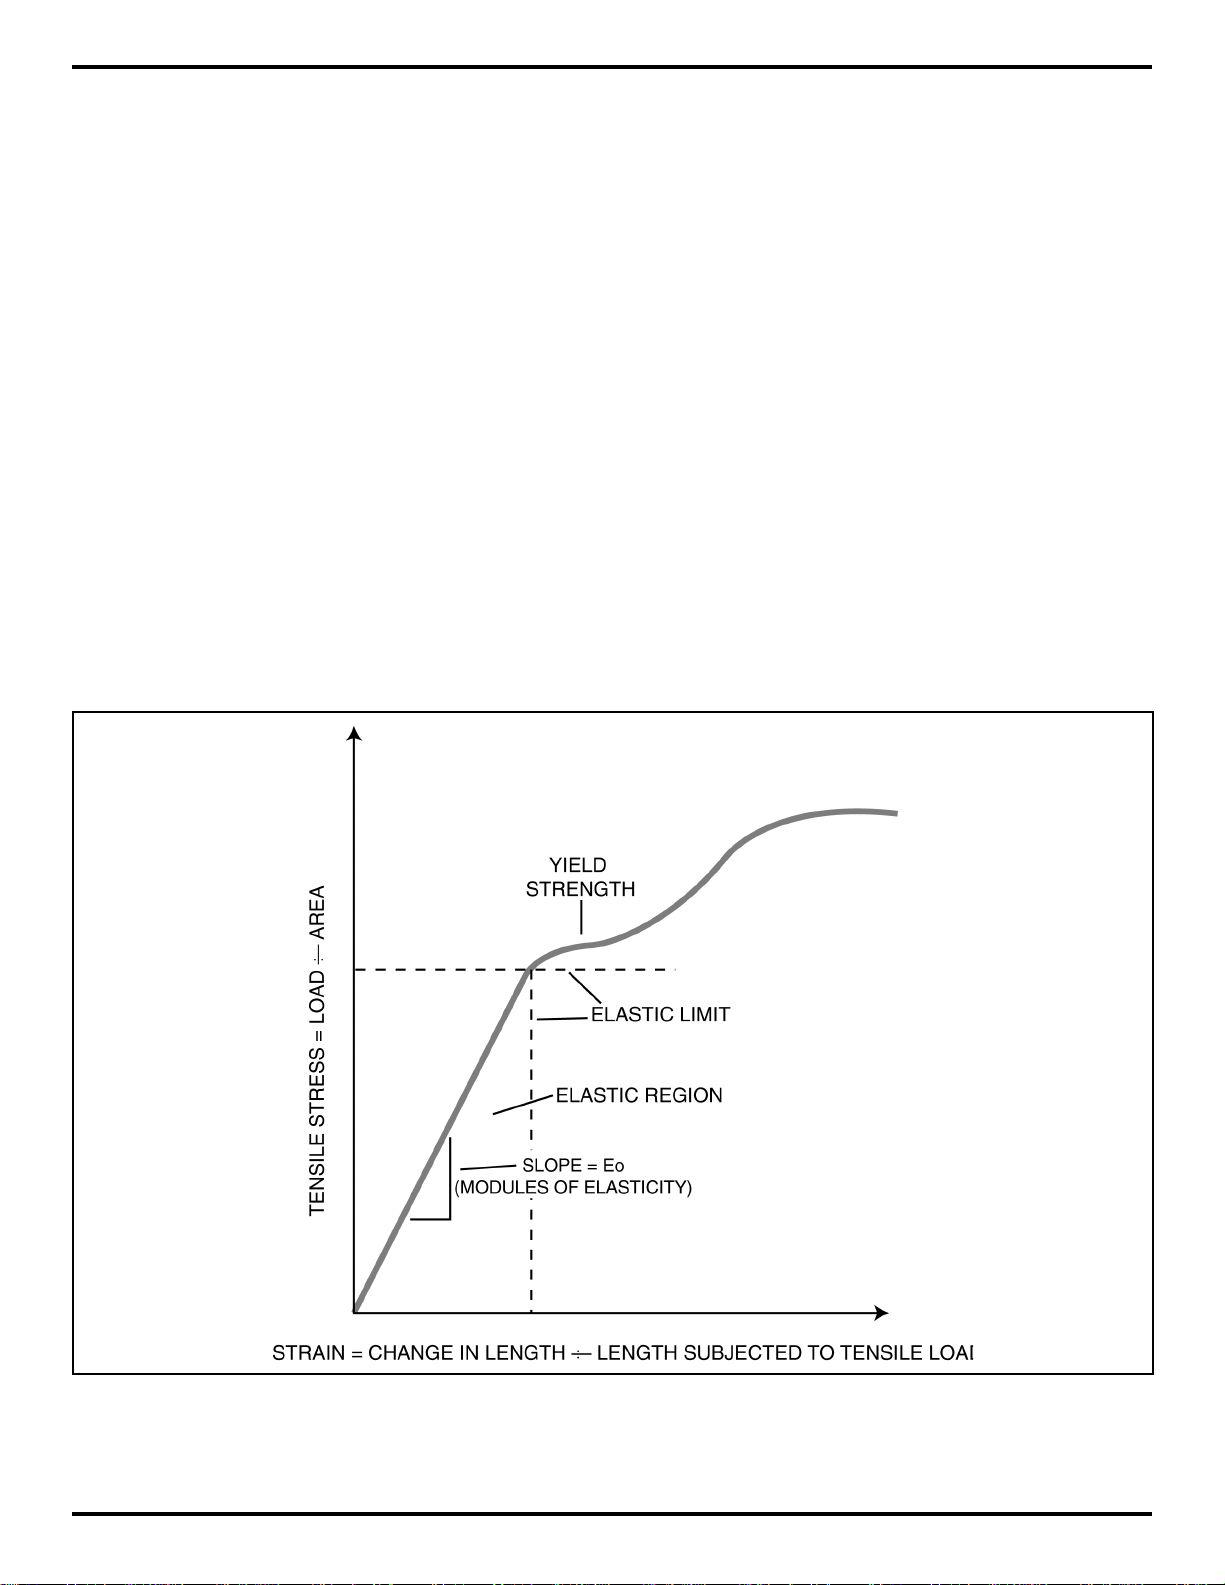
1.1.8 Modulus of Elasticity (Eo)
When a fastener is loaded with a tensile force, its length
increases. As long as the loading does not approach
the fastener’s
yield strength
(defined as the loading point
beyond which any change in material shape is not completely reversible), the relationship between the tensile
stress and elongation is linear. By this we mean that if
the stress level increases by a factor of two, the amount
of elongation also increases by a factor of two. For load
levels in the fastener’s elastic region (meaning that the
loads are less than the yield strength of the fastener),
the relationship between stress and elongation is described by a material constant known as the
elasticity
. The variable Eo in the BoltMike represents the
modulus of
modulus of elasticity . The concepts of tensile stress, elongation, modulus of elasticity, and yield strength are illustrated in Figure 1-4.
FIGURE 1-4—This graph shows the relationship between tensile stress and elongation in a fastener. The material’s
modulus of elasticity equals the slope of the straight portion of this curve (this area is known as the material’s elastic
region). The point at the top of the curve, where it is no longer linear, represents the material’s yield strength. Note
that the graph actually plots stress verses strain. Strain is simply the amount of elongation, divided by the original
length of the stressed section.
Page 4 Guide to Ultrasonic Inspection of Fasteners
Page 13
Chapter 1: Ultrasonic Measurement of Fasteners
1.1.9 Stress Factor (K)
The velocity at which a longitudinal wave moves through
an object is affected by stress. When a fastener is
stretched there are two influences on its ultrasonic length
(as determined by multiplying the sound wave’s time of
flight by the constant value of acoustic velocity). First,
the length of material through which the sound must travel
increases. Also, the fastener’s actual acoustic velocity
decreases as stress increases. In other words, even
when the stretching effect on the fastener’s physical
length is ignored, tensile stress leads to an increase in
the fastener’s ultrasonic length. In the BoltMike, a material constant known as the
Stress Factor (K)
compensates for the effect stress has on the fastener’s actual
acoustic velocity.
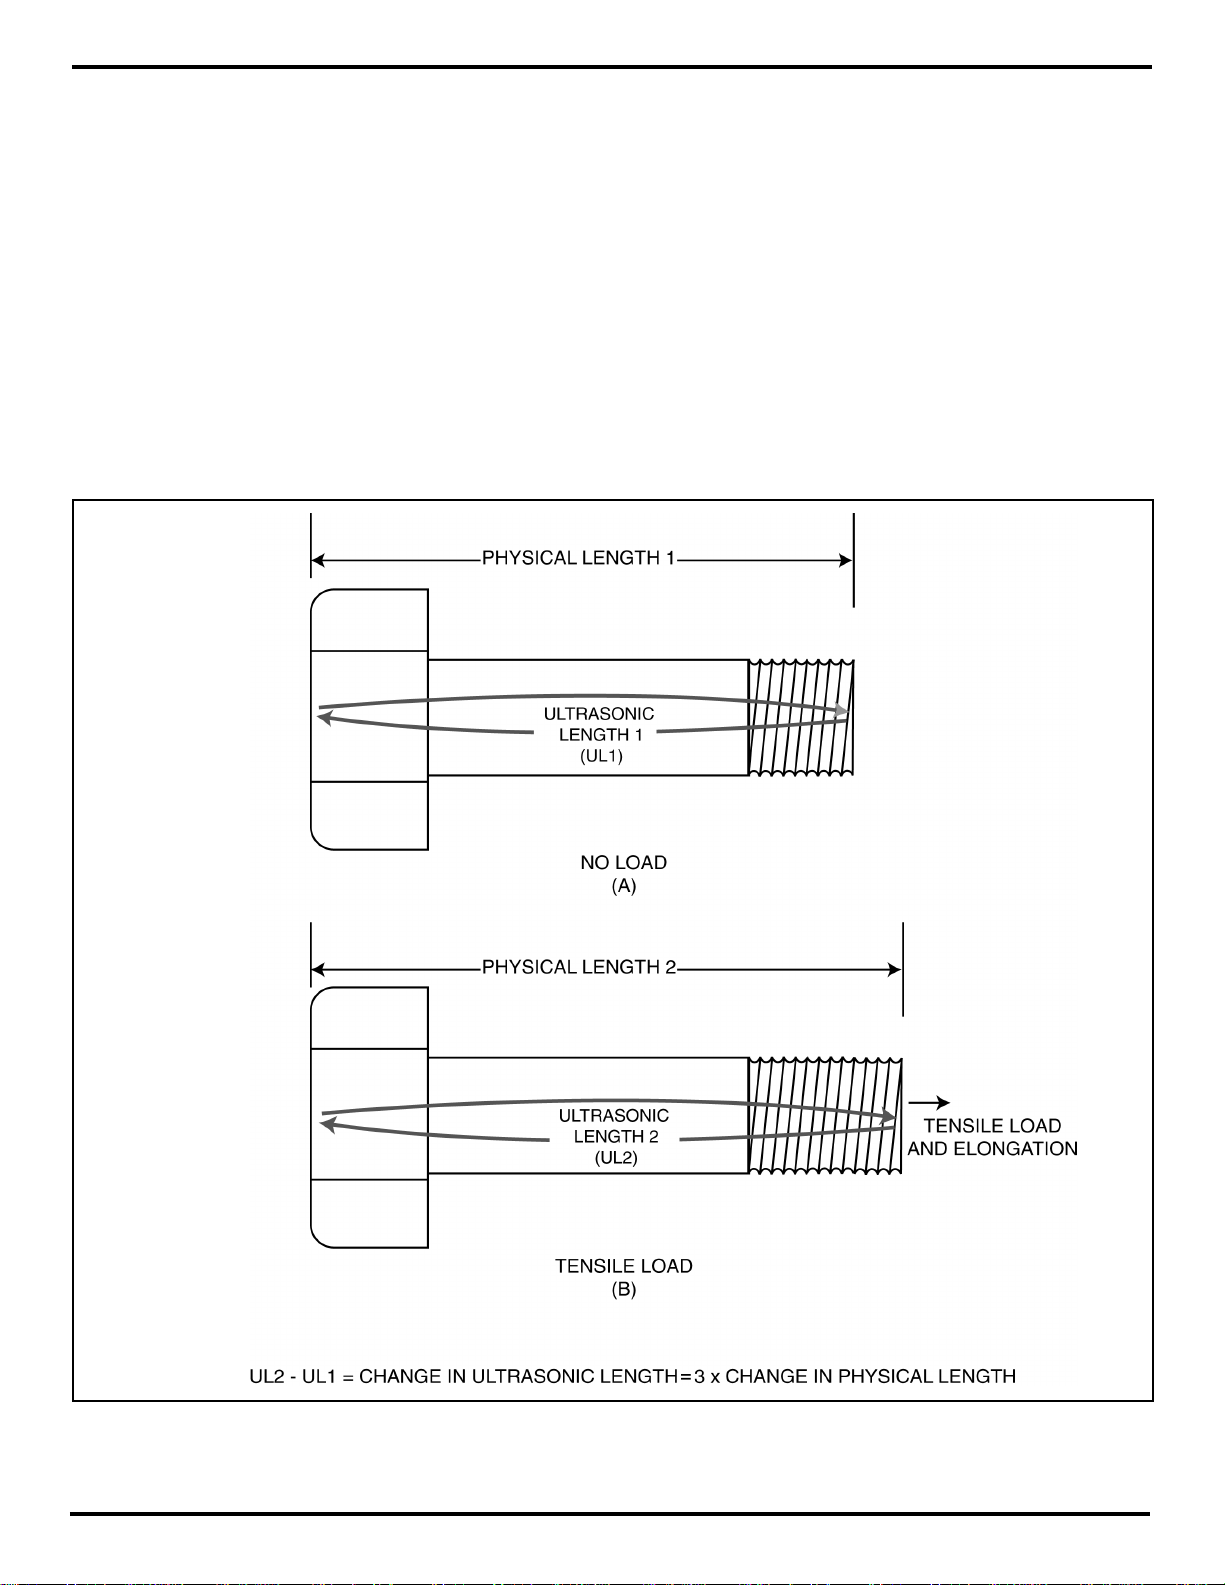
A great deal of confusion surrounds this effect. Consider the example shown in Figure 1-5 as you read the
following description. In Figure 1-5A, no load is applied
to the fastener when the reference ultrasonic length
(UL1) is recorded. In Figure 1-5B, a load is applied and
a new ultrasonic length (UL2) is recorded. Note that
Figure 1-5A and B also identify the physical length when
unloaded (Physical Length 1) and loaded (Physical
Length 2). The actual physical elongation of the fastener
equals Physical Length 1 – Physical Length 2. The difference between the ultrasonic lengths (UL1 and UL2)
is about three times the actual physical elongation of
the fastener.
FIGURE 1-5—Applied tensile stress affects the ultrasonic (measured) length of a fastener in two ways. First, it
stretches the fastener, thus increasing the actual length. Second, tensile stress reduces the fastener’s acoustic
velocity, further increasing its ultrasonic length. In the BoltMike, the material constant K (stress factor) is used to
compensate for the effect of tensile stress on acoustic velocity.
Guide to Ultrasonic Inspection of Fasteners Page 5
Page 14

Chapter 1: Ultrasonic Measurement of Fasteners
It is important to note that in order to change the acoustic velocity, stress must be applied in the same direction
traveled by the ultrasonic shock wave. Thus shear and
torsional stress have no effect on the acoustic velocity
when measured along the fastener’s length.
1.1.10 Temperature Coefficient (Cp)
The temperature of a fastener affects its physical length.
As the temperature of a fastener increases, its physical
length increases. In addition, as a fastener’s temperature increases the amount of time it takes for sound to
travel through the fastener also increases. In other words,
when a fastener is subjected to increased temperature,
its acoustic velocity decreases and, therefore, its ultrasonic length increases. In fact, temperature’s affect on
ultrasonic length is even greater than its affect on physical length. The thermal expansion of the fastener and
the ultrasonic velocity change with temperature are two
separate effects. However, for the purpose of the
BoltMike they are compensated for with a single combined factor known as the
Temperature Coefficient (Cp)
The Bolt Mike relies on a temperature compensation
system to normalize the measured time of flight (TOF)
and thus correct for temperature-caused changes in its
physical and ultrasonic length. The compensation system normalizes the TOF to the value expected at 72
degrees Fahrenheit (22 degrees C) before attempting
to calculate the fastener’s stress, load, and elongation.
This compensation greatly improves accuracy when the
temperature has changed during tightening.
1.1.11 Calibration-Group Correction Factors —
Stress Ratio and Offset
The accuracy of the BoltMike’s stress, load, and elongation calculations depends on many factors. Two major influences on the accuracy of these calculations are
the material-property constants inputted and the
fastener’s geometric characteristics.
While the material-property constants (including elasticity, acoustic velocity, and stress factor) are considered
to be standard values, actual material properties vary
widely. This variation is even found among fasteners
produced in the same manufacturer’s lot. The BoltMike’s
accuracy depends partly on the difference between the
fastener’s actual material properties and those properties represented by the standard material constants.
Similarly, variations in fastening systems’ physical characteristics affect the accuracy of load and elongation
calculations.
When BoltMike III users desire to calculate load, elongation, stress, or TOF (time of flight) values with a higher
degree of accuracy, they generally choose to create
calibration groups. During the process of creating a calibration group, the BoltMike uses inputted values of actual tensile load, as well as its own measured load data,
to calculate two correction factors: Stress Ratio and
Stress Offset. These correction factors are used to convert the BoltMike’s raw stress value into a corrected stress,
as shown in Chapter 8 of this guide.
The BoltMike uses one of two methods to determine these
correction factors. The first method, called a regression
correlation, uses a linear regression technique to determine the stress factor and offset. (Figure 1-6) The stress
factor is actually the slope of a line that represents the
relationship between actual and calculated load. The
stress offset represents the Y intercept of the actual
verses calculated load line. This value can be thought
of as the level to which actual load can increase before
the BoltMike can measure an observable load.
.
The second method used to determine correction factors is known as vector correlation. With this approach
the BoltMike calculates only a stress ratio. The value of
the stress offset is set to zero. (Figure 1-6)
When creating a calibration group, the user must decide which correction method to use. This decision should
be based on the application. If accuracy over a wide
range of loads (including low-level loads) is desirable,
the vector correction is usually preferred. If the highest
level of accuracy at a single target load is desired, the
regression method is best.
Why are two methods required? Often the relationship
between actual and measured stress is non-linear,
especially at the low end of the curve (as shown in
Figure 1-6). This can be caused by a skin effect. When
a small amount of load is applied to a fastener, most of
the stress is in the surface layers, not evenly distributed
across the cross-section. Since the longitudinal wave
travels predominantly down the center of the fastener,
less of the actual stress is observed.
1.1.12 Fastener Geometry
Several geometrical characteristics of fasteners affect
the ultrasonic measurement of load, stress, and elongation. While these characteristics are described in great
detail in Chapter 6 and the Appendix, Figure 1-7 briefly
illustrates them.
Page 6 Guide to Ultrasonic Inspection of Fasteners
Page 15

Chapter 1: Ultrasonic Measurement of Fasteners
FIGURE 1-6—When the Calibration Group feature is used, known and measured loads for a group of fasteners are
entered into the BoltMike. The correlation method chosen (vector or regression) determines if a stress ratio or a
stress ratio and offset correction factor are then calculated.
As you’ll learn in Chapter 6, the quantities inputted for
fastener geometry have varying effects on the accuracy
of the BoltMike’s calculations. In general:
• Cross-Sectional Area—Affects the calculation of
LOAD
• Effective Length—Affects the calculation of ELON-
GA TION, LOAD, & STRESS
• Approximate Total Length—Affects only the position
of the triggering gates
1.2 Principles of BoltMike Operation
NOTE: This section offers a brief description of fas-
tener elongation measurement using ultrasonics. For
more details on ultrasonic inspection techniques in
general, refer to
RIALS
, by Josef and Herbert Krautkramer, 3rd Edition
1983, (IBSN 0-318-21482-3, 324), published by the
American Society of Nondestructive Testing.
ULTRASONIC TESTING OF MATE-
FIGURE 1-7—The geometrical
characteristics of a fastener greatly
affect the results obtained by
ultrasonic inspection techniques.
Included in these important
characteristics are total length,
effective length, and average crosssectional area.
Guide to Ultrasonic Inspection of Fasteners Page 7
Page 16

Chapter 1: Ultrasonic Measurement of Fasteners
The BoltMike measures the time it takes for a sound wave
to travel through a fastener. The sound wave, more specifically known as an ultrasonic shock wave or longitudinal wave, is created in the transducer. The wave is generated when a large electric pulse is sent to the transducer from the instrument. This pulse excites a piezoelectric element in the transducer. The wave’s frequency
varies with the thickness of the piezoelectric element.
Frequencies most useful for measuring fasteners range
from 1 to 20 MHz.
This range of ultrasound will not travel in air. Couplant,
which is a dense liquid substance (usually glycerin or
oil) must be used to provide a pathway for the ultrasound
to travel from the transducer into the fastener.
When the ultrasonic wave encounters an abrupt change
in material density, such as at the end of the fastener,
most of the wave reflects. This reflection travels back
the length of the fastener, through the layer of couplant,
and back into the transducer. When the shock wave
enters the piezoelectric element a small electrical signal
is produced. The BoltMike detects this signal.
In I.P. mode (Initial Pulse mode is described in section
1.1.3), the BoltMike measures the elapsed time between
the sound entering the material and the returned signal.
This elapsed time is known as the wave’s time of flight.
Of course the time of flight actually represents the time
taken by the wave to travel the length of the fastener
two times. The TOF reported by the BoltMike equals half
of this value.
In M.E. mode (Multi-Echo mode is described in section
1.1.3), the BoltMike measures the elapsed time between
two consecutive returning signals. This elapsed time is
equal to the wave’s time of flight. As in I.P. mode this time
of flight actually represents the time taken by the wave
to travel the length of the fastener two times. The TOF
reported by the BoltMike equals half of this value.
The BoltMike then determines the
first using the temperature coefficient (Cp) to correct the
TOF for any changes in temperature. The BoltMike then
multiplies the corrected TOF by the fastener’s acoustic
velocity. Acoustic velocity is represented in the BoltMike
with the variable V and is determined by the fastener’s
material type. The stress constant (K) and effective length
are then used by the BoltMike logic to determine an uncorrected stress. As explained in Chapter 8, when the
calibration-group feature is used, the stress ratio and
offset are applied to this stress value to find a corrected
stress.
Since the actual acoustic velocity is not truly a constant,
and can vary significantly between fasteners of like material composition, the
(recorded before and after each fastener is tensioned)
change
ultrasonic length
in measured time of flight
by
must be used to accurately measure a fastener’s stress,
load, and elongation.
To determine the change in time of flight, the BoltMike
first records a
malized time of flight for a non-tensioned fastener. A
normalized time of flight measurement of the same fastener, this time while tensioned, is then recorded. The
two normalized TOF’s (which have already been corrected for the effects of temperature) are then used with
the effective length, stress factor (K), and acoustic velocity (V) to determine the uncorrected stress.
• The uncorrected stress is then corrected using the
stress offset and stress ratio (these values are
produced using a Cal group)
• Elongation is calculated using the corrected stress,
effective length, and the modulus of elasticity.
• Load is also determined using the corrected stress
and cross-sectional area.
reference length
by determining a nor-
1.3 Practical Limitations Of Ultrasonic
Measurement
Included in the list of fastening-system types that are
quite successfully inspected using ultrasonic techniques
are those where equal distribution of load is critical, such
as pipe flanges and head bolts where gaskets must be
compressed evenly for optimum performance.
Not all threaded fastening systems are suitable for measurement by ultrasonic methods, and some systems are
better suited to either multi-echo or initial pulse measurements. An understanding of ultrasonic inspection’s
practical limitations will reduce frustration and erroneous results.
1.3.1 Material Compatible with Ultrasonic
Inspection
Most metals are excellent conductors of ultrasound. However, certain cast irons and many plastics absorb ultrasound and cannot be measured with the BoltMike.
1.3.2 Significant Fastener Stretch
Since ultrasonic techniques measure a fastener’s
change in length, a significant amount of stretch is required to produce accurate measurements. Accuracy is
a significant problem in applications where the effective
length of a fastener is very short, such as a screw holding a piece of sheet metal. These applications may be
poorly suited to ultrasonic measurement because the
tensile load (and therefore tensile stress) is applied over
a very short effective length of the fastener. Because
Page 8 Guide to Ultrasonic Inspection of Fasteners
Page 17

Chapter 1: Ultrasonic Measurement of Fasteners
the stressed length is so small, little or no measurable
elongation of the fastener occurs.
In the same way, it is difficult to measure the effects of
very low loads. Negligible elongation occurs when tensile stress levels are less than about 10% of the material’s
ultimate tensile stress. The small errors in measurement
introduced by removing and replacing the transducer
(as described in section 2.2) become very significant when
trying to measure such a small amount of elongation.
1.3.3 Fastener End-Surface Configuration
The ends of bolt heads and threaded sections (bolts or
studs) must be prepared before the fastener is fit for
ultrasonic inspection. The fastener end that will be mated
with a transducer must be machined to a very flat, smooth
surface to allow for proper coupling of the transducer.
The ideal finish for the transducer coupling point is between 32 to 63 micro inch CLA (0.8 to 1.6 micro meter
Ra). Refer to section 2.1 to learn more about the requirements of fastener end-surface preparation.
Similarly, the surface at the opposite end of the fastener
(known as the
reflective surface
) must be parallel to the
surface that supports the transducer. This parallelism
allows the reflective surface to reflect the ultrasound back
to the transducer. While the finish of the reflective surface is not as critical, very rough or uneven finish can
produce errors. Problems with surfaces are indicated by
poor signal quality on the waveform display.
1.3.4 The Limitations of I.P. and M.E. Measurement Modes
Because M.E. measurement mode determines the
elapsed time between two consecutively returning echoes, it eliminates some inconsistencies introduced in I.P.
mode such as variation of couplant thickness and probe/
instrument zeroing.
However, because M.E. mode relies on the second returning echo, and the quality of ultrasonic signals diminishes substantially with each returning echo, there are
certain conditions under which the subsequent returning echoes will be distorted beyond acceptable limits and
M.E. mode will not be effective. For instance, ultrasonic
interference resulting from echoes off of the fastener’s
sidewalls increases the level of distortion present when
the second returning echo is received. To some extent
the sidewall distortion effect can be compensated for with
the use of a larger diameter transducer. Similarly, the
effects of frequency dispersion, attenuation, and sidewall
distortion can also be compensated for by using a lower
frequency transducer. In general lower transducer frequencies produce greater-amplitude returning echoes.
Ultimately , however, some small-diameter , longer-length
fastener measurements must be conducted in I.P. mode.
Guide to Ultrasonic Inspection of Fasteners Page 9
Page 18

Chapter 1: Ultrasonic Measurement of Fasteners
THIS P AGE WAS INTENTIONALL Y LEFT BLANK.
Page 10 Guide to Ultrasonic Inspection of Fasteners
Page 19

Chapter 2: Fastener Preparation
Chapter 2: Fastener Preparation
Prior to measuring a fastener, it must be properly prepared for ultrasonic inspection. The fastener ends must
be machined to be parallel and the end that will be mated
with a transducer must be machined to a controlled,
smooth surface finish. Further, to allow for proper coupling of the transducer and fastener, a suitable couplant
must be applied. Finally, consistent placement of the
transducer on the bolt head or stud end improves the
instrument’s accuracy and repeatability.
NOTE: Most fastener materials are excellent conductors of ultrasound. However, certain cast irons and
many plastics absorb ultrasound and cannot be measured with the BoltMike.
2.1 Fastener End-Surface Machining
The ends of bolt heads and threaded sections (bolts or
studs) must be prepared before the fastener is suitable
for ultrasonic inspection. The fastener end that will be
mated with a transducer must be perpendicular to the
fastener’s centerline and machined to a very flat, smooth
surface to allow for proper coupling of the transducer.
The ideal finish for the transducer coupling point is between 32 to 63 min. CLA (0.8 to 1.6 mm Ra). Inadequate
surface finishes are indicated by poor signal quality on
the A-scan display.
The reflective surface at the opposite end of the fastener must be parallel to the surface that mates with the
transducer. As shown in Figure 2-1, this parallelism allows for identical sound-path distance regardless of the
transducer’s position. The degree to which these two
surfaces are machined parallel determines the upper limit
of an ultrasonic inspection system’s accuracy.
FIGURE 2-1—Fastener ends must be uniform, parallel, and perpendicular to the fastener’s centerline to ensure
acceptable ultrasound transmission.
Guide to Ultrasonic Inspection of Fasteners Page 11
Page 20

Chapter 2: Fastener Preparation
While the surface finish of the reflective surface is not
as critical, very rough or uneven finish can produce
errors. Use care when machining fastener ends. A
common problem occurs when a small peak is left in the
center of a fastener end after facing on a lathe. This
small bump prevents the transducer from achieving
proper contact and greatly reduces the signal amplitude.
NOTE: The use of Multi-Echo measurement mode reduces some types of variation and measurement inaccuracies, especially those that are due to couplant
thickness and instrument/probe zeroing. However,
errors introduced by inconsistent transducer placement or surface preparation techniques are not eliminated with the use of M.E. mode.
2.2 Methods Of Transducer Placement
Unless fastener ends and transducer surfaces are perfectly parallel, as discussed in section 2.1 of this manual,
the reflected ultrasonic signal will vary with changes in
the transducer’s orientation, with respect to the fastener.
This condition is illustrated in Figure 2-2. Optimal repeatability and accuracy are achieved by leaving the
transducer attached to the fastener, in exactly the same
location and angular orientation, throughout the
tensioning process. As this ideal approach is often not
possible or practical, the next best practice is to consistently return the transducer to the same location and
angular orientation, with respect to the fastener. This
practice improves the chances that the path followed by
the shock wave when the reference length was measured is identical (or close to identical) to the path followed after the fastening system is tightened.
2.2.1 Practical Methods
Several practical methods are used to ensure consistent transducer placement. The most common method
utilizes a magnetic transducer, which is placed in the
center of the bolt’s head. When inspecting bolts with diameters above one inch, refer to Figure 2-3 and follow
these steps:
Step 1:
First measure the reference (non-tensioned)
length by coupling the transducer to the fastener end
and adjusting its orientation, while observing the A-scan
display. Position the transducer in the center of the fastener end and identify the angular transducer position
that returns the A-scan waveform of greatest amplitude.
At this point consider the accuracy of the selected measurement mode. M.E. mode can increase repeatability
and improve accuracy if the subsequent returning echoes are free enough of distortion to be measured properly.
Step 2:
Mark the transducer location and angular orien-
tation on the fastener end.
Step 3:
Continue with the fastener tightening procedure.
If possible, the transducer should remain connected to
the fastener end in exactly the same position and orientation. If this is not possible, proceed to step 4.
Step 4:
Before proceeding, reconfirm that the position
marked on the fastener end remains the location that
returns the greatest-amplitude waveform and the shortest length and/or lowest load or stress reading. This step
is important because in some cases, as the fastener is
tensioned, a small amount of bending occurs. When
bending occurs, the angular orientation that returns the
FIGURE 2-2—Changing the transducer’s position with respect to the fastener’s end can change the shape and/or
amplitude of the returned waveform. This effect is especially significant when inspecting long or large-diameter
fasteners.
Page 12 Guide to Ultrasonic Inspection of Fasteners
Page 21

Chapter 2: Fastener Preparation
FIGURE 2-3—A consistent approach to transducer placement ensures accurate results.
Guide to Ultrasonic Inspection of Fasteners Page 13
Page 22

Chapter 2: Fastener Preparation
maximum-amplitude waveform may change. If the
maximum-response location has changed, adjust the
position of the transducer to the new location on the bolt
head. This assures the optimum sound path is being
used, both before and after tightening.
Step 5:
Position the transducer in the marked location
(or at the newly identified maximum-amplitude location)
to continue recording tensioned readings.
2.2.2 Fixtures for Non-Magnetic Fasteners
When fasteners are made of non-magnetic materials,
fixtures are sometimes used to hold the transducer in
place. Note that the fit between the transducer and the
head of the bolt is extremely critical, and some provision
must be made in the fixture to allow the transducer to
“float” while finding the position where contact is at its
best.
NOTE: Ultrasonic inspection techniques evaluate the
change in length of a fastener. Fastener elongation
occurs when a significant portion of the fastener
(known as the effective length) is exposed to tensile
loading. However, ultrasonic techniques are not effective when only a small percentage of the fastener’s
length experiences tensile loading (such as a screw
holding a piece of sheet metal) or where load levels
are below 10% of ultimate tensile stress.
Page 14 Guide to Ultrasonic Inspection of Fasteners
Page 23

Chapter 3: Transducer Selection
Chapter 3: Transducer Selection
A wide variety of ultrasonic transducers are available.
Suitability for a specific application is determined based
on the transducer’s center frequency, diameter, and
damping. However, because there is often a broad range
of applications for which transducers are suitable, and
these ranges often overlap, it can be difficult to pick the
“best” transducer for a specific job.
NOTE: It is a generally accepted practice that the
same style and model probe be used when taking nontensioned (L-Ref) and tensioned-fastener measurements of a fastener group. Further, it is preferable
that the same probe be used to make tensioned and
non-tensioned measurements of a fastener group.
3.1 General Acceptability
There is no single rule of thumb to follow when selecting
a transducer for a specific application. For some fastening systems, many different types of transducers will
measure with acceptable results. In the case of a hardto-inspect fastener, transducer selection becomes more
critical. The best way to evaluate an application is to use
the Bolt Mike’s waveform display and an assortment of
transducers. Try making readings on a fastener that’s
similar or identical to the ones you’ll be inspecting. Use
several different transducers and observe the waveform
display and the stability of the reading produced with
each transducer. While you’re using a transducer, observe the effects of removing and replacing it. Select
the transducer that provides a large-amplitude signal and
stable, repeatable readings.
energy to reach the end of the fastener, making the noise
that reflects off the thread and shank areas less of an
issue.
However, as frequency increases, the absorption of the
ultrasound by the material also increases. Absorption
refers to the material’s ability to absorb (rather than reflect) ultrasonic sound energy. It interferes with the
shockwave, reducing the received signal’s resolution.
Lower-frequency ultrasound travels around small flaws
or air bubbles in the fastener’s without significant interference to the shock wave. Absorption is an especially
significant problem when inspecting more granular material such as is found in castings.
In conclusion, lower transducer frequencies are better
suited as fastener lengths increase.
3.3 Transducer Diameter
A transducer’s rated diameter actually refers to the diameter of its crystal. A transducer’s diameter affects the
efficiently with which it transmits sound as well as the
beamwidth of the transmitted ultrasound. Remember,
beamwidth identifies how dispersed the shock wave becomes as it travels over a specific distance. Beamwidth
decreases (that is, the wave becomes more tightly focused) and transmitting efficiency increases as the diameter of the transducer’s crystal increases. Again, a
tightly focused beam is desirable since it allows more
energy to reach the end of the fastener, making the noise
that reflects off the thread and shank areas less of an
issue.
3.2 Transducer Frequency
A transducer’s frequency rating refers to the resonant
frequency of the piezoelectric crystal. This is determined
by the thickness of the crystal material. A thin crystal
has a higher resonant frequency than a thick crystal.
The BoltMike will work with transducers in the 1 to 15
MHz (megahertz) range.
The frequency of the transducer affects the transmission of ultrasound in two different ways, beamwidth and
absorption. The
ity
) identifies how dispersed the shock wave becomes
as it travels over a specific distance. Beamwidth decreases (that is, the wave becomes more tightly focused)
as transducer frequency increases. This means that a
10 MHz transducer has a tighter beam (with a lower
beamwidth) than a 5 MHz version of the same transducer.
A tightly focused beam is desirable since it allows more
Guide to Ultrasonic Inspection of Fasteners Page 15
beamwidth
(also referred to as
directiv-
It’s generally preferable to select the largest-diameter
transducer available that will still fit on the fastener to be
measured. Note that external diameter of a transducer
equipped with a built-in magnet is much larger than the
piezoelectric crystal size. For example, a 1/4 inch 5 MHz
non-magnetic transducer has a case with a 3/8-inch
outside diameter. However, when a transducer with the
same 1/4-inch crystal is mounted in a magnetic housing,
the transducer’s outside diameter is 3/4 inch.
Purpose of Instrument and Transducer Zeroing
The BoltMike’s zeroing procedure occurs whenever the
user presses the Inst Zero key and follows the steps as
prompted. The procedure compensates for the actual
delay that occurs while the transmitted pulse travels
through the instrument’s circuitry, the probe cable, and
the probe’s head and contact surface. Variations in different probes and cables, as well as changes in the trans-
Page 24

Chapter 3: Transducer Selection
ducer cable length, affect the necessary amount of timedelay compensation.
Repeat the transducer calibration whenever changing
transducers or cables. As the probe’s contact surface
wears with use, the instrument should be periodically rezeroed to compensate for any change in time delay.
NOTE: When operating in multi-echo measurement
mode, the transducer and instrument zero do not affect the instrument’s accuracy.
Page 16 Guide to Ultrasonic Inspection of Fasteners
Page 25

Chapter 4: Temperature Compensation
Chapter 4: Temperature Compensation
The temperature of a fastener affects its physical length.
As the temperature of a fastener increases, its physical
length increases. In addition, as a fastener’s temperature increases the amount of time it takes for sound to
travel through the fastener also increases. In other words,
when a fastener is subjected to increased temperature,
its acoustic velocity decreases and, therefore, its ultrasonic length increases. In fact, temperature’s effect on
ultrasonic length is even greater than its effect on physical length. The thermal expansion of the fastener and
the ultrasonic velocity change with changing temperature are two separate effects. However , in the BoltMike’s
logic they are compensated for with a single combined
factor known as the
The BoltMike relies on its temperature compensation
system to normalize the time of flight of a fastener and
thus correct for temperature-caused changes in its physical and ultrasonic length. The compensation system
normalizes the TOF to the value expected at 22.22 degrees C (72 degrees F) before attempting to calculate
the change in the fastener’s ultrasonic length. This
compensation greatly improves accuracy when the temperature has changed during the time period between
recording a reference length and a tensioned length.
Temperature Coefficient (Cp)
.
NOTE: The range of the BoltMike temperature sensor is -55 degrees to 150 degrees C (-67 to 302 degrees F). Use of the sensor outside of these ranges
will damage the sensor.
NOTE: Large accuracy problems can occur from handling the temperature sensor. Body heat conducted
into the housing of the sensor will greatly increase
the temperature reading. After holding the sensor in
a bare hand, allow approximately ten to fifteen minutes for the temperature probe to stabilize. If while
fastener measurement is underway a temperature
sensor must be moved, handle it only while wearing a
thick glove. Alternatively, you may carefully remove
the temperature sensor by pulling on and handling
only its cable.
4.2 Limits of Accurate Temperature Measurement
Errors in temperature compensation can have several
causes including:
• Manual input of air (rather than) fasten tempera-
ture
4.1 Measuring Fastener Temperature
In some applications, significant differences in temperature exist from one portion of the fastener to another.
Compensating for these temperature gradients is
extremely difficult. Instead, the fastener’s average temperature is used for temperature compensation. While
the BoltMike allows manual input of temperature, it is
preferable to input fastener temperature using the temperature probe.
The BoltMike’s temperature sensor provides a convenient way to input fastener temperature. Because it
magnetically couples to the metal of the fastener joint, it
provides a very accurate temperature reading.
Typically, the temperature sensor is attached to the
superstructure or frame that is being fastened, not each
individual bolt. The probe is then left in place while the
lengths of all fasteners in the area are ultrasonically
measured.
NOTE: In most cases, air temperature has very little
effect on fastener temperature and should not be
entered as the temperature of the fastener. For optimum accuracy, use the temperature sensor and automatic temperature compensation.
• Contact between the operator ’s hand and the
temperature sensor
• Variation of the material’s temperature coefficient
• Materials’ non-linear response to changes in
temperature
The last two of these sources of error should be further
explained. If a sample of physically identical bolts is tested
for temperature coefficient, some bolt-to-bolt variation
will be found. The amount of variation will depend on the
type of material, and the uniformity with which the fasteners were manufactured. One way to compensate for
this variation is to determine the range of actual temperature coefficients in the sample then decide of the
difference between the actual and average values is too
significant. Alternatively, a temperature calibration can
be preformed for each fastener.
A materials actual response to changes in temperature
(as represented in the BoltMike by the temperature coefficient) is not necessarily linear over a large range of
temperatures. Although the thermal expansion of a fastener, when plotted against change in temperature, is
very nearly linear, non-linearity is present in all materials. When trying to compensate for a large variation in
temperature (in the range of fifty degrees Centigrade or
Guide to Ultrasonic Inspection of Fasteners Page 17
Page 26

Chapter 4: Temperature Compensation
more), the nonlinear thermal reaction becomes a factor
and significant errors may occur. When temperature
variations are relatively large and increased accuracy is
desired, the temperature coefficient may be adjusted to
the specific temperature range.
4.3 Adjusting the Temperature Coefficient
If measurements are to be made over a large temperature range (50 degrees C or greater), the best results
will be obtained by adjusting the temperature coefficient
to the particular bolt and the specific temperature range.
Select at least two temperature levels that fall within the
temperature range anticipated during the actual ultrasonic measurement. For example, the extremes of the
temperature range may be 20 degrees C (representative of the shop temperature when the fasteners’ reference length is recorded) and 70 degrees C (the temperature of the structure to which the bolt will be connected). In this case you might wish to examine the fastener at 20, 40, 50 and 70 degrees C.
Proper temperature calibration requires a means of controlling the bolt temperature such as a temperature oven.
Place the bolt to be measured in the oven (set to the
lower
of your two target temperatures) with a transducer
and temperature sensor attached. It is not necessary to
load the bolt to determine the temperature coefficient.
In preparation for temperature calibration, create a group
containing enough fasteners to store one L-REF for each
of the fasteners you wish to sample. Measurements made
(as described below) will only be stored as L-REFs.
Create a custom material type (with the correct acoustic
velocity) then assign it, along with a temperature
coefficient of 0 (zero) to the group.
Allow plenty of time for the bolt in the oven to reach the
target temperature. One way to tell when the internal
temperature of the fastener has stabilized is to watch
the L-REF change on the BoltMike. When the L-REF
has been stable for two minutes, the temperature in the
fastener is constant. This occurs because the displayed
L-REF is temperature compensated. Record the
fastener’s measured length and the probe’s temperature reading. Identify these as L1 and T1.
Change the oven setting to the higher temperature,
monitor the bolt length until it again stabilizes, and repeat the process described above. Identify the second
measured length and temperature as L2 and T2.
You should now have recorded at least two ultrasonic
length measurements at different temperatures. Two
measurement points will allow you to calculate a value of
Cp. These calculated values of Cp must be averaged
over a temperature range to find the best value of Cp in
the temperature range of your test. In the following formula, L1 and T1 are the reference length and temperature for data point 1, and L2 and T2 the reference length
and temperature for data point 2.
If readings are taken across a temperature range (for
example, at four temperatures) you can calculate a Cp
for T1 and T2, as well as a Cp for T3 and T4. Then,
average the two calculated values for Cp to produce an
average Cp over the temperature range.
Page 18 Guide to Ultrasonic Inspection of Fasteners
Page 27

Chapter 5: Selecting Phase
Chapter 5: Selecting Phase
When recording a reference (non-tensioned) fastener
length, the operator must first select a measurement
phase. This setting determines if the triggering gate is
positioned above or below the A-scan zero level and,
therefore, if the gate detects positive or negative heading portion of the signal.
Once the measurement phase is selected, and an L-Ref
is recorded, the phase may not be changed again for
that fastener. Therefore, it is critical that the user first
examine the A-scan shape in non-tensioned and
tensioned loading conditions. As shown in Figure 5-1,
there are often low-amplitude half-cycle features visible
on the A-scan. These echoes should not be used to trigger the gate as they are not valid representations of a
returning echo. However, the first valid echo available
should be used to trigger the gate (especially in MultiEcho mode) as later echoes may be substantially affected by sidewall distortion. Sidewall distortion results
from sound energy reflecting off of the fastener’s
sidewalls, into the primary sound path, and back towards
the transducer.
FIGURE 5-1—Select the PHASE to trigger off of the first valid echo available in both the non-tensioned and
tensioned condition. Note that invalid echoes before the first valid echo and distortion-affected later echoes should
not be used to trigger gates.
Guide to Ultrasonic Inspection of Fasteners Page 19
Page 28

Chapter 5: Selecting Phase
THIS P AGE WAS INTENTIONALL Y LEFT BLANK.
Page 20 Guide to Ultrasonic Inspection of Fasteners
Page 29

Chapter 6: Fastener Geometry
Chapter 6: Fastener Geometry
As explained throughout Chapter 1 of this guide, many
of the calculations made by the BoltMike rely directly on
user-input fastener dimensions. A fastener’s material
type, nominal length, average diameter, and effective
length (also known as working or grip length) must be
input in order for the BoltMike to perform all calculations.
While material types and the constants that define their
properties are described in Chapter 7, this chapter deals
with the geometric properties that define a fastener’s
shape. Some of a fastener’s geometric properties have
little effect on certain BoltMike calculations, while others
have a significant effect. It is important to understand
how each geometric property affects the BoltMike’s output.
6.1 Approximate Length
In the BoltMike, the approximate length is the total length
of the fastener. In terms of ultrasonics, this is the distance from the ultrasonic transducer to the opposite (reflecting) end of the fastener. The approximate length is
used to determine the distance at which the BoltMike’s
receiver is enabled.
While the accuracy of the quantity entered for total fastener length does not directly affect the accuracy of the
BoltMike readings, entering a significantly incorrect value
for total length may result in unstable or no readings at
all. If the value entered for approximate length is too
large, the first echo that returns from the bolt will be ignored. If the value entered for approximate length is too
short, the BoltMike will not detect the correct returning
echo. These two cases are shown in Figure 6-1.
6.2 Determining Effective Length
When a fastening system is tensioned, the length of the
fastener to which the tensile load is applied is known as
its effective length. When considering a constant applied
load, the amount of fastener elongation is directly proportional to a fastener’s effective length. In other words,
if two fastening systems are identical in all ways, including the tensile load on the fastener, except that the effective length of the first fastener is twice the effective
length of the second, then the elongation of the first fastener will be twice the elongation of the second.
The effective length must be entered into the BoltMike
in order to make any measurement other than the reference length. However, the accuracy of the value entered as the effective length has almost no influence on
the accuracy of the elongation measurement. And then,
the affect on elongation measurement is only noticeable
at very high tensile loads, approaching the material’s
yield strength. Because the measurement of elongation
is virtually independent of the effective length, tension
loading is specified in terms of elongation in applications
where the ability to accurately determine effective length
is questionable.
However, the accuracy of the value entered for effective
length has a direct influence on the accuracy of measured stress and load. If the value entered for effective
length is ten percent less than the actual value, the error in load and stress measurements will be ten percent.
FIGURE 6-1—The value of approximate total length is used only to set the position of the gate(s) on the A-scan
display screen.
Guide to Ultrasonic Inspection of Fasteners Page 21
Page 30

Chapter 6: Fastener Geometry
The effective length is calculated differently depending
on the fastener application. The directions for calculating the effective length in four different cases are outlined in Figures 6-2 through 6-5. Note that the resulting
values for effective length are approximate and may vary
due to certain other factors. For example, consider an
application using a bolt in a blind hole. Suppose the
material strength of the bolt is greater than the threaded
hole. The weaker threads in the hole will flex more than
the threads of the bolt, and the effective length will be
longer than if the materials were of the same material.
For the best accuracy of load or stress readings, calibrate the BoltMike for the specific application. This will
cancel errors due to effective length uncertainty. In this
approach a calibration group is formed (using fasteners
that are the same or similar to the ones being tested).
The fasteners are inserted in a fixture that loads them at
the same effective length with a known quantity of load.
Refer to Figures 6-2 through 6-5 to identify the fastening system closest to the one you are evaluating. Then
follow the instructions in the applicable figure to calculate effective loading. The figures show:
• Stud fastening system (Figure 6-2)
• Through bolt fastening system (Figure 6-3)
• Bolt (screw) turned into a threaded hole
(Figure 6-4)
• Stud turned into a threaded hole (Figure 6-5)
FIGURE 6-2—This is a typical stud configuration. The effective length of a stud with nuts on each end is found by
adding the stud diameter to the clamp length.
FIGURE 6-3—This is a typical through bolt configuration. The effective length of a bolt with a single nut is found by
adding half the diameter to one-third the diameter (5/6 of the diameter total) to the clamp length.
Page 22 Guide to Ultrasonic Inspection of Fasteners
Page 31

Chapter 6: Fastener Geometry
FIGURE 6-4—This is typical of a configuration with a bolt (screw) turned into a threaded hole. When a headed
fastener is threaded into a metal block, such as an automotive head bolt, calculate the effective length by adding
half the diameter to one third the diameter (5/6 of the diameter total), then adding this amount to the clamp length.
FIGURE 6-5—This is typical of a configuration with a stud turned into a threaded hole. When a stud is threaded into
A blind hole and a nut is placed on the opposite end, find the effective length by adding the stud diameter to the
clamp length.
Guide to Ultrasonic Inspection of Fasteners Page 23
Page 32

Chapter 6: Fastener Geometry
6.3 Fastener Cross-Sectional Area
The cross-sectional area is the average area of that
portion of a fastener that is subjected to tensile loading.
In other words, it’s an average cross-sectional area taken
over only the fastener’s effective length. The crosssectional area in threaded portions of the fastener should
be calculated based on the thread’s minor diameter . The
accuracy with which cross-sectional area is entered only
affects the BoltMike load calculation. It has no effect on
the stress or elongation measurement.
The accuracy of the value entered for cross-sectional
area has a direct influence on the accuracy of measured
load. If the value entered for cross-sectional area is ten
percent less than the actual value, then the measured
value of load will be ten percent lower than the actual
value.
If a fastener’s geometry is more complex, with varying
values of cross-sectional area along its effective length,
the various areas over the effective length may be aver-
aged to arrive at an overall average cross-sectional area.
In the case of a hollow fastener, the area of the hole
must be subtracted from the overall average cross-sectional area to determine the actual cross sectional area.
To calculate the average cross-sectional area of a fastener, multiply the length of each segment along the effective length of the fastener by the cross-sectional area
of each specific segment. (Figure 6-6) Add all of the resulting values, and then divide the total by the sum of
the lengths.
In the appendix of this manual, you will find tables of
average cross-sectional areas for various types and sizes
of common fastener.
For the best accuracy of load readings, calibrate the
BoltMike for the specific application. This will cancel errors due to cross sectional area uncertainty. In this approach a calibration group is formed (using fasteners
that are the same or similar to the ones being tested).
The fasteners are inserted in a fixture that loads them at
the same effective length with a known quantity of load.
FIGURE 6-6—Follow this procedure to determine the average cross-sectional area over the effective length of an
irregular fastener.
Page 24 Guide to Ultrasonic Inspection of Fasteners
Page 33

Chapter 7: Material Constants
Chapter 7: Material Constants
As described in Chapter 1 of this guide, several constants are used by the BoltMike to represent the material properties of a specific fastener. You have the
option of using constants already stored in the BoltMike
for standard material types or defining constants for a
custom material type.
7.1 Standard Material Constants
While constants are stored in the BoltMike for twelve standard material types, as shown in Table 7-1, any other
material type and it’s related constants may be entered
using the CUSTOM material type feature.
Material constants used by the BoltMike include:
Vo—Acoustic Velocity (described in section 1.1 of this
guide)
Eo—Modulus of Elasticity (described in section 1.1.8 of
this guide)
Cp—Thermal Coefficient (described in sections 1.1.10
and 4.3 of this guide)
K—Stress Factor (described in section 1.1.9 of this guide)
Y—Yield Strength (described in section 1.1.8 of this
guide)
The material constants listed in Table 7-1 are stored in
the BoltMike for the twelve standard material types listed.
7.2 Custom Material Constants
StressT el of fers laboratory material calibration at a nominal cost. This service is highly recommended for users
of exotic material or in applications where highest accuracy is required.
7.3 Selecting a Material Constant
There are several ways to select a bolt material constant. The best way is to compare the published specifications for the material you wish to evaluate against those
of the standard material types listed in Table 7-1. First
identify the standard material type that’s closest in properties to the non-standard material type you wish to test.
Next, while creating a Group in the BoltMike, first select
the standard material type that most closely resembles
the properties of your non-standard material, and then
press
to enter the CUSTOM material mode. When
Table 7-1
Standard Material Types and Constants Stored in the BoltMike
Name
B7 ASTM A193 B7 5964.7303 0.00007 704 206206.8966 0.000000090 6299 0 655.8621
B16 ASTM A193 B16 5957.3211 .00007704 206206.8966 0.00000009468245 655.8621
8.8 ISO 8.8 6047.9915 0.00007 704 206206.8966 0.00000011457682 627.9593
9.8 ISO 9.8 5842.0000 0.00007 704 206206.8966 0.000000139997 40 720.6897
10.9 ISO 10.9 6047.2295 0.00007704 206206.8966 0.00000011162954 882.9428
11.9 ISO 11.9 5997.6995 0.00007704 206206.8966 0.00000010720853 991.0345
12.9 ISO 12.9 5739 .8895 0.00007704 206206.8966 0.00000008989307 1058.9310
304SS 304 Stainless Steel 5725.9703 0.000103 04 19310 3.4483 0.000000092 10355 209.9862
316SS 316 Stainless Steel 5690.8192 0.000103 04 19310 3.4483 0.000000088 41941 209.9862
1020S 1020 Mild Steel 5964.7303 0.00007704 200000 0.00000008105113 295.1724
MONEL MONEL 5697.9795 0.0001459 6 193103.4483 0.00000009210355 274.9821
Material
Type
Vo
(m/s)
Cp
(1/deg C)
Eo
(MPa)
K
(m/s/Pa)
Y
(MPa)
A490 A490 Structural Steel 5928.6394 0.00007704 200000 0.00000008068271 896.5517
Guide to Ultrasonic Inspection of Fasteners Page 25
Page 34

Chapter 7: Material Constants
the CUSTOM material mode is activated, you edit the
material name and any material property to match those
of your non-standard material type.
Even if you are able to obtain published constants for a
non-standard material type, it is best to perform some
amount of testing to determine the accuracy of the resulting measurements.
Another way to determine the bolt type is to measure a
group of bolts and use the built in calibration function to
determine which material type gives the minimum error.
In this approach a calibration group is formed (using fasteners that are the same or similar to the ones being
tested). The fasteners are inserted in a fixture that loads
them at the same effective length with a known quantity
of load.
7.4 Material Variations
Many materials exhibit very uniform material constants.
However, material constants in samples of some materials will vary widely .
A material’s elastic modulus has a direct effect on that
material’s acoustic velocity (Vo) and stress factor (K).
Hardening or heat treatment of the material or relaxation
of the hardening will affect the accuracy of the standard
values of these constants. In fact, the constants in some
materials can vary dramatically as a result of work hardening of the material. Therefore, it is strongly suggested
that a sample of the bolts be tested to confirm the accuracy of the material properties you’ve chosen under actual loading conditions.
Page 26 Guide to Ultrasonic Inspection of Fasteners
Page 35

Chapter 8: BoltMike Formulas
Chapter 8: BoltMike Formulas
The BoltMike uses the following collection of formulas
as a basis for all calculations and derived values. If using the formulas manually, be certain to convert all values to the units listed below, and to adhere to accepted
rounding practices and number of significant digits. Finally , keep in mind that all BoltMike calculations are performed in metric units. When English units are displayed,
the conversion from metric to English takes place after
values are calculated.
Units
Temperature: Degrees C
Thermal Coefficient (Cp): 1 / Degrees C
Time of Flight (TOF): s (Seconds)
Acoustic Velocity (Vo): m/s (Meters per sec.)
All values of length: m (Meters)
Modulus of Elasticity (Eo): Pa (Pascal)
Stress Factor (K): m/s/Pa (meters per
second per Pascal)
Yield Strength (Y): Pa (Pascal)
Uncorrected Stress: Pa (Pascal)
Corrected Stress: Pa (Pascal)
Stress Offset: Pa (Pascal)
2
Cross-Sectional Area: m
(Square meters)
Load: kN (KiloNewton)
Measured Time of Flight (TOF)
TOF measured = Sound Path Duration
2
Reference Length (LREF)
LREF = TOF
measured
* V
Temperature Normalization
TOF
normal
= TOF
* [1 + (Cp * Temp
measured
measured
– 22.22 )]
Change in Ultrasonic Length
Change in Ultrasonic Length =
(V * TOF
normal-stressed
) – (V * TOF
normal-reference
)
Stress Calculation and Correction
Stress
uncorrected
=
V * (Change in Ultrasonic Length)
K (Change in Ultrasonic Length + Effective Length)
corrected
uncorrected
=
* (1 + Stress Ratio) + Stress Offset
Stress
Stress
100
NOTE: The units of measurement listed above are
those units used in the following equations. These are
not in all cases the same units that are displayed by
the instrument, nor are they necessarily the same units
as listed in tables throughout this guide.
Load
Load = Stress
corrected
Elongation
Elongation = Stress
* Cross-Sectional Area
* Effective Length
corrected
Eo
Guide to Ultrasonic Inspection of Fasteners Page 27
Page 36

Chapter 8: BoltMike Formulas
THIS P AGE WAS INTENTIONALL Y LEFT BLANK.
Page 28 Guide to Ultrasonic Inspection of Fasteners
Page 37

Appendix: Tabular Data
µ
g
g
g
g
g
g
Appendix: Tabular Data
NOTE: The tables contained in this appendix give the
cross sectional stressed area for many standard sizes
of bolt. The operator may choose to use these tables
to determine the area of a fastener. IMPORTANT:
These tables are provided for convenience only StressTel does not assume liability for errors.
In this appendix you will find these tables:
• Material Constants – Units of measurement
(English and Metric) for each of the BoltMike’s
constant or measured values
• Metric Standard Thread
• Metric Fine Thread
• Metric Standard Thread, Waist Bolts
• Metric Fine Thread, Waist Bolts
• Extra Fine Thread Series, UNEF and NEF
• Fine Thread Series, UNF and NF
• Coarse Thread Series ,UNC and NC
The BoltMike stores data in metric form. If a number is
entered in English units, it is converted to metric for internal use, and then converted back to English to be
displayed. The following table shows the displayed units
of the BoltMike in both English and metric.
Material Constants
ITEM ENGLISH METRIC
Vo(Velocity) Inches per microsecond (in/
Cp(Temp coef) x per de
Eo(elast. mod) Pounds per S quare Inch (psi) MegaPascals (MPa)
K(dV/force) In c hes per Second per Pounds
Y (Yield) Pounds per Sq uare Inch (psi) Me
L Approx In ches (in) Millimeters (mm)
L Effectiv e Inc hes (in) Millim eters (m m)
Area Square I n ches (in
ree
Fahrenheit (/ °)
per Square Inch (in/s/psi)
Geometry Factors
2
) Square Millimeters (mm2)
s) Meters per S e co nd (m/s)
x per degree
Centi
rade (/ °)
Meters pe r Second
per Pascal (m/s/Pa)
aPascals (MPa)
• 4 Thread Series, 4UN
• 6 Thread Series, 6UN
• 8 Thread Series, 8UN
• 12 Thread Series, 12UN
• 16 Thread Series, 16UN
• 20 Thread Series, 20UN
• 28 Thread Series, 28UN
• 32 Thread Series, 32UN
Measured Quantities
L-REF Inches (in) Millimeters (mm)
Elon
ation Inches (in) Millimeters (mm)
Stress Pounds per Square I nch (psi) MegaPascals (MPa)
Load Pounds (lb) KiloNewtons (KN)
Temperature De
rees Fahrenheit (°)De
rees Centigrade (°)
NOTE: The following tables give the cross sectional
stressed area for many standard sizes of bolt. Use
these tables to determine the area to enter into the
bolt group. IMPORTANT: These tables are provided
for convenience only - StressTel cannot assume liability for errors.
Guide to Ultrasonic Inspection of Fasteners Page 29
Page 38

Appendix: Tabular Data
METRIC STANDARD THREAD
Sizes
mm
M 4 0.7 8.7 8
M 5 0.8 14.2
M 6 1 .0 20.1
M 7 1 .0 2 8.9
M 8 1 .2 5 36.6
M 10 1.5 58.0
M 12 1.75 84.3
M 14 2.0 115
M 16 2.0 157
M 18 2.5 193
M 20 2.5 245
M 22 2.5 303
Pitch
mm
Tensile Stress Area
Sq. mm
METRIC FINE THREAD
Sizes
mm
M 8 1 .0 3 9.2
M 9 1 .0 51
M 10 1.0 64.5
M 10 1.25 61.2
M 12 1.25 92.1
M 12 1.5 88.1
M 14 1.5 125
M 16 1.5 167
M 18 1.5 216
M 18 2.0 204
M 20 1.5 272
M 22 1.5 333
Pitch
mm
Tensile Stress Area
Sq. mm
M 24 3.0 353
M 27 3.0 45 9
M 30 3.5 561
M 33 3.5 694
M 36 4.0 817
M 39 4.0 976
M 24 1.5 401
M 24 2.0 384
M 27 1.5 514
M 27 2.0 49 6
M 30 1.5 642
M 30 2.0 621
M 33 1.5 784
M 33 2.0 761
M 36 1.5 940
M 36 3.0 865
M 39 1.5 1110
M 39 3.0 1028
Page 30 Guide to Ultrasonic Inspection of Fasteners
Page 39

Appendix: Tabular Data
METRIC STANDARD THREAD
WAIST BOLTS
Sizes
mm
M 4 0.7 2.83 6.28
M 5 0.8 3.62 10.3
M 6 1.0 4.30 14.5
M 7 1.0 5.20 21.2
M 8 1.25 5.82 26.6
M 10 1.5 7.34 42.4
M 12 1.75 8.87 61.8
M 14 2.0 10.4 84.8
M 16 2.0 12.2 117
M 18 2.5 13.4 142
M 20 2.5 15.2 182
M 22 2.5 17.0 228
M 24 3.0 18.3 263
M 27 3.0 21.0 346
M 30 3.5 23.1 420
M 33 3.5 25.8 524
M 36 4.0 28.0 615
M 39 4.0 30.7 739
Pitch
mm
Waist Diameter
mm
Tensile Stress Area
Sq. mm
METRIC FINE THREAD
WAI ST B OLTS
Sizes
mm
Pitch
mm
Waist Diameter
mm
Tensile Stress Area
Sq. mm
M 8 1.0 6.10 29.2
M 9 1.0 7.00 38.4
M 10 1.0 7.90 49.0
M 10 1.25 7.62 45.6
M 12 1.25 9.42 69.7
M 12 1.5 9.14 65.7
M 14 1.5 10.94 94.1
M 16 1.5 12.74 128
M 18 1.5 14.54 166
M 18 2.0 13.99 154
M 20 1.5 16.34 210
M 22 1.5 18.14 259
M 24 1.5 19.94 312
M 24 2.0 19.39 295
M 27 1.5 22.64 403
M 27 2.0 22.09 383
M 30 1.5 25.34 504
M 30 2.0 24.79 483
M 33 1.5 28.04 618
M 33 2.0 27.49 594
M 36 1.5 30.74 742
M 36 3.0 29.09 664
M 39 1.5 33.44 878
M 39 3.0 31.79 794
Guide to Ultrasonic Inspection of Fasteners Page 31
Page 40

Appendix: Tabular Data
EXTRA FINE THREAD SERIES, UNEF AND NEF
Sizes
12(.216) 0.2160 32 0.0270
5/16 0.3125 32 0.0625
7/16 0.4375 28 0.1274
9/16 0.5625 24 0.214
11/16 0.6875 24 0.329
13/16 0.8125 20 0.458
15/16 0.9375 20 0.620
Basic Major
in.
Diameter in.
1/4 0.2500 32 0.0379
3/8 0.3750 32 0.0932
1/2 0.5000 28 0.170
5/8 0.6250 24 0.268
3/4 0.7500 20 0.386
7/8 0.8750 20 0.536
Threads per in.
Tensile Stress Area
Sq. in.
FINE THREAD SERIES, UNF AND NF
Sizes
in.
Basic Major
Diameter in.
Threads per in.
Tensile Stress Area
Sq. in.
0(.060) 0.0600 80 0.00180
1(.073) 0.0730 72 0.00278
2(.086) 0.0860 64 0.00394
3(.099) 0.990 56 0.00523
4(.112) 0.1120 48 0.00661
5(.125) 0.1250 44 0.00830
6(.138) 0.1380 40 0.01015
8(.164) 0.1640 36 0.01474
10(.190) 0.1900 32 0.0200
12(.216) 0.2160 28 0.0258
1/4 0.2500 28 0.0364
5/16 0.3125 24 0.0580
1/3 0.3750 24 0.0878
1 1.0000 20 0.711
1 1/16 1.0625 18 0.799
1 1/8 1.1250 18 1.901
1 3/16 1.1875 18 1.009
1 1/4 1.2500 18 1.123
1 5/16 1.3125 18 1.244
1 3/8 1.3750 18 1.370
1 7/16 1.4375 18 1.503
1 1/2 1.5000 18 1.64
1 9/16 1.5625 18 1.79
1 5/8 1.6250 18 1.94
1 11/16 1.6875 18 2.10
7/16 0.4375 20 0.1187
1/2 0.5000 20 0.1 599
9/16 0.5625 18 0.203
5/8 0.6250 18 0.256
3/4 0.7500 16 0.373
7/8 0.8750 14 0.509
1 1.000 12 0.663
1 1/8 1.1250 12 0.856
1 1/4 1.2500 12 1.073
1 3/8 1.3750 12 1.315
1 1/2 1.5000 12 1.581
Page 32 Guide to Ultrasonic Inspection of Fasteners
Page 41

Appendix: Tabular Data
COARSE THREAD SERIES, UNC AND NC
Sizes
1(.073) 0.0730 64 0.000263
2(.086) 0.08660 56 0.00370
3(.099) 0.0990 48 0.00487
4(.112) 0.1120 40 0.00604
5(.125) 0.1250 40 0.00794
6(.138) 0.1380 32 0.00909
8(.164) 0.01640 32 0.0140
10(.190) 0.1900 24 0.0175
12(.216) 0.2160 24 0.0242
5/16 0.3125 18 0.0524
3/8 0.3750 16 0.0775
7/16 0.4375 14 0.1063
9/16 0.5625 12 0.182
5/8 0.6250 11 0.226
3/4 0.7500 10 0.334
7/8 0.8750 9 0.462
1 1/8 1.1250 7 0.763
1 1/4 1.2500 7 0.969
1 3/8 1.3750 6 1.133
1 1/2 1.5000 6 1.403
1 3/4 1.7500 5 1.90
2 1/4 2.2500 4 1/2 3.25
2 1/2 2.5000 4 4.00
2 3/4 2.7500 4 4.93
3 1/4 3.2500 4 7.10
Basic Major
in.
Diameter in.
1/4 0.2500 20 0.0318
0.5000 13 0.1419
1 1.0000 8 0.606
2 2.0000 4 1/2 2.50
3 3.0000 4 5.97
Threads per in.
Tensile Stress Area
Sq. in.
4-THREAD SERIES, 4UN
Sizes
Primary
in.
2 1/2 2.5000 4.00
2 3/4 2.7500 4.93
3 1/4 3.2500 7.10
3 1/2 3.5000 8.33
3 3/4 3.7500 9.66
4 1/4 4.2500 12.61
4 1/2 4.5000 14.23
4 3/4 4.7500 15.9
5 1/4 5.2500 19.7
5 1/2 5.5000 21.7
5 3/4 5.7500 23.8
Secondary
in.
2 5/8 2.6250 4.45
2 7/8 2.8750 5.44
3 3.0000 5.97
3 1/8 3.1250 6.52
3 3/8 3.3750 7.70
3 5/8 3.6250 9.00
3 7/8 3.8750 10.36
4 4.0000 11.08
4 1/8 4.1250 11.83
4 3/8 4.3750 13.41
4 5/8 4.6250 15.1
4 7/8 4.8750 16.8
55.000017.8
5 1/8 5.1250 18.7
5 3/8 5.3750 20.7
5 5/8 5.6250 22.7
5 7/8 5.8750 24.
6 6.0000 26.0
Basic Major Diameter
in.
Tensile Stress Area
Sq. in.
3 1/2 3.5000 4 8.33
3 3/4 3.7500 4 9.66
44.0000 4 11.08
Guide to Ultrasonic Inspection of Fasteners Page 33
Page 42

Appendix: Tabular Data
6-THREAD SERIES, 6UN
Sizes
Primary in.
1 3/8 1.3750 1.1555
1 1/2 1.5000 1.405
1 5/8 1.6250 1.68
1 3/4 1.7500 1.98
1 7/8 1.8750 2.30
2 1/4 2.2500 3.42
2 1/2 2.5000 4.29
2 3/4 2.7500 5.26
3 1/4 3.2500 7.49
3 1/2 3.5000 8.75
3 3/4 3.7500 10.11
4 1/4 4.2500 13.12
4 1/2 4.5000 14.78
4 3/4 4.7500 16.5
5 1/4 5.2500 20.3
5 1/2 5.5000 22.4
5 3/4 5.7500 24.5
Secondary
in.
1 7/16 1.4375 1.2777
1 9/16 1.5625 1.54
1 11/16 1.6875 1.83
1 13/16 1.8125 2.14
1 15/16 1.9375 2.47
2 2.0000 2.65
2 1/8 2.1250 3.03
2 3/8 2.3750 3.85
2 5/8 2.6250 4.76
2 7/8 2.8750 5.78
3 3.0000 6.33
3 1/8 3.1250 6.89
3 3/8 3.3750 8.11
3 5/8 3.6250 9.42
3 7/8 3.8750 10.83
4 4.0000 11.57
4 1/8 4.1250 12.33
4 3/8 4.3750 13.94
4 5/8 4.6250 15.6
4 7/8 4.8750 17.5
5 5.0000 18.4
5 1/8 5.1250 19.3
5 3/8 5.3750 21.3
5 5/8 5.6250 23.4
5 7/8 5.8750 25.6
6 6.0000 26.8
Basic Major Diameter
in.
Tensile Stress Area
Sq. in.
8-THREAD SERIES, 8UN
Sizes
Primary in.
Secondary
in.
Basic Major Diameter
in.
Tensile Stress Area
1 1.0000 0.606
1 1/16 1.0625 0.695
1 1/8 1.1250 0.790
1 3/16 1.1875 0.892
1 1/4 1.2500 1.000
1 5/16 1.3125 1.114
1 3/8 1.3750 1.233
1 7/16 1.4375 1.360
1 1/2 1.5000 1.492
1 9/16 1.5625 1.63
1 5/8 1.6250 1.78
1 11/16 1.6875 1.93
1 3/4 1.7500 2.08
1 13/16 1.8125 2.25
1 7/8 1.8750 2.41
1 15/16 1.9375 2.59
2 2.0000 2.77
2 1/8 2.1250 3.15
2 1/4 2.2500 3.56
2 3/8 2.3750 3.99
2 1/2 2.5000 4.44
2 5/8 2.6250 4.92
2 3/4 2.7500 5.43
2 7/8 2.8750 5.95
3 3.0000 6.51
3 1/8 3.1250 7.08
3 1/4 3.2500 7.69
3 3/8 3.3750 8.31
3 1/2 3.5000 8.96
3 5/8 3.6250 9.64
3 3/4 3.7500 10.34
3 7/8 3.8750 11.06
4 4.0000 11.81
4 1/8 4.1250 12.59
4 1/4 4.2500 13.38
4 3/8 4.3750 14.21
4 1/2 4.5000 15.1
4 5/8 4.6250 15.9
4 3/4 4.7500 16.8
4 7/8 4.8750 17.7
5 5.0000 18.7
5 1/8 5.1250 19.7
5 1/4 5.2500 20.7
5 3/8 5.3750 21.7
5 1/2 5.5000 22.7
5 5/8 5.6250 23.8
5 3/4 5.7500 24.9
5 7/8 5.8750 26.0
6 6.0000 27.1
Sq. in.
Page 34 Guide to Ultrasonic Inspection of Fasteners
Page 43

Appendix: Tabular Data
12-THREAD SERIES, 12UN
Sizes
Primary in.
Secondary
in.
Basic Major Diameter
in.
Tensile Stress Area
9/16 0.5625 0.182
5/8 0.6250 0.232
11/16 0.6875 0.289
3/4 0.7500 0.351
13/16 0.8125 0.420
7/8 0.8750 0.495
15/16 0.9375 0.576
1 1.0000 0.663
1 1/16 1.0625 0.756
1 1/8 1.1250 0.856
1 3/16 1.1875 0.961
1 1/4 1.2500 1.073
1 5/16 1.3125 1.191
1 3/8 1.3750 1.315
1 7/16 1.4375 1.445
1 1/2 1.5000 1.58
1 9/16 1.5625 1.72
1 5/8 1.6250 1.87
1 11/16 1.6875 2.03
1 3/4 1.7500 2.19
1 13/16 1.8125 2.35
1 7/8 1.8750 2.53
1 15/16 1.9375 2.71
2 2.0000 2.89
2 1/8 2.1250 3.28
2 1/4 2.2500 3.69
2 3/8 2.3750 4.13
2 1/2 2.5000 4.60
2 5/8 2.6250 5.08
2 3/4 2.7500 5.59
2 7/8 2.8750 6.13
3 3.0000 6.69
3 1/8 3.1250 7.28
3 1/4 3.2500 7.89
3 3/8 3.3750 8.52
3 1/2 3.5000 9.18
3 5/8 3.6250 9.86
3 3/4 3.7500 10.57
3 7/8 3.8750 11.30
4 4.0000 12.06
4 1/8 4.1250 12.84
4 1/4 4.2500 13.65
4 3/8 4.3750 14.48
4 1/2 4.5000 15.3
4 5/8 4.6250 16.2
4 3/4 4.7500 17.1
4 7/8 4.8750 18.0
5 5.0000 19.0
5 1/8 5.1250 20.0
5 1/4 5.2500 21.0
5 3/8 5.3750 22.0
5 1/2 5.5000 23.1
5 5/8 5.6250 24.1
5 3/4 5.7500 25.2
5 7/8 5.8750 26.4
6 6.0000 27.5
Sq. in.
16-THREAD SERIES, 16UN
Sizes
Primary in.
7/16 0.4375 0.1114
9/16 0.5625 0.198
1 1/8 1.1250 0.889
1 1/4 1.2500 1.111
1 3/8 1.3750 1.356
1 1/2 1.5000 1.63
1 5/8 1.6250 1.92
1 3/4 1.7500 2.24
1 7/8 1.8750 2.58
2 1/4 2.2500 3.76
2 1/2 2.5000 4.67
2 3/4 2.7500 5.68
3 1/4 3.2500 7.99
3 1/2 3.5000 9.29
3 3/4 3.7500 10.69
4 1/4 4.2500 13.78
4 1/2 4.5000 15.5
4 3/4 4.7500 17.3
5 1/4 5.2500 21.1
5 1/2 5.5000 23.2
5 3/4 5.7500 25.4
Secondary
in.
3/8 0.3750 0.0775
1/2 0.5000 0.151
5/8 0.6250 0.250
11/16 0.6875 0.308
3/4 0.7500 0.373
13/16 0.8125 0.444
7/8 0.8750 0.521
15/16 0.9375 0.604
1 1.0000 0.693
1 1/16 1.0625 0.788
1 3/16 1.1875 0.997
1 5/16 1.3125 1.230
1 7/16 1.4375 1.488
1 9/16 1.5625 1.77
1 11/16 1.6875 2.08
1 13/16 1.8125 2.41
1 15/16 1.9375 2.77
2 2.0000 2.95
2 1/8 2.1250 3.35
2 3/8 2.3750 4.21
2 5/8 2.6250 5.16
2 7/8 2.8750 6.22
3 3.0000 6.78
3 1/8 3.1250 7.37
3 3/8 3.3750 8.63
3 5/8 3.6250 9.98
3 7/8 3.8750 11.43
4 4.0000 12.19
4 1/8 4.1250 12.97
4 3/8 4.3750 14.62
4 5/8 4.6250 16.4
4 7/8 4.8750 18.2
5 5.0000 19.2
5 1/8 5.1250 20.1
5 3/8 5.3750 22.2
5 5/8 5.6250 24.3
5 7/8 5.8750 26.5
6 6.0000 27.7
Basic Major Diameter
in.
Tensile Stress Area
Sq. in.
Guide to Ultrasonic Inspection of Fasteners Page 35
Page 44

Appendix: Tabular Data
20-THREAD SERIES, 20UN
Sizes
Primary in.
1/4 0.2500 0.0318
5/16 0.3125 0.0547
3/8 0.3750 0.0836
7/16 0.4375 0.1187
1/2 0.5000 0.160
9/16 0.5625 0.207
5/8 0.6250 0.261
3/4 0.7500 0.386
7/8 0.8750 0.536
1 1/8 1.1250 0.910
1 1/4 1.2500 1.133
1 3/8 1.3750 1.382
1 1/2 1.5000 1.65
1 5/8 1.6250 1.95
1 3/4 1.7500 2.27
1 7/8 1.8750 2.62
2 1/4 2.2500 3.81
2 1/2 2.5000 4.72
2 3/4 2.7500 5.73
Secondary
in.
11/16 0.6875 0.320
13/16 0.8125 0.458
15/16 0.9375 0.620
1 1.0000 0.711
1 1/16 1.0625 0.807
1 3/16 1.1875 1.018
1 5/16 1.3125 1.254
1 7/16 1.4375 1.51
1 9/16 1.5625 1.80
1 11/16 1.6875 2.11
1 13/16 1.8125 2.44
1 15/16 1.9375 2.80
2 2.0000 2.99
2 1/8 2.1250 3.39
2 3/8 2.3750 4.25
2 5/8 2.6250 5.21
2 7/8 2.8750 6.27
3 3.0000 6.84
Basic Major Diameter
in.
Tensile Stress Area
Sq. in.
28-THREAD SERIES, 28UN
Sizes
Primary
in.
Secondary
in.
Basic Major Diameter
in.
Tensile Stress Area
Sq. in.
12(.216) 0.2160 0.0258
1/4 0.2500 0.0364
5/16 0.3125 0.0606
3/8 0.3750 0.0909
7/16 0.4375 0.1274
1/2 0.5000 0.170
9/16 0.5625 0.21 9
5/8 0.6250 0.274
11/16 0.6875 0.335
3/4 0.7500 0.402
13/16 0.8125 0.475
7/8 0.8750 0.554
15/16 0.9375 0.640
1 1.0000 0.732
1 1/16 1.0625 0.830
1 1/8 1.1250 0.933
1 3/16 1.1875 1.044
1 1/4 1.2500 1.160
1 5/16 1.3125 1.282
1 3/8 1.3750 1.411
1 7/16 1.4375 1.55
1 1/2 1.5000 1.69
Page 36 Guide to Ultrasonic Inspection of Fasteners
Page 45

32-THREAD SERIES, 32UN
Appendix: Tabular Data
Sizes
Primary
in.
6(.138) 0.1380 0.00909
8(.164) 0.1640 0.0140
10(.190) 0.1900 0.0200
1/4 0.2500 0.0379
5/16 0.3125 0.0625
3/8 0.3750 0.0932
7/16 0.4375 0.1301
1/2 0.5000 0.173
9/16 0.5625 0.222
5/8 0.6250 0.278
3/4 0.7500 0.407
Secondary
in.
12(.216) 0.2160 0.0270
11/16 0.6875 0.339
13/16 0.8125 0.480
Basic Major Diameter
in.
Tensile Stress Area
Sq. in.
7/8 0.8750 0.560
15/16 0.9375 0.646
1 1.0000 0.738
Guide to Ultrasonic Inspection of Fasteners Page 37
Page 46

Appendix: Tabular Data
THIS P AGE WAS INTENTIONALL Y LEFT BLANK.
Page 38 Guide to Ultrasonic Inspection of Fasteners
 Loading...