

Page 1

FAXPHONE B640
Electronic User’s Manual
Page 2
How to Use this User's Guide
Before you use this User’s Guide, read this list of symbols, terms and abbreviations
to become familiar with them. A complete glossary of terms is included at the end of
this guide.
• Document
The original sheet(s) of paper you send, receive or copy with your FAXPHONE.
• Menu
A list of options or features from which you select an item to set up or change.
• Numeric buttons
The round buttons on the operation panel with digits 0 through 9, and # on them.
• Arrow buttons
The buttons used to display choices and change settings. These buttons
also change the volume setting of the speaker.
• STOP button
Press to cancel any operation or to cancel the selection of a menu item.
• START/COPY button
Press to start an operation or register a setting.
• Transaction number
A number automatically assigned every time you send or receive a fax. Transaction
numbers are 4-digit decimal numbers that can help you keep track of the documents
you send and receive.
• TX/RX NO. XXXX
Represents the transaction number when displayed on the LCD, where XXXX is the
4-digit transaction number.
• TX
Stands for transmit or send.
• RX
Stands for receive.
• NOTE
A note describes important points and helpful hints, or how to avoid minor difficulties.
As an ENERGY STAR Partner, Canon has determined that
the FAXPHONE B640 meets the ENERGY STAR guidelines for
energy efficiency.
Trademarks
Canon, BJ and FAXPHONE are registered trademarks and Bubble Jet is a trademark
of Canon Inc.
Copyright
This manual is copyrighted by Canon Computers Systems, Inc. (CCSI) with all rights reserved. Under the
copyright laws, this manual may not be reproduced in any form, in whole or part, without the prior written
consent of CCSI.
©1997 Canon Computer Systems, Inc.
ii
Page 3

Welcome
Thank you for choosing the Canon FAXPHONE® B640 Bubble JetTM facsimile. The
compact, upright design of the F AXPHONE B640 means it takes up less space in your
work area. And the Bubble Jet print mechanism uses cut-sheet plain paper, so you get
crisp reproductions of your fax documents and copies.
The FAXPHONE B640 has a number of features that make it ideal for small to
medium-sized offices with a single telephone line.
Features
Plain paper
The FAXPHONE accepts letter, legal and A4 size cut-sheet plain paper for crisp
reproduction and faxes that are flat and easy to write on.
Automatic switching between fax and voice calls
The FAXPHONE recognizes incoming fax calls, and automatically switches to
receive mode.
Automatic dialing
A variety of dialing methods lets you register frequently used fax numbers and phone
numbers and access them by pressing one or a few buttons.
Error Correction Mode (ECM) TX / RX
Automatically helps correct transmission errors due to system and telephone line noise.
Delayed transmission
Sends a fax automatically at a later time, for example, at night when telephone rates
are lower.
Distinctive Ring Pattern Detection (DRPD)
Lets you use your telephone company’s special service to have separate fax and voice
numbers with different ring patterns on a single telephone line.
360 dpi copy mode
Lets you make copies at 360 × 360 dpi.
iii
Page 4

Disclaimer
Canon Computer Systems, Inc. has reviewed this manual thoroughly in order that it will be an easy to use
guide to your Canon FAXPHONE B640 Bubble Jet facsimile. All statements, technical information, and
recommendations in this manual and in any guides or related documents are believed reliable, but the
accuracy and completeness thereof are not guaranteed or warranted, and they are not intended to be, nor
should they be understood to be, representations or warranties concerning the products described.
Your FAXPHONE has been sold to you subject to the limited warranty set forth in the warranty card. Further,
CCSI reserves the right to make changes in the specifications of the products described in this manual at any
time without notice and without obligation to notify any person of such changes.
If you have any questions regarding your FAXPHONE or the information in this manual, please call the
Canon Computer Systems Customer Care Center at 1-800-423-2366 (U.S.A.) or contact Canon Canada
at 1-800-263-1121.
Users in the U.S.A.
PRE-INSTALLATION REQUIREMENTS FOR CANON FACSIMILE EQUIPMENT
A. Location
Supply a suitable table, cabinet, or desk. See Specifications (p. 103) for unit’s dimensions and weight.
B. Order Information
1. Only a single line, touch tone or rotary telephone set is to be used.
2. Order an RJ11-C modular jack (USOC code), which should be installed by the phone company. If
the RJ11-C jack is not present, installation cannot occur.
3. Order a normal business line from your telephone company’s business representative. The line
should be a regular voice grade line or equivalent. Use one line per unit.
DDD (DIRECT DISTANCE DIAL) LINE
or
IDDD (INTERNATIONAL DIRECT DISTANCE DIAL) LINE IF YOU
COMMUNICATE OVERSEAS
NOTE: Canon recommends an individual line following industry standards [e.g., the 2500 (Touch tone)
or 500 (Rotary/Pulse Dial) telephones]. A dedicated extension off a PBX unit without “Call
Waiting” can be used with your FAX unit. Key telephone systems are not recommended
because they send non-standard signals to individual telephones for ringing and special
codes, which may cause a FAX error.
C. Power Requirements
This equipment should be connected to a standard 120 volt AC, three-wire grounded outlet only. Do not
connect this unit to an outlet or power line shared with other appliances that cause “electrical noise.” Air
conditioners, electric typewriters, copiers, and machines of this sort generate noise which often
interferes with communications equipment and the sending and receiving of documents.
CONNECTION OF THE EQUIPMENT
This equipment complies with Part 68 of the FCC rules. On the rear panel of this equipment is a label that
contains, among other information, the FCC Registration Number and Ringer Equivalence Number (REN) for
this equipment. If requested, this information must be given to the telephone company. This equipment may
not be used on coin service provided by the telephone company. Connection to party lines is subject to state
tariffs.
iv
Page 5

IN CASE OF EQUIPMENT MALFUNCTION
Should any malfunction occur which cannot be corrected by the procedures described in this
disconnect the equipment from the telephone line or unplug the power cord. The telephone line should not be
reconnected or the power cord plugged in until the problem is completely resolved.
Canon provides experienced support personnel to help you in every way.
User’s Guide
,
CANON COMPUTER SYSTEMS CUSTOMER CARE CENTER
RIGHTS OF THE TELEPHONE COMPANY
Should the equipment cause harm to the telephone network, the telephone company may temporarily
disconnect service. The telephone company also retains the right to make changes in facilities and services
which may affect the operation of this equipment. When such changes are necessary, the telephone company
is required to give adequate prior notice to the user.
WARNING
Do not make any changes or modifications to the equipment unless otherwise specified in the manual. If such
changes or modifications should be made, you could be required to stop operation of the equipment.
Note: This equipment has been tested and found to comply with the limits for a Class B digital device,
pursuant to Part 15 of the FCC Rules. These limits are designed to provide reasonable protection against
harmful interference in a residential installation. This equipment generates, uses and can radiate radio
frequency energy and, if not installed and used in accordance with the instructions, may cause harmful
interference to radio communications.
However, there is no guarantee that interference will not occur in a particular installation. If this equipment
does cause harmful interference to radio or television reception, which can be determined by turning the
equipment off and on, the user is encouraged to try to correct the interference by one of the following
measures:
• Re-orient or relocate the receiving antenna.
• Increase the separation between the equipment and receiver.
• Connect the equipment into an outlet on a circuit different from that to which the receiver is connected.
• Consult the dealer or an experienced radio/TV technician for help.
The Telephone Consumer Protection Act of 1991 makes it unlawful for any person to use a computer or other
electronic device to send any message via a telephone fax machine unless such message clearly contains in
a margin at the top or bottom of each transmitted page or on the first page of the transmission, the date and
time it is sent and an identification of the business or other entity, or other individual sending the message and
the telephone number of the sending machine or such business, other entity, or individual.
In order to program this information into your fax machine, you should complete the procedure to register your
telephone/fax number, name, date and time on pages 36, 37, and 38.
World Wide Web: http://www.ccsi.canon.com
Canon BBS: 1-757-420-2000
Fax Retrieval System: 1-800-526-4345
Customer Care Center: 1-800-423-2366
(6 a.m. to midnight EST, 7 days/week, except holidays)
v
Page 6

Important safety instructions
1 Read these safety instructions and refer to them later if you have any questions.
2 Follow all warnings and instructions marked on the FAXPHONE B640.
3 Place the FAXPHONE on a level surface. Do not place it on an unstable cart, stand, or table. If the
FAXPHONE B640 falls, serious damage could occur.
4 Do not use the FAXPHONE B640 near water.
5 Slots and openings on the cabinet and on the back or bottom are provided for ventilation. To ensure
reliable operation of the FAXPHONE B640 and to protect it from overheating, do not block or cover these
openings. Do not block the openings by placing the unit on a bed, sofa, rug, or other similar surface, or
near a radiator or heat register. Do not place the FAXPHONE B640 in a closet or built-in installation
unless proper ventilation is provided.
6 Operate the FAXPHONE B640 only from the type of power source indicated on the unit’s label. If you are
not sure of the type of power available, consult your dealer or local power company.
7 The FAXPHONE B640 is equipped with a 3-prong, grounding-type plug; the plug has a third (grounding)
pin. This plug will only fit into a grounding-type outlet. This is a safety feature. If you are unable to insert
the plug into your outlet, contact an electrician to replace your outlet (do not use a 3-to-2 adapter). Do not
defeat the safety purpose of the grounding-type plug.
8 Do not allow anything to rest on the power cord, and do not locate the FAXPHONE B640 where the cord
will be walked on.
9 If you use an extension cord with the FAXPHONE B640, make sure that the total of the ampere ratings on
the products plugged into the extension cord does not exceed the extension cord ampere rating. Also,
make sure that the total of all products plugged into the wall outlet does not exceed the current amperage of the circuit breaker.
10 Do not push objects of any kind into the slots or openings on the cabinet as they may touch dangerous
voltage points or short out parts, which could result in a risk of fire or electric shock.
11 Do not spill liquid of any kind on the FAXPHONE B640. If you spill liquid or if any substance falls into the
unit, immediately unplug the FAXPHONE B640. Call your Canon Authorized Service Facility (ASF).
12 Unplug the FAXPHONE B640 from the wall outlet before cleaning. See pp. 88 and 89 for details.
13 Except as explained elsewhere in this manual, do not attempt to service the FAXPHONE B640 yourself.
Opening and removing interior covers may expose you to dangerous voltage points or other risks. Refer
all servicing to a Canon Authorized Service Facility (ASF).
14 Unplug this product from the wall outlet and refer servicing to qualified service personnel under the
following conditions:
• When the power cord or plug is damage or frayed.
• If liquid has been spilled into the unit.
• If the FAXPHONE B640 has been exposed to rain or water.
• If the FAXPHONE B640 does not operate normally when you have followed the operating instructions.
Adjust only those controls that are covered by the operating instructions in this manual. Improper
adjustment of other controls may result in damage and many require extensive work by a qualified
technician to restore the product to normal operation.
• If the FAXPHONE B640 has been dropped or the cabinet has been damaged.
• If the FAXPHONE B640 exhibits a distinct change in performance, indicating a need for service.
You must register your fax number, your name or company name, and the date and time in the FAXPHONE
B640 before you use it.
This is required by the FCC rules governing the use of fax equipment. See pp. 36, 37, and 38 for details.
vi
Page 7

Users in Canada
PRE-INSTALLATION REQUIREMENTS FOR CANON FACSIMILE EQUIPMENT
A. Location
Supply a suitable table, cabinet, or desk. See specifications (p. 103) for unit’s dimensions and weight.
B. Order Information
1. Provide only a single line to touch-tone or rotary telephone set terminated with a standard 4-pin
modular phone plug. (Touch-tone is recommended if available in your area.)
2. Order an RJ11-C modular jack (USOC code), which should be installed by the phone company. If
the RJ11-C jack is not present, installation cannot occur.
3. Order a normal business line from your telephone company’s business representative. The line
should be a regular voice grade line or equivalent. Use one line per unit.
DDD (DIRECT DISTANCE DIAL) LINE
or
IDDD (INTERNATIONAL DIRECT DISTANCE DIAL) LINE IF YOU
COMMUNICATE OVERSEAS
NOTE: Canon recommends an individual line following industry standards [e.g., the 2500 (Touch tone)
C. Power Requirements
The power outlet should be a three-prong grounded receptacle (Single or Duplex). It should be
independent from copiers, heaters, air conditioners, or any electric equipment that is thermostatically
controlled. The rated value is 120 volts and 15 amperes. The RJ11-C modular jack should be relatively
close to the power outlet to facilitate installation.
NOTICE
The Industry Canada label identifies certified equipment. This certification means that the equipment meets
telecommunications network protective, operational and safety requirements as prescribed in the appropriate
Terminal Equipment Technical Requirements document(s). The Department does not guarantee the
equipment will operate to the user’s satisfaction.
Before installing this equipment, users should ensure that it is permissible to be connected to the facilities of
the local telecommunications company. The equipment must also be installed using an acceptable method of
connection. The customer should be aware that compliance with the above conditions may not prevent
degradation of service in some situations.
Repairs to certified equipment should be coordinated by a representative designated by the supplier. Any
repairs or alterations made by the user to this equipment, or equipment malfunctions, may give the
telecommunications company cause to request the user to disconnect the equipment. Information regarding
authorized service facility locations can be obtained by calling Canon Canada below.
or 500 (Rotary/Pulse Dial) telephones]. A dedicated extension off a PBX unit without “Camp
On” signals is also permissible with a FAX unit. Key telephone systems are not recommended
because they send non-standard signals to individual telephones for ringing and special
codes, which may cause a FAX error.
CANON CANADA
1-800-263-1121
24 HOURS A DAY, 7 DAYS A WEEK
Users should ensure for their own protection that the electrical ground connection's power utility, telephone
lines and internal metallic water pipe system, if present, are connected together. This precaution may be
particularly important in rural areas.
Caution
Users should not attempt to make such connections themselves, but should contact the appropriate electric
inspection authority, or electrician, as appropriate.
NOTICE
The Ringer Equivalence Number (REN) assigned to each terminal device provides an indication of the
maximum number of terminals allowed to be connected to a telephone interface. The termination on an
interface may consist of any combination of devices subject only to the requirement that the sum of the Ringer
Equivalence Numbers of all the devices does not exceed 5.
vii
Page 8
Precautions
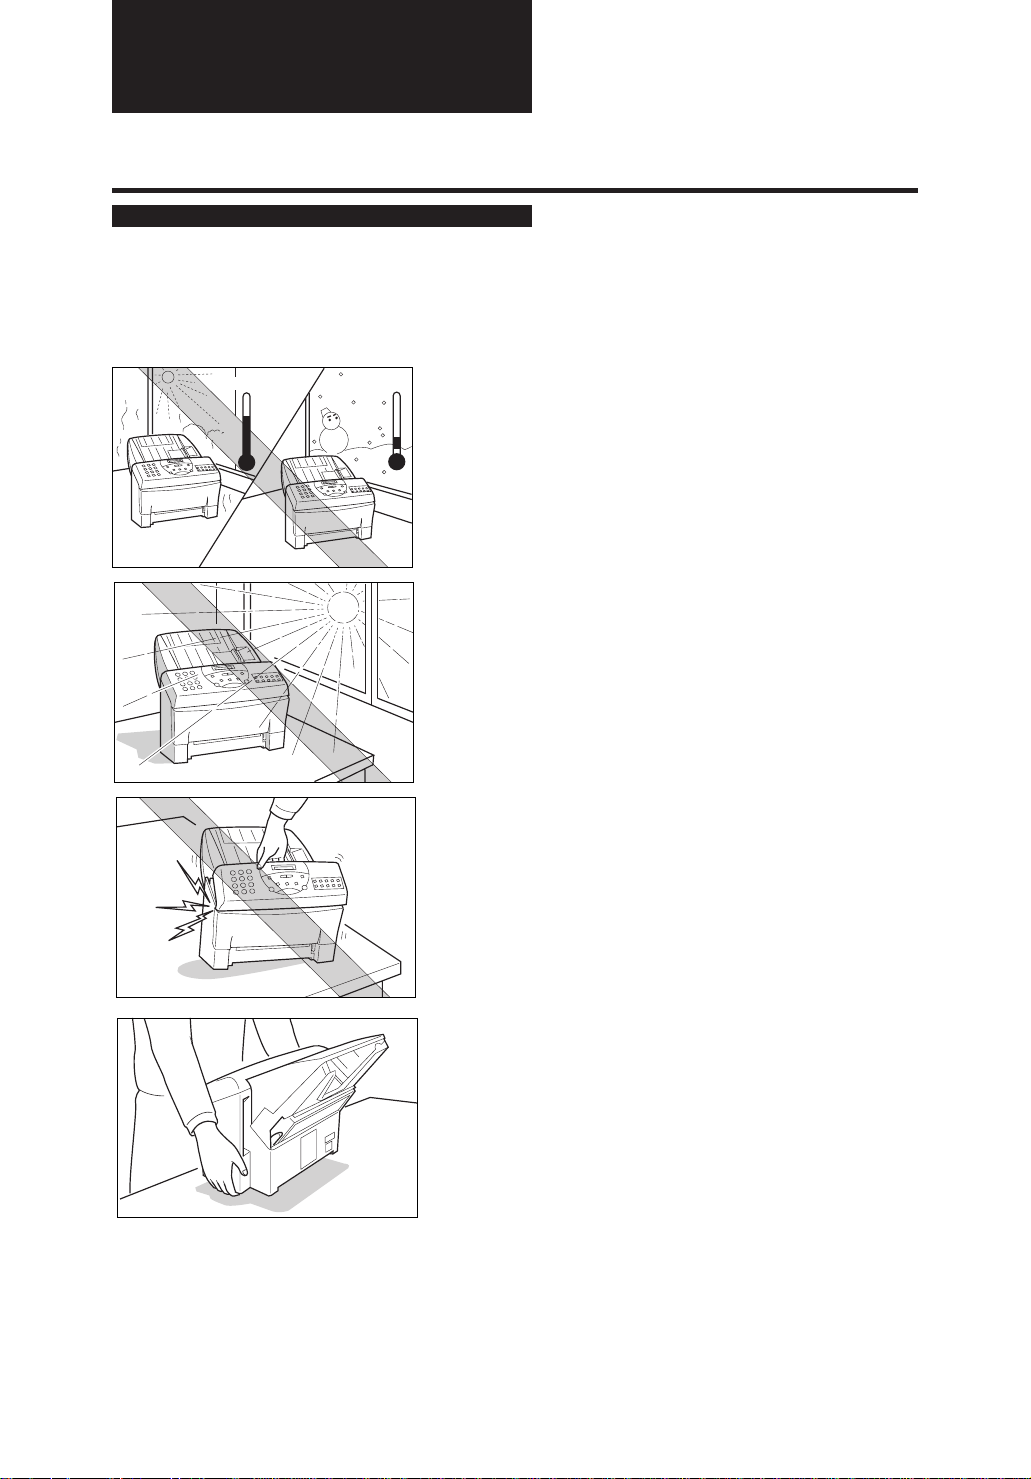
General _________________________________________
Make sure the place where you set up the FAXPHONE satisfies the following
conditions:
Over 90.5°F (32.5°C)
\
Under 50°F (10°C)
• Use the FAXPHONE only within the
following temperature and humidity
ranges.
Ambient temperature:
50°F to 90.5°F (10°C to 32.5°C)
Ambient humidity:
10% to 80% RH (no condensation)
• Keep your FAXPHONE out of direct
sunlight, as this can damage the unit.
• Do not lift the FAXPHONE by the
operation panel.
• Hold the FAXPHONE as shown when
transporting it.
viii
Page 9
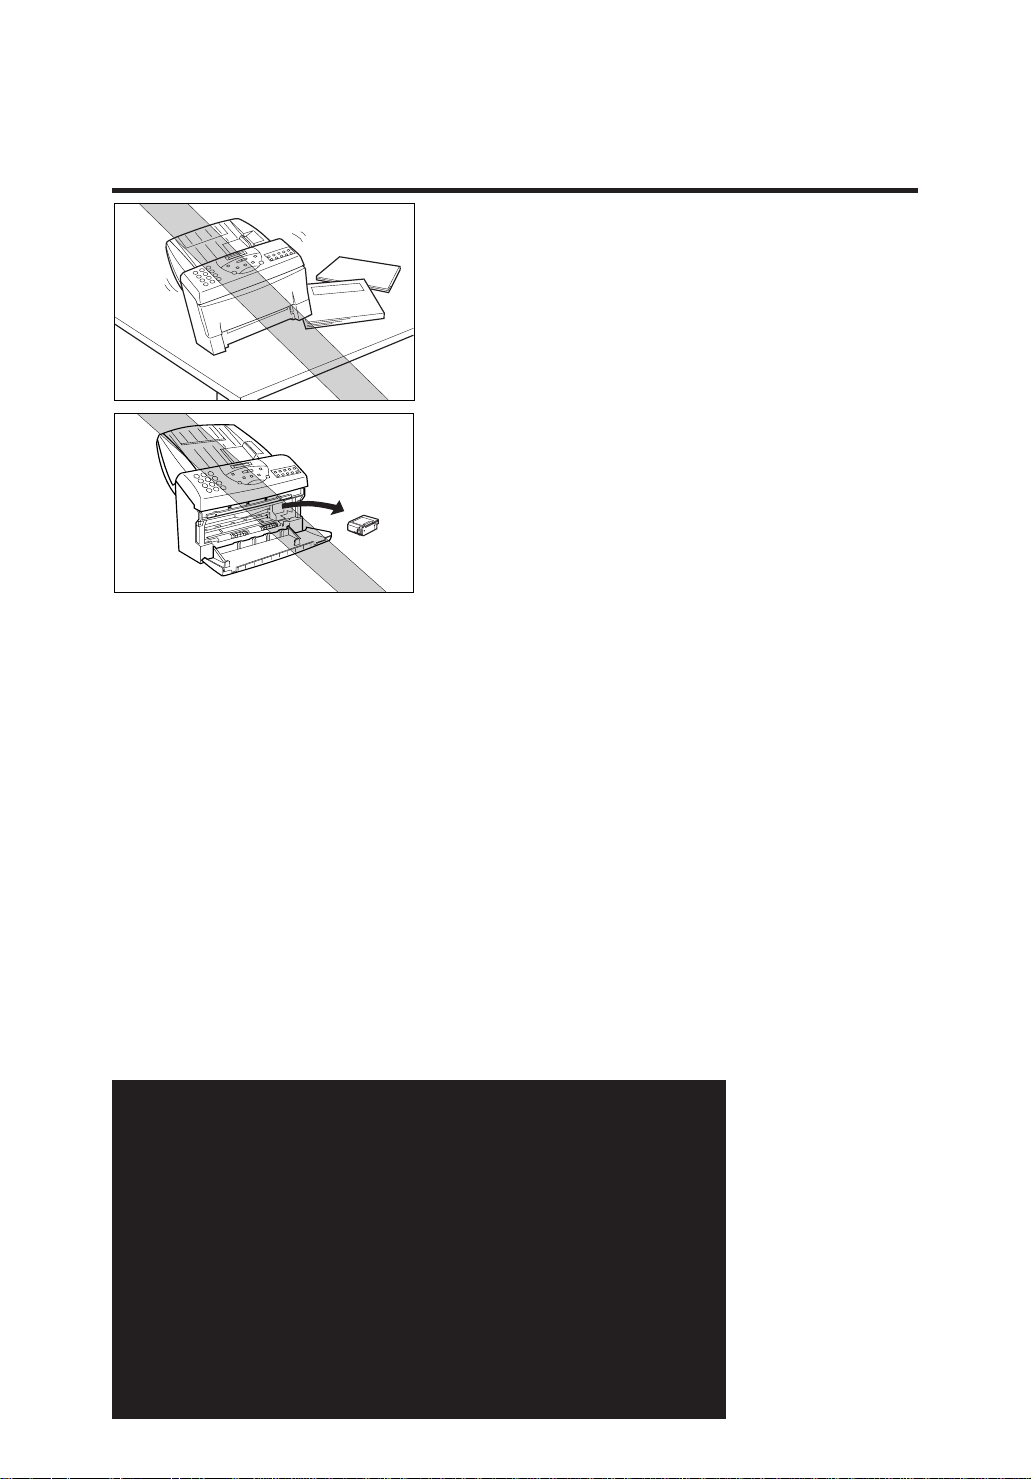
• Place the FAXPHONE on a level
surface.
• Do not remove the BJ cartridge from
the unit unless it needs to be replaced,
or when transporting the FAXPHONE.
Removing the cartridge and leaving the
print head unprotected will cause it to
dry out and become unusable.
• Do not place the FAXPHONE on the edge of a desk to prevent received documents
from falling onto the floor.
• Certain table surfaces may prevent received documents from sliding out smoothly,
resulting in paper jams. Do not place the F AXPHONE on these types of tables.
• Do not install the FAXPHONE near devices which contain magnets or generate
magnetic fields.
• Do not subject the FAXPHONE to strong physical shock or vibration.
• Keep the FAXPHONE clean. Dust accumulation can prevent the FAXPHONE from
operating properly.
• Before you transport your FAXPHONE, be sure to remove the BJ cartridge and
recover the print head with the orange tape. After moving the FAXPHONE, remove
the orange tape and reload the BJ cartridge.
Precautions
Others __________________________________________
Here are some other general precautions when using or working around the
FAXPHONE.
CAUTION
• Avoid installing your FAXPHONE in places exposed to direct sunlight, dust, vibration, high temperature or humidity, or on unstable surfaces.
• To assure proper electrical contact, make sure the F AXPHONE is firmly plugged in.
• Never pull on the cord to unplug the FAXPHONE. Pull on the plug itself.
WARNING
•
Do not overload the electrical outlet where the FAXPHONE is plugged in.
• Never plug or unplug the FAXPHONE when your hands are wet.
• For your safety, unplug the FAXPHONE during electrical storms.
• If you have problems with the FAXPHONE (smoke, odd smells or
noises), immediately unplug the FAXPHONE from the outlet. Keep
the area around the outlet free from clutter so you can unplug the
FAXPHONE quickly in case of an emergency.
• Never use liquids or drink beverages around the FAXPHONE. Liquids spilled on the FAXPHONE can cause a fire or electrical shock. If
you accidentally spill a liquid on the FAXPHONE, unplug it immediately and call your Canon service representative.
• To avoid electrical shock from exposed power points, never disassemble the FAXPHONE. There are no parts or switches in the
FAXPHONE that require adjustment.
ix
Page 10

Table of Contents
1. SETTING UP
How to Use this
User's Guide
Welcome........................................................................ iii
Features ......................................................................... iii
Disclaimer ................................................................................................. iv
Users in the U.S.A. .................................................................................. iv
Important safety instructions ................................................................ vi
Users in Canada ..................................................................................... vii
Precautions ................................................................. viii
General .................................................................................................... viii
Others ........................................................................................................ ix
Unpacking ...................................................................... 2
Removing the shipping materials .......................................................... 3
Assembling the FAXPHONE .......................................... 4
Attaching components ............................................................................ 4
Connecting the AC power cord .............................................................. 5
Loading the paper .......................................................... 6
Selecting the right kind of paper ........................................................... 6
Loading the paper .................................................................................... 6
Installing the BJ cartridge ............................................. 8
BJ cartridge guidelines ........................................................................... 8
Handling the BJ cartridge ....................................................................... 9
Installing the BJ cartridge .................................................................... 10
Connecting the phone line .......................................... 13
Connecting to the wall jack .................................................................. 13
Connecting an extension phone or answering machine (optional)...
Setting the TEL LINE TYPE .................................................................... 14
Setting up to receive faxes .......................................... 15
Selecting the receiving mode .............................................................. 15
Fax Only Mode ........................................................................................ 16
Fax/Tel Mode ...........................................................................................17
Manual Mode .......................................................................................... 18
Ans. Machine Mode .............................................................................. 19
Distinctive Ring Pattern Detection (DRPD) feature .... 21
Types of ring patterns ............................................................................ 21
Turning on DRPD and assigning a setting to a ring pattern ............ 22
How DRPD responds to calls ............................................................... 24
Communicating using the Distinctive Ring Pattern
Detection (DRPD) feature .............................................................. 24
13
2. PREPARING
TO USE YOUR
FAXPHONE
x
Main components of the FAXPHONE ......................... 28
Front view ................................................................................................ 28
Rear view ................................................................................................. 29
FAXPHONE controls — the Operation Panel .............. 30
Registering your name and number ........................... 32
Moving through the main menus ......................................................... 32
Entering a number .................................................................................. 33
Entering a name ...................................................................................... 34
Personalizing your FAXPHONE ............................................................ 35
Page 11

Table of Contents
Registering the date and time .............................................................. 36
Registering your telephone/fax number and name .......................... 37
Registering One-touch Speed Dialing numbers
and names ............................................................... 39
Registering Coded Speed Dialing numbers
and names ............................................................... 41
3. HANDLING
DOCUMENTS
4. MAKING
COPIES
5. SENDING
FAXES
Preparing documents .................................................. 44
Types of documents you can scan ...................................................... 44
Loading the document ........................................................................... 45
Setting the resolution and density ....................................................... 47
Copying documents ..................................................... 50
Preparing to send a document .................................... 52
Sending methods .................................................................................... 52
Dialing methods ...................................................................................... 52
Sending documents ..................................................... 53
Direct Sending ........................................................................................ 53
Manual Sending ..................................................................................... 53
Automatic Dialing ................................................................................... 54
Memory Sending .................................................................................... 55
Canceling Sending ................................................................................. 56
Redialing .................................................................................................. 56
Messages displayed during sending .................................................. 57
Clearing document jams (ejecting a document from the ADF) ....... 58
Delayed Sending .......................................................... 59
Sending other documents while the FAXPHONE is set
for Delayed Sending ...................................................................... 60
Canceling Delayed Sending ................................................................. 61
Sequential broadcasting .............................................. 62
Sending a document to more than one location ...............................62
6. RECEIVING
FAXES
Receiving documents .................................................. 64
Receiving documents in Manual Mode .............................................. 64
Receiving documents in Fax Only Mode ............................................ 65
Receiving documents in Fax/Tel Mode ...............................................65
Receiving documents in Ans. Machine Mode .................................. 66
Receiving documents in memory ........................................................ 67
Printing documents in memory ............................................................ 68
Receiving while registering, copying or printing .............................. 68
xi
Page 12

Table of Contents
7. SETTINGS
AND ACTIVITY
REPORTS
8.
SOLUTIONS
TO COMMON
PROBLEMS
User menu settings ..................................................... 70
Settings ........................................................................ 73
How to change a setting ....................................................................... 73
Activity reports ............................................................ 79
How to print a report .............................................................................. 79
Activity management report ................................................................. 80
One-touch Speed Dialing list ................................................................ 80
Coded Speed Dialing list ....................................................................... 81
User’s data list ........................................................................................ 82
Activity report (Sending) ....................................................................... 82
Activity report (Receiving) .................................................................... 83
Multi-activity report ............................................................................... 83
Memory clear list ................................................................................... 84
Paper jams .................................................................... 86
Automatic Document Feeder (ADF) jams ...........................................86
Recording paper jams ........................................................................... 87
Periodic care ................................................................. 88
Cleaning the FAXPHONE exterior ........................................................88
Cleaning the glass scanning window ................................................. 88
Cleaning the printer area ...................................................................... 89
Cleaning the BJ cartridge print head .................................................. 90
Replacing the BJ cartridge ................................................................... 91
Frequently Asked Questions ....................................... 92
TRANSMITTING ..................................................................................... 92
RECEIVING ............................................................................................... 93
TELEPHONE ............................................................................................. 94
COPYING .................................................................................................. 95
PAPER LOADING PROBLEMS .............................................................. 95
GENERAL ................................................................................................. 95
Print quality problems ................................................. 97
Error codes, messages and solutions ......................... 98
In case of a power failure .......................................... 101
During a power failure ......................................................................... 101
Specifications ..................................................................................................... 102
Appendix ............................................................................................................ 104
Document sizes ....................................................................................................................................................... 104
What happens when Fax/Tel Mode is selected .................................................................................................105
Glossary .............................................................................................................. 106
Index ................................................................................................................... 110
xii
Page 13

1
1
SETTING UP
Unpacking ..................................................................... 2
Removing the shipping materials .......................................................... 3
Assembling the FAXPHONE .........................................4
Attaching components ............................................................................ 4
Connecting the AC power cord .............................................................. 5
Loading the paper ........................................................ 6
Selecting the right kind of paper ........................................................... 6
Loading the paper .................................................................................... 6
Installing the BJ cartridge ............................................8
BJ cartridge guidelines ........................................................................... 8
Handling the BJ cartridge ....................................................................... 9
Installing the BJ cartridge .................................................................... 10
Connecting the phone line ........................................ 13
Connecting to the wall jack .................................................................. 13
Connecting an extension phone or answering machine (optional) ..
Setting the TEL LINE TYPE .................................................................... 14
Setting up to receive faxes ....................................... 15
Selecting the receiving mode .............................................................. 15
Fax Only Mode ....................................................................................... 16
Fax/Tel Mode ........................................................................................... 17
Manual Mode .......................................................................................... 18
Ans. Machine Mode .............................................................................. 19
Distinctive Ring Pattern Detection (DRPD) feature . 21
Types of ring patterns ............................................................................ 21
Turning on DRPD and assigning a setting to a ring pattern ............ 22
How DRPD responds to calls ............................................................... 24
Communicating using the Distinctive Ring Pattern
Detection (DRPD) feature .............................................................. 24
13
1
Page 14
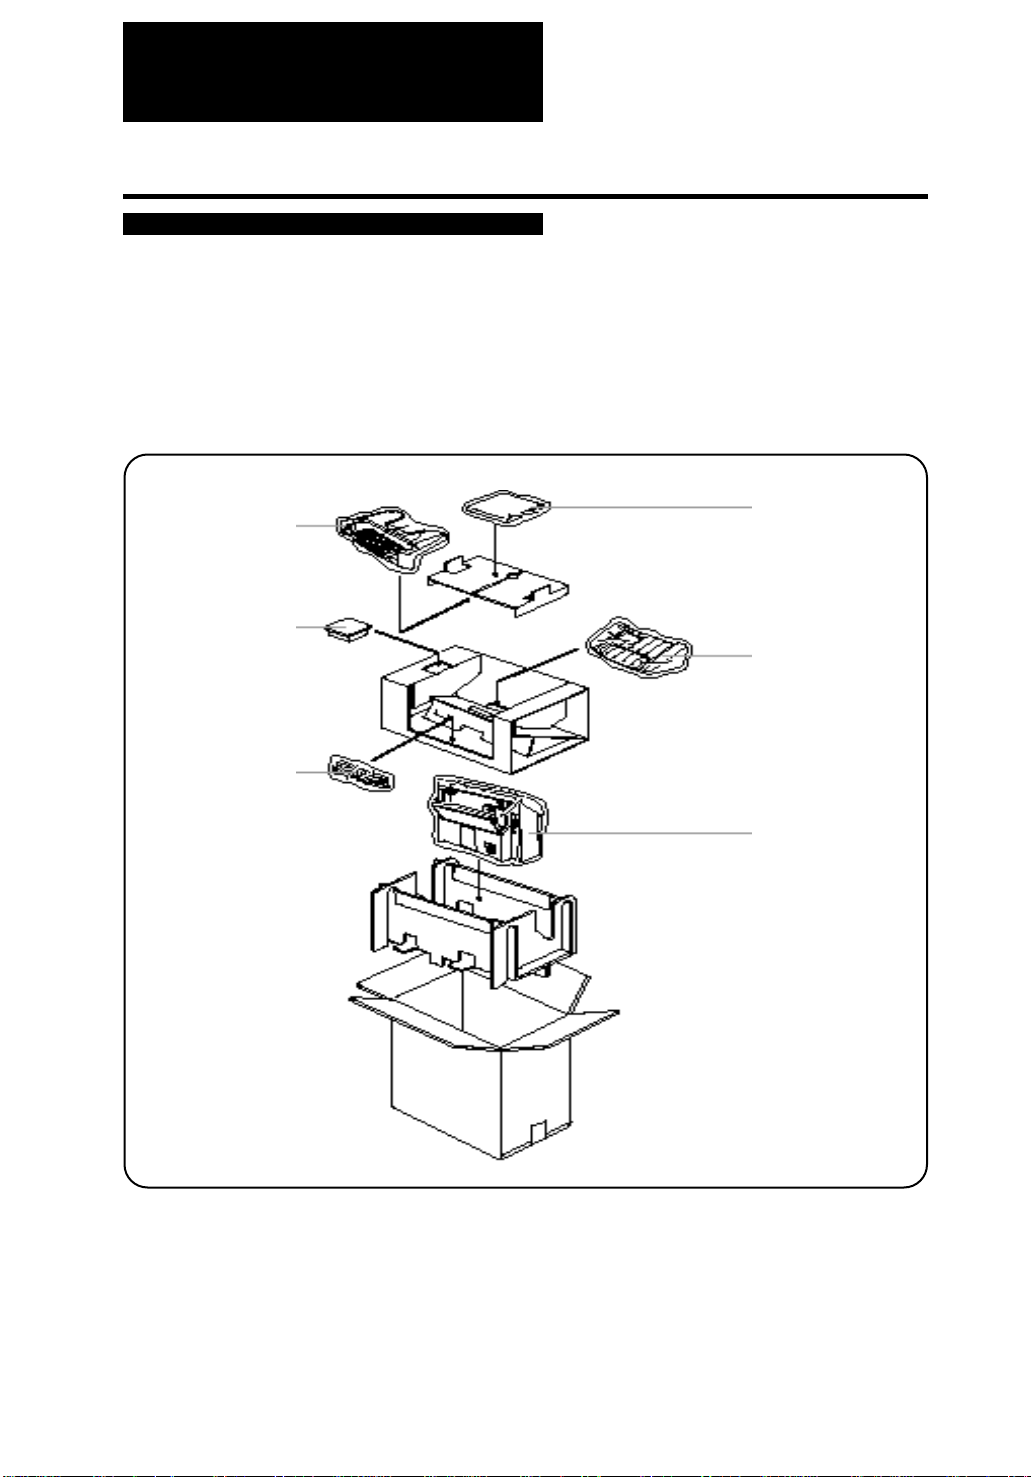
Unpacking
As you unpack the FAXPHONE, save the carton and packing material in case you
want to move or ship the unit in the future.
Carefully remove all items from the box.
❚ It is best to have someone hold the box while you lift the FAXPHONE and its
protective packaging out of the carton.
Paper tray
BX-3 BJ FAX
cartridge
Power cord and
Telephone line
FAXPHONE B640
User’s Guide
Paper tray cover
Main unit
2
Page 15
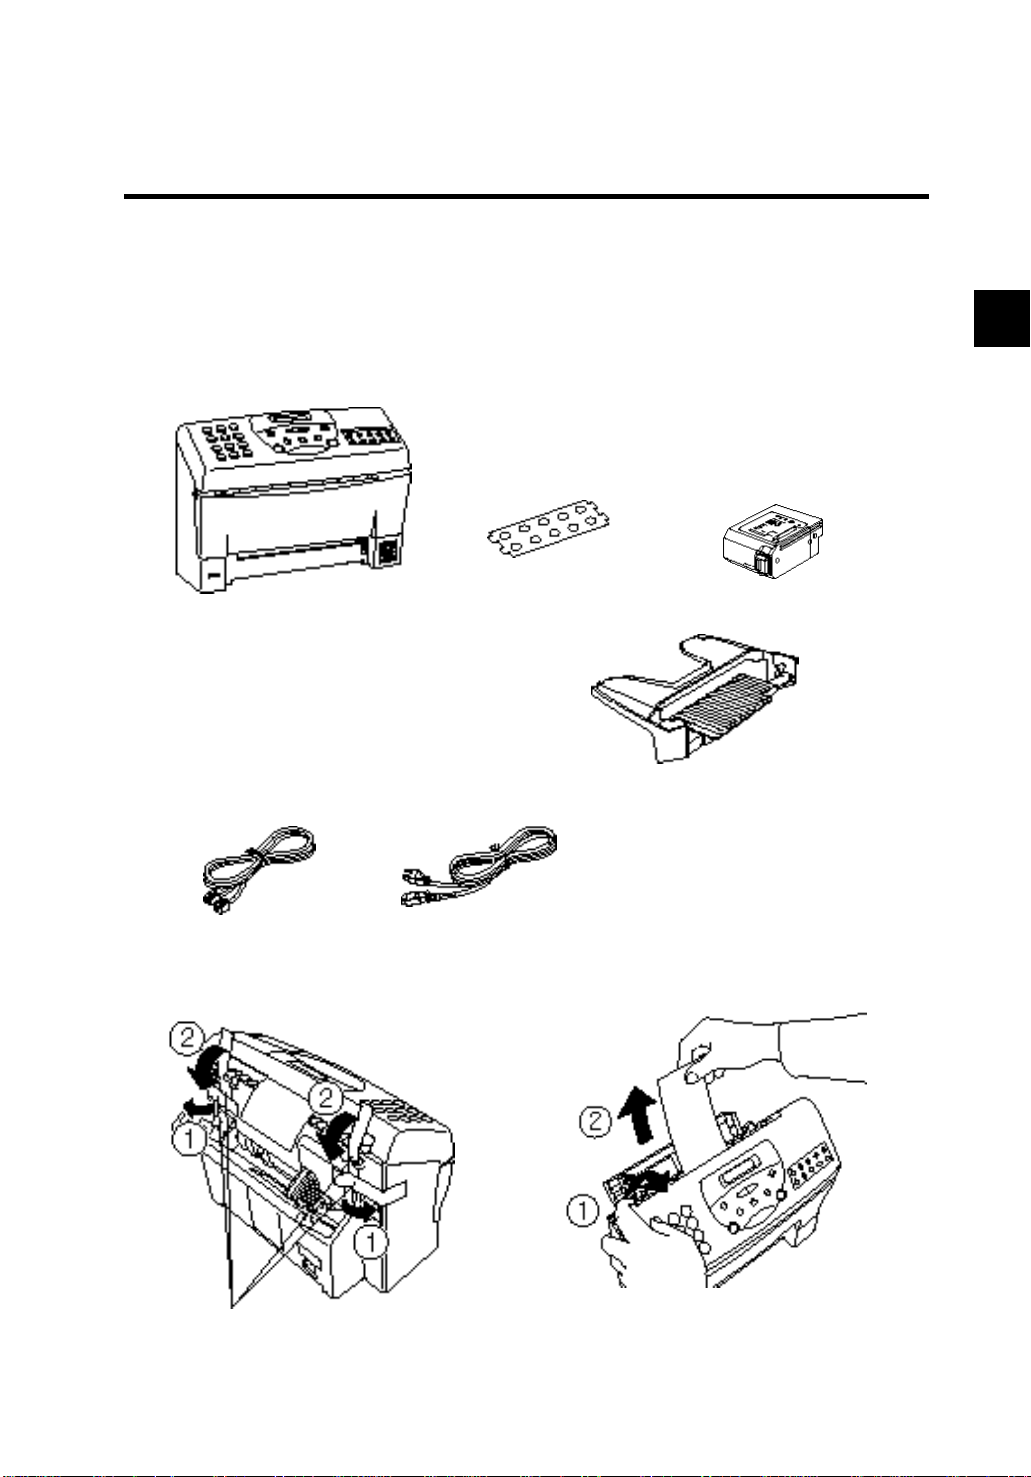
Unpacking
If any of these items are damaged or missing, please contact the Canon Computer Systems Customer Care Center.
See p. iii.
❚ Be sure to fill out your Registration card and send it or fax it to Canon Computer Systems, Inc.
(See the Registration card for details.) Also, save your sales receipt for proof of purchase.
Main unit
Paper tray cover
Telephone line
Facepla te
(may be in s tall ed
on unit)
Power cord
Paper tray
Documentation
• FAXPHONE B640 User's Guide
(this manual)
• Quick Start Guide
• Registration card
• Warranty card
• Canon Cares card
BX-3 BJ FAX
cartridge
1
Removing the shipping materials _______________
Remove the shipping materials as shown below.
Pull
Open
Remove all tape
Be sure to also remove any shipping materials from the paper tray cover and the paper tray.
3
Page 16
Assembling the FAXPHONE
To see how the FAXPHONE looks fully assembled, see Main components of the
FAXPHONE, p. 28.
Attaching components _________________________
■Paper Tray
Make sure the paper lever is in the position . Then place the paper tray into the FAXPHONE,
making sure the two knobs fit in the appropriate slots on the FAXPHONE.
This symbol
indicates the use of a
function (envelope
printing) not available
with this model.
Paper lever
■Paper Tray Cover
Place the paper tray cover over the paper tray, making sure the two tabs fit in the appropriate
slots on the FAXPHONE.
4
Page 17
■Faceplate
Assembling the FAXPHONE
Fit the 4 tabs of the faceplate into the corresponding slots around the One-touch button area.
The faceplate may be installed on the FAXPHONE. If you cannot find
the faceplate, check the One-touch button area of the FAXPHONE.
Connecting the AC power cord _________________
Plug the FAXPHONE into a 120 volt AC 60 Hz three-wire grounded outlet.
Plug the power cord connector into the
1
rear of the unit.
Plug the other end of the power cord
2
into a properly grounded AC outlet
(three-prong outlet).
1
There is no power switch on the FAXPHONE. The
power is on as long as the FAXPHONE is plugged
in.
5
Page 18
Loading the paper
Selecting the right kind of paper _______________
The quality of the paper you use affects the print quality of the FAXPHONE. Using
paper that meets the following specifications will ensure the best possible printing
results.
Quality Use plain bond, typewriter quality without curls, folds, or rough edges.
Weight 17 – 24 lbs (64 g/m2 –
Thickness 0.003" – 0.005" (0.08 mm – 0.12 mm)
Storage 64°F to 75°F (18°C to 24°C) 40% to 60% relative humidity.
Size Letter, A4, Legal
• Test the plain bond paper you intend to use first to make sure printing
results are satisfactory.
• Do not use punched or colored paper.
• Do not use glossy paper.
• Ink drying time will vary depending on the type of paper.
• Using paper other than the above may cause jamming and/or blurred
printing.
90 g/m2)
■Setting the paper size
The paper size setting determines the size of the recording paper in the paper tray. The
factory setting is letter size. If you want to use a paper size other than letter, you must
change the PAPER SIZE setting. See FAX PRINTER, p. 78.
Loading the paper ______________________________
Remove the paper tray cover.
1
6
Fan a small stack of up to 100 sheets (up
2
to 0.4" (10 mm) thick). Tap the edge of the
stack on a flat surface to even the stack.
Page 19
Loading the paper
Line up the right edge of the stack of
3
paper against the right edge of the
paper tray and insert it halfway into the
paper tray.
Complete inserting the stack of paper
5
into the paper tray until it stops.
Holding the stack of paper, squeeze and
4
slide the paper guide until it touches
the left edge of the stack of paper.
Make sure the stack of paper does not exceed the
paper limit mark on the right side of the feeder.
Replace the paper tray cover.
6
1
Do not force the paper down into the FAXPHONE.
• Make sure the stack of the paper is flat, held upright and aligned with
the left paper guide.
• The top edge of the stack does not need to be even.
7
Page 20
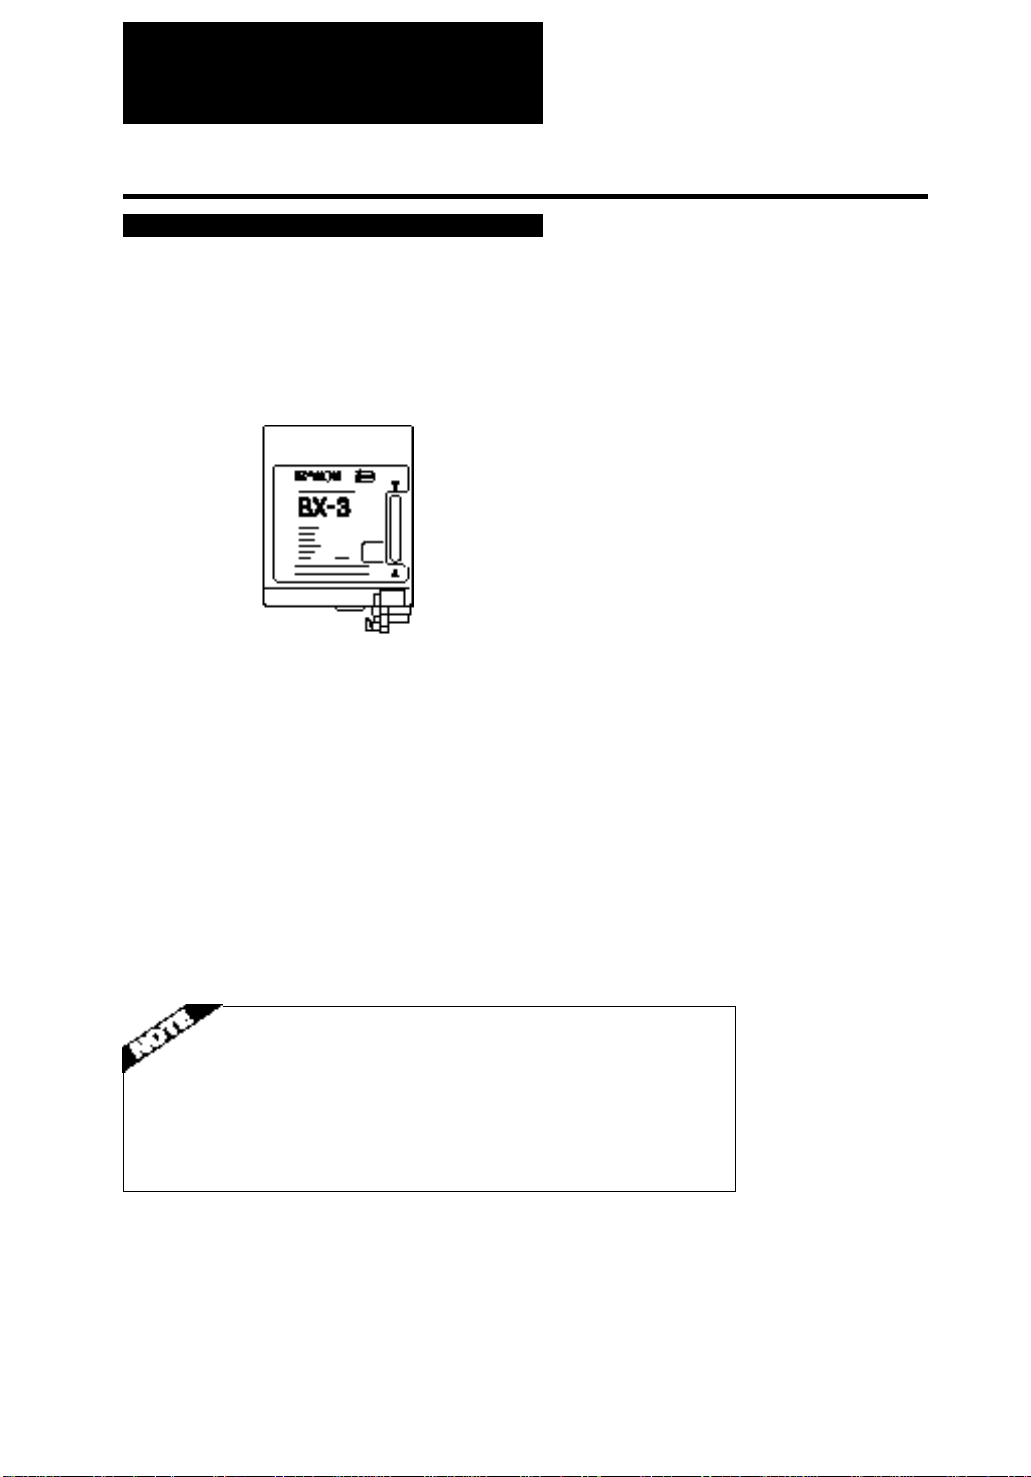
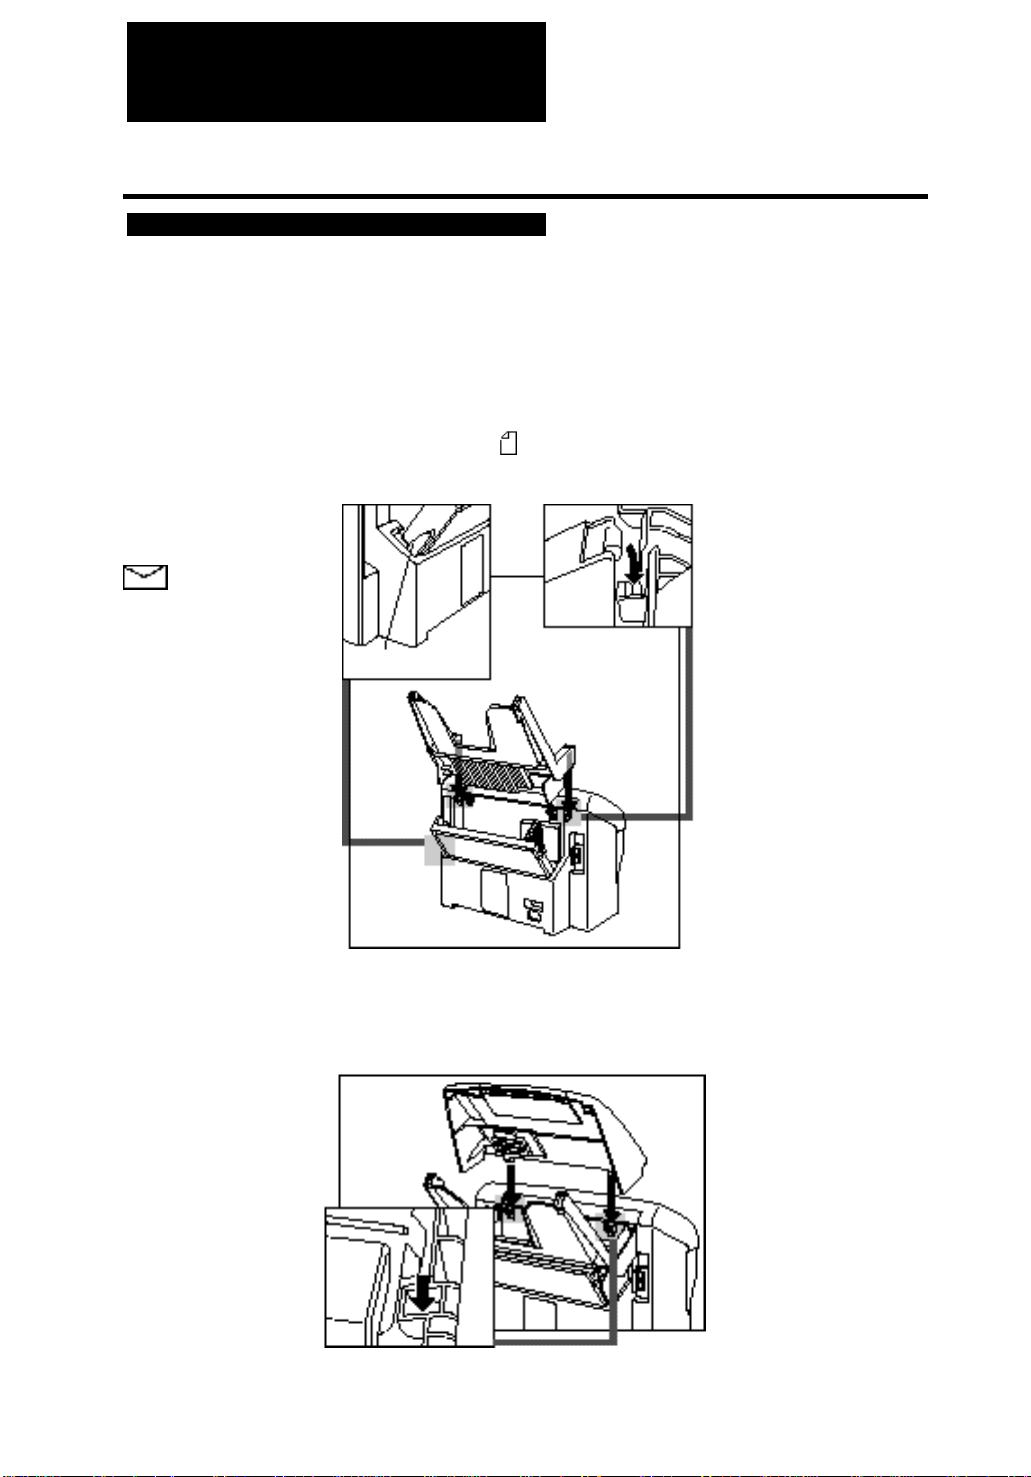
Installing the BJ cartridge
The first time you set up the FAXPHONE, you have to install the BX-3 BJ FAX
cartridge before you can begin receiving and copying documents.
BJ cartridge guidelines _________________________
Use only the Canon BX-3 BJ FAX cartridge with the FAXPHONE B640.
The actual amount of ink that you use will vary depending on the print density of a
page. If the majority of your printed output is graphics, you may need to change the ink
cartridge more often than when you are receiving or copying text only.
You may need to replace the BJ cartridge when either of the following conditions
exist:
❚ Your printed output is not crisp and clear, and there are gaps in the characters (miss-
ing dots) even after you have cleaned the print head once or twice and you have
removed and reinstalled the BJ cartridge.
❚ You have been using the BJ cartridge for over one year.
❚ To ensure optimum print quality, Canon recommends the use of the
cartridges designated by Canon. Canon accepts no liability or responsibility for damages caused by the use of any cartridge other than those
designated by Canon.
❚ Canon makes numerous ink cartridges; the BX-3 BJ FAX cartridge is
the only one designed to be used with the FAXPHONE B640.
8
Page 21
Installing the BJ cartridge
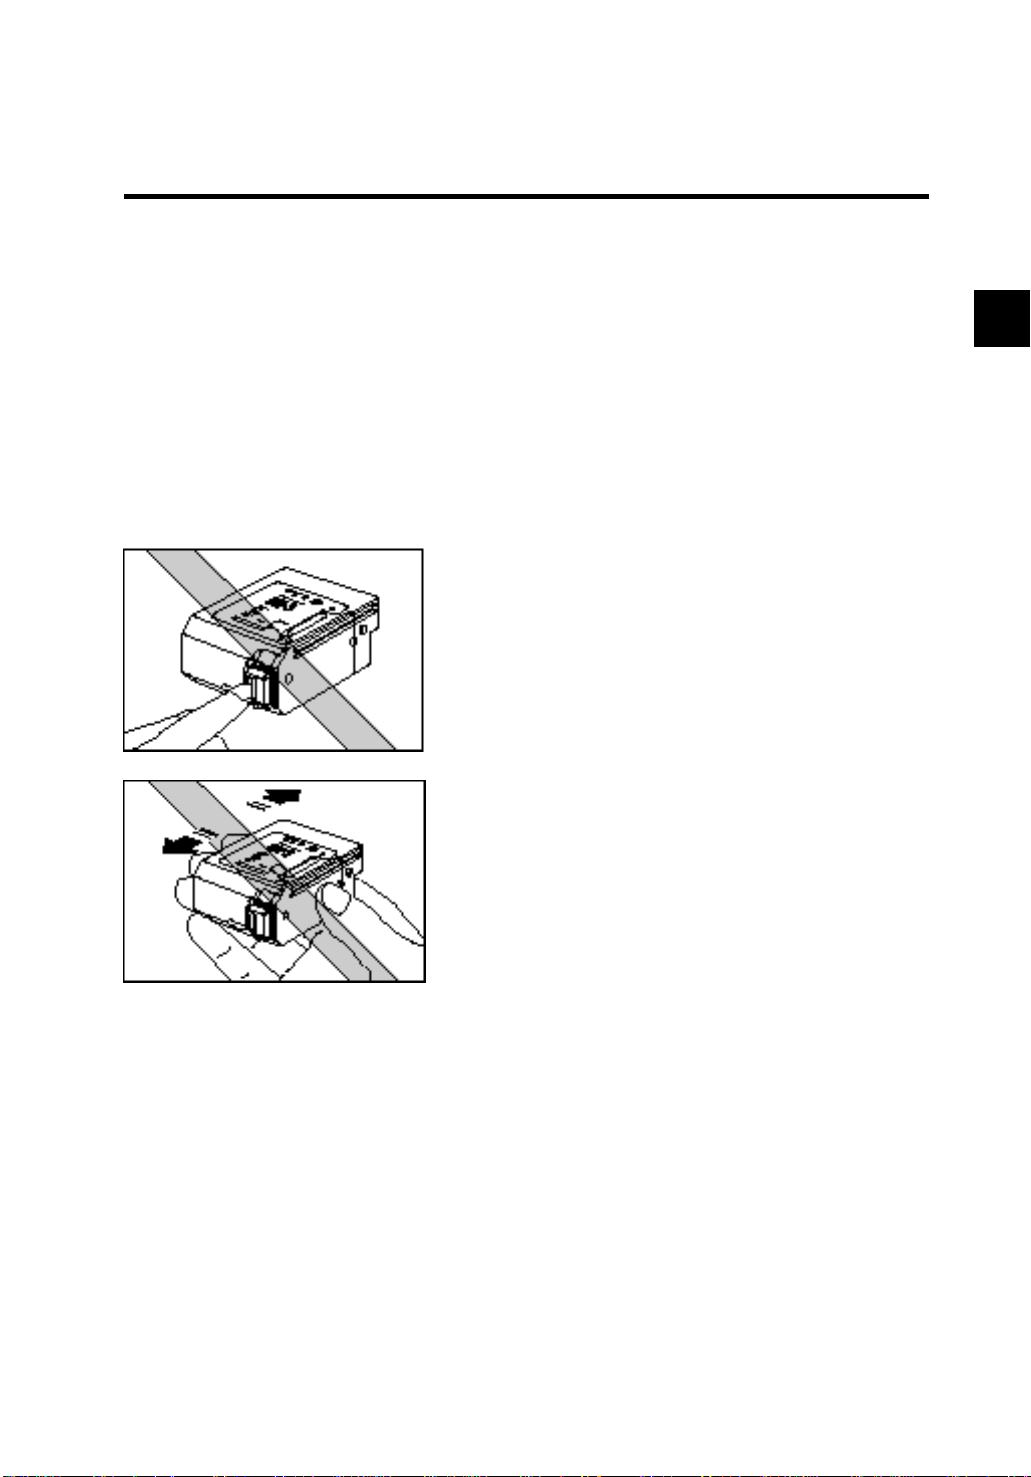
Handling the BJ cartridge_______________________
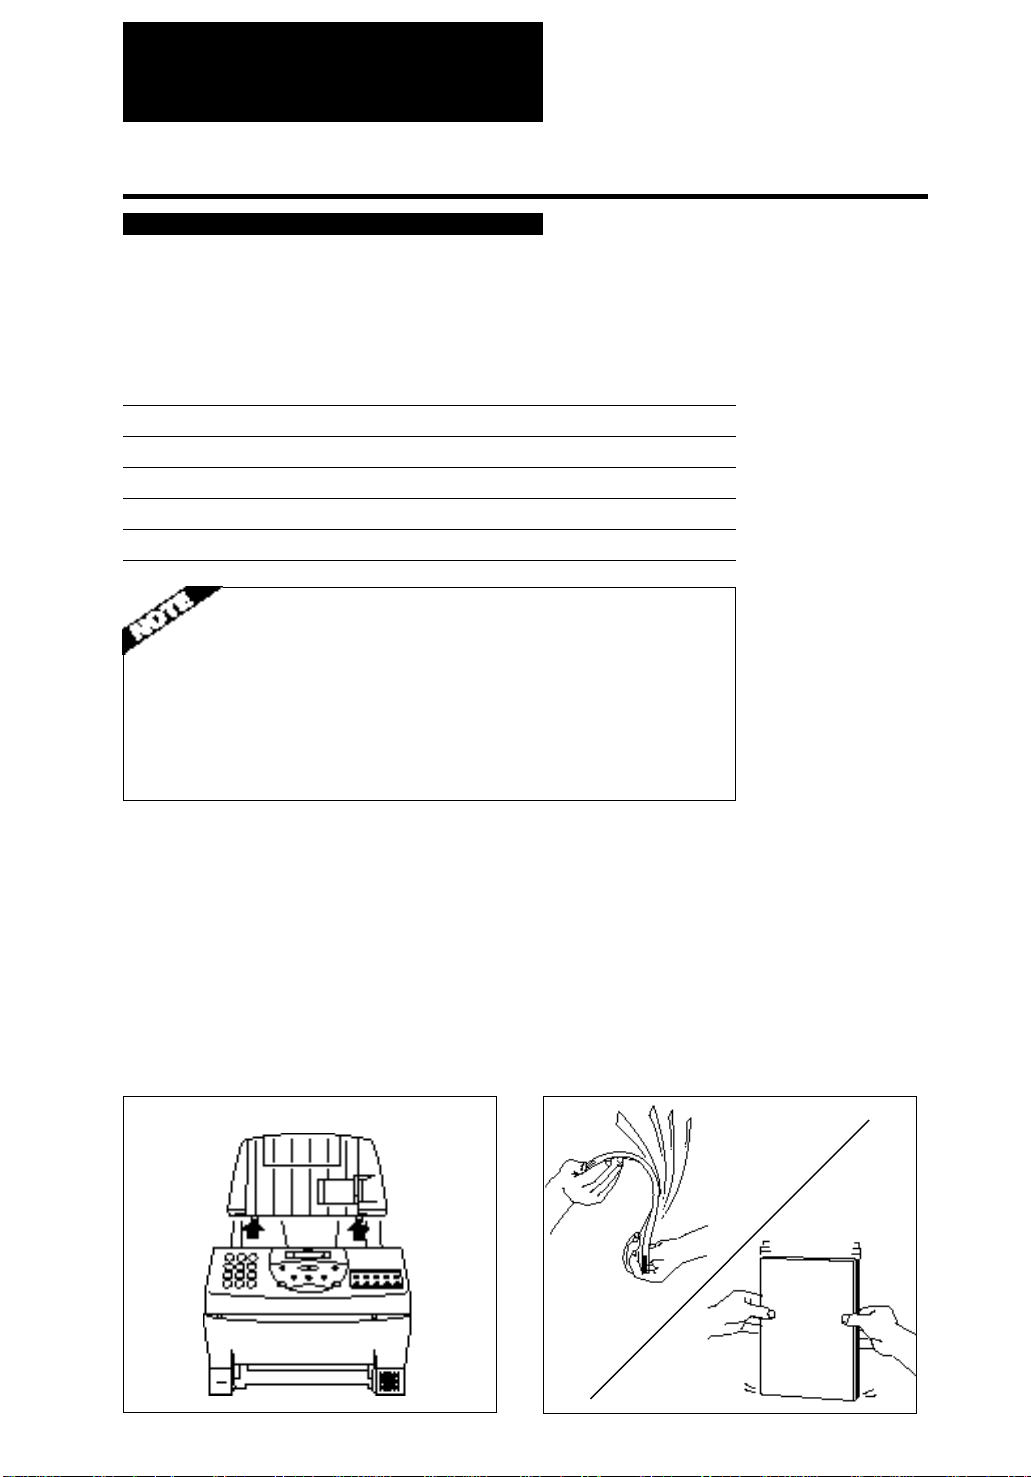
• Leave the BJ cartridge in its packaging until you are ready to use it to prevent it from
drying out.
• Store BJ cartridges out of the reach of children; the ink contains isopropyl alcohol
67-63-0.
• Replace the BJ cartridge after one year of use or if the print is not clear or is missing,
even after trying five successive head cleanings.
• Never remove the BJ cartridge unless you are going to replace it. When left exposed, the cartridge print head dries out, making it unusable.
• Do not touch the print head area on the
BJ cartridge. Ink may leak out and cause
stains.
• Never shake the BJ cartridge, especially
after removing the protective tape from
the print head.
1
If spilled, the ink is very difficult to clean. Therefore, always follow the above precautions and carefully handle the BJ cartridge.
9
Page 22
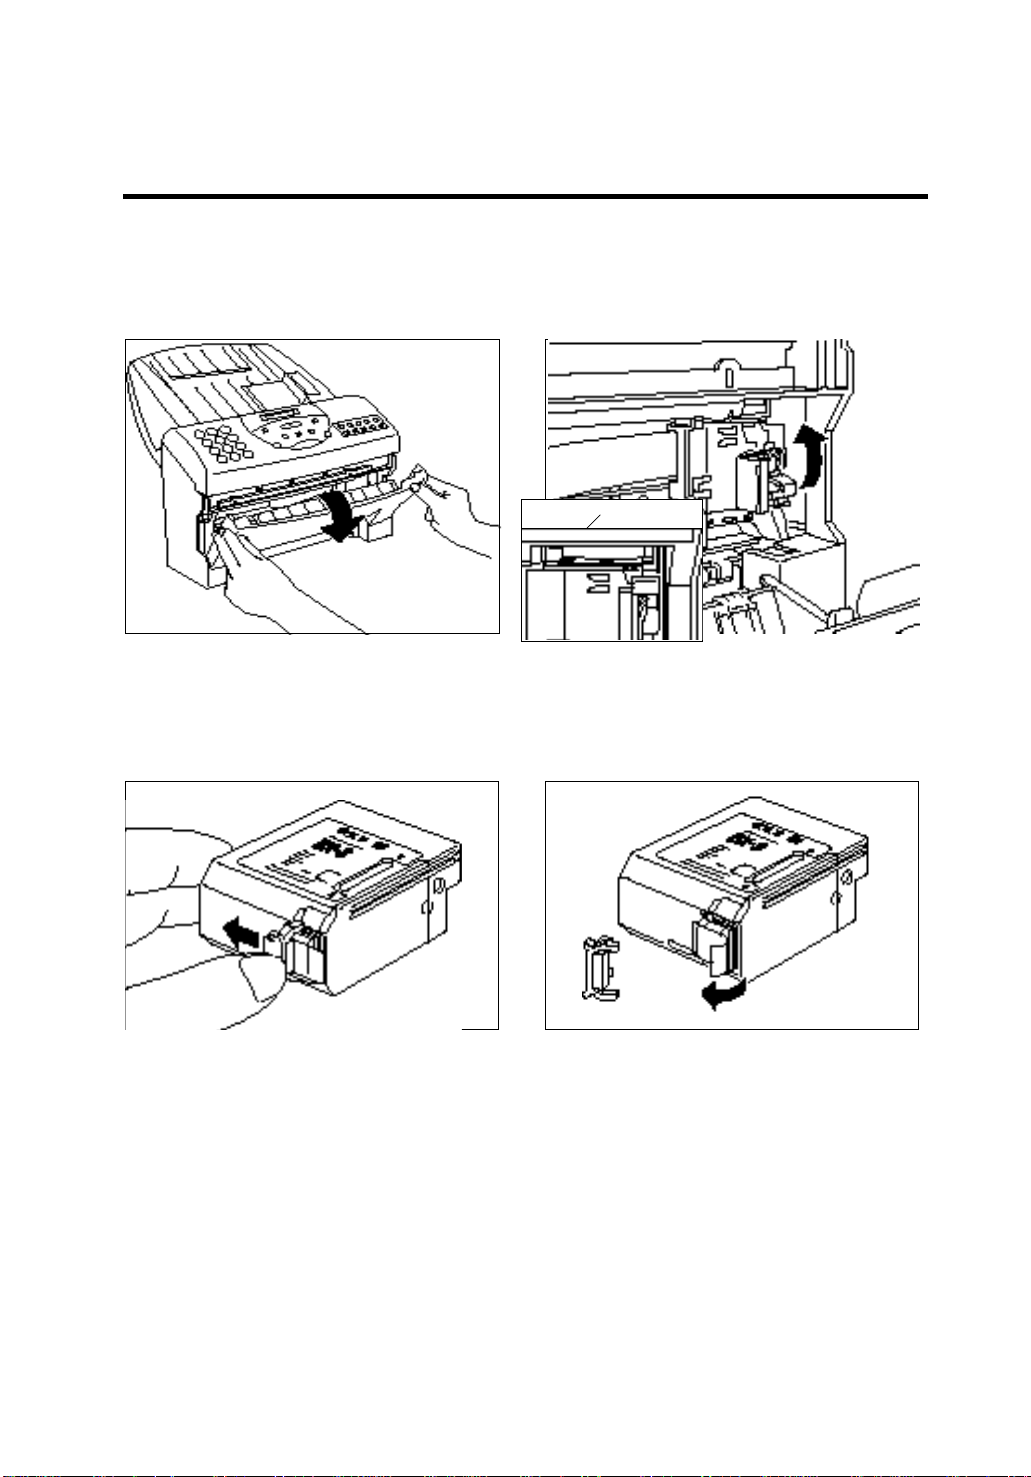
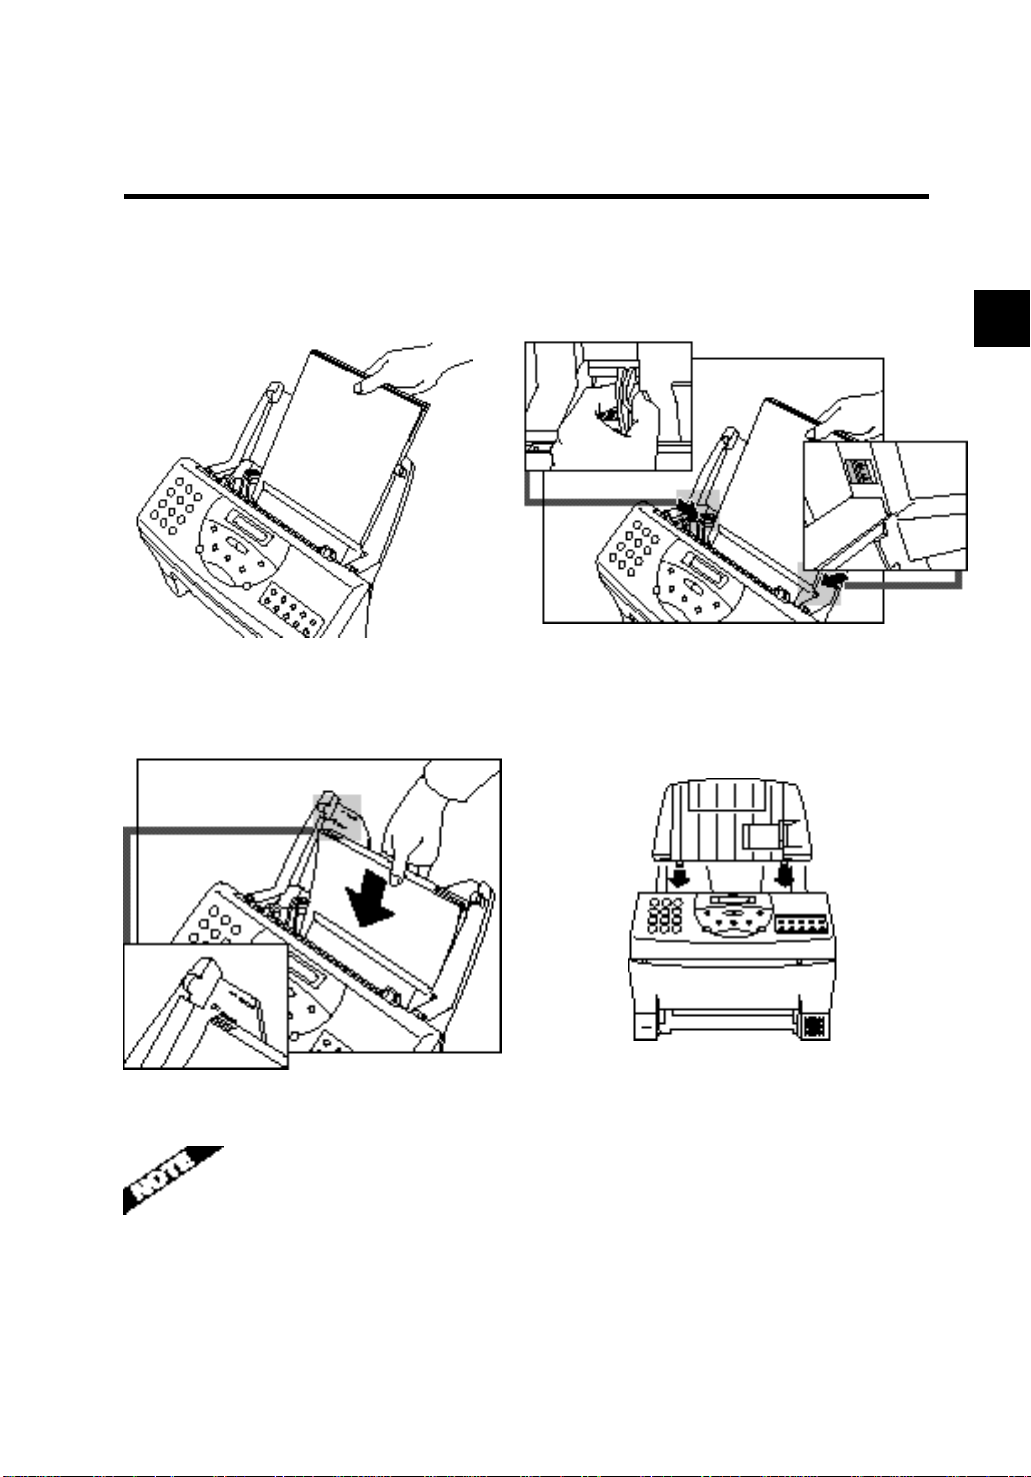
Installing the BJ cartridge ______________________
Open the front cover of the FAXPHONE.
1
Remove the print head cap from the BJ
3
cartridge.
Raise the green cartridge release lever
2
up.
Thickness lever
Make sure the paper thickness lever is set to the
paper position (left position).
Pull off the protective orange tape.
4
10
Page 23
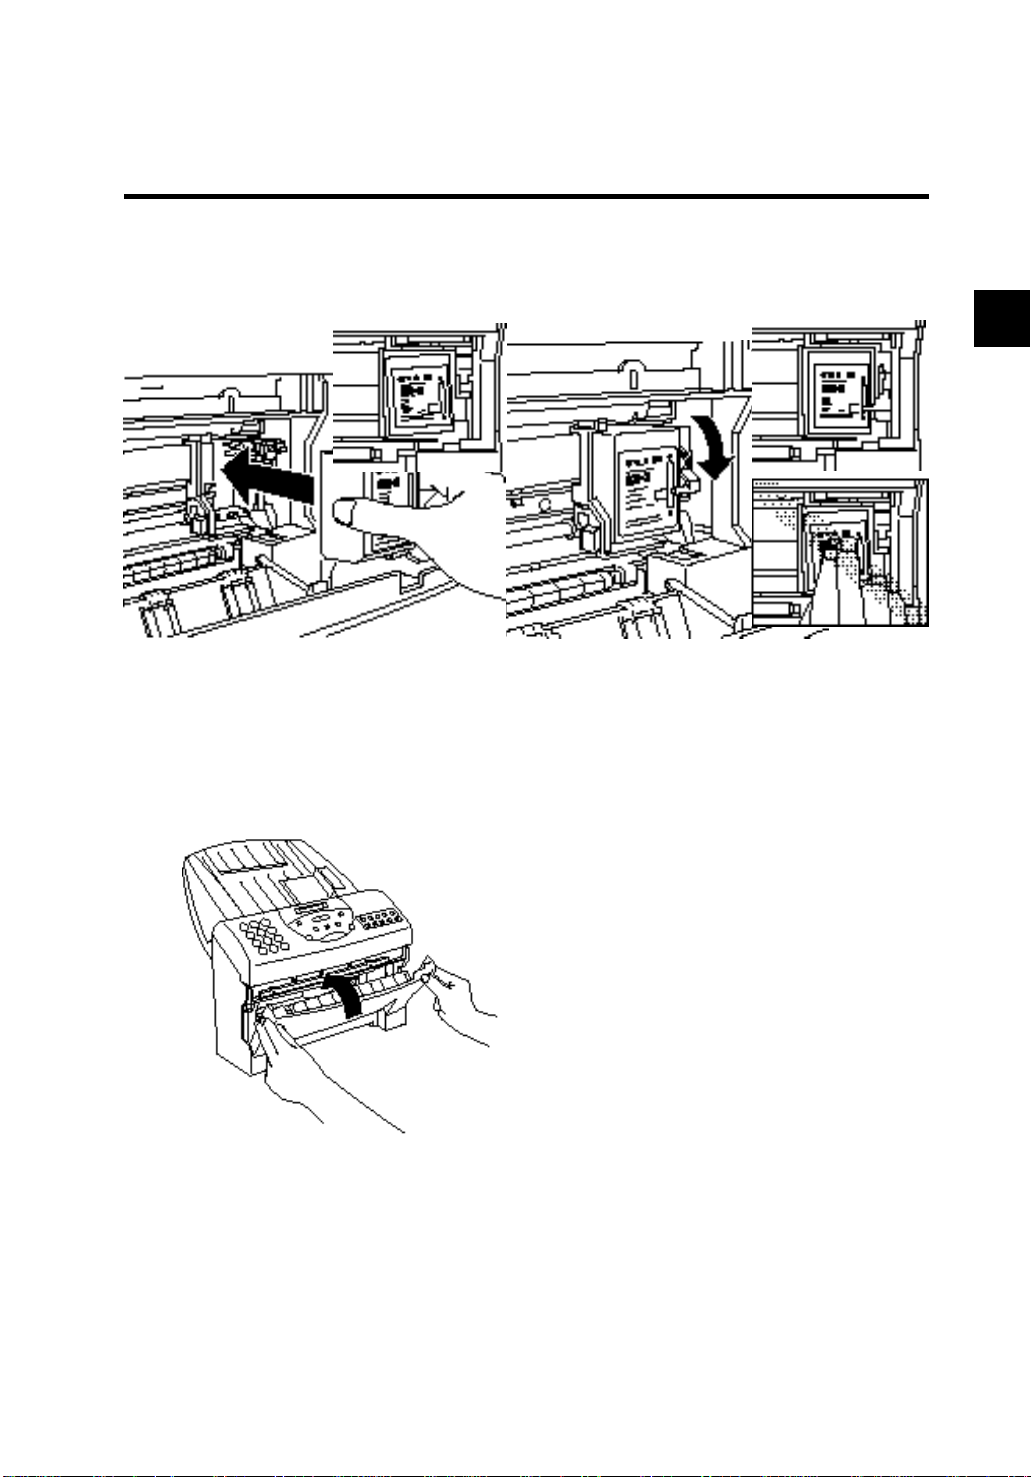
Installing the BJ cartridge
Insert the BJ cartridge. Align the slot in
5
the cartridge with the yellow post in the
FAXPHONE.
The yellow post (BJ cartridge guide) should be
visible through the slot. The BJ cartridge tilts
slightly to the left in the loaded position.
Close the front cover of the FAXPHONE.
7
Lower the cartridge release lever down
6
until you hear a click to lock the
cartridge in place.
❚ Make sure the arm on the cartridge release lever
is aligned with the marking on the BJ cartridge.
❚ If the lever movement is not smooth, release the
lever and reload the cartridge.
❚ To avoid cartridge misalignment and an error
message to appear, do not press down on the
cartridge or try to align it manually while raising
and lowering the green lever.
1
11
Page 24
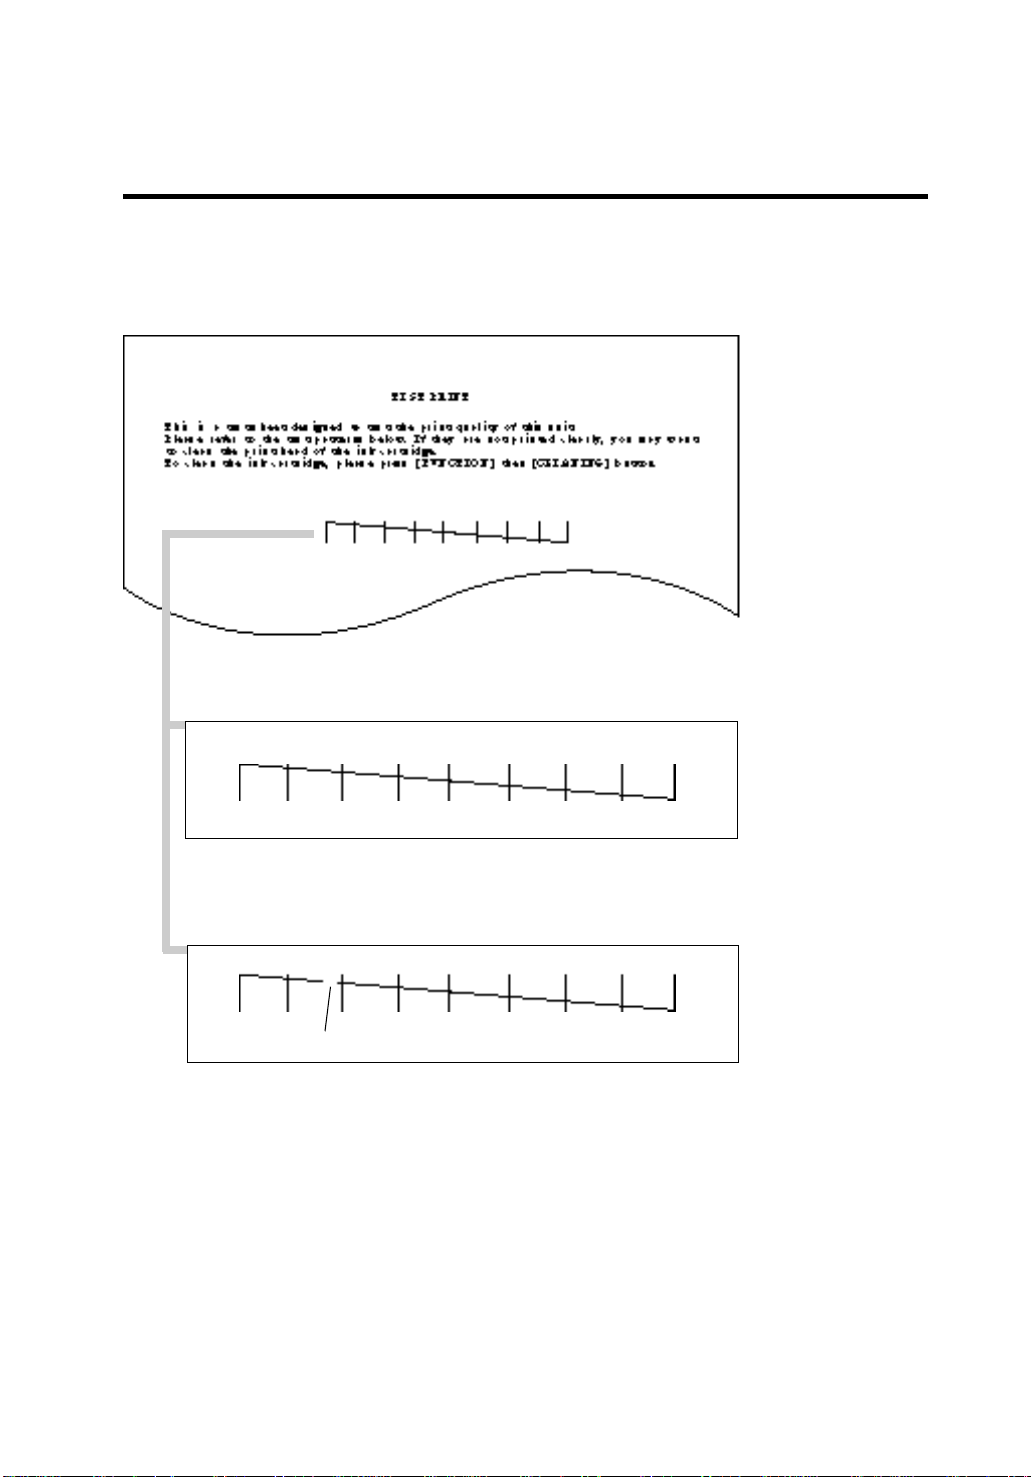
The FAXPHONE automatically prints a test page.
8
The FAXPHONE prints a test page every time you insert a BJ
cartridge.
When the BJ cartridge is properly installed, the test printout should look as
shown above.
White streak
If the printout has white streaks as shown above, try cleaning the print head.
See Cleaning the BJ cartridge print head, p. 90.
If the problem persists after cleaning, try reinstalling the BJ cartridge.
❚ You can turn off automatic test printing by changing the AUTO TEST PRINT
setting. See SYSTEM SETTINGS, p. 78.
12
Page 25

Connecting the phone line
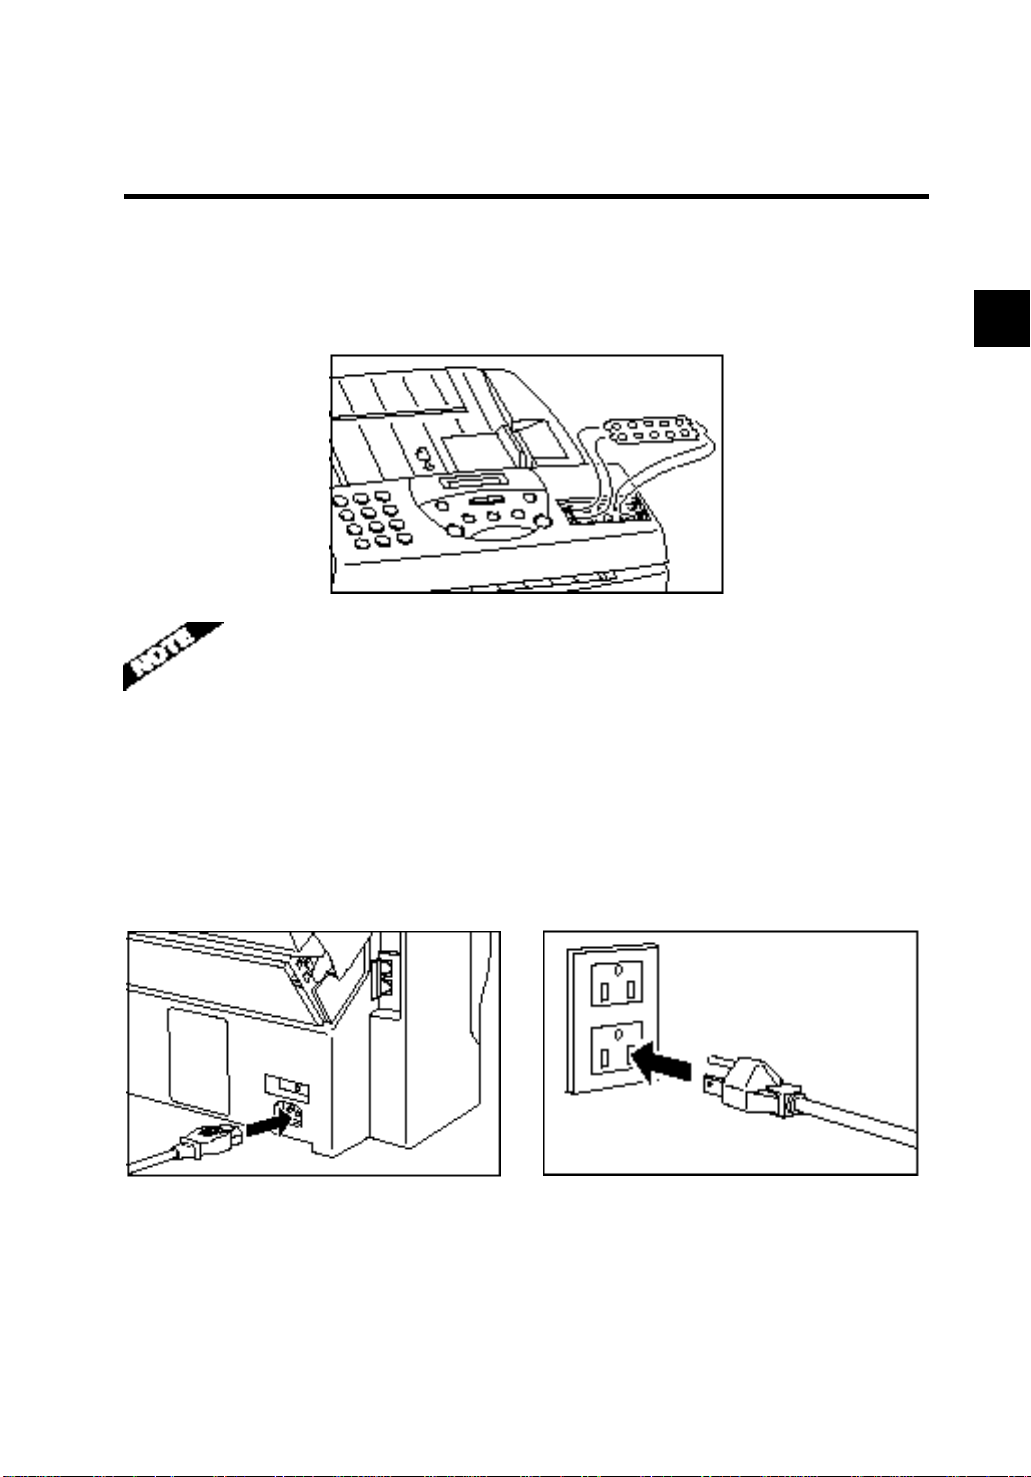
Connecting to the wall jack ____________________
You need an RJ11-C type (modular) wall jack to connect the FAXPHONE to the telephone system. Contact your local telephone company to install this type of jack if you
do not have one.
Connect one end of the supplied telephone line to the jack marked
1
on the rear of the FAXPHONE.
Connect the other end of the line to your wall telephone jack.
2
Connecting an extension phone or answering
machine (optional) ______________________________
1
Connect an extension phone or answering machine to the jack
1
marked on the rear of the FAXPHONE.
❚ To use a phone or answer machine on the same line with the FAXPHONE, the
phone and/or answer machine must be attached directly to the FAXPHONE.
❚ Be sure to connect an extension phone if you want to use the INCOMING RING
feature and you want it to ring when the FAXPHONE receives a call. See pp. 65, 77.
❚ If you connect an answering machine, refer to Ans. Machine Mode, p. 19.
13
Page 26

Setting the TEL LINE TYPE _____________________
Your FAXPHONE is factory set to work with touch tone telephone lines. If you have a
pulse line, you will need to change the telephone line setting as follows.
1 Press [FUNCTION].
Wait a second for TEL REGISTRATION to appear.
SELECT MENU
TEL REGISTRATION
2 Use [ ] or [ ] to select USER SETTINGS.
▼
Press [START/COPY].
USER SETTINGS
SET DATE
3 Use [ ] or [ ] to select TEL LINE TYPE.
▼
Press [START/COPY].
TEL LINE TYPE
4 Use [ ] or [ ] to select ROTARY PULSE.
5 Press [START/COPY].
6 Press [STOP] to finish.
14
TOUCH TONE
ROTARY PULSE
DATA ENTRY OK
Page 27

Setting up to receive faxes
Selecting the receiving mode___________________
Before you set up the receiving mode on your FAXPHONE, you should determine
how you plan to use your FAXPHONE:
❚ Are you able to dedicate the use of one telephone line to the FAXPHONE only to
receive document transmissions from other fax machines? If yes, choose Fax Only
Mode (see below).
❚ Do you want to use your FAXPHONE as both a telephone and fax, receiving docu-
ments automatically and ringing only for telephone calls? If yes, choose Fax/Tel
Mode (see below).
❚ Do you want to use your FAXPHONE mainly as a telephone, and answer every call
yourself, whether from a person or a fax unit? If yes, choose Manual Mode (see below).
❚ Do you want to connect an answering machine to your FAXPHONE and receive the
other party’s document and also record the other party’s message? If yes, choose
Ans. Machine mode (see below).
❚ Can you use the Distinctive Ring Pattern (DRP) service offered by your telephone
company allowing you to have separate numbers for telephone and fax using only
one phone line? If yes, use the Distinctive Ring Pattern Detection (DRPD) Feature
(see below).
How you answer these questions will determine which receiving method you choose.
If you are not satisfied with the mode you select, you can always change it at any time.
■Fax Only Mode (See p. 16)
You may want to use this mode if you have two phone lines in your office, and plan to
use one line for the FAXPHONE and the other line for your telephone.
Set the Fax Only Mode if you want to use your FAXPHONE only to receive faxes
automatically and do not intend to use it as a telephone.
1
■Fax/Tel Mode (See p. 17)
If you only have one phone line in your office, you may be planning to use it for both
fax and telephone communication. By setting this mode, you will be able to use your
FAXPHONE for both fax and telephone communication using only one phone line.
You will need to have an extension phone connected to the FAXPHONE so that when
it rings to alert you of a call, you can answer the call. The FAXPHONE will automatically receive faxes without ringing.
■Manual Mode (See p. 18)
Use Manual Mode if you receive more telephone calls than faxes. By having telephone
connected to your FAXPHONE, you can answer every call, whether from a person or
from another fax unit. If you hear a slow beep, simply press [START/COPY] on your
FAXPHONE and hang up the phone to receive the fax.
■Ans. Machine Mode (See p. 19)
Use Ans. Machine Mode if you have an answering machine connected to the
FAXPHONE. This mode allows you to receive not only documents sent from other fax
machines, but also messages from people calling when you are out.
15
Page 28

■
Distinctive Ring Pattern Detection (DRPD) Feature
(See p. 21)
Some companies offer a distinctive ring pattern (DRP) service that allows you to assign two or more telephone numbers with distinctive ring patterns to a single telephone line. By subscribing to such a service, you can have both a fax number(s) and a
telephone number(s) for your FAXPHONE using only one phone line.
When a call is made, the FAXPHONE checks the incoming ring pattern and knows if
the call is from another fax unit or from a telephone.
Fax Only Mode __________________________________
The FAXPHONE is set up at the factory for both fax transmission and telephone calls.
If you have a dedicated fax line, you need to set the FAXPHONE to Fax Only Mode.
■ Setting Fax Only Mode
When you set the FAXPHONE to Fax Only Mode, the unit picks up every call and
automatically treats it as a fax transmission.
The FAXPHONE cannot receive automatically if you are making copies, printing
reports, or registering information. See p. 68.
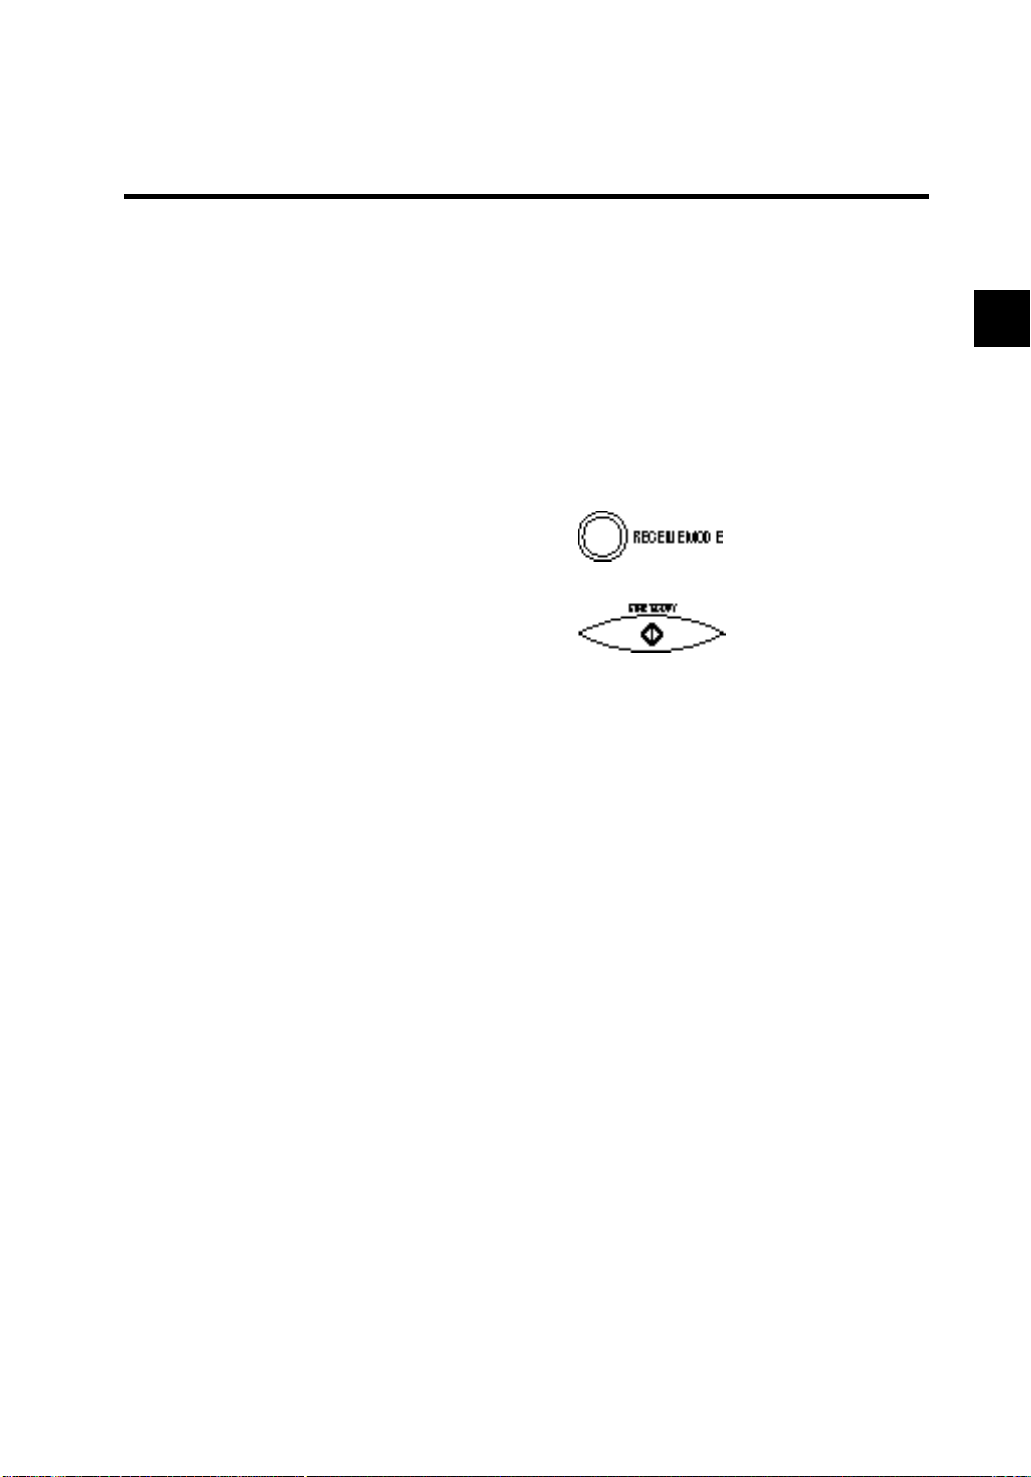
1 Press [RECEIVE MODE] until “Fax Only Mode”
appears on the LCD.
Fax Only Mode
2 Press [START/COPY].
When this mode is set, the LCD will display the
date and “FaxOnly”.
■ Receiving documents in Fax Only Mode
When the FAXPHONE is set to Fax Only Mode, it automatically receives documents
whenever a call comes over the fax line.
1 Make sure the FAXPHONE is set to “Fax Only
Mode” (see above).
The FAXPHONE assumes all incoming calls are from another fax machine sending a
document. It receives the documents automatically.
16
09/15/97 FaxOnly
Page 29
Setting up to receive faxes
Fax/Tel Mode ____________________________________
If you only have one phone line in your office, you can set the FAXPHONE to receive
both documents and telephone calls. You need to have an extension phone connected
to your FAXPHONE for this mode. See p. 13.
■ Setting Fax/Tel Mode
The FAXPHONE is set up at the factory to this mode. You only need to follow this
procedure if you have changed the factory setting.
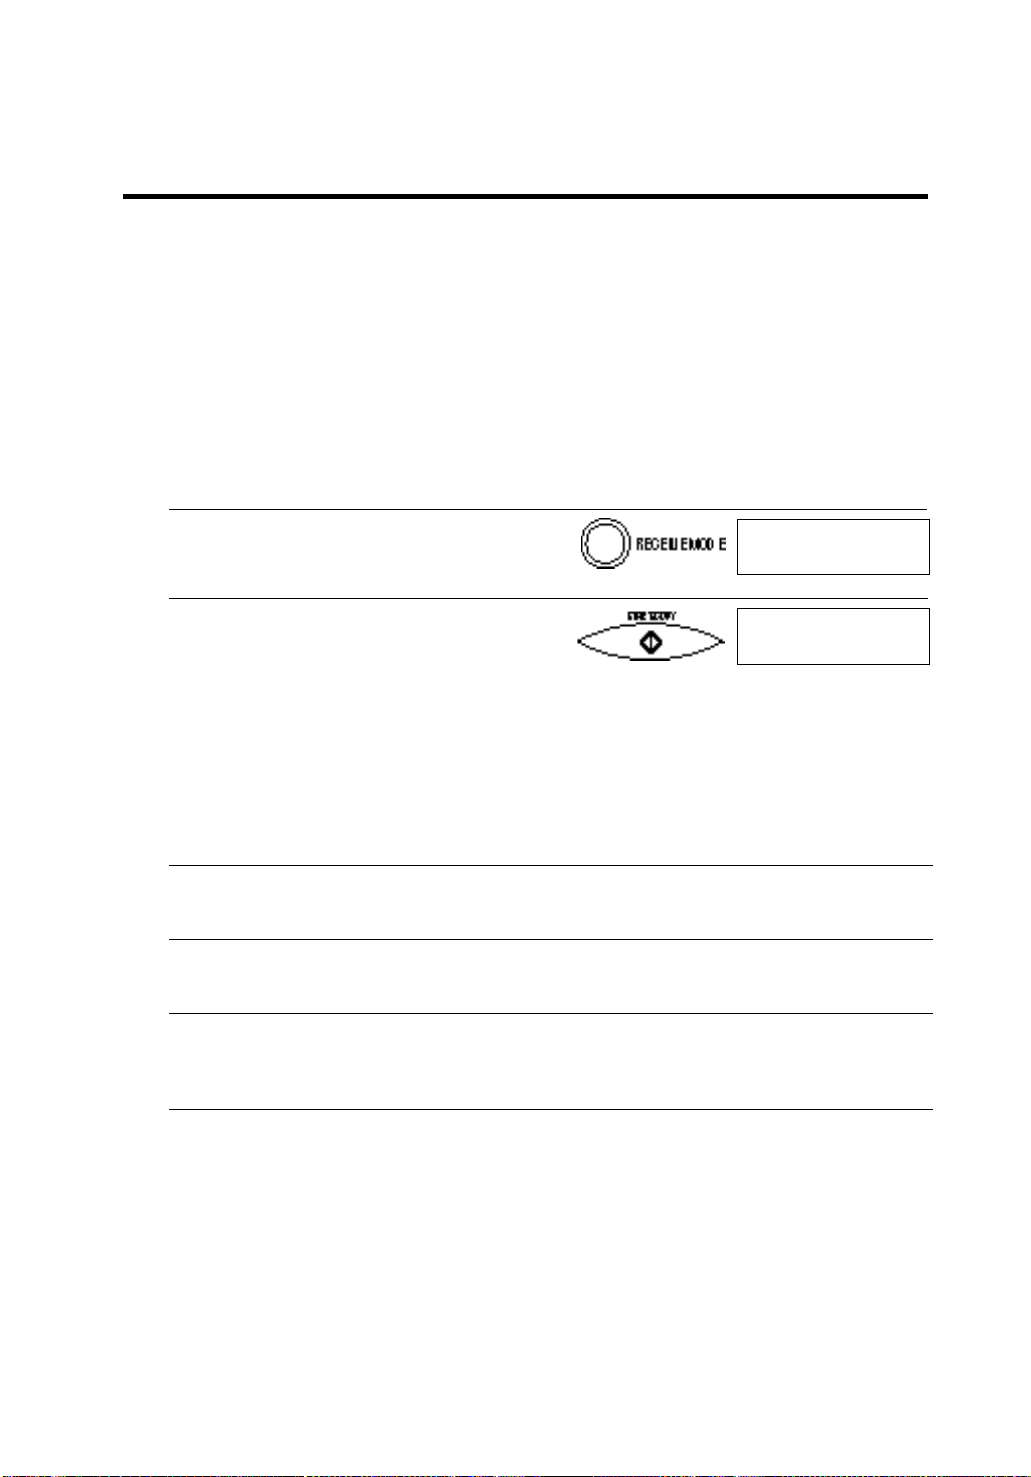
1 Press [RECEIVE MODE] until “Fax/Tel Mode”
appears on the LCD.
Fax/Tel Mode
2 Press [START/COPY].
When this mode is set, the LCD will display the
date and “Fax/Tel”.
■ Receiving documents and calls in Fax/Tel Mode
You can set the FAXPHONE to monitor all incoming calls over the fax/telephone line.
When the FAXPHONE receives an incoming call, it checks to see if the call is from
another fax machine trying to send a document, or from someone wanting to talk to
you.
The FAXPHONE cannot receive a document automatically if you are making copies,
printing reports, or registering information. See p. 68.
09/15/97 Fax/Tel
1
1 Make sure you have connected an extension
phone to your FAXPHONE. See p. 13.
2 Make sure the FAXPHONE is set to “Fax/Tel
Mode” (see above).
When the FAXPHONE receives a call, it checks to see whether the call is from
another fax machine or from a telephone.
❚ If it is a fax call, your FAXPHONE automatically switches to receive mode to
accept the fax.
❚ If the call is from a person, your FAXPHONE rings to alert you to pick up the
handset of the extension phone.
17
Page 30
Manual Mode ___________________________________
You may want to set your FAXPHONE to Manual Mode if you want to personally
monitor every call, whether from a fax machine or a person.
You need to have an extension phone connected to your FAXPHONE for this mode.
See p. 13.
■ Setting Manual Mode
Set to Manual Mode if you want to personally monitor every incoming call.
1 Press [RECEIVE MODE] until “Manual Mode”
appears on the LCD.
Manual Mode
2 Press [START/COPY].
When this mode is set, the LCD will display the
date and “Manual”.
■ Receiving documents and calls in Manual Mode
You can set the FAXPHONE to ring every time it received a call so that you can
personally check if it is from a fax machine or from a person.
Keep in mind that you cannot use Manual Mode if a document is in the Automatic
Document Feeder (ADF) waiting to be sent.
09/15/97 Manual
1 Make sure you have connected an extension
phone to your FAXPHONE. See p. 13.
2 Make sure the FAXPHONE is set to “Manual
Mode” (see above).
3 When the FAXPHONE rings, pick up the handset
of the extension phone connected to the
FAXPHONE.
4 If you hear a person’s voice, start your conversa-
tion. If the caller wants to send a document after
talking to you, press [START/COPY] on the
FAXPHONE to receive the document.
or
If you hear a slow beep or silence, another fax is
trying to send you a document. Press [START/
COPY] on the FAXPHONE.
Your FAXPHONE begins receiving the document.
18
Page 31

Setting up to receive faxes
Ans. Machine Mode_____________________________
Use Ans. Machine Mode if you have an answering machine connected to the
FAXPHONE. By setting this mode, you can receive documents automatically, and
messages from people calling when you are out.
See p. 13 for details on connecting an answering machine to your FAXPHONE.
■ Recording the outgoing message
When recording a message...
❚ Try to keep your message to less than 15 seconds long.
❚ In the message tell your callers how to send a fax.
Here’s a sample message:
“Hello. I’m not in the office right now, but please leave a message after the beep. I’ll
return your call as soon as possible. If you would like to send a fax, press the start
button on your fax after recording your message. Thank you.”
❚ Leave 4 seconds pause at the beginning of the message (the 4 seconds pause plus the
outgoing message should not exceed 15 seconds).
❚ Set the answering machine to answer on the first or second ring.
■ Setting Ans. Machine Mode
Set Ans. Machine Mode when you have an answering machine connected to your
FAXPHONE, and you are going out.
1
1 Press [RECEIVE MODE] until “Ans. Machine
Mode”appears on the LCD display.
Ans. Machine Mode
2 Press [START/COPY].
When this mode is set, the LCD will display the
date and “AnsMode”.
■ Receiving documents and messages in Ans. Machine Mode
When the FAXPHONE is set to Ans. Machine Mode, it automatically receives documents, or leaves messages on your answering machine when you are out.
09/15/97 AnsMode
1 Make sure you have connected an answering
machine to your FAXPHONE. See p. 13.
2 Make sure the FAXPHONE is set to “AnsMode”
(see above).
19
Page 32

3 Set your answering machine to answer.
❚ The FAXPHONE allows the answering machine to
answer, then listens for a fax tone, and switches to
receive mode automatically if it detects the tone.
❚ If the FAXPHONE runs out of paper or ink, it
receives the document and stores it in memory. To
print out documents in memory, see pp. 67 and 68.
4 When not in use, turn the answering machine
off and switch to Fax/Tel Mode, Manual Mode,
or Fax Only Mode using [RECEIVE MODE] .
20
Page 33

Distinctive Ring Pattern Detection (DRPD) feature
Some phone companies offer a distinctive ring pattern (DRP) service whereby they
assign two or more telephone numbers with distinctive ring patterns to a single telephone line. If your phone company offers such a service, you can have both a fax
number(s) and a telephone number(s) for your FAXPHONE using only one telephone
line.
Your FAXPHONE will automatically detect incoming calls. Based on the distinctive
ring pattern, the FAXPHONE knows if the call is from a fax machine trying to send a
document or from a telephone trying to make a voice call.
Use the information in this section to set up the FAXPHONE for use with a DRP
service.
This feature is called Distinctive Ring Pattern Detection (DRPD).
For more details on the DRP service, contact your local telephone company. (Your
telephone company may have a different name for this service. Also, this service may
not be offered in all areas.)
Types of ring patterns __________________________
Your telephone company will assign a distinctive ring pattern to each number when
you order the DRP service.
1
The setting you make with the following procedure must match the setting assigned by
the telephone company.
You can set the FAXPHONE to select among the following ring patterns:
❚ Normal ring: Ring type of normal telephone line
❚ Double ring: Two short rings at regular intervals
❚ Triple ring: Short-short-long at regular intervals
❚ Triple ring: Short-long-short at regular intervals
❚ Other ring type: Patterns other than those described above
21
Page 34

Turning on DRPD and assigning a setting to a ring pattern
1 Press [FUNCTION].
Wait a second for TEL REGISTRATION to appear.
SELECT MENU
TEL REGISTRATION
2 Use [ ] or [ ] to select RX SETTINGS.
▼
Press [START/COPY].
RX SETTINGS
ECM RX
3 Use [ ] or [ ] to select DRPD
▼
Press [START/COPY].
DRPD
4 Use [ ] or [ ] to select ON.
▼
Press [START/COPY].
Wait a second for NORMAL RING to appear.
22
OFF
ON
DATA ENTRY OK
NORMAL RING
Page 35

Distinctive Ring Pattern Detection (DRPD) feature
5 Use [ ] or [ ] to select a ring pattern.
❚ NORMAL RING
❚ DOUBLE RING
❚ SHORT-SHORT-LONG
❚ SHORT-LONG-SHORT
❚ OTHER RING TYPE
▼
When the pattern you want to set is displayed,
press [START/COPY].
6 Use [ ] or [ ] to select TEL, FAX or FAX/TEL
SWITCH.
❚ TEL
❚ FAX
❚ FAX/TEL SWITCH
▼
When the setting you want to set is displayed,
press [START/COPY].
Wait a second for DOUBLE RING to appear.
NORMAL RING
1
▼
NORMAL RING
TEL
FAX
▼
DATA ENTRY OK
7 Press [STOP] to finish.
To make additional assignments, start from step 5.
To finish, press [STOP].
When DRPD is set to ON, the communication type for each ring pattern
defaults to TEL (except for the DOUBLE RING pattern which defaults
to FAX). After you select the ring pattern that has been assigned for
your fax communications, you need to make sure that the other ring
patterns are not set to FAX. Otherwise, the FAXPHONE may answer as
a fax for each ring pattern.
DOUBLE RING
23
Page 36

How DRPD responds to calls ___________________
When there is an incoming call, the FAXPHONE checks the incoming ring pattern and
determines the type of pattern being received. The FAXPHONE may require up to 10
seconds to determine the pattern type, and during this time the FAXPHONE does not
ring. After the pattern is detected, the FAXPHONE reacts according to how you registered the setting.
Your Setting
FAX
TEL
FAX/TEL SWITCH
From Fax From Telephone
Receives the fax document
without ringing.
Ignores fax transmissions.
Switches to receive mode for
fax transmission signals and
does not ring.
Incoming Call
Answers as a fax machine.
Receives telephone calls, and
rings to alert you to pick up the
extension phone.
Rings the FAXPHONE so you
can pick up the extension
phone and take the telephone
call.
Communicating using the Distinctive Ring
Pattern Detection (DRPD) feature ______________
Using the FAXPHONE with a DRP service is almost the same as using it with a
normal telephone line. When you receive calls, however, the FAXPHONE responds
somewhat differently, as described below.
The DRP service is commonly used with automatic receiving only.
■ FAXPHONE set to Fax Only Mode
(“Fax/Only” displayed on the LCD)
When the FAXPHONE is set for automatic receiving, the FAXPHONE operates according to the mode set for the registered setting (TEL, FAX, or FAX/TEL SWITCH).
If FAX/TEL SWITCH is set, the difference between incoming telephone calls and fax
transmissions will be detected.
❚ When someone calls using the number assigned for telephone communication, the
FAXPHONE rings in the pattern you registered in the above procedure. When you
hear the telephone call ring pattern, simply pick up the extension phone connected
to the FAXPHONE and talk. If you do not pick it up, the FAXPHONE continues to
ring until the other party hangs up.
❚ When someone sends a fax using the number assigned for fax communication, the
FAXPHONE does not ring. It receives the document automatically.
24
Page 37

Distinctive Ring Pattern Detection (DRPD) feature
If you use a receiving mode other than automatic receiving with the DRP service:
■ FAXPHONE set to Manual Mode
(“Manual” displayed on the LCD)
When you receive a call over any of the numbers in the DRP system, the FAXPHONE
rings with the appropriate pattern you registered. Pick up the handset of the connected
extension phone.
❚ If the call is from a person, talk normally.
❚ If you hear a slow beep, press [START/COPY] to receive a fax.
■ FAXPHONE set to Ans Machine Mode
(“AnsMode” displayed on the LCD)
❚ When someone calls using the number assigned for telephone communication, the
FAXPHONE rings with the pattern you registered. When the FAXPHONE rings,
the answering machine connects and then takes over the call.
❚ When someone sends a fax using the number assigned for fax communication, the
FAXPHONE receives the document automatically.
■FAXPHONE set to Fax/Tel Mode
(“Fax/Tel” displayed on the LCD)
The FAXPHONE monitors all incoming calls for all the numbers with DRPD. The
FAXPHONE answers the telephone for you and checks to see if the call is from another fax machine or from a person wanting to talk to you. If the call is from another
fax, the FAXPHONE automatically receives the document. If the call is from a person,
the FAXPHONE rings to alert you to pick up the phone.
1
No matter which number receives a call, if you hear a slow beep signifying another fax
trying to send you a document, press [START/COPY] to receive the document.
25
Page 38

PREPARING
TO USE
YOUR
2
2
FAXPHONE
Main components of the FAXPHONE ......................... 28
Front view ................................................................................................ 28
Rear view ................................................................................................. 29
FAXPHONE controls — the Operation Panel .............. 30
Registering your name and number ........................... 32
Moving through the main menus ......................................................... 32
Entering a number .................................................................................. 33
Entering a name ...................................................................................... 34
Personalizing your FAXPHONE ............................................................ 35
Registering the date and time .............................................................. 36
Registering your telephone/fax number and name .......................... 37
Registering One-touch Speed Dialing numbers
and names .............................................................. 39
Registering Coded Speed Dialing numbers
and names .............................................................. 41
27
Page 39

Main components of the FAXPHONE
Front view ______________________________________
Extension
(For use with legal-size
documents)
Paper tray
Automatic document
feeder (ADF)
Paper tray cover/
document tray
Document guide
Operation panel
(Use the operation
panel buttons to
operate the
FAXPHONE.)
Front cover
Speaker
28
Page 40

Main components of the FAXPHONE
Rear view _______________________________________
2
Power cord connector
Telephone line jack
Extension phone jack
29
Page 41

FAXPHONE controls — the Operation Panel
Numeric buttons
Use the numeric buttons to enter phone numbers when dialing.
These buttons can also be used to enter text, numbers, and
symbols when registering names.
+ (#)
When registering your fax number, press to enter a plus (+).
TONE
Press to temporarily set your FAXPHONE to send a tone signal
when using pulse dialing.
Press
and
CLEANING
Press to clean the BJ cartridge print head.
REPORT
Press to print a transaction report, a list of
registered numbers, or a list of settings.
SEND OPTIONS
Press to select a transmission mode.
SPACE
Press to enter a space between numbers or letters when you
register fax numbers and names.
CLEAR
Press to clear a number or name quickly so you can re-enter it.
30
Page 42

LCD Display
Displays messages and
prompts during
operation. Displays
selectable functions,
numbers, and names
when registering
information.
FAXPHONE controls — the Operation Panel
RECEIVE MODE
Four modes are available:
Fax Only Mode: Answers calls as fax
calls automatically.
Ans. Machine Mode: Receives
documents and passes calls to an
answering machine.
Fax/Tel Mode: Receives both
documents and telephone calls.
Manual Mode: Receives calls manually.
Arrow buttons ( , )/VOLUME
Use to scroll through menus and lists
that appear on the LCD, and to
change settings. These buttons also
move the cursor in some naming
operations and adjust the volume of
the monitor speaker.
RESOLUTION
Use to set the resolution for the type of
document you want to send. You can
select from STANDARD, FINE, and
PHOTO.
2
HOOK
Press to engage or disengage the telephone
line (hands-free dialing).
START/COPY
Press to start sending, receiving and copying.
This button is also used for data entry
operations.
STOP
Press to cancel sending, receiving, copying
and data entry operations.
CODED DIAL
Press this button (followed by a twodigit code) to dial a fax number
registered for Coded Speed Dialing.
FUNCTION
Press to start data registration of fax
numbers, names, and other important
settings for sending and receiving.
REDIAL/PAUSE
Press to dial the last number dialed
with the numeric buttons.
When dialing or registering fax
numbers, press to enter pauses
between digits.
31
Page 43

Registering your name and number
You should now register the time, date, and your name and fax number, which will
appear at the top of every page you send.
In accordance with recent amendments to the FCC rules governing the
use of facsimile equipment, you are now required to include your fax
number, your name or company name and the date and time of the fax
you are sending every time that you send a fax. Please follow the setting
instructions in this manual in order to comply with this requirement.
Moving through the main menus ________________
The FAXPHONE includes a menu system that you use to register information and
select fax and telephone operations. The main menu includes these items:
TEL REGISTRATION
USER SETTINGS
REPORT SETTINGS
TX SETTINGS
RX SETTINGS
FAX PRINTER
SYSTEM SETTINGS
For a complete description of the menu system, see User menu settings, p. 70.
In general, follow these steps to access the menus and make selections:
1 Press [FUNCTION].
Wait a second for TEL REGISTRATION to appear.
2 Press [ ] or [ ] to scroll through the menus until
you see the menu you wish to access. The LCD
displays the menu title.
3 Press [START/COPY]. The LCD displays the first
selection for the selected menu.
4 You can now make a selection:
Press the arrow buttons to view the possible selections.
SELECT MENU
TEL REGISTRATION
USER SETTINGS
SET DATE
32
Page 44

5 After selecting or entering a value, press
[START/COPY].
Registering your name and number
DATA ENTRY OK
6 Repeat steps 4 and 5 as needed.
7 When the operation is complete, press [STOP].
Registration ends and the FAXPHONE returns to
standby mode.
After 60 seconds of no operation panel input, the FAXPHONE returns
to standby mode and any unregistered changes are lost.
Entering a number_______________________________
Whenever you are prompted to enter a fax number or a telephone number, follow these
procedures.
Use the numeric buttons to enter the number.
TEL=
❚ You can enter up to 20 digits for your fax number or 50 digits for a speed dialing
number.
❚ Be sure to enter 1 and the area code, if necessary, to dial a different area code.
❚ Do not enter dashes, slashes, commas, or other punctuation.
2
Use the One-touch Speed Dialing buttons as follows:
❚ To enter a space between numbers, press [SPACE].
❚ If you make a mistake, press [CLEAR] and enter the number
again.
❚ To erase a previously registered number, press [CLEAR]. You
can also enter a new number over the old one.
If you need to enter a pause for any reason,
❚ Press [REDIAL/PAUSE] at the desired point in the sequence when entering a series
of digits.
❚ A pause within a number is 2 seconds long. The length of this pause can be
adjusted. See MID PAUSE SET in TX SETTINGS, p. 76. A pause at the end of a
number is fixed at 10 seconds.
33
Page 45

Entering a name _________________________________
Whenever you register a fax number or a telephone number, you can assign a name to
that number. To enter a name from the operation panel, you use the numeric buttons to
create alphanumeric characters.
Each button has a certain letter group plus a digit assigned to it; an uppercase set
followed by a lowercase set of characters and then a digit. Each press of the button
steps to the next character in the group.
Use the chart below to determine which number to press for each character:
To enter Press this numeric button
0 0
1 1
ABCabc 2 2
DEFdef 3 3
GHIghi 4 4
JKLjkl 5 5
MNOmno 6 6
PQRSpqrs 7 7
TUVtuv 8 8
WXYZwxyz 9 9
– . * # ! “ , ; : ^ ` _ = / | ‘ ? $ @ %
& + ( ) [ ] { } < >
❚ First press the numeric button corresponding to the character you want.
❚ Press the numeric button repeatedly until the character you want appears in the
display. For example, to enter BIG 1:
Press the appropriate numeric button repeatedly until the desired character appears.
1
B Press 2 twice.
#
34
The next character is in a different group, so simply press the new group’s
2
numeric button—the cursor moves automatically. Press the numeric button
repeatedly to display the desired character.
BI Press 4 three times.
The next character is in the same group, so press [ ] to move the cursor to the
3
right first. Then press the numeric button repeatedly.
BIG Press [ ] once. Then, press 4 once.
The next character is a space. Simply press [SPACE].
4
BIG _ Press [SPACE] once.
Page 46

Registering your name and number
The next character is a digit. Press the numeric button corresponding to the digit.
5
(For digits other than 0 and 1, press repeatedly until the digit appears.)
BIG 1 Press 1 once.
After entering a name, press [START/COPY].
6
❚ You can enter up to 16 characters in a name.
❚ To enter a space between characters, press [SPACE] or move
the cursor to the right using [ ].
❚ To correct a mistake, use the arrow buttons to move the cursor
under the mistake; then enter the correct character. You can
also press [CLEAR] to begin again; then simply enter the
name again.
❚ To erase a previously registered name, press [CLEAR] or simply
enter the new name over the old one.
Personalizing your FAXPHONE __________________
■ Identifying your documents
When sending a document, you can have your fax number and your name (known as
your ID), and the current date and time printed out by the receiving fax. This information is called your TTI (Transmit Terminal Identification) and appears at the top of the
faxed document in small type.
2
In the United States, you are required to include this information every time you
send a fax. So be sure to enter your TTI information in your FAXPHONE now.
By identifying the documents you send, the receiving party will recognize your fax
messages at a glance. The illustration below shows a sample document with the iden-
tifying information.
CANON/CCSI
YOUR NAME OR COMPANY NAME
YOUR FAX/TELEPHONE NUMBER
THE DATE AND TIME YOU SENT THE DOCUMENT
The top line includes the name of the receiving party if you send the document using
One-touch Speed Dialing or Coded Speed Dialing and you registered the party’s name.
It also includes the total number of pages sent if you send the document from memory.
CANON FAX
THE NAME OF THE PARTY WHO IS
RECEIVING THE DOCUMENT
THE PAGE NUMBER/
THE TOTAL NUMBER
OF PAGES SENT
35
Page 47

Registering the date and time ___________________
Follow the steps below to set the date and time for your FAXPHONE. The date and
time appear in the LCD display as well as on the documents you send.
1 Press [FUNCTION].
Wait a second for TEL REGISTRATION to appear.
SELECT MENU
TEL REGISTRATION
2 Use [ ] or [ ] to select USER SETTINGS.
▼
Press [START/COPY].
USER SETTINGS
SET DATE
3 Press [START/COPY].
00/00/00
4 Enter today's date using the numeric buttons,
using the month-day-year format (MM/DD/YY).
❚ Precede single digits with a zero.
❚ To make a correction, press [CLEAR] to return to
the previous setting and re-enter the date.
❚ You can also use [ ] or [ ] to move the cursor..
❚ To change the date format. See SYSTEM
SETTINGS p. 78.
5 Press [START/COPY] when you finish entering the
new date.
Wait a second for SET TIME to appear.
6 Press [START/COPY].
36
09/15/97
DATA ENTRY OK
SET TIME
00:00
Page 48

Registering your name and number
7 Enter the time using the numeric buttons.
Set the time using the 24-hour clock system. Precede
single digits with a zero. Example:
07:30 = 7:30 a.m.
17:05 = 5:05 p.m.
8 Press [START/COPY] when you finish entering the
new time.
DATA ENTRY OK
9 Press [STOP].
Registration ends and the FAXPHONE returns to
standby.
Registering your telephone/fax number and name
Follow the steps below so that your fax number and name appear on the top of each
document you send.
08:15
2
1 Press [FUNCTION].
Wait a second for TEL REGISTRATION to appear.
2 Use [ ] or [ ] to select USER SETTINGS.
▼
Press [START/COPY].
SELECT MENU
TEL REGISTRATION
USER SETTINGS
SET DATE
37
Page 49

3 Use [ ] or [ ] to select ENTER YOUR TEL.
▼
Press [START/COPY].
4 Enter your fax number (up to 20 digits) using the
numeric buttons.
You can enter a plus sign (+) or space to make your
number easier to read. To enter a plus sign (+), press
[#]. To make a correction, press [CLEAR] and
re-enter the number.
5 Press [START/COPY] when you finish entering
your fax number.
Wait a second for USER NAME to appear.
ENTER YOUR TEL
TEL=
TEL= 1234 5678
(+)
DATA ENTRY OK
USER NAME
6 Press [START/COPY].
7 Enter your name (up to 16 characters) using the
numeric buttons.
See Entering a name, p. 34.
Correct errors by moving the cursor to the error using
[ ] or [ ] and entering the correct character..
8 Press [START/COPY] when you finish entering
your name.
9 Press [STOP].
Registration ends and the FAXPHONE returns to
standby.
38
_
CANON/CCSI
DATA ENTRY OK
Page 50

Registering One-touch Speed Dialing numbers and names
The quickest way to dial a fax number is to use One-touch Speed Dialing. This allows
you to dial a number by pressing a single button. Before you can use One-touch Speed
Dialing, you must register the receiving number with your FAXPHONE.
One-touch Speed Dialing assigns a fax number (up to 50 digits) to a One-touch Speed
Dialing button (01 to 10).
You can also register the name of the party (up to 16 characters); the name appears on the
printout of the One-touch Speed Dialing list. See One-touch Speed Dialing list, p. 80.
1 Press [FUNCTION].
Wait a second for TEL REGISTRATION to appear.
2 Press [START/COPY].
SELECT MENU
TEL REGISTRATION
1-TOUCH DIAL
2
3 Press [START/COPY].
4 Use [ ] or [ ] to select the number of the One-
touch button you want to use for the number.
If a number is already registered for this One-touch
Speed Dialing button, the LCD displays the number.
5 Enter the number (up to 50 digits) using the
numeric buttons.
See Entering a number, p. 33.
Correct errors by pressing [CLEAR] and re-entering
the number.
01=
03=
03= 1234
5678
39
Page 51

6 Press [START/COPY] to register the number.
Wait a second for 1-TOUCH SPD NAME to appear,
followed by 03=_.
7 Enter the party’s name (up to 16 characters) using
the numeric buttons.
See Entering a name, p. 34.
Correct errors by pressing [CLEAR] and re-entering
the name.
8 Press [START/COPY] to register the name.
DATA ENTRY OK
1-TOUCH SPD NAME
03=_
03=CANON
DATA ENTRY OK
04=
9 To assign additional One-touch Speed Dialing
numbers, start from step 4 . To finish, press [STOP].
Applying the faceplate
For quick reference, write the names for the
One-touch Speed Dialing numbers you
register on the faceplate and attach it over the
One-touch buttons. Fit the 4 tabs of the
faceplate into the corresponding slots around
the One-touch button area. See Attaching
components, p. 5.
40
Page 52

Registering Coded Speed Dialing numbers and names
To dial a fax number at the press of three buttons, use Coded Speed Dialing. Each twodigit (01-20) Coded Speed Dialing number can contain a fax number. You can register
up to 20 locations with each number containing up to 50 digits.
You can also register the name of the party (up to 16 characters); the name appears on
the printout of the Coded Speed Dialing list. See Coded Speed Dialing list, p. 81.
1 Press [FUNCTION].
Wait a second for TEL REGISTRATION to appear.
2 Press [START/COPY].
SELECT MENU
TEL REGISTRATION
1-TOUCH DIAL
2
3 Use [ ] or [ ] to select CODED DIAL.
▼
Press [START/COPY].
4 Use [ ] or [ ] to select the two-digit code you
want to assign to the number.
5 Enter the party’s number (up to 50 digits) and name
the same way you registered them for One-touch
Speed Dialing.
See steps 4 to 8 of registering One-touch Speed
Dialing. (See Registering One-touch Speed Dialing
numbers and names, p. 39.)
6 To assign additional Coded Speed Dialing num-
bers, start from step 4. To finish, press [STOP].
CODED DIAL
01=
*
15=
*
15= 1234 5678
*
41
Page 53

HANDLING
3
3
DOCUMENTS
Preparing documents ................................................. 44
Types of documents you can scan ...................................................... 44
Loading the document ........................................................................... 45
Setting the resolution and density .......................................................47
43
Page 54

Preparing documents
Types of documents you can scan ______________
■ Size
The FAXPHONE can scan standard letter, legal or A4 size documents.
■ Thickness
Each sheet of the document should be of the same thickness and between 0.003 inch
and 0.005 inch (0.08 mm - 0.13 mm) thick with a paper weight between 20 to 24 lbs
(75 to 90 g/m2).
■ Effective image size
The actual scanned image size for the FAXPHONE is shown below.
The 0.04 inch (1.0 mm) margin on either side of the sheet and the 0.08 inch (2.0 mm)
margin on the top and bottom are not picked up by the scanner.
Problem Documents
• Do not attempt to feed the following types of documents into the FAXPHONE:
wrinkled or curled or rolled paper torn paper
creased paper
carbon paper or coated paper onion skin or thin paper
carbon-backed paper
envelopes
• Remove all staples, paper clips and the like before feeding the document.
•
Make sure any glue, ink or correction fluid on the paper is completely dry before feeding the document.
• Make a photocopy of any document that will not feed into the FAXPHONE so that you can then
feed the copy.
or glossy paper
44
Page 55

Preparing documents
Loading the document __________________________
For a multipage document, tap the
1
document on a flat surface to even the
stack.
You can load up to 20 letter size, 10 legal size or 20
A4 size sheets at a time into the Automatic Document Feeder (ADF).
Adjust the right paper guide to the width
3
of the document.
Insert the document face-down and head first
2
into the Automatic Document Feeder until you
hear a beep.
The FAXPHONE automatically feeds the pages one
by one from the bottom.
If a page jams or stops while feeding, see Clearing
document jams p. 58.
3
For legal-size documents, flip the extension tray
open to accommodate the document.
Extension tray
If you are experiencing difficulty feeding multipage
documents, slant the edges of the stack and insert
the document into the Automatic Document Feeder
(ADF).
45
Page 56

■Adding pages to the document
You can load up to 20 letter size, 10 legal size or 20 A4 size sheets at a time into the
Automatic Document Feeder.
For longer documents, wait until the twentieth sheet has started feeding, then load 20
more sheets (10 for legal size).
If you want to add pages while the FAXPHONE is sending a document, insert the first
new page so it overlaps the last page by about 3/4 inch (2 cm).
Wait until the last page is being fed into the FAXPHONE before you add new pages.
46
Page 57

Preparing documents
Setting the resolution and density______________
You can control the resolution and density of the fax reproduction when sending or
copying documents.
■ What is resolution?
Resolution defines the quality of the document reproduction. STANDARD is enough
for most text documents. Documents with very fine print should be set to FINE.
Documents with photographs should be set to PHOTO.
■ Setting the resolution
To set the resolution, you first have to load the document (See p. 45).
❚ STANDARD
Press [RESOLUTION] until STANDARD appears.
Standard resolution is 203 dpi × 98 dpi.
When copying, even if you set STANDARD,
the document will automatically be scanned in FINE mode.
❚ FINE
Press [RESOLUTION] until FINE appears.
Fine resolution is 203 dpi × 196 dpi.
❚ PHOTO
To scan documents that contain photos, use the PHOTO setting. With this setting,
areas of the document that contain photos are automatically scanned with 64 levels
of gray, rather than just 2 levels, black and white. Photo resolution is 203 dpi × 196
dpi. This results in a much better reproduction of the photograph.
3
■ Density control
You can adjust the scanning density by changing DENSITY CONTROL in the USER
SETTINGS (See p. 75). For light originals choose the DARKER setting. For dark
originals choose the LIGHTER setting.
47
Page 58

MAKING
4
4
COPIES
Copying documents ................................................... 50
49
Page 59

Copying documents
One of the convenient features of the FAXPHONE is its ability to make high quality
copies. You can make up to 99 copies of one document at a time.
1 Feed the document face-down into the
Automatic Document Feeder (ADF).
See Loading the document, p. 45.
You can select the density. See p. 47.
You can select FINE or PHOTO for the resolution.
(If you set the resolution to STANDARD, your
document will automatically be copied in FINE
mode.) See p. 47.
2 Press [START/COPY].
To make a single copy, go directly to step 4.
3 Enter the number of copies (up to 99) using the
numeric buttons.
To make a correction to the number of copies, press
[CLEAR] and re-enter the number.
STANDARD
COPY PAGE 01
COPY PAGE 3
4 Press [START/COPY].
To stop copying anytime, press [STOP]. Then you
may need to lift the operation panel to remove the
document, See Clearing document jams, p. 58.
If MEMORY FULL displays on the LCD
If MEMORY FULL displays on the LCD while making multiple copies
of a document, do not use the multiple copy feature for copying the
document. Make single copies of the document instead (as many times
as required).
COPY
50
Page 60

SENDING
5
FAXES
5
Preparing to send a document .................................. 52
Sending methods .................................................................................... 52
Dialing methods ...................................................................................... 52
Sending documents ................................................... 53
Direct Sending ........................................................................................ 53
Manual Sending ..................................................................................... 53
Automatic Dialing ................................................................................... 54
Memory Sending .................................................................................... 55
Canceling Sending ................................................................................. 56
Redialing .................................................................................................. 56
Messages displayed during sending .................................................. 57
Clearing document jams (ejecting a document from the ADF) .......58
Delayed Sending ......................................................... 59
Sending other documents while the FAXPHONE is set
for Delayed Sending ...................................................................... 60
Canceling Delayed Sending ................................................................. 61
Sequential broadcasting ............................................ 62
Sending a document to more than one location ............................... 62
51
Page 61

Preparing to send a document
Before you send a document please refer to:
❚ Types of documents you can scan, p. 44.
❚ Loading the document, p. 45.
❚ Adding pages to the document, p. 46.
❚ Setting the resolution and density, p. 47.
Sending methods _______________________________
■ Direct Sending (See p. 53)
If your document has a large number of pages, you may sometimes get a MEMORY
FULL error. To avoid this, use Direct Sending.
To send directly, load the document, dial the fax number and press [START/COPY].
■ Manual Sending (See p. 53)
If you would like to speak with the other party before sending a fax to them, use
Manual Sending. When sending manually, you dial, converse normally and then press
[START/COPY] to begin sending.
For manual sending, you need to have an extension phone connected.
■ Memory Sending (See p. 55)
If you do not want to wait for your document to be scanned page by page during
sending (Direct Sending), use Memory Sending. Memory Sending scans the document into memory, then dials and sends the stored image, letting you take away the
original immediately after scanning.
Dialing methods ________________________________
There are several methods of dialing the receiving party’s number, depending on how
your FAXPHONE is set up.
Manual Dialing: Dial the recipient’s fax number using the numeric buttons.
One-touch Speed Dialing: Dial a recipient’s fax number that has been assigned to a
One-touch Speed Dialing button by simply pressing the corresponding One-touch
Speed Dialing button. (See p. 54)
Coded Speed Dialing: Dial a recipient’s fax number that has been assigned to a Coded
Speed Dialing code by pressing [CODED DIAL] and the 2-digit code assigned to the
number. (See p. 54)
52
Page 62

Sending documents
Direct Sending__________________________________
To scan and transmit a document one page at a time without storing it in memory first,
follow the steps below. This procedure is called “Direct sending”.
Use Direct Sending if you want to visually confirm that the FAXPHONE scans the
document. Each page is scanned as it is sent.
1 Feed the document face-down into the
Automatic Document Feeder (ADF).
See Loading the document, p. 45.
You can set the resolution and density. See p. 47.
STANDARD
2 Dial the other party's fax number.
Use one of the dialing methods described earlier in
this chapter (see p. 52).
TEL= 3456 7890
3 Press [START/COPY].
The FAXPHONE begins sending the document.
Manual Sending ________________________________
If you would like to first speak with the person you are sending the fax to, use Manual
Sending. You need to connect an extension phone to the FAXPHONE for Manual
Sending.
1 Feed the document face-down into the
Automatic Document Feeder (ADF).
See Loading the document, p. 45.
You can set the resolution and density. See p. 47.
STANDARD
5
2 Pick up the handset of the connected extension
phone or press [HOOK] and dial the other party’s
fax number.
❚Use one of the dialing methods described earlier in
this chapter. See p. 52.
3 If a person answers, converse normally, then
ask them to press the start button on their fax.
Press [START/COPY] and hang up.
If you hear a high pitch tone, press [START/COPY]
and hang up.
TEL= 3456 7890
53
Page 63

❚ The FAXPHONE beeps once to indicate that the document has been sent
successfully.
TRANSMITTING OK
❚ If an error occurs during sending, the FAXPHONE beeps intermittently for a few
seconds. If this happens, try sending the fax again.
❚ The FAXPHONE automatically redials if the receiving fax does not answer or if the
line is busy. (You can specify the number of times it redials; see AUTO REDIAL in
TX SETTINGS, p. 76.)
❚ To stop sending before the fax is finished, press [STOP]. Then you may need to lift
the operation panel to remove the document, see Clearing document jams, p. 58.
❚ If an error message appears on the LCD, correct the error and then press [STOP].
Refer to Error codes, messages and solutions, p. 98.
Automatic Dialing ______________________________
■Sending a document using One-touch Speed Dialing or
Coded Speed Dialing
After registering the One-touch numbers or Coded Speed Dialing numbers you can
send documents as follows:
1 Feed the document face-down into the
Automatic Document Feeder (ADF).
See Loading the document, p. 45.
You can set the resolution and the density, p. 47.
FINE
2 Press the One-touch Speed dialing button
assigned to the number to which you wish to
fax.
or
Press [CODED DIAL] and enter the appropriate
two-digit Coded Speed Dialing code.
Wait a second for the number to appear after the
name of the number.
❚ If no number is registered for the button or code
you pressed, the LCD display shows the NO TEL#
message. Make sure you pressed the correct button
or entered the correct code and that the number you
want to dial is registered correctly.
❚ If you make a mistake, press [STOP]. Then press
the correct One-Touch Speed Dialing button or
press [CODED DIAL] and re-enter the code.
❚ If an error message appears on the LCD, correct
the error and press [STOP]. If necessary, refer to
Frequently Asked Questions, p. 92.
54
CANON FAX
12345678999
CANON CANADA
2345678999
Page 64

Sending documents
Memory Sending________________________________
You can use Memory Sending to send your document. With Memory Sending, the
FAXPHONE quickly scans the document into memory. Then, after it dials the receiving party, it sends the document from memory. This means you do not have to wait for
the FAXPHONE to finish sending before you can retrieve your original document.
You can send up to 21 letter-size pages (based on the CCITT #1 Chart—standard
resolution) at one time with Memory Sending.
❚ If the memory becomes full while scanning your document, MEMORY FULL is
displayed on the LCD. If this should happen, you may need to open the operation
panel to remove the document. See Clearing document jams, p. 58. Then try dividing the document into several sections and sending each section individually, or
send using Direct Sending or Manual Sending. See p. 53.
The definition of a letter-size page for memory storage purposes is based on the CCITT
#1 Chart.
1 Feed the document face-down into the
Automatic Document Feeder (ADF).
See Loading the document, p. 45.
You can set the resolution and density. See p. 47.
2 Press [FUNCTION].
Wait a second for TEL REGISTRATION to appear.
3 Press [SEND OPTIONS].
▼
Press [START/COPY].
▼
4 Dial the other party's fax number.
Use one of the dialing methods described earlier in
this chapter (see p. 52).
5
STANDARD
SELECT MENU
TEL REGISTRATION
MEMORY TX
TEL =
TEL= 9876543333
5 Press [START/COPY].
The FAXPHONE scans the document into memory
and begins sending.
TX/RX NO. XXXX
MEMORY INPUT P01
55
Page 65

Canceling Sending ______________________________
To stop sending before the fax is finished, press [STOP]. Then you may need to open
the operation panel to remove the document, see Clearing document jams, p. 58.
Redialing________________________________________
■ Manual
To start dialing again, just press [REDIAL/PAUSE]. (When you press [REDIAL/
PAUSE], the previous number dialed with the numeric buttons is redialed.)
■ Automatic
The FAXPHONE automatically redials twice after the first attempt at sending fails
(eg. the line was busy).
The time between redials is two minutes.
You can change the number of redials and the time between redials by changing the
TX SETTINGS (see p. 76).
If the FAXPHONE fails to get through after the second redial, the FAXPHONE beeps.
The LCD displays REDIALING while the FAXPHONE is in the redialing process.
REDIALING
■ To cancel automatic redialing
You can cancel automatic redialing anytime by pressing the [STOP] button.
However, when memory is used during sending (including Delayed Sending and Sequential Broadcasting), you cannot cancel redialing while REDIALING is displayed
on the LCD. In this case, wait until dialing begins, then press [STOP] to cancel redialing.
56
Page 66

Sending documents
Messages displayed during sending ____________
When your FAXPHONE sends a document, the following messages are displayed as
the call progresses.
The FAXPHONE is dialing the recipient’s phone number.
DIALING
The recipient’s phone is ringing.
CALLING
The display tells you when transmission begins.
TRANSMIT
After a few moments the display begins changing every 2 seconds. (With Memory Sending, only the other party’s
number is displayed.)
5
TX/RX No. XXXX
⇓
or
TRANSMIT PXX If ECM is off, “TRANSMIT PXX” is displayed.
ECM TX PXX
⇓
789 3456
⇓
CANON INC.
After the document is sent, the FAXPHONE beeps once and the display tells you when
the transmission has ended.
TRANSMITTING OK
Other party’s number
Other party’s name
(For some models, the other party’s name may also be displayed.)
57
Page 67

Clearing document jams (ejecting a document
from the ADF) __________________________________
■ Removing a jammed sheet
Hold down the FAXPHONE with your left
1
hand, and gently pull the operation panel
with your right hand.
❚ Do not push the LCD display.
Gently push the operation panel shut
3
until it clicks.
While holding the operation panel open,
2
pull the sheet out from the top or bottom.
58
Page 68

Delayed Sending
Your FAXPHONE can send documents automatically at a preset time. This allows you
to take advantage of lower late night long-distance rates offered by some telephone
companies.
You can use any dialing method to dial fax numbers to send a document to up to 31
destinations at a preset time. See Sending a document to more than one location for
details, p. 62.
1 Feed the document face-down into the
Automatic Document Feeder (ADF).
See Loading the document, p. 45.
You can set the resolution and density. See p. 47.
DOCUMENT READY
2 Press [FUNCTION].
Wait a second for TEL REGISTRATION to appear.
3 Press [SEND OPTIONS].
4 Use [ ] or [ ] to select DELAYED TX.
▼
Press [START/COPY].
Wait a second for SET TIME to appear.
SELECT MENU
TEL REGISTRATION
MEMORY TX
DELAYED TX
▼
TX/RX NO. XXXX
SET TIME XX:XX
5
5 Enter the desired sending time (24-hour clock)
using the numeric buttons.
❚ Set the time using the 24-hour clock system.
Precede single digits with a zero.
Example:
07:30 = 7:30 a.m.
17:05 = 5:05 p.m.
❚ Press [CLEAR] if you need to re-enter the time.
❚ You can also use [ ] or [ ] to move the cursor..
SET TIME 23:00
59
Page 69

6 Press [START/COPY].
7 Dial the other party's fax number.
❚ You can enter the other party’s fax number using
the numeric buttons, One-touch Speed Dialing (see
p. 54), or Coded Speed Dialing (see p. 54).
❚ If you use the numeric buttons, press [START/
COPY] after entering the number to register it
before going on to the next number.
8 Press [START/COPY].
The FAXPHONE reads the document into memory.
After reading in the document, the FAXPHONE displays TIMER on the LCD. When
the set time comes, the FAXPHONE dials and sends the document.
TIMER
TEL=
TEL= 3456 7890
MEMORY INPUT P01
60
Sending other documents while the FAXPHONE
is set for Delayed Sending ______________________
You can send, receive, and copy other documents even when the FAXPHONE is set
for sending at a preset time.
The FAXPHONE can only register one preset sending operation at a time.
To send or copy other documents after setting the FAXPHONE for Delayed Sending,
simply send or copy using any other sending procedure in this manual.
Delayed sequential broadcasting
Delayed sequential broadcasting is applicable for sending one document to
more than one location at a later time when multiple fax numbers are
dialed. See p. 62.
Page 70

Delayed sending
Canceling Delayed Sending_____________________
1 Press [FUNCTION].
Wait a second for TEL REGISTRATION to appear.
SELECT MENU
TEL REGISTRATION
2 Press [SEND OPTIONS].
MEMORY TX
3 Use [ ] or [ ] to select DELAYED TX.
▼
Press [START/COPY].
Wait a second for SET TIME to appear.
▼
DELAYED TX
SET TIME 23:00
5
4 Press [CLEAR].
5 Press [START/COPY].
Delayed Sending cancels.
SET TIME _0:00
ERASING END
61
Page 71

Sequential broadcasting
Sending a document to more than one location
Sequential broadcasting sends one document to more than one location.
You can send to a total of 31 destinations as follows:
One-touch Speed Dialing = 10 destinations
Coded Speed Dialing = 20 destinations
Regular dialing (Numeric buttons dialing) = 1 destination
You can enter the One-touch Speed Dialing and Coded Speed Dialing destinations in
any order. You simply press the One-touch Speed Dialing button, or press [CODED
DIAL] followed by the two-digit code (with the numeric buttons).
You can also include one destination using Regular dialing. Remember that when
using regular dialing, you must press [START/COPY] after entering the number.
You can send up to 21 letter-size pages (based on the CCITT#1 Chart—standard
resolution).
1 Feed the document face-down into the
Automatic Document Feeder (ADF).
See Loading the document, p. 45.
You can set the resolution and density. See p. 47.
STANDARD
2 Dial the other party’s fax number.
❚ You can send to up to 31 destinations.
❚ Simply enter the numbers one after the other: press
the desired One-touch Speed Dialing button or
press [CODED DIAL] followed by the two-digit
code (with the numeric buttons).
❚ You can enter only one number directly with the
numeric buttons using regular dialing. Remember
to press [START/COPY] after entering the number.
❚ You can also press [REDIAL/PAUSE] to redial the
last number dialed with the numeric buttons.
❚ You must press each button within 10 seconds of
the preceding one. The FAXPHONE begins the
operation approximately 10 seconds after you press
the last button.
3 Press [START/COPY].
❚ The FAXPHONE reads the document into memory
and begins sending. Between transmissions,
MULTI TRANS ON displays on the LCD.
❚ To cancel a transmission, press [STOP] during
dialing or transmission. All transmissions in the
sequence are canceled.
62
TEL= 3456 7890
TX/RX NO. XXXX
MEMORY INPUT P01
Page 72

RECEIVING
6
FAXES
Receiving documents ................................................. 64
Receiving documents in Manual Mode .............................................. 64
Receiving documents in Fax Only Mode ............................................ 65
Receiving documents in Fax/Tel Mode ............................................... 65
Receiving documents in Ans. Machine Mode .................................. 66
Receiving documents in memory ........................................................ 67
Printing documents in memory ............................................................ 68
Receiving while registering, copying or printing .............................. 68
6
63
Page 73

Receiving documents
Receiving documents in Manual Mode _________
You may want to set your FAXPHONE to Manual Mode if you want to personally
monitor every call, whether from a fax machine or a person.
For Manual Mode, you need to have an extension phone connected to your FAXPHONE.
See p. 13.
Keep in mind that you cannot use Manual Receiving if a document is in the Automatic
Document Feeder (ADF) waiting to be sent.
1 Make sure you have connected an extension
phone to your FAXPHONE. See p. 13.
2 Press [RECEIVE MODE] until “Manual Mode”
appears on the LCD.
Manual Mode
3 Press [START/COPY].
4 When the FAXPHONE rings, pick up the handset
of the extension phone.
5 If you hear a person's voice, start your conver-
sation. If the caller wants to send a document
after talking to you, press [START/COPY] to
receive the document.
or
If you hear a slow beep or silence, another fax
is trying to send you a document. Press [START/
COPY].
Your FAXPHONE begins receiving the document.
❚ Hang up the handset after the FAXPHONE displays RECEIVE. If you don’t hang
up, the FAXPHONE beeps intermittently for a few seconds after you receive the
document. To turn off the beeping, see OFF HOOK ALARM in the USER SETTINGS, p. 75.
09/15/97 Manual
64
Page 74

Receiving documents
Receiving documents in Fax Only Mode ________
When the FAXPHONE is set up for a dedicated line, it automatically receives
documents whenever a call comes over the fax line.
The FAXPHONE cannot receive automatically if you are making copies, printing
reports, or registering information. See p. 68.
1 Press [RECEIVE MODE] until “Fax Only Mode”
appears on the LCD.
Fax Only Mode
2 Press [START/COPY].
09/15/97 FaxOnly
The FAXPHONE assumes all incoming calls are from another fax machine sending a
document. It receives the documents automatically.
Receiving documents in Fax/Tel Mode __________
You can set the FAXPHONE to monitor all incoming calls over the fax/telephone line.
When the FAXPHONE receives an incoming call, it checks to see if the call is from
another fax machine trying to send a document or from someone wanting to talk to
you. You need to have an extension phone connected to your FAXPHONE for this
mode. See p. 13.
The FAXPHONE cannot receive automatically if you are making copies, printing
reports, or registering information. See p. 68.
1 Make sure you have connected an extension
phone to your FAXPHONE. See p. 13.
2 Press [RECEIVE MODE] until “Fax/Tel Mode”
appears on the LCD.
Fax/Tel Mode
3 Press [START/COPY].
09/15/97 Fax/Tel
6
When the FAXPHONE receives a call, it checks to see whether the call is from another
fax machine or from a telephone.
❚ If the INCOMING RING function is set to OFF, the FAXPHONE does not ring
(even if an extension phone is connected) when it receives a call from another fax
machine that is trying to send a document. This is so that you are not disturbed when
your FAXPHONE is communicating with another fax machine. The FAXPHONE
automatically receives the document.
❚ In Fax Only Mode or Fax/Tel Mode, if you want the extension phone to ring to make
sure that someone is sending you a document, you need to set INCOMING RING to
ON and connect an extension phone.
❚ If the call is from a person, the FAXPHONE rings to alert you to pick up the exten-
sion phone.
❚ If you do not pick up the handset of the extension phone within 15 seconds, the
FAXPHONE stops ringing. It checks again to make sure the call is not from a fax
machine and then hangs up.
65
Page 75

❚ If the paper runs out or if the BJ cartridge runs out of ink, the
FAXPHONE receives the rest of the document in memory.
❚ To stop receiving before the document is complete, press [STOP].
❚ If an error message appears on the LCD, make sure the error is cor-
rected and then press [STOP]. If necessary, see Frequently Asked
Questions, p. 92.
❚ The FAXPHONE beeps once to show that the document was received. If
an error occurs, the FAXPHONE beeps intermittently for a few seconds.
If this happens, contact the other party and have them resend the
document.
Receiving documents in Ans. Machine Mode ___
Connecting an answering machine to the FAXPHONE allows you to receive not only
documents sent from other fax machines, but also messages from people calling when
you are out of the office. When the FAXPHONE is connected to an answering machine, all incoming calls are first directed to the answering machine. If the call is from
a person, the caller can leave a message. If the call is from a fax machine, your
FAXPHONE receives the document automatically. See Connecting the phone line, p.
13 for instructions on how to connect the answering machine to the FAXPHONE.
1 Make sure you have connected an answering
machine to your FAXPHONE. See p. 13.
2 Press [RECEIVE MODE] until “Ans. Machine
Mode” appears on the LCD display.
Ans. Machine Mode
3 Press [START/COPY].
4 Set your answering machine to answer.
❚ The FAXPHONE allows the answering machine to
answer, then listens for a fax tone, and switches to
receive mode automatically if it detects the tone.
❚ If the FAXPHONE runs out of paper or ink, it
receives the document and stores it in memory. To
print out documents in memory, see pp. 67 and 68.
5 When not in use, turn the answering machine
off and switch to Fax/Tel Mode, Manual Mode,
or Fax Only Mode using [RECEIVE MODE] .
66
09/15/97 AnsMode
Page 76

Receiving documents
Receiving documents in memory _______________
When the FAXPHONE receives documents in memory, you see one of the following
messages and you must perform one of the following actions:
Cause: You ran out of ink or the BJ cartridge is not
CHANGE CARTRIDGE
Action: Install a new BJ cartridge or install the BJ
Cause: There is no BJ cartridge.
PUT IN CARTRIDGE Action: Install a BJ cartridge (See Installing the
Cause: You ran out of recording paper.
CHECK REC PAPER Action: Load paper into the paper tray, then press
Cause: A paper jam has occurred.
REC. PAPER JAM Action: Clear the jam, then press [STOP]
set properly.
cartridge properly. (See Replacing the
BJ cartridge, p. 91).
BJ cartridge, p. 10).
[STOP] (See Loading the paper, p. 6).
(See Recording paper jams, p. 87).
6
Cause: The front cover is open.
CHK. FRONT COVER Action: Close the front cover.
❚ The FAXPHONE can store up to 15 letter-size pages (based on the CCITT #1 chart).
❚ When the memory contains documents, the LCD displays REC’D IN MEMORY
alternating with the error message.
67
Page 77

Printing documents in memory _________________
Except when you run out of paper, the FAXPHONE will automatically print out the
contents in memory when you remedy the cause of the problem.
If running out of recording paper caused memory reception, add recording paper and
press [STOP] to begin printing the stored page(s).
After printing the page(s) in memory, the FAXPHONE erases the documents from
memory.
Receiving while registering, copying or printing ____
If the FAXPHONE rings while you are ① entering registration information, ② making
a copy or ③ printing a report manually, lift the handset of the extension phone.
❚ If you hear a slow beep or nothing at all, someone is trying to send a fax; press
[STOP] to cancel ①, ② or ③. Then, press [START/COPY].
To cancel making a copy to receive a fax, make sure that the document is removed
from the Automatic Document Feeder (ADF). Then, press [START/COPY].
❚ If it is a phone call, you can converse normally.
If you canceled operations ①, ② or ③, start the procedure again from the beginning
after the call.
68
If you are performing operations ①,② or
not automatically answer an incoming call, even if the FAXPHONE is
in Ans. Machine Mode or Fax/Tel Mode. Follow the above procedure to
answer the call.
③ above, the FAXPHONE will
Page 78

SETTINGS
AND ACTIVITY
7
REPORTS
User menu settings .................................................... 70
Settings ........................................................................ 73
How to change a setting ....................................................................... 73
Activity reports ........................................................... 79
How to print a report.............................................................................. 79
Activity management report ................................................................. 80
One-touch Speed Dialing list................................................................ 80
Coded Speed Dialing list ....................................................................... 81
User’s data list ........................................................................................ 82
Activity report (Sending) ....................................................................... 82
Activity report (Receiving) .................................................................... 83
Multi-activity report ............................................................................... 83
Memory clear list ................................................................................... 84
7
69
Page 79

User menu settings
The following illustrates the user menu settings. The TEL REGISTRATION, USER
SETTINGS, REPORT SETTINGS, TX SETTINGS, RX SETTINGS, FAX PRINTER,
and SYSTEM SETTINGS menus comprise the items shown on the following pages.
Take a few minutes to familiarize yourself with the user menu settings.
To select the desired menu, complete the
procedure as shown in the shaded area.
Press [FUNCTION]. SELECT MENU is
displayed for approximately 1 second
followed by the TEL REGISTRATION
menu. Use the arrow buttons to scroll
through the menus.
Press to display the SELECT MENU.
Press to go to the next menu.
Press to go to the previous menu.
Press when you wish to make a
change to a setting.
Press to exit from the user menu
settings.
Whenever you make a change to a setting, press [START/COPY] and confirm that
DATA ENTRY OK displays on the LCD. Unless this message displays, the setting has
not been changed.
When you return to the previous level, press [FUNCTION].
Refer to the following section as a comprehensive guide of the user menu settings.
70
Page 80

❚ The TEL REGISTRATION menu contains the following settings.
❚ The USER SETTINGS menu contains the following settings.
User menu settings
7
❚ The REPORT SETTINGS menu contains the following settings.
❚ The TX SETTINGS menu contains the following settings.
71
Page 81

❚ The RX SETTINGS menu contains the following settings.
❚ The FAX PRINTER menu contains the following settings.
❚ The SYSTEM SETTINGS menu contains the following settings.
72
Page 82

Settings
The FAXPHONE has seven sets of settings that control its various modes of operation.
The settings and how to change them are described below.
How to change a setting ________________________
There are two basic types of settings, selectable settings and numeric entry settings.
The following example shows how to make both types of changes.
Whenever you make a change to a setting, press [START/COPY] and confirm that
DATA ENTRY OK displays on the LCD. Unless this message displays, the setting has
not been changed.
Example:
Changing INCOMING RING, the number of rings before the FAXPHONE
answers.
1 Press [FUNCTION].
Wait a second for TEL REGISTRATION to appear.
SELECT MENU
TEL REGISTRATION
7
2 Use [ ] or [ ] to select RX SETTINGS.
3 Press [START/COPY].
4 Use [ ] or [ ] to select INCOMING RING.
5 Press [START/COPY].
RX SETTINGS
ECM RX
INCOMING RING
OFF
73
Page 83

6 Use [ ] or [ ] to select ON.
7 Press [START/COPY].
8 Use the numeric buttons to enter a new ring
count, for example 3.
9
Press [START/COPY].
ON
DATA ENTRY OK
RING COUNT
2
3
DATA ENTRY OK
74
10
Press [STOP] to finish registration and return to
standby mode.
Page 84

Settings
TEL REGISTRATION
Factory settings are in bold. For instructions on how to change a setting, refer to How to change a setting, pp. 73 and 74.
Name Description Settings
1-TOUCH DIAL
CODED DIAL
See Registering One-touch Speed Dialing numbers and
names, p. 39.
See Registering Coded Speed Dialing numbers and names,
p. 41.
–
–
USER SETTINGS
Factory settings are in bold. For instructions on how to change a setting, refer to How to change a setting, pp. 73 and 74.
Name Description Settings
SET DATE
SET TIME
ENTER YOUR TEL
USER NAME
TTI OPTION SET
Set the date using the numeric buttons.
Set the time (24-hour clock) using the numeric buttons.
Enter your fax number using the numeric buttons.
This is the name that appears at the top of each fax page
you send. See Entering a name, p. 34.
This option sets the parameters for the identification header
that appears on every page you send.
–
–
–
–
7
TTI POSITION
TTI MARKER
DENSITY CONTROL
OFFHOOK ALARM
VOLUME CONTROL
PHONE VOL LEVEL
CALLING VOLUME
ALARM VOLUME
KEYPAD VOLUME
RX CALL LEVEL
DIALING TONE
TEL LINE TYPE
Select the position of the TTI.
OUTSIDE IMAGE: Position the TTI outside the image area.
INSIDE IMAGE: Position the TTI inside the image area.
Select the icon for the fax number.
FAX: Sets the fax icon.
TEL: Sets the telephone icon.
Set the density of the reproduction. Set to DARKER for light
originals and LIGHTER for dark originals.
Enable/disable the off hook alarm. The alarm alerts you that
the telephone is off hook.
Set the audio level of the line monitor, calling signal and alarm.
Set the volume of the line monitor (sound during off hook
and dialing conditions)
Set the volume of the ring produced when the FAXPHONE
detects a voice call during FAX/TEL switchover.
Set the volume of the error alarm sound.
Set the volume of the keypad.
Set the ring tone.
Turn the dial tone on/off for dialing.
Set the dialing method the FAXPHONE uses to match the
type of phone line you have.
OUTSIDE IMAGE/
INSIDE IMAGE
FAX/TEL
STANDARD/LIGHTER/
DARKER
ON/OFF
–
VOL MIN/VOL MID/
VOL MAX
VOL MIN/VOL MID/
VOL MAX
VOL MIN/VOL MID/
VOL MAX
OFF/VOL MIN/
VOL MID/ VOL MAX
LOW/HIGH
ON/OFF
TOUCH TONE/
ROTARY PULSE
75
Page 85

REPORT SETTINGS
Factory settings are in bold. For instructions on how to change a setting, refer to How to change a setting, pp. 73 and 74.
Name Description Settings
TX REPORT
Enable/disable automatic printing of the transmission report.
PRINT ERROR ONLY prints only when a transmission error
occurs.
OUTPUT YES sets the FAXPHONE to print an activity report
every time you send a document.
OUTPUT NO turns off the activity report feature.
OUTPUT YES/
OUTPUT NO/
PRINT ERROR ONLY
TX CONFIRM REP.
RX REPORT
ACTIVITY REPORT
AUTO PRINT
TX/RX SEPARATE
When you set TX REPORT to OUTPUT YES or PRINT ERROR
ONLY, you can add to the TX report half of the first page of the
document that was being sent. This can help remind you which
document was being sent. Valid only for memory transmissions.
Enable/disable automatic printing of the reception report.
PRINT ERROR ONLY prints only when an error occurs during
receiving.
OUTPUT YES sets the FAXPHONE to print an activity report
every time you receive a document.
OUTPUT NO turns off the activity report feature.
Unless you change the setting, your FAXPHONE is set to print
an activity management report for every 20 transactions
(sending or receiving).
Enable/disable automatic printing of the activity report.
Divide the activity management report into sending and
receiving transactions.
OUTPUT YES/
OUTPUT NO
OUTPUT YES/
OUTPUT NO/
PRINT ERROR ONLY
OUTPUT YES/
OUTPUT NO
ON/OFF
TX SETTINGS
Factory settings are in bold. For instructions on how to change a setting, refer to How to change a setting, pp. 73 and 74.
Name Description Settings
ECM TX
MID PAUSE SET
AUTO REDIAL
Enable/disable error correction during transmission.
Set the length of the pause you insert into a dialing
sequence.
Set the number of times the FAXPHONE will redial a number
if it fails to get a response on the first attempt, and the
interval between redial attempts.
ON/OFF
2 seconds (1 to 15)
ON/OFF
76
REDIAL TIMES
REDIAL INTERVAL
Set the number of retries.
Set the period of time between redialings.
2 times (1 to 10)
2 minutes (1 to 60)
Page 86

Settings
RX SETTINGS
Factory settings are in bold. For instructions on how to change a setting, refer to How to change a setting, pp. 73 and 74.
Name Description Settings
ECM RX
FAX/TEL SWITCH
RING START TIME
F/T RING TIME
F/T SW ACTION
INCOMING RING
RING COUNT
MAN/AUTO SWITCH
RING TIME
MEMORY RX
DRPD
NORMAL RING
DOUBLE RING
SHORT-SHORT-LONG
SHORT-LONG-SHORT
OTHER RING TYPE
Enable/disable error correction during reception.
Enable/disable FAX/TEL switchover. When ON, this feature
answers calls, and if no fax tone is detected, the FAXPHONE
rings to alert you of an incoming call.
Set the duration that the FAXPHONE listens for a fax tone
before starting to ring.
Set the length of time the FAXPHONE will ring to alert you of
an incoming call.
Select the action taken after the F/T RING TIME expires.
When the FAXPHONE is set to Fax Only Mode or Fax/Tel
Mode and an extension phone is connected, set the
FAXPHONE to ring when it receives a call.
Set the number of incoming rings before the FAXPHONE
answers.
Determine if the FAXPHONE switches to document receive
mode after the FAXPHONE rings for a specified time when
the FAXPHONE is in the manual receive mode.
Set the amount of time the FAXPHONE will ring before
switching to document receive mode.
Turn on/off memory receiving of a document.
Enable/disable the Distinctive Ring Pattern Detection (DRPD)
feature and assign a setting mode to each ring pattern.
See p. 22.
ON/OFF
8 seconds (0 to 30)
15 seconds (10 to 45)
DISCONNECT/RECEIVE
ON/OFF
2 times (1 to 99)
ON/OFF
7
10 seconds (1 to 99)
ON/OFF
ON/OFF
TEL-FAX-FAX/TEL SWITCH
TEL-FAX-FAX/TEL SWITCH
TEL-FAX-FAX/TEL SWITCH
TEL-FAX-FAX/TEL SWITCH
TEL-FAX-FAX/TEL SWITCH
77
Page 87

FAX PRINTER
Factory settings are in bold. For instructions on how to change a setting, refer to How to change a setting, pp. 73 and 74.
Name Description Settings
PAPER SIZE
RX REDUCTION
Select the size of the loaded fax paper.
Select the amount of reduction for received faxes.
LTR/A4/LEGAL
ON/OFF
REDUCTION RATE
SEL. REDUCE DIR
PRT DIRECTION
Set the reduction factor in percent.
Select reduction in width only or both width and height.
Select between unidirectional and bi-directional printing.
STANDARD/A4->LTR/
LGL->LTR
VERTICAL ONLY/HORIZ
& VERTICAL
BI-DIRECTION PRT/
PRT ONE DIRECT.
SYSTEM SETTINGS
Factory settings are in bold. For instructions on how to change a setting, refer to How to change a setting, pp. 73 and 74.
Name Description Settings
AUTO TEST PRINT
DATE FORMAT
DISPLAY LANGUAGE
TX START SPEED
RX START SPEED
Enable/disable auto test printing whenever the BJ cartridge
is replaced.
Set the date format.
Set the language of the LCD messages.
Set the speed at which the FAXPHONE starts transmitting.
Set this to a lower speed if you have difficulties connecting
over long distance or noisy lines.
Set the speed at which the FAXPHONE starts receiving. Set
this to a lower speed if you have difficulties connecting over
long distance or noisy lines.
ON/OFF
MM/DD/YY
DD/MM ’YY
‘YY MM/DD
ENGLISH/FRENCH/
SPANISH
14400bps/9600bps/
7200bps/4800bps
9600bps/7200bps/
4800bps
78
Page 88

Activity reports
Your FAXPHONE keeps track of most of its sending and receiving operations. These
operations can be printed out in the form of activity reports that can help you confirm
the dates and times of facsimile transmissions and whether or not each transaction was
successful.
How to print a report ___________________________
Depending on the type of report, you can have the FAXPHONE print the report
automatically, or you can print it directly. See REPORT SETTINGS (p. 76) on how
and when reports are printed automatically. The FAXPHONE prints the Send report,
Receive report, and Multi activity report automatically only.
You’ll find a sample of each report below.
1 Press [FUNCTION].
2 Press [REPORT].
3 Use [ ] or [ ] to display the type of report you
want to print.
▼
Press [START/COPY].
ACTIVITY REPORT
1-TOUCH SPD LIST
7
CODED SPD LIST
USER'S DATA LIST
79
Page 89

Activity management report____________________
Summarizes the information for the sending and receiving activities of your
FAXPHONE after 20 transactions. For automatic printing see ACTIVITY REPORT in
REPORT SETTINGS, p. 76.
Error Code: See Error
Codes messages and
solutions, p. 98.
[STOP] was pressed during
transaction.
If marked with an asterisk,
has already been printed out.
❚ The FAXPHONE prints sending and receiving transactions together in the same re-
port. You can also set the FAXPHONE to print sending and receiving transactions
separately. See TX/RX SEPARATE, p. 76.
Transaction
number
The number of the page with an
error.
80
One-touch Speed Dialing list ___________________
Lists the information for each of the registered One-touch Speed Dialing numbers.
Page 90

Activity reports
Coded Speed Dialing list________________________
Lists information for each of the registered Coded Speed Dialing numbers.
7
81
Page 91

User’s data list __________________________________
Lists the name and number you registered during setup and a list of all current settings.
Activity report (Sending) _______________________
Normally the FAXPHONE does not print an activity report for sending, but you can
set the FAXPHONE to print an activity report every time you send a document. See
TX REPORT in REPORT SETTINGS, p. 76.
❚ You can set the FAXPHONE to print an activity report only when an error occurs
during sending. See TX REPORT in REPORT SETTINGS, p. 76.
❚ You can set the FAXPHONE to print the first page of the documents. Valid only for
memory transmissions. See TX CONFIRM REP. in REPORT SETTINGS, p. 76.
82
Page 92

Activity reports
Activity report (Receiving) ______________________
Normally the FAXPHONE does not print an activity report for receiving, but you can
set the FAXPHONE to print an activity report every time you receive a document. See
RX REPORT in REPORT SETTINGS, p. 76.
❚ You can set the FAXPHONE to print an activity report only when an error occurs
during receiving. See RX REPORT in REPORT SETTINGS, p. 76.
Multi-activity report ____________________________
Lists the result of a Sequential broadcast.
❚ If you set the FAXPHONE to print activity reports (TX REPORT or RX REPORT)
and then use Sequential broadcasting, a Multi-activity report will be printed instead
of the activity report (Sending). See TX REPORT in REPORT SETTINGS, p. 76.
7
83
Page 93

Memory clear list _______________________________
The memory clear list summarizes the documents in memory.
❚ If you experience a power failure, the documents in the FAXPHONE memory will
be lost.
After you turn on the FAXPHONE as soon as power is restored, the FAXPHONE
will automatically print out a list of documents that were stored in the memory at the
time of the power failure.
84
Page 94

SOLUTIONS
TO COMMON
8
PROBLEMS
Paper Jams .................................................................. 86
Automatic Document Feeder (ADF) jams ...........................................86
Recording paper jams ........................................................................... 87
Periodic care ................................................................ 88
Cleaning the FAXPHONE exterior ........................................................88
Cleaning the glass scanning window ................................................. 88
Cleaning the printer area ...................................................................... 89
Cleaning the BJ cartridge print head.................................................. 90
Replacing the BJ cartridge................................................................... 91
Frequently Asked Questions ..................................... 92
TRANSMITTING ..................................................................................... 92
RECEIVING............................................................................................... 93
TELEPHONE ............................................................................................. 94
COPYING .................................................................................................. 95
PAPER LOADING PROBLEMS .............................................................. 95
GENERAL ................................................................................................. 95
Print quality problems................................................ 97
Error codes, messages and solutions ....................... 98
In case of a power failure ......................................... 101
During a power failure......................................................................... 101
8
Specifications ....................................................102
Appendix ............................................................ 104
Document sizes .................................................................................... 104
What happens when Fax/Tel Mode is selected .............................. 105
Glossary .............................................................106
Index ................................................................... 110
85
Page 95

Paper jams
Automatic Document Feeder (ADF) jams _______
■To remove a jammed document
Hold down the FAXPHONE with your left
1
hand, and gently pull the operation panel
with your right hand.
❚ Do not push the LCD display.
Gently push the operation panel shut
3
until it clicks.
While holding the operation panel open,
2
pull the sheet out from the top or bottom.
86
Page 96

Paper jams
Recording paper jams___________________________
■To remove jammed paper
Remove the paper tray cover.
1
Open the front cover.
3
Remove the recording paper.
2
Pull the sheet out slowly from the top or
4
bottom.
8
Close the front cover.
5
Load the paper (see Loading the paper,
6
p. 6), then replace the paper tray cover,
and press [STOP].
87
Page 97

Periodic care
Cleaning the FAXPHONE exterior_______________
To keep the exterior of the FAXPHONE clean, gently wipe the FAXPHONE with a
soft cloth lightly moistened with water.
Never use thinner, benzene, alcohol or any other organic solvent, as it may damage the
surface of the FAXPHONE.
Cleaning the glass scanning window ___________
The glass scanning window can accumulate dirt with continued use, resulting in spots
on faxes and copies.
■To clean the glass scanning window
Disconnect the power cord.
1
Open the front cover.
2
88
Press down on the scanning window
3
assembly and clean the glass window
with a dry cotton swab.
Close the front cover.
4
Page 98

Periodic care
Cleaning the printer area _______________________
Clean the printer area regularly to prevent accumulation of paper dust and ink spots.
■To clean the printer area
Disconnect the power cord.
1
Open the front cover.
2
Clean the printer area with a soft, dry
3
cloth.
Platen
Roller
❚ Remove any ink mist or paper debris from the
interior of the printer using a soft cloth. Clean
especially well around the platen area. If the
rollers become dirty, you can clean them using a
small, soft brush.
❚ Never use a solvent, such as thinner or benzene,
to clean the printer area.
❚ Do not remove the BJ cartridge or attempt to
wipe the cartridge print head.
Close the front cover.
4
8
89
Page 99

Cleaning the BJ cartridge print head ___________
To maintain the best possible print quality, the BJ cartridge print head needs to be
cleaned from time to time. If you notice some degradation in the print quality, try
cleaning the print head.
Cleaning the print head consumes a small amount of ink. Cleaning too often significantly reduces the amount ink in the cartridge.
1 Press [FUNCTION].
Wait a second for TEL REGISTRATION to appear.
SELECT MENU
TEL REGISTRATION
2 Press [CLEANING].
HEAD CLEANING
90
Page 100

Periodic care
Replacing the BJ cartridge______________________
Replace the BJ cartridge when you see the message CHANGE CARTRIDGE
displayed.
Open the front cover of the FAXPHONE.
1
Remove the cartridge.
3
Raise the green cartridge release lever.
2
Insert a new cartridge.
4
See Installing the BJ cartridge, steps 3
to 8, p. 10.
8
Dispose of the BJ cartridge properly.
You may want to place it in a plastic bag to keep
from spilling any residual ink.
91
 Loading...