

Page 1

GE Industrial Systems
TM
AV - 30 0
AV - 30 0
Quick Start Up Guide
i
i
1
Page 2

This book is referred to SW version 1.X00
This book replaces the Instruction Book Rev. 1.0c (09/98)
These instructions do not purport to cover all details or variations in equipment, nor to provide every possible contingency to be met during installation, operation, and maintenance. If further information is desired or if particular problems arise that are not covered sufficiently for the purchaser’s purpose, the matter should be referred to GE Industrial
Systems.
This document contains proprietary information of General Electric Company, USA and is furnished to its customer
solely to assist that customer in the installation, testing, operation, and/or maintenance of the equipment described.
This document shall not be reproduced in whole or in part nor shall its contents be disclosed to any third party without
the written approval of GE Industrial Systems.
© 1999 by General Electric Company, USA. All rights reserved.
2
Page 3

Table of Contents
1. Safety Precautions - Precautions de securité ......................................................................................................... 4
Functional connection diagram...................................................................................................7
2. Overview ......................................................................................................................................................................... 8
3. Control Terminals .......................................................................................................................................................... 9
3.1 Maximum cable cross section for regulator terminals ........................................................ 10
4. Power terminals .......................................................................................................................................................... 10
4.1 Maximum cable cross section for power terminals ............................................................ 10
5. Encoder terminals (XE connector)............................................................................................................................ 11
5.1 Encoder type connection .................................................................................................... 11
5.2 JUMPERS setting ............................................................................................................... 12
␣␣␣␣␣List of jumpers and dip-switch............................................................................................. 12
␣␣␣␣␣List of dip-switch .................................................................................................................. 13
5.3 Maximum cable length for encoder terminals..................................................................... 13
6. Keypad operation......................................................................................................................................................... 14
Keypads (on right the optional LED module) ............................................................................ 14
LEDs .......................................................................................................................................... 15
Moving inside a menu ............................................................................................................... 16
7. Pre Power Checks ....................................................................................................................................................... 17
8. Quick tuning ................................................................................................................................................................. 18
9. Options........................................................................................................................................................................... 22
10. Quick Tuning Guide for Factory Configured Drives ............................................................................................... 22
11. Troubleshooting ........................................................................................................................................................... 23
Overflow list .............................................................................................................................. 23
List of Self-tuning Errpr Messages ............................................................................................ 24
Failure alarms in the keypad display ......................................................................................... 25
Other faults ................................................................................................................................ 27
3
Page 4

1. Safety Precautions - Precautions de securité
WARNING/ATTENTION!
According to the EEC standards the AV300i should be used
only after checking that the mechanical equipment uses
safety devices required by the 89/392/EEC set of rules.
Drive systems cause mechanical motion. It is the
responsibility of the user to insure that any such motion
does not result in an unsafe condition. Factory provided
interlocks and operating limits should not be bypassed or
modified.
Selon les normes EEC, les drives AV300i et leurs
accessoires doivent être employés seulement après avoir
verifié que la machine ait été produit avec les même
dispositifs de sécurité demandés par la réglementation 89/
392/EEC concernant le secteur de l’industrie.
Les systèmes provoquent des mouvements mécaniques.
L’utilisateur est responsable de la sécurité concernant les
mouvements mécaniques. Les dispositifs de sécurité
prévues par l’usine et les limitations operationelles ne
doivent être dépassés ou modifiés.
WARNING - ELECTRICAL SHOCK AND BURN
HAZARD / ATTENTION – DÉCHARGE ÉLECTRIQUE ET
RISQUE DE BRÚLURE :
When using instruments such as oscilloscopes to work
on live equipment, the oscilloscope’s chassis should be
grounded and a differential input amplifier should be used.
Care should be used in the selection of probes and leads
so that accurate readings may be made. See the
instrument manufacturer’s instruction book for proper
operation and adjustments of the oscilloscope.
Lors de l’utilisation d’instruments (par example
oscilloscope) sur des systémes en marche, le chassis de
l’oscilloscope doit être relié à la terre et un amplificateur
différentiel devrait être utilisé en entrée.
Les sondes et conducteurs doivent être choissis avec soin
pour effectuer les meilleures mesures à l’aide d’un
oscilloscope. Voir le manuel d’instruction pour une
utilisation correcte des instruments.
WARNING - FIRE AND EXPLOSION HAZARD /
ATTENTION – RISQUE D’INCENDIES ET
D’EXPLOSIONS:
Fires or explosions might result from mounting drives in
hazardous areas such as locations where flammable or
combustible vapors are present. Drives should be installed
away from hazardous areas, even if used with motors
suitable for use in these locations.
L’utilisation des drives dans des zônes à risques (présence
de vapeurs ou de poussières inflammables), peut provoquer
des incendies ou des explosions. Les drives doivent être
installés loin des zônes dangeureuses, et équipés de
moteurs appropriés.
WARNING - STRAIN HAZARD / ATTENTION À
L’ÉLÉVATION:
Improper lifting practices can cause serious or fatal injury.
Lift only with adequate equipment and trained personnel.
Une élévation inappropriée peut causer des dommages
sérieux ou fatals. Il doit être élevé seulement avec des
moyens appropriés et par du personnel qualifié.
WARNING - ELECTRICAL SHOCK / ATTENTION – CAS
DE DECHARGE ELECTRIQUE:
Drives and motors must be grounded according to NEC.
Tous les moteurs et les drives doivent être mis à la terre
selon le Code Electrique National ou équivalent.
WARNING / ATTENTION:
Replace all covers before applying power to the drive.
Failure to do so may result in death or serious injury.
Remettre tous les capots avant de mettre sous tension le
drive. Des erreurs peuvent provoquer de sérieux accidents
ou même la mort.
WARNING / ATTENTION:
Adjustable frequency drives are electrical apparatus for
use in industrial installations. Parts of the drives are
energized during operation. The electrical installation, tuneup and troubleshooting should therefore only be carried
out by qualified personnel. Improper installation of motors
or drives may cause the failure of the drive as well as
serious injury to persons or equipment. The drive is not
equipped with motor overspeed protection logic.
Follow the instructions given in this manual and observe
the local and national safety regulations applicable.
Les drives à fréquence variable sont des dispositifs
électriques utilisés dans des installations industriels. Une
partie des drives sont sous tension pendant l’operation.
L’installation électrique et l’ouverture des drives devrait être
executé uniquement par du personel qualifié. De mauvaises
installations de moteurs ou de drives peuvent provoquer
des dommages materiels ou blesser des personnes.
Le convertisseur n’est pas pourvu de protection contre
vitesse de fuite du moteur. On doit suivir les instructions
donneés dans ce manuel et observer les régles nationales
de sécurité.
CAUTION / PRECAUTION:
Do not connect power supply voltages that exceeds the
standard specification. If excessive voltage is applied to
the drive, damage to the internal components will result.
Ne pas raccorder de tension d’alimentation dépassant la
fluctuation de tension permise par les normes. Dans le cas
d’ une alimentation en tension excessive, des composants
internes peuvent être endommagés.
4
Page 5

CAUTION / PRECAUTION:
Do not operate the drive without a ground wire being
connected. The motor chassis should be grounded to
earth through a ground lead separate from all other
equipment ground leads to prevent noise coupling.
The grounding connector shall be sized in accordance with
the NEC or Canadian Electrical Code. The connection shall
be made by a UL listed or CSA certified closed-loop
terminal connector sized for the wire gauge involved. The
connector must be attched to the wire using the crimp
tool specified by the terminal manufacturer.
Ne pas faire fonctionner le drive sans prise de terre. Le
chassis du moteur doit être mis à la terre à l’aide d’un
connecteur de terre separé des autres pour éviter le
couplage des perturbations. Le connecteur de terre devrait
être dimensionné selon la norme NEC ou le Canadian
Electrical code. Le raccordement devrait être fait par un
connecteur certifié et mentionné à boucle fermé par les
normes CSA et UL et dimensionné pour l’épaisseur du
cable correspondant. Le connecteur doit être fixé a l’aide
d’un instrument de serrage specifié par le producteur du
connecteur.
CAUTION / PRECAUTION:
Do not perform a megger test between the drive terminals
or the control circuit terminals.
Ne pas exécuter un test megger entre les bornes du drive
ou entre les bornes du circuit de contrôle.
CAUTION / PRECAUTION:
Because the ambient temperature greatly effects drive life
and reliability, do not install the drive in any location that
exceeds the allowable temperature. Leave the ventilation
cover attached for temperatures of 104° F (40° C) or below.
Étant donné que la température ambiante influe sur la vie
et la fiabilité du drive, on ne devrait pas installer le drive
dans des places ou la temperature permise est dépassée.
Laisser le capot de ventilation en place pour températures
de 104°F (40°C) ou inférieures.
CAUTION / PRECAUTION:
If the drive’s Fault Alarm is activated, consult the
TROUBLESHOOTING section of this instruction book.
Correct the problem before resuming operation, automatic
reset of faults is
not recommended.
Si la Fault Alarm du drive est activée, consulter la section
du manuel concernant les défauts et après avoir corrigé
l’erreur, reprendre l’opération. Ne pas réiniliatiser l’alarme
automatiquement par une séquence externe, etc….
CAUTION / PRECAUTION:
Be sure to remove the desicant dryer packet(s) when
unpacking the drive. (If not removed these packets may
become lodged in the fan or air passages and cause the
drive to overheat).
Lors du déballage du drive, retirer le sachet déshydraté.
(Si celui-ci n’est pas retiré, il empêche la ventilation et
provoque une surchauffe du drive).
CAUTION / PRECAUTION:
The drive must be mounted on a wall that is constructed
of heat resistant material. While the drive is operating, the
temperature of the drive's cooling fins can rise to a
temperature of 194° F (90°C).
Le drive doit être monté sur un mur construit avec des
matériaux résistants à la chaleur. Pendant le
fonctionnement du drive, la température des ailettes du
dissipateur thermique peut arriver à 194°F (90°).
Note:
The terms “inverter”, “controller” and “drive” are sometimes
used interchangably throughout the industry. We will use
the term “drive” in this document
Les mots “inverter”, “controller” et “drive” sont
interchangeables dans le domaine industriel. Nous
utiliserons dans ce manuel seulement le mot “drive”.
1. Never open the device or covers while the AC Input power supply
is switched on. Minimum time to wait before working on the
terminals or inside the drive is listed in section 4.11 in the Instruction
manual .
Ne jamais ouvrir l’appareil lorsqu’il est suns tension. Le temps
minimum d’attente avant de pouvoir travailler sur les bornes ou bien
à l’intérieur de l’appareil est indiqué dans la section 4.11 (Instruction
manual).
2. Be careful not to the damage any components when handling the
drive. Changing of the isolation gaps or removing the insulation or
covers is not permissible. If the front cover has to be removed
because of a room temperature, higher than 40°C, the user has to
ensure that no occasional contact with live parts may occur.
Manipuler l’appareil de façon à ne pas toucher ou endommager
des parties. Il n’est pas permis de changer les distances d’isolement
ou bien d’enlever des matériaux isolants ou des capots. Si la plaque
frontale doit être enlevée pour un fonctionnement avec la
température de l’environnement plus haute que 40°C, l’utilisateur
doit s’assurer, par des moyens opportuns, qu’aucun contact
occasionnel ne puisse arriver avec les parties sous tension.
3. Protect the drive from extreme environmental conditions
(temperature, humidity, shock etc.)
Protéger l’appareil contre des effets extérieurs non permis
(température, humidité, chocs etc.).
4. No voltage should be connected to the output of the frequency
inverter (terminals U2, V2 W2). The parallel connection of several
drives via outputs nor the direct connection of inputs and outputs
(bypass) are not permissible.
Aucune tension ne doit être appliquée sur la sortie du convertisseur
(bornes U2, V2 et W2). Il n’est pas permis de raccorder la sortie de
plusieurs convertisseurs en parallèle, ni d’effectuer une connexion
directe de l’entrée avec la sortie du convertisseur (Bypass).
5. When engaging a running motor, the Auto capture function (Auto
capture in the ADD SPEED FUNCT menu) must be activated (not
applicable to Regulation mode=sensorless vect).
Pour reprendre des moteurs en rotation, la fonction suivante doit
être activée : “Auto capture” dans le menu ADD SPEED FUNCT.
5
Page 6

6. A capacitative load (e.g. variable power factor capacitors) should
not be connected to the output of the drive (terminals U2, V2, W2).
Aucune charge capacitive ne doit être connectée à la sortie du
convertisseur (bornes U2, V2 et W2) (par exemple des condensateurs
de mise en phase).
7. Always connect the drive to the protective ground (PE) via the
marked connection terminals (PE2) and the housing (PE1).
Adjustable Frequency Drives and AC Input filters have ground
discharge currents greater then 3.5 mA. EN 50178 specifies that
with discharge currents greater than 3.5 mA the protective conductor
ground connection (PE1) must be a fixed type and doubled for
redundancy.
Effectuer toujours des connexions de terre (PE) par le biais des
bornes (PE2) et du chassis (PE1). Le courant de dispersion vers la
terre est supérieur à 3,5 mA. Selon EN 50178 il faut prévoir dans
ces cas une double connexion à terre.
8. The electrical commissioning should only be carried out by qualified personnel, who are also responsible for a suitable ground
connection. The power supply feeder must be in accordance with
the local and national regulations. The motor must be protected
against overloads.
La mise en service électrique doit être effectuée par un personnel
qualifié. Ce dernier est responsable de l’existence d’une connexion
de terre adéquate et d’une protection des câbles d’alimentation
selon les prescriptions locales et nationales. Le moteur doit être
protégé contre la surcharge
9. No dielectric tests should be carried out on parts of the drive. A
suitable measuring instrument (internal resistance of at least 10
kΩ/V) should be used for measuring the signal voltages.
Il ne faut pas éxécuter de tests de rigidité diélectrique sur des
parties du convertisseurs. Pour mesurer les tensions, des signaux,
il faut utiliser des instruments de mesure appropriés (résistance
interne minimale 10 kΩ/V).
10. If the drives have been stored for longer than three years, the
operation of the DC link capacitors may be impaired. Therefore,
before commissioning, connect them to a power supply for two
hours with no load connected in order to regenerate the capacitors
(the input voltage has to be applied without enabling the drive).
En cas de stockage des convertisseurs pendant plus de trois ans, il
faut tenir compte du fait que les condensateurs du circuit
intermédiaire gardent leurs caractéristiques d’origine seulement s’ils
sont alimentés avant trois ans, à partir de leur date de fabrication.
Avant la mise en service des appareils, qui sont restés stockés aussi
longtemps, il est conseillé d’alimenter les convertisseurs pendant
au moins deux heures, pour récupérer les caractéristiques d’origine
des condensateurs : appliquer une tension d’entrée sans activer le
convertisseur (Disable).
11. The drive may start accidentally because of a failure, even if
disabled, unless it has been disconnected from the AC input feeder.
L’appaeil peut rédémarrer de façon accidentel en cas d’anomalie,
sauf s’il a été déconnecté du reseau.
6
Page 7
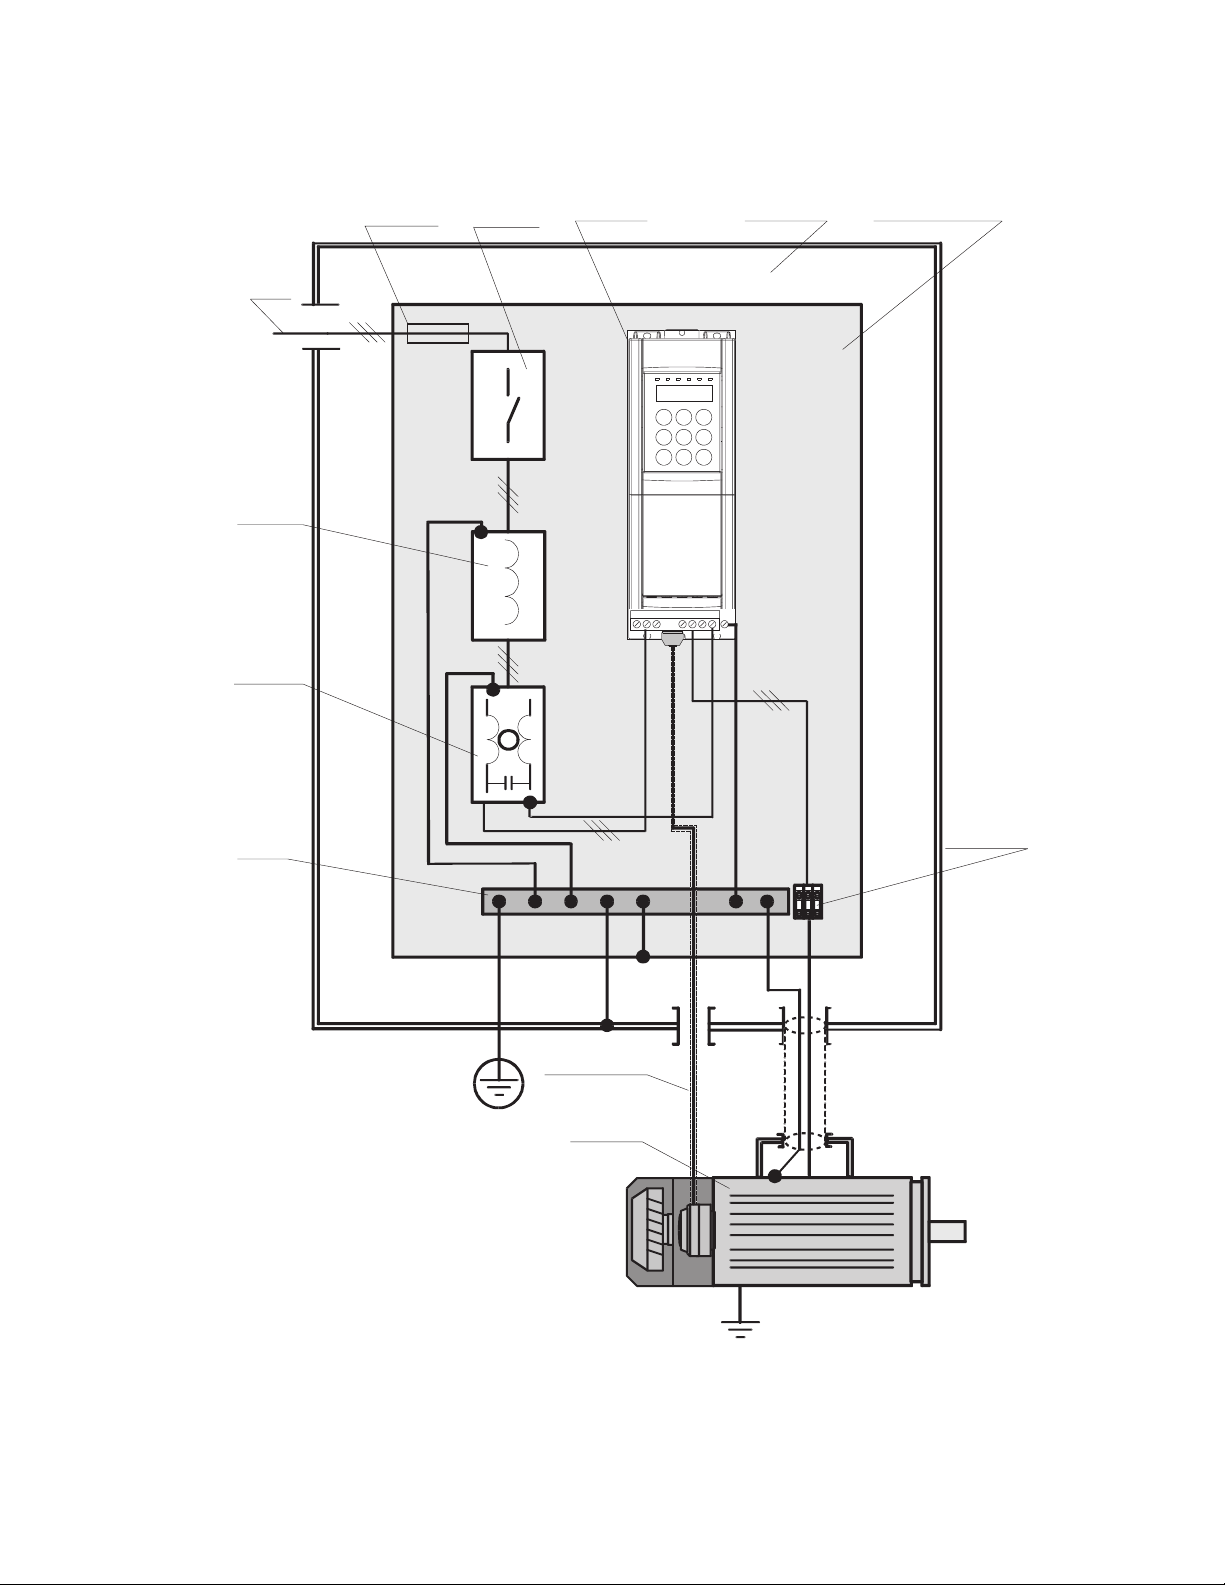
Functional connection diagram
AC
Power
Supply
AC
Line
Reactor
EMI filter
AC fuses
AC Voltage
Contactor
ACDrive
U1V1W1
U2V2W2PE2 PE1
Cabinet
Mounting panel
Ground
Bus
Motor
cable
terminals
Encoder cable
AC Motor
Note:
PE1 is the drive safety ground. If PE2 is used to connect the motor ground, EMC filter ground must connected to PE1.
7
Page 8

2. Overview
This guide assumes a standard start up using the keypad
for a drive and motor that is to be run in either sensorless
vector or flux vector (with digital or sinusoidal encoder)
mode. It is also assumed that a standard scheme is to be
used for control. In other words, that the drive will be run
from pushbuttons (or contacts) and the speed will be set
from a pot input (or a 0 to 10 VDC source). While the drive
has more modes of operation, this guide will cover most
applications. The manual can be used to help adjust more
complicated configurations.
Standard Wiring: see the manual for the standard wiring
configuration. Note that if this is a system designed and
wired by our factory, the set up of the drive (aside from
minor tuning) has already been done.
NOTE:
Memory: There are two memories for set-up parameters.
One is the active memory which is always the one currently
in use by the drive. The other is the permanent memory
which is the one the drive will use if power is lost and then
restored. Note: power up is the ONLY time when the drive
looks at permanent memory. All file uploads and
downloads, all changes, etc. are made only to the active
memory and read from the active memory. The only time
permanent memory is used in any way is when it is booted
into active memory on power up, and when it is changed
to new values by the “Save Parameters” command. When
parameters are changed during set-up, the drive will use
those parameters but unless the “SAVE
PARAMETERS”command is used these changes will not
be permanent. This is an advantage if you are “trying”
something to see how it works and don’t intend to change
your permanent set-up.
Underline: When words are underlined, they refer to a
key on the keypad.
Quotes: Quote marks are put around words which will be
seen in the display window of the keypad.
Menu Navigation: In the instructions, you will be directed
to press keys to get to certain menu items. In many cases,
the same key will have to be pressed more than once to
get to a value. Note that the display has two lines, the top
line always shows the next HIGHER level of the menu. All
of the menu items referred to in this start up will be shown
in the SECOND LINE of the display. The display on the top
line is for information only and has nothing to do with
entering data. If the instructions say to press the
arrow] to “Regulation Mode” it means keep pushing the
[Down arrow] until the “Regulation Mode” is displayed in
the second line. If you get confused, refer to the manual
as it shows the complete menu structure.
I/O Connections: the drive WILL NOT OPERATE unless
the hardware enable (I/O terminal 12) and the other
interlocks are made. It is suggested to make things simple,
to temporarily connect the terminal board inputs as follows:
Jumper 16 to 18, jumper 19 to 15, jumper 15 to 14, jumper
12 to 13, and connect a simple switch between 13 and 14.
Turning the switch on and off will now enable and disable
the drive (and start and stop it at the same time). If you
have control over the I/O with the connected logic and
can make the same connections with pushbuttons/
contacts, the drive can be enabled with those.
[Down
8
Page 9
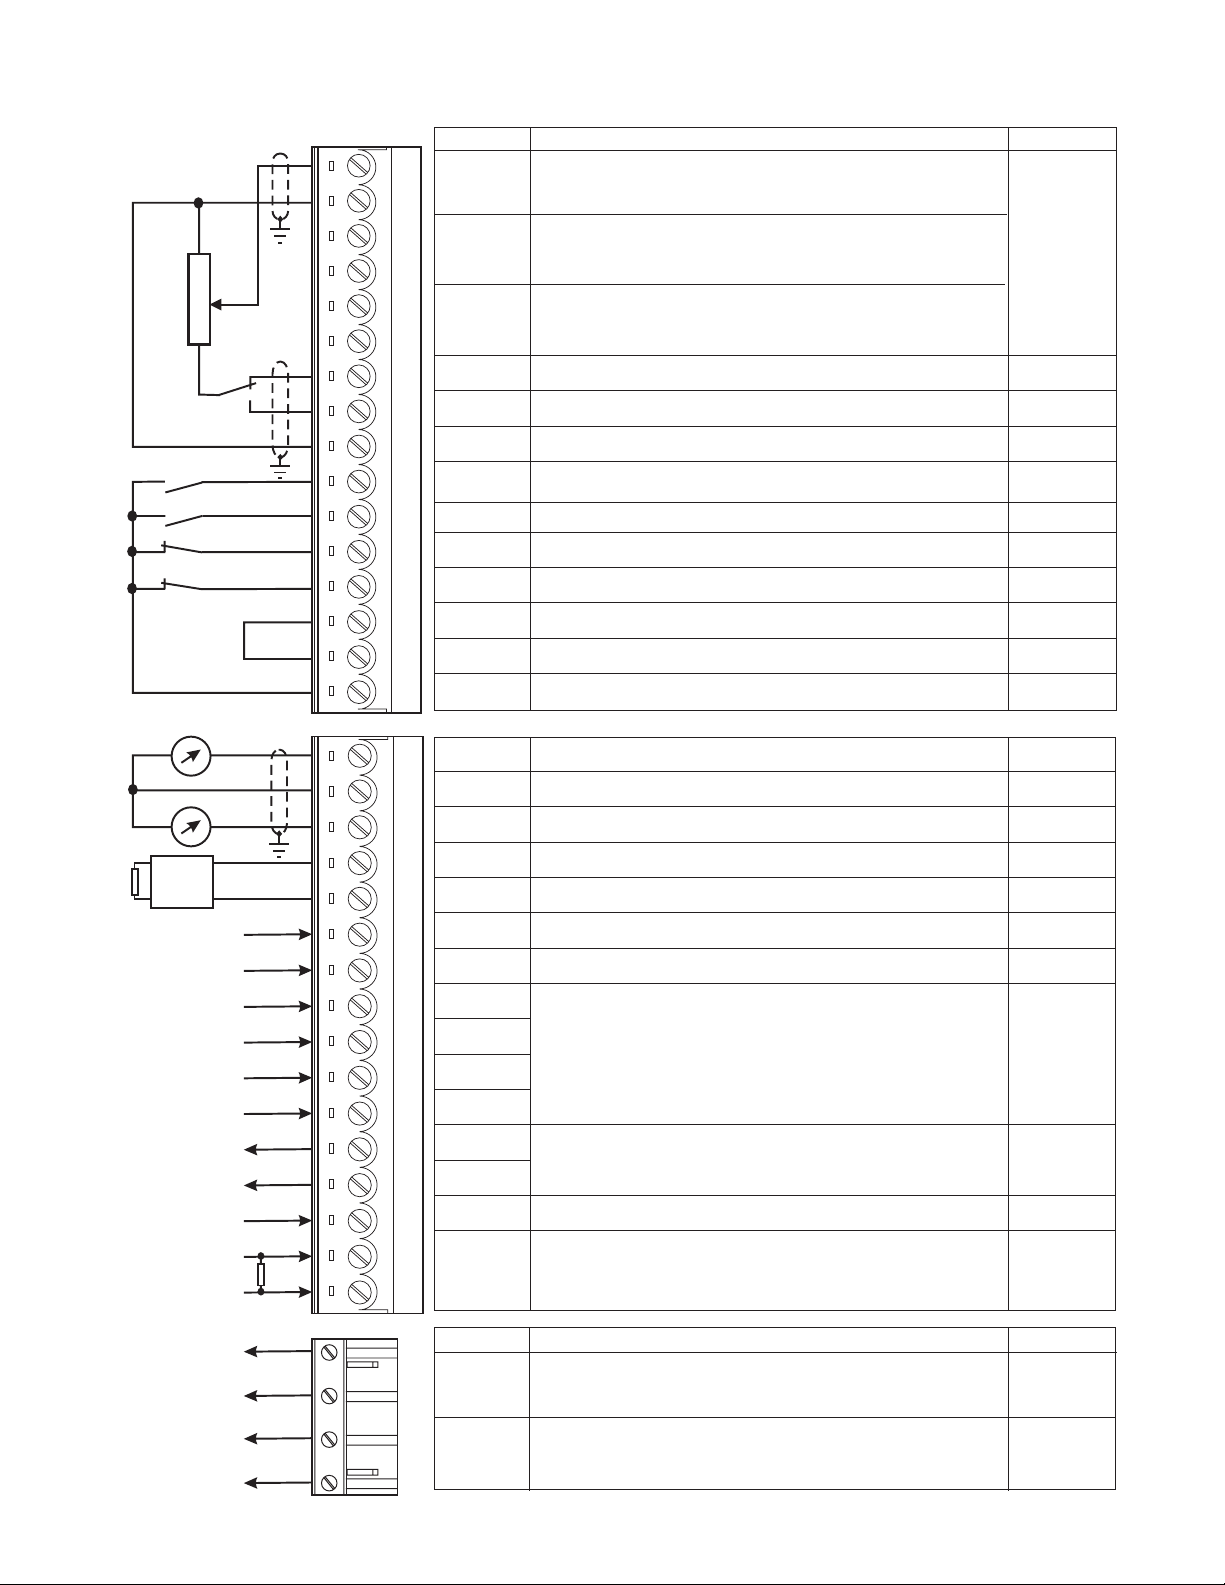
3. Control Terminals
1
2
3
4
5
6
7
8
9
12
13
14
15
16
18
19
Strip X1
Analog input 1
Analog input 2
Analog input 3
+10VDC
-10VDC
0V
Enable drive
Start
Fast stop
External fault
COMD I/O
0V24
+24VDC
F unction
Programmable / configurable analog differential input. Signal: terminal 1.
Reference point: terminal 2. Default setting: Ramp ref 1
Programmable / configurable analog differential input. Signal: terminal 3. @ 0.25mA
Reference point: terminal 4. Default setting: none (20 mA when
Programmable / configurable analog differential input. Signal: terminal 5.
Reference point: terminal 6. Default setting: none. (1)
Reference voltage +10V; Reference point: terminal 9 +10V/10 mA
Reference voltage -10V ; Reference point: terminal 9 -10V/10 mA
Internal 0V and reference point for ± 10V -
Drive enable: 0V or open; drive disabled; +15…+30V: Drive enabled
Drive start command: 0V or open: No start; +15…+30V: Start 3.2 mA@15V
OV or open: Fast stop. +15…+30V; No Fast stop.
OV or open: External fault. +15…+30V; No External fault
Reference point for digital inputs and outputs, term.12...15, 36...39, 41...42
Reference point for +24V OUT supply, terminal 19 -
+24V supply output. Reference points: terminals 18 or 27 or 28
max
±10V
current ref
input)
+30V
5 mA@24V
6.4 mA@30V
-
+22…28V
120 mA@24V
BU-
External braking
unit (optional)
R1K
Analog output
21
22
23
26
27
28
29
36
37
38
39
41
42
46
78
1
0V
Analog output
2
BU comm.
output
0V24
RESERVED -
RESERVED
Digital input1 +30V
Digital input2 3.2 mA@15V
Digital input3 5 mA@24V
Digital input4 6.4 mA@30V
Digital output
1
Digitaloutput
2
Supply DO
Motor PTC
Program. analog output; def. setting: Motor speed. Ref. point: term. 22
Internal 0V and reference point for terminals 21 and 23
Program. analog output; def. setting: Motor current. Ref. point: term. 22
VeCon controlled BU-... braking units command. Ref. point: term. 27.
Reference point for BU-...command ,terminal 26
Programmable digital input; default setting: none
Programmable digital output; default setting: none
Supply input for digital outputs on terminals 41/42. Ref. point: term.16.
Motor PTC sensing for overtemperature (cutoff R1k if used)
79
±10V/5 mA
-
±10V/5 mA
+28V/15 mA
-
+30V/40 mA
+30V/80 mA
1.5mA
80
82
83
85
Strip X2
OK relay
contact
R elay 2
contact
F unction max curr.
Potential-relay contact OK relay (closed=OK)
Potential-relay contact configurable (relay2).
Default: open 0 drive stopped
250VAC
1A, AC11
250VAC
1A, AC11
9
Page 10

3.1 Maximum cable cross section for regulator terminals
Maximum Permissible Cable Cross-Section Tightening
Terminals
[mm
2
]
AWG
flexible multi-core [Nm]
1...79 0.14...1.5 0.14...1.5 28...16 0.4
80...85 0.14...1.5 0.14...1.5 28...16 0.4
NOTE:
Terminal board points are intended for 1 wire/point.
Daisy chains and multiple wires/point are better done with a panel mounted terminal board.
4. power terminals
3Ph~
Braking resistor (optional)
U1/L1
V1/L2
W1/L3
BR1
C
D
Braking unit resistor command (braking resistor
must be connected between BR1 and C)
DC Bus circuit connection
F unction
AC line voltage
torque
Ai4090
max volts/curr.
480 VAC
+10% 3Ph
See table 2.4.2.1
770 VDC/ 1.65 X
output current
U2/T1
M
V2/T2
W2/T3
PE2/
PE1/
Motor ground connection
Grounding (protective earth) conductor
4.1 Maximum cable cross section for power terminals
Hp 3/4 1 2 3 5 7.5 10 15 20 25 30
U1, V1, W1, U2, V2, W2, C, D
terminals
Tightening torque
PE1, PE2 terminals
Tightening torque
Hp 40 50 60 75 100 125 150 200
U1, V1, W1, U2, V2, W2 ,C ,D
terminals
Tightening torque
PE1, PE2 terminals
Tightening torque
AWG
[mm2]
[Nm]
AWG
[mm2]
[Nm]
AWG
[mm2]
[Nm]
AWG
[mm2]
[Nm]
3
14
2
0.5 to 0.6
14
2
2
35
6
16
1/0 2/0 4/0 300* 350* 4xA WG2 *=kcmils
50 70 95 150 185 4x35
4 12 10-30
Motor connection
12 8 4
4
12 8 6
4
10
4
2
50
AC line volt 3Ph
1.36 X output
current
8 101625
1.2x1.5
8 101616
1.2x1.50.5 to 0.6
610
23
6
23
ai4040
10
Page 11

5. Encoder terminals (XE connector)
Designation Function I/O max.voltage max.current
PIN1
PIN2 -
PIN3
PIN4
PIN5
PIN6
PIN7
PIN8
PIN9
PIN10
PIN11
PIN12
PIN13
PIN15 I
Channel B - 5V digital or 10 mA digitalor
For B- digital or B-COS incremental signal 1V pp analog 8.3 mA analog
Channel C+ 5V digital or 10 mA digital or
For C+ digital or analog zero pulse or index 1V pp analog 8.3 mA analog
Channel C- 5V digital or 10 mA digital or
For C-digital or analog zero pulse or index 1V pp analog 8.3 mA analog
Channel A+ 5V digital or 10 mA digital or
For A+ digital or A+SIN incremental signal 1V pp analog 8.3 mA analog
Channel A - 5V digital or 10 mA digital or
For A+ digital or A+SIN incremental signal 1V pp analog 8.3 mA analog
Reference point for +5V encoder supply voltage
Channel B+ 5V digital or 10 mA digital or
For B+ digital or B+COS incremental signal 1V pp analog 8.3 mA analog
+5V encoder supply voltage
Channel E+ 5V digital or 10 mA digital or
For E+ digital commutation or SIN+ absolute position signal 1V pp analog 8.3 mA analog
Channel E- 5V digital or 10 mA digital or
For E- digital commutation or SIN- absolute position signal 1V pp analog 8.3 mA analog
Channel F+ 5V digital or 10 mA digital or
For F+ digital commutation or COS+ absolute position signal 1V pp analog 8.3 mA analog
Channel F- 5V digital or 10 mA digital or
For F- digital commutation or COS- absolute position signal 1V pp analog 8.3 mA analog
Channel G+ 5V digital or
For G+ digital commutation signal 1V pp analog
Channel G- 5V digital or
For G- digital commutation signal 1V pp analog
I
I
I
I
I
O
I
O
I
I
I
I
I
––
+5V 200 mA
10 mA digitalPIN14
10 mA digital
ai3140
5.1 Encoder type connection
XEC ONNECTORPIN
ai3160
Encoder type
DE 8 pole
SE 8 pole
SESC 12 pole
DEHS 14 pole
Shielded
cable
123456789101112131415
B- C+ C- A+ A- 0V B+ +5V E+ E - F+ F- G+ G -
• •••••••
• •••••••
• •••••••••••
• •••••••••••••
- DE: 5V digital incremental encoder with A /A, B / B, C / C
- SE: 5V sinusoidal incremental encoder with A /A, B / B, C / C
- DEHS: 5V digital incremental encoder with A /A, B / B, C / C and three Hall sensor digital position signals
(for AC Brushless motors)
- SESC: 5V sinusoidal incremental encoder with A /A, B / B, C / C and and two sin/cos traces for absolute
position (for AC Brushless motors or positioning)
11
Page 12

5.2 JUMPERS setting
Encoder/Jumpers setting S11 S12 S13 S14 S15 S16 S17 S18 S19 S20 S21 S22 S23
DE OFF OFF OFF OFF OFF OFF ON(*)
SE ON ON ON ON ON ON
SESC ON ON ON ON ON ON
DEHS OFF OFF OFF OFF OFF OFF ON(*) BBBBBB
----
- ----
AAAAAA
-
-BB
ai3150
- DE: 5V digital incremental encoder with A /A, B / B, C / C
- SE: 5V sinusoidal incremental encoder with A /A, B / B, C / C
- DEHS: 5V digital incremental encoder with A /A, B / B, C / C and three Hall sensor digital position signals (for AC
Brushless motors)
- SESC: 5V sinusoidal incremental encoder with A /A, B / B, C / C and and two sin/cos traces for absolute position
(for AC Brushless motors or positioning)
(*) If the encoder is not provided with the zero channel, S17=OFF
List of jumpers and dip-switch
Designation Function Factory setting
S0 The setting must not be changed OFF
S1 The setting must not be changed OFF
S5-S6 Terminating resistor for the serial interface RS485 ON
ON=Termination resistor IN
OFF=Noterminationresistor
S8
S9
S10
S11-S12-S13 Encodersetting OFF
S14-S15-S16 ON= Sinusoidal SE or SESC encoder (see above)
S17 Monitoring of the C-channel of the digital encoder OFF
S18-S19 Encodersetting B
S20-S21 Pos.A=digital DEHS encoder (see above)
S22-S23 Analog input 3 enabling (alternative with SESC encoder) A
S24 Jumper to disconnect 0V (of 24V) from ground ON
S25 Jumper to disconnect 0V (regulation section) from ground ON
Adaptation of the input signal of analog input 1 (terminals 1 and 2)
ON=0...20mA/4...20mA
OFF=0...10V/-10...+10V
Adaptation of the input signal of analog input 2 (terminals 3 and 4)
ON=0...20mA/4...20mA
OFF=0...10V/-10...+10V
Adaptation of the input signal of analog input 3 (terminals 5 and 6)
ON=0...20mA/4...20mA
OFF=0...10V/-10...+10V
OFF=Digital DE or DEHS encoder (see above)
ON=C-Channel monitored
OFF=C-Channel not monitored (required for single-ended channels)
Pos.B=sinusoidalSESCencoder (see above)
Pos.A=enabled
Pos.B=disabled
ON=0V connected to ground
OFF=0V disconnected from ground
ON=0V connected to ground
OFF=0V disconnected from ground
OFF
OFF
OFF
ai4060
12
Page 13

List of dip-switch S3
Hp 3/4 1 2 3 5 7.5 10 15 20
S1
S2
S3
S4
S5
S6
S7
S8
Hp 25 30 40 50 60 75 100 125 150 200
S1
S2
S3
S4
S5
S6
S7
S8
ON OFF ON OFF OFF ON OFF ON OFF
OFF ON ON OFF OFF OFF ON ON OFF
OFF OFF OFF OFF ON OFF OFF OFF ON
OFF OFF OFF OFF OFF OFF OFF OFF OFF
ON ON ON OFF ON OFF OFF OFF OFF
OFF OFF OFF OFF OFF OFF OFF OFF OFF
OFF OFF OFF OFF OFF OFF OFF OFF OFF
OFF OFF OFF OFF OFF OFF OFF OFF OFF
ON OFF ON OFF ON OFF ON OFF ON OFF
OFF ON ON OFF OFF ON ON OFF OFF ON
ON ON ON OFF OFF OFF OFF ON ON ON
OFF OFF OFF ON ON ON ON ON ON ON
OFF OFF OFF OFF OFF OFF OFF OFF OFF OFF
OFF OFF OFF OFF OFF OFF OFF OFF OFF OFF
OFF OFF OFF OFF OFF OFF OFF OFF OFF OFF
OFF OFF OFF OFF OFF OFF OFF OFF OFF OFF
ai4080
The drives are factory set, but when installing a space regulator card, remember to set dip-switch S3 according to the
above table.
5.3 Maximum cable length for encoder terminals
Cable section [mm2]
Max Length feet [m] 88 [27] 203 [62] 305 [93] 410 [125] 492 [150]
0.22 0.5 0.75 1 1.5
ai3130
13
Page 14

6. Keypad operation
The keypad is made of a LCD display with two 16-digit lines, seven LEDs and nine function keys.
Keypad LED Module
-Torque +Torque Alarm Enable Zero Speed Limit
Jog
Speed
Drive Controls
Help
Escape
Navigation
Alarm
Home
Enter
Shift
-Torque +Torque Alarm Enable Zero Speed Limit
-Torque Negative torque current
+T orque Positive
Alarm Alarm condition
Enable Drive enable status
Zero Speed Speed<=zero speed threshold
Limit Actual current >=current limit
This monitoring module can be upgraded with the keypad with
alphanumeric LCD display
torque current
Keypad is used :
- To control the drive, when keypad use has been programmed (Main commands=DIGITAL.)
- To display the speed, voltage, diagnostics etc. during operation.
- To set parameters.
LEDs
The LEDs present on the keypad and LED module are used to quickly diagnose the operating state of the drive.
Designation Color Function
-Torque yellow the LED is lit, when the drive operates with a negative torque
+Torque yellow the LED is lit, when the drive operates with a positive torque
ALARM red the LED is lit; it signals a trip
ENABLE green the LED is lit, when the drive is enabled
Zero speed yellow the LED is lit; it signals zero speed
Limit yellow the LED is lit, when the drive operates at a current limit
Shift yellow the LED is lit, when the second keypad functions are enabled
ai5010
14
Page 15

Keypad buttons
Text reference
[START]
[STOP]
Function
START button controls the Enable and Run modes of the
drive if Main commands = DIGITAL and the Stop Mode is
on. This is the default setting.
When Main commands is set as TERMINALS the button is
not active
STOP button sets the main reference to zero when Main
commands is set as DIGITAL
(Pressing this button for 2 sec will cause the drive to be
disabled, this will also cause the drive to coast stop).
When Main commands is set as TERMINALS the button is
not active.
Jog
Help
Alarm
[Increase] / [Jog]
[Decrease] / [Rotation control]
[Down arrow] / [Help]
[Up arrow] / [Alarm]
Plus button increases the speed reference for the Motor
pot function.
It is also the JOG command, when the shift button is
selected.
Minus button decreases the speed reference for the Motor
pot function.
Rotation control changes the direction in Jog mode and
Motor pot mode when the shift button is selected.
Down arrow - Used to change menu or parameter
selection. In parameter and reference setting modes, it
changes the value of the parameter or reference.
Help – Function Not available (“Help not found” displayed
when pressed with the shift button)
Up arrow - Used to change menu or parameter selection.
In parameter and reference setting modes, it changes the
value of the parameter or the reference.
Alarm - Failure register displayed ( shift selected). Use the
UP/DOWN Arrows to scroll through the last 10 alarms.
Escape
Home
Enter
Shift
[Left arrow] / [Escape]
[Enter] / [Home]
[Shift]
Left arrow-in edit mode selects the digit of the parameter
to modify. At other times it is used to exit from the setting
mode.
Escape - Used to exit from setting and Alarm displaying
mode (when shift button is pressed)
[Enter] - Used to [Enter] a new value for a parameter in the
parameter setting mode.
Home - Used to go directly to BASIC MENU (when shift
button is pressed)
Shift button enables the second keypad functions
(Rotation control, Jog, Help, Alarm, Escape, Home)
15
Page 16

Moving inside a menu
16
Page 17

7. Pre Power Checks
The following should be checked before switching ON the Drive:
Grounds / Grounding
• Verify ground connections between the drive and motor
• Verify AC Input, AC Output and control wiring aren’t grounded
Connections
• Verify AC Input (U1/L1, V1/L2, W1/L3), AC Output (U2/T1, V2/T2, W2/T3), DC link connection (C,D), Motor thermistor
(78, 79), OK Relay (80, 82), Relay 2 (83,85) and regulation board points (1.....46, XS, XE) connections.
Regulator Terminal Board Inputs:
12 ENABLE DRIVE (close to activate)
13 START (close to activate)
14 FAST STOP (open to cause a stop)
15 EXTERNAL FAULT (open to cause a stop)
16 Common for terminal board inputs
18 + 24V Common
19 +24VDC (internal power supply)
Set inputs on the regulator terminal board as follows:
• Enable drive (terminal 12) and Start (terminal 13) OPEN
• Fast stop (terminal 14) and External fault (terminal 15) CLOSED
• Record motor name plate data, encoder information, gearbox data.
MOTOR DATA
17
Page 18

8. Quick tuning
1. After a complete check of wiring, turn the power on:
• The following voltages must be present:
Terminal 7, +10V to terminal 9 (on regulation board)
Terminal 8, -10V to terminal 9 (on regulation board)
Terminal 19, +24…30V to terminal 18 (on regulation
board)
• Check DC link voltage by pressing
get “Monitor”, then
to“measurements”, then
to “DC link voltage”, then
The value should be:
275-357 VDC for 230 VAC input
480-650 VDC for 400 VAC input
550-715 VDC for 460 VAC input
If the DC Bus is not within these limits, check the AC
line voltage.
2. Default to Factory Values: If you are not certain of the
drive configuration, it will be necessary to default to factory
values or copy in a file from a PC. It is important to be
certain you are starting from a known configuration. To
default to factory values:
• Default to working memory: Push
get back to “Monitor”, then
Functions” and then
“Load Default” and
now be loaded into the working memory, the original
values are still in permanent memory.
Note:
Step 2 can be skipped if you know that the drive is loaded
with factory defaults (as it comes out of the shipping
carton).
3. Set Line Voltage:
• Press
4. Adaption to maximum ambient temperature:
• Press
5. Load Default Motor Values:
• Press
[Left arrow] to “Spec functions” then [Up
arrow] to “BASIC MENU”, then [Enter], then [Down
arrow] to “Drive type”, then [Enter] to “Mains voltage”
[Enter]. Now using the [Up arrow] / [Down
and
arrow] keys, change the voltage to your nominal AC
input rating. Then
[Down arrow] to “Ambient temp” then [Enter].
Now using the
the maximum ambient temperature value: 40°C or
50°C, then
and then
[Enter], then [Down arrow] to Motor Parameter,
[Enter], then [Down arrow] to “Load Motor Par” and
[Enter]. Use the [Up arrow]/[Down arrow] keys until
[Enter].
[Left arrow] until you are back to “BASIC MENU”
[Down arrow] to Drive Parameter, then
[Enter], then [Down arrow]
[Enter], then [Down arrow]
[Enter].
[Down arrow] to “Spec
[Enter]. Push [Down arrow] to
[Enter]. The factory values will
[Enter] to set the value.
[Up arrow] / [Down arrow] keys, set
[Down arrow] to
[Left arrow] to
the display is the correct motor voltage, then
For 460 VAC motors, select 460, and for 380/400 VAC
motors select 400.
6. Set Actual Motor Data:
• Press
then
“Nominal Voltage” then
Using the
the value and the
position. When correct press
• Press
use the
nominal speed on the motor nameplate. Press
to set data. Note, some manufacturers of vector
motors put the synchronous speed (600, 900, 1500,
1800, 3600 RPM), rather than the slip speed at 60 Hz
on the nameplate. If this is done, you MUST estimate
slip speed. Figure 20 rpm less than the synchronous
speed for these cases.
• Press
and set to the nominal frequency on the nameplate
(50 or 60 Hz) Press
• Press
and set to the nominal current on the nameplate (rated
current) by using the
Press
If the drive will “not accept” the value entered, the
most common cause is trying to
“Nominal Current” that is less than 30% of the drive
rating. This is not allowed due to parameter problems
encountered with a small motor and a large drive. Go
back to step 6 and repeat the entries. If this doesn’t
work, see the Overflow List in the troubleshooting
section of this book.
• Press
the nominal power factor on the nameplate by using
the
default if you don’t know). Press
Press
and set the base voltage by using the
[Down arrow] keys (usually rated voltage). Press
[Enter] to set data. Look in the manual for both Base
Voltage and Base Frequency when operating the motor
above normal synchronous speed.
• Press
set to the base frequency by using the
[Down arrow] keys (usually rated frequency). Press
[Enter] to set data.
• Press
and set all the motor parameters. If, when you do
this, a message saying “Over-range error XXX”
appears, there is something wrong with the data
you have entered. The drive has NOT ACCEPTED
the values you have entered. The most common cause
[Enter].
[Left arrow] until back to “Drive parameter”,
[Enter] to get “Mot plate data” and [Enter] to
[Enter] again to see the value.
[Up arrow]/[Down arrow] keys to change
[Left arrow] to move the character
[Enter].
[Down arrow] to “Nominal speed”, [Enter], then
[Up arrow] / [Down arrow] keys to get the
[Enter]
[Down arrow] to “Nom frequency” and [Enter]
[Enter] to set data.
[Down arrow] to “Nominal current” and [Enter]
[Up arrow] / [Down arrow] keys.
[Enter] to set data.
[Enter] a value for
[Down arrow] to “Cos phi” and [Enter] and set
[Up arrow] / [Down arrow] keys (accept the
[Enter] to set data.
[Down arrow] to “Base Voltage” and [Enter]
[Up arrow] /
[Down arrow] to “Base Frequency” and [Enter],
[Up arrow] /
[Down arrow] to “Take motor par” and [Enter]
18
Page 19

of this is trying to
that is less than 30% of the drive rating. This is not
allowed due to problems encountered with a small
motor and a large drive. Try to go back to the
beginning of step 6 and repeat the entries. If this
doesn’t work, see Overflow list in troubleshooting
section or contact your service office.
7. Set Drive Base Values:
• Press
• Press
• Press
8. Set Regulation Mode: (Sensorless vect, V/f or Field
• Press
• If “Field oriented” mode is selected:
• Press
• Press
• Press
9. Speed Limit:
• Press
10. Prepare for Self Tune:
• The keypad will be used for this purpose but the
[Left arrow] until back to “drive parameter” then
[Down arrow] to “configuration”, then [Enter].
[Down arrow] to “Speed Base Value” then
[Enter] and set the nameplate rated full load speed
on the motor nameplate, press
speed related calibrations on top motor speed.
[Down arrow] to “full load current” then [Enter]
and set the DRIVE (not motor) rated full load current
on the drive nameplate by using the
[Down arrow] keys, then press [Enter] to set. This
bases all current related calibraitons on motor “Full
Load Amps” (FLA).
oriented mode )
[Up arrow] to “Regulation mode”, then [Enter]
and use
“V/f”, “sensorless vect” or “Field oriented” then
[Enter].
press
[Enter]. Use the [Up arrow]/[Down arrow] keys to
select sinusoidal encoder or digital encoder, then
[Enter].
[Enter] and set the value using the [Up arrow]/[Down
arrow] keys to the PPR (pulses per revolution) of your
encoder,
then
fdbk Loss Alarm.
arrow] to “Limits”, then [Enter] for “Speed Limits”,
then
“Speed Min Amount”. Press
Max Amount”, and
5000 RPM to the maximum speed of the motor use
the
set it to 105% of the rated motor speed). Press
[Enter].
I/O needs to be connected properly to the enable/
disable functions.
[Up arrow] / [Down arrow] keys to select
[Down arrow] until to “Motor spd fbk”, then
[Enter], [Down arrow] to “Encoder 1 type”, then
[Down arrow] to “Encoder 1 pulses”, then
[Enter].
[Down arrow] four times to “Refresh Enc 1”
[Enter], “Enable” [Enter], this enables the Speed
[Left arrow] until “Basic Menu”, then [Down
[Enter] for “Speed Amount”, then [Enter] to
[Up arrow]/[Down arrow] keys as before (for now
[Enter] a value for “Nominal Current
[Enter]. This bases all
[Up arrow] /
[Down arrow] to “Speed
[Enter]. Change the value from
11. Save Parameters:
• Press
“Basic Menu” then
“save parameters”, then
The display will read “wait” until the values are
permanently stored.
12. Self Tune:
Make sure power is on and drive not enabled.
Close the switch on terminal 12 (hardware enable has
24 Vdc on it).
• When the enable switch is made, Press
until “Basic Menu” then
Parameter”, then
“motor parameters” and
arrow] to “Self Tuning” and [Enter] to “self tune 1”.
Press
1 ?” and
“enable” led illuminated, if not, make sure that you
have the jumpers (or external switches) set so that 24
VDC exists on terminal boards 12, 13, 14, 15, with
respect to 16 or 18.
• You should now see “measuring Rs” (stator
resistance). Wait until the display says “end”, then
disable the drive (open the switch to 12) and push
[Left arrow] twice to see “self tune 1”, press [Enter],
then
and
values are stored. The motor shaft must not move
during the procedure. If necessary, the motor shaft
must be locked.
NOTE:
“xxx range error” or “timeout” messages may also occur in
some extreme parameter ranges. Repeat the tune in this
case. If error messages are persistent see troubleshooting
section.
13. Self Tune part 2:
The initial part of self tuning that can be done without
the motor rotating has been accomplished. Now, to
get the best possible tuning, the motor needs to turn
with no load attached to the shaft. For this we use
Self tune mode 2a. If, for any reason, the motor cannot
be made to rotate with no load, then a “close” level of
tuning can still be accomplished by selecting Self tune
mode 2b.
• Now press
[Down arrow] to “self tune 2a or 2b and press [Enter].
Enable the drive using the switch to terminal 12. Press
[Enter], “start part 2a ?” or “start part 2b ?” then
[Enter] and see “measure sat 2a (or b)” will appear
and the motor shaft will turn (if “self tune 2a” is select).
Wait until the display says “end”, press
to see “self tune 2a (or b)” then
[Down arrow] to see “take val part 2a (or b)”. Disable
the drive (switch off terminal 12), then
[Left arrow] to “limits”, then [Up arrow] until
[Enter], then [Down arrow] to
[Enter].
[Left arrow]
[Down arrow] to “Drive
[Enter], then [Down arrow] to
[Enter]. Press “[Down
[Enter] to “start part 1” and [Enter], “start part
[Enter] again. The keypad should show the
[Down arrow] all the way to “take val part 1”
[Enter]. The display will read “wait” until the
[Left arrow] to see “self tune 1” then
[Left arrow]
[Enter] and press
[Enter].
19
Page 20

NOTE:
“xxx range error” or “timeout” messages may also occur in
some extreme parameter ranges. Repeat the tune in this
case. If error messages are persistent see troubleshooting
section.
If there was some reason you did not want to keep these
values permanently, but only wanted to try to run the drive
with them, there is no need to save them to permanent
memory. If power is cycled however, these values will be
lost unless the “Save Parameter” function is used.
14. Self tune part 3:
The third part of self tuning (Speed regulator tuning)
identifies the total inertia at the motor shaft, the friction
value and computes the proportional and integral gains
of the speed regulator. The motor needs to be free to
turn with load attached to the shaft.
NOTE:
When regulation mode = field-oriented, the encoder needs
to be verified before running Self Tune 3. Refer to page 22
“Encoder Verification”. After this verification procedure, put
the regulation mode back to field oriented.
WARNING !
This procedure requires free rotation of the motor shaft
coupled to the load. The Start/Stop command is
ignored, therefore it can not be used on drives with
limited travel, or when free rotation presen ts a safety
problem.
CAUTION !
The test is performed using the torque limit value set
in Test T curr lim parameter. The torque is applied in a
step fashion, with no ramp profile. Therefore, the
mechanical transmission must not have significant
backlash, and it must be compatible with operation at
the torque limit set in the Test T curr lim parameter.
The user can reduce the torque limit to a suitable value
via the Test T curr lim parameter.
Note !
• Application where the system inertia coupled to the
motor shaft is much higher than the motor inertia value
, increase the Test T curr lim parameter to avoid “Time
out” error.
• This procedure is not suitable for use with “hoist”
or “elevator” drives.
• Encoder feedback is required when Field oriented mode
is selected.
• Set the current limit (BASIC MENU\ T Current lim +/-)
to a value compatible with the motor size and load.
(Example when motor is 1/3 of the Drive power, the
limit should be reduced compared to the default value).
• Select the torque current value to be used during the
test via the Test T curr lim parameter
• Now press
then
to Fwd-Rev spd tune, then
direction for this test: Forward or Reverse by using
[Up arrow] / [Down arrow] keys. Press [Enter] to
set the selection.
• Enable the drive using a switch on terminal 12 [and
close terminal 13 to terminal 19 if Speed control
function is enabled (default)]. Press
to “Start part 3” then press
then
the motor will turn. Wait until the display says “end”,
press
and press
Disable the drive, then
with the initial set up and tuning with values stored in
only in the “working memory”.
NOTE:
“xxx range error” or “timeout” messages may also occur
in some extreme parameter ranges. Repeat the tune in
this case. If error messages are persistent see
troubleshooting section.
NOTE:
If there was some reason you did not want to keep these
values permanently, but only wanted to try to run the drive
with them, there is no need to save to permanent memory.
If power is cycled however, these values will be lost unless
the next step is taken.
To save all values to permanent memory, select Save
parameters and press
15.Set up for Running:
First, before saving, let’s put the drive into the
configuration you want to run it in.
The drive is factory setting to run through the Increase
[+] and Decrease [-] keys (Enable motor pot
parameter = Enabled), see the following instruction to
run.
[Left arrow] to see “self tune 2a or 2b”
[Down arrow] to “self tune 3” and press [Enter]
[Enter]. Set the motor shaft
[Down arrow]
[Enter], “start part 3 ?”
[Enter] and see “measure speed” will appear and
[Left arrow] to see “self tune 3” then [Enter]
[Down arrow] to see “take val part 3”.
[Enter]. You are now finished
[Enter] .
20
Page 21

Control buttons
Sequencing
Press START button to command the Drive to the Enable and
Run state
Press STOP button commands to stop the Drive from the
Run state
Display
Jog
Press to display the current reference value and to increase
the reference value and accelerate the drive.
Press to decrease the reference value and decelerate the drive.
Press SHIFT and [-] to change the motor shaft rotation
Shift
8.1 Motor Potentiometer function
Note!
(Main commands = DIGITAL)
Enable drive, terminal 12 connected to 24VDC
Start, terminal 13 connected to 24VDC
Resetting the speed reference value using Mot pot
function
• Press
• Press
[STOP] button to stop the motor
[Left arrow] until to “Basic menu”, then [Down
arrow] to “Functions”. [Enter] to motor pot, then
[Enter] to “enab motor pot”, press [Down arrow] to
motor pot reset, then
[Enter].
The diplay will read “ready” until the reference value
is set to zero.
Set the motor pot to “disable” (Enable motor pot
parameter = Disable) if you will want to use an analog
voltage on terminal 1 for speed reference.
Jog function
Note!
This function is enabled as a default setting (Enable jog
parameter = Enabled). Speed reference value = 100 rpm.
(Main commands = DIGITAL)
Enable drive, terminal 12 connected to to 24 VDC
Start, terminal 13 conected to to 24 VDC
Press
Press
Press
Press
Changing jog reference
Press
arrow] until “Jog reference”, [Enter], using the [Up arrow]/
[Down arrow] keys to change the value and the [Left
arrow] to move the character position, set the reference
value, then
If there are other changes you might want to make to set
up (see Options), do them now, and complete the following
step to put everything into permanent memory.
Saving all values to Permanent Memory:
• Press [Left arrow] back to “Configuration” then [Up
arrow] to “basic menu” and [Enter]. Press [Down
arrow] to “save parameters” and [Enter]. Parameters
are now stored permanently.
Motor pot oper.
+0 [rpm] POS
Motor pot oper.
-0 [rpm] NEG
[SHIFT and [+] to run, the speed will be displayed
[-] to select the motor shaft rotation
[jog] to run the other direction
[Left arrow] to exit from jog operation
[Down arrow] until “Functions”, [Enter], then [Down
[Enter].
21
Page 22

9. Options
Encoder verification: Set the Drive in V/f mode and run
the motor, enable and start the drive and set an analog
reference. If the reference is positive on terminal 1 with
respect to 2 (common) the motor should be turning
clockwise. With the motor turning clockwise (looking at
the drive end), monitor the encoder measurement by
selecting “Monitor/measurements/speed/speed in rpm/
Enc 1 speed”. The speed should be positive, not negative.
If it is negative, then A and A- or B and B- should be
interchanged on the encoder. Now return to the “Set Up
for Running” section.
Current Limit: The current limit will have been set to
approximately 136% by default in the previous setup (exact
number is a function of the power factor but the difference
is very small). The value actually set can be verified by
(from “Basic Menu”) pressing down/right arrow to “Limits”,
[Enter], then down/right arrow to “current limits”, then
then
[Enter], then down right arrow to “T current lim” and [Enter].
The value of T current limit can be changed to a higher (or
lower) number. Bear in mind that the ultimate limits are
based on the capacity of the drive, not the motor. T current
is the torque producing component of total current. Settings
in excess of 200% are possible, although the motor may
not be able to handle this current. Current Limit restricts
the magnitude of the torque current reference. The drive
has other alarms and faults to provide motor and drive
current protection.
I/O Configuration: This drive can be configured in several
ways.
The standard drive has three standard analog inputs and
two analog outputs as well as six digital inputs and two
digital outputs. These are assignable and configurable. The
drive is defaulted already to provide the analog outputs
as Actual speed and Torque current. To set up the drive
for two analog outputs (one for speed and one for load)
for metering or other purposes, do the following:
Refer to the “Control terminals” section of this guide
showing a description of the connections to the regulator.
A more detailed description and discussion of the I/O are
shown in the manual. The analog outputs are defaulted to
a scale of 1, which means 10 volts out at the max parameter
value. In other words, if analog output 1 is set to max speed
then max speed will be scaled to 10 VDC (maximum output
voltage available) at “Speed Base Value”. If you wanted 5
volts out at max speed then set the scale to 0.5. If the
output were set to Torque current then 10 VDC would be
rated current. If you wanted the output to be 10 Vdc at
150% of “Full Load Current” then the scale would be 0.66.
The standard factory default is already set up for speed
(with scale factor of 1) on analog output 1 (terminals 21
and 22) and load (Torque current, with scale factor of 1) on
analog output 2 (terminals 23 and 22). Note that terminal
22 is a common for both the outputs. This common can
be grounded, and should be grounded somewhere,
preferably at the load device (meter).
How to disable analog input 1 as ramp reference:
Analog inputs 2 and 3 are defaulted to off, #1 is defaulted
to Ramp ref 1.
• Press
[Enter].
• Press
for Analog input 1, then
[Enter] to display the setting, which will be “Ramp ref
1”.
• Press
displayed, then
How to enable analog input 2 as ramp reference
• Press
press
then
to ”analog input 2. Then
then
Use the
“Ramp ref 1” and
2 (terminals 3 and 4) will be the ramped (accel/decel)
speed reference for the drive.
The manual shows the entire configuration of other
I/O in the drive.
10. Quick Tuning Guide for Factory
Configured (or pre-configured)
Drives
When the drive configuration has already been set and
you are simply fine tuning the drive you can ignore most of
the preceding procedure. It is recommended that you go
through the steps anyway, if the data is suspect. You can
just use the
all the steps in which the entry is found to be correct. Start
with step 4 of the full procedure and do not default the
parameters to factory parameters. If there is any
question about whether the existing setup should be saved
or not, then use the configuration tool software that came
with the drive and save the file to a PC first so it can be
used later.
[Up arrow]/[Down arrow] to “I/O Config”, then
[Down arrow] to “Analog inputs”, then [Enter]
[Enter] to Select input 1, then
[Up arrow] / [Down arrow] keys until “OFF” is
[Enter].
[Up arrow]/[Down arrow] to “I/O Config” and
[Enter], then down right arrow to “analog inputs”
[Enter] for “analog input 1” then [Down arrow]
[Enter] to “select input 2”;
[Enter] again to see the set up. It says “OFF”.
[Up arrow] / [Down arrow] keys to display
[Enter]. This means the analog input
[Left arrow] key rather than the [Enter] key in
22
Page 23

11. Troubleshooting
Overflow list
CODE CAUSES
10 ; 54 The ratio between the Encoder 1 pulses[416] and the number of motor pole pairs must be
higher than 128
3 ; 4 The Stator resistance [436] value is too high. The motor is not compatible with the drive
size used.
5 ; 8 ; 9 ; 15 The Leakage inductance [437] value is too high. The motor is not compatible with the drive
size used.
16 ; 24 The Rotor resistance [166] value is too high. The motor is not compatible with the drive
size used.
17 The Nominal voltage [161] and Nom frequency [163] values produce motor nominal flux
that is too high.
- The Nominal voltage value is too high and/or the Nom Frequency value is too small.
18 The Base voltage [167] and Base frequency [168] values produce motor nominal flux
that is too high.
- The Base voltage value is too high and/or the Base frequency value is too small
23 The ratio between nominal flux (Nominal voltage, Nom frequency) and working flux (Base voltage,
base frequency) is too high.
- Verify the above parameters value.
The Magnetizing current [165] value is too high.
- Verify that this value is lower than Full load curr.
27 The Base voltage value is too high. The maximum value is 500 VAC.
28 The Base frequency value is too high. This value must be lower than 500Hz
59 The Magnetizing working curr [726] is too high.
- Verify that the nominal flux value (Nominal voltage and Nom frequency) is lower than the
working flux value (Base voltage and Base frequency). Check the parameters value.
The Magnetizing current value is too high.
- Verify that this value is lower than Full load curr.
64 The Motor cont curr [656] value, of the motor thermal protection function (menu Ovld mot contr),
produces a continuous current that is too low in comparison to the used inverter size. This error
can also be due to a too low setting of the Nominal current [164] parameter ( ≤ 0.3 x I
66 The Nominal speed [162] value is wrong.
The set value produces too small (or too high) slip value.
2N
).
23
Page 24

List of Self-tuning Error Messages
Generic messages
Description Note
“Drive disabled”: Provide enable input by setting terminal 12 high.
“Not ready”: “Take values part 1”, “Take values part 2a”, “Take values part 2b”or “Take values part 3”
can not be executed because the measurement has not been completed correctly. Repeat
self-tune procedure.
“Time out”: Measurement has not been completed in the proper time.
“Start part…?”: Press [ENTER] to confirm start of measurement.
“Tuning aborted”: Measurement aborted by user ([SHIFT] / [Escape] button has been pressed).
“Set Main cmd=Dig”: Go to CONFIGURATION menu and set Main commands = digital.
“Set Ctrl=Local”: Go to CONFIGURATION menu and set Control mode = Local.
“Reg mode NOK”: Self tune part 3 can only be executed with Regulation mode = Field oriented or Regulation
mode = Sensorless vect. Go to BASIC MENU and set Regulation mode properly.
“Inertia range”: Self-tuning part 3 procedure has found an inertia motor value too low, for this reason it
cannot calculate the speed regulator gains. Try to repeat the self-tune procedure to eliminate
accidental measurement errors.
If this error persist , do not use the “Take val part 3”command. The speed regulator will
probably be stable with the factory gains. It is possible to optimize the speed regulator by
manual tuning .
Measurement error messages
These messages may occour when extreme parameter values have been identified. It may be useful to retry the self
tune command when any of the following messages occur. If the messages persist, alternative manual tuning procedures
should be used.
Description Note
“No break point” Self-tune Part 1 failed. Check the connections between the drive and the motor and repeat
self-tune Part 1.
“Overspeed” Self-tune Part 3 detected a much higher speed than expected. Repeat Self-tune 1 or the
manual tuning that was performed.
“Drive stalled”: Increase value of parameter Test T curr lim and repeat Self tune 3
“Load applied”: Nominal zero load torque at standstill was detected. Self tune 3 is impossible for this type
of load.
“T curr too high”: Reduce value of parameter Test T curr lim for Self tune 3
“Friction null”: Value of friction is zero or lower than the accuracy limit of the control system.
24
Page 25

Failure alarms in the keypad display
Failure alarm Possible causes
BU overload The braking duty cycle is out of the allowed range
Bus loss Failure in the Bus connection (only with interface Bus option card)
Check the Bus connection
EMC compatibility problem, check wiring.
Curr fbk loss Failure in the connection between regulation card and TA transformer.
Check the connection cable on XTA connector.
DSP error Processor program error
Switch off the drive and restart
If unsuccessful there is probably an internal fault. Contact your service office.
Enable seqerr Drive is powered up or RESET* with the ENABLE input connected to 24 VAC (picked up) and
the drive in “terminal mode”. Refer to CONFIGURATION/Main Commands.
External fault External failure, reported on terminal 15
If the "External fault" message is not displayed, the connection is missing between terminals
16 and 18 (reference point) and/or 15 and 19.
If the "External fault" message is displayed:
- The signal on terminal 15 is missing (15 ... 30 V to terminal 16). With an external voltage
supply, commons must be connected together.
Failure supply Fault in the voltage supply; the voltages are below the permitted value
CAUTION: switch off voltage before removing terminal strips.
In most cases the cause is in the external wiring. Pull out the plug-in terminal strips of the
regulator card and enter the Reset command. If no other failures are reported, check your
wiring for a short-circuit, check cable shielding.
If this has not corrected the fault, try to RESET* once more.
If still unsuccessful, the fault is probably internal. Contact your service office.
Heatsink ot (For sizes from 22kW ... and higher). Temperature of the heatsink drive too high.
Failure of device fan.
Failure in the IGBT module on power section.
Fast overload current duty cycle.
Heatsink sensor Ambient temperature too high
Failure of drive fans
Dirty heatsink
Intake air ot (For sizes from 30 Hp and higher). Temperature of the cooling air too high.
Failure of drive fans
Air intake obstructed
25
Page 26

Interrupt error An unused interrupt has occurred
Switch off the drive and restart
If still unsuccessful, the fault is probably internal. Contact your service office
Module overtemp (For sizes from 1 Hp to 20 Hp). Temperature of the IGBT module is too high
Failure of drive fan
Failure in the IGBT module in the power section.
Fast overload current duty cycle.
Output stages Internal Overcurrent failure of IGBT power section
Switch off drive and restart
If unsuccessful, contact your service office
Overcurrent Overcurrent in the motor circuit
Short-circuit or ground fault at the output of the drive
Current regulator tuned incorrectly
Message appears when switching on the drive: drive is connecting to a motor
that is running. Auto capture function must be activated
Switch off drive and restart
If unsuccessful, contact your service office
Overvoltage Overvoltage on the DC Bus due to energy regenerated from motor
Lengthen deceleration ramp. If not possible:
Use a BU... braking unit to increase the energy absorption capability
Overtemp Motor Overtemperature of the motor (indicated via thermistor on terminals 78/79)
Cable between thermistor in motor and terminals 78 and 79 interrupted
Overheating of motor:
- Load cycle too extreme
- Ambient temperature at motor location too high
- Motor has an external blower and it has failed
- Motor does not have an external blower: load too large at low speeds. The cooling effect
of the fan on the motor shaft is inadequate for this load cycle. Change cycle or install an
external blower
Regulation ot Temperature of the drive regulator card is too high
Ambient temperature too high
Speed fbk loss Speed feedback loss
Encoder not connected, or incorrectly connected or not supplied:
Select the Enc 1 speed parameter in the MONITOR\ Measurement \ Speed \ Speed in rpm
menu.
- With the drive disabled, manually turn the motor clockwise (viewed from the front of the
shaft). The value indicated must be positive.
- If the indicated value does not change or random values are shown, check the power
supply and the cabling of the encoder.
- If the indicated value is negative, reverse the encoder connections. Exchange channel
26
A+ and A- or B+ and B-
Page 27

Undervoltage Line voltage parameter incorrectly set. Remedy: set parameter correctly and then acknowledge
the failure via RESET*.
The incoming voltage to the power section of the device is too low due to:
- too low an AC input voltage or extreme line dips
- poor cable connections (e.g. terminals on contactor, choke, filter ... not properly tightened).
Remedy: check connections.
* To RESET the alarms press [Escape]. If Enable and Start commands are configured for terminal mode, remove
both commands before “Reset”. To RESET remove +24V potential from these terminals.
Note:
The RESET alarm operation can be also configured for a digital input.
Other faults
Failure Possible causes
Motor not turning Failure alarm is displayed: see above
Once the error has been corrected enter the failure Reset command
Keypad display is dark: AC voltage supply to terminals U1/V1/W1 missing or an internal fuse
is faulty
Enable and/or start command missing (Check configuration of the reg. terminals)
Drive not accepting commands: incorrect or wrong operating mode
Protective device ahead of the power supply has tripped: protective device incorrectly sized
or input jumper faulty
The analog input used for the reference value was not assigned or assigned incorrectly
Motor turning in the wrong direction
Polarity of the reference signal incorrect
Motor incorrectly connected. CAUTION: if the motor rotation is reversed, two encoder cables
(A+ and A- or B+ and B-) have to be reversed also.
Motor not reaching nominal speed
Drive is encountering a speed limit. Remedy: check Speed max amount, Speed max pos
and Speed max neg parameters
Drive working at current limit (LED Ilimit) Possible causes:
- Motor overloaded
- Inverter sized too small
- Incorrect V/f characteristics set
- T current lim reduction selected via Torque reduct parameter
The entered value for the number of encoder pulses is too high. Remedy: check the parameter
“encoder 1 pulses” and set the correct value.
An override signal is reducing the main reference value.
Remedy: check the configuration
Speed base value parameter set too low
27
Page 28

Motor accelerates immediately to maximum speed
Reference set via analog input: Check whether the signal varies from min. to max.
Potentiometer used for reference: Is there a 0V (common) connection present?
Encoder not connected, or incorrectly connected.
Select the Enc 1 speed parameter in the MONITOR \ Measurement \ Speed \ Speed in rpm
menu.
- With the regulator disabled, manually turn the motor clockwise (viewed from the front of
the shaft). The value indicated must be positive.
- If the indicated value does not change or if random values are shown, check the power
supply and the cabling to the encoder
- If the indicated value is negative, reverse the encoder connections. Exchange channel
A+ and A- or B+ and B-.
Motor accelerates too slowly
Ramp value incorrectly set
Motor running at max. current
- Motor overloaded
- Drive sized too small
- Incorrect V/f characteristics set
Motor decelerates too slowly
Ramp value incorrectly set
Motor turns slowly, although reference value = Zero
Minimum speed parameter selected
Interference due to unused analog input. Remedy: set unused analog inputs to OFF
Disconnect reference on the analog input
- If drive now stands still, the effect is due to the cable resistance of the 0V (common) leg.
- Use the offset compensation on the analog input. Set Offset input xx parameter so that
the drive stands still.
Output voltage oscillates under load
The value for Rotor resistance is not correct. See section “Checking and manual tuning of
rotor resistance for field oriented mode” in the AV-300i instruction book.
Motor not supplying the maximum torque or maximum output power
The value for Magnetizing curr is less than required for the connected motor.
- The ratio Output voltage / Output frequency in the MONITOR / Measurements menu
should be approx equal to the ratio of Base voltage / Base frequency
- Drive working at current limit
- Check whether the value for Full load curr in the CONFIGURATION menu is correctly
set
- Check the value for the current limit
- The value for Magnetizing curr and/or Rotor resistance parameters is not correct.
Optimize the tuning as described in the instruction book.
28
Page 29

The speed during acceleration with maximum current is not linear
Reduce the Speed I and Speed P proportionally. If this does not lead to an improvement,
optimize the regulator per the instruction book.
Speed oscillating Check Speed P and Speed I parameter
If the operating point is in the constant Hp range, check the Flux P and Flux I parameters
Incorrect value for Rotor resistance
Remedy: Optimize the tuning as described in the AV-300i instruction book.
Drive not reacting to adaptive speed regulation
Adaptive speed regulation not enabled. Enable spd adap = Enabled
Adap reference not assigned to an analog input
Motor potentiometer function not executed
Function not enabled. Enable motor pot = Enabled
With operation via the terminal strip: Motor pot up and/or Motor pot down and Motor pot
sign were not assigned to digital inputs
Jog operation not possible
A start command is still present
Function not enabled. Enable jog = Enabled
With operation via terminal strip: Jog + and/or Jog - were not assigned to digital inputs.
Internal speed reference values not actuated
Function not enabled. Enab multi spd = Enabled
With operation via terminal strip: Speed sel 0, Speed sel 1 and Speed sel 2 were not assigned
to digital inputs.
Multi-Ramp function not reacting
Function not enabled. Enab multi rmp = Enabled
With operation via terminal strip: Ramp sel 0 and Ramp sel 1 were not assigned to digital
inputs
29
Page 30

GEK-105661 (5M 5/99)
GE Industrial Systems
1501 Roanoke Boulevard, Suite 435
Salem, VA 24153
1-800-543-6196
www.GEindustrial.com
 Loading...