

GE ASW18DKS1, ASM24DKS1, ASH18DKS1 Owner’s Manual
©
GEAppfiances.com
Safely Instruaions .......... 2, 3
Operating InsCruaions
Controls--Control I_obs ..... 6, 7
Controls--Touch Pads ....... 4, 5
Care and Cleaning
Air Filter . .................... 8
Batteries ..................... 8
Grille and Case ............... 8
Outdoor Coils ................ 8
Installation Instructions
Through-the-_A'all
Installation--Optional ........ 15
_'indow Installation ......... 9-14
Troubleshooting Tips ........ 16
Nomml Operating Sounds ..... 16
ASH l8
ASWI8
ASF24
ASL24
A&U24
A SN24
AsQ24
AS1,24
ASW24
©
Consumer Support
Consumer Support ........... 90
Product Registration ....... 17, 18
VCaiwantv .................... 19
Write the model and serial numbers here:
<
Model #
Serial #
Find these nmnbers on a label on the
side ot the air conditione_:
DB98-15880A 49-7473 12-03 JR
IMPORTANTSAFETYINFORMATION.
READALLINSTRUCTIONSBEFOREUSING.
• ,WARNING!
For your safe_ the information in this manual must be followed to minimize the risk of fire, electric shock
or personal injury.
SAFETYPRECAUTIONS
E:,:Use this appliance only %r its intended
pml)ose as described in tilts )wner s
Manual.
E:,:This air conditioner must be properly
installed in accordance with tile Installation
Instructions before it is used.
E:,:Nexer unplug your air conditioner by pulling
on the power cord. Always glqp plug firefly
and pull straight out flom tile receptacle.
E:,:Repair or replace immediamly all elecu_ic
service cords that hme become flwed or
otherwise damaged. Do not use a cord
that shows cracks or abrasion damage
along its length or at either tile plug or
connector end.
• (
;f; Turn tile mode control OFFand unplug
E:,IFor your safety...do not store or use
_: All air conditioners contain refligerants,
HOWTOCONNECTELECTRICITY
Do not, under any circumstances, cut or remove
the third (ground) prong from the power cord. For
personal safety, this appliance must be properly
grounded.
Tile air conditioner should always be plugg>d
into its own individual electrical outlet
which has a x_lmge rating fllat matches the
rating plate.
your air conditioner before making any
repairs or cleaning.
NOTE."V_:estrongly recommend that any
servicing be perfomaed by a qualified
individual.
combnsfible materials, gasoline or other
flammable vapors or liquids in tile vicinity
of this or any other appliance.
which under federal law must be remox>d
prior to product disposal. If you are g_tdng
rid of an old product with refl-igerants, check
with tile company handling disposal about
what to do.
Tile power coM of fl_is appliance is equipped
with a 3-prong (gTounding) plug which mates
with a standard 3-prong (grounding) wall
outlet m minimize the possibiligv of elecUic
shock hazard flom this appliance.
Hme the wall outlet and circuit checked by
a qualified electrician to make sure tile outlet
is properly grounded.
'_/_]lerea 9-prong wall outlet is encounmred,
it is your personal responsibility and obligation
to have it replaced with a properly grounded
_prong wall outlet.
Tiffs proxqdes tile best performance and also
prexents overloading house wiring circuits
which could cause a fire hazard flom
oxerheated wires.
See the Installation Instructions, Electrical
Requirements section for specific electlJca]
connection requirements.
2

WARNING!
USEOFEXTENSIONCORDS--115-Voltmodelsonly
GEAppliances.com
Because ofpotential safety hazards under certain
conditions, we strongly recommend against the
use of an extension cord.
Howex>t; if you must/lse an extension cord,
it is absolutely necessary that it be a UiAismd,
14 gauge, 3-wire grounding b'pe appliance
extension cord having a grounding type plug
and outlet and flint fl)e electrical rating of rite
cord be 15 amperes (minimum) and 195 x_lts.
CAUtiON:
DO NOT use an extension cord with anyof the
230/208 volt models.
USEOFADAPTERPLUGS--115-Voltmodelsonly
Because of potential safety hazards under certain
conditions, we strongly recommend against the
use of an adapter plug.
Howex>[; if you must rise an adapte[; where
local codes permit, a temporary connection may
be made to a properly grounded 9-prong wall
outlet by use of a UiAismd adaptor available at
most local hardware stores.
The larger slot in fl_e adapter must be
aligned with the larger slot in file wall outlet
to provide proper polarity in the connection
of the power cord.
When disconnecting file power cord flom the
adapter; alwws hold tile adaptor in place with
one hand while pulling tile power cord plug
with the other hand. If this is not done, the
adaptor ground temfinal is x>tT likely' to b_eak
with repeamd use.
If the adapter ground temfinal breaks, DO NOT
USEthe air conditioner until a proper ground
has been established,
Attachingthe adaptergroundtermba/ to a waftoutlet
coverscrewdoes notgroundthe applianceunlessthe
coverscrewis metal, notinsulated,and the waft outlet
is groundedthroughthe housewiring. Youshouldhave
thecircuit checkedbya qualifiedelectricianto make
surethe outlet is properlygrounded.
READANDFOLLOWTHISSAFETYINFORMATIONCAREFULLY.
SAVETHESEINSTRUCtiONS
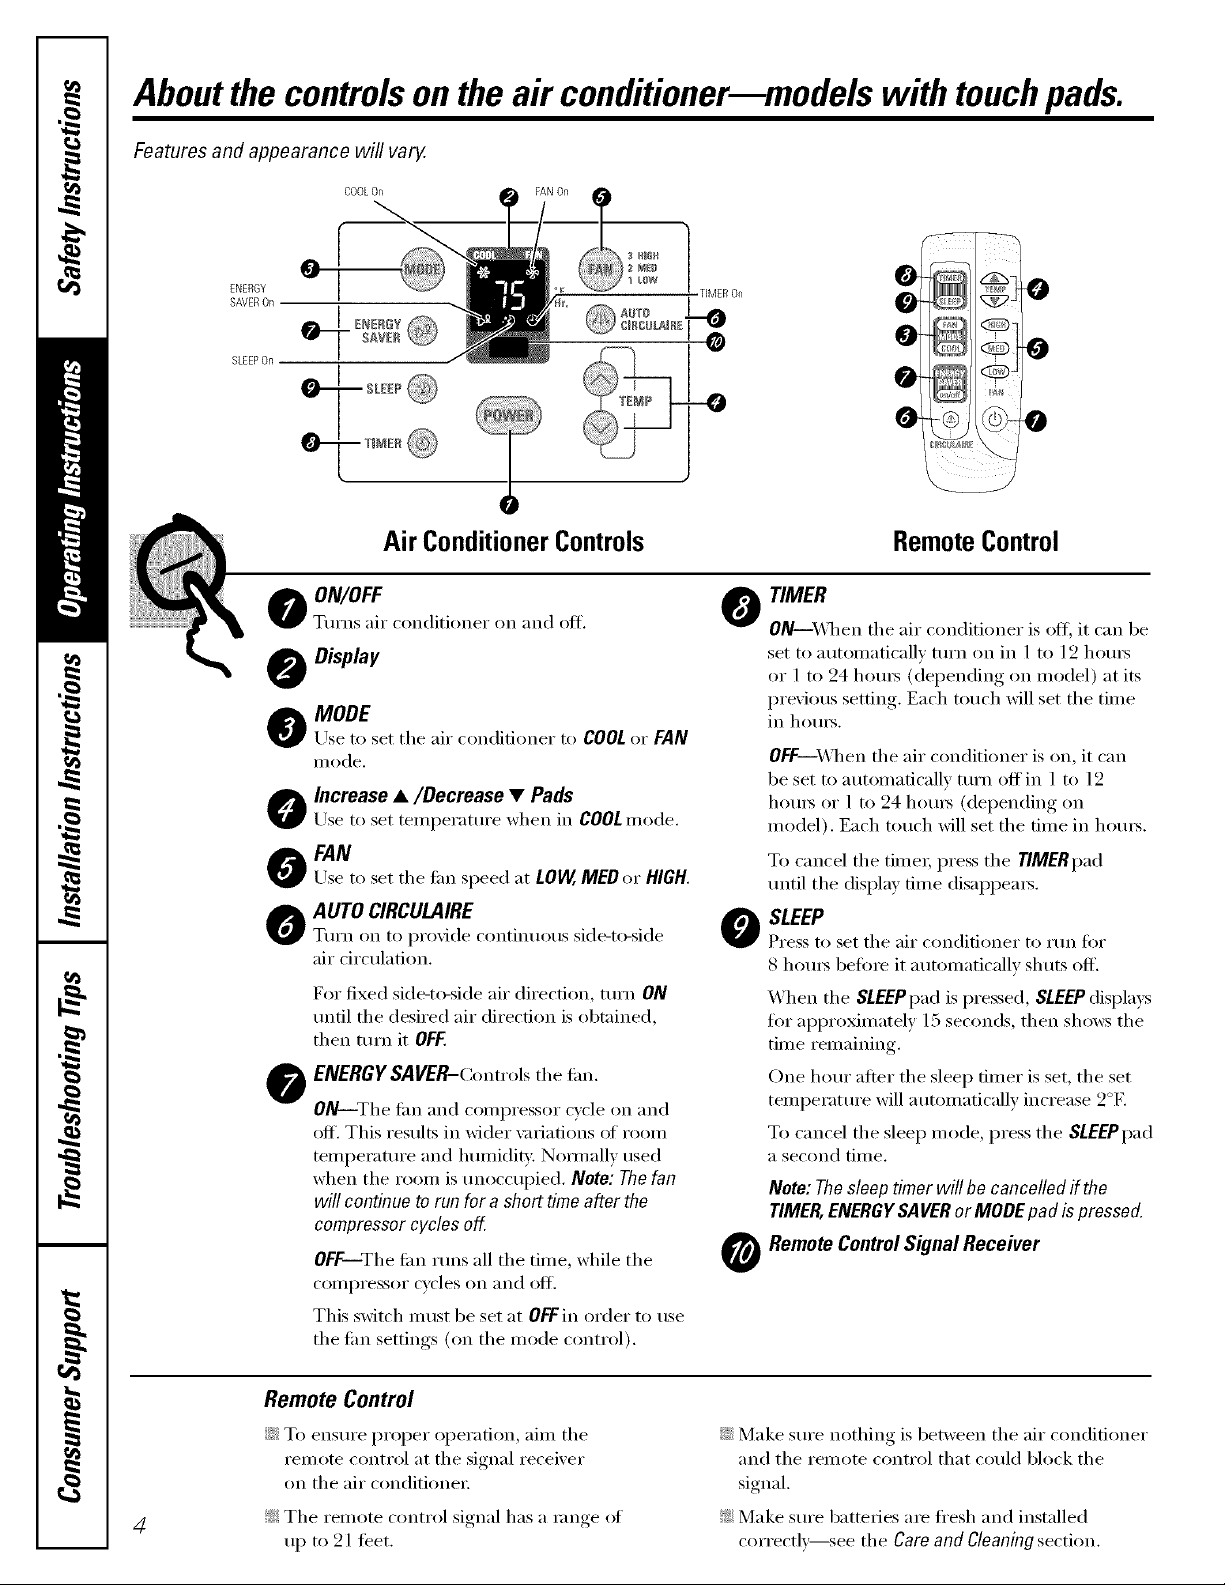
Aboutthe controlsonthe air conditioner odels with touchpads.
Features and appearance will vary.
COOLOn
0
Air ConditionerControls Remote Control
O_FF
0 Turn,; air conditioner on and off.
Oisplav
O ODE
Use to set the air conditioner to COOL or FAN
Ill ode,
O Increase •/Decrease • Pads
Use to set temperatm'e when in COOL mode.
o FAN
Use to set tile tim speed at LOW,MEDor HIGH.
) AUTO CIRCULAIRE
Tm'n on to provide continuous side-to-side
air circulation.
For fixed side-to-side air direction, mrn ON
until the desired air direction is obtained,
then mrn it OFF.
O ENERGYSAVER-(;ontrols the enl.
ON--The flirt and colnpx'essor cycle on and
off. This results in wider \miations (ff room
temperature and hmnidit,i. Nommlly used
when the room is tmoccupied. Note: The fan
will continueto run for a short timeafter the
compressorcyclesoff
OFF--The tim runs all the time, while the
compressor cycles on and off.
This switch IllllSt be set at OFF in order to rise
the tim settings (on the mode control).
0
0
@
0
TIMER
@
O
ONi_]mn the air conditioner is oit; it can be
set to automatically mrn on in 1 to 12 hems
or 1 to 24 hems (depending on model) at its
previous setting. Each touch will set the time
in hems.
OFFi_]mn tile air conditioner is on, it can
be set to automatically mrn off in 1 to 12
hems or 1 to 24 hom_ (depending on
model). Each touch will set the time in hems.
To cancel the time_; press the Y/MERpad
tmtil tile display time disappears.
SLEEP
@
Press to set tile air conditioner to run fin.
8 hom_ befin'e it automatically shuts off'.
When tile SLEEPpad is pressed, SLEEPdisplays
fin" approximately 15 seconds, then sho_vs tile
time remaining.
One hour after the sleep timer is set, the set
temperature will automatically increase 2°E
To cancel tile sleep mode, press tile SLEEPpad
a second tiI//e.
Note:Thesleep timerwill be cancelledif the
TIMER,ENERGYSAVERorMODEpad ispressed.
Remote ControlSignal Receiver
@
Remote Control
iJi::To ensure proper operation, aim tile
remote control at tile signal receixer
on tile air conditione_:
4
!i?:Tile remote control signal has a range of
tlI) 10 21 teet.
::Ji::Make sm'e nothing is between tile air conditioner
and the remote control that COlfld block the
signal.
_: Make sm'e 1)atteries a_e fl'esh and installed
correctly--see tile Care and Cleaning section.
When the air conditioner is turned on, it will
automatically start in the setting last used.
Power Outage Recovery Feature
GEAppliances.com
In tile case of a power outage or interruption, tile
unit will aut(nnatically re-start in tile settings last
used alier tile power is restored. Tile TIMERand
SLEEPfeatures will reset to tile original setting. 54m
may need to set a new time if desired.
COOLMode
Use the COOLmode with HIGH(3),MED (2)or
LOW(l) tim tot cooling. Use tile INCREASEA/
DECREASE• pads to set tile desired temperature
between 64°F and 86°F in l °F increments.
A them_ostat is used to maintain tile room
temperature. Tile compressor will cycle on and off
to kee I) tile room at tile set level ot comfi)rt. Set tile
thermostat at a lower number and tile indoor air
will becolne coole_: Set tile theilnostat at a higher
number and tile indoor air will become wanne_:
NOTE:ff theair conditioneris off andis thenturned on
whileset to COOL,it will takeapproximately3 m&utes
for the compressorto startand cooling tobegin.
CoolingDescriptions
For Normal Cooling--Select the COOL mode
and HIGH (3) (>r MED (2) tim with a middle set
temperature.
ForMaximumCoolim_---Select tile COOLmode
and HIGH (3) tm_ with a lower set temperature.
For Quieter & Nighttime Coolino---,Select tile
COOLmode and LOW(I)tim with a middle set
temperature.
NOTE:If youswitch from a COOLsetting to OFForto
a fan setting,wait at least3 minutesbeforeswitching
back to a COOLsetting.
FAN Mode
Use tile FAN at HIGH (3), MED (2) or LOW(l) t(> Since tim (rely settings do not pr(>vide cooling, a
provide air circulation and filtering without cooling, temperature setting will not be displayed.
Vent Control (onsome models)
Tile vent control is located on tile inside ot tile
air lou\'ets in the lower right cornet;
X._]_en set at CLOSE, only the air inside the room
will be circulated and conditioned. _,_]/en set at
OPEN, some inside air is exhausted outside.
Air Direction--Up and Down (on some models)
Fingertip pressure on tile horizontal louve_ a(!justs
tile air direction up or down.
Air Direction--Side-to-Side (onsomemodels)
On some models, tile side-t(_side air direction is
a(!justed by tile louver lex'e_ or by grasping and
moving tile inner vertical louvers.
(/
if"
Toopen flTevent, push the lever to the right.
Toclose it, push it to the left.
OR
OR
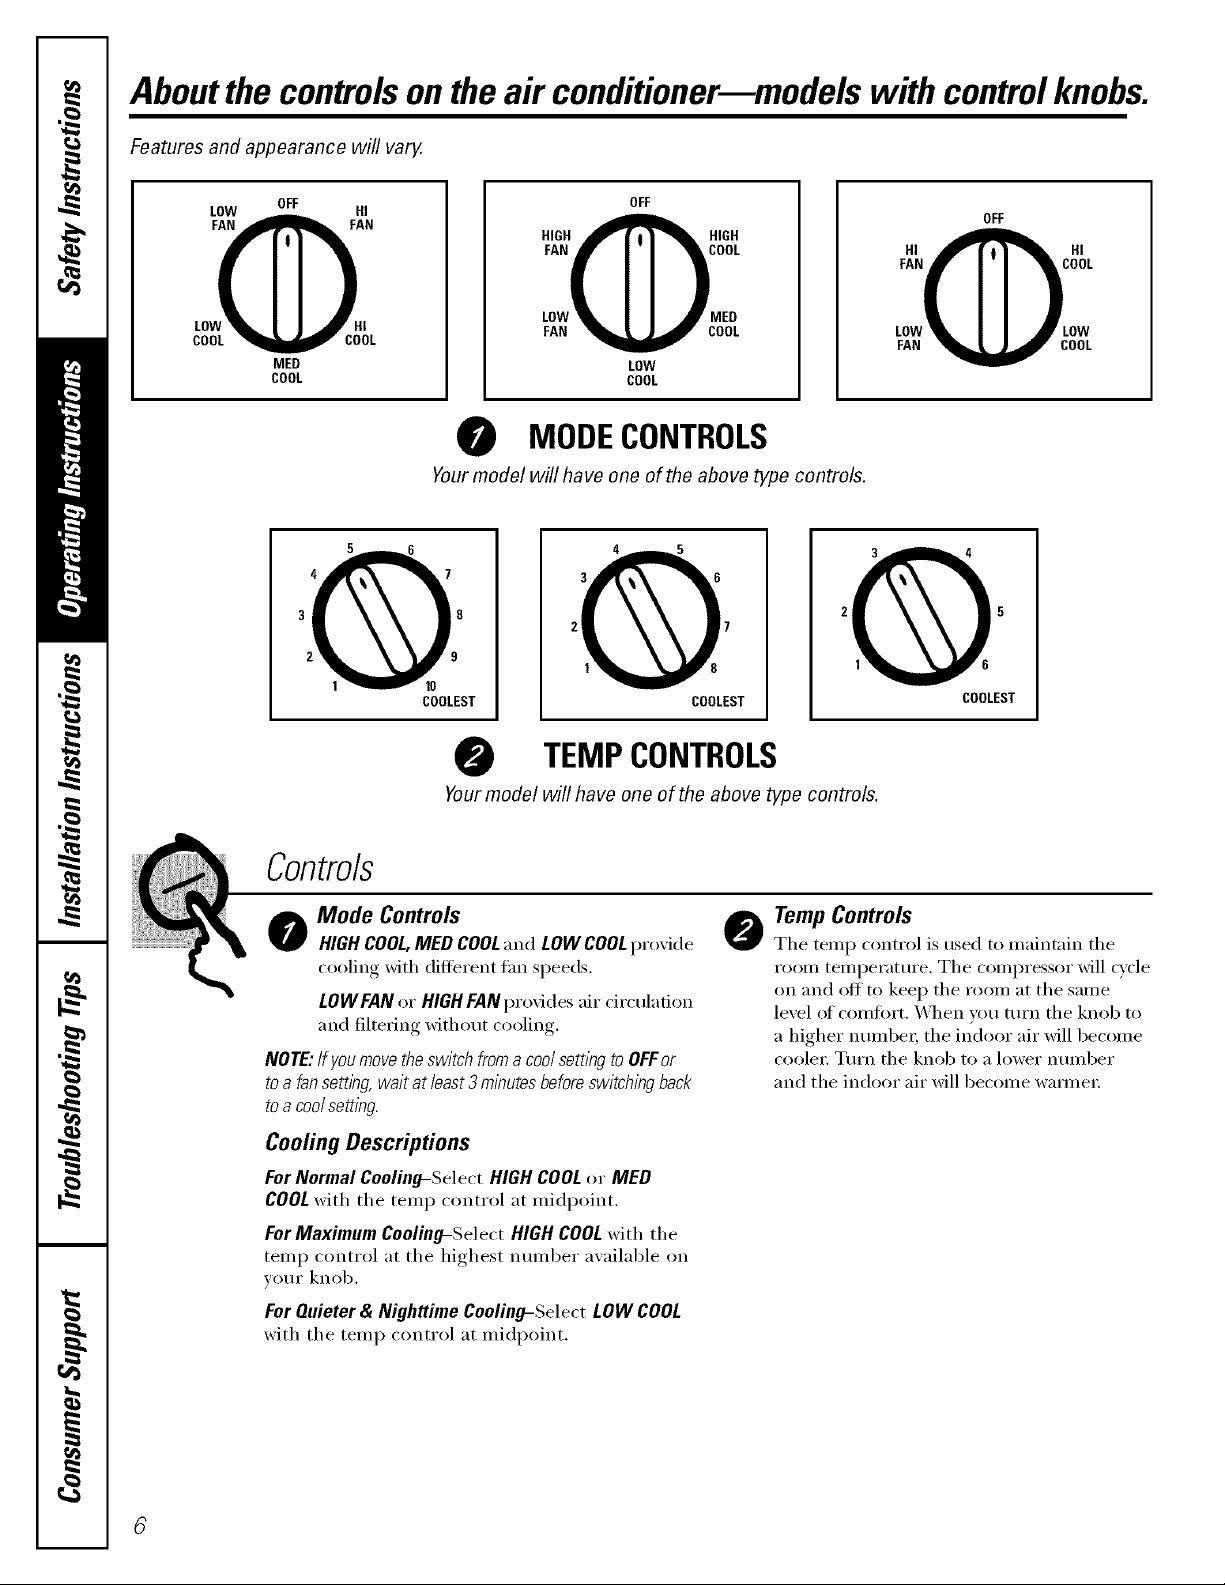
Aboutthecontrolsontheair conditionermmodelswith controlknobs.
Features and appearance will vary.
LOW HI
FAN FAN
LOY@EII
COOL COOL
OFF
MED
COOL
OFF
FAN COOL
HIGH@HIGH
LOW MED
FAN COOL
LOW
COOL
FAN OOL
LOW .OW
FAN COOL
MODECONTROLS
Yourmodel will have one of the above type controls.
EST ST COOLEST
TEMPCONTROLS
Yourmodel will have one of the above type controls.
OFF
_ Controls
o Mode Controls
HIGHCOOL,MEDCOOLand LOWCOOLpro',ide
cooling with different tim speeds.
LOWFANor HIGHFANprovides air circulation
and filtering without cooling.
NOTE:If youmovetheswitchfromacoolsettlbgtoOFFer
toa fansettbg,waitat least3minutesbeforeswitchingback
toacoolsetting.
Cooling Descriptions
ForNormal Cooling-SelectHIGHCOOLor MED
COOL with the temp control at midpoint.
For Maximum Cooling-Select HIGH COOL with the
temp control at the highest nmnber available on
wmr knob.
For Quieter & Nighttime Cooling-Select LOW COOL
with the temp control at midpoint,
TempControls
0
The temp control is used to maim;fin the
room temperature. The compressor will cycle
on and off to kee I) the room at the same
level of comfi)Yt. _A]_en you ttlI'n the knob to
a higher nmnbe_; the indoor air will become
coolex: Turn the knob to a lower number
and the indoor air will become waxmex:
 Loading...