

Page 1
©
Safety Ins_cqio_z_ ........... 2, 3
Operating lnsO_uctions
(;onu'ols_Contvol F,haobs ..... 6, 7
Conu'ols Tou(h Pads ........ 4, 5
Care and Cleaning
Air Fiber . ..................... 8
gaueri_s ...................... 8
Grille and (;as_ ................ 8
Outdoor (kills ................. S
Installation Ins_ctions
Through-the-Wall
[nsudladon--Optiot_al ......... 15
Window Insudlatkm ......... 9-14
Troubleshooting Tips ......... 1(;
Normal ()p_ rating Sounds ..... 16
ge.com
A SI) 06 *
ASM08*
ASMIO*
ASMI2*
ASQm
Asq12
ASQI4
ASVIO
ASVI2
ASV[4
©
Com'un_+ Support
Consumer Support ............ 20
Produ(t Registration ....... 17, 18
Wa nma I3..................... 19
*ENERGY• STAR _ labeled l)l-°(hlcl
ENERGYSTAR
._, an ENERGY STAR (_ [)artn_ 1; GE has
determined that this product meets
the ENERGYSTAR°°guidelines t;,_r
energy etfi_ iencv.
Write themodelandserial
numbershere:
Model #
Serial#
Find lhese mnnl)ers on a l_lt)('l on
the side of tile air conditionm:
49-7581 11-07JR
Page 2

IMPORTANTSAFETYINFORMATION.
READALLINSTRUCTIONSBEFOREUSING.
WARNING!
For your safeW, the information in this manual must be followed to minimize the risk of fire, electric shock
or personal injury
SAFETYPRECAUTIONS
?;2Use dlis appliance only tor its intended
ptupose as described ill this ()wn(r's
Manual.
_; This air conditioner must be properly
installed ill all ordan/e with tile Insmllati/:m
Instructions before it is tts(d.
_; Never unphtg yl/ltr air Collditil/ner by pulling
on da( power cord. _Mwaysgrip plug firtnly
and pull straight/)ut fi'onl the re(epm(le.
;;2Ilepktce itnniediately all electric selwi(:e
cords that have becoln<: fl_ayed or othei_wise
dalnaged. A dalnaged ltower supply cord
nlust be replaced wida a new power stq[)ply
cord ol)tained ti-oln the mantdimtm-(r and
not lepair<:d. Do not us( a cord that shows
crocks or abl_lsion dalnage along its length
or at eidter the phtg or c/mnecU)r end.
_'2If'tile rl'cepmcle does not nlatch th< phtg,
_; Turn all( unit OFFand ttnplttg your air
{_;For your safetv...do not slot( or use
{_;All air conditioners contain refl-igemnts,
HOWTOCONNECTELECTRICITY
the r(cepmcle ntust b( chang<'d out l)y a
qttalifled <4<!ctrician.
conditiolmr belbt (" tnaking ally t el)alis
or cleaning.
NOTE: We stronglyrecommendthat anyservicflTg
be performedby a qualified individual
(onibusfible tnat< l_ials,_lsolille or other
flamtnable w_pors or liquids in tit<!vicinity
of flits or ally odl(r altpliance.
whilh till(let fb(t< ml law IIIllSt })e l-eI*loved
pri/)r to prodtu t disposal. [t 7,ou art getting
lid ot an old product with r(fiqgciwnts, ch(ck
with the / ompany handling disposal about
what to do.
Do not, under any circumstances, cut or remove
the third (ground) prong from the power cord, For
personal safety, this appliance must be properly
grounded
DONOTuse an adapterplug with this appliance.
The pow(r cord of this appliance is equipped
with a 3-1)rong (grounding) phlg which mates
widl a standard ?)-prong (grotmding) _tll
outlet t<)nlinimiz< the possibili b" of ele( ttic
shock hazard tioni this appliance.
Power cord includes a currcllt intetTupter
device. A test and r(s(t lttlt_on is provided on
the plug case. The devic< should be tested on a
periodic basis by illSt pressing the gESTbutmn
and th(n _he RESETbutton whil( plugged into
the or(tier. If tile TESTbuttlm does not trip
or if tile RESETbutton will not stay engaged,
dis(on(time use ot the air conditioner and
(on(a( t a/lualified service tel hnilian.
[][ave the wall outl( t and circuit ch(cked l)y a
qualified electrician t/) nlake sm-e the Olttlet is
properly grounded.
Where a 2-prong wall outlet is encountered,
it is your pel>onal rcsltonsibility and obligiHioll
to have it rcpla( cd with a properly grounded
?,-prong _v_ll outlet.
The air conditioner should ah_v_ys1)<
ltlltgged into its ()x_r_individual (l(/:tri(al
outh't whilh has a voltage rating that inat(hes
tile lafing plato.
This provides the best perfi)tniance and also
pr(*( ms ()v( rlllading hous( wiling cir(uits
which could cattse a fire hazard flotn
overheated wires.
See tile Installation Instructions, Electrical
Requirements section tot specitic electrical
COllnectioIl rcquirelncnts.
2
Page 3
WARNING!
USEOFEXTENSIONCORDS--115-Voltmode&only
ge.com
Because of potential safety hazards under certain
conditions, we strongly recommend against the
use of an extension cord.
[Iow(_c*,if'yoll must use an extension cord,
it is al)solmcly nec(ssa_ dlat it be a UL-listed,
14 gauge, _wire gromlding type appliance
extensi,.)n cord having a grotmding type [)lug
and otttlet and fllat the electlical _ting of" ill(
cord be 15 aml)ercs (mi_fimmn) and 125 volts.
CAUTION:
DO NOTuse an extension cord with any ofthe
230/208 voltmodels.
READANDFOLLOWTHISSAFETYINFORMATIONCAREFULLY.
SAVETHESEINSTRUCTIONS
3
Page 4
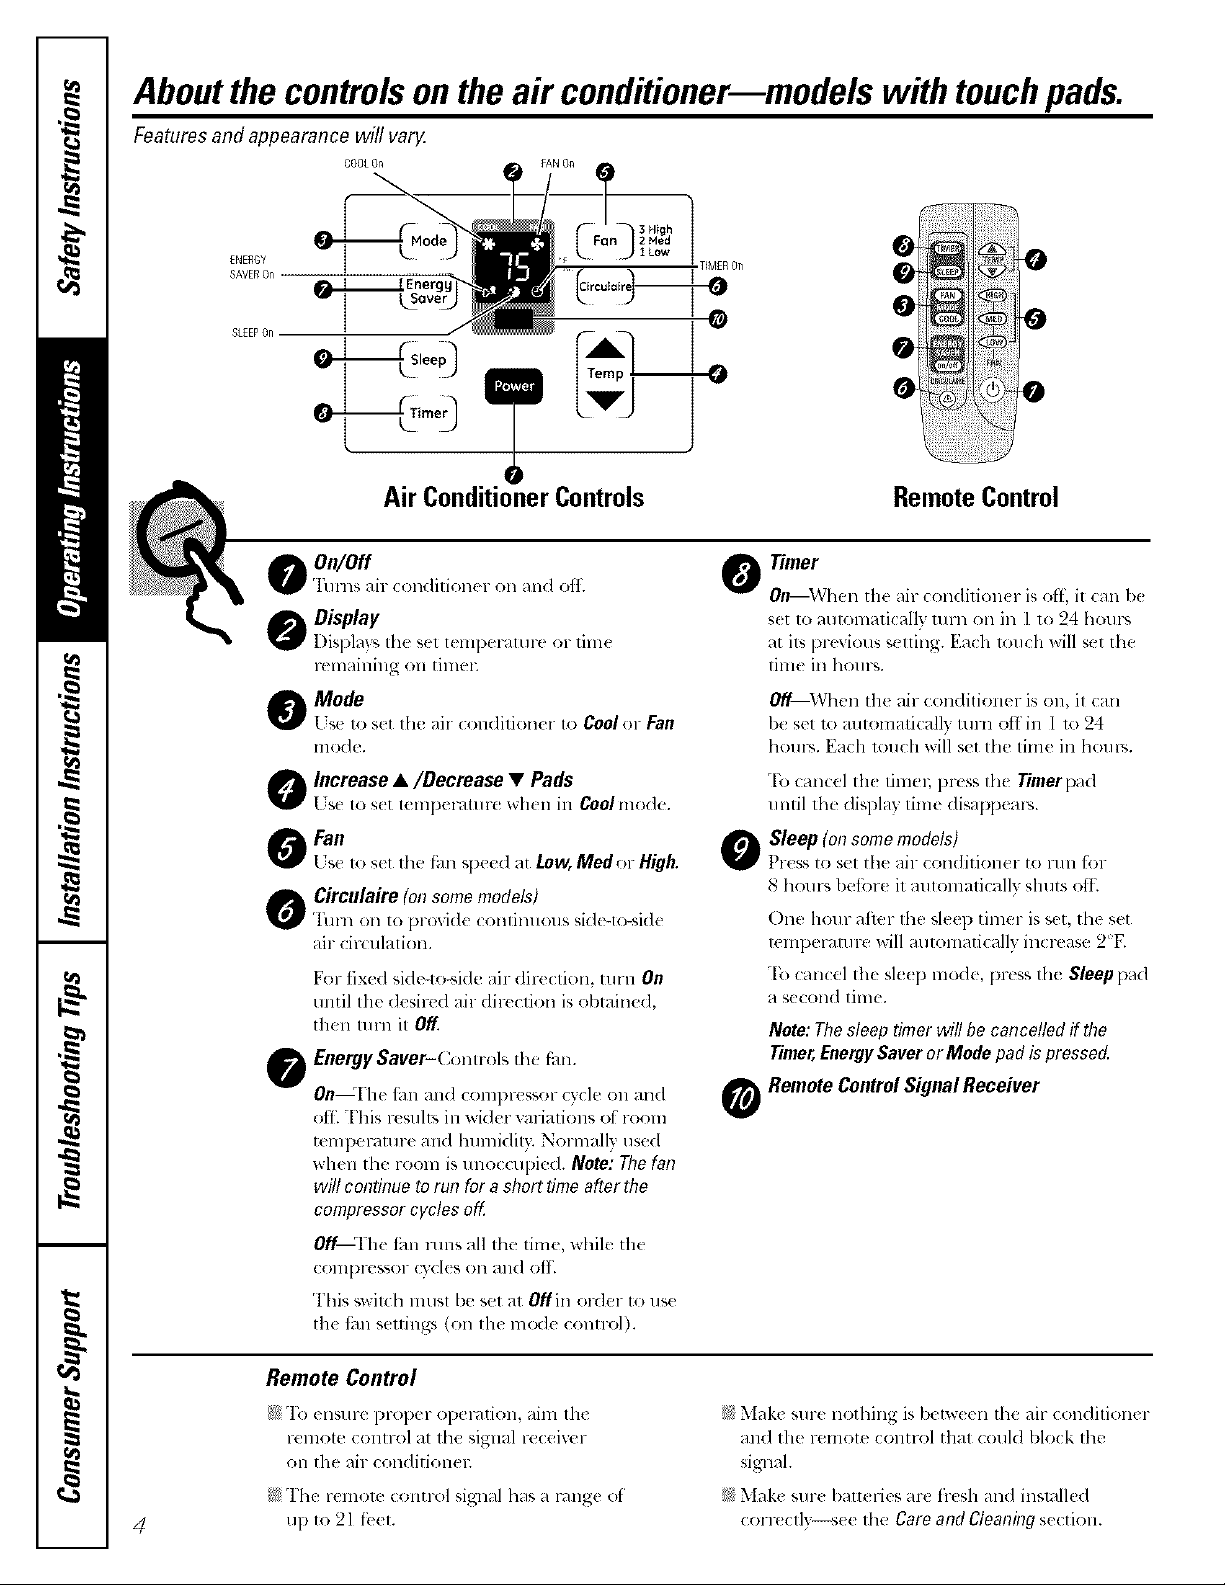
Aboutthecontrolsontheair conditioner--modelswithtouchpads.
Features and appearance wil! varg
COOtOn
ENERGY
SAVEROn
SLEEPOn
I
Air ConditionerControls
O On/Off 0
'Ftnns air (ondilioner on and elk
Display
Displays Ill(! sel lemperalure or lira(
Felxxail]in_ oxx [iHXell
O Mode
[ s_ to s_t tl_( air (on(lifioner 1o Cooler Fall
lllOd{.
O Increase •/Decrease • Pads
[ ;st to s_t t( ml)( ratu re when in Cool nxo(le.
OFa.
Lse 1o set lhe t_nlspeed at Low, Med or High.
O Circulaire (onsomemodels)
'finn on to l)rovi(Ic (ontinuous side-to-side
air cir(ulalion.
For iix{d side-reside air direction, turn 0,'1
tmtil Iht d{sired air (/ir((lion is obtained,
then lurn il 0_.
EnergySaver-Conwols the fan.
0
Oll_Fhe thn and compressor cycle on and
otE This resuhs in wider wniadons of room
temperature and humidity. Normally used
when the room is tmo((upied. Note: The fan
will continue to run for a short time after the
compressor cycles off.
O[f_I'he iiln runs all the time, while tile
compres+,or (Tcl(s on and off.
This +,wilth musl be set at Ol_in order to use
the fire seuings (on the m<_le conu-ol).
0 0
0
0 0
RemoteControl
Timer
OllIWhen tile air con(lition( r is ell; it can b(
s(t to automati(ally mm on in l to 24 hours
at ils previous setting. Each loudl will set the
time in hours.
OffIWhen th( air <onditioner is on, il can
be set 1o automati(ally turn off in 1 1o 24
hour_. Each lotl(h will set Ill{ lilxR! ill holllX,.
"[\_cancel th( timex; prtss the Timerpad
until the displa? time (lisappeap<
Sleep (onsome models)
0
Press to st'l tile air conditioner to run for
8 h(mr_ betore it automatically shuts off.
One hour aflcr lhe sleep timer is set, the set
temper, ran> will automatically increase 2E
"[b cancel the sleq) mode, press th{ Sleep pad
a SeCOlld tillle.
Note:Thesleep timer willbe cancelledif the
Timer,EnergySaveror Mode pad ispressed.
Remote ControlSignal Receiver
@
Remote Control
{;)_ "1}3 ( IISllY( J)l'Ol)( Y oJ)el}x[iOll , ailn the
FelXxote COXl[l-ol a[ 1he sigXl_ll Fe(_eiveF
on the air conditionex:
_57The 1"( llXOle (Oil[x-el sigllal has a lHllg( (If'
4
up to 21 ti'(t.
)'2 Make sure nothing is betw(en the air conditioner
and the remote COlXtrol that (ould block file
signal.
)'_ Make sul-_ batt_ lies arc frcsh an(I installed
correctly--see the Care and Cleaning section.
Page 5
Additional controls and important information.
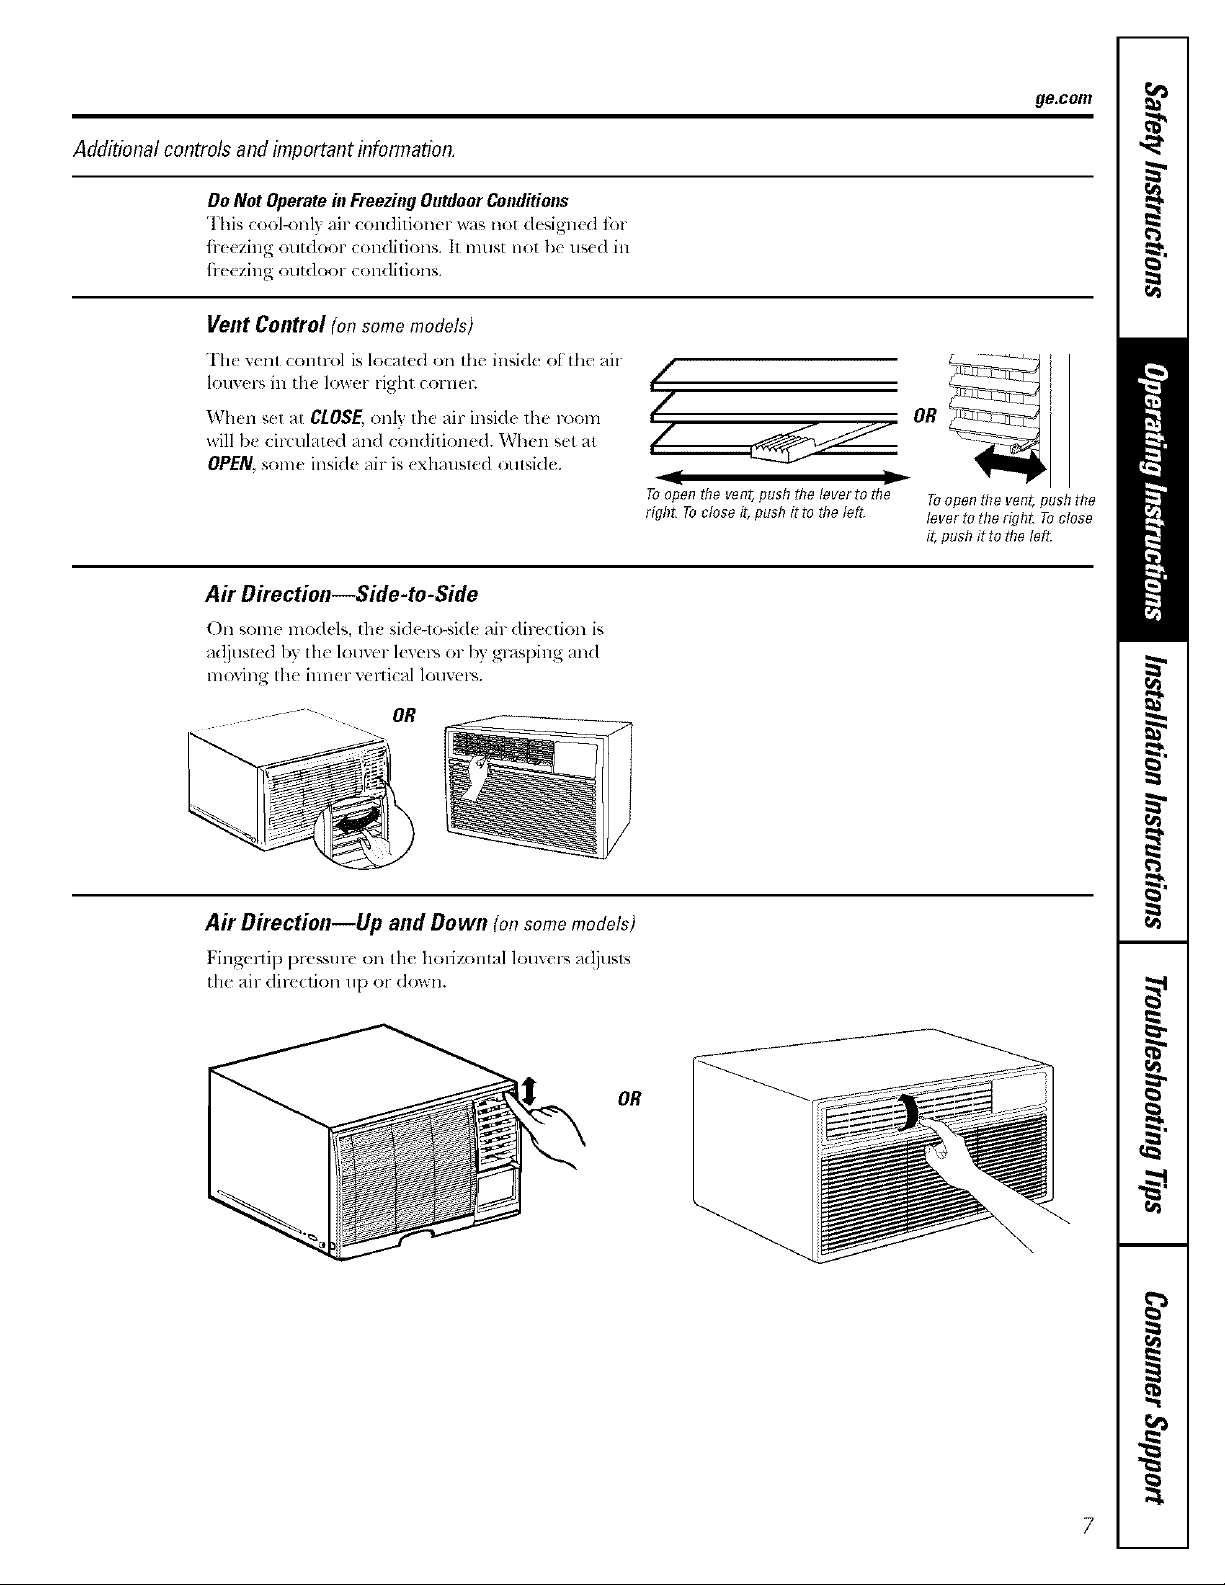
Do Not Operate in Freezing OutdoorConditions
This (eel<rely air (onditioner was not dcsign(+(l tbr
fl-eezing outdoor con(litions. It must not be used ill
fl-eezing outdoor conditions.
When the air conditioner is turned on, it wil!
automatically start in the setting last used,
Power Outage Recovery Feature
In the _ase of a power Otltage or interruption, the Sleepfbamres will res(t 1o tile original selling.
unit will amomaticall} re_mrt in tile s(tfing_ last You may n(ed to s(t a new time if desil>d.
used after tile power is restored. The Timerand
Cool Mode
go.tom
tse tile Cool mode with High(3),Mud (2)or
Low (1)fSmfk_rcooling. Lse lhe Increase • /
Decrease• pads 1o set tile desired temperature
between 64°F and 86°F ill l°F increments.
A thermostat is used to mailmlin tile room
tempet-,mn-e. The conlpressor will (3cle on and off
to kee l) tile room at tile set level ot (x)mfi_rt. Set the
thermostat at a lower mnnber and tl_e indoor air
will become coolel; Set tile thermostat at a higher
number and the indoor air will be(ome wannel;
NOTE:If theairconditioneris offandis thenturnedon
wlfiteset to Cool,it wilt take approximately3minutesfor
thecompressorto start andcoolingtobeghT.
Cooling Descriptions
ForNormal Coo/ing--Sde(t Ill( Cool mo(le
mM High (3) or Med (2)lim with a middle set
tempel-_tu re.
ForMaximum Cooling--Select tile Cool mode
mM High (3) tim with a lower s(,t temperature.
For Quieter & Nighttime Coolinff--Select th(
Cool mode mid Low (1) f_m with _ lni(/dlt" s('t
telllpel-Htll l-e.
NOTE"If you switch from a Cool setting to Off or to
a fan setting wait at least 3 mh?utesbefore switching
back to a Cool setting.
Fan Mode
I sc the Fan at High (3), Med (2) or Low (1) to provide Sinre t;m only st'ldngs do not l)rOxi(/e (ooling,
air cir(ulafion an(I filtering without cooling, a telnpemture setting will not be displayed.
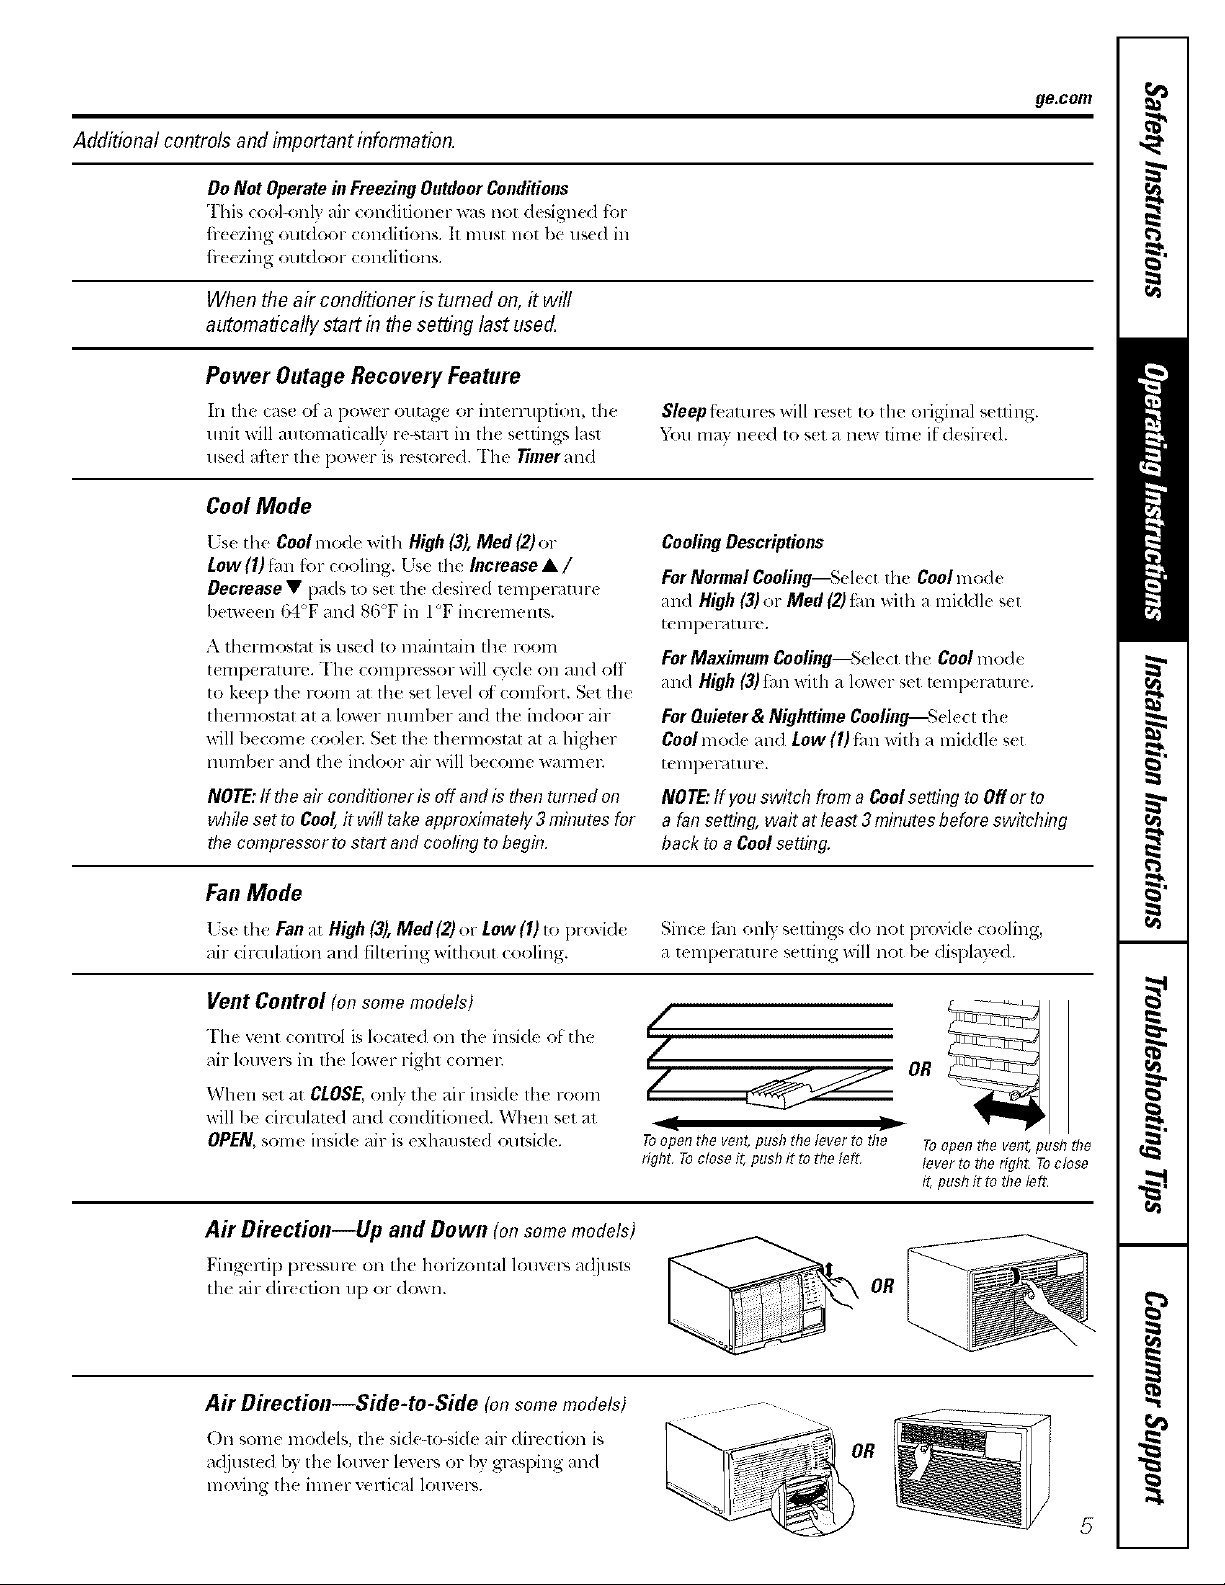
Vent Control (onsomemodels)
The yen1 colin-el is Iocaled on 1he inside of the (
air louv( p+in file lo_('r righl (orn(t; //
Wh(n sol at CLOSE,only the air insid( Ill(! room _
will be circulated and conditioned. When set at I1[ II
OPEN,some insi& air is exhausted outside. Toopentile vent`pushthelevertothe
!
right TocloseiT,pushftreftTeleft
OR
Toopen the vent, push tl?e
lever to the right. Toclose
it, push ft re the left
Air Direction--Up and Down (onsome models)
FingvJtip pressure on tflu horizontal louvers a({justs
the air dir(cfion up or down.
Air Direction--Side-to-Side (onsomemodels)
On some models, tilt' side-to-side air dire(tion is
a(ljusted b} the louxer h,xers or by grasping mid
lnoving file inner veltical louvers.
5
Page 6

Aboutthecontrolsontheairconditioner--modelswith controlknob(s).
Features and appearance may va_
Controls modelssoequipped)
Fon
O ON/OFFSwitch
Turns ai_ conditkme_ (m and off,
NOTE:If theairconditionerisoffandisthenturnedonwhile
setinaCoolmode,itwilltakeapproximately3minutesfor
thecompressortostartandcoolingtobegin.
FanSwitch (onsomemodels)
Use to set the t_mspeed to LOor HI.
O Mode/Temp Control
Use to set the air conditione[ to tile FanOnlyor a
Cool mode.
FanOnlyMode
Use FanOnlyat HI or LOFanto provkle air
drculatkm arm fi]tering_dthout cooling.
CoolMode
tJsea Coolsettingwith HIo_ LOFanfb_c(_ding.
Turn the knob c]ock_ise,towalxltile largerblue
ar_m,fb_the indoor area to become coolen Turn
the knob cotmtelvlock_dse, toward the smaller b]ue
High A_ LOW
LO
Fen On]_
-0
Medium
Cool
area, _b_file indoor air to become wam_e_;
The Mode/Temp conuo] is used to maintain the
room temperature. When set in a CoMmode, the
compressor willc)_:leon and off m keep the morn
at file stone ](we]of comfolt.
CoolingDescriptions
ForNormalCooling_%lect a Coolmode _dth the
ModeiTemp knobset tt the midpoint.
ForMaximumCooling-_Selecta Coolmode with
the ModeiTemp knob set tow,ud tilt"Imge_
bhle area.
ForQuieter& NighttimeCooling--Select a Coolmode _dth
the ModeiTemp knob _t tos_ard the smaller blue area.
NOTE:Ifyou move the ModeiTemp control knob fi'om a
Coolsetting to the FanOnsetting, wait at least 3 minutes
befi:)re s_dtching back to a Coolsetting.
Controls(o,,models so equipped)
LOW _._ Hi _
@-
ModeControl
O
HiCool,MedCooland LowCoolpro@l( cooling
_dth dttf;erentfro;sl)eeds.
LowFanor HiFanproddes all circulation and
fill(ring _ithout cooling.
ThermostatControl
@
The flaermostat control is used to maintain the
room mmpelvltute. The compressor willc}de on
and off m keel) the room at file same levelof
comfort. When }ou tuln the hl()b to a higher
mlmbm; the indoor ai__dll become coolec Tmn
6
the knob to a lower mlmber and the indoor air
_ill become xval///ell
off 5 6
-@
Ned CooJ The_mostut
NOTE"Ifyoumovetheswitchfroma coolsetbegtoOFFer
toafansetting,waitatleast3minutesbeforeswitchingbacktoa
coolsetting.
CoolingDescriptions
ForNormalCooling-&,lectHiCoolor MedCool_ith the
thermostat (ontrol at midpoint.
ForMaximumCoolino-Se]ectHiCool_dth the thermostat
control at the highest number av,filableon )_)tlrknob.
ForQuieter&NighttimeCoolinouSelectLowCoolwith the
thermostat control atmidpoint.
Page 7
Additional controls and important information.
DoNot Operatein FreezingOutdoorConditions
This cool4mly air conditioner was not designed tor
fl(ezing outdooF conditions. It must not l)e us(d in
fi-eezing outdoor conditions.
Vent Control (onsome models)
Th_ vent control is located on the inside otthe air
louver_ in th( lower right cornel:
When set at CLOSE,only the air inside the r,oom
will be cilvulated and conditioned. When set at
OPEN,some inside air is (xllatlsl(!d Otltsi(l( .
Air Direction--Side-to-Side
On sore(' modds, the sMe-lo-side air direction is
a({justed by the louvcr levers or by grasping and
moving the inner xeltical louvers.
if/
(,-
I[ II
Toopen the vent, push the lever to fl_e
right, To close it, push it to the left
go.tom
OR
Toopen the vent, push the
lever to the right. Toclose
it, push it to ttle lefL
-" OR
Air Direction--Up and Down (onsomemodels)
Fingmtip pr_ssur_ on Ih_ horizontal louv{ rsa(!jusls
the air dire( lion up or (Iown.
OR
Page 8
Careand cleaningof theair conditioner.
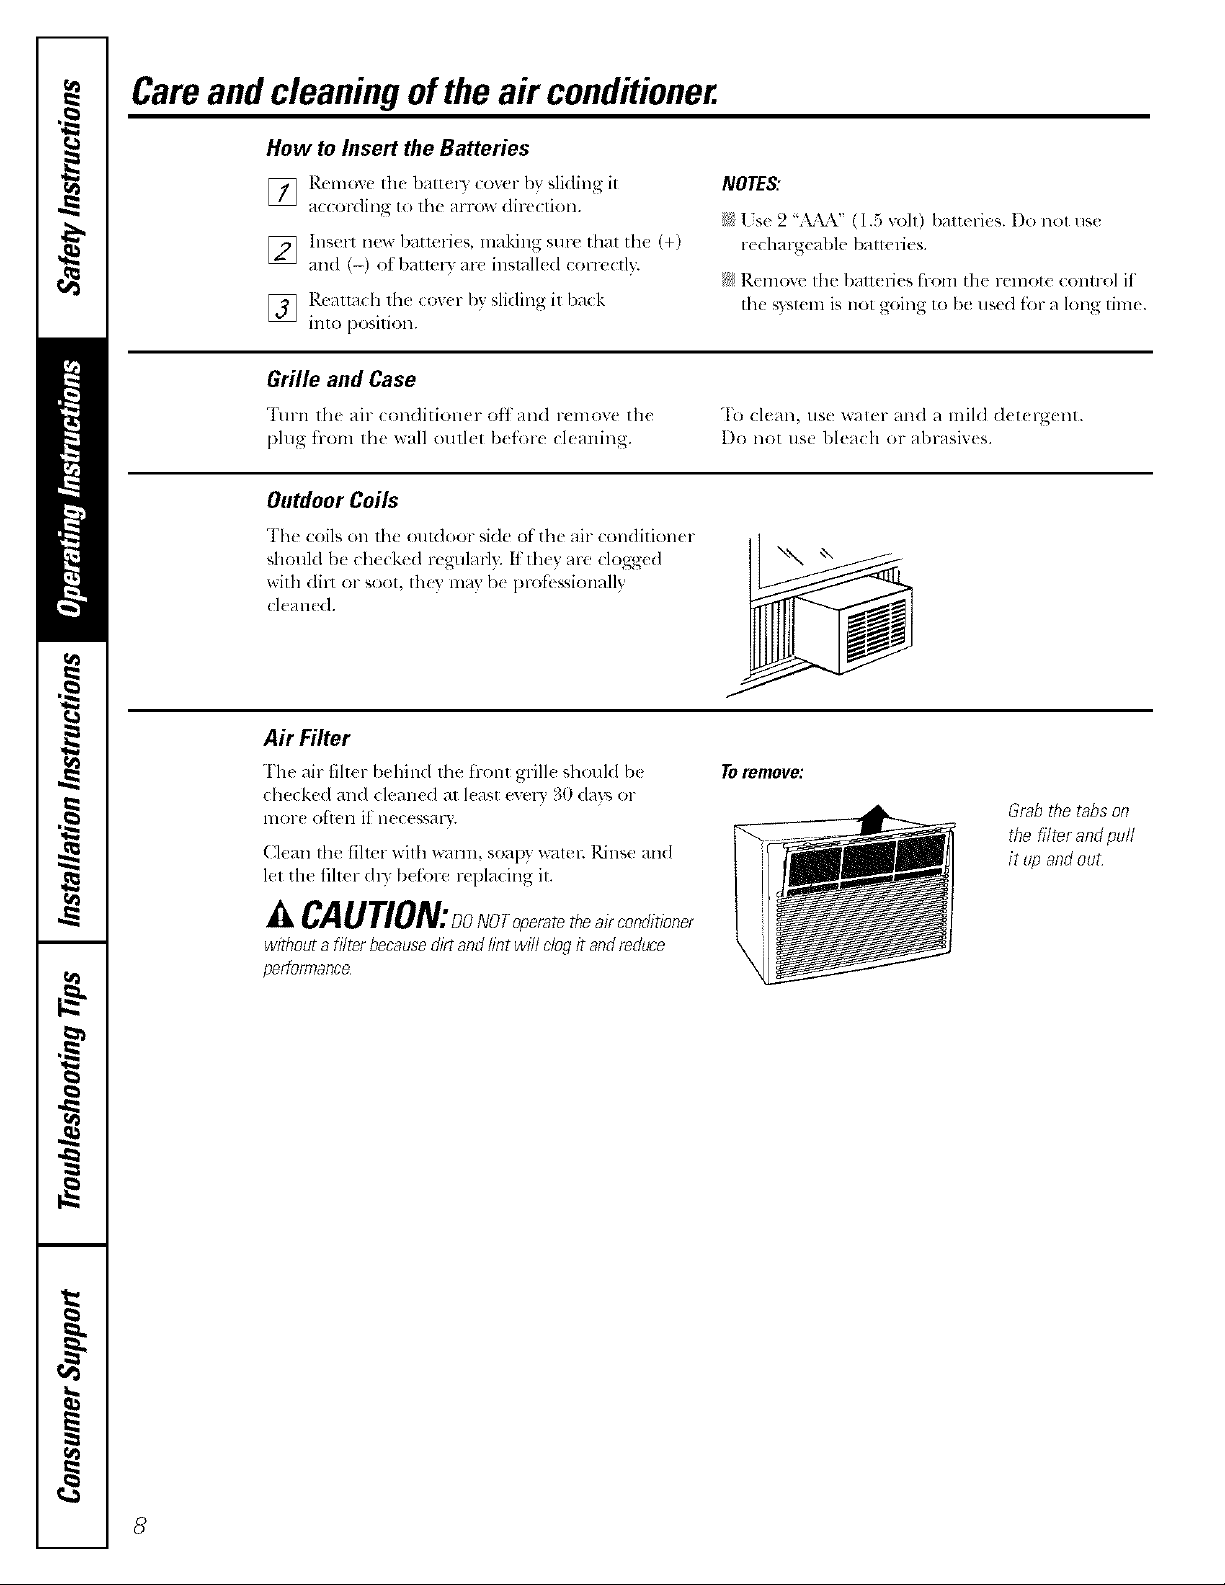
How to Insert the Batteries
] R,._mo_,ethe batt_ly ,.over by sliding it
a((ol'dill_ 1o lh_ aFrow dir_ ([iolL
] Insert new I)aueri(s, making sure that the (+)
and (-) oJ I)attety are inslall( d corre(tly.
] Realt_ch lh{ cox<r I)ysli(ling il back
into posilion.
Grille and Case
Turn lhe air _onditioner off and r_move th_
phlg from lh( wall oull(t I){for(: cleaning.
Outdoor Coils
The coils on the outdoor side o1"the air conditioner
should be checked regulm'l?; It they arc clogged
with dilt or soot, thc'_' may b< professionally
clean(d.
Air Filter
The air filter behind 1he fl-ont rille should be
checked and cleaned al l<ast evel?, 30 (la?,-, or
mor_ often il necessal).
Clean Ihe Áiller with Walln, soap} walel: ]_inse and
lel the fiher (ha' b_ fore tel)lacing il.
NOTES:
}'_Ise 2 "._¥\" (1.5 voh) batteries. Do not use
rechargeal)le batteries.
}!i_,Remove the l)all_ ties from the remote control if
the _,)stem is not going to be used f_l- a long time.
To cl_ an, use waist and a mild (ht_ rgent.
l)o not us{ bleach or al)rasixcs.
Toremove:
Grabthe tabs on
the filter andpull
it up and out
CAUTION:NOTeperated}eairconditioner
widTeutafilterbecausedirtandlint willclogit andreduce
performance
8
Page 9
Installation
Air Conditioner
Instructions
1_'1 Questions? Call 80O.GE.CARES (800.432.2737) or Visit our Website at: ge.com
BEFORE YOU BEGIN
Read these instructions completely
and carefully.
• IMPORTANT - Savethese
instructions for local inspector's use.
• IMPORTANT - Observeall
governing codes and ordinances.
• Note to Installer- Be sure to leave these
instructions with the Consumer.
• Note to Consumer- Keep these
instructions for future reference.
• Skill level - Installation of this appliance
requires basic mechanical skills.
• Completion time- Approximately 1 hour
• We recommend that two people install
this product.
• Proper installation is the responsibility
of the installer.
• Product failure due to improper installation
is not covered under the Warranty.
• You MUST use all supplied parts and use
proper installation procedures as described
in these instructions, and any separate kit
instructions, when installing this air
conditioner.
CAUTION:
Do not, under any circumstances, cut or
remove the third (ground) prong from the
power cord.
Do not change the plug on the power cord
of this air conditioner.
Aluminum house wiring may present special
problems--consult a qualified electrician.
If the sill support bolts do not contact the
window sill, or if you have a window
without a sill, you must order accessory kit
RAK87 to properly install this air conditioner.
Call 800.626.2002 or visit ge.com.
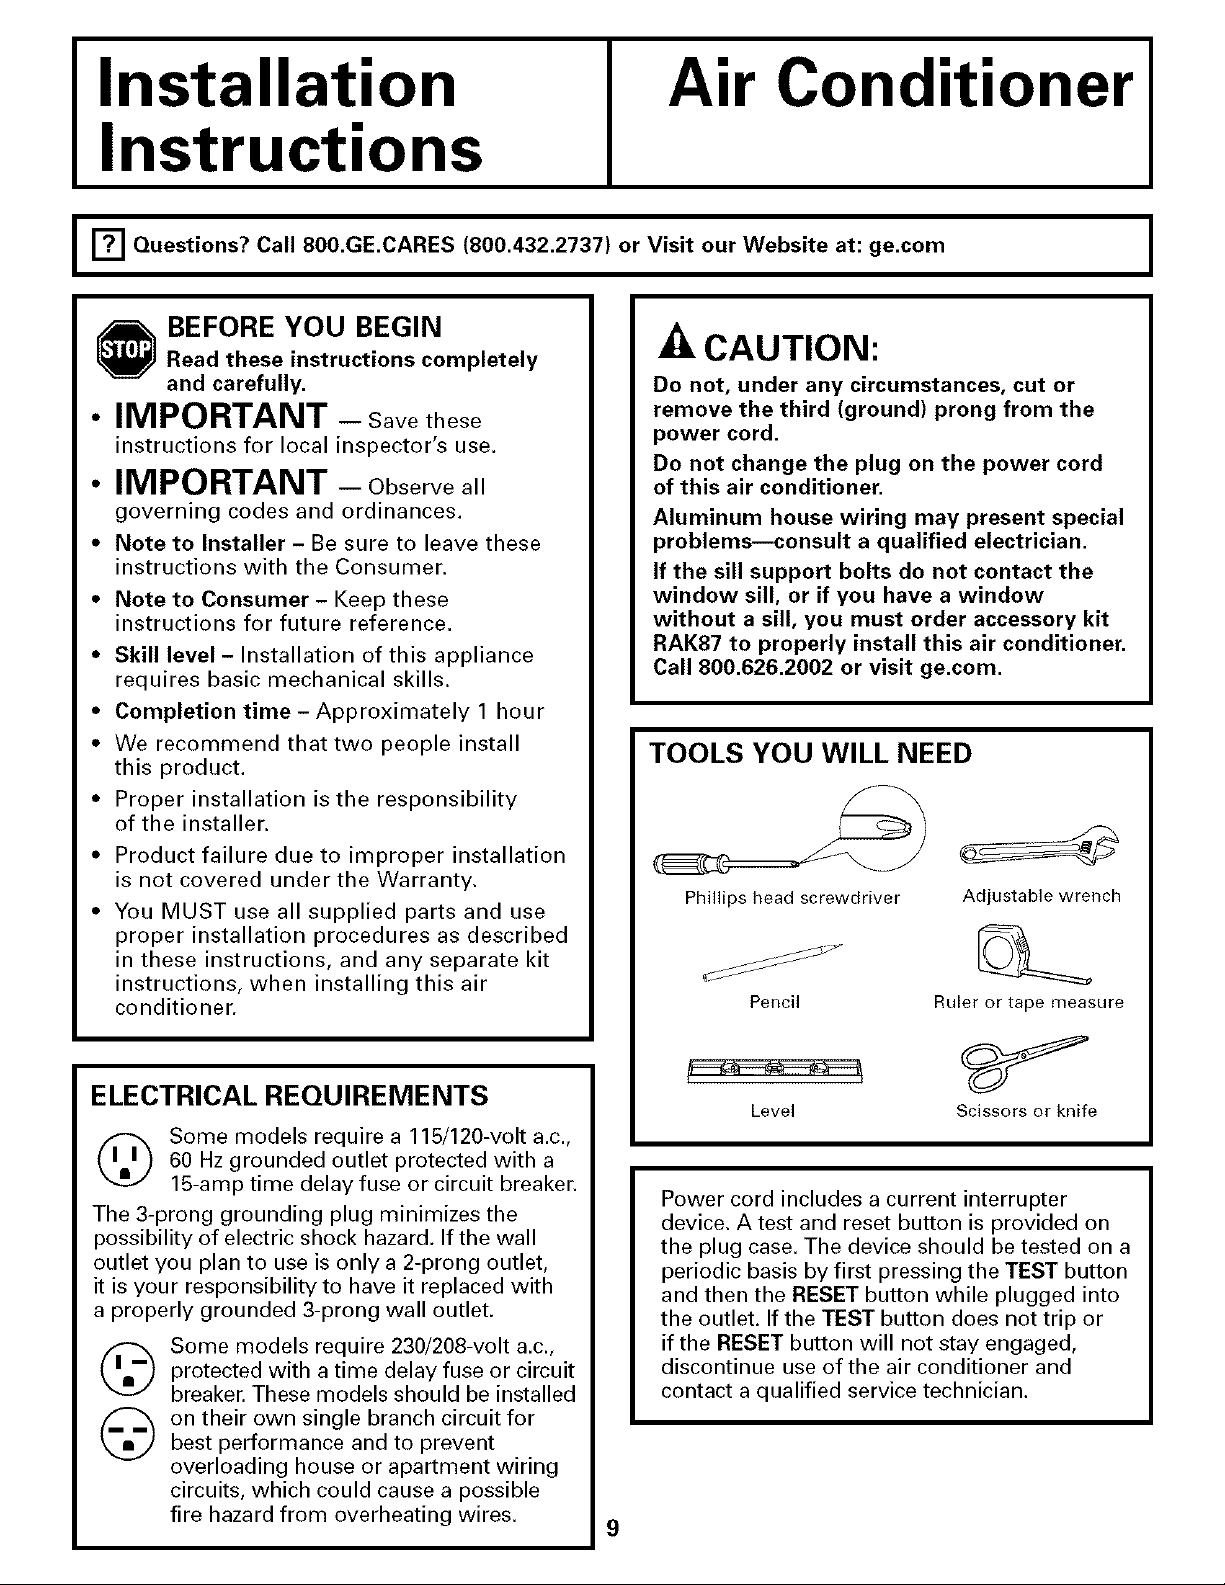
TOOLS YOU WILL NEED
Phillips head screwdriver
Pencil
Adjustable wrench
RuLer or tape measure
ELECTRICAL REQUIREMENTS
(_ Some models require a 115/120-volt a.c.,
The 3-prong grounding plug minimizes the
possibility of electric shock hazard. If the wall
outlet you plan to use is only a 2-prong outlet,
it is your responsibility to have it replaced with
a properly grounded 3-prong wall outlet.
(_ Some models require 230/208-volt a.c.,
(_ on their own single branch circuit forbest performance and to prevent
60 Hz grounded outlet protected with a
15-amp time delay fuse or circuit breaker.
protected with a time delay fuse or circuit
breaker. These models should be installed
overloading house or apartment wiring
circuits, which could cause a possible
fire hazard from overheating wires.
Level
Power cord includes a current interrupter
device. A test and reset button is provided on
the plug case. The device should be tested on a
periodic basis by first pressing the TEST button
and then the RESET button while plugged into
the outlet. If the TEST button does not trip or
if the RESET button will not stay engaged,
discontinue use of the air conditioner and
contact a qualified service technician.
9
Scissors or knife
Page 10
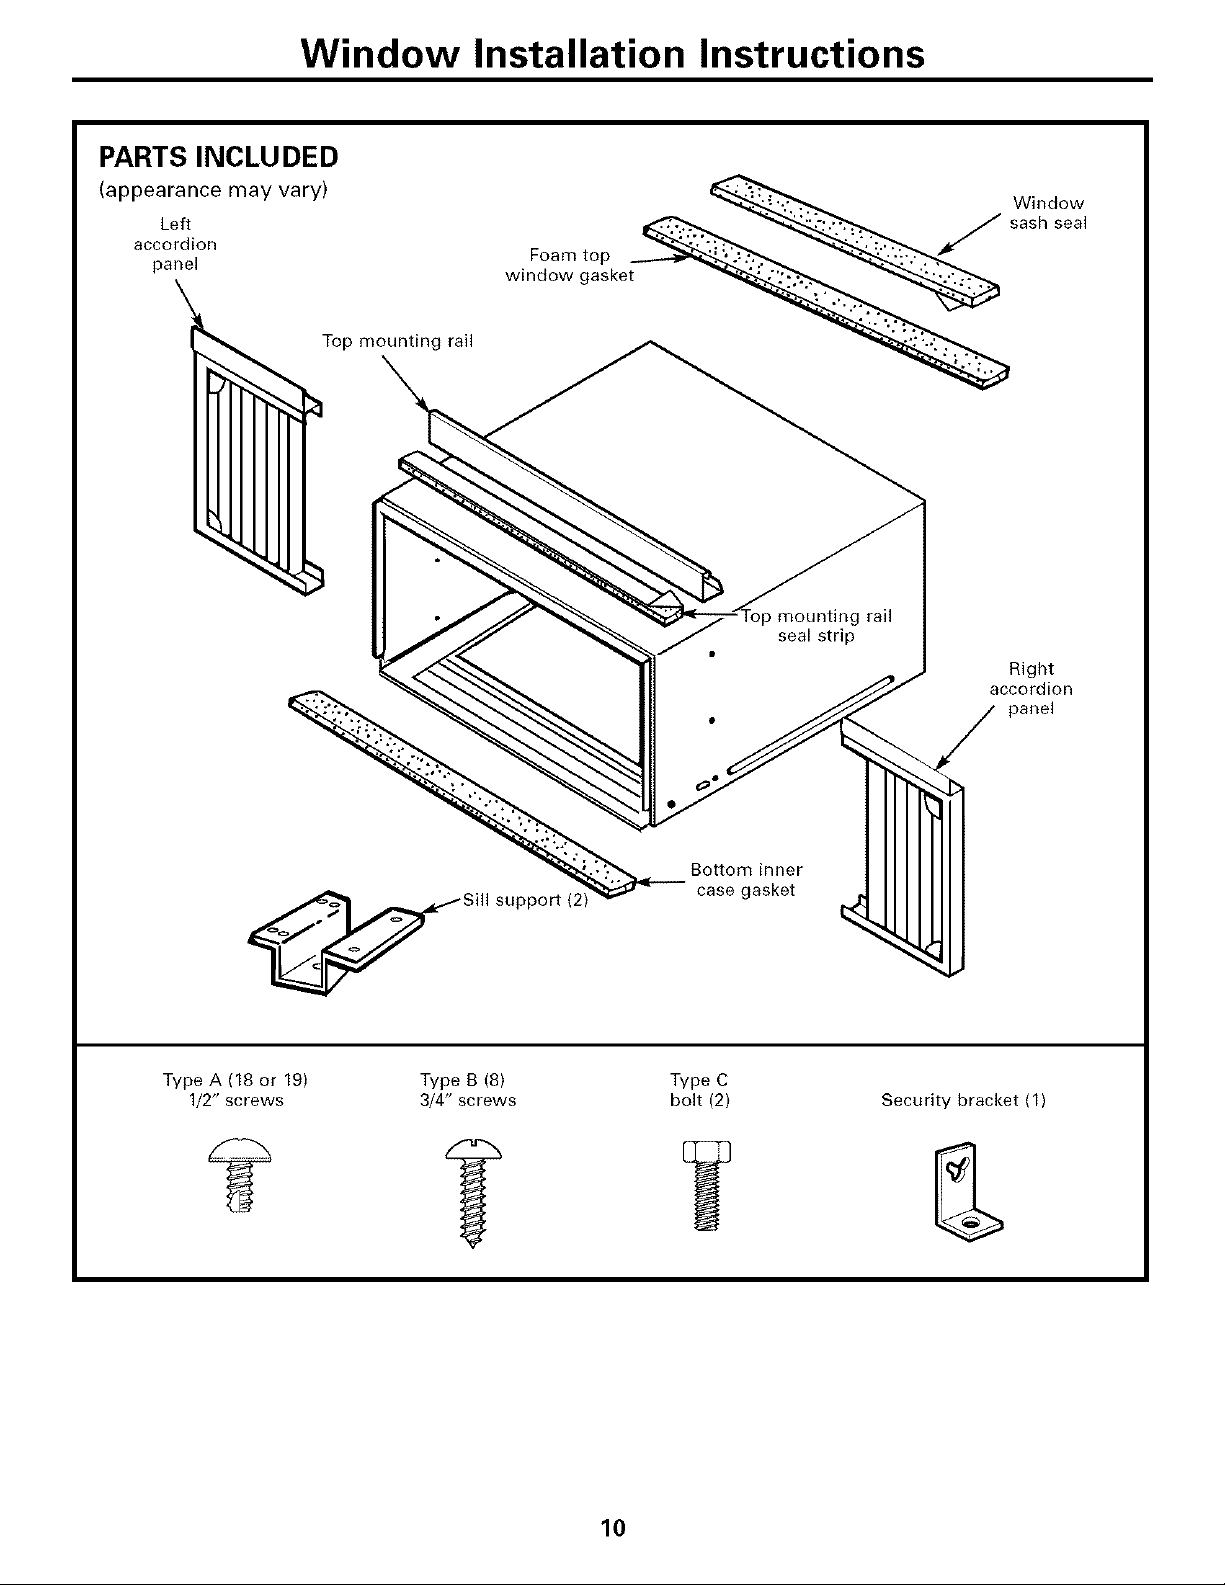
PARTS INCLUDED
(appearance may vary)
Left
accordion
panel
Window Installation Instructions
Foam top
window gasket
p mounting rail
_ Window
mounting rail
seal strip
sash seal
Right
accordion
panel
_Bo_to m inner
Type A(18 or 19)
1/2" screws
Sill support (2)"_1;;_" case gasket
Type B (8) Type C
3/4" screws bolt (2)
Security bracket (1)
10
Page 11
Window Installation Instructions
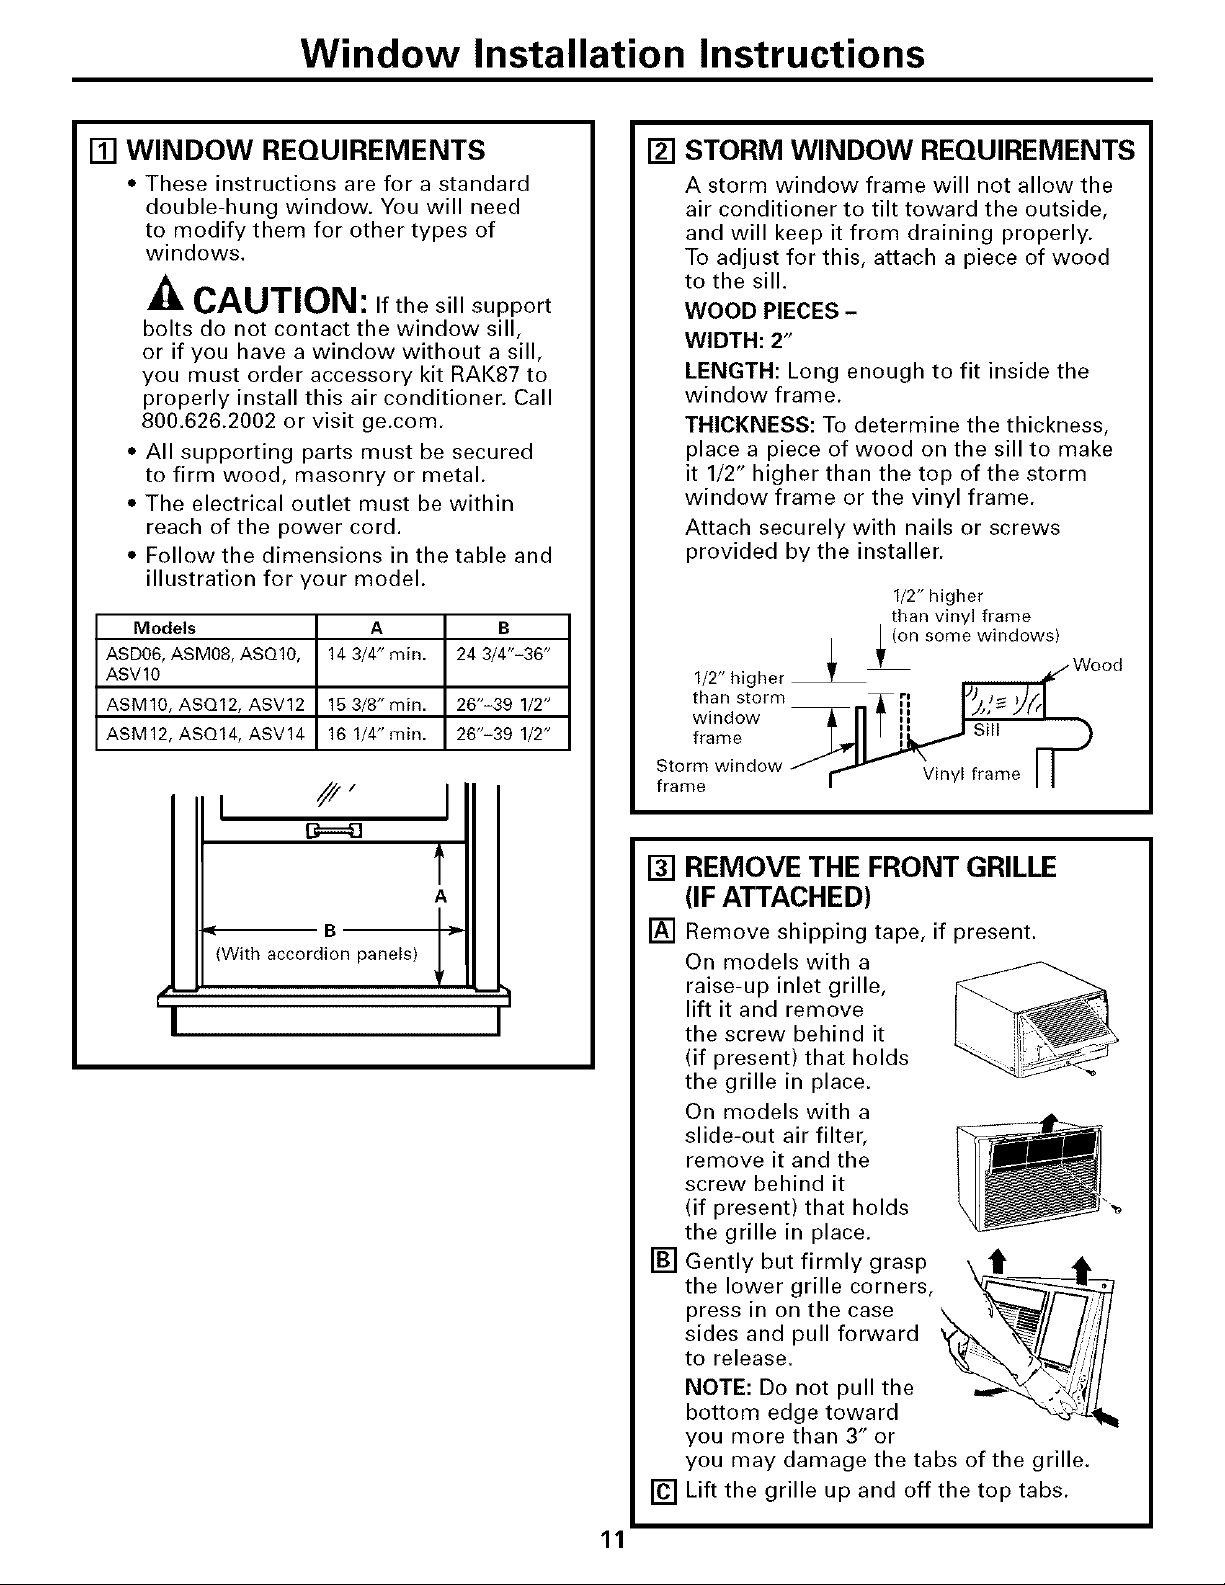
[] WINDOW REQUIREMENTS
• These instructions are for a standard
double-hung window. You will need
to modify them for other types of
windows.
CAUTION: Ifthesillsupport
bolts do not contact the window sill,
or if you have a window without a sill,
you must order accessory kit RAK87 to
properly install this air conditioner. Call
800.626.2002 or visit ge.com.
• All supporting parts must be secured
to firm wood, masonry or metal.
• The electrical outlet must be within
reach of the power cord.
• Follow the dimensions in the table and
illustration for your model.
Models A B
ASD06, ASMO8, ASQ10, 14 3/4" min. 24 3/4"-36"
ASV1O
ASM10, ASQ12, ASV12 15 3/8" rain. 26"-39 1/2"
ASM12, ASQ14, ASV14 16 1/4" rain. 26"-39 1/2"
[] STORM WINDOW REQUIREMENTS
A storm window frame will not allow the
air conditioner to tilt toward the outside,
and will keep it from draining properly.
To adjust for this, attach a piece of wood
to the sill.
WOOD PIECES -
WIDTH: 2"
LENGTH: Long enough to fit inside the
window frame.
THICKNESS: To determine the thickness,
place a piece of wood on the sill to make
it 1/2" higher than the top of the storm
window frame or the vinyl frame.
Attach securely with nails or screws
provided by the installer.
1/2" higher
than vinyl frame
1/2" higher
than storm
window
frame
Storm window
frame
_ _ (on some windows)
Sill
Vinyl frame
D==43
With accordion panels) !|r
REMOVE THE FRONT GRILLE
t
A
f
[]
(IF ATTACHED)
[] Remove shipping tape, if present.
On models with a
raise-up inlet grille,
lift it and remove
the screw behind it
(if present) that holds
the grille in place.
On models with a
slide-out air filter,
remove it and the
screw behind it
(if present) that holds
the grille in place.
[] Gently but firmly grasp
the lower grille corners,
press in on the case
sides and pull forward
to release.
NOTE: Do not pull the
bottom edge toward
you more than 3" or
you may damage the tabs of the grille.
[] Lift the grille up and off the top tabs.
11
Page 12
Window Installation Instructions
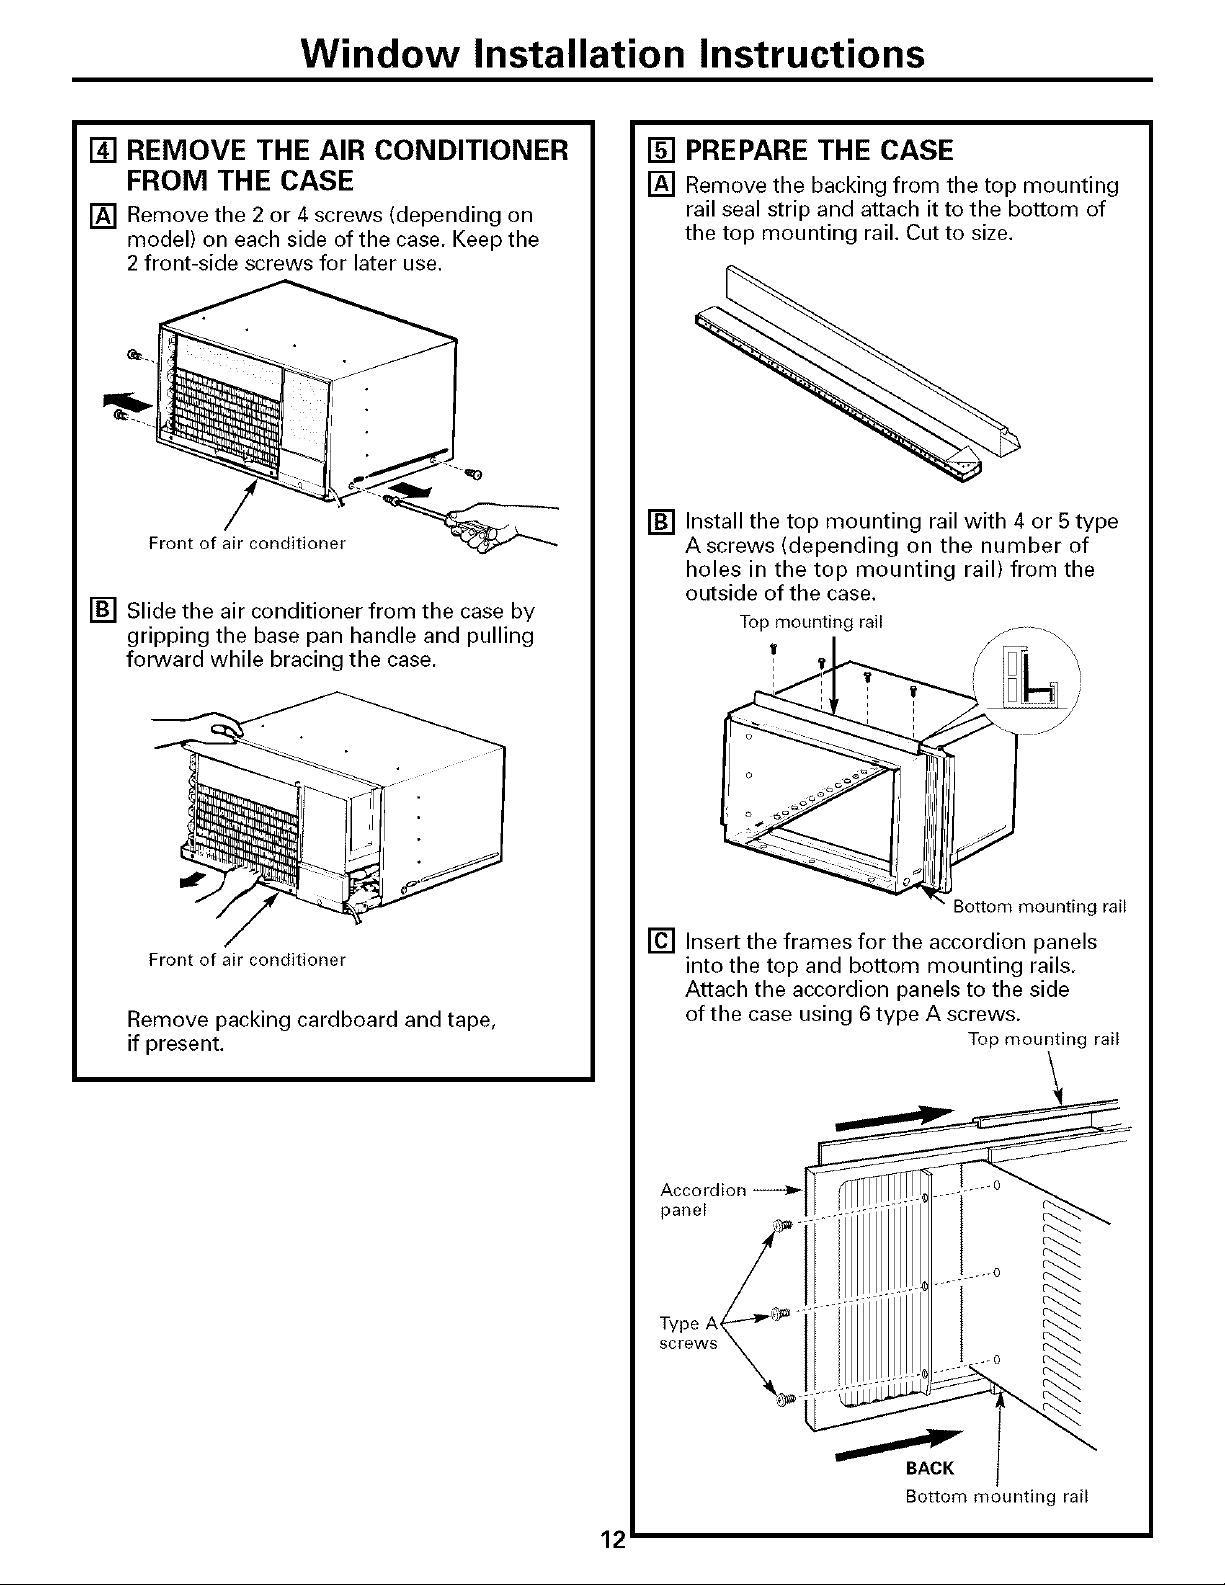
[] REMOVE THE AIR CONDITIONER
FROM THE CASE
[] Remove the 2 or 4 screws (depending on
model) on each side of the case. Keep the
2 front-side screws for later use.
[] Slide the air conditioner from the case by
gripping the base pan handle and pulling
forward while bracing the case.
[] PREPARE THE CASE
[] Remove the backing from the top mounting
rail seal strip and attach it to the bottom of
the top mounting rail. Cut to size.
[] Install the top mounting rail with 4 or 5 type
Ascrews (depending on the number of
holes in the top mounting rail) from the
outside of the case.
Top mounting rail
Front of air conditioner
Remove packing cardboard and tape,
if present.
Bottom mounting rail
[] Insert the frames for the accordion panels
into the top and bottom mounting rails.
Attach the accordion panels to the side
of the case using 6 type A screws.
Top mounting rail
panel
Type A_
screws
BACK
Bottom mounting rail
12
Page 13

Window Installation Instructions
[] INSTALL THE CASE
IN THE WINDOW
[] Cut the window sash seal to the window
width and stick the adhesive side to the
bottom of the sash.
Window sill
Window sash seal
[] Thread two type C bolts into the support
brackets.
Slide the case into the window and lower
the window behind the top mounting rail.
Position the brackets on the case bottom so
they will be near the outermost point on the
window sill. Attach the support brackets to
each side of the case bottom using 4 type A
screws on each side. Adjust the leveling
bolts to touch the sill.
[] INSTALL THE CASE
IN THE WINDOW (cont.)
[] Locate the 7 screw holes along the bottom
front edge of the case. Center the case, side-
to-side, in the window and mount it to the
window sill using 3 type B screws staggered
in the front and back rows if possible.
Top mounting rail
screws
Type B screws
[]
Extend the left and right accordion panels to
the vertical window sashes and attach with
4 type B screws.
[] INSTALL THE SECURITY
BRACKET AND THE FOAM TOP
WINDOW GASKET
__ ,Type A screws
Window sill -- =-.
_"_"-Type C bolts
ln-
CAUTION: Ifthesillsupport
bolts do not contact the window sill,
or if you have a window without a sill,
you must order accessory kit RAK87 to
properly install this air conditioner. Call
800.626.2002 or visit ge.com.
[] Attach the security bracket with a type B
screw.
[] Cut the foam top window gasket to the
window width.
[] Stuff the foam between the glass and the
window to prevent air and insects from
getting into the room.
j /
13
Page 14

Window Installation Instructions
[] INSTALL THE AIR CONDITIONER
IN THE CASE
[] Slide the air conditioner into the case,
Reinstall the 2 front-side screws removed
earlier on each side of the case.
[] Place the bottom inner case gasket between
the bottom of the air conditioner and the
inside bottom of the case. Fold up the ends
on both sides and push them in,
Front of air Bottom inner
conditioner case gasket
[] Attach the front grille to the case by inserting
the tabs on the grille into the slots on the
front of the case. Push the grille in until it
snaps into place.
Guide the lever
carefully through the
grille as you push it in.
[] Secure the front grille to the case by
replacing the screw removed in Step 3,
Caulk or weather-strip any gaps or
openings to the outside to seal the
installation.
The installation is now complete.
14
Page 15

Through-the-Wall Installation InstructionsmOptional
The case may be installed through-the-wall
in both existing and new construction.
Read completely, then follow step-by-step.
NOTE: Obtain all materials locally for
mounting the air conditioner through-
the-wall.
[] IMPORTANT
Through-the-wall installation is not
appropriate if any of the side or top louvers
in the case will be obstructed by the wall.
All side and top louvers in the case must
project on the outdoor side of the wall.
The room side of the case must project
into the room far enough to maximize the
balance of the unit.
The case must be installed level from side-
to-side and with a slight tilt from front to
rear. Use a level; no more than a 1/2 bubble
will be the correct case slant to the outside.
Lintel angle is required to support bricks or
blocks above opening.
Flashing is required and should extend the
length of the opening to ensure no inside
cavity leakage occurs.
[] Remove the air conditioner from the case.
For specific instruction, refer to the Window
Installation Instructions.
[] Make certain that a wall receptacle is
available close to the hole location or make
arrangements to install a receptacle.
i i ..... -
i ..... -
i i
[] IMPORTANT (cont.)
[] Secure with 14 wood screws anchored at
least an inch into the wall support structure.
NOTE: Drill pilot holes, if necessary, for
proper installation. If the frame is oversized,
use shims to prevent case distortion.
[] FINISH THE WALL OPENING
[] Caulk all four sides on the outdoor side of
the case to prevent moisture from getting
through to the interior wall. Use of flashing
(drip rail) will further prevent water from
dripping inside the wall and down the
outside of the building.
, 1,' (._--_Plasterhne
,, I
Lintel angle i I I
I I :_': I]l;I
Cau k ng _ I _1 T' Trim molding
II/ -(if desired)
OUTSIDE /
Air louvers
(top and _
sides must
project on the
outdoor side
of the wall)
Wood filler and
caulking (above
and below the
flashing)
Flashing
(Drip rail)
INSIDE
Bottom rail
J
Bottom
rail
[] Place the case in the wall opening and
place wood support strips between the case
bottom and the flashing on both sides of the
bottom rail. They should be the same height
as the bottom rail and the same length as
the wall opening.
Flashing
(Drip rail) Wood support strips
[] Place the air conditioner into the case.
For specific instruction, refer to the Window
Installation Instructions.
15
Page 16

TroubleshootingTips...
Possible Causes What ToDo
The air conditioner * Make sure the air conditioner plug is pushed
is unpltgged, completely into the outlet.
The fttse is blown/circuit * Check the house fi/seicitcuit breaker box and replace
breaker is tripped, the filse or rmet the bwakm:
Power failure. *g power 15ilule occtn_, turn tbe air conditioner Off.
The cmTent interrupter * Pres.sthe ResetN_tmn kmated on the power corsl plug.
device is tripped. * [t the Reset button _dll not sta?, eng'aged discontinue
Airflow is restricted. * Make sure there m'e no cmtains, blinds or fllrniture
The temp control may * On models with touch pads: In Coolmode, press the
not be set correctly. Decrease • pad,
The air Nter is dirly; • Clema the filter at least every 30 days.
When power is restored, _tit 3 minutes to rest,tit the
ail conditkme_ to prevent tripping of the compwssor
overload.
use of the air conditioner and contact a qualified
selwice technician.
blocking the ti'ont of the air condifionel;
• On models with control knobs, turn tlle temperature
knob to a bigher numbel:
5%ethe OperatingInstructiot_ssecticm.
The room may- have been hot. • 1_rhen tile air conditioner i_ fitst turned on, }ou need
CoM air is escaping. • Check tbr open tilmace registel', and cold air returns.
Cooling coils have iced up. • _e "air coeditioeertreezieg up"belo_:
Ice blocks the air flow • On models with control knobs, set the mode control
and stops file air conditioner at HighFanor High Coohdth the temp at 1oi Z
from cooling the room, * On models sdth touch pads, set tile controls at
The batteries are inserted • Check the position of the batteries. Tlle', should be
incorrectly, inserted in the Ol)l)osite (+) and (-) direction.
The batteries may be dead. • Replace the batteries.
Hot, htmfid weather. * This is normal.
The air conditioner is not * For proper x<_terdisposal, make sure the air conditioner
tiltedtotheoutside, s _ss g-_tyflomt ece_efi'< / t( tlerea:
Moistm'e removed from air • This is normal _br a short period in areas with little
and drains into base pan. humidity; normal for a kruger perk×/in ver?, lmmid m'eas.
Ftmction error code. * I rnl)lug the air conditione/: Wait 3 minutes and plug it
Apower outage or interruption • In th( c_t_eofa po_er outage or int(tmpfion, tll_ unit
occurred. Timerand Sleepl_mtures will reset to tile original setting.
to allow dine {OFthe _oom to cool doom.
• _t the air conditkmer's vent to tile closed positkm.
HighFanor High Coolmad set the thermostat to
a highe_ temperature.
ba(k ill.
}i_tl mm n_ed to set a new time if &sir_ d.
16
Normal Operating Somlds
f2You may hear a pinging noise caused by
water being picked up and thrown against the
condenser on rainy daT,s or when tbe humidity
is bigh. This design ti..ature helps rcmove
moisture and ilnl)rove ellicienc}.
i¢i'You may bear the tbermostat click when the
comprcssor cycles on and off\
f2Water will collect ill tbe base pan during
bigh humidity or on rainy days. Tbe water
may overflow and dlip flom tbe outdoor side
ot tbe trait.
i#i'The tan mm run even wben th_ compr_ ssor
does llOt.
Page 17

GE Service Protection Plus"
(,E, a nam_ re_ogniz_ d worldwid_ [br qualily and d_p_ nda )flit, ofti rs )ou
Serxke Protection Plus '"--( omprehensix e l>i"c)t( •("uon" on all xour. a I>I_liances--.
No Matter _)That Brand!
Benefits Include:
• Backed by GE
• All brands covered
• Unlimited service calls
• All parts and labor costs included
• No out-of-pocket expenses
• No hidden deductibles
• One 800 number to call
You will be <omplelely satisfl(d wilh our serxic( prolection or you may requ(st )'(>Ill- nloney ba(k
on lh( r(maining _alu( of your contract. No qu(stions asked. It's that simpl(.
Protect your r(irig(ralol; dishwasher, washer and dryer, range, "I\. VCR and much more--any brand!
Phls there's no extra charg( for emergency selwi( e and low monthly financing is available. Even icemaker
coverage and fi)od spoilage prolection is oili,red. You can resl easy, knowing that all your vahlable
household products are l)rotected against expensive repairs.
Place your <onfiden<e in GE and call us in dlc l.S. toll-fr_ e at OO0.OZO.ZZZ_
9)r more inf;-)rmation.
:i\]] I)F;IIIds (I)vl_lod, lip Io _0 y{!;lls old, ill IJll_ (I)lllill( I11 I1 [
........................................................................................... __. (ut here
We'll CoverAny Appliance.
Anywhere. Anytime.*
Please place in envelope and mail to:
General Electric Company
Warranty Registration Department
P.O. Box 32150
Louisville, KY 40232-2150
!7
Page 18

Consumer Product Ownership Registration
Dear Customer:
Thank you fbr purchasing our produ;t and thank you fbr pla(ing your (onfiden;e in us.
Follow these three steps to protect your new appliance investment:
1
Complete and mail
yollr (_ollNl.llner
Prodllct O_alership
Registration today.
Haw tile peace ot
mind ol knowing _"
(!_tll COllla( [ y_)tl in
die unlikel) evem ol:a
satert modilicafion,
2
Model Number Serial Number
I I I I I I I I I I I IIIIIII
After mailing the
registration I)elo_,
sltllTe d?is doctlnlellt
in a salt" place, It
contains i/it itl ilia t]ol/
you will need should
yotl i( quile servke,
Our selxice numbel is
800.GF.CARI'S
(800.432.2737).
Important: If you did not get a registration card with your
product, detach and return the form below to
ensure that your product is registered, or register
online at ge.com.
Consumer Product Ownership Registration
Read yOtll- Owl/el-'S
Mamlal carefllll_.
h will help you
opelall y(itl/n(w
appliance p*operl>
18
Mall]t!
SIy(,e_
Addless
AI)I, #
Mondl
M* Ms 3&s Miss
Filsl
Cil)
In Use
I I I I I I I I I Name I I I I I I I I I I I I
I I I I I I I I I I I I I I I I I I I I I I I I
I I I I I I I E_mail A&hess*
I I I I I I I I I I I I I Slal_ ]
Appliances
General Electric Company
GE Consumer & Industrial
Louisville, KY 40225
ge.com
I I I I I I I I I I I I I I I I I
Model Number Serial Number
I,asl ]
Zip
C,,d_,i
Number I I I I I
,i Please plovide your t_mail address to recelxe, via e-mail, dlscounls, special idtcrs and othel
important communications h'om (;[2 Appliances (GEA),
} Checl here if you do not wahl t<) recei e communications flora GEA's cmethlly selected
partners.
FAIl IdRE TO COMPLETE AN[) RETURN Ttt[S (ARD DOES NOT DIMINIStt YOUR
WA RRANT_ RI(;HTS.
Fo_ intormafion about GEA's privacy and dala usagl polio) go to ge.com and click
on "Pri_cy Policy" or call 800,626 2221
I I I
Page 19

GEAir ConditionerWarranty.
All warranty service provided by our Factory Service Centers,
or an authorized Customer Care® technician. To schedule service,
on-line, 24 hours a day, visit us at go.corn, or carl 800.GE.CARES
(800.432.2737).Please have serial number and model number
available when calling for service.
GE Will Replace:
Anypartof' the air conditioner which fhils due to a detbct in mawrials or workmanship.
I)uring this limitedone-yearwarranty,GE will alsoprovkle, free ofcharge,all labor and relat_d
se_vi(_ to rq)la(t, the det;.*ctivc part.
_'_Service trips to )Tour home to teacla you how to
use the product.
i!i_"Improper ii_stallation, delivery or maintenance. If you
have an ii_stallation problem, or if the air conditioner
is of improper cooling capacity for the intended rise,
contact your dealer or installer. You are responsible
for providil ,ig adequate electrical connecthlg facilities.
i!i_"Failure of the product restdt'H_ from modifications to
the product or due to unre&sonable use including faihtre
to provide reasonable and necessary maintenance.
}'_In commercial locations htbor necessm'y to move
the mlit to a location where it is acce_ible for service
hy all individual teclmiciml.
Staple your receipt here.
Proof of the original purchase
date is needed to obtahl service
under the warranty.
Replacement of house fuses or resetting of circuit
hreakers.
i!i_"Failure due to corrosion on models not corrosion-
protected.
i!i_,Damage to the product caused by improper power .supply
voltage, accident, fire, floods or acts of God.
;'_Incktental or consequential damage caused hy possible
defects with this air conditioner.
i!i_"Dmnage caused after deliver);
i!i_,Product not accessible to provide required service.
EXCLUSION OFIMPLIED WARRANTIES--Your sole and exclusive remedy isproduct repak as provided in this
Limited Warranty. Any implied warranties, including the implied warranties of merchantability or fitness for a
particular purpose, are limited to one year orthe shortest period allowed by law.
I
This warranty is extended to the origina! purchaser and any succeeding owner for products purchased for home
use within the USA. If the product is located in an area where service by a GE Authorized Servicer is not available,
you may be responsible for a trip charge or you may be required to bring the product to an Authorized GE Service
location for service, d7Alaska, the warranty excludes the cost of shipping or service calls to your home.
Some states do not allow the exclusion or limitation of incidental or consequential damages. This warranty gives
you specific legal rights, and you may also have other rights which vary from state to state. Toknow what your
lega! rights are, consult your local or state consumer affairs office or your state's Attorney General
Warrantor: General Electric Company. Louisville, KY 40225
19
Page 20

ConsumerSupport.
M____._
gEAppliancesWebsite
I Ia,,e a question or n(ed assistance wilh you r appliance? "fit Ihe (;E :\pl)lian((s _,Vtbsile any day of th_ yem-!
For ,_1"1 air!l- ('Ollvellit_ll(:( alld _/stel s_ l_ic(, }'ou Call llOXN download '(. )'Wll(_r's ._lalluals, Of e_ell old( 1- l)_lFtS
tna-lin,_.
ScheduleService
Expert (;E repair setvic( is only one step away ii-om your do(n: (;el on-line and schedule your selvice al
your convenience 24 hom-s any da', of the veal-! Or call, O0.(,L.(,:XRI.£ (800.432.2/:,,_) dill-InS normal
/)llSillOSS boil l'S.
RealLifeDesignStudio
(;E supports tile [ nivel_al Design concept--pr_glucts, se_',ic_ s and enviromnents that (an be used by
people of all ages, sizes and (apabilifies. We rctxNnize the need to design lor a wide r,mgc of ph) sical and
mental abilities and impainnenl', For details of GE's Univel_,al I)esign applications, including kitchen
design ideas tot people with disabilities, ch(ck Otlt OUl Wcbsite toda}. For tile hearing impaired, please (:all
800.TDD.GF.\C (800.833.4322).
ExtendedWarranties
t_urchase a GE _Xt(lld_d warrant} and learn abom special discounts that art! available _llil( your x_arranty
is still in eff(ct. You can purchase it on-lin( mlytime, or call 8(X).626.2224 du ring llOFlllal business hom-s.
(;t COllSIIln{ 1 I {Ollle Sel'li(x!s _ill slill be Ihere _lt'lel- yOlll- warranty expires.
ge.com
ge.com
ge.com
ge.com
M_._______
PartsandAccessories
Individuals qualili( d to s_ _,ic( Iheir own applian(es (_]11have parts or accessories s(nt dir{ ctly to their
hom(s (VISA, Mast(rCard and Discov( r car(Is are acccpt¢ d). Olxl( r on-line Iodav 24 hours e_elw' day or
by phon¢ at 800.620.2002 (hn mg normal bus[n{ ss hours.
Instructions contained in this manual cover procedures to be performed byany user, Otherservicing generally
should be referred to qualified service personnel Cautionmust be exercised, since improper servicing may cause
unsafe operation.
ContactUs
IfT,ou are not satisfied with the sel'dce you receive trom (;E, contact us on our Website with all the details
including }our phone ll!llnbel, or write to: (;eneral Manag_ 1; Custom_ r Relations
(;E Appliances, .\ppliance Park
Louisville, KY 40223
RegisterYourAppliance
Register your new appliance on-line--at ?,-our convenience! Timely product registration will allow ibr
('l]ll_lll((_d (Ol_llnlllli(_lliOll _lld [)rolnl)t s(H-vi(( lllld(?l- th( It!llns ol }'Ollr "_al'l_llll_ shollld lhe n(ed alis(.
You may also mail in th( prcl)rilm.d regislralion (ard inchlded in Ihe pa(king malctial.
ge.com
ge.com
ge.com
20 Printed in China
Page 21

°e,,,q
<
hlstrucciones de seguridad ...... 2, 3
lnstrucciones de operaci6n
Controles--botones d( (omrol . . .6, 7
( ontrol(s--te(:las de toque ...... 4, 5
Cuidado y limpieza
Baterfas ........................ 8
Bobinas para _xterior_ s ........... 8
Fihro d_ aire .................... 8
Parrilla y caja ................... 8
Instrucciones de instalaei6n
Instalaci6n :, tt-,,vds
de la pa r_ d--optional ........ 15-16
Instaladdn en una v(ntana ..... 9-14
Ideas para la identificaci6n
y reDaraci6n de problemas... 17-18
Sonidos normaks (t( operacidn ...18
ge.com
ASI)06 *
ASM08"
A SM l O*
A51 112"
ASQlO
AsQI2
,)
ASQ14
A 5_ 1 )
• 7
AM 12
• 7
AS_ 14
©
©
° !,,,,I
©
Apoyo al consumidor
Apoyo al (onsumidor. ........... 20
Garantfa ...................... |9
Produ('lo etiqu(_tado *ENERGY STAR _'>
Colno socio de ENI,R/GYST2LW '_,
GE ha confirnm(Io que cste
producto cumple las directrices
d( ENERGY STAR° relativas al
rendimiento _nergdtico.
Escribalos numeros de modelo
y serie aquk
# de Modelo
# de Serie
Pll0d( (ll(OlllY_ll" (SIOS Ill/Ill( I'OS
_11 Ulla etiqueta ell (!1 cos[_do
del acondicionador de aire.
49-7581 11-07JR
Page 22

f
INFORMACIONIMPORTANTEDESEGURIDAD.
LEATODASLASINSTRUCCIONESANTESDEUSAR.
A iADVERTENCIA!
Per su seguridad, se debe seguir la informaciSn en este manual para minimizar e! riesgo de incendios,
descargas el#ctricas o lesiones personale&
PRECAUCIONESDESEGURIDAD
#: Use este electrodomdsdco solamentc pare
el propdsiU) detctminado segfin se &scribe
en (1Mmmal del propiemlio.
_ Este acondicionador de aire debe instalarse
(7OFI'(}({AIIII211{_de aCII(F(10 (O11 las
Instruccion(s de insmlacidn antes de su use.
i< Ntmca des(nchuii: su acondi( ionador de
airc tiFdtldo del cable el& trice. Siemprc
agarrc th-mementc el enchuti: y tit( de
dl dir(cmment_ hacia athera.
_: Rcemplace inmediamment( redes los
cables (ldctricos que se hawm pelado o que
se hayan dafiado de alguna otto manem.
Un cable de corriemc dafiado no debe
relmmrse, sine que debe set sustimido per
uno m_eu) que se adquiem del filblJcalHc.
No use lit1 cable (l('(:ttico que lnuestrc
(xiden(ias de deterioro, o dafios de abmsidn
(11 Sll sup(rficie (:ll alguno de SIlS (_X[I'(_III()S.
i< Si el receptxlculo no coincide con (l
en( huff', un el(ctri( ism (alificado &be
icemplazar el r,..cept_i( ulo.
% Apagu( la unidad y desenchuf_
st*acondicionador d( airc ames d( hacer
cualquier icl)amcidn o liml)ian
NOTA:Recomendamosendrgicamenteque cualquier
serviciollevadoa cabo eneste equipoIotea/iceun
individuocalificado.
!:,_iPer su segu*idad.., no almac(n( ni use
matetial(s combustibles, gasolina u otros
vaporcs o h'quidos inflamables (n la
proximidad de &to o algfin oUo
electrodomdstico.
?!_?_Todos los acondicionadorcs de airc
conti(n( rcftigcmntes, los que [)or Ley
Fc& ral deben set rcmoxidos antes (t(
desecharlos. Si usmd planea deshacerse de
algzhl produclo qu(! COll{(:llgll rcflJgcr:mms,
pdngwse en conmct*) con la colnpal'lt'a ,.lUe
se encatga de recoger su basut-a pare que le
indi(tu( n ,.lUd hac(!t:
COMOCONECTARLAELECTRICIDAD
Bajo ninguna circunstancia, corteo remueva la
tercera pOa (tierra) flel cable eloctrica Enpos
de la seguridafl personal, este electrodomOstico
debe siempre conectarse a fierra.
NO useun enchufeadaptador coneste
electrodom#stico.
El cable elg'ctrico de estc electrodomdstico esl:i
( quit)ado con un en( huf( de tr(s pdas (ti( m0
que (,.)mbit*a (on tm mma(otriemc est_h_dar
de tres twmas de pared para minimizar la
posibilidad de una & scarg_a el('cttica.
El caM( eldct*ico incluyc un dispositixo pare
intctrupcidn de cortJente. Se incluv(, un ])ot(3n
de p_ueba y de _cinicio en el dispositivo.
El dispositivo deb( ponerse a l)meba
pe_Jddicamenm: primero se pr( siena (1 bot6n
de TEST (pmeba) y luego RESET (rcinicio)
lllielltl'_tS s(! elICIIelItFH ( llchtllildo al
tomacor_Jente. Si (1 botdn r Sr.o se dispam
o si el botdn RESET no queda enganchado,
2
dcje d( udlizar el acondicionador de airc }
comunf(lU(:S,._ con tm t&:nico calificado.
Pida a un t&mico que inspeccione el
mmacorrienm y el circuito pare c( rciomrs(
de que el tDma(otTi( rite estfl conectado a
tierm de la man(m al)ropiada.
Deride exista tm tomacorrient( de dos tomas,
es su rcsponsabilidad y obliga(idn personal
hater que dicho mmacortiente sea
r( elllp|azado pot- [lllO d( ires [()lll_tS COil
conexidn a tierm.
El acondicionador de air,_' d(bcHa siemp_*!
,.star conecmdo a ttIl tolnac()rtiente individual
con sit cir(uito de voltaje corrcspondienm.
Esto pmporciona el mayor r(ndimiemo }
a(kqmls cvim que los ( it( uitos del rtsto de
la (asa se sobrecarguen, lo (tim podria (ausar
inc(ndios per (1 sobr( calenmmiemo
del cableado.
Vcr las Instm(:ciones d( insmlacidn, en la
s<ccidn Requisites E!Octricospara los r(quisitos
esp(cificos de concxidn.
Page 23

A iADVERTENCIA!
i
USODECABLESDEEXTENSION--Modelosde 1!5 voltiossolamente
ge.com
Debide al potencial de riesgos de seguridad baje
ciertas condiciones, en#rgicamente recomendamos
centra el use de cables de extensiSn.
Sin emlxargo, si usted se w: en la nec_ sidad
(lie ltsat Ull cabh el('ctrico de ext_ nsidn, es
absolummenlc necesario que <1 mismo est('
listado b_!jo UL, sea _alibr_ 14, del tipo de
3 tomas con conexidn a tierlw pa*w
electrodom_¢sticos y el hadice eh;ctiJco debe
sel de 15 ampetios (minin;o) y 125 vohios.
A PRECAUCION:
NO USEua cable de extension con aiaguao
de los modelos de230/208 voltios
LEAYSIGAESTASINSTRUCCIONESDESEGURIDADCUIDADOSAMENTE.
GUARDEESTASINSTRUCCIONES
3
Page 24

Acerca de los controlesen el acondicionadorde aim--
modeloscon teclas de toque.
Los funciones y el aspecto pueden variar,
FRIOEncendid0
AHORRADORDE
EN_RGIA_ncendid0
DORMIREacendido
I
Controles del acondicionador de aire
On/Off(Eneendido/apagado)
ApaR'4 y pt_n(k el acondickmadot de aJr_.
Pantaga
Mt]( stra ]a tempe_:_lut adc @isle o 1] fiempo
I'(tst_tnt(el) t] SiI)(I'OI)JZa(IoL
Modo
@
Usudo para @lstar cl a(ondk ionador dc air_
al modo Cool(Frio)o Fan(Ventilador).
Teolas de Aumentar ,e,/Reduoir V
se cn(ut ntre cn el mode Cool(Frio).
O an (Ventilador)
[,silt ) I 'tst/_ 1 ',_1 _('chd delvemilado_a
Low (Bajo), Med (Medio) o High (Alto).
O ircu/aire (Circo/adorde sire) (ona/gunosmoflelos)
P_tI'd p]'Op()]tiO]]al til'(U[_l(](_n dt ail( COI/[JX]tla dt
]ado _ Ddo, ujtlstc cl hncmq)vcw dc (fi_(ulai_c cn
On(Eneendido).
Pro'4 logmr ci1(uladdn de Cdrc t!ja de lade
a lad(), coloque elk On (Eneendido) h_t_ta que la
ci_t ulal idn de aire deseada sea Iograda, ]uego
('o]o(Itlt en Off(Apagado).
( ontrola (1 x_nlila(lot:
s nergy Saver(Ahorrador de energia)
On (Encendido}--EI vendlador y el comp_esor ha(:en
cic]o cn cncendido _ _pagado. Est_ rcstllta en
_11 ]aciol)tN irlayort's el/ la 1_ lllpelaltlta de la
habitacidn y ell la Immedad. Notmalmm/l_ usado
orlando la habilacidn no eslfi ocupada. Nota: El
ventilador continuar# funcionando per un corto tiempo
despu#s de que el compresor haya entrado en el ciclo
de apagado.
Off(Apagado)--E1 _t ntilador ftmciona lode cl
tk rope, mienm_s qtm el compresor ix/sa per los
cic]os de enc{ ndido y apagado.
VENTILADOR
SINCRONIZADO£Encendido
Controlremote
Este in t(rl-uptor debe (star (n Off (Apagado) pal'a
usar los _}just( s del v( ntilador ten (l (onl]ol
de mode).
O fimer (SincmnizadoO
On (Eneendido)---Cnando (I acondk ionador d( air(
csld upagado, pucdc _!justaxsc pro'4 qtlc st" cn(icnda
atm)mfitkamenw denu'o de [ a 24 hems en el nivel
prcvio. Cada toqne ilj/lsmi5 el tiemlx) el/hoi'as.
Oll(Apagado)---Cumldo el al:(mdicionador tie air("
est_ encel/dklo, ptmde ;@stm_.e pata que se apag-ue
mm)mfificamente (/ent_*) de 1 a 24 hOl;k% Cuda
t{XlUe HjIIS[;II_I el tit I//pO el/ hol_ls.
Pint cancelm el sincroniza(lot; p_csi(me la [e(:la
timer (Sinoronizador) basra qtlt el tiempo en la
panlalla de_tparczca.
O Sleep (Oormir) [on algunosmodolos)
Pr(sione p_ti_l (]tl_ el a(o]ldi(]on;l(-Iof (le air(
tbn(:iom" per 8 hems anws d_ apa_a'a_',(
aIltOlll_ti( al]lerltt'.
[ha hera despu_s d( qu( (1 sincronizador
pare dormir haya sido _justado, la t( mpel'atul_/
S(t]e( (Tiol)a(I;t a/]l//( nla];{ ;t/llOl//_[i('al//t hi(2 2 °E
Paca cancelar el mode de dornfil; presione la tccla
Sloop(Oormir)una segunda vez.
Nora:El sincronizadordodormir ser_ cancoladosi
cualquieradelas teclas de Timer(Sinoronizador),
EnergySaver(Ahorradorde energia)oMode(Modo)
sonpresionadas.
Receptorde laserialdel controlremoto
@
0
0
0
Control remoto
};3Pare garanlizar una opera(i6n npropiada, otiente
(1 (:olllI'ol l'elllOlO hacia el receptor (h sel_lal del
a(7olldi(:iolladOF de ail-e.
I FI receptor d( seilal liene un l_lngo mSximo
4
de 21 pies.
;;!_C(rd6res( (1( qu( no haya lla(la <ntre (1
a(:olldi(:iOll_t(lof (1(! _til'e y (l COllll-_)l F(_III()IO (llle
pueda/)loqu(ar la serial.
_S,Cer(:i6rese (1( que las balerl_as Seal] irescas y
St! illslalell (OIT(_( I_/III(!III(--V( l" la S(!((i(_II (It
Cuidadoy Limpieza.
Page 25

Controles adicionales e informaciSn importante.
Nouse enlas cendicienesexternasdebajeel puntode
cengelacion
Estc acondicionador (it- ai_ no es dJscfiado pm'd u_ar cn No us_ cn 1_ _on(liciones cxt_ rnas dcb_ljo cl ptmto dc
tcm[x'rattmts extcmas deb_}jo el pm_to de ((mgelacidn. (ongda(idn.
Cuandeatacendicienader de aire se encienda, so encender_
automfiticamenteen etnivetque seencentrabala filtima vez.
Fmmi6n de recuperaci6n de pfirdida de energia
En caso dc k*p61dida de la elac_gf_ o int_*mpcidn, I't'ail./StiU;] al qjuste o_iginal. Es posiblc qnc nstcd nccesite
la urfidad rcini(:iaM automfificamenl_ el/las fimciones @_star un liempo nncvo si _.'.i Io desea.
de la tiltima vcz clue file t_t(Io una vcz la energ_u sea
wstablecida. I as fimciones de/Siecreeizadery Oermir
Modo COOL(FRIO)
Lse el modo Coolom venlilador High(3)(Alto), Med (2)
(Medie) o Low(1)(Baje) pmu _nfi i;m Iselas l_das dc
Increase• (Aumentar)/Decrease• (Reducir)pm'a qjuslar a
1_ternpcr4m_'d dcsca(lu entre 64<q_"y 86"F cn in(:Tcmentos
de I°E
S(f usa till tcrmosialo pall l/Ill/I( I]el la I(q]/p( I'd[/]l_/d( _
la habilaci6n. El compw_.or hmfi ciclo entre apagado y
encendido par_4mantenel la habitacidn ala tcmpen_tura
deseada..A:iustc el [tq'lrlOS[;ltl) a Ill/ I]t*lI//eIO HleI/Ol y el
ailc inmrno se enfi'iarJ m_i.,,.Silo ajusm atm ndmero
mayol; ]a lemperalm'a del aiw inferno se calentmfi mils.
NorA: Si atacendicienaderde aireesN apagadey tuege
so.enciende mientras esN ajustadeen Cool(Frie),tomarfi
apreximadamente3minutospara que elcempreser comience
aenfriar otra vez.
ge.com
Descripcienesdeenfriamiente
ParaenfriamientonermaI--Sclcc( ionc cl modo dc Cool
(Frio)y _cntiladol High(3) (Alto)o Med (2)(Medie)con una
tcml)cluml'4 (Ic @lstc media.
Pata enfriataieoto taaxitae--Sele( cione el modo de Cooly
venlilador High(3){Alto) ((m una lcmpe_;mu;_ de aiustc
in f.=nol
Paraenfriamientosilenciese y enfriamientonectnme--
S(k((ion_ (1 modo (k Cool?x(ndH(lor LOw(1)(Baje)
1ol/ /ll/_/ tcl]lpcIaitll_l de ajt/stc ]//edla.
NOTA:gi cambiade una/ustoCool(Frie)a Off(Apagade)ea
un ajustede ventilader,espereapreximadamente3 minutes
antesde cambiar otra vezal ajustede Cool(Erie).
Modo de FAN (Ventilador)
Lse el Fan {Ventilader) en High (3) (Alto), Med (2) (Medie)
o LOW (I) (Baje) i_m_t plopo_(ionar ( it( ulad(m de aire
filn'a(:i6n sin cnfiim/fient_). Dcbido a qnc los nivelcs dc
Control de la ventilacion (onalgunos modelos) i,I"
E1conlrol de xenlilaci61_ (:sift Io(alizado al interior de !
]as ])cP,ian;t',cnla _squina (lercch:_ inti ri(m
Ctmndo estfi @lstado en CLOSE{CERRADO),solameme
el airc en el imerior de la habitation ci*oflarJ y se I[
acondicionarfi. Cuando est_ qjt_stado en OPEN(ABIERrO),
un po(:o del ai_c inmtno es expelido hacia atue_'4.
Direccion del aire--Hacia arriba y hacia abajo _enalgunos modelos)
[na presidn sencilla con los dedos enlas persian¢_'.
ho_zormdes @lsm% la direccidn del ai_c hacia a_Tiba
o hacia abajo.
vcnliladol th/icamenm no propordonml enffiamiento,
el nivel de tcmpclamra no se mueslla en/a p;mlalla.
|
__--_ 0 BIEN
Paraabrirlaparrill& oalpujela Paraabrirlap,_rrilla,empujela
palancahaciala derechaypara palancahaciala derechaypara
cerrarlahacialaizquierda cerrarlahaciala izquierda
Direccion del a#e--de lado a lado (onatgunosmodetos)
En algunos modelos, la dircccidn (k lado a lado
del aire es @_sta(la pot la_ palan(_', de las pm-_imms
0 ag'dll;in(]o y Irl(wiel/do I;/. _, pel_,ianas vclticah/lel/[C.
I_ ::_ 0 BIEN
5
Page 26

Acercade loscontrolesen elacondicionadordeaim--
modelosconboton(es)decontrol.
Las funciones y el aspecto pueden verier,
Controles
InterrnptorON/OFF
0
Endcndc _apa_ cl acondidonador (it" aim
NOTA:SJelacondicioeadordeaire estDapagadoyeeroeceses
eecendidomientrasestbeeuemodoCool(Edriado),el comFesor
eecesitaraaproximadamente3mlTlutospareiniciary parequeel
eefriamientocomience
lnterrnptordeFan(Ventilador)
(onatgunosmodetos)
Usc esl}t flmci()l/pale cambiar Ii _elocidad dd _cnlilador
mm-c tO (BAJO)6 HI (ALTO).
Controlde Mode/Temp (Modo/Temp)
@
_sc pala _tjustalcl acondicionador oh"air('
al modo FanOnly(VeatJladorsolamente) o aun Illodo
Cool(Enlriado).
Modode FanOnly(Venti/adorsolamente)
tsc FanOnly_n HI (ALTO)o LO(BAJO)Fan(Venti/ador)
para propo_douiu" cir_nladdn dc aire _ liltnlcidn sin
e]lfl]amiel_IO.
Modode Cool(Enfriado)
[se till a:juste Coolcon HI(ALTO)o LO(BAJO)Fan
(Venti/ador)i-);ua cnfi-iamk:nIo. (;it( el bol6n end s¢mido
Contro/es
de las agqjas del reloj, hacia _1_h-eaa_ul mayor, pale que el aim
de interior se enfifc In;_s.(;i/e el Ilotdn el/seHtido contmfio al de
lasagt!jas del lel@ hacia el fil<a azul ulaispequefia, pma que el
aire de interior se calientc mils.
El control de Modt fh'mp es usado pan! lnantene/a
temperalura ambienl*. (.0ando esl(_ colocado en el modo Cool
(Enltiado),cl comprcsor harfi cido cmlc apag:Jdo clmcndido
pala illantcnel el sah'_nal I//iSl//O IliVOI de Icn/peraltlla.
Descripcionesde enfriamiento
Paraenfriamientonormal_%h,ccionc tm modo Cool(Enltiado)
con cl b(mm Mod{,,'_[cmp cnla position (kl t_ utro.
Paraenlriamientomaximo_Sch,ccionc un modo Cool(Enlriado),
con el bol6n Modc!Tcmp apuntando hacia (I firea a/ul ulayoL
ParaenfriamientomDs tranquilo& durante/asn0eh0e--Seleccion e
un modo Cool(Enlriado)con el boldn Modei]k'mp apuniando
hada el drea aztll mils pequ{ fla.
NOTA:Siusted mulxe el boldn dl (onmll de ModeiTcmp
del _juste Cool hacia el ;!juste Fee Oolg, espelc pot Io mcnos
3 minulos antes de cambi tr otto wz a till ajtlslc COOL
I H_d Ce°L Th_ _t{at I
| Control de Mode (Modo)
l Js,. ,. l modo Hi Cool (F#o AIto), Med Cool (F#o
Medio) y Low Cool (Frio Bajo) pro'4 _nfi Jar con 1_
xelo(idad_ s del _cnfihldor _m'ias.
Use (1 Low Fan (Ventilador Bajo) o Hi Fan (llentltador
Alto) panl plopor(ional (irofiacidn d( air_ )
fillra('idn sin enfl'iamienlo.
| Control de Termostato
_( tlSil tin l(tyiTios[alo p_/I'd l_)aDl(]/el ]il [t=lTIp(I_atll_l
de la habita(idn, lq (omprcsol hal_ (:i( Io entre
apagado ?,ell(:_ ndido ptna mantener la habilncidn
it [;/ IOrl/p()l'd[tlI'd d( s(_a(la+ ,A:juste el I(rl]/OSl_ttt-) a till
D!]lIlldgO IIlav(ir _, el _/il'e il)[(:ITlO S(: ( I/_l{a]i;t irl_l._. Si
6
I0 ;{justa a tin n[/i//(:l o i//( 11()1; la [(_]_/p(tFalLIl'H d(I
ili]'{2 il/{(_lI/O _} (a]el_tal'_ Ill'IS.
NOTA:Si cambiadeun ajuste Cool(Frio)a Off(Apaltado)o a
unajustede ventilador,espere aproximadamente3 minutos
antesde cambiar otra vezat ajuste de Cool(/:rio),
Descripciones de enfriamiento
Para enfriamiento normal--Sd( (t ionc d modo de Hi Cool
(/:rio Alto) o Med Cool (Frio Medio) (:on el tel moslato a un
ajuste m( dio.
PIrI eofriamieoto maximo--S( l_ccionc (1 n/odo d( Hi Cool
(FileAlto)con d 1( I'I//OSIHIO a till ]ll]]/)t'I'O ]]/_tS alto+
Para enfriamiento silencioso y enfriamiento nocturno--
Sckx:cione el modo (k Low Cool (/:rio Bajo) ( on el
[(l'l/_OSli_lO _/ lID itj/IS[( I//edio.
Page 27

Controles adicionales e informaciSn importante.
No use en /as condiciones externas debajo el punto
de congelaci6n
Est(' _wondi( i(mador (/(' _dre no es (lis<.tYMo pare
usar en lempeF41u 1-,isexternas (leb_!jo el pu nto
de (:(mgelacidn. No use en las condiciones
externas deb@) el punto de (ongelacidn.
Control de la ventilaci6n (onalgunos modotos)
El control de v(ntilacidn estfi localizado al inl( riot ,f
de las pelsianas en la esquina derecha infi,lio*; ¢/
Cuando esl_i@lsm(lo en CLOSE(CERRADO), (
solamemc el aire (n el ira( riot de la habimcidn
circulal',;_ } se aconditionm-,L Cuando est_i @lstado
{n OPEN(ABIERTO), un poco del air(' int_ mo es
{xpelido hacia afil( ra.
Direccion del a#e--de lado a lado
1
II
Paraabrirlaparrifla,empujola
palancahaciala derechaypara
cerrarlahacialaizquiorda
ge.com
Paraabrirlaparrill& empujela
palancahaciala derechaypara
cerrarlahaciala izquierda
En algunos modelos, la direcci6n de lad() a lado
(kl aire es qjusmda pot las palancas de las l)ersianas
o agarrando y moviendo las persianas
",erticahllellte.
Direcci6n del aire--Hacia arriba y hacia abajo (enalgunosmodelos)
l na presidn sencilla con los (led<_ en las persianas
horizonmles ujustal-,i la dir_*(cidn del air(! hacia
arriba o hacia abajo.
0 BIEN
Page 28

Cuidadoy limpiezadelacondicionadordeaire.
Como iusertar las baterias
] Retire la (ubic rla (le la bateria & sliz_indola
d( a(u(rdo (on la direcci6n d( la flecha.
] ]nserte baterfas nuevas, cerciol_hldose d( que
los polos posilivos (+) y n(galixos (-) estfin
Ol'ielll_l(lOS COLT( CI_/IllC 111(.
] Coloque la ctl|)iel_ta (;[l-avez d{slizfindola en
su hlgan
Parrilla y caja
NOTAS:
i;<15se2 balerfas "_L\" de 1,5 xollios. No use
hater fas r( cargabl( s.
b R( th-e las baterfas del control remoto si (1 sistema
llO ha d( _,(1" llS_(]o l)or llll l:)eri(:×h) d( lJ( llll:)O
{:X[(?I]SO.
Apague (1 a¢ondicionador de aire y relire el
(ll(Thl.l_(Y (](l [Oln_](OITi( Ill( d( 1_1 I)HY((] _]ll[(s
d( limpiar.
Bobinas para exteriores
Las bobinas cn cl lado ('xterior dcl a_on(li( ion_(Ior
de airc debe ser inspe((iomlda legulm-mcnle.
Si la misma estfi obsHuida con suciedad u hollfil,
p(_h-_ ser limpiada protbsionahnente.
Filtro de aire
El filno de aire (lelrfis de la r<jilla h_onta[ debe
inspe((ionars( y limpiame pot lo menos (ada
30 d_as o mils a m( lmdo si fll(se n( c(sario.
Liml)ie el fihro con agua lil)ia yjal)6n. Enjufigueh)
y l)(_l'l]]il_t (-ll](_ %(! S(_(ll.I(' _I][(_S (](! c,-4o(arlo olra x'(z
(11 Sll hlgal2
/
A PRECAUCION:No
acondicionadordeairesinel filtroctebidoa quelasuciedad
y/aspelusasIoobstruiranyreducirbnsurend#niento
Para linapim; us( agua y un delergente suaxe.
No t/s( (h)]o o lllal( l-ial(s al)l-asi\os.
Pararetirarlo(enalgunosmodelos):
Agarre/asorejillas
enel filtro y tire
haciaafueray
haciaarriba
8
Page 29

Instruccionespara
Acondicionadordeaire
la instalacion
"_ _Preguntas? Llame al 800,GE.CARES (800,432.2737) o bien Visite nuestra pagina Web: ge,com
ANTES DE INICIAR
Lea estas instrucciones completa y
cuidadosamente
• IMPORTANTE - Guardeestas
instrucciones para uso del inspector local.
• IMPORTANTE - Observetodos
los c6digos y 6rdenes de ley.
• Note al instalador - Aseg@ese de dejar
estas instrucciones con el consumidor.
• Note al consumidor - Conserve estas
instrucciones pare referencia future.
• Nivel de destreza - La instalaci6n de este
aparato requiere de destrezas mecanicas
basicas.
• Tiempo de ejecucion - Aprox. 1 hora
• Recomendamos dos personas pare
la instalaci6n de este producto.
• La instalaci6n apropiada es la
responsabilidad del instalador.
• La falla del producto debido a una
instalaci6n inadecuada no esta cubierta
por la garantia.
• Cuando instale este acondicionador
de aire, DEBE user todas las piezas
suministradas y usar procedimientos
adecuados de instalaci6n como describe
en estas instrucciones y algunas
instrucciones de kit separadas.
O REQUISITOS ELECTRICOS
©
@
APRECAUCION:
Bajo ninguna circunstancia corte o remueva
la tercera pua (conexion a tierra) del cable
electrico.
No cambie el enchufe en el cable electrico
de este acondicionador de aire.
Los cables caseros de aluminio podrian
presentar problemas especiales. Consulte
a un tecnico electricista calificado.
Si los tornillos de soporte del umbral
no tienen contacto con el umbral de la
ventana, o si cuenta con una ventana sin
umbral, debe ordenar el kit de accesorios
RAK87 para instalar de forma adecuada
este acondicionador de aire. Llame a
800.626.2002 o visite ge.com.
(cont.)
Algunos modelos requieren 230/208 voltios,
de corriente alterna, protegidos por un
fusible de dilataci6n de tiempo o un
cortacircuitos. Estos modelos deberian
instalarse en un ramal exclusivo del circuito
pare un rendimiento mas notable y para
prevenir sobrecargas en los circuitos de
cableados de su case o apartamento, Io cual
podria representer un riesgo de incendio
por el sobrecalentamiento de los alambres.
(_ REQUISITOS ELECTRICOS
de 115/120 voltios de corriente alterna y
Algunos modelos requieren tomacorrientes
60 Hz conectados a tierra, protegidos con
un fusible de dilataci6n de tiempo de
15 amperios o un cortacircuitos.
El enchufe de tres pleas con conexi6n a tierra
minimize la posibilidad de descargas electricas. Si
el tomacorriente de la pared que usted planea user
solamente tiene 2 tomes, es su responsabilidad
hacer que un t_cnico Io reemplace por uno de tres
tomes con conexi6n a tierra.
El cable de alimentaci6n incluye un dispositivo
para interrupcion de corriente. Se incluye un
boton de prueba y de reinicio en el dispositivo. El
dispositivo debe ponerse a prueba peri6dicamente:
primero se presiona el boton de TEST (prueba)
y luego RESET (reinicio) mientras se encuentra
enchufado al tomacorriente. Si el bot6n TEST
no se dispara o si el bot6n RESET no queda
enganchado, deje de utilizar el acondicionador
de aire y comuniquese con un t_cnico calificado.
9
Page 30

Instrucciones para la
instalacion en una ventana
HERRAMIENTAS QUE USTED NECESITARA
Destornillador Phillips
Lapiz
PARTES INCLUIDAS
(apariencia puede variar) Sello del
Panel de
acordeon Empaque superior de ........._.- .,_,_,, "_._. ventana
izquierdo espuma de la ventana --_."___,.."_
Riel de montaje superior
Regla o cinta metrica
Nivel
___ ,/ marco de la
Tijeras o cuchilla
Llave ajustable
\
Tornillos 1/2"
tipos A(18 o 19)
Soporte
el umbral
Tornillos 3/4"
tipo B (8)
Empaque
inferior de
la caja
Perno
tipo C (2)
Panel de
acorde6n
derecho
Soporte de
seguridad (1)
10
Page 31

Instrucciones para la instalacion en una ventana
[] REQUISITOS PARA LA VENTANA
• Estas instrucciones son para una ventana
estandar de dos pliegues. Usted
necesitara modificar el proceso para otros
tipos de ventanas.
PRECAUCION: Silos
tornillos de soporte del umbral no tienen
contacto con el umbral de la ventana, o
si cuenta con una ventana sin umbral,
debe ordenar el kit de accesorios RAK87
para instalar de forma adecuada este
acondicionador de aire. Llame a
800.626.2002 o visite ge.com.
• Todas las partes de apoyo deben quedar
totalmente aseguradas a alg0n metal,
mamposteria o a la madera.
• El tomacorriente el6ctrico debe estar
al alcance del cable electrico del
acondicionador de aire.
• Siga las dimensiones de la tabla y la
ilustracion seg0n su modelo.
Modelos A B
ASD06, ASM08, ASQ10, 14 3/4" min. 24 3/4"-36"
ASV10
ASM10, ASQ12, ASV12 15 3/8" mfn. 26"-39 1/2"
ASM12, ASQ14, ASV14 16 1/4"mfn. 26"-39 1/2"
[] REQUlSITOS DE UNA VENTANA
DE TORMENTAS
Un marco de ventana de tormentas no
permitira que el acondicionador de aire se
incline hacia el exterior y evitara que drene
apropiadamente. Para solucionar este problema,
adhiera un pedazo de madera a el umbral.
PEDAZOS DE MADERA -
ANCHO:2"
LONGITUD: Lo suficientemente largo
como para ajustar en el interior del marco
de la ventana.
GRUESO: Para determinar el grueso, coloque
un pedazo de madera en el umbral para
hacerla 1/2" mas alta que la parte superior
del marco de la ventana de tormentas o del
marco vinilo.
Peguelo firmemente con clavos o con
tornillos proporcionados por el instalador.
/ 1/2" mas alto que el
,_ marco vinilo (en algunas1/2" maa alto _ventanas)
que el marco _,../- Madera
de ventana . fl _ r] r_2_,/_Y/_r
de tormentas t /11 Umbra__.,)Marco de _coventana de vioilo
tormentas
t J
B==_3
(con paneles de acordeon)
t
A
11
Page 32

Instrucciones para la instalacion en una ventana
[] RETIRE LA PARRILLA FRONTAL
(SI ESTA PEGADA)
[] Retire la cinta de envio si todavia esta pegada.
En los modeles con
parrilla de entrada
elevadiza, levantela y
retire el tornillo detras
de el (siesta presente),
Io que sostiene la
parrilla en su lugar.
En los modelos con
filtro deslizables,
muevalo y el tornillo
detras de 61 (si esta
presente), Io que
sostiene la parrilla
en su lugar.
[] Agarre firmemente .'t\ I t1_
pero suavemente las
esquinas inferiores de la
parrilla, presione en los
lados de la caja ytire
para liberar.
NOTA: No tire los
extremos de la parte
inferior hacia usted mas de 3"o podria
dahar las orejillas de la parrilla.
[] Levante la parrilla y lib6rala de las orejillas.
[] RETIRE EL ACONDICIONADOR
DE AIRE DE LA CAJA
[] Retire los 2 o 4 tornillos (dependiendo en el
modelo) en cada lado de la caja. Guardelos
los 2 tornillos de la parte delantera para mas
tarde.
Frente del acondicionador de aire
[] Deslice el acondicionador de aire de la caja
agarrando la empu_adura del carter base y
tire hacia adelante mientras sostiene la caja.
12
Frente de] acondicionador de aire
Retire el carton de empaquetado y cinta,
siesta presente.
Page 33

Instrucciones para la instalacion en una ventana
[] PREPARE LA CAJA
[] Retire el apoyo de la cinta de sellado del riel
de montaje superior y p6guelo al fondo del
riel de montaje superior. Corte al tamaflo
apropiado.
[] Instale el riel de montaje superior con
4 o 5 tornillos tipo A (dependiendo en los
nt]meros de agujeros en el riel de montaje
superior) desde la parte externa de la caja,
Riel de montaje superior
[] INSTALE LA CAJA
EN LA VENTANA
[] Corte el sello del marco de la ventana de
acuerdo con el ancho de la ventana y pegue
el lado adhesivo al fondo del marco.
Umbral de
la ventana
Sello del marco de la ventana
[] Enrosque dos pernos tipo C en los soportes
de apoyo.
Deslice la caja hacia el interior de la ventana
y baje la ventana detras del riel de montaje
superior,
Coloque los soportes en el fondo de la caja
para que queden cerca del punto mas externo
en el umbral de la ventana. Una los soportes
de apoyo a cada lado del fondo de la caja
usando 4 tornillos tipo A en cada lado. Ajuste
los pernos nivelados tocar el umbral.
u
Riel de montaje inferior
[] Inserte los marcos para los paneles de
acordeon en los rieles superiores e inferiores
de montaje. Una los paneles de acordeon al
lado de la caja usando 6 tornillos tipo A.
Riel de montaje superior
Panel de
acorde6n
tipos A
_ rornillos tipo A
Umbral de ,Y_i'
la ventana _ -_F,___LL_---. Pe'rnos tipo C
PRECAUCION: silos
tornillos de soporte del umbral no tienen
contacto con el umbral de la ventana, o
si cuenta con una ventana sin umbral,
debe ordenar el kit de accesorios RAK87
para instalar de forma adecuada este
acondicionador de aire. Llame a
800.626.2002 o visite ge.com.
POSTERIOR
Riel de montaje inferior
13
Page 34

Instrucciones para la instalacion en una ventana
[] INSTALE LA CAJA
EN LA VENTANA (cont.)
[] Localice los 7 agujeros para los tornillos a Io
largo del frente inferior de la caja. Centre la
caja, de lado y lado, en la ventana y montela
en el umbral de la ventana usando 3 tornillos
tipo B escalonado en las filas frontal y
posterior si es posible.
Riel de montaje superior
'Tornillos
tipo B
Tornillos tipo B
[] Extienda los paneles de acordeon derecho
e izquierdo al marco vertical de la ventana
y peguelos con 4 tornillos tipo B.
INSTALE EL ACONDICIONADOR
[]
DE AIRE EN LA CAJA
[]
Deslice el acondicionador de aire en la caja.
Reinstale los 2 tornillos de la parte delantera
removidos anteriormente en cada lado de
la caja.
[]
Coloque el empaque inferior de la caja entre
el fondo del acondicionador de aire y el rondo
interno de la caja. Doble los extremos en
ambos lados y empujelos hacia adentro.
Frente del Empaque inferior
acondicionador de aire de la caja
[] INSTALE EL SOPORTE DE
SEGURIDAD Y LA PARTE
SUPERIOR DE LA ESPUMA
DE LA JUNTA DE LA VENTANA
[] Pegue el soporte de seguridad con un tornillo
tipo B.
V
[] Corte la parte superior de la espuma
de la junta al ancho de la ventana.
[] Rellene la espuma entre el vidrio y
la ventana para evitar que aire e insectos
se introduzcan en la habitacion.
/
[] Una la parrilla del frente a la caja insertando
las orejillas en la parrilla en las ranuras en el
frente de la caja. Empuje la parrilla hasta que
encaje en su lugar.
Guie la palanca
cuidadosamente a
traves de la parrilla
mientras la empuja.
[] Asegure la parrilla del frente en la caja
reemplazando el tornillo removido en
el Paso 3.
Calafatee todas las aberturas al exterior
para sellar la instalacion,
14
La instalacion esta ahora completa.
Page 35

Instrucciones de instalacion a traves de la paredmopcional
La caja podria instalarse a traves de la pared
en construcciones existentes o nuevas.
Lea completamente, luego siga paso por paso.
NOTA: Obtenga todos los materiales en tiendas
para montar el acondicionador de aire a traves
de la pared.
[] IMPORTANTE
La instalacion a traves de la pared no
es apropiada si alguna de las persianas
laterales o superiores est,_ obstruida por
la pared.
Todas las persianas laterales y superiores
en la caja deben proyectarse hacia el lado
exterior de la pared.
El lado de la habitacion de la caja debe
proyectarse hacia el interior de la habitacion
con la distancia suficiente como para
maximizar el equilibrio de la unidad.
La caja debe instalarse a nivel, de lado a
lado, y con una ligera inclinacion desde el
frente hacia la parte posterior. Use un nivel;
la inclinacion correcta sera una inclinacion no
superior a 1/2 burbuja.
Es necesaria una escuadra de lintel para
dar soporte a los ladrillos o bloques que se
encuentran por encima de la abertura.
[] Coloque la caja en la abertura de la pared
y coloque las bandas de soporte de madera
entre la parte inferior de la caja y los
tapajuntas de ambos lados del riel inferior.
Deben ser de la misma altura que el riel
inferior y de la misma Iongitud que la
abertura de la pared.
] Asegure con 14 tornillos para madera fijados
al menos una pulgada hacia el interior de
la estructura de soporte de la pared.
NOTA: Taladre los agujeros piloto, si es
necesario, para una instalacion apropiada.
Si el marco es demasiado grande, use cuhas
para evitar la distorsion de la caja.
Se necesitan tapajuntas que deben
extenderse a Io largo de la abertura para
asegurarse de que no se produzcan fugas
dentro de la cavidad.
[] Retire el acondicionador de aire de la caja.
Para instrucciones especificas, refi6rase alas
Instrucciones para la instalaci6n en una
ventana.
[] Cerciorese de que existe un tomacorriente
disponible cerca del orificio o haga arreglos
para que se instale uno.
15
Page 36

Instrucciones de instalacion a traves de la paredmopcional
[] TERMINE LA ABERTURA
EN LA PARED
[] Calafatee los cuatro lados del lado exterior
de la caja para evitar que la humedad
penetre a tray, s de la abertura en la pared.
El uso de tapajuntas (riel de goteo) evitara
ann m_s que el agua gotee hacia el interior
de la pared y hacia el exterior de la
construcci6n.
J Linea
i i i r de yeso
i J ',,
, , = I I
Angulo del hntel i
Calafateo _ _/I oldeado
, i i _[
i '
_---_111 "_ d_lmarco
EXTERIOR
Persianas
de aire
{persianas Z
superlores y
laterales debe
proyectar
hacia el lado
exterior de
la pared)
Relleno de madera
y calafateo (por
encima y por debajo
deltapajuntas)
/
i'
(si se desea)
INTERIOR
Riel inferior
/
Tapaju ntas de la inferior
(riel de goteo) caja
Tapajuntas
(riel de goteo)
Bandas de soporte
de madera
Riel
[] Coloque el acondicionador de aire hacia
el interior de la caja. Para instrucciones
especificas, refierase alas Instrucciones
para la instalacion en una ventana.
16
Page 37

Solucionarproblemas, go.co,,
Causasposibles Quehacer
El acondidonador de aire *Cerci6rese dc que el a(ondkionador de aire est_i
estfi desconectado, enchufhdo rotulmente en el tonaacorriente.
El fttsible se dispar6 / *1aspecc ) ae 1(s fi s b es / c/:j:_c e ate "rtptores ( e :_c s
el cortacireuitos se d'tspalq), yreemplace cualquier filsible o re@_ste el interluptox:
Interrupd6n en el *Si octme tma interlupcidn en el suministro el&'tfico, agrague
sum'm'mtro el6ctrico. (off)el acondicionador de aire. Cuando la energfu se restaure,
espere 3 mimltos pm_t reinkiar el tcondicionador de aire pal'a
prevenir que se dispare el compresor por sobrecatga.
El dispoglfivo de internlpcidn *Presione el botdn Reset ubicado en el cable de alimentacidn.
de corriente se ha acfivado. *Si el botdn Reset no se mantiene en su luga); no utilice m_s el
acondicionador de aik _y comuniquese con un t&nico cNificado.
El flujo de aire estfi res_ingido. *Cerd6rese de que no existe ningtma coltina, petsiana o
mueble bloqueando el fi'ente del acondicionadol de aire.
El control de temperamra no *En los modelos con teclado: En el modo Cool (Fifo),
es'tfiajustado apropiadamente, presione la teda ReducirV.
*En los modelos con lxltones, give la temperature a un nfimero nla>o/;
El fdtro de aim estfi sudo. *Limpie el filtro (ada 30 d;as por Io menos. Ver la se(ddn
de Instruccionesde OperaciOn.
La habi 'tacidn podrla haber *Qlando el acondidonador de ;fire se enciende, usted
estado caliente, necesim darle tiempo pare que enfiJe la habitaci6n.
El aire frio se estfi escapando. *Cer(idrese de que los registros de la calet:acci6n no estfin
abler tosy se encuenmm )etomando el aire fifo.
*Coloque lu venmnilla del acondicionador de aire en
la [×)sicidn cerlada.
Ias bobinas de enffiamiento *Ver "Acondicionador de aireso estacongelando"m:i, adelanm.
se congelaron.
ElhMo bh_ltlea el flujo *En modelos con los Lu)tones de control, coloque el modo
de aire hac'rael acondMonador deconlrolenHighFan(llontiladoralto)dHighCool
de aire e-dlando que se enfrie (/:rioalto)con la temperatura en I 6 Z
la habitaddn. *En los modelos con tecla_, col(,ultle los contt oles en
HighFan(gentiladoralto) 6 High Cool(/:rioalto)y >!jtlsw
el termostato a una tcmpemmm m_i_aim.
[as bate_s es(fin in_rtadas *lnspeccione la posicidn de las baterfa_. Deben estar
incorreclamente, insertadas en la posici6n indicada, (+) y (-).
[as baterlas pueden *Reemplace l_tsbaterfas.
estar ago 'tadas.
Tiempo h(unedo y caliente. *Esto es normal.
Elacondicionador de aire *Pa,a drermr el agua aplopiadan/ente, (er(/orese de que
no estfi indinado hada afimm, el acondicionador de aire estri inclinado lige_'4mente
La humedad removida del aire *Esto es normal [_)r tm co_1o perh)do en fir{mscon poca
y se drena hasta h bandeja, humedad; rlormal pot tm ]x!rk)do de tiempo m:;_s
posm)gado en rireas narishdmedas.
C6_go de error de flmcidn. *De_onecm el acondickmador de aire. Espere 3 minutos y
Una p&dida en el sumin'mt_'o
eli,c(rico o tma interrupd6n ha
ocurrido.
enchdf;elo otlvt vez.
*En el caso de una p&*/ida del suministro el&trio) o
una interrupci6n, las [unciones de SincronizadoryOo_iren la
unidad se re@lsmrrial @lste origim/I,Es [x_sibleque usted necesite
@lsl:arun tiempo nuevo si&_iIodesea.
17
Page 38

Solucionarproblemas.
Sonidos de operacion normales
i_ Ouiz5s escnche un sonido metfilico cmlsado pot
el agxla tomada y timda contra el condensador en
los d_as llm iosos o cuando la humedad es alto. Esta
caracmt_stica de disefio a) uda a temow'r la humedad
y mttjota la eficiencia.
N ()jliz[ksescuche que el wrmostato hace clic cuando el
comptesor hace cido emre encendido y apagado.
_ E1agua se acumula en la bandeja dumnte dirtsIluvi(_os
o con mucha humedad. Elagua podrfa dermmars*,y
gomar desde el lalo extemo de la unidad.
_0E1ventiladot p(_/rfuf'unckmaraun si el compresor no
Iohace.
!8
Page 39

GarantiadesuacondicionadordeairedeGE.
Todos los servicios de garantfa los proporcionan nuestros Centros
de ReparaciSn de F#brica o nuestros t#cnicos Customer Care®
autorizados. Para concertar una cita de reparaciSn, en Ifnea,
24 horas al ilia, visitenos al ge.com, o flame a1800.GE.CARES
(800.432.2737). Cuando flame para solicitar servicio, por favor
tenga a mano el nE/mero de serie y el n6mero de model&
__!•, ,_ GE reemplazar£
la thbricad6n.1)umntc esm garantia limitada do un a_o, GE tmnbi_n proporcionm'J, sin costo
;4_Viajes de ,,_ervicio a su ca,;a para mostrm'le c6mo
fm_ciona el equipo.
_4_h_stalaci6n o entrega inapropiada, o mantenimiento
impropio. Si usted tiene un problema durante la
instalaci6n, o si su acondicionador de aire no tiene la
capacidad de enfriamiento que usted necesita, p6i_ase
en contacto con nues_o distribuidor o hzstalador.
Usted es resl_on_,_able de proporcionar las facilidades
de conexi6n el6ctrica necesarias.
_ F'_o del producto resultante de modificaciones al
producto o debido a uso irrazonable incluyendo no
proporcionar mante_fimien/o razonable y necesario.
_ En locales comerciales, la mano de obra necesaria para
retirar la uni 'dad hacia un lugar para revisi6n por parte
de un t6_aaico individual.
Grapeaquf su recibo.
Se requiere facilitar prueba
de la fecha de compra orighTat
para obtener u, servicio
bajo la garantfa.
;;!_Reemplazo de fusibles de la casa o reajttste del sistema
de circtfi|os.
;4_Fallos debido a la corrosi6n en modelos que no estall
protegJdos contra la corrosi6n.
i;_Dafio al producto causado por voltaje inapropiado hacia
el equipo, accidentes, incendi_s, inundaciones o actos
de la naturaleza de fuerza mayor.
_ Dafios incidentales o consecuenciales causados por
defectos posibles con este acondicionador de aire.
;4_Danos despu6s de la entrega.
_ Producto no accesible para facilitar el servicio requerido.
EXCLUSIONDE GARANTIAS IMPLiCITAS--Su #nico y exclusive derecho es la reparacion del producto, tal y
como se indica en esta Garantia limitada. Cualquier garantia implicita, incluyendo las garantias implicitas de
comerciabilidad o adecuacion para un fin determinado, esMn limitadas a un a#o o el periodo de tiempo mas
breve permitido per la ley.
Estagarantia se extienfle al compraflor original y cualquier compraflor posterior de productos comprados para uso
residencial flentro de Estados Unido& Si el producto est# situado en un #rea que no dispone de servicio por parte
de un proveedor de servicio autorizado de GE,poflria tener que hacerse cargo de los costes de envio o bien podria
solicit#rsele que Ileve el producto a una centro de servicio de GE autorizado para realizar la reparaciSn. EnAlaska,
la garantia excluye el costo de envio o las visitas de servicio a su casa.
Algunos estados no permiten la exclusiSn o las limitaciones de darius incidentales o consecuenciales. Esta garantia
fla flerechos legales especificos, y usted poflria tener otros derechos que variar#n de estafio a estado. Para saber cuales
son sus derechos legales, consulte a la oficina de asuntos del consumidor local o la oficina del Attorney General en
su Iocalidad.
Garante: General Electric Company. Louisville, KY 40225
19
Page 40

Apoyoal Consumidor.
PaginaWebdeGEAppliances
qTien( alguna pregunm sobr( su ,electrodomdstio:)? iF'm(l:,_ la p:_gina "_'_!1)de (;E ,\pF, lianc(s, cualquier
d_a del afio! Pare l]l_:iTvoF,:onvenien(ia x s( rvi(io mils r@Mo, ya puede des(argar los Mamlales de los
Propi( mri(;s, (; inchlso pedir piezas hac(r una cim en linea.
Soliciteunareparaci6n
El s(l_'i(io de expertos (;E (sly{ a tan s61o un paso de su puerto, iEntre _n lfn(a y solicile su reparacidn
cuando le venga bi(n 24 horns al dfa cualquier dfa del afio! O llame al 800.GE.(TARES ........
(][ll_ll[(_ hol_as llOl-lllales de oficina.
(800.4a2.2 la 1)
RealLibDesignStudio(Estudiodedisefioparalavidareal)
(;E apoya el concepto de Dis(rio [ 7niveixal--pr<Muctos, s(lvicios y ambientes que puedel'_ usar genre de
todas Ins edades, tamm'_os y capacidades. Reconocemos la necesidad d( disefiar pm-,tuna gran gama de
habilidades v dilicuhades fisicas v mentales. Para mils detalles col)r( Ins aplicaciones de GE Disel'_o1_l'd',arsal,
incluyel'tdo id(as de disefio par,i la cocina pm-a personas con discapacidades, mir( nuestra pfigina _g(,b ho}
mismo. Para pel_onas cola dilicuha(les auditiwls, thvor d( llamar al 800.TDD.GEA(I (8(_).833.4322).
garantfasampliadas
ge.com
ge.com
ge.com
ge.com
Compre una garantfa ampliada y ,.)btenga ,:l(lall(s sol)re des(uentos esp(ciales disponibl(s mi( ntras su
gamntfa estfi a6n activa. Pu(de conaprarla (n lhaea (:11cual(luier naomenlo, o llamar al (800.626.2224)
dumnte horns n(;Hnales de (;ficina. GE COllStlll]( l" I Iollle S( l-Vi(es (:s1_t1_/al]ll ahl* (llalldO Sll garanlfa t( rmin(.
Piezasyaccesorios
Aquellos individuos con la caliiicaci6n l'_ecesaria l)ara repal-,u sus pvopios electrodomdsticos pueden
p(dir que se les manden las piezas o accesofios directamenm a sus hogares (aceptamos las tal-jetas
VISA, MastevCavd y Discovcr). Ilaga su pedido en lfi_ea hoT,;24 hoF,ts cada d;a o llamar pot _cldlbno
al 8(_).626.2002 durante hon_s normales (le oficina.
Las instruocionesdescritas en este manual cubren losprooedimientos a seguir por cualquier usuario. Cualqoier
otra reparaoi6n deberia, por regla general, referirse a personal califioado autorizado. Debe ejercerse precauci6n
ya qoe las reparaoiones incorrectas pueden caosar oondioiones de foncionamiento insegoras.
P6ngaseoncontactoconnosotros
Si no eslfi satist_clao con €1servicio que recibe d( (;E, pdngase en conla(:lo coil IIOS_)IFOS(_lll]lleSll_lp:_gina
XX(b _d (a d t(Mos los detalles as; como su lllll]l(?l-Ode teh:fono o esrrfl)anos a:
(;( neml Manag( r, Cl/SIOlll(:l"R(lations
(;F Apl)lian(( s, Applianc( Park
• . r C ,X
Louls\lll¢, t_ 4()22:_
Registresuelectrodomestico
ge.com
ge.com
ge.com
iReg_,gre su nuevo electrodom6stico en linea---cuando usted prefiera! El registrar suproducto a tieml)O 1(
propor('ionarfi, si surgiem la no( esid;id, una mejor comunic_wi6n 3 un servicio mils nil)ido bqjo los t&minos
de su gamnt_a. "Iambi&_ puede enviar _,utaljeta de registro pre-iml)resa que se incluye en el malelial de
embalaje o recorte y use el fi_rlnulario (le eslt. Manual del Propietario.
20 Impreso on China
 Loading...