

Page 1
0
©
Saf_ tngruc_ions .......... 2,3
Operating Imbue€iota"
Controls--Control Kt_obs ..... 6, 7
Comrols--Touch Pads ....... 4, 5
Care and Cleaning
Air Fihei . .................... 8
gatteiJes ..................... 8
Grille ai_d Case ............... 8
Outdoor Coils ................ 8
Installation Ircs_ructions
Through-the-Wall
Installation--Optio_ al ........ 15
Wii_dov, I_stallati<m ......... 9-14
ge.com
ASD06*
ASM08*
ASMIO*
ASMI2*
As lo
ASQ12
ASQI4
ASVI 0
ASVI2
ASVI4
©
Troubleshootirg Tips ........ t{i
Normal Operati_g Som_ds ..... [ti
Consumer Support
Consumei Suppoi t ........... 20
Product Registcati<m ....... t7, 18
Wa rra_ tv. ................... [9
*ENERGY STAR 4_ labeled product
1
ENERGYSTAR
As an ENERGY STAR ® partner, GE has
determined that this product meets
the ENERGY STAR_ guidelines for
energy efficiency.
:<
Write the model and serial
numbers here:
Model #
Serial#
Find these nmnbers on a label on
the side of the air conditione_:
DB98-26675A 49-7567 02-07JR
Page 2
IMPORTANTSAFETYINFORMATION.
READALLINSTRUCTIONSBEFOREUSING.
WARNING!
For your safe_ the information in this manual must be followed to minimize the risk of fire, electric shock
or personal inju_
SAFETYPRECAUTIONS
Use this appliance only %r its intended
puq)ose as described in this )wner s
Manual.
This air conditioner must be properly
installed in accordance with the Installation
Instructions before it is used.
Nexer unplug your air conditioner by pulling
on the power cord. Always grip plug firefly
and pull straight out from the receptacle.
Replace immediately all elecu_ic service
cords that ha_e become flwed or otherwise
damaged. A damaged power supply cord
must be replaced with a new power supply
cord obtained from the manufacturer and
not repaired. Do not use a cord that shows
cracks or abrasion damag> along its length
or at either the plug or connector end.
• (
HOWTOCONNECTELECTRICITY
If the receptacle does not match the plug,
the receptacle must be changed out by a
qualified electrician.
Turn the unit OFFand unplug your air
conditioner before making any repairs
or cleaning.
NOTE,"Westronglyrecommendthat anyservicing
be performedbya qualified individual.
For your safew...do not store or use
combustible mamdals, gasoline or other
flammable vapors or liquids in the vicinity
of this or any other appliance.
All air conditioners contain refligerants,
which under federal law must be remo_>d
prior to product disposal. If you are g>tdng
rid of an old product with reflig_rants, check
wifl/the company handling disposal about
what to do.
Do not, under any circumstances, cut or remove
the third (ground) prong from the power cord. For
personal safe_ this appliance must be properly
grounded.
DONOT use an adapterplug with this appliance.
The power co_d of dfis appliance is equipped
with a 3-prong (grounding) plug which mates
with a standard 3-prong (grounding) wall
outlet m minimize the possibility of electric
shock hazard flom this appliance.
Power cord includes a cmTent inte[xupmr
device. A rest and reset button is provided on
the plug case. The device should be msmd on a
periodic basis by first pressing the TESTbutton
and then the RESt'button. If the TESTbutton
does not trip or if die RESETbutton will not
stay eng;_g_d, discontinue use of file air
conditioner and contact a qualified seiMce
technician.
Haxe the wall outlet and circuit checked by a
qualified electrician to make sure the outlet is
properly grounded.
Where a 2-prong wall outlet is encountered,
it is your personal responsibility and obligation
to have it replaced with a properly grounded
3-prong wall outlet.
The air conditioner should always be
plugged into its own individual electrical
outlet which has a xoltag_ rating flint matches
the rating plato.
This provides the best perfommnce and also
prexents oxerloading house wiring circuits
which cou]d cause a fire hazard from
oxerheated wires.
See the Installation Instructions, Electrical
Requirements section for specific electdcal
connection requirements.
2
Page 3
WARNING!
USEOFEXTENSIONCORDS--115-Voltmodelsonly
ge.com
Because ofpotential safety hazards under certain
conditions, we strongly recommend against the
use of an extension cord.
Howex>t; if you must use an extension cord,
it is absolutely necessary that it be a UiAismd,
14 gauge, 3-wire grounding type appliance
extension cord having a grounding type plug
and outlet and flint fl)e electrical rating of file
cord be 15 amperes (minimum) and 195 x_lts.
A CAUTION:
DO NOT use an extension cord with any of the
230/208 voltmodels.
READANDFOLLOWTHISSAFETYINFORMATIONCAREFULLY.
SAVETHESEINSTRUCTIONS
Page 4
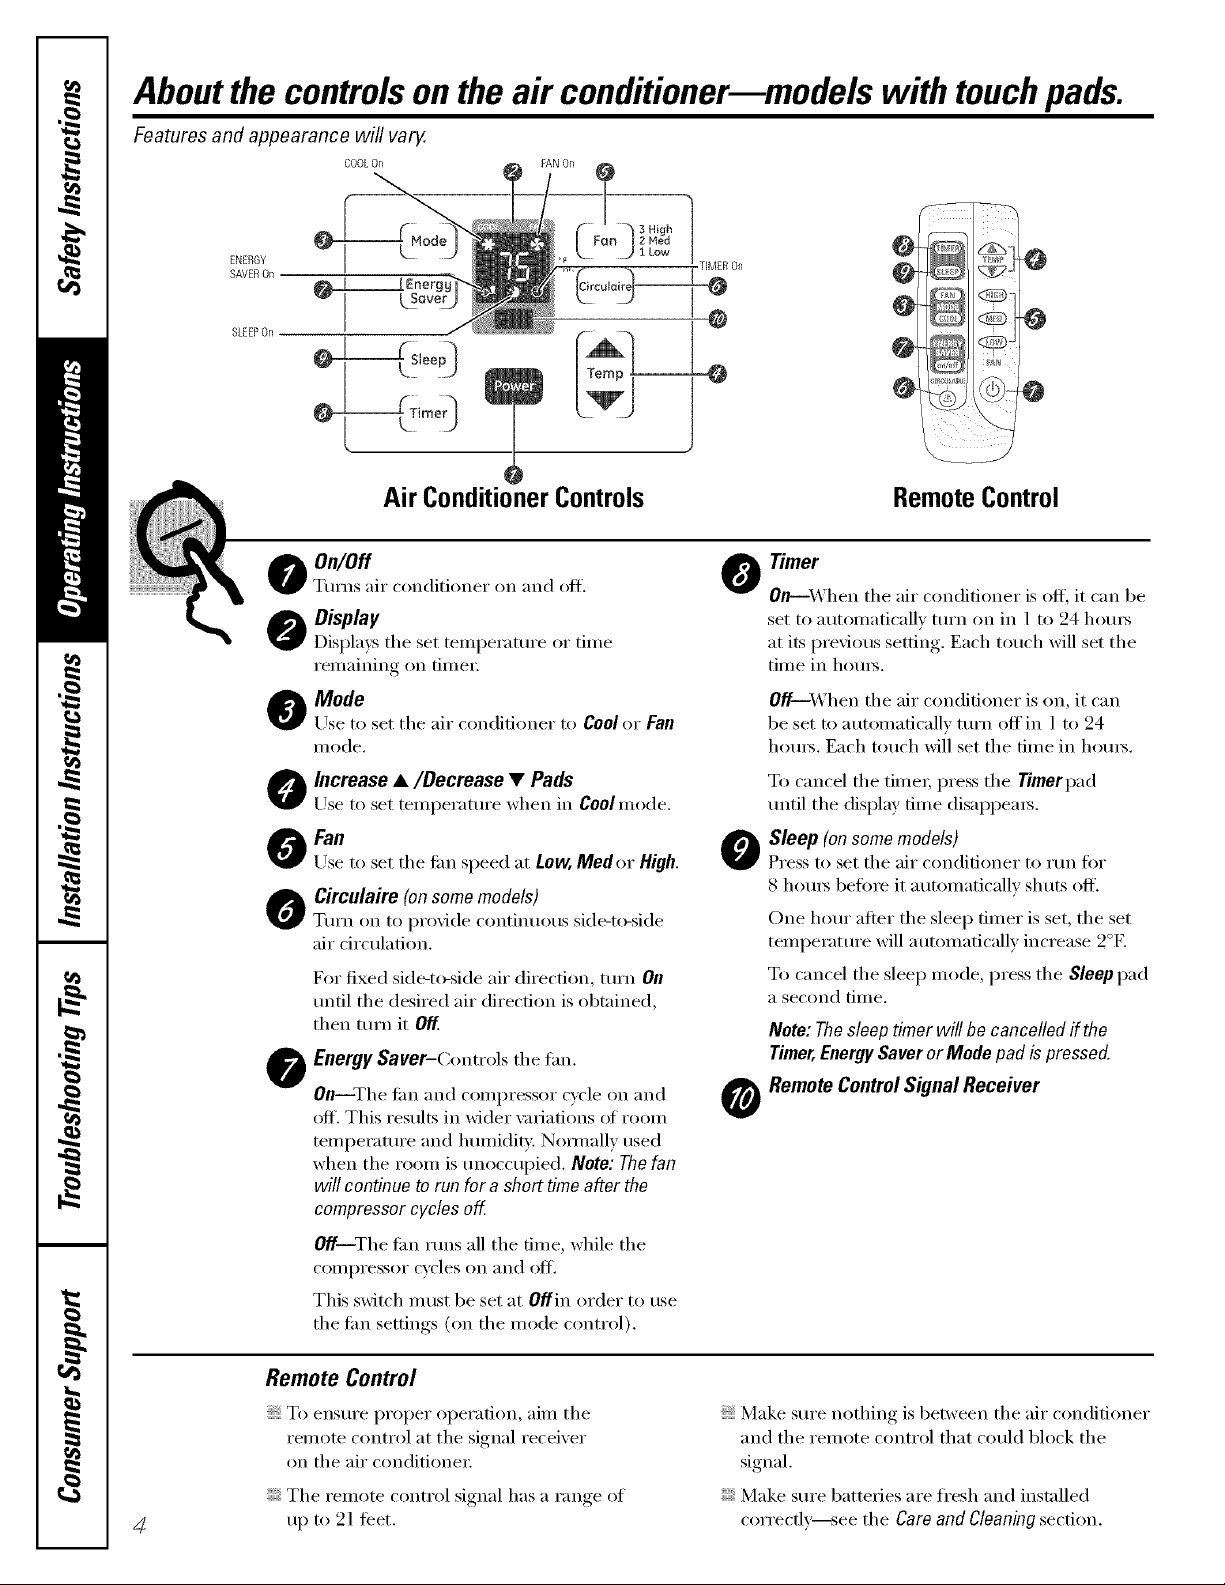
Aboutthe controlsontheair conditionermmodels with touchpads.
Features and appearance will vary.
COOLOft
ENE£GY
SAVE£On
SLEEPOn
Air ConditionerControls Remote Control
) On/Off
G Turns air conditioner on and off.
O Display
Displays tile set temperature or time
remaining on fime_:
Mode
@
Use to set tile air conditioner to Cool or Fan
I/lode.
Increase •/Decrease • Pads
O
Use to set temperature when in Cool mode.
Fan
0
Use to set tile tim speed at Low, Medor High.
o girculaire (on some models)
TtlYn on to provide ('ontintlOtlS side-to-side
air circulation.
For fixed side-to-side air direction, mrn On
until the desired air direction is obtained,
then mrn it Off.
O Energy Saver-Controls tile tim.
On--The tilll and compressor cycle on and
off. This results in wider \miations of room
temperature and humidit,i. Nommlly used
when the room is tmoccui)ied. Note: The fan
will continue to run for a short time after the
compressor cycles oK
@
@
@
Timer
On--X,Vhen tile air conditioner is off, it can be
set to automatically mrn on in 1 to 24 hom_
at its i)revious setting. Each touch will set tile
time in hom_.
O/'/J]'_ hen tile air conditioner is on, it can
be set to automatically turn off in 1 to 24
hou_. Each touch will set tile time in hom_.
To cancel tile timex; press tile Timerpad
tmtil tile display time disappears.
Sleep (on some models)
Press to set tile air conditioner to run fi)r
8 ho/u_ befi)re it automatically shuts off'.
One hour after tile sleep timer is set, tile set
temperature will automatically increase 2°F.
To cancel the sleep mode, press the Sleep pad
a second time.
Note: Thesleeptimerwill be cancelledif the
Timer,Energy Saver orMode pad ispressed.
RemoteControlSignal Receiver
0
O/'/JThe tiln rtlns all tile time, while tile
compressor cycles on and otE
This switch must be set at O//in order to use
the tim settings (on the mode control).
Remote Control
To ensure proper operation, aim tile
remote control at tile signal receixer
on tile air conditione_:
Tile remote control signal has a range of
( c
4
up t ) 21 teet.
Make sure nothing is between tile air conditioner
and the remote control that could block the
signal.
Make sure batteries are fl'esh and installed
correctly see the Care and Cleaning section.
Page 5
Additional controls and important information.
Do Not Operate in Freezing Outdoor Conditions
This cool-only air conditioner was not designed fin.
fl'eezing otltdoor conditions. It ill list not be tlsed in
fl'eezing outdoor conditions.
When the air conditioner is turned on, # will
automatically start in the setting last used.
Power Outage Recovery Feature
In the case ot a power outage or interruption, the
refit will automatically re-start in the settings last
used atter the power is restored. The rimer'and
CoolMode
g_com
Sleep t_'atures will reset to the original setting.
_4m may need to set a new time if' desired.
Use the Coolmode with High(3),Med (2)or
Low(1)tim flw cooling. Use the Increase• /
Decrease• pads to set the desired temperature
between 64°F and 86°F in 1°F increments.
CoolingDescriptions
ForNormalCoolin#---Selectthe Coolmode
and High(3)or Med (2)tim with a middle set
temperature.
A themlostat is used to maintain the room
temperature. The compressor will cycle on and off
to kee I) the room at the set level of comtort. Set the
themlostat at a lower nmnber and the indoor air
will become cooler Set the themlostat at a higher
ntunber and the indoor air will become wamle_:
NOTE:Ifthe ak conditioneris off andis thenturned on
whileset to Coolit will take approximately3minutes for
thecompressorto startand cooling to begin.
ForMaximumCoolino_--Select the Coolmode
and High(3)tim with a lower set temperature.
ForQuieter& NighttimeCoolino--Select the
Coolmode and Low (1)tim with a middle set
temperature.
NOTE:If youswitch from a Coolsettingto Offor to
a fan setting,wait at least3 minutesbeforeswitching
back to a Coolsetting.
Fan Mode
Use the Fan at High (3), Med (2) or Low (1) to pro)vide Since tim only settings do not provide cooling,
air drculafion and filtering without cooling, a temperature setting will not be displayed.
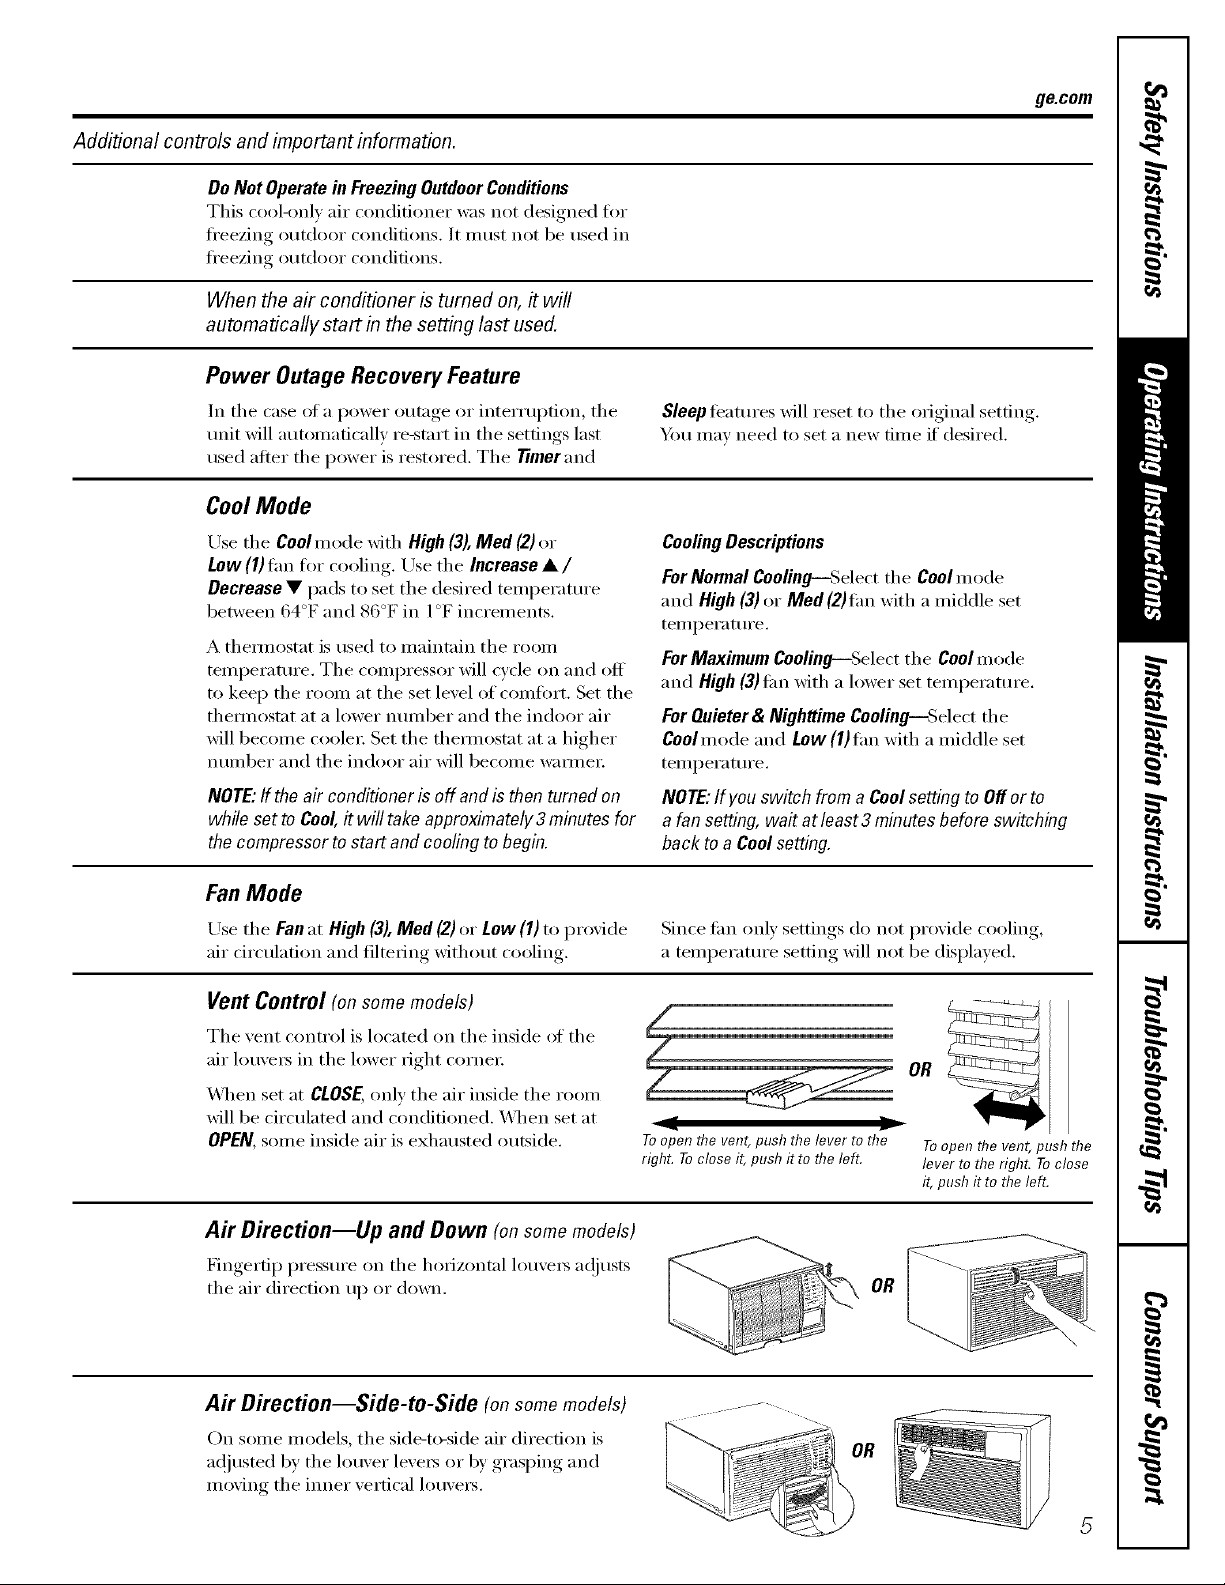
Vent Control (on some models)
The vent control is located on the inside oI the
air louve_ in the lower fight corne_;
_]len set at CLOSE,only the air inside the room
will be circulated and conditioned. X,_qaenset at
OPEN,some inside air is exhausted outside.
/
Z
TooTenflTevent,pushthelevertoflT_
righLTocloseit,pushit to theleft.
OR
Toopen the vent, push the
lever to the right Toclose
it, push it to the left.
Air Direction--Up and Down (on some models)
Fingertip pressm'e on the horizontal lou\'e_5 a(!justs
the air direction up or down,
Air Direction--Side-to-Side (onsomemodels)
On some models, the side-to-side air direction is
a(!justed by the louver lex'e_ or by grasping and
m eying the inner vertical lou\'e_.
OR
Page 6
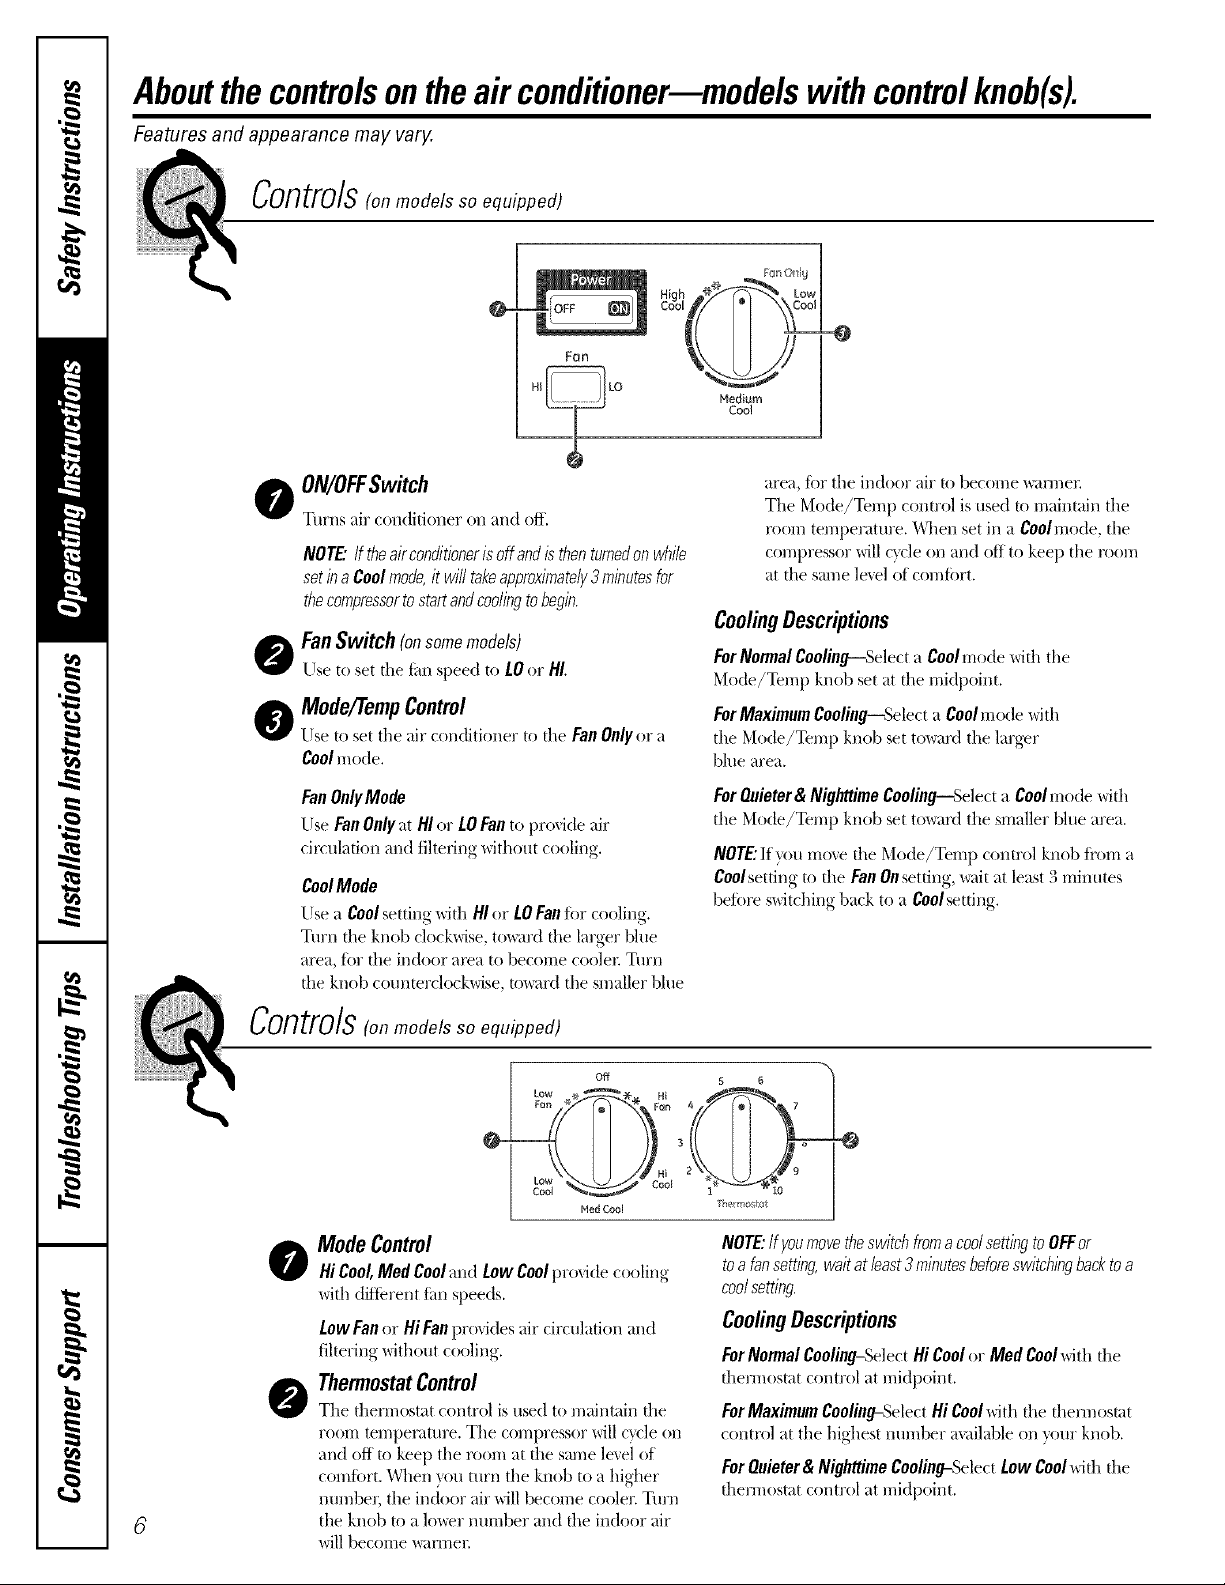
Aboutthecontrolsontheairconditioner--modelswithcontrolknob(s).
Features and appearance may vary.
Controls(o,models so equipped)
@-
Hedium
Coo!
d,
area, ti)r the indoor air to become _mnex:
o ON/OFFSwitch
Turns air conditioner on and off.
NOTE'.Iftheairconflitionerisoffandisthenturnedonwhile
setinaCoolmode,it willtakeapproximately3minutesfor
thecompressortostartandcoolingtobegin.
o FanSwitch(onsomemodels)
Llse to set the tim speed to LOor HI.
O Mode/TempControl
Use to set the air conditioner to the FanOnlyor "a
Coolmode.
T]_e Mode/Temp control is used to maintain the
room temperature. _,\l/en set in a Coolmode, the
compressor will cycle on and off to keep the room
at the same le_.el of comtort.
CoolingDescriptions
ForNormalCooling--Selecta Coolmode _dd_the
Mode/Temp knob set at the midpoint.
ForMaximumCooling--Select a Coolmode with
the Mode/Temp knob set to_ard the larger
blue area.
FanOnlyMode
UseFanOnlyatHIor LOFanto provideair
circulation and filtering _dthout cooling.
CoolMode
Use a Cool setting with HIor LOFanti,r cooling.
Turn the knob clock\dse, toward the larger Nile
area, tbr the indoor area to become coolex: Turn
file knob counterclock\_ise, tm_u'd the smaller blue
Controls(o,modelssoequipped)
Off 5 6
@-
Ned CoN _herin st(st
o ModeControl
Hi Cool,Med Cooland LowCoolproxide coolino
with (tiJterent fan speeds.
Low Fanor HiFan pro_ides _drcirculadon and
filtering without cooling.
ThermostatControl
O
The thermostat control is used to maintain the
room temperature. The compressor will cycle on
and off to keep the room at the same level of
comiort. When you turn the knob to a higher
mm_bel; the in(leer air will becolne cooler Turn
the knob to a lo_w" nm-nber and the indoor air
will become '_m'rner
ForOuieter& Nighttime Cooling--Select a Coolmode with
the Mode/Temp knob set toward the smaller blue area.
NOTE:If you mo_.e the Mo(te/Temp control knob ti'om a
Coolsetting to the Fan0nsetting, wait at le *st 3 rain tes
before s_dtching back to a Coolsetting.
-@
NOTE:If youmovetheswitchfromacoolsettingtoOFFor
toa fansetting,waitat inast3minutesbeforeswitchingbacktoa
coolsetting.
CoolingDescriptions
ForNormal Cooling=SdectHiCoolor Med Coolwith d_e
them_ostat control at midpoint.
ForMaximumCooling-Select Hi Coolwith the them_ostat
control at the highest mm_ber available on veto" knob.
ForQuieter & NighttimeCooling-Select Low Cool with the
them_osmt control at midpoint.
Page 7

Additional controls and important information.
Do Not Operate in Freezing Outdoor Conditions
This cool-only air conditioner was not designed fi)r
fl'eezing outdoor conditions. It must not be used in
ti'eezing outdoor conditions.
Vent Control (on some models)
Tile vent control is located on the inside of tile air
lou\'e_ in tile lower right corne_:
\,_]]en set at CLOSE,only tile air inside tile i'ooi11
will be circulated and conditioned. _,\]]en set at
OPEN, some inside air is exhausted outside.
A_Direction--Side-to-Side
On some models, tile side-t(_side air direction is
a(!justed by tile louver le;'e_ or by grasping and
moving tile inner vertical lou\'e_.
Z
Toop_enthe vent, push the lever to the
right. Toclose it, push it to the left.
g_com
Toopen the vent, push the
lever to the right Toclose
it, push it to the left.
.... OR
Air Direction--Up and Down (onsomemodels)
Fim)gertip pressm'e on the ]l(Mzom/ta] ]ollvers a(!jllsts
the aii" (]ii'ectio]/ lip Of do*vii.
OR
\
7
Page 8

Careand cleaning ofthe air conditioner.
How to Insert the Batteries
] Remove the battery cover by sliding it
according to the arrow direction.
] Insert new batteries, making sure that the (+)
and (-) of battery are installed correctly:
] Reattach the coxer b) sliding it back
into position.
Grille and Case
Turn the air conditioner oiI and remo'.e the
plug fl'om the wall outlet before cleanin ,
OutdoorCoils
The coils on the outdoor side of the air conditioner
should be checked regularly. If they are clogged
with dirt or soot, they may be profl_ssionally
cleaned.
NOTES:
Use 2 "_k" ( 1.5 volt) batteries. Do not use
recha_geable batteries.
Remove the batteries fl'om the remote control if'
the system is not going to be used fin" a long time.
To clean, use water and a mild deteroent
Do not use bleach or abrasives.
AirFilter
The air filter behim_d the _]'(mt grille sl]ou]d be
_]*e_ ked amid c]em_ed at ]east ever_ 30 da_s or
more often? if"m?ecessar_2
C]em_ t]_e filter wid] warm, soap} water: Rim_se m_d
let the filter dry be[ore rep]ach_g it.
CAUTION:DoNOroperateair
conditionerwitl_outafiMr becausedirtandI/?_twi//clogit
and reduce performance.
7"0remove:
Grabthetabson
thefilter andpull
it upandout
8
Page 9

Installation
Air Conditioner
Instructions
I _ Questions? Call 800.GE.CARES (800.432.2737) or Visit our Website at: ge.com I
BEFORE YOU BEGIN
Read these instructions completely
and carefully,
• IMPORTANT - Savethese
instructions for local inspector's use.
• IMPORTANT - Observeall
governing codes and ordinances,
• Note to Installer - Be sure to leave these
instructions with the Consumer.
• Note to Consumer - Keep these
instructions for future reference.
• Skill level - Installation of this appliance
requires basic mechanical skills,
• Completion time - Approximately 1 hour
• We recommend that two people install
this product.
• Proper installation is the responsibility
of the installer.
• Product failure due to improper installation
is not covered under the Warranty.
• You MUST use all supplied parts and use
proper installation procedures as described
in these instructions when installing this air
conditioner.
CAUTION:
Do not, under any circumstances, cut or
remove the third (ground) prong from the
power cord.
Do not change the plug on the power cord
of this air conditioner.
Aluminum house wiring may present special
problems--consult a qualified electrician.
Do not install this air conditioner in a
window if the type C bolts do not contact
the window sill. See the Window Installation
Instructions in this manual.
TOOLS YOU WILL NEED
Phillips head screwdriver Adjustable wrench
ELECTRICAL REQUIREMENTS
Some models require a 115/120-volt a.c.,
60 Hz grounded outlet protected with a
15-amp time delay fuse or circuit breaker.
The 3-prong grounding plug minimizes the
possibility of electric shock hazard. If the wall
outlet you plan to use is only a 2-prong outlet,
it is your responsibility to have it replaced with
a properly grounded 3-prong wall outlet.
Some models require 230/208-volt a.c.,
protected with a time delay fuse or circuit
breaker. These models should be installed
on their own single branch circuit for
best performance and to prevent
overloading house or apartment wiring
circuits, which could cause a possible
fire hazard from overheating wires.
Pencil
Level Scissors or knife
Power cord includes a current interrupter
device. A test and reset button is provided on
the plug case. The device should be tested on a
periodic basis by first pressing the TEST button
and then the RESET button, If the TEST button
does not trip or if the RESET button will not stay
engaged, discontinue use of the air conditioner
and contact a qualified service technician.
Ruler or tape measure
Page 10

Window Installation Instructions
PARTS INCLUDED
(appearance may vary)
Left
accordion
panel
Top mounting rail
Foam top
window gasket
sash seal
_ Window
mounting rail
seal strip
Right
accordion
e
panel
Type A (18 or 19)
1/2" screws
Bottom inner
case gasket
Type B (8) Type C
3/4" screws bolt (2)
Security bracket (1)
&
10
Page 11

Window mnstamiation mnsttuctions
[] WINDOW REQUIREMENTS
• These instructions are for a standard
double-hung window. You will need to
modify them for other types of windows.
• All supporting parts must be secured
to firm wood, masonry or metal.
• The electrical outlet must be within
reach of the power cord.
Models ASD06, ASM08, ASQ10, ASVl0 only
(See below illustration for Models ASM10, ASM12,
ASQ12, ASV12, ASQ14, ASV14.)
143A"min.
243/4" to 36"
(With accordion panels)
fl-
Models ASM10, ASM12, ASQ12,
ASV12, ASQ14, ASV14 only
(Seeaboveillustration for Models ASD06,
ASM08,ASQ10,ASVl0.)
l 16¼" min.
26" to 39W'
(With accordion panels)
1
STORM WINDOW REQUIREMENTS
[]
A storm window frame will not allow the
air conditioner to tilt toward the outside,
and will keep it from draining properly.
To adjust for this, attach a piece of wood
to the stool.
WOOD PIECES-
WIDTH: 2"
LENGTH: Long enough to fit inside the
window frame.
THICKNESS: To determine the thickness,
place a piece of wood on the stool to
make it 1/2" higher than the top of the
storm window frame or the vinyl frame.
Attach securely with nails or screws
provided by the installer.
1/2" higher
than vinyl frame
L (on some windows)
/
ll!
1/2" higher _
than storm _- r f"_l Jr b"/._
window _-1"1_ II 1[L1" / _1_............
frame __tool _'
Storm window •
frame /- S Vinyl frame I I
REMOVE THE FRONT GRILLE
[]
___ --Wood
(IFATTACHED)
[]
Remove shipping tape, if present.
On models with a
raise-up inlet grille,
lift it and remove
the screw behind it
(if present) that holds
the grille in place.
On models with a
slide-out air filter,
remove it and the
screw behind it
(if present) that holds
the grille in place.
[]
Gently but firmly grasp
the lower grille corners,
press in on the case
sides and pull forward
to release.
NOTE: Do not pull the
bottom edge toward
you more than 3" or
you may damage the tabs of the grille,
Lift the grille up and off the top tabs.
[]
!itt
11
Page 12

Window Installation Instructions
[] REMOVE THE AIR CONDITIONER
FROM THE CASE
[] Remove the 2 or 4 screws (depending on
model) on each side of the case. Keep the
2 front-side screws for later use.
Front of air conditioner
[] Slide the air conditioner from the case by
gripping the base pan handle and pulling
forward while bracing the case.
[] PREPARE THE CASE
[] Remove the backing from the top mounting
rail seal strip and attach it to the bottom of
the top mounting rail. Cut to size.
[] Install the top mounting rail with 4 or 5 type
A screws (depending on the number of
holes in the top mounting rail) from the
outside of the case.
Top mounting rail
Front of air conditioner
Remove packing cardboard and tape,
if present.
Bottom mounting rail
[] Insert the frames for the accordion panels
into the top and bottom mounting rails.
Attach the accordion panels to the side
of the case using 6 type A screws.
Top mounting rail
Accordion
panel
screws
BACK
Bottom mounting rail
12
Page 13

Window mnstamiation mnsttuctions
[] INSTALL THE CASE
IN THE WINDOW
[] Cut the window sash seal to the window
width and stick the adhesive side to the
bottom of the sash.
Window sill
Window sash seal
[] Thread two type C bolts into the support
brackets.
Slide the case into the window and lower
the window behind the top mounting rail.
Position the brackets on the case bottom so
they will be near the outermost point on the
window sill. Attach the support brackets to
each side of the case bottom using 4 type A
screws on each side. Adjust the leveling
bolts to touch the sill.
i
i
i
i
i
i
[] INSTALL THE CASE
IN THE WINDOW (cont.)
[] Locate the 7 screw holes along the bottom
front edge of the case. Center the case, side-
to-side, in the window and mount it to the
window sill using 3 type B screws staggered
in the front and back rows if possible.
Top mounting rail
TcYPewBt Type B
Type B screws
screws
[] Extend the left and right accordion panels to
the vertical window sashes and attach with
4 type B screws.
[] INSTALL THE SECURITY
BRACKET AND THE FOAM TOP
WINDOW GASKET
[] Attach the security bracket with a type B
screw.
._ .Type A screws
E
Window sill -- _-
_Type C bolts
-& CAUTION: Do not install this air
conditioner in a window if the type C bolts
do not contact the window sill.
[] Cut the foam top window gasket to the
window width.
[] Stuff the foam between the glass and the
window to prevent air and insects from
getting into the room.
13
Page 14

Window mnstamiation mnstructions
[] INSTALL THE AIR CONDITIONER
IN THE CASE
[] Slide the air conditioner into the case.
Reinstall the 2 front-side screws removed
earlier on each side of the case.
[] Place the bottom inner case gasket between
the bottom of the air conditioner and the
inside bottom of the case. Fold up the ends
on both sides and push them in.
Front of air Bottom inner
conditioner case gasket
[] Attach the front grille to the case by inserting
the tabs on the grille into the slots on the
front of the case. Push the grille in until it
snaps into place.
Guide the lever
carefully through the
grille as you push it in.
[] Secure the front grille to the case by
replacing the screw removed in Step 3.
Caulk or weather-strip any gaps or
openings to the outside to seal the
installation.
The installation is now complete.
14
Page 15

Through-the-Wami mnstamiation mnstructions--OptionaJ
The case may be installed through-the-wall
in both existing and new construction.
Read completely, then follow step-by-step.
NOTE: Obtain all materials locally for
mounting the air conditioner through-
the-wall.
[]
IMPORTANT
Through-the-wall installation is not
appropriate if any of the side or top louvers
in the case will be obstructed by the wall.
All side and top louvers in the case must
project on the outdoor side of the wall.
The room side of the case must project
into the room far enough to maximize the
balance of the unit.
The case must be installed level from side-
to-side and with a slight tilt from front to
rear. Use a level; no more than a 1/2 bubble
will be the correct case slant to the outside.
[] IMPORTANT (cont.)
[] Secure with 14 wood screws anchored at
least an inch into the wall support structure.
NOTE: Drill pilot holes, if necessary, for
proper installation. If the frame is oversized,
use shims to prevent case distortion.
[] FINISH THE WALL OPENING
[] Caulk all four sides on the outdoor side of
the case to prevent moisture from getting
through to the interior wall. Use of flashing
(drip rail) will further prevent water from
dripping inside the wall and down the
outside of the building.
__ 1"I Trim molding
e
Lintel angle is required to support bricks or
blocks above opening.
Flashing is required and should extend the
length of the opening to ensure no inside
cavity leakage occurs.
Remove the air conditioner from the case.
[]
For specific instruction, refer to the Window
Installation Instructions.
[]
Make certain that a wall receptacle is
available close to the hole location or make
arrangements to install a receptacle.
i ,
OUTSIDE
Air louvers
(top and /
sides must
project on the
outdoor side
of the wall)
Wood filler and
caulking (above
and below the
flashing)
Flashing
(Drip rail)
-- INSIDE
Bottom
rail
Flashing
(Drip rail)
Wood support strips
Bottom rail
/
[] Place the case in the wall opening and
place wood support strips between the case
bottom and the flashing on both sides of the
bottom rail. They should be the same height
as the bottom rail and the same length as
the wall opening.
[] Place the air conditioner into the case.
For specific instruction, refer to the Window
Installation Instructions.
Page 16

Troubleshootingtips...
Possible Causes What To Do
Airconditioner The air conditioner • Make sure tile ah" conditioner ph N is pushed
doesnotstart is unplugged, completely into tile outlet.
The fuse is bloval/circuit * Check file house fltse/circuit bx_aker box and replace
breaker is tripped, the flLse or reset the breakec
Power failure. * If t)o_er f_filure occm_, turn tile ;fir contfitioner Off
When po_er isrestored, \_;fit 3 minutes to restart the
air conditioner to prevent triplling of tile compressor
o_erload.
The current interrupter * Press tile Reset button located on file po_er cord plug.
device is lripped. • If the Reset button will not stay eng_|ged, discontinue
use of tile ;fir conditioner and contact a qu;flified
seLvice technician.
Airconditioner does Airflow is resMcted. * Make sure there are no curtains, blinds or fnmimxe
not cool as it should blocking the fi'ont of tile ;fir con(fitioner.
The temp conlrol may * On models with touc]L pads: Ill Cool mode, press the
not be set correctly. Decrease• pad.
• On models wiflLcontrol knobs, turn file temperature
knob to a higher nurrLbex:
The air Fdteris dirty. • Clean tile tilter at least eveiw 30 dm\s.
See the OperatingInstructiotis secti(;n.
The room may have been hot. • When file air conditioner is first turned on, you need
Cold air is escaping. • Check for open thrnace registers and cold air returns.
Cooling coils have iced up. • See "Air conditionerfreezingup"bellm.
Airconditioner Ice blocks the air flow • On models wiflLcontrol knobs, set tile mode control
freezing up and stops the airconditioner at High Fan or High Cool\\ith the temp at I or 2.
from cooling the room. • OIl Ulodels \_ith touch pads, set tile controls at
The remote controlis The batteries are htserted • Check file position of tile batteries. They should be
not working incorrectly, inserted ill tile opposite (+) and (-) direction.
The batteries may be dead. • Replace the batteries.
Waterdripsoutside Hot, humid weather. • This is normal.
to allo\x time for tile room to cool dox_al.
• Set the air conditioner's vent to the closed position.
HighFanor High Cool and set tile thermostat to
a higher mmperature.
Waterdripsindoors The air conditioner is not • For proper _Lter disposal, Lnake stu'e tile air conditioner
tilted to the outside, slants slightl} fi'om the case fl'ont to the reax:
Watercollectsin Moisture removed from air • This is normal fbr a short period ill areas with little
basepan and drahls into base pan. humidity; normal for a longer period ill \er\ humid areas.
"El'appears Ftmcfion error code. • U/lphlg tile air c(/nditiol/er Wait 3 l//il//l[es al/d plug it
in thedisplay back ill.
Timeror Sleepfeature A power outage or htterrupdon • Ill tile case of a power outage or interruption, the unit
notworkingproperly occurred. Timerand Sleepfeatures \_il] reset to tile original setting.
_bu may need to set a ue\_ time if desired.
78
Normal Operating Sounds
You may hear a pinging noise caused by
water being picked uI) and thrown against the
condenser on rainy days or when tile humidiP,'
is high. This design feature helps relnove
moisture and improve eflicienc'y.
You may hear tile them/ostat click when tile
compressor c'ycles on and off.
X._ater will collect in tile base pan during
high humidit}' or on rainy days. Tile water
may overflow and drip from tile outdoor side
of the unit.
; Tile lilll II/_:lV rlln even when tile COll/l)i'essor
does not.
Page 17

GE Service Protection Plus '_'
(;E, a imme recogifized wor]d_k]e for qua_ky a_]d depeildabi]k), offers )ou
Ser_ke Prote(tkm } ll_s --comp] eheI_s_ e prote(:tio[] (m a]ll }(mr applliai_(:es--
No Matter What Brand!
Benefits Include:
o Backed by GE
o All brands covered
o Unlimited service calls
o All parts and labor costs included
o No out-of-pocket expenses
o No hidden deductibles
o One 800 uumber to call
Y(a_ wi]] be completely satisfied wit]] ol_r service protectiom_ or }tin may re(p_est y(a_r mom_ey back
OH the ]'el]_aim_im_ 'valise of y(a_]" COm_tl'acL No (]10estiom_s asked. It's that sim[)]e.
Protect yollr refrige_toi; dis]_wash el; wash el" a_ d dryex; ra_lge, T\/, VCR a_] d m _lc]_ m ore--any brand!
Ph_s there's _o extra c]]arge %r emerge_cy service ai_d ]o_ moi_th]y fi_iai_ci_g is available. Eve]_ icemaker
coverage a_(]! {k)od spoilage protectio]_ is oftere(L _m ca_ rest eas}, ki_ov,]_g that a]] yore" va]_ab]e
ho_seho]d producers are protected aga]_st expe_sive repairs.
for more
'\!1 brmds cov_ r_(I, Iq) m 20 y_ars old, in dl_ c(mdn(mal U,S,
Wo Ti Corot Any Apptianco.
Anywhoro. Anytimo.
Please place in envelope and mail to:
General Electric Compan_
Warranty Registration Department
P.O. Box 3215{)
Louisville, KY 4{)232-215{)
/7
Page 18

Consumer Product Ownership Registration
Dear Customer:
Thank you for purchasing our product and thank you for placing your confidence in us.
_;e are proud to haxe you as a customer!
Follow these three steps to protect your new appliance investment:
Complete mid mail
your Constmmr
Product Ownership
Registration today:
Ilavc the pcm'c ot
nlind of knowing we
Call COlltaCt yOl/ ill
the unlikelx event of a
saft*tv modification.
After mailing the
registration below,
store this document
in a satb place. It
contains intk_rmation
vou will need should
you reqtfire service.
Our service mlmber is
800.(;E.CARES
(800.432.2737).
Model Number Serial Number
Important: If you did not get a registration card with your
product, detach and return the form below to
ensure that your product is registered, or register
online at ge.com.
Consumer Product Ownership Reg
Read vour Owner's
Manual careftflly.
It will help you
operate VOIIF llew
appliance properl>
,_Cllt here
I,,,,,,,,,,, I I , , , , , ,
M*: Ms. Mrs. Miss
First] ] Last]
Nam_ I I I I I I I I I Naln_ I I I I I I I I I I I I
Str_ et [
Address I I I I I I I I I I I I I I I I I I I I I I I I
Apl. # [ I [ I I I I I [ E-mail Address*
Daw Phc(d
Month I I
GE Consumer & Industrial
Appliances
General Electric Companu
Lauisvill< K¥ 40225
ge.con'l
Model Number SeriM Number
Pholle
* Please provide your emmil address to receive, via emmil, discomlts, special offbrs and other
important commmfications trom GE Appliances (GEA).
Check here if vou do not want to receive conm]unications d-ore (;EA's careftllly selected
partners.
FAILI RE TO COMPLETE AN[) RETI RN "FillS CARD DOES NOT DIMINISII Y( )[ 7R
W_kRI_\N'IT RI GI fFS.
For information about GEA's privacy and data usage policy, go to ge.com and click
on "Privacy Policy" or call 800.626.2224.
78
I
I
Page 19

GEAir ConditionerWarranty.
All warranty service provided by our Factory Service Centers,
or an authorized Customer Care®technician. To schedule service,
on-line, 24 hours a day, vis# us at ge.com, or call 800.GE.CARES
(800.432.2737).Please have serial number and model number
available when calling for service.
GE Will Replace:
Any part of the air conditioner which tifils due to a (lelect in materials or workmanshil).
Fromthe date of the
originalpurchase
Service trips to your home to teach you how to
use the product.
Improper hlstallation, delivery or maJntenm_ce. If you
have an h_staJlation problem, or if the air conditioner
is of improper cooling capacity for the intended use,
contact your dealer or hastaJler. You axe respmasible
for providing adequate electrical com_ecthlg facilities.
Failure of the product resulting from modifications to
the product or due to unreasonable use including failure
to provide reasonable and necessary maintenance.
In colmnercial locatimas labor necessary to move
the unit to a location where it is accessible for service
by an individual tecluficiml.
During this limited one-year warranty, GE will also provide, free of charge, all labor and related
sex,'ice to replace the defecti\'e part,
Staple your receipt here.
Proof of the original purchase
date is needed to obtain service
under the warrant_
Replacement of house fuses or resetth_g of circuit
breakers.
Failure due to corrosion on models not corrosion-
protected.
Dmnage to the product caused by hnproper power supply
voltage, accident, fire, floods or acts of God.
hacidentaJ or consequential dmnage caused by possible
defects with this air conditioner.
Dmnage caused after delivery.
Product not accessible to provide required service.
Limited Warranty. Any implied warranties, including the implied warranties of merchantability or fitness for a
EXCLUSION OF IMPLIED WARRANTIES--Your sole and exclusive remedy is product repair as provided in this
particular purpose, are limited to one year or the shortest period allowed by law.
This warranty is extended to the original purchaser and any succeeding owner for products purchased for home
use within the USA. If the product is located in an area where service by a GEAuthorized Servicer is not available,
you may be responsible for a trip charge or you may be required to bring the product to an Authorized GEService
location for service. In Alaska, the warranty excludes the cost of shipping or service calls to your home.
Some states do not allow the exclusion or limitation of incidental or consequential damages. This warranty gives
you specific legal rights, and you may also have other rights which vary from state to state. Toknow what your
legal rights are, consult your local or state consumer affairs office or your state's Attorney General.
Warrantor: General Electric Company. Louisville, KY 40225
19
Page 20

ConsumerSupport.
Haxe a question or need assist;race with your appliance? Try the (;E Al)pliances _._ebsite 24 hom_ a day,
l GEAppliancesWebsite ge.com
any da)of the year'. For greater comenience and faster service, you can now download Owner s Manuals,
order parts or e_.en schedule serxice on-line.
ScheduleService
Expert GE repair se_Mce is onl) one step away fl'om your doo_: Get on-line and schedule vc,t:u"service at
your conxenience 24 hom_ any day of the year! Or call 800.GE.(:AI/ES (800.432.2737) dufin{, n{mnal
business hom_.
ge.com
RealLifeDesignStudio ge.com
GE supports the Universal Design concept--products, services and environments that can be used by
people of all ages, sizes and capabilities. _,Verecognize the need to design for a wide range _ffphysical and
mental abilities and impaim_ents. For details of GE's Universal Design applications, including kitchen
design ideas for people with disabilities, check out our _,Vebsim today. For the hearing impaired, please call
800.TDD.GEAC (800.833.4322).
ExtendedWarranties ge.com
Purchase a (;E extended warrant_ and learn about special discounts that are axailable while xour, warrant_
is still in effect. You C_llli)urchase it on-line amfime or call 800.626.2224 during nomml business hom_.
GE (_onsulner Home Serxices will still be there after }our warrant}, expires.
PartsandAccessories
ge.com
Individtmls qualified to setMce their own appliances can have parts or accessories sent directly to their
homes (VISA, MasterCard and Discover cards are accepted). Order on-line today, 24 hom_ evet-v day or
by phone at 800.626.2002 during nomml business hom_.
Instructions contained in this manual cover procedures to be performed by any user. Other servicing generally
should be referred to qualified service personnel. Cautionmust be exercised, since improper servicing may cause
unsafe operation.
ContactUs
If vou are not safistied with the service w)u receive fl'om GE, contact us on our X.Vebsite with all the details
including your phone ntllllbeI; oi" wlJte to: General Manage_; CtlStOlllei" ]),elations
GE Appliances, Appliance Park
i,ouisville, KY 40225
Register your new applim_ce on-lhle----at your convenience! Timely product registration will allow for
l RegisterYourAppl&nce
enhanced conlinunicafion and prompt service under the terms of)our warranty, should the need arise.
You may also mail in the pre-printed registration card included in the packing material.
ge.com
ge.com
20 Printed in China
 Loading...