

Page 1
©
©
Safety Instructions ........... 2, 3
Operatt_g Ins#Tt_'ons
Comro| ....................... 4
Care and Cleaning
Air Fil_er . ..................... 5
(;rilleand (_se ................ 5
Outdoor Coils ................. 5
hgCallation Instructiolg" ..... (_9
Troubleshooting _Hps ......... 10
Nol lll_lI ()peradng Sotlllds ..... 10
Consu._- Support
(k:msmn_ r Support ............ 12
_\_m_m b . .................... 11
ge.com
A 5;5;05
Write the model and serial
numbers here:
Model #
Serial #
Find these numbers on a label on
the sid( ol the air (on(lifioneL
49-7588 11-07JR
Page 2
IMPORTANTSAFETYINFORMATION.
READALLINSTRUCTIONSBEFOREUSING.
WARNING!
For your safety, the information in this manual must be followed to minimize the risk of fire, electric shock
or personal injur_
SAFETYPRECAUTIONS
_;_Use dfis appliance only fbr its imcn& d
pmlx)se as described in this Owner's
Mmmal.
_¢;This air condition€ r must be properly
installed in accordan_ e with the Installation
[nstructions beiorc it is used.
{¢;N(_( r unplug your air conditioner 1)ypulling
on*h( l)(we('°(" Mwtvs, ,g l [) )t,gfi'nv•
and pull straight out fl'om the re(eptacle.
_;2Replace immediately all electric service
cords that have become fivw_d or othet_vise
damaged, A damaged power- supply cot-d
must be replaced with a new power supply
coM obtained from th( mamflhctnrer and
not tt paired. Do not us¢ a cotd that shows
crocks or abrasion damage along its length
o1-at tither th_ plug or connector end.
_;_If the r_ceptacle does not match the plug,
the *-ccq)tacle ill*is* be changed out b} a
qualified electrician.
{¢;Turn th_ unit OFFand unplug yore-air
_onditkmer b_ fbrc cleaning.
;;_GE does not SUl)port any se_Mcing of the air
conditioner: Wc strongly recomm(nd that
you do not attempt to s_rvic_ d_e air-
(ondition( r yoursel£
_;_ For yOtlF sat{'*}...do DOt StOl'(? OF rise
combustible mat_ rials, gasoline or other
flammable vapors or liquids in the vicinity
of this or anv other appliance.
_;__MIair conditkmers contain refAgcmnts,
which un&r t_.!deml law nmst b_ r_mov_d
prior to pt-oduc_ disposal. If you arc getting
rid of an oM product with *-cffigetwms, che_k
with the company handling disposal about
what to do.
HOWTOCONNECTELECTRICITY
Do not, under any circumstances, cut or remove
the third (ground) prong from the power cord•
For personal safety, this appliance must be
properly grounded,
DONOTuse an adapterplug with this appliance.
Th_ power tom of this appliance is _quipped
willl a 3-prong (grounding) plug which mates
with a standard &prong (grounding) x_vall
outkt to minimize the possibility of electric
shock hazard from this appliance.
Power cord illchldes a CtlrI(:IS[ iitlcrrllpt( F
device. A *(st and wset button is provided on
the plug case. The device shouM be t_st_d on a
p_ riodic basis by fi*st pr¢ ssing th< rESTbumm
and then the RESETbutton while plugged into
the outlet. If the TESTlmtton does not trip
or if the RESETbutton will not stay <ngwg< d,
discontimle use of" the air conditioner and
contact a qualified sel'vice t<chnician.
[lave the wall outlet and circuit checked by
a qualified ele_ trician to make sm_ the outlel
is properly grounded.
Whetc a 2-prong wall outkt is cncount_ re d,
it is your personal rt sponsibility and obli_ltion
u) have it replace d with a properly grounded
3-prong wall outlet.
The air condition_ r should ahvays be plugged
into its own individual dectrical outlet whk:h
has a vohag_ rating that matdms the rating
plate.
This provides the bes_ p_ rtbrmanc_ and also
prevems overloading house wiring (ircuits
which couM cause a fire hazaM fix)if*
ovedmated wir_ s.
Se_ d_e Installation Instructions, Electrical
Requirements sc_tion fi.w spedtk dc_ u'kal
COllll(X {iOll reqtsiF(qll(,llL'4,
2
Page 3

WARNING!
ge.com
USE
Because of potential safety hazards under certain
conditions, we strongly recommend against the
use of an extension cord.
[/ow¢xet, if you mus{ use all extension cord,
it is absohm ly ne cessat T that it be a 1JL-lismd,
14 gauge, _wire grounding _3pe applian_ _
extension cord having a gromlding type plug
and outlet and dmt the elecu'ical rating of the
co_*l be 15 amperes (minimum) and 125 vohs.
CORDS--115-Voltmodelsonly
CAUTION:
DO NOT use an extension cord with any of the
230/208 voltmodels.
READANDFOLLOWTHISSAFETYINFORMAtiONCAREFULLY.
SAVETHESEINSTRUCTIONS
3
Page 4
Aboutthecontrolsontheairconditioner.
Features and appearance may varg.
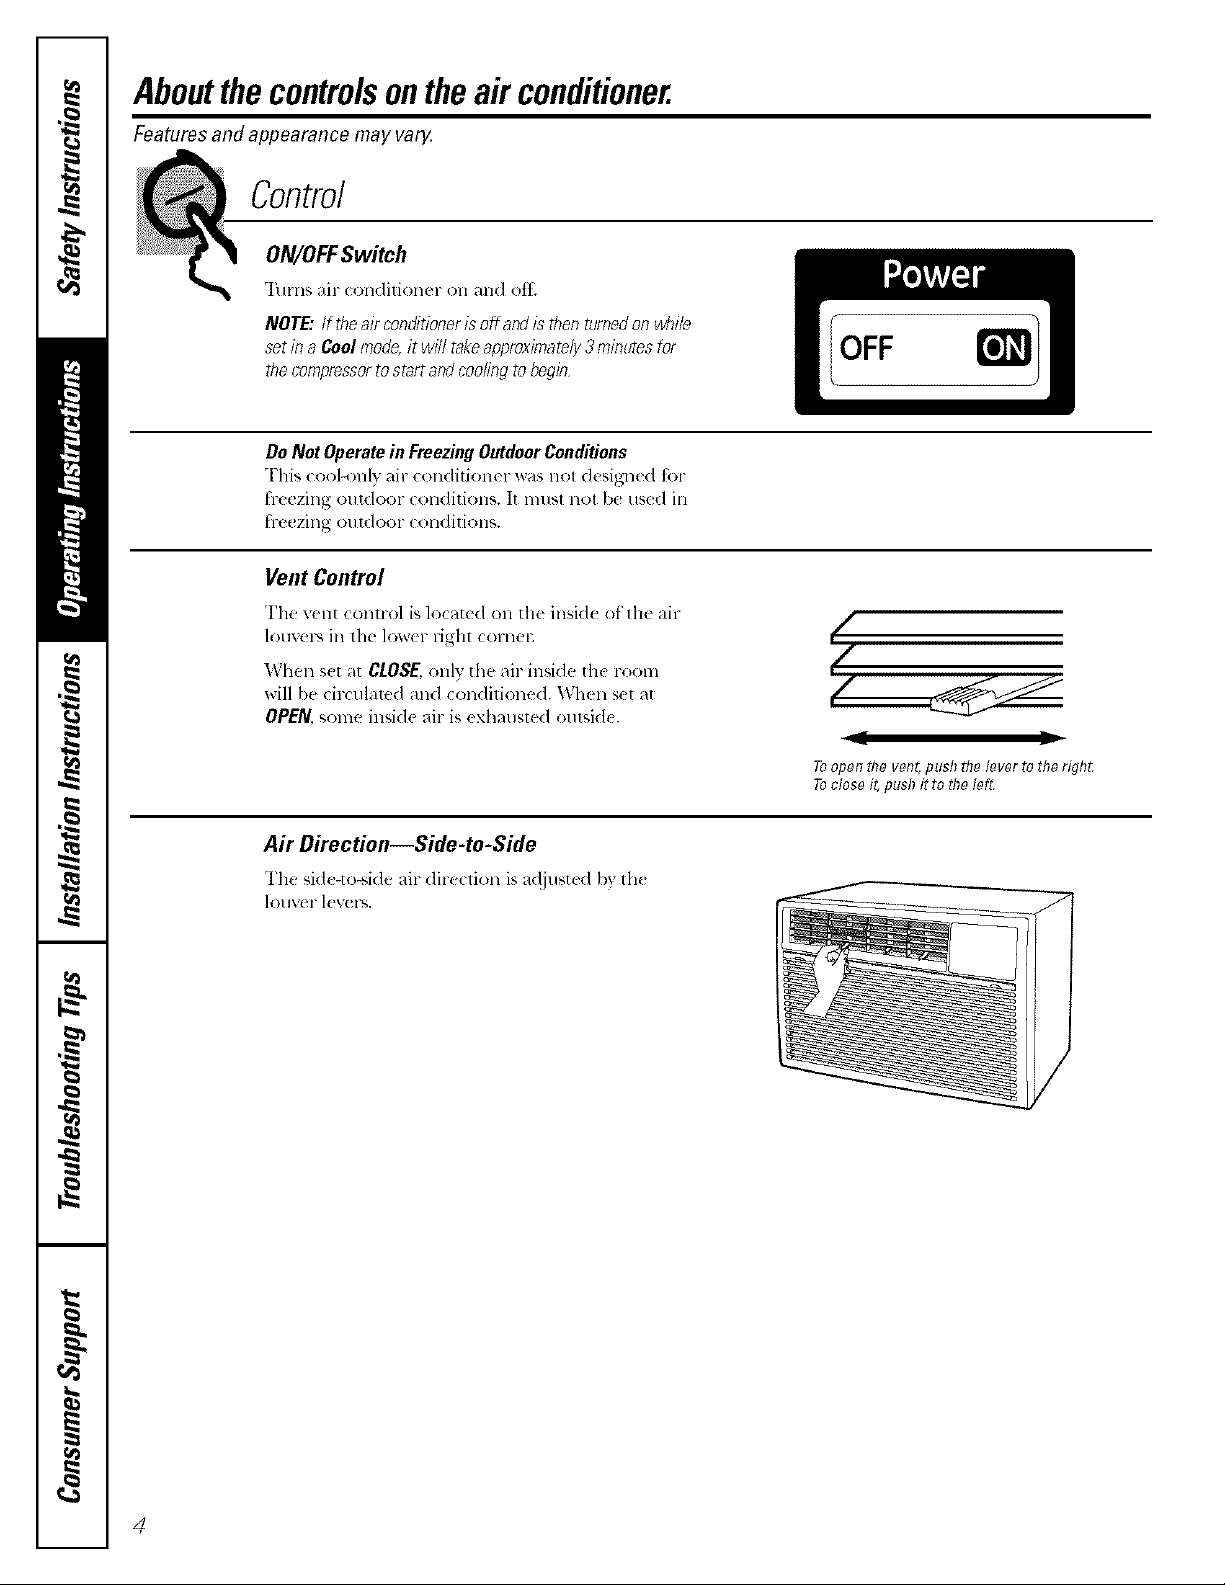
Control
ON/OFFSwitch
"I_uns air (on(lidonm- on mid oil
NOTE:If theairconditionerisoff andis thentamedon_file
setina Coolmode,it will takeapproximately3minutesfor
thecompressorto startandcoolingtobegin
Do Not Operate in Freezing Outdoor Conditions
This cool-only air con(litioner was not designed lot
[ieczing outdoor conditions. It must not be us+.(l ill
[i-eezing outdoor conditions.
Vent Control
The vent control is located on tile insid_ of'tile air
louvers ill tile lower right cornel;
When s_t at CLOSE,only tile air inside tile room
will be ci]vulalcd and conditioned. When set at
OPEN, some inside air is exhmlsted outsid(.
/
(/
I[ II
Toopen the vent, push the lever to the righL
Toclose it, push it to the left
Air Direction--Side-to-Side
The si(l_-to-qde air (lire(lion is a@lsted by th_
[OIIV(!I" 1( V( 1%.
4
Page 5
Careandcleaningoftheair conditioner, ge.com
Grille and Case
Turn the air conditiom.r off and l't'lllO'_(_[h(' "I)_dcma, use water _111(1_1nrild detergent.
plug from the wall outlet befbre cleaning. Do not use 1)1_ach or abrasixes.
OutdoorCoils
The coils on the outdoor side of th_ air conditioner
should b( checked r( gularly. If they are clogged
with dirt or soot, they may b_ professionally
cleaned.
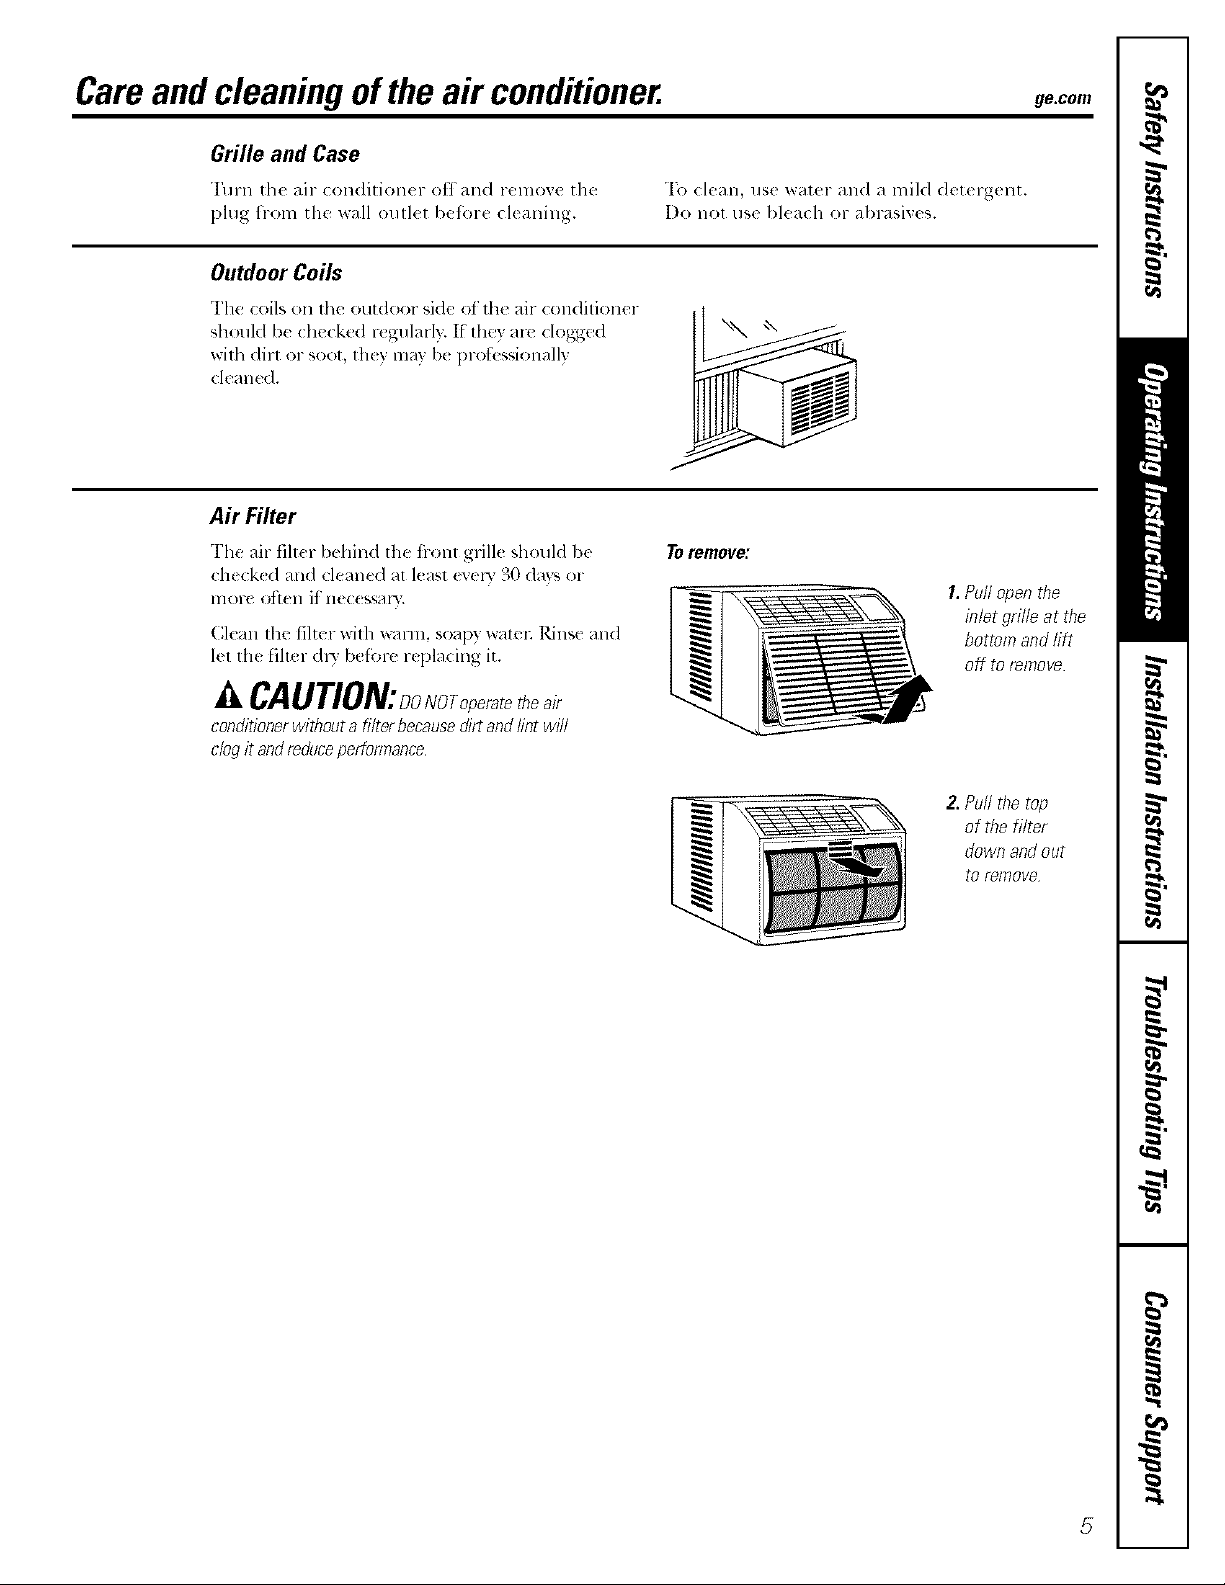
Air Filter
The air filt¢r behind the fiont grille should be
check_ d and cleaned at least evel_" 30 days or
lnOl-e o_lell if lleC(SSalW.
Clean the filter with x_ann, soap)wateE Rinse and
let the filter dl3 befbre replacing it.
CAUTION:DoNOToperatetheair
conditionerwidToota filterbecausedirtandlintwill
clogit andreduceperformance
Toremove:
1.Pullopenthe
inletgrille at the
bottomandlift
off toremove
Z Puffthetop
of the filter
downandout
to remove
5
Page 6
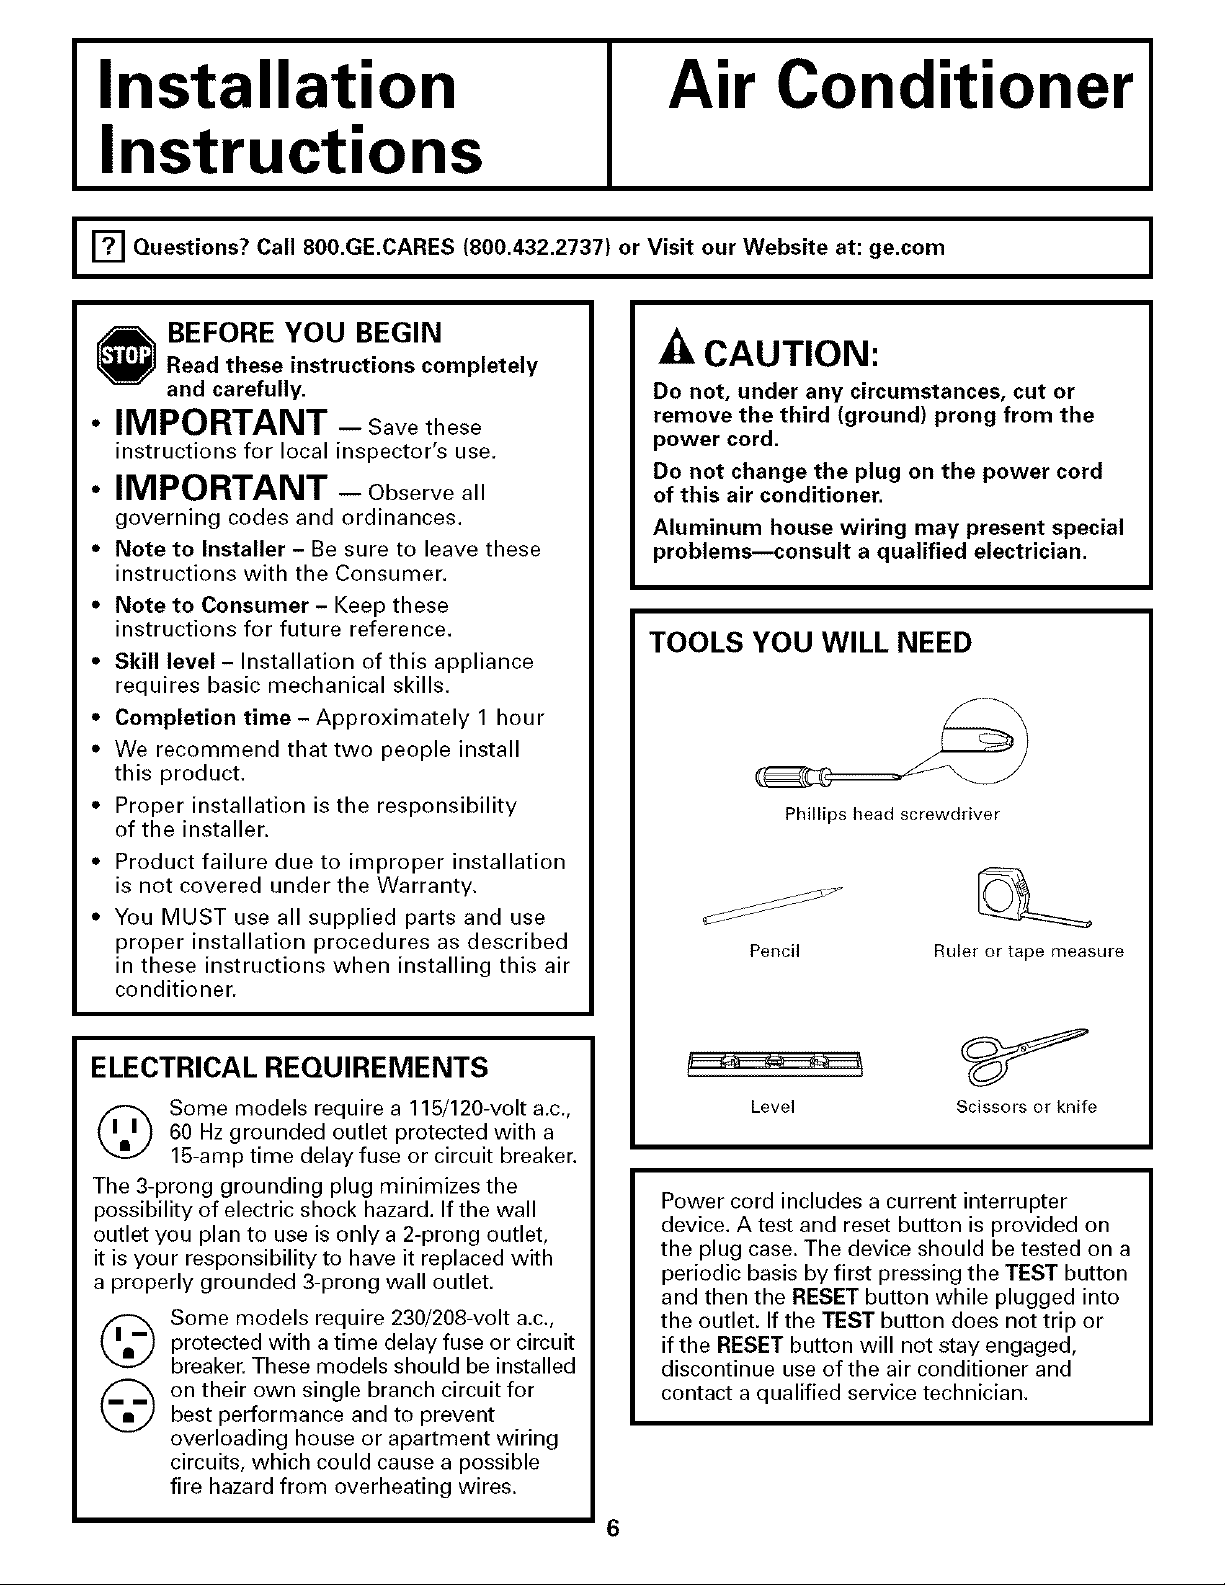
Installation
Air Conditioner
Instructions
I I"?'1Questions? Call 80O.GE.CARES (800.432.2737) or Visit our Website at: ge.com
BEFORE YOU BEGIN
Read these instructions completely
and carefully.
• IMPORTANT - Savethese
instructions for local inspector's use.
• IMPORTANT - Observeall
governing codes and ordinances.
• Note to Installer- Be sure to leave these
instructions with the Consumer.
• Note to Consumer- Keep these
instructions for future reference.
• Skill level- Installation of this appliance
requires basic mechanical skills.
• Completion time- Approximately 1 hour
• We recommend that two people install
this product,
• Proper installation is the responsibility
of the installer.
• Product failure due to improper installation
is not covered under the Warranty.
• You MUST use all supplied parts and use
proper installation procedures as described
in these instructions when installing this air
conditioner.
CAUTION:
Do not, under any circumstances, cut or
remove the third (ground) prong from the
power cord.
Do not change the plug on the power cord
of this air conditioner.
Aluminum house wiring may present special
problems--consult a qualified electrician.
TOOLS YOU WILL NEED
Phillips head screwdriver
Pencil
Ruler or tape measure
ELECTRICAL REQUIREMENTS
(_ Some models require a 115/120-volt a.c.,
The 3-prong grounding plug minimizes the
possibility of electric shock hazard. If the wall
outlet you plan to use is only a 2-prong outlet,
it is your responsibility to have it replaced with
a properly grounded 3-prong wall outlet.
(_ Some models require 230/208-volt a.c.,
(_ on their own single branch circuit forbest performance and to prevent
60 Hz grounded outlet protected with a
15-amp time delay fuse or circuit breaker.
protected with a time delay fuse or circuit
breaker. These models should be installed
overloading house or apartment wiring
circuits, which could cause a possible
fire hazard from overheating wires.
Level Scissors or knife
Power cord includes a current interrupter
device. A test and reset button is provided on
the plug case. The device should be tested on a
periodic basis by first pressing the TEST button
and then the RESET button while plugged into
the outlet. If the TEST button does not trip or
if the RESET button will not stay engaged,
discontinue use of the air conditioner and
contact a qualified service technician.
6
Page 7
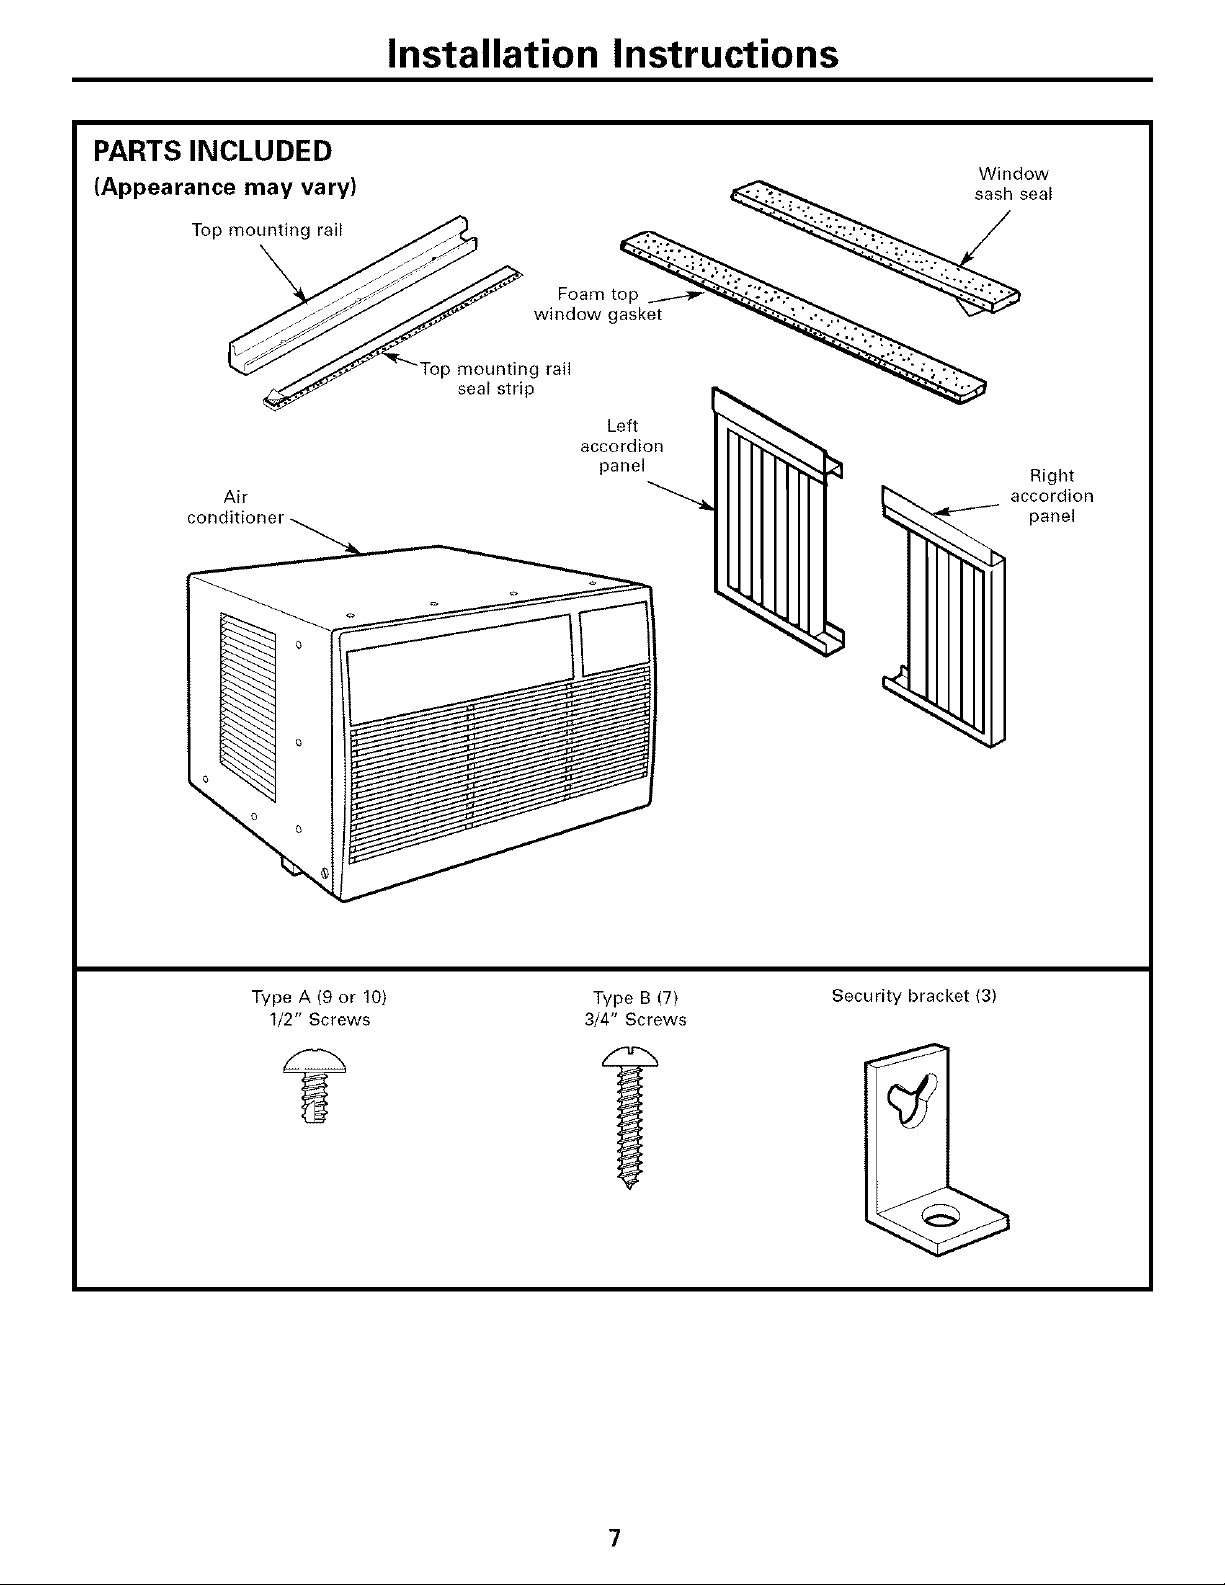
PARTS INCLUDED
(Appearance may vary)
Top mounting rail
Air
Installation Instructions
Foam top
window gasket
,p mounting rail
seal strip
Left
accordion
panel
Window
Right
accordion
panel
Type A (9 or 10)
1/2" Screws
Type B (7)
3/4" Screws
7
Security bracket (3)
Page 8
Installation Instructions
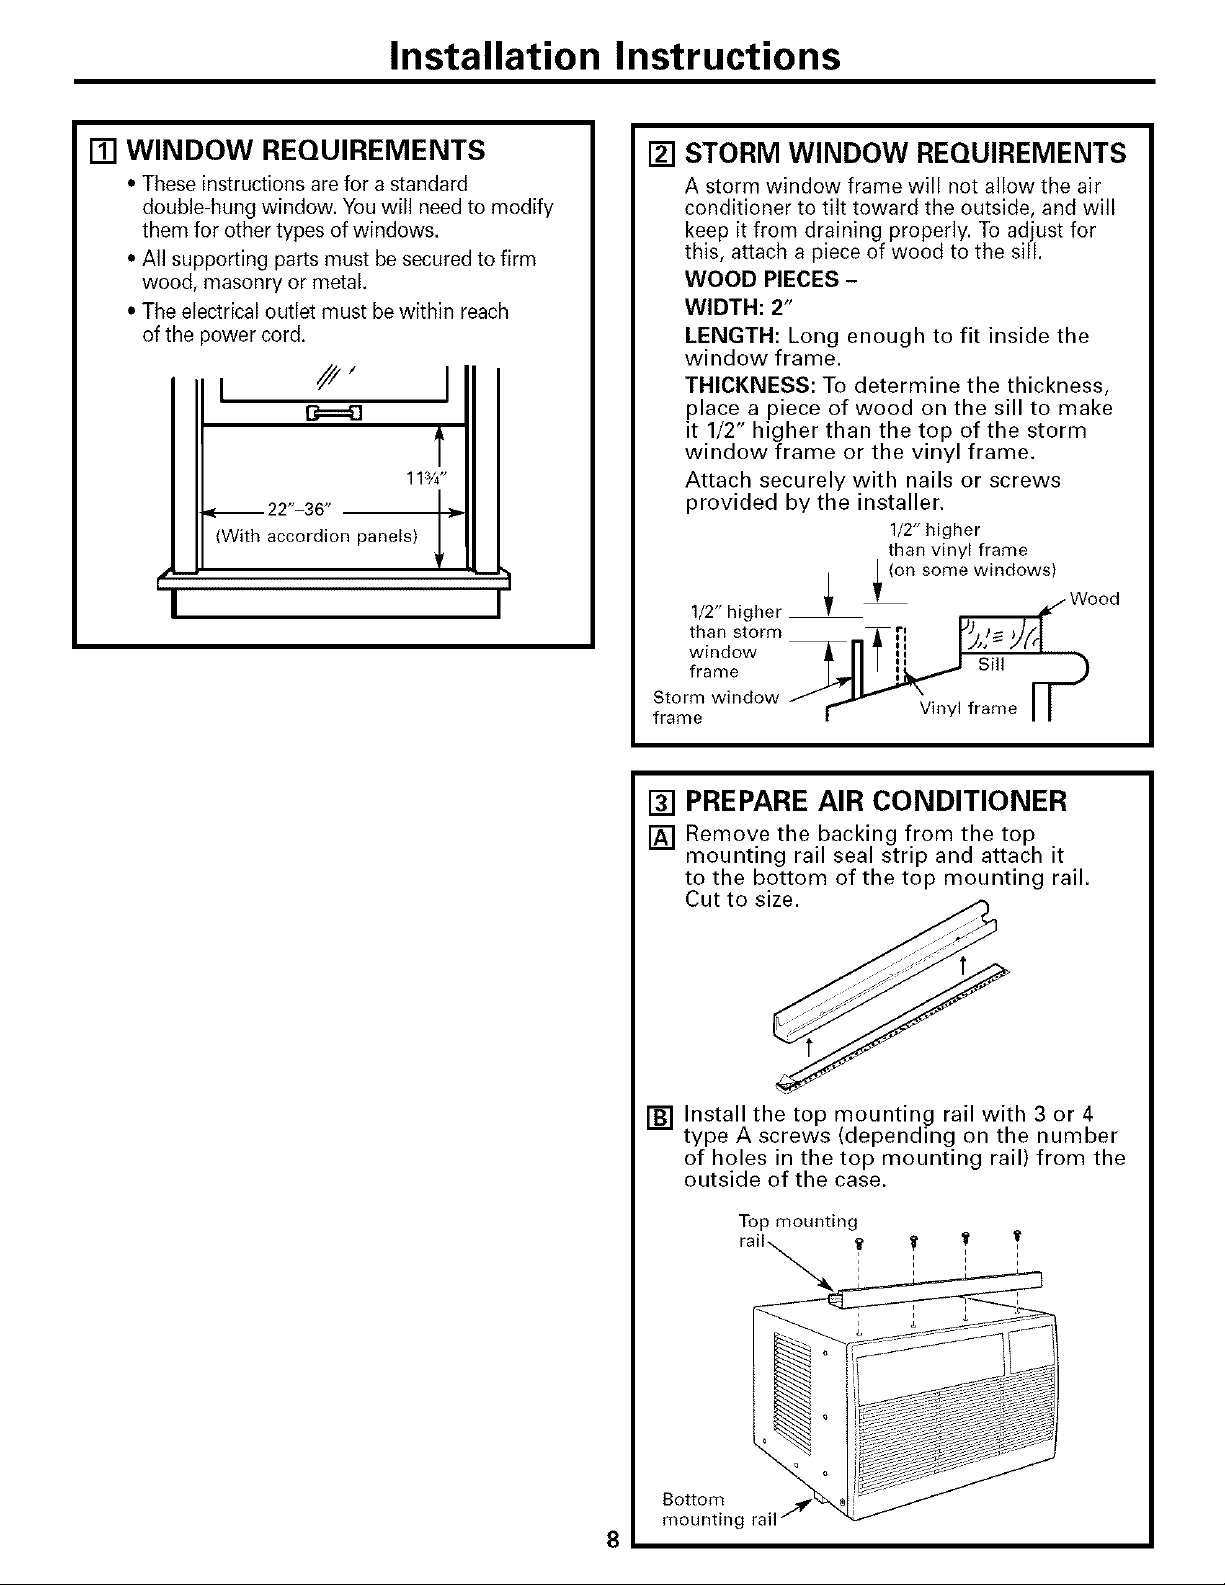
[] WINDOW REQUIREMENTS
• These instructions are for a standard
double-hung window. You will need to modify
them for other types of windows.
• All supporting parts must be secured to firm
wood, masonry or metal.
• The electrical outlet must be within reach
of the power cord.
L /P" 1
13_=8
t
113S
-- 22"-36" I
With accordion panels) _1r
q- -?
[] STORM WINDOW REQUIREMENTS
A storm window frame will not allow the air
conditioner to tilt toward the outside, and will
keep it from draining properly. To adjust for
this, attach a piece of wood to the sill.
WOOD PIECES -
WIDTH: 2"
LENGTH: Long enough to fit inside the
window frame.
THICKNESS: To determine the thickness,
place a piece of wood on the sill to make
it 1/2" higher than the top of the storm
window frame or the vinyl frame.
Attach securely with nails or screws
provided by the installer.
1/2" higher
than vinyl frame
(on some windows)
1/2" higher
than storm
window
frame
frame
Sill
Vinyl frame
[] PREPARE AIR CONDITIONER
[] Remove the backing from the top
mounting rail seal strip and attach it
to the bottom of the top mounting rail.
Cut to size.
[] Install the top mounting rail with 3 or 4
type A screws (depending on the number
of holes in the top mounting rail) from the
outside of the case.
Top mountinc
8
Bottom
mounting rail
Page 9
Installation Instructions
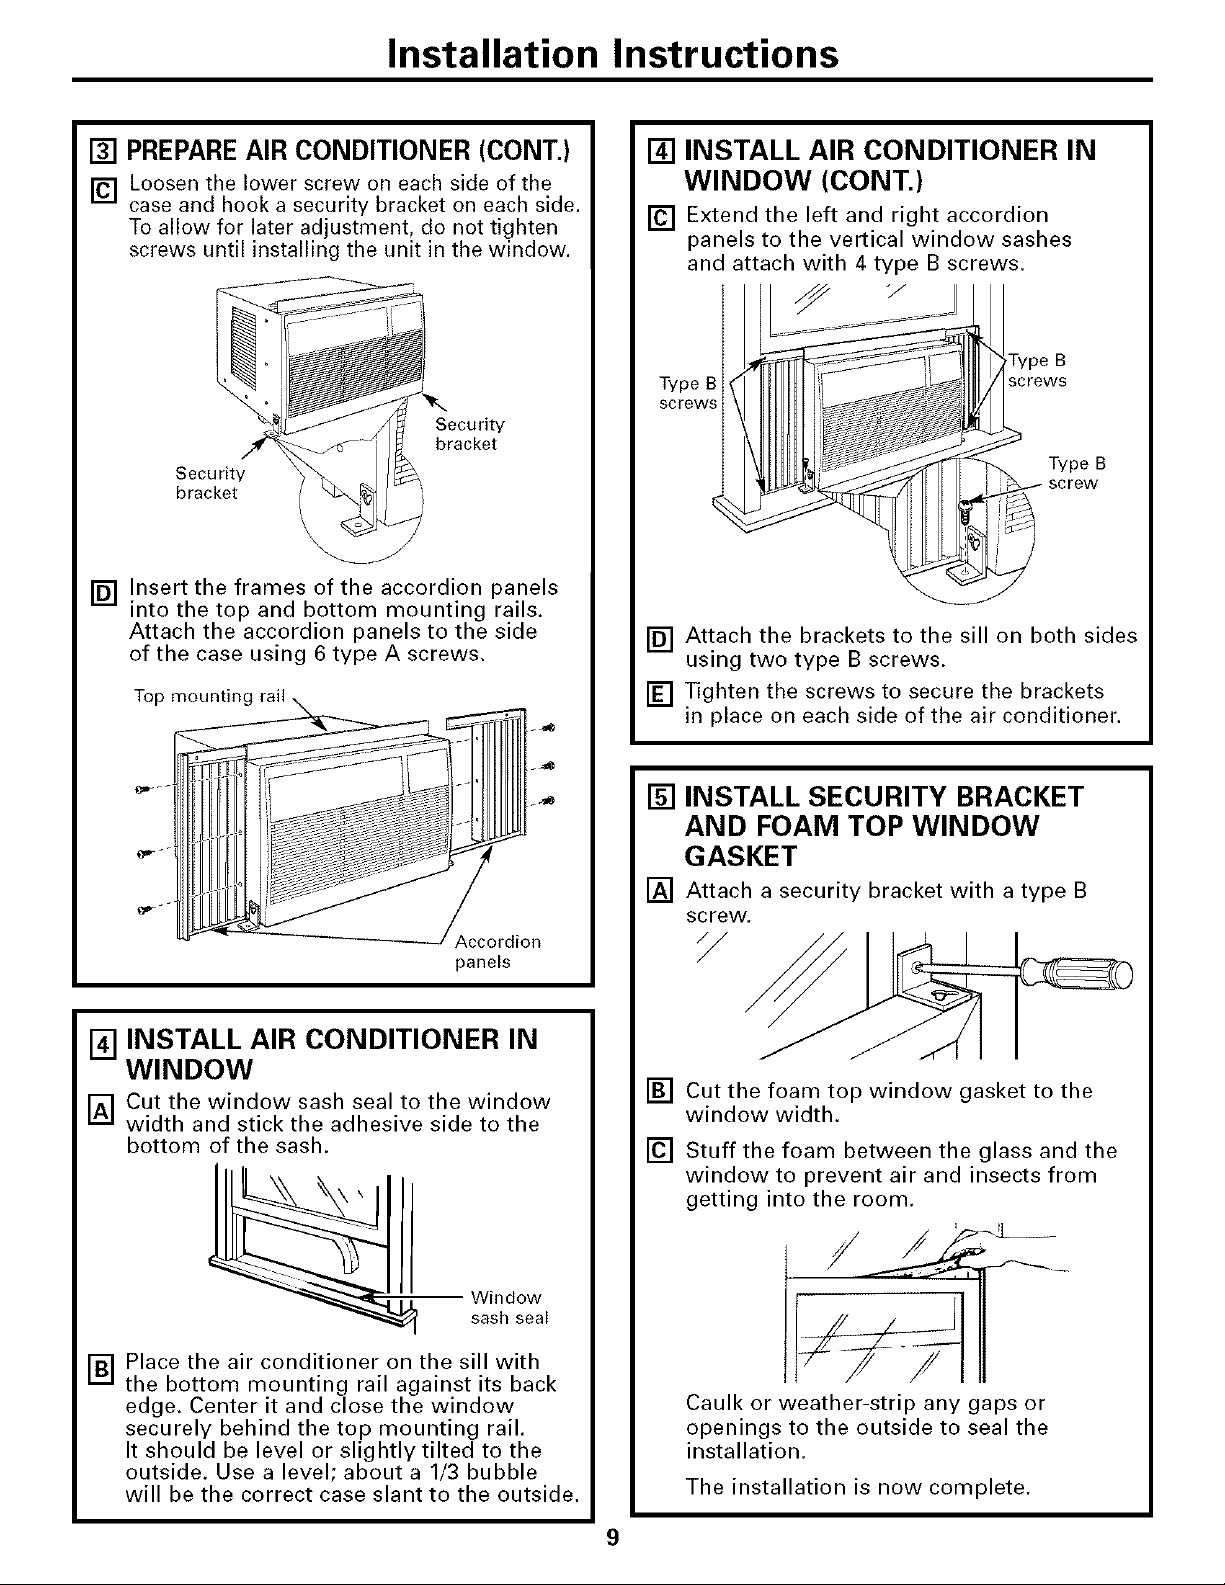
[] PREPAREAIR CONDITIONER (CONT.)
[] Loosen the lower screw on each side of the
case and hook a security bracket on each side.
To allow for later adjustment, do not tighten
screws until installing the unit in the window.
Security
bracket
Security
bracket
[] Insert the frames of the accordion panels
into the top and bottom mounting rails.
Attach the accordion panels to the side
of the case using 6 type A screws,
Top mounting
[] INSTALL AIR CONDITIONER IN
WINDOW (CONT.)
[] Extend the left and right accordion
panels to the vertical window sashes
and attach with 4 type B screws.
B
Type B
screws
[] Attach the brackets to the sill on both sides
using two type B screws.
[] Tighten the screws to secure the brackets
in place on each side of the air conditioner.
screws
Type B
panels
INSTALL AIR CONDITIONER IN
[] WINDOW
Cut the window sash seal to the window
width and stick the adhesive side to the
bottom of the sash.
sash seal
Place the air conditioner on the sill with
the bottom mounting rail against its back
edge, Center it and close the window
securely behind the top mounting rail,
It should be level or slightly tilted to the
outside. Use a level; about a 1/3 bubble
will be the correct case slant to the outside.
[] INSTALL SECURITY BRACKET
AND FOAM TOP WINDOW
GASKET
[] Attach a security bracket with a type B
screw.
/
[] Cut the foam top window gasket to the
window width.
[] Stuff the foam between the glass and the
window to prevent air and insects from
getting into the room.
Window
Caulk or weather-strip any gaps or
openings to the outside to seal the
installation.
The installation is now complete.
9
Page 10

TroubleshootingTips...
Possible Causes What ToDo
The ah" conditioner * Mak_ sure lll( air (ondilion( r plug is pushed
is unplugged. (onlplelely into the outl( t.
The fuse is blown/circtfit "(3h(ck th( house fusefl(ircuit break( r box and repla(e
breaker is tripped, the tils( or reset the br( akcr.
Power failure. "It i)o'_( r tailur( o((ul_, mrn the air (ondilioner Off.
The current interrupter "Press 1he RESETI)uuon located on Ihe power (ord phlg.
device is tripped. " It th( RESEgbuuon will nol stay engaged, dis(ontinue
Airflow is resMcted. "Make sure there are no (urtains, blinds or furniture
The air filter is dirty. "Clean the fiher al least (xel T 30 days.
The room nlay have been hot. "l_Vllell lhe air Colldilioller is i]lSl till'lied Oil, Veil lle(d
Cold air is escaping. "Ch(ck for Ol)(n fmqmc( registep_ and cold air rein rns.
Cooling coils have iced up. • See "Air conditioner freezing up" belo_x.
Ice hh, cks the air flow • "lim_ the air condition( r off until, oils defrost.
and stops the air conditioner
from coolhg the room.
Hot, hmnid weather. • This is hernial.
_*¢hell power _, ('sto e(1,'¢,t t . tl I t(.s to esll 1 Ih('
air (onditioner to pr(v( nt tripping of the (ompr( user
()'_erload.
use ot th( air condition( r and (oxlta(t a qualified
s( rvi(e te( lmician.
blocking the bont of tl_(, air conditioner.
See the Operating hTstructioRs se:CliOll.
to allow [illle t()l- [ht! 1oo111 1o (eel dowll•
S(;[ h( _llr (Ol](h toiler S V(!lll 1() [h(_ ('Iose(I posit]oil.
The air conditioner is not " For proper x_at( r disposal, nlak( sure th( air (onditioxl_ r
tilted to the outside, slants slighlly fronl lhe (as( fronl to tile r(ar.
Moisture removed from air
and into
pan.
Normal Operating Sounds
i;_;Y*)u ma} hem a pinging noise caused b) water
being picked up and thrown against the
condenser on F,dny days or when the hunlidit)
is high. This design tbaturc helps remove
moisture and improve eft]cleric):
NYou ma? hear the themaoslat click when the
COlllpFessor (7_'(Ies on and ()]i _,
• This is normal tor a shorl period in areas xdth litlle
hum]ditTy;normal for a long(r period in very humid areas.
;'2Wamr will collect in the base pan during
high humidily or on rainy days. The water
nlay ovcrflow and drip fionl the oul(Ioor side
ot tile unit.
;'>Th( tm may 11111even when tile compressor
(](leg 11o1.
10
Page 11

GEAir ConditionerWarranty--OneYearLimitedWarranty.
Staple your receipt here.
Proof of the original purchase date
is needed to make a warranty claim.
We Will Replace:
Replacement unit_)r any product _daich fhi]s due m a det_ ct in malerial'_ or workmanship,
The ex(hange unil is ,.,4n-ranled fi'_r tl_(, rc main(l_ r o[ your l)rodtl(l's original ()ll_-ye_tr
,.,41rranly l)eri_(1.
i!i_"Properly pack your unit. lye recommend using the i!i_,Include hi the package a copy of the sales receipt or other
original carton and packing, materials, evidence of date of orig'mal purchase. Also print your
_i_,Return the product to the retail location where it name mid address and a description of the defect.
was purchased.
i!i_,Ct_stomer instruction. This owner's manual provides i!i_,Replacement of house frtses or resetth_ of circuit
information regarding operating instructions mid breakers.
user controls.
_'_Improper installation. If you have zal installation problem,
or if file air conditioner is of improper coohilg capacity,
for the intended use, contact your dealer or ir_staller.
You ale responsible for providing adequate electrical
colmecth ,lg facilities.
Failm-e of the product resulting, from modificatiol_s to
the product or due to mn-e_sonable use including failure
to provide reasonable and necessm-y mahltengalce.
N Damage to the product caused by improper power supply
voltage, accident, fire, floods or acts of God.
N Incidental or consequential damage cattsed hy possible
defects with this air conditioner.
EXCLUSION OF IMPLIED WARRANTIES--Your sole and exclusive remedy is product exchange as provided in
this Limited Warranty. Any implied warranties, including the implied warranties of merchantability or fitness
for a particular purpose, are limited to one year or the shnrtest period allowed by law.
I
This warranty is extended to flTe original purchaser and any succeeding owner for products purchased for home
use within the USA.
Some states do not allow the exclusion or limitation of incidental or consequential damages. This warranty gives
you specific legal rights, and you may also have other rights which vary from state to state. To know what your
legal rights are, consult your !oca! or state consumer affairs office or your state's Attorney Genera!.
Exclusion of hnptied warranties: Except where prohibited or restricted by law, there are no warranties, whether
express, oral or statutory which extend beyond the description on the face hereof, including specifically the
implied warranties of merchantability or fitness for a particular purpose.
Warrantor: General Electric Company.Louisville, KY 40225
11
Page 12

ConsumerSupport.
i_/_ ¸
;iigZ5I
GEAppliancesWebsite
]Iave a que_lion or ne(d assislanc( xdlh }ore ,_ppll,lnc( _ It lh( ( L Appliml( e_ Websile, any day of:lhe vearl
For gr( Ell( r (OllV( lliell(( alld/_lst(_l- S(_lvi((, y(ll (_111 llOXA _ (Iown[( ad ()_ql](_l-'S Manuals, or even ord(_l- paris
on-line.
RealLifeDesignStudio
GE supports th( [ niversal De_,ign concept--products, se_vic(s and enviromnents that (an 1)e used bY
people ot all ages, siz(s and capaNlifies. _ rcc_Nnize the need to design ti)r a wide l'dnge of ph}sical
and mental abilities and impairm(nts. For d(mils of GE's [ nivel-sal Design applications, including kitch(n
design id(as fi)r people with disabiliti(s, ch(ck out ()Ill"_vVcbsite lt_da). For th( h(aring impair(d, pleas_ (:all
800iFDD.GIL\C (800.833.4322).
PartsandAccessories
Individuals qualified to s( lwice lbeir ()_11 appliances can lmxe parts or acc(ssori(s sent dil-eclly t(; their
homes (VISA, Mast( rCard and Discover cards are accept(d). Order on-line to(la x, 24 hours (v(lw day or
by phon( at 80t1.{)2b.2002 (hn lllg 13Ol-Illal b/Isilless bol/rs.
Instructions contained in this manual cover procedures to be performed by any user. GEdoes notsupport
any servicing of the air conditioner. We stronglyrecommend that you donot attempt to service the air
conditioner yourself.
ge.com
ge.com
ge.com
ContactUs
If:you m-e not satisfied with the selwice you receive hxml (;E, contact us on our Website with all the derails
including your pl_one lmmbe_; or write to: Gen(ml Manage1; Cuslomer Relations
GE Appliances, Appliance Park
Louisville, Ix_"40225
ge.com
] 2 Printed in China
Page 13

b_strucciones de segTiridad ...... 2, 3
Instrucciones de operaci6n
(ontr :A ........................ 4
Cuidado y limpieza
Bobinas para (x_eriores ........... 5
Fihro de air,.: .................... 5
Parfilla y c;_ja ................... 5
hlstrucciones de instalaci6n . .6-10
Idera, para la identificaci6n
y repamci6n de problemas ...... 11
Sonidos de operacidn normales ..12
Apoyo al consumidor
A1)oyo al ((msmnidor . ........... 16
Garal;_f_...................... 15
ge.com
A55 )_
©
°v,-I
°v,-q
©
Escribael modeloy mimero
de serie aquk
Nsmerode modelo
Nitmerodeserie
[ sted pro'de (ll_Olltlklr ('stos lll/Ill_'los
al costado ,:lel acc,ndicionador de aire.
49-7588 11-07JR
Page 14

f
INFORMACIONIMPORTANTEDESEGURIDAD.
LEATODASLASINSTRUCCIONESANTESDEUSAR.
iADVERTENCIA!
Per su seguridad, se flebe seguir la informaciSn en este manual para minimizar e! riesgo de incendios,
flescargas el#ctricas o lesiones personale&
PRECAUCIONESDESEGURIDAD
_ Use estc electrodomdstico solamem( pala
el propdsiu) detclminado segfin se d( scribe
ell el Manual del propiemno,
#: Este acondicionador d( aire debe instalarse
(;OITe( l_liilente dc at llel-do tOll las
[nstruccion( s de insmlacidn ames de su uso.
?_Ntmca desert(huE( su acondicionador de
aire tilmldo dr1 cable eldctnco. Siemprc
agarrc firm(merit( el enchutb y tire d(
dl direcmment( hacia aflmla.
?_ Reemplace inmediatament_ It)dos los cables
el&cuicos qu( se hayan [)elado o que
se hayan dafiado de alguna otra manem.
lTn came de corriemc dafiado no d,:be
r( pararse, sino que dtbe set sustimido pOT
uno rmevo que se adquiera del fM)ricatm.
No use tm cable ( l('cttico que muestrt
exid( ncias tic detclioro, o daflos de ablasidn
en su superficie en alglmo de sus exU'emos.
_ Si el receptxk:ulo no coincide con
el ( nchufe, ml elet:tticista calificado
dtbe r( emlllazar el recelltficulo.
_5Ap_gue la tmidad y desenchuf_.
su acondicionador d{ air( ames d( limpial;
i!_GE no est5 no apoy_ que st 11 proportion(
ningfin se_'icio al acondicionador de airt.
X\_lleinentemente i-t'(OlllendalllOS title
usted no imenm proporcionar se_'icio
al acondicionador de air( ustcd nlismo.
i!_PoT su segufidad.,.no almac( n( ni use
mamfiales combustibles, gasolina u otros
vaporcs o li)tuidos inflamables (n
la proximidad de 6st( o alg_in olro
elect rodom('stit o.
_ lodos los acondicionadorcs de air(
conti( n( rcflig-_ _mtes, los que pOT Ley
Fcdemn deben set rcmoxidos ames dt
deset harlos. Si ust_.d planea deshat erse de
_dgfin produ( to ttue conteng:_ rcti'igenmWs,
pdng_se en conmt to ,on la tomllafif_t que
St" ('IlCHI\_t de IR'( ogt'l" Stl baStll_t [)al'_ (Ill(:
le indiquen qud ha(el:
COMOCONECTARLAELECTRICIDAD
Bajo ninguna circunstancia, corte oremueva
la tercera p_a (tierra) del cable elOctrico. Enpos
de la seguridad personal, este electrodom#stico
debe siempre conectarse a fierra.
NO use un enchufeadaptador con este
electrodom#stico.
El caMt eldctlico de estc ell ctrodomdstit:o tst2_
t quillado (on un ent huE( de trts pfias (tit n',O
que t ombina con un tomat olriemc est_indar
de trts tomas de p_red pare minimi;';tr la
posibilidad de m_a dt stalga eldt tlka.
El cablt de alilnentacidl_ inchlvt tm
dispositivo pare ilm_lrupcidn tk corliente.
Se in(hlye un 1)ot6n dt phil bay de reinitio
tn tl dispositix o. E1 disllosidx o debe [)ol_else
a pla_eba pe_iddicamente: plJmero se presiona
11 botdn de TEST (pint b_O y hit go RESET
(rt inicio) mienm_s set nt:uentm elwhuthdo al
tomatorliente. Si cl botdn TESTno se dispara
o si el botdn RESETno queda engm_(hado,
2
deje (It udlizar el aconditionador de air( y
t omun_quese con un t_cnico calificado.
Pida a un ldcnico que inspeccione
el tomacorIienm y el cilcuito para cerciotarse
de qtte el [Dlll_tCOl'l-iell_' (SLit (:ollect_do a tierra
de la maner,_ apropiada.
Donde exista un tomacorrient_ tie dos
u)mas, (s su rcsponsabilidad y obligat idn
personal hater que dkho _oma('orrienw
Sea l-celllpl_tz_lt|o iJOT llllO de [l-i?s [()ill;_lS
COIl COtlexi0n a [iert_t.
El acondicionador de aire deber_ siemprc
estar conectado a un U)macorrientc individual
con su circuito de volt_je correspondientc.
Esto prollor_ iona el mayor rt ndimiemo y
ademgs cvim que los t irclfitos del resto de
la (:asa se S()bre(:algllt 11, lo tual potll-_ CallSal-
inct ndios pot tl sobrt calemamiemo dtl
cableado.
\\T las InstlalCCiones de insmlacidn,
ell la st ccidn Roquisitos ElOctricost)am
los requisiu)s (sp(c/ficos de conexidn.
Page 15

ge.com
iADVERTENCIA!
i
USODECABLESDEEXTENSION--Modebsde115voltiossolamente
Debido al potencial de riesgos de seguridad
bajo ciertas confliciones, en#rgicamente
recomendamos contra el uso de cables
de extensi6n.
Sin ,2mbarg,.>, si usted se xe en la nec(sidad
de usar tin cable el_:ctrico de extensit_n,
(:s _ll)s()ll][_lIllell{_} neces_trio ({lie el illisl]lo
esl(' lismdo b_io [ rE, c_4ibre ] 4, (lie fipo 3 ioim_s
COIl ( Oli(:Xi(71"i _l tit'l'I'_l p_lI'_l elcctrodom_=stk:os
y {l fndke d_be ser d_ 15 amperios (mflfiino)
y 12.5 vohios.
_,PRECAUCION:
NO USEua cable de extension con aiaguao
de los modelos de 230/208voltios.
LEAYSIGAESTASINSTRUCCIONESDESEGUR/DADCU/DADOSAMENT£
GUARDEESTASINSTRUCCIONES
3
Page 16

Acercade loscontrolesen elacondicionadordeaire.
Las funciones y el aspecto pueden variar
Control
InterroptorON/OFF
Emiendc y at)a_',_el acondidonador dc airc.
NOTA:SielacondicionadordeaireesNapagadoyentonces
esencendiflomientrasest_enunmodoCool(Enfriado),
elmmpresornecesitaraaproximadamente3 minutospara
biciary paraqueel enfriamientocomience
No useenlascendicionesextemasdebajoel punto
deoonge/aci6n
Estc _lcondidon_ldor dc _lire no cs diseflado pma
USHF (ql [('l_]p(q_l[tlI'_lS _'X[('I'I]_IS (l('l);IjO (l pUl][O
d_ congelad6n. No use en las _ondidones
exmrnas debqjo el punto de congelacidn.
Control de la ventilacion
El control de w milacidn esl*i localizado al interior
de las persim'las en la esquil'la del*!cha int;.!*iol:
Cuan(lo est_i @/stado en CLOSE(CERRADO),
solmncnte cl airc en cl interior du la hal)iul( idn
cirt ularfi y se acoTMicionar, i. Cuando estfi @lstado
ell OPEN(ABIERTO),un poco del aire inferno (s
expelido hacia afimra.
OFF
[1"
(/
ml Im
Ram abrir la parrilla, ompuje la
palanca hacia la derecha y para
cerrarla hacia la izquierda
D#ecci6n del aire--de lado a/ado
L_ldirecd6n d_ lado a lado del aire es @lstada por
las palancas de las ix rsianas.
4
Page 17

Cuidadoylimpiezadelacondicionadordeaire. g .oo
Parrilla y caja
Apague el acondicionador de aire y retire
el enchui;., del lomaconient_ d_ la pared antes
de linapim_
Bobinas para exteriores
Las bobinas en cl ludo exterior d('l at(tndi(ionador
de ;,ire debe set insp_ (donadu re}4ularment_.
Si la misma estfi obstruida coil suciedad u hollfn,
podl-fa ser limpiada profbsionahnente.
Filtro de aire
Pm-,tlimpial; use agua y un det_ rgenle suave.
No us_ cloro o malefiales abcasivos.
El filtro de aile detl-,is de la rejilla fronml debe
inspeccionarse ylimpiap, e pot 1o menc_ cada
30 dins o mils a menudo si fll_se nec_ sario.
Linlpie el fihro con agua tibia yjab6n. El!ju_iguelo
ypermim que se seque anlcs de colocarlo otto vez
en su lugal:
f
A PRECAUCION:NoO Rfel
amndMonadordeaimsklel filtredebidoaquela suciedad
y/aspelusasIoebstruiranyreducirbnsurendZmiento
Pararetirarlo:
1.Abrala rejilla
dela entrada
en/aparte
inferiory
lew{ntela
parafetirar
2. Tirelaparle
filtro haciaabajo
yhaciaafuera
5
Page 18

Instruccionespara
Acondicionadordeaire
la instalacion
"_ _Preguntas? Llame al 800,GE.CARES (800,432.2737) o bien Visite nuestra pagina Web: ge,com
ANTES DE INICIAR
Lea estas instrucciones completa y
cuidadosamente
• IMPORTANTE - Guardeestas
instrucciones para uso del inspector local.
• IMPORTANTE - Observetodos
los c6digos y 6rdenes de ley.
• Note al instalador - Aseg@ese de dejar
estas instrucciones con el consumidor.
• Note al consumidor - Conserve estas
instrucciones pare referencia future.
• Nivel de destreza - La instalaci6n de este
aparato requiere de destrezas mecanicas
basicas.
• Tiempo de ejecucion - Aprox. 1 hora
• Recomendamos dos personas pare
la instalaci6n de este producto.
• La instalaci6n apropiada es la
responsabilidad del instalador.
• La falla del producto debido a una
instalaci6n inadecuada no esta cubierta
por la garantia.
• Cuando instale este acondicionador
de aire, DEBE user todas las piezas
suministradas y usar procedimientos
adecuados de instalaci6n.
REQUISITOS ELECTRICOS
de 115/120 voltios de corriente alterna y
Algunos modelos requieren tomacorrientes
60 Hz conectados a tierra, protegidos con
un fusible de dilataci6n de tiempo de
15 amperios o un cortacircuitos.
El enchufe de tres puas con conexion a tierra
minimiza la posibilidad de descargas electricas. Si
el tomacorriente de la pared que usted planea usar
solamente tiene 2 tomas, es su responsabilidad
hacer que un t6cnico Io reemplace por uno de tres
tomas con conexion a tierra.
REQUISITOS ELECTRICOS (cont.)
Algunos modelos requieren 230/208 voltios,
de corriente alterna, protegidos por un
fusible de dilataci6n de tiempo o un
cortacircuitos. Estos modelos deberian
instalarse en un ramal exclusivo del circuito
pare un rendimiento mas notable y para
prevenir sobrecargas en los circuitos de
cableados de su case o apartamento, Io cual
podria representer un riesgo de incendio
por el sobrecalentamiento de los alambres.
APRECAUCION:
Bajo ninguna circunstancia corte o remueva
la tercera pua (conexion a tierra) del cable
electrico.
No cambie el enchufe en el cable electrico
de este acondicionador de aire.
Los cables caseros de aluminio podrian
presentar problemas especiales. Consulte
a un tecnico electricista calificado.
El cable de alimentaci6n incluye un dispositivo
para interrupci6n de corriente. Se incluye un bot6n
de prueba y de reinicio en el dispositivo. El
dispositivo debe ponerse a prueba peri6dicamente:
primero se presiona el bot6n de TEST (prueba)
y luego RESET (reinicio) mientras se encuentra
enchufado al tomacorriente. Si el bot6n TEST
no se dispara o si el bot6n RESET no queda
enganchado, deje de utilizer el acondicionador
de aire y comuniquese con un tecnico calificado.
6
Page 19

Instrucciones para la instalacion
HERRAMIENTAS QUE USTED NECESITARA
Destornillador Phillips
Lapiz
PARTES INCLUIDAS
(el aspecto puede variar)
Riel de montaje
Acondicionador
de aire .._._
Regla o cinta metrica
Empaque superior de
espuma de la ventana
Cinta de sellado
del riel de montaje
superior
Nivel
Panel de
acordeon
izquierdo
T_jeras o cuchilla
Sello del
marco de la
ana
Panel de
acordeon
derecho
Tornillos 1/2"
tipo A (9 o 10)
Tornillos 3/4"
tipo B (7)
7
Soporte de
seguridad (3)
Page 20

Instrucciones para la instalacion
[] REQUISITOS PARA LA VENTANA
• Estas instrucciones son para una ventana
estandar de dos pliegues. Usted
necesitara modificar el proceso para otros
tipos de ventanas.
• Todas las partes de apoyo deben quedar
totalmente aseguradas a algun metal,
mamposteria o a la madera.
• El tomacorriente el6ctrico debe estar
al alcance del cable electrico del
acondicionador de aire.
I I
B===_
t
113/4"
_*'_22"-36"
(con paneles de acorde6n)
If
I
[] REQUlSITOS DE UNA VENTANA
DE TORMENTAS
Un marco de ventana de tormentas no
permitira que el acondicionador de aire se
incline hacia el exterior y evitara que drene
apropiadamente. Para solucionar este problema,
adhiera un pedazo de madera a la umbral.
PEDAZOS DE MADERA -
ANCHO:2"
LONGITUD: Lo suficientemente largo
como para ajustar en el interior del marco
de la ventana.
GRUESO: Para determinar el grueso, coloque
un pedazo de madera en la umbral para
hacerla 1/2" mas alta que la parte superior
del marco de la ventana de tormentas o del
marco vinilo.
Peguelo firmemente con clavos o con
tornillos proporcionados por el instalador.
1/2" mas alto que el
1/2,,masalto _ _ marc° vin'l° (on algunasventanas)
que el marco r_ _ Madera
de tormentas II
de ventana ,_ jU:_r[a___
Marco de
ventanade " r_ Marcovinilo I I
tormentas
8
Page 21

Instrucciones para la instalacion
[] PREPARE EL ACONDICIONADOR
DE AIRE
[] Retire la parte posterior la cinta de sellado del riel
de montaje y adhieralo al fondo del riel de montaje
superior. Corte al tama_o apropiado.
[] Instale el riel de montaje superior con 3 o 4
tornillos tipo A (dependiendo en los numeros
de agujeros en el riel de montaje superior)
desde la parte exterior de la caja.
Riel de montaje l' It i l
superior., i I
,
[] PREPARE EL ACONDICIONADOR
DE AIRE (CONT.)
[] Inserte los marcos de los paneles de acorde6n en
la parte superior e inferior de los rieles de montaje.
Adhiera los paneles de acordeon al lado de la caja
usando los 6 tornillos tipo A.
Riel de montaje
Paneles de acordeon
[] INSTALE EL ACONDICIONADOR
DE AIRE EN LA VENTANA
I
montaje -_'_'_. /
inferior
[] Afloje el tornillo inferior en cada lado de la caja y
enganche un soporte de seguridad en cada lado.
Para ajuste en el futuro, no apriete los tornillos
hasta que la instalacion de la unidad en la
ventana.
Sopo_e de
seguridad
Soporte de
seguridad
[] CoRe la banda de sello de la ventana de acuerdo
con el ancho de la ventana y peguela del lado
adhesivo al fondo de la banda.
Sello de la
banda de
ventana
[] Coloque el acondicionador de aire en la umbral
con el riel de montaje inferior contra su extremo
posterior. C_ntrelo y cierre la ventana firmemente
detras del riel de montaje superior. Debe estar
nivelado o ligeramente inclinado hacia el exterior.
Use un nivel; una inclinacion de 1/3 de burbuja
sera la correcta hacia el exterior.
9
Page 22

Instrucciones para la instalacion
[] INSTALE EL ACONDICIONADOR
DE AIRE EN LA VENTANA (CONT.)
[] Extienda los paneles de acordeon izquierdo
y derecho hacia las bandas de la ventana vertical
con 4 tornillos tipo B.
Tornillos
Tornillos
tipos B
[] Pegue los corchetes a la umbral en ambos lados
usando dos tornillos tipo B.
tipos B
Tornillo
[] Apriete los tornillos para sujetar los soportes en
su lugar en cada lado del acondicionador de aire.
[] INSTALE EL SOPORTE DE
SEGURIDAD Y LA PARTE
SUPERIOR DE LA ESPUMA
DE LA JUNTA DE LA VENTANA
[] Pegue el soporte de seguridad con un tornillo
tipo B.
[] CoRe la pare superior de la espuma
de la junta al ancho de la ventana.
[] Rellene la espuma entre el vidrio y la ventana
para evitar que aire e insectos se introduzcan
en la habitacion.
Calafatee todas las aberturas al exterior
para sellar la instalacidn.
La instalacion ahora esta completa.
10
Page 23

Solucionarproblemas.
Ideas para la identificaciSn y solucidn de problemas. Ahorre dinero y tiempo!
Causasposiflles Qu#hater
ElacondMonador de aire *Ccrci6rese de que el a(ondk'ionador de _fireest_i
esth desconectado, enchtffi_dotota/mente en el romacorriente.
El fttsible se dispar6 / *lnspeccione los fiJsibles/ c@l de imermptores de la c_tsa
el cortacircttims se d'tsparo, y reemplace cualquier filsible o rt_ajusteel intcrluptol:
Inten'upd6n en el *SiOCtllTetl]ti_tinmn upcidn en el suministro el&n ico, aIyague
sumin'tstroel_da'ico. IOFFIel acondicionador de aire. Cuando la energfa se restmn'e,
espere 3 mimltos pro',,reinkim el acondicionador de _firepal'a
prexeni_que se diq)a_e el compresxlr pot sobrecarga.
Eldisposifivo de inteyrupci6n *Presione el bot6n RESErubicadoen el cable de alimentaci6m
de corriente se ha activado, *Siel bot(m RESETno se mantiene en su ]ugvmno utilice m:_.sel
acondicionador de afie y comun/quese con un t_cnico calificado.
El flujo de aire esV,i restringldo. *Celvidrl.sede que no exismninguna colrina, petsiana o
mueble bloqueando el fl'enm del acondicionador de abe.
El f'dlm de aire est_isucio. *Limpie el film) cada 30 df_,spot Io menos. X;._rla secci6n
Lahabi 'taci6npodria haber *Cuando el acondicion_Nor de aire se endende, usled
estado caliente, necesita darle tiempo para que entii_ la habitacidn.
Elaire frio se esUiescapando. *Cerci6rese de que losregistros de la calet-acci6nno estfin
Las bobhaasde enfrimnienm *Ver"Acondicionadordeaireseestacongelando"m(t_adelante.
se congelaron.
de Instruccionesde Operacidn.
abiem_syse encuent_,m tetomando el aire fifo.
*Coloque la venmnilla del acondicionador de aive en
la [x_sicidncemtda.
Elhielo bhKltlea el fhljo *Apagueel ac(mdi(ionador de aire h_tsmque las b()bin_¢_
de aire hacia el acondicionador descongvlma.
de aire evitando que se e_ffrle
lahabitad6n.
Tiempo hfnnedo y cafiente. *Estoes normal.
El acondidonador de aire *Pm'adrenar el agua _,propiadamente, cercforese de que
no esth indinado hacia afuera, el acondicionador de aire estfiinclinado ligemmente
Lahmnedad removida del aire *Esmesnormal l_.}rtm corto perfodo en fireascon poca
y se drena hasva la bandeja, humedad; normal pot un Derfodo de tiempo/'a(t_
desde elhente hada att(_s.
postergado en _;,reasmils hfimedas.
//
Page 24

Solucionarproblemas.
Sonidos de operacion normales
(.)uiz_ escuche un sonido metfilko cau_vadopot
el ag_la tomada y timda contt a el condensadol7 en
los d_as lluvkJso.',o cuando la humedad es alta. Esta
caracte_fstica de disefio ayuda a _emover/a humedad
y mc2jota ]a eficiencia.
}t5Quizfis escuche que el termostau_ hace clic cuando el
compresor hace ciclo entre encendido y apagado.
>_!E1agua se acumula en la bm_dt_iadtnante d_asllmiosos
o con mucha humedad. Elagua podvfa den'_m3arsey
gotear desde el ]adoextmno de la unidaL
iy;_E1ventilador p_/r_a flmcionar aun si el compresor no
Iohace.
12
Page 25

Notas.
ge.com
13
r*Jn
m
w
Page 26

m
._ Notas.
i L
14
Page 27

Garantiadesuacondicionadordeaire--garantia limitadadeuna#o.
Grape aqu[ su reeibo.
Se requiere faeilitar prueba de ta fecha de eompra
original para haeer un rectamo de garant[a.
_tros reemplazaremos:
Unafio Unidadde reemplazo[)ax_a(ual(lui(r produ(to (lU¢tall( d(bido a (lefi (los (n los material(s o el',
cl pr,..,(cso de f_l)ri(ad6n. La unidad d( int{ r(ambio ,:st_ garantizada pare (1 rcsto d(l p(r/,×k)
dc un aflo de garantia original del l)rodtl(lo.
;4_Empaque su mfidad apropiadamente. Recomendamos ;4_Incluya en el paquete una copia del recibo de venta
u_,_r el c_wt6n origin_d y los materiales de empaquemdo, u otra evklencia de la feclla o@al de la compra.
i;_Re_t'ese el producto al local de vent,s donde usted Adem&s imprima su hombre y direcci6n y una
1o compr6, des_xipci6n del defecto.
_ Instrucciones '_ clienle. El Manual del propietario _ Reemplazo de f_tsibles de la casa o reajusle del sistema
proporciona hfformaci6n acerca de l_tshlstrucdones de de circuitos.
operaci6n y de los controles del usum-io.
_ Instalaci6n inapropiada. Si usted fiene ml problema
durante la instMad6n, o si su acondidonador tie aire no
fiene la capacidad de enfriamiento que usted necesita,
p6ng_se en contacto con nuestro distribuidor o
instalador. Usted es responsable de proporcionar l_s
facilidades de conexi6n eVectrica necesarias.
i_ Dafio al producto causado por voltaje inapropiado hacia
el equipo, accidentes, hlcendi_s, inundaciones o actos
de la naturaleza de fuerza mayor.
;_!_Dafios incidentales o consecuendales cattsados por
defectos posibles con este acondicionador de ah-e.
i_ F'_o del producto restdtmlte de modificaciones al
producto o debido a uso irrazonable incluyendo no
proporcionar mante_fimiento razonable y necesario.
EXCLUSIONDE GARANTIAS IMPLJCITAS--Su unico y exclusive derecho es el cambio del pmductn, tal y
come se indica en esta Garantia limitada. Cualquier garantia implicit& incluyendo las garantias implicitas
de comerciabilidad o adecuacion para un fin detenninado, estan limitadas a un afio o el periodo de tiempo
mas breve permitido per la ley.
Estagarantia se extiende al comprador original y cualquier comprador posterior de productos comprados para uso
residencial dentro de Estaflos Unidos.
Algunos estados no permiten la exclusiSn o las limitaciones de dafios incidentales o consecuenciales. Esta garantia
da derechos legales especfficos, y usted podria tener otros derechos que variar#n de estado a estado. Para saber cu#les
son sus derechos legales, consulte a la oficina de asuntos del consumidor local o la oficina delAttorney General en
su Iocalidad.
Exclusi6n de garantias hnplicadas: Excepto donde est# prohibido o restringido por la leg no hay garantias,
expresas, orales o estatutarias que extiendan m#s all# de la descripci6n especifica, incluyendo especificamente
las garantias implicadas de mercanfibflidad o propiedad para un prop6sito particular,
Garante:GeneralElectricCompany.Louisville,KY40225
15
Page 28

Apoyoal consumidor.
PaginaWebdeGEAppliances
_Tiene alguna pregunm sol)r( su ele(n-(×lom(%ti(o? iPru(b( la pfigina _¥_1>d( GE Applianc(s,
cualquier dfa del aft(!! F'am mayor conveniencia v s( rvicio rafts rftpido ya puede descargar los Manuales
de los Propi(tarios, o inchlso l)edir piezas hac(r una cim en linea.
RealLifeDesignStudio(Estudbdedisefioparalavidareal)
(;E apoya el concepto de Dis(rio [ 7nivelxal--pr<Muctos, s(lvicios y ambientes que pueden usar genre de
todas Insedades, tamm'_os y capacidades. Reconocemos la necesidad d( disefiar pm-,tuna gran gama de
habilidades v dilicuhades fisicas v mentales. Para mils detalles cola-( Ins aplicaciones de GE Disel'_o L niv_rsal,
inchlyendo id(as de disefio par, i la cocina pare personas con discapacidades, mir( nuestra pfigina _g(.b ho}
mismo. Pare pel_,onas con dilicuha(les auditiwls, thvor d( llamar al 800.TDD.GEA(I (8(_).833.4322).
Piezasy accesorios
Aquellos individuos con la calificacidn necesaria pare rq)ardr sus pr()pios (l(ctrodomdslicos pu(den
pedir que se les manden las piezas o accesofios direclmnenm a sus hogares (aceptamos las larjetas
VISA, MasterCard y Discow.r). Hag',l su pedido en lfima hox, 24 horas cada d/a o llamar pot tel_tbno
al 800.626.2002 dm_lnte horns noHnales de oficina.
Las instrucciones descritas en este manua/ cubren los procedimientos a seguir por cualquier usuario, GEno esta
no apoya que se le proporcione ningun servicio al acondicionador de aire. Vehementemente recomendamos que
usted no intente proporcionar servicio al acondicionador de aire usted mismo,
ge.com
ge.com
ge.com
Pbngaseencontactoconnosotros
Si no (sift satisii!cho con el servicio (lue r( cil)e de (;F, l)(mgase en conmclo (:_m nosolros enllll( S[l_l pftgina
X_,_I)indi(an(Io t(Mos l(_s demlles asf (omo su mhnero de teldfono o escrl'banos a:
(;( llel_tl Manag( l; Customer l_.elatiOllS
(;E Applian(es, Applian(e Park
LouisGll(, Ix_' 40225
ge.com
! (_ tmpreso on China
 Loading...