

Page 1
Safely Ins_ctiom" ........... 2, 3
Operating Instruc_'ons
C(mtrols_(;ontrol l_mb ...... 6, 7
Conu'ols--Touch Pads ....... 4, 5
Care and Cleaning
_MrFiher . ..................... 8
Balteries ...................... 8
(hille arid (;as(: ................ 8
()utdoor Coils ................. 8
Installation Ins_'udions .... 9-12
ge.com
ASR05
ASH06
©
©
7!)vubleshooting Tips ......... 13
Normal ()p( rating Sotltlds ..... 13
Com'mm, r Support
Consumer Support ............. 16
'_\'_ -m 1"v . .................. 15
Write the model and serial
numbers here:
Model #
Serial #
Find lhcse numbers on a lab('l on
the side of the air conditionen
49-7590 12-07JR
Page 2
IMPORTANTSAFETYINFORMATION.
READALLINSTRUCTIONSBEFOREUSING.
a, WARNING!
For your safety, the information in this manual must be followed to minimize the risk of fire, electric shock
or personal injurg
SAFETYPRECAUTIONS
_ Use dfis appliance only for its imcn& d
pmlx)se as described in this Owner's
Manual.
_: This air condition€ r must be properly
installed in accordan_ e with the Installation
[nstructions bei_/rc it is used.
i< N(_( r unplug your air conditioner 1)ypulling
on*h( l)(we('°(" Mwtvs, ,g l [) )l,gfi'nv.
and pull straight out fl'om the re(eptacle.
>_Replace immediately all elecuic service
cords that have become fivw_d or othet_vise
damaged, A damaged power- supply co5-d
must be replaced with a new power supply
coM obtained from th( mamflhctnrt:r and
not 5-tpaired. Do not us¢ a co5-d that shows
crocks or abrasion damage along its length
o1-at tither fll_ plug or connector end.
{g}If tile r_ ceptacle does not match the plug,
_ Turn tll_ unit OFFand unplug yore-air
_} GE does not support any setMcing of the air
_!_)_For }'or IF sat('*}...do DOt StOl'(? Of rise
_¢_MIair conditk)ners contain refl-igcmnts,
HOWTOCONNECTELECTRICITY
the 5-ccq)tacle IlltlSt be changed out b} a
qualified electrician.
_cmditioner b_ fbrc cleaning.
conditiotmt: Wc strongly recomm(nd that
you do not attempt to servic_ die air-
(ondition( r yoursel£
combustible mat_ rials, gasoline or oilier
flammable vapors or liquids in the vicinity
of this or anv other appliance.
which un&r fi.!deml law nmst b_ r_mov_d
prior to pt-oduc_ disposal. If you arc getting
rid of an oM product with 5-cffigetwnts, che_k
witll the company handling disposal about
what to do.
Do not, under any circumstances, cut or remove
the third (ground) prong from the power cord.
For personal safety, this appliance must be
properly groundecL
DONOTuse an adapterplug with this appliance.
Th_ power cord of fllis appliance is _quipped
witll a 3-prong (grounding) plug which mates
with a standard 3-prong (grounding) _tll
omkt to minimize the possibility of electric
shock hazard fiom this appliance.
Power (ord iltchld(:s a ( tll5(![l[ iSHCFYtSpI( I
device. A test and reset button is provided
on the plug case. The device shouM be t_swd
on a periodic basis by fis_t pressing the TEST
l)tstmn and then tile: RESETbutton while
plugged into the outlet. If tll_ gESgbutmn
does not t_Jp or if the RESETbutton will
51ot stay en_lged, dis(ontinu _. use of th( air
conditioner and contact a qualitk d sePdce
technician.
tlave tile wall outlet and circuit checked by
a qualified electrician to make sure tile omlet
is properly grounded.
"_\]msc a 2-prong _ndl outleI is encotmt_ r(d,
it is your personal responsibility and obli_ltion
tw have it 5-cpla( ed with a propet-ly grounded
3-prong wall outlet.
The air condition€ r shouM ahvays be plugged
into its own individual elecu'ical omlet which
has a vohage rating that matches tile rating
plate.
This provides file best p_ rlbnnanc_ and also
pscvems oxerloading house wiring ( ircuits
which couM cause a fire hazard tiwm
overhealed wir_ s.
Se_ tll(! Installation Instructions, Electrical
Requirements sc_tion l;.)r spedtk ch,_u'kal
( onnc_ tion rcquircmcms.
2
Page 3
WARNING!
USEOFEXTENSIONCORDS--115-Voltmode&only
ge.com
Because of potential safety hazards under certain
conditions, we strongly recommend against the
use of an extension cord.
[Iow(_c*,if'yoll must use an extension cord,
it is al)solmcly nec(ssa_ dlat it be a UL-listed,
14 gauge, _wire gromlding type appliance
extensi,.)n cord having a grotmding type [)lug
and otttlet and fllat the electlical _ting of" ill(
cord be 15 aml)ercs (mi_fimmn) and 125 volts.
CAUTION:
DO NOTuse an extension cord with any ofthe
230/208 voltmodels.
READANDFOLLOWTHISSAFETYINFORMATIONCAREFULLY.
SAVETHESEINSTRUCTIONS
3
Page 4
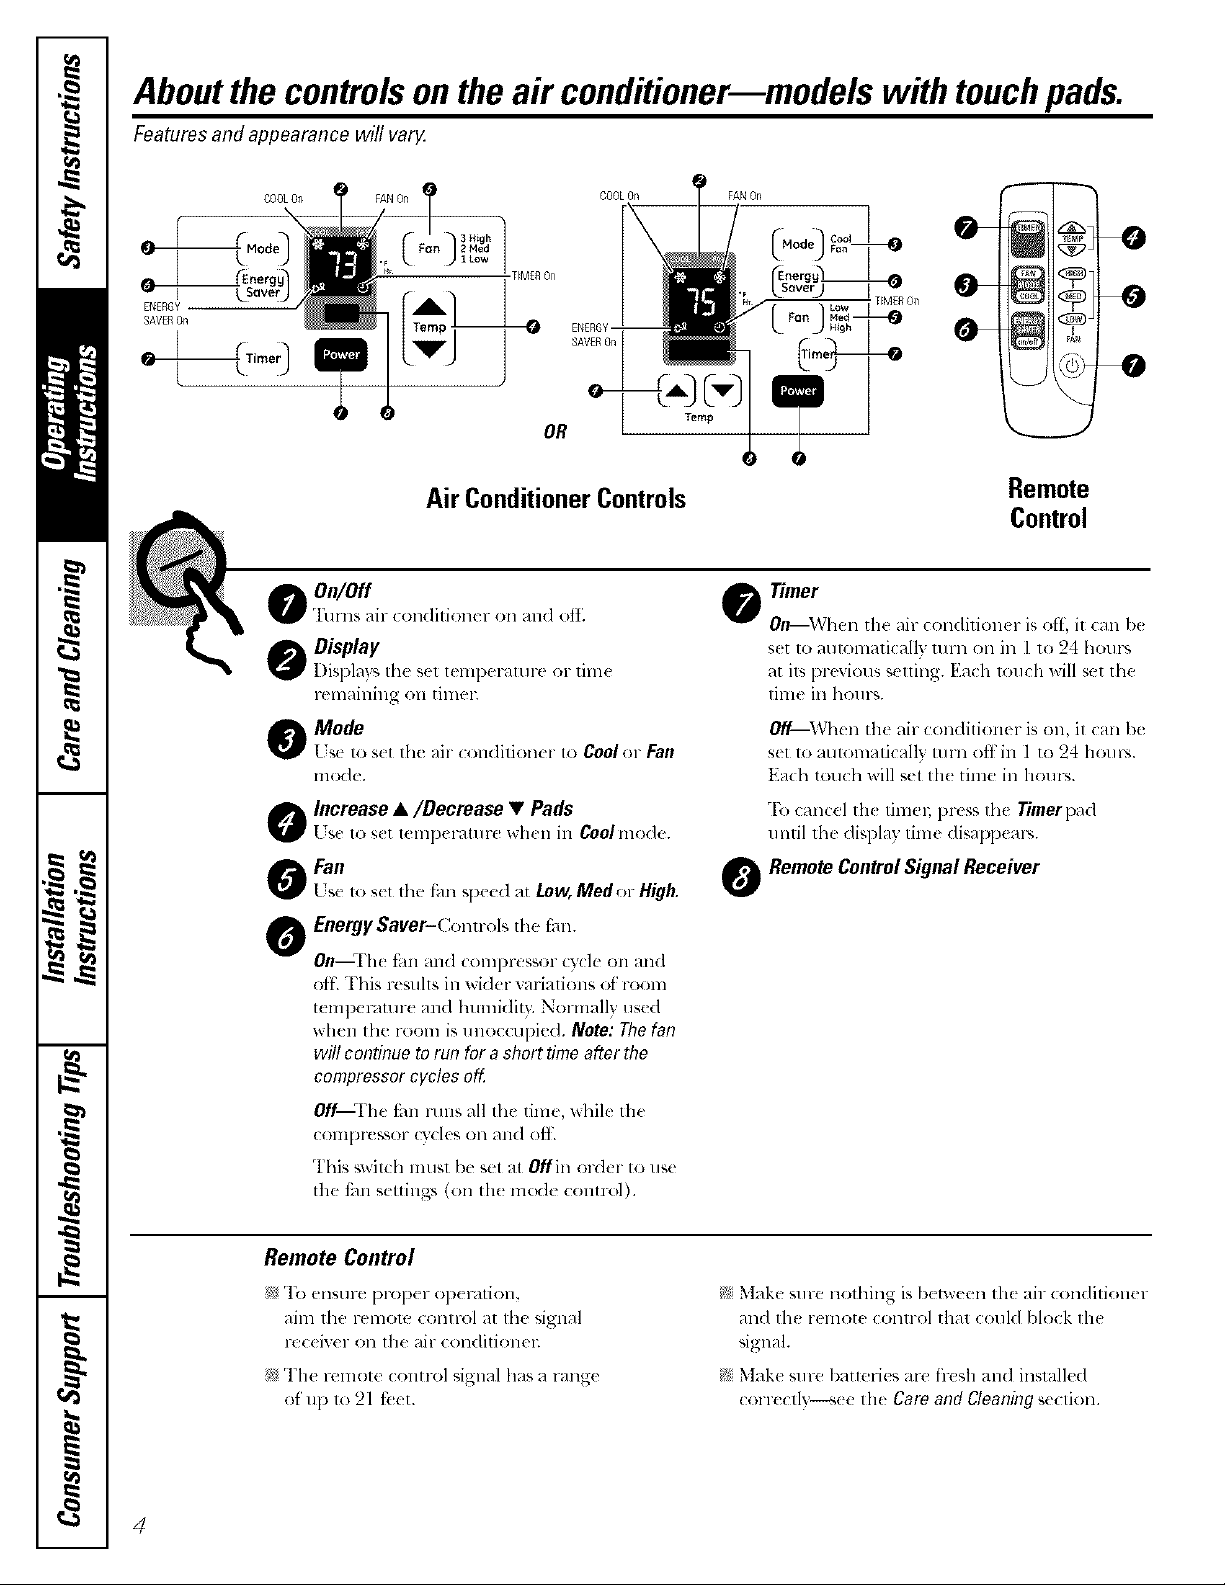
Aboutthecontrolsontheair conditioner--modelswithtouchpads.
Features and appearance will varg
COOLOn FANOn
ENERGY-
SAVEROn
0
OR
Air ConditionerControls
O On/Off
Turns air (onditioner on and ofl_
O Display
Displays Ihe set lempemmre or tim(
remah]h]g oil [IH}ell
O Mode
[ s( to s(t th( air (on(lifioner to Cool or Earl
lllOC[(.
) Increase •/Decrease • Pads
G [[S,( tO S([ t(mlxrattll-e Wh(ll ill Coolmode.
Fan
Lse to set file t_lnspeed at Low, Med or High.
EnergySaver-Comrols file [_m.
0
0n--The tim and comprussor (ycle on and
off. This resuhs ill wider variations ot room
teml)emmre and humidit}. Normally used
when the room is unoccupied. Note: The fan
will continue to run for a short time after the
compressorcyclesoff
OfP--The £m IIlHS all tile time, while the
colnpr(,_,sor (?'(:leson and oil.
This switch llltlgt be set at Offin order to use
the thn settings, (on th( mode contrt4).
Temp
Remote
Control
Timer
On--When tile air con(lition( r is off; it can b(
s(t to automatically mrn on ill l to 24 hours
at ils previous setting. Each louch will set tile
time in hours.
Off--When th_ air conditioner is on, il (an Ix
s(t 1o automati(ally un-n oflin 1 to 24 hours.
Each touch will s(t th( time in llom:_.
To cancel th_ time:; press Ill{!Timerl)ad
until l['le disl)la 3 tim( disal)F,eals.
RemoteControlSignal Receiver
Remote Control
I To ensure prol)er el?( ration,
aim lhe l-el:lOle COlllFOl _lt Ihe signal
r(:c( iver (111 the air collditiollel_
i The FelllOl( COnWOIsignal has a range
of'up 1o 21 feet.
_;_,Make sure nothing is b(tween th( air condifioller
and the remote (onn-ol that couM block file
signal.
N Make sure batmlies are flesh and installed
correctly---s( e the Care,and Cleaning se(tion.
4
Page 5
Additional controls and important information.
DoNot OperateinFreezingOutdoorConditions
This _ool-onl 3 air conditioner was not (h,signcd tbr
tie(zing outdoor conditions. It mtlst not be tlc,ed ill
tie_ zing outdoor con(litkms.
When the air conditioner is turned on, it will
automatically start in the setting last used,
Power Outage Recovery Feature
In the _ase ota power outage or interruption, the will reset to the original s(uing.'i_)u mm need to s(t
unit will mltomatically restart in the setfing_ last a new time it desired.
used aiier tile power is restored. The Tlmertbature
Cool Mode
ge.com
[se the Cool mode with High(3),Mud (2)or
Low (1)f_mfor cooling. [se llle Increase • /
Decrease• pads 1oset the desired temperature
between 64°F and 86°F in l °F increnlents.
A thermostat is used to mainlvlin the room
tempet'dmre. The compressor will (3cle on and off
to kee l) the room at the set level ot comfort. Set the
thermostat at a lower number and the indoor air
will become coolen Set the thermostat at a higher
number and the indoor air will be(olne wannen
NOTE:If theair conditioneris offandis then turned
onwhile set to Cool,it will takeapproximately3 mhTutes
fortbe compressortostart and coolingtobegin.
CoolingDescriptions
ForNormalCooling--Sek(t the Coolmo(h
and High(3)or Med (2)fim with a middle set
tempel-ature.
ForMaximumCooling--Select the Coolmode
mM High(3)tim with a lowcr sct temperature.
ForQuieter& NighttimeCooling_qdect the
Coolme&, and Low(1)fbn widl amiddle s_t
tulllp( l'dtlll'U.
NOTE:If you switch from a CoolsettingtoOffor to
a fansetting wait at least3 mh?utesbeforeswitching
back to aCoolsetting.
Fan Mode
I st, the Fanat High(3),Med(2)or Low(1)to provide Simc tim-only scttings do not l)ro_ ide (ooling,
_dr cilxulation mid filtering without cooling, a t_rap( l-dtnre setting will not be displa?ed.
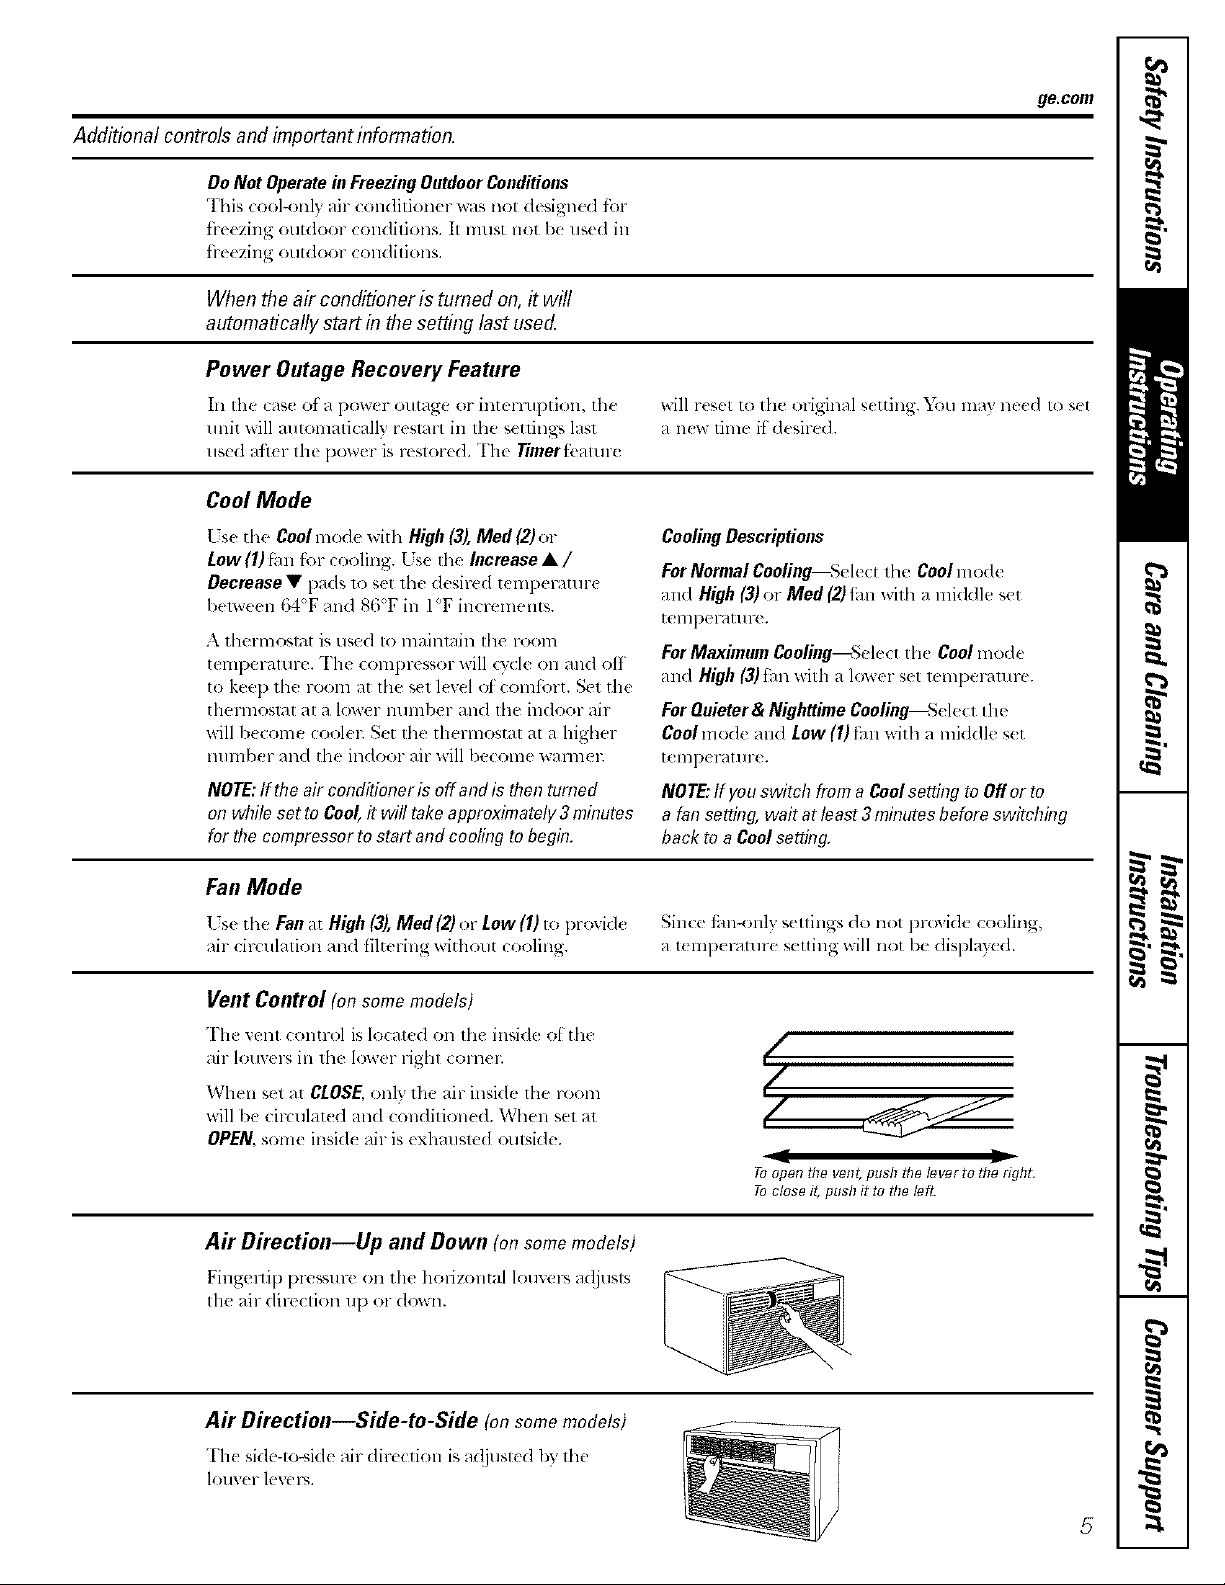
Vent Control (onsome models)
The vent control is located on the inside ot the
air lore ers in the lower light colnen
When set al CLOSE, only the air inside dm room
will be circulat( d and conditioned. When set at
OPEN,somc insid_ air is _xhausled outside.
(/
(/
II 11
Toopen the vent,push the lever to flTe righ_
Toclose it, pushit to the left.
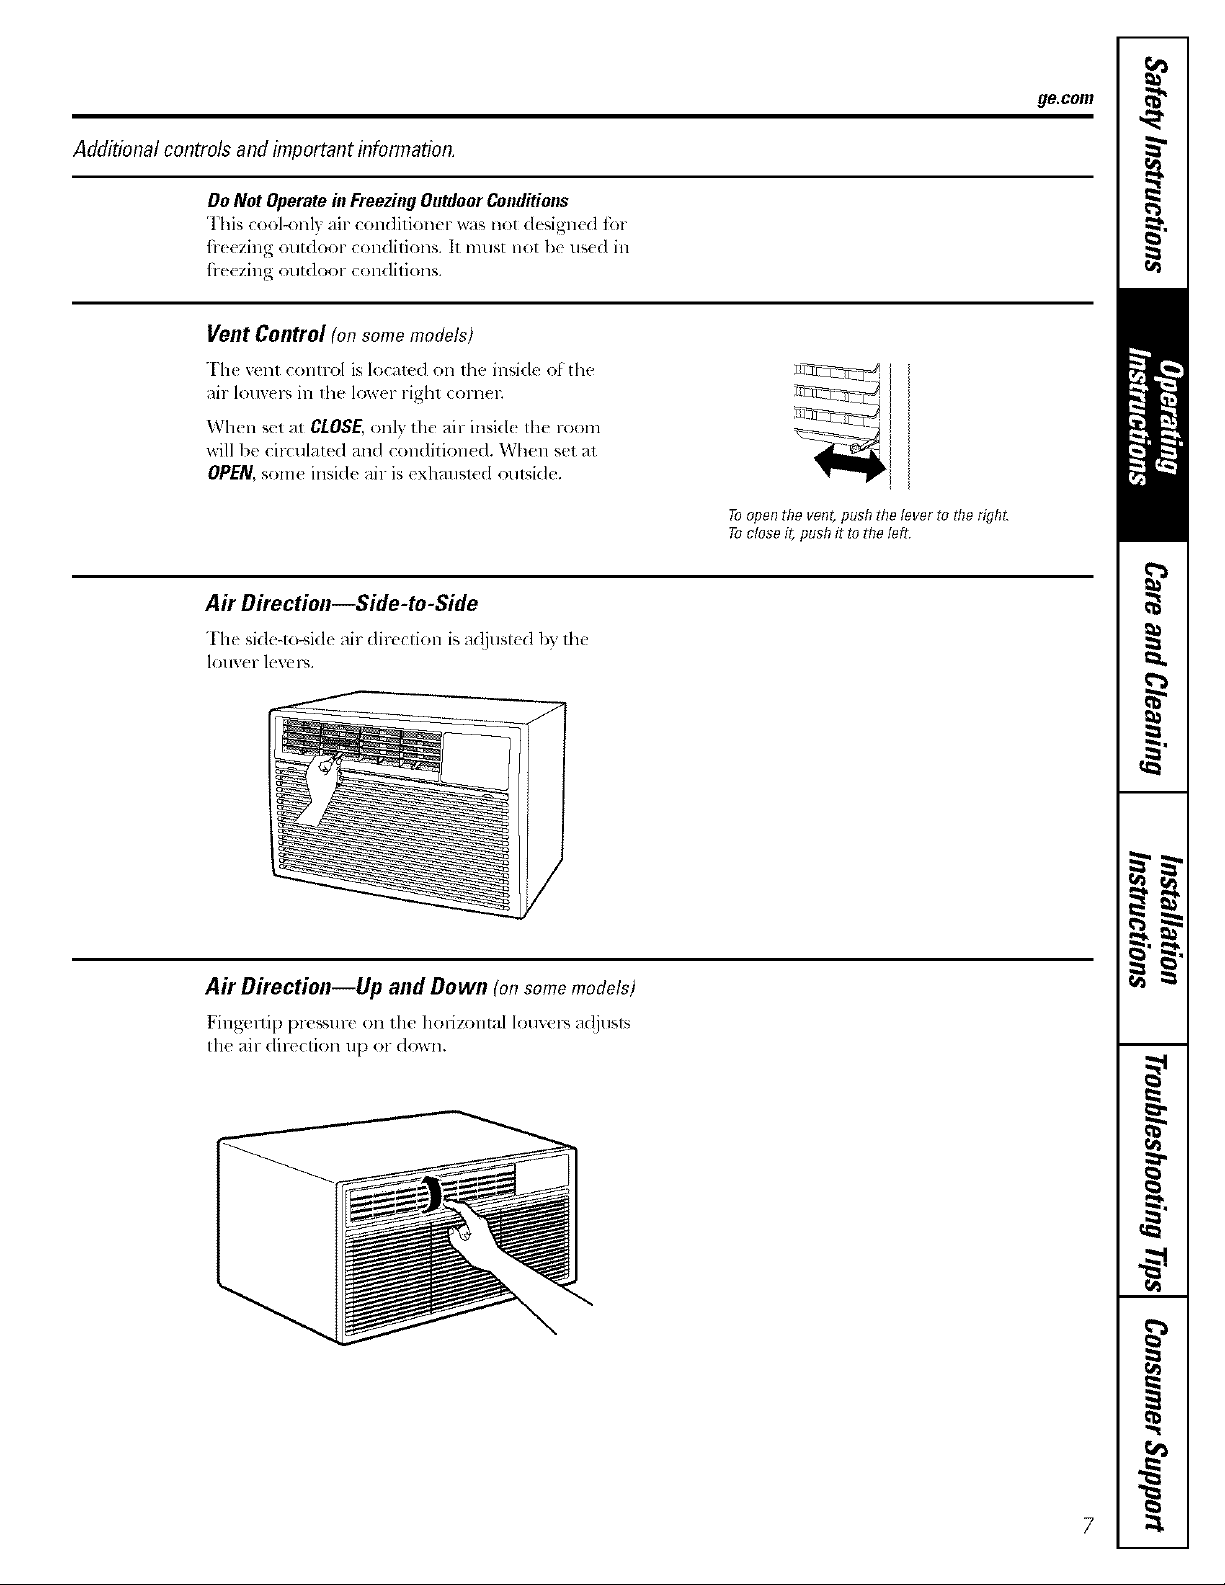
Air Direction--Up and Down (onsomemodels)
Fingmlip pressure on t[lc horizontal louxel-s _Mjusts
tile air direction up or down.
Air Directiou--Side-to-Side (onsomemodels)
The side-to-_i(h, all direclioll is a(!justed by the
louver levels.
5
Page 6
Aboutthecontrolsontheairconditioner--modelswithcontrolknob.
Features and appearance may va_
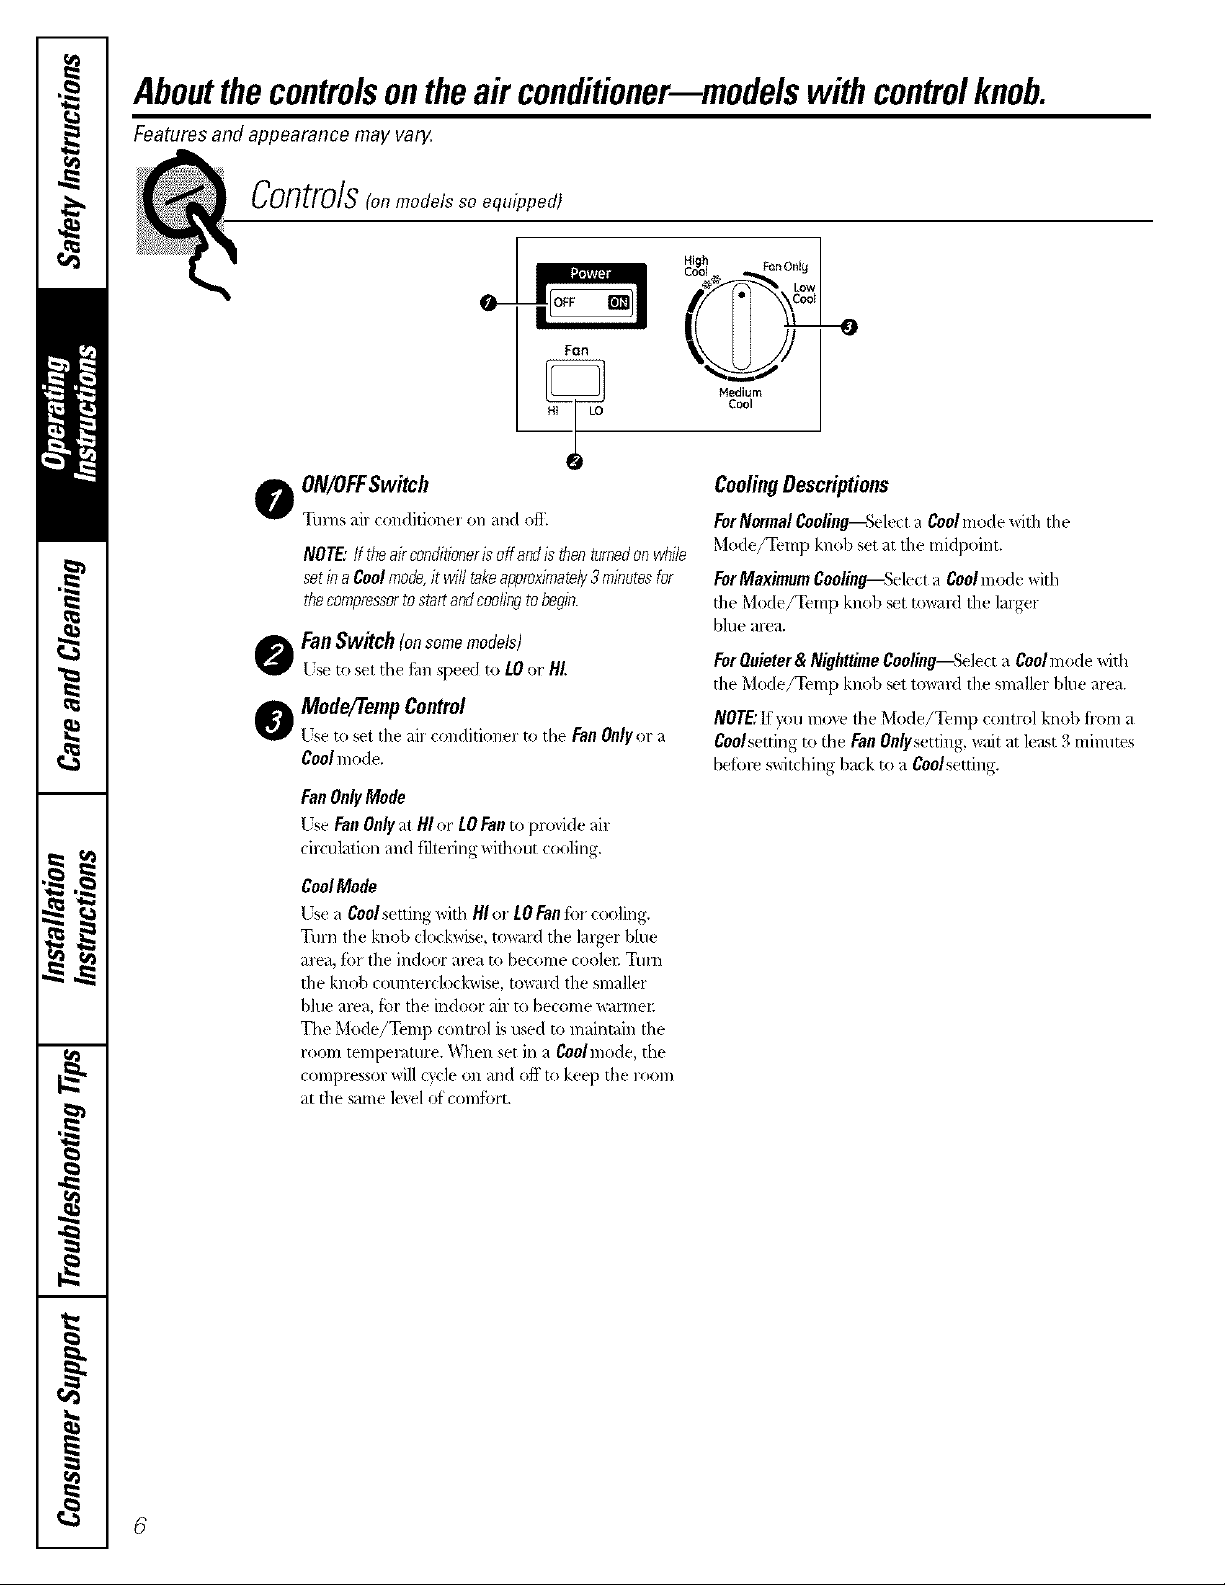
Controlsto.mode;ssoeq.;ppedj
0
Fan
Nediurn
Cool
O ON/OFFSwitch
Turns ai_ conditione_ (m and off,
NOTE:If theairconditionerisoffandisthenturnedonwhile
setinaCoolmode,itwilltakeapproximately3minutesfor
thecompressortostartandcoolingtobegin.
FanSwitch (onsomemodels)
Use to set the t_mspeed to LOor HI.
O Modo/Temp Control
Use to set the air conditione[ to tile FanOnlyor a
Cool mc_de.
FanOnlyMode
Use FanOnlyat HI or LOFanto provide air
drculatkm and fi]tering_dthout cooling.
CoolMode
tJsea Coolsetting with HIo_ LOFanfb_cooling.
Turn the knob c]ockwise,tow,uxltile ]argz-rblue
area, fb_the indoor area to become coolen Turn
the knob cotmtelz:lock_dse,toward the smaller
blue area, f}.)rthe indoor air u) become uatmeE
The Mode/Temp conuol isused U)maintain the
room tempel',ml_e.When set in a Coolmode, the
compressor willcycleon mid off to keep the room
at the same levelof comfi)rt.
CoolingDescriptions
ForNormalCooling--&qecta Coolmode _dththe
Mode/Temp knob setat the midpoint.
ForMaximumCooling--Selecta Coolmode with
the M<ule/Temp knob set reward the lalget
blue area.
ForQuieter& NighttimeCooling--Selecta Cool m ode with
the Mode/Temp knob _t to_ard the smaller l)lue area.
NOTE:If youmoxe the Mode/Temp control knob fi'oma
Coolsettingto the FanOnlysetting, waitat least 3 mimltes
befi:)res_itching back toa Coolsetting.
6
Page 7
Additional controls and important information.
Do Not Operate in Freezing OutdoorConditions
This (ool-(mly air _onditioncr was not de_igm'd tor
fl-(czing ol/tdoof conditions. It llallst not 1)c lls(d ill
fi-eezing outdoor conditions.
Vent Control (ol7some models)
The vent comrol is localt, d on tile inside oI tile
air louw, r_ in fl_e lower right (ornel;
When set at CLOSE,only the air inskl( the room
will Ix, cir( ulated and con(lition(d. When set at
OPEN,some inside air is exhausted otllside.
A# Direction--Side-to-Side
The side-lo-sid( air direclion is a(!jusled 1)7,'the
lotw( 1-level_.
ge.com
Toopen the vent, push the lever to the right.
Toclose it, push it to the left
A# Direction--Up and Down (onsomemodels)
Fingellip [)I'(?SSIlI-( Oil the hol-iZOllta[ [O/lX_(_lS a(!jtlsls
Ihe air direclion up or d(gvll,
Page 8
Careand cleaning ofthe air conditioner.
How to Insert the Batteries on the Remote Control (onsome models)
] Remove the batt(ty cover by _diding it
a((ol'dillg to lh( HFI'O_,V diY(([iol]+
] Insert new I)atleri(s making sure thai the (+)
and (-) oi I)auely are insmll(d correctly.
] Reatta(h th,_ co',(r I)y sliding it back
into posixion.
Grille and Case
Turn lhe air (onditioner off and r_move th(
phlg from 111(wall ,.)ull(t I)(fore cleaning.
Outdoor Coils
The coils on the outdoor side of the air conditioner
should be checked regulm'l?; It they arc clogged
with dilt or soot, they may b( professionally
clean(d.
NOTES:
5;!_I s( 2 _k (1.5 xolt) I)att(ti(s. Do no1 use
rechargeal)le ballel-ies.
iy, Renlove Ihe 1)all( l-i_sfronl the relnote conlrol if
th( sysl(m is not going to be uscd for a long time.
"[k:,cl(an, use wal,. r and a mild (1¢t( rgent.
l)o not us,- bleach or al)rasb{s.
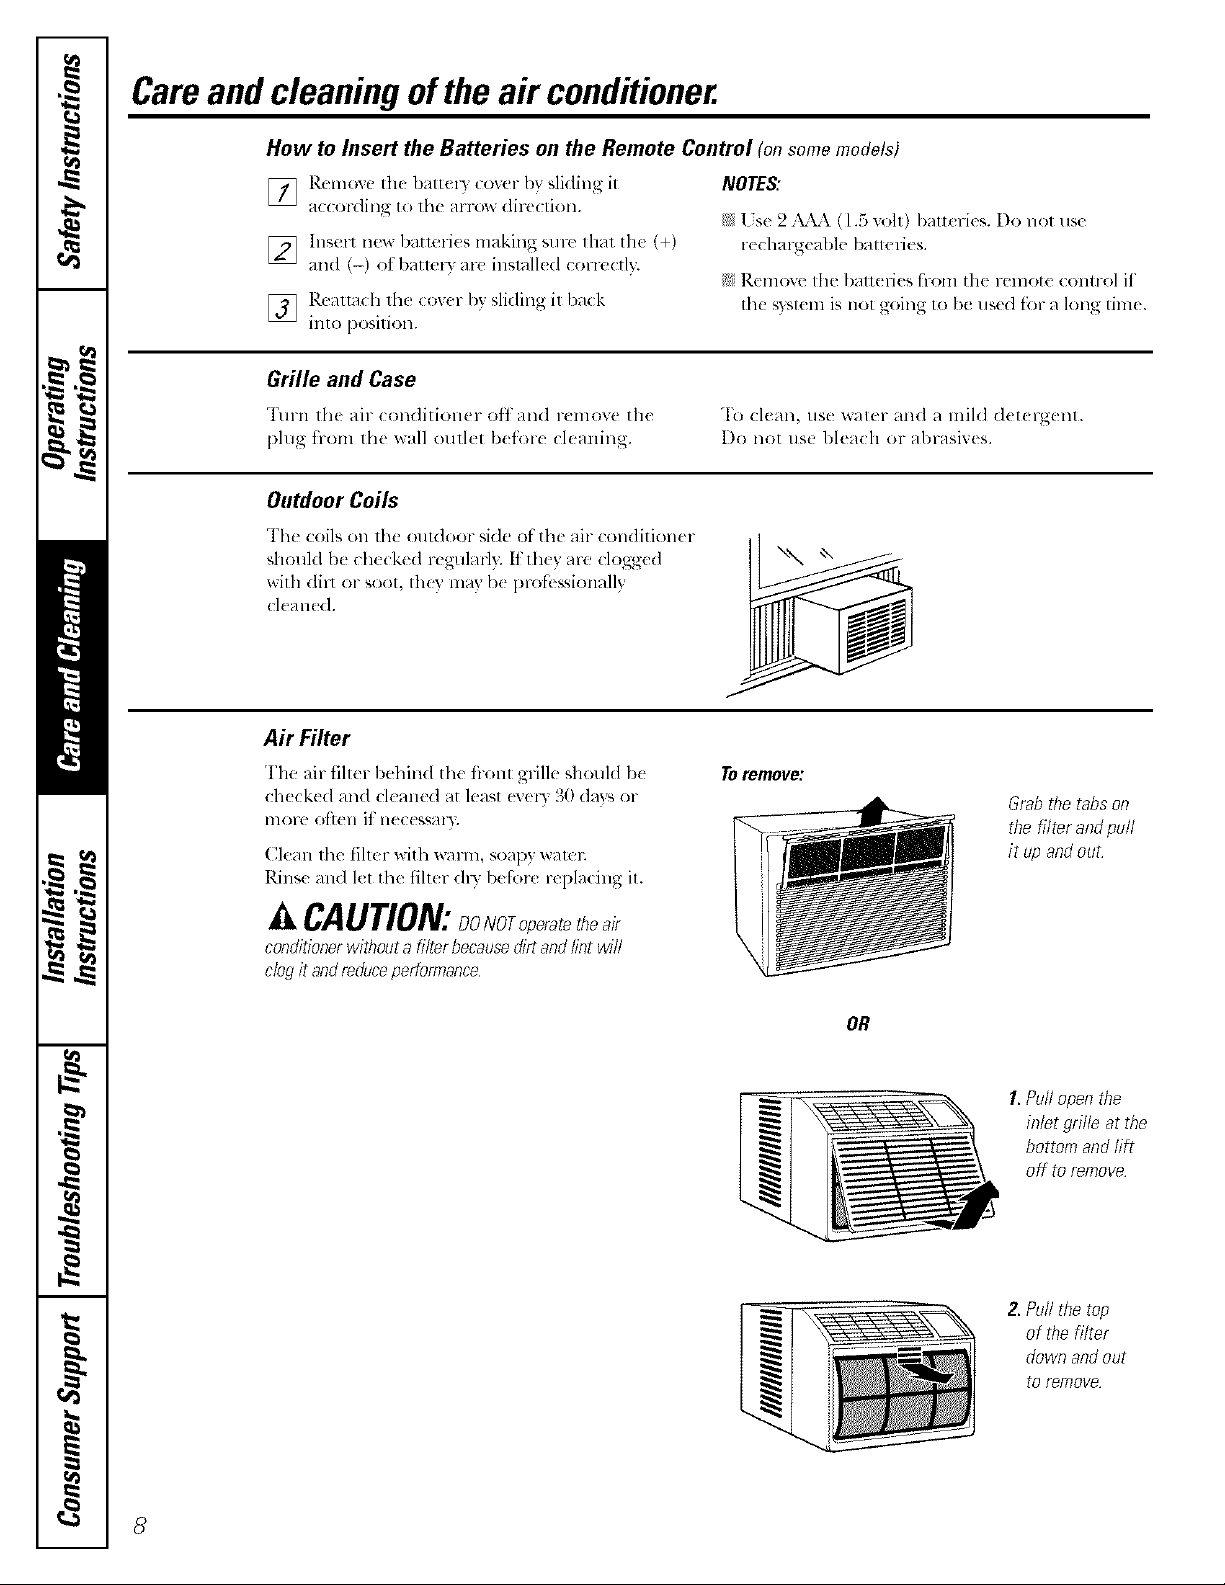
Air Filter
"1"11(air fill(r behind th( iiont grille should b(
check(d and clean(d at least (x (l?, aO (la}s (n
more o[_(,n it ne(essm T.
Clean the filter with _al-m, soapy wam_;
Rins( and let the filter (ll)" befi._rc ruplacing it.
o
,ACAUTION: Noro erateair
conditioner witboet a filter becausedirt andlint will
cloutit aod reduceperformance
Toremove:
Grabthe tabs on
tbe filter and poll
it up and out
OR
1.Pullopenthe
inletgrille at the
bottomandrift
off tore,move
Z Pefl tbe top
of the filter
down and out
to remove
8
Page 9
Installation
Air Conditioner
Instructions
['_ Questions? Call 80O.GE.CARES (800.432.2737) or Visit our Website at: ge.com
BEFORE YOU BEGIN
Read these instructions completely
and carefully.
• IMPORTANT - Savethese
instructions for local inspector's use.
• IMPORTANT - Observeall
governing codes and ordinances.
• Note to Installer- Be sure to leave these
instructions with the Consumer.
• Note to Consumer- Keep these
instructions for future reference.
• Skill level - Installation of this appliance
requires basic mechanical skills.
• Completion time- Approximately 1 hour
• We recommend that two people install
this product.
• Proper installation is the responsibility
of the installer.
• Product failure due to improper installation
is not covered under the Warranty.
• You MUST use all supplied parts and use
proper installation procedures as described
in these instructions when installing this air
conditioner.
CAUTION:
Do not, under any circumstances, cut or
remove the third (ground) prong from the
power cord.
Do not change the plug on the power cord
of this air conditioner.
Aluminum house wiring may present special
problems--consult a qualified electrician.
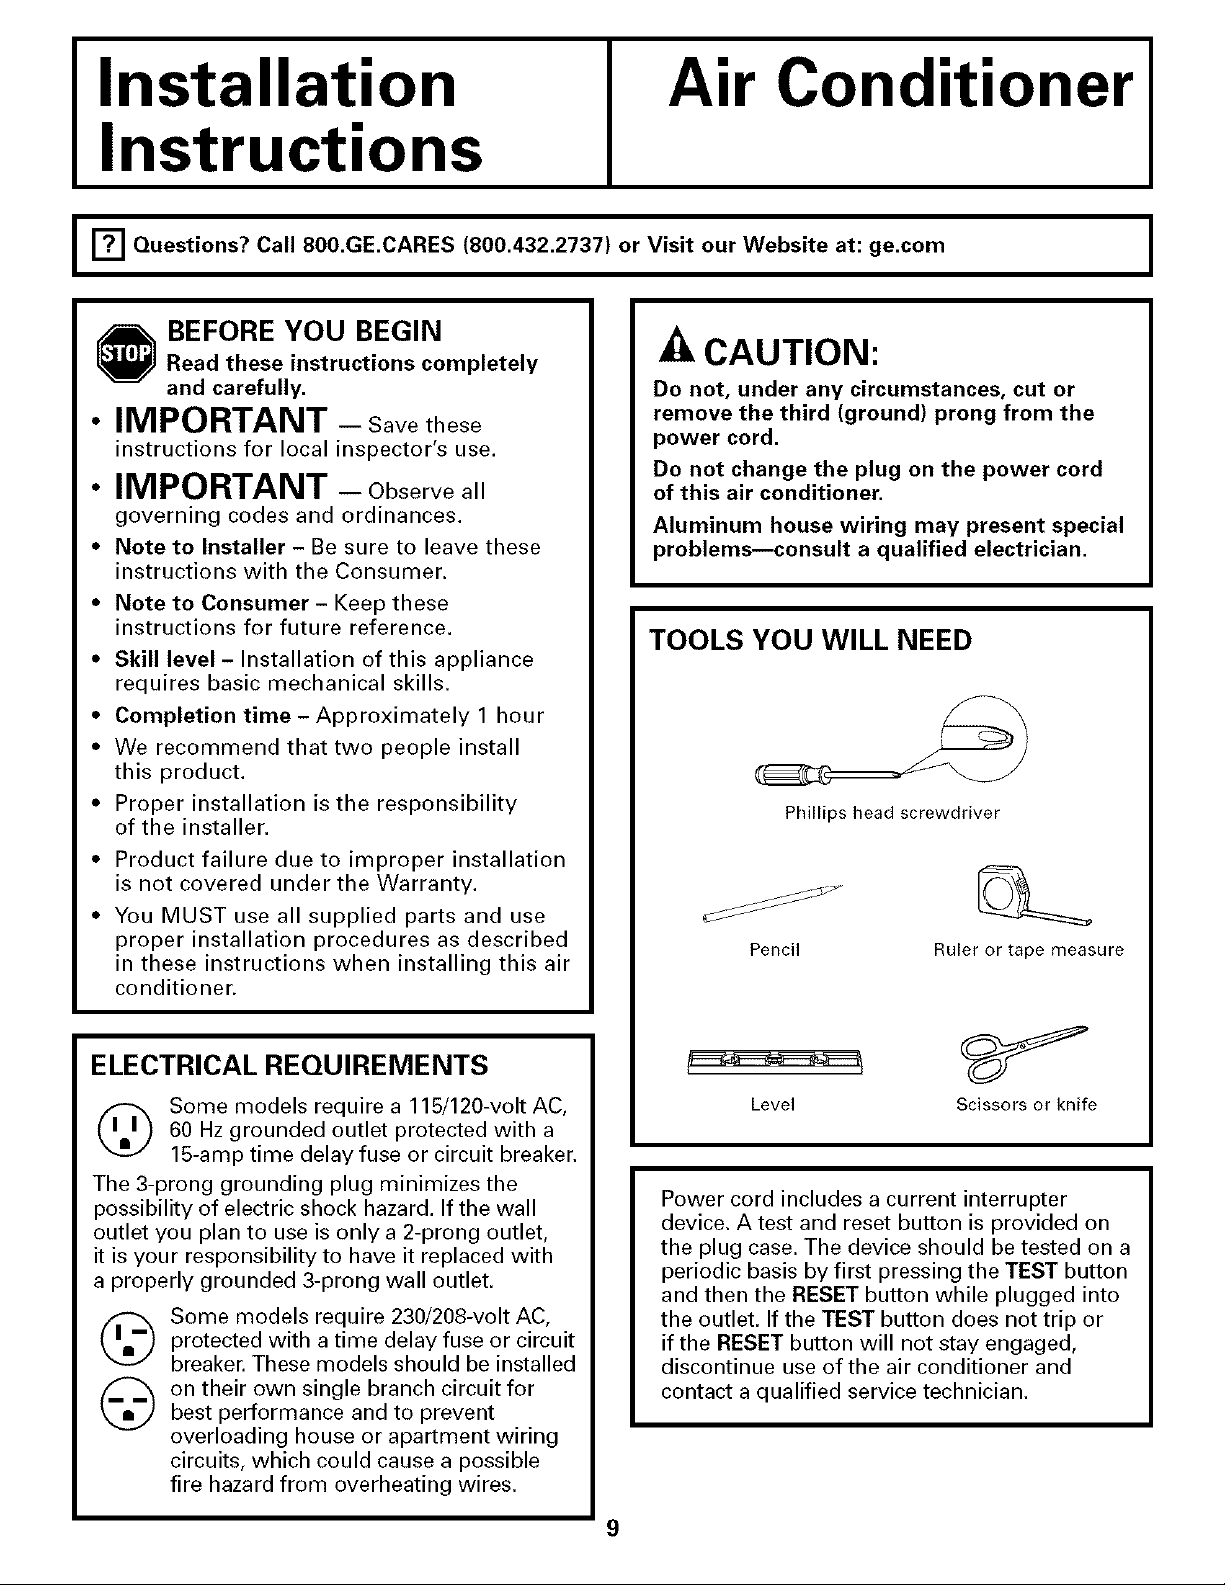
TOOLS YOU WILL NEED
Phillips head screwdriver
Pencil
Ruler or tape measure
ELECTRICAL REQUIREMENTS
(_ Some models require a 115/120-volt AC,
The 3-prong grounding plug minimizes the
possibility of electric shock hazard. If the wall
outlet you plan to use is only a 2-prong outlet,
it is your responsibility to have it replaced with
a properly grounded 3-prong wall outlet.
(_ Some models require 230/208-volt AC,
(_ on their own single branch circuit forbest performance and to prevent
60 Hz grounded outlet protected with a
15-amp time delay fuse or circuit breaker.
protected with a time delay fuse or circuit
breaker. These models should be installed
overloading house or apartment wiring
circuits, which could cause a possible
fire hazard from overheating wires.
Level Scissors or knife
Power cord includes a current interrupter
device. A test and reset button is provided on
the plug case. The device should be tested on a
periodic basis by first pressing the TEST button
and then the RESET button while plugged into
the outlet. If the TEST button does not trip or
if the RESET button will not stay engaged,
discontinue use of the air conditioner and
contact a qualified service technician.
9
Page 10
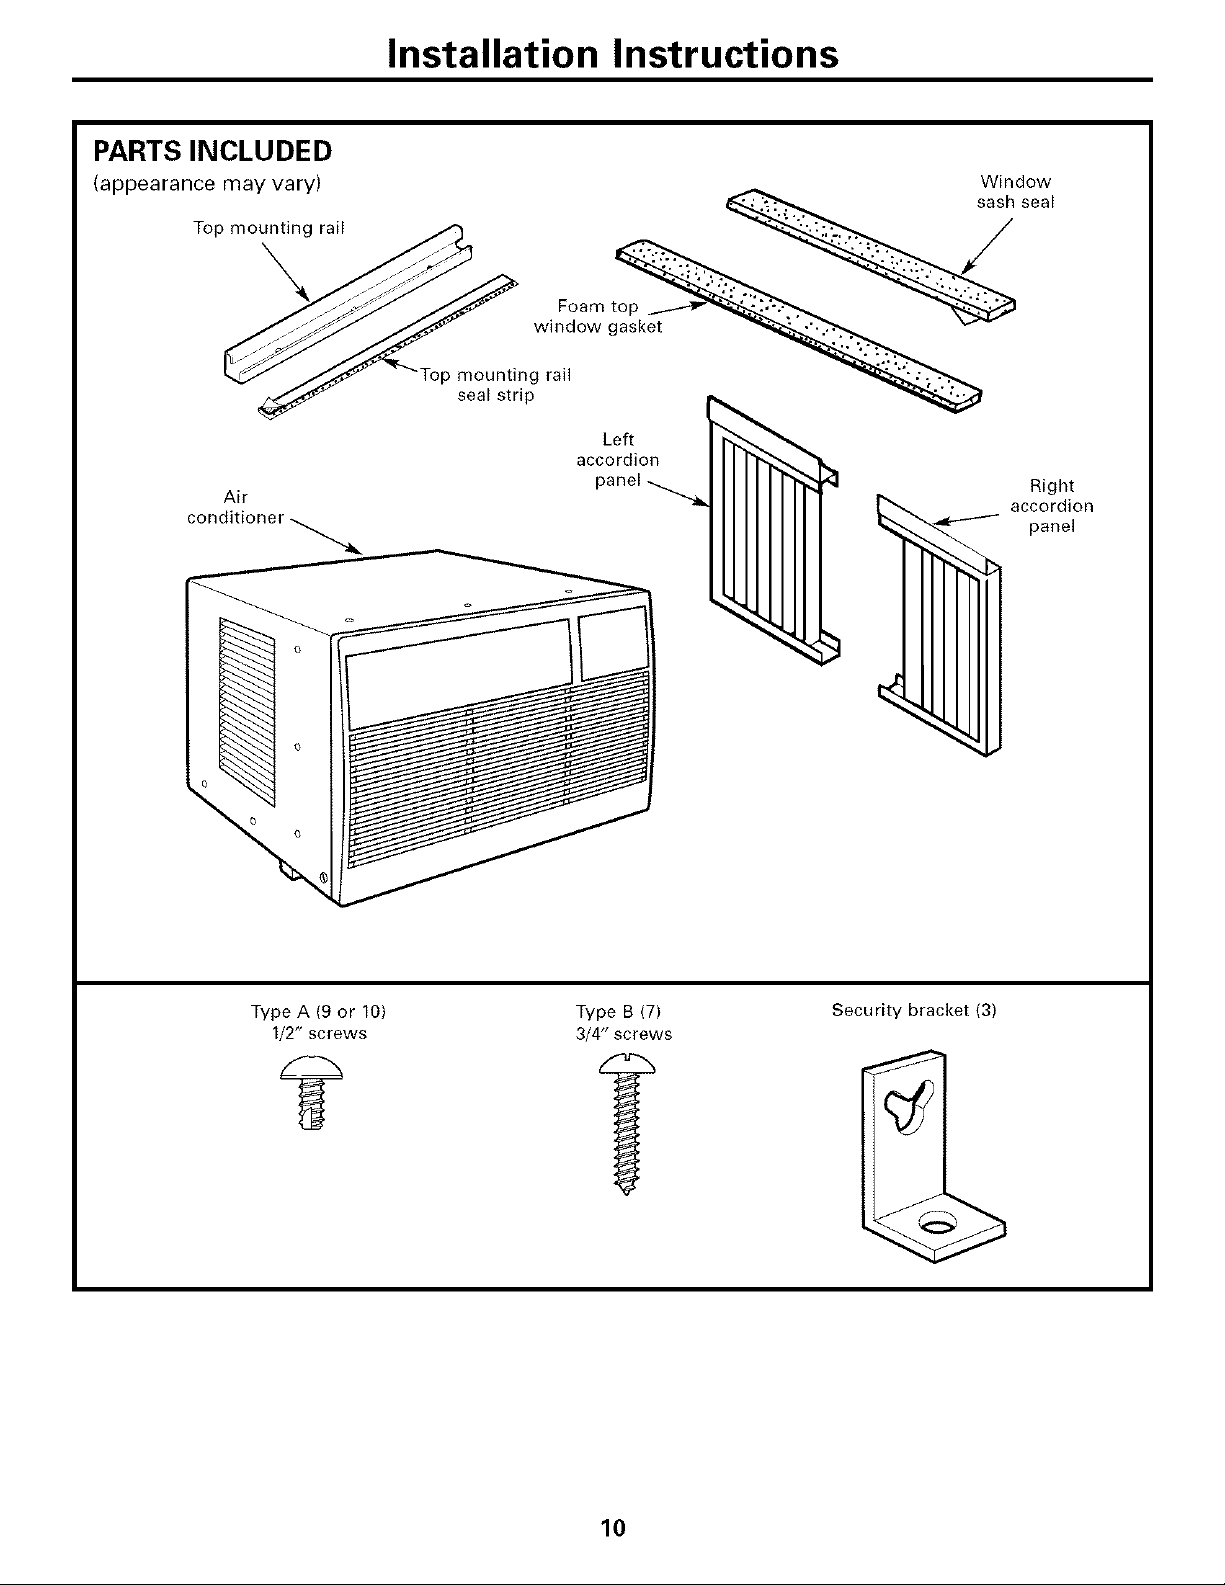
PARTS INCLUDED
(appearance may vary)
Top mounting rail
Installation Instructions
Window
Air
conditioner
\
,p:_%ir_2ro,,
wmdow gasket __-
accordion
Left
panel
aeal
Right
accordion
panel
Type A (9 or 10)
1/2" screws
Type B (7)
3/4" screws
10
Security bracket (3)
Page 11

Installation Instructions
[] WINDOW REQUIREMENTS
• These instructions are for a standard
double-hung window. You will need to modify
them for other types of windows.
• All supporting parts must be secured to firm
wood, masonry or metal.
• The electrical outlet must be within reach
of the power cord.
• Follow the dimensions in the table and
illustration for your model.
Models A B
ASR05 11 3/4" min. 22"-36"
ASHO6 13" rain. 22"-36"
I I
5_===8
t
A
B I-
With accordion panels) !|r
f
[] PREPARE AIR CONDITIONER
[] Remove the backing from the top
mounting rail seal strip and attach it
to the bottom of the top mounting rail.
Cut to size.
[] Install the top mounting rail with 3 or 4
type A screws (depending on the number
of holes in the top mounting rail) from the
outside of the case.
Top mounting
[] STORM WINDOW REQUIREMENTS
A storm window frame will not allow the air
conditioner to tilt toward the outside and will
keep it from draining properly. To adjust for this,
attach a piece of wood to the sill.
WOOD PIECES-
WIDTH: 2"
LENGTH:Long enough to fit inside thewindow
frame.
THICKNESS: To determine the thickness, place a
piece of wood on the sill to make it 1/2" higher
than the top of the storm window frame or the
vinyl frame.
Attach securely with nails or screws provided by
the installer. 1/2" higher
than vinyl frame
1/2_ higher
than storm
window
frame
Storm
frame
_ _ (on some windows)
Sill
Vinyl frame
Bottom
mounting
[] Loosen the lower screw on each side of
the case and hook a security bracket on
each side. To allow for later adjustment,
do not tighten the screws until you install
the unit in the window.
Security
bracket
Security
bracket
11
Page 12

Installation Instructions
[] PREPARE AIR CONDITIONER
(CONT.)
[] Insert the frames of the accordion panels
into the top and bottom mounting rails.
Attach the accordion panels to the side
of the case using 6 type A screws,
Top mounting
Accordion panels
[] INSTALL AIR CONDITIONER IN
WINDOW
[] INSTALL AIR CONDITIONER IN
WINDOW (CONT.)
[] Extend the left and right accordion
panels to the vertical window sashes and
attach with 4 type B screws.
Type B
Type B
screws
[] Attach the brackets to the sill on both
sides using two type B screws.
[] Tighten the screws to secure the brackets
in place on each side of the air conditioner.
screws
[] Cut the window sash seal to the window
width and stick the adhesive side to the
bottom of the sash.
--Window
sash seal
[] Place the air conditioner on the sill
with the bottom mounting rail against
its back edge. Center it and close the
window securely behind the top mounting
rail. It should be level or slightly tilted
to the outside. Use a level; about a 1/3
bubble will be the correct case slant to
the outside.
[] INSTALL SECURITY BRACKET
AND FOAM TOP WINDOW
GASKET
[] Attach a security bracket with a type B
screw.
[] Cut the foam top window gasket to the
window width.
[] Stuff the foam between the glass and the
window to prevent air and insects from
getting into the room.
/
12
Caulk or weather-strip any gaps or
openings to the outside to seal the
installation.
The installation is now complete,
Page 13

TroubleshootingTips... ge.com
Possible Causes What ToDo
The air conditioner * Make sure the air (on(litioner ph N is pushed
is unph_.ged, completel} into the outlet.
'[he fl_se is blown/drctfit * Check the house fuse/circuit breaker box and replace
breaker is tripped, the filse or _t=_t the breaker;
Power failure. * If power taihlre occurs, t/irn the air conditionex Off
When [_)wet is restored, wait 3 mimltes to restart tim ai_
conditioner m prevent tripping d the compresv)r overload.
The current interntpter * Press the HESEThumm bcated on the power cord plug.
device is tripped. *If th_ RgSgTbuttonwill not sta}_ng'aged, discontinue
use ot the air conditioner and contact a qualitied
ser_ ice technician.
Airflow is resMcted. * Make sure fllere arc no ctmains, blinds o_ fiFnitu_e
blocking the ti*mt of the air conditionen
The temp control may * On models with touch pads: In Cool mode, press the
not be set correctl}: Decrease• pad.
• On models with control knobs, turn the tempenLrure
knob to a higher numbel:
•[he air fdter is dlrl): • (]lean the filwr a le;_st every 30 day
See the Operating Instructions section.
•[he room may have been hot. • X*dmnthe air conditioner is first turned on, >_tl need
to allowti/lle _01" tlle I'{}O/I] I0 C(X)] dox_n,
Cold air is escaping. • Check tbr open tunlace registels and cold air returns.
• Set the air conditioner's vent to the clo_d [x_sition.
Cooling coils have iced up. • See "Air conditioner freezing up"below.
Ice blocks the air flow • On models with control knobs, set tile mode control
and stops the air conditioner at Fan Onlyand floe {_ms_dtch to HI.
from cooling the room. • On models with touch pads, set the contlo/s at
HighFanoi High Coolandset the themaosmt to
a higher temperature.
"['he batteries are inserted • (]heck the position of the b;Jtteries. They should be
incorrectly, instated in the opposiw (+) and (-) direction.
The hatteries may he dead. • Replace the batteries.
Hot, hmnid weathe,; • This is noHnal.
•['he air conditioner is not • For proper water disposal, make sure tlle air conditioner
tilted to the out, fide. slants slightly fi'om the case fi'_mt to the rein:
Moisture removed from air • This isnormal tor a short p_tied in arenas_th little
and thains into base pan. humidity, norlnal for a longer i×_r'iod in x_ 3 humid areas.
Ftmction error code. • Unphlg the air conditionel: Wait 3 minuws and phlg it
A power outage or interruption • In the (_ ot'a power outage or intmmption,
occm'red, tla_ unit Bmerff_uture _,ill les, t to the oliginal setting.
back in.
'_)/I lilac* need to set a new tinle if desired.
Normal Operating Sounds
r4fX._)umay hear a pinging noise caus_ d b)
water being picked up and thrown against the
condens(r on minv days or when the humidity
is lfigh. Tiffs design feature helps remow
moisture and ilnprov< ellici(m3:
g4#'_))llmav h(ar th{ th(rmostaI click when th{
compressor cycks on and olll
_;_Water will coth ct ill the I)as_ i)an during
lfigh lmmidity or on rain} days. "['h_ water
may overflow and drip flOln the outdoor side
ot th{ unit.
};iThe thn may run mell wh<n the compressor
do(s 110[.
13
Page 14

m
gw=
.=- Notes.
m
_" 14
Page 15

GEAir ConditionerWarranty--OneYearLimitedWarranty.
Staple your receipt here.
Proof of the origh?atpurchase date
is needed to make awarranty claim.
We Will Replace:
Replacementun#f{)r any produt I wlfich _hils du( to a d(fi.ct in matclials or workmanship.
Th_ l'(!p]_l( (![]]cl]l t/lli[ is %'_l]'l_)ll[c( ]. ]_{)l" Ih_ F(_l)l_lhl(](!l" of vt)tlv ])I'lXltl(['_ oFi_illa[, oll(_-v(!_l-
warranty peliod.
_',Properly pack your unit. We recommend ttsing the _',Include in the package a copy of the sales receipt or other
original carton and pacld_ materials, evidence of date of o_f'mal purchase. Also print your
_!_Retulal the product to the retail location x_4mre it name a (lesc_ptton
x_s purchased.
Custonler il_struction. This ov,laer s manual provides N Replacement of house fuses or l_setting" of circuit
information regarding opera_g instructions and breakers.
user controls.
Improper irLstallation. If you have an installation problem,
or if the air conditioner is of improper cooling capacity
for the intended use, contact your dealer or installer.
You are responsible for providing adequate electrical
connecting facilities.
Failure of the product result'uig t¥om modificatioi_s to
the product or due to unreztsonable ttse including failure
to provide re_tsonahle and necessary maintenance.
and address and of the defect.
Damage to the product cattsed by improper power supply
voltage, accident, fire, floods or acts of Cod.
Incidental or COl_sequential damage caused by possible
defects with this air conditioner.
EXCLUSIONOFIMPLIED WARRANTIES--Your sole and exclusive remedy is product replacement as provided
in thisLimited Warranty. Anyimplied warranties, including the implied warranties of merchantability or
fitness for a particular purpose, are limited to one year or the shortest period allowed by law.
I
This warranty is extended to the original purchaser and any succeeding owner for products purchased for home
use within flTeUSA.
Some states do not allow the exclusion or limitation of incidental or consequentia! damages. This warranty gives
you specific legal rights, and you may also have other rights which vary from state to state. Toknow what your
legal rights are, consult your local or state consumer affairs office or your state's Attorney General.
Exclusion of implied warranties: Except where prohibited or restricted by law, there are no warranties, whether
express, oral or statutory which extend beyond the description on the face hereof, including specifically the
implied warranties of merchantability or fitness for a particular purpose.
Warrantor: General Electric Company. Louisville, KY 40225
I
15
Page 16

ConsumerSupport.
i_/_,_ ¸
;i1(E-3I
GEAppliancesWebsite
]lave a question or need assislnnc_ _dlh }ore ,q)pll,mc(_ h lh_ ( L :\ppliances Websile, any day of:the vearl
For gl-_ _lI( 1-(OllV( lliell(( an([ /_lstel- sels,k _, y_:ll (}ill n(_.v downI< ad ()_,vl]er's _iall!l_lls, Ol- evell ordel- paris
on-line.
RealLifeDesignStudio
GE supports tll< [ niversal Deqgn concept--products, services and environments that <an 1)e used by
people ot all ages, siz<s and capaNlifies. _,_* rcc_Nnize the need to design tot a wide l',lnge ot ph}sical
and mental abilities and impairments. For d< mils of GE's [ nivel-sal Design applications, including kitch< n
design id<as t})r people with disabilitk s, ch<ck out our'vVcbsite lt_da}. For th< h< aring impair<d, pleas_ <:all
800.TDD.GIL\C (800.833.4322).
PartsandAccessories
Individuals qualified to s< l_'ice lbeir own appliances can brae paris or acc_ ssori_s sent directly to th<ir
homes (VISA, Mast_ rCard and I/iscover cards are accepted). Order on-line today, 24 hours _','_lw'day or
by phon_ at 800.62b.2002 dul lng 13Ol-Illalb/Isiness bol/rs.
Instructions contained inthis manual cover procedures to be performed by any user. GEdoes not support
any servicing of theair conditioner. We stronglyrecommend that you do not attempt to service theair
conditioner yourself.
ge.com
ge.com
ge.com
ContactUs
If you are not satisfied with the selwice you receive tmm (;E, contact us on our Website with all tbe derails
including your phone lmmbe_; or write to: Gen_ ml Manage1; Customer Relations
GE Appliances, Appliance Park
Louisville, IG _40225
ge.com
] _ Printed in China
Page 17

bzstrucciones de se_widad 2 '_
Instrucciones de operaci6n
Controles--botones de control ...6, 7
Controles-- e(las d_ _oque ...... 4, 5
Cuidado y limpieza
Baterfas ........................ 8
Bobinas pare ext(fiores ........... 8
Filtro de aire .................... 8
R(jilla y (@1 .................... 8
h_strucciones de instalaci6n
Inslalacidn en una vemana ..... (.)-12
Ideas para la identifieaci6n
y reparaci6n de problemas ...... 1_
Sonidos normak s de ol)e_-_cidn . . .14
ge.com
ASRO)
ASH" ()6
©
°v,-q
°v,-q
©
Apoyo al consumidor
Apo}o al consumidor. ........... 16
( ',ara _'_ti'a ...................... 15
Escribael modeloy mimero
deserie aquk
N(tmerode modelo
N(tmerode serie
I stt'd piled( • ('llCOlltl_lr ('SH)S lll]lnt*r(ts
_d( (_tadc, (l(l _(on(lici(m_dor dc _fir,:.
49-7590 12-07JR
Page 18

F
INFORMACIONIMPORTANTEDESEGURIDAD.
LEATODASLASINSTRUCCIONESANTESDEUSAR.
A iADVERTENCIA!
Per su seguriflad, se flebe seguir la informaciSn en este manual para minimizar el riesgo de incendios,
flescargas el#ctricas o lesiones personales.
PRECAUCIONESDESEGURIDAD
Z_Use este ele( trodomdsfico solamemc para
el prop(;sito detcrminado segfin se des( ribe
en el Matmal del propietario,
i< Es_e acondicionador de aire debt: instalarse
(olre(l:llllente de a(t/eYdo (Oll 1Hs
hlsu'u(ciones de itlsmlacidn antes tie su uso.
>_Nunca d(senclnttb su acondicionador de
aire timndo d'cl cable eldctrico. Siemprc
agarrc tinnemenm el ench:ff_ v tire de
dl direcmmente ha(ia afhen,.
_ Rc(ml)lac( inmediammente todos los cabks
el&cuicos qtl'c se hwan pelado o que s'c
hayan daflado de alguna otra manet:,.
Un cable d( cortieme daflado no debe
r'cpamrse, sino que &be SeTsustituido pOT
uno nuevo que se adquiera 'clel fifl)ricant(.
No use lttl cable eldctrico 'clue nmestle
exid'c ncias d'c dt:mtioro, o dafios de abrasi6n
ell Sll supertk ie ell algnno de siis exH'etnos.
_ Si el recept_iculo no coinckk con el
( nchuf_:, :m electricism califi(ado del)e
reemplazar 'el rccept_iculo.
_ Apague la mfidad y desenchuti' su
acondi(ionador de aiw antes de limpian
?!_(;E no est5 no apoya (ttte se le proporcione
ningfin sepcicio al acondicionador de air*.
\\'hementemente rc(onlendanlos que
usted no inmnte propot*:ionar sePd(io al
acondicionador dt: airc usted mismo.
_ PoT su seg:nktad,..no ahnac'c n'c ni use
mawriah's conlbustibk s, g_:solina u otros
vaporcs o liquidos inflamables en la
proximidad dc dstc o algfin OtTO
el( ctrodomd'stico.
{_{;Todos kls acondicionadorcs de airc
(ontiene rctiigcmnms, los que pOT LeT
F'cd'c ran deben set t_.!moxidos am*.!s (k
dese( harlos. Si ust(d planea deshacerse de
alTOn produ(to qu( contenga rcflJgerantes,
pdngase en (onmcR) con la coml)afiia 'cltm
se encatga de i('(oger su lvsu[:_ pare que le
in'cliquen qud hac(n
COMOCONECTARLAELECTRICIDAD
Bajo ninguna circunstancia, corte o remueva la
tercem peru(tierra) flel cable elOctrico. Enpos
de la seguriflafl personal, este electroflomOstico
flebe siempre conectarse a fierra.
NO useun enchufeadaptador con este
electrodom#stico.
El cabk el_cuico de estc el'c ctrodom_stico 'cst2i
'cquil)ado (on un en(huf( de tr'cs pfias (ti'c n',,)
que (oml)ina con un toma(on'ieme est_indar
de tr'cs tOlllaS de part!d para minimi_'m- la
posibilidad de una d'csca_ga eldcttica.
El cal)k ,citealimt!ntacidn incluv'c un
dispositivo pare imetrupcidn d< cortienle.
Se in(luTe un 1)ot(m & p:u'c bay de reinicio
'cn (1 dispositix o. E1 disl)ositix o debt! [)onerse
a ptueba pefi6dicamente: primero se pr('siona
d botdn de TEST (pru'c ha) y hl'cgo RESET
(t*inicio) mientras se 'cncuentra enchuthdo
al tomacot riente. Si el botfn TESTno se dispara
o si 'el 1)o16n RESE'rno queda engml( hado,
2
d@ & ufilizar el acondicionador de aire y
connmfquese (on un t& ni(o calificado.
Pida a un t&:nico que inspeccione el
[()ll}_t'cOYli(}ll[{ y el 'cit-(tlito pal_ ( er( iol-arse
de que el tomaconienm 'csill conecmdo a
tierta de la man'c ra apropiada.
Donde exista un tomacorrit!nt_ de dos
minas, (s su rcsponsabilidad y obligacidn
personal hacer que dicho Iomacorrienm
sea rcemplazado por 1111o d(! IICS toIllas
COil COIlexiOn a tiert_t,
El acondicionador de airc deber_a siemprc
(!star coneclado a un Iomacorrienm individual
con su circuito de voltx}ie cort*_spondiemv.
Esto propor( iona el mayor r'cndimiemo y
ademgs evita que los (ircuitos del rcsto de
la casa se sobleCalgll'c 11, lo (ual podtia CallSal
inc'c ndios pot d sobt* calenmmiemo dd
(ableado.
\\'r las Instmcciones de insmlacidn, (n la
seccidn RequisitosEl_ctrieos pan, los rcquisitos
esI)'ccfficos de conexidn.
Page 19

ge.com
A iADVERTENCIA!
i
USODECABLESDEEXTENSION--Modebsde115voltiossolamente
Debiflo al potencial deriesgos deseguridad
bajo ciertas confliciones, en#rgicamente
recomendamos contra el uso de cables
de extensiSn.
Sin embarg-,.>,si usted seve en Ia nec(sidad
de :_sar un cable (ldctrico de extensidm es
absohnmnentc necesmio qu_ _1 mismo _std
Iist_ldo b_!jo UL, calibre 14, d_ tipo 3 tomas con
_oncxidn _,ficrm pare ch'(_rodomdsfi(os y cl
indice d(be set d( 15 ampe:ios (mfnimo))
125 voltios.
A PRECAUCION:
NO USEun cable de extension conniaguao de los
modelos de 230/208 voltios.
LEAYSIGAESTASINSTRUCCIONESDESEGURIDADCUIDADOSAMENTE.
GUARDEESTASINSTRUCCIONES
3
Page 20

Acerca de los controlesen el acondicionadorde aire--
modeloscon teclas de toque.
Las funciones y el aspecto pueden varia_
FRIOEncend& VENTILADOR£_cendido
EncendidoS]NCRON,ZADOR ('Erie rggj i S,NCRON[ZADOR___
DEENERGIA AHORRADOR
E_cendido |Temp/_ [}£ EN£RGiA
. j (Timer _ _ J_ Encendido
0-
0
0 BIEN
Controles del acondicionador de aire
O On/Off (Encendido/apagado)
Apa_;_ )ptt nO( (1 atondi(ion_tlor (1( aJrt.
Pantalla
Mtl(slr_ ]a 1_mp(raltlt':{ de ajustt o t] li(_mpo
I'(_s[ant( {n t] Sin(I'OI/JZ_(IOL
O Modo
_dm(_lo Cool (Frio) o Fan (Wntilador).
O ToolasdeAumentarAiReduoirV
[sad(; 1);_1_1 _!just_ll" h [_ l_apt ]_lttll_l (tlitndo
s{ t_ict1(Hm t_ t_l m_do Cool(Frio).
O Fan (Ventilador)
Low (Bajo), Med o High (Alto).
O nergySaver(Ahorradordeenergia)(:(mt_'ola _1 x'_lltiladol:
On (Eoceodido)--El vendlador y el (omprt'so_" ha(-('n
ciclo t'n t'_ct'n(lido ) ;q_g_(/o. E_tt" _'cst_ha t'rl
_ali;_cJotaes I/III_OI'LISeli 1_ t('mper_tur_ de ]_
hat}it¢*ci6n y eta la humed;td. Normalmeme us_do
ctlan(Io la habil_ci6n no est{_ ocup;_(la. Nota: El
vontitador continuar_ funcionando por un corto tiempo
despu#s de que el compresor haya entrado en el ciclo
de apagado.
Off(Apagado)_l vt'latil;/do]" {tln(:i()n_ t(xIo t']
tit'mpo, lT'_]t'lttlas (lilt" _l (Oll'lpl't SOl [._asll pot lo_
ticlos (it" _'n(:t'ndido _l:>;,gado.
Este inmHt_ptor clel_ _ est_ era Off(Apagado) pal',,
usal-los ajt_stes de1 w_ntilador (era {_1(:(mt/*)l
de modo).
Temp
Control
remoto
Timer(Sincmnizador)
$
On(Encendido)--(h_mdot'l _tcondi(ion_,do_"(it"_,i_'
atlt{m_fifi(:amenlv denllw (/_ [ a 24 ho_;_sen el ni','el
p_-t?'_qo.Carla t_que i!it_starfiel liemf.u_ en ho_'._s.
Off(Apagado)--41;uma(Ioel :_ on(/iciona(Ior de air(:
esl;_enceladido, puede ajuslarse par'd que se _q_ag'lle
atltomfifi(:amenlv denll{) de [ a 24 ho_'ds. ('i_da
t{ulue aj/isl_ll-.i el tit mpo eta hoI_ls.
Paaw (:anci'laa"el sincrxmizador; p_t'si(me la te(:la
Timer (Siocrooiz_dor) hasta qtlt el tiempo en la
paaalall_adew,pal* z(:a.
Receptorde la se#aldel controlremoto
0
Control remoto
t _al_gal_mlizar tm_l _[)eraci_Sn _l)rol)ia(la, o_i(nt(
l1 colltrol 1-{lllOtO ll_l(:i_l_1r_vc{l)tor (1_:%_.:1"1_711(/_1
_, Cer{:idr_se tie que no haya nada entr( _el
acondicionad_r tie air(*y _1control l*!moto q_le
pueda blo(lu_ ar la sef_l].
I El l-(:ceptof (1( sei'lal liene till l_mgo nl;_xilno
(le _1 l)i{s.
_, Cel-ci,_3rt*setie (lue las balt'rf;_s sean tl't_scasy
se instalen (:orrt_ctamel_le--ver la Se(:(i6n tie
CuidadoyLimpieza.
4
Page 21

Controles adicionales e informaciSn importante.
Nouse enlas coodioiooosoxtoroasdobajoel puotode
congelaoi6n
Estc ac(mdicionado_ dc aiic no cs discfiado pura usar cn
lempelwmms e×hcm;t_ deba{jo e] pumo de congelacidn.
No t_se en las condiciones ( xternas debajo el ptlnlo de
congelacidn.
Cuandoel acondicionadorde airo so encienda, so oneondor_
automaticamenteon el nivelque se encontrabala #ttimavez
Fmlci6n de recuperation de p#rdida de energia
En (_.o dc la p_rdida d_ D enc_g_a o imc*mpci6n, la rcstablccida. I.as fimcioncs dcl SincronizadoryDormir
urlidad i*_ink:iatfiant_m_fificamente en las fimckmes de rcqinstarfi al ajusm original. Es I_osib]e que usled necesile
la tihima vez qtl_ file usado tma _ez la energfa sea air,star un fiempo Imevo si _t_flo desea.
Modo COOL(FRlO)
Use el modo Cooh on ventiladoJ High(3)(Alto),Med (2)
(Modio)o Low(I) (Bajo) pur,i cnfiiaL Lee la.,,tedas dc
Increase• (Aumentar)/Decrease• (Reducir)pro'4ajmtm a
la tcmpcratma deseada entre 04°F ) 86"F cn in(_cmcnlo_
dc I'E
,_e /ISi/ /In [L'IIIIOS[iI[O pare rn_!l/[t,nt-r 11/ lcltlpel'dtt/]'d dc
la habimd6n. E1 comp_csor hm'J ciclo emre apagado y
encendkh) para mamener la habilaci6n a la mmpemmm
deseada, z_jtlSte el [{'l'[llOS[_/to a HI] nt/ITlel'O Ille]toI y el
airt hllerno se entiiar,_ m_is. Silo @lsta aun mhnero
may(m la tempet'alut a del ai*c imerno se c flemm'fi i*lg_.
NOTA:Siel acondicionadorde.airoesN apagadoy tuego
soenciondomiontrasesN ajsstadoon Cool(Frio),tomar#
aproximadamonte3minutospara que el compresor comience
a enfriarotra vsz.
ge.com
Desoripciooesdeenfriamiento
Para oofriamiento OormaI--Sck,(donc cl modo d,."Cool
(Frio)?,w.'ntilador High(3)(Alto)o Med(2)(Medio) _on tma
tt'ffl])c]_tltl]i_ (]C _jliSIC mcdiiL
Para Oofriamientomaximo--Sd__dom, cl modo de CooI)
_cnliladol High(3)(Alto)con una tcmpclmura t'lv Hjustc
I_/t*n()l.
Paraenfriamientosilenciosoy enfriamiootoOooturoo_
S(k(ckme (I modo (k Cool3'ventiladol Low(I) (Bajo)
COil /I]/U lt'Hlpt'lillt/111 (1_" i!j/ISlt" I_/cdi;I.
NOTA:Sicambiade,unajsste Cool(Frio)a Off(Apagado)o a
un ajuste deventitador,espereaproximadamente3minutos
antesde cambiar otra vezal ajostodeCool (Frio),
Modo de FAN (Ventilador)
Use el Fan (Vontilador) en High (3) (Alto),Med (2) (Medio) o
Low(1)(Bajo)pa1"a p]oporcional circulacidn d( aire )
fihracidn sin enfiiamienlo. Debido a que los niveles de
Control de la ventilacion (on atgunosmodotos)
El conn ol de xcmilacidn estfi lo(_liz_do al imelior de las
i)el_iam_s en la esquina de_ccha inh'rkm
(;uando eslfi @_stadoen CLOSE(CERRADO),s()lm_mntc
el ai_c en el interior de la habitaci6n cilmularfi v se
acondicionarJ. Ct_ando estfi ajuslado en OPENiABIERrO),
un poco del ailc inmrno es cxpelklo hacia afilera.
vemiladol finicamem_ no pro[×_rcionan enhimlfiento,
el nivel de tcmpm'dml"d no s*. muestrd en ]a pantalla.
/
/
II Ii
Paraabrirlaparrilla,empujela
palancahaciala derechaypar,_
cerrarlahacialaizquierda
Direccion del aire--Hacia arriba y hacia abajo (onalgunosmodetos)
[ ina prcsidn sencilla con lo_, dedos en lk', pmsiana.s
hofizontales ;,jt_slarfi la di_t ccidn dd aire ha(ia altdl)a
o ha(ia abajo.
Direcci6n del aim--de lado a lado (on algunosmodetos)
[a_ dircc(idn dc lado a lado dcl ;d_c cs ;!ji_stildapor las
pallm(:a._de las pet_,ian_s.
5
Page 22

Acercade Inscontrolesen elacondicionadordeaim--
modelosconbotonde control.
Las funciones y el aspecto pueden variat:
HJogo_ _QnOnly
Fan
Controles(o,,_)_.,,o_.,o._)o_j
InterrnptorON/OFF
0
Endcndc apa_ _l a_ondidonador de aJr_.
NOTA:Sielacondicionadordeaireest_apagadoyontoncoses
encondidomiontrasest,,enunrondoCool(EMriado),elcompresor
necesitaraaproximadamento3minutosparafl#ciaryparaquoel
enfriamien[ocomience
IntermptordeFAN(VENTILADOR)
@
(onatgunosmodetos)
Lsl (sla thm:i61apare cambial lavelocklad dd v_nlilador
critic LO(BAJO)) HI(ALTO).
ControldeMode/Temp(Modo/Temp)
@
Lse para ajusta_cl a(ondicionador dc airc al rondo Fan
Only(Ventiladorsolamente)o a un rondo Cool(Enfriado).
MododeFanOnly(Venti/adorsolamente)
Lsv FanOnlycn HI(ALTO)o LO(BAJO)Fan(Ventilador)
parapropor(ionar (ir(l_laci6n dc aire _filha(i6n sill
enfliamienm.
MododeCool(Enfriado)
[sc un ajusleCoolcon Hi(Alto)oLow(Bajo)Fan
(Ventilador)pmvtcllIiiamiento. Girt el|!ol(nl cn (I scnlkh)
de ]as agqjas del reloj, hacia _1fireaazul minor, para que
el aire de interior se enfi{e ma_. Gire el bot6n en sentido
o:mtrario al de las agt!jasdel rel@ hacia el filca azul in,is
pequefla, pa;a que el aivcde intelior se (:alienle m_.s.
El control de Mod_i3k'mp (s usa(k) para mantener a
Ivnlperatula _bienle. Cuando eslf colocado in el
rondo Cool(Enfriado),(I compr(sor hal(J cMo _nu-e
apag'ddoy encendido para mantenel el sa/6n al mismo
nixcl de Iempe_attl]',_.
I f/
Medium
Cool
Descripcionesde enfriamiento
Paraenfriamientonerma/_Sck,ccJoncunm_do Cool(Enfriado)
(on cl bol6n Modc/Tcmp cn la posici6n del (:entl'o.
Paraerdriamientomaximo--Seleccioneun inodo Cool(Enfriado),
(on cl I)ol(nlModc/Tcmp aptlnlal_do hada cl S_eaazul mayo_).
Paraenfriamientomastranquilo& durantelasneche_%l( c(io_e
un rondo Cool(Enfriado)con _'lI)ot6nModc,'3_ ulp apuntando
ha(in cl _h-caa/ul ross peflucfia.
NOTA:Siusled mueve el bot6n de conhTolde Mode/T_ mp
del ajuste Coolhacia el ajuste FanOnly,espere pot Io menos 3
IDilIIIIDS alllCs d(! Call/l)JaF o[1_1 vez a till ;!jtlslc COOl.
0
6
Page 23

Controles adicionales e informaciSn importante.
No useen lascondicionesexternasdebajoelpunto
decongelaci_n
Estc acondidon_Jdor de aitc no es discfiado pm'a u_a_" cn
[t*lll[_'l]t[t]l]tS t*X[I{+[I]_/_ d+.'lJ_{jo cl ptl]l[o (]l_" ('oI]gclaci(}l].
No LISt + en 1;Is (o]]dJcJol](% (x[,Dl'l]i_s dk'hHjo (l ptln[O {It'
congdaci6n.
Control de ventilaci#n (on algurtos modelos)
El control de xemilaci6n e_tfi localizado en el
interior de las parrillas de all> en la esquina
int_,rior derecha.
Cuando _st_i@lstado a CLOSE(CERRADO),
solmm'ntc el _dre ('n el interior de la h_ll)it_(idm
circulal',i y se acondicionat-,L Cuando eslfi
@lstado a OPEN(ABIERTO),un poco del aire
intemo es expelido hacia afheF,t.
Direcci6n del aire--de lado a lado
ge.com
Para abrir la parrilla, empuje la
palanca hacia laderecha y para
cerrarla hacia laizquierda
La dire(ci6n dul airc de lado a lado ('s ajusu_d_ pot
las l)alanquitas en las parvillas.
Direccion dol a#e--Hacia arriba y hacia abajo (on a/gunos modelos)
Una presi6n sencilla con los (ledo_ en las panillas
hofizomales ajustar_ la dil>ccidn d(l nil(" hacia
aniba o hacia al)_jo.
Page 24

Cuidadoy limpiezadelacondicionadordeaire.
Come insertar /as baterias de/COlltro/remote (en algunos modetos)
] Retire la cubic rm de la bateria (h slizfindola
d( a(u(rdo (on la dir(((idn d( la fie(ha.
] hlsel'[( I)_I[('I'[_S IIII(!V_IS (('l_(iol'_/lldOS( ([e (ltl(!
los polos l)osilivos (+) y n(gali',os (-) estfin
orit'lll_ldos ( Ol-l-e( l_lllle 111('.
] Coloqu( la (ul)k ml otra v(z d(sliz_in(h)la
en su lugal:
Rejilla y caja
NOTAS:
_l s( 21)alt as A/Lk (1( 1.Svohios. Nouse
baterfas r( (m-gal)l( s.
i_I Refit( las bat( rfas del control remoto si no ",a
_t tlS_tl"el sislelll_ ])of till l)erl_(X]o Drolollg;_do.
Ai)agu( (1 a(ondici<)mldor de air( v retir( (1
(ll(?hl.l_(_ (](1 [Oln_(OITi( 11[( d( l_l I)HY((] _II[(S
(1( liml)iar.
Bobinas para exteriores
St*d,. I>en inslx t cionm ,.on fi-(.',-ucn( i_,las bobinas
en el l_,do (xterior d(l acondi(ionador de airc. Si
las nfismas (stfin obstmidas con sudedad u hollfn,
p(xh-i'ml limpiar,,e prt)tL:sionalmente.
Filtro de aire
El fihro (le aire (lelr_s (le la r(jilla f'rontal debe
inslx,(donars( y limpial_e pot 1o menos (ada
)(} d /s ) 1] s }1 11]( lllldo si ftl(,se ll(((S_lliO.
Limpie el fihro (on agua tibia y,jabdn. Eqjufigudo y
[3(!1 llli[_] (Ill(! S(' S(qlle _IIll(!S de (olo(arlo on'a vez en
su lugm:
f
PRECAUCION:No
acondicionadordo aire sin el fi/tro debidoa que la suciedad
y /as pehsas Io obstruin_ny reducirbnsu rendhniento
P}?ll-_/ liml)ial; rise ;l_gll}71 y till d(!t( rg(tllte Stl_/'v'( .
No t/c,e clolo o lll_l(!l-i_l(!':, _bl_siv()s.
Para retirarlo:
Agarrebs orejillas
en el fi/troy tire
haciaarribayhacia
afuera
0 BIEN
1.Abrala rejilla
do la entrada
on h parte
#_eriery
levh}tela
parr retira_
2. Tirelaparte
superiordelfiltro
haciaabaje
y haciaafuera
parr f_tira_
8
Page 25

Instruccionespara
Acondicionadordeaire
la instalacion
I r_ __Preguntas? Llame a1800.GE.CARES (800.4322737) o bien Visite nuestra pagina Web: ge.com I
ANTES DE INICIAR
(_) REQUISITOS ELECTRICOS
(cont.)
Lea estas instrucciones completa y
cuidadosamente
• IMPORTANTE - Guardeestas
instrucciones para uso del inspector local.
• IMPORTANTE - Observetodos
los c6digos y 6rdenes de ley.
• Nota al instalador- Asegurese de dejar
estas instrucciones con el consumidor.
• Nota al consumidor - Conserve estas
instrucciones para referencia futura.
• Nivel de destreza - La instalacion de este
aparato requiere de destrezas mecanicas
basicas.
• _empo de ejecucion - Aprox. 1 hora
• Recomendamos dos personas para
la instalacion de este producto.
• La instalaci6n apropiada es la
responsabilidad del instalador.
• La falla del producto debido a una
instalacion inadecuada no esta cubierta
por la garantia.
• Cuando instale este acondicionador
de aire, DEBE usar todas las piezas
suministradas y usar procedimientos
adecuados de instalaci6n.
REQUISITOS ELECTRICOS
Algunos modelos requieren 230/208 voltios,
de corriente alterna, protegidos por un
fusible de dilatacion de tiempo o un
cortacircuitos. Estos modelos deberian
instalarse en un ramal exclusivo del circuito
para un rendimiento mas notable y para
prevenir sobrecargas en los circuitos de
cableados de su casa o apartamento, Io cual
podria representar un riesgo de incendio
por el sobrecalentamiento de los alambres.
PRECAUCION:
Bajo ninguna circunstancia corte o remueva
la tercera pua (conexion a tierra) del cable
electrico.
No cambie el enchufe en el cable electrico
de este acondicionador de aire.
Los cables caseros de aluminio podrian
presentar problemas especiales. Consulte
a un tecnico electricista calificado.
El cable de alimentacion incluye un dispositivo
para interrupcion de corriente. Se incluye un bot6n
de prueba y de reinicio en el dispositivo. El
dispositivo debe ponerse a prueba peri6dicamente:
primero se presiona el bot6n de TEST (prueba)
y luego RESET (reinicio) mientras se encuentra
enchufado al tomacorriente. Si el boton TEST
no se dispara o si el bot6n RESET no queda
enganchado, deje de utilizar el acondicionador
de aire y comuniquese con un t_cnico calificado.
de 115/120 voltios de corriente alterna y
Algunos modelos requieren tomacorrientes
60 Hz conectados a tierra, protegidos con
un fusible de dilatacion de tiempo de
15 amperios o un cortacircuitos.
El enchufe de tres pLias con conexi6n a tierra
minimiza la posibilidad de descargas electricas. Si
el tomacorriente de la pared que usted planea usar
solamente tiene 2 tomas, es su responsabilidad
hacer que un tecnico Io reemplace por uno de tres
tomas con conexion a tierra.
9
Page 26

Instrucciones para la instalacion
HERRAMIENTAS QUE USTED NECESITARA
Lapiz
Destornillador Phillips
PARTES INCLUIDAS
(apariencia puede variar)
Riel de montaje superior
Acondicionador
de aire
Regla o cinta metrica
Parte superior de la
espuma de la junta
de la ventana
Cinta de sellado
del riel de
montaje
superior
Panel de
izquierdo
Tijeras o cuchilla
Nivel
Banda e sello
entana
Panel de
acordeon
derecho
Tornillos 1/2"
tipos A (9 o 10)
Tornillos 3/4"
tipo B (7)
10
Soporte de
seguridad (3)
Page 27

Instrucciones para la instalacion
[] REQUISITOS PARA LA VENTANA
• Estas instrucciones son para una ventana
estandar de dos pliegues. Usted necesitara
modificar el proceso para otros tipos de ventanas.
• Todas las partes de apoyo deben quedar
totalmente aseguradas a algQn metal,
mamposterfa o a la madera.
• El tomacorriente el_ctrico debe estar al alcance
del cable el_ctrico del acondicionador de aire.
• Siga las dimensiones de la tabla y la ilustracion
segQnsu modelo.
Modelos A B
ASR05 11 3/4" mfn. 22"-36"
ASH06 13" mfn. 22"-36"
I I
B===8
t
A
B i_
(con paneles de acorde6n)
[] PREPARE EL ACONDICIONADOR
DE AIRE
[] Retire la parte posterior la cinta de sellado del
riel de montaje y adhieralo al rondo del riel de
montaje superior. Corte al tamaflo apropiado.
Instale el riel de montaje superior con 3o 4
[]
tornillos tipo A (dependiendo en los numeros
de agujeros en el riel de montaje superior) desde
la parte exterior de la caja.
Riel de. montaje 11' 11' V
superlor_ i i 1
i I i
q
[] REQUISITOS DE UNA VENTANA
DE TORMENTAS
Un marco de ventana de tormentas no permitira
que el acondicionador de aire se incline hacia el
exterior y evitara que drene apropiadamente.
Para solucionar este problema, adhiera un
pedazo de madera a la repisa.
PIEZAS DE MADERA-
ANCHO: 2"
LONGITUD: Suficiente Iongitud para ajustarse al
interior del marco de la ventana.
ESPESOR: Para determinar el espesor, coloque
un pedazo de madera en la repisa para hacerlo
1/2" mas alto que la parte superior del marco de
la ventana de tormentas.
Una firmemente con puntillas o tornillos provistos
por el instalador. 1/2"mas alto que
marco vinilo (en
1
_ algunas ventanas)
1/2" mas alto
que el marco
de ventana
de tormentas
Repisa
inferior _ _
Afloje el tornillo inferior en cada lado de la caja
[]
y enganche un soporte de seguridad en cada
lado. Para ajuste en el futuro, no apriete los
tornillos hasta que la instalacion de la unidad
en la ventana.
Soporte de
seguridad
Soporte de
seguridad
de tormentas 1 1
Marco vinilo
Page 28

Instrucciones para la instalacion
[] PREPARE EL ACONDICIONADOR
DE AIRE (CONT.)
[] Inserte los marcos de los paneles de acordeon en
la parte superior e inferior de los rieles de montaje.
Adhiera los paneles de acordeon al lado de la caja
usando los 6 tornillos tipo A.
Riel de montaje
Paneles de acordeon
[] INSTALE EL ACONDICIONADOR
DE AIRE EN LA VENTANA
[] Corte la banda de sello de la ventana de acuerdo
con el ancho de la ventana y peguela del lado
adhesivo al fondo de la band&
[] INSTALE EL ACONDICIONADOR
DE AIRE EN LA VENTANA (CONT.
[] Extienda los paneles de acordeon izquierdo
y derecho hacia las bandas de la ventana vertical
con 4 tornillos tipo B.
Tornillos
Tornillos
tipos B
Tornillo
tipo B
[] Pegue los corchetes a la repisa en ambos lados
usando dos tornillos tipo B.
[] Apriete los tornillos para sujetar los soportes en
su lugar en cada lado del acondicionador de aire.
tipos B
[] INSTALE EL SOPORTE DE
SEGURIDAD Y LA PARTE
SUPERIOR DE LA ESPUMA
DE LA JUNTA DE LA VENTANA
-- Sello de la
banda de
ventana
[] Coloque el acondicionador de aire en la repisa
con el riel de montaje inferior contra su extremo
posterior. Centrelo y cierre la ventana firmemente
detras del riel de montaje superior. Debe estar
nivelado o ligeramente inclinado hacia el exterior.
Use un nivel; una inclinacion de 1/3 de burbuja
sera la correcta hacia el exterior.
[] Pegue el soporte de seguridad con un tornillo
tipo B.
[] Corte la parte superior de la espuma
de la junta al ancho de la ventana.
[] Rellene la espuma entre el vidrio y la ventana
para evitar que aire e insectos se introduzcan
en la habitaci6n.
/
Calafatee todas las aberturas al exterior
para sellar la instalaci6n.
La instalaci6n ahora esta completa.
12
Page 29

Solucionarproblemas, ge.com
Causas posibles Qu# hacer
El acondicionador de aire * Cerd6rese de clue el a(ondidonador de aire estfi
estit de,_yoneetado, ellChll_(]o [o[;_llllell[( (11 (l loll]_(OFli( llIe.
El fttsible se dispar6/ * Insp(((ione los fhsibl(s/'(aja d( inlerruptores de la (asa
el cormcircuitos _ dispar6 y re( replace (ual(lui( r fhsibl_ o l-(_jtlsle (1 int( rruploL
Interrupci6n en el '*Si o(urre una inlerrupci61a ell (1 Slm_inislro e[dclrk o,
suministro el6ctrico, al)ague (Off) el a( ondidonador d( aire. Cuando la
(_11(1"_(_1 S( I'(SI_II/I'(_, (Sp(l'( _ I]IiI]II[OS p_ll'_l r(,inJ(iar
el a(ondicionador (h aire para prevenir que se dispare
el COHI[)r(_soI" I)or sobl-eC_ll-g3.
El disposifivo de interrupci6n * Presione el bot6n RESETubkado (n el cable de alimentaci6n.
de corriente se ha activado. * Si (l bot6n RESETno se mantien_ en su lugm; no utilice m;_sel
acondicionador de aire }comun/quese con un r_cnico calificado.
El fluiD de aire est_ resh'ingido. * Cerci6rese de (lU( no cxisl( ninguna ( oxlina, p( rsiana o
mucl)l( bh)queando el fr( nte d(l a( ondkionador de air(.
El control de tempera_tra no "En los modelos con leclado: En (1 modo Cool (Frio),
esta ajustado apropiadamente, presione la leda Decrease V.
• Ell 10S lno(lelos (011 I)O[OII(S, gir( la IClII[)(!F_IIIlI'H H Ilia
11!] l]lel-o 111_1_'012
El filtro de aire esta sucio. * IAmpi( ( 1f h ) (ada 30 dfas por 1o m( nos. V(r la s( ((i6n
de hlstrucciones de Operacifn.
La habitaci6n podria haber * (]tl_)l](_o el _l(A:)ll(_iCiOll_/dOfd( air( s( cn( i( n(14,, llSICd
estado caliente, n((csita daft( li( ml)O para (lU( enfri( _la habita(i6n.
El aire frio se esta escapando. * Cerci()resc de que los regislros de la calefi_cci()n no (stfin
_[)i(l_[OS V S( ( ll(tl( I][I'F{]I l'{![Ol ll_ll(|O CI ;_il'(_l'i*().
• (k4O(lU( la vcmanilla del a(ondicionador (1( aire cn
la posiciGn cem_da.
Lasbobhz_ts(teenfriamiento Xcr Acondlclonadordealrecongelandose masadclant,:.
• r . .... .
se congelaron.
El hielo bloquea el flujo * Eli modek)s (on los lx)tones d( ( ontrol, (olo(lu( _1 modo
de aire hacia el acondicionador de control cn Fan Only(Ventiladorsolamente) y el inten'uptor
de _dre evilmldo que se enfrie dcl ",elttilador en HI(ALTO).
la habitacion. * 1(11h:)s rood(los (on le(las, (oloqu( los (ontrol(s (11
High Fan (Yentilador Alto) 6 High Cool(Frio) Alto))' :!jusl(
(!1 1( FI]IOS[310 _t 11113 l( H]I)(!I'3I/II-_ III_S _l[_.
_l_ootrolrem_to I_s bateri_m est:an insertadas • Insp(( ( k,ne la posici(m (k. las baxerias, l)eben e';[ar
incorrectamente, insel-[adas en la l)osid6n indi( ada, (+) y (-).
I_s bateiias podriala. * Re_ mpla( e las [)31eFl'3S.
Tiempo hiunedo y caliente. "last() es nounal.
El acondicionador de aire * ])al_ drenar el agua al)ropiadament_, (er(iorese de (lue
no esth hiclinado hacia afuera, el a(ondi(ionador (le aire (sift in(linado ligeram( nte
(l(s(l( (l fixnte ha(ia all%s.
La lmmedad removida del aire
y se drena hasta la bmadeja, hmnedad; norlnal i)or un i)er/odo (l( li(mpo In,is
l)oslergado en fireas mils hfimedas.
C6digo de error de fimci6n. "Descolqe( le el a(Olldl( lOild(IOl (1(!dlI e. 1-_sl)(te :) D]IIIHIOSV
• , • . , , • 7 o • ,
enchtif_do om_ vez.
SINCRONIZADORiT/MER)
Una p6rdida en el smninisWo
el6ctrico o una interrupci6n ha
octwrido.
• En el caso de tma I)6r(lida (lel suministro cldctrico
o una intem_pci()n, la ftmddn de Sincronizadoren
la mfid:_d s_ rc@lslac, i al @lstc original. Es posible qtw
uslcd n(ccsitc _juslm un tiempo ml(vo si asi 1o (lesea_
13
Page 30

Solucionarproblemas.
Sonidos de operacion normales
_4_¢Zuiz_is cs¢ uchc un sonklo mct_ilk o €mlsado por
el agua tomada } timda (OIl[l_/ el condensador en
los dfas lluviosos o cuando la humedad es alta.
Esta cai-actel fstica de disefio mama a rclnover la
hmnedad y m_jora la eficiencia.
N (_uizfis esodche que el mrlnostat_:, llac( clic cuando
el conlprcsor hate ciclo entre enc_ ndido y aD_g_do.
;_!El agua se acumula en la ban&ja durante dfas
lluviosos o coil mucha humedad. El agua podrfa
derl-amal_e y v,v_tear desde el lad() (xterno (1(
la unidad.
_5El ventilador podrfa funcionar aun si el
COlnpFe':,Of 110 lo hate.
!4
Page 31

GarantiadesuacondicionadordeaireIgarantia limitadadeuna#o.
Grape aquf su recibo.
Serequiere facilitar prueba de la fecha de compra
origflTalpara hacer un rectamo de garantia.
Nosotros reemplazaremos:
Unidad de reemplazo l)ara cuM(ltfi(r pro(lu(:lo que [hll_ debido _t(|efl,ctos en los materiales (_(n
,_!1l)roc(!so (l_ t d)ri(a(i6n. L_lunid_ad (l(_ re(_nq)lazo eslx_gaYanfizad_xl:)ara el r,estod,el l)er/odo
de un m_o de gm_mti_l original (l_l 1)rc_:hlcto.
i_ Empaque su unidad apropia .damente. Recomendmnos i_ Incluya en el paquete una copia del recibo de venta
ttsar el cart6n orig_ y los materiales de empaquetado, u otra evidenda de la fecha original de la compra.
_!_Reg_se el producto al locM de ventas donde usted Adem'As imprima su nombre y direcci6n y una
1o compr6, descripcion del defecto.
_ Ii_trucciones al cliente. El Manual del propietario _ Reemplazo de fu_lbles de la casa o reajuste del sistema
propordona informaci6n acerca de l&sirLstrucciones de de circuitos.
operaci6n y de los controles del usuario.
;_!_lalstalaci6n inapropiada. Si itsled dene un problema
dtwmlte la illstalaci6n, o si su acon(licionador de aile no
tiene la capacidad de enfriamJento que us|ed nece_lta,
p6ngase en contacto con nuestro dJstribtddor o
instalador. Usted es responsable de proporcionar kts
fadlidades de conexi6n el6ctrica necesarias.
_!_Dmlo al producto ca_tsado por voltaje hmpropiado hacia
el eqtdpo, accidentes, incendios, inundaciones o actos
de la naturaleza de fuerza mayor.
_!_Dmlos incidentales o cor_secuenciales causados por
defectos posibles con este acondicionador de ail-e.
_!_Fallo del producto resultante de modificaciones al
producto o debido a uso h-razonable hachtyendo no
proporcionm- mantenimiento lazonable y necesario.
EXCLUSION DEGARANTIAS IMPLJCITAS--Su #nice y exclusivo deracho es el reemplazo del producto, tal y
come se indica en esta Garantia limitada. Cualquier garantia implicita, incluyendo las garantias implicitas
de comerciabilidad o adecuaci6n para un fin determinado, esMn limitadas a un a#o o el periodo de tiempo
I
mas brevepermitido por la ley.
Estagarantfa se extiende al comprador original y cualquier compraflor posterior de profluctos compraflos para use
resiflencial dentro de Estaflos Uniflos.
Algunos estafios nopermiten la exclusi6n o las limitaciones de fiafios incidentales o consecuenciales. Esta garantfa
fla flerechos legales especfficos, y ustefl poflria tener otros flerechos que variar#n de estaflo a estaflo. Para saber cu#les
son sus fierechos legales, consulte a la oficina de asuntos flel consumiflor local ola oficina flel Attomey General en
su Iocalifiafl.
Exclusi6n de garantias implicadas: Excepto donde est# prohibido o restringido por la ley, no hay garantfas,
expresas, orales o estatutarias que extiendan m#s all# de la descripci6n especffica, incluyendo especfficamente
las garantfas impficadas de mercantibilidad o propiedad para un prop6sito particula_
Garante:GeneralElectricCompany.Louisville,KY40225
15
Page 32

Servicioal consumidor.
P@inaWebdeGEAppliances
_Ti( ne algmaa pregunta sot)re su d(clrodom('stico? iPmeb_ la pfigina Web de GE Applianc_ s, cuaklui(r
d;a dd afio! Pare ram,or c,-mveniencia v•servicio naris rfilfido, va l)uede descargar, los Mammies de los
Prolfi,_tari_s, o inchlso pedir piezas ha_er una cila en lfilea.
RealLifeDesignStudio(Estudiodedbefioparalavidareal)
GE apoya el concepto de Dis(rio Universal--productos, s( lwicio,, } ambient(s <lue pueden usar gentt: de
todas las edad(s, tamaflos y capacidades. Reconocemos la necesidad de disefiar i)aF,i una gran gmna tie
habilidad(s y dificulmdes t_sicas } mentales. Pa_-a mils detalles col)re las aplicaciones de GE Disefio 1_nivel-sal,
inchlyendo ideas de dis_ rio pare la cocina pa_-4 personas con discapacidades, mire lmestla pdgina Web boy
mismo. Pal-4 personas con diticuhades mlditivas, tilw)r de llamar al 800.TDD.GI_AC (800.833.4322).
Piezasyaccesorios
.\quellos individuos con la calificacidn necesaria pm'a reparar sus propios el(ctrodomdsticos lmeden
l)(dir qu_ se les manden las pi(zas o accesofios directamentc a sus hogares (ac( ptamos las tmjetas
VISA, Masml'Card y Discover). Itaga su pedido en lfima ho?,; 24 horns ca(la d_a o llamar pot ml_f_mo
al 800.626.2(X12 dm-4nte horas normales de oficina.
Las instrucciones descritas en este manua/ cubren los procedimientos a seguirpor cualquier usuario. GEno esta
no apoya que se le proporcione ning(mservicio al acondicionador de aire. Vehementemente recomendamos que
usted no intente proporcionar servicio al acondicionador de aire usted mismo.
ge.com
ge.com
ge.com
POngaseencontactoconnosotros
8i no _stfi satisf_cho con _1 s_:lxicio que r_ cib_ d_ GE, _dn _as_ [ ,[ _ (11 (OII[_C[I) COIX III)SI)[I'OS _?ll llIl(Sll'_/ )_ill_?l
Wd) indi(ando todos los d_ lall_ s as_ (omo su mhnero (k td_fono o c s(rfl)anos a:
General Manager, Customer Relalions
(;l:. Appliances, Appliance F'ark
Louisx ille, KN 4(1225
ge.com
[ (_ Impreso on China
 Loading...