

GE ASV05LKS1, ASQ05LKS1, ASM05LKS1 Owner’s Manual
0
©
www.GEAppliances.com
Safety Instructions .......... 2, 3
Operating InsCruaions
Controls--Control I_mobs ..... 6, 7
Controls--Touch Pads ....... 4, 5
Care and Cleaning
Air Fiher . .................... 8
Batteries ..................... 8
Front Grille .................. 9
Grille and Case ............... 8
Outdoor Coils ................ 8
Installation Inslructions . ..10-13
Troubleshooting Tips ........ 14
Normal Operating Sounds ..... 14
ASF05
ASL05
ASM05
ASN05
AsQo5
ASV05
ASL06
AS?V06
©
Consumer Support
Consumer Support ........... 18
Product Registration ....... 15, 16
_'anantv .................... 17
Write the model and serial
numbers here:
Model #
Serial #
Find these numbers on a label on
the side ot the air conditionex:
DB98-15878A 494471 ! 7-03JR
IMPORTANTSAFETYINFORMATION.
READALLINSTRUCTIONSBEFOREUSING.
WARNING!
For your safe_ the information in this manual must be followed to minimize the risk of fire, electric shock
or personal injury.
SAFETYPRECAUTIONS
J; Use this appliance only %r its intended
pml)ose as described in tins )wner s
Manual.
J; This air conditioner must be properly
installed in accordance with the Installation
Insmmtions 1)efore it is used.
J; Nexer unplug your air conditioner by pulling
on the power cord. Always g_i ) ping firefly
and pull straight out from the receptacle.
_t{_;Replace immediately all electric set\ice cords
that haw become flwed or othexwise
damaged. Do not use a cord that shows
cracks or abrasion damag_ along its length
or at either the plug or connector end.
• (
_{_Turn the mode control OFFand unplug
J; GE does not support any servicing of the air
_{:;Fox your safely...do not store or use
_: All air conditioners contain refrigerants,
HOWTOCONNECTELECTRICITY
Do not, under any circumstances, cut or remove
the third (ground) prong from the power cord.
Forpersonal safe_ this appliance must be
properly grounded.
The air conditioner should always be plugged
into its own individual electrical antler
which has a xoltage rating that matches the
rating plate.
your air conditioner before cleaning.
conditioner VVestrongly recommend that
you do not attempt to ser\_ice the air
conditioner yourself.
combusdl)le materials, gasoline or other
flammable vapors or liquids in the vicinity
of this or any other appliance.
which under federal law must be remox>d
prior to product disposal. If you are g_tting
rid of an old product with refrigerants, check
with the company handling disposal about
what to do.
The power cord of this appliance is equipped
with a 3-prong (grounding) plug which mates
with a standard 3-prong (grounding) wall
outlet m minimize tim possil)ilitv of electric
shock hazard flom this appliance.
Have the wall outlet and circuit checked by
a qualified electrician to make sure the outlet
is properly grounded.
$&]]ere a 9-prong wall outlet is encountered,
it is your personal responsil)ilitv and obligation
to have it replaced with a properly grounded
3-prong wall outlet.
This provides the best perfommnce and
also prexents oxerloading house wiring
circuits which could cause a fire hazard
flom overheated wires.
See the Installation Instructions, Electrical
Requirements section fox specific electdca]
connection requirements.
2
WARNING!
USEOFEXTENSIONCORDS--115-Voltmodelsonly
www.GEAppliances.com
Because ofpotential safety hazards under certain
conditions, we strongly recommend against the
use of an extension cord.
Howex>t; if you must/lse an extension cord,
it is absolutely necessary that it be a UiAismd,
14 gauge, 3-wire grounding b'pe appliance
extension cord having a grounding type plug
and outlet and flint fl)e electrical rating of rite
cord be 15 amperes (minimum) and 195 x_lts.
CAUTION:
DO NOT use an extension cord with any ofthe
230/208 voltmodels.
USEOFADAPTERPLUGS--115-Voltmodelsonly
Because of potential safety hazards under certain
conditions, we strongly recommend against the
use of an adapter plug.
Howex>[; if you must/lse an adapte[; where
local codes permit, a temporary connection
may be made m a properly grounded 9-prong
wall outlet by use of a UiAisted adaptor
available at most local hardware stores.
The larger slot in fl_e adapter must be
aligned with the larger slot in file wall outlet
to provide proper polarity in the connection
of the power cord.
When disconnecting file power cord flom rim
adaptel, alwws hold tile adaptor in place with
one hand while pulling tile power cord plug
with the other hand. If this is not done, the
adapter ground mmfinal is x>tT likely' to b_eak
with repeamd use.
If the adapter ground temfinal breaks, DO NOT
USEthe air conditioner until a proper ground
has been established.
Attachingtheadaptergroundtermba/ to a waftoutlet
coverscrewdoesnotgroundtheapplianceunlessthe
coverscrewis metal, andnotbsulated, andthe waft
outlet is groundedthroughthehousewiring. Youshould
havethecircuitcheckedby aquafifiedelectricianto
makesuretheoutlet is properlygrounded.
READANDFOLLOWTHISSAFETYINFORMATIONCAREFULLY.
SAVETHESEINSTRUCTIONS
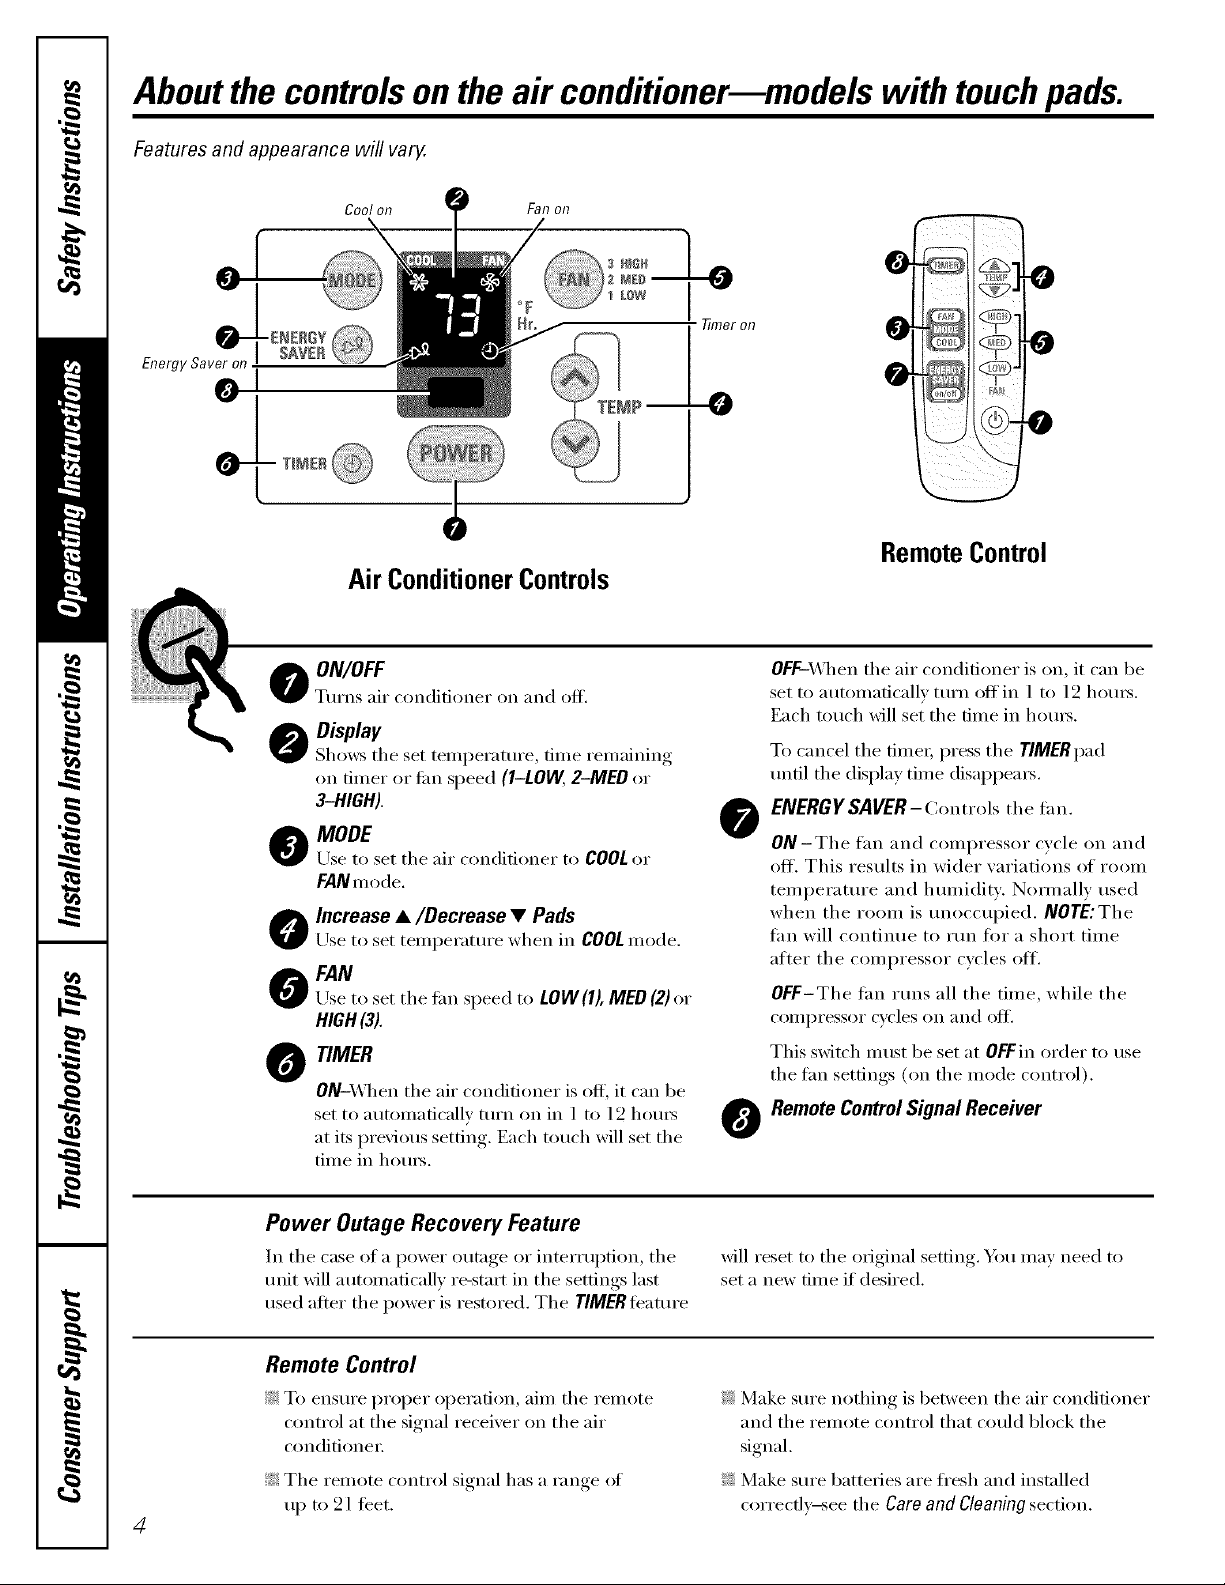
Aboutthe controlsonthe air conditionermmodels with touchpads.
Features and appearance will vary.
Cool on Fan on
Air ConditionerControls
O ON/OFF
TtlYns aiY (-onditioneY on and of L
Oisplav
Shows tile set teml)erature, time remaining
on tilner or tim speed (I-LOW, 2-MED or
a-HIGH).
O MODE
Use to set tile air conditioner to COOLor
FANmode.
Increase •/Decrease • Pads
Use to set temperature when in COOL mode.
0 FAN
Llseto set tile tim speed to LOW(l), MED(2)or
HIGH(3).
O TIMER
ON-X_]len tile air conditioner is off; it can be
set to automatically turn on in 1 to 12 hom_
at its l)revious setting. Each touch will set tile
time in hom_.
ME_
°°°° 0
77meron 0
Pm--O
RemoteControl
OFF-\_qlen tile air conditioner is on, it can be
set to automaficall_ turn off in 1 to 12 hom_.
Each touch will set the time in horn3.
To cancel tile timeL press tile TIMERpad
until tile display time disappeaI_.
ENERGYSAVER- Controls tile f_n.
O
ON-TIle tim and compressor cycle on and
off. This results in wider variations of room
teml)erature and hunfiditv: Nommllv used
when tile room is unoccul)ied. NOTE:The
thn will continue to IUn for a short time
after tile coml)ressor cycles off.
OFF-The tim iuns all the tilne, while the
coml)ressor cycles on and ott_
This switch must be set at OFFin order to use
the tim setdngs (on the inode control).
RemoteControlSignal Receiver
O
0
0
@
Power Outage Recovery Feature
In tile case ot a power outage or interrul)tioi L tile
Ulfit will autonmficallv re-start in the settings last
used after the power is restored. The rIMER teature
will reset to tile original setting. You Inay need to
set a new time if desired.
Remote Control
_: To enstli'e l)roper ol)eration , aill/ tile I'elllote
control at tile signal receiver on tile air
conditioner.
!i?:Tile remote control signal has a range of
up to 21 teet.
4
_: Make sure nothing is between tile air conditioner
and the remote control that could ])lock the
signal.
_: Make sure batteries are fl'esh and installed
cori'ectlx_see tile Care and CIoaning section.
When the air conditioner is turned on, it will
automatically start in the setting last used.
COOLMode
www.GEAppliances.com
Use tile COOLmode with HIGH (3),MED (2) or
LOW(1)tim fin" cooling. Use tile INCREASEA/
DECREASE• pads to set tile desired temperature
between 64°F and 86°F in 1°F increments,
A them_ostat is used to maintain tile room
temperature. The compressor will cycle on and off
to kee I) the room at the set level of comtort. Set the
them_ostat at a lower numl)er and tile indoor air
will becolne cooler Set the thelinostnt at a higher
nulnber and tile indoor air will becolne vamnei:
NOTE:Iftheair conditioneris off andis thenturnedon
whileset to COOL,it will takeapproximately3 m&utes
for the compressorto startand coolingtobegin.
FAN Mode
Use tile FAN at HIGH (3),MED (2) or LOW(l) to
provide air circulation and filtering without cooling.
Since tim only settings (lo not provide cooling, a
temperature setting will not be displayed.
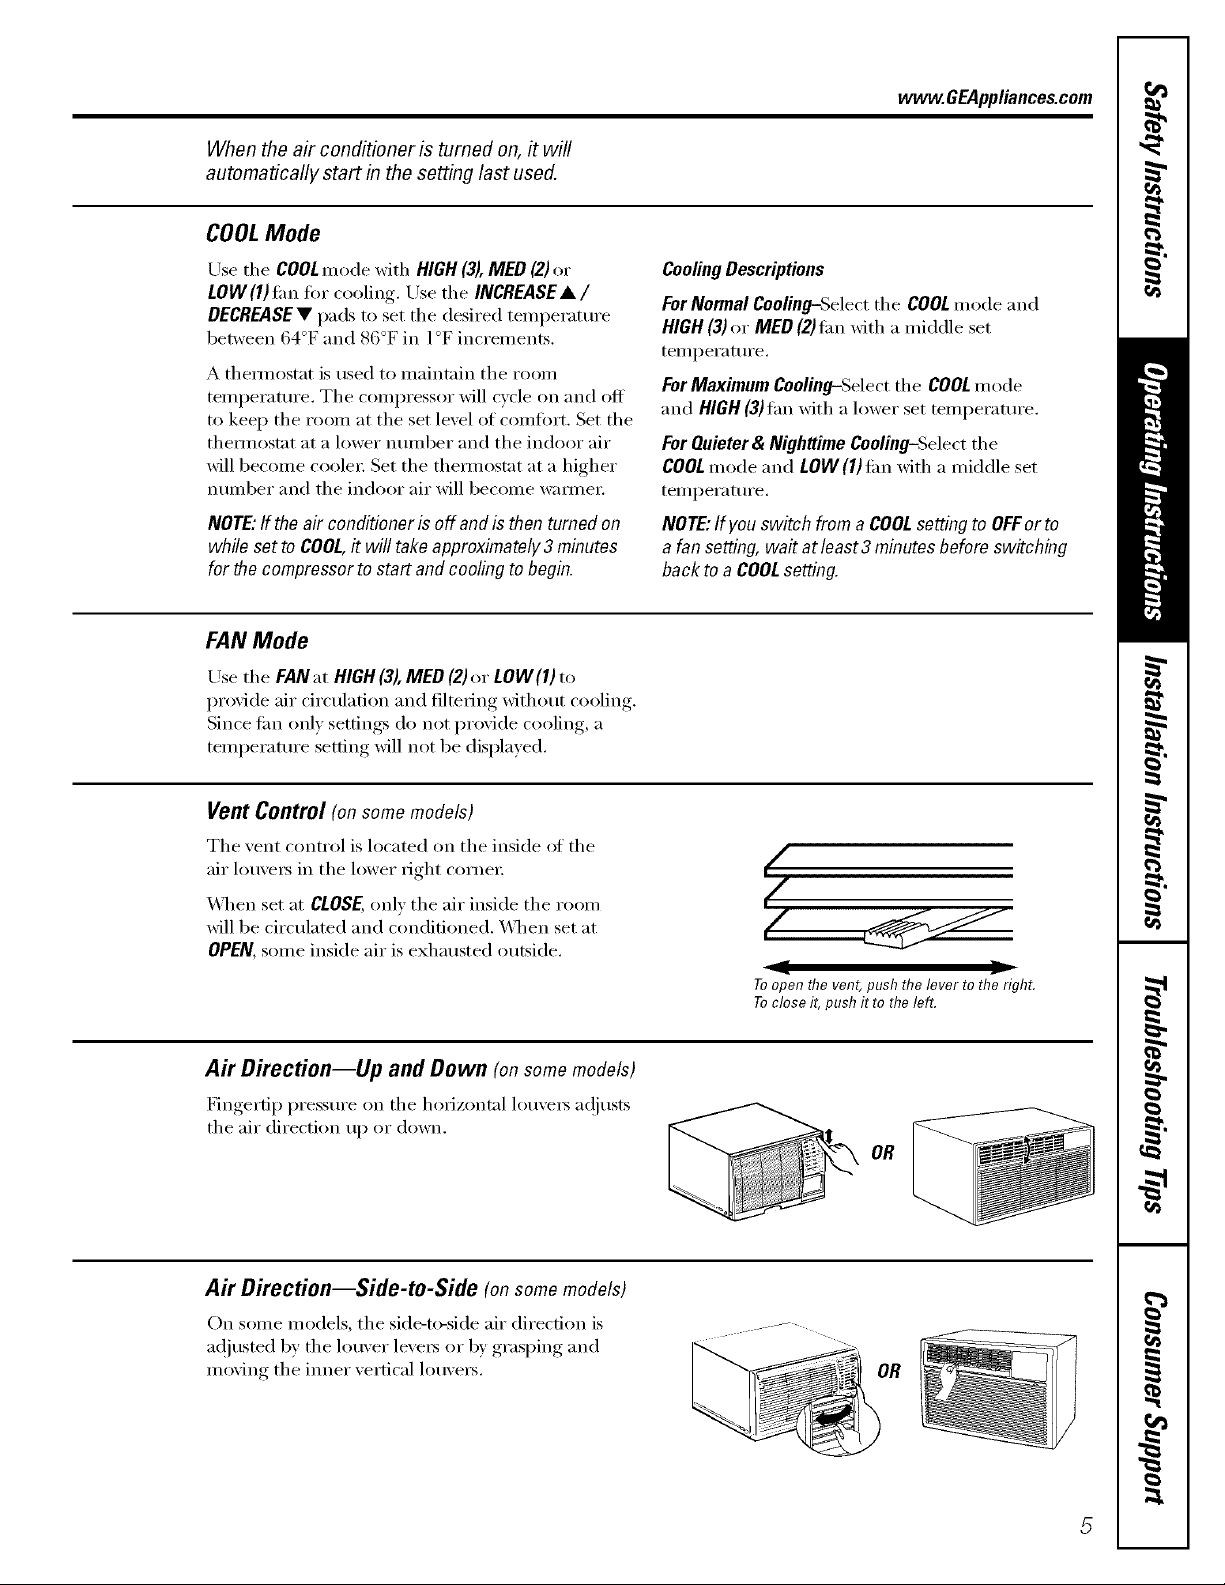
Vent Control (on some models)
Tile vent control is located on tile inside of tile
air lou\'e_ in tile l()wer right corne_:
_]_en set at CLOSE, only tile air inside tile room
will be circulated and conditioned, \_]/en set at
OPEN, some inside air is exhausted outside.
CoolingDescriptions
For Normal Cooling-Select tile COOL mode and
HIGH(3)or MED (2)tim with a middle set
temperature,
For Maximum Cooling-Select tile COOL mode
and HIGH (3)tim with a lower set temperature,
For Quieter& Nighttime Cooling-Select tile
COOLmode and LOW(1)tim with a middle set
temperamre.
NOTE:Ifyouswitch from a COOLsettingto OFForto
a fan setting,wait at least3 minutesbefore switching
back to aCOOLsetting.
I
(/
Air Direction--Up and Down (on some models)
Fingertip pressm'e on tile horizontal lou\'e_ a(!justs
tile air direction up or down.
Air Direction--Side-to-Side (onsomemodels)
On some models, tile side-to-side air (lirecfion is
ac!justed by tile louver leveI5 or b)' grasping and
m eying tile ironer vertical lou\'e_.
Toopen flTevent, push the lever to the right.
Toclose it, pushit to the left.
OR
0.
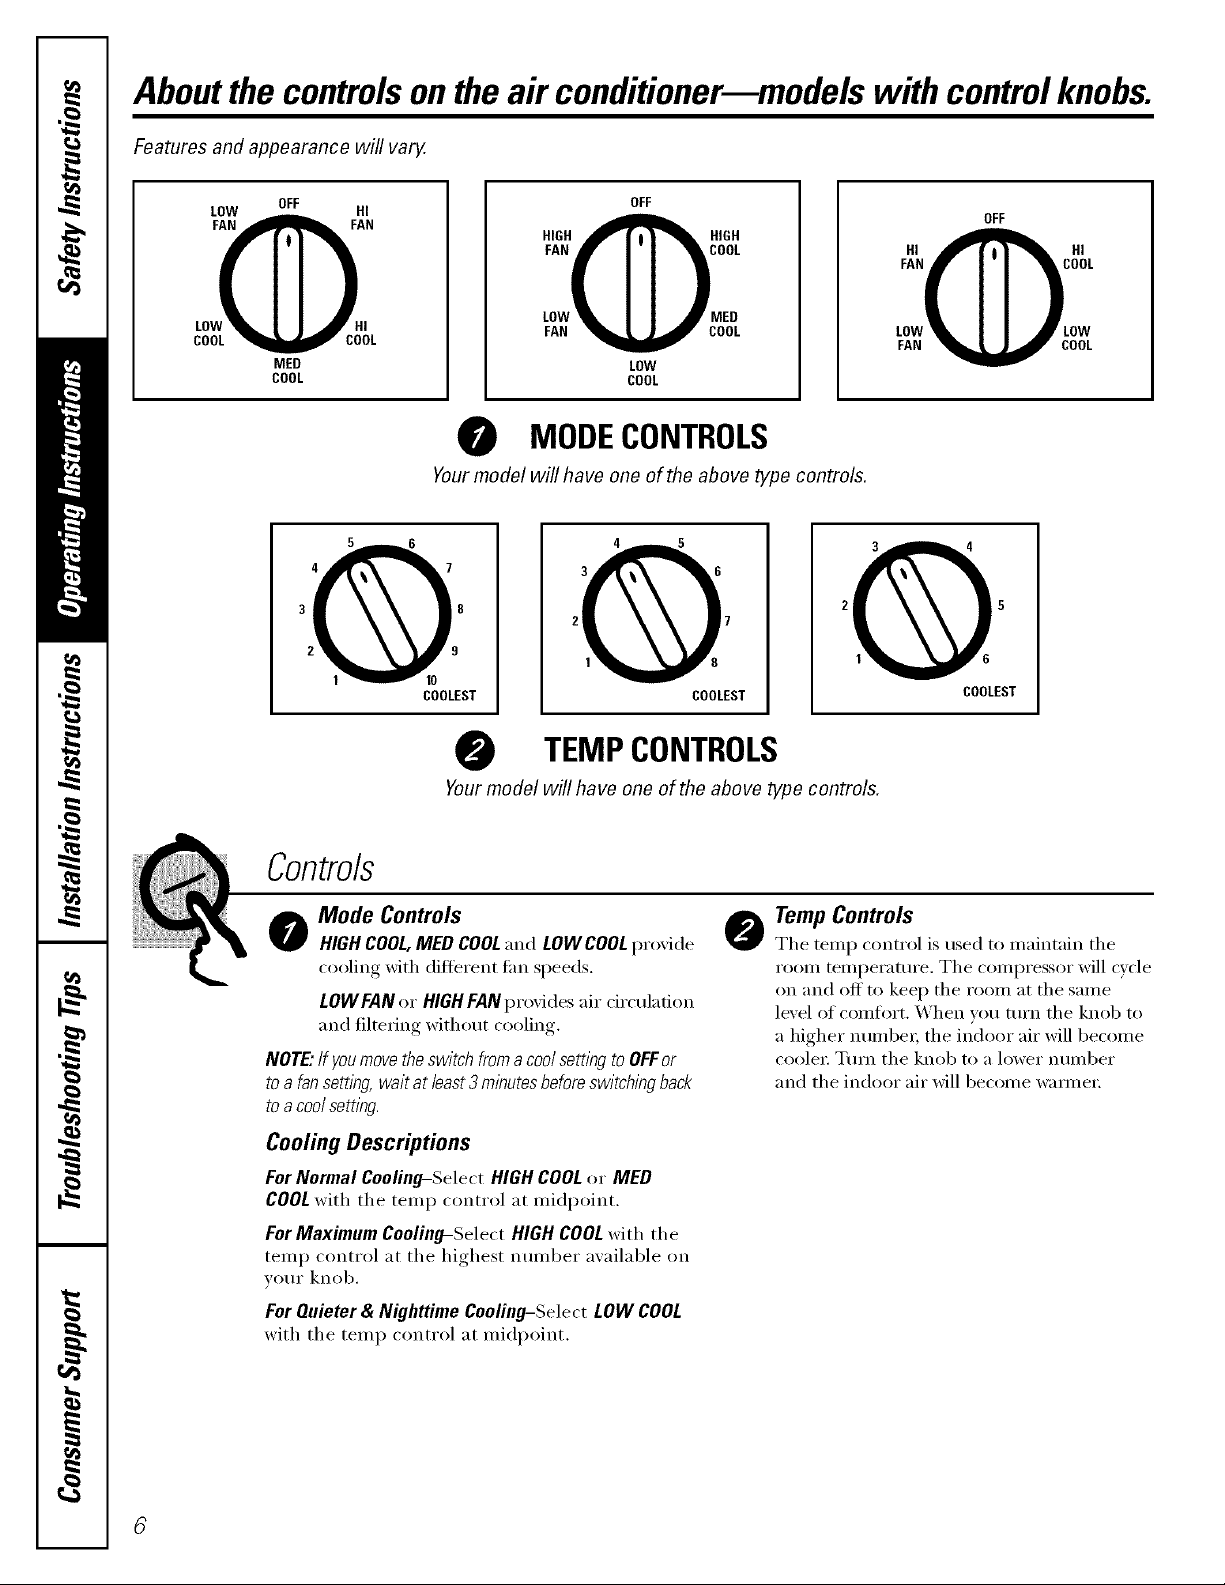
Aboutthe controlsontheair conditionermmodelswith controlknobs.
Features and appearance will vary.
LOW HI
FAN FAN
LOVOHI
COOL COOL
OFF
MED
COOL
OFF
HIGH_ HIGH
FAN OOL
LOW_ I I ,m' MED
FAN _ COOL
LOW
COOL
HI OIHI
LOW LOW
FAN COOL
MODECONTROLS
Yourmodel will have one of the above type controls.
EST COOLEST COOLEST
TEMPCONTROLS
Yourmodel will have one of the above type controls.
OFF
Controls
o ode Controls
HIGHCOOL,MED COOLand LOWCOOLpro'dde
cooling with difterent thn speeds.
LOWFANor HIGHFANprovides air circulation
and filtering without cooling.
NOTE."If you move the switch from a cool setting to OFF or
to a fan setting, wait at least 3 minutes before switching back
to a cool setting.
Cooling Descriptions
ForNormal Cooling-Select HIGHCOOLor MED
COOLwith the temp control at midpoint.
For Maximum Coolingt-Select HIGH COOL with the
temp control at the highest number available on
wmr knob.
For Quieter & Nighttime Cooling-Select LOW COOL
with the temp control at midpoint.
TempControls
@
The temp control is used to maintain the
room temperature. The compressor will cycle
on and off to kee I) the room at the same
level of comfiwt. When w)u turn the knob to
a higher numbe_; the indoor air will become
coole_: Turn the knob to a lower number
and the indoor air will become wannei:
 Loading...