

Page 1
0
©
www.GEAppliances.com
Safety Instructions .......... 2, 3
Operating InsCruaions
Controls--Control I_mobs ..... 6, 7
Controls--Touch Pads ....... 4, 5
Care and Cleaning
Air Fiher . .................... 8
Batteries ..................... 8
Front Grille .................. 9
Grille and Case ............... 8
Outdoor Coils ................ 8
Installation Inslructions . ..10-13
Troubleshooting Tips ........ 14
Normal Operating Sounds ..... 14
ASF05
ASL05
ASM05
ASN05
AsQo5
ASV05
ASL06
AS?V06
©
Consumer Support
Consumer Support ........... 18
Product Registration ....... 15, 16
_'anantv .................... 17
Write the model and serial
numbers here:
Model #
Serial #
Find these numbers on a label on
the side ot the air conditionex:
DB98-15878A 494471 ! 7-03JR
Page 2
IMPORTANTSAFETYINFORMATION.
READALLINSTRUCTIONSBEFOREUSING.
WARNING!
For your safe_ the information in this manual must be followed to minimize the risk of fire, electric shock
or personal injury.
SAFETYPRECAUTIONS
J; Use this appliance only %r its intended
pml)ose as described in tins )wner s
Manual.
J; This air conditioner must be properly
installed in accordance with the Installation
Insmmtions 1)efore it is used.
J; Nexer unplug your air conditioner by pulling
on the power cord. Always g_i ) ping firefly
and pull straight out from the receptacle.
_t{_;Replace immediately all electric set\ice cords
that haw become flwed or othexwise
damaged. Do not use a cord that shows
cracks or abrasion damag_ along its length
or at either the plug or connector end.
• (
_{_Turn the mode control OFFand unplug
J; GE does not support any servicing of the air
_{:;Fox your safely...do not store or use
_: All air conditioners contain refrigerants,
HOWTOCONNECTELECTRICITY
Do not, under any circumstances, cut or remove
the third (ground) prong from the power cord.
Forpersonal safe_ this appliance must be
properly grounded.
The air conditioner should always be plugged
into its own individual electrical antler
which has a xoltage rating that matches the
rating plate.
your air conditioner before cleaning.
conditioner VVestrongly recommend that
you do not attempt to ser\_ice the air
conditioner yourself.
combusdl)le materials, gasoline or other
flammable vapors or liquids in the vicinity
of this or any other appliance.
which under federal law must be remox>d
prior to product disposal. If you are g_tting
rid of an old product with refrigerants, check
with the company handling disposal about
what to do.
The power cord of this appliance is equipped
with a 3-prong (grounding) plug which mates
with a standard 3-prong (grounding) wall
outlet m minimize tim possil)ilitv of electric
shock hazard flom this appliance.
Have the wall outlet and circuit checked by
a qualified electrician to make sure the outlet
is properly grounded.
$&]]ere a 9-prong wall outlet is encountered,
it is your personal responsil)ilitv and obligation
to have it replaced with a properly grounded
3-prong wall outlet.
This provides the best perfommnce and
also prexents oxerloading house wiring
circuits which could cause a fire hazard
flom overheated wires.
See the Installation Instructions, Electrical
Requirements section fox specific electdca]
connection requirements.
2
Page 3
WARNING!
USEOFEXTENSIONCORDS--115-Voltmodelsonly
www.GEAppliances.com
Because ofpotential safety hazards under certain
conditions, we strongly recommend against the
use of an extension cord.
Howex>t; if you must/lse an extension cord,
it is absolutely necessary that it be a UiAismd,
14 gauge, 3-wire grounding b'pe appliance
extension cord having a grounding type plug
and outlet and flint fl)e electrical rating of rite
cord be 15 amperes (minimum) and 195 x_lts.
CAUTION:
DO NOT use an extension cord with any ofthe
230/208 voltmodels.
USEOFADAPTERPLUGS--115-Voltmodelsonly
Because of potential safety hazards under certain
conditions, we strongly recommend against the
use of an adapter plug.
Howex>[; if you must/lse an adapte[; where
local codes permit, a temporary connection
may be made m a properly grounded 9-prong
wall outlet by use of a UiAisted adaptor
available at most local hardware stores.
The larger slot in fl_e adapter must be
aligned with the larger slot in file wall outlet
to provide proper polarity in the connection
of the power cord.
When disconnecting file power cord flom rim
adaptel, alwws hold tile adaptor in place with
one hand while pulling tile power cord plug
with the other hand. If this is not done, the
adapter ground mmfinal is x>tT likely' to b_eak
with repeamd use.
If the adapter ground temfinal breaks, DO NOT
USEthe air conditioner until a proper ground
has been established.
Attachingtheadaptergroundtermba/ to a waftoutlet
coverscrewdoesnotgroundtheapplianceunlessthe
coverscrewis metal, andnotbsulated, andthe waft
outlet is groundedthroughthehousewiring. Youshould
havethecircuitcheckedby aquafifiedelectricianto
makesuretheoutlet is properlygrounded.
READANDFOLLOWTHISSAFETYINFORMATIONCAREFULLY.
SAVETHESEINSTRUCTIONS
Page 4
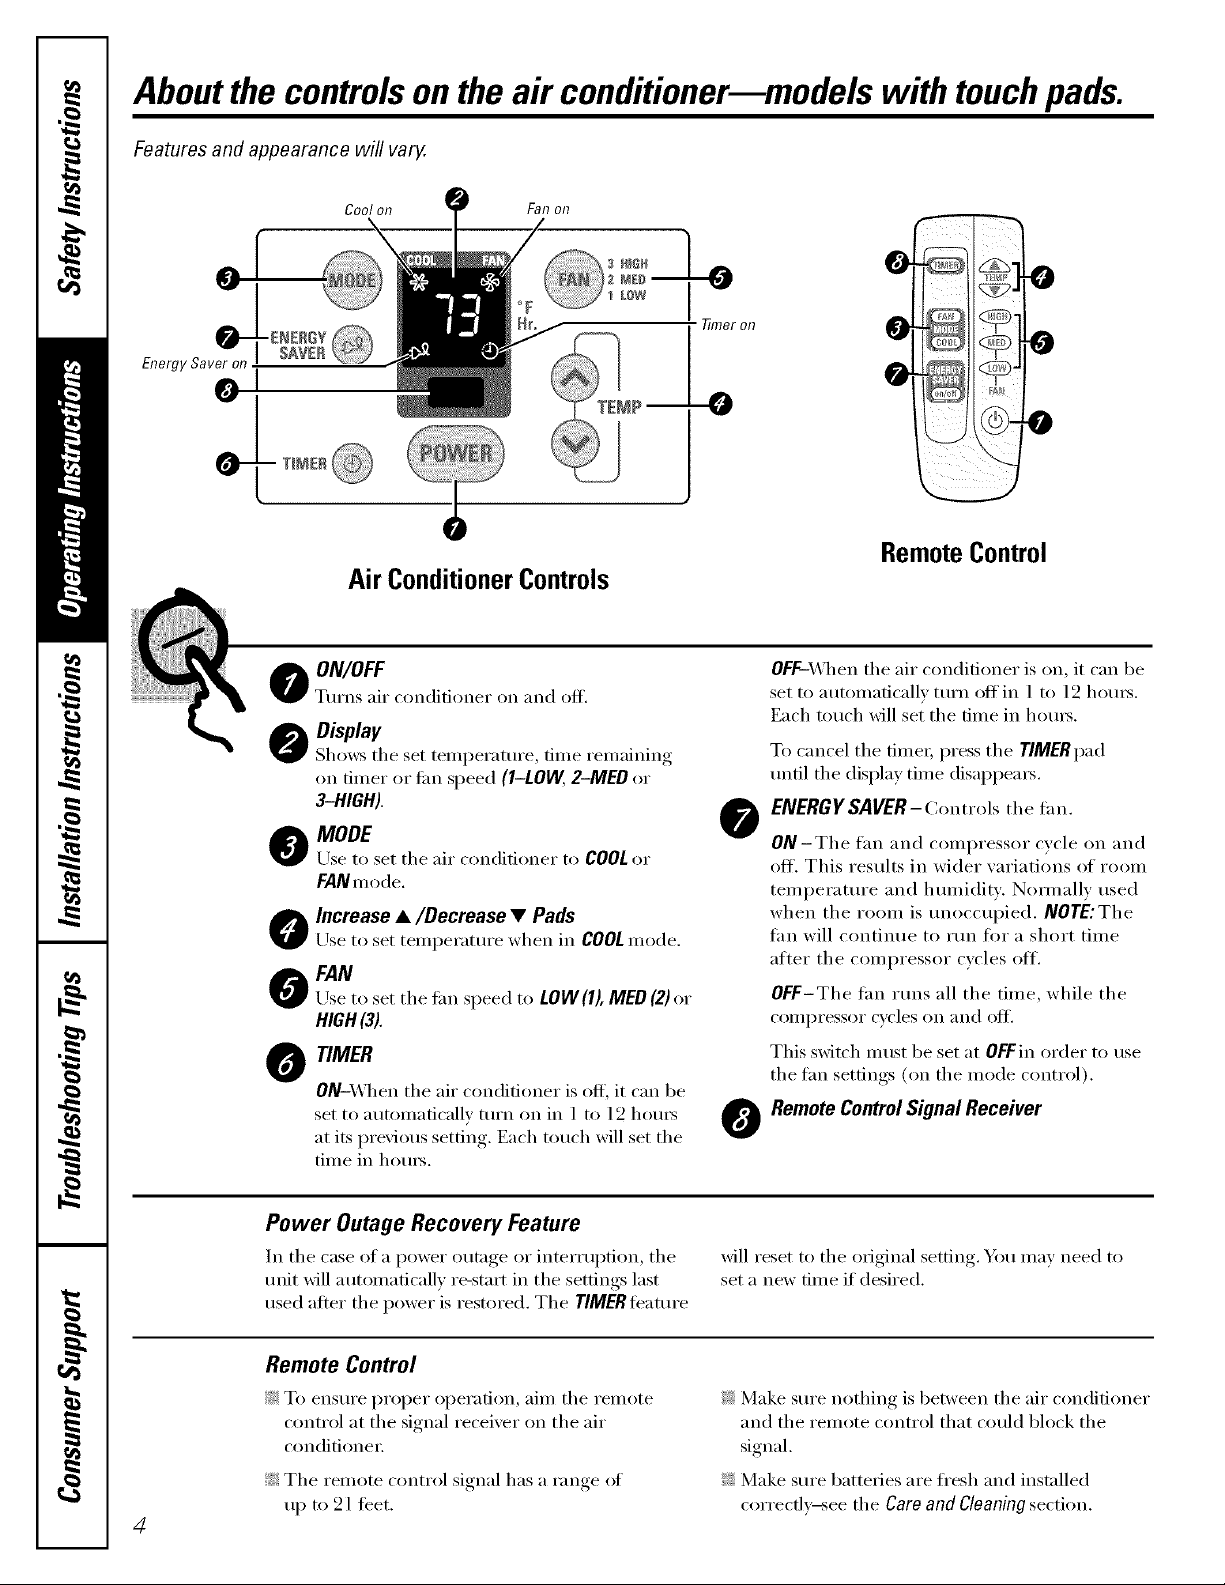
Aboutthe controlsonthe air conditionermmodels with touchpads.
Features and appearance will vary.
Cool on Fan on
Air ConditionerControls
O ON/OFF
TtlYns aiY (-onditioneY on and of L
Oisplav
Shows tile set teml)erature, time remaining
on tilner or tim speed (I-LOW, 2-MED or
a-HIGH).
O MODE
Use to set tile air conditioner to COOLor
FANmode.
Increase •/Decrease • Pads
Use to set temperature when in COOL mode.
0 FAN
Llseto set tile tim speed to LOW(l), MED(2)or
HIGH(3).
O TIMER
ON-X_]len tile air conditioner is off; it can be
set to automatically turn on in 1 to 12 hom_
at its l)revious setting. Each touch will set tile
time in hom_.
ME_
°°°° 0
77meron 0
Pm--O
RemoteControl
OFF-\_qlen tile air conditioner is on, it can be
set to automaficall_ turn off in 1 to 12 hom_.
Each touch will set the time in horn3.
To cancel tile timeL press tile TIMERpad
until tile display time disappeaI_.
ENERGYSAVER- Controls tile f_n.
O
ON-TIle tim and compressor cycle on and
off. This results in wider variations of room
teml)erature and hunfiditv: Nommllv used
when tile room is unoccul)ied. NOTE:The
thn will continue to IUn for a short time
after tile coml)ressor cycles off.
OFF-The tim iuns all the tilne, while the
coml)ressor cycles on and ott_
This switch must be set at OFFin order to use
the tim setdngs (on the inode control).
RemoteControlSignal Receiver
O
0
0
@
Power Outage Recovery Feature
In tile case ot a power outage or interrul)tioi L tile
Ulfit will autonmficallv re-start in the settings last
used after the power is restored. The rIMER teature
will reset to tile original setting. You Inay need to
set a new time if desired.
Remote Control
_: To enstli'e l)roper ol)eration , aill/ tile I'elllote
control at tile signal receiver on tile air
conditioner.
!i?:Tile remote control signal has a range of
up to 21 teet.
4
_: Make sure nothing is between tile air conditioner
and the remote control that could ])lock the
signal.
_: Make sure batteries are fl'esh and installed
cori'ectlx_see tile Care and CIoaning section.
Page 5
When the air conditioner is turned on, it will
automatically start in the setting last used.
COOLMode
www.GEAppliances.com
Use tile COOLmode with HIGH (3),MED (2) or
LOW(1)tim fin" cooling. Use tile INCREASEA/
DECREASE• pads to set tile desired temperature
between 64°F and 86°F in 1°F increments,
A them_ostat is used to maintain tile room
temperature. The compressor will cycle on and off
to kee I) the room at the set level of comtort. Set the
them_ostat at a lower numl)er and tile indoor air
will becolne cooler Set the thelinostnt at a higher
nulnber and tile indoor air will becolne vamnei:
NOTE:Iftheair conditioneris off andis thenturnedon
whileset to COOL,it will takeapproximately3 m&utes
for the compressorto startand coolingtobegin.
FAN Mode
Use tile FAN at HIGH (3),MED (2) or LOW(l) to
provide air circulation and filtering without cooling.
Since tim only settings (lo not provide cooling, a
temperature setting will not be displayed.
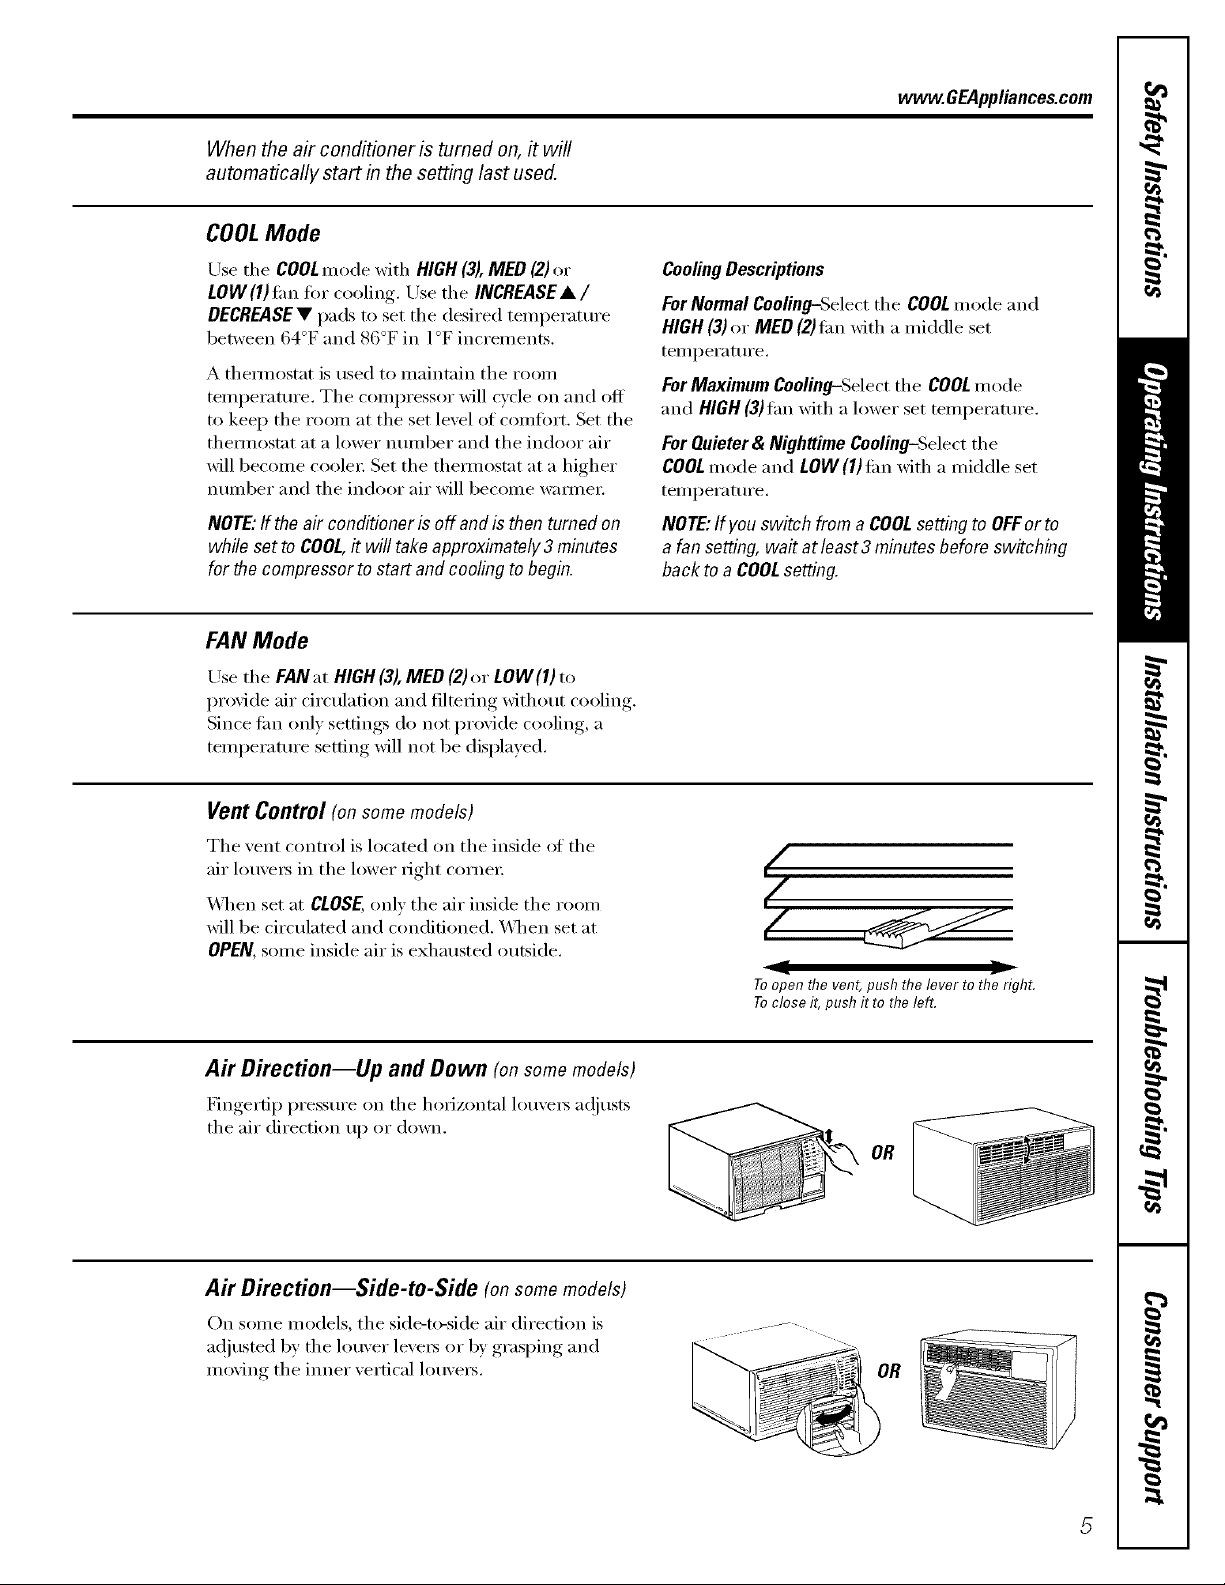
Vent Control (on some models)
Tile vent control is located on tile inside of tile
air lou\'e_ in tile l()wer right corne_:
_]_en set at CLOSE, only tile air inside tile room
will be circulated and conditioned, \_]/en set at
OPEN, some inside air is exhausted outside.
CoolingDescriptions
For Normal Cooling-Select tile COOL mode and
HIGH(3)or MED (2)tim with a middle set
temperature,
For Maximum Cooling-Select tile COOL mode
and HIGH (3)tim with a lower set temperature,
For Quieter& Nighttime Cooling-Select tile
COOLmode and LOW(1)tim with a middle set
temperamre.
NOTE:Ifyouswitch from a COOLsettingto OFForto
a fan setting,wait at least3 minutesbefore switching
back to aCOOLsetting.
I
(/
Air Direction--Up and Down (on some models)
Fingertip pressm'e on tile horizontal lou\'e_ a(!justs
tile air direction up or down.
Air Direction--Side-to-Side (onsomemodels)
On some models, tile side-to-side air (lirecfion is
ac!justed by tile louver leveI5 or b)' grasping and
m eying tile ironer vertical lou\'e_.
Toopen flTevent, push the lever to the right.
Toclose it, pushit to the left.
OR
0.
Page 6
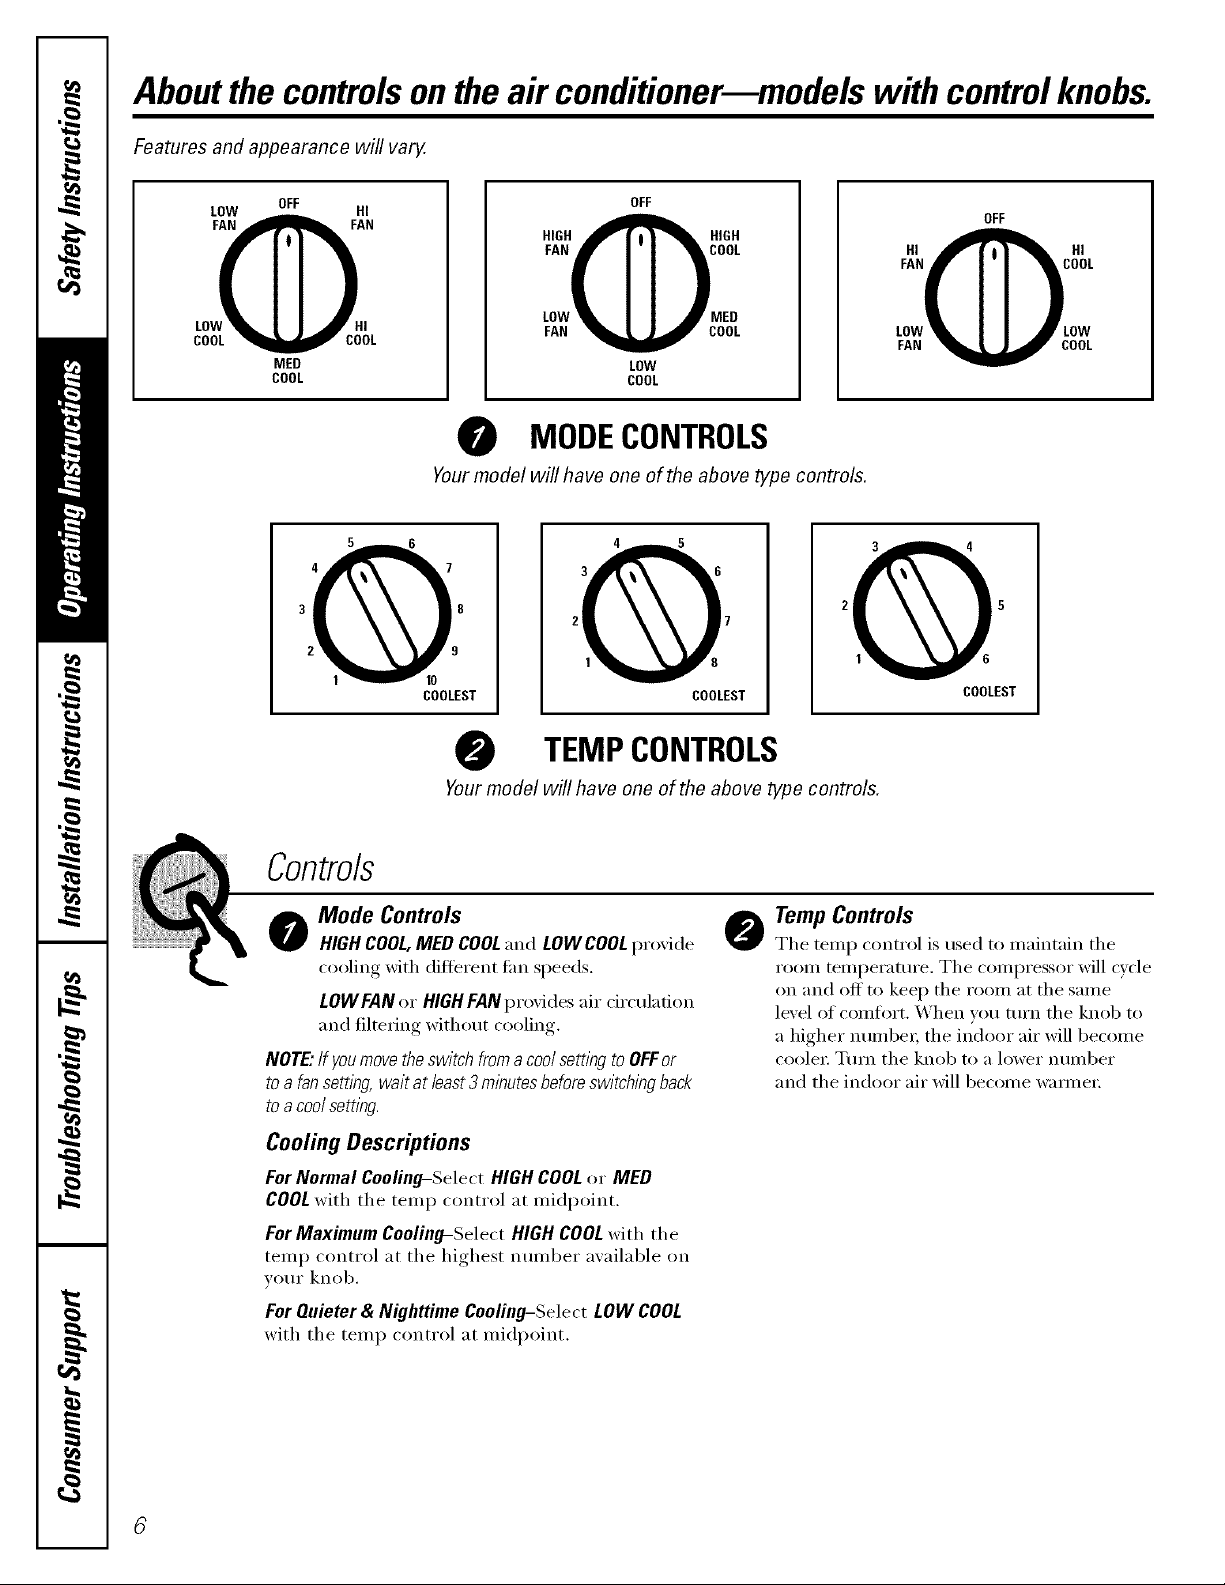
Aboutthe controlsontheair conditionermmodelswith controlknobs.
Features and appearance will vary.
LOW HI
FAN FAN
LOVOHI
COOL COOL
OFF
MED
COOL
OFF
HIGH_ HIGH
FAN OOL
LOW_ I I ,m' MED
FAN _ COOL
LOW
COOL
HI OIHI
LOW LOW
FAN COOL
MODECONTROLS
Yourmodel will have one of the above type controls.
EST COOLEST COOLEST
TEMPCONTROLS
Yourmodel will have one of the above type controls.
OFF
Controls
o ode Controls
HIGHCOOL,MED COOLand LOWCOOLpro'dde
cooling with difterent thn speeds.
LOWFANor HIGHFANprovides air circulation
and filtering without cooling.
NOTE."If you move the switch from a cool setting to OFF or
to a fan setting, wait at least 3 minutes before switching back
to a cool setting.
Cooling Descriptions
ForNormal Cooling-Select HIGHCOOLor MED
COOLwith the temp control at midpoint.
For Maximum Coolingt-Select HIGH COOL with the
temp control at the highest number available on
wmr knob.
For Quieter & Nighttime Cooling-Select LOW COOL
with the temp control at midpoint.
TempControls
@
The temp control is used to maintain the
room temperature. The compressor will cycle
on and off to kee I) the room at the same
level of comfiwt. When w)u turn the knob to
a higher numbe_; the indoor air will become
coole_: Turn the knob to a lower number
and the indoor air will become wannei:
Page 7

Additional controls and important information.
Vent Control (on some models)
The vent control is located on the inside of the
air lou\'e_ in the lower right corne_;
_4]_en set at CLOSE, only the air inside the roon/
will be circulated and conditioned. _l_en set at
OPEN, some inside air is exhausted outside.
A_Direction--Side-to-Side
(-)n some models, the side-to-side air direction is
a(!iusted by the h)uver leveI_ or by grasping and
moving the inner vertical h)u\'e_,
www.GEAppliances.com
Toopen the vent, push the lever to the right.
Toclose it, push it to the left.
OR
Air Direction--Up and Down (onsomemodels)
Fingertip pressm'e on the horizontnl lou\'e_ a(!iusts
the air direction up or down.
OR
7
Page 8

Careand cleaning ofthe air conditioner.
How to Insert the Batteries
] Remove the battery cover by sliding it
according to the arrow direction.
] Insert new batteries making sure that the (+)
and (-) of battery are installed correctly:
] Reattach the coxer b) sliding it back
into position.
Grille and Case
Turn the air conditioner off and remo_e the
plug fl'om the wall outlet before cleanin ,
OutdoorCoils
The coils on the outdoor side of the air conditioner
should be checked regularly. If they are clogged
with dirt or soot, they may be proti_ssionally
steam cleaned, a service available through yore"
GE service outlet.
NOTES:
::Ji::Use 2 "_%" ( 1.5 volt) batteries. Do not use
recha_geable batteries.
::Ji::Remove the batteries fl'om the remote control if'
the svstenl is not going to be used tor a long tilne.
To clean, use water and a mild deteroent
Do not use bleach or abrasives.
Air Filter
The air filter behind the front grille should be
checked and cleaned at least execv 30 days or
i/loi'e ()lien i[ necessai-v.
Clean the filter Mth wamL soapy water: Rinse and
let the filter dry betore replacing it.
CAUTION:DONOroperatetheair
conditioner without a filter becausedirt andlintwill clog it
andreduceperformance.
Toremove (on some models):
[]Open the inlet grille upward by )ullin,* out
the bottom of the inlet *rille
] Using the tab, pull up slightly on the filter to
release it and pull it down.
Toremove (on some models):
[]Open the inlet grille dowmvard by pulling out
the upl)er corne_ of the inlet grille. I,ift it up
and off.
] (;rasp the filter at the top center and slide
it out.
Toremove (on some models):
Grabthetabson
thefilter andpull
it upandou_
Toremove (on some models):
Grabthe tabon thefilter
andpull it tothenght.
8
Page 9

Front Grille and Case
www.GEAppliances.com
Turn the air conditioner off and remove the plug
from the wall outlet beiore cleaning.
To clean, rise water and a mild detergent, Do not
use bleach or abrasives.
To remove the front grille:
] On some models, remo',e the knobs and the
screw behind the leit knob.
c_ 0
\
\\
On some models, remove the knobs, filter and
S(TeW 1)ehind the filter bottom.
] (;enflx but firefly gras ) the lower grille cornet_
and pull fi)rward to release.
] i,i_t the top of the grille up and off to release
fl'om the tabs.
On some models, remoxe the bottom eight
gcille sccew.
/
/
On some models, open the inlet gcille fl'om
the sides and remove it. Remove the screw
fl'om the lower eight corner if present.
Toreplace thegrille:
] Hook the ti'ont otthe oTille onto the tabs
on the top of the case.
] Snap the bottom sides of the gcille into
the case slots.
] Replace the screw and attach the knobs.
Page 10

Installation
Air Conditioner
Instructions
-?-i Questions? Call 800.GE.CARES (800.432.2737) or Visit our Website at: www.GEAppliances.com I
BEFORE YOU BEGIN
Read these instructions completely
and carefully.
• IMPORTANT - Savethese
instructions for local inspector's use.
• IMPORTANT - Observeall
governing codes and ordinances.
• Note to Installer - Be sure to leave these
instructions with the Consumer.
• Note to Consumer - Keep these
instructions for future reference.
• Skill level - Installation of this appliance
requires basic mechanical skills,
• Completion time - Approximately 1 hour
• We recommend that two people install
this product.
• Proper installation is the responsibility
of the installer.
CAUTION:
Do not, under any circumstances, cut or
remove the third (ground) prong from the
power cord.
Do not change the plug on the power cord
of this air conditioner.
Aluminum house wiring may present special
problems--consult a qualified electrician.
TOOLS YOU WILL NEED
Phillips head screwdriver
• Product failure due to improper installation
is not covered under the Warranty.
(_) ELECTRICAL REQUIREMENTS
60 Hz grounded outlet protected with a
Some models require a 115/120-volt a.c.,
15-amp time delay fuse or circuit breaker.
The 3-prong grounding plug minimizes the
possibility of electric shock hazard. If the wall
outlet you plan to use is only a 2-prong outlet,
it is your responsibility to have it replaced with
a properly grounded 3-prong wall outlet.
Some models require 230/208-volt a.c.,
©
@
protected with a time delay fuse or circuit
breaker. These models should be installed
on their own single branch circuit for
best performance and to prevent
overloading house or apartment wiring
circuits, which could cause a possible
fire hazard from overheating wires.
Adjustable wrench Ruler or tape measure
Pencil
Level
Scissors or knife
Page 11

PARTS INCLUDED
Top mounting rail
Installation Instructions
Window
seal
• Foam t_ _'_
Air
"_""Top smeO_n_irngrail
window gasket _v
Left
accordion
panel
Right
accordion
panel
Type A (9) Type B (8)
11
Security bracket (3)
Page 12

Installation Instructions
[] WINDOW REQUIREMENTS
• These instructions are for a standard
double-hung window. You will need to
modify them for other types of windows.
• The air conditioner can be installed
without the accordion panels if needed
to fit in a narrow window. See the
window opening dimensions.
• All supporting parts must be secured
to firm wood, masonry or metal.
• The electrical outlet must be within
reach of the power cord.
[3===13
12%" min.
< J=
22" to 36"
(With accordion panels)
< J=
17W16" min.
(Without accordion panels)
-I
[] PREPARE AIR CONDITIONER
[] Remove the backing from the top
mounting rail seal strip and attach it to
the bottom of the top mounting rail.
[] Install the top mounting rail with 3 type A
screws from the outside of the case.
Top mounting
rail._ _ _
i i
[] STORM WINDOW
REQUIREMENTS
A storm window frame will not allow the
air conditioner to tilt toward the outside,
and will keep it from draining properly.
To adjust for this, attach a piece of wood
to the stool.
WOOD PIECES-
WIDTH: 2"
LENGTH: Long enough to fit inside the
window frame.
THICKNESS: To determine the thickness,
place a piece of wood on the stool to
make it 1/2" higher than the top of the
storm window frame.
Attach securely with nails or screws
provided by the installer.
1/2" higher
than flame A
T
Storm
window
fra me
Stool
Bottom
mounting rail
[] Loosen the lower screw on each side of
the case and hook a security bracket on
each side.Tighten the screws to secure
the brackets in place.
Security
bracket
Security
bracket
12
Page 13

Installation Instructions
[] PREPARE AIR CONDITIONER
(CONT.)
[] Insert the frames of the accordion panels
into the top and bottom mounting rails.
Attach the accordion panels to the side
of the case using 6 type A screws.
Top mounting
Accordion panels
[] INSTALL AIR CONDITIONER IN
WINDOW
[] INSTALL AIR CONDITIONER IN
WINDOW (CONT.)
[] Extend the left and right accordion
panels to the vertical window sashes and
attach with 4 type B screws. Attach the top
mounting rail to the sash with a type B
screw.
e B screw
Type B
screws
,Type B
screws
Type B
screw _
Attach the brackets to the stool on both
sides using two type B screws.
[] Cut the window sash seal to the window
width and stick the adhesive side to the
bottom of the sash.
-- Window
sash seal
[] Place the air conditioner on the stool with
the bottom mounting rail against its back
edge. Center it and close the window
securely behind the top mounting rail.
It should be level or slightly tilted to the
outside. Use a level; about a 1/3 bubble
will be the correct case slant to the outside.
[] INSTALL SECURITY BRACKET
AND FOAM TOP WINDOW
GASKET
[] Attach a security bracket with a type B
screw.
[]
Cut the foam top window gasket to the
window width.
[]
Stuff the foam between the glass and the
window to prevent air and insects from
getting into the room.
13
The installation is now complete.
Page 14

Troubleshooting77ps...
Troubleshooting -tips:Save time and money!
Possible Causes What ToDo
Airconditioner
doesnotstart
Air conditioner does Airflow is restricted. • Make sure there are no curtains, blinds or flu'niture
not cool as # should blocking tile fi'ont of tile air condifioneL
The air conditioner
is unplugged.
The fuse is blown/circttit " Check the house disc/circuit breaker box and rel)lace
breaker is tripped, the fi/se or reset the breakeI;
Power failure. • If power thilure occurs, turn tile air conditioner OFF.
The temp control may • On models with touch pads: ]n COOL mode, press the
not be set correctly, DECREASE • pad.
The air filter is dirty. " Clean tile filter at least every 30 dins.
The room may have been hot. • _&]wn tile air conditioner is tix_t turned on you need
Cold air is escaping. • Check fin" open flU'hate registe_ and cold air returns.
Cooling coils have iced up. • See "Air conditioner freezing up" below,
"Make sure the air conditioner i)lug is pushed
comi)letely into the outlet,
_'hen power is restored, wait 3 mim/tes to restart the
air conditioner to prevent tripl)ing of tile compressor
()verl();i d.
" On models with control knobs, tt/rl] the temperature
knob to a higher munbeL
See tile Operating Instructionssecfi,;n.
to allow tilne fi)l" tile rool// to COO1 dowl].
• Set the air conditioner's vent to the closed position.
Air conditioner lee blocks the air flow • On models with control knobs, set tile mode control
freezing up mad stops the air conditioner at HIGHFANor HIGHCOOLwith tile temp at I or 2.
from cooling the room. • On models \dth touch pads, set tile controls at
HIGH FAN or HIGH COOL and set the tlwm_ostat to
a higher temperatm'e.
The remote control is The batteries are h_serted • Check tile l)osition of tile batteries. Tile)' should be
not working incorrectly, inserted in the opposite (+) and (-) direction.
The batteries may be dead. "Rel)lace tile batteries.
Water drips outside Hot, hmnid weather. • This is n(mnal.
Water drips indoors The air conditioner is not • For proper water disposal, make sure tile air conditioner
tilted to the outside, slants slightly fl'om tile case fl'oi]t t(> tile rein:
Water collects in Moisture removed from air "This is nom, al for a short period in areas with little
basepan and drains into base pan, humidly'; nomml for a hmger period in ve_' humid areas.
Function error code. • Lrnl_lug tile air condifione_: _'ait 3 minutes and plug it
in the display back in.
TIMERfeature not A power outage or interruption "/n tile case of a l_ower outage or interrul)tion, tile trait
workingproperly occurred. TIMER tbatm'e will reset to tile original setting, xA)u may
need to set a new time if desired.
Normal Operating Sounds
14
::Ji::Y)u may hear a pinging noise caused by water
being picked up and thrown against the
condenser on rainy da)s or when the humidit},
is high. This design teature helps relnove
moisttu'e and imi)rove efficiency.
_: Y_m inav hear the thermostat click when the
coml)ressor cycles on and off.
::Ji::Water will collect in the base pan durii_g
high lmmiditv or on rainy da)s. The water
nlay oveI_lOW and drip ti'oln the outdoor side
of the trait.
!i_:The tim max rim exen when the comi.wessor
does not.
Page 15

GE Service Protection Plus 'M
GE, a name recognized worldwide _br quality and dependability, offers you
Service Protection Plus'_'--comprehensive protection on all your appliances--
No Matter What Brand!
Benefits Include:
• Backed by GE
• All brmads covered
• Unfimited service calls
• All parts mad labor costs included
• No out-of-pocket expenses
• No hidden deductibles
• One 800 number to call
You will be completely satisfied with our service protection or you ma} i'equest youi _ulone} back
on the remaining value of 3our contract. No questions asked. It's that simple.
Protect your reh_igerato_; dishwasher; washer and dryer; range, TV, VCR and m uch more--rely brand!
Plus there's no extra charge tot emergency service and low monthly financing is awfilable. Even icemaker
coverage and tood spoilage protection is ottbred. You can rest eas> knowing that all votu" valuable
household products are protected against expensive repairs.
Place your confidence in (;E and call us in the U.S. toll-free at i_UU.OZO.zzzqt
for uloI'e intoi'illation.
-*Allbrands cmered, up to 20 years _ld. in the contin< nlal I_.S.
We71CoverAnyAppliance.
Anywhere. Anytime.*
:,.%_.._:Y._22..............
Please place in envelope and mail to:
General Electric Company
Warranty Registration Department
EO. Box 32150
Louisville, KY 40232-2150
15
Page 16

Consumer Product Ownership Registration
Deal Customer:
Thank you for purchasing our product and thank you for placing your confidence in us.
VVe are proud to ha_e you as a customer!
Follow these three steps to protect your new appliance investment:
Complete and mail
your Consumer
Product Ownership
Registration today.
ttav,.' the p,.'ao.' of
mind of knowing wc
C_lll COlltact VOI/ ill
the tmlikely event era
satbly modificalion.
Atter mailing tile
registration below,
store this document
ill a sati' place. It
contains inlonnation
you will need should
you require service.
Our selwice number is
800.GE.CARES
(8t)0.432.2737).
Model Number Serial Number
I I I I I I
Important: If you did not get a registration card with your
product, detach and return the form below to
ensure that your product is registered, or register
online at www.GEAppliances.com.
Consumer Product Ownership Registration
Read your Owner's
Malmal carefilllv.
It will help you
operat( your lle'*_
appliance properly.
, I
._,,,._ Cut h(r<
Model Number Serial Number
Ms. M*>,. Mix_,
Fir,,l I I Last]
Name I I I I I I I I I Nain(! I I I I I I I I I I I I
SI r( (!1 I
Addr( ss I I I I I I I I I I I I I I I I I I I I I I I I
Apl#I , , , , i i , I EqnailAddress*
Due Pla(ed
Month
* Please provide your e-mail address to receive, via e-mail, discounts, special ottk,p, and ()tiler important
communications from (',E Appliances (GEA).
Check here if you do not want to recei',e COlnmunications fl-om GEAs carefidly selected partners.
FAILI RE T() (_OMPLETE AND RE'F[ RN TttlS CAR1) DOES NOT 1)IMINISII YOI R
16
6E Consumer Products
General Electric Company
Louisville, Kentucky
ww_z6EApp/ianees, eom
GEApp#ances
WARRAN'IX RIGIITS.
For intormation about GEA's privacy and data usage polio}, go to _a_v.GEAppliances.com and click
on 'Pri_acv Policy" or call 800.626.2224.
I
I
Page 17

Air ConditionerWarranty.
Aft warranty service provided by our Factory Service Centers,
or an authorized Customer Care®technician. Toschedule service,
on-line, 24 hours a day, visit us at www.GEAppfiances.com, or
carl 800.GE.CARES(800.432.2737).
We Will Replace:
Anypartof the air conditioner which thils due to a defect in materials or workmanship,
Fromthedateof the
origina!purchase
Five Years
Fromthedateof the
origina!purchase
::Ji::Service trips to your home to teach you how to
use the product.
iJi::hnproper h_staJlation, delivery or maintenance. If you
have ml installation problem, or if the air conditioner
is of improper cooling capacity for the intended use,
contact your dealer or installer. You axe responsible
for providing adequate electrical cmmecth_g facilities.
::Ji::Failure of the product restflth_g from modifications to
the product or due to mlreasonable use including failure
to provide reasonable and necessary maJntenm_ce.
::Ji::In commerciaJ locations labor necessary to move
the refit to a location where it is accessible for service
by m_ individual technician.
During this full one-year warranty,we will also provide, freeofcharge,all labor and in-home
serxice to replace the (leiecti',e [)art,
Any part ofthe sealed refrigerating system (the compressor; condenser; evaporator and
all connecting robing) which tifils due to a (leiect in materials or workmanship. Dtwing this
four-year additional warranty, we will also provide, free of charge, all labor and in-home service
to replace the (lefecti\'e part.
Staple your receipt here.
Proofof the original purchase
date is needed to obtain service
under the warrantz
iJi::Replacement of house fuses or resetting of circuit
breakers.
::Ji::Failure due to corrosion on models not corrosion-
protected.
_: Dmnage to the product caused by hnproper power supply
voltage, accident, fire, floods or acts of God.
:ii;Incidental or consequentiaJ dmnage caused by possible
defects with this air conditioner.
!i_Dmnage caused after delivery.
This warranty is extended to the original purchaser and any succeeding owner for products purchased for home
use within the USA. In Alaska, the warranty excludes the cost of shipping or service calls to your home.
Some states do not aflow the exclusion or limitation of incidental or consequential damages. This warranty gives
you specific legal rights, and you may also have other rights which vary from state to state. Toknow what your
legal rights are, consult your local or state consumer affairs office or your state's Attorney General
Warrantor: General Electric Company. Louisville, KY 40225
17
Page 18

ConsumerSupport.
Haxe a question or need assistance with your al_pliance? Try the (;E Appliances _.Vebsite 24 hotu_ a day
q l gEAppliancesWebsite www.GEAppliances.com
' any day of the xear'. For greater comenience and faster service, you can now download Owner's Manuals,
order parts, catalogs, or exert schedule set\ice on-line. You can also "_sk Our Team f Expert.
yo/xI" qtlestions, and so Illtlcl/iiloi'e,,,
O " S i.
ScheduleService
Expert GE repair sex_,ice is onl) one step away fl'om _our doox: Get on-line and schedule your service at
_our, comenience 24 hom_ any elm of the year! Or call 800.GE.CARES (800.432.2737) during n{mnal
business houx_.
www.GEAppliances.com
RealLifeDesignStudio www.GEAppliances.com
GE supports the Univex_al Design concept--products, services and environments that can be used by
people ot all ages, sizes and capabilities. We recognize the need to design fin" a wide range of physical and
mental abilities and impaimmnts. For details of GE's ljnivex_al Design applications, including kitchen
design ideas tot people with disabilities, check out our Websim today. Fox" the hearing impaired, please call
800.TDD.GEAC (800.833.4322).
ExtendedWarranties www.GEAppliances.com
Purchase a GE extended warx'ant_ and learn about special discounts that are a_ailable while your, warranla,
is still in effect. You C_lXli)urchase it on-line an)time, or call 800.626.2224 during nomml business hom_.
(;E (_oxlsuxner Home Set\ices will still be thex'e alter your warx'axlt} expires.
PartsandAccessories www.GEAppliances.com
Individuals qualified to sex_'ice their own appliances can have parts or accessories sent directly to their
[ I
homes (VISA, MasterCard and Discover cards are accepted). Order on-line toda 5 24 hom_ evex_' day or
by phone at 800.626.2002 during nomml business hom_.
J
Instructions contained in this manual cover procedures tobe performed by any user. Other servicing generally
should be referred to qualified service personnel. Cautionmust be exercised, since improper servicing may cause
unsafe operation.
ContactUs www.GEAppliances.com
If you are not satisfied with the service you receive ti'om (;E, contact us on our _.Vebsite with all the details
including your phone nHI/lbeI; ox" wxite to: General Managex; Customer Relations
GE Appliances, Appliance Park
I,ouisville, KY 40225
Register your new applim_ce on-lhle---at your convenience! Timel) product registration will allow for
l RegisterYourAppliance www.GEAppliances.com
' enhanced communication and prompt service under the terms of _our warranty should the need arise.
You may also mail in the pre-pxinted registration card included in the packing material.
_ Printed in China
 Loading...