

Page 1
©
Safety Instructions .......... 2, 3
Operating Instru_¢ions
Controls--Control ga_obs ..... 6, 7
Controls--Touch Pads ....... 4, 5
Care and Cleaning
Air Fiher ..................... 8
Batteries ..................... 8
Grille and Case ............... 8
Outdoor Coils ................ 8
Installation Instru_¢ions
Th rough-the-_A_dl
Installation--Optional ........ 15
Window Installation ......... 9-14
Troubleshooting Tips ........ 16
Normal ()perating Sounds ..... 16
ge.com
ASHIO
ASL08
Consumer Support
Consumer Support ........... 20
*Aarranty' .................... 19
Write the model and serial
numbers here:
Model #
Serial #
Find these numbers on a label on
the side ot the air con(litione_:
DB98-26702A 49-7566 02-07JR
Page 2

IMPORTANTSAFETYINFORMATION.
READALLINSTRUCTIONSBEFOREUSING.
WARNING!
For your safe_ the information in this manual must be followed to minimize the risk of fire, electric shock
or personal injury.
SAFETYPRECAUTIONS
Use dfis appliance only %r its intended
pull)ose as described in this Owner's
Manual.
This air conditioner must be properly
installed in accordance with the Installation
Instructions befbre it is used.
Nexex unplng your air conditioner by pulling
on the power cord. Always grip plug firefly
and pull straigtlt out flom the receptacle.
Replace immediately all electric service
cords flint haxe become flayed or otherwise
damaged. A damaged power supply cord
nmst be replaced with a new power supply
cord obtained flom the manutZacun_er and
not repaired. Do not use a cord that shows
cracks or abrasion damage along its length
or at eiflter the ping or connector end.
_{_:If file receptacle does not match the plug,
the receptacle must be changed out by a
qualified electrician,
_?{:_Tm_ d_e unit OFFand unplug your air
conditioner before cleaning.
_{:_(;E does not support any servicing of dm air
conditioner V_>strongly recommend that
you do not attempt to service the air
(:ondifioner yourself.
_{_For your safety...do not store or use
combustible materials, gasoline or other
flammable vapors or liquids in the vicinity
of this or any other appliance.
E:,:All air condiuoners contain refrigerants,
which under federal law must be remoxed
prior to product disposal. If you are getting
rid of an old product with refligerants, check
with the company handling disposal about
what to do.
HOWTOCONNECTELECTRICITY
Do not, under any circumstances, cut or remove
the third (ground) prong from the power cord.
For personal safety, this appliance must be
properly grounded.
DONOT use an adapterplug with this appliance.
The power cord of fllis appliance is equipped
with a 3-prong (grounding) ping which mates
with a standard 3-prong (grounding) wall
outlet m minimize the possibility of electric
shock hazard flom this appliance.
Power cord includes a cmTent intenupmr
device. A rest and reset button is provided on
the plug case. The device should be tesmd on a
periodic basis by first pressing the rESrbutton
and then tile RESErbutton. If the TESTbutmn
does not trip or if the RESETbutton will not
stay eng_ged, discontinue use of the air
conditioner and contact a qualified
service mchnician.
Haxe the wall outlet and circuit checked by
a qualified electrician to make sure the outlet
is properly grounded.
Where a 9q)rong wall oudet is encountered,
it is your personal responsibility and obligation
to haxe it replaced with a properly grounded
3-prong wall oudet.
The air conditioner should always be plugged
into its own indi_qdual electrical outlet which
has a xoltage rating that matches tile rating
plate.
This provides the best perfommnce and also
prments oxerloading house wiring circuits
which could cause a fire hazard flom
oxerheated wires.
See the Installation Instructions, Electrical
Requirementssection for specific electrical
connection requirements.
2
Page 3
WARNING!
USEOFEXTENSIONCORDS--115-Voltmodelsonly
ge.com
Because ofpotential safety hazards under certain
conditions, we strongly recommend against the
use of an extension cord.
Howex>t; if you must use an extension cord,
it is absolutely necessary that it be a UiAismd,
14 gauge, 3-wire grounding type appliance
extension cord having a grounding type plug
and outlet and flint tim electrical rating of file
cord be ] 5 amperes (minimum) and 195 x_lts.
CAUTION:
DO NOTuse an extension cord with any ofthe
230/208 voltmodels.
READANDFOLLOWTHISSAFETYINFORMATIONCAREFULLY.
SAVETHESEINSTRUCTIONS
Page 4
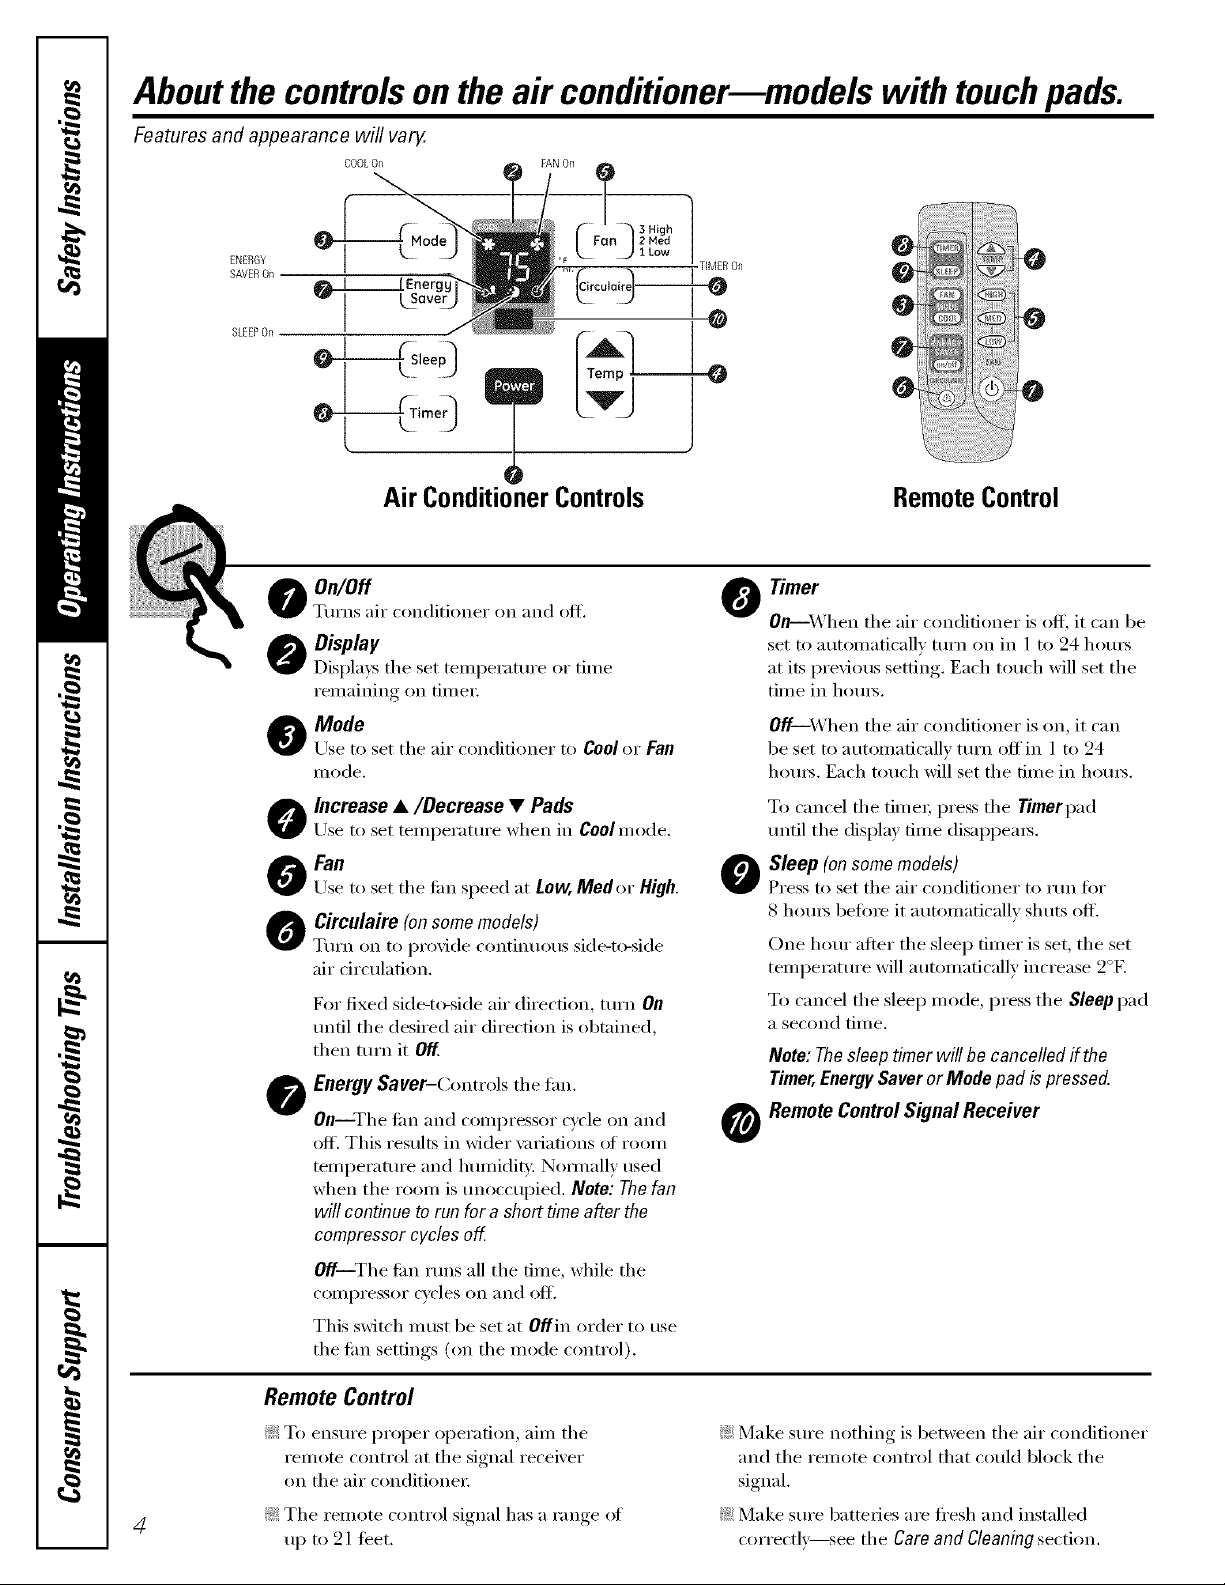
Aboutthe controlsonthe air conditionermmodels with touchpads.
Features and appearance will vary.
COOLOft
ENERGY
SAVEROn
SLEEPOn
Air ConditionerControls Remote Control
O On/Off
Turns air conditioner on and off.
@ Display
Displays the set telni)erature or tilne
remaining oil fimei:
Mode
@
Use to set the air conditioner to Cool or Fan
I/lo(le.
Increase •/Decrease • Pads
Use to set telni)erature when in Coolmode.
/an
Use to set the fire speed at Low,Medor High.
O Circulaire (onsomemodels)
Turn on to provide continuous side-to-side
air circulation.
For fixed side-to-side air direction, turn On
until the desired air direction is obtained,
then turn it 0_.
O EnergySaver-Coxmols the tim.
0n--The lilll aim comI)x'essox" cycle oil aim
off. This results in wider \miations (4 room
temperature and hunfidit,i. Normally used
when the rooln is unoccul)ied. Note:Thefan
will continueto runfor a short timeafterthe
compressorcyclesoff
Of/JThe filll rtlns all the dine, while the
COlili)i'essoi" cycles on and ()lJ.
This sMtch xnust be set at Offin order to use
the tim settings (oil the mode control).
O Timer
0niWhen the air conditioner is off; it can be
set to autolnatically turn on ill 1 to 24 houI_
at its I)revious setting. Each touch will set the
time in houls.
0f[J_{ hen the air conditioner is on, it can
be set to aUtolnafically turn off ill 1 to 24
hours. Each touch will set the dine ill houI_.
To cancel the tilneI; press the Timerpad
until the display time disappeaxs.
Sleep (on some models)
0
Press to set tile air conditioner to rtln fi)r
8 houI_ befin'e it autolnaticallv shuts off'.
One hour after the sleep tilner is set, the set
temi)erature will autolnaticallv increase 9°F.
To cancel the sleep inode, press the Sleep pad
a second tilne.
Note: Thesleeptimerwill be cancelledffthe
Timer,Energy Saver orMode padis pressed.
RemoteControlSignal Receiver
0
Remote Control
!i_:To ensure proper operation, aim the
remote control at the signal receixer
on the air conditioner
4
!i?:The remote control signal has a range of
up to 21 teet.
?_:Make sux'e xlothing is between the aix" conditioner
and the remote control that could block the
signal,
_: Make sure batteries are fl'esh and installed
correctly--see the Care and gleaning section.
Page 5
Additional controls and important information.
Do Not Operate in Freezing Outdoor Conditions
This cool-only air conditioner was not designed fi)r
fl'eezing outdoor conditions. It must not be used in
ti'eezing outdoor conditions.
When the air conditioner is turned on, # will
automatically start in the setting last used.
Power Outage Recovery Feature
In the case el a power outage or interrul)tion, the
refit will automatically re-start in the settings last
used atter the power is restored. The Timerand
CoolMode
g_com
Sleep ligatures will reset to the original setting.
_)u may need to set a new time if' desired.
Use the Cool mode with High (3),Med (2)or
Low (1)tma for cooling. Use the Increase • /
Decrease • pads to set the desired temperatm'e
between 64°F and 86°F in 1°F increments.
CoolingDescriptions
ForNormalCoolin#---Selectthe Coolmode
and High(3)(>rMed (2)tim with a middle set
temperature.
A them/ostat is used to maintain the room
temperature. The compressor will cycle on and off
to kee I) the room at the set level of comfi)rt. Set the
them_ostat at a lower nmnber and the indoor air
will become cooler Set the them_ostat at a higher
nuinber and the indoor air will becoine warnlei:
NOTE:Ifthe ak conditioneris offandis thenturnedon
whileset to Coolit will take approximately3 minutes for
thecompressorto startand coolingto begin.
ForMaximumCoolin{p---Selectthe Coolmode
and High(3)tim with a lower set temperature.
ForQuieter& Nighttime Coolino--Select the
Coolmode and Low(1)tim with a middle set
temperatm'e.
NOTE:Ifyou switch from a Coolsettingto Offor to
a fan setting,wait at least3 minutesbefore switching
back to aCoolsetting.
Fan Mode
Use the Fan at High (3), Med (2) or t0w (1) t(>pr(>vide Since tim only settings do not provide cooling,
air drculafion and filtering without cooling, a temperature setting will not be displayed.
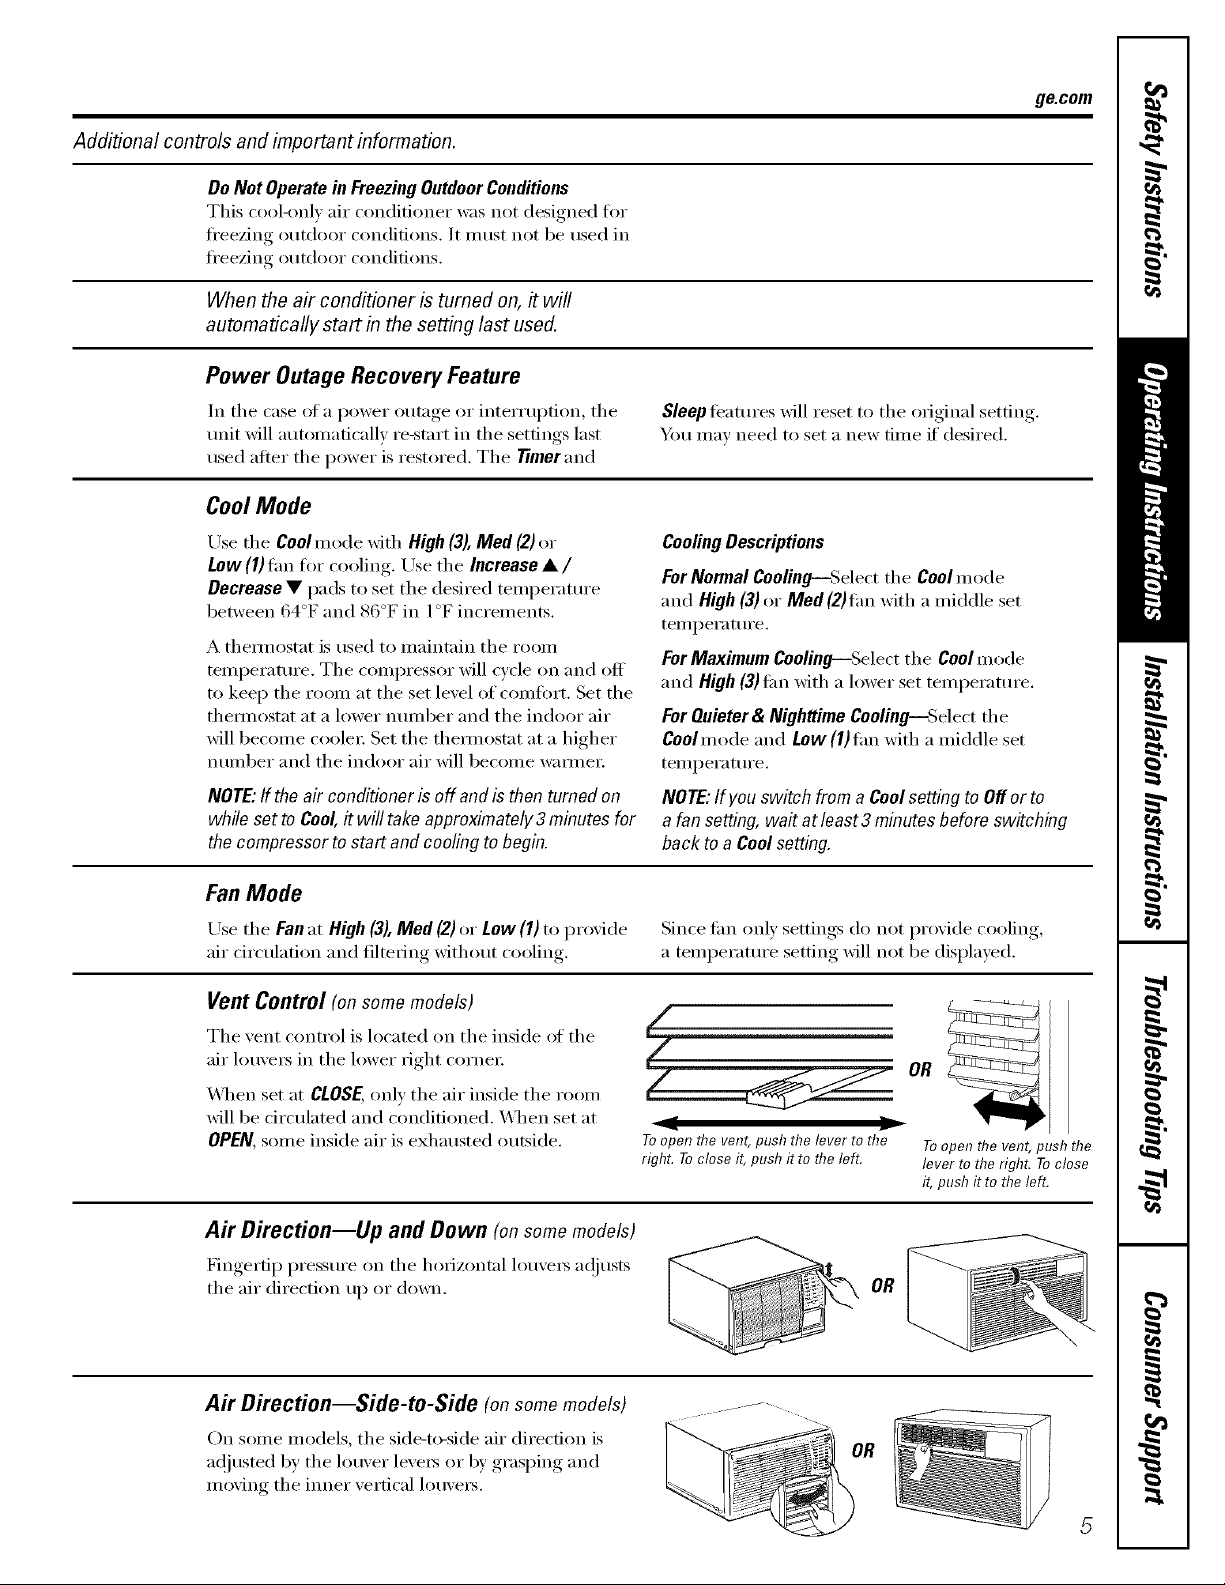
Vent Control (onsome models)
The vent control is located on the inside el the
air lot/\'ers in the lower right ('oi'nei-
_,_]_en set at CLOSE,only the air inside the room
will be circulated and conditioned. _,_q/en set at
OPEN,seine inside air is exhausted outside.
/
l
/
7
Toop_"enflTevent,pushthelevertoflT_
righLTocloseit,pushit to theleft.
OR
Toopen the vent, push the
lever to the righL Toclose
it, push it to the left.
Air Direction--Up and Down (on somemodels)
Fingertip pressm'e on the horizontal lou\'e_ a(!iusts
the air direction up or down.
Air Direction--Side-to-Side (onsomemodels)
On some models, the side-to-side air direction is
a(!justed by the louver leve_s or by grasping and
moving the inner vertical lou\'e_.
OR
J-" ----.
Page 6
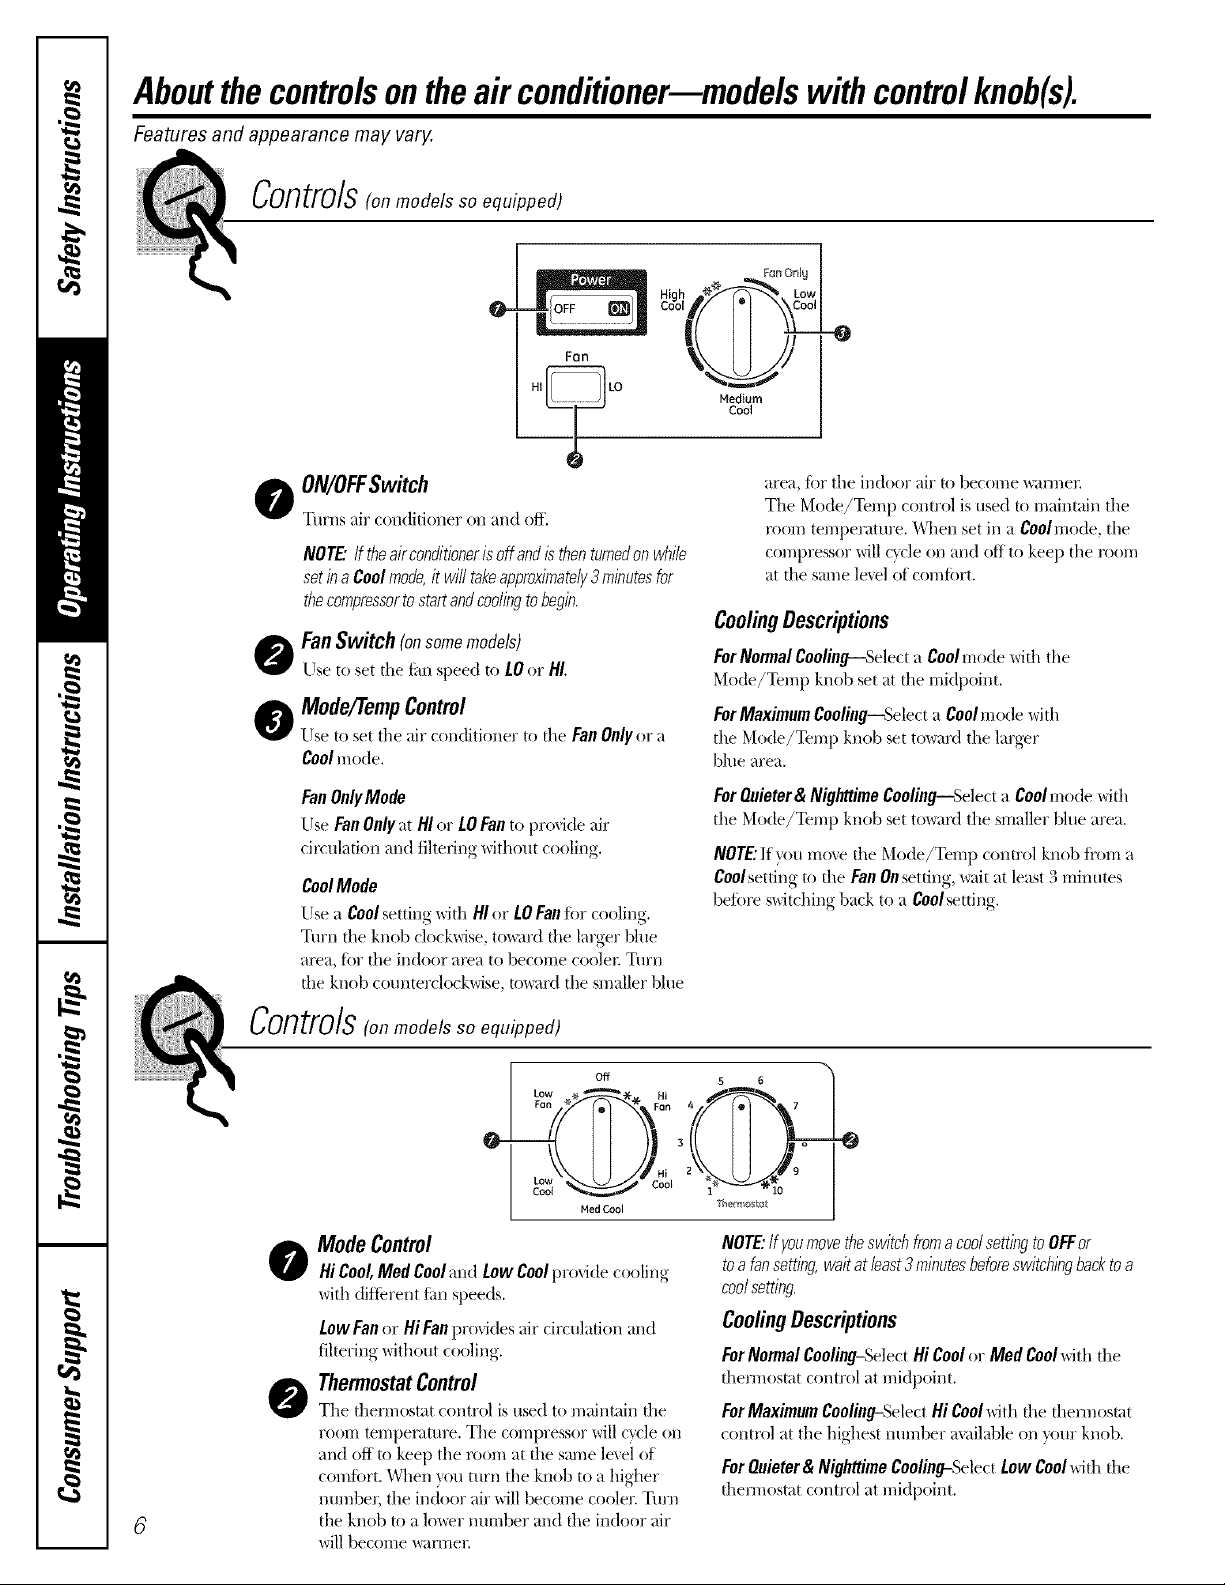
Aboutthecontrolsontheairconditioner--modelswithcontrolknob(s).
Features and appearance may vary.
Controls(o,models so equipped)
-0
.,LLCLo ,o_i_m
ON/OFFSwitch
0
Turns air conditioner on and off.
NOTE'.Iftheairconditlenerisoffandisthenturnedonwhile
setinaCoolmode,it willtakeapproximately3minutesfor
thecompressortostartandcoolingtobegin.
o FanSwitch(onsomemodels)
Use to set the tim speed to LOor HI.
O Mode/TempControl
Use to set the air conditioner to the FanOnly(: "a
Coolmode.
FanOnlyMode
UseFanOnlyatHIor LOFanto provide air
circulation and filtering _dthout cooling.
CoolMode
Use a Coolsetting with HIor LOFantor cooling.
Turn the knob clock\qse, toward the larger Nile
area, ior the indoor ax_a to become coolex: Turn
file knob counterclock\_ise, toward the smaller blue
Controls(o,modelssoequipped)
area, ti)r the indoor air to become _mnex:
T]_e Mode/Temp control is used to maintain the
room temperature. _,\l/en set in a Coolmode, the
compressor will (}cle on and off to keep the room
at the same le_.el of comtort.
CoolingDescriptions
ForNormalCooling--Select a Coolmode with the
Mode/Temp knob set at d_e midpoint.
ForMaximumCoolingiSelect a Coolmode with
the Mode/Temp knob set to_ard the larger
blue area.
ForOuieter& Nighttime CoolingISelect a Coolmode with
the Mode/Temp knob set toward the smaller blue area.
NOTE:If you mo_.e the Mode/Temp control knob ti'om a
Coolsetting to the Fan0nsetting, wait it le _st _)mm to,
befiwe s_dtching back to a Coolsetting.
) ' S,
0-
o ModeControl
Hi Cool,Med Cooland LowCoolprovide coolino
with ditterent Jim speeds.
LowFanor HiFan proddes _dr circulation and
filtering without cooling.
ThermostatControl
0
The thermostat control is used to maintain the
room temperature. The compressor will ctcle on
and off to keep the room at the same level of
comfort. When you turn the knob to a higher
mm_be_; the in(ioor air will become cooler Turn
the knob to a lo_w" nm-nber and the indoor air
will become _u'rner
Off 5 6
-@
Ned Cool Th÷rt_ o_tet
NOTE:IfyoumovetheswitchfromacoolsettingtoOFFor
toa fansetting,waitat least3minutesbeforeswitchingbacktoa
coolsetting.
CoolingDescriptions
ForNormalCooling_SdectHiCoolor Med Coolwith d_e
them_ostat control at midpoint.
ForMaximumCooling-Select Hi Coolwith the them_ostat
contxxd at the highest munber available on your knob.
ForQuieter& NighttimeCooling-Select Low Cool with the
thermostat control at midpoint.
Page 7

Additional controls and important information.
Do Not Operate in Freezing Outdoor Conditions
This cool-only air conditioner was not designed fi)r
ti'eezing outdoor conditions. It must not be used in
ti'eezing outdoor conditions.
Vent Control (onsome models)
The vent control is located on the inside of the air
lou\'e_ in the lower fight corne_:
\._]_en set at CLOSE,only the air inside the room
will be circulated and conditioned. _,\]_en set at
OPEN,some inside air is exhausted outside.
Air Direction--Side-to-Side
On some models, the side-t_vside air direction is
ac!iusted b) the louver lex e_ or 1)_,,grasI)ing, and
moxino the inner xertical loux e_.
z-
l
l !
Toop_'enthe vent,push the lever to the
right. Toclose it, push it to flTeleft.
ge.com
Toopen the vent, push the
lever to flTeright. Toclose
it, push it to flTeleft.
.... OR
Air Oirection--Up and Oown (onsomemodels)
Fingertip pressure on the hoiizontal louve_ ac!iusts
the air direction up or down.
OR
7
Page 8

Careand cleaning of theair conditioner.
How to Insert the Batteries
] Remove the battery cover by sliding it
according to the arrow direction.
] Insert new batteries, making sure that the (+)
and (-) of battery are installed correctly:
] Reattach the coxer b) sliding it back
into position.
Grille and Case
Tm'n the air conditioner oiI and remo_e the
plug fl'om the wall outlet before cleanin ,
OutdoorCoils
The coils on the outdoor side of the air conditioner
should be checked regularly. If they are clogged
with dirt or soot, they may be proti_ssionally
cleaned.
NOTES:
::Ji::Use 2 "_k" ( 1.5 volt) batteries. Do not use
recha_geable batteries.
::Ji::Reinove the batteries fl'oIn the reInote control if'
the svstenl is not going to be used tor a long tilne.
To clean, use water and a mild deteroent
Do not use bleach or abrasives.
Air Filter
The air filter behind the fi'ont g_lle should be
checked and cleaned at least ever_ 30 days or
I/lore often if Ilecess;irv,
Clean the filter with _:mn, soapy _:lter_ Rinse and
let the filter (h)' befbre replacing it.
CAUTiON:DoNoropera ea,>
conditionerwithouta filterbecausedirtaM hbtwi//clogit
and reduce perfornTance
To gemove:
Grabthetabson
thefilter andpull
it upandout
8
Page 9

Installation
Air Conditioner
Instructions
I _-_ Questions? Call 800.GE.CARES (800.432.2737) or Visit our Website at: ge.com I
BEFORE YOU BEGIN
Read these instructions completely
and carefully,
• IMPORTANT - Savethese
instructions for local inspector's use.
• IMPORTANT - Observeall
governing codes and ordinances.
• Note to Installer - Be sure to leave these
instructions with the Consumer.
• Note to Consumer - Keep these
instructions for future reference.
• Skill level - Installation of this appliance
requires basic mechanical skills.
• Completion time - Approximately 1 hour
• We recommend that two people install
this product.
• Proper installation is the responsibility
of the installer.
• Product failure due to improper installation
is not covered under the Warranty.
• You MUST use all supplied parts and use
proper installation procedures as described
in these instructions when installing this air
conditioner.
CAUTION:
Do not, under any circumstances, cut or
remove the third (ground) prong from the
power cord.
Do not change the plug on the power cord
of this air conditioner.
Aluminum house wiring may present special
problems--consult a qualified electrician.
Do not install this air conditioner in a
window if the type C bolts do not contact
the window sill. See the Window Installation
Instructions in this manual.
TOOLS YOU WILL NEED
Phillips head screwdriver
Adjustable wrench
ELECTRICAL REQUIREMENTS
(_ Some models require a 115/120-volt a.c.,
The 3-prong grounding plug minimizes the
possibility of electric shock hazard. If the wall
outlet you plan to use is only a 2-prong outlet,
it is your responsibility to have it replaced with
a properly grounded 3-prong wall outlet.
©
60 Hz grounded outlet protected with a
15-amp time delay fuse or circuit breaker.
Some models require 230/208-volt a.c.,
protected with a time delay fuse or circuit
breaker. These models should be installed
on their own single branch circuit for
best performance and to prevent
overloading house or apartment wiring
circuits, which could cause a possible
fire hazard from overheating wires.
Pencil
Level Scissors or knife
Power cord includes a current interrupter
device. A test and reset button is provided on
the plug case. The device should be tested on a
periodic basis by first pressing the TEST button
and then the RESET button. If the TEST button
does not trip or if the RESET button will not stay
engaged, discontinue use of the air conditioner
and contact a qualified service technician.
Ruler or tape measure
Page 10

Window Installation Instructions
PARTS INCLUDED
(appearance may vary)
Left
accordion
panel
Window
__ ,j sashseo,
Top mounting rail
wiF_awm ;°Pke_
mounting rail
seal strip
o
Bottom inner
case gasket
Right
accordion
panel
Type A (18 or 19)
1/2" screws
Type B (8) Type C
3/4" screws bolt (2)
10
Security bracket (1)
&
Page 11

Window Installation instructions
[] WINDOW REQUIREMENTS
• These instructions are for a standard
double-hung window. You will need to
modify them for other types of windows.
• All supporting parts must be secured
to firm wood, masonry or metal.
• The electrical outlet must be within
reach of the power cord.
l J
B===8
24¾" to 36"
(With accordion panels)
14¾" min.
STORM WINDOW REQUIREMENTS
[]
A storm window frame will not allow the
air conditioner to tilt toward the outside,
and will keep it from draining properly.
To adjust for this, attach a piece of wood
to the stool.
WOOD PIECES-
WIDTH: 2"
LENGTH: Long enough to fit inside the
window frame.
THICKNESS: To determine the thickness,
place a piece of wood on the stool to
make it 1/2" higher than the top of the
storm window frame or the vinyl frame.
Attach securely with nails or screws
provided by the installer.
1/2" higher
than vinyl frame
f
1/2" higher f_
than storm T P _'J_J_ JJ/._
window _-rl _t II i1.. /,,_
frame __ [__
Storm window/" _ Vinyl frame I I
frame m .... , , ,
L (on some windows)
/
!1
v -Wood
.. ii/I_ JStool
REMOVE THE FRONT GRILLE
[]
(IFATTACHED)
[]
Remove shipping tape, if present.
On models with a
raise-up inlet grille,
lift it and remove
the screw behind it
(if present) that holds
the grille in place.
On models with a
slide-out air filter,
remove it and the
screw behind it
(if present) that holds
the grille in place.
[]
Gently but firmly grasp
the lower grille corners,
press in on the case
sides and pull forward
to release.
NOTE: Do not pull the
bottom edge toward
you more than 3" or
you may damage the tabs of the grille,
Lift the grille up and off the top tabs.
[]
11
Page 12

Window Installation Instructions
[] REMOVE THE AIR CONDITIONER
FROM THE CASE
[] Remove the 2 or 4 screws (depending on
model) on each side of the case. Keep the
2 front-side screws for later use.
Front of air conditioner
[] Slide the air conditioner from the case by
gripping the base pan handle and pulling
forward while bracing the case.
[] PREPARE THE CASE
[] Remove the backing from the top mounting
rail seal strip and attach it to the bottom of
the top mounting rail. Cut to size.
[] Install the top mounting rail with 4 or 5 type
A screws (depending on the number of
holes in the top mounting rail) from the
outside of the case.
Top mounting rail
Front of air conditioner
Remove packing cardboard and tape,
if present.
Bottom mounting rail
[] Insert the frames for the accordion panels
into the top and bottom mounting rails.
Attach the accordion panels to the side
of the case using 6 type A screws.
Top mounting rail
Accordion
panel
screws
BACK
Bottom mounting rail
12
Page 13

Window Installation instructions
[] INSTALL THE CASE
IN THE WINDOW
[] Cut the window sash seal to the window
width and stick the adhesive side to the
bottom of the sash.
Window sill
Window sash seal
[] Thread two type C bolts into the support
brackets.
Slide the case into the window and lower
the window behind the top mounting rail,
Position the brackets on the case bottom so
they will be near the outermost point on the
window sill, Attach the support brackets to
each side of the case bottom using 4 type A
screws on each side. Adjust the leveling
bolts to touch the sill.
[] INSTALL THE CASE
IN THE WINDOW (cont.)
[] Locate the 7 screw holes along the bottom
front edge of the case. Center the case, side-
to-side, in the window and mount it to the
window sill using 3 type B screws staggered
in the front and back rows if possible.
Top mounting rail
TcYPewBt Type B
Type B screws
[] Extend the left and right accordion panels to
the vertical window sashes and attach with
4 type B screws.
screws
[] INSTALL THE SECURITY
BRACKET AND THE FOAM TOP
WINDOW GASKET
.Type A screws
m
Window sill --
'_Type C bolts
CAUTION: Do not install this air
conditioner in a window if the type C bolts
do not contact the window sill.
[] Attach the security bracket with a type B
screw.
[] Cut the foam top window gasket to the
window width.
[] Stuff the foam between the glass and the
window to prevent air and insects from
getting into the room.
13
Page 14

Window Installation instructions
[] INSTALL THE AIR CONDITIONER
IN THE CASE
[] Slide the air conditioner into the case.
Reinstall the 2 front-side screws removed
earlier on each side of the case.
[] Place the bottom inner case gasket between
the bottom of the air conditioner and the
inside bottom of the case. Fold up the ends
on both sides and push them in.
Front of air Bottom inner
conditioner case gasket
[] Attach the front grille to the case by inserting
the tabs on the grille into the slots on the
front of the case. Push the grille in until it
snaps into place.
Guide the lever
carefully through the
grille as you push it in.
[] Secure the front grille to the case by
replacing the screw removed in Step 3.
Caulk or weather-strip any gaps or
openings to the outside to seal the
installation.
The installation is now complete.
14
Page 15

Through-the-Wall Installation InstructionsmOptional
The case may be installed through-the-wall
in both existing and new construction.
Read completely, then follow step-by-step.
NOTE: Obtain all materials locally for
mounting the air conditioner through-
the-wall.
[] IMPORTANT
Through-the-wall installation is not
appropriate if any of the side or top louvers
in the case will be obstructed by the wall.
All side and top louvers in the case must
project on the outdoor side of the wall.
The room side of the case must project
into the room far enough to maximize the
balance of the unit.
The case must be installed level from side-
to-side and with a slight tilt from front to
rear. Use a level; no more than a 1/2 bubble
will be the correct case slant to the outside.
Lintel angle is required to support bricks or
blocks above opening.
Flashing is required and should extend the
length of the opening to ensure no inside
cavity leakage occurs.
Remove the air conditioner from the case.
[]
For specific instruction, refer to the Window
Installation Instructions.
[]
Make certain that a wall receptacle is
available close to the hole location or make
arrangements to install a receptacle.
i .......
i = ...........
=.............
[] IMPORTANT (cont.)
[] Secure with 14 wood screws anchored at
least an inch into the wall support structure.
NOTE: Drill pilot holes, if necessary, for
proper installation. If the frame is oversized,
use shims to prevent case distortion.
[] FINISH THE WALL OPENING
[] Caulk all four sides on the outdoor side of
the case to prevent moisture from getting
through to the interior wall. Use of flashing
(drip rail) will further prevent water from
dripping inside the wall and down the
outside of the building.
Plaster line
Lintel angle
Caulking Trim molding
OUTSIDE !-
Air louvers
(top and /
sides must
project on the
outdoor side
of the wall)
Wood filler and
caulking (above
and below the
flashing)
Flashing
(Drip rail)
Bottom
rail
(if desired)
INSIDE
Bottom rail
J
= =
[] Place the case in the wall opening and
place wood support strips between the case
bottom and the flashing on both sides of the
bottom rail, They should be the same height
as the bottom rail and the same length as
the wall opening.
Flashing
(Drip rail)
Wood support strips
[] Place the air conditioner into the case.
For specific instruction, refer to the Window
Installation Instructions.
Page 16

Troubleshootingtips...
Possible Causes What ToDo
Airconditioner
doesnotstart
Airconditioner does Airflow is resMcted. • Make sure there are no curtains, blinds or flmlitule
not cool as it should blocking tile fi'(mt of tile ;fir c()n(fiti(mec
Airconditioner Ice blocks the air flow • On models wiflt control knobs, set tile mode control
freezing up and stops the airconditioner at HighFan or High Cool\\ith the temp at Ior 2.
Theremotecontrolis The batteries are htserted • Check rite position of tile batteries. They shoukl be
The air conditioner
is tmplugged.
The fuse is bloval/circuit • Check file house fltse/circuit bx_aker box and replace
breaker is tripped, tile fltse or reset tile breaker.
Power failure. • If t)o_er fifilure occm_, turn tile ;fir con(fitioner Off.
The current interrupter • Press tile Reset button located on rite power cord plug.
device is Wipped. • If the Reset button will not stay eng_|ged, discontinue
The temp conWol may • On models with toucIt pads: Ilk Cool mode, press the
not be set correctly. Decrease• pad.
The air Fdteris dirty. • Clean tile tilter at least eveFv30 dm\s.
The room may have been hot. • When rite air conditioner is first turned on, you need
Cold air is escaping. • Check fin"open tin'hate registers and cold air returns.
Cooling coils have iced up. • See "Air conditionerfreezingup"bel(m.
from cooling the room. • Oil ntodels \_ith touc]t pads, set the controls at
• Make sure tile air conditioner plug is pushed
corr@etely into tile outlet.
When po_er is restored, \_;fit 3 minutes to restart tile
air conditioner to prevent tripping of tile compressor
o_erload.
use of tile ;fir conditioner and contact a qu;flified
service technician.
• On models wiflt control knobs, turn rite temperature
knob to a higher nurrtbel:
See the OperatingInstructiotis secti(;n.
to allo\x time for tile room to cool dox_al.
• Set tile air conditioner's vent to the closed position.
HighFanor High Cooland set tile thermostat to
a higher temperature.
networking incorrectly, inserted ilkthe opposite (+) and (-) direction.
The batteries may be dead. • Replace the batteries.
Waterdripsoutside Hot, humid weather. • This is normal.
Waterdripsindoors The air conditioner is not • For proper \_ater disposal, make sure the air conditioner
tilted to the outside, slants slightl} fi'om rite case fl'ol/t to file real:
Watercollects in Moisture removed from air • This is n(mnal for a short period ill areas \_ith little
basepan and drains into base pan. humidil); normal fi,r a longer period ilk\er\ humid areas.
"El"appears Fmlcfion error code. • U/lphlg tile air c(/nditiol/er. Wait 3 I//il/tltes al/d plug it
in thedisplay back in.
Timer or Sleep feature A power outage or interruption • Ilk tile case of a power outage or interruption, the unit
notworkingproperly occurred. Timerand Sleepfeatures \_il] reset to the original setting.
_bu may need to set a ne\_ tittle if desired.
Normal Operating Sounds
::Ji::You may hear a pinging noise caused 1)y
water 1)eing picked up and thrown against the
condenser on rainy days or when the humidiP,'
is high. This design teature helps remove
moistm'e and improve efficiency.
/8
::Ji::You may hear the them/ostat click when the
compressor c'ycles on and off.
::Ji::X_ater will collect in the base pan during
high humidity or on rainy days. The water
may overflow and drip fl'om the outdoor side
of the unit.
_: Tile [illl ll/_:lV rill) evell whell tile COll/pI'essor
does ilOt,
Page 17

Notes.
ge.com
I
m
I
m
m
17
Page 18

m
_ Notes.
r_
a
m
m
Q_
18
Page 19

GEAir ConditionerWarranty--One YearLimitedWarranty.
Staple your receipt here.
Proofof the original purchase date
is needed to make a warranty claim.
We Will Replace:
Replacement un#fin any product which fifils due to a defect in materials or workmanship.
From the date of the The exchange unit is warranted fin" the remainder of xotu" i)roduct's original one-year
originalpurchase "warraub perh)d.
::Ji::Properly pack your unit. We recommend using the
original caxton mad packing materials.
_: Return the product to the retail location where it
was purchased.
iJi::Customer instruction. This owner's mmmaJ provides
information regarding operating instructions mad
user controls.
iJi::hnproper h_staJlation. If you have an installation problem,
or if the air conditioner is of improper cooling capacity
for the intended use, contact your dealer or hlstaller.
You axe responsible for providing adequate electrical
cmmecth_g facilities.
::Ji::Failure of the product resttlth_g from modifications to
the product or due to mlreasonable use including failure
to provide reasonable m_d necessary mah_tenm_ce.
iJi::Include in the package a copy of the sales receipt or other
evidence of date of original purchase. Also print your
nmne mad address m_d a description of the defect.
iJi::Replacement of house fuses or resetting of circuit
breakers.
iJi::Damage to the product caused by hnproper power supply
voltage, accident, fire, floods or acts of God.
!i?:Incidental or consequential damage caused by possible
defects with this air conditioner.
EXCLUSION OF IMPLIED WARRANTIES--Your sole and exclusive remedy is product exchange as provided in
this Limited Warranty. Any implied warranties, including the implied warranties of merchantability or fitness
for a particular purpose, are limited to one year or the shortest period allowed by law.
This warranty is extended to the original purchaser and any succeeding owner for products purchased for home
use within the USA.
Some states do not allow the exclusion or limitation of incidental or consequential damages. This warranty gives
you specific legal rights, and you may also have other rights which vary from state to state. Toknow what your
legal rights are, consult your local or state consumer affairs office or your state's Attorney General.
Exclusion of implied warranties: Except where prohibited or restricted by law, there are no warranties, whether
express, oral or statutory which extend beyond the description on the face hereof, including specifically the
implied warranties of merchantability or fitness for a particular purpose.
Warrantor: General Electric Company. Louisville, KY 40225
/9
Page 20

ConsumerSupport.
Haxe a question or need assistance with your appliance? Try the (;E Appliances _4'ebsite 24 hom_ a day
q gEAppliancesWebsite ge.com
' any day of the xear'. For greater comenience and taster service, you can now download Owner's Manuals,
or exert order parts on-line.
RealLifeDesignStudio ge.com
GE supports the Universal Design concept--products, services and environments that can be used by
people of all ages, sizes and capabilities. We recognize the need to design lot a wide range of physical
and mental abilities and impaim_ents. For details of GE's Universal Design applications, including kitchen
design ideas fin" people with disabilities, check out our Website today. For the headng impaired, please call
800.TDD.GEAC (800.833.4322).
PartsandAccessories
Individuals qualified m se_'ice their own appliances can have parts or accessories sent directly to their
homes (VISA, MasterCard and Discover cards are accepted). Order on-line today, 24 hours evet-v day or
by phone at 800.626.2002 dudng nomml business hours.
Instructions contained in this manual cover procedures to be performed byany user. GEdoes not support
any servicing of the air conditioner. We stronglyrecommend that you do not attempt to service the air
conditioner yourself.
ContactUs
If you are not satistied with the service w)u receive fl'om (;E, contact us on our X&'ebsite with all the details
including your phone ntlI/lbeI; oI" write to: General Manager; Customer Relations
GE Appliances, Appliance Park
I,ouisville, KY 40225
ge.com
ge.com
20 Printed in China
 Loading...