

GE ASH12ACS1, ASH10ABS1, ASH08FCS1, ASH08FAS1 Owner’s Manual

©
GEAppliances.com
Safety Instructions .......... 2, :_
Operating Instructions
Controls-Control I_mbs ...... 6, 7
Controls-Touch Pads ........ 4, 5
Care and Cleaning
Air Filter ..................... 8
Batteries ..................... 8
Grille and Case ............... 8
Outdoor Coils ................ 8
Instagation Instructions
Through-the-Wall
Installation-Optional ......... 15
Window Installation ......... 9-14
Troubleshooting Tips ........ 16
Normal Operating Sounds ..... 16
ASH08
ASW08
ASH10
ASWIO
ASH12
ASW12
Consumer Support
Consuiner Support .... t_ack Cover
Product Regiswation ....... 17, 18
Warranty .................... 19
Writethemodelandserial numbershere:
Model #
Serial #
Find tbese numbers on a label on the
side of the air conditioner.
49-7424 11-01JR

IMPORTANTSAFETYINFORMATION.
READALLINSTRUCTIONSBEFOREUSING.
A WARNING!
For your safe_ the information in this manual must be followed to minimize the risk of fire, electric shock
or personal injury.
SAFETYPRECAUTIONS
Use this appliance only/br its intended
purpose as described in this Owner's
Manual.
N Turn tim mode control OFFand unplug
your air conditioner beIbre making _y
repairs or cleaning.
N This air conditioner must be properly
installed in accm_lance with tim Installation
Insmlctions beIbre it is used.
N Never unplug your air conditioner by"pulling
on the power cord. Mways grip plug firefly
and pull swaight out from the receptacle.
N Repair or replace iinmediately all electric
service coMs fllat have become flayed or
othe*_vise daan_ed. Do not use a cord
tllat shows cracks or ablmion damage
along its length or at either tim plug or
connector end.
@ For your sMety...do not store or use
HOWTOCONNECTELECTRICITY
Do not, under any circumstances, cut or remove
the third (ground) prong from the power cord. For
personal safe_ this appliance must be properly
grounded.
Tile power cor*l of tiffs appliance is equipped
with a 3-prong (grounding) plug which mates
with a standard 3-prong (grounding) wall
outlet m minimize the possibility of electric
shock hazard from this appliance.
Have the wall outlet and circuit checked by
a qualified electrician m make sure tim outlet
is properly" grounded,
The air conditioner should always be plugged
into its own individual electrical outlet
which has a voltage rating that matches the
rating plate.
This provides tim best performance and also
prevents overloading house wMng circuits
which could cause a fire hazard from
overheated wires.
See tim Installation Instructions, Electrical
Requirements section t:or spedfic electrical
connection requirement_s.
NOTE:We strongly recommend that any
selwicing be pertbrmed by a qualified
individual.
combustible mamrials, gasoline or other
flammable vapors or liquids in the vicinity
of tiffs or any otlmr appliance.
Where a 2-prong wall outlet is encounmred,
it is your personal responsibility and obligation
m have it replaced wit1 a properly grounded
.'gprong wall outlet.
2

it WARNING!
USEOFEXTENSIONCORDS-77&Voltmodelsonly
GEAppliances.com
Because of potential safety hazards under certain
conditions, we strongly recommend against the
use of an extension cord.
However; if"you inust use an extension COIII,
it is absolumly necessary that it be a ULlismd,
14 gauge, .%wire grounding type appliance
extension cord having a grounding type plug
and outlet arid that the electiical rating of the
cor_l be 15 amperes (mininnun) arid 125 volts.
_, CAUtiON:
DO NOT usean extension cord with any of the
230/208 volt models.
USEOFADAPTERPLUGS-715-Voltmodelsonly
Because of potential safety hazards under certain
conditions, we strongly recommend against the
use of an adapter plug.
Howexe,; if you must use an adapter, where
local codes pemfit, a temporaryconnection may
be made to a properly grounded 2-prong wall
outlet by use of a UL-listed adapter available at
most local hardvrare stores.
The larger slot in die adapter mttst be
aligned widi the larger slot in Hie wall outlet
m provide proper polarity in the connection
of the power coM.
When disconnecting file power cord from die
adapm*; always hold the adapter in place widi
one hand while pulling the power cord plug
widi the other hand. If dfis is not done, the
Mapter ground terminal is ve*y likely to break
widi repeated use.
If the adapter ground terininal breaks, DO NOT
USE dm air conditioner until a proper ground
has been established.
Attachingtheadapterground terminalto a wall outlet
coverscrewdoesnot groundtheapplianceunlessthe
coverscrewis metal, not insulated,andthewaft outlet
isgroundedthroughthehousewiring. Youshouldhave
thecircuitcheckedbyaquafifiedelectricianto make
surethe outlet isproperlygrounded
READANDFOLLOWTHISSAFETYINFORMATIONCAREFULLY.
SAVETHESEINSTRUCTIONS
3

Aboutthecontrolsontheair conditioner-modelswith touchpads.
Features and appearance will varg.
AirConditionerControls RemoteControl
ON/OFF
hrns air conditioner on and off.
_| Display
PShows the set temperature, time remaining
on timer or iCanspeed (FI-LOW, FZ-MEOor
F3-HIGH).
O MODE
Use to set the air conditioner to COOL or
FANmode.
G| Increase •/Decrease • Pads
FUse to set temperature when in COOLmode.
_i FAN
FUse to set the fan speed to LOW(F1),MED(F2)
or HIGH(F3).
Remote Control
/_;5To ensure proper operation, aim the
remote control at the signal receiver
on the air conditioner.
/}55The remote control signal has a range of
up to 21 R'et.
O TIMER
ON-When the air conditioner is off, it can be
set to m]tomatically turn on in 1 to 12 hours
at its previous setting. Each touch will set the
time in hours.
0R:-When the air conditioner is on, it can
be set to automatically turn offin 1 to 19
hours. Each touch will set the time in hours.
To cancel the timm; press the TIMERpad
until the display time disappears.
RemoteControlSignal Receiver
0
_ Make sure nothing is between the air
conditioner and the remote control that
could block the signal.
_ Make sure batteries are fresh and installed
correctly--see the Careand Cleaningsection.
4
GEAppliances.com
When the air conditioner is turned on, it will Lights next to the touch pads on the air conditioner
automatically start in the setting last used. control panel indicate the selected settings.
COOL Mode
Use the COOLmode widl HIGH(F3),MED (F2)or
LOW (F1)fan for cooling. Use the INCREASE •/
DECREASEV pads to set the desired temperature
between 64°F and 86°F in 1°F increments.
A thermostat is used to maintain the room
temperature. 'i11e compressor will cycle on and off
to keep the room at the set level of comfort. Set the
thermostat at a lower number and the indoor air
will become cooler. Set the thermostat at a higher
number and tim indoor air will bccome w-armen
NOTE:If theair conditioneris offandis thentumed on
whileset to COOL,ff will takeapproximately3 minutes
for the compressorto start andcoolingtobegin.
FAN Mode
Use the FAN at HIGH (F3), MED (F2)or LOW (F1)to
provide air circula6on and filtering without cooling.
Since fan only" settings do not provide cooling, a
temperature setting will not be displayed.
VentControl
_ilae vent control is located on the inside of the
air louvers in the lower right corner.
When set at CLOSE,only"the air inside the room
will be circulated and conditioned. When set at
OPEN,some inside air is exhausted outside.
CoolingDescriptions
ForNormal Cooling- Select the COOLmode and
HIGH(F3)or MED(F2)tan wida a middle set
temperature.
For Maximum Cooling - Select the COOL mode
mad HIGH(F3) Fan with a lower set temperature.
ForQuieter& NighttimeCooling-Select the
COOLmode and LOW(F1)fan with a middle set
temperature.
NOTE:ff youswitch froma COOLsetting to OFFerto
a fan setting,wait at least3 minutesbeforeswitching
back to aCOOLsetting.
I f
t/"
v
Toopen the vent, push the lever to the right,
Toclose it, push it to the left.
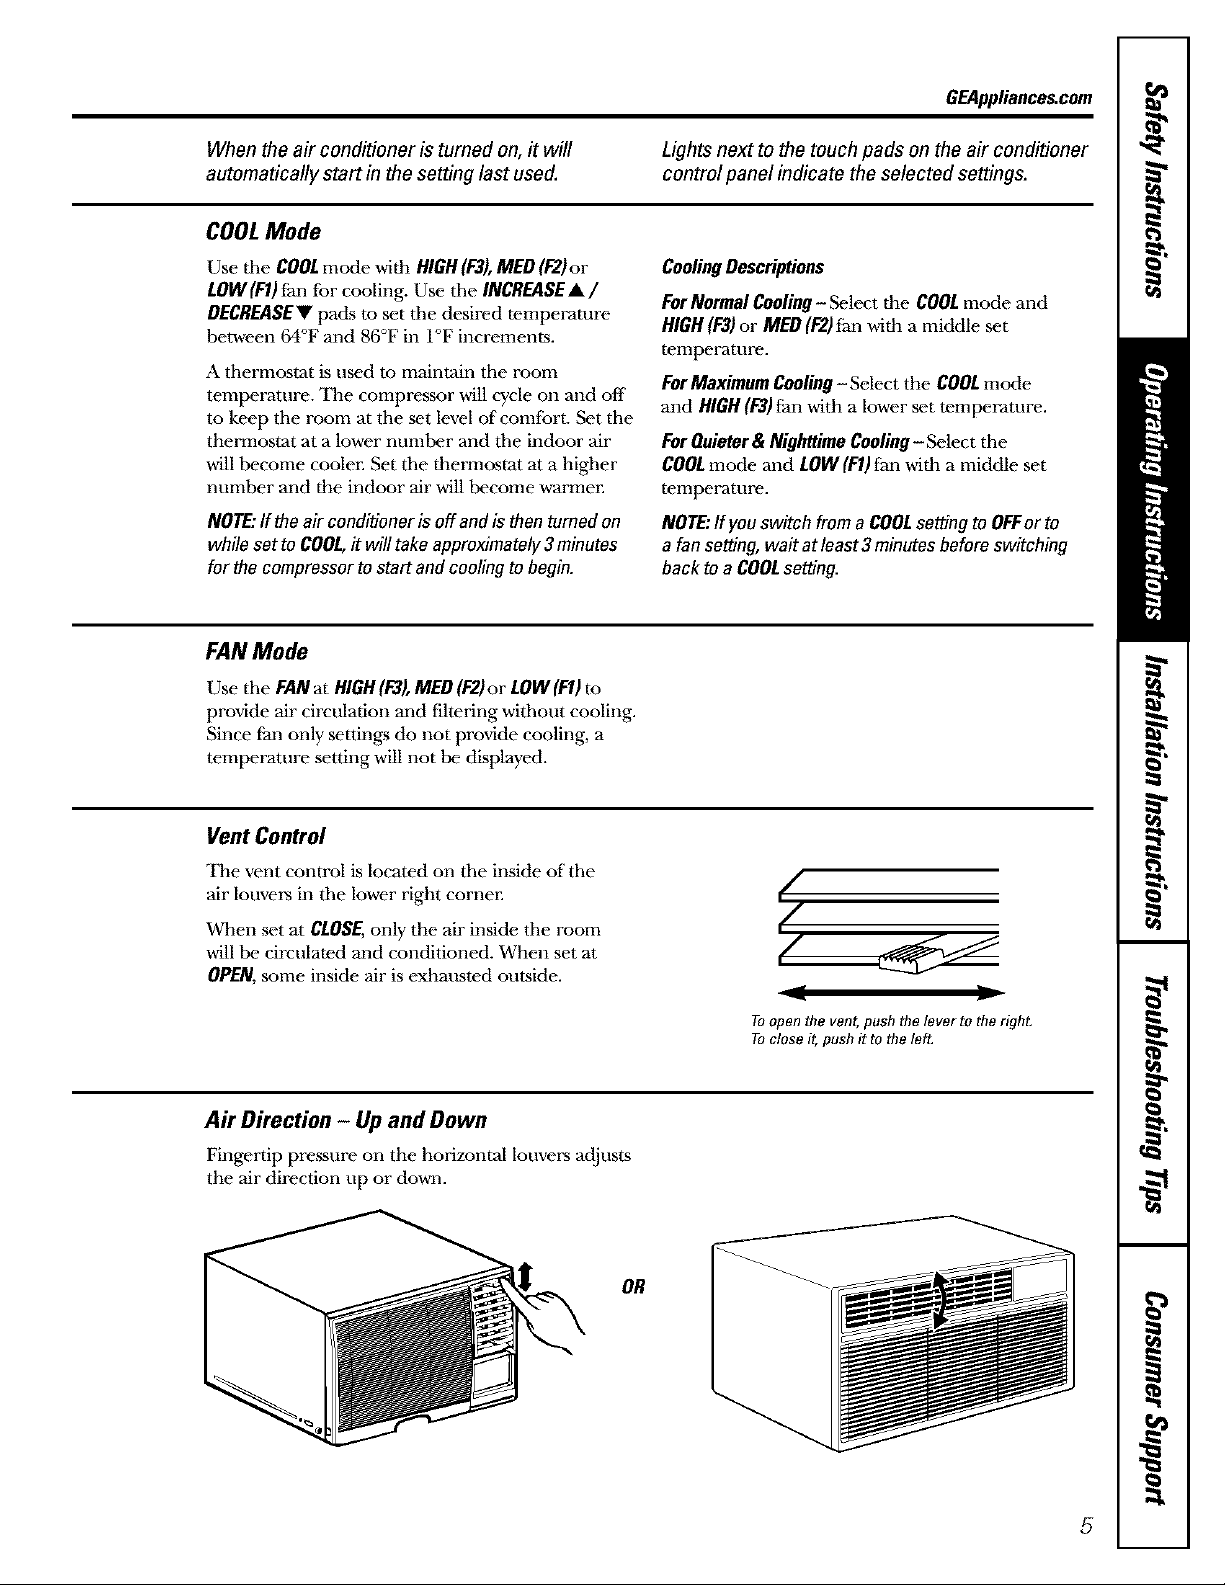
Air Direction - Up and Down
Fingertip pressure on the horizontal louvers adjusts
the air direction up or down.
OR
5

Aboutthecontrolsontheair conditioner-modelswith controlknobs.
Features and appearance will vary.
LOW OFF HI
FAN FAN
LOWQ£I
COO 0L
MED COOL
32 _ 2 7 2 5
I'o1['' e l['ol
OFF
FAN COOL
HIGHQHIGH
LOW IMED
FAN COOL
LOW
COOL
O MODECONTROLS
Yourmodel will have one of the above type controls.
O TEMPCONTROLS
Your model will have one of the above type controls.
OFF
FAN OOL
"'0 :"'
LOW .OW
FAN COOL
Controls
o Mode Controls
HIGHCOOLMEDCOOLand LOWCOOLprovide @
cooling with different thn speeds.
LOW/AN or HIGH FAN provides air circulation
and filtering without cooling.
NOTE:If youmovetheswitchfroma coolsettingtoOFFor
toa fansetting,waitat least3minutesbeforeswitchingback
toacoolsetting.
Cooling Descriptions
ForNormal Cooling- Select HIGHCOOLor MED
COOLwith the temp control at midpoint.
For Maximum Cooling- Select HIGH COOL with the
temp control at the highest number available on
your knob.
ForQuieter& NighttimeCoofing- Select LOWCOOL
with the temp control at midpoint.
TempControls
The temp control is used m maintain the
room temperanlre. _lZqecompressor will cycle
on and off to keep the room at the same
level of comfort. When you turn the knob to
a higher number the indoor air will become
cooler. '11ml the knob m a lower immber mid
the indoor air will become warmen
6
 Loading...