

GE Appliances PT925 Owner's Manual
0
0
om
4.J
0
0
0
0
ol
0
E
0
ol
GEAppliances.com
Safety Instructions .............. 2-4
Operating Instructions
Broiling .................................. 8
Clock, Kitchen Timer and
Control Lock ........................... 11
Convection Oven .................. 13-17
Roasting Guide ...................... 17
Timed Features .................. 15, 16
Lower Oven ............................. 7
Oven Controls ........................... 5
Probe .................................. 10
Sabbath Feature ....................... 24
Self-Cleaning ....................... 20, 21
Slow Cook, Pizza,Warming
and Proofing Features ............. 18-19
Special Features ................... 22-25
Thermostat Adjustment-
Do It Yourself .......................... 12
Timed Baking and
Roasting Features ...................... 9
Upper Oven ............................. 6
PT925
4.J
0
B
I
Printed in the United States 49-80581 04-09 JR
Care and Cleaning ............ 25-28
Troubleshooting Tips ......... 29-31
Accessories ........................ 52
Consumer Support
Consumer Support .................... 34
Warrantg ............................. 33
Write the model and serial
numbers here:
Model #
Serial #
You can find them on a label
on the front of the lower oven
behind the oven door.
IMPORTANT SAFETY INFORMATION.
READ ALL INSTRUCTIONS BEFORE USING.
,& WARNING!
For your safety, the information in this manual must be followed to minimize the risk of fire
or explosion, electric shock, or to prevent property damage, personal injury, or loss of life.
IMPORTANT SAFETYNOTICE
The California Safe Drinking Water and Toxic Enforcement Act requires the Governor
of California to publish a list of substances known to the state to cause cancer, birth defects
or other reproductive harm, and requires businesses to warn customers of potential exposure
to such substances.
The fiberglass insulation in self-clean ovens gives off a very small amount of carbon monoxide
during the cleaning cycle. Exposure can be minimized by venting with an open window or using
a ventilation fan or hood.
SAFETY PRECAUTIONS
When using electrical appliances, basic safety precautions should be followed, including
the following:
Use this appliance only for its intended
purpose as described in this Owner's
Manual.
Be sure your appliance is properly installed
and grounded by a qualified technician in
accordance with the provided installation
instructions.
iiiiiil
Do not attempt to repair or replace
any part of your oven unless it is specifically
recommended in this manual. All other
servicing should be referred to a qualified
technician.
iiiiiil
Have the installer show you the location
of the circuit breaker or fuse. Mark it for
easy reference.
iiiiiiili_
Before performing any service, disconnect
the oven power supply at the household
distribution panel by removing the fuse
or switching off the circuit breaker.
iiiiiiili_
Do not leave children alone-children should *:*
not be left alone or unattended in an area
where an appliance is in use. They should
never be allowed to sit or stand on any part
of the appliance.
iiiiiiili_
Do not allow anyone to climb, sit, stand
or hang on the oven door. They could
damage the oven, or cause severe
personal injury.
Be sure the oven is securely installed
in a cabinet that is firmly attached
to the house structure.
Never leave the oven door open when
you are not watching the oven.
Always keep combustible wall covering,
curtains or drapes a safe distance from
your oven.
Always keep dish towels, dishcloths, pot
holders and other linens a safe distance
from your oven.
Always keep wooden and plastic utensils
and canned food a safe distance away
from your oven.
Teach children not to play with the controls
or any other part of the oven.
Large scratches or impacts to glass doors
can lead to broken or shattered glass.
Do not store flammable materials
in an oven.
CAUTION:Itemsofinterest
to children should not be stored in cabinets
above an oven; children climbing on the
oven to reach items could be seriously
injured.
WARNING!
SAFETYPRECAUTIONS
GEAppliances.com
Never wear loose-fitting or hanging
garments while using the appliance. Be
careful when reaching for items stored in
cabinets over the oven. Flammable material
could be ignited if brought in contact with hot
surfaces or heating elements and may
cause severe burns.
Use only dry pot holders-moist or damp pot
holders on hot surfaces may result in burns
from steam. Do not let pot holders touch
hot heating elements. Do not use u towel
or other bulky cloth.
For your safety, never use your appliance
for warming or heating the room.
Do not let cooking grease or other flammable
materials accumulate in or near the oven.
Do not use water on grease fires. Never pick
up a flaming pan. Turn the controls off.
Flame in the oven can be smothered
completely by closing the oven door
and turning the oven off or by using
a multi-purpose dry chemical
or foam-type fire extinguisher.
Do not touch the heating elements
or the interior surface of the oven. These
surfaces may be hot enough to burn even
though they are dark in color. During and
after use, do not touch, or let clothing or
other flammable materials contact any
interior area of the oven; allow sufficient
time for cooling first.
Potentially hot surfaces include oven
vent openings, surfaces near the openings,
crevices around the oven door, the edges
of the window and metal trim parts above
the door.
REMEMBER: The inside surface of the oven
and door may be hot when the door is
opened.
Stand away from the oven when opening
the oven door. Hot air or steam which
escapes can cause burns to hands,
face and/or eyes.
}
Do not heat unopened food containers.
Pressure could build up and the container
could burst, causing on injury.
Keep the oven vent unobstructed.
Keep the oven free from grease buildup.
Place the oven rack in the desired position
while the oven is cool. If racks must be
handled when hot, do not let pot holder
contact the heating elements.
iiiiiil
When using cooking or roasting bugs
in the oven, follow the manufacturer's
directions.
iiiiiiili_
Pulling out the rack to the stop-lock is
a convenience in lifting heavy foods. It is also
a precaution against burns from touching
hot surfaces of the door or oven walls.
iiiiiiili_
Do not use the oven to dry newspapers.
If overheated, they can catch on fire.
iiiiiiili_
Do not use the oven for a storage area.
Items stored in an oven can ignite.
iiiiiiili_
Do not leave paper products, cooking
utensils or food in the oven when not in use.
iiiiiiili_
After broiling, always take any broiler
pan out of the oven and clean it. Leftover
grease in a broiler pan can catch fire next
time you use the pan.
iiiiiiili_
Clean only parts listed in this Owner's
Manual.
iiiiiiili_
Do not use aluminum foil to line oven
bottoms, except us suggested in this manual.
Improper installation of aluminum foil may
result in a risk of electric shock or fire.
Never leave jars or cans of fat drippings
in or near your oven.
Do not store or use combustible materials,
gasoline or other flammable vapors and
liquids in the vicinity of this or any other
appliance.
]
IMPORTANT SAFETY INFORMATION.
READ ALL INSTRUCTIONS BEFORE USING.
COOK MEATAND POULTRY THOROUGHLY...
Cook meot and poultry thoroughly-meot to at leost on INTERNAL temperature of l 60°F and
poultry to at leost on INTERNALtemperature of 180°£ Cooking to these temperatures usually
protects against foodbome illness.
SELF-CLEANING OVEN
Do not clean the door gasket. The door
gasket is essential for a good seal. Care
should be taken not to rub, damage or
move the gasket.
Do not use oven cleaners. No commercial
oven cleaner or oven liner protective coating
of ang kind should be used in or around ang
part of the oven. Residue from oven cleaners
will damage the inside of the oven when
the self-clean cgcle is used.
Before self-cleaning the oven, remove
the probe and ang broiler pan, grid and
other cookware.
Be sure to wipe up excess spillage before
starting the self-cleaning operation.
If the self-cleaning mode malfunctions,
turn the oven off and disconnect the power
supplg. Have it serviced bg a qualified
technician.
READAND FOLLOW THISSAFETY INFORMATION
CAREFULLY.
SAVE THESE INSTRUCTIONS
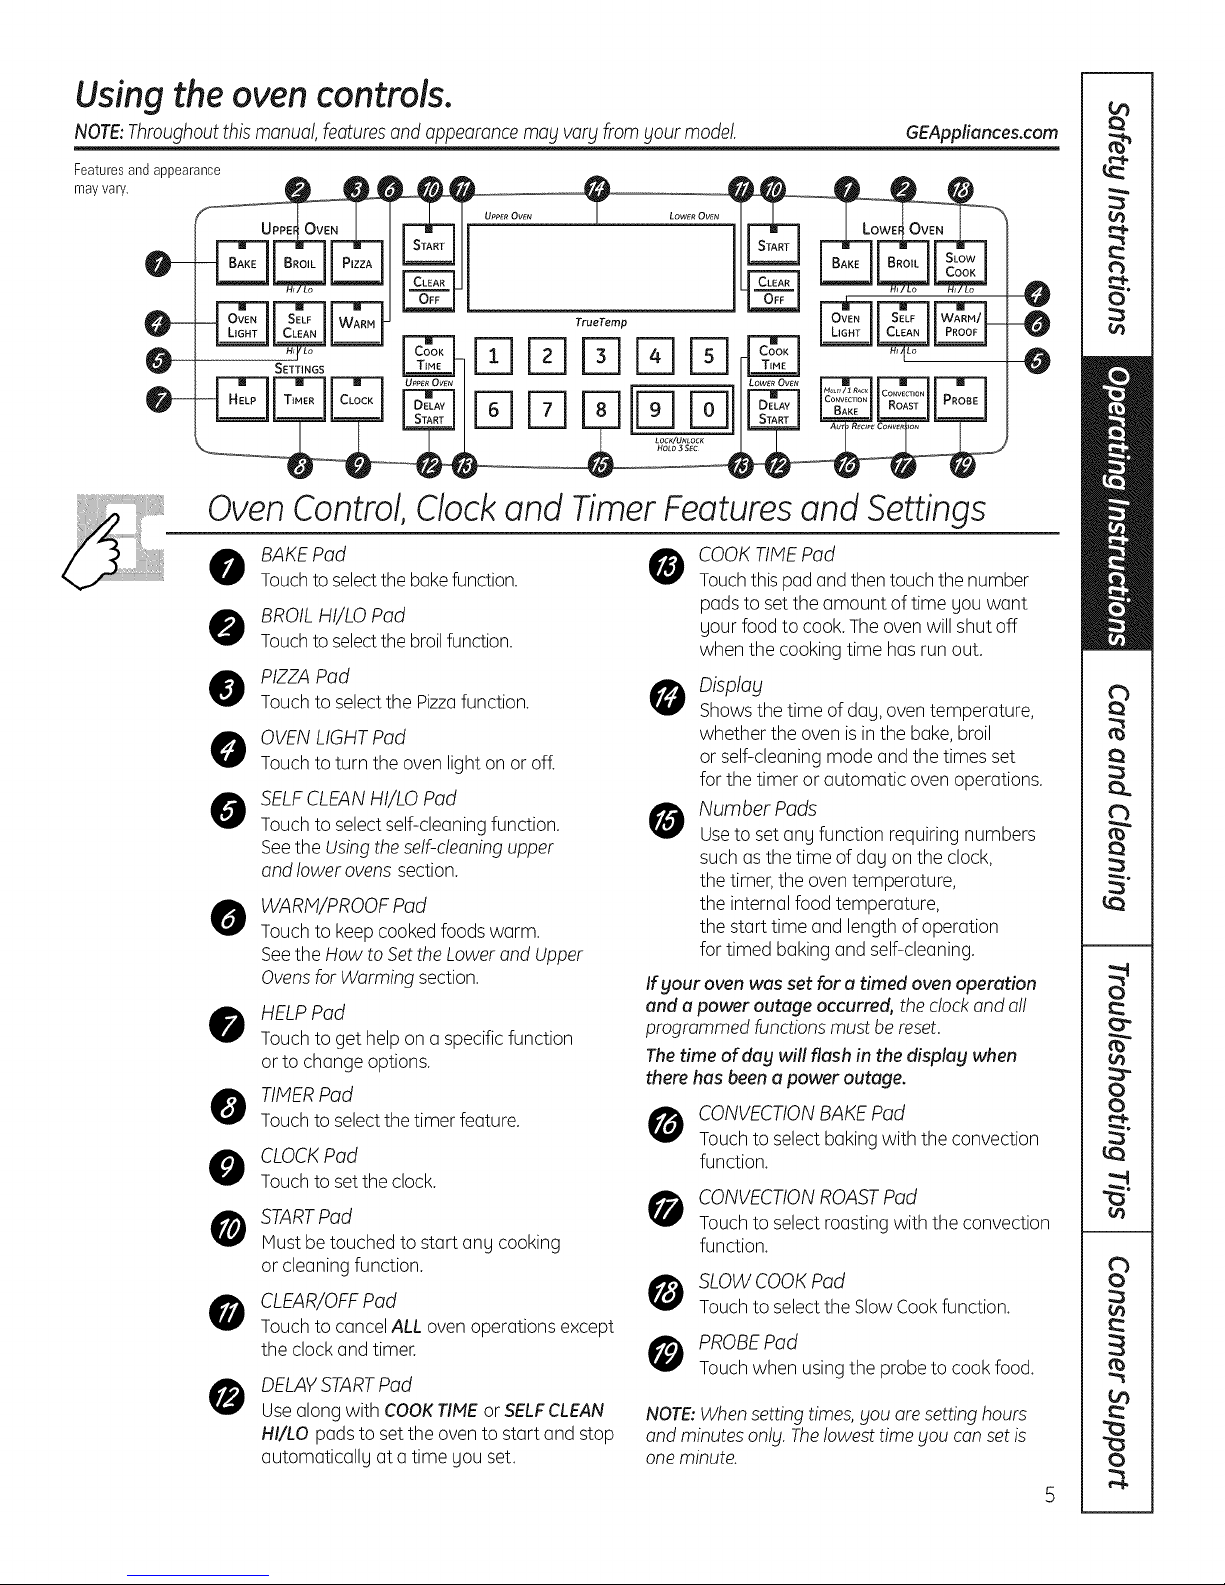
Usingthe ovencontrols.
NOTE:Throughoutthis manual, featuresand appearancemag vary from gour model. GEAppliances.com
Features and appearance
may vary.
OvenControl,Clockand TimerFeaturesand Settings
0
BAKE Pad 0
Touchto selectthe bakefunction.
BROIL HI/LO Pad
0
Touchto selectthe broilfunction.
PIZZAPad
@
Touch to selectthe Pizzafunction.
OVENLIGHT Pad
0
Touch to turn the oven light on or off.
SELFCLEAN HI/LO Pad
0
Touch to selectself-cleaning function.
Seethe Using theself-cleaningupper
and lower ovens section.
WARN/PROOF Pad
0
Touch to keep cooked foods warm.
Seethe How to Setthe Lower and Upper
Ovensfor Warming section.
HELPPad
0
Touch to get helpon a specificfunction
or to change options.
TIMERPad
G
Touchto selectthetimer feature.
CLOCKPad
0
Touchto setthe clock.
STARTPad
G
Mustbe touched to start ang cooking
or cleaning function.
CLEAR/OFFPad
0
Touch to cancelALL oven operations except
the clockand timer.
DELAYSTARTPad
0
Usealongwith COOKTIMEor SELFCLEAN
HI/LO pads to set the ovento start and stop
automatically at atime you set.
COOKTIMEPad
Touchthispad and thentouch the number
padsto set the amount of time gouwant
your food to cook. The oven will shut off
when the cooking time has runout.
O Display
Shows the time of dag, oventemperature,
whether the oven is in the bake,broil
or self-cleaning mode and the times set
for the timer orautomatic ovenoperations.
Number Pads
Useto set ang function requiring numbers
such asthe time of dag on the clock,
the timer,the oventemperature,
the internal food temperature,
the start time and length of operation
for timed baking and self-cleaning.
If your oven was set for a timed oven operation
and a power outage occurred, the clock and a!!
programmed functions must be reset.
The time of day will flash in the display when
there has been a power outage.
CONVECTIONBAKE Pad
Touch to select baking with the convection
function.
CONVECTIONROASTPad
Touch to select roasting with the convection
function.
SLOWCOOKPad
Touch to selectthe SlowCookfunction.
PROBEPad
Touch when using the probe to cook food.
NOTE:When setting times,you are settinghours
and minutesonly. Thelowest time you canset is
one minute.
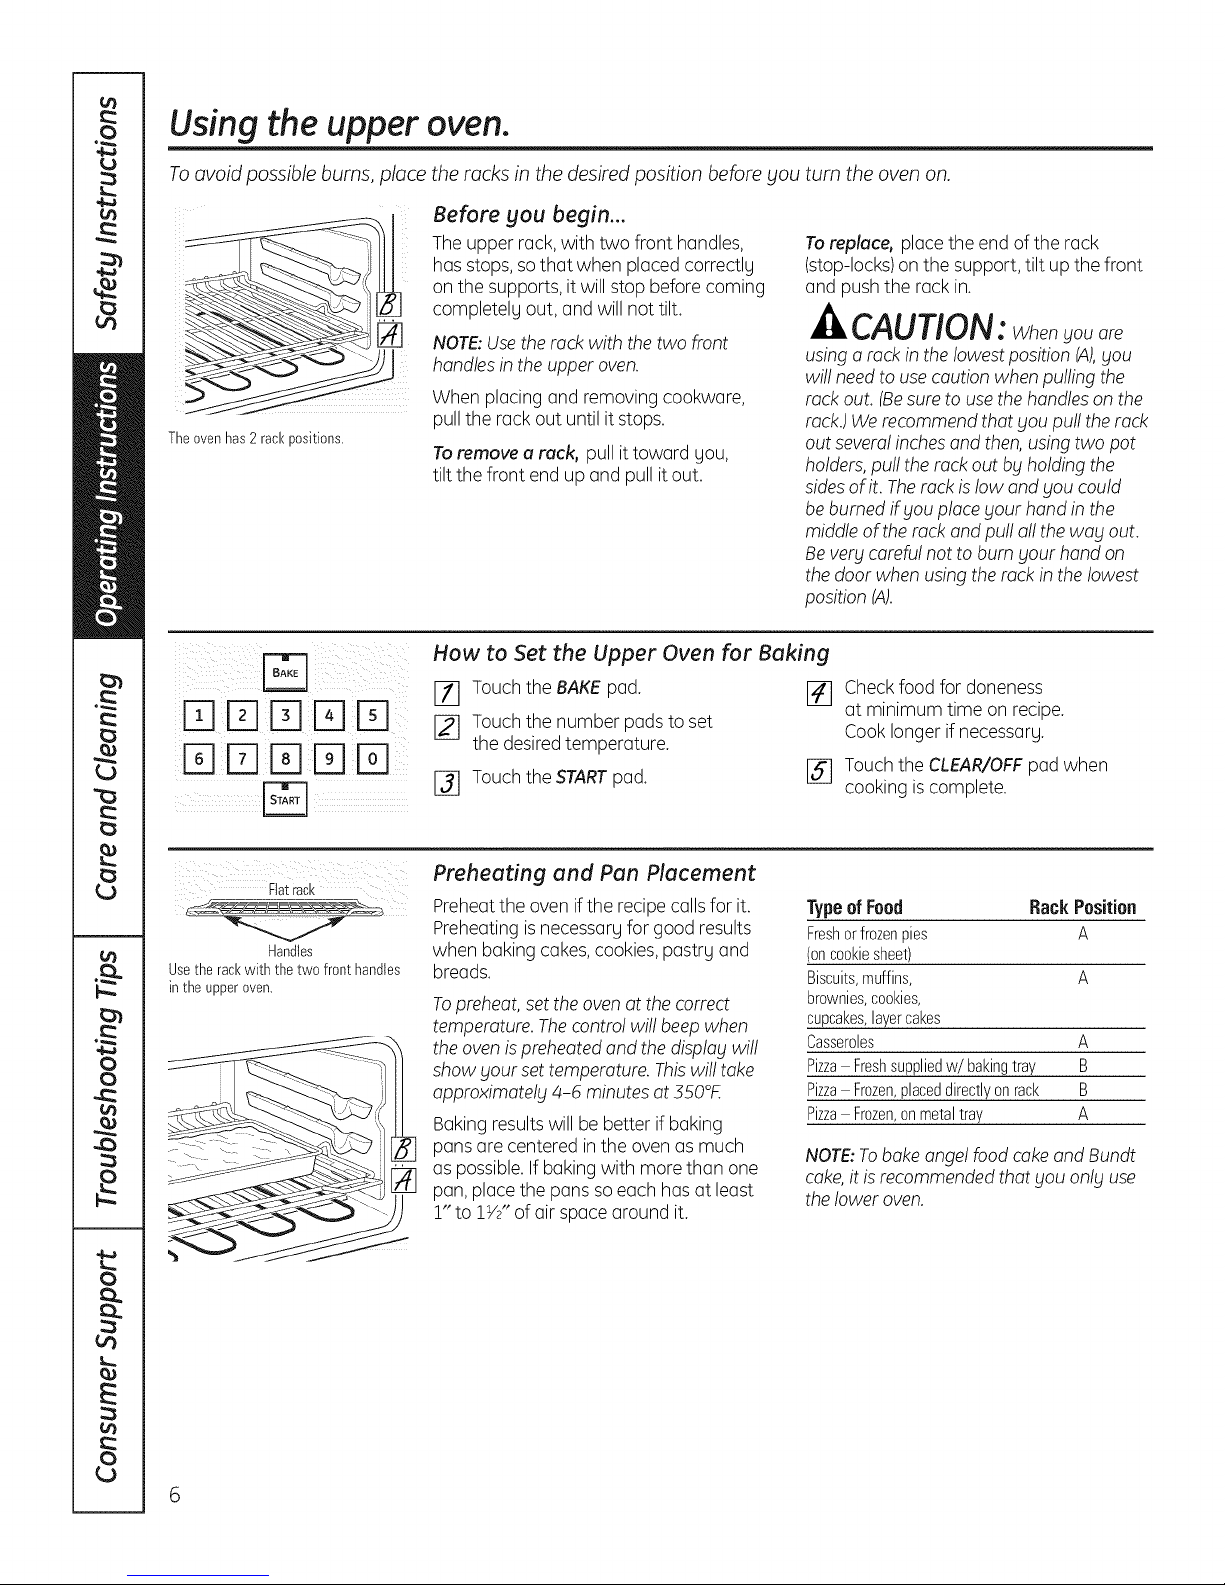
Using the upper oven.
To avoid possible burns, place the racks in the desired position before you turn the oven on.
Before you begin...
Theupper rack,with two front handles,
has stops,so that when placed correctly
on the supports, it will stopbefore coming
completely out, and will not tilt.
NOTE:Usethe rackwith the two front
handlesin the upper oven.
When placing and removing cookware,
pull the rack out until it stops.
Theovenhas2 rackpositions.
Toremove e reck, pull it toward you,
tilt the front end upand pull itout.
How to Set the Upper Oven for Baking
Toreplace, place the end of the rack
(stop-locks)on the support, tilt up the front
and pushthe rack in.
.,AUTiON. Whenyouare
using a rock in the lowest position (A),you
wi!!need to use caution when pulling the
rack out. (Be sure to use the handles on the
rock.) We recommend that you pu!! the rack
out severo! inches and then, using two pot
holders, pull the rock out by holding the
sides of it. The rock is low and you could
be burned if you place your hand in the
middle of the rock and pu!!a!!the way out.
Be very carefu! not to bum your hand on
the door when using the rack inthe lowest
position (A).
o
E]
FqE]FqE]
E]
DE]DEE
Flatrack
Usethe rackwith thetwo front handles
in theupper oven.
Handles
[77 Touch the BAKEpad.
[_ Touch the number padsto set
the desiredtemperature.
[_ Touch the STARTpad.
Preheating and Pan Placement
Preheatthe oven ifthe recipe callsfor it.
Preheating isnecessary for good results
when baking cakes,cookies,pastry and
breads.
Topreheat, set the oven at the correct
temperature. The control willbeep when
the oven is preheated and the display wi!!
show _tourset temperature. Thiswi!! take
approximately 4-6 minutesat 350°£
Baking resultswill be better if baking
pans are centered inthe oven as much
as possible.If baking with morethan one
pan, placethe pans so each has at least
1" to 1W' of air space around it.
F41 Checkfood for doneness
at minimum time on recipe.
Cook longer if necessary.
[_ Touch the CLEAR/OFFpadwhen
cooking iscomplete.
Type of Food Rack Position
Freshorfrozenpies A
(oncookiesheet)
Biscuits,muffins, A
brownies,cookies,
cupcakes,layercakes
Casseroles A
Pizza Freshsuppliedw/baking tray B
Pizza Frozen,placeddirectlyonrack B
Pizza Frozen,onmetaltray A
NOTE:Tobake angel food cokeand Bundt
coke,it isrecommended that _/ouon!_/use
the lower oven.
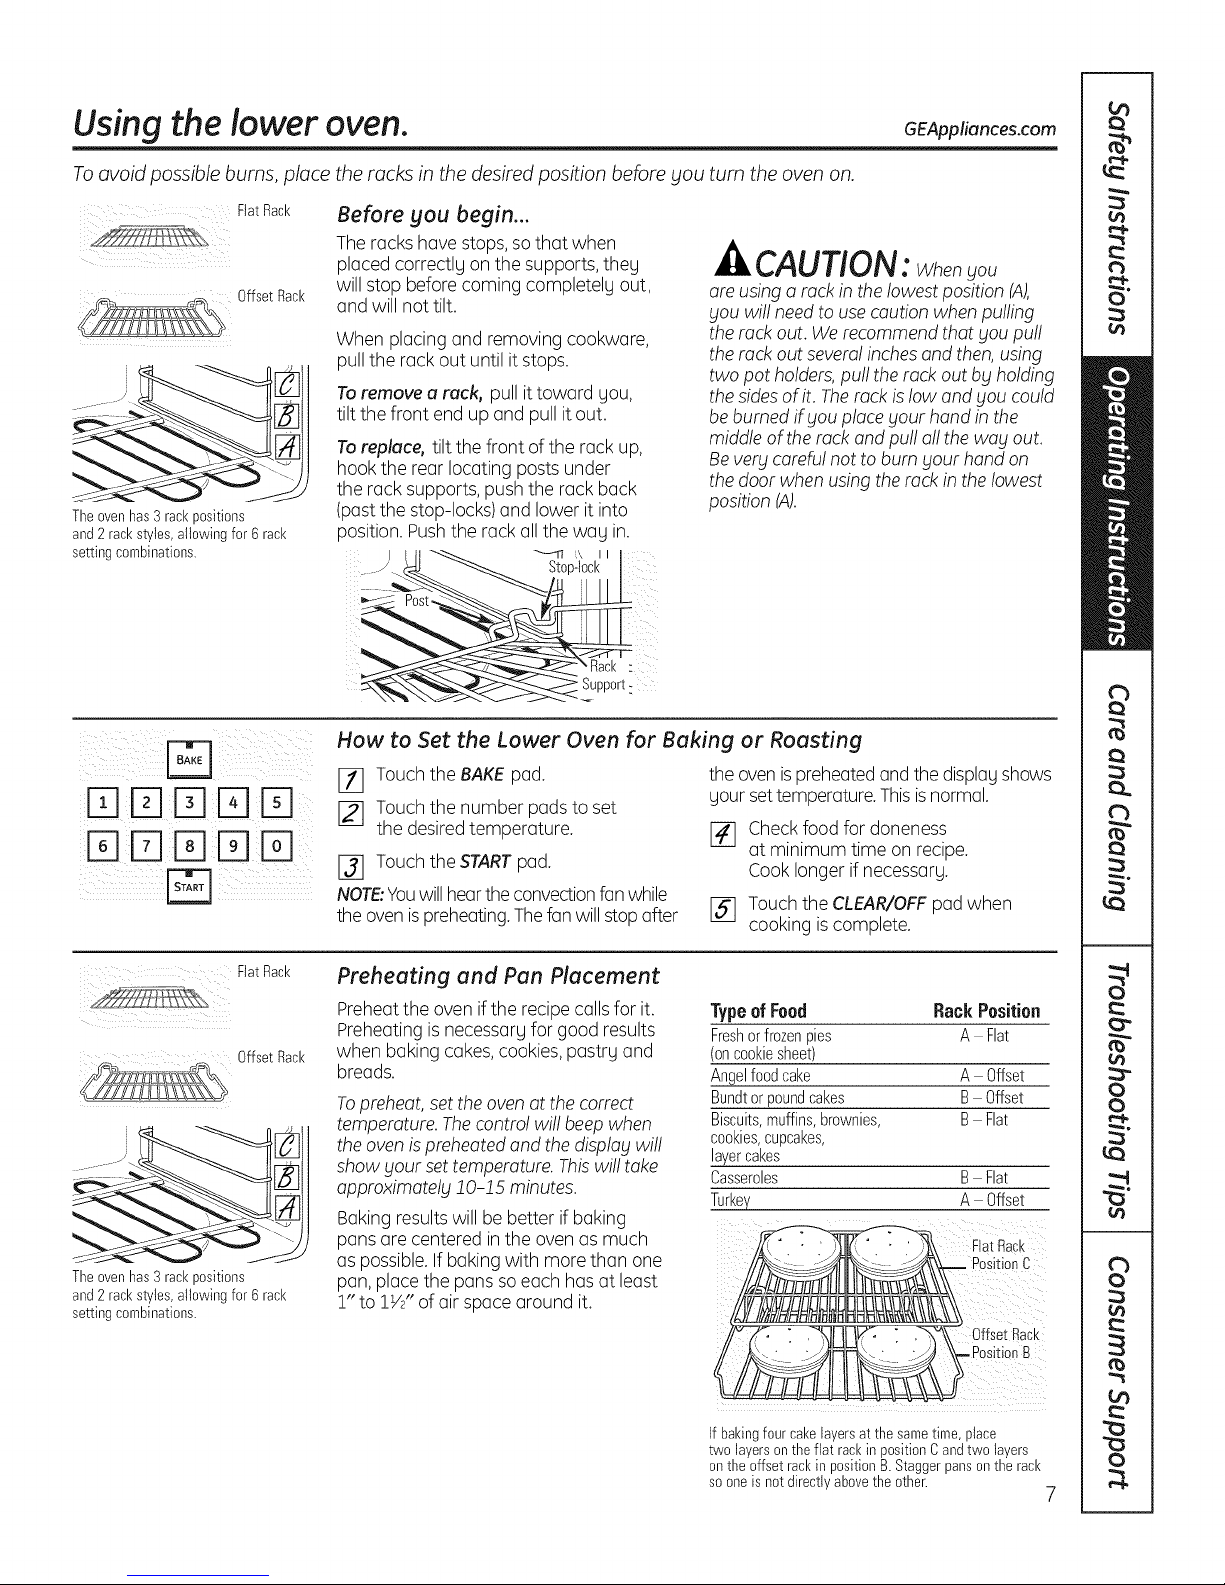
Using the lower oven. GEAppliances.com
To avoid possible burns, place
FlatRack
OffsetRack
Theovenhas3 rackpositions
and2 rackstyles,allowing for 6 rack
settingcombinations.
the racks in the desired position before you turn the oven on.
Before you begin...
The racks have stops, so that when
placed correctly on the supports, they
willstop before coming completely out,
and willnot tilt.
When placing and removing cookware,
pull the rack out until it stops.
.AUTION. Whenyou
are using a rack in the lowest position (A),
you will needto use caution when pulling
the rock out. Werecommendthat you pu!!
the rock out sever!! inchesand then,using
two pot holders,pu!!the rack out by holding
Toremove a rack, pull it toward you,
tilt the front end upand pull itout.
Toreplace, tilt the front of the rack up,
hook the rear locating posts under
the rack supports,push the rack back
(pastthe stop-locks)and lower it into
thesidesof it. Therock is low andyou could
be burned if Fou place your hand in the
middle of the rock and pu!!a!!the way out.
Bevery carefu!not to bum your hand on
the door when usingthe rock in the lowest
position (A).
position. Pushthe rack allthe way in.
How to Set the Lower Oven for Baking or Roasting
[_ Touch the BAKEpad.
[_ Touch the number padsto set
the desiredtemperature.
[_ Touch the STARTpad.
NOTE:Youwill heartheconvectionfanwhile
the ovenispreheating.Thefanwill stopafter
the ovenispreheatedand the displayshows
your settemperature.Thisisnormal.
[_ Checkfood for doneness
at minimum time on recipe.
Cook longer if necessary.
[] Touch the CLEAR/OFFpadwhen
cooking iscomplete.
FlatRacl<
OffsetRack
............ --J
Theovenhas3 rackpositions
and2 rackstyles,allowing for 6 rack
settingcombinations.
Preheating and Pan Placement
Preheatthe oven ifthe recipe callsfor it.
Preheating isnecessary for good results
when baking cakes,cookies,pastry and
breads.
Topreheat, set the oven at the correct
temperature. The control willbeep when
the oven is preheated and the display wi!!
show your set temperature. This wi!!take
approximately !0-!.5 minutes.
Baking resultswill be better if baking
pans are centered inthe oven as much .......
as possible.If baking with morethan one
pan, placethe pans so each has at least
!" to 1V2"of air space around it.
Type of Food
Freshorfrozenpies
(oncookiesheet)
Angelfoodcake
Bundtorpoundcakes
Biscuits,muffins,brownies,
cookies,cupcakes,
layercakes
Casseroles
Turkey
If bakingfourcake layersat the sametime, place
two layersontheflat rackin positionCand two layers
onthe offset rackin positionB. Staggerpanson the rack
so oneis notdirectlyabovethe other.
Rack Position
A Flat
A Offset
B Offset
B Flat
B Flat
A Offset
FlatRack
C
OffsetRack
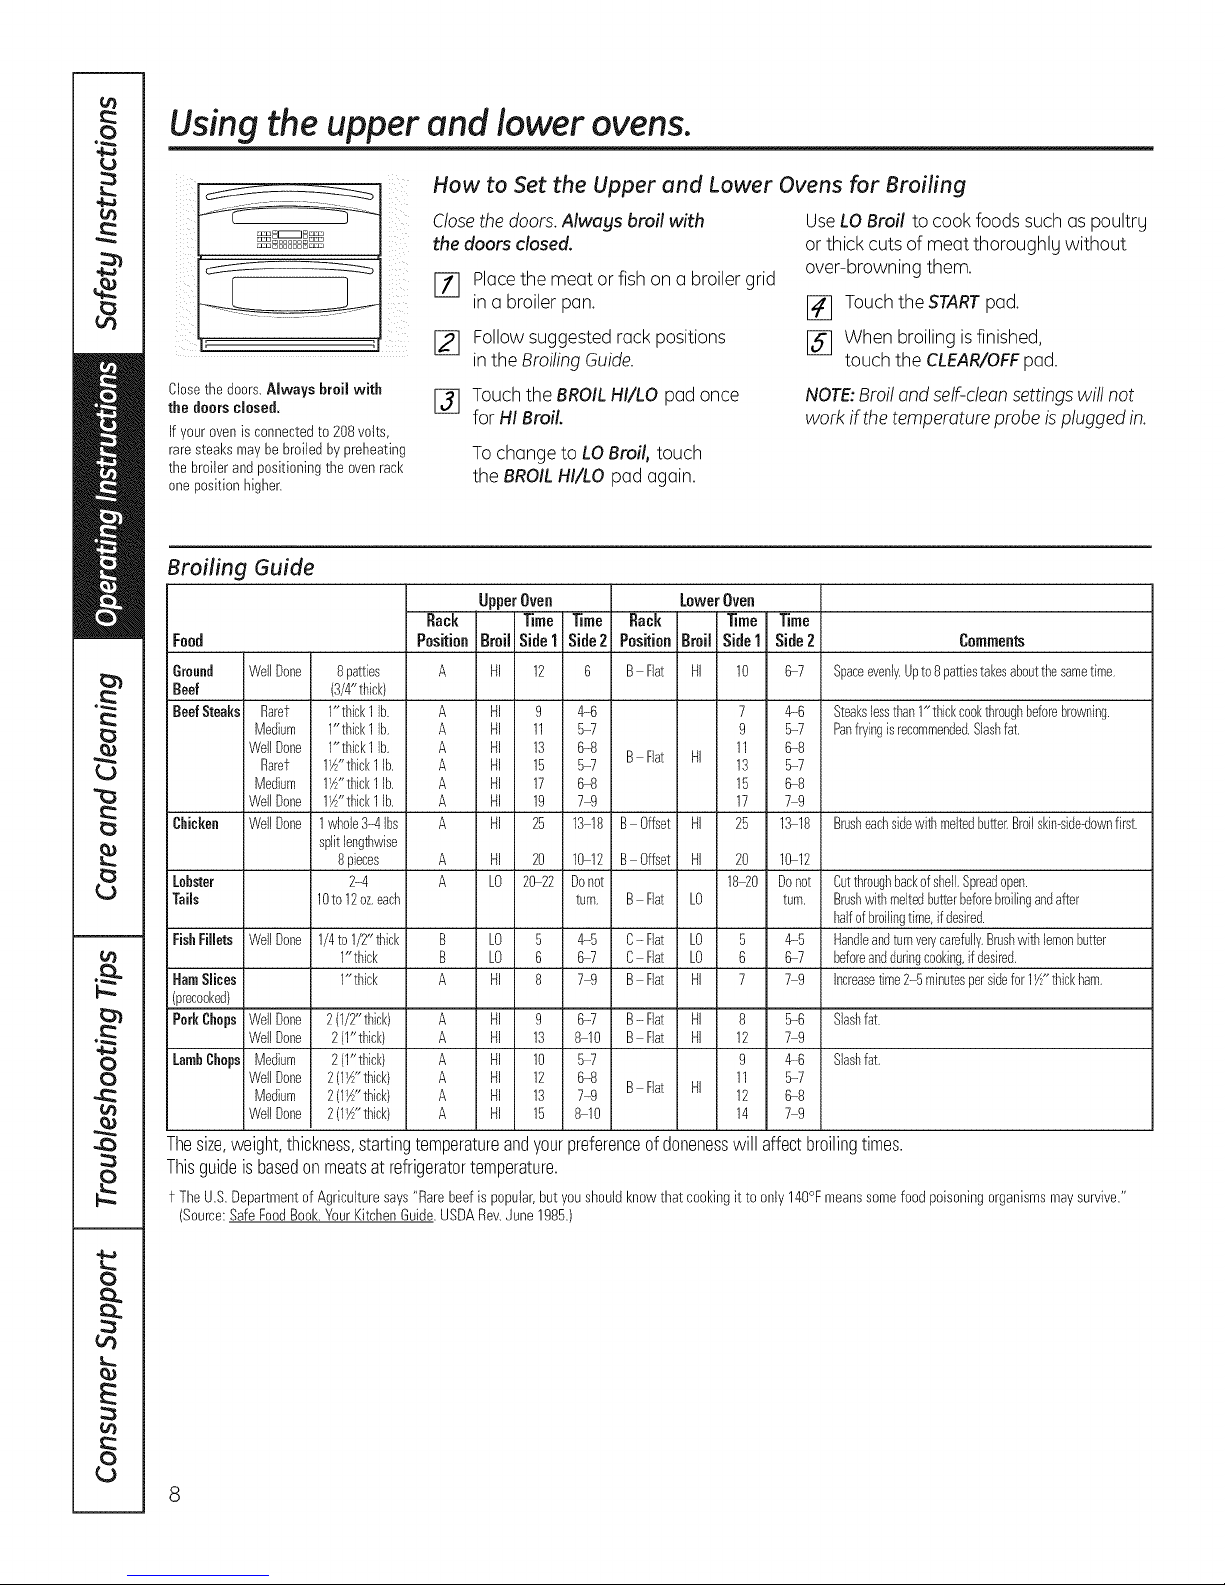
Using the upper and lower ovens.
How to Set the Upper end Lower Ovens for Broiling
Closethedoors.Always broil with
the doorsclosed.
If yourovenis connectedto 208 volts,
raresteaksmaybe broiledby preheating
thebroiler andpositioningthe ovenrack
onepositionhigher.
Close the doors. Alwags broil with
the doors closed.
Placethe meat or fish on a broiler grid
in a broiler pan.
Follow suggested rackpositions
[]
in the BroilingGuide.
E_ Touch the BROILHI/LO pad once
for HI Broil.
To change to LO Broil, touch
the BROIL HI/LO pad again.
UseLO Broil to cook foods suchas poultry
or thick cuts of meat thoroughly without
over-browning them.
I_ Touchthe STARTpad.
I_ When broiling isfinished,
touch the CLEAR/OFFpad.
NOTE:Broi!and self-cleonsettings wi!!not
work if the temperature probe isplugged in.
Broiling Guide
UpperOven LowerOven
Rack Time Time Rack Time Time
Food
Ground WellDone
Beef
BeefSteaks Rarer
Medium
WellDone
Rarer
Medium
WellDone
Chicken WellDone
Lobster
Tails
FishFilJets WellDone
BamSlices
(precooked)
PorkChops WellDone
WellDone
LambChops Medium
WellDone
Medium
WellDone
8patties A HI 12 6 B Flat HI 10
(3/4"thick)
l"tl_ick1lb. A HI 9 4_ 7
1"thick1]b, A HI 11 5-7 9
1"thick1Ib• A HI 13 6-8 11
1F/'thick1lb. A HI 15 5-7 13
1V/'thick1 ]b, A HI 17 6-8 15
l_'thick 1]b, A HI 19 7-9 17
lwho]e3q]bs A HI 25 13 18 B Offset HI 25
splitlengfl_wise
8pieces A HI 20 10 12 B Offset HI 20
2-4 A LO 2(F22 Denot 18_0
10to12oz.each turn. B Hat LO
1/4to1/2"thick B LO 5 4-5 C- Flat LO 5
1"thick B LO 6 6_ C Flat LO 6
1"thick A HI 8 74 B Flat HI 7
2(1/2"thick) A HI 9 6-7 B- Flat HI 8 5-6 Slashfat.
2(1"thick) A HI 13 8 10 B Flat HI 12 7 9
2(1"thick) A HI 10 5-7 9 4-6 Slashfat,
2(l_"thick) A HI 12 6-8 11 5-7
2(?_"thick) A HI 13 7-9 12 5-8
2(l_"thick) A HI 15 8 10 14 7 9
Thesize,weight,thickness,startingtemperatureandyourpreferenceofdonenesswill affectbroilingtimes•
Thisguideisbasedonmeatsatrefrigeratortemperature.
f TheU.S.DepartmentofAgriculturesays"Rarebeefis popular,but youshouldknowthat cookingit to only140%meanssomefoodpoisoningorganismsmaysurvive."
(Source:SafeFoodBook.YourKitchenGuide.USDARev.June 1985.)
PositionBroilSide1 Side2 PositionBroil Side1 Side2 Comment$
5-7 Spaceevenly,Upto8pattiestakesaboutthesametime,
4-6 Steakslessthan1"thickcookthroughbeforebrowning.
5-7 Panfryingisrecommended.Slashfat.
B Hat HI
B Fiat Hi
5-8
5-7
5-8
79
1.318
BrusheachsidewithmeltedbutterBroilskin-side-downfirst.
1012
Donot
Cutthroughbackof shell,Spreadopen.
turn.
Brushwithmeltedbutterbeforebroilingandafter
haftofbroilingtime,ifdesired.
4-5
Handleandturnven/carefully.Brushwithlemonbutter
5-7
beforeandduringcooking,ifdesired.
79
Increasetime2-5minutespersidefor11//'%ckham
Using the timed baking and roasting features. GEAppliances.com
NOTE: Foods that spoil easilbl-such as milk, eggs, fish, stuffings, poultrbl and pork-should not be allowed
to sit for more than 1 hour before or after cooking. Room temperature promotes the growth of harmful bacteria.
Be sure that the oven light is off because heat from the bulb will speed harmful bacteria growth.
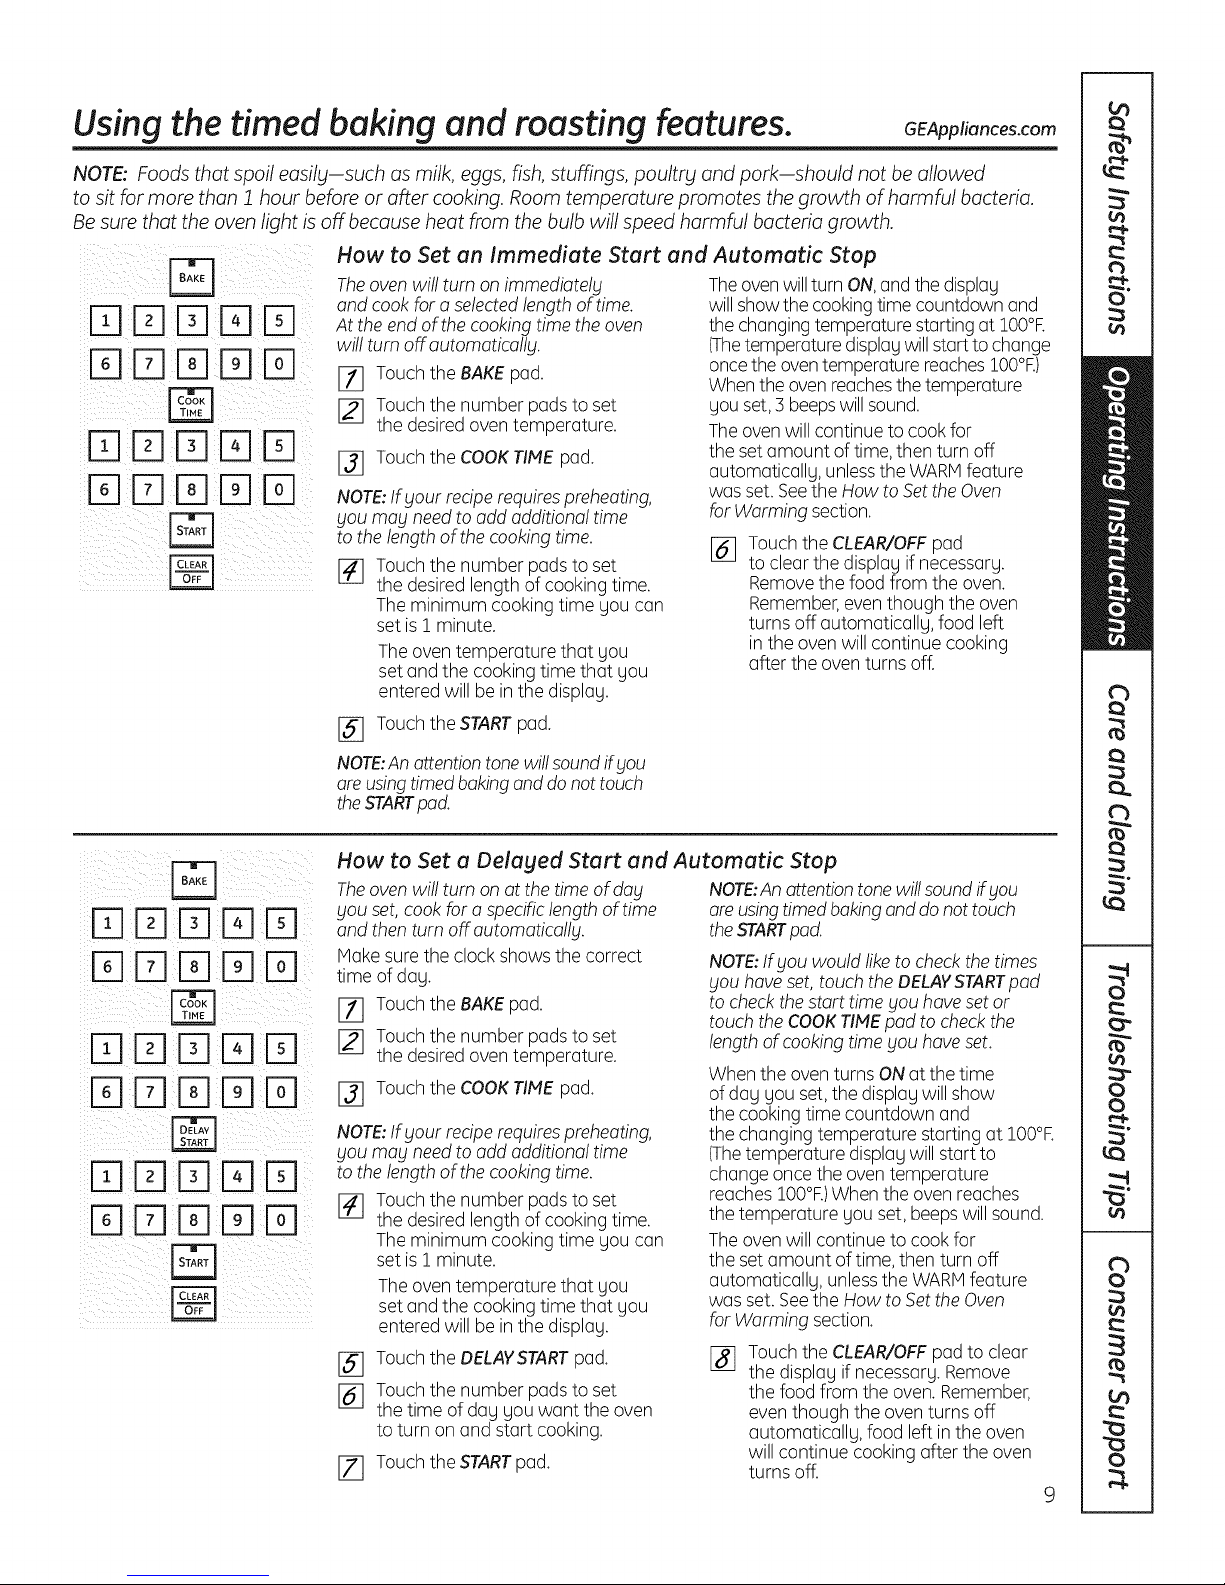
How to Set on Immediate Start and Automatic Stop
Theoven will turn on immediately Theoven will turn ON,andthe display
E_ _-_ D and cookfaro selectedlength of time. willshow the cookingtime countdown and
D oncethe oventemperature reaches!O0°R)
D[Z]_ [_ wfl!tumoffautomatically. (Thetemperaturedisp,aywi,,startto change
[_D [_ Touch the COOKTItvtEpad. the set amount of time, then turn off
iD E] FqF1Fq
! iii!i !ii ii iii! i il:II II
DDD%D
DDD D
DDD D
DDDDD
DDD D
DDDDD
B
At the end of the cooking time the oven the changing temperature starting at lO0°R
[_ Touch the BAKEpad.
[_ Touch the number padsto set you set,3 beepswill sound.
the desiredoven temperature. Theovenwill continue to cook for
NOTE:Ifyour reciperequirespreheating,
you may needto add additional time
to the length ofthe cooking time.
[_ Touch the number padsto set
the desired length of cooking time.
The minimum cooking time you can
set is 1minute.
The oventemperature that gou
set and the cooking timethat gou
entered will be in the displag.
I_ Touchthe STARTpad.
NOTE:Anattentiontonewill soundifyou
areusingtimedbaking and do nottouch
theSTARTpad.
How to Set a Delayed Start end Automatic Stop
The oven will turn on at the time of day
you set, cook for a specific length of time
and then turn off automatically.
Make sure the clock shows the correct
time of dog.
[71 Touch the BAKEpad.
[_ Touch the number padsto set
the desiredoven temperature.
13] Touch the COOKTIME pad.
NOTE:Ifyour reciperequirespreheating,
you may needto add additiona! time
to the length ofthe cooking time.
14] Touch the number pads to set
the desired length of cooking time.
The minimum cooking time gou can
set is 1minute.
The oventemperature that gou
set and the cooking timethat gou
entered will be in the displag.
Touch the DELAYSTARTpad.
%
Touch the number pads to set
%
the time of dog gou want the oven
to turn on and start cooking.
171 Touch the STARTpad.
Whenthe ovenreachesthe temperature
automaticallg, unlessthe WARMfeature
was set. Seethe How to Setthe Oven
for Warming section.
[_ Touch the CLEAR/OFFpad
to clear the display if necessarg.
Remove the food from the oven.
Remember,even though the oven
turns off automaticallg, food left
in the oven will continue cooking
after the oven turns off.
NOTE:An attention tone wi!!sound ifyou
are using timed baking and do not touch
the STARTpod.
NOTE:Ifyou would liketo check the times
you haveset,touch the DELAYSTARTpod
to check the start time you have set or
touch the COOKTIMEpad to check the
length of cooking time you have set.
Whenthe oventurns ONat the time
of dog gouset,the display will show
the cooking time countdown and
the changing temperature starting at !O0°R
(Thetemperature displagwill start to
change once the oventemperature
reaches IO0°F.)When the oven reaches
the temperature gou set, beepswill sound.
Theovenwill continue to cook for
the set amount of time, then turn off
automaticallg, unlessthe WARMfeature
was set. Seethe How to Set the Oven
for Warming section.
[] Touch the CLEAR/OFFpadto clear
the displag if necessarg.Remove
the food from the oven. Remember,
eventhough the oventurns off
automaticallg, food left in the oven
will continue cooking after the oven
turns off.
9
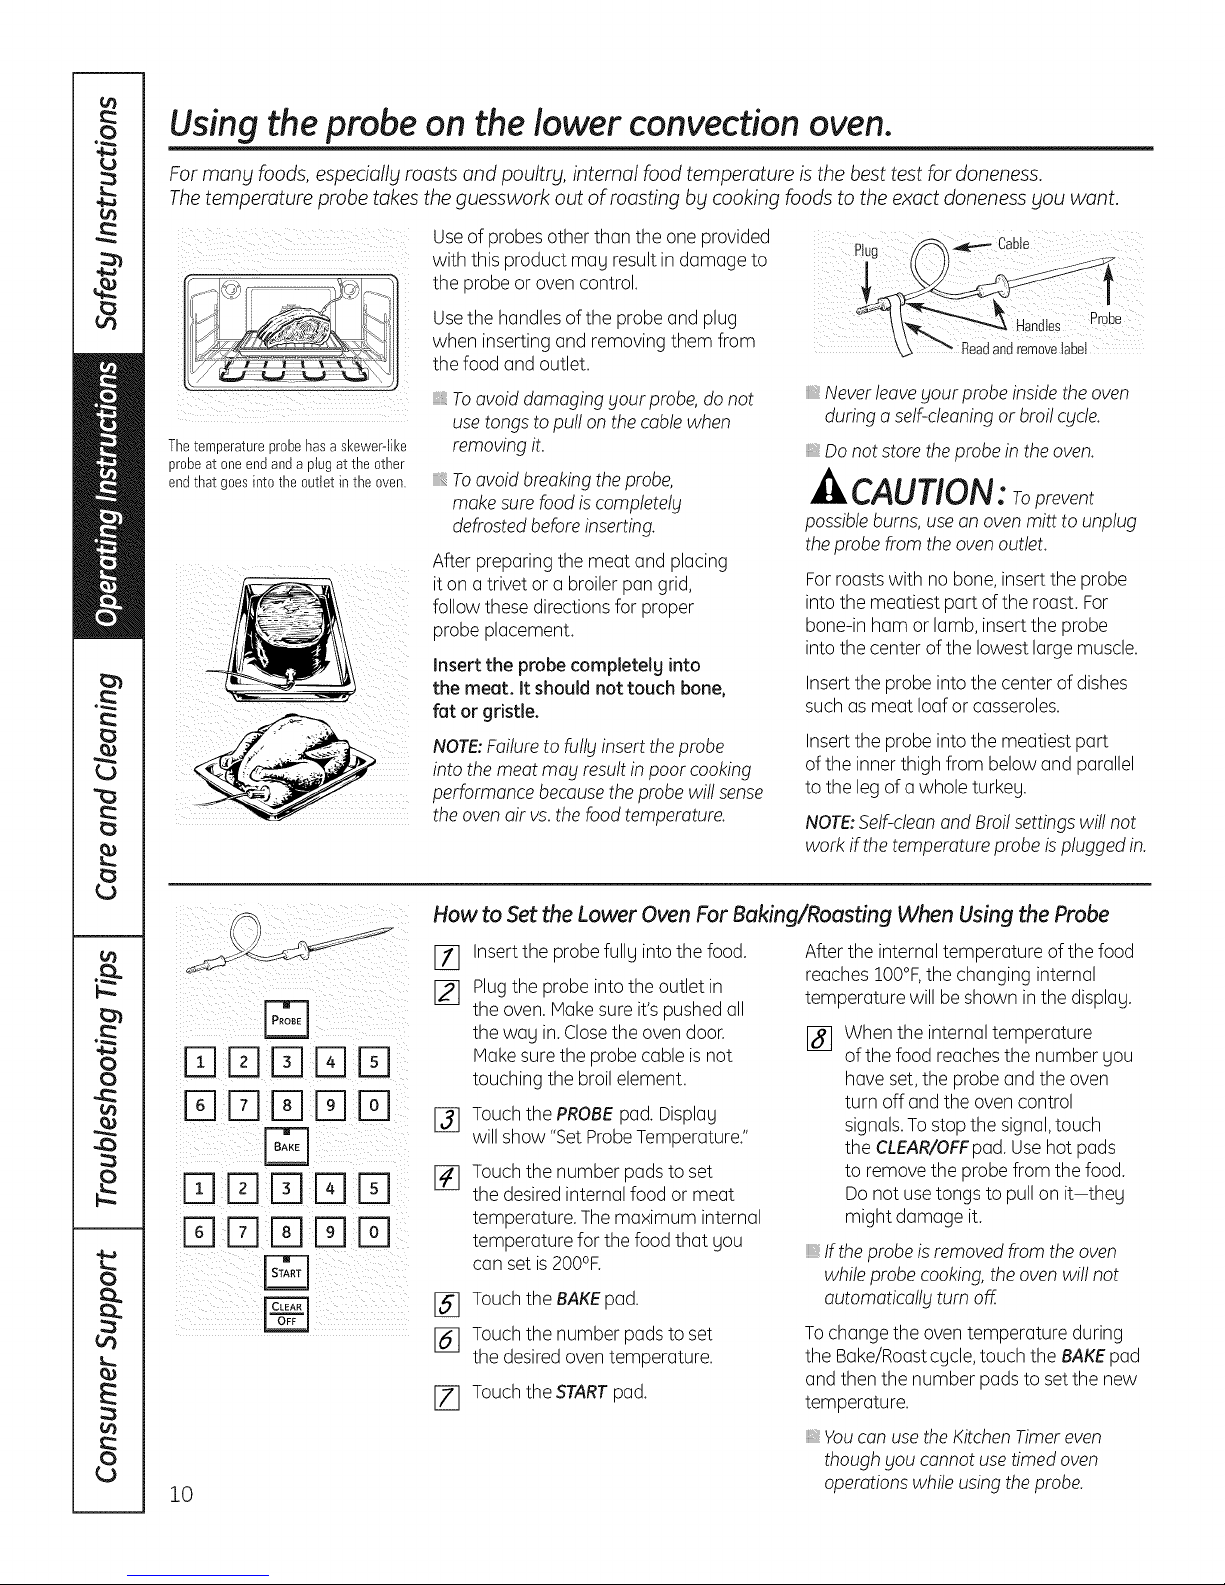
Using the probe on the lower convection oven.
For many foods, especially roasts and poultry, internal food temperature is the best test for doneness.
The temperature probe takes the guesswork out of roasting by cooking foods to the exact doneness you want.
Useof probesother than the one provided
with this product may result in damage to
the probe oroven control.
Usethe handlesof the probe and plug
when inserting and removing them from
the food and outlet.
_,Neverleaveyour probe insidethe oven
during a self-cleaningor broi!cycle.
Donot store the probe in the oven.
CAUTION. Toprevent
possibleburns,use anovenmitt to unplug
theprobe fromthe ovenoutlet.
Forroasts with no bone, insert the probe
into the meatiest part of the roast. For
bone-in ham orlamb, insertthe probe
into the center of the lowest large muscle.
Insertthe probe into the center of dishes
such as meat loaf or casseroles.
Insertthe probe into the meatiest part
of the inner thigh from below and parallel
to the leg of a whole turkey.
NOTE:Self-cleanand Broilsettings wil! not
work if the temperature probe isplugged in.
o
Thetemperatureprobehasa skewer-like
probeat oneendand aptug at the other
endthat goesinto theouttet in the oven.
Toavoid damaging your probe, do not
usetongs to pu!!on the cablewhen
removing it.
Toavoid breakingthe probe,
make sure food iscompletely
defrostedbeforeinserting.
After preparingthe meat and placing
it on atrivet or a broilerpan grid,
follow thesedirections for proper
probe placement.
Insert the probe completely into
the meat. It should not touch bone,
fat or gristle.
NOTE:Failureto fully insert the probe
into the meat may result in poor cooking
performance becausethe probe wi!!sense
the ovenair vs.the food temperature.
10
How to Set the Lower Oven For Baking/Roosting When Using the Probe
Insertthe probe fully intothe food.
%
Plugthe probe intothe outlet in
[]
the oven. Make sure it's pushed all
the way in.Closethe ovendoor.
Make sure the probe cable is not
touching the broilelement.
Touch the PROBEpad. Display
%
will show "SetProbeTemperature."
Touch the number pads to set
[]
the desiredinternal food or meat
temperature. Themaximum internal
temperature for the food that you
can set is200°F.
[] Touch the BAKEpad.
16] Touch the number pads to set
the desiredoven temperature.
[Z] Touch the STARTpad.
After the internal temperature of the food
reaches IO0°F,the changing internal
temperature will be shown in the display.
I_] When the internal temperature
of the food reachesthe number you
have set,the probe and the oven
turn off andthe oven control
signals.To stop the signal,touch
the CLEAR/OFFpad.Usehot pads
to remove the probe from the food.
Do not use tongs to pull on it-they
might damage it.
If the probe isremoved from the oven
whileprobe cooking,the ovenwi!! not
automatically turn off.
Tochange the oven temperature during
the Bake/Roastcycle,touch the BAKEpad
and then the number pads to setthe new
temperature.
Youcan usethe KitchenTimer even
though you cannot usetimed oven
operations while usingtheprobe.
Using the clock, kitchen timer and control lock. GEAppliances.com
To Set the Clock
Makesurethe clockis setto thecorrect
timeof day.
Theclock must be set to the correct time
of dog for the automatic oventiming
functions to work properly. The time of dog
cannot be changed during a timed baking
or self-cleaningcgcle.
To Set the Kitchen Timer
[_] Touchthe CLOCKpad.
[_ Touchthe number pads.
[] Touch the STARTpad.
TheKitchenllmer isin hoursandminutes.
TheKitchenTimerdoesnotcontroloven
operations.Themaximumsettingonthe
KitchenTimeris9hoursand59 minutes.
Touch the TIMERpad.
[]
Touch the number pads until
[]
the amount of time gou want shows
in the displag. Forexample,to set
2 hoursand 45 minutes,touch 2, 4
and 5 inthat order. If gou make
a mistaketouch the TIMERpad
and beginagain.
[_ Touchthe STARTpad.
To Reset the Kitchen Timer
If the displag is still showing the time
remaining, goumag change it bg touching
the TIMERpad, then touch the number
pads until the time you want appears
in the display.
After touching theSTARTpad,SET
disappears;this tellsyou the timeis
counting down, although the display does
not change until oneminute has passed.
Secondswi!! not beshown in thedisplag
unti! the lastminute iscounting down.
[_ Whenthe KitchenTimer reaches:00,
the control willbeep 3 timesfollowed
bg onebeep everg 6seconds until
the TIMERpad istouched.
The6-second tone can be canceledby
following the steps in theSpeda! features
of your oven contro!sectionunder Tones
at the Endof a TimedCycle.
If the remaining time isnot in the displag
(clock,delag start or cooking time are in
the displag),recall the remaining time bg
touching the TIMERpad and then touching
the number pads to enter the new time
you want.
To Cancel the Kitchen Timer
Touchthe TIMERpad twice.
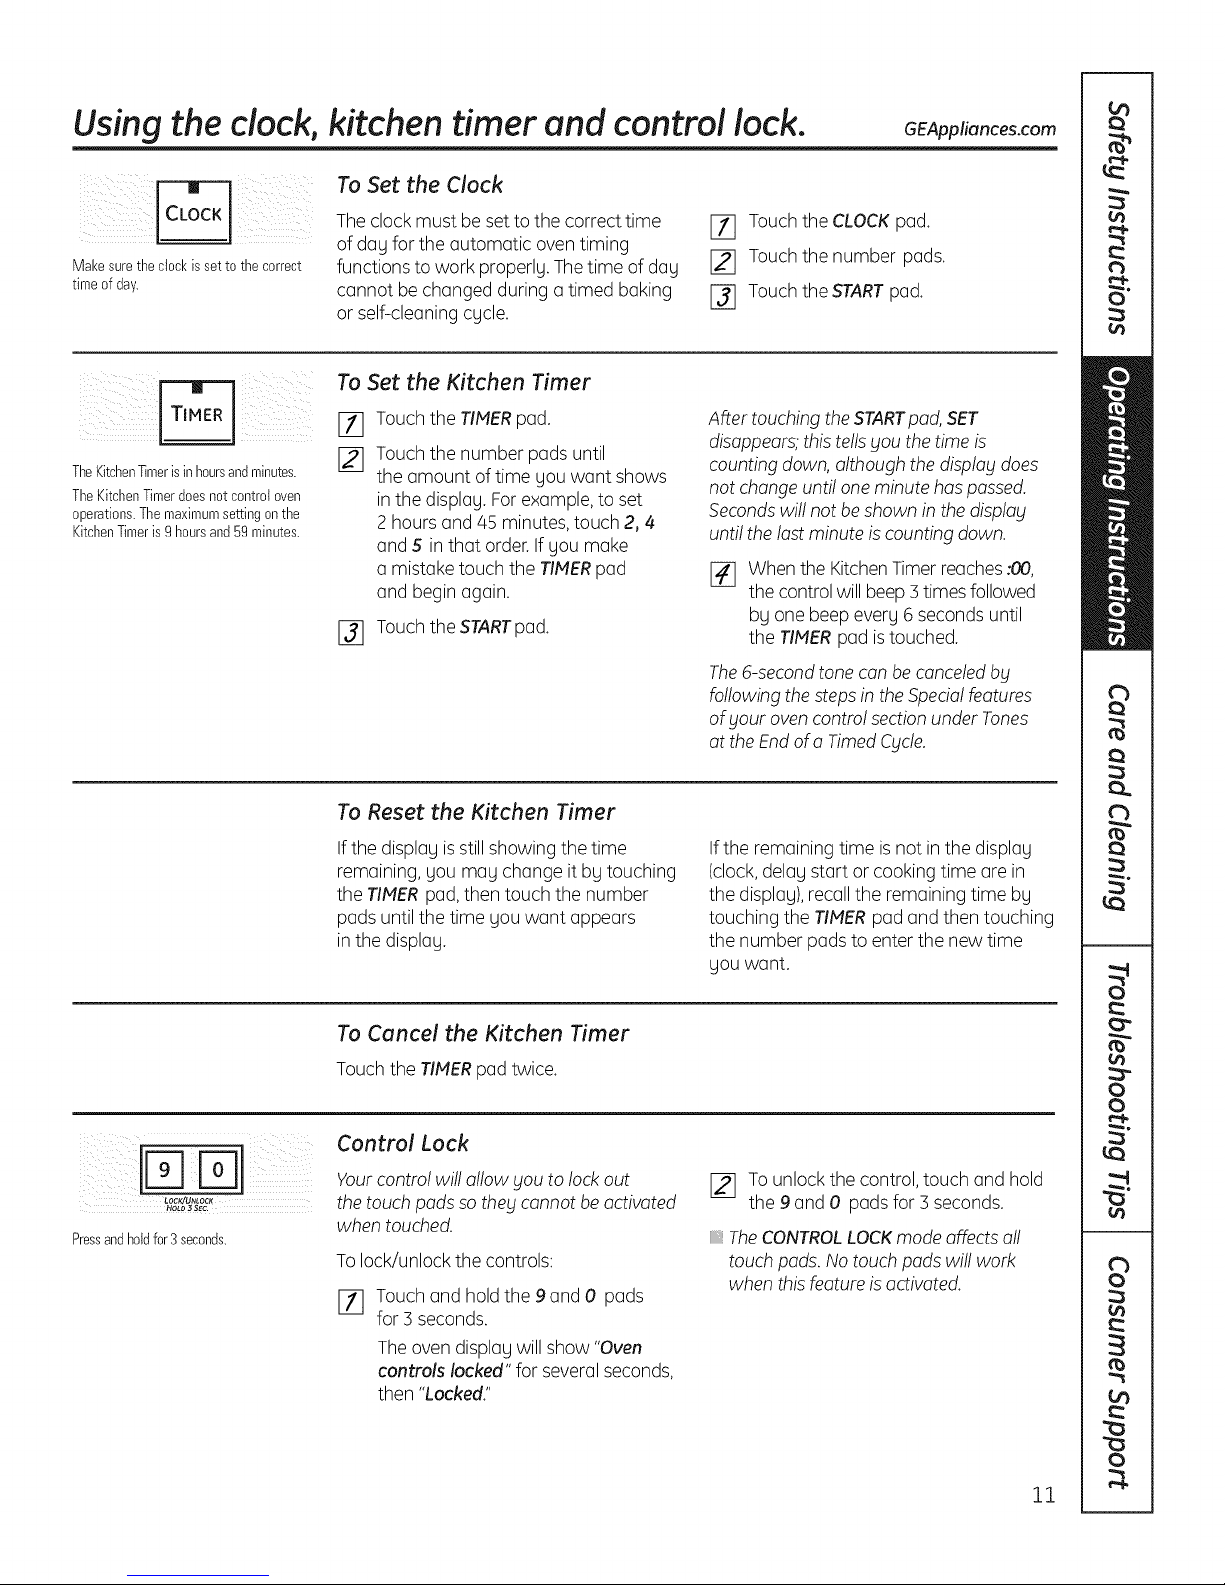
Control Lock
LOCK/U_WCK
HOLD3 SEC.
Pressandholdfor3seconds.
Yourcontro!wi!! allow you to lockout
the touch pads sothey cannot beactivated
when touched.
Tolock/unlock the controls:
[7] Touch and hold the 9 and 0 pads
for 3 seconds.
Theoven displag will show "Oven
controls locked" for severalseconds,
then "Locked."
[_ To unlock the control, touch and hold
the 9 and 0 pads for 3seconds.
TheCONTROLLOCKmodeaffects a!!
touch pads. No touch pads wi!! work
when this feature is activated.
11

Adjust the upper or lower oven thermostat--Do it gourselfl
You may find that your new oven cooks differently than the one it replaced. Use your new oven for a few
weeks to become more familiar with it. IfFou still think your new oven is too hot or too cold, you can adjust
the thermostat yourself.
Do not usethermometers,such as thosefound in grocery stores,to checkthe temperature settingof Four oven.
Thesethermometers may vary 20-40 degrees.
NOTE: This adjustment will only affect baking and roasting temperatures; it will not affect broiling or self-cleaning
temperatures. The adjustment will be retained in memory after a power failure.
To Adjust the Thermostat
[_ Touch the BROIL HI/LO and BAKE
pads at the same time until the
display shows SF.
FqFqPqFqFq
FqFqE]FqFq
Fsl
[_ Touch the BAKEpad.A two digit
number shows in the display.
Touch BAKEagain to alternate
between increasingand decreasing
the oven temperature.
To adjust the upper oven thermostat,
touch the upperOvenBAKE pad.
To adjust the lower oventhermostat,
touch the lower Oven BAKEpad.
The oventemperature can be
%
adjusted upto (+)35°Fhotter or (-)
35°Fcooler.Touch the number pads
the same way you read them.
Forexample,to change the oven
temperature 15°F,touch 1 and 5.
When you have made the adjustment,
touch the STARTpadto go backto
the time of day display. Useyour
ovenas you would normally.
The type of margarine will affect baking performance!
Host recipes for baking have been developed using high fat products such as butter or ma(garine (80% fat).
If Fou decrease the fat, the recipe may not give the same results as with a higher fat product.
Recipe failure can result if cakes, pies, pastries, cookies or candies are made with low fat spreads.
The lower the fat content of a spread product, the more noticeable these differences become.
Federalstandards require products labeled "margarine" to contain at least80% fat by weight. Lowfat spreads,on the other
hand, contain lessfat and more water. The highmoisture content of these spreads affects the texture and flavor of baked
goods. For best resultswith your old favorite recipes,use margarine,butter or stick spreads containing at least70%
vegetable oil.
12
Using the convection oven. GEAppliances.com
Convection Fan Operation
In a convection oven, a fan circulates hot air
_ i _ _1ill
over, under and around the food.
Thiscirculatinghot air isevenly distributed
throughout the oven.As aresult,foods are
even!gcookedand browned-often in less
time with convection heat.
Introduction
Theconvection ovencomes with two
convection baking modes:
Multi and 1 Rack:
MULTI--for convection cooking on more
than one rack. Touch the CONVECTION
BAKEpad andthen the 2 pad.
Seethe Multi-RackConvection
Bakingsectionbelow.
NOTE:To maximize cooking evenness,
the fan isdesignedto rotate inboth
directions,with a pausein between.
Thisisnormal.
Theconvection fan shuts offwhen
the oven door isopened.DONOTleave
the door openfor long periodsof time
while using convection cooking or you
may shorten the lifeof the convection
heating element.
1 RACK--for convection cooking on one
rack only. Touch the CONVECTIONBAKE
pad andthen the 1 pad.Seethe ! Rack
ConvectionBakingsection below.
Multi-rack position.
Multi-Rack Convection Baking
Because heated airiscirculated evenly
throughout the oven,foods can be baked
with excellent results using multiple racks.
Multi-rack baking may increase cook times
slightly for some foods but the overall result
istime saved.Cookies,muffins, biscuitsand
other quickbreadsgive very good results
with multi-rack baking.
1 Rack Convection Baking
Whenconvection baking with only ! rack,
useCONVECTIONBAKE1 RACKand follow
the rack positionsrecommendedin
the Usingthe ovensection.
Adapting Recipes...
Youcan useyour favorite recipes
in the convection oven.
Whenconvection baking,theAuto Recipe'"
Conversionfeatureautomatically reduces
the set regularbakingtemperature by
the recommended2S°F.SeeAuto Recipe'"
Conversioninthe SpecialFeaturessection.
Tocook food on more than one rack in
convection bake,useCONVECTIONBAKE
MULTI.
Formulti-rack baking, place the flat rack
in the highest (C)positionand the offset
rack inthe middle (B)position.
_,Idea!for baked foods cookedon ! rack.
Usepan sizerecommended.
,, Somepackage instructionsfor frozen
casserolesor main disheshave been
developedusing commercia!convection
ovens.For best resultsin this oven,
preheat the oven and use the
temperature on the package.
13
Using the convection
oven.
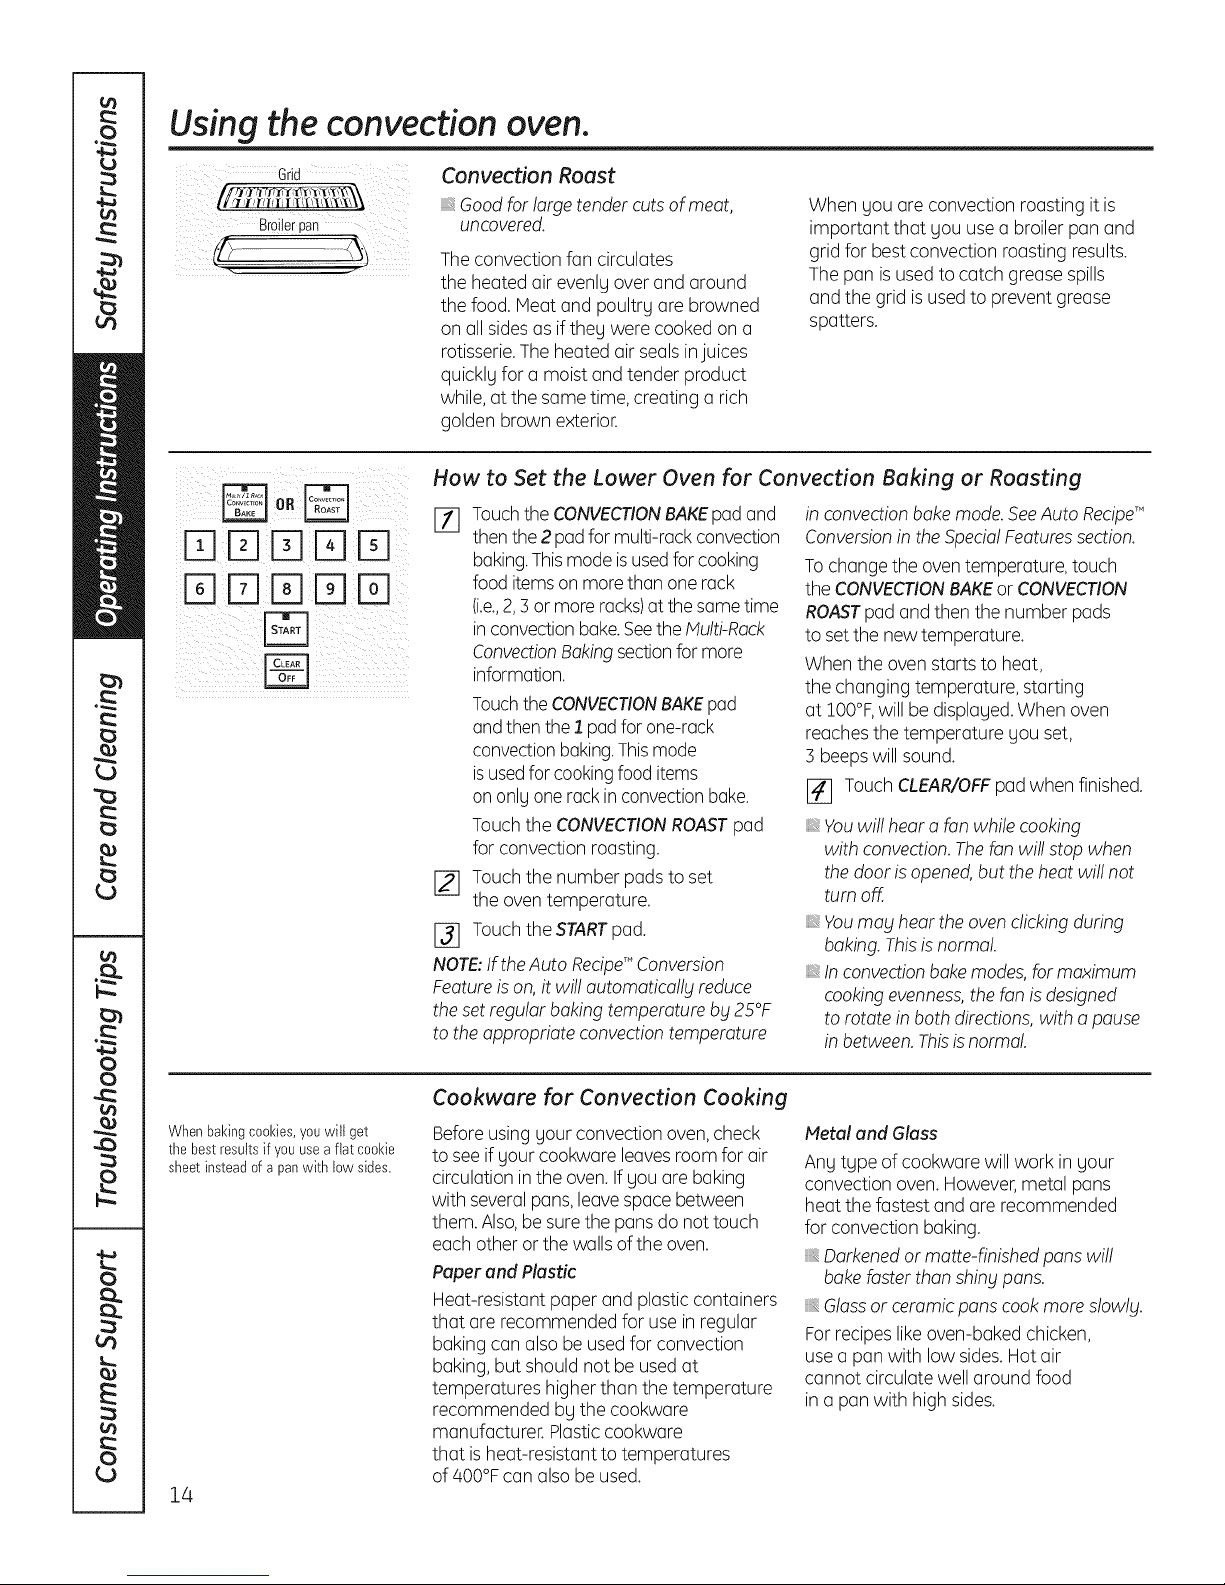
Grid
FqIZIE] E] E]
E]E]E] E]E]
B
Convection Roast
Good for largetender cutsof meat,
uncovered.
Theconvection fan circulates
the heated air evenly over and around
the food. Meatand poultry are browned
on allsidesas if they were cooked on a
rotisserie.The heated air seals injuices
quickly for a moist and tender product
while, at the same time, creating a rich
golden brown exterior.
How to Set the Lower Oven for Convection Baking or Roasting
I_] Touchthe CONVECTIONBAKEpad and
thenthe 2 pad for multi-rackconvection
baking.Thismode isusedforcooking
food itemson morethan one rack
(i.e.,2,3 or moreracks)at the sametime
in convectionbake.Seethe Multi-Rack
ConvectionBakingsectionfor more
information.
Touchthe CONVECTIONBAKEpad
andthen the 1 pad for one-rack
convectionbaking.Thismode
isusedfor cookingfood items
on only one rackin convectionbake.
Touch the CONVECTIONROASTpad
for convection roasting.
[_ Touch the number padsto set
the oven temperature.
I_ Touchthe STARTpad.
NOTE:IftheAuto Recipe_'Conversion
Featureison,it wil! automatically reduce
theset regular bakingtemperature by 2S°F
to the appropriate convectiontemperature
When you are convection roasting it is
important that you usea broiler pan and
grid for best convection roasting results.
Thepan isusedto catch greasespills
and the grid isusedto prevent grease
spatters.
in convection bakemode.SeeAuto Recipe_"
Conversionin the SpecialFeaturessection.
Tochangethe oventemperature, touch
the CONVECTIONBAKEor CONVECTION
ROASTpad and then the number pads
to set the new temperature.
When the oven starts to heat,
the changing temperature, starting
at !O0°F,will be displayed.When oven
reaches the temperature you set,
3 beepswill sound.
I_ Touch CLEAR/OFFpad when finished.
Youwi!! hear a fan while cooking
with convection.Thefan wi!!stop when
thedoor isopened,but theheat wi!!not
turn off.
Youmay hear the oven clicking during
baking.Thisis norma!.
_,In convectionbake modes,for maximum
cookingevenness,the fan isdesigned
to rotate in both directions,with apause
in between. Thisis normal
Whenbakingcookies,youwill get
thebest resultsif youusea flat cookie
sheetinsteadof a panwith low sides.
14
Cookware for Convection Cooking
Beforeusingyour convection oven,check
to seeif your cookware leavesroom for air
circulation inthe oven.If you are baking
with severalpans,leavespace between
them.Also,be surethe pansdo not touch
each other or the walls of the oven.
Paper end Plastic
Heat-resistant paperand plastic containers
that are recommended for use inregular
baking can also beusedfor convection
baking, but should not be usedat
temperatures higher than the temperature
recommended by the cookware
manufacturer. Plasticcookware
that is heat-resistant to temperatures
of 400°Fcan also beused.
Metal and Glass
Any type of cookware willwork in your
convection oven.However,metal pans
heat the fastest and are recommended
for convection baking.
Darkenedor matte-finished panswi!!
bake faster than shiny pans.
Glassor ceramicpans cook more slowly.
Forrecipes like oven-baked chicken,
usea panwith low sides.Hot air
cannot circulate well around food
in a pan with high sides.
Using the timed features for convection cooking. GEApp,onces.com
You will hear a fan while cooking with these features. The fan will stop when the door is opened, but the heat
will not turn off.
NOTE: Foods that spoil easily-such as milk, eggs, fish, stuffings, poultry and pork-should not be allowed
to sit for more than 1 hour before or after cooking. Room temperature promotes the growth of harmful bacteria.
Be sure that the oven light is off because heat from the bulb will speed harmful bacteria growth.
How to Set un Immediute Sturt end Automutic Stop
DDDDD
%DDDD
DDDD
%DDDD
B
The lower oven willturn on immediately and
cook fora selected length of time. At the end
of the cooking time, the oven will turn off
automatically.
Hake surethe clockshowsthe correct
time of day.
Touch the CONVECTIONBAKEpad
BE
and then the 2 pad for multi-rack
convection baking.This mode is used
for cooking food items on more than
one rack (i.e.,2,3 or more racks)at the
same time in convection bake.See
Multi-RackBaking section for more
information.
Touchthe CONVECTIONBAKEpad
and then the 1pad for one-rack
convectionbaking.Thismode isused
for cookingfood itemson onlyone rack
in convectionbake.
Touchthe CONVECTIONROAST pad
for convection roasting.
[21 Touch the numberpadsto set theoven
temperature.
F3l Touch the COOKTIMEpad.
NOTE:IfFour reciperequires preheating, you
may need to add additional time to the length
of the cooking time.
[_ Touchthe numberpadsto set
the desiredlengthofcookingtime.
Theminimumcookingtime you canset
is1 minute.Theoventemperature that
youset and thecookingtime that you
enteredwill beinthe display.
[_ Touch the STARTpad.
Theovenwill turn ON,and the display
willshowthe cookingtime countdown and
thechangingtemperaturestartingat lO0°R
(Thetemperaturedisplaywill start to change
oncetheoventemperaturereachesIO0°R)
Whenthe ovenreachesthetemperature
you set,3 beepswillsound.
NOTE:If the Auto Recipe" Conversion
Feature is on, it wi!! automatically reduce
theset regular bakingtemperature by 25°F
to the appropriate convectiontemperature
in convection bakemode.SeeAuto Recipe'"
Conversionin the Specia!Featuressection.
Theovenwill continueto cookfor the set
amount of time,then turn off automatically,
unlesstheWARHfeature was set. Seethe
How to Set the Oven for Warming section.
Afterthe oventurns off,the end-of-cycletone
willsound.
[_] Touchthe CLEAR/OFFpadto clear
the display ifnecessary.Remove
the foodfrom the oven.Remember,
eventhough the oventurnsoff
automatically,foodleft inthe oven
will continuecookingafter the oven
turns off.
15

Using the timed features for convection cooking.
How to Set a Delayed Start and Automatic Stop
DDD D
%DD D
DDD D
%DD D
DDD%D
%D% D
Thelower ovenwillturn onat thetime ofday
youset,cookfora specificlengthof time and
thenturnoff automaticalf£.
Makesurethe clockshowsthe correct
time of day.
Touch the CONVECTIONBAKEpad
%
and then the 2 pad for multi-rack
convection baking.This mode is used
for cooking food items on more than
one rack (i.e.,2,] or more racks)
at the same time inconvection bake.
SeeMulti-RackBakingsection for
more information.
Touchthe CONVECTIONBAKEpad
andthen the 1padfor one-rack
convectionbaking.Thismode is used
for cookingfood itemson only one rack
in convectionbake.
Touch the CONVECTIONROASTpad
for convection roasting.
[] Touchthe numberpadsto setthe oven
temperature.
r3] TouchtheCOOKTIMEpad.
NOTE:Ifgour reciperequirespreheating,£ou
ma£needto addadditionaltime tothelength
ofthecookingtime.
[_ Touchthe numberpadsto set
the desiredlengthofcookingtime.
Theminimumcookingtime you canset
is! minute.
Theoventemperature that youset and
the cookingtime that you enteredwill
be inthe display.
[_] Touchthe DELAYSTARTpad.
[_] Touchthe numberpadsto setthe time
ofday youwant the oventoturn on
andstart cooking.
[_ Touchthe STARTpad.
NOTE:An attentiontonewill soundifgou are
usingtimed bakingor roastingand do not
touchtheSTARTpad.
NOTE:Ifyou wouldliketo checkthetimes
you haveset,touch theDELAYSTARTpad
to checkthestart time you haveset,or touch
theCOOKTIHEpad to checkthelength
ofcookingtimeyou haveset.
Whenthe oventurns ONat thetime
of day you set, the displaywill show
thecookingtime countdown andthe
changingtemperature starting at IO0°F.
(Thetemperaturedisplaywill start to change
oncetheoventemperaturereachesIO0°R)
Whenthe ovenreachesthetemperature
you set,] beepswillsound.
NOTE:IftheAuto Recipe_'Conversion
Featureison,it wil! automatically reduce
theset regular bakingtemperature by 25°F
to the appropriate convectiontemperature
in convection bakemode.SeeAuto Recipe_"
Conversionin the Specia!Featuressection.
Theovenwill continueto cookfor the
programmed amount oftime,thenshut
off automatically,unlesstheWARMfeature
was set. Seethe How to Set the Oven
for Warming section.
Afterthe oventurns off,the end-of-cycletone
willsound.
16
[_] Touchthe CLEAR/OFFpadto clear
the display ifnecessary.Remove
the foodfrom the oven.Remember,even
though the ovenshutsoff automatically,
food left inthe oven will continue
cookingafter theoventurnsoff.
Using the convection oven. GEAppliances.com
How to Set the Lower Oven for Convection Roosting when Using
the Probe
Forbestresults when roastinglarge
turkeysand roasts,we recommend
usingthe probeincludedin the
convectionoven.
D %DD
Tochangetheoventemperature
duringthe ConvectionRoastcycle,
touchtheCONVECTIONROASTpad
andthen touchthe numberpadsto set
thenew desiredtemperature.
I_ Placethe oven rack inthe position
that centers the food between
the top and bottom of the oven.
Insertthe probe intothe meat.
Make sure it is pushed allthe way in.
[] Plugthe probe intothe outlet
in the oven.Make sure it is pushed
all the wag in.Closethe oven door.
[_ Touch the CONVECTIONROASTpad.
F41 Touch the number pads to set
the desiredoven temperature.
I-_ Touchthe PROBEpad.
I_ Touch the number padsto setthe
desiredinternal meat temperature.
NOTE:Themaximum internaltemperature
for the food that you can set is200°R
IZ] Touch the STARTpad.
Thedisplay will flash PROBEand the oven
control will signal ifthe probe isinserted
intotheoutlet,and you have not seta probe
temperature and pressedthe STARTpad.
When the oven starts to heat, the word
LO will be in the display.
Afterthe internaltemperature of the
meat reachesIO0°F,thechanging internal
temperature will be shown inthe display.
I_ When the internal temperature
of the meat reachesthe number
you have set,the probe and the oven
turn off and the oven control signals.
To stop the signal,touch the
CLEAR/OFFpad. Useanoven mitt
to remove the probe from the food.
Do not use tongs to pull on it-they
might damage it.
NOTE:Iftheprobe isremoved from
the ovenwhile probe cooking,the oven
wi!!not automatically turn off.
.AUTION. Toprevent
possibleburns,use anovenmitt to unplug
theprobe fromthe ovenoutlet.
NOTE:
Youwi!! hear a fan while cooking with this
feature.Thefan wi!!stop when thedoor
isopened,but the heat wi!!not turn off.
_,Youcan usethe KitchenTimer even
though you cannot usetimed oven
operations.
_,Neverleaveyour probe insidethe oven
during a self-cleaningcycle.
i Do not store the probe in the oven.
Probenot forusein Broilor Self-Clean
functions.
Fanon!y rotatesin one direction.
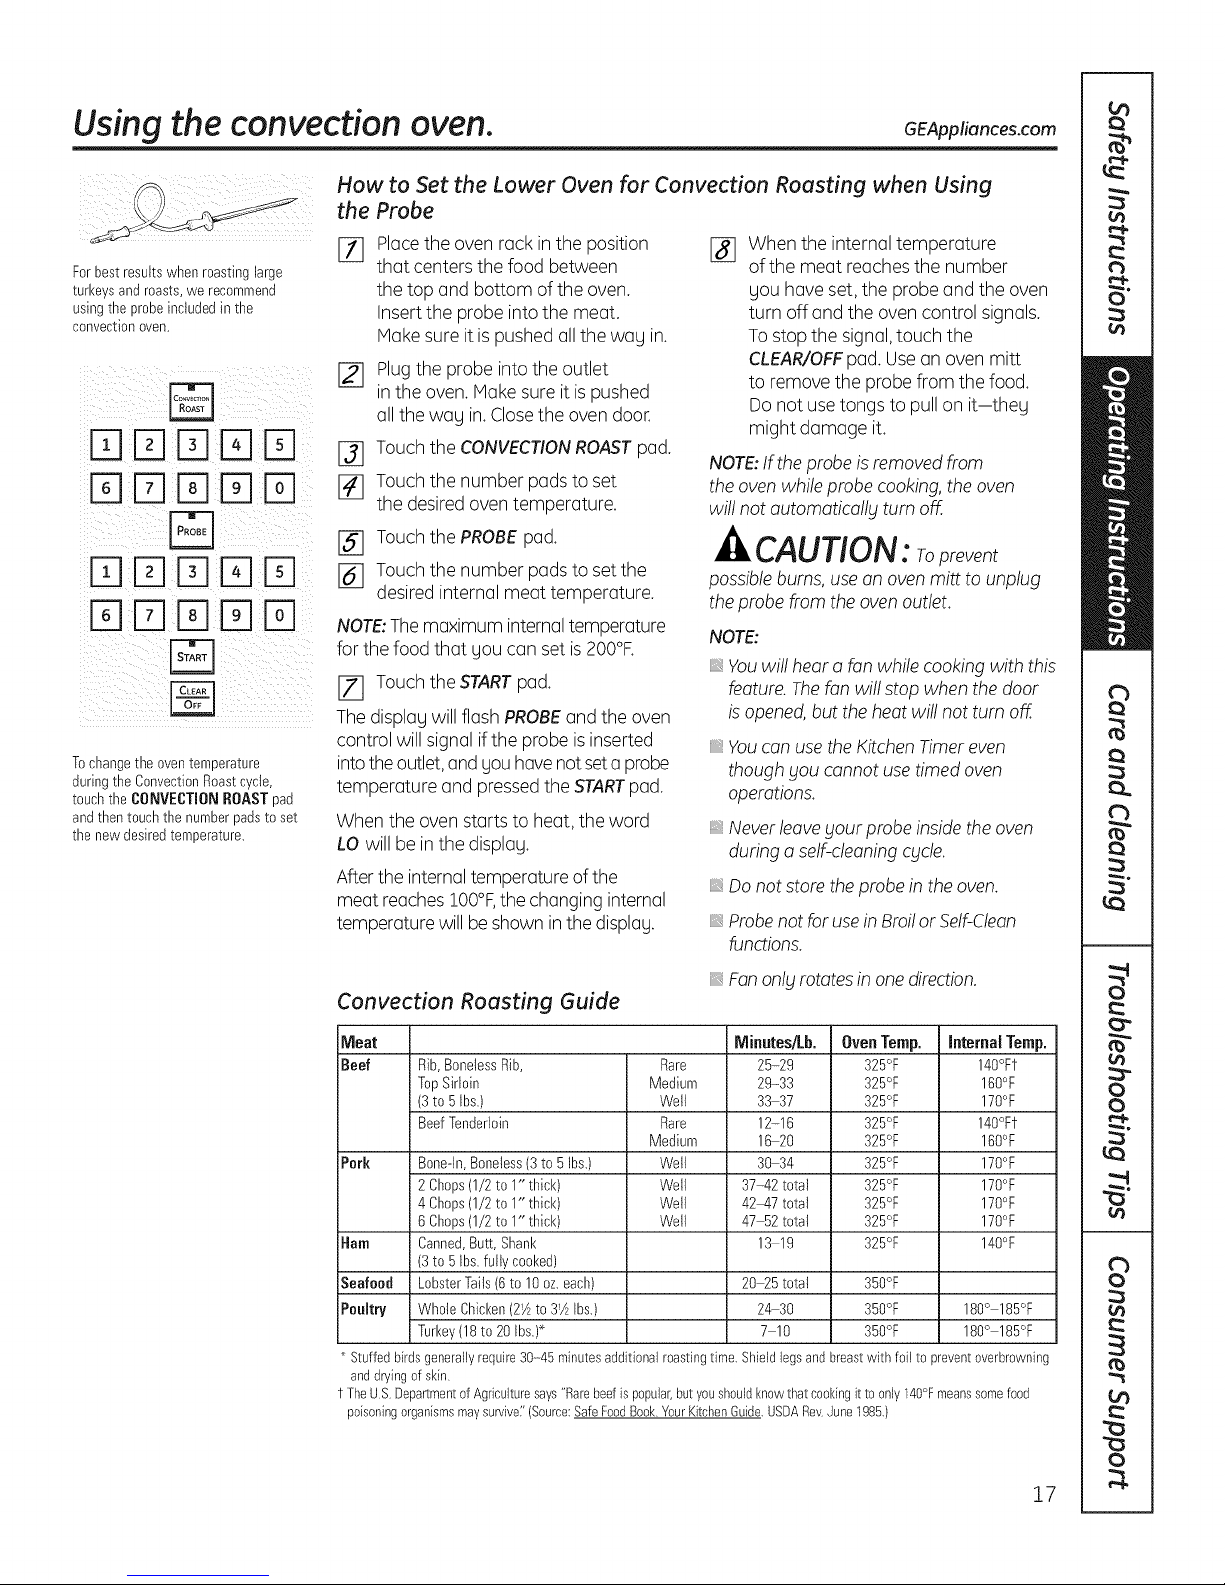
Convection Roosting Guide
Meat Minutes/Lb. Oven Temp. Internal Temp.
Beef Rib,BonelessRib, Rare 25-29 32B°F 140°F1-
TopSirloin Medium 29-33 325°F 160°F
(3to 5Ibs.) Well 33 37 325°F 170°F
BeefTenderloin Bare 12-16 325°F 140°F1-
Medium 16 20 325°F 160°F
Pork Bone-In,Boneless(3to 5Ibs.) Well 30 34 325°F 170°F
2Chops(1/2to 1" thick) WeN 37-42 total 325°F 170°F
4Chops(1/2to 1" thick) Well 42_47total 325°F 170°F
6Chops(1/2to 1" thick) Well 47 52total 325°F 170°F
liar. Canned,Butt, Shank 13 19 325°F 140°F
(3to 5Ibs.fully cooked)
Seafeod LobsterTails(6to 10oz.each) 20_5 total 350°F
Poultry Whole Chicken(2A to 3_AIbs.) 2_30 350°F 180° 185°F
Turkey(18to 20 Ibs.)* 7 10 350°F 180° 185°F
* Stuffed birds generally require30-45 minutes additional roasting time. Shield legs and breast with foil to prevent overbrowning
anddrying of skin
f The US Departmentof Agriculture says "Rare beef is popular,but youshould know that cookingit toonly 140°Fmeans some food
poisoning organismsmay survive:' (Source:SafeFoodBook Your Kitchen Guide.USDA Re_zJune 1985.)
17
Using the slow cook, pizza, warming and proofing features.
x
r--n r--_ r-m r-m141 I_ Touch the SLOW COOKpod once
.... for HISlowCook.
iiEElEEiEEEE[Et
ii%:EEEEFqIo-1/
il i
!YCi il¸i }/}}i}i}
How to Set the Lower Oven For Slow Cook
SlowCook is designed for long hours
of unattended cooking.
Tochange to LOSlow Cook,touch
the SLOWCOOKpod again.
[_ Touch the number podsto select
the desiredsetting - i for Beef,
2 for Poultrg,3 for Porkor 4for Stews.
Use 1-Beef if Sou ore unsure which
setting to use.
I_ Touch the number podsto set
the desired length of cooking time.
Forthe HIsetting, the cooking time
must be between 3 and 8 hours.
Forthe LOsetting, the cooking time
must be between 3 and 12 hours.
F4I Touch the STARTpod.
When the Slow Cookfunction has
completed, the oven will go into the Worm
mode. Displogwill sag"Cooking Complete
KeepingWorm." Thetotal time the oven
will be on (SlowCooktime plusWorm time)
is 12 hours.This isbecauseof the safetg
12-Hour Shutdown feature described
on page 22.
NOTE:Ira power outage occurswhile the
ovenis inSlow Cook,the ovenwi!!shut off.
Slow Cook Guide
Food
Beef
ChuckRoast
BeefRibs
Poultry
WholeChicken
ChickenPieces
Pork
iBonelessBlade
Roast
CountryStyle
PorkRibs
PorkChops
Soup
VegetableBeef
Soup
iChfl{
Quantity Position Setting (Hours)
3372 Ibs A Offset 1-Beef HI 5-6 hrs.
37241bs A Offset 1-Beef HI 3-4 hrs.
8 pieces
(approx.3Ibs.)
3 4 Ibs
3724 Ibs
4 8 lbs
4 quarts
4 quarts
4 Ibs
Rack Food Time
LO8-10 hrs.
LO6 8hrs.
A Offset
B Flat
A Offset
A Offset
A Offset
A Offset
A Offset
2-Poultry HI 4-5 hrs.
2-Poultry HI 3 4 hrs.
3-Pork HI 5-6 hrs.
3-Pork HI3-4 hrs.
3-Pork HI3-4 hrs.
4-Stew HI4-5 hrs.
4-Stew HI3-4 hrs.
LO7-9 hrs.
LO5 6hrs.
LO8-10 hrs.
LO6-8 hrs.
LO6 8hrs.
LO8-10 hrs.
LO6 8hrs.
Comments
Add 1/2cupliquid.
Placeribsin a singlelayer.
Add 1/2cupliquid.
Bestsubmergedunderasauce
to preventsurfacedrying.
Add 1/2 1 cupliquid.
Placeribsin a singlelayer.
Placechopsina singlelayer.
Makesure beefchunks
aresubmerged.
Submergebeans
to preventsurfacedrying.
Guideline Tips
Theslowcookprogramusesacomplexseries
oftemperaturecgclingto obtainthebest
results.Forthisreason,itisrecommended
thattheslowcookprogrambeallowedto run
withoutcancellingor restarting.Restarting
theslowcookfeaturewhileit is inprogress
mauresultin overcookedmeat.
Forjuicgandtendermeat,choosecuts
ofmeatsuchaschuckroastor a boneless
bladeroast.Leanercutsof meat,such
astop round,aredrierandmay need
additionalliquid.
Useonlgglassand ceramicdishes.
Metalpotsand panstendto transfer
theheatintothefoodstooquicklU.
Matchthequantitgoffoodtothesizepan.
Fillthepanabout3/4fullforbestresults.
Toolargeapotallowsthesteamto escape,
causingfoodsto drg out.
Alwagscoverthe potwith a lid
oraluminumfoil.
Awiderangeofrecipesmagbeused
intheslowcookfeature.Forbestresults
someadjustmentsmaUneedto bemade.
Forsmallersizedrecipes,beginchecking
atminimumtime.Forlargerecipesorwhen
doublingrecipes,foodsmaUbecooked
forlongerperiodsoftime.
Whentheslowcookfeaturecompletes,
theovenwillautomaticallUswitchto "warm"
mode.Ifadditionalslowcooktimeisdesired,
thiswarmmodemaUbeusedto obtain
theextratime.
EEEE
l-qEEEEEEEE
EEES171Fq171
18 I-_
How to Set the Upper Oven For Pizza
Adjust rack position for tupe of pizzatrau
being used(seechart).
I_ Touch the PIZZApad.
[_ Touch the number padsto select
i for fresh or2 for frozen pizza.
F_ Touch the number padsto set
the bakingtemperature.
[_ Touch the STARTpad.
Bakingtime is determined bu package
directions.
Type of PizzaTray Rack Position
Traysuppliedwith freshpizza B
Pizzaplaceddirectlyonrack B
Metaltray A
GEAppliances.cam
How to Set the Lower and Upper Ovens For Worming
The WARMfeature keepscooked Checkcrispnessafter 20-50 minutes.
foods hot. Add time as needed.
Thisfeature isnot designed to reheat
cold food.
Tousethe WARMfeature, touch the WARM
pad orthe WARM/PROOFpad once and
then the STARTpad.
Tousethe WARMfeature after Timed
Baking or Roasting,follow these steps:
Touch the mode of cooking that
%
gou want to use(BAKE,CONVECTION
BAKEMULTI,CONVECTIONBAKE
1 RACKor CONVECTIONROAST).
[_ Touch the number padsto set
the oven temperature.
13] Touch the COOKTIMEpad.
[] Touch the number padsto set
the desired length of cooking time.
[_ Touch the WARMor
the WARM/PROOFpad once.
IMPORTANT NOTES:
iiiilDiiii:_
Foodshould be kept hot inits cooking
container or transferredto a heat-safe
serving dish.
Formoist foods,cover them with
an oven-safelid or aluminum foi!.
iiiilDiiii:,
Friedor crisp foods do not need
to be covered,but can become
too dry if warmed for too long.
Repeatedopening of the door al!ows
the hot air to escapeand the food to coo!.
Allow extra timefor the temperature
insidethe ovento stabilize after adding
items.
With large loadsit may benecessary
to cover some of thecooked food items.
iiiiiiiiii:,
Removeserving spoons,etc.,
beforeplacing containersin theoven.
[_ Touch the STARTpad.
ToCrisp Stale Items
Placefood in low-sided dishes or pans.
Forbest results,placethe food items
in a single lager.Do not stack.
Leavethem uncovered.
Do not use plastic containers,
lidsor plasticwrap.
.,AUTION. /astic
containers,lidsor plasticwrap wil! melt
ifp!oced in the oven.Meltedplastic mo_l
not be removable and isnot coveredunder
gout warranty.
o
How to Set the Lower Oven for Proofing
Theproofingfeaturemaintainsowormenvironmentusefulforrisingbteost-leovenedproducts.
[] Placethe covered dough in the oven
on rackB or C.
NOTE:Forbest results,cover the dough
with a cloth or with greasedplastic wrap
(theplastic mabtneedto be anchored
underneath the containerso the oven
fan wi!!not blow it off).
[_ Touchthe WARM/PROOFpadtwice.
The display will read PrF (proof).
The oven interior light turns on
and remainson during proofing.
The proofing feature automaticallg
provides the optimum temperature
for the proofing process,and therefore
does not have atemperature adjustment.
[-_ Setthe TIMERfor the minimum
proof time.
[_ When proofing isfinished,touch
the CLEAR/OFFpad.
_,Toavoid lowering the oven temperature
and lengthening proofing time, do not
open the oven doorunnecessarilbl.
_,Checkbread products earlgto avoid
over-proofing.
NOTE:
Donotusetheproofingmodeforwarming
foodor keepingfoodhot.Theproofingoven
temperatureis not hotenoughtoholdfoods
atsafetemperatures.UsetheWarmfeature
to keephotfoodwarm.
Proofingwillnotoperatewhenovenisabove
125°K"HOT"willshowinthedisplobt. 19
Using the self-cleaning upper and lower ovens.
Before o Cleon Cycle
Soilon the front frame of the oven and
outside the gasket on the door will need
to be cleaned by hand. Cleanthese areas
with hot water,soap-filled steel-wool pads
or cleanserssuch as SoftScrub_.Rinsewell
with clean water and dry.
Do not clean the gasket. Thefiberglass
material of the oven door gasket cannot
withstand abrasion. It isessentialfor the
gasket to remain intact. If you notice it
becoming worn orfrayed, replace it.
Wipe up any heavyspilloverson the oven
bottom.
Hake surethe oven light bulbcover
isin placeand the oven light isoff.
ItvtPORTANT:The health of some
birds isextremely sensitiveto the fumes
given off during the self-cleaningcycle
of any oven. Hove birdsto another
well-ventilated room.
ii ¸ ............x
i i iii i i i
Wipe up heavysoil onthe ovenbottom.
NOTE:Do notattemptto lift the heating
element.Doingsocoulddamage
theelement.
We recommend venting your kitchenwith
an openwindow or usinga ventilation fan
or hoodduring the first self-clean cycle.
Removeany broiler pan, broilergrid,probe,
all cookware and any aluminum foilfrom
the oven.
NOTE:
If your oven isequipped with shiny,
silver-coloredoven racks,remove them
before you begin the self-cleancycle.
If your oven isequipped with gray
porcelain-coated oven racks,they
may be left in the oven during
the self-cleancycle.
How to Set the Upper/Lower Oven for Cleening
Theoven doors must be dosedond a!!
controlsset correctlgforthe cgcleto work
properlg.
[_ Touch the SELFCLEANHI/LO pad
once for a 5-hour cleantime or
twice for a ]-hour clean time.
A S-hour self-cleantime is
recommended for usewhen cleaning
small, contained spills.A self-clean
time of 5hours isrecommended
for a dirtier oven.
If a time other than 5hours or
F_
] hours isneeded,usethe number
pads and enter the desiredclean time.
Youcan change the cleantime to any time
between ] hoursand 5 hours,depending
on how dirty your oven is.
r3] Touch the START pad.
Theupper and lower oven doors lock
automatically. The display will show
the clean time remaining. Itwill not be
possibleto open the ovendoors until
the temperature drops below the lock
temperature and LOCKEDgoes off
in the control display.
When LOCKEDgoes off, you will beable
to open the doors.
Theword LOCKEDwill flash and
the word door will display ifyou set
the cleancycle and forget to close
the oven doors.
Tostop aclean cycle, touch the
CLEAR/OFFpad. When LOCKEDgoesoff,
indicating the ovens have cooled below
the locking temperature, you will be able
to open the doors.
Youcan set a clean cycle in both ovens
at the same time; however,they will not
self-clean at the sametime. Thelast oven
set will automatically delay its start until
the end ofthe first oven'sclean cycle.
When either oven isset to self-clean,both
oven doors will lock.Theovens cannot
be used when one of the ovens isset
to self-clean.
20
The oven doors must be closed and all controls set correctly for the cycle to work properly.
How to Deluy the Sturt of Cleuning
GEAppliances.com
@
DDD%D
%DD D
DDD D
%DD D
[Z] Touch the SELF CLEAN HI/LO pad
once for a 5-hour cleantime or
twice for a ]-hour clean time.
A ]-hour self-clean time is
recommended for usewhen cleaning
small, contained spills.A self-clean
time of 5hours isrecommended
for a dirtier oven.
If a time other than 5hours or
r_
] hours isneeded,usethe number
pads and enter the desiredclean time.
Youcan change the cleantime to
any time between ] hours and 5 hours,
depending on how dirty your oven is.
After u Cleun Cycle
Youmay notice some white ash
in the oven.Wipe it up with a damp cloth
after the oven cools.
If white spotsremain, remove them
with asoup-filled stee! woo! pod andrinse
thoroughly with a vinegar andwater
mixture.
Thesedepositsare usuallya saltresidue
that cannot be removed bg the clean cycle.
If the oven is not clean after one clean
cycle, repeat the cycle.
I_ Touchthe DELAYSTARTpad.
[_] Usingthe number pads,enter
the time of day you want the clean
cycle to start.
[_] Touchthe STARTpad.
Theupper and lower oven doors lock
automatically. The display will show
the start time. It will not be possibleto open
the oven doors until the temperature drops
below the lock temperature and LOCKED
goes off inthe control display.
When LOCKEDgoes off, you will beable
to open the doors.
You cannot set the oven for cooking
or another self-clean cycle until the oven
iscool enough for the door to unlock.
While the oven isself-cleaning, you can
touch the CLOCKpad to display the time
of day. Toreturn to the clean countdown,
touch the SffLFCLEANHI/LO pad.
Ifthe racks become hard to slide,
apply a smallamount of cooking oil
to a papertowel and wipe the edges
ofthe oven rackswith the papertowel.
21
 Loading...