

GE Appliances Profile PFWS4605, Profile PFWS4600, Profile PFWH4405, Profile PFWH4400 Owner's Manual & Installation Instructions
Page 1
GEAppliances.corn
Safety Instructions .............. 2,s
Operating Instructions ........ 4-16
Control Panel ......................... 4
Control Settings ................... 5-10
Features .......................... 10, 11
Loading and Using the Washer .... 12-15
Available Accessories ................. 15
Smart Appliance ..................... 16
PFWS4605
PFWS4600
PFWH4405
PFWH4400
Installation Instructions ...... 17-22
preparing to Install Your Washer ...... 17
Location of Your Washer ............. 18
Rough-In Dimensions ................. 18
Unpacking Your Washer .............. 19
Electrical Requirements .............. 19
Grounding Requirements ............. 19
Drain Requirements .................. 20
Water Supplg Requirements .......... 20
Installing the Washer .............. 20, 21
Replacement Parts ................... 21
Adaptive Vibration Control ............ 22
Troubleshooting Tips ......... 23-28
Consumer Support
Warrantg (U.S.)....................... 27
Warrantg (Canada) ................... 28
Consumer Support ................... 29
Laveuses
Profile
La section fran(;aise commence _ la page 30
Lavadoras
Profile
La secci6n en espa_ol empieza en la p6gina 55
ENERGYSTAR
As an ENERGYSTAR@ partner,
GEhas determined that this
product meets the ENERGYSTAR@
guidelines for energg efficiencg.
Write the model and serial
numbers here:
Model #
Serial #
You can find them on a label on the
sideof the washer.
49-90391 06/16/10 GE
Page 2

IMPORTANT SAFETY INFORMATION.
READ ALL INSTRUCTIONS BEFORE USING.
_,WARNING! _o__o__o_,_ informationin_,i_mon.o_m._b__o,ow_,_omin,mi__ _i_,
of fire or explosion, electric shock, or to prevent property damage, personal injury or
loss of life.
The instructions in this manual and all other literature included with this washer are
not meant to cover every possible condition and situation that may occur. Good, safe
practices and caution MUSTbe applied when installing, operating and maintaining any
appliance.
WATERHEATERSAFETY
Undercertain conditions, hydrogengas may beproduced in a water heater that has not been usedfor two weeks
or more. Hydrogengascan beexplosiveunder thesecircumstances.
Ifthe hot water has not been usedfor two weeksor more, preventthe possibilityof damage or injury by
turning on all hot water faucets and allowing them to run for several minutes. Dothis before usingany electrical
appliancewhich isconnected to the hot water system.Thissimple procedurewill allow anybuilt-up hydrogen
gasto escape.Sincethe gas isflammable, do not smokeor usean openflame or appliance during thisprocess.
PROPERINSTALLATION
Thiswasher must beproperly installedand located inaccordance with the Installation Instructions beforeit is used.
'_Installor store where itwill not beexposed ,_Properlyground washerto conformwith all governing
to temperaturesbelowfreezingor exposed codesand ordinances.Followdetailsin Installation
to the weather, which couldcause permanentdamage Instructions.
and invalidatethe warranty.
YOURLAUNDRYAREA
[] Keepthe area underneath and around your
appliances free of combustible materials such as
lint, paper, ragsand chemicals.
[] Do not leave the washer door open.An open door
could entice children to hang on the door or crawl
insidethe washer.
[] Closesupervision isnecessary ifthis appliance is
used by or near children. Donot allow children to
play on, with or insidethis or any other appliance.
Page 3
Use this
appliance
only for its
intended
purpose as
describedin
this Owner's
Manual.
GEAppliances.com
WHEN USINGTHEWASHER
[] Never reach into washer while it is moving. [] Never attempt to operate this appliance
Wait until the machine has completely stopped if it is damaged, malfunctioning, partially
before opening the door. disassembled, or has missing or broken parts,
Donot mix chlorine bleach with ammonia
or acids such as vinegar and/or rust remover.
Mixing different chemicals can produce a toxic gas
which may cause death.
Donot wash or dry articles that have been cleaned
in, washed in, soaked in or spotted
with combustible or explosive substances (such
as wax, oil, paint, gasoline, degreasers, dry-
cleaning solvents, kerosene, etc.)which may ignite
or explode. Do not add these substances to the
wash water. Do not use or place these substances
around your washer or dryer during operation.
The laundry process can reduce the flame
retardancg of fabrics. To avoid such a result,
carefully follow the garment manufacturer's
wash and care instructions.
To minimize the possibility of electric shock, unplug
this appliance from the power supply
or disconnect the washer at the building's
distribution panel by removing the fuse or
switching off the circuit breaker before attempting
any maintenance or cleaning. NOTE:Pressing the
power button does NOT disconnect the appliance
from the power supply.
including a damaged cord or plug.
[]
Do not slam the washer door closed. Do not try
to force the door open when locked (LOCKED
indicator ON).This could result in damage to
the washer.
[]
The washer is equipped with an electrical overload
protector. The motor will stop
if it becomes overheated. The washer will
automatically restart after a cool-down
period of up to 2 hours, if the washer
has not been manually turned off
during this time.
WHEN NOT IN USE
[]
Turn off water faucets to relieve pressure
on hoses and valves and to minimize leakage
if a break or rupture should occur. Check
the condition of the fill hoses; they should
be replaced every 5 years.
[]
Before discarding a washer, or removing it
from service, remove the washer door to prevent
children from hiding inside.
[] Do not attempt to repair or replace any part of this
appliance unless specifically recommended
in this Owner's Manual, or in published user-repair
instructions that you understand and have the
skills to carry out.
[] Do not tamper with controls.
READANDFOLLOWTHISSAFETYINFORMATIONCAREFULLY.
SAVE THESE INSTRUCTIONS
Page 4
About the washer control panel.
Youcan !ocateyour mode!number on a labe!onthe sideof the washer.
^,_WARNING! _o_d_ _h__,_ko_,_,_/_,__ho_k,o__nj__o_o_, _od_h_,_o_
SAFETY INSTRUCTIONS before operating this appliance.
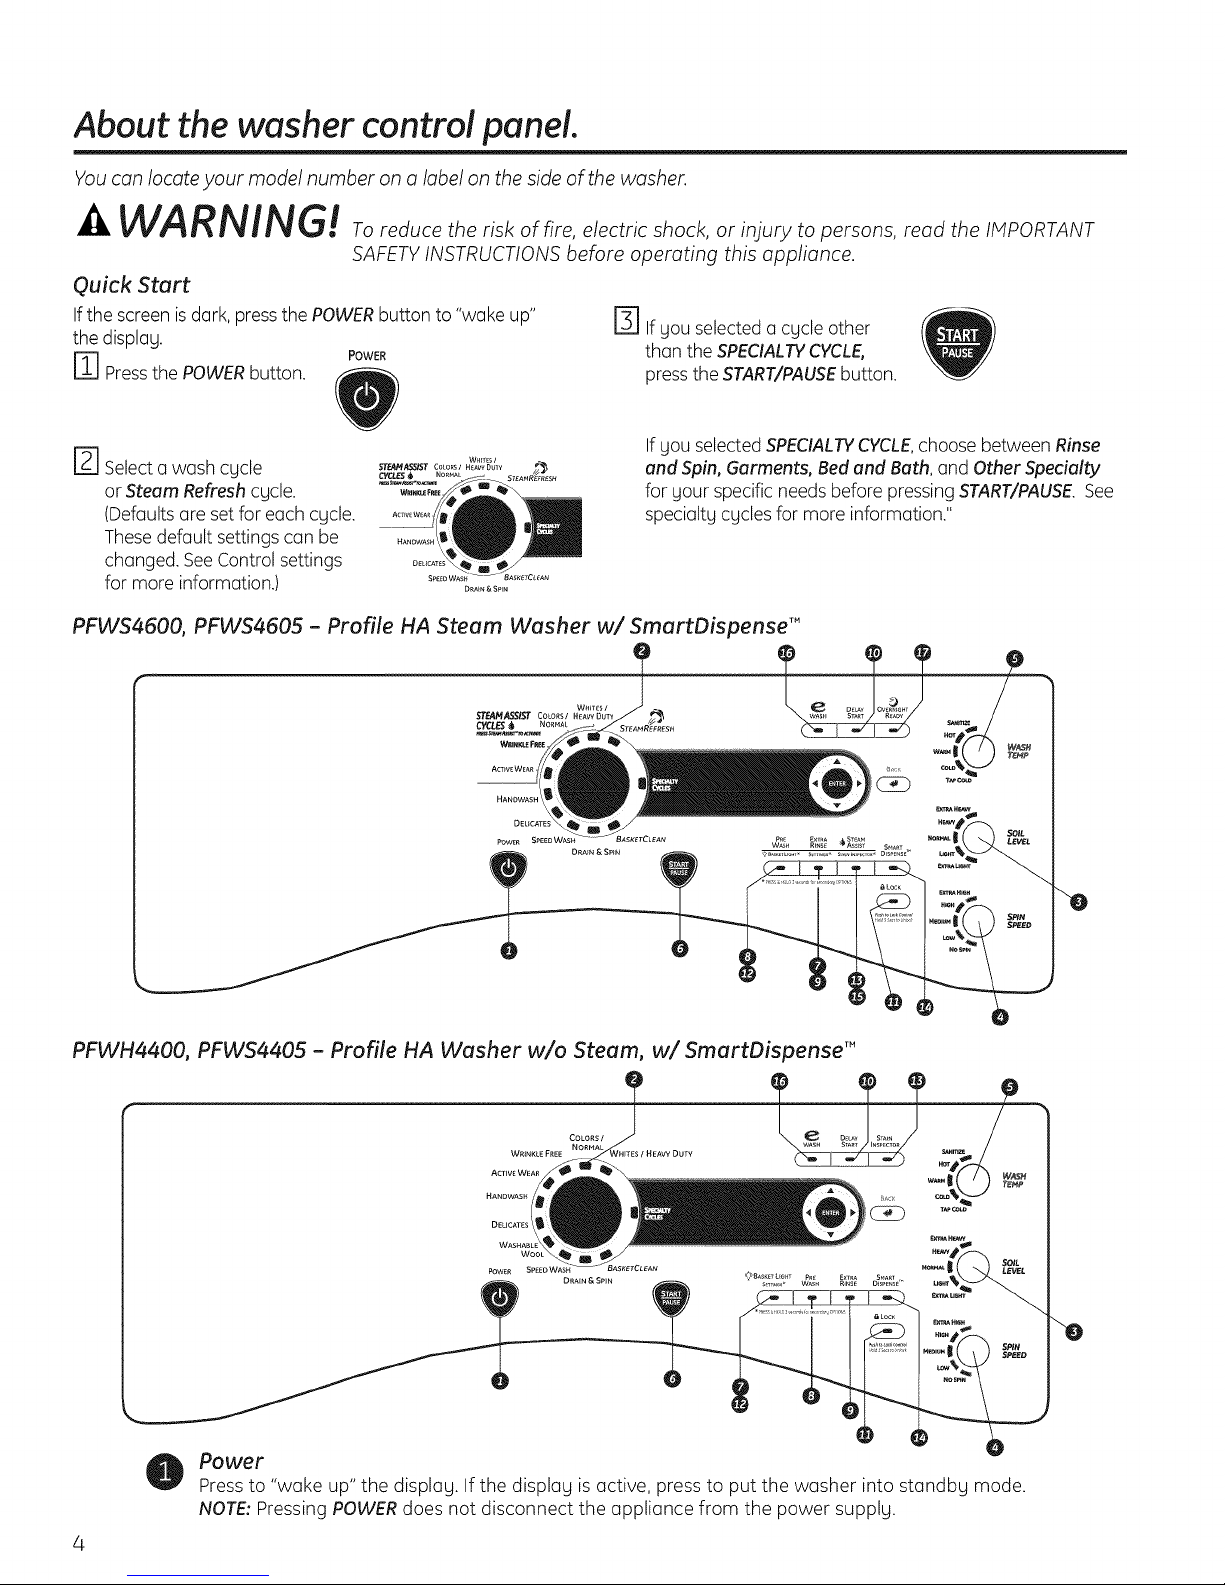
Quick Start
Ifthe screenisdark, pressthe POWERbutton to "wake up" [] If you selected acycle other
the display.
E] Pressthe POWERbutton, press the START/PAUSEbutton.
[27 Selecta wash cycle
or Steam Refresh cycle.
(Defaultsare set for each cycle.
Thesedefault settings can be
changed. SeeControl settings
for more information.)
PFWS4600, PFWS4605 - Profile HA Steam Washer w/ SmartDispense TM
POWER than the SPECIALTYCYCLE,
If you selectedSPECIALTYCYCLE,choose between Rinse
and Spin, Garments, Bed and Bath, and Other Specialty
for your specific needs before pressing START/PAUSESee
specialty cycles for more information."
PFWH4400, PFWS4405 - Profile HA Washer w/o Steam, w/SmartDispense TM
Power
Pressto "wake up" the display. If the display is active, press to put the washer into standby mode.
NOTE:Pressing POWERdoes not disconnect the appliance from the power supply.
"-e
Page 5
Control settings. GEApplionces.com
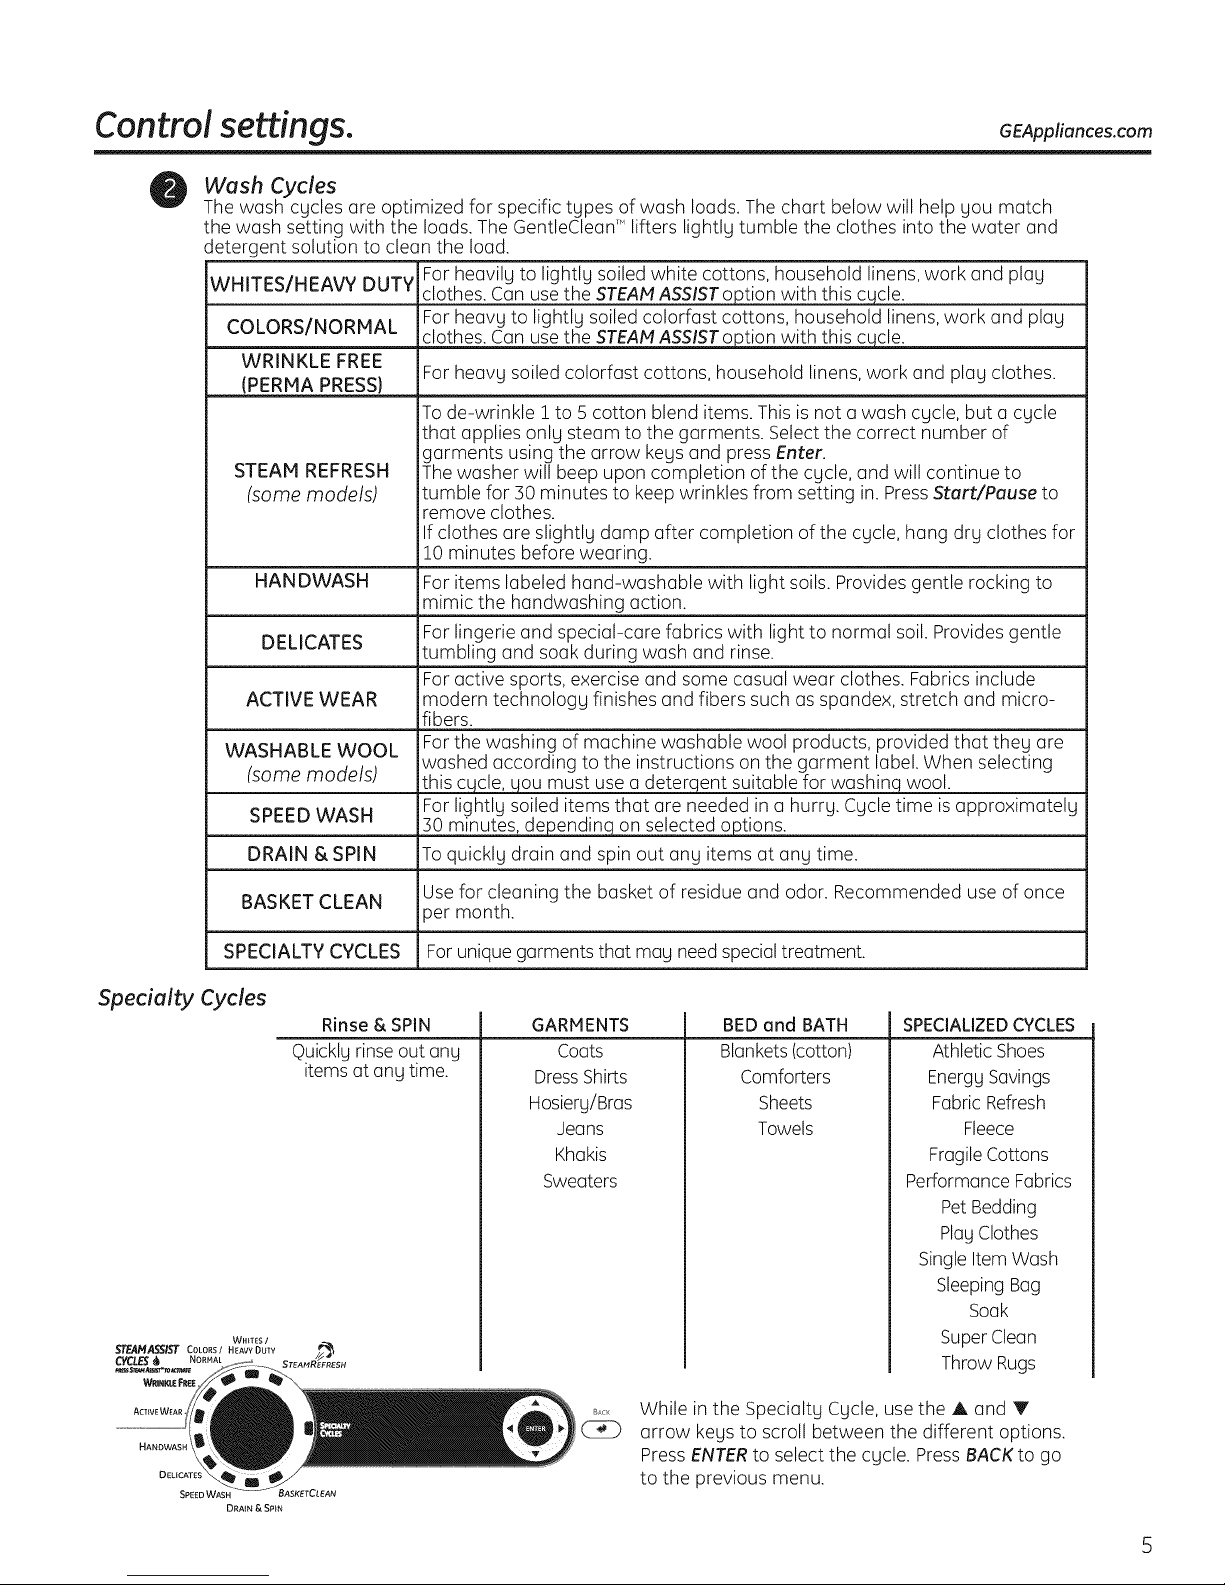
Wash Cycles
The wash cycles are optimized for specific types of wash loads. The chart below will help you match
the wash setting with the loads. The GentleClean_ lifters lightly tumble the clothes into the water and
detergent solution to clean the load.
WHITES/HEAVY DUTY clothes. Can usethe STEAMASSISToption with this cNcle.
COLORS/NORMAL
WRINKLE FREE
(PERMA PRESS)
STEAM REFRESH
(some models)
HANDWAS H
DELICATES
ACTIVE WEAR
WASHABLE WOOL
(some models)
SPEEDWASH
DRAIN & SPIN
For heavily to lightly soiled white cottons, household linens, work and play
For heavy to lightly soiled colorfast cottons, household linens, work and play
clothes. Can usethe STEAMASSISToption with this cqcle.
For heavy soiled colorfast cottons, household linens, work and play clothes.
To de-wrinkle ! to 5 cotton blend items. This is not a wash cycle, but a cycle
that applies only steam to the garments. Select the correct number of
garments using the arrow kegs and press Enter,
The washer will beep upon completion of the cycle, and will continue to
tumble for 30 minutes to keep wrinkles from setting in. PressStart/Pause to
remove clothes.
If clothes are slightly damp after completion of the cycle, hang dry clothes for
10 minutes before wearing.
For items labeled hand-washable with light soils. Provides gentle rocking to
mimic the handwashing action.
For lingerie and special-care fabrics with light to normal soil. Provides gentle
tumbling and soak during wash and rinse.
For active sports, exercise and some casual wear clothes. Fabrics include
modern technology finishes and fibers such as spandex, stretch and micro-
fibers.
For the washing of machine washable wool products, provided that they are
washed according to the instructions on the garment label. When selecting
this cqcle, qou must use a deterqent suitable for washinq wool.
For lightly soiled items that are needed in a hurry. Cycle time is approximately
30 minutes, depending on selected options.
To quickly drain and spin out any items at any time.
BASKET CLEAN
SPECIALTY CYCLES For unique garments that may need specialtreatment.
Specialty Cycles
Use for cleaning the basket of residue and odor. Recommended use of once
per month.
Rinse & SPIN
Quickly rinse out any
items at any time.
GARMENTS BED and BATH
Coats
DressShirts
Hosiery/Bras
Jeans
Khakis
Sweaters
While in the Specialty Cycle, usethe A and Y
arrow kegs to scroll between the different options.
Press ENTERto select the cycle. PressBACKto go
to the previous menu.
Blankets (cotton)
Comforters
Sheets
Towels
SPECIALIZEDCYCLES
Athletic Shoes
Energy Savings
Fabric Refresh
Fleece
FragileCottons
Performance Fabrics
PetBedding
PlayClothes
Single Item Wash
SleepingBag
Soak
SuperClean
Throw Rugs
Page 6
Control settings.
Soil Level
Changingthe SOILLEVELincreases or decreases the wash time to remove different amounts of soil.
To change the SOILLEVEL,pressthe SOILLEVELbutton until gou have reachedthe desired setting.Youcan choose
between Extra Light, Light,Normal, Heavgor Extra Heavgsoil.
Spin Speed
Changingthe SPINSPEEDchanges the final spin speedof the cgcles.Alwags follow the garment manufacturer's care
label when changing the SPINSPEED.
To change the SPINSPEED,pressthe SPINSPEEDbutton until gou have reached the desiredsetting. Youcan choose
between No Spin,Low, Medium, High or Extra HighSpin. Higher spin speeds are not available oncertain cgcles,such
as Delicates.
Higherspin speedsremove more water from the clothes and will help reduce drgtime, but mag alsoincrease the
possibilitgof setting wrinkles on some fabrics.
Wash Temp
Adjust to selectthe proper water temperature for the wash cgcle.Theprewash and rinsewater isalwags cold to help
reduce energg usageand reducesetting of stains andwrinkles.
Follow the fabric manufacturer's care labelwhen selecting the wash temperature.
To change the wash temperature, pressthe WASHTEMPbutton until gou have reached the desired setting.Youcan
choose between Tap Cold,Cold,Warm, Hot orSanitize.TheSanitizedwash temperature isnot available on certain
cgcles,such as Delicates.
When selecting the Sanitizewash temperature, the washer increasesthe water temperature to sanitizeand kill more
than 99% of mang common bacteria found in home laundrg.Thesanitizewash temperature is onlg availableon
the Whites/Heavg Dutg wash cgcle.Forbest results,select the heavg soilsetting when using the Sanitizewash
temperature setting.
NOTE:Thefirst !0 secondsof the wash fill is alwags cold.Thisfeature assistsin conditioning the fabric and
preventing stains from setting on garments.
START/PAUSE
Pressto start a wash cgcle. If the washer is running, pressing it oncewill pausethe washer and unlock the door.
It will take a few secondsfor the door to unlock after pressing PAUSE.Pressagain to restart the wash cgcle.
NOTE:Ifthe washer ispaused and the cgcle is not restarted within 15 minutes,the current wash cgcle will be
cancelled.
NOTE:In some cgclesthe washer will drain first, then unlock the door when it ispaused.
NOTE:Thewasher performs automatic sgstem checks after pressingthe STARTbutton. Water will flow in 45 seconds
or less.You mag hear the door lockand unlock before water flows;this isnormal.
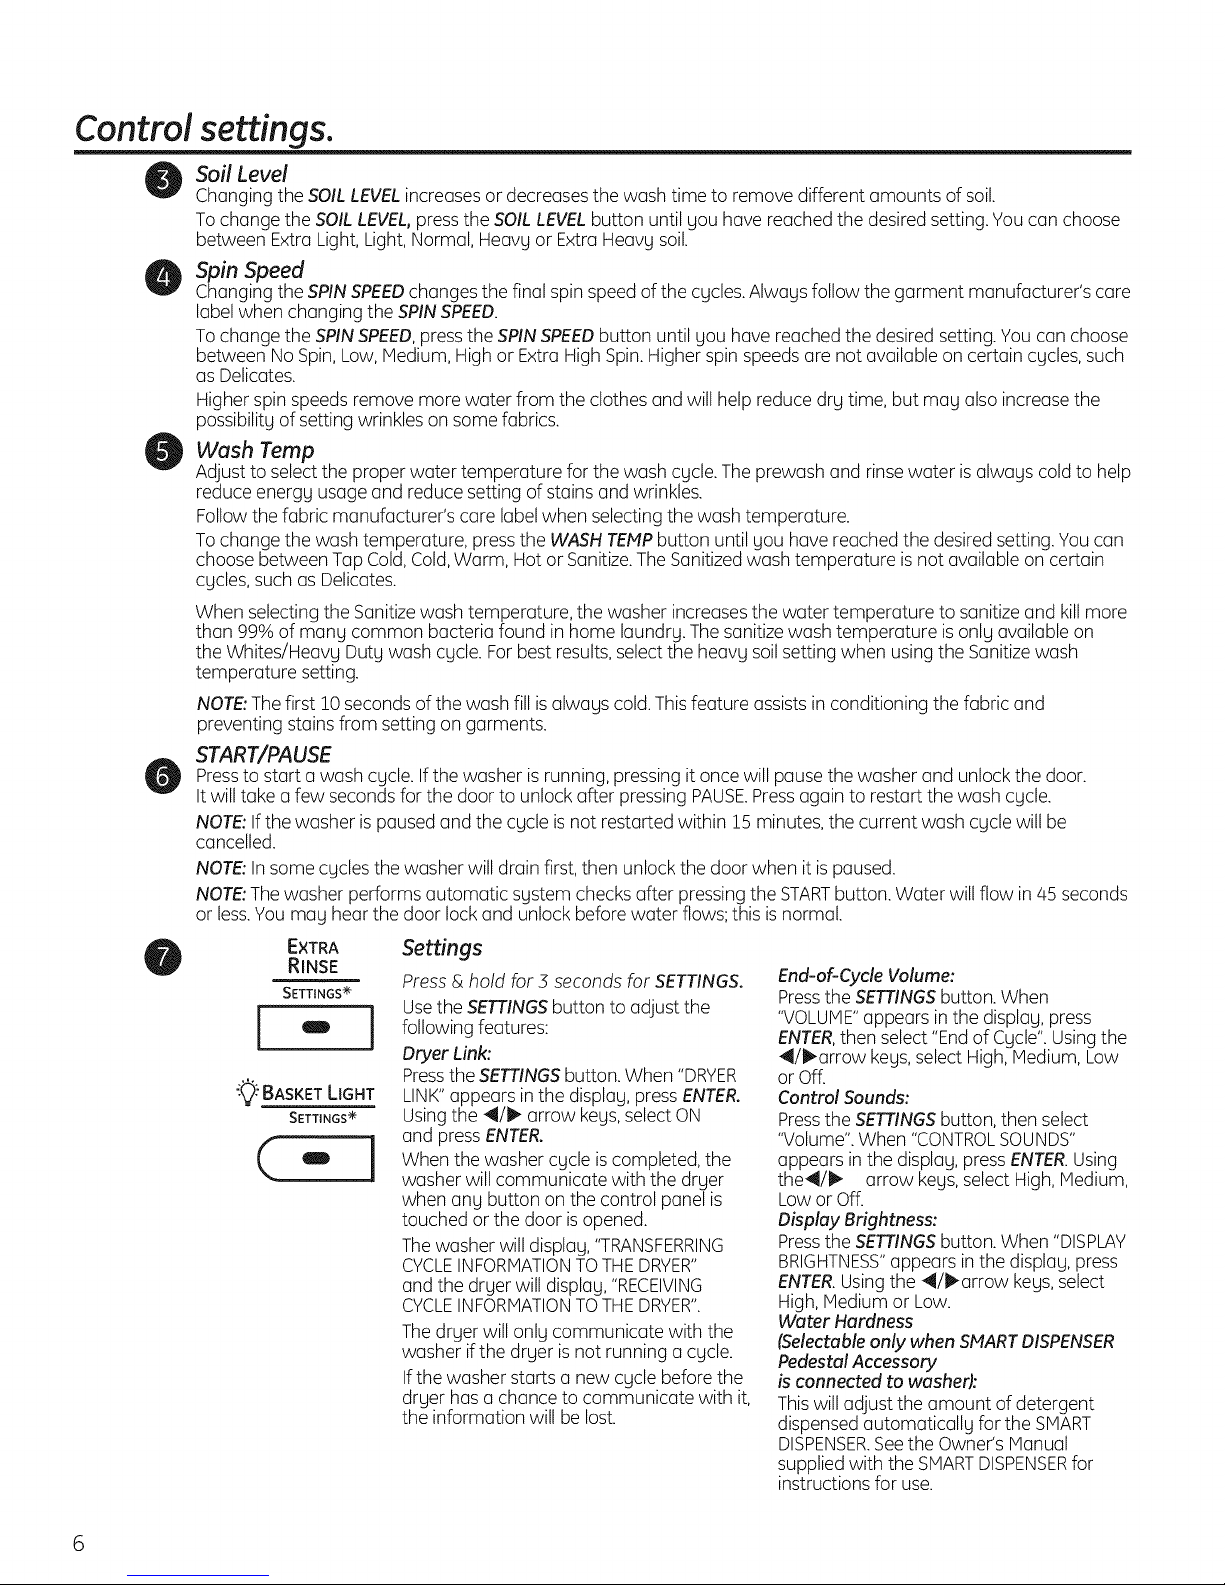
EXTRA Settings
RINSE
SETTINGS ÷
I"1
_ BASKETLIGHT
SETTINGS ÷
("1
Press& hold for 3 seconds for SETTINGS.
Usethe SETTINGSbutton to adjust the
following features:
Dryer Link:
Pressthe SETTINGSbutton. When "DRYER
LINK"appears in the displag, pressENTER.
Usingthe 4/i_ arrow kegs,selectON
and pressENTER.
When the washer cgcle is completed, the
washer will communicate with the drger
when ang button onthe control panel is
touched or the door is opened.
Thewasher will displag,"TRANSFERRING
CYCLEINFORMATIONTOTHEDRYER"
and the drger will displag,"RECEIVING
CYCLEINFORMATIONTOTHEDRYER".
Thedrger will onlg communicate with the
washer if the drger is not running acgcle.
If the washer starts a new cgcle before the
drger hasa chance to communicate with it,
the information will be lost.
End-of-Cycle Volume:
Press the SETTINGS button. When
"VOLUME"appears inthe displag, press
ENTER,then select "End of Cgcle". Using the
_l/l_arrow kegs, select High, Medium, Low
or Off.
Control Sounds:
Press the SETTINGS button, then select
"Volume". When "CONTROLSOUNDS"
appears in the displag, press ENTER. Using
the41/_ arrow kegs, select High, Medium,
Lowor Off.
Display Brightness:
Press the SETTINGS button. When "DISPLAY
BRIGHTNESS"appears in the displag, press
ENTER. Using the 41/ll_arrow kegs, select
High, Medium or Low.
Water Hardness
(Selectable only when SMART DISPENSER
Pedestal Accessory
is connected to washefl:
This willadjust the amount of detergent
dispensed automaticallg for the SMART
DISPENSER.See the Owner's Manual
supplied with the SMARTDISPENSERfor
instructions for use.
Page 7
GEAppliances.com
PRE
WASH
"_ BASKET LIGHT ÷
(-i
PRE
WASH
i-I
EXTRA
RINSE
SETTINGS ÷
I
EXTRA
RINSE
i
DELAY
START
O
[
!
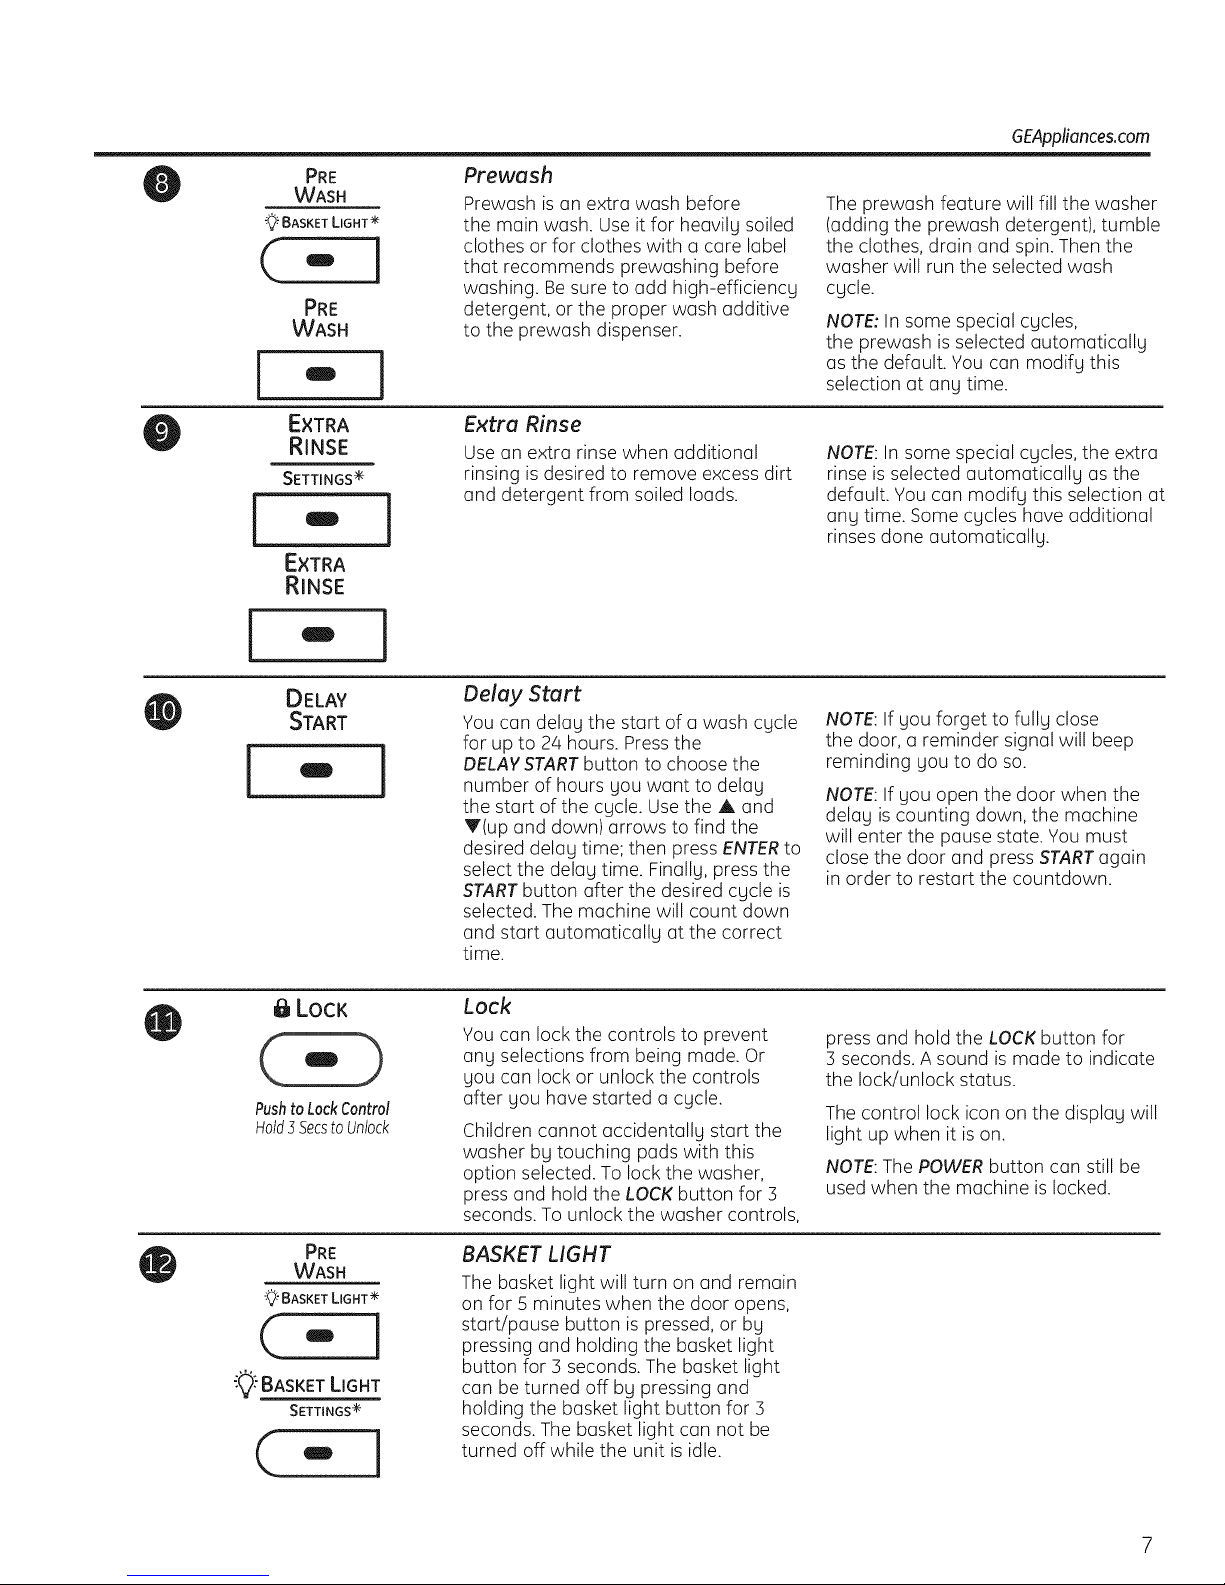
Prewash
Prewash is an extra wash before
the main wash. Use it for heavilg soiled
clothes or for clothes with a care label
that recommends prewashing before
washing. Be sure to add high-efficiencg
detergent, or the proper wash additive
to the prewash dispenser.
Extra Rinse
Use an extra rinse when additional
rinsing isdesired to remove excess dirt
and detergent from soiled loads.
Delay Start
You con delog the start of o wash cgcle
for up to 2/4hours. Pressthe
DELAYSTARTbutton to choose the
number of hours gou want to delag
the start of the cgcle. Use the A and
Y(up and down) arrows to find the
desired delog time; then press ENTERto
select the delag time. Finallg, press the
STARTbutton after the desired cgcle is
selected. The machine will count down
and start automaticallg at the correct
time.
The prewash feature will fill the washer
(adding the prewash detergent), tumble
the clothes, drain and spin.Then the
washer will run the selected wash
cgcle.
NOTE:In some special cgcles,
the prewash is selected automaticallg
as the default. You can modifg this
selection at ang time.
NOTE:In some special cgcles, the extra
rinse is selected automaticallg as the
default. You can modifg this selection at
ang time. Some cgcles have additional
rinses done automaticallg.
NOTE:If gou forget to fullg close
the door, a reminder signal will beep
reminding gou to do so.
NOTE:If gou open the door when the
delag is counting down, the machine
will enter the pause state. You must
close the door and press STARTagain
in order to restart the countdown.
LOCK
(..)
PushtoLockControl
Hold5SecstoUnlock
PRE
WASH
_" BASKET LIGHT ÷
(--1
_9:BASKETLIGHT
SETTINGS ÷
(..
Lock
You can lock the controls to prevent
ang selections from being made. Or
gou can lock or unlock the controls
after gou have started a cgcle.
Children cannot accidentallg start the
washer bg touching pads with this
option selected. To lock the washer,
press and hold the LOCK button for 3
seconds. To unlock the washer controls,
BASKET LIGHT
The basket light will turn on and remain
on for 5 minutes when the door opens,
start/pause button is pressed, or bg
pressing and holding the basket light
button for 3 seconds. The basket light
can be turned off bg pressing and
holding the basket light button for 3
seconds. The basket light can not be
turned off while the unit is idle.
press and hold the LOCKbutton for
3 seconds. A sound is made to indicate
the lock/unlock status.
The control lock icon on the displag will
light up when it is on.
NOTE:The POWERbutton can still be
used when the machine is locked.
Page 8

Control settings.
',_iSTEAM
ASSIST
STAIN INSPECTOR ÷
-1
STAIN
INSPECTOR
You have the following stains available to choose from:
Stain Inspector
PFWS4600,4605 Press & hold for 3
seconds for STAIN INSPECTOR.
The STAIN INSPECTORfeature allows you
to indicate what stains are on the
garments in your load. This feature can be
used with any wash cycle.
To use STAIN INSPECTOR:
1. Selectthe wash cycle.
2. Pressthe STAININSPECTORbutton
(the button will light up when it is on).
3. Check the wash instructions on your
garment.
F'r'e:_i::_EHTER t.o Cor_t.i.r_ue
4. Press the ENTER button to continue.
5. Usethe A and Y arrows to find the
desired stain category,
6. Pressthe ENTER button to select the
stain category,
7. Usethe A and Y arrows to select the
desired stain.
OUTDOOR
Clay
Grass
Mud/Dirt
Rust Iron
Tree Sap
PERSONAL
Blood
Perspiration
Urine/Feces
Mouthwash
Vomit
8. Pressthe ENTERbutton to select the stain,
9. Your selected stain will appear on the display.
10. Pressthe STARTbutton to start the cycle.
NOTE:To turn off STAININSPECTORor to select a
different stain, press the STAININSPECTORbutton
again.
COSMETICS
Lipstick/LipBalm
Deodorant
Lotions
Makeup (water-based)
Oil(hair/mineral)
SCHOOL/OFFICE/HOME LAUNDRY
Adhesive Tape
Ballpoint Ink
Glue (white common)
PencilHark
Correction Fluid
BEVERAGES FOOD/COOKING
GrapeJuice
Coffee/Tea
FruitJuice Other
Milk/Dairy
Wine (red/white)
Dingy White Socks
Collar/Cuff Soil
Dye Transfer
FabricSoftener
Yellowing
NOTE:Prewash is selected automatically
as the default for some stains. When selected
automatically, the PREWASHbutton will light.
For optimum stain removal, it is recommended
to add high-efficiency detergent or proper wash
additive to the prewash dispenser. You can turn
off the prewash option ifyou do not want to add
the prewash to the cycle.
Butter/Margarine
Cooking/Vegetable Oil
Chocolate
Tomato Based
BarbecueSauce
OIL/GREASE/WAX
Motor Oil/Lube
Ointment/Salve
CandleWax
Crayon
Chapstick_
Page 9
GEAppliances.com
SMART
DISPENSE TM
,,_STEAM
ASSIST
STAIN INSPECTOR ÷
i-i
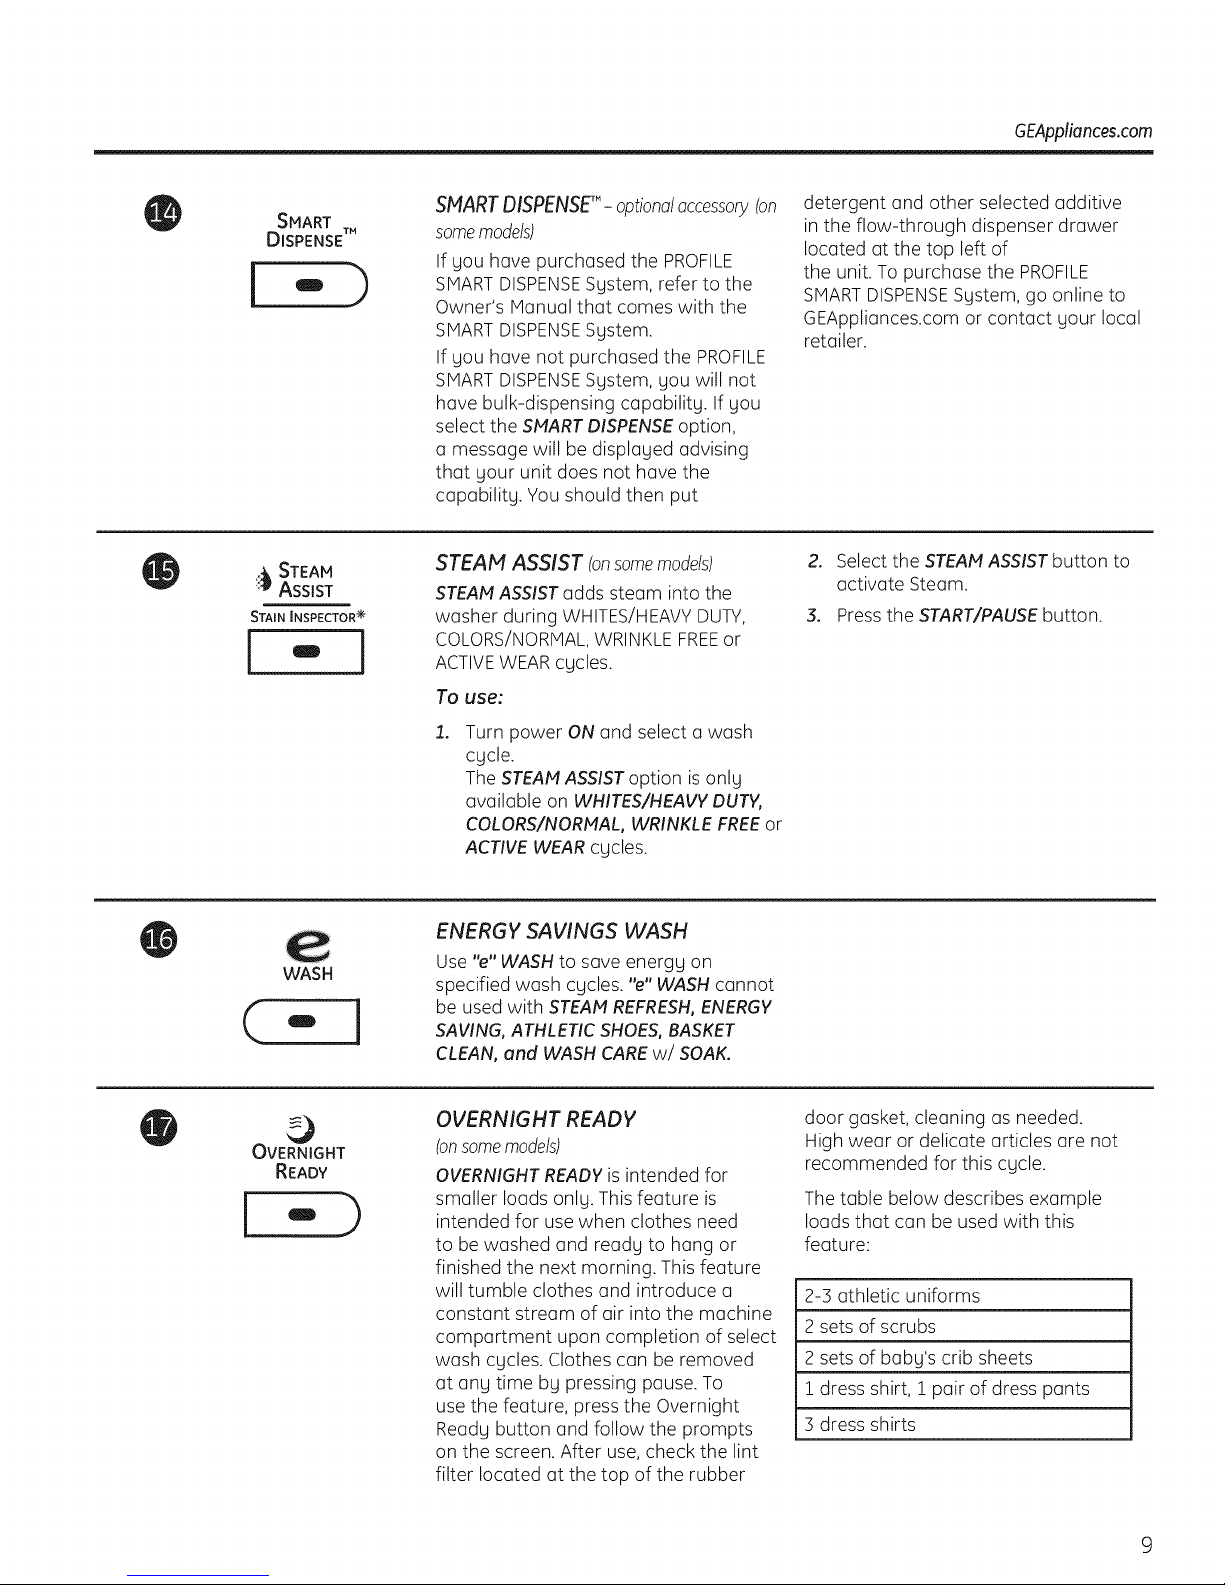
SMART DISPENSE"- optionalaccessory(on
somemodels)
If you have purchased the PROFILE
SMARTDISPENSESystem, refer to the
Owner's Manual that comes with the
SMARTDISPENSESystem.
If you have not purchased the PROFILE
SMARTDISPENSESystem, you will not
have bulk-dispensing capability. If you
select the SMARTDISPENSEoption,
a message will be displaged advising
that your unit does not have the
capabilitg. You should then put
STEAM ASSIST (onsomemodels)
STEAMASSISTadds steam into the
washer during WHITES/HEAVYDUTY,
COLORS/NORMALWRINKLEFREEor
ACTIVEWEARcycles.
To use:
.
Turn power ON and select a wash
cgcle.
The STEAHASSISToption is onlg
available on WHITES/HEAVYDUTY,
COLORS/NORMAL,WRINKLE FREEor
ACTIVEWEAR cgcles.
detergent and other selected additive
in the flow-through dispenser drawer
located at the top left of
the unit. To purchase the PROFILE
SMARTDISPENSESgstem, go online to
GEAppliances.com or contact gout local
retailer.
2. Select the STEAM ASSIST button to
activate Steam.
3. Press the START/PAUSE button.
WASH
OVERNIGHT
READY
ENERGY SAVINGS WASH
Use "e" WASH to save energg on
specified wash cgcles. "e" WASH cannot
be used with STEAM REFRESH, ENERGY
SAVING, ATHLETIC SHOES, BASKET
CLEAN, and WASH CARE w/ SOAK.
OVERNIGHT READY
(onsomemodels)
OVERNIGHTREADYis intended for
smaller loads only. This feature is
intended for use when clothes need
to be washed and ready to hang or
finished the next morning. This feature
will tumble clothes and introduce a
constant stream of air into the machine
compartment upon completion of select
wash cycles. Clothes can be removed
at any time by pressing pause. To
use the feature, press the Overnight
Ready button and follow the prompts
on the screen. After use, check the lint
filter located at the top of the rubber
door gasket, cleaning as needed.
High wear or delicate articles are not
recommended for this cgcle.
Thetable below describes example
loads that can be used with this
feature:
2-3athletic uniforms
2 sets of scrubs
2 sets of baby's crib sheets
1 dress shirt, 1 pair of dress pants
3 dress shirts
Page 10
Control settings.
Overnight Ready
Lint Filter
oO_OoOoO
oOoOoOoO
%°°°°°°°
.oOoO°°o_
OoO°O°O_O
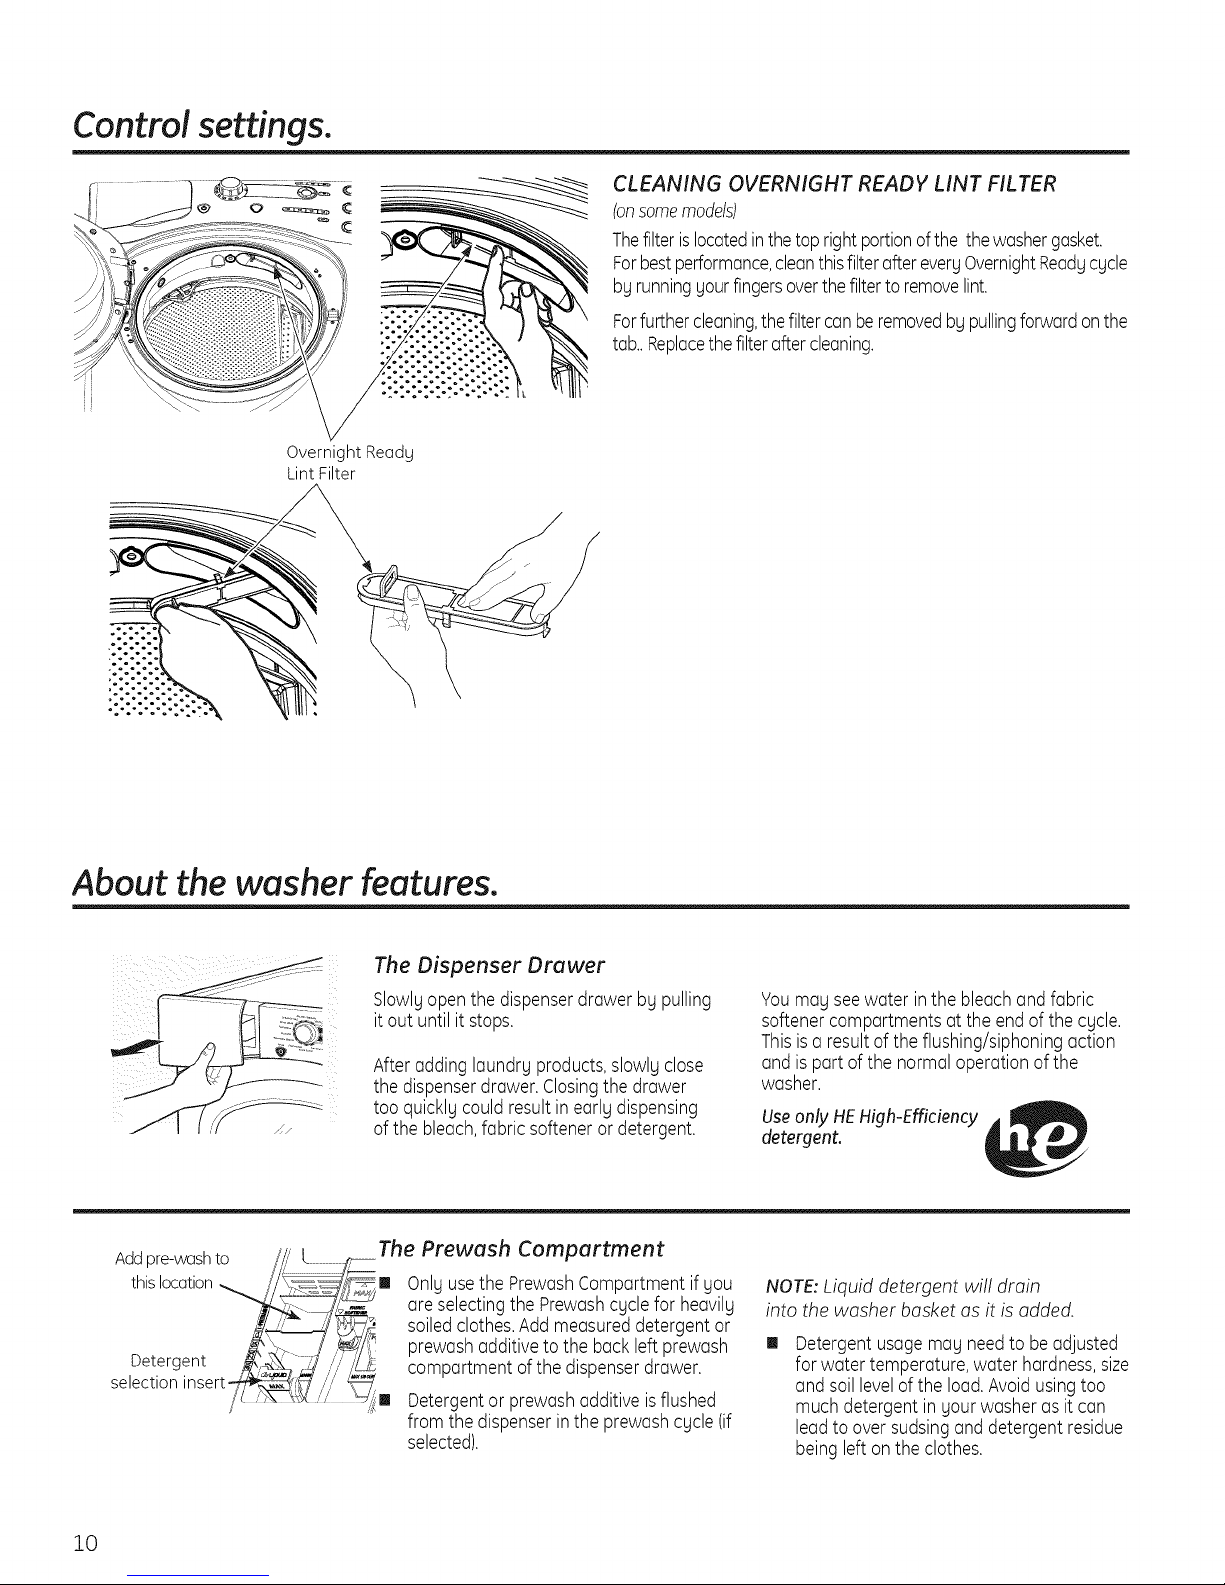
CLEANING OVERNIGHT READY LINT FILTER
(onsomemodels)
Thefilteris locatedinthe top right portionofthe the washergasket.
Forbestperformance,cleanthisfilteraftereveryOvernightReadycycle
by runningyourfingersoverthefilterto removelint.
Forfurthercleaning,thefiltercanberemovedbypullingforwardonthe
tab..Replacethefilteraftercleaning.
About the washer features.
The Dispenser Drawer
Slowlyopen the dispenser drawer by pulling
it out until it stops.
After adding laundry products,slowly close
the dispenserdrawer.Closingthe drawer
too quickly could resultin early dispensing
of the bleach,fabric softeneror detergent.
Addpre-washto /// L The Prewash Compartment
thislocation,,_ _ @ I Onlyusethe PrewashCompartmentifyou
Detergent _"'
selection insert __/'/'
_ /
___ areselectingthe Prewashcyclefor heavily
__ _._ soiledclothes.Add measureddetergentor
_ _,_-._,,":_ prewashadditiveto the backleft prewash
_/_ compartmentof thedispenserdrawer.
I Detergentor prewashadditive is flushed
from the dispenserinthe prewashcycle (if
selected).
Youmay see water inthe bleachandfabric
softenercompartments atthe end of the cycle.
Thisisa resultof the flushing/siphoningaction
and is portof the normaloperationof the
washer.
UseonlyHEHigh-Efficiency
detergent.
NOTE: Liquid detergent will drain
into the washer basket as it is added.
m
Detergentusagemay needto be adjusted
for watertemperature,water hardness,size
and soil level of the load.Avoid using too
much detergent inyour washeras itcan
lead to oversudsinganddetergent residue
being left onthe clothes.
10
Page 11
About the washer features. GEAppliances.com
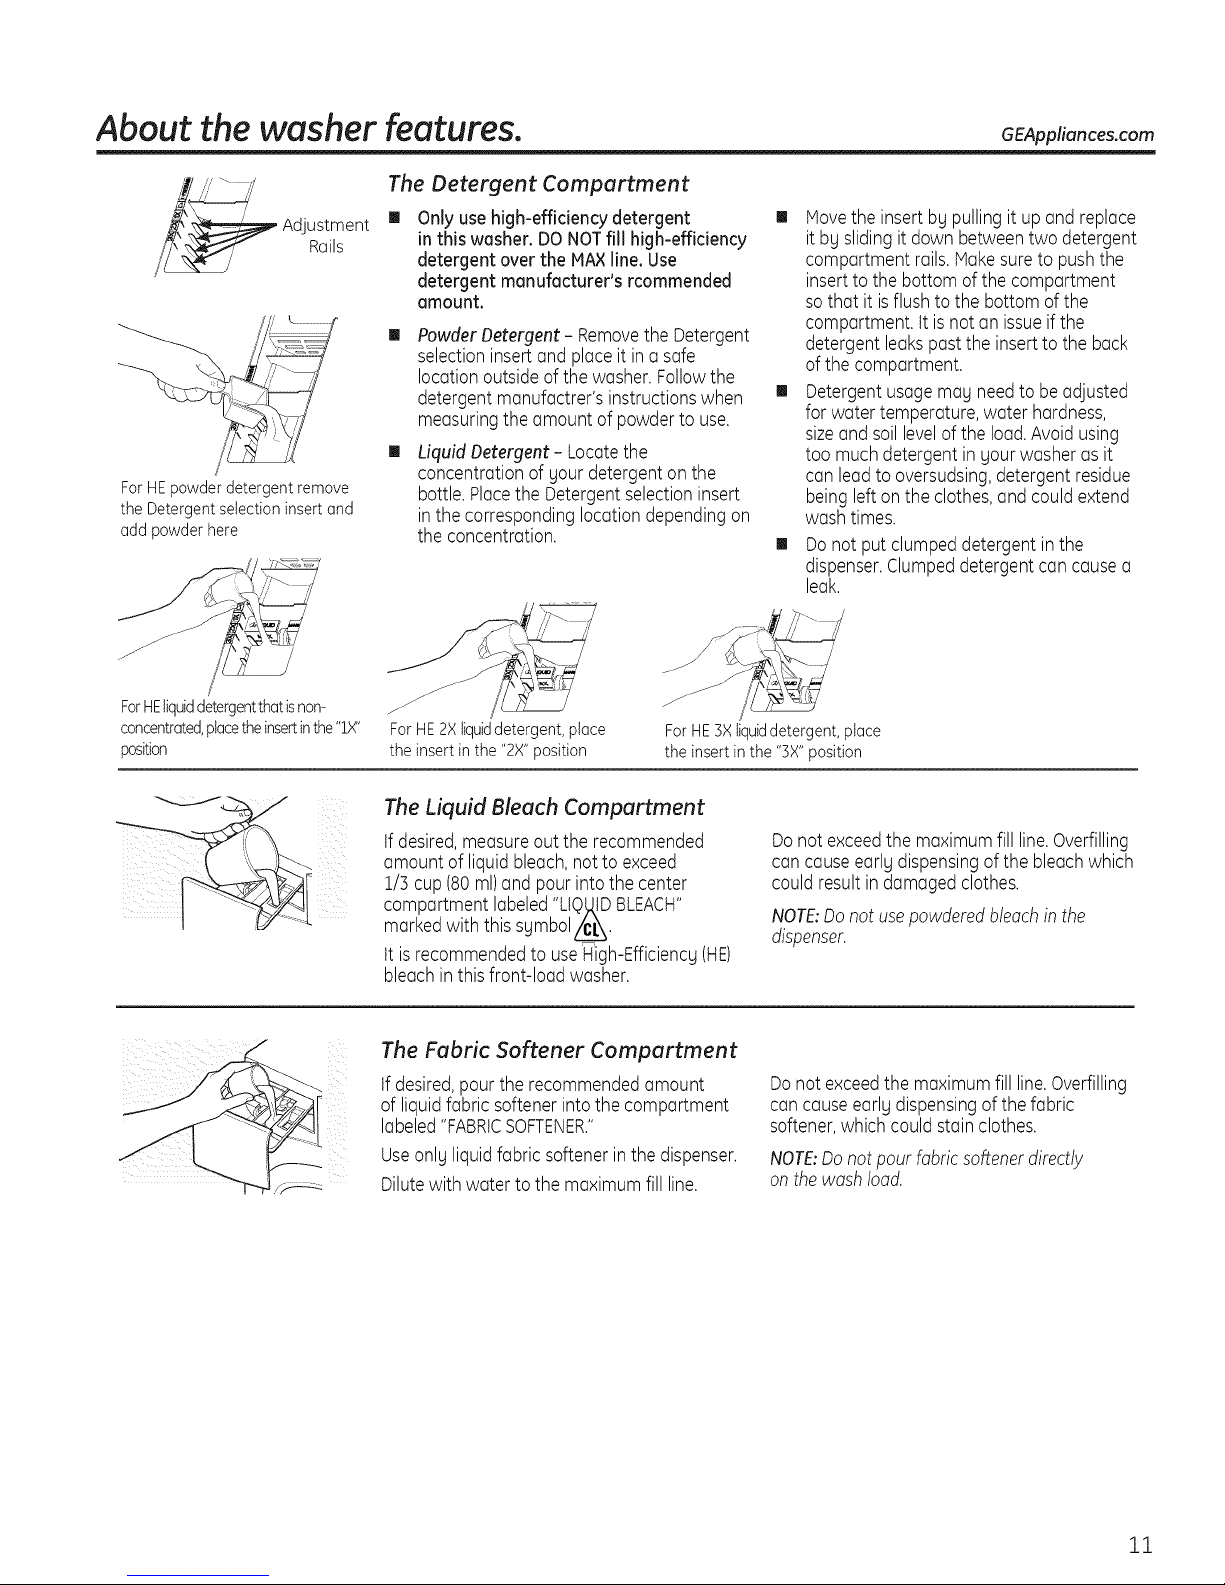
The Detergent Compartment
_ Adjustment
Rails
ForHEpowderdetergentremove
theDetergent selectioninsertand
addpowderhere
Onlyusehigh-efficiency detergent
in this washer. DONOTfill high-efficiency
detergent over the HA× line. Use
detergent manufacturer's rcommended
amount.
PowderDetergent- Removethe Detergent
selectioninsertand placeit in a safe
locationoutsideof the washer.Followthe
detergentmanufactrer's instructionswhen
measuringthe amountof powderto use.
Liquid Detergent- Locatethe
concentrationof your detergenton the
bottle.Placethe Detergentselectioninsert
inthe correspondinglocationdependingon
the concentration.
I Movethe insertby pulling it up andreplace
it by sliding it down betweentwo detergent
compartment rails.Makesure to pushthe
insert to thebottom of the compartment
sothat it isflush to the bottom ofthe
compartment, tt isnot an issueif the
detergent leakspastthe insertto the back
of the compartment.
I Detergentusagemay needto be adjusted
for watertemperature,water hardness,
sizeand soil levelof the load.Avoidusing
too muchdetergent in yourwasher asit
can leadto oversudsing,detergentresidue
being left onthe clothes,andcouldextend
wash times.
Donot put clumpeddetergent in the
dispenser.Clumpeddetergentcan causea
leak.
ForHEliquiddetergentthatisnon-
concentrated,placetheinsertinthe"IX"
position
J
/J
ForHE2×liquiddetergent,place
theinsertinthe"2X"position
ForHE3Xliquiddetergent,place
the insert in the "3X"position
The Liquid Bleach Compartment
tf desired,measureout the recommended
amount of liquid bleach,not to exceed
1/3 cup(80ml)and pour intothe center
compartmentlabeled"LIQUIDBLEACH"
markedwith this symbol\.
tt is recommendedto useHigh-Efficiency(HE)
bleachinthis front-load washer.
The Fabric Softener Compartment
tf desired,pour the recommendedamount
of liquidfabric softenerintothe compartment
labeled"FABRICSOFTENER."
Useonly liquidfabric softener in the dispenser.
Dilutewith water to the maximumfill line.
Donot exceedthe maximumfill line.Overfilling
can causeearly dispensingof the bleachwhich
could resultin damagedclothes.
NOTE:Donot usepowderedbleachin the
dispenser.
Donot exceedthe maximumfill line.Overfilling
can causeearly dispensingof the fabric
softener,which could stain clothes.
NOTE:Donotpour fabricsoftenerdirectly
on the wash load.
11
Page 12
Loadingand usingthewasher.
Always follow fabric manufacturer's care label when laundering.
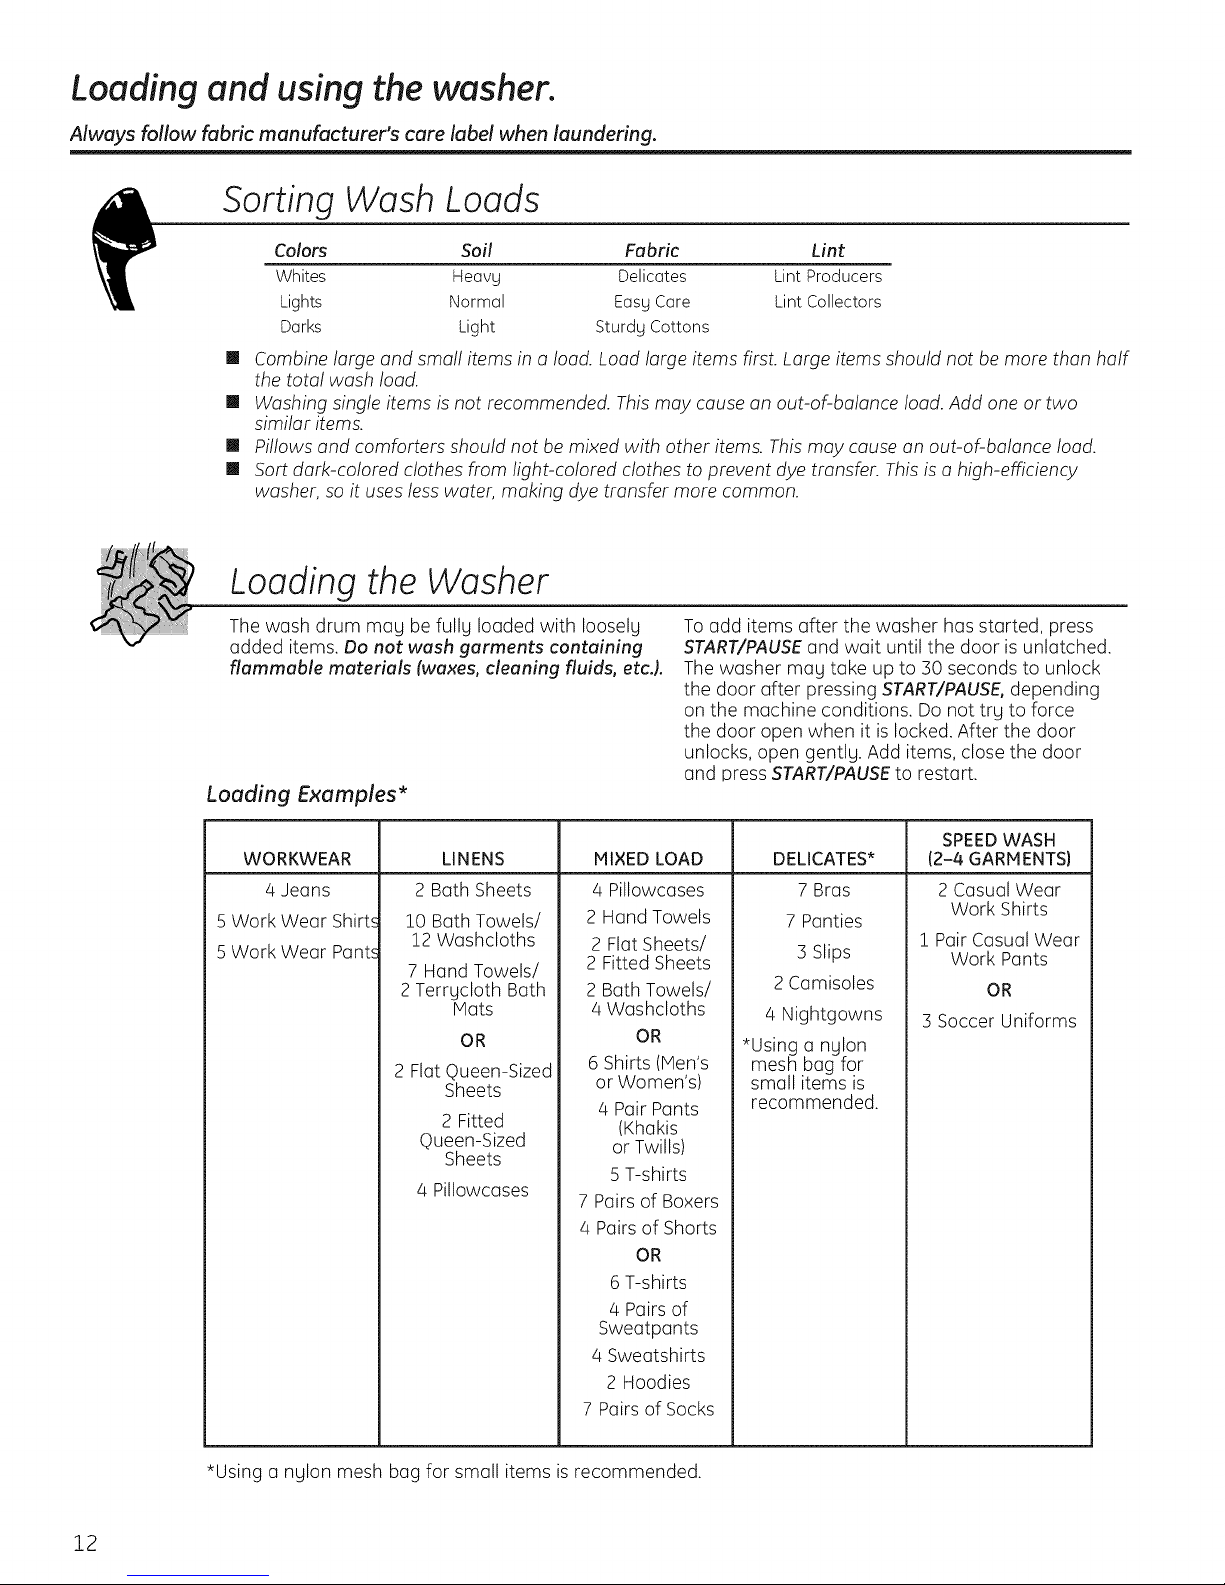
Sorting Wash Loads
Colors Soil Fabric Lint
Whites Heavy Delicates LintProducers
Lights Normal EasyCare LintCollectors
Darks Light Sturdy Cottons
[]
Combine large and small items in a load. Load large items first. Large items should not be more than half
the total wash load.
[]
Washing single items is not recommended. This may cause an out-of-balance load. Add one or two
similar items.
[]
Pillows and comforters should not be mixed with other items. This may cause an out-of-balance load.
[]
Sort dark-colored clothes from Iighbcolored clothes to prevent dye transfer. This isa high-efficiency
washer, so it uses less water, making dye transfer more common.
Loading the Washer
The wash drum may be fully loaded with loosely
added items. Do not wash garments containing
flammable materials (waxes, cleaning fluids, etcJ.
Loading Examples*
WORKWEAR
4 Jeans
5 Work Wear Shirts
5 Work Wear Punts
LINENS
2 Both Sheets
10 Bath Towels/
12 Washcloths
7 Hand Towels/
2 Terrycloth Bath
Mats
OR
2 Flat Queen-Sized
Sheets
2 Fitted
Queen-Sized
Sheets
4 Pillowcases
MIXEDLOAD
/4Pillowcases
2 Hand Towels
2 Flat Sheets/
2 Fitted Sheets
2 Bath Towels/
4 Washcloths
6 Shirts (Men's
or Women's)
7 Pairs of Boxers
/4Pairsof Shorts
/4Sweatshirts
7 Pairs of Socks
To add items after the washer has started, press
START/PAUSEand wait until the door is unlatched.
The washer may take up to 30 seconds to unlock
the door after pressing START/PAUSE,depending
the door open when it is locked. After the door
OR
4 Pair Pants
(Khakis
or Twills)
5 T-shirts
OR
6 T-shirts
4 Pairs of
Sweatpants
2 Hoodies
on the machine conditions. Do not try to force
unlocks, open gently. Add items, close the door
and press START/PAUSEto restart.
DELICATES*
7 Bras
7 Panties
3 Slips
2 Camisoles
4 Nightgowns
*Using a nylon
mesh bag for
small items is
recommended.
SPEEDWASH
(2-4 GARMENTS)
2 Casual Wear
Work Shirts
! Pair Casual Wear
Work Pants
OR
3 Soccer Uniforms
*Using a nylon mesh bag for small items is recommended.
12
Page 13
Always follow fabric manufacturer's care label when laundering. GEAppliances.com
Care and Cleaning/General Maintenance
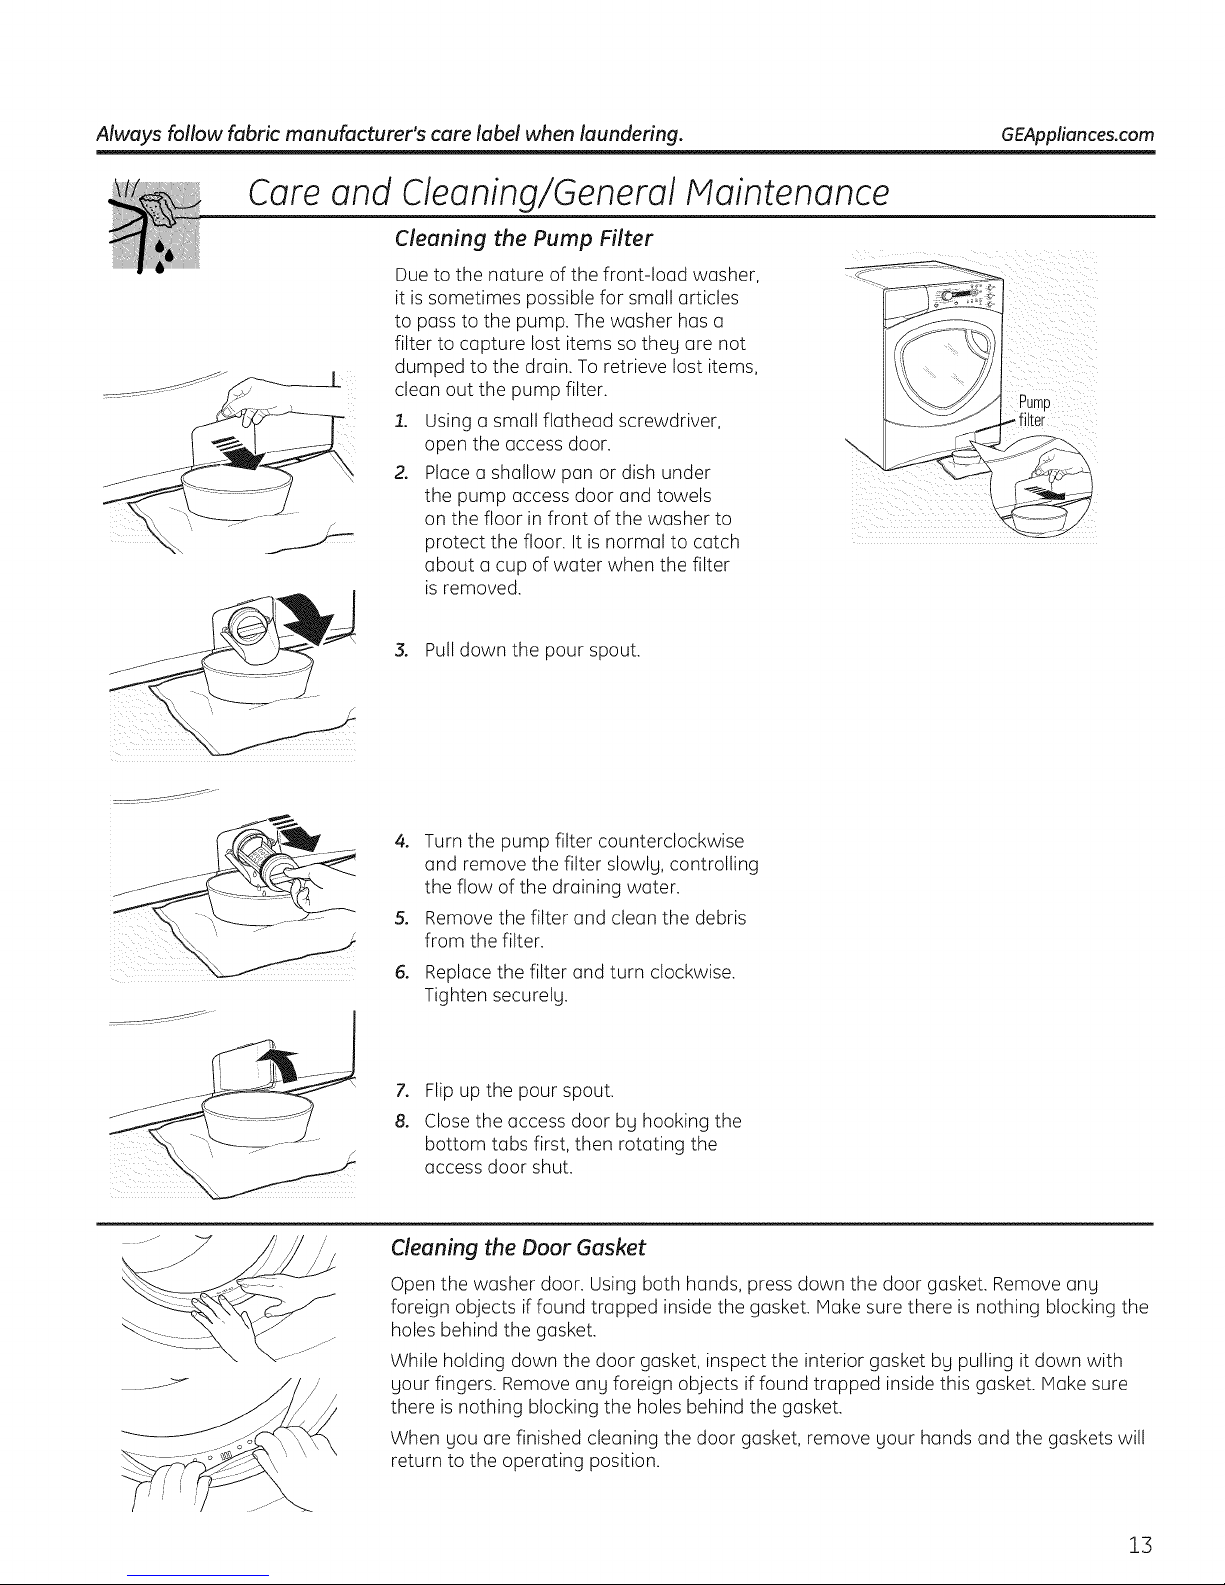
Cleaning the Pump Filter
Dueto the n(]ture of the front-lo(]d w(]sher,
it is sometimes possible for sm(]ll (]rticles
to p(]ss to the pump. The washer h(]s a
filter to c(]pture lost items so they (]re not
dumped to the dr(]in. To retrieve lost items,
cle(]n out the pump filter.
1. Using (] sm(]ll fl(]the(]d screwdriver,
open the (]ccess door.
2. Pl(]ce (] sh(]llow p(]n or dish under
the pump (]ccess door (]nd towels
on the floor in front of the w(]sher to
protect the floor. It is norm(]l to c(]tch
(]bout (] cup of w(]ter when the filter
is removed.
3. Pull down the pour spout.
\
",,.
Pump
,_filter
o
Turn the pump filter counterclockwise
(]nd remove the filter slowly, controlling
the flow of the dr(]ining w(]ter.
5°
Remove the filter (]nd cle(]n the debris
from the filter.
6.
Repl(]ce the filter (]nd turn clockwise.
Tighten securely.
°
Flip up the pour spout.
8.
Close the (]ccess door by hooking the
bottom t(]bs first, then rot(]ting the
(]ccess door shut.
Cleaning the Door Gasket
Open the w(]sher door. Using both h(]nds, press down the door g(]sket. Remove (]ny
foreign objects if found tr(]pped inside the g(]sket, ivl(]kesure there is nothing blocking the
holes behind the g(]sket.
While holding down the door g(]sket, inspect the interior g(]sket by pulling it down with
your fingers. Remove (]ny foreign objects if found tr(]pped inside this g(]sket. H(]ke sure
there is nothing blocking the holes behind the g(]sket.
When you (]re finished cle(]ning the door g(]sket, remove your h(]nds (]nd the g(]skets will
return to the oper(]ting position.
13
Page 14
Loading and using the washer.
Always follow fabric manufacturer's care label when laundering.
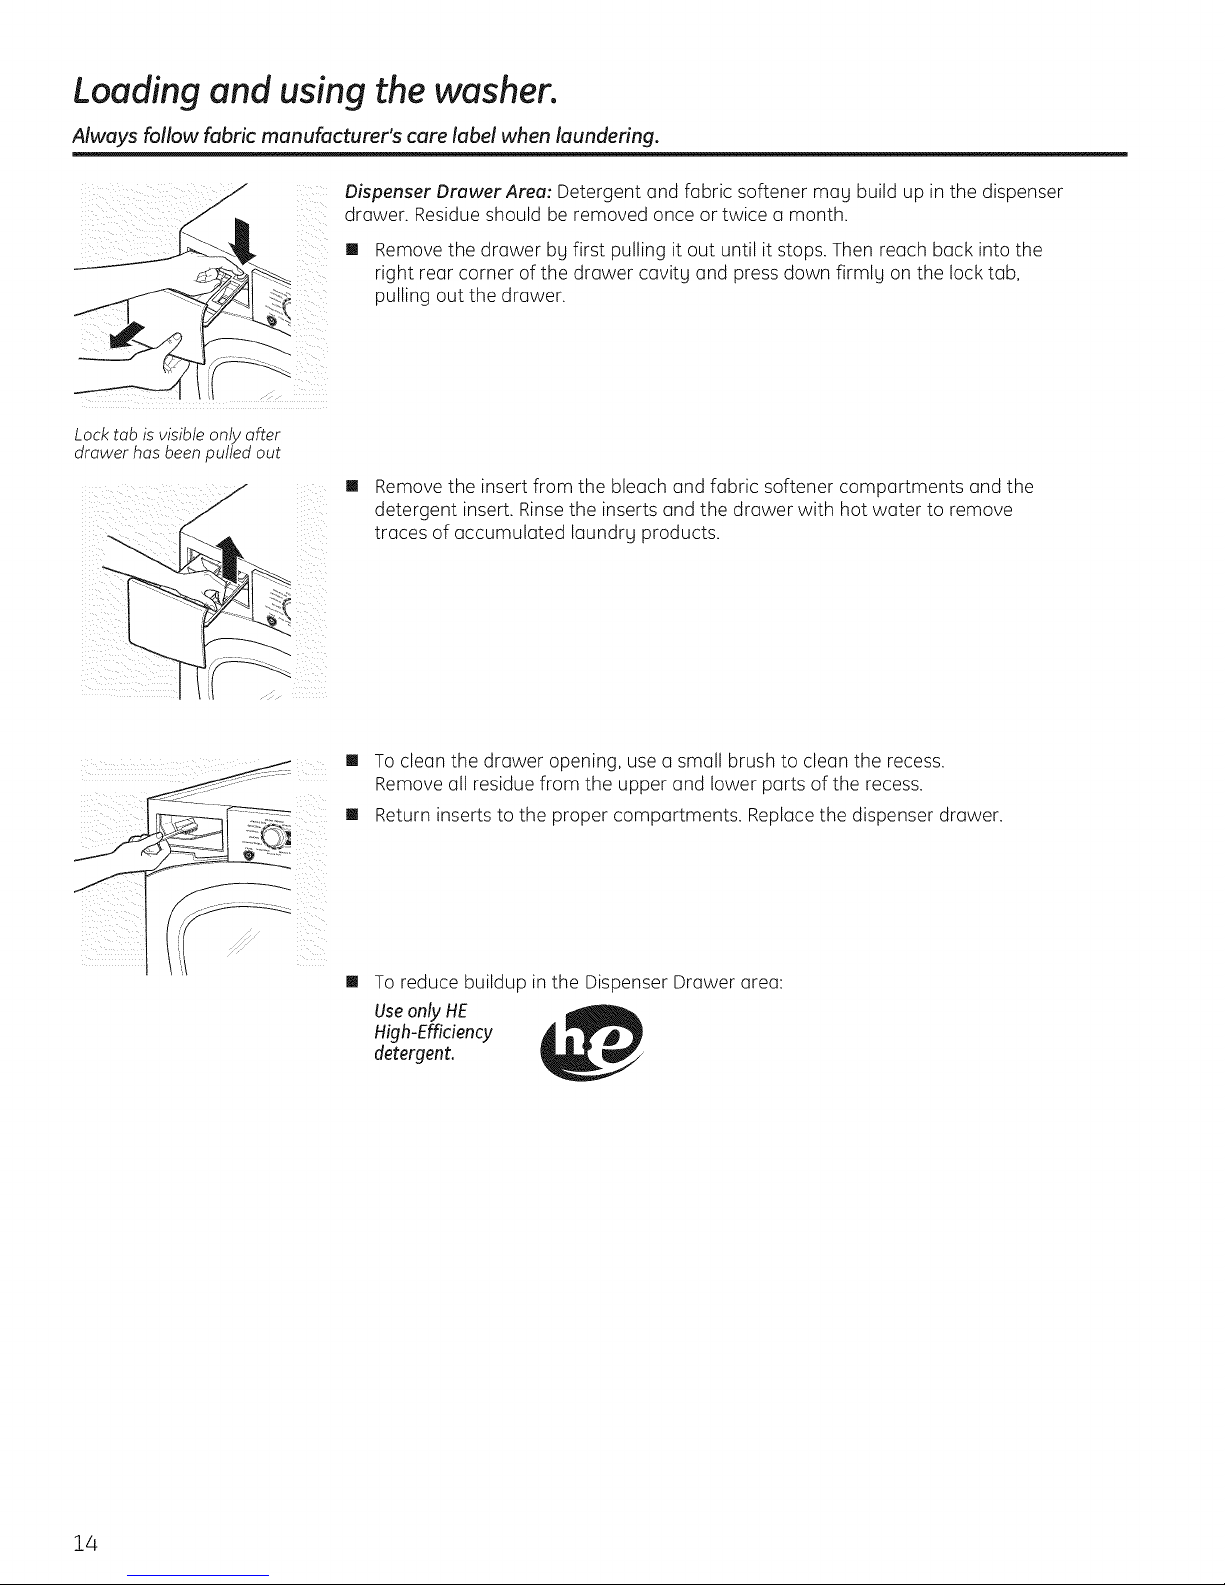
Dispenser Drawer Area: Detergent and fabric softener mag build up in the dispenser
drawer. Residue should be removed once or twice a month.
m Remove the drawer bg first pulling it out until it stops. Then reach back into the
right rear corner of the drawer cavitg and press down firmlg on the lock tab,
pulling out the drawer.
Lock tab is visible only after
drawer has been pulled out
[] Remove the insert from the bleach and fabric softener compartments and the
detergent insert. Rinse the inserts and the drawer with hot water to remove
traces of accumulated laundrg products.
_!i_!ii__ii_I_Iii__ii!_i_i_i_i___"- ................_ __!i;i_i_ili
,,,S ,,,
[] To clean the drawer opening, use a small brush to clean the recess.
Remove all residue from the upper and lower parts of the recess.
[] Return inserts to the proper compartments. Replacethe dispenser drawer.
[]
To reduce buildup in the Dispenser Drawer area:
Useonly HE
High-Efficiency
detergent.
14
Page 15
Always follow fabric manufacturer's care label when laundering. GEAppliances.com
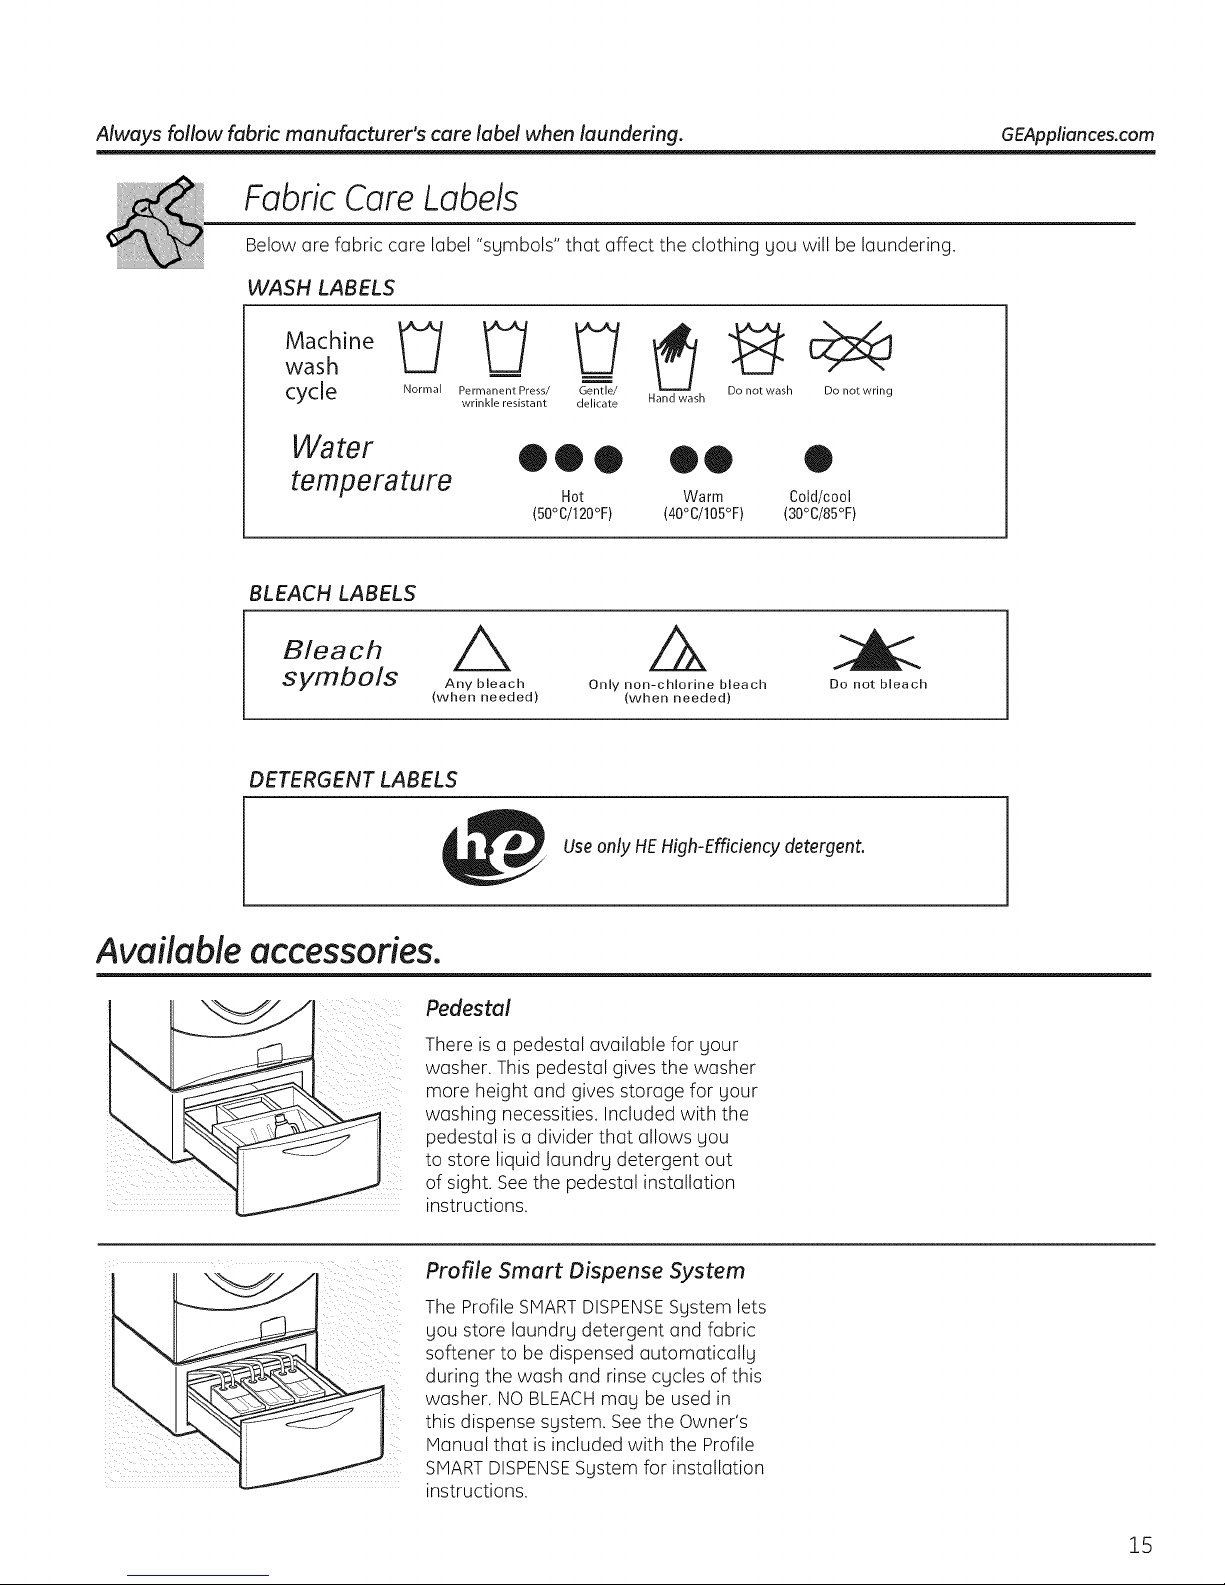
FabricCare Labels
Below are fabric care label "symbols" that affect the clothing you will be laundering.
WASH LABELS
wash m
cycle N.... I p....... t Press/ Gentle/ Do not wash Do not wring
Water • • • • • Q
temperature Hot Warm Cold/cool
BLEACH LABELS
Bleach__. , A A
symuois Any bleach Only non-chlorine bleach
wrinkle resistant delicate Hand wash
(50°C/120°F) (40°C/105°F) (30°C/85°F)
Do not bleach
(when needed) (when needed)
DETERGENT LABELS
Available accessories.
Useonly HEHigh-Efficiency detergent.
Pedestal
There is a pedestal available for your
washer, This pedestal gives the washer
more height and gives storage for your
washing necessities, Included with the
pedestal is a divider that allows you
to store liquid laundry detergent out
of sight. See the pedestal installation
instructions.
Profile Smart Dispense System
The Profile SMARTDISPENSESystem lets
you store laundry detergent and fabric
softener to be dispensed automatically
during the wash and rinse cycles of this
washer. NO BLEACHmay be used in
this dispense system. See the Owner's
Manual that is included with the Profile
SMARTDISPENSESystem for installation
instructions.
15
Page 16
SmartAppliance GEAppliances.com
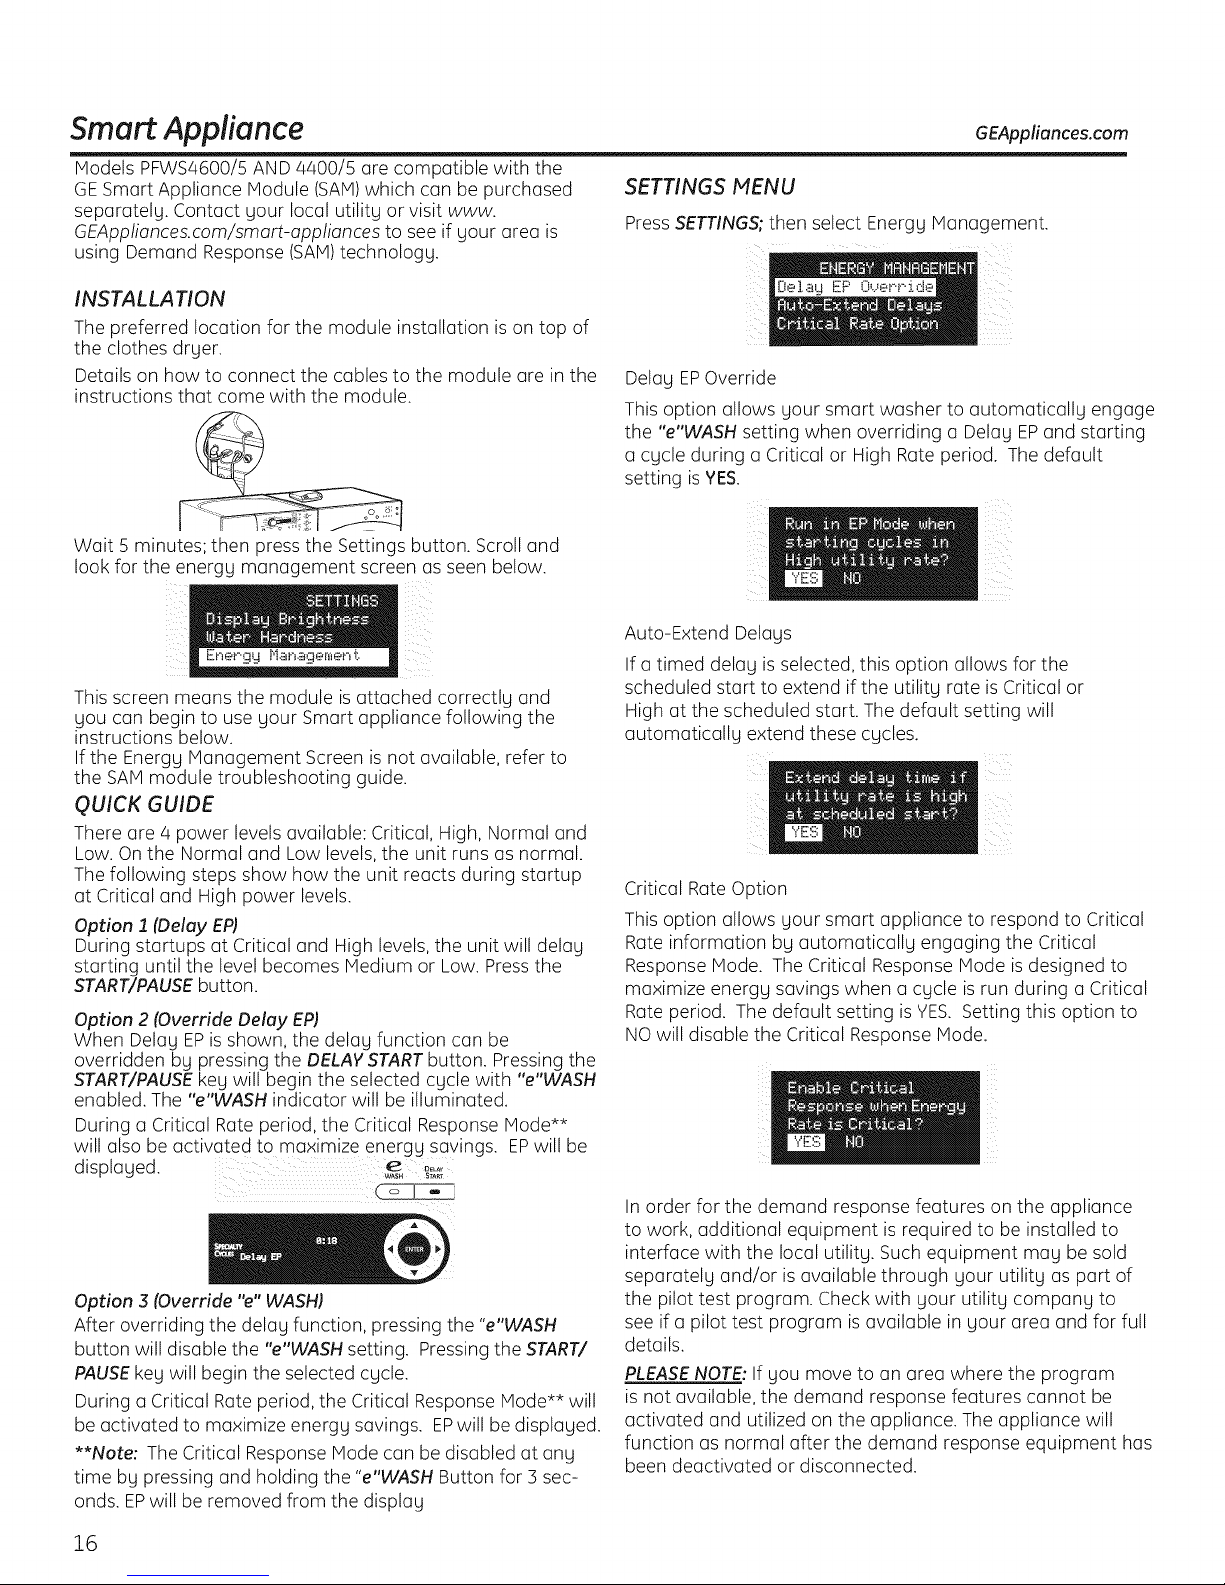
Models PFWS4600/5 AND 4400/5 are compatible with the
GESmart Appliance Module (SAM)which can be purchased
separately. Contact your local utility or visit www.
GEAppliances.com/smart-appliances to see if your urea is
using Demand Response(SAM)technology.
SETTINGS MENU
Press SETTINGS;then select Energy Management.
INSTALLATION
The preferred locution for the module installation is on top of
the clothes dryer.
Details on how to connect the cables to the module are in the
instructions that come with the module.
Wait 5 minutes; then press the Settings button. Scroll and
look for the energy management screen as seen below.
EnergLl i'lanagemeiq t.
This screen means the module is attached correctly and
you can begin to use your Smart appliance following the
instructions below.
If the Energy Management Screen is not available, refer to
the SAM module troubleshooting guide.
QUICK GUIDE
There are 4 power levels available: Critical, High, Normal and
Low. On the Normal and Low levels, the unit runs as normal.
Thefollowing steps show how the unit reacts during startup
at Critical and High power levels.
Option 1 (Delay EP)
During startups at Critical and High levels, the unit will delay
starting until the level becomes Medium or Low. Press the
START/PAUSEbutton.
Option 2 (Override Delay EP)
When Delay EPisshown, the delay function can be
overridden by pressing the DELAYSTARTbutton. Pressing the
START/PAUSEkey will begin the selected cycle with "e"WASH
enabled. The "e"WASH indicator will be illuminated.
During a Critical Rate period, the Critical Response Mode**
will also be activated to maximize energy savings. EPwill be
displayed. _, _;T_i
Del...':'_LIEP O,..,er.r.]de
Delay EPOverride
This option allows your smart washer to automatically engage
the "e'WASH setting when overriding a Delay EPand starting
a cycle during a Critical or High Rate period. The default
setting is YES.
Auto-Extend Delays
If a timed delay is selected, this option allows for the
scheduled start to extend if the utility rate is Critical or
High at the scheduled start. The default setting will
automatically extend these cycles.
Critical Rate Option
This option allows your smart appliance to respond to Critical
Rate information by automatically engaging the Critical
Response Mode. The Critical Response Mode is designed to
maximize energy savings when a cycle is run during a Critical
Rate period. The default setting is YES.Setting this option to
NO will disable the Critical Response Mode.
Option 3 (Override "e" WASH)
After overriding the delay function, pressing the "e'WASH
button will disable the "e'WASH setting. Pressingthe START/
PAUSEkey will begin the selected cycle.
During a Critical Rate period, the Critical Response Mode** will
be activated to maximize energy savings. EPwill be displayed.
**Note: The Critical Response Mode can be disabled at any
time by pressing and holding the "e'WASH Button for 3 sec-
onds. EPwill be removed from the display
16
In order for the demand response features on the appliance
to work, additional equipment is required to be installed to
interface with the local utility. Such equipment may be sold
separately and/or is available through your utility as part of
the pilot test program. Check with your utility company to
see if a pilot test program isavailable in your area and for full
details.
PLEASENOTE:If you move to an area where the program
is not available, the demand response features cannot be
activated and utilized on the appliance. The appliance will
function as normal after the demand response equipment has
been deactivated or disconnected.
Page 17

Instailati
Washer
I str cti s
PFWS4605, PFWS4600
PFWH4405, PFWH4400
If you have any questions, call 800.GE.CARES(800.432.2737)
or visit our Website at: GEAppliances.com
In Canada, coil 1.800.561.3344 or visit www.GEAppliances.ca
BEFORE YOU BEGIN
Read these instructions completely and carefully.
" IMPORTANT - Savetheseinstructions
for local inspector's use.
. IMPORTANT - Observeallgoverning
codes and ordinances,
, Note to Installer - Be sureto leave these
instructions with the Consumer.
. Note to Consumer - Keepthese instructions
for future reference.
, Skill level - Installation of this appliance requires
basic mechanical and electrical skills.
, Completion time - 1-3 hours
, Proper installation isthe responsibilitu of the installer.
, Product failure due to improper installation is not
covered under the Warranty.
[] 1/4" nut driver
[] 3/8" socket with ratchet
[] 3/8" open-end wrench
[] Adjustable wrench or 7/16" socket with ratchet
[] Adjustable wrench or 9/16" open-end wrench
[] Channel-lock adjustable pliers
[] Carpenter's level
PARTS SUPPLIED
TOOLS REQUIRED FOR
WASHER INSTALLATION
FOR YOUR SAFETY:
_Z_WARNING
This appliance must be properlg grounded and
installed as described in these Installation Instructions.
Do not install or store appliance in an area where
it will be exposed to water/weather. See Location
of Your Washer section.
NOTE: This appliance must be properly
grounded, and electrical service to the washer
must conform with local codes and ordinances
and the latest edition of the National Electrical
Code, ANSI/NFPA 70.
[] Cable Tie
@
[] Water Hoses (2)
17
Page 18
Installation Instructions
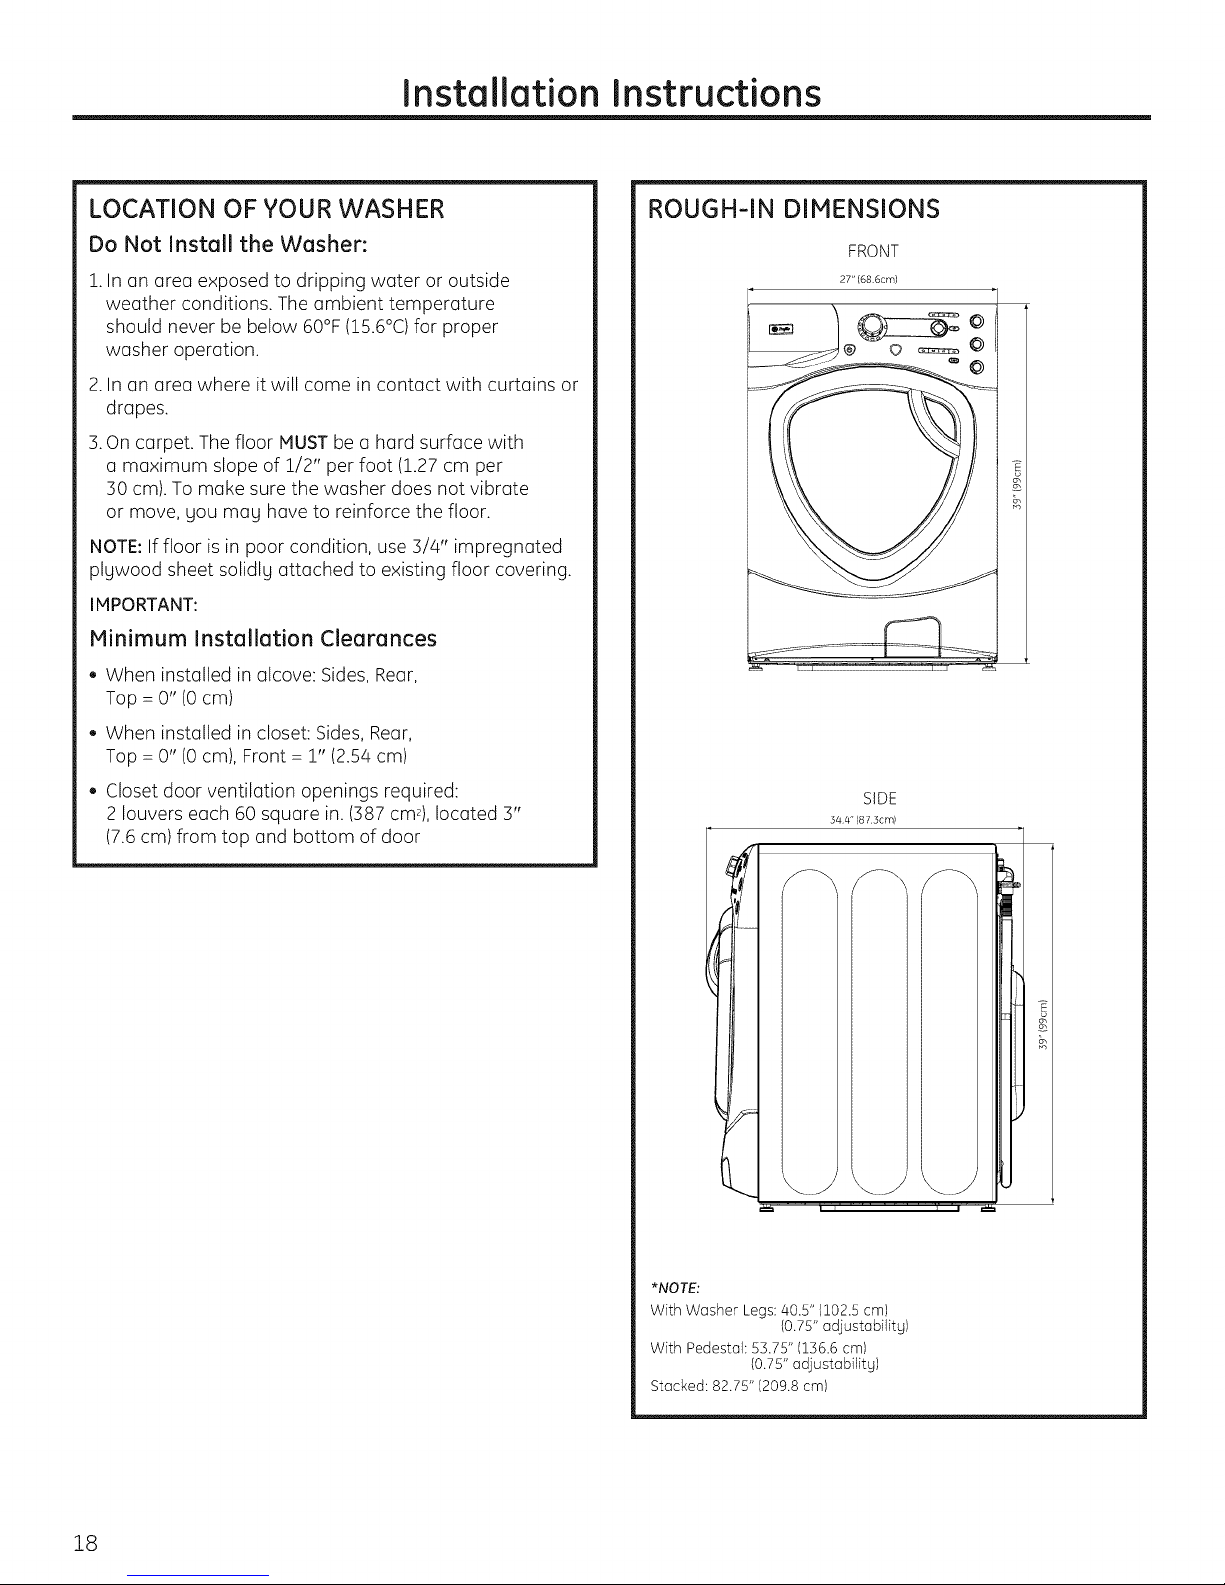
LOCATION OF YOUR WASHER
Do Not Install the Washer:
1.In an area exposed to dripping water or outside
weather conditions. The ambient temperature
should never be below 60°F (!5.6°C) for proper
washer operation.
2.In an area where it will come in contact with curtains or
drapes.
3.On carpet. The floor MUST be a hard surface with
a maximum slope of !/2" per foot (1.27cm per
:SOcm).To make sure the washer does not vibrate
or move, you may have to reinforce the floor.
NOTE:If floor is in poor condition, use 3/4" impregnated
plywood sheet solidly attached to existing floor covering.
IMPORTANT:
Minimum Installation Clearances
. When installed in alcove: Sides, Rear,
Top = O"(0 cm)
. When installed in closet: Sides, Rear,
Top = O"(0 cm), Front = r' (2.54 cm)
ROUGH-IN DIMENSIONS
FRONT
27" (68 6cm)
h
• Closet door ventilation openings required:
2 louvers each 60 square in. (387 cm2),located 3"
(7.6cm) from top and bottom of door
SIDE
544" (873crn)
h
*NOTE:
With Washer Legs: 40.5" (102.5 cm)
(0.75" adjustability)
With Pedestal: 53.75" (136.6 cm)
(0.75" adjustability)
Stacked: 82.75" (209.8 cm)
18
Page 19
Installation Instructions
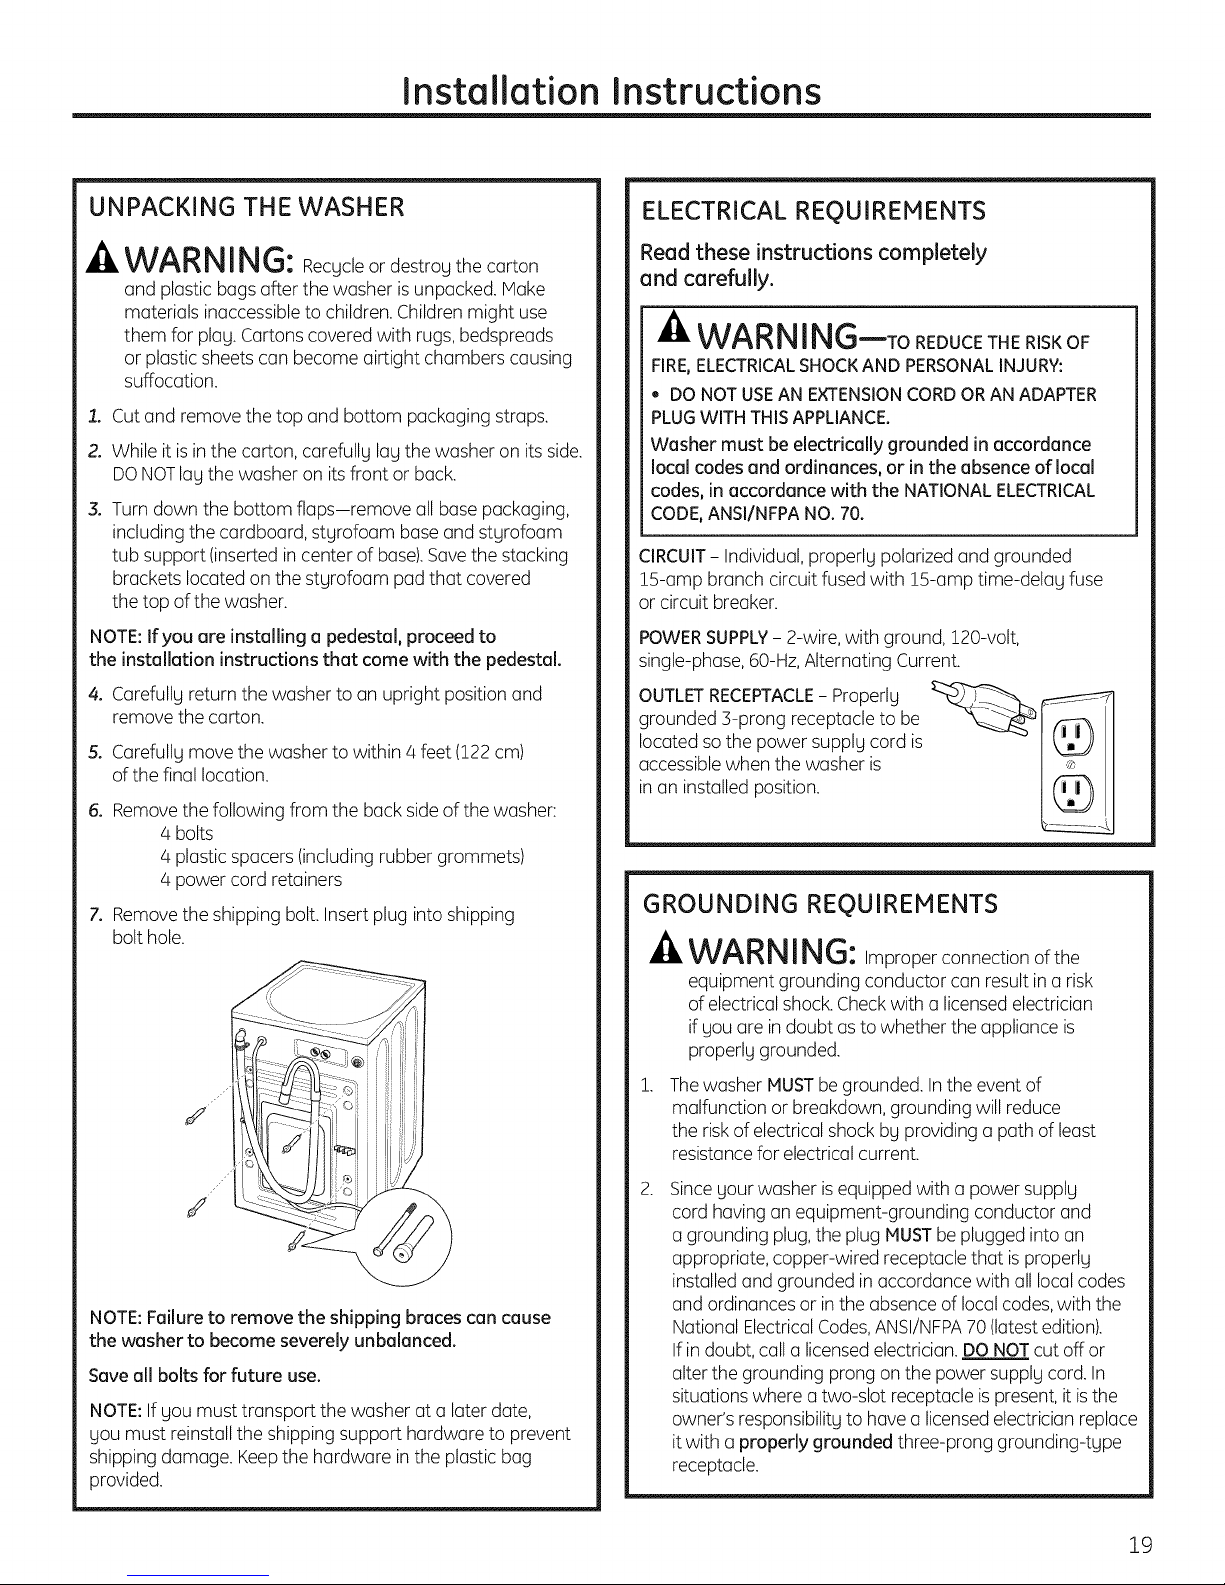
UNPACKING THE WASHER
WARNING: Recycleor destroy the carton
and plastic bags after the washer is unpacked. Make
materials inaccessibleto children.Children might use
them for play. Cartons covered with rugs,bedspreads
or plastic sheetscan become airtight chambers causing
suffocation.
1. Cut and remove the top and bottom packaging straps.
2. While it isin the carton, carefully lay the washer on its side.
DONOTlay the washer on itsfront or back.
3. Turndown the bottom flaps-remove all base packaging,
including the cardboard, styrofoam baseand styrofoam
tub support (insertedin center of base).Savethe stacking
brackets located on the styrofoam pad that covered
the top ofthe washer.
NOTE:If you ere installing a pedestal, proceed to
the installetion instructions that come with the pedestel.
4. Carefully return the washer to an upright position and
remove the carton.
5. Carefully movethe washer to within 4 feet (122cm)
of the final location.
6. Removethe following from the back sideof the washer:
/4bolts
4 plasticspacers (includingrubber grommets)
/4power cord retainers
Z. Removethe shipping bolt. Insertplug into shipping
bolt hole.
J
//
/,
J
NOTE:Feilure to remove the shipping braces cen cause
the washer to become severely unbalanced.
Saveall bolts for future use.
NOTE:If you must transport the washer at u later date,
you must reinstall the shipping support hardware to prevent
shipping damage. Keepthe hardware in the plastic bag
provided.
ELECTRICAL REQUIREMENTS
Read these instructions completely
and carefully.
-A WARNING--TOREDUCETHERIsKOF
FIRE,ELECTRICALSHOCKAND PERSONALINJURY:
,, DO NOTUSEAN EXTENSIONCORDORAN ADAPTER
PLUGWITHTHISAPPLIANCE.
Washer must be electrically grounded in accordance
local codes and ordinances, or in the absence of local
codes, in occordance with the NATIONALELECTRICAL
CODE,ANSI/NFPANO. 70.
CIRCUIT- Individual,properly polarizedand grounded
15-amp branch circuit fused with 15-amp time-delay fuse
or circuit breaker.
POWERSUPPLY- 2-wire, with ground, 120-volt,
single-phase,60-Hz, Alternating Current.
grounded 3-prong receptacle to be
located sothe power supply cord is
accessiblewhen the washer is
in an installed position.
roper
GROUNDING REQUIREMENTS
WARNING: Improperconnectionofthe
equipment grounding conductor can result in a risk
of electricalshock.Checkwith a licensedelectrician
if you are indoubt asto whether the appliance is
properly grounded.
.
Thewasher MUSTbegrounded. Inthe eventof
malfunction or breakdown,grounding will reduce
the riskof electrical shockby providing apath of least
resistancefor electrical current.
.
Sinceyour washer isequipped with a power supply
cord having an equipment-grounding conductor and
a grounding plug, the plug MUSTbe plugged into an
appropriate, copper-wired receptacle that isproperly
installedand grounded in accordance with all localcodes
and ordinances or inthe absence of localcodes,with the
National ElectricalCodes,ANSI/NFPA70(latestedition).
If in doubt,call alicensedelectrician. DONOTcut off or
alterthe grounding prong on the power supply cord.In
situations where a two-slot receptacle ispresent, it isthe
owner's responsibilityto have a licensedelectrician replace
itwith a properly grounded three-prong grounding-type
receptacle.
19
Page 20
Installation Instructions
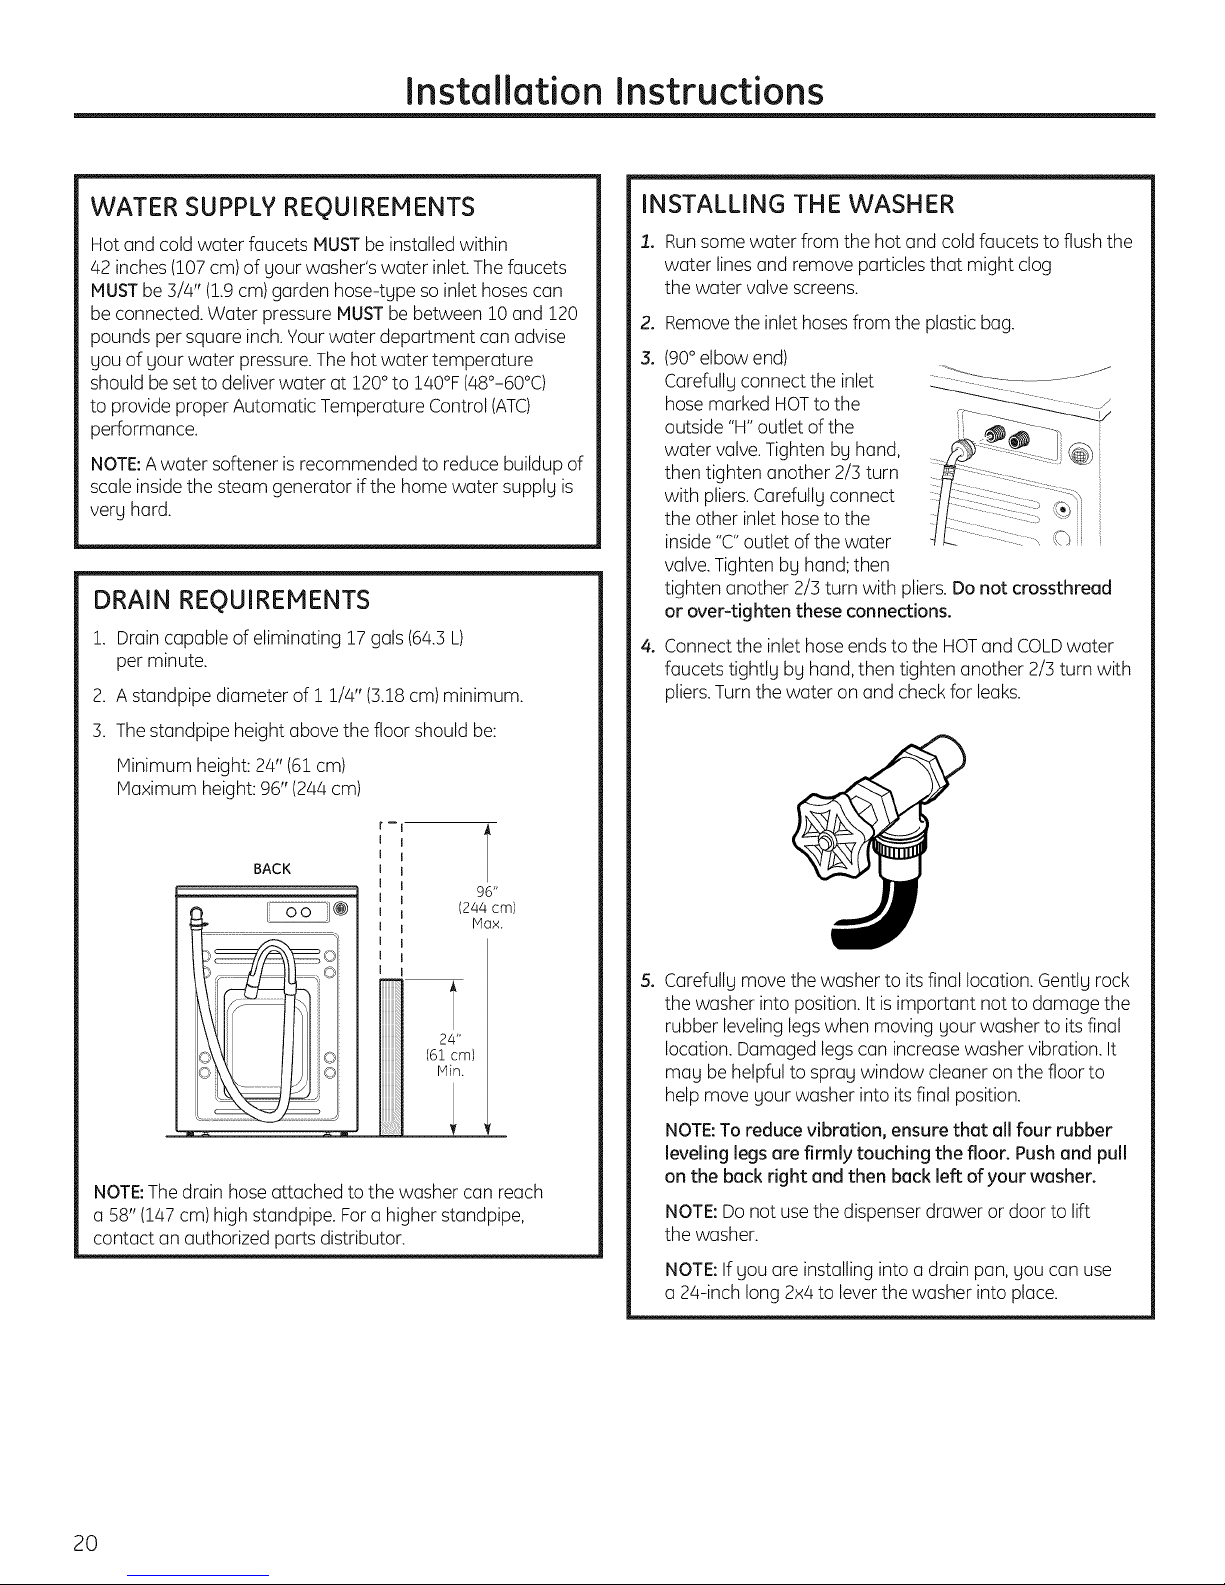
WATER SUPPLY REQUIREMENTS
Hot and cold water faucets MUSTbe installedwithin
42 inches(107 cm)of gour washer's water inlet.Thefaucets
MUSTbe 3/4" (1.9cm) garden hose-tgpe so inlethoses can
be connected. Water pressure MUSTbe between 10 and 120
pounds per square inch.Your water department can advise
gou of gour water pressure.Thehot water temperature
should beset to deliver water at 120° to 140°F(48°-60°C)
to provide proper Automatic Temperature Control (ATC)
performance.
NOTE:Awater softener is recommended to reduce buildup of
scale inside the steam generator if the homewater supplg is
verg hard.
DRAIN REQUIREMENTS
!. Drain capable of eliminating 17 gals(64.3L)
per minute.
2. A standpipe diameter of i 1/4" (3.18cm) minimum.
3. Thestandpipe height above the floor should be:
Minimum height: 24" (61 cm)
Maximum height: 96" (244cm)
f_
INSTALLING THE WASHER
1. Runsome water from the hot and cold faucets to flushthe
water lines and remove particlesthat might clog
the water valve screens.
.
Removethe inlet hosesfrom the plastic bag.
3.
(90°elbow end)
Carefullg connect the inlet --- ...............
hose marked HOTto the
outside "H"outlet of the
water valve.Tighten bg hand,
then tighten another 2/3 turn
with pliers.Carefullg connect
the other inlet hoseto the
inside"C"outlet of the water (G_
valve.Tighten bg hand;then
tighten another 2/3 turn with pliers.Do not crossthreod
or over-tighten these connections.
o
Connectthe inlet hoseends to the HOTand COLDwater
faucets tightlg bg hand, then tighten another 2/3 turn with
pliers.Turnthe water on and check for leaks.
BACK
96"
(244 cm)
Max.
24"
(61 cm)
I OII ::©
IV]in.
NOTE:The drain hoseattached to the washer can reach
a 58" (!47 cm) highstandpipe. Fora higher standpipe,
contact an authorized parts distributor.
5o
Carefullg move the washer to its final location. Gentlg rock
the washer into position. It is important not to damage the
rubber leveling legswhen moving gour washer to its final
location. Damaged legscan increasewasher vibration. It
mag be helpful to sprag window cleaner on the floor to
help move gour washer into itsfinal position.
NOTE:To reduce vibration, ensure thet oll four rubber
leveling legs ore firmly touching the floor. Push and pull
on the back right and then back left of your washer.
NOTE:Donot use the dispenser drawer or door to lift
the washer.
NOTE:If gou are installing into adrain pan, gou can use
a 24-inch long 2x4to lever the washer into place.
2O
Page 21

Installation Instructions
INSTALLING THE WASHER (cont.)
6. With the washer in its final
position, place a level on top
of the washer (if the washer
is installed under a counter,
the washer should not be
able to rock). Adjust the front
leveling legs up or down to
ensure the washer is resting
solidly. Turn the lock nuts
on each leg up toward the base of the washer and snug
with a wrench.
NOTE:Keep the leg extension at a minimum to prevent
excessive vibration. Thefarther out the legs are
extended, the more the washer will vibrate.
Ifthe floor is not level or is damaged, you may have
to extend the rear leveling legs.
7. Attach U-shaped hose guide to the end of the drain
hose. Place the hose in a laundry tub or standpipe and
secure it with the cable tie provided in the enclosure
package.
NOTE:Placingthe drain hose too far down the drain pipe
can causea siphoning action.No morethan 7 inchesof hose
should bein the drain pipe.Theremust bean airgap around
the drain hose.Asnug fit can cause a siphoning action.
o
Plug the power cord into a grounded outlet.
NOTE:Check to be sure the power isoff at the circuit
/
breaker/fuse box before plugging the power cord into
an outlet.
°
Turn on the power at the circuit breaker/fuse box.
10.
Read the rest of this Owner's Manual. It contains
valuable and helpful information that will save you
time and money.
11.
Before starting the washer, check to make sure:
[] Main power isturned on.
[] Thewasher isplugged in.
[] Thewater faucets are turned on.
[] The unit is leveland all four leveling legs are firmly
on the floor.
[] The shipping support hardware is removed
and saved.
[] The drain hoseis properly tied up.
[] There are no leaksat the faucet, drain line
or washer.
12.
Run the washer through a complete cycle.
Check for water leaks and proper operation.
13.
If your washer does not operate, please review
the Before YouCallForServicesection before
calling for service.
14.
Place these instructions in a location near the washer
for future reference.
CableTie/ Cable Tie/
1
REPLACEHENT PARTS
If replacement parts are neededfor your washer, they can be
ordered in the United States by visiting our Website
at GEAppliances.com or by calling 800.GE.CARES.In
Canada, visit geappliances.ca or call 1.800.56!.3344.
21
Page 22

Installation Instructions
ADAPTIVE VIBRATION CONTROL
YourGEwasher is equipped with Adaptiive Vibration Control
Technologg.Using information about the floor, this sgstem
can reduce vibration and improve spin performance in
some installations bg adapting the spin cgcle.TheDEFAULT
configuration isspeciallg designed to provide optimal
performance across the widest range of floor tgpes. Follow
the procedure below to enable more specificadaptive
settings.Yourwasher can be returned quicklg and easilg
to the DEFAULTconfiguration at ang time usingthe same
procedure.
Floor Type Selection
1.Inthe settings menu, select "floor tgpe setup".
2.SelectYesor Nofor Pedestal.
/4.Selectthe tgpe of wood floor.
5.Selectthe floor tgpe.
3.Select either Default,Concrete orWood for floor tgpe.
**Default selection is acceptable for most
installations.
22
Page 23
Before you call for service... GEAppliances.com
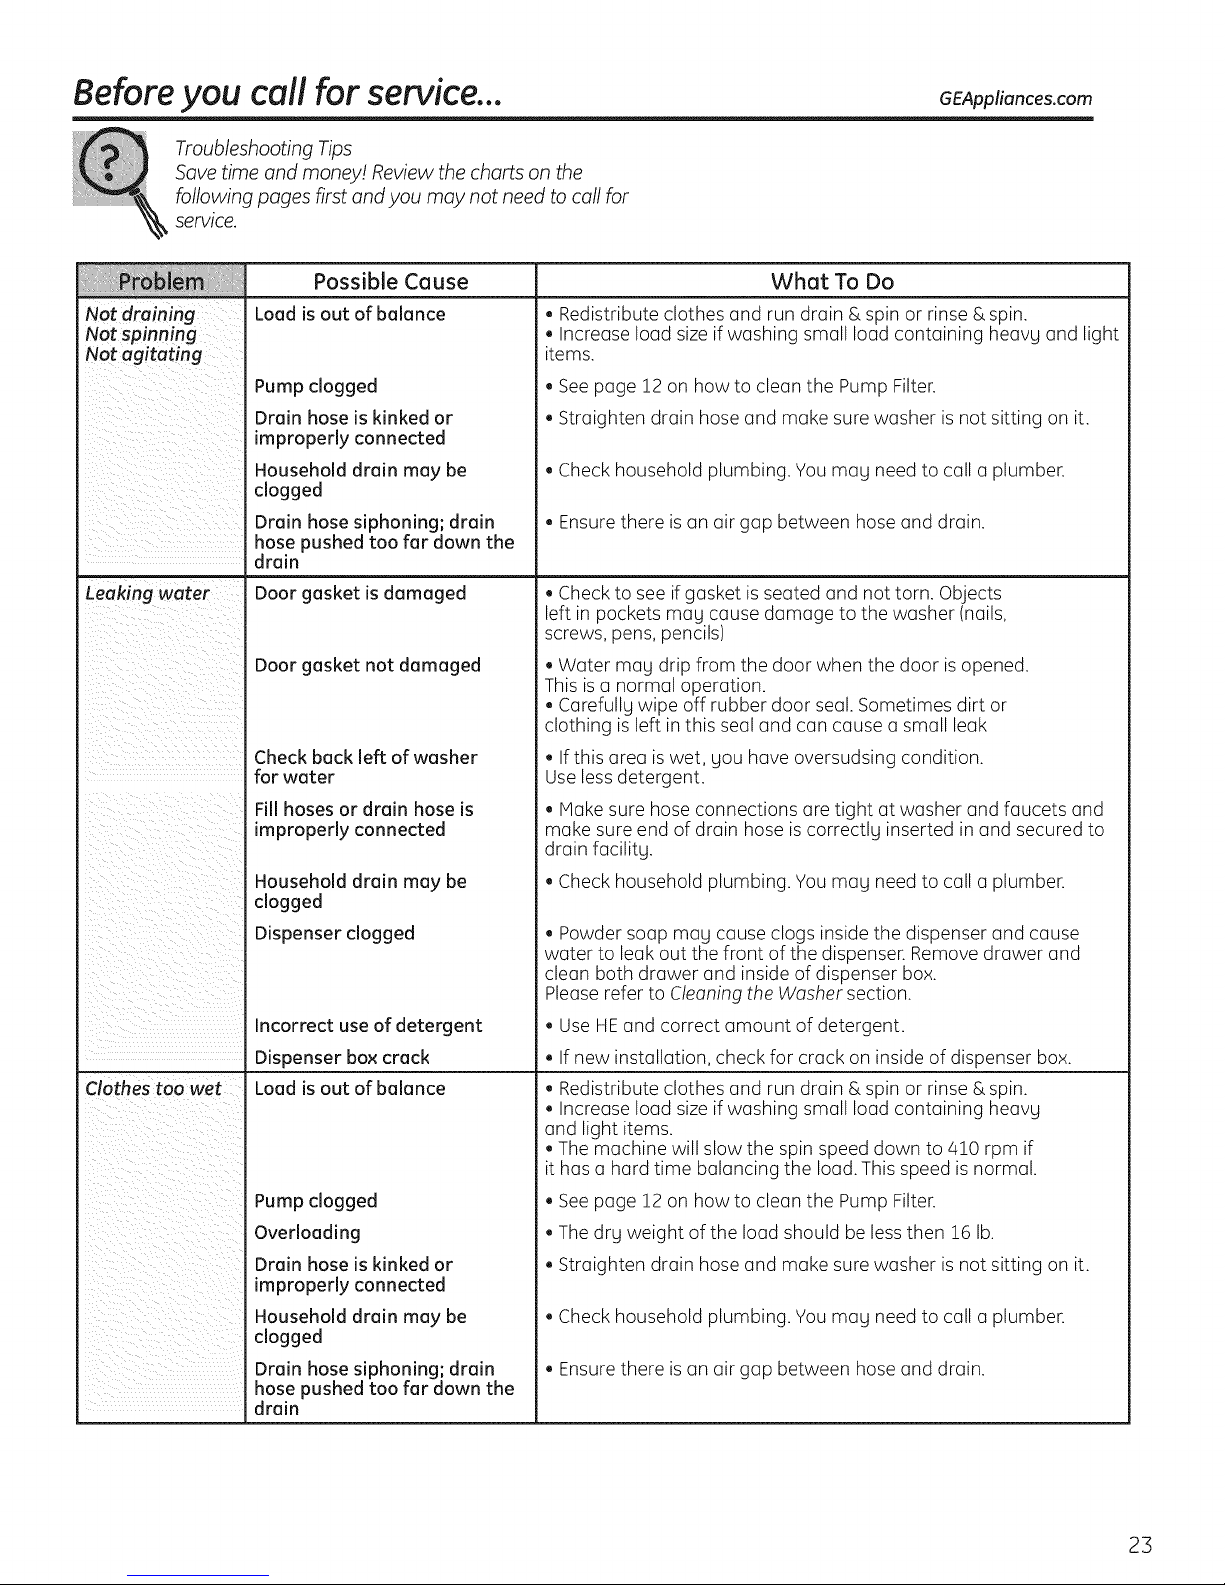
Troubleshooting Tips
Save time and money! Review the charts on the
following pages first and you may not need to call for
service.
Possible Cause What To Do
Not draining
Not spinning
Not agitating
Leaking water
Clothes too wet
Load is out of balance
Pump clogged
Drain hose is kinked or
improperly connected
Household drain may be
clogged
Drain hose siphoning; drain
hose pushed too far down the
drain
Door gasket is damaged
Door gasket not damaged
Check back left of washer
for water
Fill hoses or drain hose is
improperly connected
Household drain may be
clogged
Dispenser clogged
Incorrect use of detergent
Dispenser box crack
Load is out of balance
Pump clogged
Overloading
I Drain hose is kinked or
improperly connected
Household drain may be
clogged
Drain hose siphoning; drain
hose pushed too far down the
drain
. Redistribute clothes and run drain & spin or rinse & spin.
. Increase load size if washing small load containing heavg and light
items.
. See page 12 on how to clean the Pump Filter.
. Straighten drain hose and make sure washer is not sitting on it.
. Check household plumbing. Youmag need to call a plumber.
. Ensure there is an air gap between hose and drain.
• Check to see if gasket isseated and not torn. Objects
left in pockets mag cause damage to the washer (nails,
screws, pens, pencils)
• Water mag drip from the door when the door is opened.
This is a normal operation.
. Curefullg wipe off rubber door seal. Sometimes dirt or
clothing is left in this seal and can cause a small leak
• If this area iswet, gou have oversudsing condition.
Use less detergent.
. Hake sure hose connections are tight at washer and faucets and
make sure end of drain hose is correctlg inserted in and secured to
drain facilitg.
. Check household plumbing. Youmag need to call a plumber.
. Powder soap mag cause clogs inside the dispenser and cause
water to leak out the front of the dispenser. Remove drawer and
clean both drawer and inside of dispenser box.
Please refer to Cleaning the Washer section.
. Use HE and correct amount of detergent.
. If new installation, check for crack on inside of dispenser box.
. Redistribute clothes and run drain & spin or rinse & spin.
. Increase load size if washing small load containing heavy
and light items.
. The machine will slow the spin speed down to 410 rpm if
it has a hard time balancing the load. This speed is normal.
. See page 12 on how to clean the Pump Filter.
. Thedrg weight of the load should be less then 16 lb.
. Straighten drain hose and make sure washer is not sitting on it.
. Check household plumbing. Youmag need to call a plumber.
. Ensure there is an air gap between hose and drain.
23
Page 24
Beforeyou call for service...
Possible Cause
Incomplete cycle
or timer not
advancing
Loud or unusual Cabinet moving
noise; vibration
orshaking All rubber leveling legs are not
No power/
washer not
working or dead
Snags, holes; Overloaded
tears, rips or
controitime This is normal
wrong or
changes
Notenough This is normal
water
Washer pauses Pump clogged
or has to be
restarted, or
Washer door is
locked and will
not open
Door unlocksor This is normal
PmreSsSTARTand
achine doeSnt
operate
Automatic load redistribution
Pump clogged
Drain hose is kinked or
improperly connected
Household drain may be
clogged
Drain hose siphoning; drain
hose pushed too far down the
drain
firmly touching the floor
Unbalanced load
Pump clogged
Washer is unplugged
Water supply is turned off
Circuit breaker/fuse is tripped/
blown
Automatic self system checks
Pens, pencils, nails, screws or
other objects left in pockets
Pins, snaps, hooks, sharp
buttons, belt buckles, zippers
and sharp objects left in
pockets
Incorrect operation
What To Do
. Timer adds 3 minutes to cycle for each rebalance. 11 or 15
rebalances may be done. This isnormal operation.
Do nothing; the machine will finish the wash cycle.
. See page 12 on how to clean the Pump Filter.
Straighten drain hose and make sure washer is not sitting on it.
Check household plumbing. You may need to call a plumber.
Ensurethere is an air gap between hose and drain.
Washer is designed to move 1/4" to reduce forces transmitted to
the floor. This movement is normal.
. Pushand pull on the back right and then back left of your washer
to check if it is level. If the washer is uneven, adjust the rubber
leveling legs so they are all firmly touching the floor and locked in
place. Your installer should correct this problem.
. Open door and manually redistribute loud. Tocheck machine, run
rinse and spin with no load. If normal, unbalance was caused by
load.
See page 12 on how to clean the Pump Filter.
Make sure cord isplugged securely into a working outlet.
Turn both hot and cold faucets fully on.
. Check house circuit breakers/fuses. Replace fuses or reset breaker.
Washer should have separate outlet.
Firsttime the washer is plugged in, automatic checks occur. It
may take up to 20 seconds before you can use your washer. This is
normal operation.
. Do not exceed maximum recommended load sizes. See
recommended maximum load sizes on page 10.
Remove loose items from pockets.
. Fasten snaps, hooks, buttons and zippers.
. During spin the washer may need to rebalance the load
sometimes to reduce vibrations. When this happens, the estimated
time is increased causing time left to increase orjump.
Horizontal washers do not require the tub to fill with water like top-
load washers.
See page !2 on how to clean the Pump Filter.
. Front-load washers start up differently than top-load
washers, and it takes 30 seconds to check the system. The door will
lock and unlock.
, Simply open and close the door firmly; then press START.
24
Page 25
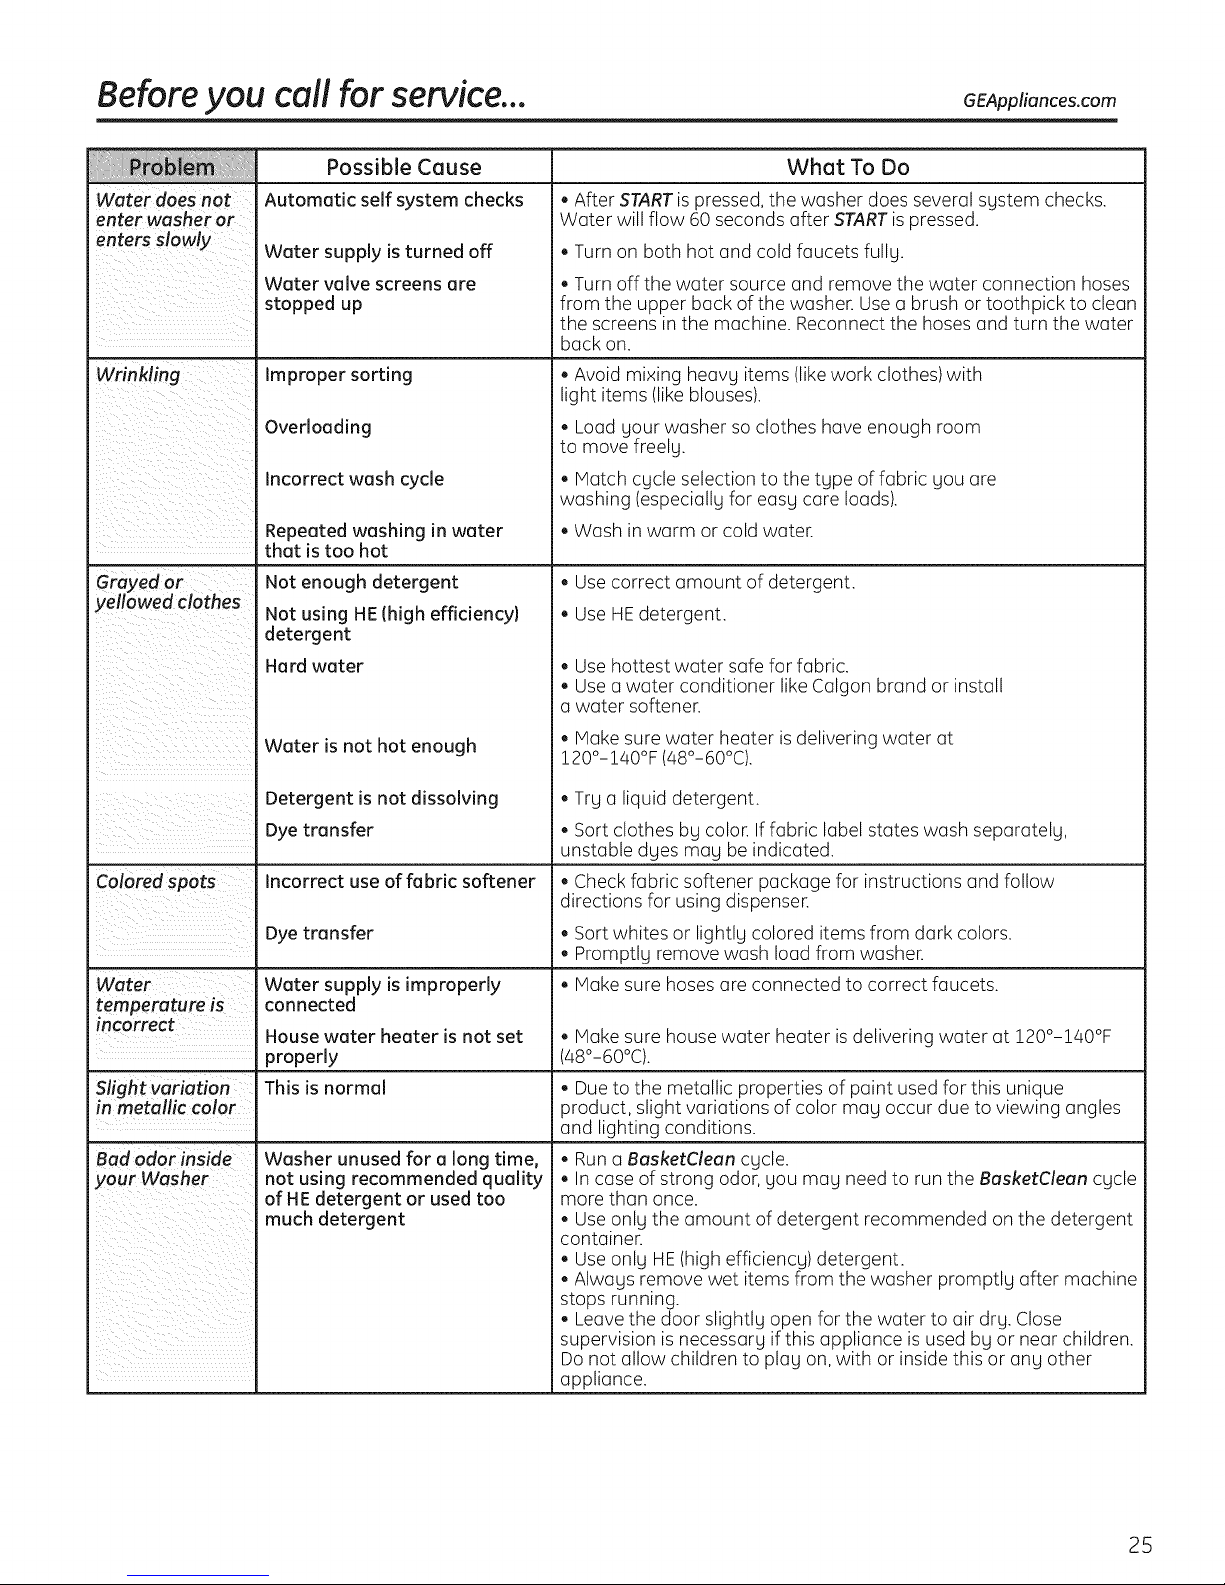
Before you call for service... GEAppliances.com
Possible Cause
Water does Automatic self system checks
enter washer Or
Water supply is turned off
Water valve screens are
stopped up
Wrinkling Im proper sorti ng
Overloading
Incorrect wash cycle
....... that is too hot
Grayed Or
yellowed Clothes
Repeated washing in water
Not enough detergent
Not using HE (high efficiencyl
detergent
Hard water
Water is not hot enough
What To Do
After STARTis pressed, the washer does several system checks.
Water will flow 60 seconds after STARTis pressed.
. Turn on both hot and cold faucets fully.
. Turn off the water source and remove the water connection hoses
from the upper back of the washer. Use a brush or toothpick to clean
the screens in the machine. Reconnect the hoses and turn the water
back on.
• Avoid mixing heavy items (like work clothes) with
light items (likeblouses).
. Load your washer so clothes have enough room
to move freely.
. Hatch cycle selection to the type of fabric you are
washing (especially for easy care loads).
. Wash in warm or cold water.
Use correct amount of detergent.
Use HE detergent.
Use hottest water safe for fabric.
. Use a water conditioner like Calgon brand or install
a water softener.
. Make sure water heater is delivering water at
120°-140°F (48°-60°C).
ColoredsPotS
Water
temperature is
incorrect
Slight Variation
in metallic color
i
iBad odor reside
your Washer
Detergent is not dissolving
Dye transfer
Incorrect use of fabric softener
Dye transfer
Water supply is improperly
connected
House water heater is not set
properly
This is normal
Washer unused for a long time,
not using recommended quality
of HE detergent or used too
much detergent
Try a liquid detergent.
. Sort clothes by color. If fabric label states wash separately,
unstable dyes may be indicated.
. Check fabric softener package for instructions and follow
directions for using dispenser.
. Sort whites or lightly colored items from dark colors.
. Promptly remove wash load from washer.
. Hake sure hoses are connected to correct faucets.
. Make sure house water heater is delivering water at 120°-140°F
(48°-60°C).
. Due to the metallic properties of paint used for this unique
product, slight variations of color may occur due to viewing angles
and lighting conditions.
. Run a BasketClean cycle.
. In case of strong odor, you may need to run the BasketClean cycle
more than once.
. Use only the amount of detergent recommended on the detergent
container.
. Use only HE(high efficiency) detergent.
. Always remove wet items from the washer promptly after machine
stops running.
. Leave the door slightly open for the water to air dry. Close
supervision is necessary if this appliance is used by or near children.
Do not allow children to play on, with or inside this or any other
appliance.
25
Page 26
Before you call for service...
Possible Cause
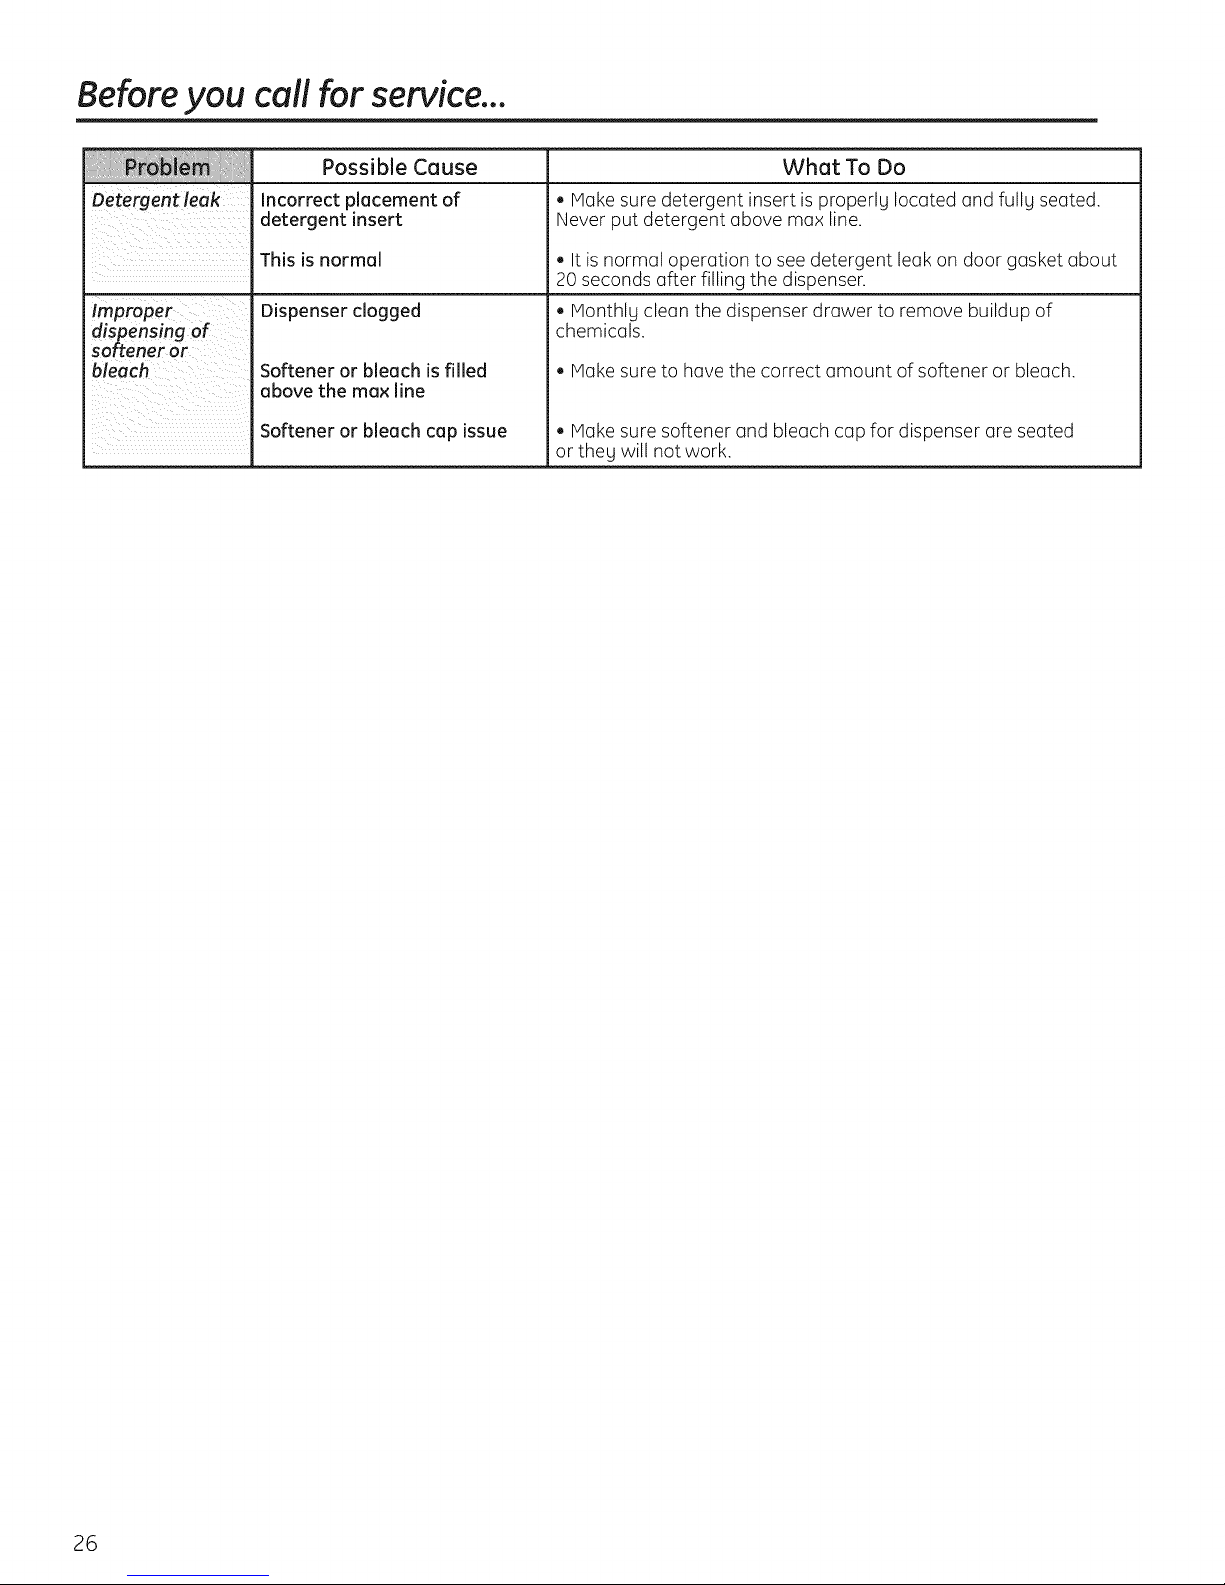
Detergent leak Incorrect placement of
detergent insert
This is normal
Improper
dispensing of
softener or
bleach
Dispenser clogged
Softener or bleach is filled
above the max line
Softener or bleach cap issue
What To Do
Hake sure detergent insert is properlUlocated and full Useated.
Never put detergent above max line.
It isnormal operation to see detergent leak on door gasket about
20 seconds after filling the dispenser.
. ivlonthlg clean the dispenser drawer to remove buildup of
chemicals.
. Make sure to have the correct amount of softener or bleach.
Hake sure softener and bleach cap for dispenser are seated
or theg will not work.
26
Page 27
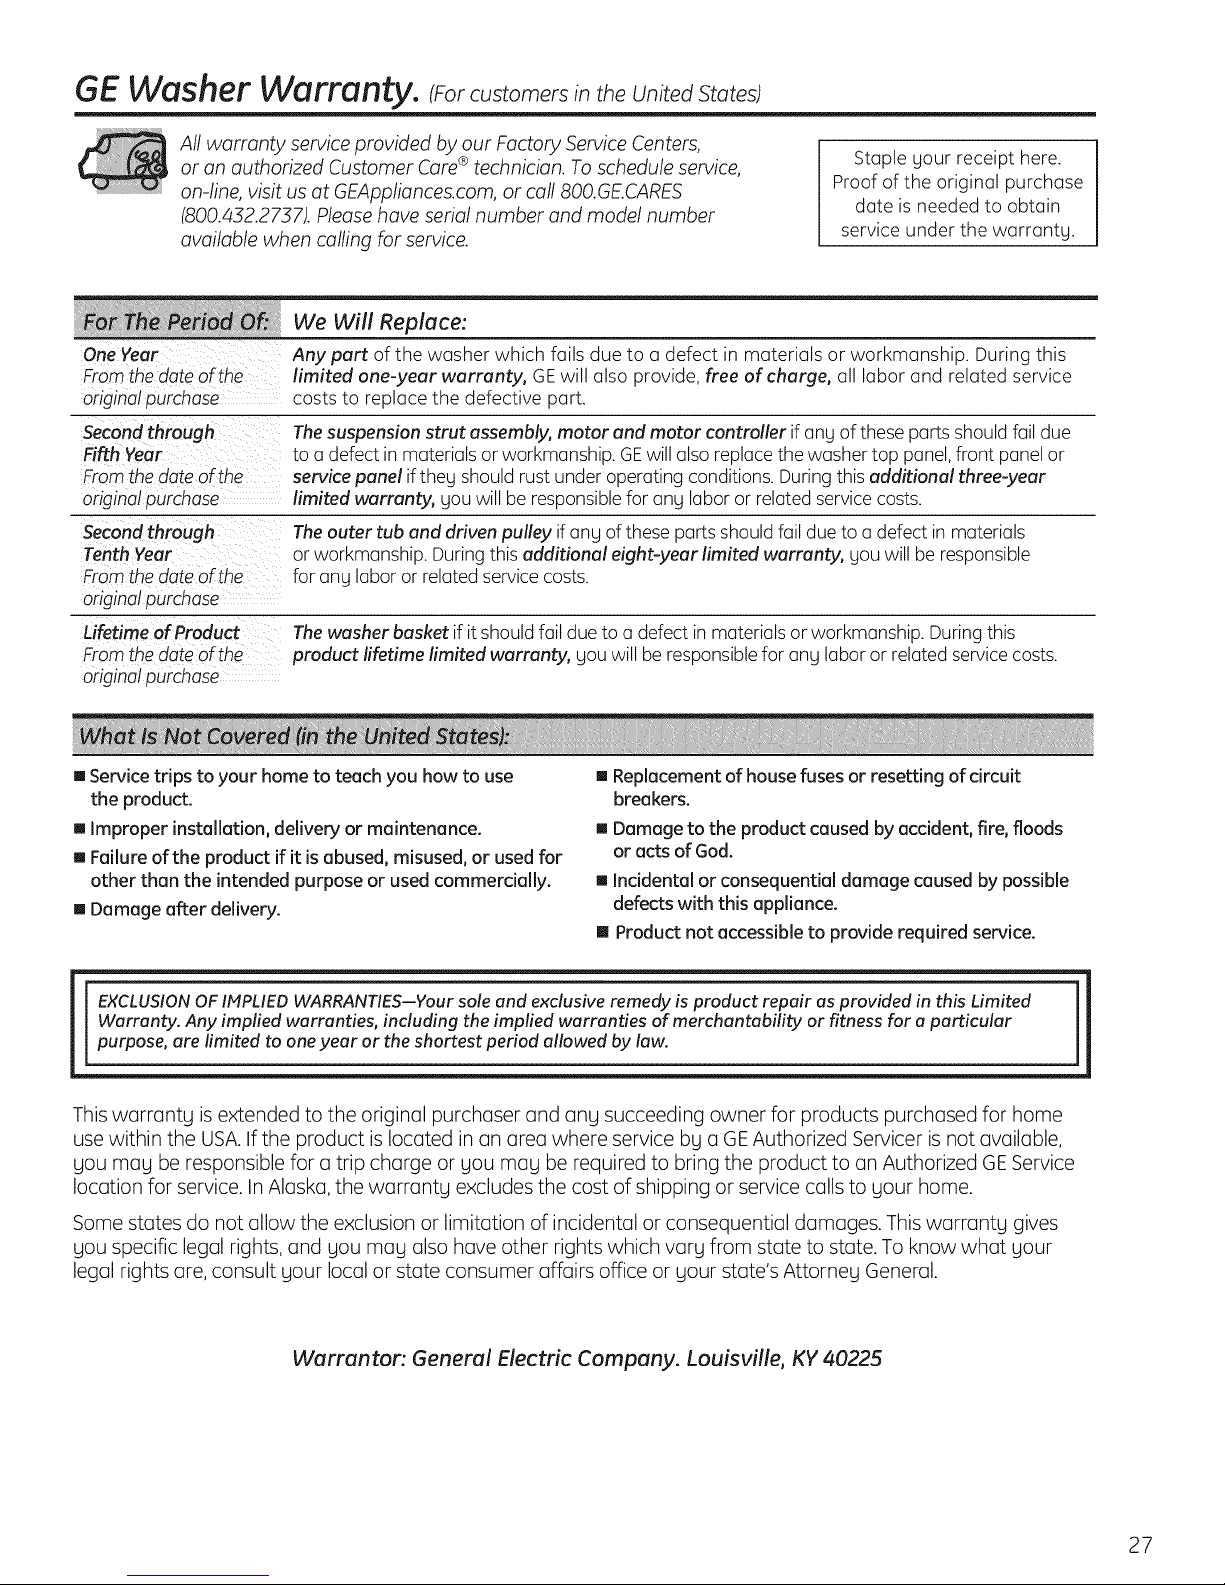
GEWasher Warranty. cForcustomersin the UnitedStates)
All warranty service provided by our Factory Service Centers,
or an authorized Customer Care®technician. To schedule service,
on-line, visit us at GEAppliances.com, or call 800.GE.CARES
(800.432.2737). Please have serial number and model number
available when calling for service.
One Year
From the dote ofthe
original purchase
Secondthrough
Fifth Year
From the date ofthe
original purchase
Secondthrough
Tenth Year
From the date of the
original purchase
Lifetime of Product
From the date ofthe
original purchase
Staple gout receipt here.
Proof of the original purchase
date is needed to obtain
service under the warrantg.
We Will Replace:
Any part of the washer which fails due to a defect in materials or workmanship. During this
limited one-year warranty, GEwill also provide, free of charge, all labor and related service
costs to replace the defective part.
Thesuspension strut assembly, motor and motor controller if ang of these parts should fail due
to a defect in materials or workmanship. GEwill also replacethe washer top panel, front panel or
service panel iftheg should rust under operating conditions. During this additional three-year
limited warranty, gouwill be responsiblefor ang labor or related servicecosts.
Theouter tub and driven pulley ifang of these parts should fail due to a defect in materials
or workmanship. During this additional eight-year limited warranty, gou will beresponsible
for ang labor or related servicecosts.
Thewasher basket if it should fail due to a defect in materials or workmanship. During this
product lifetime limited warranty, gou will be responsiblefor ang labor or related service costs.
[] Service trips to your home to teach you how to use
the product.
[] Improper installation, delivery or maintenance.
[] Failure of the product if it isabused, misused, or used for
other than the intended purpose or used commercially.
[] Damage after delivery.
EXCLUSION OF IMPLIED WARRANTIES--Your sole and exclusive remedy is product repair as provided in this Limited
Warranty. Any implied warranties, including the impfied warranties of merchantability or fitness for a particular
purpose, are limited to one year or the shortest period allowed by law.
[] Replacement of housefuses or resetting of circuit
breakers.
[] Damage to the product caused by accident, fire, floods
or acts of God.
[] Incidental or consequential damage caused by possible
defects with this appliance.
[] Product not accessible to provide required service.
Thiswarrants isextended to the original purchaserand ang succeedingowner for products purchasedfor home
usewithin the USA.Ifthe product is locatedin an area where service bga GEAuthorized Serviceris notavailable,
Sou mag be responsiblefor a trip charge or Soumag be required to bringthe product to an Authorized GEService
location for service.InAlaska,the warrants excludesthe cost of shippingor servicecalls to sour home.
Some states do not allow the exclusion or limitation of incidental or consequential damages. This warrantg gives
gou specific legal rights, and gou meg also have other rights which varg from state to state. To know what gout
legal rights are, consult gout local or state consumer affairs office or gout state's Attorneg General.
Warrantor'. General Electric Company. Louisville, KY 40225
27
Page 28

GEWasher
All warranty service provided by our Factory Service Centres or an authorized
technician. For service, call 1.800.561.3344.
Please have serial number and model number available when calling for service.
One Year Any part of the washer which fails due to a defect in materials or workmanship. During this
From the date of the limited one-year warranty, GEwill also provide, free of charge, all labour and related
original purchase service costs to replace the defective part.
Secondthrough Thesuspension strut assembly, motor and motor controller ifany of these parts should fail due
Fifth Year to a defect in materials or workmanship. GEwill alsoreplace the washer top panel, front panel or
From the date of the service panel ifthey should rust under operating conditions, Duringthis additional three-year
original purchase limited warranty, you will be responsiblefor any labour or related servicecosts,
Secondthrough Theouter tub and driven pulley if any of these parts shouldfail due to a defect in materials
Tenth Year or workmanship. Duringthis additional eight-year limited warranty, you will be responsible
From the date ofthe for any labour or related servicecosts.
original purchase
Lifetime of Product Thewasher basket if it should fail due to a defect in materials or workmanship. During this
From the date of the product lifetime limited warranty, you will be responsiblefor any labour or related service costs.
original purchase
Warranty. _For customers in Canada)
We Will Replace:
[] Service trips to your home to teach you how to use
the product.
[] Improper installation, delivery or maintenance.
[] Failure of the product if it isabused, misused, or used for
other then the intended purpose or used commercially.
[] Damage after delivery.
EXCLUSION OF IMPLIED WARRANTIES--Your sole and exclusive remedy is product repair as provided in this Limited
Warranty. Any implied warranties, including the implied warranties of merchantability or fitness for a particular
purpose, are limited to one year or the shortest period allowed by law.
This warranty is extended to the original purchaser and any succeeding owner for products purchased in
Canada for home use within Canada. In-home warranty service will be provided in areas where it is available
and deemed reasonable by Mabe to provide.
[
[
WARRANTOR ISNOT RESPONSIBLEFORCONSEQUENTIAL DAMAGES.
Warrantor: HABE CANADA INC.
[] Replacement of house fuses or resetting of circuit
breakers.
[] Damage to the product caused by accident, fire, floods
or acts of God.
[] Incidental or consequential damage caused by possible
defects with this appliance.
[] Product not accessible to provide required service.
J
]
28
Page 29

Consumer Support.
GEAppliances Website G EAppliances.corn
Havea question or need assistancewith your appliance?Try the GEAppliances Website,24 hours a day,any
day of the year! For greater convenience and faster service,you can now download Owner's Manuals,order
parts or evenschedule service on-line.
Schedule Service GEAppliunces.corn
Expert GErepair service is only one step away from your door. Get on-line and schedule your service at
your convenience any day of the year! Or call 800.GE.CARES(800./432.2737) during normal business hours.
RealLife Design Studio GEAppliunces.com
GEsupports the Universal Design concept-products, services and environments that can be used by
people of all ages, sizes and capabilities. We recognize the need to design for a wide range of physical and
mental abilities and impairments. For details of GE's Universal Design applications, including kitchen design
ideas for people with disabilities, check out our Website today. For the hearing impaired, please call 800.TDD.
GEAC(800.833.4322).
Extended Warranties
Purchasea GEextended warranty and learn about specialdiscounts that are available while your warranty
isstill in effect. You can purchase it on-line anytime, or call800.626.2224during normal businesshours.
GEConsumer Home Serviceswill still be there after your warranty expires.
Partsand Accessories
Individualsqualified to servicetheir own appliances can have parts or accessoriessent directly to their homes
(VISA,iVlasterCardand Discovercards are accepted).Order on-line today, 24 hours every day or by phone
at 800.626.2002during normal businesshours.
Instructions contained in this munuul cover procedures to be performed by any user. Other servicing
generully should be referred to qualified service personnel. Caution must be exercised, since improper
servicing may cause unsafe operation.
Contact Us
If you are not satisfied with the service youreceive from GE,contact uson our Website with all the details
including your phone number, or write to: GeneralManager, Customer Relations
GEAppliances,Appliance Park
Louisville,KY40225
G EAppliunces.corn
G EAppliunces.corn
G EAppliunces.corn
Register YourAppliance GEAppliunces.com
Register your new appliance on-line--at your convenience! Timely product registration will allow for
enhanced communication and prompt service under the terms of your warranty, should the need arise.
You may also mail inthe pre-printed registration card included in the packing material.
Printed in China
29
Page 30

Plesures de s6curit6 ............. 31, 32
Fonctionnement
Accessoires disponibles ................. 44
Caract6ristiques ..................... 59, 40
Chargement et utilisation
de la laveuse ........................ 40-44
Panneau de contr61e ................... 33
R6glage des contr61es ............... 54-59
Module d'appareil intelligent .............. 45
Installation ....................... 46-51
D6ballage de votre laveuse ............. 48
Dimensions ............................. 47
Emplacement de votre laveuse .......... 47
E×igences d'alimentation d'eau .......... 49
Exigences de mise 6 la terre ............. 48
E×igences de vidange ................... 49
E×igences 61ectriques ................... 47
Installation de la laveuse ............ 49, 50
PiSces de rechange ..................... 50
Pr6paration 6 I'installation de
votre laveuse ........................... 46
Conseils de d_pannage .......... 52-55
Soutien au consommateur
Garantie (Canada)...................... 56
Soutien au consommateur ............. 57
ENERGYSTAR
En qualit6 de partenaire ENERGY
STAR®,GEa trouv6 que ce produit
rencontre les directives d'ENERGY
STAR®en mati_re d'efficience
6nerg6tique.
Inscrivez ici les num#ros
de module et de s#rie :
ModUle #
S#rie #
Vous les trouverez sur une etiquette
olac6e du cOtSde la laveuse.
30
Page 31

RENSEIGNEMENTS IMPORTANTS EN h,fATI[::-REDE S_-CURITeL.
LISEZ TOUTES LES INSTRUCTIONS AVANT D'UTILISER VOTRE
LAVEUSE.
AVERTISSEMENT!
SbLCURITbLDU CHAUFFE-EAU
Dons certaines conditions,un chauffe-eaupeut produirede I'hydrogdnegazeux si onne I'apas utilisdpendant plus
de deux semaines.Dons cesconditions,I'hydrogSnegazeux peut exploser.
Sivous n'avez pas utilis6le chauffe-eaupendant deux semainesou plus,emp_chez tout dommage ou blessure
possibleen ouvrant tousles robinetsd'eau chaude et en leslaissantcouler pendant plusieursminutes. Faitescela
avant d'utilisertout appareil 61ectrom6nagerbranch6au systemed'eau chaude.Cetteproc6dure simplepermet
a toute accumulation d'hydrogene gazeuxde s'6chapper.Comme cegaz est inflammable,nefumezjamais ou
n'utilisezjamais deflamme vive ou d'appareil 61ectrom6nagerpendant cette proc6dure.
BONNE INSTALLATION
Pour votre sdcuritd, vous devez suivre les insl:rucl:ions conl:enues
dons ce manuel, pour r4duire le danger d'incendie ou d'explosion,
de secousse dlecl:rique el:pour empScher les dommages mal:driels,
les blessures corporelles ou les pertes de vie humaine.
Les instructions conl:enues dons ce manuel el:dons l:ous /es aul:res
documenl:s qui accompagnenl: la laveuse ne couvrenl: pas l:oul:es
les sil:ual:ionsou condil:ions possibles qui peuvenl: se produire.
Vous devez loire preuve de prudence el:udliser des mall:hades
sdcuril:aires pour insl:aller,loire foncdonner el:enl:rel:enir l:oul:appareil
dlecl:romdnager.
Vousdevezbien installer etplacer cettelaveuse,conformdment aux instructions d'installation,avant de I'utiliser.
[] Installezou placezvotre laveusedans unendroit o0 [] Mettezbiena laterre la laveuse,conform@mentatous
elle n'estpasexpos@ea des temp@raturesinf@rieures les codeset lesordonnancesen vigueur.Suiveztous
a z@rodegr@centigradeou adu mauvaistemps, les d@tailsdes instructionsd'installation.
Celarisquede causerdes dommages permanents
et d'annulerla garantie.
VOTREAIREDELESSIVE
[] Ne conservez aucun materiau combustible, comme
de la charpie, du papier,des chiffons ou desproduits
chimiques, en dessousou 5 proximit6 de votre
laveuse.
[] Ne laissezjamais la porte de la laveuseouverte. Une
porte ouverte est,pour des enfants, une invitation a
sependre a la porte ou a secacher dans lalaveuse.
[] Vous devezsurveiller constamment votre laveuse
sivous I'utiliseza proximit6 d'enfants ou sides
enfants I'utilisent.Ne permettezjamais ades
enfants dejouer avec,ou dans cet appareil,
ou avec tout autre appareil 61ectrom6nager.
31
Page 32

OUAND VOUSUTILISEZVOTRELAVEUSE
www.electromenagersge.ca
N'utilisez
votre
laveuse
qu'aux fins
prdvues
ddcrites
clans ce
manuel du
propridtaim.
[] N'essagezjamais d'ouvrir votre laveuse quand []
elle fonctionne. Attendez que la machine soit
compl@tement art@t@ pour ouvrir la porte.
[]
Nemaangezjamais d'eau dejavel au chlore
avec de I'ammoniaque ou des acides comme
du vinaigre et/ou de I'antirouille. Le m61ange
de diff@ents produits chimiques peut produire
des gaz toxiques qui peuvent causer la mort.
[]
Nelavezjamais ou ne faites jamais s6cher des
articles qui ont _t_ nettog6s, laves, tremp6s ou
mouill6s dans des substances combustibles ou
explosives (comme la cite, I'huile, la peinture,
I'essence, les substances d_graissantes, les
solvants de nettogage @sec, le p6trole, etc.)qui
peuvent br01erou exploser. N'ajoutezjamais ces
substances @I'eau de lavage. N'utilisezjamais ou
ne placezjamais ces substances @proximit6 de
votre laveuse ou de votre s6cheuse pendant leur
fonctionnement.
[]
La proc6dure de lessivage peut r6duire la
r_sistance aux flammes des tissus. Pour @iter
cela, suivez soigneusement les instructions de
lavage et de soins du fabricant de v_tements.
[]
Pour r@duirele risque de secousse @lectrique,
d6branchez votre laveuse de sa prise murale ou
d6branchez la laveuse au niveau du panneau de
distribution de I'immeuble en enlevant le fusible
ou en faisant basculer le disjoncteur, avant
d'entreprendre tout entretien ou nettogage.
NOTE: Vous ne d6branchez pes votre appareil
de son alimentation 61ectrique en appugant
sur le bouton POWER(alimentation).
N'essagezjamais de faire fonctionner votre
laveuse si elle est endommag6e, si elle ne
fonctionne pas bien, si elle est partiellement
d6mont6e ou si elle a des pi_ces manquantes
ou cass6es, en particulier sa fiche ou son
cordon d'alimentation endommag6.
[]
Ne faites jamais claquer la porte pour la fermer.
N'essagezjamais de forcer sur la porte pour
I'ouvrir quand elle est verrouill6e (le vogant
LOCKED[verrouill6e] est allum6). Vous risquez
d'endommager votre laveuse.
[]
Votre laveuse est _quip6e d'un m6canisme de
protection contre la surintensit6. Son moteur
s'arr_te s'il chauffe trop. Votre laveuse se remet
automatiquement en marche apr_s une p@iode
de refroidissement qui peut atteindre 2 heures,
si vous n'avez pas arr_t6 6 la main votre laveuse
pendant ce temps.
QUAND VOUS NE L'UTILISEZ PAS
[] Fermez les robinets d'eau pour r6duire la pression
sur les tugaux et les robinets et pour r6duire la
fuite s'il se produit une cassure ou une rupture.
V@ifiez1'6tat des tugaux d'alimentation; vous
devez les remplacer tous les 5 ans.
[] Avant de jeter une laveuse ou de la mettre hors-
service, enlevez sa porte pour emp_cher les
enfants de se cachet dedans.
LISEZ ET SUIVEZ SOIGNEUSEMENT CES
RENSEIGNEIENTS EN MATI cREDE SbLCURITbL.
CONSERVEZ CES INSTRUCTIONS
32
[]
N'essagezjamais de r@arer ou de remplacer
une piece de votre laveuse, @moins que ce ne soit
sp6cifiquement recommand6 dans ce Manuel
du propri6taire ou dans des instructions de
r@arations par I'utilisateur publi6es, que vous
comprenez et pour lesquelles vous poss6dez
les comp6tences n6cessaires.
[] Ne faussezjamais les contr61es.
Page 33

Lepanneau de contr61e de votre laveuse.
Vous pouvez repdrer le numdro de module sur !'dtiquette figurant sur le c6td de la laveuse.
AVERTISSEMENT!
Pour rdduire le risque d'incendie, d'dlectrocution ou de blessure
corporelle, veuillez lire les CONSIGNES DE SECURITEIMPORTANTES avant
de mettre cet appareil en service.
D_marrage rapide
Si1'6cranest obscur, appuyez sur le bouton POWER(alimentation)
pour activer I'afficheur.
r_ Appuyez sur le bouton POWER
(alimentation).
[] %lectionnez le cgcle delavage
ou le cgcle Steam Refresh
(RafraTchissement5 lavapeur).
(Desr6glagespar d6faut sont 6tablis
pour chaque lavage.Cesr6glages
peuvent @remodifi6s. Consultezla
section R@lagesdescontr61espour
de plusamples informations).
POWER
%
Sivous avez choisiun cgcle de lavagediff6rent de
SPECIALTYCYCLE(Cgclesparticuliers),appugez
sur lebouton START/PAUSE(Harche/pause).
Sivous avez s61ectionn6SPECIALTYCYCLE(cgcles
particuliers),choisissezentre Rinse and Spin(rinqageet
essorage),Garments (v6tements),Bed and Bath (literieet sale
de bains) et Other Specialty (autres cgclesparticuliers)selon
vos besoinssp6cifiques avant d'appuger sur START/PAUSE
(Marche/Pause).Reportez-vousaux cgcles particuliers pour
plusde renseignements.
PFWS4600, PFWS4605 - Laveuse _ la vapeur Profile HA avec SmartDispense T"
PFWH4400, PFWS4405 - Laveuse profil HA sans vapeur avec SmartDispense _"
Power (alimentalon)
AppuyezpouractiverI'affichage.SiI'affichageestactif,appuyezpourmettrela laveuseenmoded'attente.
NOTE:VousneddbranchezpasvotreappareildeI'alimentationdectriqueenappuyantsurPOWER(alimentation).
33
Page 34

R glage des contr61es.
Cycles de lavage
Les cycles sont optimis6s pour des cat6gories particuli@es de charges de lavage. Le tableau ci-dessous vous aidera
{_trouverun r6glagedelavagequicorrespond6votrechargedelavage.Lespales616vatricesGentleCleanT"font d61icatementculbuter
lesv_tementsdanslasolutiond'eauet de d6tergentpourleslaver.
WHITES/HEAVY DUTY
(BLANCSIINTENSIF)
COLORS/NORMAL
(COULEURS/NORMAL)
WRINKLEFREE(PERMAPRESS)
TISSUSINFROISSABLES[PRESS.
PERM.])
STEAMREFRESH
(RAFRAICHISSEMENT,A
LA VAPEUR}
(certains modules)
HANDWASH
(LAVADO A MANO)
DELICATES
[DELICATE)
ACTIVE WEAR
(VETEMENTS SPORT)
WASHABLE WOOL
(LAINIER LAVABLE}
(certains modules)
SPEED WASH
(LAVAGE RAPiDE)
DRAIN & SPiN
(VIDANGEET ESSORAGE)
BASKET CLEAN
(NETTOYAGE PANIER)
SPECIALTYCYCLES
[CYCLESPARTICULIERS}Pourv_tements particuliers n6cessitant untraitement sp6cial.
Pour les cotonnades blanches, le linge de maison, les v_tements de travail et dejeux tr_s 6
16,q_rementsal6s. L'option STEAMASSIST(Aide vapeur) peut _tre utilis6e avec ce cycle.
Pour les cotonnades de couleur, le linge de maison, lesv_tements de travail et dejeu tr_s 6
16g_rement sal6s. L'option STEAMASSIST(Aidevapeur) peut _tre utilis6e avec ce cycle.
Pour les articles d'entretien facile et 6 pressage permanent. Vous pouvez utiliser I'option
STEAH ASSIST(aide vapeur) avec ce cycle.
Pour d6froisser I 6 5 articles en coton m61ang& II mes'agit pas d'un cycle de lavage, mais
d'un cycle permettant I'application de vapeur sur les v_tements. S61ectionnezle nombre de
v_tements souhait6s 6 raidedestouchesfl@ch@s,puisappugezsurlatoucheENTER(Entr@).
La laveuse 6met un bip 6 la fin du cycle et continue 6 tourner pendant 30 minutes pour 6viter
que lesfroissementsnesefixent.AppugezsurSTART/PAUSE(Harche/pause)pourretirerlesv@tements.
Si vos v_tements sont 16g_rement humides 6 la fin du cycle, 6teindez les secs pendant S
minutes avantdelesporter.
Pour les articles 6tiquet6s lavage (i la main peu sales. La laveuse remue gentiment pour imiter
le lavage 6 la main.
Pour la lingerie et lestissus d'entretien sp6cial peu 6 normalement sails.Assure un trempage et
un culbutage d61icatspendant le lavage et le rinqage.
Pour les v_tements de sport, d'exercices et certains v_tements sport. Lestissus comprennent
lesfibres et finis modernes comme le spandex, les fibres 61astiqueset les microfibres.
Pour laver les produits lainiers lavables (3la machine (3condition que ces produits ils soient
laves conform6ment aux instructions de I'@iquette du v_tement. Enchoisissant ce cycle, vous
devez utiliser un d@erqent appropri6 pour laver la laine.
Pour articles 16g_rement sales qu'il faut laver en vitesse. La dur6e du cycle est d'environ 30
minutes, se/on lesoptions choisies.
Pour 61iminer I'eau et essorer n'importe quel article n'importe quand.
Pour nettoyer le panier de r6sidus et odeurs. Utilisation recommand6e une lois par mois.
Cycles particuliers
RINSE&SPIN
(RINfAGEETESSORAGE)
Pourrincerrapidementn'importe
qudarticlen'importequand.
STEANASSISTCOLORS/ HEAVYDUT¥
C_CLE__ NORMAL ......_< STEA_REFRESH
WH{TESI
GARMENTS BEDandBATH SPECIALIZEDCYCLES
fV_[TEMENTS) (LITetSALLEDEBAIN) (CYCLESPARTICULIERS)
Coats(llanteaux)
DressShirts{Chemiseshabill6es/
Hosierg/Bras
(Bas/Soutiens-gorge)
Jeans
Khakis(Kakis)
Sweaters(Chandails/
Blankets(cotton){
Couvertures[coton])
Comforters(Douillettes/
Sheets{Draps)
Towels(Serviettes)
AthleticShoes
(Chaussuresathl6tiques)
EnergySavings
Economied'&nergie
FabricRefresh
(Revitalisanttextile)
Fleece(Moll@n)
FragileCottons(Cotonsfragiles)
PerformanceFabrics
(Tissusdeperformance)
PetBedding(Literied'animaux)
PlayClothes(V6tementsdejeux/
SingleitemWash(Artideunique/
SleepingBag(Sacdecouchage)
Soak(Trempage)
Superdean{Superpropre)
ThrowRugs(Carpettes)
Une fois Specialty Cycle (Cycles particuliers) choisi, utilisez
les touches "_1/_"pour d6filer entre diff6rentes options.
Appugez sur ENTER(Entr6e) pour s61ectionner le cycle.
Appuyez sur BACK (Pr6c6dent) pour revenir au menu
pr6c6dent.
Page 35

R glage des contrSles.
SoilLevelINiveau desalet_)
Enchangeantleniveaudesalet_,vousaugmentezoudiminuezladur_edelavagepourenteverdiversmontantsde salet_.
Pourchangerleniveau desa/et@,appuyezsur leboutonSOILLEVEL(niveaudesalet@)jusqu'aur@glaged@sir@.Vouspouvezchoisir
entreExtraLight(tr@speusale),Light(peusale),Normal(normal)ou Hears Soit(vraimentsale).
SpinSpeed(Vitessed'essorage)
Enchangeantlavitessed'essorage,vouschangezlavitessedeI'essoragefinal descgcles,fiuiveztoujourslesinstructionsdeI'_tiquette
duv@ementpourchangerlavitessed'essorage.
Pourchangerla dtessed'essorage,appugezsurleboutonSPINSPEED(vitessed'essorage)jusqu'aur@glaged@sir@.Vouspouvez
choisirentre NoSpin(Pasd'essorage),Low(Lent),Medium(Hod@r@),High(Rapide)ouExtraHigh(Tr@srapide).Lesvitessesd'essorage
lesptusrapidesnesontpasoffertespourcertainscuries,commalecgcied@ticats.
Lesvitessesd'essorageplusrapidesenl@entplusd'eaudesv@tements,et aident(_r@duireletempsdes@chage,maisaugmentent
@galementla possibitit@defroissercertainstissus.
Wash Tempff emp_rature delavage)
Ajustezpourchoisirlabonnetemp@aturedei'eaupouriecgcledelavage.L'eaudepr@tavageetde ringageesttoujoursfroidepour
r@duireI'utitisationd'@nergieet diminuerla fixationdestachesetles froissements.
SuivezI'@tiquettedu fabricantpourchoisirlatemp@aturedelavage.
Pourchangerla temp@aturede lavage,appugezsurleboutonWASHTEMP(temp@aturede lavage)jusqu'aur@glaged@sir@.
VouspouvezchoisirentreTapCotd(Froidedurobinet),Cotd(Froide),Warm(Ti@de),Hot(Chaude)ouSanitize(Hggi@nique).La
temp@aturedelavageaseptis@n'estpasoffertepourcertainscuries,commalecycled@ticats.
Enchoisissantla temp@aturedelavageSanitize(Hggi@nique),lamachine(_laveraugmentelatemp@aturedel'eaupourd@sinfecter
ettuerplusde99%denombreusesbact@riescourantesqual'onretrouvedanstetavager@sidentieLLateml_raturedelavagehggi@nique
n'estdisponibtequapourlecycledeWhites/HearsDuty(Btancs/Lavageintense).Pourdemeitteursr@sultats,choisissezler@glage
delavagetr@ssateenutitisantler@glagedetemp@aturedelavageSanitize(Hggi@nique).
NOTE:Pendanttesdixpremi@essecondesduremplissage,I'eauesttoujoursfroide.Celaaide(_conditionnerlestissusetemp@che
lafixationdes tachessurlesv@tements.
START/PAUSE(D@art/pause)
Appugezpourmettreenmarche uncgclede lavage.Silalaveusefonctionne,vousl'arr@ezenappugantunefoiset d@errouitiez
laporte.Apr@savoirappugersurPAUSE(pause),its'@couleraquelquessecondesavantquala portenes'ouvre.Appugez(_nouveau
pourremettreenmarchelecurie delavage.
NOTE:Enarr@anttalaveuseetenneremettantpasenmarchelecgciedanstes15minutesquisuivent_vousannuteztectjdedetavageactuet.
NOTE:Dartscertainscycles,tataveuse@acuerat'eaud'abord,puisd@errouitterataporte@tapause.
NOTE:Lalaveuseproc@de(_desv@ificationsautomatiquesdusgst@meunefoisquavousavezappug@surteboutonSTART.!_'eausemettra
(_couterdansund@laide45secondesoumoins.Vousentendrezpeut-@trelaporteseverrouitleretsed@errou@ravantquaI'eaunecoule;
ceciestnormal.
EXTRA
RINSE
SETTINGS ÷
i-i
_9:"BASKET LIGHT
SETTINGS ÷
("i
Settings (R6glages)
UtitisezieboutonSETTINGS(R_glages)pour
r@glerlesfonctionssuivantes:
Communicationavecla s_cheuse:
AppugezsurleboutonSETTINGS.Lorsque
lemessage<<DRYERLINK>>(Communication
avecla s@cheuse)s'affiche,appuyezsur
ENTER(Entr@).A I'aidedestouchesfl@ch@s
4/_, choisissezON(Marche)et appuyez
surENTER.
Unefoistecycledelavagetermin@,
la laveusecommuniqueraaveclas@cheuse
d@sl'ouverturedeia porteousursimple
pressionden'importequetbouton
dupanneaudecontrGte.
Lalaveuseafticheratemessage
<<TRANSFERRINGCYCLEINFORMATION
TOTHEDRYER>>(Transfertd'information
surtecycle(_las@cheuse)et las@cheuse
affichera<<RECEIVINGCYCLEINFORMATION
TOTHEDRYER>>(R@ceptiond'information
surtecycleparlas@cheuse).
Pourcommuniqueravecla iaveuse,
la s@cheusenedoltpasse trouver
encoursdecycle.
Silalaveused@marreunnouveaucycle
avantqualas@cheuseait eula possibitit@
decommuniqueravecette,I'information
seraperdue.
Volumedefin decycle:
Appuyezsurle boutonSETTINGS.Lorsque
<<VOLUME>>s'affiche,appuyezsurENTER
(Entr@),puischoisissez<<EndofCycle>>
(Findecycle).AI'aidedestouchesfl@ch@s
4/_, s&tectionnezHigh(Fort),Medium
(Mod@@),Low(Faible)ouOff(D@sactiver).
Sonorit_descontr61es:
AppuyezsurleboutonSETTINGS,
puiss_tectionnez<<Volume>>.Lorsque
<<CONTROLSOUNDS>>(Sonorit@des
contrGtes)s'affiche,appuyezsurENTER.
AI'aidedestouchesfl@ch@s4/_,
s@tectionnezHigh,Medium,LowouOff.
Luminosit_deI'affichage:
AppuyezsurleboutonSETTINGS.Lorsque
<<DISPLAYBRIGHTNESS>>(Luminosit@de
I'affichage)s'affiche,appuyezsurENTER.
AI'aidedestouchesfl@ch@s_J/_,
s@tectionnezHigh,Mediumou Low.
Duret_deI'eau(S'afficheseulementIorsque
I'accessoireSMARTDISPENSER[Distributeur
intelligent]estconnect__la laveuse):
Cettefonctionr_glelaquantit_ded_tersif
distribu_automatiquementpourle
SMARTDISPENSER.ConsultezleManuel
du propri@airequi accompagneteSMART
DISPENSERpourlesdirectivesd'utitisation.
35
Page 36

PRE
WASH
"_"BASKET LIGHT÷
(" 1
PRE
WASH
[-J
Prewash _Pr6-1avage)
Pr61avageestun lavage suppl6mentaire
avant lelavage principal. Utilisez-le
pour lesv@tementstr@ssalesou pour les
v@tementsdont I'@tiquetterecommande
un pr61avageavant lelavage. Assurez-vous
d'ajouter du d6tergent 6 rendement 61ev6
ou lebon additif de lavage au distributeur de
pr61avage.
www.electromenagersge.ca
La fonction de pr61avaged6clenche
les@tapessuivantes : remplissage de la
laveuse (ajout du d6tersif de pr61avage),
culbutage des v@tements,6vacuation
et essorage.Ensuite,la laveuse ex@cute
le cgcle de lavage s61ectionn&
NOTE: Pourcertains cyclesspdciaux,le
prdlavageest prdsdlectionndpar ddfaut. Vous
pouvez modifier cette sdlectionen tout temps.
I
1
i
EXTRA
RINSE
SETTINGS ÷
O
EXTRA
RINSE
O
DELAY
START
i
]
i
Extra Rinse fRingage extra)
Utilisezun rin_age suppl_mentaire quand il
faut davantage rincer pour enlever la salet6
et led6tergent suppl6mentaires mis pour du
linge vraiment sale.
Delay Start
(Mise en marche retard_e)
Vous pouvez retarder la mise en marche
d'un cgcle de lavagejusqu'6 24 heures.
Appuyez sur lebouton DELAYSTARTpour
choisir le nombre d'heures que vous voulez
attendre pour commencer le cgcle de lavage.
Utilisezlestouches fl6ch6es 41/1_pour
faire apparaTtrele d61aid6sir6; appugez
ensuite sur ENTERpour s61ectionnerled@lai.
Enfin,appugez sur le bouton STARTapr@s
la s@lectiondu cgcle. Lamachine compte
automatiquement letemps d'attente, puis se
met en marche automatiquement 6I'heure
d6sir6e.
NOTE: Pourcertains cgcles sp6ciaux,le
rinqage extra est pr6s@lectionn@par d@faut.
Vouspouvez modifiercette s@lectionentout
temps. Certains cgcles ex@cuteun Tin€age
extra automatiquement.
NOTE:Sivous oubliez de farmer
compl#tement laporte, un signal sonorade
rappel se fait entendre pour vous rappeler de
le loire.
NOTE: Si vous ouvrez la porte pendant qua
la machine compte 8 rebours le temps qui
reste avant la mise en marche, la machine fait
une pause. Vous devez refermer la porte et
appuyer 8 nouveau sur le bouton START pour
recommencer
le compte 8 rebours.
LOCK
PushtoLockControl
Hold5SacstoUnlock,
PRE
WASH
"9:" BASKET LIGHT ÷
(--1
":9:"BASKET LIGHT
SETTINGS ÷
(._I
36
Lock (Verrouillage)
Vous pouvez verrouiller les contr61es pour
emp@cher tout choix de cgcle, ou vous
pouvez verrouiller les contr61es apr_s avoir
commenc6 un cgcle.
Les enfants ne peuvent pas mettre
accidentellement en marche la laveuse
en appuyant sur des touches quand vous
choisissez cette option.
Pourverrouiller lescontr61esde la laveuse,
appugez sur le bouton LOCKet tenez-la
appug6e pendant 3 secondes.Pour
BASKET LIGHT (VOYANT DE PANIER)
Levoyant depanier s'allumeet resteallumd
pendant 5 minutesIorsque laporte s'ouvre,
qua le bouton start/pause est appuyd ou en
appuyant sur le bouton de voyant de panier et
en le gardant appuyd pendant 3 secondes. Le
voyant de panier peut 6tre dteint en appuyant
sur le bouton de voyant de panier et en le
maintenant appuyd pendant 3 secondes.
Le voyant de panier ne peut pas 6tre dteint
pendant que la machine est inactive.
d6verrouiller lescontr61esde la laveuse,
appugez sur le bouton LOCKet tenez-la
appug@ependant 3 secondes.Un son
retentit pour indiquer 1'6tatverrouill6/
d6verrouill&
L'ic6nedecontr61edeverrouillagede
I'affichages'allumequand ilest branch&
NOTE: Vouspouvez encore utiliser
le bouton POWER(alimentation)quand
la machine est verrouillde.
Page 37

R@glagedes c6ntroles.
',i_STEAM
ASSIST
STAIN INSPECTOR ÷
[-i
STAIN
INSPECTOR
Stain Inspector flnspecteur de
taches)
PFWS4600,4605Appuyezsur STAIN
INSPECTOR (inspecteur de taches) et
maintenez-le appuyd pendant 3 secondes pour
activer la fonction.
Lo fonction STAIN INSPECTOR (Inspecteur
de taches) vous permet d'indiquer les
cat6gories de taches qui salissent les
v_tements de votre brass6e. Cette fonction
s'utilise avec n'importe quel cgcle de
lavage.
Pour utiliser I'inspecteur de taches :
1. S61ectionnez le cgcle de lavage,
2. Appugez sur le bouton STAIN INSPECTOR
(Inspecteur de taches)(le bouton s'allume
Iorsqu'il est activ6).
3. Lisez les instructions de lavage de vos
v_tements.
5. Utilisez les fl_ches A/V pour rep6rer la
cat6gorie de taches concern6e.
6. Appugez sur le bouton ENTERpour
s_lectionner
la cat6gorie de taches.
7.Utilisez les fl6ches A/Y pour choisir la
tache concern6e.
4. Appuyez sur le bouton ENTERpour
continuer.
Vous pouvez choisir parmi les taches suivantes :
OUTDOOR(EXTERIEUR) BEVERAGES(BOISSONS) FOOD/COOKING(ALIMENTS/CUISSON)
Clog(Argile)
Gross(Herbe)
Mud/Dirt(Boue/Solet@)
RustIron(Rouille)
TreeSap(S@ve)
PERSONAL(PERSONNEL) (ECOLE/BUREAU/DOMICILE) LAUNDRY(LESSIVE) GRAISSE/CIRE)
Blood(Sang)
Perspiration(Sueur)
Urine/Feces(Urine/Feces)
Mouthwash(Rince-bouche)
Vomit(Vomissure)
8. Appuyez sur le bouton ENTERpour s61ectionner
la tache.
9. La tache s61ectionn6es'affichera.
.10.Appugez sur le bouton STARTpour d6marrer le cgcle.
NOTE : Pour d6sactiver STAIN INSPECTOR(Inspecteur
de taches) ou s61ectionner une tache diff6rente,
appugez sur le bouton STAIN INSPECTORde nouveau.
COSMETICS(COSMETIQUES)
Lipstick/LipBalm
(Rouge6levres/Pommade)
Deodorant(D6odorant)
Lotions
Makeup(water-bused)
(Moquillage[6based'eau])
Oil(hair/mineral)
(Huiie[cheveu×/min@rale])
SCHOOL/OFFICE/HOME OIL/GREASE/WAX(HUILE/
AdhesiveTape(Rubanadh@sif)
BallpointInk(Encredestglo)
Glue(whitecommon)/Colle[blanche])
PencilMark(Marquedecrogon)
CorrectionFluid(C0rrecteurliquide)
GrapeJuice(Jusderaisin)
Coffee!Tea(Caf@iTh@)
FruitJuiceOther
(Autresjusdefruits)
Miik/Dairg(LaiffProduitsiaitiers)
Wine(red/white)
(Vin[rouge/blanc])
DinggWhiteSocks(Basblanc)
Collar/CuffSoil(Cemeaucollet/poignet)
DgeTransfer(Transfertdecolorant)
FabricSoftener(Assoup%sant)
Yellowing(Jaunissement)
NOTE: Lepr61avage est automatiquement s_lectionn6
par d_faut pour certaines taches. Dans le cas d'une
s61ectionautomatique, le bouton PREWASH(Pr61avage)
s'allumera. Pour un nettogage optimal des taches, on
recommande d'ajouter un d6tersif @haute efficacit6
ou un additif de lavage appropri6 dans le distributeur
pour pr61avage.Vous pouvez d6sactiver I'option
de pr_lavage si vous ne souhaitez pas ajouter un
pr61avageau cgcle. 37
Butter/Margarine(Beurre/Margarine)
Cooking/Vegetable0il
(Huiledecuisson!v@g@tale)
Chocolate(Chocolat)
TomatoBased(Aliments0basedetomates)
BarbecueSauce(SauceBarbecue)
MotorOil/Lube(Huile/Lubrifiant6moteur)
Ointment/Sabe(OnguentiPommade)
CandleWax(Ciredechandelle)
Crogon(Crogondecouleur)
Chapstick"(BaumepourI@vres)
Page 38

www.electromenagersge.cu
SMART
DISPENSE TM
:!_STEAM
ASSIST
STAIN INSPECTOR ÷
I--1
SMART DISPENSE T"- accessoire en option
(sur certains modules)
Si vous avez fait I'acquisition du sgst_me
PROFILESMARTDISPENSE(Distributeur
intelligent), reportez-vous au Manuel du
propri6taire qui accompagne
ce produit.
Si vous ne poss6dez pas le PROFILESMART
DISPENSE,votre laveuse est tout de m@me
dot6e d'un sgst@mede distribution en vrac.
Dans ce cas, la s61ectionde I'option SMART
DISPENSEfera apparaTtre un message vous
informant de I'absence de ce sgst@me.Vous
devez alors placer le d6tersif et tout autre
additif s@lectionn6dans le tiroir de distribution
situ@dans
la partie sup6rieure gauche de I'appareil.
STEAM ASSIST (Aide vupeur)
LeSTEAH ASSIST(sur certains modules) (Aide
vapeur) ajoute de la vapeur dans la laveuse
pendant les cgcles WHITES/HEAVYDUTY
(Blancs/Intensif), COLORS/NORMAL(Couleurs/
Normal), WRINKLEFREE(Tissusinfroissables)
ou ACTIVEWEAR(V_tements de sport).
Utilisation :
o Allumez la laveuse _ONJet s_lectionnez le
cgcle de lavage. L'option STEAHASSIST
est seulement disponible avec lescgcles
WHITES/HEAVYDUTY(Blancs/I ntensif),
Pour vous procurer le sgst@mePROFILE
SMARTDISPENSE,visitez le site
electromenagersge.ca
ou communiquez avec votre d6taillant local.
COLORS/NORMAL(Couleurs/Normal),
WRINKLE FREE(Tissusinfroissables) ou
ACTIVEWEAR (V_tements de sport).
.
S61ectionnezle bouton STEAMASSIST
(Aidevapeur) pour activer la vapeur.
3.
Appugez sur le bouton START/PAUSE
(Marche/pause).
ENERGY SAVINGS WASH (Luvuge
WASH
OVERNIGHT
READY
1--)
38
_conome d'_nergie)
utilisez "e" WASH pour 6conomiser de
1'6nergie sur des cgcles de lavage sp_cifi6s.
"e" WASH ne peut pas _tre utilis6 avec
STEAH REFRESH (RafraTchissement 6
OVERNIGHT READY (PR_:-TLE
LENDEMAIN)
(surcertainsmodules)
OVERNIGHTREADYne convient qu'aux plus
petites charges. Cette fonction peut @tre
utilis_e Iorsque les v@tementsdoivent @tre
lav6s et pr@ts6 @tresuspendus ou finis le
lendemain matin. Cette fonction culbute les
v@tementset introduit unjet d'air constant
dans le compartiment de la machine 6 la fin
de certains cgcles de lavage. Lesv@tements
peuvent @tresortis 6 tout moment en
appugant sur Pause. Pour utiliser la fonction,
appugez sur le bouton Overnight Readg et
suivez les invites 6 1'6cran.Apr_s I'emploi,
inspectez le filtre 6 charpie en haut du joint
la vapeur), ENERGYSAVING (Economie
d'6nergie), ATHLETICSHOES(chaussures
de sport), BASKETCLEAN(nettogage du
panier),et WASH CAREw/SOAK (lavage
soign6 avec trempage).
de porte en caoutchouc, nettogez-le si
besoin. Ce cgcle ne convient pas aux articles
d61icatsou fr6quemment port6s.
Le tableau ci-dessous donne des exemples
de charge compatibles avec cette fonction:
2 6 3 uniformes athl@iques
2 tenues de personnel m6dical
2 parures de berceau
1 chemise habill6e, I pantalon habill6
3 chemises habill6es
Page 39

R glugedescontr61es
Filtre @charpie apr@sle
cycle Overnight Ready
_o°oOoO
ooo°o°°
.oO°°o°.-
,o°oO°°°°
Oo°°°°OoO
ooo°
_o-o-oOo°°O
_°Oo°°O°o°ooo
°°°°O°°oOoOoo
NETTOYAGE DE FILTRE A CHARPIE APRE-S LE
CYCLE OVERNIGHT READY
(surcertoinsmodules)
Lefiltresetrouvedans lapartiesup@ieuredroitedujoint d'@tanch@it@
dela laveuse.Pourdemeilleursr@sultats,nettoyezcefiltreapres
chaquecycleOvernightReady(Pr@tlelendemain)enpassantvos
doigtssurlefiltrepourretirerlescharpies.
Lefiltrepeut@tresortientirant surlalanguette,pourmieuxlenettoyer.
RemettezlefiltreenplaceapresI'avoirnettoy&
Les caract .ristiques de votre laveuse.
Le tiroir distributeur
Ouvrezlentementletiroirdistributeurenletirant
jusqu'@sonarr@tfinal.
Apr_sovoirojoutdvosproduitsdeIovoge,fermez
lentementletiroirdistributeur.Sivousfermezle
tiroirtraprite,vousrisquezdedistribuerI'eoude
dovel,I'odoucissontouleddtergenttrapt6L
Ajouterle produit
Le compartiment de pr_lavage
N'utilisezlecompartimentdepr@lavageque
sivouschoisissezlecycledepr@lavage
c_OUrdesvOtementstressales.Ajoutezle
@tergentmesur@ouI'additifdepr@lavageau
compartimentdepr@lavagesitu@@I'ar@re
gauchedutiroirdistributeur.
Led@tergentouI'additifdepr6lavageest@vacu6
dudistributeurpendantlecycledepr6lavage(si
vousI'avezchoisi).
VouspouvezvoirdeI'eoudons/escomportiments
d'eoudedove/etd'odoucissont0 Iofinducycle.
C'estoccosionndpar/'actiondevidonge/
siphonnogeetcelofoitportiedufonctionnement
normaldeIoIoveuse.
Utilisezseulementle d6tergent
hauteefficacit6HE.
NOTE:Leddtergentliquidepassedonsletambourde
Iolaveuse0mesurequevousI'ojoutez.
I Vousdevezajusterlaquantit6ded6tergent
latemperaturedeI'eau,@laduret6deI'eau,
latailledelachargeet@sonniveaudesalet6.
Evitezd'utilisertrapded@tergentdansvotre
laveusecarcelapeutprovoquerdestracesde
d6tergentetdemoussesurlesv@tements.
39
Page 40

I_ Roils
d'ajustement
D_tergent en poudre haute
efficacit_ • retirer I'_tiquette de
choix et ajouter la poudre ici.
Le
compartiment de d_tergent
m
Utilisezseulementdud_tergenthaute
efficacit_donscettelaveuse.NEPASremplir
deced_tergentau-de!6dela ligneMAX.
Utilisezlaquantit_recomrnand_eparle
fabrimntdud_tergent.
m
O_tergentenpoudre- RetirezI'@tiquettede
choixded@tergentetplacez-ladansunendroit
s0r_I'ext@ieurdelalaveuse.Respectezles
instructionsdufabricantded@tergentpourla
mesuredelaquantit@depoudre.
m
O_tergentliquide-Rep@ezlaconcentration
dud_tergentsurIobouteille.PlacezI'_tiquette
dechoix_I'endroitcorrespondant_ la
concentration.
www.electromenagersge.ca
I D@locezI'_tiquettedechoixenIotirontversle
hautetglissez-laverslebasentredeuxrailsde
compartimentpourlarepositionner.Assurez-
vousdepousserI'_tiquetteverslebasde%on
qu'ellearriveoum_meniveauquelefonddu
compartiment.Cen'estpasunproblemesidu
d_tergents'_couleau-del_deI'_tiquettepar
I'ar@reducompartiment.
I Vousdevrezpeut-@eajusterlaquantit_de
d_tergentenfonctiondelatemp@atureetdela
duret_deI'eauainsiqueduvolumeet dudegr_
desalet_delacharge.Evitezd'utilisertrapde
d_tergentdansvotrelaveusecarcelacauser
und_bordementsavonneux,laisserdestraces
ded_tergentetdemoussesurlesv_tements,et
ollongerIodur@duIovoge.
I Neversezpasded_tergentgrumeleuxdonsle
distributeur,ourisquedecauserunefuite.
/
D&tergentliquidehaute efficacit_non
concentr_: ptacerI'_tiquette(_laposition
"IX".
D_tergentliquideh.e.2X placer
I'_tiquette(_laposition"2X'.
D_tergent liquideh.e.3X:placer
I'_tiquette(_la position"3X".
Le compartiment d'eau de Javel
liquide
Sivousled@sirez,mesurezlemontantrecommand@
d'eaudeJavel,ned@assant
pas1/3detasse(80ml)etversez-ledansle
compartimentcentral@tiquet@L_UtDBLEACH(eau
deJavel)etportantlesymbole___.
IIestrecommonddd'employerunjavellisont_houte
e_cocitd(HE)pourcetteIoveuse_chorgementfrontal.
Ned@ossezjomois/o/ignederemp/issoge
maximum.Sivousmetteztrapd'eoudedovel,cola
risquedeprovoquerunedistributionprdmoturdede
I'eoudedovel,quipeutoccosionnerdesdommoges
vosv_tements.
NOTE:N'utilisezjomoisdepoudre_blonchirdonsle
distributeur.
Le compartiment d'adoucissant
sivousled_sirez,versezlemontantrecommand_
d'adoucissantliquidedanslecompartiment_tiquet_
FABRICSOFTENER(adoucissant).
N'utilisezquedeI'adoucissantliquidedans
ledistributeur.
Oiluezdonsdel'eoujusqu'alolignemaximum
deremplissoge.
4O
Ned@ossezjomaislolignemaximumderemplissoge.
Sivousmetteztrapd'odoucissont,colarisquede
provoquerunedistributionpr_motur_edbdoucissant,
quipeut tocher
vos v_tements.
NOTE:Wemettezjomoisd'odoucissantdirectement
dons locharge_laver.
Page 41

Chargement et utilisation de la laveuse.
Suivez toujours I'dtiquette du fabricant de tissus pour laver.
Cauleurs Salet_ Tissus Charpie
Tri des charges de lavage
Blancs Beaucoup D61icat Producteurs
Clairs Normal Soinsfaciles decharpie
Fonc6s Peu Cotonnades Collecteurs
solides de charpie
[] Regraupezlesgrands et despetits articlesdans unem_me charge.Chargezlesgrands articlesd'abord. Les
grands articlesne doiventpas reprdsenterplus de la moitidde la totalitd de lacharge delavage.
[] Nous vousrecommandons de nepas laver unarticle seuLCelapeut occasionnerun ddsdquilibrede charge.
Ajoutez un ou deux articlessemblables.
[] Vous ne devezpas mdlanger lesoreillersetlesddredonsaux autresarticles.Celapeut occasionnerune
charge mal dquilibrde.
[] Sdparezlescouleursfoncdesdesp6lespour prdvenirle transfertde coloranL Commeil s'agit d'une laveuse
haute efficacitdqui consomme moinsd'eau,le transfertde colorant estplus frdquent.
Chargement de/a/aveuse
Vous pouvezcharger compl_tement le tambour de La laveusepeutprendrejusqu'a 30 secondespour
lavage enajoutant les articles lachement. Nelavez d6verrouillersa porte apr_s que vous agez appug6
jamais de v_tements qui contiennent desmat6riau× sur START/PAUSE,selon lesconditions. N'essagez
inflammables (cires,liquidesde nettayage, etc.), pasde forcer la porte pour I'ouvrir quand elleest
Pourajouter desarticles apr_s avoir misen marche gentiment. Ajoutez les articles, refermez la porte
la laveuse,appugezsur START/PAUSE(miseen marche/ et appugez surSTART/PAUSEpour remettreen marche.
pause)et attendez que la porte soitd6verrouill6e.
verrouill6e. Quand la porte estd6verrouill6e, ouvrez
Exemples de brass6es*
VE-TEMENTS
DETRAVAIL
4 Jeans
5chemisesdetravail
5pantalonsdetravail
LINGEDEMAISON
10serviettesdebain/
12d6barbouillettes
2tapisdebaignoire
2drapsplatsformat
2draps-houssesformat
2drapsdebain
7essuie-mains/
entissu6ponge
OU
grandlit
grandlit
4 talesd'oreiiier
BRASSEESPII_fTES TISSUSDELICATS*
4taiesd'oreiller
2essuie-mains
2drapsplats/
2draps-housses
2serviettesdebain/
4 d6barbouillettes
OU
6chemises(homme
oufemme)
4pantalons(kakisou
tissuscrois6s)
5tee-shirts
7bo×eurs
cale_ons
OU
6tee-shirts
pantalons
molletonn6s
7soutiens-gorge
7culottes
3slips
2 camisoles
4 chemisesdenuit
*Onrecommande
deplacerlespetits
articlesdansunsac
enfiletdenglon.
LAVAGESRAPIDES
(26 4v_tements)
2chemisessport
ipantalonssport
OU
3uniformesdesoccer
*On recommande de placer les petits articles dans un sac en filet de nglon.
pullsmolletonn6s
2 kangourous
7pairesdebas
45
Page 42

Suiveztoujourslesinstructionsdufabricantdetissuwant delaver, www.electrome,ogersge.co
Nettoyoge du fi/tre de Io pompe
Cleaning the Pump Filter
Enraison de la nature de la laveuse 6
chargement frontal, il est parfois possible
pour les petits articles d'atteindre la
pompe. La laveuse pr6sente un filtre pour
pi6ger les articles perdus pour qu'ils ne
tombent pas dans le drain. Pour r6cup@er
les articles perdus, nettogez le filtre de la
pompe.
1. Ouvrez la porte d'acc_s 6 I'aide d'un
petit tournevis 6 t@teplate.
2. Placez un plat ou un bac peu profond
sous la porte d'acc_s 6 la pompe et
des serviettes sur le sol devant la
laveuse pour prot6ger le sol. IIest
normal de recueillir environ une tasse
d'eau Iorsque le filtre est retir6.
_Pump
3. Tirez sur le bec verseur
o
5. Retirez lefiltre et nettogez lesd6bris du
6. Remettez le filtre en place et tournez
7. Relevez lebec verseur
8. Fermez la porte d'acc_s en accrochant
d'abord les languettes inf@ieures, puis en
tournant la porte d'acc_s pour la fermer.
Nettoyage dujoint d'@tanch@it@de la porte
Ouvrez la porte de la laveuse. Avec les deux mains, poussez le joint
d'6tanch6it6 vers le bas. Enlevez tout objet 6tranger qui pourrait se trouver
dans le joint. Assurez-vous que rien ne bloque les orifices derriere lejoint.
Tout en maintenant lejoint en position basse, inspectez-en I'int@ieur en
tirant vers le bas avec les doigts. Enleveztout objet @ranger qui pourrait
se trouver dans lejoint. Assurez-vous que rien ne bloque les orifices derriere
le joint.
Une lois le nettogage termin6, retirez vos mains et les joints retourneront
6 ses positions normales.
42
Tournez le filtre de la pompe dans
le sens inverse des aiguilles d'une
montre et retirez lentement le filtre, en
contr61ant le d6bit de I'eau 6vacu6e.
filtre.
dans le sens des aiguilles d'une
montre. Serrez fermement.
Page 43

Suivez toujours l'_tiquette du lubricant de tissus pour laver, www.electromenagersge.ca
Emplacement du tiroir distributeur: Le d6tergent et I'adoucisseur peuvent s'amasser
dans letiroir distributeur. IIfaut enlever ces r6sidus une ou deux lois par mois.
[] Enlevezletiroir en letirant d'abordjusqu'a cequ'il s'arr_te.Atteignez ensuite lecoin
artiste droit de I(]cavit6 du tiroir et (]ppugez fermement sur let(]quet de verrouill%e,
en tir(]nt le tiroir.
Letaquet duverrou n'est visibleque
quand letiroir estcompl_tement tir_
[] Enlevezles etiquettes des compartiments d'eau de J(]vel et d'adoucissant et
1'6tiquetteded6tergent. Rinsez5 I'e(]uch(]ude les6tiquettes et le tiroir pour enlever
toute trace de produit de lessiv(]ge.
i_i _i i
[]
Pour nettoger I'ouverture du tiroir,utilisezune petite brosse pour I'int6rieur.Enlevez
tout r6sidu en haut et en basde I'int6rieur.
[]
Remettezles 6tiquettes d(]ns lear bon comp(]rtiment. Remettez en place letiroir
de distribution.
[] Pour r6duire I'accumul(]tion dans le tiroir de distribution •
Utilisez seulement
un d_tergent
huute efficucit_ HE.
43
Page 44

Chargement et utilisation de la laveuse, www.electromenagersge.ca
f
Etiquettesdetissus
Lessgmboles suivants de tissussetrouvent sur lesv_tements que vous allezlaver.
_-TIQUETTES DE LAVAGE
C c,e eg g glavage 6 _
la machine ......_ ii ......... s Douxm Nepasl .... Nep .........
Temp@ature QO0 00 •
de I'eau Chaude Tilde Froide/fraTche
_-TIQUETTES D'EAU DE JAVEL
Symboles A A
d'eau Ioutes les eaux Eaux de Javel sans chlore Ne pas utiJiser
de Javel de Javel (si n6..... irel d'eau de Javel
(si n6cessaire)
repassage/ d61icat Lavage 6
r6slstants au× pJis la main
Isocmo_l 14oc/losFIIsoc/ss_/
_-TIQUETTES DE D_-TERGENT
Accessoires disponibles.
Pi_destal
Vous pouvezvous procurer un pi6destal
pour votre laveuse. Ce pi6destal
augmente la hauteur de lalaveuse et
procure du rangement pour les articles
de lavage. Lepi_destal comprend un
diviseur pour ranger discr_tement le
d@ersifliquide.Consultez les instructions
d'installation du pi6destal.
Syst_me Profile Smart Dispense
(Distributeur intelligent)
Le syst_me SMARTDISPENSE
permet de ranger et de distribuer
automatiquement le d@ergent et
I'assouplissant durant les cgcles de
lavage et de rinqage de cette laveuse.
AUCUN JAVELLISANTne peut _tre
utilis6 dans ce distributeur intelligent.
Utilisezseulementun d6tersif 8 haute efficacit6 HE.
Consultez le Manuel du propri@aire
qui accompagne le sgst_me Profile
SMARTDISPENSEpour connattre les
instructions d'installation.
44
Page 45

Module d'appareil intelligent CsurcertainsmodSles)
LesmodSles PFWS4600/5 et 4400/5 sont compatibles avec
le module d'appareil intelligent (SAM)GEqui peut _tre achetS
sSparSment.Contactez la compagnie d'SlectricitSlocale ou
rendez-vous 5 www.GEAppliances.com/smart-appliances pour voir si
votre zone utilise la technologie de rSponse5 la demande.
Lesfonctions suivantes de rSponsea la demande sont disponibles
en tant que programme d'essaipilate en collaboration avec votre
compagnie locale de services publics pour aider lesconsommateurs
rSduire leurconsommation Slectriquede pointe.
INSTALLATION
L'emplacement prSf@Spour I'installation du module estau dessus
de la sScheuse.
Des d@ailssur la mani@e deconnecter les cables sur lemodule sont
dans lesinstructions fournies avec lemodule.
Attendez 5 minutes, puis appugez sur le bouton Settings (rSglages).
FaitesdSfiler et cherchez I'_crande gestion d'_nergie comme vu
ci-dessous.
CetScran signifie que lemodule est correctement fixSet que vous
pouvez commencer 5 utiliser I'appareilintelligent en suivant les
instructions ci-dessous.
SiI'Scrande gestion d'Snergie n'est pas disponible, reportez-vous au
guide de dSpannage du module SAM.
GUIDERAPIDE
IIexiste4 niveaux de puissance disponibles :Critique, Haut,
Normal et Bas.Surles niveaux Normal et Bas,I'appareil fonctionne
normalement. LesStapessuivantes montrent comment I'appareil
rSagit pendant ledSmarrage aux niveaux de puissance Critique et
Haut.
Option 2 (d_lai EP)
Au dSmarrage aux niveaux Critiqueet Haut, I'appareilretarde
le dSmarragejusqu'5 ce que le niveau devienne Hagen ou Bas.
Appugez surle bouton START/PAUSE(marche/pause).
Option 2 (Annuler d_lai EP)
Lorsque Delag EPest affichS, la fonction de dSlai peut _tre
annulSe en appugant sur lebouton DELAYSTART(mise
en marche diff@Se). Appuger sur la touche START/PAUSE
commence le cgcle sSlectionnS avec "e" WASH activ& Levogant
"e" WASH s'allume.
Pendant une p@iode de tarif critique, le mode de rSponse
critique** sera aussi activS pour maximiser les Sconomies
d'_nergie: EP sera affich&
WASH S_A_r
Option 3 (Annuler "e" WASH)
AprSsannulation de la fonction de dSlai,appuyer sur le bouton "e"
WASHdSsactive lerSglage "e" WASH.Appuger sur latouche START/
PAUSEcommence le cgcle sSlectionn&
Pendant une p@iode de torif critique, lemode de rSponse critique**
sera activS pour maximiser les Sconomies d'Snergie.EPsera affich&
**Remerque : Lemode de rSponsecritique peut _tre dSsoctivS5 tout
moment en appugant sur le bouton "e" WASHet en le maintenant
appuyS pendant 3 secondes.EPne sera plus affich&
MENU SETTINGS (r_glages)
Appugez surSETTINGS(RSglages),puissSlectionnez Energg
Management (Gestiond'_nergie).
Delag EPOverride (annulation de dSlaiEP)
Cette option permet 5 la laveuseintelligente d'engager
automatiquement le rSglage"e"WASH Iorsde I'annulation d'un dSlai
EPet du dSmarrage d'un cgcle pendant une p@iodede tarif Critique
ou Haut. Le rSglagepar dSfaut est YES_oui).
Auto-Extend Delags(Prolongation automatique du dSlai)
Siune mise en marche diff@Seest sSlectionnSe,cette option permet
de prolonger le dSlai si letarif au moment de lamise enmarche
est Critical(critique)ou High (haut).Le rSglage par dSfaut prolonge
automatiquement ces cgcles.
Option Critical Rate (tarif critique)
Cette option permet 5 I'appareil intelligent de rSpondre5
I'information de tarif critique en engageant automatiquement le
mode de rSponsecritique. Lemode Critical Response(rSponse
critique)est conqu pour maximiser lesSconomiesd'SnergieIorsqu'un
cgcle est exScutSpendant une p@iodede tarif critique. LerSglage
par dSfaut estYES(oui).RSglercette option sur NO(non)dSsactive le
mode Critical Response(R_ponsecritique).
Pour que lesfonctions de rSponse5 la demande sur I'appareil
fonctionnent, un Squipement supplSmentaire doit _tre installs
pour faire I'interface avecla compagnie d'SlectricitSlocale. Un tel
Squipement peut _tre vendu sSparSmentet/ou est disponible auprSs
de la compagnie d'SlectricitS dans le cadre du programme d'essai
pilate.V@ifiezauprSs de la compagnie d'SlectricitSsi un programme
d'essaispilate est offert dans votre zone et demandez tousles
dStails.
REMARQUE:Sivous allezdans unezone oOle programme n'est
pas offert, les fonctions de la rSponse 5 la demande ne peuvent
pas @reactivSes et utilisSessur I'appareil. L'appareil fonctionne
encore normalement aprSs ladSsactivation ou ledSbranchement de
I'Squipement de rSponse5 lademande.
45
Page 46

Instructi
Lave
se
d'install
tio
PFWS4605,
PFWH4405,
Des questions? Appelez le 2.800.562.3344 ou Visitez notre site Web 8 I'odresse : www.electromenagersge.ca 1
OUTILS NI_CESSAIRES POUR INSTALLER
PFWS4600
PFWH4400
AVANT DE COMMENCER
Lisez ces instructions enti_rement et soigneusement.
LA LAVEUSE
[] Tourne-acrou de 1/a po.
. IMPORTANT - Conservezces instructions
pour I'inspecteur local.
. IMPORTANT - Observeztouslescodes
et les ordonnances en vigueur.
. Note a J'JnstaJJateur - Assurez-vous de laisser
ces instructions au consommateur.
. Note au consommateur - conservez ces
instructions a titre de raf@ence.
, Niveau de comp_tences - L'installation de cet
appareil 61ectomanager nacessite des comp@ences
macaniques et 61ectriques de base.
, Temps d'installation - 1-3 heures
, L'installateur est responsable de bien installer
cet appareil.
, Toute panne de produit due a une mauvaise
installation n'est pas couverte par la garantie.
[] Douillede 3/8 po.avec cl6a cliquet
[] cI6 a fourche de3/8 po.
[] CI6anglaise ou douille de 7/16 po.avec cl6 a cliquet
[] cI6 anglaiseou cl6 a fourche de 9/16 po.
[] Pincemultiprise acramaill_re
[] Niveau a bulle
PII_CES FOURNIES
[] Attache de cable
POUR VOTRE RITE:
s4cu "
-& AVERTISSEMENT
, Cetappareil 61ectromanagerdoit _tre bien mis a la terre
et install6conformament @cesInstructions d'installation.
N'installezjamais ou ne rangezjamais votre appareil
dans unendroit oC]il estexpos6@I'eau ou aux
intemp@ies.Consultezla section Emplacement de votre
laveuse.
NOTE: Cetappareil 6lectrom_nager doit 6tre bien mis
a la terre et I'alimentation 61ectrique devotre laveuse
doit se conformer aux ordonnances et codes Iocaux et
a la derni_re _dition du National Electrical Code,ANSI/
NFPA70.
[]
Tuyaux d'eau (2)
46
Page 47

Instructions d'installation
EMPLACEMENT DE VOTRE LAVEUSE
N'JnstallezjamaJs votre laveuse •
i. Dans un endroit expos_ 6 de I'eau qui coule ou aux
conditions climatiques ext@ieures. La temp@ature
ambiante ne doitjamais _tre inf@ieure 6 15,6°C
(60°F)pour que la laveuse fonctionne bien.
2.Dans un endroit o0 elle entre en contact avec des
tentures ou des rideaux.
3.Surun tupis. Le sol DOlT _tre une surface dure avec
une pente maximum de 1,27 cm per 30 cm (1/2 pouce
par pied). Pour vous assurer que la laveuse ne vibre
pas ou ne bouge pus, il est possible que vous deviez
renforcer le plancher.
NOTE: Sile plancher est en mauvais #tat, utilisez
une feuille de contreplaqu# trait6 de 3/4 po. fix#
solidement (3la couverture de plancher actuelle.
IMPORTANT:
Espaces libres minimum pour I'installation
. Installation dans unealc6ve •C6t6s,arr@e,
haut = 0cm (0 po.)
. Installation dans un placard :C6t6s,arri@re,
haut = 0cm (0 po.),avant =2.54 cm (! po.)
, Ouverturede ventilation de porte de placard requise:
2 grilles d'a@ation chaque 387 cm_(60pouce carr6),
situ#es(37,6 cm (3po.)du haut et du basde la porte.
DIMENSIONS
AVANT
27" (68 6cm)
k
COTE
344" (873cm)
k
*NOTE :
Avec ]es pattes de nivellement :40,5 po (102,5 cm)
(r6glable de 1,9 cm [0,75 po])
Avec pi6destal : 55,75 po (136,6 cm)
(r6gJable de 1,9cm [0,75 po])
Superpos6 : 82,75 po (209,8 cm)
47
Page 48

Instructions d'installation
DEBALLAGE DE VOTRE LAVEUSE
AVERTISSEM ENT : Recyclez
ou d@ruisezle carton et les sacs en mati@eplastique
apr_savoir d6ball6 votre laveuse.Mettez cesmat@iaux
horsde la port6e desenfants. Lesenfants peuvent @tre
tent6sde lesutiliser pourjouer. Lescartons recouverts
de tapis, de couve-lit,ou de drap en mati@replastique
peuvent devenir deschambres herm6tiquement closes
risquant d'6touffer des enfants.
1. Coupezet enlevezles bandesd'emballage du haut et
du bas.
2. Alors qu'elleest dans lecarton, posezavec soin la laveuse
surson c6t6. NE LAISSEZJAMAISreposer lalaveusesur
sonavant ou son arri@re.
3. Tournez versle bas les rebords du bas-enlevez tout
I'emballage debase, gcompris lecarton, la base en
stgrofoam et le soutien de cuve en stgrofoam (ins@6e
au centre de la base).Conservezlessupports de
superposition situ_ssur le coussinet de stgromousse
qui recouvre le dessusde la laveuse.
NOTE:Sivous installezvotre laveusesur un pi_destal,suivez
lesinstructions d'installation qui acccompagnent lepi@destal.
4. Remettez soigneusement soin la laveusedebout et
enlevezle carton.
5. Amenez soigneusement la laveuse6 moins de 4pieds
(122cm) de son emplacement final.
6. Enlevezlespisces suivantesde I'arri@ede la laveuse:
/4boulons
/4bagues en mati@e plastique
(gcompris lesanneaux en caoutchouc)
4 dispositifs de cordon d'alimentation
7. Enlevezle boulon de transport. Ins@ezlebouchon
dans letrou du boulon de transport.
NOTE: Sivous n'enlevez pas les cales d'exp@dition,
vous risquez de d_s_quilibrer s_rieusement la laveuse.
Conservez tous les boulons pour un usage futur.
NOTE:Sivous deveztransporter la laveuse 6une date
future, vous devezremettre en place laquincaillerie de
soutien d'emballage pout 6viter tout dommage pendant
le transport. Conservezla quincaillerie dans le sac en
mati_re plastique fourni.
E×IGENCES I LECTRIOUES
Usezcesinstructionssoigneusementetcompl_tement.
,A AVERTISSEMENT--POUR
R#DUIRELEDANGERD'INCENDIE,DE SECOUSSE
I_LECTRIQUEETLESBLESSURESCORPORELLES:
, N°UTILISEZPASDECORDONPROLONGATEUR
OUUNEFICHED'ADAPTATIONAVECCETAPPAREIL
La laveuse dolt @tremise a laterre conform_ment
6 toutes lesordonnances et 6 tous les codes Iocaux
ou, en I'absence decodes Iocaux, aux National
Electrical Code, ANSI/NFPA70.
CIRCUIT- Circuitde d@rivationindividuel, bienpolaris@et mis
6 la terre, de 15amp., branch@par I'interm@diaired'un fusible
6 retardement ou d'un disjoncteurde 15amp.
ALIMENTATIONI_LECTRIQUE- 2-fils,avec mise 6 laterre,
monophas6e, 120-volt.,60-Hz, courant alternatif.
PRISEMURALE - Prisebien mise
6 la terre, triphas_e,situ_e dans
un emplacement tel que lecordon
d'alimentation est accessible
quand la laveuseest install6e.
E×IGENCES DE MISE ,A LA TERRE
AVERTISSEMENT: Unmauvais
branchement de lamise 6 laterre devotre laveuse
peut occasionner un risquede secousse61ectrique.
V@ifiezaupr@sd'un61ectricienlicenci6sivous ne
savezpas si votre appareil est bienmis 6 laterre.
1. La laveuseDOlT@tremise6 la terre.Encas de mauvais
fonctionnement ou de panne,la mise 6 laterre r6duit
le risque de secousseen fournissant un chemin de
moindre r6sistanceau courant 61ectrique.
2. Commevotre laveuseest 6quip6ed'un cordon
d'alimentation 61ectriquequi a unconducteur de mise6
la terre et unefiche demise 6 la terre, lafiche DOlT@re
branch_e dans une prisead6quate, c6bl6een cuivre,
qui est bien install6eet mise6 la terre conform@ment6
toutes les ordonnances et 6tousles codes Iocaux ou,
en I'absencede codes Iocaux,aux National Electrical
Codes,ANSI/NFPA70 (derni_re6dition).Encas dedoute,
appelez un61ectricienlicenci6.NECOUPEZPASou ne
modifiezjamais la broche de mise6 laterre du cordon
d'alimentation 61ectrique.Dans lessituations oOilexiste
une prise 6 deux trous, le propri@aireest responsable
de demander 6 un 61ectricienlicenci6de la remplacer
par une prise 6 troistrous bien mise 6 la terre.
48
Page 49

Instructions d'installation
EXIGENCES D'ALIMENTATION D'EAU
VousDEVEZinstallerdes robinets d'eau chaudeet froide
6 moins de 42 pouces (107 cm)de I'entr6ed'eau de votre
laveuse.Lesrobinets DOIVENT@redes robinets dejardin
de 1,9cm (:3/4po.),pour pouvoir brancher les tuyaux
d'entr6e. Lapressionde I'eau DOlT @reentre !0 et 120 livres
par pouce cart6. Votre service d'eau peut vous indiquer
votre pression d'eau. Latemp@ature de I'eau chaude doit
@rer6gl6e de mani@e6 fournir de I'eau6 une temp@ature
de 48°C 660°C (!20°F 6 140°F)pour obtenir unrendement
ad_quat dela commande de temp@atureautomatique (ATC).
REHARQUE: L'utilisationd'un adoucisseur d'eau est
recommand6e pour r6duire I'accumulation de calcaire 6
I'int@ieurdu g6n@ateurde vapeur sivotre eau esttr_s dure.
E×IGENCES DE VIDANGE
!. Unevidange capable d'61iminer64,3 L(17gals)par
minute.
2. Un diam_tre minimum de tuyau ascendant de
3,!8 cm (! 1/4 po.).
3. La hauteur du tuyau ascendant au dessusdu plancher
doit @trela suivante•
INSTALLATION DE LA LAVEUSE
.
Faitescouler un peud'eau des robinets chaud et froid
pour purger lestuyaux d'eau et enlever lesparticules
qui peuvent boucher lestamis de robinet d'eau.
Z.
Enlevezlestuyaux d'entr6e d'eaudu sac enmati@re
plastique.
.
(extr6mit6 coud6e 90°)
Branchez soigneusement le
tugau d'entr6e marqu@HOT
(chaud)6 la sortieext@ieure
du robinet d'eau marqu6e
H.Serrez6 la main, puis
serrezencore 2/3 detour
avec des pinces.Branchez
soigneusement I'autretuyau
d'entr6e 6 la sortie int@ieure
du robinet d'eau marqu6e C.Serrez6 la main, puis serrez
encore 2/:3de tour avec des pinces. Ne faussez pas le
filetage ou ne serrez pas trop ces branchements.
.
Branchez les extr6mit6s du tugau d'entr6e aux robinet
d'eau CHAUDEet FROIDE,en serrant 16g@ement6
la main, puis en serrant encore 2/3 de tour avec des
pinces.OuvrezI'eau et v@ifiezqu'il n'g ait pas defuite.
Hauteur minimum :61 cm (24po.)
Hauteur maximum 244 cm (96po.)
ARRIERE
T
96 po
(244 cm)
Max.
T
24 po
(61 cm)
f r lu ,_
NOTE : Le tuyau de vidange attach6 6 la laveuse doit
pouvoir atteindre un tuyau ascendant de 147 cm (58
po.). Pour un tuyau ascendant plus 61ev6,contactez un
distributeur autoris6 de pisces.
Min.
S.
Amenezsoigneusement la laveusedans son
emplacement final. Mettezgentillement la laveuse 6
sa place,en la balanqant. IIest important de ne pas
endommager les pattes de nivellement en caoutchouc
Iorsquevous d_placez lalaveuse verssa position
finale. Despattes endommag6es peuvent accro_treles
vibrations produites par la laveuse. La vaporisation
de nettoyant 6 vitres sur le plancher peutfaciliter le
d_placement de la Iaveuse vers sa position finale.
NOTE:Afin de r_duire lesvibrations, assurez-vous
que les quatre pattes de nivellement reposent
fermement au plancher. Poussezet tirez sur l'arri@re
de la laveuse du c6t_ droit, puis du c6t_ gauche
pour ajuster les pattes.
NOTE : N'essagezjamais de soulever lalaveuse par
sa porte ou par sontiroir distributeur.
NOTE : Sivous installezdans un bac de vidange,
vous pouvez utiliser un2 x 4 long de 24 po.pour bien
mettre 6 I'horizontalela laveuse.
49
Page 50

Instructions d'installation
INSTALLATION DE LA LAVEUSE
. La laveuse dans son
emplacement final, placez
un niveau 6 bulle sur la
laveuse (si elle
est install6e sous un
comptoir, elle ne doit pas
bouger). Ajustez les pattes
de nivellement avant vers
le haut ou vers le bas pour
vous assurer qu'elle ne bouge pas. Tournez les contre-
6crous de chaque patte vers la base de la laveuse et
serrez avec une cl6 anglaise.
NOTE : Conservez les extensions des pattes 6 un
minimum pour emp_cher les vibrations. Plus les pattes
sont tir_s, et plus la laveuse vibre.
Si le plancher n'est pas bien horizontal ou est
endommag@, ilest possible que vous deviez allonger
les pattes de nivellement arri@re.
.
Attachez le guide de tugau en U6 I'extr6mit6 du tugau
de vidange. Placez le tugau dans une cuve 6 lessive
ou un tugau vertical et liez-le avec la ligature de c@ble
fournie dans le paquet.
REMARQUE: Placer le tugau de vidange trop en bas
du conduit d'6vacuation peut causer un siphonage.
II ne doit pas g avoir plus de 18 cm de tugau dans
le conduit d'6vacuation. IIdoit g avoir un espace
d'air autour du tugau de vidange. Un ajustement
trop serf6 peut causer un siphonage.
8. Branchez le cordon d'alimentation dans une prise
mise 6 la terre.
NOTE : V@ifiez que le courant est coup6 au niveau
du disjoncteur ou de la boite 6 fusibles avant de
brancher le cordon d'alimentation 6 une prise.
.
Branchez le courant au niveau du disjoncteur ou
de la boite 6 fusibles.
10. Lisezle reste de ce Manuel du propri6taire. IIcontient
des renseignements pr6cieux et utiles qui vous feront
6conomiser du temps et de I'argent.
11. Avent de mettre en merche le leveuse, v_rifiez que
tout est en ordre :
[] L'alimentation principale decourant est branch6e.
[] La laveuseest branch6e5 la prise.
[] Les robinets d'eau sont ouverts.
[] L'appareil est bien horizontal et lesquatre pattes
de nivellement reposent fermement sur leplancher.
[] La quincailleriede soutien pour I'exp6dition est
enlev6eet mise de c6t6.
[] Letugau de vidange est bien attach6.
[] Le robinet,lesrondelleset letugau de vidange
ne fuient pas.
12. Faites marcher la laveuse pendant un cgcle complet.
V@ifiezqu'il n'g a aucune fuite d'eau et qu'elle
fonctionne bien.
13. Sivotre laveuse ne fonctionne pas, nous vous prions
de consulter la section Avant d'appeler un r6parateur,
avant d'appeler le service.
14. Rangez ces instructions dans un emplacement
proche de la laveuse pour r6f6rence future.
Ligature
Ligaturedecable
--....
5O
de cable"
PII_CES DE RECHANGE
1
Sivous avez besoinde pi_cesde rechange pour votre
laveuse,vous pouvez lescommander au Canada en visitant
notre siteweb www.electromenagersge.ca ou en appelant
le800.561.3344.
Ligature
de cable
Page 51

Instructions d'installation
ADAPTIVE VIBRATION CONTROL
(CONTROLE ADAPTATIF DES VIBRATIONS}
Lc]I(]veuse GE est 6quip6e de la technologie de contr61e
(]dc]ptc]tif des vibrations./_ pc]rtir des renseignements clu
sol, ce sgst_me peut r6duire les vibrations et c]m61iorer k]
performance de I'essorc]ge dc]ns certc]ines installations en
(]daptant le cgcle d'essorc]ge. Lc]configuration PAR DEFAUT
est sp6cic]lement conque pour assurer une performance
optimc]le sur la plus grc]nde gc]mme des tgpes de sol.
Suivez Ic] proc6dure ci-dessous pour (]ctiver des r6glc]ges
c]dc]ptc]tifs plus sp6cifiques. Lc]k]veuse peut _tre rc]pidement
et fc]cilement rc]men_e (_k] configuration PAR DEFAUT (_tout
moment en utilisc]nt I(] m_me proc6dure.
S_lection du type de sol
1. Dens le menu des r6gk]ges, s_lectionnez <<floor tgpe setup
>>(configuration clu tgpe de sol).
4. %lectionnez le tgpe de sol en bois.
5. %lectionnez le tgpe de sol.
2. %lectionnez Yes (oui) ou NO (non) pour le pi6dest(]l.
3. %lectionnez Default (d6fc]ut), Concrete (b6ton) ou Wood
(bois) pour le tgpe de sol.
**Lc] s_lection per d6fc]ut est acceptable pour Ic]
plupc]rt des installations.
51
Page 52

Avant d°appeler un r6parateur...
Conseilsdeddpannage-4conomisezdutempsetdeI'argent!
Consultezd'@ordlestableauxquisuiventetvouspourrez
peut-_tredviterdefaireappel8un rdparateur,
Pus de vidange
Pas d'essorage
Pus d'agitution
Causes possibles
La charge est d(_s(_quilibr(_e
La pompe est colmat(_e
Le tuyau de vidange est tortill(_
ou mal connect@
Le siphon d'(_vacuation de la
malson peut 6tre bouch_
Siphonage du tuyau de
vidange; tuyau de vidange
entonc(_ trop bas dans le drain.
Lej,oint de 19porte est
enaommage
Lej,oint de 19porte n'est pas
enaommage
V(_rJfiezla pr(_sence d'eau 6
la partie arri_re gauche de la
laveuse
Correctifs
, Redistribuez les v@ements et faites un drainage et essorage ou un
rinqage et essorage.
Augmentez la taille de la charqe si vous lavez une petite charge
contenant des articles 16gers etTourds.
Reportez-vous page 12 pour le nettogage du filtre de la pompe.
Redressez le tugau de vidange et assurez-vous que la laveuse
n'est pas dessus.
, V@ifiez la plomberie de la maison. Vous pouvez avoir besoin
d'appeler un plombier.
, Assurez-vous qu'il g a un espace d'air entre le tugau et le drain.
, V@ifiezsilejoint est bien en placeet s'iln'est pasd_chir_. Lesobjets
oubli_sdans lespoches peuvent endommager la laveuse(clous,vls,
stglos,cragons).
, L'eau peut d6goutter de la porte Iorsquecelle-ci estouverte. IIs'agit
d'un fonctionnement norma.
, Essugez soigneusement lejoint de porte encaoutchouc. Parfoisde la
salet6 ou desv@ements coinc6s dans lejoint peuvent causer unepetite
fuite.
, Sicette pattie est mouill6e, cela indique la pr6sence d'un surplusde
moussesavonneuse.Utilisezmoinsde d@ergent.
le tuyau de vidange ne sont pas
.Les tuyaux d'entr@e de I'eau ou
bien branch_s
La vidange de la maison est
peut-(_tre bloqu_e
Distributeur colmat(_
Utilisation Jncorrecte de
d(_tergent
Compartiment de distributeur
fissur_
V_tements trop La charge est d_s_quilibr_e
La pompe est colmat(_e
Surcharge
Le tuygu de vidange est tortill(_
ou mal connect6
Le siphon d'_vacuation de la
maison peut 6tre bouch_
, Assurez-vous que les tugaux soient bien branch6s au niveau des
robinets et lalaveuseet assurez-vousque letugau de vidange soit bien
ins@6et fix_ 6 I'installation de vidange.
• V@ifiez la plomberie de la maison. IIest possible que vous agez
besoind'appeler un plombier.
, Le savon en poudre peut causer des colmatages (3I'int@ieur
du distributeur et causer une fuite d'eau 6 I'avant du distributeur.
Retirezle tiroir et nettogez le tiroir et I'int@ieur de la botte de
distributeur.Reportez-vous @la section Nettoyage de la laveuse.
, Utilisez du d@ergent HE et en bonne quantit&
•Dans le cas de nouvelle installation, recherchez lesfissures sur
I'int6rieur du distributeur.
, Redistribuez les v_tements et faites un drainage et essorage ou un
rinqage et essoraqe.
Augmentez la tallle de la charge si vous lavez une petite charge
contenant des articles 16gerset-lourds.
La machine ralentit la wtesse d'essorage @zd0 tr/min sielle a du
mal @6quilibrer la charge. Cette vitesse est normale.
, Reportez-vous page 12 pour le nettogage du filtre de la pompe.
, Le poids @sec de lacharge doit _tre inf@ieur @16 Ibs.
Redressez le tugau de vidange et assurez-vous que la laveuse
n'est pas dessus.
V@ifiezla plomberie de la maison. Vous pouvez avoir besoin
d'appeler un plombier.
Siphonage du tuyau de
vidange; tuyau de vidange
enfonc_ trop bas dans le drain.
52
Assurez-vous qu'il g a un espace d'air entre le tugau et le drain.
Page 53

Avant d°appeler un r parateur...
CyC eincomplet
ou minuterie
iill _ ii ii_!i_ iiii_i i
Secousses,
vibrations ou
bruits forts ou
inhabituels
Pas de
puissance/
la laveuse ne
fonctionne pas
ou semble hors
tension
Causes possibles
Redistribution automatique de
la charge
La pompe est colmat6e
Le tuyau de vidange est tortill_
ou mal connect_
Le siphon d'_vacuation de la
malson peut @tre bouch_
Siphonage du tuyau de
vid_ange; tuyau de vidange
entonc_ trap bas dens le drain.
D_placement d'armoire
TOUSles p!eds de mise .6niveau
en caoutchouc ne touchent
pas fermement le sol
Charge d_s_quilibr_e
Pompe colmat_e
La laveuse est d_branch_e
L'arriv_e d'eau est couple
Le disjoncteur est d_clench_/le
fusible a saut_
Correctifs
. La minuterie ajoute 3 minutes au cycle pour chaque r66quilibrage.
!! ou !S r@@quiribragespeuvent @treeffectu6s. C'est un
fonctionnement normal.
Nefaites rien, la machine terminera le cycle de lavage.
. Reportez-vous page 12 pour le nettoyage du filtre de la pompe.
. Redressez le tugau de vidange et assurez-vous que la laveuse
n'est pas dessus.
. V@ifiez la plomberie de la maison. Vous pouvez avoir besoin
d'appeler un plombier.
. Assurez-vous qu'il y a un espace d'air entre le tuyau et le drain.
. La laveuse est conque pour bouger de 6 mm pour r6duire les
forces transmises au sol. Ce mouvement est normal.
. Pousseztirezsur I'arri@edroit puissur I'arri@egauche de la laveuse
pour v@ifierqu'elle est de niveau.Sielle ne I'estpas, r@lez les pieds de
mise 5 niveau en caoL_tchoucpour qu'ils touchent fermement le solet
qu'ilssebloquent en place.L'installateur dolt corriger ce probl_me.
Ouvrezla porte et redistribuezmanuellement la charge.Pour inspecter
la machine, ex6cutez un rinqageet un essorage 5vide.Sitout est
normal, le d6s6quilibre@aitcaus6 par lacharge.
Reportez-vous page !2 pour le nettogage du filtre de la pompe.
• Assurez-vous que le cordon est bien branch6 dans une prise sous
tension.
Ouvrez 5 fond les robinets d'eau chaude et d'eau froide
Inspectez les disjoncteurs/fusibles de la maison. Remplacez les
fusibles ou r6armez le disjoncteur. La laveuse dolt pr6senter une
prise distincte.
Accrocs, trous,
d_chirures, ou
Tempsde contr61e
incorrect ou
variations
p s
as assez d eau
La laveuse fair
une pause ou dolt
_tre red_marr_e
ou la porte de
la laveuse est
verrouill_e et ne
s'ouvre pas
V_rifications automatiques du
syst_me
Surcharge
Stylos, crayons, claus, vis ou
autres objets _gar_s dens les
poches
Aiguilles, boutons pressions,
agrafes, boutons (_bard vif,
boucles de ceinture, termetures
a glissi_re et objets 6 bard vif
@gar@sdens les poches
C'est normal.
C'est normal.
Pompe colmat_e
la premiere fois que la laveuse est branch_e, des v@ifications
automatiques se prqduisent. II peut @tren@cessaired'attendre
20 secondes avant de pouvoir utiliser la laveuse. C'est un
fonctionnement normal.
• Ne d@assez pas les tallies de charge maximum recommand6es
Reportez-vous aux tallies de charge maximum recommand6es page
10.
Retirez lesobjets 6gar6s dans lespoches.
. Fermez les boutons pressions, agrafes, boutons et fermetures 5
glissi_re
. Pendant I'essorage, la laveuse peut avoir besoin de r66quilibrer la
charge parfois pour r6duire les wbrations. Lorsque cela se produit,
le temps estim6est augment6, ce qui cause une augmentation du
temps qu_reste.
Leslaveuses horizontales ne n@cessitentpas que la cure se
remplisse d'eau contrairement aux laveuses 6 charge par le haut
Reportez-vous page !2 pour le nettogage du filtre de la pompe.
53
Page 54

Avant d'appeler un r parateur.., www.electromenagersge.ca
La porte se
d_bloque ou
la machine ne
fonctionne pas
Iorsque vous
appuyez sur
START.
L'eau ne rentre
pas clans la
laveuse ou entre
V_tements
gris6tres ou
jaun6tres
Causes possibles
C'est normal.
Fonctionnement incorrect
V_rifications automotiques du
syst@me
L°arriv_e d'eau est couple
Lestamis de vanne d'eau sont
colmat_s
Tri incorrect
Surcharge
Cycle de lavage incorrect
Lavage r_p_t(_ dans de l'eau
trap chaude
Pas assez de d(_tergent
De'tergent utilis(_ pas HE (haute
efhcacit_}
Correctifs
, Leslaveuses 6 chargement frontal d6marrent diff@emment de
celles 6 chargement par le haut, et il faut :30secondes pour v6rifier
le sgst6me. La porte severrouille et se d6verrouille
, Ouvrez et fermez simplement la porte fermement, puis appugez
sur START.
, Une fois STARTappug6, la laveuse fait plusieurs v6rifications du
sgst6me. L'eau coule 60 secondes apr6s que STARTsoit appug6.
, Ouvrez6 fond les robinets d'eau chaude et d'eau froide.
Coupez I'arriv6e d'eau et retirez lestugaux de connexion d'eau en
haut 61'arri@e de la laveuse. Utilisez une brosse ou un cure-dent
pour nettoger les tamis dans la machine. Reconnectez les tugaux et
rouvrez I'arriv6e d'eau.
Evitezde m61anger des articles Iourds (comme des v_tements de
travail) avec des articles 16gers(comme des chemisiers).
, Chqrgez la laveuse pour que lesv_tements aient assez de place
pour Douger librement.
, Assortissez la s_lection de cgcle au tgpe de tissus que vous lavez
(surtout pour les charges 6entretien facile).
, Lavez dans I'eau froide ou chaude.
, Utilisez la bonne quantit6 de d@ergent.
, Utilisez du d@ergent HE.
k ¸
i i i
Tachescdor es
La temperature
de I'eau est
incorrecte
L_ggre variation
de la couleur
m_tallique
Eau calcaire
L'eau n°est pas assez chaude
Le d@tergent ne se dissout pas
Transfert de colorant
Utilisation incorrecte
d'assouplisseur
Transfert de colorant
L°arriv_e d'eau est mol
connect_e
Le chauffe-eau de la maison
est mal r_gl_
C'est normal.
, Utilisez I'eau la plus chaude possible pour le tissu.
Utilisez un conditionneur d'eau comme la marque Calgon ou
installez un adoucisseur d'eau.
Assurez-vous que le chauffe-eau distribue de I'eau entre/48 et
60°C.
Essagezun d@ergent liquide
Triez lesv_tements par couleur. Si I'@iquette du v_tement indique
de laver s6par6ment, cela peut indiquer des colorants instables.
Inspectez le sachet d'gssouplisseur de tissu pour des instructions
et suivez lesdirectives d'utilisation du distributeur.
%parez le blanc et les couleurs claires des couleurs fonc6es.
Sortez rapidement le linge de la laveuse.
Assurez-vous que les tugaux sont connect6s aux bons robinets.
• Assurez-vous que le chauffe-eau distribue de I'eau entre/48 et
60°C.
, En.raison des propri@6s m_talliques de la peinture utilis6e pour ce
produit exclusif, de 16g6resvariations de couleur peuvent se produire
selon I'angle de vision et les conditions d'6clairage.
54
Page 55

Avant d°appeler un r parateur...
Odeur
d_sagr_able
dans la laveuse
Fuite de
d_tergent
m
Distribution
incorrecte de
I'ossouplisseur
ou de I'ogent
blanchissant
Causes possibles
Laveuse inutilis_e pendant
longtemps, pas d'utilisation
du d_tergeqt HE de la qualit_
recommand_e ou utilisatJon
d'une quantJt_ excessive de
d_tergent.
Positionnement incorrect du
contenant de d_tergent
C'est normal
Distributeur colmat_
Assouplisseur ou agent
blanchissont au-dessus du
trait max
Probl_me de bouchon
d'assouplisseur ou d'agent
blanchissant
Correctifs
, Ex6cutez un cgcle BasketClean (nettogage de panier).
, Encas d'odeur forte, vous pouvez avorr besoin d'ex6cuter le cgcle
BasketClean plus d'une lois.
Utilisez uniquement la quantit6 de d@ergent recommand6e sur le
conteneur de d@ergent.
Utilisez uniquement du d@ergent HE (haute efficacit6)
Retireztoujours rapidement les v@tements humides de la laveuse
apr_s arr@ clela machine.
• Laissez la porte I_g_rement ouverte pour que I'eau s@che6 I'air.
Une surveillance 6troite est requise pour tout app_areilutilis6 par des
enfants ou 6 leur pr.gximit6. Ne laissez pas les enfantsjouer sur,avec
ou clans cet appare_l ou tout autre.
, Assurez-vousque lecontenant de d@erqent est correctement
positionn6 et plac6. Ne mettezjamais de d@ergentau-dessusdu trait
max.
, IIest normal de voir led@erqentfuir sur lejoint de laporte environ 20
secondesapr_s remplissage c]udistributeur.
,. Nettogez une lois par mois le tiroir distributeur pour retirer les
d6p6ts de produits chimiques.
Assurez-vous de mettre la bonne quantit6 d'assouplisseur ou
d'agent blanchissant.
Assurez-vous que les bouchons d'assouplisseur et d'agent
blanchissant du distributeur sont positionn6s ou ils ne
fonctionneront pas.
55
Page 56

Garantie de laveuse GE. www.electromenugersge.cu
Tout le service sous garantie est fourni par has Centres de service de fabrique ou par un technicien
autoris@. Pour le service, appelez le 2.800.561.3344.
Veuillez foumir le numdro de sdrie et le numdro de mod@leIorsque vous appelez pour obtenir le service.
Nous remplacerons :
Un an Toute piece de la laveuse qui tombe en panne _ cause d'un vice de mat@iau ou de main-
A partirde Iodote d'oeuvre. Pendant cette garantie limit_e d'un an, GEfournit 6galement, gratuitement,
de I'oehatoriginal tousles frais de main-d'oeuvre et de services connexes pour remplacer la piScedSfectueuse.
De la deuxneme
lu cinqui_me annie
A partir de la dote
de !'aehat original
De lu deuxi#me Lo cuve ext#rieure et la poulie d'entruTnement si n'importe laquelle de ces pisces s'av@e
lu dixi#me annie ddectueuse (_cause d'un vice de matiSre ou de fabrication. Pendant la p#riode de huit uns couverte
Apartir de Io dote per cette gurontie limit#e additionnelle, vous serez tenu d'assumer les coots affSrents de main-
deI'ochat original d'oeuvre ou de rSparation.
D.uM.ede viedu produit
A partir de !adote
de I'achat original
L'assembluge des entretoises de suspension, le moteur et lu commando de moteur si n'importe
laquelle de ces pisces s'avSre d6fectueuse 5 cause d'un vice de muti@e ou de fabrication. GE
remplacera aussi le punneuu sup#rieur de la luveuse, le punneuu frontal ou le punneuu de service
si ceux-ci rouillent en cours de fonctionnement. Pendant lu p#riode de trois uns couverte par cette
garuntie limit#e udditionnelle, vous serez tenu d'assumer les coots aff@ents de main-d'oeuvre ou
de rSparation.
Le punier de lu laveuse s'il s'av@e dSfectueux (_cause d'un vice de mati@e ou de fabrication.
Pendant la dur#e de vie du produit couverte par cette garantie limit#e, vous serez tenu d'assumer
les coots aff@ents de main-d'oeuvre ou de rSparation.
[] Les frais de d_placements 6 votre maison pour vous
apprendre 6 utiliser votre produit.
[] Une mauvaise installation, livraison ou entretien.
[] Une panne du produit si celui-d est maltrait_, real utilis_
ou utilis_ 6 desfins autres que celles au×quelles il est
destin_, ou utilis_ commercialement.
[] Des dommages apr_s la livraison.
EXCLUSION DE GARANTIES IMPLICITES - Votre soul et unique recours est la r#paration du produit
solon los dispositions de cette Garantie limit#e. Taurus los garanties implicites, incluant los garanties
de commercialit# et d'ad#quation _ un usage sp#cifique, sont limit#es _ une annie ou _ la p#riode
la plus courte autoris#e par la I#gislation.
Cette garantie est offerte _ I'acheteur initial, ainsi qu'_ tout propri@taire subsdquent d'un produit achetd
au Canada en vue d'une utilisation domestique au Canada. Le service _ domicile en vertu de la garantie
sera foumi dons les rdgions oO il est disponible et oO Mabe estime raisonnable de le foumir.
I
LEGARANTN'ESTPASRESPONSABLEDESDOMMAGESINDIRECTS. ]
[] Le remplacement de fusibles de la maison ou la remise en
marche d'un disjoncteur.
[] Desdommages au produit causes par un accident, un
incendie, une inundation ou une catastrophe naturelJe.
[] Tout dommage indirect ou cons_cutif caus_ par des
pannes possibles de cet appareil _lectrom_nager.
[] Leservice s'il est impossible d'avoir acc_s au produit
pour ce loire.
[
56
Garant • P1ABECANADA INC. j
Page 57

Soutien au consommateur.
Site Web appareils dlectromdnagers GE www.electromenagersge.ca
Vousavez unequestion ou vous avezbesoind'aide pour votre apparei161ectrom6nager?Contactez-nouspar
Internet au site_,w.electromenagersge.ca 2z_heures parjour, tous lesjours de I'ann6e.
Servicede rdparations
Servicede r6parations GEest tout pros de vous.
Pour faire r6parer votre 61ectrom6nagerGE,ilsuffit de nous t616phoner.
1.800.561.3344
Studio deconception rdaliste
Sur clemande,GEpeut fournir une brochure sur I'am6nagement d'une cuisine pour lespersonnes
6 mobilit6 r6duite.
Ecrivez: Directeur, Relationsavec lesconsommateurs, Mabe Canada Inc.
Bureau 310, 1 Factoru Lane
Moncton, N.B.E1C9M3
Prolongation de garantie www.dectromenagersge.ca
Achetezun contrat d'entretien GEavant que votre garantie n'expireet b6n6ficiezd'un rabais substantiel.
Ainsile service apr_s-vente GEsera toujours 15apr_s expiration de la garantie.
Visitez notre site Web ou appelez-nous au 1.888.261.2133.
Pi_ceset accessoires
Ceuxqui d6sirent r6parer eux-m_mes leurs61ectrom6nagerspeuvent recevoir pisceset accessoires
directement (_la maison (cartesVISA,MasterCardet Discoveraccept_es).
Lesdirectives stipul_es duns le present manuel peuvent _tre effectu_es par n'importe quel utilisateur.
Lesautres r6parations doivent g6n6ralement _tre effectu6espar un technicien qualifi6. Soyezprudent,
car une r6paration inadequate peut affecter le fonctionnement s6cufitaire de I'appareil.
Voustrouverez dans lespagesjaunes de votre annuaire le num@o du Centre deservice ivlabe le plus proche.
Autrement, appelez-nous au 1.800.661.1616.
Contactez-nous
Sivous n'@espas satisfait du serviceapr_s-vente dont vous avez b6n6fici6:
Premi_rement, communiquez avec lesgensqui ant r6par_ votre appareil.
Ensuite, sivous n'@estoujours pas satisfait envogeztousles d@ails-num@o de t616phonecompris-au
Directeur, Relationsavec lesconsommateurs, ivlabeCanada Inc.
Bureau 310, 1 Factors Lane
Moncton, N.B.E1C9M3
"] Inscrivez votre apparel/_lectrom_nager www.electromenagersge.ca
communications et notre serviceapr_s-vente. Vous pouvez 6galement nous envoger par la paste
Inscrivez votre appareil 61ectrom6nager en direct, aussit6t que possible. Celaam61ioreranos
le formulaire d'inscriptionjoint 5 votre documentation.
Imprimd en Chine
Page 58

Instrucciones de seguridad .. 56, 57
Instrucciones de funcionamiento
Accesorios disponibles ............... 69
Ajustes de control ................. 59-63
Carga g uso de la lavadora ........ 66-69
Funciones ......................... 64, 65
Panel de control ...................... 58
M6dulo de Aparato Inteligente .......... 70
Instrucciones de instalaci6n. 7t- 76
Control de vibrati6n .................. 76
Desembalaje de la lavadora .......... 73
Dimensiones aproximadas ........... 72
Instalaci6n de la lavadora ......... 75, 76
Piezas de repuesto ................... 75
Preparaci6n para la instalaci6n
de la lavadora ....................... 71
Requisitos de conexi6n de tierra ...... 74
Requisitos de desagOe ............... 74
Requisitos de suministro de agua ..... 74
Requisitos el#ctricos .................. 74
Ubicaci6n de la lavadora ............. 72
Consejos para la soluci6n
de problemas .................. 77-80
Atenci6n ul cliente
Garantia (EEUU.) ..................... 83
Servicio al consumidor ............... 84
ENERGYSTAR
Como socio de Energg Star®,GE
ha confirmado que este producto
cumple las directrices de Energg
Star®relativas al rendimiento
energ6tico.
Escriba aqui los n_meros de
modelo y serie:
N. ° de modelo
N. ° de serie
Puedeencontrarlos en una etiqueta
situada en el costado de la lavadora.
Page 59

INFORMACiON DE SEGURIDAD IMPORTANTE.
LEA TODAS LAS INSTRUCCIONES ANTES DEL USO.
-&iADVERTENCIA!
SEGURIDAD DEL CALENTADOR DE AGUA
En determinadas condiciones,en uncalentador de aguaque no sehaya utilizado durante un minima
de dos semanassepuede producir gashidrdgeno. Elgas hidrdgenopuede resultar explosivoen determinadas
circunstancias.
Siel agua caliente no seha utilizadopar dossemanaso m6s,prevengala posibilidad de sufrirda_oso lesiones
abriendo todos los grifos deagua caliente y dej6ndola correr durantevarios minutos.Realiceeste proceso antes
de utilizar cualquier electrodom6stico que seconecte al sistema de aguacaliente. Estesencilloprocedimiento le
permitirciliberar todo el gas hidr6genoacumulado. Debidoa queel gas esinflamable,no fume ni utilice ninguna
llamao electrodom6stico durante el proceso.
INSTALACI()N CORRECTA
LoIovodorosedebeinstolory colocorcorrectomentedeocuerdoconlosinstruccionesde instolocidn,antesdeutilizorlo.
I Instaleo almacenela lavadoraen unlugar donde I Conectecorrectamente atierrala lavadorade
noest6 expuestaa temperaturasbajo cero conformidad contodos losc6digosg ordenanzas
nialas inclemenciasclimdticas,ga queesto puede regulatorias.Sigala informaci6nde Instrucciones
provocarda_osirreversibleseinvalidarla garantfa, de instalaci6n.
Para su seguridad, siga la informacidn de este manual con el fin de
minimizar el riesgo de incendio, explosidn o descarga eldctrica, asf coma
para evitar dahos materiales, lesiones o la muerte.
Los instrucciones de este manual, asf coma el resto de la
documentacidn que se incluye con la lavadora, no cubren todas los
situaciones o estados posibles que pueden producirse. El usuario DEBE
adaptor procedimientos correctos, seguros y prudentes al instalar,
utilizar
y realizar el mantenimiento de cualquier electrodomdstico.
ZONA DE LAVADERO
[] Mantenga las zonas debajo de los
electrodom6sticos g entorno a elias sin materiales
combustibles coma pelusa,papel,trapos
g productos qu[micos.
[] No deje la puerta de la lavadora abierta.Si lapuerta
estc_abierta, puede hacer que los nihosse cuelguen
de ella o seintroduzcan en la lavadora.
[] Esnecesario vigilar con atenci6n a losnihos
siutilizan la lavadora o seencuentran en las
proximidades. Nodeje que losnihosjueguen
sobre 6steu otro electrodom6stico,
con 61o en su interior.
Page 60

AL UTILIZARLALAVADORA
GEAppliances.com
Utilice este []
electro-
domdstico
s61o para
el uso que
se describe []
en este
manual del
propietario.
[]
Noabra nunca la lavadora mientras est6
en movimiento. Espere a que se detenga
por completo para abrir la puerta.
No mezcle blanqueadores clorados con amoniaco
o 6cidos como vinagre o desoxidantes. La mezcla
de distintos productos quimicos puede producir
gases t6xicos que pueden causar la muerte.
No lave ni seque prendas que se hagan limpiado,
lavado, empapado o manchado con sustancias
inflamables o explosivas (como cera, aceite,
pintura, gasolina, desengrasantes, disolventes
de limpieza en seco, queroseno, etc.) que puedan
prenderse o explosionar. No a_ada ninguna
de estas sustancias al agua de lavado.
No utilice ni coloque ninguna de estas
sustancias en torno a la lavadora
o la secadora durante el funcionamiento.
[]
Elproceso de lavado puede reducir el tiempo
previo a la inflamaci6n de los tejidos. Para evitar
este efecto, siga con atenci6n las instrucciones
de lavado g cuidado del fabricante de la prenda.
[]
Para minimizar la posibilidad de descarga
el6ctrica, desenchufe el electrodom6stico
de la corriente o desconecte la lavadora
en el panel de distribuci6n de la vivienda quitando
el fusible o apagando el interruptor antes de
realizar cualquier tarea de mantenimiento o
limpieza. NOTA: al pulsar el bot6n de apagado,
NO se desconecta la lavadora de la corriente.
[]
No intente en ning0n caso utilizar la lavadora
si est6 dahada, funciona incorrectamente,
est6 parcialmente desmontada, le faltan
piezas o algunas est6n rotas, incluidos
el cable o el enchufe.
[]
No cierre la puerta bruscamente. No intente
forzar la puerta para abrirla cuando est_
bloqueada (el indicador LOCKED[Bloqueada]
est6 ENCENDIDO).Puede dahar la lavadora.
[]
La lavadora est6 equipada con un sistema
de protecci6n de sobrecargas el6ctricas.
El motor se detendr6 si se recalienta.
La lavadora se iniciar6 de nuevo
autom6ticamente despu_s de un periodo
de enfriamiento de hasta 2 horas si no
se apaga manualmente durante ese tiempo.
CUANDO NO EST4LEN US0
[] Cierre las Ilaves de paso para reducir la presi6n
de las tuberfas g las v61vulas,g minimizar
las fugas en caso de que se produzca una rotura
o grieta. Compruebe el estado de las tuberias
de toma de agua, ua que deben sustituirse
cada 5 aBos.
[] Antes de deshacerse de una lavadora o de
desecharla, quite la puerta de la lavadora para
evitar que los ni_os se escondan en su interior.
LEA DETENIDAMENTE V 51GA LA INFORMACION
DE 5EGURIDAD.
GUARDE ESTAS INSTRUCClONES
[] No intente reparar ni sustituir ninguna pieza
de este electrodom6stico, a menos que se
recomiende de manera expl[cita en el manual
del propietario o en instrucciones publicadas
de uso g reparaci6n que sean comprensibles
g que pueda realizar usted.
[] No manipule los controles.
Page 61

E!panel de control de la lavadorao
Puede encontrar el nOmero de modelo en una etiqueta situada en el costado de la lavadora
ADVERTENClA!Para reducir el riesgo de incendio, descarga ddctrica o lesionesa personas, lea
las INSTRUCCIONESIMPORTANTESDE SEGURIDADantes de utilizar este aparato.
Inicio r4pido
si lapantalla est6 oscura, presione el bot6n POWER
(encendido)para "despertar" la pantalla.
E] Presioneel bot6n POWER (encendido). POWER
Seleccioneun ciclo de lavado
o elciclo Steam Refresh (renovaci6n con
vapor).(Existenconfiguraciones
predeterminadas para cada ciclo.
Estasconfiguraciones predeterminadas
pueden cambiarse. Paramc_sinformaci6n,
ver Configuracionesde control).
PFWS4600, PFWS4605 - Lavadora con vapor Profile HA con SmartDispense T"
[_Si seleccion6 unciclo diferente a un SPECIALTY A
CYCLE(ciclode especialidad),presioneel bot6n
START/PAUSE(iniciar/pausa).
Siseleccion6SPECIALTYCYCLE(ciclode especialidad),
elija entre Rinse& Spin (desagOeg centrifugado),
Garments (prendas),Bed and Bath (cama g ba_o)g
Other Specialty (otra especialidad)para sus necesidades
espedficas antes de presionar START/PAUSE(iniciar/
pausa).
para mas informaci6n, vet Ciclosde especialidad.
PFWH4400, PFWS4405 - Lavadora Profile HA sin vapor con SmartDispense TM
Power (Encendido/apagado)
pulse este bot6n para "activar" la pantalla. Si la pantalla estc_ activa, pOIselo para poner la lavadora en
modo de espera.
58
NOTA:AI pulsar el bot6n de POWER(encendido/apagado) no se desconecta la lavadora de la corriente.
"o
J
Page 62

Ajustes de control. GEAppliances.com
Ciclas de lavado
Losciclosdelavadosehanoptimizadoparatiposespecificosdecargasdelavado.Lasiguientetablaleagudar_acombinareltipodelavadoconlascargas.Los
elevadoresGentleCleanT"hacengirarla ropasuavementeen lasohciGndeaguag detergenteparalimpiarlacarga.
WHITES/HEAVYDUTY Para prendas de algod6n, ropa de hogar, prendas de trabajo o deportivas de color blanco con mucha o
(ROPA BLANCA/
MUY RESISTENTES) _oca suciedad. Puede utilizarse la opci6n STEAHASSIST(aguda de vapor) con este ciclo.
COLORS/NORMAL Para prendas de algod6n, ropa de cama, prendas de trabajo o deportivas de colores sGlidos con mucha o
(ROPADECOLOR/NORMAL} goca suciedad. Puede utilizarse la opci6n STEAMASSIST(aguda de vapor) con este ciclo.
WRINKLE FREE(PERMAPRESS) Para prendas de cuidado normal g planchado permanente. Puede utilizarse la opci6n STEAPIASSIST
LIBREDE ARRUGAS
(PLANCHADO PERMANENTE) (aguda de vapor) con este ciclo.
Para estirar de i a 5 elementos de mezcla de algod6n. Este no es un ciclo de lavado, sino un ciclo que sGIo
STEAM REFRESH
(RENOVACIGN POR VAPOR)
(Atgunos modelos)
HANDWASH
{LAVADO A MANO}
DELICATES
{PRENDAS DELICADAS)
ACTIVE WEAR
(ROPA DEPORTIVA}
WASHABLE WOOL
(LANAS LAVABLES}
(At,qunos modelos)
SPEED WASH
(LAVADO RAPIDO)
DRAIN &,SPIN
(DESAGOE Y CENTRIFUGADO)
BASKET CLEAN
(LIMPIEZA DE TAMBOR}
SPECIALTY CYCLES
(ClCLOS ESPECIALES)
aplica vapor alas prendas. Seleccione la cantidad correcta de prendas utilizando las teclas de flecha g
gresione ENTER.
La lavadora emitira un sonido cuando finalice el ciclo, g seguira girando durante 30 minutos para evitar la
formaci6n de arrugas. Presione START/PAUSE(iniciar/pausa) para quitar las prendas.
Sila ropa se encuentra ligeramente hLimeda una vez completado el ciclo, sequela misma a mano durante
!0 minutos antes de usar.
Para prendas en las que se indique que se pueden lavar a mano con poca suciedad.
La ropa se sacude con liqereza afin de imitar la acci6n del lavado a mano.
Para lencer[a g telas delicadas con suciedad de ligera a normal. Ofrece un secado delicado g remojo
durante el lavado Uenjuague.
Para prendas de deportes activos, ejercicio g algunas de uso informal. Lastelas inclugen acabados g fibras
de tecnologia moderna como el spandex, telas elcisticas L_micro fibras.
Para lavar aquellos productos de lana lavables a mciquina, siempre g cuando se realice de acuerdo con
las instrucciones de la etiqueta de la prenda. Cuando seleccione este ciclo, debe utilizar un detergente
apropiado para el lavado de la lana.
Para prendas con poca suciedad que se necesiten en poco tiempo. La duraci6n del ciclo esde
aproximadamente 30 minutos, dependiendo de las opciones seleccionadas.
Para desaguar g centrifugar rcipidamente cualquier prenda en cualquier momento.
Utilicelopara limpiarel tambor deresiduosg olor. Serecomiendasu usouna vezpor mes.
ParaprendasOnicasquenecesitanuntratamientoespecial.
Ciclos especiales Rinse&SPIN
(ENJUAGUEYCENTRIFUGADO)
R@idamenteenjuaguecualquielr
prendaencualquiermomento.
GARMENTS
{PRENDAS)
Coats(Abrig0s)
DressShirts(Camisasdevestir)
Hosierg!Bras(Medias/sostenes)
Jeans
Khakis
Sweaters
Hientras se encuentre usando un ciclo de especialidad, utilice
las flechas A g V para desplazarse entre las diferentes opciones.
Presione ENTER(ingresar) para seleccionar el ciclo. Presione BACK
(atrc_s)para volver al menOanterior.
BEDandBATH
(CAMAy BANO)
Blankets(cotton)
(Hantas[cotGn])
Comforters(Edredones)
Sheets(SGbanas)
Towels(ToaJlas)
SPECIALIZEDCYCLES
{CICLOSDEESPECIALIDAD)
AthleticShoes(Zapatillas)
EnerggSavings
(Ahorrodeenergh)
FabricRefresh
(RenovaciGndetehs)
Fleece(Corderito)
FragileCottons
(AlgodonesfrGgiles)
PerformanceFabrics
(Tehsderendimiento)
PetBedding
(Camasdemascotas)
HagClothes(Prendasdejuego)
SingleItemWash
(LavadodeprendaLinica)
SleepingBag(Boisadedormir)
Soak(Remo]o)
SuperClean(SOperhvado)
ThrowRugs(Hantasdeviaje)
59
Page 63

Ajustes de control.
Soil Level (Nivel de suciedad)
Atcambiaretnivetde suciedad,aumentao disminugeettiempodelavadoconetfin de eliminarlosdistintascantidadesde suciedad.
Paracambiaretnivetdesuciedad,pulseetbot6nSOILLEVEL(Nivetdesuciedadthastaobtenerelvalordeseado.Puedeetegirentrelos
nivetesdesuciedadExtraLight(Mugpoca/,Light(Poca/,Normalo Heavg(Mucha/.
SpinSpeedfVdocidaddecentrifugado)
Atcambiarla velacidadde centrifugado,cambiala vetocidadfinaldecentrifugadode losciclos.Sigasiemprelosindicaciones
de laetiquetadecuidadodelfabricantedela prendaalcambiarla velacidaddecentrifugado.
Paracambiarla velocidaddecentrifugado,pulseetbot6nSPINSPEED(Vetocidaddecentrifugado)hastaobteneretvalordeseado.
PuedeetegirseentreNoSpin(sincentrifugado),Low(ba]o),Medium(media),High(alto)oExtraHighSpin(centrifugadoextraalto).
Losvetocidadesdecentrifugadomdsr6pidasnoest6ndisponiblesendeterminadoscidos,comaDeticates(Prendasdeticadas).
Condichasvetocidades,seetiminamdsaguadelosprendasgsereduceettiempode secado,aunquetambi6npuedeaumentar
la posibitidaddequeseformenarrugasenalgunoste]idos.
Wash Tempffemperaturade lavado)
Ajusteestecontrolparaseteccionarlatemperaturadetagua adecuadaparaetcidodelavado.Elaguade pretavadog en]uagado
est6siemprefriaparapoderreduciretconsumodeenergiaglosmanchasgarrugas.
Sigalosindicacionesde laetiquetadecuidadodeifabricantedeltejidoal seleccionarla temperaturadelavado.
Paracambiarlatemperaturadeiavado,pulseetbot6nWASHTEMP(Temperaturade lavado)hastaobteneretvalordeseado.
PuedeetegirseentreTapCold(friodegrifo),Cold(frio),Warm(tibia),Hot (caliente)o Sanitize(desinfecci6n).Latemperaturadelavado
dedesinfecci6nnoest6disponibleendeterminadosciclos,comaDeticates(Prendasdelicadas).
Atseieccionarla temperaturadeSanitize(Desinfecci6n),la lavadoraaumentalatemperaturadetaguaparaesteritizargetiminar
mdsdet99%delosbacteriasqueaparecendeformafrecuenteenloslavadoshogareflos.Latemperaturadedesinfecci6nest6
disponibteexclusivamenteenetcicloWhites/HeavgDutg(Ropablanca/Mugresistentes).Paraobtenermejoresresultados,seleccione
laconfiguraci6ndesuciedadexcesivacuandoutiticelaopci6ndetemperaturadedesinfecci6n.
NOTA:Los!0 primerossegundosdelatomadeagua,siempreest6fria.Estafunci6npermiteacondicionarettejidog evitar
quelosmanchasseadhierana losprendas.
START/PAUSEflnicio/pausa)
Pulseestebot6nparainiciaruncido de lavado.Sila lavadoraest6enfuncionamiento,al pulsarlounavez,lalavadorasedetendr6
gsedesbloquear6la puerto.Lapuertotardar6 unossegundosendestrabarsedespu6sdepresionarPAUSE(pausa).Vuelvaa pulsar
etbot6nparareiniciarelciclodelavado.
NOTA:Silalavadaraestddeteniday etdda nosereiniciaen15minutas,secancdardel dcla delavadaactual.
NOTA:Enalgunosciclos,lalavadorarealizaetdesagOeprimero,luegodestrabelapuertacuandoseencuentraenpausa.
NOTA:Lolavadororealizarevidonesautomdticasdd sistemadespu4sdepredonarelbot6nSTARTflnicio).Elflujodeaguaseiniciard
en45segundosoantes.Podrdescucharlapuertaal tmbarsey destmbarseantesdequecomienceafluirelagua;estoesnormal
EXTRA
RINSE
SETTINGS ÷
i--i
9,- BASKETLIGHT
SETTINGS ÷
(..
6O
6O
Settings (Configuraciones)
Utilice el bot6n SETTINGS (configuraciones)
para ajustar las siguientes caracteristicas:
Dryer Link (conexi6n con secadora):
Presione el bot6n SETTINGS. Cuando aparece
"DRYERLINK"(conexi6ncon secadora) en la
pantalla, presione ENTER.Utilizando losteclas
_1/_, seleccioneON (encendido)g presione
ENTER.
Cuando finaliza el ciclo dela lavadora, 6sta
secomunicar6 con la secadora cuando se
presione cualquier bot6n del panelde control o
seabra la puerta.
La lavadora mostrar6 la siguiente legenda:
"TRANSFERRINGCYCLEINFORMATIONTOTHE
DRYER"(transfiriendo informaci6n del ciclo a la
secadora) yla secadora mostrar6 "RECEIVING
CYCLEINFORMATIONTOTHEDRYER"(secadora
recibiendo informaci6n del ciclo).
La secadora se comunicar6 con
la lavadora s61osi lasecadora no est6
operando un ciclo.
Sila lavadora comienza un nuevo
ciclo antes de que la secadora pueda
comunicarse con ella,la informaci6n
seperder6.
Volumen de final de ciclo:
Presioneel bot6n SETTINGS.Cuando aparece
"VOLUME"(volumen)en la pantalla, presione
ENTER,luego seleccione"Endof Cgcle"(final
de ciclo). Utilizando las teclas_l/_, seleccione
High (alto),Medium (media),Low (bajo) u Off
(apagado).
Sonidos del control:
Presione el bot6n SETTINGS, luego seleccione
"Volume" (volumen).Cuando aparece
"CONTROLSOUNDS"(sonidosdel control) en la
pantalla, presione ENTER.Utilizando losteclas
4/_, seleccioneHigh (alto),Medium (media),
Low (bajo)u Off(apagado).
Brillo de la pantalla:
Presione el bot6n SETTINGS. Cuando aparece
"DISPLAYBRIGHTNESS"(brillo de la pantalla)
en la pantalla, presione ENTER.Utilizando los
teclas/, seleccione High(alto),Medium (media)
o Low (bajo).
Dureza del agua (s61oaparece cuando
se conecta a la lavadora el accesorio de
pedestal SMART DISPENSER [dosificador
inteligente]):
Estoajustar6 la cantidad de detergente
que sedosifica autom6ticamente para
el SMARTDISPENSER.Ver el Manual
de Propietario incluido con SMART
DISPENSERpara las instrucciones
de uso.
Page 64

GEAppliances.com
PRE
WASH
_ BASKETLIGHT ÷
(.1
PRE
WASH
[..!
EXTRA
RINSE
SETTINGS ÷
o
EXTRA
RINSE
1
[
DELAY
START
i- 1
LOCK
PushtoLockControl
Hold3SeestoUnlock
PRE
WASH
_}_BASKET LIGHT ÷
("1
":71"BASKET LIGHT
SETTINGS ÷
(--i
Prewash (Prelavado)
Elprelavado es un lavado adicional que
se realiza antes del lavado principal.
Utilicelo con prendas mug sucias
o con aquellas prendas en cugas
etiquetas de cuidado se recomiende
realizar un prelavado.Aseg_rese de
afladir detergente de alta eficacia o la
sustancia de lavado correspondiente
en la cubeta de prelavado.
Extra Rinse (Enjuagado extra)
Use esta funci6n cuando desee un
enjuagado adicional para eliminar los
restos de suciedad g detergente en
cargas sucias.
Delay Start (Retrasar inicio)
Puederetrasar el iniciodel ciclo de lavado
hasta 24horas. Pulseel bot6n DELAY
START(Retrasarinicio)para seleccionar
el n5mero de horas que deseeretardar
el inicio del ciclo. Utilice lasteclas A g V
(arriba g abajo)para buscar eltiempo
de demora; luego presioneENTER
para seleccionar eltiempo de demora.
Finalmente,presioneel bot6n START
despu6s de haber seleccionado el
ciclo deseado. Lalavadora comenzarc_
la cuenta regresiva g se pondrc_en
funcionamiento autom@icamente a la
hora se_alada.
Lock _loqueafl
Puedebloquear loscontroles para impedir
que se realice cualquier selecci6n.O bien
puede bloquear los controles despu6sde
haber iniciado un ciclo.
Conesta opci6n seleccionada, los nihos
no podr@nponer en marcha la lavadora
de manera fortuita aunque toquen el
panel.
Para bloquear la lavadora, mantenga
pulsado elbot6n LOCK(bloquear)durante
3 segundos. Para desbloquear los
controles dela lavadora, mantenga
BASKET LIGHT (luz del tambor)
La luz del tambor se encenderc_g
permanecerc_activada durante S
minutos cuando la puerta se abra, se
presione el bot6n start/pause (iniciar/
pausa), o presionando g sosteniendo
la luz del tambor durante 3 segundos.
La luz del tambor puede apagarse
presionando g sosteniendo el bot6n de
la luz del tambor durante 3 segundos.
La caracteristica de prelavado Ilenar6
la lavadora (agregando el detergente
de prelavado), girarc_la ropa,efectuar6
el desag0e g el centrifugado. Luego la
lavadora realizarc_elciclo de lavado
seleccionado.
NOTA:Enalgunos ciclos especiales,el
prelavado se seleccionaautomdticamente
pot defecto. Estaseleccibnpuede
modificarse en cualquier momento.
NOTA:En algunos ciclos especiales,
el enjuague extra seselecciona
automdticamente pot defecto. Esta
seleccibn puede modificarse en
cualquier momento. Algunos ciclos
cuentan con enjuagues adicionales que
se realizan automdticamente
NOTA:Siolvidacerrarpor completo la
puerta,sonardunasehalpara recorddrsdo.
NOTA:Siabre la puerta durante la cuenta
regmsiva,la lavadora entrard enestado
de pausa. Debecerrar lapuerta y pulsar
de nuevo START(Iniciar)para reiniciar
la cuenta regresiva.
pulsado elbot6n LOCK durante
3 segundos.Seescuchar6 un sonido
que indica la condici6n debloqueado/
desbloqueado.
Elicono debloqueo de los controles
que aparece en lapantalla seencenderd
cuando est6activado.
NOTA:Elbot6n POWER(encendido/
apagado)puede seguir utilizdndose
cuando lalavadora estdbloqueada.
La luz del tambor no puede apagarse
mientras la unidad no se encuentra en
funcionamiento.
61
Page 65

Ajustesdecontrol.
:_STEAM
ASSIST
STAIN INSPECTOR ÷
-1
STAIN
INSPECTOR
Pueden seleccionarse las siguientes manchas:
Stain Inspector (Inspector de
manchas)
PFWS4600,4605 Presioney sostenga durante
3 segundos para STAIN INSPECTOR.
La caracter[stica STAININSPECTORle permite
sehalar las manchas que se encuentran en
las prendas de la carga. Esta caracteristica
puede usarse con cualquier ciclo de lavado.
C6mo usar STAIN INSPECTOR:
1. Seleccioneel ciclo de lavado.
2. Presione el bot6n STAIN INSPECTOR(el
bot6n seiluminard_cuando se encienda).
3. Verifique las instrucciones de lavado de su
prenda..
4. Presione el bot6n ENTERpara
continuar.
5. Utilice las teclas ,J, y V para seleccionar
la mancha deseada.
6. Presione el bot6n ENTERpara
seleccionar la categor[a de manchas.
7. Utilice las teclas A y T para
seleccionar la mancha deseada..
OUTDOOR (EXTERIOR) COSMETICS BEVERAGES FOOD/COOKING
Clay (Arcilla)
Grass(C6sped)
Mud/Dirt (Barro/suciedad)
RustIron (Herrumbre)
TreeSap (Savia)
PERSONAL SCHOOL/OFFICE/HOME LAUNDRY (ROPA SUCIA) OIL/GREASE/WAX
Blood(Sangre)
Perspiration(Transpiraci6n)
Urine/Feces(Orina/heces)
Mouthwash(Enjuaguebucal)
Vomit(V6mito)
8. Presione el bot6n ENTERpara seleccionar la
mancha.
9. La mancha seleccionada aparecer6 en la pantalla.
10. Presione el bot6n STARTpara iniciar el ciclo.
NOTA: Para apagar STAIN INSPECTORo para
seleccionar una mancha diferente, presione de nuevo
el bot6n STAIN INSPECTOR.
Lipstick/LipBalm
(Ldpizdelabios/protectorlabial)
Deodorant(Desodorante)
Lotions(Lociones)
Makeup(water-based)
(Maquittaje[baseagua])
Oit(hair/mineral)
(Aceite[cabelto/mineral])
(ESCUELA/OFICINA/HOGAR} (ACEITE/GRASA/CERA}
AdhesiveTape(Cintaadhesiva)
BallpointInk(TintadeboFgrafo)
Glue(whitecommon)
(Pegamento[blancocomOn])
PencilMark(MarcadeIdpiz)
CorrectionFluid(Fluidocorrector)
Grape Juice (Jugo de uvas)
Coffee/Tea(Caf6/t6)
FruitJuice Other
(Otrojugo de frutas)
Milk/Dairy (Leche/16cteos)
Wine (red/white)
(Vino[tinto/blanco]))
DinggWhiteSocks(Mediasblancassudas}
C011ar/CuffS0il
(Sudedadencuell0s/mangas}
FabricSoftener(Suavizante)
NOTA: Elprelavado se selecciona por defecto
autom6ticamente para algunas manchas. Cuando se
selecciona autom6ticamente, se encender6 el bot6n
PREWASH(prelavado). Para una remoci6n 6ptima
de manchas, se recomienda agregar detergente de
alta eficiencia o aditivos de lavado adecuados al
dosificador de prelavado. La opci6n de prelavado
puede cancelarse si no se desea agregar el prelavado
al ciclo.
Butter/Margarine(Manteca/
margarina)
Cooking/VegetableOil
(Aceiteparacocci6n/vegetal)
Chocolate
TomatoBased(Basetomate)
BarbecueSauce(Salsabarbacoa)
MotorOil/Lube(Aceite/lubricantedemotor)
CandleWax(Ceradevelas}
62
Page 66

GEAppliances.com
SMART
DISPENSE TM
:_STEAM
ASSIST
STAIN INSPECTOR ÷
i-i
SMARTDISPENSETM(DosificaciGninteligente)-
accesorioopcional(enalgunosmodelos)
SihaadquiridoelsistemaSMARTDISPENSE
dePROFILE,diriasealManualdePropietario
incluidoconelsistemaSMARTDISPENSE.
SinohaadquiridoelsistemaSIARTDISPENSE
dePROFILE,nocontar6con lacapacidadde
dosificaciGnagranel.Siseleccionala opciGn
SMARTDISPENSE,aparecer6unmensaje
sehalandoquesuunidadnocuentacondicha
capacidad.Tendr6quecolocardetergente
g otrosaditivosseleccionadoen elcajGn
dosificadorubicadoenla partesuperior
izquierdadelaunidad.
STEAMASSIST(Ayuda de vapor)
(Enalgunos modelos)
Lo funciGn de STEAMASSIST(aguda
de vapor) agrega vapor a la lavadora
durante los ciclos de lavado de WHITES/
HEAVYDUTY(ropa blanca/mug
resistentes), COLORS/NORMAL(ropa
de color/normal), WRINKLE FREE(libre
de arrugas) o ACTIVEWEAR(ropa de
ejercicio).
Para usar:
£ Encienda el aparato (ON)g
seleccione un ciclo de lavado. La opciGn
Paraadquirirel sistemaSMARTDISPENSE
dePROFILE,diriasea GEAppliances.como
comuniqueseconsu minoristalocal.
STEAN ASSIST(aguda de vapor) sGIo
se encuentra disponible en los ciclos
WHITES/HEAVYDUTY(ropa blanca/mug
resistentes), COLORS/NORMAL(ropa
de color/normal), WRINKLE FREE(libre
de arrugas) o ACTIVE WEAR(ropa de
ejercicio).
2. Seleccione el botGn STEAMASSIST
para activar Steam (vapor).
& Presione el botGn START/PAUSE
(iniciar/pausa).
WASH
OVERNIGHT
READY
[..)
ENERGY SAVINGS WASH (lavado
con ahorro de energfa)
Utilice "e" WASH (lavado ecolGgico)
para ahorrar energfa en ciclos de
lavado especFicos. "e" WASH no
puede utilizarse con STEAMREFRESH
OVERNIGHT READY (listo durante
la noche)
(Algunosmodelos)
El ciclo OVERNIGHTREADY(listo
durante la nochel estc_concebido
sGIopara cargas pequeBas. Esta
caracteristica est6 disehada para
cuando las prendas deben lavarse
g quedar listas para colgar o
finalizarse la maBana siguiente. Esta
caracteristica hace girar las prendas
e introduce un chorro constante de
aire dentro del compartimento de
la mc_quina al finalizar los ciclos de
lavado seleccionados, Lasprendas
pueden quitarse en cualquier momento
presionando pausa. Para utilizar
esta caracter[stica, presione el botGn
Overnight Readg g siga las indicaciones
de la pantalla. DespuGsdel uso,
verifique el filtro de pelusa ubicado en
(revovaciGn por vapor), ENERGYSAVING
(ahorro de energfa), ATHLETICSHOES
(calzado deportivo), BASKETCLEAN
(limpieza de tambor) g WASH CAREw/
SOAK(cuidado de lavado con remojo).
la parte superior de la junta de la puerta
de goma, g limpielo si es necesario.
No se recomiendan para este ciclo
art[culos de desgaste alto o art[culos
delicados,
La tabla de abajo describe ejemplos de
cargas que pueden utilizarse con esta
caracteristica:
2-3 equipos de gimnasia
2 conjuntos de uniformes mGdicos
2 conjuntos de sabanas de cuna de
beb6
1 camisa de vestir, 1 par de
pantalones de vestir
3 camisas de vestir
63
Page 67

Configuracionesdecontrol.
Filtro de pelusa del
ciclo Overnight Ready
oO_OoOoO
oOoOoOoO
.OoOoOoO
.oOoOo°o_
OoO°OoOo o
LIMPIEZA DEL FILTRO DE PELUSA DEL CICLO
OVERNIGHT READY (listo durante la noche)
(Ena/gunosmodelos)
Elfiltroseencuentraenla porci6nsuperiorderechadelajunta dela
lavadora.Paraun mejordesempe_o,limpieestefiltrodespu6sdecada
ciclodeOvernightReadypasandosusdedosparelfiltroparaquitarla
pelusa.
Paraunamayorlimpieza,elfiltropuedequitarsetirandode lalengOeta
haciadelante.Vuelvaa colocarelfiltrodespu6sdelalimpieza.
Acerca delas funciones dela lavadora.
Dep6sito de detergente
Abralentamenteeldep6sitodedetergente
tirandode61hastaquesedetenga.
Trasarhadirlosproductosdelavado,ci6rrelo
despacio.Sicierraeldep6sitodemasiador6pido,
c_uedeprovocarquelalejia,elsuavizanteoel
etergenteseadministrenantesdetiempo.
Compartimento de prelavado
Agregueel /_S/
prelavadoen esta_ //[!
ubicaci6n _
Dispositivo de _._
inserci6n del _,_ x__
detergente //_
elegido
Utilices61aelcampartimentadeprelavadosi
vaa seleccionare/ciclaPreWash(Prelavado)
paraprendasmuysucias.Ahadalacantidad
dedetergenteadesustanciadeprelavadoal
campartimentadeprevaladosituadoenlaparte
posteriorizquierdadeldep6sitadedetergente.
Eldetergenteolasustanciadeprelavadose
ar_adendesdeeldep6sitoduranteelciclade
prelavado(encasadequeseselecciane).
Esposiblequeobserveaguaenlos
compartimentosdelejiay suavizantealfinaldel
ciclo.Esteeselresultadodela acci6ndetrasvase
yformapartedelfuncionamientonormaldela
lavadora.
Uses61odetergentedealto
eficienciaHE.
NOTA:EldetergenteIfquidosevaciardeneltambor
delalavadoraa medidaquesea_ada.
Esposiblequehayaqueajustarelusode
detergente a latemperaturadelagua,a la
durezadelamisma,altamar_oyal nivelde
suciedadde lacarga.Eviteutilizardemasiado
detergenteen lalavadorayaquepuede
praducirdemasiadojab6ny dejarrestas
enlasprendas.
64
Page 68

Rieesde
/_ Ajuste
Paracotocarel detergente enpotvo
HEretireel dispositivode inserci6n
deldetergente elegidog agregueel
potvoaqui.
Compartimento para el detergente
I Use s61o detergente con alto nivet de
eficiencia en esta lavadora. NOsupere
la Jinea Ha× at colocar el detergente con
alto nivel de eficiencia. Use la cantidad
de detergente recomendada par el
fabricante.
I Detergenteen Polvo- Retireel espaciode
inserci6ndel detergenteelegidog coloque
el mismoenuna ubicaci6nsegura afuera
de la lavadora.Sigalasinstrucciones I
del fabricante de detergenteal medirla
cantidad de polvoa usar.
I DetergenteLiquido- Ubique la
concentraci6n desu detergenteen
la botella.Coloqueel espaciode
inserci6ndel detergenteen laubicaci6n
correspondiente,dependiendodel nivelde
concentraci6n.
I Muevael espaciode inserci6nempujando
haciaafuera y reemplazandoel mismoal
GEAppliances.com
deslizarloentre losdosrielesdel
compartimiento paradetergente.
AsegOresede empujar el espacio
de inserci6nen laparteinferiordel
compartimiento,de modo que Ileguehasta
el final del compartimiento.No ser6 un
problemaque eldetergentegoteeafuera
del espaciode inserci6nsobrela parte
trasera del compartimiento.
Esposibleque el usodeldetergentese
deba ajustarcon relaci6na latemperatura
del agua, durezadel agua,tama_o g
nivelde suciedaddela carga. Eviteusar
demasiadodetergenteen lalavadora,
yaque puede producirexcesodejab6n,
residuosdedetergente en laropa,g podrfa
extender lostiemposde lavado.
Nousegrandescantidadesde detergente
en el dispositivodesuministrodejab6n, ga
que puedenprovocar escapes.
ParadetergenteI[quidoHEquenoes
concentrado,coioqueetaccesorioenla
posici6n"lX".
Paracotocardetergente liquido
HE2X,cotoqueel espaciode
inserci6nen laposici6n"2X"
Compartimento para lejia liquida
SiIodesea,midalacantidadrecomendada
delejfaIfquida,quenosobrepase1/3 del
recipiente(80ml)yvi@rtalaenelcompartimento
centralconlaetiqueta"LiquidBleach"(Lejia
liquida)marcadocon estesfmbolo_.._.
Para cotocar detergente liquido
HE 5 X,cotoque el espacio de
inserci6n en la posici6n "SX"
Compartimento para el suavizante
SiIodesea, vierta lacantidad recomendada
desuavizanteIfquidoenelcompartimento
conla etiqueta"FabricSoftener"(Suavizante).
Utilices61osuavizanteIfquidoeneldep6sito.
Dil%aloconaguahastalaIfneadeIlenado
m6ximo.
/
Serecomiendael usodelejfadealtaeficiencia
(HE)conestalavadoradecargafrontal.
NosobrepaselaIfneadeIlenadom6ximo.Un
Ilenadoexcesivopuedehacerquela lejfase
administredemasiadoprontoy,comoresultado,
da_elasprendas.
NOTA:Noutilicelejfaenpolvoeneldep6sito.
Nosobrepasela IfneadeIlenadom6ximo.Un
Ilenadoexcesivopuedehacerqueelsuavizante
seadministredemasiadoprontoy manchelas
prendas.
NOTA:Noviertadirectamenteelsuavizante
sobrelacarga.
65
Page 69

Carga y uso de la lavadora.
Sigosiemprelosindicacionesdelaetiquetadecuidadodeltejidodelfabricanteenellavadoyelplanchado. GEAppliances.com
Separaci6n de cargas
Colores Suciedad Tejido Pelusas
Ropablanca Mucha Prendas delicadas Prendas que
Ropa de colores Normal Prendas de facil sueltan pelusa
claros Poca cuictado Prendas alas
Ropa de colores Prendas resistentes que se adhiere
oscuros de algoct6n la pelusa
[] Combine las prendas grandes y pequehas en cada carga.Cargue primero las prendas grandes. Las
prendas grandes no deben representar rodsde la mitad de lacarga total de lavado.
[] No serecomienda lavar prendas sueltas.Esto puede producir una carga desequilibrada. ABadauna o dos
prendas similares.
[] Las almohadas g los edredones no deben mezclarsecon otras prendas. Estopuede producir una carga
desequilibrada.
[] Separelas prendas de coloresoscuros de lasde coloresclaros para evitar latransferencia de colores.Esta
esuna lavadora dealta eficiencia,que usamenos agua,pot Ioque latransferencia de colores resultamds
comQn.
Carga de la lavadora
Puedeque el tambor de la lavadora est# totalmente
Ilenocon prendas sueltas queseahadan. No lave
prendas quecontengan materiales inflamables (ceras,
I[quidosde limpieza, etc.).
Paraa_adir prendas una vezque la lavadora est# en
marcha, pulse START/PAUSE(Iniciar/pausa) y espere
hasta que se desbloquee la puerta. Lalavadora puede
tardar unos :30segundos en desbloquear la puerta
despu6sde pulsar START/PAUSE,dependiendo de las
condiciones dela misma. No intente forzar la puerta
para abrirla cuando est6 bloqueada. Unavez que
sedesbloquee,6brala con cuidado. Ahada prendas,
cierre lapuerta y pulse START/PAUSEpara reiniciar
el funcionamiento.
Ejemplos de carga*
ROPA ROPA
DETRABAJO DE CAMA DELICADOS*
2 toallones
S camisas
detrabajo
5 pantalones
detrabajo
grandes
!0 toallas de baho/
12 toallitas
7 toallas de mano/
2 alfombras de
baho de toalla
O
2 sabanas rectas
tamaho Queen
2 sabanas
ajustables
tamaBo Queen
4 fundas
de almohada
CARGAIVllXTA
/4fundas de
almohada
2 toallas de mano
2 s6banasrectas/
2 s6banasajustables
2 toallas de ba_o/
4 toallitas
O
6 camisas
(de hombre
o de mujer)
4 pantalones
(Khakis o
de sarga)
Scamisetas
7 boxers
4 shorts
0
6 camisetas
4 pantalones
de gimnasia
4 sudaderas
2 sudaderas
con capucha
7 pares de medias
7 pantaletas
Qcamisones
*Se recomienda
el uso de una
bolsa de malla
de nylon para
elementos
pequehos
7 sostenes4 Jeans
3 enaguas
2 camisolas
LAVADO RAPIDO
(2-4 PRENDAS)
2 camisas de
trabajo informales
1 pantal6n de
trabajo informal
O
:3uniformes
de fLXbol
*Se recomienda el uso de una bolsa de malla de nglon para elementos pequehos.
Page 70

Siempre siga las instrucciones de la etiqueta del fabricante de la prenda cuando realice los lavados. GEAppliances.com
Cuidadoy limpieza/lantenimiento general
C6mo limpiar el filtro de la bomba
Debido a la naturaleza de la lavadora
de carga frontal, es posible que a veces
pasen particulas pequeBas a la bomba.
La lavadora cuenta con un filtro para
capturar los elementos perdidos y que no
caigan en el drenaje. Para recuperar los
elementos perdidos, limpie el filtro de la
bomba.
1. tilizando un destornillador de lados
pianos, abra la puerta de acceso.
2. Coloque una bandeja o plato poco
profundo bajo la puerta de acceso y
toallas en el piso frente a la lavadora para
proteger el piso. Esnormal que salga
alrededor de una taza de agua cuando se
quita el filtro.
3. Baje el pico vertedor.
4. Gire el filtro de la bomba en sentido
contrario a las agujas del reloj y quite
el filtro lentamente, controlando el flujo
del agua que sale.
5. Quite el filtro y limpie las suciedades.
5. Vuelva a colocar el filtro y gire en
sentido de las agujas del reloj. Ajuste
bien.
.
Eleve elpico vertedor.
8.
Cierre la puerta de acceso
enganchando las lengOetas del rondo
primero, luego girando g cerrando la
puerta de acceso.
C6mo limpiar la junta de la puerta
Abra la puerta de la lavadora. Usando ambas manos, presione lajunta de
la puerta hacia abajo. Quite los objetos extrahos que encuentre atrapados
dentro de la junta. Aseg0rese de que no haga ning0n objeto bloqueando
los orificios ubicados detrc_sde lajunta.
Hientras presiona lajunta de la puerta hacia abajo, inspeccione lajunta
interiorjal_ndola hacia abajo con los dedos. Quite los objetos extrahos
que encuentre atrapados dentro de esta junta. Aseg0rese de que no haga
ning0n objeto bloqueando los orificios ubicados detrc_sde lajunta.
Cuando haya terminado de limpiar la junta de la puerta, quite las manos g
lasjuntas volverdn a la posici6n de funcionamiento.
67
Page 71

Siasiemrelosindicacionesdelaetiuetadecuidadodelre'idadelfabricanteenellavadoel lanchado.
Zona del dep6sito de detergente: Eldetergente g el suavizante puedenacumularse
en el dep6sito dedetergente. Losresiduosdeben eliminarse una odos vecesal rues.
[] Saqueel dep6sito tirando de 61hasta que sedetenga. Enla esquina trasera derecha
de la cavidad del caj6n, presionefirmemente en la pestaBade bloqueo g tire a lavez
del dep6sito.
ka leng_eta de bloqueo s61o
es visible tras sacar el depdsito
[] Extraigala piezade loscompartimentos para lejiag suavizante,asicoma la piezadel
detergente. Lavelas piezas g eldep6sito con agua caliente para eliminar los restos
de productos de limpieza acumulados.
_!_>_i_i_i_'_ii!i_fii_ii_i_ _ _i__ii_i_i_i_!
[] para limpiar la abertura del dep6sito, utilice un cepillopequeBo afin de limpiar
el hueco. Retiretodos los restosde las partes superiore inferior delhueco.
[] Vuelva a colocar laspiezas en loscompartimentos correspondientes. Introduzca
de nuevoel dep6sito de detergente.
Z
[] para reducir la acumulaci6n en la zona del dep6sito de detergente:
Uses61odetergente
dealto eficiencia HE.
68
Page 72

Carga y usa de la lavadora. GEAppliances.com
Etiquetasde cuidado de tejido
A continuaci6n semuestran "s[mbolos"de etiquetasde cuidadode tejidoque afectan alas prendas que selavan.
ETIQUETAS DE LAVADO
lavado en m
m6qulna NormalHanchado permanente/ Suave_/ No lave No escurra
Temperatura • • • • • Q
del ag ua Caliente Tibia Fria/fresca
ETIQUETAS DE LEJiA
Simbolos de A //_
bla nq ueador Cualquier blanqueadorS6lo blanqueador sin cloro No use blanqueador
resistentea arrugas delicado Lavar a mano
(50°C/120°F) (40°C/105°F) (30°C/85°F)
(cuando se necesita) (cuando se necesita)
ETIQUETAS DE DETERGENTES
Accesorios disponibles.
Pedestal
Su lavadora cuenta con un pedestal
disponible. El pedestal otorga mc_s
altura a la lavadora g ofrece un
lugar de almacenamiento para sus
productos de lavado. Con el pedestal
se incluge un elemento divisorio que
Sistema Smart Dispense
de Profile
El sistema SMART DISPENSE
(dosificaci6n inteligente) de Profile
le permite almacenar detergente g
suavizante para que se dosifiquen
automc_ticamente durante los ciclos
de lavado g enjuague de esta
lavadora. NO PUEDE USARSE LEJ[A en
este sistema de dosificaci6n. Consulte
Uses61odetergentedealta eficiencia HE.
le permite almacenar detergente
liquido fuera de la vista. Consulte
las Instrucciones de instalaci6n
del pedestal.
el Manual de Propietario incluido con
el sistema SMARTDISPENSEde Profile
para instrucciones de instalaci6n.
69
Page 73

M6dulo de Aparato Inteligente GEAppliances.com
Losmodelos PFWS4600/5 y 4400/5 son compatibles con
Smart Appliance Hodule (SAM)(P16dulode Aparato Inteligente)
que puede adquirirse en forma separada. Comun[quese
con su empresa local de servicio pQblico ovisite www.
GEAppliances.com/smart-appliances para consultar si en su
@ease est6 u,tilizando la tecnolog[a SAH.
INSTALACION
La ubicaci6n preferida de la instalaci6n del m6dulo es en la
parte superior de la secadora de ropa.
Losdetalles sobre c6mo conectar los cables al m6dulo se
encuentran con las instrucciones que vienen con el m6dulo.
Espere5 minutos; luego presione el bot6n Settings
(confiquraciones). Despl6cese por la pantalla g busque la
panta]la de administraci6n de energ[a como puede verse
abajo.
Esta pantalla que € se encuentra bien
conectado g que usted puede comenzar a utilizar su aparato
inteligente siguiendo las instrucciones de abajo.
Si la pantalla de administraci6n de energ[a no se encuentra
disponible, consulte la gu[a de identificaci6n g soluci6n de
problemas del m6dulo de SAM.
6UiA R,4PIDA
Existen 4 niveles de energ[a disponibles: Critical (cr[tico), High
(alto), Normal g Low (bajo). En los niveles Normal g Low (bajo),
la unidad funciona de manera normal. Lossiguientes pasos
muestran c6mo reacciona la unidad durante el inicio en Io
niveles de energ[a Critical (crffico) g High (alto).
Opci6n 1 (Delay EP) (Retardo EP)
Durante los inicios en los niveles Critical (crffico) g High (alto),
la unidad retardar6 el inicio hasta que los niveles alcancen
Medium (medio) o Low (bajo).Presione el bot6n START/PAUSE
(inicio/pausa).
Opci6n 2 (Override Delay EP) (Canceler returdo EP)
Cuando aparece Delag EP,la funci6n de retardo puede
cancelarse presionando el bot6n DELAY START(retardar
inicio). Cuando se presiona la tecla START/PAUSE(inicio/
pausa), se iniciarc_el ciclo seleccionado con "e" WASH
activado. El indicador de "e" WASH se iluminar& Durante
un per[odo de nivel crffico, tambi_n se activarc_ el Hodo de
Respuesta ante nivel Critico** para potenciar al mc_ximoel
ahorro de energ[a. Podr6 verse EP.
Opci6n 3 (Cancelar "e" WASH)&AVADO "e")
Despu6s de cancelar la funci6n de retardo, presione el bot6n
"e" WASH para desactivar la configuraci6n "e" WASH. Pre-
sionar la tecla START/PAUSE(inicio/pausa) iniciar6 el ciclo
seleccionado. Durante un per[odo de nivel cr[tico, se activar6
el Hodo de Respuesta ante nivel Crffico** para potenciar al
m6ximo el ahorro de energ[a. Podr6 verse ER
**Nora: El Modode Respuesta ante nivel Crffico puede desac-
tivarse en cualquier momento presionando g sosteniendo el
bot6n "e" WASHdurante 3 segundos. EPdesaparecer(_ de la
7_ntalla.
MENO DE CONFIGURACIONES
Presione SETTINGS(configuraciones); luego seleccione Energg
Management (administraci6n de energfa).
i3e],ag E:P 0,...,er'r.ide
Retardo de la cancelaci6n de EP
Esta opci6n le permite a su lavadora inteligente accionar
autom6ticamente la configuraci6n de "e" WASH cuando se
cancela un retardo EPg se inicia un ciclo durante un per[odo
de nivel crffico o alto. La configuraci6n predeterminada es
YES(s[).
Auto-Extend Delags (Retardos de prolongaci6n autom6tica)
Si se selecciona un retardo temporizado, esta opci6n permite
la prolongaci6n del inicio programado si el nivel de energ[a
de la empresa de servicio pOblico se encuentra en Critical
(cr[tico) o High (alto)en el inicio programado. La configuraci6n
predeterminada prolongar(_ estos ciclos en forma autom@ica.
Critical Rate Option (Opci6n de Nivel Crffico)
Esta opci6n le permite a su aparato inteligente responder a
una informaci6n de nivel cr[tico activando autom@icamente
el Hodo de Respuesta ante nivel Crffico. El Hodo de
Respuesta ante nivel Crffico se encuentra diseflado para
potenciar al m6ximo el ahorro de energ[a cuando un ciclo
est6 funcionando durante un per[odo de nivel crffico. La
configuraci6n predeterminada es YES(s[).Configurar esta
opci6n en NO desactivar(_ el Hodo de Respuesta ante nivel
Crffico.
Para que funcionen las caracterfsticas de respuesta ante
demanda del aparato, debe instalarse equipamiento adicional
para poder conectarse con la empresa local de servicio
p0blico. Eseequipamiento puede venderse por separado g/o
se encuentra disponible a trav@sde su empresa de servicio
p0blico como parte de un programa de prueba piloto.
Consulte a su empresa de servicio p0blico sobre la existencia
de un programa de prueba piloto en su @ea g solicite todos
los detalles.
NOTA IMPORTANTE: Si usted se muda a una regi6n en donde
el programa no se encuentra disponible, las caracter[sticas de
respuesta ante demanda no podr6n activarse g utilizarse en
su aparato. Elaparato funcionarc_ de modo normal despu6s
de que el equipamiento de respuesta ante demanda se haga
desactivado o desconectado.
Page 74

Instrucciones
Lavaclora
de i stel ci °
PFWS4605, PFWS4600
PFWH4405, PFWH4400
Si tiene alguna pregunta, Ilame a 800.GE.CARES (800.432.2737) o visite nuestro sitio Web en: GEAppliances.com I
HERRAMIENTAS NECESARIAS PARA
ANTES DE COHENZAR
Leo detenidumente todus los instrucciones.
. IMPORTANTE - Guardeestas
instrucciones para usa del inspector local.
. IMPORTANTE - Cumplatodos
los c6digos g ordenanzas regulatorias.
. Nora al instalador - Aseg0resede dejar
estas instrucciones al usuario.
. Nota aJ usuario - guarde estas instrucciones
para consultas futuras.
. Nivel de habilidad - la instalaci6n de este
electrodom6stico requiere habilidades mec6nicas
g el6ctricas b6sicas.
. Duraci6n- de ! a 3 horas
. La instalaci6n adecuada es responsabilidad
del instalador.
. La garantia no cubre fallas producidas par
la instalaci6n inadecuada del producto.
LA INSTALACI6N DE LA LAVADORA
[] Llavepara tuercas de 1/4"
[] Toma de corriente con trinquete de 3/8"
[] Llavede boca de 3/8"
[] I_laveinglesa o toma decorriente con trinquete de 7/16"
[] Llaveinglesao Ilavede boca de9/16"
[] Alicates ajustables Channel-lock
[] Nivel decarpintero
PIEZAS INCLUIDAS
[] Abrazadera de cable
PARA SU SEGURIDAD:
-&ADVERTENCIA
. Esteelectrodom_stico sedebe conectar a tierra
e instalar correctamente tal g coma se describe
en estas Instrucciones de instalaci6n.
. No instaleni guarde esteelectrodom6stico en una zona
en la que est_expuesto al agua o al exterior. Consulte
la secci6n Ubicaci6n dela lavadora.
. NOTA:Este electrodom_stico debe estar
correctamente conectado atierra y la corriente
el_ctrica de Io lavodoro debe cumplir losc6digos y
ordenanzos locales, asi coma Io Oltima edici6n del
C6digo el_ctrico nacional, ANSl/NFPA70.
[] Tuberias de agua (2)
71
Page 75

Instruccionesde instalaci6n
UBICACION DE LA LAVADORA
No instale la lavadora:
1. En un 6rea expuesta a goteras o a las condiciones
del exterior. La temperatura ambiente no debe set
nunca inferior a 60°F (lS,6°C) para que la lavadora
funcione correctamente.
2.En una zona en la que pueda entrar en contacto
con cortinas u otras telas.
3. Sobre una alfombra. El suelo DEBE set una superficie
dura con una inclinaci6n mdxima de 1/2" pot pie
(1,27cm pot cada :SOcm). Para asegurarse de que
la lavadora no vibre ni se mueva, es posible que tenga
que reforzar el suelo.
NOTA:Si el suelo se encuentra en mal estado, utilice
una plancha con 3/4" de contrachapado bien fUa
al revestimiento existente en el suelo.
IMPORTANTE:
Distancias minimas de separaci6n para la
instalaci6n
. Cuando seinstale en alcoba: costados,parte trasera,
parte superior = 0" (0cm)
Cuando seinstale en unarmario: costados, parte trasera,
parte superior = 0" (0cm), parte delantera = 1"(2,54cm)
Aberturas de ventilaci6n necesarias en la puerta
del armario:
2 listones,cada uno de 60 pulgadas cuadradas
(387cm% situados a 3" (7,6cm)de las partes superior e
inferior de lapuerta
DIMENSIONES APROXIMADAS
PARTE DELANTERA
27" (68.6cm)
m
I
COSTADO
344" (873cm)
/m
72
\J
I
*NOTE:
Con paras de ]a lavadora: 40,5" (102,5 cm)
(ajustabiFdad de 0,75")
Con pedestal: 55,75" (156,6 cm)
(ajustabiFdad de 0,75")
Apilada: 82,75" (209,8 cm)
Page 76

Instrucciones de instalaci6n
DESEMBALAJE DE LA LAVADORA
ADVERTENCIA:Recicleo desechela caja
de cart6n y las bolsasde pl6stico unavezqua haya
desembaladola lavadora,iVlantengaestosmateriales
fueradel alcancede los nihos,pues@stospodrian
utilizarlosparajugar. Lascajas decart6n cubiertascon
mantas,colchaso 16minasde pl6sticopuedenconvertirse
en c6maras deaire herm@ticasy producirasfixia.
1. Corteg retirelasbandasdeembalajesuperioreseinferiores.
2. Mientras seencuentre dentro de la caja,coloque con
cuidado la lavadora sobre el costado de la misma.NOla
tumbe por la parte delantera ni trasera.
3. Abra lastapas inferiores gretire todo el embalaje de la
base,incluido elcart6n, la base g elsoporte de lacuba
de espuma de poliestireno (insertado enel centro de
la base).Conservelos soportesde apilado ubicados en
la almohadilla de poliestireno quecubria la parte superior
de la lavadora.
NOTA:Siva ainstalar un pedestal,continSe con
lasinstrucciones deinstalaci6n correspondientes.
4. Vuelvaa levantar la lavadora con cuidado g retire la caja
de cart6n.
5. Desplacepoco a poco la lavadora basra/4 pies(122cm)
de su ubicaci6n definitiva.
6. Quite lassiguientes piezasde la parte trasera de la
lavadora:
4 pernos
4 separadores de pldstico (incluidaslas arandelas
de goma)
q sujeciones del cable de alimentaci6n
7. Quite el perno de embalaje. Introduzca la clavija dentro
del orificio del perno de embalaje.
f
/
NOTA:Sise retiran incorrectamente los pernos de
transporte, puede que la lavadora seyea gravemente
desequilibrada.
Guarde todos los pernos para uso futuro.
NOTA:Sinecesitara transportar la lavadora posteriormente,
debe volver a colocar las piezas de sujeci6n para el
transporte con el fin de evitar daflos durante el mismo.
Guarde dichas piezas en la bolsa de plastico que se incluge.
REOUISlTOS ELECTRICOS
Lea detenidamente todas las instrucciones.
_ZlADVETENCIA--pARA,INI,IzAR
EL RIESGODEINCENDIO, DESCARGAELI_CTRICA
O LESIONESPERSONALES:
. NO USE UN ENCHUFEADAPTADOR O UN CABLE
DEEXTENSI6NCON ESTEELECTRODOMI_STICO.
La lavadora debe ser conectado a tierra de acuerdo
con todos los c6digos y ordenanzas locales o, a falta
de normativa local, con el C6digo el_ctrico nacional
(National Electrical Code) ANSI/NFPA NO. 70.
CIRCUITO- circuito derivado de 15 amperios individual,
correctamente polarizado g conectado a tierra,con
interruptor o fusible de retardo de 15 amperios.
ALIMENTACI6NELI_CTRICA- corriente alterna de 60Hz,
monof6sica,de 120voltios,con conexi6n a tierra,bifilar.
RECEPT,ACULODE SALIDA - _
receptc_culocorrectamente "*'_ I
conectado a tierra con 3 clavijas, -'-"a I
situado de forma que se pueda I
acceder al cable de alimentaci6n I
cuanclo la lavadora est6 instalada.
REQUISITOS DE CONE×I6N A TIERRA
-& ADVERTENCIA: Laconexi6nincorrecta
del conductor de tierra del equipopuede causar
riesgosde descargas el_ctricas.Consultea un
electricistacalificado sitiene dudasacerca de la
conexi6n a tierra correcta del electrodom@stico.
I.
Lalavadora DEBEestarconectada a tierra. Encaso
de un mal funcionamiento o averia, laconexi6n a
tierra reducir@el riesgode descargas el_ctricas al
proporcionar un recorrido deresistenciaminima a la
corriente el6ctrica.
o
Debidoa quela lavadoraest6 equipadacon un cable
de alimentaci6n quatiene un conductor para conexi6n
a tierra guna clavijade conexi6na tierra, laclavija
se DEBEenchufar enel recept6culode hilode cobra
apropiado qua se haga instaladog conectado a tierra
correctamente deacuerdocontodos losc6digosg
ordenanzaslocaleso,a falta denormativa local,con el
C6digoel@ctriconacional,ANSt/NFPA70 (01timaedici6n).
Encaso de duda,llamaa un electricistacalificado. NO
corte ni modifique laclavija deconexi6n atierra del
cable dealimentaci6n.Ensituacionesen lasqua exista
un recept6culo de dosranuras,es responsabilidaddel
propietarioqua unelectricistacalificado Iosustituga
por un recept6culo apropiado de tipo de cone×i6n
a tierra para tresclavijas.
73
Page 77

Instruccionesde instalaci6n
REQUISITOS DE SUMINISTRO
DE AGUA
LasIlavesde paso de agua caliente y fr[a DEBEN
encontrarse a 42 pulgadas (107cm) como m6ximo de la
toma de agua de la lavadora. LasIlaves de paso DEBENset
de 3/4" (1.9cm) g tipojard[n para que se puedan conectar
lastuber[as deentrada. Lapresi6n delagua DEBEestar
entre !0 g 120 libraspor pulgada cuadrada. Lacompafl[a
de agua puede informarle de la presi6ndel agua. La
temperatura del agua caliente sedebe establecer para
suministrar agua a una temperatura de entre 120° g 140°F
(48°- 60°C)para brindar un desempeflo adecuado del
control autom6tico de temperatura (ATC).
NOTA:Serecomienda el usode un suavizante de agua para
reducir la acumulaci6n de sarro dentro del generador de
vapor si el suministro dom6stico contiene agua mug dura.
REQUISITOS DE DESAGUE
1. DesagQecapaz de eliminar 17galones (64,3I)por minuto.
2. Di6metro minimo de tuberia vertical de 1 1/4" (3,18cm).
3. La altura de latuber[a vertical desde elsuelodebe set:
Altura minima: 24" (61cm)
Altura maxima: 96"(244 cm)
INSTALACI6N DE LA LAVADORA
Io
Dejecorrer un poco de agua de losgrifos deagua
caliente g fr[a para purgar las tuberfas de agua g eliminar
lasparticulas que puedan obstruir losfiltros de la vdlvula
de agua.
.
Saque las tuber[as de entrada de la bolsade pl6stico.
3.
(Extremoacodado de 90°)
Conecte con cuidado la
tuberfa de entrada marcada
con HOT(Caliente)ala salida
"H" exterior de la valvula de
agua. Apriete con la mano g,
a continuaci6n, apriete 2/3
de vuelta con losalicates.
Conecte con cuidado la otra
tuber[a de entrada ala salida
"C" interior de lav@lvuladeague. Apriete con lamano
g,a continuaci6n, apriete 2/3 de vuelta con losalicates.
No pese las roscas ni aprJeteexcesivamente estas
conexiones.
. Conecte losextremos de latuber[a de entrada alas
tomas de agua CALIENTEg FR[Aajust@ndolosconla
mano g,a continuaci6n, apriete de nuevo 2/3 de vuelta
con los alicates.Abra la Ilavede paso gcompruebe
que no hag ninguna fuga.
PARTE TRASERA
- T
96"
(244 cm)
M6x.
24"
(61 cm)
M[n.
1
NOTA:Latuber[a de desagOede la lavadora puede alcanzar
la altura de unatuberia vertical de 58" (147cm).Parauna
tuberia vertical m6s alta,p6ngase en contacto con un
distribuidor de piezasautorizado.
5o
Desplacela lavadora con cuidado hasta su ubicaci6n
final, klueva suavemente la lavadora para situarla en su
lugar.Esimportante no dahar las patas niveladorasde
caucho al trasladar su lavadora a su ubicaci6nfinal. Si
laspatas seda_an podria aumentar la vibraci6n dela
lavadora. Podria ser6til rociar el pisocon limpiador para
ventanas a fin detrasladar m6s f6cilmente su lavadora
a su ubicaci6nfinal. NOTA:Pare reducir le vibraci6n,
aseg6rese de que cada una de las cuatro pates
niveladoras est6n en contacto con el piso. Empuje
y tire de la parte posterior derecha y luego de la
parte posterior izquierda de su lavadora.
NOTA:No utiliceel dep6sito de detergente nila puerta
para levantar la lavadora.
NOTA: Sise instala en un dep6sito de desagQe,puede
utilizar una tabla 2x4 de 24 pulgadas de Iongitud para
colocar la lavadora en sulugar haciendo palanca.
74
Page 78

Instruccionesde instalaci6n
INSTALACI6N DE
LA LAVADORA (cont.)
6. Una vez situada la lavadora f;-- ......._
en su posici6n final, _ ...........
coloque un nivel en la parte _"_
superior de la misma (si
est6 instalada debajo de _\Z]
un contador, la lavadora
no deberia vibrar). Ajuste
las patas niveladoras
delanteras hacia arriba
o hacia abajo para asegurarse que la lavadora se
apoga en una superficie s61ida.Gire las contratuercas
de cada pata hacia la base de
la lavadora g apri6telas con una Ilave.
NOTA: Mantenga la extensi6n de los soportes al
minimo para evitar una vibraci6n excesiva. Cuanto
m6s se extiendan las patas, m6s vibrar6 la lavadora.
Siel suelo no est6 niveladoo est6 dahado, puede que
sea necesarioextender laspatas niveladoras traseras.
7. Coloque la gala de la tuber[a en forma de Uen
el extremo de la tuber[a de desagC_e.Coloque
la tuber[a en una pila de lavar o tuberia vertical
g suj@telacon la abrazadera de cable que se
proporciona en el paquete adjunto.
NOTA: Colocar la manguera de drenaje muy debajo
de la tuberfa de drenaje puede provocar un efecto de
sif6n. No debe haber m6s de 7 pulgadas de manguera
en la tuberfa de drenaje. Debe haber unespacio de aire
alrededor de la manguera de drenaje. Sila manguera
est6 mug ajustada, tambi@npuede provocarse un
efecto de sif6n.
8. Enchufe el cable de alimentaci6n en una salida
de conexi6n a tierra.
NOTA:AsegOrese de que la alimentaci6n est6
cortada en un interruptor/caja de fusibles antes
de enchufar el cable de alimentaci6n a una toma de
corriente.
9. Conecte la alimentaci6n a un interruptor/caja
de fusibles.
10.
Lea el resto del Manual del propietario. Contiene
informaci6n valiosa g 6til que supondr6 un ahorro
de tiempo g dinero.
11.
Antes de poner en funcionamiento la lavadora,
aseg6rese de comprobar Io siguiente:
[] La alimentaci6n est6 conectada.
[] La lavadora est6 enchufada.
[] Las Ilavesde paso est6n abiertas.
[] Lalavadoraest6 niveladag quecada una de las
cuatro patas niveladorasest6nencontacto conel
piso.
[] Las piezasde sujeci6n para eltransporte sehan
quitado g guardado.
[] Latuberia de desagC_eseha asegurado
correctamente.
[] No existeninguna fuga en la Ilavede paso,la
tuberia de desagC]enila lavadora.
12.
Ponga en funcionamiento la lavadora en un ciclo
completo. Compruebe que no haga fugas de agua
g que funcione correctamente.
13.
Si la lavadora no funciona, revise la secci6n Antes
de Ilamar al servicio de asistencia t6cnica antes
de ponerse en contacto con el servicio de
asistencia t6cnica.
Abrazadera
de cable
--....
,j,
\\
Abrazader_]
de cable
\
7
.1.4.Coloque las instrucciones en un lugar pr6ximo
a la lavadora para futuras consultas.
1
PIEZAS DE REPUESTO
Sise necesitan piezasde repuesto para la lavadora, se
pueden solicitar en EstadosUnidos atrav6s delsitio Web
GEAppliances.como Ilamando a800.GECARES.
Abrazadera
de cable
7S
Page 79

Instruccionesde instalaci6n
CONTROL DE VIBRACION ADAPTATIVO
Su lavadora GEse encuentra equipada con Tecnologia
de Control de Vibraci6nAdaptativo. AI usar informaci6n
sobre elpiso,el sistema puedereducir la vibraci6n y
mejorar el desempeflo giratorio en algunas instalaciones
adapt6ndose al ciclogiratorio. Laconfiguraci6n DEFAULT
(predeterminada) se encuentra especialmente diseflada
para brindar un desempeflo 6ptimo a trav@sde unaamplia
gama de tipos de pisos. Sigael procedimiento de abajo
para activar configuraciones adaptativas m6sespecificas.
Su lavadora puede volverse r6pida y f6cilmente a la
configuraci6n DEFAULTen cualquier momento utilizando el
mismo procedimiento.
Selecci6n del tipo de piso
1.Enel men6 de configuraciones, seleccione"floor type setup"
(configuraci6n detipo de piso).
4.Seleccioneel tipo de piso de madera.
5.Seleccioneel tipo de piso.
2.SeleccioneYes(sDo No para elpedestal.
3.SeleccioneDefault (predeterminado),Concrete (concreto) o
Wood (madera)para el tipo de piso.
**La selecci6n default (predeterminada) es
aceptable para la magoria de las instalaciones.
76
Page 80

Antes de Ilamar al servicio de asistencia t6cnica... GEApUio.ces.com
Consejos para la soluci6n de problemas
iAhorre tiempo g dinero! Consulte primero las tablas de
las pdginas siguientes gquiz6s no necesite Ilamar al
servicio de asistencia t6cnica.
Nohay drenaje
Nohay rotad6n
Nohay agitad6n
Fugasdeaguar
Causas posibles
Locargo est_ desequilibrodo
Labomba est6 tapada
Lamanguero dedrenoje est6torcida
omal conectada
Eldrenaje dela vivienda puedeestar
obstruido
Lamanguera dedrenaje haceefecto
sif6n; Io manguera de drenajeseha
empujado muy profundamente dentro
deldrenaje
Lajunto dela puerto est6
desbalonceado
Lajunto dela puerto est_noestci
daffoda
Revisela porte posterior izquierda
dela lavadorapara verificarsi hay
presenciadeagua
Soluci6n
• Redistribugalasprendasgaccioneeldren_e g centrifugado oe_uague g
centrifugado
•AumenteeltamoBo dela corgasilavo una corgapequeBaque contiene elementos
pesadosglivianos.
•Vetla p:igina67 sobrec6mo limpiar el filtro dela bomba.
• Enderecela manguera dedrenajeg verifiqueque lalavadora nola est6
aplastando.
• ControtelacaBer[adela vivienda, q)uizdsdebaItamara un plomero
• Verifiquequehaga unespacio deaire entre lamangueragel drenaje
• Revisequelajuntaest6cotocadaensusitiogque nose hagaroto.Losobjetosdejados
enlosbotsittospodriancausardaBosa lalavadora(ctavos,tornittos,kipices,botigrafos).
I
•Eloguapodr[agoteardelapuertacuandolamismoestOabierta.Estoformopartedet
funcionamientonormal.
• Concuidadolimpie elseltadode goma dela puerta.A vecesquedansuciedadeso
prendasenesteseltado g puedenprovocarsepequeBasp@didas.
•Siesta @ease encuentro mojada,existeuna condici6nhagaroto.Losobjetos
dejadosenlosbotsiltospodriandetergente
Lasprendas est_n
muymojadas
Lostuberiasdetoma deaguaIotubeda
dedesagiienosehanconectado
correctamente
Puedeque latubeda dedesagiiedela
viviendaest_obstruida
Dep6sitotapado
Usoincorrecto del detergente
Rotura en lacajo deldep6sito
Locargo est6 desequilibrada
Lobomba est_ tapada
Cargoexcesiva
Lamanguera dedrenoje est_torcida
omal conectoda
Eldrenaje de Ioviviendo puedeestar
obstruido
•AsegOresedeque se han apretado correctamente lasconexionesdelastuber[as
delalavadoraglasltavesdepasogqueetextremodelatuberiadedesagOeseha
introducidogfijadocorrectamenteal desagOe.
•Compruebelastuberiasdelavivienda.PuedequeseanecesarioItamaraun
ptomero.
• Eljab6nen potvopuedeprovocaratascosdentrodel dep6sito ghacerque salga
aguadesdeel frente del dep6sito. Quite elcaj6n glimpielo,al igual quela parte
internade lacaja deldep6sito.Consultelasecci6nde Limpiezadela lavadora.
• Usedetergente HEen lacontidad correcta.
•Sila instalaci6nes nuevo,controtequeno hagaroturosen laparte interna de la
cajadel dep6sito.
• Redistribugalasprendasgaccioneeldrenaje g centrifugado oenjuagueg
centrifugado.
• Aumenteel tamoBo de lacorga silava unacorga pequeBaquecontiene
elementospesadosglivianos.
• Lam@uina reducird lavelocidaddelcentrifugado a410 rpmsile cuesta equitibrar
la carga. Estavelocidadesnormal.
• Vetla p:igina67 sobrec6mo limpiar el filtro dela bomba.
• Elpeso secode lacargadebeset menora 16lb.
• Enderecela manguera dedrenajeg verifiqueque la lavadorano laest6aplastando
• ControtelacaBer[adela vivienda, q)uizdsdebaItamara un plomero.
Lomanguero dedrenoje haceefecto
sif6n; la manguera de drenajeseha
empujado muy profundamente dentro
deldrenaje.
• Verifiquequehaga unespacio deaire entre lamangueragel drenaje.
77
Page 81

Antes dellamar al servicio de asistencia t cnica...
Causas posibles
Ciclo incompleto o ' Redistribuci6n de carga
el temporizudor no
QvQnzQ
Ruido fuerte o Se mueve el gabinete
inusual; vibraci6n
autom6tica
La bomba est6 tapada
La manguera de drenaje est6
torcida o real conectada
El drenaje de la vivienda puede
estar obstruido
La manguera de drenaje hace
efecto sif6n; la manguera de
" drenaje se ha empujado muy
profundamente dentro det drenaje
Las patas de nivelaci6n de goma
no tocan et piso firmemente
Carga desequilibrada
La bomba est6 tapada
m
Soluci6n
• Eltemporizador agrega ] minutos al ciclo por cada reequilibrio. Pueden
efectuarse 11 o 1S reequilibrios. Esto es una operaci6n normal. No haga
nada; la m6quina finalizar6 el ciclo de lavado.
Ver la p6gina 12 sobre c6mo limpiar el filtro de la bomba.
Enderece la manguera de drenaje g verifique que la lavadora no la est6
aplastando.
• Controle la car_eria de la vivienda. Quiz6s deba Ilamar a un plomero.
• Verifique que haga un espacio de aire entre la manguera g el drenaje.
• La lavadora est6 diser_ada para moverse 1/4"para reducir las fuerzas
transmitidas al piso. Este movimiento es normal.
• Presione g tire en la parte trasera derecha g luego en la parte trasera
izquierda de su lavadora para verificar que est6 nivelada. Si la lavadora
est6 desequilibrada, ajuste las patas de nivelaci6n de goma para que est6n
firmemente en contacto con el piso g trabadas en su lugar. Suinstalador
debe corregir este problema.
• Abra la puerta g redistribuga la carga manualmente. Para controlar la
m6quina, accione el enjuague g centrifugado sin carga. Sies normal, el
desequilibrio fue provocado por la carga.
• Ver la p6gina 12 sobre c6mo limpiar el filtro de la bomba.
i
|
I
78
Page 82

GEAppliances.com
causas posibles
"El agua no Auto-controles autom6ticos del
ingresa a la
lavadora o
ingresa muy
lentamente
Formaci6n de
arrugas
Prendas grises o
amarillentas
sisteme
El suministro de agua est6
cerrado
Los filtros de v61vula de agua
quedaron trabados
Closificod6n inadecuado
Cargo excesiva
Ciclo de lavado incorrecto
Lavodos repetidos en agua
demasiado caliente
No se coJoc6 suficiente
detergente
No se us6 detergente HE (alto
eficiencia)
Agua dura
Soluci6n
Despu@sde presionar START(iniciar),la lavadora realiza varios
controles del sistema. Elagua comenzar6 a correr 60 segundos
despu6s de presionar START(iniciar).
Abra por completo los grifos de agua caliente y fria.
Cierre el suministro de agua y quite las mangueras de conexi6n
de agua de la parte superior trasera de la lavadora. Utilice un cepillo
o escarbadientes para limpiar los filtros de la m6quina. Vuelva a
conectar las mangueras y abra el suministro de agua.
No mezcle elementos pesados (como prendas de trabajo) con
prendas livianas (como blusas).
Load your washer so clothes have enough room
to move freely.
Coincida la selecci6n del ciclo con el tipo de tela que est6 lavando
(especialmente para cargas de cuidado f6cil).
Lave con agua tibia o fria.
Use la cantidad correcta de detergente.
Use detergente HE.
Utilice agua caliente segura para las telas.
Utilice un acondicionador de agua como Calgon o instale un
suavizante de agua.
Manchas de
color
La temperatura
del agua es
Peque_a
variaci6n del
color met61ico
Mal olor dentro
de la lavadora
Elogua no est6 Io
suficJentemente caliente
El detergente no se disuelve
TronsferencJa de colores
Usa incorrecto del suavizonte
de telas
Dye transfer
El suministro de agua est6 mal
conectado
El colentodor de agua de
Io viviendo no est6 bien
configurado
Esto es normal
La lavadora no se us6 durante
un periodo prolongado,
no se utiliza una calidad
recomendoda de detergentes
HE(alta eficiencial o se est6
usondo demasiado detergente
Verifique que el calentador de agua est6 suministrando agua a
!20°-!40°F (48°-60°C).
, Pruebe con un detergente I[quido.
, Divida las prendas por color.Si la etiqueta de la tela dice "lavar por
separado", puede indicarse colores inestables.
, Consulte el paquete del suavizante de telas sobre las instrucciones
y siga las indicaciones de uso del dep6sito.
, Separe los blancos o los colores claros de los colores oscuros.
, Quite r6pidamente la carga de lalavadora.
, Verifique que las mangueras est6n conectadas a los grifos
correctos
Verifique que el calentador de agua de la vivienda est6
suministrando agua a !20°-!40°F (48°-60°C).
Debido alas propiedades met61icas de la pintura utilizada con
este producto L_nico,pueden ocurrir pequehas variaciones de color
debido a 6ngulos de visualizaci6n g condiciones de iluminaci6n.
Haga funcionar unciclo BasketClean (limpieza de tambor).
Encaso de un fuerte olor, puede necesitarse el funcionamiento del
ciclo 8asketClean (limpieza de tambor) m6s de una vez.
Use s61ola cantidad de detergente recomendada en el recipiente
del detergente.
Use s61odetergente HE(alta eficiencia).
Deje la puerta un poco abierta para que el agua se seque.Se
requiere una supervisi6n estricta cuando este aparato es utilizado
pot nihos o en su cercania. No permita que los ni_osjueguen sobre,
con o dentro de este o cualquier otto aparato.
79
Page 83

Antes de#amar al servicio de asistencia t cnica...
Causas posibles
P_rdida de
detergente
Ubicaci6n incorrecta de la pieza
del detergente
i_!i_iii_ii_:_ii_!_i!5ii___ii_ii_ii_
i i i m
il i ii _ iiiiii
osificaci6n Dep6sito tapado
inadecuada de
suavizante o
blanqueador Secoloc6 suavizante o
Esto es normal
blanqueador por encima de la
linea m6xima de llenado
Softener or bleach cap issue
Problemas con el suavizante o
la tapa del blanqueador
Soluci6n
. Aseg6rese de que I(] piez(] del detergente est6 bien ubic(]do g
coloc(]do. Nunc(] coloque detergente sobre I(] line(] m6xim(] de
Ilen(]do.
. Esnormal ver un(] p6rdid(] de detergente sobre I(]junt(] de I(]
puert(] (]lrededor de 20 segundos despu6s de Ilen(]r el dep6sito.
. Monthly clean the dispenser drawer to remove buildup of
chemicals.
• Aseg@ese de cont(]r con I(] c(]ntid(]d correct(] de su(]viz(]nte o
bl(]nque(]dor.
. Verifique que el suavizante o la tapa del blanqueador est6n bien
colocados en el dep6sito o no funcionar6n.
8O
Page 84

Notas.
Page 85

Notas.
Page 86

Garantia de la lavadora GE. (ParaclientesdeEstadosUnidos)
Todos los servicios de garantia se ofrecen a trav6s de nuestros centros
de asistencia t6cnica o un t6cnico autorizado de Customer Care®.
Para programar servicio de asistencia t6cnica en linea, visite la p6gina
GEAppliances.com o Ilame a1800.GE.CARES(1.800.432.2737). Cuando
Ilame para solicitar servicio, por favor tenga a mano el n0mero de
serie g el n0mero de modelo.
un aho
A partir de lafecha de
adquis_ci6noriginal
Delsegundo
al quinto ano
A partirde a fecha de
adquisici6n orig hal
Delsegundo
al d@cimoaho
A partir de lafecha de
adquisici6n original
Todalavida del producto
A partir de lafecha de
adquisici6n original
Engrape el recibo aqui.
Se necesita el comprobante
con la fecha de compra
original para que la garantia
cubra los servicios.
Se sustituir6:
Cualquier pieza de la lavadora que falle debido a un defecto en los materiales o la
fabricaci6n. Durante este garantfa limitada de un aho, GEcorrer6 adem6s, sin cargo alguno,
con todos los gastos de mano de obra g reparaci6n relacionados para sustituir la pieza
defectuosa.
Elmontaje del puntal de suspensi6n,motor y controlador del motor si alguna de estaspiezas
fallara debidoa un defecto demateriales o mano deobra.GEtambi6n reemplazar6el panel superior
de la lavadora, elpanel frontal o el panel deservicio sise herrumbraran en condiciones de
funcionamiento. Durante esta garant[a limitada adicional de tres ahos,usted ser6 responsable
de cualquier clase decostos de mano de obra o de serviciosrelacionados.
Eltambor externo g la poleaimpulsada si alguna deestas piezasfallara debidoa undefecto
de materiales o mano de obra. Durante estagarantia limitada adicional de ocho ahos, usted
set6 responsable de cualquier clasede costos de mano de obra o de serviciosrelacionados.
Eltambor de la lavadora sifallara debido a un defecto de los materiales o mano de obra. Durante
esta garantia limitada de pot vida del producto, ustedser6 responsable de cualquier clase de
costos de mano de obra o de serviciosrelacionados.
[] Visitasde servicio a domicilio para mostrarle c6mo utilizar el
producto.
[] Instalaci6n, envb o mantenimiento incorrectos.
[] Fallasdel producto por manipulaci6n, uso incorrecto o
distinto al destinado o previsto comercialmente.
[] Dahostras la entrega.
EXCLUSION DE GARANT/AS IMPL/CITAS--Su Onicog exclusivo derecho es la reparaci6n del producto,
[] Sustituci6nde losfusibles de lavivienda o restablecimiento
de los interruptores.
[] Dahoscausados por accidentes, incendios,inundaciones
o fen6menos naturales.
[] Da_osemergentes o fortuitos causados por posibles
defectos del electrodom6stico.
[] Producto noaccesiblepara facilitar el servicio requerido.
tal g como se indica en esta Garantia limitada. Cualquier garantia implicita, inclugendo las garantias
implicitas de comerciabilidad o adecuaci6n para un fin determinado, est6n limitadas a un a_o o
el periodo de tiempo m6s breve permitido por la leg.
Estagarantia seextiende al comprador original g cualquiercomprador posterior de productos comprados para uso
residencialdentro des EstadosUnidos.Siel producto est6 situado en un 6reaque no dispone deservicio por parte
de un proveedorde servicioautorizado de GE,podriatenet que hacersecargo de loscostes deenvio o bien podria
solicit6rseleque Ileveel producto a una centro de serviciode GEautorizado para realizarla reparaci6n. EnAlaska,
la garantia excluge el costode envio olas visitasde servicio asu casa.
Algunosestados no permiten laexclusi6n o laslimitaciones de daBos incidentaleso consecuenciales.Estagarantia
da derechoslegales especificos,gusted podria tenet otros derechosque variar6n de estado aestado. Parasaber
cu61essonsus derechoslegales,consulte a laoficina de asuntos del consumidor localo la oficina del Prucurador
(AttornegGeneral)en su Iocalidad.
Garante: General Electric Compang. Louisville, KY 40225
Printed in China
Page 87

Servicioal consumidor.
P6ginaWeb de GEAppliances GEApplionces.com
_LTienealguna pregunta sabre suelectrodomastico? iPruebela pc_ginaWeb de GEAppliances 24horas aldiG,
cualquier d[a del aho! Paramagor conveniencia g serviciomc_src_pido,go puede descargar los Manuales
de los Propietarios,pedir piezaso incluso hacer una cita en I[neapara que vengan a realizar una reparaci6n.
Soliciteuna reparaci6n GEAppliances.com
Elserviciode expertosGEestc_a tan s61oun pasode su puerta,iEntreen I[neag solicite su reparaci6n cuando
le venga bien cualquier d[adel aflo! O Ilameal 800.GECARES(800.432.2737)durante horas normales de oficina.
RealLifeDesignStudio(Estudiodedisefloparalavidareal)GEAppliances.com
GEapoga elconcepto de Diseflo Universal-productos, servicios gambientes que pueden usar gente de
todas lasedades, tamahos g capacidades. Reconocemosla necesidadde dise_ar para una gran gama de
habilidades gdificultades fisicas g mentales.Para mc_sdetalles cobre lasaplicaciones de GEDiseflo Universal,
inclugendo ideas de diseflo para la cocina para personascon discapacidades,mire nuestra pc_ginaWeb hog
mismo. Para personascon dificultades auditivas, favor de Ilamara1800.TDD.GEAC(800.833.4322).
Garantiasampliadas GEAppliances.com
Compre una garant[a ampliada g obtenga detalles sobre descuentos especiales disponibles mientras su garant[a
est6 a_n activa. Puedecomprarla enI[neaen cualquier momento, o Ilamar al (800.626.2224)durante horas
normales de oficina. GEConsumer Home Servicesestar6 a_n ah[ cuando su garant[a termine.
Piezasg accesorios GEAppliances.com
Aquellosindividuos con la calificaci6n necesariapara reparar sus propios electrodom6sticos pueden
pedir que se lesmanden laspiezas oaccesorios directamente a sushogares (aceptamos lastarjetas
VISA,iqasterCard g Discover).Haga su pedido en I[neahog,24 horas cada d[a oIlamar por tel6fono
a1800.626.2002durante horas normales deoficina.
Lasinstruccionesdescritasen estemanual cubren losprocedimientosa seguirpor cualquierusuario.Cualquierotra
reparaci6ndeber[a,por reglageneral,referirsea personalcalificado autorizado. Debeejercerseprecauci6n ga que
lasreparacionesincorrectaspueden causarcondicionesde funcionamiento inseguras.
P6ngaseencontacto con nosotros GEAppliances.com
Sino estc_satisfecho con elservicioque recibe de GE,p6ngase en contacto con nosotros en nuestra
pc_ginaWeb indicandotodos losdetalles as[como su n0mero detel6fono o escr[banosa:
General Manager, Customer Relations
GEAppliances,Appliance Park
Louisville, KY40225
Registresu electrodom6stico GEAppliances.com
iRegistre su nuevo electrodom6stico en I[nea-cuando usted prefiera! El registrar su producto a tiempo le
proporcionarc_, si surgiera la necesidad, una mejor comunicaci6n gun servicio mc_src_pidobajo los t@minos de
su garant[a. Tambi6n puede enviar su tarjeta de registro pre-impresa que se incluge en el material de embalaje
o recorte g use el formulario de este Manual del Propietario.
84
 Loading...