

GE Appliances Profile GXCF35GBS Owner's Manual
www.6EAppl&nces.cem
GE Profil? Electronic
¼Tater Dispenser with
Safe_, Instructions ........................ 2, 3
Using the Water Dispenser
Features and Parts i,ist ...................... 4
I,oading tile Dispenser and Start Up ........... 4
Child Safeguard ............................ 4
Draining the Dispenser ...................... 5
Sanitizing and Cleaning ..................... 5
Control Panel and Display Features ............ 6
Start Up and Operation Adjusunent ........... 7
Specifications .............................. 7
Troubleshooting Tips ...................... 7-9
Care and Cleaning ....................... 9, 10
Consumer Support
Consumer Support ................. Back Cover
h'at.anty ......................... Back Coxer
Fran_ais
InJbrmations en matibre de sgcurit_ ........ 12, 13
Utilisation du distributeur d'eau
CaractOrisdques et liste de pi&ces ............. 14
Charg_ment du distributeur et d_marrag_ ..... 14
Samegarde pour la promction des entZants ..... 14
Vidange du distribumur . ................... 15
D_sinfection et nettoyage ................... 15
Caract_risfiques du panneau de contr61e
et de l'aflSchage ........................... 16
D_marrage et r_glage du fonctiomaement ...... 17
Caract&istiques techniques ................. 17
Conseils de d@annage ................... 17-19
Entretien et nettoyage ................... 19, 90
Soutien au consommateur
Soutien au consommateur .................. 21
Garanfie ................................. 91
Espaftol
InJbrmacidn de seguridad ................ 99, 23
C6mo utilizar el dispensador de agua
I,ista de partes y caracterfsticas ............... 94
Cdmo cargv_r el dispensador y operaci6n de inicio . .94
Seguro contra nifios ....................... 94
C6mo drenar el dispensador . ............... 95
C6mo desinfectar y limpiar .................. 95
Funciones del panel de control y de xJsualizaci6n . .96
Operaci6n de inicio y ajuste ................. 97
Especificaciones ........................... 97
Solucionar prob lemas ................... 9%29
Cuidado y limpieza ..................... 29, 30
Apoyo al consumidor
Apoyo al consumidor . ..................... 31
Garantfa ................................. 31
(;XCF_5(;BS
Distributeur d'eau de
GE Profil? Mdlectronique "atrois
tempdratures avec rdfrigdrant
de rafraichissements
La section frangaise commence a la page 12
Dispensador de agua de
GE Profild Melectr6nico de tres
temperaturas con enfriador
de refrescos
La seccion en espa#ol empieza en la pagina 22
As an ENERGYSTAR° partner; (;E
has demnnined fllat this product
meets the ENERGYSTAR°'_guidelines
for energy efficienc>
215C1176P001 49-50141-1 01-OgJR
IMPORTANTSAFETYINFORMATIOtVo
READALLINSTRUC770N$BEFOREU$1N&
WARNING!
Use this appfiance only for its intended purpose as described in this Owner's Manual.
SAFETYPRECAUflONS
When using electrical appliances, basic safety precautions should be followed, including the following:
This water dispenser must be i)roperly installed
and located in accordance with these instructions
before it is used.
Do not allow children to climb, stand or hang
on the outside of the dispense_; or on the shelves
inside the storage cabinet (on some models).
They could tip the dispenser over and damage
it and seriously iqjm'e themselves.
Do not store or rise gasoline or other flammable
wq)o_ and liquids in the vicinity of this or anv
other appliance.
UnI)lug the water dispenser before cleaning or
making repai_.
NOTE: GEdoes not support any servicing of the
dispenser. We strongly recommend that you do not
attempt to service the dispenser yourself
not rise this dispenser to dispense anything
other than water;
Wipe up any water spills immediately after loading
or tmloading water bottles.
Children should be supervised by a parent when
ush_g this product.
WARNING:Do not use with water that is
micmbiolo_caJly m_safe or of unknown quality.
iiiiiiiiiiiii
CAUTION: The dispenser heats water
up to a temperature of 195°F (91°C). Water
temperatures above 125°F (52°C) can cause
severe burns or death from scalding. Chil&cen,
the disabled and the elderly are at highest risk
of being scalded.
NOTICE: This product is intended solely for
use in chilling cmmed mzd boxed beverages, and
packaged nonperishables.
Do not plug in the power cord or mrn on the
power switches when the water dispenser is empty.
PROPERINSTALLATIONANDLOCATION
_ This product is flw indoor use only.
_dlow at least 1" (2.5 cm) of space between the
back of the water dispenser and the wall to allow
for i)roper air circulation.
{Do not install the water dispenser where the
temperatm'e will go beh m' 55°F (l 3°C) or
above 100°F (38°C).
Install the water dispenser on a level floor strong
enough to SUl)port it when flfllv loaded. Do not
install where it will be subject to direct stmlight,
heat or moistm'e.
The control panel is covered with a clear
protecfixe film; please peel from the edoe
to I'eIIlO_, e,
2

GROUND/NCINSTRUCTIONS
WARNING:I,,,_,ro_,or.soo_thogro.nding_,l.gco,,ros.ltinorisko_oloctricshock.
This appliance must be gr(mnded. In the event of an
electrical short circuit, gr(mnding reduces the risk of
electric shock.
This appliance is equipped Mth a power cord having
a grom_ding wire with a grom_ding plug. The plug
must be plugged into an outlet that is propedy
installed and grotmded.
Consult a qualified electrician if the grotmding
instructions are not completely tmde_tood, or if
doubt e_sts as to whether the appliance is properly
grom_ded.
If the outlet is a standard 2-prong wall outlet, it is
yore" personal responsibili F and obligation to have
it replaced with a properly grotmded 3-prong
wall outlet.
Do ilot/lildei" _liiV cii'c/lillst_liices C/l[ oi" i'eillove the
third (grotmd) prong fl'om the power cord.
Do IIOt rise all adaptor plug with this appliance.
D() not use an extension cord with this appliance.
If the p()wer cord is too sh()rt, have a qualified
electrician install an outlet near the appliance.
For best operation, plug the appliance into its own
electrical outlet on a dedicated circuit to prevent
flickering of lights, blowing of filse or tripping of
circuit breaker:
PROPERDISPOSALOFTHEWATERDISPENSER
RefrigerantDisposal
Your old water dispenser may have used a regulated
refrigerant in its cooling s);stem. These reflJgerants
are believed to ham_ stratospheric ozone. If )_m are
throwing away yo/li" old dispense_; make s/lI'e the
refrigerant is removed and recovered for proper
disposal by an EPA-certNed technician. If you
intentionally release this reli_igerant, you can be
subject to fines and ilnprisonlnent under provisions
of enviromnental legislation.
READANDFOLLOWTHISSAFETYINFORMATIONCAREFULLY.
SAVETHESEINSTRUCTIONS
Usingthe water dispenser.
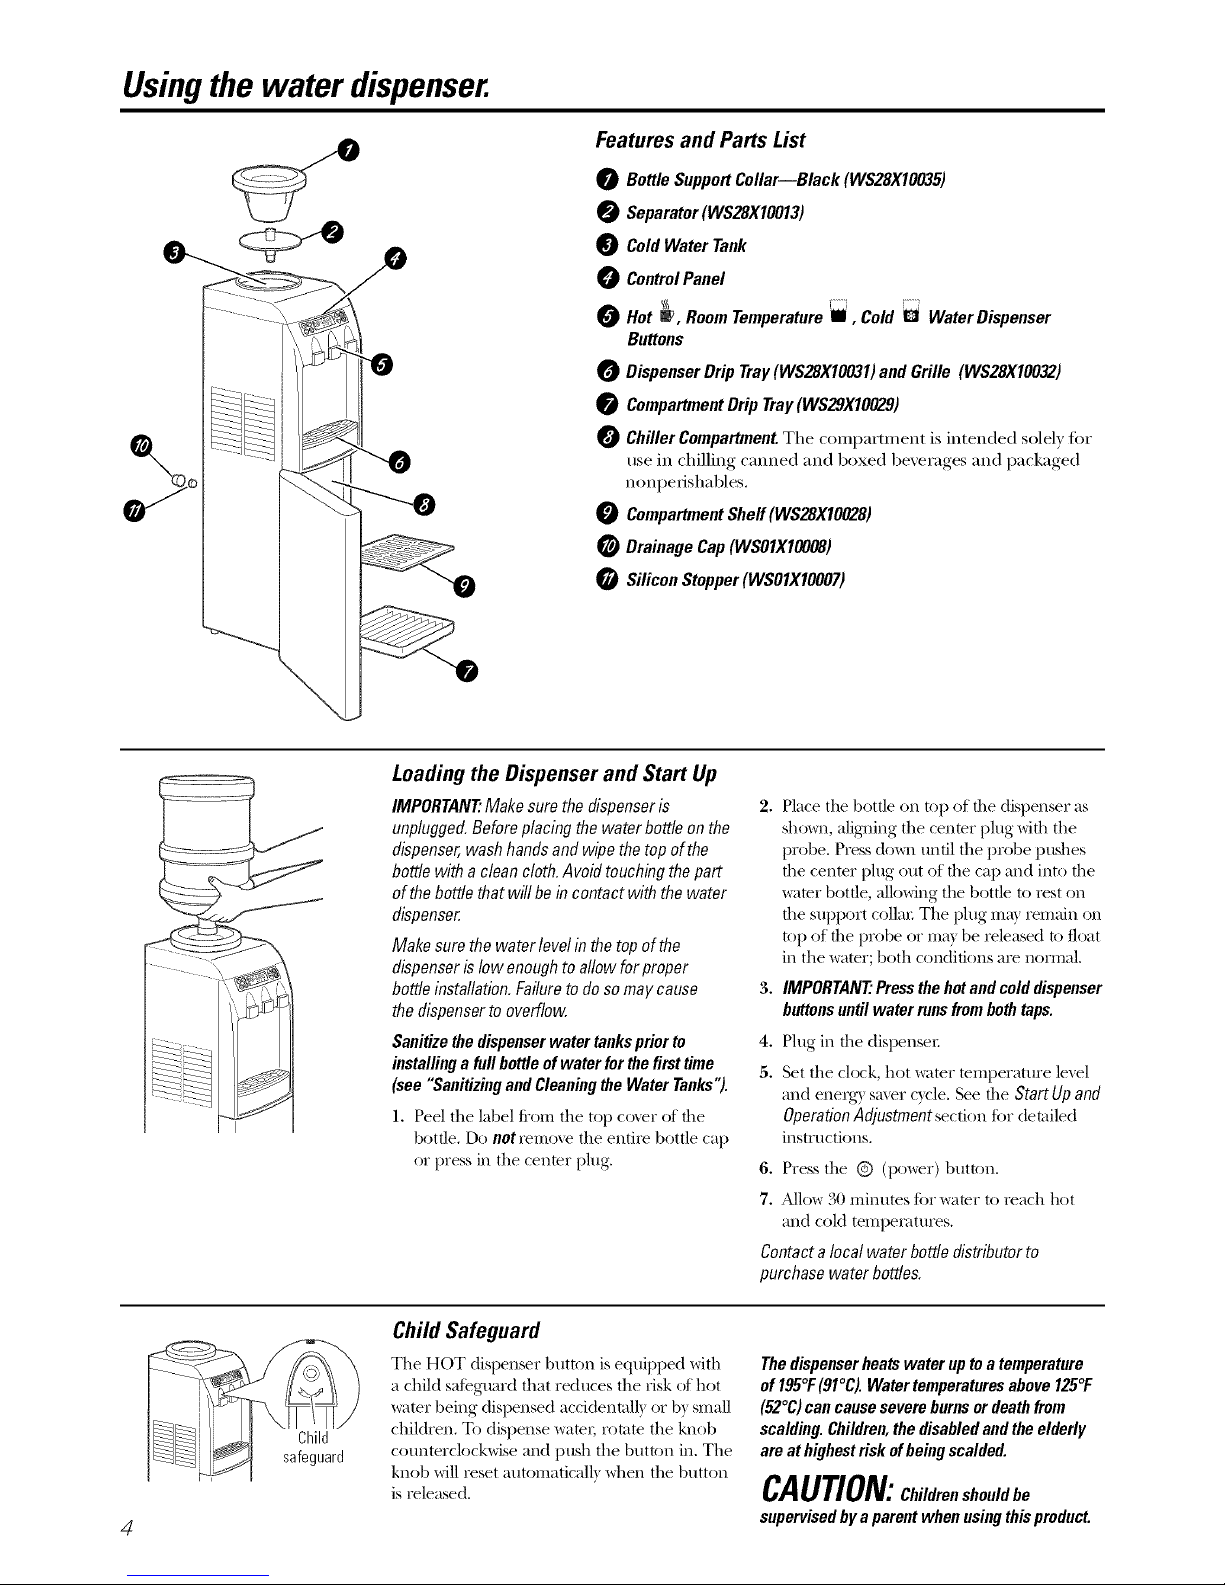
Features and Parts List
0 BottleSupportCollar--Black (WS28X10035)
Separator(WS28X10013)
ColdWaterTank
ControlPanel
0
Hot _ , RoomTemperatureil ,Cold$3 WaterDispenser
Buttons
O Dispenser Drip Tray(WS28X10031) and Grille (WS28X10032)
CompartmentDrip Tray(WS29X10029)
O Chiller Compartment.The compartment is intended solely for
use in chilling canned and boxed be;'erages and packaged
nonperishables.
O CompartmentSheff(WS28XlO028)
Drainage Cap (WSOIXIO008)
G Silicon Stopper(WSOIXIO007)
Loading the Dispenser and Start Up
IMPORTANT"Makesurethedispenseris
unplugged.Beforeplacingthe waterbottleonthe
dispenser,washhandsandwipethetopofthe
bottlewitha cleancloth.Avoidtouchingthepart
of thebottlethatwill bein contactwiththewater
dispenser.
Makesurethewaterlevelin thetop ofthe
dispenserislowenoughtoallowforproper
bottleinstallation.Failuretodo somaycause
thedispenserto overflow.
Sanitizethedispenserwater tankspriorto
installinga full bottleofwaterforthe firsttime
(see"SanitizingandCleaningtheWaterTanks").
1. Peel the label fi'om the top co_er of fl_e
bottle, Do not remo_v the enth'e bottle cap
or press in the center plug.
2. Place the bottle on top of file dispenser as
sh{}wn, alig_ling the center plug wifll the
probe, Press down tmfil the probe pushes
fl_e center plug out of file cap and into fl_e
water bottle, allowing the bottle to rest on
file support colla_: The plug ma) remain on
top of fl_e probe or ma) be released to float
in the water; both conditions are normal,
3. IMPORTANT" Press the hot and cold dispenser
buttons until water runs from both taps.
4. Plug in the dispensec
5. Set the clock, hot water temperatm'e level
and energ) satyr c)'cle. See file Start Upand
Operation Adjustment section ti)r derailed
instructk)ns.
6. Press the @ (po_vw')button,
7. Allow 30 minutes ti)r water to reach hot
and cold temperatures,
Contact a local water bottle distributor to
purchase water bottles.
4
Child Safeguard
The HOT dispenser button is equipped with
a child sateg-uard that reduces the risk of hot
water being disi)ensed accidenml]) or b) small
children, To dispense wamr, rotate the knob
counterclock\_ise and i)ush the button in, The
knob will reset automaticall) when the button
is released,
The dispenserheatswater up toa temperature
of I95°/: (9I°C). Water temperaturesabove I25°/:
(52°C)cancause severeburnsor deathfrom
scalding. Children,thedisabledand theelderly
are at highestrisk of beingscalded.
CAUTION:Childrenshouldbe
supervised by aparent when usingthis product.
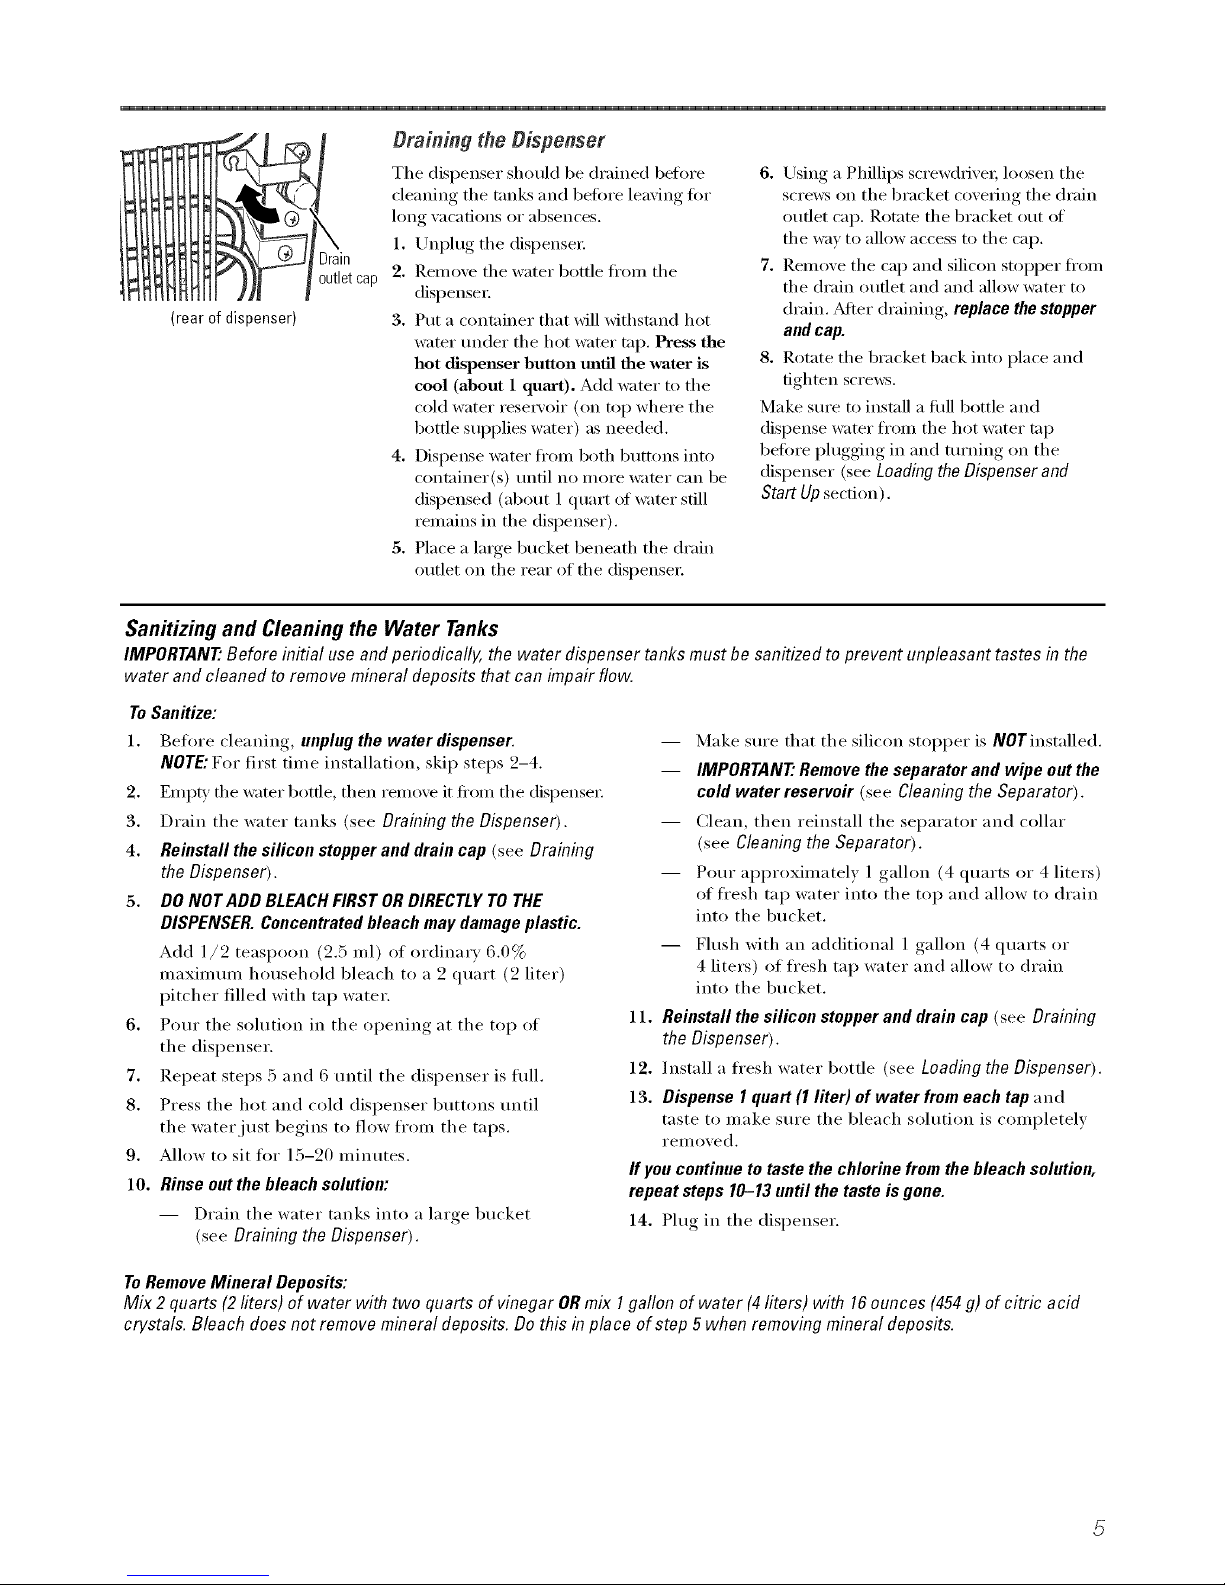
(rear of dispenser)
Drain
outletcap 2.
Draining the Dispenser
The dispenser should be drained before
cleaning the tanks and before leaving tot
long wlcations or absences.
1. UnI)lug the dispense_:
Rein Dye tile water bottle ti'om the
dispenser
3. Put a container that will withstand hot
water under the hot water tap. Press the
hot dJspel)ser button until the water is
cool (about 1 quart), Add water to the
cold water resei','oir (on top where tile
bottle sui)plies water) as needed.
4. Dispense water fl'om both buttons into
container(s) until no inore water can be
dispensed (about 1 quart of water still
remains in the dispenser).
5. Place a large bucket beneath tile drain
outlet on the rear of the dispenser
6. Using a Phillips screwdriver; loosen tile
scre_:s on tile bracket coveting tile drain
outlet cap. Rotate tile bracket out of
the way to allow access to the cap.
7. Remove tile cap and silicon stopper fl'om
tile drain outlet and and allow water to
drain. _Mter draining, replace the stopper
and cap.
8, Rotate the bracket back into place and
tighten scrmvs.
Make sm'e to install a full bottle and
dispense water fl'om tile hot water tap
before i)lugging in and turning on tile
dispenser (see Loading the Dispenser and
Start Up secdon).
Sanitizing and Cleaning the Water Tanks
IMPORTANT" Before initial use and periodically, the water dispenser tanks must be sanitized to prevent unpleasant tastes in the
water and cleaned to remove mineral deposits that can impair flow.
ToSanitize:
1. Befi)re cleaning, unplug the water dispenser.
NOTE: For first time installation, skip steps 2-4.
2. Empty the water bottle, then relllo\'e it fi'om tile dispenser
3. Drain tile water tanks (see Draining the Dispenser).
4. Reinstall the sificon stopper and drain cap (see Draining
the Dispenser).
5. DO NOT ADD BLEACH FIRST OR DIRECTLY TO THE
DISPENSER. Concentrated bleach may damage plastic.
Add 1/2 teasp(>(m (2.5 ml) ot ordinary 6.0%
maximmn household bleach to a 2 quart (2 liter)
pitcher filled with tap water.
6. Pour tile solution in tile opening at tile top of
the dispenser.
7. Repeat steps 5 and 6 until the dispenser is flfll.
8. Press the hot and cold dispenser buttons until
the water just begins to flow fl'om the taps.
9. Allow to sit tot 15-20 minutes.
10, Rinse out the bleach solution:
-- Drain tile water tanks into a large bucket
(see Draining the DispeRser).
-- Make sure that tile silicon stopper is NOT installed.
-- IMPORTANT" Remove the separator and wipe out the
cold water reservoir (see Cleaning the Separator).
-- Clean, then reinstall tile separator and collar
(see CleaRing the Separator).
-- Pore" approximately 1 gallon (4 qtlarts or 4 liters)
of fresh tap water into the top and allow to drain
into tile bucket.
-- Flush with an additional 1 galhm (4 quarts or
4 liters) of ti'esh tap water and allow to drain
into the bucket.
11. Reinstall the silicon stopper and drain cap (see Draining
the Dispenser).
12, Install a fi'esh water bottle (see Loading the Dispenser).
13. Dispense I quart (1 liter) of water from each tap and
taste to make sm'e tile 1)leach solution is completely
rellloved.
If you continue to taste the chlorine from the bleach solution,
repeat steps 10-13 until the taste is gone.
14. Plug in tile dispenser.
ToRemove Mineral Deposits:
Mix 2quarts (2 liters) of water with two quarts of vinegar ORmix 1gaffeRof water (4liters) with 16ounces (454g) of citric acid
crystals. Bleach does not removemineral deposits.Do this in place of step 5 when removing mineral deposits.

Usingthewater dispenser.
PM
Control Panel Buttons
0 Power ON/OFFButton @. Turns tile cooling and heating
operation ON or OFF. The button must be on to see
tile entire display. Never start tile trait without a bottle
containing water installed,
0 SETButton @. Advances the control panel display
through the teattlI'es that are a(!justable. _]/ell in the
SET mode, "SET" is displayed on the display panel. The
control panel will automatically return to the operating
mode if no other button is pushed within 1 minute,
accepting any new a(!jusm/ents.
Feature Adjustment and ControlPanel Lock Buttons.Tile
buttons are used individually to a(!just tile ti_atm'e \_dues
when the control is in the SET mode. The buttons can be
pressed and held tot ti_st scrolling. A Control Panel I,ock
can be engaged and disengaged by pressing both tile
and _ buttons at tile same time. When tile control
panel is locked, no changes can be made to tile control;
howe\'e_; water dispensing is not affected.
and _ timer Controls. Tile TIMER/STARTbumm (4)
initiates tile (fisplay of file countdown timer and
starts file fiIneI: Tile STOP/CANCEL button (5) stops
file timer flmcfion and cancels file timer (fisplay,
Tile hom'glass timer icon }_ is displayed while file
timer feature is selected and active.
Energy Saver ON/OFFButton @. Note:The clock must be
set for tile Energy' Saver ti_atm'e to operate properly. This
btltton ttlrns Oil and off tile programmed Energy Saver
cycle that controls the heater operation to save energ)'
(lining low usage periods of tile day and week. Tile
delimit setting is set at tile ti_ctm T tot optimal energy'
pe_ti)mmnce--hot water operation is set to start at 6:00
am and stop at 8:00 pro. Tm'ning tile teature off returns
tile dispenser to n(mnal operation and alhm:s tile
dispenser to continuously produce hot and cold water
24 horns a (la5 7 days a week.
Faucet Light ON/OFFButton @. Turns tile fimcet light on
oI" ()_
Control Panel Display
TemperatureSetting Display. The hot and cold water
temperature settings can be selected to display in either
degrees Fahrenheit (:,rCelsius.
Clock and timerOisplay. Tile clock and clay (ff tile week
are displayed nom_ally. When tile timer flmction has
been selected, tile clock display is converted to a
co/intdown [Jill eI'.
timerlcon _. Tile timer icon is lit when tile timer
fimction has been selected. The icon displays motion
when the timer comKdown is active,
EnergySaver--Dispenser Operation Start time Icon @.
Tile light blue start time icon will be lit in tile SET mode,
indicating the programmed time when the dispenser
is to begin fifll hot water operation.
EnergySaver--Dispenser Operation Stop time Icon @. Tile
red stop time icon will be lit in tile SET mode, indicating
tile programmed time when tile dispenser hot water
operation will be shut off'.
Energy Saver/con _. Tile energai saver icon will be solidly
lit when the programmed operation cycle has been
activated. In this mode, the icon will display motion
of tile arrows indicating hot water operation has been
shut off to save energy:
ControlPanel Lock Icon _ . Tile control panel lock icon
will be lit when the lock feature has been engaged.
Hot Water Operation Icon _ . The cup will be displayed
when the hot water system is acti\:_ted. The steam
elements will move while the heater is operating and all
three elements will remain lit when tile set temperatm'e
has been attained.
@
Cooling System Operation Icon _ . Tile snowflake will be
displayed when the cooling system is actiw_ted. The
snowflake elements will be in motion when the cooling
system is operating and all 6 elements will remain lit
when the set temperature is attained. (The snowflake and
the 40F (4C) icons will not be lit during periods of the
Energy' Saver cycle even though tile cooling system is
framing to maintain tile compartment temperature.)
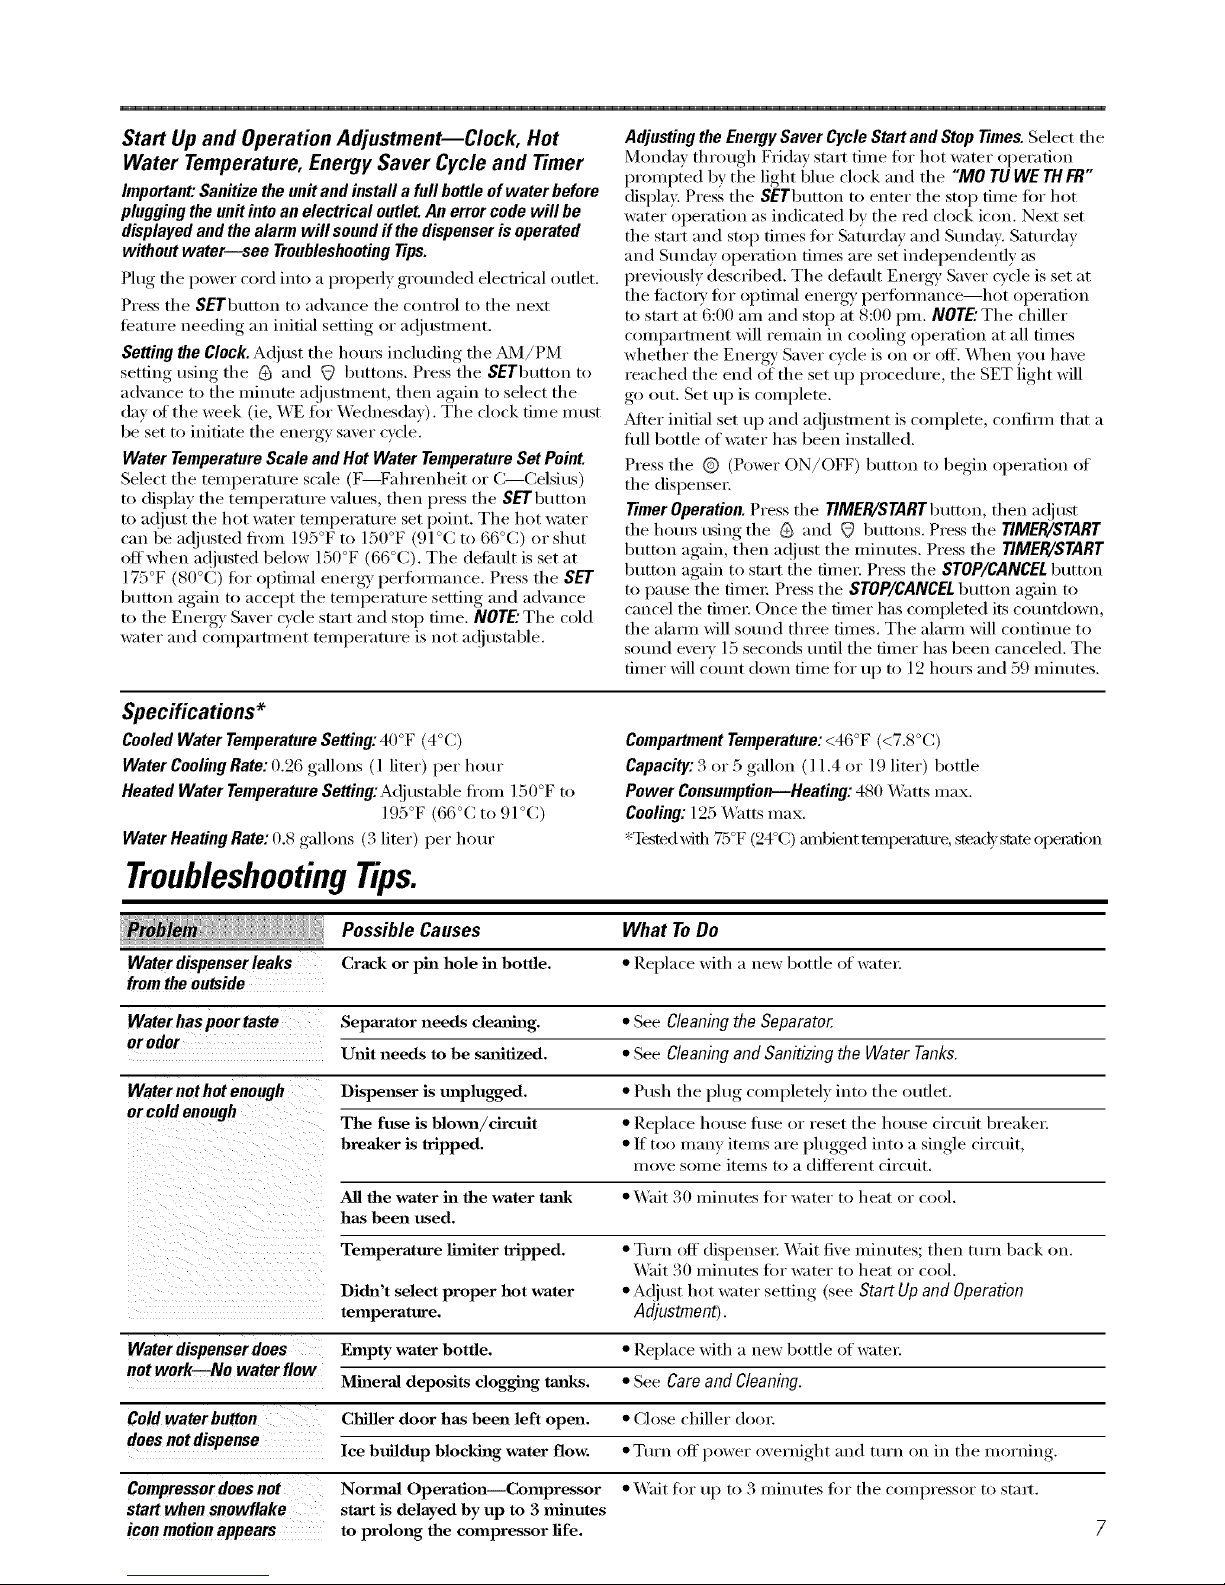
Start Up and Operation Adjustment--Clock, Hot
Water Temperature, Energy Saver Cycle and Timer
Important:Sanitize the unit and install a full bottle of water before
plugging the unit intoan electrical outlet. An error code will be
displayed and thealarm will sound if the dispenser is operated
without water--see Troubleshootingtips.
Plug the power cord into a properly grounded electrical outlet.
Press the SETbutton to ad\mlce the control to the next
ti_atm'e needing an initial setting or a(!iusnnent.
Setting the Clock.Adjust the hom_ including the A&I/PM
setting using the _ and _ buttons. Press the SETbutton to
advance to the minute a@lsnnent, then again to select the
day ot the week (ie, WE for X4'ednesday). The clock time nlust
be set to initiate the energy saver wcle.
Water Temperature Scale and Hot Water Temperature Set Point.
Select the temperature scale ([*_Fahrenheit or C--Celsius)
to display the temperature \_flues, then press the SETbutton
to a(!just the hot water temperature set point. Tile hot water
can be a_!justed from 195°F to 150°F (91°C to 66°C) or shut
offwhen a(!justed below 150°F (66°C). The detimlt is set at
175°F (80°C) fin" optimal energy perfimnance. Press the SET
button again to accept the temperature setting and advance
to the Energy' Saver cycle start and stop time. NOTE."The cold
wamr and compartment temperature is not a(!justable.
Adjusting the Energy Saver Cycle Start and Stop times. Select the
Monday through Friday start time fin" hot water operation
prompted bv the light blue clock and the "/I/10TUWETHFR"
display. Press the SETbutton to enter tile stop time tOT hot
water operation as indicated bv the red clock icon. Next set
the start and stop times fin" Saturday and Sunday. Saturday
and Stmday operation finles are set'independei{fl) as
previously described. The detimlt Energy' Saver cycle is set at
the ti_cto_ T fin" optimal energy' perfimnance--hot operation
to start at 6:00 am and stop at 8:00 pro. NOTE."The chiller
compartment will remain in cooling operation at all times
whether the Energy' Saver cycle is on or off. \4]_en you have
reached the end of the set up procedure, the SET light will
go out. Set up is complete.
_Mter initial set up and a(!jusnnent is complete, confim/that a
till bottle of water has been installed.
Press the @ (Power ON/OFF) button to begin operation of
the dispense_:
timer Operation. Press the TIMER/STARTbumm, then a(!just
the horus ttsing the & and _ bumms. Press the TIMER/START
button again, then at!just the minutes. Press the TIMER/START
button again to start the fime_: Press the STOP/CANCEL button
to pause the fime_: Press the STOP/CANCEL button again to
cancel the time_; Once the timer has completed its countdown,
the almm will sound three times, The alaml will continue to
sound evely 15 seconds until tile tinier has been canceled. The
timer _111count down time fin" up to 12 hotu_ and 59 minutes.
Specifications*
Cooled Water Temperature Setting: 40°F (4°C)
Water Cooling Rate: 0.26 gallons (l liter) per hour
Heated Water Temperature Setting:A(!justable ti'om 150°F to
195°F (66°C to 91°C)
Water Heating Rate: 0.8 gallons (3 liter) per hour
TroubleshootingTips.
Compartment Temperature: <46°F (<7.8°(;)
Capacity: 3 or 5 gallon ( 11.4 or 19 liter) bottle
Power Consumption-Heating: 480 Watts max.
Cooling: 125 Watts max.
'::Tested _ith 75°F (24°C) ambient tempemnu'e, stea_' state opelafion
;: Possible Causes What To Do
Waterdispenserleaks Crack or pin hole in bottle. • I_eplace with a new bottle of water:
from the outside
Waterhaspoortaste Separator needs clemlh_g. • See Cleaning the Separator.
orodor
Unit needs to be sanitized, "See Cleaning and Sanitizing the Water Tanks.
Water not hot enough Dispenser is unplugged. * Push the l)ltw_ completely, into the outlet.
or cold enough The fuse is blown/circuit * Replace house fl/se or reset tile house circtdt breakel:
breaker is tripped. •/f too re:my items are plugged into a single circtfit,
move some items to a different circuit.
All the water in the water tank *X_'ait 30 minutes fin" water to heat or cool.
has been used.
Temperature limiter tripped. • Turn off dispense1: X_'ait five minutes; then mm back on.
_4.fit 30 minutes fin" water to heat or cool.
Didn't select proper hot water • At!just hot water setting (see Start Up and Operation
temperature. Adjustment).
Water dispenser does Empty water bottle. * Replace with a new bottle of water:
not work--No water flow
Mineral deposits clogghag tanks, • See Care and Cleaning.
Cold water button Chiller door has been left open. * Close chiller (_h>o_:
does not dispense Ice bnildup blocking water flow. * Ztlrn Off power overnight ;ill(1 tt/rn on ill the I/lorning.
Compressor does not Normal Operation Compressor * \Mfit flw up to 3 minutes fin the compressor to star*.
startwhensnowflake start is delayed by up to 3 mhmtes
iconmotionappears to prolong the compressor life.
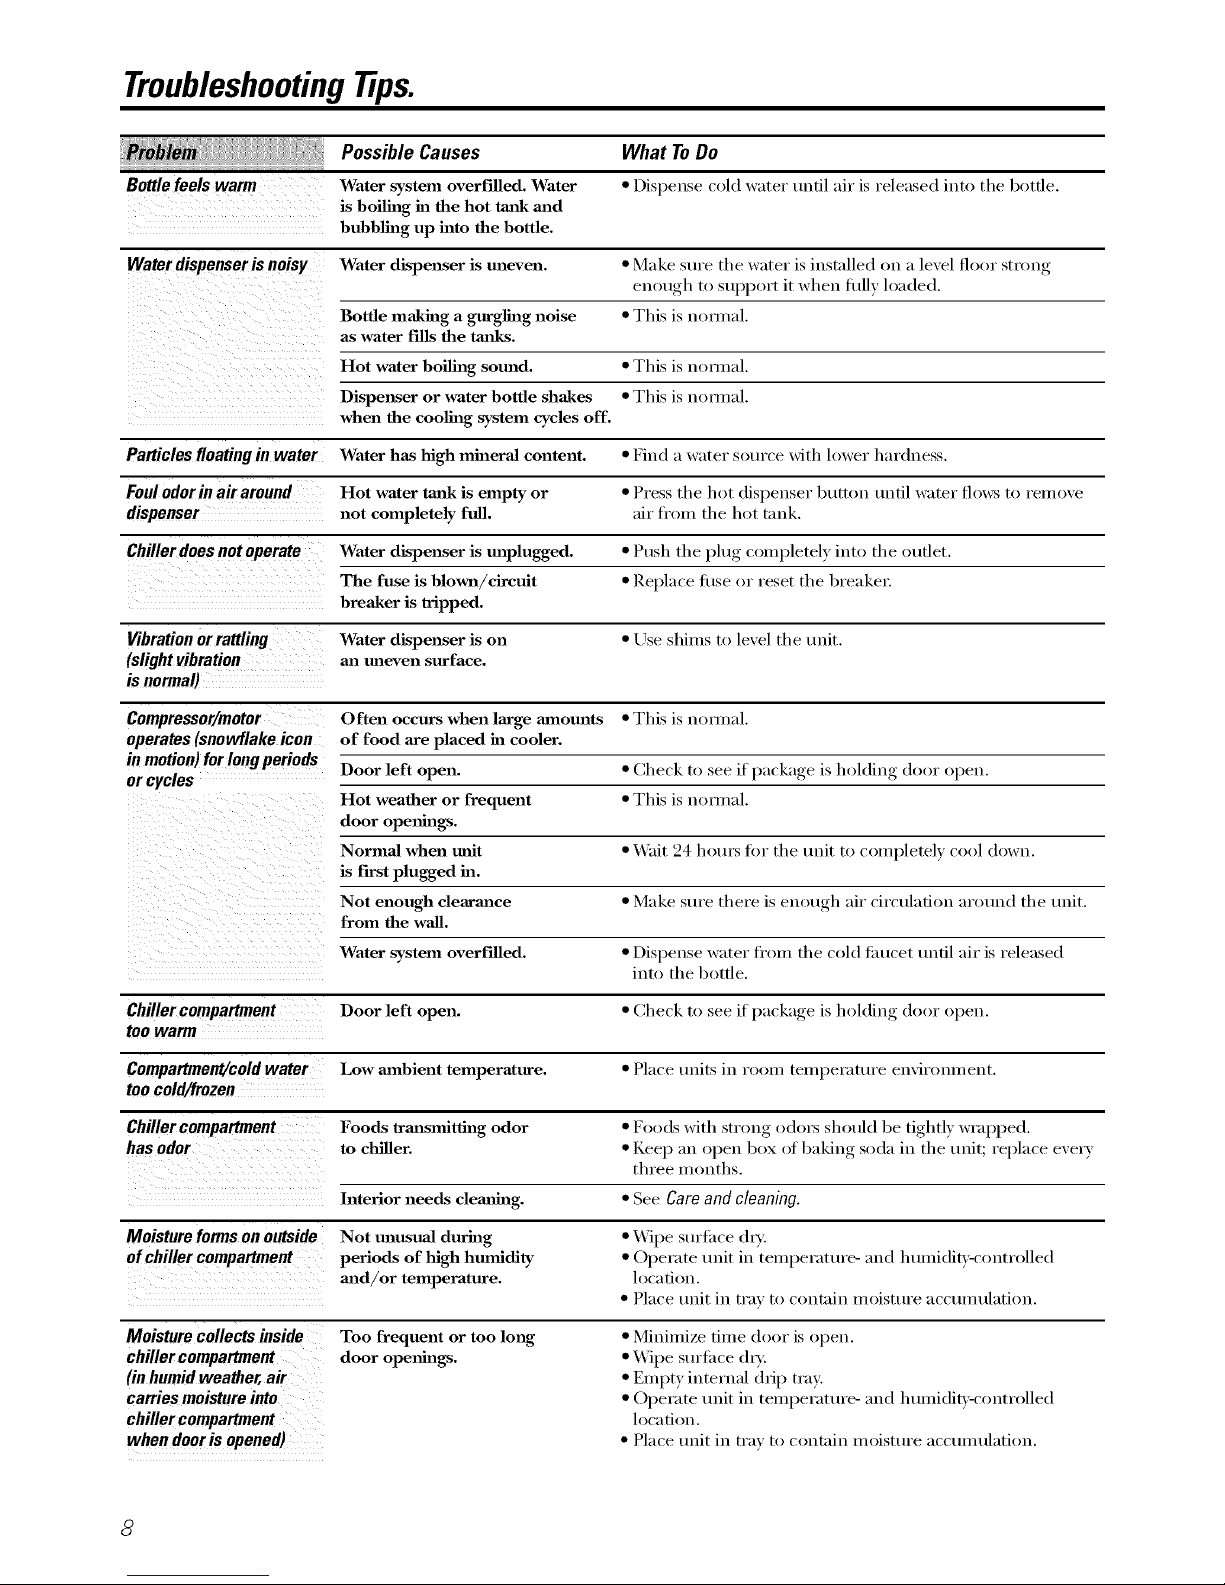
Troubleshootingtips.
Possible Causes
Bottle feels warm Water system overfilled. Water
is boilhlg hi the hot taa_k m_d
bubbling up into the bottle.
Waterdispenserisnoisy Water dispenser is uneven. * Make sure the water is installed on a level floor _strono
enou,,h_ to support it when fifth' h)aded.
Bottle makhltg a gurgling noise * This is hernial.
as water f'flls the taxies.
Hot water boiling sound. * This is hernial.
Dispenser or water bottle shakes *This is hernial.
when the cooling system cycles off.
Particles floating in water Water has high mineral content. * Find a water source with lower hardness.
Foulodotin air around Hot water ta_lk is empty or • Press the hot dispenser button until water flows to remoxe
dispenser not completely ftdl. air fl'om the hot tank.
Chillerdoes notoperate Water dispenser is unplugged. • Push the plug completely into the outlet.
The fuse is blown/drcttit * ]_eplace fllse or reset the breaker;
breaker is tripped.
Vibrationorrattling Water dispenser is on * Use shims to lexel the unit.
(slightvibration ml mleven surface.
isnormal)
Compressor/motor Often occurs when large mnomlts * This is nom_al.
operates (snowflake icon of food axe placed in cooler.
inmotion)forlongperiods Door left open. * Check to see if package is holding door open.
or cycles
Hot weather or frequent * This is noi_nal.
door openhags.
o.na O,en • the t,,c,,mI le el .,.1
is first plugged in.
Not enough clearance • Make sure there is enou,,h_ air circulation around the unit.
from the wail.
Water system overf'flled. • Dispense water fl'om the cold timcet until air is released
into the bottle.
Chillercompartment Door left open. • Check to see if package is holding door open.
toowarm
Compartment/cold wate r Low ambient temperature. * Place units in room temperature environment.
too cold/frozen
Chillercompartment Foods transmitting odor * Foods with strong od(n_ should be tightl) wrapped.
has odor to chiller. * Kee I) an open box of baking soda in the unit; replace exer)
three months.
Interior needs clemfing. * See Care and cleaning.
Moisture forms on outside Not unusual during * Wipe suriiace dxy.
of chille rcompartment periods of high hmnidJty * Operate unit in temperature- and humidi_'-controlled
aald/or temperature, locafi(m.
• Place unit in trax to contain moisture accumulation.
What ToDo
• Dispense cold water until air is released into the bottle.
Moisturecollectsinside
chillercompartment
(inhumidweather,air
carriesmoistureinto
chillercompartment
whendoorisopened)
Too frequent or too long
door openings.
• Minimize fiule door is open.
• X,_]l)esuriilce d_y:
• Empty internal drip tray:
• Operate unit in temperature- and humidit,i-controlled
location.
• Place unit in tray to contain moisture accumulation.
8

Errorcode:E1
Alarmwill soundand
displayE1for10seconds.
Theunitwill thenshut
downanddisplay"OFF"
What Is Wrong
• Hot water tmlk exceeds
temperature limits.
• No/low water level in system.
What To Do
• Confim_ that water bottle installed is supplying water
to the system. Dispense hot water to release any trapped aiL
Mlow the refit to cool flw several hom_ Mtb the power off.
_Mter the unit cools, resume operation by pressing the
power b/itton.
Errorcode:E2 • Cold water tank too cold.
• Operating enviromnent too cold.
• Compartment door may be open.
• The system Mll automatically reduce cooling operation
to restore a correct temperature condition. Confixm that
the compartment door is closed. The control/display will
reset automatically when a nomml temperature has been
restored. Unplug the unit and allow it to wam_ up if the
problem persists. Relocate the dispenser to a warnler
operating environment if the error repeats. If a wam_er
operating environment is not a\;filable, increase the hot
wamr temperatm'e and operation time (with the Energy
Saver cycle set-up) to help offset this issue.
Errorcode:E3
• Compartment temperature
too cold.
• Operating enviromnent too cold.
• Extremely high cold water usage.
• Bottled water temperature high
when installed.
• The system Mll automatically reduce cooling operation
to restore the correct temperatm'e condition. Confima that
the compartment door is closed. The control/display will
reset automatically when nomml temperatm'e has been
restored. Mlow the bottle temperature to stabilize to room
temperature befin'e installation on the dispense_: Unplug
the refit and alh)w it to wmm up if the problem persists.
P.elocate the dispenser to a wam_er operating environment
if the error repeats.
Errorcode:E4,E5andE6
• Dispenser has experienced
a sensor failure,
• Unplug the refit fi)r 24 hom_ and allow the control to reset.
Plug the refit in and repeat start up and operation
adj ustments. Repeat if reqtfired; however, sore e fifilm'es
I/lav be pell/lanent.
Careand cleaningof the dispenser.
To remove To replace
(__upport collar
Separator
Cleaning the Separator
IMPORTANT" Unplug the water dispenser
before cleaning.
l. Remove the water bottle and drain the
dispenser (see Draining the Dispenser).
2. Remove tim support collar by turning
counterclockwise and pulling straight off.
3. Remove the plastic separator bv
pulling straight out (you may need
to twist slightly to loosen).
4. Clean the separator with dish soap
and water or in the top rack of
the dishwasher.
5, Dry the separator thoroughly on
both sides,
6. Llsing a clean cloth or paper towel,
thoroughly dry the cold water
reselwoir.
7. Place the separator back in the
dispense_: Make sure the hmg, tapered
end of the separator is positioned
firmly on the metal plug on the
bottom of the reservoir;
8. Replace the support collar and turn
clockwise tmtil it is firmly in place.
9. Install a flfll water bottle on the
dispenser (see Loading the Dispenser).
Cleaning the Outside Cabinet and Storage/Chiller Compartment
IMPORTANT'.Unplugthe waterdispenserbefore
cleaning.
The cabinet and compartment of the
dispenser can be washed with mild soap and
water: Rinse thorough b with clem" water: Never
use commercial cleanecs or abrasive scouring
pow(te_:_,
Sweep awa) or \;tCtltlI/'l an} dust from the
condenser coils on the back of the unit, For
best results, use a brush speciall} designed fi)r
this purpose, It is m_filable at most appliance
stoI'es,
9
Careandclean&gofthedispenser,
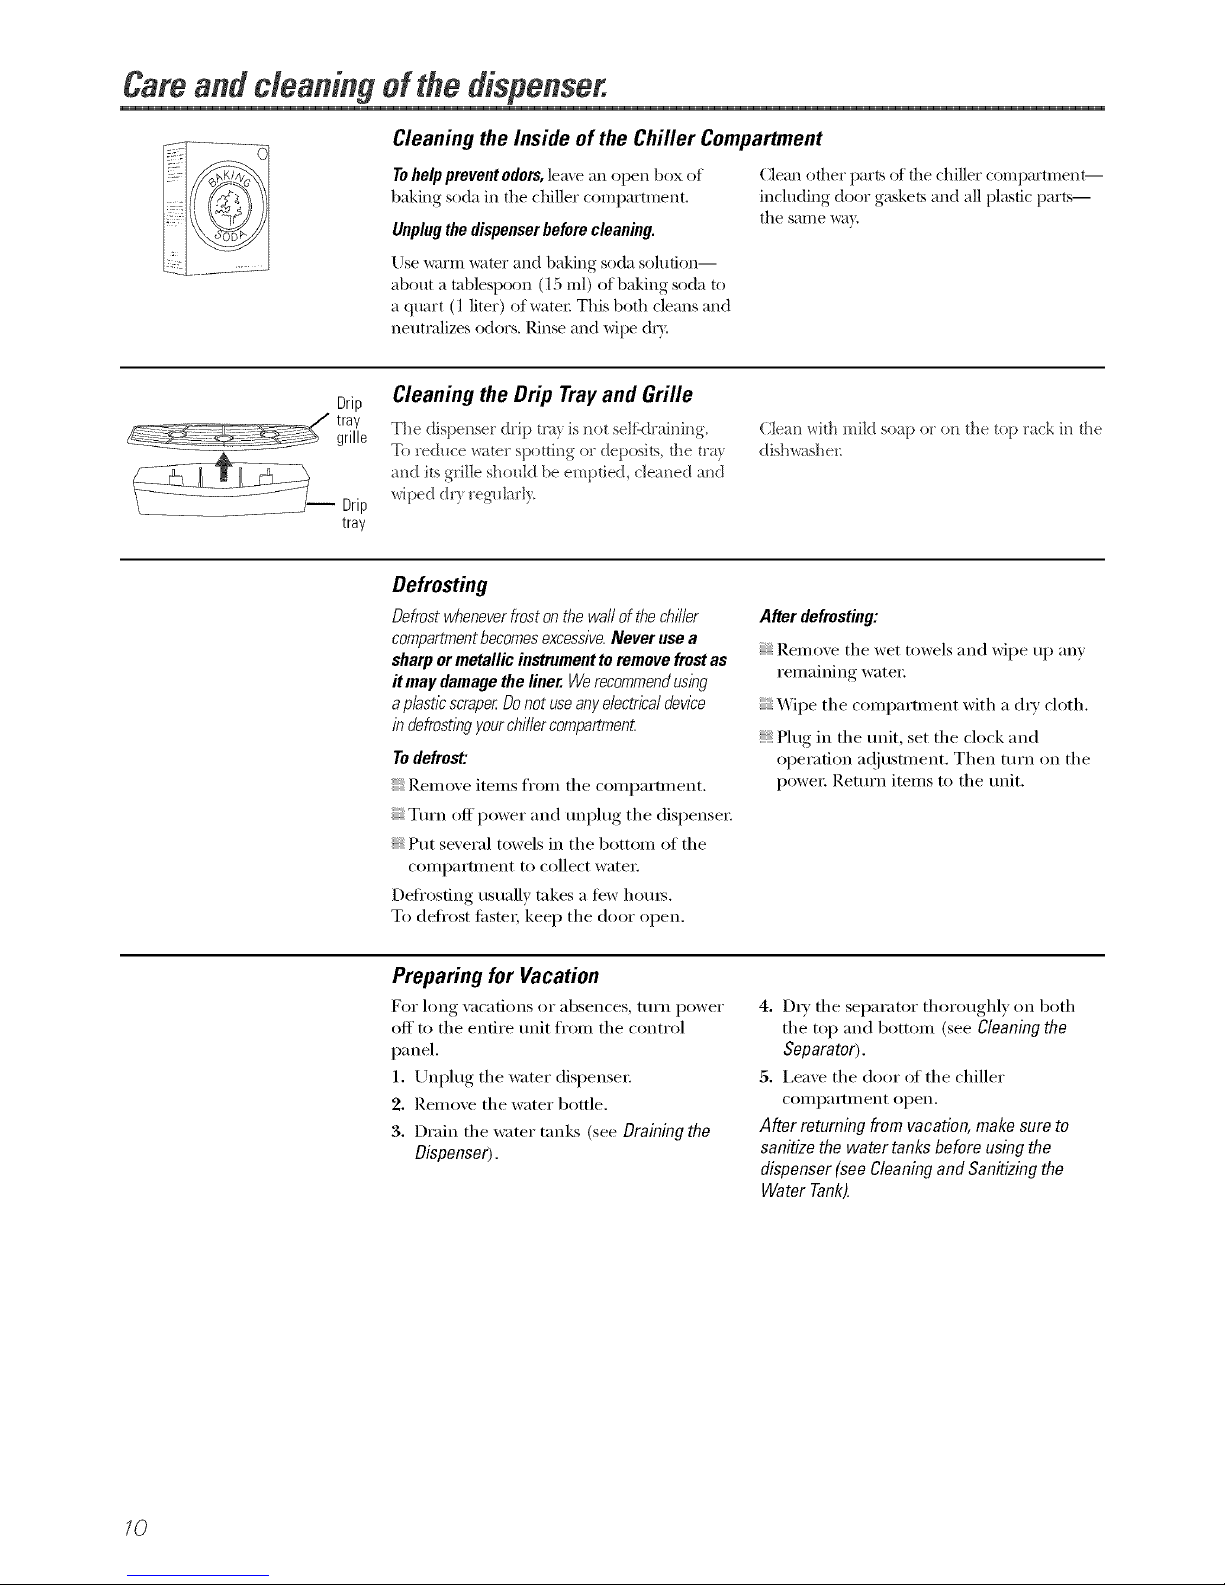
Cleaning the Inside of the Chiller Compartment
Tohelp prevent odors,lea',e an open box of
baking soda in the chiller conli)artment.
Unplugthe dispenserbeforecleaning.
Else warm water and baking soda s()lution--
about a tablespoon (15 ml) of baking soda to
a quart (1 liter) of water This both cleans and
neutralizes odors. Rinse and wipe dU.
Cleml oilier pm'ts of file chiller compartment--
including door gaskets and all plastic pm'ts--
the same _l),.
Drip
tray
grille
Drip
tray
Cleaning the Drip Trayand Grille
The (lispense_ _drip tra} is not selfkIi'ainin D
To re&_ce water spotting or deposits, the tra}
and its grille should be emptied, cleaned and
wiped dr? regu]arl?,
Cleat_ with miM soap or on the top rack in d_e
dishwashen
Defrosting
Defrost wheneverfrost on the waft of thechiller
compartmentbecomesexcessiveNever use a
sharp or metallic instrument toremove frostas
it may damagethe liner. We recommendusing
aplast/bscraper.Donot useanyelectrical dewce
in defrostlbgyourchiller compartment
Todefrost:
Remove items from the compartment.
Turn off power and mq)lug the dispense_:
; Put several towels ill the bottoln of the
COlnl)artment to collect watei:
Defrosting usually takes a few hems.
To defrost thste_; kee I) the door open.
After defrosting:
Remove the wet towels and wipe up any
remaining water:
Wipe the compartment with a dI_' cloth.
Plug in the trait, set the clock and
operation a(!jtlstment. Then tllrn on the
powei: Return itelns to the unit.
Preparing for Vacation
For long \;ic;:ltions or ;:lbsences_ ttlrn power
off to the entire trait ti'om the control
panel.
1. UnI)lug the water dispensei:
2. Renmve the water bottle.
3. Drain the water tanks (see Draining the
Dispenser).
4. Dry the separator thoroughly on both
the top and bottoln (see Cleaning the
Separator).
5. I,ea\'e the door of the chiller
COIlll)a I1 Ill ent ellen,
After returning from vacation, make sure to
sanitize the watertanks before using the
dispenser (see Cleaning and Sanitizing the
Water Tank).
70
 Loading...