

GE Appliances GHDX100GM0WW, GTDX200EM0WW, GTDL310EM0WS, GTDL200EM0WW, GTDP250EM0WW Owner's Manual
GEAppliances.com
Safety Instructions ........ 2-4
Operating Instructions
Control Panel .................. 5, 6
Control Settings .................. 7
Features ......................... 8
Loading and Using
the Drger .................... ZO-ZZ
Reversing the Door .............. 9
Venting the Drger ............... ZZ
Troubleshooting Tips ... 12, 13
Consumer Support
Consumer Support .............. 16
Warrantg ...................... 15
Write the model and serial
numbers here:
Model #
Serial #
Youcan find them on a label
on the front of the drger behind the
door.
234Dl157PO02 49-90407 05/28/10 GE
IMPORTANT SAFETY INFORMATION.
READ ALL INSTRUCTIONS BEFORE USING.
WARNING!
For your safety, the information in this manual must be followed to minimize the risk
of fire or explosion, electric shock, or to prevent property damage, personal injury, or
death.
[] Do not store or use gasoline or other
flammable vapors and liquids in the
vicinity of this or any other appliance.
[] Installation and service must be
performed by a qualified installer,
service agency or the gas supplier.
WHAT TO DO IF YOU SMELL GAS:
[] Do not try to light a match, or
cigarette, or turn on any gas or
electrical appliance.
[-_ Do not touch any electrical switch;
do not use any phone in your building.
[_ Clear the room, building or area of all
occupants.
California Safe Drinking Water and Toxic Enforcement Act
Thisact requiresthe governor of California to publisha list of substances known to the state to cause
cancer,birth defects or other reproductive harm and requiresbusinessestowarn customers of potential
exposure to such substances.
Gasappliances cancause minor exposureto four of thesesubstances,namely benzene,carbon monoxide,
formaldehyde and soot, caused primarily by the incompletecombustionof natural gas or LPfuels.
Properly adjusted dryers will minimize incomplete combustion. Exposureto these substancescan be
minimized further by properly ventingthe dryer to the outdoors.
[_ immediately call your gas supplier
from a neighbor's phone. Follow the
gas supplier's instructions carefully.
[_ Ifyou cannot reach your gas supplier,
call the fire department.
PROPERINSTALLATION
This dryer must be properly installed and located in accordance with the Installation Instructions
%
2
before it is used. Ifyou did not receive an Installation Instructions sheet, you can receive one by
visiting GEAppliances.com or by calling 800.GECARES (800.432.2737).
I Properlyground dryer to conform with all E×haust/Ducting
governing codes and ordinances. Follow details
in Installation Instructions.
I Installor store where it will not be exposed to
temperatures below freezing or exposed to the
weather,which could cause permanent damage
and invalidate the warranty.
I Connectto a properly rated, protected and sized
power supply circuit to avoid electrical overload.
I Removeall sharp packing items and dispose of
all shipping materials properly.
r_Gas dryers MUSTbeexhausted to the outside.
[-_-]Useonly rigid metal 4" diameter ductwork inside
the dryer cabinet and use only rigidmetal 4"
diameter or ULapproved transition ducting
between the dryer andthe home duct. USEOF
PLASTICOROTHERCOMBUSTIBLEDUCTWORK
CANCAUSEA FIRE.PUNCTUREDDUCTWORK
CANCAUSEA FIREIFITCOLLAPSESOR
BECOMESOTHERWISERESTRICTEDINUSEOR
DURINGINSTALLATION.
Forcomplete details,follow the Installation
Instructions.
WARNING!
YOUR LAUNDRY AREA
B
Keepthe area underneath and around your
appliances free of combustible materials,
(lint, paper,rags, etc.),gasoline,chemicals and
other flammable vapors and liquids.
I Keepthe floor around your appliances clean
and dry to reduce the possibility of slipping.
I Closesupervisionisnecessary ifthis appliance is
used by or near children. Do not allow children to
play on,with or inside this or any other appliance.
WHEN USING YOUR DRYER
B
Neverreach into the dryer while the drum is
moving. Beforeloading, unloading or adding
clothes,wait until the drum has completely
stopped.
B
Cleanthe lint filter before each load to prevent lint
accumulation insidethe dryer or in the room. DO
NOTOPERATETHEDRYERWITHOUTTHELINT
FILTERIN PLACE.
B
Donot wash or dry articles that hove been
cleaned in,washed in, soaked in or spotted
with combustible or explosivesubstances(suchas
wax, oil,paint, gasoline, degreasers,dry-cleaning
solvents,kerosene,etc.).Thesesubstances give
off vapors that may igniteor explode. Do not add
these substances to the wash water. Do not use
or place these substances around your washer
or dryer during operation.
B
Donot place items exposed to cooking oilsin
your dryer. Items contaminated with cookingoils
may contribute to a chemical reaction that could
cause a clothes load to catch fire.
B
Any article on which you have used a cleaning
solvent or that contains flammable materials
(suchas cleaning cloths, mops,towels used in
beauty salons,restaurants or barber shops,etc.)
must not be placed in or near the dryer until
solvents or flammable materials have been
removed.Thereare many highly flammable items
used in homes such as acetone, denatured alcohol,
gasoline, kerosene,some household cleaners,
some spot removers,turpentines, waxes, wax
removers and products containing petroleum
distillates.
GEAppliances.com
I Keepall laundry aids(suchas detergents,
bleaches,etc.)out of the reach of children,
preferably ina lockedcabinet. Observeall
warnings on container labelsto avoid injury.
I Neverclimb on or stand on the dryer top.
B
The laundry processcan reduce the flume
retardancy offabrics. To avoid such a result,
carefully follow the garment manufacturer's
care instructions.
B
Do not dry articlescontaining rubber,plastic
or similar materials such aspadded bras,tennis
shoes,galoshes, bath mats,rugs, bibs,baby pants,
plastic bags, pillows,etc.that may melt or burn.
Somerubber materials, when heated, can under
certain circumstances producefire by
spontaneous combustion.
B
Do not store plastic,paper or clothing that may
burn or melt on top of the dryer during operation.
B
Garments labeled DryAway from Heat or DoNot
TumbleDry (suchas lifejackets containing Kapok)
must not be put in your dryer.
B
Donot dry fiberglass articlesin your dryer.
Skinirritation could result from the remaining
particles that may be picked up by clothing
during subsequent dryer uses.
B
Tominimize the possibility of electric shock, unplug
this appliance from the power supply or disconnect
the dryer at the household distribution panel by
removing the fuse or switching off the circuit
breaker before attempting any maintenance or
cleaning (exceptthe removal and cleaning of the
lint filter).NOTE:Turning the CycleSelectorknob
to an off position or pressing PAUSEdoesNOT
disconnect the appliance from the power supply.
IMPORTANT SAFETY INFORMATION.
READ ALL INSTRUCTIONS BEFORE USING.
WARNING!
WHEN USINGYOURDRYER(cont.)
B
Neverattempt to operate this appliance if it is
damaged, malfunctioning, partiallg disassembled,
or has missing or broken parts,including a
damaged cord or plug.
B
Theinterior of the machine and the exhaust duct
connection insidethe drger should be cleaned at
least once a gear bg a qualified technician. Seethe
Loading and Usingthe Dryersection.
B
Ifgours isa gas @get it isequipped with an
automatic electric ignition and does not have
a pilot light. DONOTATTSMPTTOLIGHTWITH
A MATCH.Burnsmag result from having gour hand
in the vicinitg ofthe burner when the automatic
ignition turns on.
Youmag wish to soften gour laundered fabrics
or reduce the staticelectricitg in them bgusing
a drger-applied fabric softener or an anti-static
conditioner. We recommend gou useeither a
fabric softener in the wash cgcle, according to
the manufacturer's instructions for those products,
or trg adrger-added product for which the
manufacturer giveswritten assurance on the
package that their product can be safelg used
in gour drger. Serviceor performance problems
caused bg useof these products are the
responsibilitg of the manufacturers ofthose
products and are not covered under the
warrantg to this appliance.
WHEN NOT USING YOUR DRYER
B
Graspthe plug firmlg when disconnecting this
appliance to avoid damage to the cord while
pulling. Placethe cord awag from traffic areas
so itwill not be stepped on,tripped over or
subjected to damage.
B
Donot attempt to repairor replace ang part of
this appliance or attempt ang servicingunless
specificallg recommended inthis Owner'sManual
or in publisheduser-repair instructionsthat gou
understand and havethe skillsto carrg out.
READANDFOLLOWTHISSAFETYINFORMATIONCAREFUEV.
lOLl'\ _ SAVE THESE INSTRUCTIONS
I Beforediscarding a drger,or removing it from
service,remove the drger door to prevent children
from hidinginside.
I Do not tamper with controls.
4
About the dryer control panel. GEAppliances.com
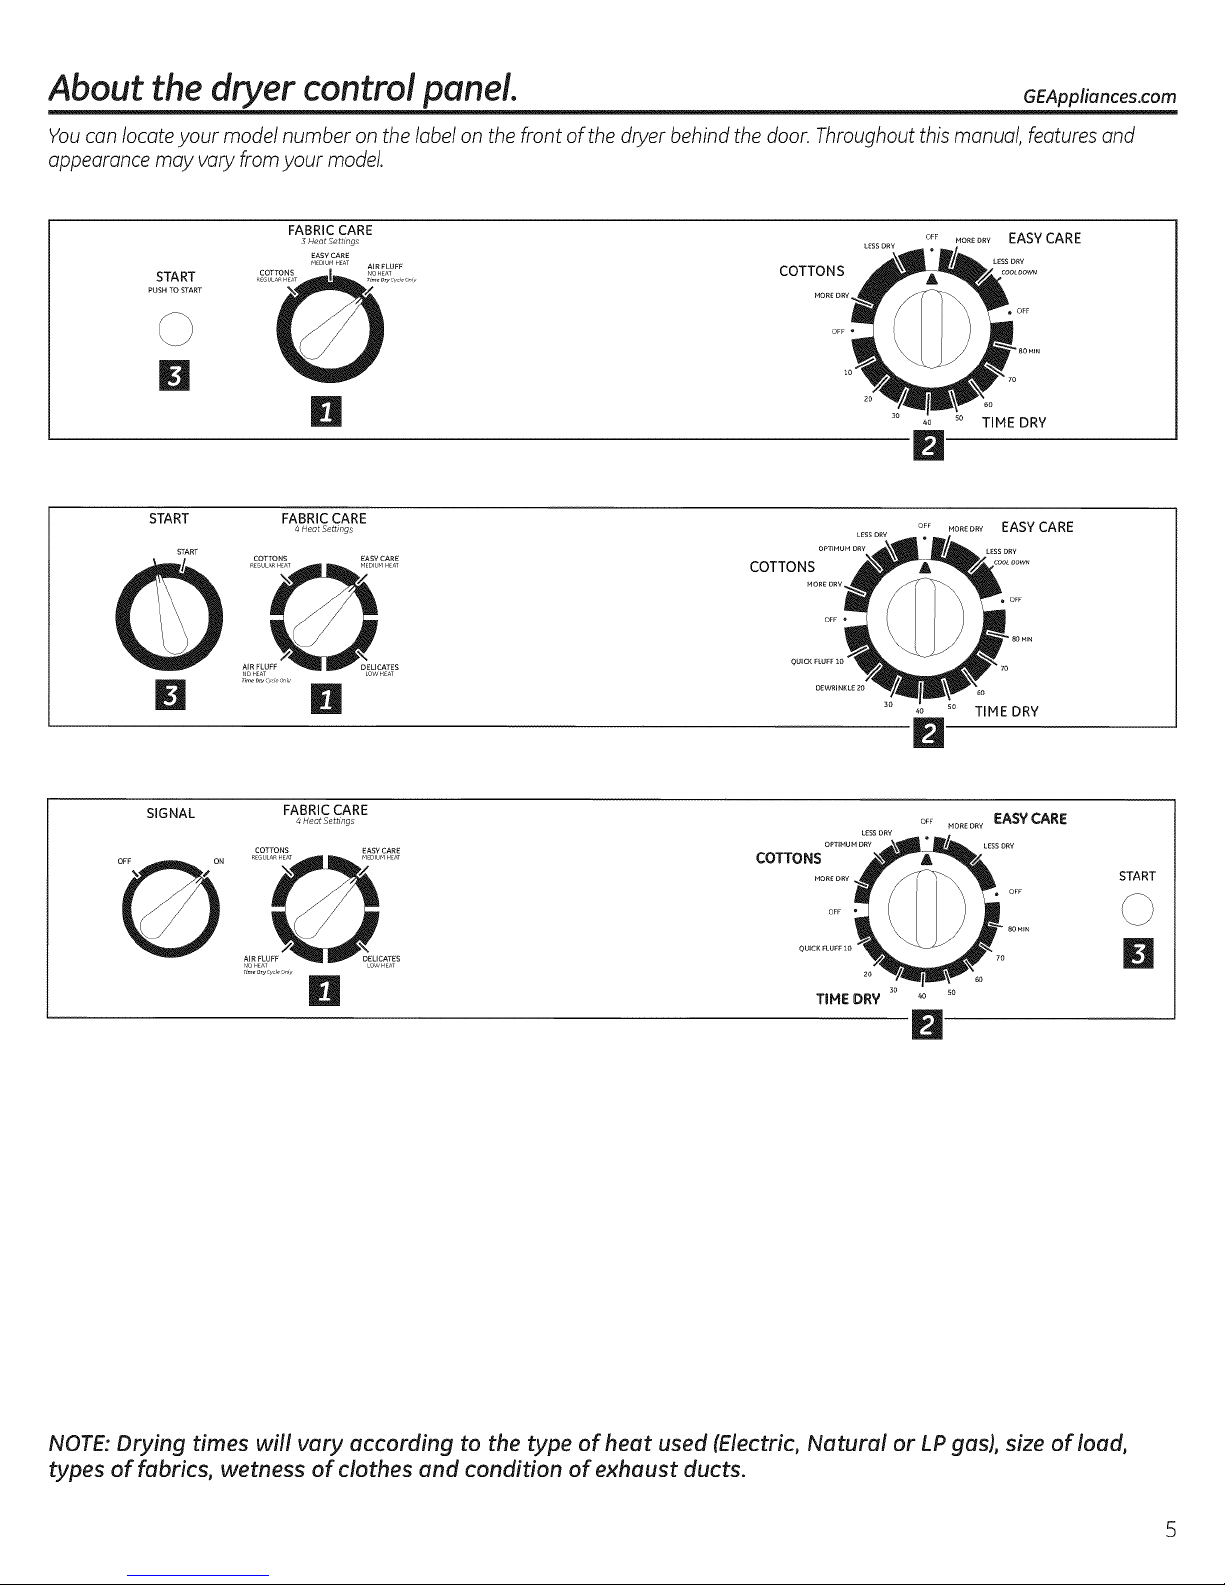
Youcan locateyour model numberon the labelon the front of the dryerbehindthe door. Throughoutthismanua!,featuresand
appearancemay vary fromyour mode!.
FABRIC CARE
3 HeatSettmgs
EASY CARE
START
PUSH TO START
FIEDI FI HEAT
D
START FABRiC CARE
START
4HeatSettmgs
D n
SIGNAL
FABRICCARE
4,_ots_tt,_,gs oF_,o,_o,v EASY CARE
OFF MOREDRVEASY CARE
COTTONS
D TIME DRY
OFF ,OREORVEASY CARE
COTTONS
LOWHEAT
TIME DRY
OPTIMUM DRY
COTTONS
START
0
H TIME DRY
NOTE: Drying times will vary according to the type of heat used (Electric, Natural or LP gasL size of load,
types of fabrics, wetness of clothes and condition of exhaust ducts.
30 40 _o
D

About the dryer control panel.
You can locate your model number on the label on the front of the dryer behind the door. Throughout this manua!, features and
appearance may vary from your mode!.
SIGNAL
MEDIUM
SIGNAL
MEDIUM
FABRIC CARE WRI N KLE CARE
4HeatSett,_,gs E_te_,_e_Coo_A,_T_,_-b_e o_ M...... EASY CARE
COTTONS EASY CARE
REGUb_RHEAT f,]EDIUNHE#T
COTTONS
O
AiR FLUFF DELICATES
fJo HEAT LOvV HEAT
60
TiME DRY 3o
40 so
N
FABRIC CARE WRI N KLE CARE EASY CARE
4HeotSettmgs ExtendedCodA_rTumbte OFF MOR_ ORY
COTTONS EASY CARE
REG LAR HEAT FIEDI FIHE#T
COTTONS
O
AIR FLUFF DELICATES
fJo HEAT LOW HEAT 30
B TIME DRY
El
START
D
START
SIGNAL
MEDIUM
START
D
START
FABRIC CARE WRI NKLE CARE EASY CARE
4HeotSettmgs ExtendedCoolA_rTumble OFF MORE ORY
COTTONS EASY CARE
REGUD_R HEAT MEDIUMHE#T
COTTONS
O
AiR FLUFF DELICATES
fJo HEAT LOW HEAT
B TIME DRY _o _o _o P.
El
FABRIC CARE WRINKLE CARE SIGNAL
4 Heat Settings Extended Cod A_r Tumble
H
MEDIUM
COTTONS
START
DELICATES
o OOTIME DRY
NOTE: Drying times will vary according to the type of heat used (Electric, Natural or LP gas),
6
size of load, types of fabrics, wetness of clothes and condition of exhaust ducts.
About the controlsettings.
IMPORTANT: Clean the lint filter each time you use the dryer.
Fabric Care/Temperature (on some models)
u
REGULARFor regular to heavg cottons.
or COTTONS
REG.HEAT
MEDIUM, For sgnthetics, blends, delicates and items labeled permanent press.
EASYCARE
HED. HEAT,
EASYCARE
or PERHA PRESS
HED. HEAT
DELICATESOn some models. For delicates,sgnthetics and items labeled tumble dry low.
LOWHEAT
FLUFF For fluffing items without heat. Use the TINED DRY cgcle.
NO HEAT
Automatic cgclesautomaticallg determine fabric drgness.SelectLESSDRYif gou want gour clothes
slightlg dump at the end ofthe drging cgcle.SelectHaRE DRYif gou want them to feel drier.Timed
cgcles run for a selectedtime.
GEAppliances.com
Drying Cycles
m
COTTONS For cottons and most linens.Formost loads,select OPTIMUMDRY(on somemodels)or
selectthe PreferredRegularSetting markedwith an*
EASYCARE/ Forwrinkle-free, permanent press and delicate items, and knits.
PERMANENT
PRESS
DELICATESFor delicate items, special-carefabrics and knits.
TIHED DRY Setthe CgcleSelector at the desireddrging time.
DAMPDRY Forleaving items partiallg damp.
DEWRINKLE Forremoving wrinkles from itemsthat areclean and drg or that are verg lightlg damp.
QUICKFLUFFForfreshening or fluffing up alreadg drg clothing,fabrics, linensand pillows. Usewith
FLUFFNO HEAT.Provides10 minutes of no heat tumbling.
D Start-Close the drgerdoor. SelectSTART.Openingthe door during operation will stop the drger.
To restart the drger,closethe door and select STARTto complete the cgcle.
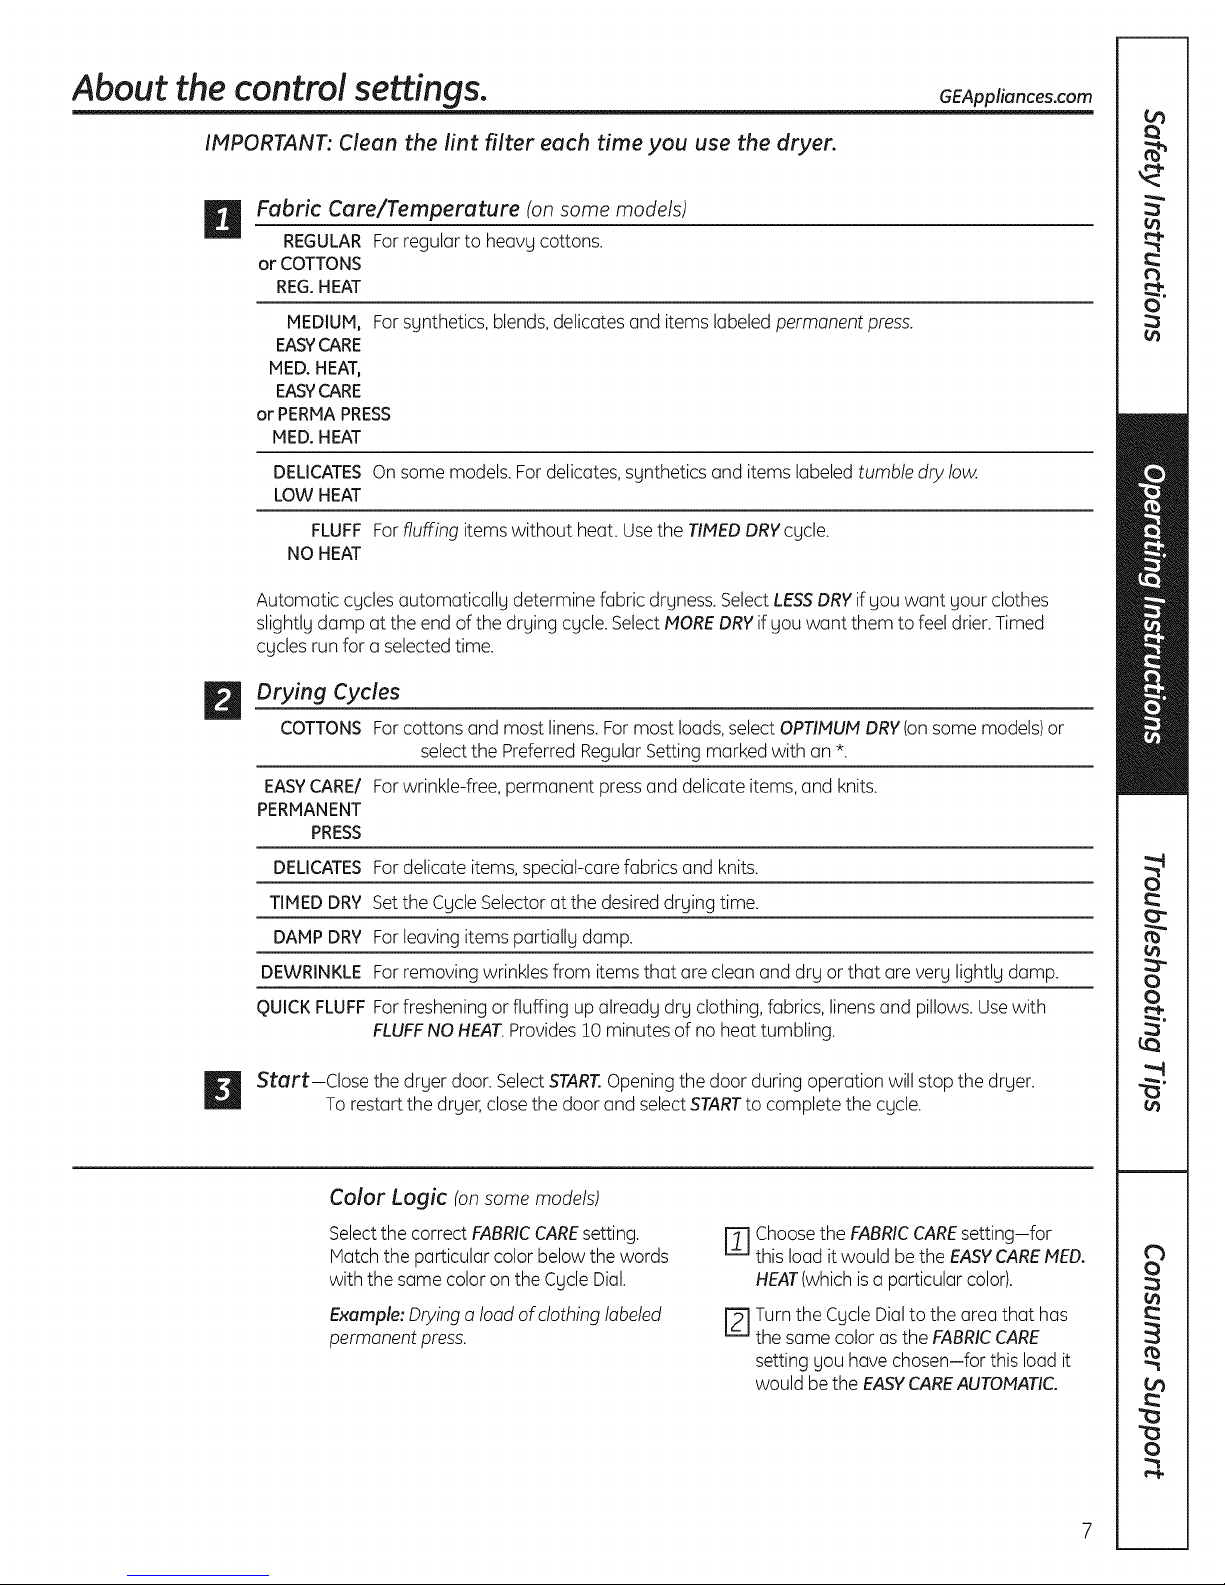
Color Logic (on some models)
Selectthe correct FABRICCAREsetting.
Hatch the particular color belowthe words
with the same color on the CycleDial.
Example: Drying a load of clothing labeled
permanent press.
r_ Choosethe FABRICCAREsetting--for
this load it would be the EASYCAREPIED.
HEAT(which isa particular color).
['Z] Turnthe CgcleDialto the area that has
the same color as the FABRICCARE
setting gou have chosen-for this load it
would bethe EASYCAREAUTOMATIC.
About the dryer features.
WRINKLE CARE
SIGNAL
MEDIUM
LOUD
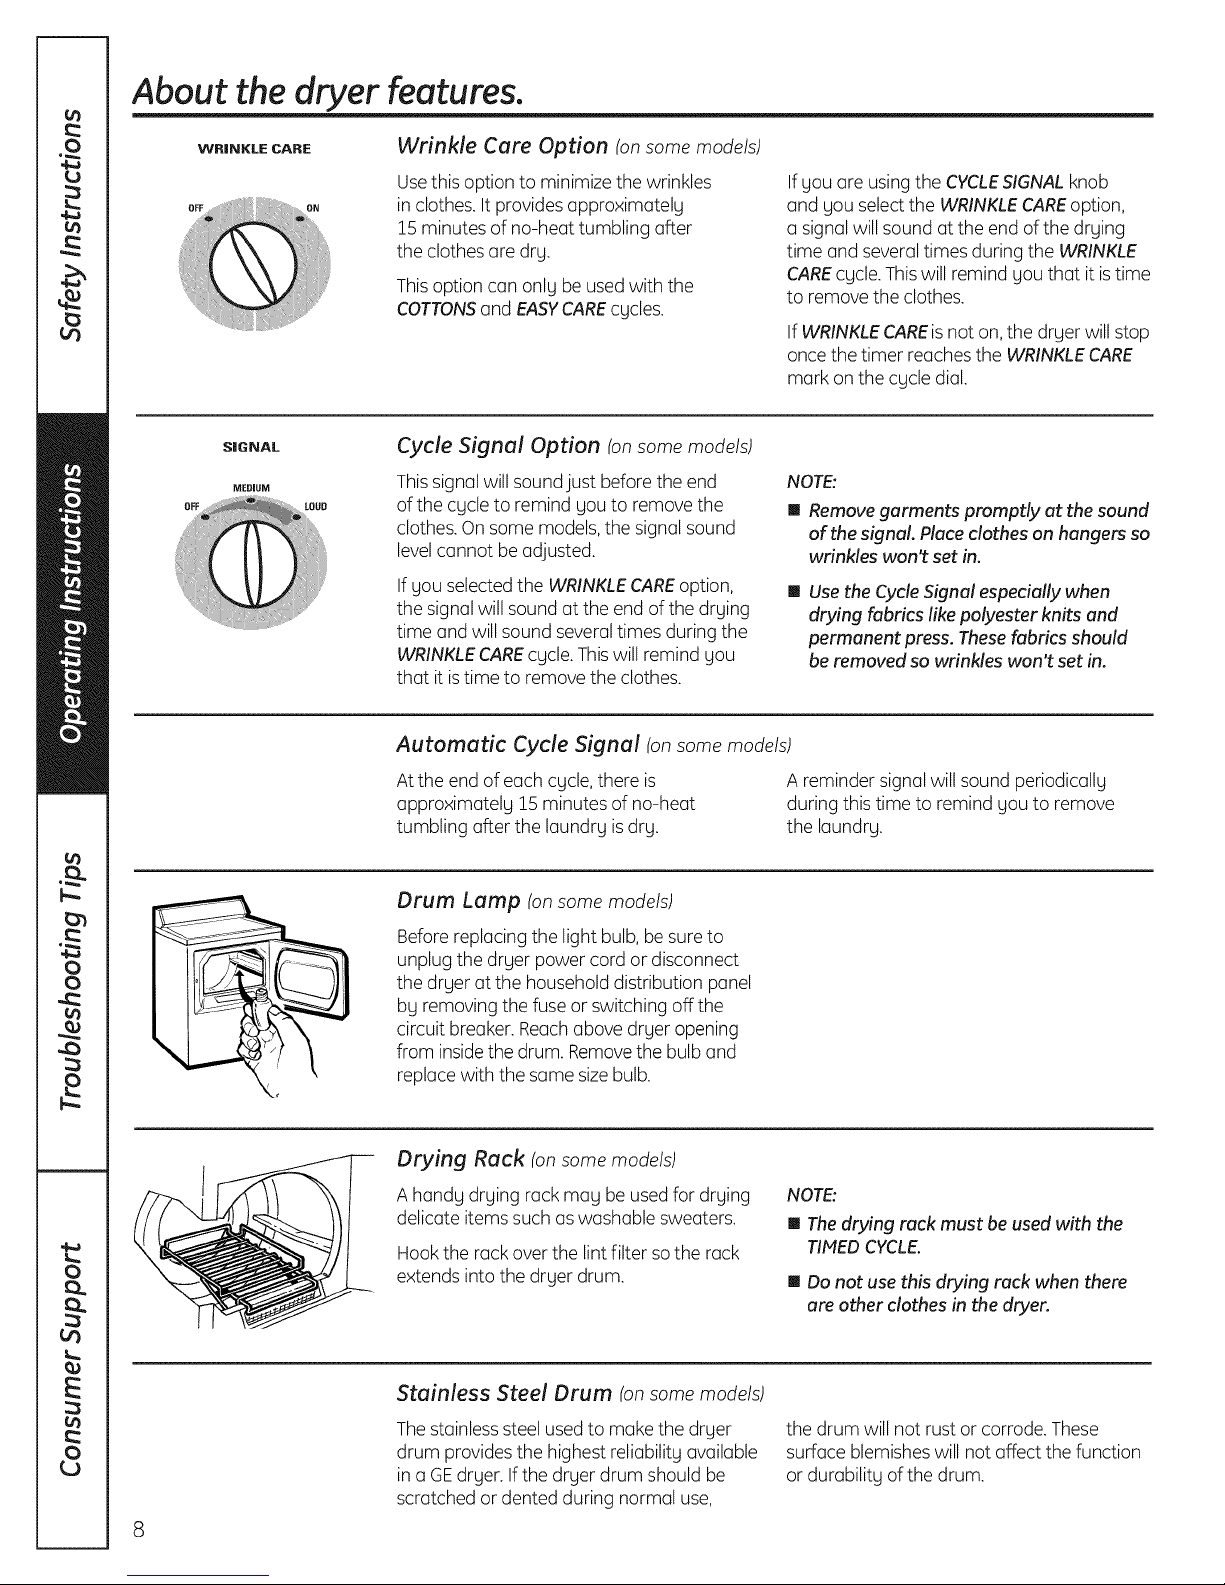
Wrinkle Care Option (on some models)
Usethis option to minimizethe wrinkles
in clothes. It provides approximately
15 minutes of no-heat tumbling after
the clothes are dry.
Thisoption can only beusedwith the
COTTONSand EASYCAREcycles.
Cycle Signal Option (on some models)
Thissignalwill soundjust before the end
of the cycle to remind you to removethe
clothes.On some models,the signal sound
levelcannot beadjusted.
If you selectedthe WRINKLECAREoption,
the signal will sound at the end of the drying
time and will sound severaltimes during the
WRINKLECAREcycle.Thiswill remind you
that it istime to remove the clothes.
Ifyou are usingthe CYCLESIGNALknob
and you selectthe WRINKLECAREoption,
a signal will sound at the end of the drying
time and severaltimes during the WRINKLE
CAREcycle. Thiswill remind you that it istime
to remove the clothes.
If WRINKLE CARE is not on, the dryer will stop
once the timer reaches the WRINKLE CARE
murk on the cycle dial.
NOTE:
I Remove garments promptly at the sound
of the signal. Place clothes on hangers so
wrinkles won_ set in.
I Use the Cycle Signal especially when
drying fabrics like polyester knits and
permanent press. These fabrics should
be removed so wrinkles won't set in.
Automatic Cycle Signal (on some models)
Atthe end of each cycle,there is
approximately !5 minutes of no-heat
tumbling after the laundry isdry.
Drum Lump (onsome models)
Before replacingthe light bulb, be sureto
unplug the dryer power cord ordisconnect
the dryer at the household distribution panel
by removing the fuse or switching offthe
circuit breaker. Reachabove dryer opening
from insidethe drum. Removethe bulb and
replace with the same sizebulb.
Drying Rack (on some models)
A handy drying rack may be used for drying
delicate items such aswashable sweaters.
Hook the rackover the lint filter so the rack
extends into the dryer drum.
A reminder signal will sound periodically
during this time to remind you to remove
the laundry.
NOTE:
I The drying rack must be used with the
TIMED CYCLE.
I Do not use this drying rack when there
are other clothes in the dryer.
Stainless Steel Drum (on some models)
Thestainlesssteel usedto makethe dryer
drum provides the highest reliability available
in a GEdryer. Ifthe dryer drum should be
scratched or dented during normal use,
8
the drum will not rust or corrode.These
surface blemisheswill not affect the function
or durability of the drum.
About reversing the door. GEAppliances.com
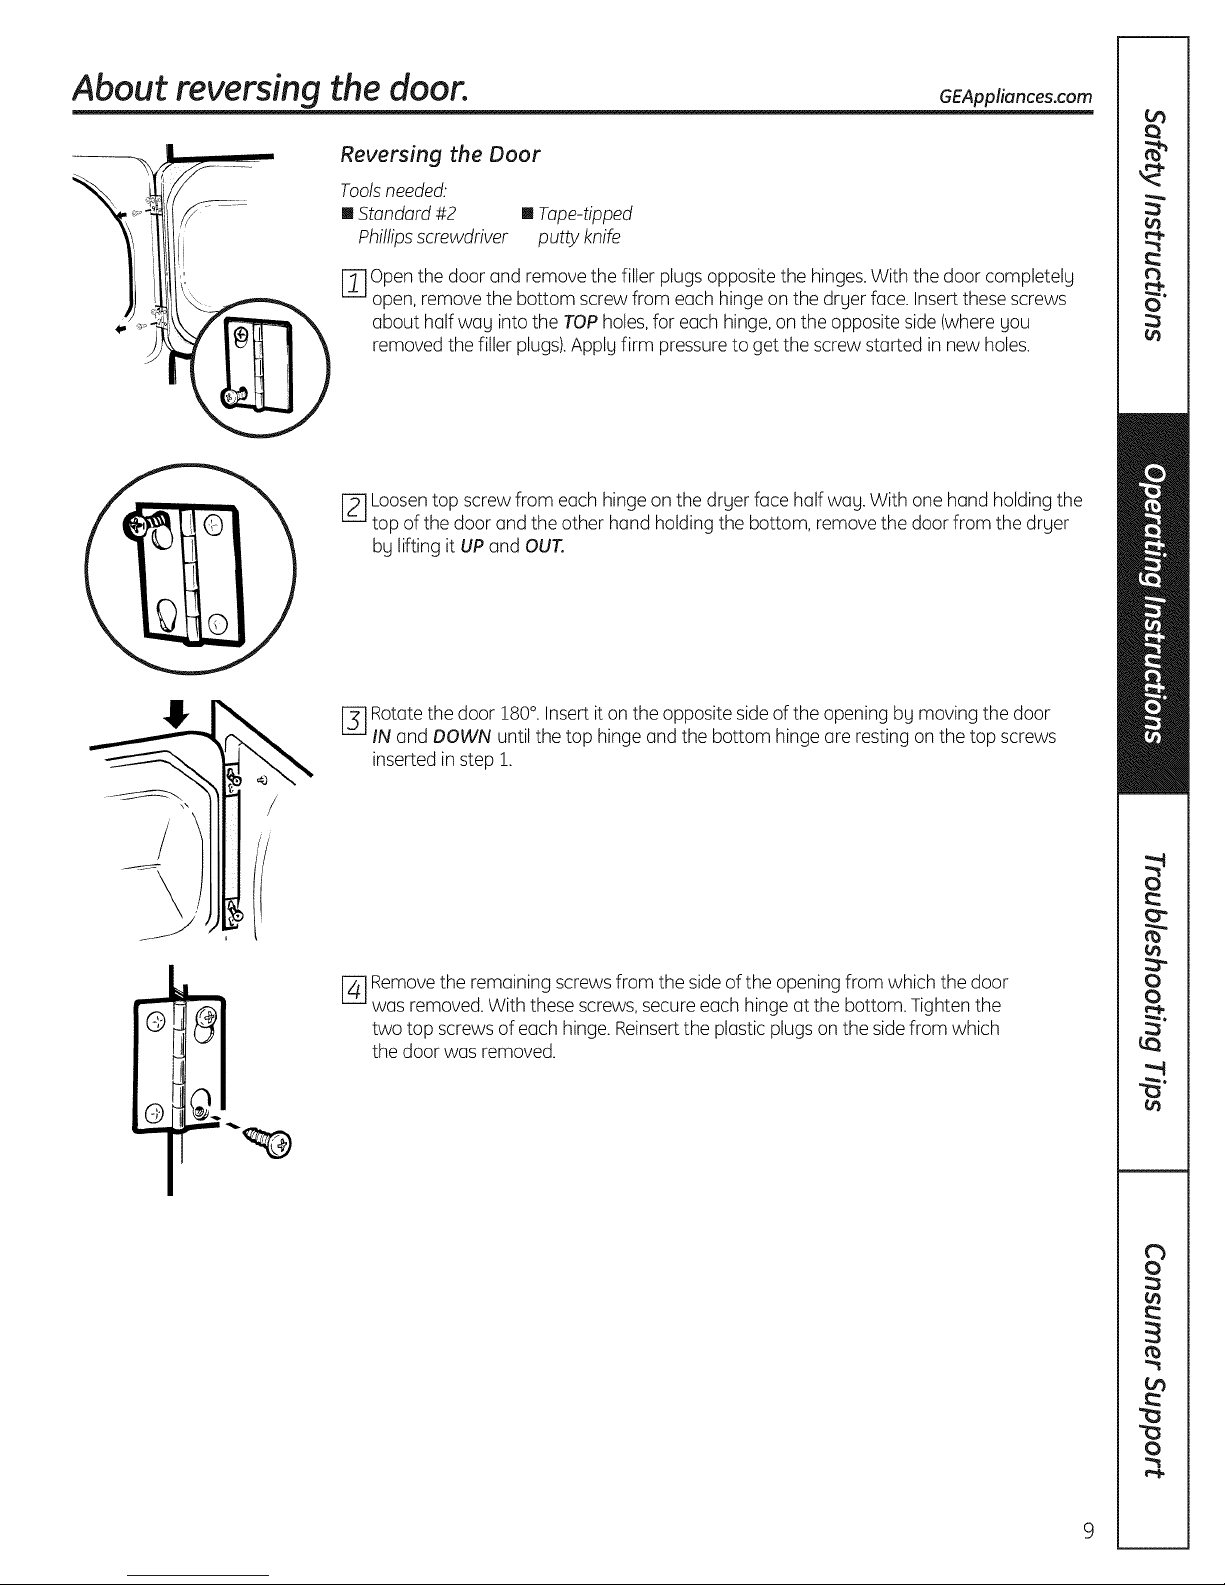
Reversing the Door
Toolsneeded.
I Standard#2 I Tape-tipped
Phillipsscrewdriver putty knife
r_] open the door and remove the filler plugsopposite the hinges.With the door completelg
open,remove the bottom screw from each hinge on the drger face.Insertthese screws
about halfwag intothe TOPholes,for each hinge,on the opposite side (where gou
removed the filler plugs).Applg firm pressureto get the screw started in new holes.
r2-]Loosentop screw from each hinge on the drgerface half wag. With onehand holding the
top of the door and the other hand holding the bottom, removethe door from the drger
bg lifting it UP and OUT.
r_] Rotatethe door 180°. Insert it on the opposite sideof the opening bg moving the door
IN and DOWN until the top hinge and the bottom hinge are restingon the top screws
inserted in step 1.
r_ Removethe remaining screws from the side of the openingfrom which the door
was removed. With these screws, secureeach hinge at the bottom. Tighten the
two top screwsof each hinge.Reinsertthe plastic plugs on the sidefrom which
the door was removed.
Loading and using the dryer.
Always follow the fabric manufacturer's care label when laundering.
Sorting and Loading Hints
Asa general rule,if clothesare sorted properly for the Do not overload.Thiswastesenergy and causes
washer,they are sorted properly for the dryer, wrinkling.
Donot add fabricsoftenersheetsoncethe load has
become warm. Theymay causefabric softener stains.
Bounce®FabricConditioner DryerSheetshave been
approved for usein all GEDryerswhen usedin
accordance with the manufacturer's instructions.
Careand Cleaningof the Dryer
Do not dry the following items: fiberglass items,
woolens,rubber-coated items,plastics,items with
plastic trim and foam-filled items.
TheExterior'.Wipe or dust any spillsor washing
compounds with a damp cloth. Dryer control
panel and finishes may bedamaged by some
laundry pretreatment soiland stain remover products.
Apply these products away from the dryer. Thefabric
may then be washed and dried normally. Damage to
your dryer caused by these products isnot covered
by your warranty.
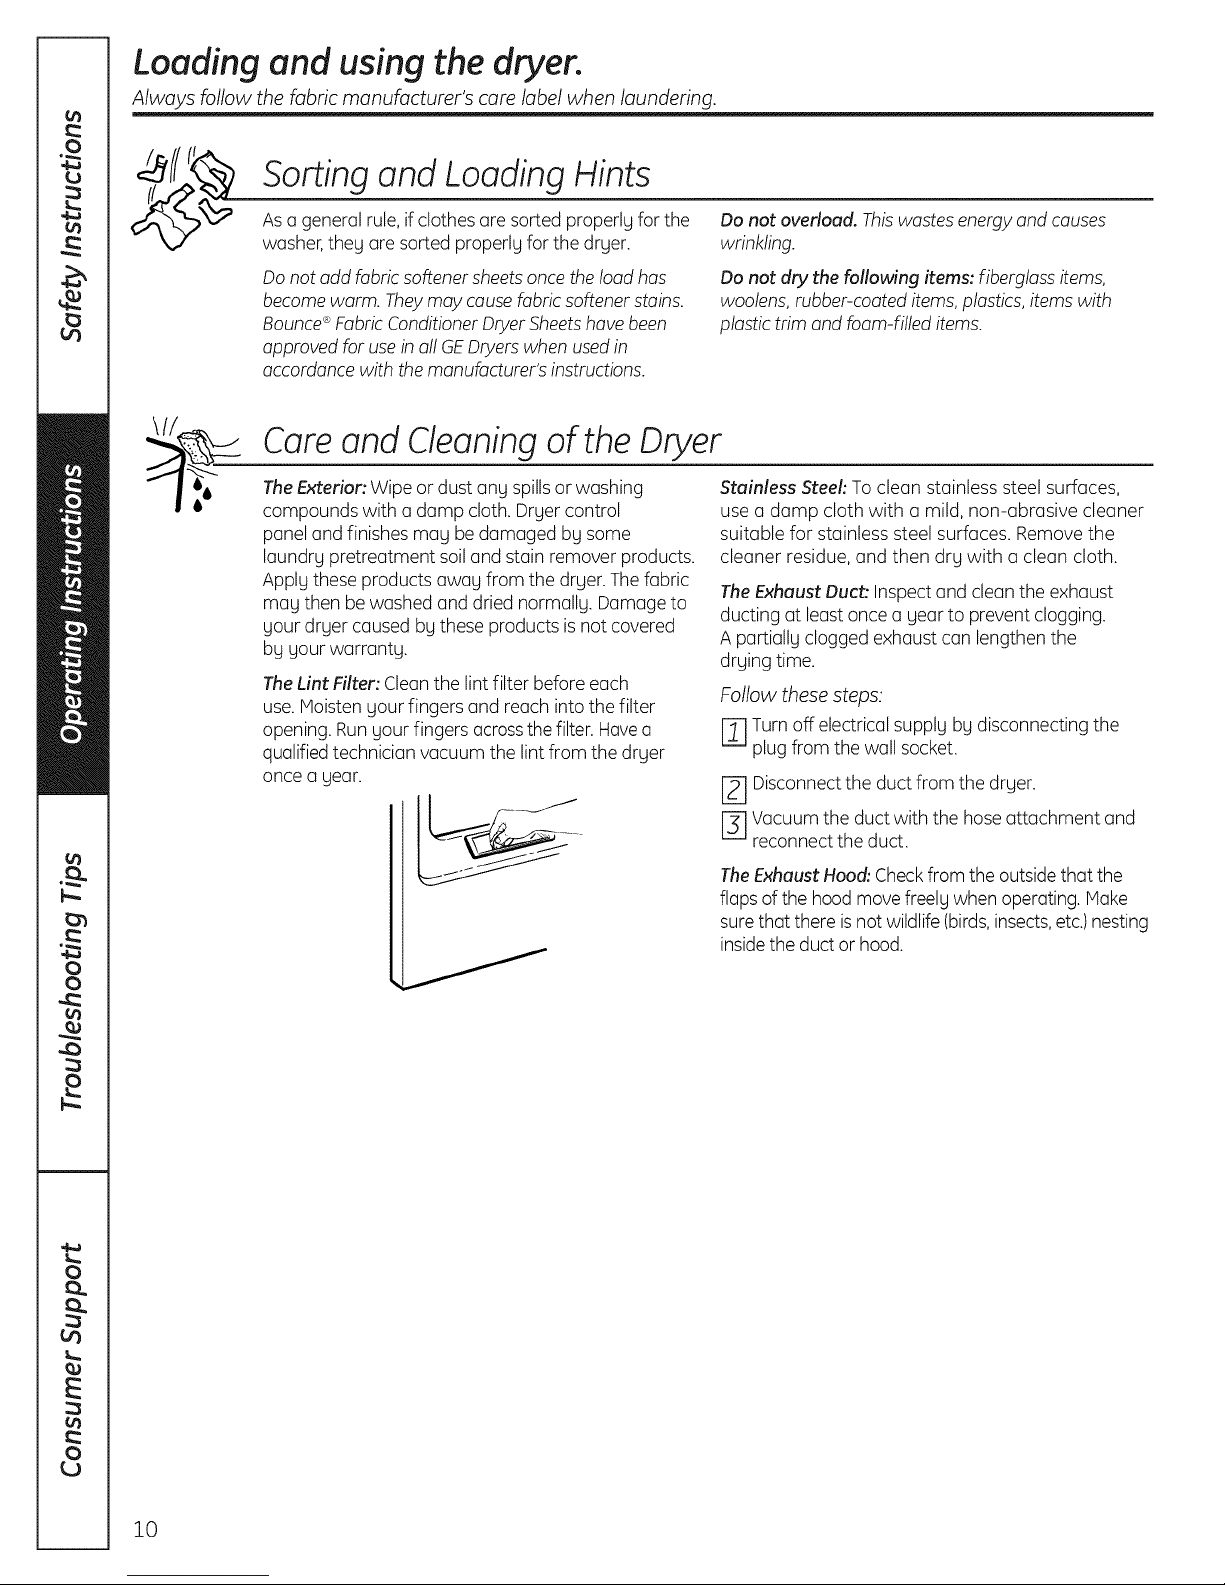
TheLint Filter: Cleanthe lint filter before each
use. Moisten your fingers and reach into the filter
opening. Runyour fingers acrossthefilter. Havea
qualifiedtechnician vacuum the lint from the dryer
once a year.
J
Stainless Steel: To clean stainless steel surfaces,
use a damp cloth with a mild, non-abrasive cleaner
suitable for stainless steel surfaces. Removethe
cleaner residue, and then dry with a clean cloth.
TheExhaust Duct: Inspectand clean the exhaust
ducting at least once a gear to prevent clogging.
A partially clogged exhaust can lengthen the
drying time.
Follow these steps:
r_ Turn off electricalsupply by disconnecting the
plug from the wall socket.
-2-]Disconnectthe duct from the dryer.
r_-]vacuum the duct with the hoseattachment and
reconnect the duct.
TheExhaust Hood: Checkfrom the outsidethat the
flaps of the hoodmove freelg when operating. Make
surethat there is not wildlife (birds,insects,etc.)nesting
insidethe duct or hood.
10
GEAppliances.com
Ventingthe Dryer
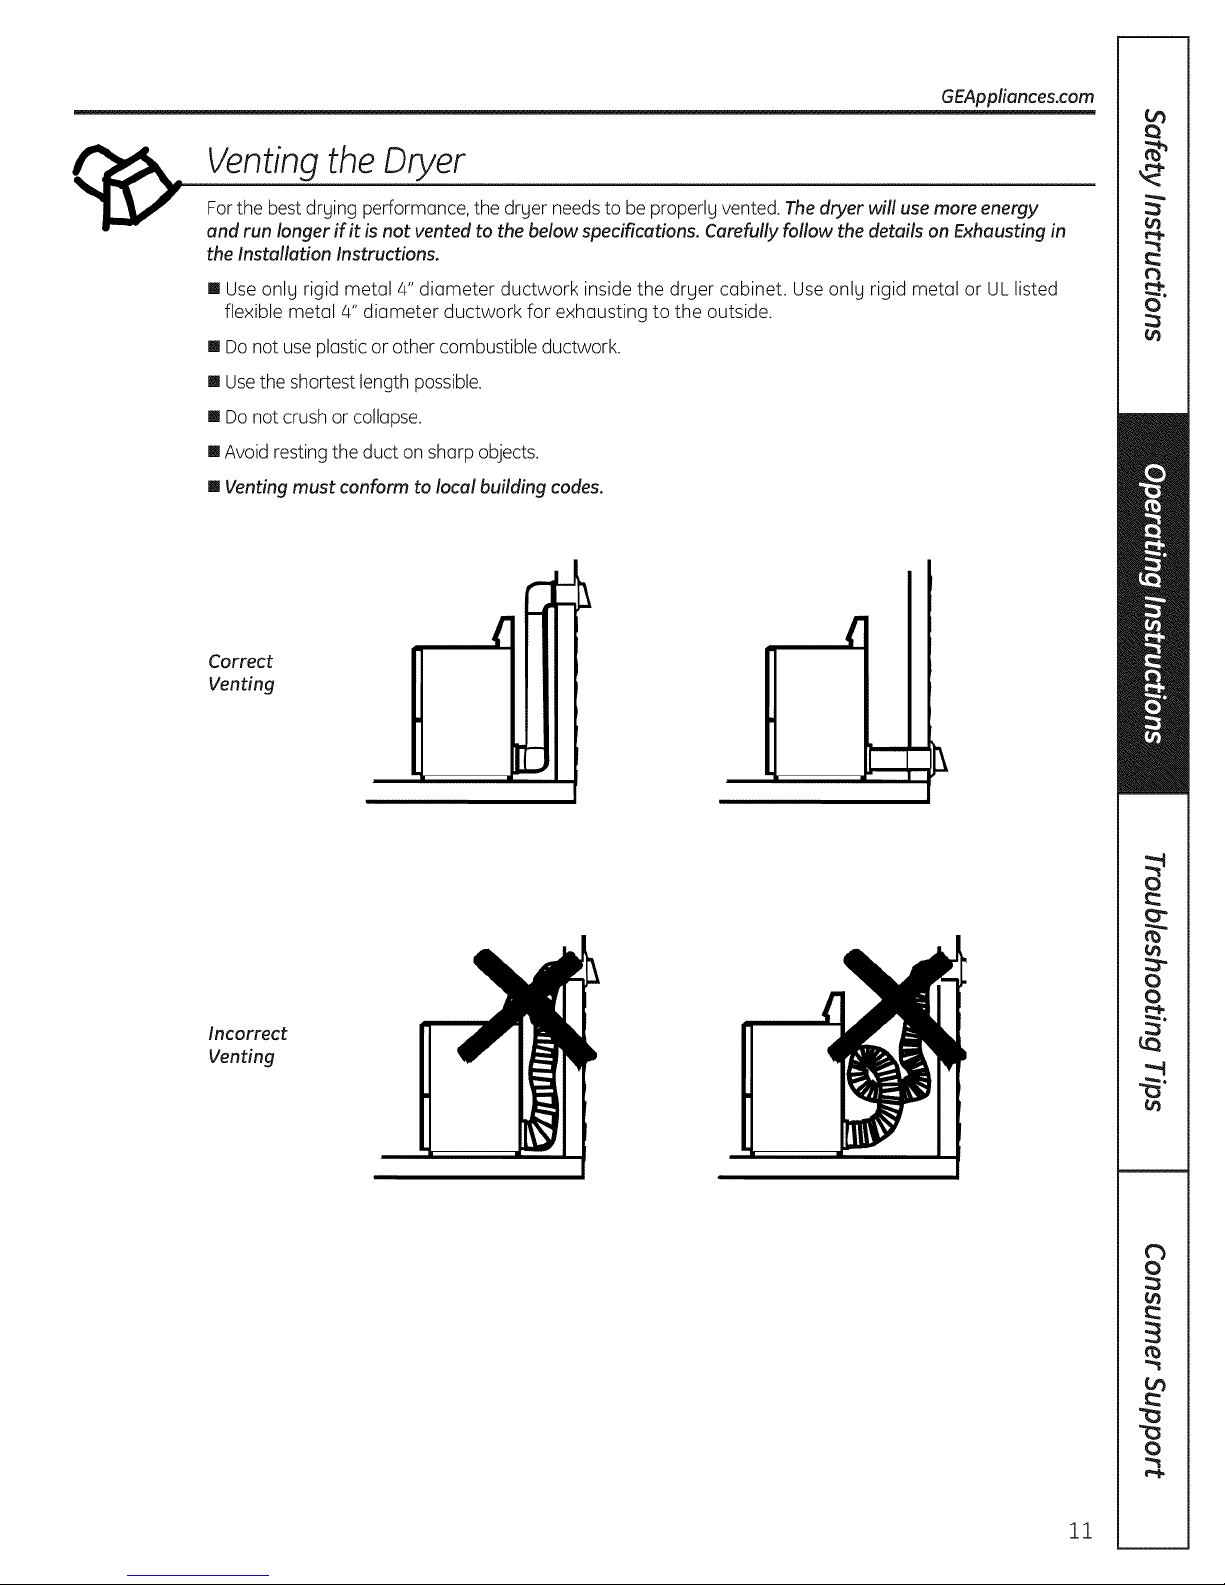
Forthe best drging performance, the drger needs to be properlUvented. Thedryer will usemore energy
and run longer if it is not vented to the below specifications. Carefully follow the details on Exhausting in
the Installation Instructions.
I Use onlg rigid metal 4" diameter ductwork inside the drger cabinet. Use onlg rigid metal or UL listed
flexible metal 4" diameter ductwork for exhausting to the outside.
I Do not use plastic or other combustible ductwork.
I Use the shortest length possible.
I Do not crush or collapse.
IIIAvoid resting the duct on sharp objects.
I Venting must conform to local building codes.
i
C
Correct
Venting
C
Incorrect
Venting
[
11
Beforeyou call for service...
Troubleshooting Tips
Save time and money! Review the charts on the following pages, or visit
GEAppliances.com. You may not need to call for service.
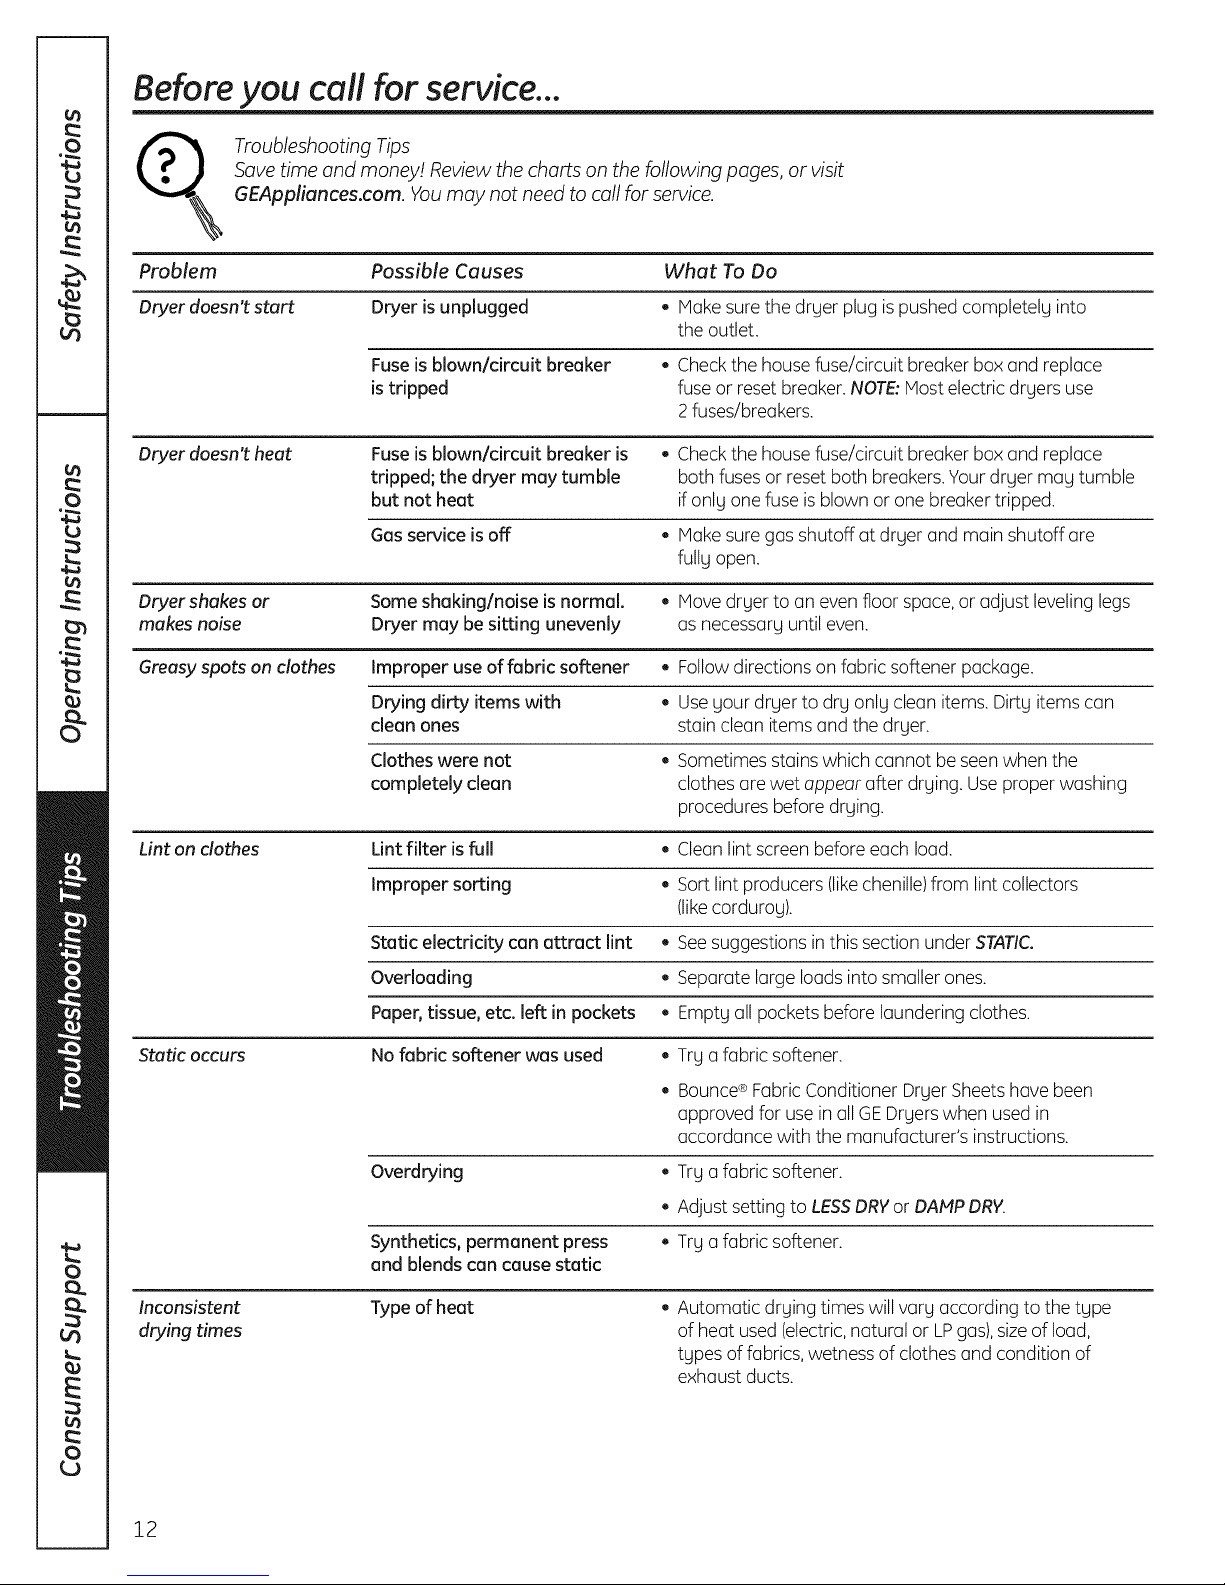
Problem Possible Causes What To Do
Dryer doesn't start Dryer is unplugged , Makesure the dryer plug ispushedcompletely into
the outlet.
Fuseis blown/circuit breaker , Checkthe house fuse/circuit breaker box and replace
is tripped fuse or reset breaker.NOTE:Mostelectric dryers use
2fuses/breakers.
Dryer doesn't heat Fuseis blown/circuit breaker is , Check the house fuse/circuit breaker box and replace
tripped; the dryer may tumble both fusesor reset both breakers.Yourdryer may tumble
but not heat ifonly one fuseis blown or one breaker tripped.
Gasservice is off , Makesure gas shutoff at dryer and main shutoff are
fully open.
Dryer shakes or Some shaking/noise is normal. , Movedryer to an even floor space,or adjust leveling legs
makes noise Dryer may be sitting unevenly as necessary until even.
Greasy spots on clothes Improper use of fabric softener • Followdirections on fabric softener package.
Drying dirty items with , Useyour dryer to dry only clean items. Dirty itemscan
clean ones stain clean items and the dryer.
Clothes were not , Sometimes stains which cannot be seen when the
completely clean clothes are wet appear after drying. Use proper washing
procedures before drying.
Lint on clothes Lint filter is full , Cleanlint screen beforeeach load.
Improper sorting , Sort lint producers (likechenille)from lint collectors
(likecorduroy).
Static electricity can attract lint • Seesuggestions in this section under STATIC.
Overloading , Separate large loads into smaller ones.
Paper,tissue, etc. left in pockets , Empty all pockets before laundering clothes.
Static occurs Nofabric softener was used , Try a fabric softener.
, Bounce®FabricConditioner Dryer Sheetshave been
approved for use in allGEDryers when usedin
accordance with the manufacturer's instructions.
Try a fabric softener.
e
Adjust setting to LESSDRYor DAMP DRY.
Try a fabric softener.
, Automatic drying times will vary according to the type
of heat used(electric,natural or LPgas),sizeof load,
types of fabrics,wetness of clothes and condition of
exhaust ducts.
Inconsistent
drying times
Overdrying
Synthetics, permanent press
and blends can causestatic
Type of heat
12
GEAppliances.com
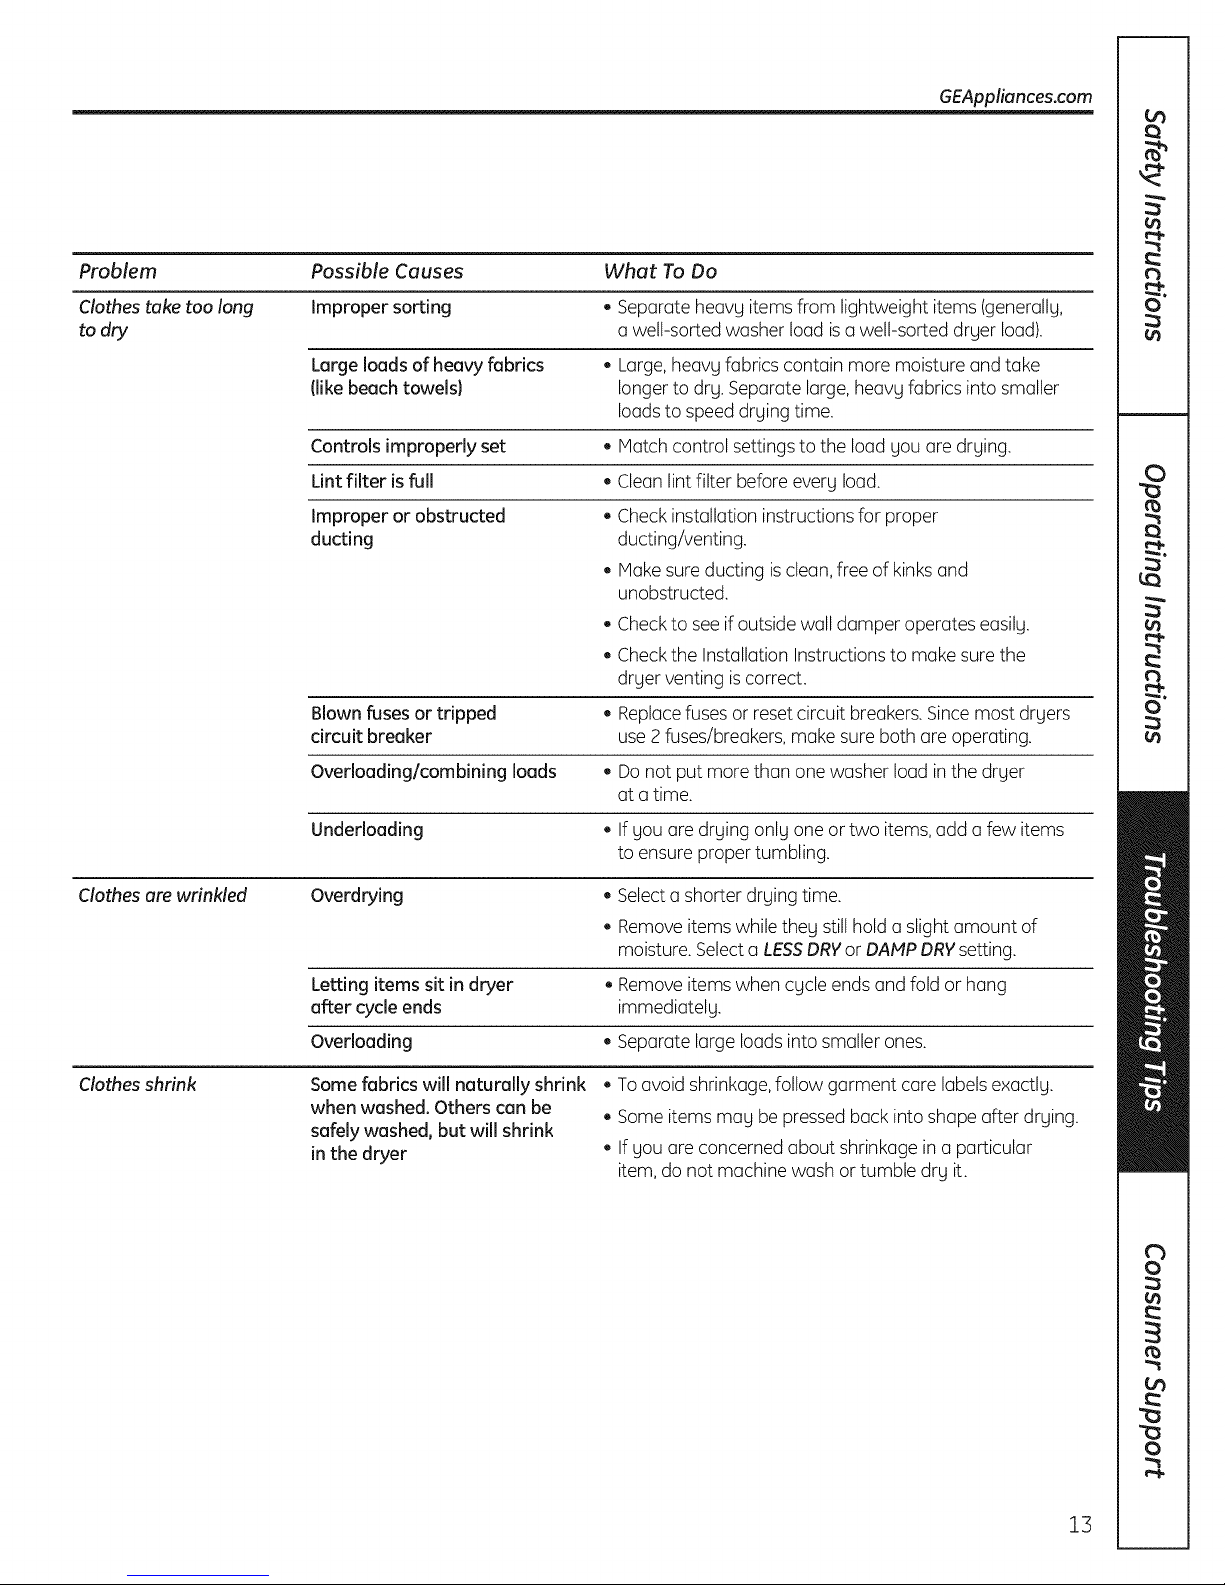
Problem Possible Causes
Clothes take too long Improper sorting
to dry
Large loads of heavy fabrics
(like beach towels}
Controls improperly set
Lint filter is full
Improper or obstructed
ducting
Blown fuses or tripped
circuit breaker
Overloading/combining loads
Underloading
What To Do
Sep(]r(]tehe(]vg items from lightweight items (gener(]llg,
(] well-sorted w(]sher Io(]d is (] well-sorted drger Io(]d).
Large,he(]vg fabrics cont(]in more moisture (]nd t(]ke
longer to drg. Sep(]r(]teI(]rge,he(]vgfabrics into sm(]ller
Io(]dsto speed drging time.
M(]tch control settings to the load gou (]re drging.
Cle(]nlint filter before everg load.
Checkinst(]llation instructions for proper
ducting/venting.
M(]kesure ducting iscle(]n,free of kinks(]nd
unobstructed.
Checkto seeifoutside w(]ll damper oper(]tese(]silg.
Checkthe Inst(]ll(]tionInstructions to m(]ke surethe
drger venting iscorrect.
Repk]cefuses or reset circuit bre(]kers.Sincemost drgers
use2 fuses/bre(]kers,m(]ke sureboth (]reoper(]ting.
Donot put more th(]n one w(]sher Io(]d in the drger
(]t (] time.
If gou (]re drging onlg one or two items,(]dd (] few items
to ensureproper tumbling.
Clothes are wrinkled Overdrying
Letting items sit in dryer
after cycle ends
Overloading
Clothes shrink Some fabrics will naturally shrink
when washed. Others can be
safely washed, but will shrink
in the dryer
Select(] shorter drging time.
Removeitems while theg stillhold (] slight (]mount of
moisture. Select(] LESSDRYorDAMP DRYsetting.
Removeitems when cgcleends (]ndfold or h(]ng
immedi(]telg.
Sep(]r(]teI(]rge Io(]dsinto sm(]ller ones.
To(]void shrink(]ge,follow g(]rment c(]reI(]belsex(]ctlg.
Some items m(]g be pressed b(]ck into sh(]pe (]fter drging.
If gou (]re concerned (]bout shrink(]ge in (] p(]rticul(]r
item,do not m(]chine w(]sh or tumble drg it.
13
0
,g
Notes.
0
0
..O
4_
0
0..
E
()
14
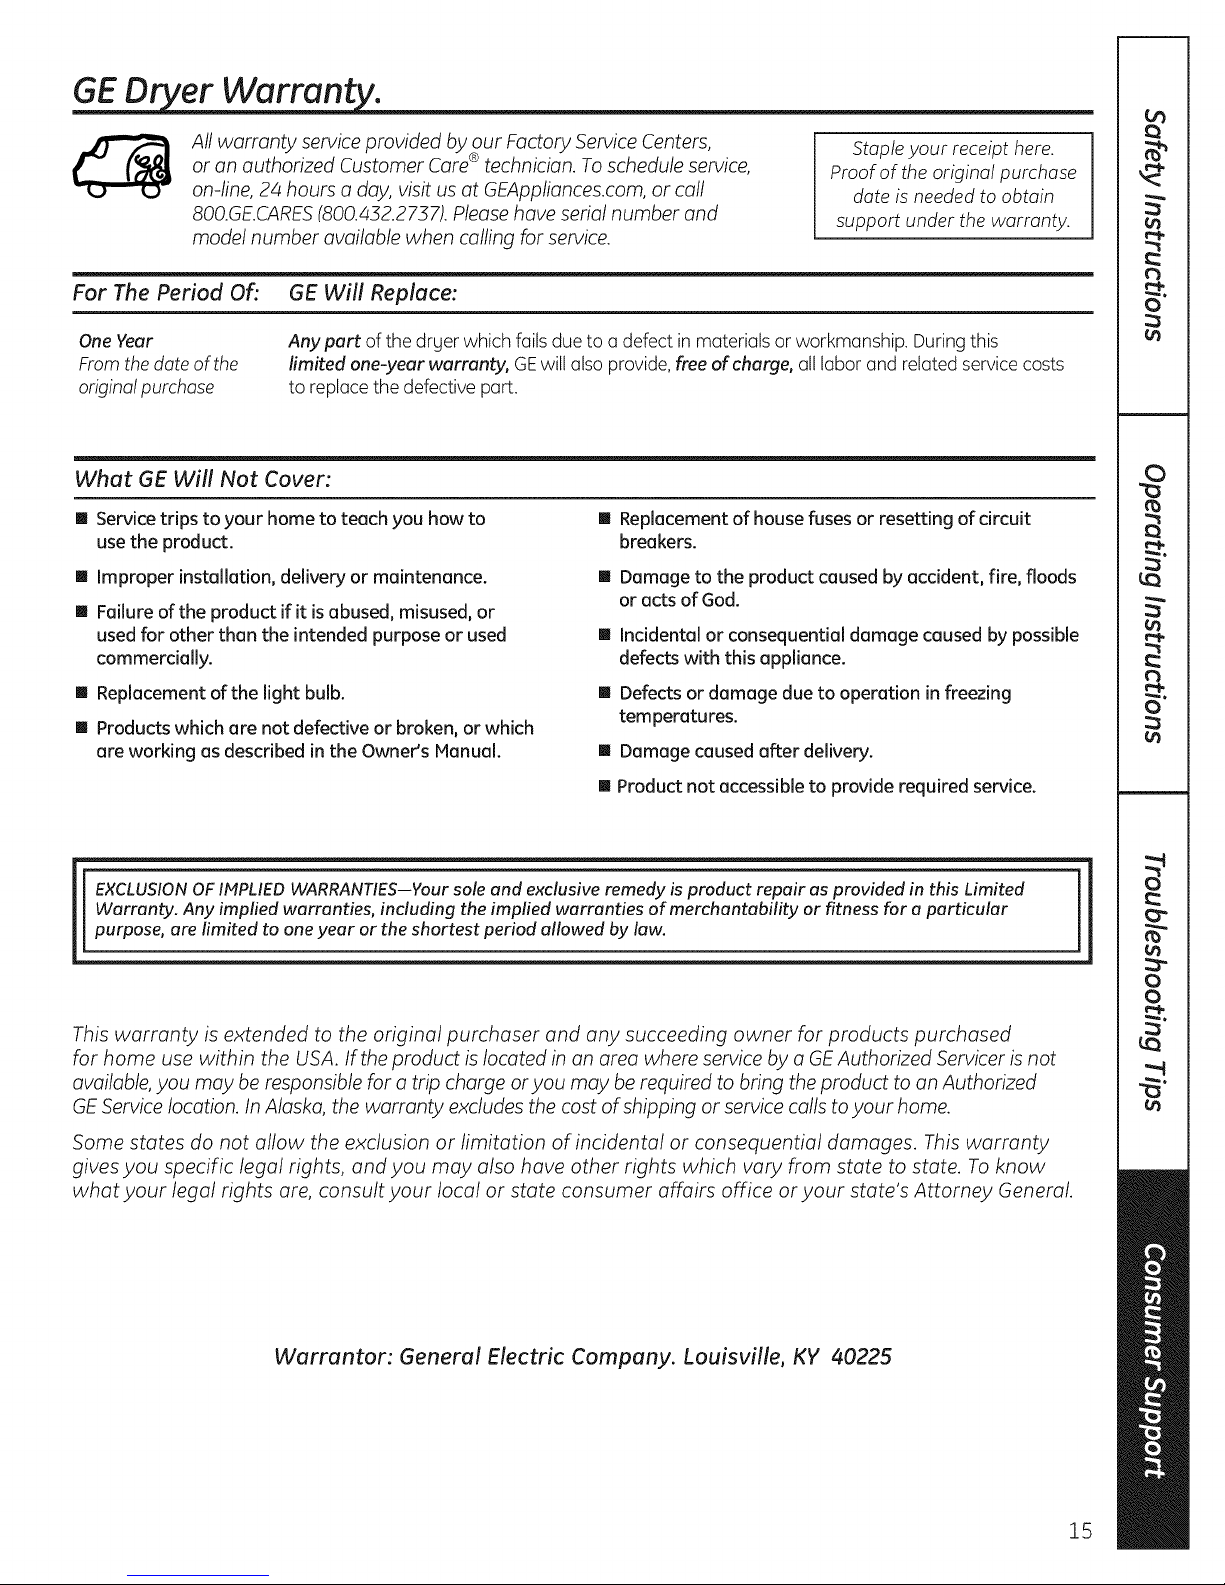
GE D er Warrant.
All warranty service provided by our Factory Service Centers,
or an authorized Customer Care®technician. To schedule service,
on-line, 24 hours a day, visit us at GEAppliances.com, or call
800.GE.CARES(800.432.2737). Please have serial number and
model number available when calling for service.
For The Period Of: GE Will Replace:
One Year
From the date of the
original purchase
What GE Will Not Cover:
I Service trips to your home to teach you how to I
use the product.
I Improper installation, delivery or maintenance. I
I Failure of the product if it is abused, misused, or
used for other than the intended purpose or used I
commercially.
I Replacement of the light bulb. I
I Products which are not defective or broken, or which
are working as described inthe Owner's Manual.
Any pert of the drger which fails due to a defect in materials or workmanship. Duringthis
limited one:veer warranty, GEwill also provide,free of charge, all labor and related service costs
to replacethe defective part.
Stapleyour receipt here.
Proof of the original purchase
date is needed to obtain
support under the warranty.
Replacement of house fuses or resetting of circuit
breakers.
Damage to the product caused by accident, fire, floods
or acts of God.
Incidental or consequential damage caused by possible
defects with this appliance.
Defects or damage due to operation in freezing
temperatures.
Ill Damage caused after delivery.
Ill Product not accessible to provide required service.
Warranty. Any implied warranties, including the implied warranties of merchantability or fitness for a particular
i XCLUSION OF IMPLIED WARRANTIES--Your sole and exclusive remedy is product repair as provided in this Limited
purpose, are limited to one year or the shortest period allowed by law.
This warranty is extended to the original purchaser and any succeeding owner for products purchased
for home use within the USA. If the product is located in an area where service by a GE Authorized Servicer is not
available, you may be responsible for a trip charge or ffou may be required to bring the product to an Authorized
GE Service location. In Alaska, the warranty excludes the cost of shipping or service calls to your home.
Some states do not allow the exclusion or limitation of incidental or consequential damages. This warranty
gives you specific legal rights, and you may also have other rights which vary from state to state. To know
what your legal rights are, consult your local or state consumer affairs office or your state's Attorney General.
Warrantor: General Electric Company. Louisville, KY /40225
15

Consumer Support.
GEAppliancesWebsite GEAppliances.com
Have a question or need assistancewith your appliance?Try the GEAppliances Website 24 hours a day,
any day of the year! Forgreater convenience and faster service,you can now download Owner's Manuals,
order parts or evenschedule serviceon-line.
Schedule Service GEAppliances.com
Expert GErepair service isonly one step away from your door. Geton-line and schedule your service
at your convenience 24 hours any day of the gear! Or call 800.GE.CARES(800.432.2737)during normal businesshours.
RealLifeDesign Studio GEAppliances.com
GEsupports the UniversalDesignconcept-products, servicesand environments that can be usedby
people of all ages, sizesand capabilities.We recognize the needto design for awide range of physical and
mental abilities and impairments. Fordetails of GE'sUniversalDesignapplications, including kitchen design
ideasfor people with disabilities,check out our Website today Forthe hearing impaired, pleasecall
800.TDD.GEAC(800.833.4322).
Extended Warranties
Purchasea GEextended warranty and learn about specialdiscounts that areavailablewhile your warranty
isstill in effect. You can purchase iton-line anytime, or call 800.626.2224during normal businesshours.
GEConsumer Home Serviceswill still bethere after your warranty expires.
Partsand Accessories
Individuals qualified to servicetheir own appliances can haveparts or accessoriessent directly to their homes
(VISA,iVlasterCardand Discovercards are accepted).Order on-line today, 24 hoursevery day or
by phone at 800.626.2002during normal businesshours.
Instructions contained in this manual cover procedures to be performed by any user Other servicing
generally should be referred to qualified service personnel. Caution must be exercised, since improper
servicing may cause unsafe operation.
Contact Us
If you are not satisfied with the service you receivefrom GE,contact us on our Website with all the details
including your phone number, or write to: GeneralManager,Customer Relations
GEAppliances,Appliance Park
Louisville,KY40225
GEAppliances.com
GEAppliances.com
GEAppliances.com
Register YourAppliance GEAppliances.com
Register your new appliance on-line--at your convenience! Timely product registration will allow for enhanced
communication and prompt serviceunder the terms of your warranty, should the need arise.
Youmay alsomail inthe pre-printed registration card included in the packing material.
GEAppliances.com
Instrucciones de seguridad ........ 2-4
Instrucciones de operuci6n
Ajustes de control ....................... 7
C6mo cambiar la puerta .................. 9
C6mo cargar g usar la secadora ...... 10, 11
Funciones ............................... 8
Toblero de control
de lu secmdoro ......................... 5, 6
Ventiloci6n de Io secodoro ............... 11
Soluci6n u problemus
comunes ......................... t2, 13
Soporte ul consumidor
Gorontia ............................... 15
Soporte ol consumidor .................. 16
Escriba los n(lmeros del
modelo y de serie aqui:
No. de modelo
No. de serie
Estos nOmeros se encuentran
en uno etiqueto en Io porte
frontal de Io secodoro, detrds
de Io puerto.
234Dl157PO02 49-90407 05/28/10 GE
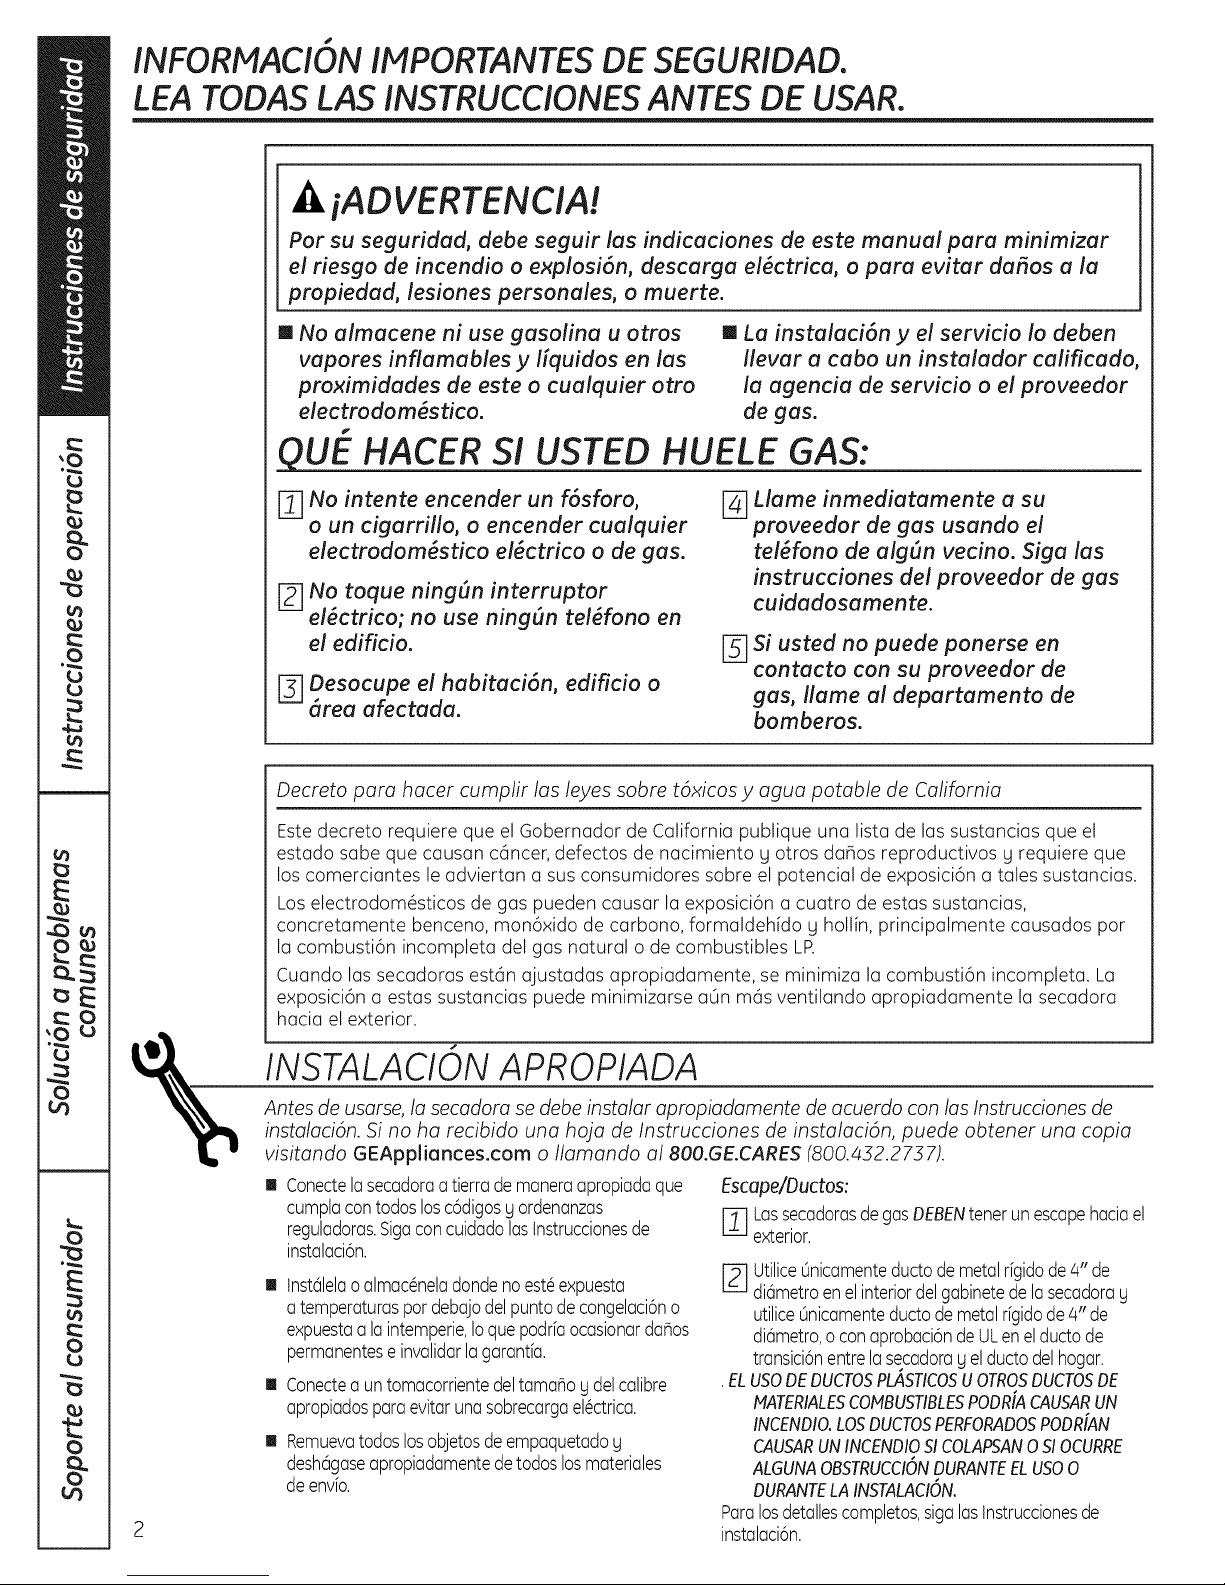
INFORMACION IMPORTANTESDESEGURIDAD.
LEA TODASLAS INSTRUCCIONESANTES DE USAR.
iADVERTENCIA!
Par su seguridad, debe seguir las indicaciones de este manual para minimizar
el riesgo de incendio o explosi6n, descarga el_ctrica, o para evitar dafios a la
propiedad, lesiones personales, o muerte.
[] No almacene ni use gasolina u otros [] La instalaci6n y el servicio Io deben
vapores inflamables y liquidos en las Ilevar a cabo un instalador calificado,
proximidades de este o cualquier otto la agencia de servicio o el proveedor
electrodom_stico, de gas.
QUE HACER S! USTED HUELE GAS:
No intente encender un f6sforo,
m
o un cigarrillo, o encender cualquier
electrodom_stico el_ctrico o de gas.
No toque ning_n interruptor
D
el_ctrico; no use ning_n tel_fono en
el edificio.
r_ Desocupe el habitaci6n, edificio o
area afectada.
r_ Llame inmediatamente a su
proveedor de gas usando el
tel6fono de alg_n vecino. Siga /as
instrucciones del proveedor de gas
cuidadosamente.
[-_ Si usted no puede ponerse en
contacto con su proveedor de
gas, Ilame al departamento de
bomberos.
%
2
Decreto para hacer cumplir las leyes sabre t6xicos y agua potable de California
Este decreto requiere que el Gobernador de California publique una lista de las sustancias que el
estado sabe que causan cc_ncer,defectos de nacimiento g otros dahos reproductivos g requiere que
los comerciantes le adviertan a sus consumidores sabre el potencial de exposici6n a tales sustancias.
Los electrodom6sticos de gas pueden causar la exposici6n a cuatro de estas sustancias,
concretamente benceno, mon6xido de carbono, formaldehido g hollin, principalmente causados par
la combusti6n incompleta del gas natural o de combustibles LP.
Cuando los secadoras estc_najustadas apropiadamente, se minimiza la combusti6n incompleta. La
exposici6n a estas sustancias puede minimizarse aOn mds ventilando apropiadamente la secadora
hacia el exterior.
INSTALACION APROPIADA
Antes de usarse, la secadora se debe instalar apropiadamente de acuerdo con/as Instrucciones de
insta/aci6n. Si no ha recibido una hoja de Instrucciones de instalaci6n, puede obtener una copia
visitando GEAppliances.com o//amando a/800.GE.CARES (800.452.2737).
m Conectelasecadoraatierrade maneraapropiadaque
cumplacontodoslosc6digosgordenanzas
reguladoras.Sigaconcuidadolastnstruccionesde
instalaci6n.
tnst(_lelaoalmac6neladondenoest6expuesta
a temperaturaspardebajodelpuntodecongelaci6no
expuestaa laintemperie,Ioquepodrfaocasionardar_os
permanentese invalidarlagarantia.
Conectea untomacorrientedeltamaSogdelcalibre
apropiadosparaevitarunasobrecargael6ctrica.
Remuevatodoslosobjetosdeempaquetadog
deshc_gaseapropiadamentedetodoslosmateriales
deenvio.
Escape/Ductos:
[-_ LassecadorasdegasDEBENtenerunescapehaciael
L_e_J
exterior.
i-P-]UtiliceOnicamenteductodemetalrigidode/-t"de
di@metroenelinteriordelgabinetedelasecadorag
utiliceOnicamenteductodemetalrigidode4" de
di@metro,oconaprobaci6ndeULenelductode
transici6nentrelasecadorag elductodelhogar.
•ELUSODEDUCTOSPLASTICOSUOTROSDUCTOSDE
MATERIALESCOMBUSTIBLESPODR[ACAUSARUN
INCENDIO.LOSDUCTOSPERFORADOSPODR[AN
CAUSARUNINCENDIOStCOLAPSAN0 SIOCURRE
ALGUNAOBSTRUCCIONDURANTEELUS00
DURANTELAINSTALACION.
Paralosdetallescompletos,sigalastnstruccionesde
instalaci6n.

iADVERTENCIA!
su AREADE SECADO
GEAppliances.com
II
Mantenga el @eadebajo g alrededor de
sus electrodom@sticoslibre de materiales
combustibles (pelusas,papel,trapos, etc.),
gasolina, productos qu[micosg otros I[quidos
g vapores inflamables.
ill
Mantenga el pisoalrededor de sus
electrodom_sticos limpios g secospara reducir
la posibilidad de un accidente.
ill
Supervisea losnihosen caso de que ellosusen
la secadora ojueguen cercade ella durante su
operaci6n. No permita que losnihosjueguen
con la secadora, en su interior,sobreella o
ningOnotro electrodom6stico.
CUANDO USE SU SECADORA
I Nunca introduzca sus manos en el interior de I
la secadora mientras el tambor giratorio est6
movi_ndose.Antes de agregar y sacar ropa, espere
hasta que el tambor giratorio sehaya detenido.
I Limpieel filtro depelusas antes de cada carga I
para evitar la acumulaci6n de pelusasen el interior
de la secadora o en la habitaci6n. NO OPERELA
SECADORASINELFILTRODEPELUSASENSU
LUGAR.
B
Nolaveo seque art[culos que se hagan limpiado,
lavado, remojado osalpicado con sustancias
combustibles o explosivas (talescomo cera, aceite,
pintura, gasolina, desengrasadores, solventesde
tintorer[a, kerosene).Estassustancias producen
vapores que podr[an incendiarse oexplotar. No
agregue estas sustancias al agua de lavado. No
use ni coloque estas sustancias alrededor de la
lavadora o secadoradurante su uso.
B
Nocoloque art[culos expuestos a aceite
de cocinar en la secadora. Los art[culos
contaminados con aceites de cocinar podr[an
contribuir a formar unareacci6n qdmica que
podr[a causar que una carga de ropas se incendie.
B
Cualquierart[culo sobre el cual usted us6
un solvente de limpieza oque contenga materiales
inflamables (talescomo pa_osde limpieza,
trapeadores,toallas usadas en salonesde belleza,
restaurantes o barber[as)no sedeben colocar en el
interior o en las proximidades de la secadora hasta
que los solventeso I[quidos inflamables se hayan
removido. Existenmuchos art[culosinflamables
en el hogar tales como laacetona, el alcohol, la
gasolina, el kerosene,algunos limpiadores, algunos
quitamanchas, aguarrc_s,trementina, ceras,
removedores de cera y productos que contengan
derivados del petr61eo.
B
iVlantengatodos los art[culos de limpieza
(talescomo detergentes y blanqueadores)fuera
del alcance de losni_os, preferiblemente
encerrados en un gabinete. Pongaatenci6n alas
advertencias en lasetiquetas de losenvases para
evitar accidentes.
B
Nunca trepe ni se ponga de pie sobre la parte
superior de la secadora.
Elproceso de lavado puede reducir la habilidad
de retardar laflamabilidad dealgunas telas.
Para evitar tal resultado,siga lasinstrucciones
del fabricante de lastelas con mucho cuidado.
No sequeart[culos que contengan goma, plc_stico,
espuma o materiales similarestales como sostenes
(brasieres)con relleno,ganchos de goma,
alfombras de baho, baberos deniBo,pantalones de
niho,bolsas pk_sticasy almohadas quese puedan
derretir o quemar. AIgunos materiales gomosos,
cuando se calientan, bajo ciertas circunstancias
podr[an incendiarse por combusti6n espontc_nea.
ill
Durante su operaci6n, no almacene encima de la
secadora plc_sticos,papel o ropa que se puedan
quemar o derretir.
ill
Lasprendas de vestir etiquetadas "Dryaway
from heat" (Secaralejadasdel calor)o "Donot
tumble dry" (Nosecar pot giro)--talescomo
chaquetas salvavidas que contienen capoc-
no se deben colocar en su secadora.
ill
No sequeart[culos de fibra de vidrio en su
secadora. Estopodr[aocasionar irritaci6n en la piel
debido alas part[culas restantes que sepodr[an
adherir a la ropa durante usossubsecuentes
de la secadora.
ill
Para minimizar la posibilidadde una descarga
el6ctrica, desconecte 6ste electrodom_stico de su
tomacorriente o desconecte la secadora del panel
de distribuci6n el6ctrica del edificio removiendo el
fusible o desconectando el circuito antes dedar
cualquier tipo de mantenimiento o limpieza (conla
excepci6n de remover y limpiar elfiltro de la
pelusa).NOTA:accionar la perillaSelectorade ciclo
a una posici6n de apagado (Off)o apretar PAUSE
(PAUSA),NO desconecta el electrodom6stico de la
fuente de alimentaci6n el6ctrica. 3
INFORMACION IMPORTANTESDESEGURIDAD.
LEA TODASLAS INSTRUCCIONESANTES DE USAR.
_ iADVERTENCIA!
CUANDO USESU SECADORA(cont.)
II
Nunca intente operar 6ste electrodom6stico
siest6 da_ado, si no funciona bien,si est6
parcialmente desarmado, o si lefaltan partes o
6stasest6n rotas, inclugendo dahos al cable
el6ctrico.
II
Elinterior de la m6quina y la conexi6n
del tuba deescape en el interior dela secadora
sedeben limpiar par Iomenos una vez al aho par
parte de unt_cnico calificado. Ver la secci6n
COmausarla secadom.
II
Sisusecadora esde gas,6sta estc_equipada con
un encendido el_ctrico autom6tico y no necesita
una luz piloto. NO INTENTEENCENDERLACONUN
FOSFORO.Podrian resultar quemaduras por tener
su mano en las cercan[as del quemador cuando el
encendido el6ctrico automdtico comience.
Esposible que usted desee suavizar su ropa
o reducir la electricidad est@icaen ella usando
una toalla suavizante para secadora o un
acondicionador antiest@ico.Recomendamos
que usted use un suavizante de telas en elciclo
de lavado,de acuerdo con las instrucciones del
fabricante para estos productos, o trate un
producto enel que el fabricante le proporcione
una garantb escrita en el paquete especificando
que es seguro para usaren lassecadoras. Los
problemas de servicioo de rendimiento causados
par estos productos son responsabilidad de los
fabricantes de estosproductos g no estc_n
cubiertos par la garantia de 6ste electrodom6stico.
CUANDO NO SEENCUENTREUSANDO SU SECADORA
B
Cuando desconecte 6ste electrodom_stico, agarre
el enchufe firmemente para evitar dahos al cable
el@ctricomientras Iohale.Coloqueel cable
el6ctrico en un lugar alejado de las @easde trc_fico
para que nadie Io pise,tropiece o Io puedadahar.
B
Nointente hacer reparaciones o reemplazar
ninguna parte de6ste electrodom6stico ni intente
Ilevar a cabo ningOntipo de servicioa no serque
Iorecomiende el Manual del propietario o
instrucciones publicadas que usted entienda
g tenga la habilidad de Ilevara cabo.
it Antes de desechar esta secadora o de removerla
para darle servicio,remueva la puerta de la
secadora para evitar que algOnnino
seesconda en su interior.
it Nointente alterar loscontroles.
LEAYSIGAESTAINFORMACIONDESEGURIDADCONMUCHOCUIDADO.
GUARDE ESTAS INSTRUCCIONES
4
 Loading...