

Page 1
GEAppliances.com
Safety Instructions ........................2,3
Operating Instructions .................4,5
Care and Cleaning
Air Filter .............................................................5
Grille and Case ...............................................5
Outdoor Coils ..................................................5
Installation Instructions
Through-the-Wall
Installation-Optional ...............................12
Window Installation .............................7-11
AEE08
AEE12
Climatiseur
Lo section franqaise commence a la page 19
0_
0_
O
Troubleshooting Tips ..............14,15
Consumer Support
Consumer Support ..................Back Cover
Ownership Registration for
Customers in Canada only ............15, 16
Warranty for Customers
in Canada .......................................................17
Warranty for Customers
in the U.S.A.....................................................18
Acondicionodor
deoire
Lo seccidn en espahol empieza en la pdgina 55
Write the model and serial numbers here:
Model #
0_
Serial #
Find these numbers on c]label on the sideof
the air conditioner.
In Canada, contact us at:
www.GEAppliances.ca
49-7665 12-10 GE
Page 2

IMPORTANT SAFETY INFORMATION.
READ ALL INSTRUCTIONS BEFORE USING.
WARNING!
Foryour safety, the information in this manual must be followed to minimize the risk of fire, electric shock
or personal injury.
SAFETYPRECAUTIONS
Use this appliance only for its intended
purpose as described in this Owner's
Manual.
This air conditioner must be properly
installed in accordance with the Installation
Instructions before it isused.
Never unplug your air conditioner by pulling
on the power cord. Always grip plug firmly
and pull straight out from the receptacle.
Replace immediately all electric service
cords that have become frayed or otherwise
damaged. A damaged power supply cord
must be replaced with a new power supply
cord obtained from the manufacturer and
not repaired. Do not use a cord that shows
cracks or abrasion damage along its length
or at either the plug or connector end.
If the receptacle does not match the plug,
the receptacle must be changed out by a
qualified electrician.
Turn the unit OFFand unplug your air
conditioner before making any repairs
or cleaning.
NOTE: We strongly recommend that any
servicing be performed by a qualified
individual.
For your safety...do not store or use
combustible materials, gasoline or other
flammable vapors or liquids in the vicinity
of this or any other appliance.
Allair conditioners contain refrigerants,
which under federal law must be removed
prior to product disposal. If you are getting
rid of an old product with refrigerants, check
with the company handling disposal about
what to do.
These R410A air conditioning systems
require contractors and technicians to use
tools, equipment and safety standards
approved for use with this refrigerant.
DO NOTuse equipment certified for R22
refrigerant only.
HOW TO CONNECT ELECTRICITY
Do not, under any circumstances, cut or remove
the third (ground) prong from the power cord. For
personal safety, this appliance must be properly
grounded.
DO NOT use an adapter plug with this
appliance.
The power cord of this appliance is equipped
with a 3-prong (grounding) plug which mates
with a standard 3-prong (grounding) wall outlet
to minimize the possibility of electric
shock hazard from this appliance.
Power cord includes u current interrupter device.
A test and reset button is provided on the plug
case. The device should be tested on a periodic
basis by first pressing the TESTbutton and then
the RESETbutton. If the TESTbutton does not
trip or if the RESETbutton will not stay engaged,
discontinue use of the air conditioner and
2
contact a qualified service technician.
Have the wall outlet and circuit checked by a
qualified electrician to make sure the outlet is
properly grounded.
Where a 2-prong wall outlet is encountered,
it is your personal responsibility and obligation to
have it replaced with o properly grounded
3-prong wall outlet.
The air conditioner should always be
plugged into its own individual electrical
outlet which has a voltage rating that matches
the rating plate.
This provides the best performance and also
prevents overloading house wiring circuits which
could cause o fire hazard from overheated wires.
See the Installation Instructions, Electrical
Requirements section for specific electrical
connection requirements.
Page 3

GEAppliances.com
WARNING!
EXTENSIONCORDS
RISK OF FIRE. Could couse serious injury or
death.
• DO NOT use an extension cord with this
Window Air Conditioner.
• DO NOT use surge protectors or multi-outlet
adaptors with this Window Air Conditioner.
READAND FOLLOW THISSAFETYINFORMATIONCAREFULLY.
SAVE THESE INSTRUCTIONS
Page 4
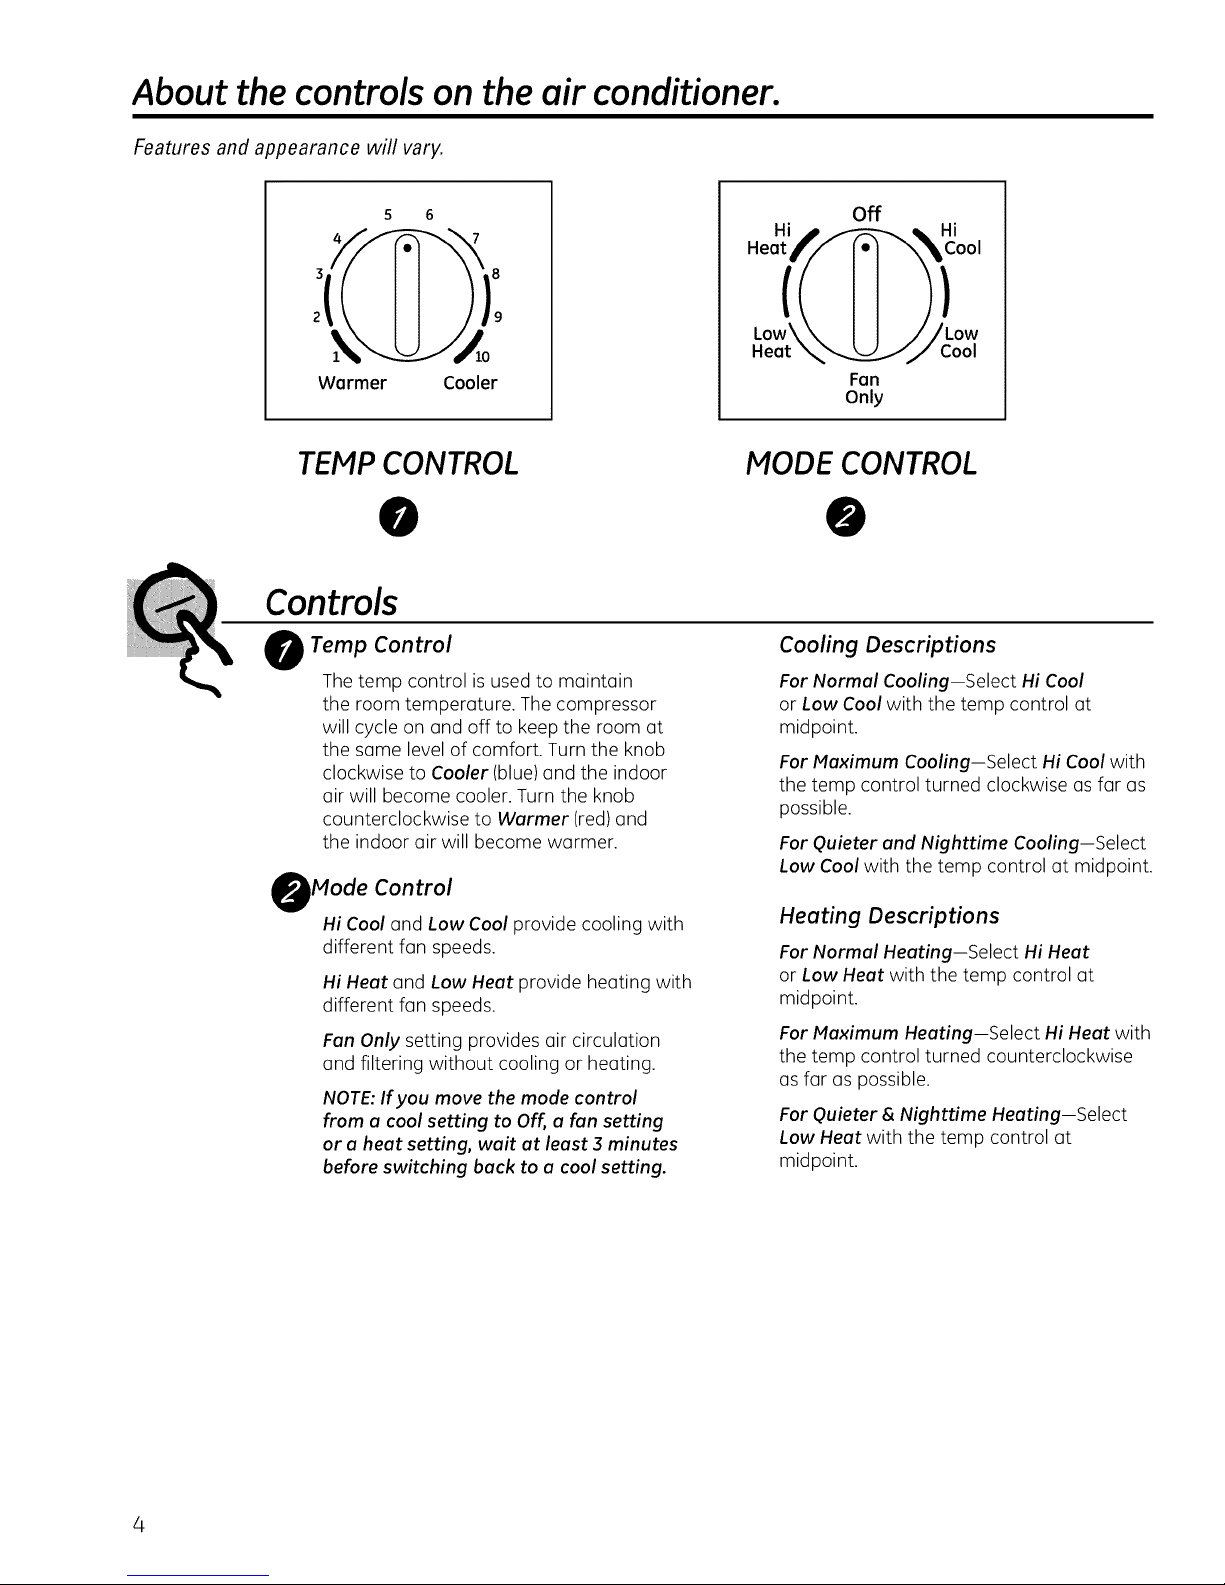
About the controlson theair conditioner.
Features and appearance will vary.
Hea I'1 oo,
Low\\ I I //Low
Heat _",.,,...__.Y/ Cool
Warmer Cooler
off
Hi h_%. Hi
Fan
Only
TEMP CONTROL
0
Controls
O Temp Control
The temp control is used to maintain
the room temperature. The compressor
will cycle on and off to keep the room at
the same level of comfort. Turn the knob
clockwise to Cooler (blue) and the indoor
air will become cooler. Turn the knob
counterclockwise to Warmer (red)and
the indoor air will become warmer.
Mode Control
Hi Cool and Low Cool provide cooling with
different fan speeds.
Hi Heat and Low Heat provide heating with
different fan speeds.
Fan Only setting provides air circulation
and filtering without cooling or heating.
NOTE: If you move the mode control
from a cool setting to Off, a fan setting
or a heat setting, wait at least 3 minutes
before switching back to a cool setting.
MODE CONTROL
0
Cooling Descriptions
For Normal Cooling-Select Hi Cool
or Low Cool with the temp control at
midpoint.
For Maximum Cooling--Select Hi Cool with
the temp control turned clockwise as far as
possible.
For Quieter and Nighttime Cooling-Select
Low Cool with the temp control at midpoint.
Heating Descriptions
For Normal Heating--Select Hi Heat
or Low Heat with the temp control at
midpoint.
For Maximum Heating--Select Hi Heat with
the temp control turned counterclockwise
as far as possible.
For Quieter & Nighttime Heating--Select
Low Heat with the temp control at
midpoint.
4
Page 5
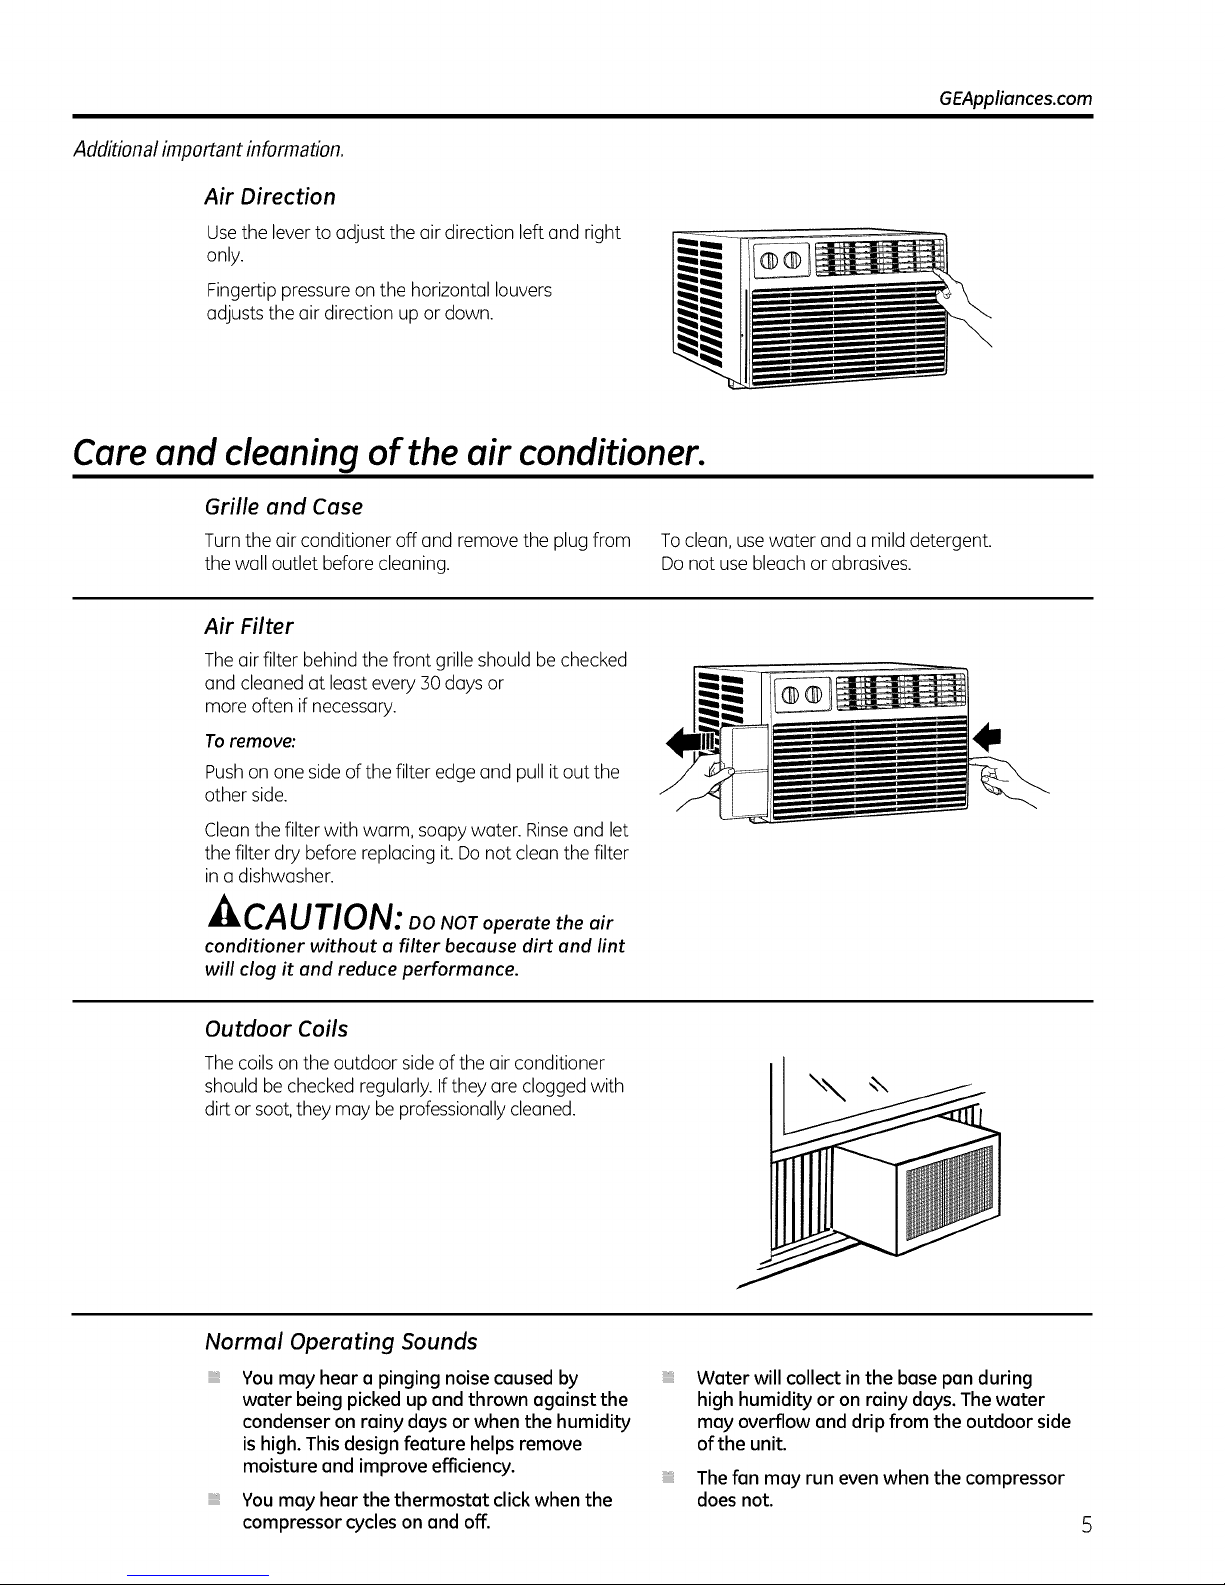
Additional important information.
Air Direction
Usethe lever to adjustthe air direction left and right
only.
Fingertip pressure on the horizontal louvers
adjusts the air direction up or down.
Care and cleaning of the air conditioner.
Grille and Case
Turn the air conditioner offand remove the plug from To clean, use water and a mild detergent.
the wall outlet before cleaning. Do not use bleach or abrasives.
Air Filter
Theairfilter behindthe front grille should bechecked
and cleaned at least every 30 days or
more oftenif necessary.
Toremove:
Pushon one sideof the filter edge and pull it out the
other side.
GEAppliances.com
Cleanthe filter with warm, soapy water. Rinseand let
the filter dry before replacing it. Donot cleanthe filter
in a dishwasher.
-&CAUTION: ooNoToperate theair
conditioner without a filter because dirt and lint
will clog it and reduce performance.
Outdoor Coils
Thecoilsonthe outdoor sideof the air conditioner
should be checked regularly. Ifthey are clogged with
dirt orsoot, they may be professionallycleaned.
Normal Operating Sounds
iiiiiiiiiiii_iii
You may hear a pinging noise caused by
water being picked up and thrown against the
condenser on rainy days or when the humidity
is high. This design feature helps remove
moisture and improve efficiency.
You may hear the thermostat click when the
compressor cycles on and off.
iiiiiiiiiiii_iii
Water will collect in the base pan during
high humidity or on rainy days.The water
may overflow and drip from the outdoor side
of the unit.
iiiiiiiiiiii_iii
Thefan may run even when the compressor
does not.
Page 6
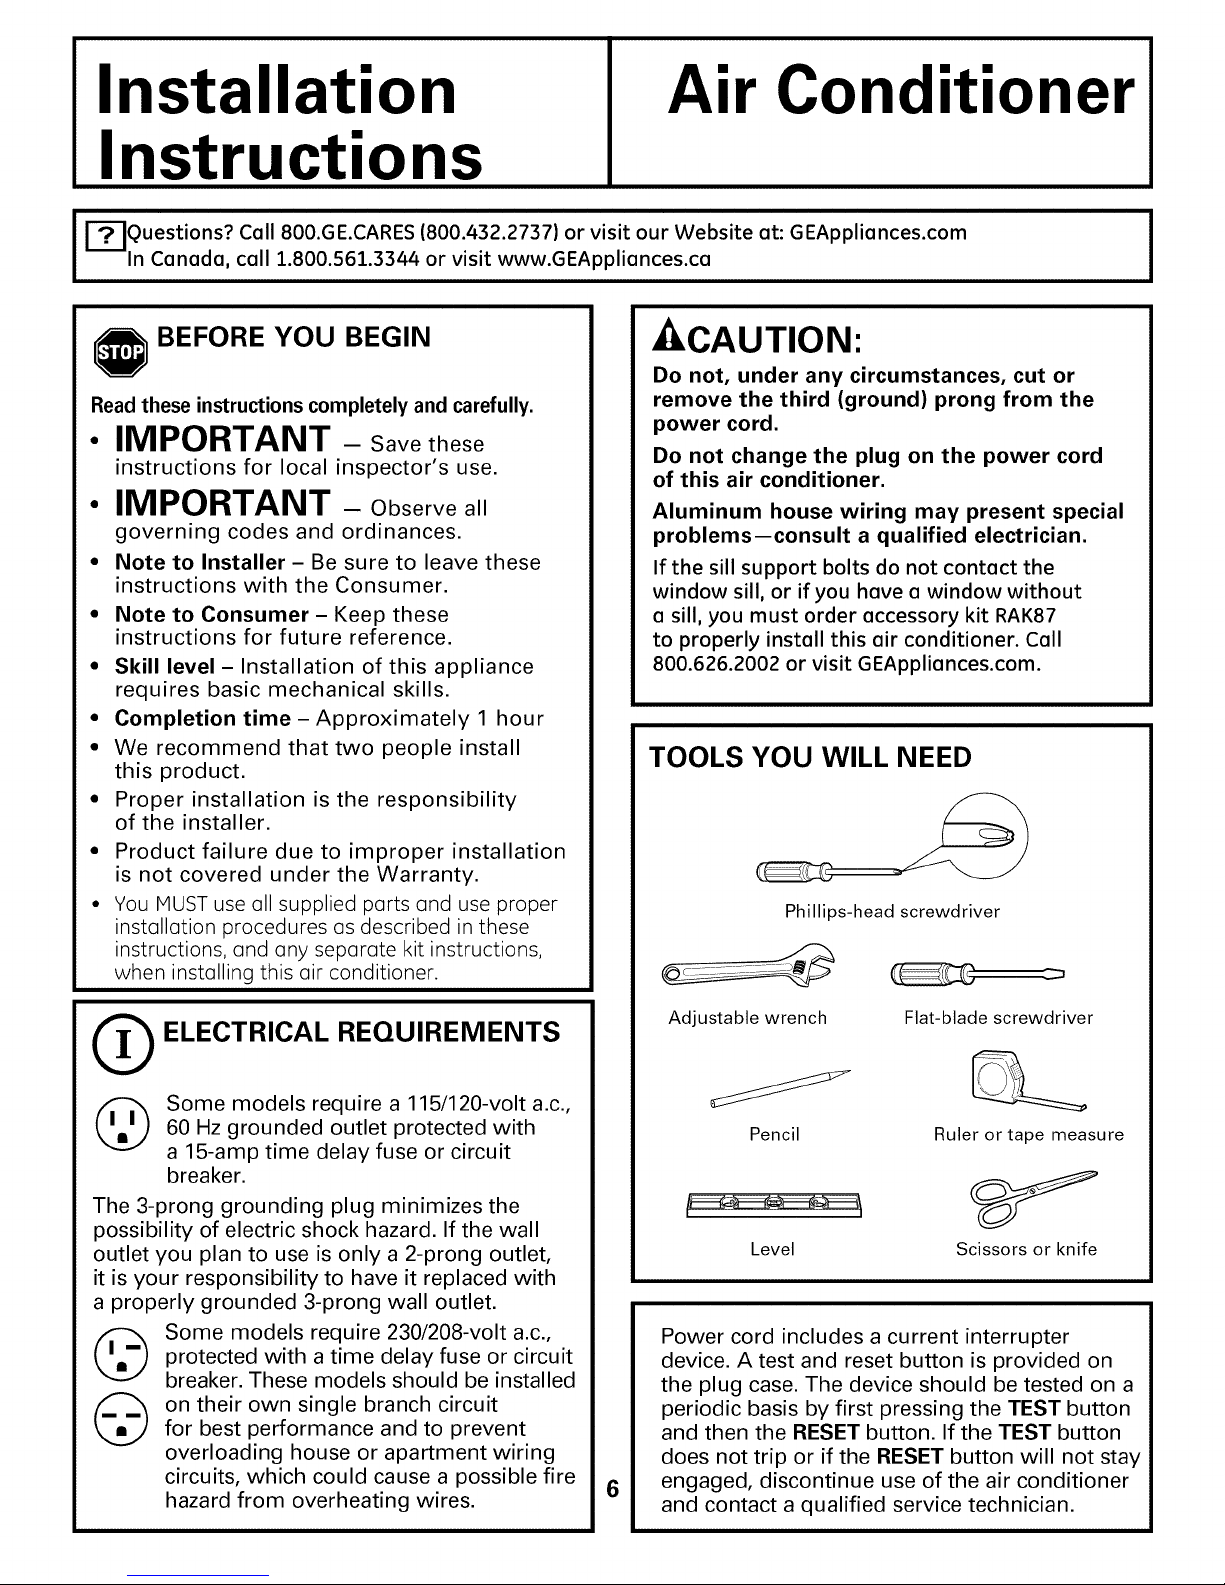
IInstallation
Instructions
Air Conditioner]
I r'_Questions? Cell 800.GE.CARES (800.432.2737) or visit our Website at: GEApplionces.comIn Canada, call 1.800.561.3344 or visit www.GEAppliances.ca
BEFORE YOU BEGIN
Read these instructions completely and carefully.
-&CAUTION:
Do not, under any circumstances, cut or
remove the third (ground) prong from the
power cord.
• IMPORTANT - Savethese
instructions for local inspector's use.
• IMPORTANT - Observeall
governing codes and ordinances.
• Note to Installer- Be sure to leave these
instructions with the Consumer.
• Note to Consumer- Keep these
instructions for future reference.
• Skill level - Installation of this appliance
requires basic mechanical skills.
• Completion time- Approximately 1 hour
• We recommend that two people install
this product.
• Proper installation is the responsibility
of the installer.
Product failure due to improper installation
is not covered under the Warranty.
You MUST use all supplied parts and use proper
installation procedures (is described in these
instructions, and any separate kit instructions,
when installing this air conditioner.
Do not change the plug on the power cord
of this air conditioner.
Aluminum house wiring may present special
problems--consult a qualified electrician.
If the sill support bolts do not contact the
window sill, or if you have a window without
a sill, you must order accessory kit RAK87
to properly install this air conditioner. Call
800.626.2002 or visit GEApplionces.com.
TOOLS YOU WILL NEED
I
Phillips-head screwdriver
O ELECTRICAL REQUIREMENTS
(_ Some models require a 115/120-volt a.c.,
The 3-prong grounding plug minimizes the
possibility of electric shock hazard. If the wall
outlet you plan to use is only a 2-prong outlet,
it is your responsibility to have it replaced with
a properly grounded 3-prong wall outlet.
60 Hz grounded outlet protected with
a 15-amp time delay fuse or circuit
breaker.
Some models require 230/208-volt a.c.,
protected with a time delay fuse or circuit
breaker. These models should be installed
on their own single branch circuit
for best performance and to prevent
overloading house or apartment wiring
circuits, which could cause a possible fire
hazard from overheating wires.
Adjustable wrench
Pencil
Level
Power cord includes a current interrupter
device. A test and reset button is provided on
the plug case. The device should be tested on a
periodic basis by first pressing the TEST button
and then the RESET button. If the TEST button
does not trip or if the RESET button will not stay
engaged, discontinue use of the air conditioner
6
and contact a qualified service technician.
Flat-blade screwdriver
Ruler or tape measure
Scissors or knife
Page 7

Window Installation Instructions
PARTS INCLUDED
(appearance may vary)
•Foa_
window gasket ---------_
Left
accordion
panel
Case bottom seal
(thin, adhesive-backed)
Type A (6) Type B (7) Type C (6)
Type D (3)
Sill support (2)
Nut (2)
Bolt (2)
Top mounting rail
Right
accordion
panel
Window locking
bracket (2)
7
Page 8
Window Installation Instructions
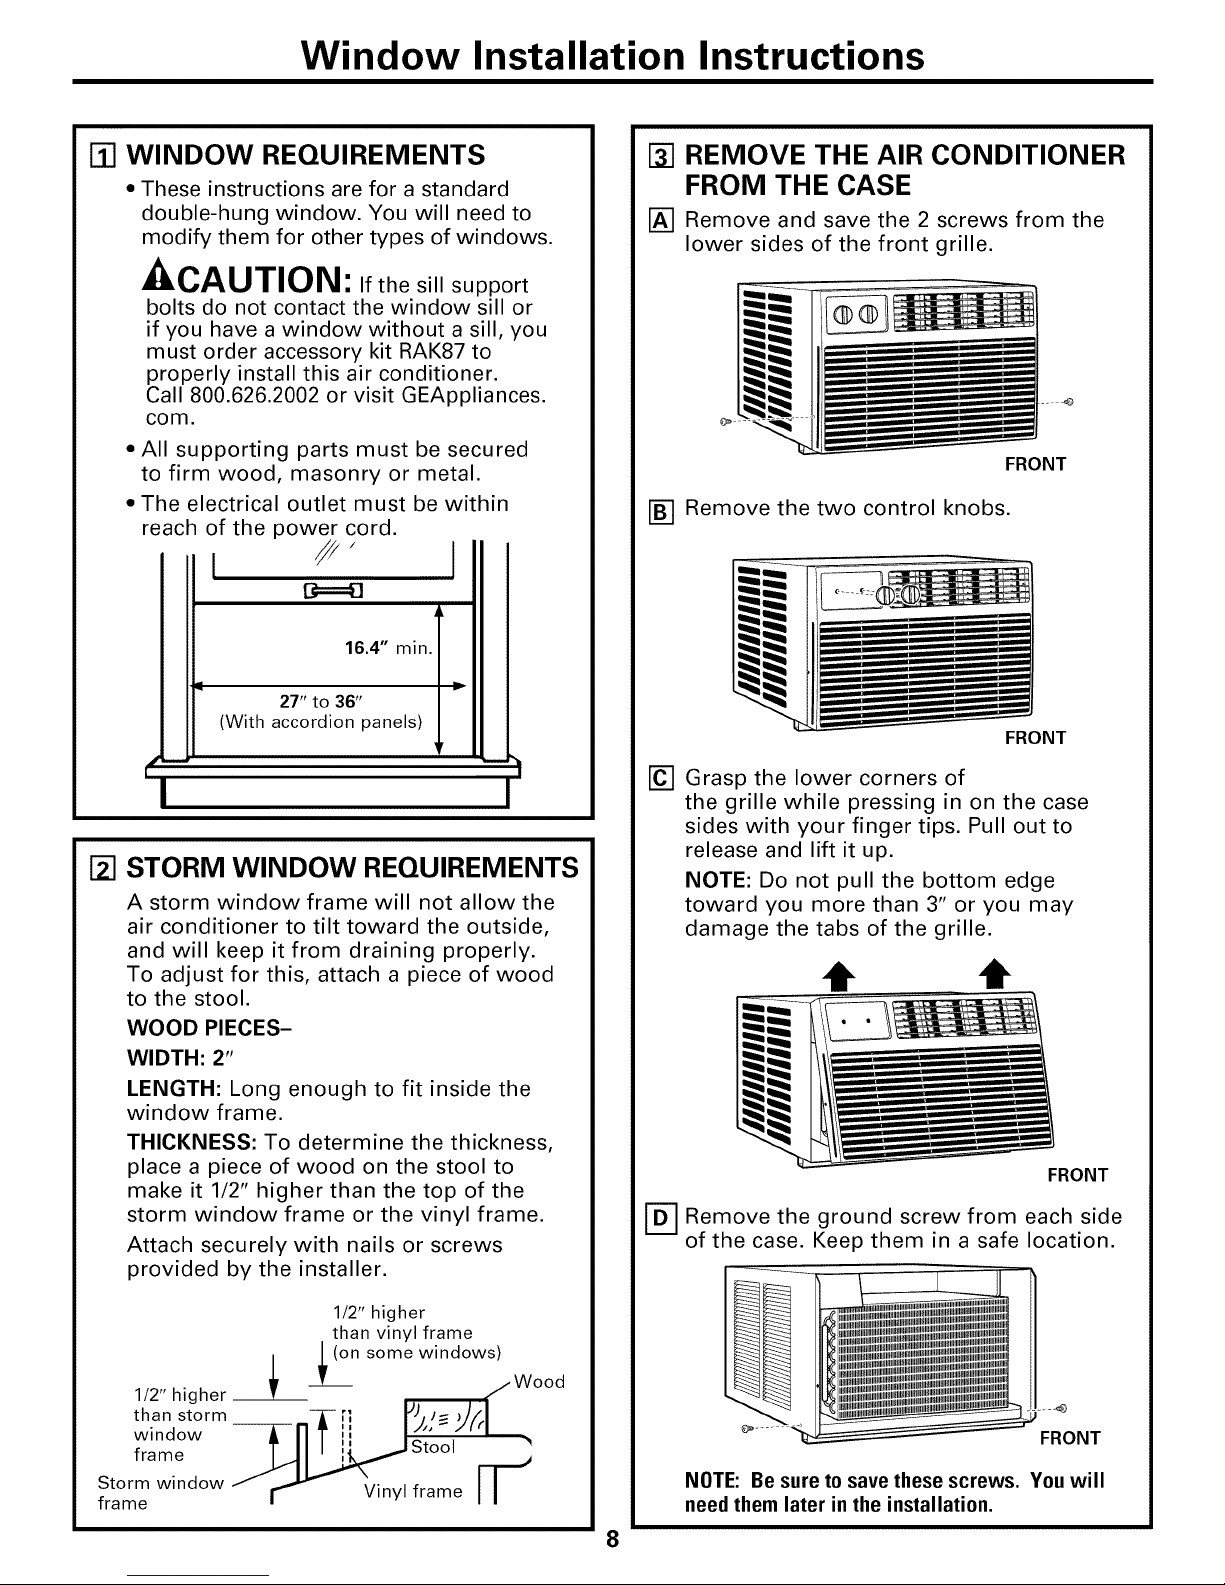
[] WINDOW REQUIREMENTS
• These instructions are for a standard
double-hung window. You will need to
modify them for other types of windows.
A
-&CAUTION: If the sill support
bolts do not contact the window sill or
if you have a window without a sill, you
must order accessory kit RAK87 to
properly install this air conditioner.
Call 800.626.2002 or visit GEAppliances.
com.
• All supporting parts must be secured
to firm wood, masonry or metal.
• The electrical outlet must be within
reach of the power cord.
I //J
B===_
I 27" to 36" ='
(With accordion panels)
16.4" min.
REMOVE THE AIR CONDITIONER
FROM THE CASE
[] Remove and save the 2 screws from the
lower sides of the front grille.
FRONT
I-_ Remove the two control knobs.
I
FRONT
I
[] STORM WINDOW REQUIREMENTS
A storm window frame will not allow the
air conditioner to tilt toward the outside,
and will keep it from draining properly.
To adjust for this, attach a piece of wood
to the stool.
WOOD PIECES-
WIDTH: 2"
LENGTH: Long enough to fit inside the
window frame.
THICKNESS: To determine the thickness,
place a piece of wood on the stool to
make it 1/2" higher than the top of the
storm window frame or the vinyl frame.
Attach securely with nails or screws
provided by the installer.
1/2" higher
than vinyl frame
L (on some windows)
/
!1
1/2" higher _ L K/Wood
1-07Grasp the lower corners of
the grille while pressing in on the case
sides with your finger tips. Pull out to
release and lift it up.
NOTE: Do not pull the bottom edge
toward you more than 3" or you may
damage the tabs of the grille.
e
FRONT
I-_ Remove the ground screw from each side
of the case. Keep them in a safe location.
thanwindowStOrm_-n--f [J _l)_tJoo _/(/
frame I •
Storm window _ F'_
frame yl frame
FRONT
NOTE: Be sure to save these screws. You will
need them later in the installation.
8
Page 9
Window Installation Instructions
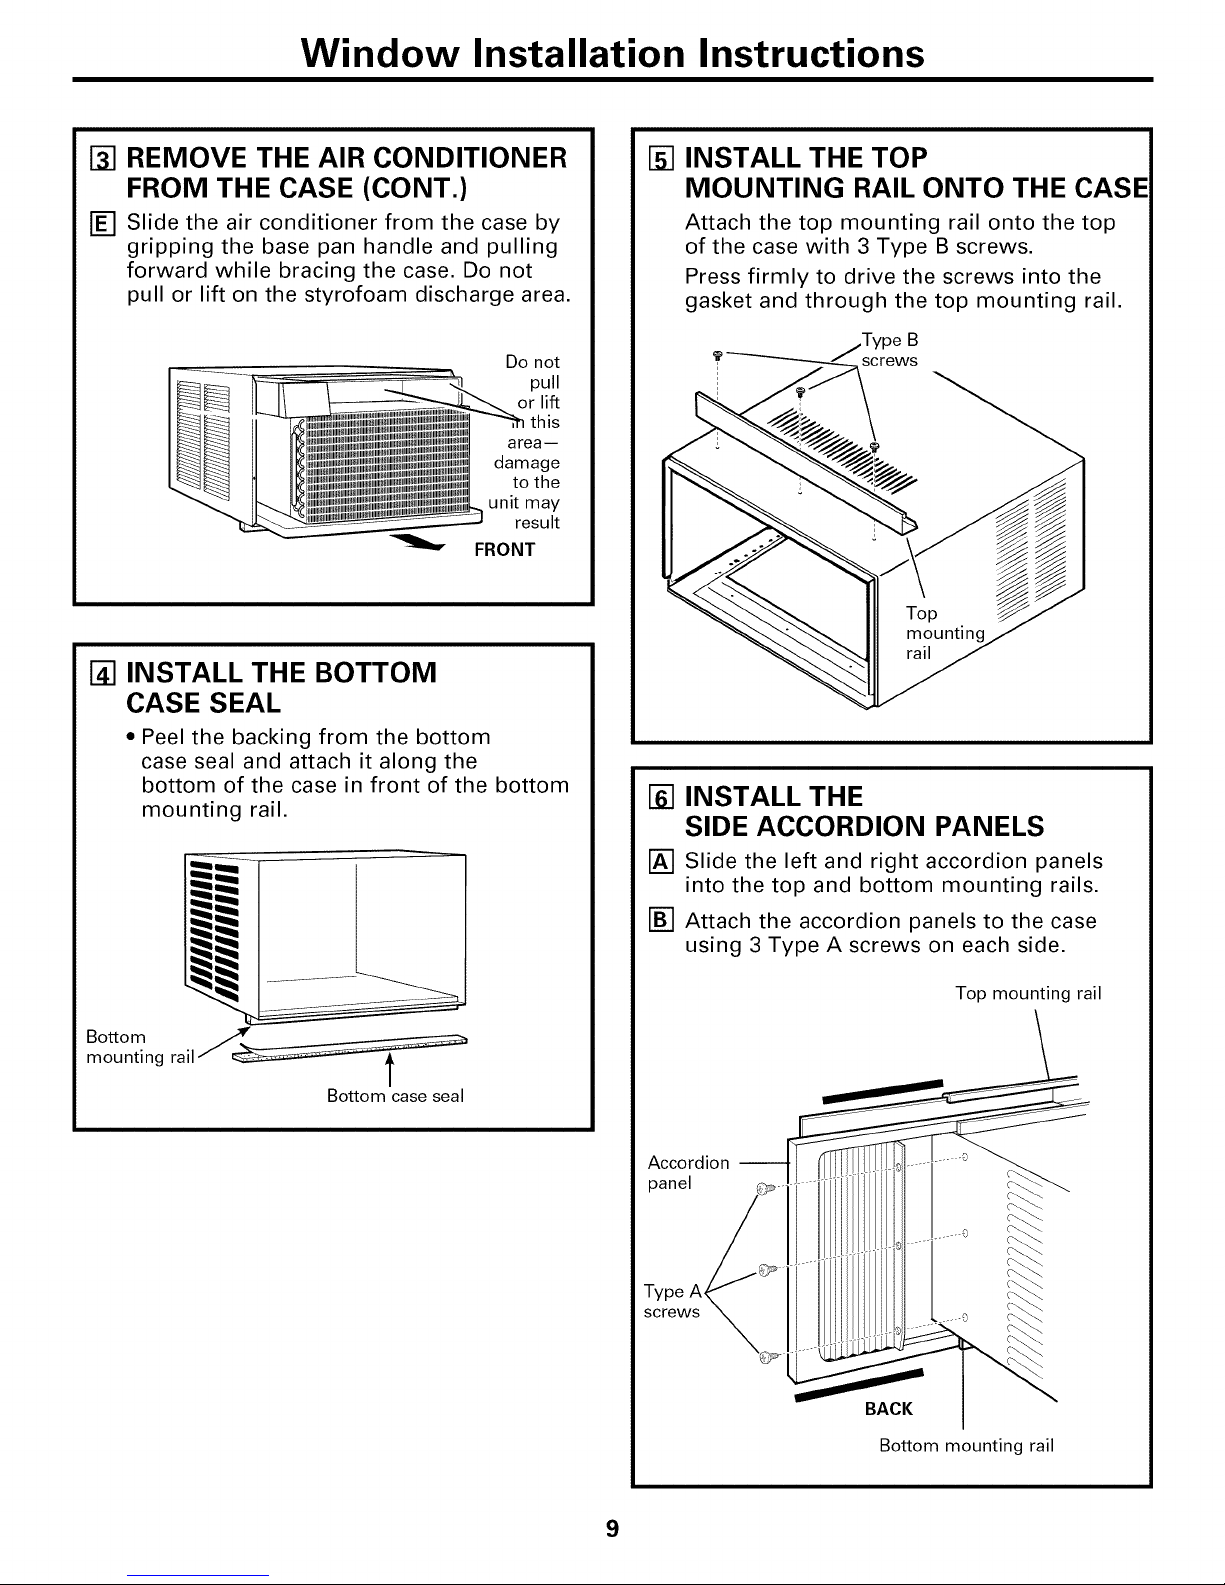
[_] REMOVE THE AIR CONDITIONER
FROM THE CASE (CONT.)
[] Slide the air conditioner from the case by
gripping the base pan handle and pulling
forward while bracing the case. Do not
pull or lift on the styrofoam discharge area.
Do not
pull
or lift
this
areai
damage
to the
unit may
result
FRONT
[] INSTALL THE BOTTOM
CASE SEAL
• Peel the backing from the bottom
case seal and attach it along the
bottom of the case in front of the bottom
mounting rail.
[] INSTALL THE TOP
MOUNTING RAIL ONTO THE CASE
Attach the top mounting rail onto the top
of the case with 3 Type B screws.
Press firmly to drive the screws into the
gasket and through the top mounting rail.
B
screws
1-61INSTALL THE
SIDE ACCORDION PANELS
mounting rail
Bottom
IA] Slide the left and right accordion panels
into the top and bottom mounting rails.
[] Attach the accordion panels to the case
using 3 Type A screws on each side.
Top mounting rail
Bottom case seal
Accordion --
panel
BACK
Bottom mounting rail
9
Page 10
Window Installation Instructions
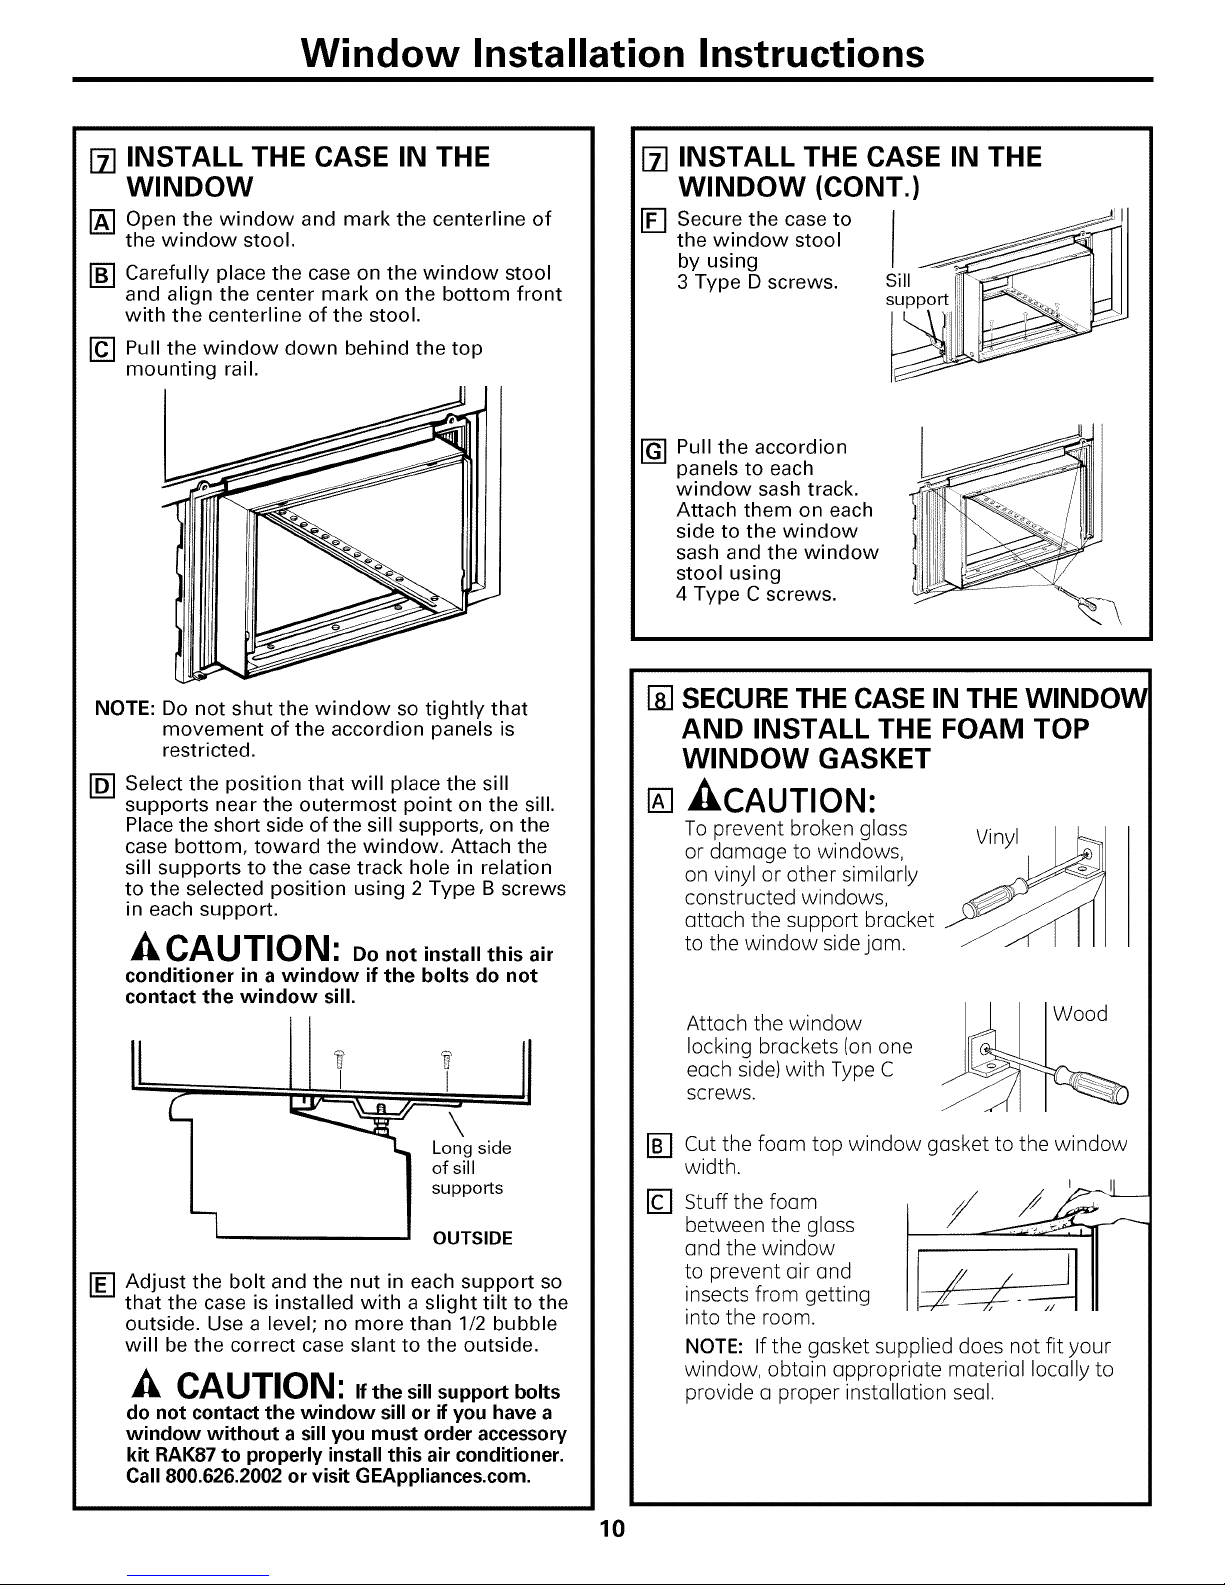
171INSTALL THE CASE IN THE
WINDOW
[_] Open the window and mark the centerline of
the window stool.
[_] Carefully place the case on the window stool
and align the center mark on the bottom front
with the centerline of the stool.
[_ Pull the window down behind the top
mounting rail.
NOTE: Do not shut the window so tightly that
movement of the accordion panels is
restricted.
_] Select the position that will place the sill
supports near the outermost point on the sill.
Place the short side of the sill supports, on the
case bottom, toward the window. Attach the
sill supports to the case track hole in relation
to the selected position using 2 Type B screws
in each support.
A CAUTION: Do not install this air
conditioner in a window if the bolts do not
contact the window sill.
\
Long side
of sill
supports
OUTSIDE
[_ Adjust the bolt and the nut in each support so
that the case is installed with a slight tilt to the
outside. Use a level; no more than 1/2 bubble
will be the correct case slant to the outside.
A CAUTION:. the sill support bolts
do not contact the window sill or if you have a
window without a sill you must order accessory
kit RAK87 to properly install this air conditioner.
Call 800.626.2002 or visit GEAppliances.com.
171INSTALL THE CASE IN THE
WINDOW (CONT.)
the window stool __
[] Secure the case to _I
by using
3 Type D screws.
Pull the accordion
panels to each
window sash track.
Attach them on each
side to the window
sash and the window
stool using
4 Type C screws.
Sill
support_l
[] SECURE THE CASE IN THE WINDOW
AND INSTALL THE FOAM TOP
WINDOW GASKET
- CAUTION:
To preventbroken glass
ordamage towindows,
on vinylor othersimilarly
constructedwindows,
attachthe support bracket
tothe window sidejam.
Attach the window
locking brackets (on one
each side) with Type C
screws.
Cut the foam top window gasket to the window
[]
width.
Stuff the foam
©
between the glass
and the window
to prevent air and
insects from getting
into the room.
NOTE: If the gasket supplied does not fit your
window, obtain appropriate material Iocolly to
provide a proper installation seal.
Vinyl
Wood
/
10
Page 11
Window Installation Instructions
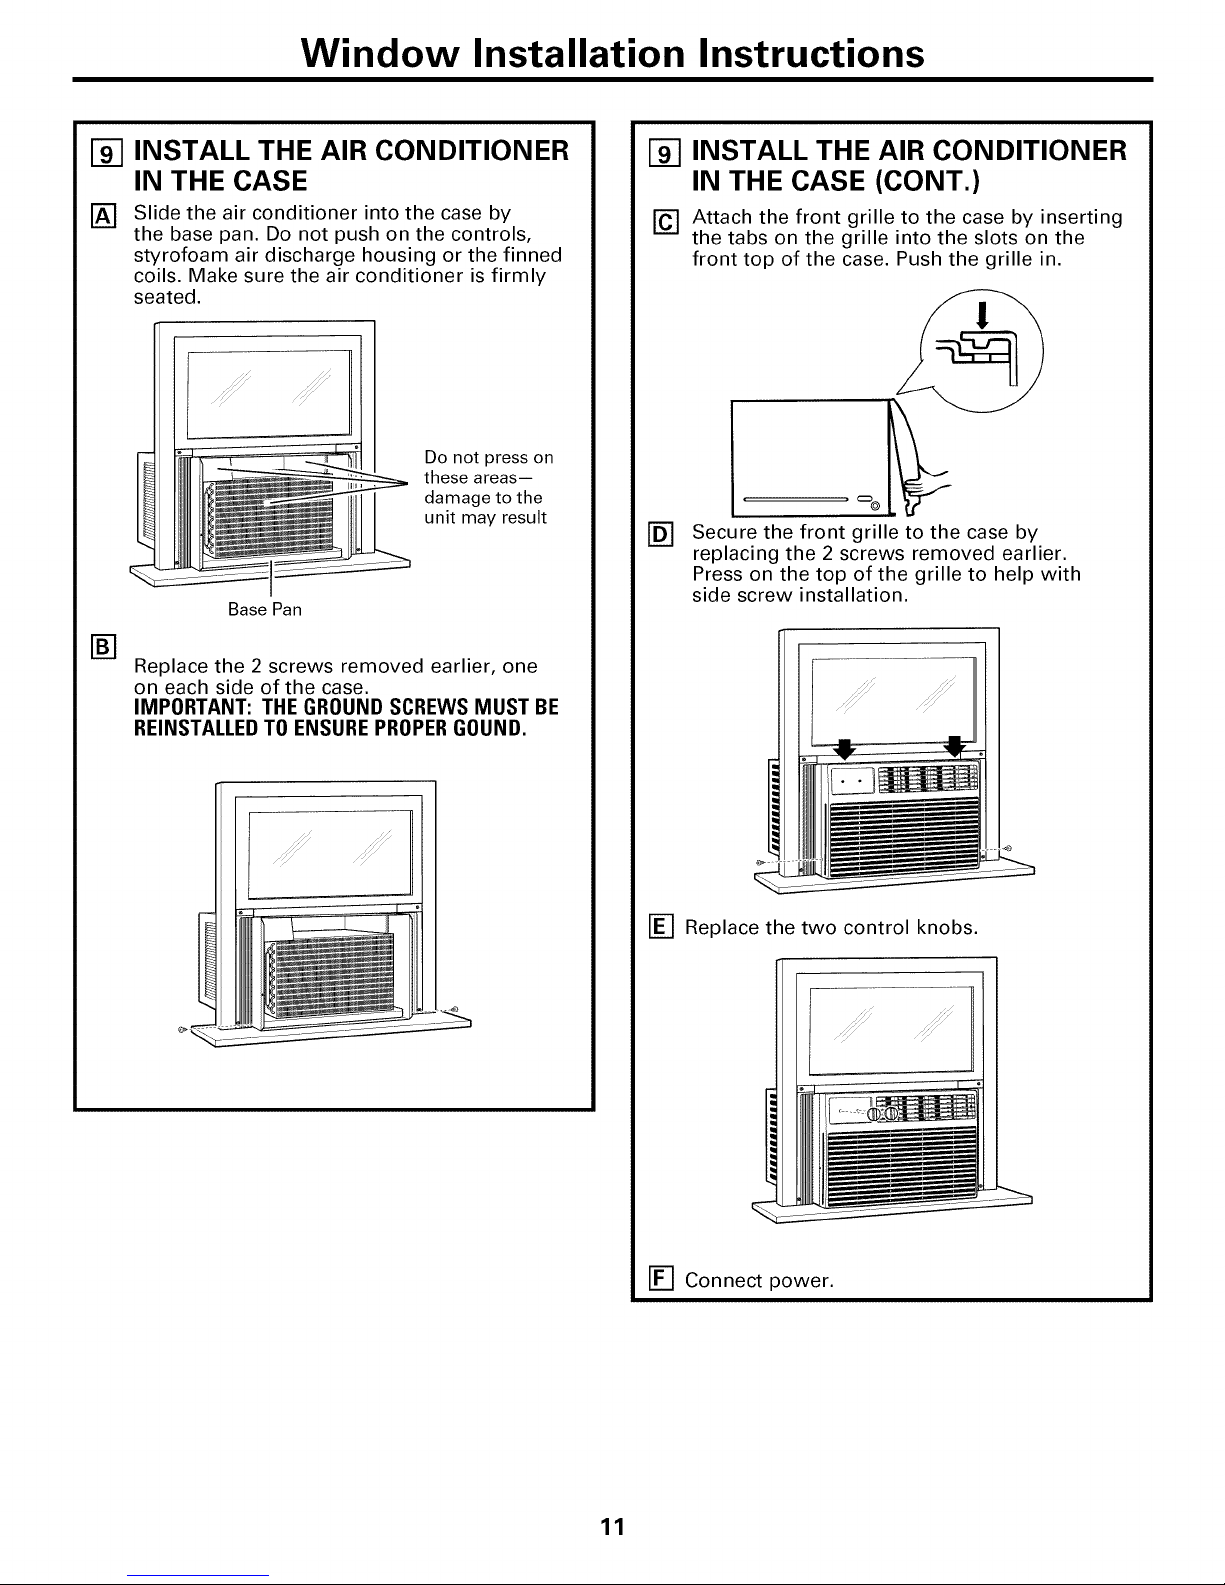
INSTALL THE AIR CONDITIONER
[]
IN THE CASE
Slide the air conditioner into the case by
[]
the base pan. Do not push on the controls,
styrofoam air discharge housing or the finned
coils. Make sure the air conditioner is firmly
seated.
/!!_:!
Do not press on
these areas i
damage to the
unit may result
Base Pan
19] INSTALL THE AIR CONDITIONER
IN THE CASE (CONT.)
['_ Attach the front grille to the case by inserting
the tabs on the grille into the slots on the
front top of the case. Push the grille in.
c _ ¢:::::3@_
Secure the front grille to the case by
replacing the 2 screws removed earlier.
Press on the top of the grille to help with
side screw installation.
[]
Replace the 2 screws removed earlier, one
on each side of the case.
IMPORTANT: THE GROUND SCREWS MUST BE
REINSTALLEDTO ENSURE PROPERGOUND.
[_ Replace the two control knobs.
[-_ Connect power.
11
Page 12
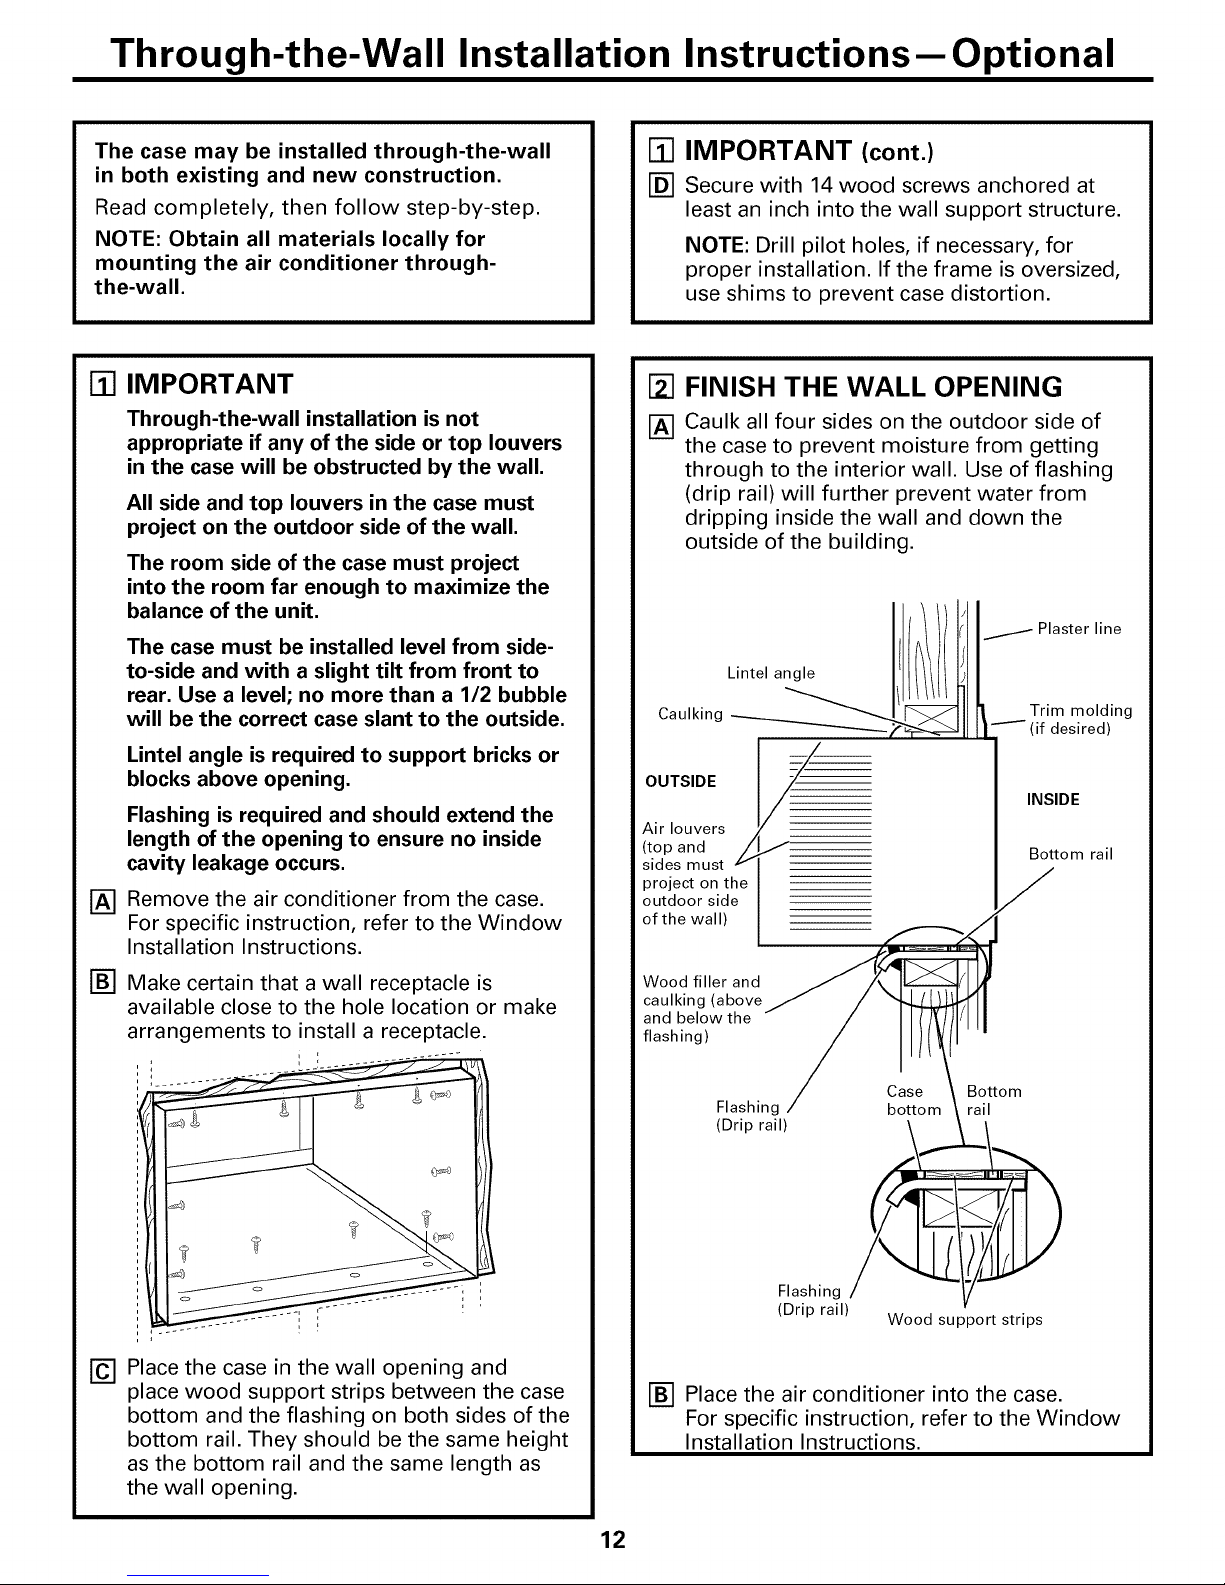
Through-the-Wall Installation Instructions--Optional
The case may be installed through-the-wall
in both existing and new construction.
Read completely, then follow step-by-step•
NOTE: Obtain all materials locally for
mounting the air conditioner through-
the-wall.
%
IMPORTANT
Through-the-wall installation is not
appropriate if any of the side or top louvers
in the case will be obstructed by the wall.
All side and top louvers in the case must
project on the outdoor side of the wall.
The room side of the case must project
into the room far enough to maximize the
balance of the unit.
The case must be installed level from side-
to-side and with a slight tilt from front to
rear. Use a level; no more than a 1/2 bubble
will be the correct case slant to the outside.
Lintel angle is required to support bricks or
blocks above opening,
Flashing is required and should extend the
length of the opening to ensure no inside
cavity leakage occurs.
Remove the air conditioner from the case•
[]
For specific instruction, refer to the Window
Installation Instructions•
Make certain that a wall receptacle is
available close to the hole location or make
arrangements to install a receptacle•
[] IMPORTANT (cont.)
[-D']Secure with 14 wood screws anchored at
least an inch into the wall support structure•
NOTE: Drill pilot holes, if necessary, for
proper installation• If the frame is oversized,
use shims to prevent case distortion•
[] FINISH THE WALL OPENING
[_ Caulk all four sides on the outdoor side of
the case to prevent moisture from getting
through to the interior wall. Use of flashing
(drip rail) will further prevent water from
dripping inside the wall and down the
outside of the building•
Caulking [1 Trim molding
OUTSIDE
Air louvers
(top and l
sides must
project on the
outdoor side
of the wall)
Wood filler and
caulking (above
and below the
flashing)
L_ I _ Plaster line
• !I,''- (if desired)
INSIDE
Bottom rail
J
Place the case in the wall opening and
@
place wood support strips between the case
bottom and the flashing on both sides of the
bottom rail. They should be the same height
as the bottom rail and the same length as
the wall opening•
Flashing bottom rail
(Drip rail)
Flashing
(Drip rail)
[] Place the air conditioner into the case•
For specific instruction, refer to the Window
Installation Instructions•
Case Bottom
Wood support strips
12
)
Page 13
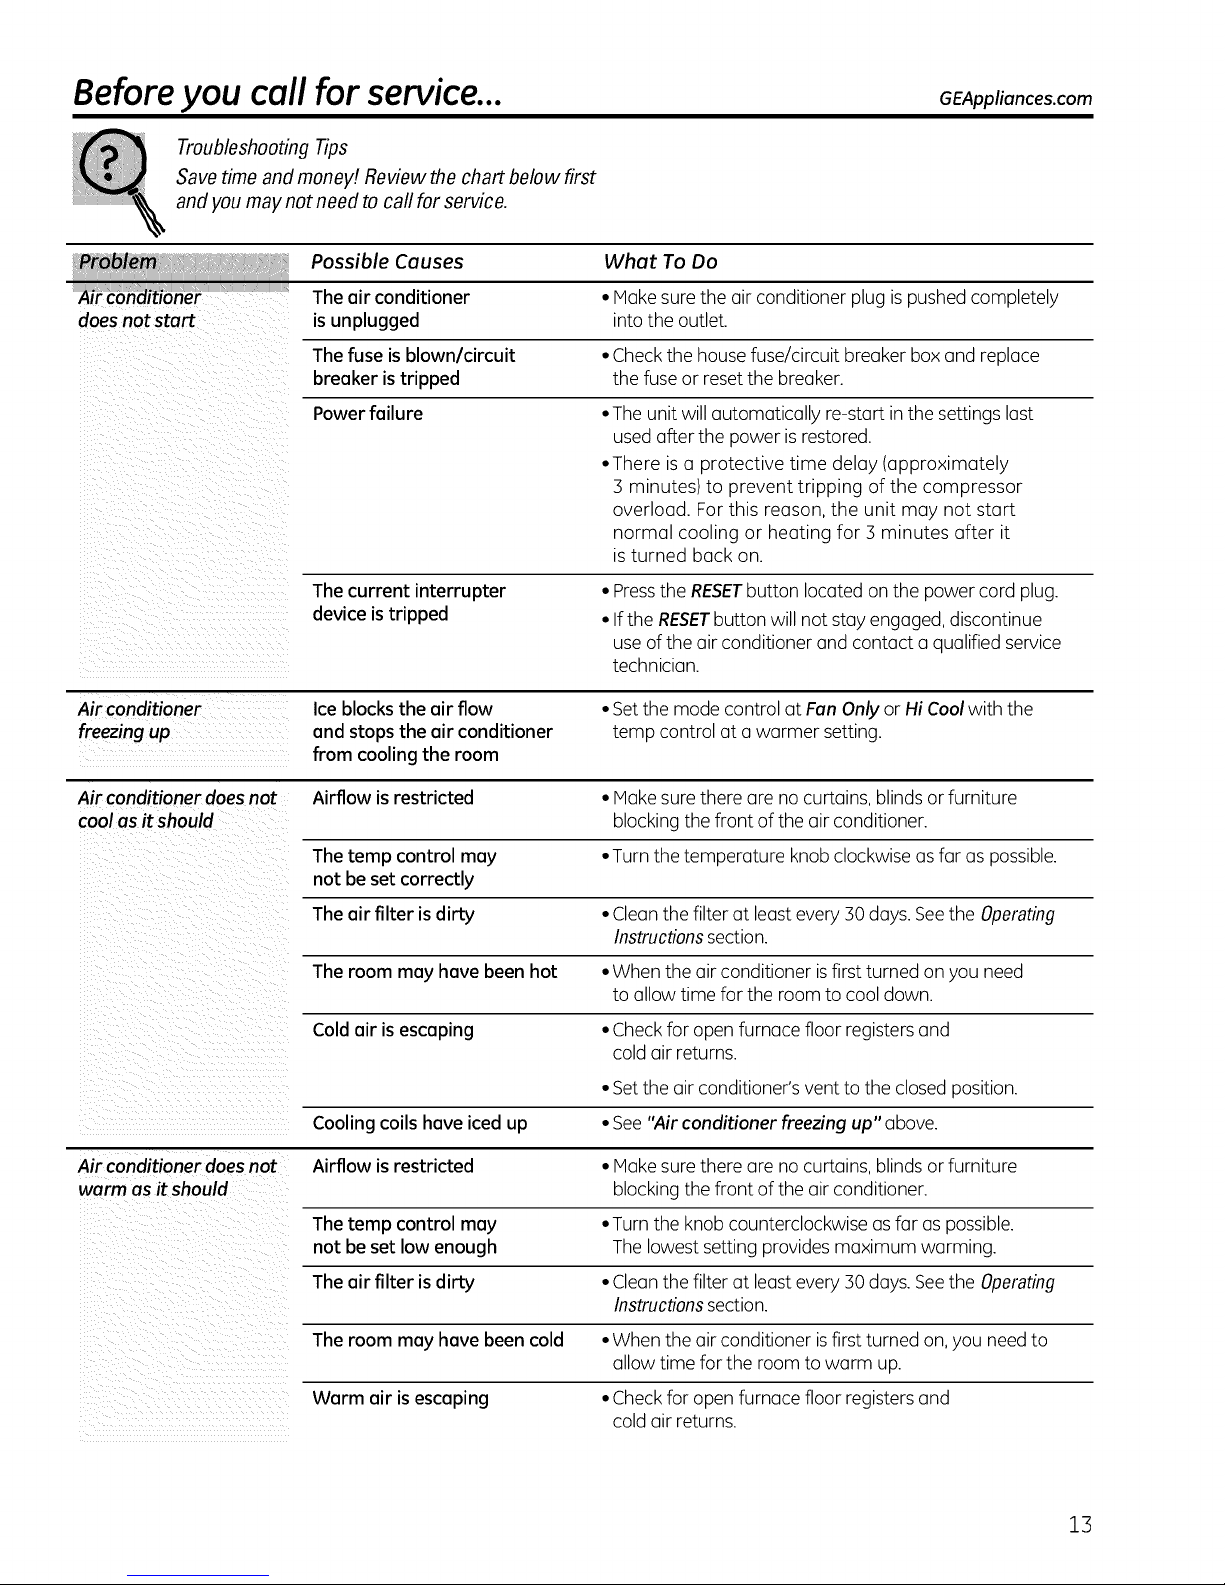
Before you call for service...
Troubleshooting Tips
Savetime and money! Review the chart below first
and you may not need to call for service.
Possible Causes What To Do
Theair conditioner • Hoke surethe oir conditioner plug ispushed completely
doesnot stort is unplugged into the outlet.
Thefuse is blown/circuit • Checkthe house fuse/circuit breaker box and replace
breoker is tripped the fuse or reset the breaker.
Power foilure •The unit will automaticc]lly re-start in the settings last
used after the power is restored.
• There isa protective time delay (approximately
3 minutes) to prevent tripping of the compressor
overload. For this reason, the unit may not start
normal cooling or heating for 3 minutes after it
i!_i!i__?iii_i_I:I:i : :ii iii_i_i!!ii!i_ii_i_i!iC
The current interrupter • Pressthe RESETbutton located on the power cord plug.
device is tripped
is turned back on.
• Ifthe RESETbutton will not stay engaged, discontinue
use of the airconditioner and contact a qualified service
technician.
GEAppliances.com
Air conditioner Ice blocks the air flow • Setthe mode control at Fan Only or Hi Coolwith the
freezing up and stops the air conditioner temp control GtGwGrmer setting.
from coolingthe room
Air conditionerdoes not Airflow is restricted • HGkesurethere Greno curtGins,blinds orfurniture
coolas itshould blocking the front of the airconditioner.
The temp control may • Turnthe temperature knob clockwise asfar as possible.
not be set correctly
The air filter is dirty • Cleanthe filter at leastevery 30 days.Seethe Operating
Instructionssection.
The room may have been hot • When the air conditioner isfirst turned on you need
to allow time for the room to cool down.
Cold air is escaping • Checkfor open furnace floor registers and
cold air returns.
• Setthe air conditioner's ventto the closedposition.
Cooling coils have iced up • See"Air conditioner freezing up" above.
Air conditionerdoes not Airflow is restricted • Makesurethere (]re nocurtains, blindsor furniture
warm as it should blocking the front of the oir conditioner.
Thetamp control may • Turnthe knob counterclockwise usfor uspossible.
not be set low enough Thelowest setting provides maximum warming.
The air filter is dirty • Cleanthe filter at leastevery 30 days.Seethe Operating
Instructionssection.
The room may have been cold • When the air conditioner isfirst turned on,you need to
Warm air is escaping • Check for open furnace floor registers and
allow time for the room to warm up.
cold air returns.
13
Page 14
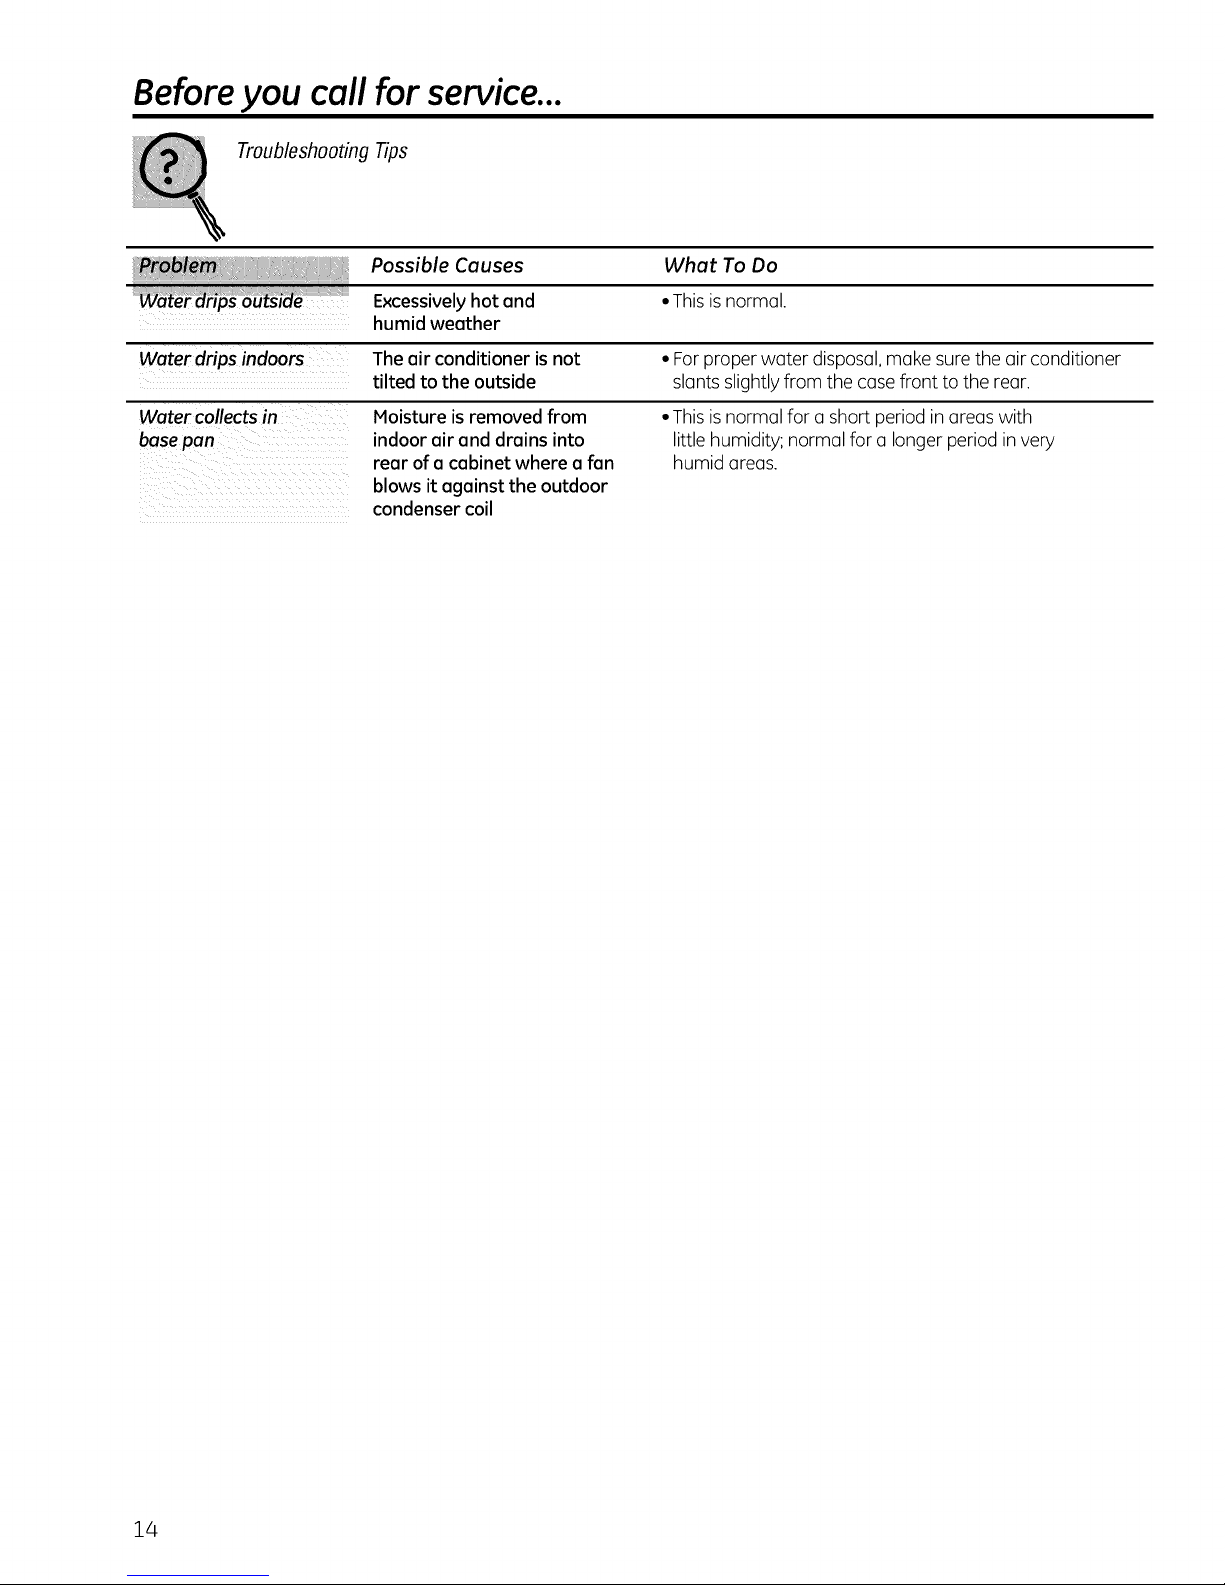
Before you coil for service...
Troubleshooting Tips
Possible Causes What To Do
Excessively hot and • Thisisnormal.
humid weather
Water drips indoors Theair conditioneris not • Forproper water disposal, make sure the air conditioner
tilted to the outside slants slightlyfrom the case front to the rear.
Water collects in Moisture is removed from
basepan indoor air and drains into
rear of a cabinet where a fan
blows it against the outdoor
condenser coil
• Thisisnormal for a short period inareaswith
little humidity; normal for a longer period in very
humid areas.
14
Page 15

Notes.
15
Page 16

Notes.
16
Page 17

GEAir Conditioner-One-Year Limited Warranty. (For customers in the U.S.A.)
All warranty service provided by our Factory Service Centers,
or an authorized Customer Care_ technician. To schedule service,
visit us on-line at GEAppliances.com, or carl 800.GE.CARES
(800.432.2737).Have serial number and model number available
when calling for service.
GE Will Replace:
Any part of the air conditioner which fails due to adefect in materials or workmanship.
Fromthe dateofthe
originalpurchase
Servicetrips to your home to teach you how to
usethe product.
Improper installation, delivery or maintenance. If you
have an installation problem, or if the air conditioner
isof improper cooling capacity for the intended use,
contact your dealer or installer. You are responsible
for providing adequate electrical connecting facilities.
Failure of the product resulting from modifications to
the product or due to unreasonable use including failure
to provide reasonable and necessary maintenance.
In commercial locations, labor necessary to move the
unit to a location where it is accessible for service
by an individual technician.
Duringthis limited one-year warranty, GEwill also provide, free of charge, all labor and related
serviceto replace the defective part.
Staple your receipt here.
Proof of the original purchase
date is needed to obtain
service under the warranty.
Replacement of house fuses or resetting of circuit
breakers.
Failure due to corrosion on models not corrosion-
protected.
Damage to the product caused by improper power
supply voltage, accident, fire, floods or acts of God.
Incidental or consequential damage caused by possible
defects with this air conditioner.
Damage caused after delivery.
EXCLUSION OF IMPLIED WARRANTIES--Your sole and exclusive remedy is product repair as provided in
this Limited Warranty. Any implied warranties, including the implied warranties of merchantability or
fitness for a particular purpose, are limited to one year or the shortest period allowed by law.
This warranty is extended to the original purchaser and any succeeding owner for products purchased for home
use within the USA. If the product is located in an area where service by a GE Authorized Servicer is not
available, you may be responsible for a trip charge or you may be required to bring the product to an
Authorized GE Service location for service. In Alaska, the warranty excludes the cost of shipping or service
calls to your home.
Some states do not allow the exclusion or limitation of incidental or consequential damages. This warranty gives
you specific legal rights, and you may also have other rights which vary from state to state. Toknow what your
legal rights are, consult your local or state consumer affairs office or your state's Attorney General
Warrantor: General Electric Company. Louisville, KY40225
17
Page 18

GEAir Conditioner--One-Year Limited Warranty. (For customers in the Canada)
All warranty service provided by our Factory Service Centers,
or an authorized Customer Care_ technician. For service, carl
1.800.561.3344.Please have serial number and model number
available when calling for service.
Mabe Will Replace:
One Vear
Fromthedate ofthe
originalpurchase
Service trips to your home to teach you how to
use the product.
Improper installation, delivery or maintenance. If you
have an installation problem, or if the air conditioner
is of improper cooling capacity for the intended use,
contact your dealer or installer. You are responsible
for providing adequate electrical connecting facilities.
Failure of the product resulting from modifications to
the product or due to unreasonable use including failure
to provide reasonable and necessary maintenance.
In commercial locations, labor necessary to move the
unit to a location where it isaccessible for service
by an individual technician.
Any part of the oir conditioner which foils due to o defect in moteriols orworkmonship.
During thislimited one-year warranty, Mobewill olso provide, free ofchorge, oll Iobor ond
reloted service to replocethe defective port.
Staple your receipt here.
Proof of the original purchase
date is needed to obtain
service under the warranty.
Replacement of house fuses or resetting of circuit
breakers.
Failure due to corrosion on models not corrosion-
protected.
Damage to the product caused by improper power
supply voltage, accident, fire, floods or acts of God.
Incidental or consequential damage caused by possible
defects with this air conditioner.
Damage caused after delivery.
EXCLUSION OF IMPLIED WARRANTIES--Your sole and exclusive remedy is product repair as provided in
this Limited Warranty. Any implied warranties, including the implied warranties of merchantability or
fitness for a particular purpose, are limited to one year or the shortest period allowed by law.
This warranty is extended to the original purchaser and any succeeding owner for products purchased in
Canada for home use within Canada. In-home warranty service will be provided in areas where it is available
and deemed reasonable by Mabe to provide.
Some provinces do not allow the exclusion or limitation of incidental or consequential damages, so the above
exclusion may not apply to you. This warranty gives you specific legal rights, and you may also have other
rights which vary from province to province. To know what your legal rights are in your province, consult your
local or provincial consumer affairs office.
Warrantor: Mabe Canada Inc.,
Burlington, Ontario
18
Page 19

Consignes de s_curit_ ............. 2o,21
Consignesd'utilisation............... 22,25
Entretien et nettoy(]ge
Filtre(_air ................................ 23
Retraitducadredelagrille ............... 23
Serpentinsext6rieurs..................... 23
Instructions de montage
Instructions de montage pour une
installation (_travers un mur--En option ...... 30
Instructions de montage
dans une fen_tre ..................... 25-29
Conseils de d_pannage ............... 33
Service (_I(]clientele
Service (_la clientele ....................... 36
Garantie .................................. 35
Enregistrement du titre
de propri6t6 ........................... 31, 32
AEE08
AEE12
Inscrivezici lesnumerosdemodeleet deserie
Numerode modele
Numerode Serie
Vous trouverez ces num6ros sur 1'6tiquette
oppos6e sur le c6t6 du climotiseur.
Au Canada, visitez-nous au •
www.electromenagersge.ca
19
Page 20

IMPORTANTESCONSIGNESDESI CURITI .
VEUILLEZLIRETOUTESLESCONSIGNESAVANTUTILISATION.
-&AVERTISSEMENT!
Pour votre s_curit_, les informations contenues dans ce manuel doivent _tre suivies afin de minimiser
les risques d'incendie, de chocs _lectriques ou de blessures corporelles.
CONSIGNESDESI CURITI
N'utilisez cet appareil qu'aux fins pr#vues
d6crites duns le manuel d'utilisation.
Ce climatiseur dolt _tre correctement
install6 conform6ment aux Instructions
d'lnstallation avant route utilisation.
Ne d6branchezjamais votre climatiseur en
tirant sur le cordon d'alimentation. Prenez
toujours fermement la fiche en main et tirez
pour la sortir de la prise.
Remplacez imm6diatement tout cordon
61ectrique us6 ou endommag& Un
cordon d'alimentation endommag6 dolt
_tre remplac6 par un nouveau cordon
d'alimentation obtenu du lubricant. Ne
r6parez pus le cordon endommag& N'utilisez
pas un cordon fissur6 ou pr6sentant des
dommages dus aux frottements suit sur
sa Iongueur ou aux extr6mit6s du c6t6
de la fiche ou du raccord.
Si la prise de courant est d'un format
diff@ent de la fiche, cette prise dolt _tre
chang6e par un 61ectricien qualifi&
Eteignez votre climatiseur et d6branchez-le
avant d'effectuer des r6parations ou de
le nettoyer.
REMARQUE: Nousvous recommandonsdefaire
effectuerla maintenanceparun technicienquail%.
Pour votre s6curit6, ne stockez pas et
n'utilisez pus de mat@iaux combustibles,
d'essence ou d'autres vapeurs et liquides
inflammables dans les parages de cet
appareil ou de tout autre appareil.
Tousles climatiseurs contiennent des
fluides frigorig_nes qui, conform6ment, 6 la
16gislation f6d6rale doivent _tre retir6s avant
la mise au rebut de I'appareil. Sivous mettez
au rebus un ancien appareil contenant des
fluides frigorig_nes, v6rifiez la proc6dure 4]
suivre aupr_s de la compagnie responsable
de 1'61imination.
Ces syst6mes de climatisation R410A
demandent que les contracteurs et
les techniciens utilisent des outils, de
1'6quipement et des mesures de s6curit6
homologu6s pour une utilisation avec
frigorig_ne. N'UTILISEZPASun 6quipement
certifi6 pour fluide R22 refrigerant only.
20
BRANCHEMENTSI LECTRIQUES
Ne coupez pas ou n'enlevez pas, sous aucun
pr_texte, la troisi_me broche de mise b la terre
du cordon d'alimentation. Pour des raisons
de s_curit_, cet appareil dolt _tre correctement
mis b la terre.
N'utilisezPASd'adaptateuraveccetappareil.
Le cordon d'alimentation de cet appareil
est 6quip6 d'une fiche 6 trois broches (pour une
mise 6 la terre) qui s'adapte 6 la prise
de courant standard 6 3 broches (pour une mise
6 la terre) pour minimiser les risques
de chocs 61ectriques par cet appareil.
Le cordon d'alimentation est 6quip6 d'un
dispositif d'interruption du courant. Un bouton
d'essai et de r6enclenchement est fourni
sur le bottler de la prise. Vous devez tester le
m6canisme r6guli_rement en appuyant d'abord
sur le bouton TEST(Essai)puis sur le bouton
RESET(R6enclenchement)Iorsque I'appareil est
branch& Si le bouton TEST(Essai)ne bascule pas
ou si le bouton RESET(R6enclenchement) ne reste
pas enclench& cessez d'utiliser votre climatiseur
et appelez un technicien de service qualifi&
Faites v@ifier la prise murale et le circuit
#lectrique par un 61ectricien qualifi6 pour
s'assurer que le syst6me est correctement
mis 6 la terre.
Dans le cas d'une prise biphas6e,
I'installateur a la responsabilit6 et I'obligation
de la remplacer par une prise triphas6e
correctement mise 6 la terre.
Le climatiseur dolt toujours @trebranch6
6 sa propre prise 61ectrique d'une tension
nominale correspondant 6 celle indiqu_e
sur sa plaque signal_tique.
Ceci permet d'obtenir un meilleur rendement
du climatiseur et _vite de surcharger les circuits
_lectriques du domicile qui risque d'occasionner
un incendie en surchauffant.
Consultez les Consignes d'lnstallations, dans
la section Exigences Electriques pour les
exigences de branchements _lectriques
particuliers.
Page 21

www.electromenagersge.co
VERTISSEMENT !
UTILISATION DE RALLONGES
RISQUED'INCENDIE. Peut occasionner des
blessures graves ou la mort.
• NE PASutiliser de rallonge avec ce climatiseur.
• NE PASutiliser de parasurtenseur ou
d'adaptateur _ prises multiples avec ce
climatiseur.
LISEZETSUIVEZSOIGNEUSEMENTCESCONSIGNESDESFtCURITFt.
CONSERVEZCESINSTRUCTIONS
21
Page 22

A proposdescommandesduclimatiseur
mo@lesdotesdeboutonsdecommande.
Les fonctions et I'aspect peuvent varier.
5 6
Warmer Cooler
COMMANDESDELATEMPFtRATURE
0
Commandes
0
CommandedelaTemperature
Lescommandesde latemp@aturesontutilis@s
pourmaintenirJatemp@ature
deJapiece.Lecompresseursemetenmarcheet
s'arrCtea intervatJesregulierspourmaintenirJa
i@e_un niveaudeconfortconstant.TournezJe
outondansJesensdesaiguillesd'unemontrevers
Cooler(Plusfroid)(bteu)etI'airambiantse refroidira.
TournezJeboutondansJesensinversedesaiguilles
d'unemontresurWarmer(Pluschaud)(rouge)etJ'air
ambiantser@hauffera.
0
Hi ,0 _ _ Hi
off
HeaT(// "/ _ i°°l
Low\\ I I //Low
Heat _"-.....V_.._J Cool
Fan
Only
COMMANDESDUMODE
0
CommandesduMode
HiCool(Fortrefroidissement)et LowCool(Refroidissement
faible)permettentderefroidir
a desvitessesdeventilationdifferentes.
LesreglagesHiHeat(Chauffagefort)etLowHeat
(Chauffagefaible)permettentde r@hauffera
desvitessesdeventilationdifferentes.
LereglageFanOnly(Ventilateuruniquement)permet
aussidefairecircuterJ'airetdeJefittrersansJe
refroidirouier@hauffer.
REMARQUE:Sivouspassezd'unmodederefroidissement
surArr_t,8unmodedeventilationou8unmodede
chauffage,attendezaumoins3minutesavantderepasser
unmodederefroidissement.
22
DescriptionsdesModesdeRefroidissement
PourunrefroidissementNormal-%lectionnezHiCool(Fort
refroidissement)ouLowCool(Refroidissementfaible)avecun
reglagesurunetemperaturemoyenne.
PourunrefroidissementMaximal-%tectionnez
HiCool(Fortrefroidissement)avecJeboutonderegtage
deJatemperaturetourneaumaximumdonsJe
sensdesaiguiltesd'unemontre.
PourunRefroidissementplusSilencieuxouDurantlaNuit-
%tectionnezlemodeLowCool(Refroidissementfable)avec
unreglagesurunetemperaturemoyenne.
Descriptionsdesmodesdechauffage
PourunchauffageNormal-%lectionnezHiHeat
(Chauffagefort)ouLowHeat(Chauffagefaible)avecun
reglagesurunetemperaturemoyenne.
PourunchauffageMaximal-%lectionnezHiHeat
(Chauffagefort)avecJeboutonderegtagede Ja
temp@aturetourneau maximumdansJesens
inversedesaiguillesd'unemontre.
PourunChauffageplusSilencieuxouDurantlaNuit-
%tectionnezJemodeLowHeat(Chauffagefaible)avec
unreglagesurunetemp@aturemoyenne.
Page 23

Information suppl_mentaire importante.
Direction de I'Air
Utilisezle levier pourr6gler I(]direction de I'(]irvers I(]
gauche ou vers I(]droite seulement.
Une 16g_re pression du bout des doigts sur les
persiennes vous permet de r6gler la direction de I'air
vers le h(]ut ou vers le b(]s.
Entretienetnettoyageduclimatiseur.
Grille et BoTtler
www.electromenagersge.ca
Eteignezet d_branchezleclimatiseuravant tout
nettoyage.
Pourle nettoyer,utilisezdeI'eauet un d_tergentdoux.
N'utilisezpasd'eaude Javeloudenettoyantsabrasifs.
Filtre a Air
Lefiltre (_air derriere la grille frontale dolt _trev6rifi6
et nettoy6 au bout de 30jours de fonctionnement ou
plus souvent sin6cessaire.
Pourretirerlefiltre:
Poussezsur lesbords du filtre et tirez-lede I'(]utre
c6t&
Nettoyez le filtreavec de I'e(]usavonneuse tilde.
Rincezle filtre et laissez-les6cher avant de leremettre
dans le climatiseur. Nenettoyez p(]svotre filtre (]u
lave-vaisselle.
-&MISEENGARDE"NEfaitesPAS
fonctionnerleclimatiseursanslefiltresouspeinedele
boucheravecdelapoussiereetdelacharpieetderOduireson
efficacit&
Serpentins ExtOrieurs
Lesserpentins situ6sduc6t6 ext6rieur du climatiseur
doivent #tre r6guli_rement v6rifi6s.S'ilssont obstru6s
par des poussi_resou de la suie,il estpossiblede les
f(]ire nettoyer par des professionnels.
Bruits normauxdefonctionnement
Vous pouvez enmndre un cliquefis dfl a de l'eau qui
est abso_%_,eet est projet_e contre le condensateur les
jours de pluie off quand il v a beaucoup d'humiditO.
Cette caract&isfique diminue l'humiditO et am_liore
le rendement.
Vouspouvez entendre le claquement du themlostat
quand le compresseur se met en marche et s'arr_te.
De l'eau s'amasse dartsle plateau du bas pendant les
p&iodes de grande humiditd ou s'il pleut. Cette eau
peut ddborder et couler de l'appareil du c6td extdrieur.
Le venfilateur peut tourner m&ne quand le compresseur
ne foncfionne pas.
23
Page 24

Instructions
Climatiseur
de montage
| Questions? Composez le 1.800.361.3400 ou visitez notre site web 6 ' www.electromenagersge.ca
I
/I, MISE EN GARDE •
AVANT DE COMMENCER
Lisez ces instructions entierement et
attentivement.
• IMPORTANT iConservezces
instructions pour I'inspecteur electrique local.
• IMPORTANT - Respectez tousles
codes et r@glements en vigueur.
• Remarque pour I'installateur - Assurez-vous de
remettre ces instructions au client.
• Remarque pour le client- Conservez ces
instructions pour toute ref6rence future.
• Niveau de competence - L'installation de cet
appareil demande des connaissances de base
en mecanlque.
• Delai d'execution - Environ 1 heure
• Nous recommandons que I'installation de ce
produit soit effectuee par deux personnes.
• L'installateur est responsable de I'installation
correcte de I'appareil.
• La panne de I'appareil due a une mauvaise
installation n'est pas couverte par la garantie.
• Vous DEVEZ utiliser routes les pisces fournies
c_tsuivre I.esproc6dures correctes d'instollation
6crites dans cette notice ainsi que toutes
les instructions concernant certaines pisces
s6par6es Iors de I'installation de ce climatiseur.
Ne coupez pas ou n'enlevez pas, sous aucun
pretexte, la troisieme broche de raise a la terre
du cordon d'alimentation.
Ne changez pas la fiche du cordon
d'alimentation du climatiseur.
Un c_blage en aluminium du domicile peut
occasionner des problemes particuliersi
consultez un electricien qualifie.
Si les boulons de maintien au rebord ne font pas
contact avec le rebord de la fen_tre, ou
si vous avez une fen_tre sans rebord, vous
devez commander le jeu d'accessoires RAK87
pour installer correctement ce climatiseur.
Appelez le 800.626.2002 ou consultez le site
Internet www.electromenagersge.ca.
OUTILLAGE NECESSAIRES
Tournevis cruciforme Phillips
I
Cle _ molette
EXIGENCES ELECTRIQUES
Certains modules necessitent une prise
mise a la terre de 115/120 Volts AC, 60 Hz,
proteg6e par un fusible a action differ6e
ou par un disjoncteur.
La fiche triphasee avec terre reduit le risque
de choc electri..que. Si la prise murale que vous
envisagez d'utihser est b_phas6e, vous avez la
responsabilite et I'obligat_on de la remplacer par
une prise triphasee correctement mise a la terre.
mise a la terre de 230/208 Volts AC,
Certains modules necessitent une prise
proteg6e par un fusible a action differ6e
doivent _tre installes sur leur propre
ou par un disjoncteur. Ces modules
circuit deriv6 pour eviter de surcharger
les circuits electriques du domicile qui
peut occasionner un risque d'incendie par
surchauffe des c_bles.
24
Tournevis _ t6te plate
Crayon
Niveau
Le cordon d'alimentation est equip6 d'un dispositif
d'mterrupt_on du courant. Un bouton d'essa_ et
de reenclenchement est fourni sur le bokier de
la prise. Vous devez tester le mecanisme
r6guli_rement en appuyant d'abord sur
lebouton TEST (Essai) puis sur le bouton RESET
(Reenclenchement) Iorsque I'appareil est branch&
Si le bouton TEST (Essail ne bascule pas ou si le
bouton RESET (Reenclenchement) ne reste pas
enclenche, cessez d'utiliser votre climatiseur et
appelez un technicien de service qualifi&
R_gle ou m_tre
Ciseaux ou couteau
Page 25

Instructions de montage dans une fen6tre
PIECES INCLUES
(l'aspect peut varier)
Jo!nt d'6ta_
su Pedr_elurfen 6tre_ _
Panneau en
accordeon
gauche
Joint inferieur du Iogement
(fin, adh6sif au dos)
Type A (6) Type B (7) Type C (6) Type D (3)
Support de seuil (2)
I_crou (2)
Boulon (2)
Rail de montage
superieur
Panneau en
accordeon
droit
Ferrure de verrouillage
de la fen6tre (2)
T
25
Page 26

Instructions de montage dans une fen6tre
INSTRUCTION RELATIVED,
E]
LA FENETRE
* Ces instructions sont valables pour une fen6tre
standard _ guillotine _ deux chassis mobiles.
Vous devrez modifier les instructions pour les
autres types de fen6tres.
i
A MISEENGARDE'Silesboulonsde
maintien au rebord ne font pas contact avec Ic
rebord de la fen6tre ou si vous avez une fen6tre
sans rebord, vous devez commander le jeu
d'accessoires RAKe7 pour installer correctement
ce climatiseur. Appelez le 800.626.2002 ou
consultez le site Internet ge.com.
* Toute la ferrure de montage doit 6tre solidement
fixee au bois, a la ma?onnerie ou au metal.
* La prise d'alimentation electrique doit se trouver
ported du cordon d'alimentation.
16.4po rain.
27po I
a 36 po l r
(Aveclespanneaux
enaccordeon)
1-51RETRAIT DU CLIMATISEUR DE
SON LOGEMENT
r_ Retirez et mettez de c6te les deux vis des c6tes
inferieurs de la grille frontale.
.... 40
AVANT
Retirez les deux boutons de
commande.
AVANT
I I
[] INSTRUCTIONS RELATIVE D,
LA CONTRE-FENETRE
Le cadre de la contre-fen6tre emp@he le
climatiseur de pencher vers I'ext@ieur, et donc de
se drainer correctement. Pour r6gler ce probl_me,
fixez un morceau de bois au rebord
de la fen6tre.
MORCEAU DEBOIS
LARGEUR : 2 po
LONGUEUR:Suffisamment long pour se Ioger
I'int@ieur du cadre de la fen6tre.
EPAISSEUR: Pour determiner I'epaisseur, placez
un morceau de bois sur le rebord de la fen6tre de
fa?on ace que le morceau de bois soit
1/2po plus 61ev6que le dessus du cadre
de la contre-fen6tre ou du cadre en vinyle.
Fixez solidement a I'aide de vis ou de clous fournis
par I'installateur.
1/2po plus elev6 que le cadre en
vinyle (sur certaines fen6tres)
[-_ Attrapez les deux coins inferieurs de la grille
tout en appuyant sur les c6tes du Iogement avec
le bout des doigts. Tirez vers vous pour liberer
la grille puis sortez-la en levant.
REMARQUE : Ne tirez pas le bord inferieur
vers vous de plus de 3 po ou vous risquez
d'endommager les languettes de la grille.
t
AVANT
r_ Retirez les vis de chaque c6te du
Iogement du climatiseur. Mettez-les dans un
endroit s0r.
1/2pop lus 6lev6 _ i ,z/Boi s
que le cadre de T ;'I I_) J- #/r I
la contre-fen6tre ,_ II_ ' Rebord
Cadre de la _ _ Cadre en vinylert "D
contre-fen6tre
AVANT
NOTE •Veillez _ conserver ces vis. Elles seront
necessaires dans une etape ulterieure de
I'installation.
26
Page 27

Instructions de montage dans une fen tre
r_ RETRAIT DU CLIMATISEUR
DE SON LOGEMENT (SUITE)
rE] Retirez et mettez de c6te la vis de mise
la terre.
Sortez le climatiseur de son Iogement en
le faisant glisser et en attrapant la poignee
du conteneur de fond et en tirant vers vous
tout en maintenant le Iogement. Ne tirez pas
et ne soulevez pas la zone d'evacuation en
mousse de polystyrene.
Ne tirez pas et
ne soulevez pas
vous risquez
d'endommager
votre appareil
AVANT
[TI INSTALLATION DU JOINT
INFERIEUR DU LOGEMENT
cette zone,
INSTALLATION DU RAIL DE
%
MONTAGE SUPI2RIEUR sun
LE LOGEMENT
Fixez le rail de montage superieur sur
le Iogement a I'aide de 3 vis de type B.
Appuyez fermement pour enfoncer
les vis dans le joint et a travers le rail
de montage superieur.
type B
• Decollez la pellicule au dos du joint
inferieur du Iogement et collez-le le long
du bas du Iogement devant le rail de
montage inferieur.
Rail de
montage
inferieur
Joint inferieur du Iogement
r_ INSTALLATION DES PANNEAUX EN
ACCORDI2ON sun LES COTI2S
r_ Faites glisser les panneaux en accordeon
gauche et droit dans les rails de montage
inferieur et superieur.
r_ Fixez les panneaux en accordeon au
Iogement a I'aide de 3 vis de type A
de chaque c6t&
Rail de montage superieur
Panneau en
accordeon
ARRIERE
Rail de montage inferieur
27
Page 28

Instructions de montage dans une fen tre
rT] INSTALLATION DU LOGEMENT
DANS LA FENI2TRE
INSTALLATION DU LOGEMENT
r71
DANS LA FENI_TRE (SUITE)
r_ Ouvrez la fen6tre et marquez I'axe central
du rebord de la fen_tre.
[_ Placez delicatement le Iogement sur le rebord
de la fen_tre et alignez la marque centrale sur
la partie inferieure avant avec I'axe central
du rebord de la fen_tre.
[] Tirez la fen_tre vers le bas derriere le rail
de montage superieur.
REMARQUE • Ne fermez pas la fen6tre
completement pour eviter que le mouvement
des panneaux en accordeon soit restreint.
[] Choisissez la position qui placera les ferrures
du rebord sur le point le plus externe du
rebord. Placez les c6tes courts des ferrures du
rebord sur le bas du Iogement vers la fen_tre.
Fixez les ferrures du rebord aux trous dans les
rails du Iogement en accord avec la position
choisie en utilisant 2 vis de type B par ferrure.
_MISE EN GARDE • N'insta,ez
pas ce climatiseur dans une fen6tre si les
boulons ne sont pas en contact avec
le rebord de la fen6tre.
r_ Attachez le
Iogement au
rebord de la
fen_tre en utilisant
3 vis de type D.
Tirez les panneaux
@
en accordeon vers
chaque rail de la
fen_tre a guillotine.
Fixez-les de chaque
c6te du cadre et du
rebord de la fen6tre
I'aide de 4 vis de
type C.
si, _1
@FIXATIONDU LOGEMENT DANS LA
FENI_TREETINSTALLATIONDUJOINT
D'I_TANCHFtlTI_SUPI_RIEURENMOUSSE
DELA FENI_TRE
D -& MISE ENGARDE•
Pourpreventezlaverrebrisezdans
lesfen@tres,attachezuneferrure
de support 6 la c6tedu
fen¢tre.
Fixez les ferrures de
verrouillage de la fen_tre (une
de chaque c6te) avec des vis
de type C.
Vinyle
Bois
I I.,,i Long c6te
I | desferrures
I I dereb°rd
--'] I EXTERIEUR
1-8
Ajustez le boulon et I'ecrou sur chaque ferrure
de fa£;on a ce que le Iogement soit legerement
incline vers I'exterieur. Utilisez un niveau,
environ 1/2 bulle donnera la pente correcte
vers I'exterieur.
MISEENGARDE'Silesboulonsde
maintienau rebordne font pas contactavec le rebord
de la fen6tre ou si vous avezunefen6tre sansrebord,vous
devezcommanderlejeu d'accessoiresRAK87
pour installercorrectementce climatiseur.Appelez
le 800.626.2002ou consultezle site Internetge.com.
r_ Decoupezlejoint
d'etancheitesuperieur
en mousse6 lulurgeur
[] de la fenCtre.
ns rezomousseentre
la vitre et lufenCtre
pour emp_cherI'air etlesinsectesde p_netrerdunsla
piece.
NOTE:Silejoint d'_tuncheitefourni ne s'udaptepus6
votre fenCtre,procurez-vousIocalementI'articleuppropri_
din d'obtenirune_tancheiteadequatede I'instalbtion.
28
Page 29

Instructions de montage dans une fen tre
INSTALLATION DU CLIMATISEUR
[]
DANS SON LOGEMENT
Faites glisser le climatiseur dans le Iogement
@
par le conteneur du fond. Ne poussez pas
sur les commandes, sur le boTtier en mousse
de polystyrene pour la sortie d'air ni sur les
serpentins a ailettes. Assurez-vous que le
climatiseur est correctement positionn&
N'appuyez pas
sur ces zones,
vous pourriez
endommager
votre appareil
Conteneur de fond
INSTALLATION DU CLIMATISEUR
DANS SON LOGEMENT (SUITE)
Fixez la grille frontale en inserant les
©
languettes de la grille dans les fentes situees
dans la partie superieure avant du Iogement.
Poussez sur la grille.
. .%
Attachez la grille frontale au Iogement
@
en remettant en place les 2 vis retirees
auparavant. Appuyez sur le dessus de
la grille pour permettre la mise en place
des vis de c6t&
Remettez en place les deux vis de mise
D
la terre retirees plus t6t, une de chaque c6te
du Iogement.
IMPORTANT • Les vis de mise a la terre
doivent 6tre remises en place pour assurer
une mise _ la terre adequate.
r_ Remettez les deux boutons de commande
en place.
E_ Branchez I'alimentation.
29
Page 30

Instructionsdemontagepouruneinstallationatraversunmur--Enoption
Le Iogement peut _tre installe a travers un mur
dans une habitation existante ou neuve.
Veuillez lire entierement ces instructions,
puis les suivre etape par etape.
REMARQUE : Excepte pour les supports en
V (fournis), veuillez obtenir tousles materiaux
Iocalement pour I'installation du climatiseur
travers un tour.
Ff] IMPORTANT
Une installationa travers un mur n'est pas appropri@
si une ou plusieurs des persiennes sur le c6te ou sur
ledessus sont obstru@s par lemur.
Toutes les persiennes sur le c6te ou sur le dessus
doivent depasser du c6te ext@eur du mur.
Le c6te int@eur du Iogement dolt depasser
suffisamment dans la piece pour equilibrer I'appareil.
Le Iogement dolt 6tre installe de niveau de droite
gauche et 16gerement penche de I'avant vers
I'arriere. Utilisez un niveau, environ 1/2 bulb donnera
la pente correcte vers I'ext@eur.
Une corniere de linteau est n@essaire pour
maintenir les briques ou les blocs au-dessus
de I'ouverture.
Un solin est n@essaire et dolt se prolonger
le long de I'ouverture pour @iter toute fuite
vers I'int@eur du mur.
Retirez le climatiseur de son Iogement. Pour
des instructions particulieres, veuillez vous
ref6rer aux Instructions de Montage dans une
fen_tre.
Assurez-vous qu'une prise murale se trouve
proximite de I'ouverture ou installez-en une.
I-TiIMPORTANT (suite)
Fixez le Iogement a I'aide de 14 vis a bois ancrees
d'au moins un pouce dans la structure du mur.
REMARQUE ' Si n@essaire, percez des trous de
guidage pour permettre une installation correcte.
Si le cadre est trop grand, utilisez des cales pour
@iter toute distorsion.
D FINITION DE L'OUVERTURE DANS
LE MUR
Calfeutrez les quatre c6tes du c6te exterieur
du Iogement pour eviter que I'humidite ne
penetre par lemur interieur. L'utilisation
d'un solin (rail d'ecoulement) permettra
davantage d'eviter que I'eau ne s'ecoule
dans lemur et le long du mur exterieur.
Couche de
pl_tre
Calfeutr
EXTERIEUR
Persiennes
(le c6te et /
le dessus
doivent
depasser du
c6te exterieur
du mur)
Remplissage des
trous et calfeutrage
(au-dessus et en
dessous du solin)
/.I
Moulure
e--- (s'il y a lieu)
INTERIEUR
Rail inferieur
J
_ Positionnez le Iogement dans I'ouverture dans
le tour et placez les bandes de maintien en bois
entre le bas du Iogement et le solin des deux
c6tes du rail inferieur. Elles doivent _tre de la
m_me hauteur que le rail inferieur et de la m_me
Iongueur que I'ouverture dans le tour.
Supports
Solin (Rail
d'ecoulement)
Solin (Rail
d'ecoulement) Bande de maintien en bois
Rail
inferieur
I_Placez le climatiseur dans le Iogement. Pour
des instructions particulieres, veuillez vous
ref6rer aux Instructions de Montage dans
une fen_tre.
30
Page 31

Avantd'appelerleservice.., www.electromenagersge.ca
Causespossibles Quefaire
Leclimatiseur • Assurez-vousquelafichedu climatiseursoitbienbranchee
metaasenmarcne estdebranch& dansla prisemurale.
Lefusibleasautd • V@ifiezlaboTte_ fusible/_disjoncteurset remplacezlefusible
ledisjoncteurestouvert, ou rebranchezledisjoncteur.
IIy aunepannedecourant. • S'ilseproduitunepannedecourant,debranchezleclimatiseur
enlemettantenpositionOFF(arr_t).Ouandlecourantrevient,
attendez3 minutesavantderemettreenmarcheleclimatiseur,
pour@iterdedeclencherlasurchargeducompresseur.
Lemecanismed'interruption • AppuyezsurleboutonRESET(remiseenmarche)situesurlafiche
decourantestdeclanch& du cordonelectrique.
• SileboutonRESETnerestepasenfonc&arrCtezleclimatiseur
d'airetappelezuntechnicienqualifi&
Lecimatiseur Laglacebloquelacirculation * ReglezlescommandessurHIGHFAN(vitesseduventilateur_lev@)
@le d'airetemp&cheleclimatiseur ou HighCool(fortrefroidissement)etr_glezlethermostatsurune
derefroidirlachambre, temp@atureplus_lev_e.
Leclimatiseurnerefroidit Lacirculationd'airestbloquee. • Assurez-vousqu'iln'yapasde rideau,destoreou demeuble
pasautantqu'illedevrait quibloqueledevantduclimatiseur.
Lecontr61edetemp@ature • EnmodeCOOL(frais)appuyezsurlatoucheDECREASE0 pad.
n'estpasbienr_gl& • Surlesmo@lesdotesdeboutonsdecommandes,tournez
leboutondetemp@aturesurunevaleurplus_lev@.
Lefiltre_ airestsale. • Nettoyezlefiltreaumoinstousles30jours.Consulterla section
Instructionsdefonctionnement.
Lachambre_taitchaude. • Apresavoirmisen marcheleclimatiseur,attendezque
L'airfroids'_chappe • V@ifiezlesgrilles_registredeplancheretlesreprisesd'airfroid.
delachambre.
Lesserpentinssontgelds. • Consultez"Leclimatiseurd'air@le"ci-dessous.
Leclimatiseurnecnauffe Lacirculationd'air *Assurez-vousquedesrideaux,desstoresoudesmeubles
uasautantqu'illeoevrait estrestreinte, nebloquentpasledevantduclimatiseur.
Lacommandede latemp@ature *Tournezleboutonaussiloinquepossibledanslesensinverse
n'estpeutCtrepasr_gl_e desaiguillesd'unemontre.Lesr_glageslesplusbasdonnent
assezbas. lechauffagemaximum.
Lefiltre_ airestsale. *Nettoyezlefiltreau moinstousles30jours.Consultezla section
Latemp@aturedansla piece *Apresavoirmisleclimatiseurenmarche,attendezque
etaitpeut-¢trebasse, latemp@aturedanslapieceser_chauffe.
L'airchauds'_chappe. • V@ifiezlesgrilles_ registreausoldufour etlesretoursd'airfroid.
DeI'eaucoule8I'exterieur IIfaittreschaudethumide. • C'estnormal.
DeI'eaucoule_I'int_rieur Leclimatiseurn'estpas • Pourobtenirunebonne@acuationdeI'eau,assurez-vous
inclineversI'ext@ieur. queleclimatiseursoitI_gerementinclinedeI'avant
L'eaus'amassedans L'humiditeestextraitede
eo/ateaudufond I'airde lachambreetpasse
dansleplateaudufond.
lachambreserefroidisse.
Instructionsd'Utilisation.
du boTtierversI'ar@re.
• C'estnormalpendantunep@iodecourtedansdesregions
peuhumides;normalpendantdesp@iodesplusIongues
dansdesr_gionstreshumides.
3;L
Page 32

Notes.
32
Page 33

Notes.
33
Page 34

Notes.
34
Page 35

ClimatiseurGE--GarantieLimiteeD'unAn. www.electr0menagersge.ca
Lesservices sous garantie sont dispens6s par nos centres de
r6paration ou par nos r6parateurs Customer Care®autoris6s.
Pour obtenir le service, appelez le 1.800.561.3344. Veuillez
fournir le num6ro de s6rie et le num6ro de module Iorsque
vous appelez pour obtenir le service.
Nousremplacerons:
Toute piece deleclimatiseur manifestant un vice de mat6riau ou defabrication. Durant cette
A c0mpter de!a date
dlachat initial
Lesd6placements de service 6 votre muison pour vous
apprendre 6 utiliser le produit.
Unmontage, une livroison ou un entretien
ddicient Sivous oyez un probl_me de montage
ou sile climotiseur n'opas Io bonne cupocit6 de
refroidissement pour son usage pr6vu,appelezvotre
revendeur ou votre installateur. Vous_tes responsable
de fournir une installation de raccordement 61ectrique
convenable.
Lespannes occasionn6es par desmodifications
au produit ou une utilisation non raisonnable, en
particulier une absence d'entretien raisonnable
et n6cessaire.
p6riode de garantie limit6e d'une ann6e,Mabe fournira aussi,gratuitement, lamain-d'oeuvre
et leservice de r6paration connexepour leremplacement de la pieced6fectueuse.
Agrafez le requ d'achat ici.
Pour obtenir le service sous
gurantie, vous devrez fournir la
preuve de I'uchat original.
Leremplacement desfusiblesde la maison ou la
r6activation desdisjoncteurs.
Lespannes occasionn6es par la corrosion sur les
modules qui ne sont pas prot6g6scontre lacorrosion.
Lesdommages occasionn6s par un mouvais voltage de
I'alimentation 61ectrique,un accident, unincendie,une
inondation ou une calamit6 naturelle.
Lesdommages indirects et cons6cutifs (]la propri6t6
personnelle occasionn6s par desvicespossiblesde
ce climatiseur.
Les dommages occasionn6s par la livraison.
Danslesemplacements commerciaux, la main-d'oeuvre
n6cessairepour d6m6nager I'appareiljusqu'6 un
emplacement o_ il est accessible par un technicien
particulier.
EXCLUSION DE GARANTIES IIVlPLICITES- Votre seulet unique recours est la r6paration du produit
selon les dispositions de cette Garantie limit6e. Toutes les garanties implicites, incluant les garanties
de commercialit6 et d'ad6quation 6 un usage sp6cifique, sont limit6es 6 une ann6e ou 6 la p6riode
la plus courte autoris6e par la 16gislation.
Cette garantie est valable pour le premier propri6taire et tout autre propri6taire du produit s'il achet6 au Canada
pour utilisation domestique dons Canada. Leservice 6 domicile sous garantie sera fourni 16oOil est disponible et
dons les r6gions que Mabe consid6re que I'offre de service est raisonnable.
Dons certaines provinces, il est interdit d'exclure ou de limiter les dommages directs ou indirects. II est alors
possible que les limitations ou exclusions ci-dessus ne s'appliquent pas dons votre cos. La pr6sente garantie
vous conf6re des droits juridiques sp6cifiques. Vous pouvez b6n6ficier d'autres droits, qui varient d'une province
6 I'autre. Pour connaTtre les droits dont vous b6n6ficiez dons votre province, communiquez avec le bureau des
relations avec les consommateurs de votre r6gion.
Garant : Mabe Canada Inc.,
Burlington, Ontario
35
Page 36

Assistance_ laclientele.
Vousavez unequestion ouvous avezbesoind'aide pour votre appareil#lectrom#nager? Contactez-nous par
Site InternetGE www.electromenagersge.ca
' Internet au site www.electromenagersge.ca 2/4heuresparjour, tous lesjours de I'ann#e.
Service de r_pc]rc]tions
Servicede r#parations GEest tout pros de vous.
Pour faire r#parervotre #lectrom#nager GE,ilsuffit de nous t#l#phoner.
1.800.561.3344
Studio de conception r_aliste www.electromenagersge.ca
Sur demande, GEpeut fournir une brochure sur I'am#nagement d'une cuisinepour lespersonnes
6 mobilit# r6duite.
Ecrivez: Directeur, Relationsavec les consommateurs, Mabe Canada Inc.
Bureau :310,1 Factory Lane
Moncton, N.B.E1C9M3
Prolongation de garantie www.electromenagersge.ca
Achetezun contrat d'entretien GEavant que votre garantie n'expireet b#n#ficiez d'un rabais substantiel.
Ainsileserviceapr_s-vente GEsera toujours 16apr_s expiration de la garantie.
Visiteznotre siteWeb ou appelez-nous au L888.26L21:3:3.
Pi_ces et occessoires
www.electromenagersge.ca
Ceuxqui d#sirent r#parer eux-m_mes leurs#lectrom#nagers peuvent recevoir pisceset accessoires
directement (3la maison (cartesVISA,MasterCardet Discoveraccept#es).
Lesdirectives stipul#esdans lepr#sent manuel peuvent _tre effectu#es par n'importe quel utilisateur.Les
autres r#parations doivent g#n#ralement _tre effectu#espar un technicien qualifi#.Soyezprudent,car une
r#paration inad#quate peut affecter le fonctionnement s#curitaire deI'appareil.
Voustrouverez dans lespagesjaunes de votre annuaire le num#ro du Centre de service Mabele plus proche.
Autrement, appelez-nous au 1.800.561.3344.
Contc]ctez-nous www.electromenagersge.ca
Sivous n'_tes pas satisfait du serviceapr_s-vente dont vous avez b#n#fici#:
Premi_rement, communiquez avec lesgens qui ant r#par# votre appareil.
Ensuite,si vous n'_testoujours pas satisfait envoyeztousles d#tails-num#ro de t#l#phone compris-au
Directeur, Relationsavec les consommateurs, Mabe Canada Inc.
Bureau :310,J_Factory Lane
Moncton, N.B.E1C9M:3
Inscrivezvotre appareil #lectrom#nager en direct,aussit6t que possible.Celaam#liorera nos communications
I Inscrivez votre appareil _lectrom_nager www.electromenagersge.ca
et notre serviceapr_s-vente. Vouspouvez #galement nousenvoyer par la paste
le formulaire d'inscription joint (3votre documentation.
36
Page 37

Instrucciones de seguridod ........... 38,39
Instrucciones de opemci6n ........... 40,41
Cuidado y limpieza
Bobinas para exteriores ...................... 41
Filtro de (]ire .................................. 41
Remoci6n del armaz6n
de la pc_rrilla.................................. 41
Instrucciones de instalaci6n
Instrucciones de instalaci6n
c]trav6s de k] pared-opcional ............... 48
Instrucciones de
instalaci6n en una ventana ............... 42-47
Solucionor problemos .................... 49
Servicio (]1consumidor
Garantk] ...................................... 50
Servicio al consumidor ....................... 51
AEE08
AEE12
EscribalosnOmerosdemodelo
yserieaqd:
# deModelo
# deSerie
Puede encontror estos nOmeros
en un(] etiquet(] en elcost(]do
del (]condicion(]dor de (]ire.
37
Page 38

INFORMACIONIMPORTANTEDESEGURIDAD.
LEATODASI_ASINSTRUCCIONESANTESDEUSAR.
-&iADVERTENCIA!
Por su seguridad, se debe seguir la informaci6n en este manual para minimizar el riesgo de incendios,
descargas el_ctricas o lesiones personales.
PRECAUCIONESDESEGURIDAD
Useeste electrodom6sticosolamente para
el prop6sito determinado seg0n sedescribe
enel Manual del propietario.
Esteacondicionador de aire debeinstalarse
correctamente deacuerdo con las
Instruccionesde instalaci6nantes de su uso.
Nunca desenchufesu acondicionador de
aire tirando del cableel6ctrico.Siempre
agarre firmemente elenchufe y tire de
61directamente hacia afuera.
Reemplace inmediatamente todos los
cables el6ctricos que se hayan pelado o que
se hayan dahado de alguna otra manera.
Un cable de corriente dahado no debe
repararse, sino que debe ser sustituido por
uno nuevo que se adquiera del fabricante.
No use un cable el6ctrico que muestre
evidencias de deterioro, o dahos de
abrasi6n en su superficie en alguno de sus
extremos.
Si el recept6culo no coincide con el
enchufe, un electricista calificado debe
reemplazar el recept6culo
Apague la unidad (OFF)y desenchufe el
acondicionador de aire antes de efectuar
reparaciones o la limpieza.
NOTA:Recomendamosenf_ticamenteque
un t_cnicocalificadorealicelasreparaciones.
Porsu seguridad...noalmacene ni use
materiales combustibles,gasolinau
otros vapores o liquidosinflamables
en laproximidad de 6ste o alg0n otro
electrodom6stico.
Todoslos acondicionadores de aire
contiene refrigerantes,los quepor Ley
Federaldeben ser removidosantes de
desecharlos.Siusted planeadeshacersede
alg0n producto que contenga refrigerantes,
p6ngase encontacto con lacompaBia que
seencarga de recoger su basura para que
le indiquen qu6 hacer.
Estos sistemas de acondicionadores de
aire R410A requieren que los contratistas
y t6cnicos usen herramientas, equipos
y est6ndares de seguridad aprobados
para su uso con este refrigerante. NO
use equipamiento certificado s61opara
refrigerante R22.
COMOCONECTARLAELECTRICIDAD
Bajo ninguna circunstancia, corte o remueva la
tercera pSa (tierra) del cable el_ctrico. En pos
de la seguridad personal, este electrodom_stico
debe siempre conectarse a tierra.
NOuseunenchufeadaptadorconesteelectrodom@stico.
El cable el6ctrico de este electrodom6stico est6
equipado con un enchufe de tres pOas (tierra)
que combina con un tomacorriente est6ndar
de tres tomas de pared para minimizar la
posibilidad de una descarga el6ctrica.
El cable de alimentaci6n incluye un
dispositivo para interrupci6n de corriente.
Se incluye un bot6n de prueba y de reinicio
en el dispositivo. El dispositivo debe ponerse
a prueba peri6dicamente: primero se presiona
el bot6n de TEST(prueba) y luego RESET
(reinicio) mientras se encuentra enchufado al
tomacorriente. Siel bot6n TESTno se dispara
o si el bot6n RESETno queda enganchado,
38
deje de utilizar el acondicionador de aire y
comuniquese con un t6cnico calificado.
Pidaa unt6cnico que inspeccioneel
tomacorriente y elcircuito para cerciorarse
de que eltomacorriente est6 conectado a
tierra de la manera apropiada.
Donde exista un tomacorriente de dos
tomas, es su responsabilidad y obligaci6n
personal hacer que dicho tomacorriente
sea reemplazado pot uno de tres tomas
con conexi6n a tierra.
Elacondicionador de aire deberia siempreestar
conectado a un tomacorriente individual con su
circuito de voltaje correspondiente.
Esto proporciona el mayor rendimiento y
adem6s evita que los circuitos del resto de
la casa se sobrecarguen, Io cual podria causar
incendios por el sobrecalentamiento del
cableado.
Ver las Instrucciones de instalaci6n, en la
secci6n Requisitos EI6ctricos para los requisitos
especificos de conexi6n.
Page 39

GEAppliances.com
Z iADVERTENCIA!
USO DE PROLONGADORES
RIESGO DE INCENDIO. Podria ocasionar
lesiones graves o la muerte.
• NO use un prolongador con este
Acondicionador de Aire de Ventana.
• NO use protectores contra picos de tensi6n ni
adaptadores pare mOItiples tomacorrientes con
este Acondicionodor de Aire de Ventono.
LEAYSIGAESTASINSTRUCCIONESDESEGURIDADCUIDADOSAMENTE.
GUARDEESTASINSTRUCCIONES
39
Page 40

Acercadeloscontrolesenelacondicionador
deaire--modelosconbotonesdecontrol.
Las funciones y el aspecto pueden variar.
5 6
,k /o
Warmer Cooler
CONTROLDETEMPERATURA
@
Controles
@
Control de temperatura
Elcontrol detemperatura seutilizapara
mantener la temperaturade la habitaci6n.
Elcompresorse encender6y apagar6 para
mantener Iohabitaci6ncon el mismonivelde
confort.GireIo perilloen sentidode los ogujos
del relojo Cooler(HaSfrio)(colorozul)y el oire
interiorser6m6s fib. GireIoperilloen sentido
controrio o losogujosdel relojo Warmer(HaS
tibio)(colorrojo)y eloire interiorseentibior6.
demodo
Hi h__ Hi
off
Hea "1 oo,
Low\X I I //Low
Heat __J Cool
Fan
Only
CONTROLDEMODO
@
DescripcionesderefrigeraciOn
Paraunarefrigeraci6nnormaI-Seleccione
HiCool(frioalto)o LowCool(friobajo)con el control
de temperoturoenIoposici6nmedic.
Paraunarefrigeraci6nmaxima-Seleccione
HiCool(frioalto)conelcontrolde temperoturo
girodo en sentidode los ogujosdel reloj ensu
posici6nmdximo.
ParaunarefrigeraciOnsilenciosay nocturna-
SeleccioneLowCool(friobajo)conelcontrol
de temperoturoenIoposici6nmedic.
HiCool(frioalto)y LowCool(friobajo)brindan
refrigeroci6ncondiferentesvelocidodesde
ventilodor.
HiHeat(caloralto)y LowHeat(calorbajo)brindan
colefocci6ncondiferentesvelocidodesde
ventilodor.
Laconfiguraci6nFanOnly(s61oventilador)ofrece
circuloci6ny filtro deoire sinrefrigeroci6no
colefocci6n.
NOTA:Siusteddesplazaelcontroldemododeuna
configuraci6nfriaa Off(apagado),unaconfiguraci6nde
ventiladorodecalefacci6n,espereporIomenos
3minutosantesdecambiaraunaconfiguraciOndefrio
40
Descripcionesdecalefacci6n
ParaunacalefacciOnnormaI-Seleccione
HiHeat(caloralto)oLowHeat(calorbajo)con
el controlde temperoturo en Ioposici6nmedic.
Paraunacalefacci6nmaxima-SeleccioneHiHeat
(caloralto)conel control detemperoturogirodo
en sentidocontrorio o los ogujosdel relojen su
posici6nmdximo.
ParaunacalefacciOnsilenciosaynocturna-Seleccione
LowHeat(calorbajo)con el control de temperoturo
en Ioposici6nmedic.
Page 41

Informaci6nimportanteadicionale.
DirecciOndel aire
Utilice lapalanca para ajustar la direcci6n del aire
s61ode izquierda a derecha.
Mediante una presi6nde los dedos sobre las
persianas horizontales, la direcci6n del aire puede
ajustarse en direcci6n ascendente o descendente.
Cuidadoy limpiezadelacondicionadordeaire.
Rejilla Ycaja
Apague el acondicionador de aire y retire el enchufe
del tomacorriente de la pared antes
de limpiar.
Filtro deaire
Para limpiar, use aguay un detergente suave.
No usecloro o materiales abrasivos.
GEAppliances.com
Elfiltro de aire detrOsde la rejilla frontal debe
inspeccionarse y limpiarse porIo menos carla
:30dias o m6s a menudo sifuese necesario.
Pararetirarlo:
Empujeen un lado delborde delfiltro y tirelo
del otro lado.
Limpie elfiltro con agua tibia yjab6n. Enju6gueloy
permita que seseque antes de colocarlo otra vez en
su lugar. Nolave el filtro en un lavavajillas.
PRECAUCIONNoOPEREelacondicionador
deairesinelfiltrodebidoaquela suciedad
ylaspelusasIoobstruirSny reducirSnsurendimiento.
Bobinasparaexteriores
Sedeben inspeccionar con frecuencia lasbobinas
en el lado exterior del acondicionador de aire. Si
las mismasest6n obstruidas con suciedad u hollin,
podrian limpiarse profesionalmente.
Sonidosde operaci6nnormales
Quizfis escuche tm sonido metfilico causado pot
el aglm tomada y tirada conu'a el condensador
en los dfas lluviosos o cuando la humedad
es aim. Esta caracterfsfica de diseflo ayuda a
remover
la humedad y mejora la eficiencia.
Quiz_is escuche que el termostato hace clic
cuando el compresor hace ciclo entre encendido
y apagado.
E1 again se acumula en la bandeia dumnte dfas
lluviosos o con mucha humedad. E1 agl_a podria
derrmnarse y gotear desde el lado externo de
la unidad.
E1venfilador podrfa flmcionm" aun si el
compresor no lo hace.
41
Page 42

Instrucciones
Acondicionador
de instalaci6n
I F_Preguntas? Llame 800.GE.CARES (800.432.2737) o visite nuestra pagina en la red en GEAppliances.com ]
de aire
-ZILPRECAUCION
ANTES DE INICIAR
Lea estas instrucciones completa y
cuidadosamente.
• IMPORTANTE JGuardeestas
instrucciones para uso del inspector local.
• IMPORTANTE JObservetodos
los c6digos y 6rdenes de ley.
• Nota al instalador- Asegurese de dejar estas
instrucciones con el consumidor.
• Nota al consumidor- Conserve estas
instrucciones para referencia futura.
• Nivel de destreza - La instalaci6n de este
aparato requiere de destrezas mecanicas
basicas.
• Tiempo de ejecuci6n - Aprox. 1 hora
• Recomendamos dos personas para
la instalacion de este producto.
• La instalaci6n apropiada es la
responsabilidad del instalador.
• La falla del producto debido a una
instalaci6n inadecuada no esta cubierta
por la garantia.
• Cuando instale este acondicionador
de aire, DEBE usar todas las piezas
suministradas y usar procedimientos adecuados
de instalaci6n como describe en estas
instrucciones y algunas instrucciones de kit
separadas.
El cable de alimentacion incluye un dispositivo
para interrupcion de corriente. Se incluye un
bot6n de prueba y de reinicio en el dispositivo.
El dispositivo debe ponerse a prueba
peri6dicamente: primero se presiona el bot6n de
TEST (prueba) y luego RESET (reinicio) mientras
se encuentra enchufado al tomacorriente. Si el
bot6n TEST no se dispara o si el bot6n RESET
no queda enganchado, deje de utilizar el
acondicionador de aire y comuniquese con
un tecnico calificado.
Bajo ninguna circunstancia corte o remueva
la tercera pOa (conexion a tierra) del cable
electrico.
No cambie el enchufe en el cable electrico
de este acondicionador de aire.
Los cables caseros de aluminio podrian
presentar problemas especiales. Consulte
a un tecnico electricista calificado.
Si los tornillos de soporte del umbral no tienen
contacto con el umbral de la ventana o si
cuenta con una ventana sin umbral,
debe ordenar el kit de accesorios RAK87
para instalar de forma adecuada este
acondicionador de aire. Llame a
800.626.2002 o visite GEAppliances.com.
REQUISITOS ELECTRICOS
Algunos modelos requieren
tomacorrientes de 115/120 voltios de
corriente alterna y 60 Hz conectados
a tierra, protegidos con un fusible de
dilatacion de tiempo de 15 amperios
o un cortacircuitos.
El enchufe de tres pQas con conexion a tierra
minimiza la posibilidad de descargas electricas. Si
el tomacorriente de la pared que usted planea usar
solamente tiene 2 tomas, es su responsabilidad
hacer que un tecnico Io reemplace por uno de tres
tomas con conexion a tierra.
Algunos modelos requieren 230/208
voltios, de corriente alterna, protegidos
por un fusible de dilataci6n de tiempo
o un cortacircuitos. Estos modelos
deberian instalarse en un ramal exclusivo
del circuito para un rendimiento mas
notable y para prevenir sobrecargas en
los circuitos de cableados de su casa o
apartamento, Io cual podria representar
un riesgo de incendio por el
sobrecalentamiento de los alambres.
42
Page 43

Instrucciones de instalaci6n en una ventana
HERRAMIENTAS QUE NECESITARA
Un destornillador de estrella
PARTES INCLUIDAS
(apariencia puede variar)
Panel de
acorde6n
izquierdo
Llave ajustable
Tijeras o cuchilla
Empaque superior de
espuma de la ventana
Un destornillador
con hoja plana
Nivel
Lapiz
Una regla o cinta metrica
Soporte del umbral
(2)
Tuerca (2)
Perno (2)
Sellado de la carcasa
inferior (fino, con (]dhesivo
en I(] parte posterior)
Tipo A (6) Tipo B (7)
Tipo C (6)
Tipo D (3)
Riel de montaje
superior
Panel de
,acorde6n
derecho
Soporte para bloqueo
de ventana (2)
43
Page 44

Instrucciones de instalaci6n en una ventana
rT] REQUISITOS PARA LA VENTANA
* Estas instrucciones son para una ventana
estandar de dos pliegues. Usted necesitara
modificar el proceso para otros tipos de ventanas.
-ZiLPRECAUCION" silostornillos
de soporte del umbral no tienen contacto con
el umbral de la ventana o si cuenta con una
ventana sin umbral, debe ordenar el kit de
accesorios RAK87 para instalar de forma adecuada
este acondicionador de aire. Llame a 800.626.2002
o visite GEAppliances.com.
* Todas las partes de apoyo deben quedar
totalmente aseguradas a algQn metal,
mamposteria o a la madera.
° El tomacorriente electrico debe estar al alcance
del cable electrico del acondicionador de aire.
I
B===8
16.4" min.
,1[
27" a36" (con
paneles de acordeon)
m
1-
I
D REQUISITOS DE UNA VENTANA
DE TORMENTAS
Un marco de ventana de tormentas no permitira
que el acondicionador de aire se incline hacia el
exterior y evitara que drene apropiadamente. Para
solucionar este problema, adhiera un pedazo de
madera a el umbral.
PEDAZOS DE MADERA
ANCHO: 2"
LONGITUD: Lo suficientemente largo como para
ajustar en el interior del marco de la ventana.
GRUESO: Para determinar el grueso, coloque un
pedazo de madera en el umbral para hacerla 1/2"
mas alta que la pare superior del marco de la
ventana de tormentas o del marco vinilo.
Peguelo firmemente con clavos o con tornillos
proporcionados por el instalador.
D QUITE EL ACONDICIONADOR
DE AIRE DE LA CARCASA
r_ Quite y conserve los 2 tornillos de los lados
inferiores de la parrilla frontal.
FRENTE
[-_ Retire las dos perillas de control.
FRENTE
FC] Tome las esquinas inferiores de la parrilla
mientras presiona hacia adentro sobre los
costados de la carcasa con sus dedos. Tire
hacia afuera para liberar y levantelo.
NOTA: No tire del borde inferior hacia usted
mas de 3" porque puede daSar las lengQetas
de la parrilla.
FRENTE
r_ Quite los tornillos de cada lado de la carcasa.
Conservelos en una ubicacion segura.
| 1/2" mas alto que el
que el marco .... Madera
de ventana i n_ [] r_,;_g/_
de tormentaSMarcode _ Umbra_._
ventanade " r_ Marcovinilo I I
tormentas
_ marco vinilo (en algunas1/2" mas alto '_ventanas)
FRENTE
NOTA: AsegQrese de guardar estos tornillos.
Los necesitara mas adelante en la instalacion.
44
Page 45

Instrucciones de instalaci6n en una ventana
QUITE EL ACONDICIONADOR DE
AIRE DE LA CARCASA (CONT.)
Quite y conserve el tornillo de cable a tierra.
Deslice el acondicionador de aire de la carcasa
tomando la manija de la bandeja inferior y
tirando hacia adelante mientras se sujeta la
carcasa. No tire o levante el area de descarga
de poliestireno.
FRENTE
R-I INSTALE EL SELLADO DE
LA CARCASA INFERIOR
* Pele el papel que cubre el sellado de
la carcasa inferior e instalelo a Io largo
de la parte inferior de la carcasa frente
al riel de montaje inferior.
No tire o
levante
esta zona
porque
pueden
provocarse
daflos a la
unidad.
D INSTALE EL RIEL DE MONTAJE
SUPERIOR EN LA CARCASA
Sujete el riel de montaje superior a la parte
superior de la carcasa con 3 tornillos tipo B.
Presione firmemente para introducir los
tornillos dentro de la junta y a traves del riel
de montaje superior.
Tornillos
Tipo B
1-61INSTALE LOS PANELES EN
ACORDEON LATERALES
montaje
Rielde
inferior
r_ Deslice los paneles en acordeon izquierdo
y derecho dentro de los rieles de montaje
superior e inferior.
r_ Sujete los paneles en acordeon a la carcasa
utilizando 3 tornillos tipo A en cada lado.
Riel de montaje superior
Sellado de la carcasainferior
Panel en
acorde6n
Tornillos
tipo A -_"
PARTE TRASERA
Riel de montaje inferior
45
Page 46

Instrucciones de instalaci6n en una ventana
I711NSTALE LA CARCASA
EN LA VENTANA
[] Abra la ventana y marque la linea central
del alfeizar de la ventana.
[_ Con cuidado coloque la carcasa en el alfeizar
de la ventana y alinee la marca central sobre
el frente inferior con la linea central del
alfeizar.
r_ Baje la ventana detras del riel de montaje
superior.
INSTALE LA CARCASA
rfl
EN LA VENTANA (CONT.)
['_ Fije la carcasa
al alfeizar de la
ventana utilizando
3 tornillos tipo D.
support t
Tire los paneles en
@
acorde6n hacia cada
carril de los marcos
de la ventana.
Sujetelos sobre ////___j_
cada lado al marco
de la ventana y al
alfeizar de la ventana
utilizando 4tornillos i:I _ i
tipo C.
N©TA: No cierre la ventana con tanta firmeza
para que el movimiento de los paneles en
acordeon se vea restringido.
r-_ Seleccione la posicion en la que los soportes
del alfeizar quedaran mas cerca del punto mas
alejado del alfeizar. Coloque el lado corto de
los soportes del alfeizar, en la parte inferior
de la carcasa, hacia la ventana. Sujete los
soportes del alfeizar al orificio de la carcasa
en relacion con la posicion seleccionada
utilizando 2 tornillos tipo B en cada soporte.
PRECAUCI0 N" Noinstaleeste
acondicionador de aire en una ventana si los
pernos no hacen contacto con elalfeizarde laventana.
I I_ Costado largo
] I de los soportes
I I delalf6izar
--] I EXTERIOR
[_ Ajuste el tornillo y la tuerca de cada soporte
de modo que la carcasa quede instalado
con una ligera inclinacion hacia el exterior.
Utilice un nivel; la inclinacion correcta hacia el
exterior no debera ser de mas de 1/2 burbuja.
PRECAUCION" silostomi,osde
soporte del umbral no tienen contacto
con el umbral de la ventana o si cuenta con una
ventana sin umbral, debe ordenar el kit
de accesorios RAK87 para instalar de forma
adecuada este acondicionador de aire. Llame
a 800.626.2002 o visite GEAppliances.com.
46
FIJE LA CARCASA EN LA VENTANA
@
E INSTALE LA JUNTA SUPERIOR
DE ESPUMA DE LA VENTANA
%
PRECAUCION:
Enventanas construidas
de vinil o de similar Vinilo
construcci6n, conecte el
soporte a el marco de la
ventana para prevenirdaBoa
laventanayvidro quebrado.
Sujete los soportes de
fijacion de la ventana
(uno en cada lado) con
tornillos tipo C.
%
Cortelajunta de espumasuperiordela ventanaal
©
anchodela ventana. / '_Rellenela espumaentre
paraevitarque airee
elvidrio yla ventana l_ll
insectos
seintroduzcanen la
habitaci6n.
NOTA:Silajunta provistano esadecuadapara su
ventana,obtenga elmaterialapropiadoIocalmente
pararealizarunaadecuadainstalaci6nde sellado.
Page 47

Instrucciones de instalaci6n en una ventana
INSTALE EL ACONDICIONADOR
[]
EN LA CARCASA
Deslice el acondicionador de aire dentro de la
@
carcasa de la bandeja inferior. No haga presion
sobre los controles, carcasa de poliestireno de
la descarga de aire o las serpentinas de aletas.
Verifique que el acondicionador de aire se
encuentre firmemente asentado.
/_!!!!!:_ /!!!!__
No presione
en estas areas
porque puede
daflarse la
unidad.
Bandeja inferior
@
Vuelva a instalar los 2 tornillos quitados
antes, uno en cada lado de la carcasa.
INSTALE EL ACONDICIONADOR
EN LA CARCASA (CONT.)
Sujete la parrilla frontal a la carcasa
@
introduciendo las lengQetas de la parrilla
dentro de las ranuras de la parte superior
frontal de la carcasa. Presione la parrilla
hacia adentro.
Fije la parrilla frontal a la carcasa reinstalando
E3
los 2 tornillos quitados con anterioridad.
Haga presion sobre la parte superior de
la parrilla para ayudar con la instalacion
de tornillos laterales.
IMPORTANTE: Los tornillos de conexion a
tierra deberan ser reinstalados para asegurar
una conexion a tierra adecuada.
[] Reinstale las dos perillas de control.
@
Conecte la electricidad.
47
Page 48

Instrucciones de InstalaciOn a Traves de la ParedmOpcional
La carcasa puede instalarse a traves de la pared en
construcciones existentes y nuevas.
Lea por completo y luego siga todos los pasos.
NOTA: Con excepci6n de los montajes de soportes en
V (incluidos), obtenga todos los materiales en forma
local para montar el acondicionador de aire
a traves de la pared.
rT] IMPORTANTE
La instalaci6natraves de la pared no es apropiada si
alguna de las persianaslateraleso superiores
de la carcasaquedar_n obstruidas por la pared.
Todas las persianaslateralesy superiores de
lacarcasadeben proyectarse sobre la pared exterior
de la pared.
Ellado interior de lacarcasadebe proyectarse dentro
de la habitaci6n Iosuficiente parapotenciar al m_ximo
el equilibrio de la unidad.
Lacarcasa debe estar instaladade ladoa ladoy con
una peque_a inclinaci6n del frente haciala parte
trasera. Utilice un nivel; la inclinaci6n correcta de la
carcasahacia el exterior no deber_ ser de m_s de 1/2
burbuja.
Se requiere un 4ngulode dintel para sostener ladrillos
o bloques sobre laabertura.
Se requiere un revestimiento de aislaci6n que
debe extenderse pot la Iongitud de la abertura para
asegurar que no haya perdidas en lascavidades
internas.
[-_Quite el acondicionador de aire de la caja.
L__lPara instrucciones especificas, consulte las
Instrucciones de instalacion en una venta
Instrucciones de instalacion en una ventana.
AsegQrese de que haya un tomacorrient_
-_AsegQrese de que haya un tomacorriente cerca
de la ubicacion del orificio o efectQe arrel
de la ubicacion del orificio o efectQe arreglos
para instalar un tomacorriente.
[!] IMPORTANTE (cont.)
Fije con 14tornillos para madera sujetos por Io menos
una pulgada dentro de la estructura de soporte de
la pared.
NOTA:Perforeorificios piloto, si fuera necesario,para
una instalacionadecuada.Si el armazonesmas grande,
utilice cutlas paraprevenir ladeformacion de la carcasa.
ITI TERMINE LA ABERTURA
DE LA PARED
Utilice calafateo en los cuatro costados
del lado exterior de la carcasa para que no
ingrese humedad a la pare interna. El uso de
revestimiento de aislacion (riel de goteo) evitara
aQn mas el ingreso de agua dentro de la pared
yen la pare exterior del edificio.
( 4.....----Linea
f de yeso
Angulo d
Calafateo _ -"--._ r<<_ Ij [i 4_. M old ura
EXTERIOR
Persianas de INTERIOR
aire (la parte
superior y /
los costados_. _ Riel inferior
deben
proyectarse J
sobre el lado
externo de
la pared) r___
Relleno de madera _ I/_ I t,_/L
y calafateo (por/ \\ /11
encimaydebajo \X II II(/\111'1
de revestimiento //,!r/\\,J I IIII (ll
deaislaci6n) J / _11_''' _
SoportesenV / Parteinferior\ Riel
Revestim.iento \ \ /
---"-"-"-_?"_"Jr_ IJ I_ (si se desea)
/ delacarcasa \ inferior
l/ ttlll
Coloque la carcasa en la abertura de la pared
y coloque guias de soporte de madera entre
la pare inferior de la carcasa y el revestimiento
de aislacion sobre ambos lados del riel inferior.
Deben ser de la misma altura del riel inferior y
de la misma Iongitud de la abertura de la pared.
re, ea tno
Revestimiento de
aislaci6n de
_] Coloque el acondicionador de aire dentro de la
48
(riel goteo)
Guias de soporte de madera
carcasa. Para instrucciones especificas, consulte
las Instrucciones de instalacion en una ventana.
Page 49

Solucionarproblemas.
Causasposibles
Elacondicionadordeaire
noencienoe est6desconectado.
Elfusiblesedispar6/ • Inspeccionelosfusibles/ cajadeinterruptoresde lacasa
elcortacircuitossedispar6, y reemplacecualquierfusibleo reajusteel interruptor.
Interrupci6nen el • Launidadsereiniciar6autom6ticamentecon la
configuraci6n
aproxlmadamente
sobrecargadelcompresor.
Elacondicionadorueaire
Cool
seestacongelanao
Elacondicionadordeaire Elflujodeaireest6restringido. • Cerci6resedequenoexisteningunacortina,persianao
noenfr[acomodebeda mueblebloqueandoelfrentedelacondicionadordeaire.
tecla
mayor.
suministroel_ctrico.
Eldispositivodeinterrupci6n
decorrientesehaactivado.
Elhielobloqueaelflujo
deairehaciaelacondicionador
deaireevitandoqueseenfrfe
lahabitaci6n.
Elcontroldetemperaturano • Enlosmodelosconteclado:EnelmodoCool(Frio),presionela
est6ajustadoapropiadamente. Reducci6n0.
Elfiltro deaireest6sucio. • Limpieelfiltrocada]0 dfasporIomenos.Verlasecci6n
Lahabitaci6npodrfahaber • Cuandoelacondicionadorde aireseenciende,usted
estadocaliente, necesitadarletiempoparaqueenfri6lahabitaci6n.
Elairefrfoseest6escapando. • Cerci6resedequelosregistrosdelacalefacci6nnoest6n
Lasbobinasdeenfriamiento • Ver"Acondicionadordeairecongel4ndose"m6sadelante.
secongelaron.
Qu_hacer
• Cerci6resedequeelacondicionadordeaireest6
enchufadototalmenteeneltomacorriente.
utilizadaporOltimavezluegodereestablecerlaelectricidad.
• Existeunretrasodetiempoporprotecci6n(de
3minutos)paraevitarladesconexi6npor
Porestaraz6n,esposiblequelaunidadnocomienceaenfriarde
forma normalhastatranscurridos3minutosdesdequevolvi6a
encenderse.
• Presioneelbot6nRESETubicadoenelcabledealimentaci6n.
• Sielbot6nRESETnosemantieneensulugar,noutilicem6s
elacondicionadordeairey comunfqueseconuntecnicocalificado.
• ColoqueloscontrolesenHighFan(ventiladoralto)6High
(fifoalto)yajusteeltermostatoaunatemperaturem6salta.
• Enlosmodelosconbotones,girelatemperaturaaun nOmero
deCuidadoYlimpieza.
abiertosy seencuentranretornandoelairefib.
E acondicionadordeaire Elflujodeaireest6 • Verifiquequeno hayacortinas,persianaso muebles
nocalientacomodeberia restringido, bloqueandoelfrentedelacondicionadordeaire.
Elcontroldetemperatura • Girelaperillaensentidocontrarioalasagujasdelrelojalm6ximo.
noestdconfiguradoIo Laconfiguraci6nm6sbajaoffeceunacalefacci6nm6xima.
suficientementebajo.
Elfiltro deaireest6sucio. • LimpieelfiltroporIomenoscada]0 alas.Verlasecci6n
Lahabitaci6nestabafib. • Cuandorecienseenciendeel acondicionadordeaire,debepasar
Elairecalienteseescapa. • Controlequenohayaabiertasrejillasdepisodecalderas
Hayaguagoteandoafuera TiempohOmedoy caliente. • Estoesnormal.
Hayaguagotean@ene Elacondicionadordeaire • Paradrenarelaguaapropiadamente,cercbresedeque
interiordelahabitaciOr noest6inclinadohaciaafuera, elacondicionadordeaireest6inclinadoligeramente
Seacumulaaguaen
labandeja
Lahumedadremovidadelaire
y sedrenahastalabandeja.
Instruccionesdeoperaci6n.
untiempohastaquelahabitaci6nsecaliente.
o retornosdeairefrio.
desdeelfrentehaciaatr6s.
• Estoesnormalporuncortoperbdoen6reasconpoca
humedad;normalporunperfododetiempom6spostergado
en6reasm6shOmedas.
49
Page 50

Garantia de su acondicionador de aJre-garantia Iimitada de un ano.
Todos los servicios de garantia los proporcionan nuestros
Centros de Reparaci6n de F6brica o nuestros t6cnicos
Customer Care®autorizados. Para concertar una cita de
reparaci6n, en linea, 24 horas al dia, visitenos al GEAppliances.
com, o Ilame al 800.GE.CARES (800.432.2737).Cuando Ilame
para solicitar servicio, pot favor tenga a mano el n0mero de
serie y el n0mero de modelo.
GE reemplazar6:
Cualquier parte del acondicionador de aire que falle debido a defectos en los materiales o en
A partir de lafecha
de la compra original
Viajesdeservicioa su casa para mostrarle c6mo
funciona el equipo.
Instalaci6n o entrega inapropiada, o mantenimiento
impropio. Siusted tiene un problema durante lainstalaci6n,
o sisu acondicionador de aire no tiene la capacidad de
enfriamiento que usted necesita,p6ngase en contacto con
nuestro distribuidor o instalador.
Ustedes responsable de proporcionar lasfacilidades
de conexi6n el6ctrica necesarias.
Fallodel producto resultante de modificaciones al producto
o debido a uso irrazonable incluyendo no proporcionar
mantenimiento razonabley necesario.
Enlocalescomerciales, lamano de obra necesaria para
retirar la unidad hacia un lugar para revisi6n por parte
de un t6cnico individual.
la fabricaci6n. Durante esta garantia limitada de un afio, GEtambi6n proporcionar6, sincosto
alguno,toda lamano deobra y elservicio relacionado-para reemplazarpartes defectuosas.
Grape aqui su recibo.
Se requiere facilitar prueba
de la fecha de compra original
para obtener un servicio
bajo la garantia.
Reemplazode fusiblesde la casa o reajuste del sistemade
circuitos.
Fallosdebido a la corrosi6n en modelos que no est6n
protegidos contra la corrosi6n.
Dafio al producto causado por voltaje inapropiado hacia el
equipo,accidentes, incendios,inundaciones oactos
de la naturaleza de fuerza mayor.
DaBosincidentales oconsecuenciales causados por
defectos posiblescon esteacondicionador de aire.
DaBosdespu6s de la entrega.
EXCLUSION DE GARANTJASIMPLJCITAS--Su 0nico y exclusivo derecho es la reparaci6n del producto, tal y
como se indica en esta Garantia limitada. Cualquier garantia implicita, incluyendo las garantias implicitas
de comerciabilidad o adecuaci6n para un fin determinado, est6n limitadas a un aflo o el periodo de
tiempo m6s breve permitido por la ley.
Estagarantia seextiende al comprador originaly cualquier comprador posteriorde productos comprados para
uso residencialdentro deEstadosUnidos.Si el producto est6 situado en un 6tea que no dispone de servicio pot
parte
de un proveedor de servicio autorizado de GE,podria tenet que hacerse cargo de los costes de envio o
bien podria solicit6rsele que Ileve el producto a una centro de servicio de GEautorizado para realizar la
reparaci6n. EnAlaska,la garantia excluyeel costo deenvioo lasvisitas de servicioa su casa.
Algunos estados no permiten la exclusi6n o las limitaciones de dahos incidentales o consecuenciales. Estagarantia
da derechos legales especificos, y usted podria tenet otros derechos que variar6n de estado a estado. Para saber
cu61es son sus derechos legales, consulte a la oficina de asuntos del consumidor local o la oficina del Attorney
General en
su Iocalidad.
50 Garante: General Electric Company. Louisville, KY 40225
Page 51

Soporte al consumidor.
P6gina Web de GEAppliances GEAppliances.com
iLTiene alguna pregunta sabre su electrodom6stico? iPruebe la p6gina Web de GEAppliances 2/4horas al d[a,
cualquier d[a del aria! Para mayor conveniencia y servicio m6s r6pido, ya puede descargar los Manuales de los
Propietarios, pedir piezas o incluso hacer una cita en I[nea para que vengan a realizar una reparaci6n.
Solicite una reparaci6n GEAppliances.com
Elserviciode expertosGEest6 a tan s61oun pasode su puerta,iEntreen I[neay solicitesu reparaci6n cuando
le venga bien 2/4horas ald[a cualquier d[a del aria! O Ilame a1800.GE.CARES(800.432.2737)durante horas
normales de oficina.
RealLifeDesignStudio(Estudiodedisehopara lavidareal)
GEapoya el concepto de Dise_o Universal-productos, serviciosy ambientes que pueden usar gente de todas
lasedades,tama_os y capacidades. Reconocemosla necesidadde dise_ar para una gran gama de habilidades
y dificultadesfisicas y mentales. Param6s detalles cobre las aplicaciones de GEDise_oUniversal,incluyendo
ideas de disefio para lacocina para personascon discapacidades, mire nuestra p6gina Web hay mismo. Para
personas con dificultades auditivas,favor de Ilamaral 800.TDD.GEAC(800.833./4322).
GEAppliances.com
Garantias ampliadas GEAppliances.com
Compre una garant[a ampliada y obtenga detalles sabre descuentos especialesdisponibles mientras su garantfa
est6 a0n activa. Puedecomprarla en I[neaen cualquier momenta, o Ilamar al (800.626.222/4)durante horas
normales de oficina. GEConsumer Home Servicesestar6 a0n ah[ cuando su garant[a termine.
Piezas y accesorios GEAppliances.com
Aquellosindividuos con la calificaci6n necesaria para reparar sus propios electrodom6sticos pueden
pedir que se lesmanden laspiezas o accesoriosdirectamente asushogares (aceptamos lastarjetas
VISA,MasterCardy Discover).Haga su pedido en I[neahay, 2/4horas cada d[ao Ilamar partel6fono
a1800.626.2002durante horas normales de oficina.
Lasinstrucciones descritas en este manual cubren los procedimientos a seguir par cualquier usuario.Cualquier
otra reparaci6n deberfa,par regla general, referirsea personal calificado autorizado. Debe ejercerseprecauci6n
ya que las reparaciones incorrectas pueden causar condiciones defuncionamiento inseguras.
P6ngase en contacto con nosotros GEAppliances.com
Sino est6 satisfecho con el servicio que recibe deGE,p6ngaseen contacto con nosotros ennuestra p6gina
Web indicando todos losdetallesas[coma su n0mero de tel6fono o escr[banosa:
General Manager, Customer Relations
GEAppliances,Appliance Park
Louisville,KY/40225
iRegistresu nuevo electrodom6stico en I[nea-cuando usted prefiera! Elregistrar su producto a tiempo le
Registre su electrodom_stico GEAppliances.com
proporcionar6, si surgiera la necesidad,una mejor comunicaci6n y un serviciom6s r6pido bajolost6rminos de
su garantfa.Tambi6n puede enviar su tarjeta de registro pre-impresa que se incluye en el material
de embalaje.
51
Page 52

Consumer Support.
GEAppliances Website IntheU.S.A.GEAppliances.com
Have a question or need assistance with your appliance?Try the GEAppliancesWebsite 24 hours a day,
any day of the year! Forgreater convenience andfaster service,you can now download Owner's Manuals,
order parts or even scheduleserviceon-line. InCanada: www.GEAppliances.ca
ScheduleService Inthe U.S.A.GEAppliances.com
Expert GErepair serviceisonly one step away from your door. Get on-lineand scheduleyour service at your
convenience 2/4hoursany day of the year! Orcall 800.GE.CARES(800.432.2737)during normal businesshours.
In Canada,call 1.800.561.33/44
RealLife DesignStudio IntheU.S.A.GEAppliances.com
GEsupports the Universal Designconcept-products, servicesand environments that can beused by people of
all ages, sizesand capabilities.We recognizethe need to design for a wide range of physical and mental abilities
and impairments. For details of GE'sUniversal Designapplications, including kitchen design ideasfor people with
disabilities,check out our Website today. Forthe hearing impaired, pleasecall 800.TDD.GEAC(800.833./4322).
In Canada,contact: Manager, Consumer Relations,IVlabeCanada Inc.
Suite310, 1 Factory Lane
Moncton, N.B.E1C9M3
ExtendedWarranties
Purchase a GEextended warranty and learn about special discounts that are available while your warranty isstill
in effect. Youcan purchase iton-line anytime, orcall 800.626.2224during normal businesshours.GEConsumer Home
Serviceswill still be there afteryour warranty expires. In Canada,call 1.888.261.2133
Partsand Accessories
Individuals qualified to servicetheir own appliances can have parts or accessoriessent directly to their homes
(VISA,MasterCard and Discovercards are accepted).Order on-line today, 24 hours everyday or by phone at
800.626.2002during normal business hours.
Instructions contained in this manual cover procedures to be performed byany user.Other servicinggenerally should
be referred to qualified service personnel.Caution must be exercised,since improper servicing maycause unsafe
operation.
Customers inCanada should consult the yellow pagesfor the nearest IV]abeservicecenter,or call 1.800.561.:3344.
Contact Us
If you are not satisfied with the serviceyou receivefrom GE,contact uson our Website with all the details including
your phone number, or write to: General Manager, Customer Relations
GEAppliances,Appliance Park
Louisville,KY/40225
In Canada:www.GEAppliances.ca,or write to: Director, Consumer Relations,IVlabeCanada Inc.
Suite310, 1 Factory Lane
Moncton, N.B.E1C9M3
IntheU.S.A.GEAppliances.com
IntheU.S.A.GEAppliances.com
IntheU.S.A.GEAppliances.com
RegisterYourAppliance Inthe U.S.A.GEAppliances.com
Registeryour new appliance on-line--at your convenience! Timely product registration will allow for enhanced
communication and prompt service under the terms of your warranty, should the need arise.You may also mail
in the pre-printed registration card included inthe packing material. In Canada:www.GEAppliances.ca
Printed inChina
 Loading...