

GE Appliances 24, Appliances 28, Appliances 30, 24 Owner's Manual
GEAppliances
©
ProfileModels
24 BuiMn Style,
28 and30
Part No. 162D7747PO04 Pub.No. 49-6910
Congratulations!
YouAre Now Part of the GEFamily.
Welcome to the C,Etilmily.
We're proud of our quality
products and we are
c()mrnitted to providing
dependable service. You'll
see it in this eas?_o-use
(hvner's Manual and you'll
hear it in the fl'iendly voices
of our customer service
deparunent.
Best at all, ym'll experience
these vahles each dnle you
use your refl'igerator.
That's important, because
your new refl'igerator will
be part at your timfily tot
many }-ears.And we hope
y)u will be part at ours tot a
long time to come.
We thank you ibr bu}ing
GE. We appreciate your
purchase, and hope y_u
will continue to rely on us
whenever you need quality
appliances tor your home.
Important!
Staple sales slip orcancelled
check here.
Proof of the original purchase date
is needed to obtain service under
the warrantg.
Write the model andserial
numbershere.
#
#
Youcan find them on a label on the
wall beside the top drawer or at the
bottom, just inside the fresh food
compartment door.
GE& You,
A ServicePartnership.
Ask any GEappliance owner and they will
tefl you we stand behind our products with
unmatched quality service. However, did
you know that most questions result from
simple problems that you can easily fix
yourself in just a few minutes? This
Owner's Manual can tefl you how.
thisManual
Inside you willlind many
helpful hints on how to use and
maintain your refl'igerator
properly..lust a little preventive
care on your part can saveyou a
great deal o£tirne and money
over the liIe of) our refl'igerator.
ReviewtheSectionon
Troubleshootingtips
You'll lind many answers to
connnon problems here,
flyou review ant chart of
Troubleshooting Tips first, you may
not need to call for service at all.
If YouNeedService
If yotl do need service, yotl can
rebe_,knowing help isonl) a
phone call awW.Alistof toll-fl'ee
_storner servicenumbers is
included in the back section. Or, in
the #.S.,>)u can alwayscall the C,E
Answer Center <'_at800.626.2000,
94 hours aday, 7 days aweek.
In Canada, call 800-361-3400.
Languages
English .................. 4
Francais ................ 45
Espa#ol ................. 91
Safety Information
Safety Precautions........... 4
How toConnectElectricity .... 6
UseofAdapterPlugs....... 6,2
Useof ExtensionCeres....... 7
Operating Instructions
TemperatureControls ...... 8,9
Features............... 10-14
AutomaticIcemaker......... 15
Iceand WaterDispenser.. 16, !7
CareandCleaning....... 18-22
Installation Instructions
Preparingto
InstafitheRefrigerator ...23-25
TrimKitsand
DecoratorPanels........ 26-31
WaterLineInstallation ...32-37
Troubleshooting77ps
NormalOperatingSounds.... 38
BeforeYou
CarlForSemce ......... 39 42
CustomerService
Warrant_
forCanadianCustomers..... 43
Warran8
forU.S.Customers.......... 44
ServiceTelephone
Numbers .......... BackCover
3 ..........................................
IMPORTANTSAFETYINFORMAtiON.
READALLINSTRUCtiONSBEFOREUSING.
WARNING!
Use this appliance only for its intended purpose as
described in this Owner's Manual
ii iii i l,ii!!lil
_i_i!iii_iiiiiiiiiii!iiii!i!,_i_iiii
iiiii!i!i iiiiHi
%%
SAFETYPRECAUTIONS
When using electrical appliances, basic safety precaufions
should be followed, including the following:
s_?'This refi'igerator must be
properly installed and
located in accordance with
the hlstallation Instructions
[)eli)re it is used.
':¢Do not allow children to
climb, stand or hang on tile
shelves in tile reti'igerator.
They could damage the
reti"igerator and seriously
injure themselves.
':¢Do not touch the cold
surPaces in tile ti'eezer
comparunent, particularly
when hands are damp or wet.
Skin may stick to these
extremely cold surl_lces.
/ Do not store or use gasoline
or ()tiler flammable vapors
and liquids in the vicinity of
this or any other appliance.
/ hi reti'igerators with
autonlafic icenlakers, avoid
Corltact with tile movintr Darts
of tile ejector mechanism, or
with the heating element that
releases tile (albes. Do not
place fingers or hands on tile
automatic icemaking
mechanism while tile
refl'igerator is plugged in.
Keep fingers out of tile
"pinch point" areas;
clearances between the
doors and between the doors
and cabinet are necessarily
small. Be careflfl closing
doors when children are in
the area.
Unplug the refl'igerator
betore cleaning and making
repairs.
NOTE:Westroeglyrecommeed
thatan}/servicingbeperformed
byaqualifiediedividuaL
Turning tile control to tile
OFFposition does not remove
power to tile light ciroait.
::_:Do not reti'eeze fl'ozen
t0ods which have thawed
completely.
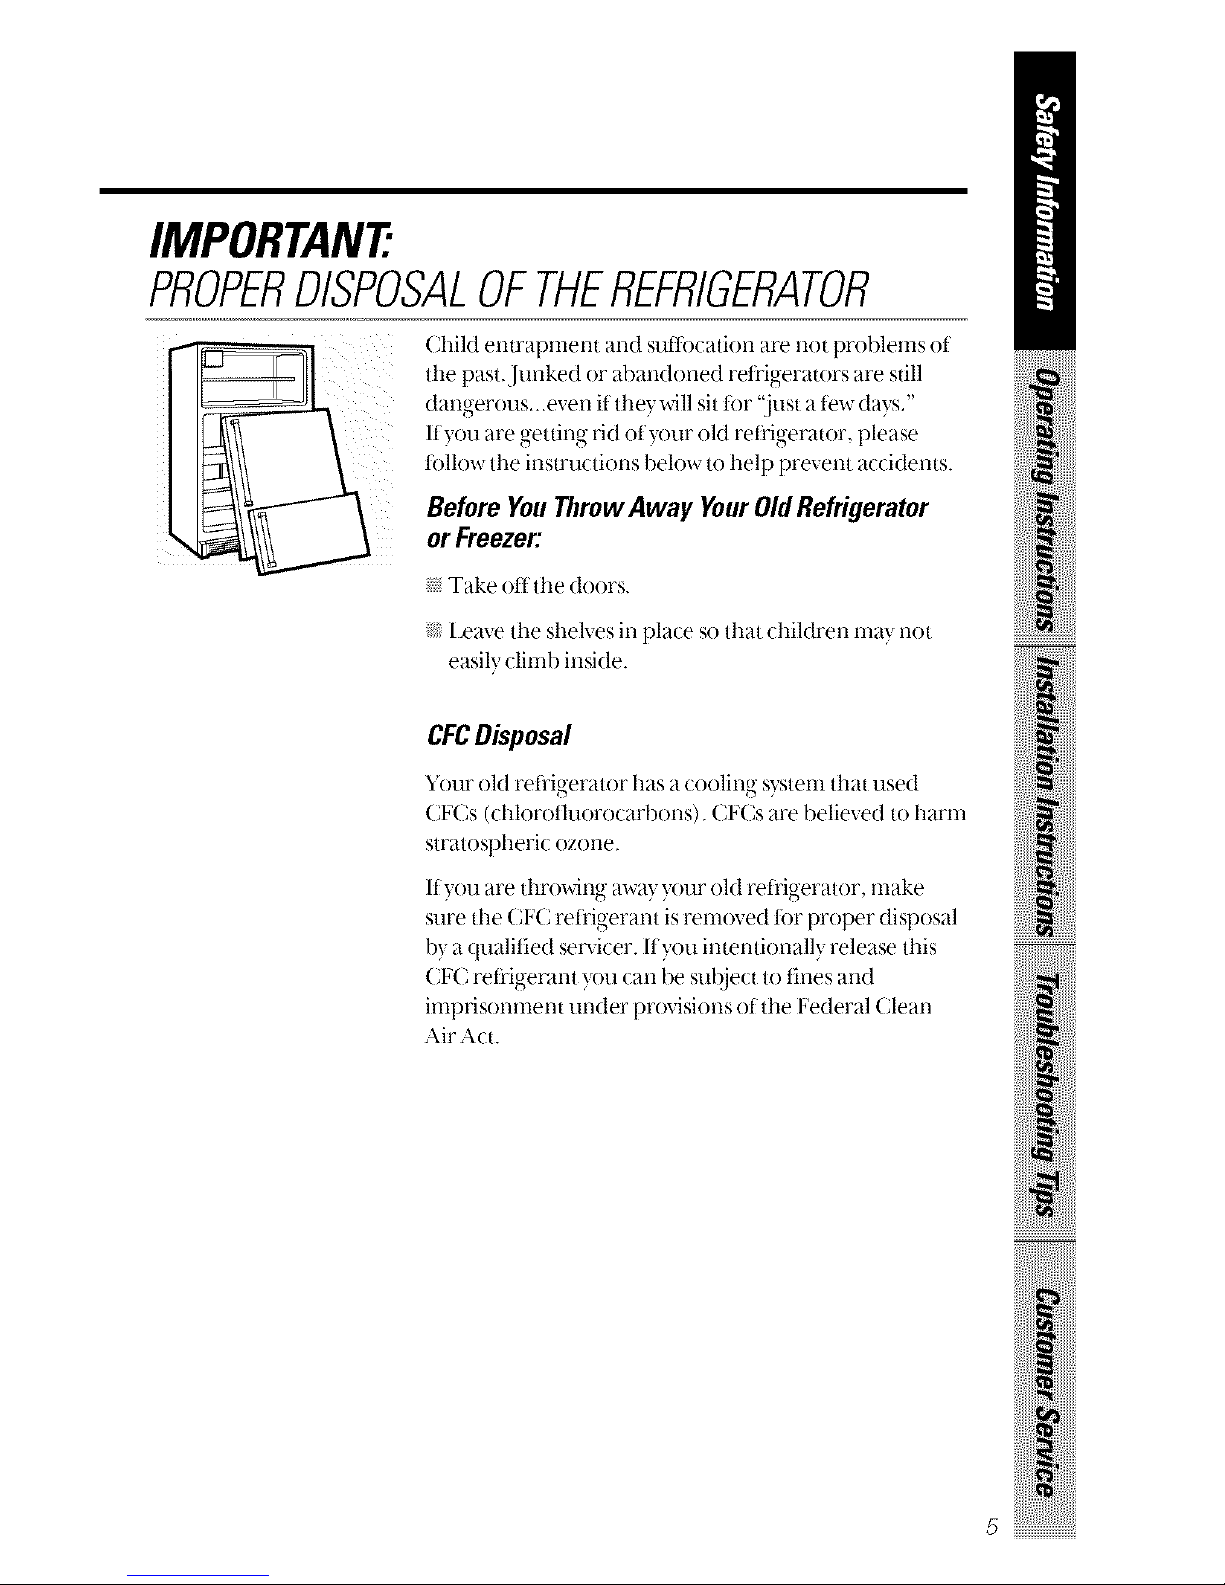
IMPORTANT:
PROPERDISPOSALOFTHEREFRIGERATOR
the past.Junked or abandoned retiigerators are still
dangerous,..even if'the) will sit for "just a tew days,"
lf}ou are getting rid of}our old retHgerator, please
follow the instructions below to help prevent accidents.
Before You Throw Away Your Old Refrigerator
or Freezer:
;;::Take ott'ttle doors.
I_eave tile shelves in place so that children ma} not
easily climb inside.
CFCDisposal
Your old reiHgerator has a cooling system that used
CFCs (chlorothlorocarbons). CFCs are believed to harm
stratospheric ozone.
lf}ou are throwing away your old reiiigerator, make
sure the CFC reii'igerant is removed for proper disposal
by a qualitied servicer, lt?xm intentionally release this
CFC retHgerant you can be subject to tines and
imprisonment under provisions of the Federal (;lean
Air Act.
5!i
IMPORTANTSAFETYINFORMAtiON.
READALLINSTRUCtiONSBEFOREUSING.
WARNING!
ii_iiillii!!lil
_i_i!iii_iiiiiiiiiii!iiii!i!,_i_iiii
iiiiiii!i_iiiiHi
HOWTOCONNECTELECTRICITY
Donot, under any circumstances, cut or remove the third
(ground) prong from the power cord. For personal safe_
this appliance must be properly grounded.
The power cord of this appliance is equipped with a 3-prong
(grourlding) plug which mates with a standard 3-prong
(grour_dirN) wall outlet to mirdnfize the possibility ot electric
shock hazard fl'om this appliance.
Have the wall outlet and circuit checked by a qualified electrician
to make sure the outlet is properly grounded.
"_,here a standard 2-pron_ wall outlet is encountered, it is _our
personal responsibility and obligation to have it replaced with a
properly grounded 3-prong wall outlet.
The reti'igerator should alwa) s be plugged into its own indMdual
• " o ' • " •
electrical outlet wlnch has a voltage rating that matches the rating
plate.
This provides the best perfommnce and also prevents overloading
house wiring circuits which could cause a fire hazard fl'om
overheated wires.
Never unplug your reii'igerator by pulling on tile power cord.
Ahvays grip __r_luo_firmh• and l)ull straight, out ti'om tile outlet.
Repair or replace immediately all power cords that h_ve become
ti'ayed or otheiavise damaged. Do not use a cord that shows cracks
or abrasion damage along its length or at either end.
When moving the refl'igerator away fi'om the wall. be carethl not to
roll over or damage tile power cord.
USEOFADAPTERPLUGS
Because of potential safety hazards under certain conditions,
we strongly recommend against the use of an adapter plug.
However, ifyou nltlSt use an adapter, where local codes permit, a
temporaryconnectionma} be made to a properl} grounded 2-prong
wall outlet byuse eta UIAisted adapter available at most lolal
hardware stores.
The larger slot in the adapter must be aligned with the larger slot in
the wall outlet to provide proper polarityin the _onne( dor_ oI the
power cord.
When disconnecting the power cord Fern the adapter, always hold
the adapter in place with one hand while pulling the power cord
plug with the other hand. II this is not done, the adapter gTound
terminal is vet) likely to break with repeated use.
If the adapter ground temfinal breaks, O0 NOT USE the reti'igerator
until a proper grourld has been established.
Attaching theadapterground terminal to a wall outlet cover screw does not
ground the appliance unless thecoverscrew ismetal, and not insulated,and the
waft outlet isgrounded through the housewiring. Youshouldhave thecircuit
checkedby a qualified electrician to makesure theoutlet isproperly grounded
USEOFEXTENSIONCORDS
Because of potential safety hazards under certain
conditions, we strongly recommend against the use of an
extension cord.
Ho_vver, iI}xm must use an extension cord, it is absolutely
necessary that it be a UI Aisted, 3-wire grounding type appliance
extension cord having a grourKtirlg t)i)e plug and outlet and that
the electrical rating of the cord be 15 amperes (minimum) and
120 vohs,
REMEMBER...
Yourcontinued health and safety are important to us.
Please read and follow this Safety Information carefully.
We want you to remain a happy and healthy part of our
GEfamily.
SAVETHESEINSTRUCTIONS
7 !i
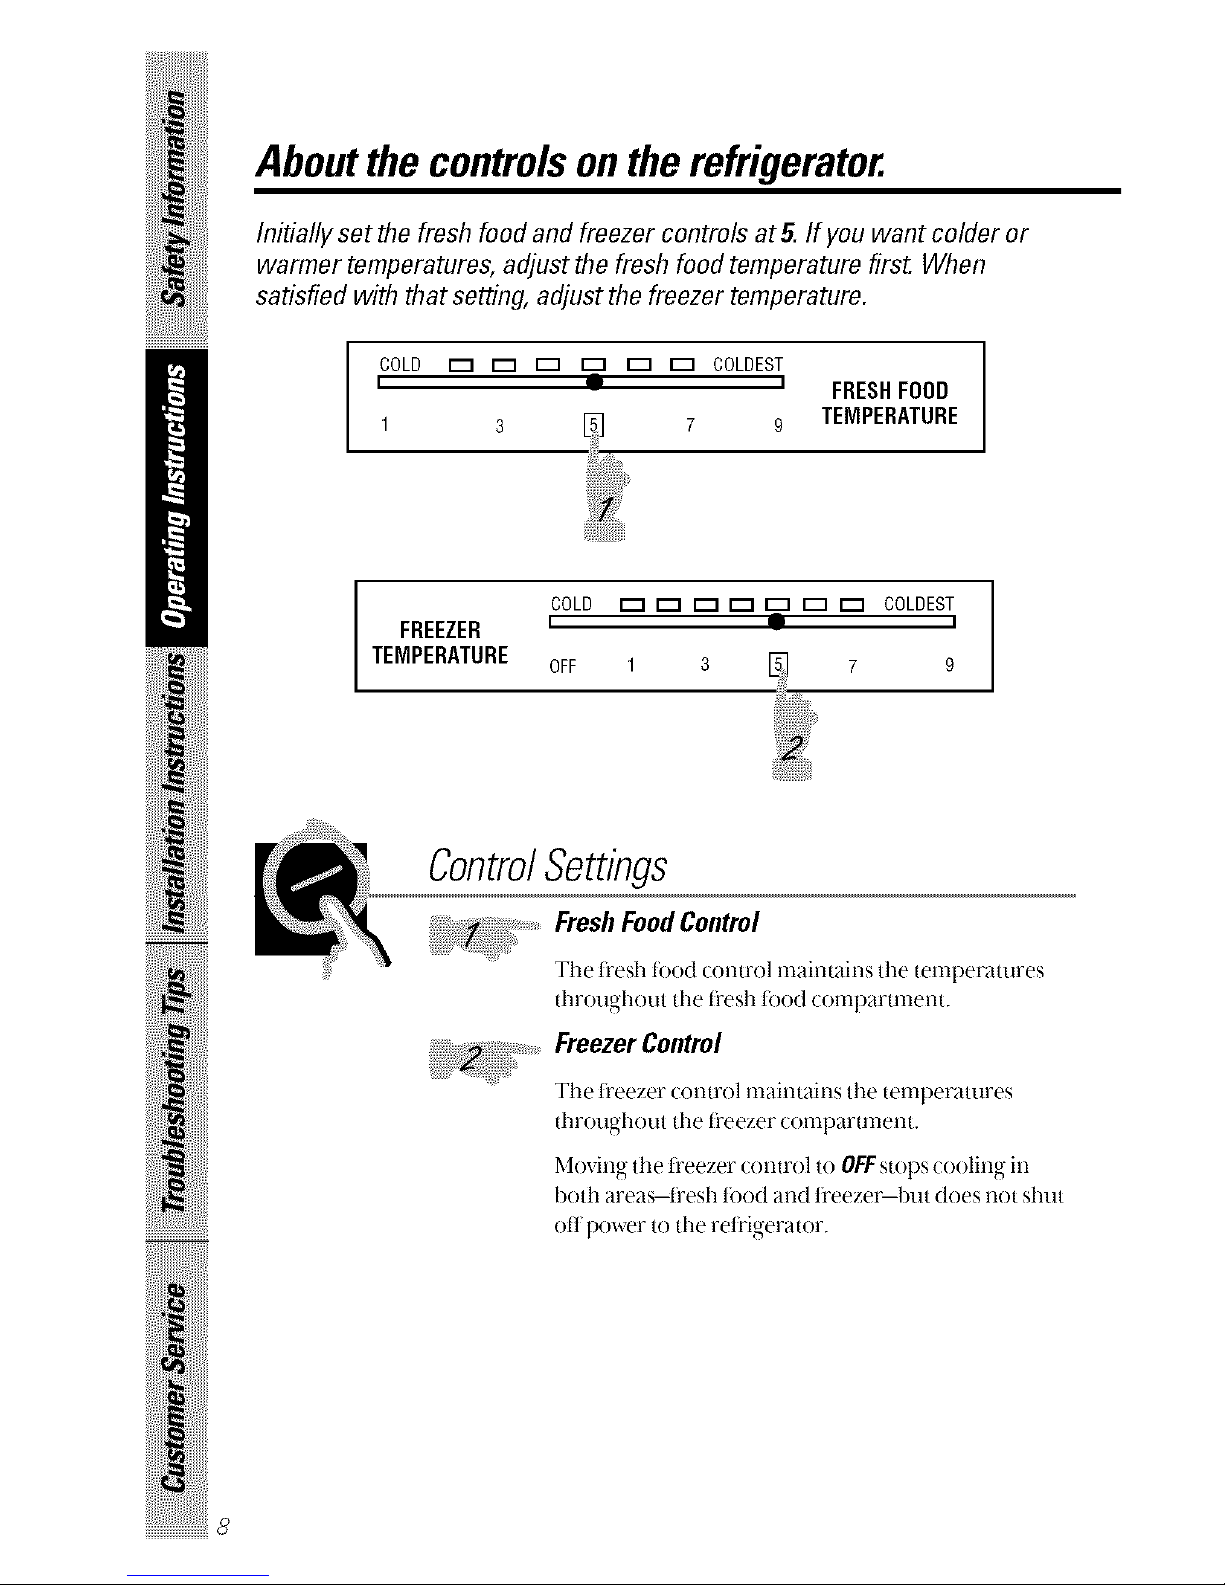
Aboutthe controlson the refrigerator.
Initially set the fresh food and freezer controls at5. If you want colder or
warmer temperatures, adjust the fresh food temperature firsL When
satisfied with that setting, adjust the freezer temperature.
COLD D D [_ [_ [_ [_ COLDEST
I • I FRESH FOOD
1 3 7 9 TEMPERATURE
l
FREEZER
TEMPERATURE
COLD D D _ _ [_ _ I:_ COLDEST
I • z
OFF 1 3 7 9
1
ii_iii_i_l,ii!!lil
_i_i!iii_iiiiiiiiiii!iiii!i!,_i_iiii
iiiii!i!i iiiiHi
ControlSettings
FreshFoodControl
Tile t_'esh tood (onu'ol nlaintains tile tenlperatures
throughout tile tiesh food con_parunent.
Freezer Control
Tile ti'eezer (olltl'O] lllailltains tile tempei'attll'es
throughout tile ti'eezer comparunent.
Moving tile t_'eezer control to OFF stops cooling in
both areas--t;'esh tood and ti'eezer but does not shut
oit power to tile ret_'igerator.
Automatic Energy Saver System
Youwon'tfindanenergysaver switchonthisrefrigerator
Warm liquid ti'()m the refi'igerator's conder_ser is autonlaticallx
circulated _-lrotlnd tile ti'()ilt edge of tile t_'eezer cornpartrnent to
help kee I) moisture tram fomling on tile outside of tile reti'igerator
during humid weather.
Mare. refl'i_erators use st)ecial...........electric heaters This ret_'ioerator
needs none. That's why there is no energysaverswitch._there's ilo
need tor it.
How ToTestTemperatures
Use tile milk test tbr tile ti'esh toed compartment. Place a container
at milk on the top shelf and check it a day later. ILlthe milk is to()
warm or too cold, a(!just the temperature controls.
Use the ice cream test tbr the ti'eezer comparunent. ['lace a
container otice crem-n in the center otthe ti'eezer and check it atier
a day. If it's too hard or too soti, a(!just the temperature controls.
Afterchangingthecontrols,allow24hoursfortherefrigeratortoreachthe
temperatureyouhaveset.
FoodStorage
The type of packaging used and tile storage temperatures will altect
how long t_>odwill kee l) in tile reti'igerator.
New t_od storage glddelines are constantl) being developed.
ConsulttheCountyExtensionServiceforthelatestieformatioeonfreezingand
storingfoods.
9

Aboutthe refrigeratordoors.
RefrigeratorDoors
The retdgerator doors may feel different thar_ the ()nes
)ou are used to. The special door opening/closing
t_amre makes sure the doors close all the way and are
seodrely sealed.
When opening and closing the door )ou will notice a
stop position. It tile door is opened past dfis stop point,
the door will remain open to allow you to load and
unload tbod more easily. When the door is only partially
open it will automatically close.
The resistance you teel at the stop position will be
reduced as the door is loaded with tood,
Whenthedoorb onlypartiaHy
openit will automaticallyclose.
Beyondthisstopthedoorwill
stayopen.
ii iii i l,ii!!lil
_i_i!iii_iiiiiiiiiii!iiii!i!,_i_iiii
iiiii!i!i iiiiHi
Aboutthe shelves and baskets.
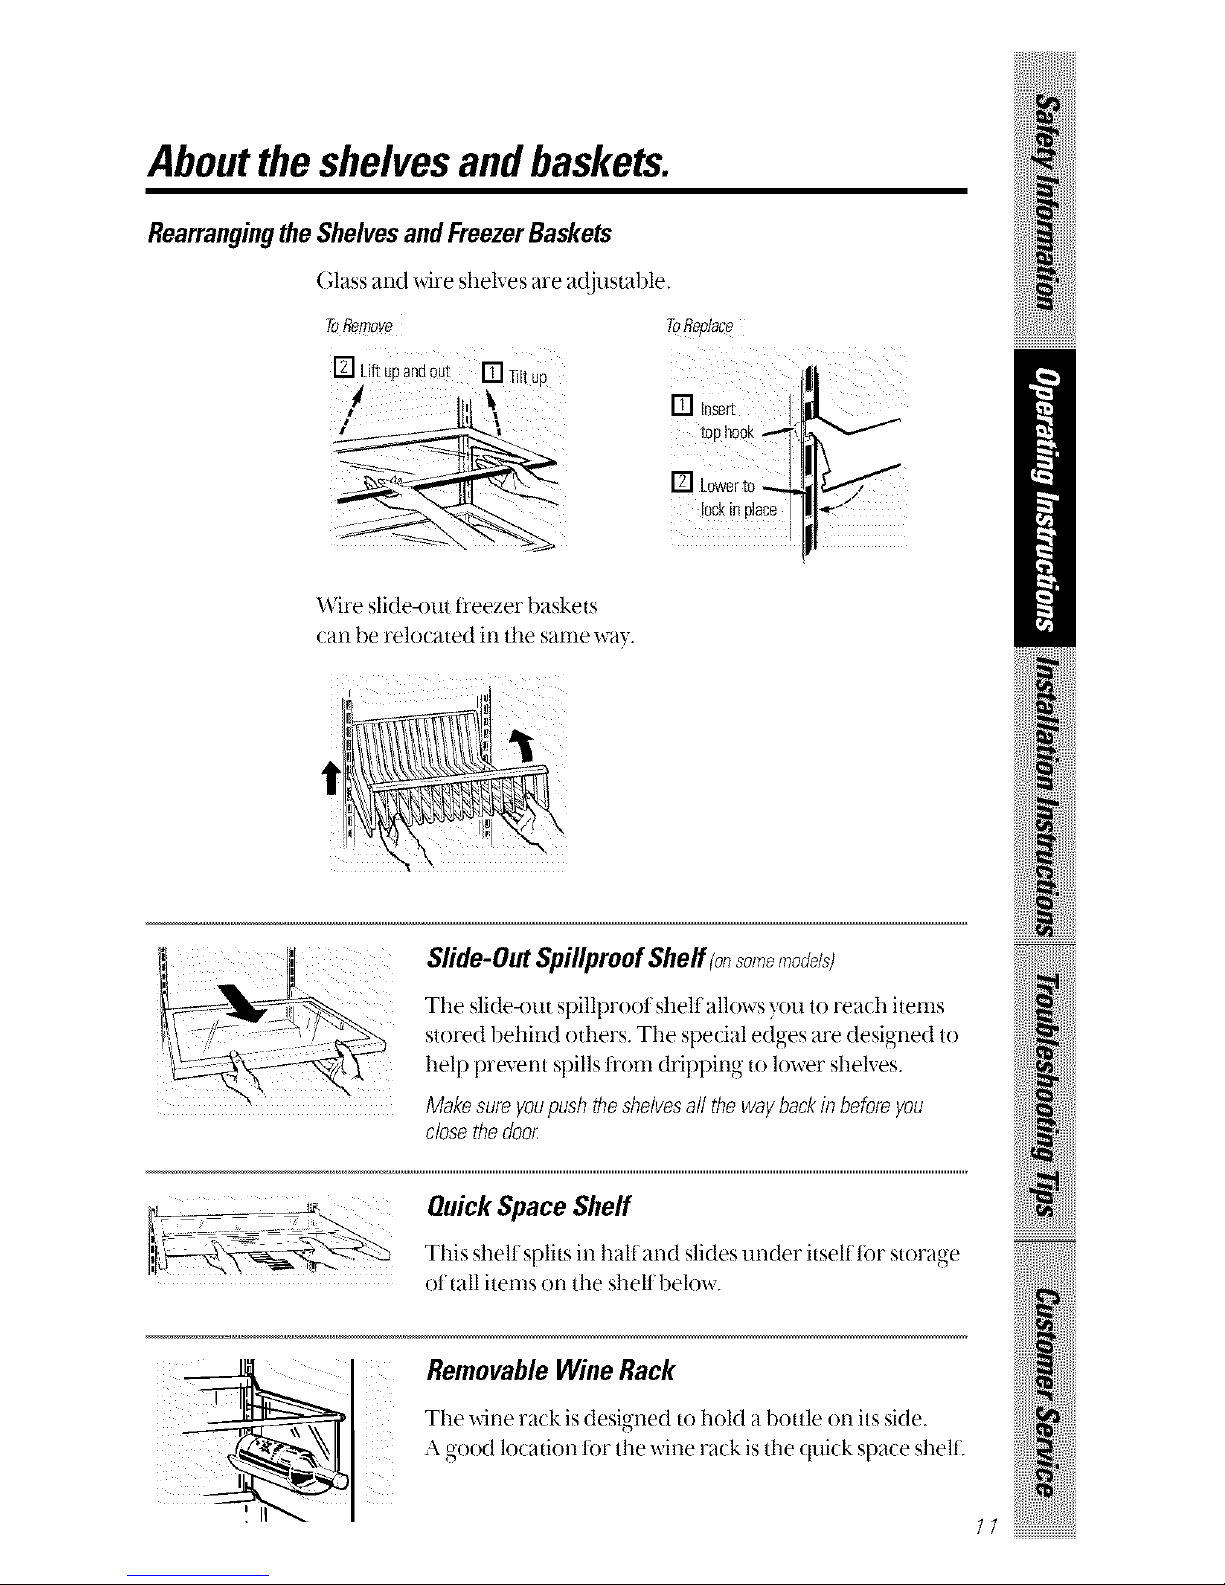
RearrangingtheShelvesandFreezerBaskets
(;lass and wire shelves are a(!justable.
To Remove
[] UftUPano0ut 1"7liltUp
i
ToReplace
top hook_
[] LOwe_tO_
lockinplace _*
Wire slide-out fl'eezer baskets
Call be relocated il-ithe same wa).
iI _i
Slide-Out SpillproofSheff (onsomemo_le/s;
The slide-out spillproot shelt allows you to reach items
stored 1)ehind others. The special edges are designed to
help prevent spills fl'om dripping to lower shelves.
Makesureyoupusbtheshelvesall thewaybackinbeforeyou
closethedoor.
__ Quick Space Shelf
,;, _ 7-- _ " This shell splits in half and slides under itself for storag-e
of tall items on tim shell:below.
Removable Wine Rack
Tile wine rack is designed to hold a bottle on its side.
'_ oood location for the x_ine rack s the (trick sr/ace shelf
77!i
ii iii i lii!!lil
_i_i!iii_iiiiiiiiiii!iiii!i!,_i_iiii
iiiii!i!i iiiiHi
Aboutthe refrigeratorbinsand dishes.
Not all features are on all models.
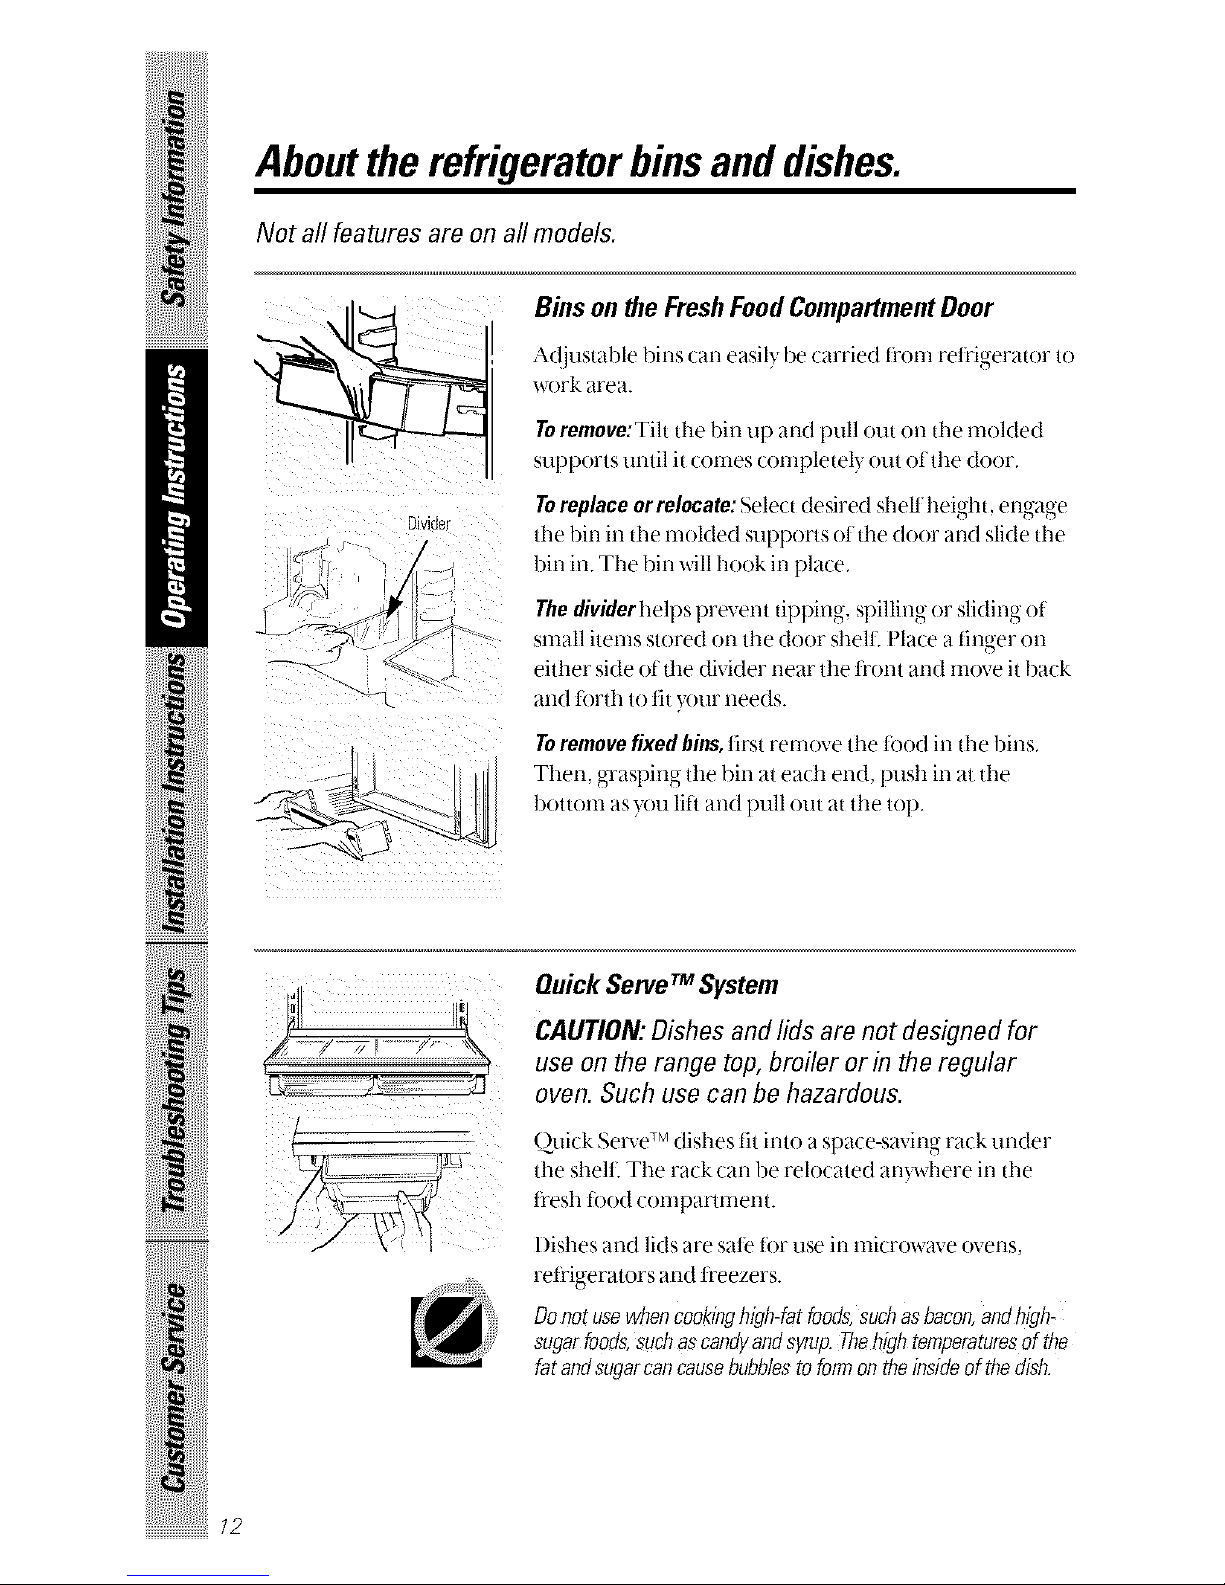
_ Bins on the Fresh Food Compartment Door
Divlaer
/
A(!justable bins can easily be carried fi'om ret[igerator to
work area.
Toremove:Tiltdze bin up and pull out on dze molded
supports until it conies completely out of the door.
Toreplaoe orrelooate'Select desired shell heMn en a_,e
the bin in the molded supports el the door and slide the
bin in. The bin will hook in place.
The dividerhelr_s l_revent tirmino spilling or sliding of
small items stored on the door shell Place a linger on
either side of the divider near the l['ont and move it back
and lorth to tit your needs.
Toremove fixed Mns, lirst remove the lood in the bins.
Then. g-rasping the bin at each end. push in at the
bottom as you lift and pull out at the top.
il _ ] iI
Quick SenteTM System
CAUTIOn"Dishes and lids are not designed for
use on the range top, broiler or in the regular
oven. Such use can be hazardous.
Quick Serve TM dishes tit into a space-saving rack under
the shel£ The rack can be relocated an}where in the
fl'esh tbod compartment.
l)ishes and lids are sate tbr use in microwave ovens,
retiigerators and l_'eezers.
Donotusewhencookinghigh-fatfoods,suchasbacon,andhigh.
sugarfoods,suchascandyandsyrup.Thehightemperaturesofthe
fatandsugarcancausebubb/estoformontheinsideof thedish.
12
Aboutthe storagedrawers.
Not all features are on all models.
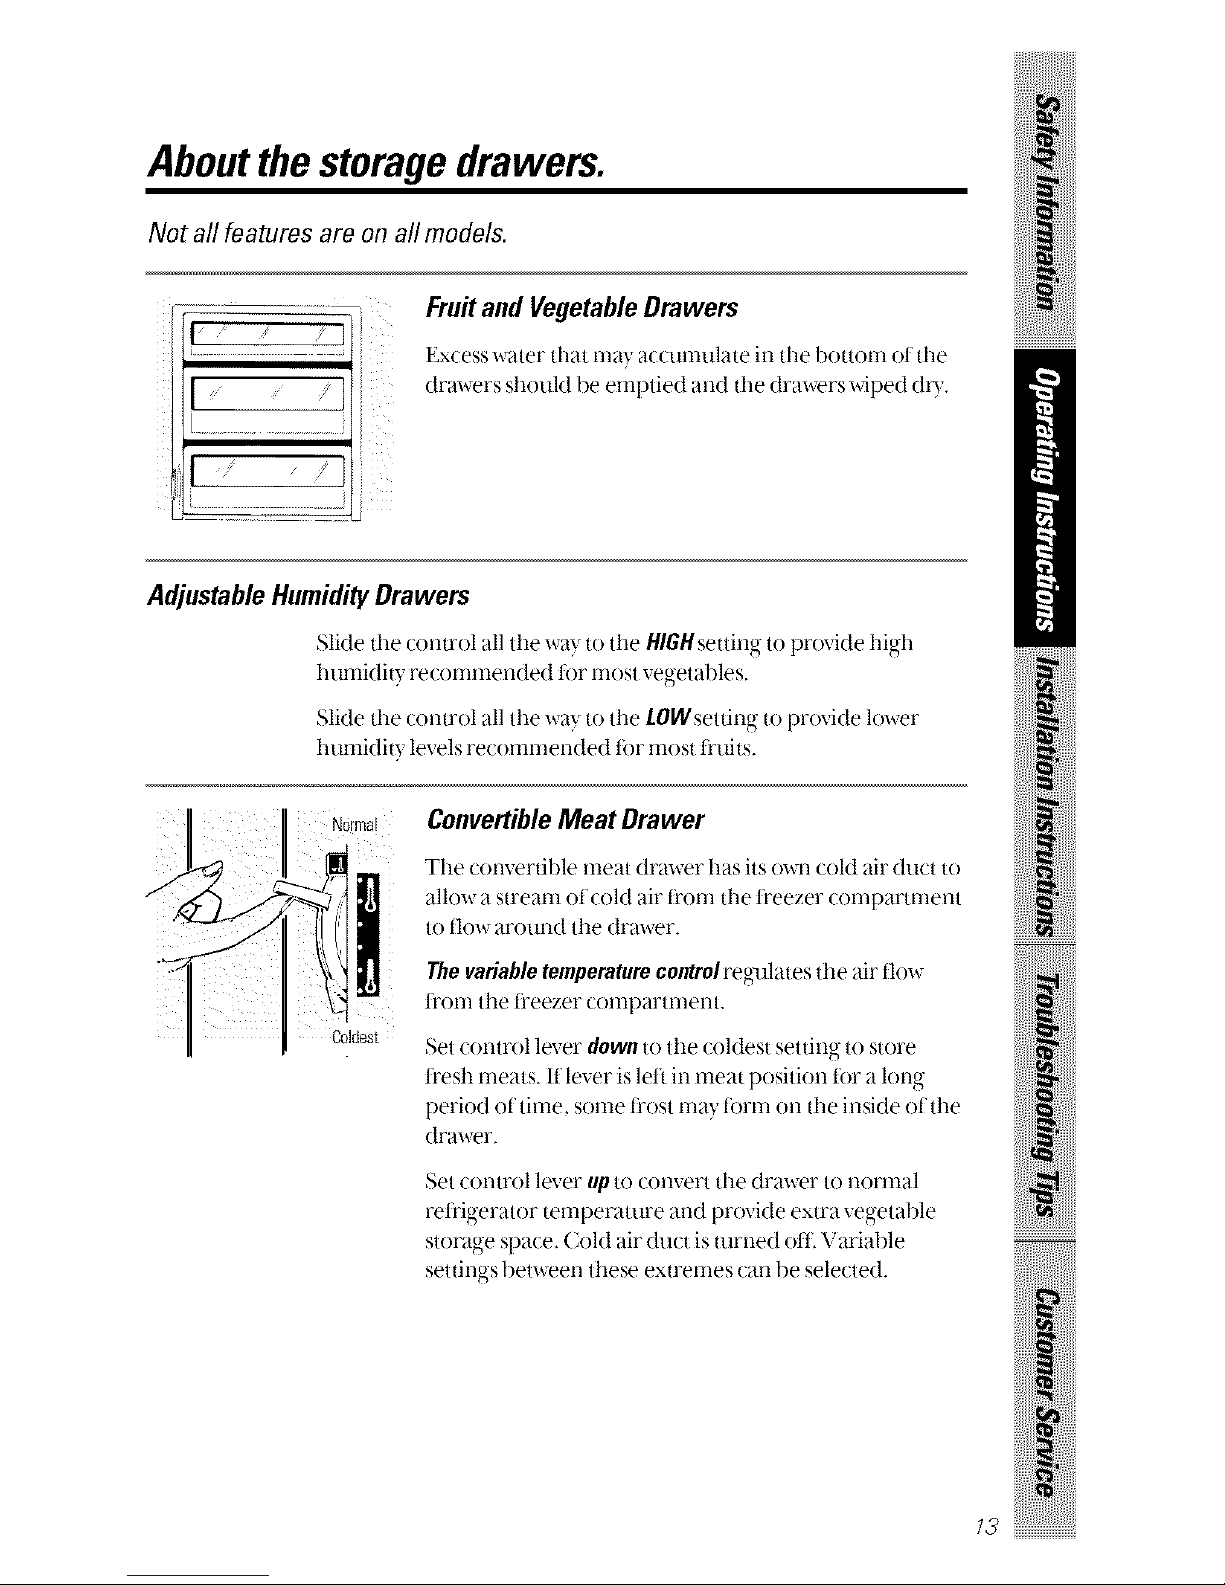
Fruit and Vegetable Drawers
Excess water that l-ll_t},a((umulate in the bottonl ot the
drawers shouM be emptied and the drawers wiped oh).
Adjustable HumidityDrawers
Slide the control all the way to the HIGHsetting to provide high
humidity recommended t0r most vegetables.
Slide the control all the way to the LOWsetting to provide lower
humidity levels recommended t0r most fl'uits.
Coldest
ConvertibleMeat Drawer
Tile convertible meat drawer has its ()wn cold air dt[ct to
allow a stream of coM air il'ofn the fl'eezer cornpartrnent
to tlow around the drawer.
Thevariable temperaturecontrol reglflates the air flow
ti'orn the li'eezer compartment.
Set control lever down to the coMest setting to store
fl'esh meats. If lever is left in [neat position tot a long
period of time, some ti'ost may torm on the inside of the
drawer.
Set control lever up to convert tile drawer to normal
reli'ioerator,_ temperature _lll(l I)r°vide extra ve_,-etableo
storage space. CoM air duct is turned oil. Variable
settings between these extren[es can be selected.
73!i
Aboutstoragedrawer removal
Not all features are on all models.
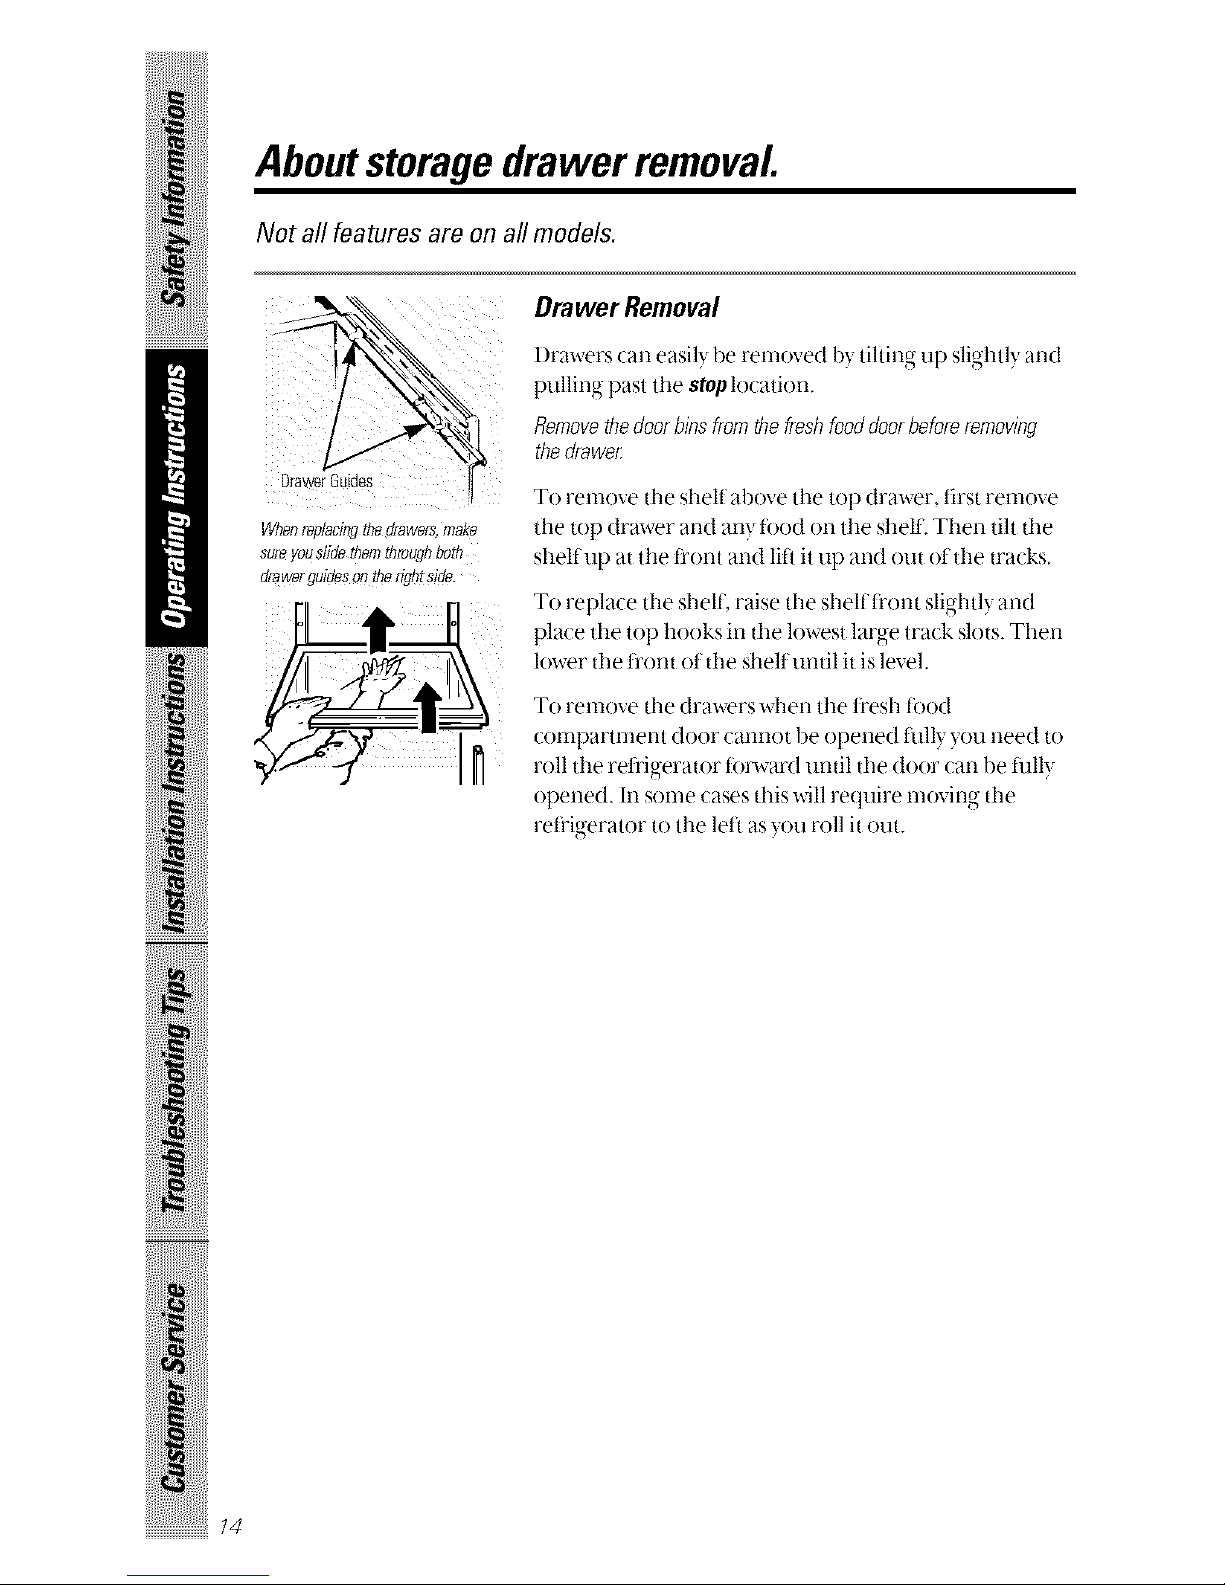
Drawer Removal
Draw Suides
Wt?aR rep/aci_ [Re orawars, qlaKe
sureyouslide themthroughoom
drawerguideson tt_er__rslae.
I)rm_ ers _an eas lv be removed 3', tiltino- UD SI_hth and
[-mllinc_t)astthe stoplocation.
Removethedoorbinsfromthefreshfooddoorbeforeremoving
thedrawe_
To remove the shelf above tile top drawer, first remove
the top drawer and any tood on the shell:. Then tilt the
shelf up at the ti'ont and liti it up and out of the tracks.
To replace the shelf, raise the shelf trent slightI:, and
place the top hooks in the lowest large track slots. Then
lower the fl'ont ot the shelt until it is level.
To remove the drawers when the fl'esh tood
compartment door cannot be opened fully you need to
roll the reti'igerator torward until the door can be flflly
opened. In some cases this will require moving the
reFigerator to the left as you roll it out.
ii iii i l,ii!!lil
_i_i!iii_iiiiiiiiiii!iiii!i!,_i_iiii
iiiii!i!i iiiiHi
Aboutthe automatic icemaker.
A newly-installed refrigerator may take 8to 12hours to begin making ice.
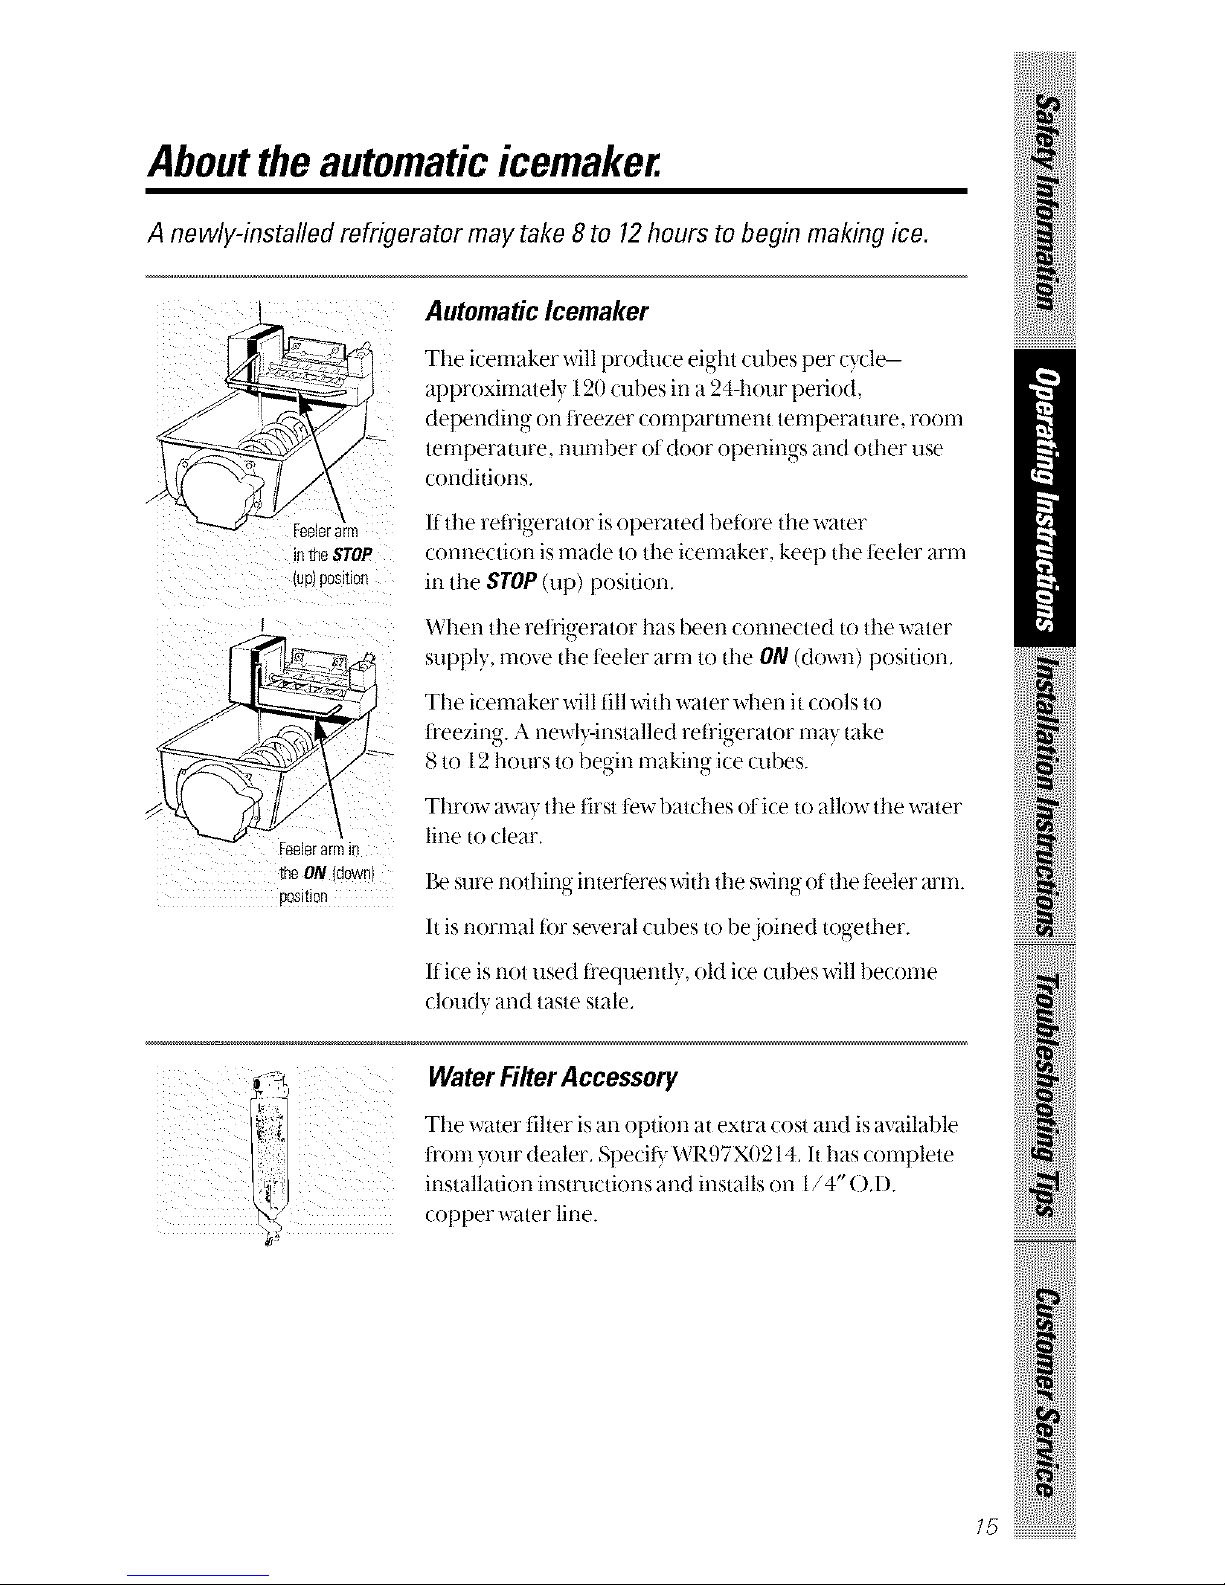
Automatic Icemaker
_r am
n1J_eSTOP
UDI DOSfflOl]
Feelerarm
the ON/downl
[}OSl{J[3rl
The icemaker will produce eight cubes per cycle-
approximately 120 cubes in a 24-hour period,
depending- on fi'eezer Col-npartnletlt temperauu'e. FOOnl
temperature, number of door openings and other use
conditions.
If the reti'igerator is operated betore tile water
connection is made to tile icemaker, kee I) the teeler arm
in tile STOP (up)position.
When tile retfigerator has 1)een connected to tile water
supply, move the teeler arm to the O/V(down) position.
The icemaker will fill with water when it cools to
t_'eezino _ newl>installed reti" gerator may take
8 to 12 hours to begin making ice cubes.
Throw away tile first tew batches of ice to allow tile water
line to clear.
lie sure nothing interteres with tile swing of ttle teeler arm.
Itis normal tor several cubes to bejoined together.
If ice is not used ti'equently, old ice/afi)es will become
cloudy and taste stale.
Water FilterAccessory
The water tiher isan option at extra costand is available
t_'omyour dealer. Specit_,"WR97X0214. It has complete
installation insu'uctions and installson 1/4" Od).
copper water line.
,5!i
ii iii i lii!!lil
_i_i!iii_iiiiiiiiiii!iiii!i!,_i_iJii
iiiii!i!i iiiiHi
Aboutthe ice and water dispenser.
Onsome models
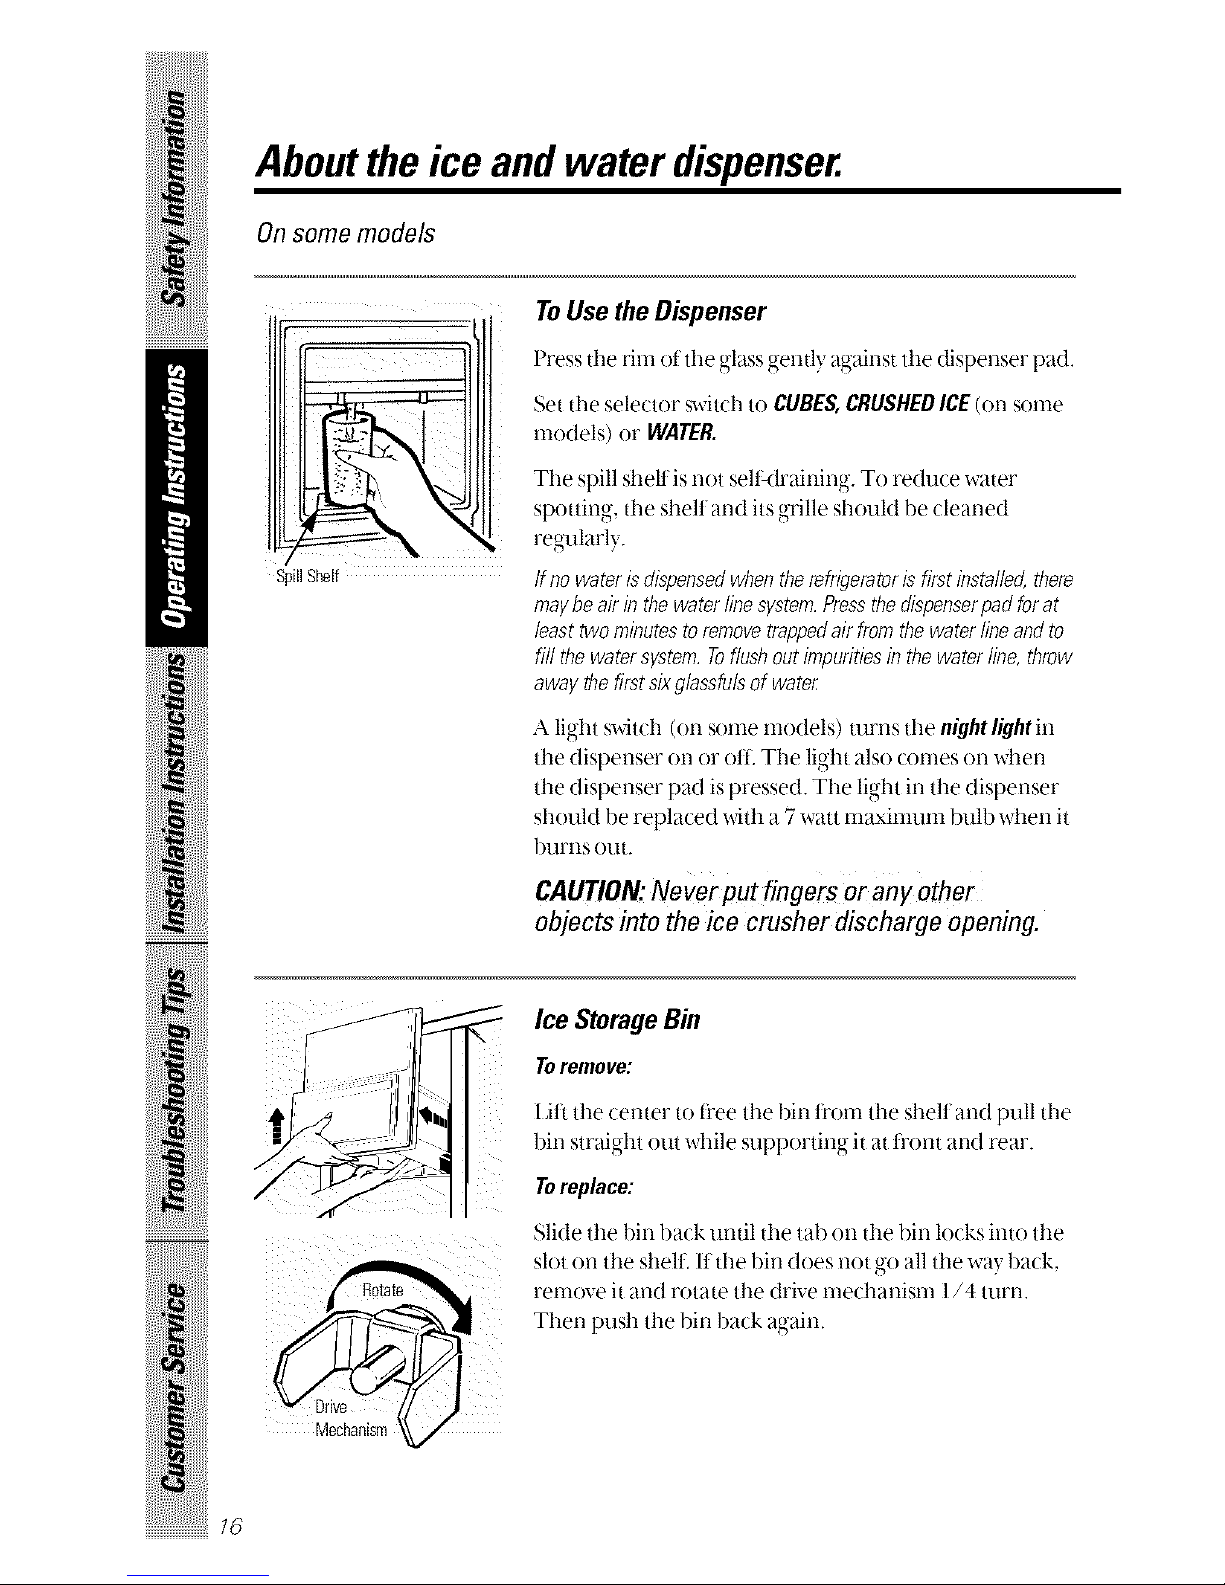
To Use the Dispenser
Press the rim of the glass gently against the dispenser pad.
Set the selector switch to CUBES,CRUSHEDICE(on some
models) or WATER.
The spill shell is not seltklraining. To re(lute water
spotting, the shelf and its grille shouM be cleaned
reg_darl}
ff no water isdispensed when the refrigerator is first installed, there
may be air in the water linesystem. Pressthe dispenserpad for at
/east two minutes to remove trapped air from the water lineand to
fill the water system. Toflushout impurities in the water line, throw
away the first sixg/assfu/sof water
A light switch (on some models) turns the night light in
the dispenser on or oil. The light also comes on when
the dispenser pad is pressed. The light in the dispenser
should be replaced with a 7 watt maximum bulb when it
burns otlt.
CAUTION."Never put fingers or anyother
objects into the ice crusher discharge opening.
18
Ice StorageBin
Toremove:
[,ift the center to ti'ee the 1)in t['om the shelt and pull the
bin straight out while supporting it at trent and rear.
Toreplace:
Slide the bin ba(k until the tab on the bin lo(ks into the
slot on the shell It the bin does not go all the wa} back,
remove it and rotate the drive nm(hanism l/4 turn.
Then push the bin back again.
ImportantFactsAbout YourDispenser
s_i'Add ice before tilling the glass with a beverage. This will
prevent splashing, which could cause the ice selector switch
to stick or bind.
'_ Do not add ice fl'om traysor bags to the storage bin. It may not
crush or dispense well.
Avoid overfilling glass with ice and use oI nan'ow or extra-tall
_,-lasses Backed-up ice can jam the chute or cause the door in the
chute to fleeze shut. Kice is blocking the chute, poke it through
with a wooden spoon.
Beveragesand foods should not be quick-chilled in the ice
storage bin. Cans, bottles or tood packages in the storage bin
maycause the icemaker or auger to jam.
::_:Some (rushed icemay be dispensed even thotgh you selected
CUBES.This happens occasionallywhen a tew _afl)esaccidentally
get directed to the crusher.
£: After crushed iceis dispensed, some water may drip fl'om
the chute.
':_Sometimes a mound ot snowwil110rm on the door in the ice
chute. This condition is normal and usually occurs when you
have dispensed crushed ice repeatedly. The snowwill eventually
evaporate.
'_ Dispensed water is not chilled. For colder water, add crushed ice
or cubes betore dispensing water.
77!i

ii iii i lii!!lil
_i_i!iii_iiiiiiiiiii!iiii!i!,_i_iiii
iiiii!i!i iiiiHi
Care and cleaning ofthe refrigerator.
Pressheret[
remove grille.
!
/ \
Cleaning the Outside
Thedispenserwell (on somemodels), beneath the grille,
should be wiped (hT. Water left in the well may leave
deposits. Remove the deposits 1)}adding undiluted
vinegar to the well. Soak until the deposits disappear or
beconle loose enough to rinse away.
Thedispenser pad (on some models). (;lean with warm
water and baking soda sohltioll-;-lbotlt a tablespoon
(15 ml) of baking soda to a quart (1 L) ofwater. Rinse
thoroughl} and wipe oh).
HINT:Openthefreezerdoorpartwaytopreventdispensingof ice
or waterwhencleaning.
The soft door handles are easy to keep clean it they are
waxed every tew months. Use a household wax such as
Pledge brand or Jubilee brand to coat the handles. Soil
will then easily wash oil with soapy water or a non-
abrasive all-purpose cleaner.
The long door handles andtrim (on models with a trim kit).
(;lean with a cloth dampened with soapy water. D_)-with
a soil cloth.
Keep theoutsideclean.Wipe with a clean cloth lightly
dampened with kitchen appliance wax or mild liquid
dish detergent. [)_Tand polish with a clean, sott cloth.
Do not wipe the refrigerator with a soiled dishcloth or wet towel,
Thesemayleave aresidue that canerode thepaint. Donot use
scouringpads, powdered cleaners,bleachor cleaners containing
bleachbecause theseproducts can scratchand weaken the paint
finish.
18
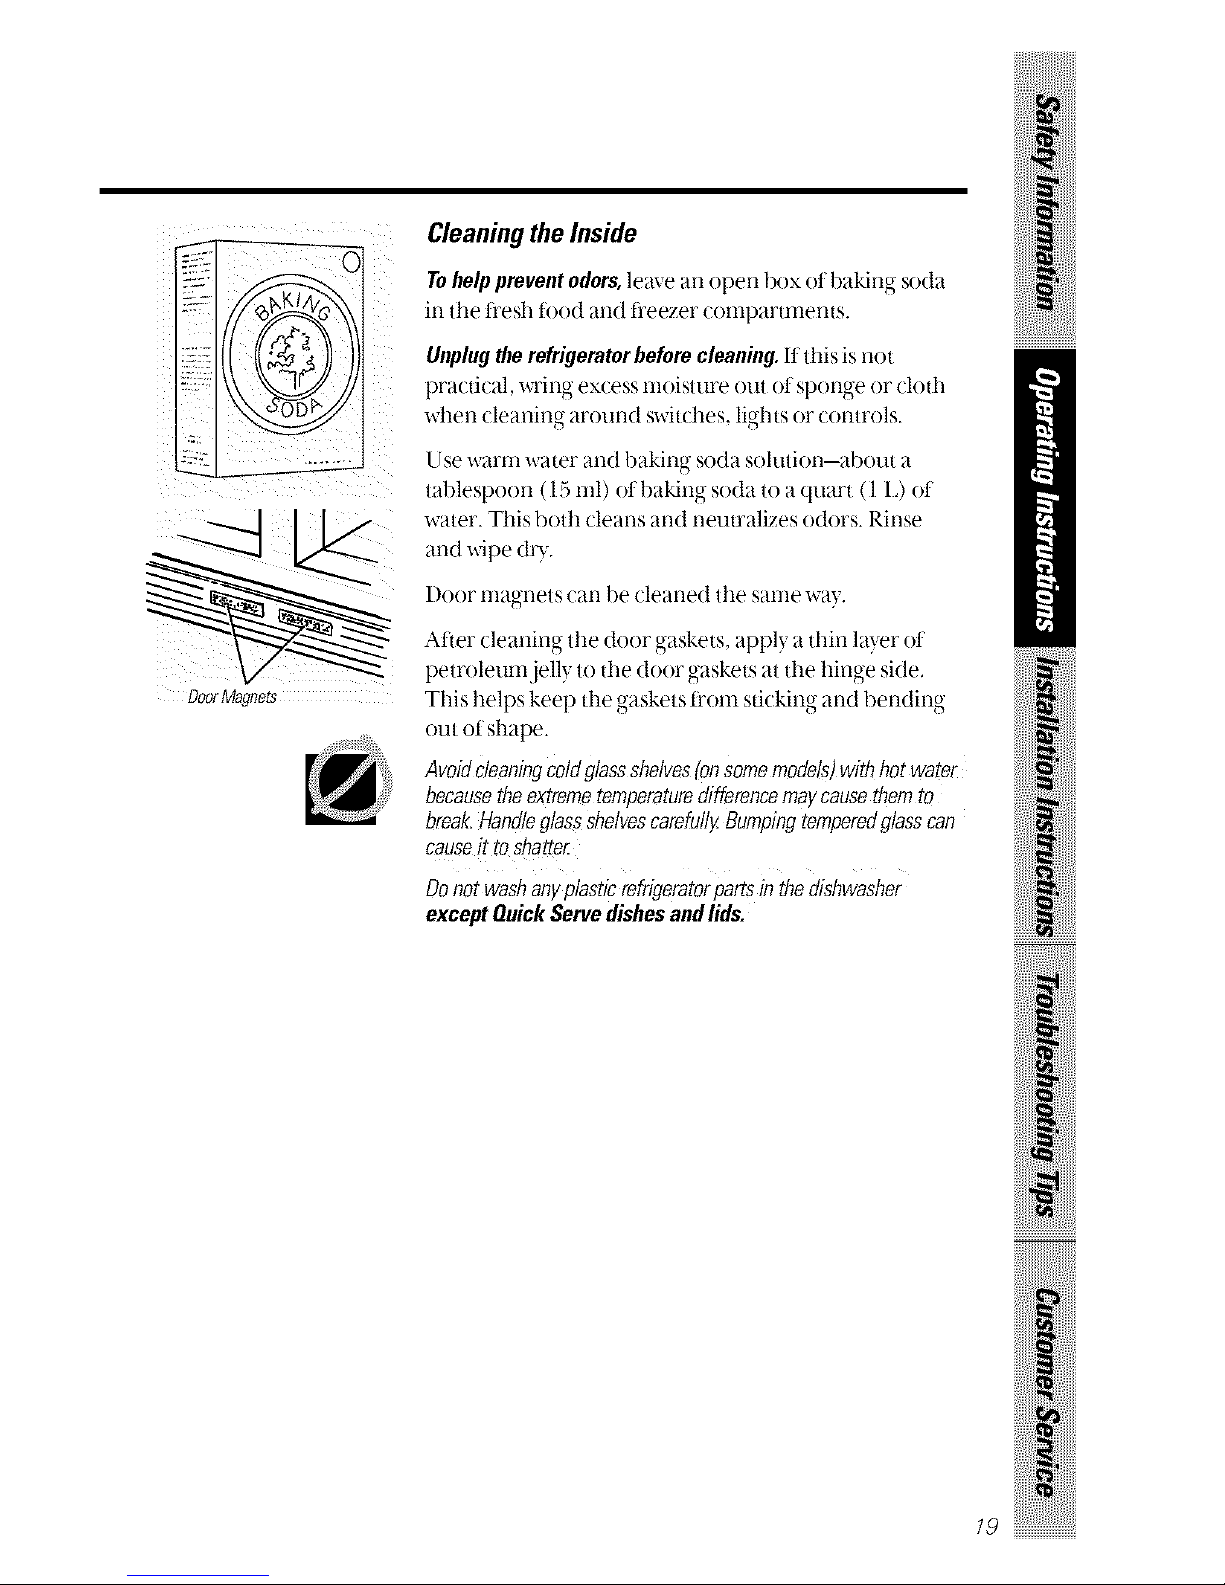
DoorMagnets
Cleaning the Inside
Tohelppreventodors,leave an open 1)o×ot baking soda
in the fl'esh tbo(t and fi'eezer comparunents.
Unplugtherefrigerator beforecleaning.Ifthis is not
pra(tical, wi'il-lg ex(ess l-noisttlre ()lit ot spOl-lge or cloth
when cleaning around switdms, lights or controls.
Use wam_ water and baking soda solution-about a
tal)lespoon ( 15 ml) of baking soda to a quart (1 1_)of
water. This both cleans and neutralizes odors. Rinse
and wipe dU.
I)oor lnagnets can be cleaned the same way.
After (leaning the door gaskets, appl_, a thin la}er of
petroleum jell_, to the door gaskets at the hinge side.
This helps keel) the gaskets from sticking and bending
out of shape.
Avoidcleaningcoldglassshelves(onsomemodels)withhot water
becausetheextremetemperaturedifferencemaycausethemto
break.HandleglassshelvescarefullyBumpingtemperedglasscan
causeit toshatter
Donotwashanyplasticrefrigeratorpartsinthedishwasher
except QuickServedishesandlids.
19
ii iii i lii!!lil
_i_i!iii_iiiiiiiiiii!iiii!i!,_i_iiii
iiiii!i!i iiiiHi
Care and cleaning ofthe refrigerator.
Behind the Refrigerator
Be....careflfl when rnovir N, the retiigerator, away,•tmrn the wall. All
types ot floor c()verings can be damaged, particularl_ cushioned
coveriugs and those with eulbossed Sl.lYt_tces.
I'ull the refl'igerator straight out and return it to position by
pushing it straight in. Moving the r in? r " "e "ge ator lit a s_cte direction
ma) result in damage to the floor covering or refl'igerator.
Whenpushing therefrigerator back, make sureyou don't roll over thepower cord
or icemaker supplyline.
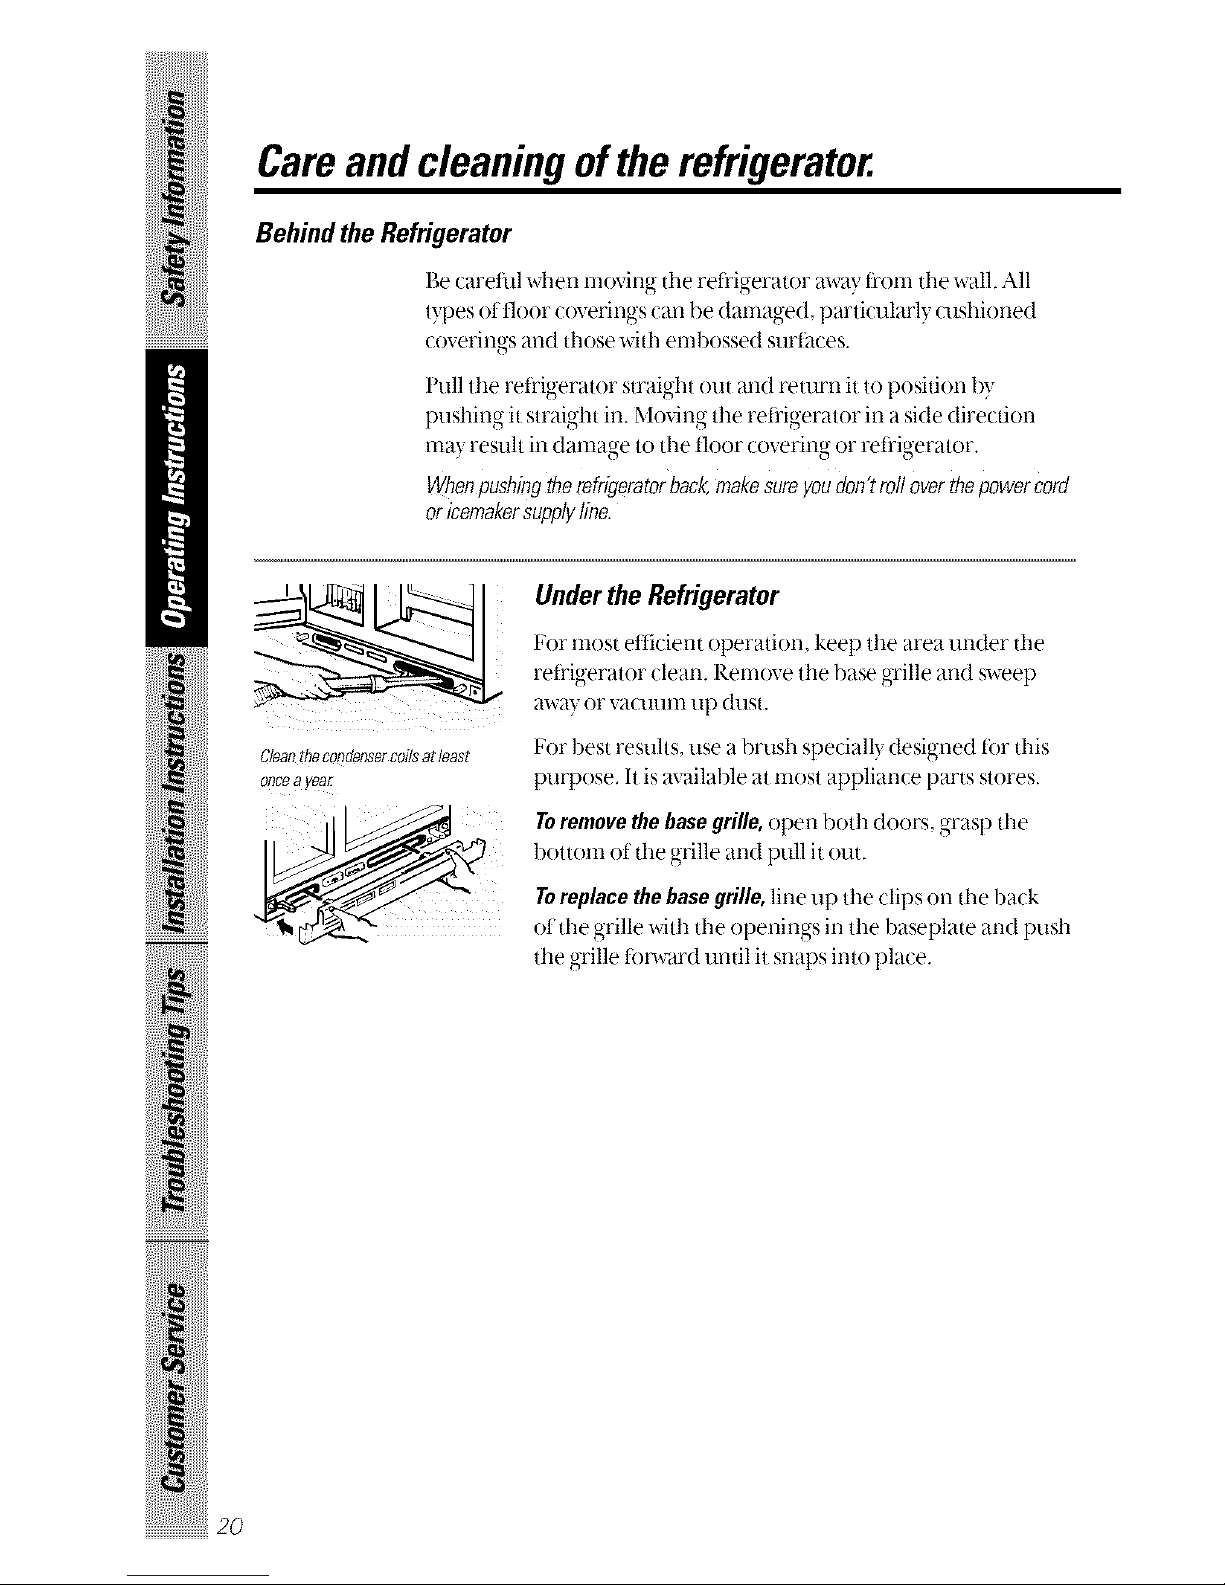
Cleafi the condenser coils at least
oece a yeaE
UndertheRefrigerator
For most etlicient operation, keep the area under the
reti'igerator clean. Remove the base grille and sweep
away OF vaO.lllUt lip dust.
For best resuhs, use a brush specially designed lot this
purpose. It is available at most appliance parts stores.
Toremovethebasegrille,open both doors, grasp the
bottom of the grille and pull it out.
Toreplace the base grille, line up the clips on the back
ot the crille with the openino-s in the 1)aseplate and push
the grille ti)rward until it snaps into place.
20
Preparingfor Vacation
For long vacations or absences, remove ti)od and unplug tile
reti'igerator. Move tile ti'esh t()od control to tile OFFposifion, and
clean tile interior with a baking soda sohltion of one tablespoon
(15 ml) of baking soda to one quart (1 L) ot water. Leave tile
doors open.
Move the i_ernaker tbeler arm to STOP(up) position and shut
oil tile water supply to tile ret_'igerator.
If the tenlperamre can drop below fl'eezing, have a qualified
servicer drain the water supply system to prevent serious property
damage due to t]ooding.
Preparing to Move
Se/alre all loose itenls sudl as grille, shelves and drawers by taping
them securel} in place to prevent damage.
Besuretherefrigeratorstagsin anuprightpositionduringmoving.
2, !!i
Replacing the light bulbs.
Turning the control to the OFFposition does not remove power to the
light circuit.
ii iii i lii!!lil
_i_i!iii_iiiiiiiiiii!iiii!i!,[i_iiii
iiiii!i!i iiiiHi
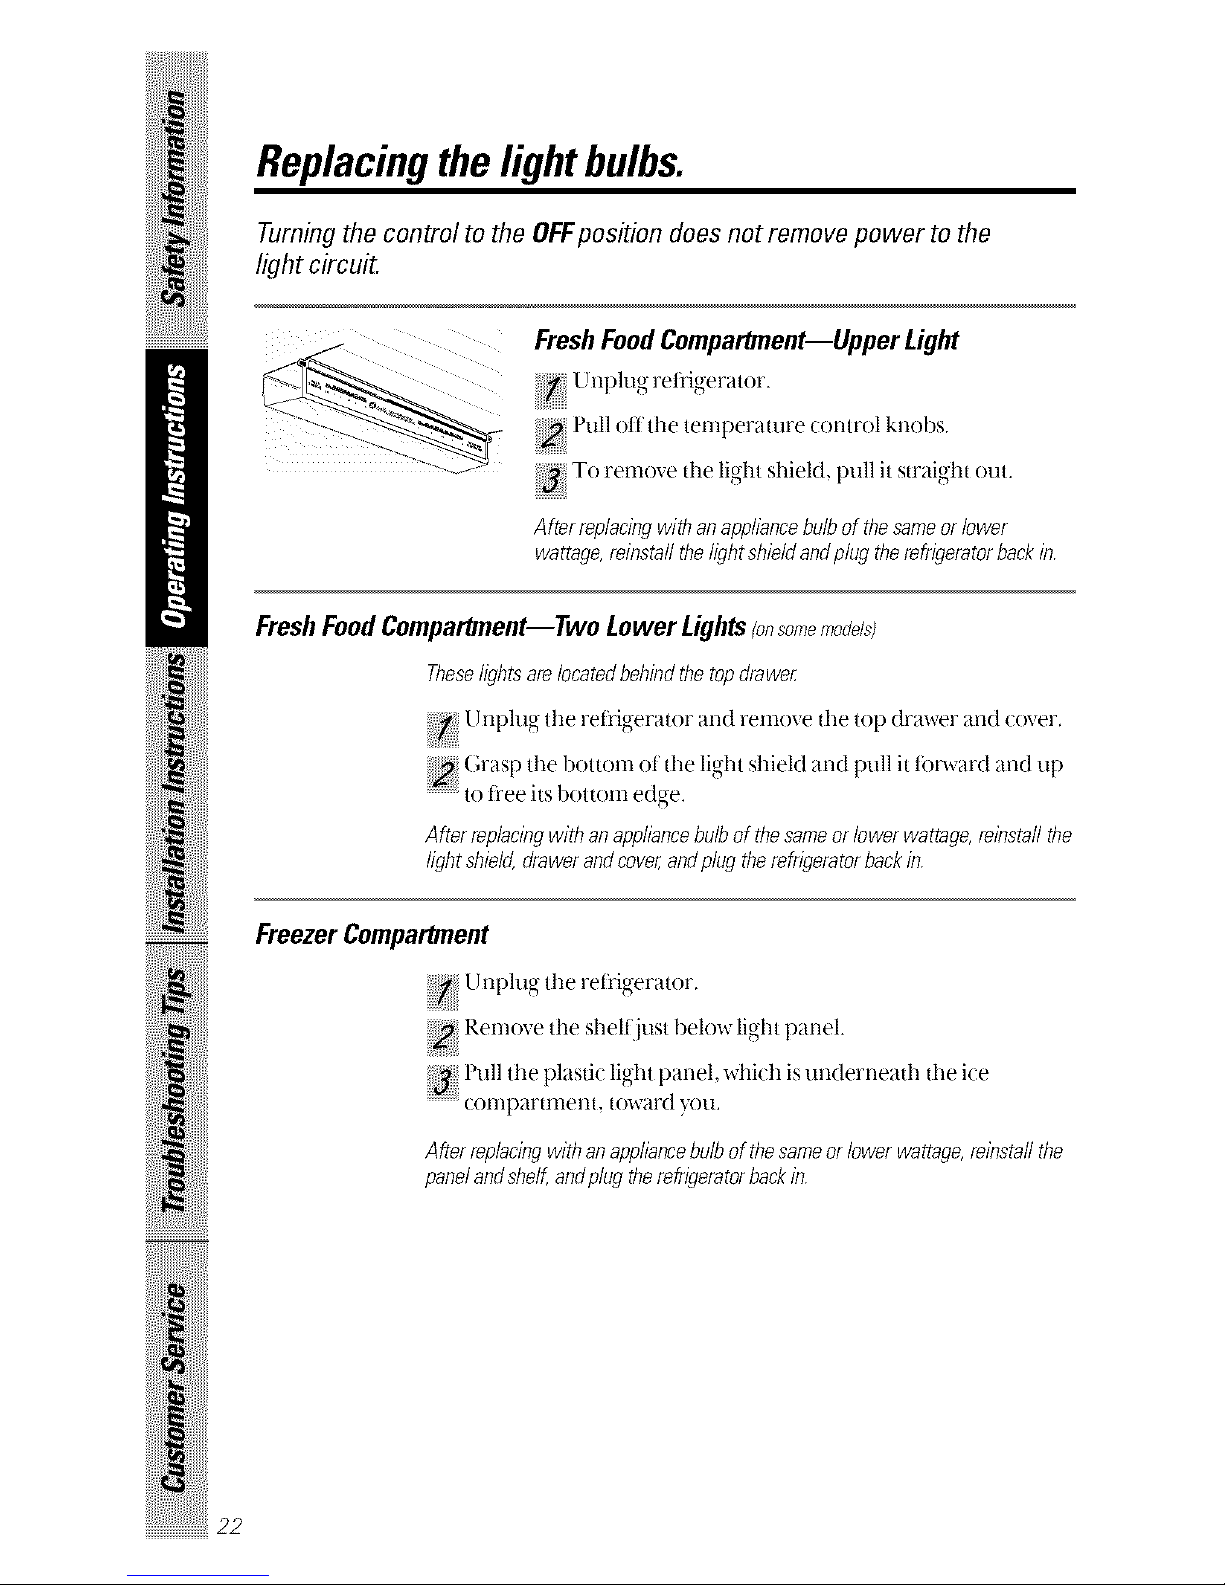
FreshFoodCompartment--Upper Light
Pull off'the ternperamre control knobs.
:_ To remove the lig-ht shield, pull it straight out.
After replacing with anappliance bulb of thesameor lower
wattage, reinstall the light shlald andplug therefrigerator back in.
FreshFoodCompartment--Two Lower Lightsionsomemo_/s;
Theselights are located behind the top drawar
:::: Unplug the refl'igerator and remove the top drawer and cover,
Grasp the bottom of the light shield and pull it forward and up
to fi'ee its bottom edge.
After replacingwith an appliancebulb of thesameor &war wattage, reinstall the
light shield, drawer andcover,andplug the refrigerator back in.
Freezer Compartment
Remove the shelf ust below light panel.
Pull the Plastic lio-ht )ariel xdlich is underneath the ice
_0 r _ _ _ , ....
¢olnpartnlent, toward you,
After replacing with an appliancebulb of thesame or lower wattage, reinstall the
panel andshelf,and plug therefrigerator back in.
22
Preparingtoinstall the refrigerator.
Read these instructions completely and carefully.
WaterSupplyto theIcemaker
Y()tl'will need to conrlect the icenlaker to a cold water line.
A water suppl} kit (containing- copper tubing, shutoffvah_e, thtings
arm instructior_s) is available at extra cost ti'orn your dealer.
RefrigeratorLocation
l)o not install the ret_'ig-erator where the temperature will go beh)w
t)O°F,(I(')°C.) because it will not run ()lien enough to maintain
proper temperatures.
Install it on atloor strong enough to support it fulh loaded.
Clearances
Allow the tblloMng clearances tbr ease of installation, proper air
circulation and plumbing and electrical connections:
24"Model 28"Model 30"Model
Sides l/8" (3 ram) l/8" (3 ram) l/8" (3 ram)
Top 1" (25 ram) 1/8" (3 ram) 1/8" (3 mm)
Back 1/2" (13ram) 1/2" (13ram) 1/2" (13ram)
Ifbuilt-ie,allow7/8"(22 ram)forhingecovers,
If the reti'igerator is against a wall on either side. allow 3/4"
(19 ram) for door clearance.
23!i

_iii!iiiiilJiiii_iilli!iiiiiiiji
Preparingtoinstall the refrigerator.
Read these instructions completely and carefully.
Leveling Rollers
Therollers have2purposes:
The rollers can be ac!iusted so the rei_igerator is th'rnly positioned on the
::::::tloor and does llOt rock back _-lil(lforth.
Rollers allow you to move the retY gerator awa} tram the wall tor cleaning.
Toadjust the rollers remove.... the 1)ase_oTilleb,,.l)ulling it out at the l)ottom.
_i_i!iii_iiiiiiiiiii!iiiiiii!ii_!i
iiiii!i!i iiiiii
Turr_ the _woti'ont roller a(!justir N screws clockwise toraisethe refligerator,
counterclockwise to lower it. Use a 3/8" socket wrench, a(!iustable wrench
or pliers,
FrontRoller
Bc[ew
(onBuilt-inStylemodelsonly}
Usethisscrewif therefrigerator
hasone.
FrontRoller
(onBuiltdnStylemodelsonly}
Usethisscrewif therefrigeratordoes
nothavethe screwpicturedto the left.
Built-In Style models also have rear a(!iustable rollers so you can align the
retiigerator with }our kitchen cabinets. Use a 5/16" socket wrench to turn the
screws for the rear rollers-clockwise to raise it, counterclockwise to Iower it
24
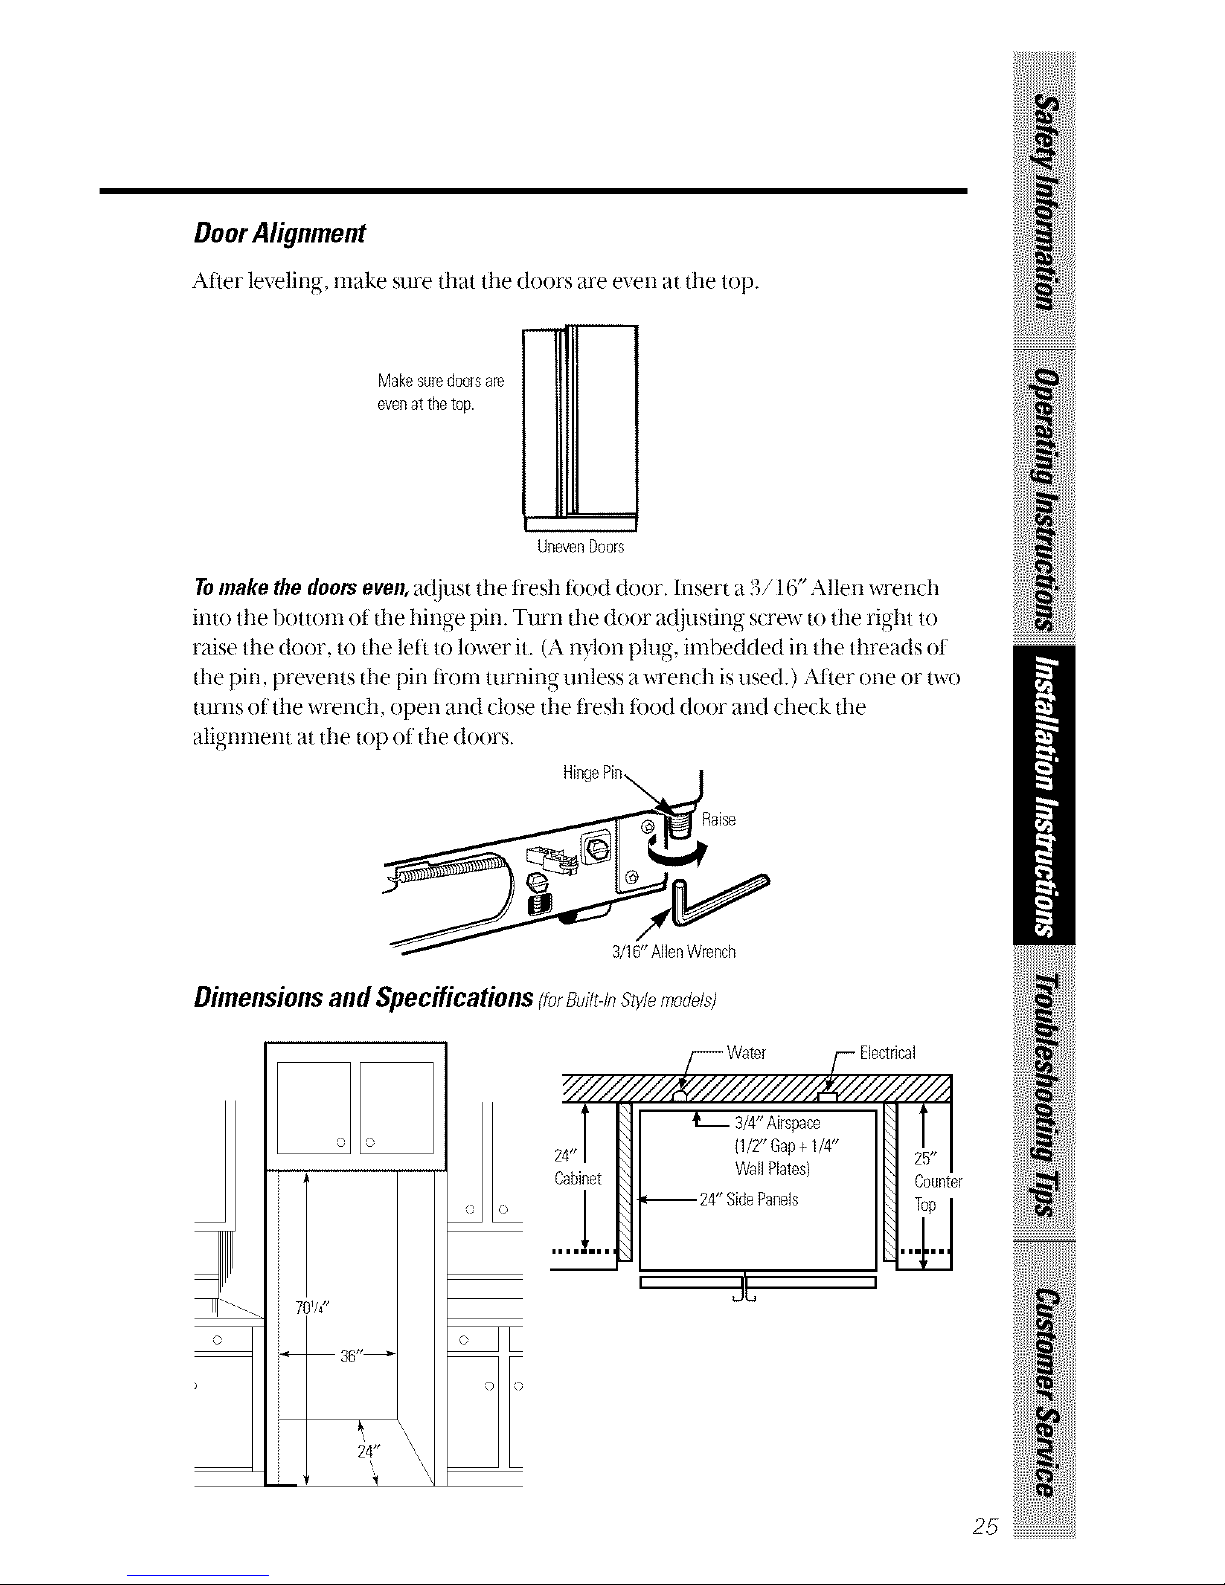
Door Alignment
Alier levering, make sure that the doors are even at the top.
Make suredoors are
even at the top.
UnevenDoors
Tomake the deers even, a(!just the t[esh tood door, Insert a 3/16" Allen wrench
into the bottonl of the hinge pin. Turn the door a(!justing screw to the right to
raise the door. to the left to h)wer it. (A nylon plug, imbedded in the threads ot
the pin, prevents the pin ti'om turning unless a wrench is used.) _Mter one or two
turns of the wrench, ()pen and close the ti'esh t0od door and check the
alignment at the top of the doors.
3/16"AllenWrench
Dimensionsand Specifications/forB,i/t-/ns_/lemodels)
Cabinet
z z
o
' A
Electrical
Counter
!!ii!i
_iiiii/iiiii:_!iiY_!_i!
25 ......................................
iii!iiiiilJii:i iilli!iiiiiiij}
_i_i!iii_iiiiiiiiiii!iiiiiii!ii_!i
iiiii!i!i iiii'ii
Trimkits and decoratorpanels.
For built-in style models
Read these instructions completely and carefully.
BeforeYouBegin
Some models are equipped with trim kits that allow you
to instafl door panels. You can order pre-cut black or
white decorator panels from GE Parts and Accessories,
800-626-2002, or you can add wood panels to match your
kitchen cabinets.
Panels lessthan 1/4"(6mm) Thick
When installing wood panels less than l/4" (6 ram) thick, you need
to create a tiller panel, such as 1/8" cardboard, that will tit between
the ta(e ot the door and the wood panel, If;, ou are installing the
premut decorator panels, pre<ut tiller panels are included in the
kit. The combined thickness ot the decorator or wood panel and
the tiller panel should be 1/4" (6 ram),
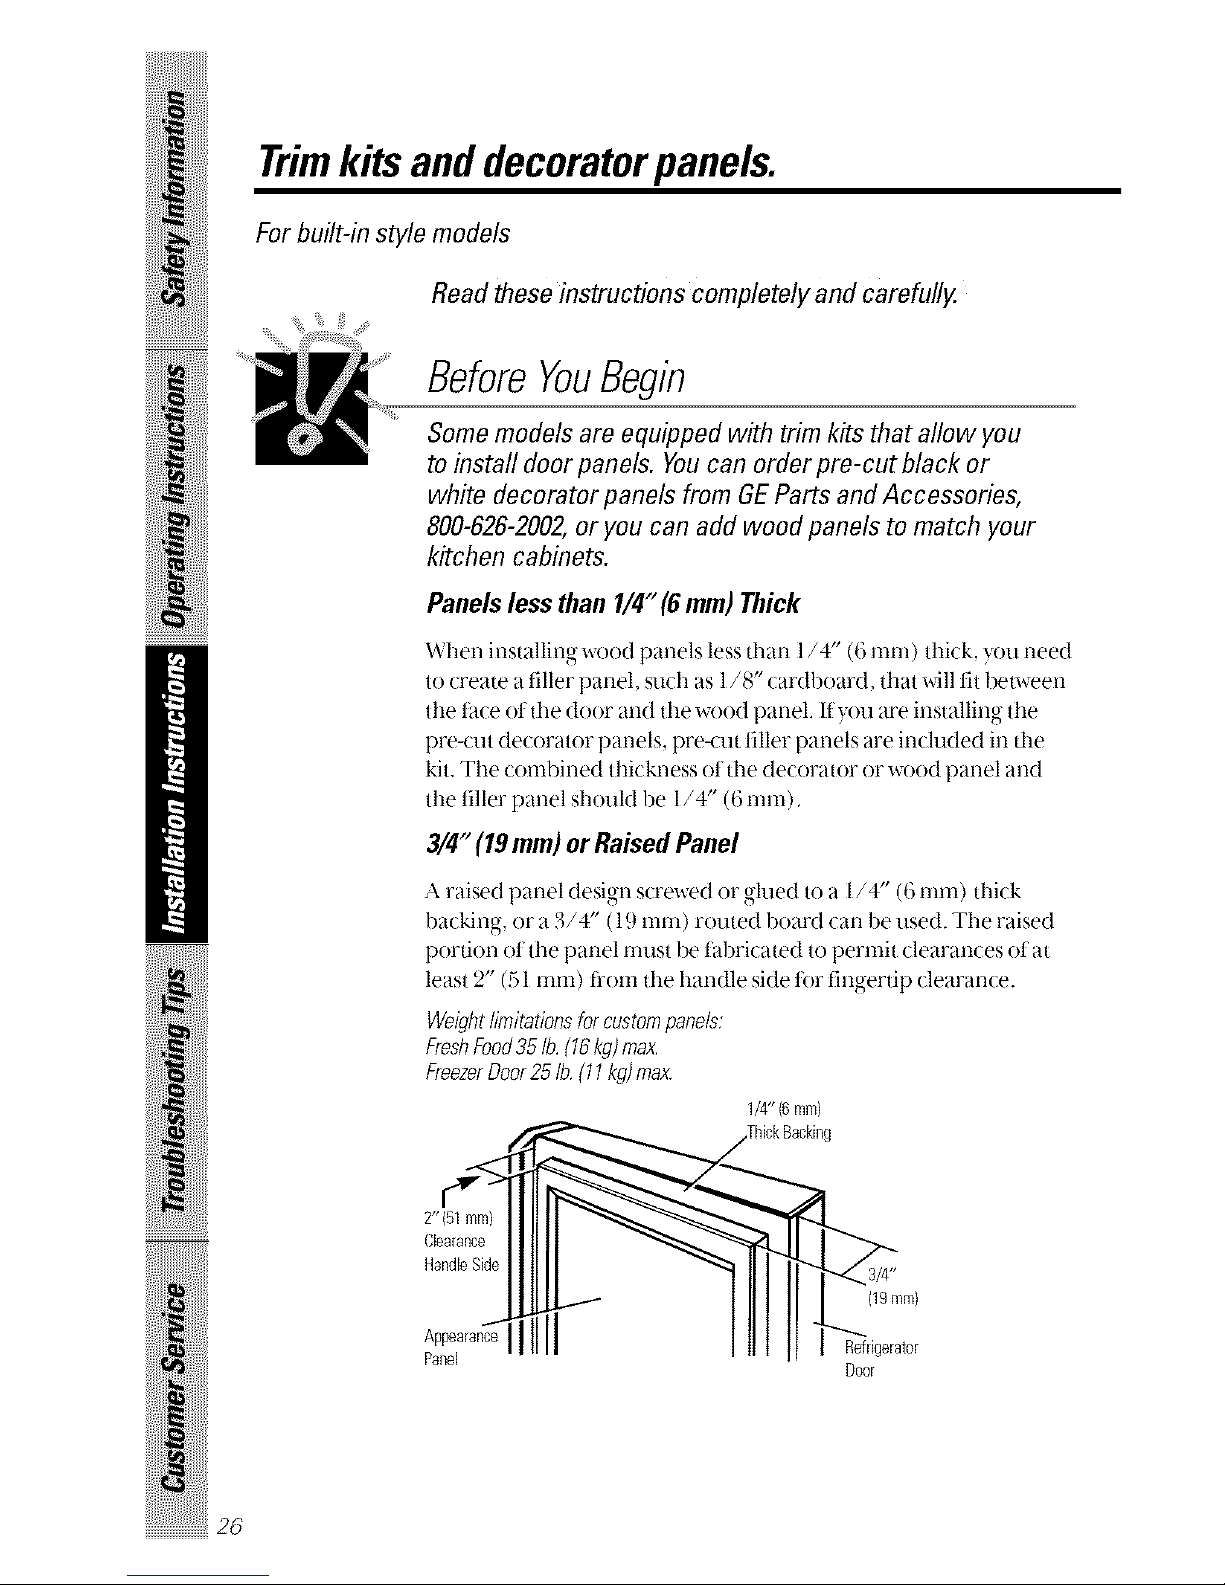
3/4" (19 mm) or Raised Panel
•'_raised, l)and desim-_,.,,screwed or ,glued to a 1/4" (6 ram) thick
backing, or a 3/4" (l 9 ram) routed board can be used. The raised
portion ot the panel nmst be Pabricated to permit clearances ot at
least 2" (51 nun) li'om the handle side tor fingertip clearance.
Weight/imitatioesforcustompanels:
FreshFood35lb.(16kg)max.
FreezerDoor25/b,(11kg)max.
1/4" {6rnrn}
.____ //Thick Backing
HandleSide
Appearanc'_,
Panel Door
26

Care ofPre-CutPanels
(;lean these panels Llsin_ an anti-static ......cleaner or a l-nild deteroent
and water. ([,ook tor anti-static cleaner in electronic or computer deparunents.)
Rinse thoroughly and blot @)'with a clean, damp cloth or chamois. Do not use
paper towels to wash or d[7 the panels. Do not use cleaners that contain solvents,
such as ammonia, because the)can damage the panels.
Shall()w scratches and abrasions can be corrected with a good grade of hard
automobile paste wax. Do not use a cleaner/wax combination. The wax will
fill in any minor suriilce scratches and will help to maintain the luster of the
panels. Appl) the w_e_.sparingly and butt'lightl} with a clean ,,soft cloth usino-,
a cir(aflar motion.
Dimensions
Wood panels need to be cut to tile tollowing specifications.
Freezer Panel Freezer Panel
Without Dispenser With Dispenser Fresh FoodPanel
Cutout.... .3/32" Cutout_I I_ 3/32" 3/37".... Cutout
_1 _
I FRONT
34%"
@14VZ'
"2"
1"
!: t
FRONT
2"½ --19'q .......
Li L
Tile areas at tile top of the panels need
to be cut out of tile panels. All other
dotted lines indicate areas that must be
routed out about 3/16" (5 ram) on the
back side ot panels 1/4" (6 ram) thick
or more. For panels less than 1/4"
(6 ram) thick, these areas can be cut
out ot the filler panels,
_.___._i_ll, Depthofmatedalto
be routedout
1 4 3/16
Front
ExampleofRouting
!!i'i !i
27 ......................................
@:(_iiBiiJ}
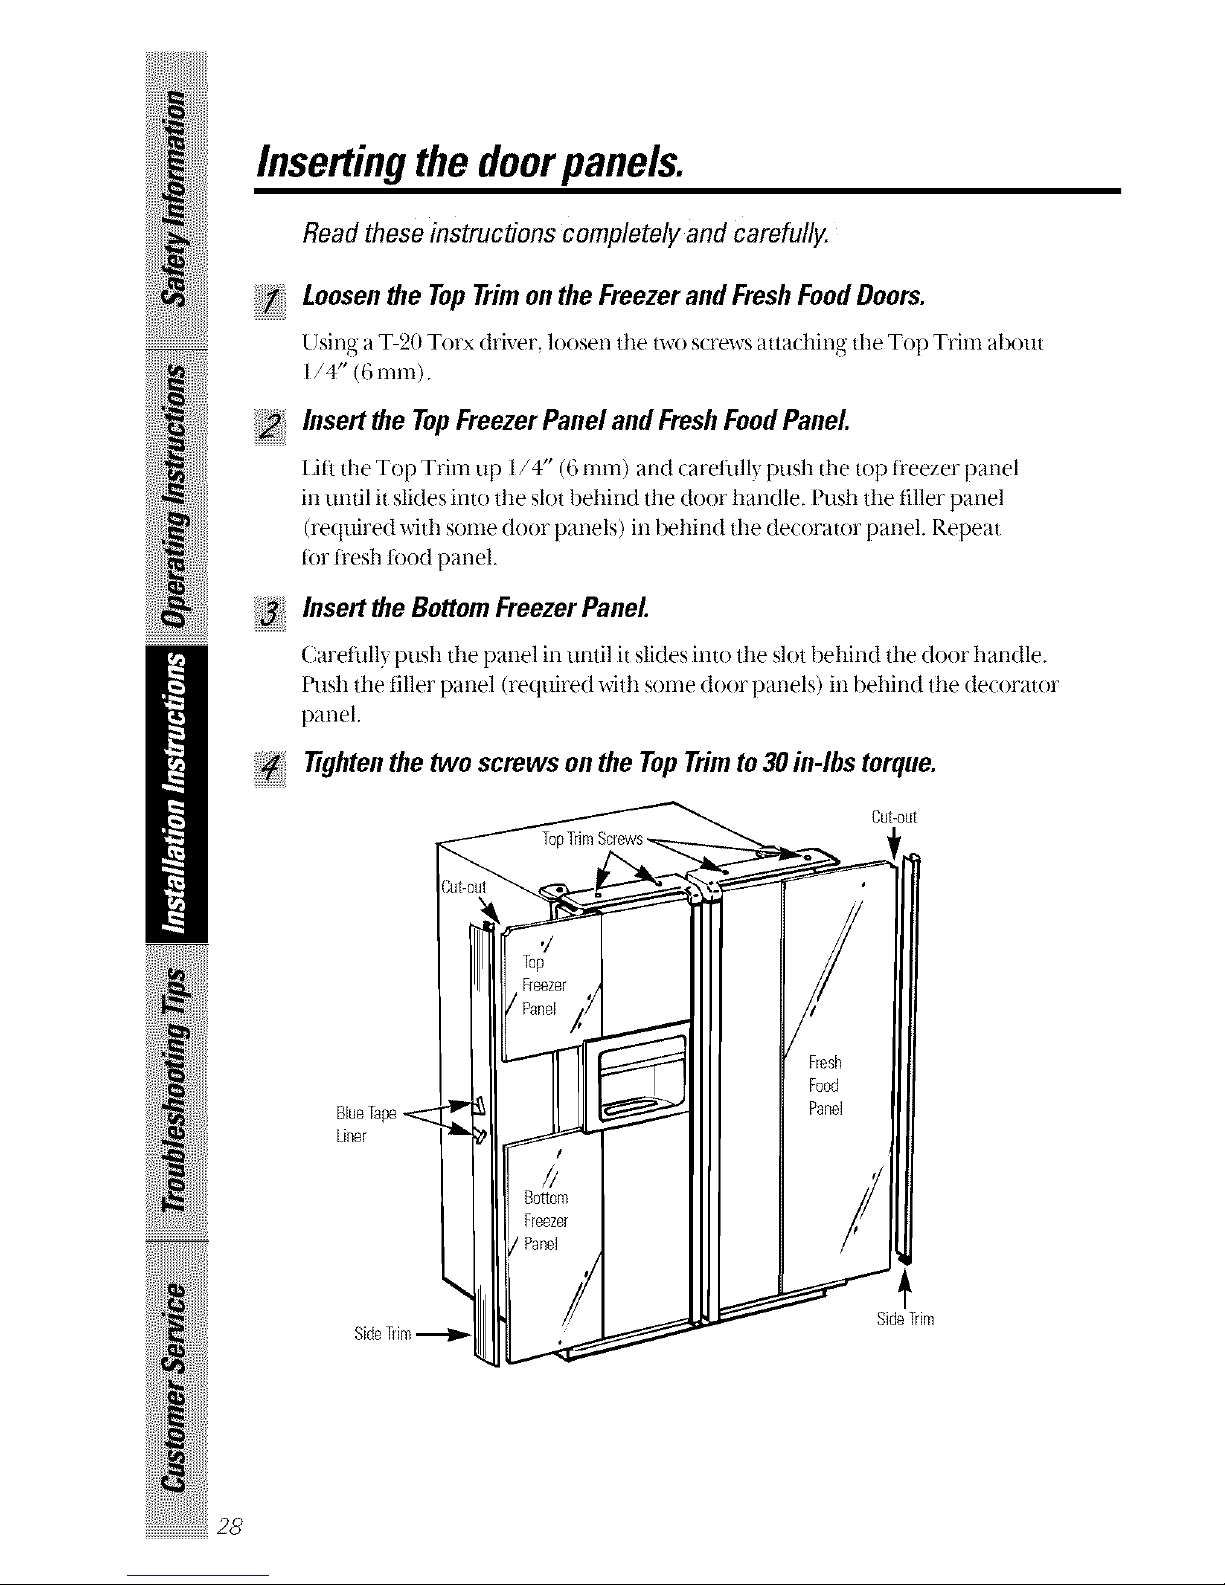
Insertingthe doorpanels.
Read these instructions completely and carefully.
Loosenthe TopTrimonthe Freezerand FreshFoodDoors.
Llsing a T-20 Torx driver, l()()sen the t_vos(rews atta(hir N the Top Trim about
1/4" (6 ram).
Insert the Top Freezer Panel and Fresh Food Panel
I.iti the Top Trim up l/4" (6 ram) and (arefully push the top ti'eezer panel
in until it slides into the slot behind the door handle. Push the filler panel
(required with some door panels) in behind the decorator panel. Repeat
tot ti'esh tbod panel.
Insert the BottomFreezerPanel
Carefull} push the panel in until it slides into the slot behind the door handle.
Push the filler panel (required with some door panels) in behind the decorator
panel.
tighten the two screws on the TopTrimto30 in-lbs torque.
Cut-out
@iiiiiiiiiii!iiiiiii!ii_!i
iiiiiii!i iiii'ii
2_
BlueTape
Liner
SideTdm
SideTrim
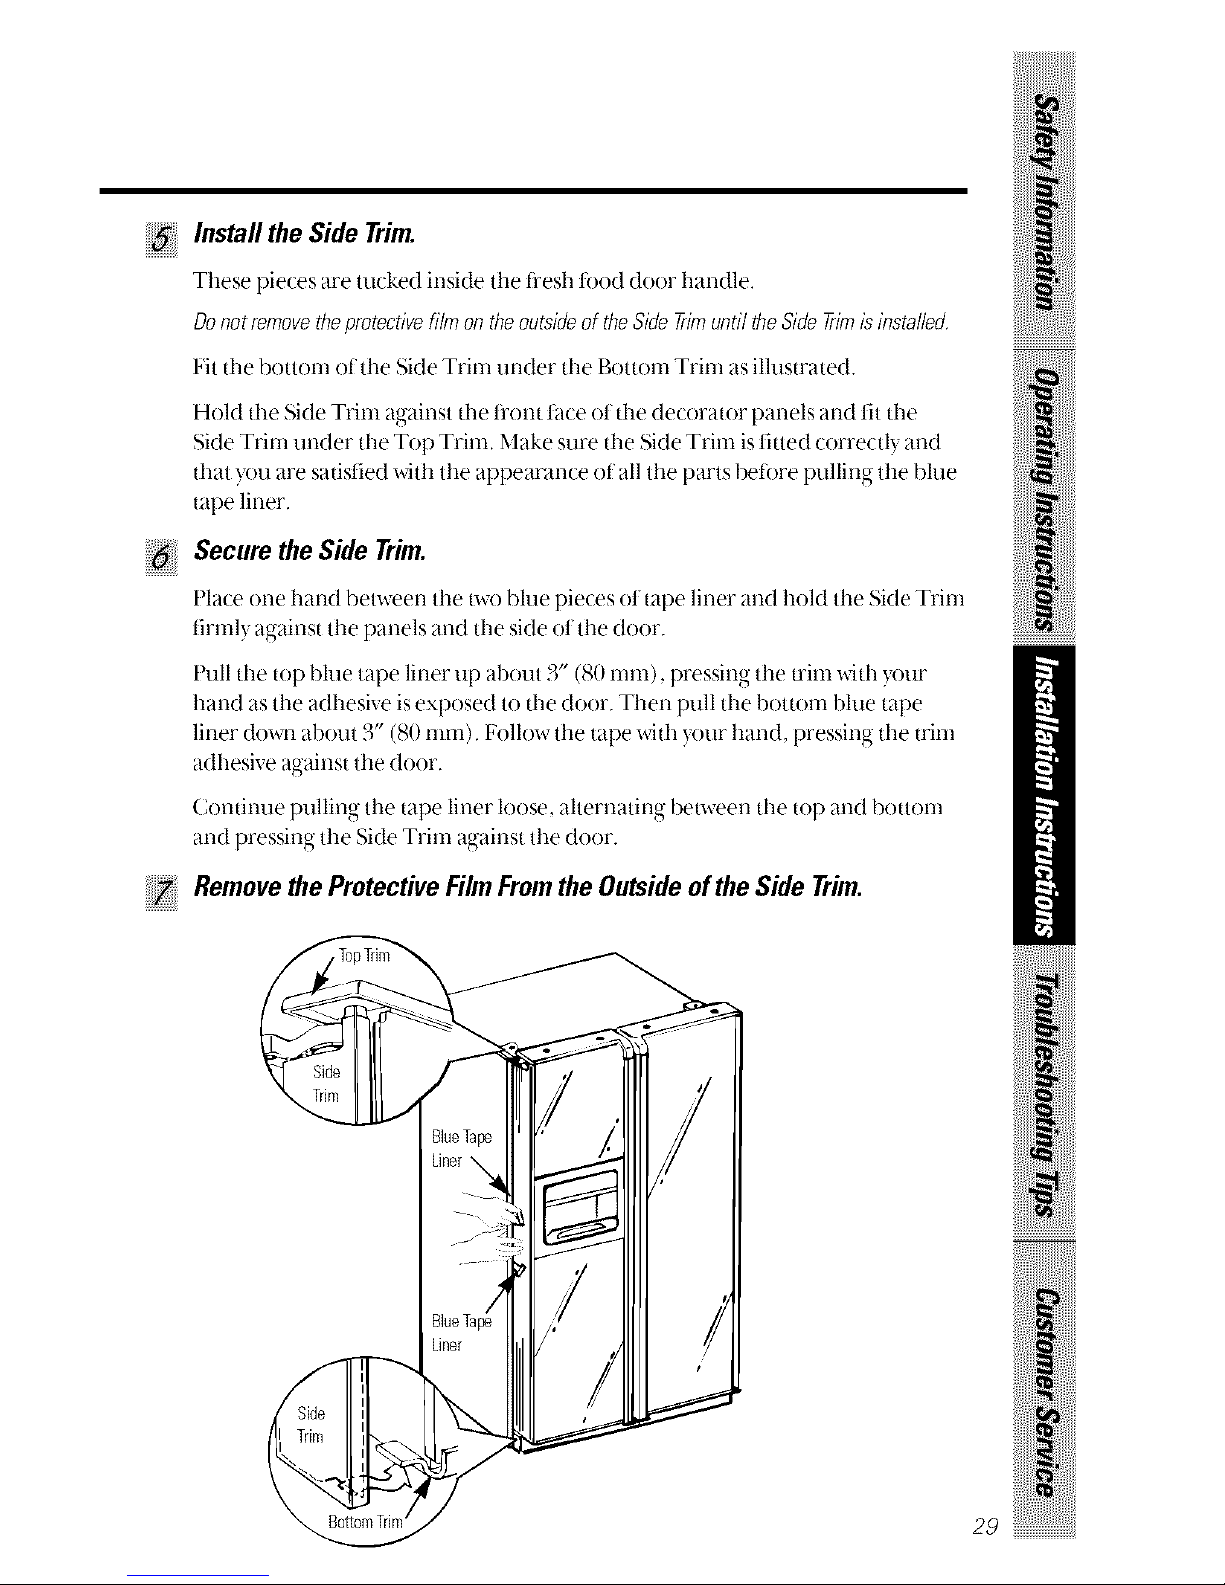
Install the Side Trim.
These pieces are tucked inside the fi'esh food door lmndle.
Donotremovetheprotectivefilm ontheoutsideof theSideTrimuntiltheSideTrimisinstalled.
F'it the bottom of the Side Trim under the Bottonl Trim as illustrated.
Hold the Side Trim against the t?ont thce of the decorator panels and fit the
Side Trim under the Top Trim. Make sure the Nde Trim is titted correctly and
that you are satisfied with the appearance of all the parts betore pulling the Mue
tape liner.
Secure the Side Trim.
Pla(e one hand between the tx\x)blue pie(es ot tape liner and hold the Side Trim
firmly _|gainst the p_mels and the side of the door.
Pull tlle top blue tape liner up about 3" (80 ram), pressing the trim widl ?our
hand as the adhesive is exposed to tlle door. Then pull the bottom blue tape
liner down about 3" (80 ram). Follow the tape with your hand, pressing the trim
adhesive against the door.
Continue pulling the tape liner loose, alternating between the top and bottom
and pressing the Side Trim against the door.
Remove theProtective FilmFromthe Outside ofthe Side Trim.
2_ ......................................
_iii!iiiiilJii:i_iilli!iiiiiiiji
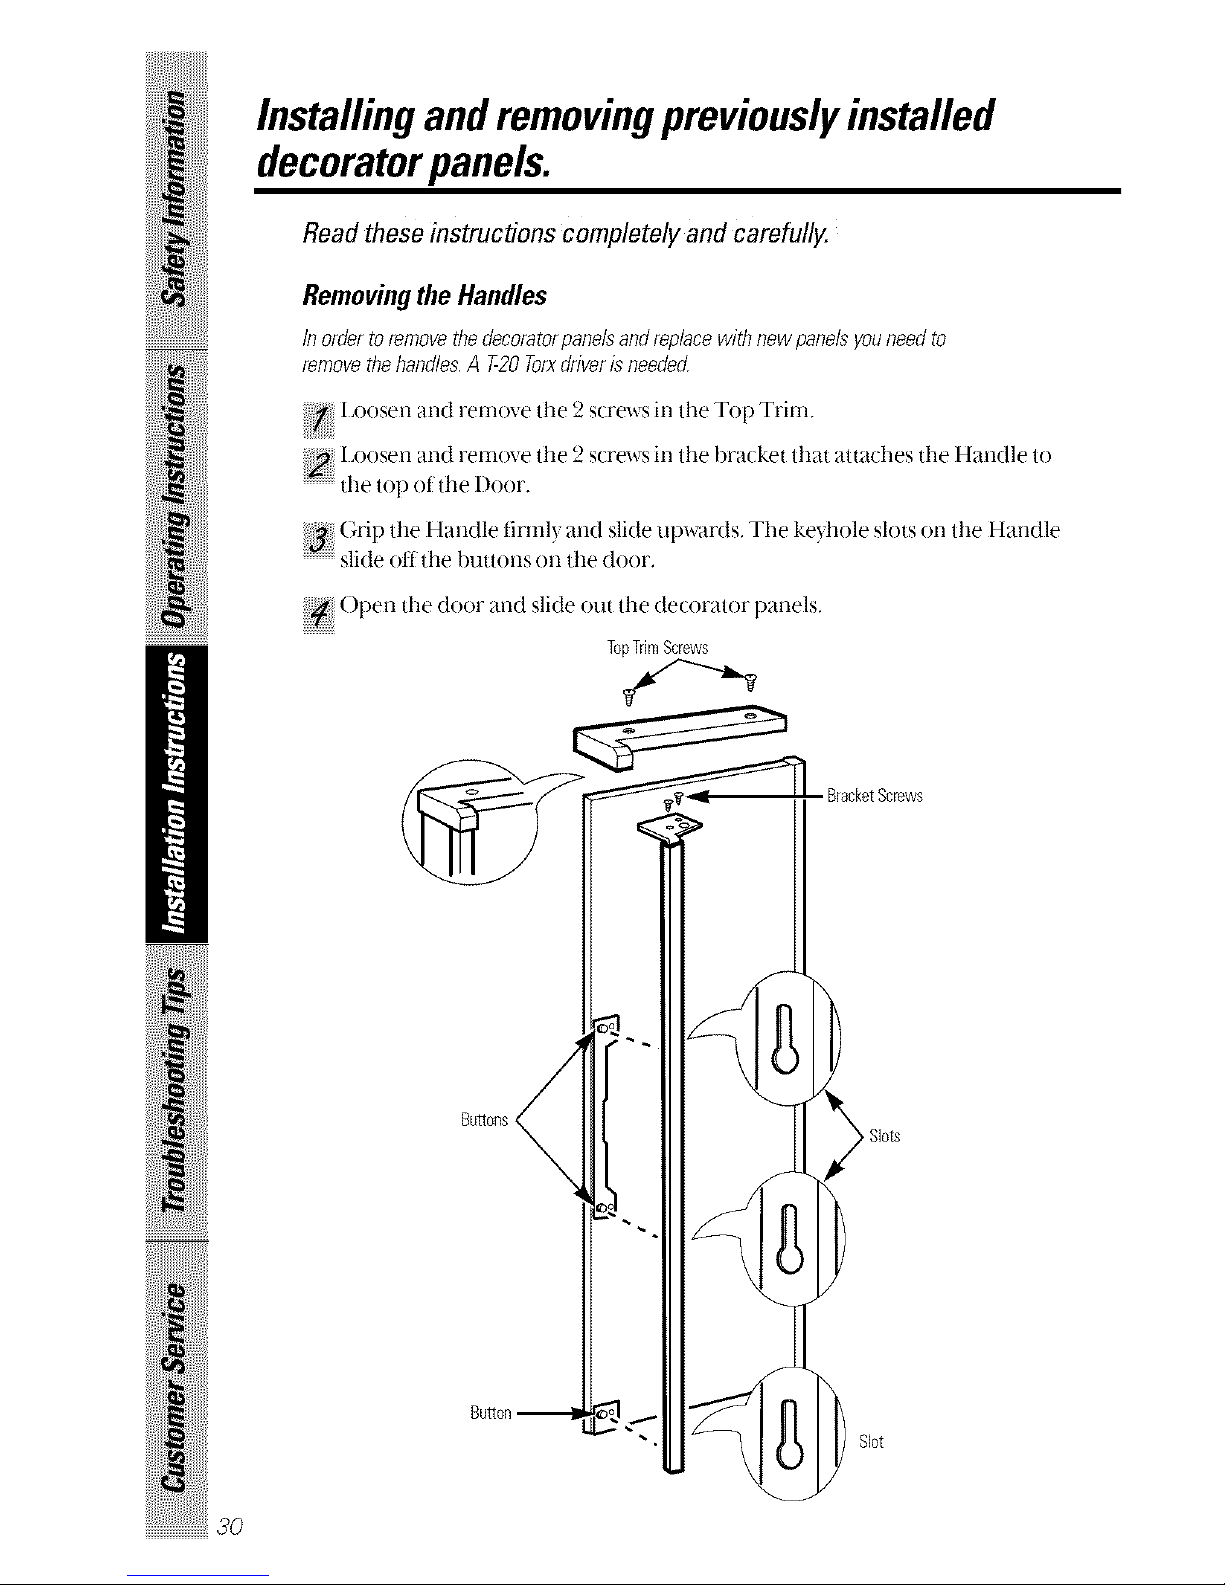
Installingandremovingpreviouslyinstalled
decoratorpanels.
Read these instructions completely and carefully.
Removingthe Handles
In order to remove the decoratorpanels and replace with new panels youneed to
remove the handles, A T-20Torxdriveris needed
[ x)osen and remove the 2 s(rews in the Top Trim
[,oosen and remove the 2 screws in the bracket that attaches the Handle to
the top of the I)oor.
(;rip the Handle tirmly and slide upwards, The keyhole slots on the Handle
slide off" the buttons on the door,
( )pen the door and slide out the decorator panels.
TopTrimScrews
BracketScrews
_i_i!iii_iiiiiiiiiii!iiiiiii!ii_!i
iiiii!i!i iiii'ii
3O
Buttoes
Slots
SI0t
 Loading...