

Page 1
?
..
..—
7
IuseandCare&
contents
AdapterPlug 3
AirDirection
ApplianceRegistration 2
CareandCleaning
AirFilter 6
Grille&Cabinet
OutdoorCofi
ConsumerSeHtices
ControlSettings
ElectricalRequirements
5
6
6
6
15
4,5
3
~nstai~ationGuideI
EnergySaverS\titch 4
Energy-SavingTips
ExtensionCords
FreezingUp
Grounding
InstallationInstmctions
ModelandSerialNumbers 2,6
ProblemSolver
SdfetyInstructions 2
UserMaintenanceInstructions 6
8-14
BackCover
7
3
4
3
7
Page 2
.
”
.
Helpushelp you.*e
Beforeusingyour air
conditioner,readthisbook
$arefullyo
It is intended to help you operate
and maintain your new air
conditionerproperly.
Keep it handy for answersto your
questions.
If yotldon’t understandsomething
or need more help,write (include
your phonenumber):
ConsumerAffairs
GE Appliances
AppliancePark
Louisville,KY 40225
writedownthemodel
serial numbers.
and
YoLI’11find them on a label on
the right hand side of thecabinet
and/or behind the frontgrille on
the front end of thebase pan
(for service use).
These riulmbersare also on the
Consumer Product Ownership
Registration Card that came with
your air conditioner.Before
sending in this card, please write
these numbers here:
Model Number
Serial Number
Use these numbers in any
cc~rrcspondcnceor service calls
concerning your air conditioner.
moRTmT
men usingthisappliance,always
exercisebasicsafetyprecautions,
includingthefollowing:
eusethisapplianceonlyfori~
intendedpurposeasdescribed
inthisUseandCareGuide.
oNeverunplugyourair
conditionerbyptiingonthe
po~vercord.Alwaysgripplug
firdy andpullstraightoutfrom
thereceptacle.
sRepairorreplaceimmediately
allelectricSertieecordsthat
havebecome
damaged.Donotusea cordthat
showscracksorabrasiondamage
alongitslengthorateitherthe
plugorconnectorend.
~Unplugyourairconditioner
before
makinganyreptirs.
Note:Westronglyrecommend
thatanyservicingbeperformed
byaqualifiedindividual.
frayedorOthertise
To obtainservice,see the
ConsumerServicespage in the
back of this book.
We’reproud of ourserviceand
wantyou to be pleased.If for some
reason you are not happy with the
serviceyou receive,here arethree
stepsto followfor further help.
FIRST,contact the peoplewho
servicedyour appliance.Explain
why youare not pleased. In most
cases, thiswill solvethe problem.
NEXT, if you are stillnot pleased,
write all the details—including
your phone number—to:
Manager,Consumer Relations
GE Appliances
AppliancePark
Louisville,KY 40225
FINALLY,if your problem is still
not resolved, write:
Major Appliance Consumer
Action Panel
20 North WackerDrive
Chicago, IL 60606
e ‘--
If you receiveda dalnaged
QirConditioner.
Iinmediately contact [he dealer
(or builder) that sold you the
air conditioner.
e e
__-.-..=m----- . .
~For yoursafety...d.onotstore
orusecombustiblematerials,
gasolineorotherflammable
vapors
or liquids inthevicinityOf
thisoranyotherappliance.
—..—,..——.—.
_—.————..
.—
__.—..
Page 3
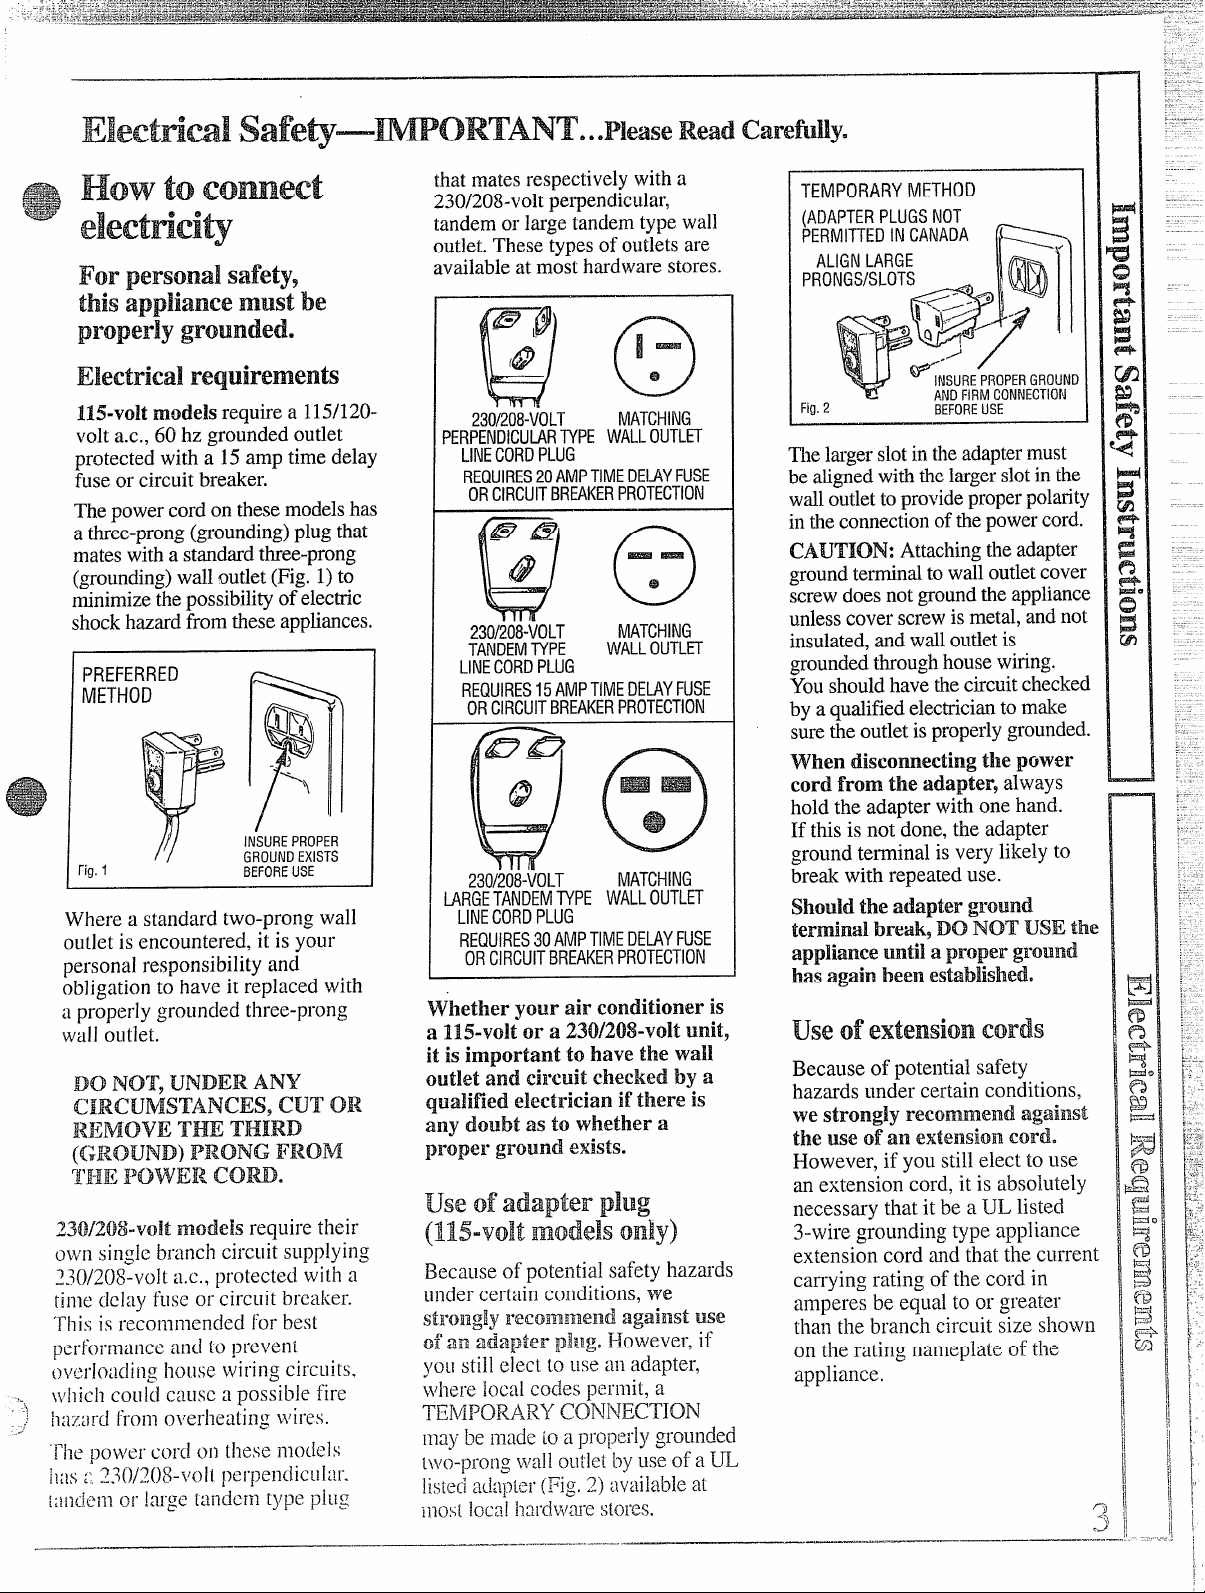
For personalsafety,
appiiancemustbe
this
properly
Electrical
115-voltmodels require a 115/120-
volta.c., 60 hz grounded outlet
protected with a 15amp time delay
fuse or circuit breaker.
Thepowercord on thesemodelshas
a three-prong(grounding)plugthat
mateswith a standardthree-prong
(grounding)walloutlet(Fig. 1)to
minimizethepossibilityof electric
shockhazardfrom theseappliances.
PREFERRED
METHOD
‘ig,1
L-_
Where a standard two-prong wall
outlet is encountered, it is your
personal responsibility and
obligation to have it replaced with
a properly grouncledthree-prong
wall oLltlet.
Do NOrFyUNDKR AN17
CIRCUMSTANCES, CUT 01{
REMOVE THE THIRD
(GROUND) P~o~~ ~~~~
T1-IEI’GWEI%Corn.
230/208-volt models require their
groundede
requirements
‘\
~
QQ
%
-<,
~
INSUREPROPER
GROUNDEXISTS
BEFOREUSE
thatmates respectivelywith a
230/208-voltperpendicular,
tandemor largetandemtype wall
outlet.These types of outletsare
availableat most hardware stores.
b
BQ
L
(?
Q
*QTe
PERPENDICiLARUPE WALLOUTLET
LINECORDPLUG
REQUIRES20AMPTIMEDELAYFUSE
ORCIRCUITBREAKERPROTECTION
@@
230/208-VOLT MATCHING
TANDEMTYPE
LINECORDPLUG
REQUIRES15AMPTIMEDELAYFUSE
ORCIRCUITBREAKERPROTECTION
D .0
@
Qo
230/208-VOLT
IARGETANDEMTYPEWALLOUTLET
LINECORDPLUG
REQUIRES30AMPTIMEDELAYFUSE
ORCIRCUITBREAKERPROTECTION
i
e
MATCHING
WALLOUTLET
mm
@
MATCHING
W“hetheryour airconditioner is
a 115-voltor a 230/208-volt umit~
it isimportant to have the wall
outlet and circuit checliedby a
qualified electrician if there is
any doubt as to
~lroperground exists.
whether a
TEMPORARYMETHOD
Fig.2
Thelargerslotintheadapter must
beafignedwiththelargerslotin the
walloutlet to provideproperpolarit
inthe connectionofthepowercord
CAUT1ON: Attachingthe adapter
groundterminaltowall outlet cove
screwdoesnot ground the applianc
unless cover screwis metal,and no
insulated,and wdl outletis
groundedthroughhousewiring.
Youshouldhavethecircuitchecke
by a qualifiedelectriciantomake
surethe outletisproperlygrounde(
when diseomeeting tile power
cord.from the
hold the adapter wfihone hand.
If this is not done, the adapter
grot~ndterminal isvery likely tO
break with repeated use.
Shouldthe adapterground
terminal break,DO NOT USE the
applianceuntil a proper ground
hasagainbeeneshblishedo
Because of potential safety
hazards under certain conditions,
we strongly recommend against
the use of
However, if you still elect to use
an extension cord, it is absolutely
necessary that it be a UL listed
3-wire grounding type app]iance
extension cord and that the current
carrying rating of the cord in
amperes be equal to or greater
than the branch circuit size shown
on the rating nameplate of the
appliance.
BEFOREUSE
adapter9always
an extensioncord.
——
.—
—..—...—.—......-—-.—.——
.——— .
——— —.
.
.—
—.—-
Page 4
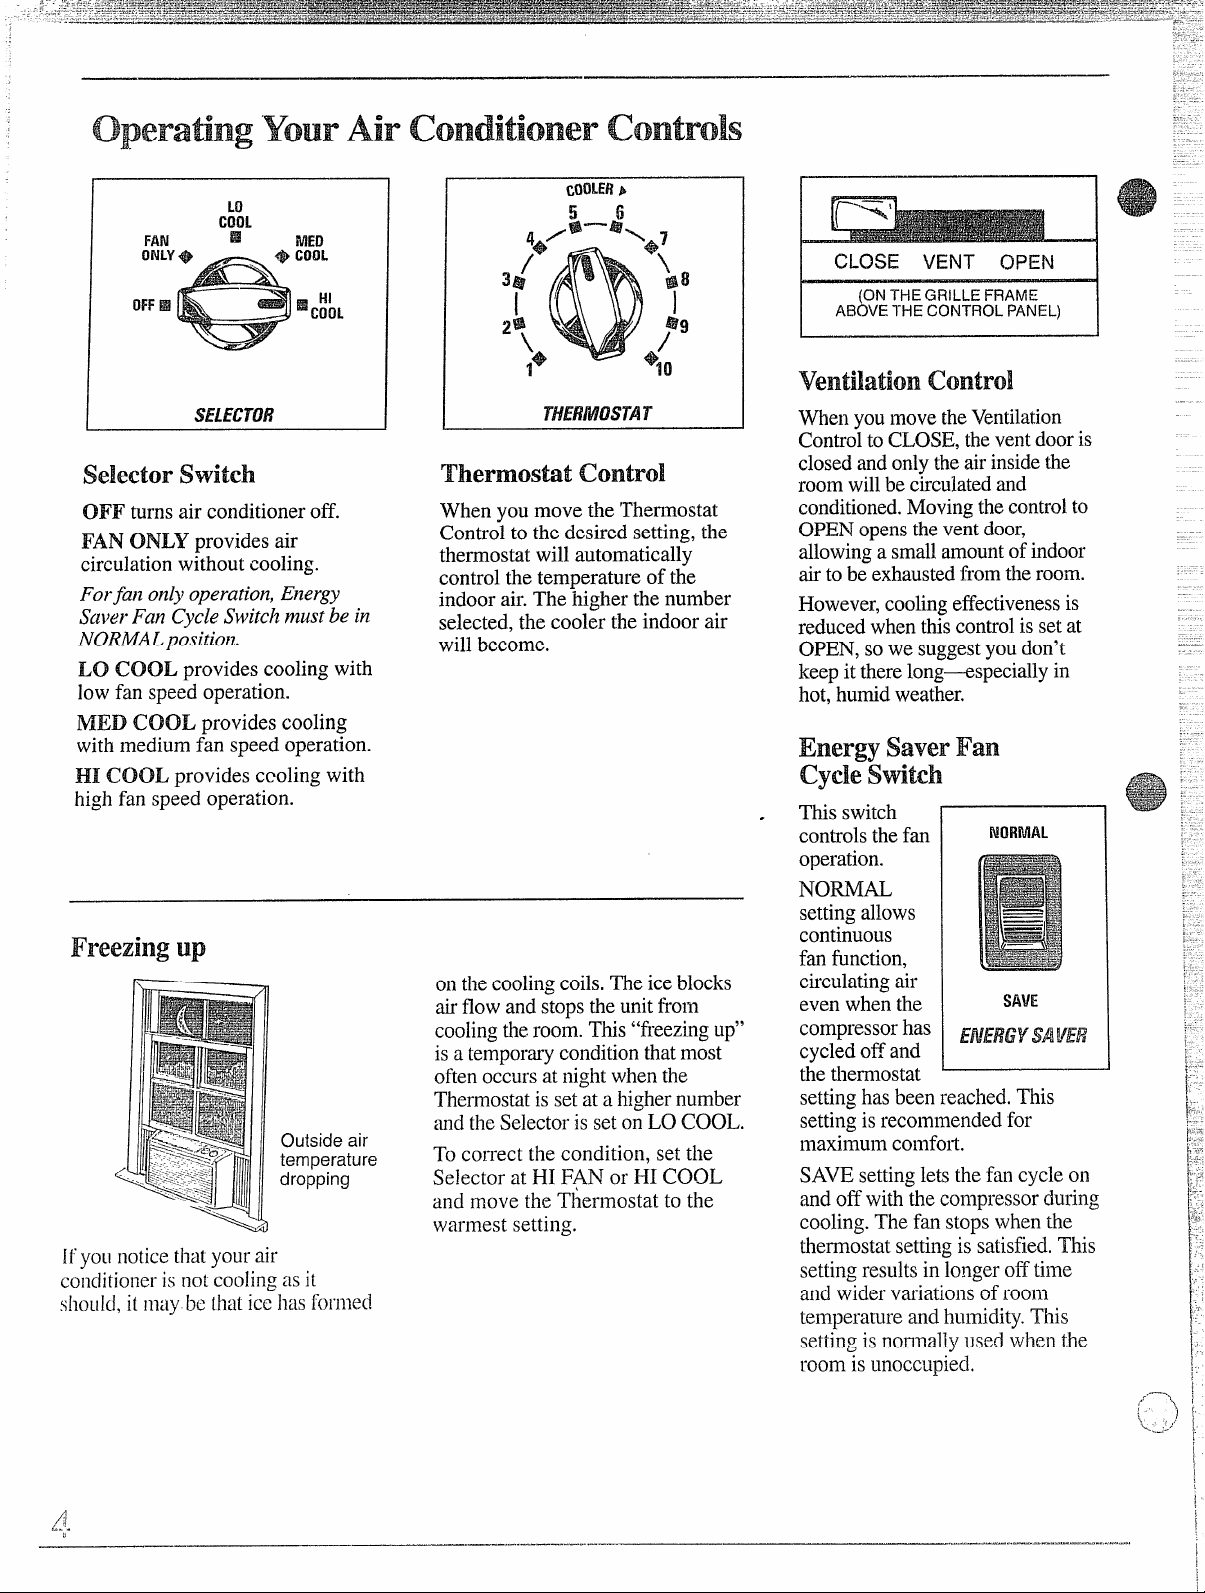
Operating “YourAir ConditionerControls
CLOSE VENT OPEN
I
(ONTHEGRILLEFRAME
ABOVETHECONTROLPANEL)
ventilationcontrol
I
[
selectorswitch
OFF turnsair conditioneroff.
FANONLY providesair
circulationwithout cooling.
Forfa?zonlyoperation,Energy
SaverFan CycleSwitc/tnzustbein
NOMM positio~z.
LO COOL provides cooling with
low fan speed operation.
MED COOL providescooling
with medium fan speed operation.
HI COOL provides ceoling with
high fan speed operation.
Freezingup
r\
Outside air
temperature
dropping Selector at HI F~ or HI COOL
..—
If’you noticethat yoLlrair
conditioneris nc]tcoolingas it
ShOLl~d,it m;iybe [hat ~cchas f0rlllt3d
Thermostat control
When youmove the ‘rherrnostat
Controlto the desired setting,the
thermostatwill automatically
controlthe temperature of the
indoor air.The higher the number
selected,the cooler the indoor air
will become.
on thecoolingcoils.The iceblocks
airflow and stopstheunitfrom
coolingtheroom. This “freezingup”
isa temporaryconditionthatmost
oftenoccursat nightwhen the
Thermostatis set at a highernumber
and theSelectoris set on LO
To correct the condition, setthe
and move the Thermostat to the
warmest setting.
COOL.
When youmovetheVentilation
Control to CLOSE,the ventdooris
closedandonlythe airinsidethe
room willbe circulatedand
conditioned.Movingthecontrolto
OPEN opensthe ventdoor,
allowinga smallamountof indoor
airto be exhausted from the room.
However,coolingeffectivenessis
reducedwhen thiscontrol is set at
OPEN, so we suggestyoudon’t
keep itthere long-especially in
hot,humidweather.
EnergysaverFan
cyclestitch
This switch
.
controls the fan
operation.
NORMAL
settingallows
continuous
fan function,
circulatingair
even when the
compressorhas
cycled OHand
the thermostat
settinghas been reached.This
settingis recommendedfor
maximum comfoll.
SA\~Esettinglets the fan cycle on
and off with the compressor during
cooling.The fan stopswhen the
thermostatsettingis satisfied.This
settingresultsin longerofftime
and wider variationsof room
temperature and humidity.This
settingis nol~nallyused when the
room is Llnoccupied,
— ———.—.-—..— .—— ...—..-=-..-.--=---------.=.-.....”..
i
Page 5
For nor~nalcooling
“.—.—.
For quieteroperation
1,Set theSelectorSwitch at MED
COOL.
2.SettheThermostatControlat
thedesirednumber (usually5 or 6
is a good startingposition). If room
temperatureis not satisfactoryafter
a reasonabletime, set the
ThermostatControlat ahigher
numberfor a coolerroom or at a
lower numberfor a warmerroom.
3. Set theEnergy SaverSwitch at.
NORMAL position.
4. Set the VentilationControl at
CLOSE except forbrief periods
when you want to exhaustroom air
to the outside.
For maximum cooling
1. Set the SelectorSwitch at
HI COOL.
2. Turn the Thermostat Control
to 10.
3. Set the VentilationControl at
CLOSE.
4.Set the Energy SaverSwitch at
YORMALposition.
1. Set the Selector Switchat the
LO COOL position.
2. Turn the ThermostatControl to
the desired number,
3. Set theVentilation Control at
CLOSE.
4. Set the EnergySaver Switchat
NORMAL position.
Note:When the Energy Saver
Switch is at theSAVEposition,
changesin the sound level may be
more noticeable than when it’sat
the NORMAL position,
For nighttinleoperation
During the coolerevening hours,
we recommend that you setthe
Selector Switch atLO COOL
for quieter operation and the
Thermostat Controlat mid-range
(4 or 5). Set the Ventilation
Control at CLOSE and the Energy
Saver Switch at NORMAL or
SAVEposition.
Forextremetemperatures
For greatest economy and best
performance, we suggestyou
set the Selector Switch at HI
COOL in extren~elyhot weather.
.——
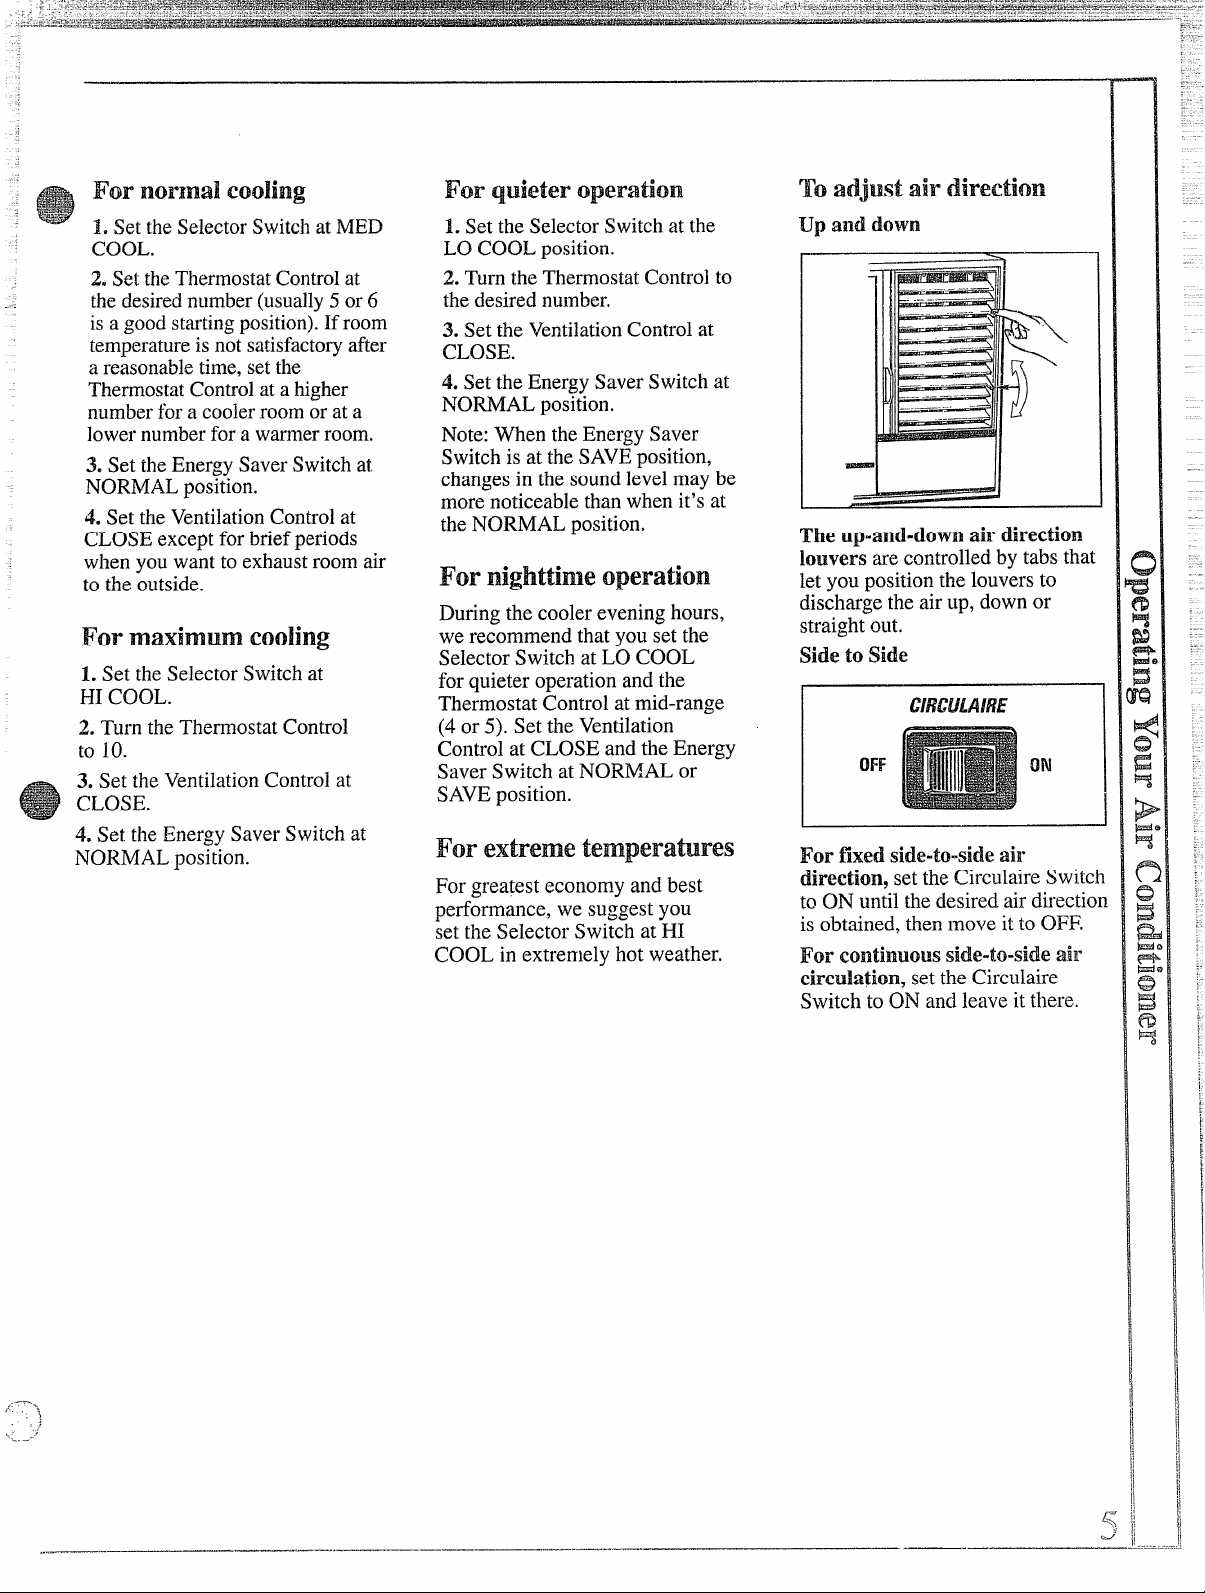
The up-and-down
airdirection
louvers are controlledby tabsthat
let you positionthe louvers to
discharge the air up, down or
straightout.
side to side
For
fixed side-to-side air
direction, setthe CirculaireSwitc
to ON until the desiredair directic
is obtained, then move it to
OFF.
For continuousside-to-side air
circulation,
set the Circulaire
Switch to ON and leave itthere.
..... ..
———
-—.
Page 6
L . .-..>.=-
—
.—
. ..—
.— —
.
. .
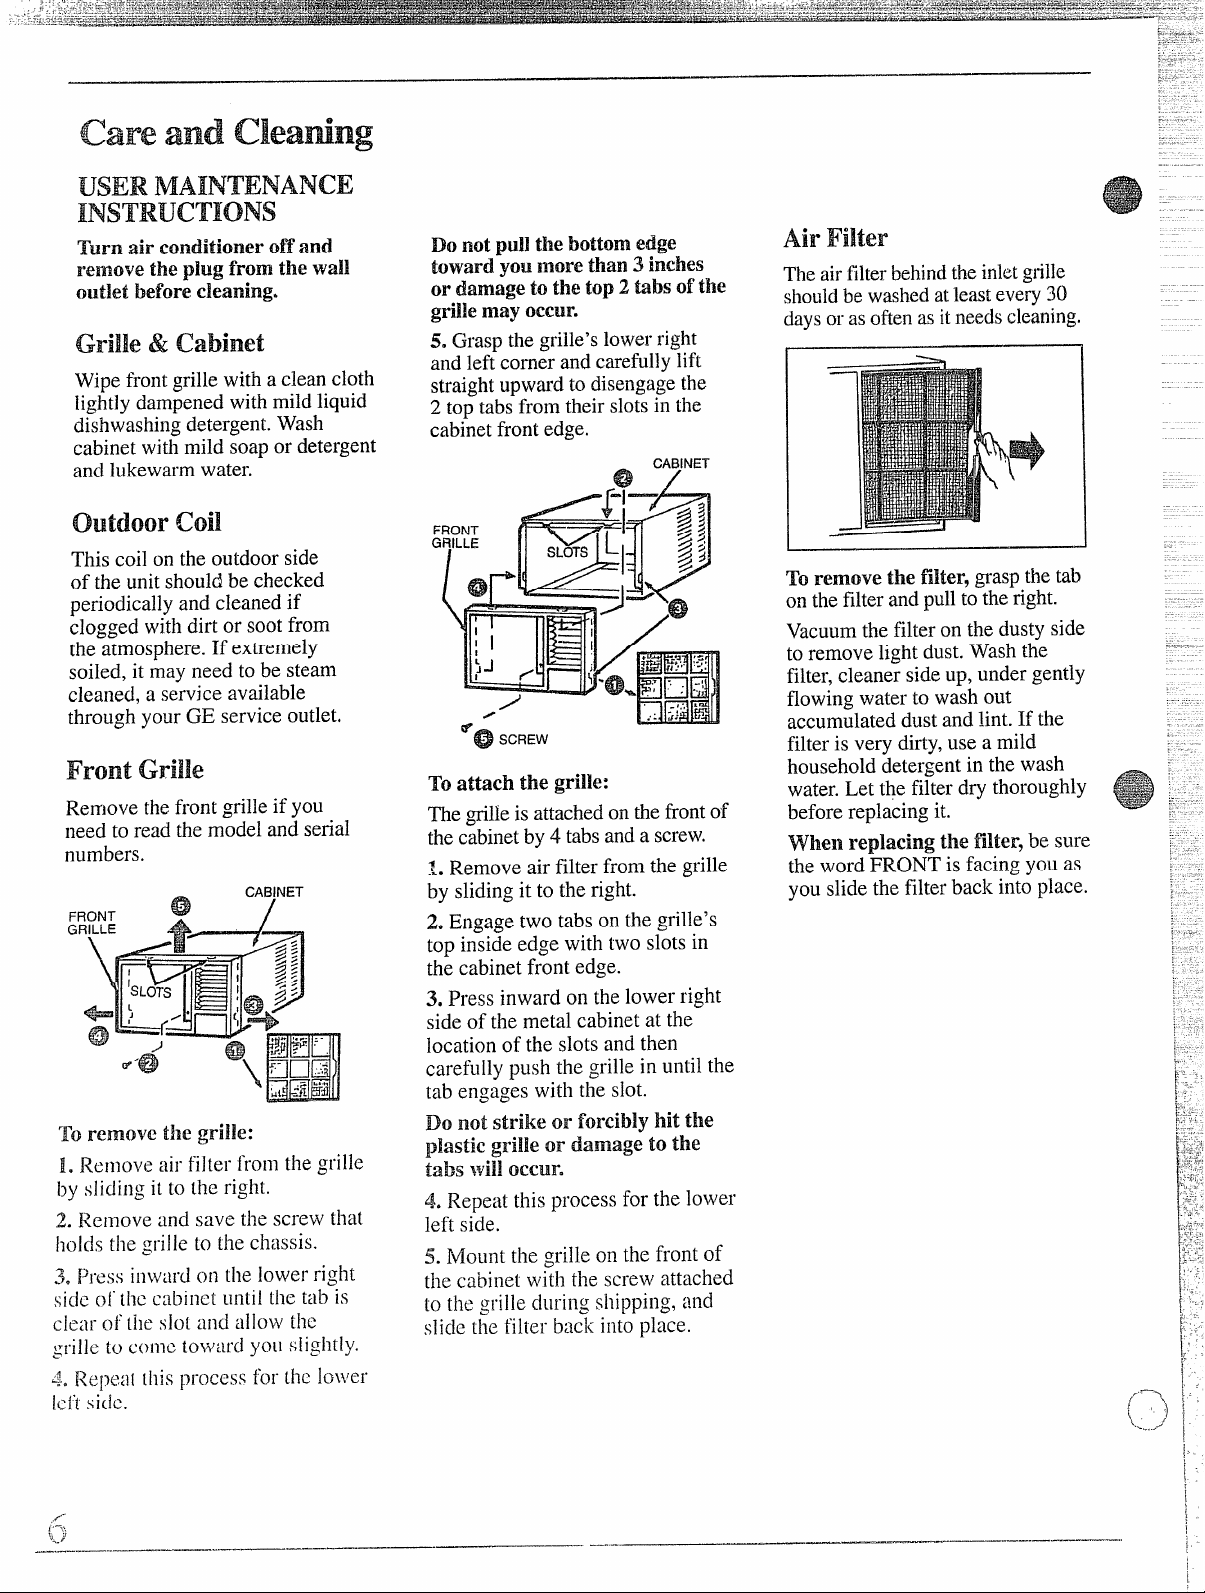
careand cHeadng
USERMAINTENANCE
INSTRUCTIONS
Turn airconditioner ofTand
remove the plug
outlet before
Wipefront grille with aclean cloth
lightlydampened with mild liquid
dishwashingdetergent.Wash
cabinet with mild soapor detergent
and lukewarm water.
This coil on the outdoor side
of the unit shouldbe checked
periodicallyand cleaned if
clogged withdirt or soot from
the atmosphere. If extremely
soiled, it mayneed to be steam
cleaned, a service available
through your GE service outlet,
FrontGrille
Remove thefront grille if you
need to read themodel and serial
numbers.
To remove tile
1. Rcn]ove air filter from the grille
by sliding itto the right.
2. Remove and save the screw tha(
holds the grille LOthe ch:]ssis.
3. Press ii~w:~rdon the iower right
siclcc}f”the cabinet until the tab is
clear C)f
~’rilleto cf~nletow;lrd ycl[lslightly<
.+
the slot and allow [he
fromtile wall
cleaning.
grille:
Do notpull tile bottom edge
towardyoumorethan3 inches
or damageto thetop2 tibs of the
grille may occur.
Grasp the grille’slower right
5.
a~d left corner and carefullylift
straightupward to disengagethe
2 top tabsfrom their slotsin the
cabinetfront edge.
CABINET
E
“@ SCREW
attach the grille:
To
~tilleis attachedon the frontof
The
thecabinetby 4 tabsand a screw.
1. Remove air filter from the grille
by slidingit to the right.
2. Engage two tabs on the grille’s
top insideedge with two slots in
the cabinet front edge.
3. Press inward on the lower right
side of the metal cabinetat the
location of the slotsand then
carefully push the grillein until the
tab engages with the slot.
Do not
plasticgrille or damage‘tothe
tabs!Villoccur.
~a
strike or forcibly hit t~le
Repeatthisprocess for the lower
left side.
5. Ttiountthe grille on the front of
the cabinet with the screw attached
to the grille during shipping, and
sliclcthe filter back intoplace.
Air Filter
Theairfilterbehindtheinletgrille
shouldbe washedatleastevery30
daysor as oftenas itneedscleaning.
To
removethefilter, graspthe tab
on thefilterand pullto the right.
Vacuumthe filteron the dusty side
to remove lightdust.Wash the
filter,cleaner sideup, under gently
flowing water to wash out
accumulateddust and lint. If the
filter is very dirty,use amild
householddetergent in the wash
water.Let the filter dry thoroughly
before replacing it.
Whe~~replacing the filter, be sure
the word FRONT isfacing you as
you slidethe filter back into place.
f’
T-
f
? .,
~’..t
. ..—..—...—.. --———-” -----
_ — ...,. —
i
—.
\
Page 7

*Keep theair filterclean.
aFor mostefficient cooling,
keep the ventilationcontrolin
the CLOSE position except
when you wantto exhaustair,
smoke or odors from the room.
~Don’t let theroom get too
hot. Wheneverpossible, turn the
uniton beforethe room heatsup.
Whenheat is “storedup” in walls,
furniture,rugs and draperies,your
air conditionertakes longer to
produce the desired comfort
condition.
~Keep windows and doors
closed. Cool, dry air escapes
when they’reopen.
~Keep furnace floor registers
and cold air returns closed. Cold
air can easily escape through them.
0Don’t letdrapes or furniture
block the top or frontof unit
and restrict air flow when it
is operating.
QIt’s bestto operate your air
conditioner at high speed during
extremely hot weather.
QKeep the outdoor condenser
coil clean.
~Turn air conditioner off before
vacations or extended absences
from home.
.-—
.-~
—-
PROBLEM
CONDITIONER
AIR
DOES NOT OPERA~
AIR CONDITIONER
“DOES NOT COOL
.4SIT SHOULD”
OPEMTING SOUNDS
POSSIBLE
~Not
CAUSE
pluggedin. plug ~~fiyhavebeen bu~nPed
looseby vacuumcleal~eror furniture,
~If pluggedin, fusecould haveblown or
circuitbreaker may have tripped.
‘“~
CUItir-1, blindsorfurnitu~cblockingthetoPOr
thefrontoftheairconditionerwill r~strictairtlow,
@ThermostatControlmay notbe set high
enough+Move theknob to ahighernumber.
Highest setting shouldprovidemaximum
cooling.When EnergySaver Switchis setat
SAVE,temperaturerangeinroomwillvarymore.
~Air filter dirty,shouldbe cleanedat least
every 30 days.
*Roommayhavebeen veryhotwhenair
conditionerwasfiistturnedon.Allowtime
for itto cooldown.
~Cold airmay be escaping throughopen
furnacefloorregistersandcold airreturns.
*VentilationControlmaybe setat OPENposition,
Mowinghotoutsideairto entertheroom.
*Cooling coils have icedup. To melt ice,
mtive the Selector Switchto FANONI.Y and
the Thermostat Controlto a lower number.
*Thermostatcfick,a metallicsound,maybeheard
whencompressorcycleson andoH.Thisisnormal.
eFan runs continuous y when Selector Swilch
is in COOL or FAN position.This is normal.
When Energy Saver Switch is set at
SAVE,
fan cycleson and offwith cornp~essor.
... . . .. u—
WATERDRIPPING
OUTSIDE
~JqATERIN B.4$E PAN
(ON OUTDOORSIDE)
QExcess water may overflow in extremely hot
and humid weather. This is normal.
~Air conditionermustbe installedlevel or tilted
slightlyto the outsideforproper waterdispos~ti.
~This is normal for a short period in areas with
little humidity; normal for a longer period in
very humid areas. Moistureremoved from
indoor air d~ainsto rear of cabinet where it is
picked up by a fan and thrown against ~he
outdoor condenser coil,
—
.———-—. .
Page 8

Beadthese instructionscompletely and
carefully.
lMPORTANT—Observe
ailgoverning codes
andOu-dinances.
!NsTALLER—Be
instructions withthe consumer.
CONSUMER—l(eep these instructions for
future reference.
sure to leave these
ELECTRICALREOUIREMEITS
FORPERSONALSAFETY
“THIS APPLIANCEMUST BEPROPERLY
GROUNDED.
“ Do NOT, UNDER ANY CIRCUMSTANCES,
CUT OR REMOVE
PRONGFROMTHEPOWERCORD.
~WE RECOMMENDTHAT YOU DONOTUSE
AN EXTENS!ONCORDORANADAPTER
PLUGW~THTHISAPPLIANCE.
~ DO NOTCHANGETHEPLUGONTHE
POWERCORDOFTHISAPPLIANCE=
o FOLLOWNATIONALElectrical CODES
OR LOCALCODESAND ORDINANCES.
See grounding instructions.
THETHIRDGROUNDING
~Standarddouble-hungwindow with actual
openingwidth of 26” to42”.
~Clearverticalopeningof 151/z”minimum from
bottomofsashto stool.
* Installthe airconditionerinawindow where
therewill beenoughclearancearoundthe cabinet
to allow ample circulationofairthroughthe unit.
I
4
4
~’
26”to 42”
I
4
b
~51/2”
min.
-6
Note: All supporting parts should be secured to
firmwood,masonryormetal.
\
115V
circuit
15AMP
“parallel” type
230V1208V
20AMPcircuit
“perpendicular” type
230V1208V
15AMPcircuit
“tandem” type
230V1208V
30AMPcircuit
“tandem” type
@@@@
* Ifthe electrical supply provided does not meet
Lheabove specifications,call a licensedelectrician.
~~luminum house wiring may posespecial
,~roblems-consuit a qualified electrician.
~This unitrequires a separate circuitservingonly
this appliance.
Page 9

N
TOOLSHEEDED
@Phillipsheadscrewdriver
* Blade-typescrewdriver
sSharp knifeor razorblade
@JRuleor tape measure
~Pencii
Type A
screw
\
Type C
screw
<
“ Level
Sash
/
#
a
\
@
* Boxwrench
Type A
Top
mounting
SCREWSFURNISHED(seesamples)
TypeA TypeB
T
i
Qty-3
Qty-2
Type C
7
Qty-4 Qty-6
Type D
%
window filler
panel
TypeB-
screw
Sealer (11/2oz.)
Type A
screw
\\\\\
+ Right
window filie
panel
Type C<
(continued next page)
Page 10

See Front Grilie section.
E PREPARECABINED
o
MPREPARECHASSIS.
1. Remove chassis locking bracket and chassis
locking
(Savefor reuse.)
screwwith a Phillipsheadscrewdriver.
I
Chassis lockings
1 ------
Chassis locking bracket
2. Remove ground screw and groundwire.
(Savefor reuse.)
Roomside+
t
4!.
1.Installtop mountingrailontotop ofcabinet
with 3 Type D screws.
Type D screw
Sill
ch-
2. Installbottom sillchannel onto cabinet by
insertingnotcheson channel intoslotslocated
on bottom of cabinet andsecuringwith 3 Type D
screws.
+ Top mountingrail
L
,
m
t
Type D screw
\’
Type D
screw
Cabinettop
0!
1
I
3. Remove chassisfrom cal~inetusingThebase pan
ISa handle.
(--’”)
“L_-”
Page 11

7. Slide left window filler pane! into top and bottom
....
mounting rails.
2.
Slideretainerpanelintowindow fillerpaneland
attachto cabinetwith 2 TypeCscrews.
3. Repeatfor rightside.
g rail
5. Securetop mountingrailwith twoTypeBscrews.
-rypeA >
screw
\\
‘Y
z Window
Window
fillerpanel
ngrail
— Retainer panel
1.Cutsealingribbonto window width andstickit
to bottom ofthe lower window sash.
2. Measure and markcenter ofwindow sillto
establishmounting positionof cabinet.
3. Installcabinet intoopening and center on line
marked onwindow sill.Puttop of cabinettoward
youand lowerwindow sashbehindtop mounting
rail.
B
/
~<dow filler
#
v
panel
screws
(attachedon the
top mountingrail
duringship~ng)
Cutfoam sashgasketto window width andstuff
between top of lower sashand glasspanesof
uppersash.Make surefoam gasketisflushwith
top of lower sash.
I
Sealing
ribbon
(ADHESIVE
SIDE)
Center line
.. Extend
and secure left and rightwindow filler
-1
anels to window sashwith Type A screws, one
a(; h side.
~L._,.ti_-:,. ........==..--—. .
.-+-.La.-.. --=.qc=.=.-—=-—- !..-.--—-~-~-=
——
~ \N$MILSASHLOCK
Installsashlockingbracket usingType~ screws.
Type A
screw
0[7
Page 12

E IISMLLcHA$slslNcABINEr
.--.
... ..-
—.——.-.———
1.Slidechassisintocabinet.(Make suretubingon
unitisnottouchingwail case.)
2. Lockchassisintocabinetbyreinstallingchassis
lockingbracketand chassislockingscrew removed
inStep
2.
Chassis lockingbracket
E CHECKFORAIRLEAKS.
Seal smallopeningsaroundcabinetwith gum-type
sealer,provided.
❑/NsmLLFRONTGR!LLE
See FrontGrillesection.
L
3. Reconnect ground
chassis.
4. Removeenough linecordto reachthe wall
receptacle.
wire removedinStep 2 to
Page 13

THE CABINET MAY BE INSTALLED
.—
-.—.......... ..—.-—-
-..-”..-
.-—.—-.———.
—.-—.—..—-.----,........... —-
.—. ..——.-..... . .——.—.%
THROUGH THE WALL IN BOTHEXISTING
BUILDINGS
AND NEWCONSTRUCTION.
iMPoRMNT
“ Any side louvers must projecton the Oudoor
ofthe Wval!o
side
oThe roomsideofthe cabinetmustprojectinto
the roomat least 1“ from the finishedwall.
~The cabinetmust be installedlevelfrom sideto
sideandwith a 3/8” tiltfrom front to rear.
~Phillipsheadscrewdriver
0Blade-typescrewdriver
* Magnetic studfinder(optional)
~Tin snips
eHandsaw
“ Level
beChisel
* Concretesaw (ifinstallingthrougha masonrywall)
“ Hammer
“ Cal~lkinggun
* Tapemeasure
1.Determinesizeofopening.Measurewidth and
heightof cabinetandadd !/8” to eachdimension.
“
2. choose the wall openinglocation. Be sure a
power receptacleis(orwill be) installednearby.
3. Maketheopening. Frameit to supportthe
weight ofthe airconditioner.
Add metalflashingoverbottom offrame opening
and 1“upon sidesto reducethe possibilityof
moistureenteringthe areabetween the innerand
outerwall. The flashinglipshouldbe 1“wide and
bent down 45: See the illustration,page 14.
(obtain locally)
“12 #10 wood screws, 1“ long
“1tube highgrade caulkingcompound
“Wooden framing studs
* I...intel,if required,to supportbricksor blocks
above opening
~Flashing,aluminum or galvanizedsteel
..-1
,. .- -,
?
,!
.-----
1. Removechassisfrom cabinet.See Step 2 of
Window Installation.
2. With caulkingcompound or electricaltape,
sealall holesprovidedinthe cabinetfor window
installationhardware not usedinthisinstallation.
Place cabinet inwall opening.
~.
2. Securecabinet bottom railto wooden frame
with two 1“long #10 wood screws.
Page 14

3. Securecabinetsidesto wooden frame with six
1“long#10 wood screwsand securecabinettop
to framewith four 1“ long#10 wood screws.
II
1
Drill holesincabinet sidesand top, if necessaryfor
properinstallation.Ifframe isoversize,useshimsto
preventcabinetdistortion.
4. Caulkallfoursidesonthe outdoorsideof
cabinetto preventmoisturefromgetting
throughtothe interiorwall.Useofflashing(a
piece ofaluminum orgalvanizedsteelavailableat
most hardware stores)will further preventmoisture
from gettinginto interiorwalls.
5. Installwood trim molding(obtained locally)
around roomsideprojection of cabinet, ifdesired.
I
.- —
.—
.— —
.—
.—
——
.—
.— —
.—
.—
——
—, —
.—
.—
——
Caulking
FlashingLip ‘“--”
Flashinq
WoodScrews ~0
Flashing
T
Holesfor
#10 l“ Long
\
J
.......
p,-~,-
w
ine
ing
sired)
(
—
I
Lift the chassis and carefully slide itinto cabinet. Do
not pushon controlsorfinned coils.Make sure
chassisisfirmly sested toward rear of cabinet.
Page 15
Withthe~urchase OfyOUrnew GE appliance, receive the
...———.—..—. ..——.
asstIrancethat
fromGIZ,we’llbe tiere. Allyou havetodo iscall–toll-free!
AGE consumerserviceprofessional
willprovideexpertrepairservice,
scheduledatatimethat’sconvenient
foryoL1.Mal~yGEconsumer Service
company-operatedlocationsoffer
VOLl SefiCe ~Oda~ Or tornorrc)w, or at
,
yoLlrconvenience(7:00a.m.to7:00p.m.
weekdays,9:00a.m.to
clays).Ourfactoly-trainedtechnicians
knowyourapplianceinsideandout–
s(}mostrepairscanbehandledilljust
onevisit.
ifyoueverneed ifiomation orassismnce
Youcanhavetie securefeelingthat
GEConsumerServicewillstillbe
thereafteryourwarrantyexpires.PurchaseaGEcontractwhileyourwarrantyisstillineffectandyou’llreceive
asubstantialdiscount.Witha multiple-
yearcontract,you’reassuredof future
serviceattoday’sprices.
2:00p.m.Satur-
Whatever yourquestionabout.anyGE
majorappliance,GEAnswerCenter”
informationserviceisavailableto
help.Yourcall–andyourquestion–
willbeansweredpromptlyand
courteously.Andyoucancallany
time.GEAnswerCentermserviceis
open 24hoursaday,7daysaweek.
TelecommunicationDevicefor the Deaf
,,,.,,
,!.. ,,,.”,. A,*O “r
SECTION . ..A
OW o,m,, .!..., W,?,4?,4 “,.. . . . ..
“..,,,...,1.
.C.,c ,.,
LTponrequest, GEwillprovicleBraill(
controlsfora
and a brochure to assistin pla~lning a
barrier-free kitchen for pe;-sonswith
....
.,,
limiteclmobility.To obtainthf:seiten3s,
free ofcharge, call
~oIlsLImers with impaired hearing
or s]3eecllTvhohave accessIf) zlT1>D
01ilconven [ional teletypet~v-iter may
call 8ooJrDD-Gfi\c (:300-s:33-4322)
to request informatiol~ or se]~~ice.
varietyof GEappliance
800.626,2000.
Page 16
.. ’_-
.- .
[
j
YOURGEROOMAIRCOND!TIONER
WARRANTY
.
1
WHATISCOVERED
I
Saveproof of original purchasedatesuch asyour sales slip or cancelled check to establish ~warrantyperiod.
FULL ONE-YEAR WARRANTY
Forone year fromdateoforiginal
purchase,wewillprovide,freeof
charge,partsandservicelaborin
your home to repairor replace
any Pafl of the room air
eanditianer thatfailsbecause
ofa manufacturingdefect.
FULL-FIVE YEAR
Forfive yearsfrom the dateof
original purchase,we will provide,
free of charge, partsand service
labor in your hometo repairor
replace any pati Ofthesea!ed
refrigerating system (the
compressor,condenser,
evaporatorand all connecting
tubing) that fails becauseof a
manufacturingdefect.
Foreach Ottheabove warranties:
TransDotiationexpenseto andfrom
a serviceshop and shopservice
laborif requiredwill be free of
charge.
WARRANTY
This warranty isextended to
the originalpurchaserand any
succeedingowner for products
purchasedfor usein the 48
mainlandstates, Hawaiiand
Washington,D.C.In Alaskathe
warrantyis the sameexcept that it
is LIMITED becauseyou mustpay
to shipthe productto the service
shop or for the servicetechnician’s
travel costs to yourhome.
All warranty servicewill be
providedby our FactoryService
Centers or by our authorized
CustomerCare” servicersduring
normal working hours,
Look in the Whiteor Yellow Pages
of your telephonedirectory for
GENERAL ELECTRIC
COMPANY, GENERAL
ELECTRIC FACTORY SERVICE,
GENERAL ELECTRIC-HOTPOINT
FACTORYSERVICEor GENERAL
ELECTRICCUSTOMERCARE@
4
WHATisNOTCOVERED
~Service trips to your hometo
teach you how to use the product.
ReadyourUseandCarematerial.
If you then have any questions
about operating the product please
contact your dealer or our
Consumer Affairs office at the
address below, or call, toll free:
GE Answer Center”
800.626.2000
consumer information service
Some states do not allow the exclusion or limitation of incidental or consequential damages, so the above Iilmitationor exclusion
may not apply to YOU,
know what your legal rights are in your state, consult your local or state consumer affairs office or your state’s Attorney General.
To
—-....
-.-—” .%-—--Z
.
-----..-~-=-~-=----,-=-
Thiswarrantygivesyou specific legal rights, and you may also have other rights which vary from state to state.
Wlanager—ConsLJmerF4Wairs,GE Appliances, Louisville, KY 40225
Wav~a~~OF: ~@~@Fa/
If further help
~Improper installation.
If
you havean installation
problem, or if the air conditioner is
of impropercooling capacityfor the
intended use, contact your dealer
or installer. You are responsible for
providing adequate electrical
connectingfacilities,
~Replacement of housefuses or
resetting of circuit breakers.
sIn commercial locations labor
necessary to move the unit to a
location where it is accessible for
service by an individual technician.
~lectric Company
is needed concerning this warranty7write:
~Failureof the productresulting
from modificationsto the productor
dueto unreasonableuse including
failureto providereasonableand
necessarymaintenance.
* Failure due to corrosion on
models notcorrosion-protected.
~Damage to product caused
by improper power supply voltage,
accident,fire, floods or actsof God.
WARRANTOR IS
RESPONSIBLE FOR
CONSEQUENTIAL DAMAGES.
—.-—
I
NOT
.=— ... .- ,_-v_”~.._.
 Loading...