

Page 1
©
www.GEAppfiances.com
Safety Instruc_tions ......... 2, 3
Operating Instructions
Control Knob Models ....... 6, 7
Touch Pad Models .......... 4, 5
Care and Cleaning
Air Fiher . .................. 8
Grille and Case .............. 8
Outdoor Coils ............... 8
A GM l 4
AGLI8
A GM l8
A(;Q s
AGVI8
A GL24
©
©
Installation Instruc_tions
Preparing to Install the
Air Conditioner . ............. 9
Window Installation ....... ] 0-14
Troubleshooting Tips .... 15, 16
Normal Operating Sounds .... 16
Consumer Support
Consumer Support .......... 20
Product Registration ...... 17, 18
_A'arranty .................. 19
AGQ24
AGV24
A GW24
Write the model and serial numbers here:
Model #
Serial #
Find these nmnbers on a label on the
side of the air conditione_:
3828A20514G
49-7499-7 03-05 JR
Page 2
IMPORTANTSAFETYINFORMATION.
READALLINSTRUCTIONSBEFOREUSING.
a, WARNING!
For your safe_ the information in this manual must be followed to minimize the risk of fire, electric shock
or personal injury.
SAFETYPRECAUTIONS
Use this appliance only %r its intended
pull)ose as described in this Owner's
Manual.
iiiiiiiiiiii_iii
This air conditioner must be properly
installed in accordance with d_e Installation
h_structions before it is used.
Never unplug your air conditioner by
pulling on the power cord. Mwws grip
plug firefly and pull straight out from the
receptacle.
iiiiiiiiiiii_iii
Replace immediamly all electric setMce
cords that haxe become flayed or ofl_erwise
damaged. Do not use a cord that shows
cracks or abrasion damag_ along its length
or at either the ping or connector end.
HOWTOCONNECTELECTRICITY
Do not, under any circumstances, cut or remove
the third (ground) prong from the power cord. For
personal safe_ this appliance must be properly
grounded.
The power cord of dais appliance is equipped
with a 3-prong (grounding) plug which mates
with a standard 31)iong (grounding) wall
outlet m minimize the possibility of electric
shock hazard flom this appliance.
Power coM includes a cnnent intemq)ter
device. A rest and reset button is provided
on the plug case. The device should be rested
on a periodic basis by first pressing the rEsr
bntton and then file RESt'button. [["the rest
button does not trip or if file RESETbutton
will not stay eng_aged, discontinue use of file
air condiuoner and contact a qualified
se_Mce mchnician.
Hme the wall outlet and circuit checked by a
qualified electrician to make sure the outlet is
properly grounded.
Where a 9-prong wall outlet is encounmred,
it is your personal responsibility and obligation
to haxe it replaced with a properly grounded
31)iong wall outlet.
The air conditioner should always be
plugged into its own individual elecuical
outlet which has a x_ltag> rating flint matches
the rating plato.
This provides the best perfommnce and also
prexents oxerloading house wiring circuits
which could cause a fire hazard from
oxeflleated wires.
See the Installation Instructions, Electrical
Requirementssection for specific elecuqcal
connection requirements.
Turn the mode control to 0ffand unplug
your air conditioner before making any
repairs or cleaning.
NOTE.'XA:estrongly recommend that any
servicing be perforated by a qualified
individual.
For your safety...do not store or use
combustible mamrials, gasoline or oilier
flammable vapors or liquids in the vicinity
of this or any other appliance.
All air conditioners contain refrigerants,
which under federal law must be remoxed
plJor to product disposal. If you are getting
rid of an old product with refrigerants, check
with the company handling disposal about
what to do.
2
Page 3
WARNING!
USEOFEXTENSIONCORDS--115-Voltmodelsonly
Becauseofpotentialsafetyhazardsundercertain...^CAUTION:
conditions, we strongly recommend against the
use of an extension cord.
Howex>_; if you must/lse ail exmnsion cord,
it is absolumly necessm y that it be a UL-lismd,
14 gauge, 3-wi_e grounding type appliance
extension cord having a grounding type plug
and outlet and that the electrical rating of the
cord be 15 amperes (minimum) and 195 volts.
USEOFADAPTERPLUGS--115-Voltmodelsonly
DO NOT use an extension cord with any of the
230/208 volt models.
GEAppliances.com
Because of potential safety hazards under certain
conditions, we strongly recommend against the use
of an adapter plug.
Howe_l; if you must rise an adapmi; where
local codes permit, a temporary connectionmay
be made to a properly grounded 9-prong wall
outlet by use of a UL-lismd adaptor available at
most local hardware stores.
The larger slot in the adapter must be aligned
with the larger slot in the wall outlet to proxqde
proper polarity in the connection of the power
cord.
_]:lei:l disconnecting the power cord flom the
adapmi, alwws hold the adaptor in place with
one hand while pulling the power cord plug
with the other hand. If this is not done, the
adaptor ground mrminal is ve_T likely' to break
with repeamd use.
If file adapter ground terminal breaks, DO NOT
USEthe air conditioner until a proper ground
has been established.
Attachingtheadapter groundterminalto a waft outlet
coverscrewdoesnot groundtheapplianceunlessthe
coverscrewis metal, andnot bsulated, andthe wall
outlet isgroundedthreughthe housewiring. Youshould
havethecircuit checkedby a qualifiedelectricianto
makesuretheoutlet is properlygrounded.
READANDFOLLOWTHISSAFETYINFORMATIONCAREFULLY.
SAVETHESEINSTRUCTIONS
Page 4
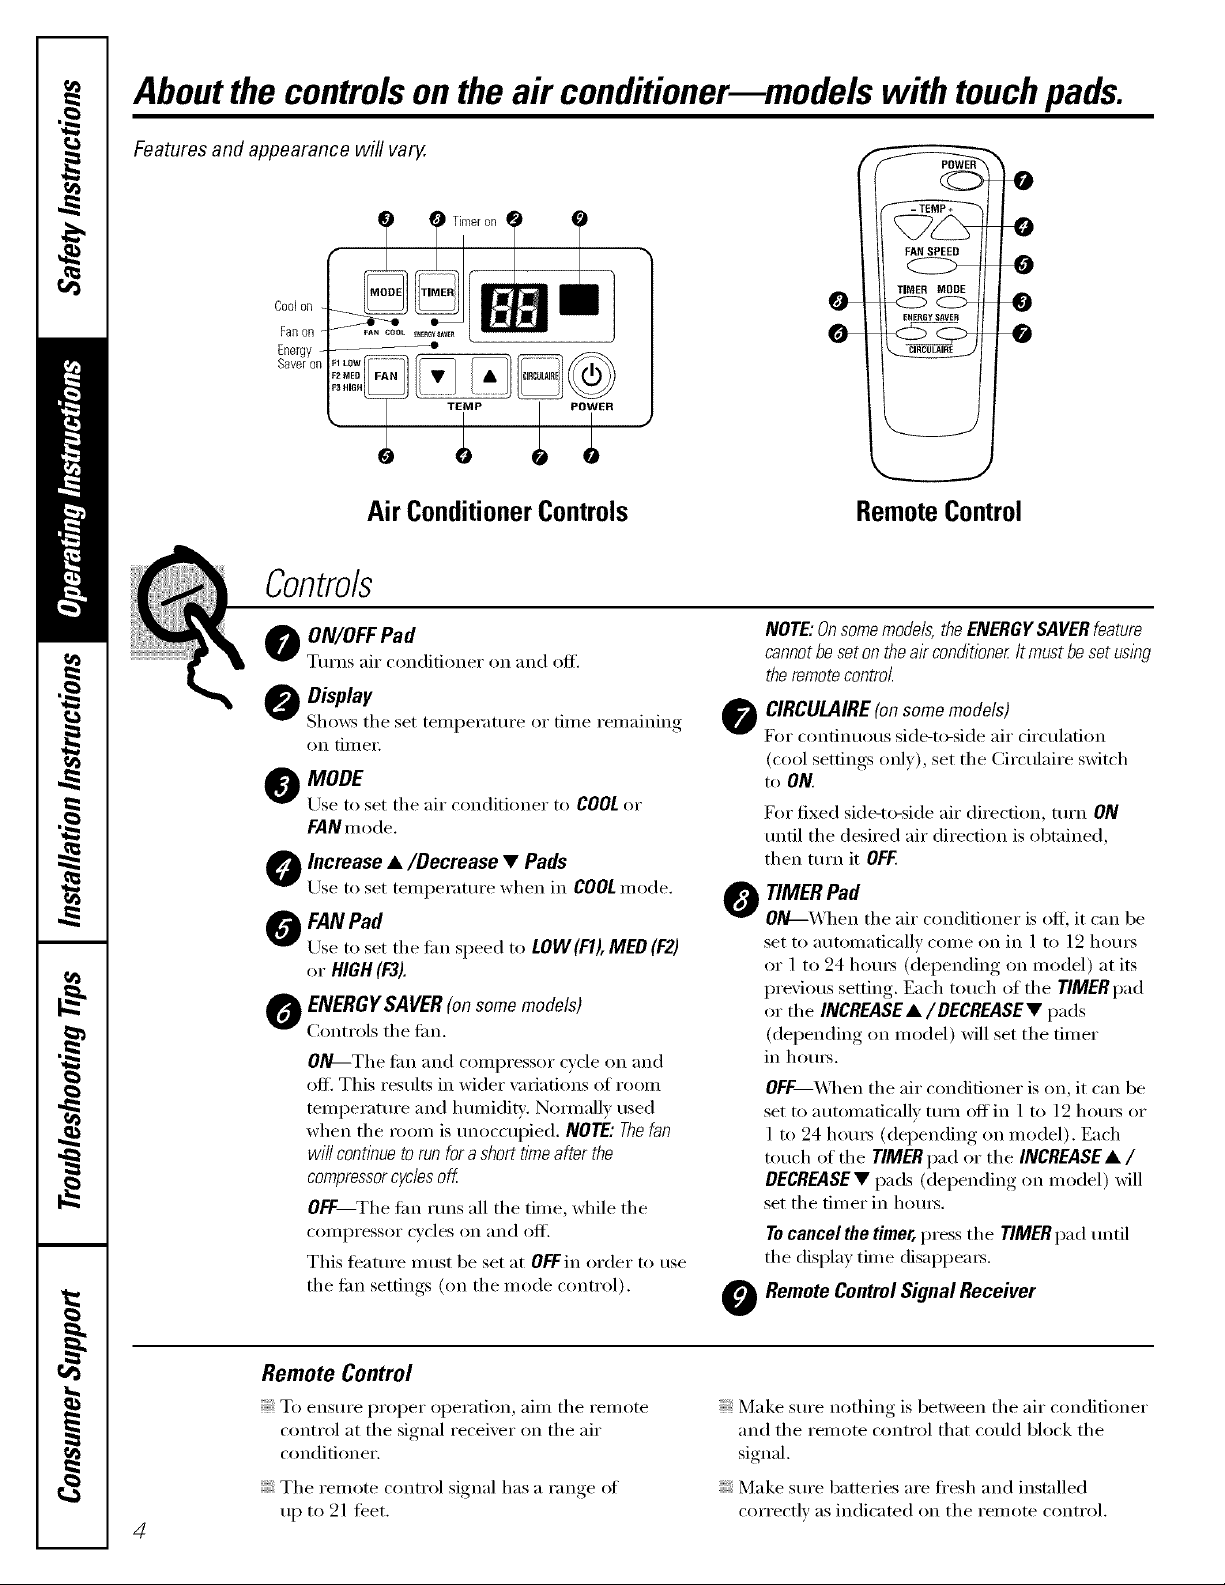
Aboutthe controlsonthe air conditionermmodels with touchpads.
Features and appearance will vary.
Coolon
Fanon
Energy
Saveroi
Air ConditionerControls Remote Control
Controls
NOTE:Onsomemodels, theENERGYSAVERfeature
O ON/OFF Pad
Turns air conditioner on and off.
oisplav
Shows the set temi)eramre or time remaining
on tilller.
O MODE
Use to set tile air conditioner to COOLor
FAN m ode.
Increase •/Decrease • Pads
Use to set temperature when in COOLmode.
O FAN Pad
Use to set the _im speed to LOW(F1), MED (F2)
or HIGH (F3).
O ENERGYSAVER(on some models)
Controls tile tim.
0]_-The tim and c()mi)ressor c)'cle on and
off. This results in wider \_riafions of room
temperature and humidiP,'. Nommllv used
when tile room is tmoccuI)ied. NOTE: Thefan
will continue to runfor ashort timeafter the
compressorcyclesoff
OFF Tile tim rtms all tile time, while tile
COIIII)I'eSSOI" cycles on [In(1 o]C{ ',
This t_'atm'e must be set at OFFin order to use
the tim settings (on the mode control).
cannotbe set on the air cond/tione_It must beset uslhg
the remote control
O CIRCULAIRE(onsomemodels)
FOF (onfint/otls side-to-side air circulation
(cool settings only), set the Circulaire switch
to ON.
Dn" fixed side-to-side air direction, turn ON
until the desired air direction is obtained,
then turn it OFK
O TIMERPad
0/_-_ hen tile air conditioner is off, it can be
set to automatically come on in 1 to ] 2 ho/u_
or 1 to 24 hom_ (depending on model) at its
previous setting. Each touch of tile TIMER pad
or tile INCREASE•/DECREASE• pads
(del)ending on model) will set tile diner
in hom_.
OlaF _&l/en the air conditioner is on, it can be
set to automatically mm off in 1 to 12 hom_ or
1 to 24 hems (depending on model). Each
touch of tile TIMER pad or tile INCREASE• /
DECREASE• pads (depending on model) will
set tile timer in hom_.
Tocancel the tinier, press tile TIMERpad until
tile display time disappears.
Remote Control Signal Receiver
Remote Control
To ensure proper operation, aim tile remote
control at tile signal receiver on tile air
conditioner.
Tile remote control signal has a range of
up to 21 feet.
Make sm'e nothing is between tile air conditioner
and the remote control that could block the
signal.
Make sm'e batteries are fl'esh and installed
correctly as indicated on tile remote control.
4
Page 5

Lights next to the touch pads on the air conditioner
control panel indicate the selected settings.
Power Outage Recovery Feature
In the case of a power outage or interruption, the
unit will maomafically re-start in the settings last
used alter the power is restored. The TIMERleatm'e
COOLMode
GEAppliances.com
will reset to the original setting. You may need to set
a new time if desired.
Use the COOLmode with HIGH(F3),MED(F2)or
LOW(F1)tim tor cooling. Lrse the INCREASEA/
DECREASEV pads to set the desired temperature
between 60°F and 86°F in l °F increments.
An electronic them/ostat is used to maintain the
room temperature. The c_m_pressor will cyde on
and offto kee I) the room at the set level of comfort.
Set fl_e thermostat at a lower number and fl_e indoor
air will becoille coole_: Set the theIIllostnt at a higher
number and the indoor air will become wam/e_;
NOTE"If the air conditioner isoff and/s then turnedon while
set to COOL,it will take approximately3 minutes for the
compressorto start andcooling tobegin.
FAN Mode
Lrsethe FANat HIGH(F3),MEO(F2)or LOW(FI)to
provide air circulation and filtering without cooling.
Since tim only settings do not provide cooling,
a temperature setting will not be displayed.
Vent Control
The vent control is located on the inside of the air
louve_ on the lower right side.
CoolingDescriptions
ForNormalCooling--Selectthe COOLmode and
HIGH(F3)or MED(F2)timwith a middle set
temperature.
ForMaximumCooliug--Select the COOL mode
and HIGH(F3)timwith a lower set temperature.
ForQuieter& NighttimeCooling--Select the
COOL mode and LOW(FI)tim with a middle set
temperature.
NOTE:/fyou switch from a COOLsettlbg to OFFor to
a fan settlbg, wait at least 3 mlbutes before switching
back toa COOLsettlbg.
To open the vent, pull the lever toward you.
To close it, push it in.
When set at CLOSE, only the air inside the room will
be circulated and conditioned. X4q_en set at OPEN,
some inside air is exhausted outside.
Air Direction--Up and Down
Fingertip pressm'e on the 1)ank of horizontal lou\'e_
a_)iusts the air direction up or down.
5
Page 6
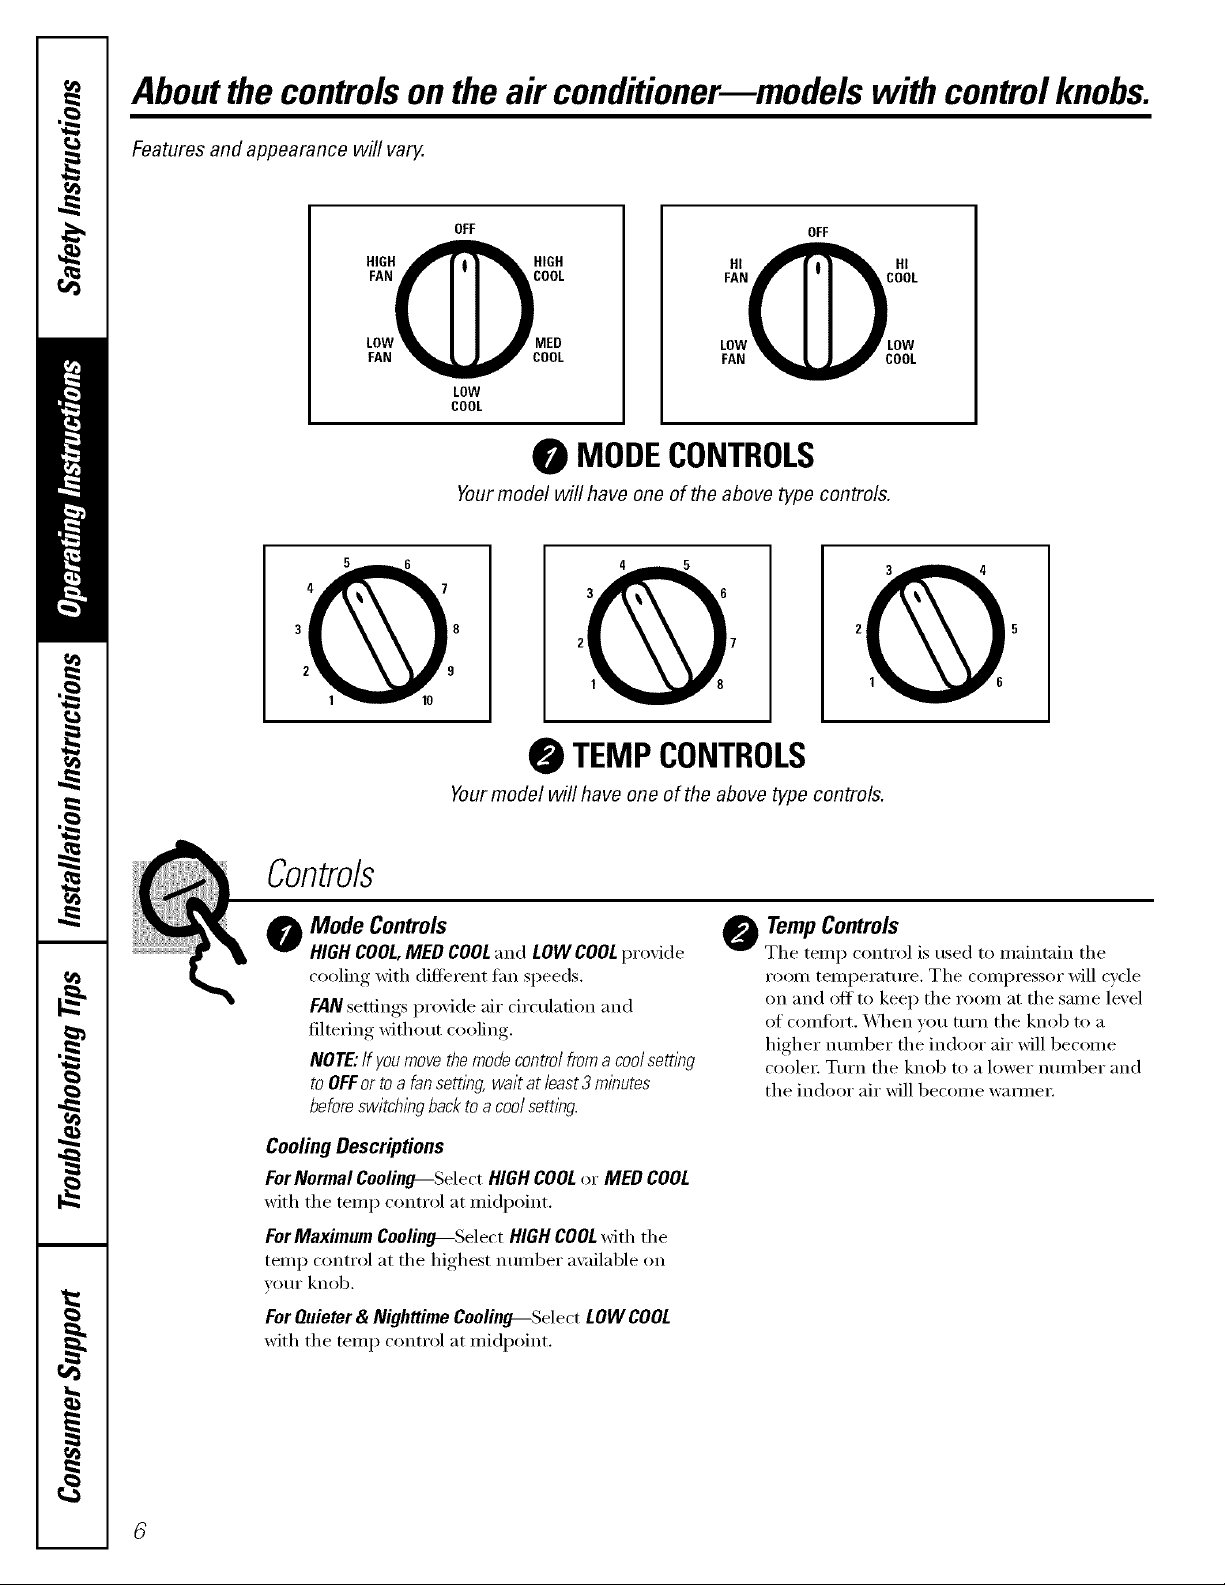
Aboutthe controlsonthe air conditionermmodelswith controlknobs.
Features and appearance will vary.
OFF
FAN COOL
HIGHQHIGH
LOW MED
FAN COOL
LOW
COOL
Yourmodel will have one of the above type controls.
Yourmodel will have one of the above type controls.
OFF
FAN OOL
HI OIHI
LOW .OW
FAN COOL
MODECONTROLS
TEMPCONTROLS
Controls
Mode Controls
0
HIGHCOOL,MED COOLand LOWCOOLprovide
cooling with different tim speeds.
FANsettings provide air circulation and
filtering without cooling.
NOTE: If you move the mode control from a cool settlbg
to OFF or to a fan settlbg,wait at least 3 minutes
before switchingback to a cool setting.
CoolingDescriptions
ForNormalCooling--SelectHIGHCOOLor MED COOL
with the temp control at midpoint.
ForMaximumCoolino---Select HIGHCOOLwith the
temp control at the highest number a\_filable on
VOILE knob.
For Quieter & Nighttime Coolin#---Select LOW COOL
with the temp control at midpoint.
O TempControls
The temp control is used to maim;fin the
room temperature. The compressor will cycle
on and off to keep the room at the same level
of comtort. \_]_en you ttlI'n the knob to a
higher nmnber the indoor air will become
coole_: Tm'n the knob to a lower number and
the indoor air will become wam_e_:
Page 7
Additional controls and important information.
Energy Saver (on some models)
The energa, saver switch controls the tim.
O/_-The tim and compressor cycle on and off
together: This results in wider \m_iafions ot room
temperature and humidity. Nommllv used when
the room is tmoccul)ied.
Vent Control
The vent control is located al)ove the control
knobs.
_&]_en set at CLOSE, only the air inside the room will
be circulated and conditioned. X4q_en set at OPEN,
some inside air is exhausted outside.
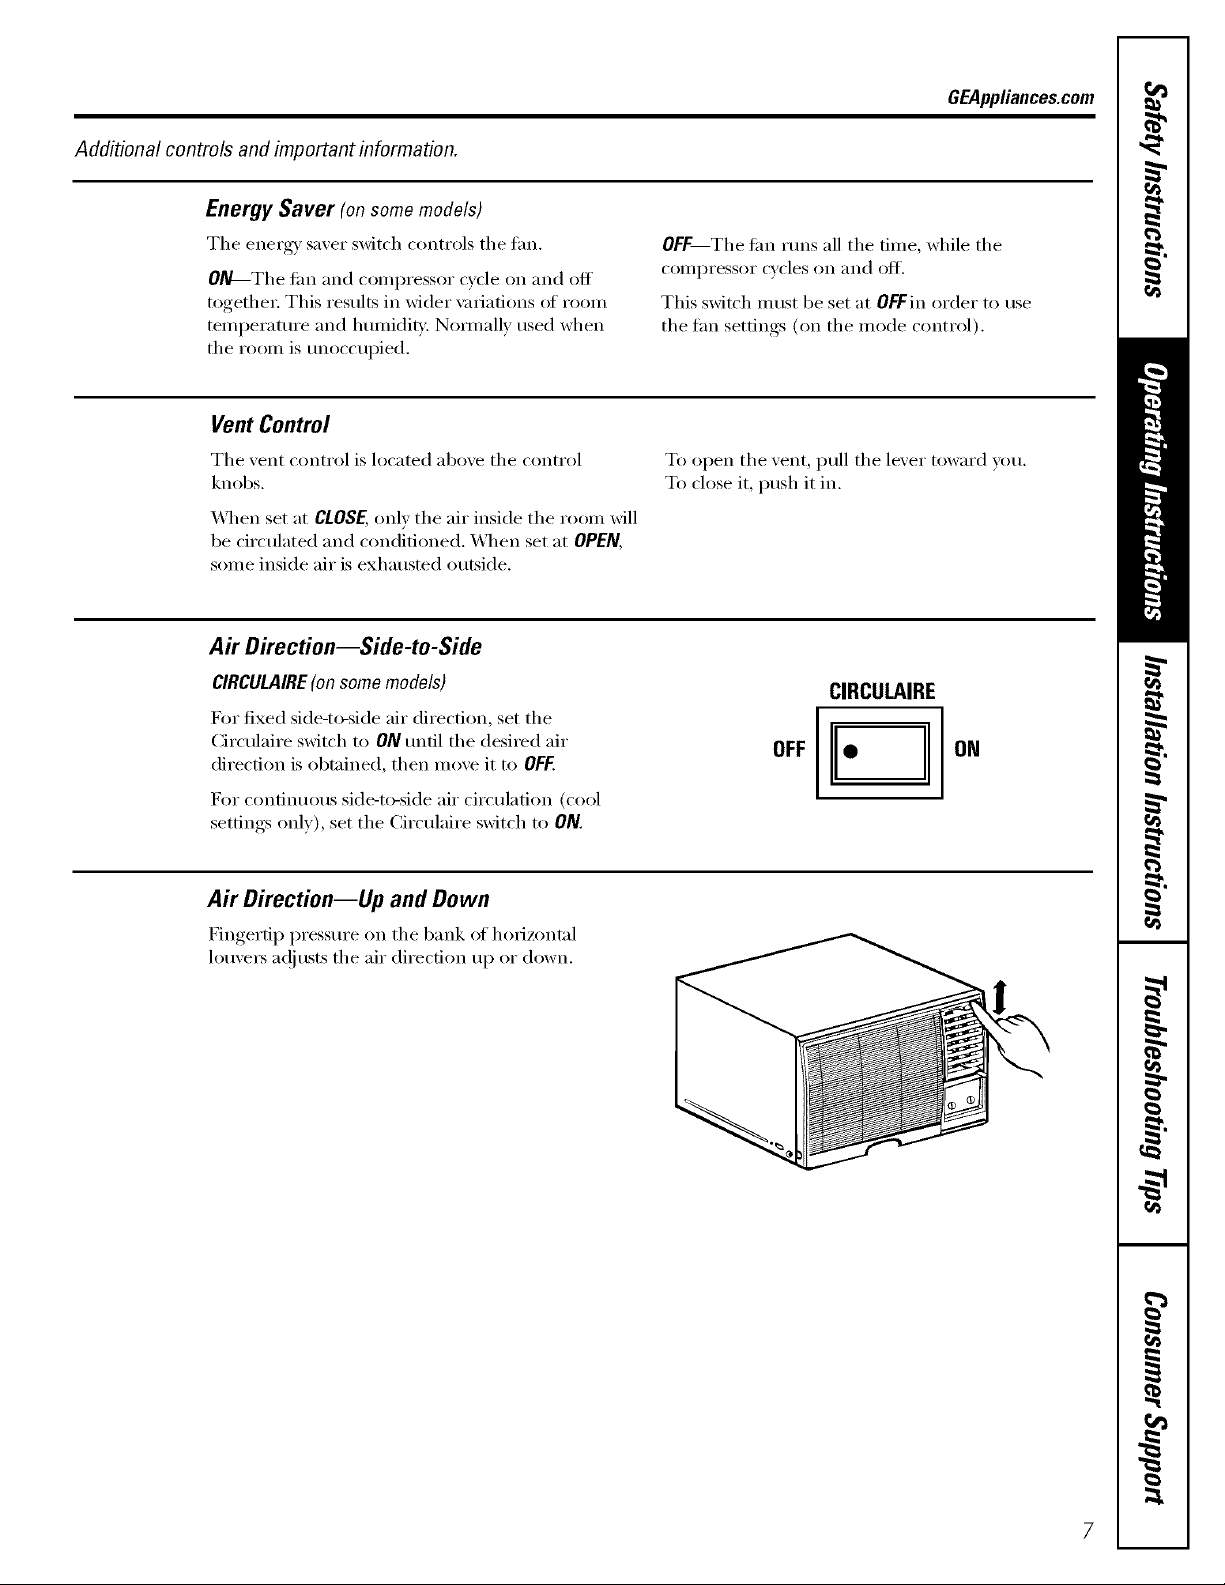
Air Direction--Side-to-Side
GEAppliances.com
OFF The tim runs all the time, while the
compressor cycles on and oil
This switch must be set at OFf in order to use
the tim settings (on the mode control).
To open the vent, pull the lever toward you.
To close it, push it in.
CIRCULAIRE (on some models)
For fixed side-t_)-side air direction, set the
Circulaire switch to ONuntil the desired air
direction is obtained, then move it to OFF.
FoI" contintlotls side-to-side air circulation (cool
settings only), set the Circulaire switch to ON.
Air Direction--Up and Down
Fingertip pressure on the 1)ank of horizontal
lou\'e_5 at!justs the air direction up or down.
OFF
CIRCULAIRE
ON
Ill"
7
Page 8
Careand cleaning ofthe air conditioner.
Grille and Case
Turn the air conditioner off and remo_,e the To clean, use water and a mild deteroent Do not
plug, fl'om the wall outlet before cleaning, use bleach or abrasi;es.
OutdoorCoils
The coils on the outdoor side of the air conditioner
should be checked regularly. If they are clogged
with cli_ or soot, they may be protessionally cleaned.
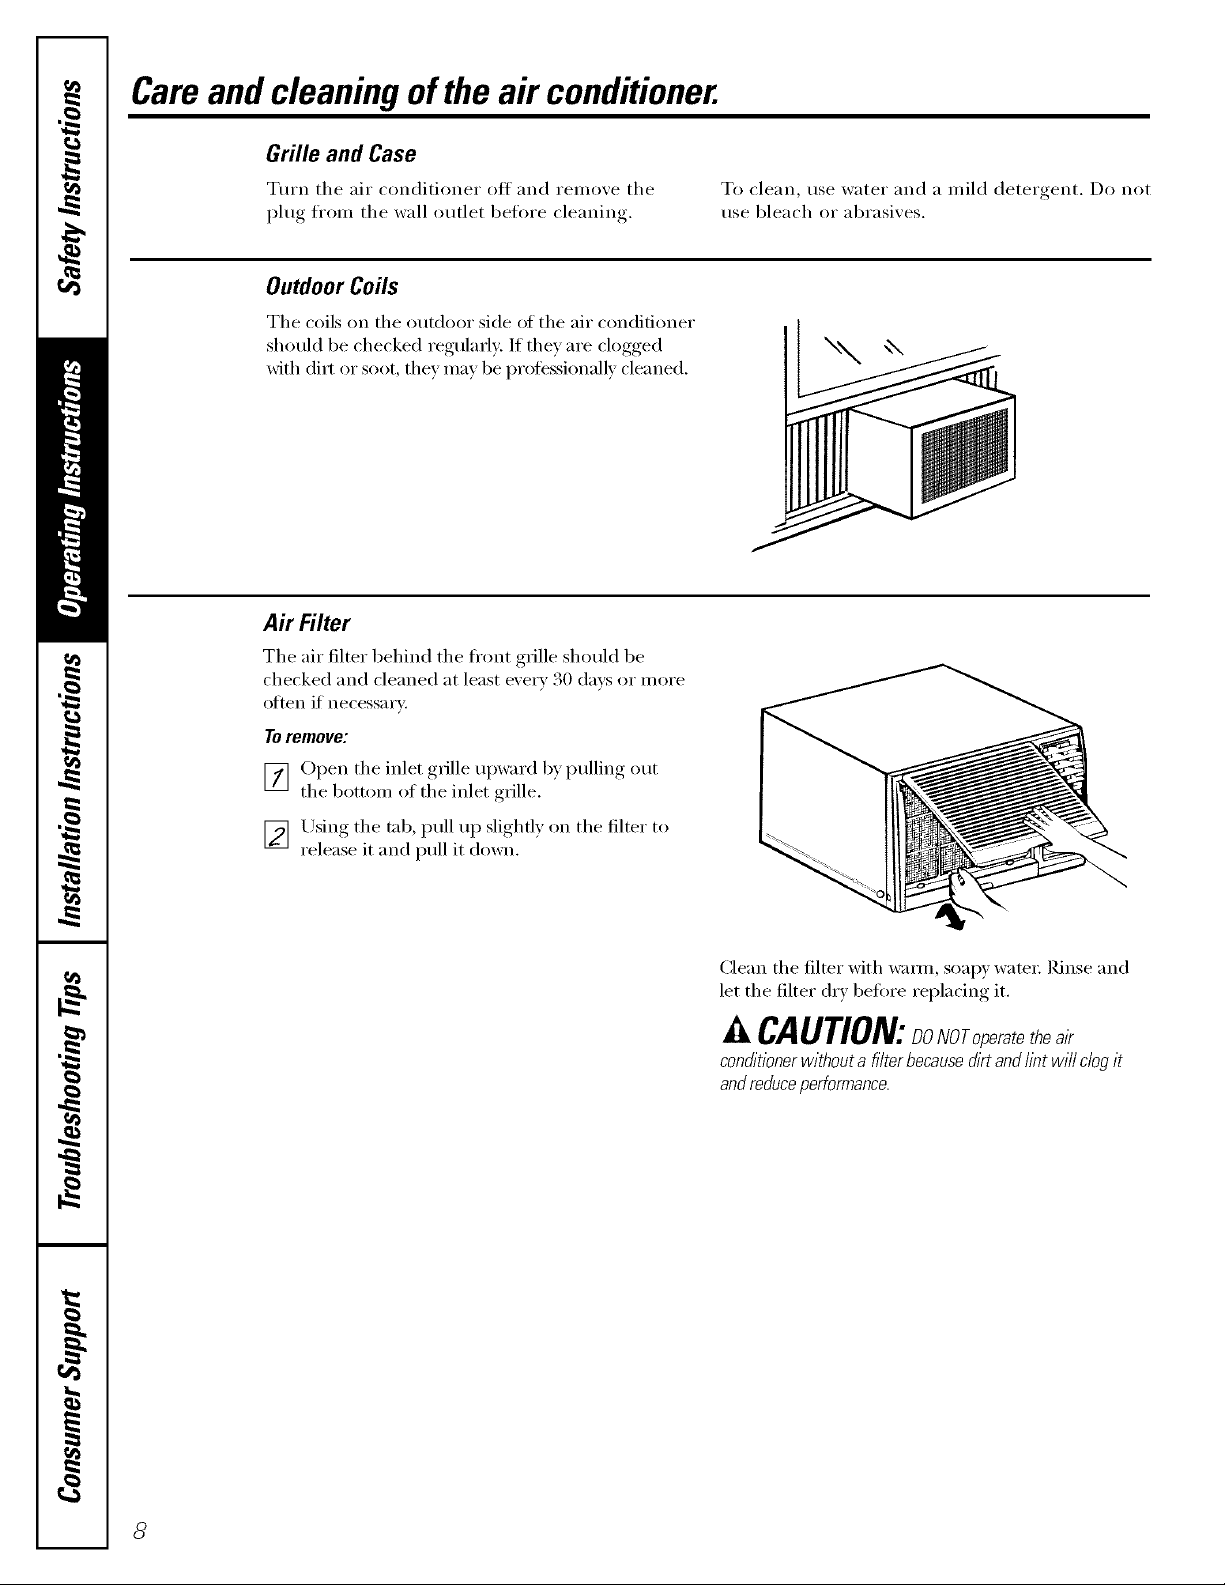
Air Filter
The air filter behind the fi'ont grille should be
checked and cleaned at least every 30 days or more
otten if necessary:
Toremove:
_] Open the inlet grille upward by pulling out
the bottom of the inlet grille,
] Using the tnb, pull up slightly on the filter to
release it and pull it down.
Clean the filter with _m_n, SOalU watet: Rinse and
let the filter dry betore replacing it.
CAUTION:DoNOro_ere_ethea,_
conditioner without a filter becausedirt and tint will clog it
andreduceperformance.
8
Page 9

Installation
Air Conditioner
Instructions
I I'_'1 Questions? Call 800.GE.CARES (800.432.2737) or Visit our Website at: www.GEAppliances.com I
BEFORE YOU BEGIN
Read these instructions completely
and carefully.
• IMPORTANT - Savethese
instructions for local inspector's use.
• IMPORTANT - Observeall
governing codes and ordinances.
• Note to Installer - Be sure to leave these
instructions with the Consumer.
• Note to Consumer - Keep these
instructions for future reference.
• Skill level - Installation of this appliance
requires basic mechanical skills,
• Completion time - Approximately 1 hour
• We recommend that two people install
this product.
• Proper installation is the responsibility
of the installer.
CAUTION:
Do not, under any circumstances, cut or
remove the third (ground) prong from the
power cord.
Do not change the plug on the power cord
of this air conditioner.
Aluminum house wiring may present special
problems--consult a qualified electrician.
TOOLS YOU WILL NEED
Phillips head screwdriver
• Product failure due to improper installation
is not covered under the Warranty.
O ELECTRICAL REQUIREMENTS
60 Hz grounded outlet protected with a
Some models require a 115/120-volt a.c.,
15-amp time delay fuse or circuit breaker.
The 3-prong grounding plug minimizes the
possibility of electric shock hazard. If the wall
outlet you plan to use is only a 2-prong outlet,
it is your responsibility to have it replaced with
a properly grounded 3-prong wall outlet.
Some models require 230/208-volt a.c.,
protected with a time delay fuse or circuit
breaker. These models should be installed
on their own single branch circuit for
best performance and to prevent
overloading house or apartment wiring
circuits, which could cause a possible
fire hazard from overheating wires.
Flat-blade screwdriver
Pencil
Level Scissors or knife
Power cord includes a current interrupter
device. A test and reset button is provided on
the plug case. The device should be tested on a
periodic basis by first pressing the TEST button
and then the RESET button, If the TEST button
does not trip or if the RESET button will not stay
engaged, discontinue use of the air conditioner
and contact a qualified service technician.
Ruler or tape measure
Page 10
Installation Instructions
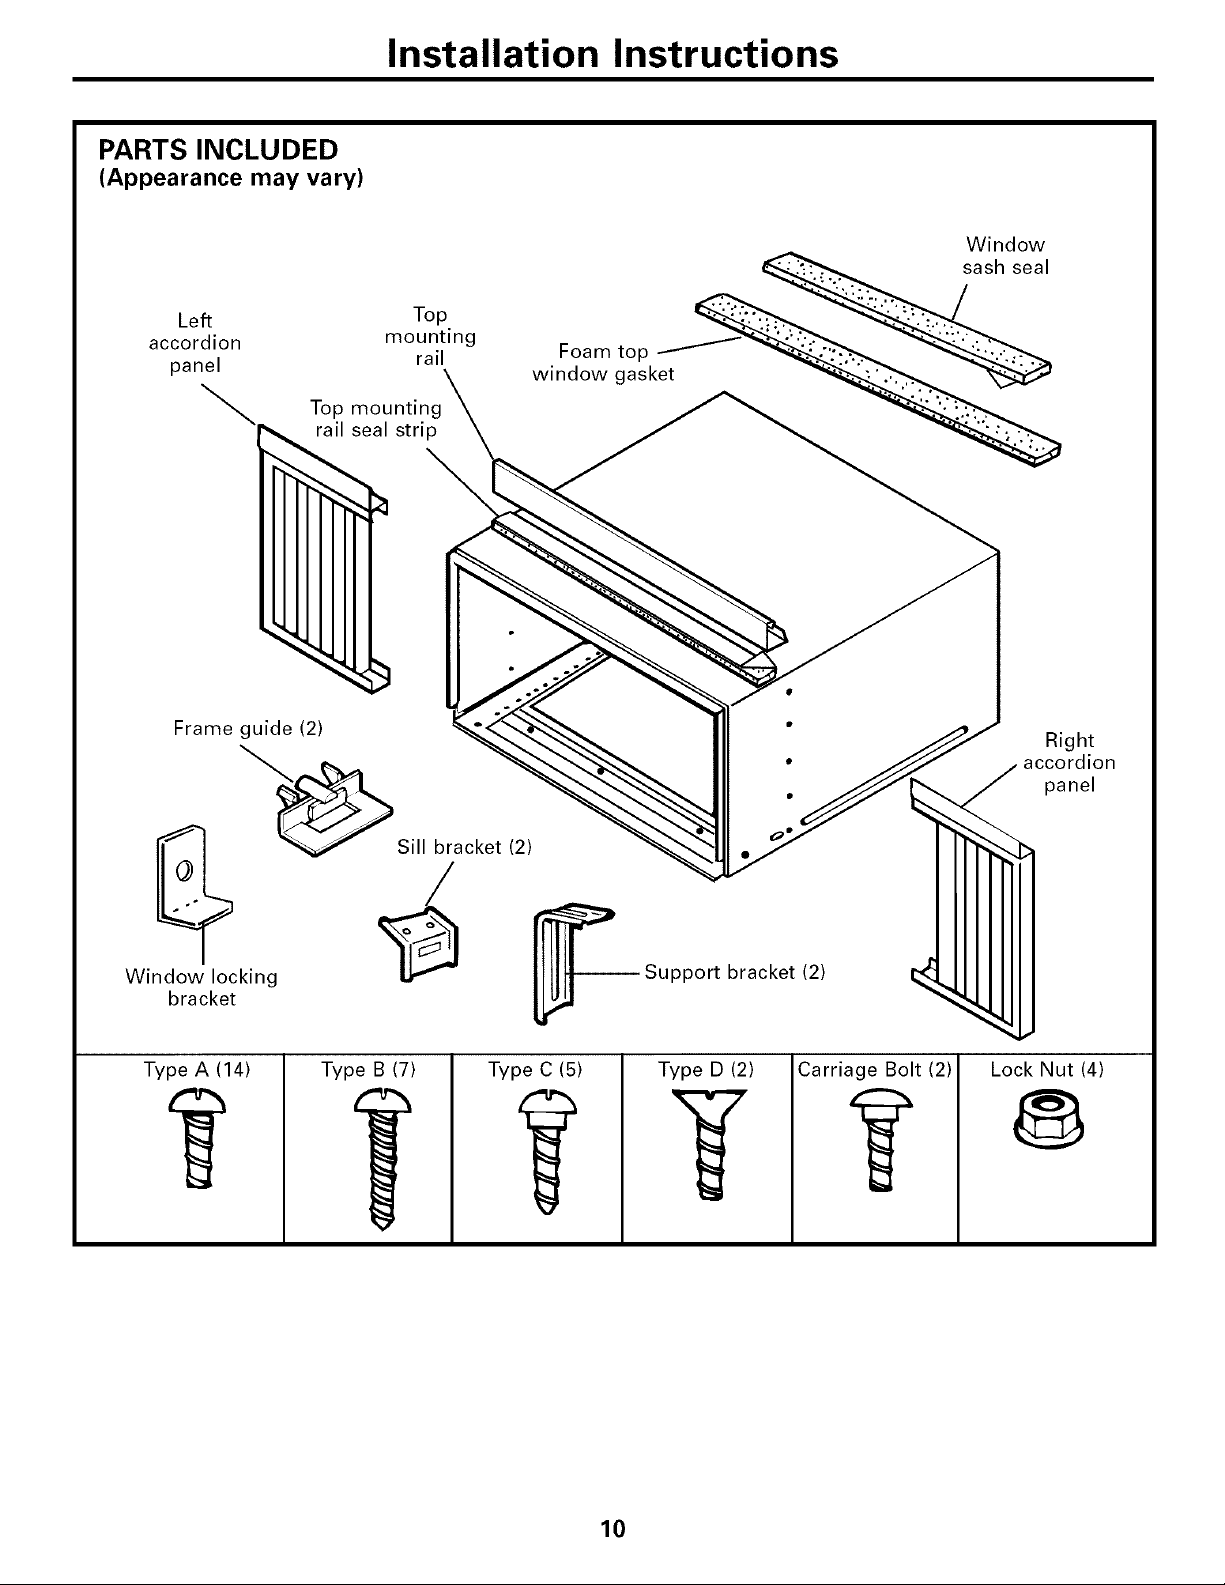
PARTS INCLUDED
(Appearance may vary)
Left Top. ___
accordion mount,ng Foam top /___':.._-
panel rail\ window gasket __. "_.
To0_ount,n0\ _ __"
--, railsealstri _ _ _
Window
;ash seal
Frame _d_. (2) "" i ac!!_dhei/n
"_ S b k 2 _llllllll
Window locking " IltlJl upport rac et( )
bracket [Jr,_
Type A (14)
Type B (7)
Type C (5) Type D (2) Carriage Bolt (2)
Lock Nut (4)
@,
i
@
10
Page 11
Installation Instructions
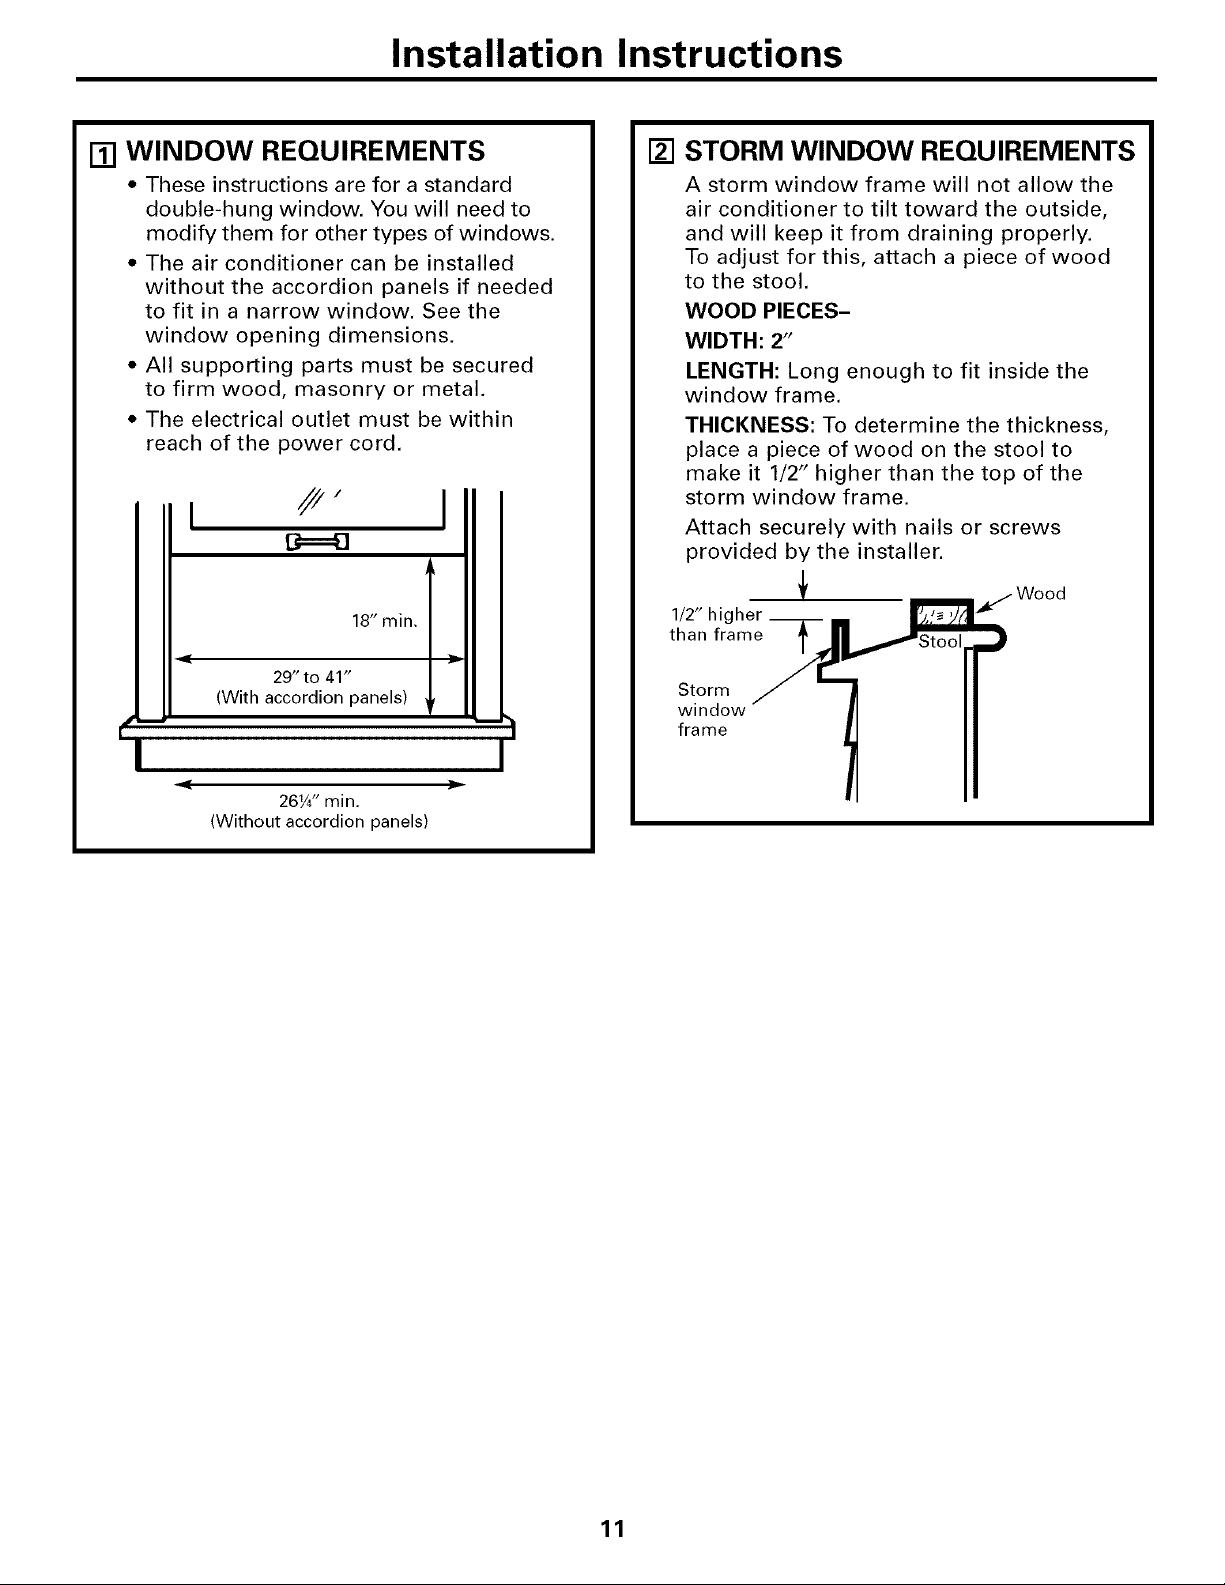
[] WINDOW REQUIREMENTS
• These instructions are for a standard
double-hung window. You will need to
modify them for other types of windows.
• The air conditioner can be installed
without the accordion panels if needed
to fit in a narrow window. See the
window opening dimensions.
• All supporting parts must be secured
to firm wood, masonry or metal.
• The electrical outlet must be within
reach of the power cord.
B==43
STORM WINDOW REQUIREMENTS
[]
A storm window frame will not allow the
air conditioner to tilt toward the outside,
and will keep it from draining properly.
To adjust for this, attach a piece of wood
to the stool.
WOOD PIECES-
WIDTH: 2"
LENGTH: Long enough to fit inside the
window frame.
THICKNESS: To determine the thickness,
place a piece of wood on the stool to
make it 1/2" higher than the top of the
storm window frame.
I
Attach securely with nails or screws
provided by the installer.
<
29" to 41"
(With accordion panels)
,<
26¼" min.
(Without accordion panels)
18" min.
1/2" hi
than frame Stool
Storm
window
fra me
I
11
Page 12
Installation Instructions
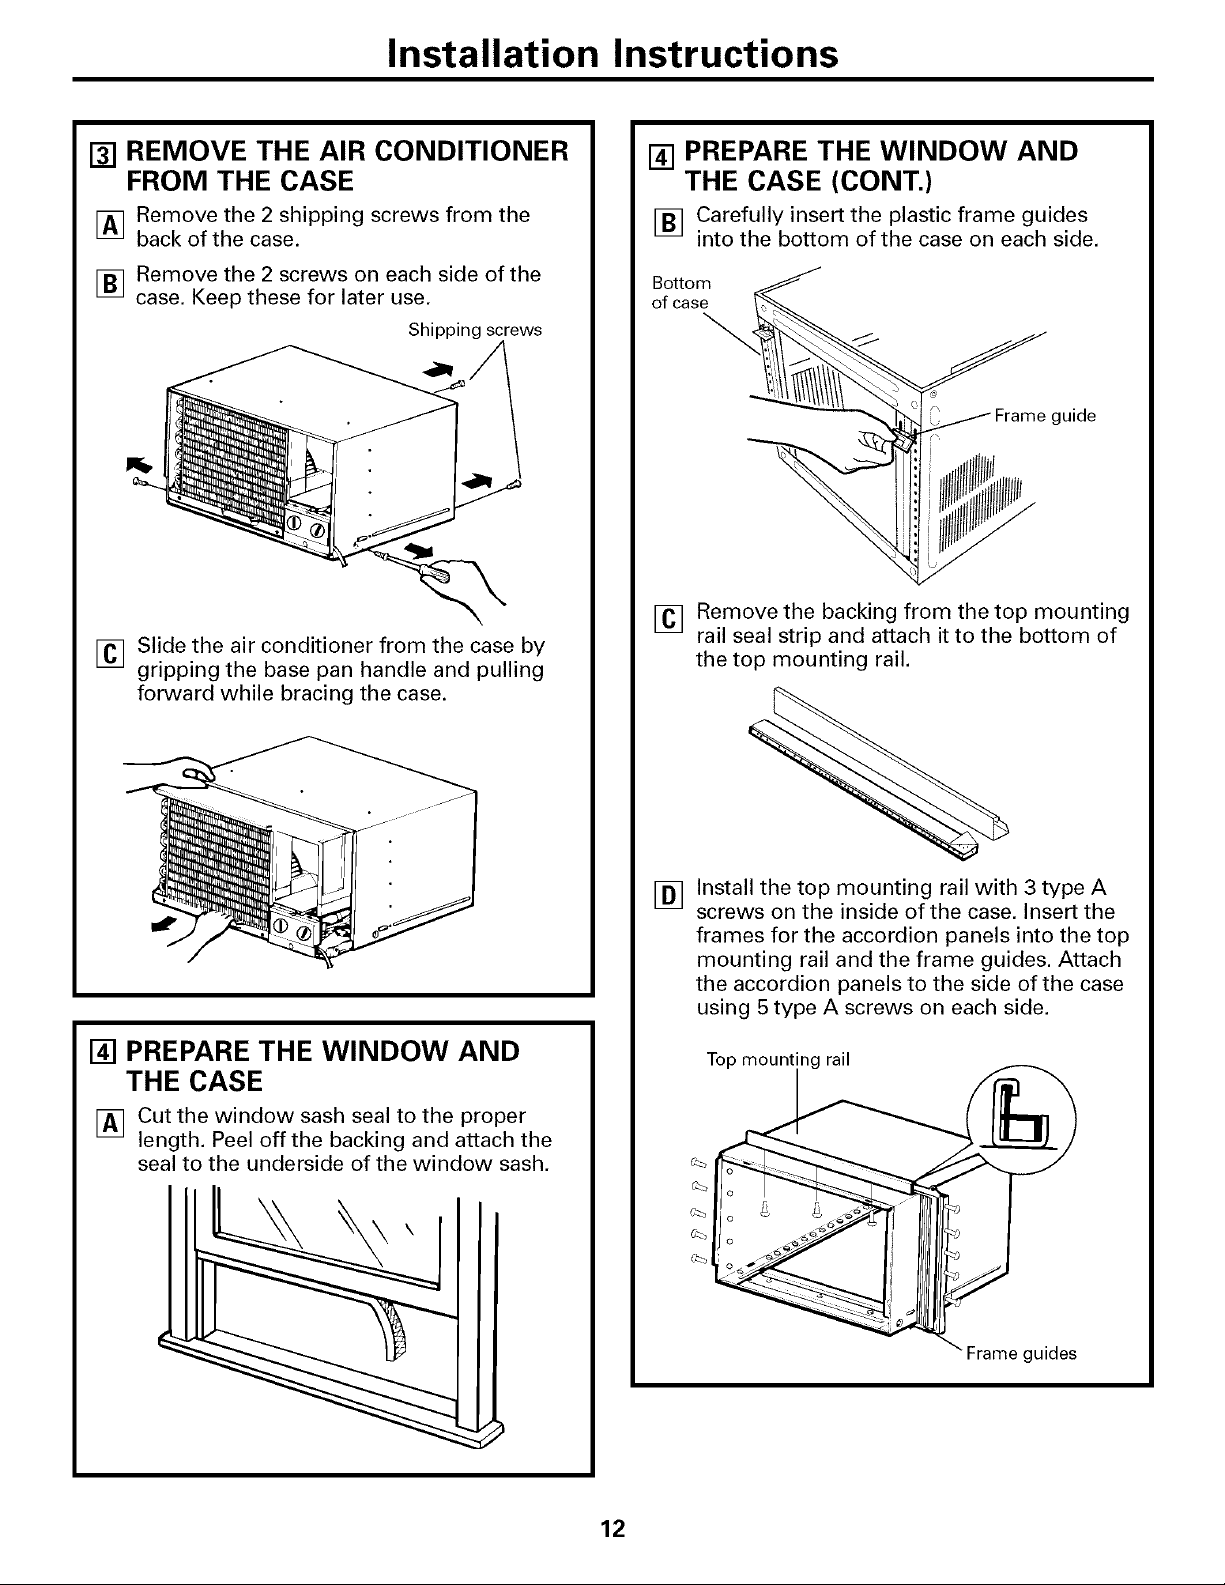
[] REMOVE THE AIR CONDITIONER
FROM THE CASE
IAq Remove the 2 shipping screws from the
back of the case.
F_ Remove the 2 screws on each side of the
case. Keep these for later use.
Shipping screws
[] Slide the air conditioner from the case by
gripping the base pan handle and pulling
forward while bracing the case.
[] PREPARE THE WINDOW AND
THE CASE (CONT.)
[] Carefully insert the plastic frame guides
into the bottom of the case on each side.
Bottom
of case
_lttf!!iil I guide
F
[] Remove the backing from the top mounting
rail seal strip and attach it to the bottom of
the top mounting rail.
[] PREPARE THE WINDOW AND
THE CASE
[] Cut the window sash seal to the proper
length. Peel off the backing and attach the
seal to the underside of the window sash.
Install the top mounting rail with 3 type A
[]
screws on the inside of the case. Insert the
frames for the accordion panels into the top
mounting rail and the frame guides. Attach
the accordion panels to the side of the case
using 5 type A screws on each side.
Top mounting rail
\ Frame guides
12
Page 13

Installation Instructions
[] PREPARE THE WINDOW
[_ Loosely attach the sill brackets to the
support brackets using the 2 carriage bolts
and 2 lock nuts.
Support bracket
Carriage I
bolt _ _ __l__j.ock nut
Sill bra_k_et__'_" _"
Open the window and mark the centerline
[]
of the window stool. Measure and mark 11"
to the left and right of the centerline.
Centerline
[] INSTALL THE CASE IN THE
WINDOW (CONT.)
[] Adjust the carriage bolts and the lock nuts
in each support so that the case is installed
with a slight tilt to the outside. Use a level;
about 1/3 bubble will be the correct case
slant to the outside. Tighten the bolts.
CAUTION: DO NOT drill a hole in the base pan.
The unit is designed to operate with
approximately 1/2" of water in the base pan.
[] Secure the case to the window stool by
using 3 type B screws.
[] INSTALL THE CASE IN THE
WINDOW
[] Align the inside edge of the sill brackets
with the 11" marks from the centerline and
attach them to the window sill using 2 type
B screws on each side.
Carefully place the case on the window
[]
stool aligning the center front on the
bottom with the centerline marked on the
window stool. Close the window making
sure the window sash is behind the top
mounting rail.
Using the larger diameter hole in the case,
[]
attach the brackets to the case using two
type D screws and 2 lock nuts on each side.
[] Pull the accordion panels to each window
sash track. Attach them on each side to the
window sash and the window stool using
4 type C screws.
13
Page 14

Installation Instructions
[] INSTALL A SUPPORT BRACKET
AND THE FOAM TOP WINDOW
GASKET
[] Attach a support bracket with a Type C
screw.
[] Cut the foam top window gasket to the
window width.
[] Stuff the foam between the glass and the
window to prevent air and insects from
getting into the room.
[] INSTALL THE AIR CONDITIONER
IN THE CASE
I_q Slide the air conditioner into the case.
Inl
Reinstall the 2 screws removed earlier on
each side of the case.
[] Before installing the front grille, pull out the
vent control lever located above the unit
control knobs, as shown.
Attach the front grille to the case by inserting
[]
the tabs on the grille into the slots on the
front of the case. Push the grille in until it
snaps into place.
14
Guide the lever
carefully through
the grille as you
push it in.
Lift the inlet grille and secure the front
[]
frame with a type A screw through the
front grille. Lower the inlet grille back into
place.
Page 15

TroubleshootingTips. GEAppliances.com
Troubleshooting -tips
Save time and money/.Review the chart below first
and you may not need to call for service.
Possible Causes What ToDo
Air cond#ioner The air conditioner * Make sure tile air conditioner plug is pushed completely
does notstart is unplugged, into the outlet.
The fuse is blown/circuit • Check the house fi]se/circuit breaker box and replace
breaker is tripped, the fi/se or reset the breakeI:
Power failure. •/f power tifilure occtu_, turn the air coucliffouer OFF.
_]leu power is restored, wait 3 minutes to restart the
air conditioner to prevent tripping oI the compressor
()verload.
The current interrupter • Press the RESKrbuttou located on the l)ower cord l)lug.
device is tripped. •/f the RESKrbuttou will not stay eu,_zwed discontinue
use of the air conditioner and contact a qualified service
technician.
Airconditionerdoesnot Airflow is restricted. • Make sure there are no curtains, blinds or flu'uiture
cool as it should bh)ckiug the fl'()ut of the air c()udiffonel:
The temp control may • On models with touch pads: hi COOL mode, press tile
not be set correctly. DECREASE Vpad.
• On models with control knobs, turn tile teml)erature
knob to a higher uunlbel:
The air f'flter is dirty. • Clean the filter at least evely 30 dm_s.
See the OperatingInstructionssecff(;u.
The room may have been hot. * _4]wu the air conditioner is filst turned on you need to
alh)w time fi)r the l'OOl// to COO1 dowu.
Cold air is escaping. • Check fi)r oI)eU flu'uace floor registels and cold air
I'ettWUS.
• Set the air conditioner's vent to the closed position.
Cooling coils have iced up. • See "Air conditionerfreezingup"beh)w.
Airconditioner Ice blocks the air flow • On models with control knobs, set the lnode control at
freezing up mad stops the air conditioner HIGH FAN or HIGH COOL with tile temp :at I or 2.
from cooling the room.
• On models with touch pads, set the controls at
HIGH(F3)FANor HIGH(1:3)COOLand setthe them, ostat
to a higher temperature.
The remote control The batteries are haserted ° Check tile position of the batteries. Tile}' should be
is not working incorrectly, inserted ill the ol)posite (+) and (-) direction.
The batteries may be dead. ° Replace the batteries.
Waterdrips outside I_Ncessively hot and • This is u(mual.
Water drips indoors The air conditioner is not • For l)r()per water disp()sal, make sure tile air c()udiff(mer
Water collects in Moisture is removed from • This is u(mual fl)r a short l)eriod ill areas with little
base pan indoor air and drains into lmmidity; u(mnal fl)r a longer pefi()cl ill very humid
TIMER feature not A power outage or interruption • Ill the case of a power outage or interruption, the unit
hmnid weather.
tilted to the outside, slants slightly ti'()m the case ti'out to the real:
rear of a cabinet where a fml areas.
blows it against the outdoor
condenser coil.
workingproperly occurred. TIMER teature will reset to the original setting. Y)u may
need to set a uew ffIne if desired.
15
Page 16

Beforeyoucall forservice...
Normal Operating Sounds
Ym may hear a pinging noise caused by water being
picked up and thrown against the condenser on rainy
days or when the humidi V is high. This design feature
helps remove moisture and improve efficiency.
Y}m may hear the them/ostat click when the compressor
cycles on and off.
X_ter will collect in the base pan dm_Jng high humidity
or on rain) days. The water may oxerflow and drip fl'om
the outdoor side of the trait.
The tim ma_ run exert when the compressor does not.
16
Page 17

GE Service Protection Plus 'M
GE, a name recognized worldwide for quality' and dependability, oflers y'ou
Service Protection Plus"--comprehensive protection on all y'our appliances--
No Matter What Brand!
Benefits Include:
• Backed by GE
• All brands covered
• Unlimited service calls
• All parts and labor costs included
• No out-of-pocket expenses
• No bidden deductibles
• One 800 number to call
You will be coxnpletely satisfied with our service i)x'otection or )ou ma) request your inone) back
on the reuaailaing "_alue of your contract. No questions asked. It's that silnple.
Protect your refl'igeratoi; dishwashei; washer and dryei; range, TV, VCR and nmch more--aaay brand!
Plus there's no extra charge fi)r eu_ergency service and low molKhly fii_ai_cing is awfilable. Even icelnaker
coverage and tood spoilage protection is offered. You can rest easy; knowing that all your wduable
household products are protected against expensive repairs.
Place your confidence in (;E and call t,s in the U.S. toll-free at _(IU.OZO.ZZZ_
for UlOi'e ilatorlnatiola.
"*AllImmds cmered, up to 20 )¢ms old. in the contin¢ ntal [.S.
We71CoverAnyAppliance.
Anywhere. Anytime.*
Please place in envelope and mail to:
General Electric Company
Warranty Registration Department
EO. Box 32150
Louisville, KY 40232-2150
17
Page 18

Consumer Product Ownership Registration
Dear Customer:
Thank you for purchasing our product and thank you for placing your confidence in us.
We are proud to haxe you as a customer!
Follow these three steps to protect your new appliance investment:
Complete and mail
your Consunler
Product Ownership
Registration today.
tlaw' the peace of
mind of knowing we
Call COlltact VOll ill
tile unlikely (x(nt of a
satbly modification.
Atter lnailing tile
registration below,
store this document
ill a sati. place. It
contains inlormation
you will need should
you require service.
Our service number is
800.GE.CAI(ES
(800.432.2737).
Model Number Serial Number
I I I I I I
Important: If you did not get a registration card with your
product, detach and return the form below to
ensure that your product is registered, or register
online at www.GEAppliances.com.
Consumer Product Ownership Registration
Read your Owner's
Manual carethllv.
It will help you
o])el-_lte yOtlr llew
appliance properly.
, I
._ (_//I here
Model Number Serial Number
Ms. M*_. Mi_s
Fir'lI I Lasll
Nalne I I I I I I I I I Name I I I I I I
S[ r()(!l I
Addr(ss I I I I I I I I I I I I I I I I I I I I I I I I
I I I I I I
Ap .#l, , , , , , , I l:.-inailA(l(lress,::
Zip
l)ale PIi( ed
.,,o.,l I-I I I , I
* Please provide your e-mail address to receive, via e-mail, discounts, special ottLr _,and other important
communications troln GE Appliances (GEA).
Check here if you do not want to receive communications ti-om GEA's carefidly selected partners.
FAII.I 7RE T() C()MPI.ETE AND RE'F[ RN Tt tIS CARD DOES NOT DIMINISII Y( )l JR
_,E\RRANTY RIGIITS.
For intbrmation about GEA's prixacy and data usage polio), go to _avw.GEAppliances.com and click
on 'Prixacv Policy" or call 800.626.2224.
GE Consomer & htdttstrial
Louisville, Ketttttck¥
www, GEAppliances, com
GEAppliances
Nunll)er I , i i i i i
I
I
18
Page 19

Air ConditionerWarranty.
Aft warranty service provided by our Factory Service Centers,
or an authorized Customer Care®technician. To schedule service,
on-line, 24 hours a day, visit us at www.GEAppfiances.com, or
carl 800.GE.CARES(800.432.2737).
We Will Replace:
Fromthe date of the
origina!purchase
Fromthedateof the
origina!purchase
Service trips to your home to teach you how to
use the product.
hnproper h_staJlation, delivery or maintenance. If you
have ml installation problem, or if the air conditioner
is of improper cooling capacity for the intended use,
contact your dealer or installer. You axe responsible
for providing adequate electrical cmmecth_g facilities.
Failure of the product resulting from modifications to
the product or due to mlreasonable use including failure
to provide reasonable and necessary maJntenm_ce.
In commerciaJ locations labor necessary to move
the refit to a location where it is accessible for service
by m_ individual technician.
Anypartof the air conditioner which fhils due to a defect in materials or workmanship,
During this full one-year warranty, we will also provide, free of charge, all labor and in-home
serxice to replace the defectixe part,
Any part ofthe sealed refrigerating system (the comi)ressot; condenset; evaporator and
all connecting tubing) which tifils due to a (leiect in materials or workmanship. During this
four-year additional warranty, we will also provide, free of charge, all labor and in-home service
to replace the (lefecti\'e part.
Staple your receipt here.
Proofof the orig&al purchase
date is needed to obtain service
under the warrantF
Replacement of house fuses or resetting of circuit
breakers.
Failure due to corrosion on models not corrosion-
protected.
Dmnage to the product caused by hnproper power supply
voltage, accident, fire, floods or acts of God.
Incidental or consequentiaJ dmnage caused by possible
defects with this air conditioner.
Dmnage caused after delivery.
This warranty is extended to the original purchaser and any succeeding owner for products purchased for home
use within the USA. In Alaska, the warranty excludes the cost of shipping or service calls to your home.
Some states do not allow the exclusion or limitation of incidental or consequential damages. This warranty gives
you specific legal rights, and you may also have other rights which vary from state to state. Toknow what your
legal rights are, consult your local or state consumer affairs office or your state's Attorney General
Warrantor: General Electric Company. Louisville, KY 40225
19
Page 20

ConsumerSupport.
Hme a question or need assistance with your appliance? Try the (;E Appliances _,Vebsite 24 hom_ a (lax;
q l gEAppliancesWebsite www.GEAppliances.com
' any day of the year! For greater comenience and faster service, you can now download Owner s Manuals,
order parts, catalogs, or exert schedule serxice on-line. You can also "_sk Our Team of Experts ....
yo/II" questions, and so IIl/Ich iiloi'e...
ScheduleService
Expert (;E repair seiMce is onl) one step awa) from your (looi; Get on-line and schedule your service at
your, comenience 24 hom_ am dm of the _ear! Or call 800.GE.(:ARES (800.432.2737) during n(mnal
business hotu_.
www.GEAppliances.com
RealLifeDesignStudio www.GEAppliances.com
GE supports the Univei_al Design concel_t--products, services and environments that can be used by
people of all ages, sizes and capabilities. _'e recognize the need to design fin" a wide range of physical and
mental abilities and impaim/ents. For details of GE's Univei_al Design applications, including kitchen
design ideas fin" people with disabilities, check out o/ii" _'ebsite today. For the hearing impaired, please call
800.TDD.GEAC (800.833.4322).
Extended Warranties www.GEAppliances.com
Purchase a GE extended warranty and learn about special discounts that are a_ailable while your, warrant_
is still in effect. You can purchase it on-line an) time, or call 800.626.2224 during nomml business hotu_.
(;E ()msuiner Home Serxices will still be there after your warrant} expires.
PartsandAccessories www.GEAppliances.com
Individuals qualified to seIMce their own appliances can have parts or accessories sent directly to their
homes (VISA, MasterCard and Discover cards are accepted). Order on-line today, 24 hom_ every day or
by I_hone at 800.626.2002 duIJng noi_nlal business houI_.
Instructions contained in this manual cover procedures tobe performed by any user. Other servicing generally
should be referred to qualified service personnel. Cautionmust be exercised, since improper servicing may cause
unsafe operation.
ContactUs www.GEAppliances.com
If'you are not satisfied with the service you receive from GE, contact us on our _'ebsite with all the details
including your phone numbei; or write to: General Managei; Customer Relations
GE Appliances, Appliance Park
i,ouisville, KY 40225
Register your new applim_ce on-line---at your convenience! Timel) product registration will allow fin"
q
"1 RegisterYourAppliance www.GEAppliances.com
enhanced communication and prompt service under the terms of )our warranty, should the need arise.
j You may also mail in the pre-printed registration card included in the packing material.
20 Printed in Korea
Page 21

www. GEAppliances.com
Instruc_qones de seguridad .... 9 3
Instrucciones de operaei6n
Modelos de bot6n de control .... 6, 7
Modelos de tecla de toque ...... 4, 5
Cuidado y limpieza
Bobinas para exteriores .......... 8
Fihro de aire ................... 8
Parrilla y caja .................. 8
Instrucciones de instalaci 6n
C6mo prepararse para instalar
el acondicionador de aire ........ 9
Instalaci6n en xentanas ....... ]0-14
Ideas para la identifica_q6n
y reparacq6n de problemas .. 15, 16
Sonidos normales de operaci6n . . .16
A GM l4
AGLI8
A (;M l 8
AGVI8
AGL24
Ac :4
A GV24
AGW24
©
©
©
Apoyo al consumidor
Apoyo al consumidor . .......... 90
Garantfa ..................... 19
Escriba el modelo y numero
de serie aqui:
Numero de modelo
Numero de serie
Usted puede encontrar estos n0meros
al costado del acondicionador de aire.
3828A20514G 49-7499- ! 03-05JR
Page 22

INFORMACIONIMPORTANTEDESEGURIDAD.
LEATODASLASINSTRUCCIONESANTESDEUSAR.
A iADVERTENCIA!
Par su seguridad, se debe seguir la informacidn en este manual para minimizar el riesgo de incendios,
descargas el#ctricas o lesiones personales.
PRECAUCIONESDESEGURIDAD
Use este electrodom&stico solamente para
el prop6sito detenninado segfin se describe
en el Manual del propietario.
iiiiiiiiiiii_iii
Este acondicionador de aire debe instalarse
correctamente de acuerdo con las
h_strucciones de instalaci6n antes de su uso.
iiiiiiiiiiii_iii
Nunca desenchufe su acondicionador de
aire tirando del cable el_ctrico. Siempre
ag_ane firmemente el enchufe y tire de
_l directamente hacia aflmra.
iiiiiiiiiiii_iii
Reemplace imnediatamente todos los
cables el_ctricos que se hayan pelado o que
se hwan daflado de alguna otra manera.
No use tm cable el_ctrico que muestre
evidencias de demrioro, o daflos de abrasi6n
en su superficie en alg, mo de sus exuemos.
Apague el control de modo y desenchufe
su acondicionador de aire antes de hacer
cualquier reparaci6n o limpiar
NOTA:Recomendamos en_rgicamente que
cualquier servicio llexado a cabo en este
equipo lo realice un individuo calificado.
Pot" su seguridad...no ahnacene ni use
mamriales combustibles, gasolina u otros
vapores o lfquidos inflamables en la
proximidad de _ste o algfin otto
electrodom_stico.
Todos los acondicionadores de aire
contiene refrigerantes, los que por Ley
Federan deben set removidos antes de
desecharlos. Si usted planea deshacerse de
algfin producto que contenga refrig_rantes,
p6ngase en contacm con la compaflfa que
se encatga de recoger su 1)asura para que le
indiquen qu_ hace_;
COMOCONECTARLAELECTRICIDAD
Bajo ninguna circunstancia, corto o remueva la
tercera pOa (tierra) del cable el6ctrico. En pos
de la seguridad personal, este electrodom6stico
debe siempre conectarse a tierra.
E1 cable el_ctrico de esm electrodom_stico est_i
equipado con un enchufe de tres pdas (tielTa)
que coml)ina con un tomacon-ienm estfindar
de tres minas de pared para minimizar la
posibilidad de una descatga ek?cu-ica.
E1 cable de alimentaci6n incluve un dispositix_
para inmrrupci6n de cotTienm. Se incluye un
1)ot6n de pruel)a y de reinicio en el dispositix_.
E1 dispositix_ debe ponerse a pruel)a
peri6dicamente: pfimero se presiona el bot6n
derEsr(pmeba) y lueg_ RESET (reinicio).
Si el 1)ot6n rEsr.ose dispara o si el bot6n
RESETnoqueda enganchado, deje de utilizar
el acondicionador de aite y comunfquese
con un t(4cnico calificado.
Pida a un t_cnico que inspeccione el
tomaconJente y el circuito para cerciorarse
de que el mmacorrienm est_ conectado a
tiena de la manera apropiada.
Donde exism un tomacorfiente de dos tomas,
es su responsabilidad y obligaci6n personal
hacer que dicho tomaconiente sea
reemplazado por uno de tres tomas con
conexi6n a tiena.
E1 acondicionador de aire deberfa siempre
estar conectado a un tomacorriente individual
con su circuito de xohaje conespondiente.
Esto proporciona el mayor rendimiento y
adem_is evita que los circuitos del resto de
la casa se sobrecarguen, 1o cual podtSa causar
incendios pot el sobrecalentamiento
del cableado.
Ver las Instmcciones de instalaci6n, en la
secci6n Requisitos ElOctricos para los requisitos
especfficos de conexi6n.
2
Page 23

GEAppliances.com
iADVERTENCIA!
f
USODECABLESDEEXTENSION--Modelosde 115voltiossolamente
Debido al potencial de riesgos de seguridad
bajo ciertas condiciones, en6rgicamente
recomendamos contra el uso de cables
de extensidn.
Sin embargo, si usted se x> en la necesidad
de usar un cable el_cuico de exmnsi6n, es
absolutamenm necesario que el mismo est_
lismdo bajo UI,, calibre 14, de dpo 3 minas con
conexi6n a dena para elecuodom_sdcos y el
fndice debe set de 15 amperios (mfnfino) y
195 x_ltios.
A PRECAUCION:
NO USEun cable de extension con ningunode los
modelos de230/208 voltios.
USODEENCHUFESADAPTADORES--Modelosde115voltiossolamente
!
Debido al potencial de riesgos de seguridad
bajo ciertas condiciones, en6rgicamente
recomendamos contra el uso de enchufes
adaptadores.
Sin embargo, si usted seve en la necesidad de
usar un adapmdo_; donde los c6digos legales
locales lo permitan, una conexion temporal
podrfa set hecha a un interruptor de 2 tomas
siempre que se use un tomacon-ienm lismdo
UL disponible en la mworfa de las fen_eterfas.
La ranura mayor en el adaptador debe estar
alineada con la pda mayor en la pared para
proporcionar una polaridad apropiada en la
conexi6n del cable el_ctrico.
Cuando se disponga a desconectar el cable
el_ctrico del adaptado_, siempre sostenga el
adaptador en su lugar con una mano mientras
tira del cable el_cuico con la otra mano. Si no
hace esto, la mnninal de fierra del adaptador
podrfa romperse despu& de que esm proceso
sea repeddo varias _>ces.
Si se rompe la tem/inal de conexi6n a tie_xa
del adaptado_; NO USE el acondicionador de
aire hasta que la conexi6n a tiena haya sido
restablecida.
Unirel terminaldeconexi6na tierra del adaptador
a un tomi//ode/a cubiertaen/a parednoconectaa
tierrael e/ectrodomesticoaprepiadamenteanoser que
/a cubiertade/tomi//o seamet#licay noesteais/ada
y el tomacorrientede la casaesteapropiadamente
conectadoa tierra a travesde/cab/eado de/a casa.
Hagaque un tecnicocafificadoinspeccioneel circuito
de/a casaparacerciorarsequeest#conectadoa tierra
aprepiadamente.
LEAYSIGAESTASINSTRUCCIONESDESEGURIDADCUIDADOSAMENTE.
GUARDEESTASINSTRUCCIONES
Page 24

Acerca de los controlesen el acondicionadorde aim--
modelosconteclas de toque.
Las funciones y el aspecto pueden variar.
Sincmnizador
Enfriamiento
encendido -
Ventiladorencendido-
EnergySaver
encendid0
Controles del acondicionador de aire Control remote
Controls
0
0
FANSPEED
O ON/OFF(ENCENDIDO/APAGADO)
Apaga ) prende el acondieionador de aire.
O Pantalla
Muestra la tempemtura a.justada o el tiempo
resmnte ell el sincronizadol:
O MODO
Usado. para aitlstar.. el aeondicionador de aire al
mode COOL(FRIO)o FAN (VENTILADOR).
O Teclas de Increase (aumentar) &/Decrease
(reducir)•
Llsado para _!iustm"la temperam{'a cuando se
encuentre en el mode COOL(FRIO).
OF AN (VENTILADOR)
Usado para ajustar la vel(icidad del ventilador a
LOW(F1)(BAJO),MED (F2)o HIGH(F3)(ALTO.
O ENERGYSAVER(AHORRADORDE ENERGIA)
(on algunos modelos)
Controla el ventiladol:
ON(ENCENDIDO)--EI vemilador } el compresor
hacen el eiekl de eneendido y apagado.
Este resulm en variaeiones ross amplias en las
temperatm_ls de la habimcidn y la humedad.
Nonnalmente usado cuando la habimcidn no
esm ocupada. NORA:Elventiladorcontinuarb
funcionandoper un/apsecortodespudsdequee/
compresorentreen e/cic/odeapagado.
OFF(APAGADO)--EI ventilador flmciona todD el
tiempo, mientras el compresor hace ciclo entre
encendido y apagado.
Esm flmeidn debe esmr coklcada en OFF
(APAGADO)pal_l usar las flmciones del vemilador
(ell el modekl de control).
NOTA:Ena/gunosmode/os,/afunci6ndeENERGY
SAVER(AHORRADORDEENERGIA)nopuedeser
ajustadaen elacondicionadordeaire.Debenserajustadas
usandoelcontrolremote.
O CIRCULAIRE(CIRCULADORDEAIRE)
(on algunos modelos)
Para cireulacidn continua de aire de lade a lade
(en la flmcidn de enfliado solamente), _!iuste el
interrul)tor de (_irculaire a ON(ENCENDIDO).
Para direceidn I!ja de lade a lade, gire a ON
(ENCENDIDO)hasta que la direccidn deseada sea
obtenida, entonees coklque en OEF(APAGAO0).
O TIMER (SINCRONIZADOR)
ON(ENCENDIDO)---Cuando el aeondicionador de
aire est5 apagado, puede set _!iusta(lo para que
se encienda automSticamenm de ] a ] 2 horas o
1 a 24 bergs (dependiente en modek/) horas a
partir de su _!iusm previo. Cada toque de la tecla
TIMER(SINCRONIZADOR) o teclas de INCREASE •
(AUMENTAR)/DECREASE• (REDUCIR)
(dependiente ell modelo) _!itlstar_i el tiempo
ell hoE, is.
OFE(APAGADO)_Cuando el acondicionador de
aire est5 eneendido, puede set @lsm(lo para que
se apague automSticamente de 1 a 12 horas o
I a 24 bergs (dependiente en modekl). Cada
toque de la tecla TIMER(SINCRONIZADOR)o
teclas de INCREASE• (AUMENTAR)/ DECREASE
• (REDUCIR)(dependiente en modelo) aiustar;i
el tiempo en horas.
Para cancelar el sincronizador,presione la tecla
TIMER(SINCRONIZADOR)hasmque el dempo en
la panmlla desaparezea.
O Receptor de la se_al del control remote
Control remote
Para garantizar [ma operacidn apropiada, oriente
el control remou_ hacia e/Receptor de seriales del
acondicionador de aire.
4
El Receptor de sefiales tiene un rango m_ximo de 21 pies.
Cercidrese de que ii1)hK_anada enu:e el acondicionador
de aire y el cone:o/remote que pueda bloquear la serial.
Cerci6rese de que las baterfas son fl'escas e insmladas
COlTeCtalI/ente seg(m se indJca en el control remote.
Page 25

GEAppliances.com
Las luces al lado de las teclas de toque en el panel
de control del acondicionador de aire indicar#n los
ajustes seleccionados.
Funcion de recuperacion de perdida de energia
En cast, de la p&'dida de la energfa o interrupci6n, TIMER(SINCRONIZADOR)reajustarfi al @lste original.
la unidad reiniciarfi atttonlfificamente en las Es posible que usted necesite ajustar un tienlpo
fiuldones de la (lltin/a vez que file usado una nuevo si asf lo desea.
vez la eneigfa sea restablecida. Ia fluld6n del
Modo COOL(FRIO)
Useel nlodo COOLcon ventilador HIGH(F3)- ALTO,
MEDIF2)MEDIOtt LOW(F1)BAJOpara enffiai: Llse
lastedas de INCREASE(AUMENTAR)&/DECREASE
(REDUCIR)• para ajustar a la temperatura deseada
entre 64°F v 86°F en incren/entos de I°E
Se tlSa till telillOSt;tto electr(3nico para i/lantenei" la
tenlperatura de la habitad6n. E1coinpresor harfi
ciclo entre apagado y encendido para n/antener
la habitaci6n a la tenlperatura deseada, Ajuste el
telIIlostato a till n(lillei'o IllenoI" V el aire intelilO
se enflJai5 mils. Si lo ajusta a un n(unero inavoi;
la tenlperatura del aire inmrno se calentarfi mils.
NOTA:Sfofacondfcfonadordeafroest_apagado yontoncos
esencendfdomientrasest#ajustadoonCOOL(FRJO),tomarfi
aprox/Tnadamente3mlhutosparaclueof compresorcomfence
a enfnarotravez.
Descripciones de enfriamiento
ParaenfriamientonormaI--Se]eccionee]nlodo de
_entilador COOL(FRIO)_ HIGH(1:3)(ALTO)o MEDIF2)
(MEDIO)con una tenlperatura de ajuste n/edia.
Para enfrianliento maxinlo--Seleccione el nlodo
de ventilador COOLv HIGHIF3)(ALTO)con tlll}t
tei/lpei'attli'a de aitlste i/lenoi i
Paraenfriamientosilencioso& enfriamiento
nocturno--Seleccioneel inodo deventilador COOL
(FRJO)yLOW(FI) (BAJO)con una tenlperatura de
ajuste nledia.
NOTA:Sfustedcamb/adeunajusteCOOL(FRIO)a
OFF(APAGADO)oaunajustedeventf/ador,espere
aproxlTnadamente3minutosantesdecambiarotravez
al ajustedeCOOL(FRIO).
Modo de FAN (Ventilador)
Useel FAN(Ventilador)en HighIF3)(ALTO),MED IF2)
(MEDIO)o LOW(R) (BAJO)para proporcionar
circulaci6n de aire v filtracidn sin enfl_iamiento.
Vent Control (Control de la ventilacion)
E1 control de ventilaci6n estfi localizado en el
interior de las peisianas en la esquina derecha
iniefioI:
()land(> estfi @lstado a CLOSE(CERRADO),
solamente el aire en el interior de la habitaci6n serfi
circulado v acondicionado. Cuando estfi ajustado a
Direccion del aire--Hacia arriba y hacia abajo
Una presidn sencilla con los de(los en parte
posteiior de la pei_ianit;t horizontal ajttstarfi la
direcd6n del aire hada arriba o hacia ab@).
Debido a que los niveles de vendlador Onicanlente
no proporcionan enfl{amiento, el nivel de
tenlperattn'a no se nluestra en la pantalla.
OPEN(ABIERTO),ttIl poco del aire interno es
expelido hacia afltera.
Para abiir la rejilla, tire de la palanca hacia usted.
Para cerraita, en/p(/jela hada adentro.
5
Page 26

Acerca de los controlesen el acondicionadorde aim--
modelosconbotonde control
Las funciones y el aspecto pueden variar.
OFF
HIGH HIGH
FAIOCOOL
LOW MED
FAN COOL
LOW
COOL
FAN OOL
HI OIHI
LOW LOW
FAN COOL
OFF
CONTROLESDEMODO
Su modelo tendM uno de los tipos de control mostrados arriba.
CONTROLESDETEMPERATURA
Su modelo tendM uno de los tipos de control mostrados arriba.
Controls
O ontroles de modo
HIGHCOOL(ENFRIAMIENTOALTO),MED
COOL(ENFRIAMIENTOMEDIO)yLOWCOOL
(ENFRIAMIENTOBAJO)proporciona
enfl_amiento con diferentes teclas de
velocidad.
I,os @lstes de FAN(VENTILADOR)
proporcionan circulaci6n de aire v
filtrad6n sin enfl_ax:
NOTA:S/ustedmueveestecontro/edemodode
unnivelfifoa OFF(APAGADO)oaunajustede
ventiiador,esperepot/o menos3 minutosantesde
camb/arotravezaunajustedeenfnamiento.
Descripciones de enfriamiento
ParaenfriamientonormaI--Seleccione HIGH
COOL(ENFRIAMIENTOALTO)o MEDCOOL
(ENFRIAMIENTOMEDIO)con el control de
temperatm'a en el nivel medio.
Paraenfriamientomaximo--Seleccione HIGH
COOL(ENFRIAMIENTOALTO)con el control de
temperatm'a entm nOmero mayor disponible
en su teclado.
Paraenfriamientosilenciosodurantela noche---
Selecdone LOWCOOL(ENFRIAMIENTOBAJO)con
el control de temperatura en el nivel medio.
O Controlesdetemperatura
E1 control de temperatm'a es usado para
inantener la telnperatura de la habitaci6n.
E1 compresor ham ciclo entre encendido v
apagado para mantener el mismo nivel de
temperatm'a en la habitaci6n. Cuando usted
gira el bot6n hacia tm n(unero inayoi; el aire
interno se enfl{aM re;is. Si lo aiusta atm
nOlnero menoi; la temperatura del aire
interno se calentaM m_is.
Page 27

Controles adicionales einformaciSn importante.
Ahorro de energia (ena/gunosmodelos)
E1 inten'uptor de ahorro de energfa controla
el ventilado_:
ON (ENCENDIDO)--E1 ",entilador y el compresor
hacen ciclo entre encendido y apagado. Esto
da como resultndo mayores \_niaciones de
temperaturas y hmnedad en la habitncidn.
Nolillah//ellte este es tlsado C/I}lIldo l}l
habitnci6n no estfi siendo ocupada.
Vent Control (Control de la ventilacion)
E1 control de ventilacidn estfi hwalizado encima de
los botoiles de coiltrol.
Cuand(> estfi _0ustn(l(> a CLOSE(CERRADO),
solamente el aire en el interior de la habitaci(m
serfi circulado v acondicionado. Cuando estfi
_!iustn(lo a OPEN(ABIERTO),m_ poco del aire
interno es expelido ha(ia afuera.
GEAppliances.com
OFF(APAGADO)--E1 xenfilador es accionado todo el
tiempo, mientras el compresor hace cich) entre
apagado y encendido.
Este interruptor debe quedar ajustndo a OFF
(APAGADO) para poder usar los ajusws del
ventilador (en el modelo de control).
Para abrir la rejilla, fire de la palanca hacia usted.
Para cerrarla, emp(/jela hada adentro.
Direcci6n del aire--lado a lado
CIRCULAIRE(CIRCULADORDE AIRE)
(on algunos modelos)
Para direc('i(,n de lado a lado del aire, ajuste el
interruptor de CIRCUIAIRE ((:IR(:UIADOR DE
AIRE) a ON (ENCENDIDO)hastnobtener la direcci6n
lateral de aire clue es deseada; entonces mu(_wdo
hastn OFF(APAGADO).
Para circulaci6n del aire de lado a lado continua
(fimcidn de enfl_iamiento solamente), _!juste el
CI]ICUIAIRE ((:IR(:UIADOR DE AIRE) a la
posicidn ON(ENCENDIDO)y d_jelo asf.
Direcci6n del aire--Hacia arriba y hacia abajo
Una presidn sencilla con los dedos en parLe
posterior de la pe_ianita horizontal @lstnrfi la
direccidn del aire hacia arfiba o hacia abajo.
CIRCULAIRE
ON
OFF I II •
7
Page 28

Cuidadoy limpieza del acondicionadorde aire.
Parrilla y caja
Apague el acondicionador de aire v retire el
enchufe del tomacorriente de la pared antes
de limpiar.
Bobinas para exteriores
ias bobinas en el lado exterior del acondicionador
de aire debe set inspeccionada regulam/ente. Si
las mismas estfin obstruidas con suciedad u hollfn,
podrfan limpimse proiesionalmente,
Filtro de aire
El filtro de aire detrfis de la parrilla ti'ontnl debe
ser inspeccionado y limpiado pot lo inenos cada
30 dfas o mils a nlenudo si fllese necesario.
Para limpiar, use agua y tm detergente suaxe.
No use cloro o nlateriales abrasixos.
Para retirar:
[_] Abra la parrilla de entrada hacia arriba tirando
de la misma desde el fi)ndo.
[_] Usando la parrilla, tire hacia arriba
ligeramente sol)re el filtro para liberarlo y
extrfiigalo.
IJmpie el film> con agua tibia yjab6n. Ei_jufiguelo y
peII/lit;I qtle se seque antes de colocarlo otra vez en
su luga_:
PRECAUCION:No ol
acond/cionadorde ake sin el filtro debidoa que la suciedad
y/aspelusas/oobstruirfin y reducirfinsurendlmiento.
8
Page 29

Instrucciones
Acondicionador
de instalacion
I _ zPreguntas? Llame 800.GE.CARES(800.432.2737)oVisite nuestra pagina en la red en: www.GEAppliances.com I
ANTES DE INICIAR
Lea estas instrucciones completa y
cuidadosamente
• IMPORTANTE - Guardeestas
instrucciones para uso del inspector local.
• IMPORTANTE - Observetodos
los c6digos y 6rdenes de ley.
• Nota al instalador - Asegurese de dejar
estas instrucciones con el consumidor.
• Nota al consumidor - Conserve estas
instrucciones para referencia futura.
• Nivel de destreza - La instalaci6n de este
aparato requiere de destrezas mecanicas
basicas.
• l"iempo de ejecucion - Aprox. 1 hora
• Recomendamos dos personas para
la instalaci6n de este producto.
• La instalaci6n apropiada es la
responsabilidad del instalador.
• La falla del producto debido a una
instalaci6n inadecuada no esta cubierta
por la garantia.
El enchufe de tres peas con conexi6n a tierra
minimiza la posibilidad de descargas electricas.
Si el tomacorriente de la pared que usted planea
usar solamente tiene 2 tomas, es su
responsabilidad hacer que un tecnico Io
reemplace por uno de tres tomas con conexi6n
a tierra.
©
REQUISITOS ELECTRICOS
Algunos modelos requieren
tomacorrientes de 115/120 voltios de
corriente alterna y 60 Hz conectados a
tierra, protegidos con un fusible de
dilataci6n de tiempo de 15 amperios o
un cortacircuitos.
Algunos modelos requieren 230/208
voltios, de corriente alterna, protegidos
por un fusible de dilataci6n de tiempo o
un cortacircuitos. Estos modelos
deberian instalarse en un ramal
exclusivo del circuito para un
rendimiento mas notable y para prevenir
sobrecargas en los circuitos de
cableados de su casa o apartamento,
Io cual podria representar un riesgo de
incendio por el sobrecalentamiento de
los alambres.
de aire
A PRECAUCION:
Bajo ninguna circunstancia corte o remueva
la tercera pt_a (conexion a tierra) del cable
electrico.
No cambie el enchufe en el cable electrico de
este acondicionador de aire.
Los cables caseros de aluminio podrian
presentar problemas especiales. Consulte a
un tecnico electricista calificado.
El cable de alimentaci6n incluye un dispositivo
para interrupci6n de corriente. Se incluye un
bot6n de prueba y de reinicio en el dispositivo.
El dispositivo debe ponerse a prueba
peri6dicamente: primero se presiona el bot6n
de TEST (prueba) y luego RESET (reinicio).
Si el bot6n TEST no se dispara o si el bot6n
RESET no queda enganchado, deje de utilizar
el acondicionador de aire y comuniquese
con un tecnico calificado.
Page 30

Instrucciones de instalacion
HERRAMIENTAS QUE NECESITARA
Un destornillador de estrella
PARTES INCLUlDAS
(aparencia puede variar) _ Ban,da de sello
Panrdlde n rnontaje ___...._...._
. . , superior Parte superior de la - _..'_".-,_ ''.._"-<_..._._>_._
,zqu,erclo \ espuma de la junta _'__
Cinta de sellado\ de la ventana _ __-
_ del riel de \ / _ _.._._.
Tijeras o cuchilla
Un destornillador Lapiz
con hoja plana
Riel de __
Nivel
__ oe la ventana
Una regla o cinta metrica
Guia eel marco (2) ___ " " _ /
_- _ _,.___ • _ / aPcandlele
_1_ ____ °_ _ derecho
"_" _S°P°/_delumbral(2) _ o_ f _1
÷ hlllllll
Soporte de _ IJ11_[---_ Soporte de apoyo (2) _ _11II III I
cierre de la IL_ _'_JIII I
ventana _lr
TipoA (14)
@,
Tipo B (7)
1
Tipo C (5) Tipo D (2)
10
Tornillocorredizo(2) Tuerca de cierre (4)
Page 31

Instrucciones de instalacion
REQUlSITOS PARA LA VENTANA
[]
• Estas instrucciones son para una
ventana estandar de dos pliegues.
Usted necesitara modificar el proceso
para otros tipos de ventanas.
• El acondicionador de aire puede
instalarse sin los paneles de acorde6n
para ajustarse a una ventana mas
estrecha. Ver las dimensiones de la
abertura de la ventana mas adelante.
• Todas las partes de apoyo deben quedar
totalmente aseguradas a algun metal,
mamposteria o a la madera.
• El tomacorriente electrico debe
estar al alcance del cable electrico
del acondicionador de aire.
I
18" minimo
29" a 41"
(con paneles de acorde6n)
T i
[] REQUlSITOS DE UNA VENTANA
DE TORMENTAS
Un marco de ventana de tormentas no
permitira que el acondicionador de aire se
incline hacia el exterior y evitara que
drene apropiadamente. Para solucionar
este problema, adhiera un pedazo de
madera a la repisa.
PIEZAS DE MADERA-
ANCHO: 2"
LONGITUD: Suficiente Iongitud para
ajustarse al interior del marco de la
ventana.
ESPESOR: Para determinar el espesor,
coloque un pedazo de madera en la repisa
para hacerlo 1/2" mas alto que la parte
superior del marco de la ventana de
tormentas.
Una firmemente con puntillas o tornillos
provistos por el instalador.
1/2" mas
que el marco
Marco de
ventana de
tormentas
261¼"minimo
(sin paneles de acorde6n)
11
Page 32

Instrucciones de instalacion
[] RETIRE EL ACONDICIONADOR DE
AIRE DE LA CAJA
[] Remueva los 2 tornillos de envio de la parte
posterior de la caja.
[] Retire los 2 tornillos en cada lado de la caja.
Guardelos para mas tarde.
Tornillos de envio
[] Deslice el acondicionador de aire de la caja
agarrando la empuhadura del carter base y
tire hacia adelante mientras sostiene la caja.
[] PREPARE LA VENTANA Y LA
CAJA (CONT.)
[] Con cuidado, inserte las guias del marco
plastico en el fondo de la caja en cada lado.
de la caja
Fondo __
[] Remueva la parte posterior de la banda de
sellado del riel de montaje superior y unala
al fondo del riel de montaje superior.
f
Guia del marco
[] PREPARE LA VENTANA Y
LA CAJA
Corte el sello de la banda de la ventana a la
[]
Iongitud apropiada. Pele la parte posterior y
pegue el sello a la parte inferior de la banda
de la ventana.
[] Instale el riel de montaje superior con 3
tornillos tipo A en el interior de la caja.
Inserte los marcos para los paneles de
acorde6n en el riel de montaje superior y
las guias del marco. Una los paneles de
acorde6n al lado de la caja usando 5
tornillos tipo A en cada lado.
Riel de montaje superior
Gul'as del marco
12
Page 33

Instrucciones de instalacion
[] PREPARE LA VENTANA
[] Una los soportes del umbral a los soportes
de apoyo que queden flojos usando 2
tornillos corredizos y 2 tuercas de cierre.
Soporte de apoyo
Tornillo I
corredizo
_ @-_. _.. TuerCar re
Soporte del umbral
[] Abra la ventana y marque la linea central de
la repisa de la ventana. Mida y marque ] 1"
hacia la izquierda y hacia la derecha de la
linea central.
Linea central
r
[] INSTALE LA CAJA EN
LA VENTANA
Ajuste los tornillos corredizos y las tuercas
[]
de cierre en cada soporte de forma tal que
la caja este instalada con una pequeha
inclinaci6n hacia el exterior. Use un nivel;
aproximadamente 1/3 de burbuja sera la
inclinaci6n correcta hacia el exterior. Apriete
los tomillos.
PRECAUCION: NO taladre un agujero en el
carter base. La unidad esta disehada para
operar con aproximadamente 1/2" de agua
en el carter base.
[] INSTALE LA CAJA EN
LA VENTANA
[] Alinee el extremo interno de los apoyos del
umbral con las marcas de 11" a partir de la
linea central y _nalos al umbral de la ventana
usando 2 tornillos tipo Ben cada lado.
[] Con cuidado coloque la caja en la repisa de
la ventana alineando el centro frontal en el
fondo con la linea central marcada en la
repisa de la ventana. Cierre la ventana
cerciorandose de que la banda esta detras
del riel de montaje superior.
[] Usando el agujero de mayor diametro en la
caja, pegue los soportes a la caja usando 2
tornillos tipo D y 2 tuercas se cierre en cada
lado.
[] Asegure la caja a la repisa de la ventana
usando 3 tornillos tipo B.
[] Tire de los paneles de acorde6n hacia cada
paso del marco de la ventana, Unalos a
cada lado del marco de la repisa de la
ventana usando 4 tornillos tipo C.
13
Page 34

Instrucciones de instalacion
[] INSTALE EL SOPORTE DE CIERRE
DE LA VENTANA Y LA JUNTA DE
ESPUMA SUPERIOR DE LA
VENTANA
[] Una el soporte de cierre de la ventana
con un tornillo tipo C.
IRq Corte la parte superior de la espuma de la
L_J
junta al ancho de la ventana.
I_q Rellene la espuma entre el vidrio y la
L_J
ventana para evitar que aire e insectos se
introduzcan en la habitaci6n.
[] INSTALE EL ACONDICIONADOR
DE AIRE EN LA CAJA
[] Deslice el acondicionador de aire en la caja.
Reinstale los 2 tornillos removidos
anteriormente en cada lado de la caja.
[] Antes de instalar la parrilla frontal, tire
hacia afuera de la palanca de control de
ventilaci6n Iocalizada encima de los
botones de control de la unidad, como se
muestra.
//',,
<"_;"
Una la parrilla del frente a la caja insertando
[]
las orejillas en la parrilla en las ranuras en el
frente de la caja. Empuje la parrilla hasta que
encaje en su lugar.
14
Gufe la palanca
cuidadosamente a
trav#s de la parrilla
mientras la empuja.
Levante la parrilla de entrada y asegurela al
[]
marco frontal con un tornillo tipo A. Baje la
parrilla de entrada a su lugar.
Page 35

Solucionarproblemas. GEAppliances.com
Ideas para la identificaciSn y soluciSn de problemas:
iAhorre dinero ytiempo! Revise la siguiente tab& primero y
quiz#s no tenga que Ilamar para solicitar servicio.
Causasposibles Que hacer
El acondicionador de aire E1 acondicionador de aire • CefiOrese (le que el ac(mdici(mador de aire estfi
no enciende est_ desconectado, enchttlildo tot;dmente ell el toumcorfiente.
E1 fusible se disparo/ • ]nspec('ione los fllsibles/caja de intelTuptores de la casa
el cortacircuitos se disparG, y reeulplace cualquier fl/sible o re;ijuste el interrul)tol:
h_terrupciGn en el • Si ocurre una imerrupciGn ell el suministro el#ctrico,
sumilfistro el_clrico, apagtw (OFF)el acondicionador de aire. (3lando 1:1
energfa se l'estmwe, espere 3 minutos l):U'a reiniciar el
acondicionador de aire para pre\'enir que se dispare
el c( )in l) i'es( )i" l)( )i" s( )b I'ec;i I'g;i.
I_3 dJspositivo de h_terrupciGn • Presione el botGn RESETubicado ell el cable de
de corriente se ha activado, alimentacian.
• Si el bot()n RESETno se mantiene ell SU lug:u; no
utilice mils el acondicionad(n" de aire y c(m/unfquese
con un t_cnico calificado.
Elacondicionadorde aire I_3 flujo de aire es_ res_'hlgido. • CerciGrese de que no existe ningtma cortina, l)elsiana o
no enfrJa como deberJa mueble 1)loqueando el fi'ente del ac()ndicionad()r de live.
I_3 conlrol de temperatura no • Ell los modelos con teclado: Ell el modo COOL (Frio),
esttl ajustado apropiadmnente, presione la tecla DECREASE V.
• Ell los iuodelos con botones, giI'e la [elllpel';Itt/l';I tl tin
nfimero mavol:
E1 filtro de aire esta sucio. • lJmpie el filtro cada 30 dfas por lo menos. Ver la sec(iGn
de Instrucciones de OperaciGn.
La habitaciGn podria haber • (_uando el acondicionad/)r de aire se enciende, usted
estado caliente, necesita darle fienq)o l)ara title enfi'/e la habitaciGn.
I_3 aire frio se estti escapmado. • CerdGrese de que los lvgistros de 1:1calefiwciGn no estfin
bobinas de enfrimniento • Vet Acondicionador do airo congolandoso mils adelante.
se congelaron.
Elacondicionadordeaim _3 hielo bloquea el flujo de • Ell iuodehls con los botones de control, coloq ue el
se esM congelando aire hada el acondidonador control de modo ell HIGH FAN (Ventilador Alto) (5
de aire evitmzdo que se enfrle HIGH COOL (FrioAlto) con la temperatura ell I (3 2.
la habitacion. • Ell los Illodel(/s con teclas (le toque, (olo que los
abiertos v se en/-t/entl';in l'etoYn;indo el aire fl'fo.
• Coloque 1:1\'entanilla del acondicionador de Give ell 1:1
posiciGn terraria.
comr()les ell HIGHFAN(VentiladorAlto) (3HIGHCOOL
(Frio Alto) y ajuste el tell[lost_lto a t/n;I tell/l)el'_lttlI'e
mils alia.
El control remoto no Las baterias est,_ h_sertadas •/nsl)ecci()ne la p()siciGn de las baterias. Deben estar
funciona h_correcmJnente, insertadas ell las p(lsiciGn indicada, (+) y (-).
I_as baterias estma agotadas. • Reeuq)lace las 1)aterfas.
Hayagua goteando Calor excesivo y tiempo • Esto es nomlal.
afuera hthnedo.
Hay agua goteando en el _3 acondicionador de aire no • Para (lrenar el agua aprol)iadamente, (erci(Srese de que
interiorde la habitacion es_ haclhmdo hacia afuera, el acondidonador de aire estfi inclinado ligeramente
(lesde el fl'ente hacia atrfis.
Lafuncionde
SINCRONIZADOR(TIMER)
noestafuncionando
apropiadamente
Una p_rdJda en el sumhlistro
el_ctrico o tma interrupciGn
ha ocurrido.
• En el caso de una I)_rdicla del suministro el_ctrico o
una interrupciGn, la flmdGn de $1NCRONIZADOR en la
unidad se reajustarfi al ajuste original. Es posible que
usted necesite ajustar un fienq)o nue\'o si asf lo desea.
15
Page 36

Solucionarproblemas.
Ideas para la identificaci6n y soluci6n de problemas:
so ,g..o.i.
! iii
Sonidos de operacion normales
Quiz_is escuche ttn sonido lnet_ilico cattsado por
el agua tonlada )' firada contra el condensador ell
los dfas lhtviosos o cuando la hunledad es alta.
Esta caracterfstica de diseflo avuda a refirar la
hunledad y nlejora la eficiencia.
Quizfis escttche que el temlostato hace clic
cuando el colnpresor hace ciclo entre encendido
y apagado.
Causasposibles
La hmnedad es removida del
aire interno y drenada hacia
la paJcte posterior del gabhmte
donde tm ventilador la empuja
con_ca el embobhlado del
condensador.
Que hacer
• Esto es nolillal poi" till COl'to perfodo ell ;/I'eas con poca
hunledad; nolmal por till perfodo de fien/po in;is
postergado ell fil'eas mils hfilnedas.
E1 agua se acunlula en la bandeja durante dfas
lhlviosos o con nlucha htunedad. E1 agua podrfa
derramal_e y gotear desde el lado externo de la
unidad.
E1 ventilador podrfa flnlcionar aun si el
COII/pI'eSoI" no lo hace,
IC
Page 37

_ta,S.
m
r5
m
m
w
/7
Page 38

m
._ Netas.
m
m
18
Page 39

Garantiadesu acondicionadorde aire.
Todos los servicios de garantfa los proporcionan nuestros Centros
de ReparaciSn de F#brica o nuestros t#cnicos Customer Care®
autorizados. Para concertar una cita de reparaciSn, en Ifnea,
24 horas al dfa, visftenos al www.GEAppliances.com, o flame
a1800.GE.CARES(800.432.2737).
Grapeaqui su recibo.
Se requiere facilitar prueba
de la fecha de compra original
para obtener un servicio
bajo la garantfa.
Nosotros reemplazaremos:
tin a#o Cualquierparte del acondidonador de aire que tidle debido a deiectos en los materiales o en
A par#r de la focha la filbl'ic;ici()n, Durante este a#o completo de garantia, nosotl'oS tnmbi6n proporcionaremos,
de la compra original sin costo alguno, toda la mano de obra v los sela'idos internos-para reemplazar partes defectuosas,
Cincoafos
A partir de la fecha
de la compraoriginal
Viajes de servicio a su casa pm'a mostrarle como
fmlciona el equipo.
InstaJaci6n o entrega hmpropiada, o mmlte_fimiento
hnpropio. Si usted fiene m_ problema durmlte la
hlstaJaci6n, o si su acondJcionador de aJre no tiene la
capacidad de enfriamiento que usted necesita, p6ngase
en contacto con nuestro dJstribuidor o h_sta3ador.
Usted es responsable de proporciona_r las facilidades
de conexi6n el6ctrica necesm'ias.
FaJlo del producto resultaa_te de modificaciones aJ
producto o debido a uso irrazonable hlcluyendo no
proporcionar mm_te_fimiento razonable y necesario.
I_hllocales comerciales, la mm_o de obra necesa_ria pasta
retira_r la mfidad hacia tm luga_r paJca revision por pa_rte
de tm t6ofico hldJviduaJ.
Cualquier parte del sistema de refrigeraci6n sellada (compreso_; condensado_, evapo_ldor y tuberfas
de con(%v_i(_)n) (1[/1_ tilllell debido a (lefbctos ell los lnatel_ales o filblJcaciGn. Dtlrante estos cuatro
afos de garantia adicionales, tnmbi_n propordonaremos, sin costo alguno, toda la mano de obra
v los servi(ios intel31os p;ll'_l Y(_ex//pl_lz;IY p;II'[(_S dei_('tt/osas.
Reemplazo de fusibles de la casa o reajuste del sistema
de circuitos.
Fallos debido a la corrosi6n en modelos que no estfi31
protegidos contra la corrosion.
Dm-_o al producto causado pot voltaje hmpropiado hacia
el equipo, accidentes, h_cendJos, hltmdaciones o actos
de la naturaJeza de fuerza mayor.
Dm-_os h_cidentaJes o consecuenciaJes causados por
defectos posibles con este acondJcionador de aJre.
Dm-_os despu6s de la entrega.
Esta garant[a se extiende al comprador original y cualquier comprador posterior de pmductos comprados para uso
residencial dentro de Estados Unidos. EnAlaska, la garant[a excluye el costo de env[o o las visitas de servicio a su casa.
Algunos estados no permiten la exclusifn olas limitaciones de dafios incidentales o consecuenciales. Estagarant[a
da derechos legales espec[ficos, y usted podr[a tener otros derechos que variar#n de estado a estado. Para saber cufiles
son sus derechos legales, consulte a la oficina de asuntos del consumidor local o la oficina delAttomey General en
su Iocalidad.
Garante: General Electric Company. Louisville, KY 40225
19
Page 40

Soporteal Consumidor.
_Tiene_ alouna_ l_regunta, sobre su electrodom_stico? iPmebe la pfigina _,_1) de (;E Appliances 24 horas al
q l PdginaWebdegEApplbnces vvvvvv.GEAppliances.com
' dfa, cualquier dfa del aflo! Para mayor comeniencia _ ser\icio mils rfipido, )a puede descargar los Manuales
de los Propietarios, pedir piezas o incluso hacer tma cita en lfnea para tlue xengan, a realizar tma
reparaci6n. Tambi_n puede "_sk Ore" Team of Experts TM" (Pregtmtar a nuestro equipo de expertos) sobre
cualquier cuesti6n ) m ucho mils...
Solic/teunareparaci6n vvvvvv.GEAppliances.com
E1 ser\_cio de expertos GE estfi a tan s6lo un paso de su puerta, iEntre en lfnea y solicite su reparaci6n
cuando le xenga bien 24 horas al dfa cualquier dfa del afio! O llame al 800.(;E.CARES (800.432.2737)
(hli'ante hoi'as noY/llales de oficina.
RealLibDesignStudio(Estudiodedisefioparalavidareal)www.aEApp/iances.com
(;E apoya el concepto de Disefio Univex_al--productos, servicios y ambientes que pueden usar gente de
todas las edades, tamaflos y capacidades. Reconocemos la necesidad de disefiar para tma gran gama de
habilidades y dificultades tisicas v mentales. Para mils detalles cobre las aplicaciones de GE Disefio Universal,
incluvendo ideas de diseflo para la cocina para personas con discapacidades, mire nuestra pfigina Web hoy
mismo. Para personas con dificultades audifivas, e_\'or de llamar al 800.TDD.GEAC (800.833.4322).
Garant[as amp//adas vvvvvv.GEAppliances.com
Compre una garantfa ampliada y obtenga detalles sol)re descuentos especiales disponibles mientras su
gamntfa estfi afin actixa. Puede compmrla en lfnea en cualquier momento, o llamar al (800.626.2224)
din'ante horas normales de oficina. GE (_onsumer Home Services estarfi afin ahf cuando su garantfa temfine.
Piezasgaccesorios _w. GEAppliances.com
Aquellos individuos con la calificaci6n necesaria para reparar sus propios electrodom_sticos pueden
pedir que se les manden las piezas o accesorios directamente a sus hogares (aceptamos las tmjetas
VISA, MasterCard y Discover). Haga su pedido en lfnea hoy, 24 horas cada dfa o llamar pot tel_qbno
al 800.626.2002 durante horas nommles de _Ncina.
Las instrucciones descritas en este manual cubren los pmcedimientos a seguir per cualquier usuario. Cualquier
otra reparaci6n deberia, par regla general, referirse a personal calificado autorizado. Debe ejercerse precauci6n
ya que las reparaciones incorrectas pueden causar condiciones de funcionamiento inseguras.
P6ngaseencontacto connosotros vvvvvv.GEAppliances.com
Si no estfi satisfecho con el servicio que recibe de (;E, pdngase en contacto con nosotros en nuestra pfigina
_A'ebindicando todos los detalles asf como su nfimero de tel_fimo o escrfl)anos a:
General Manage_; Customer Relations
GE Appliances, Appliance Park
I,ouisville, KY 40225
Registresu electrodom#stico vvvvvv.GEAppliances.com
lRegislre su nuevo electrodom6stico en lfilea---cumldo usted prefiera! E1 registrar su producto a tiempo le
proporcionarfi, si sm'giera la necesidad, tma mejor commficaci6n y tm servicio mils rfipido bajo los t&minos
de su garantfa. Talnbi_n puede enviar su taljeta de registro pre-ilnpresa title se incluve en el inatefial de
embak!je.
20 Impreso on Corea
 Loading...