

GE AGQ05LAG1 Owner’s Manual
©
www. GEAppliances.com
Safety Instructions ......... 2, 3
Operating Instructions
Control knob models ....... 6, 7
Touch pad models .......... 4, 5
Care and Cleaning
Air Filter . .................. 7
Front Grille and Case ......... 8
Outdoor Coils ............... 7
Installation Instructions ...9-13
A (;F05
A (;M 05
Acqo5
AG}D5
©
©
Troubleshooting Tips ....... 14
Normal Operating Sounds .... 15
Consumer Support
Consumer Support .......... 90
Product Registration ...... 17, 18
_'arranty .................. 19
Write the model and serial numbers here:
Model #
Serial #
Find these numbers on a ]abe! on the
side ot the air con(litione_:
494446 11-02Jfl
IMPORTANTSAFETYINFORMATION.
READALLINSTRUCTIONSBEFOREUSING.
WARNING!
For your safe_ the information in this manual must be followed to minimize the risk of fire, electric shock
or personal injury.
SAFETYPRECAUTIONS
Use this appliance only %r its intended
puli)ose as described in this Owner's
Manual.
This air conditioner must be properly
installed in accordance with the Installation
h_structions before it is used.
Nexer unplug your air conditioner by pulling
on the power cord. Always grip plug fim/ly
and pull straight out flom the receptacle.
Repair or replace immediately all electa_Jc
service cords that have become flwed or
otherwise damag>d. Do not use a cord
that shows cracks or abrasion damag>
along its length or at either the ping or
connector end.
q?{:_Turn the mode control to 0FFand unplug
E:,IFox your safety...do not store or use
E:,IAll air conditioners contain refligerants,
HOWTOCONNECTELECTRICITY
Do not, under any circumstances, cut or remove
the third (ground) prong from the power cord.
For personal safe_ this appliance must be
properly grounded.
The air conditioner should always be plugged
into its own individual electrical outlet
which has a xohage rating that matches the
rating plate.
your air conditioner before making any
repairs or cleaning.
NOTE:XAestrongly recommend that any
servicing be perfomaed by a qualified
individual.
combusdble mamfials, gasoline or oflxer
flammable vapors or liquids in the vicinity
of this or any other appliance.
which under federal law must be remoxed
prior to product disposal. If you are getting
rid of an old product with refl_Jgerants, check
with the company handling disposal about
what to do.
The power cord of dais appliance is equipped
with a 3-prong (grounding) plug which mates
with a standard 3-piong (grounding) wall
outlet m minimize the possibility of electric
shock hazard flom this appliance.
Haxe the wall outlet and circuit checked by
a qualified electrician to make sure the outlet
is properly grounded.
Where a 2-prong wall outlet is encounmred,
it is your personal responsibility and obligation
m have it replaced with a properly grounded
3-prong wall outlet.
This provides the best performance and also
piexents oxerloading house wiring circuits
which could cause a fire hazard flom
oxerheated wires.
See the Installation Instructions, Electrical
Requirements section fox specific electrka]
connection requirements.
2
WARNING'!
USEOFEXTENSIONCORDS--115-Voltmodelsonly
GEAppliances.com
Because of potential safety hazards under certain
conditions, we strongly recommend against the
use of an extension cord.
Howexei; if you mtlSt use an extension cord,
it is absolutely necessal T that it be a UiAisted,
14 gauge, _wire grounding type appliance
extension cord having a grounding type plug
and outlet and fl)at file electiJcal radng of tile
cord be 15 ami)eies (minimum) and 195 x_lts.
Jl,CAUTION:
DO NOT use an extension cord with anyof
the230/208 volt models.
USEOFADAPTERPLUGS--115-Voltmodelsonly
Because of potential safety hazards under certain
conditions, we strongly recommend against the
use of an adapter plug.
Howexei; if you m/lSt rise an adaptei; where
local codes i)ermit, a temporaryconnection may
be made m a properly grounded 9-prong wall
outlet by use of a UiAisted adapter available at
most local hardware stores.
The larger slot in file adaptor mtlst be
aligned with the larger slot ill fl_e wall outlet
to provide proper polaiitv in tile connection
of the power cord.
When disconnecting tile power coM flora tile
adaptel; always hold tile adapter in place with
one hand while I)ulling the i)ower cord I)lug
with the other hand. If fills is not done, the
adaptor ground ml_ninal is x>U likely to break
with repeated use.
If tile adapter ground temlinal breaks, DO NOT
USE tile air conditioner until a proper gTound
has been established.
Attachingthe adaptergreundterminalto a waftoutlet
coverscrewdoesnotground the applianceunlessthe
coverscrewis metal,andnotinsulated,andthe waft
outlet is groundedthroughthehouse wiring. Youshould
havethe circuitcheckedbya quafifiedelectricianto
makesurethe outlet is properlygrounded.
READANDFOLLOWTHISSAFETYINFORMATIONCAREFULLY.
SAVETHESEINSTRUCTIONS
Aboutthe controlsonthe air conditionermmodels with touchpads.
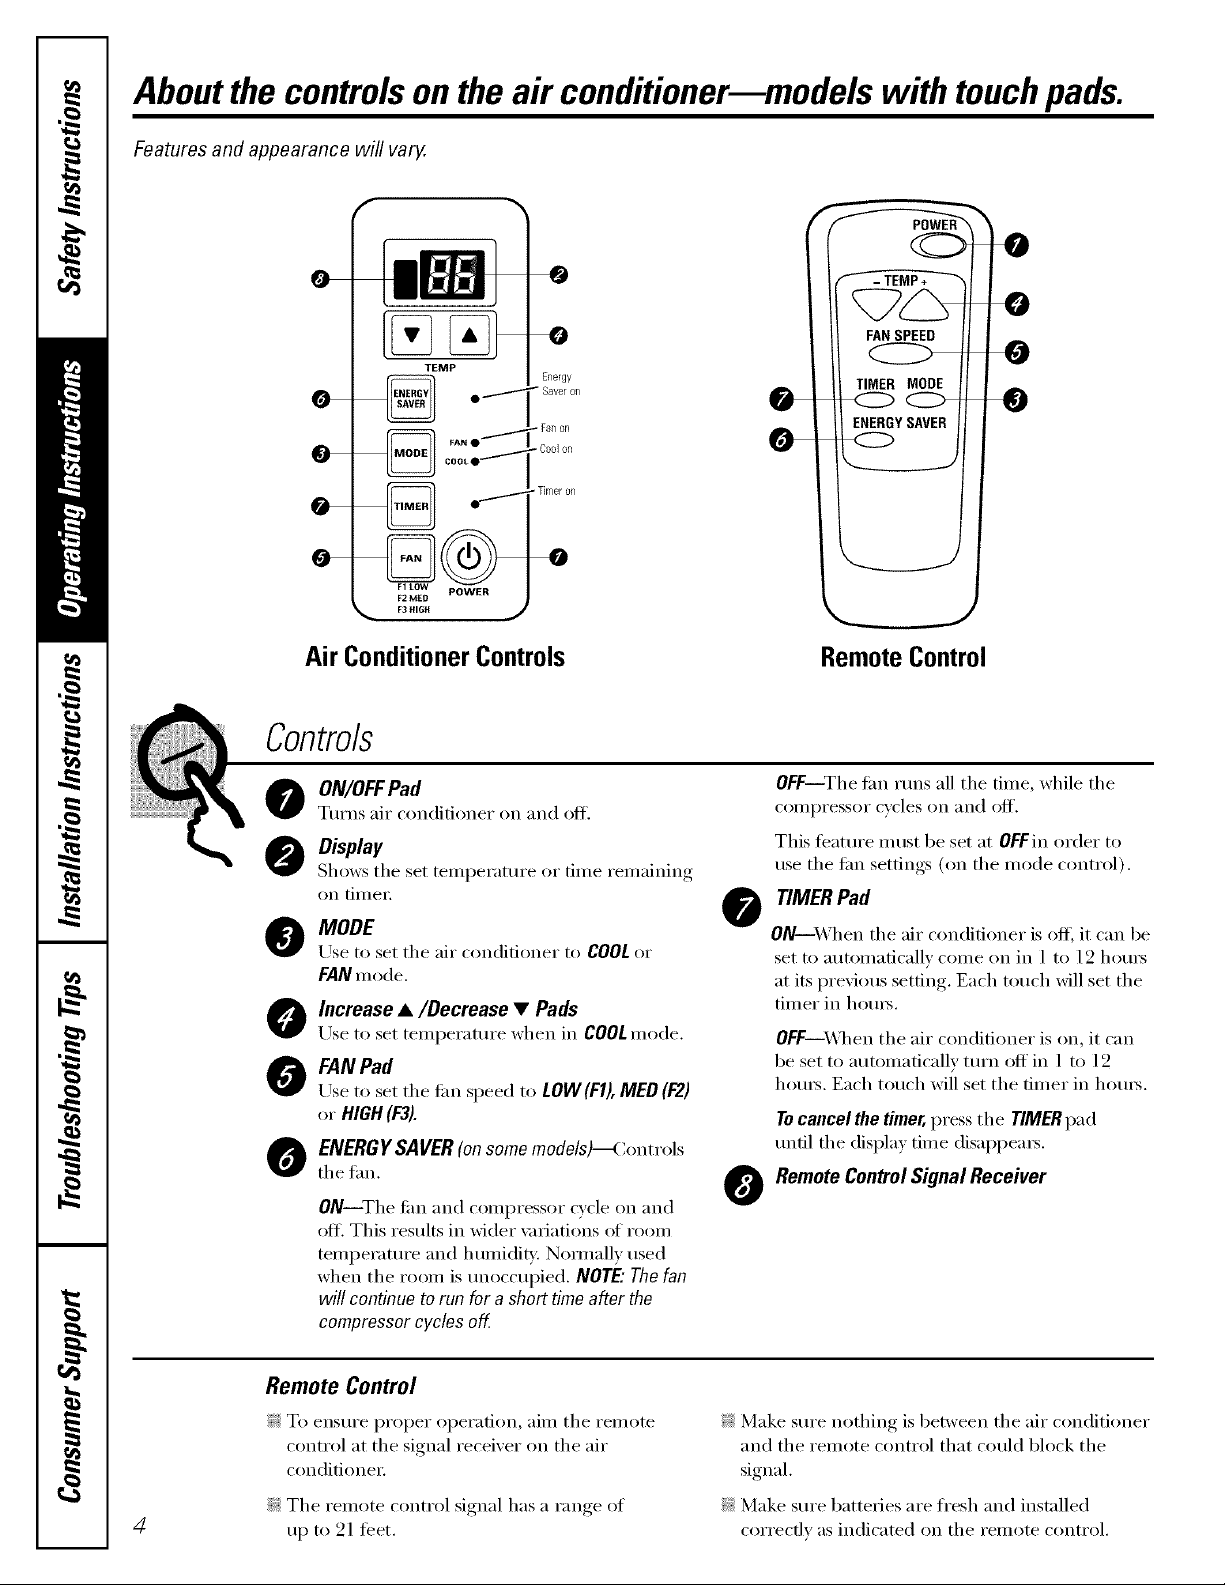
Features and appearance will vary.
MP • Energy
_ Saverorl
- Fanon
- Timer on
Air ConditionerControls Remote Control
Controls
O ON/OFFPad
Turns air conditioner on and off.
Display
Shows the set teml)erature.... or time remaining,
on tililei:
MODE
@
Use to set the air conditioner to COOLor
FAN m ode.
Increase •/Decrease • Pads
o
Use to set temperature when in COOLmode.
FANPad
@
Use to set the tim speed to LOW(FI), MED (F2)
or HIGH (F3).
ENERGYSAVER(onsome models)--Controls
@
the tim.
ON--The tim and compressor cycle on and
off. This results in Mder \m_iations of room
temperature and humidim Nom_allv used
when the room is tmoccupied. NOTE"Thefan
will continue to run for a shorttime after the
compressorcycles off
OFF--The tim runs all the time, while the
COlIlpI'eSSOI" cycles on _111(1 ()]c{,
This teatm'e must be set at OFFin order to
use the tim settings (on the mode control).
TIMER Pad
@
ON--X_'hen the air conditioner is off, it can be
set to automatically come on in 1 to 12 hom_
at its previous setting. Each touch will set the
timer in hom_.
OFF--_q_ei,_ the air conditioner is on, it can
be set to automatically, turn off in 1 u) 1_2
hom_. Each touch will set the timer in hom_.
Tocancel the timer, press the TIMER pad
tmdl the displa) time disappears.
Remote Control Signal Receiver
@
Remote Control
!i_:To ensm'e proper operation, aim the remote
control at the signal receixer on the air
conditione_:
4
!i?:The remote control signal has a range of
11I) to 21 tb'et.
_: Make sure nothing is between the air conditioner
and the remote control that could block the
signal.
_: Make sure batteries are fl'esh and installed
correctly as indicated on the remote control.
Lights next to the touch pads on the air conditioner
control panel indicate the selected settings.
COOLMode
Use the COOLInode with HIGH(F3),MED(F2)or
LOW(F1)tim for cooling. Usethe INCREASEA/
DECREASEVpads to set the desired temperature
between 60°F and 86°F in l°F increments.
An electronic themtostat is used to maintain the
room temperature. The compressor will (-)'de on and
off to kee I) the room at the set level ot comfi)rt. Set
the them(ostat at a lower number and the indoor air
will become (()()let: Set the them/ostat at a higher
number and the indoor air will become war)net;
NOTE."ff theak conditioneris off and isthen tumed on
whileset to COOL,it will take approximately3minutes
for the compressorto startand cooling tobegin.
FAN Mode
Use the FANat HIGH(F3),MED (F2)or LOW(F1)to
provide air circulation and filtering without cooling.
Since lilt( only settings do not provide cooling,
a temperature setting will not be displayed.
GEAppliances.com
CoolingDescriptions
ForNormalCoolino---Select the COOLm(>de and
HIGH(F3)or IVIED(F2)lim with a middle set
temperature.
ForMaximumCooling---Select the COOLmode
and HIGH(F3)tilt(with a lower set temperatm'e.
ForQuieter& NighttimeCoolino---Select the
COOLm(>de and LOW(FI)tilt( with a middle set
temperamre,
NOTE:If youswitchfromaCOOLsettingto OFForto
a fan setting,wait at least3 minutesbeforeswitching
back to a COOLsetting.
Additional controls and important information.
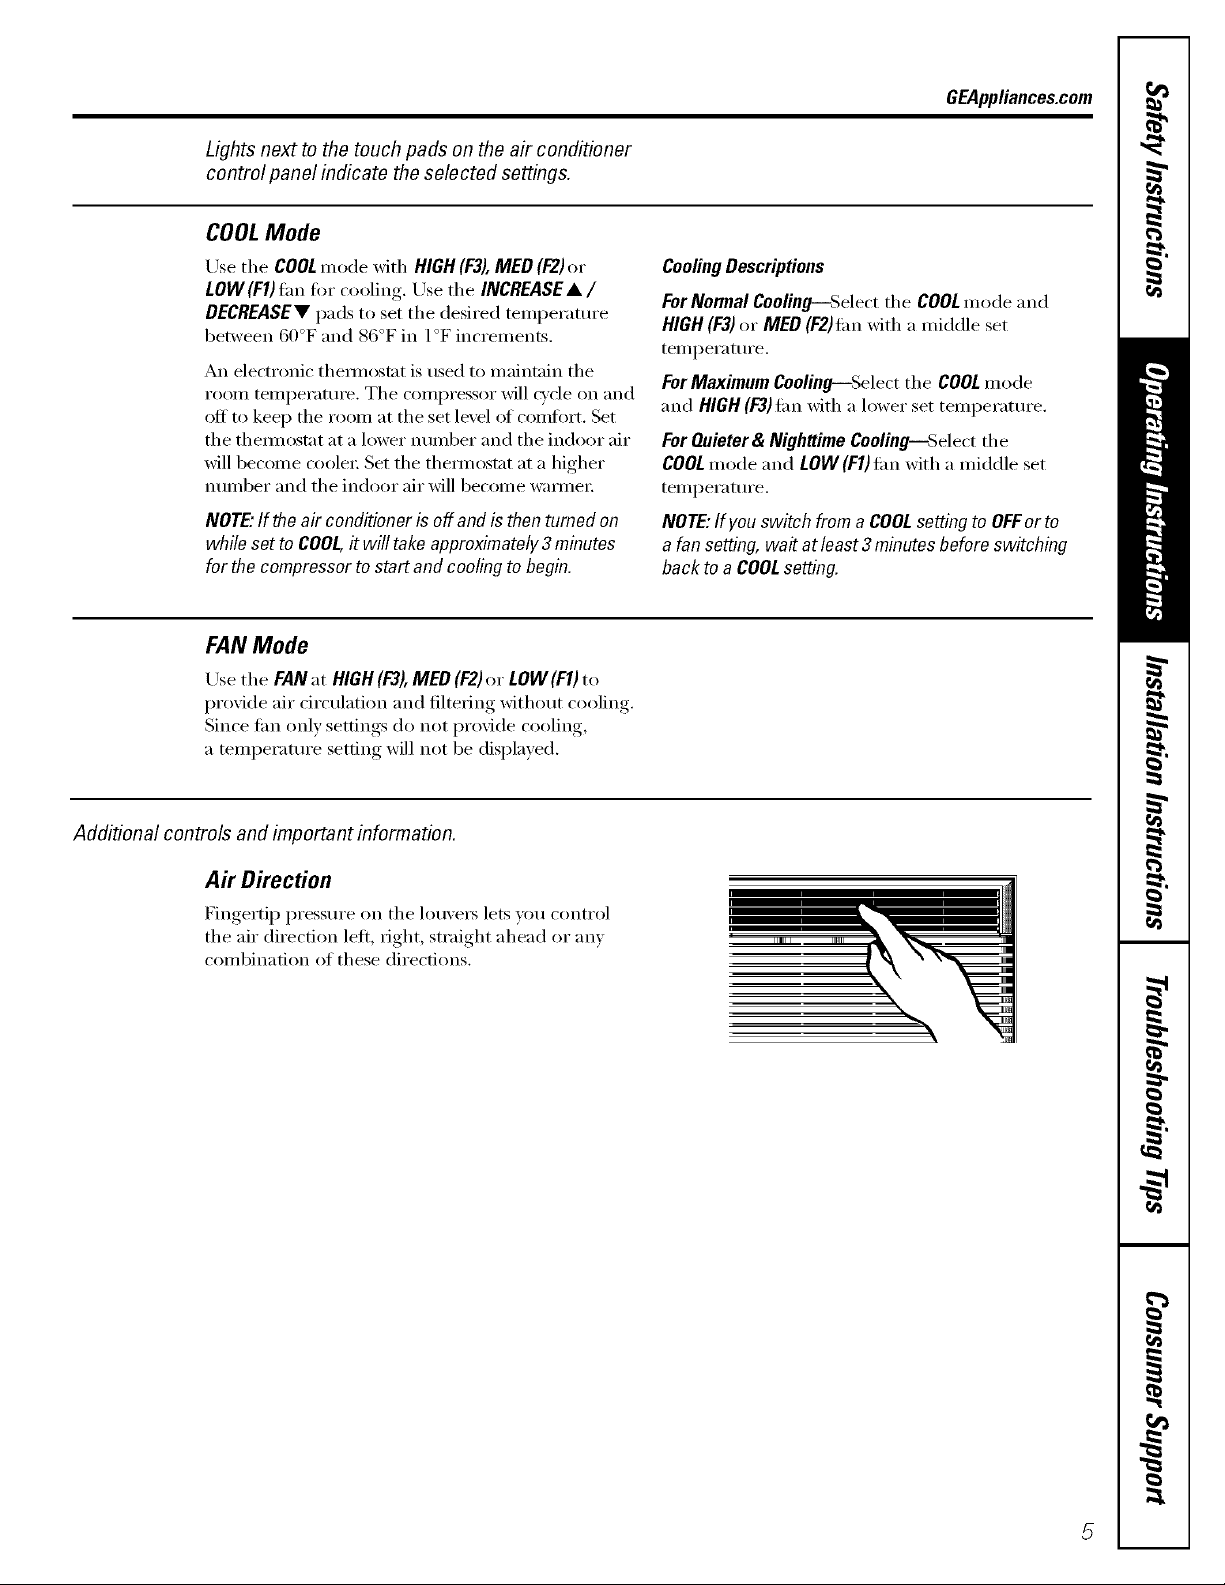
Air Direction
Fingertip pressure on the lou\'et_ lets you control
the air direction lelL right, straight ahead or any
combination of these directions.
5
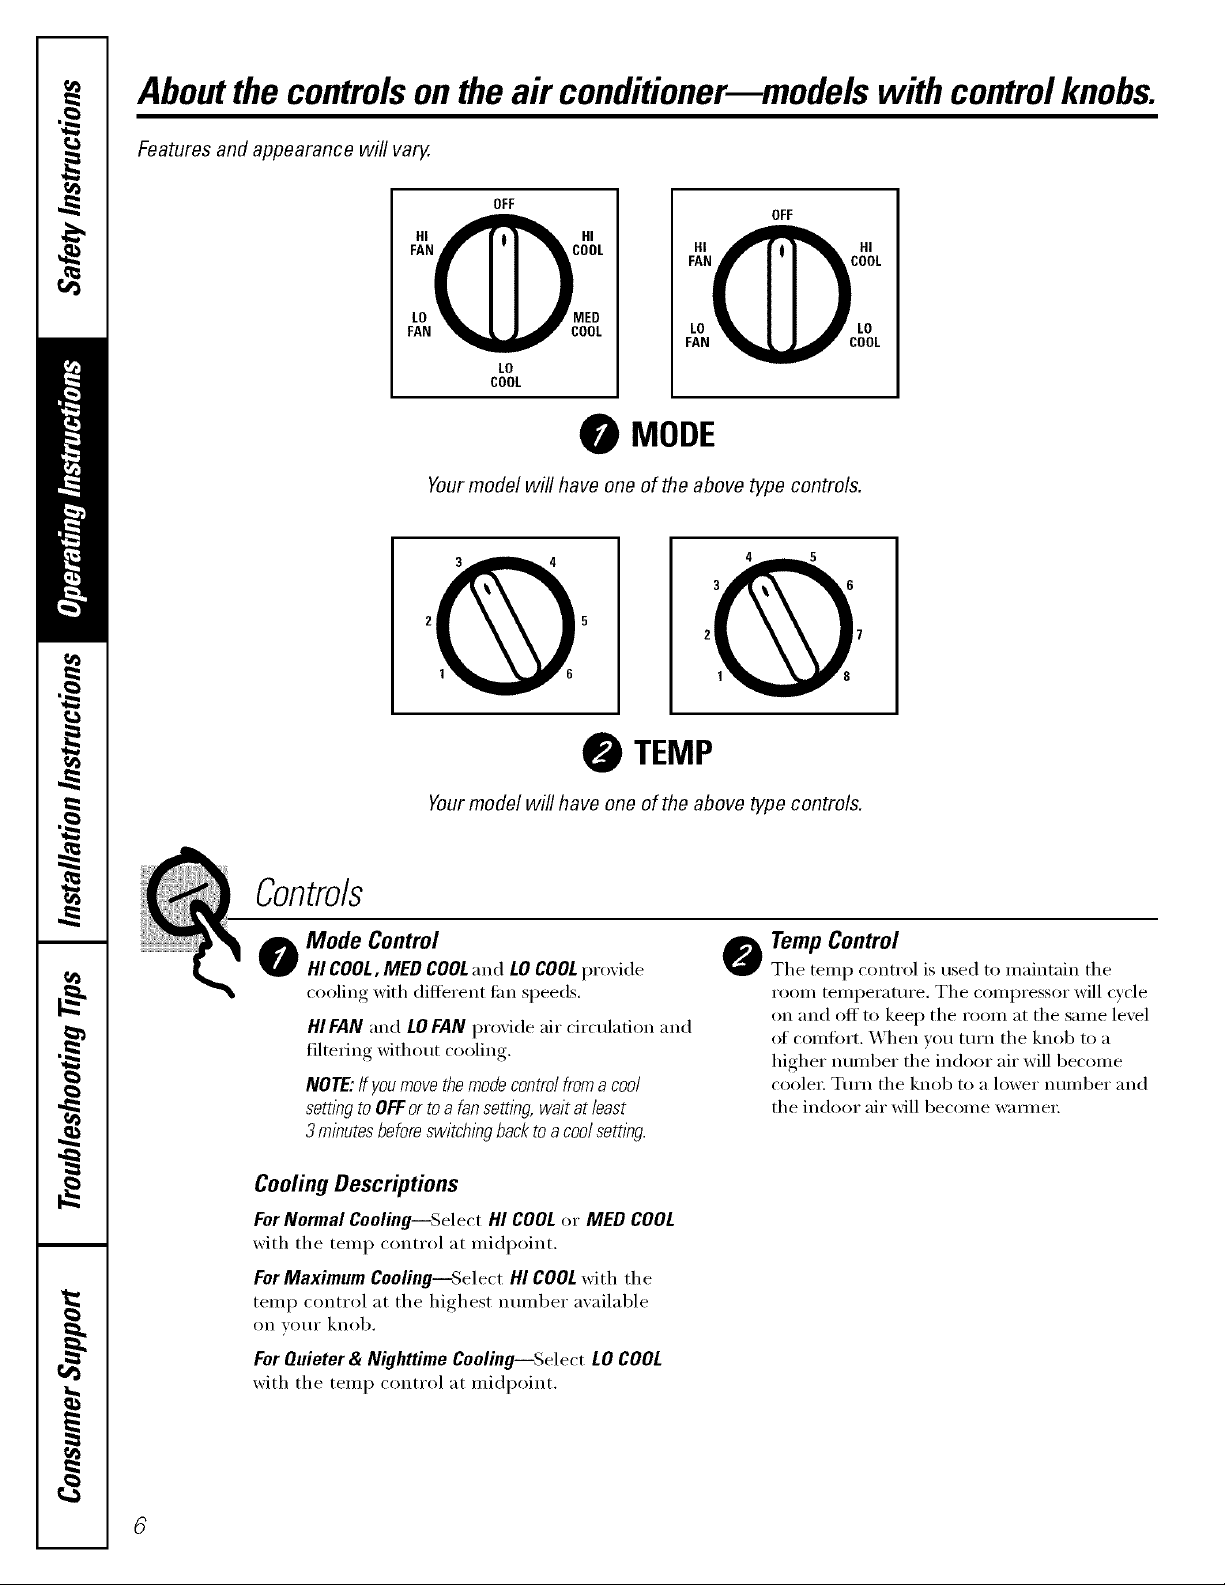
Aboutthecontrolsonthe air conditionermmodelswith controlknobs.
Features and appearance will vary.
OFF
OFF
F_"'_O'L
LO _ I I AP' LO
LO
COOL
FAN _ COOL
O MODE
Yourmodel will have one of the above type controls.
2 5 2 7
TEMP
Yourmodel will have one of the above type controls.
Controls
o Mode Control
HI COOL,MED COOLand LOCOOLproxide I,.
cooling with different tim speeds.
HI FANand LOFANprovide air circulation and
filtering without cooling.
NOTE: Ifyoumove the mode control from a cool
settingto OFF or to a fan setting,wait at least
3 minutes before switchingback to a cool settlbg.
Cooling Descriptions
ForNormal Cooling--Select HI COOLor MED COOL
with the temp control at midpoint.
ForMaximum Cooliug--Select HI COOLwith the
temp control at the highest number available
on VOtlI" knob.
For Quieter & Nighttime Cool&g--Select LO COOL
with the temp control at midpoint.
TempControl
The temp control is used to maintain the
room temperatm'e. The compressor will cycle
on and off to kee I) the room at the same level
of comtort. When you turn the knob to a
higher mmd)er the indoor air will become
cooler Turn the knob to a lower number and
the indoor air will become wam_e_:
 Loading...