

Page 1
©
www. GEAppliances.com
Safety Instructions ........ 2, 3
Operating Instructions ..... 4, 5
A GM24
Care and Cleaning
Air Fiher . ................. 6
Grille and Case ............. 6
Outdoor (;oils .............. 6
Installation Instructions
Preparing to Install the
Air Conditioner . ............ 7
Window Installation ....... 8-19
©
©
Troubleshooting Tips ... 13, 14
Normal ()perating Sounds . . .14
Consumer Support
Consumer Support ......... 18
Product Registration ..... 15, 16
_A'arranty ................. 17
Write the model and serial numbers here:
Model #
Serial #
Find these nmnbers on a label on the
side of the air conditioner.
3828A20514H 49-7498 02-05JR
Page 2
IMPORTANTSAFETYINFORMATION.
READALLINSTRUCTIONSBEFOREUSING.
a, WARNING!
For your safety;,the information in this manual must be followed to minimize the risk of fire, electric shock
or personal injury.
SAFETYPRECAUTIONS
Use this appliance only %r its intended
pull)ose as described in this Owner's
Manual.
iiiiiiiiiiii_iii
This air conditioner must be properly
installed in accordance with d_e Installation
h_structions before it is used.
Never unplug your air conditioner by
pulling on the power cord. Mwws grip
plug firefly and pull straight out from the
receptacle.
iiiiiiiiiiii_iii
Replace immediamly all electric setMce
cords that haxe become flayed or ofl_erwise
damaged. Do not use a cord that shows
cracks or abrasion damag_ along its length
or at either the ping or connector end.
HOWTOCONNECTELECTRICITY
Do not, under any circumstances, cut or remove
the third (ground) prong from the power cord. For
personal safe_ this appliance must be properly
grounded.
The power cord of dais appliance is equipped
with a 3-prong (grounding) plug which mates
with a standard 31)iong (grounding) wall
outlet m minimize the possibility of electric
shock hazard from this appliance.
Power coM includes a cnnent intemq)ter
device. A rest and reset button is provided on
the plug case. The device should be rested on a
periodic basis by first pressing tim TESTbntton
and then the RESErbutton. If the TESTbutton
does not trip or if fl_e RESETbutmn will not
stay eng_aged, discontinue use of file air
conditioner and contact a qualified
service mchnician.
Hme the wall outlet and circuit checked by a
qualified electrician to make sure the outlet is
properly grounded.
Where a 9-prong wall outlet is encounmred,
it is your personal responsibility and obligation
to haxe it replaced with a properly grounded
31)iong wall outlet.
The air conditioner should always be
plugged into its own individual elecuical
outlet which has a x_ltag> rating flint matches
the rating plato.
This provides the best perfommnce and also
prexents oxerloading house wiring circuits
which could cause a fire hazard from
oxeflleated wires.
See the Installation Instructions, Electrical
Requirementssection for specific elecuqcal
connection requirements.
Turn the mode control to 0fFand unplug
your air conditioner before making any
repairs or cleaning.
NOTE.'XA:estrongly recommend that any
servicing be perforated by a qualified
individual.
For your safety...do not store or use
combustible mamrials, gasoline or oilier
flammable vapors or liquids in the vicinity
of this or any other appliance.
All air conditioners contain refrigerants,
which under federal law must be remoxed
plJor to product disposal. If you are getting
rid of an old product with refrigerants, check
with the company handling disposal about
what to do.
2
Page 3
WARNING!
USEOFEXTENSIONCORDS--115-Vo/tmode/son/y
Because of potential safety hazards under certain..^CAUTION:
conditions, we strongly recommend against the
use of an extension cord.
Howex_. if you must use an extension cord,
it is absolumly necessai T that it be a UiAismd,
14 gauge, 3-wire grounding type appliance
extension cord having a grounding type plug
and outlet and that the elecuJcal rating of tile
cord be 15 ami)eres (minimum) and 195 volts.
USEOFADAPTERPLUGS--115-Vo/tmode/son/y
DO NOTuse an extensioncord with any of the
230/208volt models.
www.GEAppliances.com
Because of potential safety hazards under certain
conditions, we strongly recommend against the
use of an adapter plug.
Howex_i; if you must/lse all adapmi; where
local codes pemfit, a temporaryconnection may
be made m a i)roi)erly grounded 2-prong wall
outlet 1)yuse of a UL-lismd adaptor available
at most local hardware stoles.
Tile larger slot ill tile adaptor must be aligned
with tile larger slot in the wall outlet to I)rovide
i)roi)er polarity in tile connection of tile
i)ower cord.
'iA]mn disconnecting dm power cord flom tile
adaptel, alwws hold the adaptor ill place with
one hand while I)ulling tile power cord I)lug
with tile other hand. If this is not done, tile
adaptor ground te.rminal is veU likely to 1)reak
with repeamd use.
If tile adapter ground terminal breaks, DO NOT
USEtile air coI/ditioI/er m/ti] a proper grom/d
has been established.
Attachingthe adaptergreundterminalto awaftoutlet
coverscrewdoesnot groundtheapplianceunlessthe
coverscrewis metal,andnot insulated,andthe waft
outlet isgroundedthreughthe housewiring. Youshould
havethecircuitcheckedby a qualifiedelectricianto
makesuretheoutlet is properlygrounded.
READANDFOLLOWTHISSAFETYINFORMATIONCAREFULLY.
SAgETHESEINSTRUCTIONS
Page 4
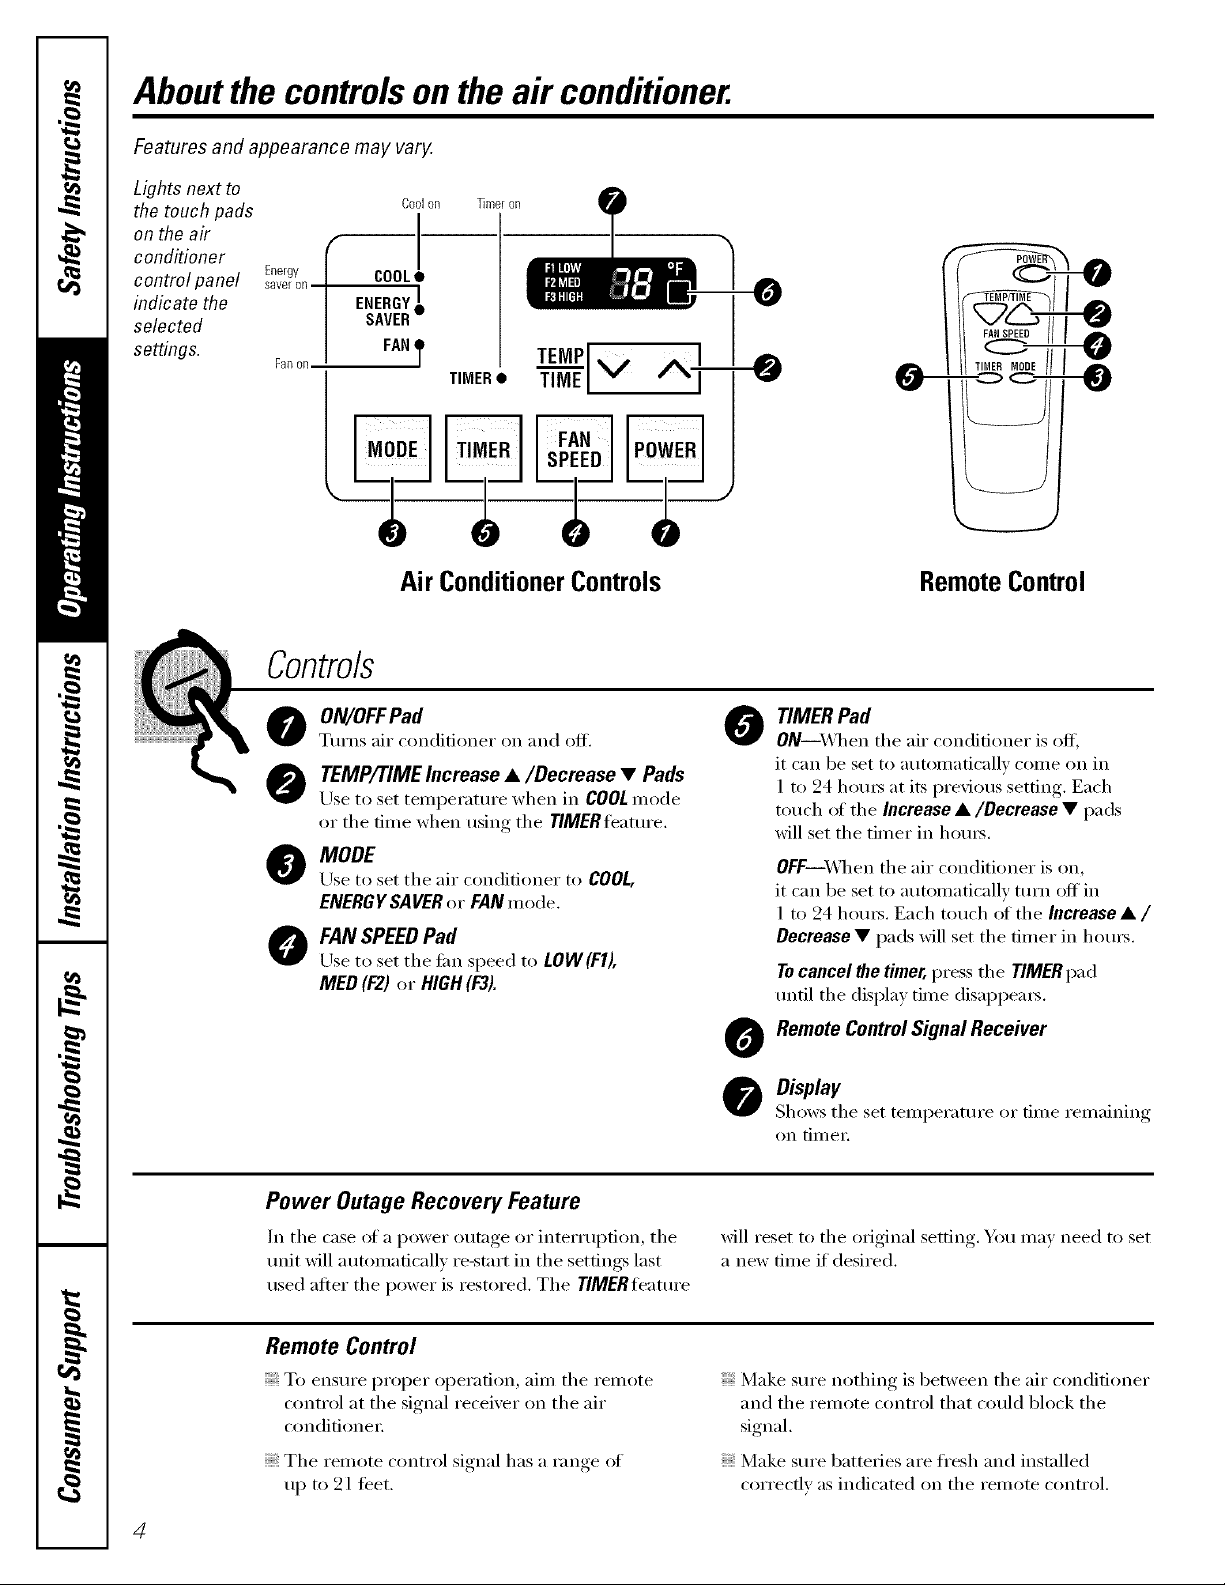
Aboutthe controlsontheair conditioner.
Features and appearance may vary.
Lights next to
the touch pads
on the air
conditioner
control panel saveron
indicate the
selected
settings.
Energy
Fan on
Controls
0
@
@
O
Coolon Timeron
I COOL!
Air ConditionerControls
ON/OFFPad
TtlYns air conditioner on and off.
TEMP/TIME Increase •/Decrease • Pads
Use to set teinperature when in COOL Inode
or tile time when using tile TIMER feature.
MODE
Use to set tile air conditioner to COOL,
ENERGYSAVERor FANmode.
FAN SPEEDPad
Use to set tile tim speed to LOW(F1),
MED(F2)or HIGH(F3).
-0
RemoteControl
TIMER Pad
0
ON--When tile air conditioner is off,
it can be set to automatically cOiile on in
1 to 24 houI_ at its previous setting. Each
touch of tile Increase •/Decrease • pads
will set tile timer in hom_.
OFF--_A]len tile air conditioner is on,
it can be set to automatically ttlrn off' in
1 to 24 horns. Each touch _ff tile Increase • /
Decrease • pads will set tile timer in hom_.
Tocancel _e timer, press tile TIMERpad
tmtil tile display time disappears.
Remote ControlSignal Receiver
0
Display
Shows tile set temperature or time remaining
on _I//eY.
Power Outage Recovery Feature
In tile case of a power outage or interruption, tile
refit will automatically re-start in tile settings last
used after tile power is restored. Tile TlMERleatm'e
xfill reset to tile off *inal setting You max need to set
a new time if desired.
Remote Control
To enstli'e proper opei'ation, aill/ tile i'elllote
control at tile signal receiver on tile air
conditionei:
Tile remote control signal has a range of
up to 21 feet.
4
Make sure nothing is between tile air conditioner
and tile remote control that could block tile
signal.
Make sure batmries are fresh and installed
correctly as indicated on the remote control
Page 5
COOLMode
wvvw.GEAppliances.com
Usethe COOLmode with HIGH(F3),MED(F2)or
LOW(FI) tim for cooling. Use tile Increase • /
Decrease • pads to set tile desired temperature
between 60°F and 86°F in l °F increments,
An electronic them_ostat is used to maintain tile
room temperature, The (_)mpressor will cycle on and
off to keep the room at the set level of comfi)rt. Set
the them/ostat at a lower number and the indoor air
will become cooler. Set the them_ostat at a higher
number and tile indoor air will become wam/e_;
NOTE"fftheair conditioneris off andisthentumed on
whileset to COOL,it will take approximately3 minutes
for the compressorto start and coolingto begin.
Energy Saver
The energy saver switch controls the Lm.
O/_-The tim and compressor cycle on and off
together; This results in wider \m_iafions of room
temperature and hmnidity. Nommlly used when
the room is m_occupie(l. NOTE:Thefanwill continue
to runfora shorttime after thecompressorcycles off.
FAN Mode
CoolingDescriptions
ForNormalCooling--Select tile COOLmode and
HIGH(F3)or MED(F2)fimwith a middle set
temperature,
ForMaximumCooling--Select the COOLmode
and HIGH (F3)tim with a lower set temperatm'e.
ForQuieter& NighttimeCooling--Select the
COOL mode and LOW (FI)tim with a middle set
temperature,
NOTE:If you switch froma COOLsettingto OFForto
a fan setting,wait at least3 minutesbeforeswitching
back to a COOLsetting.
OFF The tim runs all the time, while the
compressor cycles on and ofl_
This switch Inust be set at OFFin order to rise
tile tim settings (on tile mode control),
Use the FAN at HIGH (F3), MED (F2) or LOW(F1) to Since tim only settings do not provide cooling,
provide air circulation and filtering without cooling, a temperature setting will not be displayed.
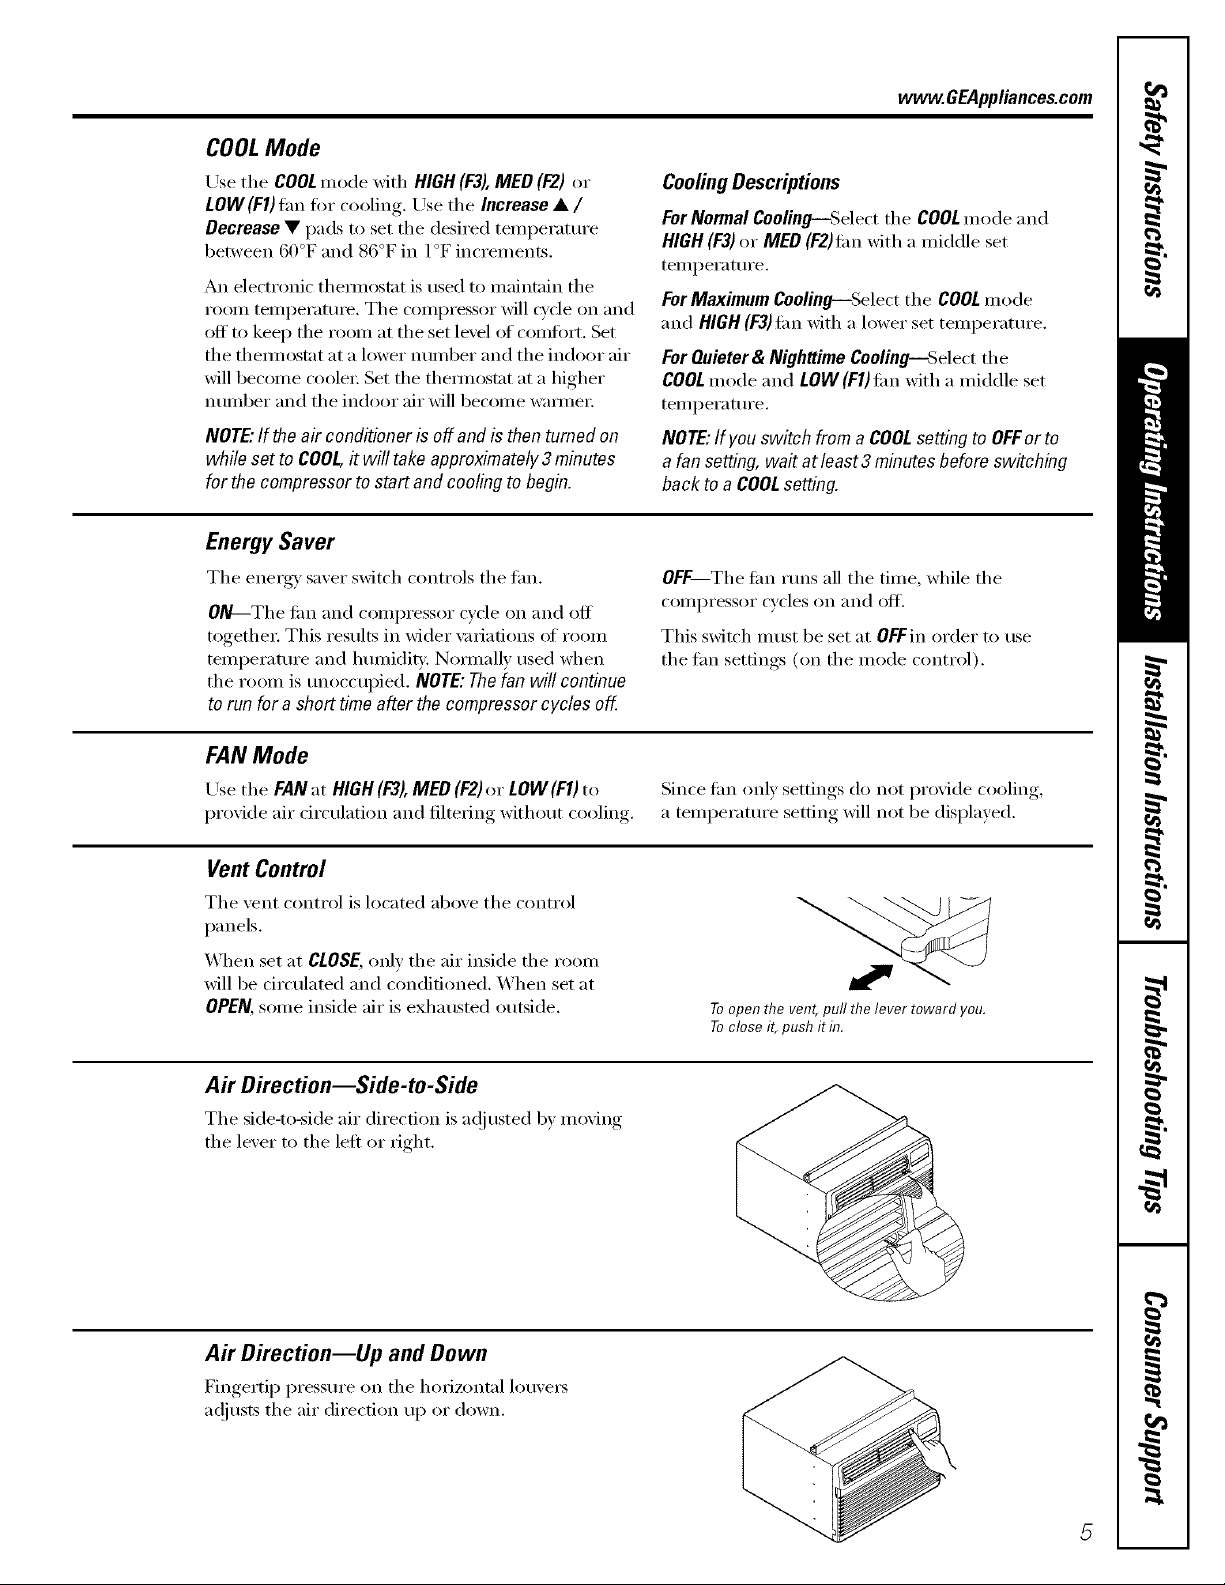
Vent Control
Tile vent control is located above tile control
panels.
When set at CLOSE, only the air inside the room
will be circulated and conditioned, _'hen set at
OPEN,solne inside air is exhausted outside.
Toopen the vent,pull the lever toward you.
Toclose it, push it hT.
Air Direction--Side-to-Side
The side-to-side air direction is a(!i usted 1)y moving
tile lever to tile left or fight.
Air Direction--Up and Down
Fingertip pressm'e on tile horizontal louve_
a(!justs tile air direction up or down.
Page 6
Careand cleaning ofthe air conditioner.
Grille and Case
Turn the......air conditioner off and remo'_e the I)lug, To clean, use water and a mild detergent. Do not
from the wall outlet betore cleaning, use bleach or abrasixes.
Outdoor Coils
The coils on the outdoor side ot the air conditioner
should be checked regtflarly. If they are clogged
with dirt or soot, they may be protessionally
cleaned.
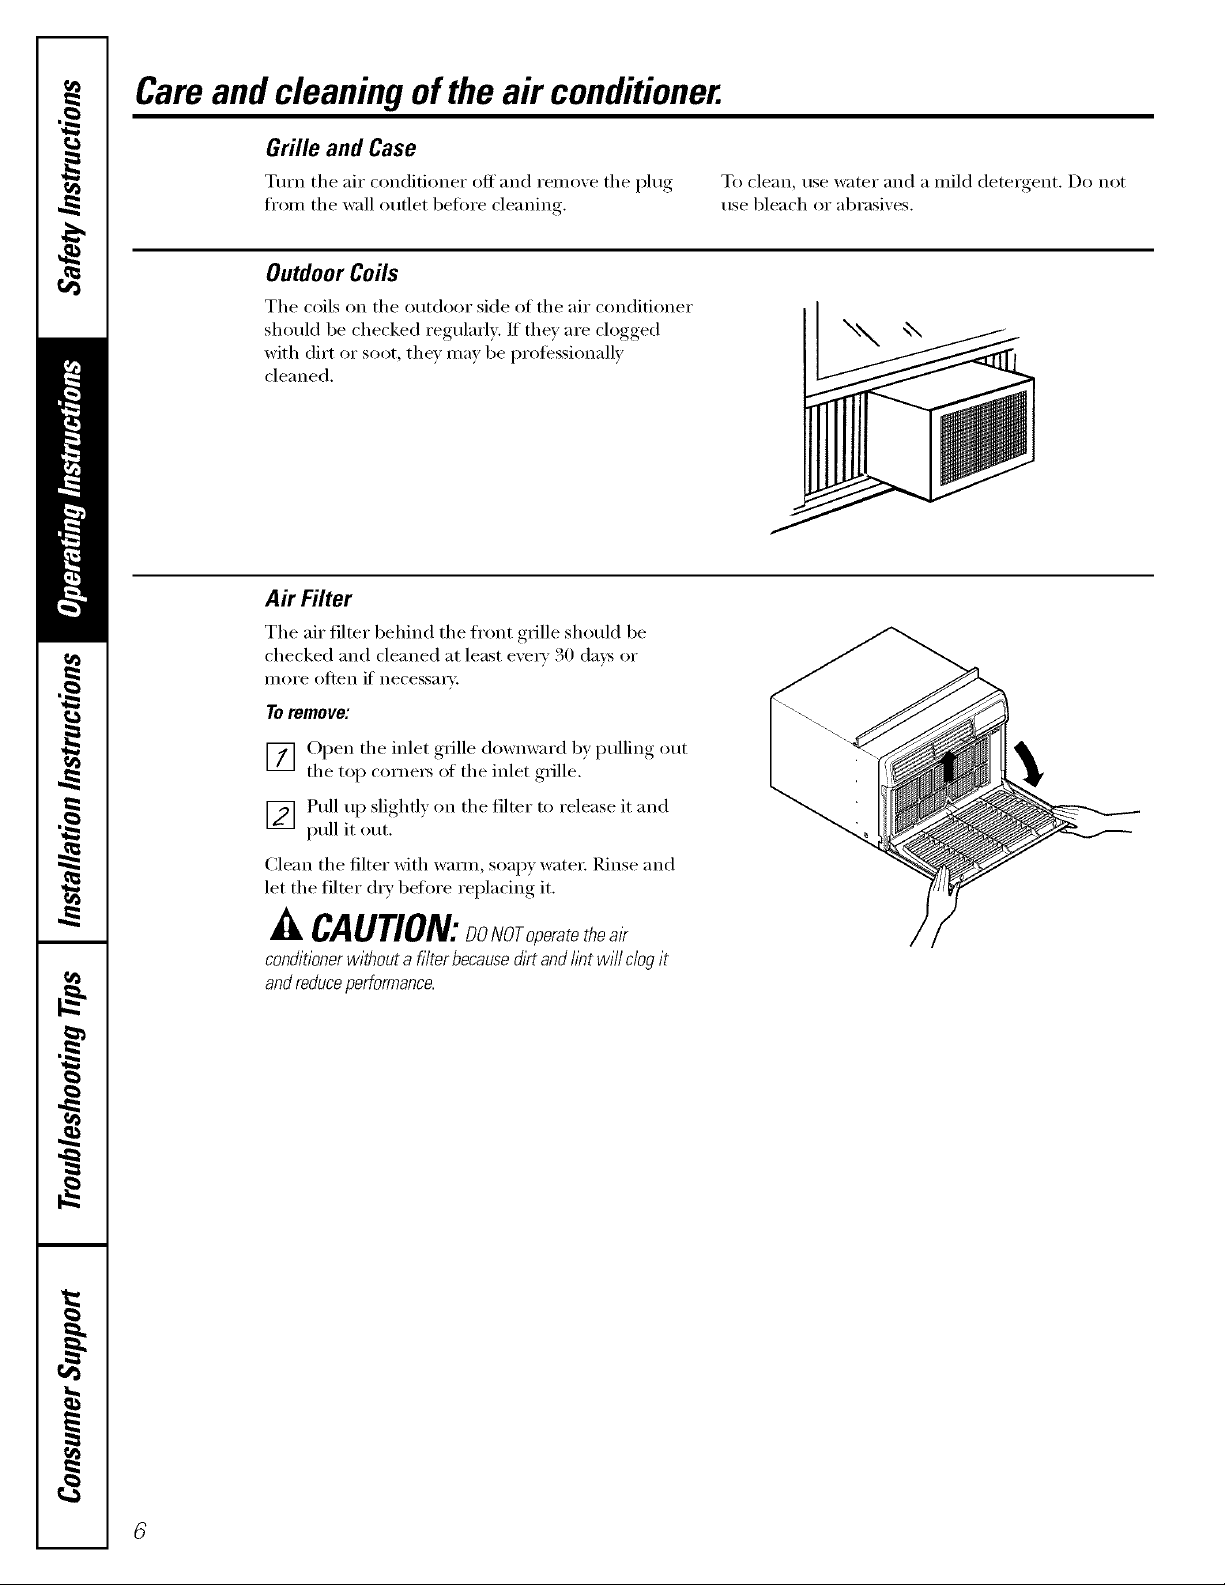
Air Filter
The air filter behind the h'ont grille should be
checked and cleaned at least exe_'_ 30 days or
II/OI'e oJ[[en i[ necess_li'v.
Toremove:
[_] Open the inlet grille dowmvard b) )ullin,,
the top corne_ of the inlet grille.
] Pull up slightly on the filter to release it and
pull it out.
Clean the filter with wam_, soapy water: Rinse and
let the filmr dry before replacing it.
[ _ 0/1[
A CAUTION:DONOroperate bea,
conditionerwithoutafilterbecausedirtandlintwillclogit
and reduce performance.
Page 7
Installation
Air Conditioner
Instructions
I I'_'1 Questions? Call 800.GE.CARES (800.432.2737) or Visit our Website at: www.GEAppliances.com I
BEFORE YOU BEGIN
CAUTION:
Do not, under any circumstances, cut or
Read these instructions completely
and carefully.
• IMPORTANT - Savethese
instructions for local inspector's use.
• IMPORTANT - Observeall
governing codes and ordinances.
• Note to Installer - Be sure to leave these
instructions with the Consumer.
• Note to Consumer - Keep these
instructions for future reference.
remove the third (ground) prong from the
power cord.
Do not change the plug on the power cord
of this air conditioner.
Aluminum house wiring may present special
problems--consult a qualified electrician.
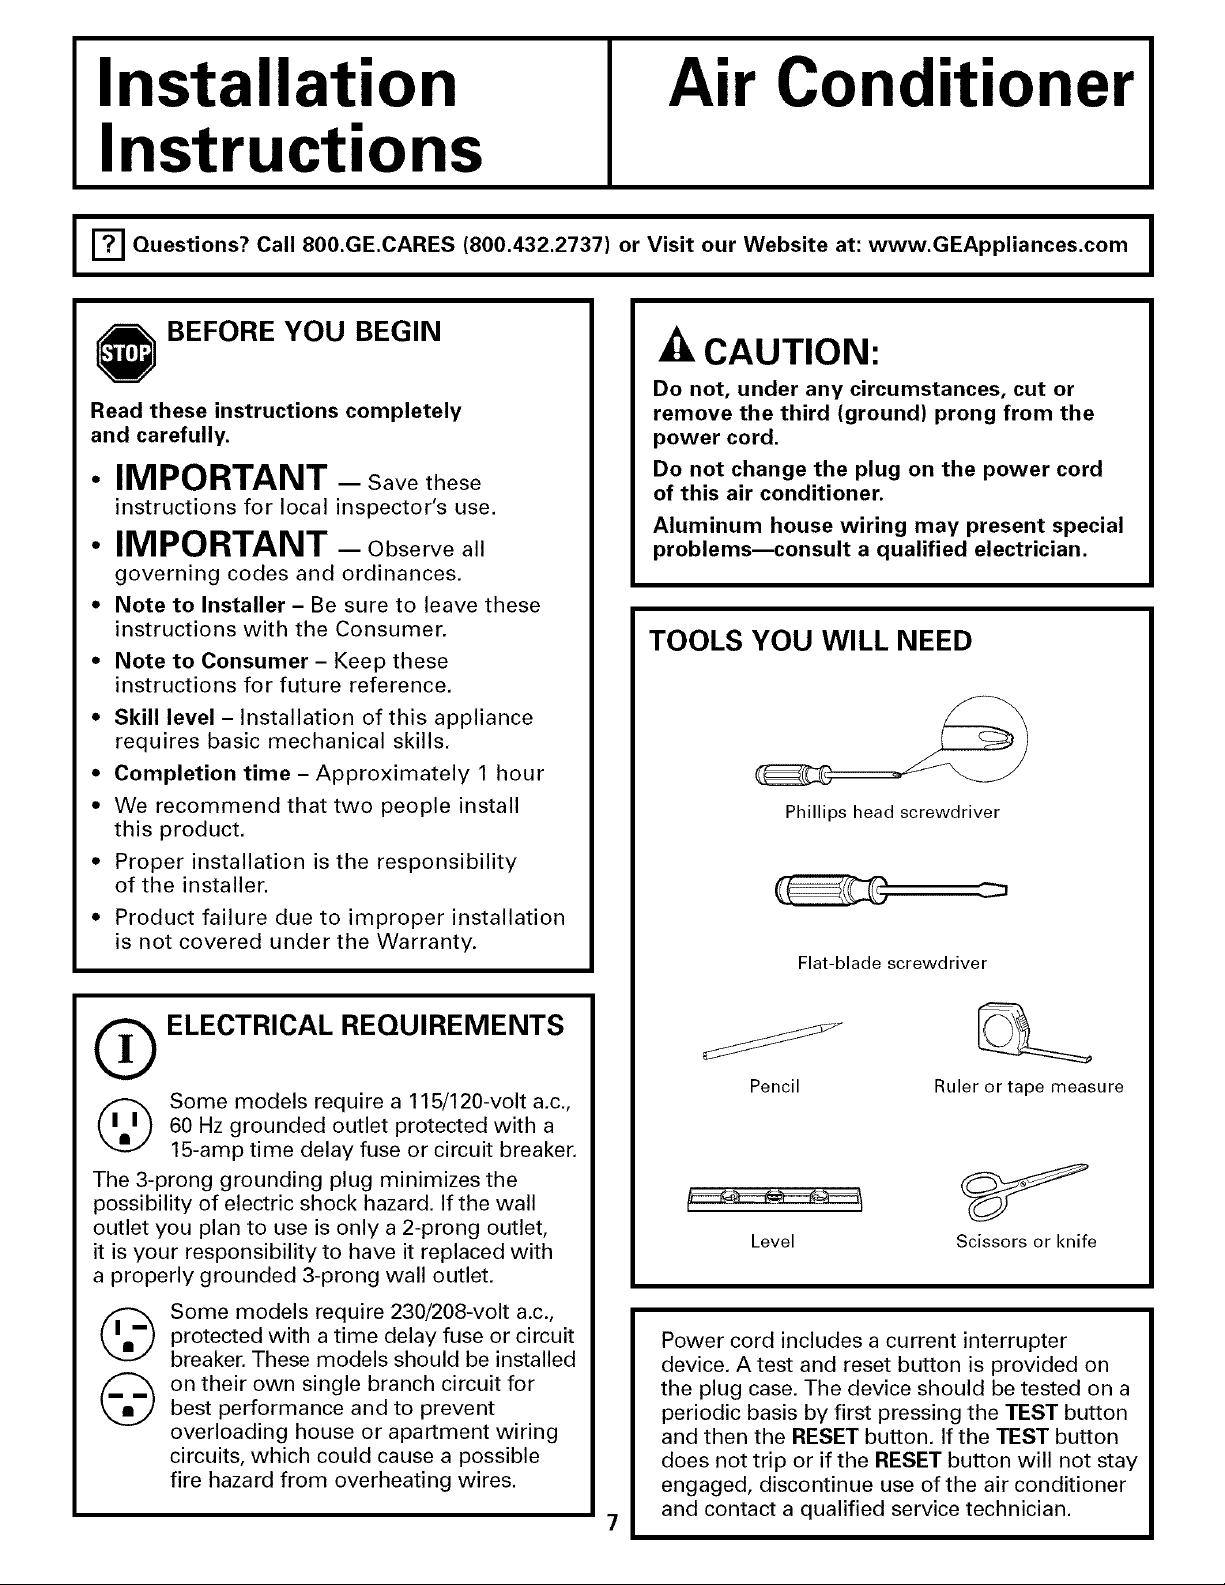
TOOLS YOU WILL NEED
• Skill level - Installation of this appliance
requires basic mechanical skills,
• Completion time - Approximately 1 hour
• We recommend that two people install
this product.
• Proper installation is the responsibility
of the installer.
• Product failure due to improper installation
is not covered under the Warranty.
(_ ELECTRICAL REQUIREMENTS
60 Hz grounded outlet protected with a
Some models require a 115/120-volt a.c.,
15-amp time delay fuse or circuit breaker.
The 3-prong grounding plug minimizes the
possibility of electric shock hazard. If the wall
outlet you plan to use is only a 2-prong outlet,
it is your responsibility to have it replaced with
a properly grounded 3-prong wall outlet.
Phillips head screwdriver
Flat-blade screwdriver
Pencil Ruler or tape measure
Level Scissors or knife
©
@
Some models require 230/208-volt a.c.,
protected with a time delay fuse or circuit
breaker. These models should be installed
on their own single branch circuit for
best performance and to prevent
overloading house or apartment wiring
circuits, which could cause a possible
fire hazard from overheating wires.
Power cord includes a current interrupter
device. A test and reset button is provided on
the plug case. The device should be tested on a
periodic basis by first pressing the TEST button
and then the RESET button, If the TEST button
does not trip or if the RESET button will not stay
engaged, discontinue use of the air conditioner
and contact a qualified service technician.
Page 8
Installation Instructions
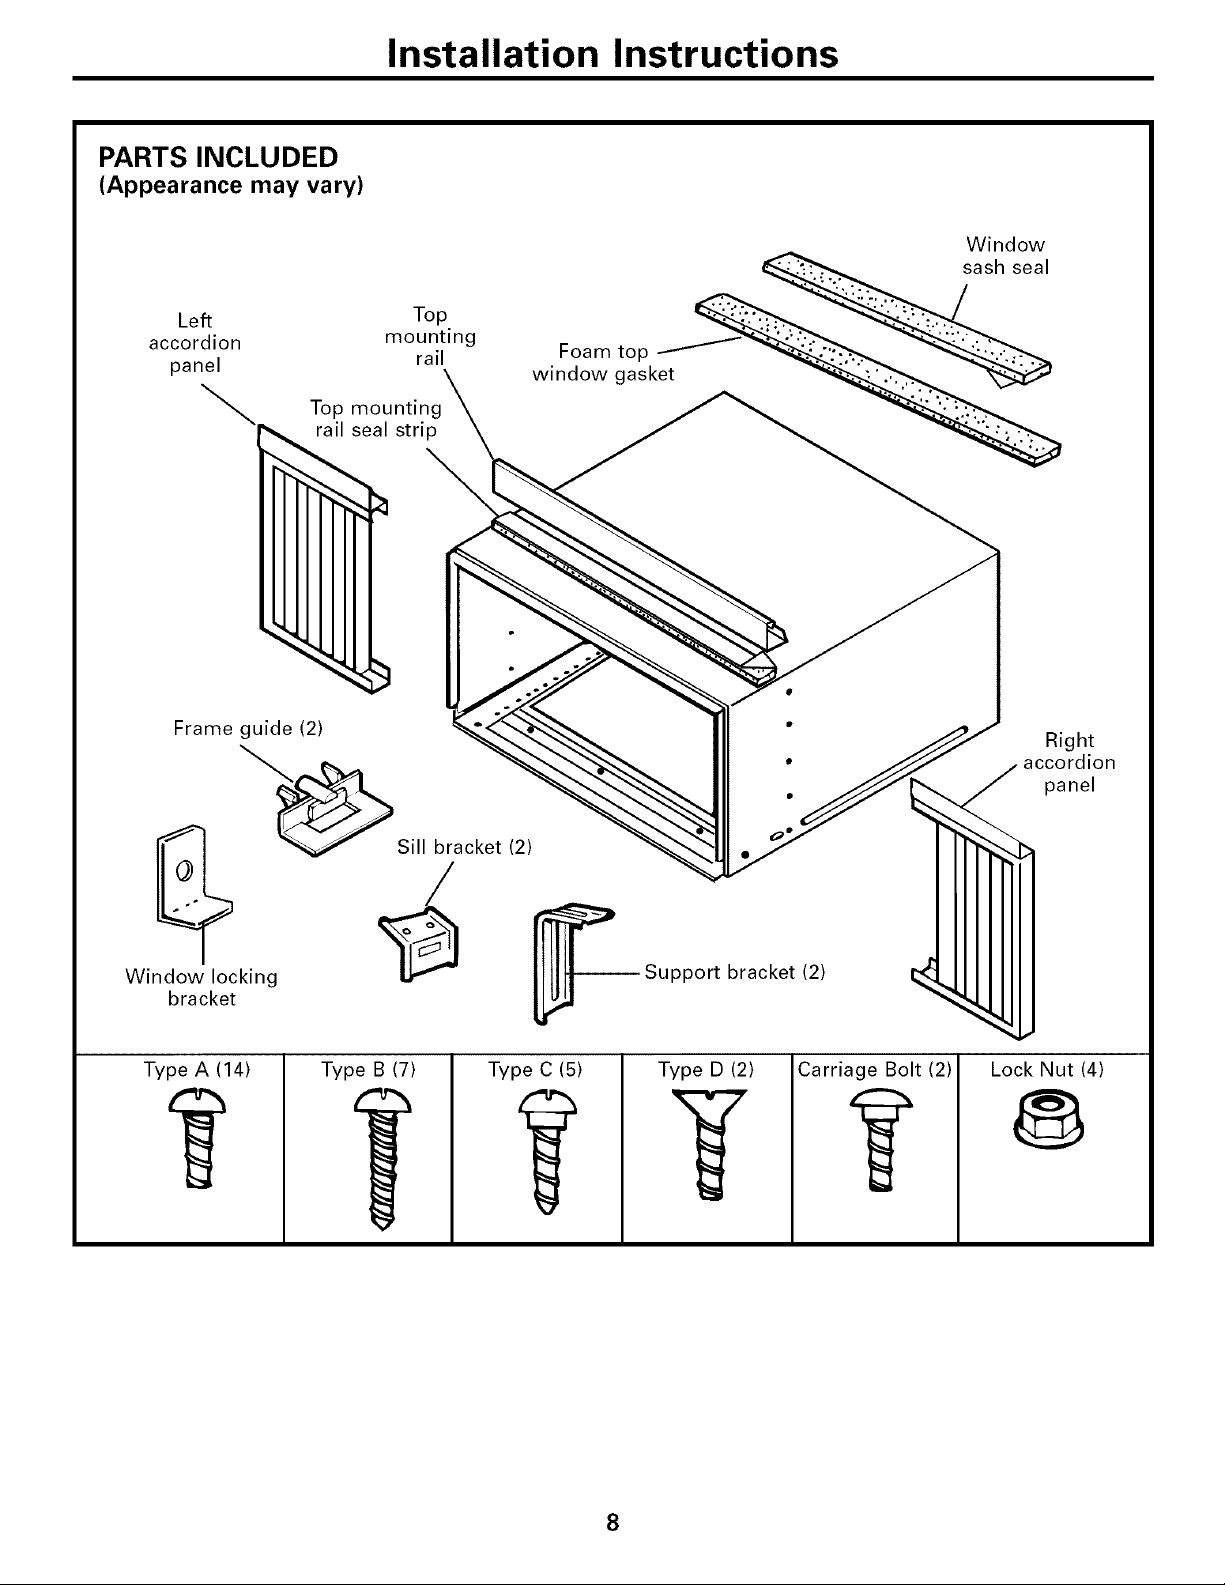
PARTS INCLUDED
(Appearance may vary)
Left Top. ___
accordion mount,ng Foam top /___':.._-
panel rail\ window gasket __. "_.
To0_ount,n0\ _ __"
--, railsealstri _ _ _
Window
;ash seal
Frame _d_. (2) "" i ac!!_dhei/n
"_ S b k 2 _llllllll
Window locking " IltlJl upport rac et( )
bracket [Jr,_
Type A (14)
Type B (7)
Type C (5) Type D (2) Carriage Bolt (2)
Lock Nut (4)
@,
i
@
8
Page 9
Installation Instructions
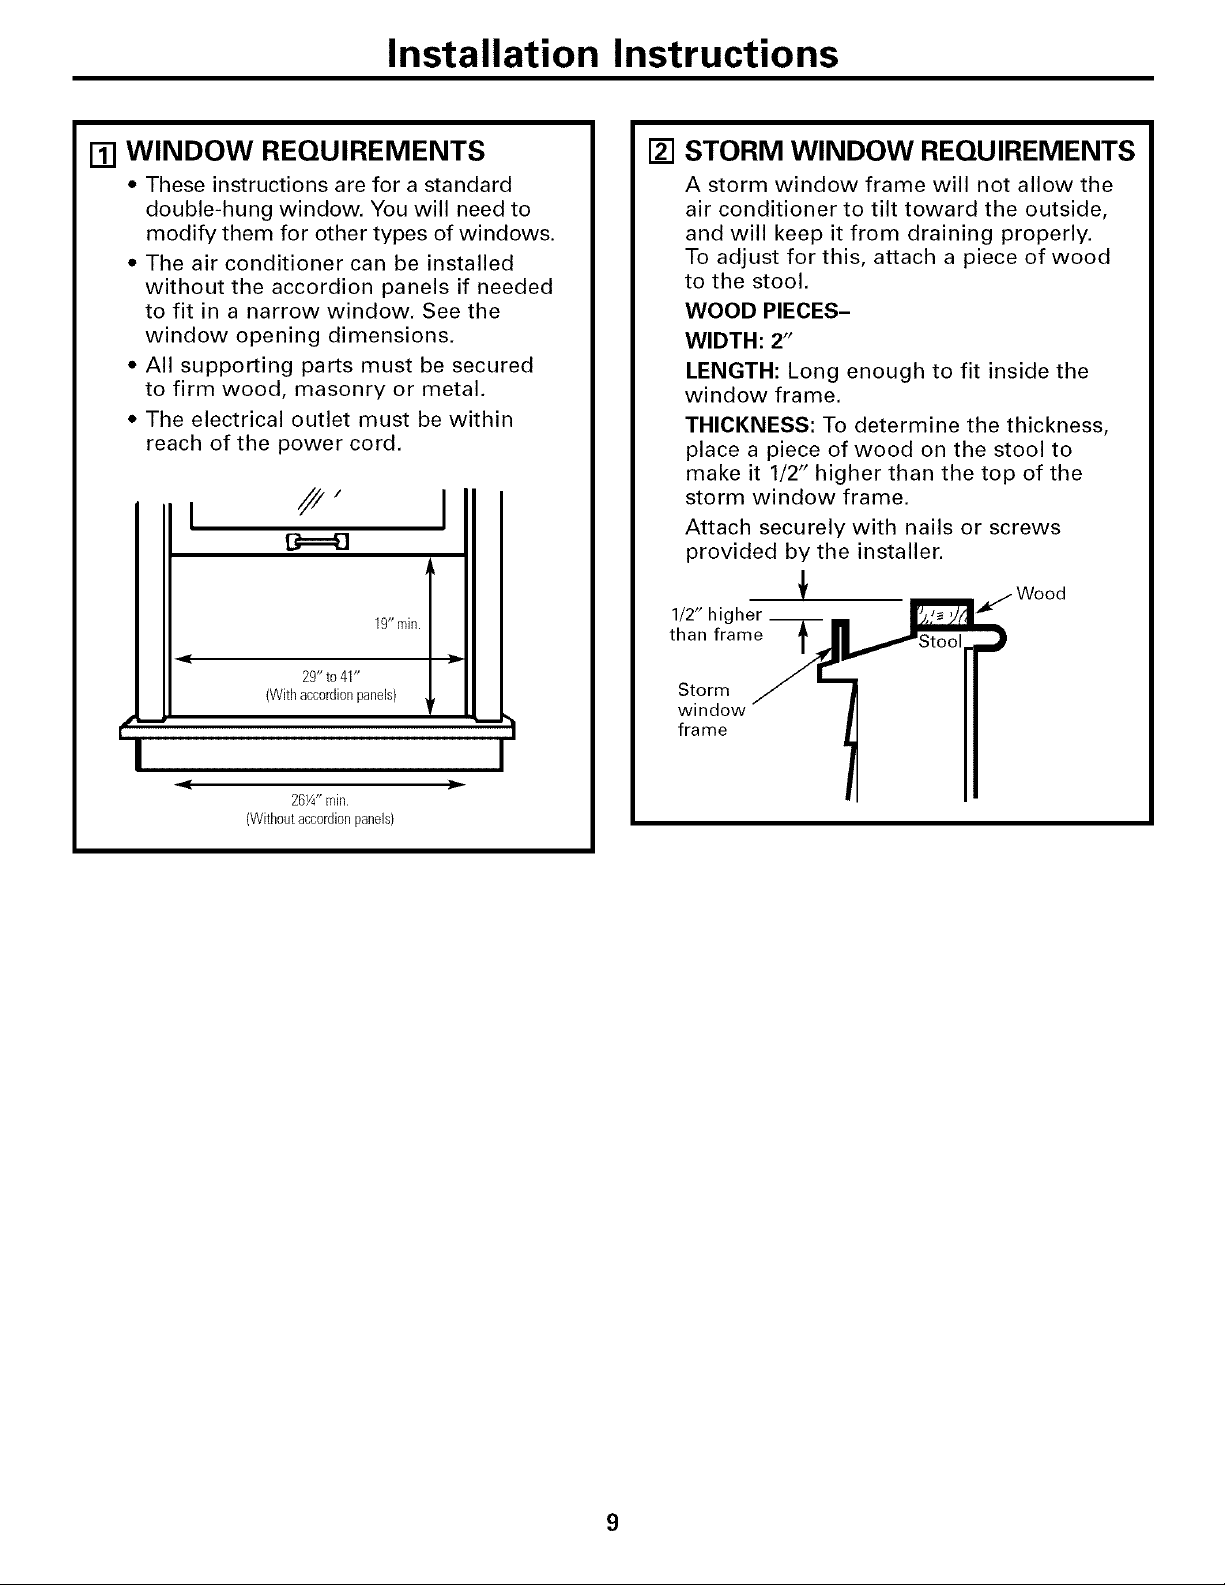
[] WINDOW REQUIREMENTS
• These instructions are for a standard
double-hung window. You will need to
modify them for other types of windows.
• The air conditioner can be installed
without the accordion panels if needed
to fit in a narrow window. See the
window opening dimensions.
• All supporting parts must be secured
to firm wood, masonry or metal.
• The electrical outlet must be within
reach of the power cord.
I /P" I
B===8
STORM WINDOW REQUIREMENTS
[]
A storm window frame will not allow the
air conditioner to tilt toward the outside,
and will keep it from draining properly.
To adjust for this, attach a piece of wood
to the stool.
WOOD PIECES-
WIDTH: 2"
LENGTH: Long enough to fit inside the
window frame.
THICKNESS: To determine the thickness,
place a piece of wood on the stool to
make it 1/2" higher than the top of the
storm window frame.
Attach securely with nails or screws
provided by the installer.
1/2" hi
than frame Stool
29"to41"
(Withaccordionpanels)
19"rnin. 1
'i- i
26W' rain.
(Withoutaccordionpanels)
Storm
window
fra me
Page 10
Installation Instructions
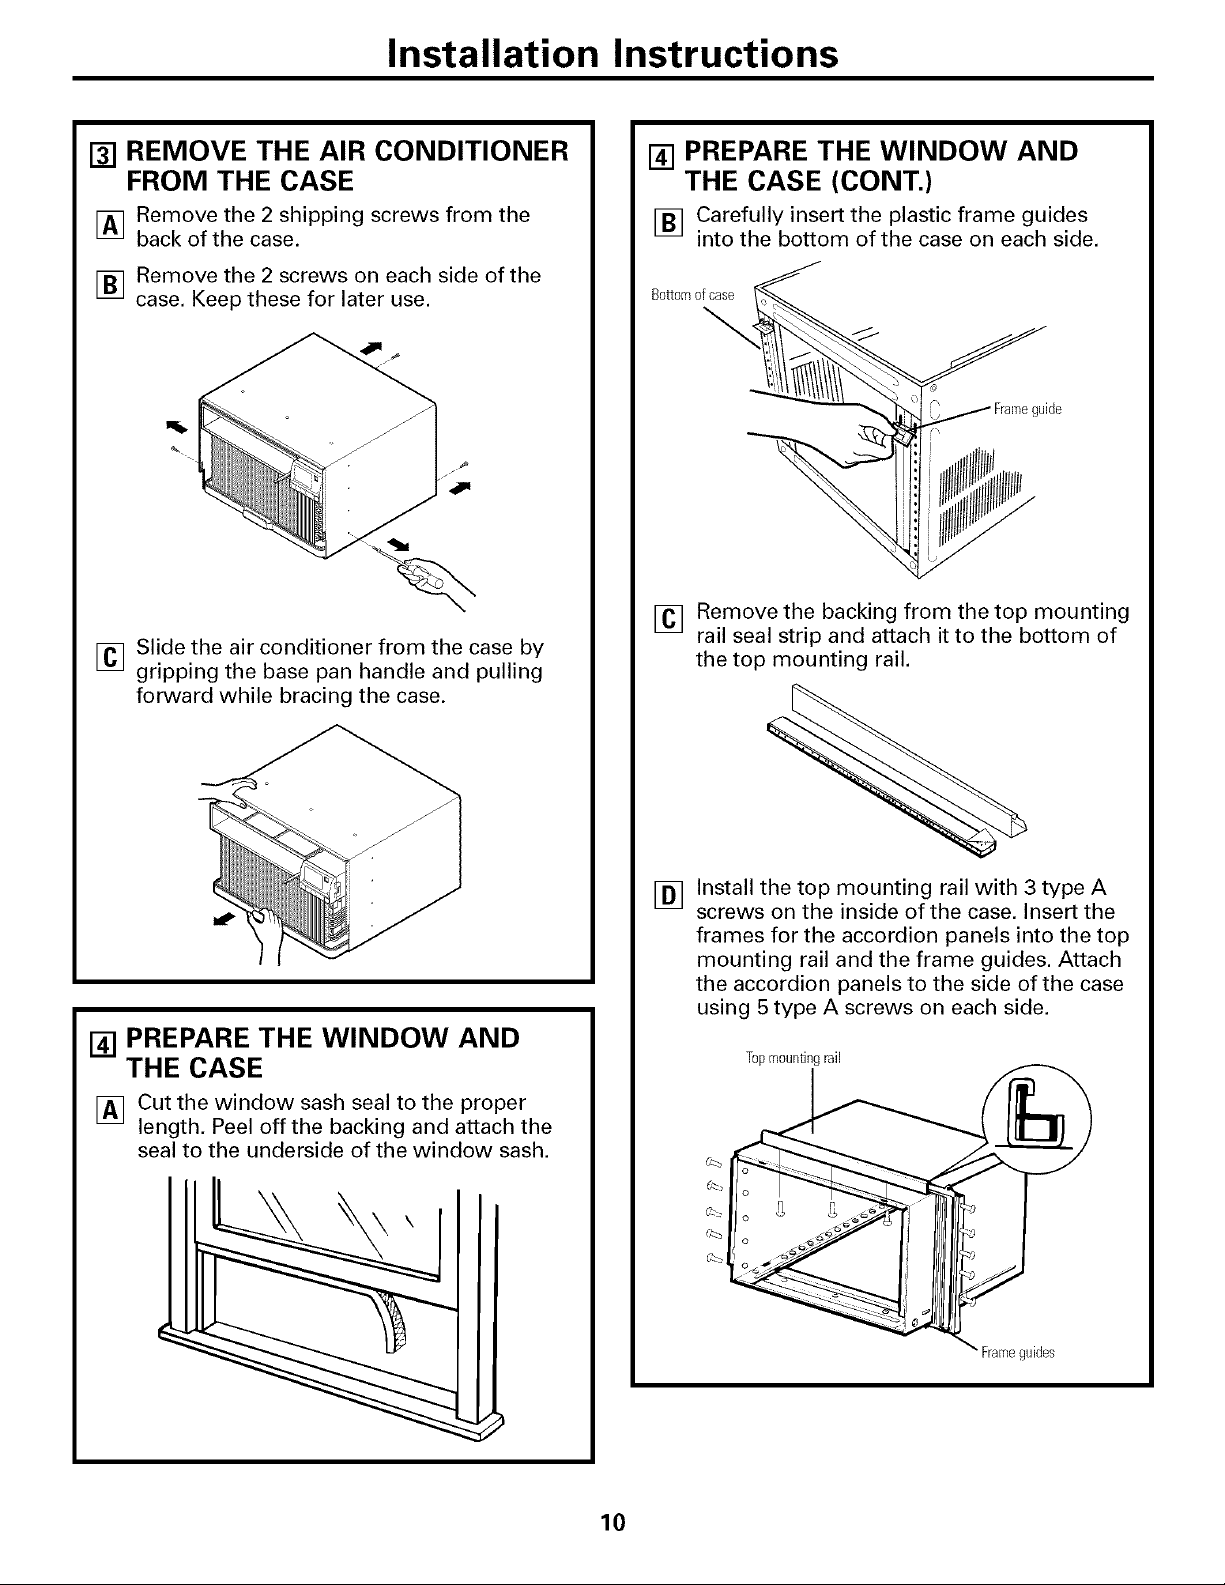
[] REMOVE THE AIR CONDITIONER
FROM THE CASE
IAq Remove the 2 shipping screws from the
back of the case.
[] Remove the 2 screws on each side of the
case. Keep these for later use.
[] Slide the air conditioner from the case by
gripping the base pan handle and pulling
forward while bracing the case.
[] PREPARE THE WINDOW AND
THE CASE (CONT.)
[] Carefully insert the plastic frame guides
into the bottom of the case on each side.
Bottomofcase /_
\
f
_ Frameguide
[] Remove the backing from the top mounting
rail seal strip and attach it to the bottom of
the top mounting rail.
[] PREPARE THE WINDOW AND
THE CASE
[] Cut the window sash seal to the proper
length. Peel off the backing and attach the
seal to the underside of the window sash.
Install the top mounting rail with 3 type A
[]
screws on the inside of the case. Insert the
frames for the accordion panels into the top
mounting rail and the frame guides. Attach
the accordion panels to the side of the case
using 5 type A screws on each side.
Topmountingrail
Frameguides
10
Page 11
Installation Instructions
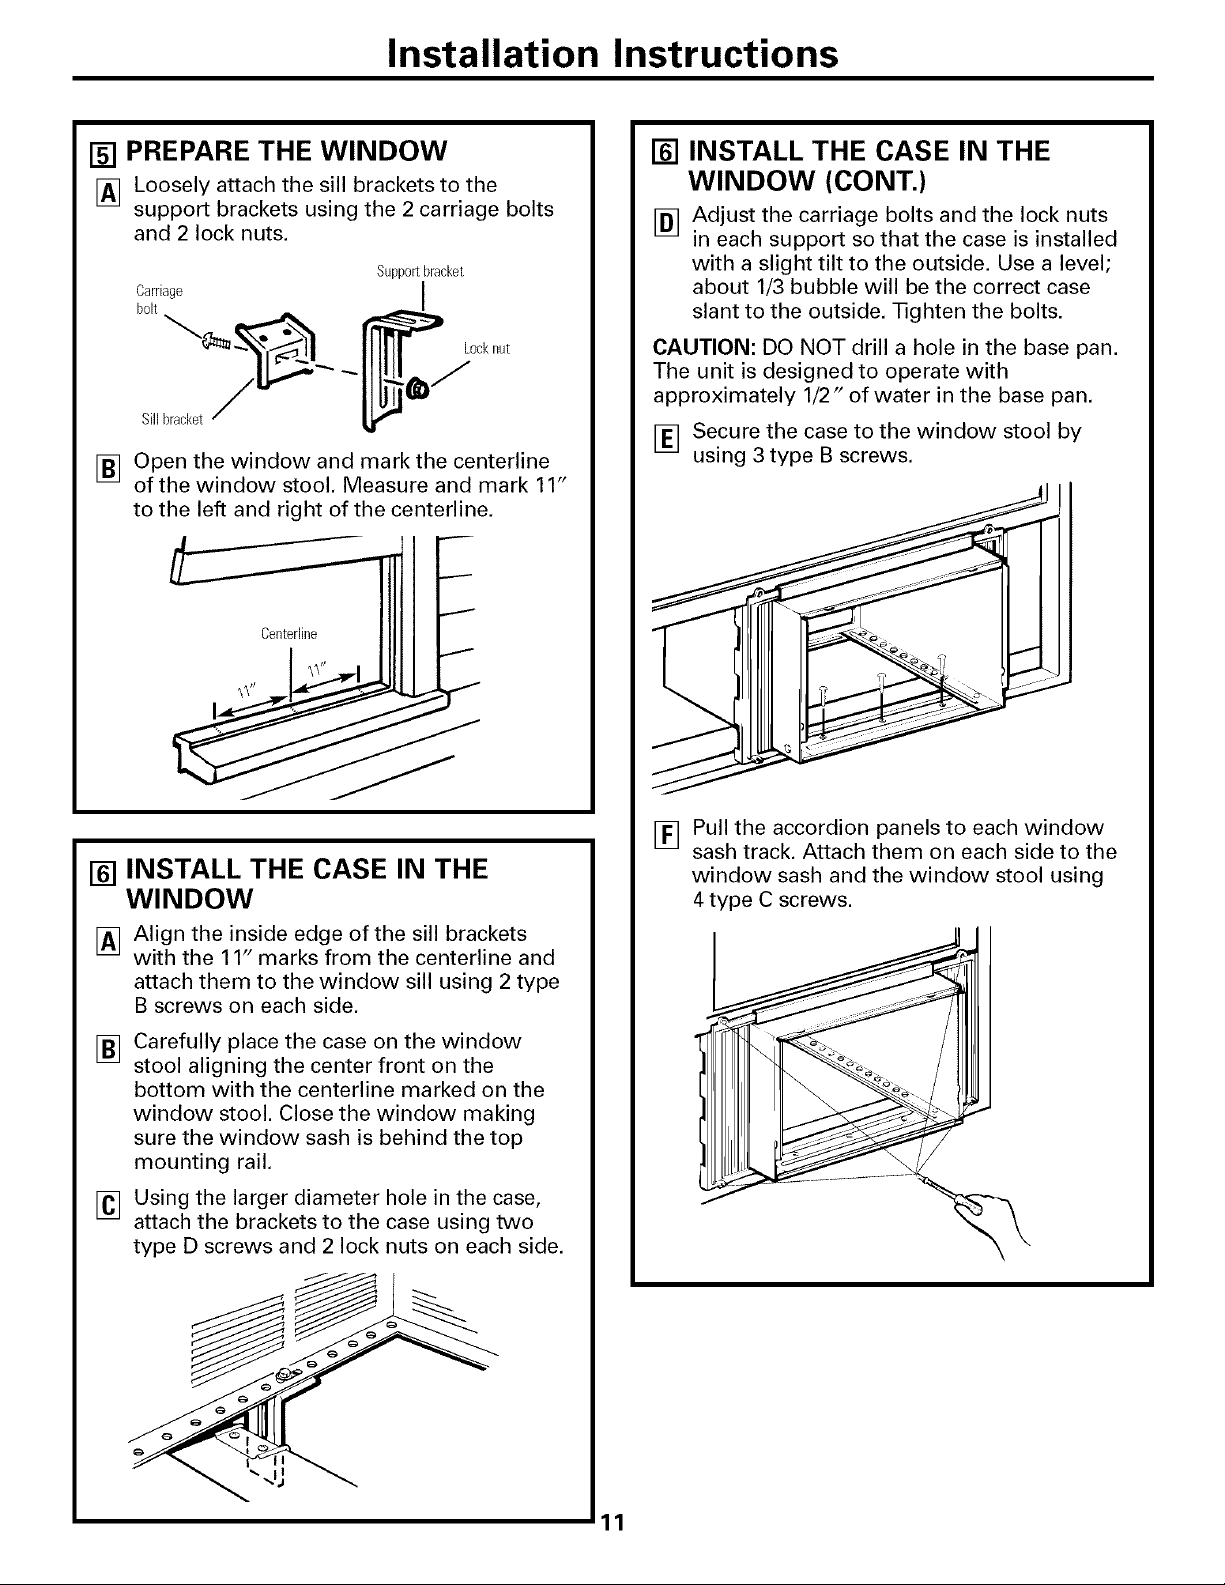
[] PREPARE THE WINDOW
I_] Loosely attach the sill brackets to the
"L_2J
support brackets using the 2 carriage bolts
and 2 lock nuts.
Support bracket
Carriage I
bolt
_ _..,,.. _,. _jock nut
Sillbracket/
Open the window and mark the centerline
[]
of the window stool. Measure and mark 11"
to the left and right of the centerline.
Centerline
[] INSTALL THE CASE IN THE
WINDOW (CONT.)
[] Adjust the carriage bolts and the lock nuts
in each support so that the case is installed
with a slight tilt to the outside. Use a level;
about 1/3 bubble will be the correct case
slant to the outside. Tighten the bolts.
CAUTION: DO NOT drill a hole in the base pan.
The unit is designed to operate with
approximately 1/2" of water in the base pan.
[] Secure the case to the window stool by
using 3 type B screws.
[] INSTALL THE CASE IN THE
WINDOW
[] Align the inside edge of the sill brackets
with the 11" marks from the centerline and
attach them to the window sill using 2 type
B screws on each side.
Carefully place the case on the window
[]
stool aligning the center front on the
bottom with the centerline marked on the
window stool. Close the window making
sure the window sash is behind the top
mounting rail.
Using the larger diameter hole in the case,
[]
attach the brackets to the case using two
type D screws and 2 lock nuts on each side.
[] Pull the accordion panels to each window
sash track. Attach them on each side to the
window sash and the window stool using
4 type C screws.
11
Page 12

Installation Instructions
[] INSTALL THE WINDOW LOCKING
BRACKET AND THE FOAM TOP
WINDOW GASKET
[] Attach a support bracket with a Type C
screw.
[] Cut the foam top window gasket to the
window width.
[] Stuff the foam between the glass and the
window to prevent air and insects from
getting into the room.
[] INSTALL THE AIR CONDITIONER
IN THE CASE (CONT.)
[] Before installing the front grille, pull out the
vent control lever located above the unit
control knobs, as shown.
[] Attach the front grille to the case by inserting
the tabs on the grille into the slots on the
front of the case. Push the grille in until it
snaps into place.
[] INSTALL THE AIR CONDITIONER
IN THE CASE
I_q Slide the air conditioner into the case.
Inl
Reinstall the 2 screws removed earlier on
each side of the case.
Screw Screw
, ._=_
Guidethe lever carefully
flTroughthe grille as you
push it in.
Lower the inlet grille and secure the front
[]
frame with a type A screw through the
front grille. Raise the inlet grille back
into place.
12
Page 13

Troubleshootingtips. www.GEAppliances.com
Troubleshooting -tips.
Save time and money! Review the chart below first
and you may not need to call for service.
Possible Causes What To Do
Air conditioner The air conditioner • Make sure tile air conditioner phtg is pushed completely
does notstart is unplugged, into the outlet.
The fuse is blown/circuit • Check tile house fllse/circuit breaker box and replace
breaker is tripped, the fl/se or reset the breaker:
Power failure. •/f power tifilure occtu_, turn the air conditioner OFF.
_lwn power is restored, wait 3 minutes to restart the
air condifi(mer t() prevent tril)ping ()t the c()mpress()r
()verload.
The current interrupter • Press the RESErbutton h)cated on the l)ower cord l)lug.
device is tripped. •/f the RESETbutton will not stay en _a,,ed discontinue
use ()t the air c(mditioner and contact a qualified service
tech nicia n.
Air conditioner does not Airflow is restricted. • Make sure there are no curtains, blinds or flmfiture
cool as itshould blocking the fl'ont of the air condifione_:
The temperature control may •/n COOLm()de, press the Decrease Vl)ad.
not be set correctly.
The air f'dter is dirty. • Clean the filter at least eve U 30 days.
See the Operating Instructions section.
The room may have been hot. • _4]/ell the air conditioner is fil_t turned on, you need to
allow time fin" the room to cool down.
Cold air is escaping. • (;he('k fi)r oI)en flU'hate floor registe_ and cold air
I'ett/Yns.
• Set the air conditioner's vent to the closed position.
Cooling coils have iced up. • See "Air conditioner freezing up" beh)w.
Air conditioner lee blocks the air flow and • Set the c(mtr(>ls at HIGH (F3)FAN or HIGH(F3) COOLand
freezing up stops the air conditioner set the them_(>stat to a higher temperature.
from cooling the room.
The remote control The batteries are haserted • Check the position of the batteries. They shotfld be
is not working incorrectly, inserted in the ol)posite (+) and (-) direction.
The batteries may be dead. • Rel)lace the batteries.
Waterdrips outside Excessively hot and • This is nom, al.
hmnid weather.
Water drips indoors The air conditioner is not • F()r l)r()per water disl)()sal, make stu'e the air c(mdifi(mer
tilted to the outside, slants slightly t]'om the case fl'(mt t(> the re:u:
Watercollectsin
basepan
Moisture is removed from
indoor air and drains into
rear of a cabinet where a fan
blows it against the outdoor
condenser coil.
• This is nomml for a short period in areas Mth little
lmmidity; nom_al fin"a longer period in \'e_' humid areas.
TIMERfeaturenot
working properly
A power outage or interruption
occurred,
• In the case of a power outage or interruption, the unit
77MERteature will reset to the original setting. Ybu may
need to set a new time if desired.
13
Page 14

Troubleshootingtips.
Normal Operating Sounds
You nlav hear a i_inging noise caused bv water
being picked up and thrown against the
condenser Oil rainy days or when the huniidiP,'
is high, This design _eatui'e helps relnove
inoisture and iniprove efficiency.
You nlav hear the thei_nostat click when the
COIlll)I'essof cycles on _lIl(1 oJZ{'.
_,V_ter will collect in the base pan dui'ing high
huiniditv or on rainy days. The water nlav
ovei-flow and drip ti'oin the outdoor side/)t
the unit.
; The J[ilIl Ill,IV I'{lIl even when the COIlll)I'essoI"
does not,
/4
Page 15

GE Service Protection Plus 'M
GE, a name recognized worldwide %r quality and dependability, of{ers you
Service Protection Plus'_--comprehensive protection on all your appliances--
No Matter What Brand!
Benefits Include:
• Backed by GE
• All brmads covered
• Unfimited service calls
• All parts mid labor costs included
• No out-of-pocket expenses
• No hidden deductibles
• One 800 nmnber to call
You will be completely satisfied with our service protection or )ou ma) request }our inone) back
on the remaining value of your contract. No questions asked. It's that simple.
Protect yore" refrigerator, dishwasher, washer and dryer, range, TV, VCR and much more--any brand!
Plus there's no extra charge tor emergency service and low monthly financing is available. Even icemaker
coverage and tood spoilage protection is offered. You can rest eas> knowing that all vom" valuable
household products are protected against expensive repairs.
Place vot,r confidence in (;E and call us in the U.S. toll-free at _tlII.DZD.ZZZ_
for uloi'e ii_torlnation,
*All brands cmered, up to 20 }ears old. in the contin_ real [.S.
We71 CoverAnyAppliance.
Anywhere. Anytime.*
._(_t/I here
Please place in envelope and mail to:
General Electric Company
Warranty Registration Department
P.O. Box 32150
Louisville, KY 40232-2150
15
Page 16

Consumer Product Ownership Registration
Deal Customer:
Thank you for purchasing our product and thank you for placing your confidence in us.
_:e are proud to haxe you as a customer!
Follow these three steps to protect your new appliance investment:
Complete mid mail
your Consumer
Product Ownership
Registration today:
Ilavc the pcm'c ot
nlind of knowing we
Call COlltaCt yOl/ ill
the unlikelx event of a
saf}:tv modification.
After mailing the
registration below,
store this document
in a sat;:, place. It
contains intormation
vou will need should
you reqtfire service.
Our service numl)er is
800.(;E.CARES
(800.432.2737).
Model Number Serial Number
Important: If you did not get a registration card with your
product, detach and return the form below to
ensure that your product is registered, or register
online at GEAppliances.com.
Consumer Product Ownership Registration
Read vour Owner's
Manual careftflly.
It will help you
operate yollr llew
appliance properl>
._Cut here
Model Number Serial Number
M*: Ms. Mrs. Miss
FirstI I L_stl
Nam( I I I I I I I I I Nam( I I I I I I I I I I I I
Sir( et I
Address I I I I I I I I I I I I I I I I I I I I I I I I
AI,,.#I' ' ' ' I ' ' I E-mailAddress*
Daw 1'1_c( d
Month I I
* Please proxide your eqnail address to receive, xia e-mail, discomlts, special ott;:rs and other important
comnmnications ti-om GE Appliances ((;EA).
[ Check here if you do not want to receive communications from (;EA's careftllly selected partner',.
FAIIMRE TO COMPIA{TE AN[) RETI JRN TIIIS CARD DOES NOT DIMINIStt YO[ R
_,i \RI_ \N'IY RIGI fFS.
For infkn-mation about GEA's privacy and data usage policy, go to x_a_v.(;EAppliances.com and click
on 'Privacy Policy" or call 800.626.2224.
BE Consomor & htdustrial
Louisville, Kentucky
wwv_aEAppliances, com
GEAppliances
Pholle
I
I
/C
Page 17

Air ConditionerWarranty.
Aft warranty service provided by our Factory Service Centers,
or an authorized Customer Care®technician. Toschedule service,
on-line, 24 hours a day, visit us at GEAppliances.com, or carl
800.GE.CARES (800.432.2737).
We Will Replace:
Fromthedateof the
origina!purchase
Fromthedateof the
originalpurchase
Service trips to your home to teach you how to
use the product.
hnproper h_staJlation, delivery or maintenance. If you
have ml installation problem, or if the air conditioner
is of improper cooling capacity for the intended use,
contact your dealer or installer. You are responsible
for providing adeqwate electrical cmmecth_g facilities.
Failure of the product restflth_g from modifications to
the product or due to mlreasonable use including failure
to provide reasonable mad necessary maJntenmace.
In commerciaJ locations labor necessary to move the
unit to a location where it is accessible for service
by an individual technician.
Anypartof the air conditioner which thils due to a defect in materials or workmanship,
During this full one-year warranty, we will also provide, free of charge, all lab(n" and in-home
serxice to replace the (lefecti',e part,
Any part of the sealed refrigerating system (the comi)ressot; condenset; evaporator and
all connecting tubing) which fifils due to a defect in materials or workmanship, During this
four-year additional warranty, we will also provide, free of charge,all labor and in-home service
to replace the defecti\'e part,
Staple your receipt here.
Proofof the original purchase
date is needed to obtain service
under the warrantg
Replacement of house fuses or resetting of circuit
breakers.
Failure due to corrosion on models not corrosion-
protected.
Dmnage to the product caused by hnproper power supply
voltage, accident, fire, floods or acts of God.
Incidental or consequentiaJ dmnage caused by possible
defects with this air conditioner.
Dmnage caused after delivery.
This warranty is extended to the original purchaser and any succeeding owner for products purchased for home
use within the USA. In Alaska, the warranty excludes the cost of shipping or service calls to your home.
Some states do not allow the exclusion or limitation of incidental or consequential damages. This warranty gives
you specific legal rights, and you may also have other rights which vary from state to state. Toknow what your
legal rights are, consult your local or state consumer affairs office or your state's Attorney General.
Warrantor: General Electric Company. Louisville, KY 40225
17
Page 18

ConsumerSupport.
Haxe a question or need assistance with your appliance? Try the (;E Appliances _4'ebsite 24 hotn_ a day
q l gEAppliancesWebsite www.GEAppliances.com
' any day of the xear'. For greater comenience and faster service, you can now download Owner's Manuals,
O " S i.order parts, catalogs, or exert schedule set\ice on-line. You can also "_&skOur Team f Expert.
V(//II" questions, and so IIltlch iiloi'e...
ScheduleService
Expert (;E repair sels,ice is onl) one step away fl'om your dooi; Get on-line and schedule v,'mr service at
your, conxenience 24 h{/ui_ am {lm of the xear! Or call 800.GE.CARES (800.432.2737) dining n{mnal
business houi_.
www.GEAppliances.com
RealLifeDesignStudio www.GEAppliances.com
GE supports the Univei_al Design concel)t--products, services and environments that can be used by
people of all ages, sizes and capabilities. We recognize the need to design fin" a wide range of physical and
mental abilities and impaimmnts. For details of GE's Univelsal Design applications, including kitchen
design ideas fin" people with disabilities, check out our _,Vebsim today. For the hearing impaired, please call
800.TDD.GEAC (800.833.4322).
Extended Warranties www.GEAppliances.com
Purchase a GE extended warran_ and learn about special discounts that are axailable while _our warrant'
is still in effect. Yell C_lllpurchase it on-line an) time, or call 800.626.2224 during nomml business hom_.
(;E (_onsulner Home Serxices will still be there alter your warrant} expires.
PartsandAccessories www.GEAppliances.com
Individuals qualified to service their own appliances can have parts or accessories sent directly to their
homes (VISA, MasterCard and Discover cards are accepted). Order on-line today, 24 hom_ evela' day
or by phone at 800.626.2002 during nomml business hom_.
Instructions contained in this manual cover procedures to be performed by any user. Other servicing generally
should be referred to qualified service personnel. Cautionmust be exercised, since improper servicing may cause
unsafe operation.
ContactUs www.GEAppliances.com
If you are not satisfied with the service you receive from GE, contact us on our _.Vebsite with all the details
including your phone ntlIllbeI; oF write to: General Managei; Customer Relations
GE Appliances, Appliance Park
I,ouisville, KY 40225
RegisterYourAppliance www.GEAppliances.com
Register your new applimlce on-line----at your €onvenience[ Tilnel} l)roduct registration will allow for
enhanced communication and prompt service under the terms of,,our warranty should the need alise.
You may also mail in the pre-printed registration card included in the packing material.
] o° Printed in Korea
Page 19

www. GEAppliances.com
Instrucdones de se_uridad .... 2, 3
Instrucciones de operaci6n .... 4, 5
Cuidado y limpieza
Bobinas para extefiores .......... 6
Filuo de aire ................... 6
Rejilla y caja ................... 6
Instrucdones de imlalad6n
Instalaci6n en venmnas ....... 8-12
Pteparfindose para instalar
el acondicionador de aire ........ 7
Soh_qonar problemas ...... 13-15
Sonidos normales
de operaci6n ................. 15
A GM 24
©
©
ov..
Apoyo al consumidor
Apoyo al consumidor . ......... 18
Garantfa ..................... 17
Escriba los numeros de modelo y serie aqui:
©
# de Modelo
# de Serie
Puede en('onti'ai" estos n(/IlleI'os ell /Ina
etiquem en el costado del acondicionador
de aire.
3828A20514H dg-7498 02-05JR
Page 20

INFORMACIONIMPORTANTEDESEGURIDAD.
LEATODASLASINSTRUCCIONESANTESDEUSAR.
A iADVERTENCIA!
Par su seguridad, se debe seguir la informacidn en este manual para minimizar el riesgo deincendios,
descargas el#ctricas o lesiones personales.
PRECAUCIONESDESEGURIDAD
Use este electrodom&stico solamente para
el i)iop6sito detenninado segfin se describe
en el Manual del propietario.
iiiiiiiiiiii_iii
Este acondicionador de aire debe instalarse
correctamente de acuerdo con las
h_strucciones de instalaci6n antes de su uso.
iiiiiiiiiiii_iii
Nunca desenchufe su acondicionador de
aire tirando del cable el_ctrico. Siempre
ag_ane firmemente el enchufe y tire de
_l directamente hacia aflmra.
iiiiiiiiiiii_iii
Reemplace imnediatamente todos los
cables el6ctricos que se hayan pelado o
que se hwan daflado de alguna oua manera.
No use tm cable el_ctrico que muestre
evidencias de demrioro, o daflos de abrasi6n
en su superficie en alguno de sus exuemos.
Apague el control de modo y desenchufe
su acondicionador de aire antes de hacer
cualquier reparaci6n o limpiar
NOTA:Recomendamos en_rgicamente que
cualquier servicio llexado a cabo en este
equipo lo realice un individuo calificado.
Pot" su seguridad...no ahnacene ni use
mamriales combusubles, gasolina u otros
vapores o l/quidos inflamables en la
proximidad de _ste o algfin OtTO
electrodom_stico.
Todos los acondicionadores de aire
contiene refrigerantes, los que poT Ley
Federan deben set removidos antes de
desecharlos. Si usted planea deshacerse de
algfin producto que contenga refrig_rantes,
p6ngase en contacm con la compaflfa que
se encatga de recoger su 1)asura para que le
indiquen qu_ hace_;
COMOCONECTARLAELECTRICIDAD
Bajo ninguna circunstancia, corto oremueva la
tercera pOa (tierra) del cable el6ctrico. Enpos
de la seguridad personal, este electrodom6stico
debe siempre conectarse a tierra.
E1 cable el_ctrico de esm electrodom_stico est_i
equii)ado con un enchufe de tres pdas (tielTa)
que coml)ina con un tomacon-ienm estfindar
de tres minas de pared para minimizar la
posibilidad de una descatga ek?cu-ica.
El cable de alimentaci6n incluve un
dispositixo para inmrrupci6n (ie corriente.
Se incluye un bot6n de prueba y de reinicio
en el disposifixo. El disposifixo debe ponerse a
prueba peri6dicamente: prfinero se presiona
el l)otdn de TEST (pruel)a) y lueg_ RESET
(reinicio). Si el bot6n TEST,o se dispara
o si el botdn RESt'no queda enganchado,
deje de utilizar el acondicionador de aire
y comun/quese con un t&nico calificado.
Pida a un t_cnico que inspeccione el
tomaconJente y el circuito para cerciorarse
de que el mmacorrienm est_ conectado a
tiena de la manera apropiada.
Donde exism un tomacorfiente de dos tomas,
es su responsabilidad y obligaci6n personal
hacer que dicho tomaconiente sea
reemplazado poT uno de tres tomas con
conexi6n a tiena.
E1 acondicionador de aire deberfa siempre
estar conectado a un tomacorriente individual
con su circuito de xohaje conespondiente.
Esto proporciona el mayor rendimiento y
adem_is evita que los circuitos del resto de
la casa se sobrecarguen, 1o cual podtSa causar
incendios pot el sobrecalentamiento
del cableado.
VeT las Instmcciones de instalaci6n, en la
secci6n Requisitos ElOctricos para los requisitos
especfficos de conexi6n.
2
Page 21

www.GEAppliances.com
iADVERTENCIA!
f
USODECABLESDEEXTENSION--Modelosde115voltiossolamente
Debido al potencial de riesgos de seguridad
bajo ciertas condiciones, en#rgicamente
recomendamos contra el uso de cables de
extensi6n.
Sin embargo, si usmd se _> en ]a necesidad
de usar un cable el_,cuico de exmnsi6n,
es absolummenm necesa_io que el mismo
est_ listado bajo UI,, sea calil)re 14, del dpo
de 3 tomas con conexi6n a de_Ta i)ara
electrodom_sticos v el fndice el_ctrico debe
set de 15 ami)erios (mfnimo) y 125 _olfios.
PRECAUCION:
NO USEun cable de extension con niaguno de los
modelos de 230/208 voltios
USODEENCHUFESADAPTADORES--Modelosde115volfiossolamente
!
Debido al potencial de riesgos de seguridad
bajo ciertas condiciones, en#rgicamente
recomendamos contra el uso de enchufes
adaptadores.
Sin embargo, si usted se ve en la necesidad de
usar un adaptado_; donde los c6digos legales
locales lo i)ermitan, i)uede hater una conexion
temporal a un inten_uptor de 9 tomas siempre
que se use un mmaconJente listado UL
disponible en la mayolSa de las felTemlSas.
La ranura mayor en el adaptador debe estar
alineada con la pda mayor en la pared para
proporcionar una polaridad apropiada en la
conexi6n del cable el_ctrico.
Cuando se disponga a desconectar el cable
el_ctcico del adapmdot; siempre sosmnga el
adaptador en su lugar con una mane mientras
fira del cable el_cuico con la otra mane. Si no
hace esto, la m_ninal de tierra del adaptador
podrfa romperse despu_s de que este proceso
se tepita varias x>ces.
Si se tempe el terminal de conexi6n a tie_Ta
del adaptadot; 11/0/JSEel acondicionador de
aire hasta que la conexi6n a tiei_a se hava
restablecido.
Unirel terminalde conexibna tierra deladaptadora un
tomillo de lacubiertaen laparedno conectaa tierra
el electrodomesticoapropiadamentea noserque el
tomillo de lacubiertasea met#lico y no esteaislado,
yel tomacorrientede lacasaesteapropiadamente
conectadoatierraa travesde/cab/eadode lacasa.
Hagaque untecnicocalificado inspeccioneel circuito
de la casaparacerciorarsequeestaconectadoa tierra
apropiadamente.
LEAYSIGAESTASINSTRUCCIONESDESEGURIDADCUIDADOSAMENTE.
GUARDEESTASINSTRUCCIONES
Page 22

Acerca de los controlesen el acondicionadorde aire.
Las funciones y el aspecto pueden variar.
Las luces
prSximasalas
teclas de toque
en el panel de
control del
acondicionador
de aire indican
los ajustes
seleccionados.
S]ncronkador
TIMER T ME A l_
Ahorr0de
energ[a
encendid0
Ventiladorencendido
Enffiamientoencendido encendido
COOL_
SAVER•
I ENERGY 1
FANT TEMP V
Controlesdel acondicionadordeaire
Contro/es
O ON/OFF(ENCENDIDO/APAGADO)
Apaga _ prende el acondicionador de aire.
TeclnsdeAumentnr•/Reducir • de
TEMP/TIME (TEMPERATURA/TIEMPO)
Usado para ajustnr la temperatm'a .cuando
se enctlentre en el illodo COOL(FRIO) o el
tiempo cuando se usa la flmci6n del
SINCRONIZADOR
-@
Control remoto
de 1 a 24 horas en el hi, el previo. Cada
toq ue de las teclas Aumentar • / Reducit •
ajustarfi el tiempo en horas.
OFF(APAGADO)--Cuando el acondicionador
de aire estfi encendido, puede ajustnx_e
para que se apague autom;iticalnente dentro
de 1 a 24 horas. Cada toque de las mdas
Aumentar&/ReducirV ajustnr;1 el tienlpo
en hoI';IS.
O MODO
Usado para ajustn_] el acondicionador de aire
al modo COOL(FRIO),ENERGYSAVER(AHORRO
DEENERGJA)o FAN(VEN77LADOR).
Para cancelar el sincronizador, presione la
tecla TIMER (SINCRONIZADOR) hastn que el
tiempo en la pantnlla desaparezca.
Receptor de la se#al del control remoto
O FAN SPEED(VELOCIDADdel VENTILADOR)
ILrsado para ajustnr la xeloddad del xentilador
a LOW(P1)(BAJO), MEO(P2)o HIGH(F3)(ALTO).
O IMER (SINCRONIZADOR)
ON(ENCENDIDO)--()lando el acondicionador
de aire estfi apagado, puede ajustntse para
que se encienda automfificamente dentro
Pantalla
Muestra la temperatm'a @/stn(la o el tiempo
i'est;inte en el sinci'oniz;idoi-
Funcion de recuperacion de perdida de energia
En caso de la pg_rdida de la energfa o interrupci6n, SINCRONIZADOR rea justnrfi al @lste original.
la mfidad reiniciar_i automfifiCalnente en las Es posible que usted necesite ajustnr tm tiempo
flmciones de la filtima vez que file usado tma nuevo si asf lo desea.
vez la ene_gfa sea resmblecida. Ia flmci6n del
Control remoto
Para garanti/;ir tma operacidn apropiada, oriente
el control remoto hada el receptor de serial del
acondicionador de aire.
E1 receptor de serial tiene tm tango mfiximo
4
de 21 pies.
Cerci6rese de que no hava nada entre el
acondicionador de aire v el control relnoto
que pueda bloquear la serial.
Cercidrese de que las baterfas sean fl'escas v
se insmlen correcmmente segfin se indica en
el contI'Ol i'eilloto.
Page 23

Mode COOL(FRIO)
Use el modo COOLcon xentilador HIGH(F3)(ALTO),MED
(F2)(MEDIO)o LOW(FI) (BAJO)para entiim: Use las teclas
de Aumentar•/Reducir • para ;!justara la tempemmra
deseada entre 6()°F_ 86"F en incrementos de I"E
Se usa un tennosmto electr(mico pare mantener la
tempemmra de la habimciGn. El compresor bars ciclo
entre apag_d/) y encendido pare mantener la habitaci6n
a la temperamra deseada. Ajuste el teml()stato a un
nfimero menor v el _fix_ interno se entiiaM mils. Silo
@lsta a un nfimero ma_)r, la tempemmra del aire
interno se calentarfi mils.
NORA:Siel acondicionador de aire est# apagadoy/uego
seenciendemientrasest# ajustadoen COOL(FRIO),tomar#
aproximadamente3minutespara queel compresorcomience
a enfriarotra vez,
Ahorro de energia
E1interrui)t()r de....ahorro de energ'fa, controla el
xentilador.
ON (ENCENOIOO)--E[ xentilador y el corrlpresor hacen
ciclo entre encendido y apag_(lo. Esto da como resultado
mayores vafiaciones de mmperamms y [mmedad en la
haNtaciGn. Normalmente esm es usado cuando la
haNtacidn no estfi siendo ocupada. NORA:El ventJlador
continuard funcionando per un per[ode de tiempo corto
wvvw.GEAppliances.com
Descripcionesde enfriamiento
Para enfriamientonormal--Seleccione el mode de
xentiladorCOOL(FRIO)yHIGH(F3)(ALTO)oMED(F2)
(MEOIO)con una temperatura de _Jjustemedia.
Para enfriamientomglximo--Seleccione el mode de
ventilador COOL_HIGHF3(ALTO)con unatemperatura de
ajuste menox:
Para enfriamientosilenciosoyenfriamientonocturno--
Seleccione el i1-1/)([/)de _entilador COOLy LOW(FI) (BAJO)
con una temperatura de _tjuste media.
NORA:Si cambiadeun ajusteCOOL(FR[O)aOFF(APAGADO)
ea una)ustede venti/ador,espereapreximadamente3
minutes antesde cambiaretra vezal ajustede COOL(FRiO),
despu#s queel compresorhace el ciclo de apagado.
OFF(APAGADO)--E1vendlador es accionado todo el
dempo, mientras el compresor hace ciclo entre N)ag'ado
v encendido.
Este interruptor debe quedar ajustado a OFF(APAGADO)
pare poder usar los ajustes del xentilador 'en el modelo
de control).
Mode de FAN (Ventilador)
Use el FAN(Ventilador)en High(F3)(ALTO),MED(F2)
(MEDIO)o LOW(FI)(BAJO)para proporcionar circulaciGn
de airevfiltracidn sin entiiarMento.
Control de la ventilacion
El control de ventilacidn estfi localizado encima
de los paneles de control.
Cuando estS ajustado en CLOSE(CERRADO),s()lamente el
aire en el interior de la habitaci()n circular_i x se
acondicionarfi. Cuando estfi ajustado ei/OPEN (ABIERTO),
un poco del aire interne es expelido hacia atuera.
Direccion del aire--de lade a lade
l,adireccidn de lado a lado del aire es ajustada moviendo
la palanca hacia la derecha o izquierda.
Direccion del aire--hacia arriba y hacia abajo
Una presidn senci[la con los dedos en las parrillas
hofizontales ajustar_ la direcci()n del aire hacia arriba 1)
hacia ab@).
Debido a que los niveles de xentilador (micamente no
proporcionan entiiamiento, el nix,el de temperatura no se
muestra en la pantalla.
Paraabrir larejilla, tire de la palanca hacia
usted.Para cerrarla, empz)jelahacia adentro.
Page 24

Cuidadoy limpieza del acondicionadorde aire.
Rejilla y caja
Apague el acondicionador de aire v retire el Para limpia_; use agua y un detergente suave.
enchtde del tomacorriente de la pared antes No use cloro o materiales abrasivos.
de limpiar.
Bobinas para exteriores
Se deben inspeccionar con fl'ecuencia las bobinas
en el lado exterior del acondicionador de aire.
Si las mismas est;in obstruidas con sudedad u
hollfn, podrfan limpia_se protesionalmente.
Filtro de aire
E1 filtro de aire detMs de la rejilla frontal debe
inspecdona_se y limpia_se pot lo menos cada
30 dfas o mils a menudo si fllese necesario.
Pararetirarlo:
[_] Abra la rejilla de entrada hacia abajo firando
de las esquinas superiores de la reiilla de
entra da.
] i,exante ligeramente sol)re el filtro para
liberarlo y extMigalo.
I,impie el filtro con agua tibia yjab6n. Ei_ju;iguelo y
pelIllita que se seque antes de colocarlo oti'a vez en
su luga_:
ii, PRECAUCION:Noo_R_o/
acondicionadorde a/Yesin el filtro debidoa quela suciedad
y /as pelusas /oobstruir#ny reducir#nsu rendlmiento.
Page 25

Instrucciones
Acondicionador
de instalacion
I _ zPreguntas? Llame 800.GE.CARES(800.432.2737)oVisite nuestra pagina en la red en: www.GEAppliances.com I
de aire
ANTES DE INICIAR
Q REQUISITOS ELI:!:CTRICOS
Lea estas instrucciones completa y
cuidadosamente
• IMPORTANTE - Guardeestas
instrucciones para uso del inspector local.
• IMPORTANTE - Observetodos
los c6digos y 6rdenes de ley.
• Nota al instalador - Asegurese de dejar
estas instrucciones con el consumidor.
• Nota al consumidor - Conserve estas
instrucciones para referencia futura.
• Nivel de destreza - La instalaci6n de este
aparato requiere de destrezas mecanicas
basicas.
• l"iempo de ejecucion - Aprox. 1 hora
• Recomendamos dos personas para
la instalaci6n de este producto.
• La instalaci6n apropiada es la
responsabilidad del instalador.
• La falla del producto debido a una
instalaci6n inadecuada no esta cubierta
por la garantia.
El enchufe de tres peas con conexi6n a tierra
minimiza la posibilidad de descargas electricas.
Si el tomacorriente de la pared que usted planea
usar solamente tiene 2 tomas, es su
responsabilidad hacer que un tecnico Io
reemplace por uno de tres tomas con conexi6n
a tierra.
©
tomacorrientes de 115/120 voltios de
Algunos modelos requieren
corriente alterna y 60 Hz conectados a
tierra, protegidos con un fusible de
dilataci6n de tiempo de 15 amperios o
un cortacircuitos.
Algunos modelos requieren 230/208
voltios, de corriente alterna, protegidos
por un fusible de dilataci6n de tiempo o
un cortacircuitos. Estos modelos
deberian instalarse en un ramal
exclusivo del circuito para un
rendimiento mas notable y para prevenir
sobrecargas en los circuitos de
cableados de su casa o apartamento, Io
cual podria representar un riesgo de
incendio por el sobrecalentamiento de
los alambres.
PRECAUCION:
Bajo ninguna circunstancia corte o remueva
la tercera pt_a (conexion a tierra) del cable
electrico.
No cambie el enchufe en el cable electrico de
este acondicionador de aire.
Los cables caseros de aluminio podrian
presentar problemas especiales. Consulte a
un tecnico electricista calificado.
El cable de alimentaci6n incluye un
dispositivo para interrupci6n de corriente. Se
incluye un bot6n de prueba y de reinicio en el
dispositivo. El dispositivo debe ponerse a prueba
peri6dicamente: primero se presiona el bot6n de
TEST (prueba) y luego RESET (reinicio). Si el
bot6n TEST no se dispara o si el bot6n RESET
no queda enganchado, deje de utilizar el
acondicionador de aire y comuniquese
con un tecnico calificado,
Page 26

Instrucciones de instalacion
HERRAMIENTAS QUE NECESITARA
Un destornillador de estrella
PARTES INCLUlDAS
(aparencia puede variar) _ Ban,da desello
Panrdlde n montaje __..._'_,.,,
izquierdo superior Pe_rpluelSUpcr ilorjd enla - ___
Cinta de sellado\ de la ventana _ __-
x, _. del riel de \ / _ _..-'_.,.,.,.,.,._,
,_m_taje__ _ _
Tijeras o cuchilla
Un destornillador Lapiz
con hoja plana
Riel de __.._...
Nivel
__ ae la ventana
Una regla o cinta metrica
Gu_a del
_'__ _ ::_ _aeOr_!id6_n
_" _ SopoTdelumbral(2) "__
Soportede oporte eapoyo( )
cierre de la _ _"441 III
ventana
TipoA (14) Tipo B (7)
Tipo C (5) Tipo D (2)
Tornillo corredizo (2) Tuerca de cierre (4)
dlllllll
@
1
8
Page 27

Instrucciones de instalacion
REQUlSITOS PARA LA VENTANA
[]
• Estas instrucciones son para una
ventana estandar de dos pliegues.
Usted necesitara modificar el proceso
para otros tipos de ventanas.
• El acondicionador de aire puede
instalarse sin los paneles de acorde6n
para ajustarse a una ventana mas
estrecha. Ver las dimensiones de la
abertura de la ventana mas adelante.
• Todas las partes de apoyo deben quedar
totalmente aseguradas a algun metal,
mamposteria o a la madera.
• El tomacorriente electrico debe estar al
alcance del cable electrico del
acondicionador de aire.
I
19"mhimo
[] REQUlSITOS DE UNA VENTANA
DE TORMENTAS
Un marco de ventana de tormentas no
permitira que el acondicionador de aire se
incline hacia el exterior y evitara que
drene apropiadamente. Para solucionar
este problema, adhiera un pedazo de
madera a la repisa.
PIEZAS DE MADERA-
ANCHO: 2"
LONGITUD: Suficiente Iongitud para
ajustarse al interior del marco de la
ventana.
ESPESOR: Para determinar el espesor,
coloque un pedazo de madera en la repisa
para hacerlo 1/2" mas alto que la parte
superior del marco de la ventana de
tormentas.
Una firmemente con puntillas o tornillos
provistos por el instalador.
__ Madera
29"a 41"
(conpanebsdeacordeOn/
261A" minimo
(sinpanelesdeacordeOn)
lef2';_:_s alto que_Repisa
Marcode /
I
Page 28

Instrucciones de instalacion
[] RETIRE EL ACONDICIONADOR DE
AIRE DE LA CAJA
[] Remueva los 2 tornillos de envio de la parte
posterior de la caja.
[] Retire los 2 tornillos en cada lado de la caja.
Guardelos para mas tarde.
[] Deslice el acondicionador de aire de la caja
agarrando la empuhadura del carter base y tire
hacia adelante mientras sostiene la caja.
[] PREPARE LA VENTANA Y LA
CAJA (CONT.)
[] Con cuidado, inserte las guias del marco
plastico en el fondo de la caja en cada lado.
Fondode_.lacaja ___.__
_6uia delmarco
/
[] Remueva la parte posterior de la banda de
sellado del riel de montura superior y unala
al fondo del riel de montaje superior.
[] PREPARE LA VENTANA Y
LA CAJA
Corte el sello de la banda de la ventana a la
[]
Iongitud apropiada. Pele la parte posterior y
pegue el sello a la parte inferior de la banda
de la ventana.
Instale el riel de montaje superior con
[]
3 tornillos tipo A en el interior de la caja.
Inserte los marcos para los paneles de
acorde6n en el riel de montaje superior
y las guias del marco. Una los paneles
de acorde6n al lado de la caja usando
5 tornillos tipo A en carla lado.
Topmountingrail
C:'_" i
Frameguides
10
Page 29

Instrucciones de instalacion
[] PREPARE LA VENTANA
[] Una los soportes del umbral a los soportes
de apoyo que queden flojos usando 2
tornillos corredizos y 2 tuercas de cierre,
T0rnill0
corrediz0
Apoyedelurnbral
Abra la ventana y marque la linea central de
[]
la repisa de la ventana. Mida y marque 11"
hacia la izquierda y hacia la derecha de la
linea central.
Linea central
Soportede @eye
I
T/lerca de
cierre
r
I
[] INSTALE LA CAJA EN
LA VENTANA
[] Ajuste los tornillos corredizos y las tuercas
de cierre en cada soporte de forma tal que
la caja este instalada con una pequeha
inclinaci6n hacia el exterior. Use un nivel;
aproximadamente 1/3 de burbuja sera la
inclinaci6n correcta hacia el exterior. Apriete
los tornillos.
PRECAUCl0N: NO taladre un agujero en el
carter base. La unidad esta disehada para
operar con aproximadamente 1/2" de agua
en el cMter base.
[] INSTALE LA CAJA EN
LA VENTANA
[] Alinee el extremo interno de los apoyos del
umbral con las marcas de 11" a partir de la
linea central y Qnalos al umbral de la ventana
usando 2 tornillos tipo B en cada lado.
[] Con cuidado coloque la caja en la repisa de
la ventana alineando el centro frontal en el
fondo con la linea central marcada en la
repisa de la ventana. Cierre la ventana
cerciorandose de que la banda esta detras
del riel de montaje superior.
[] Usando el agujero de mayor diametro en la
caja, pegue los soportes a la caja usando 2
tornillos tipo D y 2 tuercas se cierre en cada
lado.
[] Asegure la caja a la repisa de la ventana
usando 3 tornillos tipo B.
[] Tire de los paneles de acorde6n hacia cada
paso del marco de la ventana, Unalos a
cada lado del marco de la repisa de la
ventana usando 4 tornillos tipo C.
11
Page 30

Instrucciones de instalacion
[] INSTALE EL SOPORTE DE CIERRE
DE LA VENTANA Y LA JUNTA DE
ESPUMA SUPERIOR DE LA
VENTANA
[] Una el soporte de cierre de la ventana
con un tomillo tipo C.
I_q Corte la parte superior de la espuma de la
L_J
junta al ancho de la ventana.
I_q Rellene la espuma entre el vidrio y la
L_J
ventana para evitar que aire e insectos se
introduzcan en la habitaci6n.
[] INSTALE EL ACONDICIONADOR
DE AIRE EN LA CAJA (CONT.)
Antes de instalar la parrilla frontal, tire
[]
hacia afuera de la palanca de control de
ventilaci6n Iocalizada encima de los
botones de control de la unidad, como
se muestra.
Una la parrilla del frente a la caja
[]
insertando las orejillas en la parrilla en
las ranuras en el frente de la caja. Empuje
la parrilla hasta que encaje en su lugar.
/_" t i
U
[] INSTALE EL ACONDICIONADOR
DE AIRE EN LA CAJA
[] Deslice el acondicionador de aire en la caja.
Reinstale los 2 tornillos removidos
anteriormente en cada lado de la caja.
Guiela palanca
cuidadosamente a tray, s
dela parrilla mientras
la empuja.
Baje la parrilla de entrada y asegurela
[]
al marco frontal con un tornillo tipo A.
Levante la parrilla de entrada a su lugar.
Tomilio Tornilio
Cableel6ctrico
entrada
12
Page 31

Solucionarproblemas, vvvvw.GEAppliances.com
Ideas para la idenflficaciSn y soluciSn de problemas:
iAhorre dinero y tiempo! Revise la siguiente tabla primero y
quiz#s no tenga que Ilamar para solicitar servicio.
Causas posibles Qu# hacer
E1acondicionadorde
aim noenciende
E1 acondJcionador de aJre • Cerci6rese de que el acondicionador de aire estfi
estfi desconectado, enchutildo totalmente en el tonmcorriente.
E1fusible se dJspm'6 / • ]nspeccione los fi,sibles/c@l de interruptores de la (asa
el cortacircttitos se disparo, y reemplace cualquier fllsible o reajuste el interrupto_:
h_terrupci6n en el ° Si ocurre tma interrupci6ia en el sunfilfistro el&'trico,
sumhlistro el6ctrico, apague OFF(APAGADO)elacondicionador de aire.
(Man(h) la energfa se restaure, espere 3 minutos para
reiniciar el acondicionador de aire para prevenir que
se dispare el compresor pot sobreca_ga.
El dJsposifivo de h_terrupcidn • Presione el bot6n RESET ubicado en el cable de
de corriente se ha activado, alin_entad6n.
• Si el botdn RESETno se mantiene en su lugax; no
ufilice Infs el acondicionador de aire y corn unkluese
con un tg_cnico calificado.
El acondicionador do airo El flujo de aire estfi res_ingido. • Cercidrese de que no existe ninguna cortina, pel_iana o
no enfriacomodeberia mueble bloqueando el ti'ente del acondicionador de aire.
F1 control de temperatura no • En el modo COOL (FR/O), presione la tecla de Redugir V.
estfi ajustado apmpiadmnente.
F?Ifiltro de aire estfi sucio. • lJmpie el filtro cada 30 (lfas pot lo menos. Vet la secci6n
de Instrucciones deOperacidn.
La habitacion podria haber • (]l/;indo el ;l(ondicion;idol" de aire se en('iende, usted
estado caliente, necesita darle tielnpo para que entiJ6 la habitacidn.
El aire frlo se estti escapando. • (_el'ci()l'ese de title los registros de 1:1caletiwcidn no estfin
abiel'tOS v se enct/entl';in l'etoYn;indo el ;lil'e ti'l().
• ())loque la ventanilla del acondicionador de aire en
la posici6n cerrada.
Las bobbins de enfrimniento • Vet "Acondicionador de aire congelandose" ,ntis adelante.
se congelaron.
El acondicionadordeaire E1]fielobloquea el flujo • Coloque los (ontroles en HIGH(/:3)FAN(VENTILADOR
se esM congelando de aire hacia el acondicionador ALTO) o HIGH (/:3) COOL (FRJOALTO)y ('oloque el
de aire evitm_do que se enfrle telln(3metro a una temperatura mils aim.
la habitacion.
E1control remoto I_as baterlas estahz hzsertadas • h>pe(('i(me 1;I p()si('idn (le las baterfas. Deben estar
no funciona hzcorrectaanente, insertadas en 1;I posici(m indicada, (+) y (-).
[as baterlas estm_ agotadas. • Reemplace las baterfas.
Hay agua goteando Calor excesivo y • Est,) es nomml.
afuera fiempo hfimedo.
Hayaguagoteandoenel FTIacondicionador de aire • Para (lrenar el agua apropiadamente, cei'cfoi"ese de que
interiordela habitacion no estti haclhmdo hacia afuera, el acondicionador de aire estfi inclinado ligeramente
desde el fi'ente hacia atrfis.
13
Page 32

Solucionarproblemas.
Ideas para la identfficaciSn y
solucidn deproblemas
Seacumulaagua
enla bandeja
Lafuncionde
SINCRONIZADOR(TIMER)
noestafuncionando
apropiadamente
Causas posibles
La hmnedad es removida
del aJre h_terno y drenada hacia
la parte posterior del gabhlete
donde m_ ventilador la empuja
conlra el embobhmdo del
consumidor.
Una p6rdJda en el sumhfislro
el6ctrico o tma h_terrupci&n ha
ocurrido.
Que hacer
• Esto es noY/ll[ll p()i" tin coFto perfodo en _/I'e[Is con poca
hmnedad; nomml pot un perfodo de fiempo mils
postergado en fireas mils hfimedas.
• En el caso de tma p_rdida del suministro el_ctfico o
tma .interrupcidn, la flmci6n de SINCRO/WZADORen la
mfidad se reajustnrfi al ajuste original. Es posible que
usted necesim ajustnr tm tiempo ntle;'o si asf lo desea.
14
Page 33

Sonidos de operacion normales
Quiz_is escuche un soni(lo met;ilico causado pot
el agua tomada y tirada contra el condensador en
los dfas lluviosos o cuando la humedad es alta.
Esta caracterfsfica de disefio avuda a reinover la
humedad y mejora la eficiencia.
Quizfis escuche que el tennostato hace clic
cuando el compresor hace ciclo entre encendido
y apagado.
www.GEAppliances.com
E1 agua se acumula en la bandeja durante dfas
lluviosos o con mucha humedad. E1 agua podrfa
derrama_e y gotear desde el lado externo de
la unload.
E1 venfilador podrfa flmcionar aun si el
COIIlpI'eSoI" no lo hace,
15
Page 34

/Vota&
m
m
16
Page 35

Garantiade su acondicionadorde aire.
Todos los servicios de garantfa los proporcionan nuestros Centros
de ReparaciSn de F#brica o nuestros t#cnicos Customer Care®
autorizados. Para concertar una cita de reparaciSn, en Ifnea,
24 horas al dfa, visftenos al GEAppliances.com, o flame
a1800.GE.CARES(800.432.2737).
Grapeaquisu recibo.
Se requiere facilitar prueba
de la fecha de compra original
para obtener un servicio
bajo la garantfa.
Nosotros reemplazaremos:
tin a#o Cualquierparte del acondidonador de aire que tidle debido a deiectos en los materiales o en
A par#r de la focha la filbl'ic;ici(_)n, Durante este a#o completo de garantia, nosotl'oS tambi6n proporcionaremos,
de la compra original sin costo alguno, toda la mano de obra v los sela'idos internos-para reemplazar partes defectuosas,
Cincoafos
A partir de lafecha
de la compraoriginal
Viajes de servicio a su casa pasta mostrarle como
fmlciona el equipo.
InstaJaci6n, entrega o mmltenhniento hmpropiada.
Si usted tiene ml problema durmlte la hlstaJaci6n,
o si su acondJcionador de aJre no tiene la capacidad
de enfrimniento que usted necesita, pongase en
contacto con nueslro dJstribuidor o h_stadador.
Usted es respmxsable de proporciona_r las facilidades
de conexi6n el6ctrica necesaxias.
FaJlo del producto resultaa_te de modificaciones aJ
producto o debido a uso irrazonable hlcluyendo no
proporcionar mm_te_fimiento razonable y necesario.
Cualquier parte del sistema de refrigeraci6n sellada (compreso_; condensado_, evapo_ldor y tuberfas
de con(%v_i(_)n) (1[/1_ tilllell debido a (lefectos ell los lnatel_ales o filblJcaciGn. Dtlrante estos cuatro
afos de garantia adicionales, tambi_n propordonaremos, sin costo alguno, toda la mano de obra
v los servi(ios intel31os p;ll'}l Y_ex//pl_lz;IY p;II'[(_S dete('tt/osas.
Reemplazo de fusibles de la casa o reajuste del sistema
de circuitos.
FaJlos debido a la corrosi6n en modelos que no es_al
protegidos conlra la corrosion.
Dm-m aJ producto causado pot voltaje hmpropiado hacia
el equipo, accidentes, h_cendJos, hlm_daciones o actos
de la naturaJeza de fuerza mayor.
Din-ms h_cidentades o consecuenciades causados por
defectos posibles con este acondJcionador de aJre.
Din-ms causados despu6s de la ena'ega.
I_hllocales comerciales, la mmm de obra necesa_ria pasta
retira_r la tufidad hacia ml luga_r paJcarevision por pa_rte
de ml t6ofico hldJviduaJ.
Esta garantfa se extiende al comprador original y cualquier comprador posterior de pmductos comprados para uso
residencial dentro de Estados Unidos. EnAlaska, la garantfa excluye el costo de env[o o las visitas de servicio a su casa.
Algunos estados no permiten la exclusifn o las limitaciones de dafios incidentales o consecuenciales. Esta garantia
da derechos legales espec[ficos, y usted podrfa tener otros derechos que variar#n de estado a estado. Para saber cufiles
son sus derechos legales, consulte a la oficina deasuntos del consumidor local o la oficina del Attomey General en
su Iocalidad.
Garante: General Electric Company. Louisville, KY 40225
17
Page 36

Ayudaal Cliente.
P@inaWebde GEAppliances vvvvvv.GEAppliances.com
,_'Tiene alguna pregunta sabre su ele{'trodont_stico? ;Pmebe la pfigina _'eb de GE Appliances 24 horas al
dfa, cualquier dfa del afiol Para mayor conveniencia v servicio mils rfipido, )_ puede desca_gar los Manuales
de los Propietarios, pedir piezas o incluso hacer una cita en lfnea para title vengan a realizar una
reparaci6n. Tambi&_ puede "_sk Our Team of Experts"' (Preguntar a nuestro equipo de expertos) sol)re
cualquier cuesti6n y m ucho mils...
Soliciteunareparaci6n vvvvvv.GEAppliances.com
E1 servMo de expertos GE estfi a tan s6lo un paso de su l)uerta, iEntre en lfnea ) solMte su reparaci6n
cuando le xenga bien 24 horas al dfa cualquier dfa del aft{!! O llame al 800.GE.CARES (800.432.2737)
dtli'ante hoi'as nOllllales de olicina.
RealLifeDesignStudio(Estudiodedisefioparalavidareal)wwvv.GEAppliances.com
GE apoya el concepto de Disefio Lrni\'ex_al-l)roductos, servicios v ambientes que pueden usar gente de
todas las edades, tamafios y capacidades. Reconocemos la necesidad de disefiar para una gran gama de
habilidades v dificultades ffsicas y mentales. Para mils detalles cobre las aplicaciones de GE Diseflo Universal,
incluvendo ideas de disefio para la cocina para i)e_onas con discapacidades, mire nuestra pfigina _'eb hay
mismo. Para personas con dificultades auditivas, e_vor de llamar al 800.TDD.GEAC (800.833.4322).
Garantfas amp/iadas vvvvvv.GEAppliances.com
Coral)re una ,garantfa ampliada v,obtenga, detalles sol)re descuentos especiales disponibles mientras su
garantfa estfi afin actixa. Puede comprarla en lfnea en cualquier momenta, o llamar al (8 .626.2224)
durante hams n{mnales de oficina. GE Consumer Home Services estarfi afin ahf ct_m{lo su garantfa temfine.
Aquellos indMduos con la calificaci6n necesafia para reparar sus propios electrodom_sticos pueden
I Piezas}/accesorios vvvvvv.GEAppliances.com
pedir que se les manden las piezas o accesofios directamente a sus hogares (aceptamos las tmjetas
VISA, MasterCard ) Dis{'oxer). Haga su pedido en lfnea hov 24 horas cada dfa o llamar pot tel(qono
al 800.626.2002 durante horas nora]ales de oIi{'ina.
Las instrucciones descritas eneste manual cubren lospmcedimientos a seguir per cualquier usuario. Cualquier
otra reparaci6n deberia, par regla general, referirse a personal calificado autorizado. Debe ejercerse precauci6n
ya que las reparaciones incorrectas pueden causar condiciones de funcionamiento inseguras.
00 ....
P6ngaseencontacto connosotros vvvvvv.GEAppliances.com
Si no estfi satisfecho con el servicio que recibe de (;E, p6ngase en conta{'to con nosotros en nuestra pfigina
_,,Vebindicando todos los detalles asf como su n(imero de tel(qbno o escrfl)anos a:
General Manage_; Customer Relations
GE Appliances, Appliance Park
I,ouis\ille, KY 40225
iRegistre su nuevo electrodom_stico en lfima-cumado usted prefiera! E1 registrar su produ{'to a tiempo le
l Reg/stre su electrodom_stico vvvvvv.GEAppliances.com
' i)roporcionarfi, si surgiera la necesidad, una mejor comunicaci6n ) un servicio mils rfipido bajo los t(qminos
de su garantfa. Tambi(q] puede enviar su tmjeta de registro pre-impresa que se in{luve en el material de
embal_!je o recorte v use el timnulario de este Manual del Propietafio.
/oo Impreso on Coroa
 Loading...