

Page 1
©
GEAppliances.com
Safety Instructions ......... 2, 3
Operating Instructions
Control Knot) Models ....... 6, 7
Touch Pad Models .......... 4, 5
Care and Cleaning
Air Filter ................... 8
Grille and Case .............. 8
Outdoor Coils ............... 8
Installation Instructions
Preparing to Install the
Air Conditioner .............. 9
Window Installation ....... 10-14
Troubleshooting Tips .... 15, 16
Normal Operating Sounds .... 16
AGM14 AGH24
AGL18 AGL24
AGM18 AGN24
A GN18 A GQ24
AGQ18 AGV24
AGV18
©
Consumer Support
Consuiner Support .......... 20
Product Registration ...... 17, 18
Warranty .................. 19
Writethemodelandserial numbershere:
Model #
Serial #
Find these numbers on a label on the
side of tim air conditioner.
3828A20145P 49-7429 12-01JR
Page 2
IMPORTANTSAFETYINFORMATION.
READALLINSTRUCTIONSBEFOREUSING.
WARNING!
For your safe_ the information in this manual must be followed to minimize the risk of fire, electric shock
or personal injury.
SAFETYPRECAUTIONS
N Use tiffs appliance only tbr its intended
purpose as described in this Ouamr's
Manual.
N This air conditoner must be properly"
installed in accorxlanee with file Installation
Instnmfions beibre it is used.
@ Never unplug your air conditoner by
pulling on tim power coM. Always grip plug
firmly and pull straight out from the
receptacle.
@ Repair or replace iinmediately all electric
service cords fllat have become flayed or
otherwise dain_ed. Do not use a cord that
shows cracks or abrasion dmn_e along its
lengfll or at either the plug or connector
end.
@ Turn file mode control m OFFand unplug
@ For your s_ety...do not store or use
HOWTOCONNECTELECTRICITY
Do not, under any circumstances, cut or remove
the third (ground) prong from the power cord. For
personal safe_ this appliance must be properly
grounded.
The air conditioner should always be
plugged into its own individual electrical
outlet which has a voltage rating that matches
tile rating plate..
your air conditioner beIbre making ally
repairs or cleaning.
NOTE:We strongly reconmmnd that any
selwicing be pertbnned by a qualified
individual.
combustble materials, gasoline or other
flammable vapors or liquids in the vicinity"
of tiffs or any other appliance.
The power coM of tiffs appliance is equipped
with a 3-prong (grounding) plug which mates
with a standard 3-prong (grounding) wall
outlet m minimize the possibility of electric
shock hazard from tiffs appliance.
Have the wall outlet and circuit checked by a
qualified electrician m make sure the outlet is
properly" grounded.
"v@mre a 2-prong wall outlet is encounmred,
it is your pe*:sonal responsibility" and obligation
to have it replaced with a properly grounded
@prong wall outlet.
This provides tim best perfomlance and also
prevents ovefl_yading house wMng circuits
which could cause a fire hazard from
overheated wires.
See tim Installation Instructons, Electrical
Requirements section t:or specific electrical
connection requirement_s.
2
Page 3
WARNING!
USEOFEXTENSIONCORDS-77&Voltmodelsonly
GEAppliances.com
Because of potential safety hazards under certain
conditions, we strongly recommend against the
use of an extension cord.
However; if you must use an extension cord,
it is al_olumly nece_ry that it be a UL-listed,
14 gauge, 3-wire grounding type appliance
extension corvt having a grounding tytm plug
and outlet and that the electiical rating of the
cord be 15 amperes 0ninimum) and 125 volts.
,_ CAUTION:
DONOT use an extension cord with any of
the230,/208voltmodels.
USEOFADAPTERPLUGS-115-Voltmodelsonly
Because of potential safety hazards under certain
conditions, we strongly recommend against the use
of an adapter plug.
Howexe,; if you nlust use an adapter, where
local codes permit, a temporaryconnection may
be made to a properly grounded 2-prong w-all
outlet by use of a UL-listed adapter available at
most local hardware stores.
The larger slot in tim adaptor must be aligned
wifll the larger slot in the wall outlet m provide
proper polarity in the connection of the power
cord.
When disconnecting the power cord from the
adapte,; always hold the adapter in place wifll
one hand while pulling the power cord plug
with the other hand. If this is not done, the
adapter ground mmlinal is ve_T likely m break
with repeated use.
If tile adapter ground mrminal breaks, DONOT
USE tile air conditioner until a proper ground
has been estal)lished.
Attaching theadapterground terminalto a wall outlet
coverscrewdoesnotground the applianceunlessthe
coverscrewis metal,and not insulated,and thewall
outlet is groundedthrough the housewiring. Youshould
havethecircuitcheckedbya qualifiedelectrician to
makesuretheoutlet isproperlygrounded.
READANDFOLLOWTHISSAFETYINFORMATIONCAREFULLY.
SAVETHESEINSTRUCTIONS
3
Page 4
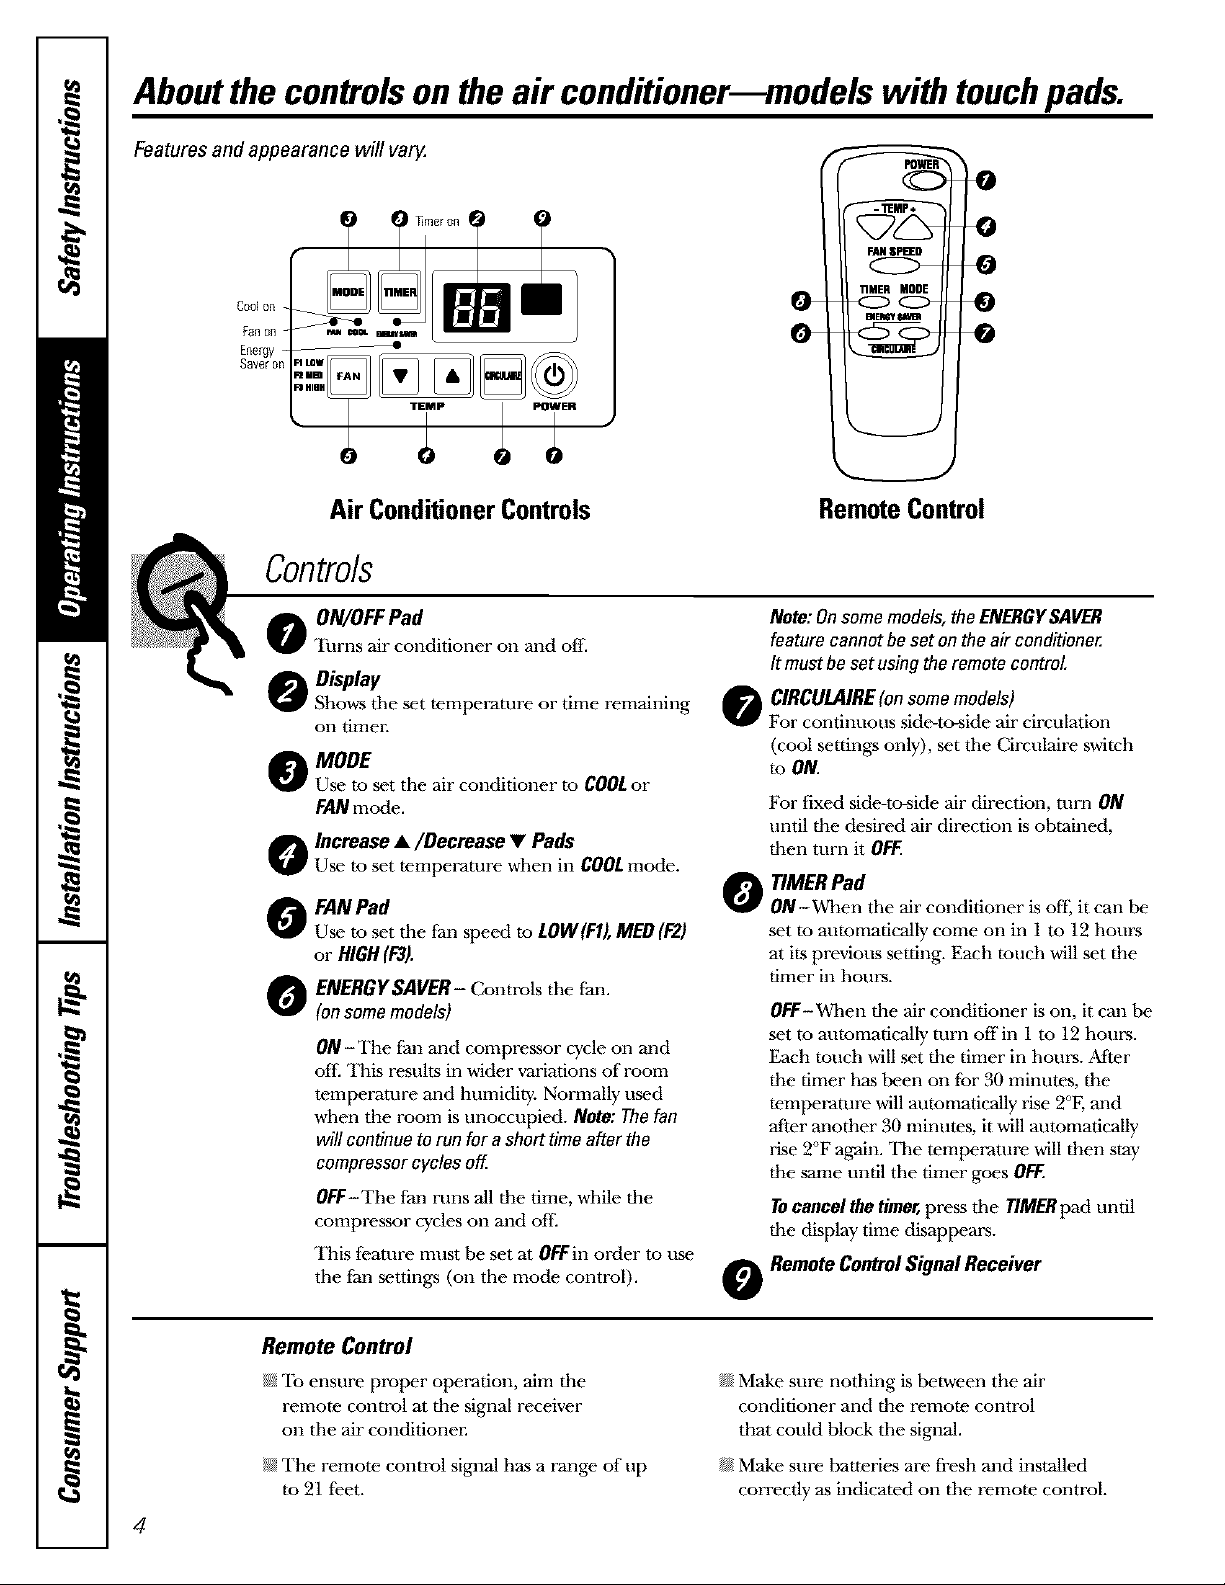
Aboutthecontrolsontheair conditioner odels withtouchpads.
Features and appearance will varg.
0
O
0
Co01 On
_n on
Energy
Saver 0[/
Air ConditionerControls
Controls
o ON/OFFPad
Turns air conditioner on and otE
k Display
F Shov_ the set temperature or time remaining
on timel:
O MODE
Use to set the air conditioner to COOLor
/AN mode.
Gk Increase •/Decrease • Pads
r Use to set temperature when in COOLmode.
O FANPad
Use to set the fan speed to LOW(F1),MED(F2)
or HIGH(F3).
OENERGYSAVER-Controls the fan.
(on some models)
ON-The thn and compressor cycle on and
off. This results in wider variations of room
temperature and humidity. Normally" used
when the room is unoccupied. Note: The fan
will continue to run for a short time after the
compressor cycles of_
OFF-The fan runs all the time, while dm
compressor cycles on and off.
This feature must be set at OFFin order to use
the tan settings (on the mode control).
0
0
0
RemoteControl
Note:Onsomemodels,theENERGYSAVER
feature cannot beset ontheair conditioner.
It mustbe setusingtheremote control.
O CIRCULAIRE(onsomemodels)
For continuous side-to-side air circulation
(cool settings only'), set the Circulaire switch
to ON.
For fixed side-to-side air direction, turn ON
until the desired air direction is obvained,
then turn it OFI_
O TIMER Pad
ON-When the air conditioner is of[; it can be
set to automatically come on in 1 to 12hours
at its previous setting. Each touch will set the
timer in hours.
OFF-When the air conditioner is on, it can be
set to automatically turn offin 1 m 12 hours.
Each touch will set the timer in hours, zM'ter
tim timer has been on for 30 miimtes, the
temperature will automaticAly rise 2°E and
after another 30 minutes, it will m]mmatically
rise 2°F again. _12qemmperature will then stay"
the same until the timer goes OFF.
TOcancel the timer, press the TIMER pad until
the display" time disappears.
o Remote ControlSignal Receiver
Remote Control
% To ensure proper operation, aim the
remote control at the signal receiver
on the air conditioner.
% The remora control signal has a range of up
to 21 feet.
4
_ Make sure nothing is between the air
conditioner and the remote control
that could block the signal.
_ Make sure batmries are fresh mad installed
correctly as indicated on the remote control.
Page 5
GEAppliances.com
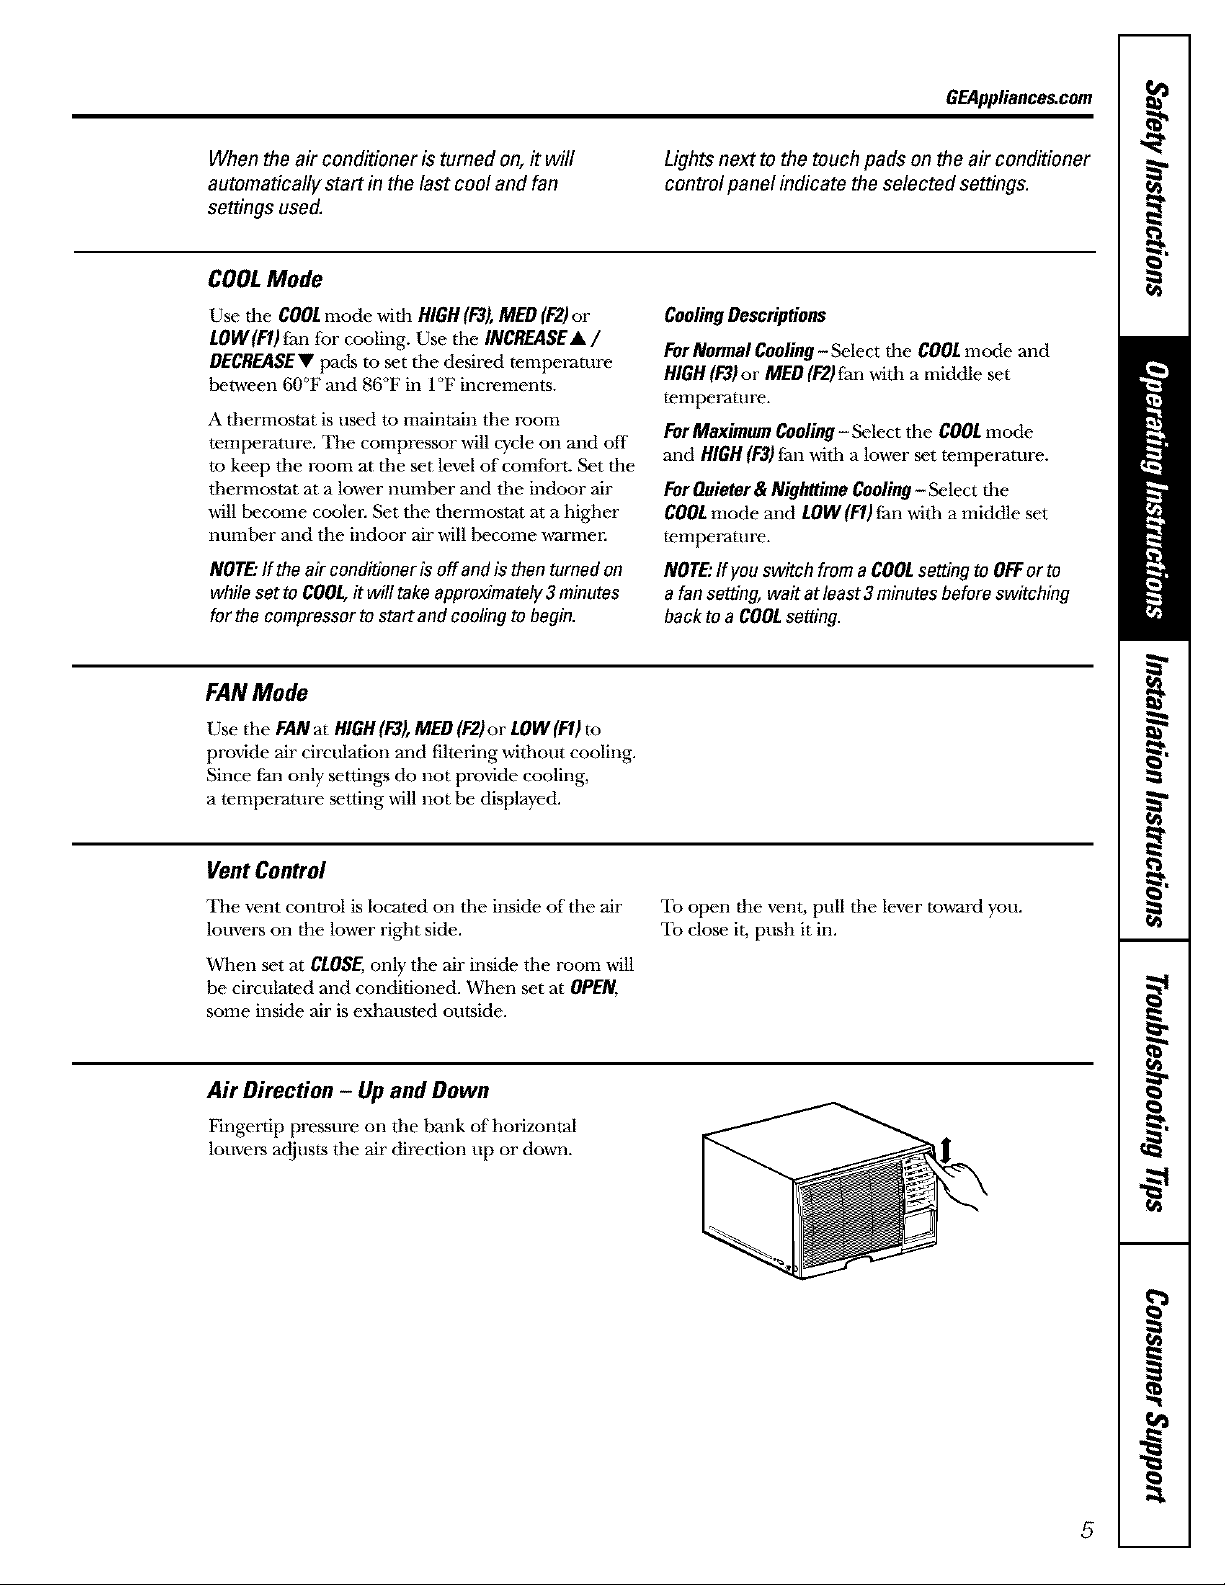
When the air conditioner is turned on, it will
automatically start in the last cool and fan
settings used.
COOLMode
Use the COOLmode with HIGH (F3),MED (E2)or
LOW(F1) fan for cooling. Use the INCREASE • /
DECREASEY pads to set the desired temperature
between 60°F and 86°F in 1 °F increments.
A thermostat is used to maintain the room
temperature. _i11ecompressor will cycle on and off
to keep the room at the set level of comforL Set dm
thermostat at a lower number and the indoor air
will become coolen Set the thermostat at a higher
numix-r and the indoor air will become ,a_rmm:
NOTE:ff the air conditioneris off andis thenturnedon
whileset to COOL,it will take approximately3minutes
for the compressorto startand cooling to begin.
FAN Mode
Use the FAN at HIGH (F3),MED (F2)or LOW (F1)to
provide air circulation and filtering without cooling.
Since tan only settings do not provide cooling,
a temperature setting will not be displayed.
Lights next to the touch pads on the air conditioner
control panel indicate the selected settings.
CoolingDescriptions
ForNormal Cooling-Select the COOL mode and
HIGH (F3) or MED (F'2)fan with a middle set
temperature.
FOrMaximum Cooling- Select the COOLmode
and HIGH(F3)t:an with a lower set temperature.
For Quieter & Nighttime Cooling- Select dm
COOLmode mad LOW(F1) Pan with a middle set
temperature.
NOTE:If youswitch from a COOLsettingto OR:orto
a fan setting, wait at least3 minutesbeforeswitching
back to a COOLsetting.
VentControl
_ille vent control is located on the inside of the air
louvers on dm lower right side.
When set at CLOSE, only the air inside the room will
be circulated and conditioned. When set at OPEN,
some inside air is exhausted outside.
Air Direction - Up and Down
Fingertip pressure on the bank of horizontal
louvers adjusts the air direction up or down.
'lb open dm vent, pull the lever tow-ard you.
To close it. push it in.
5
Page 6
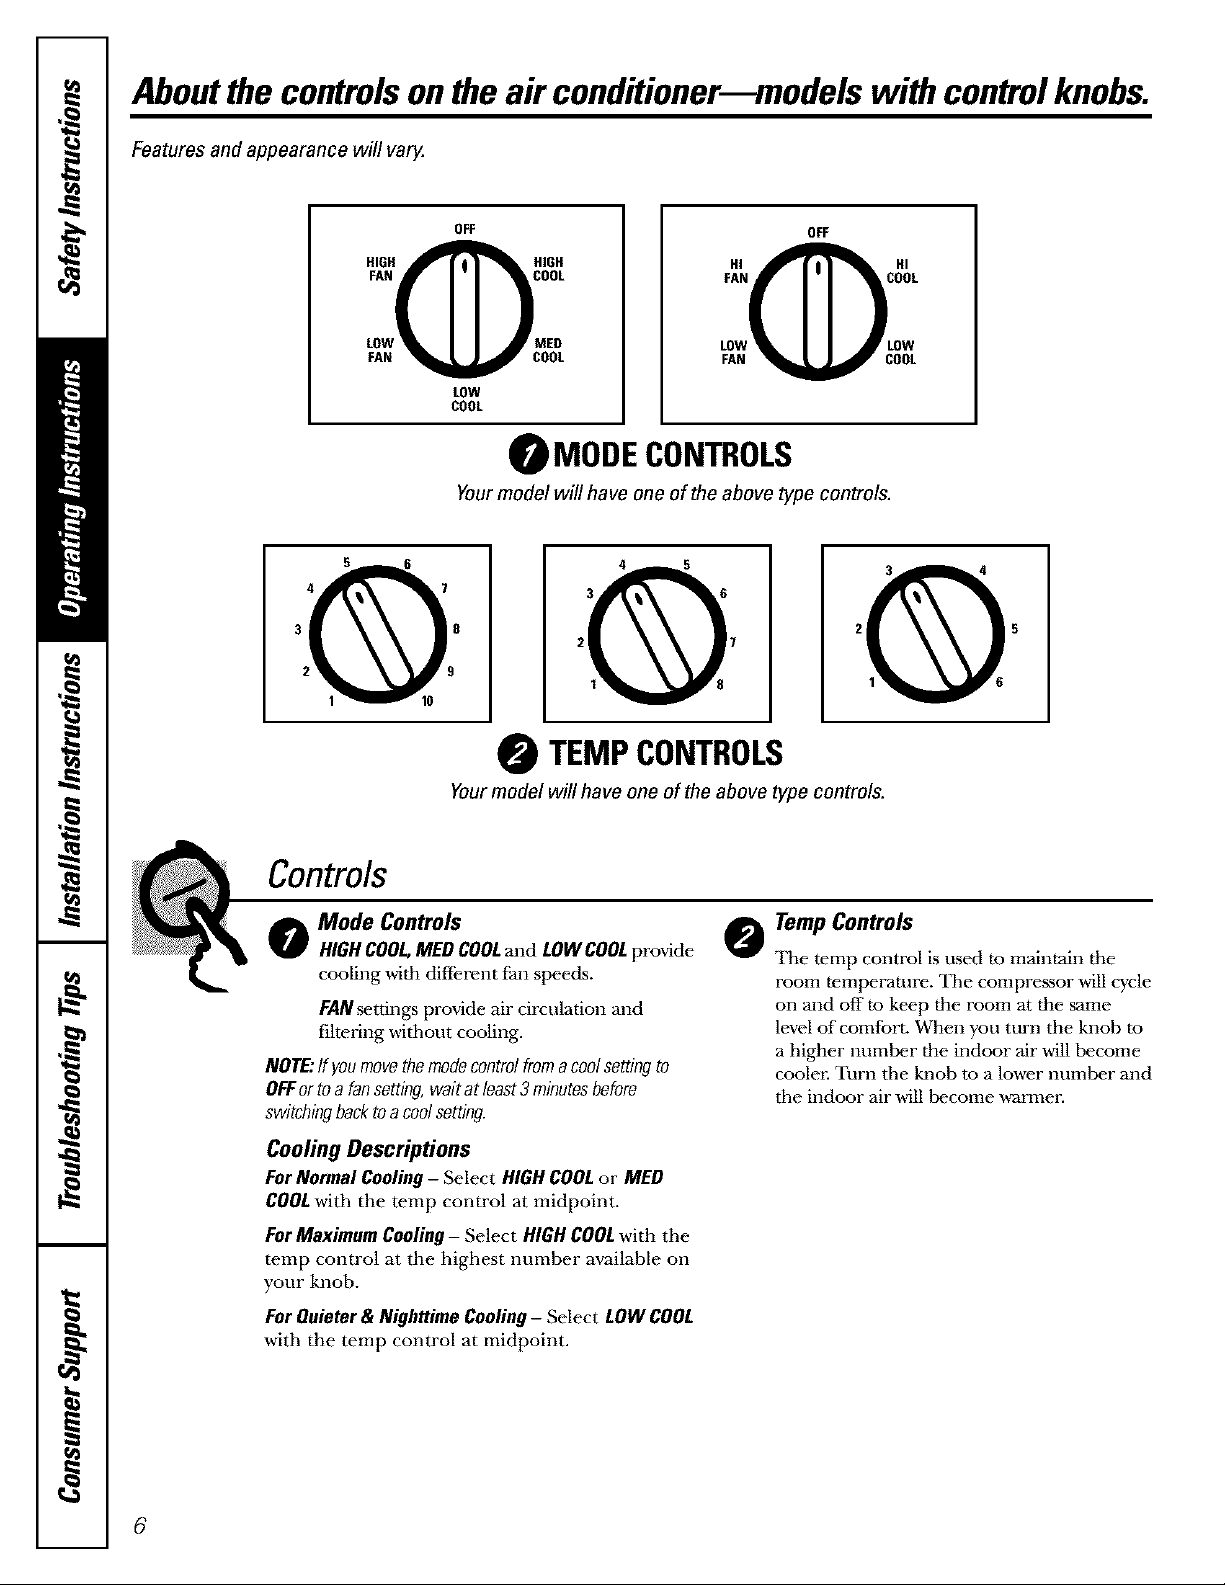
Aboutthe controlsonthe air conditioner_odels with controlknobs.
Features and appearance will va_
OFF
FAN COOL
HIGHOIIGH
LOW MED
FAN OOL
LOW
COOL
O MODECONTROLS
Yourmodel will have one of the above type controls.
O TEMPCONTROLS
Yourmodel will have one of the above type controls.
OFF
Controls
o Mode Controls
HIGHCOOL,MEDCOOLand LOWCOOLprovide @
cooling with diffbrent thn speeds.
FAN mttings provide air circulation and
filtering without cooling.
NOTE:If youmovethemodecontrolfromacoolsettingto
OFFortoafansetting,waitat least3minutesbefore
switcbiWbacktoa coolsetting.
Cooling Descriptions
ForNormal Cooling- Select HIGHCOOLor MED
COOLwith the temp control at midpoint.
For Maximum Cooling - Select HIGH COOL with the
temp control at the highest immber available on
your knob.
ForQuieter& Nighttime Cooflng- Select LOWCOOL
with the ternp control at midpoint.
TempControls
The temp control is used m maintain the
room temperature. _lZqecompressor will cycle
on and off to keep the room at the same
level of comfort. When you turn the knob to
a higher number the indoor air will become
cooler. 'filrn the knob m a lower immber mid
the indoor air will become warmen
6
Page 7

Additional controls and important information.
Energy Saver (on somemodels)
_i11e energy saver switch controls the fan.
ON- _i11et:an and compressor cycle on and off
together. 'I11isresults in wider variations of room
mmperature and humidity: Normally" used when
the room is unoccupied.
Vent Control
The vent control is located above the control
knobs.
When set at CLOSE,only the air inside the room will
be circulated and conditioned. When set at OPEN,
some inside air is exhausted outside.
Air Direction - Side-to-Side
GEAppliances.com
OFF - The fan runs all the time, while the
compressor cycles on and off
This switch must he set at OFFin order to use
the fan settings (on the mode control).
rib open the vent, pull the lever toward you.
To close it, push it in.
CIRCULAIRE(on some models)
For fixed side-to-side air direction, set the
Circulaire switch to ON until the desired air
direction is obtained, then move it to OFF.
For continuous side-to-side air circulation (cool
settings only), set the Circulaire switch to ON.
Air Direction - Up and Down
Fingertip pressure on the bank of horizontal
louvers adjusts the air direction up or down.
OFF
ClRCULAIRE
ON
7
Page 8

Careand cleaningof theair conditioner.
Grille and Case
Turn tbe air conditioner off and remove the To clean, use water and a mild detergent. Do llOt
plug from the wall outlet before cleaning, use bleach or abrasives.
OutdoorCoils
_12qecoils on the outdoor side of the air conditioner
should be checked regularly. If they" are clogged
with dirt or soot they" may" Ix- professionally steam
cleaned, a mrvice available through your GE
service outlet.
AirFilter
The air filter behind the front grille should be
checked and cleaned at least every 30 days or more
often if necessary.
Toremove:
[] Open the inlet grille up,a_rd by pulling out the
bottom of the inlet grille.
[] Using the tab, pull up slightly on the filter to
release it and pull it dowql.
Clean the filter with ,a-arm, soapy water. Rinse and
let the filter diT before replacing it.
CAUTION:DONOToperatetheairconditionerwithouta
filterbecausedirtandlint will clogit andreduceperformance.
8
Page 9

Preparingtoinstall theair conditioner.
Read these instructions completely and carefully.
BeforeYou
NOTE TOINSTALLER:Leave these instructions with
the air conditioner after installation is completed.
NOTE TOCONSUMER:Keep this Owner's Manual
and Installation Instructions for future use.
IMPORTANT NOTES:
Forpersonal safe_ this air conditioner must be
properly grounded.
Itis important to have the wall outlet and circuit
checked by a qualified electrician if there is any
doubt as to whether a proper ground exists.
Follow National Electric Codes (NEC)and/or local
codes and ordinances.
Electrical
Some models require 115/120-volt a.c.,
@
_l]ae 3-prong grounding plug minimizes the
possibilivy of"electric shock hazard. If the wall outlet
you plan m use is only" a 2-prong outlet, it is your
responsibility to have it replaced with a properly"
grounded 3-prong wall outlet.
60 Hz grounded outlet protecmd with
a 15-arnp time delay" fuse or circuit
breakm:
CAUTION:
Do not, under any circumstances, cut or
remove the third (ground) prong from the
power cord.
Do not change the plug on the power cord
of this air conditioner.
Aluminum house wiring maypresent
special problems--consult a qualified
electrician.
protected with a time delay fuse or circuit
Some models require 230/208-volt a.c.,
breaker. These models should be installed
on their own single branch circuit for bestperformance and to prevent overloading
houm or apamnent wiring circuits, which
could cause a possible fire hazard from
overheating wires.
ToolsYouWillNeed
_; Phillips-head screwdriver
N Flat-blade screwdriver
N Ruler or tape measure
N Scissors or knife
U_Pencil
_ Level
_ Hammer
9
Page 10

WindowInstallationInstructions.
Parts Included
Le_o ___ __
acco d'o Z-_YJZ.,_ Foam top _ _._ _''_;_
_Top mounting rail J _
-.--__ sealst.p
Frame guide (2) __._ • ._"S'J Right
_ _ "_._'_t_ _ .s accordion
_ _ _._ .__ 0ooe,
Wi " Support bracket (2) ., ,
n_tk'ng _ _
Type A (14) Type B (7) Type C (5) Type D (2) Carriage Bolt (2) Lock Nut (4)
10
Page 11

Read completely, then follow step-by-step.
Window Requirements
@ These instructions are for a standard double-
hung window. You will need to modify" them for
other Wpes of windows.
The air conditioner can be installed without the
accordion panels if needed m fit in a narrow
window. See the window opening dimensions to
the right.
All supporting parts must be secured to firm
wood, masom T or metal.
The electrical outlet must be within reach of the
power cord.
Storm Window Requirements
A storm window frame will not allow the air
conditioner to tilt towards the outside and will keep
it from draining properly: To adjust for this, attach
a piece of wood to the stool.
1/2" higher
thanframe
frame
Stool
j Wood
I I
29"to41"
{Withaccordionpanels)
I
I I
26¼"rain
(Withoutaccordionpanels)
WOODPIECES-
WIDTH:2"
LENGTH:Long enough to fit inside the window
frame.
THICKNESS:'Ib determine the thickness, place a
piece of wood on the stool to make it 1/2" higher
than the top of the storm window frame.
Attach securely with nails or screws provided by"
the installer.
18"rain
11
Page 12

WindowInstallationInstructions.
Remove the Air Conditioner From the Case
[]Remove the 2 shipping screws from the back of
the case.
[]Remove the 2 screws on each side of the case.
Keep these for later use.
Shippingscrews
[]Slide the air conditioner from the case by
gripping the base pan handle and pulling
forward while bracing the case.
Prepare the Window and the Case
[] Cut the window sash seal to the proper length. [] Remove the backing from the top mounting
Peel off the backing and attach the seal to the rail seal strip and attach the seal to the bottom
underside of the window sash. of the top mounting rail.
[_ Install the top mounting rail with 3 )pe A
screws on the inside of the case. Insert the
frames for the accordion panels into the top
[R] Carefully insert the plastic frame guides into
the bottom of the case on each side.
Bottomofcase
mounting rail and the frame glfides. Attach
the accordion panels to the side of the case
using 5 type A screws.
Topmountingrail
O-
12 Frameguides
Page 13

Prepare the Window
[]Loosely attach the sill brackets m the support
brackets using the 2 carriage bolts and 2
lock nuts.
Supped:bracket
Carriage I
bolt ___ Locknut
SiEIbracket/
Install the Case in the Window
[] _Mignthe inside edge of tim sill brackets with
tim 11" marks fi'om the centerline and attach
flmm to the window sill using 2 Woe B screws
on each side.
[] Careflflly place the case on the window stool
aligning the center front on the bottom with
the centerline marked on the window stool.
Close the window making sure the window sash
is behind the top mounting rail.
[]Open the window and mark the centerline of
the window stool. Measure and mark 11" to the
left and right of the centerline.
Centedine
[] Secure the case to the window stool by
using 3 Woe B screws.
[]Using the larger diameler hole in the case,
attach the brackets to the case using m,o type D
screws and 2 lock nuts on each side.
_ Ac_ust the carriage bolts and the lock nuts in
each support m that the case is installed with a
slight tilt m the outside. Use a level; about 1/3
bubble will be the correct case slant to the
outside. Tighten the bolts.
CAUTION:DONOTdrilla holeinthebasepan.Theunitis
designedtooperate withapproximately1/2" ofwaterin the
basepan.
[]Pull the accordion panels to each window
sash track. Attach them on each side to the
window sash and the window stool using
4 type C screws.
13
Page 14

WindowInstallationInstructions.
Install the Window Locking Bracket and the Foam Top Window Gasket
[]Attach the window locking bracket with a
type C screw.
I
Install the Air Conditioner in the Case
Slide tim air conditioner into the case.
[]
Reinstall the 2 screws removed earlier on each
side of the case.
Before installing the front grille, pull out the
[]
vent control lever located above the unit
coim'ol knobs, as shown.
[]Cut the foam top window gasket to the window
width.
[]Stuff the foam between the glass and the
window to prevent air and insects from getting
into the room.
[] Attach the front grille m the case by inserting
the tabs on the grille into the. slots on the fi'ont
of the case. Push the. grille in until it snaps into
place.
14
f
Guidethe lever carefully
through the grille as you
push it in.
]Lift the inlet grille and secure the front frame
with a type A screw. Lower tim inlet grille into
place.
Page 15

Beforeyoucall forservice... GEAppliances.com
Troubleshooting tips
Save time and money! Review the chart below first
and you may not need to call for service.
Possible Causes What ToDo
The air conditioner • Make sure the air conditioner plug is pushed completely
is tmplugged, into the outlet.
The fuse is blown/cireult • Check the house fltse/circuit breaker box and replace
breaker is tripped, the fi]se or reset tim breaker.
Power failure. • If power failure occurs, turn the air conditoner OFF.
When power is restored, wait 3 minutes to restart the
air conditioner to prevent tripping of the compressor
overload.
Airflow is restricted. * Make sure there are no curtains, blinds or fi]rniture
blocking tim front of the air conditioner.
The temp control may • On models with touch pads: In COOL mode, press tim
not be set correcdy. DECREASE•pad.
• On models with control knobs, turn the temperature
knob to a higher numbel:
The air Filter is dirty. • Clean the filter at least every 30 days.
See tim Operating Instructions section.
The room may have been hot. • When the air conditioner is first turned on you need to
allow time for the room to cool down.
Cold air is escaping. • Check for open fi]rnace floor registers and cold air
Cooling coils have iced up. • See "air conditioner froozinfl up" below.
Ice blocks the air flow • On models with control knobs, set the mode control at
and stops the air conditioner HIGH FANor HIGH COOLwith the temp at t or 2.
from cooling the room. • On models with touch pads, set the controls at
The batteries are inserted • Check the position of the batteries. _i]ley should be
incorrectly, inserted in the opposite (+) and (-) direction.
The batteries may be dead. • Replace tim batteries.
Excessively hot and • This is normal.
humid weather.
The air conditioner is not • For proper water disposal, make sure the air conditoner
tilted to the outside, slants slightly" from the case fi'ont to tim rein:
Wato_llo_tsin Moisture is removed from
: indoor air and drains into
blows it against the outdoor
rear of a cabinet where a fan
condenser coil.
Feturils.
• Set tim air conditioner's vent to tim closed position.
HIGH (F3)FAN or HIGH (F3) COOLand set the thermostat
to a higher temperature.
• This is normal for a short period in areas with little
humidity; normal for a longer period in very humid
areas.
15
Page 16

Before youcall forservice...
Normal Operating Sounds
NYou may hear a pinging noise caused by"water being
picked up and thrown against the condenser on rainy
days or when the humidity is high. _lNisdesign feature
helps remove moisture and improve efficiency:
/}55You may hear the thermostat click when the compressor
cycles on and of[i
N Water will collect in the base pan during high humidi W
or on rainy days. "Ilm water may overflow and drip from
the outdoor side of tim unit.
/})5The fan may" mn even when the compressor does llOL
16
Page 17

GE Service Protection Plus TM
GE, a name recognized worldwide tbr qualily and dependabilily, offers you
Service Protection Plus '_'--comprehensive protection on all your appliances--
No Matter What Brand!
Benefits Include:
• Backed by GE
• All brands covered
• Unlimited service calls
• All parts and labor costs included
• No out-of-pocket expenses
• No hidden deductibles
• One 800 number to call
You will be completely satisfied with our service protection or you may request your money back
on the remaining value of your contract. No questions asked. It's that simple.
Protect your refl'igeratol; dishwashm, w-asher and drym, range, _7, VCR and much more--any brand!
Plus there's no extra charge for emergency service and low monthly financing is available. Even icemaker
coverage and tood spoilage protection is oflered. You can rest easy, knowing that all your valuable
household products are protecte.d against expensive repairs.
Place your confidence in GE and call us in the U.S. toll-ti'ee at 800.626.2224
for more information.
*All bral_ds covei ed, up to 20 yeais old, in the comi_lental U.S.
We'll CoverAny Appliance.
Anywhere. Anytime.*
,_., Cut here
Pleaseplace in envelopeand mail to:
General Electric Company
Warranty Registration Department
P.O. Box 32150
Louisville, KY 40232-2150
17
Page 18

Consumer Product Ownership Registration
Dear Customer:
Thank you for purchasing our product and thank you/br placing your confidence in us.
We are proud to have you as a customer!
Follow these three steps to protect your new appliance
1
Complete and mail
your Consumer
Product Ownership
Regis_afion today.
Have tile peace of
mind of knowing we
can contact you in
the unlikely event of
a satbty modification.
2
Model Number Serial Number
I I I I I I I I I I I
After mailing tile
registration below,
store this document
in a satb place. It
contains intbrrnation
you will need should
you require service.
Our service number is
800.GE.CARES
(800.432.2737).
mvestment:
Important: If you did not get a registration card with your
product, detach and return the form below to
ensure that your product is registered, or register
online at GEAppliances.com.
Read your Owner's
Manual careflflly.
It will help you
operate your new
appliance properly.
IIIIIII
,_ Cut here
Consumer Product Ownership Registration
I I I I I I I I I I I I I I I I I
Mz. [] Ms. [] Mrs. [] Miss []
First I l_-st I
Name I I I I I I I I I Name I I I I I I I I I I I I
Street ]
Address I I I I I I I I I I I I I I I I I I I I I I I I
Apt. # ] I I I I I I I E-mail Address*
(:it>,] I I I I I I I I I I I I I State]
Date Placed
Month II III
* Please provide }o_,11"e-mail address to receive, via e-mail, disco/in/s, special otteI_ and other important
communications from GE Appliances (GEA).
[_ Check here ityou do not want to receive communicatiol_s fl'om GEA's caretully selected partners.
Model Number Serial Number
Zip
Code [
I
Nm_llwr ] I I
, I I
18
General Eleetiic Compan?
Louisville, gealucky
GEAppliances.com
GEApplincu
Page 19

Air ConditionerWarranty
All warranty service provided by our Factory Service Centers,
or an authorized Customer Care ®technician. To schedule service,
on-line, 24 hours a day, visit us at GEAppliances.com, or call
800.GE.CARES (800.432.2737).
Staple your receipt here.
Proof of the original purchase
date is needed to obtain service
under the warranty.
We Will Replace:
Any part of the air conditioner which l_ailsdue to a defect in materials or workmanship.
During this fullone-year warranty, we will also provide, free of charge, all labor and in-home
service to replace the defective part.
Five Yea_ Any patt ofthe sealed refrigerating system (the compre_ol; condensel; evaporator and
all co,mecting robing) which l_ailsdue to a defect in materials or workmanship. During this
_rigin_i _ _ _ four-year additional warranty, we will also provide, free of charge, all labor and in-home service
to replace the defective part.
_ Service trips to your home to teach you howto
use the product.
_ Improper instaBafion. If you have an installation problem,
or if the air conditioner is of improper cooling capacity
for the intended use, contact your dealer or installer.
You are responsible for providing adequate electrical
connecting facilities.
_ Failure of the product resulth_g from modifications to
the product or due to unreasonable use including failure
to provide reasonable and necessary maintenance.
_ In commercial locations labor necessary to move the
unit to a location where it is accessible for service
by an individual technician.
_ Replacement of house fuses or resetting of circuit
breakers.
_ Failure due to corrosion on models not corrosiom
protected.
_ Damage to the product caused by improper power supply
voltage, accident, fire, floods or acts of God.
_ Incidental or cousequential damage caused by possible
defects with this air conditioner.
This warranty is extended to the original purchaser and any succeeding owner for products purchased for home
use within the USA. In Alaska, the warranty excludes the cost of shipping or service calls to your home.
Some states do not allow the exclusion or limitation of incidental or consequential damages. This warranty gives
you specific legal rights, and you may also have other rights which vary from state to state. To know what your
legal rights are, consult your local or state consumer affairs office or your state's Attorney General
Warrantor: General Electric Company. Louisville, KY 40225
19
Page 20

ConsumerSupport.
/_ ¸ ¢
GEAppliancesWebsite
Have a question or need assistance with your appliance? 'l_Tr"the GE Appliances Websim 24 hours a day;
any day of the year! For greamr convenience and faster service, you can now download Owner's Manuals,
order parts, catalogs, or even schedule service on-line. You can also "Ask Our 'it-am of Experts ''_"
your questions, and so much more...
ScheduleService
Expert GE repair service is only one step aw_ayfrom your door. Get on-line and schedule your smwice at
your convenience 24 hours any day of the year! Or call 800.GE.C_M/ES (800.432.2737) during normal
business hours.
GEAppliances.com
GEAppliances.com
RealLifeDesignStudio GEAppliances.com
GE supports the Univm.-salDesign concept_products, mrvices and environments that can be used by
people of all ages, sizes mad capabilities. We recognize the need to design for a wide range of pbysical and
mental abilities mad impairments. For details of GE's Universal Design applications, including kitchen
design ideas fbr people with disabilities, check out our Website today. For the hearing impaired, please call
800.TDD.GEAC (800.833.4322).
ExtendedWarranties
GEAppliances.com
Purchase a GE extended vmrranty and learn about special discounts tbat are available while your vcarran W
is still in effect. You can purchase it on-line anytime, or call 800.626.2224 during normal business hours.
GE Consumer Home Services will still Ix- there after your warranty expires.
PartsandAccessories
Individuals qualified to service tbeir own appliances can have parts or accessories sent directly to their
homes (V1Sz_MastelCard and Discover cards are accepted). Order on-line today; 24 hours eve W day or by"
phone at 800.626.2002 during normal business hours.
Instructionscontainedin thismanualcoverprocedurestobeperformedbyanyuser.Otherservicinggenerally
shouldbe referredtoqualifiedservicepersonnelCautionmustbeexercised,sinceimproperservicingmaycause
unsafeoperation.
ContactUs
Kyou are not satisfied with the service y_u receive from GE, contact us on our Website with all the details
including your phone numbel, or write to: General Manage_, Customer Relations
GE Appliances, Appliance Park
Louisville, KY40225
GEAppliances.com
GEAppliances.com
RegisterYourAppliance GEAppliances.com
Register your new appliance on-line--at your convenience! Timely product registration will allow fbr
enhanced communication and prompt service under the terms of your warranty; should the need arise.
You may also mail in the pre-printed registration card included in the packing material.
20 Printed in Korea
 Loading...