

GE AGH18DAG1, AGD18DAG1 Owner’s Manual
www.GEAppfiances.com
Safety Information
Adapter Plugs ................. 3
Connect Elecuici/y ............ 2
Extension Cords ............... 3
Safety Precautions ........... 2, 3
Operating Instructions
Conuol Knob Models ........ 6-
Touch Pad Models ........... 4-5
Care and Cleaning
Air Filter . .................... 8
(,nile and Case ................ 8
Outdoor Coils ................. 8
"7
AG_18 - l&O00 BTU mode£
A G_24 - 24, 000 BTU mode£
0
0
Installation Instructions
Preparing In Install the
Air Conditioner . .............. 9
Window Installation ....... 10-14
Troubleshooting Tips ....... 15
Norlnal Operating Sounds ..... 16
Consumer Support
Consumer Support ...Back Cover
Product Regisuafion ....... 17, 18
Warranty .................... 19
®
Write the model and serial numbers here:
#
#
Find these numbers on a label on the
side of the air conditioner.
3828A20024P 49-7403-3 11-OOJR
iMPORTANTSAFETYiNFORMATiON.
READALLiNSTRUCTiONSBEFOREUSING.
A
For your safety, the information in this manual must be fo#owed to minimize the risk of fire, electric shock
or personal injury.
SAFETYPRECAUTIONS
_i::Use tiffs appliance only for its intended
purpose asdescribed in this Owner's
Manual.
iJ_i:;This air conditioner **lust be properly
installed in acc(mlance with the Installation
Insmlctions befbre it is used.
iJ_i::Nex>r unplug _xmr air conditioner by pulling
on the power coixl. Always gTip plug firmly
and pull straight out from the receptacle.
_ Repair or replace immediately all electric
service corxls that have become fiayed or
otherwise damaged. Do not use a cord that
shows cracks or abrasion damage along its
length or at either the plug or connector end.
iJ_i:;Turn tire nrode control to OR:and unplug
iJhi:;For }_)nr saf:ety...do not store or use
HOWTOCONNECTELECTRICITY
Do not, under any circumstances, cut or remove
the third (ground) prong from the power cord. For
personal safety, this appliance must be properly
grounded.
The air conditioner shouM ahvays be
plugged into its own indMdual electrical
outlet which has a voltage rating that matches
the rating plate.
your air conditioner befi)re making any
repairs or deaning.
NOTE:WesUongly recommend flrat any
serxicing be performed by a qualified
individual.
combustible materials, gasoline or odrer
flammable vapors or liquids in the vicinity
of this or any other appliance.
The power cot,1 of this appliance is equipped
with a 3-prong (g_mnding) plug which mates
with a standai,13-prong (g_mnding) wall
outlet m minimize tire possibility of electric
sho& hazai,l from this appliance.
Have tim wall outlet and circuit checked by a
qualified elecuician to make sure tile outlet is
properly gTounded.
V_qrere a 2-prong wall outlet is encountered,
it is _x)ur personal responsibility and obligation
to have it replaced with a properly g_mn(led
3-prong wall oudet.
This provides tire best pe_tbrmance and also
prevents overloading house wiring circuiLs
which could cause a fire hazai,l from
overheated wires.
See fire Installation hlsmlctions, Electrical
Requirements section for specific elecuical
connection requiremenLs.
2
WARNING!
USEOFEXTENSIONCORDS-115-Voltmodelson/)/
Because of potential safety hazards under certain
conditions, we strongly recommend against the _ CAUTION:
use of an extension cord.
However, if you must use an extension col,l,
it is absolutely necessa U that it be a UL-listed,
14 gauge, 3-wire g_unding type appliance
extension cot,1 having a gTounding type plug
and outlet and that tile electrical rating of tile
cord be 15 amperes (minimum) and 125 volts.
USEOFADAPTERPLUGS-115-Voltmodelsonly
DO NOTuse an extension cord with any of
the 230/208 volt models.
vvww.GEAppliances.com
Because of potential safety hazards under certain
conditions, we strongly recommend against the use
of an adapter plug.
However, if}xm must use an adapter, where
local codes permit, a temporary connection mW
be **lade m a properly g_mnded 2-prong wall
outlet by use of a UL-listed adapter available at
most local hai,lware stores.
The larger slot in tim adapter must be aligned
with the larger slot in the wall outlet to provide
proper polarity in the connection of the power
cord.
V_qmn disconnecting tim power cot,1 from lhe
adapter, always hold the adapter in place wilh
one hand while pulling tim power cord plug
with the other hand. If tills is not done, the
adapter gTound temfinal is very likely to break
with repeated use.
If the adapter gTound temnnal breaks, DO NOT
USEtim air conditioner until a proper gTound
has been established.
Attachingthe adaptergroundterminalto a waftoutlet
coverscrewdoesnot groundtheapplianceunlessthe
coverscrewis metal,andnot insulated,andthe waft
outlet isgroundedthreughthe housewiring. Youshould
havethe circuit checkedbya qualifiedelectricianto
makesurethe outlet is properlygrounded.
READANDFOLLOWTHISSAFETYINFORMATIONCAREFULLY.
SAVETHESEINSTRUCTIONS
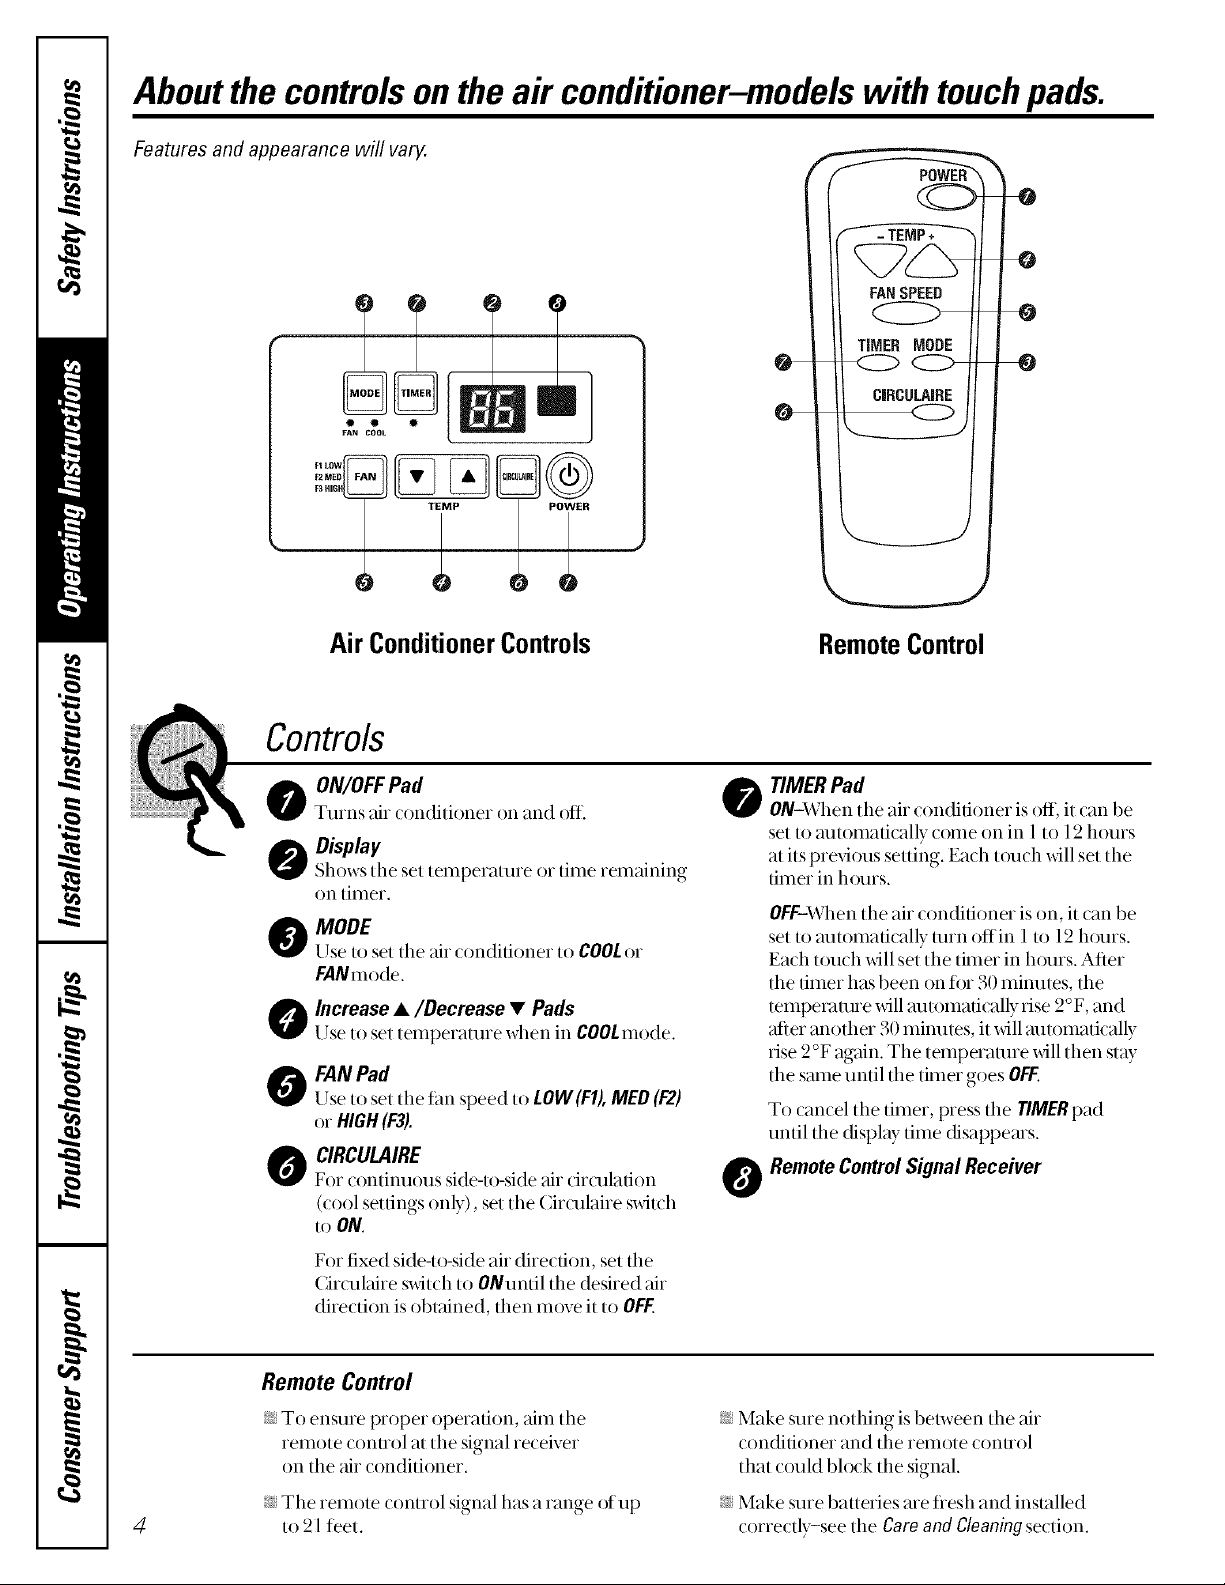
Aboutthe controlsontheair conditioner-modelswith touchpads.
Features and appearance will vary.
- TEMP+
FANSPEED
TIMER MODE
CJRCULAiRE
Air ConditionerControls
Controls
o ON/OFFPad
Ttnns air (onditioner on and ()ft_
Display
Shows the set temperature or time remaining
on timer.
O MODE
Use to set tile air (ondifioner to COOLor
FANmode.
Increase •/Decrease • Pads
Use to set temperature when in COOLmode.
O FANPad
Use to set the fan speed to LOW(F1),MED(P2)
or HIGH(F3!.
O IRCULAIRE
For continuous side-to-side_tircirculation
(cool settings only), set the ( irculaire s_dt(:h
to ON.
Remote Control
TIMER Pad
ON-When the air (onditioner is off, it can be
set to automatically come on in l to 12 houI's
at its previous setting. Each touch will set tile
time_ in horns.
OFF-When the air conditioner is on, it can be
set to mltomafically turn off in 1to 12 h{nns.
Each touch will set the timer in hours. After
the timer has been on fin 30 minutes, the
tempex'aune will mlmmafically rise 2°F, and
after another 30 minutes, it will mltomatically
rise 2 °F again. The temperaUne will then stW
the same until the timer goes OFF.
To cancel the timer, press the TIMERpad
until the display time disappears.
O RemoteControlSignal Receiver
For fixed side-to-side air direction, set the
Circulaire switch to ONuntil the desired air
direction is obtained, then move it to OFF.
Remote Control
i_:To ensure proper operation, aim the
remote conuol at the signal receiver
on the air conditioner.
i_:The remote control signal has a range ofup
4
to 21 feet.
i__Make sure nothing is between the air
conditioner and the remote (:ontiol
that (ould blo(k tile signal.
i__Make suie batteries are fiesh and installed
_orre_ tly-see the Care and Cleaningsection.
www.GEAppliances.com
When the air conditioner is turned on, it will
automatically start in the last cool and fan
settings used.
COOLMode
Use the #00L mode _dth HIGH(F3),MED(F2)or
LOW(FIt tin1fi)r cooling. Use the INCREASE&/
OECREASEV pads to set the desired temperature
belween 60°F and 86°F in 1°F increments.
A thermoslat is used to maintain the room
temperature. The compressor will (ycle on and off
to keep the room at the set level of comfi)rt. Set the
thermostat at a lower number and the indoor air
will become cooler. Set the thermostat at a higher
number and the indoor air will become warmer.
NOTE."ff the air conditioneris off and isthenturnedon
whileset to COOL,it will takeapproximately3 minutes
for the compressorto startand coolingtobegin.
FAN Mode
Use the FANat HIGH(F3),MED(F2)or LOW(FI) to
pr_)dde air circulation and fihering without cooling.
Since tan only settings do not pro)vide cooling,
a temperature setting willnot be displayed.
Lights next to the touch pads on the air conditioner
control panel indicate the selected settings.
CoolingDescriptions
ForNormalCooling-Select the COOLmode and
HIGH(13)or MED(F2)tim with a middle set
temperature.
ForMaximum Cooling-Select the COOLmode
and HIGH(F3)tim with a lower set temperature.
ForQuieter& NighttimeCooling-Select the
COOLmode and LOW(FIttim with a middle set
temperature.
NOTE."If you switch from aCOOLsetting to OFForto
a fan setting,wait at least3 minutesbeforeswitching
back to a ¢00L setting.
Vent Control
The vent conuol is located on the inside of the air
louvers on the htwer right side.
When set at CLOSE,only the air inside the room _dll
be circulated and conditioned. When set at OPEN,
some inside air is exhm_sted outside.
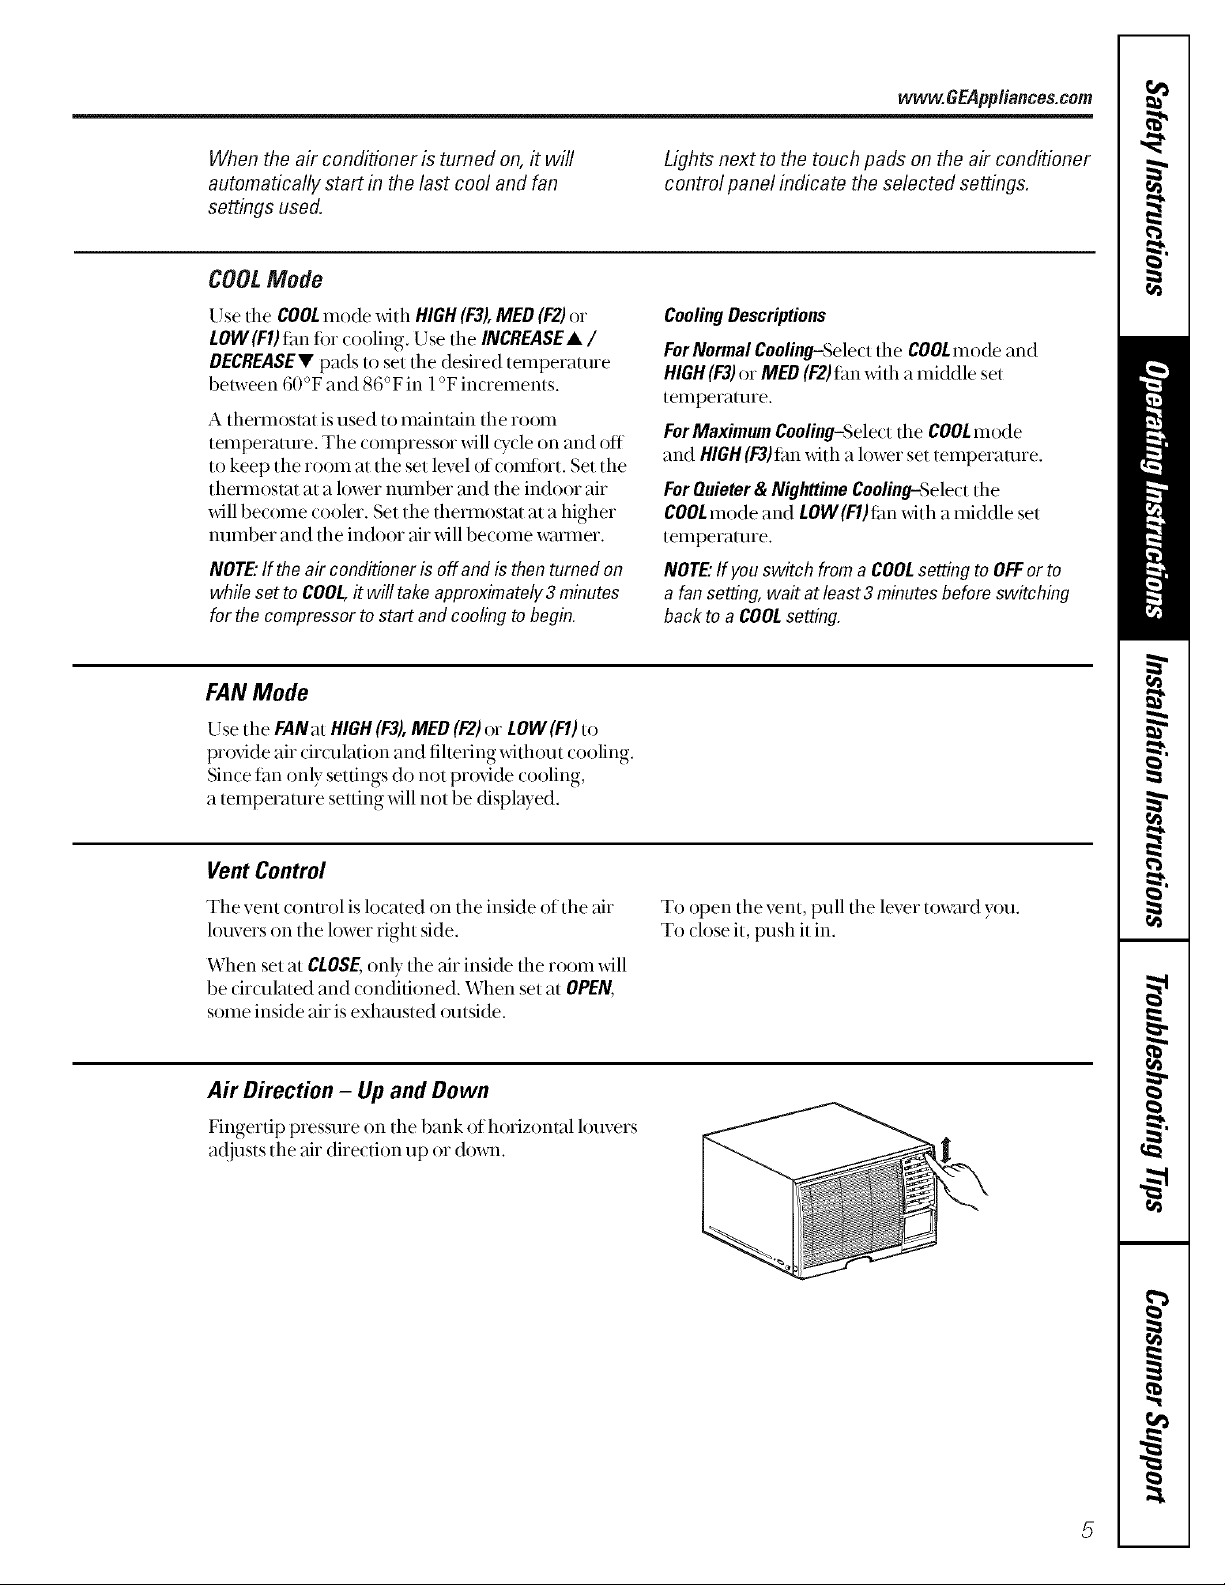
A# Direction - Up and Down
Fingertip pressure on the bank of horizontal louvers
at!justs the air direction up or down.
To open the vent, pull the lever toward you.
To close it, D_sh it in.
5
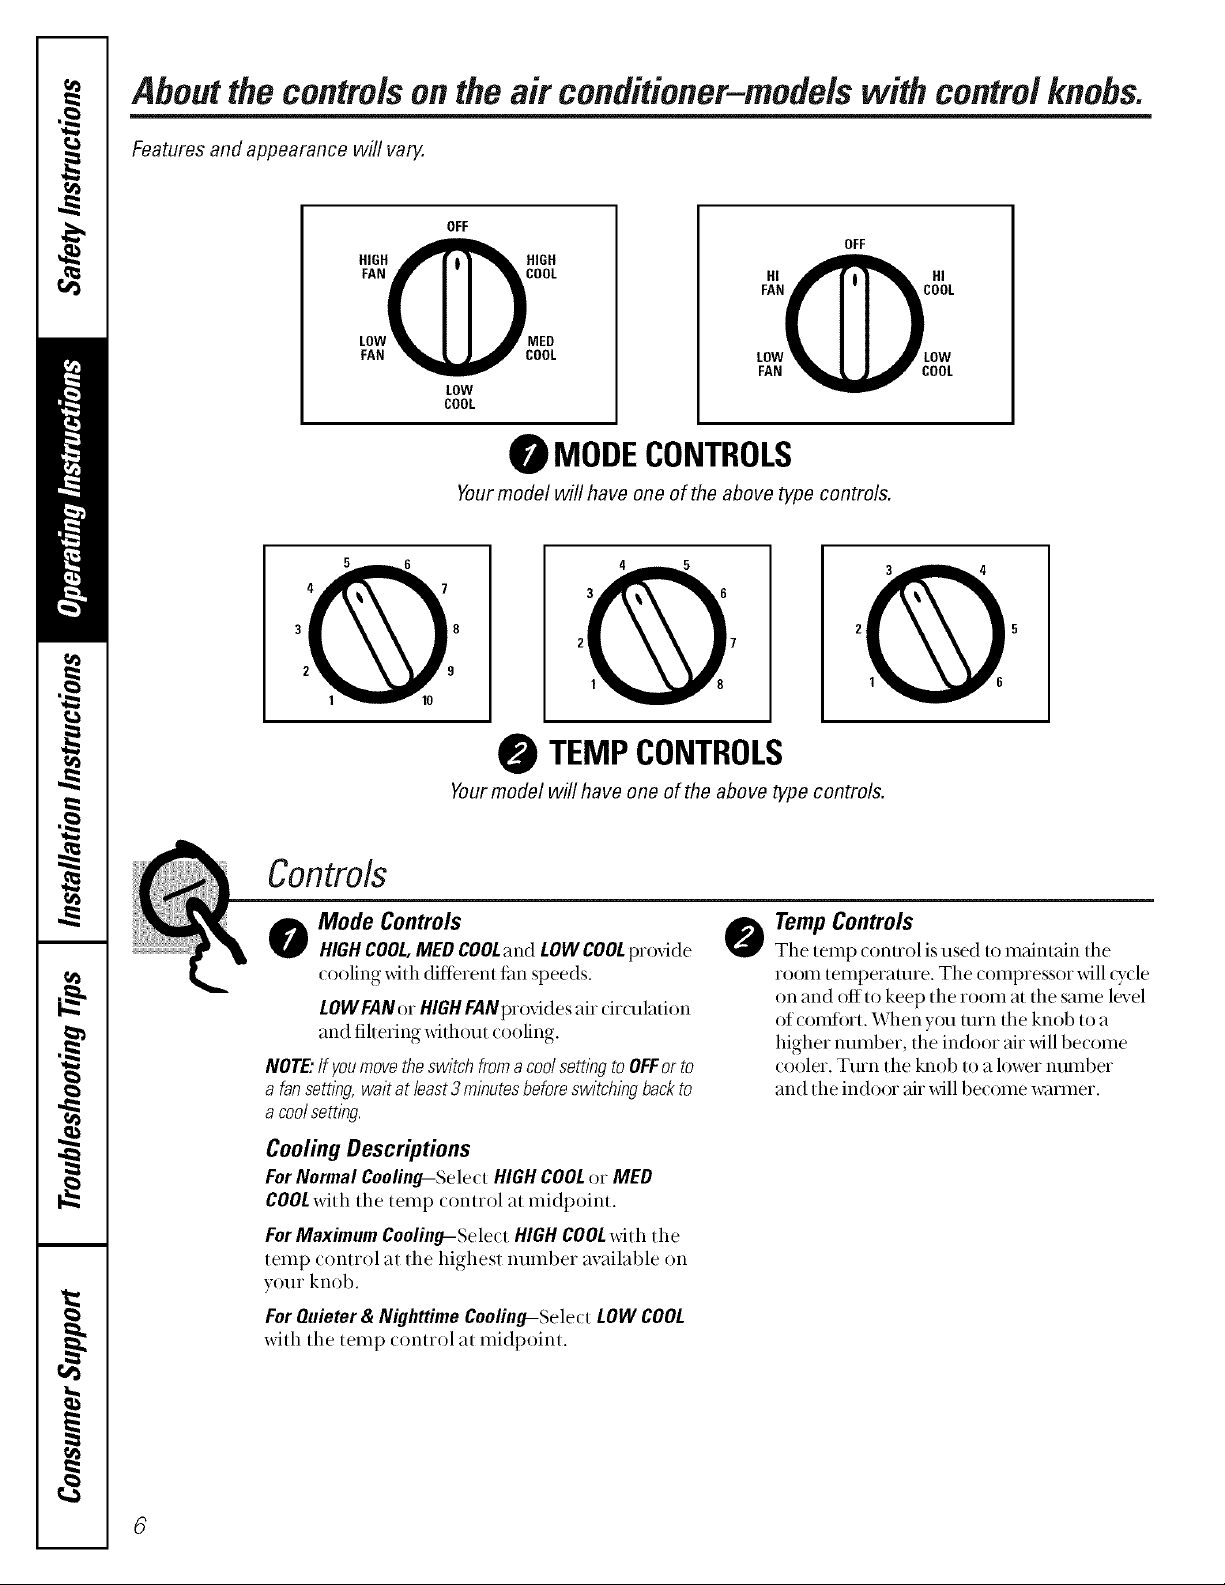
Aboutthecontrolson theair conditioner-models with controlknobs.
Features and appearance will vary.
OFF
FAN OOL
HIGHOIIGH
LOW _ED
FAN COOL
LOW
COOL
Yourmodel will have one of the above type controls.
Yourmodel will have one of the above type controls.
FAN OOL
HI OIHI
LOW .OW
FAN COOL
MODECONTROLS
TEMPCONTROLS
OFF
Controls
o Mode Controls
HIGHCOOL,MED COOLand LOWCOOLpro',4de @
(ooling wifll diflerem fire speeds.
LOWFANor HIGHFANprovides air circulation
and fihering _4fl_out cooling.
NOTE."If youmovetheswitchfromacoolsettlbgtoOFFor to
a fansettlbg,waitatleast3minutesbeforeswitchingbackto
a coolsetting.
Cooling Descriptions
ForNormal Cooling-Se]e( t HIGHCOOLor MED
COOLwith tile temp ( ontrol at midpoint.
ForMaximum Cooling-Select HIGH COOLwith the
temp (ontrol at tile highest number available on
your knob.
For Quieter & Nighttime Cooling-Select LOW COOL
with the temp control at midpoint.
TempControls
The temp conuol is used to maintain the
room temperature. The compressor will _ycle
on and offto keep the room at the same level
of comfort. When you unn the knob to a
higher number, the indoor air will become
cooler. Turn the knob to a lower number
and the indoor air will become winmet.
 Loading...