

Page 1

www.GEAppliances.com
Safety Instrudions
Adapter Plugs ................. 3
( onnect Electrkity ............ 2
Extension Cords ............... 3
Saletv Precautions ........... 2, 3
AG_07 - 7,000 BTY? modds
A(;_O8 - & 000 BTU rt_odds
©
Operating Instructions
Contro! Knob Models ........ ),
Touch Pad Models ........... 4, 5
Care and Cleaning
Air Filter . .................... 8
Grille and Case ................ 8
Outdoor Coils ................. 8
Installation Instructions
Preparing to Install the
Air Conditioner . .............. 9
Window h_stallatioz_ ....... 10-14
Troubleshooti_ N Tips ... Ir.
Nomml ()perating Sounds ..... 16
Consumer Support
Consumer Support ...Back Cover
Product Regist_atiou ....... 17, I 8
Wan'anty .................... 19
..... )
A (_ t O - l O,O00 BTU model._
AG_12 - 12,000 BTU modd.s
AG_14 - 14,000 BTU modds
©
<
Write themodel andserial numbershere:
Model #
Serial #
Find Ihcse mmfl)_ rs on a label on Ihe
side ot fhe air condilioner.
3828A20060J 49-7402-2 01-01JR
Page 2
iMPORTANTSAFETYiNFORMATiON.
READALLINSTRUCTIONSBEFOREUSING.
,&WARNING!
For your safetg, thethformation in this manual must be followed to minimize the risk of fire, electric shock
or personal injury.
SAFETYPRECAUTIONS
¢_[ Ysethis appliance only for its intended
purpose as descnhed in this (_rner's
Manual.
_t¢This air conditioner must be properly
installed in accordance with the Installation
Instructions heti)re it is used.
i!!_Never unplug your air conditioner by pulling
on the power cord. Always grip plug tirmly
mid pull straight out ti-om the receptacle.
?_¢;_Repair or replace immediately all electric
set_dce cords that have become ti'ayed or
otherwise damaged. Do not use a cord that
shows oacks or abrasion damage along its
length or at either the plug or connector end.
¢}Turn the mode control to OFFand unph g
i!!_For }xmr satbty...do not store or use
HOWTOCONNECTELECTRICITY
Donot, under any circumstances, cut or remove
the third (ground) prow from the power cord For
personal safetg, this appliance must be properly
grounded
The air conditioner should always he
plugged into its own individual electrical
outlet which has a vohage rating dmt matches
the rating plate.
)x)ur air conditioner beff)re making any
repairs or cleaning.
NOTE:We strongly recommend that any
selvicing be performed hy a qualitied
indMdual.
combustible materials, gasoline o1"other
flammable vapors or liquids in the vidnity
ot this or any other appliance.
The power cord of this appliance is equipped
with a 3-prong (grounding) ping which mates
with a standard 3-prong (grounding) wall
outlet to minimize the possibility of electric
shock hazard ti-om this appliance.
Have the wall outlet and drcuit checked by a
qualitied electrician to make sure the outlet is
properly grounded.
"_\qmre a 2-prong wall outlet is encountered,
it is }xmr personal responsibility and obligation
to have it replaced with a properly grounded
3-prong wall outlet.
This pr(Mdes the best perfbrmance and also
prevents overloading house wiring circuits
which could cause a fire hazard ti-om
overheated wires.
See the Installation Insm_ctions, Electrical
Requirements set tion for spedtk' electrical
t onnettion requirenlents.
2
Page 3
.4,WARNING!
USEOFEXTENSIONCORDS-!15-Voltmodelsonly
ww_t. GEA.ppliances.com
Because of potential safety hazards under certain
conditions, we strongly recommend against the
use of an extension cord.
However, if,vou inus[ t/se an extension cord,
it is absolutely necessaly that it be a UI.-listed,
14 gauge, 3-wire grounding type appliance
extension cord hax_ng a grounding type plug
and outlet and that the electrical sating of the
cord be 15 ampeles (minimum) and 125 volts.
,_ CAUTION:
DO NOTuse an extension cord with any of
the 230/208 voltmodels.
USEOFADAPTERPLUGS-!15-Voltmodelsonly
Because of potential safety hazards under certain
conditions, we strongly recommend against the use
of an adapter plug.
However, if,vou must use an adapter, where
local codes permit, a temporaryconnectionmay
he made to a properly grounded 9-prong wall
oudet by use of a [ YL-listed adapter available at
most local hardware stores.
Tile larger slot in tile adapter must be aligned
with the larger slot in the wall outlet to provide
proper polari b"in the connection of'the power
cord.
When disconnecting tile power cord fl'om the
adapter, alwa}s hold the adapter in place with
one hand xdfile pulling the power cord plug
with the other hand. It"this isnot done, the
adapter ground terminal is veU likely to break
with repeated use.
If tile adapter ground terminal breaks, DONOT
USEthe air conditioner until a proper ground
has heen established.
Attaching theadaptergroundterminal to a waft outlet
coverscrewdoesnot groundtheapplianceunlessthe
coverscrewis metal,andnot insulated,andthe waft
outlet isgroundedthroughthe housewiring Youshould
havethecircuitcheckedbya qualifiedelectricianto
makesuretheoutlet isproperlygrounded
READANDFOLLOWTHISSAFETYINFORMAtiONCAREFULLY.
SAVETHESEINSTRUCTIONS
3
Page 4
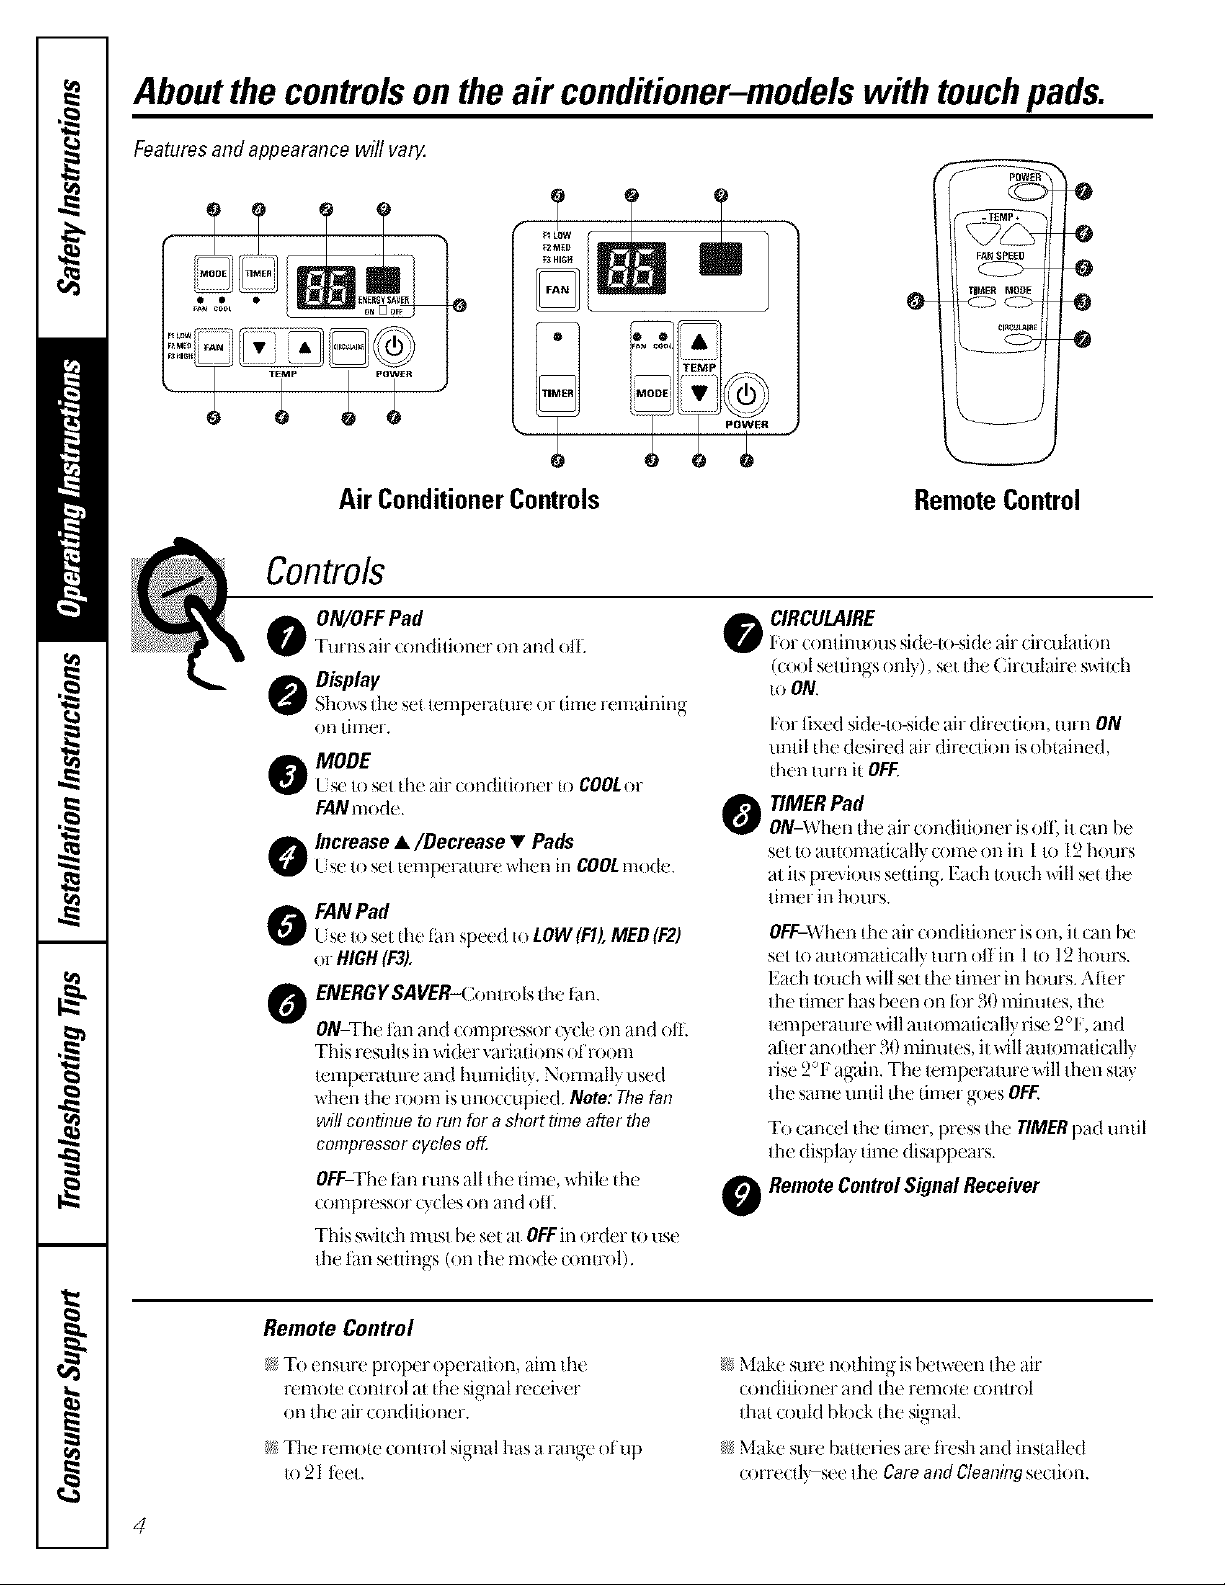
Aboutthecontrolsontheair conditioner-modelswith touchpads.
Features and appearance will varg
0
Air ConditionerControls RemoteControl
Controls
k CIRCULAIRE
_F 1;'(51-conlinuotlS side-lo-side air circulation
((o(51 _ Illnt_s onl}) st I I1-1_( AI (tl[,lli t swHdl
to ON.
FANPad
Lse Io _1 {he [iraspeed Io LOW(FI),MED(F2)
or HIGH(F3).
O ENERGYSAVER-(Ionm4s Ihe l:an.
ON-The t_mand compressor ()cle on and oil.
This resuhs in wider varia dons of morn
k'mp_ raltn-e and humidil}. Normally used
when Ihe room is unoccupied. Note: The fat?
wiltconN?ue to rut?fora short time aCtorNo
compressorcycles ofL
OFF-The[hnruns all the time, while tim
con_pIeSS( )I Ocles on and oll
This s_ilch musl be set al OFFin order Io use
Ihe I_m,<.uings (on the mode omu-ol).
l'or lixed side-I<>-sideair direction, turn ON
unlil die d_sired air dir_(li( mis oblained,
{hen lurn it OFF.
TIMER Pad
0
ON-When Ihc air _ondili()ner is o11;il can bc
sel Io automatically come on in I I_) 12hours
al its pr(_ ious seuing. Each Iouch will se_ d}e
limer in h(>UFS.
OFF-When {he air c(mdifioner is on,it can be
sel Io aulomafically turn offin l {o12 hours.
Each Iouch will ,<'1{he Ihner in houis. Afim-
1he timer has been on lbr 30 minu{es, Ihe
lemperamr( will au{omalicflly ri_' 2°1i', and
aher anofl_er 30 minu{es, il will aul*)madcally
rise 2°1,`again. The I(lnperamre will Ihen slay
Ihe same unlil Ihe Umm goes OFF.
To cancel the {liner, press Ihe TIMERpad until
fl-_edisplay lime disappears.
RemoteControlSignal Receiver
O
Remote Control
_5T() ensuFe prol)el- (I5)el'dlion, aim Ih(
rem()le c(_nlr()l at {he si_lla[ receiver
on the air condilioner.
k!The remo{ec(m{rolsignal has a rang_ (51up
1(521 l_:el.
4
r4fMake sun' nolhing is between Ihe air
condili(mer and Ihe remole O)I}lI'O[
Iha{ could block {he signal.
_4_Make sure ba{Iwies art fl-csh and ins{ailed
correcll} see Ihe Care and Cleaningseclion.
Page 5
www.GEAppliances.com
When the air conditioner is turned on, it will Lights next to the touch pads on the air conditioner
automatically start h7the last cool and fan control panel indicate the selected settings,
settings used,
COOLMode
t;se 1heCOOLmode _dlh HIGH(F3),MED(F2) or
LOW(F1)fml tier cooling. [ 's('Ihe INCREASEA/
DECREASE• pads Io sel Ih_'desired temperature
1)e_ween60° 1"and 8i_°1_"in 1'_1_'incr,._m(,z'ds.
A [ht I'lI]( )slat is used tx) maintain die _oom
I_mperafl]_. The compressor will _cle on and {)ff
Io keep th_ _oom al tile set level el Q_mli)rl. St't tilt
th_'lmost}lt a! a lower ntlmber }llld the indoor }liI
will become cooler. N't fhe thermiist_ll at a higher
number and the indoor air willbecome _lrmer.
NOTE:If the air conditioneris off armis thenturnedo/7
whileset to COOL,it will takeapproximately3 minutes
forthe compressorto startand coolingto begin.
FAN Mode
t sethe FANal HIGH(F3),MED(F2)or LOW(F1)to
provide air circul_ltion and tihering wilhout cooling.
Since Iim only setdngs do not prox ide cooling,
a lemperamre setung will n{_lbe displayed.
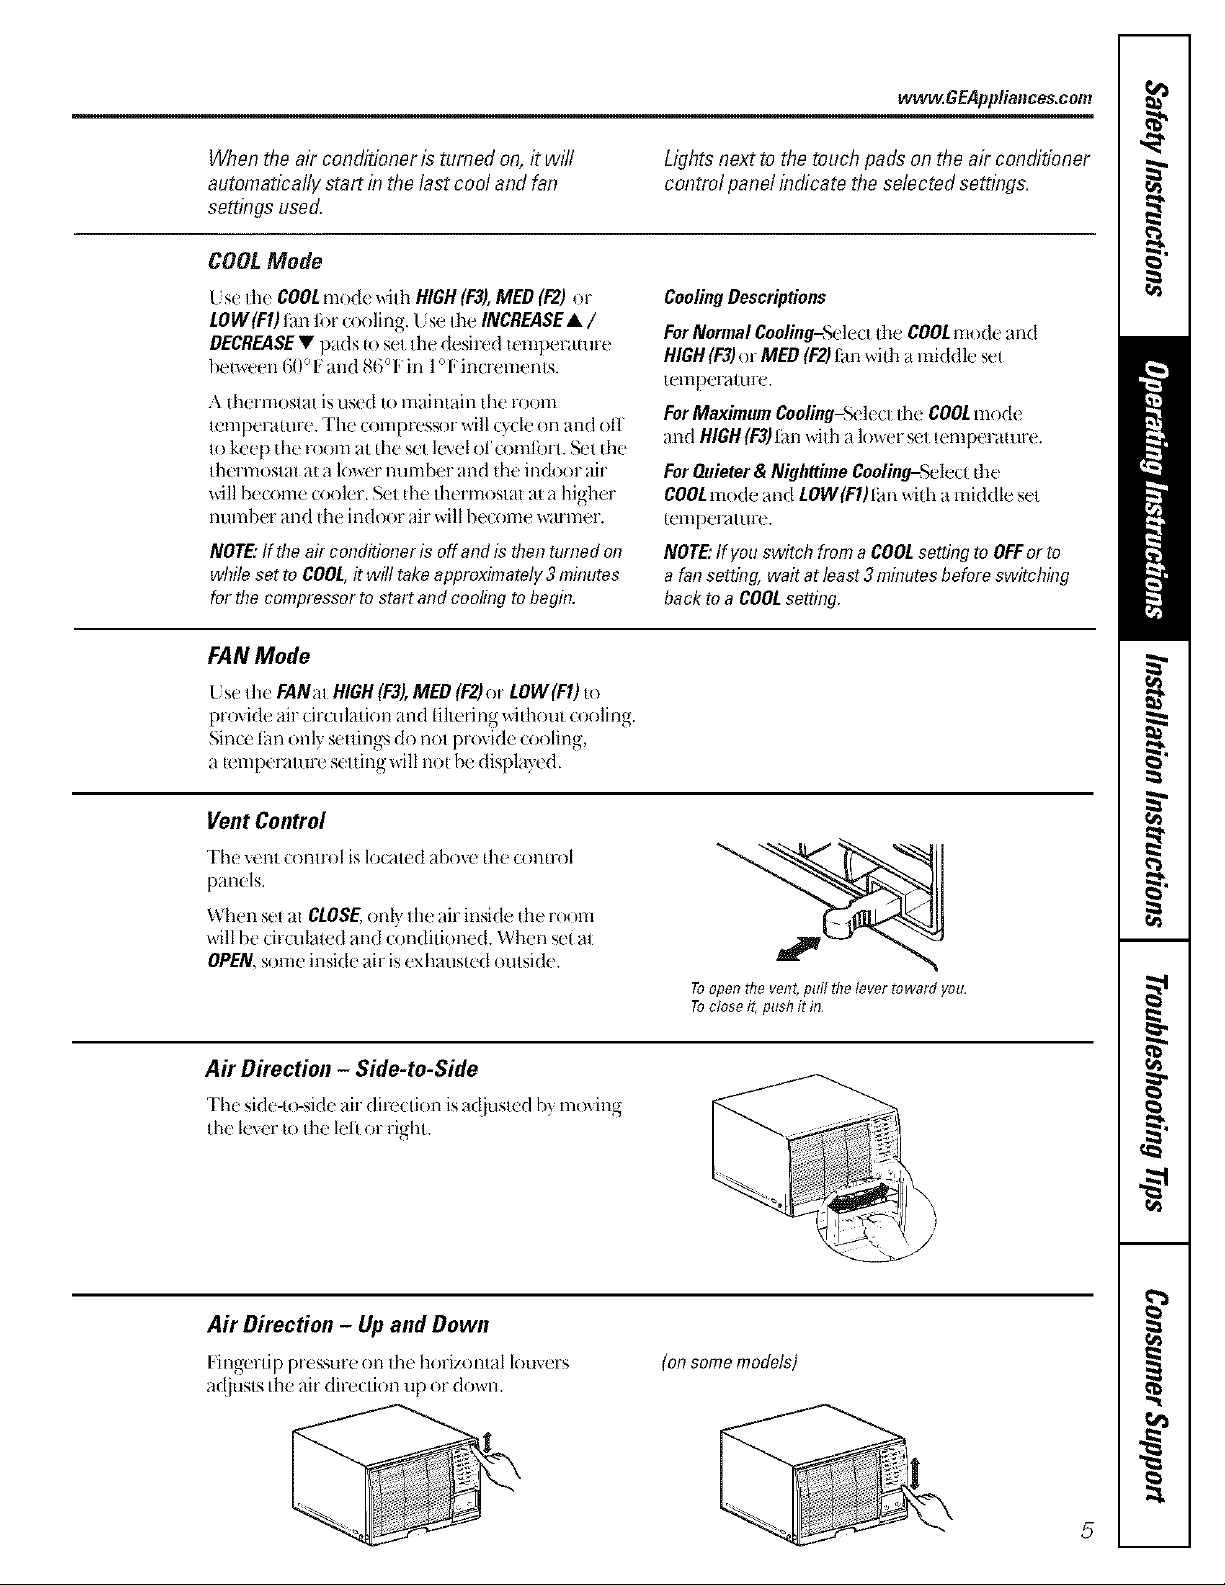
Vent Control
Tilt vent conli1)[ is localed above {lie C{)ll{lO]
panels.
When set m CLOSE,only II_eair inside tile room
will be cir(ulaled and conditioned. \\'h,.'n set al
OPEN,some inside air isexhausled oulside.
CoolingDescriptions
ForNormalCooling=SelectIhe COOLmode and
HIGH(E3)or MED(P2)l_m wilh a middle set
temperature.
ForMaximum Coaliog=Selt cl Ihe COOLmodt
and HIGH(P3)I_mwilh a lowm ,_'t femperamre.
ForQuieter & Nighttime Coolin#-Sclect die
COOLmode and LOW(F1)lira whh a middle set
femperamre.
NOTE:If youswitch from a COOLsetting to OFFor to
a fansetting, wait at least3 mhTutesbeforeswitching
back to a COOLsetting.
Toopen the vent, pull the lever reward you,
Toclose i_,push it in
Air Direction - Side-to-Side
The side-lo-side air di_ettii_n is _Jdiusled 137,moving
Ihe lever u) the left or rigill.
Air Direction - Up and Down
l ingertip pressure on Ihe horizontal louvers
adjusts tile air direction up or down.
(onsome models)
5
Page 6
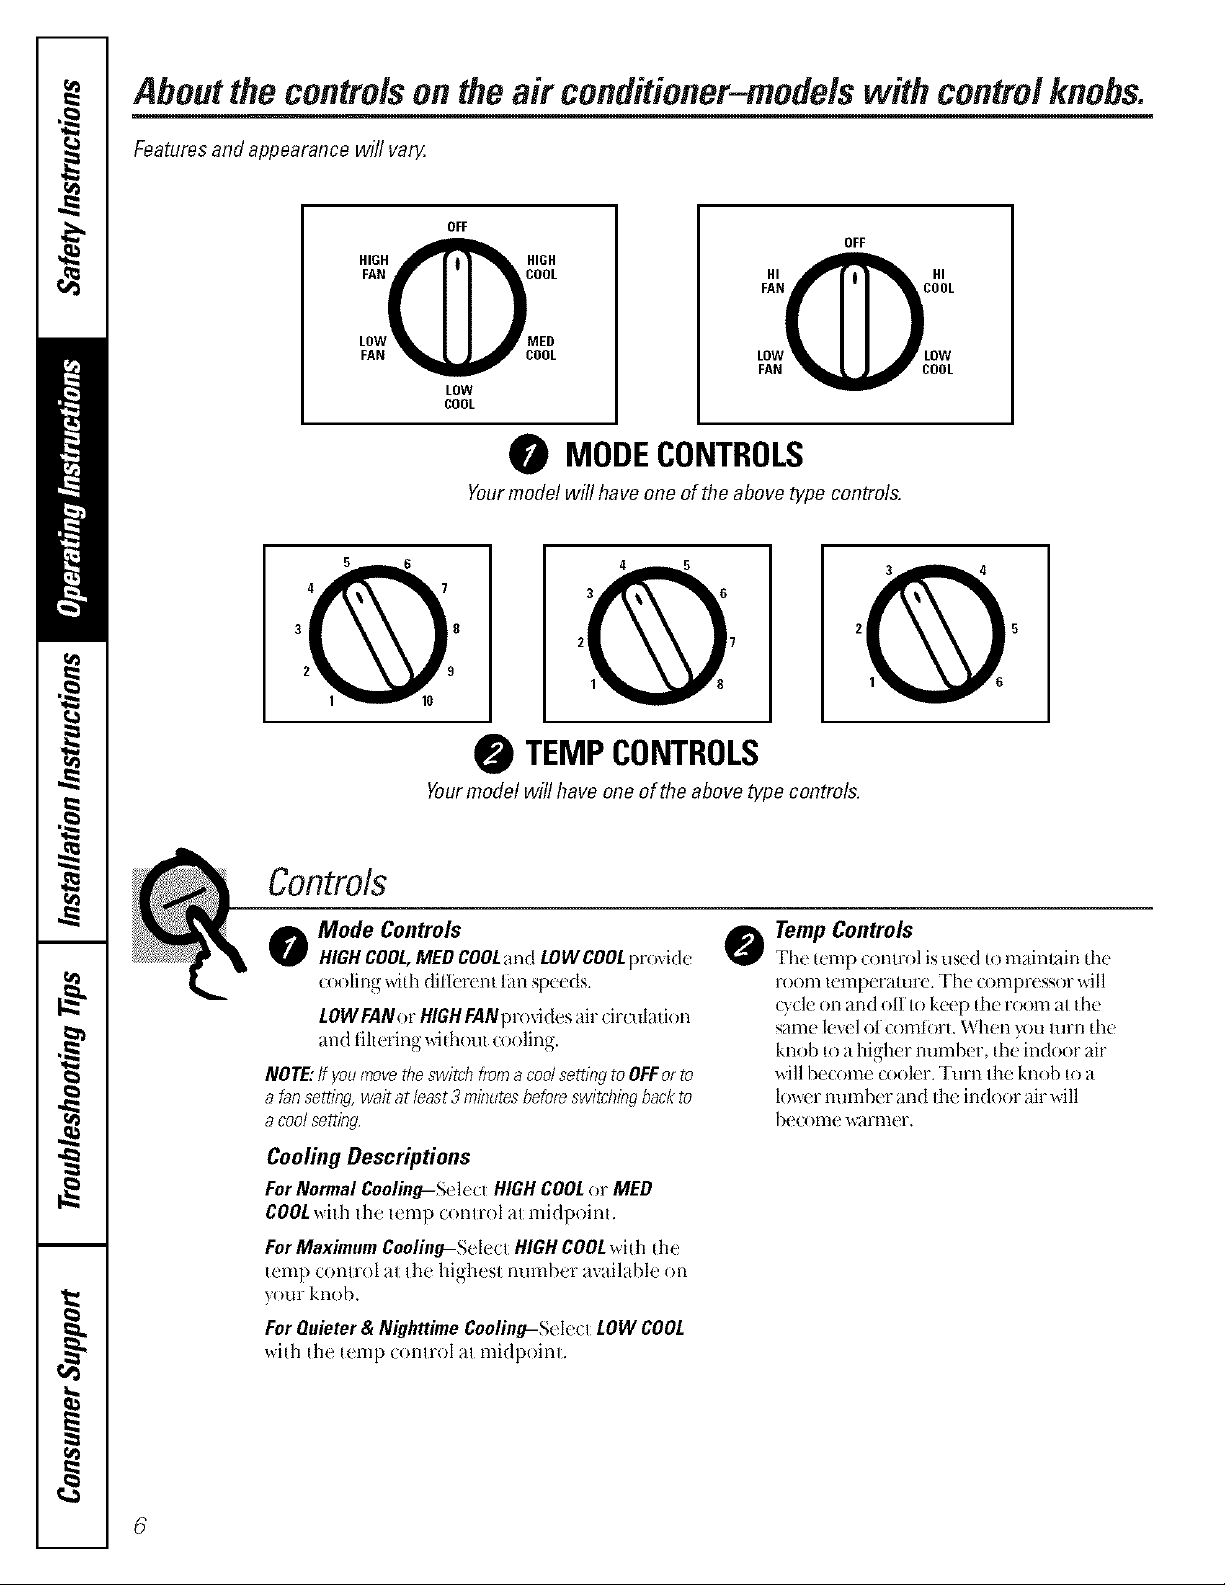
Aboutthe controlson theair conditioner-models with controlknobs.
Features and appearance will vail/.
OFF
FAN COOL
HIGH@21GH
LOW MED
FAN OOL
LOW
COOL
OFF
0 MODECONTROLS
Yourmode! will have one of the above type controls.
1+:o +1I @,11 o
0 TEMP CONTROLS
Yourmodel will have one ofthe above type controls.
Controls
o Mode Controls
HIGHCOOL,MEDCOOLand LOWCOOLpr(Md_
c{}{)litUgwi{h dillbr( m l_mspeeds .
LOWFAN<nHIGHFANpr{Mdes air (:irculati{ m
and tihering _d{hout ({}{}ling.
NOTE:If youmovedTeswitchfroma coolseizingtoOFFerto
a tansetting,waitat least3minutesbeforeswitcKngbackto
acoolse##}g
Cooling Descriptions
ForNormal Cooling-ScIecl HIGHCOOLor MED
COOL_ill_ II_, R'mp control _Jlmidpoim.
ForMaximum Cooling-Sd( cl HIGHCOOLwi{h {he
tcmp comrol _Jlthe highesl number _Jvailable {m
y{mr knob.
ForQuieter& Nighttime Cooiing-Sdc{ I LOWCOOL
wi{h {he {crop corm-ol _J(midp{)in(.
TempControls
The R'mp (onu-ol is ustd 1omainl_dn the
1"{)OIll I('nlpcI?lP.11tL The L'{)l]]pl{ ssoy will
Qdc on and off I{}kctp {hefOOl]]:l{[hc
san]( levi1 ol ComtoYLWIIOIIT_)I1IllI-YI[hc
knob 1oa higher YIIIIIIb{ I', {he ilKloor _lii
will BCCOII1C L'{ )OIcY. Ttlrll Ih(' knob 1o a
lower number and Ihc indoor _drwill
b{'o m](' WHYI]](T.
6
Page 7

Additional controls and important information.
Energy Saver (onsome models)
Tile energy saver swilch conlrols Ihe litn.
ON-The tan and o mlpr{ ssor c}cle on and off
Iogedler. This resuhs in wider varia dons of morn
romp{ ramre and humidity. Normally used when
1he room isunoca_pied.
Vent Control
The vtnl _onllol is located above fhc conirol knobs.
When set al CLOSE, only (he air inside the room will
be circulated and conditioned. When _1 al OPEN,
some inside air isexhauswd otnside.
wvwzGEAppliances.com
OFF- Tile tim runs all {he ume, while Ihe
C( )lllpl'eSsof cycles on and oll
This swhch musf bc sel al OWin order Io use 1he
lan seuings (on 1liemode conlrol).
Toopen the vent, puff the lever _oward you,
Toclose i_,push it in
A# Direction - Side-to-Side
()n _mlc models, Ihe sidc-{o-_ide air direcuon is
adiusled by moving file lever I*)tile left or right.
Ak Direction - Up and Down
l:ingcrfip pressure im lilt' horizontal louvers adjusls
1he air direction up or down.
CIRCULAIRE(onsome models)
lot fixed side-to-side air direction, set Ihe
Circulaire swilch Io ONunlil the desired air
direction is obtained, Ihen move il Io OFF.
For conlinuous side-lo-side air circulation (cool
seuings only), sel Ihe Circulaire switch to ON.
CIRCULAIRE
OFF _ ON
(onsomemodels)
Page 8

Careand cleaning ofthe air conditioner.
Grifle and Case
Turn Ill( air (ondifioner oit and rcmo,.,.' d_eplug To clean, use v,ater and a mud de(erg_m, l)o no{
hom Ih( _all otfll(I |)elore cleaning, us_ blea(h or abrasives.
Outdoor Coils
The o)ils on ll_e ouldoor side of dae air conditioner
should be checked rcg_darly. It they arc clogged
wilh dirl or sool Ihey may be protcssionally smam
cleaned, a selwice a_dlable fl_rough your GE
selwice Ollllel.
Air RIter
The air liller b,.'hind 1he tionl grill(' should be
checked and clean( d at leasl eve U 30 clays or
more often if necessarv.
Toremove:
[] Open d_einl_l grille upward b} pulling o,.nthe
b(m_)mot d_e inlet grille.
[_[ sing d-le {ab, pull up slighlly on d-leliher {o
rdea_e i{and pull il d__wn.
• * , , ....... . • , •
(Jean the hll_l _l h _al m, soap} _al_. Rm_ and
[el {h(! filler (h _,, b(?[_)l(! rq)lacing il.
CAUTION:DONOToperatetheairconditionerwifl_outa
filterbecausedirtandI_ntwill clogit andreduceperformance
8
Page 9

Preparingtoinstalltheair conditioner.
Read these instructions completely and carefully.
NOTE TOINSTALLER:Leave these instructions with
the air conditioner after installation is completed'
NOTE TO CONSUMER:Keep this Owner's Manual
and Installation Instructions for future use.
IMPORTANT NOTES:
For personal safety, this air conditioner must be
proper/y grounded,
It is important to have the wall outlet and circuit
checked by a qualified electrician if there is any
doubt as to whether a proper ground exists.
Follow National Electric Codes (NEC)and/or local
codes and ordinances.
The 3-prong grounding plug minimizes the
possibilily ot electric shock hazard, lithe wall oudet
?ou plan to u_ is only a 2-prong Otlllel, it is 3our
responsibility _o have it replaced wilh a properly
grounded 3-prong wall oudet.
CAUTION:
iDo not, under any circumstances, cut or
remove the third (ground) prong from the
power cord,
Do not changethe plugonthepower cord
of thisair conditione_
Aluminum house wiring may present
specia! problems--consult a qualified
electrician.
&)me models require 230/208-xoh a.c.,
pr()tected with aume delay lilse or circuit
breaker. These models should be inslalled
on dmir own single branch drcuil lot besl
perlbmmnce and Io prevent overloading
house or apartmenl wiring circuilN, which
could cause a possible fire hazard tiom
overhearing wires.
ToolsYouWillNeed
i;_l'hillip_-h_ ad screwdriver
_! Hat-blade scr_ wdriver
N P-.u]__r or tape m(!asul€._
;;!_Scissors or kniR
;:#l'enciI
;;!_I_evel
9
Page 10

WindowInstallationInstructions.
Parts Included
Left
accordion
panel
Frame guide (2)
Top mounting rail
Top mounting rail
seal strip
Window
sash seal
\
Right
panel
Window locking
bracket
Type A (16)
10
Type B (3)
Sill support (2)
Type C(5)
Nut(2)
Bolt (2)
Page 11

Read completely, then follow step-by-step.
Window Requirements
!_;_iThese inst]'u(tions are 1_)1-a standard doubl(_
hung window. You will need t_ modity them liw
other {ypesof windows.
i!!_The air omditioner can be installed wilhout
the accordion panels if needed I*)ill in a narrow
window. N'e the window opening dimensions
below.
!¢
_, All supp_ ung p _ Is must be _(u_ ed U*In m
wood, I11_1_ )lli'V Of
m(lal.
_The le( (al }u[le nus[I)(xv[h 1 (achollhe
( )vqe 1- C( _t'd
p .
7,000, 8,000 and 10,000 BTU models
14" rain
22"to 36"
t
18_" min.
(Withoutaccordionpanels)
Storm Window Requirements
A st_mn xdndow h-ame will nol allow Ihe air
conditioner Io lill Iowards Ihe oulside and will keep
il liom draining properly. To ac!jusl lor this, auach
a piece, ot wood to Ihe slool.
12,O00 and 14,000 BTU models
1W rnin
27"to 39"
(Withaccordionpanels)
m
T
237N"rain
(Withoutaccordionpanels}
WOODPIECES--
WIDTH:2"
LENGTH:l.ong enough Ill lit inside the wind* m
li_mle.
I/U higher
thanframe
t Stool
THICKNES&To de(ermine Ihe (hickne ss, plac( a
9 hi_her
than Ihe top of {he st(nan _dndow li-ame.
,_lla('h.... _'cur(_ ]v,wilh nails, or screws Im )vided by.
th( installer.
11
Page 12

WindowInstallationInstructions.
Remove the Air Conditioner From the Case
[] P.emove fhe 2 shipping screws li'om t h_ ba_ k el
] P.emove 1he 2 sc_ ews or_ each side of die ( a_'.
Keep Ihes_ liar taler use.
Shippingscrews
Prepare the Window and the Case
] (Jill tilt! WilT(low sash st!el/0 tilt! plop(l" length.
Peel ell'the_ backing and _llt}l(hlh_ seal lo/he
undersMe ot Ill(:wi1_(1()_%rsaisl_+
] Sl!d_.Ihe air conditioner fl-om Ihe case by
gripping Ih( bast pan handle and pullinoo
li)rward while bracing (he (a_'.
] R(_movelhe backing, lkomth( lopmounting
l_li[ _a[ suip and atl21ch il 1otile b(Hll)m i)t Ill(!
(op mtmining rail.
[] lnsIall he opmot n ingr ilwi h 3 yp( \
strews on Ill( i)aside ttl'lhe Ca_. lns(rl the
h-ames ti)r th< ac('()rdion panels inlo fhe lop
] (_,u(lull} ]n_t I Ih__ plasll( h ,Ira(_ e,uld__s 11111)
Ihe bo[Ittnl ttl'lhe C}lS( ()l-i (%l(:h side,
mounting rail and Ihe li'am< w_tides. Almch
th< accordion panels Io tile side of 1he ca,ae
using 4 lype A screws on each side.
Topmountingrail
Bottomofcase
72 Frameguides
Page 13

Install the Case in the Window
] Opun 1he windo_ and mark II-l_ o. n_rlin( ()|'
Ihe wind()_ stool.
_(,aldul b ph_ Ih( La_ on _h_ x_mdox_sll)l)l
and align d_e (cnlcr mark on fl_c b{)mm_ lioFd
wi|h Ihe c(n[(!llill( ol IN(! SIOt)l.
[_ Pull dle_in(Iowdo_n b('hinddlelo
L_J
m()uming rail.
NOTE:Do not shut tl}e window so tightly thatmovement of
the accordionpanelsis restricted
[_ I x_o_'ly assembl( Ihe sill supporls.
INDOOR OUTDOOR
P
[] A(!jusl dl( boh and Ihe nul in each supporl so
dial Ihe case is insfalled wil h a sligh! fill Ii) Ill(
oulside. Is_ a 1(_(1; abltu! 1/3 bubble will 1)(
Ill( Ci)YrecI case sl_lnl I() Ill(! !)ulside.
] _cul-e Ihe ca_t__) tile window su)ol b? using
3 bpe l_,screws.
Sill
support
] Pull Ihe accordion panels 1o(ach window
S_tsh ll_lCk. AII_Ich Ihel]l o1"1 each side Io ihe
window sash 2111(1Ihe window sloo[ using
4 b'pe (1screws.
upport J
[_ Selecl Ihe posifi{m Ihal will place Ihe sill
SllppOl-lS I1(!211- II'Ic OUlelInosl poin{ on file sill.
A{I_Ich Ih(! sill supporls Io {h( (:as( Ir_lck hole in
rel_ don Io Ihe s(lecled p_)silion using 2 lype ,\
screws in each supporl.
Frameguide
!
7.
13
Page 14

WindowInstallationInstructions.
Install the Window LockingBracket and the Foam Top Window Gasket
] Cul dae lbam lop windo_ ,_askel I*) [he
win& _w_ddIh.
] Smff lhe lbam bclween Ihe glass and Ih_
window u) prevenl air and in_?cls fi-(ma gelting
into ih_ FOOl11.
/
Install the Air Conditioner in the Case
[] Slide Ihc air condidoner inu* Ih_ (asc.
Reirlslall [h( 2 SCI'e_rS removed earlier on
ead-_ side of Ihe (ase.
_ [_dbre inslalling Ihe li-onl grill(, pull out Ihe
x,(_l-llconllol 1_'1- localcd al)ov_' Ihe ulqil
comrol knobs, as shown.
[_ Auach tl-telionl gdlle Iod-le ('a_ by ins_'rting dw
I_ll)silia the grille into d-_eslots on the tionl oflhe
case. l_usl-idae grille in until it snaps into place.
_:==:==:==:==:====_c:Fo@
Guidethe lever carefully
through the grille as you
push it in
[_1 Jfl II_ inlet grille and secure the li-onl flame
with a type ,'kScrew through the ti-onl grill_.
I,o_xcr Ihe inlel m-illc back inlo place
m •
_J
14
Page 15

Beforeyoucall forservice...
Troubleshooting tips
Save time and money! Review the chart below first
and you may not need to call for service.
Possible Causes What ToDo
The air conditioner * Make sure Ihc air conditioner plug is pushed complewly
is tmplugged, inlo Ihe oullel.
The fuse is blown/circuit * Check {he house file'/circuit breaker box and replace
breaker is Iwipped. Ihe tuse ,n resel Ihe breaker.
Power failure. * If power lhilure occurs, lurn the air conditioner OFF.
Airflow is restricted. * Make sure Ihere are no curtains, blinds or lhrnimre
The temp control may not "On models udth touch pads: In COOL mode, press dm
be set correctly. DECREASE•pad.
The air Nter is dilly. "Clean Ihe tiher at Ieas/e_e_) 30 days.
The room may have been hot. **When fhe air c,mdifion( r is lirsl turned on you need I!)
When power is reslored, wai{ 3 ulinules tO reslarf the
air _oudili, mer u) prever}l uippiug o[ d_e compressor
overload.
blocking 1he liom of fhe air conditioner.
• On models wilh conlrol knobs, lurn Ihe lemperamre
knob to a higher number.
See Ihe Operating hTstructions A'clion.
allow lime tiir [he iOOlll 1!) clil)l down.
Cold air is escaping. "Check tbr open lurnace tloor registers and cold air returns.
Cooling coils have iced up. • See "Air conditioner freezing up" below.
Ice blocks the air flow and • On models ,_dlh ,_onm)l knobs, s(.I the mode (onu-ol m
stops the air conditioner HIGH FAN or HIGH COOL_dlh Ihe letup a{ I or 2.
from cooling the room. • On mod(ls wid_ Iou(h pads, s(_lIhe cor}lrols a!
The batteries are inserted • Check tl_e posili( n-iof Ih( bali(ties. Th(v should b(
incorrectly, inserted in Ihe o-) )osile (+) and ( ) dire(lion.
Theha.eries a.hedead•l ep,ace,he, a,,e,,e
Excessively hot mid • This is normal.
hmnid weather.
The air conditioner is not "lbr proper wawr disposal, make sure Ihe air condilioner
filled to the outside, slanls slighdy h-ore the case lionl to dm rear.
Wn #_ts Moisture is removed from
indoor air and drakes into
rear of a cabinet where a fan
blo_s i| agilinst the outdoor
condenser coil.
• Sel lhe air conditi, reef's veto _o the closed position.
HIGH (F3)FAN or HIGH (F3)COOLand sel doe Ihermosml
u) a higher Icmperalurc.
• This is normal lor a short period in areas whh liule
humidib; normal lbr a longer period in vel') humid areas.
/5
Page 16

Beforeyoucall forservice...
Troubleshooting tips
Normal Operating Sounds
i_ You )nay hear a pinging nois*_causc,d bywamr
being picked up and fhrowl-i against Ihe
o mdens( r on rainy claysor wh(n tile humidil} is
high. This design k'amre helps remo_ e moislm-e
and improve ellick ncb
}_5You mm hear {he Ihermoslal (:lickwhen Ihe
o mlp_-essor cycles on and oil
_, Wmer will collecl in Ihe base pan during
high humidily or on rainy days. The wamr
may overllow and dup li'om Ille otndoor side
oi Ihe unil.
_, The lira may mn even when d_e compressor
does no1.
16
Page 17

GE Service Protection Plus TM
(;E, a name re(ognized woHdwide for quality and dependabilib', offe_ s you
Servi( e Prole(tion Plus'"-comprehensive p_o_e_ fion on all your appliances-
No Matter What Brand!
Benefits Include:
'_Backed by GE
*All brands covered
" Unlimited service calls
"All parts aald labor costs included
'_No out-of-pocket expenses
"No hidden deductibles
'_One 800 number to cal!
x_ _ wl!! I)< ( mpl I(:]y sallsfl< d _l/h ol i stA-VlCt_ pl-ole(:lJt)n o1 you nlay l(_(]ue sl )_}_.117Ira}no) back
on Ih( remaining vahle Ol'yOlll" collllac{. NO (/uesd,)ns asked, h's/ha{ simple.
Protect your refl:igerator, dishwasher, washer and dryer, range, TV, V(R and much more>--any brand!
Plus Ihere's no ex{ra charge for emergency se_Mce and low m, mthly financing is available. Even icemaker
coverage and lood spoilage prolecdon is ollered. You can res{ easy, knowing dial all your valua/)le
h, msehold produc{s are pro/ec/ed against expensive repairs.
Place your ct,nfhlence in GE and call us in Ih< E .,%.{oll-fk-eeal 800-626-2224
lot more inl_rmad<m.
_11 bia}](]S (0_ (!rC(J lip Ill 20 )_}llS Ill(I, ill Ili_ (OI/lill(Nll_ll [iS
We'll CoverAny Appliance.
Anywhere. Anytime.
........................................................................................... ._.S.._._2_"2'._'.'_.............
Please place in envelope and mail to:
GeneralElectricCompany
Warranty Registration Department
P.O. Box 32150
Louisville, KY 40232-2150
17
Page 18

Consumer Product Ownership Registration
Dear C,ustomer:
Thank )ou for purchasing our product and thank )ou for plaEing )our confidenEe in us.
We are proud to have you as a CI1S[()IIIeF!
Follow these three steps to protect your new appliance investment:
Complete and mail
your Con_ulner
Product OwnerMlip
Registration today.
t ta_e dw peace ot
mind of knowing we
Call comao you in the
tnflikely evenl of a
sa k'(y modification.
After mailing the
regist iation below,
stoic this documem
in a sate place, h
c(intains inhffnlalion
you will need should
yOtl requile _ervice.
I)ur selvi(c number is
800 GE (:ARES
(800-432-2737).
Model Number Serial Number
I I I I I I I I I I I IIIIIII
Important: If you did not get a registration card with your
product, detach and return the form below to
ensure that your product is registered, or register
online at www.GEAppliances.com.
Consumer Product Ownership Registration
Read your Owllel's
Manual cai eflflly.
It will help you
operale }Ittlr new
appliam,_ properly.
_._0P_ (ut here
I I I I I I I I I I I I I I I I I
Model Number Serial Number
Mr J MS J MIs J Miss
Firsl I [,asl I
Name I I I I I I I I I Name I I I I I I I I I I I I
SII eel I
.,kdt'h _ss I I I I I I I
\pt.# [ I I I I [ I I
I I
city I I I I I I I I I I I I I I S(me I
I_lte PI iced
ln_' _ I)aV 1_ Ph(,13,!
Monlh
Oem_tal Electric Cottlflattf
Louisville, Ken_ck F
www_GEApplia*tc_,s_Jto
, Nunlbel i [ [
()(casionally, we lllay dlow sele_md ( (tlllpallieS 1o send you illt_ll'll/alioIL
(heck here ityou do tll)l wanl lhis inf_)rnlafion.
GEAppliances
I I I I I I I I
Emlail ".ddless
I
(ode
I I
Zip
I I
I I I
I I I
78
Page 19

Air ConditionerWarranty.
All warranty service provided by our Factory Service Centers,
or an authorized Customer Care®technician. Toschedule service,
on-line, 24 hours a day, contact us at wwwGEAppliances'com, or
call 800-GE-CARES.
GE Will Replace:
Anypartot Ihe air condid, mer _d]ich tifils due toadct('ct in malerials or workmanship.
l)uring Ihis full one-year warranty. CE will al_> provide, free of charge, all labor
and in-home se_ice lo replace' the del_ctivc par1.
Anypartofthesealed refrigeratingsystem(Ihc con]pres.)r, condenser, evaporator
and all connecting robing) which lails due I,_a deice in real( rials or _orkmanship.
l)uring this five-year warranty,(;E will also provide, freeofcharge,all labor and
in-home selwic_ I,) replace' the delecdw par1.
_4_Service trips to your home to teach you how to use the
product.
_4_Improper installation. If you have an installation problem,
or if the air conditioner is of improper cooling capacity
for the intended use, contact yore" dealer or installer. You
are responsible for providing adeqtiate electrical
cmmecting facilities.
r4_Failure of the product resulting- from modifications m the
product or due to unreasonable use including failure to
provide reasonal)le and necessary maintenance.
Staple your receipt here.
Proof of the origh?atpurchase
date is needed to obtah7service
under the warranty.
_4_Replacement of house fuses or resetting of circuit
breakers.
r4_Failure due to con'osion on models not corrosion-
protected.
_ Damage m the product caused by improper power supply
voltage, accident, fire, floods or acts of God.
_, Incidental or consequential damage catised by possible
defects with this air conditioner.
_, In commerciallocations labor necessary to move the unit
to a location where it is accessible for service by an
individual technicima.
This warranty is extended to the original purchaser and any succeeding owner for products purchased for home
use within the USA. In Alaska, the warranty excludes the cost of shipping or service calls to your home.
Some states do not allow the exclusion or limitation of incidental or consequential damages, This warranty gives
you specific legal rights, and you may also have other rights which vary from state to state. Toknow what your
legal rights are, consult your local or state consumer affairs office or your state's Attorney General
Warrantor: General Electric Company. Louisville, KY 40225
19
Page 20

ConsumerSupport.
gEAppliancesWebsite vvvvw.GEAppliances.com
Hay( a qu( sdon or need assistanc( MIh your applia ace? Try tile (;E Appliances \\cbsile 24 hours a day,
any da} el the year} For gl-cater convenience and l_lster sep,ice, )x)n can now download OwneFs Manuals,
order parts, cafalogs, or even schedule set,ice on-line. You can also "Ask O!lr Team el Experts ....
)_mr queslions, and so nmch mote...
ScheduleService
Fx..t3er{ ( ;F• repair ....S(_I_ ice is (till> ()tie slep _t _ra_ l 1-( )Ill _( )tlf ('It }{ t f, (_lel ( }l_l-lil]_ a 1_i([ schednl( }our se_ice at
your (onve ni_ n(e 24 hours an\ elm of the _an ()r (all SO04;E4;ARI;S (8004,_2-27a ¢) during nornml
business hours.
RealLifeDesignStudio
(;E suppotls Ille (' niversal I)esign concepl-prodncls, ,x.rdces and envimnmenls thai can b( used by
people otall ages, sizes and capabilities. We recognize Ihe need to design for a wide range ot physical and
menial abilifi( s and impairmenls, l.or derails of Gl,i's Universal Design applications, including kitchen
design ideas for people wilh disabilities, check ouf our _A_,bsileIoday. For 1he hearing impaired, please call
800-TI)I)-(;EA(] (8011-833-4322).
ExtendedWarrantbs
Purchase a (;E exl(nded wmTanly and karn about sp(cial disconnls Ihaf art availabl( while your wmTanly
is still in ell_:cl. _ou can purchase il on-line an}time, or call 8004126-2224during n()final business hours.
(;F...............( 2resumer H_mae N'I-_i('es will still be there alier x<,)nl _,_,all-anp,,ex.I)ires,.
PartsandAccessories
vvvvw.GEAppliances.com
vvvvw.GEAppliances.com
www.GEAppliances.com
vvvvw.GEAppliances.com
Individuals qnalili(d u) s(rvice Iheir ()wn applianc(s can hay( paris or accessttries _'nl direclly Iotbd)- homes
(\ 1SA, Maslk r( _al d and Discover cards arc acc(pied). ( )rdo- on-lint u )day, 94 Ix )nrs lye U dayor by ph(tn( at
8004;21;-2002 during normal business hours.
Instructions contained in this manual cover procedures to be performed by any user. Other servicing generally
should be referred to qualified service _etsormeL Cautionmust be exercised, since improper servicing may cause
unsafe operation.
ContactUs
lf}_m are not safislled with tile _q-dce you receix e liom (;E, o)ntacl us on our '_\_])site wilh
including your phone nunlber, or _Tite _o: ( ;eneral Manager, Customer Relafions
GE Appliances, Appliance Park
Ixmisville, KY 40225
RegisterYourAppliance
Register your new appliance on-line--at your convenience! Timely pmdncl regisu'adon will allow tot
enhanced commnnicalion and prompt scr, ice under tile terms el your warranb, should tile need arise.
You may also mail in the pre-prin(ed registration card included in Ill(: packing malerial, or detach and
use die lorm in dfis ()wner's Manual.
vvvvvv.GEAppliances.com
all tile details
vvvvw.GEAppliances.com
Printed in Korea
 Loading...