

Page 1
E
GEAppliances.com
Safety Instructions ............. 2, 3
Recycle Information ................... 3
Operating Instructions
Controls ........................... 4-6
Care and Cleaning
Air Filter .............................. 6
Outdoor Coils ......................... 6
Installation Instructions ...... 7-13
AEZ24
AEW24
"0
Troubleshooting Tips ............ 14
Normal Operating Sounds ............ 14
Consumer Support
Consumer Support .......... Back Cover
Warranty ............................ 14
Acondicionador
de aire
La seccion en espahol empieza en la pagina 37
Write the model and serial numbers here:
II
Model #
Serial #
Find these numbers on a label on the side of
the air conditioner,
49-7728 10-13 GE
Page 2
iMPORTANTSAFETYINFORMATION.
READALLiNSTRUCTiONSBEFOREUSING.
A
Foryour safety, the information in this manual must befollowed to minimize the risk offire, electric shock
or personal injury.
m
SAFETYPRECAUTIONS
i Use this appliance only for its intended i
purpose as described in this Owner's
Manual.
This air conditioner must be properly
installed in accordance with the Installation
Instructions before it is used.
Never unplug your air conditioner by pulling
on the power cord. Always grip plug firmly
and pull straight out from the receptacle.
Replace immediately all electric service
cords that have become frayed or otherwise
damaged. A damaged power supply cord
must be replaced with a new power supply
cord obtained from the manufacturer and
not repaired. Do not use a cord that shows
cracks or abrasion damage along its length
or at either the plug or connector end.
_i_iiii!iiii
Turn the unit OFFand unplug your air
conditioner before cleaning.
For your safety,,,do not store or use
combustible materials, gasoline or other
flammable vapors or liquids in the vicinity
of this or any other appliance.
All air conditioners contain refrigerants,
which under federal law must be removed
prior to product disposal. Ifyou are getting
rid of an old product with refrigerants, check
with the company handling disposal about
what to do.
If the receptacle does not match the plug,
the receptacle must be changed out by a
qualified electrician.
These R410A air conditioning systems
require contractors and technicians to
use tools, equipment and safety standards
approved for use with this refrigerant.
DO NOT use equipment certified for
R22 refrigerant only.
GEdoes not support any servicing of the
air conditioner. We strongly recommend
that you do not attempt to service the air
conditioner yourself.
HOWTOCONNECTELECTRICITY
Do not, under any circumstances, cut or remove
the third (ground) prong from the power cord,
For personal safety, this appliance must be properly
grounded,
DONOT use an adapterp/ug with thisappliance.
The power cord of this appliance is equipped
with a 3-prong (grounding) plug which mates
with a standard 3-prong (grounding) wall outlet
to minimize the possibility of electric shock
hazard from this appliance.
Power cord includes a current interrupter device.
A test and reset button is provided on the plug
case. The device should be tested on a periodic
basis by first pressing the TESTbutton and
then the RESETbutton while plugged into the
outlet. If the TESTbutton does not trip or if the
RESETbutton will not stay engaged, discontinue
use of the air conditioner and contact a qualified
2
service technician.
Have the wall outlet and circuit checked by
a qualified electrician to make sure the outlet
is properly grounded.
Where a 2-prong wall outlet is encountered,
it isyour personal responsibility and obligation to
have it replaced with a properly grounded
3-prong wall outlet.
The air conditioner should always be plugged
into its own individual electrical outlet which has
a voltage rating that matches the rating plate.
This provides the best performance and also
prevents overloading house wiring circuits which
could cause a fire hazard from overheated wires.
See the Installation Instructions, Electrical
Requirementssection for specific electrical
connection requirements.
Page 3
GEAppliances.com
A
USEOFEXTENSIONCORDS
RISK OF FIRE Could cause serious injury or
death.
• DO NOTuse an extension cord with this
Window Air Conditioner.
DO NOTuse surge protectors or multi-outlet
adaptors with this Window Air Conditioner.
BEADANDFOLLOWTHISSAFETY/NFORMATIONCAREFULLY
SAVETHESEiNSTRUCTiONS
RECYCLINGINFORMATION
For appliance recycling information please visit
www.geappfiances.com/recycling.
Page 4
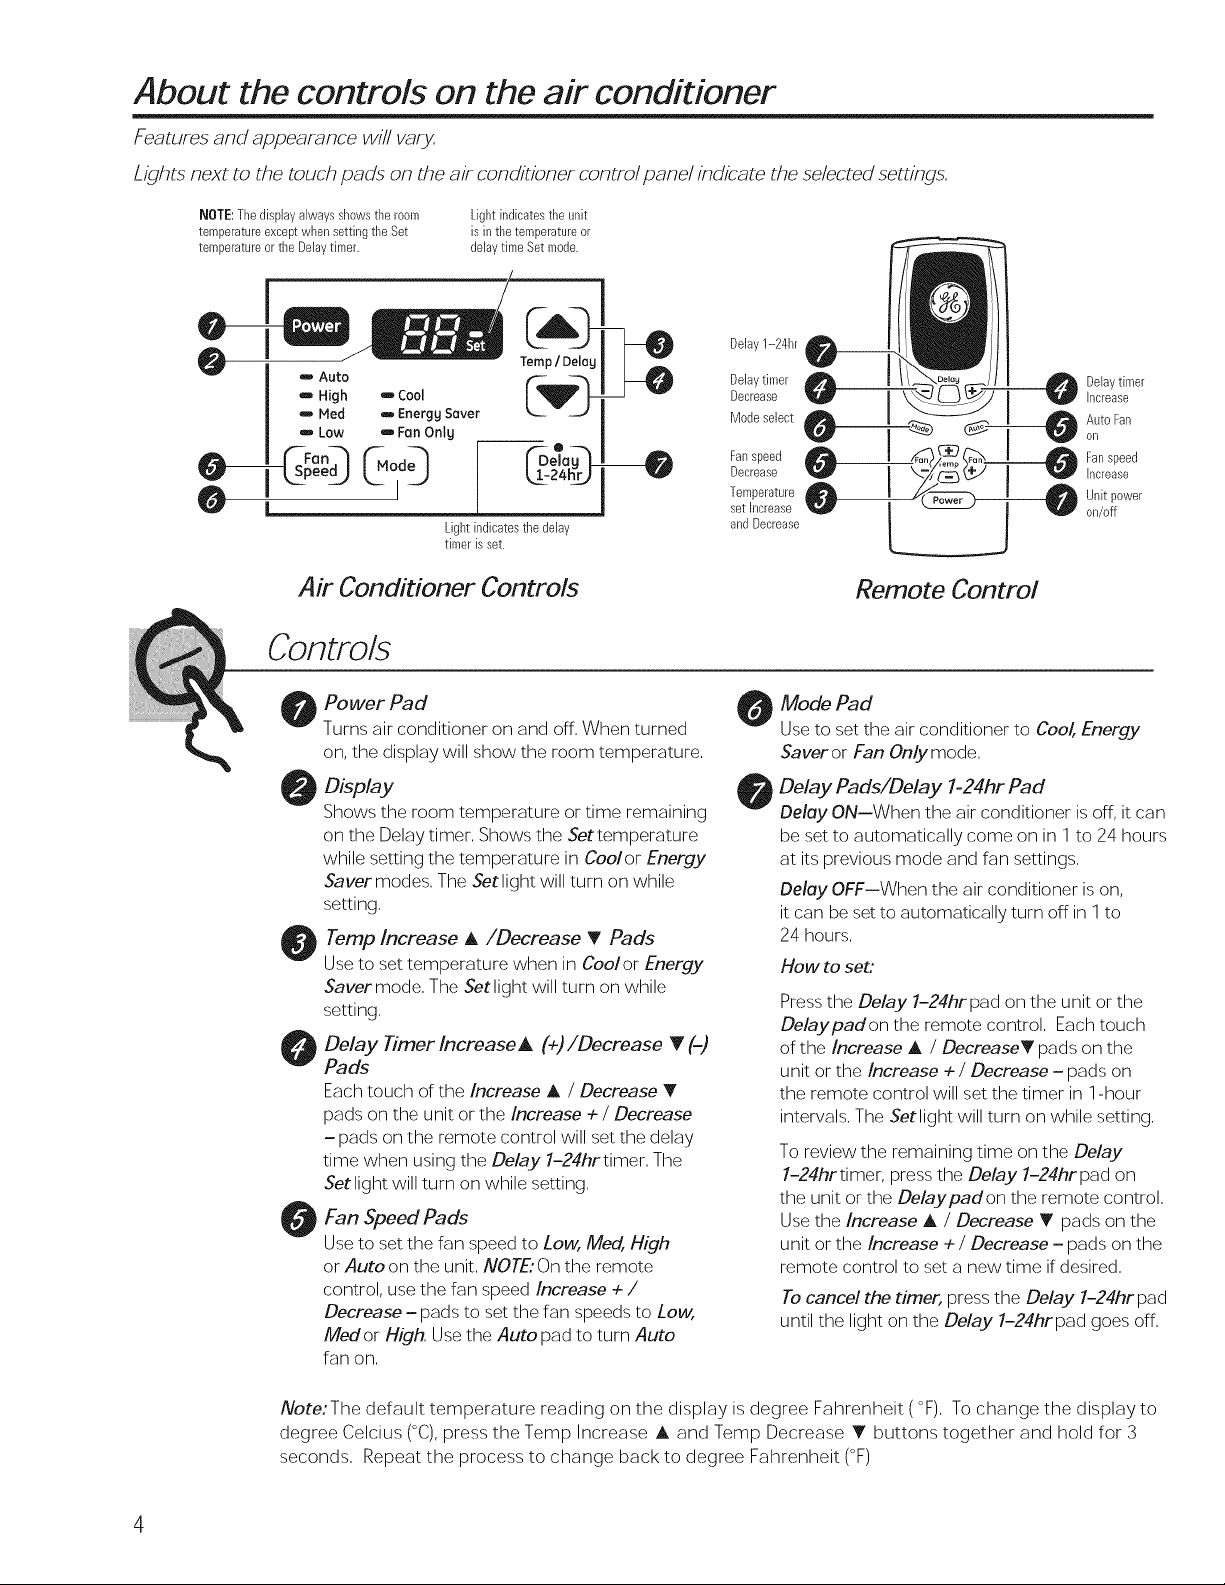
About the controls on the air conditioner
Features and appearance win vary.
Lights next to the touch pads on the air conditioner control pane/indicate the selected settings.
NOTE:The display always showsthe room
temperatureexceptwhen setting the Set
temperatureor tile Delaytimer.
Air Conditioner Controls
Controls
Power Pad
Turns air conditioner on and off, When turned
on, the display will show the room temperature,
Display
Shows the room temperature or time remaining
on the Delay timer, Shows the Settemperature
while setting the temperature in Coo/or Energy
Saver modes, The Set light will turn on while
setting,
Temp Increase A/Decrease T Pads
Use to set temperature when in Coolor Energy
Savermode, The Setlight will turn on while
setting,
Delay l-liner IncreaseA (+)/Decrease Y (-)
Pads
Each touch of the Increase A / Decrease T
pads on the unit or the Increase + / Decrease
= pads on the remote control will set the delay
time when using the Delay 1-24hrtimer, The
Set light will turn on while setting,
Fan Speed Pads
Use to set the fan speed to Low, Meal, High
or Auto on the unit, NOTE."On the remote
control, use the fan speed Increase + /
Decrease = pads to set the fan speeds to Low,
Medor High, Use the Auto pad to turn Auto
fan on,
Lightindicates the unit
is inthe temperatureor
delaytime Set mode.
Lightindicates tile delay
timer is set.
Delay1-24hr
Decrease Increase
Mode select Auto Fan
Fanspeed Fanspeed
Delaytimer __/_ li__ Delaytimer
Decrease Increase
setIncrease 0n/off
andDecrease
Temperature 0 _ @ Unit power
oil
Remote Control
Mode Pad
Use to set the air conditioner to Coo/, Energy
Saver or Fan Only mode,
Delay Pads/Delay 1-24hr Pad
Delay ON--When the air conditioner is off, it can
be set to automatically come on in I to 24 hours
at its previous mode and fan settings,
Delay OFF--When the air conditioner is on,
it can be set to automatically turn off in 1 to
24 hours,
How to set:
Press the Delay 1-24hrpad on the unit or the
Delaypadon the remote control, Each touch
of the Increase A / DecreaseT pads on the
unit or the Increase + / Decrease = pads on
the remote control will set the timer in 1-hour
intervals, The Setlight will turn on while setting,
To review the remaining time on the Delay
1-24hrtimer, press the Delay 1-24hr pad on
the unit or the De/aypadon the remote control,
Use the Increase A / Decrease T pads on the
unit or the Increase + / Decrease = pads on the
remote control to set a new time if desired,
Tocancel the timer, press the Delay 1-24hr pad
until the light on the Delay 1-24hrpad goes off,
IVote:The default temperature reading on the display is degree Fahrenheit (°F), To change the display to
degree Celcius (°C),press the Temp Increase A and Temp Decrease _' buttons together and hold for 3
seconds, Repeat the process to change back to degree Fahrenheit (°F)
4
Page 5
Do Not Operate in Freezing Outdoor Conditlbns
This cool-only air conditioner was not designed for
freezing outdoor conditions, It must not be used in
freezing outdoor conditions,
Remote Control
GEAppliances.com
, To ensure proper operation, aim the remote
control at the signal receiver on the air
conditioner,
, Make sure nothing is between the air conditioner
and the remote control that could block the
signal,
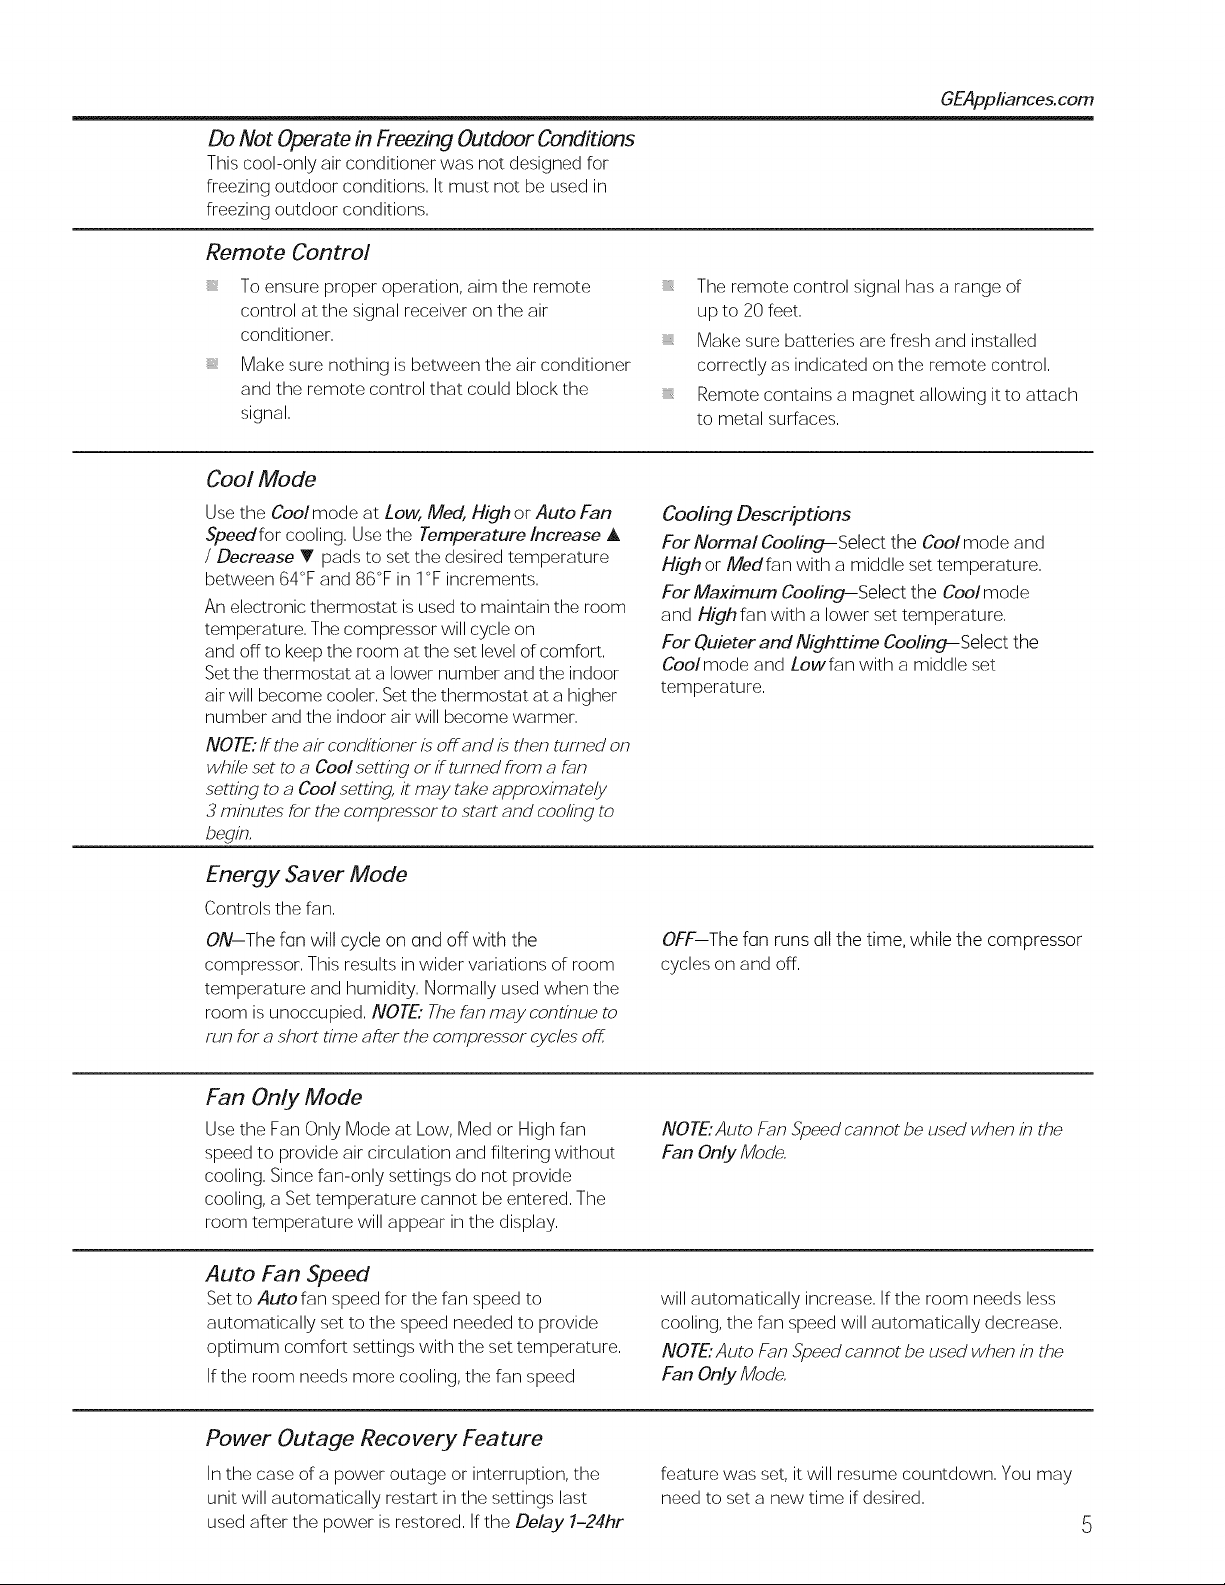
Cool Mode
Use the Coolmode at Low, Meal, High or Auto Fan
Speedfor cooling, Use the Temperature Increase A
/ Decrease • pads to set the desired temperature
between 64°F and 86°F in I°F increments,
An electronic thermostat is used to maintain the room
temperature, The compressor will cycle on
and off to keep the room at the set level of comfort,
Set the thermostat at a lower number and the indoor
air will become cooler, Set the thermostat at a higher
number and the indoor air will become warmer,
NOTE:/fthe air conditioner is off and is then turned on
while set to a Cool setting or if turned from a f_n
setting to a Cool setting, it may take approximately
3 minutes for the compressor to start and cooling to
begin,
, The remote control signal has a range of
up to 20 feet,
, Make sure batteries are fresh and installed
correctly as indicated on the remote control,
, Remote contains a magnet allowing it to attach
to metal surfaces,
Cooling Descriptions
For Normal Cooling-Select the Cool mode and
High or Medfan with a middle set temperature,
For Maximum Cooling-Select the Cool mode
and Highfan with a lower set temperature,
For Quieter and Nighttime Cooling- Select the
Coo/mode and Lowfan with a middle set
temperature,
Energy Saver Mode
Controls the fan,
ON-The fan will cycle on and off with the
compressor, This results in wider variations of room
temperature and humidity, Normally used when the
room is unoccupied, NOTE: Thef_n may continue to
run for a short time aRer the compressor cycles off,
Fan Only Mode
Use the Fan Only Mode at Low, Med or High fan
speed to provide air circulation and filtering without
cooling, Since fan-only settings do not provide
cooling, a Set temperature cannot be entered, The
room temperature will appear in the display,
Auto Fan Speed
Set to Auto fan speed for the fan speed to
automatically set to the speed needed to provide
optimum comfort settings with the set temperature,
If the room needs more cooling, the fan speed
Power Outage Recovery Feature
In the case of a power outage or interruption, the
unit will automatically restart in the settings last
used after the power is restored, If the Delay 1-24hr
OFF-The fan runsall the time, while the compressor
cycles on and off,
NOTE'Auto Fan Speed cannot be used when in the
Fan Only Mode,
will automatically increase, If the room needs less
cooling, the fan speed will automatically decrease,
NOTE'Auto Fan Speed cannot be used when in the
Fan Only Mode,
feature was set, it will resume countdown, You may
need to set a new time if desired,
Page 6
About the controls on the air conditioner
Additional important information.
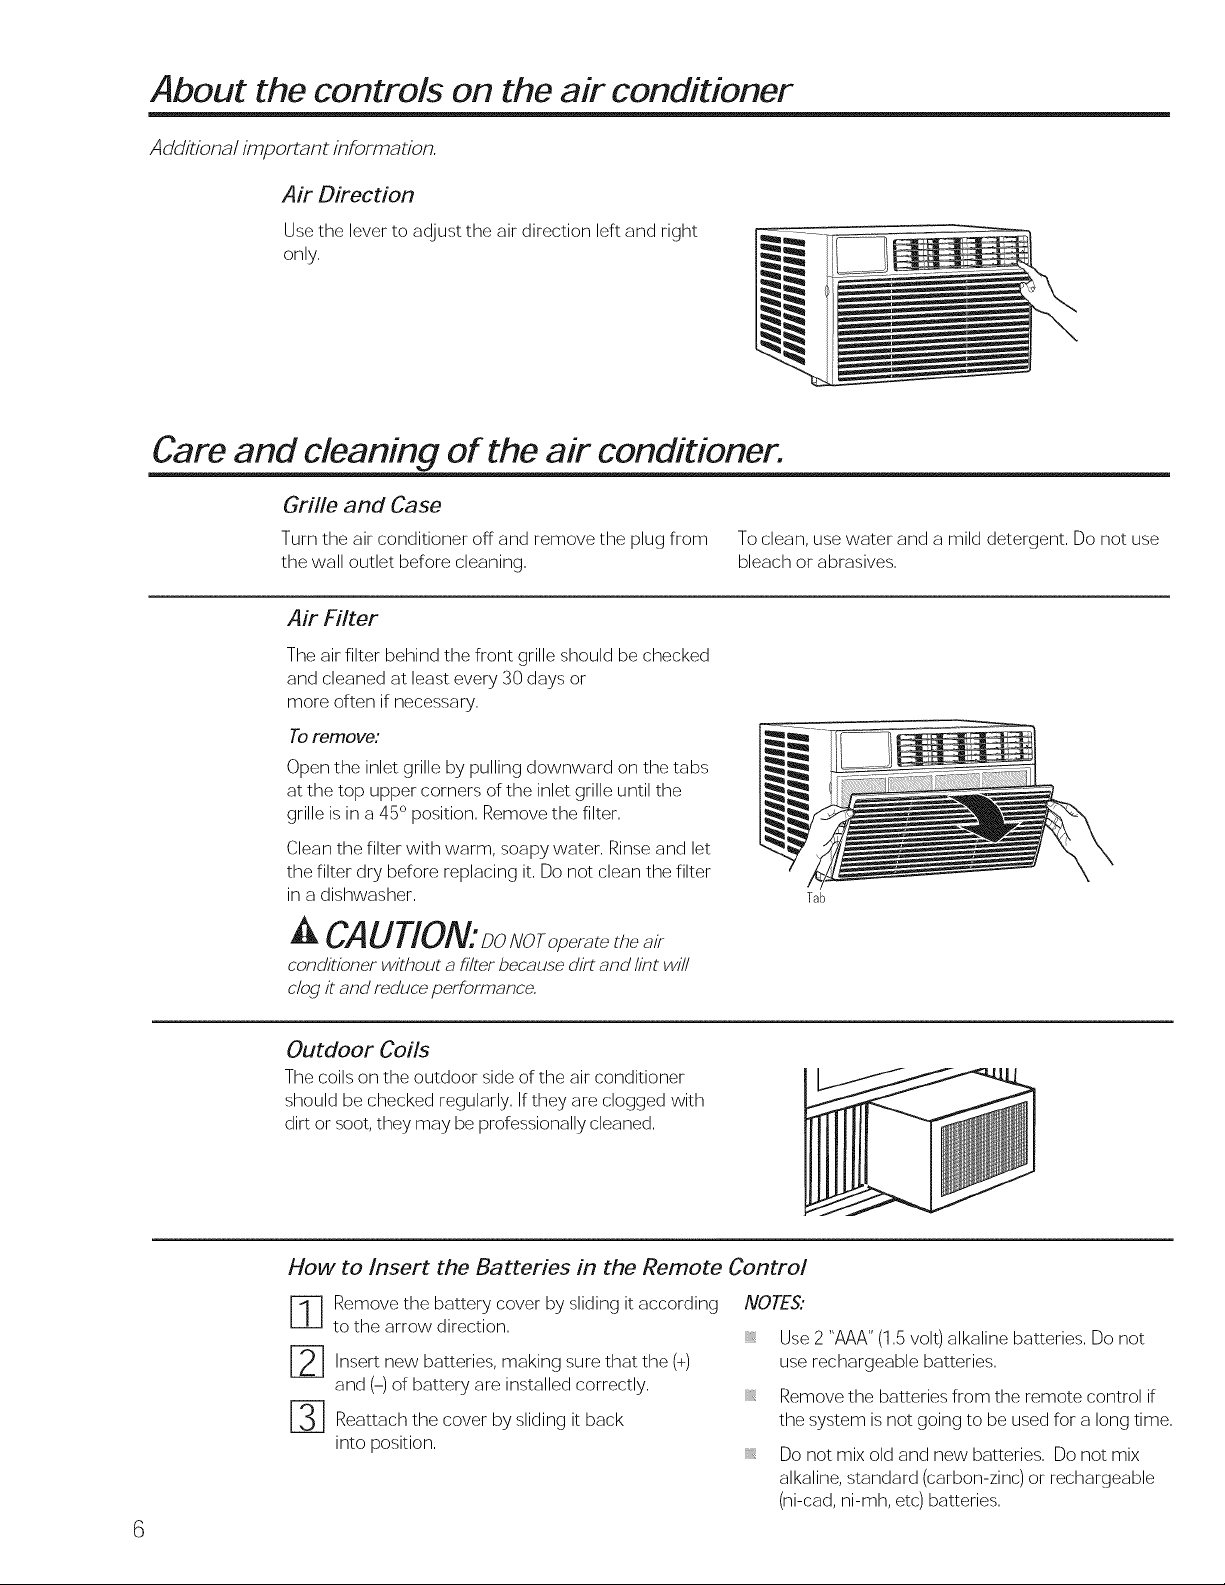
Air Direction
Use the lever to adjust the air direction left and right
only.
Care and cleaning of the air conditioner.
Grifle and Case
Turn the air conditioner off and remove the plug from To clean, use water and a mild detergent. Do not use
the wall outlet before cleaning, bleach or abrasives.
Air Filter
The air filter behind the front grille should be checked
and cleaned at least every 30 days or
more often if necessary.
To remove:
Open the inlet grille by pulling downward on the tabs
at the top upper corners of the inlet grille until the
grille is in a 45° position. Remove the filter.
Clean the filter with warm, soapy water. Rinse and let
the filter dry before replacing it. Do not clean the filter
in a dishwasher.
Tab
CAUTION:DoNoro r t air
conditioner without a filter because dirt and lint wi//
clog it and reduce performance,
Outdoor Coils
The coils on the outdoor side of the air conditioner
should be checked regularly. Ifthey are clogged with
dirt or soot, they may be professionally cleaned.
How to Insert the Batteries in the Remote Control
-] emove the battery cover by sliding it according
to the arrow direction.
--] Insert new batteries, making sure (+)
and (-) of battery are installed correctly.
[-3-] Reattach the cover by sliding it back
into position.
that the
6
NOTES:
Use 2 "AAA" (1.5 volt) alkaline batteries. Do not
use rechargeable batteries.
, Remove the batteries from the remote control if
the system is not going to be used for a long time.
, Do not mix old and new batteries. Do not mix
alkaline, standard (carbon-zinc) or rechargeable
(ni-cad, ni-mh, etc) batteries.
Page 7
II i
Co i
I struct"
|
BEFOREYOU BEGIN
Read these instructions completely
and carefully.
• IMPORTANT - Savetheseinstructions
for local inspector's use,
• IMPORTANT- Observeallgoverning
codes and ordinances.
• Note to Installer- Be sure to leave these
instructions with the Consumer.
• Note to Consumer - Keep these instructions for
future reference.
• Skill level - Installation of this appliance
requires basic mechanical skills.
• Completion time - Approximately 1 hour
• We recommend that two people install
this product.
• Proper installation is the responsibility
of the installer.
• Product failure due to improper installation is not
covered under the Warranty.
• You MUST use all supplied parts and use proper
installation procedures as described in these
instructions when installing this air conditioner.
ACAUTION:
Do not, under any circumstances, cut or remove
the third (ground) prong from the power cord.
Do not change the plug on the power cord
of this air conditioner.
Aluminum house wiring may present special
problems--consult a qualified electrician.
TOOLSYOUWILL NEED
Phillips head screwdriver
Flat-blade screwdriver
(3 ELECTRICALREQUIREMENTS
(_ ome models require a 115/120-volt AC,
possibility of electric shock hazard. If the wall outlet
you plan to use is only a 2-prong outlet, it isyour
responsibility to have it replaced with a properly
grounded 3-prong wall outlet.
60-Hz grounded outlet protected with a
15-amp time-delay fuse or circuit breaker.
The 3-prong grounding plug minimizes the
Some models require 230/208-volt AC,
protected with a time-delay fuse or circuit
breaker. These models should be installed on
their own single branch circuit for best
performance and to prevent overloading
house or apartment wiring circuits, which
could cause a possible fire hazard from
overheating wires.
Pencil
Level Scissors or knife
Power cord includes a current interrupter device. A
test and reset button is provided on the plug case. The
device should be tested on a periodic basis by first
pressing the TEST button and then the RESET button
while plugged into the outlet. Ifthe TEST button does
not trip or if the RESET button will not stay engaged,
discontinue use of the air conditioner and contact a
qualified service technician.
Ruler or tape measure
Page 8
JnstaJlationinstructions
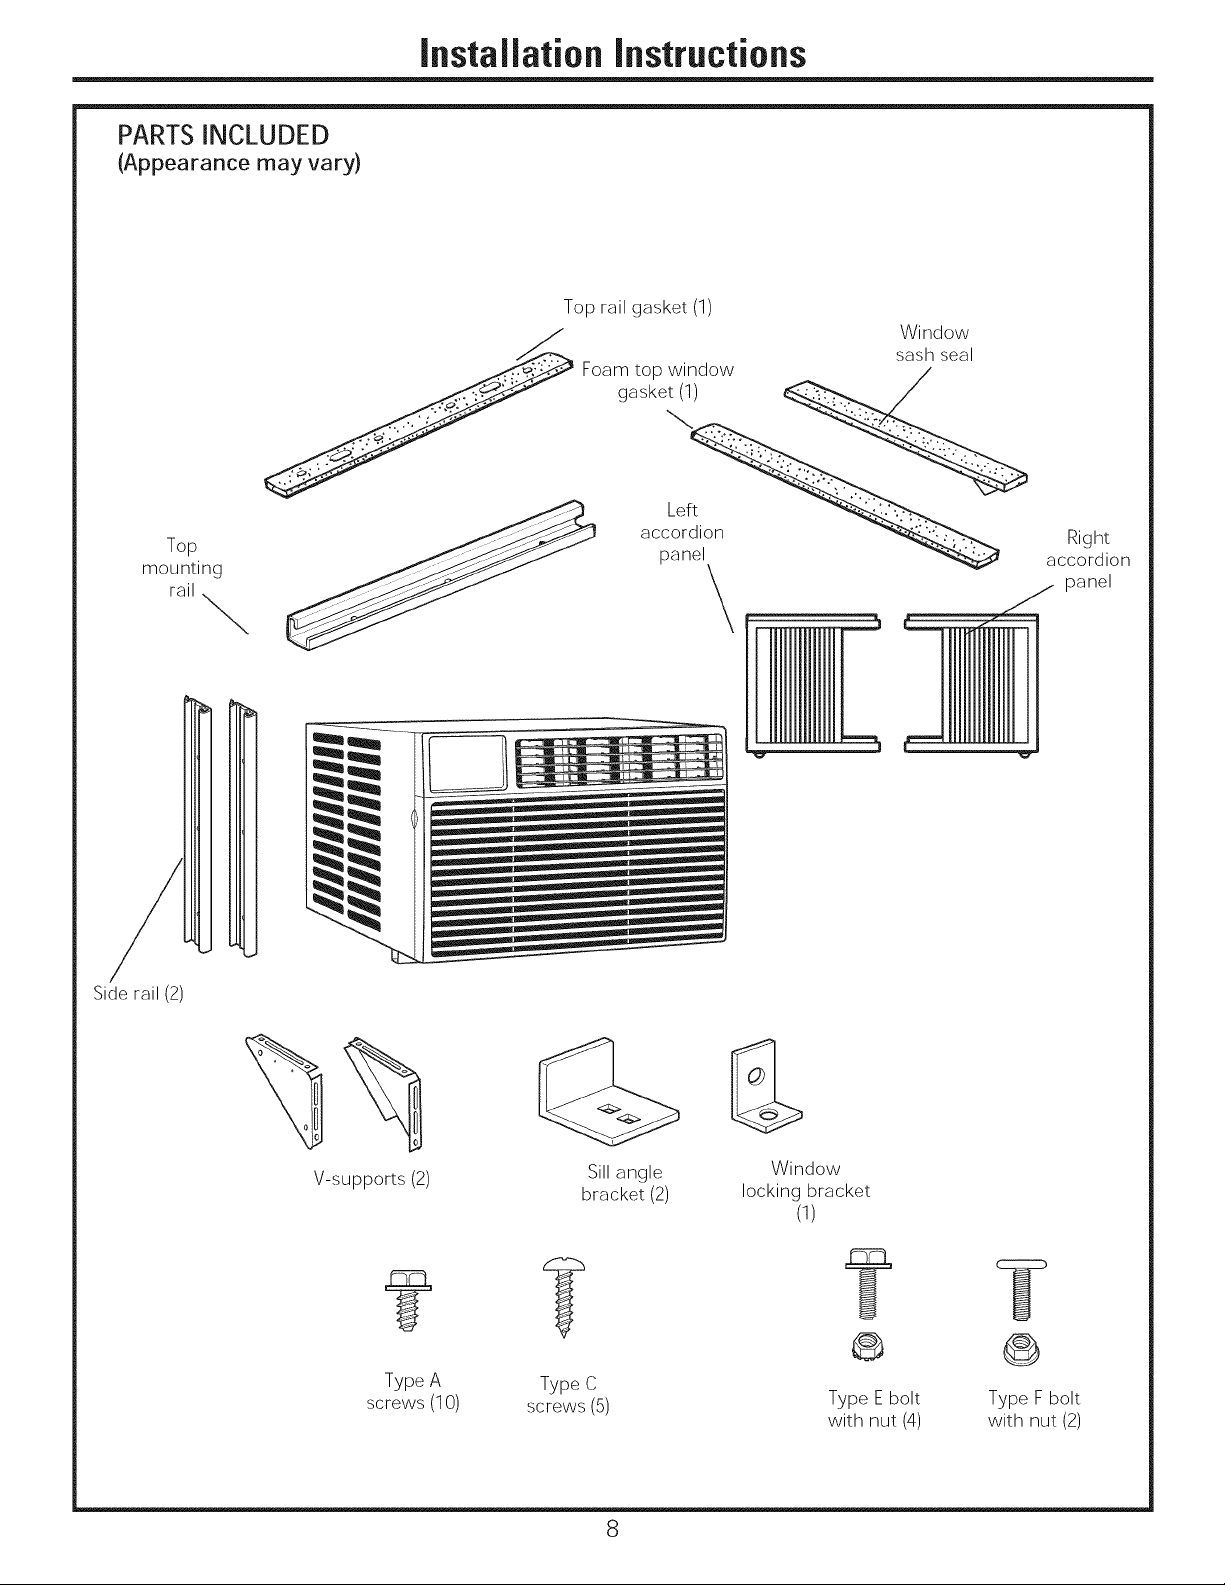
PARTSiNCLUDED
(Appearance may vary)
Top rail gasket (1)
Foam top window /
gasket(1) __ /
mounting _ pan
Right
accordion
panel
Side rail (2)
V-supports (2)
Sill angle
bracket (2)
\i
Window
locking bracket
(1)
t sr
0
Type A Type C
screws (10) screws (5) Type Ebolt Type F bolt
8
with nut (4) with nut (2)
Page 9
JnstaJlationinstructions
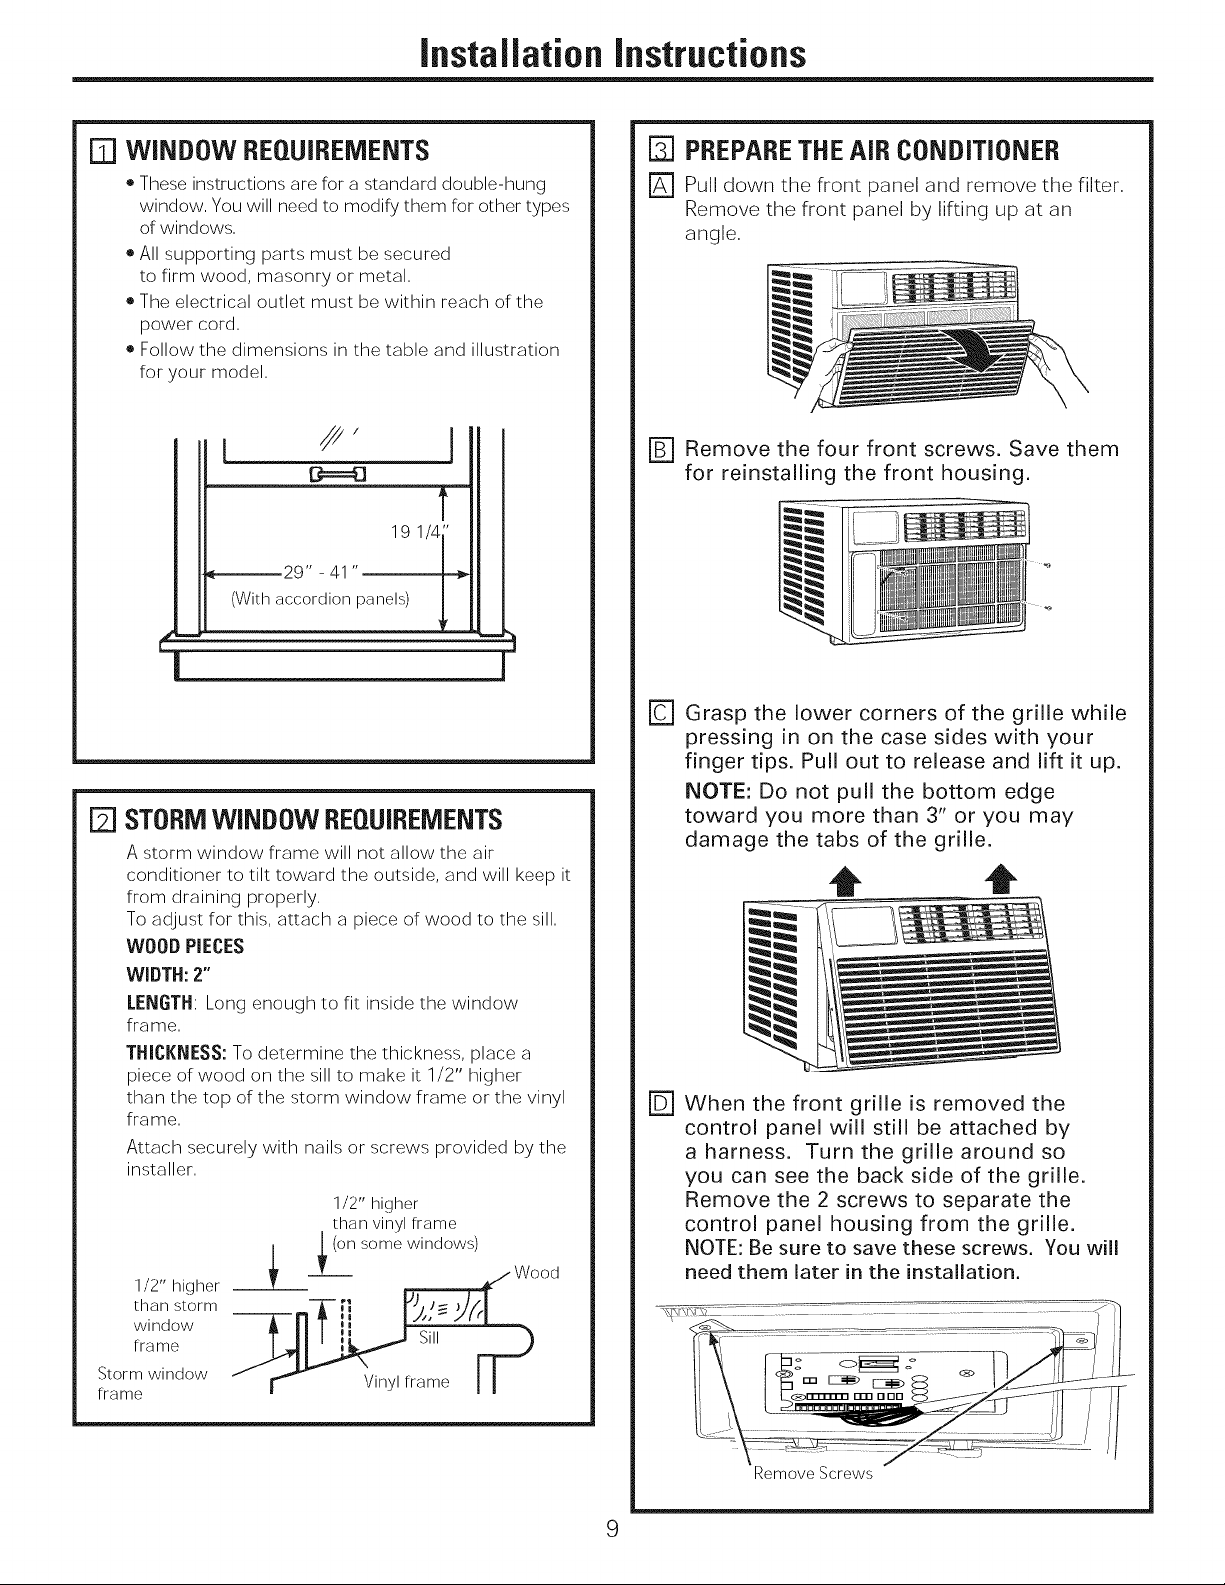
[] WINDOW REQUIREMENTS
• These instructionsare for a standard double-hung
window. Youwill needto modify them for other types
of windows.
• All supporting parts must be secured
to firm wood, masonry or metal,
• The electrical outlet must be within reach of the
power cord,
• Follow the dimensions in the table and illustration
for your model,
I
19 1/4"
_-------29" - 41 "
(With accordion panels)
1
171STORMWINDOW REQUIREMENTS
A storm window frame will not allow the air
conditioner to tilt toward the outside, and will keep it
from draining properly.
To adjust for this, attach a piece of wood to the sill,
WOOD PIECES
WIDTH:2"
LENGTH: Long enough to fit inside the window
frame,
THICKNESS: To determine the thickness, place a
piece of wood on the sill to make it 1/2" higher
than the top of the storm window frame or the vinyl
frame,
Attach securely with nails or screws provided by the
installer,
1/2" higher
than vinyl frame
_ _ (on sorne windows
1/2" higher
than storm
window
frame
Storm window
frame
- r_ Vinyl frame I !
L-] _ Wood
[_ PREPARETHEAiR CONDITIONER
r_ Pull down the front panel and remove the filter.
Remove the front panel by lifting up at an
angle.
r_ Remove the four front screws. Save them
for reinstalling the front housing.
rc] Grasp the lower corners of the grille while
pressing in on the case sides with your
finger tips. Pull out to release and lift it up.
NOTE: Do not pull the bottom edge
toward you more than 3" or you may
damage the tabs of the grille.
t t
r51When the front grille is removed the
control panel will still be attached by
a harness. Turn the grille around so
you can see the back side of the grille.
Remove the 2 screws to separate the
control panel housing from the grille.
NOTE: Be sure to save these screws. You will
need them later in the installation.
Remove Screws
9
Page 10
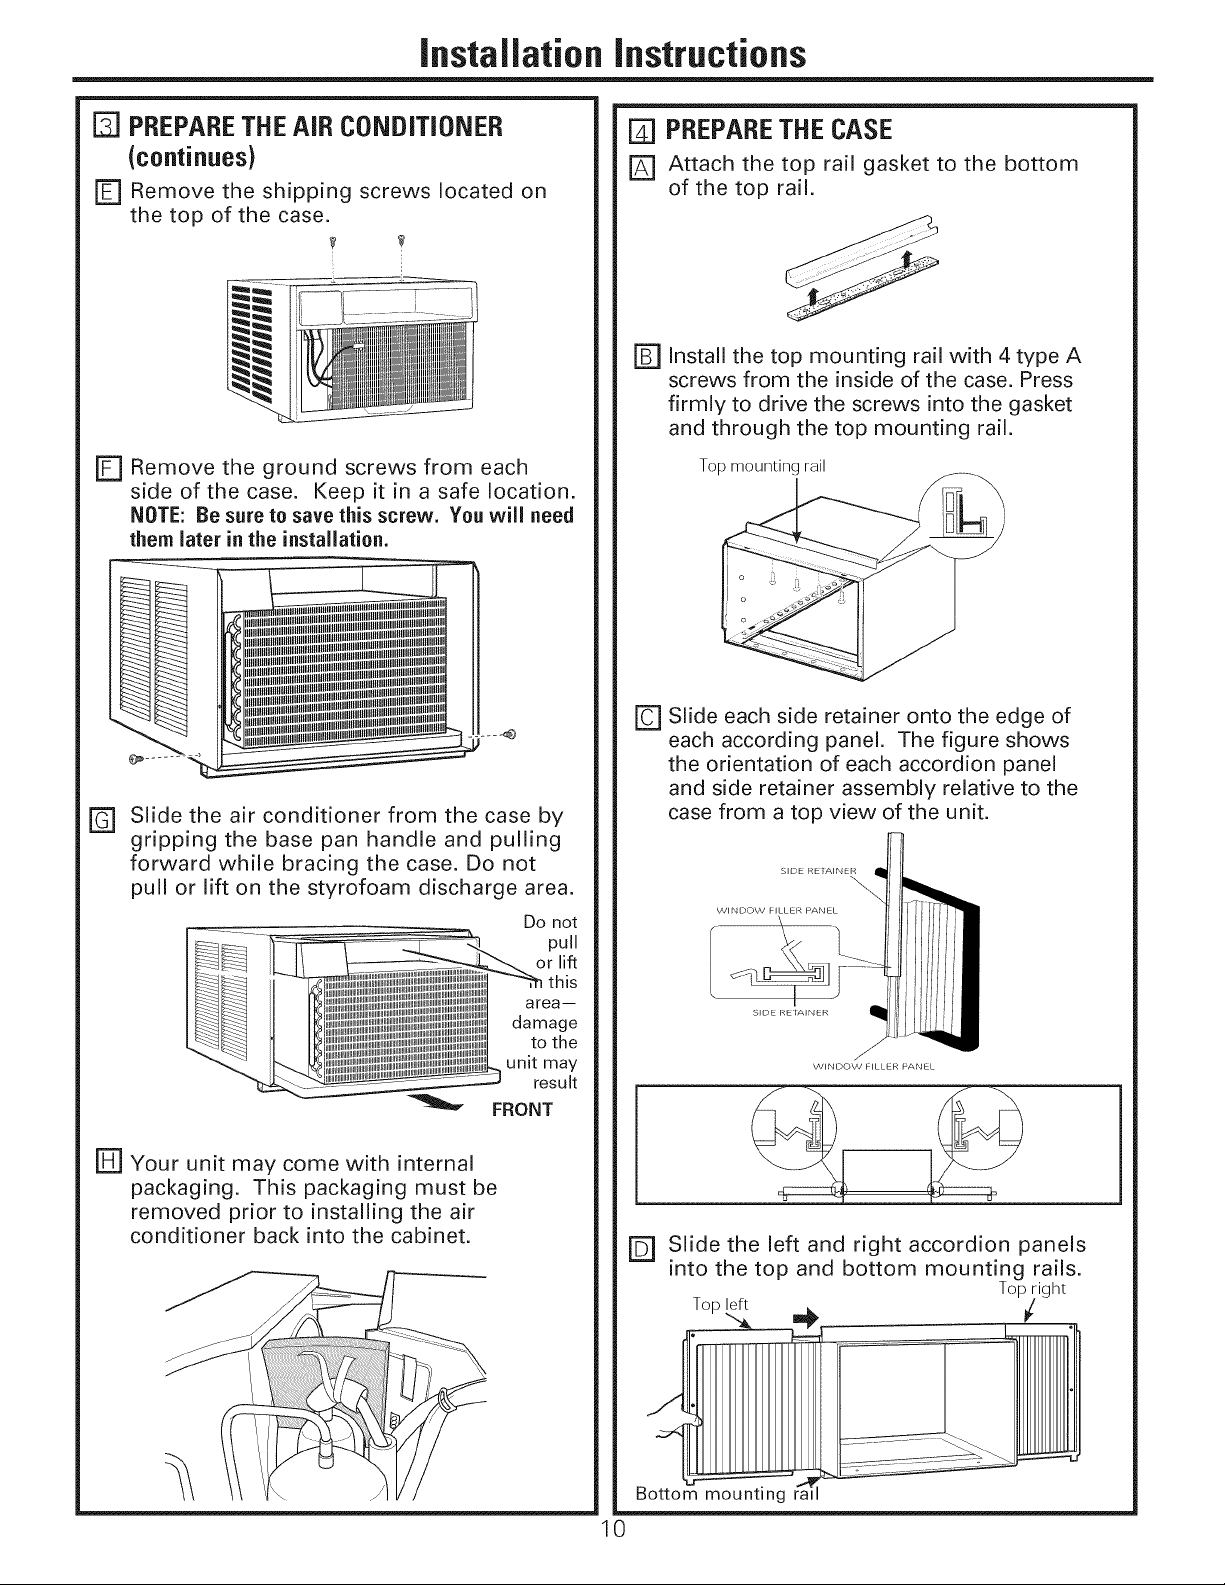
InstaJiationInstructions
[=_PREPARETHE AiR CONDiTiONER
(continues)
F_ Remove the shipping screws located on
the top of the case.
i
E] Remove the ground screws from each
side of the case. Keep it in a safe location.
NOTE: Be sure to save this screw. You will need
them later in the installation.
[_ PREPARETHECASE
r_ Attach the top rail gasket to the bottom
of the top rail.
Y
F_ Install the top mounting rail with 4 type A
screws from the inside of the case. Press
firmly to drive the screws into the gasket
and through the top mounting rail.
Top mounting rail
Slide the air conditioner from the case by
@
gripping the base pan handle and pulling
forward while bracing the case. Do not
pull or lift on the styrofoam discharge area.
FH-]Your unit may come with internal
packaging. This packaging must be
removed prior to installing the air
conditioner back into the cabinet.
Do not
area--
damage
unit may
FRONT
pull
to the
result
D Slide each side retainer onto the edge of
each according panel. The figure shows
the orientation of each accordion panel
and side retainer assembly relative to the
case from a top view of the unit.
SIDE IRE IAINEI3
r_ Slide the left and right accordion panels
into the top and bottom mounting rails.
\
f
WINDOW FILLER PANEL
Top_ __ Tonight
Bottom mounting ra
0
Page 11

JnstaJlationinstructions
FJ PREPARETHECASE(continues)
r_ Attach the side retainers to the case using 6
type A screws.
[ PREPARETHEWINDOW AND INSTALL
THECASE
r_ cut the window sash seal to the proper length.
Peel off the backing and attach the seal to the
underside of the window sash.
[]PREPARE THEWINDOW AND INSTALL
THECASE(continues)
F_ Assemble the V-support and V-support
bracket with Type F nut and bolt
Type Ebolt
nut
Left i
Sill angle
bracket _--_Q _
V-support Type
F bolt and nut
Position the V-supports
D
on the case bottom so
that they will be near
the outside wall. Attach
a V-support to each side
of the bottom of the case
with Type E bolts, 2 for
each support.
E1
Adjust sill an qle brackets to rest on sill.
Right
ipport
r_Open the window and mark the center of
the window sill.
FCI Carefully slide the case into the window
and center the case. Lower the window
behind the top mounting rail. Pull the
bottom of the case forward so that the
bottom mounting rail is tight against the
back of the window stool. Mount the case
to the window sill using 2 type C screws.
Drill pilot holes, if necessary.
Stool
r_ Extend the left and right accordion panels
to the vertical window sashes. Drill pilot
holes and attach the top corners with 2 type
C screws.
_L_2LII_t
Type C
screw
screw
11
Page 12

JnstaJlationinstructions
[]PREPARE THEWINDOW AND iNSTALL
THECASE(continues)
A CAUTION:
To prevent broken Vinyl
glass or damage to
windows, on vinyl or
other similarly
constructed windows,
attach the window
locking bracket to the window side jamb.
Attach the window locking Wood
bracket with one Type C
screw.
[r] cut the foam top window gasket to the
window width.
r_ stuff the foam
between the
glass and the
window to
prevent air and
insects from getting into the room.
NOTE: If the gasket supplied does not fit
your window, obtain appropriate material
locally to provide a proper installation seal.
[=6_INSTALL THE AIR CONDITIONER
IN THE CASE (continues}
r_ Replace the 2 screws removed earlier, one
on each side of the case.
IMPORTANT: THE GROUND SCREWS MUST BE
REINSTALLED TO ENSURE PROPERGOUND.
r_ Reinstall the control to the panel housing by
replacing the 2 screws you removed earlier.
Install Screws
Attach the front grille to the case by inserting
@
the tabs on the grille into the slots on the
front top of the case. Push the grille in.
r_ INSTALL THE AIR CONDITIONER
IN THE CASE
Slide the air conditioner into the case by
[]
the base pan. Do not push on the controls,
styrofoam air discharge housing or the finned
coils. Make sure the air conditioner is firmly
seated.
Do not press on
these areas--
damage to the unit
may result
Base Pan
r_ Replace the screws.
r_ Install the filter and the front grille.
['G--]Plug in the air conditioner.
12
Page 13

Through-the-Wall Installation Instructions--Optional
The case may be installed through-the-wall
in both existing and new construction.
Read completely, then follow step-by-step.
NOTE: Obtain all materials locally for
mounting the air conditioner through-
the-wall.
[] IMPORTANT
Through-the-wall installation is not
appropriate if any of the side or top louvers
in the case will be obstructed by the wall.
All side and top louvers in the case must
project on the outdoor side of the wall.
The room side of the case must project
into the room far enough to maximize the
balance of the unit.
The case must be installed level from side-
to-side and with a slight tilt from front to
rear. Use a level; no more than a 1/2 bubble
will be the correct case slant to the outside.
Lintel angle is required to support bricks or
blocks above opening.
Flashing is required and should extend the
length of the opening to ensure no inside
cavity leakage occurs.
Remove the air conditioner from the case.
[]
For specific instruction, refer to the Window
Installation Instructions.
[]
Make certain that a wall receptacle is
available close to the hole location or make
arrangements to install a receptacle.
IT] IMPORTANT (cont.)
F_ Secure with 14 wood screws anchored at
least an inch into the wall support structure.
NOTE: Drill pilot holes, if necessary, for
proper installation. If the frame is oversized,
use shims to prevent case distortion.
FINISH THE WALL OPENING
Caulk all four sides on the outdoor side of
the case to prevent moisture from getting
through to the interior wall. Use of flashing
(drip rail) will further prevent water from
dripping inside the wall and down the
outside of the building.
/i
Caulking
OUTSIDE
Air louvers (top/
and sides mus/t/j
project on the v
outdoor side of
the wall)
Wood filler and
caulking (above an
below the flashinc
"-_'_ ---" desired)
INSIDE
Bottom rail
/
F_ Place the case in the wall opening and
place wood support strips between the case
bottom and the flashing on both sides of the
bottom rail. They should be the same height
as the bottom rail and the same length as
Flashing bottom rail
Case Bottom
(Drip rail)
)
Flashing
(Drip rail) Wood support strips
FB'] Place the air conditioner into the case.
For specific instruction, refer to the Window
Installation Instructions.
13
Page 14

TroubleshootingTips.
Possible Causes What To Do
Theair conditioner
doesnotstart
Airconditionerdoes Airflow is restricted, . Make sure there are no curtains, blinds or furniture
notcoolas it should blocking the front of the air conditioner,
is unplugged, completely into the outlet,
The fuse is blown/circuit *Check the house fuse/circuit breaker box and replace
breaker is tripped, the fuse or reset the breaker,
Power failure, *The unit will automatically restart in the settings last
The current interrupter *Press the RESETbutton located on the power cord plug,
device is tripped, . If the RESETbutton will not stay engaged, discontinue
The temp control may . In the C001mode, press the DecreaseT pad,
not be set correctly,
The air filter is dirty, *Clean the filter at least every 30 days,
The room may have been hot, *When the air conditioner isfirst turned on,you need
*Make sure the air conditioner plug is pushed
used after the power is restored,
*There is a protective time delay (approximately
3 minutes) to prevent tripping of the compressor
overload, For this reason, the unit may not start
normal cooling for 3 minutes after it is turned
back on,
use of the air conditioner and contact a qualified
service technician,
See the Care and Cleaning section,
to allow time for the room to cool down,
Cold air is escaping, *Check for open furnace registers and cold air returns,
Cooling coils have iced up, *See "Air conditioner freezing up" below,
Air conditioner Ice blocks the oir flow oSet the controls at HighFanor High C001and set the
freezingup and stops the air conditioner thermostat to a higher temperature,
from cooling the room,
Therernomcontrol The batteries are inserted *Check the position of the batteries, They should be
isnot working incorrectly, inserted in the opposite (+)and (-) direction,
The batteries may be dead, . Replace the batteries,
Water drips outside Hot, humid weather, *This is normal,
Water drus indoors The air conditioner is not *For proper water disposal, make sure the air conditioner
tilted to the outside, slants slightly from the case front to the rear,
Watercollects n
basepan
Moisture removed from air
and drains into base pan,
*This is normal for a short period in areas with little
humidity; normal for a longer period invery humid areas,
Normal Operating Sounds
You may hear a pinging noise caused by
water being picked up and thrown against the
condenser on rainy days or when the humidity
is high, This design feature helps remove
moisture and improve efficiency,
You may hear the thermostat click when the
compressor cycles on and off,
Water will collect inthe base pan during
high humidity or on rainy days, The water
may overflow and drip from the outdoor side
of the unit,
iiiiiiiiiiii_i_
The fan may run even when the compressor
does not,
14
Page 15

GE Air Conditioner--One-Year Limited Warranty. (For customers in the US, A)
All warranty service provided by our Factory Service Centers,
or an authorized Customer Card _>technician. Toschedule service,
visit us on-line at ge.com, or call 800.GE.CARES(800.432.2737).
Have serial number and model number available when calling
for service.
GE Will Replace:
oneYear
From the date of the
odgina! purchase
Service trips to your home to teach you how to
use the product.
Improper installation, delivery or maintenance. If you
have an installation problem, or if the air conditioner
is of improper cooling capacity for the intended use,
contact your dealer or installer. You are responsible
for providing adequate electrical connecting facilities.
Failure of the product resulting from modifications to
the product or due to unreasonable use including failure
to provide reasonable and necessary maintenance.
Anyport of the air conditioner which fails due to a defect in materials or workmanship.
During this limited one-year warranty, GE will also provide, free of charge, all labor and related
service to replace the defective part.
St_?pleyour receipt here,
Proof of the original purchase
d_?teis needed to obt_?in service
under the warranty,
Replacement of house fuses or resetting of circuit
breakers.
, Failure due to corrosion on models not corrosion-
protected.
, Damage to the product caused by improper power
supply voltage, accident, fire, floods or acts of God.
, Incidental or consequential damage caused by possible
defects with this air conditioner.
Damage caused after delivery.
In commercial locations, labor necessary to move the
unit to a location where it is accessible for service
by an individual technician.
EXCLUSION OF IMPLIED WARRANTIES--Your sole and exclusive remedy is product repair as provided in
this Limited Warranty. Any implied warranties, including the implied warranties of merchantability or
fitness for a particular purpose, are limited to one year or the shortest period allowed by la w.
This warranty is extended to the original purchaser and any succeeding owner for products purchased for
home use within the USA. ff the product is located in an area where service by a GEAuthorized Servicer is
not available, you may be responsible for a trip charge or you may be required to bring the product to an
Authorized GEService location for service, in Alaska, the warranty excludes the cost of shipping or service calls
to your home.
Some states do not allow the exclusion or limitation of incidental or consequential damages. This warranty
gives you specific legal rights, and you may also have other rights which vary from state to state. Toknow
what your legal rights are, consult your local or state consumer affairs office or your state's Attorney General.
Warrantor: General Electric Company. Louisville, KV 40225
15
Page 16

Instrucciones de seguridad ......... 17, 18
Informacion sobre Recicla]e .................. 18
Instrucciones de operacion
Controle .................................. 19, 20
Cuidado y limpieza
Bobinas para exteriores ...................... 21
Filtro de aire .................................. 21
Instrucciones de instalacidn ....... 22-28
Solucionar problemas ................... 29
Sonidos de operacion normales .............. 29
Servicio al consumidor
Garantia ...................................... 30
Apoyo al consumidor ......................... 31
AEZ24
AEW24
Escriba los numeros de modelo
y serie aquL"
//de Modelo
# de Serie
Puede encontrar estos numeros
en una etiqueta en el costado
del acondicionador de aire,
16
Page 17

INFORMACION IMPORTANTEDE SEGURIDAD.
LEA TODASLASINSTRUCCIONESANTES DE USAR.
iADVERTENCIA!
Por su seguridad, se debe seguir la informacion en este manual para minimizar el riesgo de
incendios, descargas electricas o lesiones personales.
PRECAUCIONESDESEGUR/DAD
Use este electrodomestico solamente para
el proposito determinado segLln se describe
en el Manual del propietario.
Este acondicionador de aire debe instalarse
correctamente de acuerdo con las
Instrucciones de instalacion antes de su uso.
Nunca desenchufe su acondicionador de
aire tirando del cable electrico. Siempre
agarre firmemente el enchufe y tire de
el directamente hacia afuera.
Reemplace inmediatamente todos los
cables electricos que se hayan pelado o que
se hayan dahado de alguna otra manera.
Un cable de corriente dafiado no debe
repararse, sino que debe ser sustituido pot
uno nuevo que se adquiera del fabricante.
No use un cable electrico que muestre
evidencias de deterioro, o dafios de
abrasion en su superficie en alguno de sus
extremos.
Apague la unidad y desenchufe su
acondicionador de aire antes de limpiar.
GE no esta no apoya que se le proporcione
ningLln servicio al acondicionador de aire.
Vehementemente recomendamos que
usted no intente proporcionar servicio al
acondicionador de aire usted mismo.
Por su seguridad,,,no almacene ni use
materiales combustibles, gasolina u
otros vapores o liquidos inflamables
en la proximidad de este o algLln otro
electrodomestico.
Todos los acondicionadores de aire
contiene refrigerantes, los que pot Ley
Federal deben ser removidos antes de
desecharlos. Si usted planea deshacerse de
algLln producto que contenga reffigerantes,
pongase en contacto con la compahia que
se encarga de recoger su basura para que
le indiquen que hacer.
Si el receptaculo no coincide con el enchufe,
un electricista calificado debe reemplazar el
receptaculo.
Estos sistemas de acondicionadores de
aire R41OArequieren que los contratistas
y tecnicos usen herramientas, equipos y
estandares de seguridad aprobados para
su uso con este refrigerante. NO use
equipamiento certificado solo para
refrigerante R22.
COMOCONECTARLAELECTR/C/DAD
Bajo ninguna circunstancia, corte o remueva la
tercera pLla (tierra) del cable electrico. En pos
de la seguridad personal, este electrodomestico
debe siempre conectarse a tierra.
NO use un enchufe adaptador con este
electrodomestico.
Elcable electrico de este electrodomestico esta
equipado con un enchufe de tres pLlaS(tierra)
que combina con un tomacorriente estandar
de tres tomas de pared para minimizar la
posibilidad de una descarga eBctrica.
Elcable de alimentacion incluye un
dispositivo para interrupcion de corriente.
Se incluye un boron de prueba y de reinicio
en el dispositivo. Eldispositivo debe ponerse
a prueba periodicamente: primero se presiona
el boron de TEST(prueba)y luego RESET
(reinicio) mientras se encuentra enchufado al
tomacorriente. Siel boron TESTno se dispara
o si el boron RESETno queda enganchado,
deje de utilizar el acondicionador de aire y
comuniquese con un tecnico calificado.
Pida a un tecnico que inspeccione el
tomacorriente y el circuito para cerciorarse
de que el tomacorriente esta conectado a
tierra de la manera apropiada.
Donde exista un tomacorriente de dos
tomas, es su responsabilidad y obligacion
personal hacer que dicho tomacorriente
sea reemplazado por uno de tres tomas
con conexion a tierra.
Elacondicionador de aire deberia siempre estar
conectado a un tomacorriente individual con su
circuito de voltaje correspondiente.
Esto proporciona el mayor rendimiento y
ademas evita que los circuitos del resto de
la casa se sobrecarguen, Io cual podria causar
incendios pot el sobrecalentamiento del
cableado.
Vet las instrucciones de instalacion, en la
seccion Requisitos El#ctricos para los requisitos
especificos de conexion.
17
Page 18

GEAppliances,com
ZLiAD VERTENCIA!
USODEPROLOA/CADORES
RIESGODE INCENDIO. Podria ocasionar
lesiones graves o la muerte.
• NO use un pro/ongador con este
Acondicionador de Aim de Ventana.
• NO use protectores contra p/cos de tension ni
adaptadores para mu/tiples tomacorrientes con
este Acondicionador de Aim de Ventana.
LEA YSICA ESTASINSTRUCCIONES DE SEGURIDAD
CUIDADOSAMENTE.
GUARDEESTASINSTRUCCIONES
INFORMACIONSOBRECOMORECICLAR
Para acceder a informacion sobre como reciclar
sus electrodomesticos, ingrese a
www. geappliances.com/recycling.
18
Page 19

Acerca de los controles en el acondicionador de aire
Las/uces a/ /ado de/as tec/as de toque en e/panel de control de/acond/b/bnador de a/#e/nd/bar4n los adbstesse/ecc/bnados,
Lasfunc/ones y elaspecto pueden vanar,
NOTA:LapantaNamuestrasiempre
la temperaturaambiente,exceptoal
configurarlatemperaturaDefinidaoel
Sincronizadorde retardo
High
m Ned
Low
Controles del acondicionador de aire
Contro/es
La luz indicaque la unidadestaenel
modode Ajuste de temperaturaode
Tiempode retardo.
T__ 1-24hderetard0
w Cool
m Energy Saver
m Fan Only
_!!!_ _ _ Sebcci6ndemodo Encendidoautom_ticodel
La luzindica queel temporizador
de retardo estaconfigurado.
Tecla de Power (Encendido)
Apaga y prende el acondicionador de aire,
AI encenderse, la pantalla mostrara la
temperatura ambiente,
Panta/la
Muestra la temperatura ambiente o
el tiempo restante en el Sincronizador de
retardo, Muestra la temperatura Definida al
configurar la temperatura en los modos Cool
(Frio)o de Energy Saver (Ahorro de energia)
La luz de Ajuste se encendera durante la
configuracion,
Teclas de Temp Aumento A/ReduccidnT
Usado para ajustar la temperatura cuando
se encuentre en el modo Cool(Frfo)o Energy
Saver (Ahorro de energfa) La luz de Ajuste se
encendera durante la configuracion,
Teclas de Sincronizador de retardo Aumento
& (+)/ReduccidnT (-)
Cada vez que toque las teclas Aumento A/
Reduccidn T de la unidad o las teclas Aumento
+/Reduccidn - en el control remoto definira
el tiempo de retardo al utilizar el Delay 1-24hr
timer (Sincronizador de retardo 1-24 h)
La luz de Ajuste se encendera durante la
configuracion,
Teclas de Fan Speed (Velocidad del ventilador)
Usado para ajustar la velocidad del ventilador
a Low (Bajo), Med (Medio), High (Alto) o
Auto (Automatica)en la unidad, NOTA: en el
control remoto, utilice las teclas Aumento +
/Reduccidn - velocidad de ventilador para
ajustar la velocidad del ventilador en Low(Bajo),
Meal(Medio) o High (Alto) Utilice la tecla Auto
para activar el ventilador automatico,
Reducci@de _ Aument0desincr0nizad0r
sincr0nizad0rderetard0_ deretard0
ventilador
Reducci@develocidad_ Aumentodevelocidad
Aumentoyreducci@de Encendido/apagadode
ajustedetemperatura launidad
Control remoto
Tecla de MODO
Usado para ajustar el acondicionador de aire
al rood o Cool (Frfo), Energy Saver (Ahorro de
energia) o Fan Only (Solo ventilador)
Teclas de Delay (Retardo)/ Delay 1-24hr
(Retardo 1-24h)
Delay ON (ENCENDIDO Retardo_uando
el acondicionador de aire esta apagado,
puede ajustarse para que se encienda
automaticamente dentro de 1 a 24 horas en el
modo y configuracion de ventilador anterior,
Delay OFF (APAGADO Retardo}--Cuando el
acondicionador de aire esta encendido, puede
ajustarse para que se apague automaticamente
dentro de 1 a 24 horas,
Como realizar el ajuste:
Pulse la tecla Delay 1-24hr (Retardo 1-24h)en
la unidad o Delaypad(Retardo)del control
remoto, Cada toque de las teclas Aumento _, /
Reduccidn Ten la unidad o las teclas Aumento
+/Reduccidn - en el control remoto definira el
temporizador en intervalos de 1 hora, La luz de
Ajuste se encendera durante la configuracion,
Para revisar eltiempo restante en el Sincronizador
de retardo 1-24 h, pulse la tecla de Delay
1-24hr (Retardo 1-24h) en la unidad o De/ay pad
(Retardo)en del control remoto, Utilice las teclas
Aumento sA/Reduccidn Ten la unidad o las
teclas Aumento +/Reduccidn - en el control
remoto para definir un nuevo tiempo, si Io
desea,
Para cancelarelsincronizador, pulse la tecla
Delay 1-24hr (Retardo 1-24h)hasta que la luz
de dicho control se apague,
Nota: Latemperatura por defecto que figura en la pantalla esta en grados Fahrenheit (°F),Para modificar
la pantalla a grados Celsius (°C),mantenga presionados los botones Temp Increase (Incremento de Tem-
peratura) A Temp Decrease (Disminucion de Temperatura) T al mismo tiempo y durante 3 segundos,
Repita el proceso para volver a modificar la pantalla a grados Fahrenheit (°F), 19
Page 20

Acerca de los controles en el acondicionador de aire.
No use en las condiciones externas debajo
eI punto de congelacion
Control remoto
Para garantizar una operacion apropiada, oriente
el control remoto hacia el receptor de serial del
acondicionador de aire,
Cerciorese de que no haya nada entre el
acondicionador de aire y el control remoto que
pueda bloquear la sepal,
Modo Cool (Frfo)
Use el modo Cool (Frfo) a Low (Bajo), Med (Medio),
High (Alto) o Auto Fan Speed (Velocidad de
ventiladorautomatica) para enfriar, Use las teclas
de Temperature (Temperatura) Aumento A (+)
/Reduccidn • (-)para ajustar a la temperatura
deseada entre 64°F y 86°F en incrementos de I°F,
Se usa un termostato electronico para mantener
la temperatura ambiente, Elcompresor hara
ciclo entre apagado y encendido para mantener
la habitacion a la temperatura deseada, Ajuste el
termostato a un numero menor y el aire interno
se enfriara mas, Si Io ajusta a un numero mayor,
la temperatura del aire interno se calentara mas,
NOTA: si el acondicionador de aire esta apagado y
se enciende mientras esta configurado en un ajuste
Este acondicionador de aire no es disenado para
usar en temperaturas externas debajo el punto de
congelacion, No use en las condiciones externas
debajo el punto de congelacion,
Elreceptor de sepal tiene un rango maximo de
20 pies,
Cerciorese de que las baterias sean frescas y
se instalen correctamente segun se indica en el
control remoto,
Elcontrol remoto cuenta con un iman que
permite adherirlo a superficies metalicas,
Cool(Frio)
o si se cambia de un ajuste de ventilador a uno
de Cool (Frfo),puede que pasen aproximadamente
unos 3 minutos hasta que el compresor arranque y
comience el enfriamiento.
Descripciones de enfriamiento
Pare enfriomiento normoI--Seleccione el modo
Cool (Frio)y ventilador High (Alto)o Med (Medio)
con una temperatura de ajuste media,
Pete enfriemiento m6ximo--Seleccione el modo
Coo/ (Frio) y ventilador High (Alto) con una
temperatura de ajuste menor,
Para enfriamiento silencioso y enfriamiento
nocturno--Seleccione el modo Cool(Frfo)y ventilador
Low(Bajo)con una temperatura de ajuste media,
Energy Saver Mode (Modo de ahorro de energ/a)
Controla el ventilador,
ON (ENCENDIDO)--EI ventilador hara un ciclo
de encendido y apagado con el compresor, Este
resulta en variaciones mayores en la temperatura
de la habitacion yen la humedad, Normalmente
usado cuando la habitacion no esta ocupada,
Modo de Fan Only (Solo ventflador)
Use el modo Fan only (Solo ventilador)a velocidad
Low (Baja), Med (Media) o High (Alta) par a
proporcionar circulacion de aire y filtracion sin
enfriamiento, Debido a que los niveles de ventilador
unicamente no proporcionan enfriamiento, no
Velocidad de ventilador automatica
Indique la opcion en Velocidad de ventilador
automatica para definir automaticamente la
velocidad necesaria para proporcionar una
configuracion de comodidad Optima con la
temperatura elegida,
Si la habitacion necesita mas enfriamiento,
la velocidad del ventilador aumentara
NOTA: puede que el ventilador siga funcionando
durante un corto tiempo despu#s de desacdvarse el
ciclo del compresor,
OFF (APAGADO)--EI ventilador funciona todo el
tiempo, mientras que el compresor pasa pot los
ciclos de encendido y apagado,
se puede introducir una temperatura Definida,
Aparecera en pantalla la temperatura ambiente,
NOTA: la Velocidad de ventilador automatica
no puede utilizarse en el modo Fan only (Solo
ventilador),
automaticamente, Sila habitacion necesita
menos enfriamiento, la velocidad del ventilador
descendera automaticamente,
NOTA: la Velocidad de ventilador automatica
no puede utilizarse en el modo Fan only (Solo
ventilador),
2O
Funcidn de recuperacidn de p#rdida de energ/a
Encaso de la perdida de la energia o interrupcion, la
unidad reiniciara automaticamente en las funciones
de la ultima vez que fue usado una
vez la energia sea restablecida, Si la funcion del
Delay 1-24hr (Retardo 1-24h) estaba definido,
continuara la cuenta regresiva, Es posible que usted
necesite ajustar un tiempo nuevo si as[ Io desea,
Page 21

Acerca de los controles en el acondicionador de aire.
/nformacidn importante adiciona/e.
Direccidn del aire
Use la palanca para ajustar la direccion del aire hacia
la izquierda y la derecha solamente,
Cuidado y limpieza del acondicionador de aire.
Rdilla y caja
Apague el acondicionador de aire y retire el enchufe
del tomacorriente de la pared antes
de limpiar.
Filtro de aire
Elfiltro de aire detras de la rejilla frontal debe
inspeccionarse y limpiarse por Io menos cada
30 dias o mas a menudo si fuese necesario.
Para retirarlo:
Abra la rejilla de entrada empujando hacia abajo
las lenguetas en las esquinas superiores de la rejilla
de entrada, hasta que la rejilla se encuentre en una
posicion de 45°, Retire el filtro.
Limpie el filtro con agua tibia yjabon, Enjuaguelo y
permita que se seque antes de colocarlo otra vez en
su lugar, No lave el filtro en un lavaw_jillas,
Para limpiar, use agua y un detergente suave.
No use cloro o materiales abrasivos.
LengOetas LengOetas
A PRECAUCION:NoOPEREel
acondicionador de aire sin el filtro debido a que la
suciedad y las pelusas Io obstruiran y reduciran su
rendimiento.
Bobinas para exteriores
Se deben inspeccionar con ffecuencia las bobinas
en el lado exterior del acondicionador de aire. Si
las mismas estan obstruidas con suciedad u hollin,
podrian limpiarse profesionalmente.
Cdmo insertar las pilas en el control remoto
[_ Retire la cubierta de la pila deslizandola
de acuerdo con la direccion de la flecha.
-2-] Inserte pilas nuevas que
polos positivos (+)y negativos (-) estan
orientados correctamente.
F-_ Coloque la cubierta otra deslizandola
en su lugar.
cerciorandose de los
vez
NOTA$"
Use 2 pilas alcalinas "AAA" de 1,5 voltios.
No use pilas recargables.
Retire las pilas del control remoto si no va
a usar el sistema por un periodo prolongado.
iNo mezcle baterias nuevas y viejas. No mezcle
baterias alcalinas, estandar (carbono-cinc)
orecargables (ni-cad,ni-mh,etc.)
21
Page 22

Instrucciones
m m
Acondlclonador
de instalacion
ANTES DE INICIAR
Lea estas instrucciones completa y
cuidadosamente.
IMPORTANTE - Guardeestas
instrucciones para uso del inspector local.
• IMPORTANTE - Observetodoslos
codigos y ordenes de ley.
• Nota al instalador - Aseg@rese de dejar estas
instrucciones con el consumidor.
Nota al consumidor - Conserve estas
instrucciones para referencia futura.
Nivel de destreza - La instalacion de este
aparato requiere de destrezas mecanicas
basicas.
• Tiempo de ejecuci6n- Aprox. 1 hora
Recomendamos dos personas para
la instalacion de este producto.
La instalacion apropiada es la responsabilidad
del instalador.
La falla del producto debido a una instalacion
inadecuada no esta cubierta
por la garantia.
Cuando instale este acondicionador
de aire, DEBE usar todas las piezas
suministradas y usar procedimientos adecuados
de instalacion.
A PRECAUCiON"
Bajo ninguna circunstancia corte o remueva la
tercera p@a(conexion a tierra) del cable electrico.
No cambie el enchufe en el cable electrico
de este acondicionador de aire.
de aire
REQUISITOS EL¢CTRICOS
115/120 voltios de corriente alterna y 60 Hz
Algunos modelos requieren tomacorrientes de
conectados a tierra, protegidos con un fusible
de dilatacion de tiempo de 15 amperios
o un cortacircuitos.
El enchufe de tres puas con conexion a tierra
minimiza la posibilidad de descargas electricas. Si
el tomacorriente de la pared que usted planea usar
solamente tiene 2 tomas, es su responsabilidad hacer
que un tecnico Io reemplace por uno de tres tomas
con conexion a tierra.
de corriente alterna, protegidos por un fusible
Algunos modelos requieren 230/208 voltios,
de dilatacion de tiempo
instalarse en un ramal exclusivo del circuito
o un cortacircuitos. Estos modelos deberian
para un rendimiento mas notable y para
prevenir sobrecargas en los circuitos de
cableados de su casa o apartamento,
Iocual podria representar un riesgo
de incendio por el sobrecalentamiento de los
alambres.
Elcable de alimentacion incluye un dispositivo para
interrupcion de corriente. Se incluye un boron de prueba
y de reinicio en el dispositivo. El dispositivo debe ponerse
a prueba periodicamente: primero se presiona el boron
de TEST (prueba) y luegoRESET(reinicio) mientrasse
encuentraenchufadoaltomacorriente.SielboronTEST
no sedisparao sielboron RESET no queda enganchado,
dejede utilizarelacondicionadorde airey comuniquese
con un tecnicocalificado.
Los cables caseros de aluminio podrian presentar
problemas especiales. Consulte
a un tecnico electricista calificado.
22
Page 23

Instrucciones de instalaciOn
HERRAMIENTAS QUE NECESITARA
Un destornillador de estrella
PARTESINCLUIDAS
(Apariencia puede variar)
Riel de
montaje
superior
\
T!jeras o cuchilla
Un destornillador
con hqja plana
Nivel
Junta del riel superior (1)
J
Panel
d__"_,..___,...._, _ ,aventana(1)
acord_'_, j
izquierdo _ Panel de
Lapiz
Una regla o cinta metrica
Sello del marco de la
ventana
(fino, con adhesivo
en la parte posterior)
acordeon
derecho
Riel lateral(2)
Soportes en V (2)
Tipo A Tipo C
tornillos (10) tornillos (5)
Soporte angular Trabas para
para alfeizar (2) marcos (1)
Perno tipo Perno tipo
Econ 2 F con 2
tuercas (4) tuercas (2)
23
Page 24

Instrucciones de instalacion
[]] REQUISITOS PARA LA VENTANA
• Estas instrucciones son para una
ventana estandar de dos pliegues,
Usted necesitara modificar el proceso para otros
tipos de ventanas,
• Todas las partes de apoyo deben quedar totalmente
aseguradas a algon metal, mamposteria o a la
madera,
• Eltomacorriente electrico debe estar al alcance del cable
electrico del acondicionador de aire,
• Siga las dimensiones de la tabla y lailustracion segun su
modelo,
B===4]
t
19 1/4"
_--- 29" - 41"
(con paneles de acordeon)
r}l REQUISITOSDE UNA VENTANA
DETORMENTAS
Un marco de ventana de tormentas no permitira que
el acondicionador de aire se incline hacia el exterior y
evitara que drene apropiadamente, Para solucionar este
problema, adhiera un pedazo de madera a el umbral,
PEDAZOS DE MADERA
ANCHO: 2"
LONGITUD: Lo suficientemente largo como para
ajustar en el interior del marco de la ventana,
GRUESO: Para determinar el grueso, coloque un pedazo
de madera en el umbral para hacerla 1/2" mas alta que
la parte superior del marco de la ventana de tormentas
o del marco vinilo,
Peguelo firmemente con clavos o con tornillos
proporcionados pot el instalador,
1/2" mas alto
que el marco
de ventana de __
tormentas
Marco de
ventana de
tormentas
_ Umbral_
/ r_ Mamovinilo I !
1/2" mas alto que el marco
vinilo (en algunas ventanas)
, _ j Madera
r_PREPARE EL ACONDICIONADOR DE AIRE
[] Baje el panel frontal y quite el filtro, Quite el panel
frontal levantandolo hacia arriba en un angulo,
r_ Quite los cuatro tornillos frontales, Conservelos para
volver a instalar la carcasa frontal,
D Tome las esquinas inferiores de la parrilla mientras
presiona hacia adentro sobre los costados de la
carcasa con sus dedos, Tire hacia afuera para
liberar y levantelo,
NOTA: No tire del borde inferior hacia usted mas de
3" porque puede dar]ar las lenguetas de la parrilla,
t t
FRENTE
r_ Cuando se retire la parrilla del frente, el panel de
control a0n seencontrar_ adjunto per un arn@. Gire
la parrilla de modoque puedaver la parte trasera de
la misma. Retirelos 2 tornillos paraseparar el espacio
del panel decontrol de la parilla NO]A: Asegurese de
guardareslos tomillos. Losnecesitara mas adelante
en la instalacion.
24
Quite tornillos
Page 25

Instrucciones de instalaciOn
[] PREPAREELACONDICIONADOR DEAIRE
[_ Quite los tornillos de embalaje ubicados en la
parte superior yen los costados de la carcasa.
i:
rq Quite los tornillos de cada lado de la carcasa.
Conservelos en una ubicacion segura.
NOTA: Asegurese de guardar estos
tornillos, Los necesitara mas adelante en la
instalaci6n.
[] PREPARELA CARCASA
r_ Sujete lajunta del riel superior a la parte
inferior del riel superior.
[] Instale el riel de montaje superior con 4 tornillos
tipo A desde la parte interior de la carcasa,
Presione firmemente para introducir los tornillos
dentro de lajunta y a traves del riel de montaje
superior.
Riel de montaje superior
FRENTE
rGl Quite y conserve el tornillo de cable a tierra,
Deslice el acondicionador de aire de la carcasa
tomando la manija de la bandeja inferior y
tirando hacia adelante mientras se sujeta la
carcasa, No tire o levante el area de descarga
de poliestireno
No tire o
esta zona
provocarse
daffos a la
FRENTE
rill Su unidad puede venir con empaque interno.
Este empaque debe qtlitarse antes de la
instalacion del acondi_;ionador de aire de vuelta
en el gabinete.
levante
porque
pueden
unidad.
ra Deslice cada soporte pot el extremo de cada
panel correspondiente. La figura muestra la
orientacion de cada panel de acordeon }/junta de
soporte lateral relativos a la caja desde una vista
superior de la unidad.
Soporte lateral
Panel para cubrir la ventana
Soporte lateral
Panel para cubrir la ventana
r_ Deslice los paneles de acordeon de izquierda a
derecha sobre los rieles de montaje superior e
inferior.
Derecho superior
25
Riel de montaje inferior
Page 26

Instrucciones de instalaci6n
[] PREPARE LA CARCASA (suite)
[] E Adjunte los soportes laterales a la caja usando 6
tornillos tipo A.
FI PREPARETHE WINDOW AND INSTALL
THE CASE
[_ Corte el sello de la banda de la ventana a
la Iongitud apropiada. Despegue la parte posterior
y pegue el sello a la parte inferior de la banda de la
ventana.
D PREPARELA VENTANA E INSTALE LA
CAJA
r_ Enlace el soporte en Vy la ficha del soporte en V
con una tuerca y un tornillo Tipo F.
Tornillo y tuerca
tipoE
Izquierda
Soporte
angular -_._ @
del alfeizar c_i]JJ_/
",7
Tornillo y tuerca tipo F
para soporte en V
Coloque los soportes en
rq
V en la base de la carcasa
para que esten cerca de
la pared exterior. Sujete
el soporte en V a cada
lado de la parte inferior
de la carcasa con pernos tipo
F,2 para cada soporte.
o_
Derecha
Soporte en V
Abra la ventana y marque el centro del alfeizar
de la ventana.
Con cuidado, deslice la carcasa dentro de la
ventana y centrela. Baje la ventana detras del
riel de montaje superior. Tire de la parte inferior
de la carcasa hacia adelante para que el riel
de montaje inferior quede firme contra la parte
trasera del alfeizar de la ventana. Instale la
carcasa en el alfeizar de la ventana utilizando
2 tornillos tipo C para un marco de madera o
dos tornillos tipo C con oporte para bloqueo de
ventana para otros tipos de ventanas. Perfore
orificios piloto, si fuera necesario.
r_ Ajuste los soportes angulares del alfeizar de modo
que descansen sobre elalfeizar.
porte
Extienda los paneles en acordeon izquierdo
D
y derecho hacia los marcos verticales de
la ventana. Perfore orificios piloto y sujete
las esquinas superiores e inferiores con
5 tornillos tipo C.
I Ii! y" !iL_2St
Tornillos
Tipo C
Tornillos
TipoC
Alfeizar
26
Page 27

Instrucciones de instalacion
D PREPARELA VENTANA E INSTALE LA
CAJA
rnl
APRECAUCION
Enventanas construidas de vinil o de similar
construccion, conecte el
soporte de cierre de la
ventana a el marco de la
ventana para prevenir dar]o a
la ventana y vidro
quebrado.
Conecte el soporte de cierre
de la ventana con uno tornillo
tipo C,
Corte lajunta de espuma superior de la ventana al
ancho de la ventana.
Rellene la espuma entre
el vidrio y la ventana
para evitar que aire e
insectos
se introduzcan en
la habitacion.
NOTA:Si lajunta provista no es adecuada para su
ventana, obtenga el material apropiado Iocalmente
para realizar una adecuada instalacion de sellado.
Vinilo
[_ INSTALE ELACONDICIONADOR EN LA
CARCASA
Vuelva a instalar los 2 tornillos quitados antes,
D
uno en cada lado de la carcasa. IMPORTANTE:
los tornillos de conexion a tierra deberan set
reinstalados para asegurar una conexion a
tierra adecuada.
rc] Reinstale el control en elespacio del panel
reemplazando los 2 tornillos que retiro previamente.
Reinstale tornillos
r_ Sujete la parrilla frontal a la carcasa
introduciendo las lengL]etas de la parrilla dentro
de las ranuras de la parte superior frontal de la
carcasa. Presione la parrilla hacia adentro.
[_ INSTALE EL ACONDICIONADOR EN LA
CARCASA
E] Desiice el acondicionador de aire dentro de la
carcasa de la bandeja inferior. No haga presion
sobre los controles, carcasa de poliestireno de
la descarga de aire o las serpentinas de aletas.
Verifique que el acondicionador de aire se
encuentre firmernente asentado.
No presione
en estas areas
porque puede
danarse la
unidad,
Bandeja inferior
[_] Reemplace los tornillos.
[] Instale el filtro y la rejilla frontal,
rG-lEnchufe el acondicionador de aire.
27
Page 28

Instrucciones de Instalaci6n a Tray,s de la Pared-Opcional
La carcasa puede instalarse a traves de la pared en
construcciones existentes y nuevas.
Lea por completo y luego siga todos los pasos,
NOTA: Con excepci6n de los montajes de soportes en V
(incluidos), obtenga todos los materiales en forma local
para montar el acondicionador de aire a traves de la
pared.
R] IMPORTANTE
La instalacion a traves de la pared no es apropiada si
alguna de las persianas laterales o superiores
de la carcasa quedaran obstruidas por la pared.
Todas las persianas laterales y superiores de
la carcasa deben proyectarse sobre la pared exterior
de la pared.
El lado interior de la carcasa debe proyectarse dentro
de la habitacion Io suficiente para potenciar al m_iximo
el equilibrio de la unidad.
La carcasa debe estar instalada de lado a lado y con
una pequeha inclinacion del frente hacia la parte
trasera. Utilice un nivel; la inclinaci6n correcta de la
carcasa hacia el exterior no deber_i set de m_is de 1/2
burbuja.
Se requiere un _ingulo de dintel para sostener ladrillos
o bloques sobre la abertura.
Se requiere un revestimiento de aislacion que
debe extenderse por la Iongitud de la abertura para
asegurar que no haya perdidas en las cavidades
internas.
-A-]Quite el acondicionador de aire de la caja,
Para instrucciones especificas, consulte las
Instrucciones de instalacion en una ventana,
-_Asegorese de que haya un tomacorriente cerca de la
ubicacion del orificio o efectOe arreglos para instalar un
tomacorriente,
,,
m IMPORTANTE (cont.)
-D] ijecon 14 tornillos para madera sujetos por Io menos
una pulgada dentro de la estructura de soporte de
la pared,
NOTA:Perforeorificiospiloto,sifuera necesario,parauna
instalacionadecuada,Siel armazonesmas grande,utilice
cur]aspara prevenirla deformacionde lacarcasa,
TERMINE LA ABERTURA
DE LA PARED
-A-]Utilice calafateo en los cuatro costados del
lado exterior de la carcasa para que no
ingrese humedad a la parte interna. El uso de
revestimiento de aislacion (riel de goteo) evitara
aun mas el ingreso de agua dentro de la pared y
en la parte exterior del edificio.
i Linea de
yeso
Angulo de dintel
Calafateo
EXTERIOR
Persianas de
aire (la parte
superior y
los costados
deben
proyectarse
sobre el lado
externo de
Relleno de madera
y calafateo (por
encima y debajo
revestim iento d
aislacion)
la pared)
Soportes en V Riel
Revestimiento de
aislacion (riel de
goteo)
de la carcasa inferior
Moldura
(si se desea)
INTERIOR
Riel inferior
J
I
Coloque la carcasa en la abertura de la pared y
coloque guias de soporte de madera entre la parte
inferior de la carcasa y el revestimiento de aislacion
sobre ambos lados del riel inferior, Deben set de la
misma altura del riel inferior y de la misma Iongitud de
la abertura de la pared.
Revestimiento de aislaciOn
(riel de goteo)
Guias de soporte de madera
-B-]Coloque el acondicionador de aire dentro de la
carcasa, Para instrucciones especificas, consulte
las Instrucciones de instalacion en una ventana,
28
Page 29

roblemas. GEAppliances,com
Causasposibles Qu#hacer
noenciende est4desconectado, enchufadototalmenteeneltomacorriente.
Elacondicionadordeaire Elflujodeaireest6restringido. • Cerci6resedequenoexisteningunacortina,persianao
noenffiacomodeberia mueblebloqueandoelffente delacondicionadordeaire.
Elacondicionadordeaire Elhielobloqueaelflujo • ColoqueloscontrolesenHighFan(VentiladorAlto)6 HighCool(Fr[o
seestacongelando deairehaciaelacondicionador Alto)y ajusteeltermostatoa unatemperaturemasalta.
Elacondicionadordeaire • Cerci6resedequeelacondicionadorde aireest6
Elfusiblesedispar6/ • tnspeccionelosfusibles/ cajadeinterruptoresdelacasa
elcortacircuitossedisparo, yreemplacecualquierfusibleo reajusteelinterruptor.
Interrupci6nenel
suministroelectrico.
Launidadsereiniciar6autom6ticamentecon laconfiguraci6n
utilizadaporultimavezluegodereestablecerlaelectricidad,
Existeunretrasodetiempoporprotecci6n(deaproximadamente
3 minutos)paraevitarladesconexionpotsobrecargadelcompresor,
Potestarazon,esposiblequela unidadnocomiencea enffiarde
Formanormalbasratranscurridos3minutosdesdequevolvioa
encenderse.
Eldispositivodeinterrupci6n • Presioneelbot6nRESETubicadoenel cabledealimentaci6n.
decorrientesehaactivado. • Sielbot6nRESETnosemantieneen sulugar,noutilicem6s
elacondicionadorde aireycomuniqueseconunte.cnicocalificado.
Elfiltrodeaireest6sucio. • Limpieelfiltrocada]0 d[asporIomenos.Verlasecci6n
deCuidadoy limpieza.
Lahabitaci6npodr[ahaber • Cuandoelacondicionadordeaireseenciende,usted
estadocaliente, necesitadarletiempoparaqueenffiela habitacion.
Elairefr[oseest6escapando. • Cerci6resedequelosregistrosdela calefacci6nnoest6n
abiertosyseencuentranretornandoelaireffio.
Lasbobinasdeenfriamiento • Ver"Elacondicionadordeaireseest6congelando"m6sadelante.
secongelaron.
deaireevitandoqueseenffie
la habitacion.
Hayaguagoteandoafuera TiempohOmedoycaliente. • Estoesnormal.
nayaguagoteandoenel Elacondicionadordeaire • Paradrenarelaguaapropiadamente,cerdoresedeque
interiordela habitaciO_ noestainclinadohaciaafuera, elacondicionadordeaireestainclinadoligeramente
desdeelffente haciaatr4s.
Seacumulaaguaen
labandeja
Lahumedadremovidadelaire
y sedrenahastala bandeja.
Estoes normal por un corto periodo en 6reas con poca
humedad; normal pot un periodo de tiempo mas postergado
en 4teas mas humedas,
Sonidos de operacidn normales
, Quizasescuche un sonido metalico causado por
el agua tomada y tirada contra el condensador
en los dias Iluviososo cuando la humedad
esalta. Estacaracteristica de diser]oayuda a
remover
la humedad y mejora la eficiencia,
, El agua se acumula en la bandeja durante dias
Iluviosos o con mucha humedad, El agua podria
derramarse y gotear desde el lado externo de
la unidad,
, Elventilador podria funcionar aun si el compresor
no Io hace,
(]uizas escuche que el termostato hace clic
cuando elcompresor hace ciclo entre encendido
y apagado,
29
Page 30

Garantfa de su acondicionador de aire-garantia limitada de un afro.
Todos los servic/os de garont/o los proporc/onan nuestros
Centros de Reparoc/dn de Fbbr/ca o nuestros tecn/cos Customer
Core '_"autorizodos. Poro concertor una cito de reparoc/dn,
en I/nea, 24 horos al d/o, visftenos al ge.com, o/lame al 800.
GE.CARES(800. 432.2737). Cuando /lame paro solicitor servicio,
pot favor tenga a mano el nomero de serie y el nomero de
modelo.
GE reemplazara:
Cudquierperb del acondicionador de aire que falle debido a defectos en los materiales o en
A partir de !a fecha
de h compro original
la fabricacion, Durante esta garant[a limitada de un a_o, GE tambien proporcionar& sin costo
Glguno, toda h mano de obrG y elservicio rehcionGdo-parG reemphzGr partes defectuosGs.
viajes de servido a su casa para mostrarle c6mo
funciona el equipo.
, Instalacion o entrega inapropiada, o mantenimiento
impropio. Siusted tiene un problema durante la
instaiacion, o si su acondicionador de aire no tiene la
capacidad de enfriamiento que usted necesita, pongase
en contacto con nuestro distribuidor o instalador.
Usted es responsable de proporcionar [as faciiidades
de conexion electrica necesarias.
Fallo del producto resultante de modificaciones al
producto o debido a uso irrazonable incluyendo no
proporcionar mantenimiento razonable y necesario.
Grape aqu{ su recibo,
Se requiere fZ_cilimr prueba
de la fecha de cornpro original
paro obtener un servicio
bajo la garontio,
Reemplazode fusibles dela case o reajuste del sistema
de circuitos,
Fallos debido a la corrosi6n en modelos que no estan
protegidos contra la corrosi6n.
Daffo al producto causado por voltaje inapropiado hacia
el equipo, accidentes, incendios, inundaciones o actos
de [a naturaleza de fuerza mayor,
Daffos incidentales o consecuenciaies causados por
defectos posibies con este acondicionador de aire.
Daffos despues de la entrega.
En locales comerciales, [a mano de obra necesaria para
retirar la unidad hacia un lugar para revisi6n por parte
de un tecnico individual.
EXCLUSION DE GARANT[AS IMPLiCITAS--Su _nico y exdusivo derecho es la reparaci6n de! producto,
tal y como se indica en esta Garantia limitada. Cualquier garantia implicita, incluyendo las garantias
implicitas de comerciabilidad o adecuaci6n para un fin determinado, estSn limitadas a un afro o el
periodo de tiempo mas breve permitido pot la ley.
Esm garant/a se extiende al comprador origina/ y cualquier comprador posterior de productos comprados para uso
residencial dentro de Estados Unidos. Si el producto esta situado en un area que no dispone de servicio pot porte
de un proveedor de servicio autorizado de GE,podr/a tenet que hacerse cargo de los costes de env/o o bien
podr/a solicitarsele que Ileve el producto a una centro de servicio de GE autorizado para realizar la reparacidn.
EnAlaska, la garont/o excluye el costo de env/o o los visitas de servicio a su casa.
Algunos estodos no permiten Io exclusion o los Iim/toc/ones de dohos /ncidentoles o consecuenc/oles. Esto garant/o
do derechos legales espedficos, y usted podr/o tenet otros derechos que vorioran de estodo a estodo. Poro saber
cuales son sus derechos legales, consulte a Io oficina de asuntos de/consumidor local o Io oficina del Attomey General
en su Iocalidod
3O
Garante: General Electric Company. Louisville, KY 40225
Page 31

A.A__o al consumidor.
PaginaWeb de GE Appliances GEAppliances,com
_,Tienealguna pregunta sobre su electrodomestico? iPruebe la pagina Web de GE Appliances 24 horas al dia,
cualquier dia del ar]o! Para mayor conveniencia y servicio mas rapido, ya puede descargar los Manuales de los
Propietarios, pedir piezas o incluso hacer una cita en linea para que vengan a realizar una reparacion.
para la vida real)GEAppliances,com_ Studio (Estudiode diseho
/
| I las edades, tamaflos y capacidades. Reconocemos la necesidad de diseflar para una gran gama de habilidades
k_ "" - J y dificultades fisicas y mentales. Para mas detalles cobre las aplicaciones de GE Diser]o Universal, incluyendo
I GE apoya el concepto de Dise_o Universal-productos, servicios y ambientes que pueden usar gente de todas
ideas de diser]o para la cocina para personas con discapacidades, mire nuestra pagina Web hoy mismo. Para
personas con dificultades auditivas, favor de Ilamar al 800.TDD.GEAC (800.833.4322).
Piezasy_accesorios GEAppliances,com
Aquellos individuos con la calificacion necesaria para reparar sus propios electrodomesticos pueden
pedir que se les manden las piezas o accesorios directamente a sus hogares (aceptamos las tarjetas
VISA,MasterCard y Discover). Haga su pedido en linea hoy, 24 horas cada dia o Ilamar pot telefono
al 800.626.2002 durante horas normales de oficina.
Las instrucciones descritas en este manual cubren los procedimientos a seguir pot cualquier usuario.
GEno esta no apoya que se le proporcione ningun servicio al acondicionador de aire. Vehementemente
recomendamos que usted no intente proporcionar servicio al acondicionador de aire usted mismo.
(" _ en contacto con nosotros GEAppliances,com
Si no esta satisfecho con el servicio que recibe de GE,pongase en contacto con nosotros en nuestra pagina
Web indicando todos los detalles as[ como su numero de telefono o escribanos a:
\. J General Manager, Customer Relations
GEAppliances, Appliance Park
Louisville, KY40225
31
Page 32

Consumer Support.
GEAppliances Website In the US,A,: GEAppliances,com
Have a question or need assistance with your appliance? Try the GE Appliances Website 24 hours a day,
any day of the year! For greater convenience and faster service, you can now download Owner's Manuals,
or even order parts on-line, In Canada: www,GEAppliances,ca
people of all ages, sizes and capabilities, We recognize the need to design for a wide range of physical
GEsupports the Universal Design concept-products, services and environments that can be used by
and mental abilities and impairments, For details of GE's Universal Design applications, including kitchen design
ideas for people with disabilities, check out our Website today, For the hearing impaired, please call 800,TDD,
GEAC(800,833,4322),
In Canada, contact: Manager, Consumer Relations, Mabe Canada Inc,
Studio In the US,A,: GEAppliances,com
Suite 310, 1 Factory Lane
Moncton, N,B, E1C9M3
Parts and Accessories
Individuals qualified to service their own appliances can have parts or accessories sent directly to their homes
(VISA,MasterCard and Discover cards are accepted), Order on-line today, 24 hours every day or
by phone at 800,626,2002 during normal business hours,
Instructions contained in this manual cover procedures to be performed by any user, GEdoes not support any
servicing of the air conditioner, We strongly recommend that you do not attempt to service the air conditioner
yourself,
Customers in Canada should consult the yellow pagesfor the nearest Mabe servicecenter,
or call 1,800,561,3344,
Contact Us
If you are not satisfied with the service you receive from GE,contact us on our Website with all the details
including your phone number, or write to: General Manager, Customer Relations
GEAppliances, Appliance Park
Louisville, KY40225
In Canada: www,GEAppliances,ca, or write to: Director, Consumer Relations, Mabe Canada Inc,
Suite 310, 1 Factory Lane
Moncton, N,B, E1C9M3
In the US,A,: GEAppliances,com
In the US,A,: GEAppliances,com
Printed in China
 Loading...