

Page 1
©
Safety Instructions ......... 2, 3
Operating Instructions
Control Knob Models ....... 6, 7
Touch Pad Models .......... 4, 5
Care and Cleaning
Air Filter ................... 7
Outdoor Coils ............... 7
Installation Instructions ...8-11
Troubleshooting Tips ....... 12
Normal Operating Sounds .... 12
Consumer Support
Consumer Support .......... 14
Warranty .................. 13
ge.com
AET05
AE WO5
AEW06
AE WO8
Writethemodelandserial numbershere:
Model #
Serial #
Find these numbers on a label on the
side of the air condifioneL
4g-1514-1 11-05Jfl
Page 2
IMPORTANTSAFETYINFORMATION.
READALLINSTRUCTIONSBEFOREUSING.
WARNING!
For your safety, the information in this manual must be followed tominimize the risk of fire, electric shock
or personal injury.
SAFETYPRECAUTIONS
iiiiiiiiiiiii!
Use this appliance only for its intended
purpose as described in this Owner's
Manual.
This air conditioner must be properly
installed in accordance xdth the Installation
Instructions before it is used.
Never unplug your air conditioner by pulling
on the power cord. Always grip plug firmly
and pull straight out flom the receptacle.
Replace immediately all electric serx,ice
cords that have become flayed or otherwise
damaged. A damaged power supply cord
must be replaced with a new power supply
cord obtained from the manufacturer and
not repaired. Do not use a cord that shows
cracks or abrasion damage along its length
or at either the plug or connector end.
Turn the unit OFFmid unplug your air
conditioner before cleaning.
GE does not support any ser\,icing of the air
conditioner We strongly recommend that
you do not attempt to serx,ice the air
conditioner yourself,
iiiiiiiiiiiii!
For your safety...do not store or use
combustible mamrials, gasoline or other
flammable vapors or liquids in the x,icinity
of this or any other appliance.
All air conditioners contain refligerants,
which under federal law must be removed
prior m product disposal. If you are getting
rid of an old product with refrigerants, check
with the company handling disposal about
what to do.
HOWTOCONNECTELECTRICITY
Do not, under any circumstances, cut or remove
the third (ground) prong from the power cord.
For personal safety, this appliance must be
properly grounded.
The power cord of this appliance is equipped
with a 3-prong (grounding) plug which mates
with a standard 3-prong (grounding) wall
outlet to minimize the possibility of electric
shock hazard from this appliance.
Power cord includes a current intermpmr
dex,ice. A test and reset button is prox,ided on
the plug case. The dex,ice should be tested on a
periodic basis by first pressing the rESrbutton
and then the RESErbuuon._f the rESrbutto.
does not trip or if the RESErbutton will not
stay engaged, discontinue use of the air
conditioner and contact a qualified
ser\,ice technician.
Have the wall outlet and circuit checked by
a qualified electrician to make sure the outlet
is properly _ounded.
Where a 2-prong wall outlet is encounmred,
it is your personal responsibility and obligation
to have it replaced with a properly grounded
3-prong wall outlet.
The air conditioner should always be plugged
into its own indix,idual electrical outlet which
has a voltage rating that matches the rating
plate.
This prox,ides the best performance and also
prevents overloading house xdring circuits
which could cause a fire hazard from
overheated xdres.
See the Installation Instructions, Electrical
Requirements section for specific electrical
connection requirements.
2
Page 3
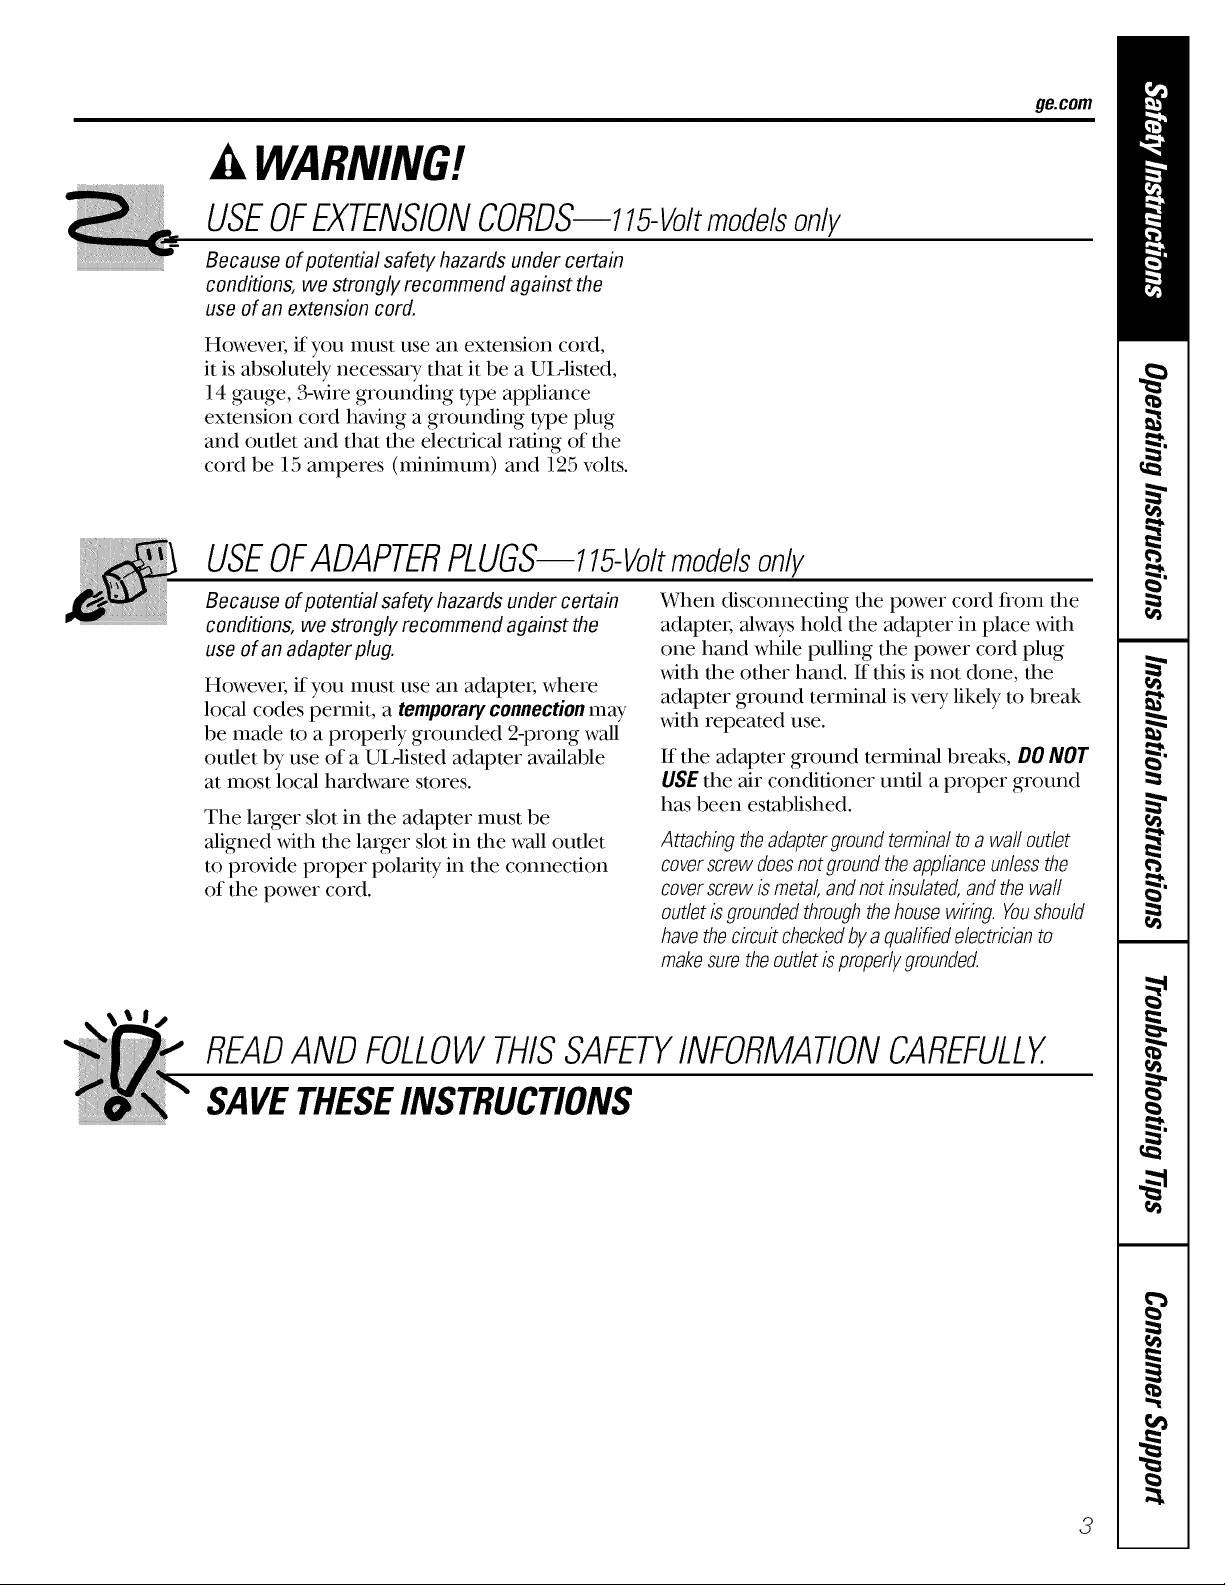
WARNING!
USEOFEXTENSIONCORDS--115-Volt modelsonly
Because of potential safety hazards under certain
conditions, we strongly recommend against the
use of an extension cord.
However, if you must use an extension cord,
it is absolutely necessa U that it be a UL-listed,
14 gauge, 3_wiregrounding type appliance
exmnsion cord ha\,ing a grounding type plug
and outlet and that the electrical rating of the
cord be 15 amperes (minimum) and 125 volts.
USEOFADAPTERPLUGS--115-Volt modelson/)/
ge.com
Because of potential safety hazards under certain
conditions, we strongly recommend against the
use of an adapter plug.
However, if you must use an adapte_, where
local codes permit, a temporaryconnectionmay
be made m a properly grounded 2-prong wall
outlet by use of a Ui,-listed adaptor available
at most local hardware stores.
The larger slot in the adapter must be
aligned with the larger slot in the wall outlet
to prox,ide proper polarity in the connection
of the power cord.
When disconnecting the power cord fiom the
adapte_, always hold the adapter in place with
one hand while pulling the power cord plug
with the other hand. If this is not done, the
adapter ground terminal is veU likely m break
with repeated use.
If the adapter ground terminal breaks, DONOT
USE the air conditioner until a proper ground
has been established.
Attachingtheadapterground terminaltoa waftoutlet
coverscrewdoesnotgmund theapplianceunlessthe
coverscrewismetal,andnot bsulated,andthe waft
outlet is groundedthroughthehousewiring. Youshould
havethecircuitcheckedbyaqualified electricianto
makesuretheoutletisproperlygrounded.
READANDFOLLOWTHISSAFETYINFORMATIONCAREFULLY.
SAVETHESEINSTRUCTIONS
3
Page 4
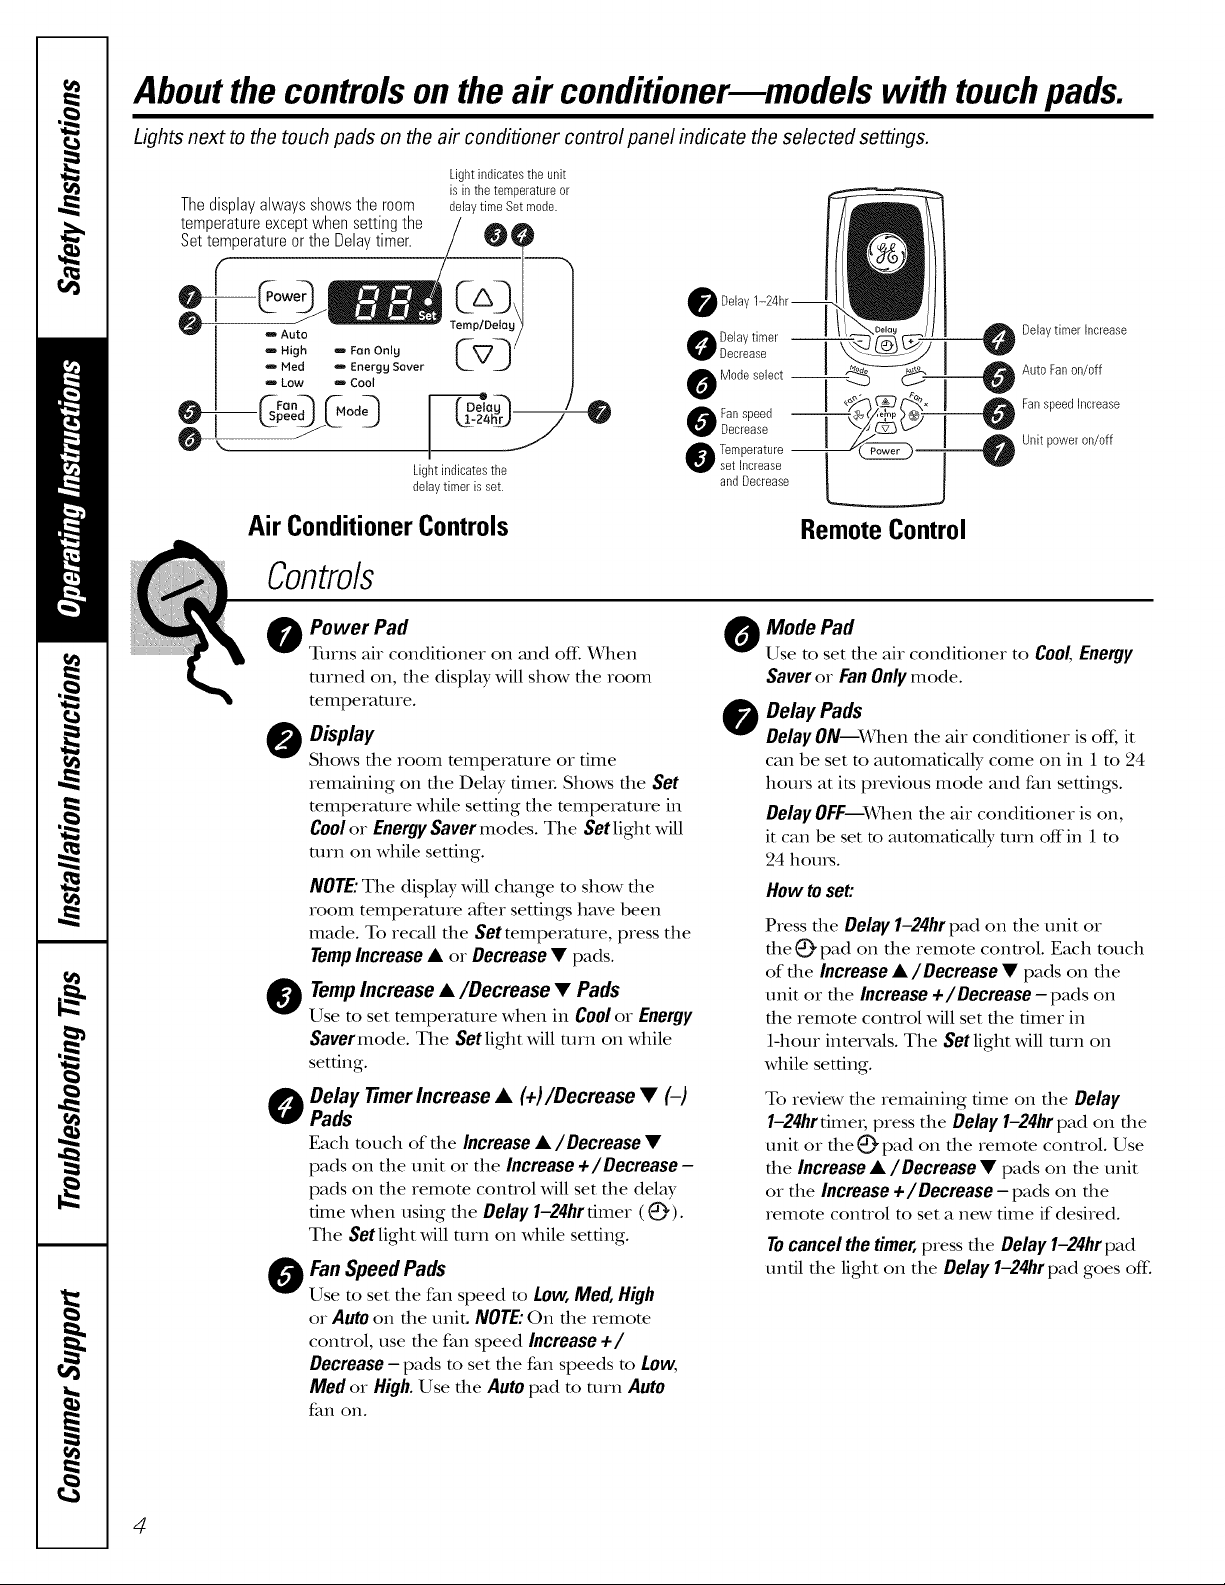
Aboutthe controlsontheair conditioner--models with touchpads.
Lights next to the touch pads on the air conditioner control panel indicate the selected settings.
Light indicatesthe unit
Thedisplayalwaysshowsthe room
temperatureexceptwhensettingthe
Settemperatureor theDelaytimer.
m Auto
amHigh m Fan Onl 9
bled amEnergg Saver
m LOW m Cool
is in the temperatureor
delaytime Set mode.
Lightindicates the
delaytimer is set.
Delay
Delaytimer
Decrease J
0 Modeselect -----_
O an speed
Decrease
Temperature --
set increase
and Decrease
Delaytimer Increase
Auto Fanon/off
Fanspeed Increase
Unit poweron/off
AirConditionerControls
Contro/s
O ower Pad
Turns air conditioner on _md off. _rhen
turned on, tile display will show tile room
temperature.
0 Display
Shows tile room temperature or time
remaining on the Delay fimeL Shows the Set
mmpemture while setting the mmpetature in
Coolor EnergySavermodes. The Setlight will
mrn on while setting.
NOTE:The display will change to show file
room temperature after settings have been
made. To recall the Set mmpemture, press the
TampIncrease• or Decrease• pads.
O empIncrease •/Decrease • Pads
Use to set temperature when in Coolor Energy
Savermode. The Setlight will turn on while
setting.
O elay fimerlncrease • (+)/Decrease • (-)
Pads
Each touch of the Increase•/Decrease •
pads on the unit or the Increase+/Decrease -
pads on the remote control will set the delay
time when using tlle Delay1-24hrdiner (_).
The Setlight will mrn on while setting.
O an Speed Pads
Use to set tile fan speed to LOW,Med,High
or Auto on the unit. NOTE:On the remote
conuol, use the fan speed Increase +/
Decrease - pads m set the fan speeds m LOW,
Med or High. Use the Auto pad m mrn Auto
fan oil.
Remote Control
O odePad
Use to set tlle air conditioner to Cool,Energy
Saveror FanOnlymode.
Delay Pads
0
DelayON--When the air conditioner is ofL it
can be set to automatically come on in 1 to 24
hom_ at its previous mode and fan settings.
Delay OFF--When the air conditioner is on,
it can be set m automatically mrn off in 1 m
24 hems.
How toset:
Press file Delay 1-24hrpad on the unit or
file (_ pad on file remora conuol. Each touch
of the Increase •/Decrease • pads on the
unit or the Increase +/Decrease- pads on
the remora conuol will set the timer in
1-hour intervals. The Set light will mrn on
while setting.
To review die remaining time on die Delay
1-24hrtimei; press the Delay 1-24hr pad on the
unit or the _ pad on the remote control. Use
the Increase •/Decrease • pads on the unit
or the Increase +/Decrease-pads on the
remote control to set a new time if desired.
Tocancel the timer, press tt_e Delay 1-24hr pad
until tile light on the Delay 1-24hr pad goes off:
4
Page 5
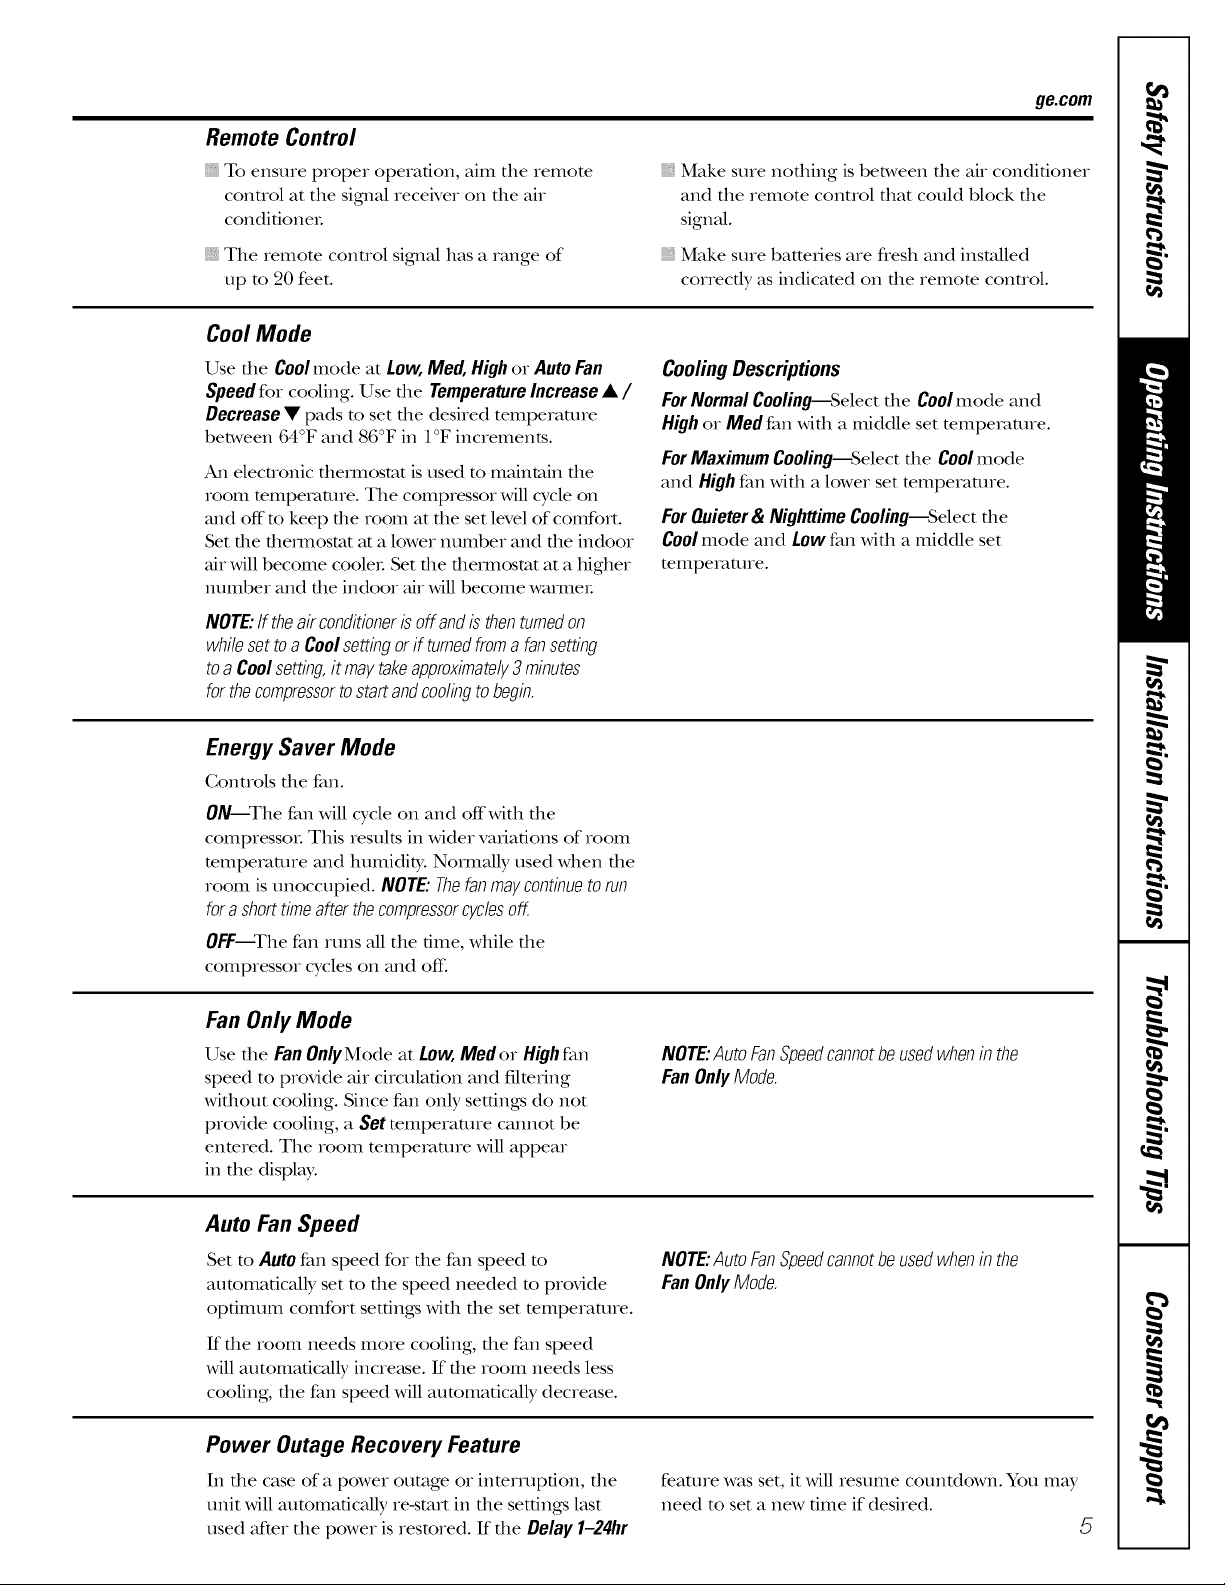
Remote Control
ge.com
To ensure proper operation, aim the remote
connol at the sigaml receiver on file air
condifioneL
The remora control sigmal has a range of
up m 20 feet.
CoolMode
Use file Coohnode at Low, Med, Highor Auto Fan
Speed for cooling. Use the TemperatureIncrease • /
Decrease• pads to set the desired temperature
between 64°F and 86°F in 1°F increments.
2M1electronic dlemlostat is used to maintain die
room mmperamre. The compressor will cycle on
and off"m keep the room at the set level of comfort.
Set the tbemlosmt at a lower number and the indoor
air will become cooleL Set the tbemlosmt at a higher
number and the indoor air will become wamleL
NOTE:ff theairconditionerisoffandisthenturnedon
whilesettoa Coolsettingorif turnedfromafansetting
toa Coolsetting,it maytakeapproximately3minutes
forthecompressortostartandcoolingtobegin.
Energy Saver Mode
Controls the fan.
Make sure noflflng is between file ah conditioner
and the remote control flint could block file
signal.
Make sure batteries are flesh and installed
correctly as indicated on file remote conuol.
CoolingDescriptions
ForNormalCooling--Selectthe Coolmode and
Highor Med fan with a middle set temperature.
ForMaximumCooling--Select file Coolmode
and Highfan wifll a lower set mmperamre.
For Quieter & Nighttime Cooling--Select d_e
CO01mode and LOWfan wifll a middle set
mmpemture.
0N--The fan will cycle on and offwith the
compressoL This results in wider vaIiafions of room
temperature and humidity. NormaUy used when the
room is unoccupied. NOTE:Thefanmaycontinueto run
forashorttimeafterthecompressorcgclesoff.
OFF--The fan runs all the time, while die
compressor cycles on and off:
Fan Only Mode
Use the FanOnlyMode at Low,Medor Highfan
speed to provide air circulation and filtering
without cooling. Since fan only settings do not
provide cooling, a Set temperature cannot be
enmred. The room mmpemmre will appear
in the displ W.
Auto Fan Speed
Set to Autofan speed for the fan speed to
automatically set to the speed needed m provide
optimum comfort settings wifll the set temperature.
If die room needs more cooling, file fan speed
will automatically incre_tse. If the room needs less
cooling, the fan speed will automatically decrease.
NOTE:AutoFanSpeedcannotbeusedwhenin the
FanOnlyMode.
NOTE:AutoFanSpeedcannotbeusedwhenin the
FanOnlyMode.
Power Outage Recovery Feature
In the case of a power outage or interruption, the
unit will automatically re-start in the settings last
used after the power is restored. If the Delay 1-24hr
feature was set, it will resume countdown. You may
need to set a new time if desired.
5
Page 6
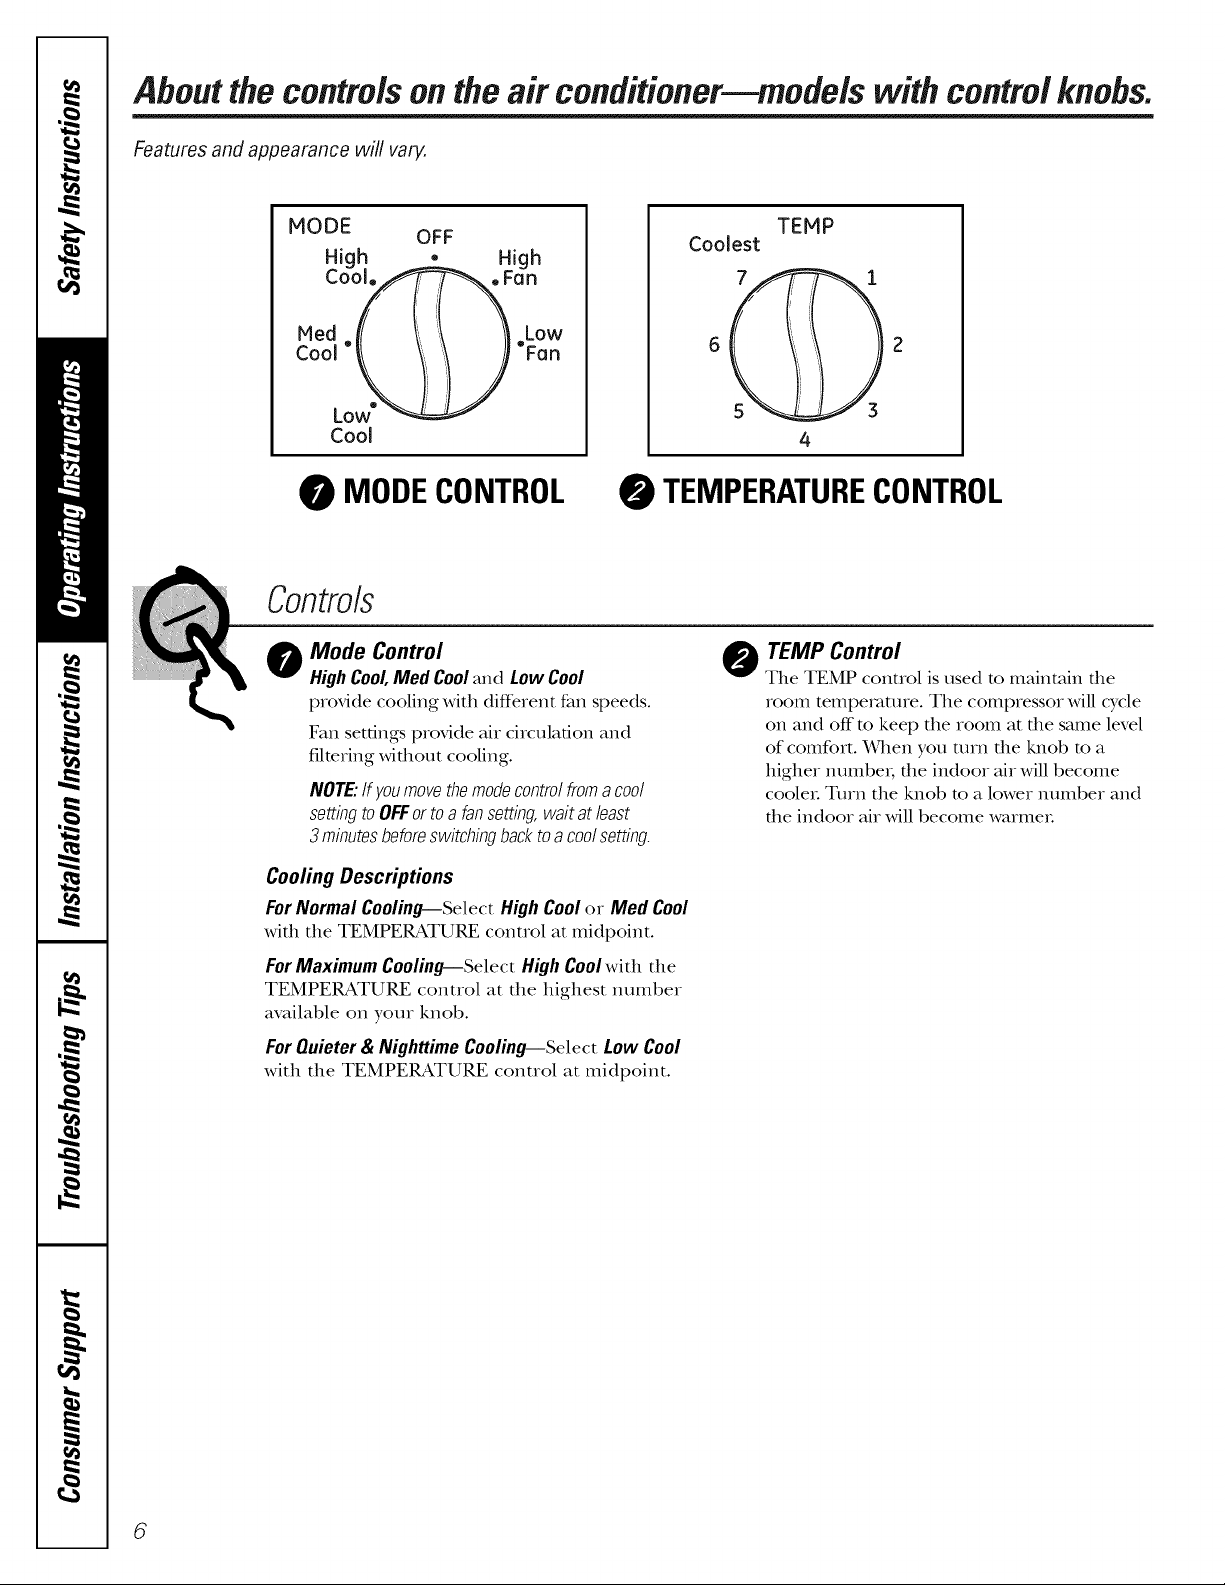
About the controls on the air conditioner--models with control knobs.
Features and appearance will vary.
NODE
High •
Cool.
Low"
Cool
OFF
High
MODECONTROL
Controls
Mode Control
0
HighCool,Med Cooland LowCool
provide cooling with different fan speeds.
Fan settings provide Mr circulation and
filtering Mfllout cooling.
NOTE:If youmovethemodecontrolfromacool
settingtoOFFortoa fansetting,waitatleast
3 minutesbeforeswitchingbacktoa coolsetting.
Coolest
TENP
TEMPERATURECONTROL
TEMP Control
O
Tile TEMP control is used to maintain the
room tempei_une. Tile compressor will cycle
oil and off"m keep tile room at tile same level
of comfort. V_r]lenyou Unn tile blob m a
higher numbei; the indoor air will become
cooleL Turn tile knob m a lower number and
the indoor air will become warmeI.
Cooling Descriptions
ForNormal Cooling---SelectHighCoolor Med Cool
with tile TEMPERATURE control at midpoint.
ForMaximum Coolino--Select High Coolwith tile
TEMPERATURE control at tile highest number
available oil your knob.
ForQuieter& NighttimeCoolino--Select Low Cool
with tile TEMPERATURE control at midpoint.
6
Page 7
Additional important information.
Air Direction
Use die lever to adjust file air direction left and
right only.
Careand cleaningof theair conditioner.
Grille and Case
Turn the air conditioner off and remove the plug To clean, use water and a mild detergent. Do not
flom tile wall oudet before cleaning, use bleach or ab_wsives.
Air Filter
The air filter behind the front grille should be
checked and cleaned at least eve_T 30 days or
more often if necessary.
Toremove:
Push on one side of the filter edge and pull it out
the other side.
ge.com
Glean tlle filter widl warm, soapy wateL Rinse and
let the filter dry before replacing it. Do not clean
the filter in a dishw_MleL
CAUTION:DoNoToperatetheair
conditionerwithoutafilterbecausedirtandlintwillclog
it andreduceperformance.
Outdoor Coils
The coils on the outdoor side of the air conditioner
should be checked regularly: If flley are clogged
Mill dirt or soot, flley may be professionMly cleaned.
How to Insert the Batteries in the Remote Control
[-_ Remove the batte D,cover by sliding it
according to the arrow direction.
[] Insert new batteries, making sure that the (+)
and (-) of battery are installed correcdy.
[-3--]Reatmch the cover by sliding it back
into position.
NOTES:
Use 2 "AAA" (1.5 volt) alkaline batteries. Do not
use recha_geable batteries.
, Remove the batteIies flom the remora control if
the sysmm is not going m be used for a long time.
7
Page 8
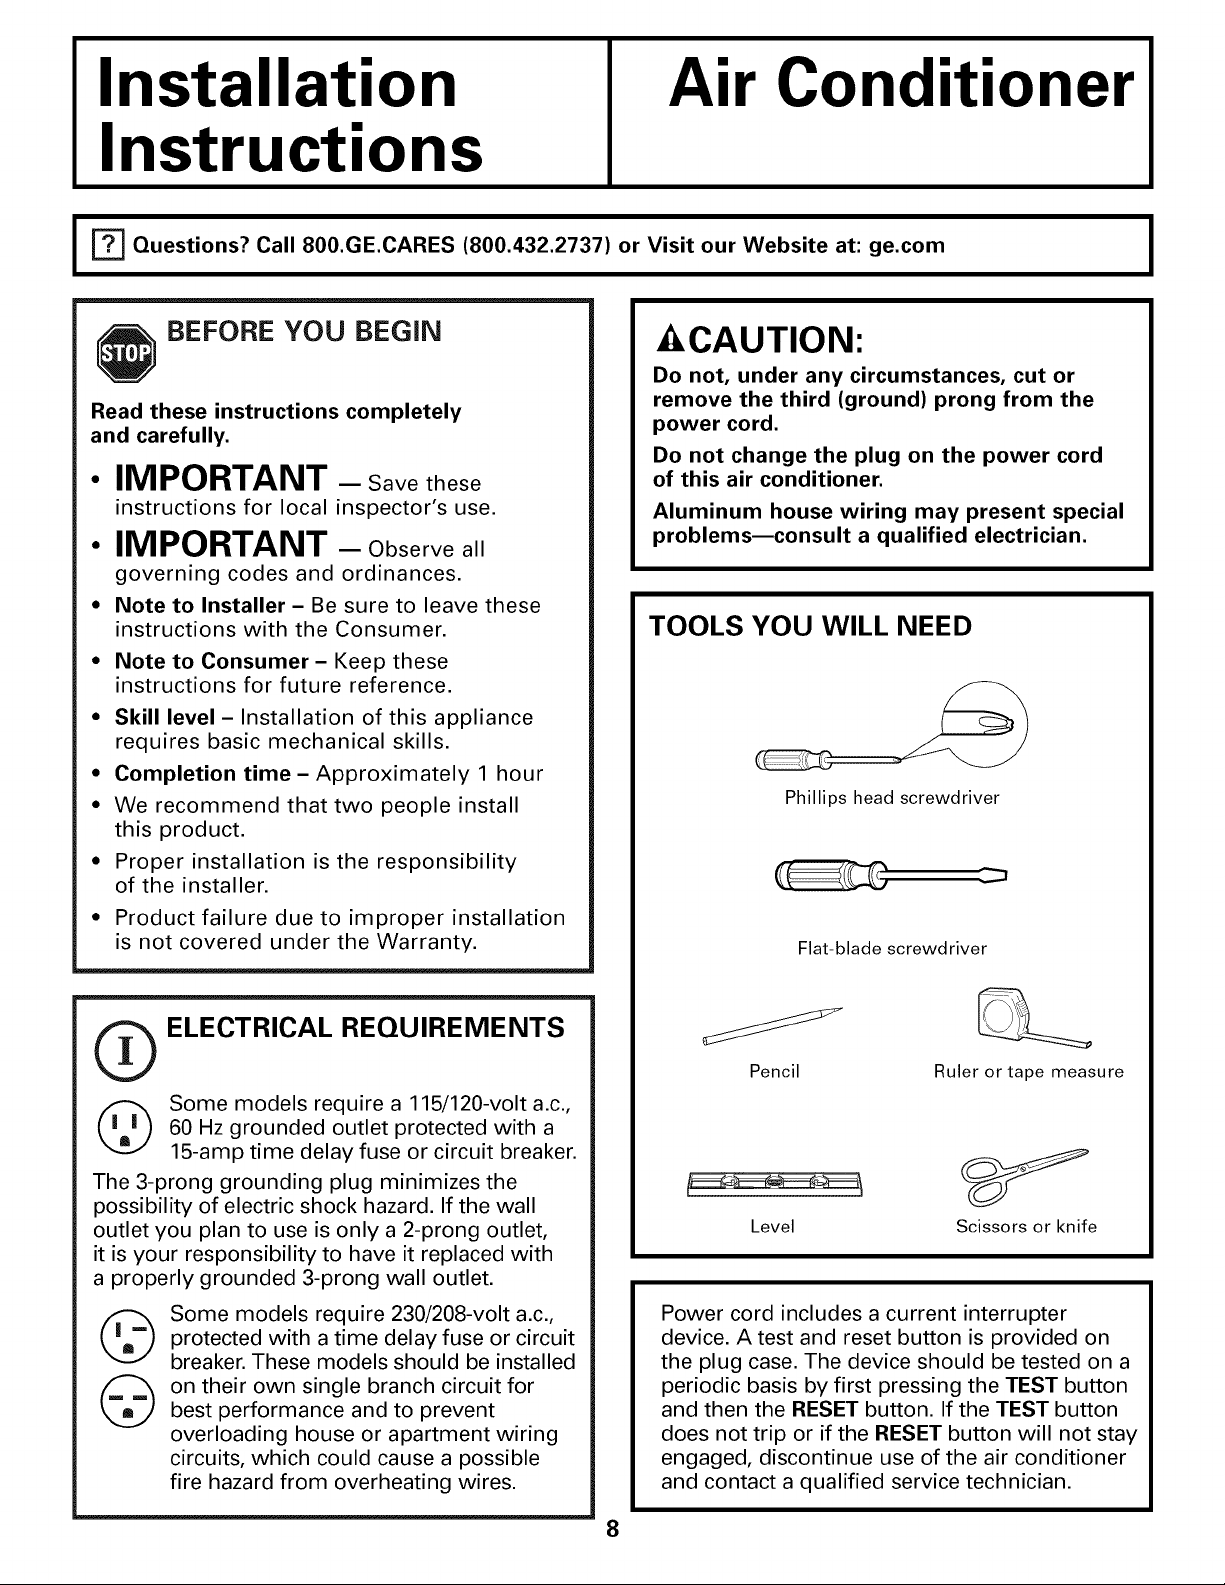
ilnsta,,at,onnsttuct,onsIAirC°ndit'°nerl
I_ Questions? Call 800.GE.CARES (800.432.2737) or Visit our Website at: ge.com
BEFORE YOU BEGIN
Read these instructions completely
and carefully.
IMPORTANT - Savethese
instructions for local inspector's use.
• IMPORTANT - Observeall
governing codes and ordinances.
• Note to Installer- Be sure to leave these
instructions with the Consumer.
• Note to Consumer- Keep these
instructions for future reference.
• Skill level - Installation of this appliance
requires basic mechanical skills.
• Completion time- Approximately 1 hour
• We recommend that two people install
this product.
• Proper installation is the responsibility
of the installer.
• Product failure due to improper installation
is not covered under the Warranty.
- CAUTION:
Do not, under any circumstances, cut or
remove the third (ground) prong from the
power cord.
Do not change the plug on the power cord
of this air conditioner.
Aluminum house wiring may present special
problemsmconsult a qualified electrician.
TOOLS YOU WILL NEED
Phillips head screwdriver
Flat-blade screwdriver
I
_ ELECTRICAL REQUIREMENTS
(_ Some models require a 115/120-volt a.c.,
The 3-prong grounding plug minimizes the
possibility of electric shock hazard. If the wall
outlet you plan to use is only a 2-prong outlet,
it is your responsibility to have it replaced with
a properly grounded 3-prong wall outlet.
©
60 Hz grounded outlet protected with a
15-amp time delay fuse or circuit breaker.
Some models require 230/208-volt a.c.,
protected with a time delay fuse or circuit
breaker. These models should be installed
on their own single branch circuit for
best performance and to prevent
overloading house or apartment wiring
circuits, which could cause a possible
fire hazard from overheating wires.
Pencil Ruler or tape measure
Level Scissors or knife
Power cord includes a current interrupter
device. A test and reset button is provided on
the plug case. The device should be tested on a
periodic basis by first pressing the TEST button
and then the RESET button. If the TEST button
does not trip or if the RESET button will not stay
engaged, discontinue use of the air conditioner
and contact a qualified service technician.
8
Page 9
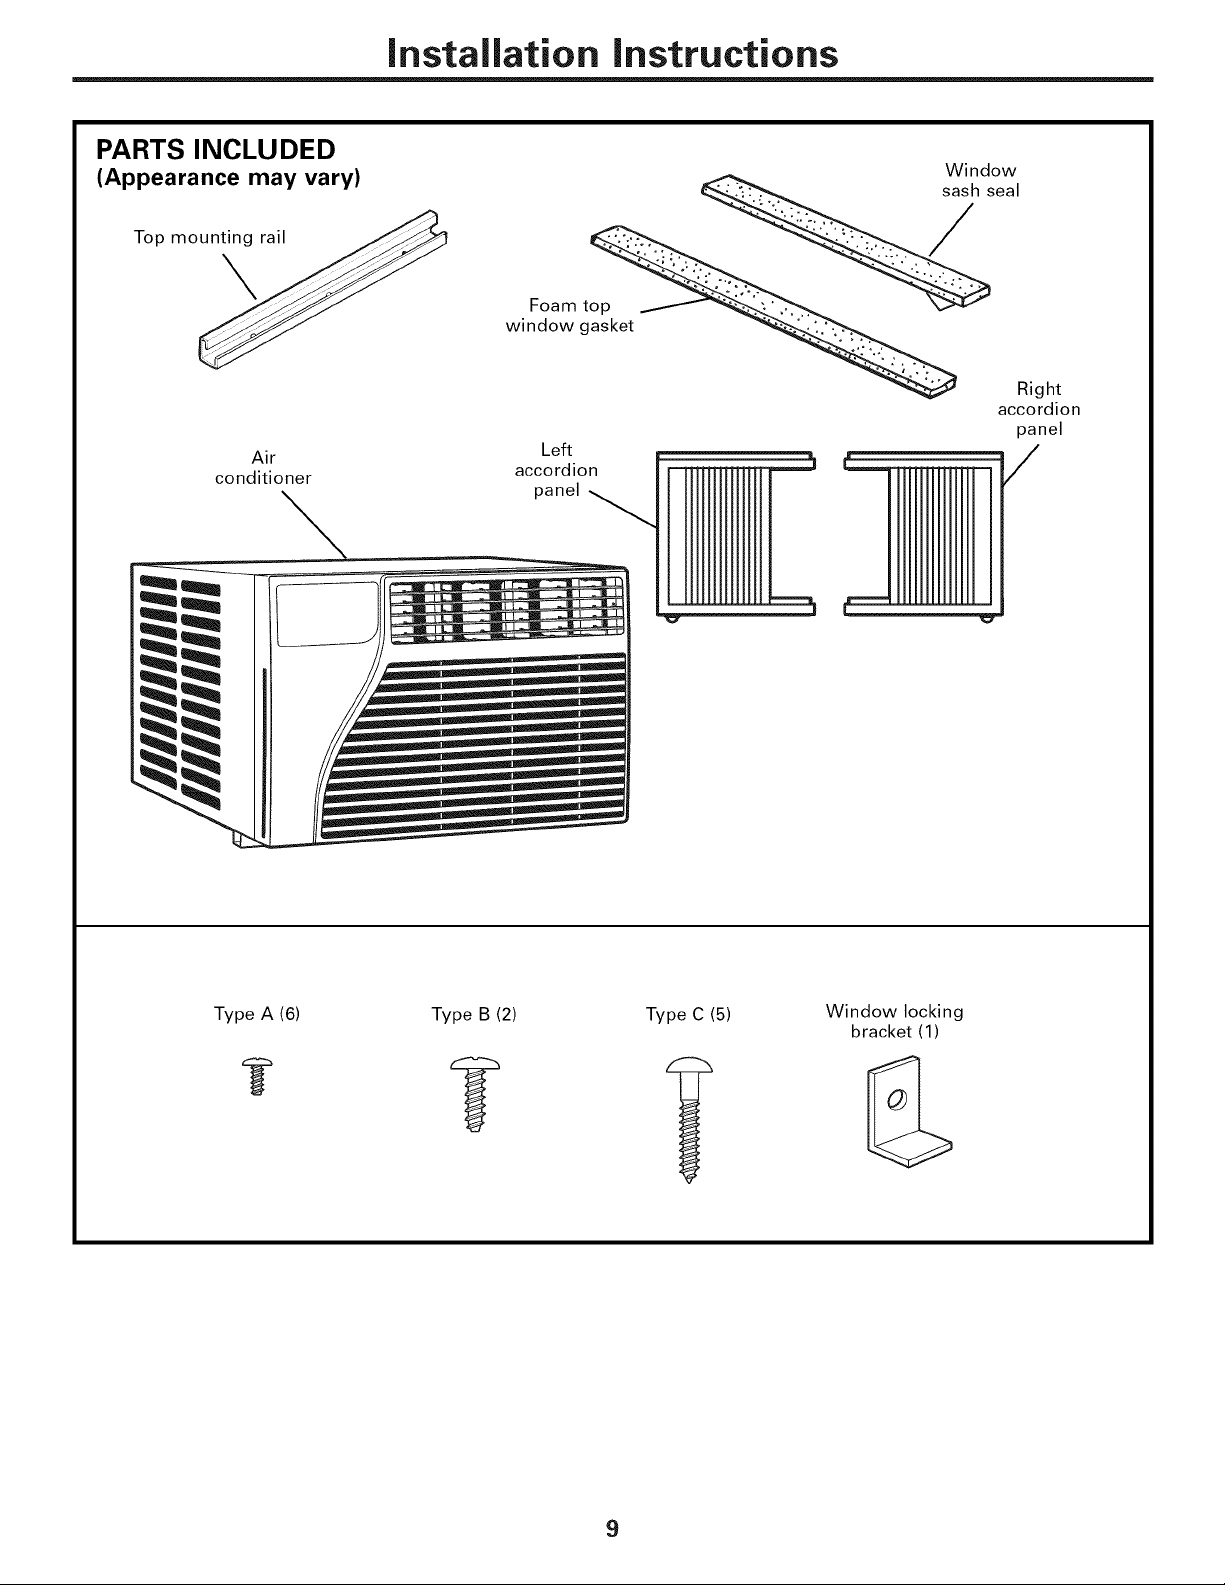
Installation instructions
PARTS INCLUDED
(Appearance may vary)
Top mo_
Air
conditioner
Window
seal
wiF_awm __ Right
accordion
panel
Left
accordion
panel
_L ,_
/
Type A (6) Type B (2) Type C (5) Window locking
bracket (1)
9
Page 10

Installation instructions
131WINDOW REQUIREMENTS
• These instructions are for a standard
double-hung window. You will need to
modify them for other types of windows.
• The air conditioner can be installed
without the accordion panels if needed
to fit in a narrow window. See the
window opening dimensions.
• All supporting parts must be secured
to firm wood, masonry or metal.
• The electrical outlet must be within
reach of the power cord.
• Follow the dimensions in the table and
illustration for your model.
Models A B C
AET05, AEW05 13 1/4" min. 22"-38" 18 1/4" min.
AEW06, AEW08 14 1/2" min. 23"-38" 19" min.
B===8
t
A
[] STORM WINDOW REQUIREMENTS
A storm window frame will not allow the
air conditioner to tilt toward the outside,
and will keep it from draining properly.
To adjust for this, attach a piece of wood
to the stool.
WOOD PIECES-
WIDTH: 2"
LENGTH: Long enough to fit inside the
window frame.
THICKNESS: To determine the thickness,
place a piece of wood on the stool to
make it 1/2" higher than the top of the
storm window frame.
Attach securely with nails or screws
provided by the installer.
1/2" higher _ m
than frame f__,,_Stool _==_!r
Storm / r //
window / 7 //
frame II //
_r __j- Wood
(With accordion panels)
C -_
(Without accordion panels)
[] PREPARE THE AIR CONDITIONER
_-1 Install the top mounting rail with 2 Type B
screws from the outside of the case.
Top mounting rail
Bottom mounting rail
[] Slide the left and right accordion panels
into the top and bottom mounting rails.
Top left
Top right
10
Page 11

Installation instructions
131PREPARE THE AIR CONDITIONER
(cont.)
[] Attach the accordion panels to the case
using 3 Type A screws on each side.
Top mounting rail
Accordion
panel
Type
screws
BACK
[] INSTALL THE AIR CONDITIONER
IN THE WINDOW
[A] Place the air conditioner on the stool with
the bottom mounting rail against its back
edge. Center it and close the window
securely behind the top mounting rail.
It should be level or slightly tilted to the
outside. Use a level; about a 1/3 bubble
will be the correct case slant to the outside.
/
Type C screws
['B] Extend the left and right accordion panels
to the vertical window sashes and attach,
through the holes in the panels, with 4
Type C screws, as appropriate.
Bottom mounting rail
[_] PREPARE THE WINDOW
Cut the window sash seal to the proper
length. Peel off the backing and attach the
seal to the underside of the window sash.
INSTALL A SUPPORT BRACKET
AND THE FOAM TOP WINDOW
GASKET
[A] Attach the support bracket with one
Type C screw.
['_ Cut the foam top window gasket to the
window width.
['C-']Stuff the foam between the glass and the
window to prevent air and insects from
getting into the room.
/
11
Page 12

TroubleshootingTips.
What ToDo
used after tile power is restored.
• There is a protective time del W (approximately
3 minutes) to prevent tripping of tile compressor
overload. Fox this reason, tile unit may not start
normal cooling for 3 minutes after it is turned
back on.
use of tile air conditioner and contact a qualified
service technician.
Air conditioner
does notstart
Po,, h oCa.,o,
The air conditioner • Make sure the air conditioner plug is pushed
is unplugged, completely into tile outlet.
The fuse is blown/circuit • Check tile house fixse/circuit breaker box and replace
breaker is tripped, tile fixse or reset tile breakex.
Power failure. • Tile unit will automatically re-start in tile settings last
The current interrupter • Press tile RESETbutton located on tile power cord plug.
device is tripped. • If tile RESETbutton will not stay engaged, discontinue
Air conditioner does Airflow is restricted. • Make sure there are no curtains, blinds or fiuniture
not coolas it should blocking the flont of the air condifioneL
The temp control may • On models with touch pads: In tile Cool mode, press tile
not be set correctly. Decrease • pad.
• On models with control kalobs, turn the temperature
knob m a higher numbe_.
The air filter is dirty. = Glean the filter at least eve D, 30 days.
See tile Operating Instructions secdon.
The room may have been hot. • When file air conditioner is filst turned on, you need
to Mlow time for file room to cool down.
Cold air is escaping. • Gheck for open fiunace reg,iste_s and cold air returns.
Cooling coils have iced up. • See "Air conditioner freezing up" below.
Air conditioner
freezingup
Theremote control The batteries are inserted • Gheck tile position of tile batteries. Tile}, should be
is not working incorrectly, inserted in tile opposite (+) and (-) direction.
Ice blocks the air flow
and stops the air conditioner
from cooling the room.
The batteries may be dead. • Replace tile batteries.
• On models Mill conUol knobs, set file mode conuol at
High Fanor High Coolwidl tile rempat 1 or 2.
• On models with touch pads, set tile controls at HighFan
or High Cooland set tile dlemlosmt m a higher
tempex_mxre.
Waterdrips outside Hot, humid weather. • This is normal.
Water drips indoors The air conditioner is not • Fox proper water disposal, make sure tile air conditioner
tilted to the outside, slants slightly from tile case flont to tile real
Water collects in Moisture removed from air • This is normal for a short period in areas with little
base pan and drains into base pan. humidity; hernial for a longer period in very humid areas.
Normal Operating Sounds
72
, You may hear a pingfing noise caused by water
being picked up and thrown against tile
condenser on xwiny dws or when tile humidit T
is high. This desigm feature helps remove
moisture and improve efficienc>
You may hear tile dlermosmt click when tile
compressor cycles on and of£
Water Mll collect in die base pan during
high humidity or on rainy dws. Tile wamr
mW overflow and dx-ipflom tile outdoor side
of the unit.
Tile fan may run even when tile compressor
does not.
Page 13

GEAir ConditionerWarranty--One YearLimited Warranty.
Staple yourreceipt here.
Proof of the original purchase date
is needed to make a warranty claim.
We Will Replace:
Replacement unitfor any product which fails due to a defect in materials or workmanship.
Fromthe date of the The exchange unit is warranted for the remainder of your product's origfinal one-year
originalpurchase warranty period.
Properly pack your unit. We recommend using the
original carton and packing materials.
Return the product to the retail location where it
was purchased.
Customer instruction. This owner's manual provides
information regarding operating instructions and
user controls.
Improper installation. If you have an installation problem,
or if the air conditioner is of improper cooling capacity
for the intended use, contact your dealer or installer.
You are responsible for providing adequate electrical
connecting facilities.
Failure of the product resulting from modifications to
the product or due to unreasonable use including failure
to provide reasonable and necessary maintenance.
Include in the package a copy of the sales receipt or other
evidence of date of original purchase. Also print your
name and address and a description of the defect.
Replacement of house fuses or resetting of circuit
breakers.
Damage to the product caused by improper power supply
voltage, accident, fire, floods or acts of God.
Incidental or consequential damage caused by possible
defects with this air conditioner.
This warranty is extended to the original purchaser and any succeeding owner for products purchased for home
use within the USA.
Some states do not allow the exclusion or limitation of incidental or consequential damages. This warranty gives
you specific legal rights, and you may also have other rights which vary from state to state. To know what your
legal rights are, consult your local or state consumer affairs office or your state's Attorney General
Exclusion of implied warranties: Except where prohibited or restricted by law, there are no warranties, whether
express, oral or statutory which extend beyond the description on the face hereof, including specifically the
impfied warranties of merchantability or fitness for a particular purpose.
Warrantor: General Electric Company.Louisville, KY 40225
13
Page 14

ConsumerSupport.
GEAppliancesWebsite
Have a question or need assistance widl your appliance? T1Tthe GE Appliances Website 24 hours a day,
any day of file year! For greater convenience and f_tster selMce, you can now download (h,vner's Manuals,
or even order parts and catalogs ondine. You can also "Ask Our Team of Experts _''' your questions, and
SO Illtlcll IlloIe...
ge.com
RealLifeDesignStudio ge.com
GE supports the Universal Desigm concept--products, services and enviionments that can be used by
people of aU ages, sizes and capabilities. We recognize the need m design for a wide range of physical and
mental abilities and impahments. For details of GE's Univeisal Design applications, including kitchen
design ideas for people with disabilities, check out our Website today. For the hearing impahed, please call
800.TDD.GEAC (800.833.4322).
PartsandAccessories
IndMduals qualified to service their own appliances can have parts or accessories sent directly to their
homes (VISA, MasterCard and Discover cards are accepted). Order on-line today, 24 horns every day or
by phone at 800.626.2002 during nomlal business hours.
Instructionscontainedinthismanualcoverprocedurestobeperformedbyanyuser.GEdoesnotsupport
anyservicingoftheair conditioner.Westronglyrecommendthatyoudonotattempttoservicetheair
conditioneryourself.
ge.com
ContactUs
If you are not satisfied wifll die se_Mce you receive flom GE, contact us on our Website wifll all die details
including your phone numbe_, or wrim m: General Manage_, Customer Relations
GE Appliances, Appliance Park
I,ouisville, KY40225
ge.com
/ 4 Printed in China
Page 15

Instrucdones de seguridad .... 2, 3
Instrucciones de operaci6n
Modelos con botones de control 6, 7
Modelos con teclas de toque ...4, 5
Cuidado y limpieza
Bobinas para extefiores .......... 7
Filtro de aire ................... 7
Instrucciones de instalaci6n . .8-1
Solucionar problemas ......... 12
Sonidos de operaci6n normales . .12
Servicio al consumidor
Garantfa ..................... 13
Servicio al consumidor ......... 14
ge.com
AET05
AEW05
AEW06
AEW08
©
©
Escribalos mJmemsde modelo
y serie aqui:
# de Modelo
#de Serie
Puede encontrar estos nfinleros
en una efiquem en el cosmdo
del acondicionador de aire.
49-7514-1 11-05Jfl
Page 16

INFORMACIONIMPORTANTEDESEGURIDAD.
LEATODASLASINSTRUCCIONESANTESDEUSAR.
& iAD VERTENCIA!
Por su seguridad, se debe seguir la informaciSn en este manual para minimizar el riesgo de incendios,
descargas el#ctricas o lesiones personales.
PRECAUCIONESDESEGURIDAD
iiiiiiiiiiiii!
Use este electrodomOstico solamente para
el prop6sito determinado segdn se describe
en el Manual del propietario.
Este acondicionador de aire debe instalarse
correctamente de acuerdo con las
Instmcciones de instalaci6n antes de su uso.
Nunca desenchufe su acondicionador de
aire tirando del cable elOctrico. Siempre
agarre firmemente el enchufe y tire de
_1 directamente hacia _uera.
Reemplace inmediatamente mdos los cables
el_ctricos que se hayan pelado o que se
hayan daflado de alg_na otra manera.
Un cable de corrienm daflado no debe
repararse, sino que debe ser sustituido por
uno nuevo que se adquiera del fabricante.
No use un cable el_ctrico que muestre
ex,idencias de demrioro, o daflos de abrasi6n
en su superficie en alg_no de sus extremos.
Apague la unidad y desenchufe su
acondicionador de aire antes de limpiar.
GE no estd no apoya que se le proporcione
ningdn ser\,icio al acondicionador de aire.
Vehementemente recomendamos que
usted no intente proporcionar ser\,icio al
acondicionador de aire usted mismo.
Por su seguridad...no almacene ni use
materiales combustibles, gasolina u otros
vapores o lfquidos i_fflamables en la
proximidad de _sm o algdn otro
electrodom_stico.
Todos los acondicionadores de aire
contiene refiigerantes, los que por Ley
Federan deben ser remox,idos antes de
desecharlos. Si usted planea deshacerse de
algdn producm que conmnga refrigerantes,
p6ngase en contacm con la compaMa que
se encarga de recoger su basura para que le
indiquen quO hacer.
COMOCONECTARLAELECTRICIDAD
Bajo ninguna circunstancia, corte o remueva la
tercera pEla(tierra) del cable el#ctrico. Enpos
de la seguridad personal, este electrodomfistico
debe siempre conectarse a tierra.
E1 cable elOctrico de este electrodomOstico est_
equipado con un enchufe de tres pdas (tierra)
que combina con un tomacorriente est_ndar
de tres mmas de pared para minimizar la
posibilidad de una descarga elOctrica.
E1cable de alimentaci6n incluye un
dispositivo para intermpci6n de corriente.
Se incluye un bot6n de pmeba y de reinicio
en el dispositivo. E1dispositivo debe ponerse
a pmeba peri6dicamente: primero se presiona
el bot6n de TEST(pmeba) y luego RESET
(reinicio). Si el bot6n rESr,o se dispara
o si el bot6n RESETno queda enganchado,
de,je de utilizar el acondicionador de aire y
comunfquese con un t_cnico calificado.
Pida a un tOcnico que inspeccione el
tomacorriente y el circuito para cerciorarse
2
de que el tomacorriente est_ conectado a
tierra de la manera apropiada.
Donde exista un tomacorriente de dos
tomas, es su responsabilidad y obligaci6n
personal hacer que dicho tomacorriente
sea reemplazado por uno de tres tomas
con conexi6n a tierra.
E1acondicionador de aire deberfa siempre
estar conectado a un tomacorriente indMdual
con su circuito de volta,je correspondiente.
Esm proporciona el mayor rendimiento y
ademas ex,itaque los circuitos del resto de
la casa se sobrecarg_en, lo cual podrfa causar
incendios por el sobrecalentamiento del
cableado.
Ver las Instmcciones de instalaci6n, en la
secci6n Requisitos El_ctricos para los requisitos
espec/ficos de conexi6n.
Page 17

ge.com
iAD VERTENCIA!
f
USODECABLESDEEXTENSION--Modelosde115volfiossolamente
Debido al potencial de riesgos de seguridad bajo
ciertas condiciones, en_rgicamente recomendamos
contra el uso de cables de extensi6n.
Sin embargo, si usted seve en la necesidad
de usar un cable elOctfico de exmnsi6n, es
absolutamenm necesano que el mismo estO
listado ba,jo UI,, sea calibre 14, del tipo de
3 mmas con conexi6n a derra para
electrodomOsticos y el fndice elOctdco debe
ser de 15 ampenos (mfnimo) y 125 voldos.
USODEENCHUFESADAPTADORES--Modelosde115volfiossolamente
Debido al potencial de riesgos de seguridad bajo
ciertas condiciones, en#rgicamente recomendamos
contra el uso de enchufes adaptadores.
Sin embargo, si usted seve en la necesidad de
usar un adaptado_, donde los c6digos legales
locales lo permitan, puede hacer una conexi_Jn
temporala un inmrmpmr de 2 tom,is siempre
que se use un mmacorriente listado UL
disponible en la mayoria de las *erreterias.
La ranura mayor en el adaptador debe estar
alineada con la pda mayor en la pared para
proporcionar una polaridad apropiada en la
conexi6n del cable el_ctrico.
Cuando se disponga a desconectar el cable
el_ctfico del adaptado_, siempre sosmnga el
adaptador en su lugar con una mano mientras
tira del cable el_ctrico con la otra mano. Si no
hace esm, la terminal de tierra del adaptador
podr/a romperse despu& de que este proceso
se repita varias veces.
Si se rompe el terminal de conexidn a derra
del adaptadox, NO USEel acondicionador de
aire hasta que la conexi6n a tierra se haya
restablecido.
Unirel termbal de conexi6natierradel adaptadora un
tornillode la cubbrta en laparedno conectaa tierra
el electrodom#sticoapropbdamenteanoserque el
tornillode la cubbrta seametdlicoy no est#aislado,
y el tomacorrientedelacasaest#apropiadamente
conectadoa tierraatrav#sdelcableadode lacasa.
Hagaqueun t#cnicocalificadoinspeccbneelcircuito
de la casaparacerciorarsequeestd conectadoa tierra
apropiadamente.
LEAYSIGAESTASINSTRUCCIONESDESEGURIDADCUIDADOSAMENTE.
GUARDEESTASINSTRUCCIONES
3
Page 18

Acerca de loscontrolesen el acondicionadorde aim--
modelosconteclas de toque.
Laslucesal ladodelas teclas de toqueenel panelde control delacondicionadordeaire indicar#nlos ajustesseleccionados.
Lapantallamuestrasiemprela
temperaturaambiente,exceptoal
configurarlatemperaturaDefinida
oel Sincronizadorde retardo.
m Auto
:"22 : E:nr°Zvo,
m Low m Cool
[ Fan
O -_. Laluz indica queel tempofizador
C0ntr01esdelacondicionad0rdeaire
E@ r
de retardo est_ configurado.
Controles
La luz indicaque la unidadest_ en el modode
Ajuste de temperaturao deTiempode retardo.
Reducci6nde
sincronizadorde retardo
O Selecci6ndemodo
O Reducci6nde
delventilador
O umentoyreducci6n -
de ajuste de temperatura
1-24 hde retardo
1
Control remoto
Aumentode sincronizadorde
retardo
Encendido/apagado
autom_ticodel ventilador
Aumentode velocidaddel
ventilador
Encendido/apagadodela
unidad
Teclade Power (Encendido)
0
Apaga y prende el acondicionador de aire.
A1 encendei_e, la pamalla mostmr_ la
mmperamm ambiente.
Pantalla
O
Muestra la temperatura ambiente o
el dempo resmnte en el Sincronizador de
remrdo. Muesua la mmperamra Definidaal
configurar la temperamra en los modes Cool
(Frio)o de EnergySaver(Ahorrode energia).
I,a luz de Ajustese encenderd durante la
configuracidn.
NOTA: la pantalla cambiard para mosuar la
temperamra ambiente una vez que se haya
realizado la configuracidn. Para resdmir la
temperamra Oefinida,pulse las teclas de Temp
(remperatura) Aumento • o Reduccion •.
TeclasdeTempAumento•/Reduccion •
@
Usado pare _jusmr la mmperamra cuando
se encuentre en el mode CO01 (Frio)oEnergy
Saver(Ahorrode energia).I,a luz de Ajustese
encende_5 duranm la configuracidn.
O eclas deSincronizadorderetardoAumento•
(+)/Reduccion • (-)
Carlavez que toque las teclasAumento• /
Reduccion• de la unidad o las teclas Aumento
+/ReduccitJn- en el control remote definird
el dempo de remrdo al ufilizar el Delay 1-24hr
timer (Sincronizador de retardo 1-24 h) (_ ).
Ia luz de Ajustese encender_i dumnte la
configumcidn.
O TeclasdeFanSpeed(Velocidaddelventilador)
Usado para ajustar la velocidad del ventilador
a Low(Bajo),Med (Medio),High(Alto)o Auto
(Automgltica)en la unidad. NOTA:en el control
remote, utilice lasteclas Aumento+/Reduccion
- velocidad de ventilador para @1star la
velocidad del ventilador en Low(Bajo),Med
(Medio)o High(Alto).Utilice la teclaAutop'am
activar el ventilador automdtico.
O ecla de MODO
Usado para _jusmr el acondicionador de aire
al mode Cool(Frio),EnergySaver(Ahorrode
energia)o FanOnly(Soloventilador).
TeclasdeDelay(Retardo)
0
DelayON(ENCENDIDORetardo)_]uando
el acondicionador de aire est5 apagado,
puede _jusmrse para que se encienda
aumm_ficamente dentro de 1 a 24 betas en el
mode y configumcidn de venfilador anterioL
DelayOFF(APAGADORetardo)_ ]uando el
acondicionador de aire est_i encendido, puede
_justarse para que se apague autom_ticamente
denuo de 1a 24 betas.
Come realizar el ajuste:
Pulse la tecla Delay 1-24hr (Retardo 1-24h) en
la unidad o en la mcla @ del conuol remora.
Cada tuque de las mclas Aumento • /
ReduccilJn • en la unidad o las mclas Aumento
+/ReduccilJn - en el conuol remora definird
el mmpolizador en inmrvalos de 1 hera.
Ia luz de Ajuste se encender_i dumnte la
configumcidn.
Pare revisar el fiempo restante en el
Sincronizador de retardo1-24h,pulse la mcla
de Delay1-24hr(Retardo1-24h)en la unidad o
en la tecla @ del conuol remora. Ufilice las
teclas Aumento •/ReduccilJn • en la unidad
o las mclas Aumento ÷/ReduccilJn - en el
conuol remora para definir un nuevo
dempo, si lo desea.
Paracancelarel sincronizador,pulse la mcla
Delay1-24hr(Retardo1-24h)hasm que la luz
de dicho control se apague.
4
Page 19

Control remoto
Para gmantizar una operaci6n apropiada, (Mente
el conuol remora hacia el receptor de serial del
acondicionador de a'ue.
E1receptor de serial fiene un tango mdximo de
20 pies.
Modo Cool(Frio)
Use el modo Cool(Frio)aLow(Bajo),Med (Medio),
High(Alto)o AutoFanSpeed(Velocidadde ventilador
automgltica)para enffiaL Use las teclas de
Temperature(Temperatura)Aumento• (+1/Reduccion
• (-)para _justar a la temperatura deseada entre
64°F y 86°F en incremenms de I°E
Se usa un mi_nosmto electr6nico para mantener
la tempeIvmm_ ambienm. E1 compresor hard
ciclo enue apagado y encendido pma mantener
la habimci6n a la mmperamra deseada. Ajusm el
mrmosmm a un nfimero menoi y el ahe inmrno
se enfliaM mgts. Si lo _jusm a un nfimero mwox;
la temperamra del aire interno se c_flenmM mils.
NOTA:sielacondicionadordeaireest_apagadoyse
enciendemientrasestdconfiguradoenunajusteCool(Frio)
o si secambiadeunajustedeventiladoraunodeCool
ge.com
Gercidrese de que no haya nada entre el
acondicionador de ahe y el conuol remoto que
pueda bloquear la serial.
Gerci6rese de que las bamiT"assean flescas y se
instalen correctamenm segdn se indica en el
control remoto.
(Frio),puedequepasenaproximadamenteunos3minutos
hastaqueel compresorarranqueycomienceelenfriamiento.
Descripcionesde enfriamiento
Para enfriamientonormaI--Seleccione el modo
Cool(Frio)yvenfilador High(Alto)o Med (Medio)
con una temperatura de _juste media.
Para enfriamientomaximo--Seleccione el modo
Cool(Frio)yvenfilador High(Alto)con una
tempe_mlra de _juste menoL
Para enfriamiento silencioso y enfriamiento
noctumo--Seleccione el modo Cool (Frio)y
ventilador Low (Bajo) con una tempe_mm_
de _juste media.
Energy Saver Mode (Modo de ahorro de energia)
Gonuola el venfiladoi.
ON(ENCENDIDO)--E1venfilador ham un ciclo
de encendido y apagado con el compresox. Esm
resulm en variaciones mwores en la temperatma
de la habimci6n yen la humedad. Normalmenm
usado cuando la habimci6n no est;i ocupada.
Modo de Fan Only (Solo ventilador)
Use el modo Fanonly(Soloventilador)a velocidad
LOW(Baja),Med(Media)o High(Alta)par'a
proporcionar circulaci6n de aire yfiltraci6n
sin enffiamiento. Debido a que los niveles
de venfilador finicamenm no proporcionan
enffiamienm, no se puede introducir una
Velocidad de ventilador automMica
Indique la opci6n en Velocidad de venfilador
autom_dca para definir aumm_ticamenm la
velocidad necesaria paxwproporcionar una
configuracidn de comodidad 6pdma con la
mmpexvmm_ elegida.
Si la habimci6n necesim rods enfliamienm,
la velocidad del venfilador aumenmM
NOTA:puede que el ventiladorsiga funcionandodurante un
corto £iempodespu_sde desacfivarseel ciclo de/compresor.
OFF(APAGADO)--EI venfilador funciona todo el
dempo, mientras que el compresor pasa pot los
ciclos de encendido y apagado.
temperamra Definida.ApareceM en
panmlla la temperatuxv_ ambienm.
NOTA:laVelocidaddeventiladorautom_ticanopuede
ufilizarseenelmodoFanonly(Soloventilador).
automdficamente. Si la habimci6n necesim
menos enffiamiento, la velocidad del venfilador
descendeM aumm_ficamenm.
NOTA:/aVelocidaddeventiladorautomdticanopuede
ufilizarseenelmodoFanonly(Soloventilador).
Funcion de recuperacion de perdida de energia
En caso de la p&dida de la enexgfa o inmrrupci6n,
la unidad reiniciaM aummgficamente en las
flmciones de la dlfima vez que tim usado una
vez la ener_a sea resmblecida. Si la flmcidn del
Delay1-24hr(Retardo1-24h)estaba definido,
confinuaM la cuenm regresiva. Es posible que usted
necesim _justar un fiempo ntlevo si as1 lo desea.
5
Page 20

Acerca de loscontrolesen el acondicionadorde aire--modelos con
botonesdecontrol.
Las funciones y el aspecto pueden variar.
MODE
High ,,
Cool._
Low*
Cool
OFF
High
CONTROLDEMODO
Controles
Control de modo
0
HighCool(FrioAlto),MedCool
(FrioMedio)y LowCool(FrioBajo)
proporcionan enfiiamiento con
diferenms velocidades del venfiladoL
I,os @_stes del venfilador proporcionan
circulacidn de aire y filnacidn sin enflia_.
NORA:Siustedmueveelcontroldemododeunnivel
frfoaOFF(APAGADO)oaunniveldeventilador,
esperepor/omenos3minutosantesdecambiarotra
vezaunniveldeenfriamiento.
Coolest
TEMP
CONTROLDE
TEMPERATURA
Control de TEMP
0
E1control de TEMP es usado para
manmner la mmpemmra ambiente. E1
compresor hard ciclo enne encendido y
apagado para manmner el mismo nivel de
mmperamra en la habimcidn. Cuando usmd
gdra el bot6n hacia un ndmero mwoi; el aire
inmrno se enfriard rods. Si lo @1sin a un
nfimero menor, la temperature del aire
inmrno se calenmm rods.
Descripciones de enfriamiento
Paraenfriamientonormal--SeleccioneHighCool
(FrioAlto)o MedCool(FrioMedio)con el control
de TEMPERATURA en el medio.
Paraenfriamientomaximo--Seleccione HighCool
(FrioAIto)con el control de TEMPERATURA en
el ndmero mayor disponible en su teclado.
Paraonfriamiontosiloncioso durantolanoche---
Seleccione LOWCool(FrioBajo)con el control de
TEMPERATURA en el nivel medio.
6
Page 21

Informaci6nimportante adicionale.
Direccion del aire
Use la palanca para _justar la direcci6n del aire
hacia la izquierda y la derecha solamente.
Cuidadoy limpieza del acondicionadorde aire.
Rejilla y caja
Apague el acondicionador de aire y retire el
enchufe del mmacoxTienm de la pared anms
de limpiaL
Filtro de aire
E1filtro de aire detMs de la rejilla flonml debe
inspeccionarse ylimpiaxse pox lo merits cada
30 dfas o m_s a menudo si flmse necesaxio.
Paxa limpiax; use agua y un detexgente suave.
No use cloxo o matex-iales abmsivos.
ge.com
Pararetirarlo:
Empt_je en un lado del borde del filtro y tirelo
del otto lado.
I,impie el filuo con agua tibia yjab6n. Enju5guelo y
pennim que se seque antes de colocarlo om_ vez en
su lugaL No lave el filtro en un lavav@llas.
PRECAUCION:Noo fRfo/
acondicionadordeairesinel filtrodebidoaquelasuciedad
y/aspelusasIoobstruir_nyreducir_nsurendimiento.
Bobinas para exteriores
Se deben inspeccionar con flecuencia las bobinas
en el lado exmrior del acondicionador de aire. Si
las mislnaS estdxl obsu-ui&ts con suciedad u hollhl,
podrfan limpiaxse profesionalmenm.
Como insertar las pilas en el control remoto
V-_ Retire la cubierta de la pila deslizdndola
de acuerdo con la direcci6n de la flecha.
V2--]Inserte pilas Imevas cercioMndose de que los
polos posidvos (+) y negativos (-) estfin
oxientados coxTectamente.
-_ Goloque la cubiexta otra vez deslizdndola
en su lugaL
NOTA&
Use 2 pilas alcalinas "AAA" de 1,5 volfios.
No use pilas recargables.
Retire las pilas del control remoto si no va
a usar el sistema pox un pexfodo pxolongado.
Page 22

Instrucciones
Acondicionador
de instalacion
I_ i Preguntas? Llame 800.GE.CARES (800.432.2737) o Visite nuestra pagina en la red en: ge.com I
de aire
ANTES DE INICIAR
O REQUISITOS ELECTRICOS
Lea estas instrucciones completa y
cuidadosamente.
IMPORTANTE - Guardeestas
instrucciones para uso del inspector local.
• IMPORTANTE - Observetodos
los codigos y ordenes de ley.
• Nota al instalador- AsegOrese de dejar
estas instrucciones con el consumidor.
• Nota al consumidor- Conserve estas
instrucciones para referencia futura.
• Nivel de destreza- La instalacion de este
aparato requiere de destrezas mecanicas
basicas.
• "13empo de ejecucion - Aprox. 1 hora
• Recomendamos dos personas para
la instalacion de este producto.
• La instalacion apropiada es la
responsabilidad del instalador.
• La falla del producto debido a una
instalacion inadecuada no esta cubierta
por la garantfa.
_) lgunos modelos requieren
El enchufe de tres peas con conexion a tierra
minimiza la posibilidad de descargas electricas.
Si el tomacorriente de la pared que usted planea
usar solamente tiene 2 tomas, es su
responsabilidad hacer que un tecnico Io
reemplace por uno de tres tomas con conexion
a tierra.
(_ Algunos modelos requieren 230/208
tomacorrientes de 115/120 voltios de
corriente alterna y 60 Hz conectados
a tierra, protegidos con un fusible de
dilatacion de tiempo de 15 amperios
o un cortacircuitos.
voltios, de corriente alterna, protegidos
por un fusible de dilatacion de tiempo
o un cortacircuitos. Estos modelos
deberfan instalarse en un ramal
exclusivo del circuito para un
rendimiento mas notable y para prevenir
sobrecargas en los circuitos de
cableados de su casa o apartamento,
Io cual podrfa representar un riesgo
de incendio por el sobrecalentamiento
de los alambres.
PRECAUCION:
Bajo ninguna circunstancia corte o remueva
la tercera pua (conexion a tierra) del cable
electrico.
No cambie el enchufe en el cable electrico
de este acondicionador de aire.
Los cables caseros de aluminio podrian
presentar problemas especiales. Consulte
a un tecnico electricista calificado.
El cable de alimentacion incluye un
dispositivo para interrupcion de corriente. Se
incluye un boton de prueba y de reinicio en el
dispositivo. El dispositivo debe ponerse a prueba
periodicamente: primero se presiona el boton de
TEST (prueba) y luego RESET (reinicio). Si el
boton TEST no se dispara o si el boton RESET
no queda enganchado, deje de utilizar el
acondicionador de aire y comunfquese
con un tecnico calificado.
8
Page 23

Instrucciones de instalacion
HERRAMIENTAS QUE NECESITARA
Un destornillador de estrella
PARTES INCLUlDAS
(Apariencia puede variar)
Riel de mo_
Acondicionador
de aire
\
Tijeras o cuchilla
esdPJ_an_i Panel de
Panel de
acordeon
izquierdo
Un destornillador
con hoja plana
Nivel
Lapiz
Una regla o cinta metrica
Sello de la banda
ntana
acordeon
derecho
/
Tipo A (6)
Tipo B (2)
Tipo C (5) Soporte de cierre
de la ventana (1)
9
Page 24

Instrucciones de instalacion
ITI REQUlSITOS PARA LA VENTANA
• Estas instrucciones son para una
ventana estandar de dos pliegues.
Usted necesitara modificar el proceso
para otros tipos de ventanas.
• El acondicionador de aire puede instalarse
sin los paneles de acordeon para ajustarse
a una ventana mas estrecha. Ver las
dimensiones de la abertura de la ventana.
• Todas las partes de apoyo deben quedar
totalmente aseguradas a algQn metal,
mamposterfa o a la madera.
• El tomacorriente electrico debe estar al alcance
del cable electrico del acondicionador de aire.
• Siga las dimensiones de la tabla y la
ilustracion segQn su modelo.
Nlodelos A B C
AET05, AEW05 13 1/4" min. 22"-38" 18 1/4" min.
AEW06, AEW08 14 1/2" min. 23"-38" 19" min.
[] REQUlSITOS DE UNA VENTANA
DE TORMENTAS
Un marco de ventana de tormentas no
permitira que el acondicionador de aire se
incline hacia el exterior y evitara que drene
apropiadamente. Para solucionar este problema,
adhiera un pedazo de madera a la repisa.
PIEZAS DE IVIADERA-
ANCHO: 2"
LONGITUD: Suficiente Iongitud para
ajustarse al interior del marco de la ventana.
ESPESOR: Para determinar el espesor,
coloque un pedazo de madera en la repisa
para hacerlo 1/2" mas alto que la parte
superior del marco de la ventana de tormentas.
Una firmemente con puntillas o tornillos
provistos por el instalador.
{
1/2" mas
alto que t
el marco
Marco de
ventana de
tormentas
,( B ),,
(con paneles de acordeon)
L.=-
A
I I
C
(sin paneles de acordeon)
[] PREPARE EL ACONDICIONADOR
DE AIRE
[_] Instale el riel de montaje superior con
2 tornillos tipo B desde la parte exterior
de la caja.
Riel de _
monta )
superior ]
Riel de
montaje
inferior
r_ Deslice los paneles de acordeon izquierdo
y derecho en los rieles de montaje
superior e inferior.
Superior derecha
Superior izquierda
10
Page 25

Instrucciones de instalaci6n
131 PREPARE EL ACONDICIONADOR
DE AIRE (cont.)
r_ Una los paneles de acordeon a la caja
usando 3 tornillos tipo A en cada lado.
Riel de montaje superior
Panel de
acordeon
Tornillos,
tipo A
POSTERIOR
Riel de montaje inferior
[] INSTALE EL ACONDICIONADOR
DE AIRE EN LA VENTANA
[_] Coloque el acondicionador de aire en
la repisa con el riel de montaje inferior
contra su extremo posterior. Centrelo y
cierre la ventana firmemente detras del riel
de montaje superior. Debe estar nivelado
o ligeramente inclinado hacia el exterior.
Use un nivel, una inclinacion de 1/3 de
burbuja sera la correcta hacia el exterior.
Tornillos tipo C
[_] Extienda los paneles de acorde6n izquierdo
y derecho hacia las bandas de la ventana
vertical y pegue, a traves de los huecos de
los paneles, con 4 tornillos tipo C segQn
corresponda.
[_] PREPARE LA VENTANA
Corte el sello de la banda de la ventana a
la Iongitud apropiada. Despegue la parte
posterior y pegue el sello a la parte inferior
de la banda de la ventana.
INSTALE UN SOPORTE DE ClERRE
Y LA JUNTA DE ESPUMA
SUPERIOR DE LA VENTANA
[_] Una el soporte de cierre con uno tornillo
tipo C.
[] Corte la junta de espuma superior de
la ventana al ancho de la ventana.
rc-] Rellene la espuma entre el vidrio y la
ventana para evitar que aire e insectos
se introduzcan en la habitacion.
11
Page 26

Solucionarproblemas.
Causasposibles Quehacer
Elacondicionador de aire El acondicionador de aire *Cerci6rese de que el acondicionador de aire estfi
noenciende estfidesconectado, enchufado totahnente en el tomacorfiente.
El fusible se dispar6 / *lnspeccione los fl/sibles / caja de interruptores de la casa
el cortacircuitos se dispar6, y reemplace cualquier filsible o reajuste el interruptor
Interrupci6n en el
suministro el6ctrico.
El dispositivo de interrupci6n "Presione el bot6n RESETubicado en el cable de alimentaci6n.
de corriente se ha activado. "Si el bot6n RfSfTno se manfiene en su lugm; no ufilice mils
Elacondicionadordeaire El flujode afireestfi restringido. "Cerci6rese de que no existe ninguna corfina, persiana o
noenfriacomodeberia mueble bloqueando el fl'ente del acondicionador de aire.
El control de temperamra no "En los modelos con teclado: En el modo Cool (Frio),presione la tecla
es_ ajustado apropiadamente. ReductionV.
El f'dtro de aim estit sucio. "Limpie el filtro cada 30 dfas pot lo menos. \_r la secci6n
La habitaci6n podria haber "Cuando el acondicionador de aire se enciende, usted
estado caliente, necesita darle fiempo pava que enffi( _la habitaci6n.
El afire frio se es_ escapando. "Cerci6rese de que los registros de la calefacci6n no estfin
Las bobinas de enfriamiento "\_r "Acondicionador de aire congelandose" mils adelan/e.
se cougelarou.
Elacondicionadordeaire
seestacongelando
Elcontrolremoto Las baterias est,fn insertadas "lnspeccione la posici6n de las ba/erfas. Deben estar
nofunciona incorrectamente, insertadas en la posici6n indicada, (+) y (-).
Hayaguagoteandoafuera Tiempo hfimedo y caliente. "Esto es normal.
El hielo bloquea d flujo
de aire hacia d acondicionador
de aire evitando que se enfrie
la habitaci6n.
Las baterias estfin agotadas. "Reemplace las baterfas.
Hayaguagoteandoenel El acondicionador de aire "Pare drenar el agua apropiadamente, cercforese de que
interiordela habitacion no estit indinado hacia afuera, el acondicionador de aire estfi inclinado ligeramente
•La unidad se reiniciavA autom_ficamente con la configuvaci6n
ufilizada i)or filfima xez luego de reestablecer la electricidad.
"Existe un rewaso de fiempo pot protecci6n (de aproximadamente
3 minums) para evimr la desconexi6n pot sobrecarga del compresor
Por esm vaz6n, es posible que la unidad no comience a enffiar &
forum nomM hasm wanscurridos 3 minums desde que xolvi6 a
elicellderse,
el acondicionador de aire y comunfquese con un t_Xcnicocalificado.
•En los modelos con botones, gire la tempevamra a un nfimero mayor
& Instrucciones de OperaciOn.
abiertos y se encuenwan retornando el aire fl'fo.
•Eta modelos con los botones de control, coloque el control
de modo en HighFan(VentiladorAlto)6 HighCool(FrioAlto)con
la tempevamva en 16 2.
•En los modelos con mclas de tuque, colo que los con/roles en
HighFan(VentiladorAlto)6 HighCool(FrioAlto)y ajuste el termosmm a
una temperature m_s alta.
desde el frente hacia aw_s.
Se acumulaaguaen La humedadremovida del aire "Esto es normal pot un corto perfodo en fireascon poca
la handeja y se drena hastala bandeja, humedad; normal pot un perfodo de tiempo milspostergado
en _reas mils hfimedas.
Sonidos de operacion normales
12
O.uiz_s escuche un sonido metfi_lico causado por
el agua tomada y firada contra el condensador
en los dfas lluviosos o cuando la humedad es aim.
Esm caracmrfsfica de disefio wuda a iemover
la lmmedad y mejora la eficiencia.
Quiais escuche que el ternlostato hace clic
cuando el compresor hace ciclo enue encendido
y apagado.
E1agua se acumula en la bandeja durante dfas
lluviosos o con mucha humedad. E1agua podria
derramarse y gotear desde el lado exmrno de
la unidad.
E1venfilador podria flmcionar aun si el compresor
no lo hace.
Page 27

Garantiade su acondicionadorde aire garantia limitada de una o.
Grapeaquf su recibo.
Se requiere facilitar prueba de la fecha de compra
original para hacer un reclamo degarantfa.
Nosotros reemplazaremos:
Unidadde reemplazo para cualquier producto que falle debido a defectos en los matefiales o en
A part#de la fecha
de la compra original
el proceso de fabricacidn. La tmidad de intercambio esui gamntizada para el resto del perfodo
de un afio de gamntfa original del producto.
Empaque su tmidad apropiadamente. Recomendamos
ttsar el cart6n original y los materiales de empaquetado.
Regrese el producto al local de ventas donde usted
1o compr6.
Instrucciones al cliente. El Manual del propietario
proporciona informaci6n acerca de las instrucciones de
operaci6n y de los controles del usuario.
Instalaci6n inapropiada. Si usted tiene tm problema
durante la instalaci6n, o si su acondicionador de aire no
tiene la capacidad de enfriamiento que usted necesita,
p6ngase en contacto con nuestro distribuidor o
instalador. Usted es responsable de proporcionar las
facilidades de conexi6n el6ctrica necesarias.
Fallo del producto resultante de modificaciones al
producto o debido a uso irrazonable incluyendo no
proporcionar mantenimiento razonable y necesario.
Incluya en el paquete tma copia del recibo de venta
u otra evidencia de la fecha original de la compra.
Adem_ imprima su nombre y direcci6n y tma
descripci6n del defecto.
Reemplazo de fusibles de la casa o reajuste del sistema
de circuitos.
Dafio al producto causado por voltaje inapropiado hacia
el equipo, accidentes, incendios, intmdaciones o actos
de la naturaleza de fuerza mayor.
Dafios incidentales o consecuenciales causados por
defectos posibles con este acondicionador de aire.
Esta garantfa so extiende al comprador original y cualquier comprador posterior de productos comprados para uso
residencial dentro de Estados Unidos.
Algunos estados no permiten la exclusiSn o las limitaciones de dafios incidentales o consecuenciales. Esta garantfa
da derechos legales especfficos, y usted podrfa tener otros derechos que variar#n de estado a estado. Para saber cu#les
son sus derechos legales, consulte a la oficina de asuntos del consumidor local o la oficina del Attomey General en
su Iocalidad.
Exclusion de garantias implicadas: Excepto donde est# prohibido o restringido por la ley, no hay garantfas,
expresas, orales o estatutarias que extiendan m#s all# de la descripci6n especffica, incluyendo especfficamente
las garantias implicadas de mercantibilidad o propiedad para un prop6sito particular.
Garante: General Electric Company.Louisville, KY 40225
13
Page 28

Servicioal consumidor.
P ginaWebdeGEAppliances
4Tiene alguna pregunta sobre su electrodom&sfico? iPruebe la pfigina _reb de GE Appliances 24 horas al
dfa, cualquier dfa del afio! Para mayor conveniencia y servicio mils r_pido, ya puede descargar los Manuales
de los Propiemiios, o incluso pedir piezas o cat_i_logos hacer una cim en lfnea. Tambi_n puede "Ask Our
Team of Experts'"" (Pregunmr a nuesuo equipo de expertos) sobre cualquier cuesfi6n y mucho m_s...
RealLifeDesignStudio(Estudiodedisefioparalavidarea/)
GE apoya el concepm de Disefio Universal--producms, servicios yambientes que pueden usar genre de
mdas las edades, mmafios ycapacidades. Reconocemos la necesidad de disefiar para una gmn gama de
habilidades y dificulmdes ffsicas y menmles. Para rods demUes cobre las aplicaciones de fie Disefio Universal,
incluyendo ideas de disefio para la cocina pare peisomts con discapacidades, mire nuesna p_gina Web boy
mismo. Pare personas con dificulmdes audidvas, favor de ll_unar al 800.TDD.GEAC (800.8,33.4322).
Piezasyaccesorios
Aquellos indMduos con la calificaci6n necesaria para repaint sus propios elecuodom_sticos pueden
pedir que se les manden las piezas o accesorios direcmmenm a sus hogares (acepmmos las m_jetas
VISA, MasterCard y Discover). Haga su pedido en lfnea boy, 24 horns cada dfa o llamar pot ml_fono
al 800.626.2002 dumnte hor_ts normales de oficina.
Lasinstruccionesdescritasen estemanualcubrenlosprocedimientosa seguirporcualquierusuario.GEnoesta
noapoyaqueseleproporcioneningunservicioal acondicionadorde aire. Vehementementerecomendamosque
ustednointenteproporcionarservicioalacondicionadordeaire ustedmismo.
ge.com
ge.com
ge.com
P6ngaseencontactoconnosotros
Si no estfi satisfecho con el servicio que recibe de GE, p6ngase en conmcm con nosouos en nuesua pfigina
Web indicando mdos los demlles asf como su n6mero de ml_fono o escrfl)anos a:
General Manage_, Customer Relations
GE Appliances, Appliance Park
I,ouisville, KY40225
ge.com
14 Impreso on China
 Loading...