

GE AEL14 Series, AEL18 Series, AEP12 Series, AEP14 Series Owner's Manual And Installation Instructions
Page 1
0_
GEAppliances.com
Safety Instructions ............. 2,3
Operoting Instructions
Controls ........................... 4-6
Care and Cleaning
Air Filter .............................. 6
Outdoor Coils ......................... 6
Installation Instructions ...... 7-tB
Troubleshooting Tips ............ 14
Normal Operating Sounds ............ 14
Consumer Support
Consumer Support .......... Back Cover
Warranty ............................ 15
AEL14*
AEL18*
Climatiseur
La section fronqoise commence 5 Io page 17
Acondicionador
.I..!
0_
-0
®
*ENERGY STAR ® labeled product
I
ENERGYSTAR
As an ENERGYSTAR®partner, GEhas
determined that this product meets
the ENERGYSTAR®guidelines for
energy efficiency.
Write the model and serial numbers here:
Model #
deaire
La secci6n en espaflol empieza en la p6gina 33
Serial #
Find these numbers on a label on the side of
the air conditioner.
49-7722 09-13 GE
Page 2
IMPORTANT SAFETY INFORMATION.
READ ALL INSTRUCTIONS BEFORE USING.
ik WARNING!
Foryour safety, the information in this manual must be followed to minimize the risk of fire, electric
shock or personal injury.
SAFETYPRECAUTIONS
Use this appliance only for its intended
purpose as described in this Owner's
Hanual.
This air conditioner must be properly
installed in accordance with the Installation
Instructions before it is used.
Never unplug your air conditioner by pulling
on the power cord. Always grip plug firmly
and pull straight out from the receptacle.
Replace immediately all electric service
cords that have become frayed or otherwise
damaged. A damaged power supply cord
must be replaced with a new power supply
cord obtained from the manufacturer and
not repaired. Do not use a cord that shows
cracks or abrasion damage along its length
or at either the plug or connector end.
Turn the unit OFFand unplug your air
conditioner before cleaning.
GEdoes not support any servicing of the
air conditioner. We strongly recommend
that you do not attempt to service the air
conditioner yourself.
For your safety...do not store or use
combustible materials, gasoline or other
flammable vapors or liquids in the vicinity
of this or any other appliance.
All air conditioners contain refrigerants,
which under federal law must be removed
prior to product disposal. Ifyou are getting
rid of an old product with refrigerants, check
with the company handling disposal about
what to do.
If the receptacle does not match the plug,
the receptacle must be changed out by a
qualified electrician.
These R410A air conditioning systems
require contractors and technicians to
use tools, equipment and safety standards
approved for use with this refrigerant.
DO NOT use equipment certified for
R22 refrigerant only.
HOW TO CONNECT ELECTRICITY
Do not, under any circumstances, cut or remove
the third (ground) prong from the power cord.
For personal safety, this appliance must be
properly grounded.
DO NOT use an adapter plug with this appliance.
The power cord of this appliance is equipped
with a 3-prong (grounding) plug which mates
with a standard 3-prong (grounding) wall outlet
to minimize the possibility of electric
shock hazard from this appliance.
Power cord includes a current interrupter device.
A test and reset button is provided on the plug
case. The device should be tested on a periodic
basis by first pressing the TEST button and
then the RESETbutton while plugged into the
outlet. If the TESTbutton does not trip or if the
RESETbutton will not stay engaged, discontinue
use of the air conditioner and contact a qualified
service technician.
2
Have the wall outlet and circuit checked by
a qualified electrician to make sure the outlet
is properly grounded.
Where a 2-prong wall outlet is encountered,
it is your personal responsibility and obligation to
have it replaced with a properly grounded
3-prong wall outlet.
The air conditioner should always be plugged
into its own individual electrical outlet which has
a voltage rating that matches the rating plate.
This provides the best performance and also
prevents overloading house wiring circuits which
could cause a fire hazard from overheated wires.
See the Installation Instructions, Electrical
Requirements section for specific electrical
connection requirements.
Page 3

GEAppliances.com
A WARNING!
USEOF EXTENSION CORDS
RISK OF FIRE. Could cause serious injury or
death.
,, DO NOT use an extension cord with this
Window Air Conditioner.
,, DO NOT use surge protectors or multi-outlet
adaptors with this Window Air Conditioner.
READAND FOLLOWTHISSAFETYINFORMATIONCAREFULLY.
SAVETHESEINSTRUCTIONS
Page 4
About the controls on the air conditioner.
Features and appearance will vary.
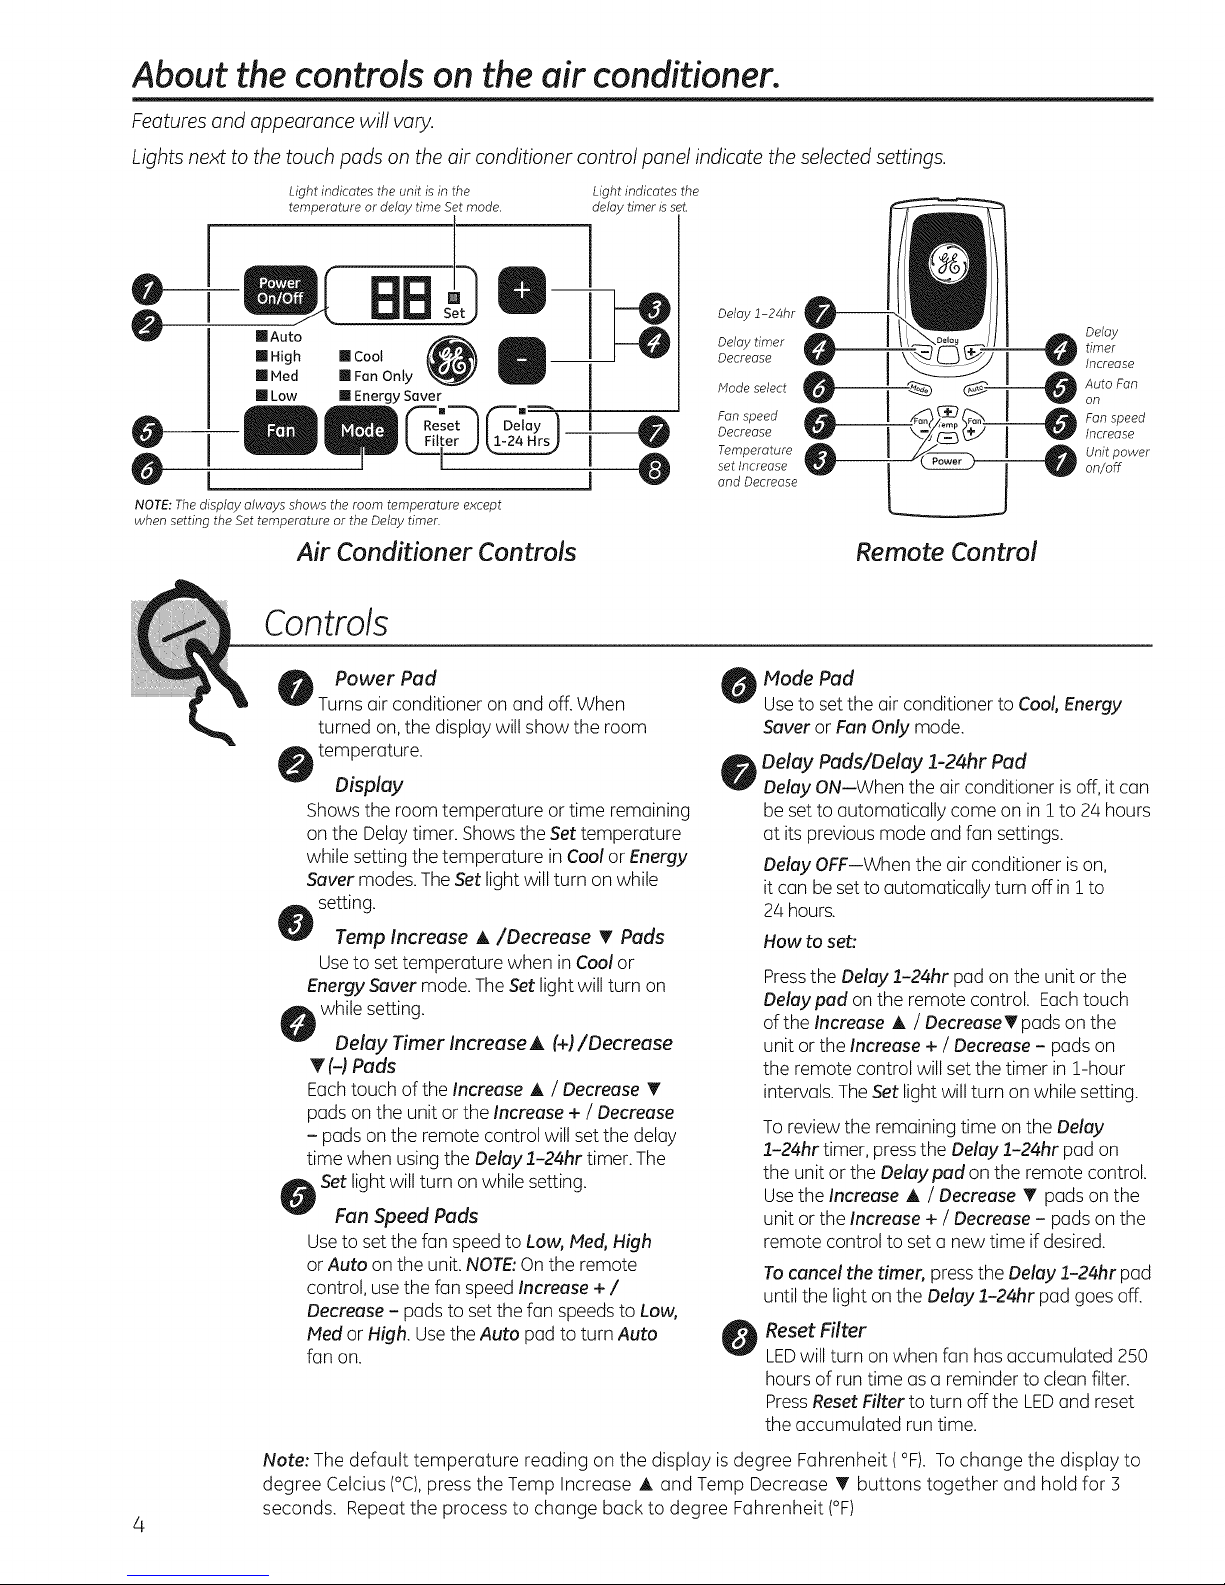
Lights next to the touch pads on the air conditioner control panel indicate the selected settings.
Light indicates the unit is in the
temperature or delay time Set mode.
Dght indicates the
delay timer s set.
0
[] High [] Cool
•Auto @O
[] Med [] Fan Only
[] Low [] Energy Saver
0 0
NOTE: The display always shows the room temperature except
when setting the Set temperature or the Delay timer.
Air Conditioner Controls
Controls
Power Pad
Turnsair conditioner on and off.When
turned on, the displaywill show the room
temperature.
Display
Shows the room temperature ortime remaining
on the Delaytimer. Showsthe Set temperature
while setting the temperature in Coolor Energy
Saver modes.TheSet light will turn on while
setting.
Temp Increase A/Decrease T Pads
Useto set temperature when in Coolor
Energy Saver mode. TheSet lightwill turn on
while setting.
Delay Timer Increase A (+)/Decrease
(-) Pads
Eachtouch of the Increase A / Decrease T
pads onthe unit or the Increase + / Decrease
- pads onthe remote control will setthe delay
time when using the Delay 1-24hr timer.The
Setlight will turn on while setting.
FanSpeedPads
Useto set the fan speedto Law, Meal,High
or Auto onthe unit.NOTE:Onthe remote
control, usethe fan speed Increase + /
Decrease - pads to setthe fan speedsto Low,
Med or High. Usethe Auto pad to turn Auto
fan on.
Delay
--@timer
J----_ Auto Fan
_jjOFon speed
_ nit power
Increase
on
Increase
on/off
Remote Control
Mode Pad
Useto set the air conditioner to Coo/,Energy
Saver orFan Only mode.
Delay Pads/Delay 1-24hr Pad
Delay ON--When the air conditioner isoff, it can
be set to automatically come on in ! to 24 hours
at its previousmode and fan settings.
Delay OFF--When the air conditioner is on,
it can be setto automatically turn off in ! to
24 hours.
How to set:
Pressthe Delay 1-24hr pad on the unit orthe
Delaypad onthe remote control. Eachtouch
of the Increase A / DecreaseT pads onthe
unit or the Increase + / Decrease - pads on
the remote control will set the timer in 1-hour
intervals.TheSet light will turn on while setting.
Toreview the remaining time onthe Delay
1-24hr timer, pressthe Delay 1-24hr pad on
the unit or the Delaypad onthe remote control.
Usethe Increase A / Decrease _' pads onthe
unit or the Increase + / Decrease - pads on the
remote control to seta new time if desired.
To cancel the timer, pressthe Delay 1-24hr pad
until the light onthe Delay :L-24hrpad goesoff.
Reset Filter
LEDwill turn on when fan has accumulated 250
hours of run time as a reminder to clean filter.
PressResetFilter to turn off the LEDand reset
the accumulated run time.
Note: The default temperature reading on the display isdegree Fahrenheit (°F). Tochange the display to
degree Celcius (°C),press the Temp Increase A and Temp Decrease T buttons together and hold for 3
4
seconds. Repeat the process to change back to degree Fahrenheit (°F)
Page 5
Do Not Operatein FreezingOutdoor Conditions
Thiscool-only air conditioner was not designed for
freezing outdoor conditions. Itmust not be used in
freezing outdoor conditions.
Remote Control
GEAppliances.com
, Toensure proper operation,aim the remote
control at the signal receiveron the air
conditioner.
, ivlakesure nothing isbetween the air conditioner
and the remote control that could block the
signal.
Cool Mode
Usethe Cool mode at Low, Meal,High or Auto Fan
Speedfor cooling. Usethe Temperature Increase A
/ Decrease • padsto set the desiredtemperature
between 64% and 86°F in I°F increments.
An electronicthermostat isusedto maintain the room
temperature. Thecompressorwill cycleon
and off to keepthe room at the setlevelof comfort.
Setthe thermostat at u lower number and the indoor
air will becomecooler.Setthe thermostat at uhigher
number and the indoor airwill become warmer.
NOTE:Ifthe air conditioner isoff and is then turnedon
while setto a Cool setting orif turned from a fan
setting to a Coolsetting,it may takeapproximately
5 minutes for thecompressor to start and coolingto
begin.
, Theremote control signal has u rangeof
up to 20feet.
, Makesure batteries are fresh and installed
correctly us indicated onthe remote control.
, Remotecontains u magnet allowing it to attach
to metal surfaces.
Cooling Descriptions
For Normal Cooling-Select the Cool mode and
High or Med fan with a middle settemperature.
For Maximum Cooling-Select the Cool mode
and High fan with a lower settemperature.
For Quieter and Nighttime Cooling-Select the
Cool mode and Low fun with a middle set
temperature.
Energy Saver Mode
This mode optimizes the cooling power of your air
conditioner, thereby saving you energy. Once the
set point temperature has been reached, the fan
will cycle off to save energy.Thefan will cycle back
on periodically to insure all cooling capacity in the
system isused.This mode isthe default mode for the
unit. Eachtime the unit is powered off, it will restart
in Energy Saver mode ON.This includes Delay timer
mode. Thefirst time the unit isturned on, the settings
will be 70° and Low fan. Youcan adjust the fan
speed and temperature to your personal comfort.
Fan Only Mode
Usethe Fan Only Modeat Low, Medor Highfan
speedto provide air circulation and filtering without
cooling. Sincefan-only settingsdo not provide
cooling, a Set temperature cannot be entered.The
room temperature will appear in the display.
Auto Fan Speed
Setto Auto fan speedfor the fan speedto
automatically set to the speedneeded to provide
optimum comfort settings with the set temperature.
If the room needsmore cooling,the fan speed
Energy Saver ON--Helps minimize electricity use.
It is normal for the fan to cycle off and then back
on in this mode. This on/off cycle can repeat
multiple times. Because the fan will cycle off, you
may notice a variation in room temperature and
humidity.
Energy Saver OFF--Whenthis mode is not engaged,
the fan will run continuously, and in Cool mode the
compressor will cycle on and off to maintain room
temperature.
NOTE:Auto FanSpeedcannot beusedwhen inthe
Fan Only Mode.
will automatically increase.If the room needs less
cooling, the fan speedwill automatically decrease.
NOTE:Auto FanSpeedcannot be used when inthe
Fan Only Mode.
Power Outage Recovery Feature
Inthe case of a power outage or interruption, the
unit will automatically restart in the settings last
used after the power isrestored. Ifthe Delay 1-24hr
feature was set,it will resumecountdown. You may
need to seta new time if desired.
Page 6
About the controls onthe air conditioner
Additional important information.
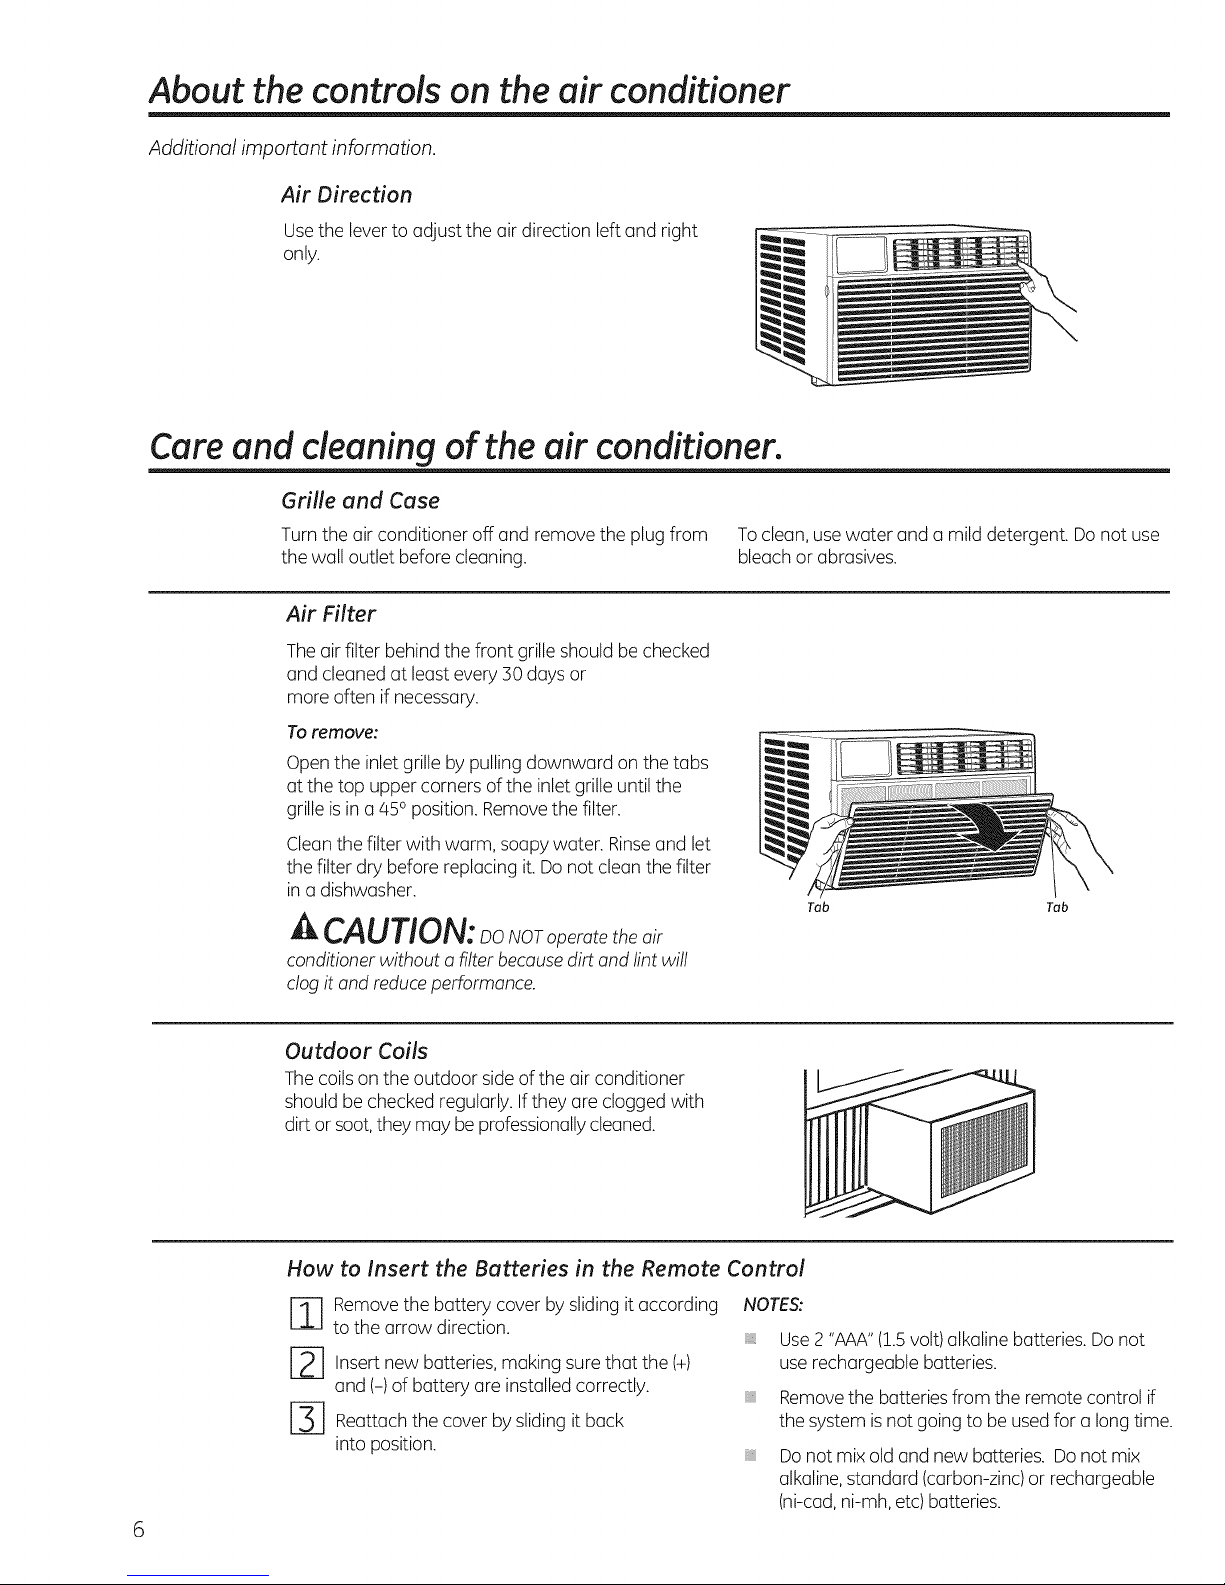
Air Direction
Usethe leverto adjust the air direction left and right
only.
Care and cleaning of the air conditioner.
Grille and Case
Turn the air conditioner off and remove the plug from To clean, usewater and a mild detergent. Do not use
the wall outlet before cleaning, bleachor abrasives.
Air Filter
Theair filter behind the front grille should be checked
and cleaned at least every 30days or
more often if necessary.
To remove:
Open the inlet grilleby pulling downward on the tabs
at the top uppercorners ofthe inlet grille until the
grille is ina 450position. Removethe filter.
Cleanthe filter with warm, soapywater. Rinseand let
the filter dry before replacing it.Do not cleanthe filter
in a dishwasher.
A CAUTION:DoNoroneratetheair
conditioner without a filter because dirt and lint will
clog it and reduce performance.
Tab Tab
Outdoor Coils
Thecoils onthe outdoor side of the air conditioner
should bechecked regularly. Ifthey are clogged with
dirt orsoot, they may beprofessionallycleaned.
How to Insert the Batteries in the Remote Control
-] emove the battery coverby sliding it according
to the arrow direction.
[2-2-] Insertnew batteries, making sure that the (+)
and (-) of battery are installed correctly.
[-3] Reuttuchthe cover by slidingit back
into position.
6
NOTES:
, Use2"AAA"(1.5volt) alkaline batteries. Do not
use rechargeable batteries.
, Removethe batteriesfrom the remote control if
the system isnot goingto be usedfor along time.
, Donot mixold and new batteries. Donot mix
alkaline,standard (carbon-zinc)or rechargeable
(ni-cad,ni-mh, etc) batteries.
Page 7
stall ti
I
I
structi
Air Conditio r
ns
BEFORE YOU BEGIN
Read these instructions completely
and carefully.
. IMPORTANT - Savetheseinstructions
forlocalinspector'suse
.IMPORTANT -Observeallgoverning
codes and ordinances
, Note to Installer- Be sure to leave these
instructions with the Consumer.
, Note to Consumer - Keep these instructions for
future reference.
. Skill level - Installation of this appliance requires
basic mechanical skills.
. Completion time - Approximately Z hour
. We recommend that two people install
this product.
, Proper installation is the responsibility
of the installer.
Product failure due to improper installation is not
covered under the Warranty.
You MUST use all supplied parts and use proper
installation procedures as described in these
instructions when installing this air conditioner.
ACAUTION:
Do not, under any circumstances, cut or remove
the third (ground) prong from the power cord.
Do not change the plug on the power cord
of this air conditioner.
Aluminum house wiring may present special
problems-consult o qualified electrician.
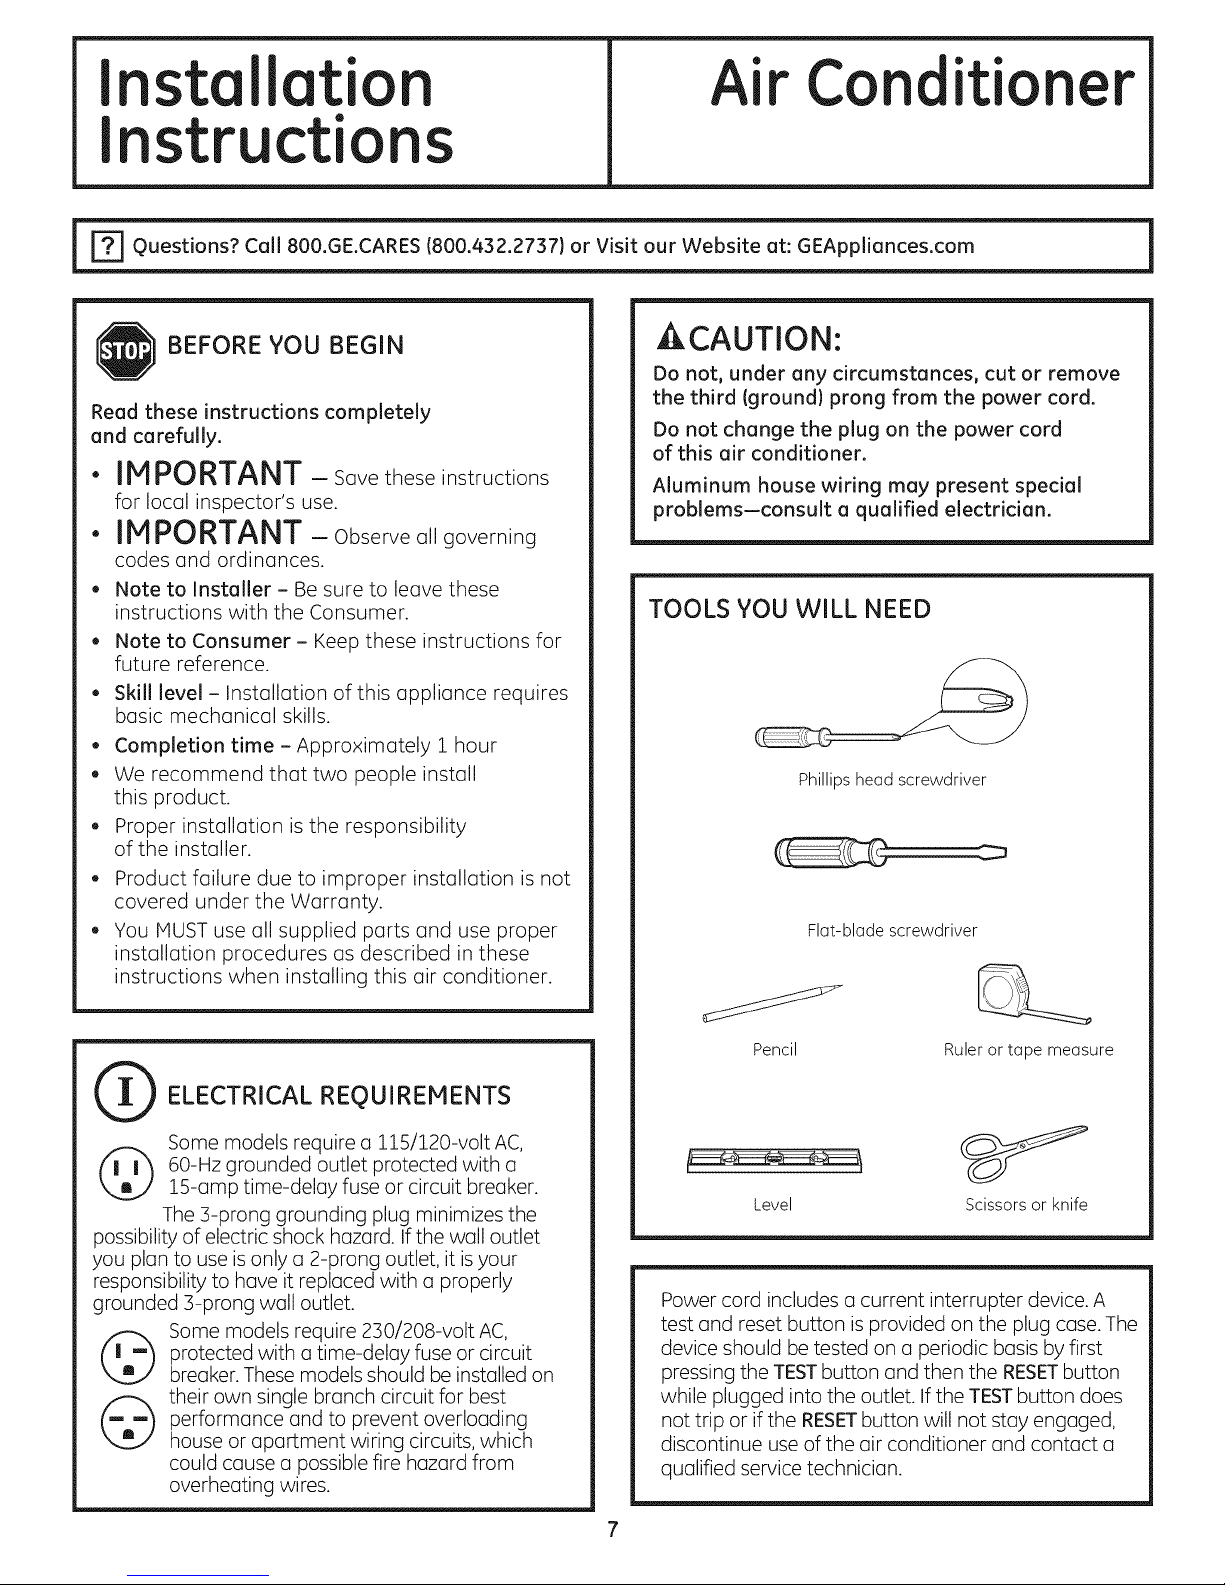
TOOLS YOU WILL NEED
Phillips head screwdriver
Flat-blade screwdriver
ELECTRICAL REQUIREMENTS
Some models require a 115/120-volt AC,
60-Hz grounded outlet protected with a
1B-amp time-delay fuse or circuit breaker.
The 3-prong grounding plug minimizes the
possibility of electric shock hazard. If the wall outlet
you plan to use is only a 2-prong outlet, it is your
responsibility to have it replaced with a properly
grounded 3-prong wall outlet.
Some models require 230/208-volt AC,
©
@
protected with a time-delay fuse or circuit
breaker. These models should be installed on
their own single branch circuit for best
performance and to prevent overloading
house or apartment wiring circuits, which
could cause a possible fire hazard from
overheating wires.
Pencil
Level Scissorsor knife
Power cord includes a current interrupter device. A
test and reset button is provided on the plug case. The
device should be tested on a periodic basis by first
pressing the TESTbutton and then the RESETbutton
while plugged into the outlet. If the TESTbutton does
not trip or if the RESETbutton will not stay engaged,
discontinue use of the air conditioner and contact a
qualified service technician.
Ruler or tape measure
Page 8

Installation Instructions
PARTS INCLUDED
(Appearance may vary) Top rail gasket (1)
Window
Foam top window /
gasket (1) _/
mounting ____ panel _ accordion
sash seal
Side rail(2)
Window
V-supports (2)
Sill angle
bracket (2)
locking bracket
(2)
@
Type A Type C
screws (10) screws (4) Type Ebolt with
Type B
screws (2)
nut (4)
Type Fbolt with
nut (2)
Page 9
Installation Instructions
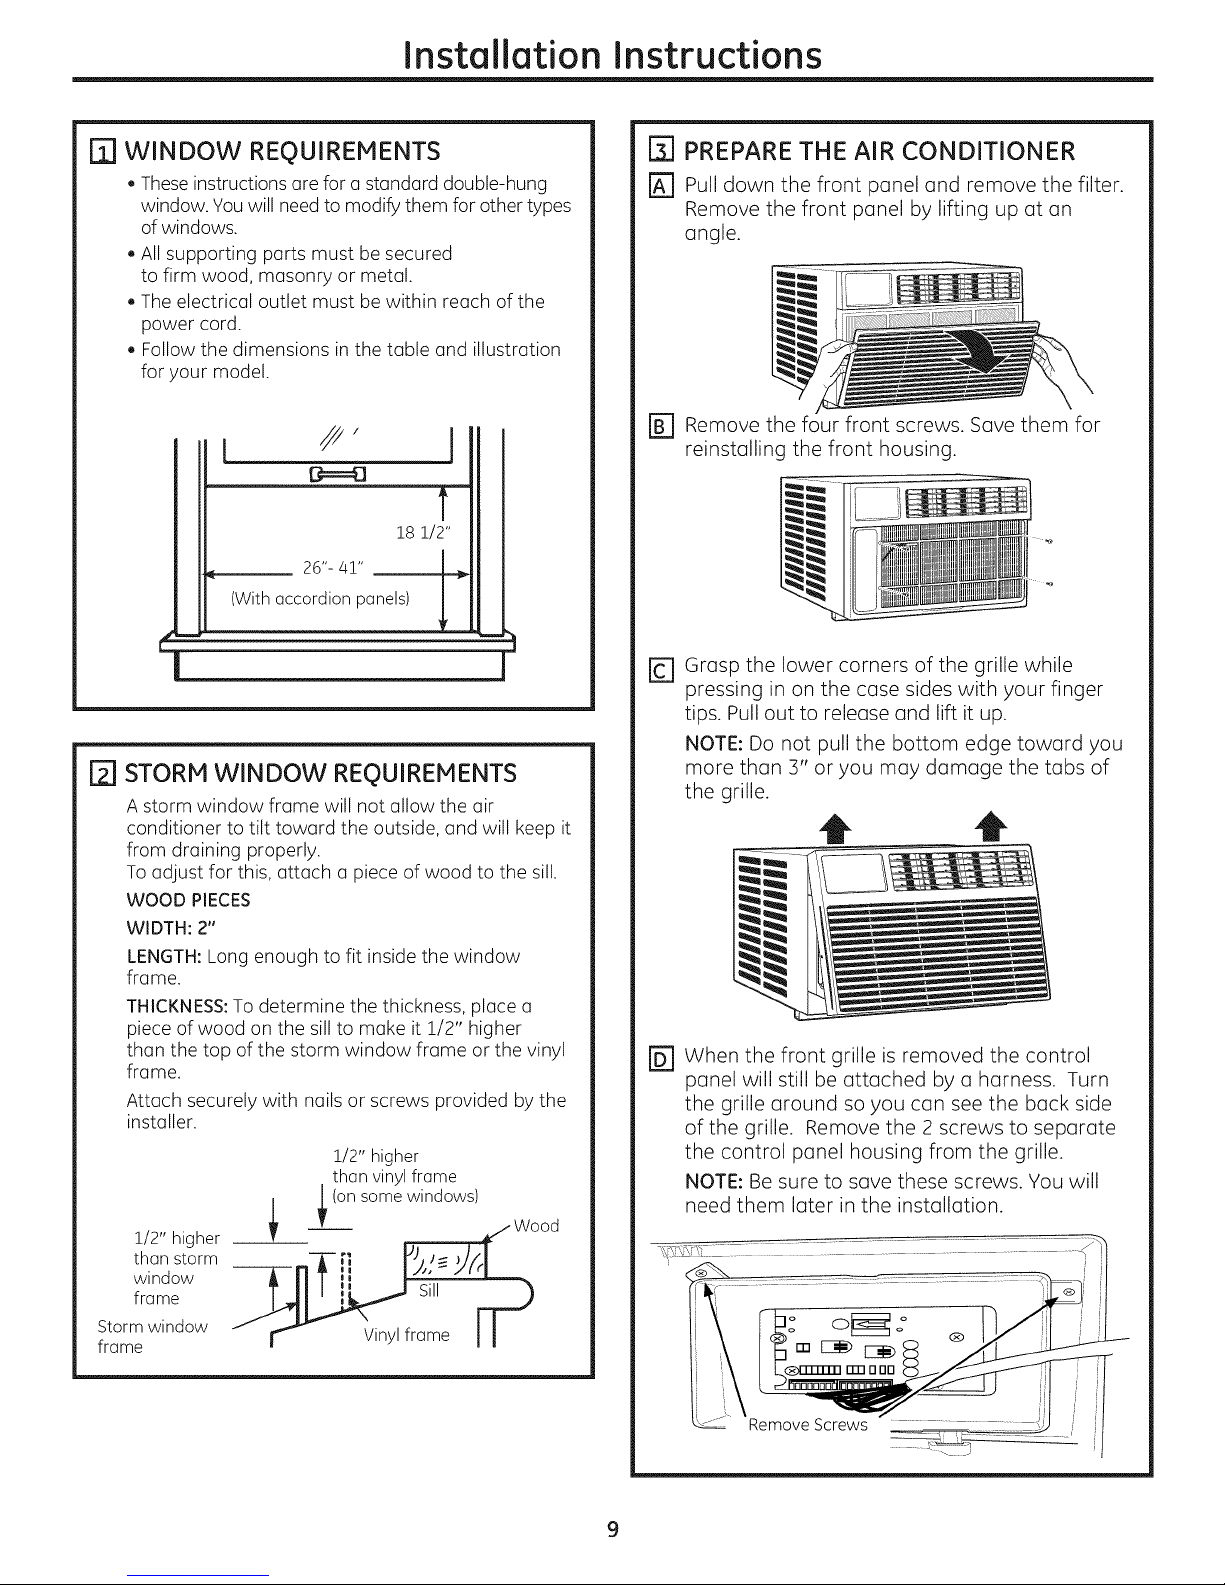
r_ WINDOW REOUIREMENTS
, Theseinstructions ore for o standard double-hung
window. You will need to modify them for other types
of windows.
, All supporting parts must be secured
to firm wood, masonry or metal.
. The electrical outlet must be within reach of the
power cord.
. Follow the dimensions in the table and illustration
for your model.
I
!8 !/2"
26"-41" __
(With accordion panels)
[Z] STORM WINDOW REQUIREMENTS
A storm window frame will not allow the air
conditioner to tilt toward the outside, and will keep it
from draining properly.
To adjust for this, attach (] piece of wood to the sill.
WOOD PIECES
WIDTH: 2"
LENGTH:Long enough to fit inside the window
frame.
THICKNESS: To determine the thickness, place a
piece of wood on the sill to make it 1/2" higher
than the top of the storm window frame or the vinyl
frame.
Attach securely with nails or screws provided by the
installer.
1/2" higher
than vinylframe
[_ PREPARE THE AIR CONDITIONER
[_ Pull clown the front panel and remove the filter.
Remove the front panel by lifting up at an
angle.
[] Remove the four front screws. Save them for
reinstalling the front housing.
rc1 Grasp the lower corners of the grille while
pressing in on the case sides with your finger
tips. Pull out to release and lift it up.
NOTE: Do not pull the bottom edge toward you
more than 3" or you may damage the tabs of
the grille.
t t
rD1 When the front grille is removed the control
panel will still be attached by a harness. Turn
the grille around so you can see the back side
of the grille. Remove the 2 screws to separate
the control panel housing from the grille.
NOTE: Be sure to save these screws. You will
need them later in the installation.
1/2" higher
than storm
window
frame
Storm window
frame
_ (onsomewindows
Page 10
Installation Instructions
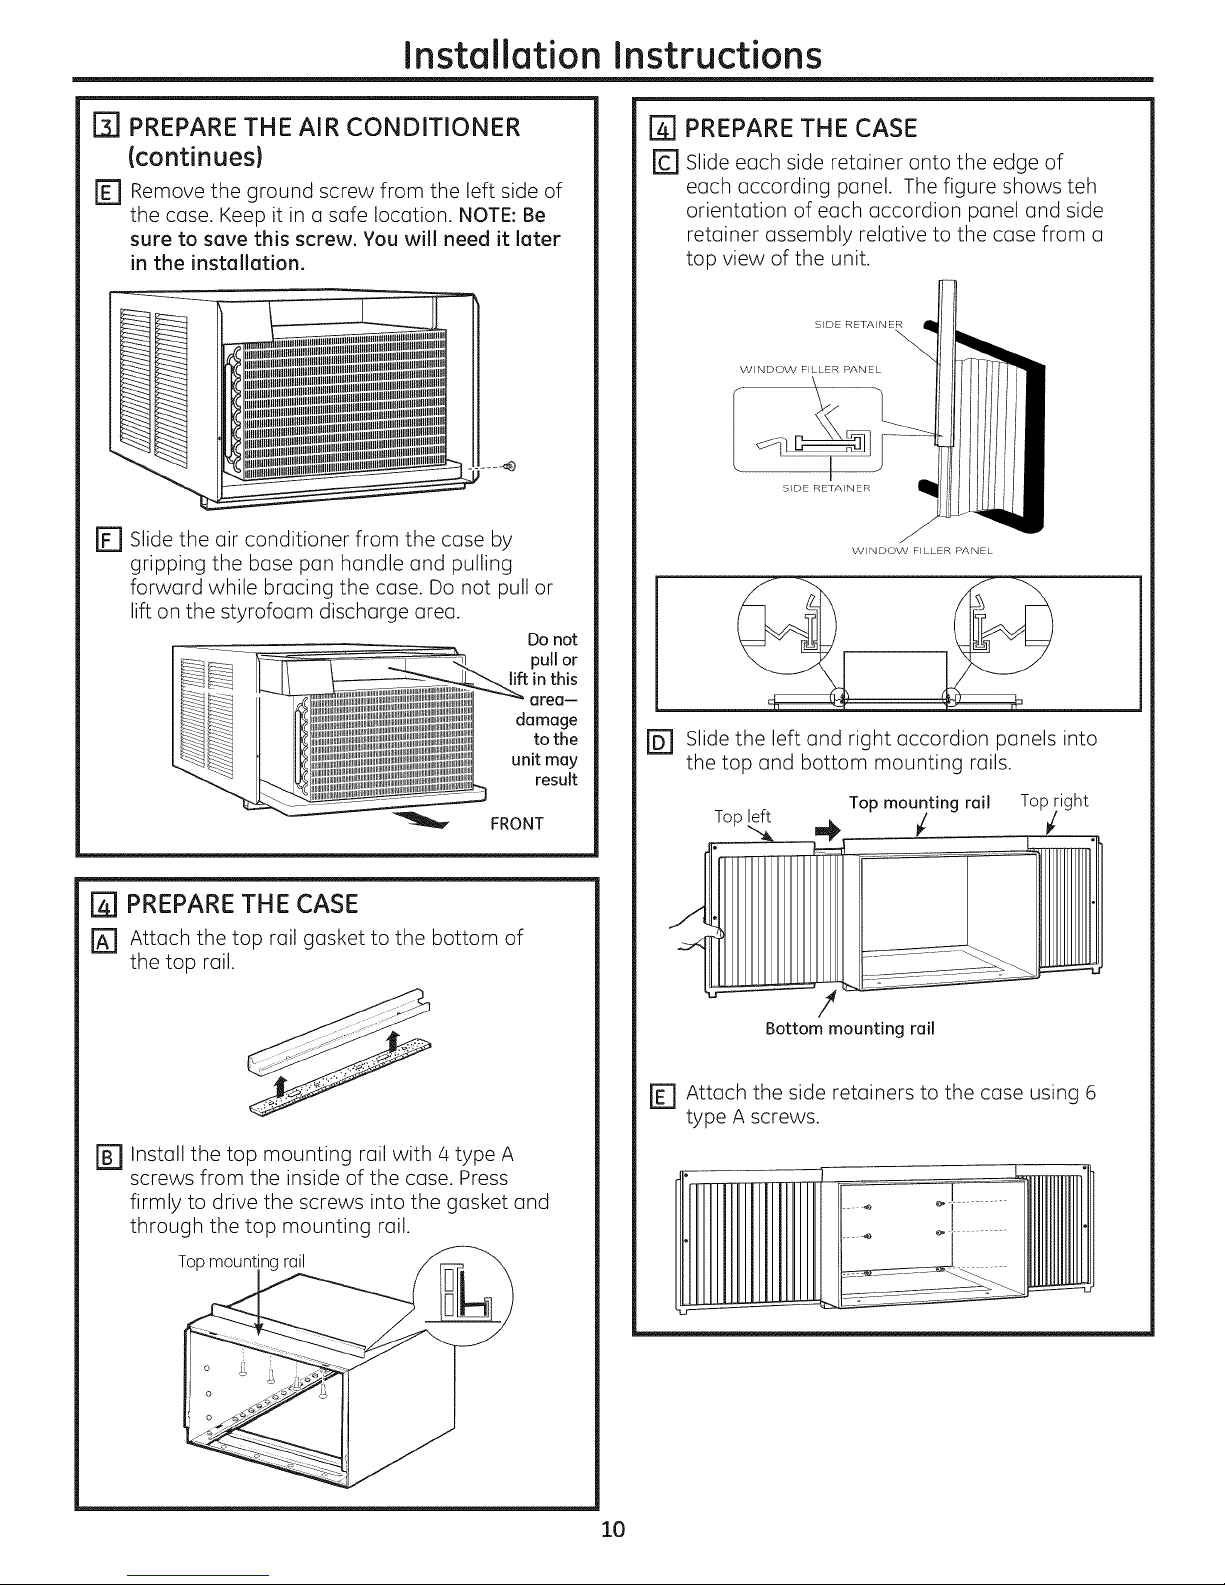
FB]PREPARE THE AIR CONDITIONER
(continues)
IT] Remove the ground screw from the left side of
the case. Keep it in a safe location. NOTE: Be
sure to save this screw, You will need it later
in the installation.
r_ Slide the air conditioner from the case by
gripping the base pan handle and pulling
forward while bracing the case. Do not pull or
lift on the styrofoam discharge area.
Do not
pull or
lift in this
[_[] PREPARE THE CASE
r_ Slide each side retainer onto the edge of
each according panel. The figure shows teh
orientation of each accordion panel and side
retainer assembly relative to the case from a
top view of the unit.
SIDE RETAINER
FRONT
F41PREPARE THE CASE
r_ Attach the top rail gasket to the bottom of
the top rail.
r_ Install the top mounting rail with 4 type A
screws from the inside of the case. Press
firmly to drive the screws into the gasket and
through the top mounting rail.
Topmount rail
damage
to the
unit may
result
Slide the left and right accordion panels into
@
the top and bottom mounting rails.
Top left
Top mounting rail Top right
/
Bottom mounting rail
r_ Attach the side retainers to the case using 6
type A screws.
10
Page 11
Installation Instructions
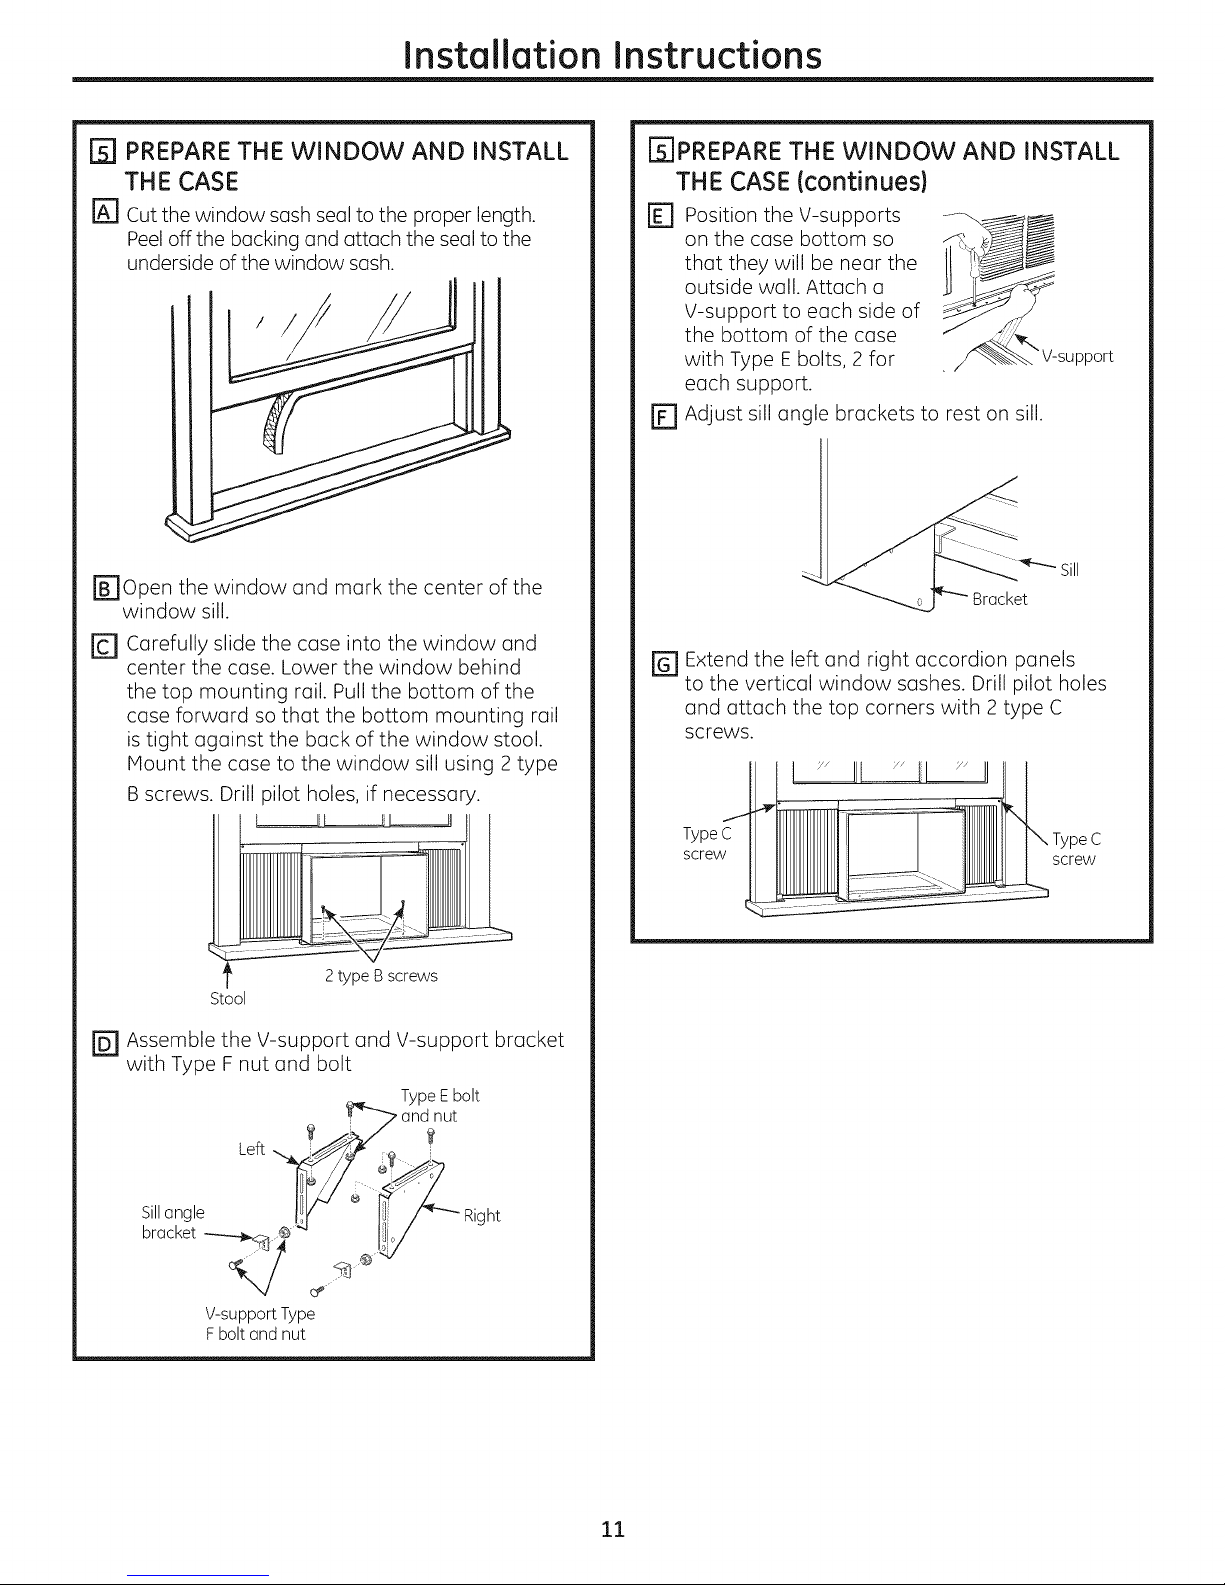
[_1 PREPARE THE WINDOW AND INSTALL
THE CASE
r_ cut the window sash seal to the proper length.
Peel off the backing and attach the seal to the
underside of the window sash.
r_Open the window and mark the center of the
window sill.
rc1 carefully slide the case into the window and
center the case. Lower the window behind
the top mounting rail. Pull the bottom of the
case forward so that the bottom mounting rail
is tight against the back of the window stool.
Haunt the case to the window sill using 2 type
B screws. Drill pilot holes, if necessary.
[_[]PREPARE THE WINDOW AND INSTALL
THE CASE (continues)
r_ Position the V-supports J_.
on the case bottom so m'
that they will be near the II
outside wall. Attach a
V-support to each side of
the bottom of the case
with Type E bolts, 2 for ipport
each support.
[] Adjust sill angle brackets to rest on sill.
r_ Extend the left and right accordion panels
to the vertical window sashes. Drill pilot holes
and attach the top corners with 2 type C
screws.
Stool
rD1 Assemble the V-support and V-support bracket
with Type F nut and bolt
Type Ebolt
and nut
Left
Sillangle
bracket _1_
V-support Type
Fbolt and nut
Mht
TypeC
screw
c
screw
11
Page 12
Installation Instructions
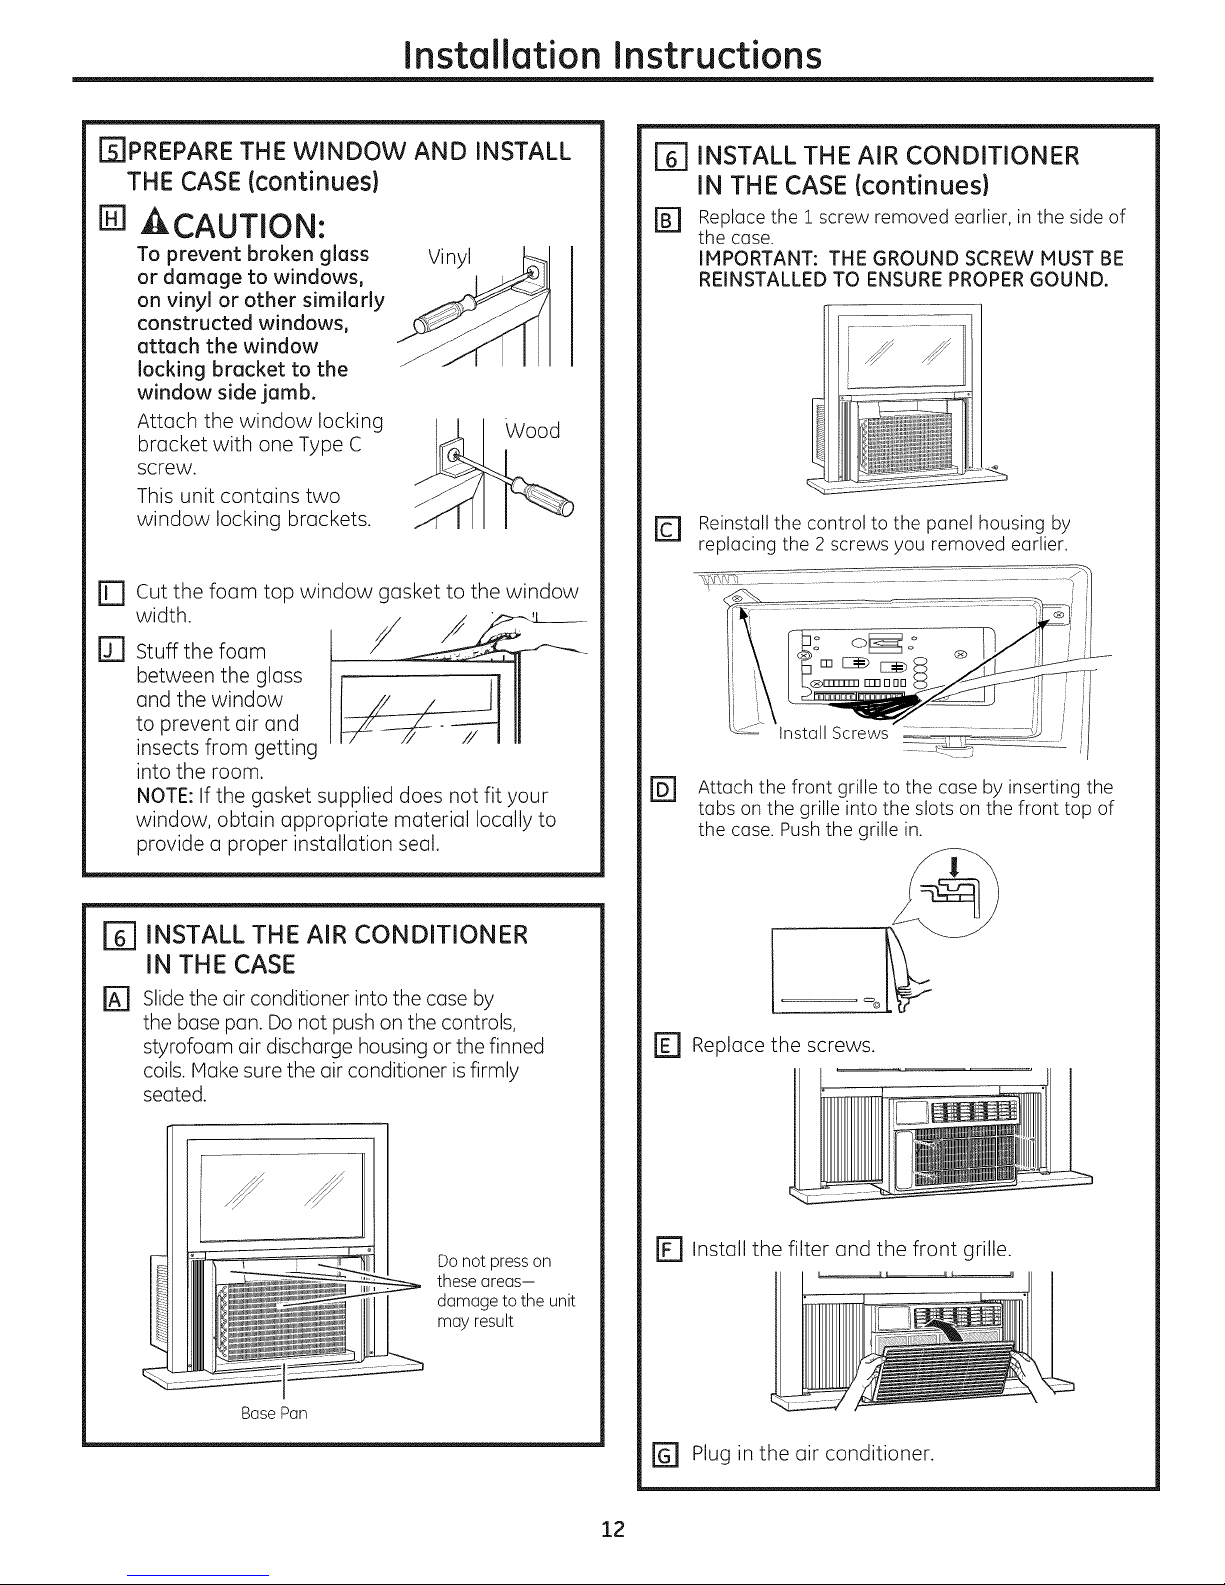
[_]PREPARE THE WINDOW AND INSTALL
THE CASE lcontinues}
B]
ACAUTION:
To prevent broken glass
or damage to windows,
on vinyl or other similarly
constructed windows,
attach the window
locking bracket to the
window side jamb.
Attach the window locking
bracket with one Type C
screw.
This unit contains two
window locking brackets.
[[-1 Cut the foam top window gasket to the window
width.
rJ-] stuff the foam
between the glass
and thewindow
topreventairand
insectsfrom getting
intothe room.
NOTE: If the gasket supplied does not fit your
window, obtain appropriate material locally to
provide a proper installation seal.
Vinyl
Wood
[_ INSTALL THE AIR CONDITIONER
IN THE CASE (continues)
r_ Replace the 1 screw removed earlier, in the side of
the case.
IMPORTANT: THE GROUND SCREW MUST BE
REINSTALLED TO ENSURE PROPER GOUND.
r_ Reinstall the control to the panel housing by
replacing the 2 screws you removed earlier,
Install Screws
r_ Attach the front grille to the case by inserting the
tabs on the grille into the slots on the front top of
the case. Pushthe grille in.
INSTALL THE AIR CONDITIONER
IN THE CASE
% Slide the air conditioner into the case by
the base pan. Do not push on the controls,
styrofoam air discharge housing or the finned
coils. Make sure the air conditioner isfirmly
seated.
Do not presson
these areas-
damage to the unit
may result
Bose Pon
r_ Replace the screws.
r_ Install the filter and the front grille.
[] Plug in the air conditioner.
12
Page 13
Through-the-Wall Installation Instructions-Optional
The case may be installed through-the-wall in
both existing and new construction.
Read completely, then follow step-by-step.
NOTE: Obtain all materials locally for mounting
the air conditioner through-the-wall.
FTJIMPORTANT
Through-the-wall installation is not appropriate
if any of the side or top louvers in the case will
be obstructed by the wall.
All side and top louvers in the case must project
on the outdoor side of the wall.
The room side of the case must project
into the room far enough to maximize the
balance of the unit.
The case must be installed level from side-to-
side and with a slight tilt from front to rear. Use
a level; no more than a 1/2 bubble will be the
correct case slant to the outside.
Lintel angle is required to support bricks or
blocks above opening.
Flashing is required and should extend the
length of the opening to ensure no inside cavity
leakage occurs.
Remove the air conditioner from the case.
E]
For specific instruction, refer to the Window
Installation Instructions.
@
Make certain that a wall receptacle is
available close to the hole location or make
arrant ements to install a receptacle.
I]] IMPORTANT (cont.)
r_ Secure with 14 wood screws anchored at least an
inch into the wall support structure.
NOTE: Drill pilot holes, if necessary, for proper
installation. If the frame is oversized, use shims to
prevent case distortion.
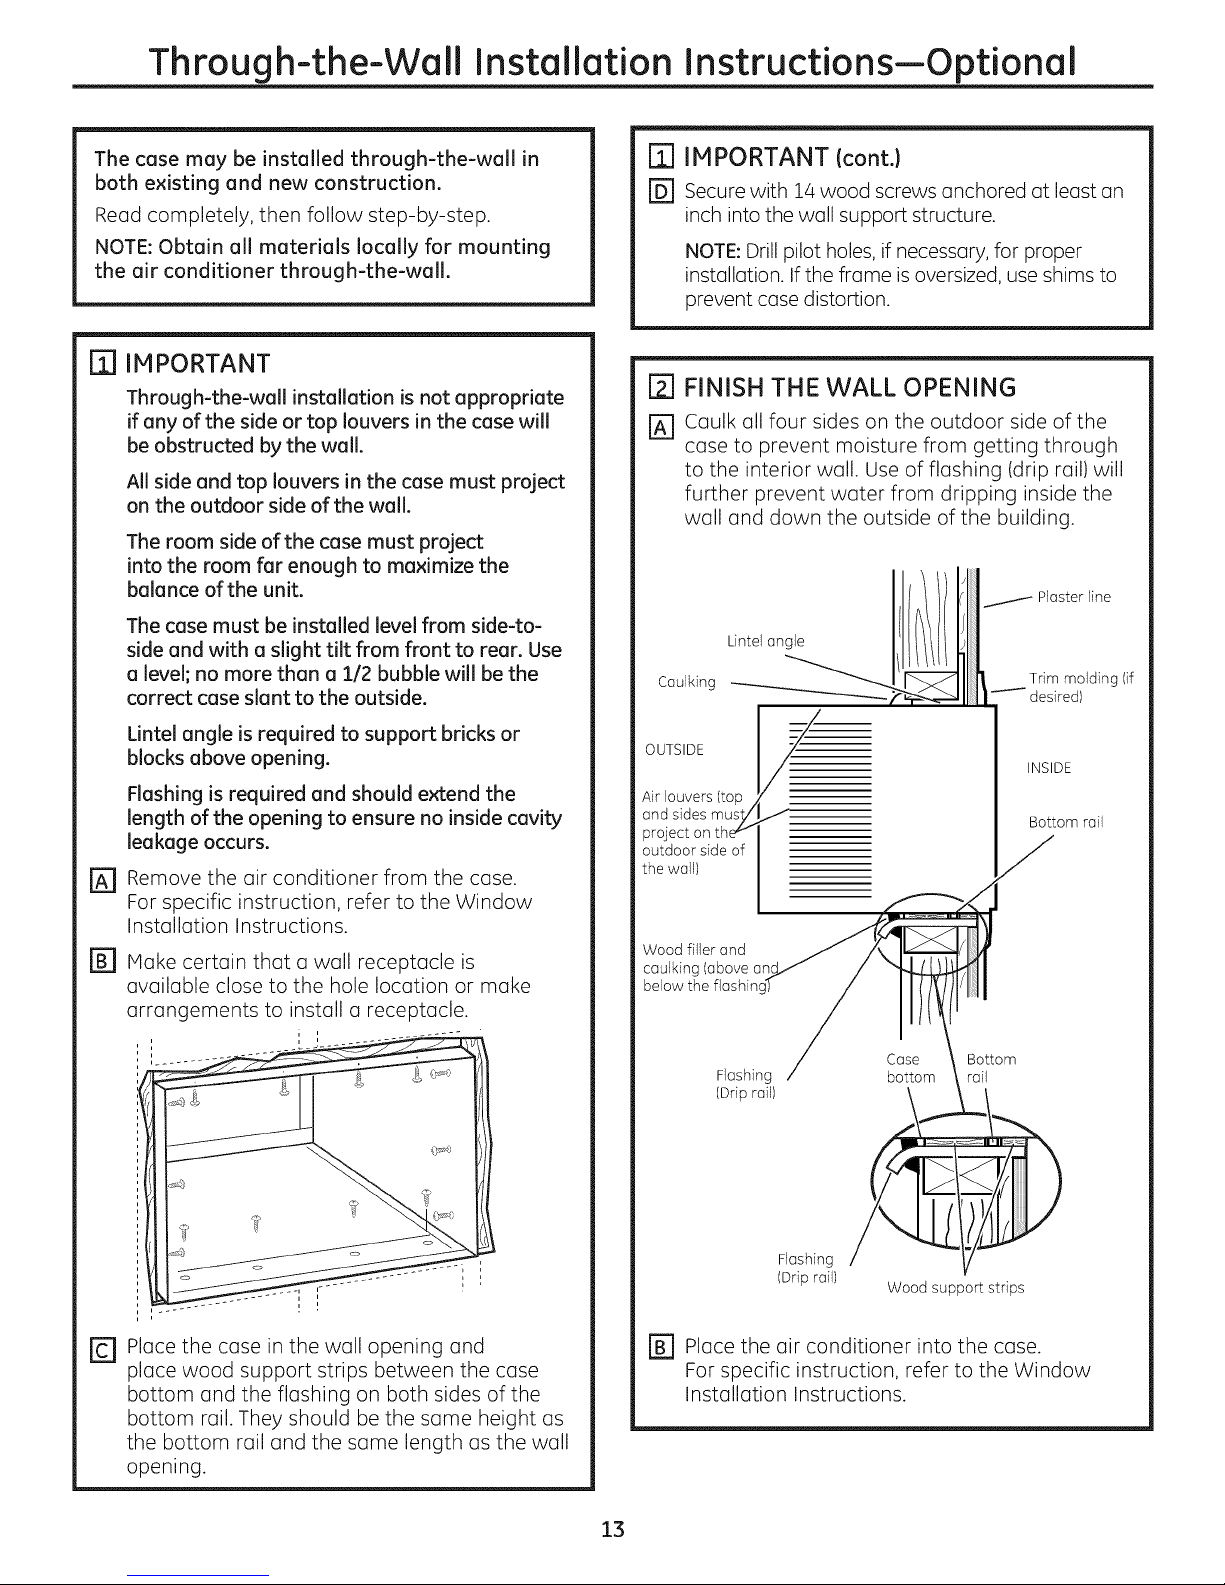
ITI FINISH THE WALL OPENING
r_ Caulk all four sides on the outdoor side of the
case to prevent moisture from getting through
to the interior wall. Use of flashing (drip rail) will
further prevent water from dripping inside the
wall and down the outside of the building.
Plaster line
Lintel angle
Caulking Trim molding (if
OUTSIDE
Air louvers (top j
and sides must/
projecton thev
outdoor side of
the wall)
Wood filler and
caulking (above an
below the flashinc
desired)
INSIDE
Bottom rail
J
rc1 place the case in the wall opening and
place wood support strips between the case
bottom and the flashing on both sides of the
bottom rail. They should be the same height as
the bottom rail and the same length as the wall
opening.
Flashing
(Drip rail)
Flashing
(Drip rail)
Wood support strips
[] Place the air conditioner into the case.
For specific instruction, refer to the Window
Installation Instructions.
13
Bottom
rail
Page 14
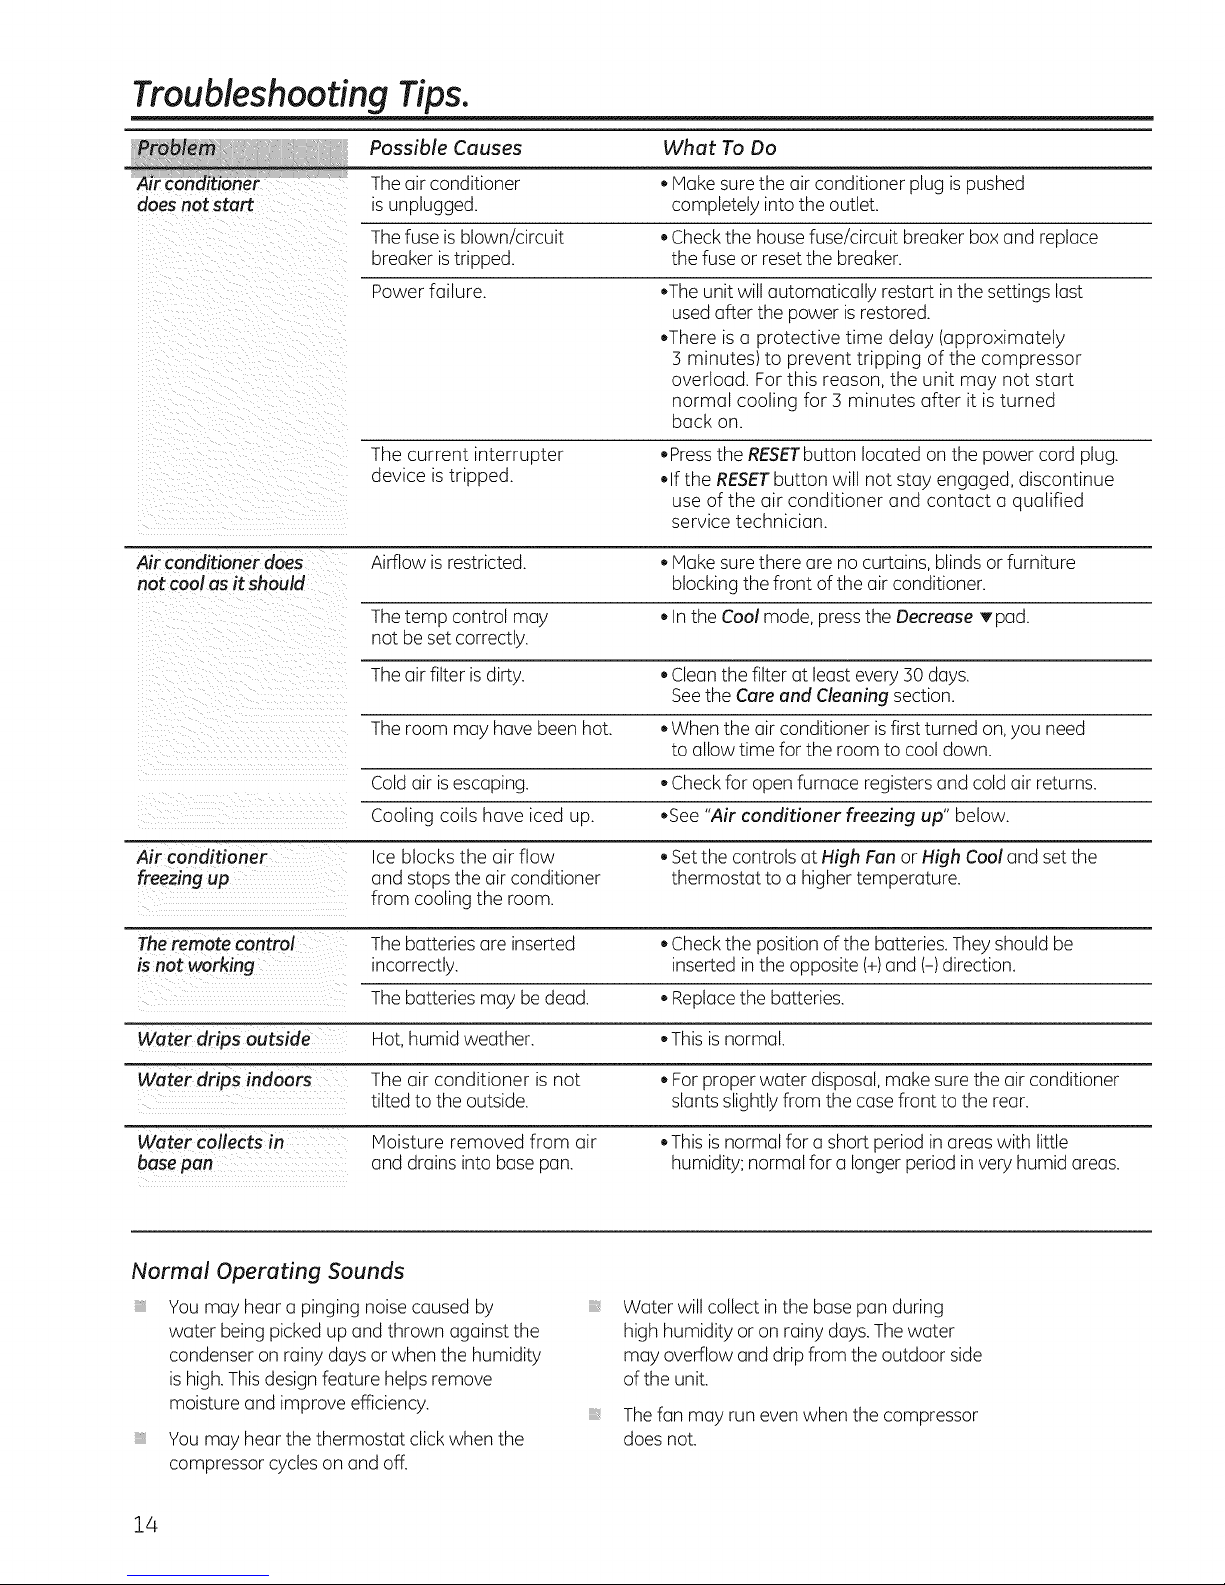
Troubleshooting Tips.
Possible Causes What To Do
Theair conditioner • Hake surethe air conditioner plug ispushed
does not start isunplugged, completely into the outlet.
Thefuse is blown/circuit •Checkthe house fuse/circuit breaker box and replace
breaker istripped, the fuse or resetthe breaker.
Power failure. ,The unit will automatically restart in the settings last
usedafter the power is restored.
•There is a protective time delay (approximately
3 minutes) to prevent tripping of the compressor
overload. For this reason, the unit may not start
normal cooling for 3 minutes after it is turned
back on.
The current interrupter ,Press the RESETbutton located on the power cord plug.
device istripped. ,If the RESETbutton will not stay engaged, discontinue
use of the air conditioner and contact aqualified
service technician.
Air conditioner does Airflow isrestricted. • Hake surethere are no curtains,blindsor furniture
not cool as it should blocking the front of theair conditioner.
Thetemp control may • Inthe Cool mode,press the Decrease Tpad.
not beset correctly.
Theair filter is dirty. • Clean the filter at least every30 days.
Seethe Care and Cleaning section.
Theroom may have been hot. • When the air conditioner isfirst turned on,you need
to allow time for the room to cool down.
Coldair is escaping. •Checkfor open furnace registers and cold air returns.
Cooling coils have iced up. ,See "Air conditioner freezing up" below.
Air conditioner Ice blocks the air flow , Setthe controls at High Fan orHigh Cool and set the
freezing up and stops the air conditioner thermostat to a higher temperature.
from cooling the room.
Theremote control Thebatteries are inserted •Checkthe position of the batteries.They should be
isnot working incorrectly, inserted in the opposite (+)and (-) direction.
Thebatteries may be dead. • Replacethe batteries.
Water drips outside Hot,humid weather. •This is normal.
Water drips indoors The air conditioner is not • For proper water disposal, make surethe airconditioner
tilted to the outside, slants slightly from the case front to the rear.
Water collects in Hoisture removed from air ,This is normal for a short period in areas with little
basepan and drains into basepan. humidity; normal for a longer period invery humid areas.
Normal Operating Sounds
You may hear a pinging noisecaused by
water being picked up and thrown against the
condenser on rainy daysor when the humidity
is high.Thisdesign feature helps remove
moisture and improve efficiency.
You may hear thethermostat click when the
compressor cycles on and off.
Water will collect inthe base pan during
high humidity or onrainy days.Thewater
may overflow and dripfrom the outdoor side
of the unit.
iiiiiiiiiiii_i_
Thefan may run even when the compressor
does not.
14
Page 15
GE Air Conditioner--One-Year Limited Warranty.
All warranty service provided by our Factory Service Centers,
or an authorized Customer Care® technician. To schedule service,
visit us on-line at ge.com, or call 800.GE.CARES (800.432.2737).
Have serial number and model number available when calling
for service.
GE Will Replace:
One Year
From the date Ofthe
0rigina! purChoSe
Servicetrips to your home to teach you how to
usethe product.
, Improper installation, delivery or maintenance. If you
have an installation problem, or if the air conditioner
isof improper cooling capacity for the intended use,
contact your dealer or installer. You are responsible
for providing adequate electrical connecting facilities.
Failure of the product resulting from modifications to
the product or due to unreasonable use including failure
to provide reasonable and necessary maintenance.
In commercial locations, labor necessary to move the
unit to a location where it is accessible for service
by an individual technician.
Any part of the air conditioner which fails due to u defect in materials or workmanship.
During this limited one-year warranty, GEwillalso provide, free of charge, all labor and related
service to replace the defective part.
Stapleyour receipt here.
Proof of the original purchase
date is needed to obtain service
under the warranty.
Replacement of house fuses or resetting of circuit
breakers.
, Failure due to corrosion on models not corrosion-
protected.
, Damage to the product caused by improper power
supply voltage, accident, fire, floods or acts of God.
, Incidental or consequential damage caused by possible
defects with this air conditioner.
Damage caused after delivery.
EXCLUSION OF IMPLIED WARRANTIES--Your sole and exclusive remedy is product repair as provided in
this Limited Warranty. Any implied warranties, including the implied warranties of merchantability or
fitness for a particular purpose, are limited to one year or the shortest period allowed by law.
This warranty is extended to the original purchaser and any succeeding owner for products purchased for
home use within the USA.If the product is located in an area where service by a GEAuthorized Servicer is
not available, you may be responsible for a trip charge or you may be required to bring the product to an
Authorized GEService location for service. In Alaska, the warranty excludes the cost of shipping or service calls
to your home.
Some states do not allow the exclusion or limitation of incidental or consequential damages. This warranty
gives you specific legal rights, and you may also have other rights which vary from state to state. To know
what your legal rights are, consult your local or state consumer affairs office or your state's Attorney General.
Warrantor: General Electric Company. Louisville, KY 40225
15
Page 16

Notes.
16
Page 17

Consignes de s6curit6 ............. 18-19
Consignes d'utilisation
Commandes .......................... 20-22
Entretien et nettoyage
Filtre & air ................................ 22
Serpentins ext#rieurs ..................... 22
Instructions de montage .......... 23-29
Conseils de d_pannoge .............. 30
Bruits normaux de fonctionnement ........ 30
Assistance _ le clientele
Assistance 5 la client61e ................... 32
Garantie .................................. 31
AEL14*
AEL18*
* Produits homologu#s ENERGYSTAR®
ENERGYSTAR
Ent(]nt que p(]rten(]ire d'ENERGYSTAR®,GE(]
d#termin# que ce produit #tait conforme (]ux
exigences d'effic(]cit# #nerg#tique d'ENERGY
STAR®.
Inscrivez ici les num6ros de module et de s6rie :
Num6ro de module :
Num6ro de S6rie :
Vous trouverez ces num6ros sur I'#tiquette
(]ppos#e sur le c6t# du clim(]tiseur.
17
Page 18

J J
IMPORTANTES CONSIGNES DE SECURITE.
VEUILLEZ LIRE TOUTES LES CONSIGNES AVANT UTILISATION.
AAVERTISSEMENT!
Pour votre s6curit6, les informations contenues dons ce manuel doivent @re suivies afin de minimiser
les risques d'incendie, de chocs 61ectriques ou de blessures corporelles.
CONSIGNES DE SECURITE
N'utilisez cet appareil qu'aux fins pr6vues
d6crites dans le manuel d'utilisation.
Ce climatiseur doit @trecorrectement
install6 conform6ment aux Instructions
d'lnstallation avant route utilisation.
Ne d6branchezjamais votre climatiseur en
tirant sur le cordon d'alimentation. Prenez
toujours fermement la fiche en main et tirez
pour la sortir de la prise.
Remplacez imm6diatement tout cordon
61ectrique us6 ou endommag& Un
cordon d'alimentation endommag6 doit
@re remplac6 par un nouveau cordon
d'alimentation obtenu du fabricant. Ne
r6parez pas le cordon endommag& N'utilisez
pas un cordon fissur6 ou pr6sentant des
dommages dus aux frottements soit sur
sa Iongueur ou aux extr6mit6s du c6t6
de la fiche ou du raccord.
Eteignez votre climatiseur et d6branchez-le
avant de le nettoyer.
GE n'offre pas de service d'entretien pour les
climatiseurs. Nous vous recommandons de
ne pas essayer d'effectuer I'entretien
de votre climatiseur vous-m_me.
Pour votre s6curit6, ne stockez pas et
n'utilisez pas de mat6riaux combustibles,
d'essence ou d'autres vapeurs et liquides
inflammables dans les parages de cet
appareil ou de tout autre appareil.
Tousles climatiseurs contiennent des
fluides frigorig_nes qui, conform6ment, 6 la
16gislation f6d6rale doivent 6tre retir6s avant
la mise au rebut de I'appareil. Sivous mettez
au rebus un ancien appareil contenant des
fluides frigorig6nes, v6rifiez la proc6dure 6
suivre aupr6s de la compagnie responsable
de 1'61imination.
Sila prise de courant est d'un format
diff@ent de la fiche, cette prise doit @tre
chang6e par un 61ectricien qualifi6.
Ces syst6mes de climatisation R410A
n6cessitent que les entrepreneurs et
techniciens adoptent des outils, du mat@iel
et des normes de s6curit6 approuv6s pour
utilisation avec ce r6frig@ant. N'utilisez pas
de mat@iel certifi6 pour le r6frig@ant R22
uniquement.
18
BRANCHEfVlENTS4LLECTRIQUES
Ne coupez pas ou n'enlevez pas, sous aucun
pr@exte, la troisi_me broche de mise 6 la terre
du cordon d'alimentation. Pour des raisons de
s6curit6, cet appareil doit @re correctement mis
6 la terre.
N'utilisez PAS d'adaptateur avec cet appareiL
Le cordon d'alimentation de cet appareil est
6quip6 d'une fiche 6 trois broches (pour une
mise 6 la terre) qui s'adapte 6 la prise de courant
standard 6 3 broches (pour une mise 6 la terre)
pour minimiser les risques de chocs 61ectriques
par cet appareil.
Le cordon d'alimentation est 6quip6 d'un
dispositif d'interruption du courant. Un bouton
d'essai et de r6enclenchement est fourni
sur le boTtierde la prise. Vous devez tester le
m6canisme r6guli@ement en appuyant d'abord
sur le bouton TEST(essai) puis sur le bouton
RESET(r6enclenchement)Iorsque I'appareil est
branch& Si le bouton TEST(essai) ne bascule
pas ou si le bouton RESET(r6enclenchement)
ne reste pas enclench6, cessez d'utiliser votre
climatiseur et appelez un technicien de service
qualifi6.
Faites v@ifier la prise murale et le circuit
61ectrique par un 61ectricien qualifi6 pour
s'assurer que le syst6me est correctement
mis 6 la terre.
Dons le cos d'une prise biphas6e,
I'installateur a la responsabilit6 et I'obligation
de la remplacer par une prise triphas6e
correctement mise 6 la terre.
Le climatiseur doit toujours 6tre branch6
6 sa propre prise 61ectrique d'une tension
nominale correspondant 6 celle indiqu6e
sur sa plaque signal@ique.
Ceci permet d'obtenir un meilleur rendement
du climatiseur et 6vite de surcharger les circuits
61ectriques du domicile qui risque d'occasionner
un incendie en surchauffant.
Consultez les Consignes d'lnstallations, dons
la section E×igences Electriques pour les
exigences de branchements 61ectriques
particuliers.
Page 19

www. GEAppliance s.cam
AAVERTISSEMENT!
UTILISATION DE RALLONGES
RISQUED'INCENDIE. Peut occasionner des
blessures graves ou la mort.
, NE PASutiliser de rallonge avec ce climatiseur.
, NE PASutiliser de parasurtenseur ou
d'adaptateur _ prises multiples avec ce
climatiseur.
s s
LISEZETSUIVEZSOIGNEUSEMENTCESCONSIGNESDESECURITE.
CONSERVEZ CES INSTRUCTIONS
19
Page 20

A propos des commandes du climatiseur.
LesfonctionsetI'aspectpeuventvarlet.
Lest_moinslumineux8c6tddestouches8effleurementsurletableaudecommandesdudimotiseurindiquentlesr_glagess@ctionnds.
Le t_moin indique que I'opporeil
est en mode Progrommotion de
/otemperature ou du d_loi. |
Le t_moin lumineux indique qua
Io minuterie est progromm@.
O [] Auto
[] High
[] Heal
[] Low
[] Cool
[] Fan Only I
[] Energy Saver
H
E
O l
NOTE : L'dcron offiche toujours la temperature de la ps_ce souf lorsque vous progrommez
Jotemperature ou Jominutene.
Commandes du Climatiseur
Commandes
Touche d'alimentation
Het leclimatiseuren positiondemarche
ou d'arr_t.L'_cranaffichela temp@ature
de la pieceIorsqueI'appareilestmis enmarche.
Affichage
Affichela temperaturede la pieceoule temps
restantavant lamiseen marcheou I'arr@tde
I'appareil.Affichelatemp@atureder_glageIors
de la programmationdela temperature pour les
modesCool(refroidissemengou EnergySaver
(economied'energie).Let6moin lumineuxSet
(programm6)s'allumeIorsdu r6glage.
Touches TempIncrease (Augmentation
temperature) A /Decrease (R6duction
de la temp6raturelT Sontutilis@espour
programmerlatemp@aturedanslesmodesCool
ou EnergySaver.Let@moinlumineuxSet s'allume
Iorsdu r@glage.
Touches Delay Timer Increase (Augmentation du
d6lailA (+l/ Decrease (Diminution du d6lail T (d
Chaque fois que vous effleurez les touches
Increase A / Decrease_rsur I'appareilou
lestouches Increase+ / Decrease- de la
t616commande,vous programmezladur6e
du d6laiIorsde I'utilisationde la minuterieDelay
1-24hr(d6laide 1-2/4h).Let6moin lumineuxSet
s'allumeIorsdu glage.
Touches devitesse du ventilateur
Sontutilis@spour r_glerlavitessedu ventilateur
de I'appareilsur Low(faible),Ned(moyenne),
High (elev_e)ouAuto (automatique).RENARQUE:
Surlat_l_commande,utilisezlestouches Increase
+/Decrease - pourr6glerlavitessedu ventilateur
surLow,Ned, ouHigh. Utilisezla toucheAuto
pour allumerleventilateuren modeAuto.
Remarque : La lecture de temp6rature par d6faut s'affiche en degr6 Fahrenheit (°F).Pourmodifier
I'affichage en degr6 Celcius (°C),appuyez simultan6ment sur les boutons d'augmentation _ou
20
d'abaissement Tde la temp6rature et maintenez-les enfonc6s pendant 3 secondes. R6p6tez la m6thode
pour effectuer un retour 5 I'affichage des degr6s Fahrenheit (°F).
Augmentation
du dalai
tarehe
automatiquedu
ventilateur
Augmentationde la
wrassedu ventilateur
Nise enmarche
de I'appareilON/OFF
(marche/arr_t)
T 16commande
Touche Node
Estutilis@pourprogrammer leclimatiseursur
lesmodesCool, EnergySaverou FanOnly
(ventilateuruniquement).
Touches deO_lai/ O_laide I _ 24heures
Delay ON(d6laideraiseenmarche)-Lorsque
leclimatiseurest _teint,il peut_tre programm6
pour d@marrerautomatiquementdans un d@lai
de 1 @2/4heures_ sesr6glagespr6c@dents(mode,
vitessedu ventilateur).
Delay OFF(d_laid'arr_t)-Lorsque leclimatiseur
est enfonctionnement,il peut_treprogramm6
pour s'arr6terautomatiquement dans un d61aide
1_ 2/4heures.
Comment leprogrammer:
AppuyezsurlatoucheDelay1-24hr(D6laide 1
2/4heures)deI'appareilou Delaypad (Touchesde
D@lai)delat_l_commande.Chaquelois quevous
effleurezlestouchesIncrease •/Decrease Tsur
I'appareilou lestouchesIncrease+/Decrease
- de lat@l@commande,vousprogrammezla
dur@edu d@laipar intervalledei heure.Let@moin
lumineuxSets'allumeIorsdu r_glage.
Pourconna_treletempsrestantsurlaminuterie
Delay1-24hr,appuyezsurlatoucheDelay1-24hr
deI'appareilouDeleypad (Touchesde D@lai)de
lat_l_commande.UtilisezlestouchesIncreaseA
/Decrease_ sur I'appareiloulestouches
Increase+/ Decrease- de lat616commandepour
programmer un nouveaud6laisin6cessaire.
Pourannular la minuterie, appuyezsurlatouche
Delay1-24hrjusqu'@cequa levoyant lumineux
surla toucheDelay 1-24hrs'6teigne.
R_initialisation du Filtre
Let6moin lumineu×s'allumemau bout d'uncumul
de 250 heuresde fonctionnement du ventilateur
pour mppelerla n6cessit6denettoyer lefiltre.
AppuyezsurResetFilter pour 6teindrelet6moin
et remettre5 z6roletempsdefonctionnement
cumul&
Page 21

www. GEAppliance s.com
Ne faites pas fonctionner votre appareil Ce climatiseurfroid seul n'est pas con_u pour fonctionner
Iorsque les temperatures ext_rieures sont avec des temp@atures ext@ieures en dessous de 0 °C
en dessous de 0 °C (32 °F). (s2 °F).IIne doit pas OtreutilisOIorsque lestemp6ratures
ext6rieures sont en dessous de O°C(32°F).
T616commande
Pourvous assurer d'un fonctionnement correct, pointez
lat616commande vers le r6cepteur de signal
du climatiseur.
Assurez-vousqu'aucunobstaclepouvantbloquer
lesignalnesetrouveentreleclimatiseuret la
t616commande.
Mode Cool (refroidissementl
utilisez lemode Cool (refroidissement) avecla vitesse
du ventilateursur Low(faible),Med (moyennel,
High (elev#elou Auto (automatique)pourrefroidir.
AppuyezsurlestouchesTemperature Increase
(augmentation de la temperature) A /Decrease
(diminution de la temp#ruture)T pour programmer la
temp@ature souhait@ entre 18 °Cet ]0 °C(64
et 86 °F)par increments de 0,5 °C(1°F).
Unthermostat _lectronique permet de maintenir la
temp@ature de la piece. Lecompresseur se met en
marche et s'arr_te 6 intervalles r_gulierspour maintenir
latemp@ature de la piece 6 un niveau de confort choisi.
R_glezlethermostat 6 une valeur plus basse et I'air
ambiant se refroidira.R_glez lethermostat 6 une valeur
plus _lev@ et I'airambiant se r_chauffera.
Mode Energy Saver (economie d'#nergie)
Ce mode optimise la puissance de refroidissement
de votre climatiseur, vous faisant du m_me coup
6conomiser de 1'6nergie. Une lois la temp@ature
du point de r_glage atteinte, le ventilateur
s'@eindra par intervalles pour 6conomiser
1'6nergie.IIs'allumera aussi p@iodiquement
pour faire en sorte que la pleine capacit6 de
refroidissement du syst_me soit utilis_e. IIs'agit
du mode par d6faut de I'appareil. A chaque fois
qu'il est mis hors tension, I'appareil red_marrera
en mode Economie d'_nergie. Cela inclut aussi
le mode Delay (Ddloi de mise en morche). A
la premi@e mise sous tension de I'appareil,
les r_glages de temp@ature et du ventilateur
indiqueront respectivement 70° et Low (Foible).
Vous pouvez r_gler la vitesse du ventilateur et la
temp@ature selon vos crit_res de confort.
Lerayon d'action de la t616commande s'6tendjusqu'6
6,4 m (20pieds).
Assurez-vousque les piles sont r6centes et
correctement install6es dons la t616commande.
Lat616commande renferme un aimant permettant de
lafixer surdes surfaces m6talliques.
REHARQUE:Sileclimatiseur6teintestallum6alorsqu'il
est programm6sur unr6glageCoolousivous passez
d'un mode Ventilation6 un modede Refroidissement,il
faudra environ3 minutespour que lecompresseurse
remetteen marcheet recommence6 refroidir.
Descriptions du Refroidissement
Pour un RefroidissementNormal - S61ectionnez
le modeCod avecla vitesseduventilateursur P/ed
ou High etun r6glage6 unetemp6rature moyenne.
Pour un RefroidissementHaximal - S61ectionnez
le modeCool aveclavitessedu ventilateursurHigh
et un r_glage 6 une temp@ature plus basse.
Pour un Refroidissementplus SilencieuxouDurant
la Nuit - %lectionnezlemodeCool avec lavitessedu
ventilateursur Lowet un r_glage6 unetemp@ature
moyenne.
Energy Saver ON (dconomie d'dnergie octivde) :
Le mode d'_conomie d'_nergie contribue h r_duire
la consommation d'_lectricit& Dans ce mode,
il est normal que le ventilateur s'_teigne puis se
rallume en alternance. Ce cycle de red_marrage
peut se r_p@er plusieurs lois. Enraison des arr_ts
p@iodiques du ventilateur, vous remarquerez
peut-_tre une variation de la temp@ature et de
I'humidit_ ambiantes.
Energy Saver OFF(dconomie d'dnergie ddsoctivde) :
Lorsque ce mode est d_sactiv_, le ventilateur
fonctionne continuellement, et dans le mode
Cool (refroidissement), le compresseur s'allume
et s'@eint en alternance pour maintenir la
temp@ature ambiante.
Mode Fan Only (ventilateur uniquemeng
Utilisezlemode Fan Onlyavec une vitesse de ventilateur
r_gl@surLow,Hedou Highpour faire circulerI'airet
lefiltrer sansle refroidir.Etantdonn_ quale modeFan
Onlyne permetpas de refroidissement,le r_glagede la
Auto Fan Speed (vitesse du ventilateur autol
R_glezlavitessedu ventilateursurauto pour que
la vitessedu ventilateurseregleautomatiquement 6la
vitessen_cessaire6I'obtentiondesr_glagesapportant
un niveaudeconfort optimal6 la temp@ature
programm_e.
Fonction de conservation des r#glages apr#s une coupure de courant
En cas de panne ou d'interruption de courant, I'appareil 6 2/4heures) @aitutilis@, I'appareil reprend son compte
red_marreautomatiquement ap@sr@ablissement 6rebours.Vousaurezpeut-_trebesoindeprogrammer
de I'alimentation_lectriqueet conservelesderniers une nouvelleheure.
r_glagesutilis_s.Silafonction Delay1-24hr(D_laide1 21
temp@aturen'affiche pas.Latemp@aturedela piece
s'affiche6 I'_cran.
REMARQUE:Lavitessedeventilateurauto nepeut_tre
utilis@Iorsqueleclimatiseurestsurle mode FunOnly.
Sila piecedemandeun refroidissementsuppl_mentaire,
la vitessedu ventilateuraugmente automatiquement.Si
la piecedemandemains derefroidissement,la vitesse
du ventilateurdiminueautomatiquement.
REI'4ARQUE:Lavitessede ventilateurauto nepeut _tre
utilis@Iorsqueleclimatiseurestsurle mode FunOnly.
Page 22

A propos des commandes du dimatiseur.
Information suppldmentaire importante.
Direction de PAir
Utilisezle levier pour r6gler la direction de I'airvers la
gauche ouvers ladroite seulement.
Entretien et nettoyage du climatiseur.
Grille et BaTtier
Eteignezet d@branchezleclimatiseuravant tout Pourle nettoyer,utilisezde I'eauet und@tergentdoux.
nettoyage. N'utilisezpas d'eaude Javeloude nettoyantsabrasifs.
Filtre _ Air
Lefiltre 6 air derriere la grillefrontale doit
_tre v_rifi6et nettoy_ au bout de 30jours de
fonctionnement ou plus souvent sin6cessaire.
Pour retirer :
Ouvrez la grilled'entr_e en tirant vers le bassur les
languettes des coins sup6rieursde la grilled'entr_e
jusqu'6 ce que lagrille soit dans uneposition 6 45
degr6s. Retirezlefiltre.
Nettoyezle filtre avecde I'eausavonneuse tilde.
Rincezlefiltre et laissez-les6cher avant de leremettre
dans leclimatiseur. Nenettoyez pas
votre filtre au lave-vaisselle.
A MISE EN GARDE: NEfaitesPAS
fonctionner leclimatiseur sans lefiltre souspeine de
le boucher avecde la pouss@e et de la charpie et de
r6duire sonefficacit6
Languette Languette
Serpentins Ext_rieurs
Lesserpentins situ6s duc8t6 ext6rieur du climatiseur
doivent _tre r6guli_rement v6rifi6s.S'ilssont obstru_s
par des poussi_resou de la suie,il estpossiblede les
faire nettoyer par desprofessionnels.
Comment InsUrer les Piles dans la T#l#commande
Retirezlecouvercle du Iogement des piles
en lefaisant glisser dans lesens indiqu6 par
lafl_che.
Ins_rezles nouvelles piles en vous assurant
que lesp61es(+)et (-)de la pile sont orient6s
dans la bonnedirection.
Remettezlecouvercle en lefaisant glisser.
22
REMARQUES :
Utilisez2 pilesalcalines AAAd'!,5 Volt. N'utilisez
pasde piles rechargeables.
Retirezles pilesde lat616commandesivous
pr_voyezde nepas utiliservotre climatiseur
pendant un certaintemps.
Nem61angezpasdes pilesneuves avec des
pilesus6es.Nem61angezpas ensemble lespiles
alcalines,standard (carbone-zinc)ou rechargeables
(ni-cad,ni-mh, etc).
Page 23

I str cti s
Cli tise r
de nta e
[F'_ Questions? Composez le 800.GE.CARES(800.432.2737} ou visitez notre site web a °www.GEAppliances.com I
AVANT DE COMMENCER
Ne coupez pos ou n'enlevez pas, sous aucun
Lisez ces instructions enti_rement et attentivement.
• IMPORTANT -Conservezcesinstructions
pour I'inspecteur 61ectrique local.
• IMPORTANT - Respectez tousles codes et
r@glements en vigueur.
• Remarque pour I'installateur - Assurez-vous de
remettre ces instructions au client.
Remarque pour le client - Conservez ces
instructions pour toute r6f6rence future.
Niveau de comp6tence - L'installation de cet
ap_)are.ildemande des connaissances de base en
mecanJque.
o
D_lai d'e×6cution - Environ 1heure
o
Nous recommandons que I'installation de ce
produit soit effectu6e par deux personnes.
• L'installateur est responsable de I'installation
correcte de I'appareil.
La panne de I'appareil due (_une mauvaise
installation n'est pas couverte par la garantie.
Vous DEVEZutiliser toutes les pi_ces fournies et
suivre la proc6dure d installation du climatiseur
d6crite dans cette notice.
pr6texte, la troisi_me broche de mise _ Io terre du
cordon d'alimentation.
Ne changez pas la fiche du cordon d'alimentation
du climatiseur.
Un cablage en aluminium du domicile peut
occasionner des probl6mes particuliers-consultez
un 61ectricien qualifi6.
OUTILLAGE NI_CESSAIRES
AMISE EN GARDE:
Tournevis cruciforme Phillips
Tournevis _ t_te plate
(_ E×IGENCES I_LECTRIQUES
(_ ertains mod@lesn6cessitent une prise mise _ la
Lafiche triphas6e avec terre r6duit le risque de choc
61ectrique.Si la prise murale que vous envisagez d'utiliser
est biphas6e, vous avez la responsabilit@et I'obligation de
la remplacer par une prise triphas6e correctement mise (_
la terre.
©
@
terre de 1:]_5/Z20Volts AC,60 Hz,prot6g6e par
un fusible (_action diff6r6e ou par un disjoncteur.
Certains modules n6cessitent une prise mise (_la
terre de 230/208 Volts AC,prot6g_e par un
fusible (]action diff6r6e ou par un disjoncteur.
Ces modules doivent _tre install6s sur leur
propre circuit d6riv6 pour 6viter de surcharger
les circuits _lectriques du domicile qui peut
occasionner un risque d'incendie par surchauffe
des cables.
Crayon R_gle ou m_tre
Niveou Ciseoux ou couteou
Le cordon d'alimentation est 6quip6 d'un dispositif
d'interruption du courant. Un bouton d'essai et de
r6enclenchement est fourni sur le battier de la prise.
Vous devez tester le m6canisme r6guli@rement en
appuyant d'abord sur le bouton TEST (essai} puis sur
le bouton RESET(r6enclenchement} Iorsque I'appareil
est branch6. Si le bouton TEST (essai} ne bascule pas
ou si le bouton RESET(r6enclenchement) ne reste
pas enclench6, cessez d'utiliser votre climatiseur et
appelez un technicien de service qualifi6.
23
Page 24

Instructions de montage
PIi_CES INCLUES Joint de rail
(L'aspect peut varier) /sup@ieur (1)
Joint en mousse /
sup6rieur(_e_fen_tre /
ai,=e
mo_toge //// g°_I
_u_e__ \
Joint d'6tanch6it6 de Iofen6tre
guillotine (fin, odh6sif ou dos)
Ponneou en
accordion
droit
Rail lat@al
Support en V (2)
Type Avis (!0) Type B vis (2) Type C vis (4)
Ferrure de rebord
de fen@tre(2)
Ferrure de
verrouillage de
la fen_tre (2)
® ®
Boulon de type E Boulon de type E
avec 2 6crous (4) avec 2 6crous (2)
24
Page 25

Instructions de montage
rq INSTRUCTION RELATIVE
LA FENETRE
• Cesinstructionssontvalablespourunefen@trestandard6
guillotine6 deuxch@ssismobiles.Vousdevrezmodifierles
instructionspourlesautrestypesdefen@tres.
• Toutelaferruredemontagedoit@tresolidementfix@au
bois,6 lamagonnerieou au m@tal.
Laprised'alimentation@lectriquedoitsetrouver6 port@
ducordond'alimentation.
• Suivezlesdimensionsindiqu@spourvotremodeledansle
tableauet surlecroquis.
[ "/" J
t--
18 1/2 po
__26 po- 41 po p
(Aveclespanneaux |
enaccordion)
INSTRUCTIONS RELATIVE A LA CONTRE-
rF1
FENETRE
Lecadrede lacontre-fen@treemp@chele climatiseur
de pencherversI'ext@ieur,et doncde sedrainer
correctement.Pourr@glerceprobleme,fixez un morceau
de boisau rebordde lafen@tre.
MORCEAU DE BOB
LARGEUR:2po
LONGUEUR:Suffisammentlong pour seIoger6 I'int@ieur
du cadrede la fen@tre.
I_PAISSEUR:Pourd@terminerI'@aisseur,placezun
morceaude boissur lerebordde lafen@trede faqon6 ce
que le morceaude boissoit ½poplus @lev@que ledessus
du cadrede la contre-fen@treou du cadre envinyle.
Fixezsolidement6 I'aidedevisou de clousfournis par
I'installateur.
/
1/2poplus_lev_ _ _._.L._ .,/- Bois
que lecadrede la " - o,
contre-fen_tre II IY,:_>'PL
Cadrede la /bl l,__
contre-fen_tre I _ Cadreenvinyle I J
]_NT!I J Rebord "_
1
1/2poplus@lev@que
le cadreenvinyle (sur
J_certainesfen@tres)
w
/
[TI PRE_PARATION DU CLIMATISEUR
Tirez sur le panneau avant et retirez le filtre.
Retirez le panneau avant en le soulevant inclin_
rB1 Retirez les quatre vis avant. Mettez-les de c6t6
pour la remise en place du capot avant.
Attrapez les deux coins inf@ieurs de la grille
tout en appuyant sur les c6t6s du Iogement
avec le bout des doigts. Tirez vers vous
pour lib@er la grille puis sortez-la en levant.
REMARQUE : Ne tirez pas le bord inf@ieur
versvous de plus de 3 po ou vous risquez
d'endommager les languettes de la grille.
,t t
@Lorsque la grille frontale est retir6e, le panneau
de commande est toujours raccord@ au
faisceau de ills. Tournez la grille de faqon 6 voir
sa face arri@re. Retirez les 2 vis pour s6parer le
boTtier du panneau de commande de la grille.
REMARQUE : Veillez 6 conserver ces vis. Elles
seront n6cessaires clans une 6tape ult@rieure
de I'installation.
25
Page 26

Instructions de montage
FBI PREPARATION DU CLIMATISEUR {suite)
rE] Retirezlevis c6t_ du Iogement du climatiseur. Hettez-le
dans un endroit sOr.
NOTE: Veillez_ conserver ce vis. Elle seront
n_cessaires dans une _tape ult_rieure de
I'installation.
r_ Retirez et mettez de c6t# la vis de mise
6 la terre.Sortez le climatiseur de son Iogement
en le faisant glisser et en attrapant la poign#e
du conteneur de fond et en tirant vers vous tout
en maintenant le Iogement. Ne tirez pus et ne
soulevez pus la zone d'@acuation en mousse de
polystyrTne.
Netirez pas et ne
;oulevezpas cette
zone,
vous risquez
d'endommager
votre appareil
PRI_PARATIONDU LOGEMENT {suite)
B1
Glisser chaque dispositif de retenue lat#ral sur
ra
le bard de chaque punneuu en accord#on.
L'illustrution indique I'orientation de chuque
panneuu en accord#on et chuque dispositif de
retenue ht#rul par rapport au capot depuis une
vue de dessus de I'appareil.
DISPOSITIF DE RETENUE LATERAL
\\
PANNEAU DE FENETRE
DISPOSITIF DE RETENUE LATERAL
PANNEAU DE FENETRE
Glisser les panneaux en accord#on gauche et
@
droit dans les rails de montage sup#rieur et
inf#rieur.
Partie supTrieure droite
AVANT
_] PREPARATION DU LOGEMENT
[] Fixez lejoint de rail sup#rieur au dessous du
rail sup#rieur.
rB] Installez le rail de montage sup#rieur avec 4 vis
de type A de I'int#rieur du Iogement Appuyez
fermement pour enfoncer les vis dans lejoint et
6 travers le rail de montage sup#rieur.
To ng rail
Rail de montage inf@rieur
r_ Fixer les dispositifs de retenue lat#raux sur le
capot 6 I'aide de 6 vis de type A.
26
Page 27

Instructions de montage
E] PREPARE THE WINDOW AND INSTALL
THE CASE
r_ D6coupez lejoint de la fen_tre 6 guillotine 6
la Iongueur ad#quate. D6collez la pellicule
protectrice et collez lejoint sur le dessous du cadre
de la fen6tre.
Ouvrez la fen6tre et marquez I'axe central
E]
du rebord de Io fen@tre.
Faites d61icotement glisser le Iogement dans
rcq
la fen@tre et centrez-le. Aboissez la fen@tre
derri6re le rail de montage sup6rieur. Tirez le
bas du Iogement vers I'avant de faqon 6 ce
que le rail de montage inf6rieur salt plaqu6
contre I'arri@e du rebord de la fen6tre. Fixez le
Iogement au rebord de la fen6tre en utilisant
2 vis de type B pour un cadre de bois ou 2 vis
de type C avec les ferrures de verrouillage de
la fen6tre pour les autres types de fen6tres.
Percez des trous de guidage si n6cessaire.
rs] PRE_PARER LA FENETRE ET POSER LE
CAPOT (suite)
r_ [Vl°nter le support en Vet la ferrure du support en
V a I'aide d'un &crou et d'un boulon de Type F
Boulon et @croude
TypeE
Gauche _. i
Ferrure de
rebord de
fen@re
(_,'
Boulon et @croude Type
Fpour support enV
Positionnez les supports en
B]
V sur le fond du Iogement
pour qu'ils soient proches
du mur ext@rieur. Fixez les
supports en V sur le fond du
Iogement, de chaque c6t6,
avec des boulons de type F,
2 pour chaque support.
r_l R6glez les ferrures de rebord de fen@tre pour
qu'elles reposent sur le rebord.
Support
en V
Rebord
2vis de type B
Rebord
Ferrure
r_ Etirezles panneaux enaccord6ons gauche
et droitjusqu'au cadre vertical de lafen6tre
6 guillotine. Percezdes trous de guidage et fixez
lescoins sup@ieurset inf6rieurs6 I'aidede 2vis de
type C.
_ L_&] L__ZJI
Visde
typeC
Visde
typeC
27
Page 28

Instructions de montage
[_ PRE_PARER LA FENETRE ET POSER LE
CAPOT {suite}
Fm
A MISE EN GARDE:
Pour preventez la verre brisez dans les fen6tres,
sur le vinyle ou d'autres Vinyle
fen_tres pareillement
construites, attachez une
ferrure de verrouillage
de la fen_tre a la c6t6
du fen@re.
Fixez la ferrure de verrouillage de la fen_tre a I'aide
d'un vis de type C.
Bois
Cette unit_ contient deux
ferrures de verrouillage de
fen_tre.
D6coupez lejoint d'_tanch_it_ sup@ieur
[]
en mousse (_la largeur de la fen@re.
Ins&rezla mousse entre la vitre et
g]
la fen@re pour
emp_cher I'air
et les insectes
de p_n@rer clans
la piece.
NOTE: Si lejoint
d'_tanch_it_ fourni
ne s'adapte pas a votre fen_tre, procurez-vous
Iocalement I'article appropri_ afin d'obtenir
une @anch_it_ adequate de I'installation.
[_] INSTALLATION DU CLIMATISEUR
DANS SON LOGEMENT {SUITE)
r_ Remettez en place levis de mise (_
la terre retir6es plus t6t, cSt_ du Iogement.
IMPORTANT : LES VIS DE MISE A LA TERRE
DOIVENT ETRE REMISES EN PLACE POUR ASSURER
UNE MISE A LA TERRE ADEQUATE.
171 Hontez de nouveau la commande sur le boTtierdu
panneau en remettant en place les 2 vis 6t6es plus
t6t.
Montez vis
Fixez la grille frontale en ins@ant les languettes
@
de la grille dans les fentes situ6es dans la partie
sup@ieure avant du Iogement. Poussez sur la grille.
INSTALLATION DU CLIMATISEUR
DANS SON LOGEMENT
Faitesglisser le climatiseur dans le Iogement par
le conteneur du fond. Ne poussez pas sur les
commandes, sur le bottler en mousse de polystyr6ne
pour la sortie d'air ni sur les serpentins 6 ailettes.
Assurez-vous que le climatiseur est correctement
positionn6.
N'appuyezpas
surceszones,
vouspourriez
endommagervotre
appareil
Conteneur defond
rE1 Replacer les vis.
r_ Poser le filtre et la grille frontale.
r_ Brancher le climatiseur.
28
Page 29

Instructionsdemontagepouruneinstallation6tmversunmur-En option
Le Iogement peut @tre install(_ 6 travers un tour
dons une habitation existante ou neuve.
Veuillez lire enti6rement ces instructions, puis les
suivre @ape par 6tape.
REMARQUE : E×cept6 pour les supports en V
ffournis), veuillez obtenir tous les mat_riaux
Iocalement pour I'installation du climatiseur 6
travers un tour.
r[] IMPORTANT
Uneinstallation a trovers un mur n°estpusoppropri_e
si uneou plusieurs despersiennessur lec6t6ou sur le
dessussont obstru_es per le mur.
Toutes les persiennes sur lec6t_ ou sur ledessus
doivent d_posser du c6t_ ext6rieur du tour.
Lec6t6 int_rieur du Iogement doit d6posser
suffisamment dens In piece pour _quilibrer I'apporeil.
LeIogement dolt @treinstoll_ de niveau de droite a
gauche et I_g_rement pench6 de I'avont vers I'arri_re.
Utilisez un niveou, environ 1/2 bulle donnero In pente
correcte vers I'ext_rieur.
r_] IMPORTANT {suite)
Fixezle Iogement5 I'aidede 14 vis 5 boisancr6es d'au
mains un poucedans la structuredu mur.
REMARQUE•Sin6cessaire,percez des trous de guidage
pour permettre une installation correcte.Silecadre est
trap grand, utilisezdes cales pour 6vitertoute distorsion.
r2] FINITION DE L'OUVERTURE DANS LE
MUR
-A] alfeutrez les quatre c6t6s du c6t6 ext6rieur du
Iogement pour 6viter que I'humidit6 ne p6n_tre
par lemur int6rieur. L'utilisation
d'un solin (rail d'6coulement) permettra davantage
d'6viter que I'eau ne s'6coule dons lemur et le
long du mur ext6rieur.
Couche de
pl_tre
Corni_re de linteau
Calfeutrage
Mou]ure
(s'ily a lieu)
Unecorni_re de linteou est n_cessaire pour mointenir
lesbriques ou les blocsou-dessus
de I'ouverture.
Unsolin est n_cessoire et dolt seprolonger
le long de I'ouverture pour _viter toute fuite
vers I'int6rieur du tour.
-_ etirez leclimatiseur deson Iogement. Pour
desinstructions particuli@es,veuillezvous r6f6rer aux
Instructions de Montage dansune fen@tre.
r_ ssurez-vousqu'une prisemurale setrouve 5 proximit6
de I'ouvertureou installez-enune.
I
-C-I ositionnez leIogement dans I'ouverturedans
lemur et placez lesbandesde maintien en bois entre
le basdu Iogement et lesolin desdeux c6t6sdu rail
inf@ieur.Ellesdoivent _trede la m_me hauteur que le
rail inf6rieuret de lam6me Iongueur queI'ouverture
dans lemur.
EXTERIEUR
Persiennes
fie c6t6 et /
le dessus
doivent
d6passer du
c6t6 e×t@ieur
Solin (Rail
d'6coulement)
Bande de maintienen bois
INTERIEUR
I-B-Jplacez le climatiseur dons le Iogement. Pour des
instructions particuli@es, veuillez vous r6f6rer aux
Instructions de Montage dons une fen6tre.
29
Page 30

Avunt d'uppeler le service...
Causes possibles Que loire
ne se Leclimatiseur • Assurez-vousquelaficheduclimatiseursaltbienbranch@
rnetpus enmurche estd6branch& donsla prisemurale.
Lefusiblea saut6/ • V6rifiezla baste_fusible/_disjoncteursetremplacezlefusible
ledisjoncteurestouvert, ou rebranchezledisjoncteur.
!1y a unepannedecourant. • S'ilseproduitunepannedecourant,d_branchezleclimatiseur
enlemettantenpositionOFF(urr@).Quandlecourantrevient,
attendez3minutesavantderemettreenmarcheleclimatiseur,
pour_viterde d_clencherlasurchargeducompresseur.
Lem@anismed'interruption • AppuyezsurleboutonRESET(remiseenmarche)situ_surlafiche
decourantestd_clanch& du cordon_lectrique.
• SileboutonRESETnerestepasenfonc&arr_tezleclimatiseur
d'airetappelezuntechnicienqualifi&
Ledimatiseurnerefroidit Lacirculationd'airestbloqu@. • Assurez-vousqu'iln'yapusderideau,de storeoudemeuble
pusuutant qu'illedevra# qui bloqueledevantdu climatiseur.
Lefiltre_ airestsole. • Nettoyezlefiltreau mainstousles 30jours.Consulterlasection
Entretienetnettoyage.
Lachambre_taitchaude. • Apresavoirmisenmarcheleclimatiseur,attendez
quela chambreserefroidisse.
L'airfroids'_chappe • V@ifiezlesgrilles_ registrede plancheret lesreprisesd'airfroid.
de lachambre.
Lesserpentinssontgel@s. • Consultez"Leclimatiseurgele"ci-dessous.
Ledimatiseur Laglacebloquelacirculation • R@glezlescommandessurHighFan(vitesseduventilateur@lev@)
g#le d'airetemp@cheleclimatiseur ouHighCool(fortrefroidissement)et r@glezlethermostatsurune
de refroidirlachambre, temp@atureplus@lev@e.
OeI'eaucode OI'exC_rieur tlfaittreschaudethumide. • C'estnormal.
OeI'eaucode 0I'int#neur Leclimatiseurn'estpas • Pourobtenirunebonne@acuationdeI'eau,assurez-vous
L'eaus'amasseduns
teplateaudu fond
inclin@versI'ext@ieur. queleclimatiseursoitI@gerementinclin@deI'avant
L'humidit@estextraitede
I'airdelachambreetpasse
dansleplateaudufond.
du battierversI'arriere.
• C'estnormalpendantunep@iodecourtedansdesr@gions
peuhumides;normalpendantdesp@iodesplusIongues
dansdesr@gionstres humides.
Bruits normaux de fonctionnement
, VouspouvezentendreuncliquetisdO_ deI'eauqui
estabsorb@etestprojet@contrelecondensateurles
joursde pluieoOquandily abeaucoupd'humidit&Cette
caract@istiquediminueI'humidit@etam@liore
lerendement.
, Vouspouvezentendreleclaquementduthermostatquand
lecompresseursemetenmarcheets'arr@te.
, DeI'eaus'amassedans leplateaudubaspendantles
p@riodesdegrandehumidit@ous'ilpleut.Cetteeaupeut
d@borderetcoulerdeI'appareildu c6t@ext@rieur.
, Leventilateurpeuttournerm@mequandlecompresseur
nefonctionnepas.
30
Page 31

Garantie du conditionneur d'air-garantie limit e d'un an.
Tout le service en vertu de la garantie est offert par nos centres de
service d'usine ou par un technicien autoris@ de Customer Care®.
Pour programmer la visite d'un technicien, consultez notre site
go.cam, ou composez le 800.GE.CARES (800.432.2737). Veuillez
fournir le numdro de sOrie et le numOro de mod@le Iorsque vous
appelez pour obtenir le service.
Nous remplacerons •
Unan Toute piece du conditionneur qui ne fonctionne pas(3cause d'unvice de mat6riau
Apartirde la date ou de main-d'oeuvre.Pendantcette garantie limit_e d'un an,nous fournirons 6galement,
d'oChatOriginal gratuitement, toute lu main-d'oeuvre et leserviceconnexe n6cessuirespour remplucer lu
pieced6fectueuse.
Lesd_placements de service 6 votre maison pour vous
apprendre 6 utiliser le produit.
, Un montage, une livraison ou un entretien d_ficient. Si
vous avez un probl_me de montage ou sile conditionneur
n'a pus la bonne capacit_ de refroidissement pour son
usage pr_vu, appelez votre revendeur ou votre installateur.
Vous_tes responsable de fournir une installation de
raccordement _lectrique convenable.
Les pannes occasionn_es par des modifications au produit
ou une utilisation non raisonnable, en particulier une
absence d'entretien raisonnable et n_cessaire.
, Dons los emplacements commerdaux, la main-d'oeuvre
n_cessaire pour d_m_nager I'appareil jusqu'_ un
emplacement oO il est accessible par un techniden
particulier.
Leremplacement des fusibles de la maison ou la
r_activation des disjoncteurs.
Les pannes occasionn_es par la corrosion sur les modules
qui ne sont pas proteges contre la corrosion.
Les dommages occasionn_s par un mauvais voltage de
I'alimentation _lectrique, un accident, un incendie, une
inondation ou une calamit_ naturelle.
Lesdommages indirects et cons_cutifs 6 la propri_t_
personnelle occasionn_s par des vices possibles de ce
conditionneur.
Les dommages occasionn_s par la livraison.
Agrafez le recu d'achat ici.
Pour obtenir le service sous
garantie, vous devrez fournir
la preuve de I'achat original.
EXCLUSION DE GARANTIES IMPLICITES - Votre saul et unique recours est la r@paration du produit
salon les dispositions de carte Garantie limit@e. Toutes los garanties implicites, incluant los garanties de
commercialit@ et d'ad@quation _ un usage sp@cifique, sont limit@as _ une ann@e
ou _ la p@riode la plus courte autoris@e par la I@gislation.
Cette garantie est offerte _ I'acheteur initial et _ tout propri@taire subs@quent d'un produit ocher@aux Etats-Unis
des fins d'usage domestique. Si le produit est install@ dons une r@gion oO nese trouve aucun r@parateur outoris@
GE, vous devrez peut-@tre assumer los ffais de transport ou apporter exp@dier le produit _ un centre de service
autoris@ GE.
Certaines provinces ne permettent pas I'exclusion ou la limitation des dommages indirects ou cons@cutifs eL par
cons@quent, I'exclusion ci-dessus pout ne pas s'appliquer _ vous. carte garontie vous donne des droits juridiques
particuliers et vous pouvez @galement avoir d'autres droits qui variant d'une province _ I'outre. Pour conna[tre vos
droits juridiques dons votre province, consultez votre bureau local ou provincial de protection des consommateurs.
Garant : General Electric Company. Louisville, KY 40225
31
Page 32

Assistance _ la dient_le.
Site Webdesappareils 6lectrom6nagers GE GEAppliances.com
Vousavez unequestion ou vous avezbesoind'aide pourvotre appareil 61ectrom6nager?
Contactez-nous par Internet au siteweb des appareils 61ectrom6nagersGE24 heures parjour, tous lesjours
de I'ann6e!Par commodit6 et pour acc616rerle service,vous pouvez maintenant t616chargerlesmanuels du
propri6taire ou m@mecommander des pi@cesen ligne.
Studio de conception r6aliste GEAppliances.com
GEappuie la notion de design universel- des produits,des serviceset des environnements qui peuvent 6tre utilis6s
par des personnesde tous Oges,tallies et capacit6s. Nousreconnaissons lebesoin de concevoir desproduits
pour un vaste 6ventaild'aptitudes et ddiciences mentales et physiquesVisiteznotre site Web aujourd'hui pour
obtenir plus de renseignements sur I'application du design universelpar GE,y comprisdes conceptions decuisine
pour lespersonnes handicap6es. Dans lecas de personnesmalentendantes, veuillezcomposer le 800.TDD.GEAC
(800.833.4322).
Pi_ceset accessoires
Lespersonnes ayant lescomp6tences requises pour r6parerelles-m@mesleursappareils peuvent recevoir
directement a la maison despi_ces ou accessoirestiescartes VISA,MasterCardet Discoversont accept6es).
Commandez en ligne d_saujourd'hui, 24 heures sur 24tous lesjours, ou en t616phonantau 800.626.2002 durant
les heuresnormales de bureau.
Lesinstructions contenues dans le pr6sent manuel comportent desproc6dures que tout utilisateur peut effectuer.
GEne recommande nullement lar6paration du climatiseur par un nonsp6cialiste.Nousvous conseillonsfortement
de vous abstenir de r6parer leclimatiseur vous-m@me.
Contactez-nous
Sivous n'@tespas satisfait du serviceapr_s-vente deGE,communiquez avecnous via notre site Web enfournissant
tousles d6tails, y compris votre num6ro de t616phone,ou 6criveza
Directeur,Relationsavec lesconsommateurs
GEAppliances,Appliance Park
Louisville,KY40225
GEApplianceParts.com
GEAppliances.com
32
Page 33

Instrucciones de seguridad ......... 34-35
Instrucciones de operaci6n
Controle .................................. 36-38
Cuidado y limpieza
Bobinas para exteriores ...................... 38
Filtro de aire .................................. 38
Instrucciones de instalaciGn ....... 39-45
Solucionar problemas ................... 46
Sonidos de operaci6n normales .............. 46
Servicio al consumidor
Garantia ...................................... 50
Servicio al consumidor ....................... 51
AEL14*
AEL18*
Producto etiquetado *ENERGYSTAR®
ENERGYSTAR
Como socio de ENERGYSTAR ®,
GEha confirmado que este
producto cumple las directrices
de ENERGYSTAR®relativas al
rendimiento energdtico.
Escriba los n_meros de modelo
y serie aqui:
# de Modelo
# de Serie
Puede encontrar estos nOmeros
en una etiqueta en el costado
del acondicionador de aire.
33
Page 34

INFORMACION IMPORTANTEDESEGURIDAD.
LEA TODASLASINSTRUCCIONESANTES DE USAR.
AiADVERTENCIA!
Por su seguridad, se debe seguir la informaci6n en este manual para minimizar el riesgo de
incendios, descargas el6ctricas o lesiones personales.
PRECAUCIONESDE SEGURIDAD
Use este electrodom6stico solamente para
el prop6sito determinado segOn se describe
en el Manual del propietario.
Este acondicionador de aire debe instalarse
correctamente de acuerdo con las
Instrucciones de instalaci6n antes de su uso.
Nunca desenchufesu acondicionador de
aire tirando del cableel6ctrico.Siempre
agarre firmemente elenchufe y tire de
61directamente hacia afuera.
Reemplaceinmediatamente todos los
cablesel6ctricos que se hayan pelado o que
sehayan da_ado de alguna otra manera.
Un cable de corrientedaBado no debe
repararse,sino que debeser sustituido por
uno nuevo que seadquiera delfabricante.
No use un cableel6ctrico que muestre
evidenciasdedeterioro,o daBosde
abrasi6n ensu superficie en alguno de sus
extremos.
Apague la unidad y desenchufe su
acondicionador de aire antes de limpiar.
GE no est6 no apoya que se le proporcione
ning0n servicio al acondicionador de aire.
Vehementemente recomendamos que
usted no intente proporcionar servicio al
acondicionador de aire usted mismo.
Por su seguridad...no almacene ni use
materiales combustibles, gasolina u
otros vapores o liquidos inflamables
en la proximidad de 6ste o algOn otro
electrodom6stico.
Todos los acondicionadores deaire
contiene refrigerantes,los quepot Ley
Federaldeben ser removidosantes de
desecharlos.Siusted planeadeshacersede
alg0n producto quecontenga refrigerantes,
p6ngase encontacto con lacompaBia que
seencarga de recoger subasura para que
le indiquen qu6 hacer.
Si el recept6culo no coincide con el enchufe,
un electricista calificado debe reemplazar el
recept6culo.
Estos sistemas de acondicionadores de
aire R410A requieren que los contratistas
y t6cnicos usen herramientas, equipos y
est6ndares de seguridad aprobados para
su uso con este refrigerante. NO use
equipamiento certificado s61opara
refrigerante R22.
34
COMOCONECTARLAELECTRICIDAD
Bajo ninguna circunstancia, corte o remueva la
tercera p0a (tierra) del cable el6ctrico. En pos
de la seguridad personal, este electrodom6stico
debe siempre conectarse a tierra.
NO use un enchufe adaptador con este
electrodom_stico.
El cable el6ctrico de este electrodom6stico est6
equipado con un enchufe de tres pOas (tierra)
que combina con un tomacorriente est6ndar
de tres tomas de pared para minimizar la
posibilidad de una descarga el6ctrica.
El cable de alimentaci6n incluye un
dispositivo para interrupci6n de corriente.
Se incluye un bot6n de prueba y de reinicio
en el dispositivo. El dispositivo debe ponerse
a prueba peri6dicamente: primero se presiona
el bot6n de TEST(prueba)y luego RESET
(reinicio) mientras se encuentra enchufado al
tomacorriente. Si el bot6n TESTno se dispara
o si el bot6n RESETno queda enganchado,
deje de utilizar el acondicionador de aire y
comuniquese con un t6cnico calificado.
Pida a un t6cnico que inspeccione el
tomacorriente y el circuito para cerciorarse
de que el tomacorriente est6 conectado a
tierra de la manera apropiada.
Donde exista un tomacorriente de dos
tomas, es su responsabilidad y obligaci6n
personal hacer que dicho tomacorriente
sea reemplazado pot uno de tres tomas
con conexi6n a tierra.
Elacondicionador de aire deberia siempreestar
conectado a un tomacorriente individual con su
circuito de voltaje correspondiente.
Esto proporciona el mayor rendimiento y
adem6s evita que los circuitos del resto de
la casa se sobrecarguen, Io cual podria causar
incendios por el sobrecalentamiento del
cableado.
Ver las Instrucciones de instalaci6n, en la
secci6n Requisitos El_ctricos para los requisitos
especificos de conexi6n.
Page 35

GEAppliances.com
AiADVERTENCIA!
USODEPROLONGADORE5
RIESGO DE INCENDIO. Podria ocasionar
lesiones graves o la muerte.
. NO use un prolongador con este
Acondicionador de Aire de Ventana.
. NO use protectores contra picos de tensi6n ni
adaptadores para mOItiples tomacorrientes con
este Acondicionador de Aire de Ventana.
LEA Y SIGA ESTAS INSTRUCCIONES DE SEGURIDAD
CUIDADOSAMENTE.
GUARDE ESTAS INSTRUCCIONES
35
Page 36

A propos des commandes du climatiseur.
Lesfonctions et I'aspectpeuvent varlet.
Lest_moins lumineux _c6t_ des touches _effieurement sur letableau de commandes du climatiseur indiquent lesr_glages s_lectionn_s.
Le t_moin indique qua I'opporeil
est en mode Progrommotion de
Iotemperature ou du d_loi. |
[] Auto
[] High
[] Med
[] Low
O l
NOTE : L'dcron offiche toujours la temperature de la ps_ce souf lorsque vous progrommez
1otemperature ou 1ominutene.
Commandes du Climatiseur
Le t_moin lumineux indique qua
Io minuterie est progromm_e.
DdoJ1-24hr
Rdductiondu ddaJ_ Augmentation
Sdectlon du mode _ _ _____l outomotique du
R6ductJonde
Augmentation
et R_ductJon de I de I'opporeil ON/OFF
la temperature (marche/arr_t)
programm_e
I Morche
I
I
I I A Augmen o ,ondeJo
du ddaJ
ventJloteur
T l commande
Commandes
36
Touche d'alimentation
Metle climatiseur en position de marche
ou d'arr_t. L'_cranaffiche la temperature
de la piece Iorsque I'appareil est mis en marche.
Affichage
Affichela temperaturede la pieceoule temps
restantavant lamiseen marcheou I'arr@tde
I'appareil.Affichelatemp6rature de r6glageIors
de la programmationdela temp6rature pour les
modesCoo/(refroidissement)ou EnergySaver
(economied'energie).Let6moin lumineuxSet
(programm6)s'allumeIorsdu r6glage.
Touche Node
Estutilis_epour programmer leclimatiseursur
lesmodesCool, EnergySaverou FanOnly
(ventilateuruniquement).
Touches deD#lai/ D_lai de 1_ 24heures
Delay ON(d#laidemiseen marche)-Lorsque
leclimatiseurest _teint,il peat_tre programm6
pour d_marrerautomatiquementdansun d_lai
de 1 _2/4heuresa sesr_glagesprecedents(mode,
vitessedu ventilateur).
Delay OFF(d#laid'arr_t)-Lorsque leclimutiseur
est enfonctionnement,il peat_treprogramm6
pour s'arr_terautomatiquement dans un d_laide
Touches TampIncrease (Augmentation
temperature) A /Decrease (R_duction
de la temp_raturelT Sontutilis_espour
programmerlatemperaturedons lesmodesCoo/
ou EnergySaver.Let_moinlumineuxSets'allume
Iorsdu r_glage.
Touches Delay Timer Increase (Augmentation du
d_lailA (+)/ Decrease (Diminution du d_lai) • (4
Chaque fois que vous effleurez les touches
Increase A / Decrease _ sur I'appareilou
lestouches Increase+ / Decrease- de la
t616commande,vous programmezladur6e
du d61aiIorsde I'utilisationde laminuterieDelay
1-24hr(d61aide 1-24h).Let6moin lumineuxSet
s'allumeIorsdu glage.
Touches devitesse du ventilateur
Sontutilis_espour r_glerlavitessedu ventilateur
de I'appareilsur Low(faible),Ned(moyenne),
High (elev_e)ouAuto (automatique).RENARQUE:
Surlat616commande,utilisezlestouchesIncrease
+/Decrease - pourr_glerlavitessedu ventilateur
surLow,Pied,ou High. Utilisezla toucheAuto
pour allumerleventilateuren modeAuto.
1_ 2/4heures.
Comment leprogrammer:
AppuyezsurlatoucheDelay1-24hr(D_laide 1
2/4heures)deI'appareilou Delaypad (Touchesde
D61ai)delat_l_commande.Chaquefoisquevous
effleurezlestouchesIncrease •/Decrease Tsar
I'appareilou lestouchesIncrease+/Decrease
- de lat_l_commande,vousprogrammezla
dur_edu d_lai parintervallede i heure.Let_moin
lumineuxSets'allumeIorsdu r_glage.
PourconnGtreletempsrestantsurla minuterie
Delay1-24hr,appuyezsurlatoucheDelay1-24hr
deI'appareilouDelaypad (Touchesde D61ai)de
lat_l_commande.UtilisezlestouchesIncrease_
/Decrease_ sur I'appareiloulestouches
Increase+/ Decrease- de lat616commandepour
programmer un nouveaud61aisin6cessaire.
Pourannular la minuterie, appuyezsurlatouche
Delay 1-24hrjusqu'(_ceque levoyant lumineux
surla toucheDelay 1-24hrs'_teigne.
R_initialisation du Filtre
Let6moin lumineuxs'allumeraau bout d'uncumul
de 250 heuresde fonctionnement du ventilateur
pour rappelerla n6cessit6de nettoyerlefiltre.
Appwez surResetFilter pour 6teindrelet6moin
et remettrec_z_roletempsdefonctionnement
cumul&
Remarque : La lecture de temp6rature par d6faut s'affiche en degr6 Fahrenheit (°F).Pourmodifier
I'affichage en degr6 Celcius (°C),appuyez simultan6ment sur les boutons d'augmentation _ou
d'abaissement Tde la temp6rature et maintenez-les enfonc6s pendant :3secondes. R6p6tezla m6thode
pour effectuer un retour 5 I'affichage des degr6s Fahrenheit (°F).
Page 37

www. GEAppliance s.com
Ne faites pas fonctionner votre appareil Ce climatiseurfroid seul n'est pas con_u pour fonctionner
Iorsque les temperatures ext_rieures sont avec des temp@atures ext@ieures en dessous de 0 °C
en dessous de 0 °C (32 °F). (s2 °F).IIne doit pas OtreutilisOIorsque lestemp6ratures
ext6rieures sont en dessous de O°C(32°F).
T616commande
Pourvous assurer d'un fonctionnement correct, pointez
lat616commande vers le r6cepteur de signal
du climatiseur.
Assurez-vousqu'aucunobstaclepouvantbloquer
lesignalnesetrouveentreleclimatiseuret la
t616commande.
Mode Cool (refroidissementl
utilisez lemode Cool (refroidissement) avecla vitesse
du ventilateursur Low(faible),Med (moyennel,
High (elev#elou Auto (automatique)pourrefroidir.
AppuyezsurlestouchesTemperature Increase
(augmentation de la temperature) A /Decrease
(diminution de la temp#ruture)T pour programmer la
temp@ature souhait@ entre 18 °Cet ]0 °C(64
et 86 °F)par increments de 0,5 °C(1°F).
Unthermostat _lectronique permet de maintenir la
temp@ature de la piece. Lecompresseur se met en
marche et s'arr_te 6 intervalles r_gulierspour maintenir
latemp@ature de la piece 6 un niveau de confort choisi.
R_glezlethermostat 6 une valeur plus basse et I'air
ambiant se refroidira.R_glez lethermostat 6 une valeur
plus _lev@ et I'airambiant se r_chauffera.
Mode Energy Saver (economie d'#nergie)
Ce mode optimise la puissance de refroidissement
de votre climatiseur, vous faisant du m_me coup
6conomiser de 1'6nergie. Une lois la temp@ature
du point de r_glage atteinte, le ventilateur
s'@eindra par intervalles pour 6conomiser
1'6nergie.IIs'allumera aussi p@iodiquement
pour faire en sorte que la pleine capacit6 de
refroidissement du syst_me soit utilis_e. IIs'agit
du mode par d6faut de I'appareil. A chaque fois
qu'il est mis hors tension, I'appareil red_marrera
en mode Economie d'_nergie. Cela inclut aussi
le mode Delay (Ddloi de mise en morche). A
la premi@e mise sous tension de I'appareil,
les r_glages de temp@ature et du ventilateur
indiqueront respectivement 70° et Low (Foible).
Vous pouvez r_gler la vitesse du ventilateur et la
temp@ature selon vos crit_res de confort.
Lerayon d'action de la t616commande s'6tendjusqu'6
6,4 m (20pieds).
Assurez-vousque les piles sont r6centes et
correctement install6es dons la t616commande.
Lat616commande renferme un aimant permettant de
lafixer surdes surfaces m6talliques.
REHARQUE:Sileclimatiseur6teintestallum6alorsqu'il
est programm6surun r6glageCoolou si vous passez
d'un mode Ventilation6 un modede Refroidissement,il
faudra environ3 minutespour que lecompresseurse
remetteen marcheet recommence6 refroidir.
Descriptions du Refroidissement
Pour un RefroidissementNormal - S61ectionnez
le modeCod avecla vitesseduventilateursur P/ed
ou High etun r6glage6 unetemp6rature moyenne.
Pour un RefroidissementHaximal - S61ectionnez
le modeCool aveclavitessedu ventilateursurHigh
et un r_glage 6 une temp@ature plus basse.
Pour un Refroidissementplus SilencieuxouDurant
la Nuit - S61ectionnezlemodeCoolavecla vitessedu
ventilateursur Lowet un r_glage6 unetemp@ature
moyenne.
Energy Saver ON (dconomie d'dnergie octivde) :
Le mode d'_conomie d'_nergie contribue 6 r_duire
la consommation d'_lectricit& Dans ce mode,
il est normal que le ventilateur s'_teigne puis se
rallume en alternance. Ce cycle de red_marrage
peut se r_p@er plusieurs lois. Enraison des arr_ts
p@iodiques du ventilateur, vous remarquerez
peut-_tre une variation de la temp@ature et de
I'humidit_ ambiantes.
Energy Saver OFF(dconomie d'dnergie ddsoctivde) :
Lorsque ce mode est d_sactiv_, le ventilateur
fonctionne continuellement, et dans le mode
Cool (refroidissement), le compresseur s'allume
et s'@eint en alternance pour maintenir la
temp@ature ambiante.
Mode Fan Only (ventilateur uniquemeng
Utilisezlemode Fan Onlyavec une vitesse de ventilateur
r_gl@surLow,Hedou Highpour faire circulerI'airet
lefiltrer sansle refroidir.Etantdonn_ quale modeFan
Onlyne permetpas de refroidissement,le r_glagede la
Auto Fan Speed (vitesse du ventilateur autol
R_glezlavitessedu ventilateursurauto pour que
la vitessedu ventilateurseregleautomatiquement 6la
vitessen_cessaire6I'obtentiondesr_glagesapportant
un niveaudeconfort optimal6 la temp@ature
programm_e.
Fonction de conservation des r#glages apr#s une coupure de courant
En cas de panne ou d'interruption de courant, I'appareil 6 2/4heures) @aitutilis@, I'appareil reprend son compte
red_marreautomatiquement ap@sr@ablissement 6rebours.Vousaurezpeut-_trebesoindeprogrammer
de I'alimentation_lectriqueet conservelesderniers une nouvelleheure.
r_glagesutilis_s.Silafonction Delay1-24hr(D61aide 1 ] 7
temp@aturen'affiche pas.Latemp@aturedela piece
s'affiche6 I'_cran.
REIARQUE: Lavitessedeventilateur auto nepeut_tre
utilis@Iorsqueleclimatiseurestsurle mode FunOnly.
Sila piecedemandeun refroidissementsuppl_mentaire,
la vitessedu ventilateuraugmente automatiquement.Si
la piecedemandemains derefroidissement,la vitesse
du ventilateurdiminueautomatiquement.
REI'4ARQUE:Lavitessede ventilateurauto nepeut _tre
utilis@Iorsqueleclimatiseurestsurle mode FunOnly.
Page 38

Acerca delos controles enel acondicionador deaire.
Informaci6nimport:anteadicionala
Direcci6n del aire
Use la palanca para ajustar la direcci6n del airehacia
la izquierday la derecha solamente.
Cuidado y limpieza de!acondicionador de aire.
Rejilla y caja
Apague el acondicionador de airey retire elenchufe
del tomacorriente de la pared antes
de limpiar.
Filtro de aire
Elfiltro de aire detr6s de larejilla frontal debe
inspeccionarse y limpiarse porIo menoscada
30 diaso m6s a menudo sifuese necesario.
Para retirarlo:
Abra la rejilla deentrada empujando hacia abajo
las leng(Jetasen las esquinas superioresde la rejilla
de entrada, hasta que la rejillase encuentre en una
posici6n de 4S°.Retireelfiltro.
Limpieelfiltro con agua tibia yjab6n. Enju6gueloy
permita que seseque antes decolocarlo otra vezen
su lugar. Nolave elfiltro en un lavavajillas.
J
Para limpiar, useagua y un detergente suave.
Nouse cloro o materiales abrasivos.
LengBetas LengBetas
a PRECAUCION:NOOPEREel
acondicionador de aire sinel filtro debido a que la
suciedad y las pelusasIo obstruirdn y reducirdn su
rendimiento.
Bobinas para exteriores
Sedeben inspeccionar con frecuencia lasbobinas
en el lado exterior delacondicionador de aire.Si
las mismasest6n obstruidas con suciedad u holl[n,
podr[an limpiarse profesionalmente.
C6mo insertar las pilas en el control remoto
-1--1 Retirela cubierta de la piladesliz6ndola
de acuerdo con la direcci6n de laflecha.
[2] nserte pilas nuevas cercior6ndose deque los
polospositivos (+)y negativos (-) estdn
orientados correctamente.
[--_ Coloque lacubierta otra vezdeslizdndola
en su lugar.
38
NOTAS:
, Use2 pilas alcalinas "AAA"de 1,5voltios.
No usepilasrecargables.
, Retirelas pilasdel control remoto si no va
a usar elsistema por un perbdo prolongado.
,No mezcle baterfas nuevas y viejas. No mezcle
baterfas alcalinas, estc_ndar(carbono-cinc)
orecargables (ni-cad,ni-mh,etc.
Page 39

I str
de i
CCl
stal
o
Acondicio dot
J
Cl
®
de
o
ire
ANTES DE INICIAR
Lea estas instrucciones completa y
cuidadosamente.
" IMPORTANTE --Guorde estos
instrucciones poro uso del inspector local.
. IMPORTANTE -Observetodoslos
c6digosy 6rdenes de ley.
, Nota al instalador - AsegOrese de dejor estos
instrucciones con el consumidor.
, Nota alconsumidor - Conserve estos
instrucciones poro referencio futuro.
, Nivel de destreza - Lo instoloci6n de este
oporoto requiere de destrezas mec6nicos
b6sicos.
, Tiempo de ejecuci6n - Aprox. i horo
, Recomendamos dos personas para
la instalaci6n de este producto.
, La instalaci6n apropiada es la responsabilidad
del instalador.
, La falla del producto debido a una instalaci6n
inadecuada no est6 cubierta
por la garantia.
, Cuando instale este acondicionador
de aire, DEBE usar todas las piezas
suministradas y usar procedimientos adecuados
de instalaci6n.
A PRECAUCl6N:
Bojo ninguno circunstoncio corte o remuevo Io
tercero p0o (conexi6n o tierra) del cable el6ctrico.
No combie el enchufe en el cable el#ctrico
de este ocondicionodor de aire.
REQUISITOS ELECTRICOS
Algunos modelos requieren tomocorrientes de
@
Elenchufe detres pOascon conexi6n atierra
minimiza Io posibilidad de descargas el#ctricas.Si
el tomacorriente de la paredque usted planea usar
solamente tiene 2 tomas, essu responsabilidadhacer
que un t6cnico Ioreemplace por unode tres tomas
con conexi6na tierra.
Elcable de alimentoci6n incluye un dispositivo para
interrupci6n decorriente. Seincluye un bot6n de prueba
yde reinicioen eldispositivo.Eldispositivodebe ponerse
a prueba peri6dicamente: primero sepresionael bot6n
deTEST(prueba)y luego RESETIreinicio) mientras se
encuentra enchufado altomacorriente. Siel bot6n TEST
nosedispara o siel bot6n RESETno quedaenganchado
dejede utilizar elacondicionador de airey comuniquese
con un t6cnico calificado.
115/120 voltios de corriente olterno y 60 Hz
conectodos a tierro, protegidos con un fusible
de dilotoci6n de tiempo de 15 omperios
o un cortacircuitos.
Algunos modelos requieren 230/208 voltios,
de corriente alterno, protegidos por un fusible
de dilotoci6n de tiempo
o un cortacircuitos. Estos modelos deberion
instolorse en un romol exclusivo del circuito
poro un rendimiento m6s notable y pora
prevenir sobrecargos en los circuitos de
cobleodos de su caso o opartomento,
Iocual podria representar un riesgo
de incendio por el sobrecalentamiento de los
alambres.
Los cables coseros de oluminio podrion presentor
problemos especiales. Consulte
o un t#cnico electricisto colificodo.
39
Page 40

Instruccionesde instalaci6n
HERRAMIENTAS QUE NECESITARA
Undestornilladorde estrella
PARTES INCLUIDAS
(Apariencia puede variar)
montaje
superior
Rielde
Tijeraso cuchilla
Undestornillador
conhoja plana
Nivel
Junta del riel superior (1) %11odel marco de la
J
_._m pl:q_!!i!!i! I de
Una regla o cinta m@trica
(fino, con adhesivo
en la parte posterior)
L6piz
ventana
acorde6n
derecho
Riel lateral(2)
Soportes en V (2)
Tipo A Tipo B Tipo C
tornillos (10) tornillos (2) tornillos (4)
Soporte angular Trabas para
para alf6izar (2) marcos (2)
40
Perno tipo Perno tipo
Econ 2 F con 2
tuercas (4) tuercas (2)
Page 41

Instruccionesde instalaci6n
_] REQUISITOS PARA LA VENTANA
. Estas instrucciones son para una
ventana est6ndar de dos pliegues.
Usted necesitar6 modificar el proceso para otros
tipos de ventanas.
, Todas laspartes de apoyo deben quedar totalmente
aseguradas a algOn metal,mamposter[a o a la
madera.
. Eltomacorrienteel@ctricodebeestaral alcancedelcable
el6ctricodelacondicionadorde aire.
. Sigalasdimensionesdelatabla y lailustraci6nseg6nsu
modelo.
t
!8 !/2"
/
26" - 41" !
(conpanelesdeacorde6n)
[] REQUISITOS DE UNA VENTANA
DE TORM ENTAS
Unmarco de ventana de tormentas no permitir6 que
el acondicionador de aire seincline hacia el exteriory
evitar6 que drene apropiadamente.Parasolucionareste
problema,adhiera un pedazode madera a el umbral.
PEDAZOSDEMADERA
ANCHO: 2"
LONGITUD: Lo suficientemente largo coma para
ajustar en el interior del marco de la ventana.
GRUESO:Paradeterminar elgrueso, coloque un pedazo
de madera enel umbral para hacerla 1/2" m6s alta que
la parte superiordel marco de laventana de tormentas
o del marco vinilo.
P_guelo firmemente con clavos o con tornillos
proporcionados por el instalador.
1/2" m6s alto
que el marco
de ventana de __
tormentas
Marco de
ventana de
tormentas
-nT b,- #/'i
1/2" mas alto queel marco
vinilo(enalgunasventanas)
I'I ? j==------_ t Hadera
Um ra,
17]PREPAREEL ACONDICIONADOR DE AIRE
r_ Baje el panel frontal y quite el filtro. Quite el panel
frontal levant6ndolo hacia arriba en un 6ngulo.
r_ Quite los cuatro tornillos frontales. Cons@velos para
volver a instalar la carcasa frontal.
r_ Tome las esquinas inferiores de la parrilla mientras
presiona hacia adentro sobre los costados de la
carcasa con sus dedos. Tire hacia afuera para
liberar y lev6ntelo.
NOTA: No tire del borde inferior hacia usted m6s de
3" porque puede da_ar las leng@etasde la parrilla.
t ,I,
FRENTE
[]
Cuando se retire la parrilla del frente, el panel
de control aOnse encontrar6 adjunto par un
arn6s. Gire la parrilla de modo que pueda ver la
parte trasera de la misma. Retire los 2tornillos
para separar el espacio del panel de control
de la parilla. NOTA:Aseg@esede guardar estos
tornillos.Losnecesitar6 m6s adelante en la
instalaci6n.
Quite tornillos
41
Page 42

Instruccionesde instalaci6n
r_ PREPAREEL ACONDICIONADOR DE AIRE
F1 Quite Io tornillo de lado de la carcase.
Cons6rvelo en una ubicaci6n segura.
NOTA: Aseg6rese de guardar esto tornillo. Lo
necesitar6 m6s adelante en la instalaci6n.
FRENTE
Quite y conserve el tornillo de cable a tierra.
Deslice el acondicionador de aire de la carcase
tomando la manija de la bandeja inferior y
tirando hacia adelante mientras se sujeta la
carcase. No tire o levante el 6rea de descarga
de poliestireno
No tire o
levante
este zone
porque
pueden
provocarse
da_os ala
unidad.
r_ PREPARE LA CARCASA
FI Deslice cada soporte por el extremo de cada
panel correspondiente. La figure muestra la
orientaci6n de cada panel de acorde6n yjunta de
soporte lateral relativos ala caja desde una vista
superior de la unidad.
Soporte lateral
Panel para cubrir la ventana
Soporte I
Panel para cubrir la ventana
[] Deslice los paneles de acorde6n de izquierda a
derecha sobre los rieles de montaje superior e
inferior.
Izquierdo superior Derecho superior
FRENTE
[_] PREPARE LA CARCASA
[] Sujete lajunta del riel superior ala parte
inferior del riel superior.
r_ Instale el riel de montaje superior con 4 tornillos
tipo A desde la parte interior de la carcase.
Presione firmemente pare introducir los tornillos
dentro de la junta y a trav6s del riel de montaje
superior.
Top mounting rail
Rielde montaje inferior
r_ Adjunte los soportes laterales ala caja usando 6
tornillos tipo A.
42
Page 43

Instruccionesde instalaci6n
I_ PREPARE THE WINDOW AND INSTALL
THE CASE
[] Corte el sello de la banda de la ventana a
la Iongitud apropiada. Despegue la parte posterior
y pegue el sello a la parle inferior de la banda de la
ventana.
Abra la ventana y marque el centro del alf6izar
n
de laventana.
Con cuidado, deslice la carcasa dentro de la
n
ventana y c6ntrela. Baje la ventana detr6s del
riel de montaje superior. Tirede la parte inferior
de la carcasa hacia adelante para que el riel
de montaje inferior quede firme contra la parte
trasera del alf6izar de la ventana. Instale la
carcasa en el alf6izar de laventana utilizando
2 tornillos tipo B para un marco de madera o
dos tornillos tipo C con oporte para bloqueo de
ventana para otros tipos de ventanas. Perfore
orificios piloto, si fuera necesario.
[_ PREPARE LA VENTANA E INSTALE LA
CAJA
r_ Enlaceel soporte en v y laficha del soporte enV
con una tuerca y un tornillo Tipo F.
Tornillo y tuerca
tipo E
Izquierda -.. i
Soporte
angular ------.__ _
delalf@izar _i_ ¢
c_
Tornillo y tuerca tipo F
para soporte en V
Coloquelos soportes en
n
Ven la basede la carcasa
para que est6ncerca de
la pared exterior,sujete
el soporte en v a cada
lado de la parte inferior
de la carcasa con pernostipo
F,2 para cada soporte.
Z] Ajuste lossoportes angularesdel alf6izarde modo
que descansen sobre elalf6izar.
Sopo_e
en V
AIf@izar
2tornillos TipoB
)orte
r_ Extienda los paneles en acorde6n izquierdo
y derecho hacia los marcos verticales de
la ventana. Perfore orificios piloto y sujete
las esquinas superiores e inferiores con
2 tornillos tipo c.
Tornillos
Tipo C
Tornillos
TipoC
43
Page 44

Instruccionesde instalaci6n
PREPARE LA VENTANA E INSTALE LA
CAJA
APRECAUCI6N:
Enventanas construidas de vinil o de similar
construcci6n, conecte el soporte de cierre de la
ventana a el marco de la Vinilo
ventana para prevenir da_o a
la ventana y vidro
quebrado.
Conecte el soporte de cierre
de la ventana con uno tornillo
Esta unidad cuenta con dos fichas
tipo C. __
para bloqueo de ventana
J'T-Jcorte lajunta de espumasuperiordela ventanaal
anchodela ventana.
Rellenela espumaentre
FI
elvidrio yla ventana
paraevitarque airee
insectos
seintroduzcanen
la habitaci6n.
NOTA:Silajunta provistano esadecuadapara su
ventana,obtenga elmaterial apropiadoIocalmente
pararealizarunaadecuadainstalaci6ndesellado.
E] INSTALE EL ACONDICIONADOR EN LA
CARCASA
Vuelva a instalar Io tornillo quitados antes,
D
en lado de la carcasa. IMPORTANTE: LO
TORNILLO DE CONE×I6N A TIERRA DEBER_,N
SERREINSTALADOS PARA ASEGURAR UNA
CONEXI6N A TIERRA ADECUADA.
r_ Reinstale el control en el espacio del panel
reemplazando los 2 tornillos que retir6 previamente.
Reinstale tornillos
r_ sujete la parrilla frontal a la carcasa
introduciendo las leng0etas de la parrilla dentro
de las ranuras de la parte superior frontal de la
carcasa. Presione la parrilla hacia adentro.
r_ INSTALE EL ACONDICIONADOR EN
LA CARCASA
Desliceel acondicionador de airedentro de la
E]
carcasa de la bandeja inferior. No haga presi6n
sobre los controles, carcasa de poliestireno de
la descarga de aire o las serpentinas de aletas.
Verifique que el acondicionador de aire se
encuentre firmemente asentado.
No presione
en estas 6reas
porque puede
dar_arsela
unidad.
Bandejainferior
j_] Reemplace los tornillos.
[] Instale el filtro y la rejilla frontal.
rG--1Enchufe el acondicionador de aire.
44
Page 45

Instrucciones de Instalaci6n a Trav s de la Pared-Opcional
La carcasa puede instalarse a troves de la pored en
construcciones e×istentes y nuevas.
Leo par completo y luego siga todos los pasos,
NOTA: Con excepci6n de los montojes de soportes en V
(incluidos), obtengo todos los moteriales en farina local
paro montor el acondicionodor de aire a troves de Io
pared.
rl] IMPORTANTE
Lo instolaci6n o troves de Io pared no es apropiodo si
alguno de los persianas loteroles o superiores
de lo carcaso quedar6n obstruidas par la pored.
Todas los persionos Ioterales y superiores de
Jacarcase deben proyectarse sabre la pared exterior
de lo pared.
El lado interior de lo corcoso debe proyectorse dentro
de lo hobitoci6n lo suficiente paro patenciar al m6×imo
el equilibria de lo unidod.
La corcaso debe estor instoloda de Iodo a lado y con
una peque_a inclinaci6n del frente hacia la porte
trosero. UtiJice un nivei; io incJinaci6n correcto de io
carcoso hodo el exterior no deber_ set de m6s de 1/2
burbuja.
Se requiere un 6ngulo de dintel paro sostener Iodrillos
o bloques sobre Io aberturo.
Se requiere un revestimiento de oisloci6n qua
debe extenderse par Io Iongitud de Io aberturo pare
aseguror que no hoyo p_rdidos en los covidodes
internes.
-_q)uite el acondicionador de aire dela caja.
Para instrucciones espec[ficas,consulte las
Instrucciones de instalaci6n enuna ventana.
-_Aseg0rese de que haya un tomacorriente cerca de la
ubicaci6n del orificio o efectOearreglos para instalar un
tomacorriente.
i ,,
II................. _- ,_ )*_,_
F] IMPORTANTE (cont.)
--D-I Uecon 1/4tornillospar(] madera sujetospar Iomenos
una pulgada dentro dela estructura de soporte de
la pared.
NOTA:Perforeorificiospiloto,sifuera necesario,pareuna
instalaci6nadecuada.Sielarmaz6n esm_sgrande,utilice
cu6as para prevenirla deformaci6n de lacarcasa.
r_ TERMINE LA ABERTURA
DE LA PARED
r_utilice calafateo enlos cuatro costados del
ladoexterior de la carcasa para que no
ingresehumedad a la porte intema. Elusode
revestimiento deaislaci6n (rieldegoteo)evitar6
aQnrodsel ingresodeagua dentro de la paredy
en la parle exterior del edificio.
Lfnea de
yeso
Angulo de dintel
Calafateo
EXTERIOR
Persianas de
aire (la parte
los costados
deben
proyectarse
sobre el lado
superiory t'
extemo de
la pared)
y calafateo
encima y
revestimi
aislaci6n)
Relleno de_
Soportes en V Riel
Revestimiento de
aislaci6n (riel de
goteo)
de la carcasa inferior
INTERIOR
Rielinferior
J
i
,,
-JColoque la carcasa en la abertura de la pared y
coloque gu[as de soporte de madera entre la parte
inferior de la carcasa y el revestimiento de aislaci6n
sobre ambos lados del riel inferior. Deben ser de la
misma altura del riel inferior y de la misma Iongitud de
la abertura de la pared.
:i
Revestimiento de aislaci6n
(riel de goteo)
Gufas de soporte de madera
J-_ Coloqueel acondicionador de airedentro dela
carcasa. Parainstrucciones especificas,consulte
los Instruccionesde instalaci6n enuna ventana.
4S
Page 46

Solucionar problemas.
Causasposibles Qu_ hacer
noendende est6desconectado, enchufadototalmenteeneltomacorriente.
Elacondicionadordeaire Elflujodeaireest6restringido. • Cerci6resedequenoexisteningunocortina,persianao
noenfriacomadeberia mueblebloqueandoelfrentedelacondicionadordeaire.
Elacondicionado-rdeaire Elhielobloqueaelflujo • Colaqueloscontrolesen HighFan(VentiladorAlto)6HighCool(Frfo
seest6congelando deairehaciaelacondicionador Alto)y ajusteeltermostatoa unatemperaturem6salto.
Elacondicionadordeaire • Cerci6resedequeelacondicionadordeaireest6
Elfusiblesedispar6/ • tnspeccionelosfusibles/ cajade interruptoresdela casa
elcortacircuitossedispar6, yreemplacecualquierfusibleoreajusteelinterruptor.
Interrupci6nenel
suministroel6ctrico.
Eldispositivodeinterrupci6n • Presioneelbot6nRESETubicadoenelcabledealimentaci6n.
decorrientese haactivado. • Sielbot6nRESETnosemantieneensulugar,noutilicem6s
Elfiltrodeaireest6sucio. • Limpieelfiltrocoda50dos parIo menos.Verlasecci6n
Lahabitaci6npodrfahaber • Cuandoelacondicionadordeaireseenciende,usted
estadocaliente, necesitadarletiempoparaqueenfri6lahabitaci6n.
Elairefrb se est8escapando. • Cerci6resedequelosregistrosde lacalefacci6nnoestOn
Lasbobinasdeenfriamiento • Ver"ElacondicionadordeaireseestOcongelando"mOsadelante.
secongelaron.
deaireevitandoqueseenfrfe
la habitaci6n.
Launidadsereiniciar6autom6ticamenteconlaconfiguraci6n
utilizadapar Oltimavezluegodereestablecerlaelectricidad.
• Existeunretrasodetiempoparprotecci6n(deaproximadamente
3 minutos)paraevitarladesconexi6nparsobrecargadelcompresor.
Parestaraz6n,esposiblequela unidadnocomiencea enfriarde
formanormalhastatranscurridos3 minutosdesdequevolvi6a
encenderse.
elacondicionadorde airey comunfquesecon unt6cnicocalificado.
deCuidadoy limpieza.
abiertosy seencuentranretornandoelairefib.
Hayaguagoteandoafuera Tiempoh0medoy caliente. • Estoesnormal.
Hayaguagoteandoenel Elacondicionadordeaire • Paradrenarelaguaapropiadamente,cerdoresedeque
interiordela habitaci6n noest6inclinadohaciaafuera, elacondicionadorde aireest6inclinadoligeramente
Seacumulaagua en Lahumedadremovidadelaire • Estoesnormalparuncortoperbdoen @easconpoca
la bandeja y sedrenahastala bandeja, humedad;normalparunperbdo detiempom@spostergado
desdeelfrentehaciaatr6s.
en0reasm0sh0medas.
Sonidos de operaci6n normales
Quiz6s escuche un sonido met61ico causado por
el agua tomada y tirada contra el condensador
en los d[as Iluviosos o cuando la humedad
es alta. Esta caracter[stica de dise_o ayuda a
remover
la humedad y mejora laeficiencia.
, Quiz6sescuche que eltermostato hace clic
cuando el compresor hace cicloentre encendido
y apagado.
, Elagua seacumula en la bandeja durante d[as
Iluviososo con mucha humedad. Elagua podr[a
derramarse y gotear desdeel lado externo de
la unidad.
, Elventilador podr[afuncionar aun si el compresor
no Iohace.
46
Page 47

Notas. GEAppliances.com
47
Page 48

Notas.
48
Page 49

Notas. GEAppliances.com
49
Page 50

Garantia de su acondidonador de aire-garantia fimitada deun a o.
Todos los servicios de garantia los proporcionan nuestros
Centros de Reparoci6n de Fdbrica o nuestros tdcnicos Customer
Core®autorizados. Pare concertar una cite de reparaci6n,
en fineo, 24 horus ol die, visftenos al ge.com, o llama o1800.
GE.CARES(800.432.2757). Cuondo llama pore solicitor servicio,
par favor tango o mane el nOmero de serie y el nOmero de
modulo.
GE reemplazar_:
Cualquierparte del acondicionador de aireque falle debido a defectos en losmateriales o en
A partir de !afecha
dela compra Original
la fabricaci6n. Durante esta garantia limitada de un aria, GEtambi@nproporcionarc_,sin costa
alguno, toda la mane de obra y el serviciorelacionado-para reemplazar partesdefectuosas.
Viajesde servicio a su casa para mostrarle c6mo
fundona el equipo.
, Instalaci6n o entrega inapropiada, o mantenimiento
impropio. Si usted tiene un problema durante la
instalaci6n, o si su acondicionodor de oire no tiene la
copacidad de enfriamiento que usted necesita, p6ngase
en contocto con nuestro distribuidor o instalador.
Usted es responsable de proporcionar los facilidodes
de cone×i6n el_ctrico necesorias.
Fallo del producto resultante de modificaciones al
producto o debido a use irrazonable incluyendo no
propordonor mantenimiento rozonable y necesorio.
Grape aqui su recibo.
Serequiem facilitar prueba
de la fecha de compra original
para obtener un servicio
bajo la garantia.
Reemplazo de fusibles de la case o reajuste del sistema
de circuitos.
iiiiiiiiiiii_i_
Folios debido a la corrosi6n en modulus que no est6n
protegidos centre Io corrosi6n.
iiiiiiiiiiii_i_
Da_o al producto causado per voltaje inapropiado hada
el equipo, accidentes, incendios, inundaciones o actos
de la naturaleza de fuerza mayor.
iiiiiiiiiiii_i_
Da_os incidentoles o consecuenciales causados per
defectos posibles con este ocondidonodor de oire.
Da_os despu_s de la entrega.
En locales comerciales, Jamano de obra necesaria para
retJrar la unidad hacia un lugar para revJsi6n por parte
de un t_cnico individual.
EXCLUSION DE GARANT[AS IMPL[CITAS--Su (1nice y e×clusivo derecho es la reparaci6n del producto,
tel y come se indica en esta Garantie limitada. Cualquier garentia impficite, incluyendo las garantias
implicitas de comerciabilidad o adecuaci6n pare un fin determinado, est_n limitadas a un a_o o el
periodo de tiempo m_s breve permitido per la lay.
Esto garonda se extiende ol compmdor original y cualquier comprador posterior de productos compmdos pare usa
residencial dentro de Estados Unidos. Si el producto estd situado en undrea qua no dispone de servicio par porte
de un proveedor de servicio autorizado de GE,podria tuner que hacerse cargo de los castes de envio o bien
podrio solicitdrsele qua Ileve el producto a una centre de servicio de GEautorizado pare realizer la reparaci6n.
En Alaska, la garantia excluye elcosta de envio o los visitas de servicio a su casa.
Algunos estados no permiten la exclusi6n o los limitaciones de dahos incidentales o consecuenciales. Estagarantfa
do derechos legales espedficos, y usted podffa tener otros derechos que variardn de estado a estado. Pare sober
cudles son sus derechos legales, consulte a la oficina de asuntos del consumidor local o la oficina del Attorney General
en su Iocalidad.
Garante: General Electric Company. Louisville, KY 40225
50
Page 51

Servicioa! consumidor.
P6gina WebdeGEAppliances GEAppliances.com
iTiene alguna pregunta sabre suelectrodom6stico? iPruebela pc_ginaWeb de GEAppliances,cualquier
d[a delaho! Para mayor conveniencia y servicio mc_src_pido,ya puede descargar losManuales de los
Propietarios,pedir piezaso inclusohacer una cita en I[neapara que vengan a realizaruna reparaci6n.
RealLifeDesignStudio(Estudiodedisefioparalavidareal) GEAppliances.com
GEapoya el concepto de Dise_o Universal-productos, serviciosy ambientes que pueden usar gente detodas
lasedades, tama_os y capacidades.Reconocemosla necesidad de diseharpara una gran gama dehabilidades
y dificultadesfisicas y mentales. Param6s detalles cobre las aplicaciones deGEDise_oUniversal,induyendo
ideas dedise_o para la cocina para personas con discapacidades, mire nuestra p6gina Web hay mismo. Para
personas con dificultades auditivas,favor de Ilamar al 800.TDD.GEAC(800.833.4322).
Piezasy accesorios GEAppliances.com
Aquellos individuos con la calificaci6n necesaria para reparar sus propios electrodom6sticos pueden
pedir que se les manden las piezas o accesorios directamente a sus hogares (aceptamos las tarjetas
VISA,klasterCard y Discover). Haga su pedido en I[nea hay, 24 horas cada d[a o Ilamar par tel6fono
a1800.626.2002 durante horas normales de oficina.
Lasinstrucciones descritas en este manual cubren los procedimientos a seguir par cualquier usuario.
GEno est(_no apoya que sele proporcione ningOnservicioal acondicionador de aire.Vehementemente
recomendamos que usted no intente proporcionar servicioal acondicionador de aire ustedmismo.
P6ngase en cantacta con nasatras GEAppliances.com
Sino estc_satisfecho con el servicio que recibe de GE,p6ngase en contacto con nosotros en nuestra pc_gina
Web indicando todos los detalles as[ coma su nOmero de tel6fono o escr[banos a:
General Manager, Customer Relations
GEAppliances,Appliance Park
Louisville,K'/40225
51
Page 52

Consumer Support.
GE Appliances Website GEAppliances.com
Have a question or needassistance with your appliance?Try the GEAppliancesWebsite 24 hours a day,
any day of the year! Forgreater convenience and faster service,you can now download Owner's Manuals,
or evenorder parts on-line.
Real Life Design Studio GEAppliances.com
GEsupports the Universal Designconcept-products, servicesand environments that can beused by
people of allages,sizesand capabilities.We recognizethe need to designfor a wide rangeof physical
and mental abilities and impairments. Fordetails of GE'sUniversalDesignapplications, including kitchen design
ideasfor people with disabilities, checkout our Website today. Forthe hearing impaired,pleasecall 800.TDD.
GEAC(800.833.4322).
Parts and Accessories
Individuals qualified to servicetheir own appliances can have parts or accessoriessent directly to their homes
(VISA,iVlasterCardand Discovercards areaccepted).Order on-line today, 24 hours everyday or
by phone at 800.626.2002 during normal businesshours,
Instructions contained in this manual cover procedures to be performed by any user. GE does not support
any servicing of the air conditioner. We strongly recommend that you do not attempt to service the air
conditioner yourself.
Contact Us
If you are not satisfiedwith the serviceyou receivefrom GE,contact us on our Website with all the details
including your phone number, or write to: GeneralManager, Customer Relations
GEAppliances,Appliance Park
Louisville,KY40225
GEApplia nceParts.com
GEAppliances.com
Printed in China
 Loading...