

Page 1
0
GEAppliances.com
Safety Instructions ...................z, 3
Operating Instructions .............4, s
AEN08*
Care and Cleaning
Air Filter .............................................................6
Outdoor Coils ..................................................6
0_
0_
0
Installation Instructions ......7-12
Troubleshooting Tips.................14
Normal Operating Sounds ....................14
Consumer Support
Consumer Support .................Back Cover
Ownership Registration for
Customers in Canada only ...........15, 16
Warranty for Customers
in Canada ......................................................17
Warranty for Customers
in the USA ....................................................18
*ENERGY STAR@ labeled product
Climatiseur
Lo section ffonqoise commence _ Io poge 19
Acondicionodor
deoire
Lo secci6n en espohol empiezo en Io pdgino 35
0_
ENERGYSTAR
As an ENERGYSTAR@partner, GE has
determined that this product meets
the ENERGYSTAR®guidelines for
energy efficiency.
Write the model and serial numbers here:
Model #
Serial #
Find these numbers on a label on the side of
the air conditioner.
49-7663 12-10 GE
Page 2
IMPORTANT SAFETY INFORMATION.
READ ALL INSTRUCTIONS BEFORE USING.
WARNING!
Foryour safety, the information in this manual must be followed to minimize the risk of fire, electric
shock or personal injury.
SAFETYPRECAUTIONS
Use this appliance only for its intended
purpose as described in this Owner's
Manual.
This air conditioner must be properly
installed in accordance with the Installation
Instructions before it is used.
Never unplug your air conditioner by pulling
on the power cord. Always grip plug firmly
and pull straight out from the receptacle.
Replace immediately all electric service
cords that have become frayed or otherwise
damaged. A damaged power supply cord
must be replaced with a new power supply
cord obtained from the manufacturer and
not repaired. Do not use a cord that shows
cracks or abrasion damage along its length
or at either the plug or connector end.
If the receptacle does not match the plug,
the receptacle must be changed out by u
qualified electrician.
Turn the unit OFFand unplug your air
conditioner before making any repairs
or cleaning.
NOTE: We strongly recommend that any
servicing be performed by a qualified
individual.
For your safety...do not store or use
combustible materials, gasoline or other
flammable vapors or liquids in the vicinity
of this or any other appliance.
Allair conditioners contain refrigerants,
which under federal law must be removed
prior to product disposal. Ifyou are getting
rid of an old product with refrigerants, check
with the company handling disposal about
what to do.
These R410A air conditioning systems
require contractors and technicians to use
tools, equipment and safety standards
approved for use with this refrigerant.
DO NOT use equipment certified for R22
refrigerant only.
HOW TO CONNECT ELECTRICITY
Do not, under any circumstances, cut or remove
the third (ground) prong from the power cord.
For personal safety, this appliance must be
properly grounded.
DO NOT use an adapter plug with this
appliance.
The power cord of this appliance is equipped
with o 3-prong (grounding) plug which mutes
with u standard 3-prong (grounding) wall outlet
to minimize the possibility of electric
shock hazard from this appliance.
Power cord includes u current interrupter device.
A test and reset button is provided on the plug
case. The device should be tested on u periodic
basis by first pressing the TESTbutton and then
the RESETbutton while plugged into the outlet. If
the TESTbutton does not trip
or if the RESETbutton will not stay engaged,
discontinue use of the air conditioner and
contact u qualified service technician.
2
Have the wall outlet and circuit checked by
a qualified electrician to make sure the outlet
is properly grounded.
Where a 2-prong wall outlet is encountered,
it isyour personal responsibility and obligation to
have it replaced with a properly grounded
3-prong wall outlet.
The air conditioner should always be plugged
into its own individual electrical outlet which has
a voltage rating that matches the rating plate.
This provides the best performance and also
prevents overloading house wiring circuits which
could cause a fire hazard from overheated wires.
See the Installation Instructions, Electrical
Requirements section for specific electrical
connection requirements.
Page 3
GEAppliances.com
WARNING!
USEOF EXTENSION CORDS
RISK OF FIRE. Could couse serious injury or
death.
• DO NOT use an extension cord with this
Window Air Conditioner.
• DO NOT use surge protectors or multi-outlet
adaptors with this Window Air Conditioner.
READAND FOLLOWTHISSAFETYINFORMATIONCAREFULLY.
SAVE THESE INSTRUCTIONS
Page 4

About the controlson the air conditioner
Features and appearance will vary.
Lights next to the touch pads on the air conditioner control panel indicate the selected settings.
The display always shows
the room temperature
except when setting the
Set temperature or the
Delay timer.
Light indicates the unit
is in the temperature or
delay time Set mode.
Lig :indicates the delay timer is set.
Air Conditioner Controls
Controls
O ower Pad O
Turns air conditioner on and off.When turned
on,the display will show the room temperature.
Display
Showsthe room temperature or time remaining
on the Delaytimer. Showsthe Settemperature
while setting the temperature in Cool or Energy
Saver modes.TheSet light will turn on while
setting.
NOTE:Thedisplay will change to show the room
temperature after settings have been made.
Torecall the Settemperature, pressthe Temp
Increase Aor Decrease vpads.
Temp Increase A/Decreasev Pads
Useto set temperature when inCoolor Energy
Savermode. TheSetlight will turn on while
setting.
Delay Timer Increase A(+)/Decreasev(-)
Pads
Eachtouch of the Increase A/Decrease • pads
on the unit or the Increase + / Decrease - pads
on the remote control will set the delay time
when usingthe Delay 1-24hr timer (+).The Set
light will turn on while setting.
O Fan Speed Pads
Useto set the fan speedto Low, Med, High
or Auto onthe unit. NOTE:On the remote
control, usethe fan speed Increase + /
Decrease- pads to set the fan speedsto Low,
Medor High. Usethe Auto pod to turn Auto
fan on.
Mode Pad
Useto set the air conditioner to Cool, Energy
Saver or Fan Only mode.
Delay Pads
Q
Delay ON--When the air conditioner isoff, it can
be set to automatically come on in 1 to 2/4hours
at its previous mode and fan settings.
Delay OFF--When the air conditioner is on,
it can beset to automatically turn off in J_to
2/4hours.
How to set:
Pressthe Delay 1-24hr pad on the unit or the
+ pad on the remote control. Eachtouch of the
Increase A/Decrease •pads on the unit or the
Increase + / Decrease - pads on the remote
control will set the timer in 1-hour intervals.The
Set lightwill turn on while setting.
Toreview the remaining time onthe Delay
1-24hr timer, pressthe Delay 1-24hr pad on the
unit or the + pad on the remote control. Usethe
Increase A/Decrease •pads on the unit or the
Increase + / Decrease - pads on the remote
control to set a new time if desired.
Tocancel the timer, pressthe Delay
1-24hr pad until the light on the Delay 1-24hr
pad goes off.
Power Outage Recovery Feature
Inthe case of a power outage or interruption, the
unit will automatically re-start in the settings last
4
used after the power isrestored. Ifthe Delay 1-24hr
feature was set, it will resume countdown. Youmay
need to set a new time if desired.
Page 5
Cool Mode
Usethe Cool mode at Low, Med, High or Auto Fan
Speedfor cooling. Usethe Temperature Increase •
/ Decrease • padsto set the desired temperature
between 64°F and 86°F in 1% increments.
An electronicthermostat isusedto maintain the room
temperature. Thecompressorwill cycleon
and off to keepthe room at the set levelof comfort.
Setthe thermostat at a lowernumber and the indoor
air will become cooler.Setthe thermostat at a higher
number and the indoor air will become warmer.
NOTE: If the air conditioner is off and is then turned on
while set to a Cool setting or if turned from a fan
setting to a Cool setting, it may take approximately
3 minutes for the compressor to start and cooling to
begin.
Energy Saver Mode
Controlsthe fan.
ON--The fan will cycle on and off with the
compressor. This results in wider variations of room
temperature and humidity. Normally used when the
room is unoccupied. NOTE: The fan may continue to
run for a short time after the compressor cycles off.
GEAppliances.com
Cooling Descriptions
ForNormal Cooling-Select the Cool mode and
High or Mealfan with a middle set temperature.
For Maximum Cooling-Select the Cool mode
and High fan with a lower set temperature.
For Quieter & Nighttime Cooling-Select the
Cool mode and Lowfan with a middle set
temperature.
Do Not Operate in Freezing Outdoor Conditions
Thiscool-only air conditioner was not designed for
freezing outdoor conditions. It must not be usedin
freezing outdoor conditions.
OFF--The fan runs all the time, while the compressor
cycles on and off.
Fan Only Mode
Use the Fan Only Mode at Low, Med or High fan
speed to provide air circulation and filtering without
cooling. Since fan only settings do not provide cooling,
a Set temperature cannot be entered. The room
temperature will appear in the display.
Auto Fan Speed
Setto Auto fan speedfor the fan speedto
automatically setto the speed needed to provide
optimum comfort settings with the set temperature.
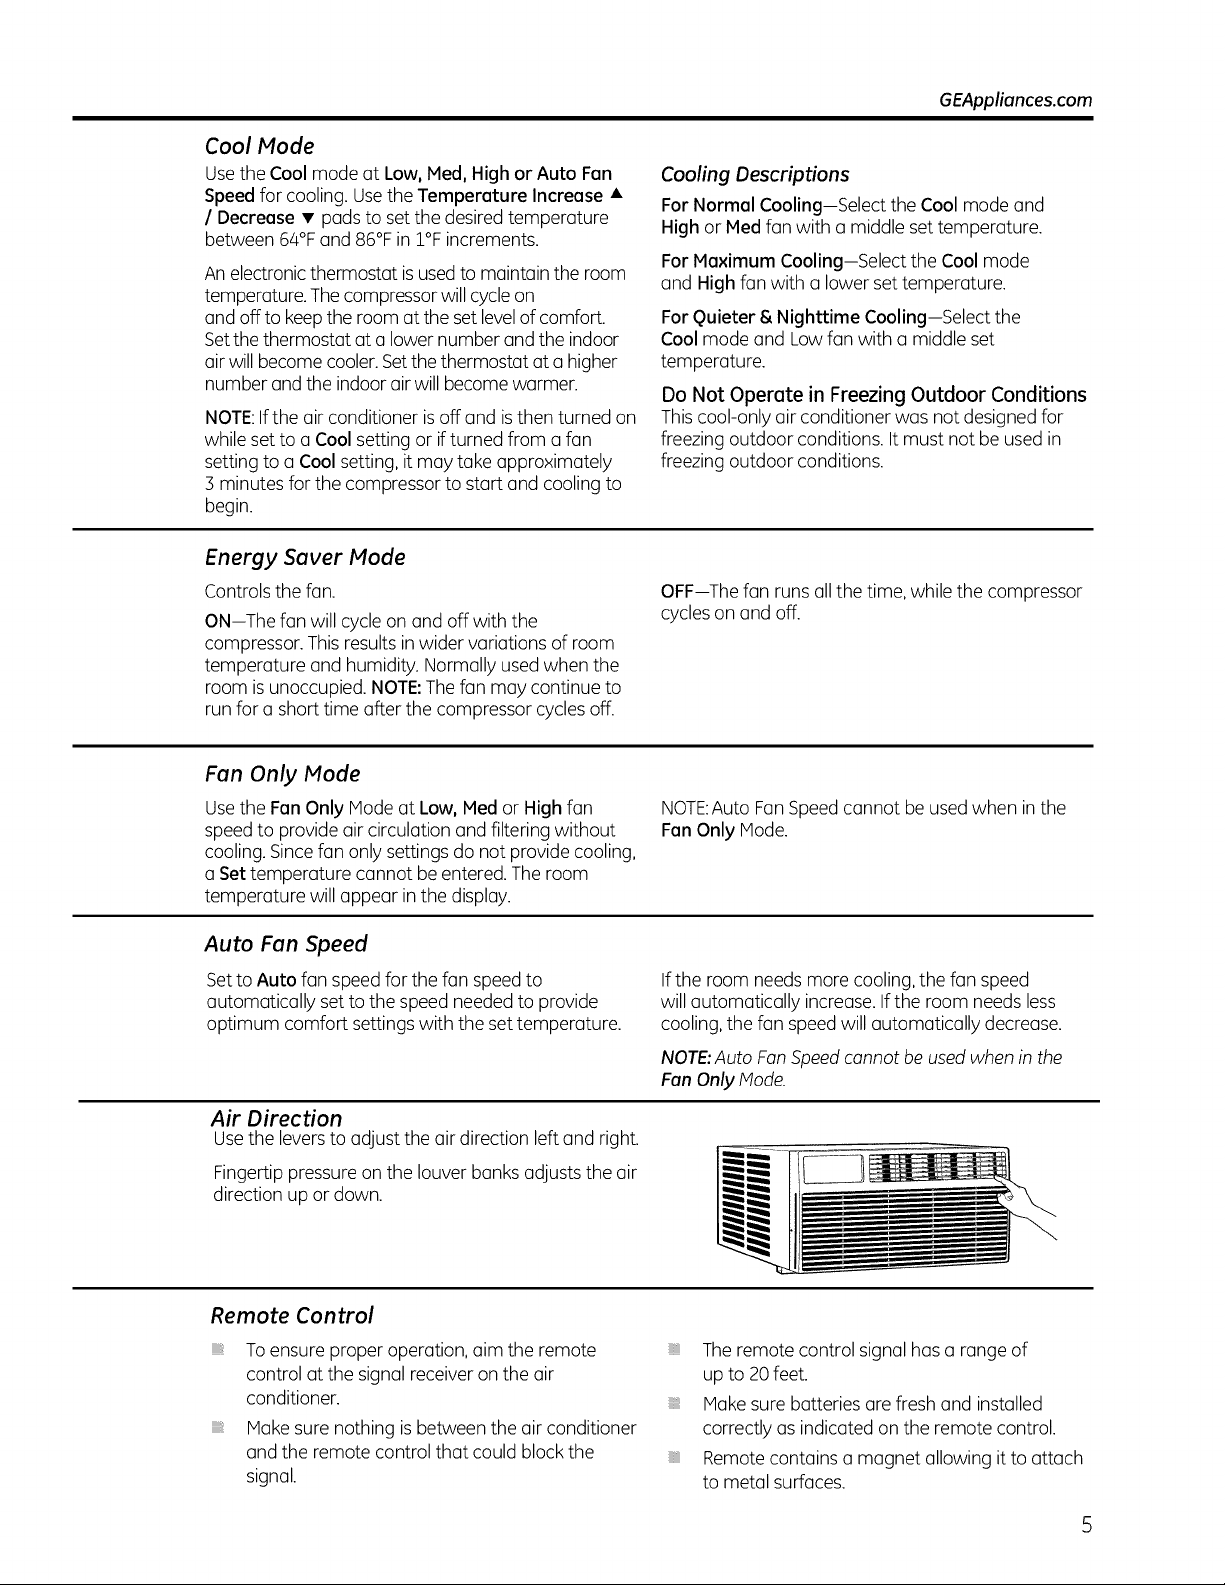
Air Direction
Usethe leversto adjust the air direction left and right.
Fingertip pressureon the louver banks adjuststhe air
direction up or down.
Remote Control
Toensure proper operation, aim the remote
control at the signal receiver on the air
conditioner.
Hake sure nothing isbetween the air conditioner
and the remote control that could block the
signal.
NOTE:Auto FanSpeedcannot be used when in the
Fan Only Mode.
If the room needsmore cooling, the fan speed
will automatically increase.Ifthe room needs less
cooling, the fan speed will automatically decrease.
NOTE:Auto FanSpeedcannot be used when in the
Fen Only Mode.
Theremote control signal has o range of
up to 20 feet.
Make sure batteries are fresh and installed
correctly as indicated on the remote control.
Remotecontains o magnet allowing it to attach
to metal surfaces.
Page 6
Care and cleaning of the air conditioner.
Grille and Case
Turnthe air conditioner off and remove the plug from Toclean, use water and a mild detergent. Donot use
the wall outlet before cleaning, bleach or abrasives.
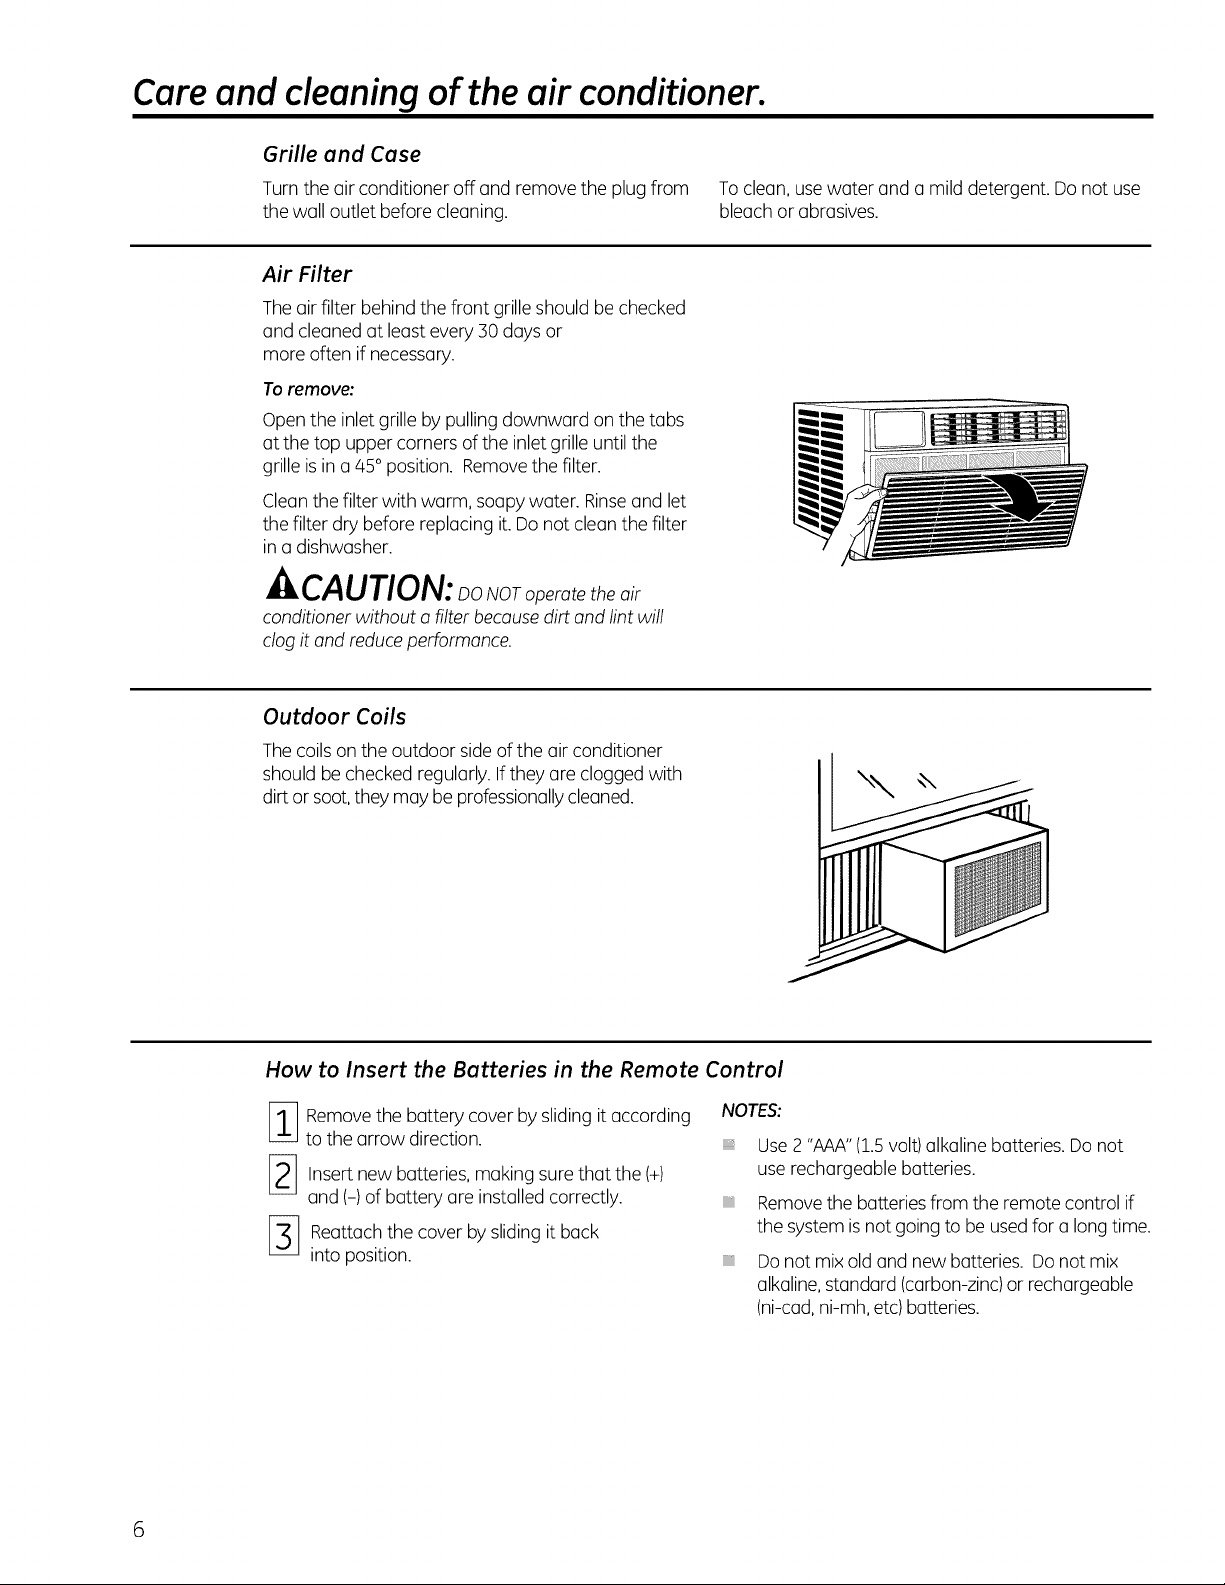
Air Filter
Theair filter behind the front grille should be checked
and cleaned at least every 30 days or
more often if necessary.
Toremove:
Open the inlet grille by pulling downward on the tabs
at the top uppercorners ofthe inlet grille until the
grille is in a 85° position. Removethe filter.
Cleanthe filter with warm, soapy water. Rinseand let
the filter dry before replacing it. Do not cleanthe filter
in a dishwasher.
-&CAUTION: NOTo erotetheair
conditioner without o filter becousedirt and lint will
clog it and reduceperformance.
Outdoor Coils
Thecoils on the outdoor side of the air conditioner
should be checked regularly. Ifthey are clogged with
dirt or soot,they may be professionallycleaned.
How to Insert the Batteries in the Remote Control
[_ emove the battery cover by sliding it according
to the arrow direction.
2_ Insert new batteries, making surethat the (+)
and (-) of battery are installed correctly.
-3] eattach the cover by sliding it back
into position.
NOTES:
Use 2 "AAA"(1.5volt)alkaline batteries. Do not
use rechargeable batteries.
Removethe batteriesfrom the remote control if
the system isnot going to be usedfor a long time.
Do not mix old and new batteries. Donot mix
alkaline,standard (carbon-zinc)or rechargeable
(ni-cad,ni-mh, etc) batteries.
6
Page 7

Installation
Air Conditioner
Instructions
-_ uestions? Call 800.GE.CARES (800.432.2737) or visit our Website at: GEAppliances.comIn Canada, call 1.800.561.3344 or visit www.GEAppliances.ca I
BEFORE YOU BEGIN
Read these instructions completely
and carefully.
• IMPORTANT - Savetheseinstructions
forlocalinspector'suse
• IMPORTANT - Observeallgoverning
codes and ordinances
• Note to Installer- Be sure to leave these
instructions with the Consumer.
• Note to Consumer - Keep these instructions for
future reference.
• Skill level- Installation of this appliance requires
basic mechanical skills.
• Completion time - Approximately 1 hour
• We recommend that two people install
this product.
• Proper installation is the responsibility
of the installer.
Product failure due to improper installation is not
covered under the Warranty.
You MUST use all supplied ports and use proper
installation procedures as described in these
instructions, and any separate kit instructions,
when installing this air conditioner.
-- CAUTION:
Do not, under any circumstances, cut or remove
the third (ground) prong from the power cord.
Do not change the plug on the power cord
of this air conditioner.
Aluminum house wiring may present special
problems--consult a qualified electrician.
If the sill support bolts do not contact the
window sill, or if you have a window without
a sill, you must order accessory kit RAK87
to properly install this air conditioner. Call
800.626.2002 or visit GEAppliances.com.
TOOLS YOU WILL NEED
Phillips head screwdriver
AdJustable wrench
ELECTRICAL REQUIREMENTS
Some models require a 115/120-volt AC,
60 Hz grounded outlet protected with a
15-amp time delay fuse or circuit breaker.
The 3-prong grounding plug minimizes the possibility
of electric shock hazard. If the wall outlet you plan to
use is only a 2-prong outlet,
it isyour responsibility to hove it replaced with
o properly grounded 3-prong wall outlet.
Some models require 230/208-volt AC,
©
protected with a time delay fuse or circuit
breaker. These models should be installed
on their own single branch circuit for best
performance and to prevent overloading
house or apartment wiring circuits, which
could cause a possible fire hazard from
overheating wires.
Fiat-blade screwdriver
Pencil
Level Scissors or knife
Power cord includes a current interrupter
device. Atest and reset button is provided on the
plug case. The device should be tested on a periodic
basis by first pressing the TESTbutton and then the
RESETbutton while plugged into the outlet. If the
TESTbutton does not trip or
if the RESETbutton will not stay engaged, discontinue
use of the air conditioner and contact a qualified
service technician.
Ruleror tope measure
Page 8
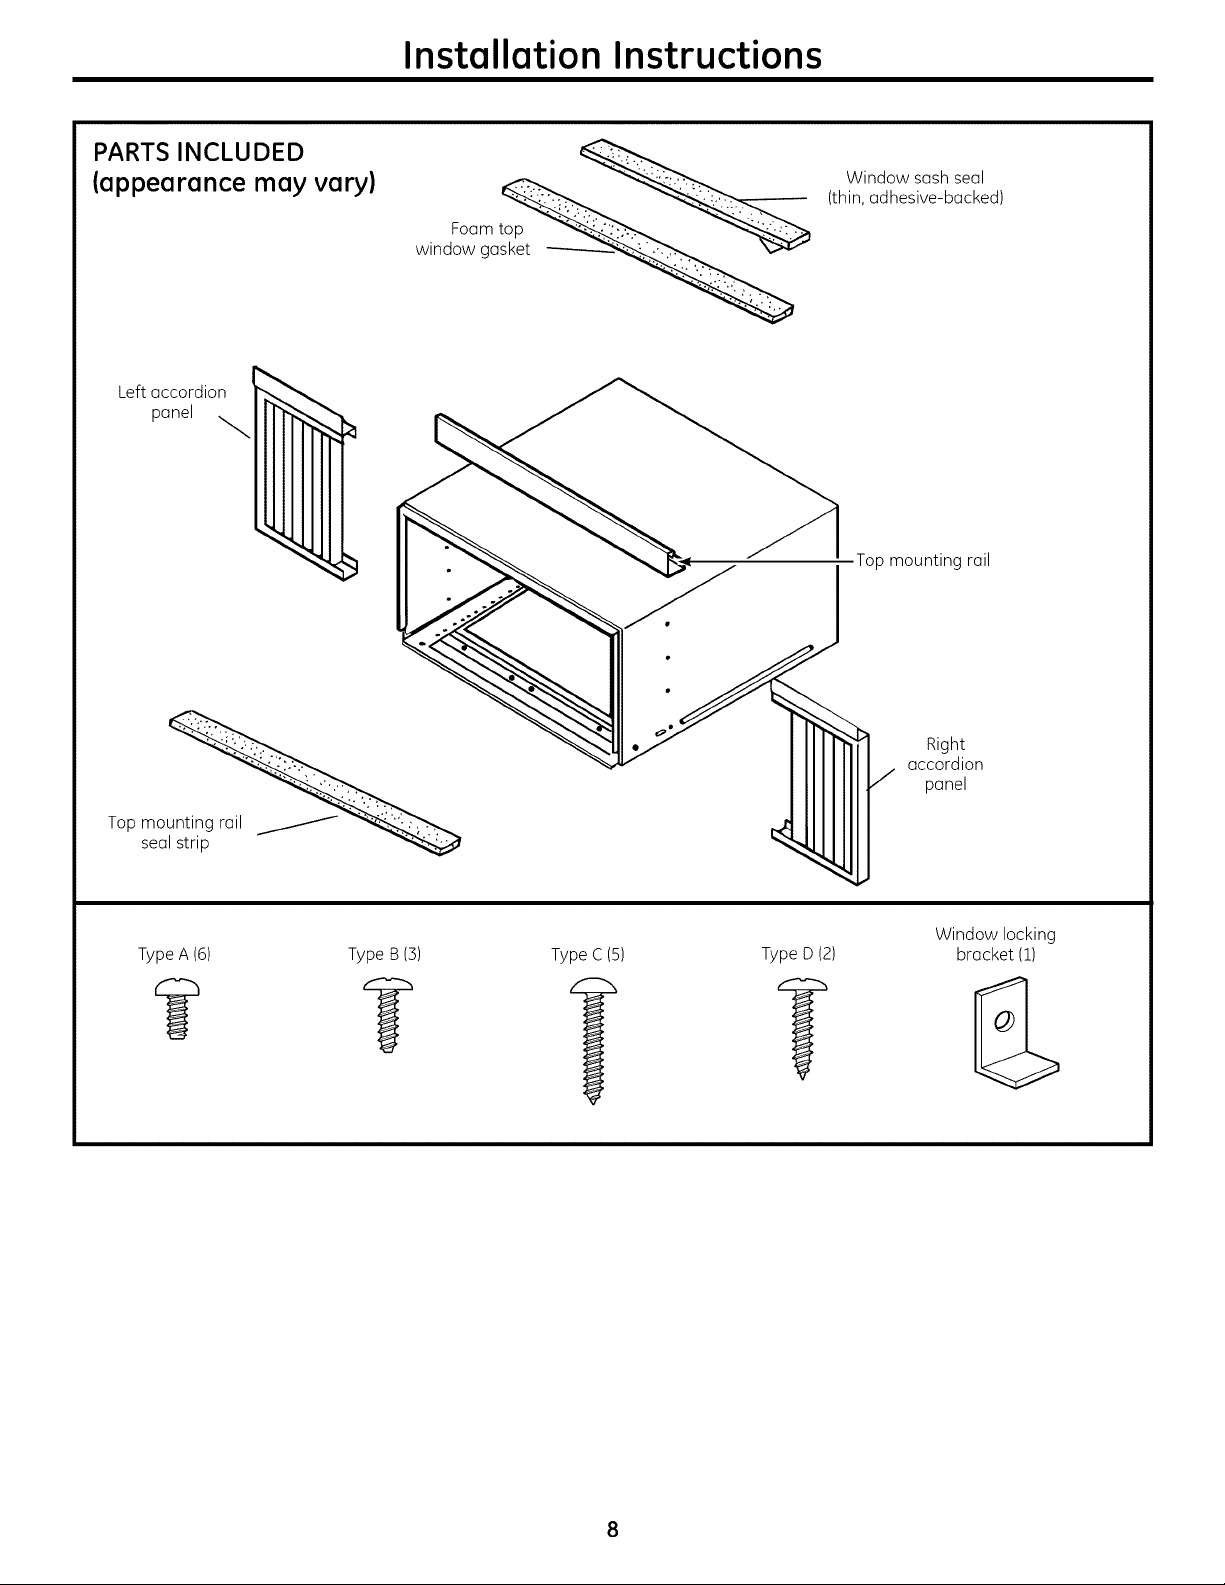
PARTS INCLUDED
(appearance may vary)
Left accordion
panel
Installation Instructions
Window sash seal
(thin, adhesive-backed)
Foam top
window gasket
Top mounting rail
Right
accordion
panel
TopmeO_
Window locking
Type A (6) Type B (5) Type C(5) Type D (2) bracket (1)
Page 9
Installation Instructions
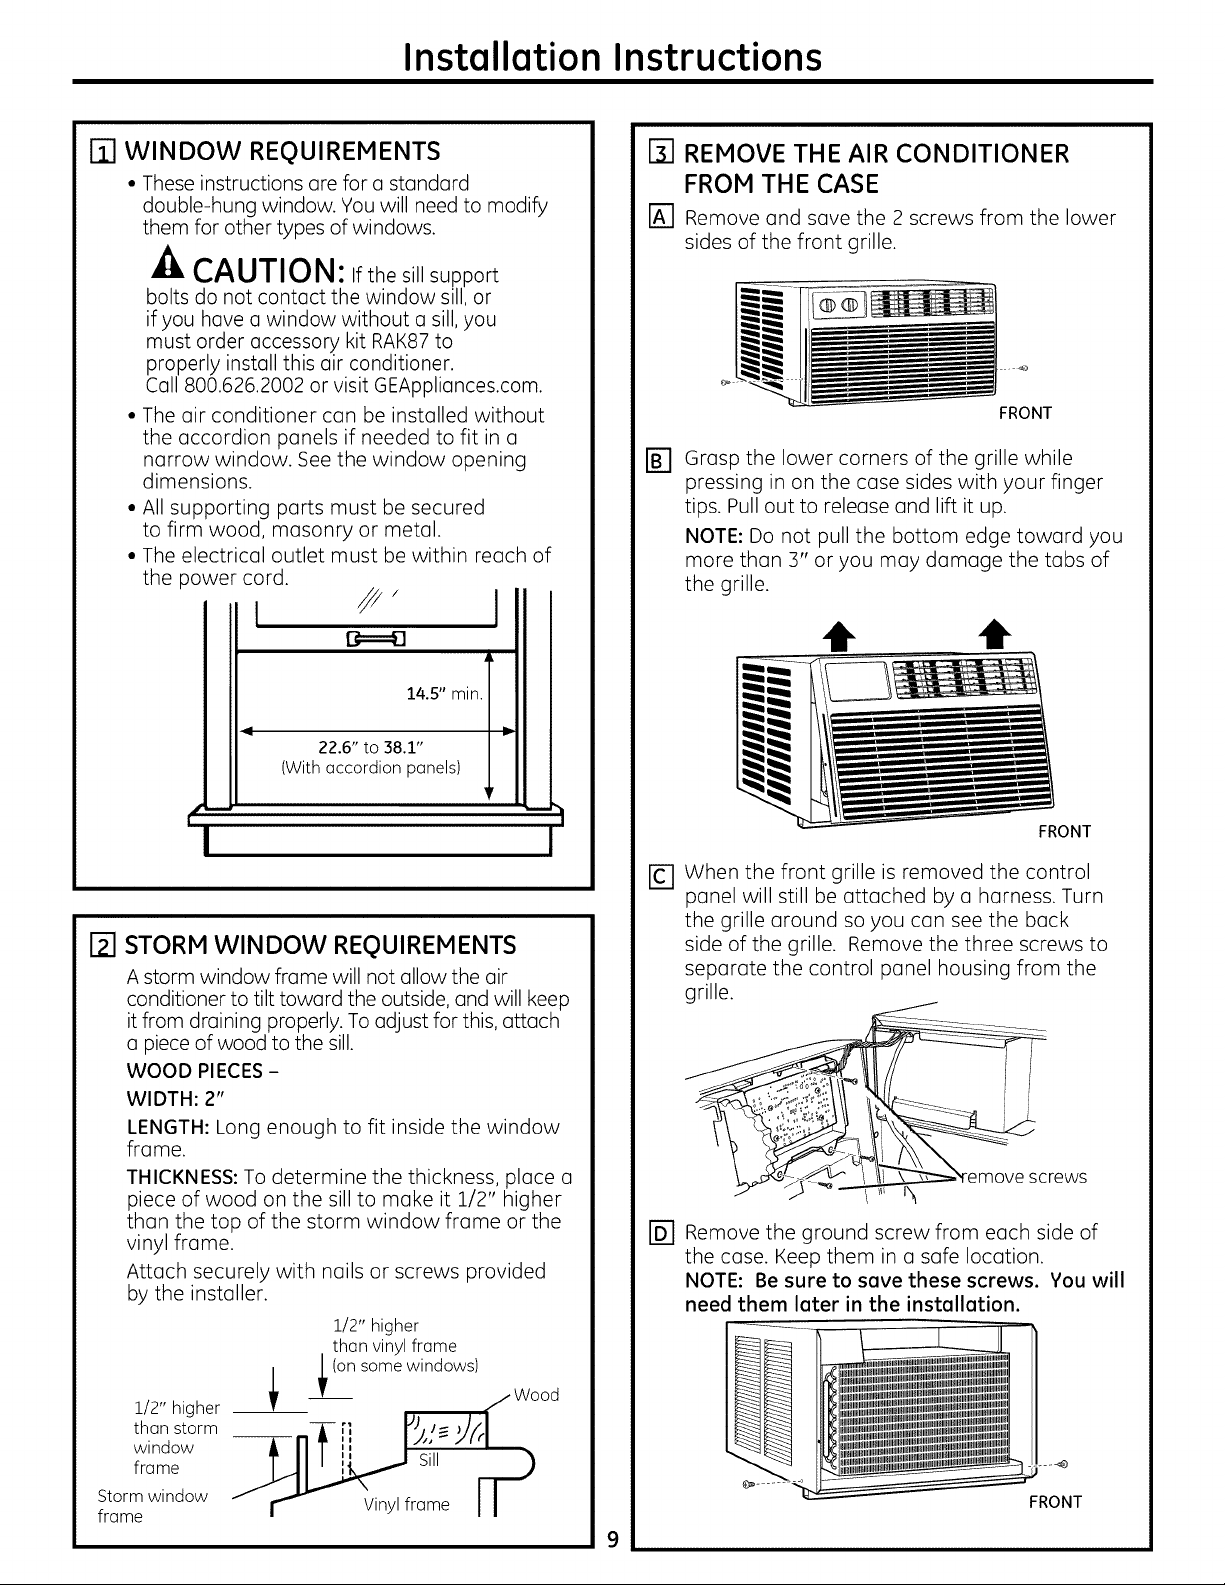
[] WINDOW REQUIREMENTS
• These instructions are for a standard
double-hung window. You will need to modify
them for other types of windows.
CAUTION: Ifthesillsupport
bolts do not contact the window sill, or
if you hove u window without u sill, you
must order accessory kit RAK87 to
properly install this air conditioner.
Cull 800.626.2002 or visit GEAppliunces.com.
The air conditioner can be installed without
the accordion panels if needed to fit in a
narrow window. See the window opening
dimensions.
All supporting parts must be secured
to firm wood, masonry or metal.
The electrical outlet must be within reach of
the power cord.
I
B==t]
I_ REMOVE THE AIR CONDITIONER
FROM THE CASE
I'_ Remove and save the 2 screws from the lower
sides of the front grille.
FRONT
Grasp the lower corners of the grille while
%
pressing in on the case sides with your finger
tips. Pull out to release and lift it up.
NOTE: Do not pull the bottom edge toward you
more than 3" or you may damage the tabs of
the grille.
I
t t
22.6" to 38.1"
(With accordion panels)
t"
14.5" min.
I
IY1STORM WINDOW REQUIREMENTS
A storm window frame will not allow the air
conditioner to tilt toward the outside, and will keep
it from draining properly. To adjust for this, attach
a piece of wood to the sill.
WOOD PIECES -
WIDTH: 2"
LENGTH: Long enough to fit inside the window
frame.
THICKNESS: To determine the thickness, place a
piece of wood on the sill to make it 1/2" higher
than the top of the storm window frame or the
vinyl frame.
Attach securely with nails or screws provided
by the installer.
1/2" higher
than vinyl frame
___ _ (on some windows)
1/2" higher
than storm
window
frame
Storm window
frame
- r v Vinyl frame I I
L- S Wood
FRONT
El When the front grille is removed the control
panel will still be attached by a harness. Turn
the grille around so you can see the back
side of the grille. Remove the three screws to
separate the control panel housing from the
grille.
rDl Remove the ground screw from each side of
the case. Keep them in a safe location.
NOTE: Be sure to save these screws. You will
need them later in the installation.
FRONT
Page 10
Installation Instructions
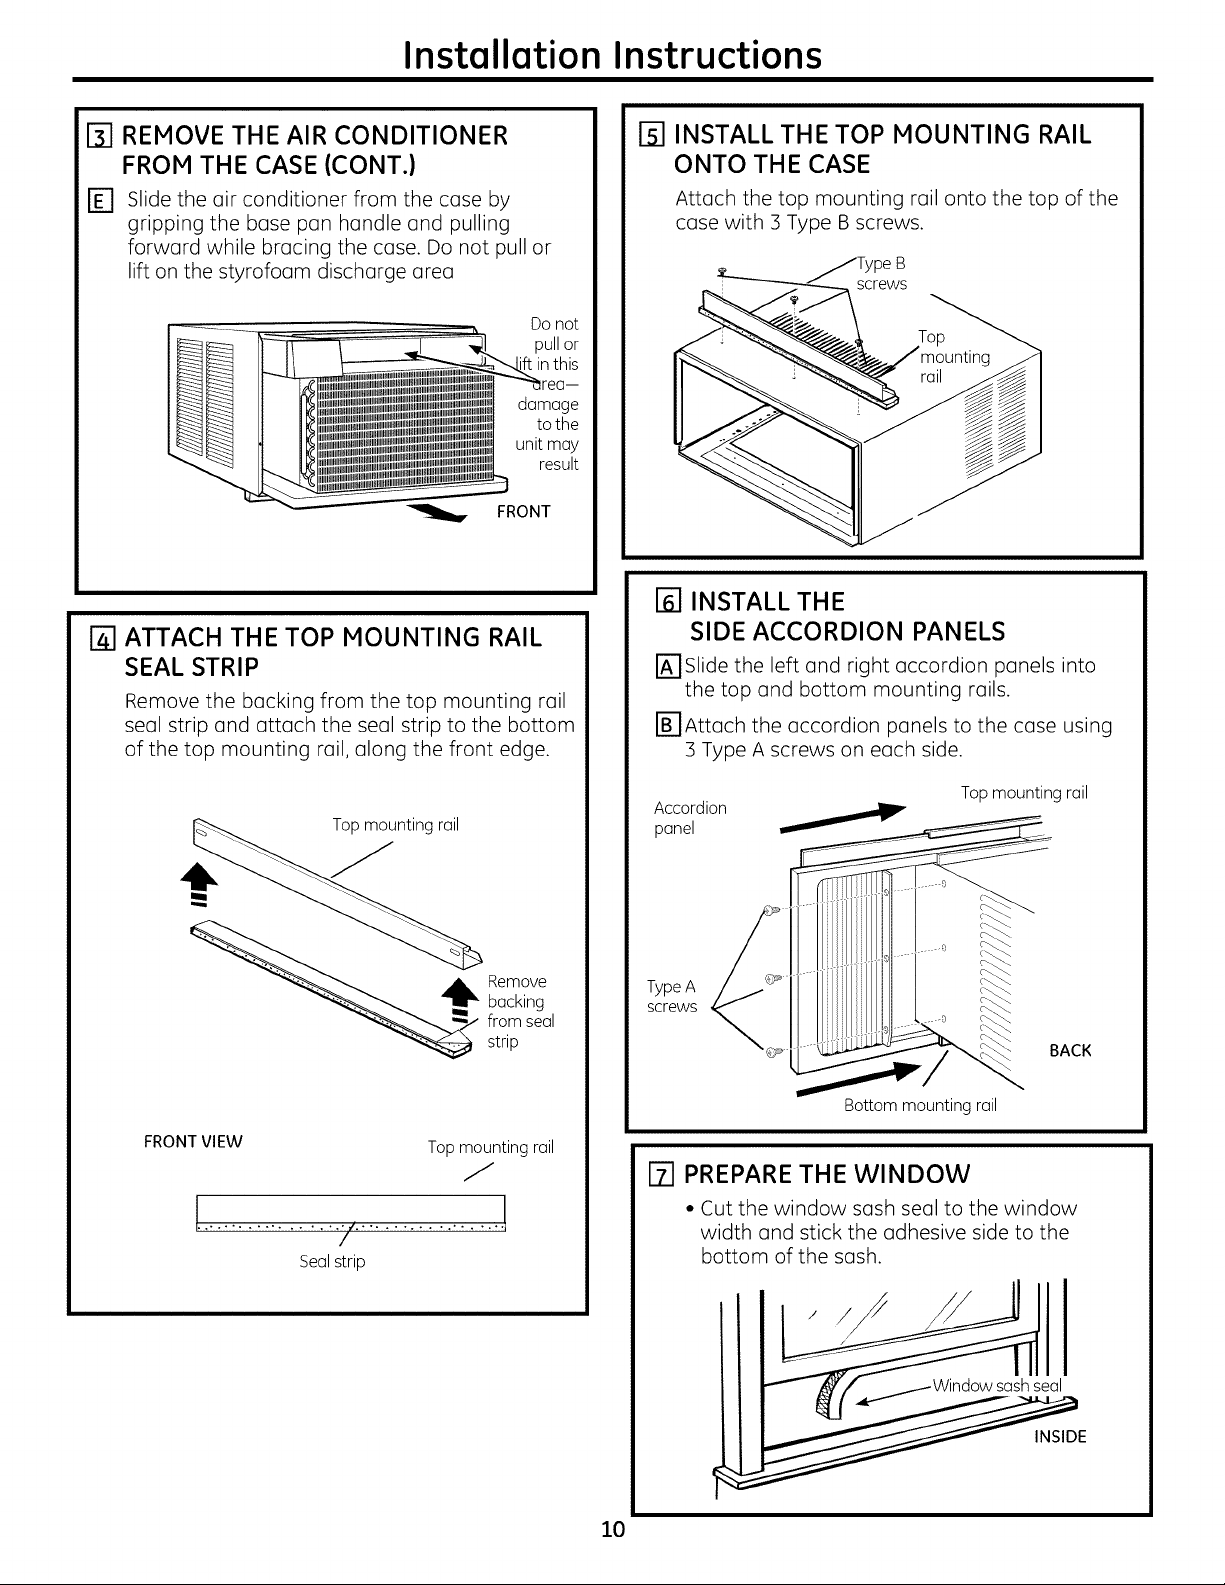
[] REMOVE THE AIR CONDITIONER
FROM THE CASE (CONT.)
Slide the air conditioner from the case by
%
gripping the base pan handle and pulling
forward while bracing the case. Do not pull or
lift on the styrofoam discharge area
damage
unit may
FRONT
I_l ATTACH THE TOP MOUNTING RAIL
SEAL STRIP
Remove the backing from the top mounting rail
seal strip and attach the seal strip to the bottom
of the top mounting rail, along the front edge.
rsl INSTALL THE TOP MOUNTING RAIL
ONTO THE CASE
Attach the top mounting rail onto the top of the
case with 3 Type B screws.
B
screws
Do not
pull or
to the
result
[] INSTALL THE
SIDE ACCORDION PANELS
[_Slide the left and right accordion panels into
the top and bottom mounting rails.
[_]Attach the accordion panels to the case using
3 Type A screws on each side.
Top mounting rail
_ emove
FRONTVIEW Top mounting rail
backing
from seal
strip
/
I................./...................!
Sealstrip
Accordion
panel
Type A
screws
Bottom mounting rail
Top mounting rail
1-71PREPARE THE WINDOW
• Cut the window sash seal to the window
width and stick the adhesive side to the
bottom of the sash.
BACK
10
/Window sashseal
INSIDE
Page 11
Installation Instructions
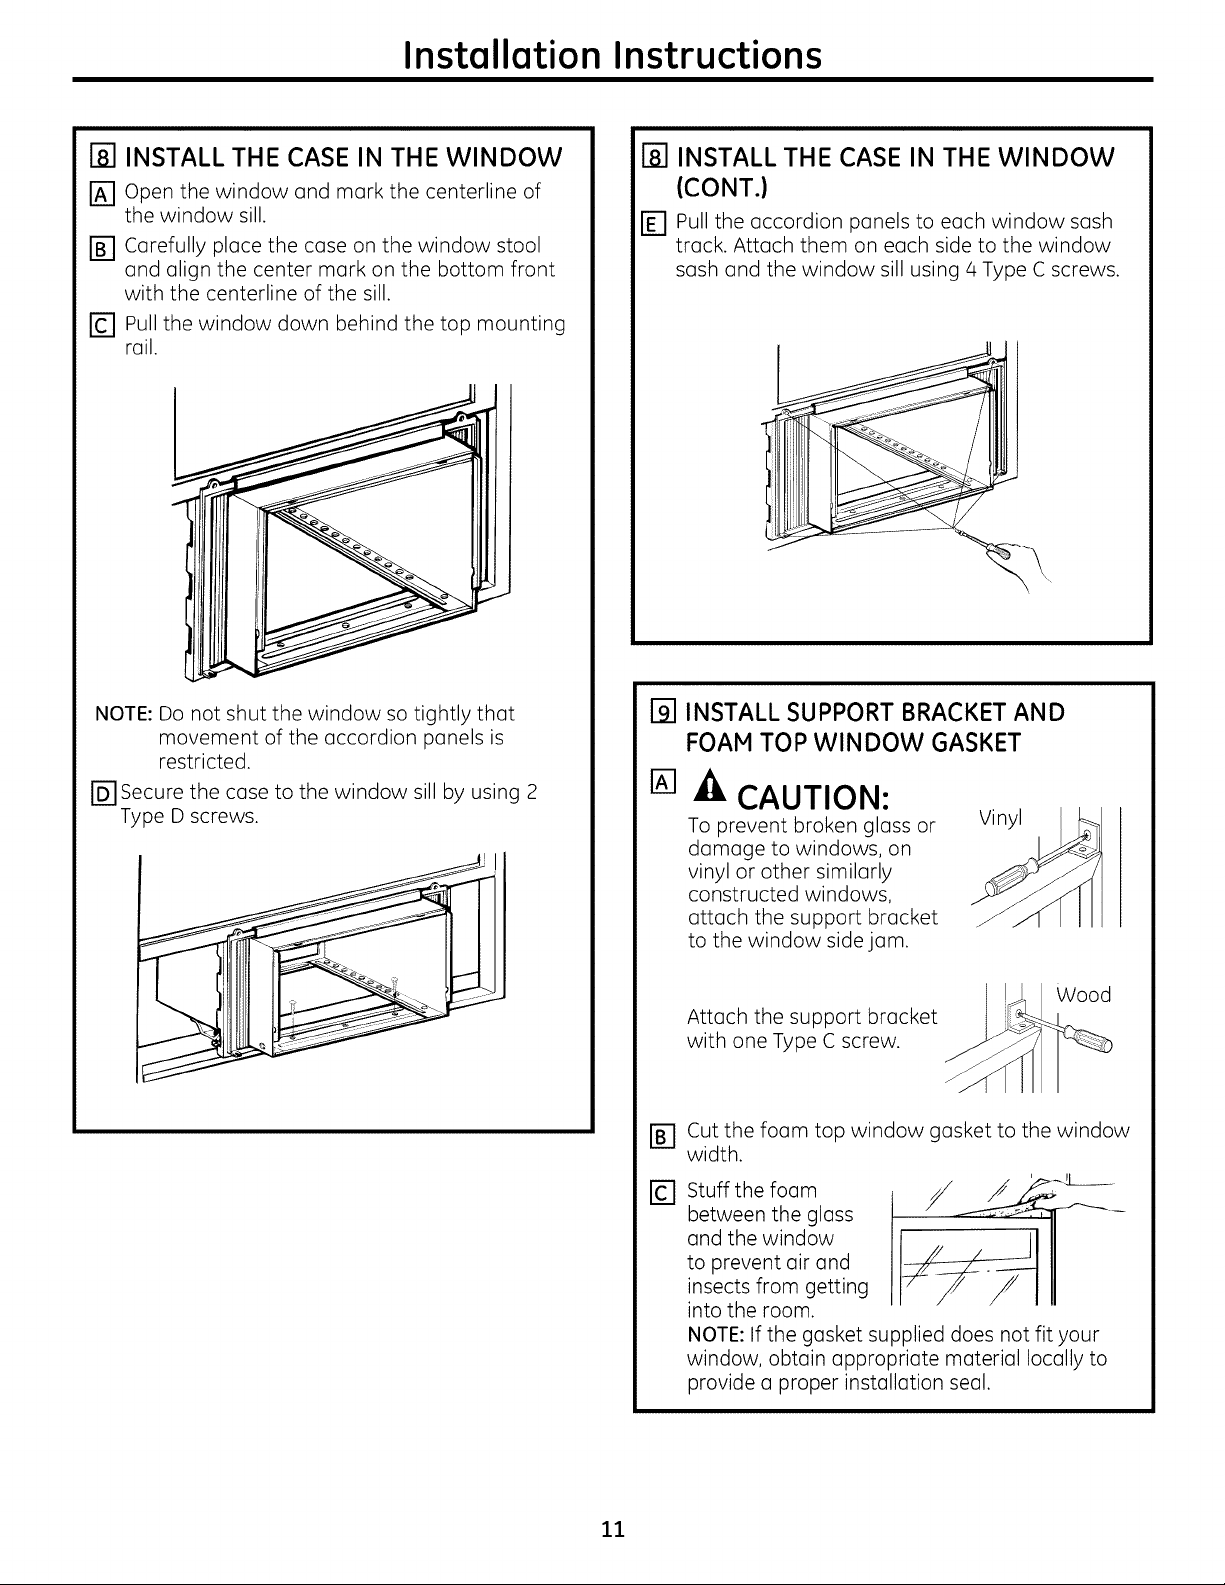
[] INSTALL THE CASE IN THE WINDOW
IA1 Open the window and mark the centerline of
the window sill.
[] Carefully place the case on the window stool
and align the center murk on the bottom front
with the centerline of the sill.
r_ Pull the window down behind the top mounting
rail.
NOTE: Do not shut the window so tightly that
movement of the accordion panels is
restricted.
rDl secure the case to the window sill by using 2
Type D screws.
INSTALL THE CASE IN THE WINDOW
ICONT.)
[] Pull the accordion panels to each window sash
track. Attach them on each side to the window
sash and the window sill using 4 Type C screws.
r91INSTALL SUPPORT BRACKET AND
FOAM TOP WINDOW GASKET
CAUTION:
To prevent broken glass or
damage to windows, on
vinyl or other similarly
constructed windows,
attach the support bracket
to the window side jam.
Vinyl
11
Attach the support bracket
with one Type C screw.
Cut the foam top window gasket to the window
width.
Stuff the foam
©
between the glass
and the window
to prevent air and
insects from getting
into the room.
NOTE: If the gasket supplied does not fit your
window, obtain appropriate material locally to
provide a proper installation seal.
Wood
Page 12
Installation Instructions
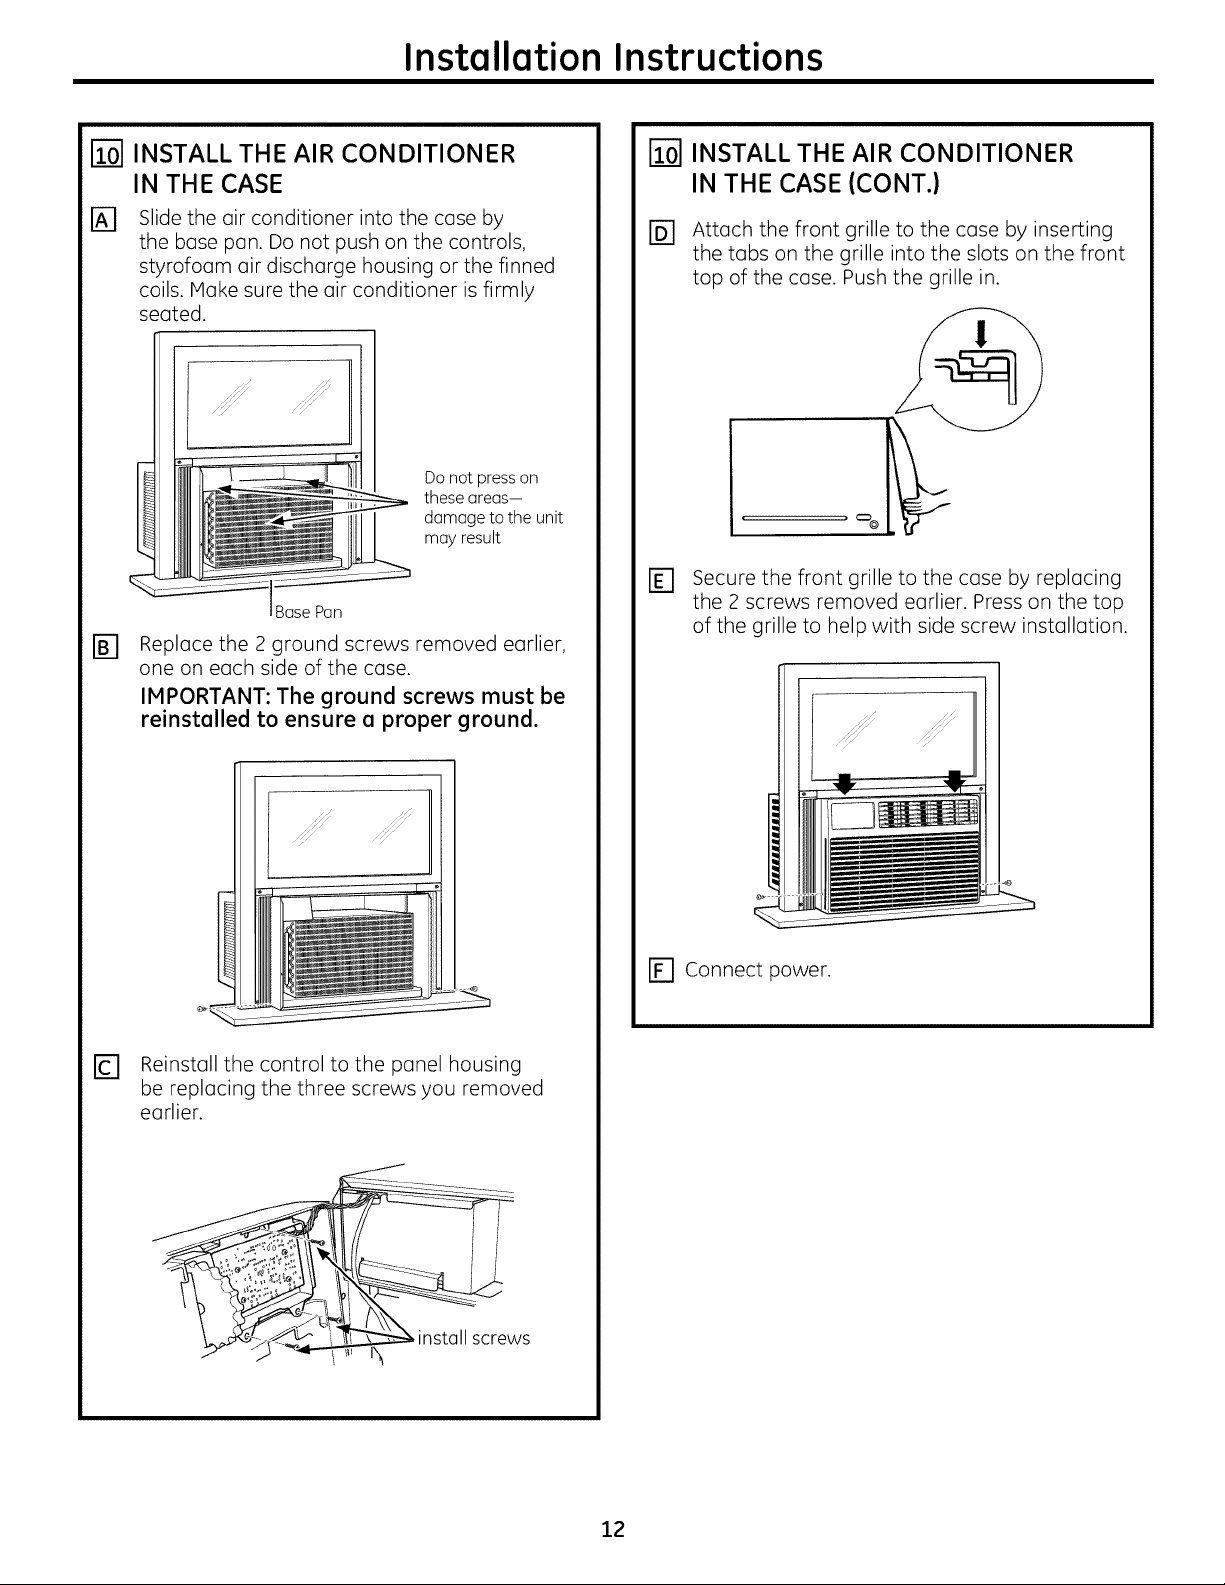
INSTALL THE AIR CONDITIONER
IN THE CASE
Slide the air conditioner into the case by
the base pan. Do not push on the controls,
styrofoam air discharge housing or the finned
coils. Make sure the air conditioner is firmly
seated.
(5 i:
Do not press on
these areas-
damage to the unit
may result
Bose Pan
Replace the 2 ground screws removed earlier,
%
one on each side of the case.
IMPORTANT: The ground screws must be
reinstalled to ensure a proper ground.
[] INSTALL THE AIR CONDITIONER
IN THE CASE(CONT.}
r_ Attach the front grille to the case by inserting
the tubs on the grille into the slots on the front
top of the case. Push the grille in.
, .=_
Secure the front grille to the case by replacing
[]
the 2 screws removed earlier. Press on the top
of the grille to help with side screw installation.
: :¸!¸¸¸¸¸¸¸¸¸¸¸5¸¸
Reinstall the control to the panel housing
©
be replacing the three screws you removed
earlier.
install screws
i\
Connect power.
J
12
Page 13
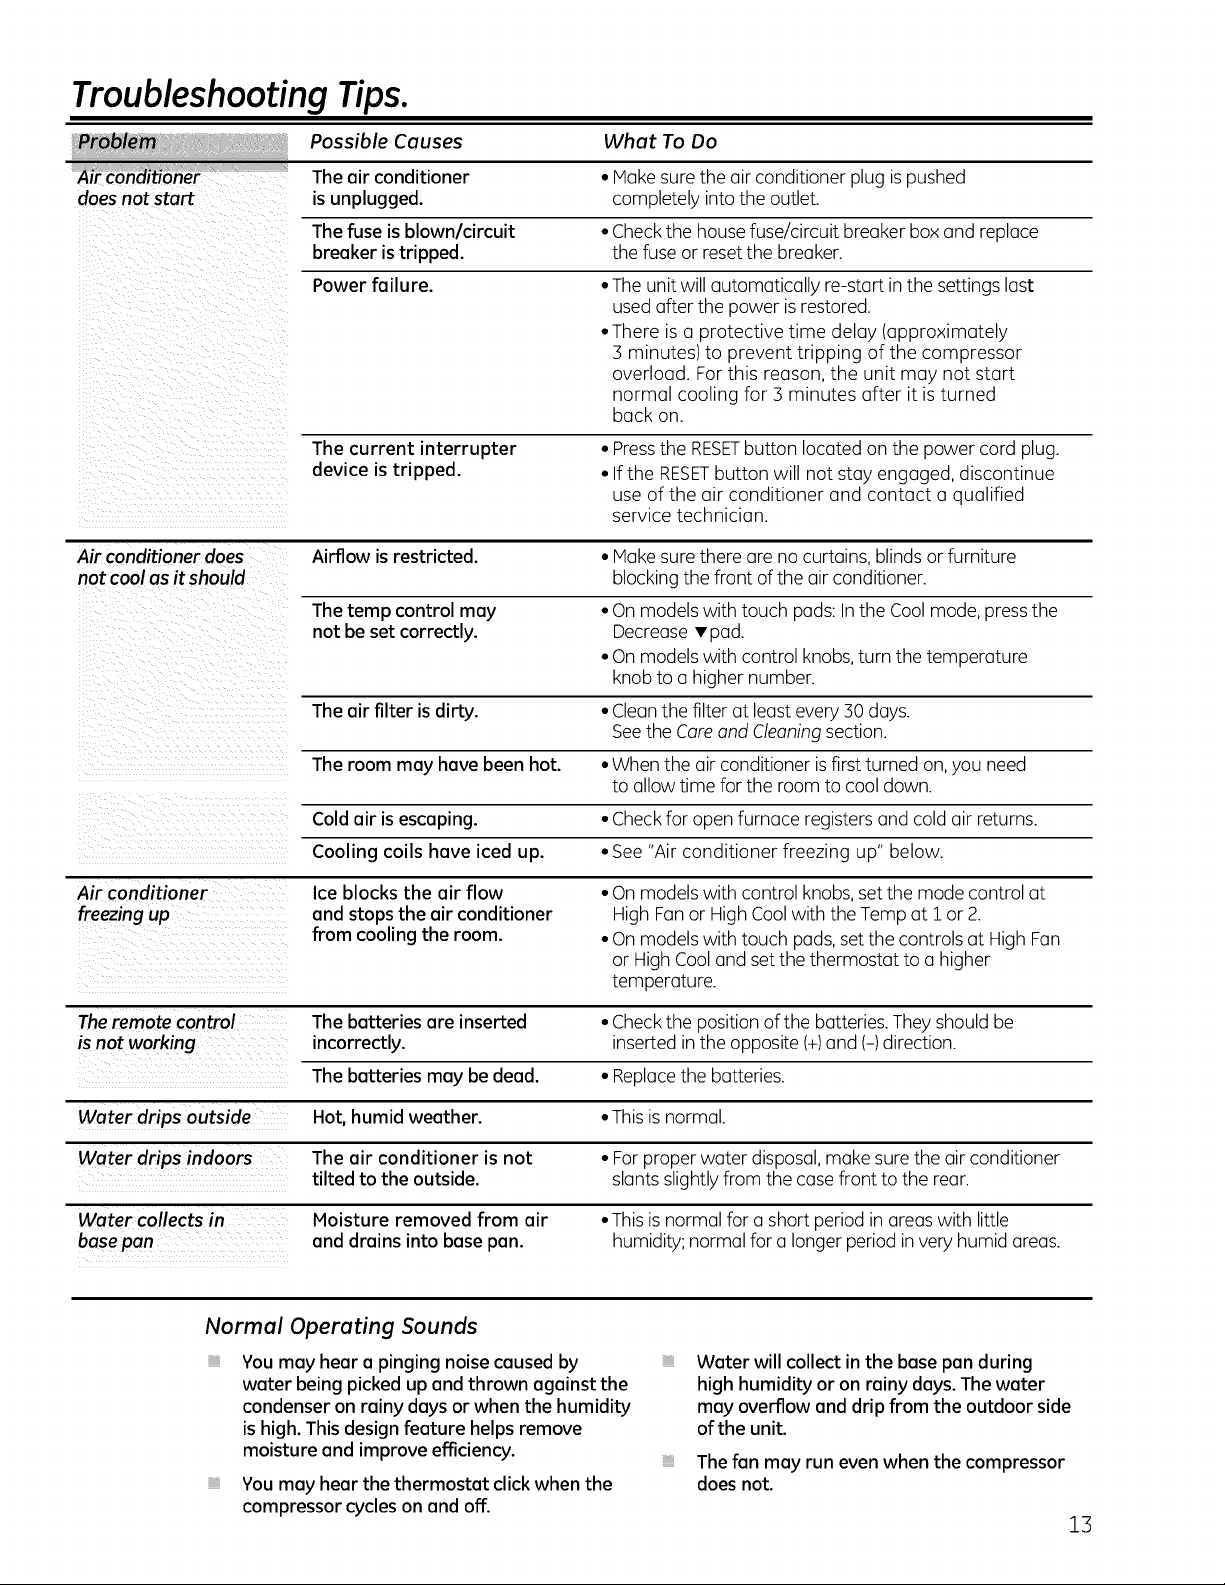
Troubleshooting Tips.
Possible Causes What To Do
Air conditioner " _ ' The air conditioner • Hake surethe air conditioner plugis pushed
does not start is unplugged, completely into the outlet.
The fuse is blown/circuit • Checkthe housefuse/circuit breaker box and replace
breaker istripped, the fuse or resetthe breaker.
Power failure. •The unit will automatically re-start in the settings last
usedafter the power is restored.
•There is u protective time delay (approximately
3 minutes) to prevent tripping of the compressor
overload. Forthis reason, the unit may not start
normal cooling for 3 minutes after it isturned
back on.
The current interrupter • Pressthe RESETbutton located on the power cord plug.
device is tripped. • If the RESETbutton will not stay engaged, discontinue
use of the air conditioner and contact a qualified
service technician.
Air conditioner does Airflow is restricted. •Hake sure there are no curtains, blinds or furniture
not cool as itshould blocking the front of the air conditioner.
The tamp control may • On models with touch pads: In the Cool mode, pressthe
not be set correctly. Decrease • pad.
• On models with control knobs,turn the temperature
knob to a higher number.
The air filter is dirty. • Cleanthe filter at least every 30 days.
Seethe Careand Cleaningsection.
The room may hove been hot. • Whenthe air conditioner isfirst turned on, you need
to allow time for the room to cool down.
Coldair is escaping. • Checkfor open furnace registers and cold air returns.
Cooling coils hove iced up. • See "Air conditioner freezing up" below.
Air conditioner
freezing up
Theremote control The batteries ore inserted • Checkthe position of the batteries.They should be
is not working incorrectly, inserted in the opposite (+)and (-) direction.
Water drips outside Hot, humid weather. • This isnormal.
Water drips indoors The air conditioner is not • Forproper water disposal,make sure the air conditioner
Water collects in Moisture removed from air •Thisisnormal for a short period in areaswith little
basepan and drains into bose pan. humidity; normal for a longer period in very humid areas.
Ice blocks the air flow
and stops the air conditioner
from cooling the room.
The batteries may be dead. • Replacethe batteries.
tilted to the outside, slantsslightly from the case front to the rear.
• On models with control knobs,set the mode control at
High Fanor HighCoolwith the Temp at i or 2.
• On models with touch pads, setthe controls at High Fan
or High Cooland set the thermostat to a higher
temperature.
Normal Operating Sounds
You may hear o pinging noise caused by
water being picked upand thrown against the
condenser on rainy daysor when the humidity
is high. This design feature helps remove
moisture and improve efficiency.
You may hear the thermostat click when the
compressor cycles on and off.
Water will collect in the bose pan during
high humidity or on rainy days.The water
may overflow and drip from the outdoor side
of the unit.
Thefan may run even when the compressor
does not.
13
Page 14

Notes.
14
Page 15
Notes.15Notes.
Page 16
16
Page 17

GEAir Conditioner-One-Vear Limited Warranty. tForcustomers intheU.S.A.I
All warranty service provided by our Factory Service Centers,
or an authorized Customer Care® technician. To schedule service,
visit us on-line at GEAppliances.com, or carl 800.GE.CARES
(800.432.2737).Have serial number and model number available
when calling for service.
GEWill Replace:
_ii _i_i_i/_ _i _i__ii_ i i? _!ii_I
OneYear
Fromthedate ofthe
originalpurchase
Service trips to your home to teach you how to
use the product.
Improper installation, delivery or maintenance. If you
have an installation problem, or if the air conditioner
is of improper cooling capacity for the intended use,
contact your dealer or installer. You are responsible
for providing adequate electrical connecting facilities.
Failure of the product resulting from modifications to
the product or due to unreasonable use including failure
to provide reasonable and necessary maintenance.
In commercial locutions, labor necessary to move the
unit to a location where it is accessible for service
by an individual technician.
Any part of the air conditioner which fails due to a defectin materials or workmanship.
During this limited one-year warranty, GEwill also provide, free of charge, all labor and related
serviceto replace the defectivepart.
Staple your receipt here.
Proof of the original purchase
date is needed to obtain
service under the warranty.
Replacement of house fuses or resetting of circuit
breakers.
Failure due to corrosion on models not corrosion-
protected.
Damage to the product caused by improper power
supply voltage, accident, fire, floods or acts of God.
Incidental or consequential damage caused by possible
defects with this air conditioner.
Damage caused after delivery.
EXCLUSION OF IMPLIED WARRANTIES--Vour sole and exclusive remedy is product repair as provided in
this Limited Warranty. Any implied warranties, including the implied warranties of merchantability or
fitness for a particular purpose, are limited to one year or the shortest period allowed by law.
This warranty is extended to the original purchaser and any succeeding owner for products purchased for
home use within the USA. If the product is located in an area where service by a GE Authorized Servicer is
not available, you may be responsible for a trip charge oryou may be required to bring the product to an
Authorized GE Service location for service. In Alaska, the warranty excludes the cost of shipping or service
calls to your home.
Some states do not allow the exclusion or limitation of incidental or consequential damages. This warranty
gives you specific legal rights, and you may also have other rights which vary from state to state. To know
what your legal rights are, consult your local or state consumer affairs office or your state's Attorney General.
Warrantor: General Electric Company. Louisville, KV 40225
Z7
Page 18

GEAir Conditioner--One-Vear Limited Warranty. (For customers in the CanadaJ
All warranty service provided by our Factory Service Centers,
or an authorized Customer Care®technician. For service, call
1.800.561.3344.Please have serial number and model number
available when calling for service.
Mabe Will Replace:
Any part of the air conditioner which failsdue to a defect in materials or workmanship.
Fromthedate ofthe
originalpurchaseiii
Service trips to your home to teach you how to
use the product.
Improper installation, delivery or maintenance. If you
have an installation problem, or if the air conditioner
is of improper cooling capacity for the intended use,
contact your dealer or installer. You are responsible
for providing adequate electrical connecting facilities.
Failure of the product resulting from modifications to
the product or due to unreasonable use including failure
to provide reasonable and necessary maintenance.
In commercial locations, labor necessary to movethe
unit to a location where it is accessible for service
by an individual technician.
During this limited one-year warranty, Habe will also provide,free of charge, all labor and
relatedservice to replace the defectivepart.
Staple your receipt here.
Proof of the original purchase
date is needed to obtain
service under the warranty.
Replacement of house fuses or resetting of circuit
breakers.
Failure due to corrosion on models not corrosion-
protected.
Damage to the product caused by improper power
supply voltage, accident,fire, floods or acts of God.
Incidental or consequential damage caused by possible
defects with this airconditioner.
Damage caused after delivery.
EXCLUSION OF IMPLIED WARRANTIES--Your sole and exclusive remedy is product repair as provided in
this Limited Warranty. Any implied warranties, including the implied warranties of merchantability or
fitness for a particular purpose, are limited to one year or the shortest period allowed by law.
This warranty is extended to the original purchaser and any succeeding owner for products purchased in
Canada for home use within Canada. In-home warranty service will be provided in areas where it is available
and deemed reasonable by Mabe to provide.
Some provinces do not allow the exclusion or limitation of incidental or consequential damages, so the above
exclusion may not apply to you. This warranty gives you specific legal rights, and you may also have other
rights which vary from province to province. To know what your legal rights are in your province, consult your
local or provincial consumer affairs office.
Warrantor'. Mabe Canada Inc.,
Burlington, Ontario
18
Page 19

Consignes de sOcuritO .......... 20, 21
Consignes d'utilisation
ModUles dotds touches
•aeftleurement .................... 99, 93
Entretien et nettoyage
Filtre 'a air .......................... 24
Serpentins ext_rieurs ................. 24
Instructions de montage ........ 25-30
Conseils de ddpannage ............ 31
Bruits normaux de fonctionnement ..... 31
Assistance "ala client&le
Assistance 'a la clientble ................ 36
Garantie ............................ 35
Enregistrement du titre
de propriOt_ ..................... 33, 34
AEN08*
* Produits homologuds ENERGY STAR @
ENERGYSTAR
En rant que partenaire d'ENERGY
STAR ®,GE a dO.terminal que ce produit
dtait conforme aux exigences d'efficacitd
dnergO.tique d'ENERGY STAR ®.
Inscrivezici lesnumOrosdemodeleet desOrie
NumOrode modele•
NumOrode SOrie•
Vous trouverez ces numO.ros sur l'O.tiquette
apposOe sur le c6tO. du climatiseur.
Au Canada, visitez-nous au •
xs_s_u.electromenagersge.ca
19
Page 20

IMPORTANTESCONSIGNESDESI CURITI .
VEUILLEZLIRETOUTESLESCONSIGNESAVANTUTILISATION.
a,AVERTISSEMENT!
Pourvotre s0curit0,les informationscontenuesdanscemanueldoivent_tre suiviesafinde minimiser
lesrisquesd'incendie,de chocs01ectriquesoude blessurescorporelles.
CONSIGNESDESI CURITI
N'ufilisez cet appareil qu'aux fins pr&ues
dOcrites dans le manuel d'utilisation.
Ce climatiseur doit _tre correctement
install_ conform_ment aux Instructions
d'Installafion avant mute ufilisafion.
Ne ddbranchez,jamais votre climatiseur en
firant sur le cordon d'alimentafion. Prenez
tou,jours fermement la fiche en main et tirez
pour la sortir de la prise.
Remplacez immddiatement tout cordon
dlectrique usd ou endommagd. Un
cordon d'alimentation endommag_ dolt
_tre remplac_ pax un nouveau cordon
d'alimentation obmnu du l[abricant.
Ne rOparez pas le cordon endommagd.
N'ufilisez pas un cordon fissurd ou
prOsentant des dommages dus aux
frottements soit sur sa longueur ou aux
extrOmitds du c6td de la fiche ou du
raccord.
Si la prise de courant est d'un format
ditJ[>rent de la fiche, cette prise dolt _tre
changde pax un dlectricien qu'alifid.
Eteignez votre climatiseur et ddbranchez-le
avant d'et_ectuer des rdparafions ou de le
nettoyer.
REMARQUE: Nousvousrecommandonsde faire
effectuerla maintenanceparuntechnicienquali%.
Pour votre s_curit_, ne stockez pas et
n'utilisez pas de mat_riaux combustibles,
d'essence ou d'autres vapeurs et liquides
imqammables dans les parages de cet
appareil ou de tout autre appareil.
Tousles climatiseurs contiennent des
fluides frigoriganes qui, conl[brm_ment, 'a la
l_gisladon f_d&ale doivent _tre retires avant
la mise au rebut de l'appareil. Si vous metmz
au rebus un ancien appareil contenant des
fluides frigorig&nes, v&ifiez la procddure 'a
suivre aupras de la compagnie responsable
de l'dliminafion.
Ces systames de climatisafion R410A
demandent clue les contracteurs et
les techniciens utilisent des outils, de
l'dquipement et des mesures de sdcuritd
homology& pour une utilisadon avec
frigorigane. N'UTILISEZ PAS un
dquipement cerdfid pour fluide R22
refrigerant only.
2O
BRANCHEMENTSI LECTRIQUES
Necoupezpasou n'enlevezpas,sousaucunprOtexte,
la troisiemebrochedemiseala terredu cordon
d'alimentation.Pourdesraisonsde sOcuritO,cetappareil
doit _trecorrectementmisa la terre.
N'utilisez PAS d'adaptateur avec cet appareil.
Le cordon d'alimentation de cet appareil
est _quip_ d'une fiche 'atrois broches (pour
une mise 'ala mrre) qui s'adapte 'a la prise
de courant standard 'a 3 broches (pour une
mise 'ala terre) pour minimiser les risques
de chocs _lectriques par cet appareil.
Le cordon d'alimentation est _quip_ d'un
dispositif d'intermpfion du courant. Un
bouton d'essai et de r_enclenchement est
fourni sur le boider de la prise. Vous devez
tester le m_canisme r_guli_rement en
appuyant d'abord sur le bouton TEST(essai)
puis sur le boumn RESET(r_enclenchement)
lorsque l'appareil est branch,. Si le bouton
TEST(essai) ne bascule pas ou si le bouton
RESET(r_enclenchement) ne reste pas
enclench_, cessez d'utiliser votre climatiseur
et appelez un technicien de serx,ice qualifi_.
Faites v_rifier la prise murale et le circuit
dlectrique par un dlectricien qualifid pour
s'assurer que le syst&me est correctement
mis 'a la terre.
Darts le cas d'une prise biphas_e,
l'installateur a la responsabilit_ et l'obligation
de la remplacer par une prise triphas_e
correctement mise 'a la terre.
Le climatiseur dolt mujours _tre branch_
•asa propre prise _lectrique d'une tension
nominale correspondant 'acelle indiqu_e
sur sa plaque signal_fique.
Ceci permet d'obtenir un meilleur rendement
du climatiseur et _x,ite de surcharger les
circuits _lectriques du domicile qui risque
d'occasionner un incendie en surchautfant.
Consultez les Consignes d'Installafions, dans
la section ExigencesElectriquespour les exigences
de branchements dlectriques particuliers.
Page 21

www.electromenagersge.co
VERTISSEMENT !
UTILISATION DE RALLONGES
RISQUED'INCENDIE. Peut occasionner des
blessures graves ou la mort.
• NE PASutiliser de rallonge avec ce climatiseur.
• NE PASutiliser de parasurtenseur ou
d'adaptateur _ prises multiples avec ce
climatiseur.
LISEZETSUIVEZSOIGNEUSEMENTCESCONSIGNESDESFtCURITFt.
CONSERVEZCESINSTRUCTIONS
21
Page 22

A proposdescommandesduclimatiseur--
mo@lesdotesdetouches effleurement.
/es fonctionset I'aspectpeuventvarier.
Lest0moins lumineuxacOt0destouchesa effleurementsurletableaude commandesdu climatiseurindiquent
lesr@ages s01ectionn@.
L'@ranaffichetoujoursla temp@ature Programmationde la temp@atureou du d61ai.
delapiecesaufIorsquevousprogrammez
latemp@atureoulaminuterie.
Let6moin indiqueque rappareil est en mode
O I
Le t6moin lumineux indiqueque la minuterieest programmee.
CommandesduClimatiseur
Commandes
Touched'alimentati0n
O
Met le climauseur en position de tam'the ou
d'mT_t. L'_!cran _iche la temp_!ramre de la
piece lorsque l'appm'eil est mis en mm'che.
Affichage
O
Affiche la temp@amre de la piece ou le temps
restant avant la raise en marche ou l'arr_t de
l'appm'eil. Affiche la temp@amre de r_!glagelots
de la programmation de la temp_!ramre pour
les modes C001(refl'oidissement) ou EnergySaver
(economie d'energie). Le t_moin hmfineux Set
(progrmnm_!) s'allume lots du r_!glage.
REMARQUE:L'dcran affichera la mmp@ature
de la pibce itla fin des r_!glages.Pour rappeler
la mmp@ature rdglde, appwez sur les touches
Temp Increase(augmentation temp@amre) •
ou Decrease(r(?duction de la temp@ature) v.
TouchesTempIncrease(Augmentationtemperature)•/
@
Decrease(%ductiondelatemperature)•
Sont utilis(?espour programmer la temp_!ramre
dartslesmodes Coolou EnergySaver.Le t_!moin
lumineux Sets'allume lots du rdglage.
TouchesDelayTimerIncrease(Augmentationdud01ai)
O
• (+)/Decrease(Diminutiondud01ai)• (-)
Chaque lois que vous effleurez les touches
Increase•/Decrease • sur l'appareil ou
lestouches Increase+/ Decrease- de la
tt!l_commande, vous programmez la dur(?e du
d_!lailots de l'utilisafion de la minuterie Delay
1-24hr(ddlai de 1-24h) . Le tdmoin hmfineux Set
s'allume lots du rdgtage.
Touchesdevitesseduventilateur
O
Sont utilis_es pour r_!glerla vitesse du ventilateur
de l'appm'eil sur Low(faible), Med(moyenne),
High(elevde) ou Auto (mlmmatique). REMARQUE:
Sur la t_l_commande, udlisezles touchesIncrease
+/ Decrease- pour r_gler la vitesse du ventilateur
sur Low,Med,ou High.Utilisez la touche Auto
pour aUunler le ventilateur en mode Auto.
T010commande
O oucheMode
Est utilisde pour programmer le climatiseur
sur les modes C001,EnergySaverou Fan0nly
(ventilateur uniquement).
O TouchesdeDOlai
DelayON(delaidemiseenmarche}--Lorsquele
climatiseur est _teint, il peut _U'e programm_
pour ddmm'rer mltomafiquement dm_s un d_lai
de 1it 24 heures itses r_!glagespr_!a!dents
(mode, vitesse du ventilateur).
DelayOFF(delaid'arret)--Lorsquele climafiseur
esten fonctionnement, il peut _tre programme
pour s'arreterautomatiquement dartsun d_!lai
de 1it 24 heures.
Commentleprogrammer:
Appuyez sur la touche Delay1-24hr(D_!laide 1
it 24 heures) de l'appm'eil ou sur la touche de la
[dk!commm_de. Chaque lois que vous effleurez
les touches Increase•/ Decrease• sur l'appareil
ou les touches Increase+/ Decrease- de la
tt!ldcommm_de, vous progrmnmez la durde du
ddlai pro"intet'valle
de 1heure. Le tdmoin hmfineux Set s'allume
lots du r_!glage.
Pour conm£tre le temps restant sur la minuterie
Delay1-24hr,appwez sur la touche Delay1-24hr
de l'appm'eil ou sur la touche de la
t_k!commm_de. Ufilisez les
touches Increase• / Decrease•sur l'appareilou
les touches Increase+/ Decrease- de la
t_ldcominande pour programmer un nouvem_
ddlai si ndcessaire.
Pourannulerla minute@,appuyez sur la touche Delay
1-24hrjusqu'it ce que le vovant hlnlineux Sili"la
touche Delay1-24hrs'_!teigt{e.
22
Fonctionde conservationdes r0glagesapres une coupurede courant
En cas de patme ou d'interruption de cotlratlt, (D_!laide 1 it 24 heures) dtait utilis_!e,l'appareil
l'appareil red_!marre m_mmafiquement apr_s reprend son compte it rebours. Vous m_rez peut-_u'e
rdtablissement de l'alimenmtion dlecu'ique et consawe besoin de programmer une nouvelle heure.
les derniers r_!glages utilis_!s.Sila fbnction Delay1-24hr
Page 23

Mode Cool(refroidissement)
Utilisez le mode C001(reffoidissement) avecla vitesse
du venfilateur sur Low(f:aible), Med (moyenne),
High(elev(!e) ou Auto(automafiflue) pour refl'oidir.
Appuyez sur les touches Temperature Increase
(mlgmentation de la temp&'ature) •/Decrease
(diminution de la temp&'amre) • pour programmer
la temp(!ramre souhait(!e enu'e 18 °C et 30 °C (64 et
86 °F) pro"incr&nents de 0,5 °C (1 °F).
Un fl_em_ostat _lectronique permet de maintenir la
mmpdrature de la piece. Le compresseur se met en
marche et s'atT_m itintei_.'allesrdg_flierspour maintenir
la temp&'amre de la piece itun niveml de confbrt
choisi. R_glez le them_ostat it une valeur plus b_tsseet
l'air ambiant se refi'ddira. R_glez le them_osmt itune
valeur plus dlev_e et l'air mnbiant sel'(?d_mlfIel'a.
REMARQUE:Sileclimatiseureteintestallumealorsqu'ilest
programmesurunreglageCoolousivouspassezd'unmode
Ventilation8unmodedemefroidissement,ilfaudraenviron
3minutespourquelecompresseurseremetteenmarcheet
recommence8 refroidir.
Mode EnergySaver(economied%nergie)
Contr61e le ventilateur.
ON(active)--Le ventilateur se met en marche et s'm'r_te
en m&ne temps que le compresseur. Ceci pemmt une
plus grande variation de la temp&'amre et du taux
d'humidit_ dm_s la piece. Est en g&_(!ralutilis(! lorsque
la piOce est inoccup(!e.
www.electromenagersge.ca
DescriptionsduRefroidissement
PourunmefroidissementNormal-S_!lectionnezlemode
C001avecla vitesse du ventilateur sur Medou Highet un
r_glage it une temp_mulre moyenne.
Pourun Refr0idissementMaximal-- Sdlecfionnez le mode
C001avecla vimsse du ventilateur sur Highet un r(!glage
itune temp(!mmre plus basse.
PourunRefroidissementplusSilencieuxouDurantlaNuit--
Sdlectionnez le mode C001avecla vitesse du ventilateur
sur Lowet un r(!gtage it une tempdmulre moyenne.
NefaitespasfonctionnervotreappareilIorsquelestemperatures
exterieuressentendessousdeO°C(32°F).
Ce climatiseur Froid Seul n'est pas concu pour
fonctionner avec des temperatures ext_fieures en
dessous de 0°C (32°F). I1ne doit pas &re ufilis_
lorsque les temp(!ramres ext&'ieures sont en dessous
de 0°C (32°F).
REMARQUE: Leventilateurpeutcontinuer_fonctionnerquelques
instantsapresquelecompresseursesoitarr@te.
OFF(desactive)--Leventilateur fonctionne en continu,
alors que le compresseur se met en marche et s'arr&e
it intewalles r(!guliers.
Mode FanOnly(ventilateur uniquement)
Ufilisez le mode FanOnlyavec une vitesse de venfilateur
rdgk!e sur Low,Medou Highpour f:airecirculer l'air et
le filu'er sans le refl'oidir. Etant donn(? que le mode Fan
0nlyne permet pas de reffoidissement, le r(!gtage de la
temp&'amre n'affiche pas. lat mmp(!ramre de la piece
s'aftiche itl'dcrm_.
Auto FanSpeed(vitessedu ventilateur auto)
Rdgtezla vimssedu venfilamur sur Auto pour que
ladmsse du venfilamur se r_gle automafiquement a la
vimssendcessaire a l'obmnfion des rdglages apportant un
niveau de confort optimal a la tempdramre programmde.
Sila pibce demande un refi'oidissement suppldmentaire,
Direction de I'Air
Udlisez les leviers pour rdgler la direct.ion de l'air
vers la gauche ou vers la droite.
Vous pouvez rd._ez la direct.ion de l'air vers le haut
ou ve_ le bas en appuyant ldg&'ement avec le bout
des doigts sur les persiennes.
TOlOcommande
REMARQUE:l_t vitessede venfilateur mite ne peut _u'e
utilisde lorsque le climatiseur est sur le mode Fan0nly.
lavitesse du venfilateur augmente automafiquement. Si
lapi&e demande moins de refl'oidissement, la vimssedu
venfilateur diminue automafiquement.
REMARQUE:Lavitessedeventilateurautonepeutetreutilisee
IorsqueleclimatiseurestsurlemodeFanOnly.
L'aspectpeut
varier.
Pour vous assurer d'un fonctionnement correct, pointez
la t_l_commande vers le r&epteur de signal
du climatiseur.
Assurez-vousqu'aucun obstacle pouvant bloquer
le signal ne setrouve entre le climatiseur et la
t#l#commande.
Le rayon d'action de la t616commande s'6tend jusqu'a
6,/4m (20pieds).
Assurez-vousque les pilessent r6centes et
correctement install6es dans la t61&ommande.
La t616commande renferme un aimant permettant de
la fixer sur des surfaces m&alliques. 23
Page 24

Entretienet nettoyageduclimatiseur.
Grille et Bottier
Eteignez et ddbranchez le climatiseur mant tout
nettoyage.
Filtre a Air
Le filu'e fi air derriOre la _'ille fl'ontale doit
0tre vdrifid et nettoyd, au bout de 30jours de
foncfionnement ou plus souvent si nd.cessaire.
Pourretirerlefiltre :
Ouvrez la _'ille d'admission en fimnt vers le bas sur
les langl_ettes aux coins supd.rieursjusqu'it incliner
la grille fi un an_e de 45°. Enlevez le filtre.
Nettoyez le filu'e avec de l'eau savonneuse fi0de.
Rincez le filu'e et laissez-le sd.cher avant de le
remem'e darts le climafiseur. Ne nettoyez pas votre
filtre au lave:vaisselle.
A MISEENGARDE".EfaitesPAS
fonctionnerleclimatiseursanslefiltre souspeinedele
boucheravecdelapoussiereetdelacharpieetderOduireson
efficacitO.
Serpentins ExtOrieurs
Les serpentins simds du c6td extdrieur du
climafiseur dokent _tre rdg-uliOrement vd.rifid.s.S'ils
sont obsm_Os par des poussiOres ou de la suie, il est
possible de les f:aire nettoyer par des professionnels.
Pour le nettoyer, utilisez de l'eau et un ddtergent
doux. N'utilisez pas d'eau deJmel ou de nettoyants
abrasifs.
24
CommentInsOrerlesPilesdans la TOlOcommande
Retirez le couvercle du logement des piles
en le t:aisant _isser darts le sens indiqud par
la flOche.
Insd.rez les nouvelles piles en vous assurant
que les p61es (+) et (-) de la pile sont orientals
darts la bonne dfi'ecfion.
[3] Remettez le couvercle en le taisant glisser.
REMARQUES
: Utilisez 2 piles alcalines _ d'l,5 Volt.
N'uulisez pas de piles rechargeables.
Refirez les piles de la tdldcommande si vous
prd.voyez de ne pas ufiliser votre climafiseur
pendant un certain temps.
Ne mdlmlgez pas des piles neuves avec des
piles usdes. Ne mdlangez pas ensemble les
piles alcalines, standard (carbone-zinc) ou
rechaxgeables (hi-cad, ni-mh, etc).
Page 25

Instructions
demontage
| Questions?Composezle 1.888.361.3488ouvisiteznotresiteweba' www.electromenagersge.ca
I
MISE ENGARDE•
AVANTDECOMMENCER
Lisezces instructionsentierementet attentivement.
• IMPORTANT- Conservezces instructions
pour I'inspecteur electrique local.
• IMPORTANT- Respectez tousles codes
et r_glements en vigueur.
• RemarquepourI'installateur- Assurez-vous de
remettre ces instructions au client.
• Remarquepourle client- Conservez ces
instructions pour toute ref6rence future.
• Niveaude competence- L'installation de cet
appareil demande des connaissances de base
en mecanique.
• D@laid'ex_cuti0n- Environ 1 heure
• Nous recommandons que I'installation de ce
produit soit effectuee par deux personnes.
• L'installateur est responsable de I'installation
correcte de I'appareil.
• La panne de I'appareil due a une mauvaise
installation n'est pas couverte par la garantie.
• Vous DEVEZ utiliser toutes les pieces
fournies et suivre les procedures correctes
d'installation decrites dans cette notice
ainsi que toutes les instructions concernant
certaines pieces separ6es Iors de
I'installation de ce climatiseur.
Ne coupez pasou n'enlevez pas, sous aucunpretexte,
la troisieme broche de raise a la terre du cordon
d'alimentation.
Ne changez pas la fiche du cordond'alimentation du
climatiseur.
Un c_blageen aluminium du domicile peut occasionner des
probl_mes particuliers--consultez un _lectricien qualifi_.
Si les boulons de maintien au rebord ne font pascontact
avec le rebord de la fen_tre, ou si vous avezunefen_tre
sans rebord,vous devezcommander le jeu d'accessoires
RAK87pour installer correctement ce climatiseur. Appelez
le 800.626.2002ou consultez le site Internet www.
electromenagersge.ca
OUTILLAGENI_CESSAIRES
Tournevis cruciforme Phillips
Climatiseur
I
Cle _ molette
(_ EXIGENCESI_LECTRIQUES
(_ ertains modules necessitent une prise
La fiche triphasee avec terre reduit le risque
de choc electriq, ue. Si la prise murale que vous
envisagez d'utihser est b_phas6e, vous avez la
responsabilite et I'obligat_on de la remplacer par
une prise triphasee correctement raise a la terre.
(_ par un disjoncteur. Ces modules doivent
raise a la terre de 115/120 Volts AC, 60 Hz,
proteg6e par un fusible a action differ6e ou
par un disjoncteur.
raise a la terre de 230/208 Volts AC,
Certains modules necessitent une prise
proteg6e par un fusible a action differ6e ou
_tre instal/es sur leur propre circuit deriv6
pour eviter de surcharger les circuits
_lectriques du domicile .clui peut
occasionner un risque dqncendie par
surchauffe des c_bles.
Tournevis _ t_te plate
Crayon
Niveau
Le cordon d'alimentation est equip6 d'un
dispositif d'interruption du courant. Un bouton
d'essai et de reenclenchement est fourni sur
le boftier de la prise. Vous devez tester le
mecanisme r6guli_rement en appuyant d'abord
sur le bouton TEST(essai) puis sur le bouton RESET
(Reenclenchement) Iorsque I'appareil est branche.
Si le bouton TEST(essai) ne bascule pas ou si le
bouton RESET(reenclenchement) ne reste pas
enclenche, cessez d'utiliser votre climatiseur et
appelez un technicien de service qualifie.
25
R_gle ou m_tre
Ciseaux ou couteau
Page 26

PI[:CESINCLUES
(L'aspectpeut varier)
Panneau en
accord6on.
gauche _
Instructionsde montage
Join_
d'etanch6it6 --------__
supeneur en _."_.. "..":._.
mousse de la _; .'_..
fenetre
Joint d'6tancheit6 de la
fen6tre & guillotine
(fin, adhesif au dos)
Rail de montage
superieur
Panneau en
accordeon
Bande d_
du rail de _age J
superleur
Type A (6) Type B (3) Type C (5) Type D (2) de la fen6tre (1)
droit
Ferrure de verrouillage
26
Page 27

Instructionsde montage
ITI INSTRUCTIONRELATIVE
A LAFENETRE
• Cesinstructions sont valables pour une fen6tre
standard a guillotine a deux chassis mobiles. Vous
devrez modifier les instructions pour les autres
tvnes de fen6tres.
MISEENGARDE:silesboulonsde
maintien au rebord ne font pas contact avec le
rebord de la fen6tre, ou si vous avez une fen6tre
sans rebord, vous devez commander le jeu
d'accessoires RAK87 pour installer correctement
ce climatiseur. Appelez le 800.626.2002 ou
consultez le site Internet ge.com.
• Le climatiseur peut 6tre installe sans les panneaux
en accordeons si la fen6tre est etroite. R6ferez-vous
aux dimensions de la fen6tre indiqu6es dans le
croquis a droite.
• Toute la ferrure de montage dolt 6tre solidement
fix6e au bois, a la ma?onnerie ou au metal.
• La prise d'alimentation electrique dolt se trouver
port6e du cordon d'alimentation.
• Suivez les dimensions indiquees pour votre mod61e
dans letableau et sur le croquis.
[] RETRAITDUCLIMATISEURDESON
LOGEMENT
[_ Retirez et mettez de c6t6 les deux vis des
c6tes inferieurs de la grille frontale.
BE] Attrapez les deux coins inferieurs de
la grille tout en appuyant sur les c6tes
du Iogement avec le bout des doigts.
Tirez vers vous pour liberer la grille puis
sortez-la en levant.
REMARQUE: Ne tirezpas le bord inferieur
vers vous de plus de 3 po ou vous risquez
d'endommager les languettes de la grille.
t t
22.6p0 t
38.1po 14.5po_inL
(Avec les panneaux
en accordeon)
r
-1
I
I
[] INSTRUCTIONSRELATIVE
/_LACONTRE-FENETRE
Le cadre de la contre-fen6tre emp6che le
climatiseur de pencher vers I'exterieur, et donc de
se drainer correctement. Pour r6gler ce probDme,
fixez un morceau de bois au rebord de la fen6tre.
MORCEAUDEBOlS
LARGEUR:2 po
LONGUEUR: Suffisamment long pour se Ioger
I'interieur du cadre de la fen6tre.
EPAISSEUR:Pour determiner 1'6paisseur, placez un
morceau de bois sur le rebord de la fen6tre de
fa?on a ce que le morceau de bois soit 1/2po plus
61ev6que le dessus du cadre de la contre-fen6tre
ou du cadre en vinyle.
Fixez solidement a I'aide de vis ou de clous fournis
par I'installateur. 1/2po plus elev6 que le cadre en
vinyle (sur certaines fen6tres)
r_ Lorsque la grille frontale est retiree, le
panneau de commande est toujours
raccorde au faisceau de fils. Tournez
la grille de fa£on a voir sa face arriere.
Retirez les trois vis pour separer le boitier
du panneau de commande de la grille.
r_ Retirez les vis de mise a la terre de
chaque c6te du Iogement du climatiseur.
Mettez-les dans un endroit sQr.NOTE :
Veillez a conserver ces vis. Elles seront
necessaires dans une etape ulterieure de
I'installation.
1/2pop lus 6lev6 _ i ,k//Bois
que le cadre de T r; I_) j_ _/r I
ia contre-fen6tre _ '_ ' Rebordl_r.--')
Cadre de la
contre-fen6tre
•-,-,1,, IW,,: Yf<l
_ Cadre en vinyle I
AVANT
27
Page 28

Instructionsde montage
D RETRAITDUCLIMATISEURDESON
LOGEMENT(SUITE)
[] Sortez le climatiseur de son Iogement en
le faisant glisser et en attrapant la poignee
du conteneur de fond et en tirant vers
vous tout en maintenant le Iogement.
Ne tirez gas et ne soulevez gas la zone
d'evacuation en mousse de polystyrene
pas
et ne soulevez
pas cette zone,
vous risquez
d'endommager
votre appareil.
D FIXATIONDELABANDED'I_TANCHI_ITI_DU
RAILDEMONTAGESUPI_RIEUR
Retirez la pellicule de la bande d'etanch6it6
du rail de montage superieur et apposez
cette bande d'etanch6it6 sur le bas du rail
de montage superieur, le long du bord
avant.
D INSTALLATIONDURAILDEMONTAGE
SUPI_RIEURSURLELOGEMENT
Fixez le rail de montage superieur sur le
Iogement a I'aide de 3 vis de type B.
de
type B
e
superieur
INSTALLATIONDESPANNEAUXEN
ACCORDI_ONSURLESCOTI_S
Faites glisser les panneaux en accordeon
gauche et droit dans les rails de montage
inferieur et superieur.
Fixez les panneaux en accordeon au
Bq
boitier a I'aide de 3 vis de type A de
chaque c6te.
Rail de montage superieur
Rail de montage superieur
Illi
pellicule de
_ etirez la
VUEFRONTALE Rail de montage superieur
la bande
d'etanch6it6
J
I................./...................!
Bande d'etanch6it6
Panneau en
accordeon
Vis de ARRIERE
Type
Rail de montage inferieur
1-71PRI_PARATIONDELAFENETRE
• Decoupez le joint de la fen@re
guillotine a la largeur de la fen_tre
et collez le c6te adhesif sur le bas du
cadre.
I
.Joint d'etanch6it6 de
la fen6tre & guillotine
INTERIEUR
28
Page 29

Instructionsde montage
D INSTALLATIONDULOGEMENTDAMSLA
FENETRE
[_ Ouvrez la fen_tre et marquez I'axe central
du rebord de la fen_tre.
r_ Placez soigneusement le Iogement sur le
rebord interieur de la fen@re et alignez
la marque au centre avec I'axe central du
rebord de la fen_tre.
[] Tirez la fen_tre vers le bas derriere le rail
de montage superieur.
REMARQUE: Ne fermez pas la fen6tre
completement pour eviter que
le mouvement des panneaux en
accordeon soit restreint.
[D-]Attachez le Iogement au rebord de la
fen6tre en utilisant 3 vis de type D.
D INSTALLATIONDULOGEMENTDAMSLA
FENETRE(SUITE)
[_ Tirez les panneaux en accordeon vers
chaque rail de la fen@re a guillotine.
Fixez-les de chaque c6te du cadre et du
rebord de la fen6tre a I'aide de 4 vis de
type C.
[] INSTALLATIOND'UNEFERRUREDESUPPORTETDU
JOINTD'C:TANCHC:IT¢:SUPC:RIEURENMOUSSEDELA
FENETRE
% -&MISEENGARDE:
Pour preventez la verre
brisez dans les fen_tres,
attachez une ferrure de
support a la c6te du
fen_tre.
Vinyle
29
Fixez la ferrure de support
I'aide d'une vis de type I_ I _'U'°
C.
Decoupez le joint
d'etanch6it6 sup@ieur en mousse a la largeur
de la fen_tre.
Ins@ez la mousse
entre la vitre et
la fen_tre pour
emp_cher I'air et
les insectes de
pen6trer dans la
piece.
NOTE: Si le joint d'etanch6it6 fourni ne s'adapte
pas a votre fen_tre, procurez-vous Iocalement
I'article approprie afin d'obtenir une etanch6it6
adequate de I'installation.
Page 30

Instructionsde montage
INSTALLATIONDUCLIMATISEURDANS
SONLOGEMENT
Faites glisser le climatiseur dans le
Iogement par le conteneur du fond. Ne
poussez pas sur les commandes, sur le
boftier en mousse de polystyrene pour la
sortie d'air ni sur les serpentins a ailettes.
Assurez-vous que le climatiseur est
correctement positionn&
/!!!:!
N'appuyez pas
sur ces zones,
vous pourriez
endommager
votre appareil.
Conteneur du fond
[] Remettez en place les deux vis de mise
la terre retirees plus t6t, une de chaque
c6te.
IMPORTANT: Lesvis de mise a la terre d0ivent _tre
remisesen place pourgarantir une mise a la terre
adequate.
[] INSTALLATIONDU CLIMATISEURDANS
SONLOGEMENT(SUITE)
[] Montez de nouveau la commande sur le
boftier du panneau en remettant en place
les trois vis 6tees plus t6t.
m Fixez la grille frontale en inserant les
languettes de la grille dans les fentes
situees dans la partie superieure avant du
Iogement. Poussez sur la grille.
;;!; d/¸
, .%
Attachez la grille frontale au Iogement
rq
en remettant en place les 2 vis retirees
auparavant. Appuyez sur le dessus de la
grille pour permettre la mise en place des
vis de c6te.
E] Branchez I'alimentation.
30
Page 31

Avantd'appelerleservice...
Causespossibles Quefaire
Leeilm_tiseuihAse Le climatiseur *Assurez-vousque lafiche du climatiseur soit bien branchde
met3asenmarcne est ddbranchd, darts la prise murale.
Le fllsible a sautd/ • \:drifiez la boite itflLsible/itdisjoncmurs et remplacez le fllsible
le disjoncmur est ore'eft, ou rebranchez le disjoncmm'.
11v a one panne de courant. • S'il se produit one panne de com'mlt, ddbrmlchez le climadseur
en le mettant en posidon OFF(arr_t). Quand le courant revient,
attendez 3 minutes avantde remettre en marche le climatiseur,
pour dvimr de ddclencher la surchmge du compresseur.
Le mdcanisme d'inmrrupdon *Appuyez sur le bouton RESET(remise en marche) siredsur la fiche
de courant est ddclanchd, du cordon dlectrique.
• Silebouton RESETne reste pas enfoncd, m_'_mzle climafiseur
d'air et appelez un mchnicien qualifid.
Lec/imatiseurnerefr0idit La ci_vulafiond'air est bloqude. • Assurez-vousqu'il n'y a pas de rideau, de store ou de meuble
oasautantou'i/ledevrait qui bloque le devantdu climafisem'.
Le contrGlede tempdrature • En mode COOL(finis) appuyez sin"la touche DECR%SEvpad.
n'est pas bien rdgtd.
• Sur les modbles dotds de bomons de commandes, tom'nez
le bouton de mmpdramre sur one valem"plus dlevde.
Le filtre itair est sale. • Nettoyez le filu'e au moins tom les 30jours. Consulmr la secdon
Instructionsdefonctionnement.
La chambre dtait chaude. • Apr_s avoirmis en marche le climatiseur, attendez
que la chmnbre serefi'oidisse.
L'air fl'oid s'dchappe • \:drifiez les grilles itregistre de plancher et les reprises d'air
de la chambre, fi'oid.
Les seq_enfins sont gelds. • Consulmz "Leclimatiseurd'air@le"ci<lessous.
Leclimatiseur La glace bloque la circulation • Sur les modules dotds de boutons de commande, rdglez le mode
g_le d'air et empOche leclimatiseur sur HighFan(vitessedu ventilateur dlevde) ou HighC001(fort
de refroidir la chambre, refroidissement) avecla mmpdramre rdgtde sur 1 ou 2.
• Sur les modbles dotds de touches iteffleurement, rdglezles
commandes sin"HighFan(vimssedu ventilateur dlevde) ou High
C001(fort refi'oidissement) et rdgtez le themlostat sin"one
mmpdramre plus dim'de.
katO0c0mman0e Les piles ne sont pas ins&des • \:ddfiez la position des piles. Ellesdoivent ins&des de t'acon itce
nef0ncti0nne0as correctement, que les p61es (+) et (-) de la pile soient orientals darts des
directions opposdes.
Les piles sont peut-Otre • Remplacer les piles.
ddchargdes.
DeI'eaucoule_l'ext_deur 11t:aittr#schaud et hmnide. • C'est nomml.
DeI'eauc0u_e8 I'intOrieur Le climafiseur n'est pas • Pour obtenir one bonne dvacuadon de l'eau, assurez-vous
inclind vers l'extdrieur, que le climaoseur soit ldg_rement inclind de l'avant
t'eaus'amassecans L'humiditd est extraite de • C'est nomml pendant une pdriode com'te darts des rdgions
leplateaudufond l'air de la chambre et passe peu hmnides; nomlal pendant des pdriodes plus longues
dartsle plateau du fond. dartsdes rdgions trOshumides.
du boitier vers l'arribre.
Bruits normauxdefonctionnement
Vous pouvez enmndre un cliquefis dfi a de l'eau qui
est absorhde et est projetde contre le condensateur les
jours de pluie oh quand il va beaucou I) d'humiditd.
Cetm caractdrisdque diminue l'humiditd et amdliore
le rendement.
Vouspouvez entendre le claquement du themlostat
quartOle compresseur se met en marche et s'arr_te.
De l'eau s'amasse darts le plateau du bas pendant les
pdriodes de grande humiditd ou s'il pleut. Cette eau
i)eut ddborder et couler de l'appm'eil du c6td extdrieur.
Le venfilateur peut tourner m&ne quand le compresseur
ne foncfionne pas.
31
Page 32

Notes.
32
Page 33

Notes.
33
Page 34

Notes.
34
Page 35

ClimatiseurGE--GarantieLimit0eD'unAn. www.electromenagersge.ca
/es servicessousgarantiesont dispensesparnoscentresde reparation
ou parnosreparateursCustomerCare®autorises.Pourobtenir leservice,
appelezle 1.800.561.3344.Veuillezfournirle numerodeserieet le
numerode modeleIorsquevousappelezpourobtenirleservice.
Nousremplacerons:
i_iii_i_i!iiillZII_!_ii_i!i(iiii_i_i_i_ii_iiZ
Uneannie
Ac0mPterde !adate
d'achatinitial
Les dOplacements de sewice "avou'e maison pour vous
apprendre "autiliser le produit.
Un montage, une livx-aisonou un entrefien
deficient. Si vous avez un probl&me de montage
ou si le climafiseur n'a pas la bonne capacitd de
refl'oidissement pour son usage pr&:u, appelez vou'e
revendeur ou vou'e installateur. Vous etes x'esponsable
de fournir une installation de raccordement dlecu'ique
convenable.
Les pannes occasionnOes pax"des modifications
au produit ou une ufilisafion non raisonnable, en
parficulier une absence d'enu'etien raisonnable
et nOcessaire.
T0utepiece de le climatiseu," manifestant un vice de mat&'iau ou de f:abricafion. DuxTmtcette
p&'iode de garantielimitOedune anne<Mabe fournim aussi, gratuiternent,la main-d'oeuvre
et le sewice de reparation connexe pour le remplacement de la piece ddfecmeuse.
Agrafezle re£sud'achatici.
Pourobtenirle servicesous
garantie,vousdevrezfournirla
preuvedeI'achatoriginal.
Le remplacement des fl_sibles de la maison ou la
rdacfivation des disjoncteurs.
Les pannes occasionndes pax"la corrosion sur les
modbles qui ne sont pas protdgds conu'e la corrosion.
Les dommages occasionnds pax"un mauvais voltage de
l'alimentafion dlecu'ique, un accident, un incendie,
une inondafion ou une calamit_ namrelle.
Les dommages indirects et cons_cutifs "ala pi'opx'i_t_
personnelle occasionnds pax"des vices possibles de
ce climatiseur.
Les dommages occasionnds pax"la livraison.
Darts les emplacements commerciaux, la main-d'oeuvre
nOcessaire pour d&n&lager l'appareiljusqu"a un
emplacement off ilest accessible pax"un technicien
parficulier.
EXCLUSIONDEGARANTIESIMP/ICITES- Votre seulet uniquerecoursest la reparationdu produit
selon lesdispositionsde cette Garantie limitee. Toutes les garanties implicites, incluant les garanties
de commercialiteet d'adequation a un usagespecifique, sont limitees a une anneeou a la per!ode
la plus courte autorisee par la legislation.
Cettegarantieestvalablepourle premierproprietaireet tout autreproprietairedu produits'ilacheteauCanadapourutilisation
domestiquedansCanada./eserviceadomicilesousgarantieserafournila oQil est disponibleet danslesregionsque Mabe
considerequeI'offre deserviceestraisonnable.
Danscertainesprovinces,il est interdit d'exclureoude limiter les dommagesdirectsou indirects.IIestalorspossiblequeles
limitations ouexclusionsci-dessusnes'appliquentpas dansvotrecas./a presentegarantievousconf_redesdroitsjuridiques
specifiques.Vouspouvezbendicier d'autresdroits,qui varientd'uneprovincea I'autre.Pourconnattreles droitsdontvous
bendiciez dansvotreprovince,communiquezavecle bureaudesrelationsaveclesconsommateursdevotre region.
Garant: MabeCanadaInc.,
Burlington,Ontario
35
Page 36

Assistance_laclientele.
Vous avez une question ou vous avez besoin d'aide pour votre appareil _lectrom&lager? Contactez-nous
I SiteInternetGE www.electromenagersge.ca
' par Internet au site www.electromenagei_ge.ca 24 heures parjour, tous lesjoms de l'ann_e.
ServicederOparations
Service de r0parations GE est tout pi'_s de vous.
Pour faire r0parer votre 0]ectrom0nager GE, il suffit de nous t0]0phoner.
1.800.561.3344
StudiodeconceptionrOaliste www.electromenagersge.ca
Sur demande, GE peut fournir une brochure sur l'am&lagement d'une cuisine pour les pe_sonnes
"amobilit0, r0duite.
t_crivez: Directeur, Relations avec les consommateurs, Mabe Canada Inc.
Bureau 310, 1 Facto U Lane
Moncton, N.B. E1C 9M3
Prolongationdegarantie www.electromenagersge.ca
Achetez un conu'at d'entretien GE avant que votre gamntie n'expire et b_n_ficiez d'un mbais substantiel.
Ainsi le sewice apr_swente GE sere tot_jours 15apr_s expiration de la garanfie.
Visitez notre site Web ou appelez-nous au 1.888.2611.21133.
Piecesetaccessoires
www.electromenagersge.ca
Ceux qui ddsirent rdparer eux-m_nles leurs dlecu'omdnagers peuvent recevoir pibces et accessoires
directement "ala maison (cartes VISA, MasterCard et Discover acceptdes).
Lesdirectivesstipuleesdanslepresentmanuelpeuventetreeffectueesparn'importequelutilisateur.Lesautresreparations
doiventgeneralementOtreeffectueesparuntechnicienqualifie.Soyezprudent,carunereparationinadequatepeutaffecterle
fonctionnementsecuritairedeI'appareil.
Vous u'ouverez darts les pagesjaunes de vou'e annuaire le num&'o du Cenu'e de service Mabe le plus
proche. Auu'ement, appelez-nous au 1.800.561.3344.
Contactez-nous
Si vous n'etes pas safislCaitdu selYice aprbswente dent vous avez bdndficid :
Premi_rement, communiquez avec les gens qui ont r_pard votre appareil.
Ensuite, si vous n'_tes tot{jours pas safislCaitenvoyez tous les d0.tails--num0.ro de t0]0.phone compris--au
Directeur, Relations avec les consommateurs, Mabe Canada Inc.
Bureau 310, 1 Facto U Lane
Moncton, N.B. E1C 9M3
www.electromenagersge.ca
InscrivezvotreappareilOlectromOnager www.electromenagersge.ca
Inscrivez vou'e appareil dlectromdnager en direct, aussit6t que possible. Cela amdliorem nos
communications et notre service apr_s=vente. Vous pouvez _galement nous em_oyer par la poste
le fommlaire d'inscripfion joint "avou'e documentation.
36
Page 37

Instrucciones de seguridad ....... 38, 39
Instrucciones de operacidn
Modelos con teclas de toque .......... 40, 41
Cuidado y limpieza
Bobinas para exteriores ................. 42
Filtro de aire .......................... 42
Instrucciones de instalacidn ...... 43-48
Solucionar problemas ............... 49
Sonidos de operaci6n normales .......... 49
Servicio al consumidor
Garantia .............................. 50
Servicio al consumidor .................. 51
AEN08*
* Producto etiquetado *ENERGYSTAR_>
Como socio de ENERGYSTAR@,
GE ha confirmado que este
producto cumple las directrices
de EN[RGYSTAR@relativas al
rendimiento energd.tico.
Escriba10snOmer0sdem0del0
yserieaqui:
# de M0del0
# deSerie
Puede encontrar estos ndmeros
en una etiqueta en el costado
del acondicionador de aire.
37
Page 38

INFORMACIONIMPORTANTEDESEGURIDAD.
LEATODAS[_ASINSTRUCCIONESANTESDEUSAR.
a, iADVERTENCIA!
Porsuseguridad,sedebeseguirlainformaciOnenestemanualparaminimizarelriesgodeincendios,descargas
elOctricasolesionespersonales.
PRECAUCIONESDESEGURIDAD
Use este electrodom_stico solamente para
el prop6sito determinado segdn se describe
en el Manual del propietafio.
{{{iiiiiiiili
Este acondicionador de aire debe instalarse
correctamente de acuerdo con las
Instmcciones de instalaci6n antes de su uso.
{{{iiiiiiiili
Nunca desenchufe su acondicionador de
aire tirando del cable elOctrico. Siempre
agarre firmemente el enchufe y tire de
_1 directamente hacia dhera.
{{{iiiiiiiili
Reemplace inmediatamente mdos los cables
eldctficos que se hayml pelado o que se
hayan daflado de alguna otra manera.
Un cable de corfienm daflado no debe
repararse, sino que debe ser sustituido por
uno nuevo que se adquiera del fhbficmlm.
No use un cable eldctfico que muestre
ex,idencias de detefioro, o daflos de abrasi6n
en su supeiIicie en alg_no de sus extremos.
{{{iiiiiiiili
Si el receptaculo no coincide con el
enchute, un electficista calificado debe
reemplazar el receptaculo.
Apague la unidad (OFF)y desenchufe el
acondicionador de aire antes de etectuar
reparaciones o la limpieza.
NOTA:Recomendamosenf_ticamenteque
un tOcnicocalificadorealicelasreparaciones.
{{{iiiiiiiili
Por su seg_ridad...no almacene ni
use mamfiales combustibles, gasolina
u otros vapores o liquidos inflamables
en la proximidad de dste o alTOn otro
electrodomOstico.
{{{iiiiiiiili
Todos los acondicionadores de aire
contiene refrigerantes, los que por Ley
Federal deben ser removidos antes de
desecharlos. Si usted planea deshacerse de
alTOn producto que conmnga refligerantes,
p6ngase en contacto con la compaflfa que
se encarga de recoger su basura para que le
indiquen qud hacer.
{{{iiiiiiiili
Estos sistemas de acondicionadores de
aire R410A requieren quelos contratistas
y t_cnicos usen herramientas, equipos
y estandares de seg_ridad aprobados
para su uso con estere frigerante. NO
use equipamiento certificado s61o para
refrigerante R22.
38
COMOCONECTARLAELECTRICIDAD
Bajoningunacircunstancia,corteo remuevala tercera
pOa(tierra)delcableelOctrico.Enpos
de la seguridadpersonal,este electrodomOstico
debesiempreconectarsea tierra.
NOuseunenchufeadaptadorconesteelectrodomOstico.
E1 cable el_ctrico de este electrodom_stico est_
equipado con un enchufe de tres pOas (tierra)
que combina con un tomacorfiente est_ndar
de tres tomas de pared para minimizar la
posibilidad de una descarga el_ctfica.
E1cable de alimentaci6n incluye un
dispositivo para imermpci6n de corriente.
Se incluye un bot6n de pmeba y de reinicio
en el dispositivo. E1dispositivo debe ponerse
a pmeba pefi6dicamenm: primero se presiona
el bot6n de TEST(pmeba) y luego RESET
(reinicio) mientras se encuentra enchufado al
tomaconienm. Si el bot6n TESTno se dispara
o si el bot6n RESETno queda enganchado,
deje de utilizar el acondicionador de aire y
comuniquese con un tdcnico calificado.
Pida a un tdcnico que inspeccione el
tomacorfiente y el circuito para cerciorarse
de que el tomaconiente est_ conectado a
tierra de la manera apropiada.
Donde exista un tomacorfiente de dos
tomas, es su responsabilidad y obligaci6n
personal hacer que dicho tomaconiente
sea reemplazado por uno de tres tomas
con conexi6n a tierra.
E1 acondicionador de aire deberfa siempre
estar conectado a un tomacorfiente individual
con su circuito de volta.je correspondiente.
Esm proporciona el mayor rendimiento y
ademas ex,itaque los circuims del resto de
la casa se sobrecarg_en, lo cual podrfa causar
incendios por el sobrecalentamiento del
cableado.
Ver las Instmcciones de instalaci6n, en la
secci6n Requisit0sEl0ctric0spara los requisitos
espec/ficos de conexi6n.
Page 39

GEAppliances.com
Z iADVERTENCIA!
USO DE PROLONGADORES
RIESGO DE INCENDIO. Podria ocasionar
lesiones graves o la muerte.
• NO use un prolongador con este
Acondicionador de Aire de Ventana.
• NO use protectores contra picos de tensi6n ni
adaptadores pare mOItiples tomacorrientes con
este Acondicionodor de Aire de Ventono.
LEAYSIGAESTASINSTRUCCIONESDESEGURIDADCUIDADOSAMENTE.
GUARDEESTASINSTRUCCIONES
39
Page 40

Acercadeloscontrolesenelacondicionadordeaire
Laslucesal ladodelasteclasdetoqueenelpaneldecontroldelacondicionadordeaireindicar_nlosajustesseleccionados.
Lapantallamuestrasiemprela
temperaturaambiente,exceptoal
configurarla temperaturaDefinida
o el Sincronizadorderetardo.
La luz indicaque la unidadest9 en el modode
Ajuste de temperaturao deTiempode retardo.
@
Laluz indicaque el temporizador
de retardoest9 configurado.
Controlesdelacondicionadordeaire
Control remoto
Controles
TecladePower(Encendido)
Apaga y prende el acondicionador de aire.
A1encenderse, la pantaUa mosu'ar_ la
temperamra ambiente.
Oi Pantalla
PMuestra la temperamra ambiente o
el fiempo restante en el Sincronizador de
retardo. Muesu-a la temperamra Definidaal
configln-ar la temperatura en los modos C001
(Fr[o)o de EnergySaver(Ahorrodeenergfa).
La luz de Ajuste se encender:_ durante la
configln-aci6n.
NOTA:la pantaUa cambiara para mostrar la
temperamra ambiente una vez que se hwa
realizado la configln'aci6n. Para resfituir la
temperamra Definida,pulse las teclas de Temp
(Temperatura)Aumento• o ReducciOn•.
TeclasdeTempAumento•/ReducciOn •
ustar la tempe_tu_a cuando
se encuenu'e en el modo C00l(Frf0)o EnergySaver
(Ah0rr0deenergia).La luz de Ajustese encender:_
dumnte la configln-aci6n.
O eclasdeSincronizadorderetardoAumento• (+)/
meducciOn•(-)
Cada vez flue toque las teclas Aument0•/
ReducciOn• de la unidad o las teclas Aument0+
ReducciOn- en el control remoto definira
el fiempo de retardo al ufilizar el Delay1-24hr
timer (Sincronizador deretard0 1-24 h).La luz de
Ajustese encendeM durante la configln'aci6n.
TeclasdeFanSpeed(Velocidaddelventilador)
) para ajustar la velocidad del ventilador
a Low(Bajo),Med(Medic),High(Alto)oAuto
(AutomStica)en la unidad. NOTA:en el control
remoto, utilice lasteclasAumento+/ReducciOn
- velocidad de ventilador pare ajustar la
velocidad del venfilador en Low(Baj0),Med
(Medi0)o High(Ait0).Utilice la tecla Autopara
activar el venfilador automfifico.
TecladeMODO
para ajustar el acondicionador de aire
al modo Cool(Frfo),EnergySaver(Ahorrodeenergfa)o
FanOnly(Soloventilador).
TeclasdeDelay(Retardo)
DelayON(ENCENDIDORetardo)_Cuando
el acondicionador de aire est_ apagado,
puede ajustarse pa*_ que se encienda
autom_ficamente denu'o de 1 a 24 horas en el
modo y configln'aci6n de venfilador anterior.
DelayOFF(APAGADORetardo)_Cuando el
acondicionador de aire est_ encendido, puede
ajustarse para que se apagl_e automfificamente
denu'o de 1a 24 horas.
COmorealizarelajuste:
pulse la tecla Delay1-24hr(Retardo1-24h)en
la unidad o en la tecla del conu'ol remoto.
Cada toque de las teclas Aument0• /ReducciOn
• en la unidad o las teclas Aument0+/
ReducciOn- en el control remoto definir_ el
tempoHzador en inte,_'alos de 1 hora.
La luz de Ajustese encender_ dtn-ante la
configan_aci6n.
Pa,_arevisar el tiempo restante en el
Sincronizador deretard0 1-24 tl, pulse la tecla de
Delay1-24hr(Retardo1-2411)en la unidad o
en la tecla del conu'ol remoto. Utilice las teclas
Aument0•/ReducciOn • en la unidad o las teclas
Aument0+/ReducciOn- en el control remoto
pa,_adefinir un nuevo fiempo, si lo desea.
Paracancelarelsincronizador,pulse la mcla Delay
1-24hr(Retardo1-24h)hasta que la luz de dicho
conu'ol se apaglm.
40
Funci6nde recuperaci6nde pOrdidadeenergia
En caso de la p&'dida de la energfa o interrupci6n,
la unidad reiniciai_ automfiticamente en las
flmciones de la dlfima vez que tim usado una
vez la energia sea restablecida. Si la flmci6n del
Delay1-24hr(Retardo1-24h)estaba definido,
continuar_ la cuenta re_'esiva. Es posible que usted
necesite ajustar un fiempo nuevo si asf lo desea.
Page 41

Modo Cool(Frio)
Use el modo Cool(Frfo)a Low(Bajo),Med(Medic),
High(Alto)o AutoFanSpeed(Velocidaddeventilador
automStica)para enfliar. Use lasteclas de Temperature
(Temperatura)AumentoA(+)/meducci0nv(-) pare ajustar
a la temperatura deseada entre 64°F y 86°F en
incrementos de I°F.
Se tlsa un termostato electr6nico para mantener
la temperamra ambiente. E1compresor hai_i
ciclo entre apagado yencendido para mantener
la habitaci6n a la temperamra deseada. Ajuste el
tem_ostato a un ndmero menor y el aire interno
se enfl'imvi m_is.Si lo ajusta a un ndmero mayor,
la temperamra del aire intemo se calenta_i mils.
NOTA:siel acondicionadordeaireest8apagadoy seenciende
mientrasest8configuradoenunajusteCool(Frfo)
osisecambiadeunajustedeventiladora unodeCool(Frfo),
puedequepasenaproximadamenteunos3minutoshastaque
elcompresorarranqueycomienceelenfriamiento.
EnergySaverMode (Mododeahorrode energia)
Conu'ola el venfilador.
ON(ENCENDIDO}_E1ventilador ha,vi un ciclo
de encendido y apag'ado con el compresor. Este
resulta en variaciones mayores en la temperature
de la habitaci6n yen la humedad. Normalmente
usado cuando la habitaci6n no estfi ocupada.
GEAppliances.com
Descripcionesdeenfriamiento
Paraenfriamienton0rmaI--Seleccione el modo
Cool(Frfo)y ventilador High(Alto)o Med(Medic)
con una temperamra de ajuste media.
ParaenfriamientomSxim0--Seleccione el modo
Cool(Frfo)y ventilador High(Alto)con una temperature
de ajuste menor.
Paraenfriamientosilenciosoy enfriamientonocturno--
Seleccione el modo Cool(Frfo)yventilador Low(Bajo)
con una temperatura
de ajuste media.
Nouseenlascondicionesexternasdebajoelpunto
decongelaci0n
Este acondicionador de aire no es diseriado para
usar en temperamras extemas debajo el punto de
congelaci6n. No use en las condiciones extemas
debajo el punto de congelaci6n.
NOTA:puedequeelventiladorsigafuncionandoduranteun
cortotiempodespu0sdedesactivarseelciclodelcompresor.
OFF(APAGADO)_E1ventilador flmciona todo el
fiempo, mienu'as que el compresor pasa pot los
ciclos de encendido yapagado.
Modo de FanOnly(Soloventilador)
Use el modo Fanonly(Soloventilador)a velocidad Low
(Baja),Med(Media)o High(Alta)pare proporcionar
circulaci6n de aire y filtraci6n
sin enfliamiento. Debido a que los niveles
de venfilador finicamente no proporcionan
Velocidadde ventilador automStica
Indique la opci6n en Velocidad de ventilador
autom_ifica pare definir automfificamente la
velocidad necesaria para proporcionar una
configuraci6n de comodidad 6ptima con la
temperamra ele_da.
Direcci6n del aire
Ufilice las palancas pare ajustar la direcci6n del
aire, hacia la izquierda y hacia la derecha.
Aplique presi6n con la punta de los dedos en las
lamas de distribuci6n pare ajustar la direcci6n del
aire hacia an'iba y hacia abajo.
enfl'iaaniento, no se puede inu'oducir una
temperature Definida.Aparece,Ti en
pantaUa la temperamra ambiente.
NOTA:laVelocidaddeventiladorautomSticanopuede
utilizarseenel modoFanonly(Soloventilador).
Si la habitaci6n necesita m_is enfl'imniento,
la velocidad del venfilador aumentar_i
automfiticamente. Si la habitaci6n necesita
menos enfliamiento, la velocidad del ventilador
descende_-_iautomfificamente.
NOTA:laVelocidaddeventiladorautom&ticanopuede
utilizarseenel modoFanonly(Soloventilador).
Control remoto
Para garanfizar una opemci6n apropiada, ofienm
el conu'ol remoto hacia el receptor de serial del
acondicionador de aire.
Cerci6rese de que no haya nada enu'e el
acondicionador de aire y el conu'ol remoto que
pueda bloquear la serial.
E1 receptor de serial uene un tango m_iximo de
20 pies.
Cerci6rese de que las baterfas sean fl'escas y se
instalen correctamente seglin se indica en el
control remoto.
E1 control remoto cuenta con tm linen que
pemfite adherirlo a supe_lqcies metfilicas. /41
Page 42

Cuidadoy limpiezadelacondicionadordeaire.
Rejilla y caja
Apaglm el acondicionador de aire y retire el
enchufe del tomacorriente de la pared antes
de limpiar.
Para limpiar, use agua y un detergente suave.
No use cloro o materiales abrasivos.
Filtro de aire
E1filu'o de aire demis de la ,'ejilla fl'ontal debe
inspeccionarse y limpiarse pot lo menos cada
30 dfas o m_s a menudo sifl_ese necesario.
Pararetirarlo:
Abra la rejilla de enu'ada emptljando hacia abajo
las leng6etas en las esquinas superiores de la ,'ejil-
lade entra da, hasta que la rejilla se encuenu'e en
una posici6n de 45°. Retire el filtro.
Limpie el filu'o con aglm tibia yjab6n. Ei!ju_igl_eloy
permita que se seque antes de coloca,'lo otra vez en
su lugar. No lm_eel filu'o en un lm_avajillas.
_4,PRECAUCION:NoOPEREelacondicionador
deairesinelfiltrodebidoaquela suciedadylaspelusasIo
obstruirSnyreducirSnsurendimiento.
Bobinasparaexteriores
Se deben inspeccionar con fl'ecuencia las bobinas
en el lado exterior del acondicionador de au'e. Si
las mismas est_n obsu'uidas con suciedad u hollfn,
podrfan limpiarse profesionalmente.
C6moinsertar las pilas en el control remoto
Retire la cubierta de la pila desliz_ndola
de acuerdo con la direcci6n de la flecha.
Inserte pilas nuevas cercioi'_ndose de que los
polos posifivos (+) y negativos (-) estfin
orientados correctamente.
Coloque la cubierta owa vez desliz_ndola
en su lugar.
NOTAS:
: Use 2 pilas alcalinas "AAA" de 1,5 voltios.
No use pilas recargables.
Retire las pilas del conu'ol i'emoto si no xa
a usar el sistema pot un perfodo prolongado
No mezcle baterfas nuevas y viejas. No mezcle
baterfas alcalinas, estSndar (carbono-cinc)
orecargables (ni-cad,ni-mh,etc.
42
Page 43

Instrucciones
Acondicionador
deinstalaciOn
I F_&Preguntas? Llame 800.GE.CARES(800.432.2737)o Visite nuestrap_gina en la red en: GEAppliances.com I
deaire
PRECAUCl0N
ANTESDEINICIAR
Lea estas instrucciones completa y cuidadosamente.
• IMPORTANTE-Guardeestasinstrucciones
para uso del inspector local.
Si los tornillos de soporte del umbral no tienen contacto
conel umbral de la ventana, o si cuenta con unaventana
sin umbral, debe ordenar el kit de accesorios RAK87para
instalar de forma adecuada este acondicionador de aire.
Llamea 800.626.2002o visite GEAppliances.com.
• IMPORTANTE-Observetodoslosc0digosy
6rdenesde ley.
• Nota al instalador- AsegOresededejar estas
instrucciones con el consumidor.
• Nota al consumidor - Conserveestas instrucciones para
referencia futura.
• Nivel de destreza - La instalaciOnde este aparato
requiere de destrezas mec_nicas b_sicas.
• Tiempo de ejecuciOn-Aprox. 1 hora
• Becomendamosdos personaspara
la instalaciOnde este producto.
• La instalaciOnapropiada es la responsabilidad del
instalador.
La falla del producto debido a una instalaciOn
inadecuada no est_ cubierta
por la garantia.
Cuandoinstale este acondicionador
de aire, DEBEusartodas las piezassuministradas y usar
procedimientos adecuadosde instalaciOn como describe
en estas instrucciones y algunas instrucciones de kit
separadas.
(_ REQUISITOSELI_CTRICOS
Algunosmodelosrequierentomacorrientesde 115/120
@
ElenchufedetrespLiaSconconexiOnatierra minimizalaposibilidad
dedescargaselectricas.Sieltomacorrientede laparedqueusted
planeausarsolamentetiene2 tomas,essuresponsabilidadhacer
queuntecnicoIoreemplaceporunodetrestomasconconexiOna
tierra.
©
voltiosde corrientealternay 60 Hzconectados
a tierra, protegidoscon unfusiblede dilataciOnde
tiempo de 15amperios
o uncortacircuitos.
Algunosmodelosrequieren230/208voltios,decorriente
alterna,protegidos
porunfusiblededilataciOndetiempo
o uncortacircuitos.Estosmodelosdeberianinstalarseen
unramalexclusivodelcircuitoparaunrendimientom_s
notabley paraprevenirsobrecargasen
loscircuitosdecableadosdesucasao apartamento,Io
cualpodriarepresentar
unriesgodeincendioporel sobrecalentamientodelos
alambres.
-ZILPRECAUCl0N
Bajo ninguna circunstancia corte o remueva la tercera pOa
(conexiOna tierra) del cable el_ctrico.
No cambie el enchufe en el cable el_ctrico de este
acondicionador de aire.
Loscables caseros de aluminio podrian presentar
problemas especiales. Consultea un tecnico electricista
calificado.
Elcabledealimentaci6nincluyeundispositivoparainterrupci6n
decorriente.SeincluyeunbotOndepruebay dereinicioenel
dispositivo.Eldispositivodebeponersea pruebaperiOdicamente:
primerosepresionaelbotOndeTEST(prueba)yluegoRESET
(reinicio)mientrasseencuentraenchufadoal tomacorriente.Siel
botOnTESTnosedisparaosi elbotOnRESETnoquedaenganchado
dejedeutilizarel acondicionadordeairey comuniquesecon
untecnicocalificado.
43
Page 44

Instruccionesparala instalaci6n
HERRAMIENTASQUENECESITARA
Undestornilladordeestrella
PARTESINCLUIDAS
Panelde
acorde6n
izquierdo
Llaveajustable
Tijeraso cuchilla
Empaque superior de espu_
de la ventana
Undestornillador
conhojaplana
Nivel Unareglao cintam6trica
Sellodel marco
dela ventana
(fino,conadhesivo
enla parteposterior)
L@iz
Bandade
rieldemontajesuperior
TipoA (6) TipoB(3)
TipoC(5)
TipoD(2)
Rieldemontajesuperior
Panelde
acorde6n
derecho
Soporte para bloqueo de
ventana (1)
44
Page 45

Instruccionesdeinstalaci6n
rT1REQUISITOSPARALAVENTANA
• Estasinstruccionessonparaunaventanaest_ndardedos
pliegues.Ustednecesita@modificarel procesoparaotrostipos
deventanas.
, ILPRECAUCION"silostornillos
desoportedelumbralnotienencontactoconelumbraldela
ventana,osi cuentaconunaventanasinumbral,debeordenarel kit
deaccesoriosRAK87parainstalardeformaadecuadaeste
acondicionadordeaire.Llamea800.626.2002
ovisiteGEAppliances.com.
• Elacondicionadordeairepuedeinstalarsesinlospanelesde
acorde0nparaajustarsea unaventanamSsestrecha.Verlas
dimensionesde laaberturadela ventana.
• Todaslaspartesdeapoyodebenquedartotalmente
aseguradasa algOnmetal,mamposterfao a la madera.
• Eltomacorrienteelectricodebeestaral alcancedelcable
electricodelacondicionadordeaire.
1
14.5"min.
r_ REMUEVAELACONDICIONADORDEAIRE
DELACAJA
r_ Remuevay salve los2 tornillos de losladosinferioresde
la parrillafrontal.
FRENTE
['_ Agarrelas esquinasinferioresde la parrillamientras
presionahaciaadentroen losladosde la cajaconlas
puntasdesusdedos.Tirehaciaafuera paraliberarlay
lev_ntela.
NOTA:No hale el borde inferior hacia usted m_s de 3"
o podria da_ar las lengQetasde la rejilla.
FRENTE
22.6"a38.1"(con
panelesdeacorde6n)
m I
1"
I I
I-2-1REQUISITOSDEUNAVENTANA
DETORMENTAS
Unmarcodeventanadetormentasnopermiti@queel
acondicionadordeaireseinclinehaciaelexteriory evita@que
dreneapropiadamente.Parasolucionaresteproblem&adhieraun
pedazodemaderaael umbral.
PEDAZOSDEMADERA-
ANCH0:2"
LONGITUD:Losuficientementelargocomoparaajustarenel
interiordelmarcodelaventana.
GRUESO:Paradeterminarelgrueso,coloqueunpedazode
maderaenelumbralparahacerla1/2"mSsaltaquelaparte
superiordelmarcodelaventanadetormentasodelmarcovinilo.
%guelofirmementeconclavosocontornillos
proporcionadosporelinstalador.
F_ Cuando se retire la parrilla del frente, el panel de
control aOnseencontra@ adjunto por un ames. Gire la
parrilla de modo que pueda ver la parte trasera de la
misma. Retire los tres tornillos para separarel espacio
del panel de control de la parilla.
r-_ Remuevaeltornillo atierra decada ladode la caja.
Mant_ngalosen un lugarseguro. NOTA: Asegurese de
guardarestos tornillos. Los necesitara mas adelante
en la instalacion.
1/2" m_salto
queel marco
deventanade
torrnentas
Marcode
ventanade
tormentas
1/2" masalto queel marcovinilo
(enalgunasventanas)
A .T[ i r_/-_ _t/-r_ Madera
_ Umbral p
/ _ Mar_vini,o I I
FRENTE
45
Page 46

Instruccionesdeinstalaci6n
E] REMUEVAELACONDICIONADORDEAIRE
DELACAJA(CONT.)
El Desliceel acondicionadorde aire de la caja
agarrando la manija del recipiente de la basey
• halando hacia el frente mientras apoya la caja.
No tire o levante el _rea de descargade airede
espumade poliestireno
Notireo
levante
enesta
_rea--
podfia
dafiarla
unidad
FRENTE
Iql PEGUELABANDADESELLADODELRIEL
DEMONTAJESUPERIOR
Retirela parteposteriorde la bandade selladodel
riel de montajesuperiory peguela bandadesellado
al fondo del riel de montajesuperiora Io largo el
bordedelantero.
I-611NSTALEELRIELDEMONTAJESUPERIOR
ENLACAJA
Pegueel riel de montajesuperioren la partesuperiorde la
cajacon3 tornillos tipo B.
nontajesuperior
I-6IINSTALELOSPANELESLATERALES
DEACORDEON
r_ Deslice los panelesde acordeOnizquierdo
y derechoen losrieles de montaje superior y inferior.
Rieldemontajesuperior
_ etire
VISTAFRONTAL Rieldemontajesuperior
laparte
postenor
dela ban@de
sellado
J
I................../ ..................!
Bandadesellado
[] Una los paneles de acordeOna la caja usando3 tornillos
tipo A en cada lado.
Panelde --._
acorde6n
Tornillos _
tipoA
¢17_,
Rieldemontajesuperior
POSTERIOR
X •
Riel demontaje inferior
171PREPARELAVENTANA
• Corteel sello del marco de la ventana
a Io ancho de Qstay pegue la cinta adhesiva en la
parte inferior del marco•
46
INTERIOR
Sellodelmarcodelaventana
Page 47

Instruccionesdeinstalaci6n
l-s-IINSTALELA CAJA EN
LAVENTANA
E] Abra laventanaymarquelaIfneacentraldelumbraldela
ventana.
r_ Cuidadosamentecoloquelacajaenla repisadela ventana
y alineelaventanaconlamarcacentralen elfondo conla
Ifneacentralen
el umbral.
FC] Tiredela ventanahaciaabajodet@sdelriel demontaje
superior.
NOTA:Noaprietela ventanatantoqueel movimientodelos
panelesdeacordeOnquederestringido.
I-s-IINSTALELA CAJA EN
LAVENTANA(CONT.)
[] Asegure la caja al umbral de la ventana usando3
tornillos tipo D.
[_ Tire de los paneles de acordeOnhacia cada pasodel
marco de la ventana. Onalosa cada lado del marco de
la ventana y el umbral de la ventana usando4 tornillos
tipo C.
INSTALEUNSOPORTEDECIERREYLAJUNTADE
@
ESPUMASUPERIOR
DELAVENTANA
%
PRECAUCION:
Enventanasconstruidasde
vinil o desimilarconstrucciOn,
conecteelsoportea el marcode
laventanaparaprevenirda_oala
ventanay vidroquebrado.
Unael soportedecierreconuno I_J_ I
tornillotipo C.
Vinilo
m
Cortelajuntadeespumasuperior
de laventanaalanchode laventana.
Rellenelaespumaentre
©
el vidrioylaventanapara
evitarqueaire e insectos
seintroduzcanen la
habitaci@.
NOTA:Silajuntaprovista
noesadecuadaparasu
ventana,obtengael materialapropiadoIocalmentepara
realizarunaadecuadainstalaciOndesellado.
47
Page 48

Instruccionesparala instalaci6n
[] INSTALE
ELACONDICIONADORDEAIREENLACAJA
[_ Desliceel acondicionadordeaire haciael interior de
lacaja mediantela rejilla base.No empujepor los
controles,la carcasadedescargade aire deespumade
poliestirenoni las bobinasaleteadas,segOresede que el
acondicionadorde aire estefirmementeasentado.
Noaprietesobreestas
_reas--podfiada[iar
la unidad
Rejillabase
BE]Reemplacelosdostornillosatier@removidosanteriormente,
unodecadaladodelacaja.
IMPORTANTE:Lostornillos a tierra deben ser
instalados a nuevo para asegurar una conexiOnatierra
correcta.
| INSTALE
ELACONDICIONADORDEAIREENLACAJA
(CONT.)
[] Peguelaparrillafrontal a la caja insertandolasorejillas
en la parrilla en lasranurasenelfrente superiorde la
caja.Empujela parrilla haciaadentro.
. o d:::_@
Asegurela parrilla frontal a la cajareemplazandolos2
rq
tornillos removidosanteriormente.Empujeen la parte
superiorde la rejilla parafacilitar la instalaciOnde
lostornillos de cada ladode la caja.
[] Reinstaleelcontrol enel espaciodel panelreemplazando
lostres tornillos que retir6 previamente.
r_ Conectelaenergfael_ctrica.
48
Page 49

Solucionarproblemas.
Causasposibles
" Elacondicionadordeaire
noenciende estadesconectado.
Elfusiblesedispar6/ • Inspeccione los flBibles / caja de inmrruptores de la casa
elc0rtacircuit0ssedispar6, y reemplacecualquierfllsibleo reajusteel interruptor.
Interrupci6nenel
suministroel_ctrico.
Eldispositiv0deinterrupci6n • Presioneel bot6n RESETubicadoen el cabledealimentaci6n.
dec0rrientesehaactivado. • Sielbol6n RESETno semantieneen sulugar,no utilice rods
Elacondicionadordeaire Elflujodeaireestarestringido. • Cerci6resede que no existening]macortina,persianao
noenfr[atom0deberia mueblebloqueandoel fl'entedel acondicionadorde aire.
Elcontroldetemperaturano ° Enlosmodelosconteclado:Enel modoCo01(Frb),presionelatecla
estaajustadoapr0piadamente. Reducci@[_.
mayor
Elfiltr0deaireest_sucio. • Limpieel filu'o cada30diaspot lo menos.Vet la secci6n
LahabitaciOnpod@haber • Cuandoel acondicionadorde aireseenciende,usted
estadocaliente, necesita dade tiemi)o para que enfl'id la habitaci6n.
Elairefrioseestaescapando. • Cerci6resede que losregistrosdela cale_Cacci6nnoestfin
Lasbobinasdeenfriamiento •Vet "Acondicionadordeairecongelandose"rodsadelmlte.
secongelaron.
E[acondicionadordeaire
seestacongelanoo
Etcontrolrem0to Lasbateriasestaninsertadas • lnspeccione laposici6n de lasbaterias. Deben estar
nofunciona inc0rrectamente, insertadasenlaposicidnindicada,(+) y (-).
Hayaguagoteandoafuers Tiempohome@ycaliente. • Estoesnom_al.
Elhielobloqueaelflujo
deairehaciaelacondicionador
deaireevitandoqueseenfrie
lahabitaci6n.
Lasbateriasest_nagotadas. • Reemi)lace las baterias.
QuOhacer
• Cerci6rese de que el acondicionador de aire est_
enchufado totahnente en el tomacorriente.
• La unidad se reiniciar_ automdticamenm con la configlwaci6n
ufilizada por filfimavez luego de reestablecer la elecu'icidad.
• Exismun retraso de fiempo i)oi`protecci6n (de aproximadamenm
3minutos) pm'ae/vitro"la desconexi6n por sobrecmga del compresor.
Por esta raz6n, es posible que la unidad no comience a enfriar de
fom_a normal hasta transcurridos 3minums desde que voM6 a
encenderse.
el acondicionadorde aireycomun/queseconun t#cnicocalificado.
• En los modelos con botones, gire la temperatm'a a un nfimero
deCuidadoylimpieza.
abiertos vse encuentran retornando el aire fifo.
° En modelos con losbotones de conu'ol, coloque elcontrol
de modo en HighFan(VentiladorAlto)6 HighCool(FrioAlto)con
lammperatura en 1 6 2.
• En los modelos con mclas de toque, colo que los controles en
HighFanVentiladorAit06 HighCo01FrioAit0v ajusteel tem_ostatoa
una temperature rods alta.
Hayaguagoteanooenel Elac0ndicionadordeaire • Paradrenar el aguaaproi)iadamente,cercioresede que
interiordelahabitacbn noestainclinadohaciaafuera, el acondicionador de aire estfiinclinado ligeramente
Seacumulaaguaen
aoanaea
Lahumedadremovidadelaire
ysedrenahastalabandeja.
desde el fi'ente hacia amis.
• Esto es nom_al i)oi`un corto per/odo en fireascon poca
humedad; nomml i)oi`un per/odo de fiempo rods posmrgado
en areas rods hfimedas.
Sonidosde operaci6n normales
Quizfis escuche un sonido metfilico causado pot
el again tomada y tirada contra el condensador
en los dias lluviosos o cuando la humedad
es alta. Esta caracteffsfica de disefio ayuda a
remover
la humedad y mejora la eficiencia.
Quizas escuche que el termostato hace clic
cuando el compresor hace ciclo entre encendido
y apagado.
E1again se acumula en la bandeja dumnte dfas
lluviosos o con mucha humedad. E1agl_a podrfa
derramarse y gotear desde el lado externo de
la unidad.
E1venfilador podrfa flmcionar aun si el
compresor no lo hace.
49
Page 50

Garantiadesuacondicionadordeaire--garantialimitadadeuna o.
Todos los servicios de garantfa los proporcionan nuestrosCentrosde
ReparaciOnde F_bricao nuestrostOcnicos CustomerCare_ autorizados.
Paraconcertar una cita de reparaciOn,en linea,
24 horas al dfa, visitenos al GEAppliances.com,o Ilame al 800.GE.CARES
(800.432.2737).Cuando Ilame para solicitar servicio, por favor tenga a
mano el nOmerode serie y el nOmerode modelo.
GEreemplazar_:
Unafio
A partirdelafecha
delacompraoriginal
ViajesdeservicioasucasaparamostrarlecOmo
funcionael equipo.
InstalaciOnoentregainapropiada,omantenimientoimpropio.Si
ustedtieneunproblemadurantelainstalaciOn,o sisuacondicionador
deairenotienelacapacidaddeenfriamientoqueustednecesita,
pOngaseencontactoconnuestrodistribuidoro instalador.
Ustedesresponsabledeproporcionarlasfacilidades
deconexiOnelOctricanecesarias.
Fallodelproductoresultantedemodificacionesalproductoodebidoa
usoirrazonableincluyendonoproporcionarmantenimientorazonabley
necesario.
Cualquierparte del acondicionado," de aire que f:alledebido a defectos en los materiales o en
la f:abricaciOn.Durante estagarantialimitadadeuna_o,GE tambidn p_'opo_'cionm_,sincosto
alguno,toda la mano de obra y el servicio relacionadoipara reemplazar partes defecmo_s.
Grapeaqufsu recibo.
Serequierefacilitarprueba
de lafechadecompraoriginal
paraobtenerunservicio
bajola garantia.
Reemplazodefusiblesdelacasaoreajustedelsistemadecircuitos.
Fallosdebidoa lacorrosionenmodelosquenoestSnprotegidos
contralacorrosion.
Da_oalproductocausadoporvoltajeinapropiadohaciael equipo,
accidentes,incendios,inundacionesoactos
delanaturalezadefuerzamayor.
Da_osincidentalesoconsecuencialescausadospordefectosposibles
conesteacondicionadordeaire.
Da_osdespuOsdelaentrega.
Enlocalescomerciales,la manodeobranecesariapararetirarla
unidadhaciaunlugarpararevisionporparte
deuntOcnicoindividual.
EXCLUSIONDEGARANT[ASIMPL[CITAS--Su Onicoy exclusivoderecho es la reparaciOndel producto,tal y como se indica
en esta Garant[alimitada. Cualquiergarantia impl[cita, incluyendo lasgarant[asimplicitas de comerciabilidadoadecuaciOn
para un fin determinado,estfin limitadas a un a_o o el per[odode tiempo mas brevepermitido por la ley.
Estagarantiase extiendeal compradororiginaly cualquiercompradorposteriorde productoscompradosparausoresidencialdentro
de EstadosUnidos.Si el productoest_ situado en un _rea que no dispone de servicio por parte de un proveedorde servicio
autorizado de GE,podr[atener que hacersecargo de loscostes de env[oo bien podr[a solicit_rsele que Ileve el producto a una
centro de servicio de GEautorizado para realizar la reparaciOn.EnAlaska,la garantiaexcluyeelcostode envioo lasvisitas de
servicioa sucasa.
Algunosestadosnopermitenla exclusiono las limitacionesdeda_os incidentalesoconsecuenciales.Estagarantia
da derechoslegalesespecificos,y ustedpodriatenerotrosderechosquevariar_nde estadoa estado.Parasabercuries sonsus
derechoslegales,consultea la oficinade asuntosdel consumidorlocalo la oficinadel AttorneyGeneralen
suIocalidad.
50
Garante: General Electric Company.Louisville, KY40225
Page 51

Soportealconsumidor.
P_ginaWebdeGEAppliances GEAppliances.com
dTiene algtma pregunta sobre su elecu'odomOstico? iPruebe la pfi_na Web de GE Appliances 24 horas
al dfa, cualquier dfa del aflo! Pa*'amayor conveniencia y servicio mils r,ipido, ya puede descargar los
Manuales de los Propietarios, pedir piezas o incluso hacer una cita en lfnea para que vengan a realizar una
reparaci6n.
Soliciteunareparaci6n GEAppliances.com
E1serxdcio de expe,'tos GE estfi a tan s61o un paso de su puerta, iEnu'e en lfnea y solicite su repa,aci6n
cumldo le venga bien 24 horns al dfa cualquier dfa del aflo! O llame al 800.GE.CARES (800.432.2737)
dumnte horas normales de oficina.
RealLifeDesignStudio(Estudiodedise_oparalavidareal) GEAppliances.com
GE apoya el concepto de Disefio Universal--productos, servicios y ambientes que pueden usar gente de
todas las edades, tamaflos y capacidades. Reconocemos la necesidad de diseflar para una grin1 gama de
habilidades y dificultades ffsicas y mentales. Paisa m_s detalles cobre las aplicaciones de GE Diseflo Unive,'sal,
incluyendo ideas de diseflo para la cocina pa*'a personas con discapacidades, mire nuesu'a patna Web hoy
mismo. Para personas con dificultades auditivas, favor de llamar al 800.TDD.GEAC (800.833.4322).
Garant[asampliadas
Compi'e una gamntfa ampliada y obtenga detalles sot)re descuentos especiales disponibles mienu_s su ga*_antfa
est_ adn acfiva. Puede comprarla en lfnea en cualquier momento, o llamar al (800.626.2224) dumnte horas
normales de oficina. GE Consumer Home Services estar_ adn ahf cuando su garantfa termine.
GEAppliances.com
Piezasyaccesorios GEAppliances.com
Aquellos indMduos con la calificaci6n necesada pare repamr sus propios elecu'odomdsticos pueden
pedir que se les manden las piezas o accesodos directamente a sus hogm'es (aceptamos las tarjetas
VISA, MasterCard y Discove0. Haga su pedido en lfnea hoy, 24 horas cada d/a o llamar por teldfono
al 800.626.2002 durante horas normales de oficina.
Lasinstruccionesdescritasenestemanualcubrenlosprocedimientosaseguirporcualquierusuario.Cualquierotrareparaci0n
deberfa,porreglageneral,referirsea personalcalificadoautorizado.Debeejercerseprecauci0nyaquelasreparacionesincorrectas
puedencausarcondicionesdefuncionamientoinseguras.
P6ngaseencontactoconnosotros GEAppliances.com
Si no estfi satisfecho con el se,x4cio que recibe de GE, p6ngase en contacto con nosou'os en nuesua pfi_na
Web indicando todos los detalles asf como su nOmero de teldfono o escrfbanos a:
Gene,'al Manager, Custome," Relations
GE Appliances, Appliance Park
Louisville, KY40225
Registresuelectrodomestico GEAppliances.com
iRe_su'e su nuevo electrodomdstico en lfneaicuando usted prefie_a! E1re_suar su producto a fiempo le
proporcionar_, si sur_e,_a la necesidad, una mejor comunicaci6n y un sewicio m_s r_ipido bajo los t_nninos
de su garantfa. Tambi&l puede era'Jar su tarjeta de re_su'o preqmpresa que se incluye en el material
de embalaje.
51
Page 52

ConsumerSupport.
GEAppliancesWebsite IntheU.S.A.GEAppliances.com
Have a question or need assistance with your appliance? TU tile GE Appliances Website 24 houxs a day,
any day of tile year[ Fox"greater convenience and faster service, you can now download Owner's Manuals,
order parts or even schedule service on-line. InCanada:www.GEAppliances.ca
ScheduleService IntheU.S.A.GEAppliances.com
Expert GE x'epair service is only one step away from your door. Get on-line and schedule your service at your
convenience 24 hours any day of the year! Or call 800.GE.OM_ES (800.432.2737) dunng normal business hours.
InCanada,call1.800.561.3344
RealLifeDesignStudio Inthe U.S.A.GEAppliances.com
GE supports the Universal Design concept--products, services and environments that can be used by people of
all ages, sizes and capabiliOes. We recognize the need to design fox"a wide range of physical and mental abiliues
and impairments. Fox"details of GE's Universal Design applications, including kitchen design ideas fox"people with
disabiliues, check out our Website rod W. Fox"the healing impaired, please call 800.TDD.GEAC (800.833.4322).
InCanada,contact: Manager, Consumer Relauons, Mabe Canada Inc.
Suite 310, 1Factory Lane
Moncton, N.B. E1C 9M3
ExtendedWarranties Inthe U.S.A.GEAppliances.com
Purchase a GE extended warFan b, and learn about special discounts that are available while your wax'ranb, is still
in effect. You can purchase it on-line anydme, ox"call 800.626.2224 during normal business hours. GE Consumer
Home Services will soil be there after your warranty expires. InCanada,call1.888.261.2133
PartsandAccessories
IndMduals qualified to service their own appliances can have pax'ts ox"accessories sent directly to their homes
(VISA, Mastex'Cax'd and Discover cards are accepted). Order on-line rodW, 24 hours eveU d W or by phone at
800.626.2002 during normal business hours.
Instructionscontainedinthismanualcoverprocedurestobeperformedbyanyuser.Otherservicinggenerallyshouldbereferredto
qualifiedservicepersonnel.Cautionmustbeexercised,sinceimproperservicingmaycauseunsafeoperation.
Customex_ inCanadashould consult the yellow pages fox"the nearest Mabe service center, or call 1.800.561.3344.
ContactUs
If you are not satisfied with the service you receive fl'om GE, contact us on our Website with all the details
including your phone number, or write to: General Manager, Customer RelaOons
(;E Appliances, Appliance Park
Louisville, KY40225
InCanada:www.GEAppliances.ca,or write to: Director, Consumer Relations, Mabe Canada Inc.
Suite 310, 1Facto U Lane
Moncton, N.B. E1C 9M3
IntheU.S.A.GEAppliances.com
IntheU.S.A.GEAppliances.com
RegisterYourAppliance IntheU.S.A.GEAppliances.com
Registeryournewapplianceon-line--atyourconvenience!Timely product regisu'afion will allow fox"enhanced
communica0on and prompt sewice under the terms of your warranty, should the need arise. You may also mail
in the pre-pHnted re_su'aOon card included in the packing material. InCanada:wvwv.GEAppliances.ca
Printed in China
 Loading...