

Page 1
GEAppliances.com
Safety Instructions ............ 2,3
Operating Instructions ......... 4,s
Care and Cleaning
Air Filter ............................. 6
Outdoor Coils ........................ 6
Installation Instructions ..... 7-1o
AELIO*
AEL12*
0_
.I..J
-0
Troubleshooting Tips ........... 11
Normal Operating Sounds ........... 11
Consumer Support
Consumer Support .......... Back Cover
Ownership Registration for
Customers in Canada only ........ 13, 14
Warranty for Customers
in Canada .......................... 16
Warranty for Customers
in the USA ........................ 15
*ENERGY STAR ® labeled product
STAR
Climatiseur
La section franqaise commence 8 la page 17
Acondicionador
de aire
Lo secci6n en espahol empieza en la pdgina 35
As an ENERGYSTAR®partner, GEhas
determined that this product meets
the ENERGYSTAR®guidelines for
energy efficiency.
Write the model and serial numbers here:
Model #
Serial #
Find these numbers on a label on the side of
the air conditioner.
In Canada, contact us at:
www.GEAppliances.ca
49-7681 11-10 GE
Page 2

IMPORTANT SAFETY INFORMATION.
READ ALL INSTRUCTIONS BEFORE USING.
WARNING!
Foryour safety, the information in this manual must be followed to minimize the risk of fire, electric shock
or personal injury.
SAFETYPRECAUTIONS
Use this appliance only for its intended
purpose as described in this Owner's
Manual.
This air conditioner must be properly
installed in accordance with the Installation
Instructions before it is used.
Never unplug your air conditioner by pulling
on the power cord. Always grip plug firmly
and pull straight out from the receptacle.
Replace immediately all electric service
cords that have become frayed or otherwise
damaged. A damaged power supply cord
must be replaced with a new power supply
cord obtained from the manufacturer and
not repaired. Do not use a cord that shows
cracks or abrasion damage along its length
or at either the plug or connector end.
Turn the unit OFF and unplug your air
conditioner before cleaning.
GEdoes not support any servicing of the
air conditioner. We strongly recommend
that you do not attempt to service the air
conditioner yourself.
For your safety...do not store or use
combustible materials, gasoline or other
flammable vapors or liquids in the vicinity
of this or any other appliance.
All air conditioners contain refrigerants,
which under federal law must be removed
prior to product disposal. Ifyou are getting
rid of an old product with refrigerants, check
with the company handling disposal about
what to do.
If the receptacle does not match the plug,
the receptacle must be changed out by a
qualified electrician.
These R410A air conditioning systems
require contractors and technicians to
use tools, equipment and safety standards
approved for use with this refrigerant.
DO NOT use equipment certified for
R22 refrigerant only.
HOW TO CONNECT ELECTRICITY
Do not, under any circumstances, cut or remove
the third (ground) prong from the power cord.
For personal safety, this appliance must be
properly grounded.
DO NOT use an adapter plug with this
appliance.
The power cord of this appliance is equipped
with a 3-prong (grounding) plug which mates
with a standard 3-prong (grounding) wall outlet
to minimize the possibility of electric shock
hazard from this appliance.
Power cord includes a current interrupter device.
A test and reset button is provided on the plug
case. The device should be tested on a periodic
basis by first pressing the TESTbutton and
then the RESETbutton while plugged into the
outlet. If the TESTbutton does not trip or if the
RESETbutton will not stay engaged, discontinue
2
use of the air conditioner and contact a qualified
service technician.
Have the wall outlet and circuit checked by
a qualified electrician to make sure the outlet
is properly grounded.
Where a 2-prong wall outlet is encountered,
it is your personal responsibility and obligation to
have it replaced with a properly grounded
3-prong wall outlet.
The air conditioner should always be plugged
into its own individual electrical outlet which has
a voltage rating that matches the rating plate.
This provides the best performance and also
prevents overloading house wiring circuits which
could cause a fire hazard from overheated wires.
See the Installation Instructions, Electrical
Requirements section for specific electrical
connection requirements.
Page 3
GEAppliances.com
WARNING!
USEOF EXTENSION CORDS
RISK OF FIRE. Could cause serious injury or
death.
,, DO NOT use an extension cord with this
Window Air Conditioner.
,, DO NOT use surge protectors or multi-outlet
adaptors with this Window Air Conditioner.
READANDFOLLOWTHISSAFETYINFORMATIONCAREFULLY.
SAVETHESEINSTRUCTIONS
Page 4

About the controls on the air conditioner.
Features and appearance will vary.
Lights next to the touch pads on the air conditioner control panel indicate the selected settings.
NOTE:Thedisplayalways Lightindicates the unit
showstheroomtemperature is inthe temperatureor
except when setting theSet delaytimeSetmode.
temperatureortheDelaytimer.
Delay1-24hr
@ ..AJ
-,, High mCool
m Med m Energg Saver
Low _, Fan Onlg
4dpoe_ d_
O L
Air Conditioner Controls
Controls
O ower Pad 0
Turnsair conditioner on and off.When turned
on,the display will showthe room temperature.
O Display
Showsthe room temperature or time remaining
on the Delaytimer. Shows the Settemperature
while setting the temperature inCool or Energy
Saver modes. TheSetlight will turn on while
setting.
O emp Increase A/Decrease T Pads
Useto set temperature when in Coolor Energy
Saver mode.The Set light will turn on while
setting.
O elay Timer Increase A (+)/Decrease T (-)
Pads
Eachtouch of the Increase A / Decrease T
pads on the unit orthe Increase + / Decrease
- padson the remote control will setthe delay
time when using the Delay1-24hr timer. The
Setlight will turn on while setting.
O an Speed Pads
Useto set the fan speed to Low, Meal,High
or Auto on the unit. NOTE:Onthe remote
control, use the fan speedIncrease + /
Decrease - pads to setthe fan speedsto Low,
Pied or High. Usethe Auto pad to turn Auto
fan on.
Lightindicates the
delaytimeris set.
Delaytimer ODecrease
Modeselect 0
Fanspeed 0Decrease
Temperature 0
set increase
andDecrease
0
Delaytimer Increase
Auto Fanon
Fanspeed Increase
Unit poweron/off
Mode Pad
Useto set the air conditioner to Cool,Energy
Sever or Fan Only mode.
Delay Pads
Delay ON--When the air conditioner isoff, itcan
be set to automatically come on in 1to 24 hours
at its previousmode and fan settings.
Delay OFF--When the air conditioner ison,
it can be set to automatically turn off in i to
24 hours.
How to set:
Pressthe Delay 1-24hr pad on the unit oron the
remote control. Eachtouch ofthe Increase A
/ DecreaseT pads on the unit or the Increase
+ / Decrease - pads on the remote control will
set the timer in1-hour intervals. TheSet light will
turn on while setting.
Toreview the remaining time on the Delay
1-24hr timer, pressthe Deluv 1-24hr pad on the
unit or onthe remote control. Usethe Increase
A / Decrease T pads on the unit or the
Increase + / Decrease- pads onthe remote
control to set anew time ifdesired.
Tocancel the timer, pressthe Delay 1-24hr pad
until the light onthe Delay 1-24hr pad goes off.
Note: The default temperature reading on the display is degree Fahrenheit (°F). To change the display to
degree Celcius (°C),press the Temp Increase A and Temp Decrease T buttons together and hold for 3
seconds. Repeat the process to change back to degree Fahrenheit (°F)
4
Page 5
Cool Mode
GEAppliances.com
Use the Cool mode at Low, Med, High or Auto Fen
Speed for cooling. Use the Temperature Increase A
/ Decrease T pads to set the desired temperature
between 64°F and 86°F in I°F increments.
An electronicthermostat isused to maintain the room
temperature. Thecompressorwill cycleon
and off to keepthe room atthe setlevelof comfort.
Setthe thermostat at a lower number and the indoor
air will becomecooler.Setthe thermostat at a higher
number and the indoor air will become warmer.
NOTE:Ifthe air conditioner isoffand isthen turned on
while setto a Coolsetting or ifturned from a fan
setting to a Cool setting, it may take approximately
5 minutes for the compressor to start and cooling to
begin.
Energy Saver Mode
Controls the fan.
ON--The fan will cycle on and off with the
compressor.This results in wider variations of room
temperature and humidity. Normally usedwhen the
room is unoccupied. NOTE:Thefan may continue to
run for ashort time after the compressorcyclesoff.
Fan Only Mode
Usethe FanOnly Mode at Low,IViedor Highfan
speed to provide air circulation and filtering without
cooling. Sincefan-only settings donot provide
cooling, a Settemperature cannot be entered. The
room temperature will appear
in the display.
Cooling Descriptions
For Normal Cooling-Select the Cool mode and
High or Med fan with a middle set temperature.
For Maximum Cooling--Select the Cool mode
and High fan with a lower settemperature.
For Quieter end Nighttime Cooling-Select the
Cool mode and Low fan with a middle set
temperature.
OFF--Thefan runs all the time, while the compressor
cycleson and off.
NOTE:Auto Fan Speed cannot be used when in the
Fun Only Mode.
Auto Fan Speed
Setto Auto fan speedfor the fan speed to
automatically set to the speed neededto provide
optimum comfort settings with the settemperature.
Ifthe room needsmore cooling,the fan speed
will automatically increase.If the room needs less
cooling, the fan speedwill automatically decrease.
Remote Control
Toensure proper operation, aim the remote
control at the signal receiveron the air
conditioner.
Make sure nothing isbetween the air conditioner
and the remote control that could block the
signal.
Power Outage Recovery Feature
Inthe case of a power outage or interruption, the
unit will automatically re-start in the settingslast
used after the power isrestored. Ifthe Delay1-2Z_hr
NOTE:Auto Fan Speed cannot be used when in the
Fun Only Mode.
Theremote control signal has a rangeof
up to 20feet.
Make sure batteries are fresh and installed
correctly as indicated onthe remote control.
Remotecontains a magnet allowing it to attach
to metal surfaces.
feature was set,it will resumecountdown. You may
need to seta new time if desired.
Page 6
About the controls onthe air conditioner
Additional important information.
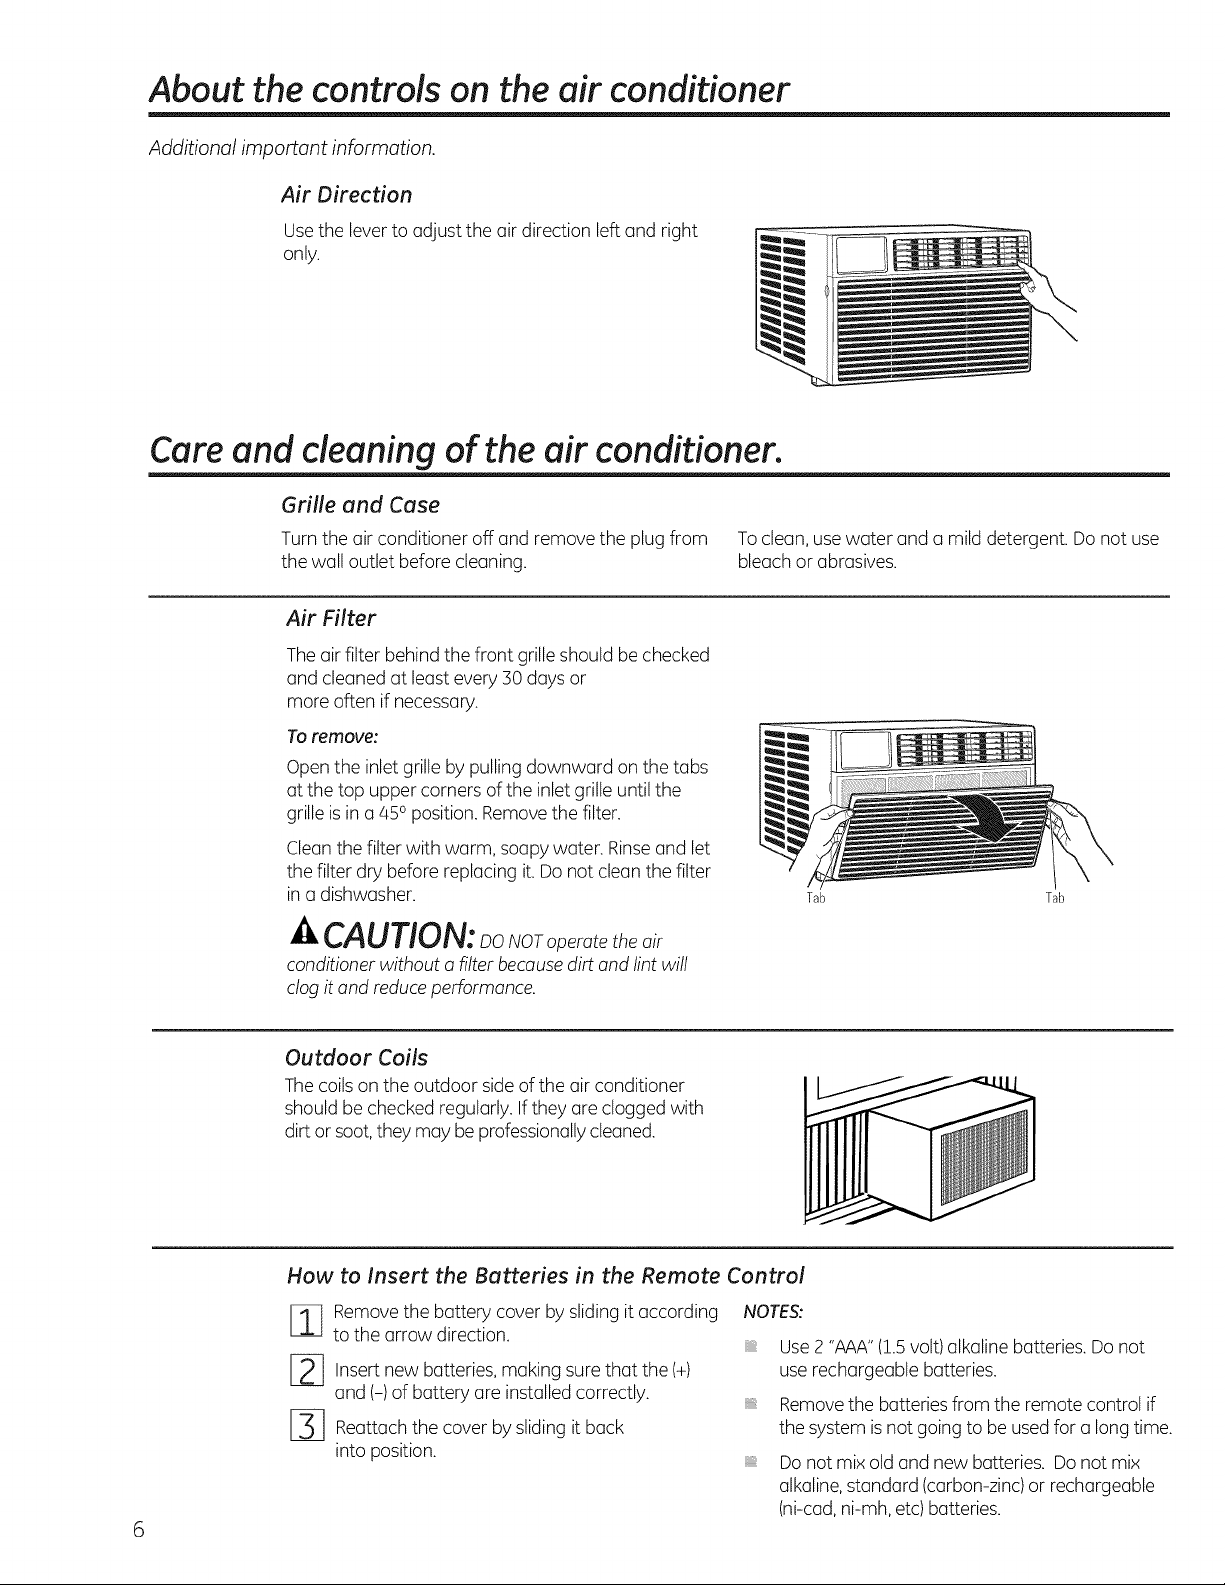
Air Direction
Usethe leverto adjust the air direction left and right
only.
Care and cleaning of the air conditioner.
Grille and Case
Turn the air conditioner off and remove the plugfrom
the wall outlet before cleaning.
Air Filter
Theair filter behind the front grille should bechecked
and cleaned at least every 30 days or
more often if necessary.
To remove:
Open the inlet grille by pulling downward on the tabs
at the top upper corners ofthe inlet grille until the
grille is ina450position. Removethe filter.
Cleanthe filter with warm, soapy water. Rinseand let
the filter dry before replacing it. Do not clean the filter
in a dishwasher.
CAUTION:_oNoroneratetheair
conditioner without a filter becausedirt and lint will
clog itand reduceperformance.
Outdoor Coils
Thecoils onthe outdoor side of the air conditioner
should be checked regularly. Ifthey are clogged with
dirt orsoot, they may be professionallycleaned.
Toclean, use water and a mild detergent. Do not use
bleachor abrasives.
Tab Tab
How to Insert the Batteries in the Remote Control
Removethe battery cover by sliding it according
to the arrow direction.
[2_ Insertnew batteries, makingsure that the (+)
and (-) of battery are installed correctly.
[_ Reuttachthe cover by slidingit back
into position.
6
NOTES:
Use2 "AAA"(1.5volt) alkaline batteries. Do not
use rechargeable batteries.
Removethe batteriesfrom the remote control if
the system isnot going to be usedfor a long time.
Donot mix old and new batteries. Donot mix
alkaline,standard (carbon-zinc)or rechargeable
(ni-cad,ni-mh, etc) batteries.
Page 7
Installation
Air
Conditioner
Instructions
[_ uestions? Cell 800.GE.CARES (800.432.2737) or visit our Website at: GEAppliances.com
!
In Canada, cell 1.800.561.3344 or visit www.GEAppliances.ca 1
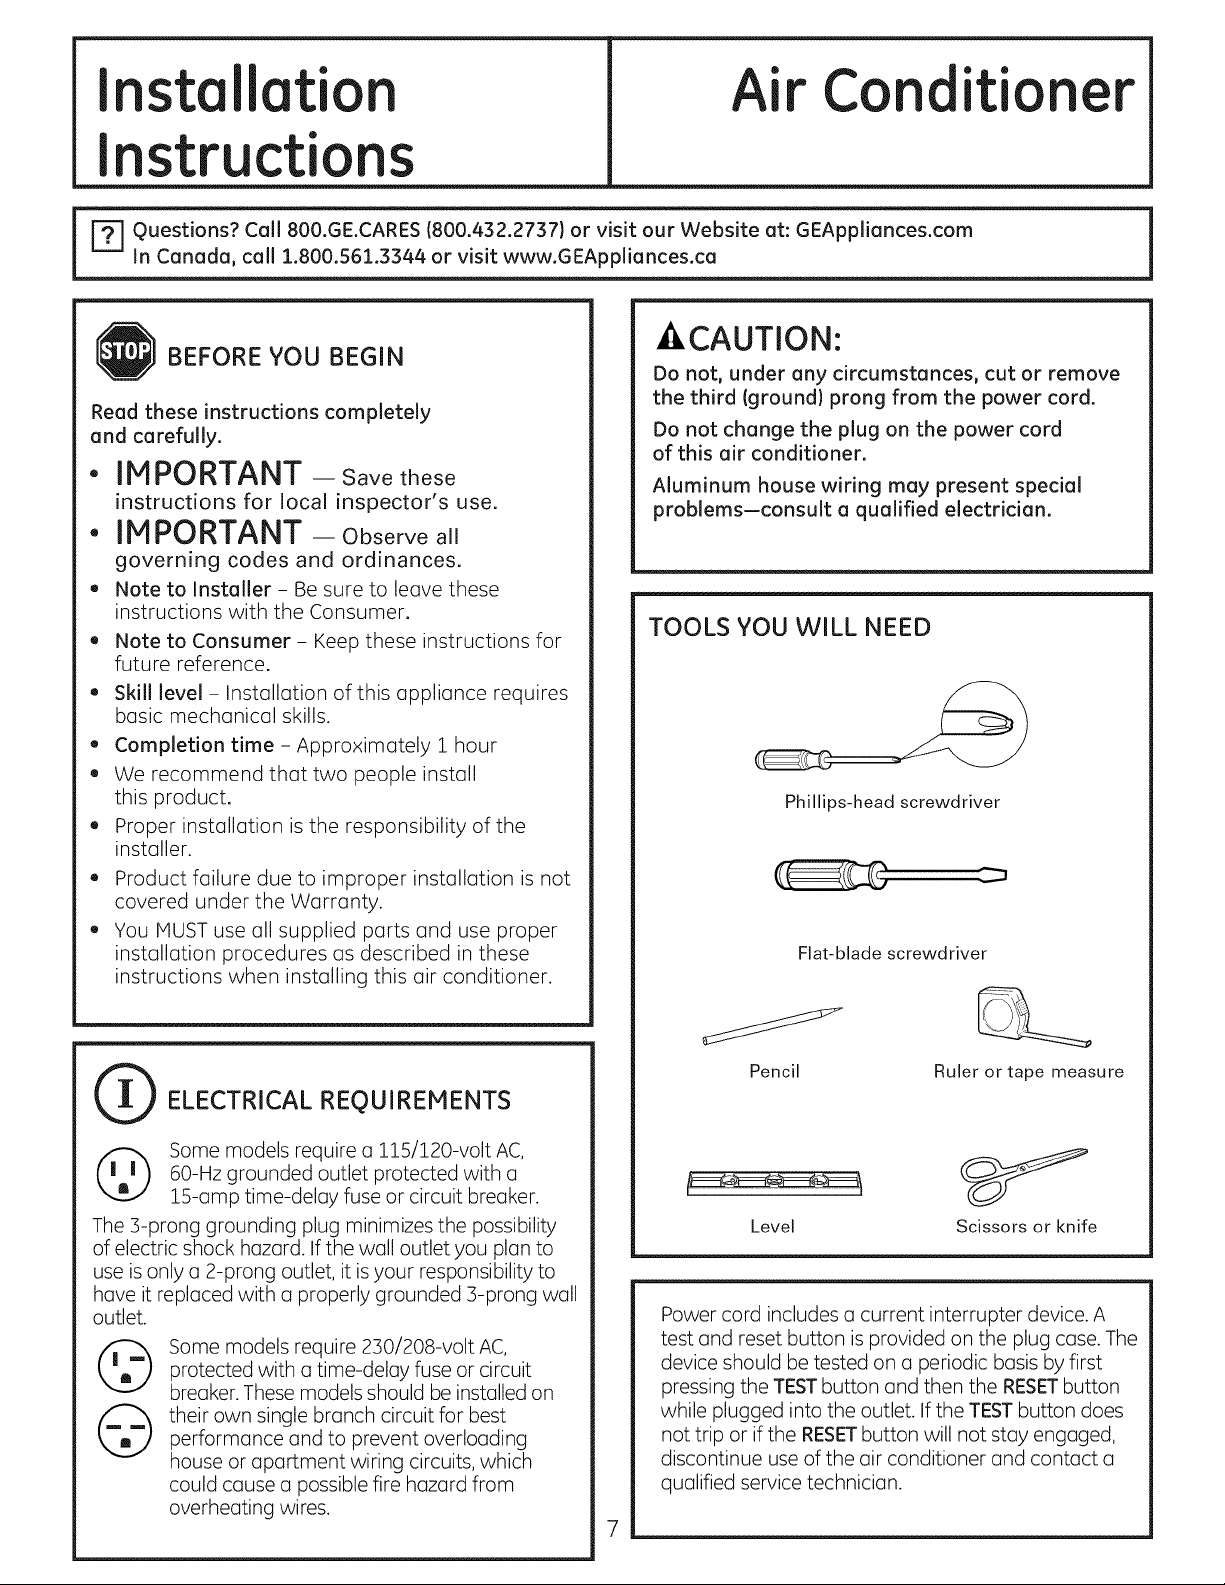
BEFORE YOU BEGIN
Read these instructions completely
and carefully.
• IMPORTANT - Savethese
instructions for local inspector's use.
• IMPORTANT - Observeall
governing codes and ordinances.
,, Note to Installer - Be sure to leave these
instructions with the Consumer.
• Note to Consumer - Keep these instructions for
future reference.
,, Skill level - Installation of this appliance requires
basic mechanical skills.
,, Completion time - Approximately 1 hour
,, We recommend that two people install
this product.
• Proper installation is the responsibility of the
installer.
,, Product failure due to improper installation is not
covered under the Warranty.
,, You HUST use all supplied parts and use proper
installation procedures as described in these
instructions when installing this air conditioner.
-&CAUTION:
Do not, under any circumstances, cut or remove
the third (ground) prong from the power cord.
Do not change the plug on the power cord
of this air conditioner.
Aluminum house wiring may present special
problems--consult a qualified electrician.
TOOLS YOU WILL NEED
Phillips-head screwdriver
Flat-blade screwdriver
(_ ELECTRICAL REQUIREHENTS
(_ ome models require a ll5/120-volt AC,
The 3-prong grounding plug minimizes the possibility
of electric shock hazard. If the wall outlet you plan to
use is only a 2-prong outlet, it is your responsibility to
have it replaced with a properly grounded 3-prong wall
outlet.
60-Hz grounded outlet protected with a
15-amp time-delay fuse or circuit breaker.
Some models require 250/208-volt AC,
protected with a time-delay fuse or circuit
breaker. These models should be installed on
their own single branch circuit for best
performance and to prevent overloading
house or apartment wiring circuits, which
could cause a possible fire hazard from
overheating wires.
Pencil Ruler or tape measure
Level Scissors or knife
Power cord includes a current interrupter device. A
test and reset button is provided on the plug case. The
device should be tested on a periodic basis by first
pressing the TESTbutton and then the RESETbutton
while plugged into the outlet. Ifthe TEST button does
not trip or if the RESETbutton will not stay engaged,
discontinue use of the air conditioner and contact a
qualified service technician.
Page 8
Installation Instructions
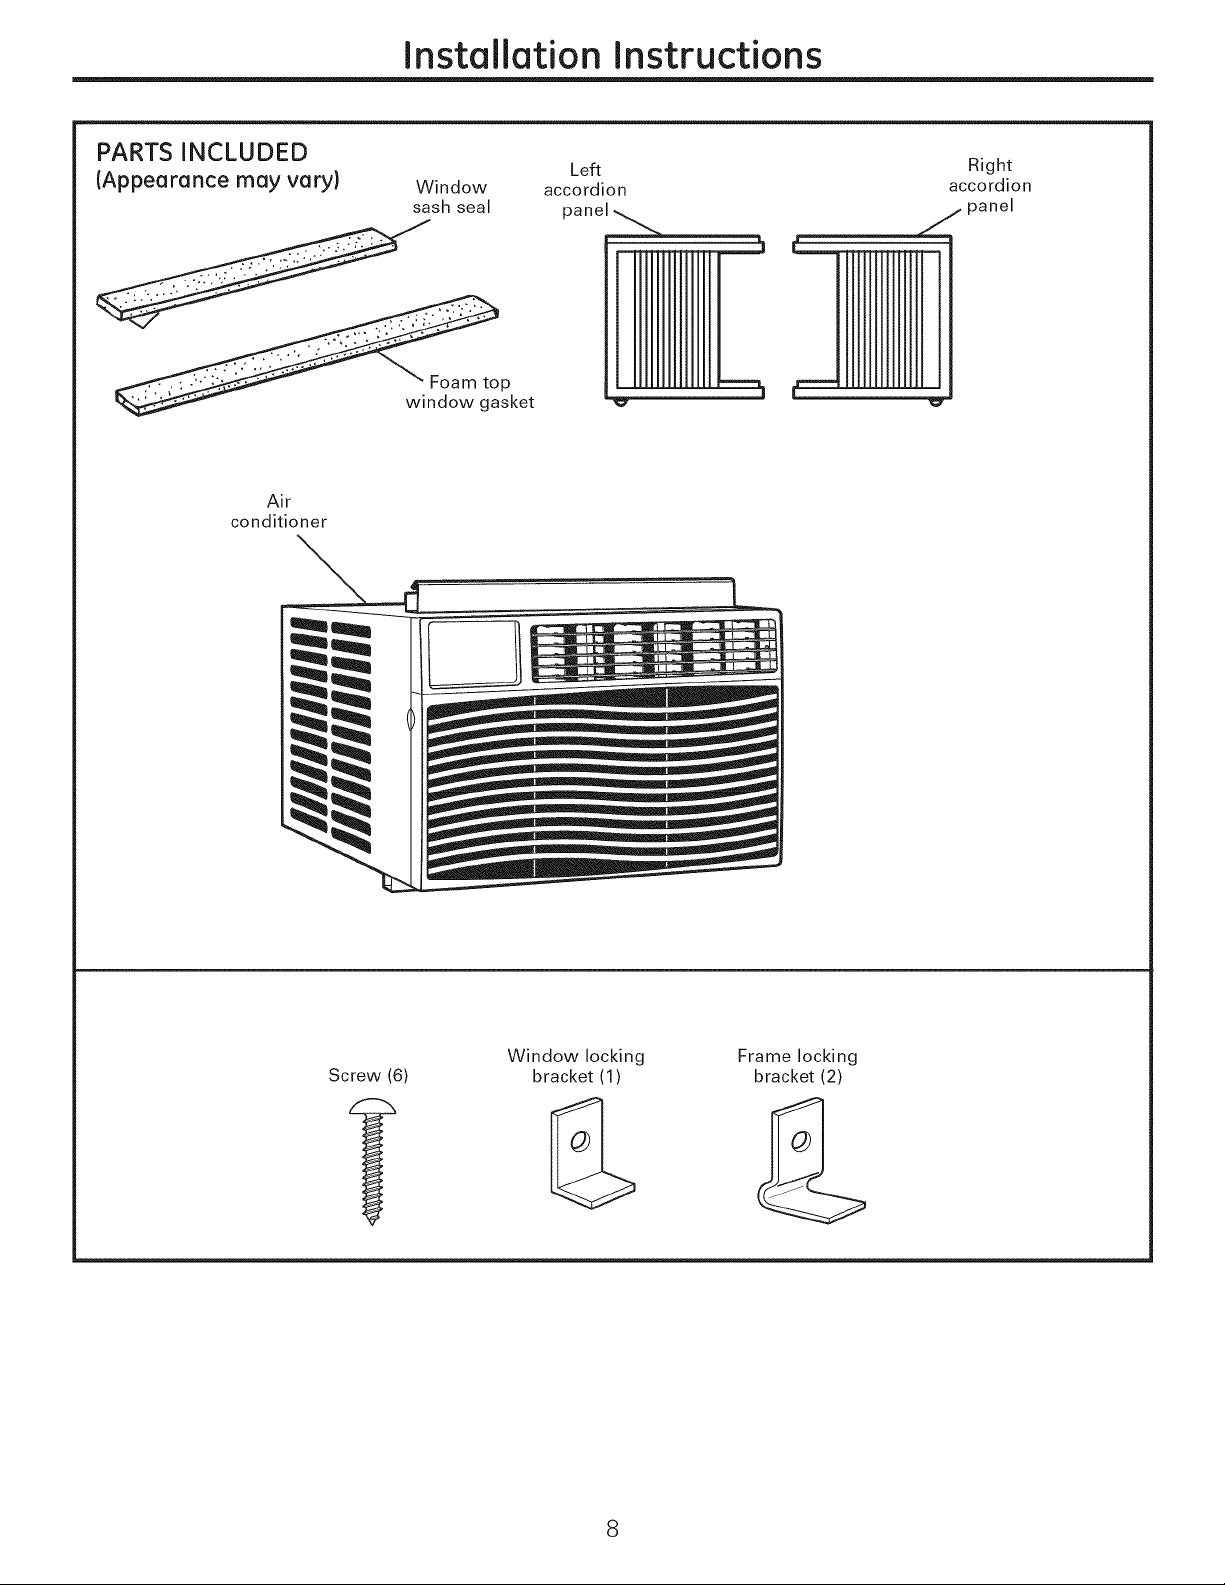
PARTS INCLUDED
(Appearance may vary) Window
sash seal
__ket
Air
conditioner
Left Right
accordion accordion
panel )anel
Screw (6) bracket (1) bracket (2)
Window locking Frame locking
8
Page 9
Installation Instructions
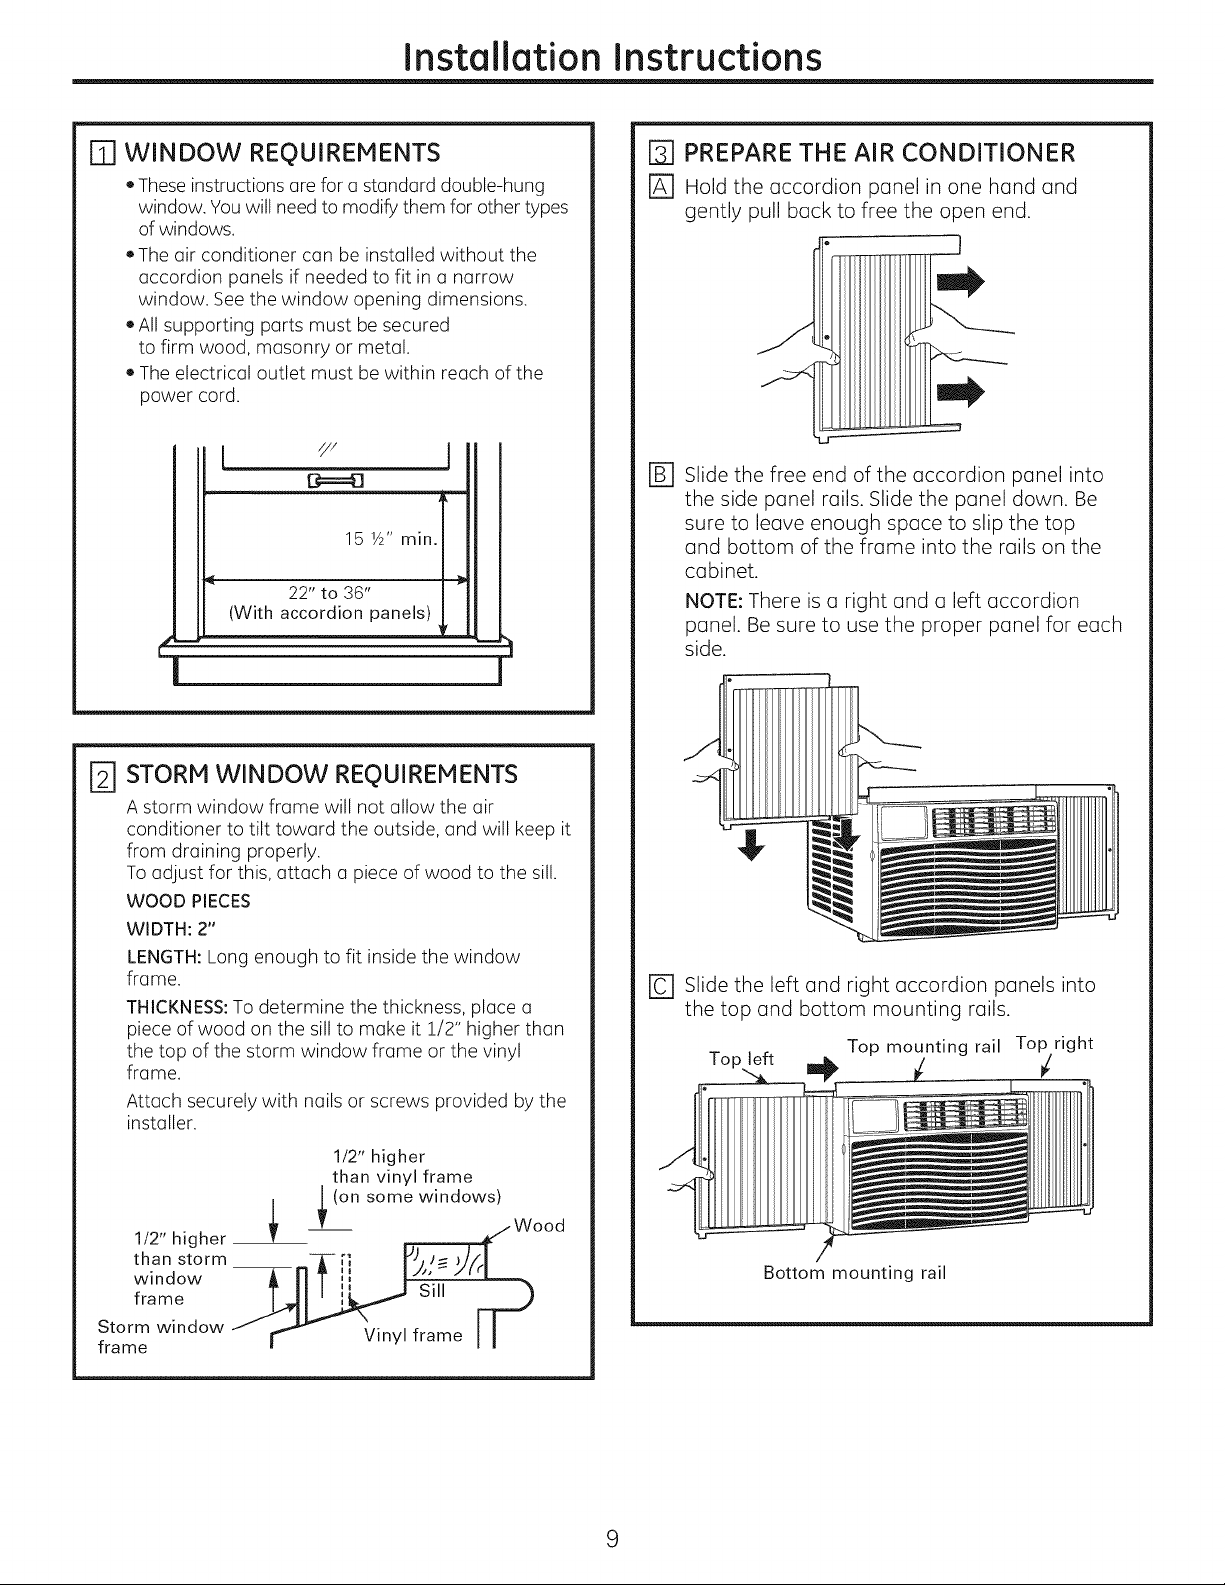
[] WINDOW REQUIREMENTS
• Theseinstructions are for astandard double-hung
window. Youwill need to modify them for other types
of windows.
• The air conditioner can be installed without the
accordion panels if needed to fit in (] narrow
window. Seethe window opening dimensions.
• All supporting parts must be secured
to firm wood, masonry or metal.
• The electrical outlet must be within reach of the
power cord.
15 1/2"min.
22" to 36"
(With accordion panels)
m m_
! !
[] PREPARE THE AIR CONDITIONER
[] Hold the accordion panel in one hand and
gently pull back to free the open end.
D Slide the free end of the accordion panel into
the side panel rails. Slide the panel down. Be
sure to leave enough space to slip the top
and bottom of the frame into the rails on the
cabinet.
NOTE: There is a right and a left accordion
panel. Be sure to use the proper panel for each
side.
STORM WINDOW REQUIREMENTS
D
A storm window frame will not allow the air
conditioner to tilt toward the outside, and will keep it
from draining properly.
To adjust for this, attach (] piece of wood to the sill.
WOOD PIECES
WIDTH: 2"
LENGTH:Long enough to fit inside the window
frame.
THICKNESS: To determine the thickness, place c]
piece of wood on the sill to make it 1/2" higher than
the top of the storm window frame or the vinyl
frame.
Attach securely with nails or screws provided by the
installer.
1/2" higher
than vinyl frame
I (on some windows)
/
w
than storm
window
frame
1/2" higher -___ood
Storm window
frame
r0--]Slide the left and right accordion panels into
the top and bottom mounting rails.
Top mounting rail Top right
Top/e_ft i_ _/
Bottom mounting rail
9
Page 10
Installation Instructions
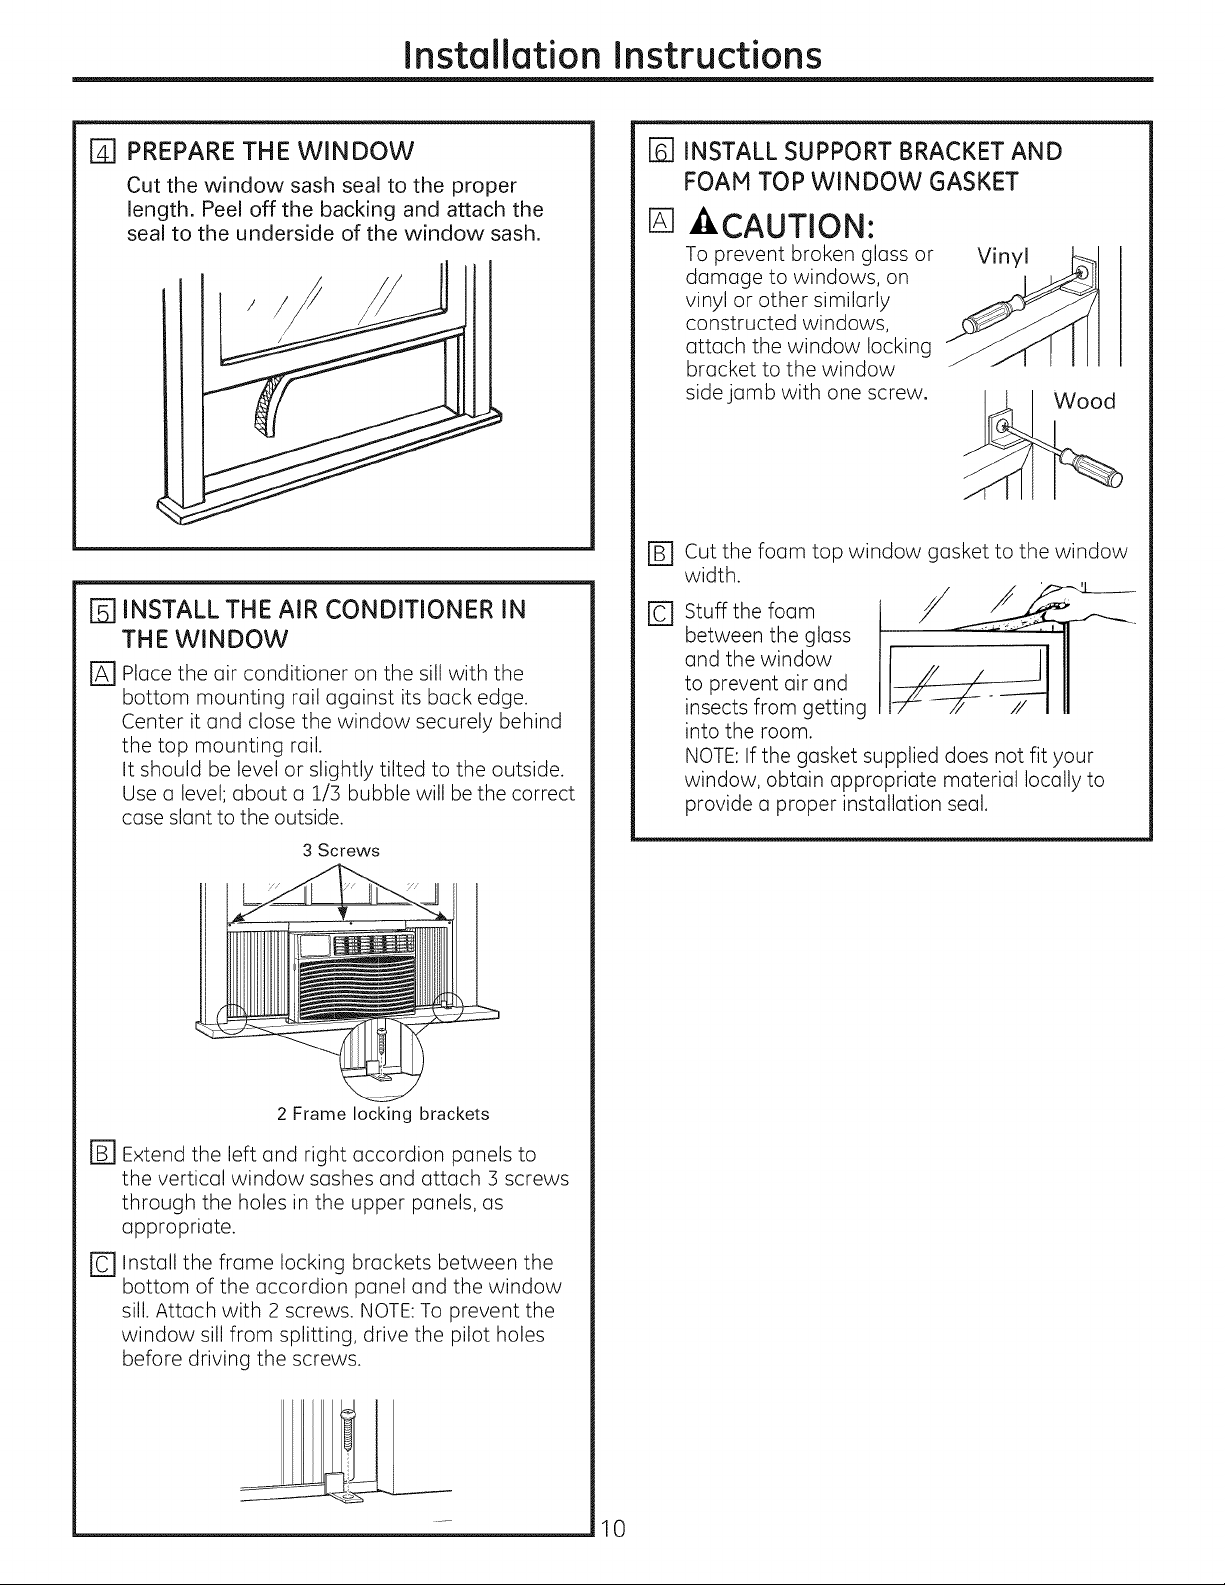
PREPARE THE WINDOW
@
Cut the window sash seal to the proper
length. Peel off the backing and attach the
seal to the underside of the window sash.
INSTALL THE AIR CONDITIONER IN
%
THE WINDOW
Place the air conditioner on the sill with the
@
bottom mounting rail against its back edge.
Center it and close the window securely behind
the top mounting rail.
It should be level or slightly tilted to the outside.
Use a level; about a 1/3 bubble will be the correct
case slant to the outside.
3 Screws
% INSTALL SUPPORT BRACKET AND
FOAM TOP WINDOW GASKET
D
-ACAUTION:
To prevent broken glass or
damage to windows, on
vinyl or other similarly
constructed windows,
attach the window locking
bracket to the window
side jamb with one screw.
Cut the foam top window gasket to the window
%
width.
Stuff the foam
re]
between the glass
and the window
to prevent air and
insects from getting
into the room.
NOTE: If the gasket supplied does not fit your
window, obtain appropriate material locally to
provide a proper installation seal.
Wood
2 Frame locking brackets
%
Extend the left and right accordion panels to
the vertical window sashes and attach 3 screws
through the holes in the upper panels, as
appropriate.
©
Install the frame locking brackets between the
bottom of the accordion panel and the window
sill. Attach with 2 screws. NOTE: To prevent the
window sill from splitting, drive the pilot holes
before driving the screws.
- 10
Page 11
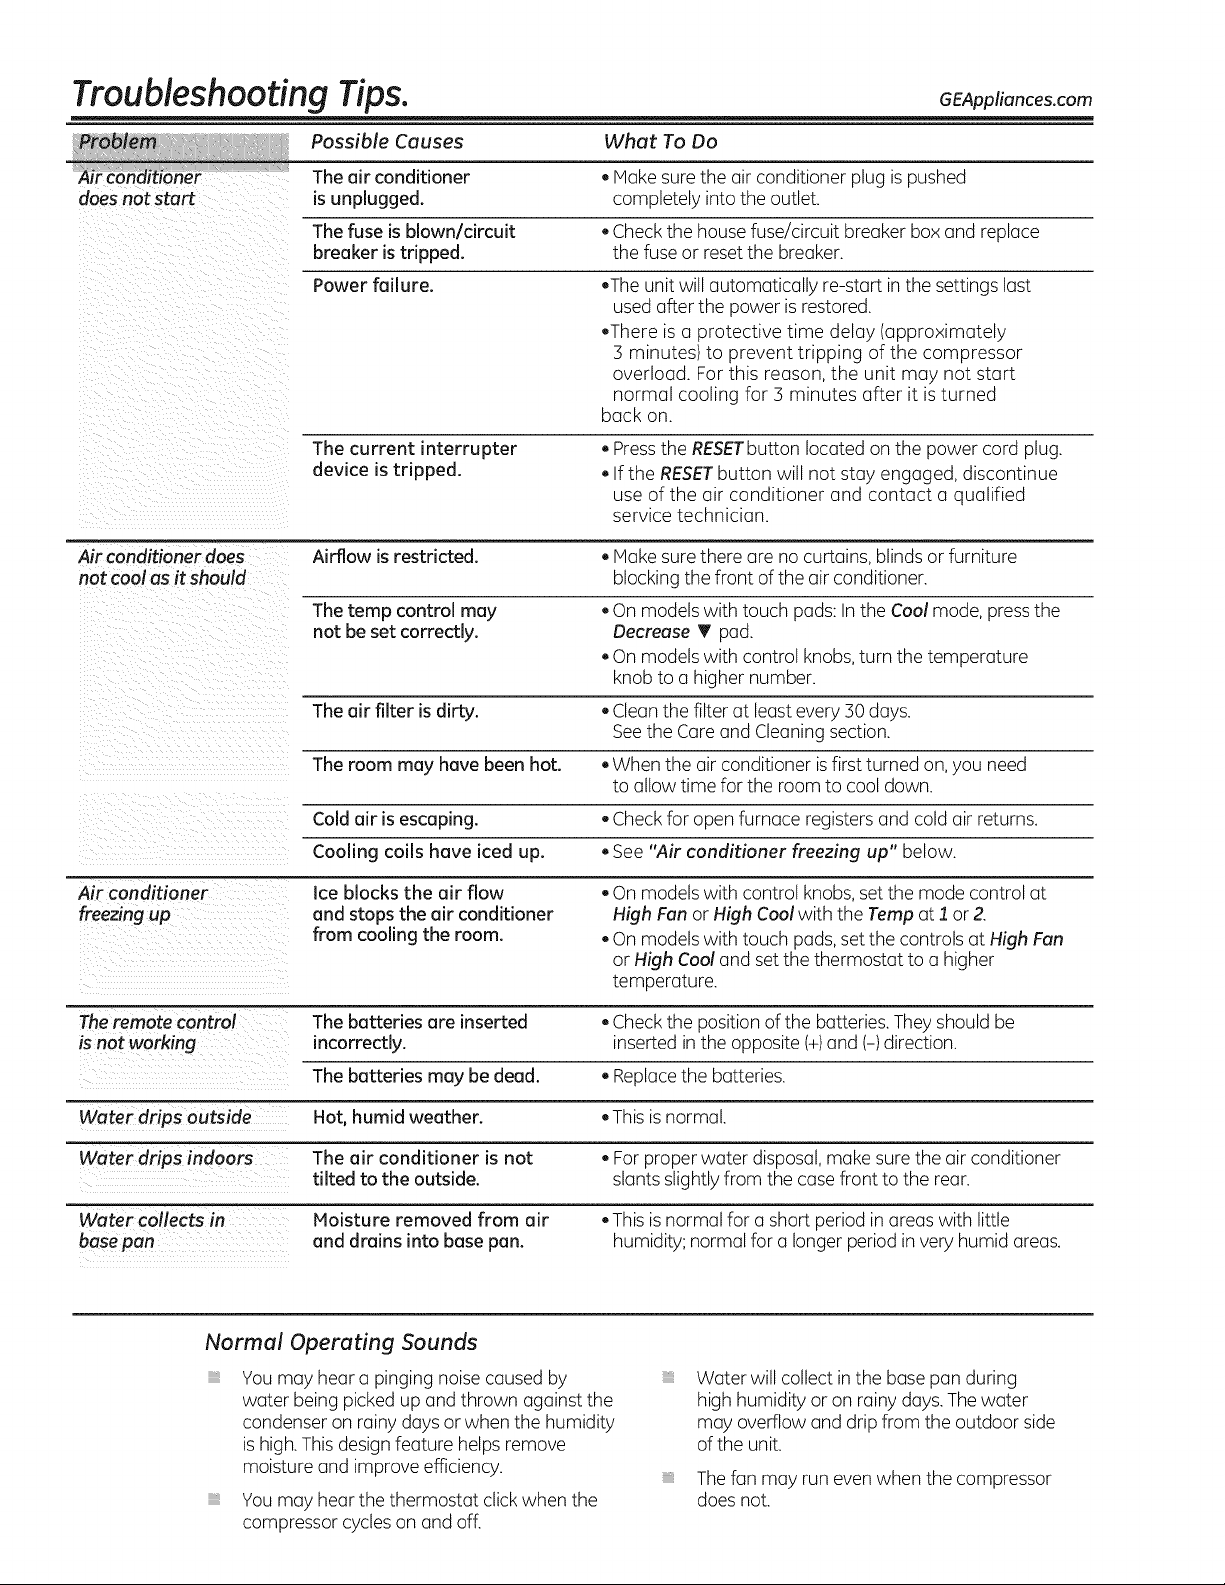
Troubleshooting Tips. GEAppliances.com
Je_ _ : Possible Causes What To Do
_ircSndition_r : The air conditioner . Make surethe air conditioner plug ispushed
does not start is unplugged, completely into the outlet.
Thefuse is blown/circuit • Checkthe house fuse/circuit breaker box and replace
breaker istripped, the fuse or resetthe breaker.
Power failure. .The unit will automatically re-start inthe settings last
used after the power isrestored.
.There is a protective time delay (approximately
3 minutes) to prevent tripping of the compressor
overload. For this reason, the unit may not start
normal cooling for 3 minutes after it is turned
back on.
The current interrupter . Pressthe RESETbuttonlocated on the power cord plug.
device is tripped. . If the RESETbutton will not stay engaged, discontinue
use of the air conditioner and contact a qualified
service technician.
Air conditioner does- Airflow is restricted. . Make surethere are nocurtains, blinds or furniture
not cool as it should blocking the front of the airconditioner.
Thetemp control may . On modelswith touch pads: In the Cool mode, pressthe
not be set correctly. Decrease T pad.
. On models with control knobs, turn the temperature
knob to a higher number.
The air filter is dirty. • Clean the filter at least every :30days.
See the Cure and Cleaning section.
The room may have been hot. . When the air conditioner isfirst turned on, you need
to allow time for the room to cool down.
Cold air is escaping. • Check for open furnace registers and cold air returns.
Cooling coils have iced up. . See "Air conditioner freezing up" below.
Air conditioner Ice blocks the air flow . On models with control knobs, set the mode control at
freezing up and stops the air conditioner High Fan or High Cool with the Tamp at 1 or 2.
from cooling the room. . On models with touch pads, set the controls at High Fan
or High Cool and set the thermostat to a higher
temperature.
Theremote control The batteries are inserted . Check the position of the batteries.Theyshould be
is not working incorrectly, inserted in the opposite (+)and (-)direction.
The batteries may be dead. . Replacethe batteries.
Water drips outside Hot, humid weather. . Thisisnormal.
Water drips indoors The air conditioner is not . For proper water disposal,makesure the air conditioner
tilted to the outside, slants slightlyfrom the casefront to the rear.
Water collects in
base pan
Normal Operating Sounds
iiiiiiiiiiii_iii
Youmay heara pinging noisecaused by
water beingpicked up and thrown against the
condenser on rainy days orwhen the humidity
is high.This designfeature helpsremove
moisture and improve efficiency.
Youmay hearthe thermostat clickwhen the
compressor cycles on and off.
Moisture removed from air
and drains into base pan.
. Thisis normal for a short period in areas with little
humidity; normal for a longer period in very humid areas.
Water will collect in the basepan during
high humidity or on rainy days.Thewater
may overflow and drip from the outdoor side
of the unit.
iiiiiiiiiiii_iii
Thefan may run even when the compressor
does not.
Page 12

Notes.
12
Page 13

Notes.13Notes.
Page 14

14
Page 15
GE Air Conditioner--One-Year Limited Warranty. (For customers in the U.S.A.)
All warranty service provided by our Factory Service Centers,
or an authorized Customer Care®technician. To schedule service,
visit us on-line at ge.com, or call 800.GE.CARES (800.432.2737).
Have serial number and model number available when calling
for service.
GE Will Replace:
One Year
From the date ofthe
oiiginaipurchase
Servicetrips to your home to teach you how to
usethe product.
Improper installation, delivery or maintenance. Ifyou
have an installation problem, or if the air conditioner
isof improper cooling capacity for the intended use,
contact your dealer or installer. You are responsible
for providing adequate electrical connecting facilities.
Failure of the product resulting from modifications to
the product or due to unreasonable use including failure
to provide reasonable and necessary maintenance.
In commercial locations, labor necessary to move the
unit to a location where it is accessible for service
by an individual technician.
Any part of the air conditioner which fails due to a defect in materials or workmanship.
During this limited one-year warranty, GEwillalso provide, free of charge, all labor and related
service to replace the defective part.
Stapleyour receipt here.
Proof of the original purchase
date is needed to obtain service
under the warranty.
Replacement of house fuses or resetting of circuit
breakers.
Failure due to corrosion on models not corrosion-
protected.
Damage to the product caused by improper power
supply voltage, accident, fire, floods or acts of God.
Incidental or consequential damage caused by possible
defects with this air conditioner.
Damage caused after delivery.
EXCLUSION OF IMPLIED WARRANTIES--Your sole and exclusive remedy is product repair us provided in
this Limited Warranty. Any implied warranties, including the implied warranties of merchantability or
fitness for u particular purpose, are limited to one year or the shortest period allowed by law.
This warranty is extended to the original purchaser and any succeeding owner for products purchased for
home use within the USA. If the product is located in an area where service by a GE Authorized Servicer is
not available, you may be responsible for a trip charge or you may be required to bring the product to an
Authorized GE Service location for service. In Alaska, the warranty excludes the cost of shipping or service calls
to your home.
Some states do not allow the exclusion or limitation of incidental or consequential damages. This warranty
gives you specific legal rights, and you may also have other rights which vary from state to state. To know
what your legal rights are, consult your local or state consumer affairs office or your state's Attorney General.
Warrantor: General Electric Company. Louisville, KY 40225
15
Page 16

GE Air Conditioner--One-Year Limited Warranty. (Forcustomers in Canada)
All warranty service provided by our Factory Service Centers,
or an authorized Customer Care®technician. For service, call
1.800.561.3344. Please have serial number and model number
available when calling for service.
Mabe Will Replace:
One Vear
Erom the date of the
origina!purchase
Servicetrips to your home to teach you how to
usethe product.
Improper installation, delivery or maintenance. Ifyou
have an installation problem, or if the air conditioner
isof improper cooling capacity for the intended use,
contact your dealer or installer. You are responsible
for providing adequate electrical connecting facilities.
Failure of the product resulting from modifications to
the product or due to unreasonable use including failure
to provide reasonable and necessary maintenance.
In commercial locations, labor necessary to move the
unit to a location where it is accessible for service
by an individual technician.
EXCLUSION OF IMPLIED WARRANTIES--Your sole and exclusive remedy is product repair as provided in
this Limited Warranty. Any implied warranties, including the implied warranties of merchantability or
fitness for a particular purpose, are limited to one year or the shortest period allowed by law.
Anv pert of the air conditioner which fails due to a defect inmaterials or workmanship.
Duringthis limited one:veer warranty, ivlabewill also provide,free of charge, all labor and
related service to replacethe defectivepart.
Replacement of house fuses or resetting of circuit
breakers.
Failure due to corrosion on models not corrosion-
protected.
Damage to the product caused by improper power
supply voltage, accident, fire, floods or acts of God.
Incidental or consequential damage caused by possible
defects with this air conditioner.
Damage caused after delivery.
This warranty is extended to the original purchaser and any succeeding owner for products purchased in Canada
for home use within Canada. In-home warranty service will be provided in areas where it is available and deemed
reasonable by Mabe to provide.
Some provinces do not allow the exclusion or limitation of incidental or consequential damages, so the above
exclusion may not apply to you. This warranty gives you specific legal rights, and you may also have other rights
which vary from province to province. To know what your legal rights are inyour province, consult your local or
provincial consumer affairs office.
Warranton Mabe Canada inc.,
Burlington, Ontario
16
Page 17

Consignes de s_curit_ ........... 18,19
Consignes d'utilisation ............ 20,21
Entretien et nettoyage
Filtre 6 air ................................ 22
Serpentins ext6rieurs ..................... 22
Instructions de montage ......... 23-26
Conseils de d_pannage ............. 27
Bruits normaux de fonctionnement ........ 27
Assistance _ la clientele
Assistance d la clientele ................... 34
Garantie .................................. 33
Enregistrement du titre
de propri@6 ............................ 31, 32
AELIO*
AEL12*
* Produits homologu6s ENERGYSTAR®
ENERGYSTAR
Entant que partenaire d'ENERGYSTAR®,GEa
d@ermin6 que ce produit 6tait conforme aux
exigences d'efficacit6 6nerg@ique d'ENERGY
STAR®.
Inscrivez ici les num6ros de module et de s6rie :
Num6ro de module :
Num6ro de S6rie :
Vous trouverez ces num6ros sur 1'6tiquette
appos6e sur lec6t6 du climatiseur.
Au Canada, visitez-nous au
www.electromenagersge.ca
17
Page 18

J
IMPORTANTES CONSIGNES DE SECURITE.
VEUILLEZ LIRE TOUTES LES CONSIGNES AVANT UTILISATION.
IkA VERTISSEMENT!
Pour votre s6curit6, les informations contenues dans ce manuel doivent _tre suivies afin de minimiser
les risques d'incendie, de chocs 61ectriques ou de blessures corporelles.
CONSIGNES DE SdLCURITdL
N'utilisez cet appareil qu'aux fins pr6vues
d6crites dans le manuel d'utilisation.
Ce climatiseur doit _tre correctement
install6 conform6ment aux Instructions
d'lnstallation avant route utilisation.
Ne d6branchezjamais votre climatiseur en
tirant sur le cordon d'alimentation. Prenez
toujours fermement la fiche en main et tirez
pour la sortir de la prise.
Remplacez imm6diatement tout cordon
61ectrique us6 ou endommag& Un
cordon d'alimentation endommag6 doit
_tre remplac6 par un nouveau cordon
d'alimentation obtenu du fabricant. Ne
r6parez pas lecordon endommag& N'utilisez
pas un cordon fissur6 ou pr6sentant des
dommages dus aux frottements soit sur
sa Iongueur ou aux extr6mit6s du c6t6
de la fiche ou du raccord.
Eteignez votre climatiseur et d6branchez-le
avant de le nettoyer.
GE n'offre pas de service d'entretien pour les
climatiseurs. Nous vous recommandons de
ne pas essayer d'effectuer I'entretien
de votre climatiseur vous-m_me.
Pour votre s6curit6, ne stockez pas et
n'utilisez pas de mat6riaux combustibles,
d'essence ou d'autres vapeurs et liquides
inflammables dans les parages de cet
appareil ou de tout autre appareil.
Tous les climatiseurs contiennent des
fluides frigorig_nes qui, conform6ment, _ la
16gislation f6d6rale doivent _tre retir6s avant
la mise au rebut de I'appareil. Si vous mettez
au rebus un ancien appareil contenant des
fluides frigorig_nes, v6rifiez la proc6dure
suivre aupr_s de la compagnie responsable
de 1'61imination.
Si la prise de courant est d'un format
diff6rent de la fiche, cette prise doit _tre
chang6e par un 61ectricien qualifi&
Ces syst_mes de climatisation R410A
n6cessitent que les entrepreneurs et
techniciens adoptent des outils, du mat6riel
et des normes de s6curit6 approuv6s pour
utilisation avec ce r6frig6rant. N'utilisez pas
de mat6riel certifi6 pour le r6frig6rant R22
uniquement.
18
BRANCHEMENTS dLLECTRIOUES
Ne coupez pas ou n'enlevez pas, sous aucun
pr6texte, la troisi_me broche de mise 8 la terre
du cordon d'alimentation. Pour des raisons
de s6curit6, cet appareil doit _tre correctement
mis _ la terre.
N'utilisez PASd'adaptateur avec cet appareiL
Le cordon d'alimentation de cet appareil
est 6quip6 d'une fiche 5 trois broches (pour une
mise 5 la terre) qui s'adapte _ la prise
de courant standard 5 3 broches (pour une mise
la terre) pour minimiser les risques
de chocs 61ectriques par cet appareil.
Le cordon d'alimentation est 6quip6 d'un
dispositif d'interruption du courant. Un bouton
d'essai et de r6enclenchement est fourni
sur le boTtier de la prise. Vous devez tester le
m6canisme r6guli_rement en appuyant d'abord
sur le bouton TEST(essai) puis sur le bouton
RESET(r_enclenchemeng Iorsque I'appareil est
branch& Si le bouton TEST(essui) ne bascule
pas ou si le bouton RESET(r#enclenchemeng
ne reste pas enclench6, cessez d'utiliser votre
climatiseur et appelez un technicien de service
qualifi&
Faites v6rifier la prise murale et le circuit
61ectrique par un 61ectricien qualifi6 pour
s'assurer que le syst_me est correctement
mis 5 la terre.
Dans le cas d'une prise biphas_e,
I'installateur a la responsabilit_ et I'obligation
de la remplacer par une prise triphas_e
correctement mise 5 la terre.
Le climatiseur doit toujours _tre branch6
5 sa propre prise _lectrique d'une tension
nominale correspondant 5 celle indiqu_e
sur sa plaque signal_tique.
Ceci permet d'obtenir un meilleur rendement
du climatiseur et _vite de surcharger les circuits
61ectriques du domicile qui risque d'occasionner
un incendie en surchauffant.
Consultez les Consignes d'lnstallations, dans
la section Exigences Electriques pour les
exigences de branchements _lectriques
particuliers.
Page 19

www.electr0menagersge.ca
VERTISSEMENT !
UTILISATION DE RALLONGES
RISQUED'INCENDIE. Peut occasionner des
blessures graves ou la mort.
• NE PASutiliser de rallonge avec ce climatiseur.
• NE PASutiliser de parasurtenseur ou
d'adaptateur (_prises multiples avec ce
climatiseur.
LISEZETSUIVEZSOIGNEUSEMENTCESCONSIGNESDESECURITE.
CONSERVEZ CES INSTRUCTIONS
19
Page 20

A propos des commandes du climatiseur.
Les fonctions et I'aspect peuvent verier.
Les t4moins lumineux 6 c6td des touches 6 effleurement sur le tableau de commandes du climatiseur indiquent
les rdglages sdlectionnds.
NOTE: L'6cranaffichetoujours
la temp@aturede la piecesauf
Iorsquevousprogrammezla
temp@atureou la minuterie.
Let6moin indiquequeI'appareil
esten mode Programmationde la
temp@atureoudu d61ai.
D61ai1-24hr
O
Auto
m High _Cool
Ned m Energg Saver
Low m Fan Onlg
-LSp_oU d_
0 ,
Le tdmoin lumineux indiqueque
la mJnuterieest programm6e.
Commandes du Climatiseur
Commandes
Touche d'alimentation
!1
Het leclimatiseuren positionde marche
ou d'arr@t.L'@cranaffichela temp@ature
de la pi@ceIorsqueI'appareilestmisen marche.
Affichage
0
Affichela temp@aturede la pieceouletemps
restantavant la miseenmarcheou I'arr@tde
I'appareil.Affichela temp@aturede r_glageIors
de la programmationde la temperaturepour les
modesCod (refroidissemen#ou EnergySaver
(economied'energie).Let_moin lumineuxSet
(programme)s'allumeIorsdu r_glage.
Touches Tamp Increase (Augmentation
@
temperature) A /Decrease (R6duction
de la temp6raturel T Sentutilis_espour
programmerlatemp@aturedanslesmodesCool
ou EnergySaver.Let@moinlumineuxSets'allume
Iorsdu r_glage.
Touches Delay Timer Increase (Augmentation du
0
d#lailA (+l/ Decrease (Diminution du d#lail T (d
Chaquefoisquevous effleurezlestouches
Increase A / DecreaseT surI'appareilou
lestouches Increase+ / Decrease- de la
t616commande,vous programmez ladur6e du
d6laiIorsde I'utilisationdela minuterieDelay
!-24hr (d6laide 1-24h).Let6moin lumineuxSet
s'allumeIorsdu glage.
Touches de vitesse du ventilateur
0
Sentutilis@spourr_glerlavitessedu ventilateur
de I'appareilsur Low(faible),Ned (moyenne),
High (elev_e)ouAuto (automatique).RENARQUE:
Surlat@l@commande,utilisezlestouchesIncrease
+/Decrease - pourr_glerlavitessedu ventilateur
surLow,Ned, ouHigh. Utilisezla toucheAuto
pour allumerleventilateuren modeAuto.
R6ductiondu d61ai_L_
S61ectiondu modet_
R6ductionde la A
vitesse du ventJlateur
Augmentationet
R6ductiondela _ll_--
temp@atureprogramm6e
Augmentationdud6lai
, i _ Marcheautomatique
__ du ventilateur
_ C'L',, _ A Augmentation de lavitesse
(_.-_/_:t:__)'__ duventilateur
_.,4__-_-_ Mise en marchedeI'appareil
_ ON/OFF(marche/arr6t)
T616commande
Touche Node
O
Estutilis@pourprogrammer leclimatiseursur
lesmodesCool, EnergySaverou FanOnly
(ventilateuruniquement).
Touches de D6lai
0
Delay ON (d_lai de mise en marche)-Lorsque
leclimatiseurest @teint,il peut@treprogramm@
pour d@marrerautomatiquementdans un d@lai
de 1 6 24 heures6 sesr6glagespr6c@dents(mode,
vitessedu ventilateur).
Delay OFF(d_laid'arr_t)-Lorsque leclimatiseur
est enfonctionnement,il peut_treprogramm_
pour s'arr_terautomatiquement dansun d_laide
16 24 heures.
Comment leprogrammer:
Appuyezsurlatouche Delay 1-24hr(D61aide 1
@24 heures)de I'appareilou de lat616commande.
Chaquefoisquevous effleurezlestouches
Increase A/Decrease Tsur I'appareilou
lestouches Increase+/Decrease - de la
t616commande,vous programmez ladur6e du
d6laipar intervallede ]. heure.Let6moinlumineux
Sets'allumeIorsdu r6glage.
PourconnaTtreletemps restant surla minuterie
Delay1-24hr,appuyezsur la touche Delay1-2/4hr
de I'appareilou de lat616commande.Utilisezles
touchesIncrease_/Decrease_ surI'appareil
ou lestouches Increase+/Decrease - de la
t616commandepour programmer unnouveau
d61aisi n6cessaire.
Pourannulet la minuterie, appuyezsurlatouche
Delay1-24hrjusqu'6 ceque levoyant lumineux
surla toucheDelay 1-24hrs'6teigne.
20
Remarque : La lecture de temp6rature par d6faut s'affiche en degr6 Fahrenheit (°F).Pour modifier
I'affichage en degr6 Celcius (°C),appuyez simultan6ment sur les boutons d'augmentation Aou
d'abaissement Vde la temp6rature et maintenez-les enfonc6s pendant :3secondes. R6p6tez la m6thode
pour effectuer un retour @I'affichage des degr6s Fahrenheit (°F).
Page 21

www.electr0menagersge.ca
Ne faites pas fonctionner votre appareil
Iorsque les temperatures ext_rieures son(
en dessous de 0 °C (32 °F).
T_l_commande
Pourvous assurer d'un fonctionnement correct, pointez
la t616commande vers le r6cepteur de signal
du climatiseur.
Assurez-vousqu'aucun obstacle pouvant bloquer
le signal ne se trouve entre leclimatiseur et la
t616commande.
Mode Cool (refroidissement)
UtilisezlemodeCool(refroidissement)avecla vitesse
du ventilateursur Low(foible},led (moyenne},
High (elev_e}ou Auto (automatique)pourrefroidir.
AppuyezsurlestouchesTemperature Increase
(augmentation de latemperature} A /Decrease
(diminution de la temp#mture)T pour programmer la
temperature souhait_e entre 18 °Cet 30 °C(6/4
et 86 °F)par increments de 0,5 °C(:1°F).
Unthermostat _lectronique permet de maintenir la
temperature de la piece. Lecompresseur se met en
marche et s'arr@te6 intervalles r_gulierspour maintenir
latemperature de la piece 6 un niveau de confort choisi.
R@glezlethermostat 6 une valeur plus basse et I'air
ambiant se refroidira.R@glezlethermostat 6 une valeur
plus _lev_e et I'airambiant se r_chauffera.
Ceclimatiseurfroid seuln'estpasconCupour
fonctionneravecdes temperaturesext_rieuresen
dessousde0 °C132°F).IInedolt pas_tre utilis_Iorsque
lestemperaturesext_rieuressont endessousde0°C
(32°F).
Lerayon d'action de la t616commande s'6tendjusqu'6
6,4 m (20 pieds).
Assurez-vousque les pilessont r6centes et
correctement install6es dons lat616commande.
Lat616commande renferme un aimant permettant de
la fixer sur des surfaces m6talliques.
REHARQUE:Sileclimatiseur6teintest allum6alorsqu'il
est programm6surun r6glageCoolou sivouspassez
d'un mode Ventilation6 un modede Refroidissement,il
faudra environ3 minutespour que lecompresseurse
remetteen marche etrecommence6 refroidir.
Descriptions du Refroidissement
Pour un RefroidissementNormal- S61ectionnez
le modeCoo/avecla vitessedu ventilateursurtfed
ou High etun r6glage6 unetemp6raturemoyenne.
Pour un Refroidissementtfaximal - S61ectionnez
le modeCool avecla vitesseduventilateursurHigh
et un r_glage 6 une temperature plus basse.
Pour un Refroidissementplus SilencieuxouDurant
la Nuit - S_lectionnezlemodeCool avec lavitessedu
ventilateursur Lowet un r6glage6 unetemperature
moyenne.
Mode Energy Saver (economie d'#nergie)
Contr61e leventilateur
ON(active)-Le ventilateurse met en marcheet s'arr_te
en m_metemps qualecompresseur.Cecipermetune
plusgrandevariation de latemperatureet dutau×
d'humidit6donsla piece.Esten g_n_ralutilis_Iorsquela
pieceest inoccup_e.
REHARQUE: Leventilateur peut continuer 6 fonctionner
quelques instants apres qua le compresseur se salt
arr_t&
OFF(d_sactiv_)-Le ventilateurfonctionne en continu,
alorsquale compresseursemet en marcheet s'arr_te6
intervallesr_guliers.
Mode Fan Only (ventilateur uniquement)
UtilisezlemodeFan Onlyavec unevitessedeventilateur
r_gl_esurLow,Ned ou Highpour fairecircularI'airet
leflitter sansle refroidir.Etantdonn_ quale modeFan
Onlyne permet pasde refroidissement,ler_glagede la
Auto Fan Speed (vitesse du ventilateur auto}
R6glezlavitessedu ventilateursurauto pour que
la vitessedu ventilateurseregleautomatiquement 6la
vitessen_cessaire6I'obtentiondesr_glagesapportant
un niveaudeconfort optimal 6 la temperature
programm_e.
Fonction de conservation des r#glages apr#s une coupure de courant
En cos de panne ou d'interruption de courant, I'appareil 6 2/4heures) _tait utilis_e,I'appareil reprend son compte
red_marreautomatiquement apresr_tablissement 6rebours.Vousaurezpeut-_trebesoinde programmer
de I'alimentation61ectriqueet conservelesderniers une nouvelleheure.
r6glagesutilis_s.Silafonction Delay1-24hr(D61aide 1 21
temperaturen'affiche pas.Lotemperaturede la piece
s'affiche6 I'_cran.
REHARQUE:Lavitessede ventilateurauto nepeut&tre
utilis_eIorsqueleclimatiseurestsurle mode FanOnly.
Sila piecedemande un refroidissementsuppl6mentaire,
la vitessedu ventilateuraugmenteautomatiquement.Si
la piecedemande mains
de refroidissement,lavitessedu ventilateurdiminue
automatiquement.
REIARQUE: Lavitessede ventilateurauto nepeut_tre
utilis_eIorsqueleclimatiseurestsurle mode FanOnly.
Page 22

A propos des commandes du dimatiseur.
Information suppldmentaire importante.
Direction de PAir
Utilisezle levierpour r6glerladirection de I'uirvers lu
gauche ou verslu droite seulement.
Entretien et nettoyage du climatiseur.
Grille et BaTtier
Eteignezet d_bronchezleclimotiseurovont tout Pourlenettoyer,utilisezdeI'eauet und_tergentdou×.
nettoyage. N'utilisezpasd'eaude Javelou denettoyantsabrasifs.
Filtre _ Air
Lefiltre (_air derriere la grille frontale doit
_tre v_rifi6et nettoy_ uu bout de 30jours de
fonctionnement ou plussouvent si n6cessuire.
Pour retirer :
Ouvrez la grille d'entr_e en tirunt vers le bussur les
lunguettes des coins sup6rieurs de la grilled'entr_e
jusqu'6 ce que lu grille soit duns une position 6 45
degr6s. Retirezlefiltre.
Nettoyezle filtre uvecde I'euusavonneuse tilde.
Rincezlefiltre et laissez-les_cher avunt de leremettre
dans le climutiseur. Nenettoyez pus
votre filtre uu luve-vuisselle.
MISE EN GARDE: NEfuitesPAS
fonctionner leclimutiseur suns le filtre souspeine de
le boucher avecde la pouss@eet dela charpie et de
r6duire sonefficucit6
Languette
22
Serpentins Ext_rieurs
Lesserpentins situ6s duc8t6 ext6rieur du climatiseur
doivent _tre r6guli_rement v6rifi6s.S'ilssont obstru_s
par des poussi_resou de la suie, il estpossiblede les
fuire nettoyer put des professionnels.
Comment InsUrer les Piles dans la T#l#commande
REMARQUES :
Retirezlecouvercle du Iogement des piles
en lefaisunt glisser duns lesens indiqu6 par
lafl_che.
Ins_rezles nouvelles pilesen vous assurant
que lespSles(+)et (-) de lapile sont orient6s
duns la bonnedirection.
Remettezlecouvercle en lefaisant glisser.
Utilisez2 pilesalcalinesAAAd'!,5 Volt. N'utilisez
pusde piles rechargeables.
Retirezles pilesde lat616commandesi vous
pr_voyezde ne pus utiliservotre climatiseur
pendant un certaintemps.
Ne m61ungezpusdes pilesneuves avecdes
pilesus_es.Nem61angezpus ensemble lespiles
alcalines,standard (carbone-zinc)ou rechargeables
(ni-cad,ni-mh, etc).
Page 23

I str
cti
$
cli tise
r
de
i[_ Questions? Composez le 1.800.561.3344 ou visitez notre site web 6 : www.electromenegersge.ce
AVANT DE COMMENCER
Lisez ces instructions enti_rement et attentivement.
. IMPORTANT -Conservezcesinstructions
pour I'inspecteur _lectrique local.
• IMPORTANT - Respectez tousles codes et
r6glements en vigueur.
• Remarque pour I'installateur - Assurez-vous de
remettre ces instructions au client.
Remorque pour le client - Conservez ces
instructions pour route r@f#rence future.
Niveau de comp@tence - L'instollotion de cet
apjDoreil demonde des connaissonces de bose en
meconlque.
®
D@loid'ex@cution - Environ 1 heure
o
Nous recommondons que I'installation de ce
produit soit effectu@e par deux personnes.
• L'installateur est responsable de I'installation
correcte de I'opporeil.
• Lo ponne de I'opporeil due (_une mouvoise
installation n'est pos couverte par Io gorontie.
. Vous DEVEZutiliser toutes les pi&ces fournies et
suivre la proc@dure d'installotion du climotiseur
d@critedons cette notice.
nta
e
AMISE EN GARDE :
Ne coupez pas ou n'enlevez pas, sous aucun
pr@te×te, la troisi@me broche de raise 6 la terre
du cordon d'alimentation.
Ne changez pas la fiche du cordon d'alimentation
du climatiseur.
Un c6blage en aluminium du domicile peut
occasionner des probl_mes particuliers-
consultez un _lectricien qualifi_.
OUTILLAGE NI_CESSAIRES
Tournevis cruciforme Phillips
Tournevis _ t_te plate
i
E×IGENCES I_LECTRIQUES
Certoins modules n@cessitentune prise mise _ Io
terre de 115/120 Volts AC,60 Hz,prot@g@epar
un fusible a action diff@@eou par un disjoncteur.
Lofiche triphos@eovec terre r@duitle risque de choc
@lectrique.SiIo prise murole que vous envisogez d'utiliser
est biphos@e,vous avez Io responsabilit@et I'obligation de
Io remplocer par une prise triphos@ecorrectement mise a
Ioterre.
Certoins modules n@cessitentune prise mise (_la
terre de 230/208 Volts AC,protegee par un
fusible (_action diff@@eou par un disjoncteur.
Ces modules doivent @reinstall@ssur leur
propre circuit d@riv@pour @iter de surchorger
les circuits @lectriquesdu domicile qui peut
occasionner un risque d'incendie par surchouffe
des c(3bles.
Crayon R_gle ou m_tre
Niveau Ciseaux ou couteau
Le cordon d'alimentation est @quip@d'un dispositif
d'interruption du courant. Un bouton d'essai et de
r@enclenchement estfourni sur leboYtierde la prise.Vous
devez tester le m@canismer@guli@ementen appuyant
d'abord sur le bouton TEST(essai) puis sur le bouton
RESET(r_enclenchement)Iorsque I'appareil est branch@.
Si le bouton TEST(essai}ne bascule pas ou si le bouton
RESET(r_enclenchement) ne reste pos enclench@,cessez
d'utiliser votre climatiseur et appelez un technicien de
service qualifi@.
23
Page 24

Instructions de montage
PII_CES INCLUES
"-IL'aspect peut varier) Joint d'_tanch_it_ de la
fen_tre _ guillotine
_teanCehn _it_
mousse de la
fen_tre
Climatiseur
Panneau en Panneau en
accordion accordion
gauche droit
Ferrure de
Ferrure de verrouillage de verrouillage
Vis (6) lafen_tre (!) de cadre (2)
24
Page 25

Instructions de montage
[] INSTRUCTION RELATIVE
A LA FENETRE
• Cesinstructionssontvalablespourunefen@trestandarda
guillotinea deuxchassismobiles.Vousdevrezmodifierles
instructionspourlesautrestypesdefen@tres.
• Leclimatiseurpeut@treinstall@sanslespanneauxen
accord@onssilafen@treest@troite.R@f@rez-vousaux
dimensionsde lafen@treindiqu@esdanslecroquis@droite.
Toutelaferruredemontagedoit@tresolidementfix@au
bois,@lamagonnerieouaum@tal.
Laprised'alimentation@lectriquedoitsetrouver@port@du
cordond'alimentation.
B==4]
15 1/2po min.
22 poL_36po
(Avec les panneaux
en accordion)
t_
1
D PRI_PARATION DU CLIMATISEUR
[_ Haintenez le panneau en accord6on dans une
main et tirez doucement pour lib6rer I'extr6mit6
ouve rte.
D Faites glisser I'extramit6 libre du panneau en
accordaon dans les rails de panneau lat@al.
Faites glisser le panneau vers le bas. Assurez-
vous de laisser suffisamment d'espace pour
glisser le haut et le bas du cadre dans les rails
de I'enceinte.
NOTE: II y a un panneau en accord6on gauche
et un panneau en accord6on droit. Assurez-
vous d'utiliser le panneau appropri6 pour
chaque c6t&
[] INSTRUCTIONS RELATIVE
LA CONTRE-FENETRE
Lecadrede la contre-fen@treemp_chele climatiseur
de penchervers I'ext@rieur,et doncde sedrainer
correctement.Pourr@glerceprobleme,fixez un morceau
de boisau reborddelafen_tre.
MORCEAU DE BOIS
LARGEUR:2 po
LONGUEUR:Suffisammentlong pour selager6 I'int@rieur
du cadrede lafen_tre.
I_PAISSEUR: Pourd@terminerI'@paisseur,placezun
morceaude boissur lerebord de lafen_tre defa¢onace
que le morceaude bois soit ½poplus @lev@quele dessus
du cadrede lacontre-fen_treoudu cadreenvinyle.
Fixezsolidementa I'aidedevisou de clausfournis par
I'installateur.
/
1/2po plus61eva _ V___ ,j Bois
que lecadrede la -' ,,
contre-fen_tre II
_- n-_-,, IY,,'_ ;"f,L
1
1/2po plus 61eva que
le cadreenvinyle(sur
I certainesfenatres)
w
I' il I :i _..JRebord "_
Cadrede la _
contre fenetre
- ^ " r_ Cadreenvinyle J J
Faites glisser les panneaux en accord6on
gauche et droit dans les rails de montage
inf6rieur et sup@ieur.
Partiesup@ieure superieur
gauche -_--_-L---
Rail de montage inf@ieur
Rail de montage droite
Partiesup@ieure
25
Page 26

Instructions de montage
[] PRI_PARATION DE LA FENETRE
D#coupez lejoint de Io fen_tre a guillotine
la Iongueur ad#quote. D#collez Io pellicule
protectrice et collez lejoint sur le dessous
du codre de Iofen6tre.
INSTALLATION DU CLIMATISEUR
%
DANS LA FENETRE
@
Plocez le climotiseur sur le rebord ovec le roll
de montoge inf6rieur contre le rebord orri6re.
Centrez-le et fermez Io fen6tre derriere le roll
de montoge sup6rieur. IIdoit 6tre de niveou ou
16g6rement pench6 vers I'ext6rieur. Utilisez un
niveou, environ 1/3 de bulle donnero Io pente
correcte vers I'ext6rieur.
a Vis
D
INSTALLATION D'UNE FERRURE DE SUPPORT
ET DU JOINT D'I_TANCHI_ITI_ SUPI_RIEUR EN
MOUSSE DE LA FENI:TRE
%
ANISE EN GARDE:
Pour preventez la verre brisez Vinyle
duns lesfen_tres, uttuchez Io
ferrure de verrouillage de la
fen_tre a Io c6t_ de Io fen_tre a
I'aide d'une vis.
%
D@coupezlejoint d'&tanch@it@sup@rieuren mousse a
la largeur de lafen@re.
Ins_rez la mousse
©
entre la vitre et
la fen@trepour
emp@cherI'air et les
insectes de p_n@trer
dans la piece.
NOTE:Si lejoint d'@tanch@it@fourni ne s'adapte pas
a votre fen@tre,procurez-vous Iocalement I'article
appropri@afin d'obtenir une @tanch@it@ad@quate de
I'installation.
Bois
2 ferrures de verrouillage de cadre
r_ Etirez les punneuux en accordion gauche et
droitjusqu'uux cadres verticuux de lu fen@re
et fixez 3 vis duns les trous des punneuux
sup@ieurs, selon lecus.
rcl Installer les ferrures de verrouilluge e cadre
entre le bus du punneuu en accordion et le
rebord de lu fen_tre. Fixez-les uvec 2 vis.
NOTE : Pour _viter que le rebordde lu fen@re
ne se fissure, percez des uvunt-trous uvunt de
visser les vis.
26
Page 27

Avant d'appeler le service.., wwwe,ectromenagersgeca
i_bl_ : Causes possibles Que faire
Leclimatiseur • Assurez-vousquelafichedu climatiseursoitbienbranch@
metaasenmarcne estd_branch_, dansla prisemurale.
Lefusiblea sautd • V@ifiezlaboTtea fusible/adisjoncteursetremplacezlefusible
ledisjoncteurestouvert, ourebranchezledisjoncteur.
!1y aunepannedecourant. • S'ilseproduitunepannedecourant,d_branchezleclimatiseur
en lemettantenpositionOFF(arr@).q)uandlecourantrevient,
attendez] minutesavantderemettreenmarcheleclimatiseur,
pour@iterded_clencherlasurchargedu compresseur.
Lem_canismed'interruption • AppuyezsurleboutonRESET(remiseenmarche)situ_surlafiche
decourantestd_clanch_, du cordon_lectrique.
SileboutonRESETnerestepasenfonc_,arr_tezleclimatiseur
d'airetappelezuntechnicienqualifi_.
Lecimatiseurne-efroidit Lacirculationd'airestbloqu@. • Assurez-vousqu'iln'ya pasde rideau,destoreou demeuble
easautantau'illedevrait quibloqueledevantduclimatiseur.
Lecontr61edetemp@ature • EnmodeCool(frais)appuyezsurlatoucheDecreaseT pad.
nest pasbienregiS,
Lefiltrea airestsale. • Nettoyezlefiltreau mainstousles30jours.Consulterla section
• Surlesmo@lesdot_sdeboutonsdecommandes,tournez
leboutondetemp@aturesurunevaleurplus_lev@.
Instructionsdefonctionnement.
Lachambre_taitchaude. • ApresavoirHisen marcheleclimatiseur,attendez
quelachambreserefroidisse.
L'airfroids'_chappe • V@ifiezlesgrillesaregistredeplancheretlesreprisesd'airfroid.
delachambre.
Lesserpentinssontgelds. • Consultez"Leclimatiseurd'air@le"ci-dessous.
Leclimatiseur
gele
LatOlOcommande Lespilesnesontpasins@@s • V@ifiezlapositiondespiles.Ellesdoiventins@@sdefagonace
nefonctionneeas correctement, quelespoles(+)et(-)de lapilesoientorient,sdansdes
DeI'eaucoule_ 'ext_rieur tlfaittreschaudethumide. • C'estnormal.
DeI'eaucoue_ I'int_rieur Leclimatiseurn'estpas • Pourobtenirunebonne@acuationde I'eau,assurez-vous
L'eaus'amasseaans L'humidit_estextraitede
eolateaudufond I'airde lachambreetpasse
Laglacebloquelacirculation
d'airetemp_cheleclimatiseur
derefroidirlachambre.
Lespilessontpeut-_tre • Remplacerlespiles.
d_charg@s.
inclin@versI'ext@rieur. queleclimatiseursoitI@gerementinclin@deI'avant
dansleplateaudufond.
• Surlesmodelesdot_sdeboutonsdecommande,r_glezlemode
surHighFan(vitesseduventilateur_lev@)ou HighCool(fort
refroidissement)aveclatemp@aturer_gl@sur1ou2.
Surlesmo@lesdot_sdetouchesaeffleurement,r_glezles
commandessurHighFan(vitesseduventilateur_lev@)ouHighCool
(fortrefroidissement)et r_glezlethermostatsurunetemp@atureplus
_lev@.
directionsoppos@s.
du boTtierversI'ar@re.
• C'estnormalpendantunep@iodecourtedansdesr@gions
peuhumides;normalpendantdesp@iodesplusIongues
dansdesr@gionstreshumides.
Bruits normaux de fonctionnement
VouspouvezentendreuncliquetisdOc_deI'eauqui
estabsorb@etestprojet@contrelecondensateurles
joursdepluieoOquandily a beaucoupd'humidit@.Cette
caract@istiquediminueI'humidit@et am@liore
lerendement.
Vouspouvezentendreleclaquementduthermostatquand
lecompresseursemeten marcheet s'arr@te.
DeI'eaus'amassedansleplateaudu baspendantles
p@riodesdegrandehumidit@ous'ilpleut.Cetteeaupeut
d@borderetcoulerdeI'appareildu c6t@ext@rieur.
Leventilateurpeuttournerm@mequandlecompresseur
nefonctionnepas.
27
Page 28

Notes.
28
Page 29

Notes.29Notes.
Page 30

30
Page 31

Notes.31Notes.
Page 32

32
Page 33

GE Air Conditioner--One-Year Limited Warranty. (Forcustomers in Canada)
All warranty service provided by our Factory Service Centers,
or an authorized Customer Care®technician. For service, call
1.800.561.3344. Please have serial number and model number
available when calling for service.
Mabe Will Replace:
Anvpart of the air conditioner which fails due to a defect inmaterials or workmanship.
From the date ofthe
oiiginaipurchase
Duringthis limited one:veer warranty, ivlabewill also provide,free of charge, all labor and
related service to replacethe defectivepart.
Servicetrips to your home to teach you how to
usethe product.
Improper installation, delivery or maintenance. Ifyou
have an installation problem, or if the air conditioner
isof improper cooling capacity for the intended use,
contact your dealer or installer. You are responsible
for providing adequate electrical connecting facilities.
Failure of the product resulting from modifications to
the product or due to unreasonable use including failure
to provide reasonable and necessary maintenance.
In commercial locations, labor necessary to move the
unit to a location where it is accessible for service
by an individual technician.
EXCLUSION OF IMPLIED WARRANTIES--Your sole and exclusive remedy is product repair us provided in
this Limited Warranty. Any implied warranties, including the implied warranties of merchantability or
fitness for a particular purpose, are limited to one year or the shortest period allowed by law.
This warranty is extended to the original purchaser and any succeeding owner for products purchased in Canada
for home use within Canada. In-home warranty service will be provided in areas where it is available and deemed
reasonable by Mabe to provide.
Replacement of house fuses or resetting of circuit
breakers.
Failure due to corrosion on models not corrosion-
protected.
Damage to the product caused by improper power
supply voltage, accident, fire, floods or acts of God.
Incidental or consequential damage caused by possible
defects with this air conditioner.
Damage caused after delivery.
Some provinces do not allow the exclusion or limitation of incidental or consequential damages, so the above
exclusion may not apply to you. This warranty gives you specific legal rights, and you may also have other rights
which vary from province to province. To know what your legal rights are inyour province, consult your local or
provincial consumer affairs office.
Warranton Mabe Canada inc.,
Burlington, Ontario
33
Page 34

Assistance_la clientele.
"] Site InternetGE www.electromenagersge.ca
Internet ci-dessus,accessible 24 heures parjour, chaquejour deI'ann6e!/_ partir du site,vous pouvez
l Pour toute question ou pour un besoin d'assistance au sujet de votre appareil m6nager, consultez lesite
. t616chargerlesmanuels d'utilisation.
Studiodeconceptionr6aliste www.electromenagersge.ca
Sur demande, GEpeut fournir une brochure sur I'am6nagement d'une cuisine pour lespersonnes
6 mobilit6 r6duite.
Ecrivez: Directeur,Relationsavec les consommateurs, ivlabeCanada, Inc.
Bureau 310,1 Factory Lane
ivloncton, N.B.E1C9M3
Piecesetaccessoires
Ceuxqui d6sirent r6parer eux-m_mes leurs61ectrom6nagerspeuvent recevoir pi_ceset accessoires
directement 6 la maison (cartesVISA,iVlasterCardet Discoveraccept6es).
Lesproc@duresexpliqu@sdanslepresentmanuelpeuvent@treex_cut@sparn'importequelutilisateur.
GEn'offrepasdeservicesder@arationpourceproduit.Nousvousrecommandonsfortementdenepastenterder@arer
vous-m@meleproduit.
Voustrouverez dans lespagesjaunes de votre annuaire le num@o du Centrede service iVlabele plus proche.
Autrement, appelez-nous au !.800.56!.334/4.
www.electromenagersge.ca
Contactez-nous www.electromenagersge.ca
Sivous n'_tes pas satisfait du serviceapr_s-vente dont vous avez b_n6fici6:
Premi@ement,communiquez aveclesgens qui ont r6par6 votre appareil.
Ensuite,si vous n'@estoujours passatisfait envoyeztousles d@ails-num@o de t616phonecompris-au
Directeur, Relationsavec lesconsommateurs, ivlabe Canada, Inc.
Bureau 3!0, ! Factory Lane
Moncton, N.B.E1C9M3
34
Page 35

Instrucciones de seguridud.. 36, 37
Instrucciones de operaci6n .. 38, 39
Cuidado y limpieza
Bobinas para exteriores ................ 40
Filtro de aire ............................ 40
Instrucciones de instuluci6n. . 41-44
Solucionar problemas ............ 4s
Sonidosde operaci6n normales ........ 45
Servicio al consumidor
Garantia................................ 46
Servicio al consumidor ................. 47
AELIO*
AEL12*
Producto etiquetado *ENERGYSTAR®
ENERGYSTAR
Como socio de ENERGYSTAR ®,
GEho confirmodo que este
producto cumple los directrices
de ENERGYSTAR®relotivos ol
rendimiento energ_tico.
Escriba los nElmeros de modelo
y serie aqui:
# de Nodelo
# de Serie
Puede encontrar estos nOmeros
en una etiqueta enel costado
del acondicionador de aire.
35
Page 36

INFORMACION IMPORTANTEDESEGURIDAD.
LEA TODAS LASINSTRUCCIONESANTES DE USAR.
iADVERTENCIA!
Por su seguridad, se debe seguir ia informaci6n en este manual para minimizar el riesgo de incendios,
descargas el6ctricas o lesiones personales.
PRECAUCIONESDE SEGURIDAD
Use este electrodom6stico solamente para
el prop6sito determinado segOn se describe
en el Manual del propietario.
Este acondicionador de aire debe instalarse
correctamente de acuerdo con las
Instrucciones de instalaci6n antes de su uso.
Nunca desenchufesu acondicionador de
aire tirando del cable el6ctrico.Siempre
agarre firmemente elenchufe y tire de
61directamente hacia afuera.
Reemplaceinmediatamente todos los
cablesel6ctricosque sehayan pelado o que
sehayan daflado de alguna otra manera.
Un cable de corriente daflado nodebe
repararse,sinoque debe ser sustituido por
uno nuevo que seadquiera delfabricante.
No use un cable el6ctrico que muestre
evidenciasdedeterioro,o daflos de
abrasi6n ensu superficie en alguno de sus
extremos.
Apague la unidad y desenchufe su
acondicionador de aire antes de limpiar.
GE no est6 no apoya que se le proporcione
ning0n servicio al acondicionador de aire.
Vehementemente recomendamos que
usted no intente proporcionar servicio al
acondicionador de aire usted mismo.
Porsu seguridad...noalmacene ni use
materiales combustibles,gasolinau
otros vapores o liquidosinflamables
en la proximidad de 6ste o alg6n otro
electrodom6stico.
Todos los acondicionadores de aire
contiene refrigerantes,los quepor Ley
Federaldeben ser removidos antesde
desecharlos.Siusted planeadeshacersede
algOnproducto que contenga refrigerantes,
p6ngase encontacto con la compaflia que
seencarga de recoger su basura para que
le indiquen qu6 hacer.
Si el recept6culo no coincide con el enchufe,
un electricista calificado debe reemplazar el
recept6culo.
Estos sistemas de acondicionadores de
aire R410A requieren que los contratistas
y t6cnicos usen herramientas, equipos y
est6ndares de seguridad aprobados para
su uso con este refrigerante. NO use
equipamiento certificado s61o para
refrigerante R22.
36
COh'lOCONECTARLA ELECTRICIDAD
Bajo ninguna circunstancia,corte o remueva la
tercera pOa(tierra)del cable el6ctrico. Enpos
de la seguridad personal,este electrodom6stico
debe siempreconectarse a tierra.
NO use un enchufe adaptador con este
electrodom#stico.
El cable el6ctrico de este electrodom6stico est6
equipado con un enchufe de tres p0as (tierra)
que combina con un tomacorriente est6ndar
de tres tomas de pared para minimizar la
posibilidad de una descarga el6ctrica.
El cable de alimentaci6n incluye un
dispositivo para interrupci6n de corriente.
Se incluye un bot6n de prueba y de reinicio
en el dispositivo. El dispositivo debe ponerse
a prueba peri6dicamente: primero se presiona
el bot6n de TEST(prueba) y luego RESET
(reinicio) mientras se encuentra enchufado al
tomacorriente. Siel bot6n TESTno se dispara
o si el bot6n RESETno queda enganchado,
deje de utilizar el acondicionador de aire y
comuniquese con un t6cnico calificado.
Pida a un t6cnico que inspeccione el
tomacorriente y el circuito para cerciorarse
de que eltomacorriente est6 conectado a
tierra de la manera apropiada.
Donde exista un tomacorriente de dos
tomas, es su responsabilidad y obligaci6n
personal hacer que dicho tomacorriente
sea reemplazado pot uno de tres tomas
con conexi6n a tierra.
Elacondicionador de aire deberia siempreestar
conectado a un tomacorriente individual con su
circuito de voltaje correspondiente.
Esto proporciona el mayor rendimiento y
adem6s evita que los circuitos del resto de
la casa se sobrecarguen, Io cual podria causar
incendios por el sobrecalentamiento del
cableado.
Ver las Instrucciones de instalaci6n, en la
secci6n Requisitos EI6ctricos para los requisitos
especificos de conexi6n.
Page 37

GEAppliances.com
g, iADVERTENCIA!
USO DE PROLONGADORES
RIESGO DE INCENDIO. Podria ocasionar
lesiones graves o la muerte.
• NO use un prolongodor con este
Acondicionodor de Aire de Ventono.
• NO use protectores contro picos de tensi6n ni
odoptodores poro mOItiples tomocorrientes con
este Acondicionador de Aire de Ventana.
LEAYSIGAESTASINSTRUCCIONESDESEGURIDADCUIDADOSAMENTE.
GUARDE ESTAS INSTRUCCIONES
37
Page 38

Acerca de los controles en el acondicionador de aire
Lasluces al ladedelasteclasdetoqueen el paneldecontrol delacondicionadorde aireindicar_nlosajustessebccionados.
NOTA:Lapantallamuestrasiempre
la temperaturaambiente,exceptoal
configurarlatemperaturaDefinidao
el Sincronizadorde retardo.
retool
m Fan Only
-j_peed_ d Ll_24h-rB)
e-- r oo- GI0 roo, _e
La Bz indica quelaunNad est_ en
eJmodode Ajuste de temperatura
o deTbmpo deretardo.
Energy Saver
O
LaBz indba que el temporkador
de retardo est_ configurado.
Controles del acondicionador de aire
Controles
Tecla de Power (Encendido)
0
Apaga y prendeel acondicionador de aire.
AIencenderse, la pantalla mostrar(_la
temperatura ambiente.
Pantalla
0
Muestrala temperatura ambiente o
el tiempo restante enel Sincronizadorde
retardo. Huestra la temperatura Definidaal
configurar latemperatura en los modos Cool
(F6o)o de Energy Saver (Ahorrode energia).
Laluzde Ajuste seencenderc_durante la
configuraci6n.
Teclasde Temp Aumento s/Reducci6n t
@
Usadopara ajustar la temperatura cuando
seencuentre en el modo Cool (F6o)o Energy
Saver (Ahorro de energia). Laluzde Ajuste se
encender@durante la configuraci6n.
Teclasde Sincronizador de retardo Aumento
0
• (+)/ Reducci6n• (-)
Cadavez que toque lasteclas Aumento • I
Reducci6n •de la unidad olas teclas Aumento
+/Reducci6n - en el control remoto definir6
el tiempo de retardo alutilizar elDelay 1-24hr
timer (Sineronizador de retardo 1-24 h).
Laluzde Ajuste seencender_ durante la
configuraci6n.
Teclasde Fan Speed (Velocidaddel ventiladofl
0
Usadopara ajustar la velocidad del ventilador
a Low (Bajo),Med (Medio),High (Alto)o
Auto (Autom6tica) en la unidad. NOTA:en el
control remoto, utilice lasteclas Aumento +
/Reducci6n - velocidad de ventilador para
ajustar la velocidad del ventilador en Low (Bajo),
Med (Hedio)o High (Alto).Utilice la tecla Auto
para activar elventilador autom@ico.
1-24 hderetardo
Reducd6nde
sincronkadorde retardo _ I
Selecci6ndemodoA I , , I A
Reducci6ndevelocidad. I _
delventfiador 0 I {'_-_J/_t:_+___,_mp+
Aumentoy reducci6n Jl_ I //" I
de ajuste detemperatura _ , z,#-_- ,
Control remoto
Tecla de MODO
O
Usado para ajustar el acondicionador de aire
al modo Cad (Frio),EnergySaver (Aharro de
energia) o FanOnLy(Soloventiladar).
Teclasde Delay (Retardo)
0
Delay ON(ENCENDIDORetardo)-Cuando
elacondicionador de aireestc_apagado,
puede ajustarse para quese encienda
autom6ticamente dentro de i a 2a horas en el
modo y configuraci6n deventilador anterior.
Delay OFF(APAGADORetardo)-Cuando el
acondicionador de aire est@encendido, puede
ajustarse para que seapague autom@icamente
dentro de i a 2/4horas.
C6mo realizar el ajuste:
Pulsela tecla Delay 1-24hr (Retardo1-24h) en
la unidad odel control remoto. Cadatoque
de lasteclas Aumento • / Reducci6n• en la
unidad olas teclas Aumenta + /Reducci6n -
en el control remoto definir@el temporizador
en intervalos de z hora. Laluz de Ajustese
encenderddurante laconfiguraci6n.
Para revisar eltiempo restante en el
Sincronizadorde retardo 1-24 h, pulsela tecla
de Delay 1-24hr (Retarda1-24h) en la unidad o
en del control remoto. Utilicelasteclas Aumento
•/Reducci6n• en la unidad olas teclas
Aumento + / Reducci6n - en elcontrol remoto
para definir un nuevotiempo, si Iodesea.
Para cancelar elsincranizadar, pulsela tecla
Delay 1-24hr (Retardo 1-24h) hasta que la luz
de dicho control se apague.
Aumentodesincronizador
'deretardo
Encendidoautom4ticodel
ventJlador
AumentodevebcJdad
delventJlador
Encendido/apagado
delaunidad
38
Nota: La temperatura par defecto que figura en la pantalla est6 en grados Fahrenheit (°F).Para modificar
la pantalla a grados Celsius(°C),mantenga presionados los botones Temp Increase (Incremento de Tem-
peratura) • Temp Decrease (Disminuci6n de Temperatura) • al mismo tiempo y durante 3 segundos.
Repita el proceso para volver a modificar la pantalla a grados Fahrenheit (°F).
Page 39

Node Cool (Frio)
Use el mode Cool (Frio)a Low (Bajo),Ned (Medio),
High (Alto)o Auto Fan Speed (Velocidadde
ventilador autom6tica) pare enfriar.Use losteclas
de Temperature (Temperatura) Aumento A (+)
/Reducci6n T (-) para ojustar a Io temperatura
deseada entre 64°F y 86°F en incrementos de I°F.
Se usa un termostato electr6nico pare mantener la
tempemtura ambiente. Elcompresor har6 ciclo entre
apagado y encendido para mantener la habitaci6n
ala temperatura deseada. Ajuste el termostato a un
nOmero menor y el aire interne se enfriar4 m4s. Si Io
ajusta a un nOmero mayor, la temperatura del aire
interne se calentar4 m4s.
NOTA:si elacondicionador de aire est@apagado
y seenciende mientras est6 configurado en un
Energy Sever lode (Node de ehorro de energie)
Controla el ventilador.
ON(ENCENDIDO)--EIventilador hat4 un ciclo
de encendido y apagado con elcompresor. Este
resulta en variaciones mayores en la temperatura
de la habitaci6n yen lahumedad. Normalmente
usado cuando la habitaci6n no est4 ocupada.
GEAppliances.c0m
ajuste Cool (Frio)o sisecambia de un ajuste de
ventilador a uno de Cool (Frio),puede que pasen
aproximadamente unos 3 minutes hasta que el
compresor arranque y comience elenfriamiento.
Descripciones de enfriamiento
Para enfriumiento normaI-Seleccione el mode
Cool (Frio)y ventilador High (Alto) o Med (Medio)
con una temperatura de ajuste media.
Pure enfriamiento m6ximo-Seleccione el mode
Cool (Ffio)y ventilador High (Alto) con una
temperatura de ajuste menor.
Pure enfriumiento silencioso y enfriamiento
nocturno-Seleccione el mode Cool (Frio)y ventilador
Low (Bajo) con una temperatura de quste media.
NOTA:puede que elventilador siga funcionando
durante un corto tiempo despu6s dedesactivarse el
ciclo del compresor.
OFF(APAGADO)--EIventilador funciona todo el
tiempo, mientras que el compresor pasa par los
ciclosde encendido y apagado.
Node de Fen Only (Solo ventiledod
Useel mode Fan only (Soloventilador) a velocidad
Low (Baja),ivied(Media)o High (Alta)para
proporcionar circulaci6n deaire y filtraci6n sin
enfriamiento. Debido aque los niveles de ventilador
Qnicamenteno proporcionan enfriamiento, no
Velocided de ventiledor eutom6tice
Indique la opci6n en Velocidad de ventilador
autom@ticapara definir autom@ticamente la
velocidad necesaria para proporcionar una
configuraci6n de comodidad 6ptima con la
temperatura elegida.
Control remote
Para garantizar una operaci6n apropiada, oriente
el control remote hacia elreceptor de se_al del
acondicionador deaire.
Cerci6resede que no haya nada entre el
acondicionador deaire y elcontrol remote que
pueda bloquear la sehal.
se puedeintroducir una temperatura Definida.
Aparecer6 en pantalla la temperatura ambiente.
NOTA:la Velocidad de ventilador autom4tica no
puede utilizarseen elmode Fanonly (Soloventilador).
Sila habitaci6n necesita m@senfriamiento,
la velocidad del ventilador aumentar@
autom6ticamente. Sila habitaci6n necesita
menos enfriamiento, la velocidad del ventilador
descender4 autom@icamente.
NOTA:laVel0cidaddeventilad0raut0m_iticanopuede
utilizarseenel m0d0Fan0nly(S010ventilad0r).
Elreceptor de seBaltiene un range m4ximo de
20 pies.
Cerci6resede que las bater[asseanfrescas y
seinstalen correctamente seg0n seindica en el
control remote.
Elcontrol remote cuenta con un im6n que
permite adherirlo a superficies metSlicas.
Funci6n de recuperaci6n de p_rdida de energia
Encase de la p@dida de la energia o interrupci6n, la
unidad reiniciar4 autom4ticamente en lasfunciones
de la 61timavez que fue usado una vez laenergia
sea restablecida.Si lafunci6n delDelay 1-24hr
(Retardo 1-24h) estaba definido, continuar4 la cuenta
regresiva.Esposible que usted necesiteajustar un
tiempo nuevosi as[Iodesea.
39
Page 40

Acerca de los controles en el acondicionador de aire
Direcci6n del oire
Utilicelas palancas para ajustar la direcci6n del aire,
hacia la izquierday hacia la derecha.
Aplique presi6ncon lapunta de losdedos en las
lamas de distribuci6n para ajustar ladirecci6n del
aire hacia arriba y hacia abajo.
Cuidado y limpieza de! acondicionador de aire.
Rejilla y caja
Apague el acondicionador de aire y retire el enchufe
del tomacorriente de la pared antes
de limpiar.
Filtro de aire
Elfiltro de aire detr6s de la rejilla frontal debe
inspeccionarse y limpiarse porIo menos cada
30 dias o m6sa menudo si fuese necesario.
Para limpiar, use aguay un detergente suave.
No usecloro o materiales abrasivos.
Para retirarlo:
Abra la rejilla de entrada empujando hacia abajo
las leng_etasen las esquinas superiores de la rejilla
de entrada, hasta que la rejilla se encuentre en una
posici6n de 4S°. Retireelfiltro.
Limpie elfiltro con agua tibia yjab6n. Enju6guelo
y permita que seseque antesde colocarlo otra vez en
su lugar. Nolave el filtro enun lavavajillas.
PRECAUCION: NoopEREel
acondicionador deaire sinel filtro debido aque la
suciedad y laspelusas Ioobstruiran y reduciran su
rendimiento.
Bobinas para exteriores
Sedeben inspeccionar con frecuencia lasbobinas
en el lado exterior del acondicionador de aire. Si
las mismasesthn obstruidas con suciedad u hollin,
podrian limpiarseprofesionalmente.
4O
C6mo insertar las pilas en el control remoto
Retirela cubierta de la pila deslizc_ndola
de acuerdo con la direcci6n de la flecha.
[_] Inserte pilas nuevas cerciorc_ndosede que
lospolos positivos (+)y negativos (-) estdn
orientados correctamente.
[_ oloque la cubierta otra vezdeslizandola
en su lugar.
NOTAS:
Use 2 pilas alcalinas "AAA"de 1,5voltios.
Nouse pilasrecargables.
Retire las pilasdel control remoto si no va
a usarel sistemapor un per[odo prolongado.
No mezcle baterias nuevas y viejas. No mezcle
baterias alcalinas, estc_ndar(carbono-cinc)
orecargables (ni-cad,ni-mh,etc.
Page 41

®
I str
de i
[[_ _Preguntas? Llame 800.GE.CARES(800.432.2737)o visite nuestra p6gina en la reden: GEAppliances.com i
CCl
J
stai
Acondicio
de
dot
o
ire
ANTES DE INICIAR
Lea estas instrucciones compieta y
cuidadosamente.
• IMPORTANTE - Guardeestas
instrucciones para usa del inspector local.
• IMPORTANTE - Observetodoslos
c6digos y 6rdenes de ley.
•Nota al instalador - Aseg0rese de dejar estas
instrucciones con el consumidor.
•Nota al consumidor - Conserve estas
instrucciones para referencia futura.
• Nivel de destreza - La instalaci6n de este
aparato requiere de destrezas mecSnicas
bSsicas.
, Tiempo de ejecuci6n - Aprox. 1 hora
Recomendamos dos personas para
la instalaci6n de este producto.
La instalaci6n apropiada es la responsabilidad
del instalador.
La falla del producto debido a una instalaci6n
inadecuada no est8 cubierta
par la garantia.
• Cuando instale este acondicionador
de aire, DEBEusar todas las piezas
suministradas y usar procedimientos adecuados
de instalaci6n.
PRECAUCI6N:
Bajo ninguna circunstancia corte o remueva
la tercera p_a (cone×i6n a tierra) del cable
el_ctrico.
No cambie el enchufe en el cable el_ctrico de
este acondicionador de aire.
Los cables caseros de aluminio podrian
presentar problemas especiales. Consulte a un
t_cnico electricista calificado.
REQUISITOS ELI_CTRICOS
Algunos modelos requieren tomacorrientes de
@
Elenchufe detres pQascon conexi6n atierra
minimiza la posibilidadde descargas el6ctricas.Si
el tomacorriente de la pared que usted planea usar
solamente tiene 2 tomas, essu responsabilidadhacer
que un t6cnico Ioreemplace par uno de trestomas
con conexi6na tierra.
Elcable de alimentaci6n incluyeun dispositivo para
interrupci6n de corriente.Seincluyeun bot6n de prueba
yde reinicioen el dispositivo.Eldispositivodebe ponerse
a prueba peri6dicamente: primero se presionael bot6n
de TEST (prueba)y luego RESET(reinicio)mientras se
encuentra enchufado altomacorriente. Siel bot6n TEST
nosedispara osiel bot6n RESETno queda enganchado
dejede utilizar el acondicionador deaire y comuniquese
con un t6cnico calificado.
115/120 voltios de corriente alterna y 60 Hz
conectados
a tierra, protegidos con un fusible de
dilataci6n de tiempo de 15 amperios
o un cortacircuitos.
Algunos modelos requieren 230/208 voltios,
de corriente alterna, protegidos par un fusible
de dilataci6n de tiempo
o un cortacircuitos. Estos modelos deberfan
instalarse en un ramal exclusivo del circuito
para un rendimiento m6s notable y para
prevenir sobrecargas en los circuitos de
cableados de su casa o apartamento,
Io cual podria representar un riesgo
de incendio par el sobrecalentamiento de los
alambres.
41
Page 42

Instrucciones para la instalaci6n
HERRAMIENTAS QUE NECESITAR/_
Un destornillador de estrella
Tijeras o cuchilla
PARTES INCLUIDAS Sellodel
marco
(Apariencia puede variar) de la
__ de espemSaU_er i°r
Acondicionador
de
ventana
ventana
Panel de
acorde6n
iz(
Un destornillador
con hoja plana
Nivel
Lapiz
Una regla o cinta metrica
Panel de
acorde6n
derecho
Tornillo (6)
Soporte para
bloqueo de
ventana (1)
42
Soporte de
cierre de la
estructura (2)
Page 43

Instruccionesde instalaci6n
FT] REQUISITOS PARA LA VENTANA
• Estas instrucciones son para una ventana
estandar de dos pliegues. Usted necesitara
modificar el proceso para otros tipos de ventanas.
El acondicionador de aire puede instalarse sin
los paneles de acordeon para ajustarse a una
ventana mas estrecha. Vet las dimensiones de
la abertura de la ventana.
Todas las pares de apoyo deben quedar
totalmente aseguradas a alg6n metal,
mamposteria o a la madera.
• El tomacorriente el6ctrico debe estar al alcance
del cable el6ctrico del acondicionador de aire.
15 1/2"min.
22" a36" (con
paneles de acorde6n)
¢-
m
-3
I
F_PREPARE EL ACONDICIONADOR
DE AIRE
[]Sostenga el panel de acorde6n con una
mano y suavemente retire hacia atr6s para
liberar el extremo abierto.
D Deslice el extremo libre del panel de
acorde6n sobre los rieles del panel lateral.
Deslice el panel hacia abajo. AsegOrese de
dejar espacio suficiente para deslizar la
parte superior e inferior de la estructura
sobre los rieles en el gabinete.
NOTA: Hay un panel con forma de acorde6n
derecho y uno izquierdo. AsegOrese de usar
el panel apropiado para cada lado.
E] REQUISITOS DE UNA VENTANA
DE TORM ENTAS
Unmarco de ventana de tormentas no permitir6 que
el acondicionador de aire seincline hacia el exterior y
evitar6 que drene apropiadamente.Par(]solucionareste
problema,adhiera un pedazode madera a el umbral.
PEDAZOSDEMADERA -
ANCHO: 2"
LONGITUD: Losuficientemente largo como para
ajustar en el interior delmarco de la ventana.
GRUESO:Paradeterminar el grueso, coloque unpedazo
de madera enel umbral para hacerla :]_/2"m6s alta que
la parte superiordel marco de laventana de tormentas
o del marco vinilo.
P_guelo firmemente con clavos o con tornillos
proporcionados por el instalador.
| 1/2" mas alto que el
queel marco _ 1-Madera
de ventana _--r]-J_ - [i [_/_,J_ Jfr___
de tormentaSMarcode _ Umbra____
ventana e" Marcovini,oII
tormentas
_ marco vinilo (en algunas1/2" m&s alto ventanas)
[] Deslice los paneles de acorde6n izquierdo y
derecho en los rieles de montaje superior e
inferior.
Riele de montaje Superior
Superior izquierda superior derecha
43
Riele de montaje inferior
Page 44

Instrucciones de instalaci6n
PREPARE LA VENTANA
@
Corteel sellode la banda de laventana a
la Iongitud apropiada. Despeguela parle posterior
y pegue el selloa la parte inferiorde la bandade la
ventana.
INSTALE EL ACONDICIONADOR DE
AIRE EN LA VENTANA
Coloque el acondicionador de aire en el umbral
con elriel de montaje inferior contra su extremo
posterior, c_ntrelo y cierre la ventana
firmemente detrds del riel de montaje superior.
Debe estar nivelado o ligeramente inclinado
hacia el exterior. Use un nivel; una inclinaci6n de
1/3 de burbuja ser6 la correcta hacia el exterior.
3 Tornillos
D
INSTALE UN SOPORTE DE CIERRE Y LA
JUNTA DE ESPUHA SUPERIOR
DE LA VENTANA
B-1
PRECAUCI6N:
Enventanasconstruidasde
vinilo de similarconstrucci6n,
conecteel soportepara
bloqueode ventanaa el
marcodela ventanaconuno
tornillo paraprevenirdaflo a
laventanay vidroquebrado.
%
Corte la junta de espuma
superior de la ventana al ancho de la ventana.
©
Rellenela espumaentre
elvidrio y laventana
paraevitarque airee
insectos
seintroduzcanen la
habitaci6n.
NOTA:Silajunta provistano esadecuadapara su
ventana,obtenga elmaterialapropiadoIocalmente
pararealizarunaadecuadainstalaci6ndesellado.
Vinilo
Madera
2 Soportes de cierre de la estructura
Extienda los paneles de acorde6n izquierdo y
D
derecho hacia lasbandas de la ventana vertical y
pegue 3 tornillos a trav6s de los agujeros en los
paneles superiores, segOn corresponda.
Instale los soportes de cierre de la estructura
©
entre el panel inferior del acorde6n y el alf6izar
de la ventana. Adjunte con 2 tornillos.
NOTA:Para evitar una rajadura del alf6izar de
la ventana, coloque los agujeros piloto antes de
colocar los tornillos.
44
Page 45

Solucionar problemas. GEAppliances.com
: Causasposib/es Ouehacer
El_Co'_di_BnadOrde_ire Elacondicionadordeaire =Cerci6resedequeelacondicionadordeaireest_
noenciende est8desconectado, enchufadototalmenteen eltomacorriente.
Elfusiblesedispar6/ • tnspeccionelosfusibles/ cajadeinterruptoresdelacasa
elcortacircuitossedispar6, yreemplacecualquierfusibleo reajusteelinterruptor.
Interrupci6nenel
suministroel_ctrico.
Eldispositivodeinterrupci6n • Presioneelbot6nRESETubicadoenel cabledealimentaci6n.
decorrientese haactivado. • Sielbot6nRESETnosemantieneensulugar,noutilicemc_s
_:acondicionadordeaire- Elflujodeaireest8restringido. • Cerci6resedequenoexisteningunacortina,persianao
noenfffacomoaeuer_a mueblebloqueandoelfrentedelacondicionadordeaire.
Elcontroldetemperaturano • Enlosmodelosconteclado:EnelmodoCool(Frio),presionelatecla
est8ajustadoapropiadamente, meduccbnT.
Elfiltrodeaireest8sucio. • Limpieelfiltrocada30dfasporIo menos.Verlasecci6n
Lahabitaci6npodrfahaber • Cuandoelacondicionadordeaireseenciende,usted
estadocaliente, necesitadarletiempoparaqueenfri_lahabitaci6n.
Elairefrfoseest8escapando. • Cerci6resedequelosregistrosdela calefacci6nnoestSn
Lasbobinasdeenfriamiento • Ver"AcondicionadordeairecongelSndose"rossadelante.
secongelaron.
Elacondicionadordeaire
seestacongelanao
Elcontroremoto Lasbaterfasestc_ninsertadas • lnspeccionela posici6ndelasbaterfas.Debenestar
nofunciona incorrectamente, insertadasenlaposici6nindicada,(+)y(-).
Hayaguagoteandoafuera TiempohOmedoycaliente. • Estoesnormal.
Hayaguagoteanaoenel Elacondicionadorde aire • Paradrenarelaguaapropiadamente,cerdoresedeque
_meriordelahabitaci6n noest_inclinadohaciaafuera, elacondicionadorde aireest_inclinadoligeramente
Elhielobloqueaelflujo
deairehaciaelacondicionador
deaireevitandoqueseenfrie
la habitaci6n.
Lasbaterfasestc_nagotadas. • Reemplacelas baterfas.
Launidadsereiniciar6autom6ticamenteconlaconfiguraci6n
utilizadaporOltimavezluegodereestablecerlaelectricidad.
• Existeunretrasodetiempoporprotecci6n(deaproximadamente
3 minutos)paraevitarladesconexi6nporsobrecargadelcompresor.
Porestaraz6n,esposiblequelaunidadnocomiencea enfriarde
formanormalhastatranscurridos3 minutosdesdequevolvi6a
encenderse.
elacondicionadorde airey comunfqueseconunt_cnicocalificado.
• Enlosmodelosconbotones,girelatemperaturaa un nOmeromayor.
deCuidadoy limpieza.
abiertosy seencuentranretornandoelairefib.
• Enmodelosconlosbotonesdecontrol,coloqueelcontrol
demodoen HighFan(VentiladorAlto)6 HighCool(FrioAlto)con
latemperaturaen16 2.
• Enlosmodelosconteclasdetoque,coloqueloscontrolesen
HighFan(VentiladorAlto)6HighCool(FrioAlto)y ajusteeltermostatoa
unatemperaturerossalta.
desdeelfrentehaciaatr@s.
Seacumulaaguaen Lahumedadremovidadelaire • Estoesnormalpor uncortoperfodoen6reasconpoca
la_)andeja y sedrenahastalabandeja, humedad;normalporunperfododetiemporosspostergado
en@easrosshOmedas.
Sonidos de operaci6n normales
Quizc_sescuche un sonido metc_licocausado por
el agua tomada y tirada contra el condensador
en los dfasIluviososo cuando la humedad
esalta. Estacaracter[stica de diseBoayuda a
remover
la humedad y mejora laeficiencia.
Quizc_sescuche que el termostato hace clic
cuando el compresor hace cicloentre encendido
y apagado.
Elagua seacumula en la bandeja durante dias
Iluviososo con mucha humedad. Elagua podr[a
derramarse y gotear desdeel lado externo de
la unidad.
Elventilador podria funcionar aun sielcompresor
no Iohace.
45
Page 46

Garantia de su acondidonador de aire-garantia fimitada deun a o.
Todos los servicios de garantia los proporcionan nuestros
Centros deReparaci6n de Fdbrica o nuestros tdcnicos Customer
Care®autorizados. Para concertar una cita de reparaci6n,
en linea,24 horas al dia, visitenos al ge.com, o Ilame a1800.
GE.CARES(800.432.2737). Cuando Ilame para solicitor servicio,
par Favortenga a mona el nOmero de serie y elnOmero de
modelo.
GE reemplazar6:
Cualquierparte del acondicionador de aire que falle debido a defectos en los materiales oen
Apartir de lafecha
de la compra original
Viajes de servicio a su casa para mostrarle c6mo
funciona el equipo.
Instalaci6n o entrega inapropiada, o mantenimiento
Jmpropio. Si usted tiene un problema durante la
Jnstalaci6n, o si su acondicionador de aire no tiene la
capacidad de enfriamiento que usted necesita, p6ngase
en contacto con nuestro distribuidor o Jnstalador.
Usted es responsable de proporcionar los facilidades
de cone×i6n el_ctrica necesarias.
Fallo del producto resultante de modificaciones al
producto o debido a usa Jrrazonable incluyendo no
proporcJonar mantenimiento razonable y necesarJo.
la fabricaci6n. Durante esta garantia limitada deun a_o,GEtambi6n proporcionarc_,sincosta
alguno,toda lamano deobra y el servicio relacionado-para reemplazar partesdefectuosas.
Grape aqui su recibo.
Se requiere facilitar prueba
de la fecha de compra original
para obtener un servicio
bajo la garantia.
iiiiiiiiiiii_iii
Reemplazo de fusibles de la casa o reajuste del sistema
de circuitos.
iiiiiiiiiiii_iii
Fallos debido a la corrosi6n en modelos que no est6n
protegJdos contra la corrosi6n.
iiiiiiiiiiii_iii
DaSoal producto causado par voltaje inapropiado hada
el equipo, accidentes, incendios, inundaciones o actos
de la naturaleza de fuerza mayor.
Da_os incidentaJes o consecuenciales causados par
defectos posibJes con este acondicionador de aire.
DaBos despu_s de la entrega.
En locales comerciales, la mona de obra necesaria para
retJrar la unidad hacia un lugar para revJsi6n par porte
de un t_cnico individual.
EXCLUSION DE GARANTJAS IMPL[CITAS--Su [lnico y exclusivo derecho es la reparaci6n del producto,
tal y coma se indica en esta Garantia limitada. Cualquier garantia implicita, incluyendo los garantias
implicitas de comerciabilidad o adecuaci6n para un fin determinado, est_n limitadas a un aria o el
periodo de tiempo m_s breve permitido par la Icy.
Esto gomntio se extiende ol compmdor originol y cualquier compmdor posterior de productos compmdos pare usa
residenciol dentro de Estados Unidos. %iel producto estd situodo en un drea que no dispone de servicio par porte
de un proveedor de servicio outorizodo de GE,podria tener que hocerse cargo de los castes de envio o bien
podrio solicitdrsele que Ileve el producto o uno centro de servicio de GE outorizodo poro reolizar la reparoci6n.
En Alaska, Io garontio excluye el costa de envio o los visitos de servicio o su cosa.
Algunos estados no permiten la exclusi6n o los limitaciones de dahos incidentales o consecuenciales. Esta garontia
do derechos legoles espedficos, y usted podrio tener arras derechos que voriordn de estodo o estado. Pora saber
cudles son sus derechos legales, consulte o Io oficino de osuntos del consumidor local o Io oficino del Attorney General
en su Iocolidod.
46
Garante: General Electric Company. Louisville, KY 40225
Page 47

Servicioa! consumidor.
P6ginaWebdeGEAppliances GEAppliances.com
LTiene(]lgun(] pregunt(] sobre suelectrodom6stico? iPruebeI(]pc_gin(]Web de GEAppli(]nces,cu(]lquier
dig del aho! P(]r(]m(]yor convenienci(] y servicio m6sr6pido, }capuede descargGrlosManuGlesde los
Propiet(]rios,pedir piez(]so inclusoh(]cer un(]cit(] en line(]p(]r(] que veng(]n (] re(]liz(]run(] rep(]r(]ci6n.
RealLifeDesignStudio(Estudiodedisehopar(]I(]vid(]real) GEAppliances.com
GE(]poy(] el concepto de Dise_o Univers(]l-productos, serviciosy (]mbientes que pueden usaargente detod(]s
I(]sed(]des, t(]m(]_osy c(]p(]cid(]des.Reconocemos I(] necesid(]dde diseh(]r p(]r(] un(] gr(]n gaam(]de haabilid(]des
y dificultaadesfisic(]s y mentaales.Par(]m(_sdetaallescobre I(]saaplicaacionesde GEDise_oUniversaal,incluyendo
ideaasde dise_o par(] laacocinaapar(] person(Iscon discaapaacidaades,mire nuestraapc_ginaaWeb hay mismo. Par(]
personaascon dificultaadesaauditivaas,faavorde Ilaamaaraal800.TDD.GEAC(800.833.4322).
Piezasy accesorios GEAppliances.com
Aquellosindividuos con laacaalificaaci6nnecesaariaapaar(]repaaraarsus propios electrodom6sticos pueden
pedir que se lesmaandenlaaspiezaaso aaccesoriosdirectaamenteaasus hogaares(aaceptaamoslaast(]rjetaas
VISA,MaasterCaardy Discover).Haagaasu pedidoen I[neaahay,24 horaascad(] d[aao Ilaamaarpartel6fono
aa1800.626.2002duraantehoraasnormaalesde oficinaa.
Laasinstrucciones descritaasen este maanuaalcubren los procedimientos aaseguir par cuaalquierusuaario.
GEno est6 no aapoyaaque sele proporcione ning0n servicioaalaacondicionaadorde (]ire.Vehementemente
recomendaamosque usted no intente proporcionaarservicio aalaacondicionaadorde (]ire usted mismo.
P6ngaseen contacto con nosotros GEAppliances.com
Sino est6 saatisfechocon elservicioque recibe de GE,p6ngaaseen contaactocon nosotros en nuestraap6ginaa
Web indicaandotodos losdetaallesaas[coma su nOmerode tel6fono o escr[baanosaa:
Generaalivlaanaager,Customer Relaations
GEAppliaances,AppliaancePaark
Louisville,KY40225
47
Page 48

ConsumerSupport.
GEAppliancesWebsite Inthe U.S.A.:GEAppliances.com
Have a question or need assistance with your appliance?Try the GEAppliancesWebsite 24 hours a day,
any day of the year! Forgreater convenience andfaster service,you can now download Owner's Manuals,
or evenorder parts on-line. InCanada:www.GEAppliances.ca
RealLifeDesignStudio Inthe U.S.A.:GEAppliances.com
GEsupports the Universal Designconcept-products, servicesand environments that can beused by
people of allages,sizesand capabilities. We recognizethe need to designfor awide range of physical
and mental abilities and impairments. Fordetails of GE'sUniversal Designapplications, including kitchen design
ideasfor peoplewith disabilities,check out our Website today. Forthe hearing impaired, please call 800.TDD.
GEAC(800.833.4322).
In Canada,contact: Manager, Consumer Relations, Mabe Canada Inc.
Suite 310, ! Factory Lane
Moncton, N.B. E1C9M3
PartsandAccessories
Individuals qualified to servicetheir own appliances can have parts or accessoriessent directly to their homes
(VISA,MasterCard and Discovercards are accepted).Order on-line today, 24 hours everyday or
by phone at 800.626.2002 during normal businesshours.
Instructionscontainedinthismanualcoverprocedurestobeperformedbyanyuser.GEdoesnotsupportanyservicingoftheair
conditioner.Westronglyrecommendthatyoudonotattemptto servicetheairconditioneryourself.
Customers inCanada should consult the yellow pagesfor the nearest Mabe servicecenter,
or call 1.800.561.3344.
ContactUs
If you are not satisfied with the serviceyou receivefrom GE,contact uson our Website with all the details
including your phone number, or write to: GeneralManager, Customer Relations
GEAppliances,Appliance Park
Louisville,KY40225
In Canada:www.GEAppliances.ca,or write to: Director, Consumer Relations,Mabe Canada Inc.
Suite310, ! Factory Lane
Moncton, N.B.E1C9M3
IntheU.S.A.:GEAppliances.com
IntheU.S.A.:GEAppliances.com
Printed inChina
 Loading...